3JDIBSE &BSOFZ -BEZTNJUI 3PBE Inside Lightroom … · the Lightroom Import dialog box will pop-up,...
14
Richard Earney - http://inside-lightroom.com Version 3 – 11.06.2007 Develop Presets are powerful tools to assist the Lightroom User to apply favourite settings to one or more images. They can be applied to images that exist in the Lightroom Catalog, or they can be applied on image import. This document has been updated to take account of the recently released version 1.1. Using Develop Presets Develop Presets can be used to apply creative effects, camera calibrations to ensure consistent results from your equipment, as well as compensating for lens defects or sensor noise. In the example shown here, I show a lens (a Sigma 15–30mm) which exhibits a small amount of Chromatic Aberration. A Preset can be applied to all of the images shot with this lens that show CA. Firstly, select one of the images shot with this lens in the Lightroom Library the press D to enter the Develop Module. Zoom up to at least 1:1, also achieved by clicking on the new warning triangle icon (see Figure 1). Figure 1: The Lens Correction pane, with the new Defringe feature and the Warning Triangle which zooms the image to 1:1. inside lightroom Figure 2: The Lightroom Interface, Filmstrip Minimized, Develop Module, Presets Visible, Lens Correction panel open Right-click the Lens Corrections pane (on the Right-hand side of the Interface). Select Solo Mode, this will close all of the panes apart from Lens Corrections. The open pane will have the settings shown in Figure 1, by default. Chromatic Aberration for both axes will be at 0. Lens Vignetting will be Amount = 0, Midpoint = 50. Defringe will be off. Chromatic Aberration (CA) is typically along Red/Cyan and Blue Yellow Axes. The Sigma 15–30mm non-Digital lens had some CA, using Lightroom I can batch minimise these problems by correcting the image, then saving a Preset. Inside Lightroom Develop Presets
Transcript of 3JDIBSE &BSOFZ -BEZTNJUI 3PBE Inside Lightroom … · the Lightroom Import dialog box will pop-up,...

Richard Earney - http://inside-lightroom.com Version 3 – 11.06.2007
Develop Presets are powerful tools to assist the Lightroom User to apply favourite settings to one or more images. They can be applied to images that exist in the Lightroom Catalog, or they can be applied on image import.
This document has been updated to take account of the recently released version 1.1.
Using Develop Presets
Develop Presets can be used to apply creative effects, camera calibrations to ensure consistent results from your equipment, as well as compensating for lens defects or sensor noise. In the example shown here, I show a lens (a Sigma 15–30mm) which exhibits a small amount of Chromatic Aberration. A Preset can be applied to all of the images shot with this lens that show CA.
Firstly, select one of the images shot with this lens in the Lightroom Library the press D to enter the Develop Module.
Zoom up to at least 1:1, also achieved by clicking on the new warning triangle icon (see Figure 1).
Figure 1: The Lens Correction pane, with the new Defringe feature and the Warning Triangle which zooms the image to 1:1.
inside lightroom
Figure 2: The Lightroom Interface, Filmstrip Minimized, Develop Module, Presets Visible, Lens Correction panel open
Right-click the Lens Corrections pane (on the Right-hand side of the Interface). Select Solo Mode, this will close all of the panes apart from Lens Corrections.
The open pane will have the settings shown in Figure 1, by default. Chromatic Aberration for both axes will be at 0. Lens Vignetting will be Amount = 0, Midpoint = 50. Defringe will be off.
Chromatic Aberration (CA) is typically along Red/Cyan and Blue Yellow Axes. The Sigma 15–30mm non-Digital lens had some CA, using Lightroom I can batch minimise these problems by correcting the image, then saving a Preset.
Inside Lightroom Develop Presets

Making the Corrections
Make your corrections, until you remove the CA, in this case I have made dramatic adjustments to both axes, just for the sake of the article.
Ensure that you check both the edges of the image and the centre as CA can appear along different axes in different parts of an image.
Saving a Preset
Now focus on the left-hand side of the interface to the presets section of Lightroom’s Develop module. I am assuming that you have your screen set up as in Figure 2 with all the panes visible. You will see the Presets section of the interface.
Click the + sign (or Shift-Cmd N) near the word Presets and a dialog box pops up. Most of the fields will be checked.
Figure 3: The Lens Correction pane, adjustments made. Defringe is a new option for 1.1.
Figure 4: Create a new Preset
Figure 5: The New Develop Preset Dialog box Figure 6: Naming and Selecting the scope of the Preset
For speed, I suggest you click the Check None Button and then check the Chromatic Aberration checkbox (under Lens Corrections), as this is the only setting you are altering. New to Version 1.1 are Preset Folders, these will allow you to create folders to store presets in logical groupings. This will make managing large numbers of Presets much simpler.
So select a Folder, or create a new one, then name the Preset, and press Create.
When the dialog box is dismissed, you are left with a new item in the Presets list inside the chosen Folder (in this case User Presets). If you wish to delete it, select the Preset and press the - (minus) button. Figure 7: The newly created Preset

Having created the Preset, you are ready to apply it in various ways, but first there is one useful tip to note. If you make amendments and wish to save the them to the Preset, rather than create a new one, select the Preset, right-click (Ctrl-Click if you are using a one-buttoned mouse) and select Update With Current Settings.
Figure 8: Updating the Preset
Using Presets
The newly created Preset can be applied in several ways.
1. Select an individual image in the Filmstrip, then select the Preset. The CA removal settings will be applied to the file.
2. Select several images in the Filmstrip, then choose the Preset.
3. Search for all images that were taken with the 15–30mm lens that exhibits CA. The easiest way to do this, is swap back to the Library Module (L or G or Cmd-Option 1). In the left pane, open the Metadata Browser. This keeps track of varying types of Metadata associated with the images in the Library. In this case we are looking for a Lens of type, 15.0–30.0 mm.
It will show that you have 185 photos shot with this lens. Now press Cmd-A (Select All) and move your focus to the right pane.
The first item under Quick Develop is Saved Preset, which will usually say Default Settings.
Select this and choose Sigma 15–30 from the pull-down menu. All the selected images will be updated with this Preset.
Figure 9: The Metadata Browser
Figure 10: Quick Develop
Figure 11: Select the Preset
4. The final way to apply the Preset is on Import. If you have shot a card’s worth of images with the 15–30mm lens, then you can apply this Preset as you import them into the Lightroom Library.

Insert your camera’s memory card and, depending on your settings, either the Lightroom Import dialog box will pop-up, or (in the Library) press Shift-Cmd I.
In the bottom left of the window is the Information to Apply section. The first pull-down menu is Develop Settings. Select this pull-down choose Sigma 15–30. Then click the Import button. The images will be imported with this Preset applied.
Figure 12: The Import Dialog box
Figure 13: Selecting the Preset on Import option
Preset Preference Settings
New to Version 1.1 is Default Settings for Presets. These are accessed in the Presets tab via the Preferences dialog.
Figure 14: Default Develop Settings Preferences

In the Default Develop Settings section you have 4 options with Apply auto greyscale mix when converting to greyscale as checked by default.
Apply auto tone adjustments set the tone adjustments to what Lightroom considers Auto. This is similar to the option that existed in Adobe Camera RAW 3. If you are happy with the Auto settings then you might want to check that.
Apply auto greyscale mix when converting to greyscale, will do apply the Auto setting when you convert to Greyscale.
Make defaults specific to camera serial number. This is useful if you have several different camera bodies. One might overexpose, one might underexpose. This way you can set different settings that could correct this.
Make defaults specific to camera ISO setting. This would be useful if you have a sensor that gets noisy at ISO 400 (for example). If the Lightroom Noise Reduction worked at this particular ISO, you could set Lightroom to apply this for all images at ISO 400.
The other section is dealt with later.
How to apply these settings.
With the example below, I have applied the Creative - Cold Tone Develop Preset to an image in the Develop Mode. Holding down the Option/Alt key will change the Reset Button to Set Default …
A Preset file
So we have seen how a Preset can be used to apply settings and even to amend basic photographic problems, but what is a Preset file?
All of the Preset files that Adobe uses for Lightroom are Lua text files and can be examined and edited in a text editor. (Lua is the programming language used by Lightroom).
Figure 15: Applying the Preset Figure 16: Hold down Option/Alt and the Reset button changes to Set Default …
Figure 17: Making a Preset the default setting for Camera and ISO
In Figure 17, having set the the defaults in the Preferences, I can now set the Creative - Cold Tone Preset to be the default on all files with the serial number of my camera when set on ISO 100

Presets can be found in the following folders.Mac: ~/Library/Application Support/Lightroom/Develop PresetsXP: C:\Documents and Settings\<username>\Application Data\Adobe\Lightroom\Develop PresetsVista: <systemdrive>/Users/<User Account>/AppData/Roaming/Adobe/Lightroom/Develop Presets
Any good text editor can be used to view and edit Presets. On the Mac I recommend, the free Text Wrangler, or the paid for TextMate (which can colour the syntax of Lua text files).
More simply, you are able to go directly from a Preset to the correct folder, by right-clicking on a Preset and selecting, Show in Finder or Show in Explorer depending on your platform.
Figure 18: Locating Presets on a Mac, PC will say Show in Explorer
New to Version 1.1 is the ability to store Presets (of all sorts) in the same folder where you Catalog is stored. (Note that what used to be called the Library is now called the Catalog so as not to be confused with the Library Module!).
To activate this, open Preferences and check Store presets with catalog, in the screenshots you will notice that the Presets have now disappeared from the list. You now have to right-click the “User Presets” folder and Import the presets from their default location (as mentioned above) or place an alias or shortcut in the new location. This is a bit clunky and hopefully will be improved in future versions.
Why might you want to do this? Well it can be useful if you keep your Catalog on removable media, such as a Thumb drive, then you are able to transport your Presets with you from location to location.
Figures 19 and 20: Storing Presets with the Catalog, before and after.Inside Presets
In this Develop Presets folder we see all the Presets that we have created. They will all have the extension .lrtemplate, but are all editable in a text editor.
Open Sigma 15–30.lrtemplate in a text editor and you will see the following:s = { internalName = “Sigma 15–30”, title = “Sigma 15–30”, type = “Develop”, value = { settings = { ChromaticAberrationB = 19, ChromaticAberrationR = -15, Defringe = 1, EnableLensCorrections = true, }, uuid = “87F5DBB9-1DD7-11DC-89F7-000A95A69B84”, }, version = 0,}
CommentsIt is possible to add comments to Preset files, the files using the following:
-- comment
This could be useful for putting the Preset’s creator in each file. However comments will not necessarily survive updating in Lightroom.

UUIDsUUID, as mentioned stands for Unique User ID. They are normally generated by Lightroom. However there may be occasions where you wish to create your own.On a Mac, open up Terminal (which is in /Applications/Utilities) then type uuidgen
at the prompt., this will give you a uuid - copy and paste to your file.There are various UUID generators – a cross platform Java one can be found at http://jug.safehaus.org/
This is reasonably easy to understand. The file has an Internal Name and a Title, both of which are Sigma 15–30, it is a Develop type of setting and then is has the values assigned in the previous process.
Chromatic Aberration on the Blue axis of 19 and Chromatic Aberration on the Red axis of -15. Defringe (the new to 1.1 feature) is on setting 1.
Each preset is assigned a unique user id (uuid) and has a version number.
Below is a more complicated example, whilst it looks daunting, it is simply a text transcription of all the settings you can make to an image.
All the terms have equivalents in the Lightroom interface, some of which are shown.
A Total Adjustment Preset
This is a preset where everything has been changed. Normally the values are stored in alphabetical order, but for the purposes of demonstration I have reordered the terms to match the diagrams.s = { internalName = “Mega Adjustment”, title = “Mega Adjustment”, type = “Develop”, value = { settings = { AutoBrightness = false, AutoContrast = false, AutoExposure = false, AutoShadows = false, ConvertToGrayscale = false, EnableCalibration = true, EnableColorAdjustments = true, EnableDetail = true, EnableGrayscaleMix = true, EnableLensCorrections = true, EnableSplitToning = true, WhiteBalance = “Custom”, Temperature = 5297.8722453117, Tint = 3.1914889812469, Exposure = 0.34042549133301, HighlightRecovery = 4, FillLight = 7, Shadows = 15, Brightness = 35, Contrast = 35, Clarity = 22, Vibrance = 30, Saturation = 28, ToneCurve = { 0, 0, 32, 22, 64, 56, 128, 128, 192, 196, 255, 255, }, ParametricDarks = 0, ParametricHighlightSplit = 75, ParametricHighlights = 50, ParametricLights = 13, ParametricMidtoneSplit = 50, ParametricShadowSplit = 25, ParametricShadows = -30, ToneCurveName = “Medium Contrast”,
Note:The small grey boxes are the “Enablers” for a particular section.
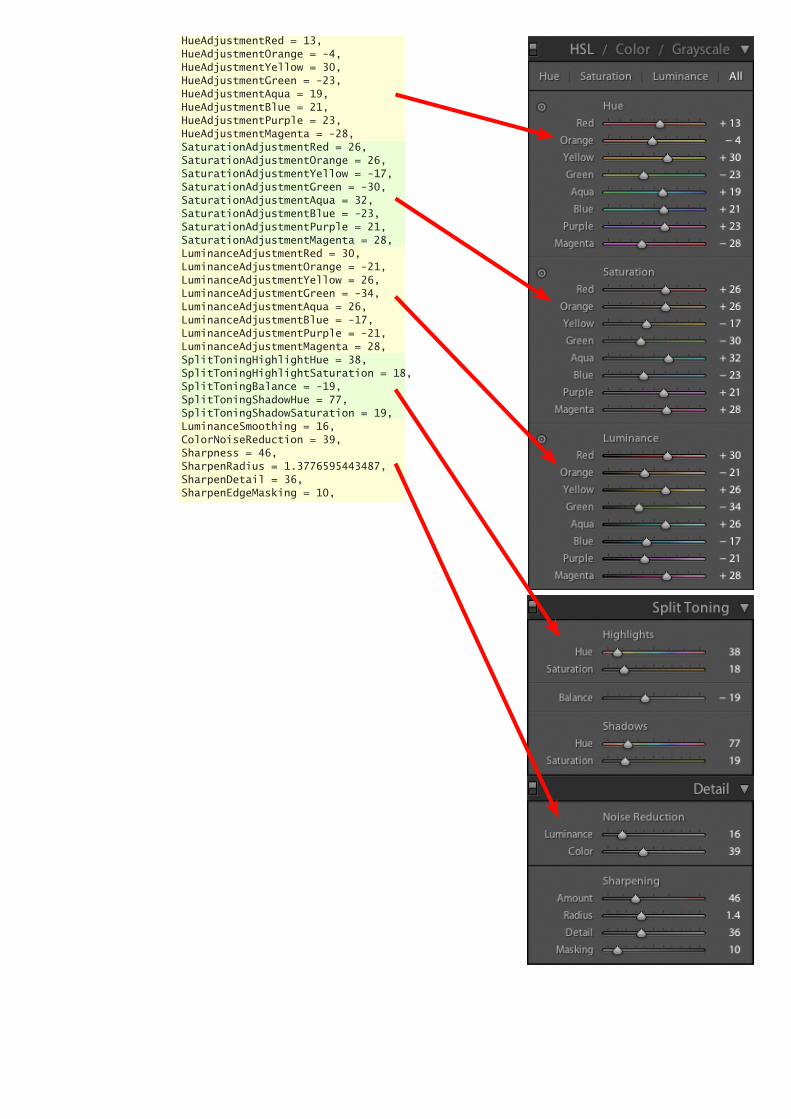
HueAdjustmentRed = 13, HueAdjustmentOrange = -4, HueAdjustmentYellow = 30, HueAdjustmentGreen = -23, HueAdjustmentAqua = 19, HueAdjustmentBlue = 21, HueAdjustmentPurple = 23, HueAdjustmentMagenta = -28, SaturationAdjustmentRed = 26, SaturationAdjustmentOrange = 26, SaturationAdjustmentYellow = -17, SaturationAdjustmentGreen = -30, SaturationAdjustmentAqua = 32, SaturationAdjustmentBlue = -23, SaturationAdjustmentPurple = 21, SaturationAdjustmentMagenta = 28, LuminanceAdjustmentRed = 30, LuminanceAdjustmentOrange = -21, LuminanceAdjustmentYellow = 26, LuminanceAdjustmentGreen = -34, LuminanceAdjustmentAqua = 26, LuminanceAdjustmentBlue = -17, LuminanceAdjustmentPurple = -21, LuminanceAdjustmentMagenta = 28, SplitToningHighlightHue = 38, SplitToningHighlightSaturation = 18, SplitToningBalance = -19, SplitToningShadowHue = 77, SplitToningShadowSaturation = 19, LuminanceSmoothing = 16, ColorNoiseReduction = 39, Sharpness = 46, SharpenRadius = 1.3776595443487, SharpenDetail = 36, SharpenEdgeMasking = 10,

ChromaticAberrationB = 0, ChromaticAberrationR = 0, Defringe = 0, VignetteAmount = 30, VignetteMidpoint = 40, CameraProfile = “ACR 3.6”, ShadowTint = 26, RedHue = -23, RedSaturation = 23, BlueHue = -28, BlueSaturation = -30, GreenHue = -19, GreenSaturation = -28, CropAngle = 7.584271, CropBottom = 1, CropConstrainAspectRatio = false, CropLeft = 0.085412, CropRight = 0.866089, CropTop = 0, RetouchInfo = { { centerX = 0.404331, centerY = 0.1778, radius = 0.01, sourceState = “sourceAutoComputed”, sourceX = 0.409465, sourceY = 0.216049, spotType = “heal”, }, }, RedEyeInfo = { }, uuid = “D33DCD85-216E-11DC-BFDF-000A95A69B84”, }, version = 0,}
The last sections of this Preset detail some of the other parts of the Develop Module that can be stored in a Preset, namely Cropping, Retouching and Red Eye. These can be applied to multiple files. Note that the Healing and Cloning will work on both Landscape and Portrait photos. But you should check the results carefully as you may end up with poor results if the source of the Clone is different.

Beyond Lightroom’s Tone CurveWhen you use the Tone Curve in Lightroom’s Develop module, you will notice that you are restricted to certain distortions of the curve. These are Parametric Curves and Lightroom visually shows you the extent to which the curve can be manipulated in the Highlights, Lights, Darks and Shadows.
If we look at the similar tool in Adobe Camera RAW 4.1, we can see that it offers not only Parametric Curve manipulation but Point Curve manipulation as well.
The Histogram in dark grey
The Tone Curve, click and drag around. The box provides visual feedback as to where you are on the curve. Here we are manipulating the “Lights”. The Sliders also produce similar results
The mid-grey section of the Tone Curve tool shows the extent of curve manipulation within Lightroom.
The Point Curve manipulation is restricted to Linear, Medium and Strong Contrast and is there for legacy compatibility with Adobe Camera RAW
Fig: 26 Adobe Camera RAW 4, with Parametric and Point Curve Tools.
Percentage value changes are shown here
The Targeted Adjustment Tool. This allows you to more precisely fine tune images directly on the image.

Adobe Camera RAW 4.1 and Lightroom 1.1 are compatible as they are both based on the same code and this means all your point curve adjustments can transfer over to Lightroom.
Here we have a photo where we would like to try a negative effect, so we manipulate the curve so that 0=255 and 255=0.
Once you are happy with your amended curve, click Done. This will save the curve settings to the RAW file non-destructively. By this I mean that this is just a recipe for the treatment of the image, and can be undone, it is either saved to the DNG or as an XMP sidecar file if you are using a RAW file.
If we now import that image into Lightroom and flip to the Develop mode [D], we can see the Negative effect has been applied to the image. We can also see that the Tone Curve is as it was in ACR4.1. But it now has the parametric curve restrictions that are in Lightroom; you can still manipulate it but only on a Negative curve!
Even better you can now save this curve as a Develop Preset, which allows you to apply this Tone Curve on one or more images.
Using this will allow more creative Tone Curves to be applied to images, Solarization Tone Curves have already been created and are hosted on Inside Lightroom, and any other Tone Curve you can create in ACR4.1 can be applied this way.
Figures: 27 and 28 Camera RAW 4.1 with a default Tone Curve and with a Negative Tone Curve

Fig: 29 The Negative version of the RAW file imported into Lightroom.
Fig: 30 The Lightroom Tone Curve with its new manipulation restrictions

Hand EditingOf course all these effects are possible by hand editing the Develop Preset file, as mentioned before. If we compare the Default Linear Lightroom Curve with the newly created Negative Curve we can see how it is achieved.
Apart from the name of the preset and the uuid, the difference is in the Tone Curve section.
Below is a Black and White Solarize preset, created by John Beardsworth with the Lightroom Tone Curve shown beside it.
s = { internalName = “Linear”, title = “Linear”, type = “Develop”, value = { settings = { ParametricDarks = 0, ParametricHighlightSplit = 75, ParametricHighlights = 0, ParametricLights = 0, ParametricMidtoneSplit = 50, ParametricShadowSplit = 25, ParametricShadows = 0, ToneCurve = { 0, 0, 255, 255, }, }, uuid = “51CC4600-CFC6-11DB-806C-000A95A69B84”, }, version = 0, -- Richard Earney}
s = { internalName = “Negative”, title = “Negative”, type = “Develop”, value = { settings = { ParametricDarks = 0, ParametricHighlightSplit = 75, ParametricHighlights = 0, ParametricLights = 0, ParametricMidtoneSplit = 50, ParametricShadowSplit = 25, ParametricShadows = 0, ToneCurve = { 0, 255, 255, 0, }, }, uuid = “FD9498A9-CFC5-11DB-806C-000A95A69B84”, }, version = 0, -- Richard Earney}
s = { internalName = “BW Solarize Point Curve”, title = “BW Solarize Point Curve”, type = “Develop”, value = { settings = { AutoGrayscaleMix = true, ConvertToGrayscale = true, ParametricDarks = 0, ParametricHighlightSplit = 75, ParametricHighlights = 0, ParametricLights = 0, ParametricMidtoneSplit = 50, ParametricShadowSplit = 25, ParametricShadows = 0, ToneCurve = { 0, 0, 80, 174, 129, 133, 173, 215, 255, 0, }, }, uuid = “71B45B68-B76A-4588-9F55-1F40620300A7”, }, version = 0, --John Beardsworth}

Many of the Adobe Photoshop Lightroom Beta Testers have contributed Develop Presets which can be found on the web at:
They cover Colour Effects, Calibrations, Black and White Effects and Split Tone Effects. Here are a few examples:
Presets are used throughout Lightroom, for many types of user-adjustable data. They can be used for
• Export Settings • Filename Templates • FTP sites • Keywords • Metadata • Labels • Print Templates • Slideshow Templates • Panel End Markers • Web Templates.
They allow tremendous flexibility for the user and I will visit some of the possibilities in further articles.
Figure 27: User created presets (from left) Cross Process by Sean McCormack, Old B&W Photo by Andreas Norén, Cool Bluetone by Richard Earney, Yellow and Blue Split Tone by Ian Lyons.
Richard Earney runs Method Photo. He is an Adobe Photoshop Lightroom Beta tester and an Adobe Photoshop Beta Tester; a Licenciate of the Royal Photographic Society and a member of the National Association of Photoshop Professionals. He is also a Series Editor for the forthcoming Digital Workflow series from Focal Press.
Thanks go to Sean McCormack, Mark Hamburg, Martin Evening, Tom Hogarty, George Jardine, Mikkel Aaland, Daniel Presedo and all the Preset contributors.
All images are © method photo 2007. All trademarks are acknowledged.
inside lightroom