3G&EDGE Super Modem or Super Router User's Manual v1.0 English
21
3G/EDGE Super Modem/Router User’s Guide Version: 1.0 Date: October 28, 2009 3JTech Co., Ltd. 2F, No. 342, Fu-Shing N. Rd. Taipei, Taiwan Tel: +886-2-2500 6916 e-mail: [email protected]
-
Upload
alexander-diachenko -
Category
Documents
-
view
69 -
download
8
Transcript of 3G&EDGE Super Modem or Super Router User's Manual v1.0 English

3G/EDGE Super Modem/Router
User’s Guide
Version: 1.0
Date: October 28, 2009
3JTech Co., Ltd. 2F, No. 342, Fu-Shing N. Rd.
Taipei, Taiwan Tel: +886-2-2500 6916
e-mail: [email protected]
http://www.3jtech.com.tw http://www.pnpipcameras.com 3G/EDGE Super Modem/Router User’s Guide
Copyright of 3JTech Co., Ltd. (also doing business as A3J Engineering Inc.) 2
Revision History Version Date Changes
1.0 October 28, 2009 First Release of 3G/EDGE Super Modem/Router User’s Guide
http://www.3jtech.com.tw http://www.pnpipcameras.com 3G/EDGE Super Modem/Router User’s Guide
Copyright of 3JTech Co., Ltd. (also doing business as A3J Engineering Inc.) 3
Table of Contents
Revision History ----------------------------------------------------------------------------------------------------------2
CHAPTER 1. PRODUCT OVERVIEW ---------------------------------------------------------------------------5
1.1 INTRODUCTION -------------------------------------------------------------------------------------------------------5 1.2 FEATURES -------------------------------------------------------------------------------------------------------------6 1.3 PACKAGE CONTENTS ------------------------------------------------------------------------------------------------6
CHAPTER 2. PHYSICAL DESCRIPTION ----------------------------------------------------------------------7
2.1 PANELS ----------------------------------------------------------------------------------------------------------------7 2.1.1 Front Panel-----------------------------------------------------------------------------------------------------7 2.1.2 Rear Panel -----------------------------------------------------------------------------------------------------8
2.2 ILLUSTRATION---------------------------------------------------------------------------------------------------------9 2.2.1 Front Panels Information -----------------------------------------------------------------------------------9
Bluetooth Connector ---------------------------------------------------------------------------------------------9 LAN Port ------------------------------------------------------------------------------------------------------------9 Reset Button -------------------------------------------------------------------------------------------------------9 Power Supply Connector-------------------------------------------------------------------------------------- 10 LEDs --------------------------------------------------------------------------------------------------------------- 10
2.2.2 Rear Panel Information ----------------------------------------------------------------------------------- 10 3G ANT SMA Connector -------------------------------------------------------------------------------------- 10 SIM Card Slot ---------------------------------------------------------------------------------------------------- 10 Switch-------------------------------------------------------------------------------------------------------------- 10
2.2.3 LED Description on 3G/EDGE Super Modem/Router --------------------------------------------- 11
CHAPTER 3. WEB-BASED MANAGEMENT---------------------------------------------------------------- 12
3.1. BASIC SETTING ----------------------------------------------------------------------------------------------------- 13 3.1.1 LAN Settings------------------------------------------------------------------------------------------------- 13 3.1.2 3G Setting ---------------------------------------------------------------------------------------------------- 15
3.1.2.1 DIALUP WAN ------------------------------------------------------------------------------------------ 15 3.1.2.2 Ping WAN----------------------------------------------------------------------------------------------- 16 3.1.2.3 Bridge Mode Advanced Setup --------------------------------------------------------------------- 16
3.1.3 DDNS (Dynamic DNS) Setting -------------------------------------------------------------------------- 17 3.1.3.1 Enable Dynamic DNS-------------------------------------------------------------------------------- 17
3.1.4 Virtual Server Setting -------------------------------------------------------------------------------------- 18 3.1.4.1 Add New Virtual Server ------------------------------------------------------------------------------ 18
3.2. ADVANCED SETUP ------------------------------------------------------------------------------------------------- 20 3.2.1 Device Admin------------------------------------------------------------------------------------------------ 20
http://www.3jtech.com.tw http://www.pnpipcameras.com 3G/EDGE Super Modem/Router User’s Guide
Copyright of 3JTech Co., Ltd. (also doing business as A3J Engineering Inc.) 4
3.2.1.1 Firmware Upgrade ------------------------------------------------------------------------------------ 20 3.2.1.2 Reboot the Device ------------------------------------------------------------------------------------ 20 3.2.1.3 Restore All Settings to the Factory Defaults---------------------------------------------------- 21

http://www.3jtech.com.tw http://www.pnpipcameras.com 3G/EDGE Super Modem/Router User’s Guide
Copyright of 3JTech Co., Ltd. (also doing business as A3J Engineering Inc.) 5
1. Product Overview 1.1 Introduction 3G/EDGE Super Modem/Router, a HSUPA/ HSDPA/ EDGE/ CDMA 1X/ EVDO/ EVDO Rev A
2G/3G modem, is built in an Ethernet port and optional Bluetooth function. Not only could it be used
to connect to Internet devices such as vending machines or our IP cameras to get on the Internet
through the modem dialup but also a Bluetooth access point with an optional Bluetooth module. Up
to 7 incoming Bluetooth connection from mobile phones and PC/NBs with Bluetooth PAN Profile will
be supported.
http://www.3jtech.com.tw http://www.pnpipcameras.com 3G/EDGE Super Modem/Router User’s Guide
Copyright of 3JTech Co., Ltd. (also doing business as A3J Engineering Inc.) 6
1.2 Features Use 3G modem dialup as the WAN connection or RJ45 interface as the WAN/LAN connection.
Multimode operation – HSUPA/HSDPA/UMTS/EDGE/GPRS/GSM.
Triple-band HSPA/UMTS 850/1900/2100 MHz.
Quad-band EDGE/GPRS/GSM 850/900/1800/1900 MHz.
HSUPA uplink up to 2.0 Mbps.
HSDPA downlink up to 7.2 Mbps.
WCDMA (UMTS) uplink data rate up to 384 kbps.
EDGE data up to 237 Kbps DL and 118Kbps UL, 3GPP Release4, class 12.
GPRS data up to 85.6 Kbps DL and 42.8 Kbps UL.
Supports the remote reboot of the device through web-based user interface.
Offer a slide switch to change the Router/Bridge operation mode.
Optional module for Bluetooth Access Point.
- Bluetooth 2.0 EDR module on board
- Bluetooth PAN Profile support
- PAN daemon enabling
- As a role of NAP (master)
- Up to 7 incoming BT connection
- All Bluetooth connection are bridging with RJ45 for outgoing TCP/IP network.
1.3 Package Contents ─ 1 x 3G Super Modem, EDGE Super Modem, 3G Super Router or EDGE Super Router
─ 1 x RJ45 Ethernet Cable
─ 1 x 3G Antenna
─ External 3G Antenna with 3M Antenna Cable (Optional)
─ 1 x Power Adapter
─ 1x Bluetooth Dongle (For 3G/EDGE Super Router Only)
─ 1 x CD with Quick Installation Guide and this User’s Manual
http://www.3jtech.com.tw http://www.pnpipcameras.com 3G/EDGE Super Modem/Router User’s Guide
Copyright of 3JTech Co., Ltd. (also doing business as A3J Engineering Inc.) 7
2. Physical Description The following information contains the physical description of 3G/EDGE Super Modem/Router. This
includes the functions and the locations of each connector and indicator. This information provides
useful reference when installing the product. Please familiarize yourself with this device.
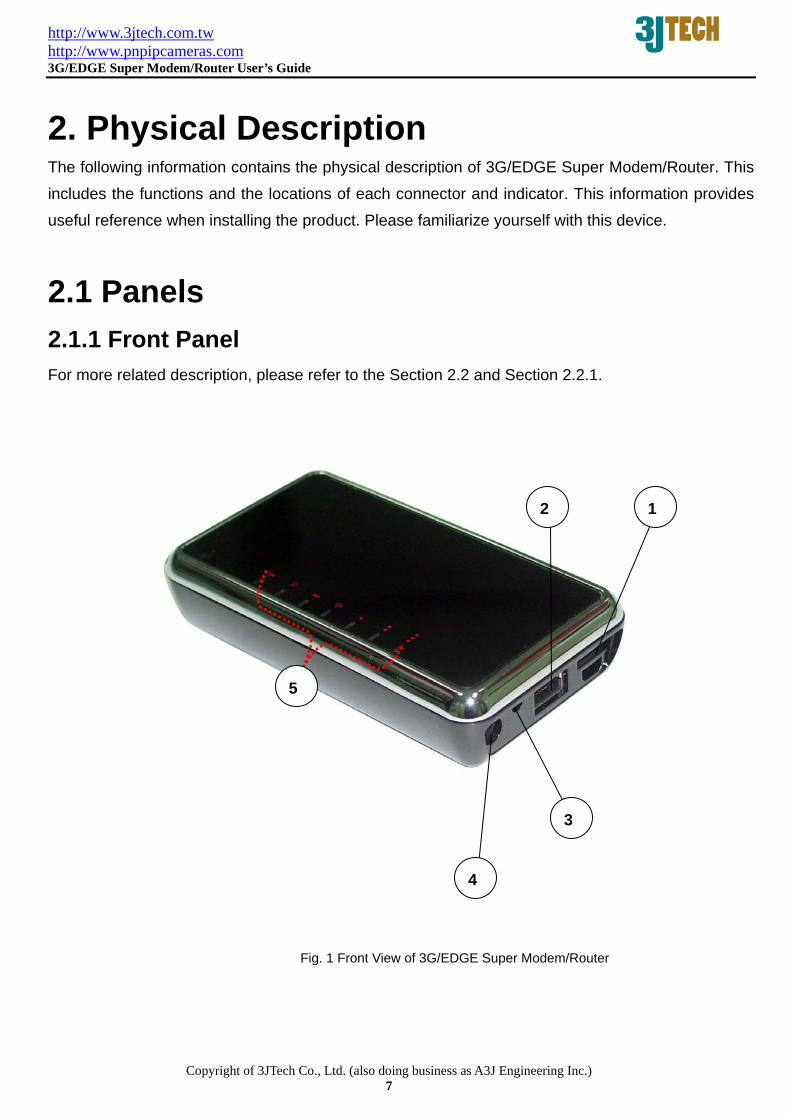
2.1 Panels 2.1.1 Front Panel For more related description, please refer to the Section 2.2 and Section 2.2.1.
5
4
2
3
1
Fig. 1 Front View of 3G/EDGE Super Modem/Router

http://www.3jtech.com.tw http://www.pnpipcameras.com 3G/EDGE Super Modem/Router User’s Guide
Copyright of 3JTech Co., Ltd. (also doing business as A3J Engineering Inc.) 8
2.1.2 Rear Panel For more detailed description, please refer to the Section 2.2 and Section 2.2.2.
6
7
8
Fig. 2 Rear View of 3G/EDGE Super Modem/Router
http://www.3jtech.com.tw http://www.pnpipcameras.com 3G/EDGE Super Modem/Router User’s Guide
Copyright of 3JTech Co., Ltd. (also doing business as A3J Engineering Inc.) 9
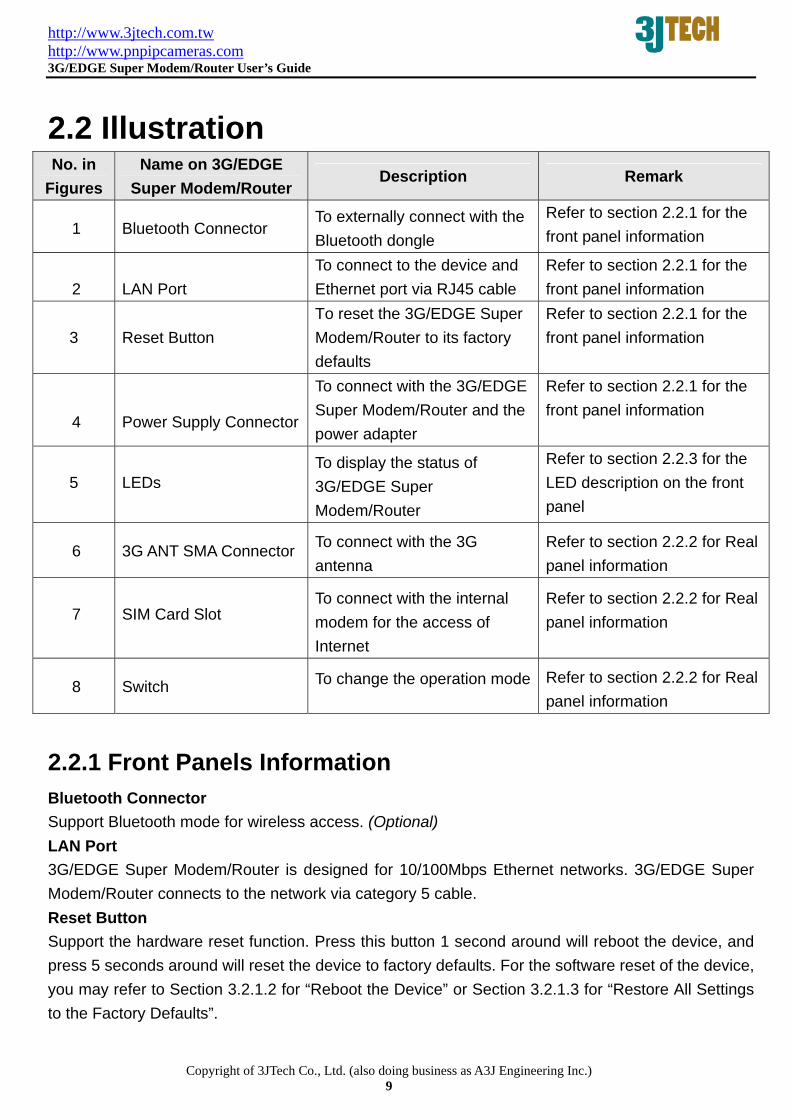
2.2 Illustration No. in
Figures Name on 3G/EDGE
Super Modem/Router Description Remark
1 Bluetooth Connector To externally connect with the Bluetooth dongle
Refer to section 2.2.1 for the front panel information
2 LAN Port To connect to the device and Ethernet port via RJ45 cable
Refer to section 2.2.1 for the front panel information
3 Reset Button To reset the 3G/EDGE Super Modem/Router to its factory defaults
Refer to section 2.2.1 for the front panel information
4 Power Supply Connector
To connect with the 3G/EDGE Super Modem/Router and the power adapter
Refer to section 2.2.1 for the front panel information
5 LEDs To display the status of 3G/EDGE Super Modem/Router
Refer to section 2.2.3 for the LED description on the front panel
6 3G ANT SMA Connector To connect with the 3G antenna
Refer to section 2.2.2 for Real panel information
7 SIM Card Slot To connect with the internal modem for the access of Internet
Refer to section 2.2.2 for Real panel information
8 Switch To change the operation mode Refer to section 2.2.2 for Real panel information
2.2.1 Front Panels Information Bluetooth Connector Support Bluetooth mode for wireless access. (Optional) LAN Port 3G/EDGE Super Modem/Router is designed for 10/100Mbps Ethernet networks. 3G/EDGE Super Modem/Router connects to the network via category 5 cable. Reset Button Support the hardware reset function. Press this button 1 second around will reboot the device, and press 5 seconds around will reset the device to factory defaults. For the software reset of the device, you may refer to Section 3.2.1.2 for “Reboot the Device” or Section 3.2.1.3 for “Restore All Settings to the Factory Defaults”.

http://www.3jtech.com.tw http://www.pnpipcameras.com 3G/EDGE Super Modem/Router User’s Guide
Copyright of 3JTech Co., Ltd. (also doing business as A3J Engineering Inc.) 10
Power Supply Connector Plug the power adapter. The specifications of 3G/EDGE Super Modem/Router’s power adapter are as follows:
Input: 100 ~ 240V AC, 50/60Hz Output: 6V DC / 1A
LEDs Include the LEDs of POWER, LAN 100/10, Bluetooth, 3G Dialup Status and Cellular Signal Strength.
2.2.2 Rear Panel Information 3G ANT SMA Connector Support 3G mode for wireless access. SIM Card Slot Plug the SIM card chip. Switch
3G or EDGE Mode: Switch the button into this operation mode, PC will get the virtual IP address assigned by 3G/EDGE Super Modem/Router. For more details on its correct position and the network connection of this mode, please refer to the quick installation guide coming with the package.
Bridge Mode (for 3G/EDGE Super Modem only) or Dongle Mode (for 3G/EDGE Super Router only): Switch the button into this operation mode, PC will get the IP address from ISP in 3G/EDGE Super Modem or the router you connected in 3G/EDGE Super Router respectively. For more details on its correct position and the network connection of this mode, please refer to the quick installation guide coming with the package.
http://www.3jtech.com.tw http://www.pnpipcameras.com 3G/EDGE Super Modem/Router User’s Guide
Copyright of 3JTech Co., Ltd. (also doing business as A3J Engineering Inc.) 11
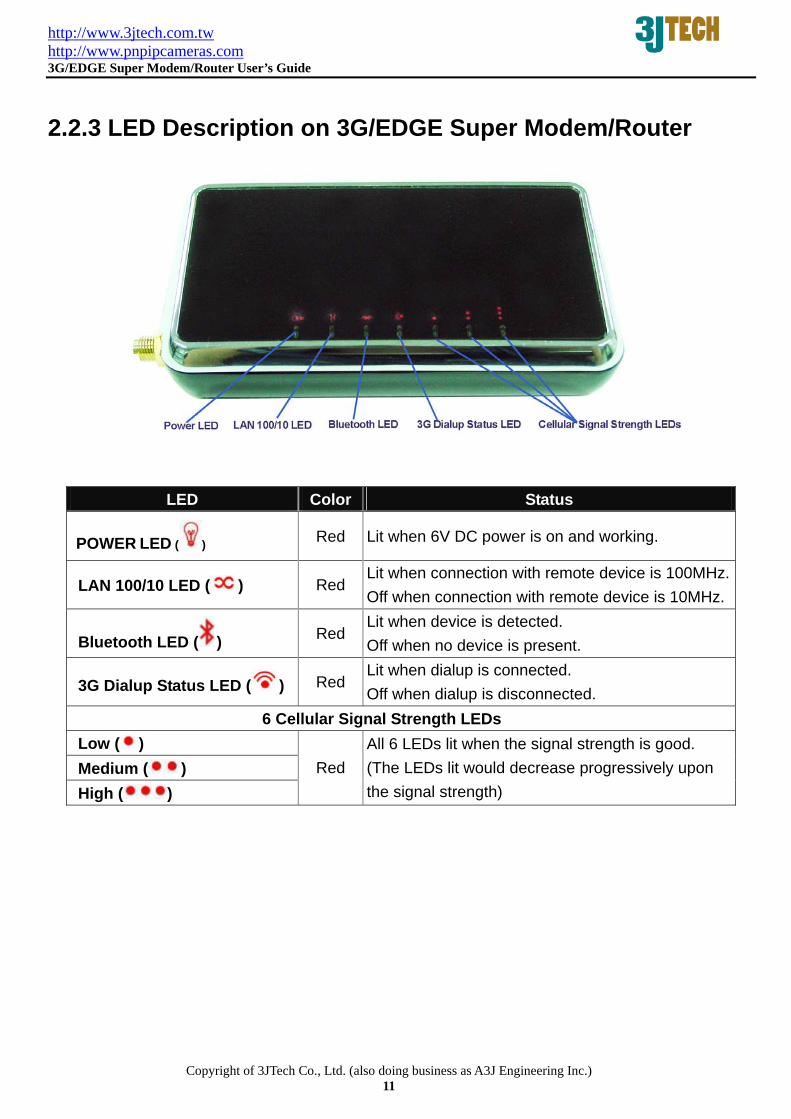
2.2.3 LED Description on 3G/EDGE Super Modem/Router
LED Color Status
POWER LED ( ) Red Lit when 6V DC power is on and working.
LAN 100/10 LED ( ) Red Lit when connection with remote device is 100MHz.Off when connection with remote device is 10MHz.
Bluetooth LED ( ) Red Lit when device is detected. Off when no device is present.
3G Dialup Status LED ( ) Red Lit when dialup is connected. Off when dialup is disconnected.
6 Cellular Signal Strength LEDs Low ( ) Medium ( ) High ( )
Red
All 6 LEDs lit when the signal strength is good. (The LEDs lit would decrease progressively upon the signal strength)
http://www.3jtech.com.tw http://www.pnpipcameras.com 3G/EDGE Super Modem/Router User’s Guide
Copyright of 3JTech Co., Ltd. (also doing business as A3J Engineering Inc.) 12
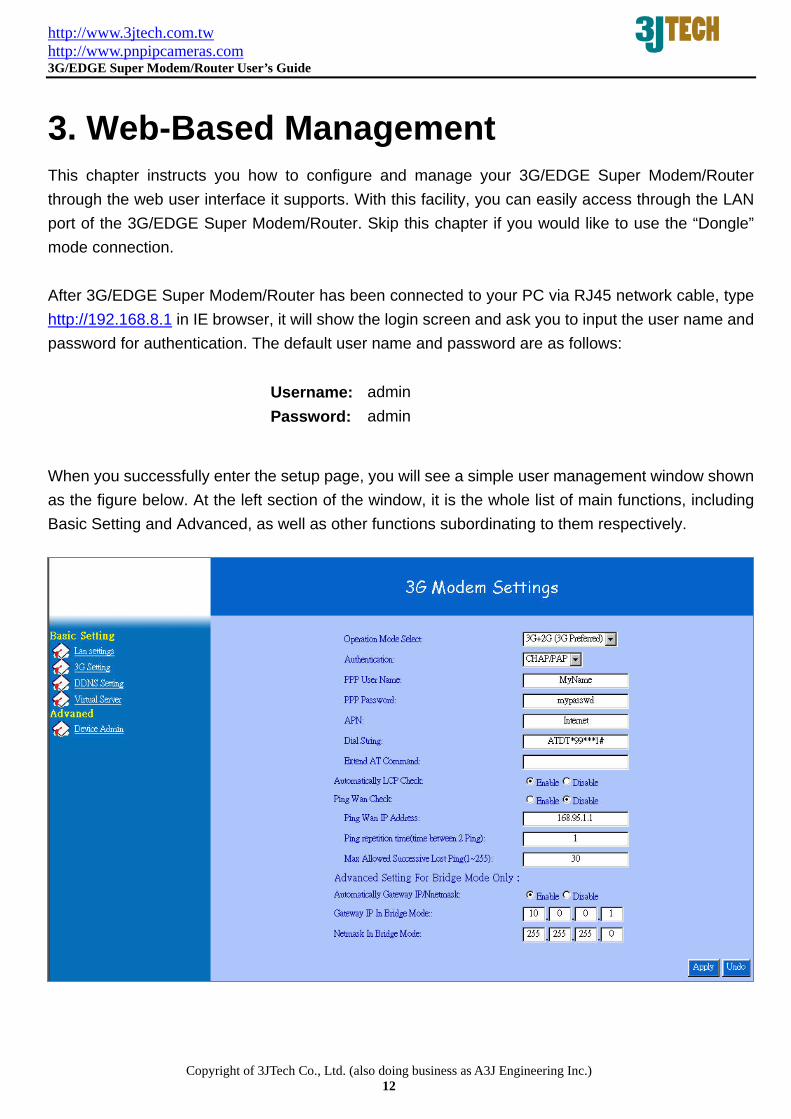
3. Web-Based Management This chapter instructs you how to configure and manage your 3G/EDGE Super Modem/Router through the web user interface it supports. With this facility, you can easily access through the LAN port of the 3G/EDGE Super Modem/Router. Skip this chapter if you would like to use the “Dongle” mode connection.
After 3G/EDGE Super Modem/Router has been connected to your PC via RJ45 network cable, type http://192.168.8.1 in IE browser, it will show the login screen and ask you to input the user name and password for authentication. The default user name and password are as follows:
Username: admin Password: admin
When you successfully enter the setup page, you will see a simple user management window shown as the figure below. At the left section of the window, it is the whole list of main functions, including Basic Setting and Advanced, as well as other functions subordinating to them respectively.

http://www.3jtech.com.tw http://www.pnpipcameras.com 3G/EDGE Super Modem/Router User’s Guide
Copyright of 3JTech Co., Ltd. (also doing business as A3J Engineering Inc.) 13
3.1. Basic Setting
3.1.1 LAN Settings These are the settings of the LAN (Local Area Network) interface for 3G/EDGE Super Modem/Router. The 3G/EDGE Super Modem/Router's local network (LAN) settings are configured based on the IP Address and Subnet Mask assigned in this section. The IP address is also used to access this web-based management interface. It is recommended that you use the default settings if you do not have an existing network.
Local IP Address: The IP address of your 3G/EDGE Super Modem/Router on the local area network. Your local area network settings are based on the address assigned here. For example, 192.168.0.1.
Subnet Mask: The subnet mask of your 3G/EDGE Super Modem/Router on the local area
network.
DHCP Server: DHCP stands for Dynamic Host Configuration Protocol. The DHCP section is where you configure the built-in DHCP Server to assign IP addresses to the computers and other devices on your local area network (LAN). Once your 3G/EDGE Super Modem/Router is properly configured and this option is enabled, the DHCP Server will manage the IP addresses and other network configuration information for computers and other devices connected to your Local Area Network. There is no need for you to do this yourself.
The computers (and other devices) connected to your LAN also need to have their TCP/IP configuration set to "DHCP" or "Obtain an IP address automatically". When you set Enable DHCP Server, the following options are displayed.
Starting IP Address and End IP Address: These two values (from and to) define a range of addresses that the DHCP Server uses when assigning addresses to computers and devices on your Local Area Network. Any addresses that are outside of this range are not managed by the DHCP Server; these could, therefore, be used for manually configured devices or devices that cannot use DHCP to obtain network address details automatically.
It is possible for a computer or device that is manually configured to have an address that does reside within this range. In this case the address should be reserved, so that the DHCP Server knows that this specific address can only be used by a specific computer or device.
http://www.3jtech.com.tw http://www.pnpipcameras.com 3G/EDGE Super Modem/Router User’s Guide
Copyright of 3JTech Co., Ltd. (also doing business as A3J Engineering Inc.) 14
Your 3G/EDGE Super Modem/Router, by default, has a static IP address of 192.168.8.1. This means that addresses 192.168.8.2 to 192.168.8.254 (from 2 to 254) can be made available for allocation by the DHCP Server.
Example, Your 3G/EDGE Super Modem/Router uses 192.168.0.1 for the IP address. You've assigned a computer that you want to designate as a Web server with a static IP address of 192.168.0.3. You've assigned another computer that you want to designate as an FTP server with a static IP address of 192.168.0.4. Therefore the starting IP address for your DHCP IP address range needs to be 5 or greater.
Example, Suppose you configure the DHCP Server to manage addresses From 100 To 199. This means that 3 to 99 and 200 to 254 are NOT managed by the DHCP Server. Computers or devices that use addresses from these ranges are to be manually configured. Suppose you have a web server computer that has a manually configured address of 192.168.0.100. Because this falls within the "managed range" be sure to create a reservation for this address and match it to the relevant computer.
Bluetooth Pin Code: Bluetooth password for authentication.

http://www.3jtech.com.tw http://www.pnpipcameras.com 3G/EDGE Super Modem/Router User’s Guide
Copyright of 3JTech Co., Ltd. (also doing business as A3J Engineering Inc.) 15
3.1.2 3G Setting
3.1.2.1 DIALUP WAN The Dialup WAN (Wide Area Network) section is where you configure your dialup up connection type. There are 2 modem types to choose from: Cellular 2G and 3G.
Operation Mode Select: There are four types of operation mode supported: 3G only, 3G+2G(3G Preferred), 2G only, and 3G+2G(2G Preferred). Default is 3G + 2G (3G Preferred). Authentication: The mode for PPP authentication.
2G/3G ISP Settings: Your 2G/3G service provider will provide you with the values to fill in for the required fields of PPP User Name, PPP Password, and Access Point Name (APN Gateway). Dial String: The 2G/3G dial command. Default is ATD*99***1#. Extend AT Command: Enter any extra AT commands for the modem here. AT commands start with AT. New AT commands will be executed until the next 2G/3G modem dialup begins.
Automatically LCP Check: The system will send an LCP echo-request frame to the peer every 3 seconds. Normally the ISP server at the remote site should respond to the echo-request by sending an echo-reply. This option can detect that the peer is no longer connected.

http://www.3jtech.com.tw http://www.pnpipcameras.com 3G/EDGE Super Modem/Router User’s Guide
Copyright of 3JTech Co., Ltd. (also doing business as A3J Engineering Inc.) 16
3.1.2.2 Ping WAN Ping WAN function provides you with an option to check the WAN connection is valid or not, if not, 3G/EDGE Super Modem/Router will try to dial up again to reconnect to Internet. The description of related parameters for the Ping WAN function is as follows:
Ping WAN Check: Enable or disable the function of Ping WAN Check. Ping WAN IP Address: The IP address is used for the ping.
Ping Repetition Time(time between 2 Ping): The time interval of sending the Ping packet.
Max. Allowed Successive Lost Ping (1~255): The maximum times that the 3G/EDGE Super Modem/Router allows to receive no response from the successive Ping. 3G/EDGE Super Modem/Router will restart to dial up in order to do the WAN connection once it exceeds this limit.
3.1.2.3 Bridge Mode Advanced Setup The followings are the advanced settings for the “Bridge” mode and only exist in 3G/EDGE Super Modem. Please skip this section if you adopt the 3G (or EDGE) mode or purchase 3G/EDGE Super Router.
Automatically Gateway IP/Netmask: Enable or disable this function. If this function is activated, the IP address of Gateway IP and netmask for the “Bridge” mode will be dynamically assigned by the 3G/EDGE Super Modem.
Gateway IP In Bridge Mode: The user needs to manually fill in an IP address as the Gateway IP for the “Bridge” mode in case the function of Automatically Gateway IP/Netmask is disabled.
Netmask In Bridge Mode: The user needs to manually fill in an IP address as the netmask IP for the “Bridge” mode in case the function of Automatically Gateway IP/Netmask is disabled.
http://www.3jtech.com.tw http://www.pnpipcameras.com 3G/EDGE Super Modem/Router User’s Guide
Copyright of 3JTech Co., Ltd. (also doing business as A3J Engineering Inc.) 17
3.1.3 DDNS (Dynamic DNS) Setting The Dynamic DNS feature allows you to host a server (Web, FTP, Game Server, etc.) using a domain name that you have registered (www.dyndns.com or www.no-ip.com) with your dynamically assigned IP address. Most broadband Internet Service Providers assign dynamic (changing) IP addresses. When you use a Dynamic DNS service provider, your friends can enter your domain name to connect to your server, no matter what your IP address is.
3.1.3.1 Enable Dynamic DNS Enable this option only if you have registered your own domain name with a dynamic DNS service provider. The following parameters are displayed when the option is enabled.
DDNS: Enable/Disable the DDNS function. Server Select: Select a dynamic DNS service provider from the pull-down list. DDNS Account: Enter the username or key provided by your service provider. If the Dynamic DNS provider supplies only a key, enter that key in all three fields. DDNS Password: Enter the password or key provided by your service provider. If the Dynamic DNS provider supplies only a key, enter that key in all three fields. Your DDNS Domain Name: Enter the hostname you have registered.
Note: After configuring 3G/EDGE Super Modem/Router for dynamic DNS, you can open a browser and navigate to the
URL for your domain (for example http://www.mydomain.info) and 3G/EDGE Super Modem/Router will attempt to
forward the request to port 80 on your LAN.
http://www.3jtech.com.tw http://www.pnpipcameras.com 3G/EDGE Super Modem/Router User’s Guide
Copyright of 3JTech Co., Ltd. (also doing business as A3J Engineering Inc.) 18
3.1.4 Virtual Server Setting The Virtual Server function gives Internet users access to services on your LAN. This feature is useful for hosting online services such as FTP or HTTP servers. For each virtual server, you can define a port or a range of ports on your 3G/EDGE Super Modem/Router for the redirection to an internal LAN IP Address and LAN port. Up to 10 sets of virtual server can be supported by 3G/EDGE Super Modem/Router.
Example,
You are hosting a HTTP Server on a PC that has LAN IP Address of 192.168.8.50 and your
ISP is blocking Port 80.
1. Select the proper name of the Virtual Server (for example: HTTP Server),
2. Enter the IP Address of the machine on your LAN (for example: 192.168.8.50),
3. Enter the Port Range as [80~80],
5. Select the Protocol – TCP,
7. Click Apply to have the settings taken effect,
8. Repeat these steps for each Virtual Server Rule you wish to add.
With this virtual server entry, all Internet traffic on Port 80 will be redirected to your internal web server at IP Address 192.168.8.50.
3.1.4.1 Add New Virtual Server You can add a new Virtual Server entry to the Virtual Servers List by filling in the parameters listed below.
Select: Entries in the list can be either active (enabled) or inactive (disabled). To activate, please assign a meaningful name to the virtual server by pulling down the “Select” list, for example, FTP Server. Several well-known types of virtual server are available in the "Select" list. Selecting one of these types of the virtual server, it will automatically fill some of the remaining parameters with standard values for that type of server. Or you may select Manual Setting if you would like to define some special port(s) for a virtual server.

http://www.3jtech.com.tw http://www.pnpipcameras.com 3G/EDGE Super Modem/Router User’s Guide
Copyright of 3JTech Co., Ltd. (also doing business as A3J Engineering Inc.) 19
Redirect IP Address: The IP address of the system on your internal network that will provide the virtual service, for example, 192.168.8.50.
Port Range: The range of ports that will be used by the assigned IP address.
Protocol: Select the protocol used by the service.
Apply: Save the new virtual server entry you add. When finished updating the virtual server entries, you must still click the Apply button to make the changes effective and permanent.
Note: The TCP Port 80(HTTP Port) will cover the original web server of the router when the user selects HTTP
type of virtual server.
http://www.3jtech.com.tw http://www.pnpipcameras.com 3G/EDGE Super Modem/Router User’s Guide
Copyright of 3JTech Co., Ltd. (also doing business as A3J Engineering Inc.) 20
3.2. Advanced Setup
3.2.1 Device Admin This section allows you to do the firmware upgrade, reboot 3G/EDGE Super Modem/Router, and restore it to the factory default settings. Restoring the unit to the factory default settings will erase all settings, including any rules that you have created.
3.2.1.1 Firmware Upgrade The firmware upgrade function can be used to update your 3G/EDGE Super Modem/Router to the latest firmware code to improve its functionality and performance. To upgrade the firmware, click the software update hyperlink in the field of Version and follow these steps listed below:
1. Click the Browse button to locate the upgrade file (*.bin) on your computer.
2. Once you have found the file to be used, click the Upload button to start the firmware upgrade process. This can take a minute or more.
3. Wait for 3G/EDGE Super Modem/Router to reboot. This will take another minute or more.
4. Confirm the updated firmware revision shown on the Administration Settings page. Here are displayed the version numbers of the firmware currently installed in your 3G/EDGE Super Modem/Router and the most recent upgrade that is available.
Note: Before performing an upgrade, be sure to save the current configuration for 3G/EDGE Super Modem/Router.
Upload: Once you have a firmware update on your computer, use this option to browse for the file and then upload the information into the 3G/EDGE Super Modem/Router.
3.2.1.2 Reboot the Device This function will have you restart 3G/EDGE Super Modem/Router when you select the Yes option in back of Reset Device and press Apply button. It is useful for restarting when you are not near the device.

http://www.3jtech.com.tw http://www.pnpipcameras.com 3G/EDGE Super Modem/Router User’s Guide
Copyright of 3JTech Co., Ltd. (also doing business as A3J Engineering Inc.) 21
3.2.1.3 Restore All Settings to the Factory Defaults This function restores all configuration settings back to the settings that were in effect at the time 3G/EDGE Super Modem/Router was shipped from the factory. Just select the Yes option in back of Factory Defaults and press Apply button, any settings that have been saved or not been saved will be lost and return into the factory defaults.


![Index [] · motherboard Modem IMEI – the Serial number of the modem installed on your PMRS Device. September 2, 2015 INFODRAW R&D MRSConfig User Manual v1.0 …](https://static.fdocuments.in/doc/165x107/5fd99e58bd95526ed332c7ad/index-motherboard-modem-imei-a-the-serial-number-of-the-modem-installed-on.jpg)