3D PRINTING OF 316L STAINLESS STEEL AND ITS EFFECT ON ...
88
Montana Tech Library Digital Commons @ Montana Tech Graduate eses & Non-eses Student Scholarship Fall 2017 3D PRINTING OF 316L STAINLESS STEEL AND ITS EFFECT ON MICROSTRUCTURE AND MECHANICAL PROPERTIES Rawn Penn Montana Tech Follow this and additional works at: hp://digitalcommons.mtech.edu/grad_rsch Part of the Other Engineering Science and Materials Commons is esis is brought to you for free and open access by the Student Scholarship at Digital Commons @ Montana Tech. It has been accepted for inclusion in Graduate eses & Non-eses by an authorized administrator of Digital Commons @ Montana Tech. For more information, please contact [email protected]. Recommended Citation Penn, Rawn, "3D PRINTING OF 316L STAINLESS STEEL AND ITS EFFECT ON MICROSTRUCTURE AND MECHANICAL PROPERTIES" (2017). Graduate eses & Non-eses. 140. hp://digitalcommons.mtech.edu/grad_rsch/140
Transcript of 3D PRINTING OF 316L STAINLESS STEEL AND ITS EFFECT ON ...

Montana Tech LibraryDigital Commons @ Montana Tech
Graduate Theses & Non-Theses Student Scholarship
Fall 2017
3D PRINTING OF 316L STAINLESS STEELAND ITS EFFECT ON MICROSTRUCTUREAND MECHANICAL PROPERTIESRawn PennMontana Tech
Follow this and additional works at: http://digitalcommons.mtech.edu/grad_rsch
Part of the Other Engineering Science and Materials Commons
This Thesis is brought to you for free and open access by the Student Scholarship at Digital Commons @ Montana Tech. It has been accepted forinclusion in Graduate Theses & Non-Theses by an authorized administrator of Digital Commons @ Montana Tech. For more information, pleasecontact [email protected].
Recommended CitationPenn, Rawn, "3D PRINTING OF 316L STAINLESS STEEL AND ITS EFFECT ON MICROSTRUCTURE AND MECHANICALPROPERTIES" (2017). Graduate Theses & Non-Theses. 140.http://digitalcommons.mtech.edu/grad_rsch/140

3D PRINTING OF 316L STAINLESS STEEL AND ITS EFFECT ON
MICROSTRUCTURE AND MECHANICAL PROPERTIES
by
Penn Rawn
A thesis submitted in partial fulfillment of the
requirements for the degree of
Masters of Science in Metallurgical Engineering and Mineral Processing
Montana Tech
2017

ii
Abstract
Laser powder bed fusion or 3D printing is a potential candidate for net shape forming and manufacturing complex shapes. Understanding of how various parameters affect build quality is necessary. Specimens were made from 316L stainless steel at 0°, 30°, 60°, and 90° angles measured from the build plate. Three tensile and four fatigue specimens at each angle were produced. Fracture morphology investigation was performed to determine the fracture mode of specimens at each build angle. Microstructural analysis was performed on one of each orientation. The average grain size of the samples was marginally influenced by the build angle orientation. Tensile yield strength was the highest for 0° and decreased in the order of 60°, 30°, and 90° angles; all had higher yield strength than wrought. Unlike with the tensile results, the 60° had the highest fatigue strength followed by the 0°, then the 30°, and the 90° build angle had the lowest fatigue strength. Tensile specimens all failed predominantly by ductile fracture, with a few locations of brittle fracture suspected to be caused by delamination. Fatigue fracture always initiated at void space. Keywords: Additive manufacturing, processing parameters, microstructure, mechanical properties, fatigue, fracture morphology

iii
Dedication
I wish to thank Mom and Dad for all their support and love, as well as our cats and dogs for their infinite enthusiasm.

iv
Acknowledgements
Research was sponsored by the Army Research Laboratory and was accomplished under Cooperative Agreement Number W911NF-15-2-0020. The views and conclusions contained in this document are those of the authors and should not be interpreted as representing the official policies, either expressed or implied, of the Army Research Laboratory or the U.S. Government. The U.S. Government is authorized to reproduce and distribute reprints for Government purposes notwithstanding any copyright notation herein. Specimens were machined by Imperium. Bryce Abstetar, Steven Keckler, Luke Suttey, and Eddie Stugelmayer were my research partners. K.V Sudhakar was my advisor and Bruce Madigan was the PI. Gary Wyss provided SEM training. Ronda Coguill and Taylor Winsor provided tensile data. Jeff Braun designed the database.

v
Table of Contents
ABSTRACT ................................................................................................................................................ II
DEDICATION ........................................................................................................................................... III
ACKNOWLEDGEMENTS ........................................................................................................................... IV
LIST OF TABLES ...................................................................................................................................... VII
LIST OF FIGURES .................................................................................................................................... VIII
LIST OF ACRONYMS .............................................................................................................................. XIII
1. INTRODUCTION ................................................................................................................................. 1
1.1. Forms of 3D printing .......................................................................................................... 1
1.2. Laser welding ..................................................................................................................... 3
1.3. 3D Printing discontinuities ................................................................................................. 4
1.4. Parameters ......................................................................................................................... 5
1.5. Grain growth ...................................................................................................................... 9
1.6. Porosity measurement ..................................................................................................... 10
1.7. Optimization..................................................................................................................... 11
2. METHODOLOGY .............................................................................................................................. 13
2.1. Equipment used ................................................................................................................ 13
2.2. Tensile testing .................................................................................................................. 14
2.3. Fatigue testing ................................................................................................................. 14
2.4. Metallography .................................................................................................................. 16
2.4.1. Orientation ........................................................................................................................................ 16
2.4.2. GED .................................................................................................................................................... 17
3. RESULTS ......................................................................................................................................... 20
3.1. Microstructure ................................................................................................................. 20

vi
3.1.1. Orientation ........................................................................................................................................ 21
3.1.2. GED .................................................................................................................................................... 26
3.2. Tensile test results ............................................................................................................ 34
3.3. Fatigue ............................................................................................................................. 35
3.4. Fractography .................................................................................................................... 37
3.4.1. Tensile ............................................................................................................................................... 37
3.4.2. Fatigue ............................................................................................................................................... 40
4. DISCUSSION .................................................................................................................................... 46
4.1. Microstructure as a function of orientation ..................................................................... 46
4.2. Microstructure as a function of GED ................................................................................ 46
4.2.1. Laser power ....................................................................................................................................... 49
4.2.2. Travel velocity ................................................................................................................................... 49
4.2.3. Hatch Spacing .................................................................................................................................... 50
4.3. Effect of orientation on elastic modulus .......................................................................... 51
4.4. Effect of orientation on yield strength ............................................................................. 51
4.5. Effect of orientation on tensile strength .......................................................................... 53
4.6. Effect of orientation on fatigue strength ......................................................................... 55
4.7. Tensile Fracture ................................................................................................................ 56
4.8. Fatigue Fracture ............................................................................................................... 57
4.8.1. 0° orientation .................................................................................................................................... 57
4.8.2. 30° orientation .................................................................................................................................. 58
4.8.3. 60° orientation .................................................................................................................................. 58
4.8.4. 90° orientation .................................................................................................................................. 58
5. CONCLUSIONS ................................................................................................................................. 60
6. RECOMMENDATIONS ........................................................................................................................ 62
7. REFERENCES CITED ........................................................................................................................... 63
8. APPENDIX A: HISTOGRAMS OF MICROSTRUCTURE WITH ORIENTATION ...................................................... 69
9. APPENDIX B: VARIATION OF MICROSTRUCTURE WITH GED ...................................................................... 71
vii
List of Tables
Table I: Build parameters...................................................................................................18
Table II: Build parameters selected for comparison ..........................................................18
Table III: Statistics of changes in grain size and shape with build orientation ..................21
Table IV: Statistics of changes in grain size and shape with GED ....................................27
Table V: Porosity measurements at different parameters ..................................................27
Table VI: Summary of tensile properties ...........................................................................35
Table VII: Estimated range of fatigue strengths ................................................................37

viii
List of Figures
Figure 1: Scan pattern to investigate short scan vectors. Source: Kruth, Jean-Pierre, et al.
“Assessing and comparing influencing factors of residual stresses in selective laser
melting using a novel analysis method.” Proceedings of the Institution of Mechanical
Engineers, Part B: Journal of Engineering .............................................................8
Figure 2: Effect of constitutional supercooling on solidification mode: (a) planar; ............9
Figure 3: Build angle of specimens for mechanical testing ...............................................13
Figure 4: Tensile specimen dimensions. Schematic provided by Imperium .....................14
Figure 5: Fatigue specimen dimensions. Schematic provided by Imperium .....................15
Figure 6: Demonstration of a) x-y-section and b) z-section ..............................................17
Figure 7: Optical micrographs of the wrought a) x-y plane showing randomly oriented grains and
b) z plane showing aligned grains ..........................................................................20
Figure 8: Optical micrograph (a) showing cellular subgrain features and SEM image (b) of 0° x-
y-section showing voids and denudation zone.......................................................22
Figure 9:SEM image of 0° z-section showing an island ....................................................22
Figure 10: Optical micrograph (a) showing fine and cellular structures and SEM image (b) of 30°
x-y-section showing balling ...................................................................................23
Figure 11: SEM image of 30° z-section containing a denudation zone .............................24
Figure 12: Optical micrograph (a) showing sharply curved MPBs and SEM image (b) showing
an island in the 60° x-y-section ..............................................................................24
Figure 13: SEM image of 60° z-section showing a void ...................................................25
Figure 14: Optical micrograph (a) showing a highly cellular microstructure and SEM image (b)
showing a keyhole in the x-y-section....................................................................26

ix
Figure 15: SEM image of 90° z-section showing balling ..................................................26
Figure 16: Optical micrograph showing dendrites and cellular features(a) and SEM image
showing porosity(b) in P-1: Power 156; Speed 866.4; Hatch 0.072 ......................28
Figure 17: Additional image of P-1 demonstrating variation of microstructure with location on
specimen ................................................................................................................28
Figure 18: Optical micrograph showing highly aligned dendrites (a) and SEM image showing
microporosity (b) in P-2: Power 234; Speed 866.4; Hatch 0.072 ..........................29
Figure 19: Optical micrograph short, thick dendrites (a) and SEM image showing a denudation
zone (b) in P-3: Power 156; Speed 1299.6; Hatch 0.072 .......................................30
Figure 20: Optical micrograph showing coarse features(a) and SEM image showing nano-sized
pores(b) in P-4: Power 234; Speed 1299.6; Hatch 0.072 .......................................30
Figure 21: Optical micrograph showing relatively coarse microstructure (a) and SEM image
showing highly varied grain growth directions (b) in P-5: Power 156; Speed 866.4; Hatch
0.108.......................................................................................................................31
Figure 22: Optical micrograph showing more dendritic and fewer cellular regions(a) and SEM
image showing a denudation zone (b) in P-6: Power 234; Speed 866.4; Hatch 0.108
................................................................................................................................32
Figure 23: Optical micrograph showing faceted voids (a) and SEM image showing unmelted
powder particles (arrow) (b) in P-7: Power 156; Speed 1299.6; Hatch 0.108 .......32
Figure 24: Optical micrograph showing an extremely fine microstructure (a) and SEM image
showing a keyhole (b) in P-8: Power 234; Speed 1299.6; Hatch 0.108 ................33
Figure 25: Optical micrograph showing high cellular region density (a) and SEM image showing
a lack of porosity (b) in P-9: Power 195; Speed 1083.0; Hatch 0.90 ....................33

x
Figure 26:Stress-strain curves for wrought specimens and 3D printed specimens built at varying
orientations .............................................................................................................34
Figure 27: Average tensile properties of four specimens ..................................................35
Figure 28: Fatigue test results for wrought and printed specimens ...................................36
Figure 29: Fracture surface of wrought tensile specimen. .................................................37
Figure 30: Fracture surface of 0° tensile specimen. ...........................................................38
Figure 31: Fracture surface of 30° tensile specimen. .........................................................39
Figure 32: Fracture surface of 60° tensile specimen. .........................................................39
Figure 33: P-8 Fracture surface of 90° tensile specimen ...................................................40
Figure 34: Fractographs of wrought fatigue specimen (a,b) crack initiation site, (c) propagation
zone, and (d) final fracture zone. ...........................................................................41
Figure 35: Fractograph of 0° build fatigue specimen (a,b) crack initiation site, (c) propagation
zone, and (d) final fracture zone. ...........................................................................42
Figure 36: Fractographs of 30° fatigue specimen (a,b) crack initiation site, (c) propagation zone,
and (d) final fracture zone. .....................................................................................43
Figure 37: Fractographs of 60° fatigue specimen (a,b) crack initiation site, (c) propagation zone,
and (d) final fracture zone. .....................................................................................44
Figure 38: Fractographs of 90° fatigue specimen (a) crack initiation site, (b) propagation zone,
and (c, d) final fracture zone. .................................................................................45
Figure 39: Sketches of an MPB a) from the side and b) from the top ...............................59
Figure 40: Length of a) 0 b) 30° c) 60° d) 90° ...................................................................69
Figure 41: Compactness of a) 0 b) 30° c) 60° d) 90° .........................................................70
Figure 42: Compactness of a) P-1 b) P-2 c) P-3 d) P-4 e) P-5 f) P-6 g) P-8 h) P-9 ...........72

xi
Figure 43: Length of a) P-1 b) P-2 c) P-3 d) P-4 e) P-5 f) P-6 g) P-8 h) P-9....................73

xii
List of Equations
Equation(1) ..........................................................................................................................6
Equation (2) .........................................................................................................................6
Equation (3) .......................................................................................................................19
Equation (4) .......................................................................................................................54

xiii
List of Acronyms
Acronym Meaning EBM Electron beam melting GED Global energy density LENS Laser enabled net shaping MPB Melt pool boundary RBF Rotating beam fatigue SEM Scanning electron microscope SLM Selective laser melting SLS Selective laser sintering UTS Ultimate tensile strength YS Yield strength µ-CT Computed microtomography

1
1. Introduction
In the 1980s additive manufacturing became a widespread topic of interest to researchers
and industry1,2. Additive manufacturing refers to any process for fabricating components by
adding material, as opposed to subtractive manufacturing where material is removed to gain the
desired shape. Several techniques including 3D printing techniques have been developed.
A discussion of laser welding basics follows. After comes a review of various methods
for 3D printing of metals, common discontinuities, parameters, and plan for optimization.
Finally, the methodology, results, discussion, and conclusions of the experiments will be
presented.
1.1. Forms of 3D printing
Many different 3D printing and additive manufacturing techniques have been developed
since companies began rapid prototyping. Newer techniques were developed with the goal of
building fully functional components rather than prototypes1,2. Many techniques can only be
used with specialized materials. For example, stereolithography requires the use of resins that
cure in the presence of ultraviolet light. Electron beam melting requires highly conductive
materials, limiting its use to metals1,2.
A few 3D printing techniques using metals include selective laser sintering (SLS),
selective laser melting (SLM), electron beam melting (EBM), and laser enabled net shaping
(LENS). All four methods listed are powder based 1,2.
All methods other than LENS are powder bed techniques that follow the same basic
process. A 3D drawing is generated in a CAD program. A second software program divides the
drawing into several “slices” of a predetermined thickness. Powder is deposited in the build
chamber and smoothed by a rake. An energy beam then scans the powder bed in the necessary

2
pattern to build the desired cross-section. The platform lowers by the predetermined layer
thickness and the process continues until the component is complete 3,4.
In SLS metal powder particles are usually either coated or mixed with polymer binders
which help support the component1. Preheating the metal powder to just below the melting point2
allows for performance without a binder. A laser provides just enough energy for fusing or
sintering of powder particles to begin. Post-processing is often needed to remove any residual
binder and porosity. Polymer burn-out and liquid metal infiltration is a common post-process
treatment3. By selecting an appropriate second phase, SLS can be used to fabricate micro-
composites3.
Unlike SLS, SLM and EBM fully melt the powder to form a near-full density part. In
SLM the powder is deposited and a high-power laser is used to melt the layer. The only
difference between SLM and EBM is that EBM uses an electron beam under high vacuum
instead of a laser in an inert gas. Near-full density is achieved by SLM, but the high heat input
causes more loss of alloying elements, residual stress, and thermal distortion than found in SLS.
A higher build rate and fully dense parts can be formed by EBM than SLM, but the surface finish
is even worse than for SLM1,2.
Finally, LENS differs from SLS, SLM, and EBM in that it uses no powder bed. Instead,
powder is deposited through a nozzle directly into the laser’s path. Both the nozzle and laser
move in conjunction so that molten metal is deposited on the substrate as programmed. Metal
can be deposited on preexisting components, making LENS usable for repair and coating
applications1. Much larger components can be made than with the other processes. Unfortunately
dimensional accuracy is low for LENS compared to SLS, SLM, and EBM2.

3
1.2. Laser welding
Laser 3D printing techniques are similar to laser welding; it could be said that the entire
component is built by welding. The multiple thermal cycles involved in 3D printing prevent
using laser welding models for the 3D printing process5. However, background information on
laser welding is beneficial to understanding the SLM process.
Compared to arc welding methods, laser welding has a much higher energy density which
allows a high melt pool penetration and small base metal heat affected to zone to be achieved6,7.
However, the heat transfer efficiency is greatly reduced because metals have high optical
reflectance. The high depth to width ratio of laser welding may also increase the chances of
thermal cracking. In a shallow weld pool, thermal stress is distributed fairly evenly in all
directions. Deep, narrow weld pools have very little thermal gradient near the bottom, but much
higher thermal gradients along the sides parallel and perpendicular to the weld track. High
thermal stresses pull directly on the fusion zone, leading to high chances of thermal cracking6.
Formation of keyholes is a common phenomenon in laser welding. High temperatures
where the laser strikes the surface induces a high metal vapor pressure on the molten metal that
pushes material away. The “keyhole” formed has a high aspect ratio. A void is created which the
molten material tries to refill after the laser passes. The high solidification rate does not always
allow time for the keyhole to be refilled before solidification.
Despite the similarities, laser 3D printing is very different from laser welding5. Powders
have higher surface area than sheet or plate, so reflectance decreases efficiency even more during
3D printing. Remelting, multiple thermal cycles, and multiple melt pools all cause complications
when modelling 3D printing5. The entire component is heated during printing, so thermal
profiles are completely different.

4
1.3. 3D Printing discontinuities
Several discontinuities specific to 3D printing have been identified1,3,8,9. Some such
discontinuities include microcracks, gas porosity, faceted voids3,10,11, balling, and denudation
zones9. Certain discontinuities such as faceted voids are only expected at low heat input; other
discontinuities such as balling and gas porosity are expected at high heat input
A combination of stress state, constitutional supercooling from alloy segregation, and the
keyhole effect contribute to microcracking. Bonding between the molten layer and the solid
substrate restricts thermal contraction at the bottom of the melt pool. The unrestrained upper melt
pool surface can contract almost freely, inducing a state of bending stress12. Bending stress
occurs when one surface is under compression and the opposite is under tension. Small cracks
initiate and grow to absorb energy, reducing the overall stress in the component10,12.
Constitutional undercooling occurs during solidification of solutions when solute is
rejected from one phase and concentrated in another6,7. Under rapid solidification, rejected solute
concentrates near the liquid/solid interface, creating a brittle phase that may crack during or
immediately following solidification6,7,10. In addition the keyhole effect6,7 may also cause cracks
to form if the keyhole refilled before solidification10. Keyhole discontinuities may look like
either thin faceted voids or wide cracks.
Most gaseous porosity in 3D printing is the result of gas entrapped between powder bed
particles16. Gas pores are often spherical because of hydrostatic pressure. Other possible sources
are evaporation of alloying elements (common in welding)6,7 and atmospheric gasses dissolved
in the molten metal which is later rejected during cooling. Porosity from dissolved gasses is more
rare because an inert argon atmosphere is usually used1,3,17,18, although at high temperatures even
argon becomes slightly soluble19.

5
Faceted voids are thought to be caused by lack of fusion or incomplete melting and are
often accompanied by unmelted particles3,13,14. Faceted voids are generally worse than gaseous
pores because faceted voids are larger and the irregular shape acts as a stress concentrator3,15.
Unmelted powder particles make it more difficult to measure porosity accuarately10.
Denudation zones are locations where material was lost due to spatter9. A “significant
backpressure”16 is present where the laser strikes16. Additionally, boiling temperatures have
been reached where the laser strikes9. Surface tension varies greatly as a result of the high
temperature gradient present during laser melting. Metal vapor pressure and the high surface
tension gradient combined causes spatter, thus creating the denudation zones9.
A surface tension effect called Marangoni convection causes balling3,9,14. Marangoni
convection results from differences in surface tension between the center and edge of the melt
pool6,7. Surface tension is typically higher at the relatively cool edge of melt pools than at the
hotter center. Molten metal is pulled from the center towards the edges by the surface tension
gradient6,7. Material at the edges flows downward and towards the center. Finally, to fill the
space, material flows up at the center. Under very high temperature gradients, Marangoni
convection causes balling to occur. Balling increases when wettability between the melt and
substrate is poor14.
1.4. Parameters
Laser 3D printing involves several parameters. Laser power, travel speed, and hatch
spacing are three of the most easily manipulated. The hatch pattern, which affects the thermal
stress profile, is easy to manipulate but the effect is difficult to quantify. Layer-by-layer
fabrication causes anisotropy, so build angle or component orientation becomes important.

6
Heat input is a function of several parameters. One definition of heat input is the energy
density (E)10:
(1)
where P is the laser power in watts, v is the travel speed in mm/s, h is the hatch spacing in mm,
and t is the layer thickness in mm. An alternative method of 3D printing has a laser blinking on
and off instead of scanning continuously14. In such cases the spot distance (distance between
exposure locations) divided by exposure time is analogous to travel speed. Decreasing travel
speed decreases porosity and increases microhardness up to a peak, but at too low of a travel
speed microhardness decreases again. Microhardness always decreases as porosity increases14.
Layer thickness was kept constant in the present study. The formula from Sun et al10 was
modified to form the global energy density (GED) defined as
(2)
without the layer thickness. While the GED is important, each individual parameter used in the
calculation may have its own effect on the resulting properties.
Laser power directly influences the GED. With all other parameters held constant, higher
laser power results in more heat accumulation. Denudation and spatter may increase with laser
power because a higher surface tension gradient forms9. Boiling temperatures in the melt pool
even occur with high enough laser power9.
Increasing laser speed decreases laser/material interaction time and lowers the heat input.
While increasing the laser speed decreases the overall build time, the loss of heat input may

7
cause faceted voids and unmelted particles3,10. Alternatively, high travel speeds during laser
welding are known to cause the formation of long, narrow, teardrop-shaped melt pools which act
as stress concentrators6,7. Depth of penetration also decreases as travel speed increases6,7, which
may lead to poor bonding between the current melt and previously melted layers.
Hatch spacing affects heat transfer between laser tracks. Higher hatch spacing means
fewer scan lines and lower heat input. With high hatch spacing, less heat is available for transfer
between melt tracks. Poor bonding or incomplete fusion between melt tracks becomes possible,
resulting in porosity when hatch spacing is high. Low hatch spacing increases the overall build
time and thermal stress10. Excessively high travel speed and low hatch spacing causes vertical
cracking10.
Powder bed thickness is another parameter. Thick powder beds require more energy for
complete melting than thin powder beds. More gas is present per layer and the gas has to travel
through more material to escape the melt, so porosity becomes more likely3. Powder bed
thickness influences heat and mass transfer in the melt pool18. Powder bed thickness was kept
constant in this study.
Other parameters exist, but are neither used in heat input calculations nor modified in this
study. One such parameter is the hatch pattern13. Scan lines can be made in various patterns such
as horizontal lines, vertical lines, or grids13. The thermal stress profile changes depending on the
pattern. Horizontal stripes or vertical stripes concentrate thermal stresses in one dimension; grid
patterns balances thermal stresses in two directions.
Thermal stresses relieving strategies are available. One strategy is rescanning the
component layers13,20. Rapid cooling of the component and constraints to thermal expansion
cause thermal stresses. Rescanning gives more time for metal to contract, relieving up to 8% of
8
thermal stress as measured by differences in curvature13. Rescanning not only relieved thermal
stress, but also significantly decreased porosity4,20. Only a single rescan is beneficial for porosity;
density drops again after multiple rescans4. Disadvantages to rescanning are that it increases
build time10,20 and the energy consumption.
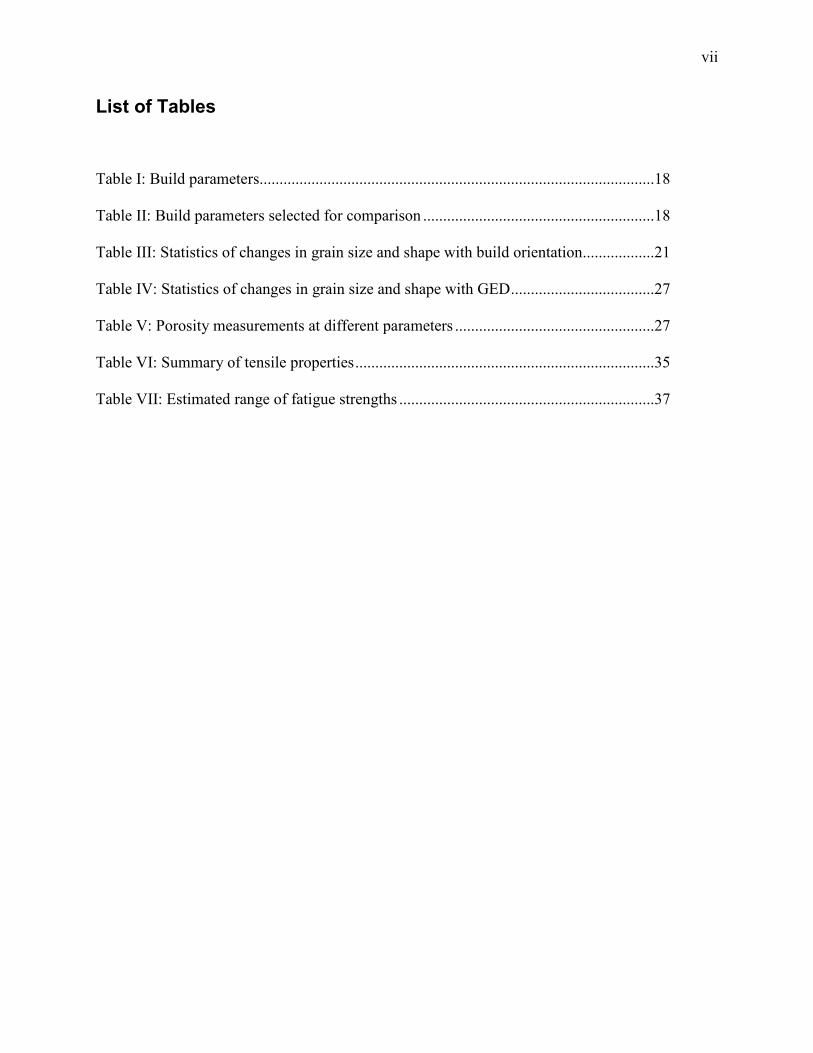
Various scanning strategies are available to influence thermal stresses. Vertical stripes,
horizontal stripes, and grid patterns all influence the thermal stress profile differently13. Scan line
length may be changed. Rather than scanning the entire line continuously, it is possible to scan a
short length in the scanning direction, move down the part, and then scan again moving up the
part. Figure 1 is a schematic drawing of two possible strategies for shorter scan vectors. Solid
arrows are scan lines. The dotted arrow shows the laser travel path between scans.
Figure 1: Scan pattern to investigate short scan vectors. Source: Kruth, Jean-Pierre, et al. “Assessing and comparing influencing factors of residual stresses in selective laser melting using a novel analysis method.”
Proceedings of the Institution of Mechanical Engineers, Part B: Journal of Engineering
Another strategy is to rotate the scan pattern after each layer3. Each time the pattern
rotates, the thermal stresses concentrate in a different direction. Balancing the thermal stress
distribution helps prevent distortion. Choosing an appropriate angle of rotation allows the
stresses to almost fully balance before repeated loading in the same direction.

9
1.5. Grain growth
Interactions between fluid flow, thermal gradient, and crystal properties control grain
growth21,22,23. Epitaxial grain growth, growth along the highest thermal gradient along the close
pack direction6,21, dominates under laminar flow conditions. Competitive growth prevents grains
from growing further when the preferred growth direction is not in line with the thermal
gradient21. Fluid flow is often turbulent during welding24, and by extension, during 3D printing.
Figure 2 shows the basic solidification modes and the relative level of constitutional
supercooling at which they occur. Constitutional supercooling is related to the ratio of the
thermal gradient (G) to the solidification rate (R), or the G/R ratio. Higher G/R ratios indicates
more constitutional supercooling and increases the chances of either planar or cellular
solidifications modes. Lower G/R ratios indicate an increased chance of dendritic solidification
occurring6. The solidification mode effects grain shape and may impart directional properties on
the metal.
Figure 2: Effect of constitutional supercooling on solidification mode: (a) planar; (b) cellular; (c) columnar dendritic; (d) equiaxed dendritic (S, L, and M denote solid,
liquid, and mushy zone, respectively). Source: Kou, Sindo. Welding metallurgy. Hoboken (New Jersey), John Wiley & Sons, 2003.

10
Fluid flow, especially turbulent flow, complicates grain growth22. Dendrite tips may
break off and rotate in the fluid, cycling in and out of orientation for epitaxial growth and
provide nucleation sites6,22,23. Grain growth is further complicated in 3D printing because of heat
accumulation between layers. Heat transfers through previous layers3, so that more heat is
absorbed by the component, the effective preheat temperature increases, and grains grow larger
than in later layers. However, the cooling rate decreases on subsequent layers5 so that more time
is available for grain growth. Misaligned dendrites indicate that the direction of the highest
thermal gradient varies. Some variation may be expected because the scan pattern rotates after
each layer.
Grain growth in SLM starts at the substrate below the melt pool9. Grains initially grow
via heterogeneous nucleation and epitaxial growth. Heterogeneous nucleation is grain nucleation
at preexisting solid/liquid interfaces, rather than within the center of the melt pool as in
homogenous nucleation. Heterogeneous nucleation is kinetically favored because the high
energy of preexisting interfaces lowers the activation energy required for nucleation6,7.
Several models have been used to predict grain growth behavior in SLM. Most are based
on modifications of finite element method9,25. Models used in laser welding such as the Monte
Carlo24 simulation are a logical starting point, but the layered structure and repeated heating
complicates such models5.
1.6. Porosity measurement
Porosity can be measured as a ratio of void area to expected full density. Porosity
measurements are usually made by density differences according to Archimedes’ principle. In
3D printing the Archimedes method often underestimates the amount of porosity13. Unmelted

11
particles have the same mass and volume as the bulk component, so voids containing unmelted
particles read as if almost fully fused.
Another potential method to measure porosity is x-ray computed microtomography (µ-
CT). In x-ray µ-CT, an x-ray source rotates around a specimen generating 2D images through the
thickness of all sides. Superimposing the 2D images produces a single 3D image. Resolutions of
less than 1 µm are theoretically possible26. Area analysis was chosen here because cross-sections
were already prepared for microscopy. Accurate porosity measurements require images of
multiple representative regions. Observations suggest porosity varies periodically as does
microstructure. Porosity is volumetric, so area analysis may not accurately represent the true
porosity. Pores are assumed to be uniformly distributed and that the results will be the same no
matter which axis the specimen was sectioned across. Neither assumption is necessarily true.
1.7. Optimization
As 3D printing is a young technology, optimization is a major challenge. Working,
casting, and machining processes have been used for centuries and a corresponding amount of
data on how to obtain desired properties already exists. Research into 3D printing started much
more recently. More data is needed on how each build parameter affects mechanical properties
and microstructure. Optimization can then be accomplished.
Various studies on parameter optimization have been reported in literature. One study
attempted to decrease build time by increasing bed thickness18. High travel speeds of 2000 to
4000 mm/s were used. The laser power was not specified and the actual travel speed used at each
thickness was not specified, so the laser power cannot be determined. Greater than 99% density
and higher tensile yield strength than wrought was achieved even at bed thicknesses of up to 150
µm18

12
Sun et al10 attempted using higher laser power and scan speed to decrease build time.
Using a laser power of 380 W with appropriate adjustments of travel speed and hatch spacing,
they decreased build time by 72%10. More than 99% density and higher microhardness were
obtained at all builds.
Mechanical properties of interest include yield strength (YS), ultimate tensile strength
(UTS), and Young’s modulus. Non-tensile properties of interest include fatigue strength and
fatigue life1,3. Microstructure is inherently linked to mechanical properties. Tensile and fatigue
strength both depend on grain size and shape27,28. Precipitate and phase distribution in multiphase
alloys also affects mechanical properties.
Metallography provides a method for measuring porosity and microstructural features. In
addition to determining porosity as a ratio, the size and shape of pores can also be measured by
metallography. Correlating the microstructure to varying build parameters and mechanical
properties is thus an important part of the optimization process.
The relationship between build angle and mechanical properties was examined.
Specimens were built at four different angles with all other parameters held constant for tensile
tests and fatigue tests. Metallography was performed on specimens from each angle. Eight more
specimens were built at 90° from the build plate with varying laser power, hatch spacing, and
travel speed for metallography. Following is a detailed procedure of the study, the results, a
discussion, and conclusions based on the data.

13
2. Methodology
Selective laser melting was the specific 3D printing method used. Particles are
completely melted and fused. The scan pattern was rotated 67° after each layer to accommodate
for thermal stress distribution. The bed thickness and d10 particle size are both 20 µm.
2.1. Equipment used
Equipment and software used for this study include:
• EOS 290 3D printer
• Hitachi S4500 Field Transmission Scanning Electron Microscope (SEM)
• Leica DM750P Optical Microscope
• Fatigue Dynamics RBF 200 Fatigue Tester
• MTS Landmark Servohydraulic Universal Test Frame
• Leica Grain Expert software
• Minitab statistical software
Specimens were built at 0°, 30°, 60°, and 90° from the horizontal for tensile and fatigue
testing. Additional specimens were built at varying laser power, travel speed, and hatch spacing
to study the effect on microstructure. Figure 3 represents the build angle of each specimen.
Figure 3: Build angle of specimens for mechanical testing

14
2.2. Tensile testing
Wrought specimens were built from rolled bar stock and tested. Tensile testing was
performed on three tensile rounds. Yield strength, ultimate tensile strength, and elastic modulus
were determined. Fatigue tests on the printed samples followed. Four specimens of each
orientation were used. Tensile strength values were used to determine starting stress range values
for fatigue testing. Dimensions of tensile specimens are provided in Figure 429.
Figure 4: Tensile specimen dimensions. Schematic provided by Imperium
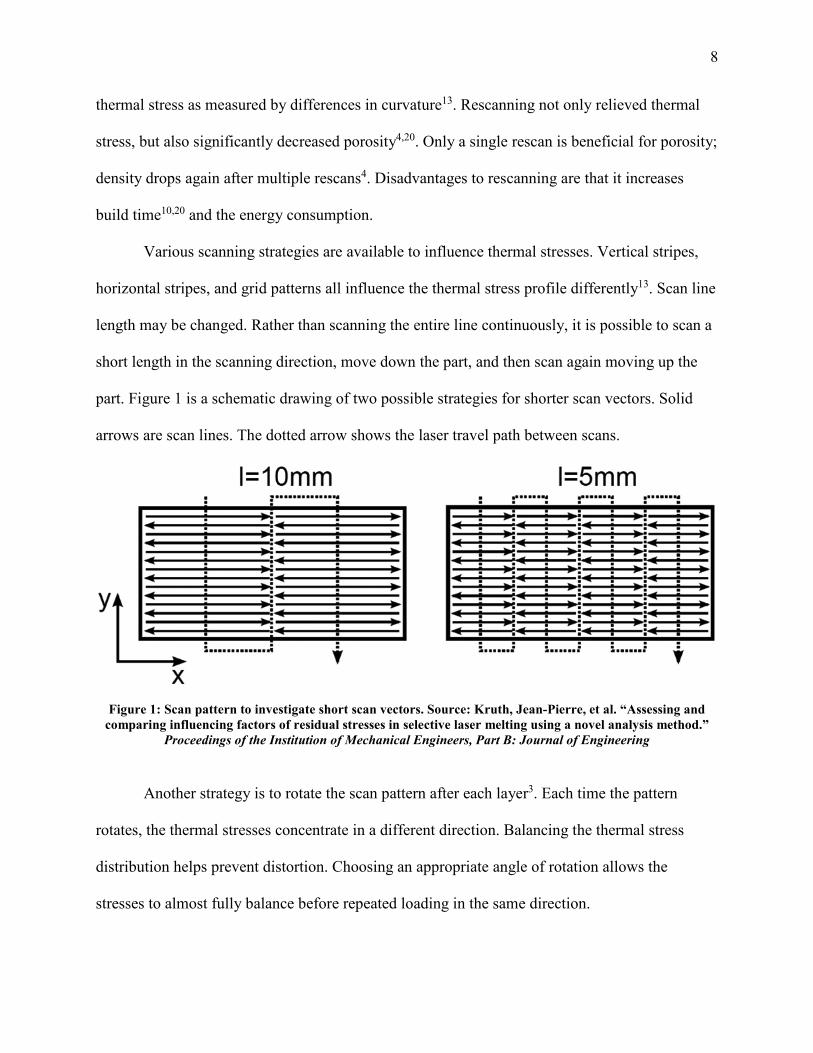
2.3. Fatigue testing
Rotating beam fatigue testing was carried out after tensile testing. Again wrought
specimens were tested first. Fatigue tests on the wrought were performed using 50% of the
ultimate tensile strength (UTS) as the starting point. Next the 90°, 60°, 30°, and 0° build angle
15
specimens were tested in order using half of the UTS. Fatigue specimen dimension are shown in
Figure 5.
Figure 5: Fatigue specimen dimensions. Schematic provided by Imperium
A rotating beam fatigue tester based on cantilever theory was used. A beam subjected to a
point load experiences bending stress, where pure tension is exerted on one surface and pure
compression on the opposite. By rotating the beam every point on the surface cycles through
100% pure compression (-σ) and 100 percent pure tension (σ).
By fixing one end and placing the load on the opposite end, bending stress is theoretically
highest at the fixed end. In real components, stress concentrations exist along the entire length
and the highest stress is difficult to predict. An annular notch with a constant radius of curvature
cut into the beam resolves the issue. Bending stress is a cubic function with respect to diameter

16
and a linear function with respect to length. Having the thinnest cross-section in the center
therefore increases the chances that the stress will be highest at the center. On the RBF 200 one
end of the specimen is inserted into a rigid support. The other end is placed in a free-floating arm
connected to a graduated lever and sliding weight. The lever arm is calibrated in inch-pounds.
2.4. Metallography
Metallography specimens were first polished on silica grit paper. Fine polishing used
cloth with 5 µm and 1 µm alumina powder. A final polishing step using 0.25 µm diamond paste
was performed. After polishing the samples were etched by immersion in Viella’s reagent.
Optical microscopy was performed. A Leica DM750P optical microscope was used. Grain length
and compactness data were generated using five images of each orientation and five images of
each parameter set. Data was compiled in Minitab® analysis software and used to create
histograms.
2.4.1. Orientation
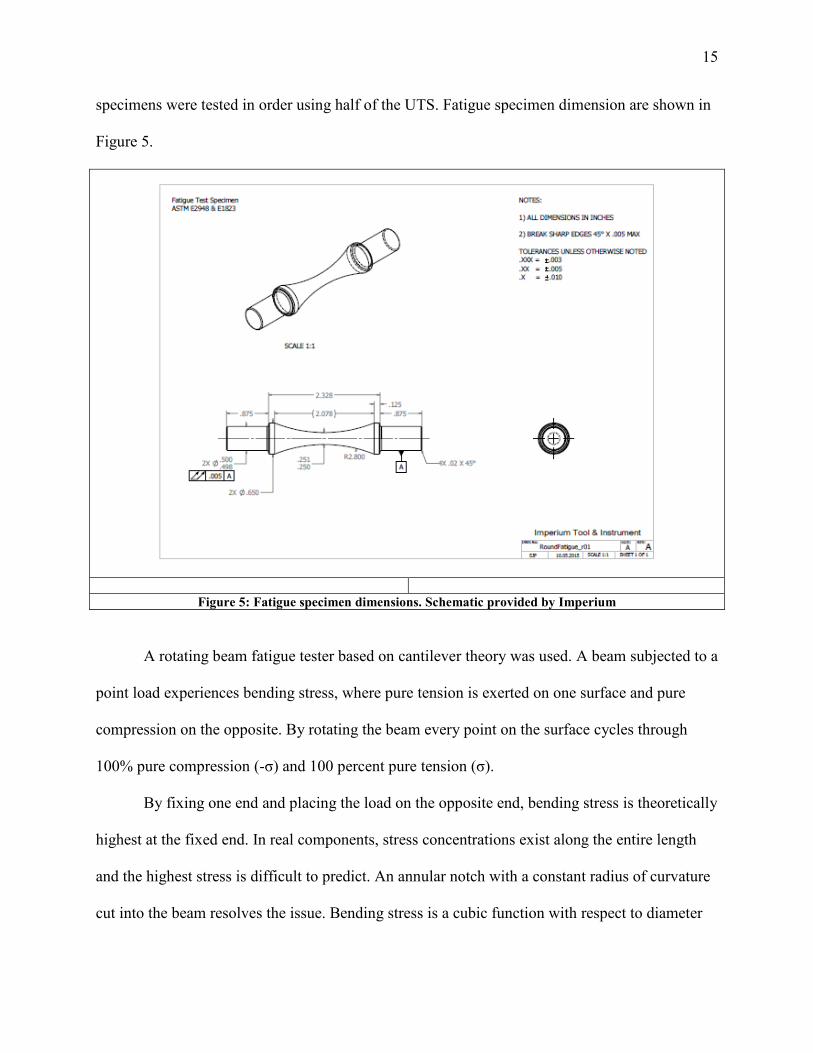
Metallography was performed on tensile specimen remnants. Two cross-sections were
taken for each orientation: an x-y cross-section (perpendicular to the loading axis) and a z cross-
section (parallel to the loading direction). Because the properties of printed metals have been
typically found to be anisotropic, both cross-sections were required to understand how
microstructure develops. Figure 6 illustrates where each cross-section was taken.
17
Figure 6: Demonstration of a) x-y-section and b) z-section
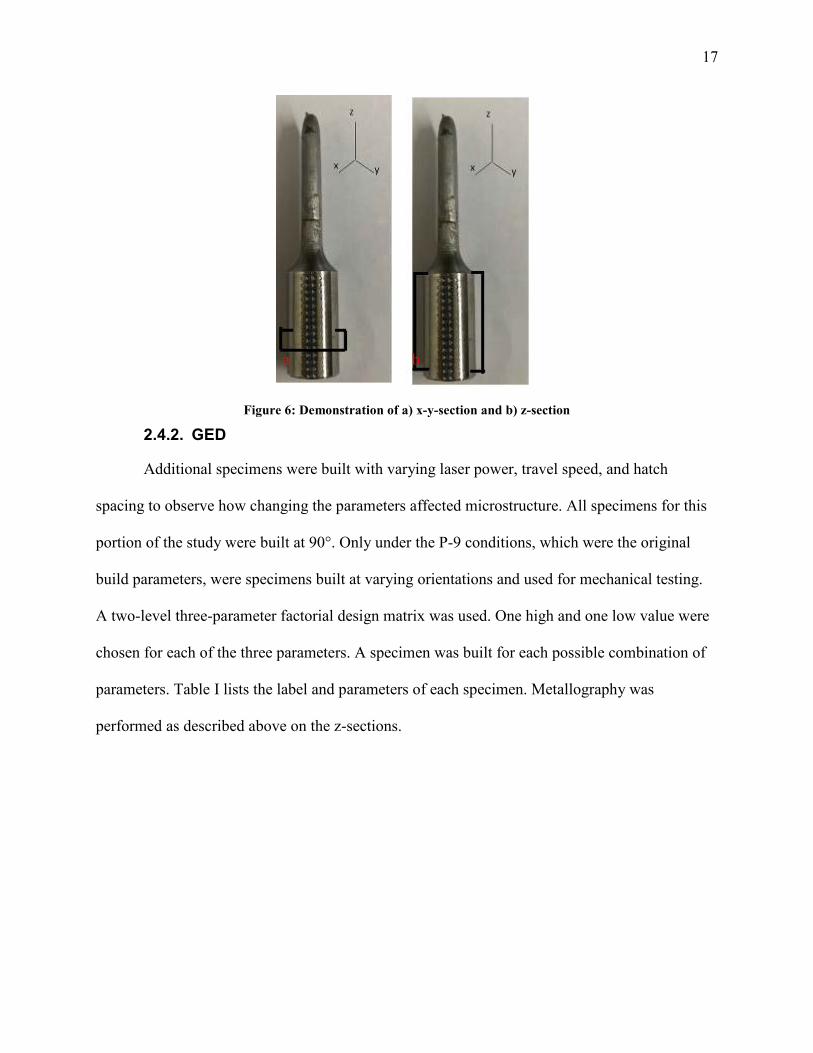
2.4.2. GED
Additional specimens were built with varying laser power, travel speed, and hatch
spacing to observe how changing the parameters affected microstructure. All specimens for this
portion of the study were built at 90°. Only under the P-9 conditions, which were the original
build parameters, were specimens built at varying orientations and used for mechanical testing.
A two-level three-parameter factorial design matrix was used. One high and one low value were
chosen for each of the three parameters. A specimen was built for each possible combination of
parameters. Table I lists the label and parameters of each specimen. Metallography was
performed as described above on the z-sections.
a b

18
Table I: Build parameters
Sample Label Power (P) Speed (v) Spacing (h) GED (P/vh) P-1 156 866.4 0.072 2.50
P-2 234 866.4 0.072 3.75
P-3 156 1299.6 0.072 1.67
P-4 234 1299.6 0.072 2.50
P-5 156 866.4 0.108 1.67
P-6 234 866.4 0.108 2.50
P-7 156 1299.6 0.108 1.11
P-8 234 1299.6 0.108 1.67
P-9 195 1083.0 0.090 2.00
Pairs of specimens where only one parameter changed were chosen for comparison as
summarized in Table II. Discontinuities were so clearly evident in P-7 (lowest GED) that it was
excluded from these comparisons.
Table II: Build parameters selected for comparison
Parameter of Interest Low Value High Value
Power P-1 P-2 P-3 P-4 P-5 P-6
Travel Speed P-1 P-3 P-6 P-8 P-2 P-4
Hatch Spacing P-1 P-5 P-2 P-6 P-4 P-8
Images were taken on both the optical microscope and the scanning electron microscope
(SEM). Based on qualitative observations of the optical microscope images a set of parameters
giving a high GED and a set of parameters giving a low GED were chosen for further analysis. A
cross section of each bar was imaged on an SEM. Microstructures were heterogeneous. Several
images were taken for analysis.

19
An image analysis software package including the Leica Grain Master tool was used for
grain size and shape measurement. Pore size and overall percent porosity were also measured.
Overall porosity was measured as an area percent and assumed to be uniformly distributed.
Porosity was analyzed using three SEM images of each parameter. Pore size was measured as the
equivalent diameter of a circle with the same area as the pore. Shape was measured as
compactness, defined by the equation
(3)
where Pr is the perimeter and A is the area. A perfect circle has a compactness of one and
the compactness approaches zero as the shape becomes more irregular30.

20
3. Results
Tensile test results, fatigue test results, and micrographs follow with qualitative
descriptions. Fractographs are also presented along with an analysis into the fracture mechanism
and root cause of failure.
3.1. Microstructure
Microstructural analysis was performed on a cross-section taken from tensile bars of each
specimen built using P-9. Specimens later built with varying hatch spacing, travel speed, and
laser power were analyzed along the length for microstructure. An image of the wrought tensile
bar was taken for reference along both the x-y plane and z-plane (Figure 7). Coarse, randomly
oriented grains are in the x-y cross-section. In the z-direction grains are still coarse but grain
boundaries are more aligned with each other. Twins, grains that are mirror images of each other,
are present in both cross-sections.
Figure 7: Optical micrographs of the wrought a) x-y plane showing randomly oriented grains and b) z plane showing aligned grains
a b

21
3.1.1. Orientation
Table III contains the mean, maximum, and minimum grain length and compactness for
each build angle. All specimens built at varying orientations were built under P-9 conditions.
Appendix A collects histograms of grain size and shape. All orientations had the same minimum
grain length, which suggests the smallest grain size was below the detection limit of the imaging
software. The largest maximum grain size and smallest mean grain size were in the 90° build
angle. The smallest maximum grain length and largest mean grain length belonged to the 30°
specimen. The 90° had the highest mean, the highest maximum, and the lowest minimum
compactness. The 30° had the lowest mean compactness. The 0° had the lowest maximum
compactness.
Table III: Statistics of changes in grain size and shape with build orientation
Orientation 0° 30° 60° 90° Mean Length (µm) 1.469 1.423 1.559 1.416 Max Length (µm) 10.298 10.415 8.436 7.389 Min Length (µm) 0.233 0.233 0.233 0.233 Mean Compactness 0.485 0.483 0.450 0.472 Max Compactness 0.870 0.887 0.875 0.918 Min Compactness 0.111 0.112 0.102 0.113
Long dendrites are seen growing parallel to melt pool boundaries in Figure 8a. Most
grains are fine cellular structures. Two small discontinuities here-on referred to as “islands”
separated from the surrounding microstructure are present31. Arrows surround very faint grain
boundaries which confirm that the cellular structure is subgranular as has been previously
reported31. Voids and denudation zones were observed on the 0° build angle x-y cross-section as
shown in Figure 8b.

22
Figure 8: Optical micrograph (a) showing cellular subgrain features and SEM image (b) of 0° x-y-section showing voids and denudation zone
Grain size and compactness data was generated from five different 1000X micrographs.
The data was consolidated and used to generate histograms in Minitab 17 statistical software.
A discontinuity best described as an island separated from the surrounding metal is seen
in the 0° build angle z-section in Figure 9. A bead of metal seems not to have melted, to have
separated from the previously melted layer, and rotated 90°. Voids surround the border of the
island.
Figure 9:SEM image of 0° z-section showing an island
a b

23
More of the longer grains are observed in the micrograph of 30° build angle x-y-section
(Figure 10a). Smaller cellular regions are present. Fine and coarse cellular structures are present,
as opposed to in the 0° where grains were either fine cellular or dendritic. Figure 10b reveals
balling. Dendrites warp around the edges and gaps are present between the ball and the rest of
the surface.
Figure 10: Optical micrograph (a) showing fine and cellular structures and SEM image (b) of 30° x-y-section showing balling
Figure 11 displays a denudation zone in the 30° build angle z-section. Material at the
edge of the cavity has a slight upward and inward slope. Nearby spattering discontinuities show
as bright spots.
a b

24
Figure 11: SEM image of 30° z-section containing a denudation zone
Figure 12a shows a microstructure almost identical to that seen in the 30°, as may be
expected from the histograms reported in Appendix A. Some difference is noted in the shape of
MPBs between the two specimens, but that may be due to how the specimen was cut. Figure 12b
indicates an island on the 60° build angle x-y-section similar to that seen on the 0° z-section.
Porosity is not present around this island, but faint lines which may be microcracks are present.
A MPB crosses the island and disappears near the middle before reappearing on other side. The
microstructure does not look like it has been rotated to the same angle as the island on the 0° z-
section.
Figure 12: Optical micrograph (a) showing sharply curved MPBs and SEM image (b) showing an island in the 60° x-y-section
a b

25
The 60° build angle z-section contains a faceted void. Some nearby spherical pores are
also observed in Figure 13. The large void resembles a tear. An MPB intersects the tear and
delaminates from the rest of the metal.
Figure 13: SEM image of 60° z-section showing a void
Even though the histogram in Figure 40d of Appendix A shows that the 90° build angle
has the longest grains of all the x-y-sections, such long dendrites are not seen in Figure 14a.
Nearly all grains are very fine cellular structures, with just a small region of dendrites. A site of
incomplete fusion or possibly a keyhole was found on the 90° x-y-section (Figure 14b). Several
smaller voids and pores are nearby.

26
Figure 14: Optical micrograph (a) showing a highly cellular microstructure and SEM image (b) showing a keyhole in the x-y-section.
Figure 15 is a ball found on the 90° build angle z-section. The surrounding microstructure
seems to have somehow glazed over a part of the ball. Pores resembling casting blows22 are near
the intersection between the ball and the plane of the cross-section.
Figure 15: SEM image of 90° z-section showing balling
3.1.2. GED
Metallography was performed on specimens of varying laser power, travel speed, and
hatch spacing that determines GED. Metallography was used to screen potential candidates for
future mechanical testing. Table IV contains the mean, minimum, and maximum grain length
a b

27
and compactness of the various parameter sets. Histograms of the grain size and shape are shown
in Appendix B.
Table IV: Statistics of changes in grain size and shape with GED
Orientation P-1 P-2 P-3 P-4 P-5 P-6 P-8 P-9 Mean Length (µm) 1.327 1.283 1.200 1.213 1.198 1.566 1.188 1.201
Max Length (µm) 6.090 6.567 4.836 4.597 5.373 7.680 17.194 4.836
Min Length (µm) 0.239 0.299 0.239 0.239 0.239 0.233 0.239 0.299
Mean Compactness 0.608 0.657 0.664 0.669 0.657 0.503 0.657 0.664
Max Compactness 0.918 0.938 0.938 0.922 0.941 0.862 0.939 0.939
Min Compactness 0.177 0.221 0.195 0.238 0.225 0.145 0.133 0.234
Optical microscopy was performed to obtain a broad overview of the features present.
Further analysis using an SEM was required because the microstructure was so fine. Several of
the SEM images display discontinuities. Porosity measurements, shown in Table V, were made
on the Leica software using SEM images. Cells where porosity was not observed are labeled
“NO”.
Table V: Porosity measurements at different parameters
Specimen P-1 P-2 P-3 P-4 P-5 P-6 P-7 P-8
Mean Pore Size (µm)
0.097 0.115 NO 0.052 0.178 NO 2.576 0.120
Porosity (area %) 1.802 14.667 NO 0.482 14.880 NO 0.361 1.923
Figure 16a is a micrograph of P-1. A complex microstructure containing melt pool
boundaries (MPBs), columnar dendrites, and cellular features appears. Extremely fine,
needlepoint-like features, thought to be pores, are present near grain boundaries. Large,
discolored features are etching artifacts. A high magnification SEM image of the cellular

28
structures (Figure 16b) reveals nano-sized pores within the grains. Some pores contain small,
bright particles believed to be nano-inclusions.
Figure 16: Optical micrograph showing dendrites and cellular features(a) and SEM image showing porosity(b) in P-1: Power 156; Speed 866.4; Hatch 0.072
Microstructure varied with position. Figure 17 demonstrates a different location on the
cross-section with a different microstructure. Compared with the micrograph in Figure 16, more
elongated grains are present. Elongated grains in different areas have mismatched orientations.
The various regions repeat periodically throughout the specimen. Further analysis is done using
images that reveal the most varied features within a specimen.
Figure 17: Additional image of P-1 demonstrating variation of microstructure with location on specimen
a b

29
Other specimens had similar microstructures. Figure 18a is the microstructure of
specimen P-2, which was built at the highest GED. Cellular structures in P-2 are slightly coarser
than in P-1. Columnar dendritic grains look longer but thinner. More of the small, needlepoint-
like features are present. Columnar dendritic grains were not all aligned in the same direction. A
high pore density with pores of varying sizes is shown under the SEM (Figure 18b). Nano-
inclusions were not observed under these conditions.
Figure 18: Optical micrograph showing highly aligned dendrites (a) and SEM image showing microporosity (b) in P-2: Power 234; Speed 866.4; Hatch 0.072
Figure 19a presents the microstructure of P-3. In contrast to Figure 16, columnar
dendritic grains are short and thick. Fine cellular structures are present. Unlike in the previous
two specimens, sharp cornered features are visible. Isolated pores were observed, but no
widespread porosity or voids were seen on the SEM. Denudation zones were present in a few
locations as shown in Figure 19b. Nano-inclusions were not observed.
a b

30
Figure 19: Optical micrograph short, thick dendrites (a) and SEM image showing a denudation zone (b) in P-3: Power 156; Speed 1299.6; Hatch 0.072
Figure 20 represents P-4. The microstructure is coarser than most of the other
microstructure except for P-2. Speed and power were high, hatch spacing was low. All dendritic
grains are aligned in the same direction. MPBs are longer and less sharply curved than in other
specimens. Small needlepoint features are present as in P-1 and P-2. As in P-1, nano-sized pores
and nano-inclusions are present.
Figure 20: Optical micrograph showing coarse features(a) and SEM image showing nano-sized pores(b) in P-4: Power 234; Speed 1299.6; Hatch 0.072
a b
a b

31
P-5 (Figure 21) was built at low laser power, low travel speed, and high hatch spacing.
The microstructure is relatively coarse. Even though the specimen had the same GED as P-3, no
noticeable faceted voids are present. Columnar dendritic structures are not as long as in P-4 and
some misalignment is again apparent. Figure 21b indicates how the layer-by-layer process and
complicated metal-laser interaction affects the microstructure. The image was taken near the
center of the specimen. With a few exceptions, dendrites tend to be oriented roughly
perpendicular to the MPBs.
Figure 21: Optical micrograph showing relatively coarse microstructure (a) and SEM image showing highly varied grain growth directions (b) in P-5: Power 156; Speed 866.4; Hatch 0.108
P-6 was produced under high laser power, low travel speed, and high hatch spacing.
Fewer cellular structures appear as demonstrated by Figure 22a. Columnar dendritic grains are
shorter than in the specimens shown so far. Analysis on the SEM revealed isolated denudation
zones and a faceted void (Figure 22b). No overall porosity was noted.
b a
32
Figure 22: Optical micrograph showing more dendritic and fewer cellular regions(a) and SEM image showing a denudation zone (b) in P-6: Power 234; Speed 866.4; Hatch 0.108
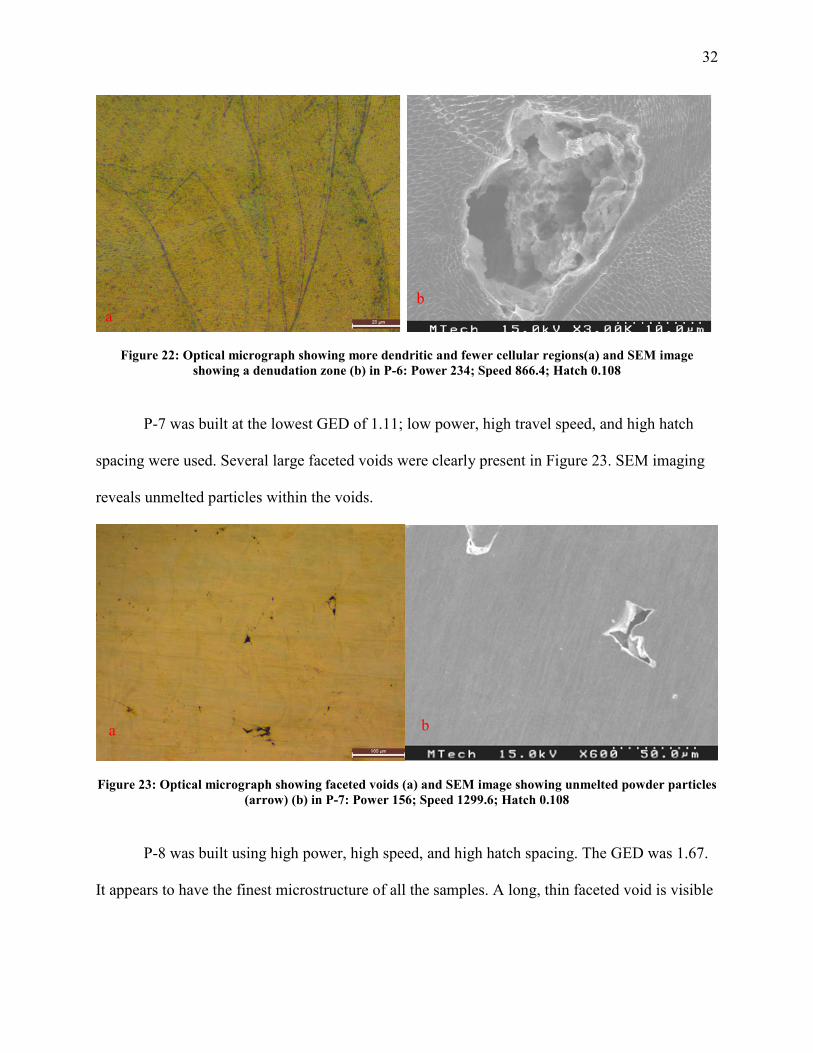
P-7 was built at the lowest GED of 1.11; low power, high travel speed, and high hatch
spacing were used. Several large faceted voids were clearly present in Figure 23. SEM imaging
reveals unmelted particles within the voids.
Figure 23: Optical micrograph showing faceted voids (a) and SEM image showing unmelted powder particles (arrow) (b) in P-7: Power 156; Speed 1299.6; Hatch 0.108
P-8 was built using high power, high speed, and high hatch spacing. The GED was 1.67.
It appears to have the finest microstructure of all the samples. A long, thin faceted void is visible
a b
b a

33
in Figure 24a. Porosity, columnar dendritic zones, and cellular zones intersect around a similar
void in Figure 24b. The voids look like either solidification cracking or keyholes.
Figure 24: Optical micrograph showing an extremely fine microstructure (a) and SEM image showing a keyhole (b) in P-8: Power 234; Speed 1299.6; Hatch 0.108
Finally, P-9 was built with the original build parameters that was used for mechanical
testing and built at various build angles as a control specimen. More short dendrites are present
than in the other parameter sets. Some longer dendrites are visible, but there are more cellular
structures than in most other parameters as shown in Figure 25a. Figure 25b reveals porosity and
nano-inclusions, but discontinuities were not observed otherwise.
Figure 25: Optical micrograph showing high cellular region density (a) and SEM image showing a lack of porosity (b) in P-9: Power 195; Speed 1083.0; Hatch 0.90
a b
a b

34
3.2. Tensile test results
Tensile tests were performed to determine mechanical properties under static loading.
The 0.2% offset yield strength (YS) is the stress where notable plastic deformation begins. The
ultimate tensile strength (UTS) is the stress at the highest point on the stress-strain curve.
Young’s modulus or the elastic modulus (E) is the relationship of stress to strain. It is the slope
of the linear region of the stress-strain curve. Figure 26 contains the stress-strain curve for each
orientation.
Figure 26:Stress-strain curves for wrought specimens and 3D printed specimens built at varying orientations
Table VI summarizes values of each mechanical property of interest except for
elongation, along with the standard deviation within each build. In all cases the standard
deviation is low (less than one), suggesting that 3D printed components may be as reliable as
traditional wrought components.

35
Table VI: Summary of tensile properties
Orientation YS (MPa) UTS (MPa)
E (GPa) Std. Dev (YS)
Std. Dev (UTS)
Std. Dev (E)
0° 527 629 185 0.14 0.18 0.403 30° 499 606 186 0.58 0.49 0.322 60° 518 617 188 0.29 0.49 0.131 90° 469 536 165 0.66 0.18 0.812
Wrought 371 646 187 0.53 0.10 0.274
Figure 27 is a bar graph comparing the YS, UTS, and E for specimens built at each build
angle.
Figure 27: Average tensile properties of four specimens
All build conditions except for the 90° had a Young’s modulus from 185 GPa to 188
GPa, having no more than about 1% difference from the wrought. Young’s modulus for the 90°
sample was 165 GPa. There was a 12% difference between the value for 90° and the wrought.
3.3. Fatigue
Figure 28 is the S-N curve summarizing the fatigue test data. It displays the fatigue life,
or number of cycles until failure (N), and the stress that each sample was tested at (S). Too few

36
specimens were available to repeat trials, so only a preliminary study could be performed Scatter
is clearly visible in the 3D printed specimens but cannot be measured. Fatigue testing of the
wrought yielded a smooth S-N curve. In the 3D printed S-N curves, some specimens survived
more cycles at higher stress than at lower stress. Except for the 90° specimens, the printed had
higher fatigue strengths than the wrought.
Figure 28: Fatigue test results for wrought and printed specimens
Four fatigue test specimens were available for each orientation. Fatigue strength is highly
sensitive to surface discontinuities, therefore several samples are typically tested at each stress
level. Four samples are not statistically significant for fatigue testing. Only a preliminary study
could be performed. Some of the specimens that did not break were rerun at other stress values to
increase the number of data points. Mechanical problems hampered testing of the 60° specimens.
Due to various laboratory infrastructure events, testing of the 60 was hampered. Data for the 60°
specimens are less reliable than for other specimens.
Too few data points were available and too much scatter was present to determine a
concrete value for fatigue strength of the 3D printed specimens. Again, only a preliminary study

37
could be performed. Table VII contains a range of stress values that the fatigue strength may fall
within. All build orientations except for the 90° were stronger than the wrought in fatigue, even
at the low end of the given ranges.
Table VII: Estimated range of fatigue strengths
Build Condition
Fatigue Strength (MPa)
90° 270-280 60° 376-402 30° 330-350 0° 345-350
Wrought 305
3.4. Fractography
Fractography was performed on one tensile fracture surface and one fatigue fracture
surface for each build angle.
3.4.1. Tensile
Fracture surfaces of the wrought, 0°, 30°, 60°, and 90° orientation specimens are
presented. Figure 29 shows the fracture surface of a wrought tensile specimen. Porous
honeycomb structures (Figure 29a) and cracking (Figure 29b) are visible.
Figure 29: Fracture surface of wrought tensile specimen.
b a

38
Figure 30 shows a fractograph of a 0° tensile specimen. Dimples and fibrous structures
are present in Figure 30a. A quasi-cleavage plane believed to be a melt pool boundary8,17 is
among the fibrous structures. Large craters are scattered around the surface. Craters are so deep
that the bottom cannot be seen as shown in Figure 30b.
Figure 30: Fracture surface of 0° tensile specimen.
Figure 31 is a fractograph of a 30° build specimen. An unmelted powder particle was
found near the edge of the surface (Figure 31a). Fibrous structures are present within the center
of the surface in Figure 31b. Some ductile ridges resemble MPBs more than grain boundaries.
An incompletely fused particle is surrounded by a relatively smooth surface.
b a

39
Figure 31: Fracture surface of 30° tensile specimen.
Figure 32 is a fractograph of a 60° specimen. A honeycomb structure surrounds a quasi-
cleavage plane. The quasi-cleavage plane in Figure 32a is thought to be either a melt pool
boundary or a delamination site. The edge of a crater is to the left of the quasi-cleavage plane.
An unmelted particle about 1 µm in diameter is wedged within a void in Figure 32b.
Figure 32: Fracture surface of 60° tensile specimen.
Figure 33 is a 90° specimen fractograph. In Figure 33a a powder particle is at the bottom
of a crater that did not fully develop. A highly ductile honeycomb structure is present. In Figure
33b secondary cracks follow MPBs.
b
b
a
a

40
Figure 33: P-8 Fracture surface of 90° tensile specimen
3.4.2. Fatigue
Fatigue fracture surfaces are divided into three zones: the crack initiation zone,
propagation zone, and final fracture zone. According to Dowling15, several different crack
initiation zones commonly form, but only one dominates failure. Plastic fracture occurs during
crack propagation and striations commonly form27. Once the crack has grown to a critical length,
fatigue specimens fail catastrophically by brittle fracture. A rough fracture surface is observed
due to the rapid failure and tearing of metal in the final fracture zone.
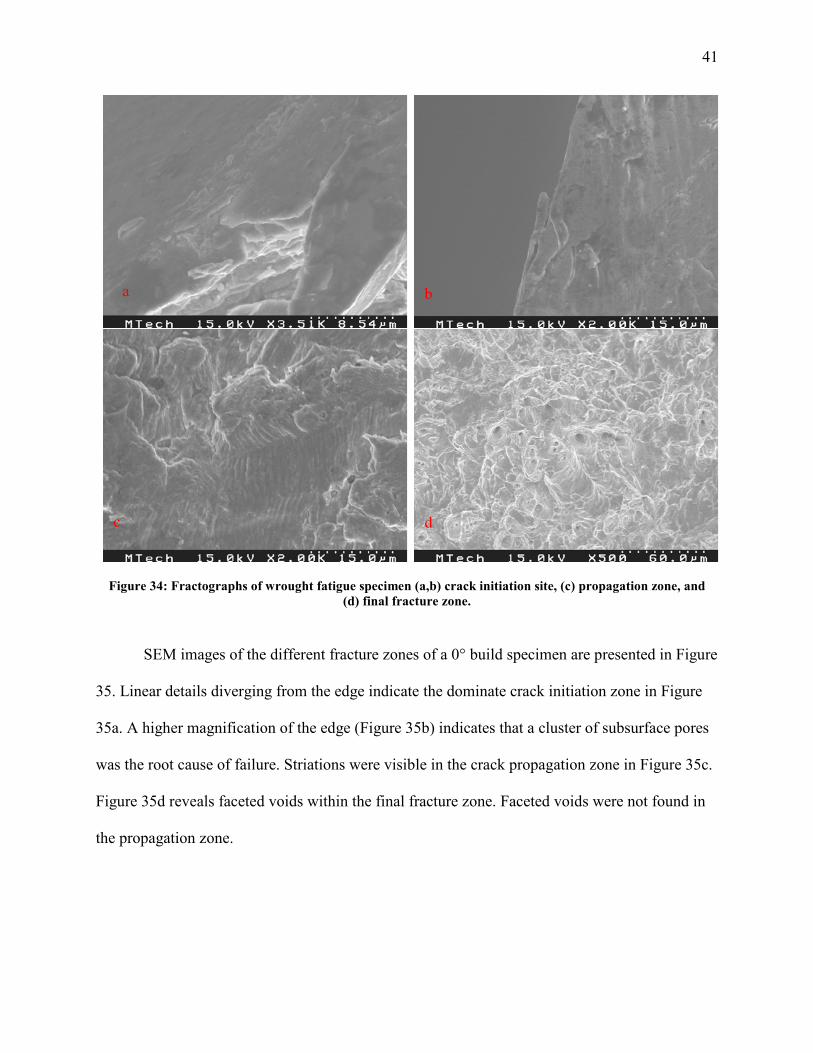
Two possible crack initiation zones were detected in the wrought specimen (Figure 34).
One was a vertical crack at the edge of the specimen shown in Figure 34a. The tip of the vertical
crack acted as a stress concentrator allowing a horizontal crack to initiate. Another possible
initiation point was where the metal folded during rolling (Figure 34b). Faint striations travel
away from the fold. Porosity and dimpling were present in the final fracture zone in Figure 34d.
b a
41
Figure 34: Fractographs of wrought fatigue specimen (a,b) crack initiation site, (c) propagation zone, and (d) final fracture zone.
SEM images of the different fracture zones of a 0° build specimen are presented in Figure
35. Linear details diverging from the edge indicate the dominate crack initiation zone in Figure
35a. A higher magnification of the edge (Figure 35b) indicates that a cluster of subsurface pores
was the root cause of failure. Striations were visible in the crack propagation zone in Figure 35c.
Figure 35d reveals faceted voids within the final fracture zone. Faceted voids were not found in
the propagation zone.
c d
b a

42
Figure 35: Fractograph of 0° build fatigue specimen (a,b) crack initiation site, (c) propagation zone, and (d) final fracture zone.
Figure 36a is a possible crack initiation site in a 30° build orientation specimen. An
unfilled space about the size of a particle is present (Figure 36b). Figure 36c is a high
magnification view of the crack propagation zone. Striations radiate from a secondary crack.
Extensive secondary cracking appears in the final fracture zone from Figure 36d.
b
c d
a
43
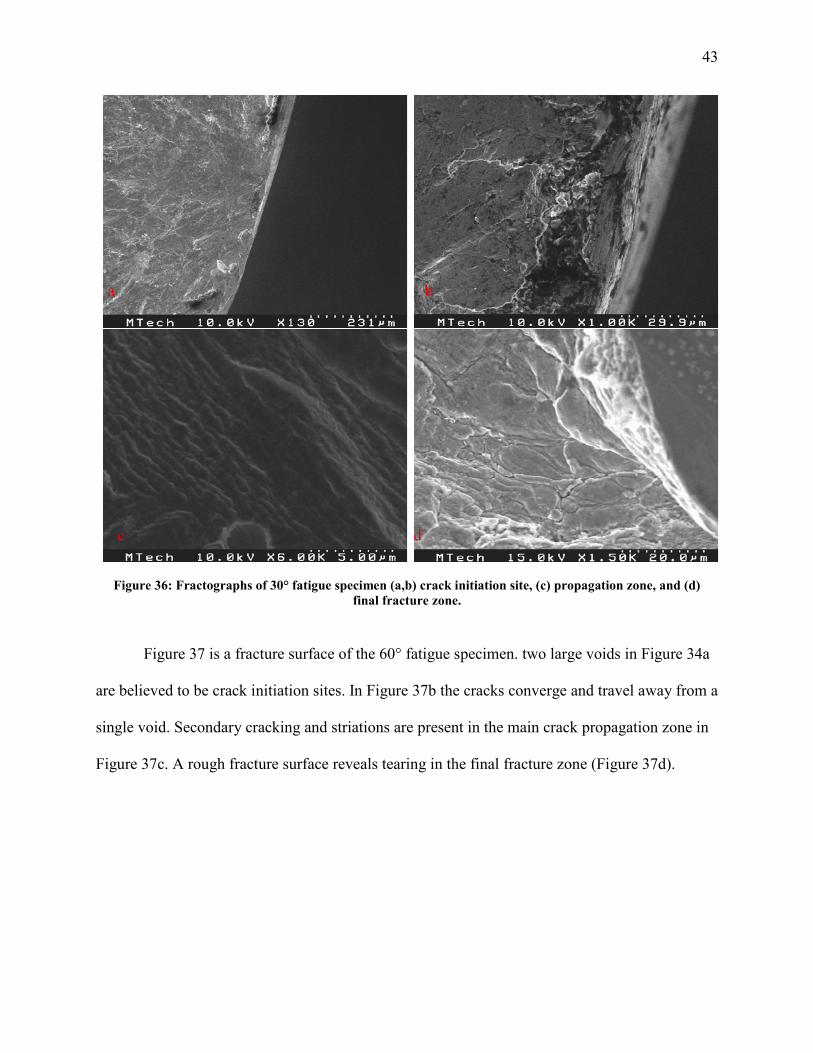
Figure 36: Fractographs of 30° fatigue specimen (a,b) crack initiation site, (c) propagation zone, and (d) final fracture zone.
Figure 37 is a fracture surface of the 60° fatigue specimen. two large voids in Figure 34a
are believed to be crack initiation sites. In Figure 37b the cracks converge and travel away from a
single void. Secondary cracking and striations are present in the main crack propagation zone in
Figure 37c. A rough fracture surface reveals tearing in the final fracture zone (Figure 37d).
a
c d
b

44
Figure 37: Fractographs of 60° fatigue specimen (a,b) crack initiation site, (c) propagation zone, and (d) final fracture zone.
A void at the surface of the specimen is in Figure 38a. Faint and highly visible linear
features run perpendicular to each other in the crack propagation zone (Figure 38b). The more
highly visible features are likely slip bands which indicate high levels of plastic deformation36.
Figure 38c shows fibrous features in the final fracture zone. A higher magnification image of the
final fracture in Figure 38d zone reveals many particulates. Secondary cracking was not observed
on the 90° fracture surface.
a
c d
b

45
Figure 38: Fractographs of 90° fatigue specimen (a) crack initiation site, (b) propagation zone, and (c, d) final fracture zone.
a
c d
b

46
4. Discussion
4.1. Microstructure as a function of orientation
Orientation had a small effect on mean grain size and shape distribution. Discontinuity
density was low at all orientations. Compactness followed a near-normal distribution, but the
size distributions were non-normal. The 0° and 90° build angles had more outliers in grain
length, while the 30° and 60° had grain lengths less concentrated around the mode. Denudation
zones and islands were the most commonly observed discontinuities.
While grain size had little dependence on build angle, the 0° and 30° build angle
specimens did have larger maximum grain sizes than either the 60° or 90° build angle specimens.
Theoretically, the highest thermal gradient is from the top layer down to the build plate. The 0°
and 30° x-y cross-sections are more in line with that expected thermal gradient than the 60° and
90° x-y cross-sections. Grains are longer because the cross-sections are more in line with the
thermal gradient.
Leica Grain Expert measured larger grains in the 90° than in the 30° or 60°, but that was
not observed in the micrograph. As suggested by Zhong et al31, cellular structures were
subgranular. The selected etchant may not have sufficiently revealed the actual grain boundaries
sufficiently for the naked eye to see, but well enough for the computer to identify.
4.2. Microstructure as a function of GED
P-7 was the only specimen with a pore size of over 1 µm. Pores were low compactness
faceted voids. Voids were irregularly spaced and concentrated near the center of the specimen, so
the percentage porosity reported is not truly representative. A truly representative value requires
use of Archimedes’ principle, but the presence of unmelted particles would also cause
measurement errors10.

47
Parameters 8, 5, and 2 had the largest gaseous pore size and the highest porosity. All
three were built at high GED. P-2 had the highest GED of all samples, and was expected to have
the highest level of gas porosity; this was not the case. P-5 had both the largest pore size and
highest percent porosity. Maybe because of the high energy density available, enough heat was
available for the metal to diffuse into and close some pores in P-2. In most specimens, pore size
and percent porosity depended on whether the region was cellular, columnar, or near a melt pool
boundary (MPB). Measurements could be affected if the micrographs were not representative of
the periodic microstructure.
Complex correlations exist between build parameters and microstructure. Micrographs
indicate that not just overall heat input but each parameter affecting heat input impacts the
microstructure differently. The optical and SEM image of P-5 each show a complex
microstructure with columnar grains aligned in various directions. Both images were taken near
the center of the specimen. Recall that during 3D printing the build platform was rotated by 67°
after each layer. The thermal gradient changed direction correspondingly, causing a change in
direction of grain growth. Laser tracks intersect near the center. The varying alignment of
dendrites is likely a result of rotating the stage. The images suggest that the laser affects the
microstructure even several layers below the working layer.
Most dendritic regions were perpendicular to MPBs, but some ran parallel. Dendrites
growing perpendicular to MPBs grew from top to bottom. Dendrites that grew parallel to MPBs
may have grown in the direction of laser travel. As the laser traveled, more heat was present in
the scanning direction. Some dendrites were thus encouraged to grow perpendicularly to others.
Under certain building parameters bright particles were found within gaseous pores. The
particles were thought to be oxide nano-inclusions. Normally inclusions are detrimental to

48
mechanical properties22, but under specific conditions they can become strengthening agents. To
increase strength, particulates (including nano-inclusions) must be: nearly spherical, below a
critical size, and uniformly distributed throughout the matrix32.
Nano-inclusions were within the expected size limit. They looked fairly round at the
available magnification. Gaseous pores containing nano-inclusions were located within specific
regions of the microstructure, so the nano-inclusions were not uniformly distributed; however,
the periodic microstructure33 suggests that clusters of nano-inclusions were also uniformly
distributed. Nano-inclusions may still act as strengthening agents10, thus they contribute to
mechanical properties.
A potential oxygen source is a preexisting oxide layer on powder particles. Whatever the
source, the oxygen is so low and the cooling rates are so high that many nano-inclusions nucleate
but lack the energy to grow larger10.
P-4 and P-8 were selected for further mechanical testing. P-8 was mainly chosen for the
apparently large proportion of cellular grains and uniform cellular grain size. P-4 was chosen
because it lacked long dendrites and again several grains within a narrow size range. Narrow size
distributions theoretically make it simpler to model relationships between microstructure and
mechanical properties27,28.
Further observations on the SEM revealed that P-3 and P-6 may have been preferable
because of the lack of observed porosity Quantitative measurements of the microstructure show
that all four had similar grain size and shape distributions, so all are worth considering for further
analysis.

49
4.2.1. Laser power
According to Saad et al9, denudation zones were caused by spatter where the laser
impinges on the powder bed. Increasing laser power increases heat input and thermal gradient.
Three effects are expected by increasing the laser power: coarser grains, more gas porosity, and
more denudation zones.
With all other parameters held constant, specimens built at higher laser power have
longer dendrites than those built at lower power. Fewer but larger dendritic regions tend to form
at higher laser powers. Except for the pair one pair built at high hatch spacing, components built
at higher laser powers tend to have higher porosity than specimens built at lower laser power.
Also excepting the same pair, specimens built at higher laser power tended to have more
compact grains. Interactions between laser power and hatch spacing must be responsible for the
differences in observations.
Cellular structure size was more varied in specimens built at high power and low speed.
The lower dwell time implied by high travel speed imparted less energy for grain growth.
Interactions between high laser power and low travel speed result in the growth of larger cellular
structures. Each grain grows at the expense of the surrounding grains, so more varied grain sizes
are observed. Building at low power and low speed gives a less varied microstructure which
theoretically makes it easier to derive a relationship between microstructure and mechanical
properties.
4.2.2. Travel velocity
At constant hatch spacing, combinations of either high power and low speed or low
power and high speed yielded more varied dendrite direction. Either condition gives a higher
GED. Increasing the GED at constant hatch spacing raised the thermal gradient. Combined with

50
the rotation of the build platform, the high thermal gradient caused grains to grow in various
directions.
Specimens built with higher travel velocity had longer grains and had larger dendritic
regions, but were more compact on average. The longer grains suggest a higher thermal gradient
in the laser travel direction. That the average compactness also increased indicates the presence
of extremely fine cellular grains in sufficient number to counteract the effect of the longer grains.
Less porosity was usually present in specimens built at high travel speeds, except for
specimens built at high hatch spacing. Having both high speed and high hatch spacing decreases
the GED, which may cause increased porosity. Specimens built at high power, low speed, and
high hatch spacing are favorable because they have lower porosity and less aligned dendrites.
Lower porosity is always expected to increase strength. Dendrites add directional properties to
metals, but having them aligned in different directions brings specimens closer to isotropic.
4.2.3. Hatch Spacing
Specimens built at low hatch spacing had larger maximum grain lengths than those built
at high hatch spacing. In general specimens with lower hatch spacing had more varied dendrite
direction. When travel speed is also high, however, higher hatch spacing gave more varied
dendrite direction. High laser speed probably increased the thermal gradient in the laser travel
direction, allowing dendrites to grow in different directions each time the build platform rotated.
Specimens with higher hatch spacing usually had higher porosity except for P-2, which
also had the highest GED of all the specimens. Based on all of the observed results, low laser
power, high travel speed, and low hatch spacing are the recommended parameters. Extreme GED
values lead to much higher porosity or void space, so values should be between 1.50 and 3.0
J/mm2.

51
4.3. Effect of orientation on elastic modulus
Most build conditions gave a consistent elastic modulus with less than or equal to 1%
difference from the wrought. In the case of the 90° build angle specimens, the elastic modulus
was much lower than that of the wrought. Elastic modulus is a physical property independent of
microstructure and processing. It should not change significantly for any two specimens of the
same alloy.
The lower elastic modulus may have been caused by discontinuities between layers.
During deformation areas of incomplete bonding increase the actual stress. Discontinuities often
concentrate at mold walls during casting22. Similarly, discontinuities may concentrate between
layers in 3D printing31. Balling has been found to occur at the substrate due to oxidation of
solidified metal and poor wetting21. Higher strain would result and the incorrectly calculated
strain would make the elastic modulus appear lower than it truly was.
Another possibility is that delamination occurred in more than one layer. Weak spots may
have caused delamination to initiate in one layer. After the crack grew a certain length,
delamination at a weak point in a separate layer became more energetically favorable. Sequential
delamination of separate layers would continue until the stress was so high that on crack grew
the entire length. Such a failure mode would cause much higher elongation and result in lowering
the measured elastic modulus.
4.4. Effect of orientation on yield strength
Wrought specimens had lower YS values but higher UTS values than 3D printed
specimens. It is not surprising that the wrought YS was lower than the 3D printed YS because of
the fine microstructure. Grain boundaries increase the strength of metals with small grains and

52
fine microstructures. Grain boundaries are barriers to dislocation motion, causing the increase in
strength27,28 of 3D printed specimens over wrought specimens.
The plane of stress on the 0° build angle specimen was orthogonal to the layers.
Delamination was unlikely, which may have caused the higher strength compared to other 3D
printed specimens. On the 30° and 60°, the planes of stress were oblique to the layers.
Delamination became more likely, weakening the metal. Both had similar yield strengths,
suggesting that the layered structure was the most significant factor in tensile strength. The 90°
had the lowest YS of the 3D printed specimens. The plane of stress was parallel to the layers.
Again discontinuities are believed to concentrate between layers. Additionally heat transfer is
less efficient between layers than within the layers; stress profiles similar to bending develop12.
All factors lead to the lower strength of 90° components.
Similarities in grain shape provide further evidence that delamination contributed to
failure more than microstructural properties. Regardless of orientation, compactness followed a
nearly normal distribution centered at values near 0.5. Shape was fairly consistent for each
orientation. Finally the 90° had the smallest mean grain size which supports that delamination
was the dominant factor in strength.
The 30° and 60° build angle specimens had similar strengths. The 60° was slightly
stronger. Both were oblique to the tensile axis. If delamination was the cause of failure, the 60°
layers were closer to 90° than the 30° and thus more in line with the tensile axis than. The 60°
was not expected to have been as strong. Similarities in grain size and the fact that the 60° had
slightly larger grains than the 30° suggest that grain size did not cause the difference in yield
strength.

53
Heat effects and differences in discontinuity population may be responsible for
differences in YS at build angles between 0° and 90°. As the angle changes, so does the cross-
sectional area of the build plane. Specimens with smaller cross-sections have shorter times
between laser scan tracks and remelting. Less time was available for heat dissipation. Increased
heat accumulation may have caused the formation of more discontinuities and thermal stress.
Differences in YS with build angle then result from the differences in discontinuity volume and
thermal stress. Qualitative analysis of discontinuity population is needed to evaluate the
hypothesis.
4.5. Effect of orientation on tensile strength
The UTS followed the same trend as the YS with respect to orientation. Similar
phenomena are therefore expected to be responsible for the differences in UTS as YS across
build angles. The 0 specimens were strongest because delamination could not occur, while
delamination was energetically preferred over yielding in the 90 specimens. Discontinuity
volume or thermal stresses may have been responsible for differences in strength between the 30
and 60 specimens.
Unlike the YS, the UTS was lower for the 3D printed specimens than for the wrought
specimens. Usually UTS and YS increase together27,28 and the 3D printed specimens should have
a higher UTS than the wrought. One hypothesis is that the microstructure is so fine that it limits
strain hardening. During strain hardening dislocations move through the crystal lattice as the
metal plastically deforms. Dislocation motion generates new dislocations which begin to impede
further dislocation motion. The strength of the metal increases27.Fine grain microstructures have
more grain boundaries than coarse microstructures. Grain boundaries increase YS by hindering
dislocation motion27,28. Too fine of a microstructure may impede dislocation motion to the point

54
that too few new dislocations form before a grain boundary cuts off motion. Strain hardening
would be significantly impaired, and the UTS would be lower than for a coarser microstructure.
Alternatively the fine grains may promote grain boundary sliding. At high temperatures,
grain boundaries act like pipelines that greatly increase the diffusion rate34, creating a new
pathway for plastic deformation. Grain boundary sliding is often the dominant creep mechanism
in metals15,27. Creep rate increases with smaller grains. Usually grain boundary sliding is only
significant under high load and temperature15. In such small grains the usual trend may not hold.
Relationships established for more moderate grain sizes sometimes fail when grains are either
extremely fine 27. Furthermore creep rate ( ) temperature (T), and grain size (q) have the
proportional relationship15
(4)
where q is a constant equal to 2 or 3 for grain boundary sliding. Rearranging the expression
reveals that as the grain size decreases, the temperature required for the same strain rate rapidly
decreases.
During low temperature static tensile tests, dislocation motion is the dominant mode of
deformation27. Dislocation motion in extremely fine grains may be hindered to the point that it
no longer sufficiently disperses energy. Grain boundary sliding may become important even at
room temperature after 3D printing because the microstructure is so much finer than observed
after conventional processing. The UTS would not increase in that case because grain boundary
sliding largely bypasses dislocation motion.

55
4.6. Effect of orientation on fatigue strength
Like tensile strength, fatigue strength depends on build orientation. The 60° build
orientation had the highest fatigue strength. Machine issues occurred during each of the trials
that broke. Data for failed 60° specimens may not be reliable, but the two survivors suggest
significantly higher fatigue strength. It is unlikely that grain size was responsible for the
differences in fatigue strength.
At all but one build angle 3D printed specimens had higher fatigue strengths than the
wrought specimens. Other studies report that 3D printed specimens have a lower fatigue limit
than their wrought counterparts12,17.
As built 3D printed components have high surface roughness which greatly reduces
fatigue life17. Machining away the surface does increase fatigue strength, but internal porosity
becomes external porosity and the strength of wrought specimens is not expected reached17.
In the present study, the rough surface was machined away. It is not specified whether the
specimens were as built or machined in Song et al12. In Mower and Long17, machining did
improve fatigue life but 3D printed specimens still performed worse than wrought specimens.
Abstetar35 tested 3D printed aluminum after machining and still found the fatigue strength was
much lower than for wrought. It may be that the porosity was sufficiently low that it did not
negatively impact fatigue strength as much as in other studies. Alternatively, the specifications
for the printer and the machinists may have coincidentally yielded an optimum surface roughness
that was not reached in other studies.
Only the 90° orientation had a lower fatigue limit than the wrought. Interfaces between
layers are potential weak points in the metal. As mentioned earlier, discontinuities may
concentrate at the substrate (previously melted layer)21,31. The plane of stress was parallel to the

56
weakest part of the specimen. Poor interfacial bonding and the potential concentration of
discontinuities both make layer interfaces potential weak points in the component.
4.7. Tensile Fracture
Each tensile specimen failed by ductile fracture. Quasi-cleavage planes on the 0° and 60°
build angle fracture surface indicate weak binding sites. Such features are possible crack
initiation sites. Brittle fracture occurred at the feature. The honeycomb structure then appeared as
ductile fracture began. Both specimens failed by initial brittle fracture followed by
transformation into ductile fracture.
Crack bridging is evident as the root cause of failure in the 90° build angle. Cracks are
seen traveling between craters. Stress concentrates in material between nearby discontinuities.
Cracks can easily initiate in such areas and grow between the discontinuities.
Each tensile fracture surface contained deep craters. Some regions of the microstructure
contained clusters of long, highly aligned columnar dendrites. The craters may have been caused
by such clusters pulling out of the surface. In that case, though, clusters of dendrites should be
visible jutting out from other regions of the surface.
Alternatively the craters could be denudation zones. Spattering raises the edges of
denudation zones, which may block powders from subsequent layers from filling the area. Deep
pits may form because little powder entered the zone for several layers. However discontinuities
were not found in the microstructural analysis in sufficient concentration to account for the
number of craters.
Plastic deformation causes craters to elongate along with the bulk metal. Rather than
having a large particle pull out, a small particle pull-out may have occurred. The appearance of

57
the craters would result from extensive plastic deformation. Unmelted powder particles, which
can be extremely small and difficult to locate, may have provided nucleation sites for cratering.
4.8. Fatigue Fracture
Faceted voids were found within the final fracture zone. Faceted voids were not
noticeable in the crack propagation zone. One possible explanation was that ductile fracture
occurs in the propagation zone. Ductile flow may cause some metal to smear over and hide
faceted voids. The final fracture zone fails from brittle overload. Faceted voids were not hidden
in the final fracture zone because of the lack of plastic deformation during brittle fracture.
Tearing in the final fracture zone may also have opened the faceted voids.
All 3D-printed fracture surfaces except the 90° build angle specimen showed secondary
cracking. Most secondary cracking appeared to follow MPBs. In most orientations gravity pulls
the melt pools parallel to the cross-section so that they overlap. In the 90°, gravity acted
perpendicularly to the cross-section, so MPBs did not overlap. Weak bonding at MPB overlap
sites may have created a path for secondary cracking which was not present in the discrete MPBs
of the 90°.
4.8.1. 0° orientation
A cluster of pores on the edge was determined to be the root cause of failure in the 0°
build angle surface. Linear macroscopic features and fatigue striations both radiate from the
cluster. Much more secondary cracking was present in the final fracture zone than for other build
angles. Large voids with curved overhangs are present in the final fracture zone. Overhangs had
curvature like MPBs. One possibility is that during final fracture some melt pools began to
separate from the surface and pull out with the opposite surface.

58
4.8.2. 30° orientation
The main crack initiated at a faceted void. A rough surface in the void suggests an
unmelted particle was present and was either pulled out or fell off the surface after fracture. Less
heat is input near the edge than in the center because the powder not scanned acts as a heat sink.
If faceted voids are going to form, they will be near the edge of the sample.
Secondary cracks in the final fracture zone had a slight curvature, similar to MPBs.
Preexisting cracks had been observed near MPBs in some micrographs. Rather than delamination
of layers, it is possible that preexisting cracks grew between MPBs. Once the crack actually
reached an MPB the melt pools delaminated from the rest of the structure, causing the observed
secondary cracking.
4.8.3. 60° orientation Striations traveled in various directions. Several potential crack initiation zones were
present in one small area of the fracture surface. A subsurface void seems to have been the
primary crack initiation site. Following the striations shows that multiple cracks converged at a
junction between two interior faceted voids. Beyond that point all striations and therefore the
crack traveled in a single direction.
4.8.4. 90° orientation
Two sets of radial features traveling perpendicular to each other were present in the crack
propagation zone. Fainter features filling the entire frame area are thought to be striations. The
clearer features are thought to be slip bands36. In ductile materials extensive plastic deformation
precedes crack initiation and crack growth27. Slip lines and ductile deformation are both
consequences of dislocation motion. Slip lines grow perpendicularly to the crack36.

59
Unlike in the other orientations, secondary cracking was not present. Layers in the 90°
build angles are parallel to the plane of stress. If secondary cracking was a consequence of
delamination, then it would not appear in the 90° orientation.
Delamination of the MPBs would also be avoided because of the shape of MPBs. Melt
pool boundaries are deformed hemispheres in shape. In the 0°, 30°, and 60° builds the melt pools
are the rounded bottoms or sides of the MPBs as depicted in Figure 36. Stress concentrators are
present at the vertices of each MPB giving a path for secondary crack growth. In the 90°, MPBs
are nearly absent as the flat, elliptical surface is parallel to the plane of stress (Figure 39).
Figure 39: Sketches of an MPB a) from the side and b) from the top
Fatigue striations were most clearly seen in the 90° build angle specimen. Cyclic stress
causes striations. In metals, ductile deformation occurs in the propogation zone. Striations show
more clearly because of the permanent deformation15. More brittle materials have less defined
striations than ductile materials because fracture is abrupt without any permanent deformation.
Striations were more prominent in the 90° specimen because it was the most ductile.
Studies on Inconel 718 suggest that striations only appear at rapid crack growth rates37.
Compared to the other specimens the 90° failed after relatively few cycles, indicating faster
crack growth rates. Striations may have appeared in the 90° and not the other orientations
because cracks in the 90° grew more rapidly. In the other orientations, striations may have been
fainter because the crack grew much less rapidly.
a b

60
5. Conclusions
• Build angle orientation had only a small effect on mean grain size, but did affect the grain
size distribution. Specimens built at 0° and 90° had more and larger outliers, but the grain
size was more concentrated around the mode. Specimens built at 30° and 60° had similar
distributions with smaller outliers, but more grains were larger than the mode. Based on
the data gathered, the layered structure was the most significant factor in the difference in
strength between build orientations.
• Grain size did not appear to be responsible for the differences in strength between build
orientations. Grain size changed little with orientation. The 60° build angle specimens
had larger grains but higher strength than the 30° build angle specimens.
• Tensile test results had low standard deviations, indicating that 3D printed specimens are
as reliable as wrought with higher yield strengths. The UTS is lower for printed
specimens; strain hardening is insignificant. With the yield strength already higher than
the wrought counterpart, and net shape forming being one of the goals, the low degree of
strain hardening is not necessarily an issue.
• Excessive scatter was present in the fatigue data. Specific fatigue strengths could not be
determined with the number of specimens available, but the 0°, 30°, and 60° orientations
all gave higher fatigue limits than the wrought. Even at the lowest point in the curve these
three performed better than the wrought. Specific values were not available and only a
range of values could be drawn. More specimens are required for testing to provide a
fully defined S/N curve. At all stresses the 90° failed at lower than the wrought.

61
• The 90° build angle had both the lowest YS and the lowest fatigue strength. It is most
likely because the plane of stress is parallel to the layered structure. Extreme elongation
in the 90° orientation may have been due to sequential delamination in multiple layers.
• Tensile failure was dominated by ductile fracture in all specimens. Cracks following melt
pool boundaries, craters, balling, and unmelted particles were evident in many of the
fracture surfaces. Planar or quasi-cleavage features are present. Any of the listed features
may have acted as a crack initiation zone.
• Fatigue failure in specimens selected for fractography initiated at either pores or voids in
every case. In two specimens voids looked as though they held unmelted particles. Some
secondary cracks grew along melt pool boundaries. Other observed cracks may have been
preexisting thermal cracks or solidification cracks.
• Changing parameters often led to conflicting results. Interactions between different
parameters are suspected based on the inconsistencies observed. Porosity measurements
and dendrite orientation in particular were inconsistent when considering individual
parameters.

62
6. Recommendations
• A method for evaluating discontinuity volume may reveal the cause for differences in
mechanical properties.
• More detailed grain size analysis is needed. A heterogeneous microstructure was present,
so the average grain size of each type of structure is needed. Statistics software is
currently being used to determine pdfs and statistics for various grain size measurements
and shape factors.
• Further fatigue testing with sufficient numbers of specimens to complete a statistically
viable S/N study is required. Such high scatter is present that methods typically reserved
for ceramics and brittle materials may be needed. Statistical methods such as Weibull
analysis are suggested.
• Mechanical testing is currently underway for specimens built at the two different GED
values determined from microstructure.
• Results suggest laser power/travel speed and laser power/hatch spacing interactions
occur. Further analysis to investigate the effect of interactions is recommended.

63
7. References Cited
[1] Guo, Nannan, and Ming C. Leu. “Additive manufacturing: technology, applications
and research needs.” Frontiers of Mechanical Engineering, vol. 8, no. 3, Aug.
2013, pp. 215–243., doi:10.1007/s11465-013-0248-8.
[2] Bikas, H., et al. “Additive manufacturing methods and modelling approaches: a
critical review.” The International Journal of Advanced Manufacturing
Technology, vol. 83, no. 1-4, 2015, pp. 389–405., doi:10.1007/s00170-015-7576-
2.
[3] Olakanmi, E.o., et al. “A review on selective laser sintering/Melting (SLS/SLM) of
aluminium alloy powders: Processing, microstructure, and properties.” Progress
in Materials Science, vol. 74, 2015, pp. 401–477.,
doi:10.1016/j.pmatsci.2015.03.002.
[4] Yasa, E, and J Kruth. “Application of laser re-melting on selective laser melting
parts.” Advances in Production Engineering and Management, vol. 6, no. 4, 2011,
pp. 259–270., ISSN: 1854-6250.
[5] Manvatkar, V., et al. “Heat transfer and material flow during laser assisted multi-layer
additive manufacturing.” Journal of Applied Physics, vol. 116, no. 12, 2014, p.
124905., doi:10.1063/1.4896751.
[6] Kou, Sindo. Welding metallurgy. Hoboken (New Jersey), John Wiley & Sons, 2003.
[7] Lancaster, J. F. Metallurgy of welding. London, Allen & Unwin, 1980.

64
[8] Carlton, Holly D., et al. “Damage evolution and failure mechanisms in additively
manufactured stainless steel.” Materials Science and Engineering: A, vol. 651,
2016, pp. 406–414., doi:10.1016/j.msea.2015.10.073.
[9] Khairallah, Saad A., et al. “Laser powder-bed fusion additive manufacturing: Physics
of complex melt flow and formation mechanisms of pores, spatter, and
denudation zones.” Acta Materialia, vol. 108, 2016, pp. 36–45.,
doi:10.1016/j.actamat.2016.02.014.
[10] Sun, Zhongji, et al. “Selective laser melting of stainless steel 316L with low porosity
and high build rates.” Materials & Design, vol. 104, 2016, pp. 197–204.,
doi:10.1016/j.matdes.2016.05.035.
[11] Wang, Zhuqing, et al. “Effect of processing parameters on microstructure and tensile
properties of austenitic stainless steel 304L made by directed energy deposition
additive manufacturing.” Acta Materialia, vol. 110, 2016, pp. 226–235.,
doi:10.1016/j.actamat.2016.03.019.
[12] Song, Bo, et al. “Differences in microstructure and properties between selective laser
melting and traditional manufacturing for fabrication of metal parts: A review.”
Frontiers of Mechanical Engineering, vol. 10, no. 2, 2015, pp. 111–125.,
doi:10.1007/s11465-015-0341-2.
[13] Kruth, Jean-Pierre, et al. “Assessing and comparing influencing factors of residual
stresses in selective laser melting using a novel analysis method.” Proceedings of
the Institution of Mechanical Engineers, Part B: Journal of Engineering
Manufacture, vol. 226, no. 6, Aug. 2012, pp. 980–991.,
doi:10.1177/0954405412437085.

65
[14] Cherry, J. A., et al. “Investigation into the effect of process parameters on
microstructural and physical properties of 316L stainless steel parts by selective
laser melting.” SpringerLink, Springer London, 6 Sept. 2014,
link.springer.com/article/10.1007/s00170-014-6297-2. Accessed 7 Sept. 2017.
[15] Dowling, Norman E. Mechanical behavior of materials: engineering methods for
deformation, fracture, and fatigue. 4th ed., Upper Saddle River (New Jersey),
Prentice-Hall, 2013.
[16] Shen, Y. F., et al. “Development of porous 316L stainless steel with controllable
microcellular features using selective laser melting.” Materials Science and
Technology, vol. 24, no. 12, 2008, pp. 1501–1505.,
doi:10.1179/174328408x287691.
[17] Mower, Todd M., and Michael J. Long. “Mechanical behavior of additive
manufactured, powder-bed laser-fused materials.” Materials Science and
Engineering: A, vol. 651, 2016, pp. 198–213., doi:10.1016/j.msea.2015.10.068.
[18] Ma, Mingming, et al. “Layer thickness dependence of performance in high-power
selective laser melting of 1Cr18Ni9Ti stainless steel.” Journal of Materials
Processing Technology, vol. 215, 2015, pp. 142–150.,
doi:10.1016/j.jmatprotec.2014.07.034.
[19] Boom, R., Kamperman, A.A., Dankert, O. et al. Metall and Materi Trans B (2000)
31: 913. https://doi.org/10.1007/s11663-000-0067-2
[20] Yasa, E., and J-P. Kruth. “Microstructural investigation of Selective Laser Melting
316L stainless steel parts exposed to laser re-melting.” Procedia Engineering, vol.
19, 2011, pp. 389–395., doi:10.1016/j.proeng.2011.11.130.

66
[21] Investigation of crystal growth mechanism during selective laser melting and
mechanical property characterization of 316L stainless steel parts
[22] Campbell, John. Complete casting handbook: metal casting processes, metallurgy,
techniques and design. Oxford, Butterworth-Heinemann, 2015.
[23] Rappaz, M., and Ch.-A. Gandin. “Probabilistic modelling of microstructure
formation in solidification processes.” Acta Metallurgica et Materialia, vol. 41,
no. 2, 1993, pp. 345–360., doi:10.1016/0956-7151(93)90065-z.
[24] Yang, Z, et al. “Three dimensional Monte Carlo simulation of grain growth during
GTA welding of titanium.” Acta Materialia, vol. 48, no. 20, 2000, pp. 4813–
4825., doi:10.1016/s1359-6454(00)00279-2.
[25] Khairallah, Saad A., and Andy Anderson. “Mesoscopic simulation model of
selective laser melting of stainless steel powder.” Journal of Materials Processing
Technology, vol. 214, no. 11, 2014, pp. 2627–2636.,
doi:10.1016/j.jmatprotec.2014.06.001.
[26] Landis, Eric N., and Denis T. Keane. “X-Ray microtomography.” Materials
Characterization, vol. 61, no. 12, 2010, pp. 1305–1316.,
doi:10.1016/j.matchar.2010.09.012.
[27] Reed-Hill, Robert E., et al. Physical metallurgy principles. 4th ed., Cengage Learning, 2009.
[28] Callister, William D. Materials science and engineering: an introduction. 8th ed.,
Hoboken, NJ, John Wiley & Sons, 2010.

67
[29] ASTM International, "ASTM E8/E8M-16a," in Standard Test Methods for Tension
Testing of Metallic Materials, West Conshohocken, Pa, ASTM International,
2016.
[30] Wenwen Li , Michael F. Goodchild & Richard Church (2013): An
efficient measure of compactness for two-dimensional shapes and its application in
regionalization problems, International Journal of Geographical Information Science,
DOI:10.1080/13658816.2012.752093
[31] Zhong, Yuan, et al. “Intragranular cellular segregation network structure
strengthening 316L stainless steel prepared by selective laser melting.” Journal of
Nuclear Materials, vol. 470, 2016, pp. 170–178.,
doi:10.1016/j.jnucmat.2015.12.034.
[32] Chawla, Krishan Kumar. Composite materials: science and engineering. 3rd ed.,
New York, Springer, 2012.
[33] Marya, Manuel, et al. “Microstructural development and technical challenges in
laser additive manufacturing: Case study with a 316L industrial part.”
Metallurgical and Materials Transactions B, vol. 46, no. 4, 2015, pp. 1654–1665.,
doi:10.1007/s11663-015-0310-5.
[34] Balluffi, R. W., et al. Kinetics of materials. Hoboken, NJ, J. Wiley & Sons, 2005.
[35] Abstetar, Bryce. SLM processing-microstructure-mechanical property correlation in
an aluminum alloy produced by additive manufacturing. ProQuest, 2016.
[36] Brooks, Charlie R., and Ashok Choudhury. Failure analysis of engineering
materials. New York, McGraw-Hill, 2002.

68
[37] Konečná , R., et al. “Fatigue crack growth behavior of Inconel 718 produced by
selective laser melting .” Frattura ed Integrità Strutturale, vol. 35, 2016, pp. 31–
40., doi:10.3221/IGF-ESIS.36.04.

69
8. Appendix A: Histograms of Microstructure with Orientation
Figure 40: Length of a) 0 b) 30° c) 60° d) 90°
a b
c d
a b

70
Figure 41: Compactness of a) 0 b) 30° c) 60° d) 90°
c d

71
9. Appendix B: Variation of microstructure with GED
a b
c d
e f
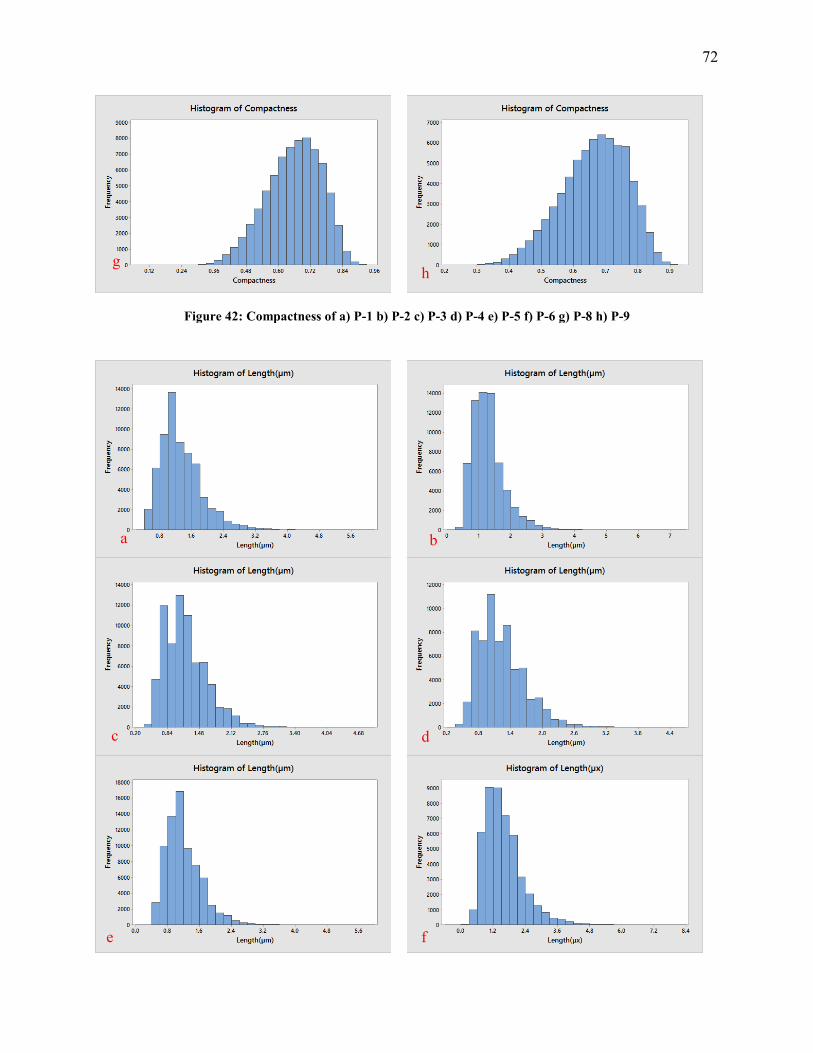
72
Figure 42: Compactness of a) P-1 b) P-2 c) P-3 d) P-4 e) P-5 f) P-6 g) P-8 h) P-9
g h
a b
c d
e f
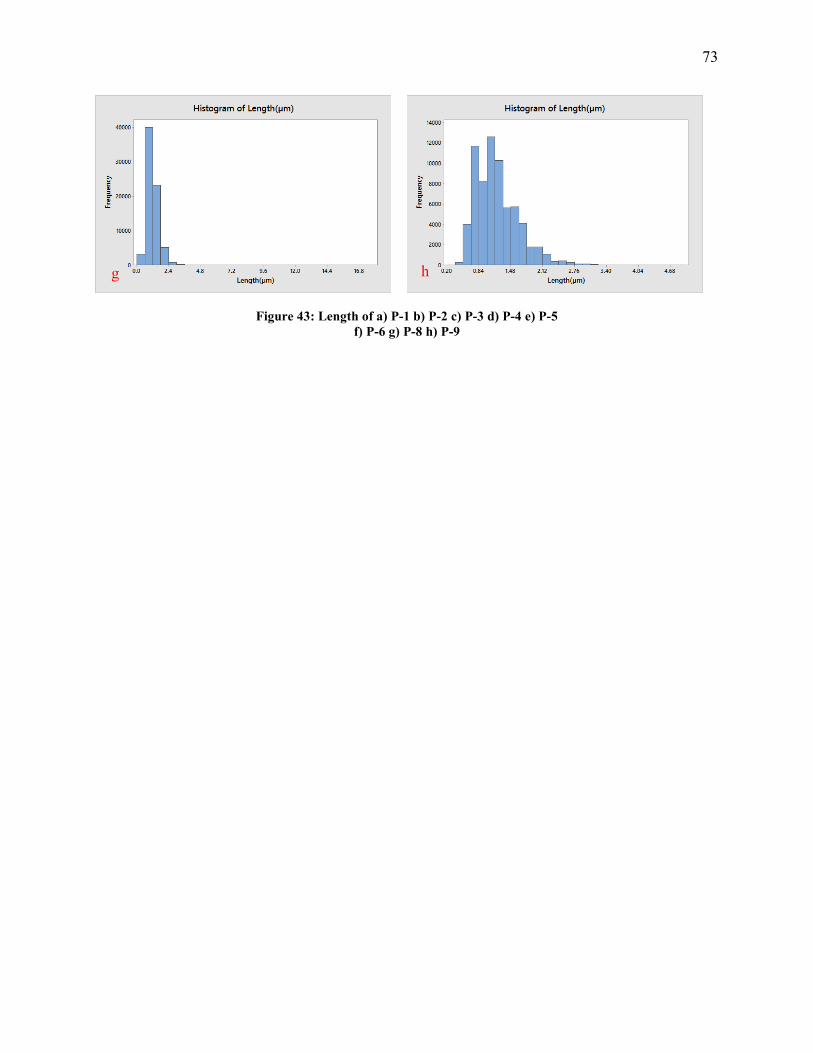
73
Figure 43: Length of a) P-1 b) P-2 c) P-3 d) P-4 e) P-5 f) P-6 g) P-8 h) P-9
g h