3D CAD, CAM and Rapid Prototyping - enac-am.epfl.ch CAD CAM... · tiny discreet dots ......
20
3D CAD, CAM and Rapid Prototyping by Mitch Heynick and Ivo Stotz >> LAPA Digital Technology Seminar << Workshop 1: Mai 10 & 11 200/ Version 1.1 Prof H.Gugger, Assistant R.Loveridge
Transcript of 3D CAD, CAM and Rapid Prototyping - enac-am.epfl.ch CAD CAM... · tiny discreet dots ......

3D CAD, CAM and Rapid Prototyping
by Mitch Heynick and Ivo Stotz
>> LAPA Digital Technology Seminar << Workshop 1: Mai 10 & 11 200/
Version 1.1 Prof H.Gugger, Assistant R.Loveridge

0.0 Contents 0.0 Table of Contents 1.0 Introduction 2.0 3D-modelling for Rapid Prototyping (geometry issues) 2.1 What is rapid prototyping? 2.2 How do I get my 3D CAD model to a rapid prototyping process? 2.3 What is an STL? 2.4 Mesh models and precision 2.5 Exporting from different software packages 2.6 Getting the .STL correctly into the RP machine software 3.0 Presentation of different RP-procedures 3.1 Stereolithography (SLA) 3.2 Laminated Object Manufacturing (LOM) 3.3 Selective Laser Sintering (SLS) 3.4 Fused Deposition Modeling (FDM) 3.5 Three Dimensional Printing (3DP) 3.6 Thermal Phase Change Inkjets 3.7 Photopolymer Phase Change Inkjets (PolyJet) 3.8 Contour Crafting (CC) 4.0 CAM/CAM/CNC in comparison to RP 5.0 List of Acronyms

1.0 Introduction This document has been created for the LAPA Digital Technology Seminary at the EPFL. Its aim is to give a basic overview of the different rapid prototyping (RP) technologies currently available. The first part deals with 3D-CAD modeling including the technical and geometric constraints involved in creating 3D-models for rapid prototyping purposes.
The second part of this document introduces the most common RP procedures and machines. A single page illustrates each of the techniques with a brief description of the principle including a schematic diagram, as well as pictures of the machines and some sample parts. Included at the end is a comparison between additive RP techniques and subtractive CNC milled part production, pointing out the similarities and differences between these two coexisting computer driven prototyping processes.

2.1 What is rapid prototyping? Rapid Prototyping (RP) is a term most commonly used to describe a variety of processes, which are aimed at quickly creating three-dimensional physical parts from virtual 3D computer models using automated machines. The parts are “built” directly from the 3D CAD model and can match that model very closely (within the precision limits of the chosen process). Rapid prototyping is different from traditional fabrication in that it is only possible through the use of computers, both to generate the 3D CAD model data, as well as to control the mechanical systems of the machines that build the parts.
Virtually all RP processes are “additive”. Parts are built up by adding, depositing, or solidifying one or more materials in a horizontal layer-wise process. The part is built up layer by layer until done. This is similar to the result one would get if one made a topographical map of the object, with the contour lines representing the layer thickness of the process.
A virtually geometry model is cut into slices for layer wise production. This is similar to the creation of topographic maps from real landscapes or virtual terrain models.
In addition to additive production processes, one must also consider the possibilities of subtractive processes such as CNC machining and laser cutting. Subtractive processes, as the name implies, create objects by removing unwanted material from a large block or sheet in the form of chips. CNC machining of 3D CAD models (normally called CAD/CAM) is not actually considered a rapid prototyping process (although it can be as fast), but both additive and subtractive approaches are important aspects of today’s prototyping industry.
RP technologies are able to create one-piece part geometries which would be difficult if not impossible
to create by machining, including overhangs, undercuts and enclosed spaces. To create these types of structures RP technologies often rely on a support material, which is used alongside the model material. These automatically generated supports must be removed after the part is finished. Other processes rely on the unused model material to support the part being built.
However, machining is still able to produce finer surfaces, more accurate and larger parts in a much
wider variety of materials than RP processes are currently able to, and complex models may often be built up out of assemblies of simpler, easier to machine parts. Thus, the two types of technologies, additive and subtractive, continue to co-exist and be complimentary in the 3D prototyping world.
The materials which are available for RP use will depend on the process chosen and are still relatively
limited, but the variety is growing. There are a number of plastics and resins commonly used, as well as some process that can use things like starch, plaster, wax and metal.
The word “Rapid” in RP is a relative term, as most of these processes are actually quite slow. The rapid actually refers to the reduced time from initial design to the production of the final part. This is due to the

elimination of extensive amounts of hand and machine work involved in making prototypes with traditional methods, as well as the ability to quickly iterate and test a design through various stages. Also, as contrasted with more complicated CAM programming and CNC machining, RP software and machines are generally simple and quick to use, resulting in significantly reduced “human time” needed to produce prototype parts.
Example of a particularly office friendly 3D-printer (SD300 3D; Solidimension) and of an object produced with it.
RP processes are generally quiet, non-dangerous processes which can run in an office environment 24/7. This contrasts with machining, which generally needs a workshop or factory environment (noise, dust, liquids) and has a number of safety issues (including personal injury or the possible destruction of the machine if things are not done properly).

2.2 How do I get my 3D CAD model to a rapid prototyping process?
3D CAD models can be made with many, many different software packages (and sometimes can pass through several), each will have its own way of representing surfaces and volumes. The problem for the user is to be able to prepare this model for 3D printing or Rapid prototyping.
In general, what is needed is one or more completely closed volumes. The RP software may be able to understand and automatically correct small openings and errors, but large holes or open objects will result in not being able to print (without the file being first repaired).
Since different programs work in different ways and have different file formats, it will be necessary to “translate” the representation of the model in that software into something more “universal” that the RP software can understand. This translation process (like any translation) can introduce problems into the process that were not apparent in the original.
In general, from the 3D CAD software, we need to export the model as a .STL file. Nearly all 3D programs can export an STL and most can import them.
In order to export a smooth object from a NURBS-modeler to an RP machine, the surface must first be converted into a polygon mesh with a face-edge-vertex topology.
2.3 What is an STL?
An STL is a type of standardized computer exchange file which contains a 3D model. The representation of the surface(s) of the object(s) in the file is in the form of one or more polygon meshes. The polygon meshes in an STL file are entirely composed of triangular faces, edges and vertices. Further, the faces have assigned normals which indicate their orientation (inside/outside).
The name “STL” is taken from its extension, .stl, originally because the files were intended for the rapid prototyping process called Stereolithography. The file format has become a world standard for exchanging 3D polygon mesh type objects between programs, and .stl’s are now used as input for virtually all rapid prototyping processes, as well as some 3D machining.

2.4 Mesh models and precision
Mesh representations of objects are “facetted”, that is to say, they are not smooth, but composed of an array of small faces which, if fine enough, can represent (approximate) smooth surfaces with a given degree of accuracy. This is much the same as how what appears to be a smooth 2D image is actually composed of many tiny discreet dots (pixels).
If the individual facets in a mesh model are too coarse or there is too much of an angle between them, the appearance of the model will be rough, and it will lack precision (unless you are working with angular shapes). The parallel to this in the 2D world is an image whose resolution is not fine enough resulting in a “grainy” look (you can actually distinguish the individual dots).
The initially smooth NURBS-surface (on the left) is converted into a facetted polygon mesh. According to the chosen rapid
prototyping procedure, the user can define different level of detail.
If the individual facets in a mesh model are extremely fine, the surface representation will generally be good, but - the model will be very data heavy and the file very large, which may cause problems with the generating or receiving software, as well as the visual display on the screen. The goal is to create an STL model which has enough accuracy and resolution for the final purpose/process, without going too far and making the model too fine. The optimum resolution will depend on what RP procedure will be used.
Mesh precision may be thought of in one way as the maximum difference allowed between the facetted mesh representation of the surfaces and the smooth surfaces themselves. For objects composed of entirely planar surfaces, this is not really a problem, as the facets will correspond exactly with the surfaces. For curved surfaces, the triangles will necessarily not lie entirely on the surface, and thus the degree of approximation becomes important.

Different tools exist which allow one to measure and to visualize the deviation between the initial NURBS-object and the converted polygon mesh. In the image above, the “good” blue points are close enough to the original surface to be within the specified tolerances, but the red points, being situated beyond the given tolerances, are marked as bad.
Which prototyping process will be used to create the final object will determine which is the optimum level of precision and tolerance that will be required for the model. Rougher processes like FDM can successfully use models with lower tolerances (lower precision) than something like a milling process which is capable of very fine detail. In general, the precision target of the model should be around one order of magnitude smaller than (1/10 the size of) the maximum precision of the process. For FDM, which can reproduce about 0.1mm detail, an STL with .01 is good. For machining, which can reproduce .01mm and finer, an STL precision of .001 or finer is necessary. 2.5 Exporting from different software packages
If the part has been modeled with a NURBS surface or volume modeler, only the export .stl mesh settings matter as outlined above. However, if the object was modeled in a software package that is based on polygon meshes, and, if the object was modeled with insufficient resolution (facets too large), there is generally nothing that can be done to fix this once the model has been exported. The facets will be seen in the model and cannot be smoothed over without extensive rework. It is therefore important to plan ahead when using polygon mesh based modelers such as 3D Studio Max, Cinema 4D, Lightwave, etc.

2.6 Getting the .STL correctly into the RP machine software
Since an STL mesh is composed entirely of triangles, it is the simplest form of mesh model format. Each facet is necessarily planar. In principle, for rapid prototyping processes, a completely closed object is required, that is to say, the mesh completely encloses a volume, with no holes, gaps, or overlaps. We sometimes speak of this as a “watertight solid”. In addition, the software controlling some processes requires that there is only one object (volume) in the file.
Each of the illustrations above show one slice of an .STL model. In order produce the layer, the RP machine software needs a closed loop that defines an interior, which is then filled with the model material. Some procedures use the .STL normals to define the interior with respect to the exterior of the curves, whereas others use nesting information.
In actual practice, there may be some tolerance allowed. Small errors or gaps may be tolerated by the prototyping software, or can be quickly repaired. Some software may allow multiple and overlapping objects. Each process and software will work differently, some are more error-tolerant than others. Therefore, in general it is best to aim to achieve a perfect 100% closed model, otherwise, depending on who is doing the prototyping and what process is being used, it may be time consuming (read: expensive) to fix.
Professional service bureaus and frequent users of RP parts will have specific software designed to manipulate and fix .stl models and prepare them for prototyping. One example of this might be Magics by Materialize (B). This type of software is expensive, but has specific tools for analyzing the integrity of .stl models and rapidly correcting defects (often automatically). They may also have other functions that permit the model to be cut into smaller parts, shelled, nested, etc.
Once the .stl is 100% correct and verified, it can then be imported into the machine-specific RP software which will generate the commands to run the machine. This data is then sent to the machine (like a printer) and the model construction is started.

3.1 Stereolithography (SLA)
SLA Model: The aspect of this model is translucent and slightly amber, however different resins can be used which have different characteristics.
Stereolithography is the most widely used rapid prototyping technology. Stereolithography builds plastic
parts or objects one layer at a time by tracing a laser beam on the surface of a vat of liquid photopolymer, inside of which is a movable stage to support the part being built. The photopolymer quickly solidifies wherever the laser beam strikes the surface of the liquid. Once one layer is completely traced, the stage is lowered a small distance into the vat and a second layer is traced directly on top of the first. The self-adhesive property of the material causes each succeeding layer to bond to the previous one and thus form a complete, three-dimensional object out of many layers.
Objects which have overhangs or undercuts must be supported during the fabrication process by support structures. These are either manually or automatically designed with a computer program specifically developed for rapid prototyping. Upon completion of the fabrication process, the object is removed from the vat and the supports are cut or broken off.
Stereolithography generally is considered to provide the greatest accuracy and best surface finish of any rapid prototyping technology. Over the years, a wide range of materials with properties mimicking those of several engineering thermoplastics have been developed. Limited selectively color changing materials for biomedical and other applications are available, and ceramic materials are currently being developed. The technology is also notable for the relatively large size range of objects possible, from parts as big as a car wheel to as small as a sugar cube, with excellent accuracy relative to the scale of the object.
On the negative side, the photopolymers are expensive and perishable, working with liquid materials can be messy and parts require a post-curing operation in a separate oven-like apparatus for complete cure and stability.
Photograph and scheme of an SLA-machine: 3DSystems, type SLA 5000 system Principal commercial providers: 3DSystems, Aaroflex, envisionTEC (non-laser stereolithography) Materials: Principally photo curing polymers which simulate polypropylene, ABS, PBT, rubber; development of ceramic-metal alloys. Most accurate Z-resolution: 0.025 mm

3.2 Laminated Object Manufacturing (LOM)
LOM Model: the piece is freed from its orthogonal support matrix. The appearance of the final object is wood like.
Profiles of object cross sections are cut from paper or other web material using a laser. The paper is
unwound from a feed roll onto the stack and first bonded to the previous layer using a heated roller which melts a plastic coating on the bottom side of the paper. The profiles are then traced by an optics system that is mounted to an X-Y stage.
After cutting of each layer is complete, excess paper is cut away to separate the layer from the web. Waste paper is wound on a take-up roll. The method is self-supporting for overhangs and undercuts. Areas of cross sections which are to be removed in the final object are heavily cross-hatched with the laser to facilitate removal. It can be time consuming to remove extra material for some part geometries, and there is a lot of inherent waste in the process, as every object uses up an amount of material equivalent to a box that contains the part - even if the part itself is very thin walled.
Variations on this method use a knife to cut each layer instead of a laser or apply adhesive to bond layers using the xerographic process. There are also variations which seek to increase speed and/or material versatility by cutting the edges of thick layers diagonally to avoid stair stepping.
In general, the finish, accuracy and dimensional stability of paper objects are not as good as for materials used with other RP methods. In addition, the laser cutting of the material creates a lot of smoke and needs to be ventilated to the outside. However, material costs are very low, and objects have the look and feel of wood and can be worked and finished in the same manner. This has fostered applications such as patterns for sand castings. While there are limitations on materials, work has been done with plastics, composites, ceramics and metals.
The principal commercial provider of LOM systems, Helisys, ceased operation in 2000, as this technology did not compete well with other RP methods that were developing. However, there are several other companies working on similar LOM technology, and 3D systems has recently marketed a small, low cost machine (developed by an Israeli company) which uses PVC film (more controllable and stable than paper). These companies are addressing market segments ranging from concept modeling to very large objects for architectural applications.
Photograph and scheme of an LOM machine: Helisys, type 1015plus Principal commercial providers: Helisys (paper); 3DSystems (plastic) Materials: Typically paper rolls but recently also plastic films Most accurate Z-resolution: 0.1 mm (paper) and 0.15(plastic)

3.3 Selective Laser Sintering (SLS)
SLS Model: in the detail you can see the porous aspect of the surface, which is typical for this method
Thermoplastic powder is spread by a roller over the surface of a build cylinder. The piston in the
cylinder moves down one object layer thickness to accommodate the new layer of powder. A piston moves upward incrementally to supply a measured quantity of powder for each layer.
A laser beam is traced over the surface of this tightly compacted powder to selectively melt and weld the grains together to form a layer of the object. The fabrication chamber is maintained at a temperature just below the melting point of the powder so that the laser elevates the temperature slightly to cause sintering - the grains are not entirely melted, just their outer surfaces - which greatly speeds up the process. The process is repeated, layer by layer, until the entire object is formed.
After the object is fully formed, the piston is raised. Excess powder is simply brushed away and final manual finishing may be carried out. No supports are required with this method since overhangs and undercuts are supported by the solid powder bed. It takes a considerable cool-down time before the part can be removed from the machine. Large parts with thin sections may require as much as two days of cooling.
SLS offers the key advantage of making large sized functional parts in essentially final materials. However, the system is mechanically more complex than stereolithography and most other technologies. A variety of thermoplastic materials such as nylon, glass filled nylon, and polystyrene are available. Surface finishes and accuracy are not as good as with stereolithography, but material properties can be quite close to those of the intrinsic materials. The method has also been extended to provide direct fabrication of metal and ceramic objects and tools.
Since the objects are sintered they are porous. It may be necessary to infiltrate the part, especially metals, with another material to improve mechanical characteristics.
Photograph and scheme of a SLS-machine: EOS, type EOSINT M Principal commercial providers: 3D systems, DTM Corporation, EOS Materials: Plastics - polystyrene, nylon, glass filled nylon, alumide (aluminum/nylon blend), Materials: Metals - aluminum, stainless steel, titanium, gold (virtually any metal can be sintered) Most accurate Z-resolution: 0.2mm for plastics, 0.02mm for metals

3.4 Fused Deposition Modeling (FDM)
FDM Model: On the left, the model on the production base with its support material (brown). On the right, the final object.
FDM is the second most widely used rapid prototyping technology, after stereolithography. A plastic
filament is unwound from a coil and supplies material to an extrusion nozzle. The nozzle is heated to melt the plastic and has a mechanism which allows the flow of the melted plastic to be turned on and off. The nozzle is mounted to an X-Y plotter type mechanism which traces out the part contours, There is a second extrusion nozzle for the support material (different from the model material).
As the nozzle is moved over the table in the required geometry, it deposits a thin bead of extruded plastic to form each layer. The plastic hardens immediately after being squirted from the nozzle and bonds to the layer below. The object is built on a mechanical stage which moves vertically downward layer by layer as the part is formed. The entire system is contained within a chamber which is held at a temperature just below the melting point of the plastic.
Several materials are available for the process including ABS and investment casting wax. ABS offers good strength, while the polycarbonate (PC) and polyphenylsulfone (PPS) materials offer more strength and a higher temperature range.
Support structures are automatically generated for overhanging geometries and are later removed by breaking them away from the object. A “water-soluble” support material is also available for ABS parts. The method is office-friendly and quiet. FDM is fairly fast for small parts on the order of a few cubic centimetres. It can be very slow for large parts with a lot of volume, however. Depending on the part geometry and orientation, it can also require more support material than the part itself (or virtually none). The finished parts are anisotropic, that is they exhibit different mechanical characteristics in different directions. The resolution is not as fine as with stereolithography, but the parts are more robust.
Photograph and scheme of a FDM machine: Stratasys, type Prodigy plus Principal commercial providers: Stratasys Materials: ABS, ABSi, PC, PC-ABS and PC-ISO, PPS (model material) Most accurate Z-resolution: 0.13 mm (Range: 0.33mm- 0.13mm)

3.5 Three Dimensional Printing (3DP)
3DP Models: These models weren’t solidified in a bath of resin, which makes them quite brittle.
Three dimensional printing was developed at MIT. It's often used as a direct manufacturing process as
well as for rapid prototyping. The process starts by depositing a layer of powder object material at the top of a fabrication chamber. To
accomplish this, a measured quantity of powder is first dispensed from a similar supply chamber by moving a piston upward incrementally. A roller or scraper then distributes and compresses the powder at the top of the fabrication chamber. The multi-channel jetting head subsequently deposits a liquid adhesive (binder) in a two dimensional pattern onto the layer of the powder (similar to inkjet printing). The binder bonds the powder particles together where it has been deposited, solidifying it to form a layer of the object.
Once a layer is completed, the fabrication piston moves down by one layer thickness, and the process is repeated until the entire object is formed within the powder bed. After completion, the object must be removed from the chamber still filled with powder (a delicate operation), and the excess powder brushed off, leaving a "green" object. No external supports are required during fabrication since the powder bed supports overhangs.
Three dimensional printing offers the advantages of speedy fabrication and low materials and system cost. In fact, it's probably the fastest of all RP methods. It is even possible to print colored parts and images onto the part surfaces. However, there are limitations on resolution, surface finish, part fragility and available materials. In order to face the problem of the fragility of the standard 3DP plaster and starch parts, the object can be “infiltrated” with a resin, which hardens the object once it cures, but even then the break resistance does not equal that of some other systems such as FDM.
3D printing is also being used with sand and a high temperature resin to create sand casting molds and cores for metal casting, as well as acrylic for creating plastic prototype parts (voxeljet).
Photograph and scheme of a 3DP-machine: ZCorp, type Spectrum Z510 Principal commercial providers: Zcorp, Voxeljet Model materials: plaster, sand, corn starch, acrylic Binder and infiltration materials: various resins, cyanoacrylates (infiltrating) Most accurate Z-resolution: 0.1 mm
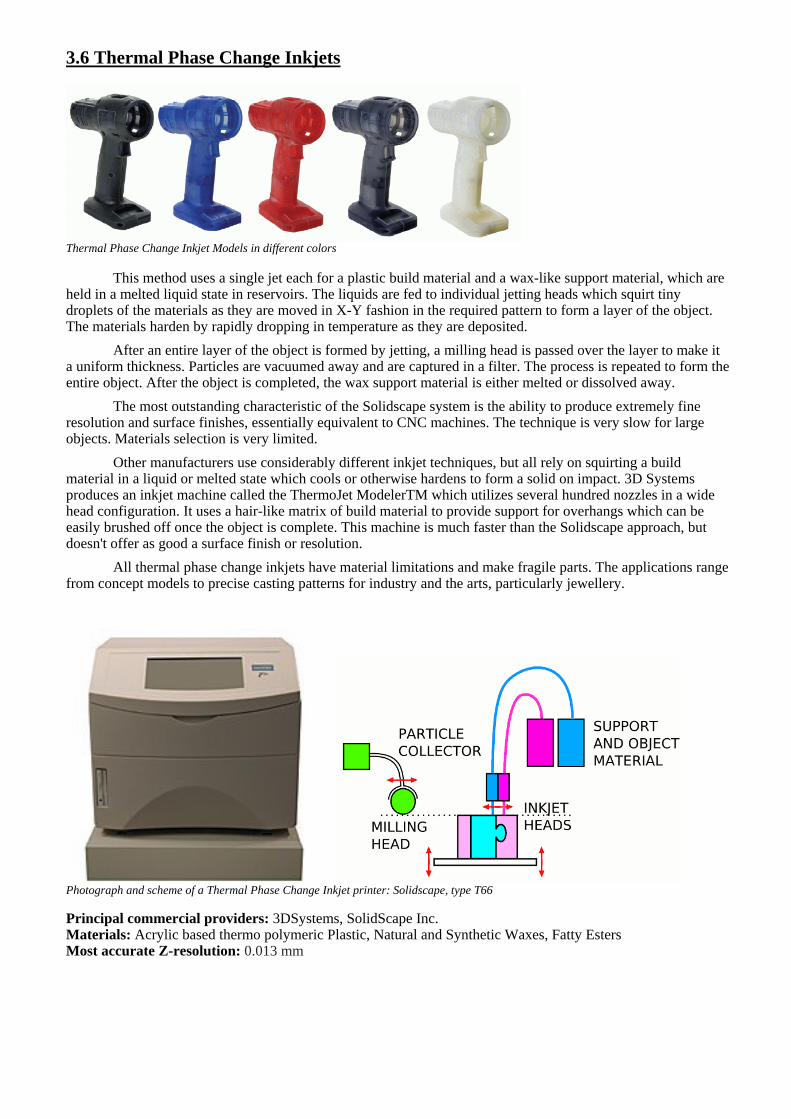
3.6 Thermal Phase Change Inkjets
Thermal Phase Change Inkjet Models in different colors
This method uses a single jet each for a plastic build material and a wax-like support material, which are held in a melted liquid state in reservoirs. The liquids are fed to individual jetting heads which squirt tiny droplets of the materials as they are moved in X-Y fashion in the required pattern to form a layer of the object. The materials harden by rapidly dropping in temperature as they are deposited.
After an entire layer of the object is formed by jetting, a milling head is passed over the layer to make it a uniform thickness. Particles are vacuumed away and are captured in a filter. The process is repeated to form the entire object. After the object is completed, the wax support material is either melted or dissolved away.
The most outstanding characteristic of the Solidscape system is the ability to produce extremely fine resolution and surface finishes, essentially equivalent to CNC machines. The technique is very slow for large objects. Materials selection is very limited.
Other manufacturers use considerably different inkjet techniques, but all rely on squirting a build material in a liquid or melted state which cools or otherwise hardens to form a solid on impact. 3D Systems produces an inkjet machine called the ThermoJet ModelerTM which utilizes several hundred nozzles in a wide head configuration. It uses a hair-like matrix of build material to provide support for overhangs which can be easily brushed off once the object is complete. This machine is much faster than the Solidscape approach, but doesn't offer as good a surface finish or resolution.
All thermal phase change inkjets have material limitations and make fragile parts. The applications range from concept models to precise casting patterns for industry and the arts, particularly jewellery.
Photograph and scheme of a Thermal Phase Change Inkjet printer: Solidscape, type T66 Principal commercial providers: 3DSystems, SolidScape Inc. Materials: Acrylic based thermo polymeric Plastic, Natural and Synthetic Waxes, Fatty Esters Most accurate Z-resolution: 0.013 mm

3.7 Photopolymer Phase Change Inkjets (PolyJet)
Photopolymer phase change inkjet models
Objet Geometries Ltd., an Israeli company, introduced its first machine based on PolyJetTM technology in early 2000. It is a potentially promising replacement for stereolithography. The process is based on photopolymers, but uses a wide area inkjet head to layer wise deposit both build and support materials. It subsequently completely cures each layer after it is deposited with a UV flood lamp mounted on the print head. The support material, which is also a photopolymer, is removed by washing it away with pressurized water in a secondary operation.
Resolution of Objet printers essentially equals that of standard stereolithography systems, and development is ongoing. Several materials are available, including transparent, flexible and black. The advantage of polyjet systems over SLA systems is that the resins come in cartridge form (no vat of liquid photopolymer), the machines are clean, quiet and office friendly. There is less post processing cleanup on parts. Disadvantages are that the print heads are relatively expensive and need to be replaced regularly, adding to maintenance costs.
In July, 2002, 3D Systems announced a similar photopolymer-based system called the InVisionTM. It uses the technology originally developed for the ThermoJet ModelerTM and deliveries began in late 2003. The company has priced the system a bit lower to better compete with 3D printers from Stratasys and Z Corp.
Photograph and scheme of an Photopolymer phase change inkjet machine: Objet, type Eden500V Principal commercial providers: Objet Geometries Ltd. Materials: Photopolymer resin Most accurate Z-resolution: 0.015mm, X-Y 600 DPI (0.04mm)

3.8 Contour Crafting (CC)
[Article downloaded from the internet] With [US] federal funding, Behrokh Khoshnevis, a professor of industrial and systems engineering at
USC, has devised a machine that takes its instructions from an architect's computerized drawings and then squirts successive layers of concrete, one on top of the other, to build vertical walls and domed roofs.
The computer-guided nozzle squeezes out a line of wet concrete like toothpaste being deposited on a
toothbrush. Then a pair of trowels attached to the nozzle shape the concrete as the robot repeats the pouring as many times as is necessary to achieve the programmed height. [This process can be thought of as large-scale FDM for buildings]
The "Contour Crafter" can work around the clock, with no need for breaks. It needs only power and a
constant feed of semi-liquid building materials. The first robot-built house will be a shell. Initially, such robot-built structures would be used as emergency housing and as low-cost homes for inner cities and emerging nations. But the federal government is interested in them for military housing and possible space applications.
So far, Khoshnevis has tested his machine with cement, but he believes a mixture of mud and straw that
is dried by the sun as it is deposited could be suitable. Degussa AG of Düsseldorf, Germany, the world's largest maker of building materials, is collaborating on the project to help find the best material.
Currently, the prototype machine hangs from a movable overhead gantry, much like a crane at shipping
depots. The scientist says it's possible the robot could run along rails on the ground, spitting out several houses at a time. But it would be more difficult to create autonomous wheeled robots that have the same precision as more stationary machines. Still, Khoshnevis thinks the technology might be used to create complex curving walls that are too difficult or costly to build by hand. And since robots may one day build houses for a quarter of today's cost, he believes that perhaps as soon as 2025, ‘all building will be done this way’.
CC prototype building a test wall; Illustration showing the principle of the this large-scale RP procedure

4.0 CAM/CAM/CNC in comparison to RP Using computer controlled cutting machines to create parts with a subtractive type material-removal
procedure is no longer considered rapid prototyping, but it is included here because it is still an important, widely used technique for creating prototype as well as production parts.
The process of creating machined parts from 2D or 3D CAD models is generally known as CAD/CAM (Computer Aided Design/Computer Aided Machining or Manufacturing). CAD/CAM represents the software and programming part of this manufacturing procedure. Its output is then sent to CNC (Computer Numerical Controlled) machines for physically producing parts by cutting away unwanted material from solid blocks. The most commonly used CNC controlled machines for creating 3D parts are milling machines and lathes.
CNC milled object: A 4 axis milling machine is cutting an object in three stages. First, a rough ‘Z-Level’ model is machined with a large cutter, which quickly removes a most of the excess material, leaving a “stair-step” finish. This step is generally termed “Roughing”. A second semi-finishing pass is made to reduce the step size, followed by a final pass for fine finishing. While the first and second passes are realized quite rapidly, the third one will be much more time consuming due to the finer resolution, needing many more closely spaced passes, which leads to a much longer machining time.
In milling, a block of material is clamped to the table of the machine, and a rotating cutting tool held in the machine spindle moves around the block, removing material from it in the form of chips. In a lathe, it is the material that is rotated in the spindle and a stationary sharp cutting tool moved across the work to remove the chips. Both of these processes are subtractive, lathes being mostly used to produce parts of round cross section (as the material is turning), milling machines being used to produce rectilinear or free-form parts. There are also machines that combine these two functions.
The advantage of these types machines and processes is that virtually any material can be worked, and
the size range of the process is much larger than that of rapid prototyping. CNC machining can make parts that range from nearly microscopic watch parts to entire boat hull molds 30m long, in any material from metal to plastics to wood to composites. In general these raw materials are also much less expensive than the special materials needed by RP machines.
In a CNC controlled machine, the material and/or the tool movements are executed by motors that are
controlled by the machine’s computer. The computer control allows the machine to move in a very precise and controlled way, resulting in very precise machined parts that would be impossible to create with conventional (hand-operated) machine tools.
The machine needs data to make the part, however. While simple parts can actually be programmed
right at the machine using a special programming language, for more complex objects, a computer model is needed, as well as a way to interpret the model data so that the machine can cut the part correctly.

3-axis milling machine cutting a site model: As for the previous model, the object is cut out of a solid block of dense foam via “chip removal” (chips and dust can be seen around the object). In fact, milling is a noisy and dust producing modeling process.
The process of CAD/CAM thus starts with the same kind of computer model of the object that might be
used for a rapid prototyping process. It then has to be exported to a specialized machine programming software (the CAM software). At that point, a person must work with the software to create the paths that the tool will use to cut the material. This is not nearly as automatic as with rapid prototyping (except on the simplest types of operations), and generally requires a well-paid, experienced operator. Complex parts can take hours or days to program correctly. Further, the CAM programs themselves can be quite expensive.
Thus the CAD/CAM/CNC method of producing parts can possibly be expensive and time consuming,
but does allow one to produce many parts that would not be able to made using RP processes, especially with regards to the fine surface finishing. Hence, the two types of processes - additive and subtractive - are complimentary, and the intelligent user can choose which process will be best for which part, end even use both together.
This last example demonstrates that parts from many different materials can be manufactured by milling. The parts being milled in the image are out of nylon, but wood, stone or metal may be machined as well.

5.0 List of Acronyms (alphabetically ordered)
3D Three Dimensional 3DP Three Dimensional Printing ABS Acrylonitrile Butadiene Styrene CAD Computer Aided Design CAM Computer Aided Machining (or Manufacturing) CC Contour Crafting CNC Computer Numerical Control FDM Fused Deposition Modeling LOM Laminated Object Manufacturing NURBS Non-Uniform Rational Basis Spline PC Polycarbonate PPS Polyphenylsulfone PVC Polyvinyl Chloride PolyJet Photopolymer Phase Change Inkjets RP Rapid Prototyping SLA Stereolithography Apparatus SLS Selective Laser Sintering .STL Stereolithography (standard polygon file format)