
3101_all_manual
334
www.novell.com Novell Training Services AUTHORIZED COURSEWARE Novell Training Services (en) 15 April 2009 SUSE Linux Enterprise 11 Fundamentals / Manual SUSE Linux Enterprise 11 Fundamentals Manual 3101
Transcript of 3101_all_manual

SUSE Linux Enterprise 11 Fundamentals / Manual
Novell Training Services (en)
SUSE Linux Enterprise 11 FundamentalsManual
www.novel l .comNovell Training Services
A U T H O R I Z E D C O U R S E WA R E
15 April
3 1 0 1
2009

Novell Training S
ervices (en) 15 April 2009
D a t e B O O K N A M E
Legal NoticesNovell, Inc., makes no representations or warranties with respect to the contents or use of this documentation, and specifically disclaims any express or implied warranties of merchantability or fitness for any particular purpose. Further, Novell, Inc., reserves the right to revise this publication and to make changes to its content, at any time, without obligation to notify any person or entity of such revisions or changes.
Further, Novell, Inc., makes no representations or warranties with respect to any software, and specifically disclaims any express or implied warranties of merchantability or fitness for any particular purpose. Further, Novell, Inc., reserves the right to make changes to any and all parts of Novell software, at any time, without any obligation to notify any person or entity of such changes.
Any products or technical information provided under this Agreement may be subject to U.S. export controls and the trade laws of other countries. You agree to comply with all export control regulations and to obtain any required licenses or classification to export, re-export or import deliverables. You agree not to export or re-export to entities on the current U.S. export exclusion lists or to any embargoed or terrorist countries as specified in the U.S. export laws. You agree to not use deliverables for prohibited nuclear, missile, or chemical biological weaponry end uses. See the Novell International Trade Services Web page (http://www.novell.com/info/exports/) for more information on exporting Novell software. Novell assumes no responsibility for your failure to obtain any necessary export approvals.
Copyright © 2008 Novell, Inc. All rights reserved. No part of this publication may be reproduced, photocopied, stored on a retrieval system, or transmitted without the express written consent of the publisher.
Novell, Inc., has intellectual property rights relating to technology embodied in the product that is described in this document. In particular, and without limitation, these intellectual property rights may include one or more of the U.S. patents listed on the Novell Legal Patents Web page (http://www.novell.com/company/legal/patents/) and one or more additional patents or pending patent applications in the U.S. and in other countries.
Novell, Inc.404 Wyman Street, Suite 500Waltham, MA 02451U.S.A.www.novell.com
Online Documentation: To access the latest online documentation for this and other Novell products, see the Novell Documentation Web page (http://www.novell.com/documentation).
Creative Commons LicenseThis manual is protected under a Creative Commons Attribution-Noncommerical-Share Alike 3.0 Unported license. You are free to share (copy, distribute and transmit the work) and to remix (adapt the work) under the following conditions: you must attribute the work in the manner specified by the author or licensor (but not in any way that suggests that they endorse you or your use of the work), and you many not use this work for commercial purposes. In addition, if you alter, transform, or build upon this work, you may distribute the resulting work only under the same or similar license to this one.
For any reuse or distribution, you must make clear to others the license terms of this work. The best way to do this is with a link to the Creative Commons license page (http://creativecommons.org/licenses/by-nc-sa/3.0/).
Novell Trademarks and Third-Party MaterialsFor Novell trademarks, see the Novell Trademark and Service Mark list (http://www.novell.com/company/legal/trademarks/tmlist.html). All third-party trademarks are the property of their respective owners.

Contents
Novell Training S
ervices (en) 15 April 2009
Introduction 9
SECTION 1 Getting to Know SUSE Linux Enterprise 11 17
Objective 1 Performing Basic Tasks in SUSE Linux Enterprise 11 18Exercise 1-1 Perform Five Basic Tasks in Linux . . . . . . . . . . . . . . . . . . . . . . . . . . . . . . . . . . . . 19
Objective 2 Overview of SUSE Linux Enterprise 11 20Differences Between the Server and Desktop . . . . . . . . . . . . . . . . . . . . . . . . . . . . 20Advantages and Disadvantages of Installing the GUI . . . . . . . . . . . . . . . . . . . . . . 21Overview of X Windows . . . . . . . . . . . . . . . . . . . . . . . . . . . . . . . . . . . . . . . . . . . . 21Window Managers - GNOME and KDE . . . . . . . . . . . . . . . . . . . . . . . . . . . . . . . . 22SLED 11 Applications - Office and Productivity . . . . . . . . . . . . . . . . . . . . . . . . . . 23SLED 11 Applications - Web Communication . . . . . . . . . . . . . . . . . . . . . . . . . . . 24SLED 11 Applications - Multimedia . . . . . . . . . . . . . . . . . . . . . . . . . . . . . . . . . . . 24
Objective 3 Use the GNOME Desktop Environment 25Log In . . . . . . . . . . . . . . . . . . . . . . . . . . . . . . . . . . . . . . . . . . . . . . . . . . . . . . . . . . . 25Understand Login Screen Options . . . . . . . . . . . . . . . . . . . . . . . . . . . . . . . . . . . . . 26Log Out . . . . . . . . . . . . . . . . . . . . . . . . . . . . . . . . . . . . . . . . . . . . . . . . . . . . . . . . . . 27Shut Down . . . . . . . . . . . . . . . . . . . . . . . . . . . . . . . . . . . . . . . . . . . . . . . . . . . . . . . 28Identify GNOME Desktop Components. . . . . . . . . . . . . . . . . . . . . . . . . . . . . . . . . 29Manage Icons in GNOME . . . . . . . . . . . . . . . . . . . . . . . . . . . . . . . . . . . . . . . . . . . 34Use the GNOME File Manager (Nautilus) . . . . . . . . . . . . . . . . . . . . . . . . . . . . . . . 38
Exercise 1-2 Work with Icons in GNOME . . . . . . . . . . . . . . . . . . . . . . . . . . . . . . . . . . . . . . . . . 40 . . . . . . . . . . . . . . . . . . . . . . . . . . . . . . . . . . . . . . . . . . . . . . . . . . . . . . . . . . . . . . . . 40
Exercise 1-3 Use the GNOME File Manager (Nautilus) . . . . . . . . . . . . . . . . . . . . . . . . . . . . . . . 41
Objective 4 Access the Command Line Interface from the Desktop 42Exercise 1-4 Access the Command Line Interface . . . . . . . . . . . . . . . . . . . . . . . . . . . . . . . . . . . 44
Summary 45
SECTION 2 Locate and Use Help Resources 47
Objective 1 Access and Use man Pages 48Exercise 2-1 Access and Use man Pages. . . . . . . . . . . . . . . . . . . . . . . . . . . . . . . . . . . . . . . . . . . 52
Objective 2 Use info Pages 53Exercise 2-2 Access and Use info Pages . . . . . . . . . . . . . . . . . . . . . . . . . . . . . . . . . . . . . . . . . . . 55
Objective 3 Access Release Notes and White Papers 56Release Notes . . . . . . . . . . . . . . . . . . . . . . . . . . . . . . . . . . . . . . . . . . . . . . . . . . . . . 56Manuals. . . . . . . . . . . . . . . . . . . . . . . . . . . . . . . . . . . . . . . . . . . . . . . . . . . . . . . . . . 57Help for Installed Packages . . . . . . . . . . . . . . . . . . . . . . . . . . . . . . . . . . . . . . . . . . 57Howtos . . . . . . . . . . . . . . . . . . . . . . . . . . . . . . . . . . . . . . . . . . . . . . . . . . . . . . . . . . 57
Exercise 2-3 Access Release Notes . . . . . . . . . . . . . . . . . . . . . . . . . . . . . . . . . . . . . . . . . . . . . . . 58
Copyright © 2010 Novell, Inc. Copying or distributing all or part of this manual is protected bya Creative Commons Attribution-Noncommercial-Share Alike 3.0 Unported license.
3Version 1

SUSE Linux Enterprise 11 Fundamentals / Manual
Novell Training S
ervices (en) 15 April 2009
Objective 4 Use GUI-Based Help 59
Objective 5 Find Help on the Web 60Exercise 2-4 Find Help on the Web . . . . . . . . . . . . . . . . . . . . . . . . . . . . . . . . . . . . . . . . . . . . . . . 61
Summary 62
SECTION 3 Manage the Linux File System 65
Objective 1 Understand the File System Hierarchy Standard (FHS) 66The Hierarchical Structure of the File System . . . . . . . . . . . . . . . . . . . . . . . . . . . . 66FHS (File System Hierarchy Standard). . . . . . . . . . . . . . . . . . . . . . . . . . . . . . . . . . 69
Exercise 3-1 Explore the SUSE Linux File System Hierarchy . . . . . . . . . . . . . . . . . . . . . . . . . . 81
Objective 2 Identify File Types in the Linux System 82Normal Files . . . . . . . . . . . . . . . . . . . . . . . . . . . . . . . . . . . . . . . . . . . . . . . . . . . . . . 82Two Special Directories (.) and (..) . . . . . . . . . . . . . . . . . . . . . . . . . . . . . . . . . . . . . 82Device Files. . . . . . . . . . . . . . . . . . . . . . . . . . . . . . . . . . . . . . . . . . . . . . . . . . . . . . . 82Links . . . . . . . . . . . . . . . . . . . . . . . . . . . . . . . . . . . . . . . . . . . . . . . . . . . . . . . . . . . . 82Sockets . . . . . . . . . . . . . . . . . . . . . . . . . . . . . . . . . . . . . . . . . . . . . . . . . . . . . . . . . . 83First In, First Out (FIFO). . . . . . . . . . . . . . . . . . . . . . . . . . . . . . . . . . . . . . . . . . . . . 83
Objective 3 Manage Directories with CLI and Nautilus 84cd command . . . . . . . . . . . . . . . . . . . . . . . . . . . . . . . . . . . . . . . . . . . . . . . . . . . . . . 84ls command . . . . . . . . . . . . . . . . . . . . . . . . . . . . . . . . . . . . . . . . . . . . . . . . . . . . . . . 84pwd command . . . . . . . . . . . . . . . . . . . . . . . . . . . . . . . . . . . . . . . . . . . . . . . . . . . . . 85
Exercise 3-2 Change Directories and List Directory Contents Using the CLI . . . . . . . . . . . . . . 88
Objective 4 Create and View Files 89Create a New File with touch . . . . . . . . . . . . . . . . . . . . . . . . . . . . . . . . . . . . . . . . . 89View a File with cat . . . . . . . . . . . . . . . . . . . . . . . . . . . . . . . . . . . . . . . . . . . . . . . . 90View a File with less . . . . . . . . . . . . . . . . . . . . . . . . . . . . . . . . . . . . . . . . . . . . . . . . 90View a File with head and tail. . . . . . . . . . . . . . . . . . . . . . . . . . . . . . . . . . . . . . . . . 91
Exercise 3-3 Create and View Files . . . . . . . . . . . . . . . . . . . . . . . . . . . . . . . . . . . . . . . . . . . . . . . 92
Objective 5 Work with Files and Directories 93Copy and Move Files and Directories. . . . . . . . . . . . . . . . . . . . . . . . . . . . . . . . . . . 93Create Directories Using the CLI . . . . . . . . . . . . . . . . . . . . . . . . . . . . . . . . . . . . . . 95Create Folders Using Nautilus . . . . . . . . . . . . . . . . . . . . . . . . . . . . . . . . . . . . . . . . 96Delete Files and Directories Using the CLI . . . . . . . . . . . . . . . . . . . . . . . . . . . . . . 97Link Files Using the CLI. . . . . . . . . . . . . . . . . . . . . . . . . . . . . . . . . . . . . . . . . . . . . 97Link Files Using Nautilus . . . . . . . . . . . . . . . . . . . . . . . . . . . . . . . . . . . . . . . . . . . 100
Exercise 3-4 Perform Multiple File Operations . . . . . . . . . . . . . . . . . . . . . . . . . . . . . . . . . . . . . 101
Objective 6 Find Files on Linux 102Use Graphical Search Tools . . . . . . . . . . . . . . . . . . . . . . . . . . . . . . . . . . . . . . . . . 103Use the find Command . . . . . . . . . . . . . . . . . . . . . . . . . . . . . . . . . . . . . . . . . . . . . 104Use the locate Command. . . . . . . . . . . . . . . . . . . . . . . . . . . . . . . . . . . . . . . . . . . . 106Use the whereis Command . . . . . . . . . . . . . . . . . . . . . . . . . . . . . . . . . . . . . . . . . . 107Use the which Command . . . . . . . . . . . . . . . . . . . . . . . . . . . . . . . . . . . . . . . . . . . 108Use the type Command . . . . . . . . . . . . . . . . . . . . . . . . . . . . . . . . . . . . . . . . . . . . . 109
Exercise 3-5 Find Files on Linux . . . . . . . . . . . . . . . . . . . . . . . . . . . . . . . . . . . . . . . . . . . . . . . . 110
Copyright © 2010 Novell, Inc. Copying or distributing all or part of this manual is protected bya Creative Commons Attribution-Noncommercial-Share Alike 3.0 Unported license.
Version 14

Novell Training S
ervices (en) 15 April 2009
Objective 7 Search File Content 111Use the grep Command. . . . . . . . . . . . . . . . . . . . . . . . . . . . . . . . . . . . . . . . . . . . . 111Use Regular Expressions . . . . . . . . . . . . . . . . . . . . . . . . . . . . . . . . . . . . . . . . . . . 112
Exercise 3-6 Search File Content. . . . . . . . . . . . . . . . . . . . . . . . . . . . . . . . . . . . . . . . . . . . . . . . 115
Objective 8 Perform Other File Operations with Nautilus 116Set File Manager Preferences . . . . . . . . . . . . . . . . . . . . . . . . . . . . . . . . . . . . . . . . 116Create CDs of Your Data . . . . . . . . . . . . . . . . . . . . . . . . . . . . . . . . . . . . . . . . . . . 117Use Bookmarks. . . . . . . . . . . . . . . . . . . . . . . . . . . . . . . . . . . . . . . . . . . . . . . . . . . 118Share Folders . . . . . . . . . . . . . . . . . . . . . . . . . . . . . . . . . . . . . . . . . . . . . . . . . . . . 118Archive Folders. . . . . . . . . . . . . . . . . . . . . . . . . . . . . . . . . . . . . . . . . . . . . . . . . . . 119
Exercise 3-7 Manage Folders with Nautilus . . . . . . . . . . . . . . . . . . . . . . . . . . . . . . . . . . . . . . . 120
Summary 121
SECTION 4 Work with the Linux Shell and Command Line Interface (CLI) 125
Objective 1 Get to Know the Command Shells 126Types of Shells . . . . . . . . . . . . . . . . . . . . . . . . . . . . . . . . . . . . . . . . . . . . . . . . . . . 126bash Configuration Files . . . . . . . . . . . . . . . . . . . . . . . . . . . . . . . . . . . . . . . . . . . . 126Completion of Commands and Filenames . . . . . . . . . . . . . . . . . . . . . . . . . . . . . . 128
Objective 2 Execute Commands at the Command Line 129History Function . . . . . . . . . . . . . . . . . . . . . . . . . . . . . . . . . . . . . . . . . . . . . . . . . . 129Switch to User root . . . . . . . . . . . . . . . . . . . . . . . . . . . . . . . . . . . . . . . . . . . . . . . . 129
Exercise 4-1 Execute Commands at the Command Line. . . . . . . . . . . . . . . . . . . . . . . . . . . . . . 130
Objective 3 Work with Variables and Aliases 131Variables . . . . . . . . . . . . . . . . . . . . . . . . . . . . . . . . . . . . . . . . . . . . . . . . . . . . . . . . 131Aliases. . . . . . . . . . . . . . . . . . . . . . . . . . . . . . . . . . . . . . . . . . . . . . . . . . . . . . . . . . 132
Exercise 4-2 Perform Common Command Line Tasks . . . . . . . . . . . . . . . . . . . . . . . . . . . . . . . 134
Objective 4 Understand Command Syntax and Special Characters 135Select Your Character Encoding. . . . . . . . . . . . . . . . . . . . . . . . . . . . . . . . . . . . . . 135Use Search Patterns for Name Expansion . . . . . . . . . . . . . . . . . . . . . . . . . . . . . . 137Prevent the Shell from Interpreting Special Characters . . . . . . . . . . . . . . . . . . . . 138
Exercise 4-3 Work with Command Syntax and Special Characters . . . . . . . . . . . . . . . . . . . . . 139
Objective 5 Use Piping and Redirection 140Exercise 4-4 Use Piping and Redirection . . . . . . . . . . . . . . . . . . . . . . . . . . . . . . . . . . . . . . . . . 144
Summary 145
SECTION 5 Administer Linux with YaST 149
Objective 1 Get to Know YaST better 150User Interfaces . . . . . . . . . . . . . . . . . . . . . . . . . . . . . . . . . . . . . . . . . . . . . . . . . . . 150YaST Applets . . . . . . . . . . . . . . . . . . . . . . . . . . . . . . . . . . . . . . . . . . . . . . . . . . . . 153Understand the Role of SuSEConfig . . . . . . . . . . . . . . . . . . . . . . . . . . . . . . . . . . 161
Exercise 5-1 Get to Know YaST . . . . . . . . . . . . . . . . . . . . . . . . . . . . . . . . . . . . . . . . . . . . . . . . 163
Copyright © 2010 Novell, Inc. Copying or distributing all or part of this manual is protected bya Creative Commons Attribution-Noncommercial-Share Alike 3.0 Unported license.
5Version 1

SUSE Linux Enterprise 11 Fundamentals / Manual
Novell Training S
ervices (en) 15 April 2009
Objective 2 Manage the Network Configuration Information from YaST 164Network Configuration in SLES . . . . . . . . . . . . . . . . . . . . . . . . . . . . . . . . . . . . . . 164Network Configuration in SLED . . . . . . . . . . . . . . . . . . . . . . . . . . . . . . . . . . . . . 174
Exercise 5-2 Manage the Network Configuration Information from YaST . . . . . . . . . . . . . . . 175
Summary 176
SECTION 6 Manage Users, Groups, and Permissions 177
Objective 1 Manage User and Group Accounts with YaST 178Basics About Users and Groups . . . . . . . . . . . . . . . . . . . . . . . . . . . . . . . . . . . . . . 178User and Group Administration with YaST . . . . . . . . . . . . . . . . . . . . . . . . . . . . . 178
Exercise 6-1 Manage User Accounts with YaST. . . . . . . . . . . . . . . . . . . . . . . . . . . . . . . . . . . . 186
Objective 2 Describe Basic Linux User Security Features 187Users and Groups . . . . . . . . . . . . . . . . . . . . . . . . . . . . . . . . . . . . . . . . . . . . . . . . . 187
Exercise 6-2 Check User and Group Information on Your Server . . . . . . . . . . . . . . . . . . . . . . 193
Objective 3 Manage User and Group Accounts from the Command Line 194Manage User Accounts from the Command Line. . . . . . . . . . . . . . . . . . . . . . . . . 194Manage Groups from the Command Line. . . . . . . . . . . . . . . . . . . . . . . . . . . . . . . 198Create Text Login Messages . . . . . . . . . . . . . . . . . . . . . . . . . . . . . . . . . . . . . . . . . 199
Exercise 6-3 Create and Manage Users and Groups from the Command Line . . . . . . . . . . . . . 201
Objective 4 Manage File Permissions and Ownership 202Understand File Permissions. . . . . . . . . . . . . . . . . . . . . . . . . . . . . . . . . . . . . . . . . 202Change File Permissions with chmod . . . . . . . . . . . . . . . . . . . . . . . . . . . . . . . . . . 204Change File Ownership with chown and chgrp . . . . . . . . . . . . . . . . . . . . . . . . . . 205
Exercise 6-4 Manage File Permissions and Ownership . . . . . . . . . . . . . . . . . . . . . . . . . . . . . . . 207Modify Default Access Permissions with umask . . . . . . . . . . . . . . . . . . . . . . . . . 207Configure Special File Permissions . . . . . . . . . . . . . . . . . . . . . . . . . . . . . . . . . . . 207
Objective 5 Ensure File System Security 210The Basic Rules for User Write Access . . . . . . . . . . . . . . . . . . . . . . . . . . . . . . . . 210The Basic Rules for User Read Access. . . . . . . . . . . . . . . . . . . . . . . . . . . . . . . . . 210How Special File Permissions Affect the Security of the System . . . . . . . . . . . . 211
Summary 213
SECTION 7 Use the vi Linux Text Editor 217
Objective 1 Use the Editor vi to Edit Files 218Start vi . . . . . . . . . . . . . . . . . . . . . . . . . . . . . . . . . . . . . . . . . . . . . . . . . . . . . . . . . . 218Use the Editor vi . . . . . . . . . . . . . . . . . . . . . . . . . . . . . . . . . . . . . . . . . . . . . . . . . . 219Learn the Working Modes. . . . . . . . . . . . . . . . . . . . . . . . . . . . . . . . . . . . . . . . . . . 219
Exercise 7-1 Use vi to Edit Files in the Linux System. . . . . . . . . . . . . . . . . . . . . . . . . . . . . . . . 221
Copyright © 2010 Novell, Inc. Copying or distributing all or part of this manual is protected bya Creative Commons Attribution-Noncommercial-Share Alike 3.0 Unported license.
Version 16

Novell Training S
ervices (en) 15 April 2009
Summary 222
SECTION 8 Manage Software for SUSE Linux Enterprise 11 223
Objective 1 Overview of Software Management in SUSE Linux Enterprise 11 224
Objective 2 Manage Software with YaST on SLES 11 227Access YaST Software Manager on the Server . . . . . . . . . . . . . . . . . . . . . . . . . . 227Search for Packages Using Filters . . . . . . . . . . . . . . . . . . . . . . . . . . . . . . . . . . . . 228Show Installation Summaries on the Server . . . . . . . . . . . . . . . . . . . . . . . . . . . . . 230View Information About a Package on the Server . . . . . . . . . . . . . . . . . . . . . . . . 232Install Software on the Server with YaST . . . . . . . . . . . . . . . . . . . . . . . . . . . . . . 232View and Resolve Package Dependencies . . . . . . . . . . . . . . . . . . . . . . . . . . . . . . 233
Objective 3 Manage Software with YaST on SLED 11 234Use YaST Software Manager . . . . . . . . . . . . . . . . . . . . . . . . . . . . . . . . . . . . . . . . 234Install Software with YaST Software Manager . . . . . . . . . . . . . . . . . . . . . . . . . . 235Use PackageKit. . . . . . . . . . . . . . . . . . . . . . . . . . . . . . . . . . . . . . . . . . . . . . . . . . . 237Install Software with PackageKit . . . . . . . . . . . . . . . . . . . . . . . . . . . . . . . . . . . . . 237
Exercise 8-1 Manage Software with YaST . . . . . . . . . . . . . . . . . . . . . . . . . . . . . . . . . . . . . . . . 238Exercise 8-2 Install Software with PackageKit . . . . . . . . . . . . . . . . . . . . . . . . . . . . . . . . . . . . . 239
Objective 4 Manage RPM Software Packages 240RPM Components and Features . . . . . . . . . . . . . . . . . . . . . . . . . . . . . . . . . . . . . . 240RPM Basics. . . . . . . . . . . . . . . . . . . . . . . . . . . . . . . . . . . . . . . . . . . . . . . . . . . . . . 241Manage Software Packages with RPM. . . . . . . . . . . . . . . . . . . . . . . . . . . . . . . . . 242
Exercise 8-3 Manage Software with RPM. . . . . . . . . . . . . . . . . . . . . . . . . . . . . . . . . . . . . . . . . 248
Objective 5 Manage Software with zypper 249Repository Management Commands . . . . . . . . . . . . . . . . . . . . . . . . . . . . . . . . . . 249Package Management Commands . . . . . . . . . . . . . . . . . . . . . . . . . . . . . . . . . . . . 250
Exercise 8-4 Manage Software with zypper . . . . . . . . . . . . . . . . . . . . . . . . . . . . . . . . . . . . . . . 253
Copyright © 2010 Novell, Inc. Copying or distributing all or part of this manual is protected bya Creative Commons Attribution-Noncommercial-Share Alike 3.0 Unported license.
7Version 1

SUSE Linux Enterprise 11 Fundamentals / Manual
Novell Training S
ervices (en) 15 April 2009
Objective 6 Update and Patch SLE 254Installing Service Packs . . . . . . . . . . . . . . . . . . . . . . . . . . . . . . . . . . . . . . . . . . . . 254Patching and Updating Packages with zypper . . . . . . . . . . . . . . . . . . . . . . . . . . . 254Installing Patched Packages with rpm. . . . . . . . . . . . . . . . . . . . . . . . . . . . . . . . . . 255Installing Service Packs Using YaST Online Update (YOU). . . . . . . . . . . . . . . . 257Managing Updates with Novell Subscription Management Tool (SMT) . . . . . . . 260
Summary 262
SECTION 9 Course 3101 and 3102 LPIC-1 Addendum 263
Objective 1 Use Debian Package Management 269Debian Linux basics . . . . . . . . . . . . . . . . . . . . . . . . . . . . . . . . . . . . . . . . . . . . . . . 269Manage Software Packages Using apt . . . . . . . . . . . . . . . . . . . . . . . . . . . . . . . . . 270Managing Software Packages Using dpkg . . . . . . . . . . . . . . . . . . . . . . . . . . . . . . 272
Objective 2 yum Package Management 274YUM Tools . . . . . . . . . . . . . . . . . . . . . . . . . . . . . . . . . . . . . . . . . . . . . . . . . . . . . . 274YUM: /etc/yum.conf and /etc/yum.repos.d/ . . . . . . . . . . . . . . . . . . . . . . . . . . . . . 275Using yumdownloader . . . . . . . . . . . . . . . . . . . . . . . . . . . . . . . . . . . . . . . . . . . . . 278
Objective 3 SQL Data Management 280Manipulate data in an SQL database. . . . . . . . . . . . . . . . . . . . . . . . . . . . . . . . . . . 280Query an SQL database. . . . . . . . . . . . . . . . . . . . . . . . . . . . . . . . . . . . . . . . . . . . . 282
Objective 4 Install and Configure X11 287X11 Installation, Video Card and Monitor Requirements . . . . . . . . . . . . . . . . . . 287Understanding the X Font Configuration File. . . . . . . . . . . . . . . . . . . . . . . . . . . . 291Understanding the X Window Configuration File . . . . . . . . . . . . . . . . . . . . . . . . 293
Objective 5 Message Transfer Agent (MTA) Basics 295Understanding Linux MTA programs: sendmail . . . . . . . . . . . . . . . . . . . . . . . . . 295Understanding Linux MTA programs: postfix . . . . . . . . . . . . . . . . . . . . . . . . . . . 296Understanding newaliases, qmail, and exim . . . . . . . . . . . . . . . . . . . . . . . . . . . . . 297Using mail, mailq, ~/.forward, and aliases . . . . . . . . . . . . . . . . . . . . . . . . . . . . . . 300sendmail emulation layer commands . . . . . . . . . . . . . . . . . . . . . . . . . . . . . . . . . . 305
Objective 6 Fundamentals of TCP-IP (dig) 309Use dig to Perform a DNS Lookup . . . . . . . . . . . . . . . . . . . . . . . . . . . . . . . . . . . . 309List of Syntax and Query Options for dig . . . . . . . . . . . . . . . . . . . . . . . . . . . . . . . 311Using dig Options . . . . . . . . . . . . . . . . . . . . . . . . . . . . . . . . . . . . . . . . . . . . . . . . . 313
Summary 322
Copyright © 2010 Novell, Inc. Copying or distributing all or part of this manual is protected bya Creative Commons Attribution-Noncommercial-Share Alike 3.0 Unported license.
Version 18

Introduction
Novell Training S
ervices (en) 15 April 2009
Introduction
In the SUSE Linux Enterprise 11 Fundamentals (3101) course, you learn the basic Linux skills necessary to prepare you for performing administrative tasks on SUSE Linux Enterprise 11 platforms.
These skills, along with those taught in the SUSE Linux Enterprise 11 Administration Course (3102), prepare you to take the Novell Certified Linux Administrator 11 (Novell CLA 11) certification test.
Your kit for Course 3101 contains the following media:
SUSE Linux Enterprise 11 Fundamentals Manual
SUSE Linux Enterprise 11 Fundamentals Workbook
SUSE Linux Enterprise 11 Fundamentals Course DVD. This DVD contains the course manual in PDF format, this workbook in PDF format, and a readme file.
In addition, there are several folders with the following content:
Exercises. This folder contains files used for the course exercises.
Documents. This folder contains all the documentation guides referenced in the course manual.
Setup. This folder contains all the files you need to set up your practice environment.
VMs. This folder contains the Virtual Machines used in the course.
SUSE Linux Enterprise Server 11 Product DVD
SUSE Linux Enterprise Desktop 11 Product DVD
The SUSE Linux Enterprise 11 Fundamentals Course DVD contains two VMware virtual machines (DA1–SUSE Linux Enterprise 11 Server; and DA-SLED–SUSE Linux Enterprise 11 Desktop) that you can use with the SUSE Linux Enterprise 11 Fundamentals Workbook outside the classroom to practice the skills in this course.
NOTE: Instructions for setting up a self-study environment are in the setup directory on the Course DVD.
Course Objectives
In this course, you will do the following:
Become familiar with the Linux Desktop and confident in your ability to perform basic tasks in Linux.
Learn how to get help for all problems you might have.
Copyright © 2010 Novell, Inc. Copying or distributing all or part of this manual is protected bya Creative Commons Attribution-Noncommercial-Share Alike 3.0 Unported license.
9Version 1

SUSE Linux Enterprise 11 Fundamentals / Manual
Novell Training S
ervices (en) 15 April 2009
Understand the structure of the Linux file system and how to work in the file system (e.g. copying, moving).
Learn how to work with the Linux Shell and Command Line Interface.
Learn how to manage software packages with the configuration tool YaST2.
Learn how to manage users, groups and file permissions to ensure a basic file system security.
Learn how to edit configuration files with an graphical editor or the command line editor vi.
Learn how to manage software with RPM.
These are fundamental and prerequisite to learning the skills of an entry-level SUSE Linux administrator or help desk technician in an enterprise environment.
Audience
While the primary audience for this course is administrators who are interested in SUSE Linux Enterprise 11, certification candidates with experience in other operating systems can also use this course to begin preparing for the Novell CLA 11 exam.
Certification and Prerequisites
This course helps you prepare for the Novell Certified Linux Administrator 11 (Novell CLA 11) Test. The Novell CLA 11 is the entry-level certification for SUSE Linux Enterprise 11.
As with all Novell certifications, course work is recommended. To achieve the certification, you are required to pass the Novell CLA 11 (050-720).
The exam tests you on objectives in this course (SUSE Linux Enterprise Fundamentals - Course 3101) and in course 3102, SUSE Linux Enterprise 11 Administration.
Copyright © 2010 Novell, Inc. Copying or distributing all or part of this manual is protected bya Creative Commons Attribution-Noncommercial-Share Alike 3.0 Unported license.
Version 110

Introduction
Novell Training S
ervices (en) 15 April 2009
The following illustrates the training/testing path for Novell CLA 11:
Figure Intro-1
Copyright © 2010 Novell, Inc. Copying or distributing all or part of this manual is protected bya Creative Commons Attribution-Noncommercial-Share Alike 3.0 Unported license.
11Version 1

SUSE Linux Enterprise 11 Fundamentals / Manual
Novell Training S
ervices (en) 15 April 2009
NOTE: For more information about Novell certification programs and taking the Novell CLA 11 exam, see the Novell Certifications Web site (http://www.novell.com/training/certinfo) and the CLA 11 site (http://www.novell.com/training/certinfo/cla11).
SUSE Linux Enterprise Server 11 Support and Maintenance
The copy of SUSE Linux Enterprise Server 11 you receive in your student kit is a fully functioning copy of the SUSE Linux Enterprise Server 11 product.
However, to receive official support and maintenance updates, you need to do one of the following:
Register for a free registration/serial code that provides you with 60 days of support and maintenance.
Purchase a copy of SUSE Linux Enterprise Server 11 from Novell (or an authorized dealer).
You can obtain your free 60-day support and maintenance code at the SUSE Linux Enterprise Server 11 Evaluation Download Site (http://www.novell.com/products/server/eval.html).
NOTE: You will need to have or create a Novell login account to access the 60-day evaluation.
SUSE Linux Enterprise Desktop 11 Support and Maintenance
The copy of SUSE Linux Enterprise Desktop 11 you receive in your student kit is a fully functioning copy of the SUSE Linux Enterprise Desktop 11 product.
However, to receive official support and maintenance updates, you need to do one of the following:
Register for a free registration/serial code that provides you with 60 days of support and maintenance.
Purchase a copy of SUSE Linux Enterprise Desktop 11 from Novell (or an authorized dealer).
You can obtain your free 60-day support and maintenance code at the SUSE Linux Enterprise Desktop 11 Evaluation Download Site (http://www.novell.com/products/desktop/eval.html).
NOTE: You will need to have or create a Novell login account to access the 60-day evaluation.
Copyright © 2010 Novell, Inc. Copying or distributing all or part of this manual is protected bya Creative Commons Attribution-Noncommercial-Share Alike 3.0 Unported license.
Version 112

Introduction
Novell Training S
ervices (en) 15 April 2009
Novell Customer Center
Novell Customer Center is an intuitive, web-based interface that helps you to manage your business and technical interactions with Novell. Novell Customer Center consolidates access to information, tools, and services such as
Automated registration for new SUSE Linux Enterprise products
Patches and updates for all shipping Linux products from Novell
Order history for all Novell products, subscriptions, and services
Entitlement visibility for new SUSE Linux Enterprise products
Linux subscription-renewal status
Subscription renewals Novell or its partners
For example, a company might have an administrator who needs to download SUSE Linux Enterprise software updates, a purchaser who wants to review the order history, and an IT manager who has to reconcile licensing. With Novell Customer Center, the company can meet all these needs in one location and can give each user access rights appropriate to their roles.
You can access the Novell Customer Center at (http://www.novell.com/center).
SUSE Linux Enterprise Server 11 Online Resources
Novell provides a variety of online resources to help you configure and implement SUSE Linux Enterprise Server 11.
These include the following:
The Novell home page for SUSE Linux Enterprise Server 11 (http://www.novell.com/products/server/)
The Novell Documentation web site for SUSE Linux Enterprise Server 11 (http://www.novell.com/documentation/sles11/index.html)
The home page for all Novell Linux support, which includes links to support options such as the Knowledge base, downloads, and FAQs (http://support.novell.com/linux/)
The Novell Cool Solutions web site, which provides the latest implementation guidelines and suggestions from Novell on a variety of products, including SUSE Linux (http://www.novell.com/coolsolutions)
Copyright © 2010 Novell, Inc. Copying or distributing all or part of this manual is protected bya Creative Commons Attribution-Noncommercial-Share Alike 3.0 Unported license.
13Version 1

SUSE Linux Enterprise 11 Fundamentals / Manual
Novell Training S
ervices (en) 15 April 2009
Agenda
The following is the agenda for this 3-day course:
Table Intro-1
Exercise Conventions
When working through an exercise, you will see conventions that indicate information you need to enter that is specific to your server.
The following describes the most common conventions:
italicized/bolded text. This is a reference to your unique situation, such as the host name of your server.
For example, if the host name of your server is DA1, and you see the following:
hostname.digitalairlines.com
you would enter:
DA1.digitalairlines.com
10.0.0.xx. This is the IP address that is assigned to your SUSE Linux Enterprise Server 10 server.
For example, if your IP address is 10.0.0.50, and you see the following:
10.0.0.xx
you would enter:
10.0.0.50
Section Duration
Day 1 Introduction 40 minutes
Section 1:Getting to Know SUSE Linux Enterprise 11 2 Hours
Section 2: Locate and Use Help Resources 1 Hour
Section 3: Manage the Linux File System 3 Hours
Day 2 Section 4: Work with the Linux Shell and Command Line Interface (CLI)
2 Hours
Section 5: Administer Linux with YaST 2 Hours
Section 6: Manage Users, Groups, and Permissions 2 Hours
Day 3 Section 6: Manage Users, Groups, and Permissions
(continued)
2.5 Hours
Section 7: Use the vi Linux Text Editor 30 Minutes
Section 8: Manage Software for SUSE Linux Enterprise 11 1 Hour
Copyright © 2010 Novell, Inc. Copying or distributing all or part of this manual is protected bya Creative Commons Attribution-Noncommercial-Share Alike 3.0 Unported license.
Version 114

Introduction
Novell Training S
ervices (en) 15 April 2009
Select. The word select is used in exercise steps to indicate a variety of actions including clicking a button on the interface and selecting a menu item.
Enter and Type. The words enter and type have distinct meanings.
The word enter means to type text in a field or at a command line and press the Enter key when necessary. The word type means to type text without pressing the Enter key.
If you are directed to type a value, make sure you do not press the Enter key or you might activate a process that you are not ready to start.
Copyright © 2010 Novell, Inc. Copying or distributing all or part of this manual is protected bya Creative Commons Attribution-Noncommercial-Share Alike 3.0 Unported license.
15Version 1

SUSE Linux Enterprise 11 Fundamentals / Manual
Novell Training S
ervices (en) 15 April 2009
Copyright © 2010 Novell, Inc. Copying or distributing all or part of this manual is protected bya Creative Commons Attribution-Noncommercial-Share Alike 3.0 Unported license.
Version 116

Getting to Know SUSE Linux Enterprise 11
Novell Training S
ervices (en) 15 April 2009
S E C T I O N 1 Getting to Know SUSE Linux Enterprise 11
Introduction
This course provides an introduction to the core concepts of Novell SUSE Linux Enterprise 11 (SLE 11). Many of the skills, applications, and commands used in SUSE Linux Enterprise 11 are common across both the Desktop and Server platforms.
Throughout this course the terms SUSE Linux Enterprise Desktop 11 (SLED 11) and SUSE Linux Enterprise Server 11 (SLES 11) may be used interchangeably. In addition, while the exercises may be performed on only one platform, unless otherwise noted, they could be done on either platform.
Section Overview
This section helps you get to know some of the basic features of SUSE Linux Enterprise 11. You are introduced to the Graphical User Interface (GUI) and the Command Line Interface (CLI).
Objectives
1. “Performing Basic Tasks in SUSE Linux Enterprise 11” on page 18
2. “Overview of SUSE Linux Enterprise 11” on page 20
3. “Use the GNOME Desktop Environment” on page 25
4. “Access the Command Line Interface from the Desktop” on page 42
Copyright © 2010 Novell, Inc. Copying or distributing all or part of this manual is protected bya Creative Commons Attribution-Noncommercial-Share Alike 3.0 Unported license.
17Version 1

SUSE Linux Enterprise 11 Fundamentals / Manual
Novell Training S
ervices (en) 15 April 2009
Objective 1 Performing Basic Tasks in SUSE Linux Enterprise 11
Many of the tasks that you might be familiar with in the administration of a Microsoft Windows machine, can be done in a similar fashion in SUSE Linux Enterprise 11.
To help ease the transition from Windows to SUSE Linux Enterprise 11, you will start with an exercise in which you perform several tasks in Linux that are similar to common Windows administration tasks.
Copyright © 2010 Novell, Inc. Copying or distributing all or part of this manual is protected bya Creative Commons Attribution-Noncommercial-Share Alike 3.0 Unported license.
Version 118

Getting to Know SUSE Linux Enterprise 11
Novell Training S
ervices (en) 15 April 2009
Exercise 1-1 Perform Five Basic Tasks in Linux
In this exercise, you perform five basic tasks on the SUSE Linux Enterprise Desktop 11 machine to help you become familiar with and confident in working with the Linux environment.
This exercise can be found in the Workbook.
(End of Exercise)
Copyright © 2010 Novell, Inc. Copying or distributing all or part of this manual is protected bya Creative Commons Attribution-Noncommercial-Share Alike 3.0 Unported license.
19Version 1

SUSE Linux Enterprise 11 Fundamentals / Manual
Novell Training S
ervices (en) 15 April 2009
Objective 2 Overview of SUSE Linux Enterprise 11
In this section, you will learn the basics of both SUSE Linux Enterprise Desktop (SLED) and SUSE Linux Enterprise Server (SLES).
The following will be discussed:
“Differences Between the Server and Desktop” on page 20
“Advantages and Disadvantages of Installing the GUI” on page 21
“Overview of X Windows” on page 21
“Window Managers - GNOME and KDE” on page 22
“SLED 11 Applications - Office and Productivity” on page 23
“SLED 11 Applications - Web Communication” on page 24
“SLED 11 Applications - Multimedia” on page 24
Differences Between the Server and Desktop
SLED and SLES are Linux distributions that are both based on the same code base from SUSE. However, the SLED distribution has been optimized to function as an end-user workstation. It includes services and applications that would typically required in the workstation role, such as OpenOffice.org.
SLES, on the other hand, has been optimized to function as a server. It includes services and applications typically used in the server role, such as DNS, DHCP, Apache Web Server, and so on. (See Table 1-1)
One thing that distinguishes both SLES and SLED from other operating systems is their ability to be run with or without a graphical user interface (GUI). You cannot install Windows without its GUI.
The Linux GUI is an application. You can choose whether or not to install it. In other words, you can skip the GUI installation and run Linux solely from the terminal window’s command line interface (CLI). Most Linux servers run without the GUI, whereas Linux desktops will likely have the GUI installed.
Most services in Linux can be configured by editing an ASCII text file, so you do not need a GUI if you want your computer to act only as a server.
Table 1-1
SLED SLES
Runs as a workstation with monitor and GUI. Often runs headless (without a monitor) and does not require a GUI.
Runs end-user programs such as OpenOffice.org, banshee (music player) F-spot (photo manager) and games.
Runs server applications such as DNS, DHCP, Apache Web Server and so on.
Meant to be run on a single machine, though it can accommodate many users.
Meant to accommodate many users and machines.
Copyright © 2010 Novell, Inc. Copying or distributing all or part of this manual is protected bya Creative Commons Attribution-Noncommercial-Share Alike 3.0 Unported license.
Version 120

Getting to Know SUSE Linux Enterprise 11
Novell Training S
ervices (en) 15 April 2009
Advantages and Disadvantages of Installing the GUI
Installing a graphical user interface has the following advantages:
Ease of use. Like any GUI, the Linux Desktop makes it easier to find and access functionality, especially for beginning users and for those who would prefer not to use the CLI. Other users may find it easier to use the command line after they have learned to navigate it.
Functionality. The functionality of programs like the YaST system tool sometimes exceeds that of the command line, especially for Open Enterprise Server (OES) Services.
Familiarity. The SUSE Linux desktop is full-featured and similar to other desktop environments such as Microsoft Windows or Mac OS.
Not installing a graphical user interface has the following advantages:
Stability. Every program contains errors that can make your system unstable. The fewer programs are installed, the more stable your system will be. A graphical user front end is a large program that might contain a large number of undiscovered programming errors, even if the error ratio is low.
Performance. Every running program needs system resources. Fewer programs running on your computer means increased performance.
You need to distinguish between graphical applications, which run in their own windows, and text-based applications, which are carried out in a terminal window.
Overview of X Windows
The X Window System was created in 1984 at Massachusetts Institute of Technology (MIT). The goal was to be able to use graphical applications across a network, independent of hardware.
The X Window System allows graphical applications to be displayed and operated on any monitor, without running the applications on the machines to which these monitors are connected.
The basis for this is the separation into a server component (X server) and the application itself (client application). The X server and client application communicate with each other by way of various communication channels.
X server. The X server controls the graphical screen. This corresponds roughly to a graphics driver on other systems. In addition, it manages the input devices, such as keyboard and mouse, and transmits their actions to the X client.
The X server, however, has nothing to do with the appearance of the window and the desktop; this is the task of the window manager. XFree86 and XOrg are free
Tight security, although not as strict as the server.
Uses stricter security features, such as more frequent authentication to perform administrator tasks.
SLED SLES
Copyright © 2010 Novell, Inc. Copying or distributing all or part of this manual is protected bya Creative Commons Attribution-Noncommercial-Share Alike 3.0 Unported license.
21Version 1

SUSE Linux Enterprise 11 Fundamentals / Manual
Novell Training S
ervices (en) 15 April 2009
implementations of the X server. SUSE Linux Enterprise Server 11 defaults to using XOrg.
Client application. The client application is a graphical application that uses the services of the X server to receive keyboard and mouse actions and to have its own output displayed on the screen.
NOTE: The communication between X server and X client uses the network protocol TCP/IP—even if the server and client run on the same computer.
Window Managers - GNOME and KDE
Window managers are specialized client applications. A window manager works together with the X server and provides additional functionality. The window manager
Provides control elements
Manages virtual desktops
Provides functionality of window frames (for example, changing their size)
The X Window System is not linked to any specific window manager and thus it is not linked to any particular look and feel.
SUSE Linux Enterprise Server 11 is currently released with several window managers, including Metacity (the GNOME window manager) and Tab Window Manager (twm).
Desktop environments go far beyond the look and feel window managers provide for desktops and manipulating windows. The aim is to provide clients with a unified look and feel:
GNOME (GNU Network Object Model Environment) is the standard graphical desktop for SUSE Linux Enterprise Server 11.
You can install another open-source desktop, the KDE (Kool Desktop Environment) desktop, instead.
Copyright © 2010 Novell, Inc. Copying or distributing all or part of this manual is protected bya Creative Commons Attribution-Noncommercial-Share Alike 3.0 Unported license.
Version 122

Getting to Know SUSE Linux Enterprise 11
Novell Training S
ervices (en) 15 April 2009
As can be seen in the following figure, the X server is running on computer da5, while the X applications are running on computers da1 and da2:
Figure 1-1
The applications are displayed, however, on the monitor attached to DA5. All of these computers can be running different operating systems.
SLED 11 Applications - Office and Productivity
SLED 11 offers a full set of applications comparable to those available on Windows or MacOS. Some of the office and productivity applications are:
OpenOffice.org 3.x Novell Edition
OpenOffice Writer (Text Documents)
OpenOffice Impress (Presentations)
OpenOffice Calc (Spreadsheets)
OpenOffice Draw (Drawings)
OpenOffice Math (Formulas)
OpenOffice Database Wizard
Photo editing
GIMP 2.6
F-Spot 0.5
Copyright © 2010 Novell, Inc. Copying or distributing all or part of this manual is protected bya Creative Commons Attribution-Noncommercial-Share Alike 3.0 Unported license.
23Version 1

SUSE Linux Enterprise 11 Fundamentals / Manual
Novell Training S
ervices (en) 15 April 2009
Vector Graphics: Inkspace 0.4
PDFs: Adobe Reader 8
Note taking: Tomboy Notes
SLED 11 Applications - Web Communication
Web browser: Firefox 3.x
Evolution 2.24
Groupwise Client 7
Instant Messaging: Pidgin 2.5
SLED 11 Applications - Multimedia
Audio/Video
Banshee 1.4
Adobe Flash Player 10
Moonlight Media Player
PulseAudio
Copyright © 2010 Novell, Inc. Copying or distributing all or part of this manual is protected bya Creative Commons Attribution-Noncommercial-Share Alike 3.0 Unported license.
Version 124

Getting to Know SUSE Linux Enterprise 11
Novell Training S
ervices (en) 15 April 2009
Objective 3 Use the GNOME Desktop Environment
GNOME is an intuitive desktop environment that supports drag and drop. Numerous programs are specifically designed for GNOME. Using these programs requires an understanding of how to navigate in GNOME.
To use the GNOME desktop environment, you need to know how to do the following:
“Log In” on page 25
“Understand Login Screen Options” on page 26
“Log Out” on page 27
“Shut Down” on page 28
“Identify GNOME Desktop Components” on page 29
“Manage Icons in GNOME” on page 34
“Use the GNOME File Manager (Nautilus)” on page 38
“Work with Icons in GNOME” on page 40
“” on page 40
“Use the GNOME File Manager (Nautilus)” on page 41
Log In
If computer users want to work with a multiuser-capable operating system, they must first identify themselves to the operating system. For this purpose, they need
A login string or user name
A password (usually assigned by the system administrator when a new user is added)
When the computer is booted and ready for work, the following login dialog appears:
Figure 1-2
Copyright © 2010 Novell, Inc. Copying or distributing all or part of this manual is protected bya Creative Commons Attribution-Noncommercial-Share Alike 3.0 Unported license.
25Version 1

SUSE Linux Enterprise 11 Fundamentals / Manual
Novell Training S
ervices (en) 15 April 2009
Understand Login Screen Options
In the lower left corner of the login screen, you will notice four options:
Restart. Restarts the system.
NOTE: Only root is allowed to reboot the system. Enter the root password.
Shut Down. Shuts down your computer.
Cancel. Cancels the login.
Log In. Select this after entering the password.
1. Type a surname and press Enter.
2. Then type your password and press Enter again. If the login is successful, the following GNOME desktop environment appears:
Figure 1-3
Copyright © 2010 Novell, Inc. Copying or distributing all or part of this manual is protected bya Creative Commons Attribution-Noncommercial-Share Alike 3.0 Unported license.
Version 126

Getting to Know SUSE Linux Enterprise 11
Novell Training S
ervices (en) 15 April 2009
Log Out
When you are ready to log out of the system, do the following:
1. Open the Computer menu (also called main menu) in the bottom panel.
Figure 1-4
2. From the System panel on the right side, select Logout.
A confirmation dialog appears.
Figure 1-5
3. Select Log Out to end the session or Switch User to suspend the session and to allow another user to log in.
Copyright © 2010 Novell, Inc. Copying or distributing all or part of this manual is protected bya Creative Commons Attribution-Noncommercial-Share Alike 3.0 Unported license.
27Version 1

SUSE Linux Enterprise 11 Fundamentals / Manual
Novell Training S
ervices (en) 15 April 2009
NOTE: If you select Switch User and do not have a regular user account created, you will return as root user.
Shut Down
Older computers that do not have power management and cannot switch themselves off can be switched off when the following message appears:
If you switch the machine off too soon, this could lead to loss of data.
NOTE: You should always shut down your computer before you turn it off.
1. Go to the Computer (main) menu at the bottom of the screen.
2. Select Shutdown from the System panel on the right side.
The following dialog is displayed:
Figure 1-6
3. Click Shut Down.
You will be asked to authenticate as root, since only root has the permission to shut down the system.
NOTE: On SUSE Linux Enterprise Server 11 machines, only root is allowed to shut down the system. When prompted, enter the root password. On SUSE Linux Enterprise Desktop 11 machines, any user can shut down the computer.
Master Resource Control: runlevel 0 has been reached
Copyright © 2010 Novell, Inc. Copying or distributing all or part of this manual is protected bya Creative Commons Attribution-Noncommercial-Share Alike 3.0 Unported license.
Version 128

Getting to Know SUSE Linux Enterprise 11
Novell Training S
ervices (en) 15 April 2009
Figure 1-7
4. Enter the root password and click Authenticate.
Identify GNOME Desktop Components
This section explains the components on the
“Bottom Panel” on page 29
“Main Menu” on page 30
“Application Browser” on page 31
“System Menu” on page 31
“Status Menu” on page 32
“Network Settings” on page 33
Bottom Panel
The GNOME desktop includes one panel at the bottom of the screen.
Figure 1-8
The menu at the left side of the panel is labeled Computer. It is called the main menu.
The empty space in the middle of the panel includes the task manager. All opened windows and applications on the screen will be listed here.
At the right of the panel you will see more icons. Which icons are present depends on your hardware and other factors. Here are some possible icons:
Monitor. Lets you configure display settings.
Copyright © 2010 Novell, Inc. Copying or distributing all or part of this manual is protected bya Creative Commons Attribution-Noncommercial-Share Alike 3.0 Unported license.
29Version 1

SUSE Linux Enterprise 11 Fundamentals / Manual
Novell Training S
ervices (en) 15 April 2009
Battery. Power management for laptops.
Speaker. Volume control.
Clock. Shows date and time.
Board. Minimizes all open windows or shows them again on the desktop.
Workspaces. Links to workspaces are discreet areas in the GNOME Desktop in which you can work.
Main Menu
You can start a program with an icon on the desktop by double-clicking the icon, but normally, programs are started from the main menu.
Figure 1-9
At the top of the left frame you see three menu buttons, representing three different filters:
Applications
This is the default view, showing favorite and recent applications.
Documents
Shows documents you have been working on recently.
Places
Shows favorite places like servers, file system, and desktop.
Copyright © 2010 Novell, Inc. Copying or distributing all or part of this manual is protected bya Creative Commons Attribution-Noncommercial-Share Alike 3.0 Unported license.
Version 130

Getting to Know SUSE Linux Enterprise 11
Novell Training S
ervices (en) 15 April 2009
In the left frame, is a button labeled More Applications. When you select this button, the application browser appears.
Figure 1-10
Application Browser
The right frame of the application browser shows a list of the most important installed applications. The applications are grouped and you can see a list of the groups in the left frame. Select a group to see only the applications that belong to this group.
The filter option adds even more flexibility. Enter a part of the name of the application you want to start in the Filter text box in the left frame. The filtered applications are shown immediately in the right frame.
System Menu
In the right frame of the main menu, there are five system options:
Help. Starts the online help.
Control Center. Starts the GNOME Control Center where you can configure your desktop.
Copyright © 2010 Novell, Inc. Copying or distributing all or part of this manual is protected bya Creative Commons Attribution-Noncommercial-Share Alike 3.0 Unported license.
31Version 1

SUSE Linux Enterprise 11 Fundamentals / Manual
Novell Training S
ervices (en) 15 April 2009
YaST. (SUSE Linux Enterprise Server) The YaST Control Center is a collection of graphical system configuration tools unique to SUSE Linux Enterprise. For more information, see Section 5.
Install Software. Shows a list of the available software on your registered installation media.
Lock Screen. (SUSE Linux Enterprise Desktop) Locks the screen. To unlock, you have to enter your password.
Log Out. Allows you to log out of the system or to switch the user.
Shutdown. Allows you to shut down, restart, or hibernate the system.
Status Menu
At the bottom of the right frame you can see the System Monitor and the Network Monitor:
The System Monitor displays the following tabs:
System: Basic system information such as hardware used, BIOS information, disk space
Processes: A list of processes and their status, CPU usage, ID, and waiting channel
Resources: CPU usage, memory and swap usage
File Systems: File systems used, their devices, type, and used/available disk space
Hardware: Hardware installed
The following graphic shows the Resources tab:
Copyright © 2010 Novell, Inc. Copying or distributing all or part of this manual is protected bya Creative Commons Attribution-Noncommercial-Share Alike 3.0 Unported license.
Version 132

Getting to Know SUSE Linux Enterprise 11
Novell Training S
ervices (en) 15 April 2009
Network Settings
The Network option under the Status menu is a shortcut to the YaST module Network Settings found in YaST > Network Devices > Network Settings. It allows you to configure the network, IPv6 settings, DHCP settings, Hostname/DNS settings, and routing.
Copyright © 2010 Novell, Inc. Copying or distributing all or part of this manual is protected bya Creative Commons Attribution-Noncommercial-Share Alike 3.0 Unported license.
33Version 1

SUSE Linux Enterprise 11 Fundamentals / Manual
Novell Training S
ervices (en) 15 April 2009
Manage Icons in GNOME
You can manage icons on your desktop in different ways. For simplicity, we will describe only the most important methods.
You can find icons in the following three areas on your desktop:
Desktop Icons
Panel Icons
Main Menu Icons
Desktop Icons
To create an icon for an application on your desktop, do the following:
1. Select the item in your application menu.
2. Drag it to a free space on your desktop and release the mouse button.
Notice there is a small plus icon at the mouse pointer when moving the icon. This indicates that a copy of the icon will be created.
To Create a New Folder
1. Right-click a free space on your desktop. A menu appears:
Figure 1-11
At the top of the pop-up menu there are three menu options to create a new icon:
Create Folder. This creates a new and empty folder icon.
Create Launcher. Creates a new application launcher.
Create Document. Creates an empty document.
Copyright © 2010 Novell, Inc. Copying or distributing all or part of this manual is protected bya Creative Commons Attribution-Noncommercial-Share Alike 3.0 Unported license.
Version 134

Getting to Know SUSE Linux Enterprise 11
Novell Training S
ervices (en) 15 April 2009
2. Click Create Folder.
3. When the icon appears, enter the folder’s name.
Figure 1-12
To create a new Launcher
1. Right-click on the desktop.
2. Click Create Launcher. A dialog appears:
Figure 1-13
3. Enter the following information:
Type. Type of file to be launched.
Name. Name and label of the launcher.
Command. Command that should be executed when double-clicking the launcher icon.
Comment. (Optional) Tool tip that appears when you hover the mouse pointer over the icon.
Icon. (Optional) Icon representing the launcher you are creating.
4. Click OK.
Copyright © 2010 Novell, Inc. Copying or distributing all or part of this manual is protected bya Creative Commons Attribution-Noncommercial-Share Alike 3.0 Unported license.
35Version 1

SUSE Linux Enterprise 11 Fundamentals / Manual
Novell Training S
ervices (en) 15 April 2009
Create a new Document
Depending on your installed software, various document types are available in this menu. Immediately after a default installation, however, you can create only an empty text file.
1. Right-click on the desktop.
2. Select New Document.
3. When the icon appears, enter the text file’s name.
Figure 1-14
Panel Icons
To add new programs to the bottom panel, do the following:
1. Right-click a free area of the panel.
2. Select Add to Panel.
3. From the dialog that appears, select the application you want to add.
4. Right-click its icon to add the program to the panel.
Copyright © 2010 Novell, Inc. Copying or distributing all or part of this manual is protected bya Creative Commons Attribution-Noncommercial-Share Alike 3.0 Unported license.
Version 136

Getting to Know SUSE Linux Enterprise 11
Novell Training S
ervices (en) 15 April 2009
Figure 1-15
To remove a program from the control panel, do the following:
1. Right-click its icon in the bottom panel.
2. Select Remove From Panel.
To move icons in the panel, do the following:
1. Hold down the right mouse button.
2. Select Move from the Context menu.
Main Menu Icons
Only the user root is allowed to add a new entry to a menu. Normal users are only allowed to declare favorite applications. To add icons to your favorites, do the following:
1. Open the main menu in the panel.
The menu appears.
2. Select More Applications.
Copyright © 2010 Novell, Inc. Copying or distributing all or part of this manual is protected bya Creative Commons Attribution-Noncommercial-Share Alike 3.0 Unported license.
37Version 1

SUSE Linux Enterprise 11 Fundamentals / Manual
Novell Training S
ervices (en) 15 April 2009
3. Select an application item in the right frame with the right mouse button.
4. Select Add to Favorites from the pop-up menu.
Use the GNOME File Manager (Nautilus)
GNOME provides its own file manager, called Nautilus.
Figure 1-16
To start Nautilus, do one of the following:
Select the username’s Home icon on the desktop.
or
Select Nautilus from the main menu.
By default, Nautilus is marked as a favorite application. Normally, Nautilus shows the content of the user’s home directory after starting. The right frame of the Nautilus window shows the content of the current directory.
You can see your current position in the location bar below the tool bar. All higher directories are shown as buttons. Select one of these buttons to switch into the higher directory.
Copyright © 2010 Novell, Inc. Copying or distributing all or part of this manual is protected bya Creative Commons Attribution-Noncommercial-Share Alike 3.0 Unported license.
Version 138

Getting to Know SUSE Linux Enterprise 11
Novell Training S
ervices (en) 15 April 2009
The Nautilus Side Panel
The left frame is called Side Panel.
Figure 1-17
At the top of the side panel there is a menu where you can select the content of the side panel:
Places. Shows the most important directories and devices to store files.
Desktop. Lists the contents of the desktop.
File System. Shows the file system folders.
Network. Shows any network locations.
CD-ROM Drive. Shows the contents of any media in any CD-ROM drives present.
Floppy Drive. Shows the contents of any media in any floppy drives present.
For more information on the Nautilus File Browser, see “Section 3: Manage the Linux File System.”
Copyright © 2010 Novell, Inc. Copying or distributing all or part of this manual is protected bya Creative Commons Attribution-Noncommercial-Share Alike 3.0 Unported license.
39Version 1

SUSE Linux Enterprise 11 Fundamentals / Manual
Novell Training S
ervices (en) 15 April 2009
Exercise 1-2 Work with Icons in GNOME
In the first exercise, you added a new launcher icon to your desktop. In this exercise, you add a panel icon to and remove a panel icon from the bottom panel.
You will find this exercise in the workbook.
(End of Exercise)
Copyright © 2010 Novell, Inc. Copying or distributing all or part of this manual is protected bya Creative Commons Attribution-Noncommercial-Share Alike 3.0 Unported license.
Version 140

Getting to Know SUSE Linux Enterprise 11
Novell Training S
ervices (en) 15 April 2009
Exercise 1-3 Use the GNOME File Manager (Nautilus)
In this exercise, you explore your GNOME desktop and learn how to use the GNOME File Manager Nautilus.
You will find this exercise in the workbook.
(End of Exercise)
Copyright © 2010 Novell, Inc. Copying or distributing all or part of this manual is protected bya Creative Commons Attribution-Noncommercial-Share Alike 3.0 Unported license.
41Version 1

SUSE Linux Enterprise 11 Fundamentals / Manual
Novell Training S
ervices (en) 15 April 2009
Objective 4 Access the Command Line Interface from the Desktop
A classic multi-user environment can be implemented by connecting several terminals (dialog stations) —monitor and keyboard units— to the serial interface of a single computer.
You can also connect several terminals to the serial interface in a Linux system. However, because more than one person often uses the same PC, virtual terminals were created in Linux.
With virtual terminals, you can work in Linux as if you had several classic terminals available at the same time.
You can have up to six virtual terminals (F1-F6) running on your computer. F7 represents the Graphical User Interface (GUI).
To switch between individual terminals, do the following:
1. Press Ctrl+Alt+Fx.
For example, to switch to terminal 3, press Ctrl+Alt+F3.
You can determine the terminal currently being used from the ttyx number (tty1–tty6) (tty is an abbreviation for teletype, which is another word for terminal). When you switch to a virtual terminal, a login prompt appears:
2. Enter your login name and password.
3. To log out, enter exit.
To switch back to your graphical user interface,
1. Press Ctrl+Alt+F7.
To access a terminal window directly from the desktop,
1. Right-click on the desktop.
2. Select Open in Terminal.
You can also start a terminal emulation from the main menu:
1. From the main menu, select Gnome Terminal (shown in the following picture)
or
2. From the System application group, select X Term.
Welcome to SUSE Linux Enterprise Server 11 (i586) - Kernel 2.6.16.14-6-default (tty1).
da51 login:
Copyright © 2010 Novell, Inc. Copying or distributing all or part of this manual is protected bya Creative Commons Attribution-Noncommercial-Share Alike 3.0 Unported license.
Version 142

Getting to Know SUSE Linux Enterprise 11
Novell Training S
ervices (en) 15 April 2009
Figure 1-18
The terminal appears inside a window with options you can select to modify the display of the terminal (such as font and background color).
Copyright © 2010 Novell, Inc. Copying or distributing all or part of this manual is protected bya Creative Commons Attribution-Noncommercial-Share Alike 3.0 Unported license.
43Version 1

SUSE Linux Enterprise 11 Fundamentals / Manual
Novell Training S
ervices (en) 15 April 2009
Exercise 1-4 Access the Command Line Interface
In this exercise, you practice switching to a virtual terminal and then switching back to the graphical user interface. You also log in to and log out of a virtual terminal.
You will find this exercise in the workbook.
(End of Exercise)
Copyright © 2010 Novell, Inc. Copying or distributing all or part of this manual is protected bya Creative Commons Attribution-Noncommercial-Share Alike 3.0 Unported license.
Version 144

Getting to Know SUSE Linux Enterprise 11
Novell Training S
ervices (en) 15 April 2009
Summary
Objective Summary
1. Overview of SUSE Linux Enterprise 11
You cannot install Windows without its graphical user interface (GUI). In contrast, the Linux GUI is an application. You can choose whether or not to install it. In other words, you can skip the GUI installation and run Linux solely from the terminal window’s command line interface (CLI). Most Linux servers run without the GUI, whereas Linux desktops will likely have the GUI installed.
Most services in Linux can be configured by editing an ASCII text file, so you do not need a GUI if you want your computer to act only as a server.
Know the following:
Advantages and Disadvantages of Installing the GUI
Window Managers - GNOME and KDE
2. Use the GNOME Desktop Environment
You learned how to log in and log out of the GNOME system and how to navigate in the GNOME desktop environment.
You learned how to manage icons at
The GNOME desktop
The bottom panel
The Applications menu
GNOME’s file manager is called Nautilus.
3. Access the Command Line Interface from the Desktop
SUSE Linux Enterprise Server provides the user with six virtual terminals.
You can use the key combinations Ctrl+Alt+F1 to Ctrl+Alt+F6 to switch between the individual terminals.
You can switch back to your graphical user interface by pressing Ctrl+Alt+F7.
With Gnome Terminal you can access the command line interface within a window.
Copyright © 2010 Novell, Inc. Copying or distributing all or part of this manual is protected bya Creative Commons Attribution-Noncommercial-Share Alike 3.0 Unported license.
45Version 1

SUSE Linux Enterprise 11 Fundamentals / Manual
Novell Training S
ervices (en) 15 April 2009
Copyright © 2010 Novell, Inc. Copying or distributing all or part of this manual is protected bya Creative Commons Attribution-Noncommercial-Share Alike 3.0 Unported license.
Version 146

Locate and Use Help Resources
Novell Training S
ervices (en) 15 April 2009
S E C T I O N 2 Locate and Use Help Resources
The Linux operating system, in general, is very well documented with many resources for help information. This section shows you how to find and use several sources of help information.
Objectives
1. “Access and Use man Pages” on page 48
2. “Use info Pages” on page 53
3. “Access Release Notes and White Papers” on page 56
4. “Use GUI-Based Help” on page 59
5. “Find Help on the Web” on page 60
Copyright © 2010 Novell, Inc. Copying or distributing all or part of this manual is protected bya Creative Commons Attribution-Noncommercial-Share Alike 3.0 Unported license.
47Version 1

SUSE Linux Enterprise 11 Fundamentals / Manual
Novell Training S
ervices (en) 15 April 2009
Objective 1 Access and Use man Pages
The most important command for help is man (an abbreviation of manual or man page). To display the man page of the man command, open a command prompt and enter: man man.
If the English man pages are not shown automatically with the man command, you can display the English version of the man page by using the option LANG=en_EN.
For example, to display the English version of the man page for the man command, enter the following: LANG=en_EN man man.
Using the parameter LANG=en_EN switches to the English language for the requested man pages only.
NOTE: All manual pages are available in English and many have been translated into other languages. Because these translations are often incomplete or not maintained, we recommend using the English versions.
The following is the first page of the manual pages for the man command:
Figure 2-1
The header of each manual page contains the command name at the left and right sides and the section number to which the manual page belongs. In the center of the header is the name of the section. The last line usually contains the date of the last changes.
Copyright © 2010 Novell, Inc. Copying or distributing all or part of this manual is protected bya Creative Commons Attribution-Noncommercial-Share Alike 3.0 Unported license.
Version 148
Locate and Use Help Resources
Novell Training S
ervices (en) 15 April 2009
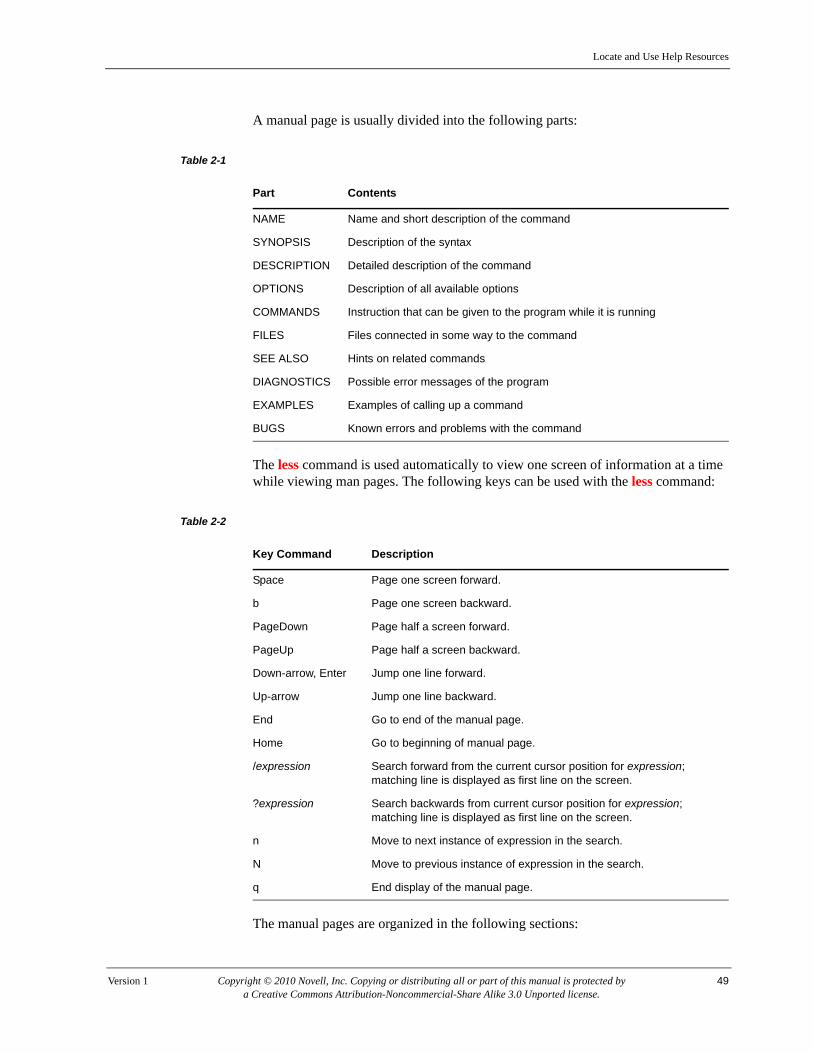
A manual page is usually divided into the following parts:
Table 2-1
The less command is used automatically to view one screen of information at a time while viewing man pages. The following keys can be used with the less command:
Table 2-2
The manual pages are organized in the following sections:
Part Contents
NAME Name and short description of the command
SYNOPSIS Description of the syntax
DESCRIPTION Detailed description of the command
OPTIONS Description of all available options
COMMANDS Instruction that can be given to the program while it is running
FILES Files connected in some way to the command
SEE ALSO Hints on related commands
DIAGNOSTICS Possible error messages of the program
EXAMPLES Examples of calling up a command
BUGS Known errors and problems with the command
Key Command Description
Space Page one screen forward.
b Page one screen backward.
PageDown Page half a screen forward.
PageUp Page half a screen backward.
Down-arrow, Enter Jump one line forward.
Up-arrow Jump one line backward.
End Go to end of the manual page.
Home Go to beginning of manual page.
/expression Search forward from the current cursor position for expression; matching line is displayed as first line on the screen.
?expression Search backwards from current cursor position for expression; matching line is displayed as first line on the screen.
n Move to next instance of expression in the search.
N Move to previous instance of expression in the search.
q End display of the manual page.
Copyright © 2010 Novell, Inc. Copying or distributing all or part of this manual is protected bya Creative Commons Attribution-Noncommercial-Share Alike 3.0 Unported license.
49Version 1

SUSE Linux Enterprise 11 Fundamentals / Manual
Novell Training S
ervices (en) 15 April 2009
Table 2-3
For example, entering the following displays general information about the crontab command:
man 1 crontab
Entering the following displays information about the configuration file for the crontab command (the configuration file is also named crontab):
man 5 crontab
It is especially important to know to which section a command belongs when there is more than one manual for a command.
For example, the uname command is both a user command and a system call. Entering the following displays information about the user command:
man 1 uname
Entering the following displays information about the system call (such as name and information about the current kernel):
man 2 uname
You can display a brief description of all the available manual pages for a command or utility by using the whatis command (as in the following):
Figure 2-2
Section Contents
1 Executable programs and shell commands (user commands)
2 System calls
3 Functions and library routines
4 Device files
5 Configuration files and file formats
6 Games
7 Macro packages and file formats
8 System administration commands
p Programmer’s manual
Copyright © 2010 Novell, Inc. Copying or distributing all or part of this manual is protected bya Creative Commons Attribution-Noncommercial-Share Alike 3.0 Unported license.
Version 150

Locate and Use Help Resources
Novell Training S
ervices (en) 15 April 2009
NOTE: In SUSE Linux Enterprise, the manual pages are located in the /usr/share/man/ directory.
If you enter man -k keyword or apropos keyword, a list of manual pages in which the keyword appears in the NAME section is displayed. For example:
Figure 2-3
Copyright © 2010 Novell, Inc. Copying or distributing all or part of this manual is protected bya Creative Commons Attribution-Noncommercial-Share Alike 3.0 Unported license.
51Version 1

SUSE Linux Enterprise 11 Fundamentals / Manual
Novell Training S
ervices (en) 15 April 2009
Exercise 2-1 Access and Use man Pages
In this exercise, you learn how to use the whatis and man command and how to navigate in the help text.
You will find this exercise in the workbook.
(End of Exercise)
Copyright © 2010 Novell, Inc. Copying or distributing all or part of this manual is protected bya Creative Commons Attribution-Noncommercial-Share Alike 3.0 Unported license.
Version 152

Locate and Use Help Resources
Novell Training S
ervices (en) 15 April 2009
Objective 2 Use info Pages
Many programs no longer use the man pages. Instead, the help information can be found in information files which can be accessed with the info command.
In SUSE Linux Enterprise Server, the info files are located in the /usr/share/info/ directory.
The following is the beginning of the info file for the info command:
Figure 2-4
The following are advantages of the info file format:
It uses a structured document setup.
Specific sections can be reached directly from the table of contents.
Specific sections can be linked.
The following are the most commonly used key commands for the info command:
Copyright © 2010 Novell, Inc. Copying or distributing all or part of this manual is protected bya Creative Commons Attribution-Noncommercial-Share Alike 3.0 Unported license.
53Version 1

SUSE Linux Enterprise 11 Fundamentals / Manual
Novell Training S
ervices (en) 15 April 2009
Table 2-4
Key Command Description
Space, PageDown Page down one screen.
Backspace, PageUp Page up one screen.
b Move cursor to the beginning of current info page.
e Move cursor to the end of current info page.
Tab Move cursor to the next reference (*).
Enter Follow the reference.
n Move to the next info page of the same level (Next:).
p Move to the previous info page of the same level.
u Move one level higher.
l Move back to the last text displayed; end help.
s Search in the info page.
h Display help.
? List a summary of commands.
q End display of info document.
Copyright © 2010 Novell, Inc. Copying or distributing all or part of this manual is protected bya Creative Commons Attribution-Noncommercial-Share Alike 3.0 Unported license.
Version 154

Locate and Use Help Resources
Novell Training S
ervices (en) 15 April 2009
Exercise 2-2 Access and Use info Pages
In this exercise, you learn how to use the info command and how to navigate in the info text.
You will find this exercise in the workbook.
(End of Exercise)
Copyright © 2010 Novell, Inc. Copying or distributing all or part of this manual is protected bya Creative Commons Attribution-Noncommercial-Share Alike 3.0 Unported license.
55Version 1

SUSE Linux Enterprise 11 Fundamentals / Manual
Novell Training S
ervices (en) 15 April 2009
Objective 3 Access Release Notes and White Papers
Release notes, white papers, and other helpful sources of information are stored in the /usr/share/doc/ directory. This directory contains the following:
“Release Notes” on page 56
“Manuals” on page 57
“Help for Installed Packages” on page 57
“Howtos” on page 57
“Access Release Notes” on page 58
Release Notes
When you complete the installation of SUSE Linux Enterprise Server, the release notes appear in a window.
Figure 2-5
If you want to access these release notes later, you can find them in the directory: /usr/share/doc/release-notes/SUSE_Linux_Enterprise_Server_11/ or /usr/share/doc/release-notes/SUSE_Linux_Enterprise_Desktop_11/.
Copyright © 2010 Novell, Inc. Copying or distributing all or part of this manual is protected bya Creative Commons Attribution-Noncommercial-Share Alike 3.0 Unported license.
Version 156

Locate and Use Help Resources
Novell Training S
ervices (en) 15 April 2009
Two release note files are available:
RELEASE-NOTES.en.html
RELEASE-NOTES.en.rtf
The content of these files is identical. Only the file format is different.
Manuals
The administration manual is also installed during the installation of SUSE Linux Enterprise Server 11. It is contained in the directory /usr/share/doc/manual/, along with the other available manuals:
NOTE: This applies only to the server. The administration manual is not installed on the desktop.
Help for Installed Packages
Help files are available in the following directory for most installed packages:
/usr/share/doc/packages/package-name
These help files are written by the programmers of the package. Therefore, the format of these files is not standardized. Some packages provide help files in HTML, while others are in regular ASCII.
Howtos
You can find additional information (including background material) in the howtos. There is a howto for almost every imaginable topic in Linux. On SLED 11 and SLES 11 the howtos are not installed by default, but you can install them manually from The Linux Documentation Project web site:
http://tldp.org/docs.html
This site has a list of all current howtos (together with available translations). The howtos are also available in ASCII, PostScript, and HTML.
SUSE Linux Enterprise Server installation media contain a large number of howtos. The howtos of the Linux Documentation Project (TLDP) in HTML format are installed in the /usr/share/doc/howto/en/html/ directory.
Copyright © 2010 Novell, Inc. Copying or distributing all or part of this manual is protected bya Creative Commons Attribution-Noncommercial-Share Alike 3.0 Unported license.
57Version 1

SUSE Linux Enterprise 11 Fundamentals / Manual
Novell Training S
ervices (en) 15 April 2009
Exercise 2-3 Access Release Notes
In this exercise, you access release notes.
You will find this exercise in the workbook.
(End of Exercise)
Copyright © 2010 Novell, Inc. Copying or distributing all or part of this manual is protected bya Creative Commons Attribution-Noncommercial-Share Alike 3.0 Unported license.
Version 158

Locate and Use Help Resources
Novell Training S
ervices (en) 15 April 2009
Objective 4 Use GUI-Based Help
An online help tool is also available for graphical applications of SUSE Linux Enterprise Server 11.
To start the online help, select Help in the System area of the main menu. Use the links to navigate through the content.
Figure 2-6
You also can use the search function to quicken your search for help. Enter a topic in the Search text box in the tool bar and press Enter.
The online help is available in most GNOME applications and can be started by pressing F1.
Copyright © 2010 Novell, Inc. Copying or distributing all or part of this manual is protected bya Creative Commons Attribution-Noncommercial-Share Alike 3.0 Unported license.
59Version 1

SUSE Linux Enterprise 11 Fundamentals / Manual
Novell Training S
ervices (en) 15 April 2009
Objective 5 Find Help on the Web
You can find an extensive collection of information about Linux on the Internet for both for general issues and special issues. The following are some of the more frequently used Linux sites:
Novell/Linux (http://www.novell.com/linux/)
TLDP web site (http://www.tldp.org)
Kernel.org (http://www.kernel.org) (especially for issues in connection with the Linux kernel)
To find other sources of information, you can use a search web site such as Google. Google offers a special search web site for questions about Linux at Google/Linux (http://www.google.com/linux).
NOTE: Be careful with information you find on personal home pages. This information can be old or wrong.
Copyright © 2010 Novell, Inc. Copying or distributing all or part of this manual is protected bya Creative Commons Attribution-Noncommercial-Share Alike 3.0 Unported license.
Version 160

Locate and Use Help Resources
Novell Training S
ervices (en) 15 April 2009
Exercise 2-4 Find Help on the Web
In this exercise, you learn how to find help on the web. You look for updates for SUSE Linux Enterprise Server 11 on the Novell support web site. You also use the Google Linux search engine to find information on GNOME and SLES11 on the internet.
You will find this exercise in the workbook.
(End of Exercise)
Copyright © 2010 Novell, Inc. Copying or distributing all or part of this manual is protected bya Creative Commons Attribution-Noncommercial-Share Alike 3.0 Unported license.
61Version 1

SUSE Linux Enterprise 11 Fundamentals / Manual
Novell Training S
ervices (en) 15 April 2009
Summary
Objective Summary
1 Access and Use man Pages The most important command for online help is man.
The manual pages are always divided into parts and arranged according to various sections.
Use the less command to view the manual pages.
2. Use info Pages Many programs are no longer provided with manual pages. Instead, info files are used, which can be read with the info command.
The following are advantages of the info format:
Structured document setup is available.
Specific sections can be reached directly from the table of contents.
Links between specific sections are possible.
3. Access Release Notes and White Papers
The release notes can be found in the following directory:
/usr/share/doc/release-notes/
In /usr/share/doc/manual/sles-admin_en/ both a PDF and an HTML version of the administrator manual are available.
Howtos are not available after the installation of the SUSE Linux Enterprise Server 11. If you install them manually, you can find them in the following directory:
/usr/share/doc/howto/en/
For most installed packages, help files are available in the following directory:
/usr/share/doc/packages/package-name
4. Use GUI-Based Help SUSE Linux Enterprise Server 11 provides a help system for graphical applications.
To start the online help, select Help from the main menu.
Help programs are available in most GNOME applications and can be started by pressing F1.
Copyright © 2010 Novell, Inc. Copying or distributing all or part of this manual is protected bya Creative Commons Attribution-Noncommercial-Share Alike 3.0 Unported license.
Version 162

Locate and Use Help Resources
Novell Training S
ervices (en) 15 April 2009
5. Find Help on the Web The Internet is a very extensive source of expert knowledge for general issues and special issues with Linux.
The following are a few of the more commonly used web sites:
Novell/linux (http://www.novell.com/linux/)
TLDP web site (http://www.tldp.org)
Cert.org (http://www.cert.org)
Security Focus (http://www.securityfocus.com)
Kernel.org (http://www.kernel.org)
Objective Summary
Copyright © 2010 Novell, Inc. Copying or distributing all or part of this manual is protected bya Creative Commons Attribution-Noncommercial-Share Alike 3.0 Unported license.
63Version 1

SUSE Linux Enterprise 11 Fundamentals / Manual
Novell Training S
ervices (en) 15 April 2009
Copyright © 2010 Novell, Inc. Copying or distributing all or part of this manual is protected bya Creative Commons Attribution-Noncommercial-Share Alike 3.0 Unported license.
Version 164

Manage the Linux File System
Novell Training S
ervices (en) 15 April 2009
S E C T I O N 3 Manage the Linux File System
In this section, you learn about the structure of the Linux file system and the most important file operation commands for working at the command line.
Objectives
1. “Understand the File System Hierarchy Standard (FHS)” on page 66
2. “Identify File Types in the Linux System” on page 82
3. “Manage Directories with CLI and Nautilus” on page 84
4. “Create and View Files” on page 89
5. “Work with Files and Directories” on page 93
6. “Find Files on Linux” on page 102
7. “Search File Content” on page 111
8. “Perform Other File Operations with Nautilus” on page 116
Copyright © 2010 Novell, Inc. Copying or distributing all or part of this manual is protected bya Creative Commons Attribution-Noncommercial-Share Alike 3.0 Unported license.
65Version 1

SUSE Linux Enterprise 11 Fundamentals / Manual
Novell Training S
ervices (en) 15 April 2009
Objective 1 Understand the File System Hierarchy Standard (FHS)
The file system concept of Linux (and, in general, of all UNIX systems) is considerably different than that of other operating systems:
Files in the file systems can be spread out over several devices. Each file system can be “mounted” any place in the directory hierarchy. With other file systems, each file system is placed on the same level, at the top. With Linux, the file systems can be placed at lower levels of the directory structure.
A filename in Linux can be up to 255 characters long. It can contain any number of special characters (“_” or “%”, for example).
Certain characters (the dollar sign “$”, the semicolon “;”, or the space, for example) have a special meaning. If you want to use one of these characters without the associated special meaning, the character must be preceded by a “\” (backslash) to mask (switch off) its special meaning.
You can use umlauts, letters with diacritical marks, or other language-specific characters.
NOTE: Using language-specific characters can lead to problems if you exchange data with people in other countries using other settings, because these characters are not present on their keyboards.
Linux differentiates between upper-case and lower-case letters. For example, the file names Invoice, invoice, and INVOICE refer to three different files.
To understand the concept of the Linux file system, you need to understand the following:
“The Hierarchical Structure of the File System” on page 66
“FHS (File System Hierarchy Standard)” on page 69
“Explore the SUSE Linux File System Hierarchy” on page 81
The Hierarchical Structure of the File System
The file system concept of Linux involves a hierarchical file system that can be shown in the form of a tree.
This tree is not limited to a local partition. It can stretch over several partitions, which can be located on different computers in a network. It begins at the root directory (/), from which the name for the system administrator comes, and branches out like the branches of a tree.
The following shows part of a typical file system tree:
Copyright © 2010 Novell, Inc. Copying or distributing all or part of this manual is protected bya Creative Commons Attribution-Noncommercial-Share Alike 3.0 Unported license.
Version 166

Manage the Linux File System
Novell Training S
ervices (en) 15 April 2009
Figure 3-1
A file in this directory tree is uniquely defined by its path. A path refers to the directory names which lead to this file.
The separation character between individual directory names is the slash (“/”). The path can be specified in two ways:
As an absolute path starting from the root of the entire file system tree.
The absolute path always begins with a slash (“/”), the symbol for the root directory.
As a relative path starting from the current directory.
Copyright © 2010 Novell, Inc. Copying or distributing all or part of this manual is protected bya Creative Commons Attribution-Noncommercial-Share Alike 3.0 Unported license.
67Version 1

SUSE Linux Enterprise 11 Fundamentals / Manual
Novell Training S
ervices (en) 15 April 2009
Figure 3-2
In this example, the current position in the file system is geeko’s home directory. To change to the /etc directory, you can use either one of the following commands:
absolute path: cd /etc
relative path: cd ../../etc
Sometimes it is necessary to specify the absolute path, because certain files can only be uniquely addressed in this way. The length of the path cannot exceed 4096 characters, including the slashes.
Each directory contains two directories that allow relative path specifications.
One of these entries (“.”) points to the directory itself. The other entry (“..”) points to the entry one level higher in the hierarchy.
NOTE: As in the Windows command prompt (cmd), cd is the command used to change the current working directory. It will be explained later in detail.
Copyright © 2010 Novell, Inc. Copying or distributing all or part of this manual is protected bya Creative Commons Attribution-Noncommercial-Share Alike 3.0 Unported license.
Version 168

Manage the Linux File System
Novell Training S
ervices (en) 15 April 2009
FHS (File System Hierarchy Standard)
The structure of the file system is described in the File System Hierarchy Standard (FHS). The FHS specifies which directories must be located on the first level after the root directory and what they contain. The current version of FHS is 2.3 (January 2004), and a description is available at http://www.pathname.com/fhs/pub/fhs-2.3.html.
The FHS does not dictate all details. In some areas it allows for your own definitions. The FHS defines a two-layered hierarchy:
The directories in the top layer (immediately below the root directory “/”).
As a second layer, the directories under /usr and /var.
Figure 3-3
Root Directory (/)
Similar to the root of the C: drive (C:\) in Windows, the root directory refers to the highest layer of the file system tree. Normally only directories (not files) are located here. When the system is booted, the partition on which this directory is located is the first one mounted.
As the kernel cannot fulfill all the tasks of the operating system, all programs that are run at system start must be available on this partition (they cannot be located on another partition).
Copyright © 2010 Novell, Inc. Copying or distributing all or part of this manual is protected bya Creative Commons Attribution-Noncommercial-Share Alike 3.0 Unported license.
69Version 1

SUSE Linux Enterprise 11 Fundamentals / Manual
Novell Training S
ervices (en) 15 April 2009
The following directories always have to be on the same partition as the root directory: /bin, /dev, /etc, /lib, and /sbin.
Essential Binaries for Use by All Users (/bin)
Similar to the C:\Program Files directory in Windows, the /bin directory contains important binaries (executable programs) that are required when no other file systems are mounted, such as all programs necessary for the system start.
These include the various shells, the most important commands for working with files, and several commands for system analysis and configuration.
The following table provides an overview of the contents of the /bin directory:
Table 3-1
Boot Directory (/boot)
Similar to the C:\Windows\System directory in Windows, the /boot directory contains system files. Specifically, it contains
Static files related to the boot loader GRUB (Grand Unified Bootloader). These files (with the exception of configuration files) are required for the boot process.
The backed-up information for the Master Boot Record (MBR) and the system map files. They contain information about where exactly the kernel is located on the partition. The MBR backup file is called backup_mbr.
The kernel, which has the file name vmlinuz. vmlinuz is actually a symbolic link to the actual kernel file. According to the FHS, however, the kernel can also be located directly in the root directory.
Other Partitions (/data)
If YaST, the graphical administration tool, finds other (non-Windows) partitions or another hard disk during the installation, it creates mount points for each partition labeled datax (/data1, /data2,and so on).
File Description
/bin/bash The bash shell
/bin/cat Displaying files
/bin/cp Copying files
/bin/dd Copying files byte-wise
/bin/gzip Compressing files
/bin/mount Mounting file systems
/bin/rm Deleting files
/bin/vi vi editor
Copyright © 2010 Novell, Inc. Copying or distributing all or part of this manual is protected bya Creative Commons Attribution-Noncommercial-Share Alike 3.0 Unported license.
Version 170

Manage the Linux File System
Novell Training S
ervices (en) 15 April 2009
Device Files (/dev)
Each hardware component in the system (such as hard drive partitions, CD drives, printer, and mouse) is represented as a file in the /dev directory.
The hardware components are addressed via these files by writing to or reading from one of these files. Two kinds of device files are included:
Character-oriented device files (for devices working sequentially, such as printer, mouse, or tape drive)
Block-oriented device files (such as floppy disks and hard drives).
The connection to device drivers in the kernel is implemented via numbered channels, which correspond to the number of the device driver in question. These are referred to as major device numbers.
A driver might be responsible for several devices of the same type. To distinguish between these devices, the minor device number is used.
Instead of the size of the files, these two numbers are displayed (the files do not occupy any space on the hard drive anyway):
In this example, you want a long list of all SCSI and SATA hard drives in the /dev directory. You enter
ls -l /dev/sda*
The major device number 8 is listed for all files. This refers to the driver for SCSI hard drives.
The minor device numbers are 0, 1, and 2 (they run from 1 to 15 for SCSI hard drives).
Many device files are already available by default. Some of these, however, are never needed. If special device files are required for specific devices, you can generate these with the mknod command. The necessary parameters must be provided by the hardware manufacturer.
The null device /dev/null is also located in this directory. The null device is a special file that discards all data written to it (but reports that the write operation succeeded), and provides no data to any process that reads from it. Program output that would normally be sent to the screen can be redirected to this device (for example, using redirects). The redirected data will be deleted.
Copyright © 2010 Novell, Inc. Copying or distributing all or part of this manual is protected bya Creative Commons Attribution-Noncommercial-Share Alike 3.0 Unported license.
71Version 1

SUSE Linux Enterprise 11 Fundamentals / Manual
Novell Training S
ervices (en) 15 April 2009
The following are some important device files:
Table 3-2
Device Device File Description
Terminals /dev/console
/dev/tty1
The system console
The first virtual console, reachable with Ctrl+Alt+F1.
Serial ports /dev/ttyS0/dev/ttyS*
The first serial port.
Parallel ports /dev/lp0/dev/lp*
The first parallel port.
Floppy disk drives /dev/fd0/dev/fd*
The first floppy disk drive. If the drives are addressed via the device files fd0 and fd1, the kernel tries to recognize the floppy disk format itself.
IDE hard drives /dev/hda
/dev/hdc
/dev/hd*
The first IDE hard drive on the first IDE controller.
The first IDE hard drive on the second IDE controller.
To label the partitions, the device names are given numbers. Numbers 1 to 4 refer to the primary partitions, higher numbers to logical partitions. Example: /dev/hda1 is the first primary partition (1) on the first IDE hard drive (a).
The limit of the number of partitions for IDE drives is 63.
IDE CD-ROM drives /dev/hd* The drives are named in the same way as the IDE hard drives. This means that the CD-ROM drive /dev/hdd is the second drive on the second IDE controller.
SCSI hard drives /dev/sda
/dev/sda*
The first SCSI hard drive
With SCSI hard drives, the device names are given numbers to label the various partitions. For example, /dev/sda1 is the first primary partition on the first SCSI hard drive.
The limit of the number of partitions for SCSI/SATA drives is 15.
SATA hard drives /dev/sda
/dev/sda*
The first SATA hard drive
With SATA hard drives, the device names are given numbers to label the various partitions. For example, /dev/sda1 is the first primary partition on the first SATA hard drive.
SCSI CD-ROM drives /dev/scd0
/dev/scd*
The first SCSI CD-ROM drive.
Copyright © 2010 Novell, Inc. Copying or distributing all or part of this manual is protected bya Creative Commons Attribution-Noncommercial-Share Alike 3.0 Unported license.
Version 172

Manage the Linux File System
Novell Training S
ervices (en) 15 April 2009
Configuration Files (/etc)
Similar to C:\WINDOWS, this directory and its subdirectories contain system configuration files. Almost all these files are ASCII files, which can be processed with any editor.
Normal users can read nearly all of these files, but only root can edit them. According to the FHS, no executable programs can be located here.
However, the subdirectories contain many shell scripts. Some important configuration files are listed in the following table:
Table 3-3
Nearly every installed service has at least one configuration file in the /etc directory or a subdirectory.
User Directories (/home)
Every user on a Linux system has his own area in which to work with files (this is similar to the C:\Documents and Settings\<username> directory in Microsoft Windows). This area is called the home directory of the user. When a user logs in, he is in his own home directory.
File Description
/etc/SuSE-release Version number of the installed SUSE Linux Enterprise Server
/etc/inittab Configuration file for the init process
/etc/init.d/* Scripts for starting services
/etc/modprobe.conf Configuration file of the kernel modules
/etc/DIR_COLORS Specifies the colors for directory listings (ls)
/etc/X11/xorg.conf Configuration file of the X Window System
/etc/fstab Table of the file systems automatically mounted at the system start
/etc/profile Login script of the shell
/etc/passwd User database; all information except passwords
/etc/shadow Encrypted passwords of users
/etc/group Database of user groups
/etc/cups/* Files for the CUPS printing system
/etc/hosts Allocation of computer names to IP addresses
/etc/motd Welcome message after a user logs in (message of the day)
/etc/issue Linux welcome message before the login prompt
/etc/sysconfig/* Central configuration files of the system
Copyright © 2010 Novell, Inc. Copying or distributing all or part of this manual is protected bya Creative Commons Attribution-Noncommercial-Share Alike 3.0 Unported license.
73Version 1

SUSE Linux Enterprise 11 Fundamentals / Manual
Novell Training S
ervices (en) 15 April 2009
Individual configuration files can be found in the user's home directory. These configuration files are hidden files, because they are normally not displayed by the ls command. All of these files have names that begin with a dot.
The following are the most important files in a user's home directory:
Table 3-4
If there are no special settings, the home directories of all users are located beneath the /home directory. The home directory of a user can also be addressed via the shortcut “~”, so ~/.bashrc refers to the .bashrc file in the user's home directory.
In many cases, the /home directory is located on a different partition or can even be located on a different computer (with central administration of home directories).
Libraries (/lib)
Many programs use specific functions that are also used by other programs. Such standard functions are removed from the actual program, stored in the system, and only called up when the program runs. They are called shared libraries.
The /lib directory contains the libraries that are used by programs in the /bin and /sbin directories. The kernel modules (hardware drivers not compiled into the kernel) are located in the /lib/modules/ directory.
You can find additional libraries below the /usr directory.
Mount Point for Removable Media (/media/*)
All files accessible in a Linux system are arranged in one big tree, the file hierarchy, rooted at /. These files can be spread out over several devices. The mount command attaches a device’s file system to the big file tree.
SUSE Linux creates directories in the /media/ directory for mounting removable media when detecting media:
/media/floppy/ Created for a floppy disk drive.
/media/cdrom/ Created for a CD-Rom drive.
/media/cdrecorder/ Created for a CD burner.
/media/dvd/ Created for a DVD drive.
File Description
.profile Private login script of the user
.bashrc Configuration file for bash
.bash_history List of commands previously run in bash
Copyright © 2010 Novell, Inc. Copying or distributing all or part of this manual is protected bya Creative Commons Attribution-Noncommercial-Share Alike 3.0 Unported license.
Version 174

Manage the Linux File System
Novell Training S
ervices (en) 15 April 2009
/media/usbdisk/ Created for a USB stick. The mount point for USB sticks can be different. Examples: /media/usbdisk/, /media/disk/, /media/disk-1. If the USB stick has a label, that label will be used.
/media/media_name Created after inserting a labeled removable media.
Application Directory (/opt)
Installed programs can store their static files in the /opt directory. First, a directory with the name of the application is created. The files are then stored in that directory.
Examples include GNOME (/etc/gconf/*) and KDE (/opt/kde3).
Administrator’s Home Directory (/root)
The home directory of the system administrator is not located beneath /home as are the home directories of normal users. Preferably, it should be on the same partition as the root directory (/) so that it is protected from other users, whose home directories should be on a different partition. Only then is it guaranteed that the user named root can always log in without a problem and have his or her own configured environment available.
System Binaries (/sbin)
The /sbin directory contains important programs for system administration. By contrast, programs that are run by normal users are located in /bin.
Programs in the /sbin directory can also, as a rule, be run by normal users but only to display the configured values. Changes to the configuration can only be made by the user root.
The following is an overview of important files in the /sbin directory:
Table 3-5
File Description
/sbin/SuSEconfig Starts the SuSEconfig modules in the /sbin/conf.d/ directory.
/sbin/conf.d/* Contains the scripts from the SuSEconfig family that are called up by
/sbin/SuSEconfig.
They are used to configure the overall system, evaluate entries in the configuration files in the /etc/sysconfig/ directory, and write further configuration files.
/sbin/yast Administration tool for SUSE Linux Enterprise Server.
/sbin/fdisk Modifies partitions.
/sbin/fsck* Checks file systems (file system check).
/sbin/init Initializes the system.
Copyright © 2010 Novell, Inc. Copying or distributing all or part of this manual is protected bya Creative Commons Attribution-Noncommercial-Share Alike 3.0 Unported license.
75Version 1

SUSE Linux Enterprise 11 Fundamentals / Manual
Novell Training S
ervices (en) 15 April 2009
Data Directories for Services (/srv)
The /srv directory contains subdirectories designed for containing data of various services. For example, the files of the Apache web server are located in the /srv/www/ directory and the FTP server files are located in the /srv/ftp/ directory.
Temporary Area (/tmp)
Various programs create temporary files that are stored in the /tmp directory until they are deleted.
The Hierarchy Below /usr
The /usr directory, in accordance with the FHS, represents a second hierarchical layer (/usr stands for Unix Specific Resources or Unix System Resources).
This is the location for all application programs, graphical interface files, additional libraries, locally installed programs, and commonly shared directories containing documentation.
These include the following:
Table 3-6
Variable Files (/var)
This directory and its subdirectories contain files that will be modified while the system is running.
/sbin/mkfs* Creates a file system (formatting).
/sbin/shutdown Shuts down the system.
Directory Description
/usr/X11R6/ Files of the X Window System
/usr/bin/ Almost all executable programs
/usr/lib/ Libraries
/usr/local/ Locally installed programs, now frequently found in the /opt/ directory
/usr/sbin/ Programs for system administration
/usr/share/doc/ Documentation
/usr/share/man/ The manual pages (command descriptions)
/usr/src/ Source files of all programs and the kernel (if installed)
File Description
Copyright © 2010 Novell, Inc. Copying or distributing all or part of this manual is protected bya Creative Commons Attribution-Noncommercial-Share Alike 3.0 Unported license.
Version 176

Manage the Linux File System
Novell Training S
ervices (en) 15 April 2009
The following table provides an overview of the most important directories beneath /var:
Table 3-7
Windows Partitions (/windows)
If YaST finds any partitions with a Microsoft file system, it creates a /windows directory automatically. Inside this directory are subdirectories labeled with Windows drive characters (e.g., C, D).
Process Files (/proc)
Linux handles process information that is made available to users via the /proc directory. This directory does not contain any real files and, therefore, does not occupy any space on the hard disk.
/proc is generated dynamically when it is accessed (for example, withls /proc). Each process has its own directory. The values in these directories can be read as if they were in a file, like a “virtual” file. Some values can also be set by writing to the corresponding “files.” Changes to this virtual file system only have an effect as long as the system is running.
For example, the init process always has the process number “1”. Information about it is, therefore, found in the /proc/1/ directory. Each numbered directory corresponds to a running process.
You can view the contents of the files with the cat command, which shows the status of the process, as in the following example:
Directory Description
/var/lib/ Variable libraries (such as databases for the locate and rpm commands)
/var/log/ Log files for most services
/var/run/ Files with information on running processes
/var/spool/ Directory for queues (printers, e-mail)
/var/lock/ Lock files that are used to protect devices from multiple use
Copyright © 2010 Novell, Inc. Copying or distributing all or part of this manual is protected bya Creative Commons Attribution-Noncommercial-Share Alike 3.0 Unported license.
77Version 1

SUSE Linux Enterprise 11 Fundamentals / Manual
Novell Training S
ervices (en) 15 April 2009
In this example, a list is displayed of what the process is called (init), what state it is in (sleeping), and to which user it belongs (Uid: 0 for root).
In addition to directories for each individual process, /proc also includes directories and files containing information about the state of the system.
The following are the most important of these:
Table 3-8
System Information Directory (/sys)
The /sys directory provides information in the form of a tree structure on various hardware buses, hardware devices, active devices, and their drivers. Similar to the /proc directory, /sys is a virtual directory.
Mount Point for Temporarily Mounted File Systems (/mnt)
Unlike in Windows, where you can access file systems (partitions and devices) by simply going to My Computer, in the Linux world, you have to integrate or “mount” them before you can access them. You can mount files system anywhere, but the standard directory for mounting is /mnt. It should only be used for temporary purposes. For permanent mounts, you should create an appropriately named directory.
In the following example, the hard drive partition /dev/hda7 is mounted at the position /mnt in the directory tree using the mount command:
da2:~# mount /dev/hda7/mnt
File Description
/proc/cpuinfo Information about the processor
/proc/dma Use of the Direct Memory Access (DMA) ports
/proc/interrupts Use of the interrupt
/proc/ioports Use of the intrasystem I/O ports
/proc/filesystems File system formats that the kernel understands
/proc/modules Active modules
/proc/mounts Mounted file systems
/proc/net/* Network-specific information and statistics in human-readable form
/proc/partitions Existing partitions
/proc/bus/pci Existing PCI devices
/proc/bus/scsi/ Connected SCSI devices
/proc/sys/* System and kernel information
/proc/version Kernel version
Copyright © 2010 Novell, Inc. Copying or distributing all or part of this manual is protected bya Creative Commons Attribution-Noncommercial-Share Alike 3.0 Unported license.
Version 178

Manage the Linux File System
Novell Training S
ervices (en) 15 April 2009
All files on this partition can now be reached via the /mnt directory. To remove this partition again, you use the umount command:
da2:~# umount /mnt
If you do not include any options with the mount command, the program tries out several file system formats. If you want to specify a specific file system, use the option -t.
If the file system format is not supported by the kernel, the command is aborted and you receive an error message. In this case, you either load the appropriate module manually or you create a new initrd containing the module. Using an updated initrd is the preferred way.
Directories for Mounting Other File Systems
Other file systems such as other hard drive partitions, directories from other computers via the network, or removable media (floppy disk, CD-ROM, removable hard drive) can be mounted to the file system at any point.
A directory must exist at the point where you intend to mount the file system. This directory is referred to as the mount point. The complete directory structure of the mounted file system can be found beneath this directory.
In most cases, only the user root can mount and unmount directories. Removable media, such as floppy disks and CDs, can be mounted by a normal user.
To mount a file system, enter the mount command, specifying the device file and the directory to which the file system should be mounted.
A file system can be removed again with the umount command. (Note that the command is NOT called unmount, but umount.) The /etc/mtab file, which is updated by the command mount, shows which file systems are currently mounted. It is possible to mount one file system at different positions.
You can mount file systems in directories that are occupied. The existing contents of these directories, however, will no longer be accessible. After the file system is removed, the data becomes available again.
You can also share certain directories with many computers. This approach is often used for the home directories of users, which are then located centrally on one machine and exported to other computers in the network.
The following directories can be shared:
Table 3-9
Directory Description
/home Home directories
/opt Applications
/usr The hierarchy below /usr
Copyright © 2010 Novell, Inc. Copying or distributing all or part of this manual is protected bya Creative Commons Attribution-Noncommercial-Share Alike 3.0 Unported license.
79Version 1

SUSE Linux Enterprise 11 Fundamentals / Manual
Novell Training S
ervices (en) 15 April 2009
The following directories cannot be imported from other computers. They must always be present locally on each computer:
Table 3-10
Directory Description
/bin Important programs
/boot Kernel and boot files
/dev Device files
/etc Configuration files
/lib Libraries
/sbin Important programs for system administration
Copyright © 2010 Novell, Inc. Copying or distributing all or part of this manual is protected bya Creative Commons Attribution-Noncommercial-Share Alike 3.0 Unported license.
Version 180

Manage the Linux File System
Novell Training S
ervices (en) 15 April 2009
Exercise 3-1 Explore the SUSE Linux File System Hierarchy
In this exercise, you explore the SUSE file system hierarchy. You find out the mount point of the DVD and mount the DVD manually at another position (/mnt) in the file system.
You will find this exercise in the workbook.
(End of Exercise)
Copyright © 2010 Novell, Inc. Copying or distributing all or part of this manual is protected bya Creative Commons Attribution-Noncommercial-Share Alike 3.0 Unported license.
81Version 1

SUSE Linux Enterprise 11 Fundamentals / Manual
Novell Training S
ervices (en) 15 April 2009
Objective 2 Identify File Types in the Linux System
The Linux file system is distinct from the file systems of other operating systems because of the various file types.
In addition to using standard files (called normal files) and directories, Linux also uses other types of files that are UNIX-specific.
This objective discusses the file types and directories used in Linux:
“Normal Files” on page 82
“Two Special Directories (.) and (..)” on page 82
“Device Files” on page 82
“Links” on page 82
“Sockets” on page 83
“First In, First Out (FIFO)” on page 83
Normal Files
Normal files refer to files as they are also known in other operating systems: a set of contiguous data addressed with one name. This includes files such as ASCII text files, executable programs, and graphics files.
The names for such files can be freely chosen and there is no division into file name and file type (such as report.txt). A number of file names still retain this structure, but these are requirements of the corresponding applications, such as word processing programs or compilers.
Two Special Directories (.) and (..)
Each directory contains two directories that allow relative path specifications.
One of these entries (“.”) points to the directory itself. The other entry (“..”) points to the entry one level higher in the hierarchy.
Device Files
Each piece of hardware in a Linux system is represented by a device file. These files represent links between the hardware components or the device drivers in the kernel and the applications.
Every program that wants to access hardware must access it through the corresponding device file. The programs write to or read from a device file. The kernel then ensures that the data finds its way to the hardware or can be read from the file.
Links
Links are references to files located at other points in the file system. Data maintenance is simplified through the use of such links. Changes only need to be made to the original file. The changes are then automatically valid for all links. There
Copyright © 2010 Novell, Inc. Copying or distributing all or part of this manual is protected bya Creative Commons Attribution-Noncommercial-Share Alike 3.0 Unported license.
Version 182

Manage the Linux File System
Novell Training S
ervices (en) 15 April 2009
are two types of links: symbolic links and hard links. For more information, see “Link Files Using the CLI” on page 97 or “Link Files Using Nautilus” on page 100.
Sockets
A socket refers to a special file with which data exchange can be implemented through the file system between two locally running processes.
First In, First Out (FIFO)
FIFO (first in, first out) or named pipe is a term used for files used to exchange data between processes. However, the file can only exchange data in one direction.
Copyright © 2010 Novell, Inc. Copying or distributing all or part of this manual is protected bya Creative Commons Attribution-Noncommercial-Share Alike 3.0 Unported license.
83Version 1

SUSE Linux Enterprise 11 Fundamentals / Manual
Novell Training S
ervices (en) 15 April 2009
Objective 3 Manage Directories with CLI and Nautilus
This objective shows how to use and manage directories with the GNOME tools (Nautilus file browser and Nautilus search tool) as well as the Command Line Interface (CLI.)
Change Directories and List Directory Contents Using the CLI
The prompt of a shell terminal contains the current directory (such as geeko@da2:~). The tilde “~” indicates that you are in the user's home directory.
You can use the following commands to change the active directory and list the contents of a directory:
cd
ls
pwd
cd command
You can use the cd (change directory) command to change between directories. Some examples include the following:
Table 3-11
ls command
The ls (list short) command lists specified files. If a directory is included with ls, the directory's contents are displayed. Without an option, the contents of the current directory are listed.
The following are the most important options you can use with ls:
Table 3-12
Command Meaning
cd plan Change to the subdirectory plan
cd /etc Change directly to the /etc directory (absolute path)
cd Change from any directory to the home directory
cd .. Move one directory level higher
cd ../.. Move two directory levels higher
cd - Move to the last valid directory
Option Meaning
None Displays the contents of the current directory in several columns (file and directory names only).
Copyright © 2010 Novell, Inc. Copying or distributing all or part of this manual is protected bya Creative Commons Attribution-Noncommercial-Share Alike 3.0 Unported license.
Version 184

Manage the Linux File System
Novell Training S
ervices (en) 15 April 2009
Figure 3-4
pwd command
You can use the pwd (print working directory) command to display the path of the current directory. If you enter pwd with the -P option, pwd prints the physical directory without any symbolic links:
-a Also displays hidden files (such as .bashrc).
-F After each name, a character indicates the file type (“/” for directories, “*” for executable files, “|” for FIFO files, “@” symbolic link).
-l (“long list”) Gives a detailed list of all files. For each file name, information about permissions, modification time, and size is included.
-t Files are sorted by date of alteration. Combined with the -r option, the output takes place in reverse order (the newest file is displayed last).
-R Output is recursive, including all subdirectories.
-u Sorted by date of last access.
Option Meaning
Copyright © 2010 Novell, Inc. Copying or distributing all or part of this manual is protected bya Creative Commons Attribution-Noncommercial-Share Alike 3.0 Unported license.
85Version 1

SUSE Linux Enterprise 11 Fundamentals / Manual
Novell Training S
ervices (en) 15 April 2009
Table 3-13
Change Folders and List Folder Contents Using the Nautilus File Browser
GNOME’s Nautilus File Browser works much like Windows Explorer. To access the browser, go to Computer > More Applications > Browse > Nautilus.
To view the file system in the browser, simply click File System in the left panel under Places. You will see a listing of the folders (directories) at the root level, including root itself:
Figure 3-5
geeko@da2:~ > ls -l doc/
lrwxrwxrwx 1 geeko users 15 2004-02-12 08:43 doc -> /usr/share/doc/
geeko@da2:~ > cd doc/
geeko@da2:~ > pwd
/home/geeko/doc
geeko@da2:~ > pwd -P
/usr/share/doc
geeko@da2:~ >
Copyright © 2010 Novell, Inc. Copying or distributing all or part of this manual is protected bya Creative Commons Attribution-Noncommercial-Share Alike 3.0 Unported license.
Version 186

Manage the Linux File System
Novell Training S
ervices (en) 15 April 2009
To change folders, simply navigate the file system. You can also search the file system by file type or by location using the Nautilus Search Tool. Access it under Computer > Applications > More Applications > Browse.
To open a folder, double-click it.
Copyright © 2010 Novell, Inc. Copying or distributing all or part of this manual is protected bya Creative Commons Attribution-Noncommercial-Share Alike 3.0 Unported license.
87Version 1

SUSE Linux Enterprise 11 Fundamentals / Manual
Novell Training S
ervices (en) 15 April 2009
Exercise 3-2 Change Directories and List Directory Contents Using the CLI
In this exercise, you learn how to use the cd, pwd, and ls commands.
You will find this exercise in the workbook.
(End of Exercise)
Copyright © 2010 Novell, Inc. Copying or distributing all or part of this manual is protected bya Creative Commons Attribution-Noncommercial-Share Alike 3.0 Unported license.
Version 188

Manage the Linux File System
Novell Training S
ervices (en) 15 April 2009
Objective 4 Create and View Files
To create and view files, you need to understand how to do the following:
“Create a New File with touch” on page 89
“View a File with cat” on page 90
“View a File with less” on page 90
“View a File with head and tail” on page 91
“Create and View Files” on page 92
Create a New File with touch
You can use the touch command to change the time stamp of a file or to create a new file with a size of 0 bytes. The following are the most important options:
Table 3-14
This is an example of how you use the touch command:
1. To list a directory’s contents, enter
ls
The directory contains the following subdirectories and files: bin, Desktop, Documents, public_html
2. To create a file called example, enter
touch example
3. Then list the directory contents again by entering
ls
The directory contents should now display as follows: bin, Desktop, Documents, example, public_html. The example file has been added.
Command Description
-a Changes only the time of the last read access (access time).
-m Changes only the time of the last modification (modification time).
-r file Sets the time stamp of file instead of the current time.
-t time Instead of the current time, sets
time (structure: [[CC]YY]MMDDhhmm.[ss] ([Century]Year] Month Day Hour Minute [Seconds], two digits in each case)).
Copyright © 2010 Novell, Inc. Copying or distributing all or part of this manual is protected bya Creative Commons Attribution-Noncommercial-Share Alike 3.0 Unported license.
89Version 1

SUSE Linux Enterprise 11 Fundamentals / Manual
Novell Training S
ervices (en) 15 April 2009
View a File with cat
You can use the cat command (concatenate) to view the contents of a file. The command must include the filename of the file you want to see, as in the following example:
1. If you wanted to view the contents of the permissions.local file in the root directory /etc, you would enter
cat /etc/permissions.local
2. This is what the output would look like:
View a File with less
You can use the less command to display the contents of a file page by page. Even compressed files (such as .gz and .bz2) can be displayed. You can use the following keystrokes with less:
Table 3-15
Keystroke Description
Spacebar Move one screen down.
b Move one screen up.
Down arrow Move one line down.
Up arrow Move one line up.
/pattern Search for pattern forward from current cursor position.
?pattern Search for pattern backwards from current cursor position.
n Move to the next instance in the search for pattern.
N Move to the previous instance in the search for pattern.
q Quit.
Copyright © 2010 Novell, Inc. Copying or distributing all or part of this manual is protected bya Creative Commons Attribution-Noncommercial-Share Alike 3.0 Unported license.
Version 190

Manage the Linux File System
Novell Training S
ervices (en) 15 April 2009
View a File with head and tail
With the head command, you can view only the first few lines of a file. The tail command shows you only the last few lines of a file.
By default, these commands only show ten lines. To change this number, append with the -number or -n option. For example, to change the number of lines to 17, enter
head -n 17 or head -17
To change the number of lines shown at the end of the file to 17, enter
tail -n 17 or tail -17
When used with the tail command, the -f option displays a continuously updated view of the last lines of a file. If a line is added at the end of the file while tail -f is running, the line is displayed. This is a very useful feature for observing log files.
To exit tail -f, press Ctrl+c.
For example, if you wanted to view the first few lines of the SUSE Linux Enterprise Server 11 Release Notes in the /usr/share/doc directory, you would enter
head /usr/share/doc/release notes/SUSE_Linux_Enterprise_Server_11/RELEASE-NOTES.en.rtf
This is what the output would look like:
Copyright © 2010 Novell, Inc. Copying or distributing all or part of this manual is protected bya Creative Commons Attribution-Noncommercial-Share Alike 3.0 Unported license.
91Version 1

SUSE Linux Enterprise 11 Fundamentals / Manual
Novell Training S
ervices (en) 15 April 2009
Exercise 3-3 Create and View Files
In this exercise, you create an empty file and view the content of a file. You use the touch, cat, less, head, and tail commands.
You will find this exercise in the workbook.
(End of Exercise)
Copyright © 2010 Novell, Inc. Copying or distributing all or part of this manual is protected bya Creative Commons Attribution-Noncommercial-Share Alike 3.0 Unported license.
Version 192

Manage the Linux File System
Novell Training S
ervices (en) 15 April 2009
Objective 5 Work with Files and Directories
In this objective, you learn how to do the following to work with files:
“Copy and Move Files and Directories” on page 93
“Create Directories Using the CLI” on page 95
“Create Folders Using Nautilus” on page 96
“Delete Files and Directories Using the CLI” on page 97
“Link Files Using the CLI” on page 97
“Link Files Using Nautilus” on page 100
“Perform Multiple File Operations” on page 101
Copy and Move Files and Directories
To copy and move files and directories, you need to know how to do the following:
“Move Files with mv” on page 93
“Copy Files with cp” on page 93
Move Files with mv
You can use the mv command (move) to move one or more files to another directory, as in the following:
mv *.txt /tmp
You can also use the mv command to rename a file, as in the following:
mv recipe new_recipe
mv Options
The following are some important options you can use with mv:
Table 3-16
Copy Files with cp
You can copy files and directories (using the -r option) with the cp (copy) command. The syntax for using cp is
Option Description
-i Asks for confirmation before moving or renaming a file. This prevents existing files with the same name from being overwritten.
-u Only moves files that are newer than the target files of the same name.
Copyright © 2010 Novell, Inc. Copying or distributing all or part of this manual is protected bya Creative Commons Attribution-Noncommercial-Share Alike 3.0 Unported license.
93Version 1

SUSE Linux Enterprise 11 Fundamentals / Manual
Novell Training S
ervices (en) 15 April 2009
cp source destination
When using the cp command, you need to remember the following:
The cp command overwrites existing files without confirmation.
You can avoid automatic overwriting by using the -i option. This option requires confirmation before overwriting occurs.
If you want to copy just the contents of a directory (without the directory itself), the target directory must already exist. An example is making a backup copy of a directory using a different name.
Examples
For example, to copy the /tmp/quarterly-1/ directory (with all its subdirectories) to the /tmp/expenses/ directory (which already exists), you would enter the following:
cp -r /tmp/quarterly-1 /tmp/expenses
The result is a /tmp/expenses/quarterly-1/ directory.
To copy the contents of a directory called proposals/ (all the files contained in it, including hidden files and subdirectories) to the directory proposals_old/ (this must already exist), do the following:
1. First, list the contents of the /proposals directory, including the hidden files (-a switch). Enter
ls -a proposals
You might see output similar to this:
. .. .hidden quarterly-1 quarterly-2 quarterly-3 quarterly-4
2. Next, copy the contents of /proposals recursively (-r, meaning including all subdirectories) to the /proposals_old directory. Enter
cp -r proposals/ proposals_old
3. Then, list the contents (including hidden files) of the proposals_old directory. Enter
ls -a proposals_old
. .. .hidden quarterly-1 quarterly-2 quarterly-3 quarterly-4
Copyright © 2010 Novell, Inc. Copying or distributing all or part of this manual is protected bya Creative Commons Attribution-Noncommercial-Share Alike 3.0 Unported license.
Version 194

Manage the Linux File System
Novell Training S
ervices (en) 15 April 2009
cp Options
You can use the following options with cp:
Table 3-17
Create Directories Using the CLI
You can use the mkdir command (make directory) to create new directories (such as mkdir proposal). The option -p lets you create a complete path, as in the following:
mkdir -p proposal/january
Option Description
-a, --archive Copies a directory and subdirectories (compare -R); symbolic links, file permissions, owners, and time stamps are not changed.
--help Displays the options of cp.
-i, --interactive Asks before overwriting.
-R, -r, --recursive Copies directories recursively (the directory and any subdirectories).
-s, --symbolic-link Makes symbolic links instead of copying
-l, --link Links files instead of copying them.
-u, --update Copies a file only when the source file is newer than the destination file or when the destination file is missing.
Copyright © 2010 Novell, Inc. Copying or distributing all or part of this manual is protected bya Creative Commons Attribution-Noncommercial-Share Alike 3.0 Unported license.
95Version 1

SUSE Linux Enterprise 11 Fundamentals / Manual
Novell Training S
ervices (en) 15 April 2009
Create Folders Using Nautilus
1. Right-click on the desktop or in any folder in Nautilus.
The following dialog appears:
Figure 3-6
2. Select Create Folder.
3. Name the folder.
4. Click OK.
Copyright © 2010 Novell, Inc. Copying or distributing all or part of this manual is protected bya Creative Commons Attribution-Noncommercial-Share Alike 3.0 Unported license.
Version 196

Manage the Linux File System
Novell Training S
ervices (en) 15 April 2009
Delete Files and Directories Using the CLI
In this section, you learn how to do the following:
“Delete Empty Directories with rmdir” on page 97
“Delete Files and Directories with rm” on page 97
Delete Empty Directories with rmdir
You can use the rmdir (remove directory) command to remove the indicated directory or directories (for example, rmdir proposal). The directory or directories must be empty before you can delete them.
Delete Files and Directories with rm
You can use the rm command (remove) to delete files, as in the following:
rm part*
This example deletes all files in the current directory that begin with part without asking for confirmation. If the user does not have sufficient permissions to delete a file, that file is ignored and an error message is printed.
NOTE: Files deleted with the rm command cannot be restored.
The following are some important options you can use with rm:
Table 3-18
Link Files Using the CLI
File system formats in Linux keep data and administration information separate. How data is organized differs from one file system format to another.
Each file is described by an inode (index node or information node). To see the inode number, you can enter ls -i.
Each of these inodes has a size of 128 bytes and contains all the information about this file apart from the filename. This includes information such as details of the owner, access permissions, the size, various time details (time of modification, time of access, time of modification of the inode), and the links to the data blocks of this file.
Option Description
-i Asks for confirmation before deleting.
-r (recursively) Allows full directories to be deleted.
-f (force) By default, rm asks for confirmation if the file that should be deleted is read-only. Using this option, the files are deleted without asking for confirmation.
Copyright © 2010 Novell, Inc. Copying or distributing all or part of this manual is protected bya Creative Commons Attribution-Noncommercial-Share Alike 3.0 Unported license.
97Version 1

SUSE Linux Enterprise 11 Fundamentals / Manual
Novell Training S
ervices (en) 15 April 2009
The ln command creates a link. A link is a reference to a file. Through a link, you can access a file from anywhere in the file system using different names for it. This means that the file itself exists only once on the system, but it can be found under different names.
Linux recognizes two kinds of links:
Hard links
A hard link is a directory reference, or pointer, to a file on a storage volume. The name associated with the file is a label stored in a directory structure that refers the operating system to the file data. As such, more than one name can be associated with the same file. When accessed through different names, any changes made will affect the same file data.
Symbolic links
A symbolic link contains a text string that is interpreted and followed by the operating system as a path to another file or directory. It is a file on its own and can exist independently of its target. If a symbolic link is deleted, its target remains unaffected. If the target is moved, renamed or deleted, any symbolic link that used to point to it continues to exist but now points to a non-existing file.
You create a hard link by using the ln command, which points to the inode of an already existing file. Thereafter, the file can be accessed under both names–that of the file and that of the link, and you can no longer discern which name existed first or how the original file and the link differ.
The following is an example of using the ln command:
Table 3-19
Hard links can only be used when both the file and the link are in the same file system (on the same partition), because inode numbers are only unique within the same file system.
geeko@da2:~/sell > ls -li
total 4
88658 -rw-r--r-- 1 geeko users 82 2004-04-06 14:21 old
geeko@da2:~/sell > ln old new
geeko@da2:~/sell > ls -li
total 8
88658 -rw-r--r-- 2 geeko users 82 2004-04-06 14:21 old
88658 -rw-r--r-- 2 geeko users 82 2004-04-06 14:21 new
geeko@da2:~/sell >
Copyright © 2010 Novell, Inc. Copying or distributing all or part of this manual is protected bya Creative Commons Attribution-Noncommercial-Share Alike 3.0 Unported license.
Version 198

Manage the Linux File System
Novell Training S
ervices (en) 15 April 2009
You can create a symbolic link with the ln command and the -s option. A symbolic link is assigned its own inode—the link refers to a file, so a distinction can always be made between the link and the actual file.
The following is an example of creating a symbolic link:
Table 3-20
With symbolic links, the limits of the file system can be overcome, because the name of the object is shown, not the object itself. The disadvantage is that a symbolic link can point to a non-existing object if the object and its corresponding name no longer exist. Another advantage of symbolic links is that you can create links to directories.
If you erase the old file in the above example, new will point to a non-existing file. You cannot see in the ls output that the link is broken:
Table 3-21
Finding Links Using the find Command
For example, to find all files that have a link count of 3, enter
find / -links 3 -type f
To find all files which are hard links to the /etc/localtime file, enter
find / -samefile /etc/localtime
geeko@da2:~/sell > ls -li
total 4
88658 -rw-r--r-- 1 geeko users 82 2004-04-06 14:21 old
geeko@da2:~/sell > ln -s old new
geeko@da2:~/sell > ls -li
total 4
88658 -rw-r--r-- 1 geeko users 82 2004-04-06 14:21 old
88657 lrwxrwxrwx 1 geeko users 3 2004-04-06 14:27 new -> old
geeko@da2:~/sell >
geeko@da2:~/sell > rm old
geeko@da2:~/sell > ls -li
total 0
88657 lrwxrwxrwx 1 geeko users 3 2004-04-06 14:27 new -> old
geeko@da2:~/sell >
Copyright © 2010 Novell, Inc. Copying or distributing all or part of this manual is protected bya Creative Commons Attribution-Noncommercial-Share Alike 3.0 Unported license.
99Version 1

SUSE Linux Enterprise 11 Fundamentals / Manual
Novell Training S
ervices (en) 15 April 2009
Link Files Using Nautilus
You can also create links using the GUI. These are symbolic links and compare to shortcuts in a Windows environment.
To create a link, do the following:
1. In the Nautilus file browser, right-click a folder.
2. Select Make Link in the following dialog:
Figure 3-7
This action will create a symbolic link for the selected item.
3. Copy the link to the desktop or to another folder.
Copyright © 2010 Novell, Inc. Copying or distributing all or part of this manual is protected bya Creative Commons Attribution-Noncommercial-Share Alike 3.0 Unported license.
Version 1100

Manage the Linux File System
Novell Training S
ervices (en) 15 April 2009
Exercise 3-4 Perform Multiple File Operations
In this exercise, you
Copy and move files with the cp and mv commands.
Create directories with the mkdir command.
Delete files and directories with the rmdir and rm commands.
Create a symbolic link and a hard link with the ln command.
You will find this exercise in the workbook.
(End of Exercise)
Copyright © 2010 Novell, Inc. Copying or distributing all or part of this manual is protected bya Creative Commons Attribution-Noncommercial-Share Alike 3.0 Unported license.
101Version 1

SUSE Linux Enterprise 11 Fundamentals / Manual
Novell Training S
ervices (en) 15 April 2009
Objective 6 Find Files on Linux
In this section you learn how to find files and programs.
If the name of the file is not completely known, you can use the two wildcards “?” (for any character) and “* “(for none, one, or several characters).
File names are case sensitive in Linux. As a result, the file names “file1”, “File1”, and “FILE1” refer to 3 different files. Suppose the following files exist:
File
file
File1
File1a
File1b
File2
File2a
MyFile
The following table shows the results of three different search strings:
Table 3-22
Search String Files Found
File? File1
File2
File* File
File1
File1a
File1b
File2
File2a
?ile* File
file
File1
File1a
File1b
File2
File2a
Copyright © 2010 Novell, Inc. Copying or distributing all or part of this manual is protected bya Creative Commons Attribution-Noncommercial-Share Alike 3.0 Unported license.
Version 1102

Manage the Linux File System
Novell Training S
ervices (en) 15 April 2009
The following tools and commands are introduced:
“Use Graphical Search Tools” on page 103
“Use the find Command” on page 104
“Use the locate Command” on page 106
“Use the whereis Command” on page 107
“Use the which Command” on page 108
“Use the type Command” on page 109
“Find Files on Linux” on page 110
Use Graphical Search Tools
Sometimes you need to find a file so you can edit it, but you do not know exactly where it is located in the file system. You might know the name of this file or only a part of the name.
At another time, you might need a list of all files that have been modified in the last two days or that exceed a certain size.
If you enter search in the application browser, two applications are found:
Nautilus Search Tool (Browse application group). The Nautilus file manager is used for searching files. This tool allows you to search for file names only.
GNOME Search Tool (System application group). This tool allows you to search for information such as file size, date, or file owner.
After selecting the GNOME Search tool from the application browser, the following dialog appears:
1. In the Name contains field, enter a part of the filename you want to find.
Copyright © 2010 Novell, Inc. Copying or distributing all or part of this manual is protected bya Creative Commons Attribution-Noncommercial-Share Alike 3.0 Unported license.
103Version 1

SUSE Linux Enterprise 11 Fundamentals / Manual
Novell Training S
ervices (en) 15 April 2009
2. In the Look in Folder field, enter the directory you want to search.
3. Select Find to start the search process.
All matching files and directories are shown in the lower window with details regarding their locations.
You can configure other settings by opening the menu under Select More Options. Select a search rule from the Available Options pull-down menu.
After selecting Add, a new text field is added, allowing you to enter the information the option needs. To remove a search rule, select Remove next to the rule.
Figure 3-8
Use the find Command
To search for files on the command line, you can use the find command. The following is the syntax for the find command:
find path criterion action
The find command has a multitude of options, a few of which are explained here. You can use the following arguments with the command:
path. The section of the file system to search (the specified directory and all its subdirectories). If nothing is specified, the file system below the current directory is used.
criterion. The properties the file should have (refer to the following):
Copyright © 2010 Novell, Inc. Copying or distributing all or part of this manual is protected bya Creative Commons Attribution-Noncommercial-Share Alike 3.0 Unported license.
Version 1104

Manage the Linux File System
Novell Training S
ervices (en) 15 April 2009
Table 3-23
action: Options that influence the following conditions or control the search as a whole, such as the following:
-print (default)
-exec command
With the -exec option, you can call up another command. This option is frequently used to link find and grep, as in the following:
Table 3-24
In this example, the find command searches for files whose names begin with the word “letter”, and then passes the names of the files found with -exec to the following command (in this case, grep appointment {}).
Option Description
-ctime [+/-]days Searches for files whose last change took place no later than (no earlier than) a specified number of days ago.
-gid number Searches for files with the numeric GID (Group ID) number.
-group name Searches for files that are owned by the group name. Instead of a name, the numeric GID is allowed.
-name pattern Searches for files whose names contain the given pattern. If the pattern contains meta characters or wild cards, the name must be enclosed by quotation marks. Otherwise the name will be interpreted by the shell and not by find.
-newer file Searches for files that were modified more recently than file.
-size [+/-]size Matches files that are above or below a certain size. The size (in blocks of 512 bytes) is given as an argument. The suffix “c“switches to byte and “k” to blocks of 1024 bytes. A preceding “+” stands for all larger files and a “-” for all smaller files.
-type file_type Searches for a file type. A file type can be one of the following: “d” for a directory, “f” for a file, or “l” for a symbolic link.
-uid number Searches for files with the numeric UID (User ID) number.
-user name Searches for files, which are owned by user name. Instead of a name, the numeric UID is allowed.
geeko@da2:~ > find ~ -name “letter*” -type f -exec grep appointment {} \;
appointment for next meeting: 23.08.
/home/geeko/letters/letter_Smith
geeko@da2:~ >
Copyright © 2010 Novell, Inc. Copying or distributing all or part of this manual is protected bya Creative Commons Attribution-Noncommercial-Share Alike 3.0 Unported license.
105Version 1

SUSE Linux Enterprise 11 Fundamentals / Manual
Novell Training S
ervices (en) 15 April 2009
The two brackets {} stand as placeholders for the filenames which are found and passed to the grep command. The semicolon closes the -exec instruction. Because this is a special character, it is masked by placing a backslash in front of it.
When grep is used alone, it searches for a specific expression in a file whose exact position in the file system is known. If you don’t know the exact file name, you can use grep -n to get just the name of a file in a subdirectory. When used in combination with find, the search is for a file that contains a certain expression, but whose location is unknown.
Use the locate Command
The locate command is an alternative to find -name (the package findutils-locate must be installed). The find command must search through the selected part of the file system, a process that can be quite slow.
On the other hand, locate searches through a database previously created for this purpose (/var/lib/locatedb), making it much faster.
The database is automatically created and updated daily by SUSE Linux Enterprise. But changes made after the update has been performed are not taken into account by locate, unless the database is updated manually using the updatedb command.
The following example shows the output of locate:
Table 3-25
The following example shows that a search with locate returns all files whose names contain the search string:
geeko@da2:~ > locate letter_Miller
/home/geeko/letters/letter_Miller
Copyright © 2010 Novell, Inc. Copying or distributing all or part of this manual is protected bya Creative Commons Attribution-Noncommercial-Share Alike 3.0 Unported license.
Version 1106

Manage the Linux File System
Novell Training S
ervices (en) 15 April 2009
Table 3-26
NOTE: To learn more about locate, enter man locate.
Use the whereis Command
The whereis command returns the binaries (option -b), manual pages (option -m), and the source code (option -s) of the specified command.
If no option is used, all this information is returned, provided the information is available. This command is faster than find, but it is less thorough.
The following is an example of using whereis:
geeko@da2:~ > locate umount
/bin/umount
/lib/klibc/bin/umount
/opt/kde3/share/icons/crystalsvg/scalable/devices/3floppy_umount.svgz
/opt/kde3/share/icons/crystalsvg/scalable/devices/5floppy_umount.svgz
/opt/kde3/share/icons/crystalsvg/scalable/devices/camera_umount.svgz
/opt/kde3/share/icons/crystalsvg/scalable/devices/cdaudio_umount.svgz
/opt/kde3/share/icons/crystalsvg/scalable/devices/cdrom_umount.svgz
geeko@da2:~ >
Copyright © 2010 Novell, Inc. Copying or distributing all or part of this manual is protected bya Creative Commons Attribution-Noncommercial-Share Alike 3.0 Unported license.
107Version 1

SUSE Linux Enterprise 11 Fundamentals / Manual
Novell Training S
ervices (en) 15 April 2009
Table 3-27
NOTE: For more information about whereis, enter man whereis.
Use the which Command
The which command searches all paths listed in the variable PATH for the specified command and returns the full path of the command. In the variable PATH, the most important directories are listed where the shell looks for executable files.
NOTE: To see the content of a variable, use the echo command and add a “$” in front of the variable’s name. To see the content of the variable PATH, enter echo $PATH.
The which command is especially useful if several versions of a command exist in different directories and you want to know which version is executed when entered without specifying a path.
The following is an example of using the which command:
geeko@da2:~ > whereis grep
grep: /bin/grep /usr/bin/grep
/usr/share/man/man1/grep.1.gz
/usr/share/man/man1p/grep.1p.gz
geeko@da2:~ > whereis -b grep
grep: /bin/grep /usr/bin/grep
geeko@da2:~ > whereis -m grep
grep: /usr/share/man/man1/grep.1.gz
/usr/share/man/man1p/grep.1p.gz
geeko@da2:~ > whereis -s grep
grep:
geeko@da2:~ >
Copyright © 2010 Novell, Inc. Copying or distributing all or part of this manual is protected bya Creative Commons Attribution-Noncommercial-Share Alike 3.0 Unported license.
Version 1108

Manage the Linux File System
Novell Training S
ervices (en) 15 April 2009
Table 3-28
NOTE: For more information on which, enter man which.
Use the type Command
The type command shows what kind of command is executed when you enter it:
a shell built-in command (an essential command that is hardcoded in the shell), for example “type” or “cd”
an external command (called by the shell)
an alias, for example “ls”
An alias defines shortcuts and synonyms for commonly used shell commands.
a function
The -a option delivers all instances of a command bearing this name in the file system.
The following is an example of using the type command:
Table 3-29
geeko@da2:~ > which find
/usr/bin/find
geeko@da2:~ > which cp
/bin/cp
geeko@da2:~ > which grep
/usr/bin/grep
geeko@da2:~ >
geeko@da2:~ > type type
type is a shell built in
geeko@da2:~ > type grep
grep is /usr/bin/grep
geeko@da2:~ > type -a grep
grep is /usr/bin/grep
grep is /bin/grep
geeko@da2:~ >
Copyright © 2010 Novell, Inc. Copying or distributing all or part of this manual is protected bya Creative Commons Attribution-Noncommercial-Share Alike 3.0 Unported license.
109Version 1

SUSE Linux Enterprise 11 Fundamentals / Manual
Novell Training S
ervices (en) 15 April 2009
Exercise 3-5 Find Files on Linux
In this exercise, you learn how to find files with the whereis, which, and find commands, and the GNOME search tool.
You will find this exercise in the workbook.
(End of Exercise)
Copyright © 2010 Novell, Inc. Copying or distributing all or part of this manual is protected bya Creative Commons Attribution-Noncommercial-Share Alike 3.0 Unported license.
Version 1110

Manage the Linux File System
Novell Training S
ervices (en) 15 April 2009
Objective 7 Search File Content
Suppose you have dozens of text files and you need to find all files that include a particular word, phrase, or item. To scan these files without opening them in an editor, you need to know how to do the following:
“Use the grep Command” on page 111
“Use Regular Expressions” on page 112
“Search File Content” on page 115
Use the grep Command
The grep command and its variant egrep are used to search files for certain patterns using the syntax grep search_pattern filename. The command searches filename for all text that matches search_pattern, and prints the lines that contains the pattern.
You can also specify several files, in which case the output will not only print the matching line, but also the corresponding file names.
Several options are available to specify that only the line number should be printed, for instance, or that the matching line should be printed together with leading and trailing context lines.
You can specify search patterns in the form of regular expressions, although the basic grep command is limited in this regard. To search for more complex patterns, use the egrep command (or grep -E) instead, which accepts extended regular expressions.
As a simple way to deal with the difference between the two commands, make sure you use egrep in all of your shell scripts.
The regular expressions used with egrep need to comply with the standard syntax of regular expressions. You can read details about this topic in the manual page of grep.
To avoid having special characters in search patterns interpreted by the shell, enclose the pattern in quotation marks.
The following is an example of using egrep and grep:
Table 3-30
geeko@da2:~> egrep (b|B)lurb file*
bash: syntax error near unexpected token `|'
geeko@da2:~> grep "(b|B)lurb" file*
geeko@da2:~> egrep "(b|B)lurb" file*
file1:blurb
filei2:Blurb
Copyright © 2010 Novell, Inc. Copying or distributing all or part of this manual is protected bya Creative Commons Attribution-Noncommercial-Share Alike 3.0 Unported license.
111Version 1

SUSE Linux Enterprise 11 Fundamentals / Manual
Novell Training S
ervices (en) 15 April 2009
The following are options you can use with the grep command:
Table 3-31
Use Regular Expressions
Regular expressions are strings consisting of meta characters and regular characters and numerals (also known as “literals”). In the context of regular expressions, metacharacters are those characters that do not represent themselves but have special meanings. They can act as placeholders for other characters or can be used to indicate a position in a string.
Many commands (such as egrep) rely on regular expressions for pattern matching. It is important to remember, however, that some meta characters used by the shell for filename expansion have a meaning different from the one discussed here.
To learn more about the structure of regular expressions, read the corresponding manual page with man 7 regex.
The following table presents the most important metacharacters and their meanings:
Table 3-32
Option Description
-i Ignores case.
-l Shows only the names of files that contain the search string.
-r Searches entire directory trees recursively.
-v Gives all lines that do not contain the search string.
-n Shows the line numbers.
-h Shows no file names.
Character Meaning Example
^ Beginning of the line ^The: The is matched if at the beginning of the line
$ End of the line eighty$: eighty is matched if at the end of line
\< Beginning of the word \<thing\>:matches the whole word thing
\> End of the word \<thing\>:matches the whole word thing
[abc] One character from the set
[abc]: matches any one of “a”, “b”, or “c”
[0-9] Any one from the specified range
[0-9]: matches any one number from “0” to “9”
[-:+]: any one of ”-”, “:” and “+”
[^xyz] None of the characters
[^xyz]: “x”, “y”, and “z” are not matched
. Any single character file.: matches file1 and file2, but not file10
Copyright © 2010 Novell, Inc. Copying or distributing all or part of this manual is protected bya Creative Commons Attribution-Noncommercial-Share Alike 3.0 Unported license.
Version 1112

Manage the Linux File System
Novell Training S
ervices (en) 15 April 2009
Search for File Content Using the GNOME File Search
You can search for file content using the Select more options dialog of the GNOME Search Tool:
1. Click Computer > Applications > More Applications > System.
2. Select the GNOME Search Tool.
+ One or more of the preceding expression
[0-9]+: matches any number
* Any number (including none) of preceding single character
file.*: matches file, file2, and file10
{min,max} The preceding expression min times at minimum and max times at maximum
[0-9]{1,5}: matches any one-digit to five-digit number
| The expression before or after
file|File: matches file and File
(...) Enclose alternatives for grouping with others
(f|F)ile: matches file and File
\? Zero or one of the preceding
file1\?2: matches both file2 and file12
\ Escape the following character to remove its special meaning
www\.novell\.com: matches www.novell.com, literally (with the dot not being treated as a metacharacter); this is also necessary for parentheses, e.g., matching a parenthetical pattern would require the expression \([a-zA-Z]+\)
Character Meaning Example
Copyright © 2010 Novell, Inc. Copying or distributing all or part of this manual is protected bya Creative Commons Attribution-Noncommercial-Share Alike 3.0 Unported license.
113Version 1

SUSE Linux Enterprise 11 Fundamentals / Manual
Novell Training S
ervices (en) 15 April 2009
3. Click Select more options. The following dialog appears:
Figure 3-9
4. In the Contains the text box, type the text you want to search for.
5. Click Find.
Copyright © 2010 Novell, Inc. Copying or distributing all or part of this manual is protected bya Creative Commons Attribution-Noncommercial-Share Alike 3.0 Unported license.
Version 1114

Manage the Linux File System
Novell Training S
ervices (en) 15 April 2009
Exercise 3-6 Search File Content
In this exercise, you learn how to find a special character combination in a file with the grep and egrep command.
You will find this exercise in the workbook.
(End of Exercise)
Copyright © 2010 Novell, Inc. Copying or distributing all or part of this manual is protected bya Creative Commons Attribution-Noncommercial-Share Alike 3.0 Unported license.
115Version 1

SUSE Linux Enterprise 11 Fundamentals / Manual
Novell Training S
ervices (en) 15 April 2009
Objective 8 Perform Other File Operations with Nautilus
In addition to manipulating files and folders, the Nautilus File Browser allows you to perform other operations, such as
“Set File Manager Preferences” on page 116
“Create CDs of Your Data” on page 117
“Use Bookmarks” on page 118
“Share Folders” on page 118
“Archive Folders” on page 119
“Manage Folders with Nautilus” on page 120
Set File Manager Preferences
You can access the file preferences dialog from within Nautilus by clicking Edit > Preferences. The following dialog appears:
Figure 3-10
From here, you can specify a number of settings: whether you want files as icons or lists, whether or not to ask before running executable text files, how to display icons, how to configure list columns, how to configure previews, how to handle media and connected devices, and more.
Copyright © 2010 Novell, Inc. Copying or distributing all or part of this manual is protected bya Creative Commons Attribution-Noncommercial-Share Alike 3.0 Unported license.
Version 1116

Manage the Linux File System
Novell Training S
ervices (en) 15 April 2009
Create CDs of Your Data
Nautilus makes it easy to burn CDs and DVDs on your CD or DVD read/write drive:
1. Click Computer > More Applications > Audio & Video.
2. Click Gnome CD/DVD Creator.
3. Drag and drop the files you want to put on the CD or DVD into the Nautilus CD/DVD Creator window.
Figure 3-11
4. Click Write to Disk.
The files are now written to the CD or DVD.
Copyright © 2010 Novell, Inc. Copying or distributing all or part of this manual is protected bya Creative Commons Attribution-Noncommercial-Share Alike 3.0 Unported license.
117Version 1

SUSE Linux Enterprise 11 Fundamentals / Manual
Novell Training S
ervices (en) 15 April 2009
Use Bookmarks
Bookmarks, similar to those used in a browser, can be used to mark your favorite folders.
1. Select the folder or item you want to create a bookmark for.
2. Click Bookmarks > Add Bookmark.
The bookmark is added to the Bookmarks menu as well as the Places menu on the left side of the file browser, with the folder name as the bookmark name.
NOTE: When you bookmark a file, it is the folder that contains the file that is actually bookmarked.
Figure 3-12
Share Folders
You can share folders with other users and groups, provided those users and groups have the appropriate permissions to that folder.
NOTE: By default, sharing options in the Nautilus file browser are disabled. To enable sharing, you need an Active Directory Domain to connect to or you need to configure a Samba server.
Copyright © 2010 Novell, Inc. Copying or distributing all or part of this manual is protected bya Creative Commons Attribution-Noncommercial-Share Alike 3.0 Unported license.
Version 1118

Manage the Linux File System
Novell Training S
ervices (en) 15 April 2009
To share a folder, do the following:
1. Right-click the folder you want to share and select Sharing Options.
Figure 3-13
2. Click Create Share.
Archive Folders
You can compress files you want to archive into a tape archive (TAR) format. To archive a folder:
1. Right-click the folder you want to archive and select Create Archive.
Figure 3-14
2. If necessary, rename the archive file.
3. Specify the location of the archive file.
4. Click Create.
Copyright © 2010 Novell, Inc. Copying or distributing all or part of this manual is protected bya Creative Commons Attribution-Noncommercial-Share Alike 3.0 Unported license.
119Version 1

SUSE Linux Enterprise 11 Fundamentals / Manual
Novell Training S
ervices (en) 15 April 2009
Exercise 3-7 Manage Folders with Nautilus
In this exercise, you learn how to edit folder preferences, create a bookmark, and archive a folder.
You will find this exercise in the workbook.
(End of Exercise)
Copyright © 2010 Novell, Inc. Copying or distributing all or part of this manual is protected bya Creative Commons Attribution-Noncommercial-Share Alike 3.0 Unported license.
Version 1120

Manage the Linux File System
Novell Training S
ervices (en) 15 April 2009
Summary
Objective Summary
1. Understand the File System Hierarchy Standard (FHS)
The Linux file system is hierarchical and can be shown in the form of a tree. This tree is not limited to a local partition, but can stretch over several partitions, which can be located on different computers in a network.
The separation character between individual directory names is the slash (“/”). The path can be specified
As a relative path
As an absolute path
The structure of the file system is described in the File system Hierarchy Standard (FHS).
2. Identify File Types in the Linux System
The six file types in Linux include the following:
Normal files
Directories
Links
Device files
Sockets
FIFOs
3. Manage Directories with CLI and Nautilus
The current directory is shown in the prompt of a shell terminal: geeko@da2:~.
The tilde “~” shows that you are in the user's home directory.
With cd (change directory), change between directories.
The pwd command (print working directory) shows the path of the current directory. The pwd command, combined with the -P option, prints the physical directory without any symbolic links.
The ls command (list) lists the specified files. If a directory is specified, its contents are displayed. Without an option, the contents of the current directory are shown.
4. Create and View Files With touch, change the time stamp of a file or create a new file with a size of 0 bytes.
With the cat command, the contents of the file can be displayed. The command needs the filename of the file you want to see.
The less command displays the contents of a file page by page. Even compressed files (.gz, .bz2 ...) can be displayed.
Copyright © 2010 Novell, Inc. Copying or distributing all or part of this manual is protected bya Creative Commons Attribution-Noncommercial-Share Alike 3.0 Unported license.
121Version 1

SUSE Linux Enterprise 11 Fundamentals / Manual
Novell Training S
ervices (en) 15 April 2009
4. Create and View Files (continued) With head you can view only the first few lines. The opposite is the tail command, which shows you only the last few lines of a file.
By default ten lines are shown by the two commands. To change this number, just append the option -number. With the -f option, tail appends data to the output as the file grows.
5. Work with Files and Directories mv (move) moves one or more files to another directory or renames a file.
Copying files and directories (with the option -r) is done with the cp command (copy): cp source destination. Existing files are overwritten without confirmation.
With mkdir (make directory), create new directories. The -p option allows you to create a complete path.
With rmdir (remove directory), the directory or directories given are deleted.
The directory or directories must be empty.
The rm command (remove) is used to delete files.
With the -i option, you are asked for confirmation before deleting.
5. Work with Files and Directories (continued)
The -r option allows non-empty directories to be deleted.
Files that are deleted with this command cannot be restored.
A link is a reference to a file.
Hard links can only be used when both the file and the link are in the same file system, because the inode numbers of link and target are identical.
A symbolic link is assigned its own inode—the link refers to a file, so a distinction can always be made between the link and the actual file.
A symbolic link can be made with the -s option.
6. Find Files on Linux The Nautilus program can be used to find files with specific features.
To search for files at the command line, use the following commands:
find
locate
updatedb
whereis
which
type
Objective Summary
Copyright © 2010 Novell, Inc. Copying or distributing all or part of this manual is protected bya Creative Commons Attribution-Noncommercial-Share Alike 3.0 Unported license.
Version 1122

Manage the Linux File System
Novell Training S
ervices (en) 15 April 2009
7. Search File Content The grep command and its variant egrep are used to search files for certain patterns.
The command prints lines that contain the given search pattern. It is also possible to specify several files, in which case the output will not only print the matching line, but also the corresponding filenames.
Search patterns can be supplied in the form of regular expressions. Regular expressions are strings consisting of meta characters and literals. Meta characters do not represent themselves but have special meanings
8. Perform Other File Operations with Nautilus
The Nautilus file browser allows you to manage files and folders in a graphical user interface. You can perform most operations you would at the command line, such as
Set file manager preferences
Create CDs and DVDs
Use Bookmarks
Share folders
Archive folders
Objective Summary
Copyright © 2010 Novell, Inc. Copying or distributing all or part of this manual is protected bya Creative Commons Attribution-Noncommercial-Share Alike 3.0 Unported license.
123Version 1

SUSE Linux Enterprise 11 Fundamentals / Manual
Novell Training S
ervices (en) 15 April 2009
Copyright © 2010 Novell, Inc. Copying or distributing all or part of this manual is protected bya Creative Commons Attribution-Noncommercial-Share Alike 3.0 Unported license.
Version 1124

Work with the Linux Shell and Command Line Interface (CLI)
Novell Training S
ervices (en) 15 April 2009
S E C T I O N 4 Work with the Linux Shell and Command Line Interface (CLI)
In this section, you learn about the basic features of the bash shell. In addition, you are introduced to some important administration commands.
Objectives
1. “Get to Know the Command Shells” on page 126
2. “Execute Commands at the Command Line” on page 129
3. “Work with Variables and Aliases” on page 131
4. “Understand Command Syntax and Special Characters” on page 135
5. “Use Piping and Redirection” on page 140
Copyright © 2010 Novell, Inc. Copying or distributing all or part of this manual is protected bya Creative Commons Attribution-Noncommercial-Share Alike 3.0 Unported license.
125Version 1

SUSE Linux Enterprise 11 Fundamentals / Manual
Novell Training S
ervices (en) 15 April 2009
Objective 1 Get to Know the Command Shells
Since you cannot communicate directly with the Linux operating system kernel, you need to use a program that serves as an interface between the user and operating system. In the operating systems of the UNIX family, this program is called the shell.
The shell accepts a user's entries, interprets them, converts them to system calls, and delivers system messages back to the user, making it a command interpreter.
To understand command shells, you need to know the following:
“Types of Shells” on page 126
“bash Configuration Files” on page 126
“Completion of Commands and Filenames” on page 128
Types of Shells
UNIX has a whole series of shells, most of which are provided by Linux in freely usable versions. The following are examples of some popular shells:
The Bourne shell (/bin/sh; symbolic link to /bin/bash) - An early and important Unix shell.
The Bourne Again shell or bash (/bin/bash) - The standard Linux shell with many advanced features - a superset of the Bourne shell.
The Korn shell (/bin/ksh) - Offers rich scripting capabilities.
The C shell (/bin/csh; symbolic link to /bin/tcsh) - Its syntax is modeled after the C programming language.
The TC shell (/bin/tcsh) - Enhanced C shell with file name completion and command line editing
The various shells differ in the functionality they provide.
Every shell can be started like a program and you can switch at any time to a different shell. For example, you can switch to the TC shell by entering tcsh; you can switch to the Korn shell by entering ksh.
Unlike most other programs, the shell does not terminate on its own. You need to enter the exit command to return to the previous shell.
A shell is started at a text console right after a user logs in. This is called the login shell. Which shell is started for which user is determined in the user database.
The standard Linux shell is bash, so we will only cover the bash shell in this objective.
bash Configuration Files
To customize bash for an interactive session, you need to know about the configuration files and about the order in which they are processed.
Copyright © 2010 Novell, Inc. Copying or distributing all or part of this manual is protected bya Creative Commons Attribution-Noncommercial-Share Alike 3.0 Unported license.
Version 1126

Work with the Linux Shell and Command Line Interface (CLI)
Novell Training S
ervices (en) 15 April 2009
To understand how shells work, you need to know the difference between the following:
“Login Shells” on page 127
“Non-Login Shells” on page 127
Like most other Linux distributions, SUSE Linux Enterprise 11 has a default setup that ensures users do not see any difference between a login shell and a non-login shell. In most cases, this is achieved by also reading the ~/.bashrc file when a login shell is started.
Login Shells
A login shell is started whenever a user logs in to the system. In contrast, any shell started from within a running shell is a non-login shell. The only differences between these two are the configuration files read when starting the shell.
A login shell is also started whenever a user logs in through an X display manager. Therefore, all subsequent terminal emulation programs run non-login shells.
The following files are read when starting a login shell:
1. /etc/profile is a system-wide configuration file read by all shells. It sets global configuration options.This configuration file will be read not only by the bash, but also by other shells.
~/.profile is a file created for each new user by default on the SUSE Linux Enterprise. Any user-specific customizations can be stored in it.
/etc/profile.local is the file with your own global settings.
2. /etc/bash.bashrc makes some useful configurations for the bash shell. For example:
Appearance of the prompt
Colors for the ls command
Aliases
For your own system-wide bash configurations, use the /etc/bash.bashrc.local file that is imported from /etc/bash.bashrc.
~/.bashrc is a configuration file in which users store their customizations.
Non-Login Shells
When you use the su command to switch to user root, you will receive that root’s default shell, but it will be as a non-login shell.
The only way to exit a non-login shell is with the exit command.
The following files are read when a non-login shell is started:
/etc/bash.bashrc
Copyright © 2010 Novell, Inc. Copying or distributing all or part of this manual is protected bya Creative Commons Attribution-Noncommercial-Share Alike 3.0 Unported license.
127Version 1

SUSE Linux Enterprise 11 Fundamentals / Manual
Novell Training S
ervices (en) 15 April 2009
/etc/bash.bashrc.local and
~/.bashrc
If you change any settings and want them to be applied during the same shell session, the changed configuration file needs to be read in again.
The proper way to read in a changed configuration file and to apply the changes to the current session is by using the internal shell source command, as in the following example:
source ~/.bashrc
You can also use the “short form” of this command, which happens to be included in many configuration files, where it is used to read in other configuration files, as in the following (with a space between the period and the tilde):
. ~/.bashrc
Completion of Commands and Filenames
The bash shell supports a function of completing commands and filenames. Just enter the first characters of a command (or a filename) and press Tab. The bash shell completes the name of the command.
If there is more than one possibility, the bash shell shows all possibilities when you press the Tab key a second time. This feature makes entering long filenames very easy.
Copyright © 2010 Novell, Inc. Copying or distributing all or part of this manual is protected bya Creative Commons Attribution-Noncommercial-Share Alike 3.0 Unported license.
Version 1128

Work with the Linux Shell and Command Line Interface (CLI)
Novell Training S
ervices (en) 15 April 2009
Objective 2 Execute Commands at the Command Line
If you do not have a graphical user interface, you can use the following to help make entering shell commands and administering SUSE Linux Enterprise 11 much easier:
“History Function” on page 129
“Switch to User root” on page 129
“Execute Commands at the Command Line” on page 130
History Function
bash stores the commands you enter so you have easy access to them. By default, the commands are written in the .bash_history file in the user's home directory. In SUSE Linux Enterprise 11, the size of this file is set to a maximum of 1,000 entries.
You can display the content of the file by using the history command.
You can display the commands stored in the history cache (one at a time) by using the arrow keys. Up-arrow shows the previous command; the Down-arrow shows the next command. After finding the desired command, edit it as needed, then execute it by pressing Enter.
When browsing the entries of the history, you can also select specific commands. Type one or more letters, and press PageUp or PageDown to display the preceding or next command in the history cache beginning with this letter.
If you enter part of the command (not necessarily the beginning of the command), pressing Ctrl+r searches the history list for matching commands and displays them. Searching starts with the last command executed.
Switch to User root
If you are working with a shell, you can become root user by entering the su - command and the root password. The root user is comparable to the Administrator user in Windows. You have to log in as root to perform system administration tasks. The root user is the superuser and the only account with all the privileges needed to do anything in the system.
When you enter su, you switch to root at the same level as before.
When you enter su -, you switch to root’s home directory and you set up the environment as if the root user logged directly into the computer.
You can check to make sure you are root by entering id or whoami. To quit the root administrator shell, enter the exit command.
Copyright © 2010 Novell, Inc. Copying or distributing all or part of this manual is protected bya Creative Commons Attribution-Noncommercial-Share Alike 3.0 Unported license.
129Version 1

SUSE Linux Enterprise 11 Fundamentals / Manual
Novell Training S
ervices (en) 15 April 2009
Exercise 4-1 Execute Commands at the Command Line
In this exercise, you use the history feature of the shell and get root permissions at the command line. You use the history and su command.
You will find this exercise in the workbook.
(End of Exercise)
Copyright © 2010 Novell, Inc. Copying or distributing all or part of this manual is protected bya Creative Commons Attribution-Noncommercial-Share Alike 3.0 Unported license.
Version 1130

Work with the Linux Shell and Command Line Interface (CLI)
Novell Training S
ervices (en) 15 April 2009
Objective 3 Work with Variables and Aliases
Two features make working with the bash shell more powerful:
“Variables” on page 131
“Aliases” on page 132
“Perform Common Command Line Tasks” on page 134
Variables
With shell and environment variables, you are able to configure the behavior of the shell and adjust its environment to your own requirements.
The convention is to write variables such as PATH in uppercase letters. If you set your own variables, they should also be written in capitals for the sake of clarity.
Environment variables are used to control the behavior of a program that is started from a shell. Shell variables, on the other hand, are used to control the behavior of shell itself.
Some important environment variables include the following:
PATH. When a program is called up, the program is searched for in the directories specified here (each separated by “:”). The order in which directories are listed is important, since they are searched in turn.
HOME. The user's home directory.
USER. The login name of the actual user.
To display the value of a shell or environment variable, enterecho $variable, as in the following:
To set the value of a variable or to create a new variable, use the syntax variable=value, as in the following:
geeko@da2:~ > echo $HOME
/home/geeko
da2:~ # MYVAR=myvalue
da2:~ # echo $MYVAR
myvalue
da2:~ #
Copyright © 2010 Novell, Inc. Copying or distributing all or part of this manual is protected bya Creative Commons Attribution-Noncommercial-Share Alike 3.0 Unported license.
131Version 1

SUSE Linux Enterprise 11 Fundamentals / Manual
Novell Training S
ervices (en) 15 April 2009
The value can be a number, a character, or a string. If the string includes a space, you have to write the value in full quotes, as in the following:
To show all variables currently set, use the set or printenv commands.
Aliases
Defining aliases allows you to create shortcuts for commands and their options or to create commands with entirely different names. Aliases can save you a lot of typing by assigning short names to long commands.
In SUSE Linux Enterprise 11, whenever you enter the dir, md, or ls command, for instance, you will be using aliases.
You can find out about the aliases defined on your system with the alias command. This will show you that
dir is an alias for ls -l
md is an alias for mkdir -p
The following are examples of aliases through which new commands are defined:
To see whether a given command is an alias for something else, use the type command. For each command specified, type will tell you whether it is a built-in shell command, a regular command, a function, or an alias.
For regular commands, the output of type lists the path to the corresponding executable. For aliases, it lists the elements aliased:
The above example shows that ls is an alias although, in this case, it is only used to add some options to the command.
da2:~ # MYVAR=”my value”
da2:~ # echo $MYVAR
my value
da2:~ #
geeko@da2:~> alias md
alias md='mkdir -p'
geeko@da2:~> alias dir
alias dir='ls -l'
geeko@da2:~> type -a ls
ls is aliased to `/bin/ls $LS_OPTIONS'
ls is /bin/ls
Copyright © 2010 Novell, Inc. Copying or distributing all or part of this manual is protected bya Creative Commons Attribution-Noncommercial-Share Alike 3.0 Unported license.
Version 1132

Work with the Linux Shell and Command Line Interface (CLI)
Novell Training S
ervices (en) 15 April 2009
The -a option was used with type to show both the contents of the alias and the path to the original ls command. The output shows that ls is always run with the options stored in the LS_OPTIONS variable.
These options cause ls to list different file types in different colors (among other things).
Most of the aliases used on a system-wide basis are defined in the /etc/bash.bashrc file. Aliases are defined with the alias command and can be removed with the unalias command.
For example, entering unalias ls removes the alias for ls, causing ls to stop coloring its output.
The following is the syntax for defining aliases:
alias aliasname="command options”
An alias defined in this way is only valid for the current shell and will not be inherited by subshells, as in the following:
To make an alias persistent, you need to store the definition in one of the shell's configuration files. In SUSE Linux Enterprise 11, the ~/.alias file is created for personal aliases defined by each user. Aliases are not inherited by subshells, therefore ~/.alias is not read by a script. Setting aliases has to be done using source ~/.alias in the script.
This file is read in by ~/.bashrc, where a command is included to that effect. Aliases are not relevant to shell scripts, but they can be a real time saver when using the shell interactively.
geeko@da2:~> alias ps="echo Hello"
geeko@da2:~> ps
Hello
geeko@da2:~> bash
geeko@da2:~> ps
PID TTY TIME CMD
858 pts/0 00:00:00 bash
895 pts/1 00:00:00 bash
...
Copyright © 2010 Novell, Inc. Copying or distributing all or part of this manual is protected bya Creative Commons Attribution-Noncommercial-Share Alike 3.0 Unported license.
133Version 1

SUSE Linux Enterprise 11 Fundamentals / Manual
Novell Training S
ervices (en) 15 April 2009
Exercise 4-2 Perform Common Command Line Tasks
In this exercise, you create an alias labeled “hello” that prints a personal “Hello username” welcome message on the screen.
You will find this exercise in the workbook.
(End of Exercise)
Copyright © 2010 Novell, Inc. Copying or distributing all or part of this manual is protected bya Creative Commons Attribution-Noncommercial-Share Alike 3.0 Unported license.
Version 1134

Work with the Linux Shell and Command Line Interface (CLI)
Novell Training S
ervices (en) 15 April 2009
Objective 4 Understand Command Syntax and Special Characters
You can use specific characters to provide special functionality. Using them can save you a lot of time and effort. In this objective, you will learn about the following:
“Select Your Character Encoding” on page 135
“Use Search Patterns for Name Expansion” on page 137
“Prevent the Shell from Interpreting Special Characters” on page 138
“Work with Command Syntax and Special Characters” on page 139
Select Your Character Encoding
SUSE Linux Enterprise 11 is internationalized and can easily be adapted to local standards.
There are some variables that determine the localization. Use the locale command to get a list of the localization variables.
Figure 4-1
The LANG variable specifies the language. In this example the language is set to US English.
The characters are encoded in UTF-8 (UCS Transformation Format), which means Unicode (Universal Character Set). Unicode lets you use all kinds of character sets, not just the Latin one.
SUSE Linux Enterprise 11 uses UTF-8 encoding for all users except user root.
For user root, the LANG variable is set to POSIX, which means the characters are ASCII encoded.
Copyright © 2010 Novell, Inc. Copying or distributing all or part of this manual is protected bya Creative Commons Attribution-Noncommercial-Share Alike 3.0 Unported license.
135Version 1

SUSE Linux Enterprise 11 Fundamentals / Manual
Novell Training S
ervices (en) 15 April 2009
The state of the LANG variable is important for this section, because the results depend on the type of encoding. The order of the characters is different in POSIX and in UTF-8.
You can see the differences between UTF-8 and POSIX encoding when you use the ls command. For user Geeko, the content of the /usr/share/doc/packages/yast2-users/ directory looks like this:
Notice that the first file in the list is “autodocs.” For user root the output is different:
The first file in the list of user root is COPYING.
In the POSIX encoding table, the lowercase characters follow the uppercase characters. In UTF-8, lowercase “a” follows uppercase “A” immediately.
geeko@da2:~> ls -l /usr/share/doc/packages/yast2-users/
total 65
drwxr-xr-x 2 root root 1352 2006-02-02 15:42 autodocs
-rw-r--r-- 1 root root 17992 2006-01-27 00:34 COPYING
-rw-r--r-- 1 root root 17992 2006-01-27 00:34 COPYRIGHT.english
-rw-r--r-- 1 root root 2013 2005-09-08 02:36 crack.html
-rw-r--r-- 1 root root 75 2006-01-27 00:34 README
-rw-r--r-- 1 root root 193 2005-09-08 02:36 TODO.txt
-rw-r--r-- 1 root root 9583 2005-09-08 02:36 users.html
geeko@da2:~>
da2:~ # ls -l /usr/share/doc/packages/yast2-users/
total 79
drwxr-xr-x 3 root root 248 Feb 2 15:42 .
drwxr-xr-x 492 root root 13976 Feb 2 16:02 ..
-rw-r--r-- 1 root root 17992 Jan 27 00:34 COPYING
-rw-r--r-- 1 root root 17992 Jan 27 00:34 COPYRIGHT.english
-rw-r--r-- 1 root root 75 Jan 27 00:34 README
-rw-r--r-- 1 root root 193 Sep 8 02:36 TODO.txt
drwxr-xr-x 2 root root 1352 Feb 2 15:42 autodocs
-rw-r--r-- 1 root root 2013 Sep 8 02:36 crack.html
-rw-r--r-- 1 root root 9583 Sep 8 02:36 users.html
da2:~ #
Copyright © 2010 Novell, Inc. Copying or distributing all or part of this manual is protected bya Creative Commons Attribution-Noncommercial-Share Alike 3.0 Unported license.
Version 1136

Work with the Linux Shell and Command Line Interface (CLI)
Novell Training S
ervices (en) 15 April 2009
As a result, in POSIX, the only character between “A” and “C” is “B”. But in UTF-8, the characters “a,” “B,” and “b” would appear between “A” and “C”.
NOTE: The behavior of POSIX encoding is much more intuitive here and we recommend setting the LANG variable to POSIX for this section.
NOTE: To change the locale variables permanently, you have to edit the /etc/sysconfig/language file. The functionality of the other variables is described in that file. For further information, see the man page of locale (man locale).
Use Search Patterns for Name Expansion
Occasionally, you might want to perform operations on a series of files without having to name all the files. In this case, you could make use of the following search patterns:
Table 4-1
NOTE: Some of the search patterns have a different meaning than they have as regular expressions.
The following examples show the use of some search patterns:
Search Pattern Description
? Any single character (except “/”).
* Any string length, including zero characters (except “.” at the beginning of a file name and “/”).
[0-9] Any of the characters enclosed (here: numbers from 0 to 9).
[a-ek-s] Any character from the ranges a-e or k-s.
[abcdefg] Any of these characters.
[!abc] None of these characters.
geeko@da2:/usr/X11/bin > ls xc*
xcalc xclipboard xclock xcmsdb xconsole xcursorgen xcutsel
geeko@da2:/usr/X11/bin > ls xc[alo]*
xcalc xclipboard xclock xconsole
geeko@da2:/usr/X11/bin > ls xc[!o]*
xcalc xclipboard xclock xcmsdb xcursorgen xcutsel
geeko@da2:/usr/X11/bin > ls xc*l*
xcalc xclipboard xclock xconsole xcutsel
Copyright © 2010 Novell, Inc. Copying or distributing all or part of this manual is protected bya Creative Commons Attribution-Noncommercial-Share Alike 3.0 Unported license.
137Version 1

SUSE Linux Enterprise 11 Fundamentals / Manual
Novell Training S
ervices (en) 15 April 2009
If search patterns (wild cards) are given on the command line, the shell tries to compare these with the filenames in the file system and, if they match, the expression is replaced with all the filenames found.
Prevent the Shell from Interpreting Special Characters
To prevent the shell from interpreting special characters in the command line, these characters must be “masked” by using the following:
\: The backslash protects one character from being interpreted by the shell, as in the following:
"...": Double quotes protect all special characters except $, \, and ` (back tick) from being interpreted by the shell, as in the following:
'...' Apart from regular expressions, variables are also protected with single quotes, as in the following:
geeko@da2:~ > mkdir new\ directory
geeko@da2:~ >
geeko@da2:~ > echo Home = $HOME
Home = /home/geeko
geeko@da2:~ > echo “Home = $HOME”
Home = /home/geeko
geeko@da2:~ >
geeko@da2:~ > echo 'Home = $HOME'
Home = $HOME
geeko@da2:~ >
Copyright © 2010 Novell, Inc. Copying or distributing all or part of this manual is protected bya Creative Commons Attribution-Noncommercial-Share Alike 3.0 Unported license.
Version 1138

Work with the Linux Shell and Command Line Interface (CLI)
Novell Training S
ervices (en) 15 April 2009
Exercise 4-3 Work with Command Syntax and Special Characters
In this exercise, you learn how to use wildcards and other special characters.
You will find this exercise in the workbook.
(End of Exercise)
Copyright © 2010 Novell, Inc. Copying or distributing all or part of this manual is protected bya Creative Commons Attribution-Noncommercial-Share Alike 3.0 Unported license.
139Version 1

SUSE Linux Enterprise 11 Fundamentals / Manual
Novell Training S
ervices (en) 15 April 2009
Objective 5 Use Piping and Redirection
Linux has three standard data channels:
Figure 4-2
Standard input (stdin). The currently running program reads the input from this channel (usually the keyboard).
Standard output (stdout). The program sends its output to this channel (usually the monitor).
Standard error (stderr). Errors are issued through this channel (usually the monitor).
These input and output channels are assigned the following numbers:
Table 4-2
Each channel can be redirected by the shell. For example, stdin can come from a file or stdout and stderr can be directed to a file. The following are the redirection characters:
Table 4-3
Channel Number Assigned
Standard input (stdin) 0
Standard output (stdout) 1
Standard error output (stderr) 2
Redirection Character Description
< Redirects standard input.
> Redirects standard output (> without a preceding number is just an abbreviation for 1>), overwrites file.
>> Redirects standard output, appends to file.
2> Redirects standard error output.
2>> Appends error output to a file
Standardinput 0
commandStandardoutput 1
Standarderroroutput
>_
2
>_
Copyright © 2010 Novell, Inc. Copying or distributing all or part of this manual is protected bya Creative Commons Attribution-Noncommercial-Share Alike 3.0 Unported license.
Version 1140

Work with the Linux Shell and Command Line Interface (CLI)
Novell Training S
ervices (en) 15 April 2009
The following is an example of a standard input, standard output, and standard error output:
If the standard error output is redirected to /dev/null, only the standard output is displayed on the screen:
To redirect standard output and standard error output to a file (such as list), enter the following:
ls /opt /recipe > list 2>&1
First, the standard output is redirected to the list file (> list); then the standard error output is directed to the standard output (2>&1). The & refers to the file descriptor that follows (1 for the standard output).
You can display the contents of the list file by using the cat command, as in the following:
This option of process communication is available not only in the shell, but can also be used in programs directly. All files in the system can be used as input or output.
Occasionally, you might want to use a file as input for a program that expects input from the keyboard. To do this, the standard input is redirected, as in the following:
geeko@da2:~ > ls /opt /recipe
/bin/ls: /recipe: No such file or directory
/opt:
gnome kde3
geeko@da2:~ > ls /opt /recipe 2> /dev/null
/opt:
gnome kde3
geeko@da2:~> cat list
/bin/ls: /recipe: No such file or directory
/opt:
kde3
geeko@da2:~ # echo "Hello Tux,
>
> how are you?
> Is everything okay?" > greetings
geeko@da2:~ # mail tux < greetings
Copyright © 2010 Novell, Inc. Copying or distributing all or part of this manual is protected bya Creative Commons Attribution-Noncommercial-Share Alike 3.0 Unported license.
141Version 1

SUSE Linux Enterprise 11 Fundamentals / Manual
Novell Training S
ervices (en) 15 April 2009
First, the text is redirected to the greetings file through the > command. The mail program, mail, receives its input from the greetings file (not the keyboard), and then the e-mail program sends the e-mail to the user tux.
One command’s output can be used as input for another command by using the pipe (“ |” ):
command1 | command2
In a pipe, a maximum of 4 KB of not yet processed data can exist. If the process creating the output tries to write to a full pipe, it is stopped and only allowed to continue if the writing process can be completed. On the other side, the reading process is stopped if it tries to read an empty pipe.
Occasionally the user might want output from a command displayed on the screen and written to a file. This can be done using the tee command:
ls -l | tee output
In this example, the output of the command is displayed on the screen as well as written to the output file. To redirect the output of several consecutive commands on the command line, the commands must be separated with semi-colons and enclosed in parentheses (command1; command2; ...):
The shell starts a separate subshell for processing the individual commands. To redirect the linked commands, the shell must be forced to execute the command chain in the same subshell by enclosing the expression in parentheses.
Upon completion, every program returns a value that states the success of the execution. If this return value is 0, the command completed successfully. If an error occurred, the return value is greater than 0. (Depending on the program, different return values indicate different errors.)
You can use the echo $? command to display a return value.
geeko@da2:~ > ls -l /etc | less
geeko@da2:~> (id ; ls ~) > output
geeko@da2:~> cat output
uid=1000(geeko) gid=100(users) groups=14(uucp),16(dialout),33(video),100(users)
bin
Desktop
Documents
output
public_html
geeko@da2:~>
Copyright © 2010 Novell, Inc. Copying or distributing all or part of this manual is protected bya Creative Commons Attribution-Noncommercial-Share Alike 3.0 Unported license.
Version 1142

Work with the Linux Shell and Command Line Interface (CLI)
Novell Training S
ervices (en) 15 April 2009
The return value can be used to trigger the execution of another command:
Table 4-4
The following illustrates using both “||” and “&&”:
The recipe file does not exist and the ls recipe command leads to an error. Because of this, the ls ~ command is executed in the first line, but not in the fourth line.
Link Result
command1 && command2 command2 is only executed if command1 is completed without any errors.
command1 || command2 command2 is only executed if command1 is completed with an error.
geeko@da2:~> ls recipe || ls ~
/bin/ls: recipe: No such file or directory
bin Desktop Documents output public_html test
geeko@da2:~> ls recipe && ls ~
/bin/ls: recipe: No such file or directory
geeko@da2:~>
Copyright © 2010 Novell, Inc. Copying or distributing all or part of this manual is protected bya Creative Commons Attribution-Noncommercial-Share Alike 3.0 Unported license.
143Version 1

SUSE Linux Enterprise 11 Fundamentals / Manual
Novell Training S
ervices (en) 15 April 2009
Exercise 4-4 Use Piping and Redirection
In this exercise, you practice piping the output of standard commands into files and other commands.
You will find this exercise in the workbook.
(End of Exercise)
Copyright © 2010 Novell, Inc. Copying or distributing all or part of this manual is protected bya Creative Commons Attribution-Noncommercial-Share Alike 3.0 Unported license.
Version 1144

Work with the Linux Shell and Command Line Interface (CLI)
Novell Training S
ervices (en) 15 April 2009
Summary
Objective Summary
1. Get to Know the Command Shells The shell serves as an interface between a user and an operating system.
Linux uses the Bourne Again shell (/bin/bash) as the default shell.
You can select two types of shells:
Login Shells
Non-login Shells
The following files are read when starting a login shell:
/etc/profile
~/.profile
/etc/bash.bashrc
/etc/bash.bashrc.local
~/.bashrc
The following files are read when starting a non-login shell:
/etc/bash.bashrc
/etc/bash.bashrc.local
~/.bashrc
To read a changed configuration file and to apply the changes to the current session use the internal shell command source or its short form “.”.
2. Execute Commands at the Command Line
The bash shell stores commands that have been entered so the user has easy access to them. By default, the commands are written in the .bash_history file in the user's home directory.
The content of the file can be displayed with the command history.
Commands stored in the history cache can be flipped through with the arrow keys.
One or several letters and Page Up or Page Down goes to the preceding or next command in the history, beginning with the specified letter.
If you enter part of the command, Ctrl+r will retroactively search the history for matching commands.
To become root, you can enter su – command
Copyright © 2010 Novell, Inc. Copying or distributing all or part of this manual is protected bya Creative Commons Attribution-Noncommercial-Share Alike 3.0 Unported license.
145Version 1

SUSE Linux Enterprise 11 Fundamentals / Manual
Novell Training S
ervices (en) 15 April 2009
3. Work with Variables and Aliases Two types of variables are used with commands:
Environment variables influence the behavior of a program which is started from a shell.
Shell variables control the behavior of the shell itself.
The value of a variable can be seen with the echo command.
Defining aliases lets you create shortcuts for commands and their options or create commands with entirely different names.
For each command specified, type will tell you whether it is a built-in shell command, a regular command, a function, or an alias.
Most of the aliases used on a system-wide basis are defined in the /etc/bash.bashrc file.
Aliases are defined with the alias command and can be removed with the unalias command.
To make an alias persistent, you need to store the definition in one of the shell's configuration files. On the SUSE Linux Enterprise Server, the ~/.alias file is created for personal aliases defined by each user.
4. Understand Command Syntax and Special Characters
Use the locale command to get a list of the localization variables.
To perform operations on a series of files without having to name all the files, you can use various search patterns:
?: stands for any character (except “/”).
*: stands for 0 or more characters (except “.” at the beginning of a file name and “/”).
[a-z]: a character from the range a-z.
[a-ek-s]: a character from the ranges a-e and k-s.
[abcdefg]: any of these characters.
[!abc]: none of these characters.
To prevent the shell from interpreting special characters in the command line, these characters must be “masked”:
\: The backslash protects exactly one character.
"...": Double quotation marks protect all special characters except “$”, “\”, and “`” (back tick).
'...': Apart from regular expressions, variables are also protected by single quotation marks.
Objective Summary
Copyright © 2010 Novell, Inc. Copying or distributing all or part of this manual is protected bya Creative Commons Attribution-Noncommercial-Share Alike 3.0 Unported license.
Version 1146

Work with the Linux Shell and Command Line Interface (CLI)
Novell Training S
ervices (en) 15 April 2009
5. Use Piping and Redirection Linux has three standard data channels:
0: Standard input (stdin)
1: Standard output (stdout)
2: Standard error (stderr)
Each channel can be redirected:
<: Redirects standard input.
>, 1> or >>: Redirects standard output.
2>: Redirects standard error output.
The contents of a file can be displayed by entering the following command:
cat filename
Using the pipe (“|”), the output from one command can be used as the input for another command.
The tee command can be used to split the standard output.
Objective Summary
Copyright © 2010 Novell, Inc. Copying or distributing all or part of this manual is protected bya Creative Commons Attribution-Noncommercial-Share Alike 3.0 Unported license.
147Version 1

SUSE Linux Enterprise 11 Fundamentals / Manual
Novell Training S
ervices (en) 15 April 2009
Copyright © 2010 Novell, Inc. Copying or distributing all or part of this manual is protected bya Creative Commons Attribution-Noncommercial-Share Alike 3.0 Unported license.
Version 1148

Administer Linux with YaST
Novell Training S
ervices (en) 15 April 2009
S E C T I O N 5 Administer Linux with YaST
YaST is a powerful tool for configuring your SUSE Linux Enterprise 11. Many modules are available for important configuration tasks. In this section you will get an overview of YaST’s capabilities on the server and on the desktop, and learn more about the network configuration module.
Objectives
1. “Get to Know YaST better” on page 150
2. “Manage the Network Configuration Information from YaST” on page 164
Copyright © 2010 Novell, Inc. Copying or distributing all or part of this manual is protected bya Creative Commons Attribution-Noncommercial-Share Alike 3.0 Unported license.
149Version 1

SUSE Linux Enterprise 11 Fundamentals / Manual
Novell Training S
ervices (en) 15 April 2009
Objective 1 Get to Know YaST better
YaST stands for Yet another Setup Tool. You can use YaST to complete many configuration tasks as a SUSE Linux Enterprise Server administrator.
User Interfaces
The YaST user interface can appear in two modes:
ncurses (Text mode)
Qt (Fully graphical mode)
Table 5-1
The appearance of the user interface depends on which command you use to start YaST and on whether you use the graphical system or the command line.
Navigating the Text Interface (ncurses)
You control the ncurses interface with the keyboard. To start the ncurses interface of YaST, you can start a terminal emulation from your GNOME desktop by selecting Gnome Terminal from the main menu (application group: System).
Command Terminal in X Window Command Line
yast2 Qt ncurses
yast ncurses ncurses
Copyright © 2010 Novell, Inc. Copying or distributing all or part of this manual is protected bya Creative Commons Attribution-Noncommercial-Share Alike 3.0 Unported license.
Version 1150

Administer Linux with YaST
Novell Training S
ervices (en) 15 April 2009
Enter su - to get root permissions. After entering the root password, start YaST by entering yast.
Figure 5-1
Press Tab to move from one box to another or to the text buttons. To go back to the previous box, press Shift+Tab. Use the arrow keys to navigate within the box. Select highlighted menu items by pressing the Spacebar.
To select a menu item, press Enter. You can often press Alt and the highlighted letter to access an item directly.
Except for the controls and the appearance, the graphical mode and the text mode of YaST are identical.
You can list the available YaST modules with the yast -l or yast --list command. To start an individual module, specify its name. For example, you can enter the following to start the software installation module:
yast sw_single
You can enter the software module name with the yast or yast2 command, as in the following:
yast sw_single (text mode)
yast2 sw_single (graphical mode)
Copyright © 2010 Novell, Inc. Copying or distributing all or part of this manual is protected bya Creative Commons Attribution-Noncommercial-Share Alike 3.0 Unported license.
151Version 1

SUSE Linux Enterprise 11 Fundamentals / Manual
Novell Training S
ervices (en) 15 April 2009
To display a list of YaST options, enter one of the following:
yast --help
yast -h
The main dialog of YaST is called the YaST Control Center.
From the YaST Control Center you can select a category on the left (such as Software or System) and a module on the right (such as Online Update) to configure and manage your system.
When you finish making changes with a YaST module, YaST uses backend services such as SuSEconfig (see Objective 2 “Understand the Role of SuSEconfig” on page 158) to implement the changes in the system.
Navigating the Graphical Interface (Qt)
In the graphical interface, you can control YaST with the mouse. To start it, select YaST from the main menu (application group: System). You are asked to enter the root password.
Figure 5-2
Copyright © 2010 Novell, Inc. Copying or distributing all or part of this manual is protected bya Creative Commons Attribution-Noncommercial-Share Alike 3.0 Unported license.
Version 1152

Administer Linux with YaST
Novell Training S
ervices (en) 15 April 2009
The YaST Control Center dialog appears.
Figure 5-3
YaST Applets
From Yast, you can perform tasks in the following categories:
“Hardware” on page 154
“Miscellaneous” on page 155
“Network Devices” on page 155
“Network Services” on page 156
“Novell AppArmor” on page 157
“Security and Users” on page 158
“Software” on page 159
“System” on page 159
Copyright © 2010 Novell, Inc. Copying or distributing all or part of this manual is protected bya Creative Commons Attribution-Noncommercial-Share Alike 3.0 Unported license.
153Version 1

SUSE Linux Enterprise 11 Fundamentals / Manual
Novell Training S
ervices (en) 15 April 2009
“Virtualization” on page 160
“Other” on page 160
Hardware
On SUSE Linux Enterprise Server, clicking the Hardware tab displays the following:
Figure 5-4
The Hardware tab on the SUSE Linux Enterprise Desktop gives you several more options:
Figure 5-5
Some tasks you can perform in the Hardware category are:
Add, configure, and remove printers.
Configure keyboard settings.
Manage external devices such as web cams, joysticks, mice and so on.
Manage additional devices such as TV card, scanners and so on (desktop only).
Copyright © 2010 Novell, Inc. Copying or distributing all or part of this manual is protected bya Creative Commons Attribution-Noncommercial-Share Alike 3.0 Unported license.
Version 1154
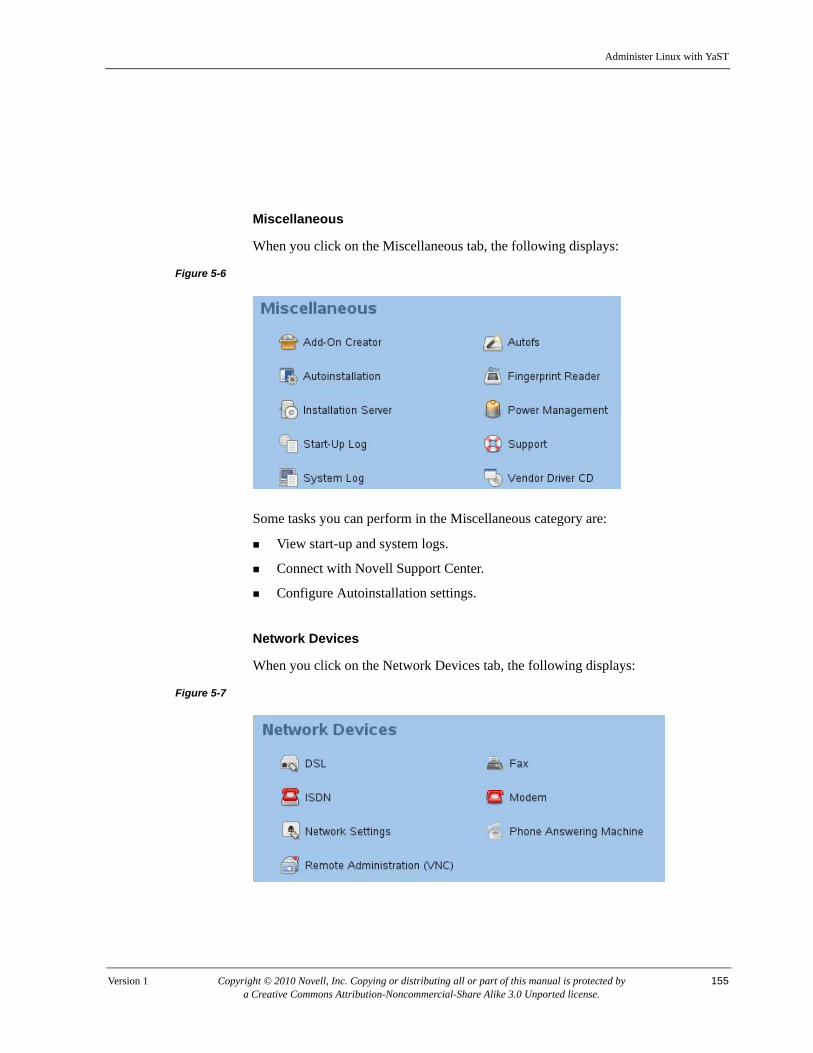
Administer Linux with YaST
Novell Training S
ervices (en) 15 April 2009
Miscellaneous
When you click on the Miscellaneous tab, the following displays:
Figure 5-6
Some tasks you can perform in the Miscellaneous category are:
View start-up and system logs.
Connect with Novell Support Center.
Configure Autoinstallation settings.
Network Devices
When you click on the Network Devices tab, the following displays:
Figure 5-7
Copyright © 2010 Novell, Inc. Copying or distributing all or part of this manual is protected bya Creative Commons Attribution-Noncommercial-Share Alike 3.0 Unported license.
155Version 1

SUSE Linux Enterprise 11 Fundamentals / Manual
Novell Training S
ervices (en) 15 April 2009
Some tasks you can perform in the Network Devices category are:
Configure network settings.
Assign IP addresses and domain names.
Manage network cards, modems, fax machines and so on.
Configure remote administration with Virtual Network Computing (VNC).
Network Services
From the server, when you click on the Network Services tab, the following displays:
Figure 5-8
Copyright © 2010 Novell, Inc. Copying or distributing all or part of this manual is protected bya Creative Commons Attribution-Noncommercial-Share Alike 3.0 Unported license.
Version 1156

Administer Linux with YaST
Novell Training S
ervices (en) 15 April 2009
Notice your options are limited in the desktop version:
Figure 5-9
Some tasks you can perform in the Network Services category are:
Configure hostnames.
Manage various network clients.
Create Windows domains and workgroups.
Configure additional server settings (server only).
Novell AppArmor
Novell AppArmor is a security framework that comes installed with SLE 11. It gives you network application security via mandatory access control for programs, protecting against the exploitation of software flaws and compromised systems. AppArmor offers an advanced toolset that largely automates the development of per-program application security so that no new expertise is required.
When you click on the Novell AppArmor tab, the following displays:
Copyright © 2010 Novell, Inc. Copying or distributing all or part of this manual is protected bya Creative Commons Attribution-Noncommercial-Share Alike 3.0 Unported license.
157Version 1

SUSE Linux Enterprise 11 Fundamentals / Manual
Novell Training S
ervices (en) 15 April 2009
Figure 5-10
Some tasks you can perform in the Novell AppArmor category are:
Enable or disable AppArmor.
Run security reports and event notification warnings.
Create and modify AppArmor profiles.
NOTE: More information on this topic can be found in Course 3102 SUSE Linux Enterprise 11 Administration.
Security and Users
When you click on Security and Users tab, the following displays:
Figure 5-11
Some tasks you can perform in the Security and Users category are:
Add/delete users.
Change password settings.
Manage firewall settings.
Copyright © 2010 Novell, Inc. Copying or distributing all or part of this manual is protected bya Creative Commons Attribution-Noncommercial-Share Alike 3.0 Unported license.
Version 1158

Administer Linux with YaST
Novell Training S
ervices (en) 15 April 2009
Software
When you click on the Software tab, the following displays:
Figure 5-12
Some tasks you can perform in the Software category are:
Install and manage software.
Check for online updates.
Check the integrity of installation media.
System
When you click on the System tab, the following displays:
Figure 5-13
Some tasks you can perform in the System category are:
Adjust date and time settings.
Back up, archive, and restore the system.
Change language settings.
Manage disk partitions.
Copyright © 2010 Novell, Inc. Copying or distributing all or part of this manual is protected bya Creative Commons Attribution-Noncommercial-Share Alike 3.0 Unported license.
159Version 1

SUSE Linux Enterprise 11 Fundamentals / Manual
Novell Training S
ervices (en) 15 April 2009
NOTE: More information on this topic can be found in Course 3102 SUSE Linux Enterprise 11 Administration.
Virtualization
When you click on the Virtualization tab, the following displays:
Figure 5-14
Some tasks you can perform in the Virtualization category are:
Install and manage Xen Hypervisor
Access libvert and other utilities
Other
When you click on the Other tab, the following displays:
Figure 5-15
Some tasks you can perform in the Other category are:
Review release note with updates to the latest version of SLE.
Manage Novell Customer Center settings.
Copyright © 2010 Novell, Inc. Copying or distributing all or part of this manual is protected bya Creative Commons Attribution-Noncommercial-Share Alike 3.0 Unported license.
Version 1160

Administer Linux with YaST
Novell Training S
ervices (en) 15 April 2009
Understand the Role of SuSEConfig
SuSEconfig acts as a backend for YaST2 and activates the configuration changes made by YaST2. SuSEconfig is automatically executed by Yast whenever you install, update or remove any package from the system.
Next time you install a package with YAST, notice that it runs SuSEconfig after completing the installation of the packages. This is because newly installed packages may have included changes to the configuration options in /etc/sysconfig/.
SUSE Linux stores much of its configuration information in the files and folders under /etc/sysconfig/. SuSEconfig configures the system according to the variables that are set in the various "/etc/sysconfig/" files.
These configuration options can be used in two ways:
1. They can be read directly
2. They can be migrated to other configuration files in /etc/ with the /sbin/SuSEconfig command.
The configuration migration method is most often the case when an option in /etc/sysconfig/ leads to several changes in other configuration files.
SuSEconfig after Command-Line Installations
If you install any package via command line, for example by running a simple rpm command, it is essential to run SuSEconfig manually. It is important for these changes to be migrated to the proper configuration files. Thus, it is important to run SuSEconfig manually after installing packages manually.
For example, execute the following command:
rpm -i package.rpm
Then enter
SuSEConfig
A message similar to the following will follow:
Copyright © 2010 Novell, Inc. Copying or distributing all or part of this manual is protected bya Creative Commons Attribution-Noncommercial-Share Alike 3.0 Unported license.
161Version 1

SUSE Linux Enterprise 11 Fundamentals / Manual
Novell Training S
ervices (en) 15 April 2009
Starting SuSEconfig, the SuSE Configuration Tool...
Running in full featured mode.
Reading /etc/sysconfig and updating the system... See Exercise 5-1 “Manage User Accounts with YaST” on page 186...
SuSEConfig Options
- verbose ---- Shows what is happening.
- quick ---- Does not rebuild kernel module dependencies.
-nonewpackage ---- Skips configuration modules that have to be run only when a package is newly installed.
-module ---- Runs SuSEConfig with the configuration module for the specific subsystem instead of running all modules.
-nomodule ---- Does not execute the subsystem-specific modules.
Copyright © 2010 Novell, Inc. Copying or distributing all or part of this manual is protected bya Creative Commons Attribution-Noncommercial-Share Alike 3.0 Unported license.
Version 1162

Administer Linux with YaST
Novell Training S
ervices (en) 15 April 2009
Exercise 5-1 Get to Know YaST
In this exercise, you learn how to use the different user interfaces of YaST and how to start some YaST modules.
You will find this exercise in the workbook.
(End of Exercise)
Copyright © 2010 Novell, Inc. Copying or distributing all or part of this manual is protected bya Creative Commons Attribution-Noncommercial-Share Alike 3.0 Unported license.
163Version 1

SUSE Linux Enterprise 11 Fundamentals / Manual
Novell Training S
ervices (en) 15 April 2009
Objective 2 Manage the Network Configuration Information from YaST
The YaST module for configuring network cards and the network connection can be accessed from the YaST Control Center.
To access the network configuration module, select Computer > YaST > Network Devices > Network Settings.
Network Configuration in SLES
On the server, the Network Settings module opens with the overview page selected, displaying the installed network cards. A desktop machine will typically show only the network card, whereas a laptop will also show the wireless card.
Figure 5-16
Notice that the following tabs are available in this module:
Global Options
Overview
Hostname/DNS
Routing
Copyright © 2010 Novell, Inc. Copying or distributing all or part of this manual is protected bya Creative Commons Attribution-Noncommercial-Share Alike 3.0 Unported license.
Version 1164

Administer Linux with YaST
Novell Training S
ervices (en) 15 April 2009
This is what the Global Options tab looks like on the Server:
Figure 5-17
These options are available in the Global Options tab:
Network Setup Method
User Controlled with NetworkManager
Use a desktop applet that manages the connections for all network interfaces. This is recommended for SLED
Traditional Method with ifup
The traditional method uses the ifup command. This is the default setup method and is recommended for servers because they are configured manually.
IPv6 Protocol Settings
DHCP Client Options
Copyright © 2010 Novell, Inc. Copying or distributing all or part of this manual is protected bya Creative Commons Attribution-Noncommercial-Share Alike 3.0 Unported license.
165Version 1

SUSE Linux Enterprise 11 Fundamentals / Manual
Novell Training S
ervices (en) 15 April 2009
Using the traditional method, the overview tab shows the detected network cards:
Figure 5-18
Copyright © 2010 Novell, Inc. Copying or distributing all or part of this manual is protected bya Creative Commons Attribution-Noncommercial-Share Alike 3.0 Unported license.
Version 1166

Administer Linux with YaST
Novell Training S
ervices (en) 15 April 2009
Figure 5-19
Usually the cards are auto detected by YaST, and the correct kernel module is used.
Copyright © 2010 Novell, Inc. Copying or distributing all or part of this manual is protected bya Creative Commons Attribution-Noncommercial-Share Alike 3.0 Unported license.
167Version 1

SUSE Linux Enterprise 11 Fundamentals / Manual
Novell Training S
ervices (en) 15 April 2009
If the card is not recognized by YaST, the required module must be entered manually in YaST. Select Add. A Hardware dialog appears.
Figure 5-20
From this dialog, you enter details of the interface to configure such as Network Device Type (Ethernet) and Configuration Name (0). Under Kernel Module, enter the name of the module to load. You can select the card model from a list of network cards.
Some kernel modules can be configured more precisely by adding options or parameters for the kernel. Details about parameters for specific modules can be found in the kernel documentation.
Copyright © 2010 Novell, Inc. Copying or distributing all or part of this manual is protected bya Creative Commons Attribution-Noncommercial-Share Alike 3.0 Unported license.
Version 1168

Administer Linux with YaST
Novell Training S
ervices (en) 15 April 2009
After selecting Next, the following dialog appears:
Figure 5-21
From this dialog you enter the following information to integrate the network device into an existing network:
Automatic Address Setup (via DHCP). Select this option if the network card should receive an IP address from a DHCP server.
Statically Assigned Address Setup. If you choose this option, you need to enter the static IP address for your computer under IP Address.
Each computer in the network has at least one address for each network interface, which must be unique in the entire network. According to the currently valid standard (IPv4), this address consists of a sequence of four bytes, separated by dots (such as 172.17.0.1).
When choosing the IP address, you need to know if the computer will be directly connected to the Internet. In this case, use an assigned official IP address. Otherwise, use an address from a private address space.
Subnet Mask. The network mask (referred to as subnet mask in YaST), determines in which network an IP address is located.
Copyright © 2010 Novell, Inc. Copying or distributing all or part of this manual is protected bya Creative Commons Attribution-Noncommercial-Share Alike 3.0 Unported license.
169Version 1

SUSE Linux Enterprise 11 Fundamentals / Manual
Novell Training S
ervices (en) 15 April 2009
The mask divides the IP address into a network section and a host section, thus defining the size of a network. All computers within the network can reach each other directly without a router in between.
Hostname. Computers in the network can be addressed directly using their IP addresses or with a unique name. A name server (DNS) must exist for the resolution of names into IP addresses and vice versa.
When you select Next, the settings are saved and you are returned to the overview tab. The Hostname/DNS tab gives you further options:
Figure 5-22
This dialog lets you enter the following:
Hostname. Enter a name by which the computer can be addressed. This name should be unique within the network.
Domain Name. This is the name of the DNS domain to which the computer belongs. Domains help to divide networks. All computers in a defined organizational area normally belong to the same domain.
Copyright © 2010 Novell, Inc. Copying or distributing all or part of this manual is protected bya Creative Commons Attribution-Noncommercial-Share Alike 3.0 Unported license.
Version 1170

Administer Linux with YaST
Novell Training S
ervices (en) 15 April 2009
A computer can be addressed uniquely by giving its FQDN (Fully Qualified Domain Name). This consists of the host name and the name of the domain, such as da51.digitalairlines.com. In this case, the domain would be digitalairlines.com.
List of name servers. To address other computers in the network with their host names, identify the name server, which guarantees the conversion of computer names to IP addresses and vice versa.
You can specify a maximum of three name servers.
Domain search list. In the local network, it is more appropriate to address other hosts not with their FQDN, but with their host names. The domain search list specifies the domains with which the system can expand the host name to the FQDN.
This complete name is then passed to the name server to be resolved. For example, da51 is expanded with the search list digitalairlines.com to the FQDN da51.digitalairlines.com. This name is then passed to the name server to be resolved.
If the search list contains several domains, the completion takes place one after the other, and the resulting FQDN is passed to the name server until an entry returns an associated IP address.
Separate the domains with commas or white space.
Routing. If the computer is intended only to reach other computers in the same subnet, then it is not necessary to enter any routes.
However, if you need to enter a default gateway or create a routing table, select Routing from the Network address setup dialog. The following appears:
Figure 5-23
Copyright © 2010 Novell, Inc. Copying or distributing all or part of this manual is protected bya Creative Commons Attribution-Noncommercial-Share Alike 3.0 Unported license.
171Version 1

SUSE Linux Enterprise 11 Fundamentals / Manual
Novell Training S
ervices (en) 15 April 2009
You can define the following:
Default Gateway. If the network has a gateway (a computer that forwards information from a network to other networks), its address can be specified in the network configuration.
All data not addressed to the local network is then forwarded directly to the gateway.
Routing Table. You can create entries in the routing table of the system after selecting Expert Configuration.
Enable IP Forwarding. If you select this option, IP packages that are not dedicated for your computer are routed.
All the necessary information is now available to activate the network card.
In the General tab of the Network Address Setup dialog, you can set up a few more options.
Figure 5-24
Firewall Zone. (De-)activate the firewall for the interface. If activated, you can specify the zone to put the interface in. Three zones are possible:
Internal Zone
Copyright © 2010 Novell, Inc. Copying or distributing all or part of this manual is protected bya Creative Commons Attribution-Noncommercial-Share Alike 3.0 Unported license.
Version 1172

Administer Linux with YaST
Novell Training S
ervices (en) 15 April 2009
Demilitarized Zone
External Zone
Device Activation. Choose when the interface should be set up. Possible values are
At Boot Time. During system start.
On Cable Connection. If there is a physical network connection.
On Hotplug. When the hardware is plugged in.
Manually.
Never.
Normally only root is allowed to activate and deactivate a network interface. To allow this for normal users, activate the option User Controlled.
MTU. (Maximum Transfer Unit) Maximum size of an IP package. The size depends on the hardware (Ethernet: max. 1,500 bytes).
After you save the configuration with YaST, the ethernet card should be available in the computer. You can verify this with the ip command, as shown in the following:
Figure 5-25
In this example, the interface eth0 was configured.
One network devices is always set up by default—the loopback device (lo).
If you run this command as a user other than root, you must enter the absolute path to the command (/sbin/ip).
Copyright © 2010 Novell, Inc. Copying or distributing all or part of this manual is protected bya Creative Commons Attribution-Noncommercial-Share Alike 3.0 Unported license.
173Version 1

SUSE Linux Enterprise 11 Fundamentals / Manual
Novell Training S
ervices (en) 15 April 2009
Network Configuration in SLED
The above information also applies to SuSE Linux Enterprise Desktop. The four tabs have a slightly different look but contain the same settings. The only difference is that the SLED dialog has some context-sensitive help information for each tab below the Network Settings heading.
Copyright © 2010 Novell, Inc. Copying or distributing all or part of this manual is protected bya Creative Commons Attribution-Noncommercial-Share Alike 3.0 Unported license.
Version 1174

Administer Linux with YaST
Novell Training S
ervices (en) 15 April 2009
Exercise 5-2 Manage the Network Configuration Information from YaST
Until now, your system got all network configuration information via DHCP. In this exercise, you change all the network configuration information to static values.
You will find this exercise in the workbook.
(End of Exercise)
Copyright © 2010 Novell, Inc. Copying or distributing all or part of this manual is protected bya Creative Commons Attribution-Noncommercial-Share Alike 3.0 Unported license.
175Version 1

SUSE Linux Enterprise 11 Fundamentals / Manual
Novell Training S
ervices (en) 15 April 2009
Summary
Objective Summary
1. Get to Know YaST better
The appearance of the user interface of YaST depends on the command used for starting:
In the graphical interface, YaST can be controlled intuitively with the mouse.
The ncurses interface is controlled exclusively with the keyboard.
Individual modules can also be started directly. Available modules can be listed with the yast -l or yast --list command.
2. Understand the Role of SuSEconfig
Sometimes YaST writes the configuration changes you make directly into the final configuration file.
In other cases the information you enter is first written to a file in the /etc/sysconfig/ directory and then written to its final destination.
SuSEconfig is a tool used in SUSE Linux Enterprise Server to configure the system according to the variables that are set in the various files in /etc/sysconfig/ and its subdirectories.
SuSEconfig acts as a back end for YaST and activates the configuration changes you make when using a YaST module.
3. Manage the Network Configuration Information from YaST
The YaST module for configuring the network card and the network connection can be found at Network Devices > Network Card.
The following details are then needed to integrate the network device into an existing network:
Method of network setup
Static IP address
Network mask
Host name
Name server
Routing (gateway)
After you save the configuration with YaST, the ethernet card should be available in the computer. You can verify this with the ip address show command.
Copyright © 2010 Novell, Inc. Copying or distributing all or part of this manual is protected bya Creative Commons Attribution-Noncommercial-Share Alike 3.0 Unported license.
Version 1176

Manage Users, Groups, and Permissions
Novell Training S
ervices (en) 15 April 2009
S E C T I O N 6 Manage Users, Groups, and Permissions
Linux is a multiuser system. In other words, several users can work on the system at the same time. For this reason the system must be able to uniquely identify all users. In this section, you learn how to manage your user accounts and their permissions.
Objectives
1. “Manage User and Group Accounts with YaST” on page 178
2. “Describe Basic Linux User Security Features” on page 187
3. “Manage User and Group Accounts from the Command Line” on page 194
4. “Manage File Permissions and Ownership” on page 202
5. “Ensure File System Security” on page 210
Copyright © 2010 Novell, Inc. Copying or distributing all or part of this manual is protected bya Creative Commons Attribution-Noncommercial-Share Alike 3.0 Unported license.
177Version 1

SUSE Linux Enterprise 11 Fundamentals / Manual
Novell Training S
ervices (en) 15 April 2009
Objective 1 Manage User and Group Accounts with YaST
With YaST, you can manage users and groups. To do this, you need to understand the following:
“Basics About Users and Groups” on page 178
“User and Group Administration with YaST” on page 178
“Manage User Accounts with YaST” on page 186
Basics About Users and Groups
One of the main characteristics of a Linux operating system is its ability to handle several users at the same time (multiuser) and to allow these users to perform several tasks on the same computer simultaneously (multitasking).
For this reason the system must be able to uniquely identify all users. To achieve this, every user must log in with the following:
A user name
A password
As the operating system can handle numbers much better than strings, users are handled internally as numbers. The number which a user receives is a UID (User ID).
Every Linux system has a privileged user, the user root. This user always has the UID 0. This is the administrator of the system.
Users can be grouped together based on shared characteristics or activities. For example:
Normal users are usually in the group users.
All users who intend to create web pages can be placed in the group webedit.
Of course, file permissions for the directory in which the web pages are located must be set so that the group webedit is able to write (save files).
As with users, each group is also allocated a number internally called the GID (Group ID), and can be one of the following types:
Normal groups
Groups used by the system
The root group (GID = 0)
User and Group Administration with YaST
You can access YaST user and group account administration in the two ways:
From the YaST Control Center, select Security and Users > User and Group Management.
or
From a terminal window, enter yast2 users or yast2 groups.
Copyright © 2010 Novell, Inc. Copying or distributing all or part of this manual is protected bya Creative Commons Attribution-Noncommercial-Share Alike 3.0 Unported license.
Version 1178

Manage Users, Groups, and Permissions
Novell Training S
ervices (en) 15 April 2009
If you have selected LDAP for authentication during the installation of the SUSE Linux Enterprise 11, you are prompted for the LDAP server administrator password.
You can switch back and forth between administering users and administering groups by selecting the Users and Groups radio buttons at the top of the module window.
User Administration
The user account management window lists the existing user accounts (as in the following):
Figure 6-1
A list of users (accounts on your server) appears with information such as login name, full name, UID, and associated groups included for each user.
Select Set Filter; then select one of the following to change the users listed:
Local Users. User accounts you have created on your local server for logging into the server.
System Users. User accounts created by the system for use with services and applications.
Copyright © 2010 Novell, Inc. Copying or distributing all or part of this manual is protected bya Creative Commons Attribution-Noncommercial-Share Alike 3.0 Unported license.
179Version 1

SUSE Linux Enterprise 11 Fundamentals / Manual
Novell Training S
ervices (en) 15 April 2009
Custom. A customized view of users based on the settings configured with Customize Filter.
Customize Filter. This option lets you combine listed user sets (such as Local Users and System Users) to display a customized view (with Custom) of the users list.
Additional sets of users (such as LDAP users) are added to the Set Filter drop-down list as you configure and start services on your server.
To create a new user account (or edit an existing account), do the following:
1. Click Add or Edit.
The following appears:
Figure 6-2
2. Enter or edit information in the following fields:
User’s Full Name. Enter a real user name (such as Geeko Chameleon).
Username. Enter a user name that is used to log in to the system (such as geeko).
Password and Confirm Password. Enter and re-enter a password for the user account.
When entering a password, distinguish between uppercase and lowercase letters.
Valid password characters include letters, digits, blanks, and #*,.;:._-+!$%&/|?{[()]}=.
Copyright © 2010 Novell, Inc. Copying or distributing all or part of this manual is protected bya Creative Commons Attribution-Noncommercial-Share Alike 3.0 Unported license.
Version 1180

Manage Users, Groups, and Permissions
Novell Training S
ervices (en) 15 April 2009
The password should not contain any special characters (such as accented characters), because you might find it difficult to type these characters on a different keyboard layout when logging in from another country.
With the current password encryption (Blowfish), the password length should be between 5 and 72 characters.
To set the properties of the user (such as the UID, the home directory, the login shell, group affiliation, and additional user account comments), do the following:
1. Select the Details tab. The following dialog appears:
Figure 6-3
2. Enter or edit information in the following fields:
User ID (uid). For normal users, this defaults to a UID greater than 999 because the lower UIDs are used by the system for special purposes and pseudo logins.
If you change the UID of an existing user, the permissions of the files this user owns must be changed. This is done automatically for the files in the user's home directory, but not for files located elsewhere.
NOTE: If this does not happen automatically, you (as root) can change the permissions of the user files in the home directory by enteringchown -R username /home/username.
Copyright © 2010 Novell, Inc. Copying or distributing all or part of this manual is protected bya Creative Commons Attribution-Noncommercial-Share Alike 3.0 Unported license.
181Version 1

SUSE Linux Enterprise 11 Fundamentals / Manual
Novell Training S
ervices (en) 15 April 2009
Home Directory. The home directory of the user. On a default installation of SLE 11, this is /home/username.
You can select an existing directory by selecting Browse.
Additional User Information. This field can contain up to three parts separated by commas. It is often used to enter office,work phone,home phone.
This information is displayed when you use the finger command on this user.
Login Shell. From the drop-down list select the default login shell for this user from the shells installed on your system.
Default Group. This is the primary group to which the user belongs. Select a group from the list of all groups configured on your system.
Groups. From the list, select all additional memberships you want to assign to the user. These are the secondary groups to which the user belongs.
To set various password parameters (such as duration of a password), do the following:
1. Select the Password Settings tab. The following appears:
Figure 6-4
2. Enter or edit information in the following fields:
Days before Password Expiration to Issue Warning. Enter the number of days before password expiration that a warning is issued to users.
Copyright © 2010 Novell, Inc. Copying or distributing all or part of this manual is protected bya Creative Commons Attribution-Noncommercial-Share Alike 3.0 Unported license.
Version 1182

Manage Users, Groups, and Permissions
Novell Training S
ervices (en) 15 April 2009
Enter -1 to disable the warning.
Days after Password Expires with Usable Login. Enter the number of days after the password expires that users can continue to log in.
Enter -1 for unlimited access.
Maximum Number of Days for the Same Password. Enter the number of days a user can use the same password before it expires.
Minimum Number of days for the Same Password. Enter the minimum age of a password before a user can change it.
Expiration Date. Enter the date when the account expires. The date must be in the format YYYY-MM-DD.
Leave the field empty if the account never expires.
Group Administration
To administer groups, do the following:
1. Select the Groups tab.
Figure 6-5
A list of groups appears with information such as group name, Group ID (GID), and group members.
Copyright © 2010 Novell, Inc. Copying or distributing all or part of this manual is protected bya Creative Commons Attribution-Noncommercial-Share Alike 3.0 Unported license.
183Version 1

SUSE Linux Enterprise 11 Fundamentals / Manual
Novell Training S
ervices (en) 15 April 2009
Select Set Filter; then select one of the following to change the groups listed:
Local Groups. Groups created on your local server to provide permissions for members assigned to the group.
System Groups. Groups created by the system for use with services and applications.
Custom. A customized view of groups based on the settings configured with Customize Filter.
Customize Filter. This option lets you combine listed group sets (such as Local Groups and System Groups) to display a customized view (with Custom) of the groups list
Additional sets of groups (such as LDAP) are added to the Set Filter drop-down list as you configure and start services on your server.
To create a new group or edit an existing group, do the following:
1. Click Add or Edit.
The following appears when you select Edit:
Figure 6-6
2. Enter or edit information in the following fields:
Group Name. The name of the group. Avoid long names. Normal name lengths are between two and eight characters.
Copyright © 2010 Novell, Inc. Copying or distributing all or part of this manual is protected bya Creative Commons Attribution-Noncommercial-Share Alike 3.0 Unported license.
Version 1184

Manage Users, Groups, and Permissions
Novell Training S
ervices (en) 15 April 2009
Group ID (gid). The GID number assigned to the group. The number must be a value between 0 and 60000. GIDs to 99 represent system groups. GIDs beyond 99 can be used for normal users. YaST warns you if you try to use a GID that is already in use.
Password (optional). Require the members of the group to identify themselves while switching to this group (see man newgrp). To do this, assign a password.
For security reasons, the password is represented by asterisks (“*”).
Confirm Password. Enter the password a second time to avoid typing errors.
Group Members. Select which users should be members of this group.
A second list appears (when you select Edit) that shows users for which this group is the default group. This list cannot be edited from YaST.
3. When you finish entering or editing the group information, click OK. You are returned to the Group Administration dialog.
4. Save the configuration settings by selecting OK.
The information you enter when creating or editing users and groups with YaST is saved to the following user administration files:
/etc/passwd
/etc/shadow
/etc/group
Copyright © 2010 Novell, Inc. Copying or distributing all or part of this manual is protected bya Creative Commons Attribution-Noncommercial-Share Alike 3.0 Unported license.
185Version 1

SUSE Linux Enterprise 11 Fundamentals / Manual
Novell Training S
ervices (en) 15 April 2009
Exercise 6-1 Manage User Accounts with YaST
In this exercise, you create and remove a user account with the YaST User Management module.
You will find this exercise in the workbook.
(End of Exercise)
Copyright © 2010 Novell, Inc. Copying or distributing all or part of this manual is protected bya Creative Commons Attribution-Noncommercial-Share Alike 3.0 Unported license.
Version 1186

Manage Users, Groups, and Permissions
Novell Training S
ervices (en) 15 April 2009
Objective 2 Describe Basic Linux User Security Features
To maintain an environment where data and applications are secure, you need to understand the following:
“Users and Groups” on page 187
“Check User and Group Information on Your Server” on page 193
Users and Groups
Because Linux is a multiuser system, several users can work on the system at the same time. For this reason, the system uniquely identifies all users through user accounts that require a user name and password to log in to the system.
In addition, Linux lets you place users who require the same type of access privileges to data and applications, into a group.
To manage users and groups, you need to know the following:
“User and Group ID Numbers” on page 187
“Regular vs. System Users” on page 189
“User Accounts and Home Directories” on page 189
“User and Group Configuration Files” on page 189
User and Group ID Numbers
Because an operating system can handle numbers much better than strings, users and groups are administered as numbers on a Linux system.
The number which a user receives is called a User ID (UID). Every Linux system has a privileged user, the user root. root is the administrator of the system. This user always has a UID of 0. UID numbering for normal users starts (by default) at 1000 for SUSE Linux.
As with users, each group is also allocated a number called the Group ID (GID). Normal users are usually included in the group users. Other groups also exist (and can be created) for special roles or tasks.
For example, all users who intend to create web pages can be placed in the group webedit. Of course, file permissions for the directory in which the web pages are located must be set so that members of the group webedit are able to write and read files.
Using the id Command
You can use the id command to display information about a user’s UID and which groups she is assigned to. For example, to obtain information about user geeko, enter
id geeko
Copyright © 2010 Novell, Inc. Copying or distributing all or part of this manual is protected bya Creative Commons Attribution-Noncommercial-Share Alike 3.0 Unported license.
187Version 1

SUSE Linux Enterprise 11 Fundamentals / Manual
Novell Training S
ervices (en) 15 April 2009
The command output includes the following:
User ID: uid=1000(geeko)
Current default (effective) group: gid=100(users)
All groups of which geeko is a member: groups=16(dialout), 33(video), 100(users).
Using the groups Command
If you want information on the groups in which you are a member, enter
groups
You can specify a particular user by entering
groups user
For example, if you entered groups geeko, you would receive this output:
geeko : users dialout video
This means user geeko is part of the groups users, dialout, and video.
Using the finger Command
To display additional information about local users, such as login ID, full name, home directory path, shell used, and last login, enter finger user. As an example, enter
finger geeko
Your output would look similar to this:
Figure 6-7
Copyright © 2010 Novell, Inc. Copying or distributing all or part of this manual is protected bya Creative Commons Attribution-Noncommercial-Share Alike 3.0 Unported license.
Version 1188

Manage Users, Groups, and Permissions
Novell Training S
ervices (en) 15 April 2009
Regular vs. System Users
In a Linux operating system, there are two basic kinds of user accounts:
Regular (normal) users. These are user accounts you create that allow users to log in to the Linux environment. This type of login gives users a secure environment for accessing data and applications.
These user accounts are managed by the system administrator.
System users. These are user accounts created during installation that are used by services, utilities, and other applications to run effectively on the server.
These users do not need any maintenance.
All users are stored in the /etc/passwd and /etc/shadow files.
User Accounts and Home Directories
Each user has a user account identified by a login name and a personal password for logging in to the system.
By having user accounts, you are able to protect a user’s personal data from being modified, viewed, or tampered with by other users. Each user can set up his or her own working environment and always find it unchanged when the user logs back in.
As part of these security measures, each user in the system has a separate directory in the /home directory.
The exception to this rule is the account root. It has its own home directory in /root.
Home directories allow personal data and desktop settings to be secured for user access only.
NOTE: You should avoid using the root account when performing day-to-day tasks that do not involve system management.
User and Group Configuration Files
The Linux system stores all user and group configuration data in the following files:
/etc/passwd
/etc/shadow
/etc/group
NOTE: Whenever possible, you should not modify these files with an editor. Instead use the Security and Users modules provided in YaST or the command line tools described in “Manage User and Group Accounts from the Command Line” on page 194.
Modifying these files with an editor can lead to errors (especially in /etc/shadow), such as a user—including the user root—no longer being able to log in.
Copyright © 2010 Novell, Inc. Copying or distributing all or part of this manual is protected bya Creative Commons Attribution-Noncommercial-Share Alike 3.0 Unported license.
189Version 1

SUSE Linux Enterprise 11 Fundamentals / Manual
Novell Training S
ervices (en) 15 April 2009
/etc/passwd File
The /etc/passwd file stores user information such as the user name, the UID, the home directory, and the login shell.
In the past, /etc/passwd also contained the encrypted password. However, because the file needs to be readable by all (e.g., to show user and group names when using ls -l), the encrypted password is now stored in /etc/shadow, which is only readable by root and members of the shadow group.
The following is an example of an /etc/password file.
Figure 6-8
/etc/shadow File
The /etc/shadow file stores encrypted user passwords and password expiration information. Most Linux systems use shadow passwords. The file can only be changed and read by the user root and members of the shadow group. The following is an excerpt from a sample /etc/shadow file:
Copyright © 2010 Novell, Inc. Copying or distributing all or part of this manual is protected bya Creative Commons Attribution-Noncommercial-Share Alike 3.0 Unported license.
Version 1190

Manage Users, Groups, and Permissions
Novell Training S
ervices (en) 15 April 2009
Figure 6-9
Each line in the /etc/shadow file belongs to one user and contains the following fields:
Figure 6-10
The above illustration shows the entry for the user geeko with an encrypted password. The plain text password is novell.
The encrypted password is coded with the Blowfish function. The encrypted word consists of letters, digits, and some special characters. If an invalid character occurs in the password field (such as “*” or “!”), that user has an invalid password.
Many users, such as wwwrun (Apache Web server) or bin, have an asterisk (“*”) in the password field. This means that these users cannot log in to the system but are needed for special applications.
If the password field is empty, then the user can log in to the system without entering a password. A password should always be set in a Linux system.
The information at the end of each line determines some limits:
Last Change. Date of last password change. The number represents the number of days since January 1, 1970.
Next Possible Change. Minimum age of a password before a user can change it.
Next Obligatory Change. Number of days a user can use the same password before it expires.
Copyright © 2010 Novell, Inc. Copying or distributing all or part of this manual is protected bya Creative Commons Attribution-Noncommercial-Share Alike 3.0 Unported license.
191Version 1

SUSE Linux Enterprise 11 Fundamentals / Manual
Novell Training S
ervices (en) 15 April 2009
Warning. Number of days before password expiration that a warning is issued to users.
Enter -1 to disable the warning.
Limit. Number of days after the password expires that the user can continue to log in.
Enter -1 for unlimited access. (This does not make sense, of course.)
Lock. Date when the account expires. The date must be in the format YYYY-MM-DD. Leave the field empty if the account never expires.
The last field in /etc/shadow is reserved and currently not in use.
/etc/group File
The /etc/group file stores group information. The following is an excerpt from the file:
Figure 6-11
Each line in the file represents a single group record, and contains the group name, the GID (group ID), and the members of the group. For example
dialout:x:15:bob,geeko,tux
dialout - Group name
x - represents the password
15 - Group ID
bob,geeko,tux - Group members
The /etc/groups file shows secondary group memberships but does not identify the primary group for a user.
Copyright © 2010 Novell, Inc. Copying or distributing all or part of this manual is protected bya Creative Commons Attribution-Noncommercial-Share Alike 3.0 Unported license.
Version 1192

Manage Users, Groups, and Permissions
Novell Training S
ervices (en) 15 April 2009
Exercise 6-2 Check User and Group Information on Your Server
In this exercise, you write down the GIDs of some groups and the UIDs of some users. You also switch to user root with the su command.
You will find this exercise in the workbook.
(End of Exercise)
Copyright © 2010 Novell, Inc. Copying or distributing all or part of this manual is protected bya Creative Commons Attribution-Noncommercial-Share Alike 3.0 Unported license.
193Version 1

SUSE Linux Enterprise 11 Fundamentals / Manual
Novell Training S
ervices (en) 15 April 2009
Objective 3 Manage User and Group Accounts from the Command Line
You can use commands to perform the same user and group management tasks available with YaST. In this objective you will learn how to:
“Manage User Accounts from the Command Line” on page 194
“Manage Groups from the Command Line” on page 198
“Create Text Login Messages” on page 199
“Create and Manage Users and Groups from the Command Line” on page 201
Manage User Accounts from the Command Line
The user root can use the following commands to perform the same user management tasks available with YaST (and some tasks not available with YaST):
useradd
userdel
usermod
useradd Command
You can create a new user account with the useradd command. If no option is specified, the useradd command creates a user without a home directory and without a valid password.
The following are the most important options of the useradd command:
-m. This option automatically generates the home directory for the user. Without further arguments, the directory is created under /home/.
In addition, several files and directories are copied to this directory. The /etc/skel/ directory (from skeleton) is used as a template for the user home directory.
-c. When creating a new user, you can enter text for the comment field by using the -c (comment) option.
-u. This option specifies the UID of the new account. If this option is not given, the next free UID is used (at maximum 60000).
-g. This option defines the primary group of the user. You can specify either the GID or the name of the group.
-e. The option -e (expire date) lets you set an expiration date for the user account, in the form of YYYY-MM-DD, as in the following:
useradd -m -e 2009-09-15 geeko
-p. Use this option to specify an encrypted password.
You can display a description of additional options by entering man 8 useradd.
After adding a new user, you need to assign a password. To do so, you use the passwd command. Enter the following:
Copyright © 2010 Novell, Inc. Copying or distributing all or part of this manual is protected bya Creative Commons Attribution-Noncommercial-Share Alike 3.0 Unported license.
Version 1194

Manage Users, Groups, and Permissions
Novell Training S
ervices (en) 15 April 2009
passwd geeko
You will be prompted for a new password and will be asked to confirm it.
When creating a user account, the necessary standard configuration information (effective group, location of the home directory, default shell, etc.) is derived from the /etc/default/useradd and /etc/login.defs files.
The following is an example of the /etc/default/useradd file:
Figure 6-12
The variables mean
GROUP. The primary group the user belongs to.
HOME. Path where the home directories are stored.
INACTIVE. Number of days of inactivity after a password has expired before the account is locked (-1 disables this feature).
EXPIRE. Date (days since January 1, 1970) when an account will expire.
SHELL. Path of the login shell.
SKEL. Path of the home directory skeleton. The /etc/skel directory contains files and directories that are automatically copied over to a new user's home directory when the user is created by the useradd program.
GROUPS. Other groups the user belongs to.
CREATE_MAIL_SPOOL. Specifies whether a mail spool directory is created automatically.
userdel Command
This command lets you delete an existing user account. It provides a single option -r, which deletes the user’s home directory and the user’s account.
Before using userdel -r, it is important that you determine the user’s UID (id user). The UID enables you to locate files outside the user’s home directory that are assigned to the user (such as /var/mail/$USER).
Copyright © 2010 Novell, Inc. Copying or distributing all or part of this manual is protected bya Creative Commons Attribution-Noncommercial-Share Alike 3.0 Unported license.
195Version 1

SUSE Linux Enterprise 11 Fundamentals / Manual
Novell Training S
ervices (en) 15 April 2009
To delete these files, enter
find / -uid user_ID -exec rm {} \;
usermod Command
This command lets you modify settings (such as UID, standard shell, home directory, and primary group) for an existing user account.
The usermod options are basically the same as those for the useradd command.
The following are examples:
Change the home directory:
usermod -d /data/geeko -m geeko
Change the UID:
usermod -u 1001 geeko
passwd Command
You can change a user's password with the passwd command. If users enter passwd without a username as an argument, they can change their own password.
Besides allowing for password changes, the passwd command provides the following features:
Locking a user account: With the -l (lock) option, a user can be locked out. Notice that after the account is locked, the password begins with an exclamation mark “!”. With the -u (unlock) option, the user’s account can be reactivated:
Figure 6-13
Listing the status of a user account: The -S option lists the status of a user account:
Copyright © 2010 Novell, Inc. Copying or distributing all or part of this manual is protected bya Creative Commons Attribution-Noncommercial-Share Alike 3.0 Unported license.
Version 1196

Manage Users, Groups, and Permissions
Novell Training S
ervices (en) 15 April 2009
Figure 6-14
The status follows directly after the username. In the above example,
PS means that this is a valid password
02/06/2009 is the date of the last password change
0 is the minimum length of validity
99999 is the maximum length of validity
7 signifies the warning periods
-1 signifies the inactivity periods when a password expires
Other options: LK (locked) means that the user is unable to log in and NP means there is no password.
Changing password times: You can change password times by using the following options:
Table 6-1 Options for Changing Password Times
The following is an example:
passwd -x 30 -w 5 geeko
In this example, the password of the user geeko remains valid for 30 days. After this time, user geeko needs to change his password. Geeko receives a warning 5 days before password expiration.
Option Description
-i number Disable an account after the password has been expired for number of days.
-n number Sets the minimum number of days before a password can be changed.
-w number Warns the user that in number of days his password will expire.
-x number Sets the maximum number of days a password remains valid. After number of days, the password must be changed.
Copyright © 2010 Novell, Inc. Copying or distributing all or part of this manual is protected bya Creative Commons Attribution-Noncommercial-Share Alike 3.0 Unported license.
197Version 1

SUSE Linux Enterprise 11 Fundamentals / Manual
Novell Training S
ervices (en) 15 April 2009
/etc/default/passwd File
When you use the passwd command to establish or change the password of a user account, the /etc/default/passwd file is checked for the encryption method to be used:
Figure 6-15
The password encryption method is set in the CRYPT variable. By default, it is set to des. Other possible encryption methods are md5 and blowfish. The advantage of des is its compatibility, but blowfish has more options and is the only algorithm that allows you to use passwords longer than eight characters. md5 should be avoided, because it lacks security.
Manage Groups from the Command Line
You can use the following commands to perform the same group management tasks available with YaST (and some tasks not available with YaST):
NOTE: You need to be logged in as root (or switch to root by entering su -) to use these commands.
groupadd. You can create a new group by entering groupadd group_name. In this case, the next free GID is used.
Use the -g option (such as groupadd -g 200 sports) to specify a GID.
Use the -p option to specify an encrypted password. You can use the mkpasswd command to create the encrypted password.
groupdel. You can delete a group by entering groupdel group_name. There are no options for this command.
Copyright © 2010 Novell, Inc. Copying or distributing all or part of this manual is protected bya Creative Commons Attribution-Noncommercial-Share Alike 3.0 Unported license.
Version 1198

Manage Users, Groups, and Permissions
Novell Training S
ervices (en) 15 April 2009
You can only delete a group if no user has this group assigned as a primary group.
groupmod. You can modify the settings (such as GID, group name, and users) for an existing group.
The following are examples:
Change the GID:
groupmod -g 201 sports
Change the group name from sports to water:
groupmod -n water sports
Add the user geeko to the group:
groupmod -A geeko water
gpasswd. Change passwords for group accounts. Only the administrator may change the password for any group. The group password can be removed with the -r option.
NOTE: You can learn more about these commands by referring to the online manual pages (such as man groupadd) or online help page (such as groupadd --help).
newgrp. Change the effective group of the executing user. Changing the effective group is only required if you want to create files and directories with this group membership.Note that sg is a symbolic link to newgrp.
Figure 6-16
In this example you can see that the current group (users) is replaced with a new group (video).
A password is requested if the group has a password and the user is not listed in the group file as being a member of that group.
Create Text Login Messages
You can create text login messages that are useful for displaying information when a user logs in from a terminal window or a virtual terminal, or logs in remotely (using as an ssh login, for example).
You can modify the following files to provide these messages:
/etc/issue. You can edit this file to configure an initial message for users logging in to the system.
The following is an example of a default /etc/issue file:
Copyright © 2010 Novell, Inc. Copying or distributing all or part of this manual is protected bya Creative Commons Attribution-Noncommercial-Share Alike 3.0 Unported license.
199Version 1

SUSE Linux Enterprise 11 Fundamentals / Manual
Novell Training S
ervices (en) 15 April 2009
Figure 6-17
/etc/issue.net. Edit this file to configure an initial message for users logging in to the network from their workstations.
/etc/motd. Edit this file to configure an initial message of the day.
Make sure you add one or two empty lines at the end of the messages, or it will run into the command line prompt.
Copyright © 2010 Novell, Inc. Copying or distributing all or part of this manual is protected bya Creative Commons Attribution-Noncommercial-Share Alike 3.0 Unported license.
Version 1200

Manage Users, Groups, and Permissions
Novell Training S
ervices (en) 15 April 2009
Exercise 6-3 Create and Manage Users and Groups from the Command Line
In this exercise, you add and remove a user from the command line.
You will find this exercise in the workbook.
(End of Exercise)
Copyright © 2010 Novell, Inc. Copying or distributing all or part of this manual is protected bya Creative Commons Attribution-Noncommercial-Share Alike 3.0 Unported license.
201Version 1

SUSE Linux Enterprise 11 Fundamentals / Manual
Novell Training S
ervices (en) 15 April 2009
Objective 4 Manage File Permissions and Ownership
You can change the current values associated with ownership and permissions by knowing how to do the following:
“Understand File Permissions” on page 202
“Change File Permissions with chmod” on page 204
“Change File Ownership with chown and chgrp” on page 205
“Manage File Permissions and Ownership” on page 207
“Modify Default Access Permissions with umask” on page 207
“Configure Special File Permissions” on page 207
Understand File Permissions
You can use the ls -l command to display the contents of the current directory with the assigned permissions for each file or subdirectory.
For example, to display the permissions for the quarterly-1 file, you would enter
ls -l quarterly-1
The output might look like this:
Figure 6-18
Look at the first ten characters of the output (“-rw-r--r--”). The first character (“-”) is not of interest here, because it indicates the type of the file:
-. Normal file
d. Directory
l. Link
The remaining nine characters show the file permissions.
You can assign the following permissions to a file or directory:
Read (r). This permission allows the file to be read or the contents of a directory to be listed.
Write (w). This permission allows a file to be modified. It allows files to be created or deleted within a directory.
Execute (x). This permission allows a file to be executed.
If a permission is set, the character is shown. Otherwise a “-” appears.
Copyright © 2010 Novell, Inc. Copying or distributing all or part of this manual is protected bya Creative Commons Attribution-Noncommercial-Share Alike 3.0 Unported license.
Version 1202

Manage Users, Groups, and Permissions
Novell Training S
ervices (en) 15 April 2009
The permission characters are grouped (“rwx rwx rwx”):
Characters 1 to 3. These represent the permissions of the file owner. The x permission on a directory is required to be able to change into that directory.
Characters 4 to 6. These represent the permissions of the owning group.
Characters 7 to 9. These represent the permissions of all other users.
Each file (and directory) can belong to only one user and one group. The name of the file owner (geeko) is shown in the ls output next to the file permissions. The name of the owning group (users) is shown next to the file owner.
View Permissions with Nautilus
You can also view permissions, owner, and group from the Nautilus file manager.
1. Right-click the icon of the file you want to look at.
2. Select Properties from the pop-up menu.
3. Select the Permissions tab.
Figure 6-19
From this dialog, you can change the Read and Write permissions for Owner, Group, and Others by selecting the appropriate option.
Copyright © 2010 Novell, Inc. Copying or distributing all or part of this manual is protected bya Creative Commons Attribution-Noncommercial-Share Alike 3.0 Unported license.
203Version 1

SUSE Linux Enterprise 11 Fundamentals / Manual
Novell Training S
ervices (en) 15 April 2009
If you have the appropriate permissions, you can also modify the user and group ownership of the file or directory by entering a user or group in the appropriate field.
Change File Permissions with chmod
You can use the chmod command to add (“+”) or remove (“-”) permissions. Both the owner of a file and root can use this command.
There are options to change the permissions for the owner (“u”), group (“g”), other (“o”), or all (“a”).
The following table lists chmod command options:
Table 6-2
In the following example, the user geeko allows the other members of the group users (g) to write (w) to the hello.txt file by entering the following command:
chmod g+w hello.txt
The output might look something like the following:
Figure 6-20
With the option -R (recursive) and a specified directory, you can change the access permissions of all files and subdirectories under the specified directory.
Besides using letters (rwx), you can also use the octal way of representing the permission letters with groups of numbers.
Every file and directory in a Linux system has a numerical permission value assigned to it. This value has three digits.
Example Result
chmod u+x The owner is given permission to execute the file.
chmod g=rw All group members can read and write.
chmod u=rwx The owner receives all permissions.
chmod u=rwx,g=rw,o=r All permissions for the owner, read and write for the group, read for all other users.
chmod +x All users (owner, group, others) receive executable permission (depending on umask).
chmod a+x All users (owner, group, others) receive executable permission (a for all).
Copyright © 2010 Novell, Inc. Copying or distributing all or part of this manual is protected bya Creative Commons Attribution-Noncommercial-Share Alike 3.0 Unported license.
Version 1204

Manage Users, Groups, and Permissions
Novell Training S
ervices (en) 15 April 2009
The first digit represents the permissions assigned to the file or directory owner. The second digit represents the permissions assigned to the group associated with the file or directory. The third digit represents the permissions assigned to others.
Each digit is the sum of the following three values assigned to it:
Read: 4
Write: 2
Execute: 1
For example, suppose a file named myfile.txt has 754 permissions assigned to it.
This means the owner of the file has read, write, and execute permissions (4+2+1), the group associated with the file has read and execute permissions (4+1), and others have read permissions (4).
By using number equivalents, you can add the numbers together, as in the following:
Table 6-3
The following are examples of using numbers instead of letters:
Table 6-4
Change File Ownership with chown and chgrp
The user root can use the chown command to change the user and group affiliation of a file by using the following syntax:
chown new_user.new_group file
To change only the owner, not the group, you can use the following command syntax:
chown new_user file
To change only the group, not the user, you can use the following command syntax:
chown .new_group file
Owner Group Others
rwx r-x r--
421 (4+2+1=7) 4-1 (4+1=5) 4-- (4)
Example Result
chmod 754 hello.txt All permissions for the owner, read and execute for the group, read for all other users (rwx r-x r--).
chmod 777 hello.txt All users (user, group, others) receive all permissions (rwx rwx rwx).
Copyright © 2010 Novell, Inc. Copying or distributing all or part of this manual is protected bya Creative Commons Attribution-Noncommercial-Share Alike 3.0 Unported license.
205Version 1

SUSE Linux Enterprise 11 Fundamentals / Manual
Novell Training S
ervices (en) 15 April 2009
As root, you can also change the group affiliation of a file with the chgrp command using the following syntax:
chgrp new_group file
A normal user can use the chown command to allocate a file that he owns to a new group by using the following syntax:
chown .new_group file
The user can also do the same with chgrp using the following syntax:
chgrp new_group file
The user can only change the group affiliation of the file that he owns if he is a member of the new group.
In the following example, root changes the ownership of the hello.txt file from geeko to the user tux by entering chown tux.users hello.txt
Figure 6-21
In the following example, chown is used to change access to the list.txt file from members of the advanced group to members of the users group:
Figure 6-22
Of course, root and the file owner continue to have rights to access the file.
Although the group has changed, the owner permissions remain the same.
Copyright © 2010 Novell, Inc. Copying or distributing all or part of this manual is protected bya Creative Commons Attribution-Noncommercial-Share Alike 3.0 Unported license.
Version 1206

Manage Users, Groups, and Permissions
Novell Training S
ervices (en) 15 April 2009
Exercise 6-4 Manage File Permissions and Ownership
In this exercise, you create directories with different permissions.
You will find this exercise in the workbook.
(End of Exercise)
Modify Default Access Permissions with umask
If the default settings are not changed, files are created with the access mode 666 and directories with 777.
The permissions set in the umask are subtracted from the default permissions.
For example, entering umask 022 has the following result:
Table 6-5
By entering umask 077 you restrict access to the owner and root only; the group and others do not have any access permissions.
Enter umask without any parameter to show the current value of the umask. For example:
A leading zero can be used to set special file permissions. But for security reasons we strongly recommend against this practice.
The default settings for umask are read from the /etc/login.defs file and are applied by pam_umask. If you want the setting to be user-specific, enter the value of umask in the .bashrc file in the home directory of the respective user.
Configure Special File Permissions
The following attributes are used for special circumstances:
Directories Files
Default Permissions rwx rwx rwx
7 7 7
rw- rw- rw-
6 6 6
umask --- -w- -w-
0 2 2
--- -w- -w-
0 2 2
Result rwx r-x r-x
7 5 5
rw- r-- r--
6 4 4
Copyright © 2010 Novell, Inc. Copying or distributing all or part of this manual is protected bya Creative Commons Attribution-Noncommercial-Share Alike 3.0 Unported license.
207Version 1

SUSE Linux Enterprise 11 Fundamentals / Manual
Novell Training S
ervices (en) 15 April 2009
Table 6-6
You set the sticky bit with chmod, using one of the following:
Permissions of others (such as chmod o+t /tmp)
Numerically (such as chmod 1777 /tmp)
The sticky bit is listed in the permissions for Others (t), as in the following:
The following is an example for SUID:
Each user is allowed to change his password, but root permissions are needed to write it into the /etc/shadow file.
The following is an example for SGID:
With wall, you can send messages to all virtual terminals. If you use wall, this command is executed with the permissions of the group tty.
Letter Number Name Files Directories
t 1 Sticky bit Not applicable. A user can only delete files when the user is the owner, or when the user is root or owner of the directory.
This is usually applied to the /tmp/ directory.
s 2 SGID (set GroupID)
When a program is run, this sets the group ID of the process to that of the group of the file.
Files created in this directory belong to the group to which the directory belongs and not to the primary group of the user.
New directories created in this directory inherit the SGID bit.
s 4 SUID (set UserID)
Sets the user ID of the process to that of the owner of the file when the program is run.
Not applicable.
Copyright © 2010 Novell, Inc. Copying or distributing all or part of this manual is protected bya Creative Commons Attribution-Noncommercial-Share Alike 3.0 Unported license.
Version 1208

Manage Users, Groups, and Permissions
Novell Training S
ervices (en) 15 April 2009
If the SUID or SGID attributes are set, the programs are carried out with the privileges of the owner (in the example for SUID above: root) or of the group (in the example for SGID above: tty).
Administrators should be careful when setting special permissions manually, so as not to compromise security. See “How Special File Permissions Affect the Security of the System” on page 211.
Copyright © 2010 Novell, Inc. Copying or distributing all or part of this manual is protected bya Creative Commons Attribution-Noncommercial-Share Alike 3.0 Unported license.
209Version 1

SUSE Linux Enterprise 11 Fundamentals / Manual
Novell Training S
ervices (en) 15 April 2009
Objective 5 Ensure File System Security
After users have logged in to the system, what they are allowed to do is mainly determined by the security settings of the file system.
In Linux, file system security is especially important, because every resource available on the system is represented as a file.
For example, when a user tries to access the sound card to play back audio data, the access rights of the sound card are determined by the permission settings of the corresponding device file in the /dev directory.
To ensure basic file system security, you need to understand the following:
“The Basic Rules for User Write Access” on page 210
“The Basic Rules for User Read Access” on page 210
“How Special File Permissions Affect the Security of the System” on page 211
The Basic Rules for User Write Access
The file systems used in Linux are structurally UNIX file systems. They support the typical file access permissions (read, write, execute, sticky bit, SUID, SGID, etc.).
Apart from additional standard functionality, such as various time stamps, the access permissions can be administered separately for file owners, user groups, and the rest of the world (user, group, others).
As a general rule, a normal user should only have write access in the following directories:
The home directory of the user
The /tmp directory to store temporary files
Depending on the purpose of a computer, other directories can be writable by users. For example, if you install a Samba file server, a writable share needs a directory that is also writable for the Linux user the connection is mapped to.
Some device files (such as those for sound cards) might also be writable for users since applications need to send data to the corresponding devices.
The Basic Rules for User Read Access
Some files in the system should be protected from user read access. This is important for files that store passwords.
No normal user account should be able to read the content of such files. Even when the passwords in a file are encrypted, the files must be protected from any unauthorized access.
The following lists some files containing passwords on a Linux system:
/etc/shadow. This file contains user passwords in an encrypted form. Even when LDAP is used for user authentication, this file contains at least the root password.
Copyright © 2010 Novell, Inc. Copying or distributing all or part of this manual is protected bya Creative Commons Attribution-Noncommercial-Share Alike 3.0 Unported license.
Version 1210

Manage Users, Groups, and Permissions
Novell Training S
ervices (en) 15 April 2009
/etc/samba/smbpasswd. This file contains the passwords for Samba users. By default, the file permissions are set to 600.
Files with Apache passwords. The location of these files depends on your configuration. They contain passwords for authorized access to the web server.
/etc/openldap/slapd.conf. This file contains the root password for the openLDAP server.
NOTE: After installing the openldap2 package, the permissions for this file are set to 644.
/boot/grub/menu.lst. This file can contain the password for the GRUB boot loader. By default, the file permissions are set to 600.
NOTE: This list is not complete. Your system could have more password files, depending on your system configuration and your software selection.
Some password files can be readable for a nonroot account. This is normally the account under which user ID a service daemon is running.
For example, the Apache web server runs under the user id of the user wwwrun. For this reason, the password files must be readable for the user wwwrun.
In this case you have to make sure that only this daemon account is allowed to read the file and no other user.
How Special File Permissions Affect the Security of the System
Three file system permissions influence the security in a special way:
The SUID bit. If the SUID bit is set for an executable, the program is started under the user ID of the owner of the file. In most cases, this is used to allow normal users to run applications with the rights of the root users.
This bit should only be set for applications that are well tested and in cases where no other way can be used to grant access to a specific task.
An attacker could get access to the root account by exploiting an application that runs under the UID of root.
The SGID bit. If this bit is set, it lets a program run under the GID of the group the executable file belongs to. It should be used as carefully as the SUID bit.
The sticky bit. The sticky bit can influence the security of a system in a positive way. In a globally writable directory, it prevents users from deleting each other’s files that are stored in these directories.
Typical application areas for the sticky bit include directories for temporary storage (such as /tmp and /var/tmp). Such a directory must be writable by all users of a system.
However, the write permissions for a directory not only include the permission to create files and subdirectories, but also the permission to delete them, regardless of whether the user has access to the files and subdirectories.
Copyright © 2010 Novell, Inc. Copying or distributing all or part of this manual is protected bya Creative Commons Attribution-Noncommercial-Share Alike 3.0 Unported license.
211Version 1

SUSE Linux Enterprise 11 Fundamentals / Manual
Novell Training S
ervices (en) 15 April 2009
If the sticky bit is set for such a writable directory, deleting or renaming files in this directory is only possible if one of the following conditions is fulfilled:
The effective UID of the deleting or renaming process is that of the file owner.
The effective UID of the deleting or renaming process is that of the owner of the writable directory marked with the sticky bit.
The superuser root is allowed to do anything.
Copyright © 2010 Novell, Inc. Copying or distributing all or part of this manual is protected bya Creative Commons Attribution-Noncommercial-Share Alike 3.0 Unported license.
Version 1212

Manage Users, Groups, and Permissions
Novell Training S
ervices (en) 15 April 2009
Summary
Objective Summary
1. Manage User and Group Accounts with YaST
Linux is a multiuser system. For this reason, the system must be able to uniquely identify all users. This is done by assigning each user account a unique internal number: the UID (UserID).
Every Linux system has a privileged user, the user root. This user always has the UID 0.
As with users, the groups are also allocated a number internally: the GID (GroupID).
You can administer user accounts from the YaST Control Center by selecting Security and Users > User Management.
You can administer groups from the YaST Control Center by selecting Security and Users > Group Management.
The entered information is saved by YaST to the following configuration files:
/etc/passwd
/etc/shadow
/etc/group
2. Describe Basic Linux User Security Features
One of the main characteristics of a Linux operating system is its ability to handle several users at the same time (multiuser) and to allow these users to perform several tasks on the same computer simultaneously (multitasking).
To maintain an environment where data and applications are secure, you learned about the following:
File System Security Components
Users and Groups
Copyright © 2010 Novell, Inc. Copying or distributing all or part of this manual is protected bya Creative Commons Attribution-Noncommercial-Share Alike 3.0 Unported license.
213Version 1

SUSE Linux Enterprise 11 Fundamentals / Manual
Novell Training S
ervices (en) 15 April 2009
3. Manage User and Group Accounts from the Command Line
To manage Linux user accounts and groups from your SUSE Linux Enterprise Server, you learned how to do the following:
Manage User Accounts from the Command Line
Manage Groups from the Command Line
Create Text Login Messages
The most important commands to manage user and groups are:
useradd
userdel
usermod
passwd
groupadd
groupdel
groupmod
newgrp
4. Manage File Permissions and Ownership
To manage file permissions and file ownership on your SUSE Linux Enterprise Server, you learned how to do the following:
Understand File Permissions
Change File Permissions with chmod
Change File Ownership with chown and chgrp
Modify Default Access Permissions
Configure Special File Permissions
The most important commands to do this are:
chmod
chown
chgrp
umask
Objective Summary
Copyright © 2010 Novell, Inc. Copying or distributing all or part of this manual is protected bya Creative Commons Attribution-Noncommercial-Share Alike 3.0 Unported license.
Version 1214

Manage Users, Groups, and Permissions
Novell Training S
ervices (en) 15 April 2009
5. Ensure File System Security The permission settings in the file system have an important meaning to the overall system security.
You should always follow some basic rules about file system security.
A user should only have write access in the home directory and the /tmp directory.
Users should never have read access to configuration files that contain passwords.
The following special file permissions affect the security of a system:
The SUID bit
The SGID bit
The sticky bit
Objective Summary
Copyright © 2010 Novell, Inc. Copying or distributing all or part of this manual is protected bya Creative Commons Attribution-Noncommercial-Share Alike 3.0 Unported license.
215Version 1

SUSE Linux Enterprise 11 Fundamentals / Manual
Novell Training S
ervices (en) 15 April 2009
Copyright © 2010 Novell, Inc. Copying or distributing all or part of this manual is protected bya Creative Commons Attribution-Noncommercial-Share Alike 3.0 Unported license.
Version 1216

Use the vi Linux Text Editor
Novell Training S
ervices (en) 15 April 2009
S E C T I O N 7 Use the vi Linux Text Editor
A text editor is one of the most important tools a Linux system administrator uses. The purpose of this section is to introduce students to the vi editor, as this is the only editor available at all stages of the system (i.e., including the rescue system). You may use other editors as well, but this section focuses on vi.
Objectives
1. “Use the Editor vi to Edit Files” on page 218
Copyright © 2010 Novell, Inc. Copying or distributing all or part of this manual is protected bya Creative Commons Attribution-Noncommercial-Share Alike 3.0 Unported license.
217Version 1

SUSE Linux Enterprise 11 Fundamentals / Manual
Novell Training S
ervices (en) 15 April 2009
Objective 1 Use the Editor vi to Edit Files
The advantage of command line editors is that you can use them without having a graphical desktop environment installed. A large number of command line editors are available for Linux. The most frequently used editor is vi
Although many factors can be involved when selecting an editor for everyday use, the reason vi is used by most administrators is that it is available on every Linux and UNIX system. Because of this, you should be able to use vi.
In SUSE Linux Enterprise Server and Desktop, vim (vi improved) by Bram Moolenaar is the standard vi editor. When you enter vi, vim is started via a link to it.
In this objective, you learn how to do the following:
“Start vi” on page 218
“Use the Editor vi” on page 219
“Learn the Working Modes” on page 219
“Use vi to Edit Files in the Linux System” on page 221
Start vi
You can start vi by entering vi or vim, followed by various options, and the name of a file to edit, as in the following example:
vi exercise
If a file does not yet exist, it is created. The text of the file appears in an editor at the command line. This example shows the /etc/host.conf file.
Copyright © 2010 Novell, Inc. Copying or distributing all or part of this manual is protected bya Creative Commons Attribution-Noncommercial-Share Alike 3.0 Unported license.
Version 1218

Use the vi Linux Text Editor
Novell Training S
ervices (en) 15 April 2009
The “~” sign indicates lines that do not exist yet. The cursor is on the first line.
Use the Editor vi
You can move the cursor with the k, j, h, and l keys (k - one line up, j - one line down, h - to the left, l - to the right) or by using the arrow keys (Up, Down, Left, and Right).
Learn the Working Modes
In contrast to many other editors, vi is mode-oriented. When vi is first started, it is in command mode. Anything you enter in this mode is considered a command. You must switch to input mode before you can type any text. This can be frustrating to users who are unfamiliar with vi.
In addition to switching modes, you must learn which keys perform which actions because you cannot use the mouse. However, the number of commands needed for everyday work is fairly small, and you can get used to them quickly.
To enter text, you must first switch the editor to input mode by typing i (insert) or pressing the Insert key. At the bottom of the screen, you will see the message --INSERT--.
Press Esc once to take you back to the command mode. From command mode you can switch to command-line mode by entering “:”. The cursor jumps to the last line after “:” and waits for a command entry.
A command will only be carried out in command-line mode after you press Enter. Then you are automatically back in command mode.
The following is a summary of the available modes:
Command mode: When vi starts, it is automatically in this mode. In command mode, vi can be given commands. The i command puts it into insert mode and the : command switches it to command-line mode.
Insert mode: In this mode, vi accepts all input as text. Return to command mode with Esc.
Command-line mode: In this mode, vi accepts commands from the command line. Pressing Enter causes the command to be executed and automatically returns to the command mode.
You can use the following commands in command mode:
Table 7-1
Command Result
i or Insert Switches vi to insert mode.
x or Delete Deletes the character where the cursor is.
dd Deletes the line in which the cursor is located and copies it to the buffer.
D Deletes the rest of the current line from the cursor position.
Copyright © 2010 Novell, Inc. Copying or distributing all or part of this manual is protected bya Creative Commons Attribution-Noncommercial-Share Alike 3.0 Unported license.
219Version 1

SUSE Linux Enterprise 11 Fundamentals / Manual
Novell Training S
ervices (en) 15 April 2009
If you want to use a command for several units, place the corresponding number in front of the command. For example, 3x deletes three characters, 5dd deletes five lines, and 7yy copies seven lines to the buffer.
You can use the following commands in command-line mode:
Table 7-2
NOTE: If you want to configure vi, you have to edit the ~/.vimrc file. By default, this file does not exist.
yy Copies the line in which the cursor is located to the buffer.
p, P Inserts the contents of the buffer after/before current cursor position.
ZZ Saves the current file and ends vi.
u Undoes the last operation.
/pattern Searches forward from the cursor position for pattern.
?pattern Searches backward from the cursor position for pattern.
n Repeats the search in the same direction.
N Repeats the search in the opposite direction.
Command Result
:q Ends vi (if no changes were made).
:q! Ends vi without saving changes in the file.
:wq or :x Saves the current file and ends vi.
:w Saves the current file.
:w file Saves the current file under the name file. (Note: You continue editing the original file, not the new file.)
Command Result
Copyright © 2010 Novell, Inc. Copying or distributing all or part of this manual is protected bya Creative Commons Attribution-Noncommercial-Share Alike 3.0 Unported license.
Version 1220

Use the vi Linux Text Editor
Novell Training S
ervices (en) 15 April 2009
Exercise 7-1 Use vi to Edit Files in the Linux System
In this exercise, you create and edit a file with the text editor vi.
You will find this exercise in the workbook.
(End of Exercise)
Copyright © 2010 Novell, Inc. Copying or distributing all or part of this manual is protected bya Creative Commons Attribution-Noncommercial-Share Alike 3.0 Unported license.
221Version 1

SUSE Linux Enterprise 11 Fundamentals / Manual
Novell Training S
ervices (en) 15 April 2009
Summary
Objective Summary
1. Use the Editor vi to Edit Files The vi command line editor is available on every Linux and UNIX system.
vi has the following modes:
Command mode: vi can be given commands. The i command puts vi into insert mode and the : command puts vi into command-line mode.
Insert mode: vi accepts all input as text. Return to command mode with Esc.
Command-line mode: vi accepts commands from the command line. Enter causes the command to be executed and automatically switches back to the command mode.
:q! ends vi without saving changes in the file.
Copyright © 2010 Novell, Inc. Copying or distributing all or part of this manual is protected bya Creative Commons Attribution-Noncommercial-Share Alike 3.0 Unported license.
Version 1222

Manage Software for SUSE Linux Enterprise 11
Novell Training S
ervices (en) 15 April 2009
S E C T I O N 8 Manage Software for SUSE Linux Enterprise 11
In this section, you learn how to manage software packages on SUSE Linux Enterprise Server with YaST Software Manager and with the rpm and zypper commands. You are also introduced to YaST and PackageKit on SLED and their capabilities, and to patching software with zypper, rpm, the YaST Update Manager, and Novell Subscription Management Tool (SMT).
Objectives
1. “Overview of Software Management in SUSE Linux Enterprise 11” on page 224
2. “Manage Software with YaST on SLES 11” on page 227
3. “Manage Software with YaST on SLED 11” on page 234
4. “Manage RPM Software Packages” on page 240
5. “Manage Software with zypper” on page 249
6. “Update and Patch SLE” on page 254
Copyright © 2010 Novell, Inc. Copying or distributing all or part of this manual is protected bya Creative Commons Attribution-Noncommercial-Share Alike 3.0 Unported license.
223Version 1

SUSE Linux Enterprise 11 Fundamentals / Manual
Novell Training S
ervices (en) 15 April 2009
Objective 1 Overview of Software Management in SUSE Linux Enterprise 11
To understand how packages are managed in SUSE Linux Enterprise 11, you need to learn about the following components of the overall architecture:
libzypp - software management engine
Satsolver - libzypp’s package dependency resolver (solver)
RPM - package management format/system
YaST, Local RPM, YUM (Yellowdog Updater, Modified), ZLM (ZENworks Linux Manager) - repository formats
rpm, yast, zypper - command-line software management tools for system administrators
YaST, PackageKit - graphical software management tools
Here is an illustration of how they fit together:
libzypp
libzypp is the software management engine for SUSE Linux. It is a library that manages dependencies for
Products: Represent a whole product, such as SUSE Linux.
Patterns: Predefined groupings of RPMs, such as all GNOME programs, all fonts, or all Novell applications. A pattern is an installable list of packages needed for a special purpose.
Copyright © 2010 Novell, Inc. Copying or distributing all or part of this manual is protected bya Creative Commons Attribution-Noncommercial-Share Alike 3.0 Unported license.
Version 1224

Manage Software for SUSE Linux Enterprise 11
Novell Training S
ervices (en) 15 April 2009
Packages: Compressed files in rpm format that contain the file for a particular program. Some packages are already installed on your system, while others are made available for installation through repositories.
Patches: Updates to the system or to applications. Patches contain one or more packages (either full packages or patchrpm or deltarpm packages). They may also introduce dependencies on packages that are not installed yet.
Figure 8-1
SatSolver
libzypp’s package dependency solver is called SatSolver. SatSolver also includes logic that allows for architecture-related package dependency resolution.
RPM
Several software package formats are available for Linux; the most commonly used format in SUSE Linux installations is the RPM Package Manager (RPM) format.
RPM Package Manager is a popular package management system used by many Linux distributions. RPM installs, updates, uninstalls, and verifies software, and allows various queries about the installed software.
Copyright © 2010 Novell, Inc. Copying or distributing all or part of this manual is protected bya Creative Commons Attribution-Noncommercial-Share Alike 3.0 Unported license.
225Version 1

SUSE Linux Enterprise 11 Fundamentals / Manual
Novell Training S
ervices (en) 15 April 2009
Installing software in the RPM format can be done with
The CLI commands rpm, zypper, and yast
The GUI-based front ends YaST and PackageKit
The main difference is that YaST and Zypper ensure the automatic resolution of dependencies, while rpm only controls them (resolution must be performed manually).
For more information on the package management tools, see the following objectives.
Copyright © 2010 Novell, Inc. Copying or distributing all or part of this manual is protected bya Creative Commons Attribution-Noncommercial-Share Alike 3.0 Unported license.
Version 1226

Manage Software for SUSE Linux Enterprise 11
Novell Training S
ervices (en) 15 April 2009
Objective 2 Manage Software with YaST on SLES 11
YaST Software Management is a GUI front end for managing RPM packages.
As a root-level administrative tool, the YaST software management module serves as the default software management interface for SUSE Linux Enterprise Server. YaST Software Management supports the GNOME, KDE, and Ncurses interfaces - this course focuses on GNOME.
YaST Software Manager allows administrators to
“Access YaST Software Manager on the Server” on page 227
“Search for Packages Using Filters” on page 228
“Show Installation Summaries on the Server” on page 230
“View Information About a Package on the Server” on page 232
“Install Software on the Server with YaST” on page 232
“View and Resolve Package Dependencies” on page 233
Access YaST Software Manager on the Server
1. Go the main menu (Computer).
2. From the System panel on the right, select YaST.
3. Go to Software > Software Management.
The search dialog is displayed.
Copyright © 2010 Novell, Inc. Copying or distributing all or part of this manual is protected bya Creative Commons Attribution-Noncommercial-Share Alike 3.0 Unported license.
227Version 1

SUSE Linux Enterprise 11 Fundamentals / Manual
Novell Training S
ervices (en) 15 April 2009
Search for Packages Using Filters
You can view and search for packages using different filters. Just select the filter from the Filter drop-down list.
By Pattern
A pattern is an installable list of packages, e.g., the SUSE Linux Base System. Here is a list of patterns as shown in the YaST interface. The patterns with a check mark next to them are installed packages.
By Package Group
Package groups show packages by functional category; for example, all security-related packages will be grouped together. Here is an excerpt from the list as it appears in YaST:
Copyright © 2010 Novell, Inc. Copying or distributing all or part of this manual is protected bya Creative Commons Attribution-Noncommercial-Share Alike 3.0 Unported license.
Version 1228

Manage Software for SUSE Linux Enterprise 11
Novell Training S
ervices (en) 15 April 2009
By Language
By Repository
A repository is a local or remote directory containing packages, plus additional information (metadata) about these packages.
By Search criteria
The search dialog that first appears when you open the Software Manager contains a search box. It lets you search for packages that meet various criteria, such as name, summary, description, etc. If you know the name of the package, this is usually the easiest way to find it.
By Installation summary (see below).
Copyright © 2010 Novell, Inc. Copying or distributing all or part of this manual is protected bya Creative Commons Attribution-Noncommercial-Share Alike 3.0 Unported license.
229Version 1

SUSE Linux Enterprise 11 Fundamentals / Manual
Novell Training S
ervices (en) 15 April 2009
Show Installation Summaries on the Server
You can show an installation summary of packages with a certain status:
Copyright © 2010 Novell, Inc. Copying or distributing all or part of this manual is protected bya Creative Commons Attribution-Noncommercial-Share Alike 3.0 Unported license.
Version 1230

Manage Software for SUSE Linux Enterprise 11
Novell Training S
ervices (en) 15 April 2009
For example, to show all packages that have the Install status (i.e., that are to be installed), do the following:
1. Check the box next to Install.
Notice that the installation state is shown by a small symbol in front of the package name. The most commonly displayed symbols include the following:
Figure 8-2
2. Click Refresh List.
NOTE: It is good general practice to check dependencies and perform an installation summary before clicking Accept. This way you can see all the changes that will be made to your system.
3. Click Accept.
Copyright © 2010 Novell, Inc. Copying or distributing all or part of this manual is protected bya Creative Commons Attribution-Noncommercial-Share Alike 3.0 Unported license.
231Version 1

SUSE Linux Enterprise 11 Fundamentals / Manual
Novell Training S
ervices (en) 15 April 2009
View Information About a Package on the Server
YaST allows the system administrator to view a lot of information about a package, including
A summary and description
Technical data such as version, size, build, and architecture
Dependencies on other packages
File list (only for installed packages)
Change log (when and what changes were made)
To view information about a package, do the following:
1. Filter on a pattern or a package group. For example, filter on the Print Server pattern:
2. Click the pattern.
3. Select a file to display its information.
4. Move from tab to tab to display description, technical data, dependencies, versions, file list, and change log.
Install Software on the Server with YaST
1. Go to the main menu (Computer) and open YaST from the System panel on the right side.
2. Click the Software group in the left panel.
3. Double-click Software Management.
4. In the search box, type gvim and click Search.
5. Look at some of the detailed descriptions and dependencies for this package.
6. Double-click the gvim package until a green check mark appears to the left of it.
Copyright © 2010 Novell, Inc. Copying or distributing all or part of this manual is protected bya Creative Commons Attribution-Noncommercial-Share Alike 3.0 Unported license.
Version 1232

Manage Software for SUSE Linux Enterprise 11
Novell Training S
ervices (en) 15 April 2009
7. Click Accept.
YaST now automatically resolves dependencies and realizes that another packages needs to be changed/installed as a result of installing gvim:
8. Click Continue.
9. Once the package has been installed, click OK.
View and Resolve Package Dependencies
You have just seen how YaST Software Manager resolves dependencies automatically. You can manage package dependencies in different ways:
View a package’s dependencies. To do so, select a package and select the Dependencies tab below the list of packages.
Resolve package dependencies automatically (Dependencies > Autocheck). This is the default setting in the Dependencies menu:
Perform an ad hoc check anytime (Dependencies > Check Now). You should always check dependencies before performing an installation to be aware of the consequences of the installation for your system.
Reset ignored dependency conflicts (Extras > Reset Ignored Dependency Conflicts).
Generate a dependency resolver test case (Extras > Generate Dependency Resolver Test Case).
Copyright © 2010 Novell, Inc. Copying or distributing all or part of this manual is protected bya Creative Commons Attribution-Noncommercial-Share Alike 3.0 Unported license.
233Version 1

SUSE Linux Enterprise 11 Fundamentals / Manual
Novell Training S
ervices (en) 15 April 2009
Objective 3 Manage Software with YaST on SLED 11
In this objective you will learn the following:
“Use YaST Software Manager” on page 234
“Install Software with YaST Software Manager” on page 235
“Use PackageKit” on page 237
“Install Software with PackageKit” on page 237
“Manage Software with YaST” on page 238
“Install Software with PackageKit” on page 239
Use YaST Software Manager
YaST Software Manager on the SUSE Linux Enterprise Desktop (SLED) displays a different interface than on the SUSE Linux Enterprise Server (SLES). The functionality is similar, but users cannot resolve package dependencies on the desktop. A user needs root privileges to run YaST.
To access the Software Manager,
1. Select Computer> System > YaST.
2. Enter the root password (novell) when prompted and click Continue.
3. In the Groups panel on the left, click Software.
4. Click Software Management.
Copyright © 2010 Novell, Inc. Copying or distributing all or part of this manual is protected bya Creative Commons Attribution-Noncommercial-Share Alike 3.0 Unported license.
Version 1234

Manage Software for SUSE Linux Enterprise 11
Novell Training S
ervices (en) 15 April 2009
From here, you can
Filter your view of packages according to groups, patterns, languages, and repositories
View and install available software packages (Available button)
View and install upgrades (Upgrades button)
View, remove, and re-install already installed software packages (Installed button)
Install Software with YaST Software Manager
To install a package called gvim (a GUI interface for the VI text editor), do the following:
1. In the Software Manager, click the Available button.
2. In the search box towards the top right, type
gvim
Copyright © 2010 Novell, Inc. Copying or distributing all or part of this manual is protected bya Creative Commons Attribution-Noncommercial-Share Alike 3.0 Unported license.
235Version 1

SUSE Linux Enterprise 11 Fundamentals / Manual
Novell Training S
ervices (en) 15 April 2009
3. Click Install.
The Changes panel on the right shows the changes that will be made to your system when you click Apply:
4. Click Apply.
5. Insert SUSE-Linux-Enterprise-Desktop-11 11-0 (Disc 1).
6. Click OK.
The package will install now.
Copyright © 2010 Novell, Inc. Copying or distributing all or part of this manual is protected bya Creative Commons Attribution-Noncommercial-Share Alike 3.0 Unported license.
Version 1236

Manage Software for SUSE Linux Enterprise 11
Novell Training S
ervices (en) 15 April 2009
Use PackageKit
PackageKit (Add/Remove Software) is an end user tool that runs only on the SUSE Linux Enterprise Desktop. PackageKit
Is used mostly as a software update manager
Can run only on the local machine - not remotely
Allows only for simple, automatic dependency resolution, not for manual dependency overrides
Requires privilege elevation to complete an installation
NOTE: System administrators should use zypper or YaST for package management.
PackageKit allows end users to
Search the software repository
Browse through groups like Office or Multimedia to install or remove software packages
Find out more about packages like descriptions, dependencies, versions, and source information
Install Software with PackageKit
1. Go to Computer > More Applications > System.
2. Double-click Add/Remove Software.
3. In the Search box, enter
gnome-media
4. Place a check mark in the box next to the top GNOME Multimedia package.
Notice how the package icon changes to an open box with a plus sign:
5. Click Apply.
6. Enter the root password:
novell
7. Click Authenticate.
The package should now install.
8. From the System menu, select Quit to exit.
Copyright © 2010 Novell, Inc. Copying or distributing all or part of this manual is protected bya Creative Commons Attribution-Noncommercial-Share Alike 3.0 Unported license.
237Version 1

SUSE Linux Enterprise 11 Fundamentals / Manual
Novell Training S
ervices (en) 15 April 2009
Exercise 8-1 Manage Software with YaST
In this exercise, you practice installing and uninstalling software packages with the YaST Software Management module.
You will find this exercise in the workbook.
(End of Exercise)
Copyright © 2010 Novell, Inc. Copying or distributing all or part of this manual is protected bya Creative Commons Attribution-Noncommercial-Share Alike 3.0 Unported license.
Version 1238

Manage Software for SUSE Linux Enterprise 11
Novell Training S
ervices (en) 15 April 2009
Exercise 8-2 Install Software with PackageKit
In this exercise, you practice installing software packages using PackageKit (Add/Remove Software) on the SUSE Linux Enterprise Desktop.
You will find this exercise in the workbook.
(End of Exercise)
Copyright © 2010 Novell, Inc. Copying or distributing all or part of this manual is protected bya Creative Commons Attribution-Noncommercial-Share Alike 3.0 Unported license.
239Version 1

SUSE Linux Enterprise 11 Fundamentals / Manual
Novell Training S
ervices (en) 15 April 2009
Objective 4 Manage RPM Software Packages
To manage installation of RPM software packages, you need to know the following:
“RPM Components and Features” on page 240
“RPM Basics” on page 241
“Manage Software Packages with RPM” on page 242
“Manage Software with RPM” on page 248
RPM Components and Features
The basic components of RPM are listed below:
RPM Package Manager. This utility handles installing and uninstalling RPM packages.
RPM database. The RPM database works in the background of the Package Manager and contains a list of all information on all installed RPM packages.
The database keeps track of all files that are changed and created when a user installs a program. This helps the Package Manager to easily remove the same files that were originally installed.
RPM package. RPM lets you take software source code and package it into source and binary packages for users. These are called RPM packages or RPM archives.
Package label. Every RPM package includes a package label that contains information such as the software name, version, and package release number.
This information helps the Package Manager track the installed versions of software to make it easier to manage software installations on a Linux computer.
Some of the advantages of using RPM Package Manager and RPM packages include the following:
Root has a consistent method for installing programs in Linux.
Programs are easily uninstalled (because of the RPM database).
Original source archives (such as tar.gz or .tar.bz2) are included as needed and easy to verify.
RPM tools can be used to enable software installations using non-interactive scripts.
RPM tools can be used to verify that software was installed correctly.
RPM tracks dependent software, preventing deinstallation of packages needed by other packages. It also informs the administrator if required software is missing when he or she tries to install a software package.
Digital signatures are supported to verify integrity of RPM archives.
Copyright © 2010 Novell, Inc. Copying or distributing all or part of this manual is protected bya Creative Commons Attribution-Noncommercial-Share Alike 3.0 Unported license.
Version 1240

Manage Software for SUSE Linux Enterprise 11
Novell Training S
ervices (en) 15 April 2009
RPM Basics
To manage software packages with RPM, you need to understand the following:
“RPM Package File-Naming Convention” on page 241
“RPM Configuration File” on page 241
“RPM Database” on page 242
RPM Package File-Naming Convention
RPM package files use the following naming format:
software_name-software_version-release_number.architecture.rpm
Example: apache2-2.2.0-21.i586.rpm
The following describes each component of the naming format:
software_name. This is the name of the software being installed.
software_version. This is the version number of the software in the RPM package.
release_number. This is the number of times the package has been rebuilt using the same version of the software.
architecture. This indicates the architecture the package was built under (such as i586, i686, or ppc) or the type of package content.
For example, if the package has an i586 architecture, you can install it on 32-bit Intel-compatible machines that are Pentium class or higher.
If the package has a .noarch extension, it does not include any binary code.
rpm. RPM archives normally have the extension .rpm. The distribution also includes source packages, called source RPMs, which have the filename extension .src.rpm (.spm or .srpm are also possible).
NOTE: Source packages are not included in the RPM database and thus are not recorded.
RPM Configuration File
The global RPM configuration file of the rpm command is /usr/lib/rpm/rpmrc. However, when the rpm command is updated, all changes to this file are lost.
To prevent this from happening, write the changes to the /etc/rpmrc file (for the system configuration) or to the ~/.rpmrc file (for the user configuration).
Copyright © 2010 Novell, Inc. Copying or distributing all or part of this manual is protected bya Creative Commons Attribution-Noncommercial-Share Alike 3.0 Unported license.
241Version 1

SUSE Linux Enterprise 11 Fundamentals / Manual
Novell Training S
ervices (en) 15 April 2009
RPM Database
The RPM database files are stored in /var/lib/rpm/. If the /usr/ partition is 1 GB in size, this database can occupy nearly 30 MB, especially after a complete update.
If the database is much larger than expected, it is useful to rebuild the database by entering rpm --rebuilddb. Before doing this, make a backup of the old database.
The cron script suse.de-backup-rpmdb, which is stored in /etc/cron.daily/, checks daily to see if there are any changes. If so, a copy of the database is made (compressed with gzip) and stored in /var/adm/backup/rpmdb/.
The number of copies is controlled by the variable MAX_RPMDB_BACKUPS (default is 5) in /etc/sysconfig/backup.
The size of a single backup is approximately 5 MB for 1 GB in /usr.
Manage Software Packages with RPM
You can use the rpm command to manage software packages. This includes querying the RPM database for detailed information about the installed software.
The command provides the following modes for managing software packages:
Installing, uninstalling, or updating software packages
Querying the RPM database or individual RPM archives
Checking the integrity of packages
Rebuilding the RPM database
You can use the rpmbuild command to build installable RPM packages from pristine sources (rpmbuild is not covered in this course).
RPM packages contain program, configuration, and documentation files to install, and certain meta information used during installation by RPM to configure the software package. This same information is stored in the RPM database after installation for documentation purposes.
To manage software packages with RPM, you need to know how to do the following:
“Verify Package Authenticity” on page 243
“Install, Update, and Uninstall Packages” on page 243
“Query the RPM Database and RPM Archives” on page 245
“Use the Yast CLI Command as a Front End to RPM” on page 247
Copyright © 2010 Novell, Inc. Copying or distributing all or part of this manual is protected bya Creative Commons Attribution-Noncommercial-Share Alike 3.0 Unported license.
Version 1242

Manage Software for SUSE Linux Enterprise 11
Novell Training S
ervices (en) 15 April 2009
Verify Package Authenticity
All SUSE Linux RPM packages are signed with the following GnuPG key:
Figure 8-3
Verifying the signature of an RPM package lets you determine whether the package originated from SUSE or from another trustworthy facility. To verify the signature of an RPM package, enter the following command:
rpm --checksig package name
Example:
rpm --checksig apache2-2.2.0-10.i586.rpm
Verifying the package signature is especially recommended for update packages from the Internet.
The SUSE public package signature key is stored in the /root/.gnupg/ and /usr/lib/rpm/gnupg/ directories. Storing the key in /usr/lib/rpm/gnupg/ lets normal users verify the signature of RPM packages.
Install, Update, and Uninstall Packages
To manage RPM software packages, you need to know how to do the following:
“Install an RPM Package” on page 243
“Update an RPM Package” on page 244
“Uninstall an RPM Package” on page 245
Install an RPM Package
For most RPM packages, you use the following command to install the software:
rpm -i package_name.rpm
When you install an RPM package, the executable programs, documentation files, configuration files, and start scripts are copied to the appropriate directories in the file system.
Copyright © 2010 Novell, Inc. Copying or distributing all or part of this manual is protected bya Creative Commons Attribution-Noncommercial-Share Alike 3.0 Unported license.
243Version 1

SUSE Linux Enterprise 11 Fundamentals / Manual
Novell Training S
ervices (en) 15 April 2009
During installation, the RPM database ensures that no conflicts arise (such as a file belonging to more than one package). The package is installed only if its dependencies are fulfilled and there are no conflicts with other packages.
If dependencies are not fulfilled, RPM lists those packages that need to be installed to meet dependency requirements. Packages that conflict with the packages to be installed are also listed.
You could use other options to ignore these errors (such as --nodeps to ignore dependencies or --force to overwrite existing files), but this is only for experts. If you force the installation despite dependency requirements not being met, the installed software most likely will not work properly.
With the -v option (verbose) more information is displayed; the -h option (hash) produces a progress bar consisting of # signs during package installation.
NOTE: For a number of packages, the components needed for software development (libraries, headers, include files, etc.) have been put into separate packages. These development packages are only needed if you want to compile software yourself (such as the most recent GNOME packages).
Such packages can be identified by the name extension -devel, such as the packages alsa-devel or gimp-devel.
Update an RPM Package
You can use the -U (or --upgrade) and -F (or --freshen) options to update a package by using the following syntax:
rpm -F package_name.rpm
This command removes the files of the old version and immediately installs the new files. If no previous version is installed, the package is not installed.
If an old version is installed, the -U option does the same as -F. However, if no previous version is installed, -U installs the new version.
NOTE: The -U option is not equivalent to uninstalling with the -e option and installing with the -i option. Use -U whenever possible for updating packages.
RPM updates configuration files carefully using the following guidelines:
If a configuration file was not changed by the system administrator, RPM installs the new version of the appropriate file. No action by the system administrator is required.
If a configuration file was changed by the system administrator before the update, RPM saves the changed file with the extension .rpmorig or .rpmsave (backup file). It then installs the version from the new package but only if the originally installed file and the newer version are different.
If this is the case, compare the backup file (.rpmorig or .rpmsave) with the newly installed file and make your changes again in the new file. Be sure to delete all .rpmorig and .rpmsave files afterwards to avoid problems with future updates.
Copyright © 2010 Novell, Inc. Copying or distributing all or part of this manual is protected bya Creative Commons Attribution-Noncommercial-Share Alike 3.0 Unported license.
Version 1244

Manage Software for SUSE Linux Enterprise 11
Novell Training S
ervices (en) 15 April 2009
The .rpmorig extension is assigned if the file has not previously been recognized by the RPM database; otherwise, .rpmsave is used.
In other words, .rpmorig results from updating from a foreign format to RPM; .rpmsave results from updating from an older RPM to a newer RPM.
A set of .rpmnew files is created if the configuration file already exists and if the noreplace label was specified in the file controlling the package creation (the so-called .spec-file).
This is used to not overwrite certain configuration files (such as /etc/httpd/httpd.conf) and to ensure continued operation.
.rpmnew does not disclose any information as to whether the system administrator has made any changes to the configuration file.
The /etc/init.d/rpmconfigcheck script searches for such files and writes a list of these files to /var/adm/rpmconfigcheck.
Uninstall an RPM Package
To uninstall (remove) an RPM package, enter the following:
rpm -e package_name
When you uninstall a package, all files except modified configuration files are removed from the system with the help of the RPM database. This ensures a clean uninstall.
RPM will delete the package only if this does not break dependencies. If other packages depend on the package you want to delete, these are listed in the error message.
You could force deletion of the package with the --nodeps parameter. However, this is not advisable because the dependent software will most likely not work anymore.
Query the RPM Database and RPM Archives
With the -q option, you can query the RPM database of installed packages and, by adding the -p option, inspect RPM archives that are not yet installed.
The following are the most commonly used RPM query options:
Table 8-1
Option Results
-a List all installed packages.
-i List package information.
-l Display a file list.
-f file Find out to which package file belongs (the full path must be specified with file).
-d List only documentation files (implies -l).
Copyright © 2010 Novell, Inc. Copying or distributing all or part of this manual is protected bya Creative Commons Attribution-Noncommercial-Share Alike 3.0 Unported license.
245Version 1

SUSE Linux Enterprise 11 Fundamentals / Manual
Novell Training S
ervices (en) 15 April 2009
For example, entering the rpm -qi wget command displays the following information about the wget package:
The -f option works only if you specify the complete filename with a full path. You can enter several filenames, as in the following:
This returns information for both /bin/rpm and /usr/bin/wget.
With the help of the RPM database, you can perform verification checks with the -V option or --verify. If any files in a package have been changed since installation, they will be displayed.
-c List only configuration files (implies -l).
--dump Display a file list with complete details (to be used with -l, -c, or -d).
--provides List features of the package that another package can request with --requires.
--requires, -R List the capabilities the package requires.
--scripts List installation scripts (preinstall, postinstall, uninstall).
--changelog Displays a detailed list of information (updates, configuration, modifications, etc.) about a specific package.
Option Results
Copyright © 2010 Novell, Inc. Copying or distributing all or part of this manual is protected bya Creative Commons Attribution-Noncommercial-Share Alike 3.0 Unported license.
Version 1246

Manage Software for SUSE Linux Enterprise 11
Novell Training S
ervices (en) 15 April 2009
RPM uses the following character symbols to provide hints about the changes:
Table 8-2
Use the Yast CLI Command as a Front End to RPM
One of the major functions of YaST is software installation. If you know the name of a software package, the -i option (install) is very useful. Example:
yast -i wireshark
This example installs the wireshark package plus any software package that is needed by wireshark from the installation media. The advantage of using yast -i is that any dependencies are automatically resolved.
You can also install any RPM package with the -i option, specifying the RPM package file name, not just the name of the software package. Example:
yast -i apache2-2.2.10-2.18.i586.rpm
However, dependencies are not resolved in this case.
Character Description
5 MD5 check sum
S File size
L Symbolic link
T Modification time
D Major and minor device numbers
U Owner
G Group
M Mode (permissions and file type)
Copyright © 2010 Novell, Inc. Copying or distributing all or part of this manual is protected bya Creative Commons Attribution-Noncommercial-Share Alike 3.0 Unported license.
247Version 1

SUSE Linux Enterprise 11 Fundamentals / Manual
Novell Training S
ervices (en) 15 April 2009
Exercise 8-3 Manage Software with RPM
In this exercise, you practice gathering information on installed software and installing software packages.
You will find this exercise in the workbook.
(End of Exercise)
Copyright © 2010 Novell, Inc. Copying or distributing all or part of this manual is protected bya Creative Commons Attribution-Noncommercial-Share Alike 3.0 Unported license.
Version 1248

Manage Software for SUSE Linux Enterprise 11
Novell Training S
ervices (en) 15 April 2009
Objective 5 Manage Software with zypper
zypper is a command-line interface to the ZYpp system management library. It can be used to
Install, update, and remove software
Manage repositories
Perform various queries.
This objective will discuss the most important examples for these actions.
The general command syntax for the zypper command is
zypper [--global-options] <command> [--command-options] [arguments]
More information on how to use the command is displayed by entering
zypper help [command]
In most cases, the command can be used in a long and a short format, e.g.
zypper info apache2
or
zypper if apache2
Repository Management Commands
zypper relies on a list of repositories for its installation and update commands. To list all repositories known to the system, enter
zypper repos
The most important options for this command are -p (show the priority for each repository) and -d (show more details for each repository).
To add a new repository, use the command
zypper addrepo [options] <URI> <alias>
DA1:~ # zypper repos# | Alias | Name | Enabled | Refresh--+-----------------+--------------+---------+--------1 | SLES-11 11-0 | SLES-11 11-0 | Yes | Yes
DA1:~ # zypper repos -d# | Alias | Name | Enabled | Refresh | Priority | Type | URI | Service--+-------------+--------------+---------+---------+---------+------+---------------------------------------+--------1 | SLES-11 11-0 | SLES-11 11-0 | Yes | Yes | 99 | yast2 | http://172.17.8.100/install/SLES11GM/CD1/ |
Copyright © 2010 Novell, Inc. Copying or distributing all or part of this manual is protected bya Creative Commons Attribution-Noncommercial-Share Alike 3.0 Unported license.
249Version 1

SUSE Linux Enterprise 11 Fundamentals / Manual
Novell Training S
ervices (en) 15 April 2009
The URI identifies the location of the repository and the alias sets a name which can be used to access the repository. An example could look like this:
Important options for this command are:
-d: Add the repository as disabled. Repositories are added as enabled by default.
-k: Enable RPM files caching for the repository (i.e., RPM packages are kept in a local directory after being installed).
-K: Disable RPM files caching.
NOTE: When a repository is added, the existence and accessibility of the repository is not checked. If there are any errors in the URI these will show up when trying to access the repository later.
In order to remove a repository from the list, use the command
zypper removerepo <alias|#|URI>
To specify the repository, you can use the alias, the sequence number or the whole URI of the repository.
Existing repositories can be modified by using
zypper modifyrepo <options> <alias|#|URI>
The following are the most important options for this command:
-e: Enable the repository.
-d: Disable the repository.
-p: Set priority of the repository. A priority of 1 is the highest priority—the higher the number the lower the priority. The default priority is 99. Packages from repositories with higher priority will be preferred even in case there is an installable higher version available in the repository with a lower priority.
Package Management Commands
To find a package in a repository, the search command with a query string is used:
zypper search [option] querystring
The result lists all packages containing the querystring and returns information on the package:
DA1:~ # zypper addrepo http://172.17.8.100/sles11/CD1 sles11
Copyright © 2010 Novell, Inc. Copying or distributing all or part of this manual is protected bya Creative Commons Attribution-Noncommercial-Share Alike 3.0 Unported license.
Version 1250

Manage Software for SUSE Linux Enterprise 11
Novell Training S
ervices (en) 15 April 2009
To see more details on the packages, the -s option can be used:
To see more information about a package, use the command
zypper info <package>
This command displays detailed information about a package, including the version, the vendor, a brief description, and whether the package is installed. For an already installed package it will also display the status of the package, such as whether the package is up-to-date or needs to be updated.
DA1:~ # zypper search apache2Loading repository data...Reading installed packages...
S | Name | Summary | Type--+-------------+------------------------------------+-----------i | apache2 | The Apache Web Server Version 2.0 | package | apache2 | The Apache Web Server Version 2.0 | srcpackage | apache2-doc | Additional Package Documentation. | package...
DA1:~ # zypper search -s apache2Loading repository data...Reading installed packages...
S | Name | Type | Version | Arch | Repository--+-------------+------------+-------------+--------+-------------i | apache2 | package | 2.2.10-2.18 | i586 | SLES-11 11-0 | apache2 | srcpackage | 2.2.10-2.18 | noarch | SLES-11 11-0 | apache2-doc | package | 2.2.10-2.18 | i586 | SLES-11 11-0...
DA1:~ # zypper info apache2Loading repository data...Reading installed packages...
Information for package apache2:
Repository: @SystemName: apache2Version: 2.2.10-2.18Arch: i586Vendor: SUSE LINUX Products GmbH, Nuernberg, GermanyInstalled: NoStatus: not installedInstalled Size: 2.1 MSummary: The Apache Web Server Version 2.0Description:Apache 2, the successor to Apache 1....
Copyright © 2010 Novell, Inc. Copying or distributing all or part of this manual is protected bya Creative Commons Attribution-Noncommercial-Share Alike 3.0 Unported license.
251Version 1

SUSE Linux Enterprise 11 Fundamentals / Manual
Novell Training S
ervices (en) 15 April 2009
If the package is not installed and you want to install it, use the command
zypper install <package>
If additional packages need to be installed, zypper will do so.
To remove an installed package, the command
zypper remove <package>
is used. If other packages depend on this package, these will be removed as well. In any case the user is informed of what will be done and can decide not to run the command.
DA1:~ # zypper install apache2Loading repository data...Reading installed packages...Resolving package dependencies...The following NEW packages are going to be installed: apache2 apache2-prefork
Overall download size: 1007.0 K. After the operation, additional 2.7 M will be used.Continue? [YES/no]:Retrieving package apache2-2.2.10-2.18.i586 (1/2), 745.0 K (2.1 M unpacked)Retrieving: apache2-2.2.10-2.18.i586.rpm [done]Installing: apache2-2.2.10-2.18 [done]...
DA1:~ # zypper remove apache2Building repository 'sles11' cache [done]Loading repository data...Reading installed packages...Resolving package dependencies...
The following packages are going to be REMOVED: apache2 apache2-prefork
After the operation, 8.8 M will be freed.Continue? [YES/no]:Removing apache2-prefork-2.2.10-2.18 [done]Removing apache2-2.2.10-2.18 [done]
Copyright © 2010 Novell, Inc. Copying or distributing all or part of this manual is protected bya Creative Commons Attribution-Noncommercial-Share Alike 3.0 Unported license.
Version 1252

Manage Software for SUSE Linux Enterprise 11
Novell Training S
ervices (en) 15 April 2009
Exercise 8-4 Manage Software with zypper
In this exercise, you will add and remove a repository, and uninstall a package.
You will find this exercise in the workbook.
(End of Exercise)
Copyright © 2010 Novell, Inc. Copying or distributing all or part of this manual is protected bya Creative Commons Attribution-Noncommercial-Share Alike 3.0 Unported license.
253Version 1

SUSE Linux Enterprise 11 Fundamentals / Manual
Novell Training S
ervices (en) 15 April 2009
Objective 6 Update and Patch SLE
In this section you will learn the following:
“Installing Service Packs” on page 254
“Patching and Updating Packages with zypper” on page 254
“Installing Patched Packages with rpm” on page 255
“Installing Service Packs Using YaST Online Update (YOU)” on page 257
“Managing Updates with Novell Subscription Management Tool (SMT)” on page 260
Installing Service Packs
There are several ways to update the system to a Service Pack (SP):
Boot from the Service Pack medium.
Execute zypper commands manually. See “Patching and Updating Packages with zypper” on page 254.
Run the YaST Online Update Configuration and Online Update.
By updating to the new feature level, additional features like new drivers or software enhancements are available to your system. For more information, see
Make use of a Subscription Management Tool (SMT) system at your site. See “Managing Updates with Novell Subscription Management Tool (SMT)” on page 260.
Patching and Updating Packages with zypper
To guarantee the operational security of a system, you should update packages frequently by installing patched packages.
There are two different ways to update software using zypper:
Integrating all officially released patches into your system
Updating all installed packages with newer available versions
To integrate all officially released patches into your system, just run:
zypper patch
In this case, all patches available in your repositories are checked for relevance and installed if necessary. After registering your SUSE Linux Enterprise installation, an official update repository containing such patches will be added to your system. The above command is all you need to enter in order to apply them when needed.
To update installed packages with their newer available versions, where possible, enter:
zypper update
Copyright © 2010 Novell, Inc. Copying or distributing all or part of this manual is protected bya Creative Commons Attribution-Noncommercial-Share Alike 3.0 Unported license.
Version 1254

Manage Software for SUSE Linux Enterprise 11
Novell Training S
ervices (en) 15 April 2009
This command does not update packages which would require a change of package vendor or which would require manual dependency resolution.
To list all needed patches, type
zypper list-patches
You can get a list of available updates with:
zypper list-updates
NOTE: This command lists only installable updates, i.e., updates which have no dependency problems or which do not change package vendor. This list is what the update command will propose to install. You can use the --all option if you want to list all packages for which newer versions are available.
Installing Patched Packages with rpm
You could update the complete package, or you could use a patch RPM suitable to the installed RPM package. The patch RPM has the advantage of being smaller, reducing the download time.
When planning an update, you need to consider the following (using the package procmail as an example):
Is the patch RPM suitable for my system?
To check this, first query the installed version of the package by entering
rpm -q procmail
The output will indicate the currently installed version of procmail:
procmail-3.22-240.3
Now check if the patch RPM is suitable for this version of procmail, by entering
rpm -qp --basedon <patchname>
--basedon shows what packages a patch rpm is based on. A patch rpm can only be installed if one of the packages it is based on is installed. The output indicates whether the patch is suitable for different versions of procmail. The installed version in the example is also listed, so the patch can be installed.
Copyright © 2010 Novell, Inc. Copying or distributing all or part of this manual is protected bya Creative Commons Attribution-Noncommercial-Share Alike 3.0 Unported license.
255Version 1

SUSE Linux Enterprise 11 Fundamentals / Manual
Novell Training S
ervices (en) 15 April 2009
Which files are replaced by the patch?
The files affected by a patch can easily be seen in the patch RPM. The -P option lets you select special patch features.
You can display the list of files by entering the following:
rpm -qPpl patchname
You will see the following:
da10:~ # rpm -qPpl procmail-3.22-42.4.i586.patch.rpm/usr/bin/formail/usr/bin/lockfile/usr/bin/procmail
If the patch is already installed, use the following command:
rpm -qPl procmail
The output will look similar to this:
/usr/bin/formail/usr/bin/lockfile/usr/bin/procmail
How can a patch RPM be installed in the system?
Patch RPMs are used just like normal RPMs. The only difference is that a suitable RPM must already be installed.
Which patches are already installed in the system and for which package versions?
You can display a list of all patches installed in the system by entering
rpm -qPa
If only the patch for procmail is installed in a new system, the following item appears:
procmail-3.22-42.4
If, at a later date, you want to know which package version was originally installed, you can query the RPM database.
For procmail, this information can be displayed by entering
rpm -q --basedon procmail
The output would appear as follows:
procmail = 3.22-42
NOTE: For additional details about the patch feature of RPM, enter man rpm orman rpmbuild.
Copyright © 2010 Novell, Inc. Copying or distributing all or part of this manual is protected bya Creative Commons Attribution-Noncommercial-Share Alike 3.0 Unported license.
Version 1256

Manage Software for SUSE Linux Enterprise 11
Novell Training S
ervices (en) 15 April 2009
Installing Service Packs Using YaST Online Update (YOU)
Before initiating the YaST Online Update to update to the Support Pack feature level, make sure that the following requirements are met:
The system must be online throughout the entire update process, because this process requires access to the Novell Customer Center.
If your setup involves third-party software or add-on software, test this procedure on another machine to make sure that the dependencies are not broken by the update
To configure online updates, do the following:
1. On the SUSE Linux Server, go to Computer > YaST > Software > Online Update Configuration.
2. Configure the Update Repository by clicking Advanced and selecting Register for support and get update repository.
3. On the Novell Customer Center Configuration page, select Configure Now and leave the defaults checked.
Figure 8-4
4. Click Next.
Copyright © 2010 Novell, Inc. Copying or distributing all or part of this manual is protected bya Creative Commons Attribution-Noncommercial-Share Alike 3.0 Unported license.
257Version 1

SUSE Linux Enterprise 11 Fundamentals / Manual
Novell Training S
ervices (en) 15 April 2009
A dialog appears, warning that Manual Interaction is required.
Figure 8-5
Copyright © 2010 Novell, Inc. Copying or distributing all or part of this manual is protected bya Creative Commons Attribution-Noncommercial-Share Alike 3.0 Unported license.
Version 1258

Manage Software for SUSE Linux Enterprise 11
Novell Training S
ervices (en) 15 April 2009
5. Click Continue.
A Mozilla Browser window opens with a Novell Customer Center Registration page displayed.
Figure 8-6
6. Fill in the required information; then click Submit.
Copyright © 2010 Novell, Inc. Copying or distributing all or part of this manual is protected bya Creative Commons Attribution-Noncommercial-Share Alike 3.0 Unported license.
259Version 1

SUSE Linux Enterprise 11 Fundamentals / Manual
Novell Training S
ervices (en) 15 April 2009
7. Continue with the registration process until you are returned to the Online Update Configuration dialog.
8. Click Finish.
The machine is now set up to receive updates automatically.
Managing Updates with Novell Subscription Management Tool (SMT)
The Subscription Management Tool for SUSE Linux Enterprise establishes a proxy system with repository and registration targets. This helps you centrally manage software updates within the firewall on a per-system basis, while maintaining your corporate security policies and regulatory compliance.
The downloadable Subscription Management Tool is integrated with Novell Customer Center and provides a repository and registration target that is synchronized with it. This is very helpful in tracking entitlements in large deployments. The Subscription Management Tool maintains all the capabilities of Novell Customer Center, while allowing a more secure centralized deployment. It is included with every SUSE Linux Enterprise subscription and is therefore fully supported.
New in SUSE Linux Enterprise Server 11
Capability to stage patches to internal managed area under full control of the site administrator. This gives the administrator the option to carry out integration testing before they fully enable the new patches on site.
Ability to centrally push packages to managed devices.
Improved set-up and facilitated operation for fully disconnected (“sneakernet”) configurations.
Full integration with the new supportability infrastructure delivered with SUSE Linux Enterprise (Novell Support Link integrated in SUSE Linux Enterprise 11 and Novell Support Advisor from Novell Technical Services). This helps easily facilitate problem reporting and troubleshooting.
Registering a Client with SMT
To register a client against an SMT server, you need to
Equip the client with the server’s URL
Make sure the client trusts the server's certificate.
Be aware of the three ways to configure the client to use SMT:
Using Kernel parameters during installationregurl - specifies the URL of the SMT serverregcert - (optional) specifies the location of the SMT server’s ACA certificate
Via an AutoYaST profile
Copyright © 2010 Novell, Inc. Copying or distributing all or part of this manual is protected bya Creative Commons Attribution-Noncommercial-Share Alike 3.0 Unported license.
Version 1260

Manage Software for SUSE Linux Enterprise 11
Novell Training S
ervices (en) 15 April 2009
As root, go to YaST > Miscellaneous >Autoinstallation > Support >Novell Customer Center Configuration, select Run Product Registration and edit the SMT Server Settings.
Via the clientSetup4SMT.sh script
The /usr/share/doc/packages/smt/clientSetup4SMT.sh script is provided with SMT. This script allows you to configure a client machine to use a specific SMT server or to reconfigure it to use a different SMT server.
Copyright © 2010 Novell, Inc. Copying or distributing all or part of this manual is protected bya Creative Commons Attribution-Noncommercial-Share Alike 3.0 Unported license.
261Version 1

SUSE Linux Enterprise 11 Fundamentals / Manual
Novell Training S
ervices (en) 15 April 2009
Summary
Objective Summary
1. Overview of Software Management in SUSE Linux Enterprise 11
Provides an overview of the concepts and terminology involved in managing software with SUSE Linux Enterprise, such as libzypp, SatSolver, and RPM.
2. Manage Software with YaST on SLES 11
To install new software packages use the YaST module Software > Software Management.
The installation status of a package is indicated by a symbol. An overview about all possible symbols can be reached via the Help > Symbols menu.
There are dependencies between the packages. In most cases these dependencies can be resolved automatically. Otherwise they must be resolved manually.
3. Manage Software with YaST on SLED 11
YaST and PackageKit run on the desktop to allow users to install and manage software.
4. Manage RPM Software Packages RPM packages are packaged in a special binary format. Apart from the executable programs, they also contain information about the configuration of the software package, as well as information about dependencies on other packages (including shared libraries).
You can use the rpm command to
Install software packages (rpm -i, or rpm -U, or rpm -F)
Uninstall software packages (rpm -e).
Query information from the RPM database (rpm -q)
5. Manage Software with zypper Zypper allows you to list known repositories, remove, add, and manage repositories, and install a package from a repository.
6. Update and Patch SLE You can update packages with zypper, install patched packages with rpm, and install Service Packs using YaST Online Update. You also learn how to manage updates with the Novell Subscription Management Tool (SMT).
Copyright © 2010 Novell, Inc. Copying or distributing all or part of this manual is protected bya Creative Commons Attribution-Noncommercial-Share Alike 3.0 Unported license.
Version 1262

Course 3101 and 3102 LPIC-1 Addendum
S E C T I O N 9 Course 3101 and 3102 LPIC-1 Addendum
CLA 11 and LPIC-1 Certification
The Linux Professional Institute Level 1 certification is the first of the three levels of certification in the LPI Certification program. LPIC Level 1 is considered the Junior Level certification, while Levels 2 and 3 are considered to be the Advanced and Senior Levels respectfully.
Just as the Novell Certified Linux Administrator 11 Certification is designed to certify the competencies that you have developed using SUSE Linux Enterprise 11, the LPIC program has been designed to certify your competencies using the Linux Standard Base and is designed to be distribution neutral.
LPIC-1 was first released in January 2000 and has been revised as of April 2009 using a JTA or Job Task Analysis survey within the industry. Passing the two exams (101 and 102), and thus obtaining your LPIC-1 certification is a mandatory requirement for taking the LPIC-2 exams, 201 and 202. Passing the LPIC-1 101 exam is the pre-requisite for taking the LPIC-1 102 exam.
The two CLA courses and their exams are designed to help you learn the basics of Linux and the commands needed to administrate a Linux distribution, primarily SUSE Linux Enterprise 11. However, the tasks and skills learned in course 3101 and 3102 along with those taught in this addendum also align with the tasks needed to pass both LPIC-1 exams, 101 and 102.
For example, in preparation for the two LPIC-1 exams, you should be able to
1. Use and work with the Linux command line
2. Perform a shutdown and reboot of the system
3. Have a strategy to backup and restore system and user data
4. Perform the maintenance tasks needed to assist users, and add a user to a larger system
5. Perform an installation and configure a workstation
6. Connect a workstation to a LAN, or connect a PC to the Internet
NOTE: For more information about Novell certification programs and taking the Novell CLA 11 exam, see the Novell Certifications Web site (http://www.novell.com/training/certinfo) and the CLA 11 site (http://www.novell.com/training/certinfo/cla11).
NOTE: For more information about Linux Professional Institute certification programs and taking the LPIC-1 exam, see the LPI web site (http://www.lpi.org/certification).
Copyright © 2010 Novell, Inc. Copying or distributing all or part of this manual is protected bya Creative Commons Attribution-Noncommercial-Share Alike 3.0 Unported license.
263Version 1

SUSE Linux Enterprise 11 Fundamentals / Manual
Table 9-1
CLA 11 Objectives for Courses 3101 & 3102 LPIC-1 Objectives for Exams 101 & 102Course 3101 Objectives Exam 101 ObjectivesSection 1: Getting to know SUSE Linux Enterprise 11
Performing Basic Tasks in SLE 11
Overview of SUSE Linux Enterprise 11
Use the Gnome Desktop Environment
Access the Command Line Interface (CLI) from the Desktop
Section 2: Locate and Use Help Resources
Access and Use man Pages
Use Info Pages
Access Release Notes and White Papers
Use GUI-Based Help
Find Help on the Web
Section 3: Manage the Linux File System
Understand the File System Hierarchy Standard (FHS)
Identify File Types in the Linux System
Manage Directories with CLI and Nautilus
Create and View Files
Work with Files and Directories
Find Files on Linux
Search File Content
Perform Other File Operations with Nautilus
Section 4: Work with the Linux Shell and Command Line Interface (CLI)
Get to Know the Command Shells
Execute Commands at the Command Line
Work with Variables and Aliases
Understand Command Syntax and Special Characters
Use Piping and Redirection
Topic 101: System Architecture
Determine and Configure Hardware Settings. Boot the System
Change Runlevels and Shutdown or Reboot the System
Topic 102: Linux Installation and Package Management
Design Hard Disk Layout
Install a Moot Manager
Manage Shared Libraries
Use Debian Package Management
Use RPM and YUM Package Management
Topic 103: GNU and Linux Commands
Work on the Command Line
Process Text Streams Using Filters
Perform Basic File Management
Use Streams, Pipes and Redirects
Create, Monitor and Kill Processes
Monitor Process Execution Priorities
Search Text Files Using Regular Expressions
Perform Basic File Editing Operations Using vi
Topic 104: Devices, Linux Filesystems, Filesystem Hierarchy Standard
Create Partitions and Filesystems
Maintain the Integrity of Filesystems
Control Mounting and Unmounting of Filesystems
Manage Disk Quotas
Manage File Permissions and Ownership
Create and Change Hard and Symbolic Links
Find System Files and Place Files in the Correct Location
Copyright © 2010 Novell, Inc. Copying or distributing all or part of this manual is protected bya Creative Commons Attribution-Noncommercial-Share Alike 3.0 Unported license.
Version 1264

Course 3101 and 3102 LPIC-1 Addendum
Section 5: Administer Linux with YaST
Get to Know YaST
Manage the Network Configuration Information from YaST
Section 6: Manage Users, Groups, and Permissions
Manage User and Group Accounts with YaST
Describe Basic Linux User Security Features
Manage User and Group Accounts from the Command Line
Manage File Permissions and Ownership
Ensure File System Security
Section 7: Use the vi Linux Text Editor
Use the Editor vi to Edit Files
Section 8: Manage Software for SUSE Linux Enterprise 11
Overview of Software Management in SUSE Linux Enterprise 11
Manage Software with YaST on SLES 11
Manage Software with YaST on SLED 11
Manage RPM Software Packages
Manage Software with zipper
Update and Patch SLE
CLA 11 Objectives for Courses 3101 & 3102 LPIC-1 Objectives for Exams 101 & 102
Copyright © 2010 Novell, Inc. Copying or distributing all or part of this manual is protected bya Creative Commons Attribution-Noncommercial-Share Alike 3.0 Unported license.
265Version 1

SUSE Linux Enterprise 11 Fundamentals / Manual
Table 9-2
Course 3102 Objectives Exam 102 ObjectivesSection 1: Install SUSE Linux Enterprise 11
Perform a SLES 11 Installation
Perform a SLED 11 Installation
Troubleshoot the Installation Process
Section 2: Manage System Initialization
Describe the Linux Load Procedure
Manage GRUB (Grand Unified Bootloader)
Manage Runlevels
Section 3: Administer Linux Processes and Services
Describe How Linux Processes Work
Manage Linux Processes
Section 4: Administer the Linux File System
Select a Linux File System
Configure Linux File System Partition
Manage Linux File System
Configure Logical Volume Manager (LVM) and Software RAID
Set Up and Configure Disk Quotas
Section 5: Configure the Network
Understand Linux Network Terms
Manage the Network Configuration Information from YaST
Set Up Network Interfaces with the ip Tool
Set Up Routing with the ip Tool
Test the Network Connection with Command Line Tools
Configure the Hostname and Name Resolution
Topic 105: Shells, Scripting, and Data Management
Customize and Use the Shell Environment
Customize or Write Simple Scripts
SQL Data Management
Topic 106: User Interfaces and Desktops
Install and Configure X11
Setup a Display Manager
Accessibility
Topic 107: Administrative Tasks
Manage User and Group Accounts and Related System Files
Automate System Administration Tasks by Scheduling Jobs
Localization and Internationalization
Topic 108: Essential System Services
Maintain System Time
System Logging
Mail Transfer Agent (MTA) Basics
Manage Printers and Printing
Topic 109: Networking Fundamentals
Fundamentals of Internet Protocols
Basic Network Configuration
Basic Networking Troubleshooting
Configure Client Side DNS
Topic 110: Security
Perform Security Administration Tasks
Setup Host Security
Securing Data with Encryption
Copyright © 2010 Novell, Inc. Copying or distributing all or part of this manual is protected bya Creative Commons Attribution-Noncommercial-Share Alike 3.0 Unported license.
Version 1266

Course 3101 and 3102 LPIC-1 Addendum
CLA 11 + LPIC-1 focuses on the objectives that are beyond the scope of the main 3101 and 3102 course material.
Section 6: Manage Hardware
Describe How Device Drivers Work in Linux
Manage Kernel Modules Manually
Describe the sysfs File System
Describe How udev Works
Section 7: Configure Remote Access
Provide Secure Remote Access with OpenSSH
Enable Remote Administration with YaST
Access Remote Desktops Using Nomad
Section 8: Monitor SUSE Linux Enterprise 11
Monitor a SUSE Linux Enterprise 11 System
Use System Logging Services
Monitor Login Activity
Section 9: Automate Tasks
Schedule Jobs with cron
Schedule Jobs with at
Section 10: Manage Backup and Recovery
Develop a Backup Strategy
Back Up Files with YaST
Create Backups with tar
Create Backups on Magnetic Tape
Copy Data with dd
Mirror Directories with rsync
Automate Data Backups with cron
Section 11: Administer User Access and System Security
Configure User Authentication with PAM
Manage and Secure the Linux User Environment
Use Access Control Lists (ACLs) for Advanced Access Control
Implement a Packet-Filtering Firewall with SuSEfirewall2
Course 3102 Objectives Exam 102 Objectives
Copyright © 2010 Novell, Inc. Copying or distributing all or part of this manual is protected bya Creative Commons Attribution-Noncommercial-Share Alike 3.0 Unported license.
267Version 1

SUSE Linux Enterprise 11 Fundamentals / Manual
This addendum covers the tasks and knowledge of Linux that are unique to the Linux Professional Institute Certification Level 1 (LPIC-1) certification objectives. Our purpose in creating this addendum is to assist those who are preparing for the LPIC-1 certification exams. You will find within the following pages objectives that are not covered in the main body of this course manual and that are specific to the LPIC-1 exams.
When preparing for the LPIC-1 exams, you will need to know both the main objectives covered in the two CLA 11 course manuals and the objectives found within this addendum.
The skills taught in the two course manuals, for Novell Courses 3101 and 3102, help to prepare you for taking the Novell Certified Linux Administrator 11 (Novell CLA 11) certification test.
This addendum provides an auxiliary means to prepare for the LPIC-1 exams. The topics and skills discussed herein are designed to give you specific information related to and covering the objectives found below.
The objectives discussed within this addendum along with those taught in the two CLA 11 courses will help you prepare for the LPIC-1 exams.
The following topics are addressed here:
1. “Use Debian Package Management” on page 269
2. “yum Package Management” on page 274
3. “SQL Data Management” on page 280
4. “Install and Configure X11” on page 287
5. “Message Transfer Agent (MTA) Basics” on page 295
6. “Fundamentals of TCP-IP (dig)” on page 309
NOTE: As of April 2009, the objectives for LPIC-1 and LPIC-2 exams have changed. The objectives presented here are the most up-to-date as of this writing. For information, visit the Linux Professional Institute web site ( http://www.lpi.org or http://www.lpi.org/certification).
Copyright © 2010 Novell, Inc. Copying or distributing all or part of this manual is protected bya Creative Commons Attribution-Noncommercial-Share Alike 3.0 Unported license.
Version 1268

Course 3101 and 3102 LPIC-1 Addendum
Objective 1 Use Debian Package Management
This section presents the basic features of using the Debian package management tools. Tasks discussed focus on installing, upgrading, and removing the Debian .deb packages. Using the apt tool apt-get and the dpkg tool will assist you in finding file or package information such as content, installation status, version of package, dependencies, and package integrity.
This section is based on the information found in
LPIC-1 102.4: (http://lpi.org/)
Candidates should be able to perform package management using the Debian package tools.
Key Knowledge Areas
Install, upgrade, and uninstall Debian binary packages
Find packages containing specific files or libraries which may or may not be installed
Obtain package information like version, content, dependencies, package integrity, and installation status (whether or not the package is installed)
The following will be discussed:
“Debian Linux basics” on page 269
“Manage Software Packages Using apt” on page 270
“Managing Software Packages Using dpkg” on page 272
Debian Linux basics
What is Debian GNU/Linux?
Debian is an operating system that uses for its core the Linux kernel. Yet most of the tools used come from the GNU project thus calling it Debian GNU/Linux. Debian states that it comes with over 25000 packages. As of this writing, the latest stable release is Debian 5.0 with its last update being on September 5, 2009. See http://www.debian.org for more information.
.deb Basics
To manage .deb software packages, you need to understand the following:
Package Naming Syntax
Debian Software on the Internet
Debian packages use the following naming syntax:
<packagename>_<versionnumber>_<architecture>.deb
Copyright © 2010 Novell, Inc. Copying or distributing all or part of this manual is protected bya Creative Commons Attribution-Noncommercial-Share Alike 3.0 Unported license.
269Version 1

SUSE Linux Enterprise 11 Fundamentals / Manual
Example: apache_2.2.17-5_i386.deb
The following describes each component of the naming format:
package_name. This is the name of the software being installed.
versionnumber. This is the version number of the software.
architecture. This indicates the architecture the package was built under, such as i386,i586, i686, or ppc.
For example, if it is a i386 architecture, you can install it on 32-bit.
Debian can be installed on different architecture; hence there is a need to make sure that the package you wish to install is supported on the architecture you have.
Packages normally have the extension .deb.
Finding Debian Software Packages on the Internet can be accomplished by searching for Debian packages using the url syntax of
http://packages.debian.org/name where name is a package name
http://package.debian.org/src:name where name is a source package name
Manage Software Packages Using apt
Performing package management tasks in Linux can be accomplished using a variety of different tools. Debian package management also has tools that can be used at the command line or with a gui.
When installing .deb packages, remember to always backup your existing data, documents, or even the whole system, just in case an issue arises.
Always make sure you verify any package you wish to install on your Debian system. .deb files come from a variety of sources; those coming directly from Debian are considered trustworthy; however, a good habit to have is to verify before you install.
You can use the apt tool which is apt-get to find, download, and install .deb packages over the internet using either ftp or http. APT is an acronym that stands for Advanced Package Tool. With apt-get you can also perform upgrades.
Here are some common apt tool commands:
apt-get
To install a new package use the syntax apt-get install packagename
Example: apt-get install ldap_2..5.3_i686.deb
To upgrade a package use the syntax apt-get upgrade packagename
Example: apt-get upgrade nfs_3.1.5-3_i586.deb
To remove a package from the system, use apt-get remove packagename
Example: apt-get remove samba_2.1.7-2_i383.deb
Copyright © 2010 Novell, Inc. Copying or distributing all or part of this manual is protected bya Creative Commons Attribution-Noncommercial-Share Alike 3.0 Unported license.
Version 1270

Course 3101 and 3102 LPIC-1 Addendum
To upgrade all packages on your system, use apt-get dist-upgrade.
Using dist-upgrade also will install extra packages such as dependencies.
Using upgrade alone as shown above will keep an installed package at its older version, even if the upgrade requires extra packages or the removal of packages.
apt-cache
The apt suite of tools also includes apt-cache which queries packages. Using apt-cache you can find packages, get dependencies listed, and receive detailed information about package versions available.
The apt-cache syntax is as follow:
To get information about a package, use apt-cache show packagename.
Example: apt-cache show ldap_3.1.5-3_i586.deb
For package versions available, use apt-cache showpkg packagename.
Example: apt-cache showpkg samba_2.5.1-2.deb
List dependencies for a package, use apt-cache depends packagename.
Example: apt-cache depends nfs_2.4-2-i383.deb
To search for packages with a specific word in its description, use apt-cache search searchword.
Example: apt-cache search language
aptitude
The apt suite of tools includes an Ncurses based frontend for the apt utility. Aptitude is text based and runs from a CLI (command line interface) or a terminal. It has a number of features including the ability to mark packages as manually installed or automatically installed. This feature allows packages to be auto-removed when they are not required any longer. It also has the ability to retrieve and display Debian change logs for many packages.
Also, among its features are a dependency resolver, a color preview of actions to be taken, and a command line mode (CLI).
Command Line Interface (CLI) syntax (may require full package name)
Table 9-3
Command Descriptionaptitude Enter at terminal to run aptitude aptitude upgrade Upgrade packages aptitude update Update packages list aptitude install samba Install samba packageaptitude remove samba Remove samba package
Copyright © 2010 Novell, Inc. Copying or distributing all or part of this manual is protected bya Creative Commons Attribution-Noncommercial-Share Alike 3.0 Unported license.
271Version 1

SUSE Linux Enterprise 11 Fundamentals / Manual
Text User Interface (TUI) syntax:
Table 9-4
There are also other package management tools such as synaptic, tasksel, and dselect. These other tools are outside the scope for this addendum.
Managing Software Packages Using dpkg
You can use dpkg to find, download, and install .deb package. Using dpkg, you can retrieve package information and description as well as the version of the package.
Here are some common dpkg commands:
To list information and verify (installed or not) a single package, use dpkg –l packagename or dpkg –s packagename | grep Status.
Example: dpkg –l samba_3.2.2-1_i686.deb
Example: dpkg –s ldap | grep Status
To list information on all installed packages, type dpkg -l.
For package description, version, etc., type dpkg –info packagename.
Example: dpkg –info apache_2.4.5-1_i386.deb
To list files provided by an installed package, use dpkg –L packagename.
Example: dpkg –L ldap_2.2.5-7_i383.deb
To list files provided by a package, use dpkg –contents packagename.
Example: dpkg –contents samba_1.2.3-2_i386.deb
To find out which package owns a file, type dpkg –S path to filename.
Example: dpkg –S /etc/exports
Other options that can be used include
-L or –list
-s or -status
aptitude purge samba Purge samba packageaptitude dist-upgrade Use to upgrade current distribution use with
cat /etc/debian_version
aptitude ~D samba List samba dependencies in reverse aptitude search samba Search samba
u Update list of available packages.U Mark packages which are upgradable. g View pending actions (modify pending actions). Press g a second time to start the
download.Actions (menu) > Cancel pending action
Command Description
Copyright © 2010 Novell, Inc. Copying or distributing all or part of this manual is protected bya Creative Commons Attribution-Noncommercial-Share Alike 3.0 Unported license.
Version 1272

Course 3101 and 3102 LPIC-1 Addendum
-split or also use –-join
--control (file control information)
--help (options list)
--install (installs packages)
--extract (packages unpacked using this will be incorrectly installed)
Copyright © 2010 Novell, Inc. Copying or distributing all or part of this manual is protected bya Creative Commons Attribution-Noncommercial-Share Alike 3.0 Unported license.
273Version 1

SUSE Linux Enterprise 11 Fundamentals / Manual
Objective 2 yum Package Management
Section Overview
This section helps you to understand yum package management. For a Linux administrator, package management is critical to know and understand. Using the yum tools, you can perform an installation, upgrade, re-install, or removal of a package.
yum will automatically calculate the dependencies that are needed for package installation. Instead of manually updating each machine using rpm, yum maintains groups of machines making the task and your time more efficient.
This section is based on the information found in
LPIC-1 102.5: (http://lpi.org/)
Candidates should be able to perform package management using YUM tools.
Key Knowledge Areas
Install, re-install, upgrade, and remove packages using ... YUM.
Obtain information on RPM packages such as version, status, dependencies, integrity, and signatures.
Determine what files a package provides as well as find which package a specific file comes from.
The following will be discussed:
“YUM Tools” on page 274
“YUM: /etc/yum.conf and /etc/yum.repos.d/” on page 275
“Using yumdownloader” on page 278
Performing package management tasks in Linux can be accomplished by the use of a variety of different tools. yum package manager, and the tools it provides, is one such tool.
YUM Tools
yum or the Yellowdog Updater Modified is used for Linux systems that are rpm compatible. yum evolved (from YUP) in order to update and manage RHL systems. Since that time, it has been used in other Linux distributions, such as, Fedora, RHEL, and CentOS.
yum has a command line interface and it has a plugin interface for the addition of other features. yum-utils extends and acts as a supplement to yum. It is a collection of different utilities and plugins which can perform queries, manage package cleanup, and perform repository synchronization.
Copyright © 2010 Novell, Inc. Copying or distributing all or part of this manual is protected bya Creative Commons Attribution-Noncommercial-Share Alike 3.0 Unported license.
Version 1274

Course 3101 and 3102 LPIC-1 Addendum
Common yum commands include
Table 9-5
YUM: /etc/yum.conf and /etc/yum.repos.d/
yum.conf
yum.conf is the configuration file for the yum package. In the yum.conf file there are software sites listed with one or more URLs and their names. For example, the following uses the fictitious site SUSE Linux rpms and its URL:
[SUSE Linux rpms] name=SUSE Linux $releasever - $basearch – suserpms baseurl=http://suselinux.novell.com/suse/linux/$releasever/$basearch/suserpms
yum.conf can be populated by editing the file and/or by uncommenting a line in the file. Best practices when editing yum.conf is to add your entries to the end of the file. If you find that any are marked as unstable or as a test, it is better to avoid those.
Command Descriptionyum list or yum list all List all packages in a repository and packages
installed on your systemyum list installed List all packages installed on your system. yum list installed packagename Displays if named package is installed
yum list installed samba_1.2.3-2_i386.rpmyum install packagename Install the named package, for example
yum install samba_1.2.3-2_i386.rpmyum list updates List of updates for all installed packages yum list update packagename Check for and update named package
yum list update samba_1.2.3-2_i386.rpmyum list available List of packages available to be installedyum info packagename Displays detailed package information, such as
version, status, dependencies, signatures
yum info samba_1.2.3-2_i386.rpmyum whatprovides path_to_file Display which package provides a file
yum whatprovides /etc/motdyum list packagename Search repository for the named package
yum list samba_1.2.3-2_i386.rpmyum remove packagename Removes the specific named package
yum remove samba_1.2.3-2_i386.rpmcreaterepo /pathtorepodirectory Used to create a repository (see Obj.2)
Copyright © 2010 Novell, Inc. Copying or distributing all or part of this manual is protected bya Creative Commons Attribution-Noncommercial-Share Alike 3.0 Unported license.
275Version 1

SUSE Linux Enterprise 11 Fundamentals / Manual
Example #1 of entries for a yum.conf configuration file
# This is the suselinuxrpms yum.conf file for my repository.# You can also add, delete or edit the settings, URLs, sections, or sites as needed.#[main]cachedir=/var/cache/yum keepcache=0debuglevel=2logfile=/var/log/yum.logpkgpolicy=newestdistroverpkg=suselinux-releasetolerant=1exactarch=1# Don't check keys for localinstallgpgcheck=0plugins=1metadata_expire=1500# Change timeout depending on stability of mirrors contacted.timeout=7
# PUT YOUR REPOS INFO HERE OR IN separate files named file.repo
Example #2 of a yum.conf configuration file
#Main settings for my yum.conf file #Last edited on January 21, 2010 5:18:29pm [main] cachedir=/var/cache/yum debuglevel=3 logfile=/var/log/yum.log pkgpolicy=newest distroverpkg=suselinux-release gpgcheck=1 tolerant=1 retries=1 exactarch=1 [base] name=SUSE Linux Base $releasever - $basearch - Base baseurl=http://suserpm.novell.com/linux/suse/core/$releasever/$basearch/os http://mirrors.backupstore.org/pub/linux/suse/sle11/base/$releasever/$basearch/yum/os http://suse.novell.com/releases/suse-linux-core-$releasever [released-updates] name=SUSE Linux Core $releasever - $basearch - Released Updates baseurl=http://suserpm.novell.com/linux/suse/core/updates/$releasever/$basearch/updates http://mirrors.backupstore.org/pub/linux/suse/sle11/base/$releasever/$basearch/yum/updates http://suse.novell.com/releases/suse-linux-core -$releasever
Copyright © 2010 Novell, Inc. Copying or distributing all or part of this manual is protected bya Creative Commons Attribution-Noncommercial-Share Alike 3.0 Unported license.
Version 1276

Course 3101 and 3102 LPIC-1 Addendum
[suselinux-extras] name=SUSE Linux Extras $releasever - $basearch - Extra Packages baseurl=http://mirrors.backupstore.org/pub/linux/suse/sle11/base/$releasever/$basearch/os failovermethod=priority [core] name=SUSE Linux Core $releasever - $basearch - core baseurl=http://suserpm.novell.com/linux/suse/core/$releasever/$basearch/core [SUSE Linux Enterprise 11 stable] name=SUSE Linux Core $releasever Stable baseurl=suselinux.novell.com/suse/linux/$releasever/$basearch/yum/stable http://suselinuxde.linux.de/suse/linux/$releasever/$basearch/yum/stable http://mirrors.backupstore.org/pub/suse/linux/enterprise11/$releasever/$basearch/yum/stable [updates] name=SUSE Linux Updates $releasever - $basearch - updates baseurl=http://suserpm.novell.com/suse/linux/$releasever/$basearch/updates
Notice in the previous example for the sites and their URLs; each section is named according to its reason or purpose for contacting it and downloading its software. Add sections according to your need, such as development, updates, or kernel.
NOTE: Additional information for yum.conf and its options may be found at (http://linux.die.net/man/5/yum.conf) and (http://www.linuxquestions.org).
yum.repos.d
yum.repos.d is the directory you use to hold the .repo files you create when specifying a repository location. This may be used in place of entering the locations in the yum.conf file. Remember to run the createrepo command after adding new packages; current versions of yum require its usage. Using the createrepo command generates the XML metadata necessary for your repository.
Using a local repository for your network installations and updates can save time for you and also save demand on your internet bandwidth, because all of the packages you need are now local to you. You may also setup a yum repository to install or update a package using an ISO CDROM image that you create.
Remember you may need to modify the yum.conf file to reflect the location of the local yum repository. Recall that the last lines of Example #1 mentioned either placing the repository URLs there or in separate files which you should name filename.repo in the /etc/yum.repos.d directory.
Copyright © 2010 Novell, Inc. Copying or distributing all or part of this manual is protected bya Creative Commons Attribution-Noncommercial-Share Alike 3.0 Unported license.
277Version 1

SUSE Linux Enterprise 11 Fundamentals / Manual
An example, the entries contained in a .repo file might look like this:
# filename /etc/yum.repos.d/install.repo # # Specify the path to the directory following baseurl= as shown here # [MyInstallRepository]name=Installbaseurl=file:///myrepos/myinstallrepoenabled=1
The above is an example of a .repo file located in the /etc/yum.repos.d directory. It contains the path to the repository directory; for example, you created a root directory named /myrepos, with repository sub-directories below it holding your files for each repository you want, such as a /myinstallrepo directory for installations. Enter any comments you wish to make about the file, and enter the baseurl= location path. Enable it using the enabled=1 entry.
For ease of viewing and recognizing your .repo files, it is often best to have a .repo file for each repository you create.
You may need to import all the gpg keys for the packages if you did not sign the rpm packages, or you can use gpgcheck=0 in the .repo file.
Using yumdownloader
yumdownloader, simply put, is a tool or program to download RPMs from yum repositories. Repositories can exist in numerous locations, and having to manually search and download packages would be time consuming. Using yumdownloader along with its many options can prove to be beneficial to you. For example, instead of downloading RPMs, you can use a list of URLs to get package downloads.
Using the --resolve option allows downloading of an RPM package to resolve any dependencies and also downloading of the packages that are required to fulfill that dependency.
yumdownloader needs and uses the yum libraries for retrieving all information. For yumdownloader to know which repositories to use for downloads, it must rely on the yum configuration. That configuration information is then passed to yumdownloader to use for its default values.
The installation of the yum-utils package will download its tools which include the yumdownloader tool. You must be root or have root privileges to install yum-utils and yumdownloader.
The command to install yum-utils as root user is as follows:
Table 9-6
Command Purposeyum install yum-utils yumdownloader is in the package.yumdownloader –source RPMsourcepackage Installs the named RPM source
package.
Copyright © 2010 Novell, Inc. Copying or distributing all or part of this manual is protected bya Creative Commons Attribution-Noncommercial-Share Alike 3.0 Unported license.
Version 1278

Course 3101 and 3102 LPIC-1 Addendum
If you are not root, you may be able to use the sudo command if you have been granted the permissions.
The default configuration for yumdownloader is to put the downloaded package under the current working directory. You can, however, use the --destdir option to use another destination directory of your choice. For example, type yumdownloader --source --destdir /tmp/directory.
yumdownloader --source kernel Installs the latest kernel source package.
Command Purpose
Copyright © 2010 Novell, Inc. Copying or distributing all or part of this manual is protected bya Creative Commons Attribution-Noncommercial-Share Alike 3.0 Unported license.
279Version 1

SUSE Linux Enterprise 11 Fundamentals / Manual
Objective 3 SQL Data Management
Overview
Working with an SQL database has become necessary in many of today’s Linux systems. The task and steps to manipulate, query, or use other basic SQL commands must be understood by administrators. This section will discuss the basic SQL commands and the manipulation of data.
SQL or Structured Query Language (pronounced es-cue-el, not sequel), despite the opinion of some, was not, is not, and never has been a Microsoft invention. SQL is a computer database language used for the management of relational database management systems (RDBMS). It is used for data storage, data query, data updates, data retrieval, and data manipulation, as well as for schema creation, schema modification, and access control of data. Originally, it was based on Relational Algebra, Edgar F. Codd in his 1970 writing, A Relational Model of Data for Large Shared Data Banks. Data manipulation commands are usually standard compliant as long as you use the base form of the command.
This section is based on the information found in
LPIC-1 105.3: (http://lpi.org/)
Candidates should be able to query databases and manipulate data using basic SQL commands. This objective includes performing queries involving joining of 2 tables and/or their subselects.
Key Knowledge Areas
Use of basic SQL commands.
Perform basic data manipulation.
The following will be discussed:
“Manipulate data in an SQL database” on page 280
“Query an SQL database” on page 282
Manipulate data in an SQL database
Basic SQL database commands allow the database administrator much flexibility in updating and performing the general tasks for the organizations database. The following commands are some of the most common ones that you will use when interacting with nearly every SQL DBMS.
If a company, for example, Novell Inc., used a table called BrainShare2010 to assign people a date and location to be at during BrainShare 2010, with columns that included Firstname, Lastname, Email, Phone, Assignment, Date, and Time, it could look similar to this:
Copyright © 2010 Novell, Inc. Copying or distributing all or part of this manual is protected bya Creative Commons Attribution-Noncommercial-Share Alike 3.0 Unported license.
Version 1280

Course 3101 and 3102 LPIC-1 Addendum
Data manipulation will depend on the commands and values we wish to insert into the table columns. Using the following command syntax, we could make entries into this table.
First Name
Last Name
Email Phone Assignment Date Time a.m./p.m.
David Manager DManager@ Novell.com
801-111-1111 DevTable 3/22-25 8-5
Adam Teamlead ATeamlead@ Novell.com
801-111-2222 DevTable 3/22-25 8-5
Shirley Certdata SCertdata@ Novell.com
801-111-3333 CertTable 3/22-25 9-6
INSERT Create new row(s) in a table with new data. Use either syntax:Syntax: INSERT INTO “table_name” VALUES (‘value1’, ‘value2’, ‘value3’, ‘…’) Syntax: INSERT INTO “table_name” (column1, column2, column3, …)
VALUES (‘value1’, ‘value2’,’value3’, ‘…’)
NOTE: number of columns and values must match to prevent error. Usage: INSERT INTO BrainShare2010 (Firstname, Lastname, Email, Phone,
Assignment, Date, Time)
Values (‘Randy’, ‘Testdev’, ‘[email protected]’, ‘801-111-4444’,
‘TestTable’,’3/22-24’,’9am-6pm’)
Results:First Name
Last Name
Email Phone Assignment Date Time
David Manager DManager@ Novell.com
801-111-1111 DevTable 3/22-25 8am-5pm
Adam Teamlead ATeamlead@ Novell.com
801-111-2222 DevTable 3/22-25 8am-5pm
Shirley Certdata SCertdata@ Novell.com
801-111-3333 CertTable 3/22-25 9am-6pm
Randy Testdev RTestdev@ Novell.com
801-111-4444 TestTable 3/22-24 9am-6pm
UPDATE Change data in existing database. Use WHERE to specify row(s)Syntax: UPDATE “table_name”
SET Column1 = value1, Column2 = value2, Column3 = value3
WHERE column = value Usage: UPDATE BrainShare2010
SET Date = ‘3/22-25’
WHERE Lastname = “Testdev” AND Firstname = ‘Randy’Results: Date entry for Randy Testdev is changed from 3/22-24 to 3/22-25. No other
change is made to data. Not specifying WHERE will change all date entries.
Copyright © 2010 Novell, Inc. Copying or distributing all or part of this manual is protected bya Creative Commons Attribution-Noncommercial-Share Alike 3.0 Unported license.
281Version 1

SUSE Linux Enterprise 11 Fundamentals / Manual
Query an SQL database
An SQL database can be queried using statements, functions, and keywords. Using these, you can group information from tables, sort the data from tables, and even join information from two tables.
GROUP BY
When the Novell employees work their assigned hours during BrainShare 2010 and the actual hours worked are entered into a database, the sum total of the hours worked by all can be extracted from the database entries, as well as the total for each individual employee.
Using the SQL GROUP BY statement along with functions such as SUM will provide a way to group the resulting dataset by database table column’s. For example, consider that Dave Manager created along with the BrainShare2010 table, another table called BrainShareHours through which means the actual hours worked by employees at the event are tracked and calculated.
Using the example database table below, we can use this to extract the SUM total and then GROUP BY each employee’s total hours spent working.
SELECT Used to select some or all data from an SQL database table.Syntax: SELECT Column1, Column2, Column3, …
FROM table_name Usage: SELECT Firstname, Lastname, Phone
FROM BrainShare2010Results All Firstname, Lastname, and Phone entries for all employees will be selected
DELETE Removes data from an SQL database table. Use with WHERESyntax: DELETE FROM table_name
WHERE Column = ValueUsage: DELETE FROM BrainShare2010
WHERE Phone = 801-111-1111Results: Data entries specified with WHERE are deleted. If WHERE is not used, ALL
entries from all rows and columns in the table are removed.
WHERE Selects data based on column name specified, as with SELECT above. An example is selecting all users (4) with a Lastname of Ecord, using a table called ClientList as in the following:
Usage: SELECT Lastname
FROM ClientList
WHERE Lastname = ‘Ecord’Results: All four users with Lastname of Ecord are selected from the table ClientList.
Copyright © 2010 Novell, Inc. Copying or distributing all or part of this manual is protected bya Creative Commons Attribution-Noncommercial-Share Alike 3.0 Unported license.
Version 1282

Course 3101 and 3102 LPIC-1 Addendum
Table 9-7
Employee Date Hours AssignmentDave Manager 3/22/09 8 Developer’s TableShirley Certdata 3/22/09 8 Certification TableRandy Testdev 3/22/09 8 Test DevelopmentDave Manager 3/23/09 9 Developer’s TableAdam Teamlead 3/23/09 9 Developer’s TableShirley Certdata 3/23/09 8 Certification TableAdam Teamlead 3/24/09 8 Developer’s TableRandy Testdev 3/24/09 8 Test DevelopmentDave Manager 3/24/09 9 Developer’s TableRandy Testdev 3/25/09 10 Test DevelopmentShirley Certdata 3/25/09 8 Certification TableDave Manager 3/25/09 10 Developer’s Table
SUM total of all hours worked by employees during BrainShareSyntax: SELECT SUM (Column)
FROM table_name Usage: SELECT SUM (Hours)
FROM BrainShareHours
SUM total of all hours worked by employees individually at BrainShareSyntax: SELECT Column, SUM (Column)
FROM table_name GROUP BY Column
Usage: SELECT Employee, SUM (Hours) FROM BrainShareHours GROUP BY Employee
Results: By the use of the statement GROUP BY, the number of hours worked by each employee can be gathered by extracting all hours worked for each individual employee.
ORDER BY This will sort the SQL data results by the use of its column’s. Looking at our first table, BrainShare2010, Dave Manager has now decided to SELECT all employees working at BrainShare 2010 and sort them by Lastname. Notice use of the wildcard *.
Syntax: SELECT * FROM table_name ORDER BY Column
Usage: SELECT * FROM BrainShare2010 ORDER BY Lastname
First Name
Last Name
Email Phone Assignment Date Time
Shirley Certdata SCertdata@ Novell.com
801-111-3333 CertTable 3/22-25 9am-6pm
David Manager DManager@ Novell.com
801-111-1111 DevTable 3/22-25 8am-5pm
Copyright © 2010 Novell, Inc. Copying or distributing all or part of this manual is protected bya Creative Commons Attribution-Noncommercial-Share Alike 3.0 Unported license.
283Version 1

SUSE Linux Enterprise 11 Fundamentals / Manual
To reverse the order displayed, you must use the SQL Keyword DESC for descending order. Add DESC after the ORDER BY clause, such as in the following:
If nothing is specified as to how to order a data set, a data set is alphabetically ordered by default (default assumes ASC not DESC).
To sort by more than one column, you must specify the columns in the ORDER BY listing such as in ORDER BY Lastname, Phone.
Column headings were adjusted due to width requirements for this document; however, we will use the Firstname, Lastname columns in our SQL command.
Adam Teamlead ATeamlead@ Novell.com
801-111-2222 DevTable 3/22-25 8am-5pm
Randy Testdev RTestdve@ Novell.com
801-111-4444 TestTable 3/22-24 9am-6pm
Syntax: SELECT * FROM table_name ORDER BY Column DESC
Usage SELECT * FROM BrainShare2010 ORDER BY Lastname DESC
First Name
Last Name
Email Phone Assignment Date Time
Randy Testdev RTestdve@ Novell.com
801-111-4444 TestTable 3/22-24 9am-6pm
Adam Teamlead ATeamlead@ Novell.com
801-111-2222 DevTable 3/22-25 8am-5pm
David Manager DManager@ Novell.com
801-111-1111 DevTable 3/22-25 8am-5pm
Shirley Certdata SCertdata@ Novell.com
801-111-3333 CertTable 3/22-25 9am-6pm
JOIN Use this whenever extracting data results from two or more tables, where a relationship exists between the specified columns in the tables. Consider the following two tables, BrainShare2010 (modified) and the BrainShareTravel table which Dave set up to record employee travel expenses for the event.Adding the common column fields of EID (EmployeeID) to both tables, Dave can now extract the information he requires from them.
BrainShare 2010EID First
NameLast Name
Email Phone Assignment
Date Time
7000 David Manager [email protected]
801-111-1111 DevTable 3/22-25 8am-5pm
7001 Adam Teamlead [email protected]
801-111-2222 DevTable 3/22-25 8am-5pm
7002 Shirley Certdata SCertdata@ Novell.com
801-111-3333 CertTable 3/23-24 9am-6pm
First Name
Last Name
Email Phone Assignment Date Time
Copyright © 2010 Novell, Inc. Copying or distributing all or part of this manual is protected bya Creative Commons Attribution-Noncommercial-Share Alike 3.0 Unported license.
Version 1284

Course 3101 and 3102 LPIC-1 Addendum
As shown, both tables have the common column field called EID. We will use that field to extract the information from both tables by matching each of their EID columns.
We will extract the Firstname, Lastname, and the TravelMileage each employee has accumulated during their travel to and from the BrainShare 2010 Conference held in Salt Lake City, Utah.
Two types of SQL JOIN can be used, INNER JOIN and OUTER JOIN. Without either keyword (INNER or OUTER) being used, the default used is INNER JOIN which would be JOIN.
If a match exists between columns in both tables, INNER JOIN will select the data from all rows matching. If an employee did not record any mileage as shown above with the employee James Instruct, this employee will not be listed in the resulting SQL query table.
7003 Randy Testdev RTestdve@ Novell.com
801-111-4444 TestTable 3/22-24 9am-6pm
7004 James Instruct JInstruct@ Novell.com
801-111-5555 CNITable 3/21-25 8am-7pm
BrainShare TravelEID Employee Name Dates Travel Milage7000 David Manager 3/22-25 4207001 Adam Teamland 3/22-25 4107002 Shirley Certdata 3/23-25 3177003 Randy Testdev 3/22-24 3097004 James Instruct 3/21-25
Syntax: SELECT 1st_table_name.Column, 1st_table_name.Column, SUM(2nd_table_name.Column,) AS new_name FROM 1st_table_name JOIN 2nd_table_name ON 1st_table_name.Column, = 2nd_table_name.Column GROUP BY 1st_table_name.Column, 1st_table_name.Column
Syntax SELECT BrainShare2010.Firstname, BrainShare2010.Lastname, SUM(BrainShareTravel.TravelMileage) AS MilesPerEmployee FROM BrainShare2010 JOIN BrainShareTravel ON BrainShare2010.EID = BrainShareTravel.EID GROUP BY BrainShare2010.Firstname, BrainShare2010.Lastname
Firstname Lastname MilesPerEmployeeDavid Manager 420Adam Teamlead 410Shirley Certdata 317Randy Testdev 309
BrainShare 2010EID First
NameLast Name
Email Phone Assignment
Date Time
Copyright © 2010 Novell, Inc. Copying or distributing all or part of this manual is protected bya Creative Commons Attribution-Noncommercial-Share Alike 3.0 Unported license.
285Version 1

SUSE Linux Enterprise 11 Fundamentals / Manual
Using OUTER JOIN, you can extract and list all employees whether or not they have entered mileage. Depending on which table you wish to select rows from, you can use the sub-types LEFT JOIN or RIGHT JOIN (OUTER does not need to be used with either of these in most databases).
If selecting all the rows from the first table listed after the FROM clause, whether there are matches or not, you would use LEFT JOIN. If selecting all rows, even those that have no matches, from the second table after the FROM clause, you would use RIGHT JOIN.
The syntax after the FROM clause to select all rows from the BrainShare2010 table would be
FROM BrainShare2010 LEFT JOIN BrainShareTravel
Any Employee not having entries matching the BrainShareTravel TravelMileage column would have an entry of NULL in place of an empty cell.
Firstname Lastname MilesPerEmployeeDavid Manager 420Adam Teamlead 410Shirley Certdata 317Randy Testdev 309James Instruct NULL
Copyright © 2010 Novell, Inc. Copying or distributing all or part of this manual is protected bya Creative Commons Attribution-Noncommercial-Share Alike 3.0 Unported license.
Version 1286

Course 3101 and 3102 LPIC-1 Addendum
Objective 4 Install and Configure X11
Overview
This section will help you to understand how to install and then also configure X11. Administrators find it helpful to verify that a video card, and also their monitors are supported by an X server. Other tasks include understanding the X font server and the X Window configuration file
This section is based on the information found in
LPIC-1 106.1: (http://lpi.org/)
Candidates should be able to install and configure X11.
Key Knowledge Areas
Verify that the video card and monitor are supported by an X server
Awareness of the X font server
Basic understanding and knowledge of the X Window configuration file
The following will be discussed:
“X11 Installation, Video Card and Monitor Requirements” on page 287
“Understanding the X Font Configuration File” on page 291
“Understanding the X Window Configuration File” on page 293
X11 Installation, Video Card and Monitor Requirements
The Graphical User Interface that we use today for many of our environments was developed by the Massachusetts Institute of Technology (MIT). X Window is a system that runs on UNIX and Linux operating systems. X Window is also called X or X11 and is the system and protocol that provides a GUI for computer networks for both client and server machines.
“Installation Requirements vs. Hardware Used” on page 287
“X11 Video Requirements” on page 289
“X11 Monitor Requirements” on page 290
Installation Requirements vs. Hardware Used
Always make sure that the machine hardware is supported by the X system. The X server program that comes with most Linux distributions is XFree86. XFree86 is a free open-source distribution of the X Window System. The Xfree86 version of XFree86 4.8.0 binary distribution should only be used if you are sure you know what you are doing; hence those unsure should avoid the binary distribution. It is possible to download and install XFree86 in the common .rpm or .deb package format but they should not be used by administrators with little knowledge of installing binaries.
Copyright © 2010 Novell, Inc. Copying or distributing all or part of this manual is protected bya Creative Commons Attribution-Noncommercial-Share Alike 3.0 Unported license.
287Version 1

SUSE Linux Enterprise 11 Fundamentals / Manual
Another open-source implementation of X window is the X.Org project release of X11R7.5, with X11R7.6 to be released soon.
Remember that hardware requirements differ among hardward platforms. However, when using Intel based systems, most distributions of X Window suggest a minimum of a 486 processor, with a minimum of 16 MB RAM with more RAM, making it all the easier for the system to function smoothly without utilitzing swapping which will slow down a hard disk. XFree86 says that a minimum of 60-80 MB of disk space is required.
When calculating space remember to include not only the X server but also libraries, fonts, and other utilities so the requirement may rise to 200+ MB very swiftly. Remember also to refer to the documentation for X Window before trying to install it. There are numerous files that you must download and install in the proper order to ensure a successful installation.
If you have determined you will install over an existing installation, it has always been good practice to perform a backup as well as making sure that any pre-existing configuration files are backed up, before beginning of course. Likewise when installing over existing X11 directories, all those under /usr/X11Rx (where x is the version number) have been backed up, making a whole directory back up including its parent structure (/usr), just in case there is reason to restore the tar file you created as the backup.
When installing over an existing installation, the install process should prompt for input before each new set of configuration files is installed into your system. If you have modified and customized configuration files, you may want to answer “no” to prompts, instead of “yes” to overwriting the files.
Being sure of the installation requirements will also help you verify that the video card and monitor requirements are met.
If your decision is to install the binaries, you will find using the XFree86 Xinstall.sh script to be beneficial. There are numerous steps to manual installations, and depending on the hardware and platform being used, the steps may differ for each. Also you should carefully follow the guidelines which you can review at the XFree86 website.
Your running the installer from within an X session is really never a good idea, and the installation process will warn you about continuing. Exit the X session, stop X from running, and then continue. If you ignore the warning, well remember, you were warned.
During installation the setup should automatically configure the use of your mouse, keyboard, video card, and monitor. With XFree86 you should be able to interact with the configuration options at the top of the screen..
If runlevel 5 is not used (inittab), then start X Window with the startx terminal session command. You may need to specify any environment variables or options such as in startx -- -display or startx -- -dpi 100.
The startx syntax is:
startx [[client] options] [-- [server] options]
Copyright © 2010 Novell, Inc. Copying or distributing all or part of this manual is protected bya Creative Commons Attribution-Noncommercial-Share Alike 3.0 Unported license.
Version 1288

Course 3101 and 3102 LPIC-1 Addendum
The -- will signify the end of the client options used and the start of the server options to be used.
When determining the client that it is to run, the startx command looks for the file .xinitrc, a hidden file in the users home directory; this specifies any customizations for that user. If not found, it then finds the xinitrc file in the xinit library directory, usually found in a path similar to /usr/X11Rx/lib/X11/xinit (where x is the version).
When determining the server that it is to run, the startx command looks for the file named .xserverrc, a hidden file in the user’s home directory; this also contains any customizations unique to the user. If not found, then it will use the system xserverrc file in the xinit library directory structure.
If any command line options are specified for either the client or server options, they will override any other behavior and revert to the xinit(1) behavior, where xinit(1) refers to the man pages for more detail.
Because using .xinitrc is normally a shell script, it can start multiple clients, depending on configuration. When the script exits, startx will kill the server session and then complete other session shutdown activities as is needed. For this reason users usually prefer to use a session manager, window manager, or an xterm application or program.
X11 Video Requirements
The video drivers supported by X11 are numerous, as a look at the XFree86 website will support. Whether you have a need for ATI, Ark Logic, Cirrus Logic, NeoMagic, VESA, or a VMware guest OS driver, you will most likely find the driver you need. Take care, however, that you watch the drivers you download, you may find them to be a preliminary release and not yet stable enough for use in a production environment.
If the video card you plan to use is not supported, it wouild be best to wait; etiher continue running the previous version of X window or change the video card to meet requirements.
Check with the video card manufacture or their documentation for information concerning the chipset and the necessary amount of RAM needed. It is best to make sure of the requirements before purchasing a video card. It is better to ask yourself “Will the hardware I want to purchase meet X Window requirements,” instead of asking, “Will X Window meet the requirements of the hardware I already purchased.”
Another way of determining the chipset support is by the use of a utility called SuperProbe. Its usage is as follows:
SuperProbe [-verbose] [-no16] [-excl list] [-mask10] [-order list] [-noprobe list] [-bios base] [-no_bios] [-no_dac] [-no_mem] [-info]
Copyright © 2010 Novell, Inc. Copying or distributing all or part of this manual is protected bya Creative Commons Attribution-Noncommercial-Share Alike 3.0 Unported license.
289Version 1

SUSE Linux Enterprise 11 Fundamentals / Manual
Table 9-8
X11 Monitor Requirements
As with the video driver, make sure of the requirements for your monitor ahead of installation time. Also as a general rule of thumb, monitors use the compatibility given to it by the video card. In other words, if the video card can drive the monitor it should work well, including the flat panel type of monitors.
As with the video card, always check the manufacturer’s website for its hardware compatibility guidelines and follow it. When having X11 monitor issues, use the xvidtune application to try and fine tune and adjust X server’s video modes and its monitor related settings. If xvidtune is not able to be used it will display a message in the terminal window.
A simple adjustment may be made using the sax2 terminal command to let it slef-adjust the monitor resolution for you; alternately it may run your video configuration utility for you to adjust and test the settings. As with any utility always read ahead to find out the options, settings, configurations, etc. that best will fit your needs.
Some administrators feel it is highly improbable to damage a monitor by their experimenting with it. Many others feel it is better to opt-in for cautiousness and be prepared by reading documentation on the monitor, or reading the man or info pages that cover the commands to be used. When X is not configured for its optimal prime settings, try running the vendors configuration utilities once again and see if the resulting display is better. While most monitors now have built-in saftey settings and precautions, remember, it is yours or your company’s money that purchased the monitor.
If you over-do it though X may not be able to start. For this reason, some prefer to use the "startx" way of starting X (see below) while "experimenting." This way, if X crashes, the display manager (GUI login) will not loop and cause you severe headaches,. startx just gracefully returns to a text console screen, where an error message may be visible.
-verbose Verbose output of information.-no16 No port requiring 16 bit I/O address decoding will be used.-excl list Any port on the specified exclusion list will not be accessed.-mask10 Compared I/O port tested against exclusion list masked to 10 bits.-order list Comma-separated list of chipsets to test and what order. Overrides default
test order.-noprobe list List of chipsets not to test and what order, comma-separated. To find list of
acceptable names use -info option below.-bios base Specifies base address for graphics-hardware BIOS. If failure to locate BIOS
then use this opton.-no_bios Assume that EGA or later board is primary video hardware. Does not allow
reading of the video BIOS.-no_dac Skip probing for RAMDAC type when SVGA or VGA is determined.-no_mem Do not probe for the amount of installed video memory.-info Print out listing of all known video hardware able to identify.
Copyright © 2010 Novell, Inc. Copying or distributing all or part of this manual is protected bya Creative Commons Attribution-Noncommercial-Share Alike 3.0 Unported license.
Version 1290

Course 3101 and 3102 LPIC-1 Addendum
X11 uses the monitors configuration specifications to determine what will be the resolution and refresh rate to run at. Specifications such as these can usually be ascertained from the documentation that was included with the monitor at purchase or usually directly from the manufacturer's website. The numbers that are needed indicate a range and refer to the horizontal scan rate and the vertical synchronization rate.
When testing your monitor’s display, some tests can produce a black screen which often make diagnoses of the monitor difficult to determine whether X11 is working properly or not. To setup the settings, initially Xorg uses a configuration file called xorg.conf. The xorg.conf file is normally found at /etc/X11/xorg.conf and can be generated by the root user or edited by the root user if it already exists.
The xorg.conf file is discussed in the X Window configuration file section in more detail.
Understanding the X Font Configuration File
The X Window system display requires that it be supplied with fonts; xfs is one of the X Window system font servers. Under normal conditions the X font server is started by means of boot files such as the /etc/rc.local file.
The process of using fonts with X can sometimes be daunting to understand for new Linux administrators. Usually the installed fonts are sufficient for every day tasks that you may perform.
Configuration of XFree86 will support TrueType fonts, PostScript fonts, and bitmap fonts. XFree86 can support one or multiple X font servers.
A font server is a background process that makes your installed set of fonts available to XFree86 and other machines running X.
The X Window system display requires that it be supplied with fonts; xfs and xfstt are the most widely used X Window system font servers.
XFS as the X Window X Font server has the purpose of supplying fonts to the X Window server display.
As previously mentioned under normal conditions the X font server is started by means of boot files such as the /etc/rc.local file. Your end users, however, may also start private font servers for a specific set of fonts they wish to use at their client.
The main configuration file that the font server will use is the default file of /etc/X11/fs/config.
You may use a number of options with xfs.
-config configuration_file Specifies the file the font server will be using. The default file /etc/X11/fs/config will be used.
-ls listen_socket This is intended to be used by the font server itself, only when auto spawning a copy to care for any additional connections.
-port tcp_port Defines the TCP port number on which the server will listen for connections. Default port number is 7100.
Copyright © 2010 Novell, Inc. Copying or distributing all or part of this manual is protected bya Creative Commons Attribution-Noncommercial-Share Alike 3.0 Unported license.
291Version 1

SUSE Linux Enterprise 11 Fundamentals / Manual
-daemon Directs xfs to fork and then go into the background at startup. If the option is not specified, xfs will run as a regular process (the exception is if xfs was built to daemonize as the default).
-nodaemon If xfs runs as a daemon by default, this option prevents that and starts xfs up as a regular process.
-droppriv xfs will try to run as user and group xfs; that is unless the -user option is used. If you use this option, you may also want to use the "no-listen = tcp" in the config file; this ensures that xfs will not use a TCP port.
-user username This is similar to –droppriv, except that xfs will run as the username that is specified.
X Font Server Setup
Steps to setup an X font server while looking easy require careful planning and prior knowledge. The following gives a high-level overview of those steps.
Steps to set up an X font server are the following:
1. Install the font server if necessary.
2. Edit the xfs.conf file that comes with it.
3. Set up a font directory such as /home/fonts/lib/ttfonts
4. Have X use the font server after all other fonts by specifying xset fp+ tcp/localhost:7100.
5. Test the font server.
To use outline fonts on X, you need a version of X that will support their use. This will include all versions of OpenWindows, X11R5 and newer, some newer versions of XFree86, as well as others.
Three ways exist that support the use of outline fonts.
Use of the X server itself
Use of an external font server
Use X modules that can be loaded, such as those with OpenWindows.
The following is a sample of a configuration file:
#This is a sample X Font server configuration file #Only a maximum of 10 clients may connect to this server client-limit = 10 #X font server will reach its limit, then start up a new one clone-self = on # an alternate font server that clients may use alternate-servers = cannon:7101,cannon:7102 #look for fonts in this path #catalogue = /usr/X11R7/lib/X11/fonts/fonttype /usr/X11R7/lib/X11/fonts/100dpi/
Copyright © 2010 Novell, Inc. Copying or distributing all or part of this manual is protected bya Creative Commons Attribution-Noncommercial-Share Alike 3.0 Unported license.
Version 1292

Course 3101 and 3102 LPIC-1 Addendum
#use 12 points, decimal pointsdefault-point-size = 120 #Resolutions to use,100 x 100 and 75 x 75 default-resolutions = 100,100,75,75use-syslog = off
Understanding the X Window Configuration File
Configuration of xorg.conf may not be necessary. With the release of version 7.3, Xorg may be able to work without a configuration file.
The command to enter, that will start the X server is startx.
The program xinit allows users to manually start an X server. startx is the script that is used as a front-end for xinit.
The default display used is :0, xinit and startx start an X server and an xterm on it. When xterm terminates, xinit and startx kill the X server.
Version 7.4 Xorg may be able to use HAL and autodetect keyboards and mice.
sysutils/hal and devel/dbus ports are installed as dependencies of x11/xorg; however, they must be enabled by you, by making the following entries in the /etc/rc.conf file:
hald_enable="YES"
dbus_enable="YES"
Start these services either manually or by a reboot before any further configuration of Xorg is carried out.
The automatic configuration can fail to work with your hardware as it may with some hardware, or it may not be possible to set things up quite as they should be.
If this happens, then in these cases manual configuration will be required.
If a desktop environment, one such as GNOME, KDE, or perhaps another is going to be installed, it will often contain tools which allow the user to set screen parameters such as the resolution.
If the default configuration will not work and you have already planned to install a desktop environment, just continuing with the installation of the desktop and the use of the appropriate screen settings tool may configure it correctly for you.
Configuration of X11 is a multiple process setup. The first step you need to perform is to build an initial configuration file. As the super user root, simply run
Xorg -configure
Generated is a skeleton or template file for X11 configuration in the /root directory named xorg.conf.new. Whether you su to root or by a direct login will affect the inherited supervisor $HOME directory variable.
X11 will attempt to probe the machines graphics hardware on the system and then create a configuration file to load the proper drivers for the hardware detected on the target system.
Copyright © 2010 Novell, Inc. Copying or distributing all or part of this manual is protected bya Creative Commons Attribution-Noncommercial-Share Alike 3.0 Unported license.
293Version 1

SUSE Linux Enterprise 11 Fundamentals / Manual
Testing is the next step for the configuration. This is to verify that Xorg will work with the installed graphics hardware on the target system.
In Xorg versions up to 7.3, type Xorg -config xorg.conf.new
As of Xorg 7.4 and later, the test produces a black screen which makes it somewhat difficult to diagnose whether X11 is working properly as it should.
Older behavior is still available by using a retro option:
Xorg -config xorg.conf.new -retro
The configuration file consists of numerous sections such as the following section names:
In the configuration file, arguments may follow keywords; the arguments are
Remember that depending on the flavor of Linux you are running or wish to run, the setup utilities may vary.
As an example, in Fedora Linux a utility named system-config-display will create a configuration file for you by running the command (it’s name):
If it is not installed, you will need to download the package and install it. You will need to run it as root, the super user.
It runs interactively; however, it may run non-interactively by using the command with the option --noui.
You may need to run it if you cannot run X at all.
Files File pathnamesFlagServer FlagsModuleDynamic Module LoadingModes Description of the Video ModesScreen Screen ConfigurationInputDevice Description of the Input DeviceDevice Description of the Graphics DeviceVideoAdapter Description of the Xv Video AdaptorMonitor Description of the MonitorServerLayout The Overall LayoutDRI Configuration specific to DRIVendor Vendor specific Configuration
Integer A number that is in hex, octal, or decimal formatReal A floating point number is usedString A string that is enclosed in “” double quote marks
system-config-display
system-config-display --noui
Copyright © 2010 Novell, Inc. Copying or distributing all or part of this manual is protected bya Creative Commons Attribution-Noncommercial-Share Alike 3.0 Unported license.
Version 1294

Course 3101 and 3102 LPIC-1 Addendum
Objective 5 Message Transfer Agent (MTA) Basics
Overview
This section discusses some of the common Linux MTA programs. Understanding of tasks such as performing basic email forwarding and the creation of an email alias will be covered. Also MTA programs such as qmail and exim are discussed.
This section is based on the information found in
LPIC-1 108.3: (http://lpi.org/)
Candidates should be aware of the commonly available MTA programs and be able to perform basic forward and alias configuration on a client host.
Key Knowledge Areas
Create e-mail aliases.
Configure e-mail forwarding.
Knowledge of commonly available MTA programs (postfix, sendmail, qmail, exim) (no configuration)
The following are discussed:
“Understanding Linux MTA programs: sendmail” on page 295
“Understanding Linux MTA programs: postfix” on page 296
“Understanding newaliases, qmail, and exim” on page 297
“Using mail, mailq, ~/.forward, and aliases” on page 300
“sendmail emulation layer commands” on page 305
Understanding Linux MTA programs: sendmail
The Linux MTA or mail transfer agent is the software that sets up the Linux machine to be an email server. Using different email clients, you can send, receive, and forward email among other features.
Sendmail has been one of the most popular mail transfer agents ever used on the Internet. Sendmail is a descendant of the ARPANET delivermail which appeared with BSD 4.0/4.1 in 1979. Sendmail coming in BSD 4.1c in 1983 was the first version of BSD to include the TCP/IP protocol. Hence sendmail is one of the oldest and one of the most widely used Internet MTAs.
Sendmail was designed with the flexibility to transfer mail between any two dissimilar mail systems. Sendmail has support for many of the protocols used to transfer mail such as UUCP, SMTP, DECnet mail11 and ESMTP, among others.
Sendmail evolved into Sendmail X (the MTA known previously as Sendmail 9). Sendmail X is a modular message transferring system, which has five and sometimes more processes. It was developed to use a centralized queue manager which controls
Copyright © 2010 Novell, Inc. Copying or distributing all or part of this manual is protected bya Creative Commons Attribution-Noncommercial-Share Alike 3.0 Unported license.
295Version 1

SUSE Linux Enterprise 11 Fundamentals / Manual
SMTP servers and clients to receive and send email. It also has an address resolver that provides mail routing capabilities using lookups, including DNS lookups. Its development also allows configuring it as a secure, efficient mail gateway; however, address masquerading is not part of its program.
Sendmail’s development was stopped in favor of a new development project known as MeTA1, which offered new features not available in other open source MTA programs.
For new administrator’s, sendmail can be very complex to setup and use. Sendmail options should be read before embarking on its configuration.
Understanding Linux MTA programs: postfix
Today many administrators prefer to use postfix over sendmail, for reasons that include ease of administration, security, and speed. Using postfix will remind the user of sendmail; however, the inner workings of postfix are very different from sendmail.
Postfix will run with AIX, HP-UX, Linux, MacOS X, Solaris, Tru64 Unix, BSD, as well as IRIX, and many other Unix systems.
Main features of postfix include various protocol support, junk mail controls, mailbox support, database support, address manipulation, and DSN or delivery status notifications which is configurable. A detailed list of individual features is as follows:
Copyright © 2010 Novell, Inc. Copying or distributing all or part of this manual is protected bya Creative Commons Attribution-Noncommercial-Share Alike 3.0 Unported license.
Version 1296

Course 3101 and 3102 LPIC-1 Addendum
Understanding newaliases, qmail, and exim
In Linux there is a newaliases command, which is used to build a new copy of the alias database from and for the mail aliases file. The mail aliases file is located in the /etc/mail/ directory and is named aliases. As with many configuration files, changes to the aliases file does not take affect until you run the newaliases command which initializes the database. Allow a minute or more for the update to become visible.
Running the newaliases command causes the sendmail command to re-read the local systems /etc/aliases file and create two additional files which contain the database information for alias. The two files are /etc/aliases.dir and /etc/aliases.pag.
The syntax for running the command in a terminal window is newaliases. It returns an exit status code, which status code depends on whether it is successful or if it has encountered an error. The codes are as follows:
0 = exits successful
>0 = error occurred
The files and directory used for the newaliases command are found at
Protocol Support
SMTP connection cache
SenderID+SPF - plug-in
DKIM or DomainKeys
Identified Mail
DomainKeys
DSN status notifications
Enhanced status codes
ETRN on-demand relay
IPv6, LMTP clients
MIME conversion
SMTP C/S Pipelining
SASL support
SASL Authentication
TLS encryption and authentication
QMQP server
Mailbox Support
Virtual Domains
Maildir format
mailbox format
Junk Mail Control
Access control per client, sender, or recipient
Content filter built-in, external before queue, and external after queue
Sendmail Milter (mail filter) protocol
Greylisting plug-in
SPF plug-in
Address probing callout
SMTP server per-client rate and concurrency limits
Stress-dependant configuration
Address Manipulation
Selective address rewriting
Masquerading addresses in outbound
SMTP mail VERP envelope return addresses
Database Support
Berkeley DB database
LDAP database
MySQL database
CDB database
DBM database
PostgreSQL database
Copyright © 2010 Novell, Inc. Copying or distributing all or part of this manual is protected bya Creative Commons Attribution-Noncommercial-Share Alike 3.0 Unported license.
297Version 1

SUSE Linux Enterprise 11 Fundamentals / Manual
Table 9-9
postalias
The postfix equivalent to sendmail’s newaliases command is the postalias command. The postalias configuration file is /etc/postfix/aliases; when done editing this file, run the postalias command by typing in a terminal window, postalias /etc/postfix/aliases. A discussion of postalias is outside the scope of the LPIC-1 108.3 MTA basics Key Knowledge Areas.
More postalias information is found at http://wiki.archlinux.org
qmail
qmail has been defined as being the modern replacement for sendmail, the SMTP server that makes sendmail obsolete, ancient. It has also been described as an email server that is a more secure replacement for sendmail. qmail was released to the public domain in 2007, but due to an unusual license agreement, it is considered non-free depending on which guideline is used. This has caused controversy.
For Linux administrators security is vital and qmail was the first security-aware mail transport agent at its time. sendmail has been a target for attacks since it was not designed with security as one of its goals. qmail on the other hand is a modular architecture which is comprised of mutually untrusting components. As an example, the SMTP queue manager uses credentials that are different from the SMTP listener component, as are other components of qmail are different from one another .
Upon release, qmail ran much quicker than sendmail especially for tasks such as bulk mail used by mailing list servers for which it was designed to manage. qmail is also easier to configure than sendmail and easier to deploy in the mail environment. Contributing to its ease of use is the ability to have user controlled wildcards. When addressing mail to “user-wildcard,” for a qmail server, the message will be delivered to separate mailboxes. Using this with mailing lists and spam management allows users to publish multiple email addresses to them.
Two protocols introduced by qmail are QMQP or Quick Mail Queuing Protocol and the QMTP or Quick Mail Transport Protocol. QMQP allows the sharing of email queues among different email hosts. QMTP is a transmission protocol whose performance is better than SMTP, accomplished by using fewer transmissions when compared to the SMTP protocol.
qmail uses the maildir format which allows it to deliver mail to Mbox mailboxes. Maildir takes individual email messages and splits it into separate files; mbox does
/usr/sbin/newaliases Contains the newaliases command/etc/aliases Contains source for the mail aliases file
command/etc/mail/aliases Contains source for the aliases for the
sendmail command/etc/aliases.db directory Contains the binary files created by the
newaliases command
Copyright © 2010 Novell, Inc. Copying or distributing all or part of this manual is protected bya Creative Commons Attribution-Noncommercial-Share Alike 3.0 Unported license.
Version 1298

Course 3101 and 3102 LPIC-1 Addendum
not. By doing this, maildir thus avoids problems with concurrency and locking. Another benefit is its ability to be used safely with NFS.
exim
Another MTA (message transfer agent) is Exim. Exim is an SMTP mail server without features like address books, iMAP4, POP3, shared calendars, group scheduling which we find in other mail systems. To have the collaboration type of groupware features, you will need additional programs. Exim has been referred to as a sendmail alternative, but it, of course, is very different in its configuration and setup.
However many advanced configuration features of Exim has made it attractive to large Unix/Linux installations, such as those found with different ISPs. While it can deal with millions of messages per day, it is found to be useful to single workstations and small to medium sized systems. If the more advanced features found in other systems such as Novell’s GroupWise or Lotus Notes are needed, then Exim would most likely not suit your requirements or needs.
It does have the capability to store lists of domains, hosts, and users, as needed, in text files, databases, and even LDAP directories. Exim’s current version is 4.71 and is available from numerous websites. If you will be using the documentation for setup and configuration, use the proper versions of documentation. Errors, frustration and inability to use have happened to some because of using an older version of the documentation. User guides and administration guides are available to you either to purchase or from a number of the Exim sites that supply free guides.
When checking for documentation, you will find the master documentation which contains everything you need to know about installing, configuring, and using Exim. Also refer to the exim filter specification documents that are available.
Exim gives support for two kinds of filter files. The Exim filter has information for instructions in a formunique to Exim. Whereas the Sieve filter contains information in the Sieve format which is referenced to by RFC 3028. The Sieve filter files are meant to be portable between various types of environments. On the other hand, the Exim facility for filters contains features many administrators like, making it feature rich, and since it is in a form unique to Exim, you will find better integration with the host system environment.
In order for a client to use either of the filtering choices, the administrator needs to configure Exim for both types of filter. If your concern is to make the most of interoperability, then Sieve filtering is the only choice for you.
Some end-users find difficulty when trying to configure filtering locally. For this issue to be addressed before it becomes an issue, make sure that either forwarding or filtering is enabled on your system, remembering that individual facilities may be enabled or disabled separately from the others. If not prepared for in advance, you may be getting support calls.
Once filtering is completed, always remember to test a new filter file once created. Some files may be quite extensive making them all the more complicated. Do not rely on the Exim preliminary testing facilities to provide you with complete test
Copyright © 2010 Novell, Inc. Copying or distributing all or part of this manual is protected bya Creative Commons Attribution-Noncommercial-Share Alike 3.0 Unported license.
299Version 1

SUSE Linux Enterprise 11 Fundamentals / Manual
results; they only check syntax and basic filter operation and only for the traditional .forward files. As with many types of filters, send a test message to discover what will happen to the message during transport. Additionally, be aware of the default path for the Exim installation. Some systems use the path /usr/sbin/sendmail while others use a path of /usr/lib/sendmail.
Two directories and the files they contaain, must be understood for messages. The first is, /var/spool/exim/msglog. This is the directory holding the logging information for your messages. Each message has a file corresponding to it and is named the same as the message-id. The second directory is /var/spool/exim/input. Files in this structure are also named using the message-id; however these messages contain an additional suffix which will designate it as either the envelope header -H or the message data -D. Both of these directory structures may contain other sub-directories for large email queues. Check them if the files you need are not directly under the input or msglog directory.
When working with Exim messages, keep in mind that the message-id is built along the lines of the following, xxxxxx-xxxxxx-xx. The message-id is made up of alpha-numeric characters and may utilize upper and lower-case. Further, when using commands that manage message logging or the message queue, you will see that most of the commands use the message-id. For every message in the spool directory, there are three files. so when working with the queue, it is best to use Exim commands that will not leave remnants of message files that may cause you any grief.
If your decision is to use Exim, then run a search on the Internet to find out more about its installation, configuration, commands, and files. You will find numerous cheat sheets for commands you want to run, as well as detailed information on running each command. You will find a number of forums and wiki’s as well as the guides we previously mentioned. As with any new software, read, read, and read before you have to read how to get out of an issue that may arise.
Using mail, mailq, ~/.forward, and aliases
The mail and mailq commands you will find are helpful in sending, composing, reading mail and in viewing mail in the mail queue. .forward and aliases are useful in the forwarding of your mail to another account.
The mail command in Linux is a very powerful command and newbies can at times find themselves lost in which command option should be used. The purpose of this objective is to help you understand and work with the mail command.
Whether you need to read and reply, compose and send, forward or delete mail, the Linux mail command may be very useful to you. Many new Linux users find the command line to be daunting and terrifying to use, at first that is. Whether you are researching the use of the mail command for yourself or for your end-users, you will find a large number of command line options, configuration options, compose-mode options, and command-mode options. We will cover those that will help you to prepare for the LPIC-1 exams.
Copyright © 2010 Novell, Inc. Copying or distributing all or part of this manual is protected bya Creative Commons Attribution-Noncommercial-Share Alike 3.0 Unported license.
Version 1300

Course 3101 and 3102 LPIC-1 Addendum
To start with, we always recommend that you log in with your regular user account and not the root account; security issues can be a concern. If root privileges are required, try using the sudo command or the su - command.
Sending and receiving mail using the command line interface can be very helpful to you and your end-users. Help your users by setting the default configuration options such as the following:
Table 9-10
These options are set in the /etc/mail.rc file or to the users ~/.mailrc file.
Command line options may be used to send mail or enable/disable features on the fly. For example, using the following syntax,
mail james –s “New meeting time and outline” </home/dave/meeting
You will send a message to the user James, and it will have a subject line of “New meeting time and outline,” with the body of the message being read from the file /home/dave/meeting.
Table 9-11
Compose-mode options will help you to interact with your messages for example:
Table 9-12
Option Descriptionrecord filename Sets the path to record outgoing mail. If not set, then the outgoing
mail is not saved nosave Does not save any aborted messages to dead.lettermetoo Will not remove the sender from a group when mailing to ithold Keeps messages in the system mailbox when quittingautoprint Prints the next message after a deletionask or asksub Prompts user for a message subjectappend Appends messages to mbox instead of having a message prefixed to
a previous one
Command Description-N Tells mail to not display message headers when either entering a mail folder
or printing an email-p Lower-case p, this option reads your mail in POP3 mode-P Upper-case P, this option disables POP3 mode-s subjectline Sets the subject line to the text following -s
Option Description~b names Add names to the bcc: header information~c names Add names to the cc: header information
Copyright © 2010 Novell, Inc. Copying or distributing all or part of this manual is protected bya Creative Commons Attribution-Noncommercial-Share Alike 3.0 Unported license.
301Version 1

SUSE Linux Enterprise 11 Fundamentals / Manual
Command-mode options can interact with the shell, mailbox, and messages. For example, using the following options you can,
Table 9-13
mailq
The mailq command is used to print a summary of the mail messages that are queued for delivery. The mailq utility will exit with 0 upon success completion and will exit with >0 if an error has occurred.
When the summary is printed, every line displays information pertinent to the message, error messages are included.
~t names Add names to the To: header information~e Starts the text editor~f Inserts messages into the message body being composed~F Similar to ~f above but will include the message header~p Print the message header and the message being sent ~q Aborts your composition of the message
Option Description? (help) List the commands available, help print out! Execute a shell command alias (a) Create an alias list or print the alias list unalias Delete or discard the previously defined aliasesalternatives (alt) Instruct mail to not reply to your own remote accounts or remote
machineschdir (c) Change (cd) to your home directory or another directory you
specifydelete (d) Delete a messagedp (dt) Display next message after deleting the current one edit (e) Edit a messageexit (ex) or xit (x) Exit mail and do not update the user?s system. mailbox or folder folders Show list of foldersfrom (f) Print the headers for messagesmail username Start composing message to the named usernext (n) Print (type) next messagequit (q) Exit mail and update folder on exit reply (r) Send mail to all names on distribution list Reply (R) Send mail to the author onlyrespond Same as reply (r)save (s) Save the message to folderset (se) Set or print the mail optionsunset Unset the mail optionssource Read the commands from file specified top Print the first few lines of every message specifiedtype or Type (t or T) Same output as next (n)undelete (u) Restore deleted messages
Option Description
Copyright © 2010 Novell, Inc. Copying or distributing all or part of this manual is protected bya Creative Commons Attribution-Noncommercial-Share Alike 3.0 Unported license.
Version 1302

Course 3101 and 3102 LPIC-1 Addendum
Table 9-14
The following options may also be used with the mailq command:
In the following substring options, invert the match when the [!] is specified.
Table 9-15
~/.forward
End-users often find they have a need to forward their messages to another account, either that of another user in their system or another mail account owned by them, perhaps on another server or even another type of email system.
To accomplish the forwarding of email, they will need instructions about how to do so. Linux has a way, a means that will forward their messages for them. That utility is .forward. Using this Linux feature, they can forward their mail without asking for assistance from the help desk or email administrator.
Like sendmail, many MTAs today will look for a .forward file in the home directory of the forwarding user. Email users most often use this file to forward messages to a messaging account on another machine or email system, hence a redirection of mail.
The contents of the .forward file, is simply the address that you wish to have your mail forwarded to. For example, to forward email to another account, the user geeko
1st line Display’s the internal identifier used on the host system for the specific message with a possibility of a status character, also the message size in bytes, time/date message entered the queue, and the envelope sender of the message
Status characters: * Indicates the job is now being processed. X Indicates the load is too high for the job to be processed. - Indicates the job age is too young to process.
2nd line Show any error message that caused the message to be retained in the queue. If the message is being processed for the first time, no error message will be seen
3rd and subsequent lines Shows a recipient of the message, one recipient per line.
-Ac Show submission queue designated in the file /etc/mail/submit.cf, not the MTA queue specified in the file /etc/mail/sendmail.cf.
Option Description-q[!]I substring Display items in queue with queue ids containing the substring -q[!]R substring Display items in queue with recipients containing the substring -q[!]S substring Display items in queue with senders containing the substring-q[!]Q substring Display any quarantined messages with quarantined reasons containing
the substring-qQ Display any quarantined items in the mail queue -qL Show any lost items in the mail queue-v Print out information in verbose mode
Copyright © 2010 Novell, Inc. Copying or distributing all or part of this manual is protected bya Creative Commons Attribution-Noncommercial-Share Alike 3.0 Unported license.
303Version 1

SUSE Linux Enterprise 11 Fundamentals / Manual
would create a file called .forward in his home directory, assuming one does not already exist that could be edited.
Create the file .forward, then enter the username or email address with the syntax of
As user geeko forwarding his mail to a local user named tux, in geeko’s home directory follow these steps:
As the user geeko when forwarding email to your own Internet address [email protected], in the geeko home directory, follow these steps:
To send to both an internal username and an Internet address, use the following syntax: user, [email protected].
If in a directory other than the home directory, make sure you use the complete path to the home directory, for example, /home/geeko.
When the file contents are read, the system treats the entry as an alias for that users email. This means that all email will be forwarded to the alias email address and not delivered to the normal mailbox for the user.
Make sure that you specify and enter correctly the address you want your mail to go to; otherwise, it could end up in someone else’s mailbox for them to read.
aliases
An alias is a common term today meaning another name that a person can be known by. It is a way to sometimes hide who you are or to take on a different identity, perhaps due to a position in your company, such as being the webmaster or being a librarian.
An alias in Linux can be a way to setup a pseudo-name or more precisely a pseudo-email address. It simply redirects your mail to another email address that you specify.
Two types of aliases that we will discuss here are MUA aliases (mail user agent) and MTA aliases (mail transfer agent). An MUA alias is one that you setup in your MUA
username If user is a local user [email protected] If it is going to an Internet address
To create the file, type vi .forward To forward email to tux, type tux To save and exit vi, type :wqTo verify file creation, type ls -a .forward To view the file text, type cat .forward
To create the file, type vi .forwardTo forward email to geeko type [email protected] To save and exit vi, type :wqTo verify file creation, type ls -a .forward To view the file text, type cat .forward
Copyright © 2010 Novell, Inc. Copying or distributing all or part of this manual is protected bya Creative Commons Attribution-Noncommercial-Share Alike 3.0 Unported license.
Version 1304

Course 3101 and 3102 LPIC-1 Addendum
as an alias only you see; other users will not be able to use it nor will they be able to see it.
Using an MUA alias, you would use the syntax
alias nc Nikki Chavez <[email protected]>
Using a mail client configuration file, perhaps like a mutt configuration file, using “nc” in an address field (To:, cc:, or bc:), the client would see this as if you had typed [email protected] in the field.
The system “aliases” file needs to be modified to contain the alias or aliases you wish to define. The system aliases file is normally /etc/aliases; however, there may be another one at a different location, depending on your MTA.
Review the standard aliases already contained in the file, perhaps the alias such as “postmaster” or the one for “mailman” or “faxmaster” may give guidance on the syntax to use.
Depending on the MTA you use, it may treat the alias as a mailbox and append the mail to it, excellent for archiving mail, or perhaps the MTA will determine the alias target to be a program, which then passes the mail to the program’s standard input.
sendmail emulation layer commands
sendmail is a program that has been in use within the UNIX/Linux community for many years now, and in order for many of the newer (and some older) messaging systems to communicate with sendmail and allow mail delievery, there is a need for an emulation utility or program to be implemented.
Third-party sendmail emulators
Compatibility is always a concern for programers and rightly so sendmail is the most widely used MTA on the Internet and will remain so in the forseeable future.
Some messaging systems maintain compatibility with sendmail by implementing their own sendmail emulation layer programs. This allows them to maintain that connection with different Linux and UNIX processes and applications that utilize sendmail. These often replace the /usr/lib/sendmail software with one of their own.
These replacements emulate the Linux sendmail program. sendmail emulators are used to ensure the compatibility with those messaging programs that use sendmail and not other protocols such as SMTP for mail delivery. These need to have a way of communicating with the mail queue and delivering mail to it.
ssmtp
While it is slightly more complex and heavier than say the Mutt nbsmtp “No-Brainer SMTP,” it is more efficient, it can write to the /var/log/maillog file, and it has a few nice features. SSMTP, however, will not be a full feaatured and complete substitute.
Other programs, such as fetchmail, do not use the MTA like sendmail, postfix, and exim do. They use the MDA, Message Delivery Agent, which does not use port 25.
Copyright © 2010 Novell, Inc. Copying or distributing all or part of this manual is protected bya Creative Commons Attribution-Noncommercial-Share Alike 3.0 Unported license.
305Version 1

SUSE Linux Enterprise 11 Fundamentals / Manual
Fecthmail forces the mail to the MDA, by-passing the MTA for simple outgoing mail delivery, which eliminates any complex detailed configuration steps.
Unlike sendmail’s configuration which can be complex, ssmtp just requires that it have the configuration file /etc/ssmtp/ssmtp.conf and a few settings.
The ssmtp.conf file will contain pairs of keyword-argument, there will be one pair per line. Just as with other configuration files, any line beginning with the # character and white lines (empty lines) will be interpreted as a comment line, no commands are processed.
The following are the possible keywords with their meanings; these are case-insensitive:
Table 9-16
ssmtp is truly a send-only sendmail emulator which is used for those machines that normally pick-up their mail from a centralized mailhub, which may be via pop, imap, nfs mounts, or another means. It provides the functionality required for humans and applications/programs to send mail by means of the standard (/usr/bin/mail) user agents.
ssmtp will not do aliasing; that must be done either within the MUA, mail user agent, or on the mailhub. It does not process .forward files; that must be accomplished on the receiving host, and it definitely will not deliver to pipelines.
Reverse aliases have the From: address placed on the user's outgoing mail messages, and as an option on the mailhub these messages will be allowed through.
To allow reverse aliases, it employees the use of the /etc/ssmtp/revaliases file, which is the reverse aliases file.
Root This is the user that will receive all mail for any uid less than 1000. If this keyword is left blank, then address rewriting will be disabled.
Mailhub This is the host to send mail to. It should be in the form of host IP_addr :portnumber. The default port used is port 25.
RewriteDomain This is the domain where mail comes from, for user authentication.Hostname This is the fully qualified name of the host. If a host name is not
entered, the host is queried for its hostname.FromLineOverride This option specifies if the “From” header of an email (if any is
specified) may override the default domain. Default setting is ''no.''UseTLS This specifies if ssmtp will use TLS to communicate with the SMTP
server. Default setting is ''no.''UseSTARTTLS This specifies if ssmtp proceeds with a EHLO/STARTTLS before
starting SSL negotiation. This is specific to RFC 2487.TLSCert This is the file name of the RSA certificate to use for TLS, if it is
required.AuthUser This is the user name to use for SMTP AUTH, if left blank SMTP
AUTH is not used.AuthPass The specific password to use for SMTP AUTH.AuthMethod This is the authorization method to use. If left unset, then plain text
is used. This can also be set to “cram-md5.”
Copyright © 2010 Novell, Inc. Copying or distributing all or part of this manual is protected bya Creative Commons Attribution-Noncommercial-Share Alike 3.0 Unported license.
Version 1306

Course 3101 and 3102 LPIC-1 Addendum
When configuring ssmtp, a good guide to look up with your browser search program is “The Quick-N-Dirty Guide to ssmtp.” It will assist you in installing and also in configuring ssmtp.
sendmail emulator options
The following are a few options that may be used with the sendmail emulator program.
Table 9-17
sendmail emulator program command-line options
Table 9-18
Milter
Due to the high increase in the amount of email volume, along with threats like spam, being targeted by viruses and being targeted with attacks such as a denial of service, there grew the need to quickly expand the abilities of sendmail to include a means of threat protection and to optimize message delivery.
Name Descriptionnewaliases Prints an error message because the aliases file is not usedmailq Reports the contents of the mail queuesendmail Sends a single mail message.
Command Description-e This will set the error-reporting mode.
-F This option sets the full name of the sender. If the sending user is not root, not a daemon, not UUCP, not SMTP, not mail, or not even sendmail, a header will be added to the message which will indicate the actual sender.
-f The email address of the sender uses the same steps as in the -F option.
-h None. The message hop count is determined by counting the number of received headers in a message.
-I Same as if invoked as the newaliases command, which will just print an error message.
-M The complete queue is processed regardless of the specified Message ID.
-m As the default behavior, the sender is never removed from the list of recipients, if she or he is listed as a recipient.
-q Deferred message queue will be processed. If a time interval is specified, this option will be ignored.
-R An attempt to process the queue for any hosts matching the pattern provided will be made.
-r Same as the -f option above.
-S Complete queue is processed regardless of the specified sender.
-v Output will be more verbose when sending mail.
Copyright © 2010 Novell, Inc. Copying or distributing all or part of this manual is protected bya Creative Commons Attribution-Noncommercial-Share Alike 3.0 Unported license.
307Version 1

SUSE Linux Enterprise 11 Fundamentals / Manual
The resulting actions enabled the creation of sendmail milters, or mail filters. This enabled third-party applications to access a mail message as it is being processed by the MTA; this allows them to examine and modify message content as well as the meta content or information during the SMTP transaction.
Filters (milters) may be added or modified without affecting other existing milters. A milter will address system-wide mail filtering issues in an easy and scalable manner.
Copyright © 2010 Novell, Inc. Copying or distributing all or part of this manual is protected bya Creative Commons Attribution-Noncommercial-Share Alike 3.0 Unported license.
Version 1308

Course 3101 and 3102 LPIC-1 Addendum
Objective 6 Fundamentals of TCP-IP (dig)
Overview
This section helps you to understand the DNS lookup utility dig. dig or the domain information groper performs a DNS lookup and will display for you the data that it receives from the name servers it queried. The dig tool is commonly used by many administrators when troubleshooting their network IP problems. It can be used either at the command line (most common usage) or by having it read lookup requests from a file; this is known as batch mode. Use the -h option with dig to view its command-line arguments and options.
This section is based on the information found in
LPIC-1 109.3: (http://lpi.org/)
Candidates should be able to troubleshoot networking issues on client hosts.
Key Knowledge Areas (related to dig command)
Debug problems associated with the network configuration.
The following will be discussed
“Use dig to Perform a DNS Lookup” on page 309
“List of Syntax and Query Options for dig” on page 311
“Using dig Options” on page 313
Use dig to Perform a DNS Lookup
Performing DNS lookups is a routine task for network administrators today. Using different tools will gather you different types and amounts of data, depending on your goals. The Domain Information Groper commonly referred to as dig, is a tool that performs a DNS lookup and finds information about the queried nameservers. dig is very flexible in its use and provides a detailed and plentiful amount of information.
When troubleshooting DNS issues, dig can be the tool of choice for many network administrators. Using dig can be done manually, as in specifying a certain domain nameserver or automatically such as when no nameserver is specified, if none is used dig will query nameservers that are listed in the resolv.conf file.
Copyright © 2010 Novell, Inc. Copying or distributing all or part of this manual is protected bya Creative Commons Attribution-Noncommercial-Share Alike 3.0 Unported license.
309Version 1

SUSE Linux Enterprise 11 Fundamentals / Manual
Shown below is the dig output when querying novell.com
Following is the dig output when no name server or domain is queried.
da1:/ # dig novell.com; <<>> DiG 9.5.0-P2 <<>> novell.com ;; global options: printcmd ;; Got answer: ;; ->>HEADER<<- opcode: QUERY, status: NOERROR, id: 59927 ;; flags: qr rd ra; QUERY: 1, ANSWER: 1, AUTHORITY: 3, ADDITIONAL: 2
;; QUESTION SECTION:;novell.com. IN A
;; ANSWER SECTION: novell.com. 86400 IN A 130.57.5.70
;; AUTHORITY SECTION:novell.com. novell.com. novell.com.
86400 86400 86400
IN IN IN
NS NS NS
ns.novell.com. ns.wal.novell.com. ns2.novell.com.
;; ADDITIONAL SECTION:ns.wal.novell.com 86400 IN A 130.57.22.5 ns2.novell.com. 86400 IN A 137.65.1.2
;; Query time: 439 msec ;; SERVER: 127.0.0.1#53(127.0.0.1);; WHEN: Sun Jan 31 21:38:17 2010 ;; MSG SIZE rcvd: 132
da1:/ #
da1:/ # dig
; <<>> DiG 9.5.0-P2 <<>>;; global options: printcmd ;; Got answer: ;; ->>HEADER<<- opcode: QUERY, status: NOERROR, id: 10583;; flags: qr rd ra; QUERY: 1, ANSWER: 13, AUTHORITY: 0, ADDITIONAL: 14
;; QUESTION SECTION: ;. IN NS
;; ANSWER SECTION:. 518322 IN NS F.ROOT-SERVERS.NET. . 518322 IN NS A.ROOT-SERVERS.NET.. 518322 IN NS J.ROOT-SERVERS.NET.. 518322 IN NS D.ROOT-SERVERS.NET.. 518322 IN NS I.ROOT-SERVERS.NET. . 518322 IN NS E.ROOT-SERVERS.NET. . 518322 IN NS M.ROOT-SERVERS.NET.
Copyright © 2010 Novell, Inc. Copying or distributing all or part of this manual is protected bya Creative Commons Attribution-Noncommercial-Share Alike 3.0 Unported license.
Version 1310

Course 3101 and 3102 LPIC-1 Addendum
List of Syntax and Query Options for dig
Performing a DNS lookup with dig will extract for you as little or conversely as much information as you want to know because the options that are available to use with dig are numerous.
The following are the options that you may use with dig; use dig -h to display all options available.
. 518322 IN NS B.ROOT-SERVERS.NET.
. 518322 IN NS C.ROOT-SERVERS.NET.
. 518322 IN NS H.ROOT-SERVERS.NET.
. 518322 IN NS L.ROOT-SERVERS.NET.
. 518322 IN NS G.ROOT-SERVERS.NET.
. 518322 IN NS K.ROOT-SERVERS.NET.
;; ADDITIONAL SECTION: A.ROOT-SERVERS.NET. 604722 IN A 198.41.0.4 A.ROOT-SERVERS.NET. 604722 IN AAAA 2001:503:ba3e::2:30B.ROOT-SERVERS.NET. 604722 IN A 192.228.79.201 C.ROOT-SERVERS.NET. 604722 IN A 192.33.4.12D.ROOT-SERVERS.NET. 604722 IN A 128.8.10.90 E.ROOT-SERVERS.NET. 604722 IN A 192.203.230.10F.ROOT-SERVERS.NET. 604722 IN A 192.5.5.241F.ROOT-SERVERS.NET. 604722 IN AAAA 2001:500:2f::f G.ROOT-SERVERS.NET. 604722 IN A 192.112.36.4 H.ROOT-SERVERS.NET. 604722 IN A 128.63.2.53 H.ROOT-SERVERS.NET. 604722 IN AAAA 2001:500:1::803f:235I.ROOT-SERVERS.NET. 604722 IN A 192.36.148.17J.ROOT-SERVERS.NET. 604722 IN A 192.58.128.30J.ROOT-SERVERS.NET. 604722 IN AAAA 2001:503:c27::2:30
;; Query time: 1 msec;; SERVER: 127.0.0.1#53(127.0.0.1) ;; WHEN: Sun Jan 31 21:36:58 2010 ;; MSG SIZE rcvd: 500
da1:/ #
dig -h Usage: dig [@global-server] [domain] [q-type] [q-class] {q-opt}
{global-d-opt} host [@local-server] {local-d-opt} [ host [@local-server] {local-d-opt} [...]]
Where: domain is in the Domain Name Systemq-class is one of (in,hs,ch,...) [default: in]q-type is one of (a,any,mx,ns,soa,hinfo,axfr,txt,...) [default:a]
(Use ixfr=version for type ixfr)q-opt is one of:
-x dot-notation (shortcut for reverse lookups)-i (use IP6.INT for IPv6 reverse lookups)-f filename (batch mode) -b address[#port] (bind to source address/port)-p port (specify port number)
Copyright © 2010 Novell, Inc. Copying or distributing all or part of this manual is protected bya Creative Commons Attribution-Noncommercial-Share Alike 3.0 Unported license.
311Version 1
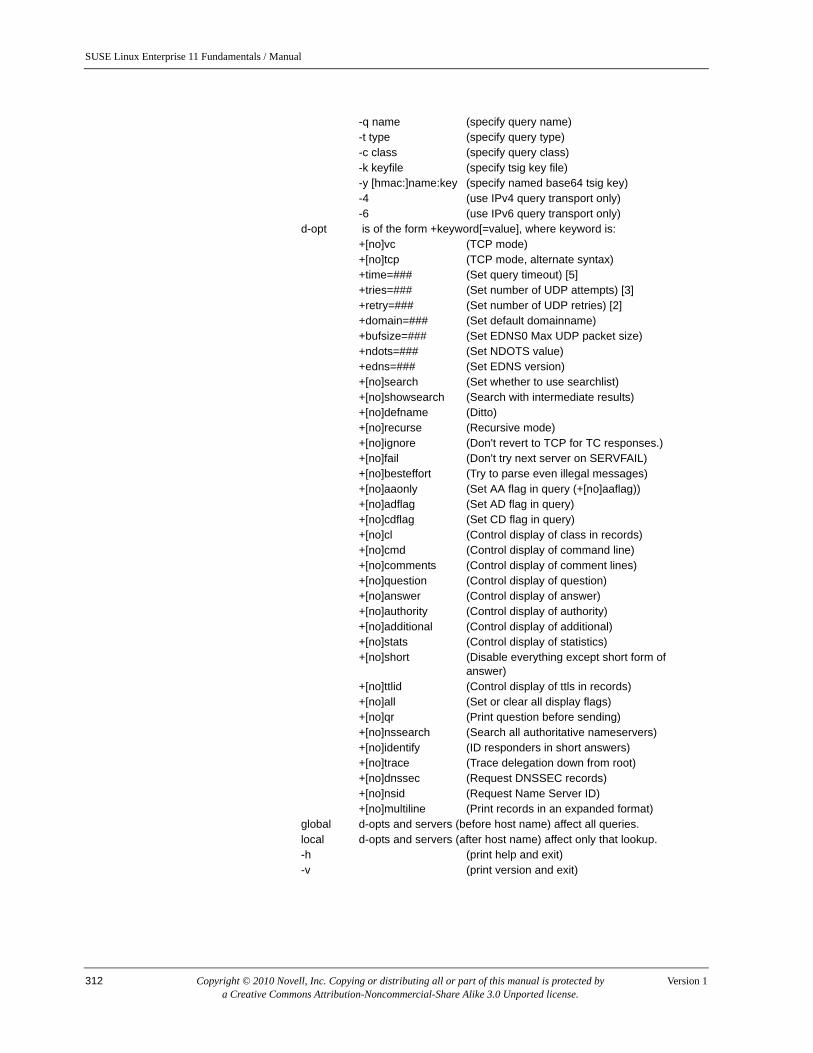
SUSE Linux Enterprise 11 Fundamentals / Manual
-q name (specify query name)-t type (specify query type)-c class (specify query class)-k keyfile (specify tsig key file) -y [hmac:]name:key (specify named base64 tsig key) -4 (use IPv4 query transport only)-6 (use IPv6 query transport only)
d-opt is of the form +keyword[=value], where keyword is:+[no]vc (TCP mode)+[no]tcp (TCP mode, alternate syntax)+time=### (Set query timeout) [5]+tries=### (Set number of UDP attempts) [3]+retry=### (Set number of UDP retries) [2]+domain=### (Set default domainname)+bufsize=### (Set EDNS0 Max UDP packet size)+ndots=### (Set NDOTS value)+edns=### (Set EDNS version)+[no]search (Set whether to use searchlist)+[no]showsearch (Search with intermediate results)+[no]defname (Ditto)+[no]recurse (Recursive mode)+[no]ignore (Don't revert to TCP for TC responses.)+[no]fail (Don't try next server on SERVFAIL)+[no]besteffort (Try to parse even illegal messages)+[no]aaonly (Set AA flag in query (+[no]aaflag))+[no]adflag (Set AD flag in query)+[no]cdflag (Set CD flag in query)+[no]cl (Control display of class in records)+[no]cmd (Control display of command line)+[no]comments (Control display of comment lines)+[no]question (Control display of question)+[no]answer (Control display of answer)+[no]authority (Control display of authority)+[no]additional (Control display of additional)+[no]stats (Control display of statistics)+[no]short (Disable everything except short form of
answer)+[no]ttlid (Control display of ttls in records)+[no]all (Set or clear all display flags)+[no]qr (Print question before sending)+[no]nssearch (Search all authoritative nameservers)+[no]identify (ID responders in short answers)+[no]trace (Trace delegation down from root)+[no]dnssec (Request DNSSEC records)+[no]nsid (Request Name Server ID)+[no]multiline (Print records in an expanded format)
global d-opts and servers (before host name) affect all queries.local d-opts and servers (after host name) affect only that lookup. -h (print help and exit)-v (print version and exit)
Copyright © 2010 Novell, Inc. Copying or distributing all or part of this manual is protected bya Creative Commons Attribution-Noncommercial-Share Alike 3.0 Unported license.
Version 1312

Course 3101 and 3102 LPIC-1 Addendum
Using dig Options
dig will interrogate a DNS server and can be used either at the command line or in a batch mode operation, reading from a file you create. dig can issue multiple lookups to gather information from sites queried. Shown are results for 11 different queries.
1. The following is a query for ptr record information.
2. The following is a query for IPv6 information.
da1:~/Desktop # dig novell.com ptr
; <<>> DiG 9.5.0-P2 <<>> novell.com ptr ;; global options: printcmd ;; Got answer: ;; ->>HEADER<<- opcode: QUERY, status: NOERROR, id: 18432 ;; flags: qr rd ra; QUERY: 1, ANSWER: 0, AUTHORITY: 1, ADDITIONAL: 0
;; QUESTION SECTION: ;novell.com. IN PTR
;; AUTHORITY SECTION: novell.com. 10800 IN SOA ns.novell.com. bwayne.novell.com.
2010012202 7200 900 604800 21600
;; Query time: 98 msec ;; SERVER: 127.0.0.1#53(127.0.0.1);; WHEN: Sun Jan 31 23:50:18 2010 ;; MSG SIZE rcvd: 74
da1:~/Desktop # dig lpi.org -6
; <<>> DiG 9.5.0-P2 <<>> lpi.org -6
;; global options: printcmd
;; Got answer:
;; ->>HEADER<<- opcode: QUERY, status: NOERROR, id: 15665
;; flags: qr rd ra; QUERY: 1, ANSWER: 1, AUTHORITY: 2, ADDITIONAL: 2
;; QUESTION SECTION:
;lpi.org. IN A
;; ANSWER SECTION:
lpi.org. 3600 IN A 24.215.7.162
;; AUTHORITY SECTION:
lpi.org. 3600 IN NS server1.moongroup.com.
lpi.org. 3600 IN NS ns.starnix.com.
;; ADDITIONAL SECTION:
ns.starnix.com. 172800 IN A 24.215.7.99
server1.moongroup.com. 172800 IN A 204.157.7.157
Copyright © 2010 Novell, Inc. Copying or distributing all or part of this manual is protected bya Creative Commons Attribution-Noncommercial-Share Alike 3.0 Unported license.
313Version 1

SUSE Linux Enterprise 11 Fundamentals / Manual
3. The following is a query for IPv4 information.
4. The following is a query for port 8443 information.
;; Query time: 748 msec
;; SERVER: ::ffff:127.0.0.1#53(127.0.0.1)
;; WHEN: Sun Jan 31 23:52:20 2010
;; MSG SIZE rcvd: 133
da1:~/Desktop # dig lpi.org -4
; <<>> DiG 9.5.0-P2 <<>> lpi.org -4
;; global options: printcmd
;; Got answer:
;; ->>HEADER<<- opcode: QUERY, status: NOERROR, id: 16916
;; flags: qr rd ra; QUERY: 1, ANSWER: 1, AUTHORITY: 2, ADDITIONAL: 2
;; QUESTION SECTION:
;lpi.org. IN A
;; ANSWER SECTION:
lpi.org. 3578 IN A 24.215.7.162
;; AUTHORITY SECTION:
lpi.org. 3578 IN NS ns.starnix.com.
lpi.org. 3578 IN NS server1.moongroup.com.
;; ADDITIONAL SECTION:
ns.starnix.com. 172778 IN A 24.215.7.99
server1.moongroup.com. 172778 IN A 204.157.7.157
;; Query time: 0 msec
;; SERVER: 127.0.0.1#53(127.0.0.1)
;; WHEN: Sun Jan 31 23:52:42 2010
;; MSG SIZE rcvd: 133
da1:~/Desktop # dig lpi.org q-p 8443
; <<>> DiG 9.5.0-P2 <<>> lpi.org q-p 8443
;; global options: printcmd
;; Got answer:
;; ->>HEADER<<- opcode: QUERY, status: NOERROR, id: 42840
;; flags: qr rd ra; QUERY: 1, ANSWER: 1, AUTHORITY: 2, ADDITIONAL: 2
;; QUESTION SECTION:
;lpi.org. IN A
;; ANSWER SECTION:
lpi.org. 3488 IN A 24.215.7.162
Copyright © 2010 Novell, Inc. Copying or distributing all or part of this manual is protected bya Creative Commons Attribution-Noncommercial-Share Alike 3.0 Unported license.
Version 1314

Course 3101 and 3102 LPIC-1 Addendum
;; AUTHORITY SECTION:
lpi.org. 3488 IN NS server1.moongroup.com.
lpi.org. 3488 IN NS ns.starnix.com.
;; ADDITIONAL SECTION:
ns.starnix.com. 172688
IN A 24.215.7.99
server1.moongroup.com. 172688
IN A 204.157.7.157
;; Query time: 0 msec
;; SERVER: 127.0.0.1#53(127.0.0.1)
;; WHEN: Sun Jan 31 23:52:42 2010
;; MSG SIZE rcvd: 133
;; Got answer:
;; ->>HEADER<<- opcode: QUERY, status: NXDOMAIN, id: 20324
;; flags: qr rd ra; QUERY: 1, ANSWER: 0, AUTHORITY: 1, ADDITIONAL: 0
;; QUESTION SECTION:
;q-p. IN A
;; AUTHORITY SECTION:
10800 IN SOA a.root-servers.net. nstld.verisign-grs.com. 2010013101 1800 900 604800 86400
;; Query time: 94 msec
;; SERVER: 127.0.0.1#53(127.0.0.1)
;; WHEN: Sun Jan 31 23:54:12 2010
;; MSG SIZE rcvd: 96
;; Got answer:
;; ->>HEADER<<- opcode: QUERY, status: NXDOMAIN, id: 31103
;; flags: qr rd ra; QUERY: 1, ANSWER: 0, AUTHORITY: 1, ADDITIONAL: 0
;; QUESTION SECTION:
;8443. IN A
;; AUTHORITY SECTION:
10800 IN SOA A.ROOT-SERVERS.NET. NSTLD.VERISIGN-GRS.COM. 2010013101 1800 900 604800 86400
;; Query time: 162 msec
;; SERVER: 127.0.0.1#53(127.0.0.1)
;; WHEN: Sun Jan 31 23:54:12 2010
;; MSG SIZE rcvd: 97
Copyright © 2010 Novell, Inc. Copying or distributing all or part of this manual is protected bya Creative Commons Attribution-Noncommercial-Share Alike 3.0 Unported license.
315Version 1

SUSE Linux Enterprise 11 Fundamentals / Manual
5. The following is a query for port 25 information.
da1:~/Desktop # dig lpi.org q-p 25
; <<>> DiG 9.5.0-P2 <<>> lpi.org q-p 25
;; global options: printcmd
;; Got answer:
;; ->>HEADER<<- opcode: QUERY, status: NOERROR, id: 43212
;; flags: qr rd ra; QUERY: 1, ANSWER: 1, AUTHORITY: 2, ADDITIONAL: 2
;; QUESTION SECTION
;lpi.org. IN A
;; ANSWER SECTION:
lpi.org. 3436 IN A 24.215.7.162
;; AUTHORITY SECTION:
lpi.org. 3436 IN A server1.moongroup.com.
lpi.org. 3436 IN A ns.starnix.com.
;; ADDITIONAL SECTION:
ns.starnix.com. 172636 IN A 24.215.7.99
server1.moongroup.com 172636 IN A 204.157.7.157
;; Query time: 15 msec
;; SERVER: 127.0.0.1#53(127.0.0.1)
;; WHEN: Sun Jan 31 23:55:04 2010
;; MSG SIZE rcvd: 133
;; Got answer:
;; ->>HEADER<<- opcode: QUERY, status: NXDOMAIN, id: 64943
;; flags: qr rd ra; QUERY: 1, ANSWER: 0, AUTHORITY: 1, ADDITIONAL: 0
;; QUESTION SECTION:
;q-p. IN A
;; AUTHORITY SECTION:
10748 IN SOA a.root-servers.net. nstld.verisign-grs.com. 2010013101 1800 900 604800 86400
;; Query time: 0 msec
;; SERVER: 127.0.0.1#53(127.0.0.1)
;; WHEN: Sun Jan 31 23:55:04 2010
;; MSG SIZE rcvd: 96
;; Got answer:
;; ->>HEADER<<- opcode: QUERY, status: NXDOMAIN, id: 56581
;; flags: qr rd ra; QUERY: 1, ANSWER: 0, AUTHORITY: 1, ADDITIONAL: 0
;; QUESTION SECTION:
Copyright © 2010 Novell, Inc. Copying or distributing all or part of this manual is protected bya Creative Commons Attribution-Noncommercial-Share Alike 3.0 Unported license.
Version 1316

Course 3101 and 3102 LPIC-1 Addendum
6. The following is a query for IPv6 reverse lookup information.
;25. IN A
;; AUTHORITY SECTION:
10800 IN SOA A.ROOT-SERVERS.NET. NSTLD.VERISIGN-GRS.COM. 2010013101 1800 900 604800 86400
;; Query time: 88 msec
;; SERVER: 127.0.0.1#53(127.0.0.1)
;; WHEN: Sun Jan 31 23:55:04 2010
;; MSG SIZE rcvd: 95
da1:~/Desktop # dig lpi.org q-i
; <<>> DiG 9.5.0-P2 <<>> lpi.org q-i
;; global options: printcmd
;; Got answer:
;; ->>HEADER<<- opcode: QUERY, status: NOERROR, id: 35700
;; flags: qr rd ra; QUERY: 1, ANSWER: 1, AUTHORITY: 2, ADDITIONAL: 2
;; QUESTION SECTION:
;lpi.org. IN A
;; ANSWER SECTION:
lpi.org. 3387 IN A 24.215.7.162
;; AUTHORITY SECTION:
lpi.org. 3387 IN NS ns.starnix.com.
lpi.org. 3387 IN NS server1.moongroup.com.
;; ADDITIONAL SECTION:
ns.starnix.com. 172587 IN A 24.215.7.99
server1.moongroup.com. 172587 IN A 204.157.7.157
;; Query time: 1 msec
;; SERVER: 127.0.0.1#53(127.0.0.1)
;; WHEN: Sun Jan 31 23:55:53 2010
;; MSG SIZE rcvd: 133
;; Got answer:
;; ->>HEADER<<- opcode: QUERY, status: NXDOMAIN, id: 48031
;; flags: qr rd ra; QUERY: 1, ANSWER: 0, AUTHORITY: 1, ADDITIONAL: 0
;; QUESTION SECTION:
;q-i. IN A
;; AUTHORITY SECTION:
Copyright © 2010 Novell, Inc. Copying or distributing all or part of this manual is protected bya Creative Commons Attribution-Noncommercial-Share Alike 3.0 Unported license.
317Version 1

SUSE Linux Enterprise 11 Fundamentals / Manual
7. The following is a query for Internet record information (used as IN NS will change the information returned).
8. The following is a query for mx record information.
10800 IN SOA A.ROOT-SERVERS.NET. NSTLD.VERISIGN-GRS.COM. 2010013101 1800 900 604800 86400
;; Query time: 197 msec
;; SERVER: 127.0.0.1#53(127.0.0.1)
;; WHEN: Sun Jan 31 23:55:54 2010
;; MSG SIZE rcvd: 96
da1:~/Desktop # dig lpi.org in
; <<>> DiG 9.5.0-P2 <<>> lpi.org in
;; global options: printcmd
;; Got answer:
;; ->>HEADER<<- opcode: QUERY, status: NOERROR, id: 45540
;; flags: qr rd ra; QUERY: 1, ANSWER: 1, AUTHORITY: 2, ADDITIONAL: 2
;; QUESTION SECTION
;lpi.org. IN A
;; ANSWER SECTION:
lpi.org. 3271 IN A 24.215.7.162
;; AUTHORITY SECTION:
lpi.org. 3271 IN A server1.moongroup.com.
lpi.org. 3271 IN A ns.starnix.com.
;; ADDITIONAL SECTION:
ns.starnix.com. 172471 IN A 24.215.7.99
server1.moongroup.com 172471 IN A 204.157.7.157
;; Query time: 15 msec
;; SERVER: 127.0.0.1#53(127.0.0.1)
;; WHEN: Sun Jan 31 23:57:49 2010
;; MSG SIZE rcvd: 133
da1:~/Desktop # dig lpi.org mx
; <<>> DiG 9.5.0-P2 <<>> lpi.org mx
;; global options: printcmd
;; Got answer:
;; ->>HEADER<<- opcode: QUERY, status: NOERROR, id: 16931
;; flags: qr rd ra; QUERY: 1, ANSWER: 1, AUTHORITY: 2, ADDITIONAL: 3
Copyright © 2010 Novell, Inc. Copying or distributing all or part of this manual is protected bya Creative Commons Attribution-Noncommercial-Share Alike 3.0 Unported license.
Version 1318

Course 3101 and 3102 LPIC-1 Addendum
9. The following is a query for A record information.
;; QUESTION SECTION
;lpi.org. IN MX
;; ANSWER SECTION:
lpi.org. 3600 IN MX mail.lpi.org.
;; AUTHORITY SECTION:
lpi.org. 3256 IN NS ns.starnix.com.
lpi.org. 3256 IN NS server1.moongroup.com.
;; ADDITIONAL SECTION:
mail.lpi.org. 3600 IN A 24.215.7.168
ns.starnix.com. 172456 IN A 24.215.7.99
server1.moongroup.com 172456 IN A 204.157.7.157
;; Query time: 3596 msec
;; SERVER: 127.0.0.1#53(127.0.0.1)
;; WHEN: Sun Jan 31 23:58:04 2010
;; MSG SIZE rcvd: 154
da1:~/Desktop # dig lpi.org a
; <<>> DiG 9.5.0-P2 <<>> lpi.org a
;; global options: printcmd
;; Got answer:
;; ->>HEADER<<- opcode: QUERY, status: NOERROR, id: 17887
;; flags: qr rd ra; QUERY: 1, ANSWER: 1, AUTHORITY: 2, ADDITIONAL: 2
;; QUESTION SECTION
;lpi.org. IN A
;; ANSWER SECTION:
lpi.org. 3229 IN A 24.215.7.162
;; AUTHORITY SECTION:
lpi.org. 3229 IN NS server1.moongroup.com.
lpi.org. 3229 IN NS ns.starnix.com.
;; ADDITIONAL SECTION:
ns.starnix.com. 172429 IN A 24.215.7.99
server1.moongroup.com 172429 IN A 204.157.7.157
;; Query time: 2 msec
;; SERVER: 127.0.0.1#53(127.0.0.1)
;; WHEN: Sun Jan 31 23:58:31 2010
;; MSG SIZE rcvd: 133
Copyright © 2010 Novell, Inc. Copying or distributing all or part of this manual is protected bya Creative Commons Attribution-Noncommercial-Share Alike 3.0 Unported license.
319Version 1

SUSE Linux Enterprise 11 Fundamentals / Manual
10. The following is a query for cname information.
11. The following is a query for soa information.
da1:~/Desktop # dig lpi.org cname
; <<>> DiG 9.5.0-P2 <<>> lpi.org a
;; global options: printcmd
;; Got answer:
;; ->>HEADER<<- opcode: QUERY, status: NOERROR, id: 32254
;; flags: qr rd ra; QUERY: 1, ANSWER: 0, AUTHORITY: 1, ADDITIONAL: 0
;; QUESTION SECTION
;lpi.org. IN CNAME
;; AUTHORITY SECTION:
lpi.org. 600 IN SOA ns.starnix.com. dns.starnix.com. 2009122101 3600 1800 3600000 600
;; Query time: 80 msec
;; SERVER: 127.0.0.1#53(127.0.0.1)
;; WHEN: Sun Jan 31 23:59:27 2010
;; MSG SIZE rcvd: 79
da1:~/Desktop # dig lpi.org soa
; <<>> DiG 9.5.0-P2 <<>> lpi.org soa
;; global options: printcmd
;; Got answer:
;; ->>HEADER<<- opcode: QUERY, status: NOERROR, id: 36377
;; flags: qr rd ra; QUERY: 1, ANSWER: 1, AUTHORITY: 2, ADDITIONAL: 2
;; QUESTION SECTION
;lpi.org. IN SOA
;; ANSWER SECTION:
lpi.org. 3600 IN SOA ns.starnix.com. dns.starnix.com. 2009122101 3600 1800 3600000 600
;; AUTHORITY SECTION:
lpi.org. 3160 IN NS ns.starnix.com.
lpi.org. 3160 IN NS server1.moongroup.com.
;; ADDITIONAL SECTION:
ns.starnix.com. 172360 IN A 24.215.7.99
server1.moongroup.com. 172360 IN A 204.157.7.157
;; Query time: 80 msec
;; SERVER: 127.0.0.1#53(127.0.0.1)
Copyright © 2010 Novell, Inc. Copying or distributing all or part of this manual is protected bya Creative Commons Attribution-Noncommercial-Share Alike 3.0 Unported license.
Version 1320

Course 3101 and 3102 LPIC-1 Addendum
As seen, the returned information resultng from a query can produce a great amount of information for you. Depending on your requirements dig may be a very useful utility when troubleshooting networking configuration issues for your end-users.
;; WHEN: Sun Jan 31 23:59:40 2010
;; MSG SIZE rcvd: 159
da1:~/Desktop #
Copyright © 2010 Novell, Inc. Copying or distributing all or part of this manual is protected bya Creative Commons Attribution-Noncommercial-Share Alike 3.0 Unported license.
321Version 1

SUSE Linux Enterprise 11 Fundamentals / Manual
Summary
Objective Summary1. “Use Debian Package Management” on page 269
“Debian Linux basics” on page 269
Debian is an OS using the Linux kernel as its core. Debian packages normally end with a .deb extension. Most of Debian tools used come from the GNU project, thus calling it Debian GNU/Linux. www.debian.org
“Manage Software Packages Using apt” on page 270
Using apt tool commands, you can install, upgrade, and remove Debian packages, as well as verify and use queries. Two apt tools are apt-get and apt-cache.
“Managing Software Packages Using dpkg” on page 272
Managing Software Packages with dpkg, you find file information, verify packages, and install .deb files. Find which package a file belongs to or list the files in a certain package.
2. “yum Package Management” on page 274
“YUM Tools” on page 274
Yellowdog Updater, Modified is an rpm compatible package manager. yum evolved to update and manager RHL systems, can also be used in other Linux distros, such as Fedora, RHEL and CentOS.
yum tools can use a command line interface and may use plugins for the additional use of other features. yum-tools extends and also acts as a supplement to yum. It is a collection of different utilities which may perform queries, package cleanup, or perform repository synchronization.
“YUM: /etc/yum.conf and /etc/yum.repos.d/” on page 275
/etc/yum.conf is the main configuration file for the yum package manager. It lists sites and their URLs where packages may be downloaded from. It also contains the yum settings, which also supplies settings for yum-utils tools.
yum.conf can be edited by the admin to include new sites and URLs for new repositories, whether remote to you or created as local by you. The file may also have lines that may be uncommented to allow those sites to be contacted. It is best to avoid sites that are marked as unstable or test sites.
/etc/yum.repos.d is the directory holding the .repo files which are created to list repository locations. It may be used in place of editing the yum.conf file. createrepo is used to generate the XML metadata necessary for the repository. You may need to import all gpg keys for the packages or use gpgcheck=0 in the .repo file.
Copyright © 2010 Novell, Inc. Copying or distributing all or part of this manual is protected bya Creative Commons Attribution-Noncommercial-Share Alike 3.0 Unported license.
Version 1322

Course 3101 and 3102 LPIC-1 Addendum
2. “yum Package Management” on page 274 (continued)
“Using yumdownloader” on page 278
This may be used to download RPMs from yum repositories. It replaces the need to manually search and perform downloads. Use yumdownloader and a list of URLs to get downloads from; use the --resolve option to resolve any dependencies and then download the packages required to fulfill those dependencies.
A requirement is the use of the yum libraries for retrieving package information. yum relies on its configuration settings to use as its default values. When installing yum-utils, it will include yumdownloader. To use yum-utils or yumdownloader you must have root privileges.
3. “SQL Data Management” on page 280
“Manipulate data in an SQL database” on page 280
Basic SQL database commands will allow you, the database administrator, flexibility in caring for, updating, or performing general tasks with your organizations database.
Using commands such as INSERT, UPDATE, SELECT, and DELETE allows manipulation of the data within the database.
Keywords such as FROM and WHERE tell the SQL interpreter where data is to be retrieved or extracted from, whether it is “FROM” a table or data in the columns and rows ”WHERE” data selection is to be made.“Query an SQL database” on page 282
Querying an SQL database can be accomplished with a number of different commands depending on the data needing to be extracted.
Using SQL statements and functions, you can group datasets by columns. For example, when creating a table, data such as HoursWorked record the hours employees have worked. You can extract either the SUM total of all hours worked or GROUP BY total hours worked by the individual employee.
Using the keyword ORDER BY, you can sort the SQL data extracted FROM the tables you are working with. Reversing the sort order with DESC (descending order) can further vary the way the extracted information is displayed.
Administrators can JOIN the in- formation in two different tables by having common fields specifying matching data. Adding the common column fields will allow the extraction of data.
INNER JOIN and OUTER JOIN will select data from rows matching (INNER JOIN) or even from columns that have cells not matching between tables. A NULL entry is shown where no matching data existed.
After specifying the FROM table name and JOIN table name, you can change the JOIN statement to read LEFT JOIN or RIGHT JOIN to select all rows, matching or not, from either the left table (FROM) listed or from the right table (JOIN) specified.
Objective Summary
Copyright © 2010 Novell, Inc. Copying or distributing all or part of this manual is protected bya Creative Commons Attribution-Noncommercial-Share Alike 3.0 Unported license.
323Version 1

SUSE Linux Enterprise 11 Fundamentals / Manual
4. “Install and Configure X11” on page 287
“X11 Installation, Video Card and Monitor Requirements” on page 287
Always make sure that the machine hardware is supported by the X system. The X server program that comes with most Linux distributions is XFree86.
Another open-source implementation of X window is the X.Org project release of X11R7.5 with X11R7.6 to be released soon.
Remember that hardware requirements differ between hardward platforms.
During installation, the setup will configure use of your mouse, keyboard, video card, and monitor.
The startx syntax is
startx [[client] options] [-- [server] options]
Startx command looks for the file .xinitrc, a hidden file, in the user’s home directory. This specifies any customizations for that user. If not found, it then finds the xinitrc file in the xinit library directory. Startx command looks for the file named .xserverrc, a hidden file, in the user’s home directory. This also contains any customizations unique to the user.
Check with the video card manufacture or their documentation for information concerning the chipset and the necessary amount of RAM needed.
Be sure of the requirements before purchasing a video card.
X Window is a system that runs on UNIX and Linux operating systems. X Window is also called X or x11 and is the system and protocol that provides a GUI for computer networks both client and server machines.
Another way of determining if the chipset is supported, is by the use of a utility called SuperProbe. It’s syntax is as follows:
SuperProbe [-verbose] [-no16] [-excl list] [-mask10] [-order list] [-noprobe list] [-bios base] [-no_bios] [-no_dac] [-no_mem] [-info]
When having X11 monitor issues, it can be helpful to use the xvidtune application to try and fine tune and adjust X server’s video modes and its monitor related settings.
If X is not able to start, use startx if you are “experimenting“ with settings. If X crashes, the display manager (GUI login) will not loop
startx just gracefully goes back to a text console screen, where an error message may be visible.
X11 uses the monitor’s configuration specifications to determine what will be the resolution and refresh rate. The correct “numbers” that are needed, indicate a range and refer to the horizontal scan rate and the vertical synchronization rate.
Objective Summary
Copyright © 2010 Novell, Inc. Copying or distributing all or part of this manual is protected bya Creative Commons Attribution-Noncommercial-Share Alike 3.0 Unported license.
Version 1324

Course 3101 and 3102 LPIC-1 Addendum
4. “Install and Configure X11” on page 287 (continued)
“X11 Installation, Video Card and Monitor Requirements” on page 287 (continued)
X11 uses the monitors configuration specifications to determine what will be the resolution and refresh rate. The correct “numbers” that are needed, indicate a range and refer to the horizontal scan rate and the vertical synchronization rate.“Understanding the X Font Configuration File” on page 291
The X Window system display requires that it be supplied with fonts; xfs and xfstt are the most widely used X Window system font servers.
There are dependencies between the packages. In most cases these dependencies can be resolved automatically. Otherwise, they must be resolved manually.
A font server is a background process that makes your installed set of fonts available to XFree86 and other machines running X.
Under normal conditions the x font server is started by means of boot files such as the /etc/rc.local file.
Users may also start private font servers for a specific sets of fonts they wish to use at their client.
The main configuration file the font server will use is the default file of /etc/X11/fs/config.
Steps to set up an X font server are the following:
1. Install the font server if necessary.
2. Edit the xfs.conf file that comes with it.
3. Set up a font directory such as, /home/fonts/lib/ttfonts.
4. Have X use the font server after all other fonts by specifying
xset fp+ tcp/localhost:7100
5. Test the font server.
To use outline fonts on X, you need a version of X that will support their use. This will include all versions of OpenWindows, X11R5, some newer versions of XFree86, as well as others.
There are three ways to support the use of outline fonts.
1. Use of the X server itself
2. Use of an external font server
3. Use X modules that can be loaded, such as those with OpenWindows
In order that fonts will be available, you need to set a path to use as a font path; add a directory to the font path with the following command
xset fp+ (directory)
Objective Summary
Copyright © 2010 Novell, Inc. Copying or distributing all or part of this manual is protected bya Creative Commons Attribution-Noncommercial-Share Alike 3.0 Unported license.
325Version 1

SUSE Linux Enterprise 11 Fundamentals / Manual
4. “Install and Configure X11” on page 287 (continued)
“Understanding the X Font Configuration File” on page 291 (continued)
Once specified, you need to have the X server re-scan for any available fonts.xset fp rehash
You will want the two commands to run automatically. To do this, put them in the servers .xinitrc file or another file depending on how you start X window. It may be either a Xclients file or .xsession file.
You will find it to your advantage to make two of the files symlinks to the other, just to help avoid confusion.
Type 1 fonts may be added to your font server using the type1inst utility.
The type1inst utility makes it easy for you to use Type 1 fonts that are not part of your fonts in X. type1inst will scan Type 1 PostScript font files; then it will generate the file fonts.scale automatically.
Objective Summary
Copyright © 2010 Novell, Inc. Copying or distributing all or part of this manual is protected bya Creative Commons Attribution-Noncommercial-Share Alike 3.0 Unported license.
Version 1326

Course 3101 and 3102 LPIC-1 Addendum
4. “Install and Configure X11” on page 287 (continued)
“Understanding the X Window Configuration File” on page 293
The command to start the X server is startx
The program xinit allows users to manually start an X server. startx is the script that is used as a front-end for xinit
The default display used is display :0, xinit and startx start an X server and an xterm on it. When xterm terminates, xinit and startx kill the X server.
sysutils/hal and devel/dbus ports are installed as dependencies of x11/xorg; however, they must be enabled by making the following entries in the /etc/rc.conf file:
hald_enable="YES"
dbus_enable="YES"
Start these services either manually or by a reboot before any further configuration of Xorg is carried out.
Desktop environment, such as GNOME, KDE or another will be installed. They often contain tools which allow the user to set screen parameters such as the resolution.
The first step you need to perform is to build an initial configuration file. As the super user root, simply run
Xorg -configure
Generated is a skeleton file for X11 configuration, in a /root directory named xorg.conf.new. Whether you su to root or by a direct login, this affects the inherited supervisor $HOME directory variable.
X11 will attempt to probe the machines graphics hardware on the system and then create a configuration file to load the proper drivers for the hardware detected on the target system.
As of Xorg 7.4 and later, the test produces a black screen which makes it somewhat difficult to diagnose whether X11 is working properly.
Older behavior is still available by using a retro option
Xorg -config xorg.conf.new -retro
The configuration file consists of numerous sections:
Files File pathnames
ServerFlags Server Flags
Modes Description of the Video Modes
Screen Screen Configuration
Objective Summary
Copyright © 2010 Novell, Inc. Copying or distributing all or part of this manual is protected bya Creative Commons Attribution-Noncommercial-Share Alike 3.0 Unported license.
327Version 1

SUSE Linux Enterprise 11 Fundamentals / Manual
5. “Message Transfer Agent (MTA) Basics” on page 295
“Understanding Linux MTA programs: sendmail” on page 295
Using sendmail you can receive, and forward email, among other features. sendmail released to the public in 1983 with BSD 4.1c which was the first version of BSD to include the TCP/IP protocol.
One of the oldest and most widely used Internet MTAs, sendmail was designed with flexibility to transfer mail between two dissimilar mail systems. It has support for protocols such as UUCP, SMTP, DECnet, mail11, and ESMTP, and more.
sendmail evolved into Sendmail X which brought with it a modular transferring system running 5 and sometimes more processes. It used a centralized queue manager controlling SMTP servers and clients to receive and send email. sendmail X also has an address resolver providing mail routing using lookups, including DNS lookups.
Development was ceased in favor of a new project called MeTA1.
“Understanding Linux MTA programs: postfix” on page 296
postfix MTA has now become one of the most preferred MTAs of many administrators today. postfix has listed among it benefits, ease of administration, security, and speed.
Use of postfix will remind users of sendmail, yet the inner workings are very different from sendmail.
postfix will run with many systems, such as AIX, HP-UX, Linux, IRIX, MacOS X, BSD, Solaris, as well as Tru64 Unix, and many other Unix systems. Its main features include various protocol support, junk mail controls, mailbox support, database support, address manipulation, and configurable DSN, delivery status notifications. (see main text for detailed list of features)
Objective Summary
Copyright © 2010 Novell, Inc. Copying or distributing all or part of this manual is protected bya Creative Commons Attribution-Noncommercial-Share Alike 3.0 Unported license.
Version 1328

Course 3101 and 3102 LPIC-1 Addendum
5. “Message Transfer Agent (MTA) Basics” on page 295 (continued)
“Understanding newaliases, qmail, and exim” on page 297
newaliases command builds a new copy of the alias database from and for the mail aliases file. The alias file /etc/aliases or /etc/mail/aliases, after editing, must be followed by your running of the newaliases command for the changes to take effect. By running newaliases it will initialize the database.
When newaliases runs, it causes the sendmail command to re-read the local systems /etc/aliases or the /etc/mail/aliases file and then create two additional files which will contain the database information for alias. The two new files are /etc/aliases.dir and /etc/aliases.pag.
newaliases uses exit codes. Exit code 0 indicates successful, however, an exit code of >0 indicates an error has occurred.
The files and directory used by the newaliases command are found at
/usr/sbin/newaliases-Contains the command.
/etc/aliases-Contains source for the mail aliases file command.
/etc/mail/aliases- Contains source for aliases for the sendmail command.
/etc/aliases.db directory-Contains binary files created by the newaliases command.
postalias is the postfix equivalent to sendmail’s newaliases command. The configuration file for postalias is the /etc/postfix/aliases file. After editing the file, run the following syntax postalias/etc/postfix/aliases.
qmail is a replacement for sendmail and has been described as being the “modern”’ replacement for it. It was designed to be more secure and was the first security-aware MTA of its time. qmail was released to the public domain in 2007; however, it is considered non-free, depending on which license guideline is used.
Its modular architecture, comprised of mutually untrusting components such as the SMTP queue, manages its credentials different from the SMTP listener. This holds true for many of its other components as well. It is considered to be quicker, easier to configure, easier to deploy, and also easier for end-users to use by the use of employing wildcards. By design, it was meant to be used for large bulk mail servers such as those used for mailing list servers.
Objective Summary
Copyright © 2010 Novell, Inc. Copying or distributing all or part of this manual is protected bya Creative Commons Attribution-Noncommercial-Share Alike 3.0 Unported license.
329Version 1

SUSE Linux Enterprise 11 Fundamentals / Manual
5. “Message Transfer Agent (MTA) Basics” on page 295 (continued)
“Understanding newaliases, qmail, and exim” on page 297 (continued)
exim is an SMTP mail server without features such as address books, iMAP, POP3, shared calendars, or group scheduling. Though referred to as a sendmail alternative, it is very different in configuration and setup. Its feature list makes it an attractive alternative for large Unix/Linux installations such as ISPs which handle millions of messages per day, it is found to be useful to single workstationsand small to medium systems as well. It is capable of storing lists for domains, hosts, and end-users in text files, databases, and in an LDAP directory.
Errors occur when using the wrong documentation for setup. It supplies support for two types of filters, the Exim filter and the Sieve filter, both of different formats.
Preference is given to the Exim filter due to its being feature rich, and its native format is unique to Exim and allows better integration with your host environment. Sieve filters are designed with its portability in mind.
Administrators must configure the system for both types of filters. Sieve filters offer the most for interoperability. Test all of your implementations of filtering systems.
/var/spool/exim/msglog contains the log files for messages with each message having its own file and named the same as the message-id.
Exim message-id has the syntax xxxxxx-xxxxxx-xx. Alpha-numeric and mixed-case are its format.
Most commands managing message logging or the message queue use the messageid. Every message in the spool directory has three files; when removing them, do not leave remnants of files in the queue. “Using mail, mailq, ~/.forward, and aliases” on page 300
mail command is very powerful, new administrators and new users do well to learn its usage first.
Using the mail command, you can read, reply, compose, send, forward, and delete mail. There are a large number of command line options, configuration options, compose-mode options, and command-mode options. Research each using the main text material in this section and search the Internet for more information.
mailq is used to print a summary of the messages queued for delivery. The exit codes indicate sucess or failure, an exit code of 0 indicates success, while an exit of >0 indicates an error has occurred. The summary’s first line displays the internal identifier for that host and for that specific message, with a possibility of a status character. Status characters can be one of the following;
Objective Summary
Copyright © 2010 Novell, Inc. Copying or distributing all or part of this manual is protected bya Creative Commons Attribution-Noncommercial-Share Alike 3.0 Unported license.
Version 1330

Course 3101 and 3102 LPIC-1 Addendum
5. “Message Transfer Agent (MTA) Basics” on page 295 (continued)
“Using mail, mailq, ~/.forward, and aliases” on page 300 (continued)
* = Job being processed.
X = Load too high to process job.
- = Job too young to process.
The second line shows any error that caused the message to be retained in the queue. No error message seen if the message is being processed for the first time.
Third line shows recipient of the message, one recipient per line. A number of options exist for mailq and are covered in the main text of this Addendum.
~/.forward will allow end-users to forward their messages to perhaps another account on another system or another machine. The forwarding of messages is configured by users creating a .forward file in their home directory, as signified by the ~/, the “.” indicates it is a hidden file.
The content of the .forward file is the address you wish to have your mail forwarded to. Use the syntax of either username (local machine user) or [email protected] Internet address, for example, geeko or [email protected].
Creating a .forward file means that all email will be forwarded to that entry, and no email will be delivered to the normal mailbox for that user.
aliases, is a pseudo-name, a pseudo-email address which redirects mail to another specified email address.
Two types of aliases are used, either the MUA alias or the MTA alias. MUA aliases are seen and used by only the user creating it.
The syntax used is (all on one line) alias jc James Christopher <[email protected]>.
An MTA alias will allow the alias to be used by your local machine, as well as remotely. The system “aliases” file needs to be modified. The system aliases file is normally /etc/aliases; however, there may be a different location, depending on your MTA.
Review standard aliases contained in the file, such as those for “postmaster” or “mailman” or “faxmaster” these may provide you guidance on the syntax to use.
Depending on the MTA you use, it may treat the alias as a mailbox and append the mail to it, which is excellent for archiving mail. Or perhaps the MTA will determine the alias target to be a program, which then passes the mail to the program’s standard input.
Objective Summary
Copyright © 2010 Novell, Inc. Copying or distributing all or part of this manual is protected bya Creative Commons Attribution-Noncommercial-Share Alike 3.0 Unported license.
331Version 1

SUSE Linux Enterprise 11 Fundamentals / Manual
5. “Message Transfer Agent (MTA) Basics” on page 295 (continued)
“sendmail emulation layer commands” on page 305
Sendmail emulation allows the ability to have mail delivery of outging mail without going through the MTA. It uses the MDA or Message Delivery Agent, thus, not using port 25.
smtp.conf file will contain pairs of keyword-argument. There will be one pair per line. For example
Mailhub This is the host to send mail to; it should be in the form of host IP_addr :portnumber. The default port used is port 25.
Root This is the user that will receive all mail for any uid less than 1000. If this keyword is left blank, then address rewriting will be disabled.
ssmtp is truly a send-only sendmail emulator which is used for those machines that normally pick-up their mail from a centralized mailhub, which may be via pop, imap, nfs mounts or another means.
Reverse aliases have the From: address placed on the user's outgoing mail messages and as an option the mailhub. These messages will be allowed through.
To allow reverse aliases, it employ’s the use of /etc/ssmtp/revaliases which is the reverse aliases file.
sendmail emulator program command line options may change the default behavior or output of sendmail.
Milters enable third-party applications to access a mail message as it is being processed by the MTA. Allowing them to examine and modify message content as well as the meta content or information during the SMTP transaction.
Milters were created due to the increase in email volume along with threats like spam, being targeted by viruses and being targeted with attacks such as a denial of service (DOS). There grew the need quickly to expand the abilities of sendmail to include a means of threat protection and to optimize message delivery.
Filters may be added or modified without affecting other existing milters. A milter will address system-wide mail filtering issues in an easy and scalable manner.
6. “Fundamentals of TCP-IP (dig)” on page 309
“Use dig to Perform a DNS Lookup” on page 309
Using the dig utility will allow you flexibility in the type of data you wish to gather from nameservers. dig stands for Domain Information Groper. It is a tool that will query a nameserver by doing DNS lookups. The amount of data gathered is plentiful and is determined by the options you choose to use.
Used without a nameserver to query dig will use the /etc/resolv.conf file and check the nameservers listed therein. dig lpi.org
Objective Summary
Copyright © 2010 Novell, Inc. Copying or distributing all or part of this manual is protected bya Creative Commons Attribution-Noncommercial-Share Alike 3.0 Unported license.
Version 1332

Course 3101 and 3102 LPIC-1 Addendum
6. “Fundamentals of TCP-IP (dig)” on page 309 (continued)
“List of Syntax and Query Options for dig” on page 311
Usage:
dig Will use the resolv.conf file
dig <nameserver> Queries a specified nameserver, like, dig lpi.org
dig -h Displays all options.“Using dig Options” on page 313
Options dig interrogates DNS servers and can be used either at the command line or in batch mode reading entries from a file you create. dig can also issue multiple lookups to gather the information from sites queried.
dig lpi.org q-p 8443 Queries port 8443 for information
dig lpi.org mx Queries for mx record information.
Objective Summary
Copyright © 2010 Novell, Inc. Copying or distributing all or part of this manual is protected bya Creative Commons Attribution-Noncommercial-Share Alike 3.0 Unported license.
333Version 1

SUSE Linux Enterprise 11 Fundamentals / Manual
Copyright © 2010 Novell, Inc. Copying or distributing all or part of this manual is protected bya Creative Commons Attribution-Noncommercial-Share Alike 3.0 Unported license.
Version 1334


