31 32 - Micron Group · 16 item part no. description qty. 1 3205/66 wire, o.5 mm2, black - 0.62m 1...
8
16 ITEM PART NO. DESCRIPTION QTY. 1 3205/66 WIRE, O.5 MM2, BLACK - 0.62M 1 2 3280/66 WIRE, O.5 MM2, RED - 0.62M 1 3 5086 PUSH BUTTON 1 4 5101 SPRING 1 5 5085 ELECTRICAL SOCKET 1 6 5103 CONNECTOR PIN 2 7 4898 TUBE, 16.00 MM O.D, ALUMINIUM - 0.42M 1 8 4647 SCREW, NO. 6 X 1/2", S/T, CSK (B) 1 9 4747 CLIP, P 2 10 3472 SCREW, NO. 6 X 1/4", S/T (AB) 2 11 5105/42 TUBE/HANDLE CONNECTOR 1 12 5132 LABEL, HERBAFLEX 1 13 5027 SCREW, NO.4 X 3/8", S/T, POZI PANHEAD 2 14 4901 EXTENSION TUBE PIECE, HEX 1 15 4941/19 CABLE SLEEVE, 6MM O.D., PVC - 0.15M 1 16 4916 MOTOR TERMINAL COVER 1 17 4915 SCREW, M5 X 16 2 18 4907 WING NUT 2 19 5399 SCREW, NO. 6 X 3/8", S/T, PANHEAD, 2 20 4960 WASHER, 4BA, BRASS 2 21 4900 MOTOR COVER 1 OPTIONAL EXTRAS (not shown) 5074A ATOMISER CONE HOUSING, B120 (C/W 2 X 5027) 5140A FEED NOZZLE, YELLOW + 'O' RING (5151) 5141A FEED NOZZLE, ORANGE + 'O' RING (5151) 5142A FEED NOZZLE, RED + 'O' RING (5151) 6594A SPRAY SHIELD (FOR USE WITH ATOMISER CONE HOUSING A90) HERBAFLEX LANCE PARTS LIST/DIAGRAM ITEM PART NO. DESCRIPTION QTY. 22 5486B MOTOR ASSEMBLY 1 23 4897 MOTOR HOUSING 1 24 4939 SCREW, NO. 4 X 3/8", S/T 4 25 5076A ATOMISER DISC ASSEMBLY 1 26 4911 DEFLECTOR 1 27 4910A ATOMISER BOTTOM CONE ASSEMBLY 1 28 4896A ATOMISER CONE HOUSING, A90 (C/W 2 X 5027) 1 29 4943 WASHER, 5MM, FLAT, NYLON 1 30 4921 NUT, M5, DOME, NYLON 1 31 5151 'O' RING 1 32 4908A FEED NOZZLE, WHITE + 'O' RING (5151) 1 4930A FEED NOZZLE, BLUE + 'O' RING (5151) 1 5049A FEED NOZZLE, BROWN + 'O' RING (5151) 1 33 4309/96 TUBE, 5MM I.D. X 8MM O.D., PVC - 0.96M 1 34 5075 KNUCKLE JOINT 1 35 5088 VALVE/HOSE CONNECTOR 1 36 5102 UNION NUT 1 37 5264 CALCULATOR, HERBAFLEX (not shown) 1 38 5316 'O' RING 1 39 5317 'O' RING 1 40 5487 MOTOR SPACER ACCESSORIES (Not shown) 5137 MEASURING CUP 1 30 29 31 32 27 26 28 18 17 23 24 25 39 38 22 21 20 19 16 15 12 10 9 14 11 3 4 5 6 7 35 8 10 9 36 33 11 33 34 1 2 13 13 40 1 DESCRIPTION The MICROFIT HERBAFLEX, part of the modular MICROFIT system, is a hand- held, shrouded, spinning disc, Controlled Droplet Application (CDA) sprayer. It is powered by four torch (D-cell/R20) batteries, with one set of good quality batteries giving over 30 hours spraying time. It is designed to apply herbicides in adjustable narrow bands of between 10 and 75 cm at low volumes (10 to 30 litres/hectare). A governed electric motor spins the atomiser disc at a constant 2,800 rpm to produce uniform spray droplets of around 200 micron - large enough to minimise any risk of spray drift. Liquid is fed by gravity through colour coded feed nozzles. The MICROFIT HERBAFLEX can be used to apply bands of herbicides around buildings, fence lines, borders and pathways as well as for treatment between crop rows. The weight of the machine ready to spray with the 2½ litre bottle full is 4 kg. Specially designed Micron Micropak backpacks and a shoulder strap are available for use with the MICROFIT HERBAFLEX. Other optional extras include an atomiser cone housing (B 120) which allows a wider band to be sprayed and a spray shield (for use with the standard A90 atomiser cone housing only). Description ............................................ 1 Safety .................................................... 2 Operator protection ................................ 2 Preparing for spraying............................ 3 Before spraying for the first time ............ 5 Mixing, filling and calibration ................ 6 To start spraying .................................. 10 After spraying ...................................... 11 Flow control valve maintenance ........... 12 Storage ................................................ 13 Optional extras ..................................... 13 Troubleshooting ................................... 14 POWERPACK parts list/diagram ......... 15 HERBAFLEX lance parts list/diagram . 16 SPRAY SHIELD FLOW ON/OFF VALVE SPRAY HEAD MOTOR ON / OFF SWITCH HERBAFLEX LANCE FEED NOZZLE LIQUID FEED TUBE BOTTLE 5 LITRE MICROPAK BACKPACK (ALSO AVAILABLE IN 10 AND 15 LITRE) Contents Page Page
Transcript of 31 32 - Micron Group · 16 item part no. description qty. 1 3205/66 wire, o.5 mm2, black - 0.62m 1...

16
ITEM PART NO. DESCRIPTION QTY.
1 3205/66 WIRE, O.5 MM2, BLACK - 0.62M 1
2 3280/66 WIRE, O.5 MM2, RED - 0.62M 1
3 5086 PUSH BUTTON 1
4 5101 SPRING 1
5 5085 ELECTRICAL SOCKET 1
6 5103 CONNECTOR PIN 2
7 4898 TUBE, 16.00 MM O.D, ALUMINIUM - 0.42M 1
8 4647 SCREW, NO. 6 X 1/2", S/T, CSK (B) 1
9 4747 CLIP, P 2
10 3472 SCREW, NO. 6 X 1/4", S/T (AB) 2
11 5105/42 TUBE/HANDLE CONNECTOR 1
12 5132 LABEL, HERBAFLEX 1
13 5027 SCREW, NO.4 X 3/8", S/T, POZI PANHEAD 2
14 4901 EXTENSION TUBE PIECE, HEX 1
15 4941/19 CABLE SLEEVE, 6MM O.D., PVC - 0.15M 1
16 4916 MOTOR TERMINAL COVER 1
17 4915 SCREW, M5 X 16 2
18 4907 WING NUT 2
19 5399 SCREW, NO. 6 X 3/8", S/T, PANHEAD, 2
20 4960 WASHER, 4BA, BRASS 2
21 4900 MOTOR COVER 1
OPTIONAL EXTRAS (not shown)
5074A ATOMISER CONE HOUSING, B120 (C/W 2 X 5027)
5140A FEED NOZZLE, YELLOW + 'O' RING (5151)
5141A FEED NOZZLE, ORANGE + 'O' RING (5151)
5142A FEED NOZZLE, RED + 'O' RING (5151)
6594A SPRAY SHIELD (FOR USE WITH ATOMISER CONE HOUSING A90)
HERBAFLEX LANCE PARTS LIST/DIAGRAM
ITEM PART NO. DESCRIPTION QTY.
22 5486B MOTOR ASSEMBLY 1
23 4897 MOTOR HOUSING 1
24 4939 SCREW, NO. 4 X 3/8", S/T 4
25 5076A ATOMISER DISC ASSEMBLY 1
26 4911 DEFLECTOR 1
27 4910A ATOMISER BOTTOM CONE ASSEMBLY 1
28 4896A ATOMISER CONE HOUSING, A90 (C/W 2 X 5027)
1
29 4943 WASHER, 5MM, FLAT, NYLON 1
30 4921 NUT, M5, DOME, NYLON 1
31 5151 'O' RING 1
32 4908A FEED NOZZLE, WHITE + 'O' RING (5151) 1
4930A FEED NOZZLE, BLUE + 'O' RING (5151) 1
5049A FEED NOZZLE, BROWN + 'O' RING (5151) 1
33 4309/96 TUBE, 5MM I.D. X 8MM O.D., PVC - 0.96M 1
34 5075 KNUCKLE JOINT 1
35 5088 VALVE/HOSE CONNECTOR 1
36 5102 UNION NUT 1
37 5264 CALCULATOR, HERBAFLEX (not shown) 1
38 5316 'O' RING 1
39 5317 'O' RING 1
40 5487 MOTOR SPACER
ACCESSORIES (Not shown)
5137 MEASURING CUP 1
30
29
3132
2726
28
18
17
23
24
25
39
38
22
21
20
19
16
1512
10
9
14
11
3
4
56
7
35
8
109
36
33
11
3334
1
2
13 13
40
1
DESCRIPTION
The MICROFIT HERBAFLEX, part of the modular MICROFIT system, is a hand-
held, shrouded, spinning disc, Controlled Droplet Application (CDA) sprayer. It is
powered by four torch (D-cell/R20) batteries, with one set of good quality batteries
giving over 30 hours spraying time. It is designed to apply herbicides in adjustable
narrow bands of between 10 and 75 cm at low volumes (10 to 30 litres/hectare). A
governed electric motor spins the atomiser disc at a constant 2,800 rpm to produce
uniform spray droplets of around 200 micron - large enough to minimise any risk of
spray drift. Liquid is fed by gravity through colour coded feed nozzles. The MICROFIT HERBAFLEX can be used to apply bands of herbicides around buildings,
fence lines, borders and pathways as well as for treatment between crop rows. The
weight of the machine ready to spray with the 2½ litre bottle full is 4 kg.
Specially designed Micron Micropak backpacks and a shoulder strap are available for use with the MICROFIT HERBAFLEX. Other optional extras include an atomiser
cone housing (B 120) which allows a wider band to be sprayed and a spray shield (for
use with the standard A90 atomiser cone housing only).
Description ............................................ 1 Safety .................................................... 2
Operator protection ................................ 2
Preparing for spraying ............................ 3
Before spraying for the first time ............ 5
Mixing, filling and calibration ................ 6
To start spraying .................................. 10
After spraying ...................................... 11 Flow control valve maintenance ........... 12
Storage ................................................ 13
Optional extras ..................................... 13
Troubleshooting ................................... 14
POWERPACK parts list/diagram ......... 15
HERBAFLEX lance parts list/diagram . 16
SPRAY SHIELD
FLOW ON/OFF
VALVE
SPRAY
HEAD
MOTOR ON /
OFF SWITCH
HERBAFLEX
LANCE
FEED NOZZLE
LIQUID FEED
TUBE
BOTTLE
5 LITRE MICROPAK BACKPACK
(ALSO AVAILABLE IN 10 AND 15
LITRE)
Contents Page Page
2
SAFETY
Using agrochemicals is a hazardous process. Operators should comply with all
relevant legislation and/or regulations governing the use of agrochemicals and should
use appropriate personal protective equipment (see 'OPERATOR PROTECTION').
Never use the MICROFIT HERBAFLEX in potentially explosive atmospheres or
spray flammable liquid through it.
The MICROFIT HERBAFLEX can be used with most conventional herbicides, as well
as specific CDA formulations (only available in some countries) to provide a closed
transfer system to improve operator safety.
OPERATOR PROTECTION
Always wear the protective clothing items listed on the product label for mixing and
filling. The minimum protective clothing required for spraying with the MICROFIT
HERBAFLEX is:
approved applications
maximum dose rates
maximum number of treatments
operator protection required
necessary environmental protection measures
N.B. 'Dose rate' refers to the amount of chemical product applied per hectare.
Never eat, drink, or smoke when working with agrochemicals. After using
agrochemicals or handling equipment wash your hands thoroughly. Keep people
(especially children) and animals out of areas being sprayed.
Always store agrochemicals safely to protect people and animals, and to safeguard the
environment (take special care to avoid water pollution). See 'SPRAYING' section for
guidelines on safe use of the MICROFIT HERBAFLEX in operation.
rubber gloves
boots/shoes and long trousers
eye protection
long sleeved shirt
Always read the product label carefully to discover:-
15
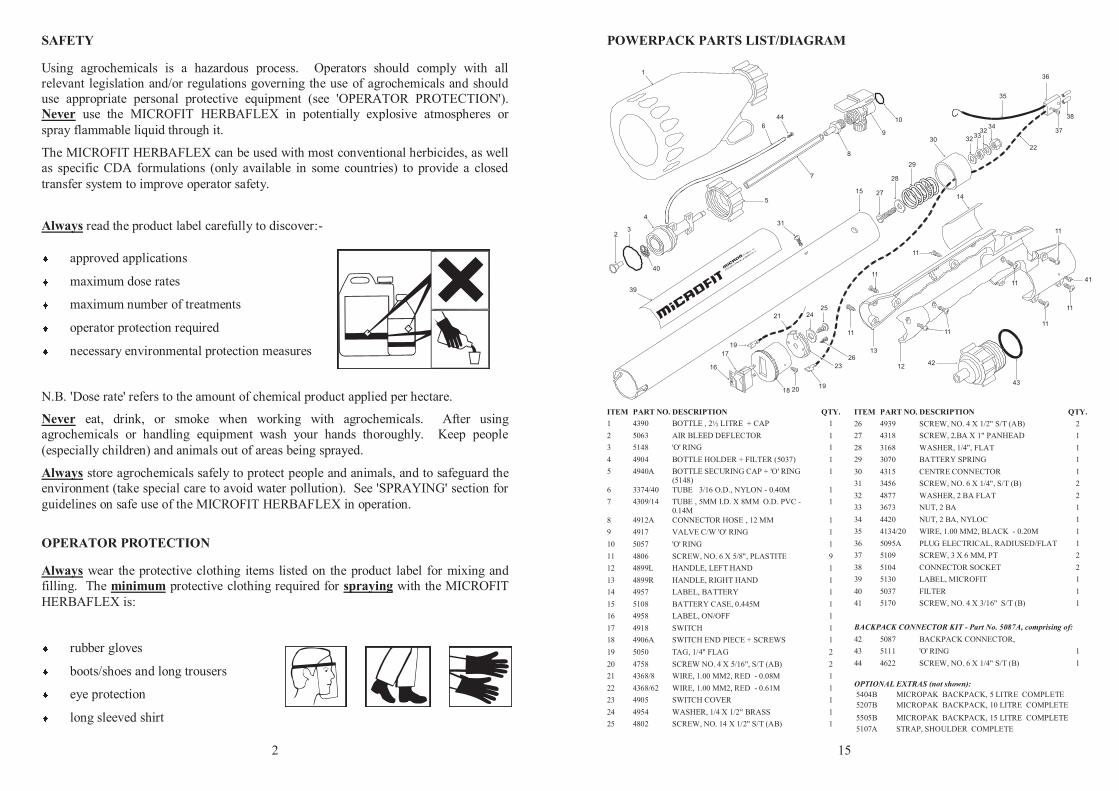
ITEM PART NO. DESCRIPTION QTY.
1 4390 BOTTLE , 2½ LITRE + CAP 1
2 5063 AIR BLEED DEFLECTOR 1
3 5148 'O' RING 1
4 4904 BOTTLE HOLDER + FILTER (5037) 1
5 4940A BOTTLE SECURING CAP + 'O' RING (5148)
1
6 3374/40 TUBE 3/16 O.D., NYLON - 0.40M 1
7 4309/14 TUBE , 5MM I.D. X 8MM O.D. PVC - 0.14M
1
8 4912A CONNECTOR HOSE , 12 MM 1
9 4917 VALVE C/W 'O' RING 1
10 5057 'O' RING 1
11 4806 SCREW, NO. 6 X 5/8", PLASTITE 9
12 4899L HANDLE, LEFT HAND 1
13 4899R HANDLE, RIGHT HAND 1
14 4957 LABEL, BATTERY 1
15 5108 BATTERY CASE, 0.445M 1
16 4958 LABEL, ON/OFF 1
17 4918 SWITCH 1
18 4906A SWITCH END PIECE + SCREWS 1
19 5050 TAG, 1/4" FLAG 2
20 4758 SCREW NO. 4 X 5/16", S/T (AB) 2
21 4368/8 WIRE, 1.00 MM2, RED - 0.08M 1
22 4368/62 WIRE, 1.00 MM2, RED - 0.61M 1
23 4905 SWITCH COVER 1
24 4954 WASHER, 1/4 X 1/2" BRASS 1
25 4802 SCREW, NO. 14 X 1/2" S/T (AB) 1
POWERPACK PARTS LIST/DIAGRAM
OPTIONAL EXTRAS (not shown):
5404B MICROPAK BACKPACK, 5 LITRE COMPLETE
5207B MICROPAK BACKPACK, 10 LITRE COMPLETE
5505B MICROPAK BACKPACK, 15 LITRE COMPLETE
STRAP, SHOULDER COMPLETE 5107A
ITEM PART NO. DESCRIPTION QTY.
26 4939 SCREW, NO. 4 X 1/2" S/T (AB) 2
27 4318 SCREW, 2.BA X 1" PANHEAD 1
28 3168 WASHER, 1/4", FLAT 1
29 3070 BATTERY SPRING 1
30 4315 CENTRE CONNECTOR 1
31 3456 SCREW, NO. 6 X 1/4", S/T (B) 2
32 4877 WASHER, 2 BA FLAT 2
33 3673 NUT, 2 BA 1
34 4420 NUT, 2 BA, NYLOC 1
35 4134/20 WIRE, 1.00 MM2, BLACK - 0.20M 1
36 5095A PLUG ELECTRICAL, RADIUSED/FLAT 1
37 5109 SCREW, 3 X 6 MM, PT 2
38 5104 CONNECTOR SOCKET 2
39 5130 LABEL, MICROFIT 1
40 5037 FILTER 1
41 5170 SCREW, NO. 4 X 3/16" S/T (B) 1
BACKPACK CONNECTOR KIT - Part No. 5087A, comprising of:
42 5087 BACKPACK CONNECTOR,
43 5111 'O' RING 1
44 4622 SCREW, NO. 6 X 1/4" S/T (B) 1
1819
23
2613
12
11
42
11
11
11
16
17
21 2425
39
23
4
5
7
8
9
1044
6
1
35
36
38
3734
3233
3230
29
28
271514
11
1141
11
11
4320
19
31
40
22

14
TROUBLESHOOTING
Atomiser disc spins but does not spray or sprays irregularly. Check:
- the feed nozzle. If the feed nozzle is blocked remove and soak in soapy water
- Never blow through the nozzle with your mouth.
- that the feed nozzle gives a flow rate within the operating range.
- the air vent tube for blockage if using the 2½ litre bottle. Clean if necessary.
- the filter gauze in the POWERPACK handle. Clean if necessary.
- the atomiser disc is clean and undamaged. Clean or replace.
- the flow control valve for blockage (see 'FLOW CONTROL VALVE
MAINTENANCE').
- the in-line syphon tap for blockage if using a backpack. Clean if necessary.
Atomiser disc fails to spin or spins unevenly. Check:
- that the batteries are fitted correctly.
- the condition of the batteries. Replace if necessary.
- that electrical terminals and contact points are clean and that electrical wires
are not broken or corroded
- the motor for corrosion or obvious signs of wear. Replace if necessary.
- the plug is in the socket.
- the atomiser disc and atomiser cone housing are fitted correctly (see 'AFTER
SPRAYING - to refit the atomiser disc').
Battery condition can be checked with a torch (or a torch light bulb and electrical wire).
Spray liquid spills from the atomiser cone during spraying:
- angle of the spray head to the ground is too great - reduce the angle
- flow rate too high - fit feed nozzle with lower flow rate and reduce walking
speed accordingly
Safety Notes:
a) Acoustic information: the sound pressure level at the operator's ear does not
exceed 70 dB(A).
b) Vibration: the weighted RMS acceleration value at the hands when using this
machine does not exceed 2.5 m/sec2.
3
Fit the HERBAFLEX spray lance to the POWERPACK, by first pushing the
electrical plug (1) on the POWERPACK
into the socket, then depressing the white
button (2) on the lance assembly and
push ing the lance in to the
POWERPACK (3) until the button
locates in the hole provided in the
POWERPACK.
PREPARING FOR SPRAYING
The sprayer is supplied as a separate POWERPACK and HERBAFLEX spray lance.
Two types of spray liquid reservoir are available for use with the MICROFIT system; a 2½ litre spray bottle which comes as standard or 5, 10 and 15 litre Micropak backpacks
which make it possible to treat larger areas between refills.
1
2
3
Screw the union nut (4) into the flow
control valve.
Insert four batteries (D cell/R20) into the POWERPACK, negative, i.e. flat end
first:
Press and rotate the switch holder anti-
clockwise (1) and remove (2). Insert
batteries (3). Refit the switch holder by
pushing in and turning clockwise.
4
1
2
3 -
+

4
Fitting the spray bottle
To fit the bottle to the POWERPACK,
fill the bottle to the required level and
place it on a level surface.
Fit the POWERPACK into the bottle (1)
ensuring that the bottle handle (3) is in
line with the flow control valve (4).
Tighten the bottle securing cap (2) and
pass the air bleed tube (5) through the
bottle handle (3). This is important to
ensure that the air bleed system functions
correctly.
Fitting a backpack
Instructions on assembling the Micron
Micropak backpacks are contained in the
tanks.
Screw the backpack connector (1) into
the bottle holder (2) ensuring the 'O' ring
(3) is in place. Seal the air vent tube (4)
with the screw provided (5) to prevent
liquid leaking from the tube. The screw
must be removed from the air vent tube
if using the 2½ litre bottle.
Fit the tube (6) to the in-line siphon tap
(7). Then fit the tube to the hose barb on
the backpack connector (1).
Flow control
To open the flow control valve press the
lever (1) down for treating small areas.
For continuous spraying press the lever
down and forward into the locked
position (2). To close the flow control
valve and stop the liquid flowing, pull
back the lever and release. N.B. For
safety in transit, the valve can be locked
in the off position by slightly raising the
lever and then sliding it forward (3).
1
2
3
4
5
1
2
3
13
Atomiser cone B120 (for wider swaths)
If wider swaths (up to 75 cm) are needed an atomiser cone housing with a wider
opening (B120) should be used. This is supplied with a set of feed nozzles (yellow,
orange and red) which give the higher flow rates needed for treating using wider
swaths. (see 'MIXING, FILLING AND CALIBRATION')
This should be fitted as described in 'AFTER SPRAYING - To refit the atomiser disc.'
STORAGE
Before storing the MICROFIT HERBAFLEX for long periods disassemble the sprayer.
Remove the bottle or backpack and unscrew the union nut from the flow control valve
then depress the white button on the POWERPACK assembly and remove the
HERBAFLEX spray lance. Remove the batteries from the POWERPACK to avoid
corrosion. Check that electrical contacts are clean and dry. Store in a dry place away
from direct sunlight. Batteries should be stored in a dry cool place.
Spray shield
In some instances where it is essential to
minimise any spray drift a spray shield
can be used. This should only be used
with the standard atomiser cone housing
A90.
OPTIONAL EXTRAS
To fit the spray shield, remove the head adjustment wingnut and screw. Slip the shield over the spray head so that it sits around the top of the motor housing. Fit the screw,
washers and wingnut provided with the spray shield to secure it and set the angle of the
spray head.
After working with agrochemicals, or handling spraying equipment, always thoroughly wash hands and exposed skin. All protective clothing should be washed
separately from other clothing and stored. Contaminated gloves should be washed

12
Check that the atomiser disc is correctly fitted by shaking the spray head. If the disc
can be heard rattling this means that it is fitted correctly and will spin freely.
Refit the nozzle, ensuring that the sealing o-ring is in place and in good condition.
FLOW CONTROL VALVE MAINTENANCE
Disconnect the HERBAFLEX spray lance from the POWERPACK and remove the 2½
litre bottle.
Remove the 9 screws (1) that hold the two halves of the POWERPACK handle
together - do not remove the small screw (2) that secures the handle (3) to the battery
case (4). Separate the handle to gain access. Unscrew the serrated cap (5) at the base
of the flow control valve (6) and then remove the spring (7) and plunger (8). Then
disconnect the flow control valve (6) and feed tube (9) from the bottle holder (10).
Clean all components in warm soapy water and re-assemble in reverse order.
First, lower the atomiser disc into the atomiser cone housing ensuring that the
disc shaft seats on the ball in the bottom
of the atomiser cone assembly.
Then fit the motor housing, taking care to ensure that the motor drive shaft is
correctly inserted into the slot on the top
of the atomiser disc. Push the screws
into the bayonet keyhole slots in the
motor housing and twist to lock the
assembly together.
5
BEFORE SPRAYING FOR THE FIRST TIME
Before spraying for the first time use soap and water only to familiarise yourself with
the sprayer and check the spray pattern produced.
Put around half a litre of water in the bottle or backpack and add a small amount (one
to two ml) of liquid detergent such as household washing up liquid. The detergent is
important to reduce the surface tension in the liquid feed tube and helps ensure an even
flow. With the sprayer in the spraying position, check for leaks. Switch on the sprayer
and then open the flow control valve. If using a Micropak backpack also open the in-
line siphon tap. Again check for leaks.
When spraying, the spray head should be held 5-7 cm above the ground or top of weed
canopy with the lance at an angle of 35-40o to the ground. Spray on one spot for
around 10 seconds, preferably on a clean dry surface (e.g. concrete) where you will be
able to see the spray pattern produced.
Changing the angle of the spray head will adjust the band width produced. To
change the angle of the spray head
slacken the adjustment nut (1), alter the
angle of the head (2), retighten the nut
and check the new band width produced.
If the spray head is horizontal the spray should project forward about 0.6 m and
produce a pattern or band around 0.5 m
wide using the standard atomiser cone
housing (A 90).
If the head is angled downwards the band width will be reduced. The angle
of the spray head should not exceed 45
otherwise dripping will result.
0.1 m
0.3 m
0.5 m
0.6 m

6
Always wear gloves when handling agrochemicals and
equipment.
Always use the correct equipment when mixing and
measuring.
Always clean all equipment
after use. Always wash off any skin
contamination.
MIXING AND FILLING AND CALIBRATION
Mixing and filling is generally the most hazardous process in the spraying operation.
Always follow the label instructions. Always use a filter (fitted in the Micron
Micropak backpacks) and use a funnel if filling a container with a small neck. Only
mix enough spray for the area to be treated thereby avoiding the need for disposal of
unused spray mix.
With the MICROFIT HERBAFLEX herbicides are usually applied in around 20 litres total spray volume per hectare, with the exception of glyphosate which can be applied
at volumes as low as 10 litres per hectare. These are lower volumes than recommended
for high volume application with knapsack sprayers. In general use the minimum dose
rate recommended on the label for the intended treatment and add water to make up to
the volume required for application with the MICROFIT HERBAFLEX.
For example, if the label recommends applying a minimum of 2 litres of product made
up to 200 litres of water per hectare with a knapsack sprayer, use 2 litres of product
made up to 20 litres for application with the MICROFIT HERBAFLEX, i.e. a spray
mix concentration of 10%.
11
To do this first remove the feed nozzle by pulling it out of the bottom of the
atomiser cone housing (1). Then remove
the atomiser cone housing by rotating it
an eighth of a turn clockwise (as viewed
from above) to unlock the bayonet
keyhole fitting (2) and pull it away from
the bottom of the motor housing (3).
1. Dispose of any surplus spray mix
according to the product approval.
Store products safely, locked up
and out of the reach of children.
2. It is essential to clean the sprayer
and bottle or backpack thoroughly
using water and detergent after use.
Never immerse the spray head in
water or under a tap, since this will
destroy the electric motor.
A water and detergent mix should be put in the bottle, swilled around, and then sprayed out onto the treated area or an area of waste ground. The sprayer and
bottle should be wiped down externally using a cloth.
To refit the atomiser disc
When refitting the atomiser disc it is important to ensure that it is correctly located in
the atomiser cone housing and motor housing to avoid damage.
AFTER SPRAYING
3. Periodically remove the atomiser cone housing and remove and clean the
atomiser disc.
The atomiser disc can be removed from the atomiser cone housing and cleaned in
soapy water using a soft brush.
10
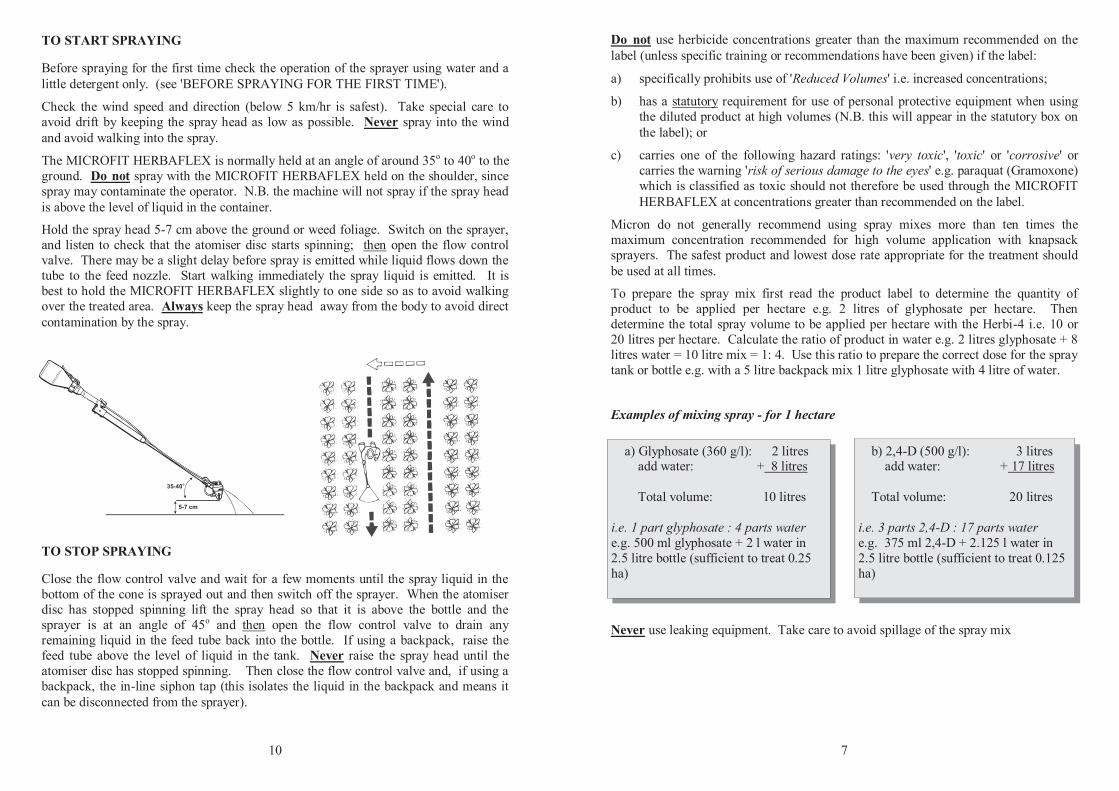
TO START SPRAYING
Before spraying for the first time check the operation of the sprayer using water and a
little detergent only. (see 'BEFORE SPRAYING FOR THE FIRST TIME').
Check the wind speed and direction (below 5 km/hr is safest). Take special care to
avoid drift by keeping the spray head as low as possible. Never spray into the wind
and avoid walking into the spray.
The MICROFIT HERBAFLEX is normally held at an angle of around 35o to 40o to the
ground. Do not spray with the MICROFIT HERBAFLEX held on the shoulder, since
spray may contaminate the operator. N.B. the machine will not spray if the spray head
is above the level of liquid in the container.
Hold the spray head 5-7 cm above the ground or weed foliage. Switch on the sprayer,
and listen to check that the atomiser disc starts spinning; then open the flow control
valve. There may be a slight delay before spray is emitted while liquid flows down the
tube to the feed nozzle. Start walking immediately the spray liquid is emitted. It is
best to hold the MICROFIT HERBAFLEX slightly to one side so as to avoid walking
over the treated area. Always keep the spray head away from the body to avoid direct
contamination by the spray.
TO STOP SPRAYING
Close the flow control valve and wait for a few moments until the spray liquid in the
bottom of the cone is sprayed out and then switch off the sprayer. When the atomiser
disc has stopped spinning lift the spray head so that it is above the bottle and the
sprayer is at an angle of 45o and then open the flow control valve to drain any
remaining liquid in the feed tube back into the bottle. If using a backpack, raise the
feed tube above the level of liquid in the tank. Never raise the spray head until the
atomiser disc has stopped spinning. Then close the flow control valve and, if using a
backpack, the in-line siphon tap (this isolates the liquid in the backpack and means it
can be disconnected from the sprayer).
5-7 cm
35-40o
7
a) Glyphosate (360 g/l): 2 litres add water: + 8 litres
Total volume: 10 litres
i.e. 1 part glyphosate : 4 parts water
e.g. 500 ml glyphosate + 2 l water in
2.5 litre bottle (sufficient to treat 0.25
ha)
Do not use herbicide concentrations greater than the maximum recommended on the
label (unless specific training or recommendations have been given) if the label:
a) specifically prohibits use of 'Reduced Volumes' i.e. increased concentrations;
b) has a statutory requirement for use of personal protective equipment when using
the diluted product at high volumes (N.B. this will appear in the statutory box on
the label); or
c) carries one of the following hazard ratings: 'very toxic', 'toxic' or 'corrosive' or
carries the warning 'risk of serious damage to the eyes' e.g. paraquat (Gramoxone)
which is classified as toxic should not therefore be used through the MICROFIT
HERBAFLEX at concentrations greater than recommended on the label.
Micron do not generally recommend using spray mixes more than ten times the
maximum concentration recommended for high volume application with knapsack
sprayers. The safest product and lowest dose rate appropriate for the treatment should
be used at all times.
To prepare the spray mix first read the product label to determine the quantity of
product to be applied per hectare e.g. 2 litres of glyphosate per hectare. Then
determine the total spray volume to be applied per hectare with the Herbi-4 i.e. 10 or
20 litres per hectare. Calculate the ratio of product in water e.g. 2 litres glyphosate + 8
litres water = 10 litre mix = 1: 4. Use this ratio to prepare the correct dose for the spray
tank or bottle e.g. with a 5 litre backpack mix 1 litre glyphosate with 4 litre of water.
Never use leaking equipment. Take care to avoid spillage of the spray mix
b) 2,4-D (500 g/l): 3 litres add water: + 17 litres
Total volume: 20 litres
i.e. 3 parts 2,4-D : 17 parts water
e.g. 375 ml 2,4-D + 2.125 l water in
2.5 litre bottle (sufficient to treat 0.125
ha)
Examples of mixing spray - for 1 hectare

8
Calibration
The formulae below give the relationship between swath (or band) width, flow rate,
walking speed and total spray volume:
Flow rate (ml/min) = 6 x total spray volume (l/ha) x walking speed (m/s) x band width (m)
Flow rate (ml/min) = total spray volume (l/ha) x walking speed (km/hr) x band width (cm)
60
To help calibrate the HERBAFLEX a calculator disc is provided with the sprayer.
This is used as below:
1. Decide the total spray volume application rate to be used. A CDA rate may be
indicated on the label of the product. If not, as a general guide, use 10 l/ha (total spray
volume) for glyphosate and 20 l/ha (total spray volume) for other herbicides.
2. Decide the swath (band) width you wish to use (e.g. 30 cm) and set the angle
of the head accordingly (see 'BEFORE
SPRAYING FOR THE FIRST TIME').
3. On the calculator disc align the swath (band) width (in cm) with the total
volume application rate (e.g. 20 l/ha) as
determined in 1. above.
5. Read off the feed rate required to give the correct application rate. (e.g. 30 ml/
min with 30 cm swath (band) width and
walking speed of 3 km/hr to apply at a
volume of 20 l/ha).
Unless using the atomiser cone housing B120 (see 'OPTIONAL EXTRAS') the flow
rate used should not exceed 45 ml/min.
e.g.
4. Having fixed the swath (band) width and application rate select the preferred
walking speed; slow (2 km/hr), medium
(3 km/hr) or fast (4 km/hr)
(N.B. 1 m/s = 3.6 km/hr)
9
e.g. Volume Application
Rate (l/ha)
Band Width
(cm)
Flow Rate
(ml/min)
Nozzle Walking Speed
(km/hr)
Glyphosate 10 45 30 White 4
Other
herbicides 20 45 45 Brown 3
20 45 30 White 2
If the sprayer is new it may be noticed that with the white or brown nozzle fitted, air trapped in the liquid feed tube reduces the flow rate. If this occurs, clear the air by
gently tapping the tube and, if necessary, flushing it through with a strong soap solution
to reduce the surface tension in it. Once a steady flow is established measure the
volume dispensed in one minute. If necessary fit a different feed nozzle and re-
measure the flow rate.
Read off from the calculator the actual walking speed which is needed to apply the
given application rate with the flow rate measured. It is preferable to walk more slowly
to achieve the required spray volume than to use higher flow rates.
6. Fit the feed nozzle which is likely to give this feed rate using the table below as a
guide:
(* Supplied for use with the atomiser cone housing B120 only - do not use with the atomiser cone housing
A90 as this will result in flooding of the cone.)
7. Measure the flow rate which this nozzle gives using the actual spray liquid to be
used.
The actual flow rate should be checked holding the MICROFIT HERBAFLEX
in the spraying position (see 'TO
START SPRAYING'). Remove the
feed nozzle from the atomiser cone
housing and allow the liquid to flow
into a suitable container (such as the
measuring cup provided with the
sprayer).
Increased Flow rate
Feed nozzle White Brown Blue Yellow* Orange* Red*
Flow rate
(ml/min)
Thin
liquids 30 45 60*
Do not
use
Do not
use
Do not
use
Thick
liquids 10-15 15-25 25-35 35-45 45-55* 55+*