3 Installing Websense Data Security - Tom Bentley Deployment Guide X 25 Installing Websense Data...
22
3 Deployment Guide X 25 Installing Websense Data Security The following procedures describe how to install Websense Data Security. The installation process and results depend on which components and which agents you choose to install. Prerequisites Prior to Websense Data Security installation, make sure the following hardware and software requirements are met and that the following are installed on the server where Websense Data Security is to be installed. For optimized performance of Websense Data Security, verify that the operating system’s file cluster is set to 4096B. For more information, see the Websense knowledge-base article: “File System Performance Optimization.” Data Security Management Server hardware requirements Data Security Management Server Minimum Requirements Recommended CPU 2 Dual-core Intel Xeon processors (2.0 GHz) or AMD equivalent 2 Quad-core Intel Xeon processors (2.0 GHz) or AMD equivalent Note: The Management Server can not have more than 8 cores. Memory 2 GB 4 GB Hard drives 2 - 72 GB 4 - 146 GB Disk space 144 GB 292 GB Hardware RAID 1 + 0 1 + 0 NICs 1 2
Transcript of 3 Installing Websense Data Security - Tom Bentley Deployment Guide X 25 Installing Websense Data...

3
Deployment Guide 25
Installing Websense Data Security
The following procedures describe how to install Websense Data Security. The installation process and results depend on which components and which agents you choose to install.
Prerequisites
Prior to Websense Data Security installation, make sure the following hardware and software requirements are met and that the following are installed on the server where Websense Data Security is to be installed.
For optimized performance of Websense Data Security, verify that the operating system’s file cluster is set to 4096B. For more information, see the Websense knowledge-base article: “File System Performance Optimization.”
Data Security Management Server hardware requirements
Data Security Management Server
Minimum Requirements Recommended
CPU 2 Dual-core Intel Xeon processors (2.0 GHz) or AMD equivalent
2 Quad-core Intel Xeon processors (2.0 GHz) or AMD equivalent
Note: The Management Server can not have more than 8 cores.
Memory 2 GB 4 GB
Hard drives 2 - 72 GB 4 - 146 GB
Disk space 144 GB 292 GB
Hardware RAID 1 + 0 1 + 0
NICs 1 2

Installing Websense Data Security
26 Websense Data Security
Data Security Server hardware requirements
Data Security Server software requirements
The following requirements apply to all Data Security servers, including the management server:
Windows 2003 standard R2 edition with the latest SP.Windows installation requirements:
Set the partition to 1 NTFS Partition. For more information, see the Websense knowledge-base article: “File System Performance Optimization.”Regional Settings: should be set according to the primary location. If necessary, add supplemental language support and adjust the default language for non-Unicode programs.Configure the network connection to have a static IP address.Install the following Windows components by running appwiz.cpl from Start > Run and selecting Add/Remove Windows Components.The Data Security Manager computer name must not include an underscore sign. Internet Explorer does not support such URLs.Short names cannot be enabled.
Application ServerASP.NETCreate a local administrator to be used as a service account.It’s necessary to set the system time accurately on the server onto which you install the Data Security Server.
In addition, the Data Security Management Server requires the following to support the Data Security Manager user interface:
Adobe Flash Player v8 or beyondThis is required for the Data Security Today and System Health dashboards. All the other functions of the manager interface can operate without Flash.One of the following Web browsers :
Internet Explorer 7
Data Security Server Minimum Requirements Recommended
CPU 2 Dual-core Intel Xeon processors (2.0 GHz) or AMD equivalent
2 Quad-core Intel Xeon processors (2.0 GHz) or AMD equivalent
Memory 2 GB 4 GB
Hard drives 2 - 72 GB 4 - 146 GB
Disk space 72 GB 292 GB
Hardware RAID 1 1 + 0
NICs 1 2

Deployment Guide 27
Installing Websense Data Security
Internet Explorer 8Firefox 2Firefox 3
If you have another browser or version, the user interface may behave in unexpected ways or report an error.
Domain considerations
The servers running the Data Security software can be set as part of a domain or as a separate workgroup. If you have multiple servers or want to perform run commands on file servers in response to discovery, we recommend you make the server(s) part of a domain.
However, strict GPOs may interfere and affect system performance, and even cause the system to halt. Hence, when putting Data Security servers into a domain, it is advised to make them part of organizational units that don’t enforce strict GPOs.
Also, certain real-time antivirus scanning can downgrade system efficiency, but that can be relieved by excluding some directories from that scanning. See Antivirus configuration, page 44 for configuration information. Please contact Websense Technical Support for more information on enhancing performance.
Protector hardware requirements
Recommended (optional) additional NICs for inline mode:
The following Silicom network cards are supported by the protector appliance. NICs SKUs are:
PEG4BPi - Intel-based Quad-Port Copper Gigabit Ethernet PCI-Express Bypass Server AdapterPEG2BPi - Intel-based Dual-Port Copper Gigabit Ethernet PCI-Express Bypass Server AdapterPXG4BPi - Intel-based Quad-Port Copper Gigabit Ethernet PCI-X Bypass Server Adapter
Protector Minimum Requirements Recommended
CPU 2 Dual-core Intel Xeon processors (2.0 GHz) or AMD equivalent
2 Quad-core Intel Xeon processors (2.0 GHz) or AMD equivalent
Memory 2 GB 4 GB
Hard drives 2 - 72 GB 4 - 146 GB
Disk space 70 GB 292 GB
Hardware RAID 1 1 + 0
NICs 2 (monitoring), 3 (inline) 2 (monitoring), 3 (inline)

Installing Websense Data Security
28 Websense Data Security
PXG2BPi - Intel-based Dual-Port Copper Gigabit Ethernet PCI-X Bypass Server AdapterPEG2Fi - Intel-based Dual-Port Fiber (SX) Gigabit Ethernet PCI-Express Server AdapterPXG2Fi - Intel-based Dual-Port Fiber (SX) Gigabit Ethernet PCI-X Server Adapter
Installing Data Security
Do the following to install Websense Data Security:
1. Install the management server. This includes any agents you’ll require on the server. (For example, the endpoint server agent or SMTP agent.)
2. Install supplemental Data Security servers, if any. For help determining the number of servers required, refer to Chapter 7: Sizing and Scaling.
3. Install any agents you will be using off the Data Security servers. (For example, the printer agent, Exchange agent, or ISA agent.) This is described in Chapter 4.
4. Install the protector. This is described in Chapter 4.
Installing the Data Security Management Server
1. Close all Windows programs on the management server before starting installation.
2. Unzip the installation package and place its folders in the same location as the .msi file. This includes the Database 10g folder.
3. Double-click the DSS 7.5.msi file in the Websense Data Security directory.During the Data Security installation, the installer verifies that the .NET 2.0 server is installed. If not, it is installed.Follow the instructions on the screen. Click the Next button to proceed throughout the installation.
NoteThose users with Websense Web Security Gateway Anywhere software need only to install the management server.

Deployment Guide 29
Installing Websense Data Security
4. Read the license agreement carefully before selecting the “I accept the license agreement” radio button and clicking Next in order to proceed.
5. Select a folder on the server into which to install Data Security. By default, it’s stored in C:\Program Files\Websense\Data Security Suite.

Installing Websense Data Security
30 Websense Data Security
6. For type of installation, select Data Security Manager and click Next.
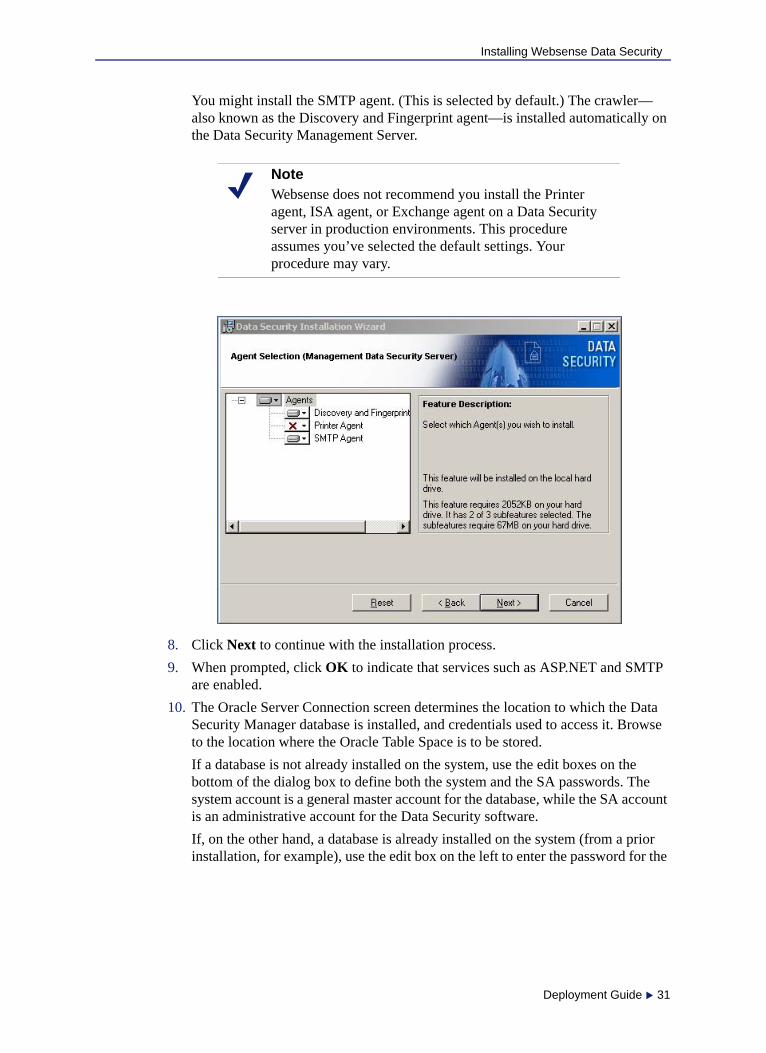
7. Click on the drop-down list next to each icon to select which agents to install. Subsequent screens depend on which options are selected here. The listed agents depend on which components Data Security detects on your system. On the management server, no agents are required.
Deployment Guide 31
Installing Websense Data Security
You might install the SMTP agent. (This is selected by default.) The crawler—also known as the Discovery and Fingerprint agent—is installed automatically on the Data Security Management Server.
8. Click Next to continue with the installation process.9. When prompted, click OK to indicate that services such as ASP.NET and SMTP
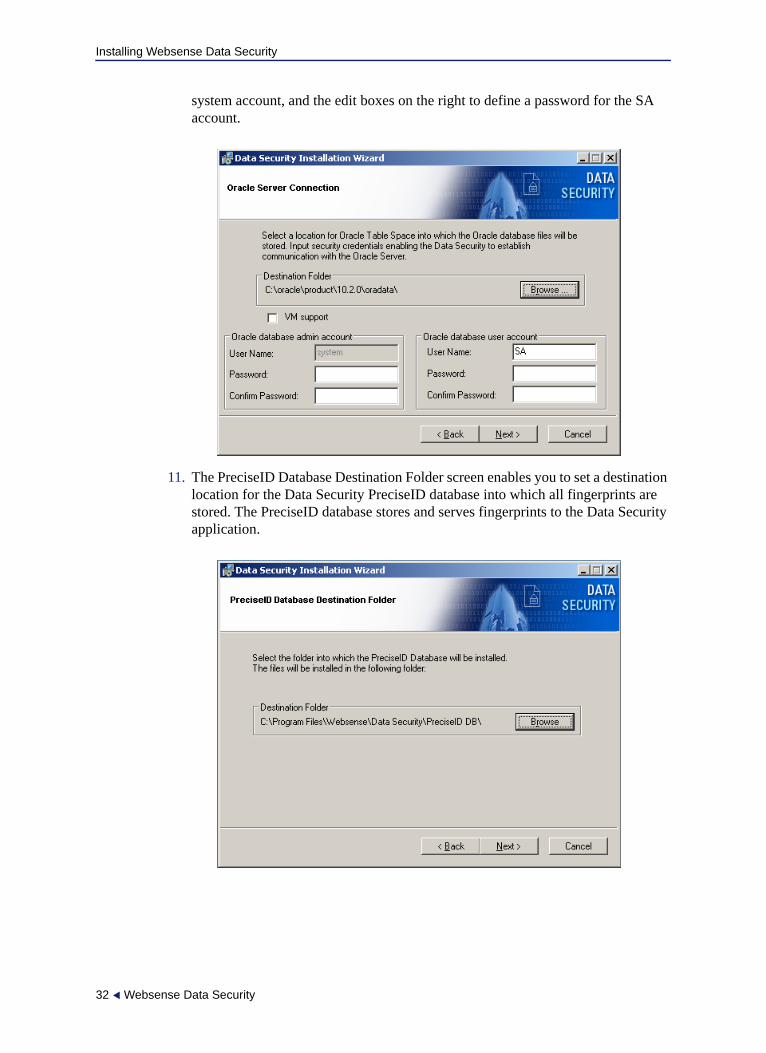
are enabled.10. The Oracle Server Connection screen determines the location to which the Data
Security Manager database is installed, and credentials used to access it. Browse to the location where the Oracle Table Space is to be stored. If a database is not already installed on the system, use the edit boxes on the bottom of the dialog box to define both the system and the SA passwords. The system account is a general master account for the database, while the SA account is an administrative account for the Data Security software.If, on the other hand, a database is already installed on the system (from a prior installation, for example), use the edit box on the left to enter the password for the
NoteWebsense does not recommend you install the Printer agent, ISA agent, or Exchange agent on a Data Security server in production environments. This procedure assumes you’ve selected the default settings. Your procedure may vary.
Installing Websense Data Security
32 Websense Data Security
system account, and the edit boxes on the right to define a password for the SA account.
11. The PreciseID Database Destination Folder screen enables you to set a destination location for the Data Security PreciseID database into which all fingerprints are stored. The PreciseID database stores and serves fingerprints to the Data Security application.
Deployment Guide 33
Installing Websense Data Security
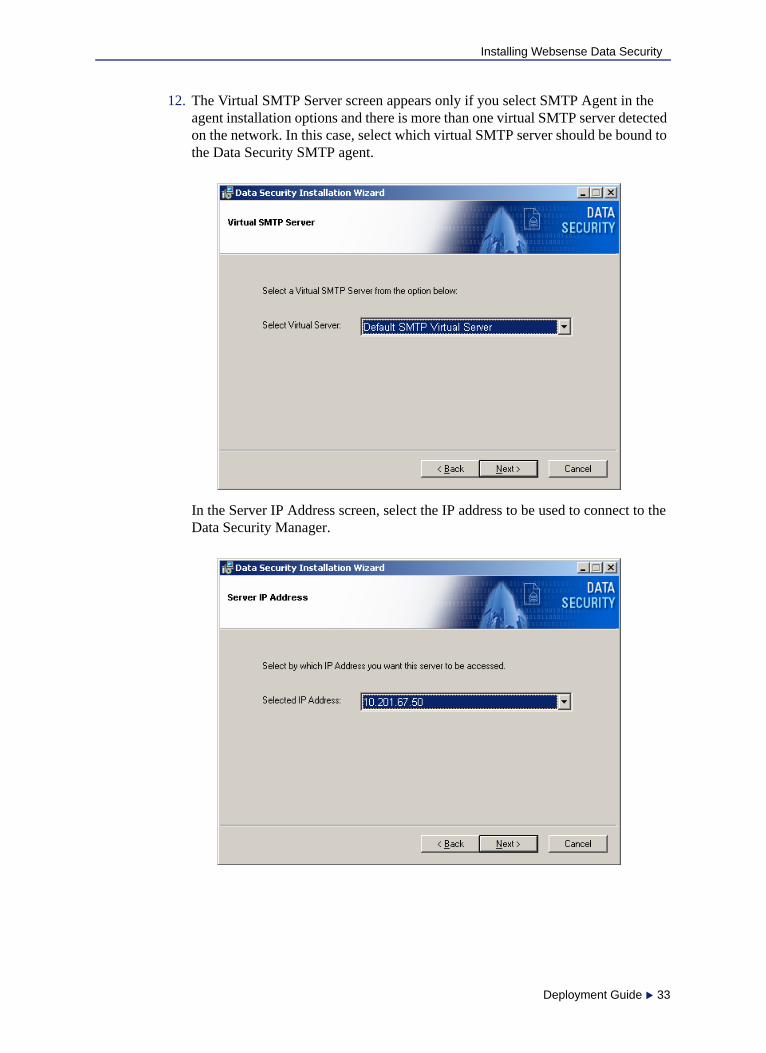
12. The Virtual SMTP Server screen appears only if you select SMTP Agent in the agent installation options and there is more than one virtual SMTP server detected on the network. In this case, select which virtual SMTP server should be bound to the Data Security SMTP agent.
In the Server IP Address screen, select the IP address to be used to connect to the Data Security Manager.

Installing Websense Data Security
34 Websense Data Security
13. Enter the local administrator user name and password according to the instructions indicated.
14. If all the information entered is correct, click the Install button to begin installation.
Installation may take a while. If the installation process is lengthy, do not assume that the installation has encountered an error unless a specific failure notification is displayed.Once installation is complete, the Installation Successful screen appears to inform you that your installation is complete.

Deployment Guide 35
Installing Websense Data Security
Pay special attention to the machine date and time. The time does not have to be synchronized to the second, but it must be reasonably accurate to avoid registration failure.
Installing Data Security on a virtual machine
Websense Data Security supports installations over Virtual Machines (VM), but to do so you must upgrade to Oracle Database 10.2.0.4 by applying a patch, available through the install process. In addition, the following must be adhered to before installing Virtual Machines via ESX (VMWare):
VMWare tools must be up to date.Protector must have at least a 20GB Hard Disk.Protector installation must have more than 1 NIC - (w/monitor at least 2 NIC).
If Oracle is not pre-installed, VM users will see a checkbox in the installer. Select that box and Oracle 10.2.0.4 will be installed. (Otherwise, Oracle 10.2.1.0 is installed.)

Installing Websense Data Security
36 Websense Data Security
Installing supplemental Data Security servers
If you require one or more supplemental Data Security servers in your network, follow the steps in this section. See Chapter 7 for guidelines on when supplemental servers may be required.
1. Close all Windows programs on the supplemental server before starting installation.
2. Unzip the installation package and place its folders in the same location as the .msi file. This includes the Database 10g folder.
3. Double-click the DSS 7.5.msi file in the Websense Data Security directory.During the Data Security installation, the installer verifies that the .NET 2.0 server is installed. If not, it is installed.Follow the instructions on the screen. Click the Next button to proceed throughout the installation.
NoteDo not install a Data Security Server on a Microsoft Exchange or ISA server in a production environment. ISA Server and Exchange Server consume so many system resources,Websense recommends you keep the Data Security Server separate.

Deployment Guide 37
Installing Websense Data Security
4. Read the license agreement carefully before selecting the “I accept the license agreement” radio button and clicking Next in order to proceed.
5. Select a folder on the server into which to install Data Security. By default, it’s stored in C:\Program Files\Websense\Data Security Suite.
6. For type of installation, select Data Security Server and click Next.

Installing Websense Data Security
38 Websense Data Security
7. Click on the drop-down list next to each icon to select which agents to install. Subsequent screens depend on which options are selected here. The listed agents depend on which components Data Security detects on your system. On a supplemental Data Security server, no agents are required.You might install the SMTP agent. (This is selected by default.) The crawler—also known as the Discovery and Fingerprint agent—is installed automatically on a Data Security server.
8. Click Next to continue with the installation process.

Deployment Guide 39
Installing Websense Data Security
9. The Virtual SMTP Server screen appears only if you select SMTP Agent in the agent installation options and there is more than one virtual SMTP server detected on the network. In this case, select which virtual SMTP server should be bound to the Data Security SMTP agent.
10. In the Server IP Address screen, select the IP address to be used to connect to the Data Security Manager.

Installing Websense Data Security
40 Websense Data Security
11. It is necessary to register with the Data Security Manager. Enter the host name or IP address of the Data Security Manager and its one-time password (set during Data Security Manager installation).
12. Enter the local administrator user name and password according to the instructions indicated.
13. If all the information entered is correct, click the Install button to begin installation.

Deployment Guide 41
Installing Websense Data Security
Installation may take a while. If the installation process is lengthy, do not assume that the installation has encountered an error unless a specific failure notification is displayed.Once installation is complete, the Installation Successful screen appears to inform you that your installation is complete.Pay special attention to the machine date and time. The time does not have to be synchronized to the second, but it must be reasonably accurate to avoid registration failure.
Configuring security software for Data Security
This section tells you how to set up and configure network security components that must work in harmony with Data Security. These include:
Firewall configurationAntivirus configuration
Firewall configuration
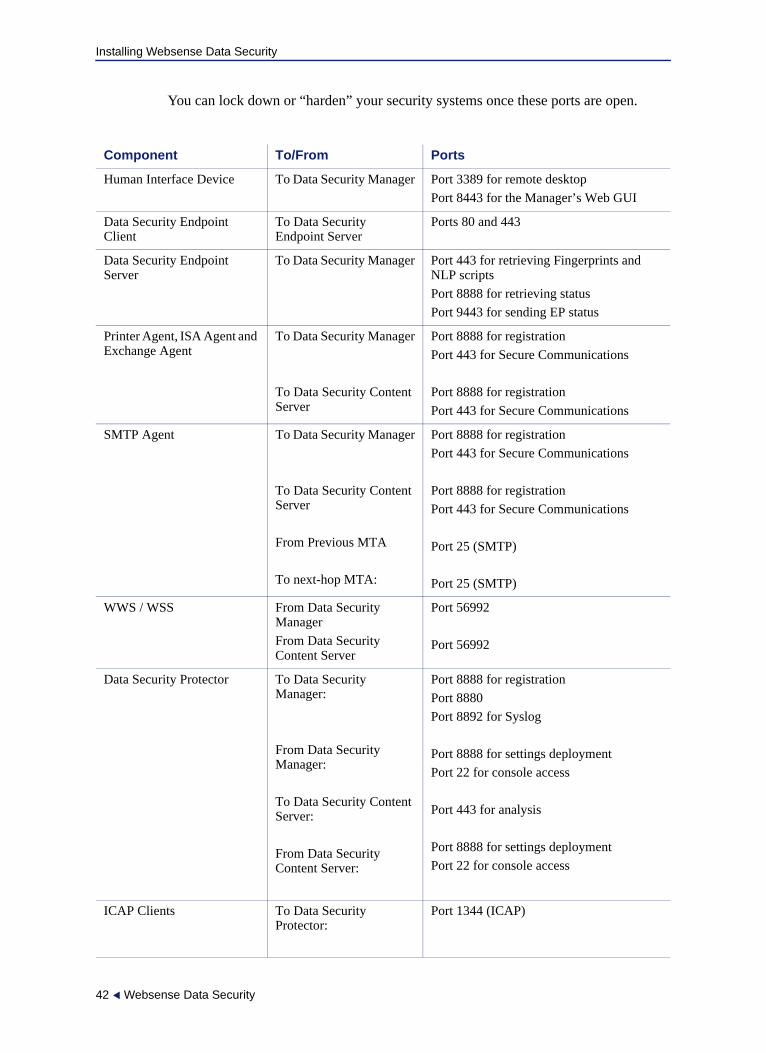
The most robust and effective implementation of Data Security depends on certain ports being open to support the mechanics of the software. The table below lists the ports that need to remain open for all of the Data Security software/hardware configurations.
If you have a security policy in place, exclude these ports from that policy so that Data Security can operate properly. If you do not, the policy you have in place may disrupt Data Security functionality.
Installing Websense Data Security
42 Websense Data Security
You can lock down or “harden” your security systems once these ports are open.
Component To/From Ports
Human Interface Device To Data Security Manager Port 3389 for remote desktopPort 8443 for the Manager’s Web GUI
Data Security Endpoint Client
To Data Security Endpoint Server
Ports 80 and 443
Data Security Endpoint Server
To Data Security Manager Port 443 for retrieving Fingerprints and NLP scriptsPort 8888 for retrieving statusPort 9443 for sending EP status
Printer Agent, ISA Agent and Exchange Agent
To Data Security Manager
To Data Security Content Server
Port 8888 for registrationPort 443 for Secure Communications
Port 8888 for registrationPort 443 for Secure Communications
SMTP Agent To Data Security Manager
To Data Security Content Server
From Previous MTA
To next-hop MTA:
Port 8888 for registrationPort 443 for Secure Communications
Port 8888 for registrationPort 443 for Secure Communications
Port 25 (SMTP)
Port 25 (SMTP)
WWS / WSS From Data Security ManagerFrom Data Security Content Server
Port 56992
Port 56992
Data Security Protector To Data Security Manager:
From Data Security Manager:
To Data Security Content Server:
From Data Security Content Server:
Port 8888 for registrationPort 8880Port 8892 for Syslog
Port 8888 for settings deploymentPort 22 for console access
Port 443 for analysis
Port 8888 for settings deploymentPort 22 for console access
ICAP Clients To Data Security Protector:
Port 1344 (ICAP)

Deployment Guide 43
Installing Websense Data Security
Following is a server configuration and port assignments diagram:
Discovery and Fingerprint Agent
To Data Security Manager:
From Data Security Manager:
To Data Security Content Server:
Port 8888 for registration.Port 443 for Secure Communications
Port 9797 - crawler listening port
Port 8888 for registrationPort 443 for Secure Communications
Exchange Server From Discovery and Fingerprint Agent:
Ports 443 and 80
File server From Discovery and Fingerprint Agent:
Ports 139 and 445 for file-sharing access
Sharepoint server From Discovery and Fingerprint Agent:
Ports 443 and 80
Database server From Discovery and Fingerprint Agent:
The port that allows connection to the database (according to database type)
Data Security Manager From Data Security Content Server:
Port 8888 for registrationPort 9443 for registration and incidentsPort 1433 for MSSQL accessPorts 139 and 445 for file-sharing accessPorts 5813 through 5821 - FR RepositorPorts 5230 and 5300 for the Event ManagerPort 8005 for the Tomcat server Port 8453 for the User RepositoryPort 443 for Secure CommunicationsPort 8892 for Syslog
Data Security Content Server From Data Security Manager:
Ports 139 and 445 for file sharingPort 8888 for registrationPort 8889Port 8892 for Syslog
Component To/From Ports

Installing Websense Data Security
44 Websense Data Security
Antivirus configuration
To prevent Data Security performance degradation, you need to exclude some directories from antivirus scanning. If you are running antivirus software, configure it to exclude the following directories from antivirus scanning on all Data Security Servers and Data Security Managers:
%DSS_HOME% *:\Oracle\*.* *:\Program files\Oracle\*.* *:\Inetpub\mailroot\*.* - (typically at the OS folder)*:\Inetpub\wwwroot\*.* - (typically at the OS folder)C:\Documents and Settings\<user>\Local Settings\Temp\*.* %WINDIR%\Temp\*.*The forensics repository (configurable; defaults to Websense folder)Endpoint processes: DSER.EXE and DSERUI.EXE EP adapter processes: EndPointClassifier.exe and kvoop.exe
See your antivirus software documentation for instructions on directory exclusions.
On non-management servers, such as Data Security analyzers, exclude the following directories from antivirus scanning:

Deployment Guide 45
Installing Websense Data Security
%DSS_HOME% *:\Inetpub\mailroot\*.* - (typically at the OS folder) *:\Inetpub\wwwroot\*.* - (typically at the OS folder) C:\Documents and Settings\<user>\Local Settings\Temp\*.* %WINDIR%\Temp\*.*The forensics repository (configurable; defaults to Websense folder)Endpoint processes: DSER.EXE and DSERUI.EXE EP adapter processes: EndPointClassifier.exe and kvoop.exe
Modifying a Data Security installation
To modify an existing Data Security installation, from Start | Settings | Control Panel |Add/Remove Programs, select Data Security and click the Change/Remove button.
Select Modify from the Application Maintenance screen. This will enable you to review the installation screens, making modifications as necessary. For more information about the installation options, see the Websense Data Security Users Guide.
Recreating Certificates
From the Modify menu, you can also use this procedure to re-certify the server. In the initial authentication, the Data Security Server trades certificates with the other servers in the network.
To re-run the security communication between Data Security components, select Modify.
In the Recreate Certificate Authority screen, check the Recreate Certificate Authority checkbox.
Set a new one-time password.
NoteRegarding the default installation folder locations in the list above, you can configure the software to install to other locations.
The FP-Repository folder is usually located inside the installation folder, but can be configured to other locations.
The location of Oracle files can also be configured during installation.
On endpoint installations, excluding the installation folder is sufficient.

Installing Websense Data Security
46 Websense Data Security
After recreating certificates, you must re-register all agents, and the Reestablish Connection process must be repeated for each agent.
Repairing the installation
Use the Repair option to restore the installation configuration to its last successful state. This can be used to recover from various corruption scenarios, such as binary files getting deleted, registries getting corrupted, etc.
Uninstalling Data Security
To uninstall Websense Data Security, from Start | Settings | Control Panel |Add/Remove Programs, select Data Security and click the Change/Remove button.
Select Remove from the Application Maintenance screen. This completely uninstalls all Data Security components.
Click the Uninstall button to remove Websense Data Security completely.
Uninstallation only removes the Websense Data Security software. The Oracle software and server remains.