3 -CO MPACT - Foyer - Foyer intérieur – Poêle – …€ Double-wall connector Unit weight: 250...
63
Transcript of 3 -CO MPACT - Foyer - Foyer intérieur – Poêle – …€ Double-wall connector Unit weight: 250...

30
0-CO
OMPACCT

2

3
[en]
Technical specifications 4 » 8 Site preparation 9 » 14 Installation 15 » 30 Directions for use 31 » 57 Product registration and contact 58 » 61
[fr]
Présentation du produit 4 » 8 Préparation du chantier 9 » 14 Installation 15 » 30 Mode d’emploi 31 » 57 Enregistrement et contact 58 » 61

4
Your fireplace was designed to provide years of enjoyment, comfort, and safety. It was built and assembled with the greatest care. If, for any reason, you are dissatisfied with your fireplace, please contact your retailer.
We recommend that you read the instructions before proceeding with the installation. With certain configurations, the sequence of operations to be performed may slightly vary.
Standards, certifications and technical specifications
This appliance has been tested and certified by CSA based on the following standards:
UL-1482 ULC S-627 EPA PHASE 2
Safety instructions
Before installing your Stûv, please contact the local building authorities or the fire department and follow their directives. The installation of your Stûv should be entrusted to a skilled professional.
If the Stûv fireplace is not properly installed, a fire could result. Your Stûv can be very hot: children and domestic animals should not touch the fireplace when operating.
Combustible materials, such as firewood, wet clothes, etc., placed too close to the appliance could catch fire. Objects placed in front of the fireplace should be kept at a distance of at least 48” (1.22m) from the glass front.
Do not let the fireplace heat up until some parts glow red. Burn the firewood directly on the refractor plates or the iron. Do not use an andiron and do not try in any way to raise the fire.
Do not install in a mobile home.
The installation instructions for your wood stove are compliant with the ULC-S627 et UL-1482 standards. They must be strictly followed in order to prevent any risk of major problems. Please read carefully this manual before
Ce foyer a été conçu pour offrir un maximum de confort et de sécurité. Le plus grand soin a été apporté à sa fabrication. Si malgré cela vous constatiez une anomalie, contactez votre revendeur.
Nous vous recommandons de lire cette notice avant de procéder à l’installation. Certaines configurations peuvent faire varier quelque peu l’ordre des opérations à effectuer.
Normes, agréations et caractéristiques techniques
Cet appareil à été testé et certifié par CSA et selon les normes suivantes :
UL-1482 ULC S-627 EPA PHASE 2
Instructions de sécurité
Avant d’installer votre Stûv, contactez les autorités locales en bâtiment ou le service des incendies et suivez leurs directives. L’installation de votre Stûv doit être confiée à un professionnel qualifié.
Si votre Stûv n’est pas installé de façon adéquate, un incendie pourrait s’ensuivre. Votre Stûv peut devenir très chaud : il faut empêcher les enfants et les animaux domestiques de toucher le foyer lorsqu’il fonctionne.
Les matériaux combustibles tels que le bois de chauffage, les vêtements mouillés, etc. placés trop près de l’appareil pourraient prendre feu. Les objets placés devant l’appareil doivent être gardés à une distance d’au moins 48" de la face vitrée de l’appareil. Ne laissez pas le foyer chauffer au point où des parties deviennent rougeoyantes. Brûlez le bois de chauffage directement sur les briques réfractaires ou la fonte. N’utilisez pas de chenet et n’essayez pas de surélever le feu de quelque façon. Ne pas installer dans une maison mobile.
Les instructions concernant l’installation de votre poêle à bois sont conformes aux normes ULC-S627 et UL-1482. Vous devez les suivre rigoureusement afin d’éliminer tout risque d’ennuis majeurs.

5
installing or operating your stove. If your stove is incorrectly installed, a fire might result which would destroy your house. To reduce the risk of fire, follow the installation instructions. Failure to follow instructions may result in property damage, bodily injury, or even death. Consult your local authorities or your insurance company regarding all applicable regulatory requirements to obtain a permit and to install your fireplace. Keep this manual handy so you may refer to it whenever necessary. CAUTION: • DO NOT USE CHEMICALS OR FLUIDS TO LIGHT THE
FIRE. • DO NOT LEAVE THE STOVE UNATTENDED WHEN THE
DOOR IS SLIGHTLY OPENED. • ALWAYS CLOSE THE DOOR AFTER THE IGNITION. • DO NOT BURN GARBAGE, FLAMMABLE FLUIDS SUCH
AS GASOLINE, NAPHTHA OR ENGINE OIL. • DO NOT CONNECT THE STOVE TO ANY HOT AIR
DISTRIBUTION SYSTEM. • HOT WHILE IN OPERATION. KEEP CHILDREN,
CLOTHIN AND FURNITURE AWAY. CONTACT MAY CAUSE SKIN BURN.
Note: We strongly recommend that our products be installed and serviced by professionals certified by the Association des Professionnels du Chauffage in Quebec or by Wood Energy Technology Training for the rest of Canada, or by the National Fireplace Institute in the U.S.
Veuillez lire attentivement ce manuel avant d’installer ou d’opérer votre poêle. Si votre poêle est mal installé, il peut en résulter un incendie détruisant votre maison. Pour réduire les risques d’incendie, suivez les instructions d’installation. Le fait de ne pas respecter les instructions peut occasionner des dommages à la propriété, des lésions corporelles et même la mort. Consultez le représentant de votre municipalité ou votre compagnie d’assurance concernant les exigences locales relatives aux permis et à l’installation de votre poêle. Gardez ce manuel pour pouvoir le consulter ultérieurement ATTENTION : • NE PAS UTILISER DES PRODUITS CHIMIQUES OU
AUTRES LIQUIDES POUR ALLUMER LE FEU. • NE JAMAIS LAISSER LE POÊLE SANS SURVEILLANCE
LORSQUE LA PORTE EST OUVERTE. • TOUJOURS FERMER LA PORTE APRÈS LA PÉRIODE
D'ALLUMAGE. • NE PAS BRÛLER DE DÉCHETS ET/OU DE LIQUIDES
INFLAMMABLES COMME L'ESSENCE, LA NAPHTA ET L'HUILE DE MOTEUR.
• NE PAS CONNECTER LE POÊLE À UN SYSTÈME DE DISTRIBUTION D'AIR CHAUD.
• L’APPAREIL EST CHAUD LORSQU’EN FONCTION. GARDEZ LES ENFANTS, VÊTEMENTS ET MEUBLES HORS DE PORTÉE. TOUCHER L’APPAREIL POURRAIT CAUSER DES BRÛLURES.
Note : Nous recommandons fortement que nos produits soient installés et entretenus par des professionnels certifiés par l’Association des Professionnels du Chauffage au Québec ou par Wood Energy Technical Training pour le reste du Canada, et par la National Fireplace Institute aux États-Unis.

6
Technical specifications
Fuel type: Cordwood
Stûv 30-compact
Maximum power: 30.000 BTU Efficiency: 83 % (European data) Chimney type: Insulated chimney 6” UL-103HT, ULC-S629
6” Double-wall connector Unit weight: 250 lbs Wood consumed per hour: 1 – 5,5 lbs / hour Maximum length of logs in vertical position: 16” Maximum length of logs in horizontal position: 10”
Marking Sticker
Caractéristiques techniques principales des appareils
Type de combustible: bûches de bois
Stûv 30-compact
Puissance maximale : 30.000 BTU Efficacité : 83% (données européennes) Type de cheminée : Conduit isolé 6” UL-103HT, ULC-S629
Connecteur à double parois de 6” Poids de l’unité : 250 Lbs Consommation bois/h : 1 -5,5 Lbs / heure Longueur maximum des bûches (vertical) : 16” Longueur maximum des bûches (horizontal) : 10”
Autocollant de marquage
7
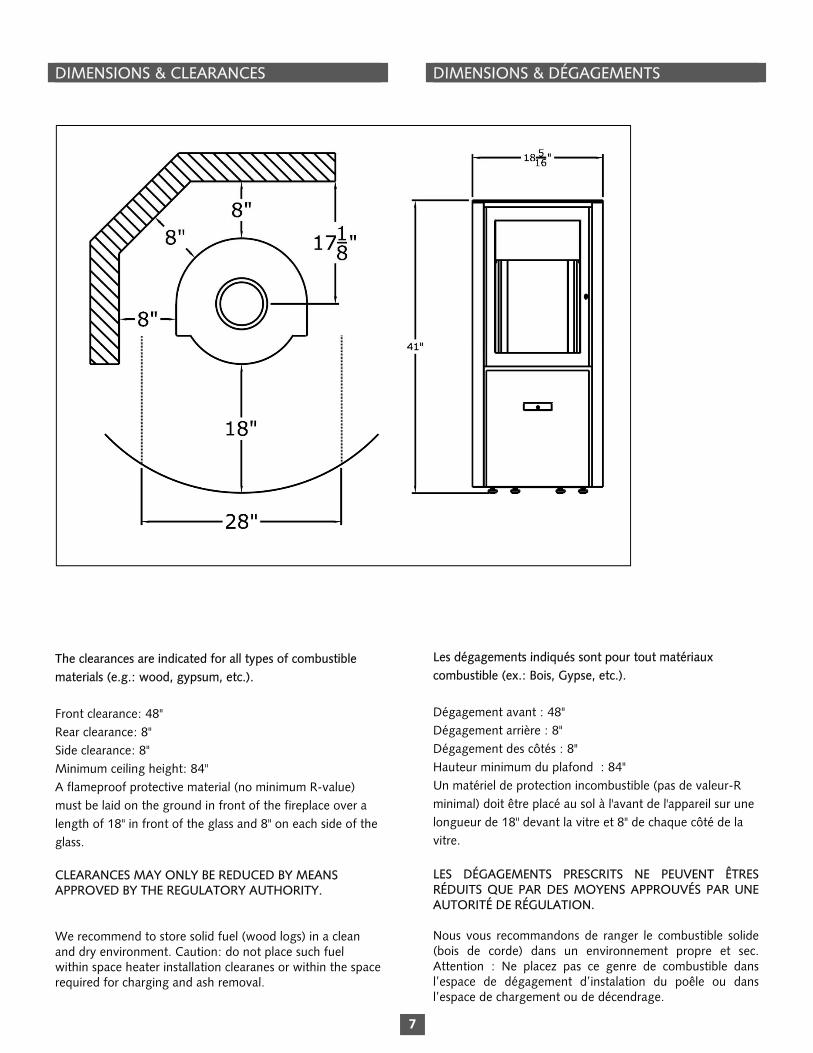
DIMENSIONS & CLEARANCES DIMENSIONS & DÉGAGEMENTS
The clearances are indicated for all types of combustible materials (e.g.: wood, gypsum, etc.).
Front clearance: 48" Rear clearance: 8" Side clearance: 8" Minimum ceiling height: 84" A flameproof protective material (no minimum R-value) must be laid on the ground in front of the fireplace over a length of 18" in front of the glass and 8" on each side of the glass.
CLEARANCES MAY ONLY BE REDUCED BY MEANS APPROVED BY THE REGULATORY AUTHORITY.
We recommend to store solid fuel (wood logs) in a clean and dry environment. Caution: do not place such fuel within space heater installation clearanes or within the space required for charging and ash removal.
Les dégagements indiqués sont pour tout matériaux combustible (ex.: Bois, Gypse, etc.).
Dégagement avant : 48" Dégagement arrière : 8" Dégagement des côtés : 8" Hauteur minimum du plafond : 84" Un matériel de protection incombustible (pas de valeur-R minimal) doit être placé au sol à l'avant de l'appareil sur une longueur de 18" devant la vitre et 8" de chaque côté de la vitre.
LES DÉGAGEMENTS PRESCRITS NE PEUVENT ÊTRES RÉDUITS QUE PAR DES MOYENS APPROUVÉS PAR UNE AUTORITÉ DE RÉGULATION.
Nous vous recommandons de ranger le combustible solide (bois de corde) dans un environnement propre et sec. Attention : Ne placez pas ce genre de combustible dans l’espace de dégagement d’instalation du poêle ou dans l’espace de chargement ou de décendrage.

8

9
30-COMPACT
10
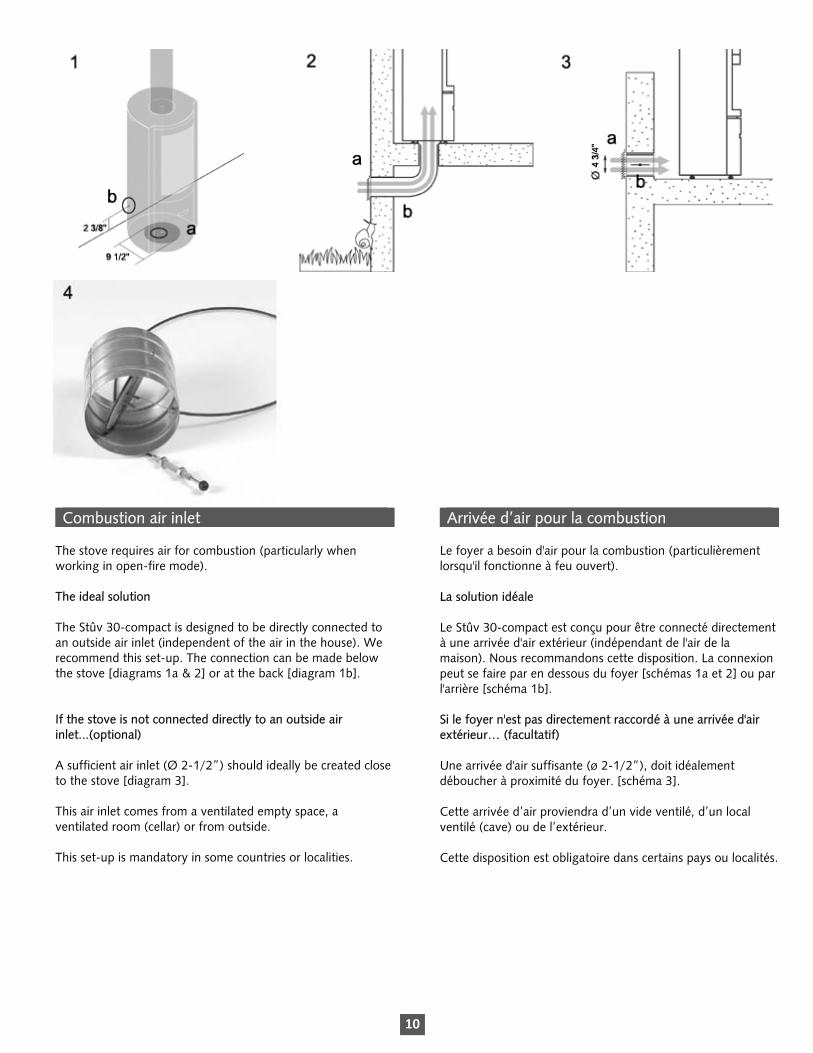
Combustion air inlet
The stove requires air for combustion (particularly when working in open-fire mode).
The ideal solution
The Stûv 30-compact is designed to be directly connected to an outside air inlet (independent of the air in the house). We recommend this set-up. The connection can be made below the stove [diagrams 1a & 2] or at the back [diagram 1b].
If the stove is not connected directly to an outside air inlet...(optional)
A sufficient air inlet (Ø 2-1/2”) should ideally be created close to the stove [diagram 3].
This air inlet comes from a ventilated empty space, a ventilated room (cellar) or from outside.
This set-up is mandatory in some countries or localities.
Arrivée d’air pour la combustion
Le foyer a besoin d'air pour la combustion (particulièrement lorsqu'il fonctionne à feu ouvert).
La solution idéale
Le Stûv 30-compact est conçu pour être connecté directement à une arrivée d'air extérieur (indépendant de l'air de la maison). Nous recommandons cette disposition. La connexion peut se faire par en dessous du foyer [schémas 1a et 2] ou par l'arrière [schéma 1b].
Si le foyer n'est pas directement raccordé à une arrivée d'air extérieur… (facultatif)
Une arrivée d'air suffisante (ø 2-1/2”), doit idéalement déboucher à proximité du foyer. [schéma 3].
Cette arrivée d’air proviendra d’un vide ventilé, d’un local ventilé (cave) ou de l’extérieur.
Cette disposition est obligatoire dans certains pays ou localités.

11
The duct that brings in outside air… (whether it is connected to the stove or not)
... will be protected on the outside by a grill [diagrams 2a-3a] the free passage section of which is at least equivalent to the section of the air inlet. Please note that the infiltration of waterand the effect of the wind can damage the system.
... will ideally be fitted with a closure valve (for example, the Stûv damper – see below) [photo 4] to prevent the room from becoming cold when the stove is not in use.
... will be as short as possible and insulated to prevent pressureloss and to keep the house from getting cold.
If you use our standard flexible Ø 2 ½’’ duct, we recommend a maximum length of 78’’ and no more than 4 elbows (see table below). If you exceed these guidelines, you must compensate with a greater diameter and/or a smoother duct. Careful not to crush the duct.
Length of flue Max. permitted ( 90°) number of elbows
4’ 4 elbows 8’ 4 elbows 10’ 2 elbows 12’ 0 elbow
The closure damper
[diagram 3b and photo 4] prevents the house from becoming cold when the stove is not in use.
This system is optional if you choose a connection directly to the stove [diagrams 1and 2]. However, it is still a good idea if the ducts are too long to reach the stove or if it is being installed in an energy-efficient house.
It should ideally be located as close as possible to the outside wall. Caution: length of the valve control cable = 48’’ and damper diameter is Ø 6”. Plan to install a reducer.
If it is not possible to bring in outside air near the stove (most unfavourable case)...
...ensure there is sufficient replenishment of air in the room when the stove is in use.
Caution:
Be careful with active air extraction systems (kitchen hoods, airconditioning, mechanically-controlled ventilation, and other stoves) in operation in the same space or in an adjacent room. They also use a lot of air and can cause a depression in the room and prevent the stove from operating correctly (risk of backdraught). They can affect the operation of the stove even if it is connected to an outside air inlet.
Le conduit qui amène l'air extérieur... (qu'il soit connecté au foyer ou pas)
... sera protégé à l'extérieur par une grille [schémas 2a-3a] dont la section de passage libre est au moins équivalente à la section d'arrivée d'air. Attention aux infiltrations d'eau et à l'influence des vents qui peuvent annihiler le système.
... sera idéalement équipé d'un clapet de fermeture (par exemple le clapet Stûv [photo 4]) pour éviter de refroidir la pièce quand le foyer n'est pas en fonctionnement.
.... sera le plus court possible et isolé pour éviter des pertes de charges et pour ne pas refroidir la maison.
Si vous utilisez notre conduit flexible standard ø 2 ½’’, nousrecommandons une longueur maximale 78’’ et pas plus de 4coudes (voir tableau qui suit). Si vous dépassez ces prescriptions, il faudra compenser par un diamètre plus important et/ou un tube plus lisse. Veiller à ne pas écraser le conduit.
Longueur du conduit
Nombre max. de coudes (à 90°) autorisés
4’ 4 coudes 8’ 4 coudes 10’ 2 coudes 12’ 0 coudes
Le clapet de fermeture
[schéma 3b et photo 4] empêche le refroidissement de la maison quand le foyer n'est pas en fonctionnement.
Ce dispositif est donc facultatif si vous optez pour un raccordement direct sur le foyer [schémas 1 et 2]. Cependant, il reste intéressant si les longueurs de gaines sont trop importantes jusqu'au foyer ou si l'installation s'effectue dans une maison à haute efficacité énergétique.
Il sera placé idéalement le plus près possible du mur extérieur.
Attention: longueur du câble de commande du clapet = 48’’ Et le diamètre du clapet est de ø 6’’. Prévoir un réducteur.
S'il n'est pas possible d'amener de l'air extérieur à proximité du foyer (cas le plus défavorable)...
... s'assurer que le renouvellement d’air dans la pièce sera toujours suffisant quand le foyer est en fonctionnement.
Note
Attention aux systèmes d’extraction actifs d’air (hotte decuisine, air-conditionné, ventilation mécanique contrôlée,autre foyer…) situés dans le même espace ou dans une piècecontigüe. Ils consomment eux aussi beaucoup d'air etpourraient créer une dépression dans le local et perturber lebon fonctionnement du foyer (risque de refoulement). Ilspeuvent perturber le fonctionnement du foyer même si celui-ciest raccordé à une arrivée d'air extérieur.

12
Connection to the chimney
Caution: Care must be taken during installation. Shortcuts or compromises may result in safety hazards or even fire. Do not connect the unit to a chimney used for another appliance. Do not cut rafters or ceiling joints without first consulting a building official to ensure that structural integrity is not compromised.
Use a 6-inch clearance double-walled connector (black). Use only a 6-inch insulated flue in compliance with the UL 103 HT or ULC S629 standard as soon as you go through a combustible wall, in compliance with your local installation standards. This connector will be fixed to the smoke outlet using 3 self tapng screws #10-1/2”.
A CHIMNEY SERVING AS AN OUTLET FOR A FIREPLACE CANNOT BE USED FOR ANY OTHER APPLIANCE.
CAUTION: PLEASE REFER TO THE INSTRUCTION MANUAL OF THE CHIMNEY MANUFACTURER FOR THE INSTALLATION DETAILS.
CAUTION: If this appliance is not correctly installed, a fire might result. To reduce fire hazards, follow the installation instructions. Consult local authorities to obtain a construction permit and to know all applicable regulatory requirements.
Raccordement à la cheminée
Attention: N’employez pas de moyens de fortune pendant l’installation: ils pourraient devenir dangereux et entraîner un incendie. Ne reliez pas cet appareil à une cheminée qui dessert un autre appareil de chauffage. Ne coupez ni chevrons ni solives de plafond sans consulter au préalable un agent du service du bâtiment pour éviter de compromettre l’Intégralité Structurale.
Utiliser un connecteur à doubles parois (noir) à dégagement de 6 pouces. Utiliser uniquement un conduit isolé de 6 pouces répertorié selon la norme UL 103 HT ou ULC S-629 dès que vous traversez une paroi combustible, selon les normes d’installations en vigueur dans votre localité. Ce connecteur sera fixé à la buse de l’appareil utilisant 3 vis auto-forantes #10-1/2".
UNE CHEMINÉE SERVANT D’ÉVACUATION À UN FOYER NE DOIT PAS SERVIR POUR AUCUN AUTRE APPAREIL.
ATTENTION : VEUILLEZ VOUS RÉFÉRER AU MANUEL D’INSTRUCTION DU MANUFACTURIER DE CHEMINÉE POUR LES DÉTAILS D’INSTALLATION DE LA CHEMINÉE.
PRÉCAUTIONS: Si cet appareil n’est pas adéquatementinstallé, un incendie peut s’ensuivre. Afin de réduire toutrisque d’incendie, suivez les instructions d’installation.Consultez les autorités locales pour obtenir un permis deconstruction ainsi que de prendre connaissance de toutes lesexigences règlementaires en vigueur.

13
Holding capacity of the structure
Ensure that the floor is resistant enough to support the stove; consult a specialist if in doubt.
The stove’s surroundings
The heat radiated from the glass door and the unit may be significant. Whichever direction the stove is facing, please adhere to the safety distances from combustible materials [diagram 1] or ensure that the materials exposed to radiate heat are resistant to high temperatures.
Prevent "heat traps" in the cladding, recess and hood
If the stove is situated in a bell-shaped area (e.g.: a former hearth), this space must be ventilated to prevent "heat traps".
Tools required
Capacité portante de la structure
S'assurer que la résistance du plancher soit suffisante pour supporter le foyer ; en cas de doute, consulter un spécialiste.
Environnement du foyer
Rayonnement
Le rayonnement de la vitre et des parois peut être important.
Quelque soit l'orientation du foyer rotatif, respectez lesdistances de sécurité par rapport aux matériaux combustibles[schéma 1], ou assurez-vous que les matériaux exposés à cerayonnement soient résistants à de hautes températures.
Éviter les "pièges à chaleur" dans l'habillage, la niche ou lahotte
Si le poêle se situe dans un environnement en forme de cloche(ex : ancien âtre), cet espace doit être ventilé pour éviter les"pièges à chaleur».
Outils à prévoir

14

15
30-COMPACT

16
On taking delivery of the equipment
Caution:
As soon as the stove is delivered, please check that the glasses have not been broken during delivery. The guarantee only covers damage due to transport if it is reported within 48 hours of delivery and if it is indicated on the delivery slip.
Claims
If you wish to make a complaint, always quote the serial number visible on the stove in the closed-door position [photo 1].
Optional accessories
– ground plate– barbecue kit– kit for rear outside air intake
If any of these accessories have been ordered, they will be found around the stove or its packaging. Check that you have received them.
Stove transportation
Caution:
The paint is not oven-baked and is therefore relatively fragile but it will harden after being heated a few times. Therefore, handle the system with care when installing.
Moving
While the stove is still packaged, you can use a pallet loader or a hand-lift truck [photo 2]. Move it close to its final position.
If you are unable to transport the stove on its pallet to its final position, please observe the following unpacking instructions.
À la réception du matériel
Attention !
Dès la réception de ce foyer, veuillez vérifier que les vitres ne se soient pas brisées au cours de la livraison. En effet, la garantie ne couvre les détériorations dues au transport que si elles ont été signalées dans les 48 heures suivant la réception et qu’elles aient été mentionnées sur le bon de livraison.
Réclamation
En cas de réclamation, communiquez toujours le n° de sérievisible sur foyer en position porte pleine [photo 1].
Accessoires Optionnels
– plaque de sol– kit barbecue– kit d'adduction d'air extérieur par l'arrière
Si un ou plusieurs de ces accessoires ont été commandés, ilssont disposés autour du foyer ou de son emballage. Encontrôler la bonne réception.
Transport du foyer
Attention !
La peinture n'est pas cuite au four, elle est donc relativementfragile mais elle durcira lors des premières chauffes ; parconséquent, manipuler l'appareil avec précaution lors de soninstallation.
Déplacement
Quand le foyer est toujours emballé, vous pouvez utiliser un transpalette ou un diable [photo 2]. Amenez-le à proximité de son emplacement définitif.
Si vous n'avez pas la possibilité de transporter le foyer sur sapalette jusqu'à son emplacement définitif, veuillez suivre lesinstructions de déballage qui suivent.

17
Unpacking
> Remove the wooden structure [photo 1] using a claw hammer.
> Remove the plastic packaging [photo 2] and the plastic films at the top and bottom of the stove which hold the mobile parts in place during transport [photo 3].
Note: The hand-lift truck protection [photo 4] supports the stove during handling to avoid putting pressure on the doors or the drum. It is later removed when the stove is moved into its final position.
Caution: Never loosen the two screws holding the support panel in place: it is factory adjusted and fixed [photo 5].
Déballage
> Retirer la structure en bois [photo 1] à l’aide du pied debiche.
> Retirer l'emballage plastique [photo 2] et les films plastiquesen haut et en bas du foyer qui maintiennent les parties mobilespendant le transport [photo 3].
Remarque! La protection transport diable [photo 4] sert à appuyer le foyer pendant la manutention pour ne pas forcer sur les portes ou le tambour. Elle sera retirée plus tard quand le foyer aura été amené à sa place définitive.
Attention! Ne jamais desserrer les deux vis positionnant lesupport parement : celui-ci a été réglé et fixé en usine [photo 5].

18
Removing the exterior parts of the stove
To make the stove lighter, easier to handle and to avoid damaging the mobile parts, we strongly recommend that you unpack the Stûv 30-compact and remove the contents from the combustion chamber before starting the actual installation.
> Remove the 2 plates on the top of the stove: on the Stûv 30-compact simply remove the one at the back and then the one at the front [photo 1].
> Remove the side panels using a size 10 socket wrench [photos 2 and 3].
> Carefully cut the plastic film holding the doors [photo 4]. Do not tear this film off! One of the ends of this film is stuck between the solid door and the body of the stove. Unlock and open the door using the cold grip to release it.
> Remove the hand-lift truck protection: – open the door and unscrew the two bolts (M6x12hexagonal heads) holding the hand-lift truck protection in place [photo 5 and 6]. – pick up the 2 bolts and close the door.
Démontage des pièces extérieures du foyer
Pour alléger le foyer, le manipuler plus facilement et éviter d'abîmer les pièces mobiles, nous vous conseillons vivement de déshabiller le Stûv 30-compact de ses parements avant de commencer l'installation proprement dite.
> Retirer les 2 tablettes situées sur le haut du foyer : retirer simplement celle de l'arrière puis celle de l'avant [photo 1].
> Retirer les parements latéraux à l’aide de la clé à douille de10mm [photos 2 et 3].
> Couper avec précaution le film plastique qui maintient les portes [photo 4]. Ne pas arracher le film ! Une des extrémités de ce film est coincée entre la porte pleine et le corps du foyer.Déverrouiller et ouvrir la porte à l'aide de la main froide pour le décoincer.
> Retirer la protection transport diable : – ouvrir la porte et dévisser les deux boulons (M6x12 têtehexagonale) qui maintiennent la protection transport diable [photo 5 et 6]. – récupérer les 2 écrous et fermer la porte.

19
> Remove the ash pan: open the ash pan door [photo 7] and take it out by lifting it off its hinges [photo 8].
> Remove the doors: half open them gently [photo 9], lift them off their hinges and slide them to the left [photo 10].
Caution: When you handle symmetrical parts while dismantling, remember to take note which are the left parts and which are the right ones! It will make re-assembly easier.
> Retirer le portillon cendrier : ouvrir le portillon cendrier [photo 7] et le retirer en le dégageant de ses gonds [photo 8].
> Retirer les portes : les entrouvrir légèrement [photo 9], lessoulever pour les sortir de leurs gonds puis les pousser vers lagauche [photo 10].
Attention ! Lorsque vous manipulez des pièces symétriques pendant le démontage, pensez à bien mémoriser quelles sont les pièces de gauche et celles de droite ! Cela vous facilitera le remontage.

20
Content of the combustion chamber
Checking the contents of the combustion chamber [photo 1]
You will find: – a spray paint for touching up [photo 1/a]– a cold grip to handle the door and the damper [photo 1/b]– 2 rotation stops and 2 M5x6 screws [photo 1/c]– a sealing plate and 2 M5x8 screws [photo 1/d]– installation instructions– instructions for use
Removing the smoke deflector
The smoke deflector has been locked down to prevent damage during transport. Remove the two blocking screws from the inside [photo 2].
Tilt and gently slide the smoke deflector towards the back [photos 3 and 4]. Turn it clockwise to release the deflector andits control [photo 5]. Let the deflector drop down [photo 6].
Contenu de la chambre de combustion
Vérification du contenu de la chambre de combustion [photo 1]
Vous trouverez : – une bombe de peinture pour retouches [photo 1a]– une poignée “main froide” pour manipuler la porte et leregistre [photo 1b] – 2 butées de rotation et 2 vis M5 x 6 [photo 1c]– une plaque d'obturation et 2 vis M5 x 8 [photo 1d]– notice d'installation– notice mode d'emploi
Retrait du déviateur de fumées
le déviateur de fumées a été verrouillé pour éviter des dommages pendant le transport. Enlever les deux vis de blocage par l'intérieur [photo 2].
Incliner et glisser légèrement vers l'arrière le déviateur defumées [photos 3 et 4]. Le faire pivoter dans le sens horairepour découpler le déviateur de sa commande [photo 5].Laisser descendre le déviateur [photo 6].

21
Final positioning of the stove
Caution: Do not forget to put the hand-lift truck protection back on before moving the stove! [photo 1]. The stove can now be moved to its final position: tilt the stove onto its front. Note: remember to put a soft protective cloth between the drum ring and the hand-lift truck.
Placement définitif du foyer
Attention! Ne pas oublier de remettre la protection transport diable avant de déplacer le foyer! [photo 1]. Le foyer peut maintenant être déplacé vers son emplacementdéfinitif: basculer le foyer sur la face. Attention, penser àajouter un chiffon de protection entre l'anneau de tambour etle diable.

22
Connection with outside air
If you are not connecting your stove to the outside air, go to the next section.
If the air connection comes from the ground:
> Fix the filling plate (using an 8 mm flat spanner and 2 M5x8hexagonal head screws) [photos 1 to 3]: > Position the stove over the outside air inlet. > Check that the joint is fully airtight below the stove in relation to the floor.
If the air connection comes from the rear wall:
> Take the "rear outside air inlet" kit [photo 5]. > Make sure the duct has the desired length bearing in mind that the maximum length of the standard Stûv inlet duct is 20”. Cut it if necessary.
> Connect the flue to the back of the stove (using 2 M5x6 hexagonal head screws and an 8 mm spanner) [photo 6].
Raccordement de l’air extérieur
Si vous ne raccordez pas votre foyer à l'air extérieur, passez au chapitre suivant.
Si la connexion d'air vient du sol :
> Fixer la plaque d'obturation (à l'aide de la clef plate de 8mm et 2 vis M5x8 tête hexagonale) [photos 1 à 3]. > Positionner le foyer au dessus de l'arrivée d'air extérieur [photo 4]. > Vérifier la bonne étanchéité du joint sous le foyer par rapport au sol.
Si la connexion d'air vient du mur arrière:
> Prendre le kit "adduction d'air extérieur par l'arrière" [photo 5]. > S'assurer que le conduit ait la longueur voulue sachant que la longueur maximum du conduit d'adduction standard Stûv est de 20”. Le recouper si nécessaire. > Brancher le conduit à l'arrière du foyer (à l'aide des 2 visM5x6 tête hexagonale et d'une clef de 8mm) [photo 6].

23
Connection with outside air (continued)
> Fix the 2 masking supports [photo 7a] – Position the supports so that the additional piece is at thefront of the stove [photo 9].
– Fix the 2 supports (using the 4 M5x6 hexagonal head screwsand an 8 mm spanner) [photo 10].
> Clip on the 2 masking pieces [photo 7b] to their supports and check that they are firmly in place [photos 11 to 12].
> Prepare the 2 panels by removing the lower pre-cut part (using a metal saw) [photo 13]. Smooth the panel edges with a half-moon file.
> Put the stove in position [photo 14].
Raccordement de l’air extérieur (suite)
> Fixer les 2 supports des demi - caches [photo 7 a] – Positionner les supports de telle sorte que l'appendice[schéma 8] soit situé à l'avant du foyer [photo 9] – Fixer les 2 supports (à l'aide des 4 vis M5x6 tête hexagonaleet d'une clef de 8mm) [photo 10].
> Coupler les 2 demi-caches [photo 7 b] à leur support et vérifier qu'ils sont bien bloqués [photos 11 à 12].
> Préparer les 2 parements en éliminant la partie prédécoupéeinférieure (à l'aide d'une scie à métaux) [photo 13]. Ebavurer leparement avec une lime demi-ronde.
> Mettre le foyer en place [photo 14].

24
Levelling the stove
Before starting, make sure that the floor covering is flat and clean. If the floor covering is not level, you will have to take steps to ensure that the lower joint is perfectly airtight.
> Remove the hand-lift truck protection for the final time [photo 1].
> Level the stove: adjust 3 out of 6 feet (1 out 2) by turning them clockwise (using a 13 mm spanner) [photo 2]. Leave the other 3 feet for the moment.
Caution: Ensure that the joint is properly supported on the ground to ensure air-tightness for outside air intake.
> Adjust the other three feet.
Note: The holes in the lower ring can be used to fix the stove to the floor [photo 3].
Mise à niveau du foyer
Avant de commencer, assurez-vous que le revêtement de sol soit plat et propre. Si le revêtement de sol n'est pas régulier, vous devrez prendre les mesures nécessaires afin d'assurer l'étanchéité parfaite au niveau du joint inférieur.
> Enlever définitivement la protection diable [photo 1].
> Mettre le foyer de niveau : régler trois pieds sur 6 (1 sur 2) en tournant dans le sens horaire (à l'aide d'une clé 13mm) [photo 2]. Les trois autres pieds restent en suspend.
Attention ! Veillez à ce que le joint soit bien appuyé sur le sol pour assurer l'étanchéité pour l'adduction d'air extérieur.
> Régler les trois autres pieds.
Remarque ! Les trous de l'anneau inférieur peuvent être utiliséspour fixer le foyer au sol [photo 3].

25
Directing the stove
A turning plate means the stove can face in the direction you want the heat to be diffused!
Various possible configurations
You can limit the rotation of the stove to a certain angle using the rotation stops. The choice of rotation angle will depend on your preference, the configuration of the site and the proximity of combustible materials.
The stove's connections (smoke outlet and outside air inlet) will also determine the choice of configuration.
Smoke connection going upwards [diagram 1]
> 360° Rotation: The mechanism allows a complete revolutionin both directions [diagram 2]. > 90° Rotation when the stove is placed in a corner [diagram 3]. > 180° Rotation when the stove is placed along a wall [diagram 4]. > 270° Rotation when the stove is placed in front of a corner or a pillar [diagram 5].
Orientation du foyer
Un plateau tournant permet d’orienter le foyer pour diffuser la chaleur où l’on veut!
Plusieurs configurations possibles
Vous avez la possibilité de limiter la rotation du foyer à un angle déterminé grâce aux butées de rotations. Le choix de l'angle de rotation se fera en fonction de vos préférences, de laconfiguration des lieux et de la proximité de matériaux combustibles.
Les connexions du foyer (sortie de fumées et arrivée d'air extérieur) détermineront aussi le choix de la configuration.
Raccordement de fumée vers le haut [schéma 1]
> Rotation à 360°: le dispositif permet d’effectuer un tour complet dans les 2 sens [schéma 2]. > Rotation 90° quand le foyer est placé dans un coin [schéma 3]. > Rotation 180° quand le foyer est placé le long d'un mur [schéma 4]. > Rotation 270° quand le foyer est placé devant un coin ouun poteau [schéma 5].
26
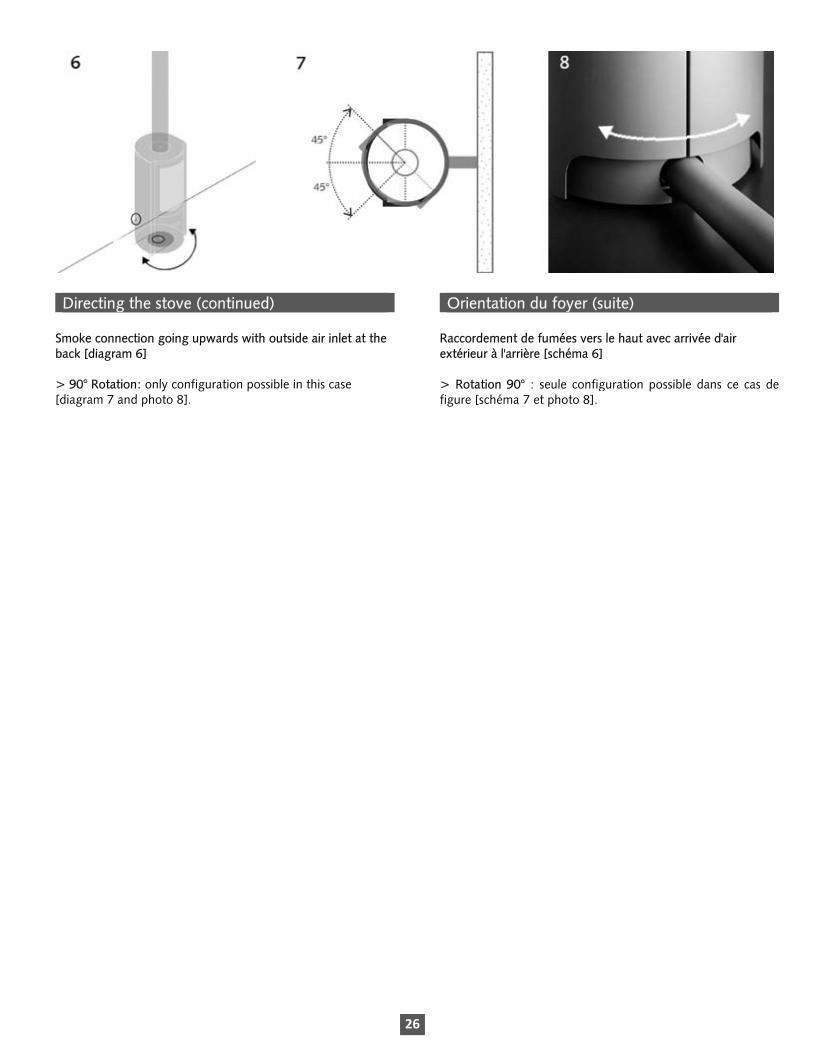
Directing the stove (continued)
Smoke connection going upwards with outside air inlet at the back [diagram 6]
> 90° Rotation: only configuration possible in this case [diagram 7 and photo 8].
Orientation du foyer (suite)
Raccordement de fumées vers le haut avec arrivée d'air extérieur à l'arrière [schéma 6]
> Rotation 90° : seule configuration possible dans ce cas defigure [schéma 7 et photo 8].

27
Rotation stop
The rotation stop enables you to choose a maximum rotation angle to which the stove can turn.
> First of all, choose your configuration for the stove (see previous pages). This will define your maximum rotation angle.
> Take out the 3 stepped screws with a flat screwdriver (2 screws at the front, 1 screw at the back) [photos 1 and 2].
Caution: Once the 3 stepped screws have been removed, do not under any circumstances move or tilt the stove. This risks damaging the rotation axle of the stove.
> Limit the rotation angle to 90°, 180° or 270° by fixing the stops [photo 3] (with the M5x6 hexagonal screws) in position: > for 90° [photo 4] > for 180° [photo 5] > for 270° [photo 6]
Caution: Ensure that you fix the stop in the right direction (look closely at the photos).
Butée de rotation
La butée de rotation permet de choisir un angle maximal de rotation dans lequel il sera permis d'orienter le foyer.
> Choisissez tout d'abord comment configurer le foyer (voir pages précédentes). Cela définira votre angle maximal de rotation.
> Enlever les 3 vis étagées avec un tournevis plat (2 vis à l'avant, 1 vis à l'arrière) [photos 1 et 2].on a pas les photos!
Attention ! Une fois les 3 vis étagées retirées, en aucun cas ne déplacer ou basculer le foyer. Cela risque d'abîmer l'axe de rotation du foyer.
> Limiter l'angle de rotation à 90°, 180° ou 270° en fixant lesbutées [photo 3] (avec les vis M5x6 tête hexagonale) suivantla position: > pour 90° [photo 4] > pour 180° [photo 5] > pour 270° [photo 6]
Attention! Veiller à fixer la butée dans le bon sens (regarderattentivement les photos).
28
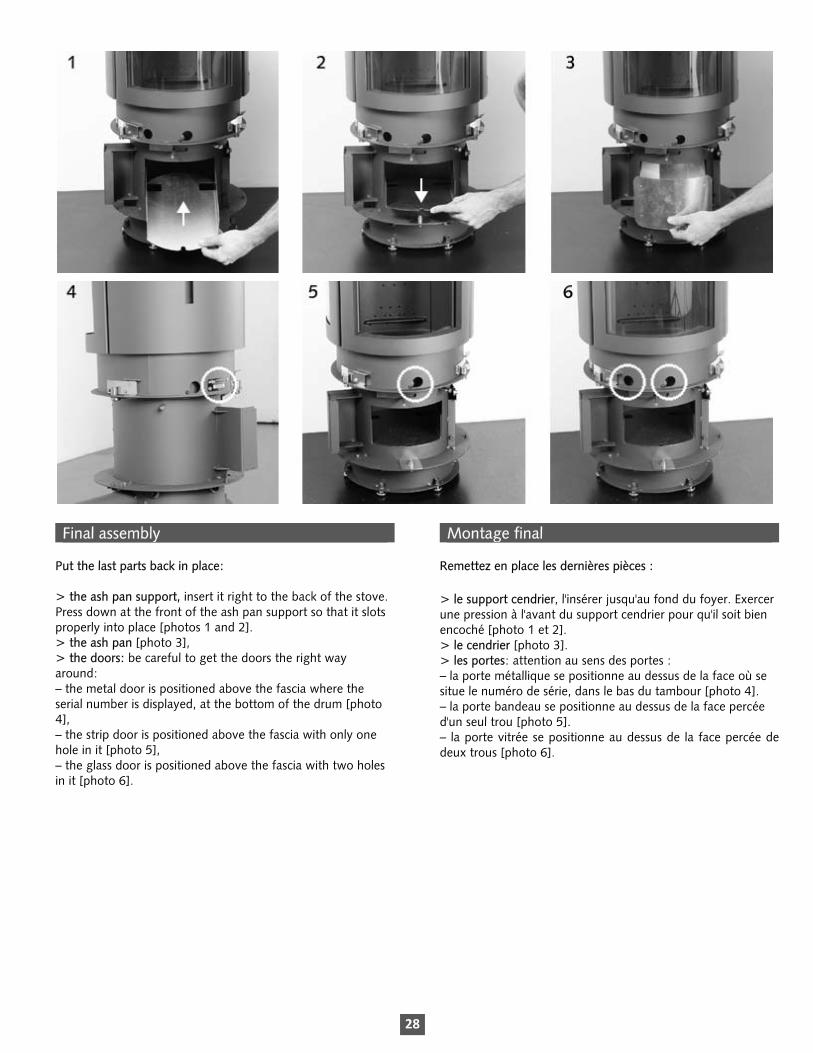
Final assembly
Put the last parts back in place:
> the ash pan support, insert it right to the back of the stove. Press down at the front of the ash pan support so that it slots properly into place [photos 1 and 2]. > the ash pan [photo 3], > the doors: be careful to get the doors the right way around: – the metal door is positioned above the fascia where theserial number is displayed, at the bottom of the drum [photo 4], – the strip door is positioned above the fascia with only onehole in it [photo 5], – the glass door is positioned above the fascia with two holesin it [photo 6].
Montage final
Remettez en place les dernières pièces :
> le support cendrier, l'insérer jusqu'au fond du foyer. Exercer une pression à l'avant du support cendrier pour qu'il soit bien encoché [photo 1 et 2]. > le cendrier [photo 3]. > les portes: attention au sens des portes : – la porte métallique se positionne au dessus de la face où sesitue le numéro de série, dans le bas du tambour [photo 4]. – la porte bandeau se positionne au dessus de la face percéed'un seul trou [photo 5]. – la porte vitrée se positionne au dessus de la face percée dedeux trous [photo 6].

29
Final assembly (continued)
Put the last parts back in place: (continued)
> the panels: position the lower part by placing the holes over the positioning cones [photo 7]. Then fix the upper part of the panels by screwing them into place (using 4 M5x8 hexagonal head screws) [photo 8].
> the 2 upper plates: clip the front part of the plate into place [photo 9]. Then place the rear part of the plate in position [photo 10].
> the ash pan door [photo 11].
Caution: Check that the blocking screws in the combustion chamber for transportation purposes have been removed [photo 12].
Montage final (suite)
Remettez en place les dernières pièces : (suite)
> les parements: placer la partie basse en mettant les trousdans les cônes de positionnement [photo 7]. Fixer ensuite lapartie haute des parements en les vissant (à l'aide de 4 vis M5x 8 tête hexagonale) [photo 8].
> les 2 tablettes supérieures : clipper la partie avant de la tablette [photo 9].Déposer ensuite la partie arrière de la tablette [photo 10].
> le portillon du cendrier [photo 11].
Attention! Vérifier que les vis de blocage transport situéesdans la chambre de combustion soient bien enlevées [photo12].

30
When installation of the stove is complete…
… test that the stove is working properly.
Before testing, make sure that no items from the installation have been left in the combustion chamber (spray paint, tube of grease, tools…)
When the fire is lit for the first time, it may give off some smoke and odours: ventilate the room well.
Consult the instructions for use.
Once the stove is installed, give the instructions for use to the user. Complete the guarantee certificate (at the end of the instructions for use) with him/her and recommend that they send it to Stûv America inc.
Lorsque l’installation du foyer est terminée
… effectuer un test de fonctionnement du foyer.
Avant ce test, s'assurer qu'aucun élément relatif à l'installation n'est resté dans la chambre de combustion (bombe de peinture, notice, outil,...)
Lors du premier feu, certains dégagements de fumées et d’odeurs peuvent se produire : ventiler la pièce abondamment.
Se référer au mode d’emploi.
Une fois le foyer installé, remettre le mode d'emploi àl’utilisateur. Compléter avec lui le certificat de garantie (qui setrouve à la fin du mode d'emploi) et lui recommander de lerenvoyer Stûv America inc.

31
30-COMPACT

32
How does your Stûv 30-compact work ?
Stûv 30-compact: 3 modes of operation
In glass door mode, your stove offers excellent efficiency and good visibility of the flames. The stove also offers excellent efficiency when used in closed-door mode. This position is used both when the stove is not in operation and to achieve a slow-burn rate. Use the stove in open-fire mode for loading logs, for barbecues and to feel the warmth of the flames.
It heats!
When the stove is working (i.e. when the lighting stage is finished) the bed of embers will glow and the logs will producelarge flames. The temperature in the combustion chamber [a] is very high and the heat dissipates in two ways: – by radiation through the glass door,– also by convection: the air circulates in the double wall [b]around the combustion chamber and reheats before dissipating around the room [c].
Comment fonctionne votre Stûv 30-compact
Stûv 30-compact : 3 modes de fonctionnement
En porte vitrée, le foyer offre un excellent rendement et une grande visibilité des flammes. En porte pleine, le foyer offre également un excellent rendement. Cette position est utilisée également lorsque le foyer est à l'arrêt ou en allure réduite. Utiliser le foyer à feu ouvert pour recharger des bûches, pourles barbecues ou pour sentir la chaleur des flammes.
Ça chauffe !
Quand le feu est en régime (c’est-à-dire que la phase d’allumage est terminée), le lit de braises est important et les bûches produisent de belles grandes flammes. La température dans la chambre de combustion [a] est très élevée et la chaleurse dissipe principalement de 2 façons : – par rayonnement au travers de la vitre et des parois,– par convection : l’air ambiant circule dans la double paroi [b]autour de la chambre de combustion et se réchauffe avant dese répandre dans la pièce [c].

33
Conserving heat
The flue [d] is full of hot gases that are much lighter than the air outside and therefore rise out of the flue that is holding them. The flue therefore literally sucks in the gases contained in the stove. However, it is important that the gases and the heat that they contain do not escape too easily from the flue.
Two mechanisms stop them:
– First, the air needed for combustion cannot get into thestove unless the damper lever is used [e] – i.e. an adjustable opening –which allows you to control the quantity needed to obtain the desired rate.
– Then the hot gases cannot enter directly into the flue: theyhave to pass through a system of deflectors [f] which form a second bottleneck.
Owing to these bottlenecks, the heat increases in the stove which is one of the objectives aimed at. The higher the temperature is, the more fully combustion takes place (better efficiency) and the lower the level of noxious waste.
In open-fire mode...
... You can enjoy the crackling of the embers, the scent of the wood fire and the pleasant sensation of heat radiated directly from the flames… of the primitive fire. ... But your stove heats less well and consumes more wood. A lot more air floods into the combustion chamber [a]. To avoid backdraughts, the deviator [f] is raised. There is nothing to impede the gases (and the heat they contain), and they escape much more quickly into the chimney [d]. Combustion istherefore incomplete.
Your Stûv 30-compact provides optimal and eco-friendly heating as well as greater efficiency in the “closed” position. Therefore, we recommend this mode of usage and advise you to restrict use in open-fire mode to short periods (e.g. barbecues).
Exactly what’s required where it’s required !
The air required for combustion is strictly reduced to the amount necessary and, when the stove is in operation, it is distributed as follows: – a small amount feeds the base of the flames [h],– another quantity enters the combustion chamber throughsmall holes arranged between the bricks [i] at the back of the chamber and ignites the residual gases in the upper part of the stove; this is “post-combustion”, – a final quantity sweeps the glass [j] to prevent smoke from condensing there. This air is also used in the combustion. You determine the rate of the stove by controlling the amount of combustion air using the damper control [k]. This has been designed to optimally distribute airflows in a single action whatever the rate chosen.
Conserver la chaleur
Le conduit de cheminée [d] est rempli de gaz chauds beaucoup plus légers que l’air extérieur et qui ne demandent donc qu’à monter ; on dit de la cheminée qu’elle «tire». La cheminée aspire ainsi littéralement les gaz contenus dans le foyer. Mais il faut éviter que les gaz et la chaleur qu’ils contiennent ne s’échappent trop facilement par la cheminée.
Deux dispositifs les freinent:
– d’abord, l’air nécessaire à la combustion ne peut pénétrerdans le foyer que par un registre [e] – c’est-à-dire une ouverture réglable – qui vous permet de doser la quantité nécessaire d'air pour obtenir l’allure désirée.
– ensuite, les gaz chauds ne peuvent pas s’engouffrerdirectement dans la cheminée : ils doivent contourner des déviateurs [f] qui constituent un second goulot d’étranglement.
Du fait de ces étranglements, la chaleur augmente dans lefoyer : c’est aussi un des buts recherchés. En effet, plus latempérature est élevée, plus la combustion s’effectuecomplètement (meilleur rendement) et plus les rejets nocifssont réduits.
à feu ouvert......
Vous profitez du crépitement des braises, de l'odeur du feu de bois, de la sensation agréable de chaleur due au rayonnement direct des flammes,... du feu primitif. ... Mais votre foyer chauffe moins bien et consomme plus de bois ! Beaucoup plus d'air s'engouffre dans la chambre de combustion [a]. Pour éviter alors que le feu ne refoule, le déviateur [f] est relevé. Les gaz (et la chaleur qu'ils contiennent), ne sont pas freinés, et s'échappent beaucoup plus vite dans la cheminée [d]. Dès lors, le rendement est moins élevé ! Votre Stûv 30-compact vous offrira un chauffage optimal etécologique ainsi qu'un meilleur rendement en position«fermé». Nous recommandons donc ce mode d'utilisation etconseillons de réserver l'utilisation à feu ouvert à de courtespériodes.
Juste ce qu’il faut, là où il faut !
L’air nécessaire à la combustion est réduit au strict nécessaire et se répartit, quand le foyer est en régime, comme suit : – une petite partie active la base des flammes [h],– une autre partie pénètre dans la chambre de combustion parde petits trous ménagés [i] au haut de la chambre et enflammeles gaz imbrûlés dans la partie supérieure du foyer ; c’est lapost-combustion, – une dernière partie enfin balaie la vitre [j] pour éviter que les fumées ne viennent s’y condenser. Ensuite, cet air participe aussi à la combustion. Vous déterminez l’allure du foyer en réglant le débit d’air decombustion au moyen de la commande du registre [k]. Celui-cia été conçu pour répartir, d’une seule action, les flux demanière optimale, quelle que soit l’allure choisie.

34
Fuel
Which wood should you choose?
Different kinds of wood have different heating capacities and do not burn in the same way. Generally you should opt for hard wood such as oak, beech, ash, hornbeam or fruit trees. They produce pleasant flames and a lot of embers which will glow for a long time.
Beech [photo 1], ash
Firewood to be recommended: they dry quickly and are readily available. They should be stored under shelter as soon as they have been cut and split otherwise they rot very quickly and lose their heating capacity. They are easy to ignite, provide dynamic fires and rather bright flames.
Oak [photo 2]
An excellent fuel but – contrary to other wood – must remain unsheltered for 2 years so that rain can wash away the tannins it contains. Then it should be stored under shelter for another two years or so before being suitable for burning. There is a significant proportion of sapwood (which burns too quickly) in small branches. Oak burns slowly, provides a quiet fire and gives nice embers. This is ideal for having a barbecue and a fire at a lower rate.
Hornbeam [photo 3], cherry wood [photo 4], fruit trees
Excellent fuels but scarce. These are hard woods providing nice, harmonious and quiet flames and give nice embers. This is ideal for having a barbecue or a less intense fire.
Les combustibles
Quel bois choisir ?
Les différentes essences de bois ont des pouvoirs calorifiques différents et elles ne brûlent pas toutes de la même façon. D’une manière générale, donnez votre préférence aux bois durs comme le chêne, le hêtre, le frêne, le charme, les fruitiers : ils produisent de belles flammes et beaucoup de braises qui restent longtemps incandescentes.
Le hêtre [photo 1], le frêne
Des bois de chauffage à recommander : ils sèchent vite et on en trouve facilement. Ils doivent être stockés sous abri immédiatement après avoir été débités et refendus, sinon ils pourrissent très vite et perdent leur pouvoir calorifique. Ils sontfaciles à allumer, offrent des feux dynamiques et des flammes très lumineuses.
Le chêne [photo 2]
C’est un excellent combustible, mais il doit − contrairement aux autres bois − rester non couvert pendant 2 ans pour que la pluie le débarrasse des tanins qu’il contient. Ensuite, on l’entreposera sous abri encore 1 an ou 2 avant de le brûler. Dans les petites branches, la proportion d’aubier (qui brûle trop vite) est importante. Il brûle lentement, offre un feu calme et donne de belles braises. Idéal pour faire un barbecue et pour un feu à allure réduite.
Le charme [photo 3], le merisier [photo 4], les fruitiers
Excellents combustibles, mais rares. Ce sont des bois durs. Ils offrent de belles flammes, harmonieuses, calmes, et donnent de belles braises. Idéal pour faire un barbecue ou pour un feu calme.

35
Birch [photo 5], lime, chestnut, poplar, robinia, acacia
These are broad-leaved trees producing soft wood. They provide nice but lively flames and few embers. Wood burns fast and will be used to light or rekindle the fire. Warning: Poplar produces abundant and volatile embers. Robinia and acacia can cause important ember projections.
Conifers
They produce a lot of heat but burn quickly; they sputter embers and the resin they contain foul up the flue. They should be avoided.
Unsuitable
Stûv stoves are designed for domestic use, and should never be used for burning waste of any kind. Only burn wood logs; do not burn coal, chipboard, varnished or chemically treated wood or any other fuel not recommended (no liquid fuels). The heat produced by these materials is too intense and can damage your stove (including the glass door which can become cloudy) and cause it to soot up. They give off toxic and polluting emanations.
Le bouleau [photo 5], le tilleul, le marronnier, le peuplier, le robinier, l’acacia
Ce sont des feuillus à bois tendre. Ils offrent de belles flammesharmonieuses mais vives, et peu de braises. Ils brûlent vite : onles utilisera pour lancer (ou relancer le feu). Attention : Lepeuplier provoque des cendres abondantes et volatiles. Lerobinier et l’acacia provoquent des projections de braisesimportantes.
Les résineux
Ils dégagent beaucoup de chaleur, mais ils se consument rapidement ; ils projettent des braises et les résines qu’ils contiennent encrassent les cheminées. À éviter.
À proscrire
Les foyers Stûv sont conçus pour un usage domestique, enaucun cas pour incinérer des déchets, quels qu’ils soient.Brûlez exclusivement des buches de bois ; ne brûlez pas decharbon, d’aggloméré, de bois vernis ou traité chimiquementou aucun autre combustible non recommandé (aucuncombustible liquide). Ces matériaux produisent une chaleurtrop intense qui peut dégrader votre foyer (entre autres lavitre qui prend un aspect laiteux) et l'encrasser. Ils dégagentdes émanations toxiques et polluantes.

36
Drying Whatever the wood chosen it should be really dry. Damp wood heats a great deal less and a great part of the energy is used to evaporate the water it contains. The sapwood – as the soft wood just beneath the bark is called – can contain up to 75% of water. Furthermore, moist wood releases a lot of smoke and not many flames and it causes the fireplace, its window and the flue to get dirty and soot up. To avoid wasting energy and slow combustion, Stûv highly recommends burning wood that has moisture content below 20%.
Wood drying Big logs should be split for the wood to dry better. Wood should be covered or sheltered from the rain, but well ventilated. Generally you should allow two years for the wood to dry properly. You will soon learn to estimate the dryness of logs by weighing them in your hand. The dryer they are the lighter they will feel, and they will produce a clearer sound when you knock two together.
Moisture tester This little accessory, available from your Stûv dealer, accuratelytests the quality of the wood and its moisture content. Before measuring the moisture content, split the log. Take the reading on the freshly split face of the wood. For electrode moisture meters, the electrodes must be pushed into the woodperpendicular to the grain of the wood.
Du bois bien sec ! Quel que soit le bois choisi, il doit être bien sec. Le boishumide chauffe infiniment moins : une grande partie del’énergie n’est utilisée que pour évaporer l’eau qu’il contient.L’aubier − c’est ainsi qu’on appelle le bois jeuneimmédiatement sous l’écorce − peut contenir jusqu’à 75%d’eau. De plus, le bois mouillé dégage beaucoup de fumée etpeu de flammes et il provoque l’encrassement du foyer, de savitre et de la cheminée. Pour éviter toute perte d'énergie etune combustion au ralenti, Stûv recommande fortement debrûler du bois à moins de 20% d'humidité (voir schéma ci-dessous).
Le séchage du bois Pour favoriser le séchage, il est important que les gros rondinssoient fendus. Le bois sera couvert ou abrité de la pluie, maisbien ventilé. En général, il faut compter deux années deséchage. Avec l’expérience, vous apprécierez le séchage ensoupesant les bûches : plus elles sont sèches, plus elles sontlégères et plus elles produisent un son clair quand on les cognel’une contre l’autre.
Testeur d'humidité Ce petit accessoire, disponible chez votre revendeur Stûv, permet de contrôler la qualité du bois et son taux d’humidité avec précision. Avant de procéder à la mesure du taux d’humidité, il estnécessaire de fendre la bûche. Prenez la mesure sur la facefraîchement fendue. Pour les humidimètres à électrodes,celles-ci doivent être enfoncées dans le bois de manièreperpendiculaire au fil du bois.

37
Use
Important!
This stove will have been installed in accordance with good practice guidelines and local and national regulations. A qualified professional will have ensured that the characteristics of the smoke flue and the surroundings are suitable for the stove installed.
Read this user guide carefully and follow the maintenance recommendations.
Complete and return the guarantee certificate [at the end of this document] to us.
Use
The stoves in the Stûv 30-compact range are designed to operate with the door closed.
The stove should be used in accordance with local and national regulations and North-American standards. Some authorities impose or restrict the conditions of use depending on the fuel used. Please bear this in mind.
Some parts of the stove – the glass door and the outside walls – may become very hot even during normal usage (ratedpower) and significant heat may be radiated from the glass door.
In order to prevent any damage or risk of fire, when the stove is in use, remove all heat-sensitive objects from the radiation area [diagram 1]. Take particular care when you leave the room.
Do not leave young children without supervision in the room where the stove is installed.
Utilisation
Important !
L’installation de ce foyer aura été réalisée suivant les instructions d’installation de cette notice et les prescriptions locales ou nationales. Un professionnel qualifié se sera assuré notamment que les caractéristiques du conduit de fumées et son environnement conviennent pour le foyer installé.
Lire attentivement ce mode d’emploi et respecter les consignesd’entretien.
Nous renvoyer le bon de garantie (qui se trouve à la fin de ce document), dûment complété.
Utilisation
Les foyers de la gamme Stûv 30 sont conçus pour un fonctionnement à porte fermée.
Le foyer doit être utilisé conformément aux réglementations locales et nationales et aux normes nord américaines. Certaines autorités imposent ou restreignent les conditions d’utilisation, suivant le combustible utilisé. En tenir compte !
Certaines parties du foyer – la vitre et les parois extérieures – peuvent être très chaudes même en usage normal (puissance nominale) et le rayonnement de la vitre peut être important.
Afin de prévenir toute détérioration ou risque d’incendie, quand l’appareil fonctionne, éloigner tout objet sensible à la chaleur de la zone de rayonnement [schéma 1]. Soyez particulièrement vigilant quand vous quittez la pièce.
Ne pas laisser des enfants en bas âge sans surveillance dans la pièce où le foyer est installé.
38
Repairs / Maintenance
Any modification carried out to the system may cause danger and will invalidate your guarantee. Only use Stûv spare parts in case of repair.
Should a fire in the flue get out of control
Do not open the stove's door during the initial period.
Close the air valve completely [photo 2]. Call the fire brigade.
If the fire has not died down after a few minutes, use a dry powder, soda acid or sand extinguisher (never water).
After a chimney fire, ventilate the room where the stove is situated.
Have the chimney cleaned and inspected by a professional. Have repairs carried out if necessary.
Preventing the risk of explosion
Poor draught increases the risk of explosion. A weak draught may be caused by a poor chimney, unfavourable weather, another operational ventilation system creating a backdraught,etc.
– Never close the damper abruptly when the stove is full ofhigh flames.
– Never close the damper after placing a large block of woodon a bed of dying embers.
– A period of use in slow-burn mode (overnight, for example)must be followed by a roaring fire (1/2 to 3/4 of an hour) to eliminate the build-up of any combustible materials.
Réparation / Entretien
Toute modification apportée à l’appareil peut créer un danger et vous privera du bénéfice de la garantie. En cas de réparation, n’utiliser que des pièces de rechange Stûv.
En cas de feu de cheminée
Dans un premier temps, surtout ne pas ouvrir la porte du foyer.
Fermer complètement le registre d’air [photo 2]. Appeler les pompiers.
Après quelques minutes, si le feu ne s'est pas calmé, utiliser un extincteur à poudre, de la soude ou du sable (surtout pas d’eau).
Suite à un feu de cheminée, ventiler la pièce dans laquelle se trouve le foyer.
Faire nettoyer et inspecter la cheminée par un professionnel. La faire réparer si nécessaire.
Prévenir les risques d'explosion
Un tirage trop faible augmente le risque d'explosion. Cette faiblesse peut être provoquée par une mauvaise cheminée, une météo défavorable, un autre système de ventilation en marche créant un contre-tirage,...
– Ne jamais fermer brusquement le registre quand le feu estrempli de grandes flammes
– Ne pas fermer le registre après avoir mis un gros bloc de boissur un lit de braises moribondes.
– Après une période d'utilisation au ralenti (passage de nuit)doit suivre une bonne flambée (1/2 à 3/4h) pour éliminer leséventuels accumulations de matières combustibles.
39
Initial precautions
Before lighting the first fire in your new stove, ensure that no items used in installation (spray paint, grease tube, tools) have been left in the combustion chamber or in the bends. The paint is not oven-baked; it is thus relatively fragile but will harden when heated for the first few times. Consequently, take care when handling the appliance.
When lighting the fire for the first few times, some smoke or unpleasant odours may be released from the paint, the steel’s protective oil or the drying of the bricks. We recommend that you keep your first fire burning strongly for several hours with the windows open. The paint will harden and the odours will disappear. The paint of some components inside the combustion chamberwill be replaced by a layer of carbon.
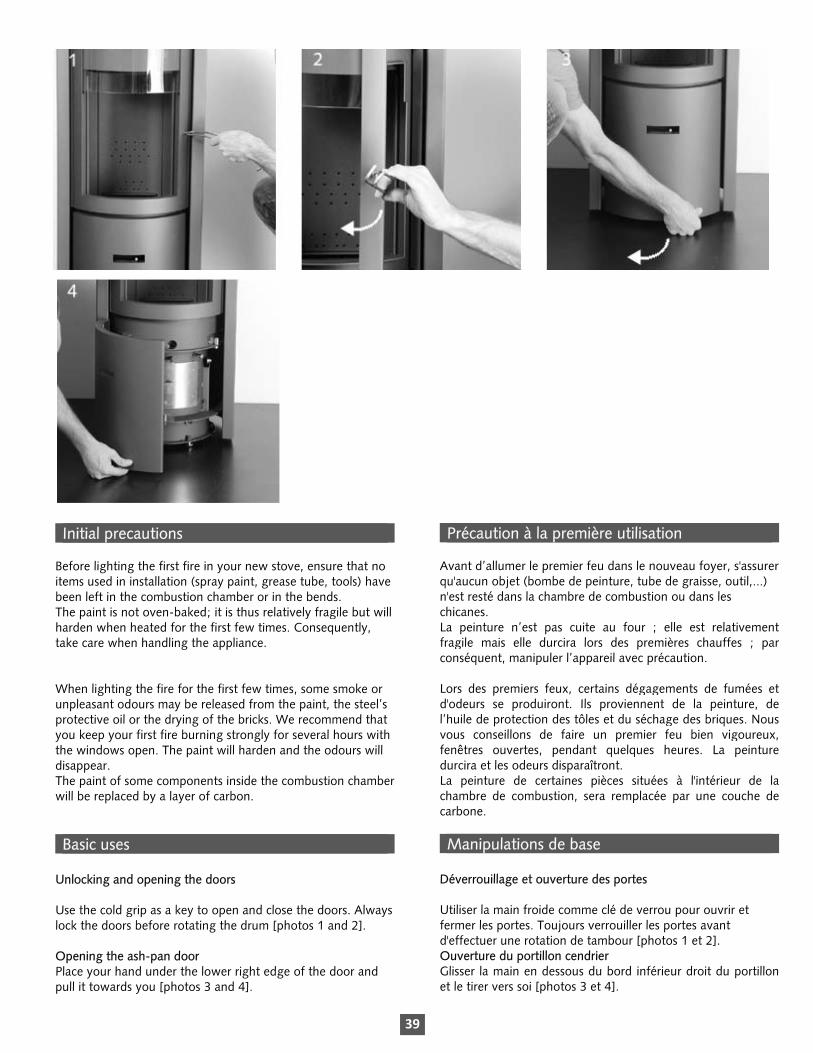
Basic uses
Unlocking and opening the doors
Use the cold grip as a key to open and close the doors. Always lock the doors before rotating the drum [photos 1 and 2].
Opening the ash-pan door Place your hand under the lower right edge of the door and pull it towards you [photos 3 and 4].
Précaution à la première utilisation
Avant d’allumer le premier feu dans le nouveau foyer, s'assurerqu'aucun objet (bombe de peinture, tube de graisse, outil,...) n'est resté dans la chambre de combustion ou dans les chicanes. La peinture n’est pas cuite au four ; elle est relativementfragile mais elle durcira lors des premières chauffes ; parconséquent, manipuler l’appareil avec précaution.
Lors des premiers feux, certains dégagements de fumées etd'odeurs se produiront. Ils proviennent de la peinture, del’huile de protection des tôles et du séchage des briques. Nousvous conseillons de faire un premier feu bien vigoureux,fenêtres ouvertes, pendant quelques heures. La peinturedurcira et les odeurs disparaîtront. La peinture de certaines pièces situées à l'intérieur de lachambre de combustion, sera remplacée par une couche decarbone.
Manipulations de base
Déverrouillage et ouverture des portes
Utiliser la main froide comme clé de verrou pour ouvrir et fermer les portes. Toujours verrouiller les portes avant d'effectuer une rotation de tambour [photos 1 et 2]. Ouverture du portillon cendrier Glisser la main en dessous du bord inférieur droit du portillonet le tirer vers soi [photos 3 et 4].

40
Rotating the drum
– Open the ash-pan door.– Place the end of the cold grip in the cylinder located on theleft [photo 5]. – Push towards the centre of the stove (lever effect) to releasethe drum bolt [photo 5]. – Pull towards the right until the next stop [photo 6]. Ensurethat you always rotate the drum from left to right. – Close the ash-pan door.
Using the riddling mechanism
– Open the ash pan door.– Place the end of the cold grip sideways into the mechanismlocated on the right [photo 7]. – Move the mechanism backwards and forwards [photo 8] torelease the ash into the ash pan.
Opening the ash pan
– Open the ash-pan door.– Pull the ash-pan handle upwards to release the pan [photo9] and then pull it towards you [photo 10].When replacing the ash pan, ensure that it locks in place.
Rotation du tambour
– Ouvrir le portillon du cendrier.– Introduire l'embout de la main froide dans le cylindre situé àgauche [photo 5]. – Exercer une poussée vers le centre du foyer (effet de levier)pour débloquer le verroux du tambour [photo 5]. – Tirer vers la droite jusqu'à la prochaine butée [photos 6].Prendre soin d'effectuer toujours les rotations de gauche à droite. – Refermer le portillon du cendrier.
Manipulation de la commande de décendrage
– Ouvrir le portillon du cendrier– Introduire de manière latérale l'embout de la main froidedans la commande située à droite [photo 7]. – Agiter la commande d'avant en arrière [photo 8] pourévacuer les cendres vers le cendrier.
Ouverture du cendrier
– Ouvrir le portillon du cendrier.– Tirer la poignée du cendrier vers le haut pour débloquer lecendrier [photo 9] et puis tirer vers vous. [photo 10]. Lors de la remise en place du cendrier, bien vérifier qu'il sebloque.

41
Rotating the stove - Open the ash-pan door; place the end of the cold grip in the stove-positioning cylinder [photo 11 and 12]. – Pull it towards you and orient the stove in the desiredposition. Lock the stove in the desired position using the locking notches spaced at 15° intervals [photo 13]. Close the ashpan door.
Storing the cold grip – Open the ash-pan door.– Place the end of the cold grip in the cylinder provided [photo14]; Push the cold grip inside the door and close it [photo 15].
Using the damper – Slide the damper lever to the left to close it and to the rightto open it [photos 16 and 17].
Rotation du foyer Ouvrir le portillon du cendrier et insérer l’embout de la main froide dans le cylindre de positionnement du foyer [photo 11 et 12]; la tirer vers soi et orienter le foyer dans la position souhaitée; des encoches de verrouillages sont prévues à cet effet tous les 15° [photo 13]. Refermer le portillon cendrier.
Rangement de la main froide Ouvrir le portillon du cendrier; insérer l'embout de la main froide dans le cylindre prévu à cet effet [photo 14] et repousser la main froide à l'intérieur du portillon et fermer celui-ci [photo 15].
Manipulation du registre Glisser la commande du registre vers la gauche pour fermer leregistre et glisser vers la droite pour l'ouvrir [photos 16 et 17].

42
Lighting the fire
Before lighting
After a period of inactivity, check that there are no obstructions in the system, its ducts or the air inlets and outletsor any mechanical blockages.
Your Stûv requires air (optional)
Your Stûv needs air for combustion. Ideally, your installation engineer will have fitted your stove with a duct that draws the air required for combustion directly from outside. If an 'open-fire' valve has been installed, open this outside air inlet (completely to make the stove operate in open-fire mode or partially - ± 20% - for ain closed-door operating mode). If no direct outside connection has been made, provide a sufficient outside air inlet (with a 120 mm diameter or a 100 cm2 area). This air duct must comply with all applicable local and national regulations. Always keep this air inlet clear. Please note that the operation of your stove may be affected (risk of backdraught) if other air consuming systems are installed in the same room (air extractor, kitchen hood, air conditioning system). Therefore, create additional air inlets in the room based on their consumption.
Principle
Start the fire rather briskly to heat up the fireplace and create a good draught. When the fire is lit, the flue is filled with cold air (heavier than the smoke). If the fire does not start vigorously enough, the smoke will not get past this bottleneck and the stove will produce a backdraught. So be generous with the kindling! [photo 1]
The upside-down fire! [photo 2]
To light the stove, Stûv recommends the upside-down fire technique, which is more environmentally friendly and subsequently results in better combustion. This technique involves placing a bed of logs in the bottom of the stove and lighting the fire on top of them.
Allumer le feu !
Avant d'allumer
Après une période d'inutilisation, vérifier qu'il n'y a pas d'obstruction de l'appareil, de ses conduits et ni de blocage mécanique.
Votre Stûv a besoin d'air (facultatif)
Votre Stûv a besoin d’air pour la combustion. Idéalement, votre installateur aura raccordé votre foyer au moyen d'un conduit pour qu'il prélève directement à l'extérieur l'air nécessaire à la combustion. Si un clapet feu ouvert a été prévu, ouvrir cette arrivée d’air extérieur (complètement pour faire fonctionner le foyer à feu ouvert ou partiellement - ± 20% - pour un fonctionnement à foyer fermé).Si ce raccordement direct n'a pas été réalisé, prévoyez une arrivée d’air extérieur suffisante (diamètre 4"²). Cette adduction d'air doit respecter toutes les réglementations locales ou nationales en vigueur. Maintenez toujours cette entrée d’air bien dégagée. Si d’autres appareils consommateurs d’air sont installés dans lemême local (extracteur d'air, hotte de cuisine, système d'airconditionné,...), sachez que le fonctionnement de votre foyerpeut être perturbé (risque de refoulement). Prévoyez parconséquent des entrées d'air supplémentaires dans le local enfonction de leur consommation.
Principe
Il faut lancer le feu assez vivement pour échauffer le foyer, favoriser un bon tirage. Lors de l’allumage du foyer, le conduit de cheminée est rempli d’air froid (plus lourd que la fumée).Si le lancement du feu n’est pas assez vigoureux, les fumées n’arriveront pas à soulever ce bouchon et le foyer refoulera. Ne soyez donc pas avare de petit bois! [photo 1]
Le feu inversé! [photo 2]
Pour l'allumage, Stûv vous recommande la technique du feuinversé qui permet un allumage plus écologique et qui garantitune meilleure combustion par la suite. Cette techniqueconsiste à placer un lit de bûches dans le fond du foyer etd'allumer le feu sur ces bûches.

43
The benefits: – By placing the logs underneath, you will considerably reducethe amount of smoke generated on lighting the fire, while gradually increasing the temperature. – Once the logs underneath have caught fire, the gases theyrelease must pass through the flames. These gases rise in temperature and are almost entirely burnt off. The result is lessCO and fewer particulates! – Using this method, you no longer need to wait for thekindling to be blazing before adding the logs and there is no longer any risk of these collapsing during combustion. – What's more, you improve the stove's efficiency with a morecomplete combustion.
Lighting the fire – Place a few logs with a maximum diameter of 4” (10 cm) inthe floor (bottom) of the stove [photo 3]. Then lay a second layer of small, bark-free logs perpendicular to the bottom layer[photo 4]. – Cover with kindling (approximately 1 kg) [photo 5].– Place an eco-friendly firelighter in the kindling [photo 6].– Open the air damper fully [photo 7].– Light.– Leave the solid door ajar [photo 8]. This small opening willdraw air in directly, by-passing the normal route (damper) and preventing the intake of too much air to be heated in one go, as is the case when the stove is completely open.
– When the logs are blazing, load the stove as normal. Closethe door. Set the damper to blazing-fire mode (damper to the right). After three quarters to one hour, select the burn rate desired using the air intake damper.
Les avantages: – En plaçant les bûches au dessous, vous diminuerezconsidérablement la production de fumées lors de l'allumagetout en augmentant petit à petit la température. – Une fois que les bûches du dessous prennent feu, les gaz quis'en échappent doivent passer par la flamme. Dès lors, ces gazmontent en température et sont presque entièrement brûlés.Donc moins de CO et de particules fines! – Ainsi, vous ne devez plus attendre que le bois d'allumage soitbien enflammé pour placer les bûches, et plus de risque quecelles-ci ne s'écroulent pendant la combustion. – De plus, vous augmentez le rendement du foyer par unecombustion plus complète.
Allumer le feu – Placer sur la sole (le fond) du foyer quelques bûches demaximum 4 pouces de diamètre [photo 3]. Puis une deuxième couche de bûchettes sans écorce disposées perpendiculairement [photo 4]. – Couvrir de petit bois d’allumage (environ 1 kg) [photo 5].– Insérer dans le petit bois un allume feu de qualité écologique [photo 6]. – Ouvrir le registre d’air au maximum [photo 7]; allumer.– Laisser la porte pleine entrouverte [photo 8]. Cette légèreouverture permet une alimentation directe du feu en air sans passer par le circuit normal (registre) tout en évitant d'amener trop d'air à réchauffer d'un coup, comme c'est le cas si le foyer est totalement ouvert. – Quand les bûches sont enflammées, procéder à une chargenormale. Fermer la porte. Régler le registre sur feu vif (registreà droite). Après 3/4 d’heure à une heure, sélectionner l’alluredésirée à l’aide du registre d’admission d’air.

44
Note: – In certain atmospheric conditions (if the temperature outsideis higher than inside), the operation of the flue can be hindered. Then, load with more kindling wood to properly heat the flue and restore the draught. In some cases, use even more paper over the kindling wood to heat up the flue and to re-establish the draught.
– Combustion is not optimal below a certain rate, the waste isgreater, the glass door gets dirty quickly and in some cases there is a risk of the fire going out.
Maintaining the fire
Two factors determine the rate of the fire: the quantity of the wood burned and the quantity of the combustion air.
Use normal loads [see wood consumption per hour, page 4]. After a while, you will find the ideal setting depending on the characteristics of the flue, the room to be heated and your personal preferences. The weight of the wood is a determining factor as well as the size of the logs: two small logs will burn more quickly than a large one of the same weight because the surface area of the wood exposed to the flame is greater.
Setting combustion
The damper of your Stûv 30-compact allows you to control the quantity of air that feeds combustion.
When and how to reload the stove?
Before reloading, half open the door 1 inch for a few seconds to allow time for the smoke to disperse before opening completely.
However, if the double-wall connectors’ installation includes a 90° elbow, always reload the stove using the ‘open-fire’ door to avoid smoke backdraught.
The best time to reload is when the logs are only producing small flames sitting on a large bed of embers.
For the new logs to catch alight, they must be heated until they reach their ignition temperature. It is the heat given off by the bed of embers that heats the new load. If you are too late in reloading, the bed of embers will not be able to heat a full load quickly enough. In this case you will have to use a partial load.
Remarques – Dans certaines circonstances atmosphériques (si la
température extérieure est supérieure à celle de l’intérieur), la cheminée refoule. Charger alors plus de petit bois pour bien échauffer le conduit de cheminée et rétablir le tirage. Dans certain cas, l'on pourra même ajouter quelques feuilles de papier journal chiffonnées par dessus afin de provoquer cette hausse de température.
– En dessous d’une certaine allure, la combustion n’est pasoptimale, les rejets sont plus importants, la vitre se salitrapidement et, dans certains cas, le feu risque de s’éteindre.
Entretenir le feu
Deux éléments déterminent l’allure du feu : la quantité de bois enfournée et la quantité d’air de combustion.
Faire des charges normales [voir consommation de bois par heure, page 4]. Après quelques temps, vous trouverez vous-même le réglage idéal en fonction des caractéristiques de la cheminée, du local à chauffer et en fonction de vos goûts personnels. Le poids de bois est un élément déterminant mais la taille des bûches en est un autre : 2 petites bûches brûleront plus vite qu’une grosse de poids équivalent, car la surface du bois exposée à la flamme est plus importante.
Le réglage de la combustion
Le registre de votre Stûv 30-compact vous permet de régler laquantité d’air qui alimente la combustion.
Quand et comment recharger le foyer ?
Avant de recharger, entrouvrez la porte de plus ou moins 1 pouce pendant quelques secondes pour laisser le temps aux fumées de s’évacuer, avant d’ouvrir complètement.
Cependant, si l’installation des connecteurs à double parois inclue un coude à 90°, toujours recharger l’appareil utilisant la porte à feu ouvert pour éviter tout refoulement de fumée.
Le meilleur moment pour recharger est celui où les bûches ne produisent plus que de petites flammes peu lumineuses et reposent sur un lit de braises important.
En effet, pour que les nouvelles bûches s’embrasent, il fautqu’elles soient réchauffées jusqu’à atteindre leur températured’inflammation ; c’est la chaleur dégagée par le lit de braisesqui réchauffe la nouvelle charge ; si vous rechargeztardivement, le lit de braise sera incapable de réchaufferrapidement une charge complète ; il faudra alors procéder àune charge partielle.

45
A large load on a dying bed of embers will lead to:
– the glass door, the stove and the flue becoming dirty,– greater pollution.
After reloading, it is advisable to open the damper for a few minutes using the cold grip.
Note:
To avoid overheating, do not exceed the maximum hourly consumption [see page 4].
Avoid resting logs against the glass door as this leaves a mark.
Operating as an open fire
Caution: The stove burns most efficiently when it is closed.
Avoid leaving an open fire burning unattended.
Beware of ember projections: the spark arrester is mandatory in the open-fire mode of operation.
Risk of backdraught To use your stove in open-fire mode, a chimney of at least 25’ is desirable. Depending on the atmospheric pressure of your location, a chimney of less than 25’ could be enough for a correct draught. Please validate this information with your installation engineer.
Air inlet Your Stûv consumes more air in open-fire mode. Open the outside air inlet completely if an air inlet has been provided.
Close the damper when you switch to open-fire mode [photo 2].
Une charge importante sur un lit de braise moribond provoque :
– le salissement de la vitre, du foyer et du conduit de fumée,– une pollution accrue.
Après le rechargement, il est recommandé d'ouvrir le registre, à l'aide de la main froide, pendant quelques minutes.
Remarques
Pour éviter une surchauffe de l'appareil, ne pas dépasser la consommation horaire maximale de bois [voir pages 4].
Évitez qu’une bûche ne se consume appuyée contre la vitre:cela pourrait laisser une tache laiteuse.
Fonctionnement à feu ouvert
Attention! On obtient le fonctionnement avec le meilleur rendement quand le poêle est fermé.
Éviter le mode de fonctionnement à feu ouvert sans surveillance. Attention aux projections de braises : L’installation du pare-étincelle est obligatoire en fonctionnement à feu ouvert.
Risque de refoulement Pour l’utilisation de votre foyer en mode à feu ouvert, un minimum de 25’ de cheminée est souhaitable. Selon la pression atmosphérique de votre emplacement géographique, moins de 25’ de cheminée pourraient suffire pour un bon tirage. Veillez à valider cette information avec votre installateur.
Arrivée d'air Votre Stûv consomme plus d’air en mode feu ouvert. Ouvrir l'arrivée d’air extérieur complètement si une arrivée d'air a été prévue.
Fermer le registre dès que vous passez en mode feu ouvert[photo 2].

46
Installing and using the grill
The Stûv grill is an optional accessory that offers a totally different style of cooking; the food is exposed to the flames instead of being laid out over the embers.
There is no need to wait until there are just embers, just push the embers and burning logs to the back of the stove.
Note:
Food is held between the two grills. The grill can hold food up to 1 inch (2.5 cm) in thickness.
The food is cooked by the radiated heat! Make sure the flamesdo not touch the food.
When using the grill, certain elements may become very hot. Be careful.
The drip pan can go in the dishwasher (but not the grills, grill support, cold grip).
Use temperature-resistant mittens when using the grills.
Installation et utilisation du Barbecue
Le grill Stûv est un accessoire en option qui offre un mode de cuisson tout à fait différent : les aliments sont exposés devant les flammes au lieu d'être disposés au-dessus des braises.
Inutile d'attendre de n'avoir plus que des braises : il suffit derepousser les braises et les bûches enflammées vers le fond dufoyer.
Remarque :
La nourriture est pincée entre les 2 grilles. Le barbecue peut accueillir jusqu'à 1 pouce d'épaisseur de nourriture.
La cuisson s'effectue par rayonnement ! Veiller à ce qu'aucune flamme ne lèche les aliments.
Lors de l'utilisation du grill, certaines parties peuvent être très chaudes. Soyez prudent.
La lèchefrite peut aller au lave-vaisselle (pas les grilles, pas lesupport de grille, pas la main froide).
Utilisez des mitaines allant au four pour manipuler lebarbecue.

47

48
Putting out the fire
– Do not put any more fuel onto the fire.– Close the air inlet valve [photo 1].– Check that the stove is properly closed.– Let the fire die down.
When the fire is out
– Close the damper and the outside air inlet (if applicable).This will prevent your house from becoming cold. – Position the stove in closed-door mode. You will avoid dustdeposits on and bleaching of the glass.
Adjusting the combustion
Basic adjustment:
Slide the damper lever to the left to close the damper and reduce the combustion air intake. Slide it to the right for the opposite effect [photos 2 and 3].
Éteindre le feu
– Ne plus charger.– Réduire le registre d'arrivée d'air [photo 1].– S’assurer que le foyer est bien fermé.– Laisser mourir le feu.
Quand le feu est éteint
– Fermer le registre ainsi que l'arrivée d’air extérieur (s’il y alieu). Vous éviterez ainsi de refroidir votre maison. – Positionnez le foyer en porte pleine. Vous éviterez le dépôtde poussière et le blanchiment de la vitre.
Réglage de la combustion
Réglage de base
Glisser la commande du registre vers la gauche pour fermer le registre et diminuer ainsi l'arrivée d'air de combustion. Glisser vers la droite pour l'effet inverse [photos 2 et 3].

49
Regular maintenance
Caution:
Wait until the stove has cooled down completely before carrying out maintenance.
Maintenance of the metal components
Use a dry cloth for cleaning.
Note: A paint spray supplied with the stove means you can retouch the paintwork if necessary. When you do this, start on a test surface to avoid spraying solvent on the old paintwork. The surface to be repainted must be smooth, clean, dry and free from grease. Please also read the instructions on the paint spray.
Cleaning of glasses
The use of oven cleaning products will cause rapid destruction of the seals. Use cleaning products intended for ordinary glass to clean the inside of the glass door. Dry the pane thoroughly as smoke settles on greasy residue. Stûv supplies a product suitable for cleaning very dirty stoves. Ask your distributor for advice.
Removal of ashes
Leave a bed of ashes at the bottom of the stove as this encourages combustion and still contains some fuel. Ashes must be removed when: there is a risk of obstructing the fire's supply of fresh air. Ashes shall be removed and placed in a steel container with a tightly fiting lid and moved outdoors immediately. Other waste shall not be placed in this container.
Entretien régulier
Attention
Avant de procéder à l’entretien, attendre le refroidissement complet.
Entretien des parties métalliques
Nettoyer avec un chiffon sec.
Remarque Une bombe de peinture fournie avec l’appareil permet d’effectuer des retouches si nécessaire. Pour ce faire, amorcer sur une surface de test pour éviter de pulvériser du solvant sur l’ancienne peinture. La surface à repeindre doit être dégraissée, lisse, propre et sèche. Se référer également à la notice d’utilisation de la bombe de peinture.
Entretien des vitres
L'usage de produits décapants pour four provoque une destruction rapide des joints. Pour nettoyer la face intérieure de la vitre, utiliser les produits d'entretien prévus pour les vitresordinaires. Bien sécher la vitre car les résidus graisseux fixent les fumées. En cas de fortes salissures, Stûv propose un produit adapté.Demander conseil à votre revendeur.
Décendrage
Laisser au fond du foyer un lit de cendres qui favorise la combustion et contient encore du combustible. Il faut décendrer quand il y a un risque d’obstruer l’alimentation du feu en air frais. Les cendres devraient êtres retirées et placées dans un contenant métallique à fermeture étanche et déplacées immédiaement à l’extérieur. Aucun autre déchet ne doit être placé dans ce contenant.

50
Quick maintenance of the flue
Stûv recommends the use of a product that decomposes soot every 15 times of use, in particular if you are burning wood that is not particularly dry. Please refer to the instructions for use of the product. Use a product that is compatible with the type of flue.
Annual maintenance
Caution:
Wait until the stove has cooled down completely before carrying out maintenance.
Do not forget, once a year, to:
– sweep your chimney,– clean between the fixed part of the stove and the drum ;– check the condition of the seals ;– clean the space beneath the ash pan.
Chimney sweeping
Do the sweeping at least once a year in accordance with the applicable local and national regulations.
Pass on this information to the chimney sweep.
Before carrying out the actual sweeping, Stûv recommends theuse of a dose of fulgent (see “Quick maintenance of the flue” item in the previous section).
Consult the instructions on the product for use. Use a product suitable for the type of chimney flue.
Whatever method is used to sweep the chimney, the smoke deflector parts must be removed.
Before doing so: – Place the stove in the closed-door position [photo 1].– Close the damper by sliding it completely to the left[photo 2].
Petit entretien du conduit de cheminée
Stûv préconise l’usage d’une dose de fulgurant (produitdécomposant les suies), environ toutes les 15 utilisations,surtout si vous ne brûlez pas du bois très sec. Se référer aumode d’emploi du produit pour son utilisation. Utiliser unproduit compatible avec le type de conduit de cheminée.
Entretien annuel
Attention !
Avant de procéder à l’entretien, attendre le refroidissement complet.
Ne pas oublier, une fois par an de :
- ramoner votre cheminée, - nettoyer entre la partie fixe du foyer et le tambour, - vérifier l'état des joints, - nettoyer l'espace sous le cendrier
Ramonage
Effectuer le ramonage au moins une fois par an conformémentaux règlements locaux et nationaux en vigueur.
Transmettre cette notice au ramoneur.
Avant d’effectuer le ramonage proprement dit, Stûv préconise l’usage d’une dose de fulgurant (voir «Petit entretien du conduit de cheminée», au chapitre précédent).
Se référer au mode d’emploi du produit pour son utilisation.Utiliser un produit compatible avec le type de conduit decheminée.
Quelle que soit la méthode de ramonage, il y a lieu de démonter les éléments déviateurs de fumées.
Avant cela il faut : - Mettre le foyer en porte pleine [photo 1] - Fermer le registre en le glissant complètement vers la gauche

51
Remove the smoke deflector
– Open the solid door:– Locate the smoke deflector [photo 4].– Remove the smoke deflector: Tilt and slide the smokedeflector slightly backwards as if into the smoke flue [photos 5 and 6]. Rotate it clockwise to disconnect the deflector from its lever [photo 7]. Pull the deflector downwards [photo 8].
Reinstalling the smoke deflector
Reverse the removal process.
Caution: Make sure the 1/4" stainless steel rod is correctly engaged intothe damper control before finishing.
[photo 2].
Démonter le déviateur de fumées
- Ouvrir la porte pleine. - Repérer le déviateur de fumées [photo 4]. - Retirer le déviateur de fumées: Incliner et glisser légèrementvers l'arrière le déviateur de fumées comme si vous alliez lefaire rentrer dans le conduit de fumée [photos 5 et 6]. Le fairepivoter dans le sens horaire pour désaccoupler le déviateur desa commande [photo 7]. Laisser descendre le déviateur [photo8].
Remonter le déviateur de fumées
Procéder à l'inverse du démontage.
Attention ! Assurez-vous que la tige en acier inoxydable de 1/4" est bienengagée dans la commande du registre avant de terminer.

52
Cleaning between the fixed part of the stove and the drum
Ash can fall between the fixed part of the stove and the drum where it may hinder the rotation of the drum and generate noise.
To avoid this inconvenience, we recommend that you clean this section of the stove twice a year.
– Open the ash pan door and locate the scraper fittedunderneath the lower crosspiece.
– Unscrew the scraper (using the 10-mm open-end spanner)[photo 1].
– Position the glass door at the halfway point [photo 2].
– With one hand, push the drum backward and, with theother, insert the flathead screwdriver between the bottom of the drum and the fixed part of the stove [photos 3 and 4].
– The scraper screws into the empty threaded hole locatednear the 26-mm Ø hole [photos 5].
– Insert and screw the scraper (point to the right and lockinglug upwards) into the opening created by the screwdriver [photo 6].
Nettoyage entre la partie fixe du foyer et le tambour
Des cendres tombent entre la partie fixe du foyer et le tambour. Ces cendres peuvent perturber la rotation du tambour et provoquer des bruits désagréables.
Pour éviter ce désagrément, nous conseillons de nettoyer cette partie du foyer 2 fois par an.
- Ouvrir le portillon cendrier et repérer le grattoir qui est fixé en dessous de la traverse inférieure.
- Dévisser le grattoir (à l'aide de la clé plate de 10mm) [photo 1].
- Positionner la porte vitrée à mi-chemin [photo 2].
- D'une main, pousser le tambour vers l'arrière, de l'autre, insérer un tournevis plat entre le bas du tambour et la partie fixe du foyer [photos 3 et 4].
- Le grattoir se visse dans le trou fileté libre qui se situe près del'orifice de Ø 1" [photos 5].
- Insérer et visser le grattoir (pointe vers la droite, et ergot de blocage vers le haut) dans l'interstice crée par le tournevis [photo 6].

53
– Push the point of the scraper towards the opening [photo 7].
– Remove the screwdriver.
– Rotate the drum several times. It is more difficult to rotatewith the scraper inserted. Use both hands [photo 8].
When finished, remove the scraper: position the glass door at the halfway point and place the screwdriver between the drum and the fixed part of the stove [photo 3]. Unscrew and remove the scraper [photo 6]. Remove the screwdriver [photo 3]. Store the scraper in the door.
- Pousser la pointe du grattoir vers l'interstice [photo 7].
- Retirer le tournevis de blocage.
- Effectuer plusieurs rotations de tambour. La rotation est plus difficile à effectuer avec le grattoir inséré. S'aider des deux mains [photo 8].
Une fois cette opération effectuée, retirer le grattoir;repositionner la porte vitrée à mi-chemin, replacer le tournevisde blocage entre le tambour et la partie fixe du foyer [photo3]. Dévisser et retirer le grattoir [photo 6]. Retirer le tournevis[photo 3]. Ranger le grattoir dans le portillon.
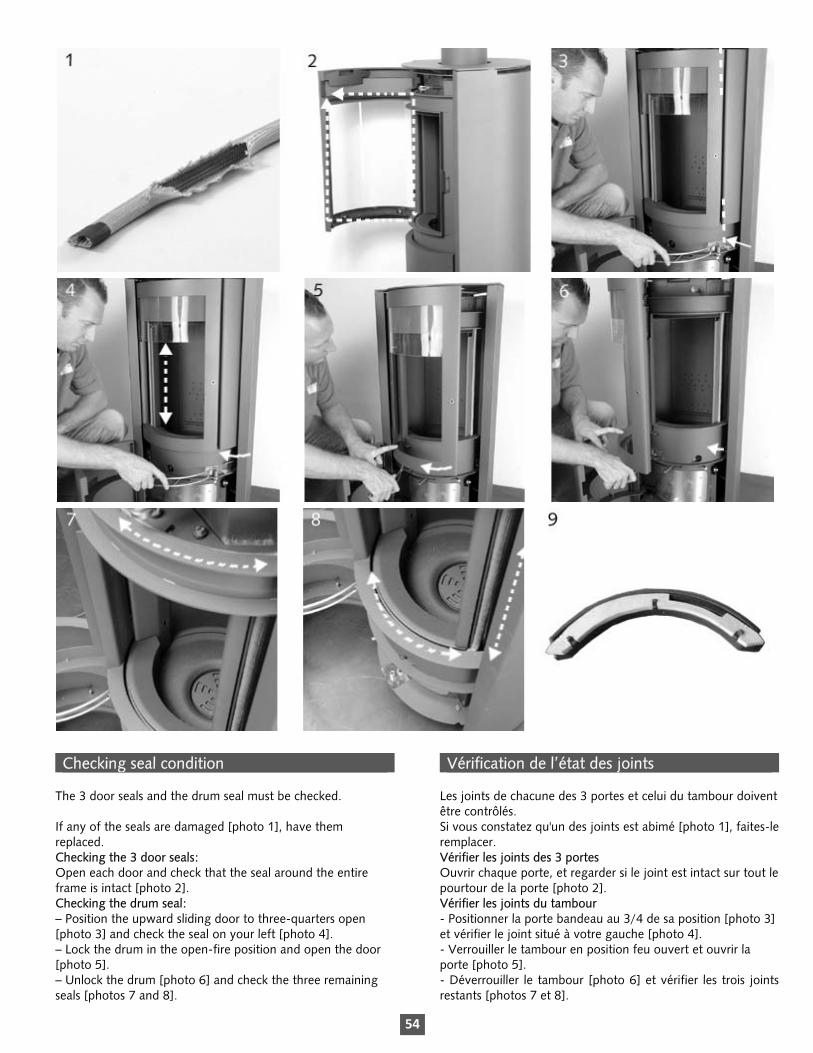
54
Checking seal condition
The 3 door seals and the drum seal must be checked.
If any of the seals are damaged [photo 1], have them replaced. Checking the 3 door seals: Open each door and check that the seal around the entire frame is intact [photo 2]. Checking the drum seal: – Position the upward sliding door to three-quarters open[photo 3] and check the seal on your left [photo 4]. – Lock the drum in the open-fire position and open the door[photo 5]. – Unlock the drum [photo 6] and check the three remainingseals [photos 7 and 8].
Vérification de l’état des joints
Les joints de chacune des 3 portes et celui du tambour doivent être contrôlés. Si vous constatez qu'un des joints est abimé [photo 1], faites-leremplacer. Vérifier les joints des 3 portes Ouvrir chaque porte, et regarder si le joint est intact sur tout lepourtour de la porte [photo 2]. Vérifier les joints du tambour - Positionner la porte bandeau au 3/4 de sa position [photo 3] et vérifier le joint situé à votre gauche [photo 4]. - Verrouiller le tambour en position feu ouvert et ouvrir la porte [photo 5]. - Déverrouiller le tambour [photo 6] et vérifier les trois jointsrestants [photos 7 et 8].

55
Replacement of the glass
The replacement operations are the same for the glass door and the «open fire» glass door.
Slightly open the door [photo 1].
Turn the drum for ±4” rightwards. Lift thedor to take it off its hinges, and then push it leftwards [photo 2]. Rest it on a support to kep it stable.
Reove the door clips spring [photo 3]. Observe its position carefully!
Unscrew the clamps that hold the glas in place [photo 4].
Replace the glass [photo 5]. Only use 5mm thick ceramic glass provided by Stûv. Do not use substitute materials.
Tighten the glass clamps while pushing the glass so as not to damage the edge of the glass [photo 6]. Be careful; place the side without sharp edge facing the glass.
Screw the door clips spring back again [photo 3].
Put the door back in place inversely [photo 2].
CAUTION: Avoid abuse of glass doors such as striking or slamming shut; Do not operate with broken glass.
Remplacement de vitre
Les opérations de remplacement de vitres se fait de la mêmemanière pour la porte vitrée et pour la porte à «feu ouvert».
Entrouvrir légèrement la porte [photo 1].
Tourner le tambour de 10cm vers la droite. Soulever la portepour la sortir hors de ses gonds, puis la pousser vers la gauche[photo 2]. Coucher-la sur un support pour la rendre stable.
Démonter le ressort clips de porte [photo 3]. Bien observer sa disposition !
Dévisser les serre-vitre [photo 4].
Remplacer la vitre [photo 5]. N’utiliser uniquement que duvere céramique de 5mm d’épaisseur distributé par Stûv. Nepas utiliser d’autre modèle de vitrage.
Revisser les serre-vitre en poussant sur la vitre pour ne pasabîmer l’arête de la vitre [photo 6]. Attention : placer le côtésans bavures face à la vitre.
Revisser le ressort clips de porte [photo 3].
Replacer la porte [photo 2].
ATTENTION : Bien être méticuleux et ne pas claquer lesportes. Ne pas faire fonctionner si une vitre est brisée.

56
Cleaning the space beneath the ash pan
– Open the ash pan door and remove the ash pan [photo 1].
– Remove the ash pan support [photo 2].
– Vacuum the bottom of the stove [photo 3].
After cleaning, replace the ash pan support so that the front is notched in place [photo 4] and reposition the ash pan [photo 1].
In case of problems
Broken or cracked glass, a worn seal, a fault in the lining of thecombustion chamber...
Contact your installation engineer with your serial number!
Nettoyage de l’espace sous le cendrier
- Ouvrir le portillon cendrier et enlever le cendrier [photo 1].
- Enlever le support du cendrier [photo 2].
- Aspirer le fond du foyer [photo 3].
Après le nettoyage, réinsérer le support cendrier, jusqu'à ce leque l'avant soit encoché [photo 4] et repositionner le cendrier[photo 1].
En cas de problème…
Vitre brisée ou fêlée, joint usé, défaut dans la garniture de la chambre de combustion,…
Faire appel à votre installateur en lui communiquant votrenuméro de série !

57

58
The Stûv guarantee: a straightforward approach for more peace of mind
This fireplace has been designed to offer you maximum pleasure, comfort and safety. Manufactured with the greatest care from high quality materials and components, it will work for many years without any problems. If, despite our best efforts, a fault should occur, we undertake to resolve it. However, you have to register your product to ensure that our customer service offers you the best possible attention and is able to meet your needs effectively.
Stûv commercial guarantee
The Stûv guarantee covers all end purchasers (users) of a Stûv system. It enters into force on the invoice date of the original sale from the seller to the purchaser.
Duration of the guarantee
Without prejudice to the guarantee covering latent defects, the Stûv commercial guarantee is for: 5 years on the body of the stove 3 years on other components (base grate, door mechanism, hinges, pulleys, runners, clasps,...)
Applicable to stoves sold after 01/07/2010. Only the sales invoice produced by the distributor for the final purchaser is valid as proof for the guarantee.
For purchases prior to 01/07/2010, please refer to the guarantee conditions contained in the installation instructions/directions for usage provided with the stove.
Conditions of application of guarantee To benefit from this commercial guarantee, you must correctly complete and return the guarantee form to us within 30 days of purchase.
You will then receive your Stûv guarantee certificate by e-mail to the address indicated or by post. Keep this document safe. In the event of problems with your stove, please contact your distributor. You must present him/her with this certificate for the commercial guarantee to apply
La garantie Stûv : une démarche simple pour plus de tranquillité
Ce foyer a été conçu pour vous offrir un maximum de plaisir, de confort et de sécurité. Fabriqué avec le plus grand soin, au départ de matériaux et de composants de qualité, il fonctionnera des années sans problème. Si, malgré notre attention, il devait présenter une défectuosité, nous nous engageons à y remédier. Cependant, vous devez enregistrer votre produit pour que notre service après-vente vous offre la meilleure attention et réponde efficacement à vos questions.
Garantie commerciale Stûv
La garantie Stûv concerne tout acheteur final (utilisateur) d’un appareil Stûv. Elle prend cours à la date de facture de vente originale du vendeur à l’acheteur.
Durée de la garantie
Sans préjudice de la garantie des vices cachés, la garantie commerciale Stûv est de : 5 ans sur le corps du foyer 3 ans sur les autres pièces (grille de fond, mécanisme de porte, charnières, poulies, glissières, fermoirs,...)
Valable pour les foyers achetés après le 01/07/2010. Seule la facture de vente établie par le revendeur à l’acheteurfinal est valable comme preuve pour la garantie.
Pour les achats antérieurs au 01/07/2010, se référer auxconditions de garantie reprise dans la notice installation/moded’emploi remise avec le foyer.
Conditions d’application de la garantie Pour bénéficier de cette garantie commerciale, il faut nous renvoyer le formulaire de garantie dûment complété dans les 30 jours qui suivent votre achat.
Vous recevrez ensuite votre certificat de garantie Stûv, par e-mail à l’adresse communiquée ou par courrier. Conservez bience document. En cas de problème avec votre foyer, adressez-vous à votre revendeur. Vous devrez lui présenter ce certificatpour que la garantie commerciale soit effective.

59
Stûv stoves are guaranteed against:
– manufacturing faults,– faults with the paintwork on the visible external parts of thestove
The guarantee does not cover
– the components subject to wear and tear (e.g. refractoryvermiculite bricks, seals) which have to be replaced from time to time in normal usage, – the glass,– damage caused to the stove or operational faults due to:> installation which does not comply with good practice guidelines and the installation instructions and with applicable national and regional regulations, > abnormal usage which does not comply with the directions for use instructions, > a lack of maintenance, > external factors, such as flooding, lightning, fire... > local conditions such as draught problems or faults caused by defective ducts. – damage caused by:> faulty installation, > overheating, > the use of inappropriate fuel. The guarantee is restricted to the exchange of components recognized as defective excluding replacement, compensation and interest costs. The replacement components supplied under the guarantee are guaranteed for the remainder of the guarantee period.
Your responsibility
As a user, you also have an important role to play in ensuring you get the best out of your Stûv. We strongly recommend: – that you entrust installation (or in any event check-over) to aqualified professional who is able, in particular, to check that the characteristics of the smoke flue are appropriate for the stove installed and to ensure that installation meets national and regional requirements in this field ; – read the directions for use and the maintenance guidelinescarefully ; – have the flue swept regularly to ensure optimal operation.We recommend sweeping at least once or twice a year and definitely before relighting the stove after a long period of inactivity either in general or just before the season when heat is required.
Note:
As a consumer, you have legal rights under the applicable national legislation governing the sale of consumer goods. Your rights are not affected by this commercial guarantee.
Les foyers Stûv sont garantis contre :
– les défauts de fabrication,– les défauts de peinture dans les parties extérieures visibles dufoyer.
La garantie ne couvre pas
– les pièces d'usure (ex. briques réfractaires, vermiculites,joints) qui nécessitent d’être remplacées de temps en temps enusage normal, – les vitres,– les dommages causés au foyer, ni les défauts defonctionnement dus : > à une installation non conforme aux règles de l’art et aux instructions d’installation, aux réglementations nationales et régionales en vigueur > à une utilisation anormale, non conforme aux indications du mode d’emploi, > à un manque d’entretien, > à une cause extérieure telle qu’inondation, foudre, incendie... > à des conditions locales, telles que les problèmes de tirage ou des défaillances liés à un conduit défectueux – les dégâts causés par :> une installation défectueuse > une surchauffe > l'utilisation d'un combustible inapproprié. La garantie est limitée à l’échange des éléments reconnusdéfectueux, à l’exclusion des frais liés au remplacement,dommages et intérêts. Les pièces de remplacement fournies engarantie sont garanties pour la période de garantie restant àcourir
Votre responsabilité
En tant qu'utilisateur, vous avez également un rôle important àjouer pour retirer de votre Stûv les satisfactions que vous en attendez. Nous vous recommandons instamment : – de confier son installation (ou en tout cas son contrôle) à unprofessionnel qualifié qui pourra notamment vérifier que les caractéristiques du conduit de fumées correspondent au foyer installé et qui s’assurera que l’installation respecte les exigences nationales et régionales en la matière ; – de lire attentivement le mode d’emploi et les consignesd’entretien ; – de faire ramoner le conduit régulièrement pour vous assurerun fonctionnement optimal. Nous préconisons le ramonage une à deux fois par an minimum, et impérativement avant de remettre le foyer au feu après une longue période d’interruption, soit en général juste avant la nouvelle saison de chauffe.
Remarque :
En tant que consommateur, vous avez des droits légaux autitre de la législation nationale applicable régissant la vente desbiens de consommation. Vos droits ne sont pas affectés par laprésente garantie commerciale.

60
Warranty
Your fireplace was designed to provide years of enjoyment, comfort, and safety. It was built and assembled with the greatest care using high-quality materials and components, to provide years of trouble-free use. However, if a problem arises, we will do our best to resolve the problem.
As a user you too have an important role in obtaining the satisfaction you expect from your Stûv fireplace.
We strongly recommend that you: - Entrust the installation (or, at any rate, its inspection) to a skilled professional who can ensure that the characteristics of the flue are appropriate for your fireplace. - Read the directions for use carefully and follow the maintenance instructions. - Have the flue swept at regular intervals (once a heating season with regular use), to ensure optimal operation and maximum safety.
Warranty coverage
Stûv fireplaces are warranted against: - manufacturing defects - painting defects in the visible portions of the fireplace - glass breakage only if it occurs when lighting the fire for the first time - transport damage if we are notified within 48 hours of delivery
This warranty does not cover damages to the fireplace or operational defects due to: - installation that does not comply with industry practice or the installation instructions - abnormal use that does not comply with the instructions for use - failure to perform maintenance - an external cause, such as floods, lightning, fire, etc.
The warranty is limited to the replacement of defective parts, excluding any damages.
Warranty terms
This warranty must be filled out and returned to us within one month from the date of purchase.
Warranty period
- 5 years on the body of the fireplace - 1 year on the refractory materials, sealing joints, door
mechanisms, hinges, pulleys, slides and clasps. -
The warranty begins on the date of purchase. The replacement of parts under warranty does not extend the duration of the initial guarantee.
Model
Serial number*: Model: Invoice date:
* This information is found on an identification plate attached to the bodyof the fireplace. The location of this plate is indicated in the instructions for use, in the warranty section.
Purchaser
Name: Address: Telephone: Installation address (if different):
Purchased from
Name: Address: Telephone:
Installer
I, the undersigned,_______________________________, acknowledge that the aforementioned fireplace was installed according to industry practice and in accordance with the technical recommendations contained in the installation instructions, and that the connections and flue have the characteristics required to ensure proper and safe operation.
Date:
Signature:
Company: Name: Address:
Phone:
Please fill in the warranty and fax it or return a copy to:
Stûv America inc. 4747 rue Bourg Montréal (Qc) H4T 1H9 Canada
Phone: +1 514 396 9463 Toll free: +1 866 487 7888 Fax: +1 514 528 9538
You can also register your fireplace at our Web site under Register your product.
www.stuvamerica.com | [email protected]

61
certificat de garantie
Ce foyer Stûv a été conçu pour vous offrir un maximum de plaisir, de confort et de sécurité ; il a été fabriqué avec le plus grand soin au départ de matériaux et de composants de qualité pour fonctionner des années sans problème. Si, malgré notre attention, il devait présenter une défectuosité, nous nous engageons à y remédier.
Cependant, comme utilisateur, vous avez également un rôle important pour retirer de votre Stûv les satisfactions que vous en attendez.
Nous vous recommandons instamment : - de confier son installation (ou en tout cas son contrôle) à un professionnel qualifié qui pourra notamment vérifier que les caractéristiques du conduit de fumées correspondent au foyer installé, - de lire attentivement le mode d’emploi et les consignes d’entretien, - de faire ramoner le conduit régulièrement (une fois par saison de chauffe, pour une utilisation régulière) pour vous assurer un fonctionnement optimal et une sécurité maximale.
Couverture de la garantie
Les foyers Stûv sont garantis contre : - les défauts de fabrication, - les défauts de peinture dans les parties visibles du foyer, - le bris de vitre uniquement lorsqu’il survient lors de la première mise à feu, - les détériorations dues au transport à condition qu’elles soient signalées dans les 48 heures de la livraison.
La présente garantie ne couvre pas les dommages causés au foyer ni les défauts de fonctionnement dus : - à une installation non conformes aux règles de l’art et aux instructions d’installation, - à une utilisation anormale, non conforme aux indications du mode d’emploi, - à un manque d’entretien, - à une cause extérieure telle qu’inondations, foudre, incendie… La garantie est limitée à l’échange des éléments reconnus défectueux, à l’exclusion de dommages et intérêts.
Conditions de la garantie
Le présent document doit nous avoir été renvoyé, dûment complété, dans le mois qui suit la date de facture du vendeur à l’acquéreur.
Durée de la garantie :
- 5 ans sur le corps du foyer - 1 an sur les matériaux réfractaires, les joints d’étanchéité, le mécanisme de porte, les charnières, les poulies, les glissières, et les fermoirs.
La période de garantie prend cours à la date de facture du vendeur à l’acquéreur. L’échange de pièces sous garantie ne prolonge pas la durée de la garantie initiale.
Le foyer
N° de série* : Modèle : Date de facture :
* Cette indication se trouve sur une plaque signalétique fixée sur le corpsdu foyer. L’emplacement de cette plaque est indiqué dans le mode d’emploi, chapitre garantie.
L’acquéreur
Nom : Adresse : Téléphone : Adresse d’installation (si différente)
Le vendeur
Nom : Adresse : Téléphone :
L’installateur (ou toute autre personne qui aurait réalisé l’installation)
Je soussigné, _________________________________________, déclare que le foyer mentionné ci-dessus a été installé suivant les règles de l’art et conformément aux recommandations techniques reprises dans les instructions d’installations et que raccordement et conduit de fumées ont les caractéristiques requises pour assurer un fonctionnement correct et sûr.
Date :
Signature :
Entreprise : Nom : Adresse :
Téléphone :
Merci de compléter ce document et le faxer ou en renvoyer une copie à :
Stûv America inc. 4747 rue Bourg Montréal (Qc) H4T 1H9 Canada Télécopieur : +1 514 528 9538
Il est aussi accessible via notre site Internet sous Enregistrez votre produit.
www.stuvamerica.com | [email protected]

62
Exclusive importer for North America: Importateur exclusif pour l’Amérique du nord :
Stûv America inc. 4747 rue Bourg Montréal QC H4T 1H9 Canada +1 866 487 7888 www.stuvamerica.com [email protected]
Stûv fireplaces are design and made in Belgium by: Les foyers Stûv sont conçus et fabriqués en Belgique par :
Stûv sa/nv |rue Jules Borbouse 4 |B-5170 Bois-de-Villers www.stuv.com

63


![EXTRUDER + MIXER MODEL AEX5 - Arcobaleno · STANDARD FEATURES Mixer and extruder– all-in-one process Only 15 minutes to mix and extrude 1.25 lbs. per batch [Up to 5 lbs. per hour]](https://static.fdocuments.in/doc/165x107/607be5261b62546b6768fb06/extruder-mixer-model-aex5-arcobaleno-standard-features-mixer-and-extrudera.jpg)