2S TINY GT7 TINY GT8
12
Instruction Manual 180920 User manual and video please visit:WWW.LDARC.COM PNP input voltage only 2S,over voltage can cause damage Safety Note:Fly only in safe areas,away from other people; The company shall not be liable for any flight caused by accident or loss. TINY GT7 TINY GT8 Only 2S Input Voltage Wheelbase Motor Prop Battery Weight 75mm XT0803-9000KV 1535 40.5g(no receiver and battery) 87.6mm XT0804-7500KV 1935 7.4V 380mAh 50C 47.8g(no receiver and battery) FC+ESC Betaflight SPRACINGF3+4in1 ESC 10A BLHeliS VTX Q25OSD(25mW 16CH Smart OSD V1) Camera OV231(800TVL 150 。 NTSC) Receiver RX2A PRO,DSM2,AC900(S-FHSS+D16) Name TINY GT8 TINY GT7 2S 2S Power
Transcript of 2S TINY GT7 TINY GT8

Instruction Manual
180920
User manual and video please visit:WWW.LDARC.COM
PNP input voltage only 2S,over voltage can cause damage
Safety Note:Fly only in safe areas,away from other people;The company shall not be liable for any flight caused by accident or loss.
TINY GT7 TINY GT8
Only 2SInput Voltage
Wheelbase
Motor
Prop
Battery
Weight
75mm
XT0803-9000KV
1535
40.5g(no receiver and battery)
87.6mm
XT0804-7500KV
1935
7.4V 380mAh 50C
47.8g(no receiver and battery)
FC+ESC Betaflight SPRACINGF3+4in1 ESC 10A BLHeliS
VTX Q25OSD(25mW 16CH Smart OSD V1)
Camera OV231(800TVL 150。
NTSC)
Receiver RX2A PRO,DSM2,AC900(S-FHSS+D16)
Name
TINY GT8TINY GT7
2S2SPower
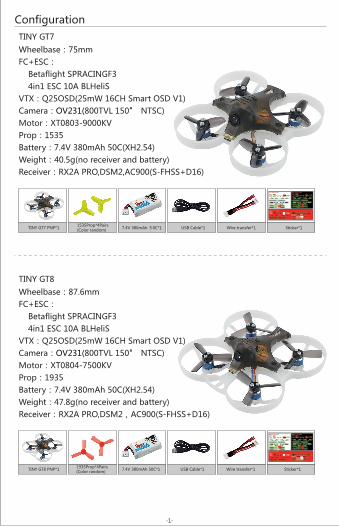
Configuration
-1-
Wheelbase:75mmFC+ESC: Betaflight SPRACINGF3 4in1 ESC 10A BLHeliSVTX:Q25OSD(25mW 16CH Smart OSD V1)Camera:OV231(800TVL 150
。 NTSC)
Motor:XT0803-9000KVProp:1535Battery:7.4V 380mAh 50C(XH2.54)Weight:40.5g(no receiver and battery)Receiver:RX2A PRO,DSM2,AC900(S-FHSS+D16)
Wheelbase:87.6mmFC+ESC: Betaflight SPRACINGF3 4in1 ESC 10A BLHeliSVTX:Q25OSD(25mW 16CH Smart OSD V1)Camera:OV231(800TVL 150
。 NTSC)
Motor:XT0804-7500KVProp:1935Battery:7.4V 380mAh 50C(XH2.54)Weight:47.8g(no receiver and battery)Receiver:RX2A PRO,DSM2,AC900(S-FHSS+D16)
TINY GT7
TINY GT8
TINY GT7 PNP*1 1535Prop*4Pairs(Color random) 7.4V 380mAh 50C*1 USB Cable*1 Wire transfer*1 Sticker*1
TINY GT8 PNP*1 1935Prop*4Pairs(Color random) 7.4V 380mAh 50C*1 USB Cable*1 Wire transfer*1 Sticker*1
图形中所有红色部份为透明
图形中所有白色部份为透明 图形中所有黑色部份为透明
图形中所有红色部份为透明
图形中所有白色部份为透明 图形中所有黑色部份为透明
-2-
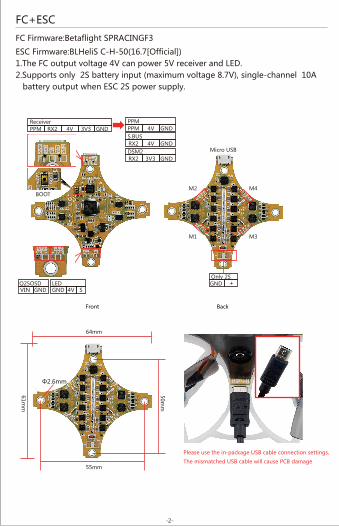
FC+ESC
FC Firmware:Betaflight SPRACINGF3
ESC Firmware:BLHeliS C-H-50(16.7[Official])1.The FC output voltage 4V can power 5V receiver and LED.2.Supports only 2S battery input (maximum voltage 8.7V), single-channel 10A battery output when ESC 2S power supply.
Micro USB
GND +
M1
M2 M4
M3
Only 2SQ25OSDVIN GND
BOOT
LEDGND 4V S
PPMReceiver
RX2 4V 3V3 GND PPMPPM
4V GNDS.BUSRX2 4V GNDDSM2RX2 3V3 GND
Φ2.6mm
55mm
64mm
50mm
61mm
Front Back
Please use the in-package USB cable connection settings,
The mismatched USB cable will cause PCB damage
-3-
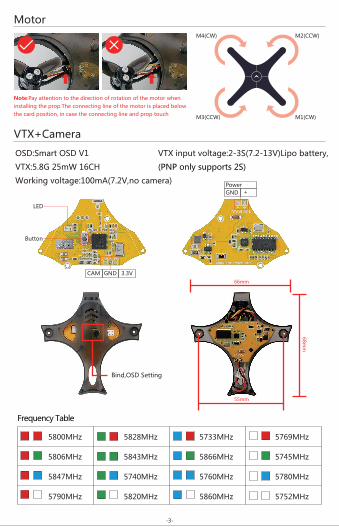
Motor
VTX+Camera
OSD:Smart OSD V1
VTX:5.8G 25mW 16CH
Working voltage:100mA(7.2V,no camera)
VTX input voltage:2-3S(7.2-13V)Lipo battery,
(PNP only supports 2S)
Frequency Table
5800MHz 5828MHz 5733MHz 5769MHz
5806MHz 5843MHz 5866MHz 5745MHz
5847MHz 5740MHz 5760MHz 5780MHz
5790MHz 5820MHz 5860MHz 5752MHz
LED
Button
CAM
Power+GND
GND 3.3V
Bind,OSD Setting
66mm
55mm
68mm
Note:Pay attention to the direction of rotation of the motor wheninstalling the prop.The connecting line of the motor is placed below the card position, in case the connecting line and prop touch
M4(CW) M2(CCW)
M3(CCW) M1(CW)

-4-
Smart OSD V1
Operating Instructions
1.Battery voltage
2.Alarm voltage(recommended set to 3.3V or 3.4V)
3.Auxiliary line
4.Camera mode settings
5.Time display
6.User name settings
7.40s no key operation,it will exit OSD setting interface
Auto PLA NTSC
Open , Close , Back
Button
Press and hold the button,then power on
Enter the OSD Settings screen
Short press button,select menu and configuration
Long press button,enter menu and configuration
Power on,then hold the button
Short press button,Change frequency
Press and hold the button 30s,VTX restore factory settings(white LED flashing)

BIND:Power on the receiver while pressing the key,green LED fast blink meaning already in bind mode,user can release the key,then set your TX into bind mode.Green LED turn off and red LED solid mean bind finished,exit TX from bind mode,receiver’sgreen LED solid mean working normally.
FAILSAFE:Support 2 failsafe mode,press the key and hold 3s while receiver working normally can switch failsafe mode.Please make sure failsafe is working correctly before use the receiver!Failsafe mode 1: After 1s when lost transmitter signal,S.BUS keep output,throttle will 988us,all other channels will 1500us.Failsaft mode 2: After 1s when lost transmitter signal,S.BUS not output,user should setting related parameters to ensure flight controller handle failsafe.
ReceiverAC900(S-FHSS+D16) bind,transmitter(FRSKY X9D/Futaba T18SZ)
RX2A PRO Bind(S.BUS),transmitter(FLYSKY FS-i6)
-5-
STATUS LED:LED of RX2A-PRO blink twice then solid when power on,the meaning as follow
First blink(air system) Second blink(failsafe mode) Then solid(signal status)
AFHDS2A air systemFailsafe mode 1
Failsafe mode 2
No signal
Signal received
Bind:Check receiver mode before bind,the first blink after power on indicate the setting, is S-FHSS, is D16FUTABA S-FHSS BIND:Turn on the TX then power on AC900 while pressing the key, green LED fast blink meaning already in bind mode, user can release the key. Bind procedure is completed and the receiver is working normally when green LED is solidFRSKY D16(NO Telemetry) BIND:Power on AC900 while pressing the key, green LED fast blink meaning already in bind mode, user can release the key, then set your TX into D16 bind mode. red LED solid meaning bind finished, exit TX from bind mode, receiver’s green LED solid meaning working normally
-6-
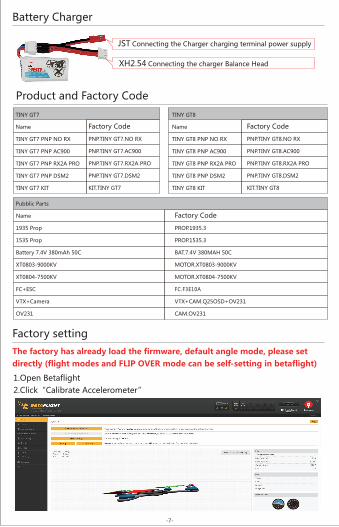
Product and Factory Code
Name
TINY GT7 PNP NO RX
TINY GT7 PNP AC900
TINY GT7 PNP RX2A PRO
TINY GT7 PNP DSM2
TINY GT7 KIT
TINY GT7 TINY GT8
Factory Code
PNP.TINY GT7.NO RX
PNP.TINY GT7.AC900
PNP.TINY GT7.RX2A PRO
PNP.TINY GT7.DSM2
KIT.TINY GT7
Name
TINY GT8 PNP NO RX
TINY GT8 PNP AC900
TINY GT8 PNP RX2A PRO
TINY GT8 PNP DSM2
TINY GT8 KIT
Factory Code
PNP.TINY GT8.NO RX
PNP.TINY GT8.AC900
PNP.TINY GT8.RX2A PRO
PNP.TINY GT8.DSM2
KIT.TINY GT8
Factory setting
Battery Charger
Pubblic Parts
Factory Code
PROP.1935.3
PROP.1535.3
BAT.7.4V 380MAH 50C
MOTOR.XT0803-9000KV
MOTOR.XT0804-7500KV
FC.F3E10A
VTX+CAM.Q25OSD+OV231
CAM.OV231
Name
1935 Prop
1535 Prop
Battery 7.4V 380mAh 50C
XT0803-9000KV
XT0804-7500KV
FC+ESC
VTX+Camera
OV231
-7-
The factory has already load the firmware, default angle mode, please set directly (flight modes and FLIP OVER mode can be self-setting in betaflight)
2.Click“Calibrate Accelerometer”1.Open Betaflight
JST
Connecting the charger Balance Head
Connecting the Charger charging terminal power supply
XH2.54

-8-
3.Open UART2,then saved
4.Select ESC protocol“DSHOT600”,set up the receiver protocol,open LED.
Please refer to the receiver sectionto set the receiver protocol
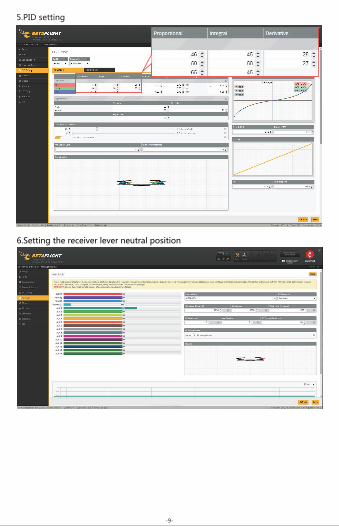
6.Setting the receiver lever neutral position
-9-
5.PID setting

7.Default angle mode,setting of receiver is 5th channel ARM(AUX1)
8.LED setting,then saved
1.Open ,then click ,select firmware
2.Click ,then click to download FW to FC,click after FW updating finish into setting menu
Connect
SPRACINGF3
3.4.1- SPRACINGF3 -02-08-2018 17:39(stable)
-10-
When the drone is not flying properly, try to load FC firmware,then restore factory settings
-11-
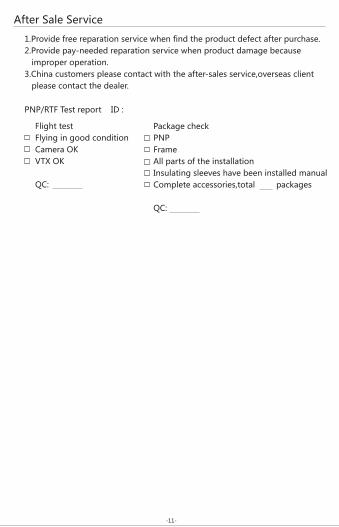
After Sale Service
1.Provide free reparation service when find the product defect after purchase.2.Provide pay-needed reparation service when product damage because improper operation.3.China customers please contact with the after-sales service,overseas client please contact the dealer.
PNP/RTF Test report ID :
Flight testFlying in good conditionCamera OKVTX OK
QC:
Package checkPNPFrameAll parts of the installationInsulating sleeves have been installed manualComplete accessories,total packages
QC: