280 2801 Instructions - TACO...
8
Grand Slam 280 and Grand Slam 2801 Installation Instructions Taco Metals, Inc., [email protected] TacoMarine.com Patent #6,668,745 GS-280 GS-2801
Transcript of 280 2801 Instructions - TACO...
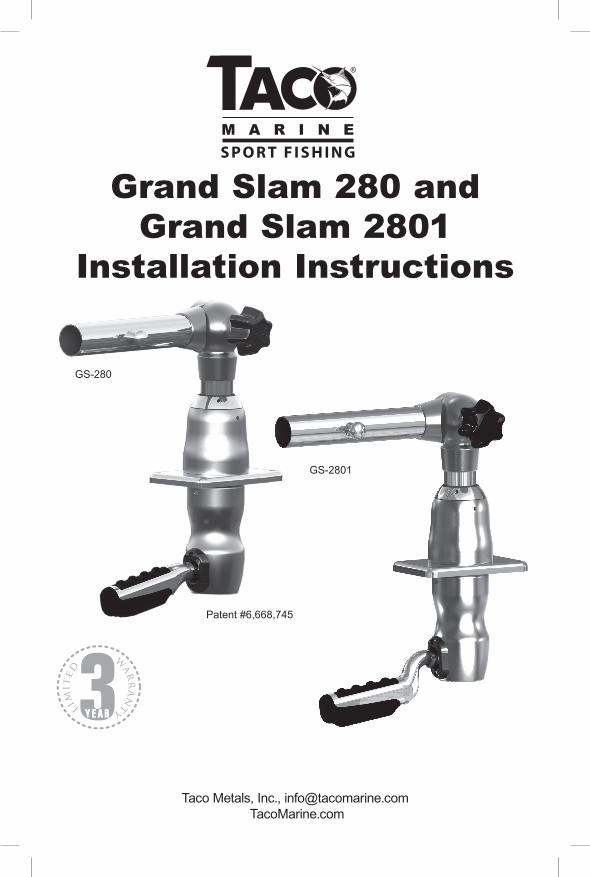
Grand Slam 280 and Grand Slam 2801
Installation Instructions
Taco Metals, Inc., [email protected] TacoMarine.com
Patent #6,668,745
GS-280
GS-2801
Page │ 2 [email protected] • 800-653-8567
Tools Needed:Electric Drill with 5/16" Drill Bit • 3/16" Allen Wrench • 1/2" Crescent Wrench
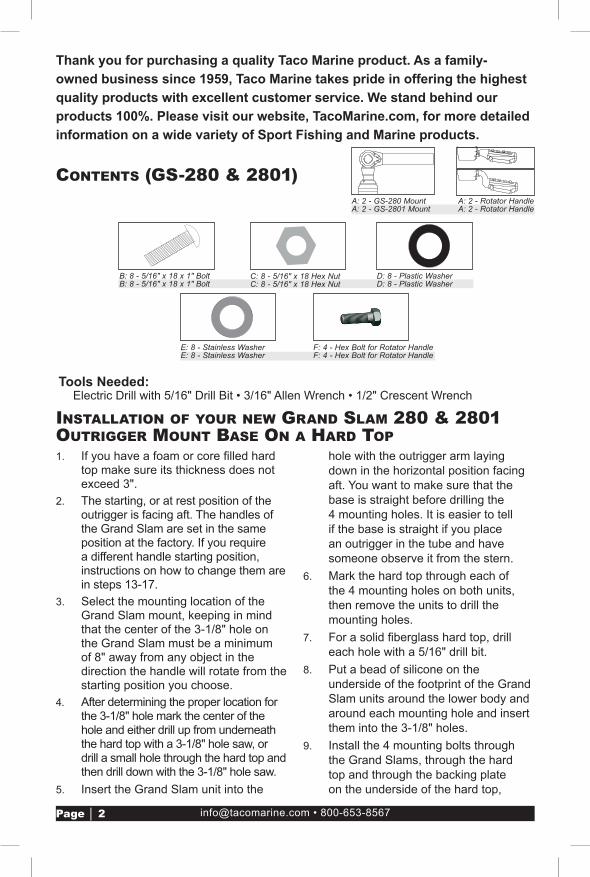
Contents (Gs-280 & 2801)
6.0
13.2
6.0
10.9
10.2
3.9
9.0
7.6
6.0
11.1
5.3
All dimensions are shown in inches
A: 2 - GS-280 MountA: 2 - GS-2801 Mount
B: 8 - 5/16" x 18 x 1" BoltB: 8 - 5/16" x 18 x 1" Bolt
C: 8 - 5/16" x 18 Hex NutC: 8 - 5/16" x 18 Hex Nut
D: 8 - Plastic WasherD: 8 - Plastic Washer
E: 8 - Stainless WasherE: 8 - Stainless Washer
1. If you have a foam or core fi lled hard top make sure its thickness does not exceed 3".
2. The starting, or at rest position of the outrigger is facing aft. The handles of the Grand Slam are set in the same position at the factory. If you require a different handle starting position, instructions on how to change them are in steps 13-17.
3. Select the mounting location of the Grand Slam mount, keeping in mind that the center of the 3-1/8" hole on the Grand Slam must be a minimum of 8" away from any object in the direction the handle will rotate from the starting position you choose.
4. After determining the proper location for the 3-1/8" hole mark the center of the hole and either drill up from underneath the hard top with a 3-1/8" hole saw, or drill a small hole through the hard top and then drill down with the 3-1/8" hole saw.
5. Insert the Grand Slam unit into the
hole with the outrigger arm laying down in the horizontal position facing aft. You want to make sure that the base is straight before drilling the 4 mounting holes. It is easier to tell if the base is straight if you place an outrigger in the tube and have someone observe it from the stern.
6. Mark the hard top through each of the 4 mounting holes on both units, then remove the units to drill the mounting holes.
7. For a solid fi berglass hard top, drill each hole with a 5/16" drill bit.
8. Put a bead of silicone on the underside of the footprint of the Grand Slam units around the lower body and around each mounting hole and insert them into the 3-1/8" holes.
9. Install the 4 mounting bolts through the Grand Slams, through the hard top and through the backing plate on the underside of the hard top,
Thank you for purchasing a quality Taco Marine product. As a family-owned business since 1959, Taco Marine takes pride in offering the highest quality products with excellent customer service. We stand behind our products 100%. Please visit our website, TacoMarine.com, for more detailed information on a wide variety of Sport Fishing and Marine products.
6.0
13.2
6.0
10.9
10.2
3.9
9.0
7.6
6.0
11.1
5.3
All dimensions are shown in inches
A: 2 - Rotator HandleA: 2 - Rotator Handle
F: 4 - Hex Bolt for Rotator HandleF: 4 - Hex Bolt for Rotator Handle
6.0
13.2
6.0
10.9
10.2
3.9
9.0
7.6
6.0
11.1
5.3
All dimensions are shown in inches
InstallatIon of your new Grand slam 280 & 2801 outrIGGer mount Base on a Hard top
Page │ 3 [email protected] • 800-653-8567
install the washers and nuts and tighten the nuts while someone holds the screws with an Allen wrench.
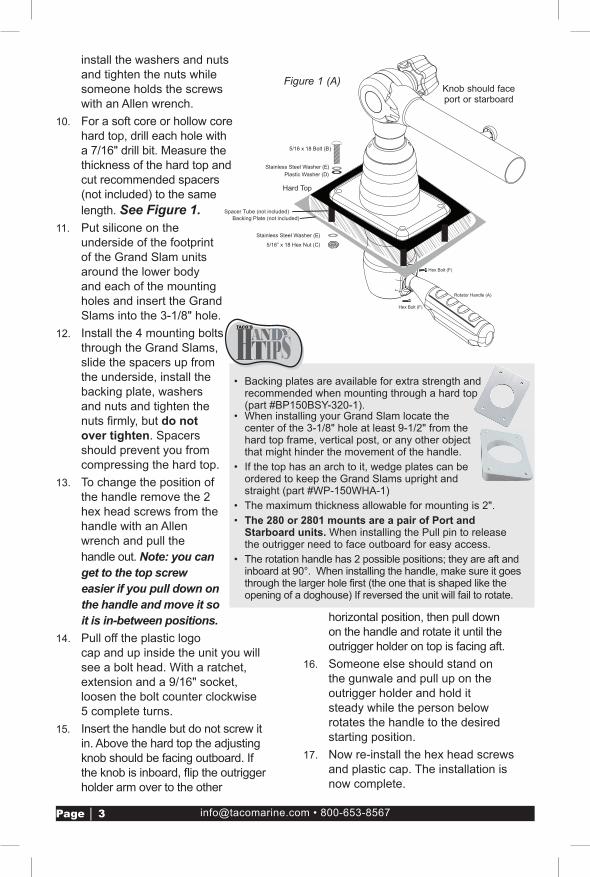
10. For a soft core or hollow core hard top, drill each hole with a 7/16" drill bit. Measure the thickness of the hard top and cut recommended spacers (not included) to the same length. See Figure 1.
11. Put silicone on the underside of the footprint of the Grand Slam units around the lower body and each of the mounting holes and insert the Grand Slams into the 3-1/8" hole.
12. Install the 4 mounting bolts through the Grand Slams, slide the spacers up from the underside, install the backing plate, washers and nuts and tighten the nuts fi rmly, but do not over tighten. Spacers should prevent you from compressing the hard top.
13. To change the position of the handle remove the 2 hex head screws from the handle with an Allen wrench and pull the handle out. Note: you can get to the top screw easier if you pull down on the handle and move it so it is in-between positions.
14. Pull off the plastic logo cap and up inside the unit you will see a bolt head. With a ratchet, extension and a 9/16" socket, loosen the bolt counter clockwise 5 complete turns.
15. Insert the handle but do not screw it in. Above the hard top the adjusting knob should be facing outboard. If the knob is inboard, fl ip the outrigger holder arm over to the other
horizontal position, then pull down on the handle and rotate it until the outrigger holder on top is facing aft.
16. Someone else should stand on the gunwale and pull up on the outrigger holder and hold it steady while the person below rotates the handle to the desired starting position.
17. Now re-install the hex head screws and plastic cap. The installation is now complete.
Hard Top
5/16 x 18 Bolt (B)
Stainless Steel Washer (E)
5/16” x 18 Hex Nut (C)
Plastic Washer (D)
Backing Plate (not included)
Stainless Steel Washer (E)
Hex Bolt (F)
Hex Bolt (F)
Spacer Tube (not included)
Rotator Handle (A)
Figure 1 (A)
• Backing plates are available for extra strength and recommended when mounting through a hard top (part #BP150BSY-320-1).
• When installing your Grand Slam locate the center of the 3-1/8" hole at least 9-1/2" from the hard top frame, vertical post, or any other object that might hinder the movement of the handle.
• If the top has an arch to it, wedge plates can be ordered to keep the Grand Slams upright and straight (part #WP-150WHA-1)
• The maximum thickness allowable for mounting is 2".• The 280 or 2801 mounts are a pair of Port and
Starboard units. When installing the Pull pin to release the outrigger need to face outboard for easy access.
• The rotation handle has 2 possible positions; they are aft and inboard at 90°. When installing the handle, make sure it goes through the larger hole first (the one that is shaped like the opening of a doghouse) If reversed the unit will fail to rotate.
Knob should face port or starboard
Page │ 4 [email protected] • 800-653-8567
1. To find the proper location of the mounting plate keep in mind that the handle of the GS-280 and 2801 requires 8" of clearance from the center of the 3-1/8" hole in order to rotate the outrigger 90º from facing aft to the outboard position. The handle positions can be changed on this model.
2. If you are going to weld your own mounting plates to the frame, unlace the canvas and remove any wires that may be inside the tubing of the brace bars and the T-Top frame where you are going to weld. If you are using one of our weld-on or clamp-on plates, steps 3 and 4 have been done for you. If you are using our clamp-on plate it is not necessary to unlace the canvas.
3. If you are having plates made, they should be 3/8" thick by 5" wide and long enough to fit between the brace bars. When drilling the holes, it is best to cut the 3-1/8" hole and drop the GS-280 into the hole and mark the location of the 4 mounting holes right through the holes in the unit. When determining where to place the 3-1/8" hole in the plate, refer to step 1.
4. Weld the plates to the frame and brace bars. The mounting plates should be welded on 3 sides.
5. Reinstall the lacing on the canvas.6. With a razor knife, cut an X in the
center of the canvas through the 3-1/8" holes in both of the aluminum mounting plates. Then cut each of those triangular pieces in half so you now have 8 flaps of canvas going down through the hole in the plate.
7. The Grand Slam pair come with the outrigger tube facing the same direction as the hole for the handle. If this is the handle position you want, one of the units will be ready to drop right in with the upper adjusting
knob facing outboard and the outrigger tube facing aft along with the handle opening you will need to install into.
8. On the underside of the Grand Slam put a bead of Silicone around all 5 holes of the unit and place on top of the canvas directly over the holes in the plate, insert the bolts and tighten with a 3/16" Allen Wrench and re-install the handle.
9. To change the handle position of the other unit, first follow steps 8 and 9, but do not put the handle in yet. Pull off the plastic logo cap and up inside the unit you will see a bolt head. With a ratchet, short extension and a 9/16" socket, loosen the bolt by turning it counter clockwise 5 complete turns.
10. Re-install the handle but do not screw it in. Pull down on the handle and rotate it until the outrigger holder on top is facing aft with the adjusting knob facing outboard. You may have to flip the outrigger holder over to the other horizontal position to accomplish this.
11. Someone else should stand on the gunwale, and pull up on the outrigger holder. The person below can now rotate the handle to any desired position. If the handle does not rotate, pull the handle out and loosen the bolt one more complete turn and try again.
12. Now re-install the hex head screws and plastic cap and the installation is complete.
InstallatIon of your new Grand slam 280 or 2801 outrIGGer mount Base on a soft top
GSE-1939BXY30-1
Optional Mounting Plate
Place bead of silicone sealer around hole in mounting plate.
Page │ 5 [email protected] • 800-653-8567
Care of your Grand slams
Rinse your Taco Marine Grand Slam Mounts thoroughly with fresh water after each use. Do not wax or use caustic cleaning agents on any of the components as that promotes corrosion.
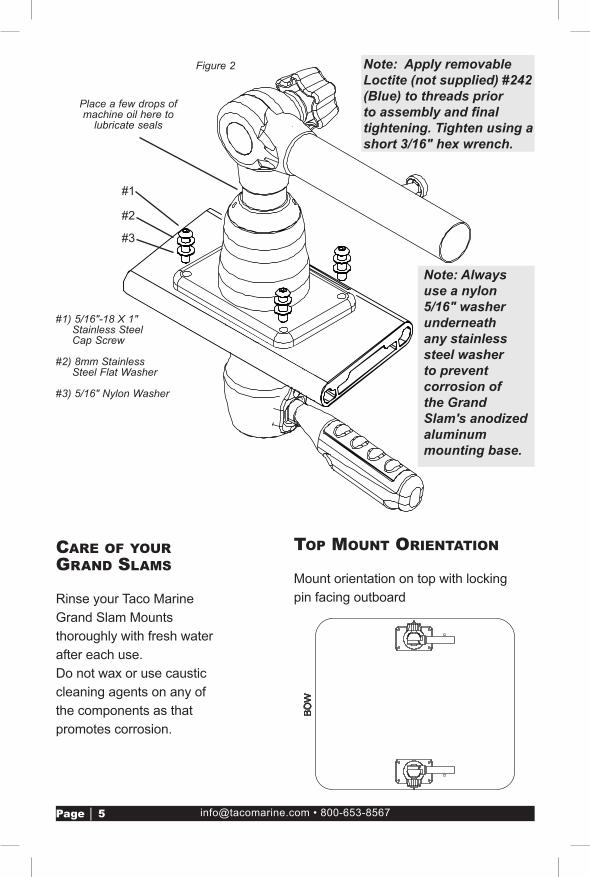
Note: Apply removable Loctite (not supplied) #242 (Blue) to threads prior to assembly and final tightening. Tighten using a short 3/16" hex wrench.
Place a few drops of machine oil here to
lubricate seals
#1
#2
#3
#1) 5/16"-18 X 1" Stainless Steel Cap Screw
#2) 8mm Stainless Steel Flat Washer
#3) 5/16" Nylon Washer
Figure 2
BOW
GS-170
BOW
GS-280
BOW
GS-380
top mount orIentatIon
Mount orientation on top with locking pin facing outboard
Note: Always use a nylon 5/16" washer underneath any stainless steel washer to prevent corrosion of the Grand Slam's anodized aluminum mounting base.
Page │ 6 [email protected] • [email protected] • 800-653-8567
Patent #5,921,196AV
AIL
AB
LE T
AC
O M
AR
INE
AC
CE
SS
OR
IES
(sol
d se
para
tely
)
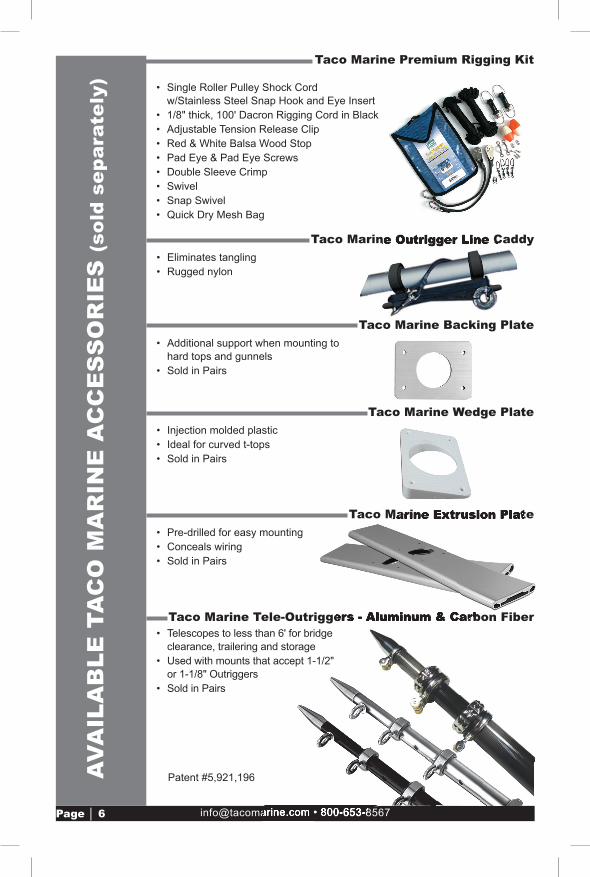
Taco Marine Premium Rigging Kit
Taco Marine Outrigger Line Caddy
• Single Roller Pulley Shock Cord w/Stainless Steel Snap Hook and Eye Insert
• 1/8" thick, 100' Dacron Rigging Cord in Black• Adjustable Tension Release Clip• Red & White Balsa Wood Stop• Pad Eye & Pad Eye Screws• Double Sleeve Crimp• Swivel• Snap Swivel• Quick Dry Mesh Bag
Taco Marine Tele-Outriggers - Aluminum & Carbon Fiber
• Eliminates tangling• Rugged nylon
• Telescopes to less than 6' for bridge clearance, trailering and storage
• Used with mounts that accept 1-1/2" or 1-1/8" Outriggers
• Sold in Pairs
Taco Marine Outrigger Line Caddy
Taco Marine Backing Plate• Additional support when mounting to
hard tops and gunnels• Sold in Pairs
Taco Marine Wedge Plate• Injection molded plastic• Ideal for curved t-tops• Sold in Pairs
Taco Marine Extrusion Plate• Pre-drilled for easy mounting• Conceals wiring• Sold in Pairs
Taco Marine Tele-Outriggers - Aluminum & Carbon Fiber
Taco Marine Extrusion Plate
Page │ 7 [email protected] • 800-653-8567
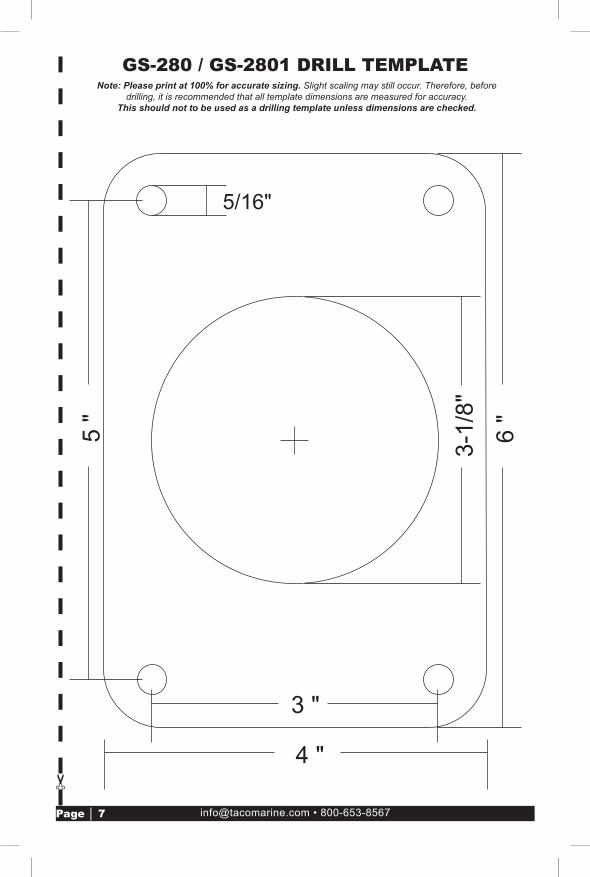
GS-280/2801 Drill TemplaTeGS-280 / GS-2801 DRILL TEMPLATE
Note: Please print at 100% for accurate sizing. Slight scaling may still occur. Therefore, before drilling, it is recommended that all template dimensions are measured for accuracy.
This should not to be used as a drilling template unless dimensions are checked.

INST
RUCT
-GRA
NDSL
AM28
0
TacoMarine.com is your “Go To” place for tips & answers to questions
about Taco Marine products.