26605278 Guide to HTML Book II Advanced HTML
52
Book II: Advanced HTML Developed by Donald Chase, LoudOffice.com http://www.LoudOffice.com [email protected] (Version 1.1 – January 2001)
-
Upload
ss9896455690 -
Category
Documents
-
view
54 -
download
4
Transcript of 26605278 Guide to HTML Book II Advanced HTML

Book II: Advanced HTML
Developed by Donald Chase, LoudOffice.com
http://www.LoudOffice.com [email protected]
(Version 1.1 – January 2001)
LoudOffice.com Guide to HTML – Part II Page 2
Table of Contents I. Tables ............................................................................................................ 3
Basic Table Tags .....................................................................................................3 Formatting Your Table..............................................................................................3 Headings and Captions.............................................................................................5 Controlling Alignment...............................................................................................6 Merging Cells ..........................................................................................................7 Using Colors in Your Tables.......................................................................................9
II. HTML Forms................................................................................................. 10 The <form> Element .............................................................................................11 The <input> Tag...................................................................................................12 Combo Boxes........................................................................................................13 Text Area .............................................................................................................13 Buttons ................................................................................................................14 A Complete Form Example......................................................................................15
III. Introduction to JavaScript ........................................................................ 16 Versions of JavaScript ............................................................................................16 Embedding JavaScript............................................................................................16 Naming Conventions..............................................................................................17 Variables and Data Types .......................................................................................18 Operators.............................................................................................................19 Assignment ..........................................................................................................20 Statements...........................................................................................................21 Conditionals..........................................................................................................21 Comments............................................................................................................22 Functions .............................................................................................................22 Document Object Model .........................................................................................23 Event Handlers......................................................................................................24
IV. Working with JavaScript in HTML................................................................. 26 Alerts, Prompts, and Confirms.................................................................................26 Mouse Over Events................................................................................................28 Popup Windows.....................................................................................................31 Writing HTML with JavaScript..................................................................................33 Validating Form Data With JavaScript.......................................................................34
V. An Introduction to Cascading Style Sheets .................................................. 35 Inline Styles .........................................................................................................36 Embedded Style Sheets..........................................................................................37 Linked Style sheets................................................................................................39 CSS Classes..........................................................................................................39 IDs ......................................................................................................................40 DIV and SPAN.......................................................................................................40 Cascading and Inheritance......................................................................................40 CSS Positioning.....................................................................................................41 CSS Cheat Sheet...................................................................................................44
VI. Adding CGI Scripts....................................................................................... 46 Adding CGI to Your Web Site ..................................................................................46 Accessing CGI Scripts Directly.................................................................................47 Accessing CGI Via a Form.......................................................................................48
VII. Getting Your Site Found By Search Engines .............................................. 49 Basic of Meta Tags.................................................................................................49
LoudOffice.com Guide to HTML – Part II Page 3
How to Get Listed..................................................................................................51
I. Tables Tables are one of the most powerful layout tools available to HTML developers. Initially only intended to be used for the columnar display of tabular information, tables are used throughout the Internet to precisely control the layout of web pages.
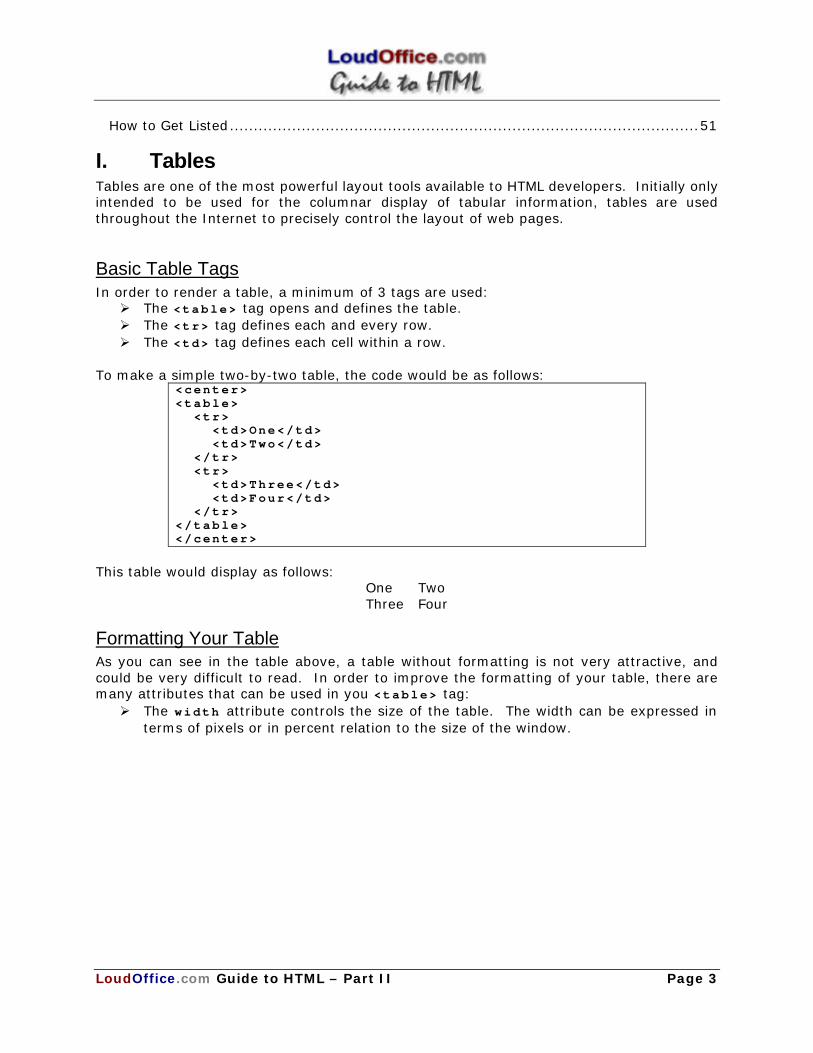
Basic Table Tags In order to render a table, a minimum of 3 tags are used: Ø The <table> tag opens and defines the table. Ø The <tr> tag defines each and every row. Ø The <td> tag defines each cell within a row.
To make a simple two-by-two table, the code would be as follows:
<center> <table> <tr> <td>One</td> <td>Two</td> </tr> <tr> <td>Three</td> <td>Four</td> </tr> </table> </center>
This table would display as follows:
One Two Three Four
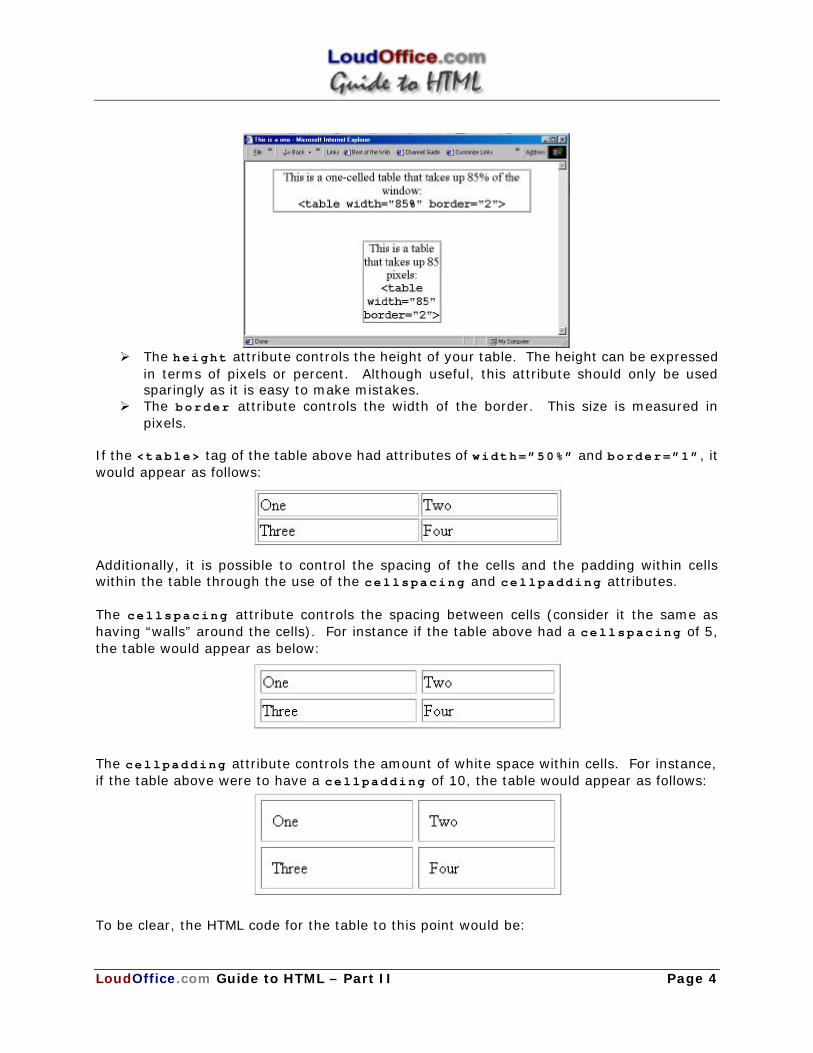
Formatting Your Table As you can see in the table above, a table without formatting is not very attractive, and could be very difficult to read. In order to improve the formatting of your table, there are many attributes that can be used in you <table> tag: Ø The width attribute controls the size of the table. The width can be expressed in
terms of pixels or in percent relation to the size of the window.
LoudOffice.com Guide to HTML – Part II Page 4
Ø The height attribute controls the height of your table. The height can be expressed
in terms of pixels or percent. Although useful, this attribute should only be used sparingly as it is easy to make mistakes.
Ø The border attribute controls the width of the border. This size is measured in pixels.
If the <table> tag of the table above had attributes of width=”50%” and border=”1” , it would appear as follows:
Additionally, it is possible to control the spacing of the cells and the padding within cells within the table through the use of the cellspacing and cellpadding attributes. The cellspacing attribute controls the spacing between cells (consider it the same as having “walls” around the cells). For instance if the table above had a cellspacing of 5, the table would appear as below:
The cellpadding attribute controls the amount of white space within cells. For instance, if the table above were to have a cellpadding of 10, the table would appear as follows:
To be clear, the HTML code for the table to this point would be:
LoudOffice.com Guide to HTML – Part II Page 5
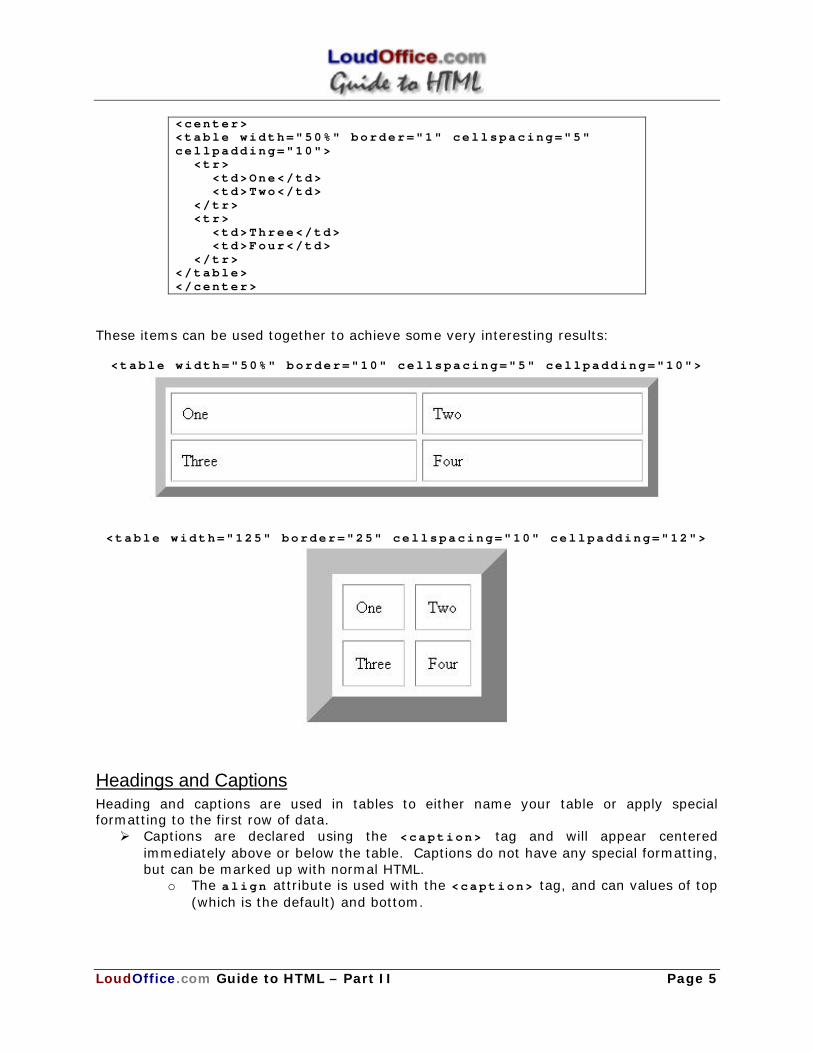
<center> <table width="50%" border="1" cellspacing="5" cellpadding="10"> <tr> <td>One</td> <td>Two</td> </tr> <tr> <td>Three</td> <td>Four</td> </tr> </table> </center>
These items can be used together to achieve some very interesting results:
<table width="50%" border="10" cellspacing="5" cellpadding="10">
<table width="125" border="25" cellspacing="10" cellpadding="12">
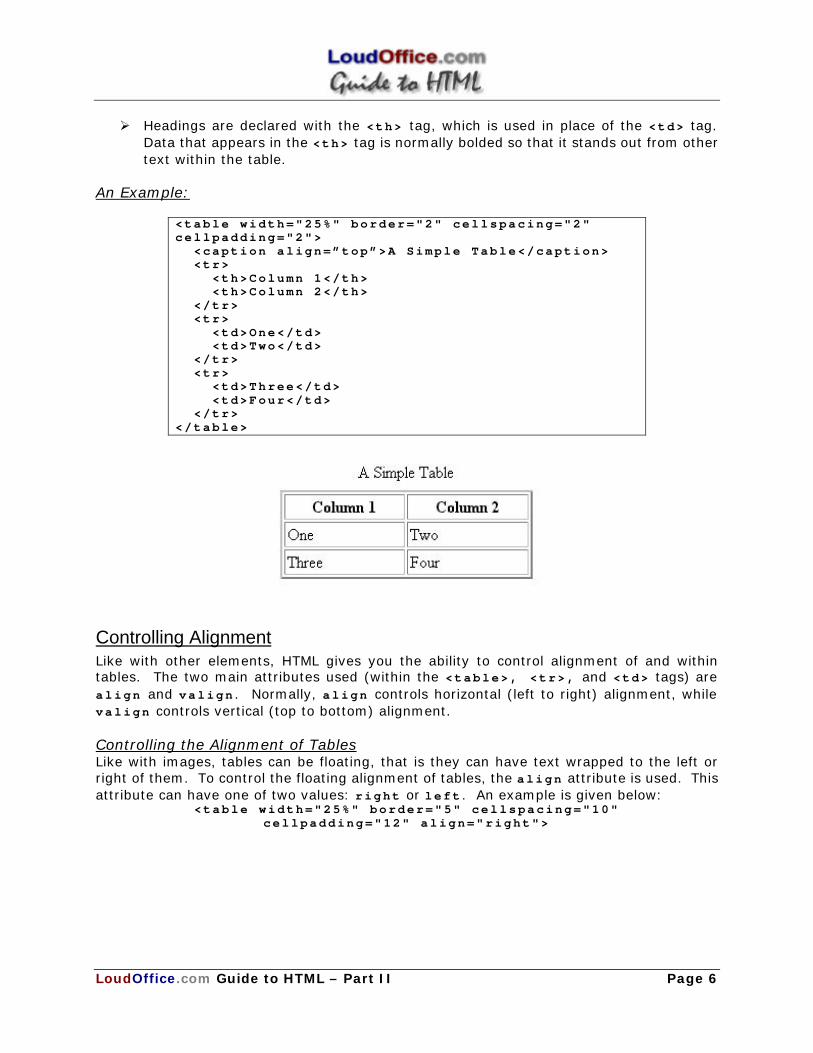
Headings and Captions Heading and captions are used in tables to either name your table or apply special formatting to the first row of data. Ø Captions are declared using the <caption> tag and will appear centered
immediately above or below the table. Captions do not have any special formatting, but can be marked up with normal HTML.
o The align attribute is used with the <caption> tag, and can values of top (which is the default) and bottom.
LoudOffice.com Guide to HTML – Part II Page 6
Ø Headings are declared with the <th> tag, which is used in place of the <td> tag. Data that appears in the <th> tag is normally bolded so that it stands out from other text within the table.
An Example:
<table width="25%" border="2" cellspacing="2" cellpadding="2"> <caption align=”top”>A Simple Table</caption> <tr> <th>Column 1</th> <th>Column 2</th> </tr> <tr> <td>One</td> <td>Two</td> </tr> <tr> <td>Three</td> <td>Four</td> </tr> </table>
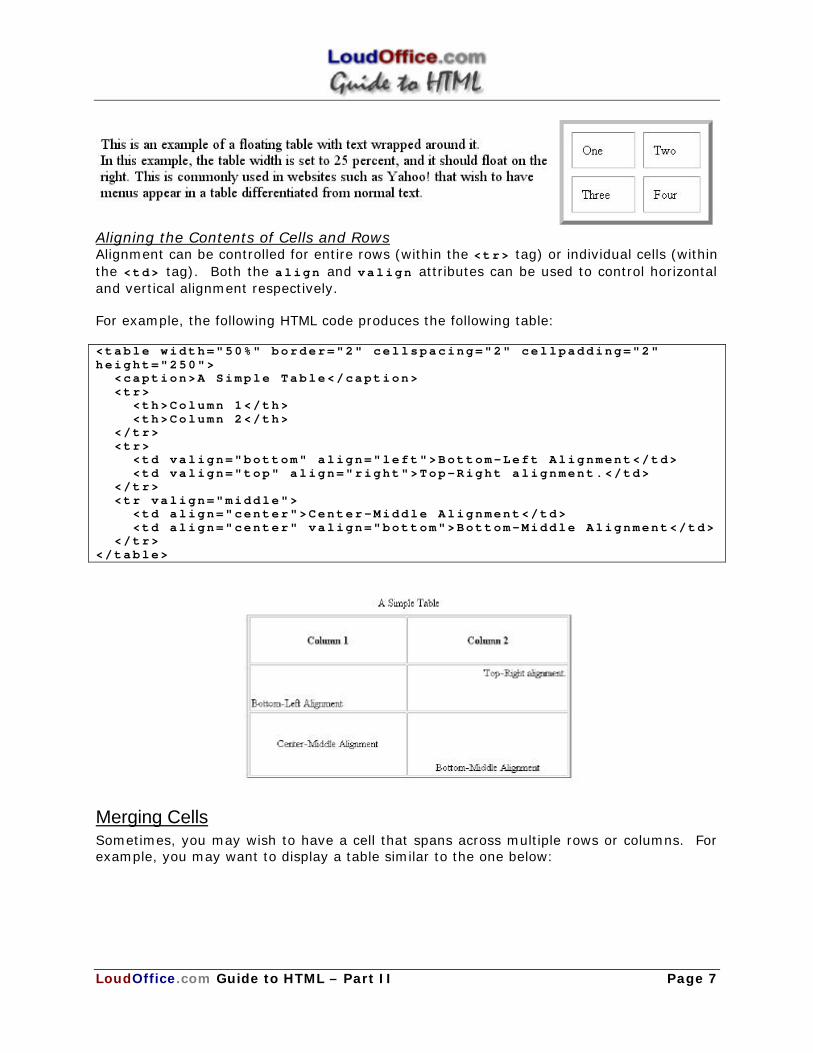
Controlling Alignment Like with other elements, HTML gives you the ability to control alignment of and within tables. The two main attributes used (within the <table>, <tr>, and <td> tags) are align and valign . Normally, align controls horizontal (left to right) alignment, while valign controls vertical (top to bottom) alignment. Controlling the Alignment of Tables Like with images, tables can be floating, that is they can have text wrapped to the left or right of them. To control the floating alignment of tables, the align attribute is used. This attribute can have one of two values: right or left . An example is given below:
<table width="25%" border="5" cellspacing="10" cellpadding="12" align="right">
LoudOffice.com Guide to HTML – Part II Page 7
Aligning the Contents of Cells and Rows Alignment can be controlled for entire rows (within the <tr> tag) or individual cells (within the <td> tag). Both the align and valign attributes can be used to control horizontal and vertical alignment respectively. For example, the following HTML code produces the following table: <table width="50%" border="2" cellspacing="2" cellpadding="2" height="250"> <caption>A Simple Table</caption> <tr> <th>Column 1</th> <th>Column 2</th> </tr> <tr> <td valign="bottom" align="left">Bottom-Left Alignment</td> <td valign="top" align="right">Top-Right alignment.</td> </tr> <tr valign="middle"> <td align="center">Center-Middle Alignment</td> <td align="center" valign="bottom">Bottom-Middle Alignment</td> </tr> </table>
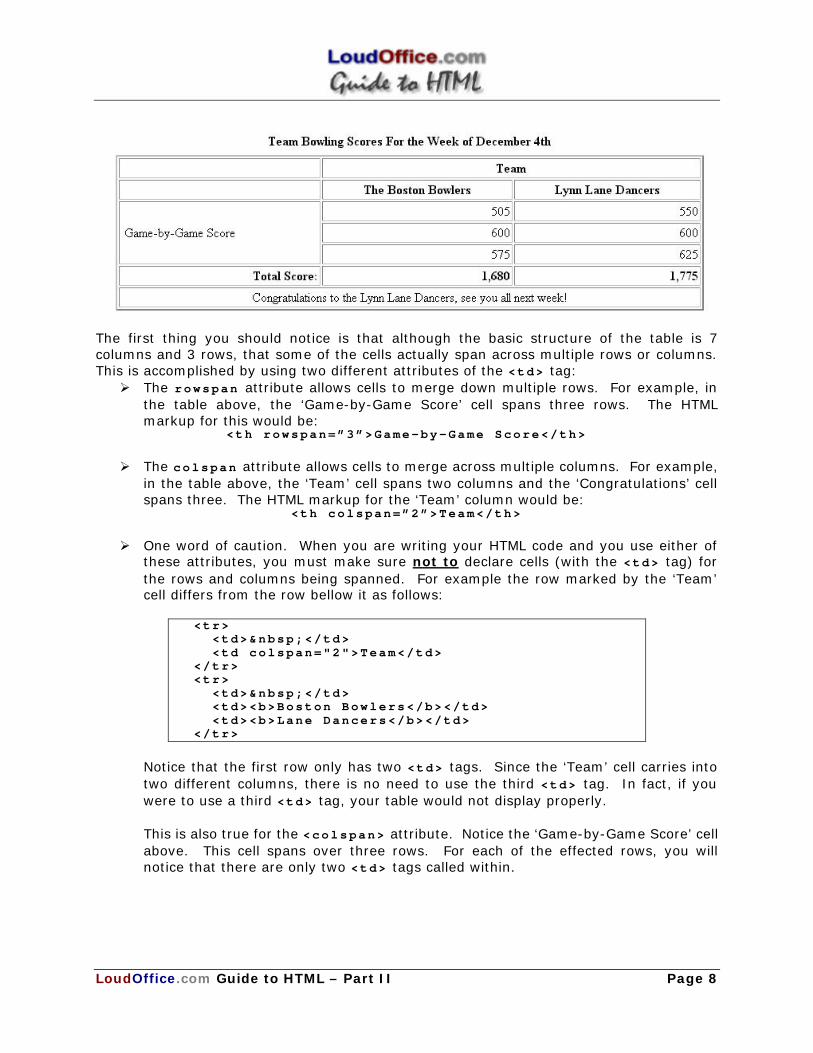
Merging Cells Sometimes, you may wish to have a cell that spans across multiple rows or columns. For example, you may want to display a table similar to the one below:
LoudOffice.com Guide to HTML – Part II Page 8
The first thing you should notice is that although the basic structure of the table is 7 columns and 3 rows, that some of the cells actually span across multiple rows or columns. This is accomplished by using two different attributes of the <td> tag: Ø The rowspan attribute allows cells to merge down multiple rows. For example, in
the table above, the ‘Game-by-Game Score’ cell spans three rows. The HTML markup for this would be:
<th rowspan=”3”>Game-by-Game Score</th>
Ø The colspan attribute allows cells to merge across multiple columns. For example, in the table above, the ‘Team’ cell spans two columns and the ‘Congratulations’ cell spans three. The HTML markup for the ‘Team’ column would be:
<th colspan=”2”>Team</th>
Ø One word of caution. When you are writing your HTML code and you use either of these attributes, you must make sure not to declare cells (with the <td> tag) for the rows and columns being spanned. For example the row marked by the ‘Team’ cell differs from the row bellow it as follows:
<tr> <td> </td> <td colspan="2">Team</td> </tr> <tr> <td> </td> <td><b>Boston Bowlers</b></td> <td><b>Lane Dancers</b></td> </tr>
Notice that the first row only has two <td> tags. Since the ‘Team’ cell carries into two different columns, there is no need to use the third <td> tag. In fact, if you were to use a third <td> tag, your table would not display properly. This is also true for the <colspan> attribute. Notice the ‘Game-by-Game Score’ cell above. This cell spans over three rows. For each of the effected rows, you will notice that there are only two <td> tags called within.
LoudOffice.com Guide to HTML – Part II Page 9
The full HTML code for the table displayed above is: <html> <head> <title>An Advanced Tables Example</title> </head> <body> <center> <table width="75%" border="2" cellspacing="2" cellpadding="2"> <caption><b><font face="Times New Roman">Team Bowling Scores For the Week of December 4th</font></b></caption> <tr> <th> </th> <th colspan="2">Team</th> </tr> <tr> <td> </td> <td align="center"><b>The Boston Bowlers</b></td> <td align="center"><b>Lynn Lane Dancers</b></td> </tr> <tr> <td rowspan="3"> Game-by-Game Score</td> <td align="right">505</td> <td align="right">550</td> </tr> <tr> <td align="right">600</td> <td align="right">600</td> </tr> <tr> <td align="right">575</td> <td align="right">625</td> </tr> <tr> <td align="right"><b>Total Score:</b></td> <td align="right"><b>1,680</b></td> <td align="right"><b>1,775</b></td> </tr> <tr> <td colspan="3" align="center">Congratulations to the Lynn Lane Dancers, see you all next week!</td> </tr> </table> </center> </body> </html>
Using Colors in Your Tables Like many other HTML elements, tables can be spruced up tremendously through the use of color. HTML allows website designers to control color for almost every aspect of tables, from the table itself, to table rows, to individual cells. To use colors, the bgcolor attribute is used. It can be used within the <table> , <tr> , or <td> tags. For example, to create a table with a black background, the <table> tag would be:
<table bgcolor=”#000000”>
LoudOffice.com Guide to HTML – Part II Page 10
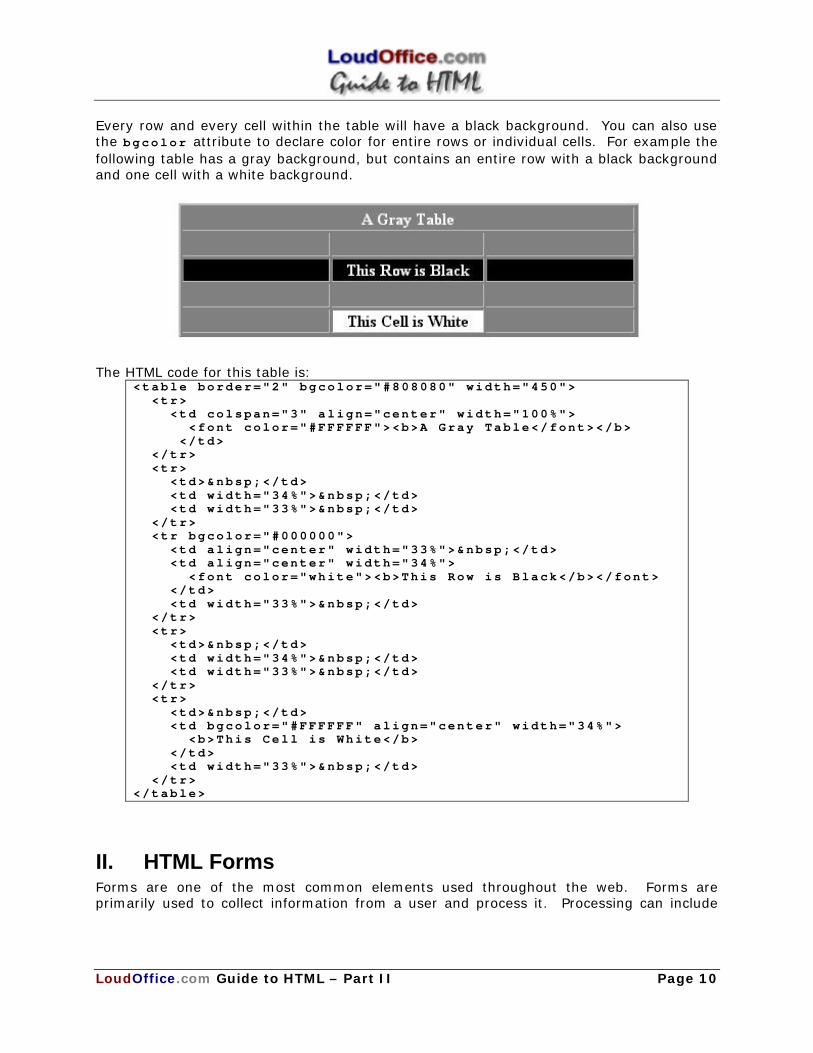
Every row and every cell within the table will have a black background. You can also use the bgcolor attribute to declare color for entire rows or individual cells. For example the following table has a gray background, but contains an entire row with a black background and one cell with a white background.
The HTML code for this table is:
<table border="2" bgcolor="#808080" width="450"> <tr> <td colspan="3" align="center" width="100%"> <font color="#FFFFFF"><b>A Gray Table</font></b> </td> </tr> <tr> <td> </td> <td width="34%"> </td> <td width="33%"> </td> </tr> <tr bgcolor="#000000"> <td align="center" width="33%"> </td> <td align="center" width="34%"> <font color="white"><b>This Row is Black</b></font> </td> <td width="33%"> </td> </tr> <tr> <td> </td> <td width="34%"> </td> <td width="33%"> </td> </tr> <tr> <td> </td> <td bgcolor="#FFFFFF" align="center" width="34%"> <b>This Cell is White</b> </td> <td width="33%"> </td> </tr> </table>
II. HTML Forms Forms are one of the most common elements used throughout the web. Forms are primarily used to collect information from a user and process it. Processing can include

LoudOffice.com Guide to HTML – Part II Page 11
anything from manipulating data (say in an online calculator), to working with a database (to store a user’s profile), to emailing feedback to a webmaster. Below is an example of a simple feedback form that uses a couple of the elements we will talk about in a few moments.
The <form> Element A form is defined in an HTML document using the <form> element. This element has an opening and closing tag and every item that you wish to be in the form should be enclosed therein. The <form> element takes a number of command elements that designates how the form is to be processed: Ø action=”url” : This defines an URL to which the output of the form is directed.
This is generally a CGI script or some other program capable of processing the information gathered by the form. The protocol set for the target URL, along with the enctype and method command parameters determine the way in which gathered information is submitted and processed. If no action parameter is included, then the URL of the HTML document that includes the form itself, becomes the target of the form.
Ø enctype="data encoding format" : Defines the format to be used to transmit user form responses to the host server if the protocol provided by the action command parameter does not require a specific format. You will not use this 95% of the time. Generally, this parameter is not necessary if data is MIME encoded, since this is the default for HTML forms.
Ø method="..." : Defines the method by which the form contents will be transmitted to the host server. There are two main options:
o get – This is the default method that appends the values entered by the user to the URL and is read as a querystring .
o post - This is the generally preferred method which formats data using MIME encoding type “application/x-www-form-urlencoded ”. It sends the data as part of the data body rather than appended to the URL.
LoudOffice.com Guide to HTML – Part II Page 12
Most of the time, the difference between the two methods is negligible. However, it is recommended that you use the post method.
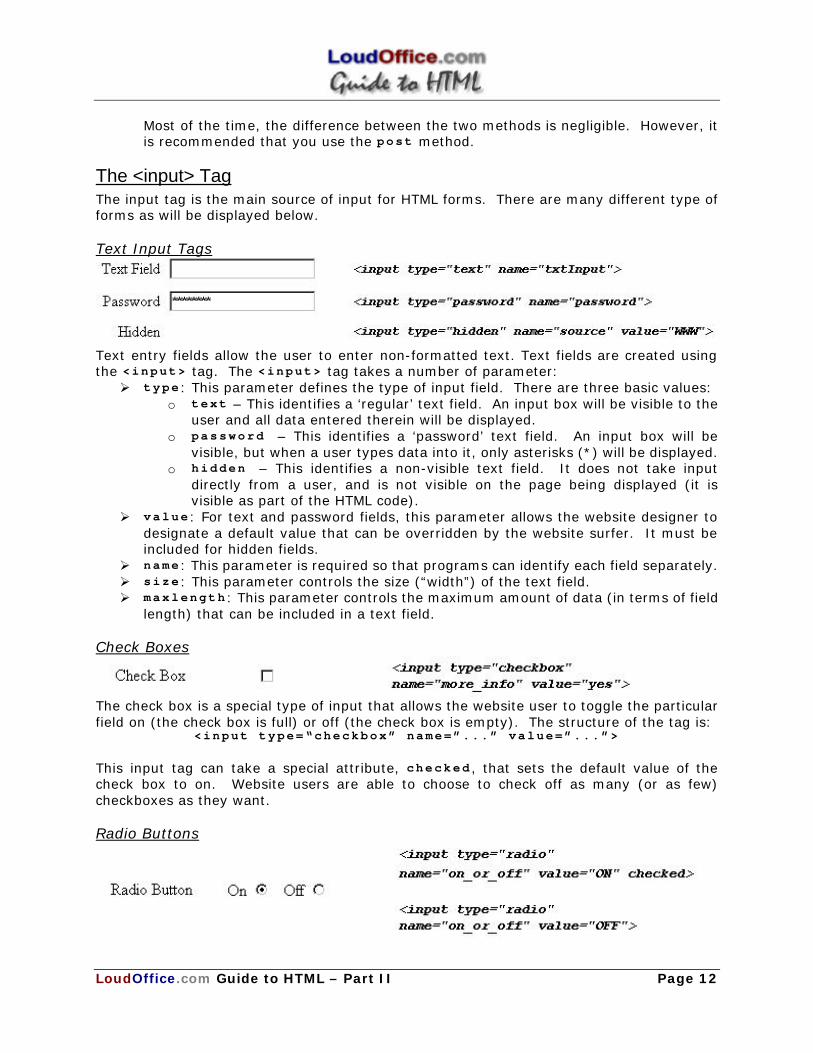
The <input> Tag The input tag is the main source of input for HTML forms. There are many different type of forms as will be displayed below. Text Input Tags
Text entry fields allow the user to enter non-formatted text. Text fields are created using the <input> tag. The <input> tag takes a number of parameter: Ø type : This parameter defines the type of input field. There are three basic values:
o text – This identifies a ‘regular’ text field. An input box will be visible to the user and all data entered therein will be displayed.
o password – This identifies a ‘password’ text field. An input box will be visible, but when a user types data into it, only asterisks (*) will be displayed.
o hidden – This identifies a non-visible text field. It does not take input directly from a user, and is not visible on the page being displayed (it is visible as part of the HTML code).
Ø value : For text and password fields, this parameter allows the website designer to designate a default value that can be overridden by the website surfer. It must be included for hidden fields.
Ø name : This parameter is required so that programs can identify each field separately. Ø size : This parameter controls the size (“width”) of the text field. Ø maxlength : This parameter controls the maximum amount of data (in terms of field
length) that can be included in a text field. Check Boxes
The check box is a special type of input that allows the website user to toggle the particular field on (the check box is full) or off (the check box is empty). The structure of the tag is:
<input type=“checkbox” name=”...” value=”...”>
This input tag can take a special attribute, checked , that sets the default value of the check box to on. Website users are able to choose to check off as many (or as few) checkboxes as they want. Radio Buttons
LoudOffice.com Guide to HTML – Part II Page 13
Radio buttons are designed to force a website visitor to have to make a choice between a number of options. Once any value within the set is selected, all others are automatically deselected. The basic format of this tag is:
<input type=“radio” name=”...” value=”...”>
Note that the name attribute must be the same for every choice within a set. Like the check box, this input tag can also take a special attribute, checked , that sets the default value of the selected radio item on.
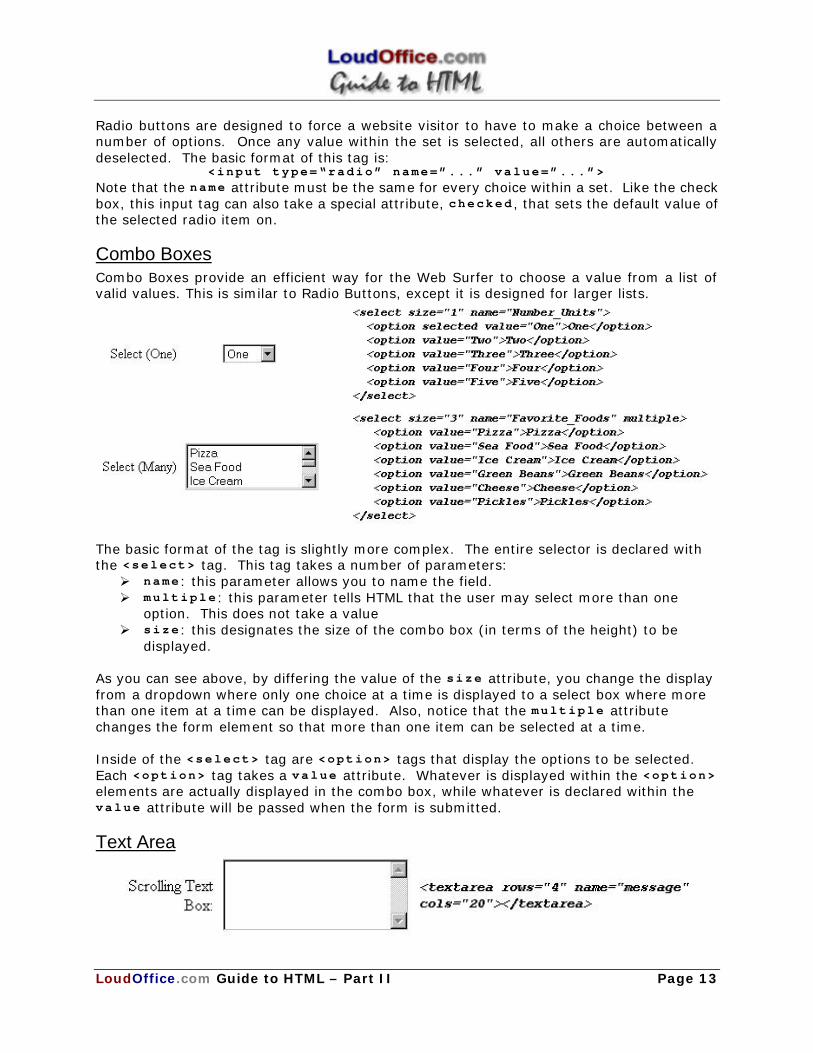
Combo Boxes Combo Boxes provide an efficient way for the Web Surfer to choose a value from a list of valid values. This is similar to Radio Buttons, except it is designed for larger lists.
The basic format of the tag is slightly more complex. The entire selector is declared with the <select> tag. This tag takes a number of parameters: Ø name : this parameter allows you to name the field. Ø multiple : this parameter tells HTML that the user may select more than one
option. This does not take a value Ø size : this designates the size of the combo box (in terms of the height) to be
displayed. As you can see above, by differing the value of the size attribute, you change the display from a dropdown where only one choice at a time is displayed to a select box where more than one item at a time can be displayed. Also, notice that the multiple attribute changes the form element so that more than one item can be selected at a time. Inside of the <select> tag are <option> tags that display the options to be selected. Each <option> tag takes a value attribute. Whatever is displayed within the <option> elements are actually displayed in the combo box, while whatever is declared within the value attribute will be passed when the form is submitted.
Text Area
LoudOffice.com Guide to HTML – Part II Page 14
Text areas allow users to type nearly unlimited amounts of text within the form. They are commonly used as memo fields. The basic formatting is:
<textarea rows=”4” cols=”30” name=”message”>Text Goes Here</textarea>
The attributes taken by the <textarea> tag are as follows: Ø name : The name of the field Ø rows : The height of the field in rows. Ø cols : The width of the column
Notice that any and all text you want to be displayed (it could be overwritten by the user) is written between the <textarea> opening and closing elements.
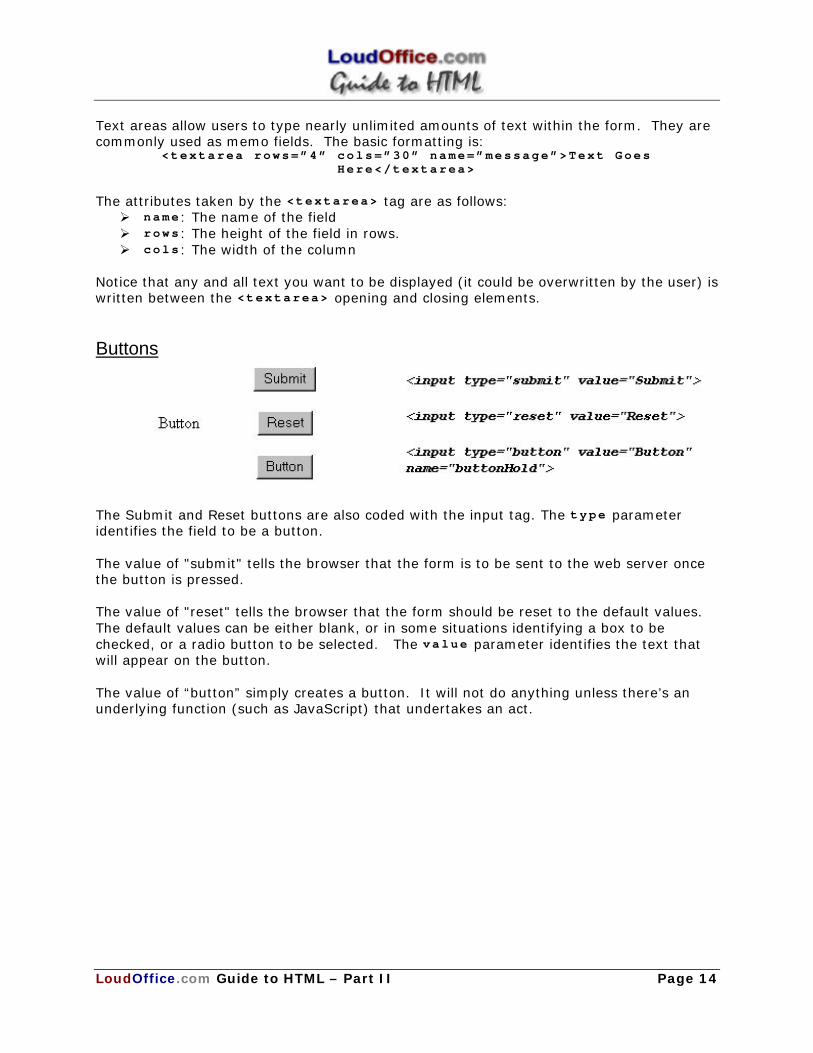
Buttons
The Submit and Reset buttons are also coded with the input tag. The type parameter identifies the field to be a button. The value of "submit" tells the browser that the form is to be sent to the web server once the button is pressed. The value of "reset" tells the browser that the form should be reset to the default values. The default values can be either blank, or in some situations identifying a box to be checked, or a radio button to be selected. The value parameter identifies the text that will appear on the button. The value of “button” simply creates a button. It will not do anything unless there’s an underlying function (such as JavaScript) that undertakes an act.
LoudOffice.com Guide to HTML – Part II Page 15
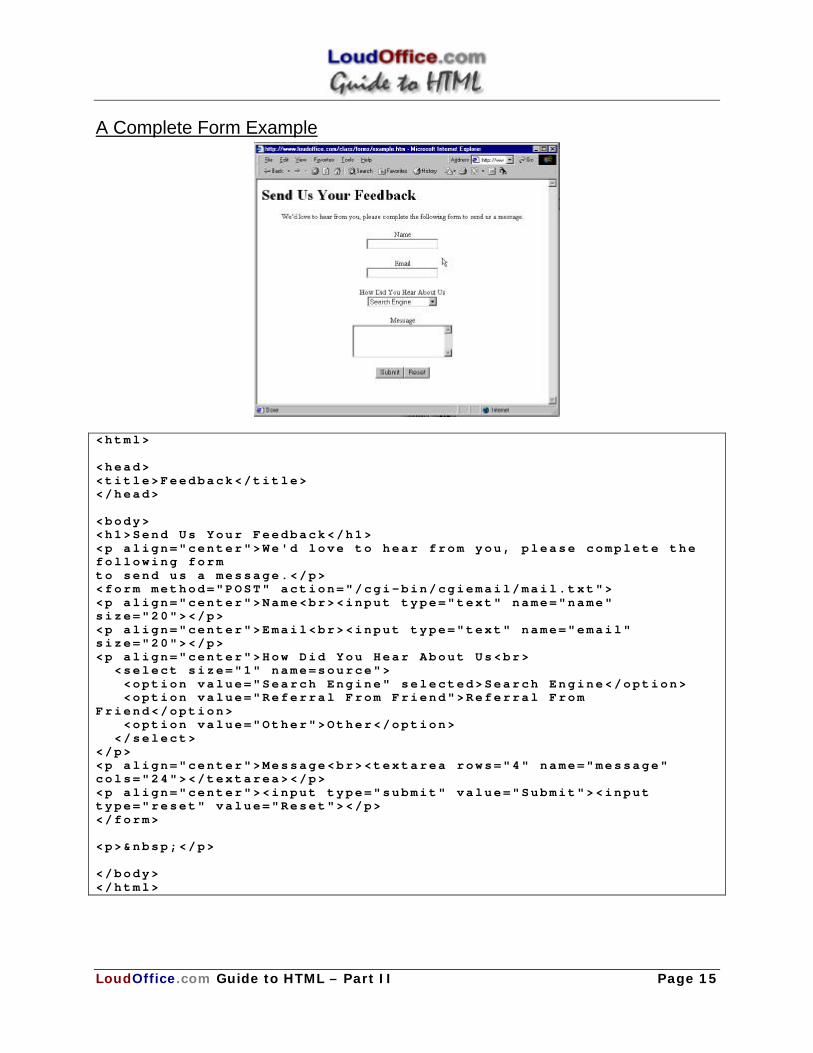
A Complete Form Example
<html> <head> <title>Feedback</title> </head> <body> <h1>Send Us Your Feedback</h1> <p align="center">We'd love to hear from you, please complete the following form to send us a message.</p> <form method="POST" action="/cgi-bin/cgiemail/mail.txt"> <p align="center">Name<br><input type="text" name="name" size="20"></p> <p align="center">Email<br><input type="text" name="email" size="20"></p> <p align="center">How Did You Hear About Us<br> <select size="1" name=source"> <option value="Search Engine" selected>Search Engine</option> <option value="Referral From Friend">Referral From Friend</option> <option value="Other">Other</option> </select> </p> <p align="center">Message<br><textarea rows="4" name="message" cols="24"></textarea></p> <p align="center"><input type="submit" value="Submit"><input type="reset" value="Reset"></p> </form> <p> </p> </body> </html>
LoudOffice.com Guide to HTML – Part II Page 16
III. Introduction to JavaScript JavaScript is an easy-to-learn programming language that can be built into Web pages, so that it executes from within the browser rather than on the web server. Intranets especially can leverage the power of JavaScript to create "smart" Web pages that can process data and interact with the user. In this introduction, we concisely look at the main programming points of the JavaScript language. This introduction is intended to be very short and brief. For a much more in-depth discussion, please visit the LoudOffice.com class website and download the Guide to JavaScript there.
Versions of JavaScript There are several versions of JavaScript supported by certain browsers and browser versions. Unfortunately, this can often lead to confusion and incompatibilities. Since Netscape originally introduced JavaScript, JavaScript 1.0 was the language specification supported in Netscape Navigator 2.0. Subsequently, Navigator 3.0 supported new enhancements which comprised JavaScript 1.1. At present, Navigator 4.0 versions below 4.05 inclusive support JavaScript 1.2 while Navigator 4.06+ and the Netscape Communicator 4.5+ series support JavaScript 1.3. Shortly after Netscape's introduction of JavaScript in Navigator 2.0, Microsoft attempted to support JavaScript 1.0 in their Internet Explorer 3.0 browser. Known as "Jscript," Microsoft's initial JavaScript support was unreliable and buggy. A push to standardize the language resulted in an "official" version of JavaScript sanctioned by the ECMA, an international standards body. Both Internet Explorer 4.0 JScript and Netscape's JavaScript 1.3 are ECMA-compliant and therefore the most compatible with one another. Internet Explorer 5 introduces additional extensions to the present ECMA standard which are not yet supported in kind by Netscape. As you can see, the ongoing browser war takes a great toll on web development at the JavaScript level. Because of the variation in support for JavaScript/JScript across browser revisions, and quite a few exceptions therein, it is impossible to say that any two browser versions are completely compatible with one another. For many web developers, authoring JavaScript code which gracefully accounts these in JavaScript support is an enormous challenge. Intranet developers may have the unique advantage of being able to focus on a single version of JavaScript in the case of intranets where only a single version of a single browser is deployed. From the developer's perspective, this type of intranet policy greatly eases the web development process, increasing both functionality and speed of development.
Embedding JavaScript JavaScript code is typically embedded into an HTML document using the SCRIPT tag. You are free to embed as many scripts into a single document as you like, using multiple SCRIPT tags. A script embedded in HTML with the SCRIPT tag uses the format:
<script language="JavaScript1.2"> <!-- // Hide From Old Browsers . . . //Unhide --> </script>
LoudOffice.com Guide to HTML – Part II Page 17
Another attribute of the SCRIPT tag, src , can be used to include an external file containing JavaScript code rather than code embedded into the HTML:
<script language="JavaScript" src="corefunctions.js"></script>
The external file is simply a text file containing JavaScript code, and whose filename ends with the extension ".js". Note that although some version 3 browsers support the SRC attribute, it only functions reliably across platforms in version 4+ browsers. Scripts can be placed inside comment fields to ensure that your JavaScript code is not displayed by old browsers that do not recognize JavaScript. The markup to begin a comment field is:
<!-- // Hide ...
// Unhide -->
Note that the double back-slash is special for JavaScript. This practice is optional, but considered good form when your page is likely to be visited by older browsers. Certainly, as older browsers fade away, or considered irrelevant in an intranet environment, this practice may be increasingly unnecessary.
Naming Conventions There are some rules and conventions you should follow when naming variables and functions. You may use any combination of letters, numbers, and underscores (_). You cannot begin with a number, and anything you name is case sensitive. Below are examples of legal and illegal names:
LEGAL ILLEGAL myVariable my_variable _my_variable myVariable_2
*my_variable 2myvariable -myVariable _my variable
Reserved Words There are a number of words you may not use within your script. The following terms are reserved by JavaScript and may not be used by you in your scripts:
abstract boolean break byte case catch char class const
else extends false final finally float for function goto
int interface long native new null package private protected
switch synchronized this throw throws transient true try typeof
LoudOffice.com Guide to HTML – Part II Page 18
continue default delete do double
if implements import in instanceof
public return short static super
var void while with
Variables and Data Types Variables store and retrieve data, also known as "values". A variable can refer to a value which changes or remains constant. Variables are referred to by name, although the name you give them must conform to certain rules. A JavaScript identifier, or name, must start with a letter or underscore ("_"); subsequent characters can also be digits (0-9). Because JavaScript is case sensitive, letters include the characters "A" through "Z" (uppercase) and the characters "a" through "z" (lowercase). Typically, variable names are chosen to be meaningful regarding the value they hold. For example, a good variable name for containing the total price of goods orders would be total . Scope When you assign a new variable to an initial value, you must consider the issue of scope. A variable may be scoped as either global or local. A global variable may be accessed from any JavaScript on the page. A local variable may only be accessed from within the function in which it was assigned. One purpose of using scope is to prevent collisions between variables of the same name; for instance, you may wish to use a variable named "Total" in one function which has a different value and meaning than another variable named "Total" in a separate function. In that case, both variables should have local scope. Commonly, you create a new global variable by simply assigning it a value: newVariable=5;
However, if you are coding within a function and you want to create a local variable which only scopes within that function you must declare the new variable using the var statement: function newFunction() { var loop=1; total=0; ...additional statements... }
In the example above, the variable loop will be local to newFunction() , while total will be global to the entire page.
LoudOffice.com Guide to HTML – Part II Page 19
Type The data assigned to a variable may consist of any sort of data. However, JavaScript considers data to fall into several possible types. Depending on the type of data, certain operations may or may not be able to be performed on the values. For example, you cannot arithmetically multiply two string values. Variables can be these types: Numbers 3 or 7.987, Integer and floating-point numbers. Booleans True or False. The possible values for Boolean variables are true and false.
In a comparison, any expression that evaluates to 0 is taken to be false, while any statement that evaluates to a number other than 0 is taken to be true.
Strings "Hello World !" Strings are delineated by single or double quotation marks. (Use single quotes to type strings that contain quotation marks.)
Objects An object is a “package” of data; a collection of variables that are all classed under a single name.
Null Not the same as zero - no value at all. A null value is one that has no value and means nothing.
Undefined A value that is undefined is a value held by a variable after it has been created, but before a value has been assigned to it.
JavaScript is a loosely typed language -- you do not have to specify the data type of a variable when you declare it, and data types are converted automatically as needed during script execution. By and large, you may simply assign any type of data to any variable. The only time data typing matters is when you need to perform operations on the data. Certain operators behave differently depending on the type of data being deal with. For example, consider the + operator:
"Jump" + "shot" yields "Jumpshot" (string concatenation)
5 + 10 yields 15 (arithmetic sum)
Operators Operators take one or more variables or values (operands) and return a new value; e.g. the '+' operator can add two numbers to produce a third. You use operators in expressions to relate values, whether to perform arithmetic or compare quantities. Operators are divided into several classes depending on the relation they perform. Arithmetic or Computational Arithmetic operators take numerical values (either literals or variables) as their operands and return a single numerical value. The standard arithmetic operators are:
+ Addition (Can also be used to concatenate strings) - Subtraction * Multiplication / Division % Modulus: the remainder after division;
e.g. 10 % 3 yields 1.
LoudOffice.com Guide to HTML – Part II Page 20
++ Unary increment: this operator only takes one operand. The operand's value is increased by 1. The value returned depends on whether the ++ operator is placed before or after the operand; e.g. ++x will return the value of x following the increment whereas x++ will return the value of x prior to the increment.
-- Unary decrement: this operator only takes one operand. The operand's value is decreased by 1. The value returned depends on whether the -- operator is placed before or after the operand; e.g. --x will return the value of x following the decrement whereas x-- will return the value of x prior to the decrement.
- Unary negation: returns the negation of operand. Comparison A comparison operator compares its operands and returns a logical value based on whether the comparison is true or not. The operands can be numerical or string values. When used on string values, the comparisons are based on the standard lexicographical (alphabetic) ordering.
== "Equal to" returns true if operands are equal. != "Not equal to" returns true if operands are not equal. > "Greater than" returns true if left operand is greater than right operand.
>= "Greater than or equal to" returns true if left operand is greater than or equal to right operand.
< "Less than" returns true if left operand is less than right operand. <= "Less than or equal to" returns true if
Boolean Boolean operators are typically used to combine multiple comparisons into one conditional expression. For example, you might want to test two different computations: for example, (24 * i) and (12 + p + 3). A boolean operator takes two operands, each of which has a true or false value, and returns a true or false result.
&& "And" returns true if both operands are true. || "Or" returns true if either operand is true.
! "Not" returns true if the negation of the operand is true (e.g. the operand is false).
>= "Greater than or equal to" returns true if left operand is greater than or equal to right operand.
< "Less than" returns true if left operand is less than right operand.
<= "Less than or equal to" returns true if left operand is less than or equal to right operand
Assignment The assignment operator (=) lets you assign a value to a variable. You can assign any value to a variable, including another variable (whose value will be assigned). Several shorthand assignment operators allow you to perform an operation and assign its result to a variable in one step.
LoudOffice.com Guide to HTML – Part II Page 21
= Assigns the value of the righthand operand to the variable on the
left. Example: total=100; Example: total=(price+tax+shipping);
+= (also -=, *=, /=)
Adds the value of the righthand operand to the lefthand variable. Example: total+=shipping; (adds value of shipping to total and assigned result to total)
&= (also |=)
Assigns result of (lefthand operand && righthand operand) to lefthand operand
Statements Statements define the flow of a script, known as "program flow." A statement, like a fully grammatical English sentence, is made up of smaller expressions that, altogether, evaluate into a cogent meaning. In JavaScript, statements are organized as conditionals, loops, object manipulations, and comments. Good practice suggests that each JavaScript statements should be terminated with a semicolon (;). This is often not strictly necessary, as a new line also serves to separate statements, but when multiple statements reside on the same line the semicolon delimiter is mandatory. A set of statements that is surrounded by braces is called a block. Blocks of statements are used, for example, in functions and conditionals. Normally statements are executed sequentially: x = 1; y = 2; z = x + y; but this can be altered by some statements that test a condition and branch or loop according to the result.
Conditionals Conditional statements direct program flow in specified directions depending upon the outcomes of specified conditions. These tests are a major influence on the order of execution in a program. if...else As seen in many programming languages, if the condition evaluates to true then the block of statements1 is executed. Optionally, an else clause specifies a block of statements2 which are executed otherwise. You may omit the else clause if there are no statements which need to be executed if the condition is false.
if (condition) { statements1; } else { statements2; }
LoudOffice.com Guide to HTML – Part II Page 22
Switch (JavaScript 1.2+) Commonly known as a "case statement," switch matches an expression with a specified case, and executes the statements defined for that case. In essence, the switch statement is a sort of shorthand for combining many implied if statements together.
switch (expression){ case selection_one : statements; break; case selection_two : statement; break; ... default : statement; }
For The for loop repeatedly cycles through a block of statements until a test condition is false. Typically, the number of times a loop is repeated depends on a counter. The JavaScript for syntax incorporates the counter and its increments:
for (initial-statement; test; increment) { statements; }
i.e. for (i=0; i<10; i++) { statements; }
Comments Despite the fact that comments are purely optional, they can easily be a crucial part of your program. Comments can explain the action, like a color commentary, which can be a great help in understanding the code. Whether as a teaching tool or to simply remind yourself what the code does, comments are best sprinkled liberally throughout a program. Remember, comments are for humans, so write them that way! Comments can also be used for debugging -- you can comment "out" sections of code to prevent them from being executed. In doing so you may learn more about why a certain problem is occurring in your program. Because JavaScript must ignore comments, there is an appropriate syntax for demarcating text as a comment. For single line comments, simply precede the line with two backslashes. For multi-line comment blocks, begin the comment with /* and close with */ .
//A lonely ol' single line comment /* A dense thicket of commentary, spanning many captivating lines of explanation and intrigue. */
Functions A function groups together a set of statements under a named subroutine. This allows you to conveniently "call" the function whenever its action is required. Functions are a fundamental building block of most JavaScript programs, so you'll become quite familiar with their use. Before you can call on a function you must first create it. We can break down the use of functions into two logical categories: defining functions and calling functions.
LoudOffice.com Guide to HTML – Part II Page 23
Defining Functions The function definition is a statement that describes the function: its name, any values (known as "arguments") which it accepts, and the statements of which the function is comprised.
function funcName(argument1,argument2,etc) { statements; }
A function doesn't necessarily require arguments, in which case you need only write out the parenthesis; e.g. funcName() . If you do specify arguments, those arguments will be variables within the function body (the statements which make up the function). The initial values of those variables will be any values passed on by the function call. Generally it's best to define the functions for a page in the <head> portion of a document. Since the <head> is loaded first, this guarantees that functions are loaded before the user has a chance to do anything that might call a function. Alternately, some programmers place all of their functions into a separate file, and include them in a page using the src attribute of the <script> tag. Either way, the key is to load the function definitions before any code is executed. Some functions may return a value to the calling expression. The following function accepts two arguments, x and y, and returns the result of x raised to the y power:
function raiseP(x,y) { total=1; for (j=0; j<y; j++) { total*=x; } return total; //result of x raised to y power }
Calling Functions Functions can be called by calling their name within another JavaScript form, or on the occurrence of an ‘Event’ (discussed below). For example, if you had a function named AlertThankYou() that was tied to the onSubmit event on a form, it would be called as follows:
<form action=”hello.cgi” method=”post” onSubmit=”AlertThankYou();”>
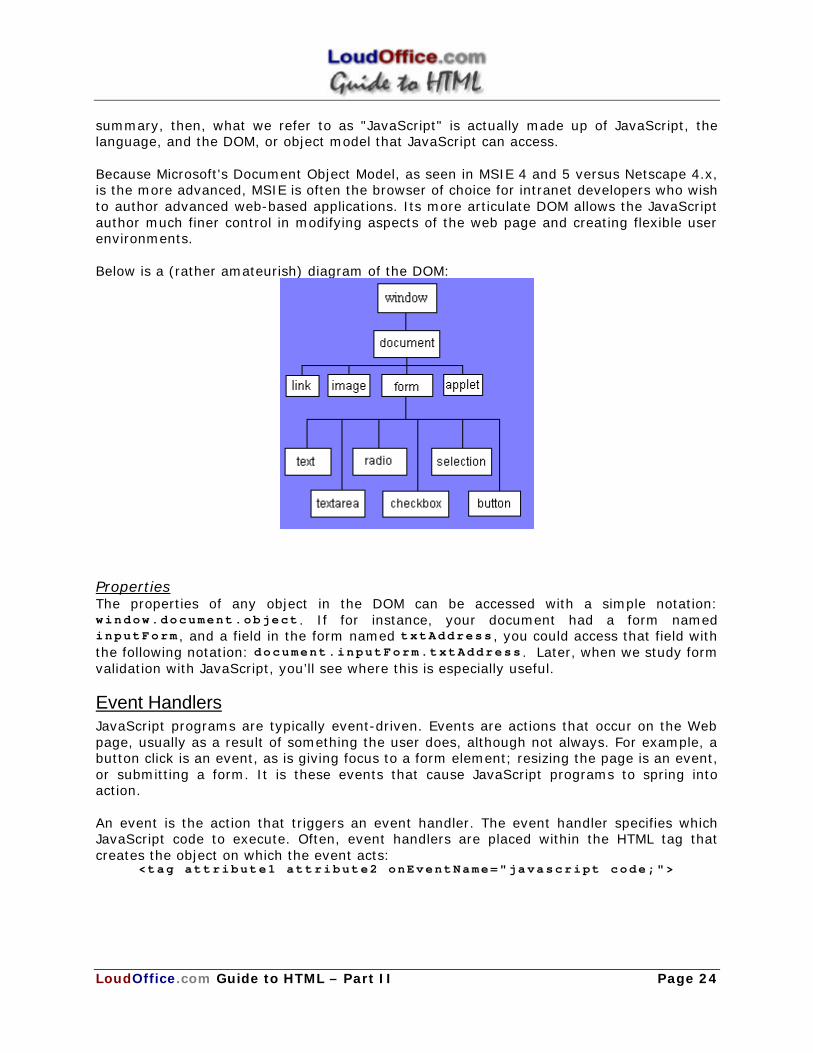
Document Object Model Often referred to as the DOM, this object model is a hierarchy of all objects "built in" to JavaScript. Most of these objects are directly related to characteristics of the Web page or browser. The reason we qualify the term "built in" is because the DOM is technically separate from JavaScript itself. That is, the JavaScript language specification, standardized by the ECMA, does not actually specify the nature or specifics of the DOM. Consequently, Netscape and Microsoft have developed their own individual DOM’s that are not entirely compatible. Additionally, the DOM stands apart from JavaScript because other scripting languages can theoretically access it as well, such as VBScript in Internet Explorer. In
LoudOffice.com Guide to HTML – Part II Page 24
summary, then, what we refer to as "JavaScript" is actually made up of JavaScript, the language, and the DOM, or object model that JavaScript can access. Because Microsoft's Document Object Model, as seen in MSIE 4 and 5 versus Netscape 4.x, is the more advanced, MSIE is often the browser of choice for intranet developers who wish to author advanced web-based applications. Its more articulate DOM allows the JavaScript author much finer control in modifying aspects of the web page and creating flexible user environments. Below is a (rather amateurish) diagram of the DOM:
Properties The properties of any object in the DOM can be accessed with a simple notation: window.document.object . If for instance, your document had a form named inputForm , and a field in the form named txtAddress , you could access that field with the following notation: document.inputForm.txtAddress . Later, when we study form validation with JavaScript, you’ll see where this is especially useful.
Event Handlers JavaScript programs are typically event-driven. Events are actions that occur on the Web page, usually as a result of something the user does, although not always. For example, a button click is an event, as is giving focus to a form element; resizing the page is an event, or submitting a form. It is these events that cause JavaScript programs to spring into action. An event is the action that triggers an event handler. The event handler specifies which JavaScript code to execute. Often, event handlers are placed within the HTML tag that creates the object on which the event acts:
<tag attribute1 attribute2 onEventName="javascript code;">
LoudOffice.com Guide to HTML – Part II Page 25
For example, a hyperlink is subject to a MouseOver event, meaning that its event handler will be triggered when the mouse passes over the link. Therefore, you place the event handler for a hyperlink's MouseOver inside the A tag:
<a href="" onMouseOver="popupFunc();">
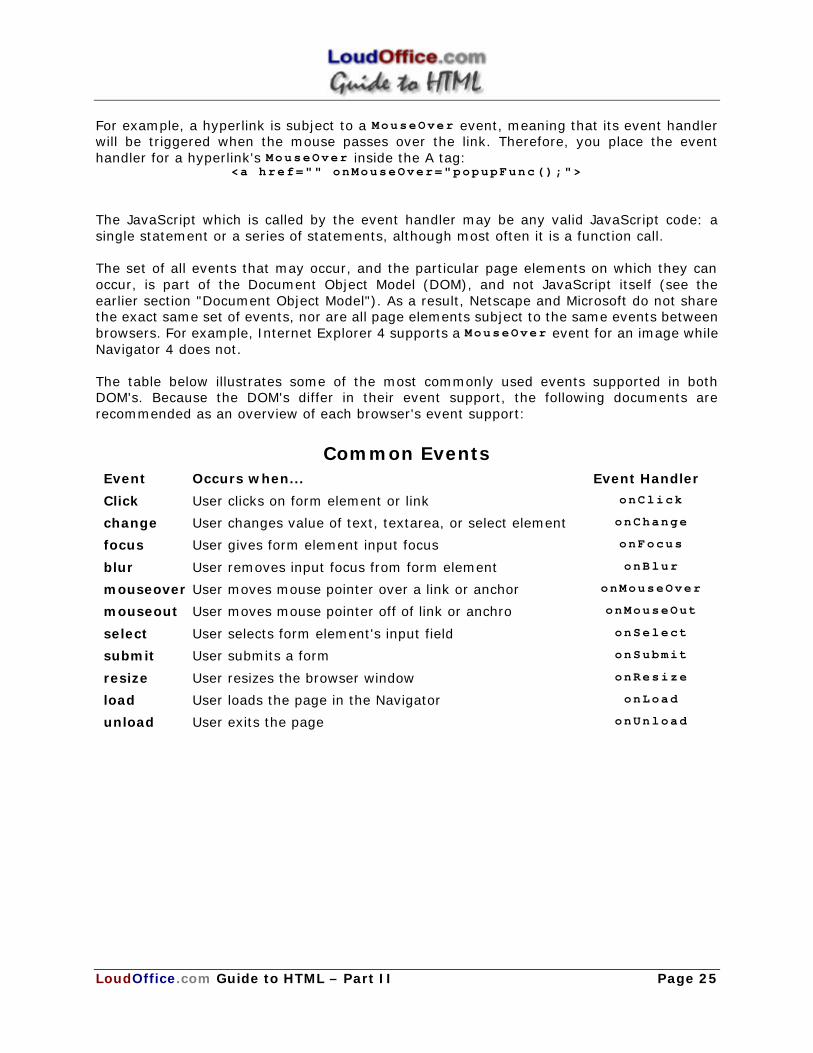
The JavaScript which is called by the event handler may be any valid JavaScript code: a single statement or a series of statements, although most often it is a function call. The set of all events that may occur, and the particular page elements on which they can occur, is part of the Document Object Model (DOM), and not JavaScript itself (see the earlier section "Document Object Model"). As a result, Netscape and Microsoft do not share the exact same set of events, nor are all page elements subject to the same events between browsers. For example, Internet Explorer 4 supports a MouseOver event for an image while Navigator 4 does not. The table below illustrates some of the most commonly used events supported in both DOM's. Because the DOM's differ in their event support, the following documents are recommended as an overview of each browser's event support:
Common Events Event Occurs when... Event Handler
Click User clicks on form element or link onClick
change User changes value of text, textarea, or select element onChange
focus User gives form element input focus onFocus
blur User removes input focus from form element onBlur
mouseover User moves mouse pointer over a link or anchor onMouseOver
mouseout User moves mouse pointer off of link or anchro onMouseOut
select User selects form element's input field onSelect
submit User submits a form onSubmit
resize User resizes the browser window onResize
load User loads the page in the Navigator onLoad
unload User exits the page onUnload
LoudOffice.com Guide to HTML – Part II Page 26
IV. Working with JavaScript in HTML Now that the boring stuff is over, let’s look at what we can do with JavaScript in our HTML documents. We’re going to cover a number of common applications with JavaScript. This will represent simply 1/100 of you can do with JavaScript in your HTML documents. If you are interested in seeing more, visit the links section of the LoudOffice.com class website.
Alerts, Prompts, and Confirms
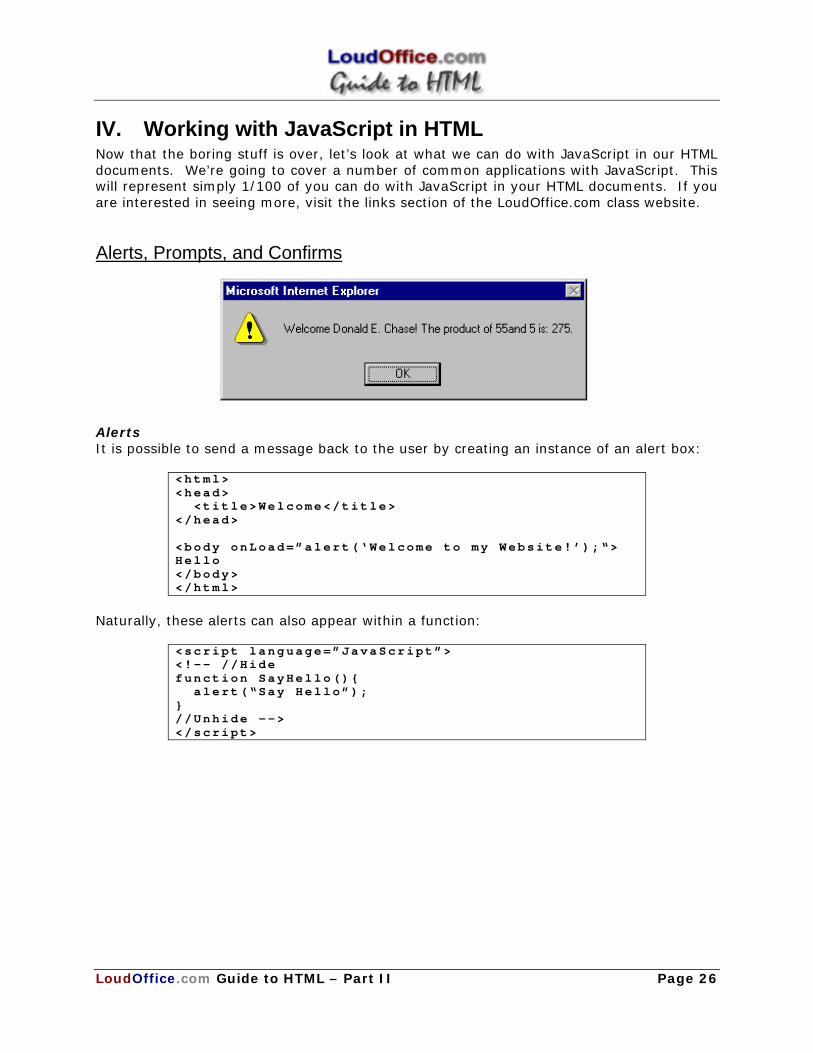
Alerts It is possible to send a message back to the user by creating an instance of an alert box:
<html> <head> <title>Welcome</title> </head> <body onLoad=”alert(‘Welcome to my Website!’);“> Hello </body> </html>
Naturally, these alerts can also appear within a function:
<script language=”JavaScript”> <!-- //Hide function SayHello(){ alert(“Say Hello”); } //Unhide --> </script>
LoudOffice.com Guide to HTML – Part II Page 27
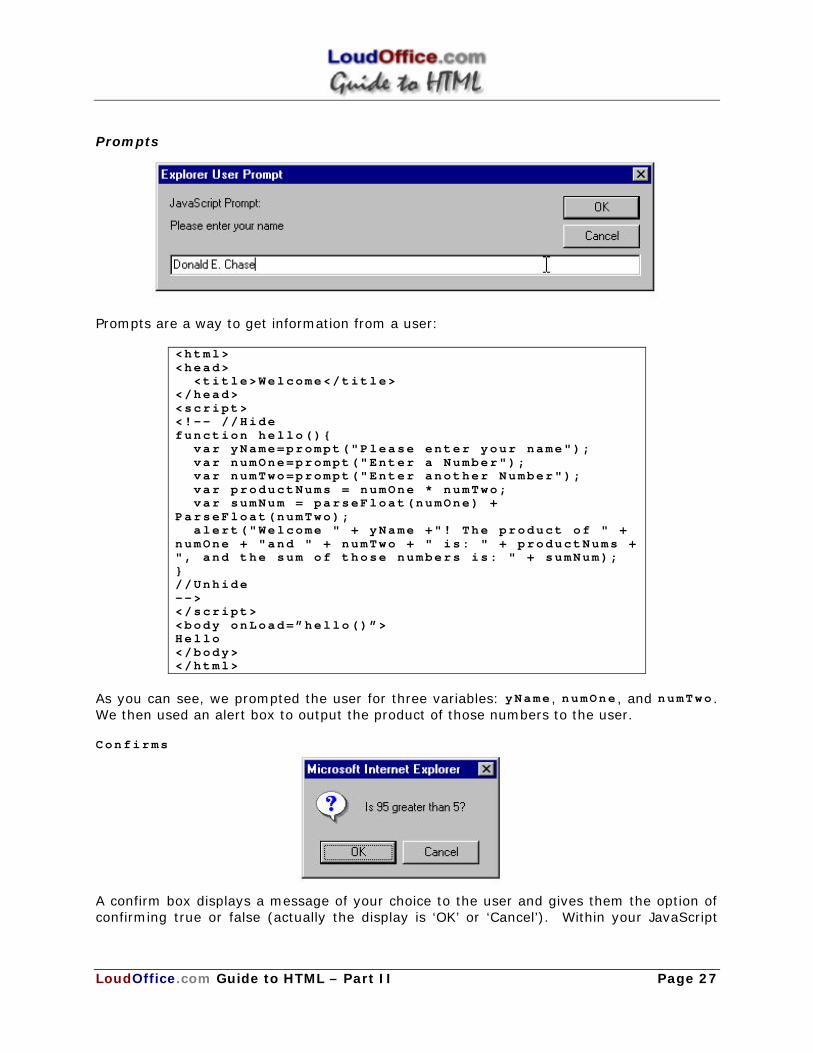
Prompts
Prompts are a way to get information from a user:
<html> <head> <title>Welcome</title> </head> <script> <!-- //Hide function hello(){ var yName=prompt("Please enter your name"); var numOne=prompt("Enter a Number"); var numTwo=prompt("Enter another Number"); var productNums = numOne * numTwo; var sumNum = parseFloat(numOne) + ParseFloat(numTwo); alert("Welcome " + yName +"! The product of " + numOne + "and " + numTwo + " is: " + productNums + ", and the sum of those numbers is: " + sumNum); } //Unhide --> </script> <body onLoad=”hello()”> Hello </body> </html>
As you can see, we prompted the user for three variables: yName , numOne , and numTwo . We then used an alert box to output the product of those numbers to the user. Confirms
A confirm box displays a message of your choice to the user and gives them the option of confirming true or false (actually the display is ‘OK’ or ‘Cancel’). Within your JavaScript
LoudOffice.com Guide to HTML – Part II Page 28
code, the confirm box returns a boolean with a value of true or false. This would be used within your JavaScript to call another action.
<html> <head> <title>Welcome</title> </head> <script> <!-- //Hide function chkValue(){ var chkTest = confirm(“Is 95 greater than 5?”); if (chkTest == true){ alert(“That is correct.”); } else { alert(“Sorry, you’re wrong.”); } } //Unhide --> </script> <body onLoad=” chkValue()”> Hello </body> </html>
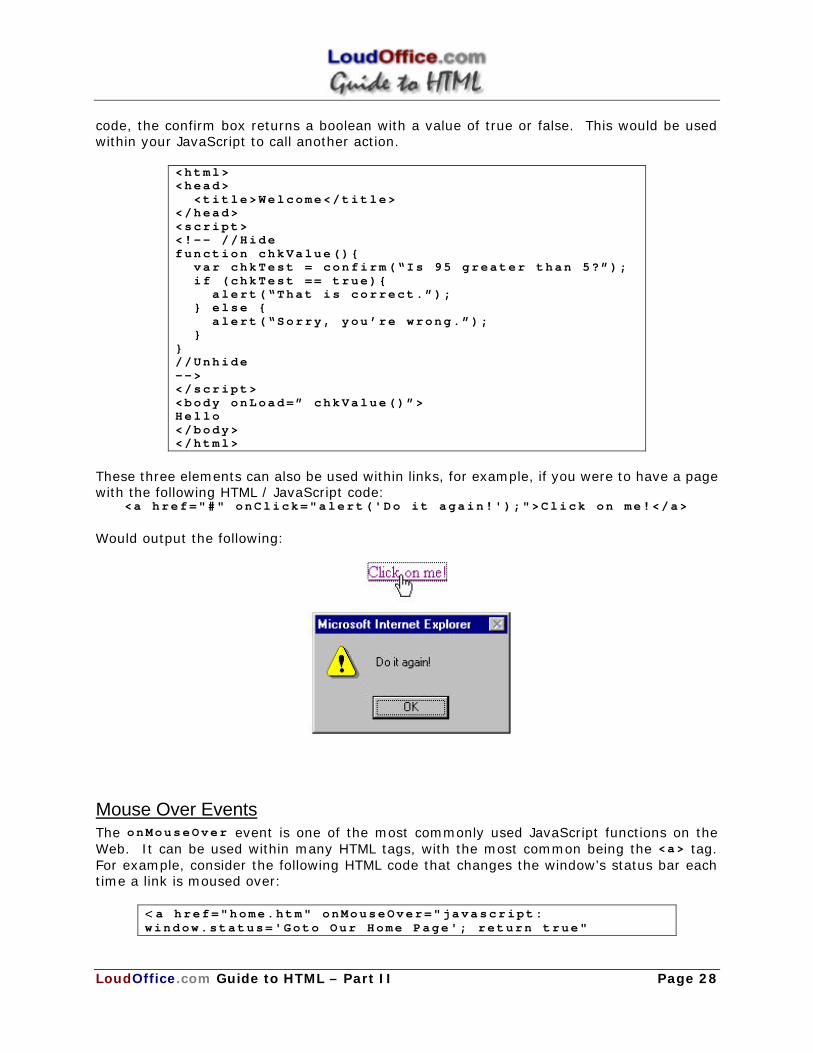
These three elements can also be used within links, for example, if you were to have a page with the following HTML / JavaScript code:
<a href="#" onClick="alert('Do it again!');">Click on me!</a>
Would output the following:
Mouse Over Events The onMouseOver event is one of the most commonly used JavaScript functions on the Web. It can be used within many HTML tags, with the most common being the <a> tag. For example, consider the following HTML code that changes the window’s status bar each time a link is moused over:
<a href="home.htm" onMouseOver="javascript: window.status='Goto Our Home Page'; return true"
LoudOffice.com Guide to HTML – Part II Page 29
onMouseOut="javascript: window.status=''; return true;">Return Home</a>
As you can see below, once you mouse over that link, the window’s status bar is changed:
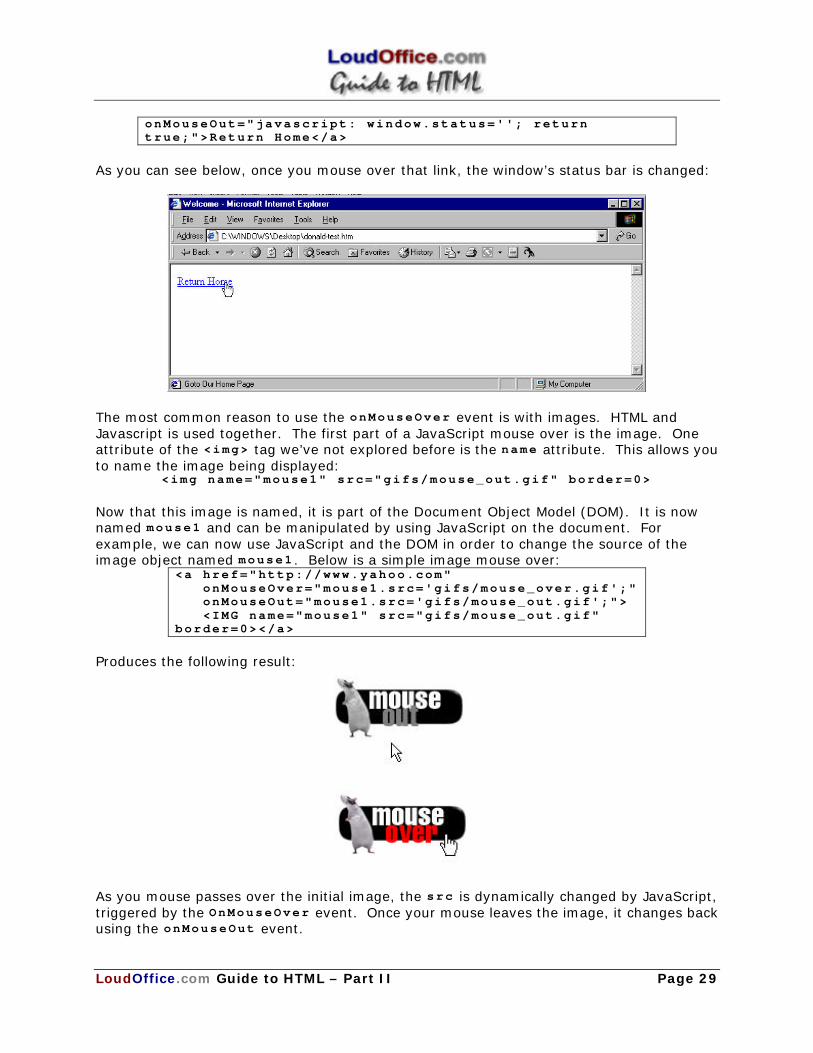
The most common reason to use the onMouseOver event is with images. HTML and Javascript is used together. The first part of a JavaScript mouse over is the image. One attribute of the <img> tag we’ve not explored before is the name attribute. This allows you to name the image being displayed:
<img name="mouse1" src="gifs/mouse_out.gif" border=0>
Now that this image is named, it is part of the Document Object Model (DOM). It is now named mouse1 and can be manipulated by using JavaScript on the document. For example, we can now use JavaScript and the DOM in order to change the source of the image object named mouse1 . Below is a simple image mouse over:
<a href="http://www.yahoo.com" onMouseOver="mouse1.src='gifs/mouse_over.gif';" onMouseOut="mouse1.src='gifs/mouse_out.gif';"> <IMG name="mouse1" src="gifs/mouse_out.gif" border=0></a>
Produces the following result:
As you mouse passes over the initial image, the src is dynamically changed by JavaScript, triggered by the OnMouseOver event. Once your mouse leaves the image, it changes back using the onMouseOut event.
LoudOffice.com Guide to HTML – Part II Page 30
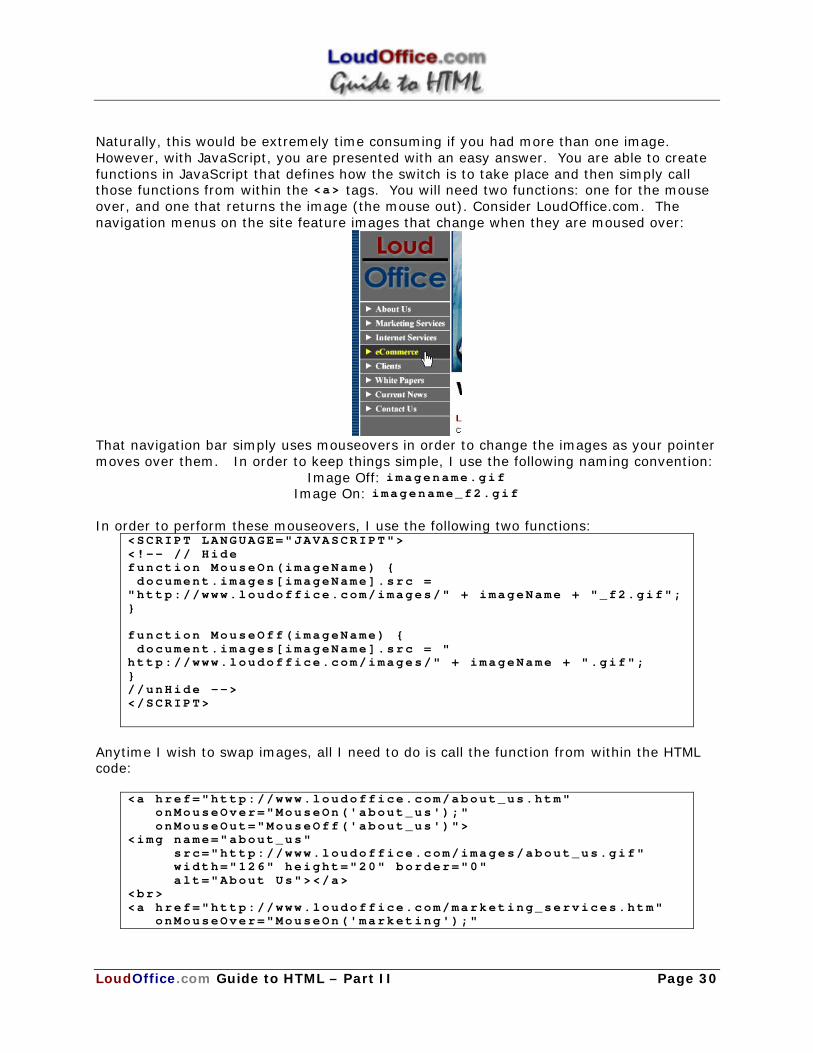
Naturally, this would be extremely time consuming if you had more than one image. However, with JavaScript, you are presented with an easy answer. You are able to create functions in JavaScript that defines how the switch is to take place and then simply call those functions from within the <a> tags. You will need two functions: one for the mouse over, and one that returns the image (the mouse out). Consider LoudOffice.com. The navigation menus on the site feature images that change when they are moused over:
That navigation bar simply uses mouseovers in order to change the images as your pointer moves over them. In order to keep things simple, I use the following naming convention:
Image Off: imagename.gif Image On: imagename_f2.gif
In order to perform these mouseovers, I use the following two functions:
<SCRIPT LANGUAGE="JAVASCRIPT"> <!-- // Hide function MouseOn(imageName) { document.images[imageName].src = "http://www.loudoffice.com/images/" + imageName + "_f2.gif"; } function MouseOff(imageName) { document.images[imageName].src = " http://www.loudoffice.com/images/" + imageName + ".gif"; } //unHide --> </SCRIPT>
Anytime I wish to swap images, all I need to do is call the function from within the HTML code:
<a href="http://www.loudoffice.com/about_us.htm" onMouseOver="MouseOn('about_us');" onMouseOut="MouseOff('about_us')"> <img name="about_us" src="http://www.loudoffice.com/images/about_us.gif" width="126" height="20" border="0" alt="About Us"></a> <br> <a href="http://www.loudoffice.com/marketing_services.htm" onMouseOver="MouseOn('marketing');"
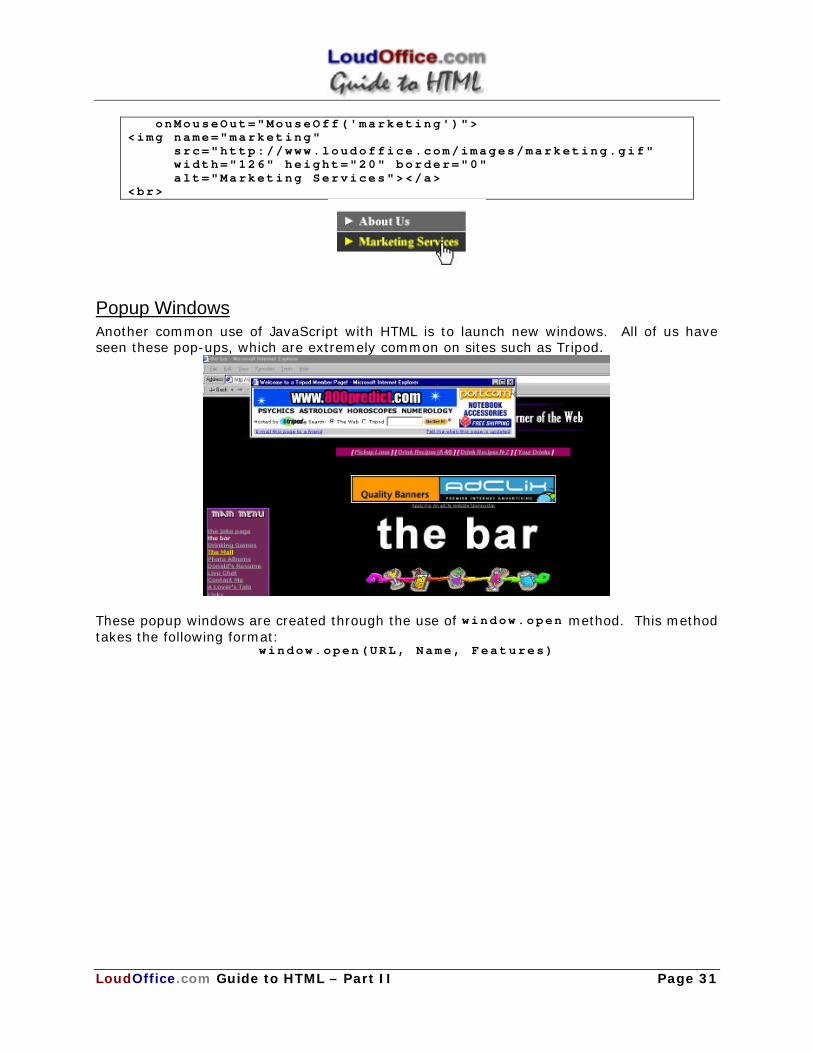
LoudOffice.com Guide to HTML – Part II Page 31
onMouseOut="MouseOff('marketing')"> <img name="marketing" src="http://www.loudoffice.com/images/marketing.gif" width="126" height="20" border="0" alt="Marketing Services"></a> <br>
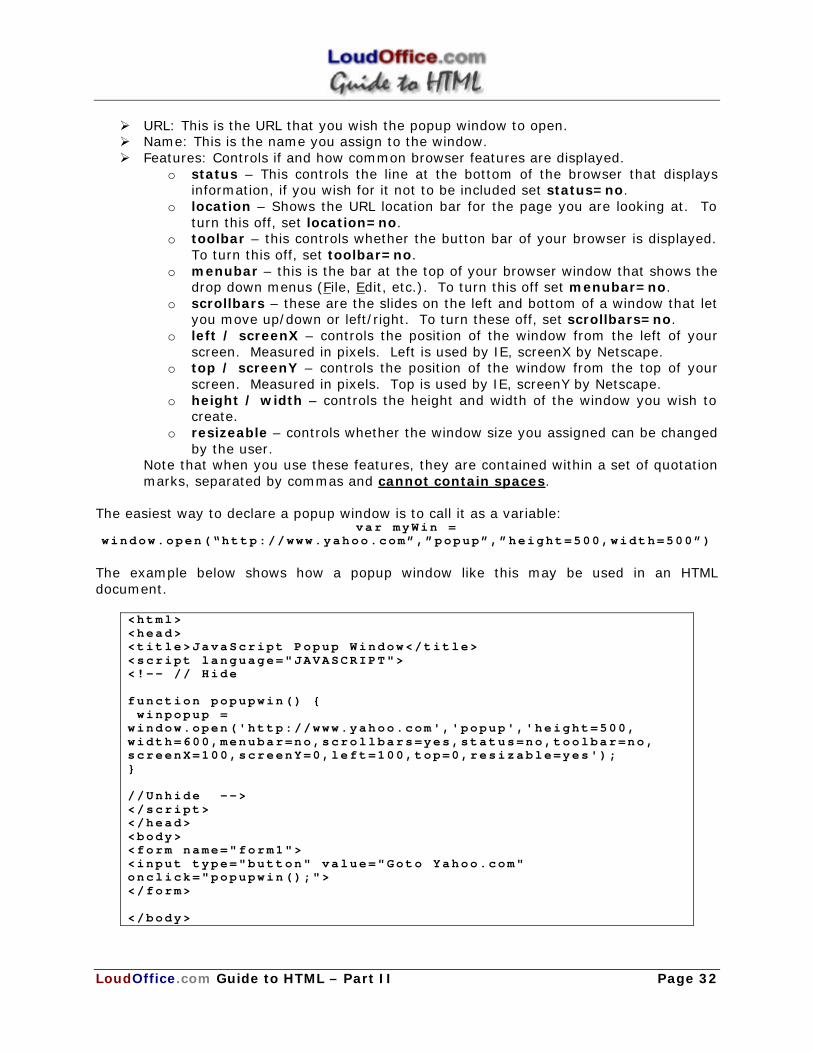
Popup Windows Another common use of JavaScript with HTML is to launch new windows. All of us have seen these pop-ups, which are extremely common on sites such as Tripod.
These popup windows are created through the use of window.open method. This method takes the following format:
window.open(URL, Name, Features)
LoudOffice.com Guide to HTML – Part II Page 32
Ø URL: This is the URL that you wish the popup window to open. Ø Name: This is the name you assign to the window. Ø Features: Controls if and how common browser features are displayed.
o status – This controls the line at the bottom of the browser that displays information, if you wish for it not to be included set status=no.
o location – Shows the URL location bar for the page you are looking at. To turn this off, set location=no.
o toolbar – this controls whether the button bar of your browser is displayed. To turn this off, set toolbar=no.
o menubar – this is the bar at the top of your browser window that shows the drop down menus (File, Edit, etc.). To turn this off set menubar=no.
o scrollbars – these are the slides on the left and bottom of a window that let you move up/down or left/right. To turn these off, set scrollbars=no.
o left / screenX – controls the position of the window from the left of your screen. Measured in pixels. Left is used by IE, screenX by Netscape.
o top / screenY – controls the position of the window from the top of your screen. Measured in pixels. Top is used by IE, screenY by Netscape.
o height / width – controls the height and width of the window you wish to create.
o resizeable – controls whether the window size you assigned can be changed by the user.
Note that when you use these features, they are contained within a set of quotation marks, separated by commas and cannot contain spaces.
The easiest way to declare a popup window is to call it as a variable: var myWin =
window.open(“http://www.yahoo.com”,”popup”,”height=500,width=500”)
The example below shows how a popup window like this may be used in an HTML document.
<html> <head> <title>JavaScript Popup Window</title> <script language="JAVASCRIPT"> <!-- // Hide function popupwin() { winpopup = window.open('http://www.yahoo.com','popup','height=500, width=600,menubar=no,scrollbars=yes,status=no,toolbar=no, screenX=100,screenY=0,left=100,top=0,resizable=yes'); } //Unhide --> </script> </head> <body> <form name="form1"> <input type="button" value="Goto Yahoo.com" onclick="popupwin();"> </form> </body>
LoudOffice.com Guide to HTML – Part II Page 33
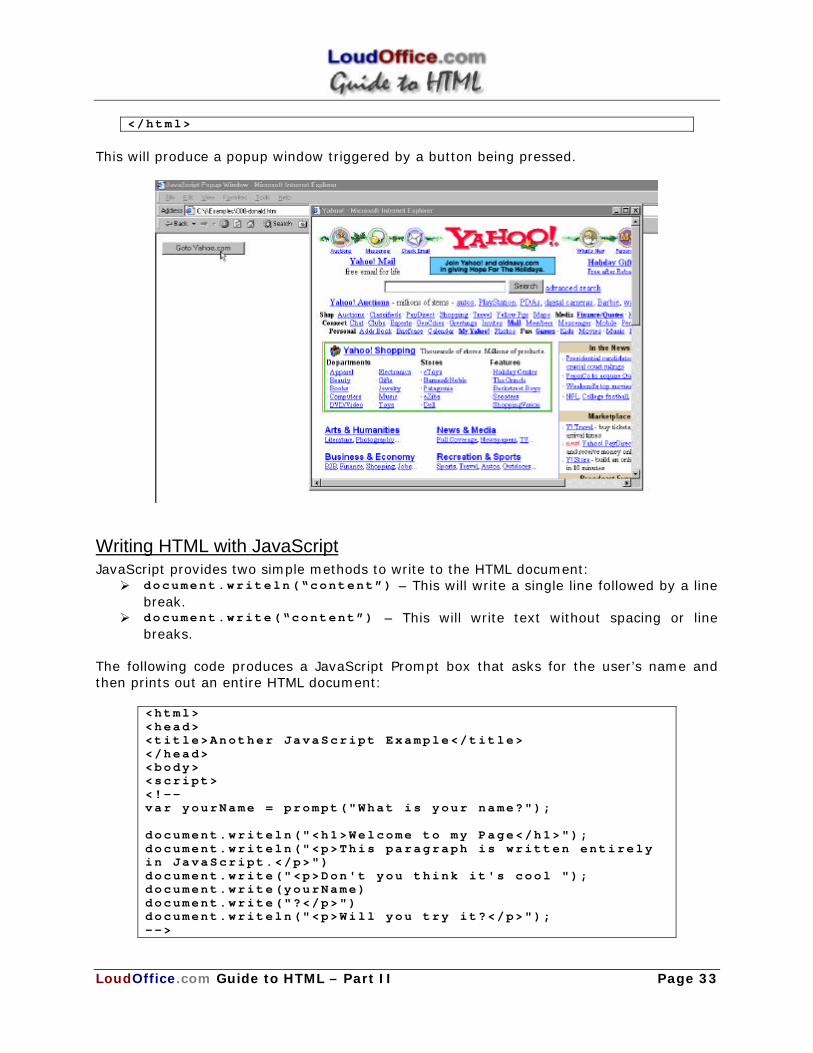
</html>
This will produce a popup window triggered by a button being pressed.
Writing HTML with JavaScript JavaScript provides two simple methods to write to the HTML document: Ø document.writeln(“content”) – This will write a single line followed by a line
break. Ø document.write(“content”) – This will write text without spacing or line
breaks. The following code produces a JavaScript Prompt box that asks for the user’s name and then prints out an entire HTML document:
<html> <head> <title>Another JavaScript Example</title> </head> <body> <script> <!-- var yourName = prompt("What is your name?"); document.writeln("<h1>Welcome to my Page</h1>"); document.writeln("<p>This paragraph is written entirely in JavaScript.</p>") document.write("<p>Don't you think it's cool "); document.write(yourName) document.write("?</p>") document.writeln("<p>Will you try it?</p>"); -->
LoudOffice.com Guide to HTML – Part II Page 34
</script> </body> </html>
Validating Form Data With JavaScript One of the most commonly used applications for JavaScript on the Web is for form validation. Form validation allows a web programmer to check information entered onto a form before it is submitted to the server. The benefit to you as a webmaster is that by validating the form on the browser (client), you will be saving valuable processing resources on the web server. JavaScript form validation occurs on a specific event – when the document is ‘submitted’ (when the submit button is pressed). A JavaScript function is called on the submission action that ‘looks’ at the form and makes sure that information has been correctly entered into each field. JavaScript can actually look at the form and each field so long as each element is named. For instance if you have a field named “email_address” in a form named “feedback_form”, JavaScript would be able to reference that field as document.feedback_form.email_address . It is then possible to determine whether information was submitted to the form and if so, if it is ‘correct’.
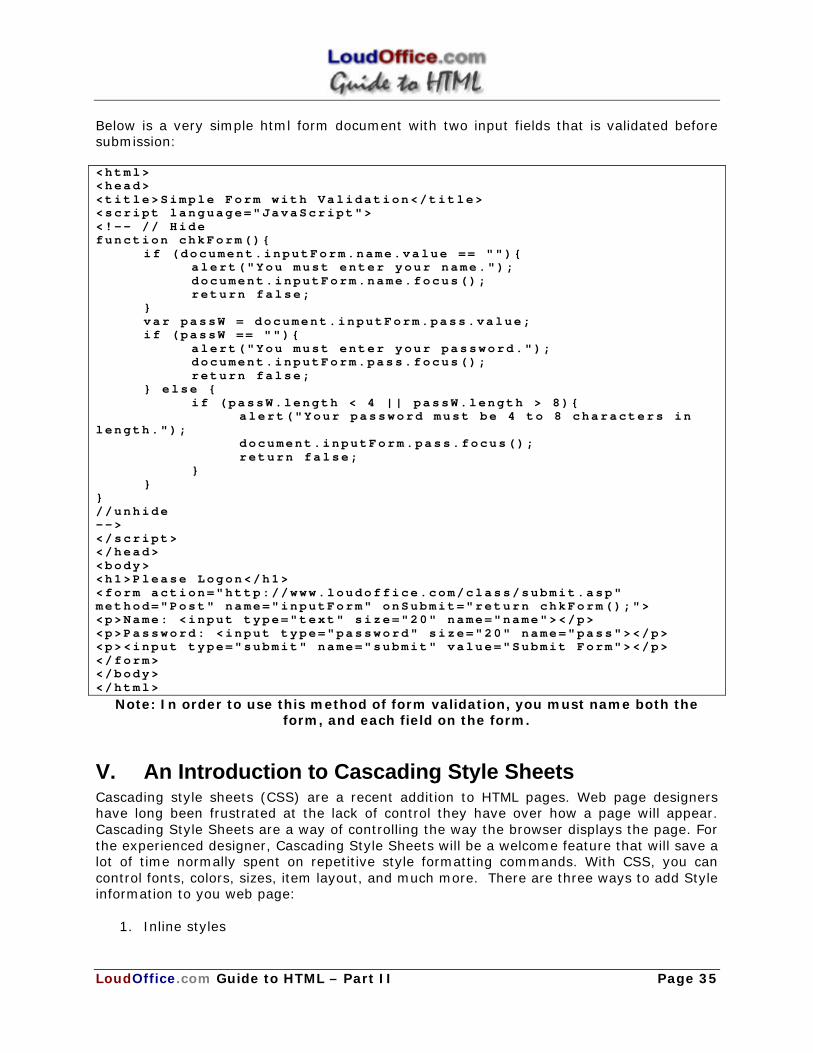
LoudOffice.com Guide to HTML – Part II Page 35
Below is a very simple html form document with two input fields that is validated before submission: <html> <head> <title>Simple Form with Validation</title> <script language="JavaScript"> <!-- // Hide function chkForm(){ if (document.inputForm.name.value == ""){ alert("You must enter your name."); document.inputForm.name.focus(); return false; } var passW = document.inputForm.pass.value; if (passW == ""){ alert("You must enter your password."); document.inputForm.pass.focus(); return false; } else { if (passW.length < 4 || passW.length > 8){ alert("Your password must be 4 to 8 characters in length."); document.inputForm.pass.focus(); return false; } } } //unhide --> </script> </head> <body> <h1>Please Logon</h1> <form action="http://www.loudoffice.com/class/submit.asp" method="Post" name="inputForm" onSubmit="return chkForm();"> <p>Name: <input type="text" size="20" name="name"></p> <p>Password: <input type="password" size="20" name="pass"></p> <p><input type="submit" name="submit" value="Submit Form"></p> </form> </body> </html>
Note: In order to use this method of form validation, you must name both the form, and each field on the form.
V. An Introduction to Cascading Style Sheets Cascading style sheets (CSS) are a recent addition to HTML pages. Web page designers have long been frustrated at the lack of control they have over how a page will appear. Cascading Style Sheets are a way of controlling the way the browser displays the page. For the experienced designer, Cascading Style Sheets will be a welcome feature that will save a lot of time normally spent on repetitive style formatting commands. With CSS, you can control fonts, colors, sizes, item layout, and much more. There are three ways to add Style information to you web page:
1. Inline styles

LoudOffice.com Guide to HTML – Part II Page 36
2. Embedded style sheets 3. Linked style sheets
Microsoft Internet Explorer (3.0 and above) and Netscape Communicator 4.0 provide the most extensive support for cascading style sheets at this time, with Internet Explorer being by far superior in it’s implementation of CSS. The specifications for the evolving CSS standard can be found at the W3C Consortium's Web page at http://www.w3.org/Style/CSS/. You will need to use the CSS standard section of the site or some other CSS reference to see all of the details for writing style commands. This chapter will focus on showing you how to apply style commands to your documents.
Inline Styles The first method of adding Style to a web page is to use the STYLE attribute of a selected element. To use an inline style, you add a STYLE attribute to a specific instance of an element, using the following syntax:
<ELEMENT STYLE="property:value; property:value; …"></ELEMENT>
For example: <B STYLE="color:navy;">In the navy.</B> This text would appear bold and navy in a browser. An inline style may be applied to any HTML element and modifies only the specific instance (occurrence in the document) of the element to which you apply it. Below is an example of an inline CSS element and it’s output:
<html> <head> <title>Quick Example of Inline CSS</title> </head> <body> <h1 STYLE="color: #800000; font-size: 24pt; font-weight: bold">Fun with CSS</h1> <p>I changed the look of the tag above using CSS. Notice that only the H1 tag above was effected, not the entire document.</p> </body> </html>
LoudOffice.com Guide to HTML – Part II Page 37
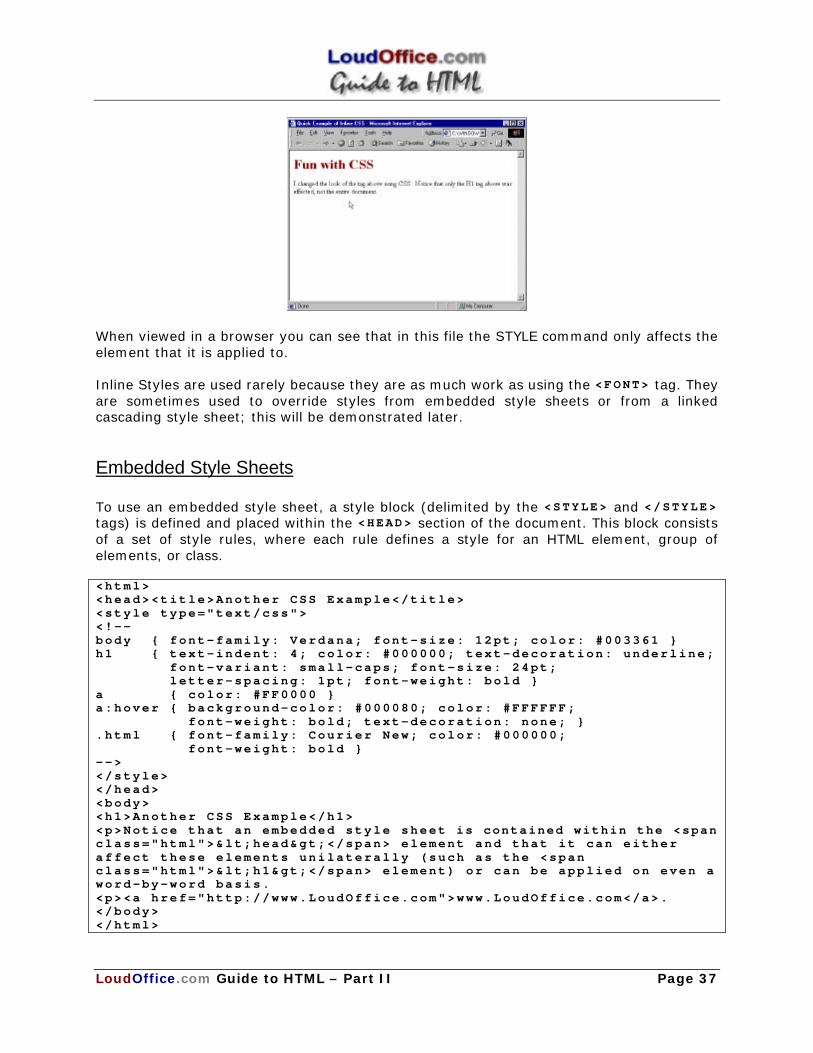
When viewed in a browser you can see that in this file the STYLE command only affects the element that it is applied to. Inline Styles are used rarely because they are as much work as using the <FONT> tag. They are sometimes used to override styles from embedded style sheets or from a linked cascading style sheet; this will be demonstrated later.
Embedded Style Sheets To use an embedded style sheet, a style block (delimited by the <STYLE> and </STYLE> tags) is defined and placed within the <HEAD> section of the document. This block consists of a set of style rules, where each rule defines a style for an HTML element, group of elements, or class. <html> <head><title>Another CSS Example</title> <style type="text/css"> <!-- body { font-family: Verdana; font-size: 12pt; color: #003361 } h1 { text-indent: 4; color: #000000; text-decoration: underline; font-variant: small-caps; font-size: 24pt; letter-spacing: 1pt; font-weight: bold } a { color: #FF0000 } a:hover { background-color: #000080; color: #FFFFFF; font-weight: bold; text-decoration: none; } .html { font-family: Courier New; color: #000000; font-weight: bold } --> </style> </head> <body> <h1>Another CSS Example</h1> <p>Notice that an embedded style sheet is contained within the <span class="html"><head></span> element and that it can either affect these elements unilaterally (such as the <span class="html"><h1></span> element) or can be applied on even a word-by-word basis. <p><a href="http://www.LoudOffice.com">www.LoudOffice.com</a>. </body> </html>
LoudOffice.com Guide to HTML – Part II Page 38
CSS and the <a> Element Notice that for the <a> element, you can apply CSS for each of these different states: Ø Normal / All: By applying CSS to just the <a> element, you effect all instances Ø Link: This will apply the CSS to all links. Ø Hover: This will apply when the mouse is ‘hovered’ over the link. Ø Active: This will apply to the ‘active’ link. Ø Visited: This will apply to only ‘visited’ links.
Required Elements A required attribute of the Style element is TYPE and it should be set to text/css . A disadvantage of Embedded Style sheets is that the style commands only apply to the document they are embedded in, which means you have to put them in each and every page you want to use them. Some browsers are not CSS-compliant and will display the contents of the STYLE element in the document window. For this reason it is a good idea to surround an embedded style sheet with an HTML comment. This will cause the content to be ignored by non-CSS browsers, but still interpreted by CSS compliant browsers. To enter comments simply type `<!-- ' just after the <STYLE> start-tag, but before the style sheet information and type `--> ' just before the </STYLE> end-tag, but after the style sheet information. Notice in the HTML code above that the <STYLE> selector has two parts:
1. A selector that identifies an HTML element or group of elements; and 2. A declaration of the style properties to be applied to that selector.
The generic syntax for a style rule is as follows: selector {property1:value1; property2:value2; ...}
Each style rule must start with a selector or group of selectors, followed by an open brace ({ ), followed by a set of declarations. Each of these declarations ends with a semi-colon and each property is separated from its value(s) by a colon (: ), ending with a close brace (} ).
LoudOffice.com Guide to HTML – Part II Page 39
Notice that the Embedded Style Sheet below will make all of the <H2> elements in the document display in blue, except for any <H2> that contains an inline style command. Inline style commands takes precedence over the embedded commands if they are in conflict.
<STYLE TYPE="text/css"> <!-- H2 {color: blue;} --> </STYLE>
Linked Style sheets The easiest method for adding style to multiple HTML documents is to use Linked Style Sheets. A Linked Style Sheet is a separate file that contains all of the style information that is referenced in each page that uses it. Below is an example of a separate Cascading Style Sheet, web-style.css :
<style> h1 {color: #800000 } h2 {color: #000080 } h3 {color: #990000 } body {font-family: verdana, arial, tahoma; font-size: 10pt } a {font-weight: bold } a:link {color: #003375 } a:visited {color: #003375 } a:hover {color: #ff0000; text-decoration: none } a:active {color: #ff0000 } </style>
MAKE SURE YOU SAVE WITH A .CSS EXTENSION
To link the style sheet to the HTML page you use a <link> element in the <head> of your document. The required attributes are href="url" , rel="stylesheet" , and type= "text/css" . For example, to use the web-style.css file above, the following tag would be used:
<link rel="stylesheet" type="text/css" href="web-style.css">
CSS Classes CSS classes allow you to define a standard CSS element that can be used for any HTML element. CLASS is an HTML attribute that has no display characteristics and can be applied to any element, like this:
<h2 class="sales">Style class ‘sales’ applied here.<h2> <p class="sales">The class ‘sales’ can also be used here.</p>
The CSS class ‘sales’ would be declared as follows:
<STYLE> <!-- .sales { color:lime; text-decoration:none } --> </STYLE>
NOTE: THAT THE SELECTOR BEGINS WITH A PERIOD (.), WHICH IS THE REQUIRED SYNTAX FOR CLASS NAMES.
LoudOffice.com Guide to HTML – Part II Page 40
As you can see, a class is simply a group of elements that can be used on scattered elements throughout a document, all of which have the same value for their CLASS attribute.
IDs Like CLASS , ID is an HTML attribute that can be applied to any element. In general, while class names are usually given to groups of elements, ID is used to identify one specific instance of an element. Style rules selected by the ID attribute are declared using the pound sign (#) to precede the selector, as follows:
<STYLE> <!-- #mainhead {color:yellow; text-decoration:italic;} --> </STYLE>
While many elements can share the same CLASS attribute value, only one element in any document can have a particular ID attribute value.
DIV and SPAN These two HTML elements <DIV> and <SPAN> are almost exclusively used as containers for CSS properties. <DIV> and <SPAN> have no inherent display characteristics, with one exception each. <DIV> defines a block consisting of text and HTML tags, and separates this block from surrounding content by line breaks, while <SPAN> is an inline element which "flows" in with surrounding content. These two elements are used to allow you to add CSS to a selected amount of text:
<STYLE> <!-- .redspan {color:yellow; text-decoration:italic;} --> </STYLE> ... <p>I can use SPAN to apply the <span class=”redspan”>red span</span> class to just a select amount of text.</p>
Cascading and Inheritance The style sheets we are discussing are called Cascading Style Sheets. Simply stated, "cascading" in CSS specifies how an element instance may be affected by styles of different types (inline style, embedded style sheet, linked style sheet, imported style sheet) and selected in a number of ways (element tag, class, ID). The logic is simple: CSS cascades from general to specific, and from top to bottom. The order of specificity, from greatest to least, is:
1. Inline styles 2. ID 3. CLASS 4. HTML element
LoudOffice.com Guide to HTML – Part II Page 41
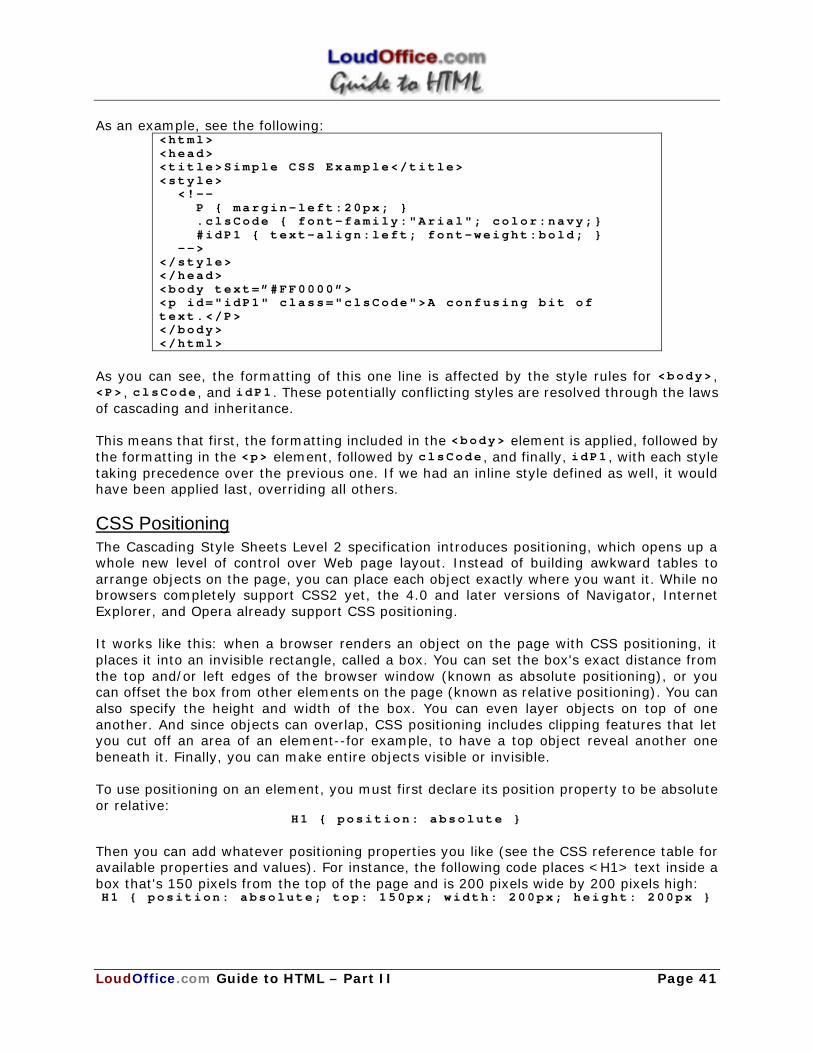
As an example, see the following: <html> <head> <title>Simple CSS Example</title> <style> <!-- P { margin-left:20px; } .clsCode { font-family:"Arial"; color:navy;} #idP1 { text-align:left; font-weight:bold; } --> </style> </head> <body text=”#FF0000”> <p id="idP1" class="clsCode">A confusing bit of text.</P> </body> </html>
As you can see, the formatting of this one line is affected by the style rules for <body> , <P> , clsCode , and idP1 . These potentially conflicting styles are resolved through the laws of cascading and inheritance. This means that first, the formatting included in the <body> element is applied, followed by the formatting in the <p> element, followed by clsCode , and finally, idP1 , with each style taking precedence over the previous one. If we had an inline style defined as well, it would have been applied last, overriding all others.
CSS Positioning The Cascading Style Sheets Level 2 specification introduces positioning, which opens up a whole new level of control over Web page layout. Instead of building awkward tables to arrange objects on the page, you can place each object exactly where you want it. While no browsers completely support CSS2 yet, the 4.0 and later versions of Navigator, Internet Explorer, and Opera already support CSS positioning. It works like this: when a browser renders an object on the page with CSS positioning, it places it into an invisible rectangle, called a box. You can set the box's exact distance from the top and/or left edges of the browser window (known as absolute positioning), or you can offset the box from other elements on the page (known as relative positioning). You can also specify the height and width of the box. You can even layer objects on top of one another. And since objects can overlap, CSS positioning includes clipping features that let you cut off an area of an element--for example, to have a top object reveal another one beneath it. Finally, you can make entire objects visible or invisible. To use positioning on an element, you must first declare its position property to be absolute or relative:
H1 { position: absolute }
Then you can add whatever positioning properties you like (see the CSS reference table for available properties and values). For instance, the following code places <H1> text inside a box that's 150 pixels from the top of the page and is 200 pixels wide by 200 pixels high: H1 { position: absolute; top: 150px; width: 200px; height: 200px }
LoudOffice.com Guide to HTML – Part II Page 42
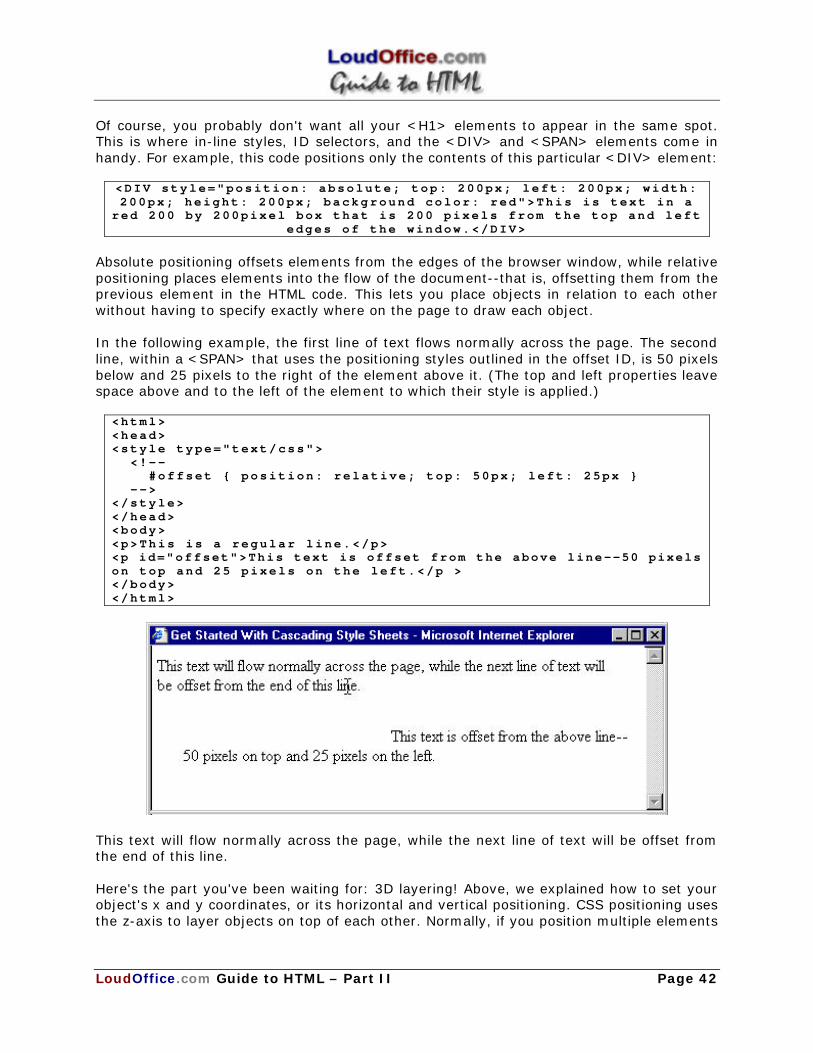
Of course, you probably don't want all your <H1> elements to appear in the same spot. This is where in-line styles, ID selectors, and the <DIV> and <SPAN> elements come in handy. For example, this code positions only the contents of this particular <DIV> element:
<DIV style="position: absolute; top: 200px; left: 200px; width: 200px; height: 200px; background color: red">This is text in a
red 200 by 200pixel box that is 200 pixels from the top and left edges of the window.</DIV>
Absolute positioning offsets elements from the edges of the browser window, while relative positioning places elements into the flow of the document--that is, offsetting them from the previous element in the HTML code. This lets you place objects in relation to each other without having to specify exactly where on the page to draw each object. In the following example, the first line of text flows normally across the page. The second line, within a <SPAN> that uses the positioning styles outlined in the offset ID, is 50 pixels below and 25 pixels to the right of the element above it. (The top and left properties leave space above and to the left of the element to which their style is applied.)
<html> <head> <style type="text/css"> <!-- #offset { position: relative; top: 50px; left: 25px } --> </style> </head> <body> <p>This is a regular line.</p> <p id="offset">This text is offset from the above line--50 pixels on top and 25 pixels on the left.</p > </body> </html>
This text will flow normally across the page, while the next line of text will be offset from the end of this line. Here's the part you've been waiting for: 3D layering! Above, we explained how to set your object's x and y coordinates, or its horizontal and vertical positioning. CSS positioning uses the z-axis to layer objects on top of each other. Normally, if you position multiple elements
LoudOffice.com Guide to HTML – Part II Page 43
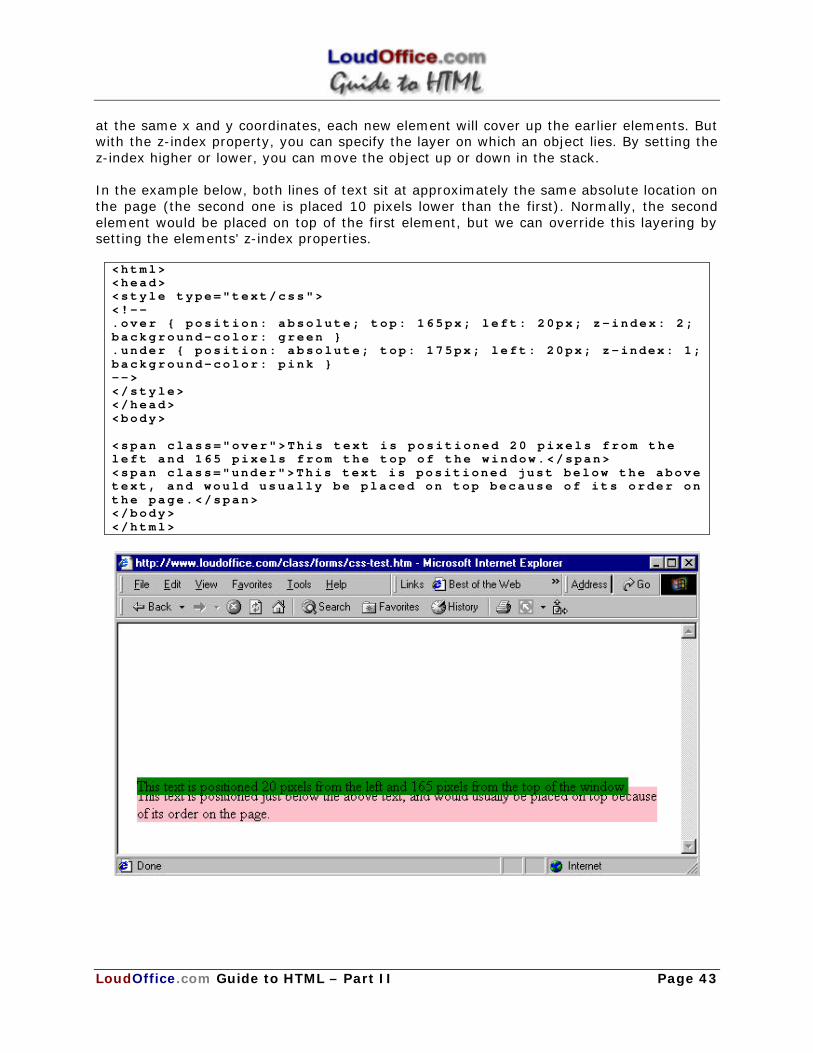
at the same x and y coordinates, each new element will cover up the earlier elements. But with the z-index property, you can specify the layer on which an object lies. By setting the z-index higher or lower, you can move the object up or down in the stack. In the example below, both lines of text sit at approximately the same absolute location on the page (the second one is placed 10 pixels lower than the first). Normally, the second element would be placed on top of the first element, but we can override this layering by setting the elements' z-index properties.
<html> <head> <style type="text/css"> <!-- .over { position: absolute; top: 165px; left: 20px; z-index: 2; background-color: green } .under { position: absolute; top: 175px; left: 20px; z-index: 1; background-color: pink } --> </style> </head> <body> <span class="over">This text is positioned 20 pixels from the left and 165 pixels from the top of the window.</span> <span class="under">This text is positioned just below the above text, and would usually be placed on top because of its order on the page.</span> </body> </html>
LoudOffice.com Guide to HTML – Part II Page 44
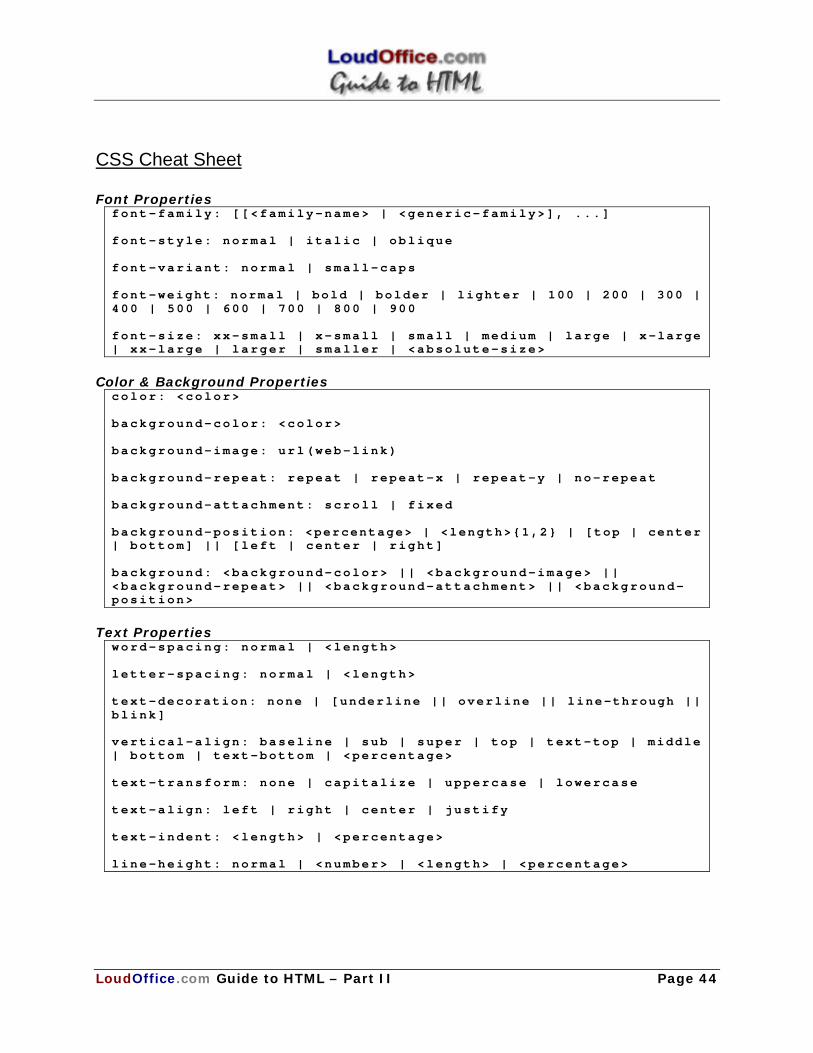
CSS Cheat Sheet Font Properties
font-family: [[<family-name> | <generic-family>], ...] font-style: normal | italic | oblique font-variant: normal | small-caps font-weight: normal | bold | bolder | lighter | 100 | 200 | 300 | 400 | 500 | 600 | 700 | 800 | 900 font-size: xx-small | x-small | small | medium | large | x-large | xx-large | larger | smaller | <absolute-size>
Color & Background Properties
color: <color> background-color: <color> background-image: url(web-link) background-repeat: repeat | repeat-x | repeat-y | no-repeat background-attachment: scroll | fixed background-position: <percentage> | <length>{1,2} | [top | center | bottom] || [left | center | right] background: <background-color> || <background-image> || <background-repeat> || <background-attachment> || <background-position>
Text Properties
word-spacing: normal | <length> letter-spacing: normal | <length> text-decoration: none | [underline || overline || line-through || blink] vertical-align: baseline | sub | super | top | text-top | middle | bottom | text-bottom | <percentage> text-transform: none | capitalize | uppercase | lowercase text-align: left | right | center | justify text-indent: <length> | <percentage> line-height: normal | <number> | <length> | <percentage>
LoudOffice.com Guide to HTML – Part II Page 45
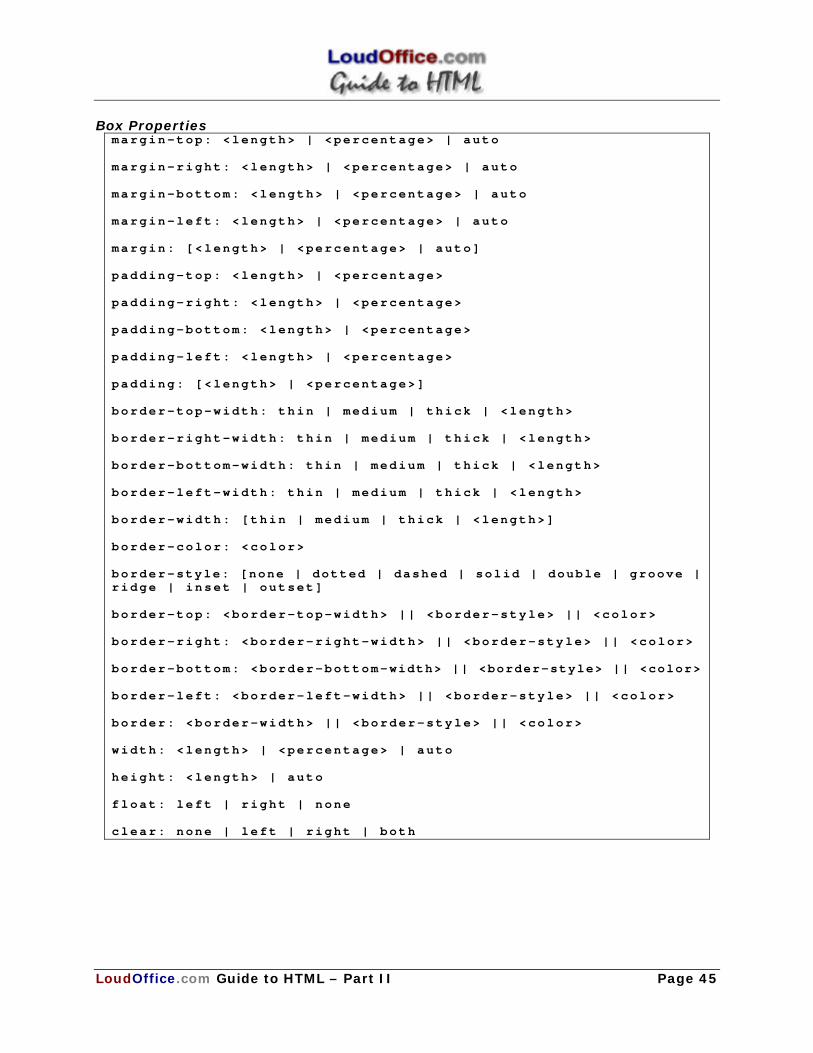
Box Properties margin-top: <length> | <percentage> | auto margin-right: <length> | <percentage> | auto margin-bottom: <length> | <percentage> | auto margin-left: <length> | <percentage> | auto margin: [<length> | <percentage> | auto] padding-top: <length> | <percentage> padding-right: <length> | <percentage> padding-bottom: <length> | <percentage> padding-left: <length> | <percentage> padding: [<length> | <percentage>] border-top-width: thin | medium | thick | <length> border-right-width: thin | medium | thick | <length> border-bottom-width: thin | medium | thick | <length> border-left-width: thin | medium | thick | <length> border-width: [thin | medium | thick | <length>] border-color: <color> border-style: [none | dotted | dashed | solid | double | groove | ridge | inset | outset] border-top: <border-top-width> || <border-style> || <color> border-right: <border-right-width> || <border-style> || <color> border-bottom: <border-bottom-width> || <border-style> || <color> border-left: <border-left-width> || <border-style> || <color> border: <border-width> || <border-style> || <color> width: <length> | <percentage> | auto height: <length> | auto float: left | right | none clear: none | left | right | both
LoudOffice.com Guide to HTML – Part II Page 46
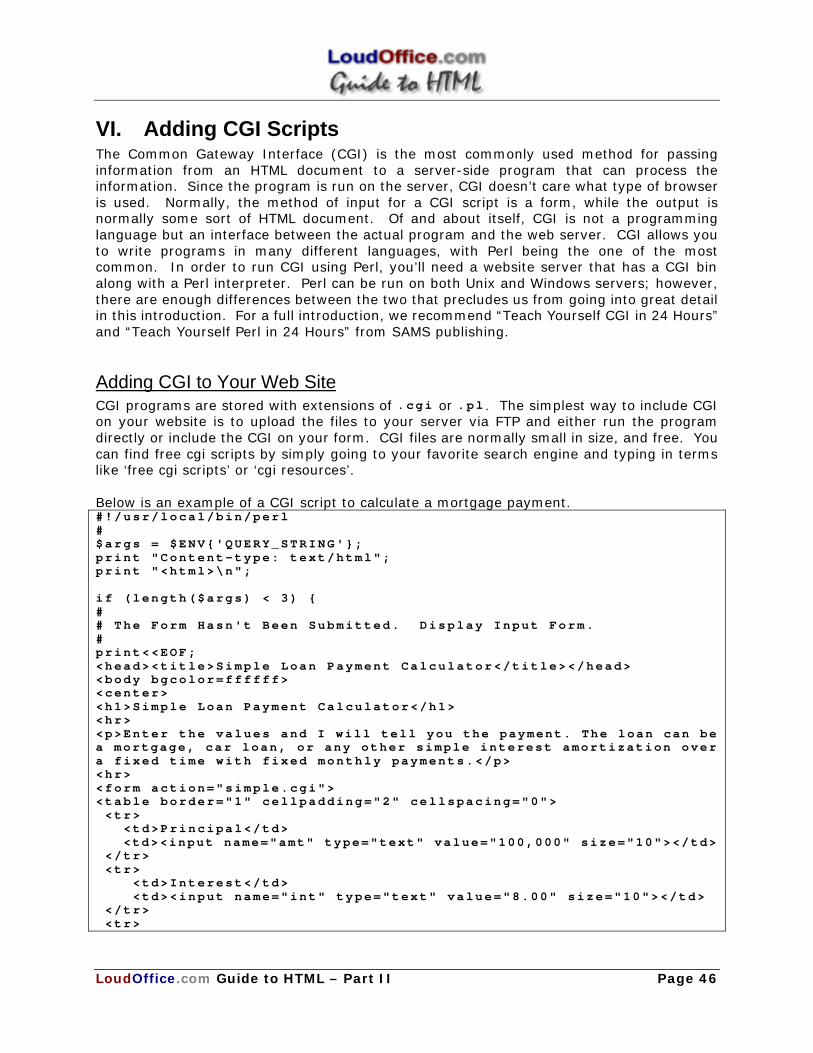
VI. Adding CGI Scripts The Common Gateway Interface (CGI) is the most commonly used method for passing information from an HTML document to a server-side program that can process the information. Since the program is run on the server, CGI doesn’t care what type of browser is used. Normally, the method of input for a CGI script is a form, while the output is normally some sort of HTML document. Of and about itself, CGI is not a programming language but an interface between the actual program and the web server. CGI allows you to write programs in many different languages, with Perl being the one of the most common. In order to run CGI using Perl, you’ll need a website server that has a CGI bin along with a Perl interpreter. Perl can be run on both Unix and Windows servers; however, there are enough differences between the two that precludes us from going into great detail in this introduction. For a full introduction, we recommend “Teach Yourself CGI in 24 Hours” and “Teach Yourself Perl in 24 Hours” from SAMS publishing.
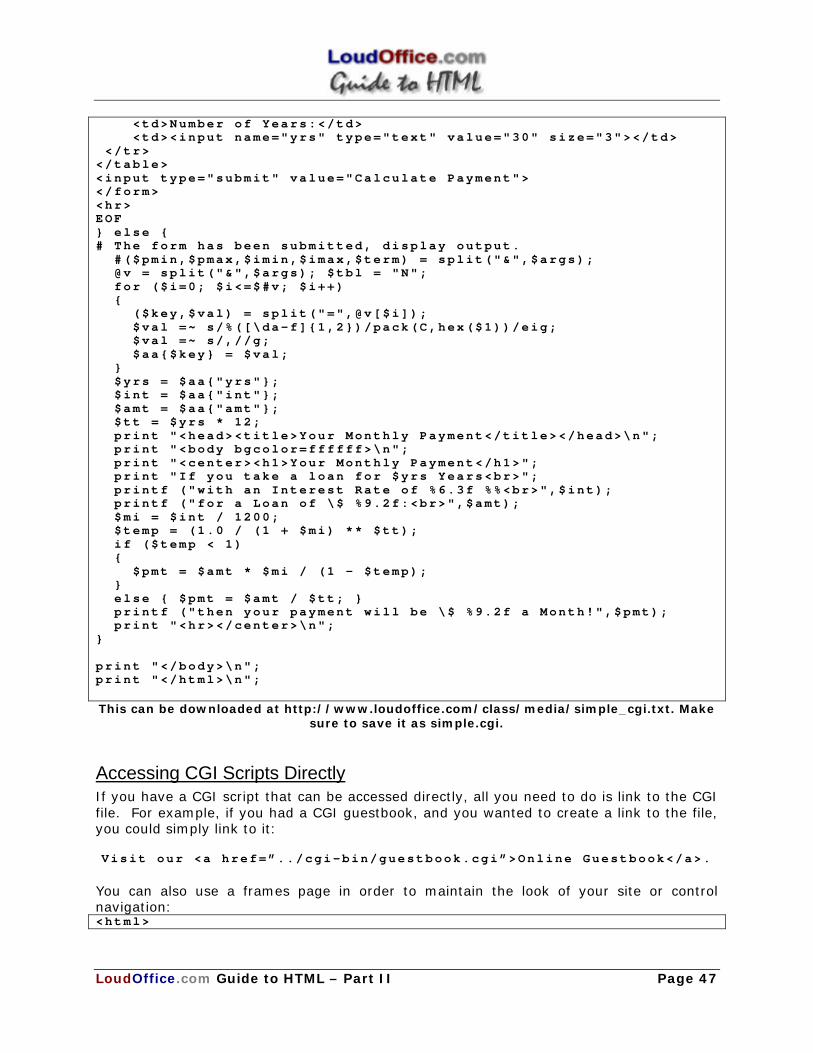
Adding CGI to Your Web Site CGI programs are stored with extensions of .cgi or .pl . The simplest way to include CGI on your website is to upload the files to your server via FTP and either run the program directly or include the CGI on your form. CGI files are normally small in size, and free. You can find free cgi scripts by simply going to your favorite search engine and typing in terms like ‘free cgi scripts’ or ‘cgi resources’. Below is an example of a CGI script to calculate a mortgage payment. #!/usr/local/bin/perl # $args = $ENV{'QUERY_STRING'}; print "Content-type: text/html"; print "<html>\n"; if (length($args) < 3) { # # The Form Hasn't Been Submitted. Display Input Form. # print<<EOF; <head><title>Simple Loan Payment Calculator</title></head> <body bgcolor=ffffff> <center> <h1>Simple Loan Payment Calculator</h1> <hr> <p>Enter the values and I will tell you the payment. The loan can be a mortgage, car loan, or any other simple interest amortization over a fixed time with fixed monthly payments.</p> <hr> <form action="simple.cgi"> <table border="1" cellpadding="2" cellspacing="0"> <tr> <td>Principal</td> <td><input name="amt" type="text" value="100,000" size="10"></td> </tr> <tr> <td>Interest</td> <td><input name="int" type="text" value="8.00" size="10"></td> </tr> <tr>
LoudOffice.com Guide to HTML – Part II Page 47
<td>Number of Years:</td> <td><input name="yrs" type="text" value="30" size="3"></td> </tr> </table> <input type="submit" value="Calculate Payment"> </form> <hr> EOF } else { # The form has been submitted, display output. #($pmin,$pmax,$imin,$imax,$term) = split("&",$args); @v = split("&",$args); $tbl = "N"; for ($i=0; $i<=$#v; $i++) { ($key,$val) = split("=",@v[$i]); $val =~ s/%([\da-f]{1,2})/pack(C,hex($1))/eig; $val =~ s/,//g; $aa{$key} = $val; } $yrs = $aa{"yrs"}; $int = $aa{"int"}; $amt = $aa{"amt"}; $tt = $yrs * 12; print "<head><title>Your Monthly Payment</title></head>\n"; print "<body bgcolor=ffffff>\n"; print "<center><h1>Your Monthly Payment</h1>"; print "If you take a loan for $yrs Years<br>"; printf ("with an Interest Rate of %6.3f %%<br>",$int); printf ("for a Loan of \$ %9.2f:<br>",$amt); $mi = $int / 1200; $temp = (1.0 / (1 + $mi) ** $tt); if ($temp < 1) { $pmt = $amt * $mi / (1 - $temp); } else { $pmt = $amt / $tt; } printf ("then your payment will be \$ %9.2f a Month!",$pmt); print "<hr></center>\n"; } print "</body>\n"; print "</html>\n";
This can be downloaded at http://www.loudoffice.com/class/media/simple_cgi.txt. Make sure to save it as simple.cgi.
Accessing CGI Scripts Directly If you have a CGI script that can be accessed directly, all you need to do is link to the CGI file. For example, if you had a CGI guestbook, and you wanted to create a link to the file, you could simply link to it: Visit our <a href=”../cgi-bin/guestbook.cgi”>Online Guestbook</a>.
You can also use a frames page in order to maintain the look of your site or control navigation: <html>
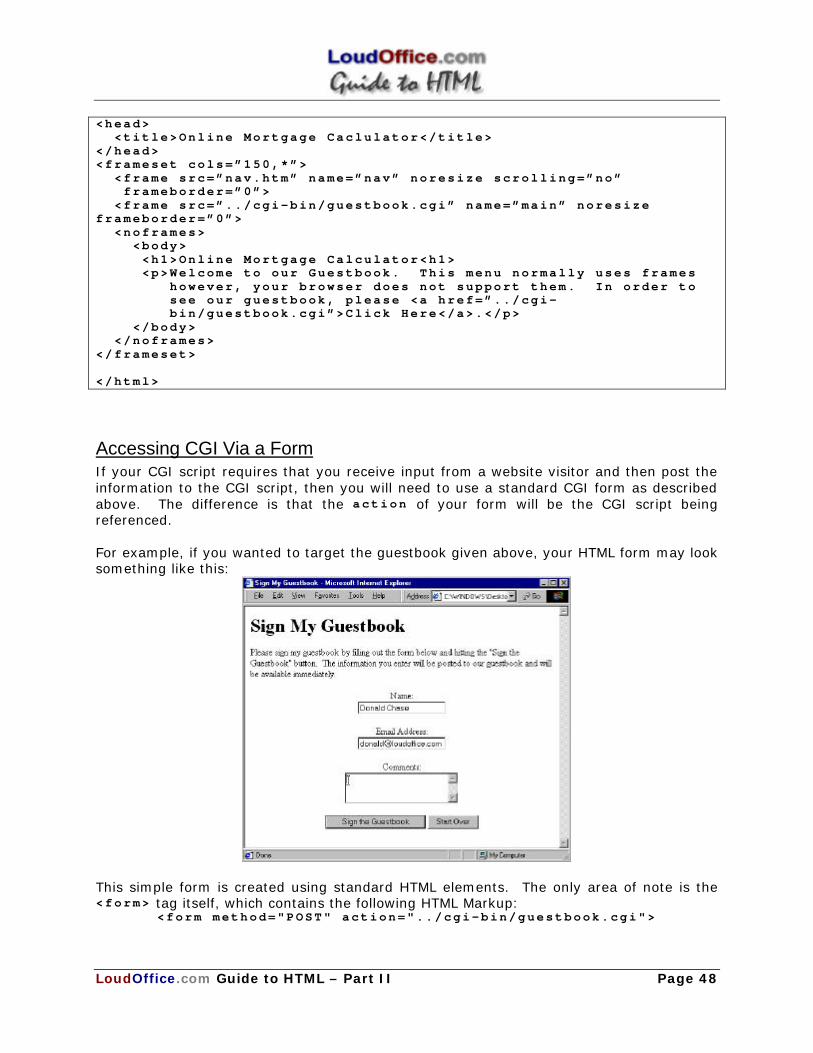
LoudOffice.com Guide to HTML – Part II Page 48
<head> <title>Online Mortgage Caclulator</title> </head> <frameset cols=”150,*”> <frame src=”nav.htm” name=”nav” noresize scrolling=”no” frameborder=”0”> <frame src=”../cgi-bin/guestbook.cgi” name=”main” noresize frameborder=”0”> <noframes> <body> <h1>Online Mortgage Calculator<h1> <p>Welcome to our Guestbook. This menu normally uses frames however, your browser does not support them. In order to see our guestbook, please <a href=”../cgi- bin/guestbook.cgi”>Click Here</a>.</p> </body> </noframes> </frameset> </html>
Accessing CGI Via a Form If your CGI script requires that you receive input from a website visitor and then post the information to the CGI script, then you will need to use a standard CGI form as described above. The difference is that the action of your form will be the CGI script being referenced. For example, if you wanted to target the guestbook given above, your HTML form may look something like this:
This simple form is created using standard HTML elements. The only area of note is the <form> tag itself, which contains the following HTML Markup:
<form method="POST" action="../cgi-bin/guestbook.cgi">
LoudOffice.com Guide to HTML – Part II Page 49
VII. Getting Your Site Found By Search Engines Before we begin any discussion about how to get your site found on the web, we should say this. If we knew with 100% accuracy how to get top search engine listings, we would not be teaching this class because we would be touring the world on our millions and millions of dollars. Therefore, this section will cover the basics, however there is an art to getting your site listed that we, like many others, are still trying to learn. An example of a site that uses META tags is LoudOffice.com. The META tags we use are as follows: <meta name="description" content="Boston-based internet strategy and e-commerce website design company that specializes in developing and hosting interactive websites and intranets."> <meta name="keywords" content="internet strategy, website design, e-commerce, database integration, eCommerce, Boston, Massachusetts, hosting, web application development, intranet, bulletin boards, online stores, idea generation, marketing plans, creative, graphics, re-design, redesign, catalogs, promotion, real estate marketing, mortgage finance, loan officers, fsbo program development, e-mail list, newsletters, internet integration, website development, internet marketing, search engine optimization, training, individual training, email, online ordering, shopping cart, merchant accounts, nt, unix, hosting, web, webs, corporate intranet, membership, password protection, cookies, e-mail, domain registration, listing, Boston, Lynn, cyberdistrict, JavaScript, VBscript, asp, application service provider, active server pages, website hosting, New England"> <meta name="robots" content="all"> <meta name="robots" content="index, follow"> <meta name="author" content="Donald Chase - [email protected]"> <meta name="revisit" content="30 days"> <meta name="rating" content="general"> <meta name="distribution" content="global"> <meta name="copyright" content="2000 - LoudOffice.com">
Basic of Meta Tags META tags can be very useful for Web developers. They can be used to identify the creator of the page, the keywords and description of the page, and the refresh parameter (which can be used to cause the page to reload itself, or to load another page). And these are just a few of the common uses. There are two basic formats which META tags take: http-equiv and META tags with name & content attributes.
NOTE: ALL META TAGS ARE INCLUDED WITHIN THE <head> ELEMENT META http-equiv Tags Expires This tells the browser the date and time when the document will be considered "expired." Most browsers allow a user to “save” a local version of a web page, sometimes many days, even weeks, after they visit your site. If you have content that updates frequently, then user may actually be viewing an older version. However, every time they visit a document whose time has "expired", the browser will initiate a new network request for the document. An illegal Expires date such as "0" is interpreted by the browser as "immediately." Dates must be in the RFC850 format, (GMT format):
LoudOffice.com Guide to HTML – Part II Page 50
<meta http-equiv="expires" content="Wed, 26 Feb 1997 08:21:57 GMT">
Pragma This is another way to control browser caching. To use this tag, the value must be "no-cache". When this is included in a document, it prevents the browser from caching a page locally.
<meta http-equiv="Pragma" content="no-cache">
These two tags can be used as together as shown to keep your content current—but beware. Many users of Microsoft browsers through version 4.01 have reported that Microsoft’s Internet Explorer refuses the META tag instructions, and caches the files anyway. Refresh This tag specifies the time in seconds before the Web browser reloads the document automatically. Alternatively, it can specify a different URL for the browser to load. For example if you had an entrance page that loaded the main page, the following META tag might be used:
<meta http-equiv="refresh" content="0;url=home.html">
Be sure to remember to place quotation marks around the entire content attribute’s value, or the page will not reload at all. Meta Tags with the NAME / CONTENT Attributes META tags are more commonly declared though the use of the name and content attributes. The most commonly used are keywords and description , however others are used as shown below. Description The META description is commonly used in search engines to show a brief description of the site in the author’s own words. This description should be short and to the point. In fact, WebPromote suggests that you keep your description to less than 25 words or 150 characters. Thinking that you'll really get noticed if your description is the longest one returned, you might be tempted to put in a whole paragraph or more, but don't waste the kilobytes. Search engines use a set amount of characters in the descriptions they return. If yours is too long, it will be cut off abruptly. For example, the description for my N’Sync fan page is:
<meta name="description" content="Donald’s World of N’Sync. Everything you’d want to learn about the world’s best band.">
Keywords The keywords attribute is used to tell the search engines which keywords to use when indexing the page. Keywords are separated by commas and can either be listed individually or as expressions. You must be careful when using keywords that do not repeat any one word more than three times, because search engines will ignore your pages, thinking you’re trying to spam them. Although you can use a large number of keywords in your HTML document, you should probably try to limit the total length of your keywords to 850 characters.
<meta name ="keywords" content="life, universe, mankind, plants, relationships, the meaning of life, science">

LoudOffice.com Guide to HTML – Part II Page 51
Search Engine ROBOTs Most pages become listed when a search engine “robot” visits their site and indexes the content into their database. This is a controllable action, since there are probably some of you who do not wish every page to be indexed by the spiders at all. The robots META attribute was designed with this problem in mind. The format uses is:
<meta name="robots" content="all | none | index | noindex | follow | nofollow">
The default for the robot attribute is "all ". This would allow all of the files to be indexed. "none " would tell the spider not to index any files, and not to follow the hyperlinks on the page to other pages. "index " indicates that this page may be indexed by the spider, while "follow " would mean that the spider is free to follow the links from this page to other pages. The inverse is also true:
<meta name="robots" content="noindex">
This META tag would tell the spider not to index this page, but would allow it to follow subsidiary links and index those pages. "nofollow " would allow the page itself to be indexed, but the links could not be followed. As you can see, the robots attribute can be very useful for Web developers. For more information about the robot attribute, visit the W3C’s robot paper.
How to Get Listed There is No Such Thing as Magic!
There is no panacea that will improve if and how your site appears in search engines. Learning the art of search engine placement takes time, patience, and experimentation. Below are a few points to help you improve your ability to get your site listed:
1. Study the different types of search engines – Like so many other elements of web design, search engines take many different types of forms and functions. Some sites (such as Excite) use “robots”, programs that browse the web from site to site, reading the HTML code of a page and indexing it to an online database. Others are directory-structured, many times with actual humans adding sites to online databases. Examples of these include Yahoo! and the Open Directory Project (dmoz.org). Each look at your site differently – robots can only attempt to analyze your HTML code while human directories look at the page itself.
2. Submit Your Site - Visit the different search engines you wish to get your site listed with and find out how to submit your site. Robot sites normally ask for some basic information and then let their robots visit your site, while others require you to enter your information, a description, keywords, etc. Read their instructions VERY CAREFULLY, and don’t try submitting your site until it is as close to 100% ready as possible. You can also find services to do so for a fee, and some are very credible, but no matter what they say, there are no guarantees.
3. Make Sure Your Description and Keywords are Relevant – if your site is about the gestation period of intestinal flu variants, then you would not be served using “mickey mouse” as a keyword or in your description. The temptation is to stuff your keywords and descriptions with “popular” search term. Even though millions of people look for information on Disney, while probably a few dozen look up information on flu variants, you are better off having relevant, rather than spam, keywords. The reason for this is that a search robot may see “mickey mouse” in
LoudOffice.com Guide to HTML – Part II Page 52
your keyword, but when it doesn’t see it in your site, it may penalize your listing. You could also face copyright or trademark infringement issues, believe it or not. Also, try to ensure that your keywords are geographically relevant as well – if you are a Boston bakery, make sure “Boston” (probably even “Boston, Massachusetts”) is in your description and keywords.
4. Tailor Each Page of Keywords to Your Page’s Content – It does not hurt to give each page it’s own keywords that specifically relate to the specific page’s content. For instance, on a real estate site, certain keywords may be on every page (such as “how to buy a home, mortgage information, home styles”, etc.), but you may have other pages that cover specific topics: “down payments, mortgage calculators”, etc. If each of those pages had added keywords that relate to the page’s content, their listing could approve. Robots do look at your HTML code, so if keywords are used in your HTML code (i.e. <h1>Mortgage Calculators</h1> ), your site’s listing will improve.
5. Find Out What Highly Ranked Pages Do- One way to see what works and what doesn’t is to look at pages in the same category as yours that are listed higher in the search engines. Study their HTML. Don’t just look at their META tags, but also consider the other HTML elements, such as heading tags, image alternative text descriptions, and more.
6. Try and Try Again - Keep in mind that search engines apply a very complicated algorithm to your page’s HTML (including META TAGS) when deciding how to list it in their directory. If you find that your pages are not getting listed high enough in search engines, try different a different description / keywords combination, check your HTML very thoroughly, and re-submit your site. Be careful that you don’t submit too often, or you’ll be considered a spammer and your site will never be listed, but if you submit once a month (even once a week for some directories), you’ll be fine.
7. Link and Get Linked – Since many robots find pages by surfing through the web, your chances of getting listed improve if a high-traffic site links to yours. This is a sort-of “popularity” factor: the more “popular” your page is, the higher it will appear in search engines. Remember, the goal of search engines is to provide website surfers with highly relevant information. If your site is a site on “treadmills” and you get links from 5 of the 10 largest exercise sites on the Web, your listing will be higher than someone whose site is not as well-linked.
8. Read, Read, Read – The best way to keep abreast of changes with regards to search engines is to identify sites that talk about these search engines, the different ways to get listed, and the differences and similarities among these sites. Many offer email newsletters which will keep you up-to-date.
Studying how to make your site listed is like learning HTML itself. It requires time, patience, and practice.