26 inch digital LCD TV - Digital UK | Home inch digital LCD TV ... and the point where it exits from...
30
26 inch digital LCD TV JLP-Model No. JL26 User guide
Transcript of 26 inch digital LCD TV - Digital UK | Home inch digital LCD TV ... and the point where it exits from...
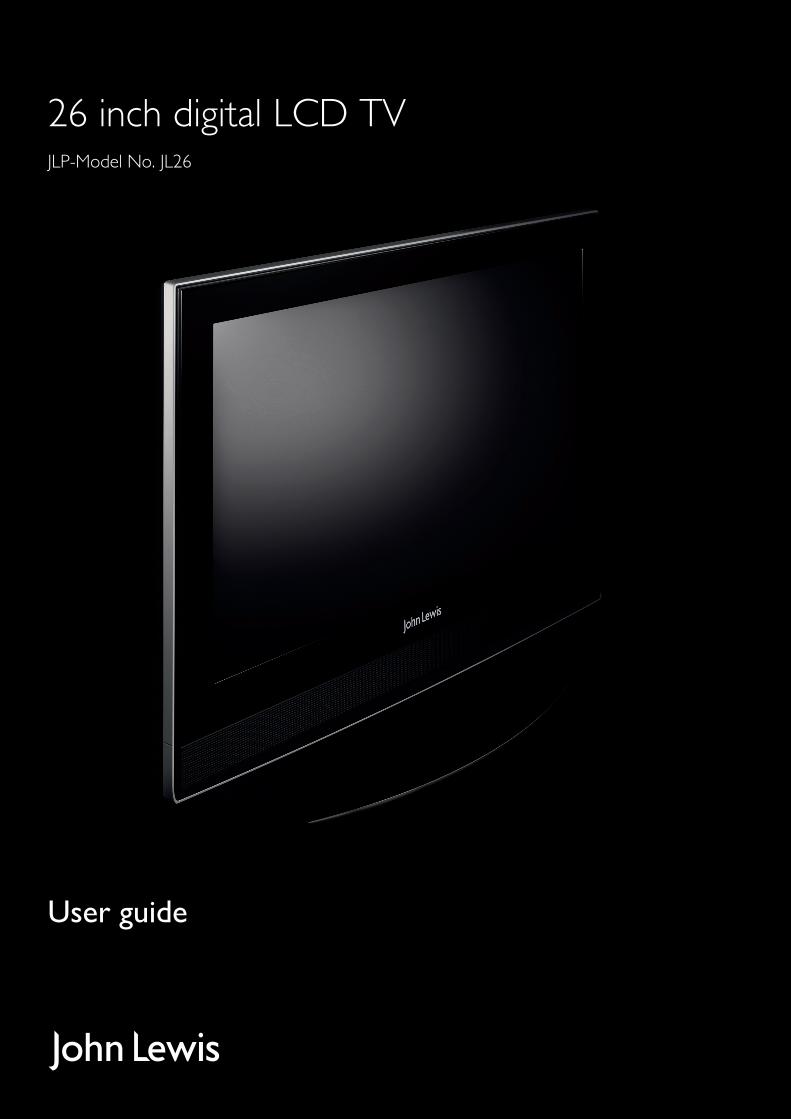
26 inch digital LCD TVJLP-Model No. JL26
User guide
JL_26inTV_UG.indd 1 27/07/2009 11:44:26

26 inch LCD TV user guide
JL_26inTV_UG.indd 2 27/07/2009 11:47:05
26 inch LCD TV user guide 3
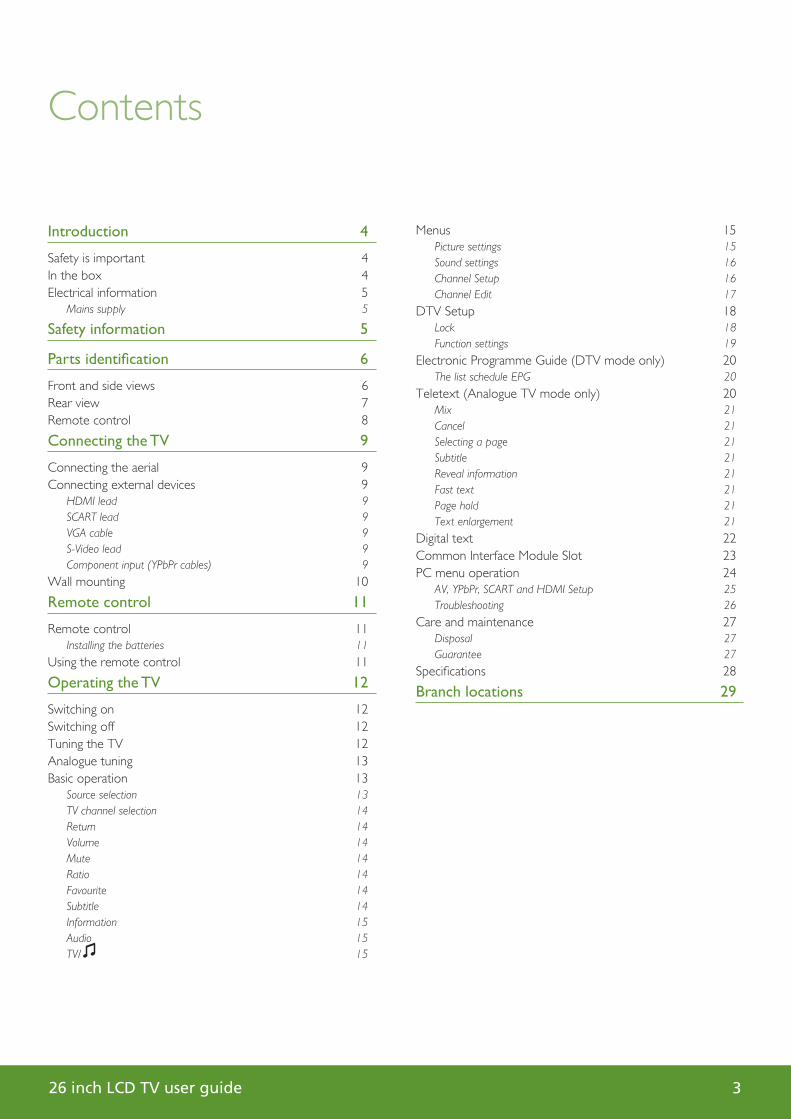
Contents
Introduction 4
Safety is important 4In the box 4Electrical information 5
Mains supply 5
Safety information 5
Parts identifi cation 6
Front and side views 6Rear view 7Remote control 8
Connecting the TV 9
Connecting the aerial 9Connecting external devices 9
HDMI lead 9SCART lead 9VGA cable 9S-Video lead 9Component input (YPbPr cables) 9
Wall mounting 10
Remote control 11
Remote control 11Installing the batteries 11
Using the remote control 11
Operating the TV 12
Switching on 12Switching off 12Tuning the TV 12Analogue tuning 13Basic operation 13
Source selection 13TV channel selection 14Return 14Volume 14Mute 14Ratio 14Favourite 14Subtitle 14Information 15Audio 15TV/ 15
Menus 15Picture settings 15Sound settings 16Channel Setup 16Channel Edit 17
DTV Setup 18Lock 18Function settings 19
Electronic Programme Guide (DTV mode only) 20The list schedule EPG 20
Teletext (Analogue TV mode only) 20Mix 21Cancel 21Selecting a page 21Subtitle 21Reveal information 21Fast text 21Page hold 21Text enlargement 21
Digital text 22Common Interface Module Slot 23PC menu operation 24
AV, YPbPr, SCART and HDMI Setup 25Troubleshooting 26
Care and maintenance 27Disposal 27Guarantee 27
Specifi cations 28
Branch locations 29
JL_26inTV_UG.indd 3 27/07/2009 11:47:05
26 inch LCD TV user guide4
Introduction
Thank you for purchasing this LCD TV.
Please take time to read these instructions and retain for future reference.
Throughout the remainder of this user guide the LCD TV will be referred to as the ‘TV’.
Safety is important
To ensure your safety and the safety of others, please read the Safety precautions before you operate this product.
Keep this information in a safe place for future reference.
In the box
You will fi nd the following:
• 26” LCD television
• Power lead
• User guide
• Quick start guide
• Remote control
• 2 x AAA batteries
• Cleaning cloth
Note: If any of the items listed are damaged or missing, please contact your local John Lewis branch.
JL_26inTV_UG.indd 4 27/07/2009 11:47:08
26 inch LCD TV user guide 5
Important safety instructions - read carefully before use
Take note of the following safety information which appears on the back of this TV.
Caution! Risk of electric shock do not open.To reduce the risk of electric shock do not remove this cover.No user-removable parts insiderefer servicing to qualifi ed personnel.
This symbol indicates that there are important operating and maintenance instructions in the literature accompanying this TV.
This symbol indicates that dangerous voltage constituting a risk of electric shock is present within this TV.
WARNING
• Do not use this TV near water.
• Do not install or operate near any heat sources such as radiators, stoves, or other apparatus that produce heat.
• Clean only with a slightly damp cloth.
• Do not block any ventilation openings.
• Install in accordance with the supplied Quick start guide and this User guide.
• Protect the power cord from being walked on or pinched, particularly at plugs, and the point where it exits from the TV.
• Do not allow the power cord to overhang the edge of a table.
• Unplug this TV during lightning storms or when unused for long periods of time.
• To avoid interference, switch this TV off while operating other radio devices in the immediate vicinity.
• Refer all servicing to qualifi ed service personnel. Servicing is required when the TV has been damaged in any way.
Warning! To reduce the risk of fi re or electrical shock, do not expose this TV to rain or moisture. The TV must not be exposed to dripping and splashing and no objects fi lled with liquids such as a vase of fl owers should be placed on the TV.
• No naked fl ame sources such as candles should be placed on the TV.
Caution! Changes or modifi cations not expressly approved by the manufacturer could void the user’s authority to operate this device.
Caution! Usage of controls or adjustments or performance of procedures other than those specifi ed herein may result in hazardous exposure.
Electrical information
Mains supply
The mains operating voltage is detailed on the rating plate on the rear of the TV.
The mains lead on this equipment is supplied with a moulded plug incorporating a fuse. Should the fuse need to be replaced, an ASTA or BSI approved BS1362 fuse must be used of the same rating. Never use the plug with the fuse cover removed. If a replacement fuse cover is required, ensure it is of the same colour as that visible on the pin face of the plug. If there is no alternative to cutting off the mains plug, dispose of it immediately, having fi rst removed the fuse, to avoid a possible shock hazard by inadvertent connection to the mains supply.
Safety information
JL_26inTV_UG.indd 5 27/07/2009 11:47:08
26 inch LCD TV user guide6
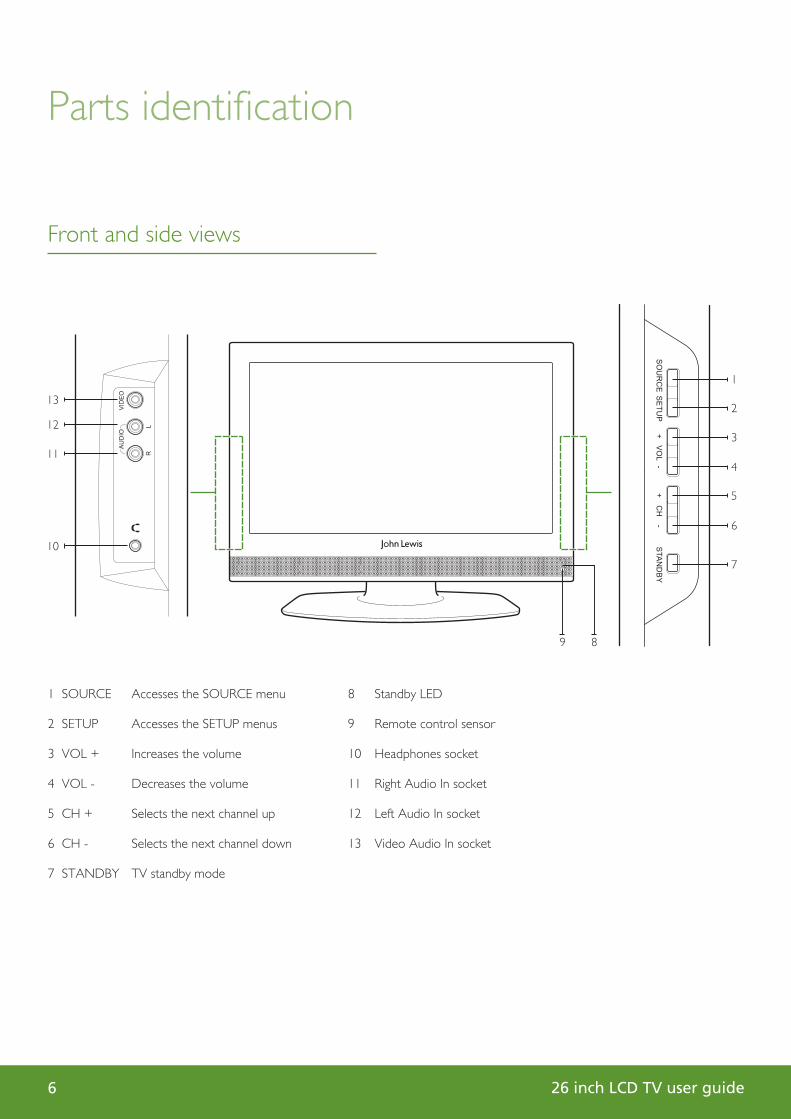
Parts identifi cation
1 SOURCE Accesses the SOURCE menu
2 SETUP Accesses the SETUP menus
3 VOL + Increases the volume
4 VOL - Decreases the volume
5 CH + Selects the next channel up
6 CH - Selects the next channel down
7 STANDBY TV standby mode
89
Front and side views
7
6
5
4
3
2
1
10
11
12
13
8 Standby LED
9 Remote control sensor
10 Headphones socket
11 Right Audio In socket
12 Left Audio In socket
13 Video Audio In socket
JL_26inTV_UG.indd 6 27/07/2009 11:47:09
26 inch LCD TV user guide 7
Parts identifi cation
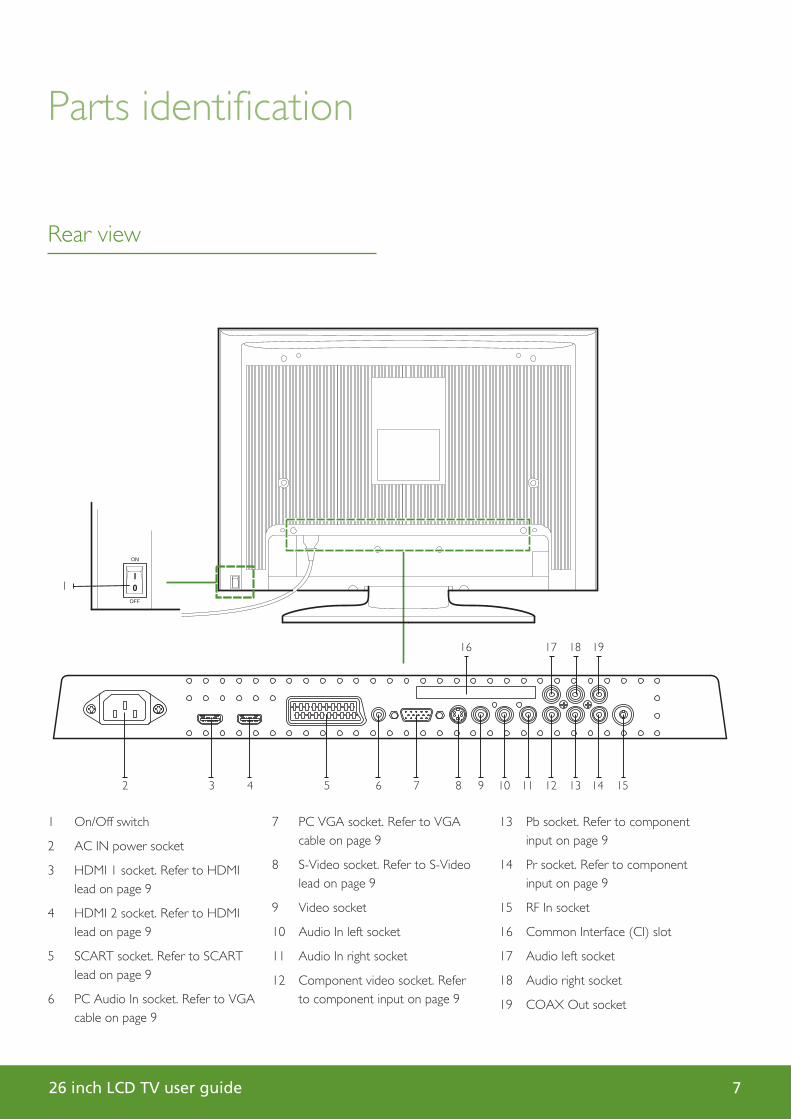
Rear view
1
1 On/Off switch
2 AC IN power socket
3 HDMI 1 socket. Refer to HDMI lead on page 9
4 HDMI 2 socket. Refer to HDMI lead on page 9
5 SCART socket. Refer to SCART lead on page 9
6 PC Audio In socket. Refer to VGA cable on page 9
7 PC VGA socket. Refer to VGA cable on page 9
8 S-Video socket. Refer to S-Video lead on page 9
9 Video socket
10 Audio In left socket
11 Audio In right socket
12 Component video socket. Refer to component input on page 9
13 Pb socket. Refer to component input on page 9
14 Pr socket. Refer to component input on page 9
15 RF In socket
16 Common Interface (CI) slot
17 Audio left socket
18 Audio right socket
19 COAX Out socket
2 3 4 5 6 7 8 9 10 11 12 13 14 15
16 17 18 19
JL_26inTV_UG.indd 7 27/07/2009 11:47:10
26 inch LCD TV user guide8
Parts identifi cation
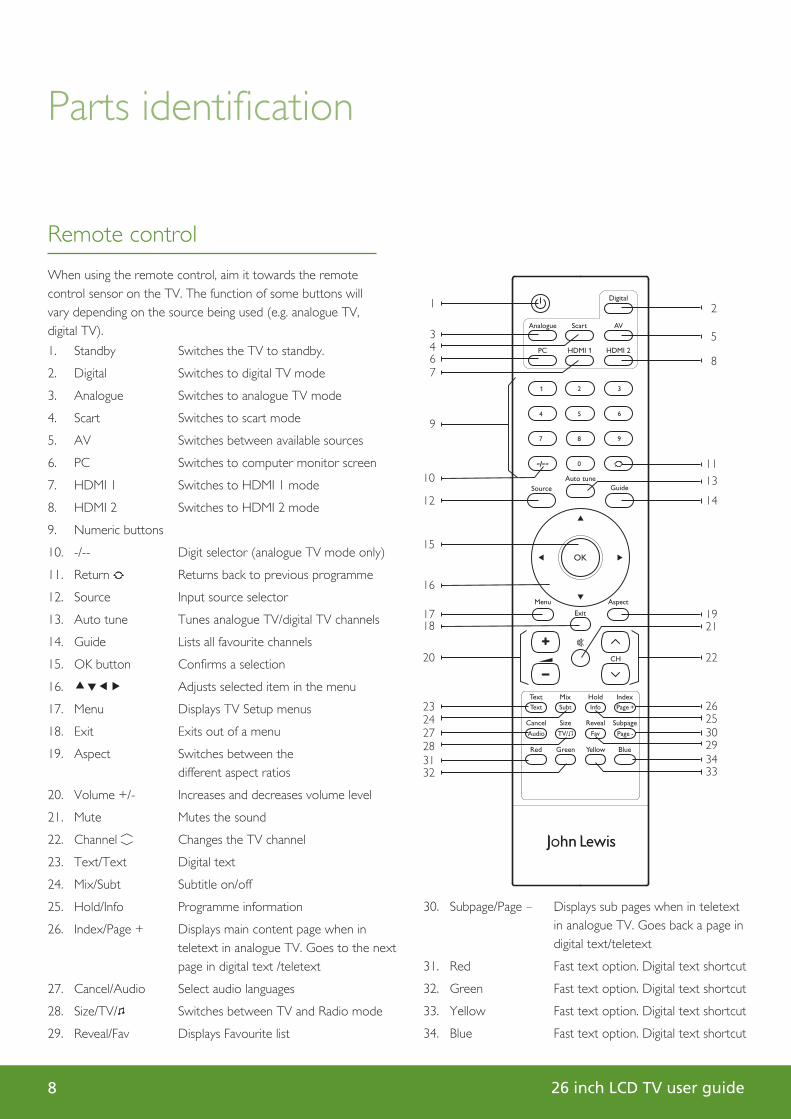
1. Standby Switches the TV to standby.
2. Digital Switches to digital TV mode
3. Analogue Switches to analogue TV mode
4. Scart Switches to scart mode
5. AV Switches between available sources
6. PC Switches to computer monitor screen
7. HDMI 1 Switches to HDMI 1 mode
8. HDMI 2 Switches to HDMI 2 mode
9. Numeric buttons
10. -/-- Digit selector (analogue TV mode only)
11. Return Returns back to previous programme
12. Source Input source selector
13. Auto tune Tunes analogue TV/digital TV channels
14. Guide Lists all favourite channels
15. OK button Confi rms a selection
16. Adjusts selected item in the menu
17. Menu Displays TV Setup menus
18. Exit Exits out of a menu
19. Aspect Switches between the different aspect ratios
20. Volume +/- Increases and decreases volume level
21. Mute Mutes the sound
22. Channel ⟨ ⟩ Changes the TV channel
23. Text/Text Digital text
24. Mix/Subt Subtitle on/off
25. Hold/Info Programme information
26. Index/Page + Displays main content page when in teletext in analogue TV. Goes to the next page in digital text /teletext
27. Cancel/Audio Select audio languages
28. Size/TV/ Switches between TV and Radio mode
29. Reveal/Fav Displays Favourite list
Remote control
When using the remote control, aim it towards the remote control sensor on the TV. The function of some buttons will vary depending on the source being used (e.g. analogue TV, digital TV).
9
1
3
64
10
24
28
32
12
15
16
17
20
23
27
31
18
1113
14
19
26
3025
29
3334
22
21
7
2
5
8
30. Subpage/Page – Displays sub pages when in teletext in analogue TV. Goes back a page in digital text/teletext
31. Red Fast text option. Digital text shortcut
32. Green Fast text option. Digital text shortcut
33. Yellow Fast text option. Digital text shortcut
34. Blue Fast text option. Digital text shortcut
JL_26inTV_UG.indd 8 27/07/2009 11:47:10
26 inch LCD TV user guide 9
Connecting external devices
The Quick Start guide shows the simplest and most effective way of connecting to external devices. These and alternate methods are listed below.
HDMI lead
You can connect this TV to a compatible device using a HDMI lead. This method will give the best picture.
Connect the cable from the HDMI equipment to one of the TV HDMI sockets.
SCART lead
You can connect this TV to a compatible device using a SCART lead. The connection uses component video signals, i.e. the red, green and blue (RGB) content of the video are sent on separate signals.
VGA cable
You can use your TV as a monitor for your personal computer by using a VGA cable. The sound from the personal computer can also be played through the TV. This will require the audio output of the personal computer to be connected to the AUDIO IN connection of the TV.
S-Video lead
You can connect this TV to a compatible device using an S-Video lead.
Component input (YPbPr cables)
You can connect this TV to a compatible device using YPbPr cables. This provides the highest quality analogue video input. Connect the red, green and blue outputs to the matching coloured inputs on the compatible device. An additional audio input is required.
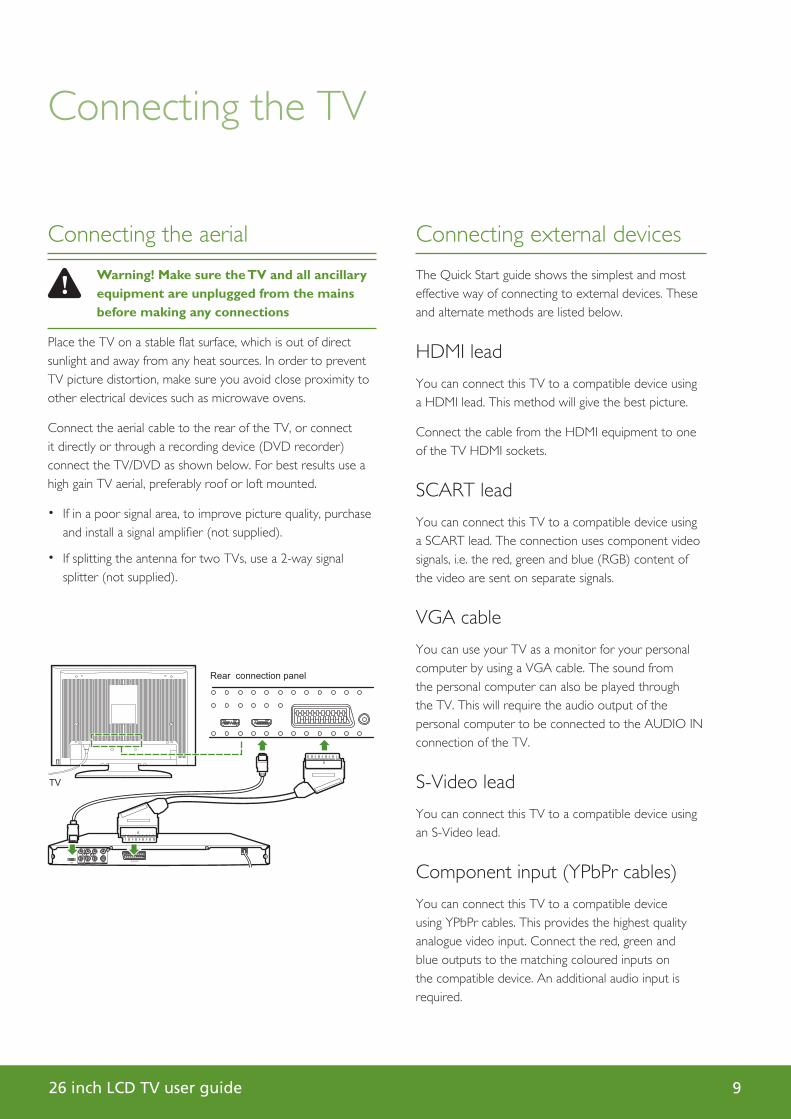
Connecting the TV
Connecting the aerial
Warning! Make sure the TV and all ancillary equipment are unplugged from the mains before making any connections
Place the TV on a stable fl at surface, which is out of direct sunlight and away from any heat sources. In order to prevent TV picture distortion, make sure you avoid close proximity to other electrical devices such as microwave ovens.
Connect the aerial cable to the rear of the TV, or connect it directly or through a recording device (DVD recorder) connect the TV/DVD as shown below. For best results use a high gain TV aerial, preferably roof or loft mounted.
• If in a poor signal area, to improve picture quality, purchase and install a signal amplifi er (not supplied).
• If splitting the antenna for two TVs, use a 2-way signal splitter (not supplied).
JL_26inTV_UG.indd 9 27/07/2009 11:47:11
26 inch LCD TV user guide10
Connecting the TV
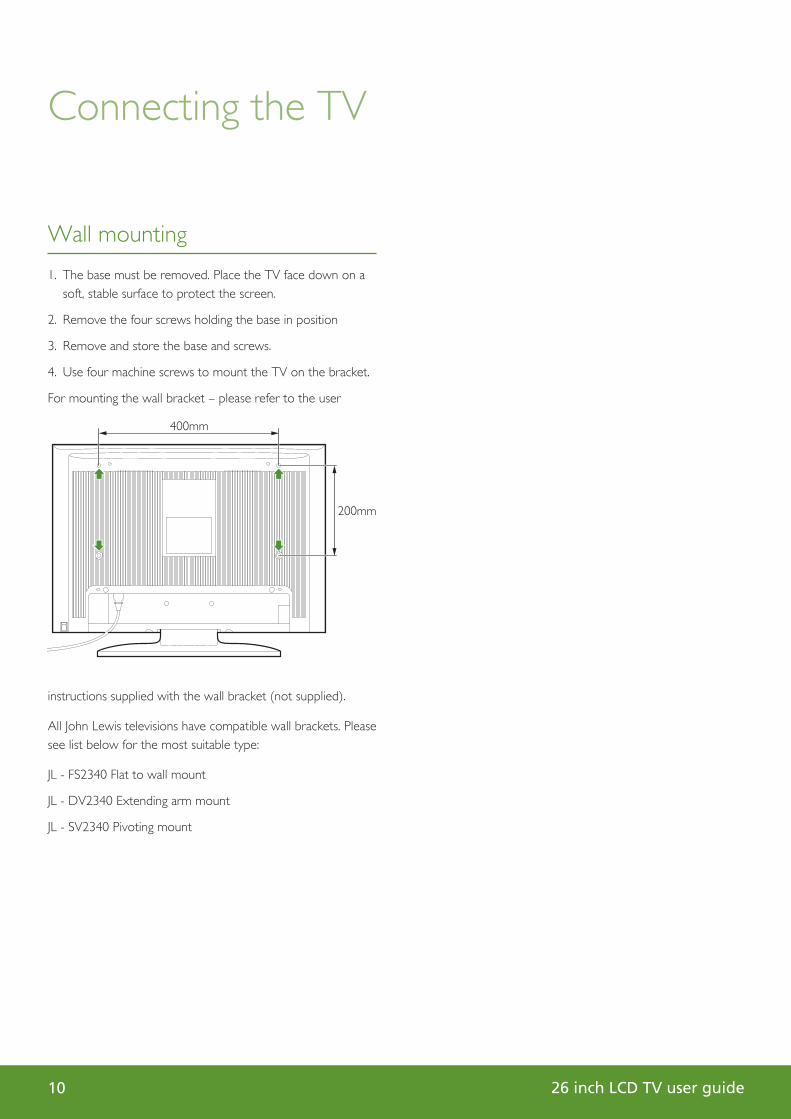
Wall mounting
1. The base must be removed. Place the TV face down on a soft, stable surface to protect the screen.
2. Remove the four screws holding the base in position
3. Remove and store the base and screws.
4. Use four machine screws to mount the TV on the bracket.
For mounting the wall bracket – please refer to the user
instructions supplied with the wall bracket (not supplied).
All John Lewis televisions have compatible wall brackets. Please see list below for the most suitable type:
JL - FS2340 Flat to wall mount
JL - DV2340 Extending arm mount
JL - SV2340 Pivoting mount
JL_26inTV_UG.indd 10 27/07/2009 11:47:11
26 inch LCD TV user guide 11
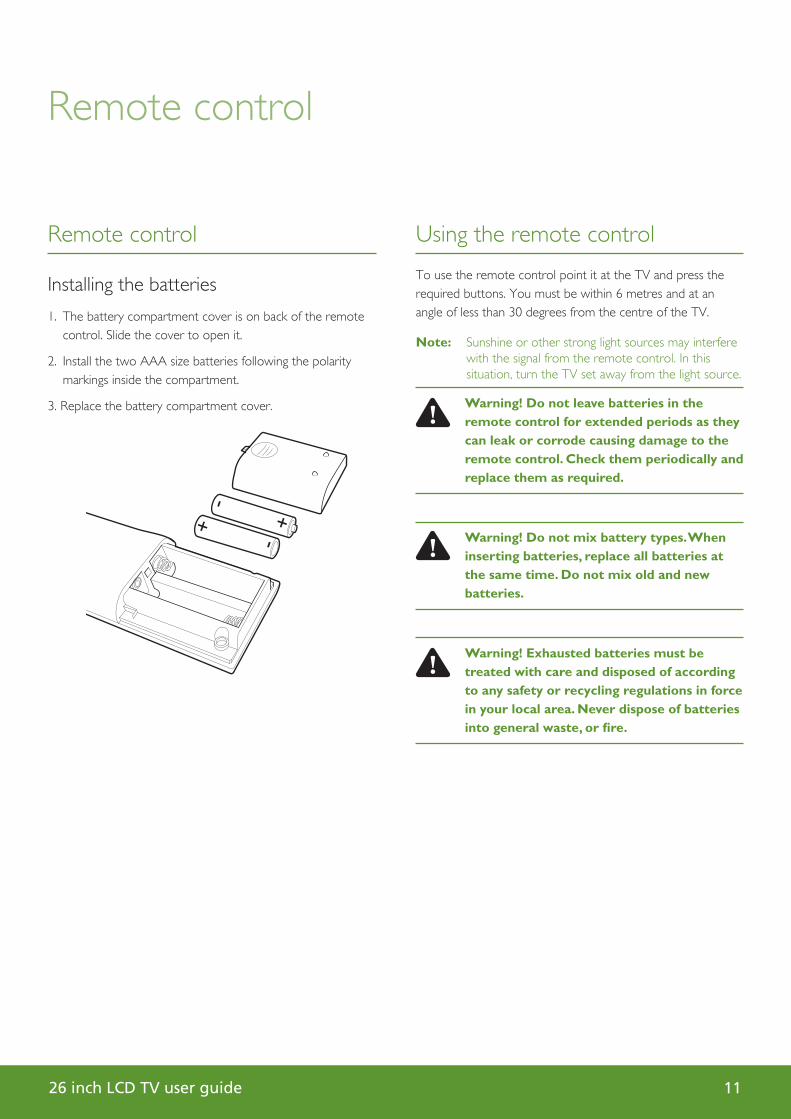
Remote control
Installing the batteries
1. The battery compartment cover is on back of the remote control. Slide the cover to open it.
2. Install the two AAA size batteries following the polarity markings inside the compartment.
3. Replace the battery compartment cover.
Remote control
Using the remote control
To use the remote control point it at the TV and press the required buttons. You must be within 6 metres and at an angle of less than 30 degrees from the centre of the TV.
Note: Sunshine or other strong light sources may interfere with the signal from the remote control. In this situation, turn the TV set away from the light source.
Warning! Do not leave batteries in the remote control for extended periods as they can leak or corrode causing damage to the remote control. Check them periodically andreplace them as required.
Warning! Do not mix battery types. When inserting batteries, replace all batteries at the same time. Do not mix old and new batteries.
Warning! Exhausted batteries must be treated with care and disposed of according to any safety or recycling regulations in force in your local area. Never dispose of batteries into general waste, or fi re.
JL_26inTV_UG.indd 11 27/07/2009 11:47:11
26 inch LCD TV user guide12
Switching on
Note: Unless otherwise stated, all references to buttons refer to the remote control.
1. Switch the On/Off switch to On at the rear of the TV. The standby indicator on the front of the TV will light glow red.
2. Press the Standby button on the remote control. The standby indicator will change to green.
Switching off
To switch the TV to standby press the Standby button on the remote control. The standby indicator will change to red.
To save energy do not leave the TV in standby mode for long periods such as overnight. Switch the set off using the On/Off switch at the rear of the TV.
Tuning the TV
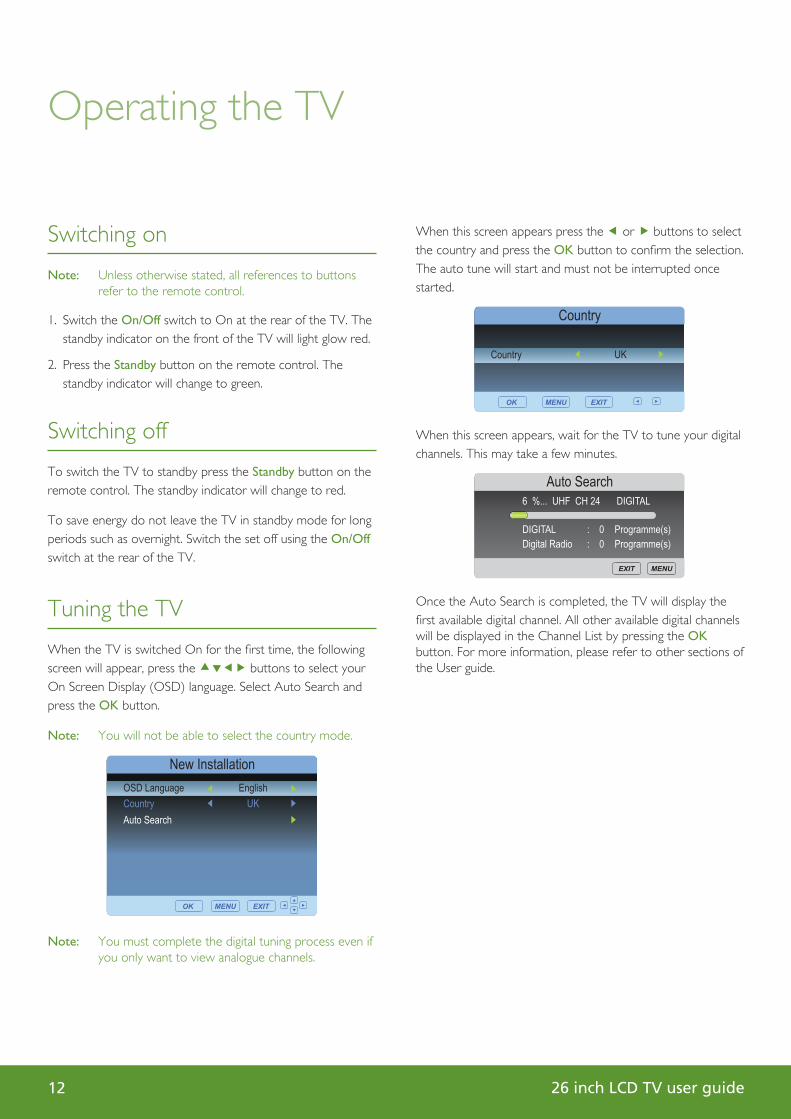
When the TV is switched On for the fi rst time, the following screen will appear, press the buttons to select your On Screen Display (OSD) language. Select Auto Search and press the OK button.
Note: You will not be able to select the country mode.
Note: You must complete the digital tuning process even if you only want to view analogue channels.
Operating the TV
When this screen appears press the or buttons to select the country and press the OK button to confi rm the selection. The auto tune will start and must not be interrupted once started.
When this screen appears, wait for the TV to tune your digital channels. This may take a few minutes.
Once the Auto Search is completed, the TV will display the fi rst available digital channel. All other available digital channels will be displayed in the Channel List by pressing the OK button. For more information, please refer to other sections of the User guide.
JL_26inTV_UG.indd 12 27/07/2009 11:47:12
26 inch LCD TV user guide 13
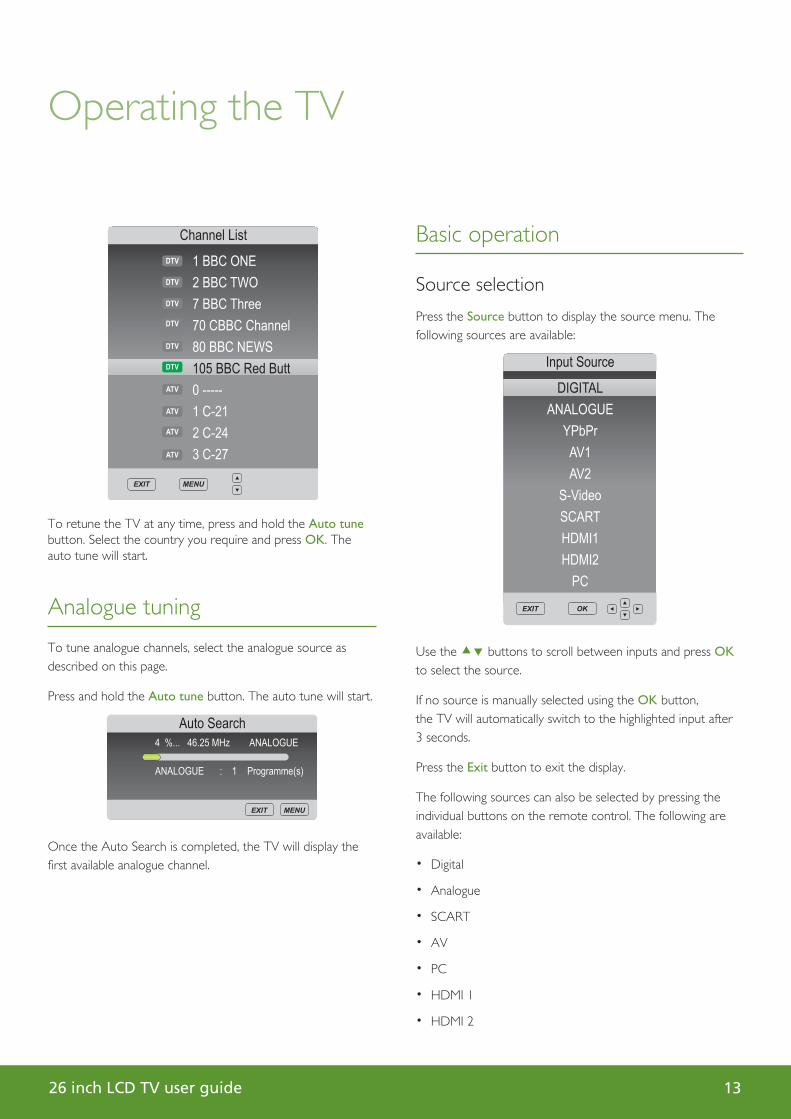
To retune the TV at any time, press and hold the Auto tune button. Select the country you require and press OK. The auto tune will start.
Analogue tuning
To tune analogue channels, select the analogue source as described on this page.
Press and hold the Auto tune button. The auto tune will start.
Once the Auto Search is completed, the TV will display the fi rst available analogue channel.
Operating the TV
Basic operation
Source selection
Press the Source button to display the source menu. The following sources are available:
Use the buttons to scroll between inputs and press OK to select the source.
If no source is manually selected using the OK button, the TV will automatically switch to the highlighted input after 3 seconds.
Press the Exit button to exit the display.
The following sources can also be selected by pressing the individual buttons on the remote control. The following are available:
• Digital
• Analogue
• SCART
• AV
• PC
• HDMI 1
• HDMI 2
JL_26inTV_UG.indd 13 27/07/2009 11:47:12
26 inch LCD TV user guide14
Operating the TV
TV channel selection
Press the CH ⟨ /CH ⟨ or use the Numeric buttons on the remote control to select a channel you require.
Analogue TV only:
If the channel is higher than nine, press the -/-- button twice and – – will be displayed. Press the Numeric buttons to select the channel you require.
Return
Press the button to swap between the channel you are watching and previously selected channel i.e. If you were watching channel 1 and change to channel 3, press the button to return to channel 1.
Press the button again to return to channel 3.
Volume
Press the V+/V- buttons to increase or decrease the volume. The volume level will be displayed at the bottom of the screen.
Mute
Press the button to mute the sound. Mute will appear at the bottom left hand side of the screen.
Press the button again or the V+ button to restore the sound. Mute will disappear from the screen.
Ratio
Press the Aspect button to choose from one of the following aspect ratio. The aspect ratio is displayed at the bottom of the screen:
• Auto
• Expand
• Zoom
• 16:9
• 4:3
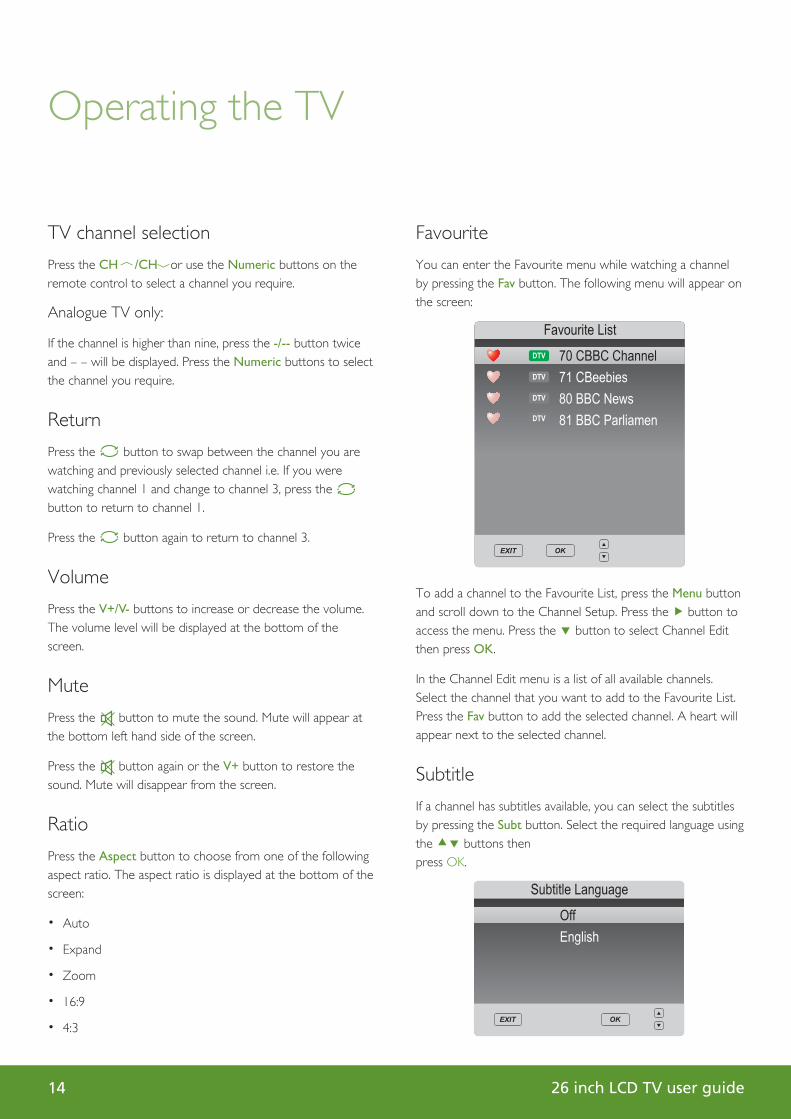
Favourite
You can enter the Favourite menu while watching a channel by pressing the Fav button. The following menu will appear on the screen:
To add a channel to the Favourite List, press the Menu button and scroll down to the Channel Setup. Press the button to access the menu. Press the button to select Channel Edit then press OK.
In the Channel Edit menu is a list of all available channels. Select the channel that you want to add to the Favourite List. Press the Fav button to add the selected channel. A heart will appear next to the selected channel.
Subtitle
If a channel has subtitles available, you can select the subtitles by pressing the Subt button. Select the required language using the buttons then press OK.
JL_26inTV_UG.indd 14 27/07/2009 11:47:12

26 inch LCD TV user guide 15
Information
You can view the programme information you are watching by pressing the Info button. The following menu is a typical example of the programme details that will be displayed.
You can view the information for the next programme by pressing the button.
Audio
• In Analogue mode press the Audio button to switch from Mono and Stereo sound.
• In Digital mode press the Audio button to change the audio language and sound track. The following menu will be displayed.
TV/
Press the TV/ button to switch between Digital TV and Digital radio modes.
Operating the TV
Menus
The setup menus allow you to adjust and control the TV.
1. To access the on screen menus, press the Menu button.
2. Press the buttons to navigate around the menu screens and available options.
3. To exit the setup menu press the Exit or Menu button.
Picture settings
This menu gives the options for adjusting the appearance of the TV picture. The following options are available:
Picture Mode – Allows you to select preset levels of contrast, brightness and colour. You can choose from the following settings:
• User
• Standard
• Dynamic
• Soft
Brightness – Allows you to increase or decrease the brightness of the picture.
Contrast – Allows you to increase or decrease the contrast of the picture.
Colour – Allows you to increase or decrease the intensity of the picture colour.
Sharpness – Allows you to increase or decrease the sharpness of the picture.
Tint – Allows you to increase or decrease the level of tint of the picture (only NTSC signal)
JL_26inTV_UG.indd 15 27/07/2009 11:47:13
26 inch LCD TV user guide16
Operating the TV
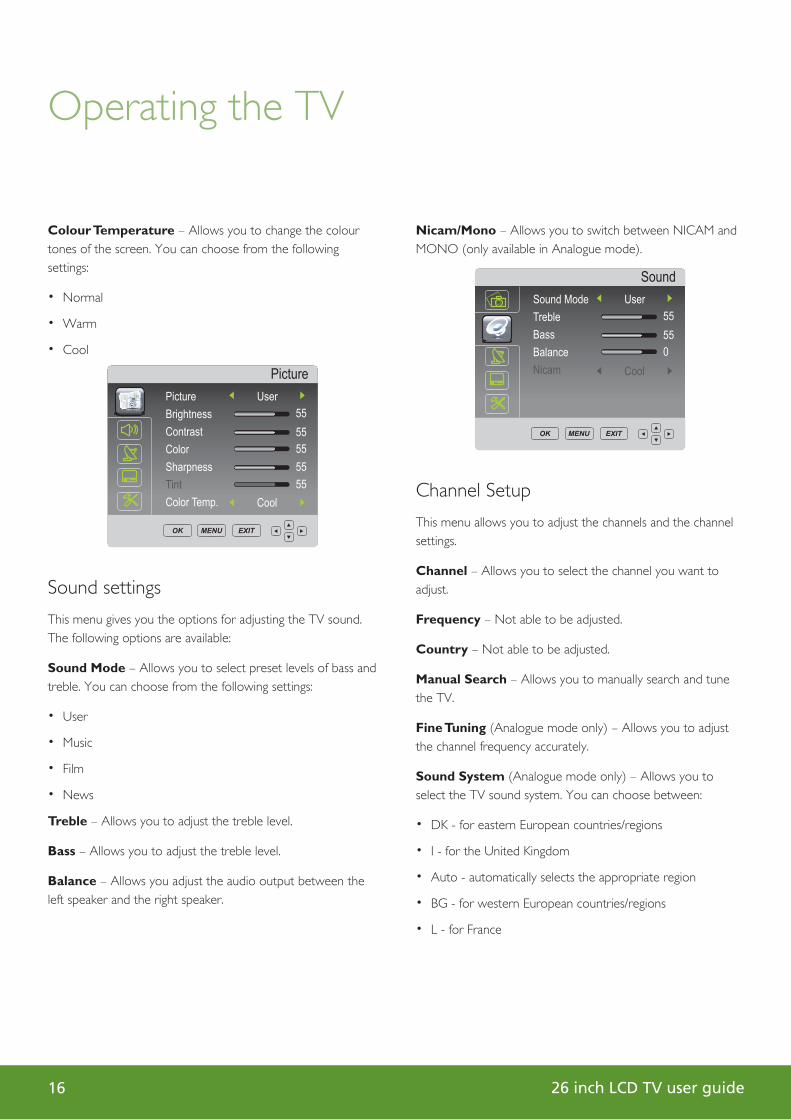
Colour Temperature – Allows you to change the colour tones of the screen. You can choose from the following settings:
• Normal
• Warm
• Cool
Sound settings
This menu gives you the options for adjusting the TV sound. The following options are available:
Sound Mode – Allows you to select preset levels of bass and treble. You can choose from the following settings:
• User
• Music
• Film
• News
Treble – Allows you to adjust the treble level.
Bass – Allows you to adjust the treble level.
Balance – Allows you adjust the audio output between the left speaker and the right speaker.
Nicam/Mono – Allows you to switch between NICAM and MONO (only available in Analogue mode).
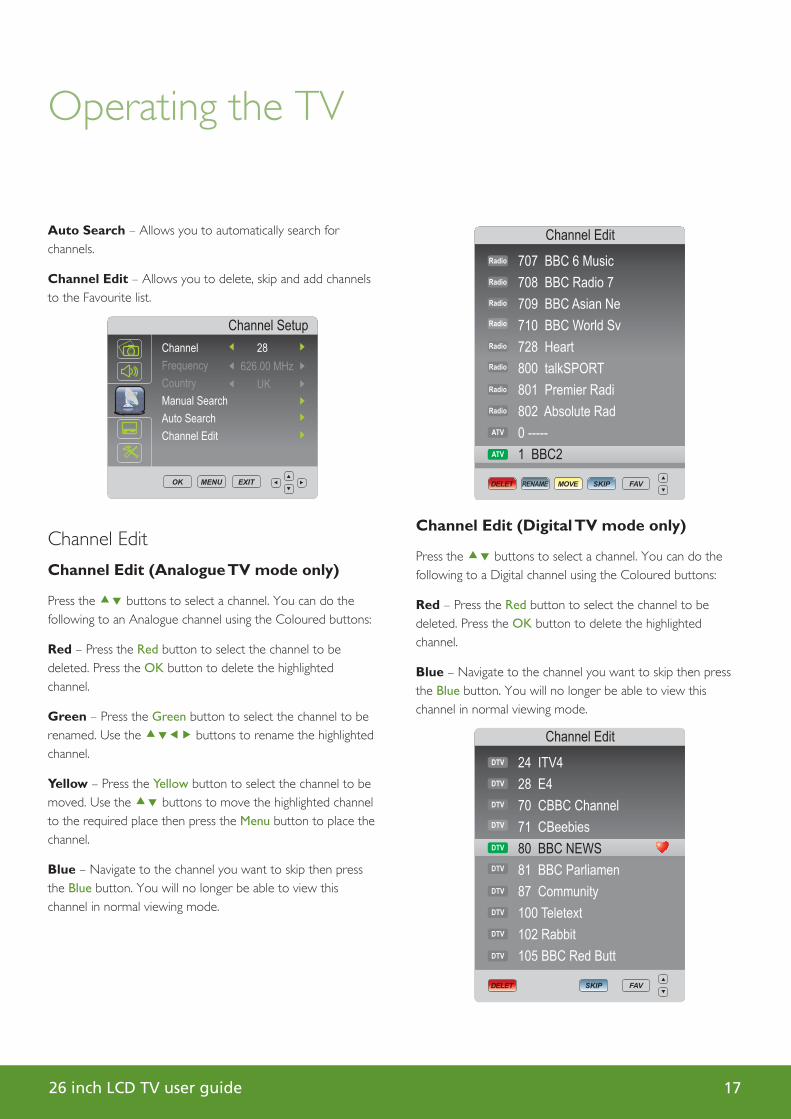
Channel Setup
This menu allows you to adjust the channels and the channel settings.
Channel – Allows you to select the channel you want to adjust.
Frequency – Not able to be adjusted.
Country – Not able to be adjusted.
Manual Search – Allows you to manually search and tune the TV.
Fine Tuning (Analogue mode only) – Allows you to adjust the channel frequency accurately.
Sound System (Analogue mode only) – Allows you to select the TV sound system. You can choose between:
• DK - for eastern European countries/regions
• I - for the United Kingdom
• Auto - automatically selects the appropriate region
• BG - for western European countries/regions
• L - for France
JL_26inTV_UG.indd 16 27/07/2009 11:47:13
26 inch LCD TV user guide 17
Operating the TV
Auto Search – Allows you to automatically search for channels.
Channel Edit – Allows you to delete, skip and add channels to the Favourite list.
Channel Edit
Channel Edit (Analogue TV mode only)
Press the buttons to select a channel. You can do the following to an Analogue channel using the Coloured buttons:
Red – Press the Red button to select the channel to be deleted. Press the OK button to delete the highlighted channel.
Green – Press the Green button to select the channel to be renamed. Use the buttons to rename the highlighted channel.
Yellow – Press the Yellow button to select the channel to be moved. Use the buttons to move the highlighted channel to the required place then press the Menu button to place the channel.
Blue – Navigate to the channel you want to skip then press the Blue button. You will no longer be able to view this channel in normal viewing mode.
Channel Edit (Digital TV mode only)
Press the buttons to select a channel. You can do the following to a Digital channel using the Coloured buttons:
Red – Press the Red button to select the channel to be deleted. Press the OK button to delete the highlighted channel.
Blue – Navigate to the channel you want to skip then press the Blue button. You will no longer be able to view this channel in normal viewing mode.
JL_26inTV_UG.indd 17 27/07/2009 11:47:14
26 inch LCD TV user guide18
Operating the TV
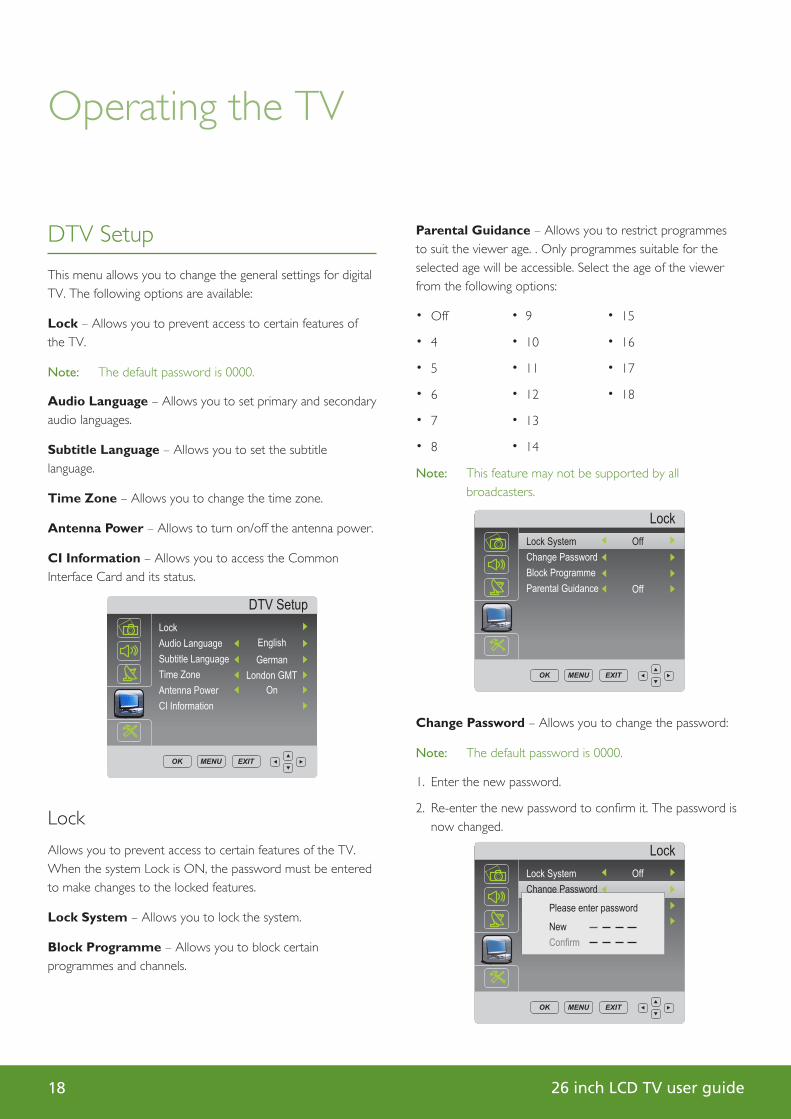
DTV Setup
This menu allows you to change the general settings for digital TV. The following options are available:
Lock – Allows you to prevent access to certain features of the TV.
Note: The default password is 0000.
Audio Language – Allows you to set primary and secondary audio languages.
Subtitle Language – Allows you to set the subtitle language.
Time Zone – Allows you to change the time zone.
Antenna Power – Allows to turn on/off the antenna power.
CI Information – Allows you to access the Common Interface Card and its status.
Lock
Allows you to prevent access to certain features of the TV. When the system Lock is ON, the password must be entered to make changes to the locked features.
Lock System – Allows you to lock the system.
Block Programme – Allows you to block certain programmes and channels.
Parental Guidance – Allows you to restrict programmes to suit the viewer age. . Only programmes suitable for the selected age will be accessible. Select the age of the viewer from the following options:
• Off • 9 • 15
• 4 • 10 • 16
• 5 • 11 • 17
• 6 • 12 • 18
• 7 • 13
• 8 • 14
Note: This feature may not be supported by all broadcasters.
Change Password – Allows you to change the password:
Note: The default password is 0000.
1. Enter the new password.
2. Re-enter the new password to confi rm it. The password is now changed.
JL_26inTV_UG.indd 18 27/07/2009 11:47:14
26 inch LCD TV user guide 19
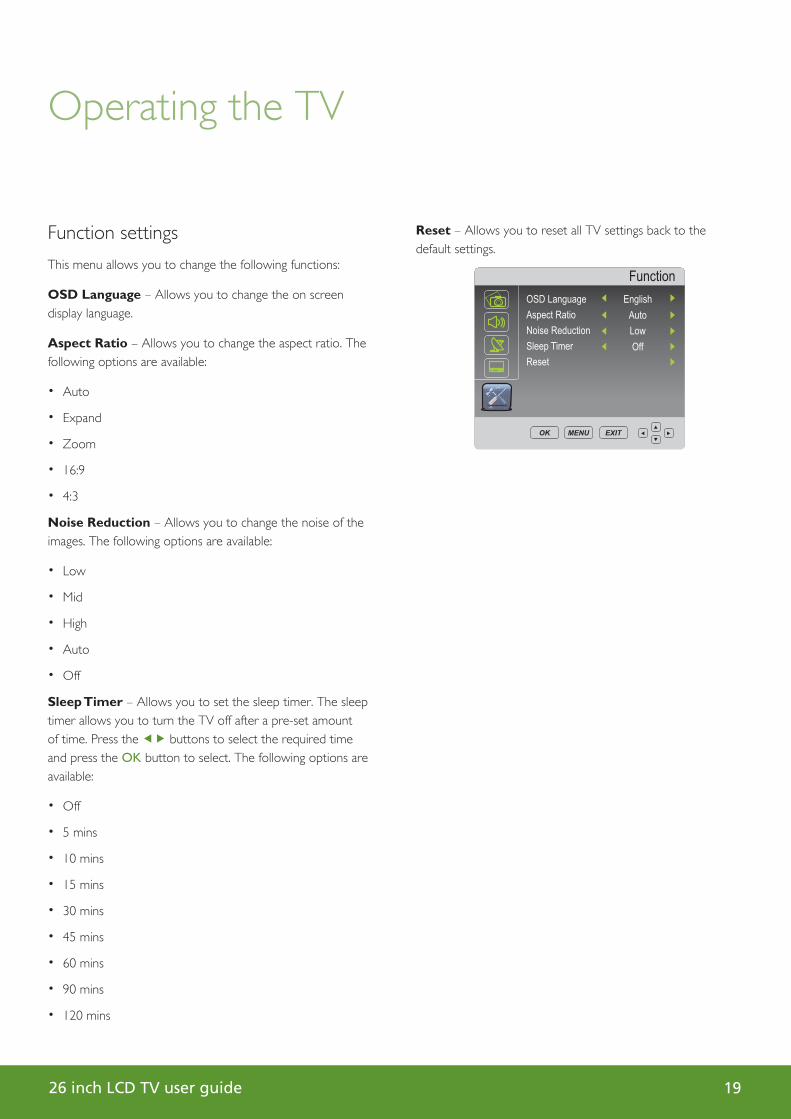
Function settings
This menu allows you to change the following functions:
OSD Language – Allows you to change the on screen display language.
Aspect Ratio – Allows you to change the aspect ratio. The following options are available:
• Auto
• Expand
• Zoom
• 16:9
• 4:3
Noise Reduction – Allows you to change the noise of the images. The following options are available:
• Low
• Mid
• High
• Auto
• Off
Sleep Timer – Allows you to set the sleep timer. The sleep timer allows you to turn the TV off after a pre-set amount of time. Press the buttons to select the required time and press the OK button to select. The following options are available:
• Off
• 5 mins
• 10 mins
• 15 mins
• 30 mins
• 45 mins
• 60 mins
• 90 mins
• 120 mins
Reset – Allows you to reset all TV settings back to the default settings.
Operating the TV
JL_26inTV_UG.indd 19 27/07/2009 11:47:15
26 inch LCD TV user guide20
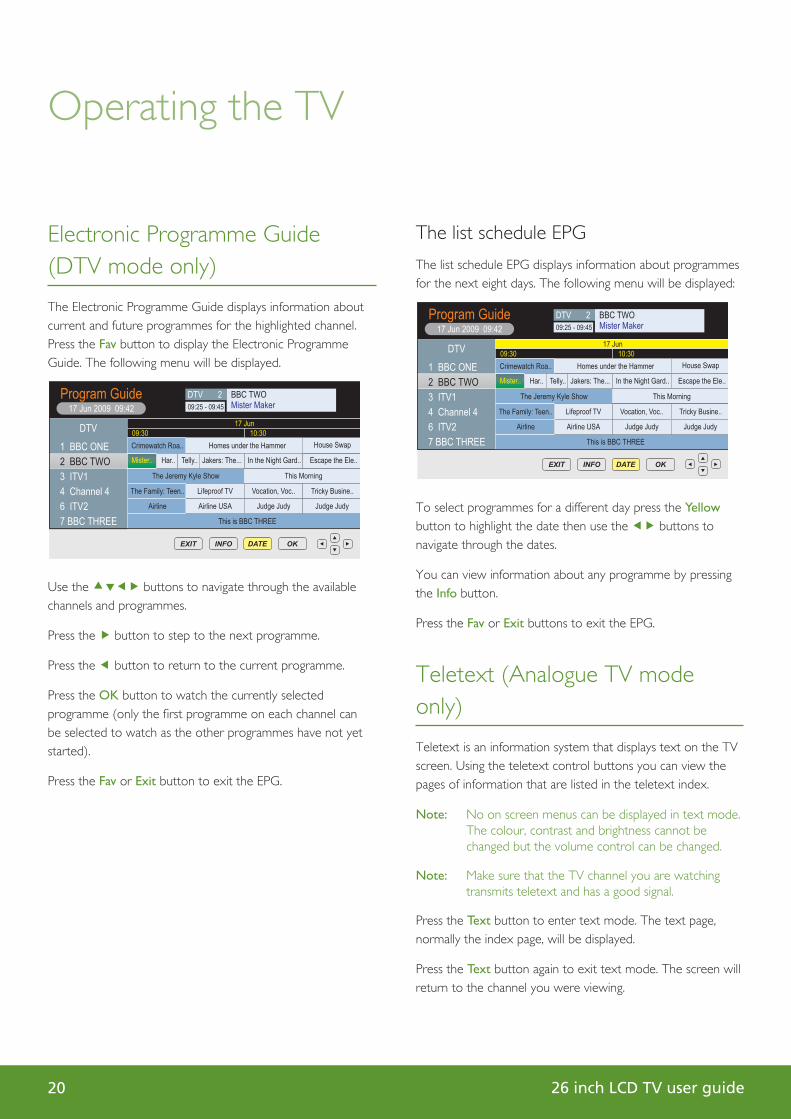
Electronic Programme Guide (DTV mode only)
The Electronic Programme Guide displays information about current and future programmes for the highlighted channel. Press the Fav button to display the Electronic Programme Guide. The following menu will be displayed.
Use the buttons to navigate through the available channels and programmes.
Press the button to step to the next programme.
Press the button to return to the current programme.
Press the OK button to watch the currently selected programme (only the fi rst programme on each channel can be selected to watch as the other programmes have not yet started).
Press the Fav or Exit button to exit the EPG.
Operating the TV
The list schedule EPG
The list schedule EPG displays information about programmes for the next eight days. The following menu will be displayed:
To select programmes for a different day press the Yellow button to highlight the date then use the buttons to navigate through the dates.
You can view information about any programme by pressing the Info button.
Press the Fav or Exit buttons to exit the EPG.
Teletext (Analogue TV mode only)
Teletext is an information system that displays text on the TV screen. Using the teletext control buttons you can view the pages of information that are listed in the teletext index.
Note: No on screen menus can be displayed in text mode. The colour, contrast and brightness cannot be changed but the volume control can be changed.
Note: Make sure that the TV channel you are watching transmits teletext and has a good signal.
Press the Text button to enter text mode. The text page, normally the index page, will be displayed.
Press the Text button again to exit text mode. The screen will return to the channel you were viewing.
JL_26inTV_UG.indd 20 27/07/2009 11:47:15
26 inch LCD TV user guide 21
Mix
Press the Mix button to enter mix mode. The text page will show with the picture behind it.
Cancel
Press the Cancel button to view the programme you are watching without any text in the background.
Selecting a page
1. To select a page in text mode, fi nd the number page you require on the Index page and enter the page number using the Numeric buttons. The number will appear in the top left hand corner of the screen. A page search will begin. Once the page is found, it will be displayed.
2. To return to the Index page, press the Index button.
3. To select a Subpage, press the Subpage button.
Subtitle
1. To display subtitles while watching a TV programme, press the Text button and go to page 888. The picture will be displayed and provided the programme is broadcast with subtitles, these will appear at the bottom of the screen.
2. Press the Text button to exit text mode.
Reveal information
1. Press the Reveal button to reveal concealed information (quiz answers etc.).
2. Press the Reveal button again to conceal the information.
Fast text
At the bottom of the teletext screen is are subject headings in red, green, yellow and blue.
1. Press the Coloured (Red, Green, Yellow and Blue) buttons on the remote control to access these pages.
2. Press the Index button to return to the Index page.
Page hold
When in text mode and you are viewing a text page with sub pages, these will automatically be displayed in order with a delay to allow you to read the page.
1. Press the Hold button to stop the next subpage being displayed. The hold symbol will appear in the top left hand corner of the screen.
2. Press the Hold button again to continue moving through the sub-pages.
Text enlargement
1. Press the Size button to enlarge the text shown on the text mode screen. Once selected, half a page will be displayed at a time.
2. Press the Size button again to view second half of the page.
3. Press the Size button a third time to return to normal text mode.
Operating the TV
JL_26inTV_UG.indd 21 27/07/2009 11:47:16
26 inch LCD TV user guide22
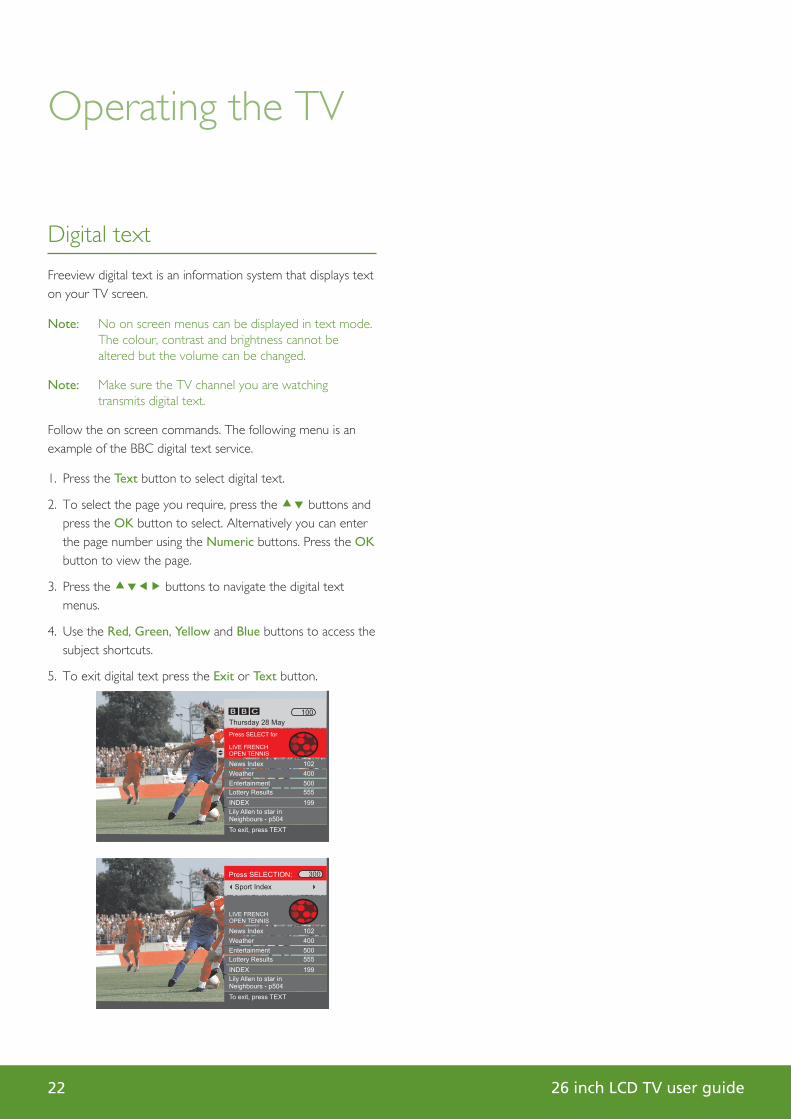
Digital text
Freeview digital text is an information system that displays text on your TV screen.
Note: No on screen menus can be displayed in text mode. The colour, contrast and brightness cannot be altered but the volume can be changed.
Note: Make sure the TV channel you are watching transmits digital text.
Follow the on screen commands. The following menu is an example of the BBC digital text service.
1. Press the Text button to select digital text.
2. To select the page you require, press the buttons and press the OK button to select. Alternatively you can enter the page number using the Numeric buttons. Press the OK button to view the page.
3. Press the buttons to navigate the digital text menus.
4. Use the Red, Green, Yellow and Blue buttons to access the subject shortcuts.
5. To exit digital text press the Exit or Text button.
Operating the TV
JL_26inTV_UG.indd 22 27/07/2009 11:47:16
26 inch LCD TV user guide 23
Operating the TV
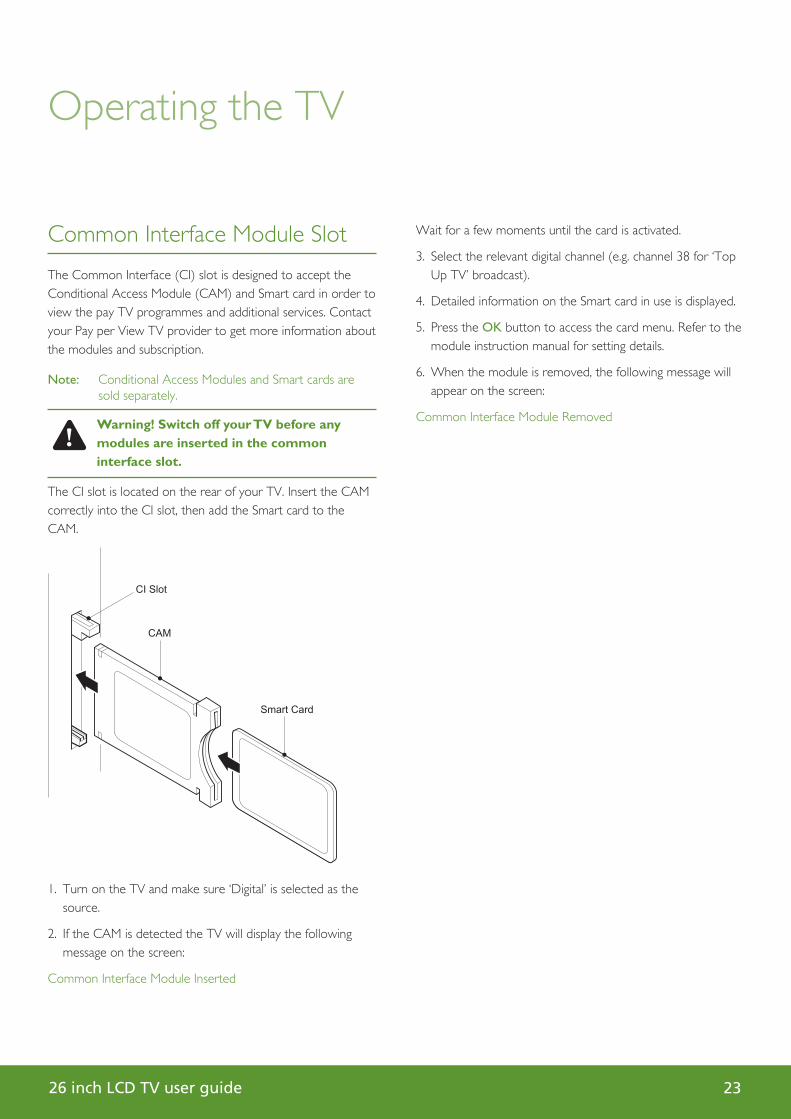
Common Interface Module Slot
The Common Interface (CI) slot is designed to accept the Conditional Access Module (CAM) and Smart card in order to view the pay TV programmes and additional services. Contact your Pay per View TV provider to get more information about the modules and subscription.
Note: Conditional Access Modules and Smart cards are sold separately.
Warning! Switch off your TV before any modules are inserted in the common interface slot.
The CI slot is located on the rear of your TV. Insert the CAM correctly into the CI slot, then add the Smart card to the CAM.
1. Turn on the TV and make sure ‘Digital’ is selected as the source.
2. If the CAM is detected the TV will display the following message on the screen:
Common Interface Module Inserted
Wait for a few moments until the card is activated.
3. Select the relevant digital channel (e.g. channel 38 for ‘Top Up TV’ broadcast).
4. Detailed information on the Smart card in use is displayed.
5. Press the OK button to access the card menu. Refer to the module instruction manual for setting details.
6. When the module is removed, the following message will appear on the screen:
Common Interface Module Removed
JL_26inTV_UG.indd 23 27/07/2009 11:47:17
26 inch LCD TV user guide24
Operating the TV
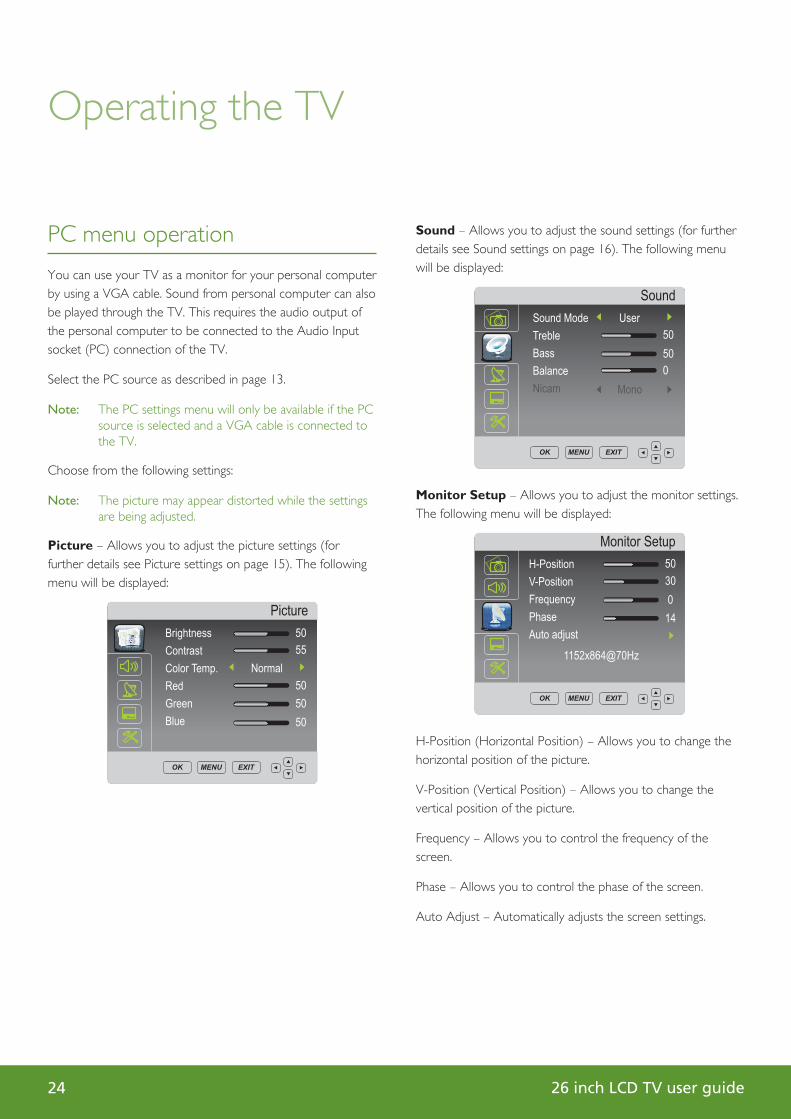
PC menu operation
You can use your TV as a monitor for your personal computer by using a VGA cable. Sound from personal computer can also be played through the TV. This requires the audio output of the personal computer to be connected to the Audio Input socket (PC) connection of the TV.
Select the PC source as described in page 13.
Note: The PC settings menu will only be available if the PC source is selected and a VGA cable is connected to the TV.
Choose from the following settings:
Note: The picture may appear distorted while the settings are being adjusted.
Picture – Allows you to adjust the picture settings (for further details see Picture settings on page 15). The following menu will be displayed:
Sound – Allows you to adjust the sound settings (for further details see Sound settings on page 16). The following menu will be displayed:
Monitor Setup – Allows you to adjust the monitor settings. The following menu will be displayed:
H-Position (Horizontal Position) – Allows you to change the horizontal position of the picture.
V-Position (Vertical Position) – Allows you to change the vertical position of the picture.
Frequency – Allows you to control the frequency of the screen.
Phase – Allows you to control the phase of the screen.
Auto Adjust – Automatically adjusts the screen settings.
JL_26inTV_UG.indd 24 27/07/2009 11:47:18
26 inch LCD TV user guide 25
Operating the TV
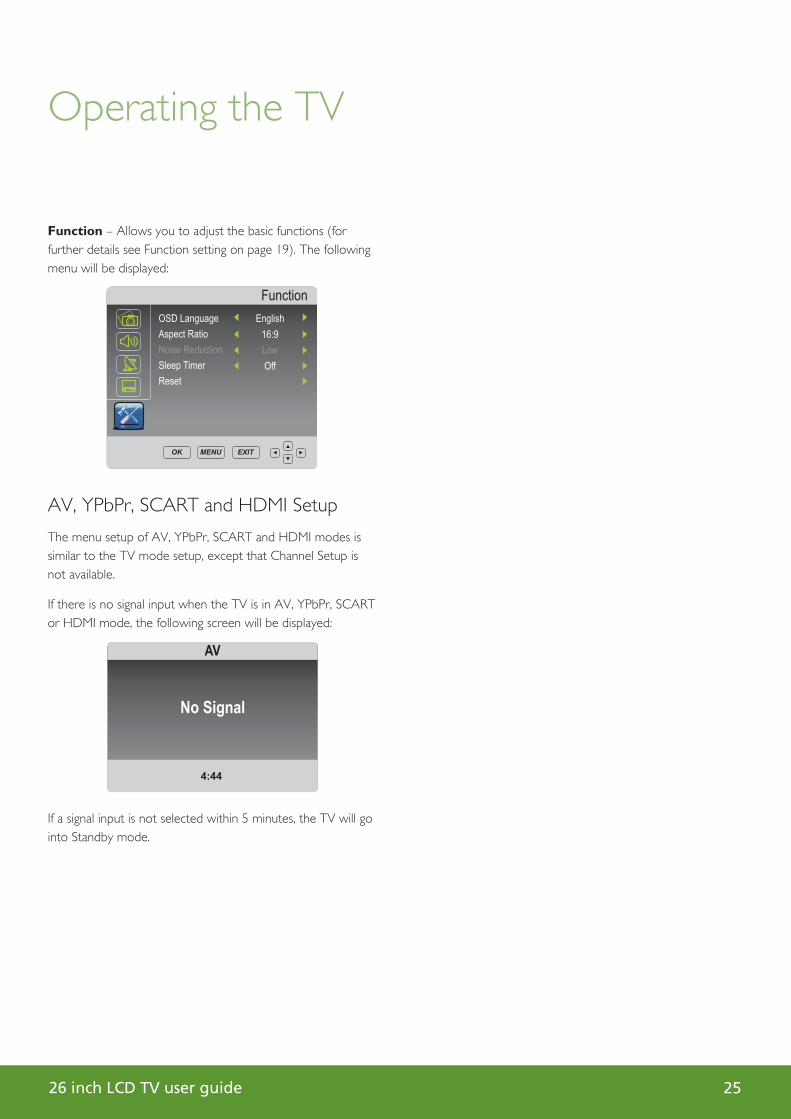
Function – Allows you to adjust the basic functions (for further details see Function setting on page 19). The following menu will be displayed:
AV, YPbPr, SCART and HDMI Setup
The menu setup of AV, YPbPr, SCART and HDMI modes is similar to the TV mode setup, except that Channel Setup is not available.
If there is no signal input when the TV is in AV, YPbPr, SCART or HDMI mode, the following screen will be displayed:
If a signal input is not selected within 5 minutes, the TV will go into Standby mode.
JL_26inTV_UG.indd 25 27/07/2009 11:47:18
26 inch LCD TV user guide26
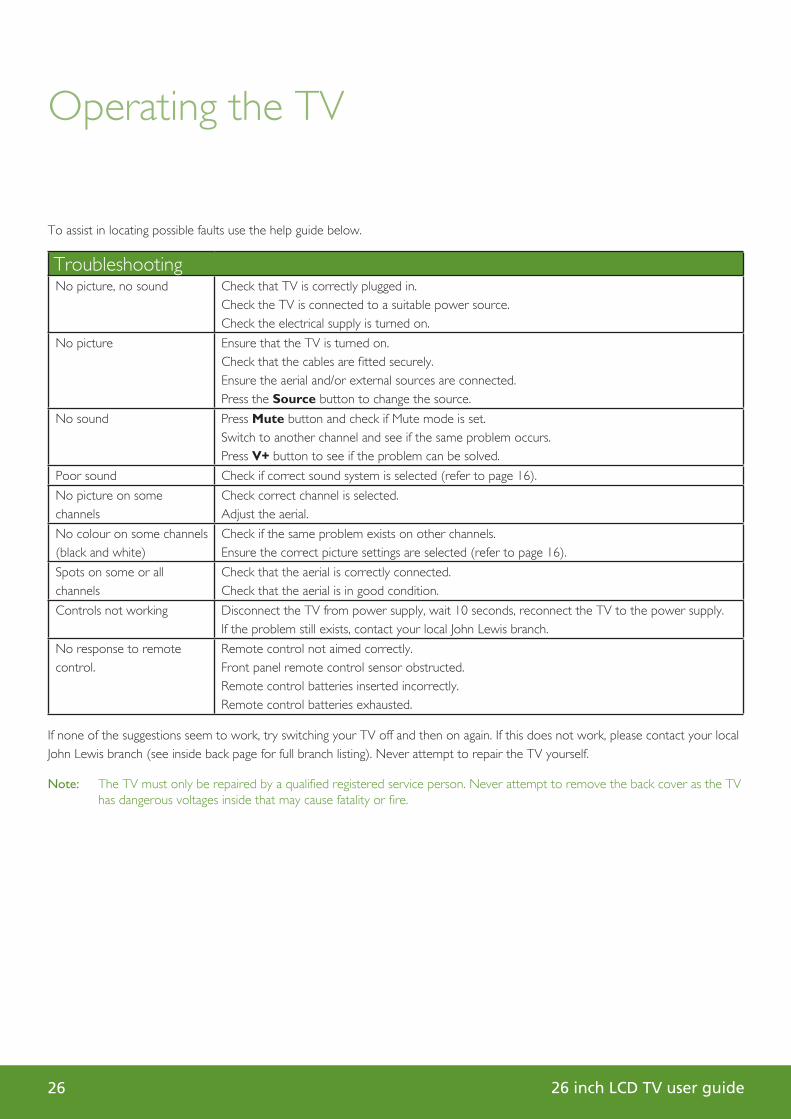
To assist in locating possible faults use the help guide below.
TroubleshootingNo picture, no sound Check that TV is correctly plugged in.
Check the TV is connected to a suitable power source.Check the electrical supply is turned on.
No picture Ensure that the TV is turned on.Check that the cables are fi tted securely.Ensure the aerial and/or external sources are connected.Press the Source button to change the source.
No sound Press Mute button and check if Mute mode is set.Switch to another channel and see if the same problem occurs.Press V+ button to see if the problem can be solved.
Poor sound Check if correct sound system is selected (refer to page 16).
No picture on some channels
Check correct channel is selected.Adjust the aerial.
No colour on some channels (black and white)
Check if the same problem exists on other channels.Ensure the correct picture settings are selected (refer to page 16).
Spots on some or all channels
Check that the aerial is correctly connected.Check that the aerial is in good condition.
Controls not working Disconnect the TV from power supply, wait 10 seconds, reconnect the TV to the power supply.If the problem still exists, contact your local John Lewis branch.
No response to remote control.
Remote control not aimed correctly.Front panel remote control sensor obstructed.Remote control batteries inserted incorrectly.Remote control batteries exhausted.
If none of the suggestions seem to work, try switching your TV off and then on again. If this does not work, please contact your local John Lewis branch (see inside back page for full branch listing). Never attempt to repair the TV yourself.
Note: The TV must only be repaired by a qualifi ed registered service person. Never attempt to remove the back cover as the TV has dangerous voltages inside that may cause fatality or fi re.
Operating the TV
JL_26inTV_UG.indd 26 27/07/2009 11:47:18
26 inch LCD TV user guide 27
Operating the TV
Care and maintenance
Disposal
This symbol on the product or on its packaging indicates that this product may not be treated as household waste. Instead it shall be handed over to the applicable collection point for the recycling of electrical and electronic equipment. By ensuring this product is disposed of correctly, you will help prevent potential negative consequences for the environment and human health, which could otherwise be caused by inappropriate waste handling of this product. For more detailed information about recycling of this product, please contact your local council offi ce, your household waste disposal service or the John Lewis branch where you purchased the product.
Guarantee
Your John Lewis television is covered by a 5 year parts and labour guarantee. This means that if the television develops a fault during the guarantee period we arrange a repair free of charge. Your original receipt acts as your guarantee so please make sure that you retain it throughout the guarantee period.
Please note that this guarantee does not cover you against faults caused by accidental damage or misuse.
JL_26inTV_UG.indd 27 27/07/2009 11:47:19
26 inch LCD TV user guide28
Operating the TV
Specifi cationsSpecifi cations of the TV that you have just purchased may vary from the information in this table due to technical innovations.Panel Type: TFT colour Size: 26” Display size (mm): 575.769(H)x323.712(V) Pixel pitch (mm): 0.1405(H)x0.4215(V) Response time (ms): 8ms Brightness (cd/m2): 500 Contrast ratio: 800:1 Viewing angle (H): 160 Viewing angle (V): 150 Panel life (hours): 60000
Frequency Vertical: Frame rate : 57 ~ 63 Hz Horizontal: N/A Display colour: 16.2M
Display Mode Optimum mode: 1366x768
Inputs Video Composite: 2 VGA: 1 SV: 1 SCART: 1 YPbPr: 1 Audio Stereo: 3 Other interface HDMI: 2
Outputs Audio Headphone: 1 Digital coaxial: 1
Colour systems TV tuner: PAL, SECAM Video inputs: PAL, SECAM, NTSC
Sound systems TV tuner: BG, I, DK, L/L’
Power Normal: 150W Standby: < 1.0 W
Environmental consideration Operating temperature: 0 ~ 40 C Operating humidity: 20 ~ 80 % Storage temperature: -20 ~ 60 C Storage humidity: 10 ~ 90 % Input connector: IEC 169-2 FEMALE
DTV Frequency range (VHF/UHF) : 177.5 ~ 858MHz Channel range (VHF/UHF): 7M/8M
Dimensions (WxHxD) 664x521x225 (mm)
Net weight 10.0kg
JL_26inTV_UG.indd 28 27/07/2009 11:47:19

26 inch LCD TV user guide 29
Branch locations
John Lewis, Oxford Street 020 7629 7711
Peter Jones, Sloane Square 020 7730 3434
John Lewis, Brent Cross 020 8202 6535
John Lewis, Kingston 020 8547 3000
John Lewis, Aberdeen 01224 625000
John Lewis, Bluewater 01322 624123
John Lewis, Cambridge 01223 361292
John Lewis, Cardiff * 02920 536000
John Lewis, Cheadle 0161 491 4914
John Lewis, Cribbs Causeway 0117 959 1100
John Lewis, Edinburgh 0131 556 9121
John Lewis, Glasgow 0141 353 6677
John Lewis, Home and Leisure, High Wycombe 01494 462666
John Lewis, Leicester 0116 242577
John Lewis, Liverpool 0151 709 7070
John Lewis, Milton Keynes 01908 679171
John Lewis, Newcastle upon Tyne 0191 232 5000
John Lewis, Norwich 01603 660021
John Lewis, Nottingham 0115 941 8282
John Lewis, Peterborough 01733 344644
John Lewis at home, Poole* 01202 756020
John Lewis, Reading 0118 957 5955
John Lewis, Sheffi eld 0114 276 8511
John Lewis, Solihull 0121 704 1121
John Lewis, Southampton 023 8021 6400
John Lewis, Trafford 0161 491 4040
John Lewis, Watford 01923 244266
John Lewis, Welwyn 01707 323456
Knight & Lee, Southsea 023 9282 7511
* opening Autumn 2009
JL_26inTV_UG.indd 29 27/07/2009 11:47:19
JL26_UG/08.09
Contact Details
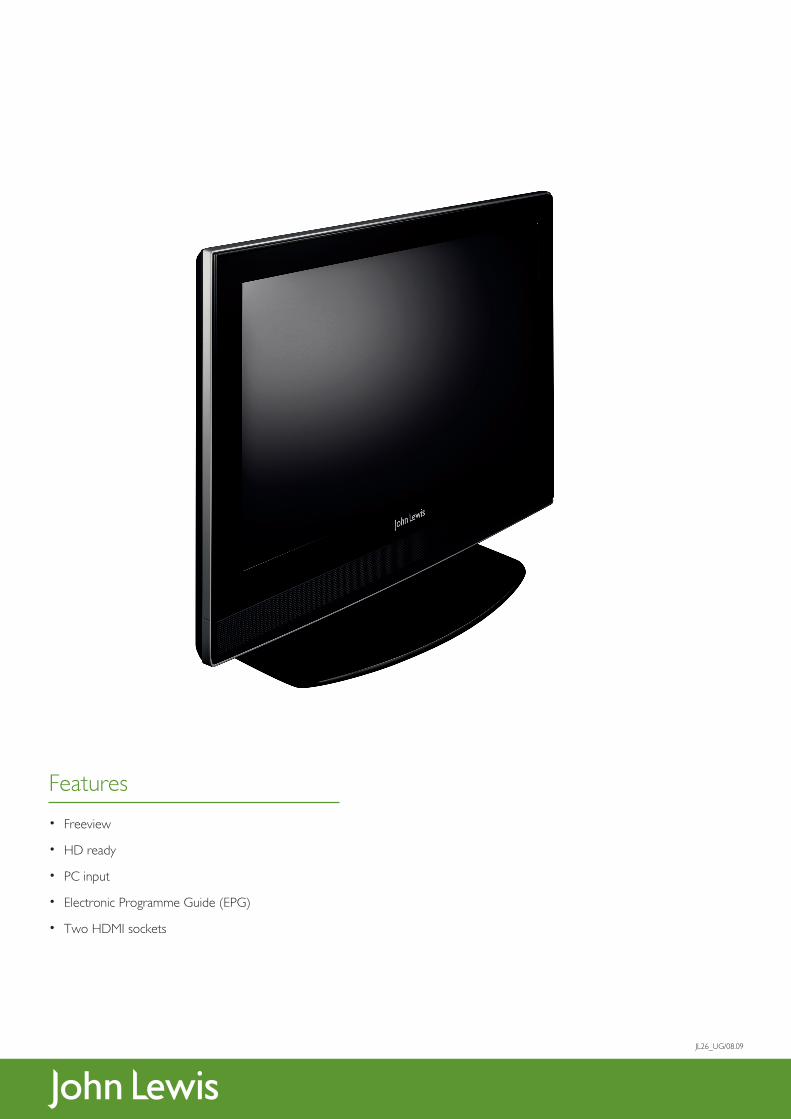
Features
• Freeview
• HD ready
• PC input
• Electronic Programme Guide (EPG)
• Two HDMI sockets
JL_26inTV_UG.indd 30 27/07/2009 11:47:19