
2
108
©2011 by Colorado School of Dental Assisting, Inc. Page 1 HANDOUT PACKAGE FOR STUDENTS OF THE COLORADO SCHOOL OF DENTAL ASSISTING and NATIONAL SCHOOL OF DENTAL ASSISTING Includes The Official School Catalog Clinical Criteria Check-Off Weekly Check Lists Handouts Lecture Notes
Transcript of 2

©2011 by Colorado School of Dental Assisting, Inc. Page 1
HANDOUT PACKAGE FOR STUDENTS OF THE
COLORADO SCHOOL OF DENTAL ASSISTING
and
NATIONAL SCHOOL OF DENTAL ASSISTING
Includes
The Official School Catalog
Clinical Criteria Check-Off
Weekly Check Lists
Handouts
Lecture Notes
©2011 by Colorado School of Dental Assisting, Inc. Page 2
The
~ Official Catalog ~ For the State of Colorado Attendance
In a short course such as the Dental Assisting Program, regular attendance and punctuality are essential for academic success.
Not more than one class may be un-excused without a makeup,
and labs must be made up if missed. If a student is absent for more than once class without contacting the school, his/her
enrollment may be terminated and a refund will be granted in
accordance with the school’s official refund policy. Measurement and Evaluation
Measurements and evaluations will be taken throughout
the program using objective traditional written tests and
performance-based activities during labs. A final grade will be issued based on ongoing measurement throughout the term. Percentage Grade GPA Percentage Grade GPA
94-100% A 4.00 74-76% C 2.00
90-93% A- 3.70 70-73% C- 1.70
87-89% B+ 3.30 67-69% D+ 1.30
84-86% B 3.00 64-66% D 1.00
80-83% B- 2.70 60% & less F 0.00
77-79% C+ 2.30
Reporting of Grades
Grades will be reported in letter grades and GPAs. Grades
will be handed back to students in class with the graded tests & assignments. Transcripts will be dynamically produced,
downloaded and printed by students from our website. Student Complaints
Student complaints should be brought to the action of the
school director in order to be resolved. If a student complaint
cannot be resolved between the student and the director,
a student may contact the Colorado Division of Private Occupational Schools at (303) 894-2960. There is a twoyear
limitation of Division action on student complaints. Placement Assistance
The CSDA offers placement assistance and career counseling to its graduates having a 3.00 GPA or B average or better as their
final grade. The CSDA does not guarantee job placement. Satisfactory Progress Policy
Students must achieve a minimum GPA of 2.7 before graduating.
Test retakes may be arranged under special circumstances
with consent of the instructor. Tuition and Fees
Tuition . . . . . . . . . . . $2,700
Book Fee . . . . . . . . . . . . . non-refundable $175
Student Liability Insurance . . . . . . . . . . . . . . . . . . . . . . $20
Total $2,895 Conduct Policy
The CSDA reserves the right to terminate the enrollment of any student who fails to maintain passing grades, who shows
excessive tardiness or absence, who maliciously destroys or
damages any school property (in which case the student may be held liable for repair and/or replacement of the damaged
property), or who is in violation of the following acts: 1. Unlawful possession, use or distribution of drugs and/or
alcolhol on school property, or during any school activity.
2. Willful abuse of equipment.
3. Insubordination and/or intolerable conduct.
4. Poor attitude or lack of motivation.
5. Unauthorized use of school equipment.
6. Falsification on any document.
7. Cheating or plagiarism.

©2011 by Colorado School of Dental Assisting, Inc. Page 3
8. Failure to make payments on due dates.
A student who has been dismissed may appeal the decision
to the director, or apply for re-entry. A student who applies for re-entry must show a change in his/her conduct which
would merit reconsideration. During the externship, the
student is expected to appear wearing OSHA standard dress, and project a professional appearance and manner. Transfer of Credit
CSDA does not guarantee transfer of credits earned in its program
to another school, nor will the program accept credits from other schools. If a student proves to have previous
experience in a certain lesson or unit, he or she can, with the
instructor’s consent, take a competency test in lieu of the lesson or unit. No refund will be given in such a circumstance. Refund Policy
3 Denial of Application A full refund is given to students who are not accepted by the school.
3 Three-day Cancellation All monies paid by an applicant are refunded if requested within three days after signing an
enrollment agreement and making an initial payment, except when the student has started training.
3 Other Cancellation Students who withdraw after three business days, but before commencement of classes, are entitled to
a full refund of all tuition paid, except a cancellation fee of $150.
3 School Termination A full refund is provided if educational
service is terminated by the school.
3 Termination Date The official date of termination for
refund purposes is the last date of recorded attendance.
3 Refund Table The student will be eligible for refunds as follows, minus a cancellation fee of $150.
Student is entitled to the following refund upon withdrawal
or enrollment termination. . . . . . . . . . Refund Within first 10% of program . . . . . . . . . . . $2,605.50
After 10% but within first 25% of program . . . . $2,171.25
After 25% but within first 50% of program . . . . $1,447.50
After 50% but within first 75% of program . . . . . . $723.75
After 75% of program . . . . . . . . . None
Refunds will be provided within 30 days of termination.
©2011 by Colorado School of Dental Assisting, Inc. Page 4
School Policy on Tardiness
At the Colorado School of Dental Assisting, we strive for success. Many business consultants,
advisors and social scientists have broken down “success” into a list of personality traits. Being
on time is one of those traits. You will never meet a successful business executive, health
practitioner, professional, who is not religiously punctual for meetings, appointments, due dates,
etc. So, at the CSDA, we’ve built punctuality into our code of ethics, as well as our grading
policy.
Being tardy to class will be reflected in your final grade and go on your transcript in this manner:
2 tardies = 1 absence. We only allow 1 unexcused absence at the School. Any other tardy or
absence must be cleared in advance with a valid excuse. Valid excuses are: pre-arranged
absences that cannot be helped (per instructor’s approval) or medical emergencies.
In addition to reinforcing a bad habit, tardiness disrupts the class and the instructor. At your
dental assisting job, there will be zero tolerance for tardiness and will be grounds for dismissal.
Please keep in mind that we have many students at the CSDA who graduate with no tardies and a
100% attendance record. These are the graduates who find employment in dental assisting. If
they can do it, so can you. Set your personal goals high, and reach to achieve them.
Sincerely,
The CSDA Staff
©2011 by Colorado School of Dental Assisting, Inc. Page 5
Weeks: Chapters Tasks
Orientation Class (optional): Administration
paperwork, and
textbook distribution
Week 1: Orientation to Dentistry Members of the dental
team, dental
Chapters 1, 3, 4, 11, 12 organization, anatomic
parts of the tooth,
types of teeth, tooth
surfaces, dentition, the
numbering system,
cavity classification
and charting symbols
Week 2: Infection Control Causes of disease,
disease
Chapters 5, 6, 7, 8 transmission, BBP,
OSHA, PPE,
disinfection,
sterilization, barriers,
types of waste,
beginning coronal
polish.
Week 3: Preventative Dentistry, Oral evacuation The clinical area, oral
evacuation
Chapters 9, 10, 17, 22 mouth rinsing, dental
diseases, Alginate
Impressions
Week 4: Dental Radiography Radiation hazards and
protection,
Chapters 15, 16 Biological effects,
patient and operator
protection, intra and
extraoral radiographs,
processing errors
Week 5: Dental Dams, Preventative Dentistry Placing a dental dam,
sealants and Chapters 10 and 18 the coronal polish
Week 6: Mid-Term, Pain and Anxiety Pain and Anxiety,
loading a syringe,

©2011 by Colorado School of Dental Assisting, Inc. Page 6
Chapter 14 Mid Term Exam and
Check Offs
Week 7: Amalgam and
Composites, Instruments Characteristics of
dental materials,
Chapters 19, 20, 21 amalgams, composites,
matrix systems, Hand
and rotary instruments,
Instrument ID,Tooth
whitening
Week 8: Crown and Bridge Bases, liners, cements,
Provisional
Chapter 23 coverage
Week 9: Dental Specialties 1 Oral Maxillofacial
surgery, Pediatric
Chapters 24, 26, 27 dentistry,
instrumentation,
pediatric exam,
Periodontics, Perio
exam
Week 10: Friends and Family Day Practice on friends and
family
Dental Specialties 2 Endodontics,
Chapters 25, 28 endodontic
instruments,
medications and filling
materials
Week 11: Review, Medical Emergencies Review all material,
allow time for
Chapter 13 check-offs, Medical
Emergencies
Week 12: CPR and the FINAL EXAM CPR course and exam,
final exam, check-offs
are due. Pizza party.
Externship At least 4 days of
externship at a dental
office is required for
graduation.

©2011 by Colorado School of Dental Assisting, Inc. Page 7
Clinical and Laboratory Criteria Checklist Student Name:_________________
Final Clinical Grade: _______/100 (Must be over 85% for pass)
Chart a partner’s oral cavity Grade:_____/3
Show existing restorations /1
Show missing teeth /1
Can verbally identify tooth numbers /1
Chart a practice chart read aloud by instructor onto dental chart
Grade:____/5
Show correct surfaces of teeth /1
Show correct symbols for restorations /1
Show correct colors for existing or recommended treatments /1
Correctly write progress notes for different procedures and circumstances /2.
Models: pouring up and trimming Grade:_____/16
Maxillary Arch:
Shows clearly the maxillary tuberosity /1
Muccobuccal fold is easily observed /1
Labial frenum is visible /1
Palatal rugae is visible /1
Crown and gingival margins are distinct /1
Mandibular Arch
Shows mandibular retromolar pad /1
Muccobuccal fold is easily observed /1
Labial frenum is visible /1
Tongue area is smooth and free of lumps /1
Crown and gingival margins are distinct. /1
Both Arches
Study cast is free of voids /1
Occludes properly without tilt /1
Occludes properly when resting on posterior heel /1
Art base is trimmed with proper border /1
Art base does not exceed 1 inch at highest point of model /1
Model is smoothed and polished /1
Bleaching Tray Grade:______/3
Adequate extension past the gum line /1
Passive fit with adequate retention /1
Smooth edges along border /1
Coronal Polish Grade:______/3
All surfaces of the tooth have been treated /1

©2011 by Colorado School of Dental Assisting, Inc. Page 8
Tooth not overheated, must use irrigation /1
Supragingival /1
Sealants Grade:_____/2
Etched until surface is satisfactory to place sealant /1
After placing sealant, checked occlusion, made necessary changes /1
Placing rubber dam Grade:_____/5
Prepared supplies /.5
Selected clamp and tied a ligature on it /.5
Placed prepared clamp bow through the key punch hole /.5
Placed frame on dental dam /.5
Used floss or Wedjets to pass dam through proximal contacts /.5
Isolation of appropriate # of teeth /.5
Proper clamp placement /.5
Inverted dam /.5
Ligated and stabilized /.5
Maintained patient comfort and followed infection control /.5
X-rays: full mouth and mounting (these must be checked off)
Grade:______/20
Two full mouth periapical series, consisting of at least 18 radiographs each, 4 of
which must be bitewings (must be checked off)
Two bitewing series, consisting of at least 4 radiographs each (must be checked
off)
Full mouth in less than 20 min. to expose /10
Verbally identified landmarks of the mouth /2
Shows apex of tooth /2
Correct angle: no overlap /2
No cone cuts /2
Shows edentulous areas /2
Other X-Ray Grade______/7
Can verbally identify process for taking panos
All objects removed from head and neck of patient /1
Place double sided lead apron on patient /1
Patient is instructed to stand as tall as possible /1
Patient is instructed to bite on bite block and align upper and lower teeth in
grooves /1
Patient’s head is vertically and horizontally aligned /1
Can verbally identify the differences of digital x-rays and non-digital /2
X-ray Mounting Grade_____/15

©2011 by Colorado School of Dental Assisting, Inc. Page 9
With correct placement in anatomic order /13
Raised dots facing the viewer /1
Name and date of exposure /1
The Anesthetic Syringe Grade:______/2
Applying a topical anesthetic /1
Loading the syringe /.5
Placing the needle on the syringe /.5
Provisional Coverage Grade:_____/10
Adequate marginal coverage /2
Appropriate contours, occlusion and embrasures /2
Adequate occlusal anatomy /2
Adequate inter-proximal contacts /2
Shade /2
Loading tofflemire Grade:_____/1
Mixing cements (followed manufacturer’s instructions)
Grade:_____/1
Passing instruments Grade:_____/3
Performs correct passing technique of instruments /1
Does not pass instruments over patient’s head or neck /1
Correct placement into doctor’s hand and field of vision /1
Inventory Grade:______/2
Demonstrate the process for checking packing slip against invoice /1
Demonstrate the process for maintaining inventory in a dental office /1
Periodontal Chart Grade:______/1
Properly record pocket depths /1

©2011 by Colorado School of Dental Assisting, Inc. Page 10
Mid-Term Progress Report:
Attitude
willingly works with all other students,
eager to learn,
participates in answering questions,
asks questions,
attendance,
bedside manner (employs proper approach to “patients”)
Progress
Check-offs up to mid-term point are completed
(There is no grade for this check-off. This is a mid-term progress report. Poor evaluation
in this section means there is risk of an unsatisfactory grade in this course)
Comments:
______________________________________________________________________________
______________________________________________________________________________
____________________________________________________________
Final Clinical/Laboratory Grade Grade:_____/100

©2011 by Colorado School of Dental Assisting, Inc. Page 11
1. WEEK 1 CHECKLIST: Orientation and Anatomy
1. _______ Write The dental specialties and HAND IN
2. _______ Practice Identifying Treatment Room Equipment with a partner
3. _______ Review Chapter 1 pgs 2-9
4. _______ *HW Exercises pg, 10
5. _______ Identify The parts of the tooth, on tooth anatomy handout. HAND IN
6. _______ Review Chpt. 4, pgs. 47-58 and study handouts
7. _______ HW Exercises pg. 60
8. _______ Review Chpt 12, pgs. 178-185
9. _______Practice Do Procedures 12-2 and 12-3 with a partner
10. _______ HW Exercises pg. 191 # 1, 3, 5, 6, 8, 9, 10.
11. _______ Review Chpt. 11 pgs. 164-170
12. _______ HW Exercises pgs. 177 #3, 4, 5, 6, 9, 10
13. _______ HW Read for next week Chapters 5, 6, 7, 8
14. _______Watch Video on Essentials of Effective Dental Assisting
15. _______Learn Equipment in dental office, all switches and adjustments
16. _______ LAB Greeting and seating patient
17. ________LAB **Basic charting of partner’s mouth
*HW refers to Homework. To be done during the week and reviewed and checked-off in class the following week.
**Workstation activity
©2011 by Colorado School of Dental Assisting, Inc. Page 12
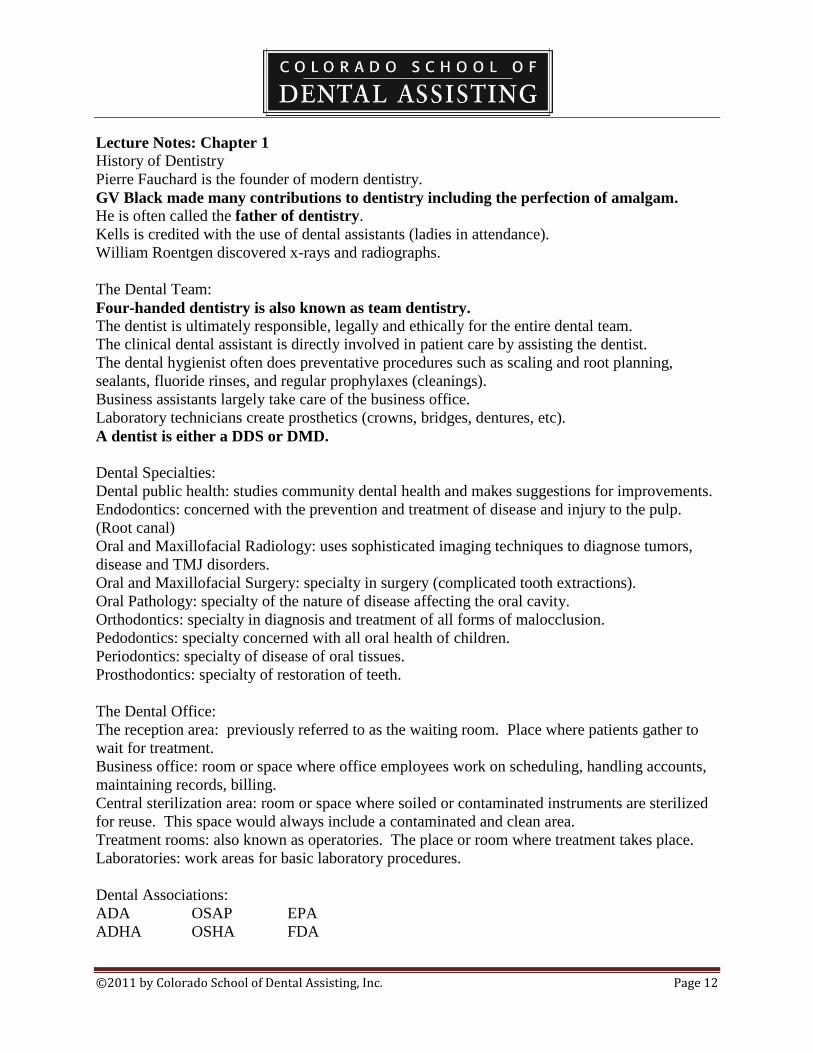
Lecture Notes: Chapter 1
History of Dentistry
Pierre Fauchard is the founder of modern dentistry.
GV Black made many contributions to dentistry including the perfection of amalgam.
He is often called the father of dentistry.
Kells is credited with the use of dental assistants (ladies in attendance).
William Roentgen discovered x-rays and radiographs.
The Dental Team:
Four-handed dentistry is also known as team dentistry.
The dentist is ultimately responsible, legally and ethically for the entire dental team.
The clinical dental assistant is directly involved in patient care by assisting the dentist.
The dental hygienist often does preventative procedures such as scaling and root planning,
sealants, fluoride rinses, and regular prophylaxes (cleanings).
Business assistants largely take care of the business office.
Laboratory technicians create prosthetics (crowns, bridges, dentures, etc).
A dentist is either a DDS or DMD.
Dental Specialties:
Dental public health: studies community dental health and makes suggestions for improvements.
Endodontics: concerned with the prevention and treatment of disease and injury to the pulp.
(Root canal)
Oral and Maxillofacial Radiology: uses sophisticated imaging techniques to diagnose tumors,
disease and TMJ disorders.
Oral and Maxillofacial Surgery: specialty in surgery (complicated tooth extractions).
Oral Pathology: specialty of the nature of disease affecting the oral cavity.
Orthodontics: specialty in diagnosis and treatment of all forms of malocclusion.
Pedodontics: specialty concerned with all oral health of children.
Periodontics: specialty of disease of oral tissues.
Prosthodontics: specialty of restoration of teeth.
The Dental Office:
The reception area: previously referred to as the waiting room. Place where patients gather to
wait for treatment.
Business office: room or space where office employees work on scheduling, handling accounts,
maintaining records, billing.
Central sterilization area: room or space where soiled or contaminated instruments are sterilized
for reuse. This space would always include a contaminated and clean area.
Treatment rooms: also known as operatories. The place or room where treatment takes place.
Laboratories: work areas for basic laboratory procedures.
Dental Associations:
ADA OSAP EPA
ADHA OSHA FDA
©2011 by Colorado School of Dental Assisting, Inc. Page 13
ADAA CDC DANB

©2011 by Colorado School of Dental Assisting, Inc. Page 14
Chapter 2
Ethics, Regulations and Licensing
Ethics involves codes of behavior surrounding the dental profession. All dental personnel are
bound by a Code of Ethics, taught in dental and hygiene school.
Legal aspects deal with the law and regulations of the governing body of that profession.
Civil Law: quality/standard of care
Criminal Law: violation of a license, inappropriate use of drugs, insurance or other fraud.
Contract Law: violation of contracts
Tort Law: violation of torts
State Board of Dental Examiners publishes the Dental Practice Act, which specifies rules and
regulations, and enforces them.
Licensure: Dentists and Hygienists must have active and current licenses to practice in the state.
Dental Assistants require registration and certifications in some states for certain procedures.
Registration can require a course, exam and registering.
Certification can require a course and exam.
Certified Dental Assistant is a DANB national certification, used in some states to allow
dental assistants to perform certain procedures. The DANB specific national and state
certifications through exams in radiology and infection control are used in certain states for
specific state certifications.
Risk Management
Malpractice is professional negligence.
Act of Omission occurs when the dentist fails to act.
Act of Commission occurs when the dentist did something unreasonable or unacceptable.
Consent means has accepted or agrees to treatment, etc. There is implied or informed consent.
Clinical Records
Dental charts are patient records, containing diagnosis, radiographs, consent forms, medical
histories, lab scripts, correspondences and progress notes. A dental chart or patient record is a
legal document.
Broken appointments or cancellations should be noted in the patient’s record.
Ownership of the chart is the dentist’s, although patients have a right to view and access the
chart.
If an error is made while making a note in the chart, draw a line through the error, date and
initial.

©2011 by Colorado School of Dental Assisting, Inc. Page 15
Chapter 3
Terms of the Body Planes
Sagittal plane is any vertical plane that divides the body into top, bottom, left, right
The Coronal Plane
Midsagittal Plane is the midline, can be called the frenum.
Head and Neck Anatomy
The maxillary bone forms the upper jaw
The mandibular bone forms the lower jaw
The temperomandibular joint is located where the temporal bone and the mandible join.
Movements of the TMJ are hinge action and gliding action movements.
The muscle that raises the mandible, closes the jaws and occludes the teeth is the masseter.
The zygomatic muscle draws the angles of the mouth upward and backward.
Tongue
Small elevated structures of mucosa called the lingual papillae are associated with taste.
The dorsal surface is the top of the tongue.
Lateral surfaces are the sides.
The underside is called the ventral.
The frenum is a narrow band of tissue that connects two structures.
The maxillary labial frenum is between the upper incisors.
The mandibular labial frenum passes between the lower anterior teeth.
The lingual frenum passes from the floor of the mouth to the midline of the undersurface of the
tongue.
The buccal frenum is located in the molar areas and it passes from the gingival to the inner sides
of the cheek.
Hard and Soft Palates
The soft palate is in the posterior area.
The hard palate is in the anterior area and may be covered with rugae.
©2011 by Colorado School of Dental Assisting, Inc. Page 16
Chapter 4
Dental Anatomy
Anatomic crown: the portion of the crown covered with enamel.
Clinical crown: the portion of the crown visible in the mouth.
Root: the portion of the tooth normally embedded in the alveolar process covered with
cementum.
Root formation: bifurcation, trifurcation, apex, apical periapical.
Cervix: where the root meets the crown (cementoenamel junction or CEJ).
Tissues of the Tooth
Enamel: hardest material in the body; it is translucent and is made up of millions of
calcified enamel prisms or enamel rods.
Dentin: Makes up the main portion of the inside of the tooth, it is yellow in color and
somewhat transparent. It is mineralized and is made up of microscopic dentinal tubules.
Inside each tubule, is a dentinal fiber that transmits pain to the pulp.
Cementum: is not as hard as enamel or dentin, it protects the root of the tooth. It is light
yellow in shade, darker than enamel. It can be exposed due to gingival recession.
Periodontal ligament : a dense connective tissue that connects the cementum to the alveolar
bone.
Pulp: the inner aspect of the dentin forms the boundaries of the pulp chamber. It is made
up of blood vessels and nerves.
Types of Teeth
There are 32 total permanent teeth.
There are 20 primary/deciduous teeth.
Incisors: single rooted teeth with a sharp thin edge located in the front (8 total).
Canines (cuspids) are located at the corners of the arch and are long and thick. (4 total).
Premolars: (bicuspids): have two cusps with a broader chewing surface. (8 total).
Molars: have more cusps, usually four, and are located in the posterior. (12 total).
Dental Arches
Mandibular: the lower arch
Maxillary: the upper arch
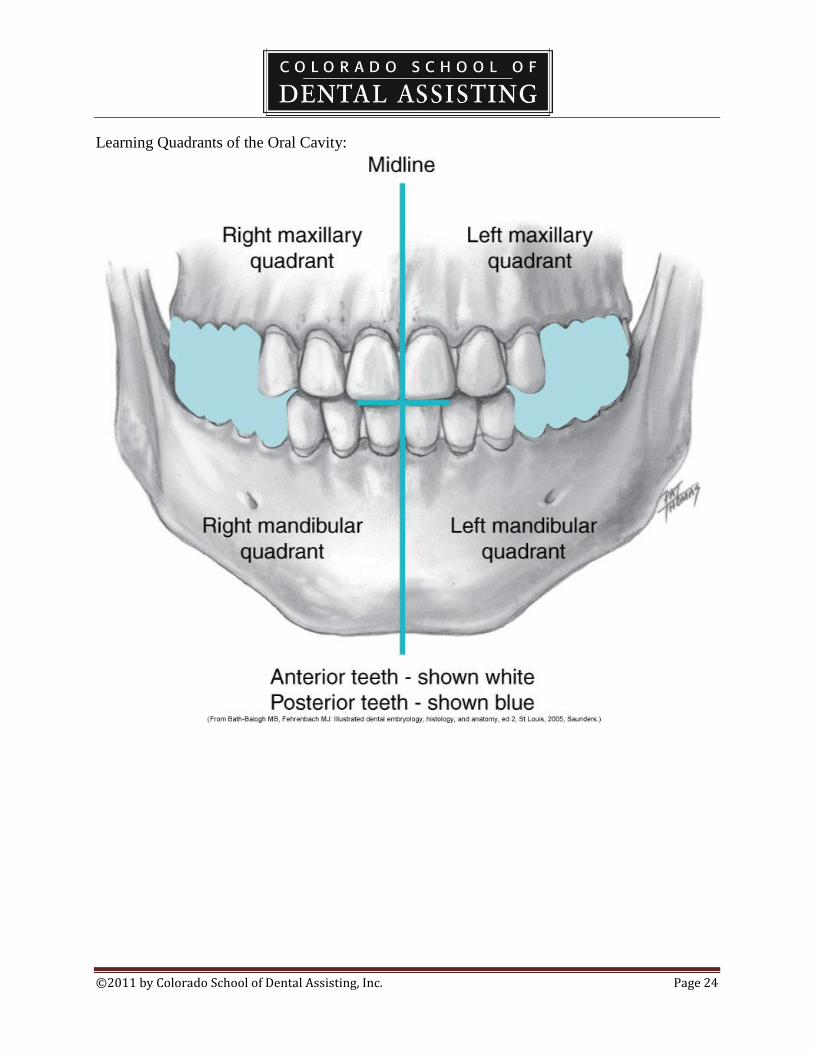
Quadrants and sextants
Quandrants divide the arch in half.
Sextants divide the arch in thirds.
Anterior and Posterior: front versus back.
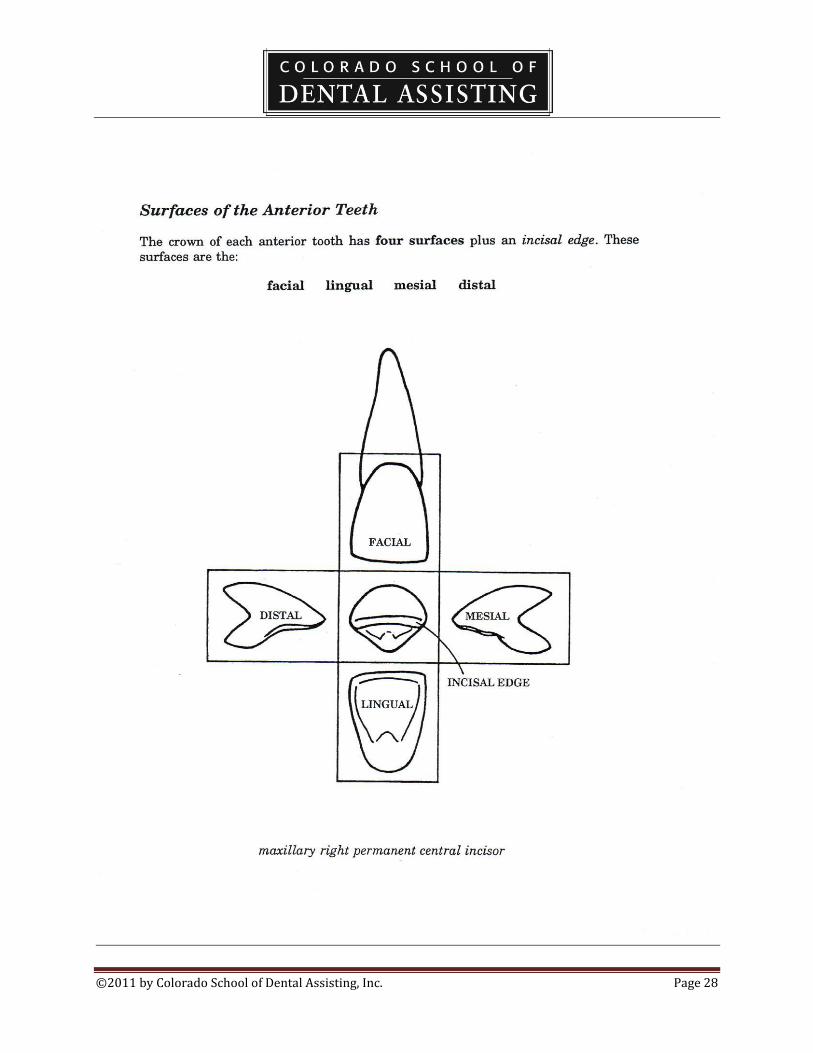
Tooth Surfaces
Facial (buccal)
Lingual
Occlusal
©2011 by Colorado School of Dental Assisting, Inc. Page 17
Mesial
Distal
Incisal
Anatomical Features
Cingulum: a bulge of enamel found on the cervical third of the lingual surface of an anterior
tooth.
Cusp: a pronounced elevation on the occlusal surface.
Cusp of Carabelli: the fifth cusp on an upper first molar.
Fissure: a fault occurring along a developmental groove caused by incomplete joining of lobes.
Pit: where two fissures cross.
Fossa: a rounded or angular depression on the surface of the tooth.
Lingual Fossa: a shallow depression on the lingual surface of an incisor or cuspid.
Central Fossa: deep angular valley in the central portion of the occlusal surface of a mandibular
molar.
Triangular Fossa: a shallow depression on the occlusal surface of the posterior teeth.
Groove: a small linear depression on the surface of the tooth.
Developmental groove: a groove formed by the union of the two lobes during development of
the crown.
Supplemental groove: these often give the occlusal surface a wrinkled appearance.
Incisal: edge formed by the junction of the facial and lingual surfaces.
Lobe: a developmental segment of the tooth.
Mamelon: ridges on anterior incisal edges.
Ridge: a linear elevation on the surface of the tooth.
Descriptive Features
A contact is the region of the mesial or distal surfaces that touch. A contact point is the
actual point where the teeth touch.
Embrassures are triangular spaces between the proximal surfaces of two adjoining teeth.
Occlusion is the contact between the maxillary and mandibular teeth.
The cusps of the teeth in one arch fit into the fossae of the teeth in the opposing arch.
Dentition refers to the natural teeth in the dental arches.
The term edentulous mean without teeth.
The primary dentition consists of twenty teeth that are in place shortly after the age of two.
Eruption is the movement of a tooth through the bone and the gingival tissue into position.
Primary teeth are also called deciduous teeth and are exfoliated in order for the permanent teeth
to come into place.
The roots of the deciduous teeth are resorbed during the process.
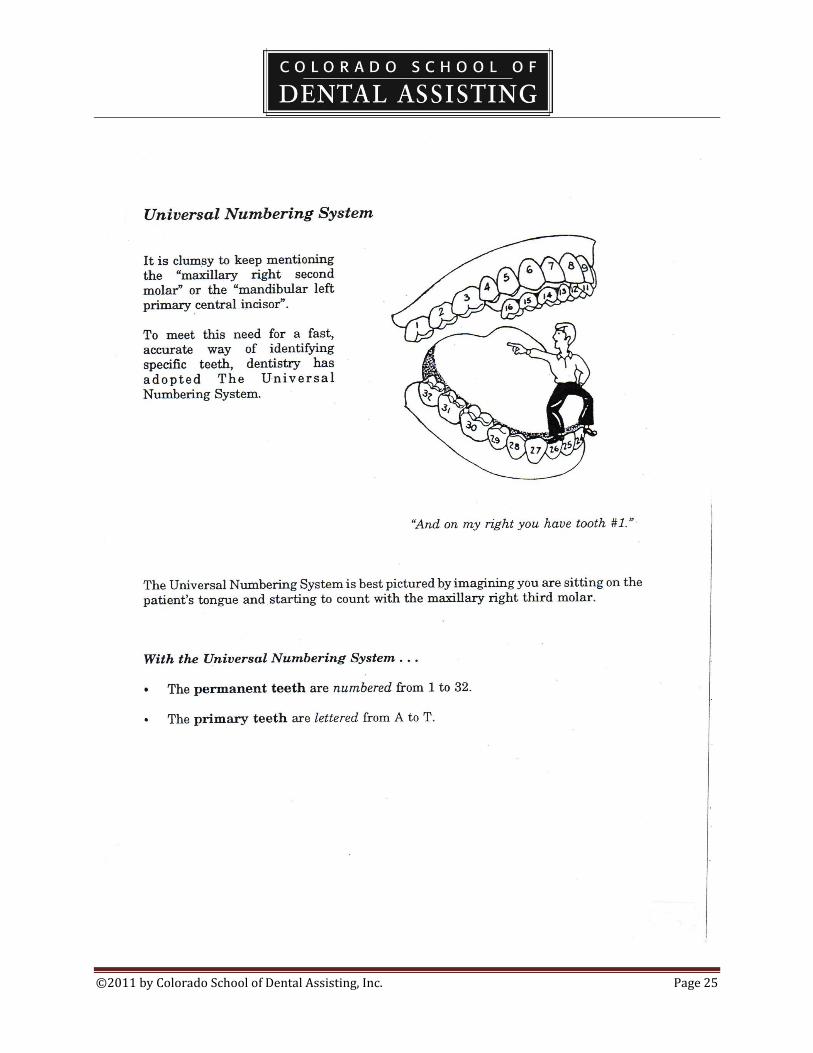
Tooth numbering systems
The system approved by the ADA is the Universal Numbering System.
Teeth are numbered 1-32 starting with the upper right, moving to the upper left, then
down to the lower left and across to the lower right.
©2011 by Colorado School of Dental Assisting, Inc. Page 18
For primary teeth in this system, letters A-T are used in the same direction as the
permanent system.
There are other systems, however, they are not widely accepted.
©2011 by Colorado School of Dental Assisting, Inc. Page 19
Chapter 12
Components of the dental examination.
The purpose of the dental examination is the diagnosis or identification of disease and the
recommendation of a treatment plan.
The examination begins after a thorough medical history and vital signs are obtained.
The exam consists of radiographs, impressions for diagnostic casts, oral examination, periodontal
examination, and examination of the teeth.
Chartings are taking a physical description and writing it down systematically in a diagram type
of form – either geometric or anatomic.
The oral examination includes a soft tissue exam of the neck, face, lips, and all soft tissues of the
head and neck areas.
A periodontal charting is done with a perio probe using a six number measuring system.
Charts are Legal Documents.
Red and Black pens are used. Red is for treatment required and black for existing
conditions.
Standard cavity classifications are used to describe the types and locations of decay.
A treatment plan is written diagnosis of all dental needs of the patient following the exam.
Levels of treatment are: Emergency Care (level 1), Standard Care (level 2), Optimum Care (level
3).
©2011 by Colorado School of Dental Assisting, Inc. Page 20
Chapter 11
The patient record.
It is a legal document.
A patient registration form is used to obtain the responsible party, insurance information,
clinical information and medical history.
Medical Histories
Medical histories include questions regarding the patient’s past and present physical
conditions, chronic conditions, allergies, and current medications taken.
It alerts the dentist to medical conditions that may complicate treatment.
It aids the dentist in identifying any special treatment needs, as well as potential medical
emergencies.
This document must be signed by the patient to insure accuracy.
The dentist may also consult the patient’s physician regarding health problems.
It is necessary to know of allergies to medications as well as latex.
Antibiotics are often prescribed to patients who have heart defects of prosthetic joints.
Medical alerts are posted on charts to inform the doctor of potential problems.
©2011 by Colorado School of Dental Assisting, Inc. Page 21
DENTAL ABBREVIATIONS
M………..mesial ANT…………anterior
D………..distal POST………..posterior
B………..buccal DEC…………deciduous
I…………incisal MAX………..maxillary
O………..occlusal
PT……...patient
NP……..new patient RHH…….review health history
CC…….chief concern HBP……..high blood pressure
APPT….appointment CA……….cancer
EX or E..examination HX……….history
TX……..treatment HH……….health history
DIAG….diagnosis RX……….prescription
BWX….bitewing x-ray ANES……anesthesia
PA……..periapical x-ray CARP……carpule
FMX…..full mouth series x-ray LIDO……lidocaine
PO……..postoperative CARBO…carbocaine
EXT……extraction EPI………epinephrine
AMAL…amalgam
COMP….composite
GING…..gingival
PREP…..preparation
SEAT….final seat of prosthesis
CRN……crown
PFM……porcelain fused to metal
FGC……full gold crown
BR……..bridge
RCT……root canal therapy
IMP……impression
SM…….study model
TEMP…temporary (provisional)
FUD…..full upper denture
FLD…..full lower denture

©2011 by Colorado School of Dental Assisting, Inc. Page 22

©2011 by Colorado School of Dental Assisting, Inc. Page 23
©2011 by Colorado School of Dental Assisting, Inc. Page 24
Learning Quadrants of the Oral Cavity:
©2011 by Colorado School of Dental Assisting, Inc. Page 25

©2011 by Colorado School of Dental Assisting, Inc. Page 26

©2011 by Colorado School of Dental Assisting, Inc. Page 27
©2011 by Colorado School of Dental Assisting, Inc. Page 28

©2011 by Colorado School of Dental Assisting, Inc. Page 29
Charting Abbreviations
Single Surface Abbreviations – ie: “O” for occlusal surface.
Combination of Surfaces – When two tooth surfaces are involved, such as distal and occlusal,
the combined surfaces are referred to as “DO” for distal-occlusal. Three surfaces combined are
also used: “MOD” for mesial-occlusal-distal. The letters are pronounced separately, ie: D-O
caries or M-O-D restoration.
Charting Symbols
Amalgam: Outline the surfaces that are involved and color in the area.
Composite: outline the surfaces involved.
Porcelain fused to metal: outline the coronal portion of the tooth and either add diagonal lines
to indicate gold or use abbreviation if another metal is used.
Gold: outline the crown of the tooth and place diagonal lines.
Sealant: place an “S” on the occlusal surface.
Stainless steel crown: outline the crown of the tooth and place “SS” on the occlusal surface.
To Be Extracted: draw a red diagonal line through the tooth. An alternative method is to draw
two red vertical lines through the tooth.
Missing Tooth: draw a blue/black “X” through the tooth. Whether the tooth was extracted or
whether it just never erupted does not make a difference in the charting. If a quadrant or arch is
edentulous, make an “X” over area where teeth would otherwise be.
Impacted or Unerupted: draw a red circle around the whole tooth, including the root.
Decay: depending on the caries classification, outline and color the area for amalgam, or outline
the area for composite.
Recurrent Decay: outline the existing restoration in red to indicate decay in the area.
Root Canal: draw a line through the center of each root involved.
Periapical Abscess: draw a red circle at the apex of the root to indicate infection.
Post and Core: draw a line through the root that requires a post, then continue the line into the
gingival third of the crown, making a triangular shape.
©2011 by Colorado School of Dental Assisting, Inc. Page 30
Rotated tooth: if a tooth has rotated in its position, indicate the direction the tooth has turned by
placing a red arrow along the side of the tooth.
Diastema: where there is considerable space between two teeth, draw two red vertical lines
between the areas.
Fixed Bridge: draw an “X” through the roots of the missing tooth or teeth. Then draw a line to
connect each of the teeth that make up the bridge. The type of material used to fabricate the
bridge will determine whether you would outline the crowns for porcelain, use diagonal lines for
gold, or use a combination of the two.
Full Crown: outline the complete crown if it is to be a porcelain crown, or outline and place
diagonal lines for a gold crown.
Drifting: place a red arrow pointing in the direction of drift of a tooth.
Implant: Draw horizontal lines through the root or roots of a tooth.
Bonded Veneer: veneers cover only the facial surface of a tooth. Outline the facial portion only
and use abbreviation “V”.
Fractured tooth or root: draw a red zigzag line where the fracture occurred.
©2011 by Colorado School of Dental Assisting, Inc. Page 31
Tooth Designation System
Maxillary Teeth
2. Maxillary right third molar (wisdom tooth)
3. Maxillary right second molar
4. Maxillary right first molar
5. Maxillary right second premolar/bicuspid
6. Maxillary right first premolar/bicuspid
7. Maxillary right canine/cuspid
8. Maxillary right lateral incisor
9. Maxillary right central incisor
10. Maxillary left central incisor
11. Maxillary left lateral incisor
12. Maxillary left canine/cuspid
13. Maxillary left first premolar/bicuspid
14. Maxillary left second premolar/bicuspid
15. Maxillary left first molar
16. Maxillary left second molar
17. Maxillary left third molar (wisdom tooth)
Mandibular Teeth
18. Mandibular left third molar (wisdom tooth)
19. Mandibular left second molar
20. Mandibular left first molar
21. Mandibular left second premolar/bicuspid
22. Mandibular left first premolar/bicuspid
23. Mandibular left canine/cuspid
24. Mandibular left lateral incisor
25. Mandibular left central incisor
26. Mandibular right central incisor
27. Mandibular right lateral incisor
28. Mandibular right canine/cuspid
29. Mandibular right first premolar/bicuspid
30. Mandibular right second premolar/bicuspid
31. Mandibular right first molar
32. Mandibular right second molar
33. Mandibular right third molar (wisdom tooth)
©2011 by Colorado School of Dental Assisting, Inc. Page 32
WEEK 2 CHECKLIST: Charting and Disinfection
1. ____Watch Video on Basic Materials and Techniques for Dental Assistants
2. ____Review Charting symbols
3. ____Review Different types of charts: anatomical and geometric (attached)
4. ____Review Chpt. 5, p. 62-73
5. ____HW Chpt. 5 exercises p. 74
6. ____Review Chpt. 6, p. 75-97
7. ____HW Chpt. 6 exercises p. 98
8. ____Review Chpt. 7, p. 99-109
9. ____HW Chpt. 7 exercises p. 112
10. ____Practice Procedures #7-1. 7-2
11. ____Review Chpt. 8 p. 113-124
12. ____HW Chpt. 8 exercises p. 130
13. ____Observe Correct procedure of oiling operatory handpieces
14. ____HW Read for next week Chpts 9, 10 (omit Dental Dam), 17 (pg. 278 – 285
only), and 22
15. ____LAB Practice charting, and do charting exercise for check-off
16. ____LAB Do reverse charting exercise for practice
17. ____LAB Practice sterilizing instruments and wiping down rooms
18. ____LAB Practice writing progress notes
©2011 by Colorado School of Dental Assisting, Inc. Page 33
©2011 by Colorado School of Dental Assisting, Inc. Page 34
©2011 by Colorado School of Dental Assisting, Inc. Page 35
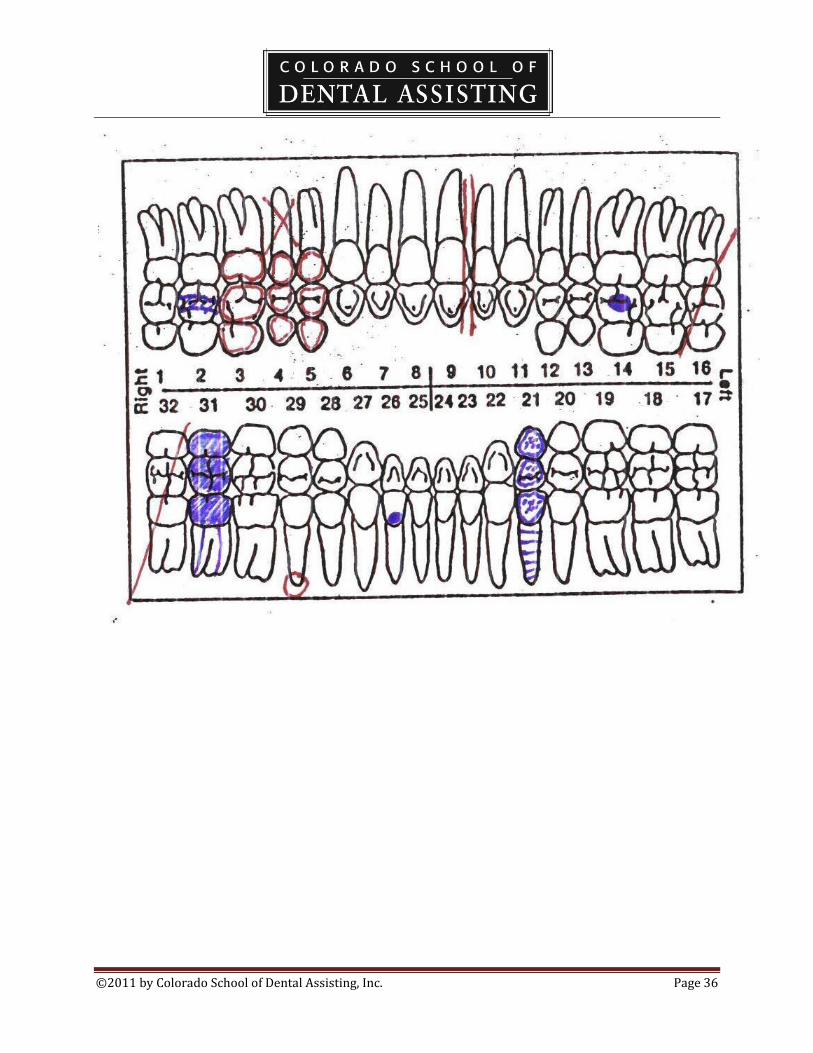
Charting Exercise: Chart the following statements on the chart provided.
1. Tooth #1 is impacted and needs to be extracted
2. Tooth #2 has a full gold crown
3. Tooth #3 has a periapical abscess and needs a root canal treatment and a crown.
4. Teeth #4, 5, 6 are missing and are replaced with a partial denture.
5. Tooth #7 has a porcelain-fused-to-metal crown.
6. Teeth #8 and 10 have Class V decay.
7. Tooth #11 has mesial Class III decay.
8. Tooth #12 has mesial-occlusal-distal-lingual-buccal carries.
9. Tooth #13 has an abscess and needs a RCT and a stainless steel crown.
10. Tooth #15 has mesial-occlusal and buccal amalgam fillings.
11. Tooth #16 is missing.
Patient has a full lower denture.
Reverse Charting: Create the statement corresponding to the completed chart provided
Tooth #2
Tooth #3
Tooth #4
Tooth #5
Tooth #9,10
Tooth #14
Tooth #16
Tooth #21
Tooth #26
Tooth #29
Tooth #31
Tooth #32
©2011 by Colorado School of Dental Assisting, Inc. Page 36
©2011 by Colorado School of Dental Assisting, Inc. Page 37
Lecture Notes
Chapter 5
Causes of Disease
A pathogen is a microorganism that is capable of causing disease.
Bacteria are one-celled microorganisms that are capable of causing disease.
Spores are highly resistant bacteria (they are resistant to heat and disinfection).
Viruses are infectious agents that are extremely small.
Fungi are plants that are capable of disease.
Candida microorganisms are in the normal flora, but can cause disease.
Modes of Transmission
Direct transmission involves direct contact with body fluids.
Indirect transmission can occur from contaminated instruments.
Splash or splatter can be sprayed during dental treatment.
Airborne transmissions include aerosols, mists and splatter.
Parenteral means through the skin as in needlesticks.
Bloodborne diseases are transferred by body fluids and include HBV, HBC, and HIV.
Infectious diseases in the dental office are
Hepatitis B
Hepatitis C
HIV
TB
Herpes virus
Infectious respiratory disease
Hepatitis B immunizations are a standard for all health care personnel including dental
personnel.
Universal Precautions state that you treat all patients as a potential source of disease.***

©2011 by Colorado School of Dental Assisting, Inc. Page 38
Chapter 6
Infection Control and Hazardous Materials:
OSHA protects the employee in the dental office. (occupational safety and health
administration)
Bloodborne Pathogen Standard and the Hazard Communication Standard protect employees
against hazards found in the workplace.
Universal precautions means that all patients are to be treated as though they have disease.
Hepatitis B vaccinations are usually required of all dental employees within 10 days of
employment.
Personal Protective Equipment
Protective clothing includes scrubs and lab coats and should be made of a fluid resistant material.
Protective masks are worn over the nose in either a dome shape or flat style and should be
changed with each patient.
Protective eye wear is worn to protect against aerosols and debris.
Face shields are worn with a mask and can replace traditional eye wear.
Examination gloves, usually made of latex are worn during patient care. Damaged gloves are
replaced immediately.
Overgloves are worn over gloves to prevent contamination from exam gloves.
Sterile surgical gloves are worn during surgery or periodontal therapy.
The order in which PPE is put on is clothing, eye wear, masks, and lastly gloves.
Medical Waste Management
Medical waste is termed contaminated waste.
Types of waste are:
General: paper towels, mixing pads
Hazardous waste: paste presenting a danger to individuals or to the environment.
Contaminated waste: waste that came into contact with blood.
Sharps: waste that can penetrate the skin and are kept in specific marked containers.
MSDS contain health and safety information about every product contained in the office.

©2011 by Colorado School of Dental Assisting, Inc. Page 39
Chapter 7
Surface barriers
Surface barriers are usually in the form of plastics that are used to cover hard surfaces.
These surface barriers include headrest covers, plastic films, and covers for bracket trays
and handpieces.
Disinfection
Disinfection is intended to kill disease producing microorganisms.
The term disinfection is used for chemicals that are applied to hard surfaces.
The hard surfaces include chairs, tubing, and counter tops.
Types of chemical disinfectants include:
Iodophores
Phenol compounds
Sodium hypochlorite (bleach)
Chlorine dioxide
Alcohol (not effective if there is bioburden)
Glutaraldehydes (most often used on instruments that are not disposable but
cannot tolerate heat sterilization. Used in cold sterile solutions).
Always follow instructions when mixing and applying disinfectants.
Waterline contamination
Biofilm accumulates in dental water units and tubing.
All waterlines need to be flushed after every procedure to insure against bacterial
contamination.
Biofilm in waterlines occur within the units and lines of high speed handpieces, air water
syringes, and ultrasonic scalers.
High Volume Evacuation
The proper placement of the HVE tip greatly reduces the amount of salivary aerosols and
splatter.
The HVE system should be cleaned at the end of the day by using a detergent type
disinfectant.
Impressions.
After removal from the patient’s mouth, the impression should be disinfected.
Classifications of instruments, equipment and surfaces
Critical instruments must be sterilized.
These are instruments that come into contact with tissues.
These instruments include surgical as well as other operative instruments and handpieces.
Semicritical instruments can be heat sterilized or disinfected by high level disinfection.
Non critical items can be cleansed with a low level disinfectant and come into contact
with skin only. Ie: chairs, countertops, hoses, etc.

©2011 by Colorado School of Dental Assisting, Inc. Page 40
Chapter 8
Sterilization Center
The sterilization center is divided into two areas: the contaminated area and the clean
area.
All soiled instruments are first brought into the contaminated area.
Next they are put into the ultrasonic cleaner for a minimum of 10 minutes.
They are then rinsed, dried and packed into sterilization pouches.
Instrument Processing
Ultrasonic cleaners loosen debris by cavitation.
In the cavitation process, bubbles too small to be seen, burst by implosion, and thus
facilitate loosening of debris.
Use only specific cleaning materials in the ultrasonic cleaner.
These solutions are disposed of daily.
This solution is highly contaminated and bare hands should never be exposed to it.
Sterilization
This is the process of destroying all forms of microbes (as opposed to disinfection).
Three methods of sterilization are autoclaving, chemical vapor sterilizers, and dry heat
sterilizers.
The three factors influencing sterilization are pressure, temperature, and time.
Forced air sterilizers, statims, can sterilize very quickly.
Packaging
All materials should be packaged to maintain sterilization.
Instruments can be bagged or placed in cassettes to keep instruments sterile once
removed.
These packages should have indicator tapes to marks to identify that it is sterilized.
Packages should not be opened until use.
©2011 by Colorado School of Dental Assisting, Inc. Page 41
Guidelines for Use of Examination Gloves
Wash hands before gloving – bacteria and other microbes like the warm moist
environment found inside gloves.
Do not wear jewelry under gloves – rings harbor pathogens and may tear the
gloves.
Wear a new pair of gloves for each patient – contaminated gloves can transmit
disease.
Discard gloves after a single use – gloves are not washed and reused.
Change gloves frequently – if the procedure is a long one, change the gloves
about once each hour.
If gloves are torn or damaged, change them immediately – a torn glove does not
provide protection.
Use overgloves as necessary – these make it possible to touch items, such as a
container of material, without contaminating it or your examination gloves.
Discard the overglove before returning to patient care – the overglove is
contaminated.
Wash hands again after removing gloves.
Use hand lotion to keep skin healthy – intact skin is an important protective
barrier.
©2011 by Colorado School of Dental Assisting, Inc. Page 42
Checklist for Closing Down Rooms
Disinfect rooms (this includes hand pieces, chairs, countertops, and equipment).
Turn off x-ray units and place unit in proper closed position.
Turn off master switch of unit.
Replace all barriers.
Return chairs to proper closed position.
Return operator chairs to proper position.
Place all bib chains and protective eyewear in the appropriate place.
Return all materials owned by the School into the cabinet.
Check to insure that all debris is picked up or vacuumed.
Turn off sterilizers.
Turn off master switch.
Put all of your ongoing laboratory projects and materials in proper
cabinets/shelves.
Please do not use gloves, masks, or other disposable materials from the host office.
©2011 by Colorado School of Dental Assisting, Inc. Page 43

©2011 by Colorado School of Dental Assisting, Inc. Page 44

©2011 by Colorado School of Dental Assisting, Inc. Page 45
WEEK 3 CHECKLIST: 4-Handed Dentistry, Oral Evacuation, Home Care and
Impressions
1. _____Watch Video on Alginate Impressions
2. _____Review Chapters 9 and 10 (pgs 145-148 only)
3. _____HW Chpt 9, pg. 144, exercises # 1-10
4. _____HW Chpt 10, pg. 161, exercises # 1, 4, 6, 7, 8, 9, 10 only.
5. _____Review Chpt. 22 p. 358 – 365
6. _____Review Chapter 17 pg. 278 – 285 only
7. _____HW Chpt 17 pg. 295 #1-9 only.
8. ____Observe Instructor takes impression and creates diagnostic casts
9. ____Select Impression trays Maxillary (upper) and Mandibular (lower) that fit
your mouth
10. ____Practice Procedures p. 365-375 #22-1 to #22-8
11. ____Complete Mix and pour up in stone
12. ____Complete Trim diagnostic casts
13. ____HW Chpt 22 exercises p. 376
14. ____HW Read for next week Chpts. 15 & 16
15. ____LAB practice 4-handed dentistry, do Procedure 9-2, 10-1, 10-2, 10-3
16. ____LAB *each student should take an impression on a partner and pour up
and hand-in to instructor (Models stay in office and will be used for restoration
procedures)
*workstation topic for several days

©2011 by Colorado School of Dental Assisting, Inc. Page 46
©2011 by Colorado School of Dental Assisting, Inc. Page 47
©2011 by Colorado School of Dental Assisting, Inc. Page 48

©2011 by Colorado School of Dental Assisting, Inc. Page 49

©2011 by Colorado School of Dental Assisting, Inc. Page 50
Lecture Notes
Chapter 9
Seating a patient.
Greet the patient in the reception area by name and escort them to the operatory.
Place all personal items in a safe and clean area.
Seat the patient in the dental chair which was left in the upright position.
Proper positioning of the dental assistant:
The assistant is seated with a straight back, and her/his eye level is 4-5 inches higher than the
operator.
The assistant is seated squarely on the seat surface with the abdominal bar adjusted to provide
back or abdominal support.
The assistant’s feet are placed on the platform at the base of the stool.
The assistant’s body is positioned facing toward the patient’s head with hips and thighs level to
the floor and parallel to the patient’s shoulders.
Instrument Transfer:
Instruments are transferred in the position of use, meaning that the working end of the
instrument is directed toward the tooth that is being treated.
The instrument is retrieved from the tray setup using the thumb, index and middle fingers
of the left hand.
The used instrument is retrieved at the end of the handle, or at the opposite end from the
working end, using the pinky and ring fingers.
When instruments are transferred, they are held so they are horizontal.
Ergonomics is the science that seeks to adapt working conditions to the physical comfort of
the worker.

©2011 by Colorado School of Dental Assisting, Inc. Page 51
Chapter 10
Oral Evacuation Methods:
Saliva ejectors are used to remove small amounts of saliva or water.
Patients can close their lips around the tip for more efficient removal of saliva or water.
The HVE is used to remove saliva, blood, water and debris.
The HVE tip is used to:
Keep the back of the mouth free of saliva, blood, water and debris.
Retract the tongue or cheek.
Reduce aerosols.
When assisting a right-handed dentist, hold the evacuator in the right hand.
The other hand is free to use the air-water syringe or to transfer instruments.
Keep the HVE tip near the area being worked on. Ie: to suction the maxilla, hold the tip
on the lingual surface of the tooth
being worked on.
Isolation Techniques
Cotton rolls
Dry-angles
Rubber or dental dam (coronal polishing is sometimes performed before dental dam
placement)
(See notes on Rubber Dam placement in Week 5).

©2011 by Colorado School of Dental Assisting, Inc. Page 52
Chapter 17
The two most common forms of dental disease are caries and periodontal disease.
Bacterial plaque
Plaque is a sticky, soft deposit of colonies of bacteria that adhere to teeth.
Plaque forms both above and below the gingival margin.
The bacteria found in plaque are the cause of dental decay and periodontal disease.
Dental calculus is mineralized plaque.
Dental caries occur when the bacteria in the plaque convert sugar in foods to acid.
Acids cause demineralization of the tooth.
Periodontal disease can range from gingivitis to extensive bone loss around the teeth or
periodontitis.
At least two brushings and flossing are recommended daily.
The longer the bacteria remains undisturbed, the more damaging the plaque.
Tooth brushing and flossing
Soft bristled brushes cause less damage to the soft tissues and exposed dentin and
cementum.
Many powered brushing, abrasion and recession can occur.
Disclosing agents identify areas of undisturbed plaque.
The Bass technique of brushing is most commonly accepted.
Place the tooth brush at a 45 degree angle to the tooth pressing lightly so that the tips of
the bristles go into the sulcus and
embrasures. On the occlusal surface,
move the brush back and forth or in
small circular strokes. On the
lingual surface, hold the brush in a
vertical position and use a gentle
back and forth stroke.
Brush the dorsal surface with the toothbrush or a tongue scraper.
Flossing is the most effective way for patients to remove plaque from the
interproximal surfaces.
Interdental aids are used to clean between the teeth (interproximally).
Fluoride is a naturally occurring mineral found in nature.
Systemic fluorides are consumed in water, food or supplements.
Topical fluorides are directly applied to the tooth in the form of rinses, gels and
toothpaste.
Longterm overexposure to fluoride can result in dental fluorosis.
Prescribed fluoride applications are given to the patient as a preventative dental
treatment.
Fluoride mouth rinses are the most effective when used after brushing and flossing.
Mouthrinses containing fluoride may be recommended as an additional source of topical
fluoride.

©2011 by Colorado School of Dental Assisting, Inc. Page 53
Brush-on fluoride gels are available with and without prescriptions for high risk patients.
Fluoride itself cannot remineralize a tooth, but it acts as a catalyst in the repair of
the tooth.
©2011 by Colorado School of Dental Assisting, Inc. Page 54
Chapter 22
Impressions
An impression is the imprint of the teeth and surrounding tissues.
They are used for diagnosis, making casts, fabricating temporary crowns, bleaching trays
and bite splints.
When an impression is poured up in stone or plaster, the model is called a cast.
Types of impressions are: preliminary and final impressions.
Alginate
Alginate is a hydrocolloid that comes in many forms, fast set and normal set.
It comes in the form of a powder that is measured with a scoop and a plastic water
measure.
Two scoops of powder are used for the lower impressions and three for the upper.
Always start with the mandibular arch to reduce gagging.
Influences on setting time:
Type of gypsum
Water to powder ratio
Mixing
Temperature of water
Humidity
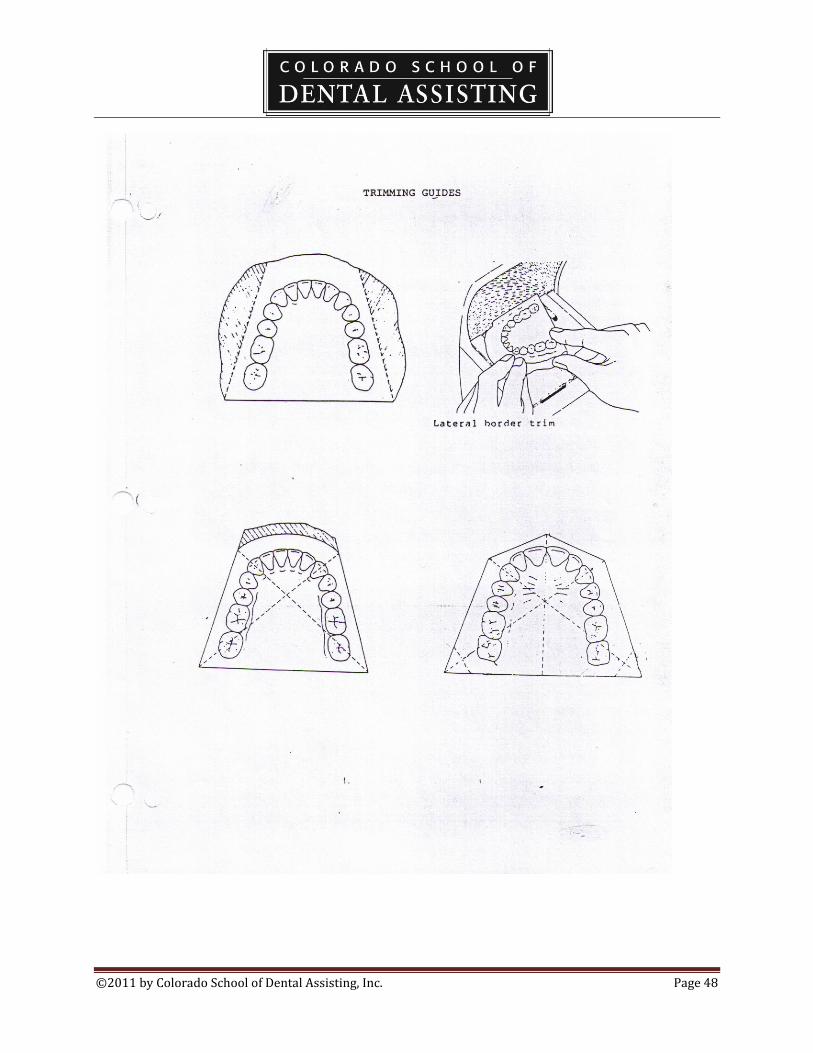
Trimming and finishing casts
Casts are trimmed on a model trimmer.
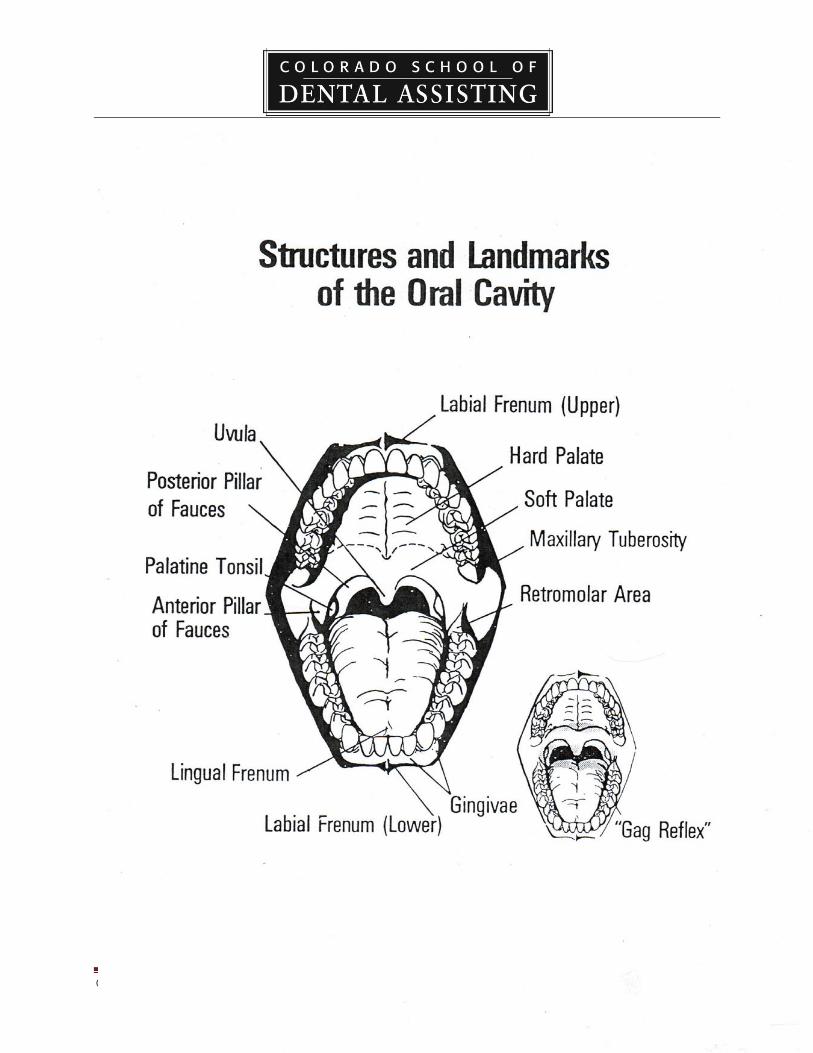
The anatomic portion includes the teeth, oral mucosa, palat, retromolar pad,
maxillary tuberosity and muscle
attachments.
The art portion forms the base. This section should be no more than ½ inch thick.

©2011 by Colorado School of Dental Assisting, Inc. Page 55
Final impressions
Elastomeric impression material has a rubber-like quality.
They are supplied as a base and catalyst and are self-curing.
The final impression materials come in three forms of viscosity: light, regular and heavy
body.
The light body is the thinnest and is expressed from a syringe around the tooth and into
the sulcus.
The regular body, which is thicker, is used as a tray material but has the ability to flow
more easily.
The heavy body, which is thickest, is used as a tray material, and has the ability to force
the light body material into close
contact with the tooth to ensure a
more accurate impression.
Types of final impression material:
Polysulfide,
polyether,
condensation silicone and
addition silicone.
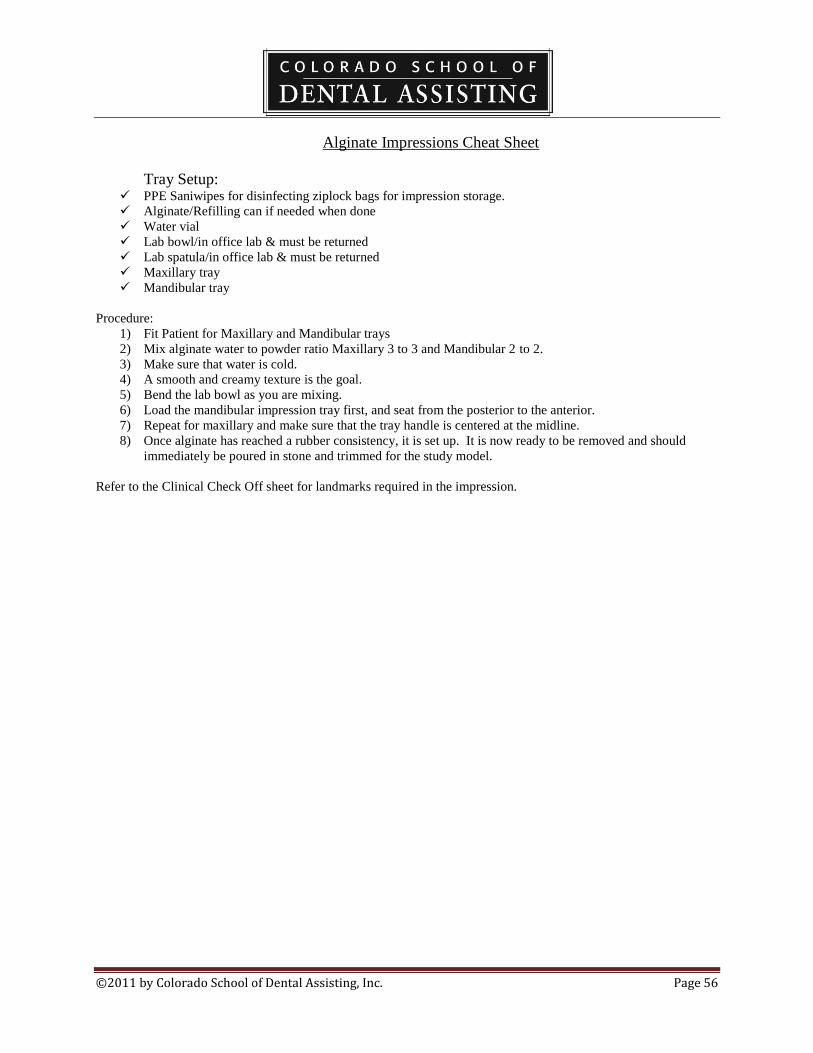
©2011 by Colorado School of Dental Assisting, Inc. Page 56
Alginate Impressions Cheat Sheet
Tray Setup: PPE Saniwipes for disinfecting ziplock bags for impression storage.
Alginate/Refilling can if needed when done
Water vial
Lab bowl/in office lab & must be returned
Lab spatula/in office lab & must be returned
Maxillary tray
Mandibular tray
Procedure:
1) Fit Patient for Maxillary and Mandibular trays
2) Mix alginate water to powder ratio Maxillary 3 to 3 and Mandibular 2 to 2.
3) Make sure that water is cold.
4) A smooth and creamy texture is the goal.
5) Bend the lab bowl as you are mixing.
6) Load the mandibular impression tray first, and seat from the posterior to the anterior.
7) Repeat for maxillary and make sure that the tray handle is centered at the midline.
8) Once alginate has reached a rubber consistency, it is set up. It is now ready to be removed and should
immediately be poured in stone and trimmed for the study model.
Refer to the Clinical Check Off sheet for landmarks required in the impression.

©2011 by Colorado School of Dental Assisting, Inc. Page 57
WEEK 4 CHECKLIST: Radiography Safety and Techniques
1. ______ Review Chapter15 p. 220-232
2. _______ HW Chpt 15 excercises pgs. 233
3. _______ Study Handout in class
4. _______Review Chpt. 16 p. 235-252
5. ______ HW Chpt. 16 exercises p. 276
6. ______ Practice Procedures #16-1, #16-2
7. ______ LAB Procedures #16-3, 16-4, 16-5, 16-7, 16-9, 16-10
8. ______LAB *Expose and mount full-mouth series on X-ray Manikin (see lab
grading criteria at beginning of this curriculum for list of required check-offs for X-
Ray lab)
9. ______LAB Practice 3-Minute timed full-mouth mounting
10. ______ HW Read for next week Chapters 10, 17, 18.
*Workstation activity for remainder of session
©2011 by Colorado School of Dental Assisting, Inc. Page 58
Lecture Notes
Chapter 15
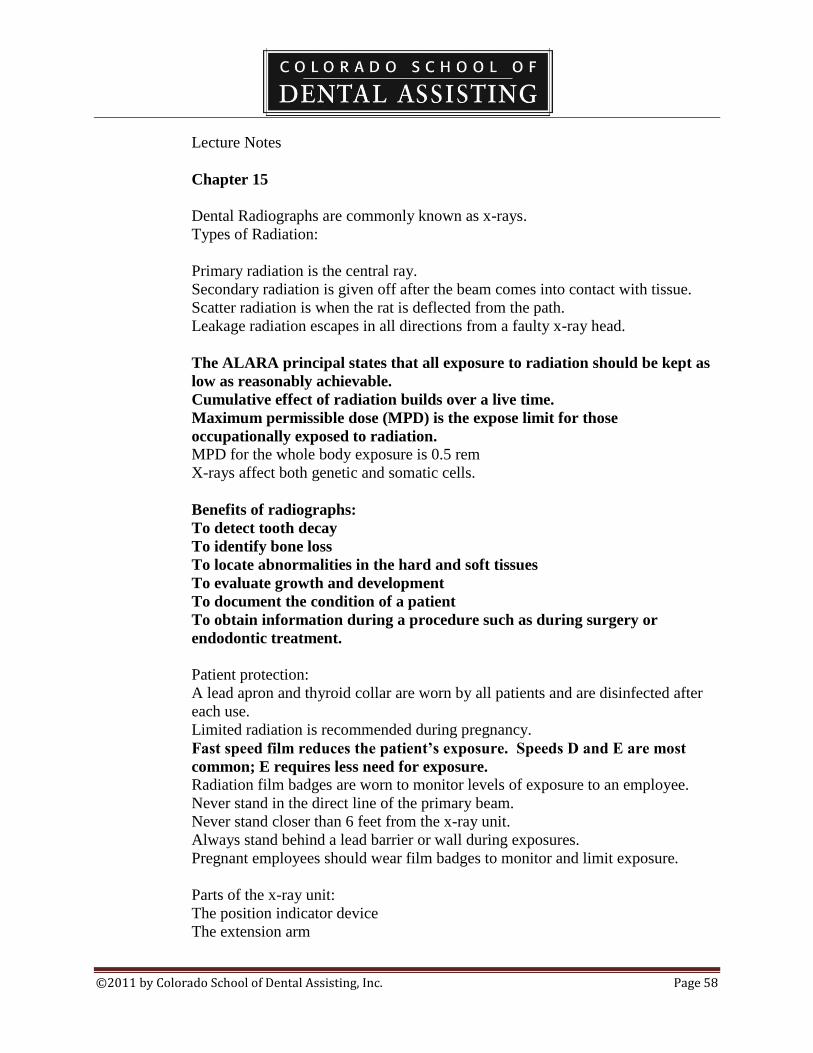
Dental Radiographs are commonly known as x-rays.
Types of Radiation:
Primary radiation is the central ray.
Secondary radiation is given off after the beam comes into contact with tissue.
Scatter radiation is when the rat is deflected from the path.
Leakage radiation escapes in all directions from a faulty x-ray head.
The ALARA principal states that all exposure to radiation should be kept as
low as reasonably achievable.
Cumulative effect of radiation builds over a live time.
Maximum permissible dose (MPD) is the expose limit for those
occupationally exposed to radiation.
MPD for the whole body exposure is 0.5 rem
X-rays affect both genetic and somatic cells.
Benefits of radiographs:
To detect tooth decay
To identify bone loss
To locate abnormalities in the hard and soft tissues
To evaluate growth and development
To document the condition of a patient
To obtain information during a procedure such as during surgery or
endodontic treatment.
Patient protection:
A lead apron and thyroid collar are worn by all patients and are disinfected after
each use.
Limited radiation is recommended during pregnancy.
Fast speed film reduces the patient’s exposure. Speeds D and E are most
common; E requires less need for exposure.
Radiation film badges are worn to monitor levels of exposure to an employee.
Never stand in the direct line of the primary beam.
Never stand closer than 6 feet from the x-ray unit.
Always stand behind a lead barrier or wall during exposures.
Pregnant employees should wear film badges to monitor and limit exposure.
Parts of the x-ray unit:
The position indicator device
The extension arm
©2011 by Colorado School of Dental Assisting, Inc. Page 59
The control panel
Image Characteristics:
Radiolucent structures appear dark or black and are areas of soft tissue.
Radiopaque structures are white and grey and are areas of density.
Contrast is the range of shades from black to white. The differences between the
shades of grey are called contrast.
Contrast is controlled by the kvp.
Density is the overall blackness or darkness of a film.
Density is controlled by the MA.
Factors that affect the density:
Amount of radiation
Distance from the tube to the patient
Processing
Patient thickness
Factors influencing image distortion:
Object-film distance
Source-film distance
Movement
Dental Radiographs should always be stored in the patient’s chart.
Digital x-rays are kept in the patient’s digital record.
Radiographs are duplicated for the purpose of sending films to insurance
agencies, a specialist, or to a general office of the patient’s choice.
Digital technology allows copies of dental radiographs to be sent electronically
rather than duplicated on film.
©2011 by Colorado School of Dental Assisting, Inc. Page 60
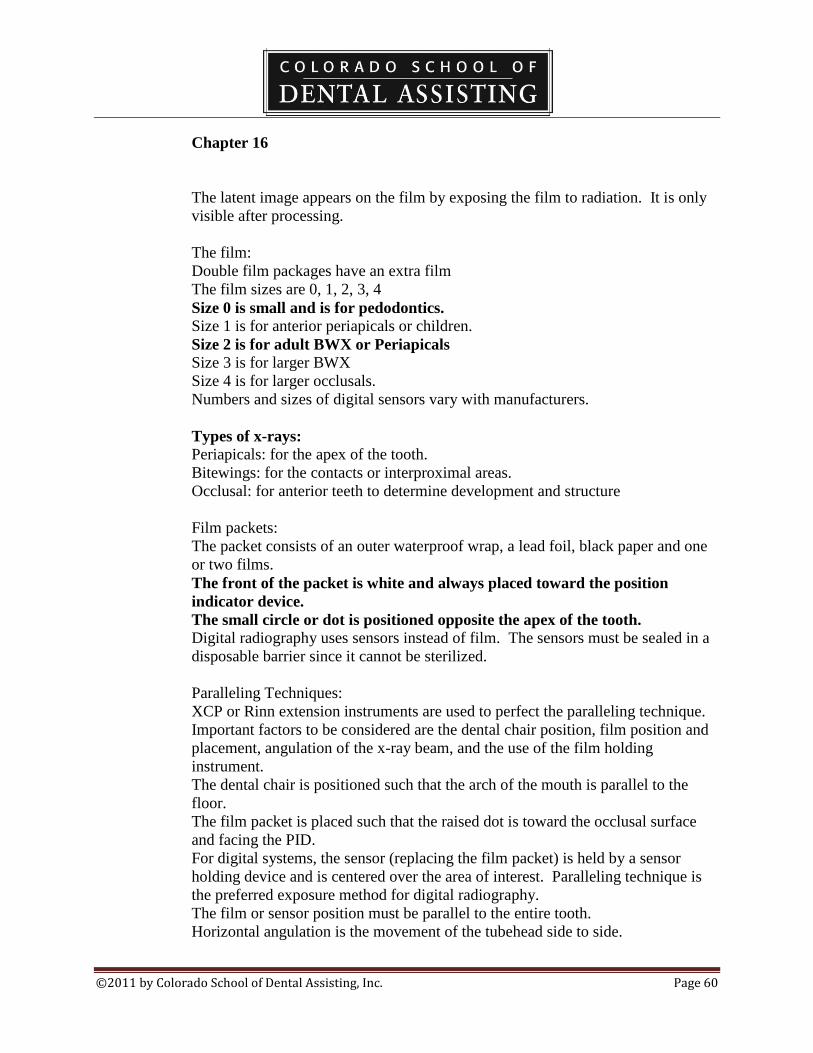
Chapter 16
The latent image appears on the film by exposing the film to radiation. It is only
visible after processing.
The film:
Double film packages have an extra film
The film sizes are 0, 1, 2, 3, 4
Size 0 is small and is for pedodontics.
Size 1 is for anterior periapicals or children.
Size 2 is for adult BWX or Periapicals
Size 3 is for larger BWX
Size 4 is for larger occlusals.
Numbers and sizes of digital sensors vary with manufacturers.
Types of x-rays:
Periapicals: for the apex of the tooth.
Bitewings: for the contacts or interproximal areas.
Occlusal: for anterior teeth to determine development and structure
Film packets:
The packet consists of an outer waterproof wrap, a lead foil, black paper and one
or two films.
The front of the packet is white and always placed toward the position
indicator device.
The small circle or dot is positioned opposite the apex of the tooth.
Digital radiography uses sensors instead of film. The sensors must be sealed in a
disposable barrier since it cannot be sterilized.
Paralleling Techniques:
XCP or Rinn extension instruments are used to perfect the paralleling technique.
Important factors to be considered are the dental chair position, film position and
placement, angulation of the x-ray beam, and the use of the film holding
instrument.
The dental chair is positioned such that the arch of the mouth is parallel to the
floor.
The film packet is placed such that the raised dot is toward the occlusal surface
and facing the PID.
For digital systems, the sensor (replacing the film packet) is held by a sensor
holding device and is centered over the area of interest. Paralleling technique is
the preferred exposure method for digital radiography.
The film or sensor position must be parallel to the entire tooth.
Horizontal angulation is the movement of the tubehead side to side.

©2011 by Colorado School of Dental Assisting, Inc. Page 61
Vertical angulation is the movement of the tubehead up and down.
The bisecting angle technique is not used often.
Care of dental films:
They should be stored so that they are protected from light, heat, moisture,
chemicals and scatter radiation.
Films that are exposed to scatter radiation will become foggy.
FMX
A full mouth series of x-rays includes films of: a molar shot, a bicuspid shot,
cuspid lateral shot and central incisors.
Avoid skipping around when taking a fmx to keep from missing a view or
doing a double exposure.
Most FMX consist of 18 films total.
BWX
This film is intended to view the interproximal surfaces of the posterior teeth.
Films are taken on each side: bicuspid and molar views totaling 4 bitewing
films.
Exposure of films:
A diagnostic quality radiograph is one that has had proper placement, exposure
and processing.
Only diagnostic quality radiographs are of use to the dentist.
Retakes require that the patient is subjected to additional radiation.
Processing dental film is a series of steps that change the latent image into a
visible image. This step is not necessary when using digital sensors.
Steps in processing radiographs
Developing
Rising
Fixing
Rinsing
Drying
Processing solutions are considered to be hazardous chemicals and are subject to
chemical labeling and disposal requirements.
Always wear your personal protection equipment when handling these chemicals.
Always follow the manufacturer’s instructions for the storage, mixing and other
instructions of care.
These solutions deteriorate with exposure to air, contamination and overuse.
Overused and old solutions cause the radiographs to become nondiagnostic.
Replenishing solutions are added to compensate for the loss of volume and
strength of the solution.
Darkroom

©2011 by Colorado School of Dental Assisting, Inc. Page 62
Darkrooms are designed to allow only safe light.
Dayloaders allow for only safe light without a specific darkroom.
Darkrooms are becoming increasingly less common with the advent of processors
and digital equipment.
Automatic Processors
Processors must be routinely cleaned.
The two most common causes of processor breakdown are failure to keep the
rollers clean and inadequate replenishment of chemicals.
Mounting radiographs
Radiographs are arranged in anatomic order in mounts.
Films are placed in the mount with the raised dot facing up.
When mounting, look for specific anatomical landmarks:
Smile line
Number of roots
Detect sinus areas
Lower arch is more dense
Match dental work
Know dental anatomy, ie: size of teeth
Reasons for maintaining duplicate x-rays
Sending to specialist
Sending to insurance companies
Sending to a new provider
Ownership
The dentist owns the radiographs even though payment was made.
Requests in writing allows a patient to transfer a copy of radiographs to a provider
or insurance company.

©2011 by Colorado School of Dental Assisting, Inc. Page 63
Radiography Terminology Handout
1. Define Radiolucent:
2. 3 things that appear radiolucent on x-rays
3. What are sizes of commonly-used films and their uses
4. Define Radiopaque:
5. Define Contrast
6. Define Density
7. Define ALARA
8. Define horizontal angulation
9. Define vertical angulation
10. What does MPD stand for?
©2011 by Colorado School of Dental Assisting, Inc. Page 64
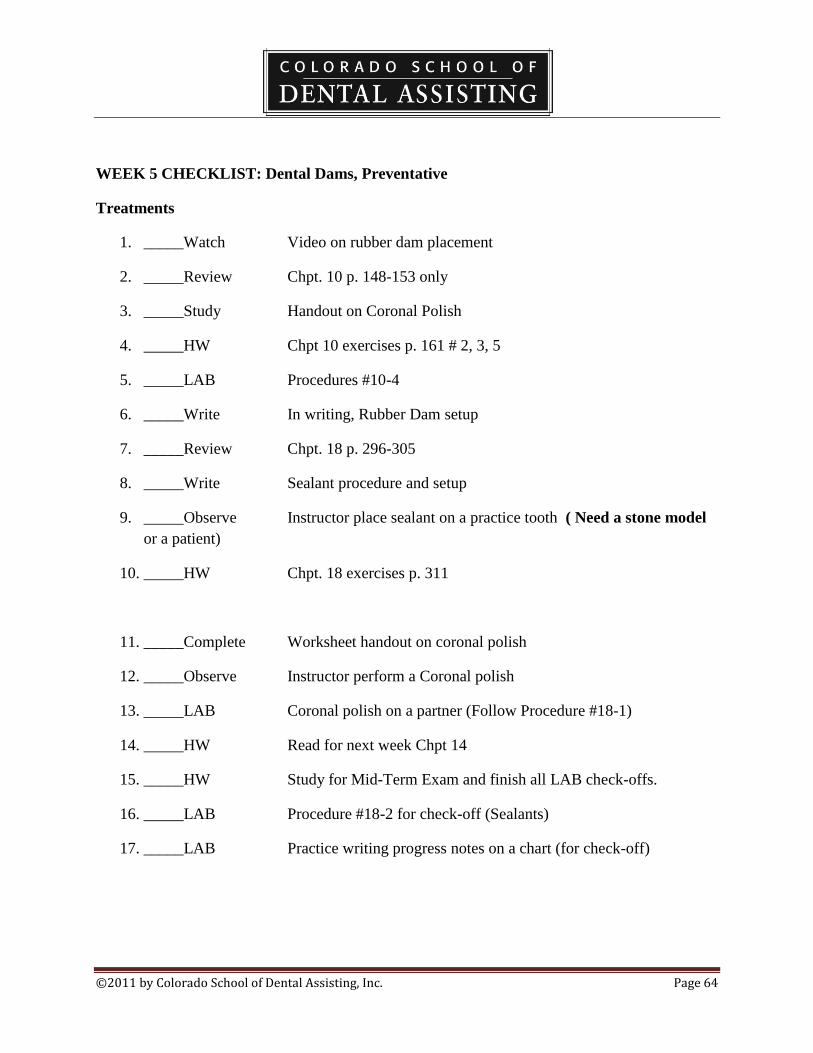
WEEK 5 CHECKLIST: Dental Dams, Preventative
Treatments
1. _____Watch Video on rubber dam placement
2. _____Review Chpt. 10 p. 148-153 only
3. _____Study Handout on Coronal Polish
4. _____HW Chpt 10 exercises p. 161 # 2, 3, 5
5. _____LAB Procedures #10-4
6. _____Write In writing, Rubber Dam setup
7. _____Review Chpt. 18 p. 296-305
8. _____Write Sealant procedure and setup
9. _____Observe Instructor place sealant on a practice tooth ( Need a stone model
or a patient)
10. _____HW Chpt. 18 exercises p. 311
11. _____Complete Worksheet handout on coronal polish
12. _____Observe Instructor perform a Coronal polish
13. _____LAB Coronal polish on a partner (Follow Procedure #18-1)
14. _____HW Read for next week Chpt 14
15. _____HW Study for Mid-Term Exam and finish all LAB check-offs.
16. _____LAB Procedure #18-2 for check-off (Sealants)
17. _____LAB Practice writing progress notes on a chart (for check-off)
©2011 by Colorado School of Dental Assisting, Inc. Page 65
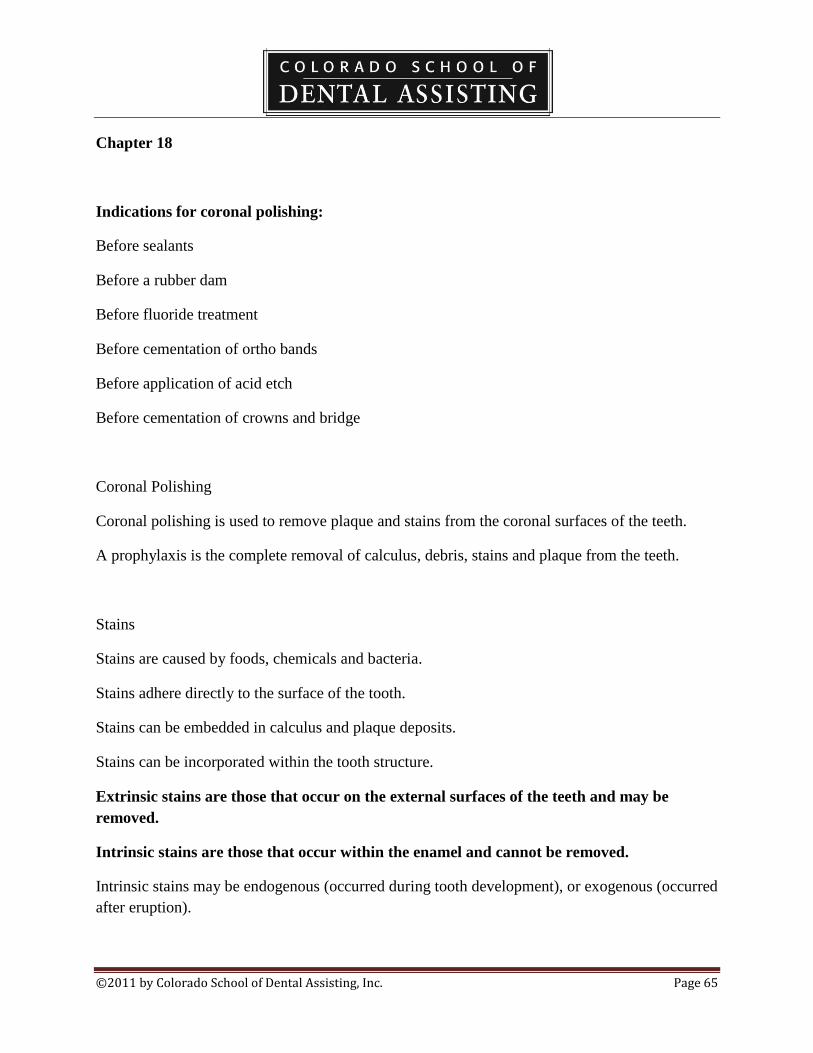
Chapter 18
Indications for coronal polishing:
Before sealants
Before a rubber dam
Before fluoride treatment
Before cementation of ortho bands
Before application of acid etch
Before cementation of crowns and bridge
Coronal Polishing
Coronal polishing is used to remove plaque and stains from the coronal surfaces of the teeth.
A prophylaxis is the complete removal of calculus, debris, stains and plaque from the teeth.
Stains
Stains are caused by foods, chemicals and bacteria.
Stains adhere directly to the surface of the tooth.
Stains can be embedded in calculus and plaque deposits.
Stains can be incorporated within the tooth structure.
Extrinsic stains are those that occur on the external surfaces of the teeth and may be
removed.
Intrinsic stains are those that occur within the enamel and cannot be removed.
Intrinsic stains may be endogenous (occurred during tooth development), or exogenous (occurred
after eruption).

©2011 by Colorado School of Dental Assisting, Inc. Page 66
Methods of removing plaque
Two methods of stain removal are: air-powder polishing and rubber cup polishing.
Air-powder techniques spray the teeth with a high-pressure water and baking soda.
Rubber cup polishing uses a rubber cup and polishing agent.
The fulcrum is used to stabilize the handpiece.
Abrasives are available in various grits.
Flossing is performed after a coronal polish.
Evaluation of polishing
A polishing is complete when there is no remaining disclosing agent on the tooth surface, the
teeth are glossy and there is no evidence of trauma.

©2011 by Colorado School of Dental Assisting, Inc. Page 67
Coronal Polish Worksheet
1. Define prophylaxis:
2. Define coronal polish:
3. For which procedures is a coronal polish indicated?
4. Define intrinsic stains:
5. Extrinsic stains may appear in different colors on the ___________________
surfaces of a tooth.

©2011 by Colorado School of Dental Assisting, Inc. Page 68
6. Which stains can be removed through polishing?
7. Which stains cannot be removed through polishing?
8. List the precautionary measures to keep in mind when performing a coronal
polishing procedure.
9. Which procedure should be performed after a coronal polish to remove debris and
grit between the teeth?
©2011 by Colorado School of Dental Assisting, Inc. Page 69
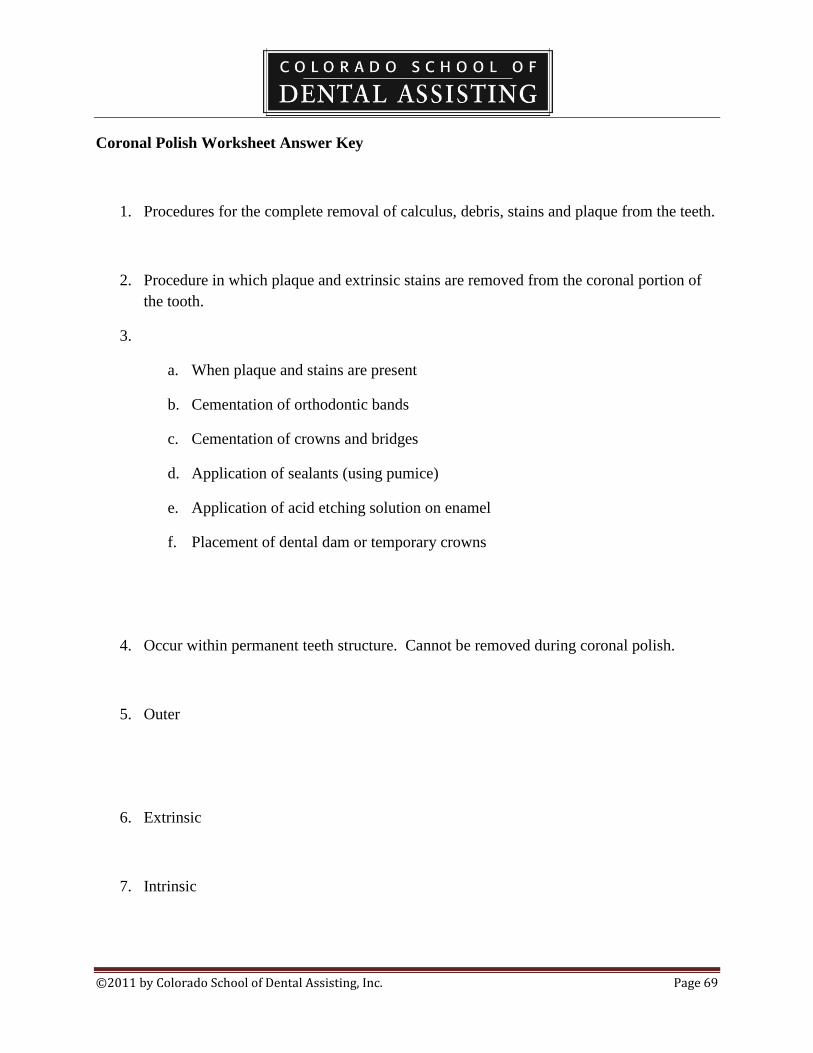
Coronal Polish Worksheet Answer Key
1. Procedures for the complete removal of calculus, debris, stains and plaque from the teeth.
2. Procedure in which plaque and extrinsic stains are removed from the coronal portion of
the tooth.
3.
a. When plaque and stains are present
b. Cementation of orthodontic bands
c. Cementation of crowns and bridges
d. Application of sealants (using pumice)
e. Application of acid etching solution on enamel
f. Placement of dental dam or temporary crowns
4. Occur within permanent teeth structure. Cannot be removed during coronal polish.
5. Outer
6. Extrinsic
7. Intrinsic

©2011 by Colorado School of Dental Assisting, Inc. Page 70
8.
a. Light pressure
b. Low speed
c. Solid finger rest/fulcrum
d. Use abrasive agent that will produce least abrasion
e. Feet flat on floor
f. Do not polish newly erupted teeth
g. Do not polish cementum
9. Rinse and evacuate
©2011 by Colorado School of Dental Assisting, Inc. Page 71
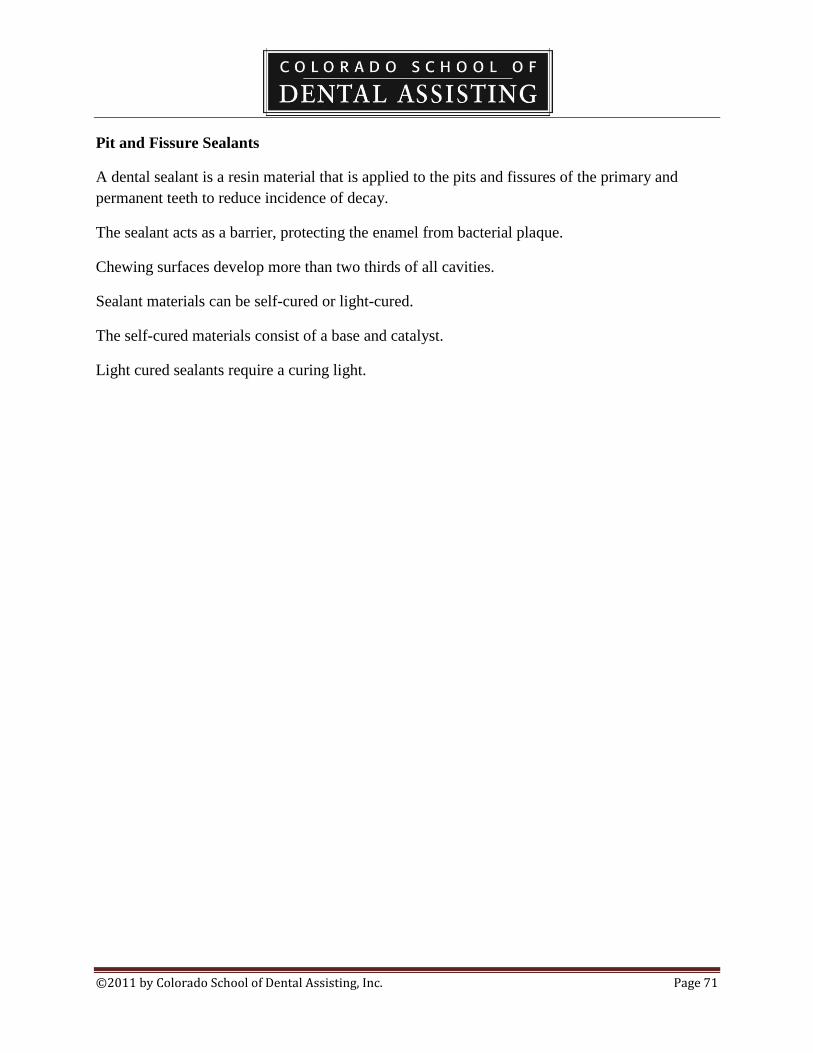
Pit and Fissure Sealants
A dental sealant is a resin material that is applied to the pits and fissures of the primary and
permanent teeth to reduce incidence of decay.
The sealant acts as a barrier, protecting the enamel from bacterial plaque.
Chewing surfaces develop more than two thirds of all cavities.
Sealant materials can be self-cured or light-cured.
The self-cured materials consist of a base and catalyst.
Light cured sealants require a curing light.
©2011 by Colorado School of Dental Assisting, Inc. Page 72
Guidelines for Placing Sealants (see Table 18-7) p. 304.
Maintain a dry tooth.
Polish with pumice.
Condition the tooth
Rinse dry for 20-30 seconds
Sealant placement
Cure (20 seconds)
Chapter 10 – Rubber Dams only
Indications for use of rubber dam:
Infection control
Reduces contact with debris
Prevents swallowing
Reduces tooth and oral cavity contamination
Improves moisture control
Improves access
Improves visibility
Parts of a Rubber Dam:
Rubber dam material
Lubricant (if necessary)
Rubber dam punch (ex. Size 1 holes mand ant, size 4 molars)
Rubber dam forcep
Rubber dam clamp

©2011 by Colorado School of Dental Assisting, Inc. Page 73
Setup for Coronal Polishing LAB
Tray
Tray cover
Gloves
Eyewear
Mask
Sani-Wipe
Disclosing Tablet
Prophy Paste ring
Floss (one strand)
4 pieces of 2x2 gauze
Saliva ejector
Air water syringe tip
Dixie cup of water and Listerine
Mouth mirror
Prophy angle (rubber cup polisher)
Straight nose cone
Fluoride tray (Blue mouth tray)
Fluoride Gel
Notes:
Put Saliva ejector in mouth with fluoride tray.
The tray stays in for 1 minute.

©2011 by Colorado School of Dental Assisting, Inc. Page 74
Instructions: do not eat or drink for 30 minutes. Patient can spit but no rinsing.
The straight nose cone is the attachment for the prophy angle.
The two un-raised dots on the straight nose cone should not apart to attach the prophy angle.
Lock it on by lining up the dots.
Must be locked before using.
The slit on the prophy angle goes on the raised dot on the straight nose cone.
Use the slow speed unit.
The foot pedal is the reastat.
Only push gently on the reastat.
Use a fulcrum (pinky) while polishing.
Entire process should take 10 – 15 minutes, and no more than 20.
©2011 by Colorado School of Dental Assisting, Inc. Page 75
WEEK 6 CHECKLIST: MID TERM, CHECK-OFFS, PAIN AND ANXIETY
CONTROL
1. _____Review Chapter 14
2. _____Demonstrate Loading and transfer of the syringe, applying topical
anesthetic
3. _____Review for Mid Term Answer questions and review topics covered up to this
point.
4. _____LAB Set up workstations for Radiology, Pain and Anxiety
Control, and any other workstation needed to complete assigned LAB work.
5. _____EXAM Mid-Term and Progress Report on Clinical Criteria Check-
Off
6. _____HW Complete exercises on pg. 218
7. _____HW Read chapters 19, 20, 21 for next week.

©2011 by Colorado School of Dental Assisting, Inc. Page 76
Chapter 14: Pain and Anxiety Control
Anesthetics
Topical anesthetic ointment can help in eliminating tissue discomfort and come in forms
of benzocaine.
Topical anesthetics need 2 to 5 minutes to take effect.
Spray anesthetic is used in larger areas to alleviate gagging.
Local anesthetics are classified as ambides and block the ability of the nerve membrane
to generate an impulse.
Induction is the time frame from when the injection is given until the numbing sensation
is gone.
Durations are short-acting, intermediate-acting and long-acting.
Vasoconstrictors are drugs added to local anesthetics causing blood vessels to
constrict thus increasing the duration of anesthesia and also decreasing bleeding.
The most common vasoconstrictors are epinephrine, levonordefin and norepinephrine.
Dentists use lidocaine and carbocaine as local anesthetics.
Certain medical conditions indicate the use of carbocaine over lidocaine, as
carbocaine contains no epinephrine.
Medical conditions to take note of:
Hypertension
Cardiovascular disease
Hyperthyroidism
Liver disease
Kidney disease
Pregnancy
Methods of anesthesia
Infiltration anesthesia involves injecting the anesthetic solution into the tissues near the
apex of the tooth.
Block anesthesia involves injecting the anesthetic into a larger nerve.
A mandibular block anesthetizes a lower quadrant.
Transfer of the anesthetic syringe takes place in the transfer zone, behind the
patient’s head.
Local anesthetic setups
The type of anesthetic to be used
The length and needle gauge
For the mandibular block, injecting into the inferior alveolar nerve, a long gauge needle is
used.
Local anesthetic cautions
A recapping device allows the dentist to recap without touching the needle.
In a single handed scoop technique the needle is slid into its cover.
Used needles are always disposed of in a sharps container.

©2011 by Colorado School of Dental Assisting, Inc. Page 77
Nitrous oxide analgesia
Nitrous oxide analgesia acts primarily as a sedative to help eliminate fear.
The baseline is the ratio of nitrous oxide to oxygen that is most effective for each patient.
At the baseline the patient is conscious and cooperative, but also relaxed.
After using nitrous oxide, the patient needs time to oxygenate after the analgesia.
Assistants who are pregnant should not be exposed to nitrous oxide.
Most commonly used drug for anxiety is valium.
Contraindications to nitrous oxide.
Pregnancy
Communication difficulty
Nasal obstructions
Emphysema
Multiple sclerosis
Emotional instability
Prescriptions
Only the dentist can prescribe medications.
Brand names are drugs that have a registered trademark and are always capitalized.
Generic drugs are not capitalized.
Parts of the syringe:
Thumb ring
Finger grip
Finger bar
Barrel of the syringe
Piston rod
Harpoon
Threaded tip

©2011 by Colorado School of Dental Assisting, Inc. Page 78
WEEK 7 CHECKLIST: Restorative Dentistry
1. _____Review Chpt.20, p. 330-335
2. _____Review Chpt. 19 p. 314-328
3. _____HW Chpt 19 exercises p. 329
4. _____Watch Video on Amalgam Restorations
5. _____Review Chpt. 21 p. 346-351
6. _____Study Amalgam and Composite tray setup
7. _____Write Describe an amalgam and composite tray setup in writing
8. _____HW Chpt 21 exercises, p. 357
9. _____Observe Restorations and placement of matrix band on a molar
10. _____Practice Placement of matrix band on molar
11. _____Complete Mock walk-through of restorative procedure with instruments
needed.
12. _____Practice Procedures #21-2 and #21-3 on models with instructor
13. ____Practice Instrument setups for composite and amalgam restorations
14. ____Practice ID materials and instruments for restorative procedures
15. ____HW Read for next week Chpt. 23
16. ____HW Chpt. 20 exercises p. 345 #1-10
17. ____LAB Practice maintenance of high-speed handpieces (cleaning and
lubricating)
18. ____LAB Practice Procedures #20-7 to #20-11
19. ____LAB Placement of matrix band on molar

©2011 by Colorado School of Dental Assisting, Inc. Page 79
20. ____LAB Procedures 21-2 and 21-3 for check-off
21. ____LAB Make a custom bleaching tray for yourself and trim

©2011 by Colorado School of Dental Assisting, Inc. Page 80
©2011 by Colorado School of Dental Assisting, Inc. Page 81
Chapter 19
Hand Instruments
Hand instruments are so named because they are held and manipulated by hand.
Examination instruments allow the dentist to complete an oral exam.
Tooth preparation instruments allow the dentist to manually remove decay and smooth, finish
and prepare tooth structure.
Restorative instruments allow the dentist to place, condense, and carve dental materials.
Accessory instruments are added to a setup for a number of reasons.
Hand instruments are classified according to setups for procedures. Ex; crown and bridge,
temporaries…
Prior to the procedure:
Sterilize instruments (they should already be sterilized from previous day)
Check for a complete set up
Place instruments in order of use
Assemble instruments and accessory items for tray setup
During the procedure:
Keep instruments in order of use
Transfer instruments using proper transfer technique
Wipe off instruments after use
Disassemble instruments and accessory items.
After procedure:
Discard sharps
Carefully place instruments in a holding or ultrasonic system.
Rotary instruments
Rotary instruments include dental handpieces, polishing tips, burs, discs and stones.
Most commonly used handpieces are the low-speed handpieces and the high-speed handpieces.
Low-speed handpieces are often referred to as the straight handpiece.
The low-speed or slow-speed (used interchangeably) is used for finishing, polishing and
contouring procedures.
The low-speed can also be used for removal of decay and fine finishing of the cavity preparation.
The low-speed is also used for procedures completed outside the mouth, such as denture
adjustments and preps of temp crowns.
Two most common attachments of the slow-speed handpiece are the contra-angle and the
prophy-angle.
Contra-angles are available in both latch type and friction grip.
High-Speed handpieces:
The bulk of tooth structure removal or preparation is done using the high speed handpiece.
Usually, in operative, the high-speed is used first.
©2011 by Colorado School of Dental Assisting, Inc. Page 82
To protect the tooth against heat, the high-speed handpieces are equipped with water spray
devices.
Fiberoptic handpieces deliver light to areas of work.
Other handpieces:
Laboratory handpieces are used to work outside of the oral cavity.
Ultrasonic handpieces are used to debride (removal of debris) the mouth.
Laser handpieces use a laser light instead of rotary instruments.
Air abrasion handpieces use microscopic abrasive particle (like sand) to remove or roughen
(etch) tooth structure.
Handpiece Maintenance
Most problems with dental handpieces result from improper cleaning and lubricating. Carefully follow the manufacturer’s instructions and schedule for handpiece maintenance and
during sterilization procedures.
Handpiece Sterilization
The handpiece is a critical instrument and must be sterilized.
Before the handpiece is removed from the dental unit, it should be run into the HVE for 20-30
seconds to discharge water and air.
Bioburden should be wiped off prior to sterilization.
Dental Burs
Many types and shapes of dental burs are available.
There are usually two ways of removing dental burs from the high-speed handpiece.
Burs must be sterilized before reuse.
Burs that become dull or worn (per doctor’s indication) are discarded in the sharps container.
To minimize handling of contaminated burs, they should be placed in a bur block prior to
cleaning.
Burs are made from strong, durable carbide materials.
Diamond burs or stones have bits of diamonds incorporated into the working surface and
cut the fastest.
Indications for using diamond burs:
Round end taper removes tooth structure and makes mechanical retention grooves. (prep for
fillings)
Flat end tapers are for crown preparation.
Cylinder burs smooth and finish walls in tooth preparation.
Flame shaped burs make bevels in crown preparations.
Round provide access to pulp chambers in endo and to adjust and shape occlusal surfaces.
Wheel shaped burs are for anterior crown preparations and can also be used to adjust and shape
occlusal surfaces.
Trimming and finishing burs:
©2011 by Colorado School of Dental Assisting, Inc. Page 83
These burs are similar to carbide burs, but the blades are much sharper and closer together.
They are used to finish composite restorations.

©2011 by Colorado School of Dental Assisting, Inc. Page 84
Chapter 20
Restorative Materials
The term restorative means to replace or bring something back to its natural appearance and
function.
Types of restorative materials are amalgams, composite resins, and cements.
Properties of dental materials: mechanical, thermal, electrical, corrosive, solubility, application.
Amalgam
Amalgam, also referred to as an alloy, is a mixture of two or more metals.
Metals in a dental amalgam are silver, tin, copper and mercury.
Amalgam is supplied in single use capsules.
The capsules are physically activated by mixing the capsule together with a triturator.
To triturate the alloys for a proper mix, an amalgamator is used (triturator).
Composite
Composite resin materials are tooth colored filling materials.
They match the color of the tooth and are bonded directly to the tooth.
Composite resins are in a paste form and are supplied using syringes.
Once the application is complete, the material is then polymerized or hardened using a curing
light.
The time of cure is dependent upon the thickness and size of the restoration and the shade of the
resin.
Temporary (Provisional) Restorations
A temporary restoration is a short term restoration that may stay in place for a few days to a few
months.
They are placed to keep the tooth in a healthy holding pattern until the permanent restoration is
placed.
IRM is the most common material for temporaries.
Etching Systems
Acid etching is a technique applied before the use of many permanent restorative materials.
Some dental materials have a better retention if the enamel is etched (roughened).
The acid etch is phosphoric acid or maleic acid.
Bonding Systems
In a bonding system a liquid material flows onto the etched surface of a tooth, creating a
micromechanical retention.
This self-cured or light-cured material improves the adherence between the tooth and the
permanent restoration.
Enamel bonding allows the placement of sealants, orthodontic brackets, resin bonded bridges,
and bonded veneers.
Resin is bonded to the enamel and to the dentin. The bonding to the enamel is much stronger
than to the dentin.

©2011 by Colorado School of Dental Assisting, Inc. Page 85
Cavity Liners
Cavity liners are made from a dental material that is placed in a thin layer as a lining between the
tooth and the permanent dental material.
3 common types of liners:
1. Dentin sealant which is designed to seal the dentin surface of the tooth and to act
as a desensitizer.
2. Calcium hydroxide helps protect the pulp and has the ability to stimulate
reparation.
3. Cavity varnish seals dentinal tubules.
Dental Cements
A luting agent is used to cement the casting of the tooth. This material needs to be fluid so
that it can be applied in thin coats.
A temporary cement is chosen to hold two things together for a short time. It is slightly thicker.’
A base is placed on the pulpal floor prior to the placement of the permanent restoration and acts
to sooth the pulp. It has the consistency of putty.
Types of Cements
Glass ionomer cements are luting materials for metal and ceramic restorations.

©2011 by Colorado School of Dental Assisting, Inc. Page 86
Chapter 21
Tooth Preparation
The objective of dentistry is to restore a tooth to its normal function and appearance.
The first step in the process is tooth preparation.
The purpose of cavity preparation is to remove the decay and a small amount of healthy tooth
structure in order to provide retention for a restorative material.
High and slow speed handpieces, a variety of burs, and hand instruments are used to accomplish
this step.
Matrix
A matrix is a metal or plastic band used to replace the missing proximal surface of a tooth during
placement of the restorative material.
A matrix and wedge are necessary to create the proper anatomic contour of a restoration.
The Tofflemire retainer and matrix band is used when placing posterior restorations.
Clear plastic matrices are used for anterior composite restorations.
Tofflemire matrix bands are made of stainless steel and are available in molar, bicuspid and
universal sizes and thicknesses.
Before assembling the band and the retainer, you must contour the band for use.
A clear plastic strip is used in the placement of composite resin or glass ionomer restorations.
The strip is placed between the teeth prior to the etching and placement of the restorative
material. The strip is pulled tightly around the tooth to adapt the composite to the contour of the
tooth.
The matrix is held in place by hand or with a retainer clip until the composite has been cured.
Wedges
Wedges are used for all interproximal restorations.
A triangular shaped wedge made of plastic or wood is placed into the embrasure to hold the
matrix band firmly against the gingival margins of the preparation.
Cotton pliers are commonly used to firmly place the wedge into the embrasure.
Wedges are also used the separate teeth slightly when necessary during restorative procedures.
Crown forms
A crown form is a thin, clear plastic tooth shaped crown that fits directly over the prepared tooth.
It helps to form a proper contour of anterior teeth and incisal edges.
After the composite material has been cured, the crown form is cut away and discarded.
Retentive pin restorations
Retention pins provide internal strength to restorations.
These pins are available in a variety of sizes.
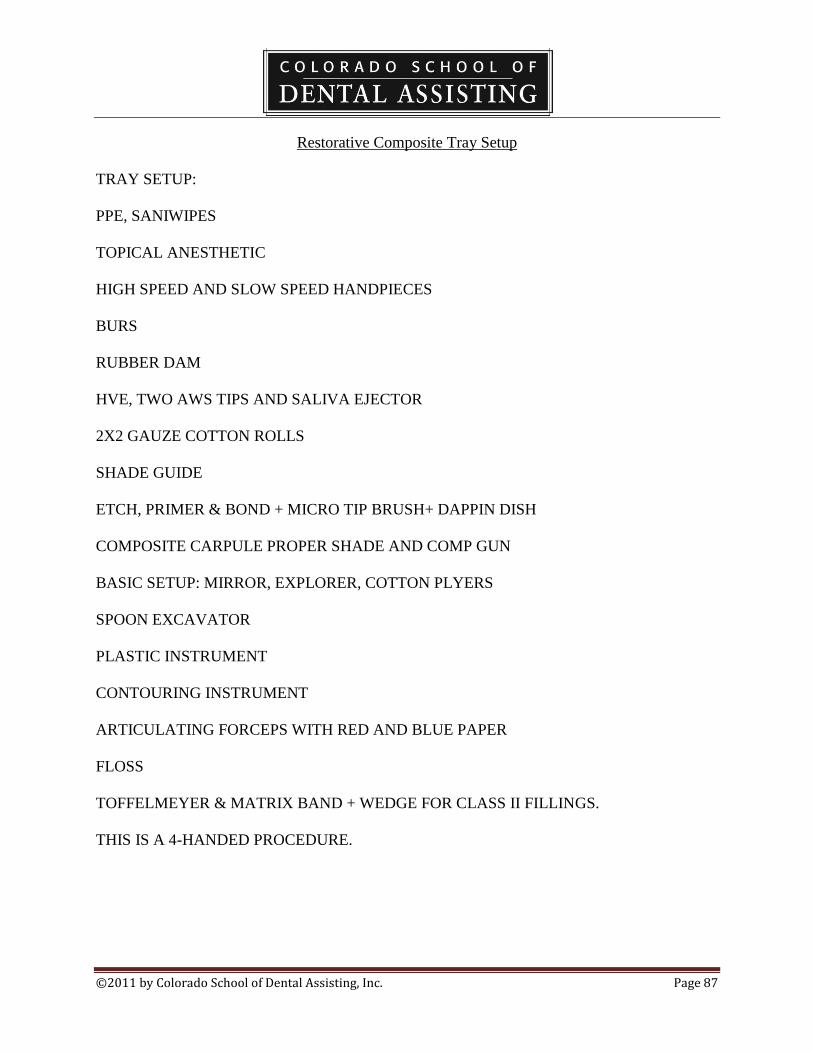
©2011 by Colorado School of Dental Assisting, Inc. Page 87
Restorative Composite Tray Setup
TRAY SETUP:
PPE, SANIWIPES
TOPICAL ANESTHETIC
HIGH SPEED AND SLOW SPEED HANDPIECES
BURS
RUBBER DAM
HVE, TWO AWS TIPS AND SALIVA EJECTOR
2X2 GAUZE COTTON ROLLS
SHADE GUIDE
ETCH, PRIMER & BOND + MICRO TIP BRUSH+ DAPPIN DISH
COMPOSITE CARPULE PROPER SHADE AND COMP GUN
BASIC SETUP: MIRROR, EXPLORER, COTTON PLYERS
SPOON EXCAVATOR
PLASTIC INSTRUMENT
CONTOURING INSTRUMENT
ARTICULATING FORCEPS WITH RED AND BLUE PAPER
FLOSS
TOFFELMEYER & MATRIX BAND + WEDGE FOR CLASS II FILLINGS.
THIS IS A 4-HANDED PROCEDURE.

©2011 by Colorado School of Dental Assisting, Inc. Page 88
RESTORATIVE AMALGAM SETUP
TRAY SET UP: PPE, SANIWIPES
TOPICAL
HIGH SPEED AND SLOW SPEED HAND PIECES
BURS
HVE, AWS TIPS, SALIVA EJECTOR
RUBBER DAM
2X2 GAUZE, COTTON ROLLS
FLOSS
AMALGAM CAPUSULES READY TO BE TRITURATED BEFORE USE
AMALGAM WELL
AMALGAM CARRIER
CONDENSOR
BALL BURNISHER, ACORN BURNISHER
HOLLENBACK/INTERPROXIMAL CARVER
CLEOID DISKLOID/OCCLUSAL CARVER
SPOON EXCAVATOR
TOFFLEMEYER MATRIX BAND AND WEDGE FOR CLASS II FILLINGS.
THIS IS A 4-HANDED PROCEDURE.
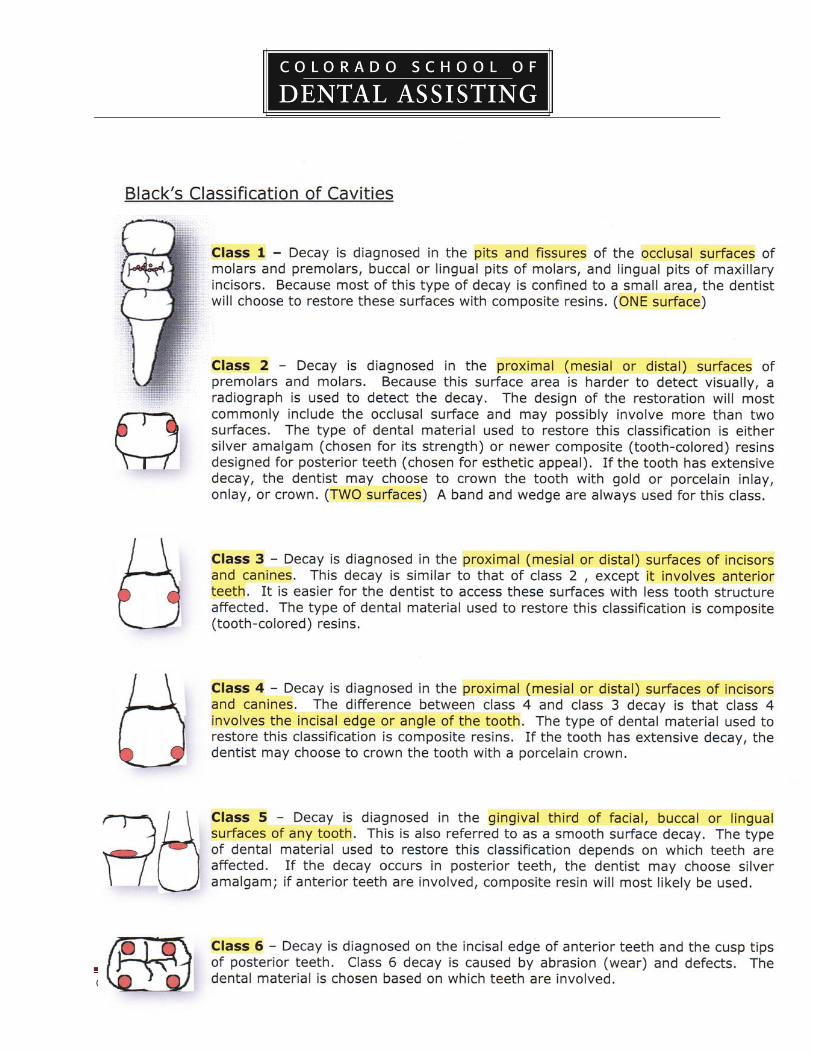
©2011 by Colorado School of Dental Assisting, Inc. Page 89

©2011 by Colorado School of Dental Assisting, Inc. Page 90
WEEK 8 CHECKLIST: Restorative (Provisional Coverage)
1. _____Watch Video on Simple Temporary Restorations
2. _____Review Chpt. 23 p. 377-390
3. _____HW Chpt. 23 exercises p. 398
4. _____Observe Instructor will demonstrate fabrication of a temporary crown
5. _____Practice Temporary crowns
6. _____Complete Take a shade on tooth #7 on two students. Record students’ names
and shades
7. _____Study Prescription abbreviations
8. ____Write List crown preparations and crown seat tray setups
9. _____LAB *Practice temporaries on models (Follow Procedure 23-3 for
check-off)
10. _____LAB Instrument setups for crown prep and seat
11. _____LAB Ongoing other workstations ie: re-taking x-rays
12. ____Practice Lab slips for two crowns (PFM and FPC) and a 3-unit bridge
13. ____LAB Practice writing progress notes
14. ____HW Read for next week Chapters 24, 26, 27
©2011 by Colorado School of Dental Assisting, Inc. Page 91
Chapter 23
Provisional Coverages
Also known as temporary coverage, it is a protective covering placed after the tooth has
been prepared and the final impression has been taken.
They are worn until the final coverage is cemented in.
The goals when placing provisional coverage are:
i. Reduce sensitivity
ii. Maintain function and aesthetics of the tooth.
iii. Protect the margins of the preparation.
iv. Prevent shifting of the adjacent or opposing teeth.
The type of provisional crown will be chosen based on aesthetic reasons.
Articulating paper is used to check the occlusion of the provisional crown so that excessive
sensitivity does not occur.
Adjustment is made either outside the mouth or inside the mouth by the dentist or EDDA/EFDA
(depending on state regulations.)
The Types of Provisional Coverages
i. Preformed aluminum crowns (not used for anterior crowns)
ii. Preformed acrylic crowns
iii. Custom acrylic temporaries made of tooth colored acrylic resin. (this is what we
teach)
When an aluminum provisional crown is tried in the mouth, but not used, it should be
sterilized.
Stainless steel prefab crowns are used for children.
Patient Care
Patient care of the provisional coverage includes complete, but gentle brushing, and
flossing but not pulled up, rather pulled through the contact.
Patients should also be advised to not chew sticky foods that would dislodge the temporary.
The Lab Prescription
The lab tech can fabricate a restoration only with the written prescription from the dentist.
A copy of the script of the work order is stored in the patient’s chart.
The script contains information
i. concerning the dentist: name, license number, address, telephone number and
signature.
ii. identification of the patient’s name and or case number,
iii. the type of prosthetic requested,
iv. type of alloy or other materials to be used,
v. the exact shade
vi. the date when the case is expected back into the practice.
The laboratory requires a specific number of working days to complete the restoration and
appointment time should be scheduled accordingly.
©2011 by Colorado School of Dental Assisting, Inc. Page 92
Crown and Bridge
The steps for crown preps and bridge preps are basically the same.
There are usually three types of crown and bridge restorations: full gold, porcelain-fused-to-
metal and all porcelain.
The steps involved in these treatments are basically the same:
i. The tooth is prepped
ii. Impressions are taken
iii. Impressions are sent to the lab with a written prescription
iv. A temporary restoration is made and cemented in with temp cement
v. The final restoration is returned from the lab,
vi. And finally the crown or bridge is cemented into place using permanent cement.
(Before the patient arrives for the last appointment, the dental assistant needs to
verify that the prosthetic has arrived back from the lab and is in the office).
The crown appointment:
The tooth is anesthetized.
If a porcelain restoration is to be done, a shade needs to be chosen.
Alginate impressions are taken prior to the preparation and used to make a temporary.
The tooth is prepared using a high speed handpiece and diamond burs.
When the preparation is complete, gingival retraction cord soaked in hemodent is placed into the
sulcus using a packing cord instrument.
After sufficient time, the cord is removed and the area is rinsed, dried and is isolated for the final
impressions and occlusal registration.
After the final impression and bite registration are taken, a temporary crown is made in order to
protect the prepared tooth.
After the temp is made, it is dried cemented using a temporary cement.
Final Impressions
Light body, heavy body and medium body.
Heavy is placed in the tray first.
The light body is placed using a syringe into the sulcus and around the tooth.
Steps for making the temporary crown
The preliminary impression is used to fabricate the temporary.
The temporary acrylic material is mixed and will appear dough-like (or a premixed material
could be used)
Using a spatula, place the acrylic into the prepared tooth area.
Place a coat of Vaseline over the area to be covered with acrylic.
Place the impression back in the patient’s mouth and allow it to set for approx 3 minutes.
Remove the temp from the impression.
Once the temp is completely set, use the acrylic burs and a slow speed to trim the temp to within
1mm of the gingival margin of the prepared tooth.
The temp is then cleaned, dried and is ready to be cemented in.
©2011 by Colorado School of Dental Assisting, Inc. Page 93
Dental Cements
A luting agent is used to cement the casting to a tooth. This material needs to be fluid so that it
can be applied in thin coats.
Liquid to powder ratio depends on the intended use.
A temporary cement holds two things together for a short period of time. It is slightly thicker
than permanent.
Types are:
Durelon (a polycarboxylate cement)
Glass ionomer cements like Ketac are luting materials for metal and ceramic restorations.
Glass ionomer releases fluoride.
Moisture does not prevent the use of ionomers.
Temp Bond is a brand of temporary cement.
Cavity liners
Cavity liners are placed in a thin layer as lining between the tooth and the permanent dental
material.
Calcium hydroxide, dycal helps protect the pulp and had the ability to stimulate reparative
dentin.
Liners can be used under all restorative materials and comes in many forms.
Bases
A base is placed on the pulpal floor prior to the placement of permanent restoration, and acts to
sooth the pulp.
It has the consistency of putty.
IRM is zinc oxide and eugenol.
Eugenol soothes the pulp and is made from the oil of cloves. The oil in IRM may interfere with the curing of composites.
©2011 by Colorado School of Dental Assisting, Inc. Page 94
©2011 by Colorado School of Dental Assisting, Inc. Page 95
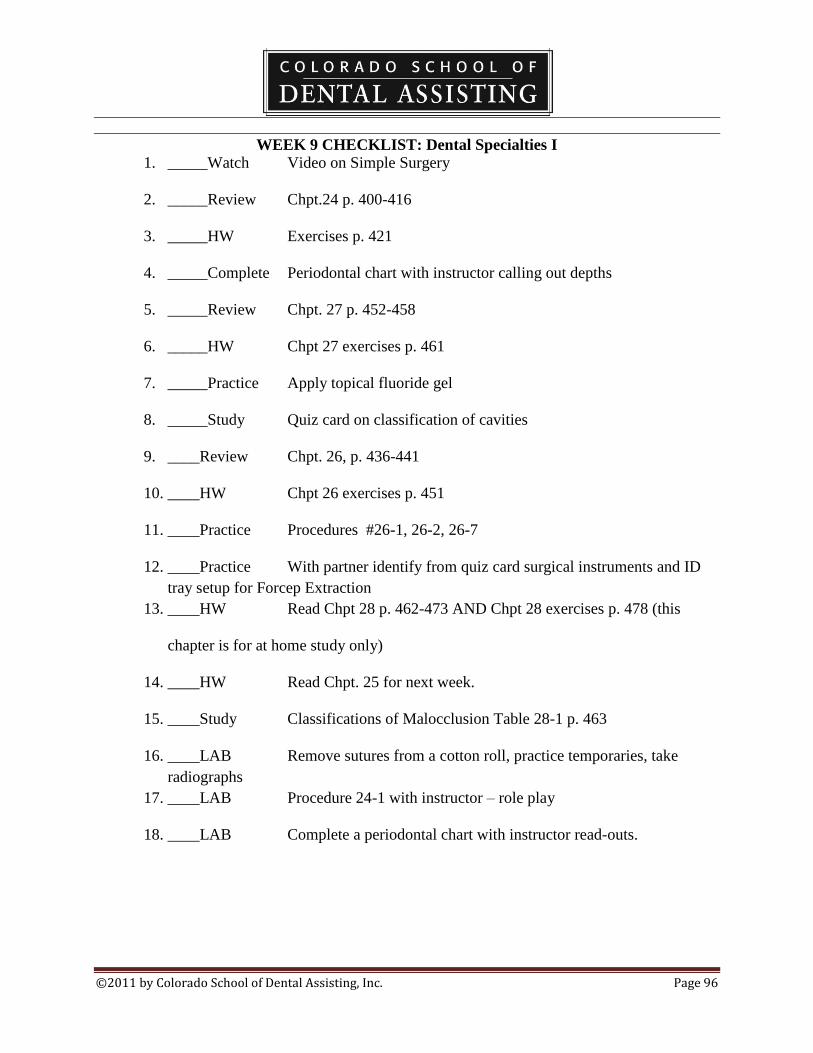
©2011 by Colorado School of Dental Assisting, Inc. Page 96
WEEK 9 CHECKLIST: Dental Specialties I
1. _____Watch Video on Simple Surgery
2. _____Review Chpt.24 p. 400-416
3. _____HW Exercises p. 421
4. _____Complete Periodontal chart with instructor calling out depths
5. _____Review Chpt. 27 p. 452-458
6. _____HW Chpt 27 exercises p. 461
7. _____Practice Apply topical fluoride gel
8. _____Study Quiz card on classification of cavities
9. ____Review Chpt. 26, p. 436-441
10. ____HW Chpt 26 exercises p. 451
11. ____Practice Procedures #26-1, 26-2, 26-7
12. ____Practice With partner identify from quiz card surgical instruments and ID
tray setup for Forcep Extraction
13. ____HW Read Chpt 28 p. 462-473 AND Chpt 28 exercises p. 478 (this
chapter is for at home study only)
14. ____HW Read Chpt. 25 for next week.
15. ____Study Classifications of Malocclusion Table 28-1 p. 463
16. ____LAB Remove sutures from a cotton roll, practice temporaries, take
radiographs
17. ____LAB Procedure 24-1 with instructor – role play
18. ____LAB Complete a periodontal chart with instructor read-outs.
©2011 by Colorado School of Dental Assisting, Inc. Page 97
Chapter 24: Periodontics
Periodontal disease is the leading cause of tooth loss in adults.
The periodontist is a specialist with advanced training in the specialty of periodontal disease.
The periodontum consists of the tissues surrounding and supporting the teeth.
What is Periodontal Disease?
The majority of periodontal diseases begins as an inflammation of the periodontum caused by
accumulation of bacterial plaque.
Periodontal diseases may also be caused by other conditions in the mouth and systemic causes
such as hormonal disturbances.
Gingivitis is inflammation of the gingival tissues.
The tissues appear red, swollen, and have a tendency to bleed easily.
Gingivitis is directly related to the presence of bacterial plaque on the tooth surface.
Periodontal disease occurs as the infection from the gingival progresses into the alveolar bone.
The Periodontal Exam
This exam includes medical and dental histories, radiographic evaluations, exam of the
teeth, examinations of the gingiva and supporting structures, and periodontal charting.
Radiographs visually show areas of boney defects and periodontal abcesses.
Examination of the teeth focuses on factors that could contribute to periodontal disease.
All teeth have a slight mobility due to the nature of the periodontal ligament.
Excess mobility can be an important sign of periodontal disease. Numbers are assigned based on
the degree of mobility going from 0 to 3.
Examination of the gingival includes an assessment of the amount of plaque and calculus, the
amount of bleeding, assessment of the bone level and measurements of the periodontal pockets.
Periodontal pockets occur when the disease causes the normal gingival sulcus to become deeper.
A periodontal probing is done to accurately measure the space between the tooth and gum.
These measurements are recorded by the dental assistant on the periodontal chart.
Instruments for Periodontal Treatment
The most important instrument is a periodontal probe. This instrument has a calibrated
measurement that gives a numeric value for the depth of the periodontal pocket.
Explorers are used to locate deposits and provide tactile information about the anatomy of the
periodontal pocket.
Scalers are used primarily to remove supragingival deposits.
The most common instruments are curettes and a scaler.
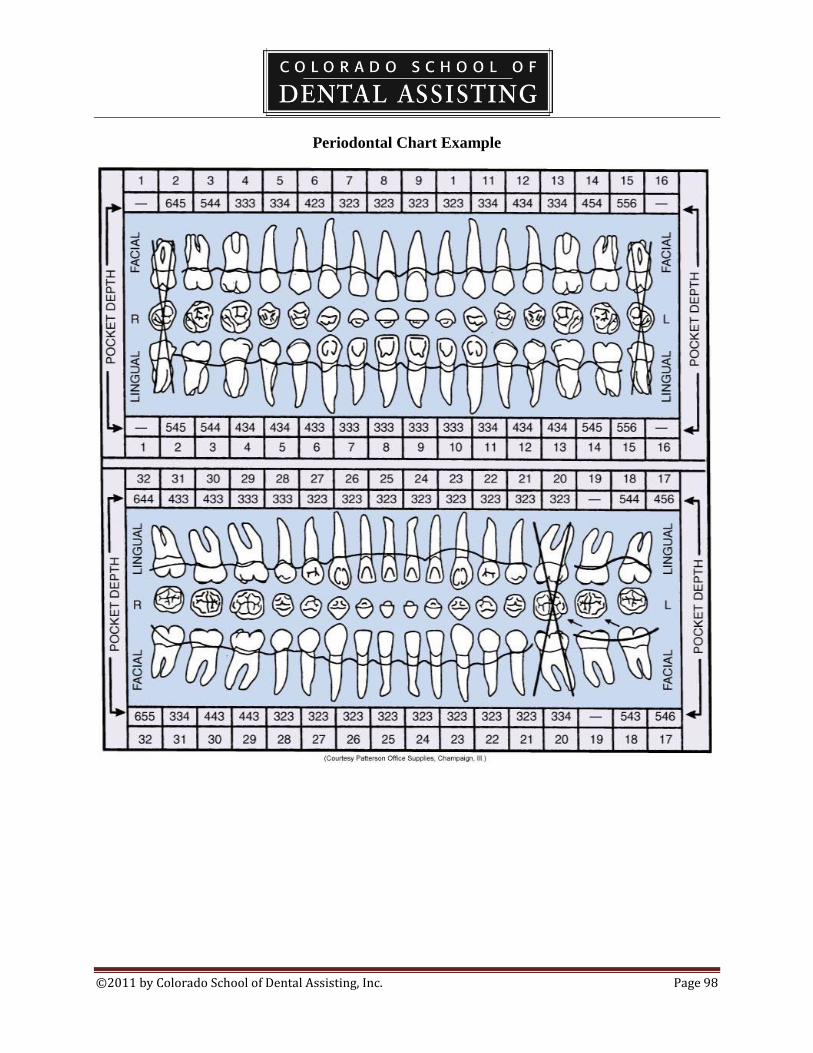
©2011 by Colorado School of Dental Assisting, Inc. Page 98
Periodontal Chart Example
©2011 by Colorado School of Dental Assisting, Inc. Page 99
Chapter 26: Oral Surgery This specialty provides the diagnosis and the treatment through surgical means of disease,
injuries and defects of the hard and soft tissues of the oral and maxillofacial regions.
This includes the removal through surgical means of impacted teeth, reconstructive surgery,
treatment of fractures of the bones of the face and jaw, implants and biopsies.
Instruments
Oral surgery instruments are designed to separate the tooth from the socket, retract surrounding
tissues, loosen and elevate the tooth within the socket and remove the tooth from the socket
(extraction).
Surgical instruments are all critical (require sterilization).
Extraction forceps are available in many different shapes and designs to accommodate the
dentist’s need for grasping teeth with different crown shapes, root configurations, and locations
in the mouth.
Forceps are used to remove the teeth from the alveolar bone after they have been slightly
loosened in the socket by the application of elevators.
Luxate means to rock the tooth back and forth.
Gold handled instruments are usually designated as surgical instruments.
Periosteal elevators are used first.
Types of Surgical Procedures
Forceps extraction (complete removal of a tooth from its permanent socket) is often described as
a simple extraction.
A forceps extraction is performed on a tooth that is fully erupted and has a solid, intact crown
that can be grasped firmly with the forceps.
Alveoplasty is a surgical contouring of the bone to provide a proper contoured ridge prior to the
placement of a removable prosthetic.
Complex or surgical extractions are done when conditions exist that require additional skill and
instrumentation to remove a tooth, for example if the tooth is impacted.
Sutures (stitches) are placed if a scalpel is used.
Sutures help control bleeding, and they assist in an even attachment of tissue, promoting quicker
healing.
Sutures are available in absorbent and nonabsorbent forms.
The #40 silk is used most often.
Dry Socket
Alveolitis is the technical term for dry socket.
The failure of the formation of a blood clot, and the accidental removal of the blood clot from the
socket, are usually the cause.
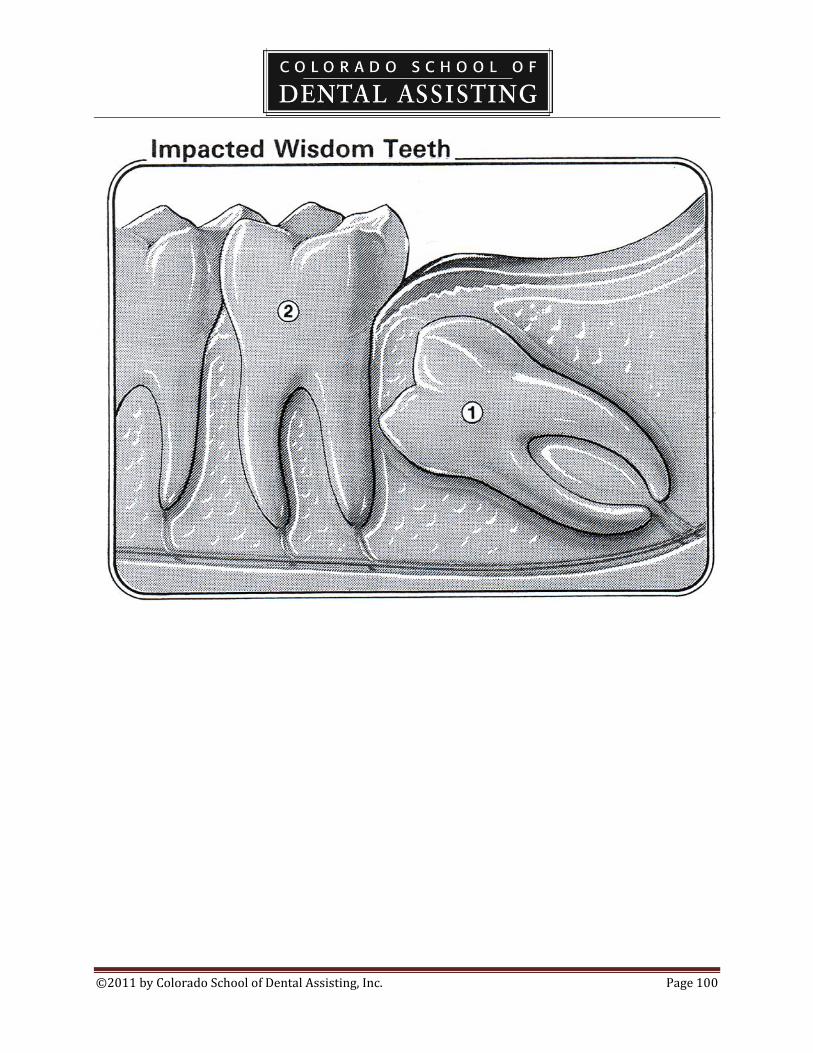
©2011 by Colorado School of Dental Assisting, Inc. Page 100
©2011 by Colorado School of Dental Assisting, Inc. Page 101
Chapter 27: Pediatric Dentistry
Pedo practices treat children from infancy to adulthood, from ages 3 to 18.
Emphasis is on developmental guidance, early detection and prevention problems and disease.
The offices are usually designed with the treatment of children in mind.
Radiographs
Size 0 BW are usually done for the youngest patients, and size increases as they grow.
Occlusal films are taken as well.
BWX are usually taken once per year.
Panorex are taken when there is concern over occlusal development.
Fluorides
They are very important in reducing decay.
Fluoride comes in tray and rinses.
Rinses are not used with children who are too young to follow instructions.
The correct tray sizes must be chosen.
Instructions include NOT swallowing.
If the child is unable to follow instructions, fluoride can be applied using a cotton tip or
toothbrush.
Fluoride treatments are given at intervals or either six months or one year depending on their
age, carries rate, tooth anatomy and fluoride intake such as fluoridation of water.
Developmental Guidance
This is the comprehensive guidance of the arch development.
Problems are corrected as they come up.
Growth can be guided with the use of appliances.
An example: space maintainers are cemented into appliances to guard the space of a prematurely
lost primary tooth.

©2011 by Colorado School of Dental Assisting, Inc. Page 102
WEEK 10 CHECKLIST: Dental Specialties
1. ____Practice Fabrication on a partner of a bleaching tray
2. ____Review Chpt. 25 p. 423-430
3. ____HW Chpt 25 Exercises p. 435
4. ____Study File sizes and color Table 25-2, and Figure 25-5
5. ____Write Endodontic Treatment setup
6. 7____Practice ID files by color and number for a partner
7. 8____Practice ID cements for a partner
8. 9____LAB Make bleaching trays, Instrument and file ID for endo

©2011 by Colorado School of Dental Assisting, Inc. Page 103
Tooth Anatomy Showing Root Canals and Pulp:
©2011 by Colorado School of Dental Assisting, Inc. Page 104
Chapter 25: Endodontics
Endodontics is the specialty that deals with the prevention, diagnosis and treatment of disorders
of the dental pulp.
Endodontic treatment is also called root canal therapy.
General dentists are qualified to perform endodontic treatment (as they are all procedures of all
specialties) but sometimes refer the difficult cases to an endodontist.
Once the endodontist/general dentist has diagnosed that a tooth is nonvital, root canal therapy is
commenced.
Endodontic Diagnosis
Diagnosis is determined by the patient’s history, duration and location of the pain, and by the
dental examination which includes:
i. Radiographs
ii. Pulp vitality tests
iii. Percussion test
iv. Heat and cold test
X-rays used for endotontic treatment:
i. The initial periapical is done at the diagnosis.
ii. The working length radiograph determines the length of the canal.
iii. The final xray film shows the final sizes of the files in the canals.
iv. The root canal final xray shows the completed treatment and the temporized fill.
Instruments for Endodontic Treatment:
Files are used to debride or clean the canal.
Endodontic explorers are long so that they can enter and locate the canal opening.
Specialized burs are used to clean the canals.
Endodontic spreader is used to fill the canal by spreading gutta percha in the canals.
Endodontic pluggers are used to condense the gutta percha in the canal.
Medications:
Formocresol is put into the exposed pulp chamber.
This medication desensitizes the nerve endings and prevents further deterioration of the pulp.

©2011 by Colorado School of Dental Assisting, Inc. Page 105
Calcium hydroxide or dycal helps in the reparative state of the dentin.
ZOE is a soothing medication that provides comfort to the pulpal environment.
Irrigation solutions are used to dissolve necrotic or dead tissues from the canal.
Sodium hypochlorite, bleach, is commonly used in a diluted solution.
Gutta percha points are most frequently used to fill the canals after treatment. They are heated
and the placed in the canals.
©2011 by Colorado School of Dental Assisting, Inc. Page 106
Self-Study: Chapter 28 Orthodontics
Orthodontics is the dental specialty that supervises, guides and corrects occlusion and jaw
structure.
Orthodontists treat all forms of malocclusion.
Preventative orthodontic procedures are designed to minimize the degree of severity of future
orthodontic problems.
Interceptive treatments occur while the patient has mixed dentition and may include redirection
of teeth that have erupted out of anatomic position.
Classifications of malocclusion.
Class I: This is the normal bite.
Class II: Appears like an over-bite. Could be due to either a tooth or jaw malocclusion.
Class III: Appears like an underbite. Could be due to either a tooth or jaw malocclusion.
Comprehensive Orthodontic Treatment entails:
Fixed appliances (braces) or,
Removable appliances, such as retainers or functional appliances.

©2011 by Colorado School of Dental Assisting, Inc. Page 107
WEEK 11 CHECKLIST: Review
1. _____ Review Review all content and practice where needed
2. _____Explain Flagging for allergies and medical conditions
3. _____View patient charts and schedule a fictitious appointment using software
4. _____Create or improve your resume. Bring to class the most current copy.
5. _____HW Study for FINAL EXAM NEXT WEEK
6. _____LAB More laboratory/workstation hours in Radiography, Temporaries,
Bleaching Tray, Impressions/Models…

©2011 by Colorado School of Dental Assisting, Inc. Page 108
Externship Plan
On an externship, you are expected to conduct yourself with a professional demeanor. Take note
specifically of the following items:
Be on time.
Dress according to OSHA standards, unless otherwise advised by the doctor.
Treat the office staff and doctor with respect.
Do not talk about personal problems with patients.
Do not talk about patients or the doctor outside of the office.
Clean up after yourself.
Hair must be off face and makeup should be minimal and professional in appearance.
Look for things to do, stay busy.
Minimum Requirements:
1. The extern will expose at least one set of radiographs on a patient.
2. The extern will sterilize instruments and learn overall office policy and procedures regarding
sterilization.
3. The extern will seat and bib the patient.
4. The extern will assist the dentist and exhibit correct instrument passing and moisture control.
5. The extern will perform at least one coronal polish on a patient.
These are minimum standards. The extern is expected to put forth as much effort as possible in
order to gain as much experience as they can while at the dental office. The extern should not
stand and observe, but rather should work as if a paid employee.
The dentist will evaluate and comment on the extern’s progress and abilities on the attached
forms.
All hours completed at the office are to be initialed by the person put in charge of overseeing the
extern’s hours within the office, or the doctor, as the situation dictates. After the full # of hours
are completed, the completed forms with the doctor’s signatures on them, should be handed in to
a teacher on the Saturday following the final externship week.


![[XLS] · Web view1 2 2 2 3 2 4 2 5 2 6 2 7 2 8 2 9 2 10 2 11 2 12 2 13 2 14 2 15 2 16 2 17 2 18 2 19 2 20 2 21 2 22 2 23 2 24 2 25 2 26 2 27 2 28 2 29 2 30 2 31 2 32 2 33 2 34 2 35](https://static.fdocuments.in/doc/165x107/5aa4dcf07f8b9a1d728c67ae/xls-view1-2-2-2-3-2-4-2-5-2-6-2-7-2-8-2-9-2-10-2-11-2-12-2-13-2-14-2-15-2-16-2.jpg)


![file.henan.gov.cn · : 2020 9 1366 2020 f] 9 e . 1.2 1.3 1.6 2.2 2.3 2.4 2.5 2.6 2.7 2. 2. 2. 2. 2. 2. 2. 2. 2. 2. 2. 2. 2. 2. 2. 2. 2. 2. 2. 2. 17](https://static.fdocuments.in/doc/165x107/5fcbd85ae02647311f29cd1d/filehenangovcn-2020-9-1366-2020-f-9-e-12-13-16-22-23-24-25-26-27.jpg)


![[XLS] · Web view1 2 2 2 3 2 4 2 5 2 6 2 7 8 2 9 2 10 11 12 2 13 2 14 2 15 2 16 2 17 2 18 2 19 2 20 2 21 2 22 2 23 2 24 2 25 2 26 2 27 28 2 29 2 30 2 31 2 32 2 33 2 34 2 35 2 36 2](https://static.fdocuments.in/doc/165x107/5ae0cb6a7f8b9a97518daca8/xls-view1-2-2-2-3-2-4-2-5-2-6-2-7-8-2-9-2-10-11-12-2-13-2-14-2-15-2-16-2-17-2.jpg)