
240 X2 HYDRAULIC EXCAVATOR OPERATOR’S MANUAL · 240 X2 HYDRAULIC EXCAVATOR OPERATOR’S MANUAL...
152
240 X2 HYDRAULIC EXCAVATOR OPERATOR’S MANUAL NOTE: LBX COMPANY LLC reserves the right to make improvements in design or changes in specifications at any time without incurring any obligation to install them on units previously sold. LINK-BELT TECHNICAL MANUALS Manuals are available from the Dealer for the operation, service, and repair of the excavator. For prompt convenient service, contact the Dealer for assistance in obtaining the manuals for the excavator. The Dealer can expedite orders for Operator’s Manuals, Parts Manuals, Service Manuals, and Maintenance records. Always give the model number, excavator serial number, and manufacturer’s number of your excavator so your Dealer can provide the correct manuals for your excavator. Book Number 2102
Transcript of 240 X2 HYDRAULIC EXCAVATOR OPERATOR’S MANUAL · 240 X2 HYDRAULIC EXCAVATOR OPERATOR’S MANUAL...

240 X2HYDRAULIC EXCAVATOR
OPERATOR’S MANUAL
NOTE: LBX COMPANY LLC reserves the right to make improvements in design or changes in specifications at any time without incurring any obligation to install them on units previously sold.
LINK-BELT TECHNICAL MANUALS
Manuals are available from the Dealer for the operation, service, and repair of the excavator. For prompt convenient service, contact the Dealer for assistance in obtaining the manuals for the excavator.
The Dealer can expedite orders for Operator’s Manuals, Parts Manuals, Service Manuals, and Maintenance records.
Always give the model number, excavator serial number, and manufacturer’s number of your excavator so your Dealer can provide the correct manuals for your excavator.
Book Number 2102

CALIFORNIAPROPOSITION 65 WARNING
Diesel engine exhaust and some of its constituents are known to the State of California to cause cancer, birth defects, and other reproductive harm.
Battery post, terminals and related accessories contain lead and lead compounds. Wash hands after handling.
Copyright © 2007 LBX Company LLCAll Rights Reserved Issued January 2007
LBX and Link-Belt are registered trademarks
M171D
Safety Decals on this excavator use the words Danger, Warning, or Caution, which are defined as follows:
☛ DANGER: Indicates an immediate hazardous situation that, if not avoided, will result in death or serious injury. The color associated with Danger is RED.
☛ WARNING: Indicates a potentially hazardous situation that, if not avoided, could result in death or serious injury. The color associated with Warning is ORANGE.
☛ CAUTION: Indicates a potentially hazardous situation which, if not avoided, may result in minor or moderate injury. It may also be used to alert against unsafe practices. The color associated with Caution is YELLOW.
THIS SAFETY ALERT SYMBOL INDICATES IMPORTANT SAFETY MESSAGES IN THIS MANUAL. WHEN THIS SYMBOL IS USED, CAREFULLY READ THE MESSAGE THAT FOLLOWS AND BE ALERT TO THE POSSIBILITY OF DEATH OR SERIOUS INJURY
IMPROPER OPERATION OF THIS EXCAVATOR CAN CAUSE DEATH OR SERIOUS INJURY. BEFORE USING THIS EXCAVATOR, MAKE CERTAIN THAT EVERY OPERATOR:Is instructed in safe and proper use of the excavator.Reads and understands the Manual(s) pertaining to the excavator.Reads and understands ALL Safety Decals on the excavator.Clears the area of other persons.Learns and practices safe use of excavator controls in a safe, clear area before operating this excavator on a job site.It is the operator’s responsibility to observe pertinent laws, regulations and follow the LBX Company, LLC instructions on excavator operation and maintenance.

TABLE OF CONTENTS
CHAPTER 1GENERAL INFORMATION
To the Owner . . . . . . . . . . . . . . . . . . . . . . . . . . . . . . . . . . . . . . . . . . . . . . . . . . . . . . . . . . . . . . . . . . . . . . . . 1-1Excavator Components . . . . . . . . . . . . . . . . . . . . . . . . . . . . . . . . . . . . . . . . . . . . . . . . . . . . . . . . . . . . . . . . 1-3Identification Numbers . . . . . . . . . . . . . . . . . . . . . . . . . . . . . . . . . . . . . . . . . . . . . . . . . . . . . . . . . . . . . . . . . 1-5
CHAPTER 2SAFETY, DECALS, AND HAND SIGNALS
Table of Contents . . . . . . . . . . . . . . . . . . . . . . . . . . . . . . . . . . . . . . . . . . . . . . . . . . . . . . . . . . . . . . . . . . . . . 2-1Safety Rules . . . . . . . . . . . . . . . . . . . . . . . . . . . . . . . . . . . . . . . . . . . . . . . . . . . . . . . . . . . . . . . . . . . . . . . . 2-3Safety Area . . . . . . . . . . . . . . . . . . . . . . . . . . . . . . . . . . . . . . . . . . . . . . . . . . . . . . . . . . . . . . . . . . . . . . . . . 2-3Utility Safety . . . . . . . . . . . . . . . . . . . . . . . . . . . . . . . . . . . . . . . . . . . . . . . . . . . . . . . . . . . . . . . . . . . . . . . . . 2-4Operator Precautions . . . . . . . . . . . . . . . . . . . . . . . . . . . . . . . . . . . . . . . . . . . . . . . . . . . . . . . . . . . . . . . . . . 2-5Decals . . . . . . . . . . . . . . . . . . . . . . . . . . . . . . . . . . . . . . . . . . . . . . . . . . . . . . . . . . . . . . . . . . . . . . . . . . . . 2-10Hand Signals . . . . . . . . . . . . . . . . . . . . . . . . . . . . . . . . . . . . . . . . . . . . . . . . . . . . . . . . . . . . . . . . . . . . . . . 2-16
CHAPTER 3INSTRUMENTS AND CONTROLS
Table of Contents . . . . . . . . . . . . . . . . . . . . . . . . . . . . . . . . . . . . . . . . . . . . . . . . . . . . . . . . . . . . . . . . . . . . . 3-1Cab . . . . . . . . . . . . . . . . . . . . . . . . . . . . . . . . . . . . . . . . . . . . . . . . . . . . . . . . . . . . . . . . . . . . . . . . . . . . . . . 3-3Steps and Access Handles . . . . . . . . . . . . . . . . . . . . . . . . . . . . . . . . . . . . . . . . . . . . . . . . . . . . . . . . . . . . . 3-4Position of the Operator’s Compartment Controls and Accessories . . . . . . . . . . . . . . . . . . . . . . . . . . . . . . 3-5Operator’s Seat . . . . . . . . . . . . . . . . . . . . . . . . . . . . . . . . . . . . . . . . . . . . . . . . . . . . . . . . . . . . . . . . . . . . . . 3-6Seat Controls . . . . . . . . . . . . . . . . . . . . . . . . . . . . . . . . . . . . . . . . . . . . . . . . . . . . . . . . . . . . . . . . . . . . . . . . 3-7Right-hand Control Arm and Instrument Panel . . . . . . . . . . . . . . . . . . . . . . . . . . . . . . . . . . . . . . . . . . . . . . 3-8Instrument Panel . . . . . . . . . . . . . . . . . . . . . . . . . . . . . . . . . . . . . . . . . . . . . . . . . . . . . . . . . . . . . . . . . . . . . 3-9Computer Monitor Display . . . . . . . . . . . . . . . . . . . . . . . . . . . . . . . . . . . . . . . . . . . . . . . . . . . . . . . . . . . . . 3-10Anti-Theft Protection Device . . . . . . . . . . . . . . . . . . . . . . . . . . . . . . . . . . . . . . . . . . . . . . . . . . . . . . . . . . . 3-11Message Display List . . . . . . . . . . . . . . . . . . . . . . . . . . . . . . . . . . . . . . . . . . . . . . . . . . . . . . . . . . . . . . . . . 3-12Left-hand Control Arm . . . . . . . . . . . . . . . . . . . . . . . . . . . . . . . . . . . . . . . . . . . . . . . . . . . . . . . . . . . . . . . . 3-14Front Console . . . . . . . . . . . . . . . . . . . . . . . . . . . . . . . . . . . . . . . . . . . . . . . . . . . . . . . . . . . . . . . . . . . . . . 3-15Heating, Ventilation and Air-conditioning Control . . . . . . . . . . . . . . . . . . . . . . . . . . . . . . . . . . . . . . . . . . . 3-16Control Pattern Selector Valve . . . . . . . . . . . . . . . . . . . . . . . . . . . . . . . . . . . . . . . . . . . . . . . . . . . . . . . . . . 3-17Arm and Upperstructure Swing Left-hand Control Lever In Pattern D . . . . . . . . . . . . . . . . . . . . . . . . . . . . 3-18Boom and Bucket Right-hand Control Lever In Pattern D . . . . . . . . . . . . . . . . . . . . . . . . . . . . . . . . . . . . . 3-18Arm And Upperstructure Swing Left-hand Control Lever In Pattern C . . . . . . . . . . . . . . . . . . . . . . . . . . . 3-19Boom And Bucket Right-hand Control Lever In Pattern C . . . . . . . . . . . . . . . . . . . . . . . . . . . . . . . . . . . . . 3-19Travel Control . . . . . . . . . . . . . . . . . . . . . . . . . . . . . . . . . . . . . . . . . . . . . . . . . . . . . . . . . . . . . . . . . . . . . . 3-20Single Pedal Travel . . . . . . . . . . . . . . . . . . . . . . . . . . . . . . . . . . . . . . . . . . . . . . . . . . . . . . . . . . . . . . . . . . 3-20Gate Lock Lever . . . . . . . . . . . . . . . . . . . . . . . . . . . . . . . . . . . . . . . . . . . . . . . . . . . . . . . . . . . . . . . . . . . . . 3-21Cab Light . . . . . . . . . . . . . . . . . . . . . . . . . . . . . . . . . . . . . . . . . . . . . . . . . . . . . . . . . . . . . . . . . . . . . . . . . . 3-21Coat Hanger Hook . . . . . . . . . . . . . . . . . . . . . . . . . . . . . . . . . . . . . . . . . . . . . . . . . . . . . . . . . . . . . . . . . . . 3-21Cab Door Window . . . . . . . . . . . . . . . . . . . . . . . . . . . . . . . . . . . . . . . . . . . . . . . . . . . . . . . . . . . . . . . . . . . 3-22Cup Holder . . . . . . . . . . . . . . . . . . . . . . . . . . . . . . . . . . . . . . . . . . . . . . . . . . . . . . . . . . . . . . . . . . . . . . . . . 3-22Storage Tray . . . . . . . . . . . . . . . . . . . . . . . . . . . . . . . . . . . . . . . . . . . . . . . . . . . . . . . . . . . . . . . . . . . . . . . 3-22Storage Compartments . . . . . . . . . . . . . . . . . . . . . . . . . . . . . . . . . . . . . . . . . . . . . . . . . . . . . . . . . . . . . . . 3-22Cab Radio . . . . . . . . . . . . . . . . . . . . . . . . . . . . . . . . . . . . . . . . . . . . . . . . . . . . . . . . . . . . . . . . . . . . . . . . . 3-23Fuse Box . . . . . . . . . . . . . . . . . . . . . . . . . . . . . . . . . . . . . . . . . . . . . . . . . . . . . . . . . . . . . . . . . . . . . . . . . . 3-24Windshield . . . . . . . . . . . . . . . . . . . . . . . . . . . . . . . . . . . . . . . . . . . . . . . . . . . . . . . . . . . . . . . . . . . . . . . . . 3-25Lower Front Window . . . . . . . . . . . . . . . . . . . . . . . . . . . . . . . . . . . . . . . . . . . . . . . . . . . . . . . . . . . . . . . . . 3-26Air Vents . . . . . . . . . . . . . . . . . . . . . . . . . . . . . . . . . . . . . . . . . . . . . . . . . . . . . . . . . . . . . . . . . . . . . . . . . . 3-27Rear Window . . . . . . . . . . . . . . . . . . . . . . . . . . . . . . . . . . . . . . . . . . . . . . . . . . . . . . . . . . . . . . . . . . . . . . . 3-27
ILBX Company, LLC

Rear View Mirrors . . . . . . . . . . . . . . . . . . . . . . . . . . . . . . . . . . . . . . . . . . . . . . . . . . . . . . . . . . . . . . . . . . . 3-28Fuel Tank . . . . . . . . . . . . . . . . . . . . . . . . . . . . . . . . . . . . . . . . . . . . . . . . . . . . . . . . . . . . . . . . . . . . . . . . . 3-29Engine Hood . . . . . . . . . . . . . . . . . . . . . . . . . . . . . . . . . . . . . . . . . . . . . . . . . . . . . . . . . . . . . . . . . . . . . . . 3-29Side Doors . . . . . . . . . . . . . . . . . . . . . . . . . . . . . . . . . . . . . . . . . . . . . . . . . . . . . . . . . . . . . . . . . . . . . . . . 3-30Towing Point . . . . . . . . . . . . . . . . . . . . . . . . . . . . . . . . . . . . . . . . . . . . . . . . . . . . . . . . . . . . . . . . . . . . . . . 3-31Lifting Eyes . . . . . . . . . . . . . . . . . . . . . . . . . . . . . . . . . . . . . . . . . . . . . . . . . . . . . . . . . . . . . . . . . . . . . . . . 3-31Windshield Washer Reservoir . . . . . . . . . . . . . . . . . . . . . . . . . . . . . . . . . . . . . . . . . . . . . . . . . . . . . . . . . . 3-32
CHAPTER 4OPERATING INSTRUCTIONS
Table of Contents . . . . . . . . . . . . . . . . . . . . . . . . . . . . . . . . . . . . . . . . . . . . . . . . . . . . . . . . . . . . . . . . . . . . 4-1Before Operating the Excavator . . . . . . . . . . . . . . . . . . . . . . . . . . . . . . . . . . . . . . . . . . . . . . . . . . . . . . . . . 4-3Operating the Excavator . . . . . . . . . . . . . . . . . . . . . . . . . . . . . . . . . . . . . . . . . . . . . . . . . . . . . . . . . . . . . . . 4-3Run-in Period . . . . . . . . . . . . . . . . . . . . . . . . . . . . . . . . . . . . . . . . . . . . . . . . . . . . . . . . . . . . . . . . . . . . . . . 4-4Starting the Engine . . . . . . . . . . . . . . . . . . . . . . . . . . . . . . . . . . . . . . . . . . . . . . . . . . . . . . . . . . . . . . . . . . . 4-4Bringing the Excavator up to Operating Temperature . . . . . . . . . . . . . . . . . . . . . . . . . . . . . . . . . . . . . . . . 4-6Engine Operation . . . . . . . . . . . . . . . . . . . . . . . . . . . . . . . . . . . . . . . . . . . . . . . . . . . . . . . . . . . . . . . . . . . . 4-6Stopping the Engine . . . . . . . . . . . . . . . . . . . . . . . . . . . . . . . . . . . . . . . . . . . . . . . . . . . . . . . . . . . . . . . . . . 4-7Operating the Excavator in Cold Weather . . . . . . . . . . . . . . . . . . . . . . . . . . . . . . . . . . . . . . . . . . . . . . . . . 4-8Operating the Excavator in Hot Weather . . . . . . . . . . . . . . . . . . . . . . . . . . . . . . . . . . . . . . . . . . . . . . . . . . 4-8Basic Operation . . . . . . . . . . . . . . . . . . . . . . . . . . . . . . . . . . . . . . . . . . . . . . . . . . . . . . . . . . . . . . . . . . . . . 4-8Swing Lock . . . . . . . . . . . . . . . . . . . . . . . . . . . . . . . . . . . . . . . . . . . . . . . . . . . . . . . . . . . . . . . . . . . . . . . . . 4-8Excavator Travel . . . . . . . . . . . . . . . . . . . . . . . . . . . . . . . . . . . . . . . . . . . . . . . . . . . . . . . . . . . . . . . . . . . . . 4-9Transporting the Excavator . . . . . . . . . . . . . . . . . . . . . . . . . . . . . . . . . . . . . . . . . . . . . . . . . . . . . . . . . . . . 4-11Unloading the Excavator . . . . . . . . . . . . . . . . . . . . . . . . . . . . . . . . . . . . . . . . . . . . . . . . . . . . . . . . . . . . . . 4-11Lifting the Excavator . . . . . . . . . . . . . . . . . . . . . . . . . . . . . . . . . . . . . . . . . . . . . . . . . . . . . . . . . . . . . . . . . 4-12Operating the Excavator in Water . . . . . . . . . . . . . . . . . . . . . . . . . . . . . . . . . . . . . . . . . . . . . . . . . . . . . . . 4-12Parking the Excavator . . . . . . . . . . . . . . . . . . . . . . . . . . . . . . . . . . . . . . . . . . . . . . . . . . . . . . . . . . . . . . . . 4-12Operating the Excavator on Sloping Ground . . . . . . . . . . . . . . . . . . . . . . . . . . . . . . . . . . . . . . . . . . . . . . 4-13Towing the Excavator . . . . . . . . . . . . . . . . . . . . . . . . . . . . . . . . . . . . . . . . . . . . . . . . . . . . . . . . . . . . . . . . 4-13Operating the Bucket . . . . . . . . . . . . . . . . . . . . . . . . . . . . . . . . . . . . . . . . . . . . . . . . . . . . . . . . . . . . . . . . 4-14Lowering the Attachment in the Event of an Excavator Failure . . . . . . . . . . . . . . . . . . . . . . . . . . . . . . . . 4-15Auxiliary Hydraulic Circuits . . . . . . . . . . . . . . . . . . . . . . . . . . . . . . . . . . . . . . . . . . . . . . . . . . . . . . . . . . . . 4-16Excavator Storage . . . . . . . . . . . . . . . . . . . . . . . . . . . . . . . . . . . . . . . . . . . . . . . . . . . . . . . . . . . . . . . . . . 4-18Hydraulic Excavator Quick Coupler Operation . . . . . . . . . . . . . . . . . . . . . . . . . . . . . . . . . . . . . . . . . . . . . 4-19
CHAPTER 5LUBRICATION, FILTERS, AND FLUIDS
Table of Contents . . . . . . . . . . . . . . . . . . . . . . . . . . . . . . . . . . . . . . . . . . . . . . . . . . . . . . . . . . . . . . . . . . . . 5-1Servicing Instructions . . . . . . . . . . . . . . . . . . . . . . . . . . . . . . . . . . . . . . . . . . . . . . . . . . . . . . . . . . . . . . . . . 5-3Daily Inspections . . . . . . . . . . . . . . . . . . . . . . . . . . . . . . . . . . . . . . . . . . . . . . . . . . . . . . . . . . . . . . . . . . . . . 5-4Hourmeter . . . . . . . . . . . . . . . . . . . . . . . . . . . . . . . . . . . . . . . . . . . . . . . . . . . . . . . . . . . . . . . . . . . . . . . . . . 5-4Lubrication Chart . . . . . . . . . . . . . . . . . . . . . . . . . . . . . . . . . . . . . . . . . . . . . . . . . . . . . . . . . . . . . . . . . . . . . 5-5Fluids and Lubricants . . . . . . . . . . . . . . . . . . . . . . . . . . . . . . . . . . . . . . . . . . . . . . . . . . . . . . . . . . . . . . . . . 5-6Fluid and Lubricant Capacities and Specifications . . . . . . . . . . . . . . . . . . . . . . . . . . . . . . . . . . . . . . . . . . . 5-8Lubrication Points . . . . . . . . . . . . . . . . . . . . . . . . . . . . . . . . . . . . . . . . . . . . . . . . . . . . . . . . . . . . . . . . . . . . 5-9Greasing the Turntable Teeth . . . . . . . . . . . . . . . . . . . . . . . . . . . . . . . . . . . . . . . . . . . . . . . . . . . . . . . . . . 5-11Fluid Levels . . . . . . . . . . . . . . . . . . . . . . . . . . . . . . . . . . . . . . . . . . . . . . . . . . . . . . . . . . . . . . . . . . . . . . . . 5-12Engines . . . . . . . . . . . . . . . . . . . . . . . . . . . . . . . . . . . . . . . . . . . . . . . . . . . . . . . . . . . . . . . . . . . . . . . . . . . 5-13Cooling System . . . . . . . . . . . . . . . . . . . . . . . . . . . . . . . . . . . . . . . . . . . . . . . . . . . . . . . . . . . . . . . . . . . . . 5-15Fuel System . . . . . . . . . . . . . . . . . . . . . . . . . . . . . . . . . . . . . . . . . . . . . . . . . . . . . . . . . . . . . . . . . . . . . . . 5-17Releasing Pressure in the Hydraulic System . . . . . . . . . . . . . . . . . . . . . . . . . . . . . . . . . . . . . . . . . . . . . . 5-22Hydraulic System . . . . . . . . . . . . . . . . . . . . . . . . . . . . . . . . . . . . . . . . . . . . . . . . . . . . . . . . . . . . . . . . . . . 5-23Bleeding Air from the Hydraulic Components . . . . . . . . . . . . . . . . . . . . . . . . . . . . . . . . . . . . . . . . . . . . . . 5-28Air Filter . . . . . . . . . . . . . . . . . . . . . . . . . . . . . . . . . . . . . . . . . . . . . . . . . . . . . . . . . . . . . . . . . . . . . . . . . . . 5-30Swing Reduction Gear . . . . . . . . . . . . . . . . . . . . . . . . . . . . . . . . . . . . . . . . . . . . . . . . . . . . . . . . . . . . . . . 5-32Travel Reduction Gears . . . . . . . . . . . . . . . . . . . . . . . . . . . . . . . . . . . . . . . . . . . . . . . . . . . . . . . . . . . . . . 5-33
II LBX Company, LLC

CHAPTER 6MAINTENANCE AND ADJUSTMENTS
Table of Contents . . . . . . . . . . . . . . . . . . . . . . . . . . . . . . . . . . . . . . . . . . . . . . . . . . . . . . . . . . . . . . . . . . . . . 6-1Tracks . . . . . . . . . . . . . . . . . . . . . . . . . . . . . . . . . . . . . . . . . . . . . . . . . . . . . . . . . . . . . . . . . . . . . . . . . . . . . 6-3Track Rollers and Idler Wheels . . . . . . . . . . . . . . . . . . . . . . . . . . . . . . . . . . . . . . . . . . . . . . . . . . . . . . . . . . 6-5Radiator and Oil Cooler . . . . . . . . . . . . . . . . . . . . . . . . . . . . . . . . . . . . . . . . . . . . . . . . . . . . . . . . . . . . . . . . 6-6Fan and Alternator Drive Belt . . . . . . . . . . . . . . . . . . . . . . . . . . . . . . . . . . . . . . . . . . . . . . . . . . . . . . . . . . . . 6-7Inspecting and Cleaning the Excavator . . . . . . . . . . . . . . . . . . . . . . . . . . . . . . . . . . . . . . . . . . . . . . . . . . . . 6-8Checking for Cylinder Leakage . . . . . . . . . . . . . . . . . . . . . . . . . . . . . . . . . . . . . . . . . . . . . . . . . . . . . . . . . . 6-8Replacing a Bucket . . . . . . . . . . . . . . . . . . . . . . . . . . . . . . . . . . . . . . . . . . . . . . . . . . . . . . . . . . . . . . . . . . . 6-9Fire Extinguisher (Not Supplied) . . . . . . . . . . . . . . . . . . . . . . . . . . . . . . . . . . . . . . . . . . . . . . . . . . . . . . . . 6-10Welding on the Excavator . . . . . . . . . . . . . . . . . . . . . . . . . . . . . . . . . . . . . . . . . . . . . . . . . . . . . . . . . . . . . 6-10Plastic and Resin Parts . . . . . . . . . . . . . . . . . . . . . . . . . . . . . . . . . . . . . . . . . . . . . . . . . . . . . . . . . . . . . . . 6-10Air Conditioning . . . . . . . . . . . . . . . . . . . . . . . . . . . . . . . . . . . . . . . . . . . . . . . . . . . . . . . . . . . . . . . . . . . . . 6-11Hardware Torque Inspection . . . . . . . . . . . . . . . . . . . . . . . . . . . . . . . . . . . . . . . . . . . . . . . . . . . . . . . . . . . 6-13
CHAPTER 7ELECTRICAL
Table of Contents . . . . . . . . . . . . . . . . . . . . . . . . . . . . . . . . . . . . . . . . . . . . . . . . . . . . . . . . . . . . . . . . . . . . . 7-1Fuses . . . . . . . . . . . . . . . . . . . . . . . . . . . . . . . . . . . . . . . . . . . . . . . . . . . . . . . . . . . . . . . . . . . . . . . . . . . . . . 7-3Battery . . . . . . . . . . . . . . . . . . . . . . . . . . . . . . . . . . . . . . . . . . . . . . . . . . . . . . . . . . . . . . . . . . . . . . . . . . . . . 7-5Connecting One or Two Booster Batteries . . . . . . . . . . . . . . . . . . . . . . . . . . . . . . . . . . . . . . . . . . . . . . . . . 7-7Alternator . . . . . . . . . . . . . . . . . . . . . . . . . . . . . . . . . . . . . . . . . . . . . . . . . . . . . . . . . . . . . . . . . . . . . . . . . . . 7-7Starter Motor . . . . . . . . . . . . . . . . . . . . . . . . . . . . . . . . . . . . . . . . . . . . . . . . . . . . . . . . . . . . . . . . . . . . . . . . 7-7Replacing a Bulb . . . . . . . . . . . . . . . . . . . . . . . . . . . . . . . . . . . . . . . . . . . . . . . . . . . . . . . . . . . . . . . . . . . . . 7-8
CHAPTER 8SPECIFICATIONS
Table of Contents . . . . . . . . . . . . . . . . . . . . . . . . . . . . . . . . . . . . . . . . . . . . . . . . . . . . . . . . . . . . . . . . . . . . . 8-1Engine . . . . . . . . . . . . . . . . . . . . . . . . . . . . . . . . . . . . . . . . . . . . . . . . . . . . . . . . . . . . . . . . . . . . . . . . . . . . . 8-3Electrical Systems . . . . . . . . . . . . . . . . . . . . . . . . . . . . . . . . . . . . . . . . . . . . . . . . . . . . . . . . . . . . . . . . . . . . 8-3Hydraulic System . . . . . . . . . . . . . . . . . . . . . . . . . . . . . . . . . . . . . . . . . . . . . . . . . . . . . . . . . . . . . . . . . . . . . 8-3Undercarriage . . . . . . . . . . . . . . . . . . . . . . . . . . . . . . . . . . . . . . . . . . . . . . . . . . . . . . . . . . . . . . . . . . . . . . . 8-4Capacity of Systems and Components . . . . . . . . . . . . . . . . . . . . . . . . . . . . . . . . . . . . . . . . . . . . . . . . . . . . 8-4Weights . . . . . . . . . . . . . . . . . . . . . . . . . . . . . . . . . . . . . . . . . . . . . . . . . . . . . . . . . . . . . . . . . . . . . . . . . . . . 8-4Boom . . . . . . . . . . . . . . . . . . . . . . . . . . . . . . . . . . . . . . . . . . . . . . . . . . . . . . . . . . . . . . . . . . . . . . . . . . . . . . 8-4Arms . . . . . . . . . . . . . . . . . . . . . . . . . . . . . . . . . . . . . . . . . . . . . . . . . . . . . . . . . . . . . . . . . . . . . . . . . . . . . . 8-4Digging Force . . . . . . . . . . . . . . . . . . . . . . . . . . . . . . . . . . . . . . . . . . . . . . . . . . . . . . . . . . . . . . . . . . . . . . . 8-4Excavator Overall Dimensions . . . . . . . . . . . . . . . . . . . . . . . . . . . . . . . . . . . . . . . . . . . . . . . . . . . . . . . . . . . 8-5Working Range . . . . . . . . . . . . . . . . . . . . . . . . . . . . . . . . . . . . . . . . . . . . . . . . . . . . . . . . . . . . . . . . . . . . . . 8-6Lifting Capacities . . . . . . . . . . . . . . . . . . . . . . . . . . . . . . . . . . . . . . . . . . . . . . . . . . . . . . . . . . . . . . . . . . . . . 8-8
CHAPTER 9INDEX
IIILBX Company, LLC

IV LBX Company, LLC

CHAPTER 1 - GENERAL INFORMATION
Chapter 1GENERAL INFORMATION
TO THE OWNER
Figure 1
This excavator has been designed and built to the highest standards of quality. It conforms to all current safety regulations. However, the risk of accidents can never be completely excluded. That is why it is essential to observe elementary safety rules and precautions.
Read this manual carefully, paying particular attention to the instructions concerning safety, operation and maintenance so as to avoid the risk of injury while operating or servicing the excavator.
The standard attachments and tools of this excavator are designed to carry out all kinds of earthmoving and rehandling operations. If you want to use this excavator to handle a load (pipes, culverts, formwork, etc.), make sure that it is designed to carry out this kind of work.
Do not use this excavator for any application or purpose other than those described in this manual. If the excavator is to be used for work involving the use of special attachments, accessories or equipment, consult your LBX Link-Belt dealer in order to make sure that any adaptations or modifications made are in keeping with the excavator's technical specifications and with prevailing safety requirements.
Any modification or adaptation which is not approved by the manufacturer may invalidate the excavator's initial conformity with safety requirements.
The excavator must undergo regular inspections, the frequency of which varies according to the type of use. Consult your LBX Link-Belt dealer.
Before permitting a new operator on this excavator, make sure:
1. That the operator has received the necessary training on how to operate the excavator correctly and safely in one of our training centers or from an approved organization.
2. That the operator has read and understood the instructions given in this manual.
1-1LBX Company, LLC

CHAPTER 1 - GENERAL INFORMATION
Always keep this manual in the operator's compartment (in the seat back, behind the operator's seat). Make sure it is always complete and in good condition. If you wish to obtain extra copies, or a copy in Latin American Spanish, consult your LBX Link-Belt dealer.
Your LBX Link-Belt dealer is at your disposal for any further information. They will also provide any after-sales service you may require, and genuine LBX Link-Belt spare parts, your guarantee of quality and match.
1-2 LBX Company, LLC

CHAPTER 1 - GENERAL INFORMATION
EXCAVATOR COMPONENTS
3-003LBX Figure 2
MAIN COMPONENTS
The 210X2 is a fully hydraulic excavator. It consists of an undercarriage fitted with tracks and a turntable bearing which supports the upperstructure frame. The upperstructure frame supports the attachment, at the front end of the excavator, plus the engine, hydraulics and cab. When the operator works the controls, the engine-driven pump delivers hydraulic fluid to the control valves. The control valves distribute the hydraulic fluid to the various cylinders and motors concerned. A cooling system maintains the hydraulic fluid at normal operating temperature.
1. CAB/OPERATOR'S COMPARTMENT 8. ARM 15. LOWER ROLLERS2. HYDRAULIC SWIVEL 9. ARM CYLINDER 16. TRAVEL REDUCTION GEARS3. UNDERCARRIAGE 10. BUCKET 17. IDLER WHEELS4. STEPS 11. BUCKET CYLINDER 18. TRACKS5. ACCESS HANDLES 12. ENGINE COMPARTMENT 19. HYDRAULIC RESERVOIR6. BOOM 13. COUNTERWEIGHT 20. FUEL TANK7. BOOM CYLINDERS 14. UPPER ROLLERS 21. SWING GEARCASE
6
1
12
10
7
8
112
9
13
16
14
1817
15
3
1920
5
5
4
21
1-3LBX Company, LLC

CHAPTER 1 - GENERAL INFORMATION
RIGHT, LEFT, FRONT AND REAR OF THE EXCAVATOR
Figure 3
The terms Right-hand, Left-hand, Front, and Rear are used in this manual to indicate the sides as they are seen from the operator's seat when the cab is over the idler wheels.
The illustration below shows the excavator in normal TRAVEL position. In normal TRAVEL position, the cab is over the idler wheels. The travel reduction gears are at the rear of the upperstructure.
1-4 LBX Company, LLC
CHAPTER 1 - GENERAL INFORMATION
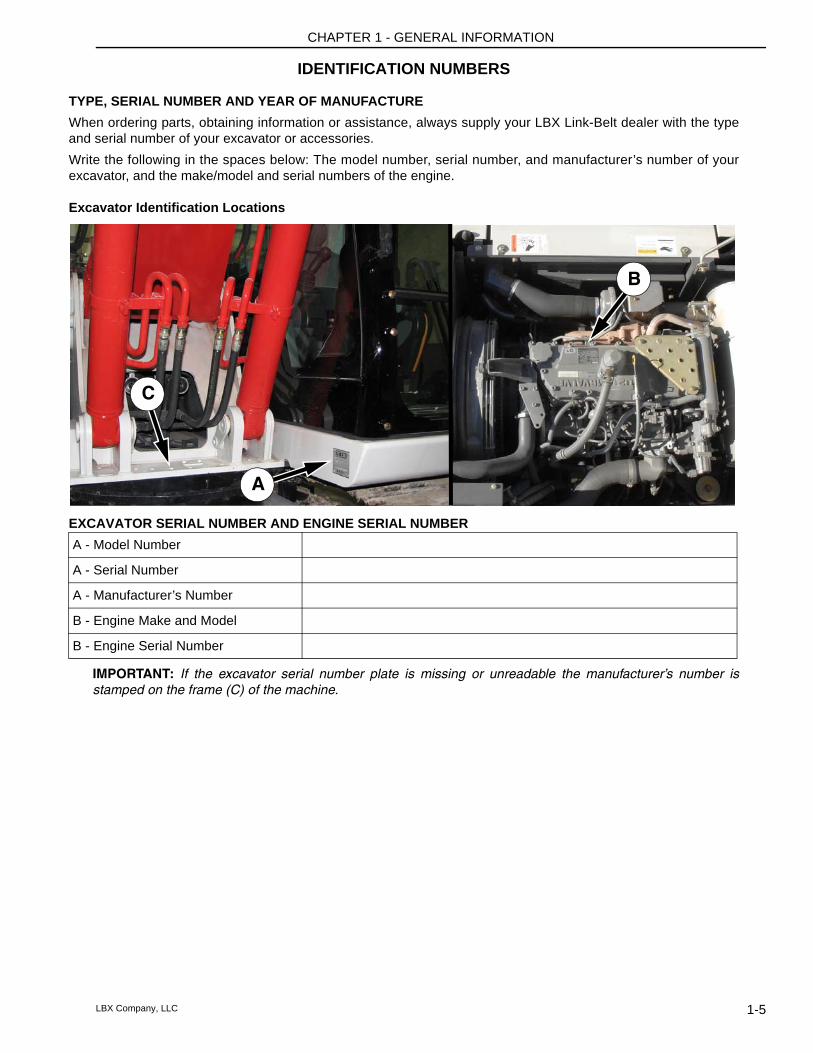
IDENTIFICATION NUMBERS
TYPE, SERIAL NUMBER AND YEAR OF MANUFACTUREWhen ordering parts, obtaining information or assistance, always supply your LBX Link-Belt dealer with the type and serial number of your excavator or accessories. Write the following in the spaces below: The model number, serial number, and manufacturer’s number of your excavator, and the make/model and serial numbers of the engine.
Excavator Identification Locations
EXCAVATOR SERIAL NUMBER AND ENGINE SERIAL NUMBER
IMPORTANT: If the excavator serial number plate is missing or unreadable the manufacturer’s number is stamped on the frame (C) of the machine.
A
B
C
A - Model Number
A - Serial Number
A - Manufacturer’s Number
B - Engine Make and Model
B - Engine Serial Number
1-5LBX Company, LLC

CHAPTER 1 - GENERAL INFORMATION
NOTES
1-6 LBX Company, LLC

Chapter 2SAFETY, DECALS, AND HAND SIGNALS
TABLE OF CONTENTS
Safety Rules . . . . . . . . . . . . . . . . . . . . . . . . . . . . . . . . . . . . . . . . . . . . . . . . . . . . . . . . . . . . . . . . . . . . . . . . 2-3Safety Area . . . . . . . . . . . . . . . . . . . . . . . . . . . . . . . . . . . . . . . . . . . . . . . . . . . . . . . . . . . . . . . . . . . . . . . . . 2-3Utility Safety . . . . . . . . . . . . . . . . . . . . . . . . . . . . . . . . . . . . . . . . . . . . . . . . . . . . . . . . . . . . . . . . . . . . . . . . . 2-4Operator Precautions . . . . . . . . . . . . . . . . . . . . . . . . . . . . . . . . . . . . . . . . . . . . . . . . . . . . . . . . . . . . . . . . . . 2-5
Personnel . . . . . . . . . . . . . . . . . . . . . . . . . . . . . . . . . . . . . . . . . . . . . . . . . . . . . . . . . . . . . . . . . . . . . . . . 2-5General . . . . . . . . . . . . . . . . . . . . . . . . . . . . . . . . . . . . . . . . . . . . . . . . . . . . . . . . . . . . . . . . . . . . . . . . . . 2-5Mounting and Dismounting Precautions . . . . . . . . . . . . . . . . . . . . . . . . . . . . . . . . . . . . . . . . . . . . . . . . . 2-5Starting and Stopping Precautions . . . . . . . . . . . . . . . . . . . . . . . . . . . . . . . . . . . . . . . . . . . . . . . . . . . . . 2-5Operating Precautions . . . . . . . . . . . . . . . . . . . . . . . . . . . . . . . . . . . . . . . . . . . . . . . . . . . . . . . . . . . . . . . 2-6Maintenance Precautions . . . . . . . . . . . . . . . . . . . . . . . . . . . . . . . . . . . . . . . . . . . . . . . . . . . . . . . . . . . . 2-7Fuel Handling Precautions . . . . . . . . . . . . . . . . . . . . . . . . . . . . . . . . . . . . . . . . . . . . . . . . . . . . . . . . . . . 2-7Burn Prevention . . . . . . . . . . . . . . . . . . . . . . . . . . . . . . . . . . . . . . . . . . . . . . . . . . . . . . . . . . . . . . . . . . . . 2-8Hazardous Chemical Precautions . . . . . . . . . . . . . . . . . . . . . . . . . . . . . . . . . . . . . . . . . . . . . . . . . . . . . . 2-8Transporting Precautions . . . . . . . . . . . . . . . . . . . . . . . . . . . . . . . . . . . . . . . . . . . . . . . . . . . . . . . . . . . . 2-8Fire Extinguisher . . . . . . . . . . . . . . . . . . . . . . . . . . . . . . . . . . . . . . . . . . . . . . . . . . . . . . . . . . . . . . . . . . . 2-8Seat Belt Precautions . . . . . . . . . . . . . . . . . . . . . . . . . . . . . . . . . . . . . . . . . . . . . . . . . . . . . . . . . . . . . . . 2-9Quick Coupler Precautions . . . . . . . . . . . . . . . . . . . . . . . . . . . . . . . . . . . . . . . . . . . . . . . . . . . . . . . . . . . 2-9Engine Precautions . . . . . . . . . . . . . . . . . . . . . . . . . . . . . . . . . . . . . . . . . . . . . . . . . . . . . . . . . . . . . . . . . 2-9Specific Precautions to this Excavator . . . . . . . . . . . . . . . . . . . . . . . . . . . . . . . . . . . . . . . . . . . . . . . . . . 2-9
Decals . . . . . . . . . . . . . . . . . . . . . . . . . . . . . . . . . . . . . . . . . . . . . . . . . . . . . . . . . . . . . . . . . . . . . . . . . . . . 2-10Hand Signals . . . . . . . . . . . . . . . . . . . . . . . . . . . . . . . . . . . . . . . . . . . . . . . . . . . . . . . . . . . . . . . . . . . . . . . 2-16
2-1LBX Company, LLC

2-2 LBX Company, LLC

CHAPTER 2 - SAFETY, DECALS, AND HAND SIGNALS
SAFETY RULES
M171C
Most accidents involving excavator operation and maintenance can be avoided by following basic safety rules and precautions. Read and understand all the safety messages in this manual, the safety manual and the safety signs on the excavator before you operate or service the excavator. See your dealer if you have any questions.
LBX001 Figure 1
1. OPERATOR’S MANUAL STORAGE COMPARTMENT
READ THIS MANUAL COMPLETELY and make sure you understand the controls. All equipment has a limit. Make sure you understand the speed, stopping, steering, stability and load characteristics of this excavator before you start to operate.
DO NOT remove this manual or the safety manual from the excavator. See your dealer for additional manuals. Also see the manual information on the inside of the rear cover of this manual.
The safety information given in this manual does not replace safety codes, insurance needs, federal, state or local laws. Make sure that your excavator has the correct equipment according to these rules or laws.
Additional safety messages are used in the text of the manual to show specific safety hazards.
IMPORTANT: The safety messages in this chapter point out situations which can happen during the normal operation and maintenance of your excavator. These safety messages also give possible ways of dealing with these conditions.
SAFETY AREA
CS97M019 Figure 2
1. WORKING AREA2. SAFETY AREA
The safety area is the space necessary for the excavator to operate at the maximum range of the tool and a full 360° swing plus 6 feet (2 meters).
WARNING: This safety alert symbol indicates important safety messages in this manual. When you see this symbol, carefully read the message that follows and be alert to the possibility of death or serious injury.
1
1
2
2-3LBX Company, LLC

CHAPTER 2 - SAFETY, DECALS, AND HAND SIGNALS
UTILITY SAFETYSafety precaution MUST be followed when working near buried and over head utility lines.
During operation it is likely that you will be working around or near buried or over head utility lines which may include, but are not limited to:• Electrical Power Line• Gas Line• Water Line• Communication Line - Telephone or Cable
Television
Before beginning any excavator operation, it is your responsibility to be aware of all such utility lines buried and over head in the area of your project and to avoid them.
ALWAYS have all local utility companies mark the location of their lines.
In U.S.A. and Canada call one of many “One Call System Director” services. If you do not know the local number, call the national number (U.S.A. and Canada only): 811.
Check with local authorities for laws, regulations and/or strict penalties requiring you to locate and avoid existing utilities.
RH99G001 Figure 3
Know the utility color code (U.S.A. and Canada):Electric. . . . . . . . . . . . . . . . . . . . . . . . . . . . . . . . . RedGas, Oil, or Petroleum. . . . . . . . . . . . . . . . . . . YellowCommunication, Telephone, Television . . . . . OrangeWater . . . . . . . . . . . . . . . . . . . . . . . . . . . . . . . . . .BlueSewer . . . . . . . . . . . . . . . . . . . . . . . . . .Green/BrownProposed Excavation . . . . . . . . . . . . . . . . . . . .WhiteSurveying . . . . . . . . . . . . . . . . . . . . . . . . . . . . . .PinkReclaimed Water and Slurry . . . . . . . . . . . . . . Purple
After locating any buried utility lines, carefully dig a hole by hand and/or automatic vacuum equipment to the utility line to verify the location and depth of the line.
2-4 LBX Company, LLC

CHAPTER 2 - SAFETY, DECALS, AND HAND SIGNALS
OPERATOR PRECAUTIONS
PERSONNEL• Be prepared for emergencies. Always have a first
aid kit and a working fire extinguisher with you and know how to use each.
• Avoid loose fitting clothing, loose or uncovered long hair, jewelry and loose personal articles.
• Know and use the protective equipment that is to be worn when operating this excavator. Hard hats, protective glasses, protective shoes, gloves, reflector type vests, respirators and ear protection are examples of types of equipment that may be required.
• Certain protective equipment should be replaced and renewed upon age and wear. Old hard hats may not afford the original users intention. Faded and soiled vests are no longer as highly visible as original intended. See the manufacturer’s recommendation.
• Do not rush. Walk, do not run.• Know and use the hand signals required for
particular jobs and know who has the responsibility for signaling.
GENERAL• It is the responsibility of the operator to read and
understand the operator’s manual and other information provided and use the correct operating procedure. Excavators should be operated only by qualified operators.
• Do not operate this excavator or perform maintenance work if you have not had appropriate training and have read and fully understand the instructions and warnings in this manual.
• Wear the seat belt at all times when operating the excavator.
• Inspect the seat belt end mounting bolts on a daily basis to ensure their integrity.
• Make sure that all protective guards are in place and secure.
• Remove all loose objects stored in the excavator. Remove all objects which do not belong in or on the excavator and its equipment.
MOUNTING AND DISMOUNTING PRECAUTIONS• Use the recommended hand holds and steps with
at least three points of support when getting on and off the excavator. Keep steps and platform clean. Face the access system when climbing up and down
• Do not jump off the excavator.• Do not dismount while the excavator is in motion.• Foreign material or grease on the steps and hand
rails can cause an accident. Keep the steps and hand rails clean.
STARTING AND STOPPING PRECAUTIONS• Walk around the excavator and warn all personnel
who may be servicing the excavator or are in the excavator path prior to starting. Do not start until all personnel are clearly away from the excavator. Sound the horn, before starting.
• Walk around the excavator’s tool, attachment, or furthermost contact point to view operation danger area from the worksite personnel view and angle.
• Adjust, secure and latch the seat and fasten the seat belt before starting the excavator.
• Start and operate the excavator only from the operator’s seat.
• Do not bypass the excavator’s gate lock system. The gate lock system must be repaired if it malfunctions.
• Use jumper cables only in the recommended manner. Improper use can result in battery explosion or unexpected excavator motion. Ventilate the battery area before using jumper cables. Make sure that using jumper cables will not interfere or harm electronic processing or computer devices. See Connecting one or two booster batteries.
• Do not operate the engine in an enclosed area without adequate ventilation.
• Park the excavator on level ground whenever possible and lower the attachment to the ground. The travel brakes will automatically apply. On grades, park the excavator with the tracks securely blocked.
• Before leaving the operator’s station, lower the equipment to the ground or put the gate lock in the locked position, and shut off the engine.
• Remove the starter key when leaving the excavator parked or unattended.
2-5LBX Company, LLC

CHAPTER 2 - SAFETY, DECALS, AND HAND SIGNALS
OPERATING PRECAUTIONS• Check all excavator control devices in accordance
with the manufacturers instructions prior to starting operation. Observe all gauges or warning instruments for proper operation. Operate all controls to ensure proper operation. If any malfunctions are found, remove the starter key. Place a DO NOT OPERATE tag on the excavator until the malfunction is corrected.
• Understand the excavator limitations and keep the excavator under control.
• Operate and drive the excavator with care and at a speed compatible with conditions. Use extra caution when operating over rough ground, on slopes, and when turning.
• Note and avoid all hazards and obstructions such as ditches, underground lines, trees, cliffs, overhead electrical wires or areas where there is danger of a slide.
• Carry loads in recommended positions for maximum stability.
• Never lift loads in excess of capacity.• Know and understand the job site traffic flow
patterns and obey signalmen, road signs and flagmen.
• Know and understand that job site conditions may change on an hourly basis. Hills of dirt, debris or obstructions may grow and change from the time you began the day. It is your responsibility to monitor the changes and keep the excavator, tools and attachments, etc. at a safe distance.
• Watch for bystanders and never allow anyone to be under or to reach through the excavator and its equipment while operating.
• When roading an excavator, know and use the signaling devices required on the excavator. Provide an escort for roading where required.
• Use the recommended transport devices when transporting the excavator. See Transporting the Excavator.
• Use an approved drawbar and / or attachment point when using the excavator for towing. If a cable or chain is used, keep people away from the tow line.
• Before you operate at night, check that all work lights illuminate.
• Engine exhaust fumes can cause death. If you operate this excavator in an enclosed area, make sure there is ventilation to replace the exhaust fumes with fresh air.
• Ensure that all windows are clean and that the windshield wipers work correctly.
• Check all controls in a clear area and make sure the excavator is operating correctly.
• Dust, fog, smoke, etc., can decrease your vision and cause an accident. Stop the excavator or decrease the speed until you can see.
• Contact with high voltage power lines, underground cables, etc., can cause serious injury or death from electrocution.
• Before you travel or operate in an area with high voltage lines, cables, or a power station, tell the power or utility company what you are going to do. You MUST HAVE THE POWER DISCONNECTED OR KEEP A SAFE WORKING DISTANCE from the lines, cables, or power station. Keep all parts of the excavator at least 15 ft (4.6 m) away from the power source. You must also know any federal, state/provincial, or local safety codes or regulations that apply to the job site.
• If a part of the excavator touches high voltage power:
1. Warn other workers NOT TO TOUCH THE EXCAVATOR and to s tay away f rom the excavator.
2. If you can break contact, reverse the operation that caused contact with the high voltage power, and move the excavator away from the danger area. If you cannot break contact stay in the excavator until the utility company de-energizes the line and tells you that the power is off.
• If you have extreme conditions, such as a fire, etc., and you are forced to leave the excavator, do not step off the excavator. Jump as far from the excavator as possible with your feet together and do not touch the ground with your hands.
• Do not operate the excavator if you do not feel well. This can be dangerous for you and for the people around you.
• You must make a judgment if weather, road, or earth conditions will permit safe operation on a hill, ramp, or rough ground.
• Stay away from hazardous areas such as ditches, overhangs, etc. Walk around the work area before you start and look for hazards.
• Be alert and always know the location of all workers in your area. Keep all other persons completely away from your excavator. Injury or death can result if you do not follow these instructions.
2-6 LBX Company, LLC

CHAPTER 2 - SAFETY, DECALS, AND HAND SIGNALS
MAINTENANCE PRECAUTIONS• Do not attempt repairs unless trained. Refer to
manuals and experienced repair personnel for help.
• Before you service the excavator, put a DO NOT OPERATE tag on the key switch.
• Wear protective glasses and other required safety equipment when servicing or repairing the excavator.
• Wear gloves to protect hands when handling cable.
• Disconnect the battery before working on the electrical system. Know the consequences of disconnecting any electronic or computer devices.
• Avoid lubrication or mechanical adjustments with the excavator in motion or the engine operating. If the engine must be in operation to make certain adjustments, put the gate lock in the locked position, place the excavator in a safe position, securely block the tracks and use extreme caution.
• Securely block the excavator or any component that may fall before working on the excavator or component. If possible, use a back up or secondary blocking device, also.
• To prevent unexpected movement, securely block working elements when repairing or changing working tool parts such as cutting edges.
• Never make repairs on pressurized components, fluid, gas or mechanical until the pressure has been relieved according to the manufacturer’s instructions.
• Use extreme caution when removing radiator caps, drain plugs, grease fittings or pressure taps. Park the excavator and let it cool down before opening a pressurized tank.
• Release all pressure before working on systems which have an accumulator. Use a piece of cardboard, newspaper, or wood to check for pressurized leaks to prevent fluid penetrating the skin. Pressurize accumulators with the proper gas according to manufacturers recommendations.
• When absolutely necessary to tow the excavator, consult your dealer for proper procedures.
• Observe proper maintenance procedures.• Whenever servicing or replacing hardened pins,
etc, use a brass drift or other suitable material between the hammer and pin or use a brass hammer, or suitable material on the pin.
• Replace all missing, illegible or damaged safety decals. Keep all safety decals clean.
FUEL HANDLING PRECAUTIONS• Do not smoke or permit open flames while fueling
or near fueling operations.• Never remove the fuel cap with the engine running
or hot. Never allow fuel to spill on hot excavator components. Never allow fuel to spill on the environment.
• To avoid spilling fuel, maintain control of the fuel filler nozzle when filling the tank.
• Do not fill the fuel tank completely to the top. Allow room for expansion.
• Clean up spilled fuel immediately and dispose of contaminated material in an environmentally correct manner.
• Tighten the fuel tank cap securely. Should the fuel cap be lost, replace it only with the original manufacturer’s approved cap. Use of a non-approved cap without proper venting may result in pressurization of the tank.
• Never use fuel for cleaning purposes.• Use the correct fuel grade for the operating
season.
2-7LBX Company, LLC

CHAPTER 2 - SAFETY, DECALS, AND HAND SIGNALS
BURN PREVENTION
M144B
• When the battery electrolyte is frozen, the battery can explode if, you try to charge the battery, or you try to jump start and run the engine. To prevent the battery electrolyte from freezing, try to keep the battery at full charge. If you do not follow these instructions, you or others in the area can be injured
• Hot coolant can spray out if the radiator cap is removed. To remove the radiator cap, let the cooling system cool, turn to the first notch, wait until the pressure is released, then remove the radiator cap.
HAZARDOUS CHEMICAL PRECAUTIONS• If you are exposed to or come in contact with
hazardous chemicals you can be seriously injured. The fluids, lubricants, paints, adhesives, coolants, etc., used with your excavator can be hazardous.
• Material Safety Data Sheets (MSDS) provide information about the chemical substances within a product, safe handling procedures, first aid measures and procedures to be taken when the product is accidentally spilled or released. MSDS are available from your dealer.
• Before you service your excavator, check the MSDS for each fluid, lubricant, etc., used in this excavator. This information indicates what the risks are and how to service the excavator safely. Follow this information when servicing the excavator.
• Before you service this excavator and before you dispose of the old fluids and lubricants, always remember the environment. DO NOT put oil or fluids into the ground or into containers that can leak.
• Check with your local environmental or recycling center or your dealer for correct disposal information.
TRANSPORTING PRECAUTIONS• Know the rules, laws, and safety equipment
necessary for transporting this excavator on a road or highway.
FIRE EXTINGUISHER• It is recommended that you have a fire
extinguisher on your excavator. The fire extinguisher is available from your dealer and can be installed on the excavator.
WARNING: BATTERY ACID CAUSES SEVERE BURNS. Batteries contain sulfuric acid. Avoid contact with skin, eyes or clothing.Antidote: EXTERNAL - Flush with water.Antidote: INTERNAL - Drink large quantities of water or milk. DO NOT induce vomiting. Seek medical attention immediately.EYES - Flush with water for 15 minutes and seek medical attention immediately.
WARNING: BATTERIES PRODUCE EXPLOSIVE GASES. Keep sparks, flame, cigars and cigarettes away. Ventilate when charging or using in enclosed area. Always wear eye protection when working near batteries. Wash hands after handling. KEEP OUT OF REACH OF CHILDREN.
2-8 LBX Company, LLC

CHAPTER 2 - SAFETY, DECALS, AND HAND SIGNALS
SEAT BELT PRECAUTIONS
LBX002 Figure 4
1. RIGHT BELT STRAP2. LATCH MECHANISM3. RELEASE LEVER
1. To latch the seat belt, pull the right belt strap to the latch mechanism.
2. Insert the metal end into the latch mechanism on the left side of the seat.
3. To unlatch the seat belt, press the release lever on the right belt strap.
4. The seat belt will come apart.
M422A
QUICK COUPLER PRECAUTIONS• Always follow the safety procedures of the quick
coupler manufacturer if you have one on your machine. See Quick Coupler Operation.
ENGINE PRECAUTIONS• The fuel system on the engine is under heavy PSI.
Do Not open the high pressure fuel lines with the engine running.
SPECIFIC PRECAUTIONS TO THIS EXCAVATOR• Keep the load or tool as low as possible while
moving the excavator around the jobsite.• Never smoke while refueling.
WARNING: Before starting the engine ensure seat belts are securely fastened. The seat belt can help ensure your safety if it is used and properly maintained. Never wear a seat belt loosely or with slack in the belt system. Never wear the belt in a twisted condition or pinched between the seat structural members.
1
2
3
2-9LBX Company, LLC

CHAPTER 2 - SAFETY, DECALS, AND HAND SIGNALS
DECALSNOTE: This chapter only covers decals relating to safety and excavator operation and servicing. For information on all decals for the excavator, consult your authorized dealer.
NOTE: When you clean the decals, use only a cloth, water and soap. Do not use solvents, gasoline, etc.
DECALS INSIDE THE CAB
Figure 5
WARNING: Make sure that the decals are perfectly legible, clean them regularly and replace decals that are destroyed, lost, painted over or no longer legible, with new ones. When parts bearing decals are replaced, be sure to put new decals on each new part.
16
4
32
5
2-10 LBX Company, LLC

CHAPTER 2 - SAFETY, DECALS, AND HAND SIGNALS
1. KHP12142
KHP12142 Figure 6
A: This portion of the decal warns the user to shut off the controls with the gate lock lever to avoid accidental movement of the machine. B: This portion of the decal warns the operator that the excavator has interchangeable controls and to be sure you know which controls are selected. C: This portion of the decal warns of the hazard of getting too close to electric wires. You should keep at least 15' or 5 meters from power lines at all times. D: This portion of the decal instructs the operator of the importance of reading and following the instructions contained in the operator’s manual. E: This portion of the decal warns the operator of the possible interference with the bucket and the cab. The use of wide buckets, buckets with long sweep radius, the addition of quick couplers or using grapples, thumbs, and clamshells may result in contact with the operator’s cab. Check for interference prior to operating the machine
2. KHP11600
KHP11600 Figure 7
This decal shows that in an emergency you have to pull the ring on the back window seal in order to force open the rear window to make an emergency exit from the machine.
3. KHP12170
KHP12170 Figure 8
This decal warns of the danger involved if the front window is not properly locked into position.
4. KHP11590
KHP11590 Figure 9
This decal warns the operator that the cigar lighter in the front is a 24 volt rating. Do not plug in any thing that is rated for 12 volts, like a phone charger.
A
B
D EC
2-11LBX Company, LLC

CHAPTER 2 - SAFETY, DECALS, AND HAND SIGNALS
5. KHP12300
KHP12300 Figure 10
This decal shows the two different patterns that the controls can be adjusted to. If you switch the control pattern be sure to change the control pattern card in the cab.
6. KHP1587
KHP1587 Figure 11
This decal warns the operator of the control patterns selector valve and that there are two different control patterns. It is best to check the controls in an open area to make sure the controls match the card in the window.
167328A1 Figure 12
This card located on the cab window shows both of the configurations of the controls. Before operating the machine it is best to check the controls in an open area.
2-12 LBX Company, LLC

CHAPTER 2 - SAFETY, DECALS, AND HAND SIGNALS
DECALS OUTSIDE OF THE CAB
Figure 13
7. KHP11681
KHP11681 Figure 14
This decal informs the operator to read the operator’s manual for the recommended diesel fuel grade. See Lube and Maintenance for the correct grade.
8. KHP1542
KHP1542 Figure 15
This decal warns the operator of the hot hydraulic fluid that can cause burns if the pressure in the tank is not properly relieved. Further instructions are located in maintance section.
7 8 9 10
1112
13
14
2-13LBX Company, LLC

CHAPTER 2 - SAFETY, DECALS, AND HAND SIGNALS
9. KHP1535
KHP1535 Figure 16
This decal warns the operator of a hot surface that could cause burns to the extremities.
10.KHP12210
KHP12210 Figure 17
This decal warns the operator to stay off edge to prevent falling of the back of the excavator.
11.KHP1010
KHP1010 Figure 18
This decal instructs the operator to properly raise the engine hood and engage the lock in the open position to prevent the hood from inadvertently falling.
12.KHP1534
KHP1534 Figure 19
This decal warns the operator to wait and relieve pressure before opening the radiator cap.
13.KHP1533
KHP1533 Figure 20
This decal warns the operator of the rotating fan blades which could sever fingers and hands.
14.KHP1011
KHP1011 Figure 21
This decal warns the operator to stay off the engine cover.
2-14 LBX Company, LLC

CHAPTER 2 - SAFETY, DECALS, AND HAND SIGNALS
LBXSIDE Figure 22
15.RAP0144
RAP0144 Figure 23
This decal warns of the swinging upper.
16.1P 2240
1P 2240 Figure 24
This decal warns the operator to stay away from power lines.
17.KHP1014
KHP1014 Figure 25
This decal warns the operator to release the pressure on the track assembly before disassembly.
18.KHP13150
KHP13150 Figure 26
This decal warns the operator of the high pressure fuel lines on the machine.
15
17
16
18
2-15LBX Company, LLC

CHAPTER 2 - SAFETY, DECALS, AND HAND SIGNALS
HAND SIGNALSWhen operating the excavator, never attempt to carry out tasks calling for fine control or to work in areas where visibility is poor or impaired without seeking the assistance of a signalman. Make perfectly sure that you and the signalman understand the signals to be used.
PDE0002A Figure 27
START THE ENGINE
PDE0002 Figure 28
SHUT DOWN THE ENGINE
PDE0003A Figure 29
COME TO ME
Wave hands back and forth (palms inwards).
PDE0003 Figure 30
MOVE AWAY FROM ME
Wave hands back and forth (palms outwards).
PDE0004A Figure 31
GO THIS FAR
PDE0005A Figure 32
RAISE LOAD OR TOOL
Wave hands back and forth.
PDE0004 Figure 33
ALL STOP AND HOLD
PDE0005 Figure 34
EMERGENCY STOP
Wave hands back and forth.
2-16 LBX Company, LLC

CHAPTER 2 - SAFETY, DECALS, AND HAND SIGNALS
PDE0006A Figure 35
RAISE LOAD OR TOOL
PDE0006 Figure 36
LOWER LOAD OR TOOL
PDE0007A Figure 37
SLOWLY RAISE THE LOAD OR TOOL
PDE0007 Figure 38
SLOWLY LOWER THE LOAD OR TOOL
PDE0009A Figure 39
RAISE TOOL
PDE0008A Figure 40
TURN THE EXCAVATOR TO THE LEFT (SWING LOAD LEFT)
To stop movement, stop moving hand and clench fist.
PDE0008 Figure 41
TURN EXCAVATOR RIGHT (SWING LOAD RIGHT)
To stop movement, stop moving hand and clench fist.
PDE0009 Figure 42
LOWER TOOL
2-17LBX Company, LLC

CHAPTER 2 - SAFETY, DECALS, AND HAND SIGNALS
PDE0010A Figure 43
RAISE TOOL
PDE0010 Figure 44
LOWER TOOL
PDE0011A Figure 45
RETRACT ARM
PDE0011 Figure 46
EXTEND ARM
PDE0012A Figure 47
FILL TOOL
PDE0012 Figure 48
EMPTY TOOL
2-18 LBX Company, LLC

CHAPTER 3 - INSTRUMENTS AND CONTROLS
Chapter 3INSTRUMENTS AND CONTROLS
TABLE OF CONTENTS
Cab . . . . . . . . . . . . . . . . . . . . . . . . . . . . . . . . . . . . . . . . . . . . . . . . . . . . . . . . . . . . . . . . . . . . . . . . . . . . . . . 3-3Steps and Access Handles . . . . . . . . . . . . . . . . . . . . . . . . . . . . . . . . . . . . . . . . . . . . . . . . . . . . . . . . . . . . . 3-4Position of the Operator’s Compartment Controls and Accessories . . . . . . . . . . . . . . . . . . . . . . . . . . . . . . 3-5Operator’s Seat . . . . . . . . . . . . . . . . . . . . . . . . . . . . . . . . . . . . . . . . . . . . . . . . . . . . . . . . . . . . . . . . . . . . . . 3-6Seat Controls . . . . . . . . . . . . . . . . . . . . . . . . . . . . . . . . . . . . . . . . . . . . . . . . . . . . . . . . . . . . . . . . . . . . . . . . 3-7Seat Height Adjustment . . . . . . . . . . . . . . . . . . . . . . . . . . . . . . . . . . . . . . . . . . . . . . . . . . . . . . . . . . . . . . . . 3-7Seat Adjustment . . . . . . . . . . . . . . . . . . . . . . . . . . . . . . . . . . . . . . . . . . . . . . . . . . . . . . . . . . . . . . . . . . . . . . 3-7Reclining Adjustment . . . . . . . . . . . . . . . . . . . . . . . . . . . . . . . . . . . . . . . . . . . . . . . . . . . . . . . . . . . . . . . . . . 3-7Armrest . . . . . . . . . . . . . . . . . . . . . . . . . . . . . . . . . . . . . . . . . . . . . . . . . . . . . . . . . . . . . . . . . . . . . . . . . . . . 3-7Headrest . . . . . . . . . . . . . . . . . . . . . . . . . . . . . . . . . . . . . . . . . . . . . . . . . . . . . . . . . . . . . . . . . . . . . . . . . . . 3-7Lumbar Support . . . . . . . . . . . . . . . . . . . . . . . . . . . . . . . . . . . . . . . . . . . . . . . . . . . . . . . . . . . . . . . . . . . . . . 3-7Seatbelt . . . . . . . . . . . . . . . . . . . . . . . . . . . . . . . . . . . . . . . . . . . . . . . . . . . . . . . . . . . . . . . . . . . . . . . . . . . . 3-7Right-hand Control Arm and Instrument Panel . . . . . . . . . . . . . . . . . . . . . . . . . . . . . . . . . . . . . . . . . . . . . . 3-8Instrument Panel . . . . . . . . . . . . . . . . . . . . . . . . . . . . . . . . . . . . . . . . . . . . . . . . . . . . . . . . . . . . . . . . . . . . . 3-9Computer Monitor Display . . . . . . . . . . . . . . . . . . . . . . . . . . . . . . . . . . . . . . . . . . . . . . . . . . . . . . . . . . . . . 3-10Anti-Theft Protection Device . . . . . . . . . . . . . . . . . . . . . . . . . . . . . . . . . . . . . . . . . . . . . . . . . . . . . . . . . . . 3-11To Set Password . . . . . . . . . . . . . . . . . . . . . . . . . . . . . . . . . . . . . . . . . . . . . . . . . . . . . . . . . . . . . . . . . . . . 3-11To Activate the Anti-theft . . . . . . . . . . . . . . . . . . . . . . . . . . . . . . . . . . . . . . . . . . . . . . . . . . . . . . . . . . . . . . 3-11Message Display List . . . . . . . . . . . . . . . . . . . . . . . . . . . . . . . . . . . . . . . . . . . . . . . . . . . . . . . . . . . . . . . . . 3-12Left-hand Control Arm . . . . . . . . . . . . . . . . . . . . . . . . . . . . . . . . . . . . . . . . . . . . . . . . . . . . . . . . . . . . . . . . 3-14Front Console . . . . . . . . . . . . . . . . . . . . . . . . . . . . . . . . . . . . . . . . . . . . . . . . . . . . . . . . . . . . . . . . . . . . . . 3-15Heating, Ventilation and Air-conditioning Control . . . . . . . . . . . . . . . . . . . . . . . . . . . . . . . . . . . . . . . . . . . 3-16Control Pattern Selector Valve . . . . . . . . . . . . . . . . . . . . . . . . . . . . . . . . . . . . . . . . . . . . . . . . . . . . . . . . . . 3-17Arm and Upperstructure Swing Left-hand Control Lever In Pattern D . . . . . . . . . . . . . . . . . . . . . . . . . . . . 3-18Boom and Bucket Right-hand Control Lever In Pattern D . . . . . . . . . . . . . . . . . . . . . . . . . . . . . . . . . . . . . 3-18Arm And Upperstructure Swing Left-hand Control Lever In Pattern C . . . . . . . . . . . . . . . . . . . . . . . . . . . 3-19Boom And Bucket Right-hand Control Lever In Pattern C . . . . . . . . . . . . . . . . . . . . . . . . . . . . . . . . . . . . . 3-19Travel Control . . . . . . . . . . . . . . . . . . . . . . . . . . . . . . . . . . . . . . . . . . . . . . . . . . . . . . . . . . . . . . . . . . . . . . 3-20Single Pedal Travel . . . . . . . . . . . . . . . . . . . . . . . . . . . . . . . . . . . . . . . . . . . . . . . . . . . . . . . . . . . . . . . . . . 3-20Gate Lock Lever . . . . . . . . . . . . . . . . . . . . . . . . . . . . . . . . . . . . . . . . . . . . . . . . . . . . . . . . . . . . . . . . . . . . . 3-21Cab Light . . . . . . . . . . . . . . . . . . . . . . . . . . . . . . . . . . . . . . . . . . . . . . . . . . . . . . . . . . . . . . . . . . . . . . . . . . 3-21Coat Hanger Hook . . . . . . . . . . . . . . . . . . . . . . . . . . . . . . . . . . . . . . . . . . . . . . . . . . . . . . . . . . . . . . . . . . . 3-21Rear Right-hand Side Window . . . . . . . . . . . . . . . . . . . . . . . . . . . . . . . . . . . . . . . . . . . . . . . . . . . . . . . . . . 3-22Cup Holder . . . . . . . . . . . . . . . . . . . . . . . . . . . . . . . . . . . . . . . . . . . . . . . . . . . . . . . . . . . . . . . . . . . . . . . . . 3-22Storage Tray . . . . . . . . . . . . . . . . . . . . . . . . . . . . . . . . . . . . . . . . . . . . . . . . . . . . . . . . . . . . . . . . . . . . . . . 3-22Storage Compartments . . . . . . . . . . . . . . . . . . . . . . . . . . . . . . . . . . . . . . . . . . . . . . . . . . . . . . . . . . . . . . . 3-22Cab Radio . . . . . . . . . . . . . . . . . . . . . . . . . . . . . . . . . . . . . . . . . . . . . . . . . . . . . . . . . . . . . . . . . . . . . . . . . 3-23Fuse Box . . . . . . . . . . . . . . . . . . . . . . . . . . . . . . . . . . . . . . . . . . . . . . . . . . . . . . . . . . . . . . . . . . . . . . . . . . 3-24Windshield . . . . . . . . . . . . . . . . . . . . . . . . . . . . . . . . . . . . . . . . . . . . . . . . . . . . . . . . . . . . . . . . . . . . . . . . . 3-25
Opening . . . . . . . . . . . . . . . . . . . . . . . . . . . . . . . . . . . . . . . . . . . . . . . . . . . . . . . . . . . . . . . . . . . . . . . . . 3-25Closing . . . . . . . . . . . . . . . . . . . . . . . . . . . . . . . . . . . . . . . . . . . . . . . . . . . . . . . . . . . . . . . . . . . . . . . . . . 3-25
Lower Front Window . . . . . . . . . . . . . . . . . . . . . . . . . . . . . . . . . . . . . . . . . . . . . . . . . . . . . . . . . . . . . . . . . 3-26Air Vents . . . . . . . . . . . . . . . . . . . . . . . . . . . . . . . . . . . . . . . . . . . . . . . . . . . . . . . . . . . . . . . . . . . . . . . . . . 3-27Rear Window . . . . . . . . . . . . . . . . . . . . . . . . . . . . . . . . . . . . . . . . . . . . . . . . . . . . . . . . . . . . . . . . . . . . . . . 3-27Rear View Mirrors . . . . . . . . . . . . . . . . . . . . . . . . . . . . . . . . . . . . . . . . . . . . . . . . . . . . . . . . . . . . . . . . . . . 3-28Fuel Tank . . . . . . . . . . . . . . . . . . . . . . . . . . . . . . . . . . . . . . . . . . . . . . . . . . . . . . . . . . . . . . . . . . . . . . . . . . 3-29Engine Hood . . . . . . . . . . . . . . . . . . . . . . . . . . . . . . . . . . . . . . . . . . . . . . . . . . . . . . . . . . . . . . . . . . . . . . . 3-29Side Doors . . . . . . . . . . . . . . . . . . . . . . . . . . . . . . . . . . . . . . . . . . . . . . . . . . . . . . . . . . . . . . . . . . . . . . . . . 3-30Towing Point . . . . . . . . . . . . . . . . . . . . . . . . . . . . . . . . . . . . . . . . . . . . . . . . . . . . . . . . . . . . . . . . . . . . . . . 3-31Lifting Eyes . . . . . . . . . . . . . . . . . . . . . . . . . . . . . . . . . . . . . . . . . . . . . . . . . . . . . . . . . . . . . . . . . . . . . . . . 3-31Windshield Washer Reservoir . . . . . . . . . . . . . . . . . . . . . . . . . . . . . . . . . . . . . . . . . . . . . . . . . . . . . . . . . . 3-32
3-1LBX Company, LLC

CHAPTER 3 - INSTRUMENTS AND CONTROLS
3-2 LBX Company, LLC

CHAPTER 3 - INSTRUMENTS AND CONTROLS
CAB
To open the door, use the handle (1) from the outside and use the handle (2) from the inside.
LBX004 Figure 1
LBX005 Figure 2
The door can be latched in completely open position. To unlatch the door, push the lever (3) downward.
LBX007 Figure 3
WARNING: Be careful not to get your hand or anything caught in the door when closing it.
WARNING: Do not leave the door ajar. Fix it in a latched position.
1
2
3
3-3LBX Company, LLC

CHAPTER 3 - INSTRUMENTS AND CONTROLS
STEPS AND ACCESS HANDLES
LBX012 Figure 4
When gett ing down from or get t ing onto the excavator, use the steps, the tracks and the access handles.
Figure 5
WARNING: Always maintain three point support while getting on and off the excavator and entering or exiting the operator’s cab. A three point support system has been provided that enables a person to use simultaneously two hands and one foot or two feet and one hand while ascending, descending or moving about the excavator.
WARNING: To get in or out of the cab, it is imperative that the upperstructure frame is in line with the undercarriage.
WARNING: Clean the steps and access handles and remove all traces of grease, oil, mud, and (in winter) ice.
WARNING: Never jump down from the excavator. When leaving the excavator or upperstructure, always face the excavator and use the steps and access handles.
3-4 LBX Company, LLC

CHAPTER 3 - INSTRUMENTS AND CONTROLS
POSITION OF THE OPERATOR’S COMPARTMENT CONTROLS AND ACCESSORIES
1-0002E Figure 6
1. OPERATOR'S SEAT 7. FRONT CONSOLE2. GATE LOCK LEVER 8. SINGLE PEDAL TRAVEL (OPTIONAL-NOT SHOWN)3. LEFT-HAND CONSOLE 9. INSTRUMENT PANEL4. FOOT REST 10. CLIMATE CONTROLS - AIR-CONDITIONER5. TRAVEL CONTROL PEDALS 11. RIGHT-HAND CONTROL LEVER6. TRAVEL CONTROL LEVERS 12. LEFT-HAND CONTROL LEVER
1
2
3
4
5
8
6
10
9
7
12
11
WARNING: Before starting the engine, make sure that you are fully aware of the location of and the function of each control. Incorrect operation of the controls can cause serious injuries.
ATTENTION: To start the engine the gate lock lever must be in the down position for the engine to crank.
3-5LBX Company, LLC

CHAPTER 3 - INSTRUMENTS AND CONTROLS
OPERATOR’S SEAT
Figure 7
1
2
3
5
10
4
6
7
8
1
9
1. ARMREST 6. CUP HOLDER2. LUMBAR SUPPORT ADJUSTMENT BULB 7. SEAT BACK ANGLE ADJUSTMENT3. WEIGHT INDICATOR 8. SEAT SLIDE ADJUSTMENT4. SEAT WEIGHT ADJUSTMENT 9. SEAT BACK5. SEAT AND CONSOLE SLIDE ADJUSTMENT 10. HEAD REST
3-6 LBX Company, LLC

CHAPTER 3 - INSTRUMENTS AND CONTROLS
SEAT CONTROLSIMPORTANT: Always stop the machine before attempting to adjust the seat. Put the gate lock lever in the locked position to avoid any unintentional movements of the machine.
Figure 8
SEAT HEIGHT ADJUSTMENT
To adjust the seat height turn the height knob (4) c lockw ise to add he igh t to the sea t , and counterclockwise to lower the seat. The middle of the height knob flips out to turn it, be sure you flip it back when you are done adjusting the seat.
SEAT ADJUSTMENT
To adjust the seat you can move either the seat sliding adjustment (8) or the seat and console sliding adjustment (5) for a better feel working with the control levers and the control pedals. Pull each lever up and move the seat and console as needed.
RECLINING ADJUSTMENT
To adjust the seat back angle pull the seat back angle adjustment lever (7) up and tilt the seat to the proper angle.
To fold the seat forward get out of the seat and pull the lever (7) and fold the seat down.
ARMREST
To adjust the armrest roll the knob (1) under the front of the armrest. The arm rests can be push up to be out of the way if your do not want to use them. Be careful that your arms do not accidentally push a button on either control arm.
HEADREST
To adjust the headrest (10), press the lock switch located at the top of the seat back to adjust the headrest.
LUMBAR SUPPORT
Press the bulb to adjust the amount of lumbar support. To release pressure, press the button right behind the bulb.
SEATBELT
Always fasten your seat belt before operating the machine. See Safety section for details on how to use the seat belt.
4
8
5
71
10
3-7LBX Company, LLC

CHAPTER 3 - INSTRUMENTS AND CONTROLS
RIGHT-HAND CONTROL ARM AND INSTRUMENT PANEL
1-0003E Figure 9
1. INSTRUMENT PANELFor more details, see Instrument panel on the next page.
2. STARTER SWITCHThis switch has four positions, ON (contact), START (eng ine ign i t ion ) , OFF (eng ine shut-down), and ACC (accessory current supply). See Starting the engine in the Operating Instructions section.This key is also used to lock the cab door, the engine hood, the side doors, and the fuel tank cap.
3. ENGINE THROTTLE BUTTONFor more details, see Engine Throttle Controls.If there is no change in engine speed, press and release the engine auto-idle speed selector. See item 10 for more information on the auto-idle switch.
4. RADIOFor more details see the Radio section.
5. STORAGE COMPARTMENT
6. ROCKER SWITCHESFor more details see Optional Controls.
7. 12 VOLT ACCESORY PLUGThis plug is used for any 12 volt accessories, like cd player or a cell phone charger.
8. TRAVEL ALARM SWITCHThis two position switch has “CONT.” which sounds the travel alarm on continuously, and “AUTO OFF” which will sound the travel alarm for 10 seconds then go off. Each time you stop travelling the alarm will reset and the travel alarm will sound for 10 seconds when you travel the machine again.
9. CONTROL ARM TILTING LEVERThis lever controls the angle of the arm.
10. ONE-TOUCH IDLE SPEED SELECTOR This contro l enables engine id le wi thout operating the throttle button. For engine idle, press and release the control and the engine will be in LOW IDLE position. Press once again on the control then release it, the engine returns to its initial speed. See Item 7 on the next page for automatic engine idle.
11. OPTIONAL CONTROLSThese buttons are pre-wired for use with optional auxiliary controls. For more information see Option Controls.
9
1 5 72 3
10
64
8
3-8 LBX Company, LLC

CHAPTER 3 - INSTRUMENTS AND CONTROLS
INSTRUMENT PANEL
Figure 10
1. HORN VOLUME CONTROLThis button controls the volume of the horn. When you press the button a beep will occur and the light will illuminate. If the green light is on then horn is in low, if the light is not illuminated then it is normal volume. The horn volume will remain the same after the engine is shut down.
2. WINDOW WASHER CONTROLWhen pressed this button applies washer fluid to the windshield and turns the wipers on.
WARNING: Do not use the window washer if the reservoir is empty. It can cause damage to the window washer pump.
3. WINDOW WIPERS CONTROLThis button controls the window wipers. There are three settings:I - Intermittent wipers II - Continuous wipers No lights - wipers are off.
IMPORTANT: Do not run the window wipers on a dry window for it can cause damage to the wipers and window.
4. WORKING LIGHT CONTROLThis button controls the working lights on the machine. When the light is on the working lights are on.
5. HOURMETERThis display shows the total elapsed operating time of the engine.
6. TRIP CONTROLThe TRIP button when pressed will show the trip hours for one minute, then return to the hour meter. To reset the trip, hold the button down for two seconds.
7. AUTOMATIC AUTO-IDLE SWITCHWhen the button is pressed a beep will sound and the light will illuminate and it will be in auto-idle mode. The machine will run at idle when the controls are in the neutral position for 5 seconds. When the controls are re-engaged, the engine rpms will return to the previous setting. The machine will stay in the same mode when the engine is turned off.
8. TRAVEL MODE CONTROLThis button toggles between Low speed travel and High speed travel. When the light is off it is in Low speed when the light is on it is in High speed travel. When the engine is shut down it resets to Low speed.
IMPORTANT: It is best to change travel speeds while the machine is not moving, changing speeds while traveling may cause erratic movement of the machine.
9. DISPLAY MONITORFor more details see Computer Monitor Display on the next page.
2 31 4 5
6789
WARNING: The role of the instrument panel is to indicate the state of the excavator and quickly warn the operator in case of any malfunction, through alarms. The instrument panel is not waterproof. Make sure that it does not get wet
3-9LBX Company, LLC

CHAPTER 3 - INSTRUMENTS AND CONTROLS
COMPUTER MONITOR DISPLAY
Figure 11
1. IconThe following icons will be displayed when the machine is in:
2. Operating ModeThis displays the mode of operation the machine is in. There are three modes:A : Applied Power mode H : Heavy mode SP:Speed Priority mode
3. Error CodeThis displays what error is occurring on the machine. If there are multiple errors the machine will flash a different code every 5 seconds.
4. Icon The following icons will be displayed when:
5. Auxiliary Hydraulic Settings Icon.The follow auxiliary hydraulic settings icons will be displayed if the machine is so equipped. For more information see Auxi l iary Hydraul ic Circuits.
6. Fuel Gauge
7. Hydraulic Oil Temperature Gauge
8. Coolant Temperature Gauge
IMPORTANT: Always warm the hydraulic oil and coolant to the second bar before starting work.
78 6
1 32 4 5
Icon Machine condition
Auto-idle
Power boost
Auto warm-up
Engine pre-heat
Icon Machine condition
Anti-theft is activated
Swing lock is activated
Free swing is activated - if equipped
Breaker 1 ~ 5 Settings
Crusher 1 ~ 5 Settings
3-10 LBX Company, LLC

CHAPTER 3 - INSTRUMENTS AND CONTROLS
ANTI-THEFT PROTECTION DEVICEThis excavator is equipped with an anti-theft device.
Contact your local LBX Link-Belt dealer to activate the anti-theft device.
If the anti-theft is activated and the wrong password is entered in the system the machine will:
• Start and stay at idle.
• Travel alarm will sound.
• When the controls are operated the engine will stop.
TO SET PASSWORD
1. After the anti-theft is activated you will get a password display on your monitor
2. To control the cursor use the following buttons:
• A - moves cursor to the left
• B - moves cursor to the right
• C - increases the number
• D - decreases the number
• E - enters the number
3. After you have entered the number hit the travel mode button (E)
4. If the number does not match it will give you an error message in the display.
IMPORTANT: If the number does not match the machine will not operate. Be sure to write down your password so that you don’t forget it. Consult your local LBX Link-Belt dealer if you forget your password or want to change it.
TO ACTIVATE THE ANTI-THEFT
1. After the excavator has been set up for the anti-theft, turn the machine off.
2. With the key in the ON position move the key to the OFF then ON then OFF again within two seconds.
3. The buzzer will sound and the Anti-theft icon will appear in the monitor
4. If you turn off the engine and leave it in the OFF position it will not activate the anti-theft.
A B
C
D
E
3-11LBX Company, LLC

CHAPTER 3 - INSTRUMENTS AND CONTROLS
MESSAGE DISPLAY LISTThe message display in the computer monitor indicates the condition of the machine and warnings. When a warning message is indicated, the warning buzzer will sound.
IMPORTANT: When the warning buzzer sounds be sure to follow the inspection and maintenance described in this section. If the warning continues to be present consult your LBX Link-Belt Dealer for further service instructions. Figure 12
BuzzerSound
BuzzerTime
Message display Meaning and Measures to be taken
No None At each 500 hour interval a service due warning will appear, for five times at start up. Follow the maintenance due section at the corresponding hour in the maintenance section.
Continuous 5 secs.
Indicates there is only one bar on the fuel gauge. Add diesel fuel immediately to avoid any damage to the engine.
Coolant level is low. Check coolant level and add if needed.
Indicates the oil pressure is low, stop the machine and check the oil level. Add oil if needed. If the oil level is correct consult your LBX Link-Belt dealer.
Indicates the engine coolant or the hydraul ic oi l temperature is too high. Change the throttle to idle and check the hydraulic oil level and coolant level.
Indicates problem with the charge system. Check the electrical system for problems.
Indicates an electrical problem. Check the electrical system for problems.
Indicates the air filter is clogged. Clean or change the air filter.
Indicates a problem in the electrical system of the engine. Check the circuits.
Indicates the boost air temperature is high. The machine will go to low idle. Quit the operation you are on but keep the machine running. If the temperature rises then the engine will shut off.
Indicates the return filter is clogged. Replace the element.
3-12 LBX Company, LLC

CHAPTER 3 - INSTRUMENTS AND CONTROLS
Beeps Once Anti-theft is turned on. For instructions on how to turn anti-theft on/off see Anti-Theft section.
Beeps Continuous Indicates the engine stop button is on. Press the engine stop button again to turn it off.
3-13LBX Company, LLC

CHAPTER 3 - INSTRUMENTS AND CONTROLS
LEFT-HAND CONTROL ARM
CT02C064 Figure 13
1. HORNTo sound the horn, press at the end of the Left-hand control lever.
IMPORTANT: Always sound the horn before operating the excavator.
2. GATE LOCK LEVERThe shape of the gate lock lever was designed to prevent the operator from leaving the operator’s compartment without having raised the lever beforehand. See Gate Lock Lever.
3. ENGINE EMERGENCY STOP SWITCHThis switch kills the engine. The “ENGINE STOP” will appear in the display window and the machine will not start until the switch is pushed again.
4. HEATING, VENTILATION AND AIR-CONDITIONING CONTROL See Heating, Ventilation and Air-Conditioning control for its use.
5. ASHTRAY
6. CONTROL ARM TILTING LEVERThis lever controls the angle of the control arm.
7. RADIO MUTE SWITCHThis button on the bottom side of the control lever will mute the radio. To resume listening to the radio press the button again.
1243
5 6
7
WARNING: To access or exit the operator’s compartment, the gate lock lever must be in the raised position. Never try to avoid this basic requirement.
3-14 LBX Company, LLC

CHAPTER 3 - INSTRUMENTS AND CONTROLS
FRONT CONSOLE
LBX028 Figure 14
1. Air Conditioner Sunlight SensorThis sensor monitors the amount of sunlight that is in the cab along with the temperature inside of the cab.
IMPORTANT: Always check the sensor to make sure nothing is covering it.
2. ClockTo set the clock press the H for the hours and M for the minute. To reset the clock hold the H button in for 5 seconds
3. Storage compartment4. 24 Volt Lighter
With the key in the ACC or ON position, push the lighter in, after a few seconds it should pop back out. When you are finished with it make sure there are no ashes in it and put it back into the plug. Be careful when lighting something for the metal will be very hot.
WARNING: This plug-in is 24 volts. Do not plug anything that runs on 12 volts into this plug for it will damage it. If you need a 12 volt plug it is located in the back right side of the cab on the control panel.
1
2
3
4
3-15LBX Company, LLC

CHAPTER 3 - INSTRUMENTS AND CONTROLS
HEATING, VENTILATION AND AIR-CONDITIONING CONTROL
CT02D158 Figure 15
1. ON/OFFThis push button (1) is for turning the system on or off. When the system is turned on it will operate at the same setting as previous use.
2. AIR-CONDITIONING SWITCHThis switch (2) turns the air-conditioning on/off. When i t is on, the snowflake on the monitor wi l l be illuminated.
3. VENTILATIONThese push buttons (3) allow the air flow to be increased or decreased. To increase the flow of air, press the top button. To decrease the flow of air, press the lower button. The segments increase or decrease on the monitor depending on the flow selected.
4. TEMPERATUREThese push buttons (4) increase or reduce the temperature. To increase the temperature, press the Right -Hand but ton. To decrease the temperature, press the Left-Hand button.
5. RECIRCULATE/FRESH AIRThis button (5) controls whether the air is recirculated or fresh air is pulled in the cab. Each time the button is pressed it changes.
6. AIR FLOW VENT SELECTIONThis button controls what mode and where the air flow is directed. To select which vents are used, press the button (5) on the monitor and it will show the vent selected.
7. WINDSHIELD DEFROSTERThis button (7) allows the windshield to be def rosted. Press the but ton, w indsh ie ld defrosting is carried out. To stop, press the button again, the indicator lamp goes off.
8. AUTO MODEThis button (8) is used to obtain automatic adjustment of the temperature, the volume and the direction of flow of the air. In this case, “Auto” will appear on the display screen (9). In automatic mode, the only possible manual adjustment is to the temperature (4). All other adjustments are made automatically
If any adjustment other than to temperature is made, the automatic mode is cancelled and “Auto” disappears from the display screen, To shut down the system, press buttons (1) or (2).
9. MONITORThe monitor displays the current setting of the system. The snowflake on the monitor means the air conditioner is running. The recirculate or fresh air is displayed. Which direction the air is blowing is shown along with the temperature of the air.
Farrenheit/Celsius ReadoutTo change the display from Fahrenheit to Celsius hold the temp buttons down for 5 seconds to change the display.
IMPORTANT: To ensure correct functioning and full effectiveness of the air conditioner is maintained it must be run once a week even if only for a short time.
1
3
4
5 2
7 8
9
6
Recirculated air
Fresh Air
3-16 LBX Company, LLC

CHAPTER 3 - INSTRUMENTS AND CONTROLS
CONTROL PATTERN SELECTOR VALVEThe X2 is equipped with a control pattern selector valve. The valve is located behind the cab under the air filter.
Selecting the C or the D pattern will determine how the right-hand and left-hand control levers operate.
IMPORTANT: When you select the C or D pattern be sure to change the decal in the window to correspond with the correct letter.
LBX014 Figure 16
To access the control pattern selector valve remove the four thumbscrews (2) and the cover (1).
LBX020 Figure 17
To switch the pattern pull the knob (1) back and push the lever (2) to either the C or D position.
LBX022 Figure 18
IMPORTANT: When you select the C or D pattern be sure to change the decal in the window to correspond with the correct letter.
1
2
1
2
3-17LBX Company, LLC

CHAPTER 3 - INSTRUMENTS AND CONTROLS
ARM AND UPPERSTRUCTURE SWING LEFT-HAND CONTROL LEVER IN PATTERN DThe speed o f movement o f t he a rm o r the upperstructure swing depends on the control lever tilt angle. In the intermediate position both movements can be obtained simultaneously.
1. The arm extends.2. The arm retracts.3. The upperstructure turns towards the left.4. The upperstructure turns towards the right.
NOTE: The movements of the excavator are shown in the Control functions decal. See Decals.
CT02C039 Figure 19
CS98M554 Figure 20
BOOM AND BUCKET RIGHT-HAND CONTROL LEVER IN PATTERN DThe speed of movement of the boom or the tool depends on the control lever ti lt angle. In the intermediate position both movements can be obtained simultaneously.
5. The boom lowers.6. The boom raises.7. The bucket retracts (filling).8. The bucket extends (dumping).
NOTE: The movements of the excavator are shown in the Control functions decal. See Decals.
CT02C040 Figure 21
CS98M554 Figure 22
1
2
3 4
3
2
4
1
5
6
7 8
5
7
6
8
3-18 LBX Company, LLC

CHAPTER 3 - INSTRUMENTS AND CONTROLS
ARM AND UPPERSTRUCTURE SWING LEFT-HAND CONTROL LEVER IN PATTERN CThe speed o f movement o f t he a rm o r the upperstructure swing depends on the control lever tilt angle. In the intermediate position both movements can be obtained simultaneously.
1. The boom lowers.2. The boom raises.3. The upperstructure turns towards the left.4. The upperstructure turns towards the right.
NOTE: The movements of the excavator are shown in the Control functions decal. See Decals.
CT02C039 Figure 23
CS98M554 Figure 24
BOOM AND BUCKET RIGHT-HAND CONTROL LEVER IN PATTERN CThe speed of movement of the boom or the tool depends on the control lever ti lt angle. In the intermediate position both movements can be obtained simultaneously.
5. The arm extends6. The arm retracts.7. The bucket retracts (filling).8. The bucket extends (dumping).
NOTE: The movements of the excavator are shown in the Control functions decal. See Decals.
CT02C040 Figure 25
CS98M554
1
2
3 4
3
2
4
1
5
6
7 8
5
7
6
8
3-19LBX Company, LLC

CHAPTER 3 - INSTRUMENTS AND CONTROLS
TRAVEL CONTROLTravel control is done by using the levers or the pedals. To travel in a straight line, both levers have to be simultaneously operated, either forward or backward. Change of direction is done either by opera t ing a s ing le leve r, o r by opera t ing simultaneously one lever forward and the other backward, so that the excavator pivots on the spot. See Moving the excavator in the Operat ing Instructions section.
IMPORTANT: In the normal travel position, the operator's compartment is above the idler wheels and the travel reduction gears are to the rear of the upperstructure. If the upperstructure is turned 180 degrees in relation to the undercarriage, to move the excavator forward, the levers have to be pulled towards yourself (i.e. in reverse) and vice-versa.
NOTE: The forward or reverse travel speed depends on whether the high speed travel switch is used or not. See High speed travel switch.
NOTE: The movements of the excavator are shown in the Control functions decal. See Decals.
Figure 26
CS98M544 Figure 27
9. The left-hand track moves forward.10. The left-hand track moves backward.11. The right-hand track moves forward.12. The right-hand track moves backward.
SINGLE PEDAL TRAVEL
LBX034 Figure 28
By using the single pedal both tracks will move at the same speed. The pedal is located to the right of the right foot rest if the machine is equipped with it.
9 11
10 12
11
10 12
9
3-20 LBX Company, LLC

CHAPTER 3 - INSTRUMENTS AND CONTROLS
GATE LOCK LEVERThe shape of the gate lock lever was designed to prevent the operator from leaving the operator’s compartment without having raised the lever beforehand.
The gate lock lever cancels the hydraulic controls.
In the raised or locked position, all hydraulic controls are disabled.
To disengage the gate lock and raise the left-hand console for exiting, pull the gate lock lever towards the rear of the machine. The console will return to the same height position when re-engaged.
LBX024 Figure 29
The left-hand control arm is raised along with the gate lock lever for better access.
LBX025 Figure 30
In the lowered position, all hydraulic controls are operational.
CAB LIGHTLocated on top of the cab on the left-hand side, the lighting is controlled by a switch built into the lamp bracket.
NOTE: To replace bulbs, see Replacing a bulb in the Electrical system section.
LBX014 Figure 31
The light has three positions. In the top position the light will be on all the time. In the middle position it will come on when the door is opened and stay on for 30 seconds. In the bottom position it will stay off.
WARNING: Make sure when you leave the machine for an extended amount of time that the light is in the off position because it will run the battery down.
COAT HANGER HOOKThe coat hanger hook is located on the rear left-hand cab upright.
CT02C059 Figure 32
IMPORTANT: Do not hang anything on the coat hanger that would block your view out the back window or the side window.
WARNING: To access or exit the operator’s compartment, the gate lock lever must be in the raised position. Never forget this basic requirement.
3-21LBX Company, LLC

CHAPTER 3 - INSTRUMENTS AND CONTROLS
CAB DOOR WINDOWTo open the window, pull the handle to the front of the cab.
CT02C060 Figure 33
To close the window, bring the handle back towards the back of the cab.
CUP HOLDERThe cup holder is located on the right-hand side on the front of the console.
LBX027 Figure 34
STORAGE TRAYThe storage tray is located behind the operator’s seat. There is also a clipboard holder on the right side.
LBX028 Figure 35
STORAGE COMPARTMENTSThere are two storage compartments located behind the seat. The one on the right side of the machine (1) i s a warm/coo l box depend ing on what the temperature of the air conditioner or heater is on. The one on the left side (2) is not climate controlled.
LBX029 Figure 36
2
1
3-22 LBX Company, LLC

CHAPTER 3 - INSTRUMENTS AND CONTROLS
CAB RADIOLocated on the right-hand console is a 12 volt radio.
ATTENTION: On the left hand control arm there is a radio mute switch, see page 3-14. If the radio is on and there is no sound coming out of the speakers check to see if the radio mute is on. Press the button to toggle between mute and unmute.
Figure 37
TO OPERATE:
Turn the key to ACC pos i t i on . Turn the Power/Volume knob (1) to the right for the desired volume. To turn the radio off turn the knob to the left and it will click when it is off.
TO SELECT STATION
First check to see what band (6) the radio is on. There are two bands, MW (medium wave or AM) and FM. Select the station by pressing the manual tuning buttons (5) up or down to get to the station. Press the seek (8) button to find stations that are present in your area.
TO SET A STATION IN THE PRESETS
When you have a station you want to enter in the presets (4) press and hold the number of the preset you want it to be. After about 3 seconds the display will turn the number you have selected. For example 1000MW is preset number 3.
To scan thru the presets select the AST (7) and it will scan thru the preset buttons 1 ~ 6. When you have the station you want to listen to select the AST button again and it will remain on the station you are on.
TREBLE VOLUME
Turn the treble volume to the right to increase the treble and left to decrease it.
CLOCK
To display the clock push the clock button (9). To set the clock push and hold the clock button and use the manual tuning buttons (5) to set the hour (H / \/) and the minutes (M / /\).
SPEAKERS
Located in the back of the cab are two speakers. There is one on the back right side and one located under the cab window catch on the left hand side of the cab.
LBX031 Figure 38
1. Power/Volume knob 2. Tone knob 3. Display
4. Preset buttons 1 ~ 6 5. Manual tuning buttons 6. Band select button
7. Preset scanning button 8. Station seeking button 9. Clock button
2
1
6 7 8 9
35
4
3-23LBX Company, LLC

CHAPTER 3 - INSTRUMENTS AND CONTROLS
FUSE BOXThe fuse box is located behind the seat.
NOTE: To replace a fuse, see Fuses in the Electrical system section.
1-0029 Figure 39
3-24 LBX Company, LLC

CHAPTER 3 - INSTRUMENTS AND CONTROLS
WINDSHIELD
OPENING1. Bring the machine to a complete stop on level
ground if possible. Lock the gate lock lever in the off position to disable the controls.
1-0040 Figure 40
2. Press the release lever (1) to the right to unlock the windshield. The windshield will release into the channel.
1-0041 Figure 41
3. Grab the upper handle (2) and the lower handle (3) securely and raise the window.
1-0042 Figure 42
4. Raise the windshield and press it into the Auto-lock (4) located in the rear left portion of the cab roof to securely fasten the windshield. Keep your hands on the handles until it has been engaged into the auto-lock. Push the windshield back and forth to make sure it is secure in the Auto-Lock.
CLOSING1. Shift the release lever (5) to the left.
1-0042 Figure 43
2. Grab the upper handle (2) and the lower handle (3) securely and slowly lower the window.
1-0041 Figure 44
WARNING: Make sure you follow the instructions below properly. If the windshield is not handled correctly it could slip and injure your fingers or hand.
1
3
2
4
5
3
2
3-25LBX Company, LLC

CHAPTER 3 - INSTRUMENTS AND CONTROLS
3. When the windshield is completely lowered press top handle (7) the top of the windshield.
CT02C086 Figure 45
Make sure the top of the windshield is correctly latched.
LOWER FRONT WINDOWThe lower front window may only be removed when the windshield is open.
1. Pull the window upwards to remove it.
Figure 46
2. Place the window in the storage position provided to the left of the operator's seat and then engage it correctly.
Figure 47
7
3-26 LBX Company, LLC

CHAPTER 3 - INSTRUMENTS AND CONTROLS
AIR VENTSThe air vents are located to the front and rear as well as under the operator's compartment, and allow the circulation and direction of air to be controlled. The air vents are opened and controlled manually.
NOTE: The air vents must always be open when the air conditioning is in use.
Figure 48
Figure 49
REAR WINDOWThe rear window should only be opened in case of emergency.
LBX035 Figure 50
To open the emergency exit pull the ring (1) to release the inner seal. Once the inner seal is completely removed, the window needs to be pushed toward the rear of the machine. Be sure to push the window with a lot of force to knock the window out of the back of the cab.
1
1
3-27LBX Company, LLC

CHAPTER 3 - INSTRUMENTS AND CONTROLS
REAR VIEW MIRRORS IMPORTANT: Before any travel operation, make sure that the rear view mirrors are correctly adjusted.
1-0080 Figure 51
TO INSTALL THE MIRRORS
1. Install the rear view mirror stay (1) to the right front access handle (2) with the two bolts (3).
1-0022 Figure 52
2. Loosen the bolt (4) and attach the mirror to the stay(1).
1-0023 Figure 53WARNING: When transporting the machine make sure the mirrors are not protruding from the machine. Fold the mirrors inward to avoid an accident.
3-28 LBX Company, LLC

CHAPTER 3 - INSTRUMENTS AND CONTROLS
FUEL TANKNOTE: Clean around the fuel cap before refuelling and do not remove the filter located in the filler orifice. See Fuel tank filter in the Maintenance/Adjustments section.
NOTE: In cold weather, use fuel corresponding to the ambient temperature. See the Lubrication/Filters/Fluids section.
IMPORTANT: In cold weather, fill the fuel tank after each working day to prevent the formation of condensation.
Located on the right-hand side of the excavator.
When installing the fuel cap, make sure that it is correctly placed in the notches and then lock it by turning it up against the stop.
NOTE: Use the key switch to lock the fuel cap.
Figure 54
There is a sight gauge on the outside to check the level of the fuel in the tank.
ENGINE HOODTo open, unhook the latch and lift the hood.
LBX044 Figure 55
To close, push the hood up and slide the bar forward to unlatch the hood stay.
Use the key to lock the hood.
WARNING: Never refuel when the engine is running. Never smoke when refuelling.
3-29LBX Company, LLC

CHAPTER 3 - INSTRUMENTS AND CONTROLS
SIDE DOORSLEFT-HAND REAR SIDE DOOR
The door provides access to the batteries, air filter, radiator, and oil cooler.
Use the outside handle to open the door. To hold the doors open, remove the struts from their storage position and install them in the holes provided. When closing, put the struts back into storage position.
Figure 56
When the back door is opened, you can open the front door.
Figure 57
RIGHT-HAND REAR SIDE DOOR
The door provides access to a number of hydraulic components (pumps, filters, etc.).
Figure 58
Figure 59
WARNING: Always install the struts when the doors are open.
WARNING: Before undertaking any travel, make sure the side doors are properly closed.
WARNING: Never leave tools or other objects behind the side doors.
3-30 LBX Company, LLC

CHAPTER 3 - INSTRUMENTS AND CONTROLS
TOWING POINTLocated on the undercarriage in both the front and the back of the excavator.
This point is to be used for towing, see Towing the Excavator.
Make sure that the slings, chains and accessories are in perfect condition and can bear the load to be moved.
Figure 60
LIFTING EYESWhen lifting loads, the slings and chains must be attached to the load handling eye on the bucket.
See Load handling in the Operating Instructions section.
IMPORTANT: This attachment point will only carry the load indicated in the maximum lift capacities table. See Maximum lift capacities tables in the Operating Instructions section.
Figure 61
WARNING: Towing is a delicate maneuver which is always carried out at the risk of the user. The manufacturer's warranty does not apply to incidents or accidents, which occur during towing.
WARNING: It is forbidden to use this point for towing another vehicle.
WARNING: The excavator must be towed very slowly, over a short distance and only if unavoidable.
WARNING: Never weld hooks or lugs on the bottom plate of the bucket for handling operations. The only attachment point which may be used is the bucket eye.
3-31LBX Company, LLC

CHAPTER 3 - INSTRUMENTS AND CONTROLS
WINDSHIELD WASHER RESERVOIR
Figure 62
In Cold weather, add anti-freeze to the windshield washer water.
Never operate the windshield washer control when the reservoir is empty. This could cause damage to the electric pump.
3-32 LBX Company, LLC

CHAPTER 4 - OPERATING INSTRUCTIONS
Chapter 4OPERATING INSTRUCTIONS
TABLE OF CONTENTS
Before Operating the Excavator . . . . . . . . . . . . . . . . . . . . . . . . . . . . . . . . . . . . . . . . . . . . . . . . . . . . . . . . . . 4-3Operating the Excavator . . . . . . . . . . . . . . . . . . . . . . . . . . . . . . . . . . . . . . . . . . . . . . . . . . . . . . . . . . . . . . . 4-3Run-in Period . . . . . . . . . . . . . . . . . . . . . . . . . . . . . . . . . . . . . . . . . . . . . . . . . . . . . . . . . . . . . . . . . . . . . . . . 4-4
After the First 50 Hours . . . . . . . . . . . . . . . . . . . . . . . . . . . . . . . . . . . . . . . . . . . . . . . . . . . . . . . . . . . . . . 4-4After the First 250 Hours . . . . . . . . . . . . . . . . . . . . . . . . . . . . . . . . . . . . . . . . . . . . . . . . . . . . . . . . . . . . . 4-4
Starting the Engine . . . . . . . . . . . . . . . . . . . . . . . . . . . . . . . . . . . . . . . . . . . . . . . . . . . . . . . . . . . . . . . . . . . 4-4Bringing the Excavator up to Operating Temperature . . . . . . . . . . . . . . . . . . . . . . . . . . . . . . . . . . . . . . . . . 4-6
Hydraulic Fluid Warm-up . . . . . . . . . . . . . . . . . . . . . . . . . . . . . . . . . . . . . . . . . . . . . . . . . . . . . . . . . . . . . 4-6Engine Operation . . . . . . . . . . . . . . . . . . . . . . . . . . . . . . . . . . . . . . . . . . . . . . . . . . . . . . . . . . . . . . . . . . . . . 4-6Stopping the Engine . . . . . . . . . . . . . . . . . . . . . . . . . . . . . . . . . . . . . . . . . . . . . . . . . . . . . . . . . . . . . . . . . . . 4-7
In the Event of an Emergency . . . . . . . . . . . . . . . . . . . . . . . . . . . . . . . . . . . . . . . . . . . . . . . . . . . . . . . . . 4-7Operating the Excavator in Cold Weather . . . . . . . . . . . . . . . . . . . . . . . . . . . . . . . . . . . . . . . . . . . . . . . . . . 4-8
Battery . . . . . . . . . . . . . . . . . . . . . . . . . . . . . . . . . . . . . . . . . . . . . . . . . . . . . . . . . . . . . . . . . . . . . . . . . . . 4-8Fuel . . . . . . . . . . . . . . . . . . . . . . . . . . . . . . . . . . . . . . . . . . . . . . . . . . . . . . . . . . . . . . . . . . . . . . . . . . . . . 4-8Engine Oil . . . . . . . . . . . . . . . . . . . . . . . . . . . . . . . . . . . . . . . . . . . . . . . . . . . . . . . . . . . . . . . . . . . . . . . . 4-8Hydraulic Fluid . . . . . . . . . . . . . . . . . . . . . . . . . . . . . . . . . . . . . . . . . . . . . . . . . . . . . . . . . . . . . . . . . . . . . 4-8Coolant Solution . . . . . . . . . . . . . . . . . . . . . . . . . . . . . . . . . . . . . . . . . . . . . . . . . . . . . . . . . . . . . . . . . . . 4-8
Operating the Excavator in Hot Weather . . . . . . . . . . . . . . . . . . . . . . . . . . . . . . . . . . . . . . . . . . . . . . . . . . . 4-8Basic Operation . . . . . . . . . . . . . . . . . . . . . . . . . . . . . . . . . . . . . . . . . . . . . . . . . . . . . . . . . . . . . . . . . . . . . . 4-8Swing Lock . . . . . . . . . . . . . . . . . . . . . . . . . . . . . . . . . . . . . . . . . . . . . . . . . . . . . . . . . . . . . . . . . . . . . . . . . . 4-8Excavator Travel . . . . . . . . . . . . . . . . . . . . . . . . . . . . . . . . . . . . . . . . . . . . . . . . . . . . . . . . . . . . . . . . . . . . . 4-9Transporting the Excavator . . . . . . . . . . . . . . . . . . . . . . . . . . . . . . . . . . . . . . . . . . . . . . . . . . . . . . . . . . . . 4-11
By Rail . . . . . . . . . . . . . . . . . . . . . . . . . . . . . . . . . . . . . . . . . . . . . . . . . . . . . . . . . . . . . . . . . . . . . . . . . . 4-11On a Trailer . . . . . . . . . . . . . . . . . . . . . . . . . . . . . . . . . . . . . . . . . . . . . . . . . . . . . . . . . . . . . . . . . . . . . . 4-11
Unloading the Excavator . . . . . . . . . . . . . . . . . . . . . . . . . . . . . . . . . . . . . . . . . . . . . . . . . . . . . . . . . . . . . . 4-11Lifting the Excavator . . . . . . . . . . . . . . . . . . . . . . . . . . . . . . . . . . . . . . . . . . . . . . . . . . . . . . . . . . . . . . . . . 4-12Operating the Excavator in Water . . . . . . . . . . . . . . . . . . . . . . . . . . . . . . . . . . . . . . . . . . . . . . . . . . . . . . . 4-12Parking the Excavator . . . . . . . . . . . . . . . . . . . . . . . . . . . . . . . . . . . . . . . . . . . . . . . . . . . . . . . . . . . . . . . . 4-12Operating the Excavator on Sloping Ground . . . . . . . . . . . . . . . . . . . . . . . . . . . . . . . . . . . . . . . . . . . . . . . 4-13Towing the Excavator . . . . . . . . . . . . . . . . . . . . . . . . . . . . . . . . . . . . . . . . . . . . . . . . . . . . . . . . . . . . . . . . 4-13Operating the Bucket . . . . . . . . . . . . . . . . . . . . . . . . . . . . . . . . . . . . . . . . . . . . . . . . . . . . . . . . . . . . . . . . . 4-14Lowering the Attachment in the Event of an Excavator Failure . . . . . . . . . . . . . . . . . . . . . . . . . . . . . . . . . 4-15Auxiliary Hydraulic Circuits . . . . . . . . . . . . . . . . . . . . . . . . . . . . . . . . . . . . . . . . . . . . . . . . . . . . . . . . . . . . 4-16
Rocker Switch configurations . . . . . . . . . . . . . . . . . . . . . . . . . . . . . . . . . . . . . . . . . . . . . . . . . . . . . . . . 4-16To Select the Flow Rate of the Pump . . . . . . . . . . . . . . . . . . . . . . . . . . . . . . . . . . . . . . . . . . . . . . . . . . 4-16To Set the Flow Rates: . . . . . . . . . . . . . . . . . . . . . . . . . . . . . . . . . . . . . . . . . . . . . . . . . . . . . . . . . . . . . 4-17
Excavator Storage . . . . . . . . . . . . . . . . . . . . . . . . . . . . . . . . . . . . . . . . . . . . . . . . . . . . . . . . . . . . . . . . . . . 4-18Preparation for Storage . . . . . . . . . . . . . . . . . . . . . . . . . . . . . . . . . . . . . . . . . . . . . . . . . . . . . . . . . . . . . 4-18Periodical Checks . . . . . . . . . . . . . . . . . . . . . . . . . . . . . . . . . . . . . . . . . . . . . . . . . . . . . . . . . . . . . . . . . 4-18
Hydraulic Excavator Quick Coupler Operation . . . . . . . . . . . . . . . . . . . . . . . . . . . . . . . . . . . . . . . . . . . . . 4-19
4-1LBX Company, LLC

CHAPTER 4 - OPERATING INSTRUCTIONS
4-2 LBX Company, LLC

CHAPTER 4 - OPERATING INSTRUCTIONS
BEFORE OPERATING THE EXCAVATOR
Before operating this excavator, be sure to do the following:
1. Check the level of all fluids (engine oil, hydraulic fluid and coolant) and make sure that the fluids and lubricants are suitable for prevai l ing conditions. See Lubrication/Filters/Fluids section and Operating The Excavator In Cold Weather section.
2. Carry out the daily maintenance operations. See Servicing Intervals section.
3. Inspect the excavator, look for any signs of possible leakage and check the hoses. Tighten o r rep lace as necessary. See Maintenance/Adjustments section.
4. See Run-in Period section if the excavator is new or if the engine has been reconditioned.
5. Check the track assemblies. See Tracks in the Maintenance/Adjustments section.
6. Clean the steps and access handles. Grease, oil, mud or ice (in winter) on the steps and access handles can causes accidents. Make sure they are kept clean at all times.
7. Clean or replace any decals which are illegible. See Decals in the Safety/Decals/Hand Signals section.
8. Make sure that the engine hood and the side doors are properly closed and latched.
9. Secure the cab door in either fully closed or fully opened position.
10. Remove any obstructions which hinder visibility. Clean the windshield, the windows and the rear view mirrors.
11. Check that no tools or other items have been left on the excavator (be it on the undercarriage or the uppers t ruc ture) o r in the opera tor 's compartment.
12. Make sure nobody is on or under the excavator. The operator must be alone on the excavator.
13. Make sure nobody is standing in the excavator working area.
14. Find out about current safety measures in use on the work site.
15. Work out a convenient means of escape from the excavator (emergency exit via the windshield, the rear window glass) in the event of the cab door being jammed or the excavator turning over. See Windshield in the Controls/Instruments/ Accessories section.
16. Before undertaking any travel or working operations during hours of darkness, make sure the lighting and signalling equipment is fully operational.
OPERATING THE EXCAVATOR
When operating the excavator, be sure to do the following:
1. When starting the engine, be sure to use the correct procedure for the prevailing weather conditions. See Starting the engine.
2. Regularly consult the hourmeter to ensure that a l l serv ic ing opera t ions are car r ied out punctually. See Servicing Intervals sections.
3. If you use your excavator in particularly harsh conditions, the servicing intervals should be reduced accordingly.
4. Take note of the locations of pipes/cables before starting work.
5. Do not work near overhead high-voltage electric l ines without checking beforehand that all necessary measures have been taken to respect the safest distances:Less than 57 000 volts: 10 feet (3 meters)More than 57 000 volts: 16 feet (5 meters)
6. Always know where any buried lines are and that they are properly marked. See Utility Safety section.
7. When working on a public highway, use standard traffic signs and take into consideration the working range of the upperstructure and its attachments.
8. Never operate the working or travel controls unless you are properly seated in the operator's seat with the seat belt correctly fastened.
9. Modify your operation to suit the type of work and working conditions. See Operating instructions in the Job Site Operation section.
10. Do not allow anyone within the excavator's operating radius. Stop all operations unti l everyone has moved away.
WARNING: Do not attempt to operate this excavator unless you have first read and perfectly understand the safety messages and instructions appearing in this manual.
WARNING: Check all controls and safety devices in a safe, open area before starting work.
4-3LBX Company, LLC

CHAPTER 4 - OPERATING INSTRUCTIONS
11. Operate all controls gradually to ensure smooth excavator operation.
12. See Operating In Water section if the excavator will be standing in water during use.
13. See Transporting The Excavator section when driving the excavator onto a trailer.
14. See Handling The Excavator section when it is necessary to lift the excavator.
15. In some configurations, the working range of the attachment allows the tool to interfere with the excavator. Always maintain a safe minimum distance between the tool and the excavator.
16. Never use the attachment for sweeping the ground to level out rubble or push objects (transversal stress on the attachment).
17. Avoid running the engine in a confined space. If there is no alternative, proper ventilation must be provided at all times.
18. Dust, smoke or mist can reduce visibility and cause an accident. Reduce speed or come to a complete halt until visibility has improved.
19. In the event of an operation problem or failure, move the excavator to a safe place, lower the attachment to the ground, shut down the engine and remove the starter switch key. Locate the problem, report it if necessary and take the necessary steps to warn others not to attempt to operate the excavator.
20. Do not stop the engine without taking prevailing weather conditions into consideration. See Stopping the engine.
21. See Parking the excavator when you have to park the excavator.
22. Whenever load handling operations are to be carried out, it is imperative to adhere strictly to the instructions given in this manual. See Load handling.
23. When traveling with the hydraulic breaker (optional), make sure it is not too close and not pointing in the direction of the cab.
RUN-IN PERIODYour excavator will last longer and will give better and more economical performance if you pay particular attention to the engine during the first twenty hours of operation.
During this period:
Warm up the engine before using it under load.
Do not run the engine for a long period at idle speed.
Frequently check the instruments on the instrument panel.
Check the oil levels and coolant solution level frequently.
During the run-in period, the following checks and servicing operations should be carried out in addition to those specified in the service schedule:
AFTER THE FIRST 50 HOURSReplace the pilot circuit filter and the return filter. See Hydraulic system in the Lubrication/Filters/Fluids section.
Check the pad screws are tightened to the correct torque. See Tracks in the Maintenance/Adjustments section.
Check all nuts and screws are tightened to the correct torque. See Hardware torque inspection in the Maintenance/Adjustments section.
AFTER THE FIRST 250 HOURSChange the oil in the travel reduction gears. See Travel Reduction Gears in the Lubrication/Filters/ Fluids section.
STARTING THE ENGINENOTE: If the excavator has been out of use for some time, see Starting Up After Storage section.
NOTE: If you need to start the engine using a booster battery, see Connecting a booster battery in the Electrical System section.
1. Take up position correctly in the operator's seat with the seat belt correctly fastened. See Operator's Seat in the Controls/Instruments/ Accessories section.
2. Make sure that the control gate lock lever is in the locked position.Sound the horn before starting the engine.
CT02C037 Figure 1
4-4 LBX Company, LLC

CHAPTER 4 - OPERATING INSTRUCTIONS
3. Make sure the engine throttle button is in low idle position.
CT02C188 Figure 2
4. Insert the starter switch key then turn the key to the ON position, check the monitor for any problems.
CT02D268 Figure 3
5. Turn the starter switch key to the START position. Release the key as soon as the engine starts to turn. If the engine stops, wait about a minute and recommence the operation.
IMPORTANT: The engine is equipped with a high pressure fuel system to comply with Tier III engine emissions. Due to this it may take more time to start the engine.
IMPORTANT: Do not operate the starter motor for more than 10 seconds at one time. Do not operate the starter motor when the engine is running.
IMPORTANT: When the engine is running, let it heat up until the low idle mode is steady.
IMPORTANT: When the engine is running, check the monitor for any problems.
6. Lower the gate lock lever.
CT02C192 Figure 4
4-5LBX Company, LLC

CHAPTER 4 - OPERATING INSTRUCTIONS
BRINGING THE EXCAVATOR UP TO OPERATING TEMPERATUREIMPORTANT: Normal operating temperature of the hydraulic fluid is between 122° - 170° F (50°C and 80°C) in the middle of the temperature indicator. If the excavator is used with the hydraulic fluid at a temperature below 68° F (20°C) damage can occur.
After starting the engine and before using the excavator, wait till the temperature of the hydraulic fluid reaches 68° F (20°C) or until the hydraulic temperature reaches two bars(1).
CT02C193 Figure 5
HYDRAULIC FLUID WARM-UPTurn the engine throttle button to half-open position. Operate the bucket control slowly until the bucket is completely closed. Operate the arm retracting control slowly until the arm is completely retracted and hold the control in this position for 30 seconds. During this time the temperature of the hydraulic fluid will increase.
After 30 seconds, extend the arm completely and hold the control in this position a further 30 seconds.
Repeat this operation of retraction and extension of the arm until the temperature increases.
Operate the travel and attachment controls three or four times to activate hydraulic fluid circulation.
ENGINE OPERATIONWhen the engine has started and before beginning work, the following procedure must be observed:
1. Let the engine idle for about five minutes until it has warmed up.
2. Move the engine throttle button to the maximum speed position.
Once normal operating temperature has been reached, check the following:
1. The exhaust smoke is normal.2. There is no abnormal noise or vibration.3. There are no oil, fuel or water leaks.
The operating speed of the excavator and of the attachment should be controlled by means of the control levers.
Check the monitor for any problems.
IMPORTANT: Stop the engine immediately if one of the following situations occurs:
1. Sudden increase or decrease in engine speed.2. Abnormal noise.3. Black smoke at the exhaust.4. Any engine warnings on the monitor.
4-6 LBX Company, LLC

CHAPTER 4 - OPERATING INSTRUCTIONS
STOPPING THE ENGINE1. Park the excavator on flat, solid ground and
lower the attachment to the ground2. Turn the engine throttle button to low idle position
and let the engine run for 5 minutes.
IMPORTANT: Always let the engine run at idle before switching off completely, except in emergency situations.
CT02C194 Figure 6
3. Turn the starter switch key to the OFF position then remove it.
IMPORTANT: When the engine is to be shut down for a considerable length of time, see Parking the Excavator section.
IN THE EVENT OF AN EMERGENCYThis switch, located on the left hand control arm, enables the engine to be shut down in case of an emergency or when it is not possible to shut it down using the starter switch key. When the button is pressed the engine shuts down, the audible alarm device sounds, ENGINE STOP is displayed in the monitor, and the button lights up.
To restart the engine, push the button and turn the starter switch key.
IMPORTANT: This switch should only be used in case of an emergency. Do not use it on a day-to-day basis.
CT02C052 Figure 7
4-7LBX Company, LLC

CHAPTER 4 - OPERATING INSTRUCTIONS
OPERATING THE EXCAVATOR IN COLD WEATHERFollow the following recommendations:
BATTERYIt must be fully charged.
FUEL1. To prevent condensation forming and water
getting into the fuel system, fill the fuel tank after each day's work and drain off any water before starting the next day's work.
2. To prevent crystals forming at -2°C, use fuel which is rated for the ambient temperature or add an appropriate antifreeze to the fuel. See the Lubrication/Filters/Fluids section.
ENGINE OILIt should be of the right viscosity for the ambient temperature. See the Lubrication/Filters/Fluids section.
HYDRAULIC FLUIDThe viscosity must correspond to the ambient temperature conditions. See the Lubrication/Filters/ Fluids section.
COOLANT SOLUTIONIt should be suitable for the ambient temperature and contain a minimum of 50% ethylene glycol solution. See the Lubrication/Filters/Fluids section.
OPERATING THE EXCAVATOR IN HOT WEATHERFollow the recommendations made below:
1. Keep the coolant at the correct level in the coolant reservoir and in the radiator.
2. Use the correct solution of ethylene glycol and water in the cooling system.
3. Test the radiator cap before hot weather starts. Replace the cap as required.
4. Clean all dirt and debris from the radiator, cooler and engine area.
5. Check the condition of the fan drive belt.6. Check the dust valve in the air cleaner frequently
during extreme dust conditions.7. Use lubricants of the correct viscosity. See Fluids
and Lubricants section.
BASIC OPERATION1. Take up position in the operator's seat and adjust
it so that all the controls are readily accessible. See Operator's Seat section. Then fasten your safety belt.
2. Make sure the cab door is firmly latched in open or closed position.
3. Start the engine, taking into consideration the prevailing weather conditions. See Starting the Engine section.
4. Check all instruments are operating correctly.5. Sound the horn.6. Lower the gate lock lever.7. Try out all the controls in a safe, open area.
SWING LOCKThe swing lock can be set to keep the upperstructure from swinging.
TO SET THE SWING LOCK
1. On the control panel press and hold the Auto-idle, working light, and the horn control for three seconds.
Figure 8
2. P will appear on the monitor.
3. To turn the swing lock off press the three buttons again to reset the lock.
4-8 LBX Company, LLC

CHAPTER 4 - OPERATING INSTRUCTIONS
EXCAVATOR TRAVEL
IMPORTANT: Before any travel operation, raise the attachment.
NOTE: Travel speed depends on the tilting angle of the levers and the travel mode speed selected. See High Speed Travel Switch in Instruments and Controls.
1. Straight line travel (Forward Travel)Press the two pedals (or push the two levers) forward at the same time.
CS98M546 Figure 9
2. Straight line travel (Reverse Travel)Press the two pedals (or push the two levers) rearward at the same time.
CS98M547 Figure 10
3. Turning to the left (Forward Travel)
Simply press the r ight-hand pedal or the right-hand lever forward.
CS98M548 Figure 11
4. Turning to the right (Forward Travel)Simply press the left-hand pedal or the left-hand lever forward.
CS98M551 Figure 12
5. Turning to the left (Reverse Travel)Simply press the r ight-hand pedal or the right-hand lever rearward.
CS98M549 Figure 13
WARNING: In the normal travel position, the operator's compartment is above the idler wheels and the travel reduction gears are to the rear of the upperstructure. If the upperstructure is turned 180 degrees in relation to the undercarriage, the controls are reversed.
4-9LBX Company, LLC

CHAPTER 4 - OPERATING INSTRUCTIONS
6. Turning to the right (Reverse Travel)
Simply press the left-hand pedal or the left-hand lever rearward.
CS98M550 Figure 14
7. Turning on the spot, to the rightPress the left-hand pedal or the left-hand lever forward and at the same t ime press the r ight -hand pedal or the r ight -hand lever rearward.
CS98M552 Figure 15
8. Turning on the spot, to the left
Press the right-hand pedal or the right-hand lever forwards and at the same t ime press the left-hand pedal or the left-hand lever rearwards.
IMPORTANT: Turning on the spot cannot be done if high speed travel is selected.
CS98M553 Figure 16
9. Gradual turn on the movePress one of the pedals or one of the levers and, at the same time, press the other pedal or the other lever in the same direction, but slightly harder.Stopping travelTo come to a complete halt, simply release the levers or pedals and they will return to neutral.
CS98M545 Figure 17
4-10 LBX Company, LLC

CHAPTER 4 - OPERATING INSTRUCTIONS
TRANSPORTING THE EXCAVATOR
BY RAILSince t ransport by ra i l is subject to specia l regulations, consult an approved organization.
ON A TRAILER
Make sure you know the safety rules and regulations before transporting the excavator. Make sure both trailer and excavator are fitted with the right safety equipment.
1. Place a block (1) behind the trailer wheels. Install the trailer side extensions (if equipped). Make sure the angle (2) of the extension is not over 15°.
Figure 18
2. Place the excavator in line with the trailer, with the travel reduction gears toward the access ramps. Raise the attachment and bring it to about 8” (20 cm) above the bed of the trailer
3. Turn the throttle down to the low position and make sure you are in the low speed travel mode.
4. When moving from the ramps onto the trailer bed, raise the boom slightly as soon as the attachment touches the trailer so as to bring the excavator level and then move forward until the excavator is resting entirely on the trailer.
5. When the excavator is completely on the trailer, raise the attachment slightly and swing the upperstructure so as to bring the attachment round to the access ramp side.
6. Place the excavator completely in front of the trailer so that the attachment can rest on the floor of the trailer.
7. Shut down the engine, remove the starter switch key, raise the gate lock lever.
8. Make sure that all doors, hoods and access panels are correctly locked.
9. Fold the rear view mirrors inwards.10. Use blocks and chains to fasten the excavator to
the trailer.
PDF0360 Figure 19
11. Excavator is now ready for transport
Measure the distance between the ground and the highest point of the excavator. You must know the overall height. See Excavator Overall Dimensions section.
UNLOADING THE EXCAVATOR1. Remove the blocks and fastening chains.2. Start the engine.3. Lower the gate lock lever.4. Raise the attachment to bring it a few inches
above the trailer bed.5. Move slowly while raising the attachment so as
to maintain it a few inches above the ground.6. Turn the rear view mirrors back to their correct
position.
WARNING: This excavator could slip and fall from a trailer or ramp and cause serious injury. Make sure the trailer and ramps are clean. The excavator should be in line with the trailer before being loaded.
WARNING: Be sure to turn the Auto-idle off to avoid the throttle changing while trying to load the machine.
12
4-11LBX Company, LLC

CHAPTER 4 - OPERATING INSTRUCTIONS
LIFTING THE EXCAVATORBefore lifting the machine always consult with your LBX Link-Belt Dealer for any special circumstances with your machine.
IMPORTANT: Before handling the excavator, make sure the slings are in perfect condition and that they are capable of supporting the weight of the excavator.
1. Fully extend the bucket and the arm cylinder. Lower the boom slowly. Turn off the engine.
Figure 20
2. Use a wire rope with a sufficient strength for lifting, and route the wire thru the lifting points(3). Use a supporting bar (2) that will keep the rope away from the machine. Make sure the lifting angle(4) is between 30° and 40°.
Figure 21
3. Slowly lift the machine off the ground, check to make sure the wire is not rubbing on the machine and check the condition of the hook.
OPERATING THE EXCAVATOR IN WATER
1. Make sure that the bottom of the stream, or stretch of water in which you will work, can support the weight of the excavator.
2. Only the undercarriage may be below water level. The maximum water level can be up to the height of the tracks.
IMPORTANT: Never work in water if the water level is higher than the tracks.
3. Before immersing the excavator, inject large quantities of fresh grease into the attachment linkages and also on the turntable and its gear teeth.
IMPORTANT: Do not operate in a fast flowing stream.
Figure 22
PARKING THE EXCAVATOR1. Position the excavator on flat, level ground.2. Place the upperstructure in line with the
undercarriage.3. Lower the attachment to the ground.4. Turn the engine throttle button to low idle position
and let the engine run for approximately five minutes.
5. Shut down the engine and remove the key.6. Raise the gate lock lever.7. Lock the operator's compartment door and make
sure that the hoods, lower panels and side doors are properly fastened.
8. Check that no part of the excavator is encroaching on the highway. If this cannot be avoided, set up approved traffic signs.
WARNING: Do not allow anyone near or under the excavator when lifting.
2
14
3
2
1
WARNING: Never jump down from the excavator. When leaving from the operator's compartment, or from the upperstructure, always face the excavator and use the steps and access handles.
4-12 LBX Company, LLC

CHAPTER 4 - OPERATING INSTRUCTIONS
OPERATING THE EXCAVATOR ON SLOPING GROUND
During hillside operations, be extra careful.
Make sure that the low speed travel is selected.
When digging on a slope, avoid swinging the upperstructure towards the bottom of the slope with the backhoe bucket full. Always keep the travel reduction gears pointing down towards the bottom of the slope.
Always travel in the same direction as the slope, to prevent the excavator from turning over.
TOWING THE EXCAVATORTowing is only authorized when the excavator has broken down.
Contact your local LBX Link-Belt dealer for proper towing procedures.
First, make sure that it can be towed without risk of further damage.
As far as possible try to carry out repairs on spot or contact your LBX Link-Belt dealer.
WARNING: Hillside operations can be dangerous. Rain, snow, ice, loose gravel, soft ground, etc. modify terrain conditions. It is up to you to decide if the excavator can be used in perfect safety.
WARNING: Towing is a delicate maneuver which is always carried out at the risk of the user. The manufacturer's warranty does not apply to incidents or accidents which occur during towing. Where possible, carry out the repairs at the site.
WARNING: The excavator must be towed very slowly, over a short distance and only if it is really unavoidable.
WARNING: The operator must be the only person on the excavator when towing. Make sure that nobody else is on the excavator or within its working range.
4-13LBX Company, LLC

CHAPTER 4 - OPERATING INSTRUCTIONS
OPERATING THE BUCKETFilling
Fill the bucket by maneuvering the arm. Keep the bottom of the bucket parallel to the cut. The bucket teeth and blade must cut the ground like the blade of a knife. The depth of dig varies depending on the type of material.
Excavating method
PDH0493M Figure 23
PDH0494M Figure 241. CORRECT2. INCORRECT. THE BUCKET WILL DIG IN AND CAUSE A STALL3. INCORRECT. THE BUCKET IS PUSHED UPWARDS. THIS WILL ALSO INCREASE THE CYCLE TIME
321
4-14 LBX Company, LLC

CHAPTER 4 - OPERATING INSTRUCTIONS
LOWERING THE ATTACHMENT IN THE EVENT OF AN EXCAVATOR FAILUREIf the engine fails, use the following procedure to lower the attachment:
1. Turn the starter switch key to the ON position.
LBX052 Figure 25
2. Lower the gate lock lever.
LBX025 Figure 26
3. Place the control lever in the position corresponding to the downward movement required.
LBX025 Figure 27
4-15LBX Company, LLC

CHAPTER 4 - OPERATING INSTRUCTIONS
AUXILIARY HYDRAULIC CIRCUITSIf the excavator came equipped with auxiliary hydraulics, it has two types of auxiliary hydraulic circuits. One circuit is for single acting equipment, such as hydraulic breakers. The second type of circuit is designed for double acting use such as crushers or thumbs. The machine can be ordered with single acting hydraulics, multi-function hydraulics, and thumb hydraulics. The rocker switch configuration for multi-function hydraulics and thumb hydraulics are the same.
ROCKER SWITCH CONFIGURATIONS
AUXILIARY HYDRAULIC CONTROLS
IMPORTANT: Always test the controls in a safe location before starting work.
On the glass above the control panel is a label showing how the auxiliary controls function.
Figure 28
Consult your LBX Link-Belt dealer or attachment manufacturer for more information on the auxiliary hydraulic controls.
TO SELECT THE FLOW RATE OF THE PUMPWhen using a special attachment, the flow rate of the pump is controlled by the rocker switch mounted on the right panel.
There are 5 programmed flow rates for each of the pump settings.
LBX069 Figure 29
When you select either crusher (1) or breaker (2) mode it is displayed on the monitor. In figure 29 crusher 1 is the mode the machine is in.
SINGLE ACTING HYDRAULICS
BREAKER MODE - When operating a breaker, press the switch illustrated to select the flow rate meeting the breaker specifications.
MULTI-FUNCTION HYDRUALICS & THUMB HYDRAULICS
1. CRUSHER MODE - When operating a crusher, press the switch illustrated to select the flow rate meeting crusher specifications.
2. BREAKER MODE - When operating a breaker, press the switch illustrated to select the flow rate meeting the breaker specifications
3. ON - When the rocker is ON two pump flow is selected.
4. OFF - When the rocker is OFF single pump flow is selected.
1
2
3
4
4-16 LBX Company, LLC

CHAPTER 4 - OPERATING INSTRUCTIONS
LBX008 Figure 30
When the rocker switch is pressed again you will be in a different mode and it will display what the maximum flow is. There are 5 different settings for the crusher and the breaker.
LBX071 Figure 31
TO SET THE FLOW RATES:
LBX008 Figure 32
1. Push the rocker switch in the mode you want to change and hold it for 3 seconds.
2. On the display screen it will show the flow rate of the selected. For Figure 33 it shows the flow rate for Breaker 2.
LBX070 Figure 33
3. There are 10 possible flow rates that can be programmed in for the different pumps.
4. To scroll though the different flow rates press the window wiper button (1) or the auto-idle button (2). To accept the setting press the rabbit (3) button.
LBX010 Figure 34
1 Pump
2 Pumps
P System Pressure
1
2
PatternFlow Rate (gpm)
1 Pump 2 Pumps
1 13 75
2 20 82
3 26 88
4 31 93
5 37 99
6 42 104
7 48 110
8 53 115
9 57 119
10 61 123
1
2
3
4-17LBX Company, LLC

CHAPTER 4 - OPERATING INSTRUCTIONS
EXCAVATOR STORAGE
PREPARATION FOR STORAGEThe following procedure applies when the excavator is to be stored for a month or more. Store the excavator on flat, level ground, inside a building. If a building is not available, park the excavator in a dry area on planks and cover the excavator with a waterproof covering. Before storing the excavator, carry out the following operations:
1. Clean the excavator.2. Retract the arm cylinder rod as far as possible
and lower the boom until the attachment is resting on the ground.
3. Grease the excavator thoroughly. The exposed surfaces of the cylinder rods should be greased or covered with a protective film. See your LBX Link-Belt dealer.
NOTE: When the excavator resumes service, the film will disappear automatically.
4. Drain the fuel tank and fill with a mixture of 90% diesel fuel and 10% anti-corrosive oil. Run the engine at idle speed for five minutes to allow the anti-corrosive oil to reach the lines, filters, pump and injectors.
5. While the engine is still warm, drain the oil sump, fill with anti-corrosive oil and replace the engine oil filter.
6. When the engine is cold, clean the outer parts of the engine with diesel fuel.
7. Clean or replace the air filter element.8. Drain the cooling system, leave the drain valves
open and do not tighten the radiator cap.9. Remove the batteries, clean the battery housings
and make sure not to leave any traces of acid. Store the batteries in a cool, dry place, where temperature is always above freezing.
10. Paint any areas where the paintwork is not good.11. Plug the air filter inlet and the exhaust pipe.12. Remove the starter switch key and place a DO
NOT OPERATE label on the right-hand control arm and then raise the gate lock lever (safety bar in inward position).
13. Lock the hoods and the cab door.
PERIODICAL CHECKSEvery month, check:
1. The electrolyte level in the batteries and the battery charge. Recharge the batteries i f necessary.
2. The grease on the cylinder rods.3. The fuel level in the fuel tank and the corrosive
oil level in the engine. Add more if necessary.4. The condition of all lines, connectors and clamps
(rust). Grease if necessary.5. The condition of the paintwork. Apply a coat of
anti-rust treatment where necessary.
STARTING UP AFTER STORAGE
1. Close the drain valves and fill the cooling system.
2. Drain the fuel tank and fill with clean diesel fuel.
3. Drain the engine sump, fill with clean engine oil and check the oil level.
4. Change the fuel filter.
5. Install the batteries.
6. Grease the excavator thoroughly.
7. Check the condition of the fan drive belt and replace it if necessary.
8. Check the hydraulic fluid level and add more fluid if necessary.
9. Check the travel reduction gears oil level and add more oil if necessary.
10. Clean the cylinder rods.
11. Unplug the air filter inlet and the exhaust pipe.
12. Remove the “Do Not Operate” tag and start the engine, following the starting up procedure.
13. Keep a careful watch on all systems display panel lamps and indicators.
WARNING: Check the excavator for leaks or for any parts that are broken, defective or missing.
WARNING: Before starting the engine, make sure that all controls are in neutral position. This prevents the excavator from moving unexpectedly or an electrical appliance from starting up.
WARNING: Avoid running the engine in a confined place. Make sure there is adequate ventilation at all times.
!
!
!
4-18 LBX Company, LLC
CHAPTER 4 - OPERATING INSTRUCTIONS
HYDRAULIC EXCAVATOR QUICK COUPLER OPERATIONQuick couplers provide quick and easy removal and reinstallation of buckets, breakers, hammers rippers, and other devices on the end of an excavator arm. Wi th th is conven ience however comes the responsibility to ensure that these attachments are properly secured and cannot accidental ly or inadvertently be dropped thus placing nearby workers in harms way.• Read, understand, and follow the operating and
safety instructions that are provided by the coupler manufacturer.
• Follow the coupler manufacturer’s instructions for ensuring that the bucket, breaker, hammer, ripper, or other device has been properly coupled to the excavator’s arm.
• Conduct the coupler manufacturer’s test to ensure that the bucket, breaker, hammer, ripper, or other device has been properly coupled to the excavator’s arm. Conduct this test each time you remove or reinstate an attachments.
• Never swing the bucket, breaker, hammer, ripper, or other device over workers and never let them under the bucket, breaker, hammer, ripper, or other device.
• Always use and install the independent secondary retention system.
• Only use quick couplers that are recommended and sized for your excavator.
• Remember that quick couplers decrease the lift capacity of your excavator. When lifting large or awkward loads use the lifting eye on the coupler and release and place the bucket, breaker, hammer, ripper, or other device on the ground.
• Remember that quick couplers change the working ranges and the reach of the excavator. The bucket, breaker, hammer, ripper, or other device could come in contact with the operator’s cab or boom.
• Do not lift loads with the bucket, breaker, hammer, ripper, or other device until the operational safety checks have been conducted to ensure that the bucket, breaker, hammer, ripper, or other device had been properly coupled to the excavator’s arm.
4-19LBX Company, LLC

CHAPTER 4 - OPERATING INSTRUCTIONS
NOTES
4-20 LBX Company, LLC

CHAPTER 5 - LUBRICATION, FILTERS, AND FLUIDS
Chapter 5LUBRICATION, FILTERS, AND FLUIDS
TABLE OF CONTENTS
Servicing Instructions . . . . . . . . . . . . . . . . . . . . . . . . . . . . . . . . . . . . . . . . . . . . . . . . . . . . . . . . . . . . . . . . . . 5-3Daily Inspections . . . . . . . . . . . . . . . . . . . . . . . . . . . . . . . . . . . . . . . . . . . . . . . . . . . . . . . . . . . . . . . . . . . . . 5-4Hourmeter . . . . . . . . . . . . . . . . . . . . . . . . . . . . . . . . . . . . . . . . . . . . . . . . . . . . . . . . . . . . . . . . . . . . . . . . . . 5-4Lubrication Chart . . . . . . . . . . . . . . . . . . . . . . . . . . . . . . . . . . . . . . . . . . . . . . . . . . . . . . . . . . . . . . . . . . . . . 5-5Fluids and Lubricants . . . . . . . . . . . . . . . . . . . . . . . . . . . . . . . . . . . . . . . . . . . . . . . . . . . . . . . . . . . . . . . . . . 5-6
Engine Oil . . . . . . . . . . . . . . . . . . . . . . . . . . . . . . . . . . . . . . . . . . . . . . . . . . . . . . . . . . . . . . . . . . . . . . . . 5-6Fuel . . . . . . . . . . . . . . . . . . . . . . . . . . . . . . . . . . . . . . . . . . . . . . . . . . . . . . . . . . . . . . . . . . . . . . . . . . . . . 5-6Coolant Solution . . . . . . . . . . . . . . . . . . . . . . . . . . . . . . . . . . . . . . . . . . . . . . . . . . . . . . . . . . . . . . . . . . . 5-7Environment . . . . . . . . . . . . . . . . . . . . . . . . . . . . . . . . . . . . . . . . . . . . . . . . . . . . . . . . . . . . . . . . . . . . . . 5-7
Fluid and Lubricant Capacities and Specifications . . . . . . . . . . . . . . . . . . . . . . . . . . . . . . . . . . . . . . . . . . . 5-8Lubrication Points . . . . . . . . . . . . . . . . . . . . . . . . . . . . . . . . . . . . . . . . . . . . . . . . . . . . . . . . . . . . . . . . . . . . 5-9
Boom / Arm / Bucket Lubrication . . . . . . . . . . . . . . . . . . . . . . . . . . . . . . . . . . . . . . . . . . . . . . . . . . . . . . . 5-9Excavator Lubrication Points . . . . . . . . . . . . . . . . . . . . . . . . . . . . . . . . . . . . . . . . . . . . . . . . . . . . . . . . . 5-10
Greasing the Turntable Teeth . . . . . . . . . . . . . . . . . . . . . . . . . . . . . . . . . . . . . . . . . . . . . . . . . . . . . . . . . . 5-11Fluid Levels . . . . . . . . . . . . . . . . . . . . . . . . . . . . . . . . . . . . . . . . . . . . . . . . . . . . . . . . . . . . . . . . . . . . . . . . 5-12Engines . . . . . . . . . . . . . . . . . . . . . . . . . . . . . . . . . . . . . . . . . . . . . . . . . . . . . . . . . . . . . . . . . . . . . . . . . . . 5-13
Service Specifications . . . . . . . . . . . . . . . . . . . . . . . . . . . . . . . . . . . . . . . . . . . . . . . . . . . . . . . . . . . . . . 5-13Level . . . . . . . . . . . . . . . . . . . . . . . . . . . . . . . . . . . . . . . . . . . . . . . . . . . . . . . . . . . . . . . . . . . . . . . . . . . 5-13Draining, Replacing the Oil Filter, and Filling . . . . . . . . . . . . . . . . . . . . . . . . . . . . . . . . . . . . . . . . . . . . 5-13
Cooling System . . . . . . . . . . . . . . . . . . . . . . . . . . . . . . . . . . . . . . . . . . . . . . . . . . . . . . . . . . . . . . . . . . . . . 5-15Service Specifications . . . . . . . . . . . . . . . . . . . . . . . . . . . . . . . . . . . . . . . . . . . . . . . . . . . . . . . . . . . . . . 5-15Coolant Solution . . . . . . . . . . . . . . . . . . . . . . . . . . . . . . . . . . . . . . . . . . . . . . . . . . . . . . . . . . . . . . . . . . 5-15Level . . . . . . . . . . . . . . . . . . . . . . . . . . . . . . . . . . . . . . . . . . . . . . . . . . . . . . . . . . . . . . . . . . . . . . . . . . . 5-15Draining . . . . . . . . . . . . . . . . . . . . . . . . . . . . . . . . . . . . . . . . . . . . . . . . . . . . . . . . . . . . . . . . . . . . . . . . . 5-15Rinsing . . . . . . . . . . . . . . . . . . . . . . . . . . . . . . . . . . . . . . . . . . . . . . . . . . . . . . . . . . . . . . . . . . . . . . . . . . 5-16Filling . . . . . . . . . . . . . . . . . . . . . . . . . . . . . . . . . . . . . . . . . . . . . . . . . . . . . . . . . . . . . . . . . . . . . . . . . . . 5-16
Fuel System . . . . . . . . . . . . . . . . . . . . . . . . . . . . . . . . . . . . . . . . . . . . . . . . . . . . . . . . . . . . . . . . . . . . . . . . 5-17Service Specifications . . . . . . . . . . . . . . . . . . . . . . . . . . . . . . . . . . . . . . . . . . . . . . . . . . . . . . . . . . . . . . 5-17Fuel System Components . . . . . . . . . . . . . . . . . . . . . . . . . . . . . . . . . . . . . . . . . . . . . . . . . . . . . . . . . . . 5-17Fuel System Air Bleed . . . . . . . . . . . . . . . . . . . . . . . . . . . . . . . . . . . . . . . . . . . . . . . . . . . . . . . . . . . . . . 5-17Draining the Fuel Tank . . . . . . . . . . . . . . . . . . . . . . . . . . . . . . . . . . . . . . . . . . . . . . . . . . . . . . . . . . . . . 5-18Fuel Pre-filter Components . . . . . . . . . . . . . . . . . . . . . . . . . . . . . . . . . . . . . . . . . . . . . . . . . . . . . . . . . . 5-19Draining Water From the Fuel Pre-filter . . . . . . . . . . . . . . . . . . . . . . . . . . . . . . . . . . . . . . . . . . . . . . . . . 5-19Replacing the Fuel Pre-filter . . . . . . . . . . . . . . . . . . . . . . . . . . . . . . . . . . . . . . . . . . . . . . . . . . . . . . . . . 5-19Fuel Main Filter Components . . . . . . . . . . . . . . . . . . . . . . . . . . . . . . . . . . . . . . . . . . . . . . . . . . . . . . . . 5-20Draining Water From the Fuel Main Filter . . . . . . . . . . . . . . . . . . . . . . . . . . . . . . . . . . . . . . . . . . . . . . . 5-20Replacing the Fuel Main Filter . . . . . . . . . . . . . . . . . . . . . . . . . . . . . . . . . . . . . . . . . . . . . . . . . . . . . . . . 5-20Filling the Fuel Tank . . . . . . . . . . . . . . . . . . . . . . . . . . . . . . . . . . . . . . . . . . . . . . . . . . . . . . . . . . . . . . . 5-21Electronic Fuel Transfer Pump Components . . . . . . . . . . . . . . . . . . . . . . . . . . . . . . . . . . . . . . . . . . . . . 5-21Cleaning the Electronic Fuel Transfer Pump . . . . . . . . . . . . . . . . . . . . . . . . . . . . . . . . . . . . . . . . . . . . . 5-21
Releasing Pressure in the Hydraulic System . . . . . . . . . . . . . . . . . . . . . . . . . . . . . . . . . . . . . . . . . . . . . . . 5-22Hydraulic System . . . . . . . . . . . . . . . . . . . . . . . . . . . . . . . . . . . . . . . . . . . . . . . . . . . . . . . . . . . . . . . . . . . . 5-23
Service Specifications . . . . . . . . . . . . . . . . . . . . . . . . . . . . . . . . . . . . . . . . . . . . . . . . . . . . . . . . . . . . . . 5-23Level in the Reservoir . . . . . . . . . . . . . . . . . . . . . . . . . . . . . . . . . . . . . . . . . . . . . . . . . . . . . . . . . . . . . . 5-24Filling the Hydraulic Reservoir . . . . . . . . . . . . . . . . . . . . . . . . . . . . . . . . . . . . . . . . . . . . . . . . . . . . . . . . 5-24Pilot Filter Replacement . . . . . . . . . . . . . . . . . . . . . . . . . . . . . . . . . . . . . . . . . . . . . . . . . . . . . . . . . . . . 5-25Replacing the Reservoir Breather . . . . . . . . . . . . . . . . . . . . . . . . . . . . . . . . . . . . . . . . . . . . . . . . . . . . . 5-25Return Filter Replacement . . . . . . . . . . . . . . . . . . . . . . . . . . . . . . . . . . . . . . . . . . . . . . . . . . . . . . . . . . . 5-26Cleaning and Replacement of the Suction Filter . . . . . . . . . . . . . . . . . . . . . . . . . . . . . . . . . . . . . . . . . . 5-26Replacing the Hydraulic Fluid . . . . . . . . . . . . . . . . . . . . . . . . . . . . . . . . . . . . . . . . . . . . . . . . . . . . . . . . 5-27
Bleeding Air from the Hydraulic Components . . . . . . . . . . . . . . . . . . . . . . . . . . . . . . . . . . . . . . . . . . . . . . 5-28Hydraulic Breaker (Optional) - Replacing Hydraulic Fluid and Filters . . . . . . . . . . . . . . . . . . . . . . . . . . 5-29
5-1LBX Company, LLC

CHAPTER 5 - LUBRICATION, FILTERS, AND FLUIDS
Air Filter . . . . . . . . . . . . . . . . . . . . . . . . . . . . . . . . . . . . . . . . . . . . . . . . . . . . . . . . . . . . . . . . . . . . . . . . . . . 5-30Service Specifications . . . . . . . . . . . . . . . . . . . . . . . . . . . . . . . . . . . . . . . . . . . . . . . . . . . . . . . . . . . . . .5-30Inspection . . . . . . . . . . . . . . . . . . . . . . . . . . . . . . . . . . . . . . . . . . . . . . . . . . . . . . . . . . . . . . . . . . . . . . . .5-30Cleaning the Outer Element . . . . . . . . . . . . . . . . . . . . . . . . . . . . . . . . . . . . . . . . . . . . . . . . . . . . . . . . . .5-30Inspecting the Element . . . . . . . . . . . . . . . . . . . . . . . . . . . . . . . . . . . . . . . . . . . . . . . . . . . . . . . . . . . . . .5-30Replacing the Elements . . . . . . . . . . . . . . . . . . . . . . . . . . . . . . . . . . . . . . . . . . . . . . . . . . . . . . . . . . . . .5-30
Swing Reduction Gear . . . . . . . . . . . . . . . . . . . . . . . . . . . . . . . . . . . . . . . . . . . . . . . . . . . . . . . . . . . . . . . 5-32Service Specifications . . . . . . . . . . . . . . . . . . . . . . . . . . . . . . . . . . . . . . . . . . . . . . . . . . . . . . . . . . . . . .5-32Level . . . . . . . . . . . . . . . . . . . . . . . . . . . . . . . . . . . . . . . . . . . . . . . . . . . . . . . . . . . . . . . . . . . . . . . . . . . .5-32Draining and Refilling . . . . . . . . . . . . . . . . . . . . . . . . . . . . . . . . . . . . . . . . . . . . . . . . . . . . . . . . . . . . . . .5-32
Travel Reduction Gears . . . . . . . . . . . . . . . . . . . . . . . . . . . . . . . . . . . . . . . . . . . . . . . . . . . . . . . . . . . . . . 5-33Service Specifications . . . . . . . . . . . . . . . . . . . . . . . . . . . . . . . . . . . . . . . . . . . . . . . . . . . . . . . . . . . . . .5-33Level . . . . . . . . . . . . . . . . . . . . . . . . . . . . . . . . . . . . . . . . . . . . . . . . . . . . . . . . . . . . . . . . . . . . . . . . . . . .5-33Draining and Refilling . . . . . . . . . . . . . . . . . . . . . . . . . . . . . . . . . . . . . . . . . . . . . . . . . . . . . . . . . . . . . . .5-33
5-2 LBX Company, LLC

CHAPTER 5 - LUBRICATION, FILTERS, AND FLUIDS
SERVICING INSTRUCTIONSRespect the maintenance intervals by checking the hourmeter every day. Before starting maintenance, park the excavator on flat, firm ground, away from any obstacles, with the arm retracted and the bucket on the ground. Unless otherwise specified, all maintenance operations must be carried out with the engine stopped, and the key removed from the starter switch. It is preferable to wait for all circuits to cool down before starting work.
Clean the grease fittings before lubrication. Clean around plugs and filler holes before adding fluid. No dust or dirt must enter the components or the circuits. Wear suitable clothing and remember to use the necessary safety equipment.
When carrying out service work on the excavator, place a Do Not Operate tag on the instrument panel. Never climb down from the operator's compartment leaving the engine running.
Any modification to this excavator without prior authorization could cause serious injury. Do not make any modifications without authorization. Consult your LBX Link-Belt dealer.
IMPORTANT: If you use your excavator in particularly harsh conditions (dusty or corrosive atmosphere, etc.), the servicing intervals should be reduced accordingly.
IMPORTANT: Take particular care to replace all filters regularly. Clean filters mean longer engine running life.
IMPORTANT: Oil and fluid should not be thrown on the ground. They must be stored and removed by a company which is responsible for their recycling or their disposal.
SERVICE SPECIFICATIONS
Intervals between overhauls are much more frequent for the following applications: construction of tunnels using a hydraulic breaker, scale stripping, foundry cleaning, operation under water etc. For special applications consult your LBX Link-Belt dealer.
WARNING: There is a risk of serious injury if maintenance or repairs are not carried out correctly. If you do not understand maintenance procedures, consult your LBX Link-Belt dealer.
WARNING: If the attachment is raised or if the excavator moves without an operator, serious injury can result. Before performing any maintenance, proceed as follows:
1. Park the excavator on flat, level ground.2. Lower the attachment until it is resting on
the ground.3. Shut down the engine and remove the
starter key switch.4. Lock the tracks to prevent any excavator
movement.
WARNING: Be sure all the service operations in this section are carried out punctually at the intervals given, in order to ensure optimum performance levels and maximum safety when using the excavator.
5-3LBX Company, LLC

CHAPTER 5 - LUBRICATION, FILTERS, AND FLUIDS
DAILY INSPECTIONSEvery day, before starting work, it is necessary to inspect the excavator and service certain of its components.
GENERAL REMARKSCheck for water or oil leaks.Check that all screws and nuts are correctly tightened.Wipe o f f any dus t (eng ine , opera to r ' s compartment, etc.).Check for damage.
ENGINECheck the oi l level and change the oi l i f necessary.Check the coolant level.Check for clogging or damage to the radiator.Check the radiator fan belt tension.Check the air filter is clean and not restricted.Check for water or oil leaks on the components.Check the condition of all lines.
UPPERSTRUCTURECheck the fuel tank level.Check the hydraulic reservoir level.Check that the hydraulic oil is clean.Check for water or oil leaks on the components.Check the condition of all lines.Check for electrical short-circuits.Check the battery connections are properly tightened.Adjust the rear view mirrors.
UNDERCARRIAGECheck the pad hardware.Check the condition of the tracks.Check that the upper and lower rollers and the idler wheels are not leaking oil.
ATTACHMENTCheck for oil leaks on the cylinders.Check the condition of all lines.Check the condition of the bucket teeth.
After Starting the EngineDid the engine start correctly? Are the exhaust fumes normal? Any strange noises?Check for abnormal noise on the hydraulic components.Check for water or oil leaks on the components.Check the audible alarm devices, working lights and windshield wipers.Check that all circuits (travel, swing and tool) are functioning correctly.
IMPORTANT: If the slightest defect is found, repair it immediately before using the excavator or see your LBX Link-Belt dealer.
HOURMETERThe hourmeter enables service operations to be scheduled. Its hourly indications are the same as those of a clock when the engine is running.
Servicing intervals are carefully calculated to guarantee safe and efficient excavator operation.
Be sure to carry out all the servicing operations properly as defined in this manual.
LBX058 Figure 1
5-4 LBX Company, LLC

CHAPTER 5 - LUBRICATION, FILTERS, AND FLUIDS
LUBRICATION CHART
KBP10701 Figure 2
IMPORTANT: Always check your machines lube chart located under the tool box cover to ensure your machine’s proper maintenance schedule.
Commonly Replaced FiltersFilter Part Number Service Interval Filter Part Number Service Interval
Engine Oil Filter KHH0533 500 Hours Outer Air Filter KBH0921 1000 Hours
Fuel Main Filter KHH0534 500 Hours Inner Air Filter KBH0922 1000 Hours
Fuel Pre-filter KHH10590 250 Hours Air Breather Filter KRJ3461 1000 Hours
Pilot Oil Filter KHJ10950 2000 Hours Air Breather Packing KRJ3463
Return Filter KRJ15830 2000 Hours Suction Filter KRJ10590 5000 Hours
5-5LBX Company, LLC

CHAPTER 5 - LUBRICATION, FILTERS, AND FLUIDS
FLUIDS AND LUBRICANTS
Respect the maintenance intervals by checking the hourmeter every day. Before starting maintenance, park the excavator on flat, firm ground, away from any obstacles, with the arm retracted and the bucket on the ground. Unless otherwise specified, all maintenance operations must be carried out with the engine stopped, and the key removed from the starter switch. It is preferable to wait for all circuits to cool down before starting work. Wear suitable clothing and remember to use the necessary safety equipment.
Clean the grease fittings before lubrication. Clean around plugs and filler holes before adding fluid. No dust or dirt must enter the components or the circuits.
When carrying out service work on the excavator, place a “Do Not Operate” tag on the right-hand control arm. Never climb down from the operator’s compartment leaving the engine running.
Any modification to this excavator without prior authorization could cause serious injury. Do not make any modifications without authorization. Consult your LBX Link-Belt dealer.
IMPORTANT: If you use your excavator in particularly harsh conditions (dusty or corrosive atmosphere, etc.), the servicing intervals should be reduced accordingly.
IMPORTANT: Take particular care to replace all filters regularly. Clean filters mean longer engine running life.
IMPORTANT: Oil and fluid should not be thrown on the ground. They must be stored and removed by a company which is responsible for their recycling or their disposal.
HYDRAULIC FLUIDUse hydraulic fluid that is specially designed for high pressure applications.
TRANSMISSION COMPONENT OILExtreme pressure oil used for enclosed transmission components.Extreme pressure oil type API GL5 grade 80W90 or ISO VG 150.
GREASEThe type of grease to use depends on ambient temperature.Temperate and hot climates-20°C to +60°CExtreme pressure grease EP NLGI grade 2 with molybdenum disulphide.Cold climates-40°C to +20°CExtreme pressure grease EP NLGI grade 0.
ENGINE OILRefer to the engine manufacturers manual for engine oil recommendations.
FUELIn order to meet the emission control regulation of Tier III, the engine components have been made precisely and are used under high pressure conditions.
Warranty will not be honored if any fuel other than the applicable standards is used, and it can cause serious engine failure.
FUEL SELECTION
Make sure the following conditions are met
• No dust in the fuel
• Proper fuel viscosity
• High cetane rating
WARNING: Lubricants must have the correct properties for each application.
WARNING: Be sure all the service operations in this section are carried out punctually at the intervals given, in order to ensure optimum performance levels and maximum safety when using the excavator.
WARNING: There is a risk of serious injury if maintenance or repairs are not performed correctly. If you do not understand the maintenance procedures, consult your LBX Link-Belt dealer.
WARNING: If the attachment is raised or if the excavator moves without an operator, serious injury can result. Before performing any maintenance, the following steps must be carried out:
1. Park the excavator on flat, level ground.2. Lower the attachment until it is resting
on the ground.3. Stop the engine and remove the starter
switch key.4. Lock the tracks to prevent any
excavator movement.
5-6 LBX Company, LLC

CHAPTER 5 - LUBRICATION, FILTERS, AND FLUIDS
• Good flow properties in lower temperatures
• Low sulfur content
• Low carbon residue content
FUEL STANDARDS
OTHER REQUIREMENTS FOR DIESEL FUEL
There are other requirements that have a big influence on service durability and service life are:
• Sulfur content - 500 ppm or less
• HFRR (High-Frequency Reciprocating Rig: an index showing lubricating properties of the fuel) - 460 Nm or less.
• Water content - .05 wt% or less.
Sulfur content reacts to moisture to change into sulfuric acid after combustion. Too much sulfur in the fuel will accelerate internal corrosion and wear. Sulfur also deteriorates the engine oil allowing its cleaning dispersive property to weaken which results in acceleration of wear of sliding portions of the engine. HFRR is an index that indicates the lubricating property of the fuel. A large number means poor lubrication so that seizure of the engine may result if the fuel is used.
Since a fuel with a high HFRR also has a lower viscosity it can be leaked out easily. If the fuel is mixed with the engine oi l , the oi l lubr icat ing properties are lowered resulting in acceleration of wear on the engine.
Water content allows the inside of the fuel tank to rust which can block the fuel line and the fuel filters which will cause a loss of power. if the temperature goes below the freezing point the water can jell the fuel and restrict and or block the fuel line.
IMPORTANT: In cold weather, fill the fuel tank at the end of the day's work, in order to prevent the formation of condensation.
FUEL STORAGE
Long storage can lead to the accumulation of impurities and condensation in the fuel. Engine trouble can often be traced to the presence of water in the fuel.
The storage tank must be placed outside and the temperature of the fuel should be kept as low as possible. Drain off water and impurities regularly.
COOLANT SOLUTIONUse only ethylene-glycol coolant solution in the cooling system. Use good quality ethylene-glycol with a high boiling point, and no additives to prevent leakage. Do not use non-approved ant i - rust additives. Anti-rust additives and ethylene-glycol can mix and work against each other, thereby reducing anti-corrosion protection, forming deposits in the cooling system and causing damage to the cooling system and radiator.
Contact your LBX Link-Belt dealer who will supply you with the suitable coolant solution.
ANTI-FREEZE/ANTI-CORROSION
Use anti-freeze in all seasons to protect the cooling system from corrosion and all risk of freezing.
For areas where the ambient temperature is over -33°F (-36°C), use a blend of 50% ethylene-glycol based anti-freeze.
For areas where the temperature is below -33°F (-36°C), it is advisable to use a blend of 40% water and 60% anti-freeze.
ENVIRONMENTBefore carrying out any maintenance operation on this excavator and before disposing of used fluids or lubricants, always think of the environment. Never throw oil or fluid on the ground and never place it in leaking receptacles.
Contact your local ecological recycling center or your LBX Link-Belt dealer to obtain information on the correct method of disposing of these lubricants.
Standard Recommendation
ASTM D 975
JIS No. 2
SIN SDIN 51601
SAE - Based on SAE-J-313C NO. 2-D
BS - Based on BS/2869-197 Class A-1
5-7LBX Company, LLC

CHAPTER 5 - LUBRICATION, FILTERS, AND FLUIDS
FLUID AND LUBRICANT CAPACITIES AND SPECIFICATIONSENGINE
Type of oil ......................................................................................................................................See chart below Capacity (with filter change) ......................................................................................................6.1 gal (23.1 liters)
COOLING SYSTEMSystem capacity ........................................................................................................................6.7 gal (25.2 liters)
FUEL SYSTEMType of fuel ....................................................................................................................................See chart belowReservoir capacity ..................................................................................................................108.3 gal (410 liters)
HYDRAULIC SYSTEMType of fluid ...................................................................................................................................See chart belowTotal system capacity ...............................................................................................................66.0 gal (250 liters)Reservoir capacity ....................................................................................................................38.8 gal (147 liters)
TRAVEL REDUCTION GEARSType of oil ......................................................................................................................................See chart belowCapacity (per reduction gear) ......................................................................................................1.2 gal (4.5 liters)
5-8 LBX Company, LLC

CHAPTER 5 - LUBRICATION, FILTERS, AND FLUIDS
L
LUBRICATION POINTS
BOOM / ARM / BUCKET LUBRICATION
LUBE1 Figure 3
Use the following grease:
EP NLGI grade 2 (for temperate and hot climates) -20°C to +60°C
EP NLGI grade 0 (for cold climates) -40°C to +20°C
The numbers within brackets mentioned on the right of the description indicate the number of lubrication points.
EVERY 1000 HOURS1. Boom foot pin (EMS). . . . . . . . . . . . . . . . . . . . (2)
Boom cylinder top pin (EMS) . . . . . . . . . . . . . (2)Arm cylinder foot pin (EMS) . . . . . . . . . . . . . . (1)
Figure 4
2. Boom cylinder foot pin (EMS) . . . . . . . . . . . . (2)
Figure 5
12
7
45
6
3
1
2 2
5-9BX Company, LLC

CHAPTER 5 - LUBRICATION, FILTERS, AND FLUIDS
3. Arm cylinder top pin (EMS) . . . . . . . . . . . . . . (1)4. Boom tip linkage (EMS) . . . . . . . . . . . . . . . . . (2)5. Bucket cylinder foot pin (EMS). . . . . . . . . . . . (1)
Figure 66. Bucket linkage (EMS) . . . . . . . . . . . . . . . . . . (4)
Figure 7
EVERY 250 HOURS7. Bucket . . . . . . . . . . . . . . . . . . . . . . . . . . . . . . (2)
Figure 8
EXCAVATOR LUBRICATION POINTSUse the following grease:
EP NLGI grade 2 (for temperate and hot climates) -20°C to +60°C
EP NLGI grade 0 (for cold climates) -40°C to +20°C
The numbers within brackets mentioned on the right of the description indicate the number of lubrication points.
EVERY 500 HOURS
Turntable bearing . . . . . . . . . . . . . . . . . . . . . . . . . (2)
Figure 9
4
3
5
66
6
7
7
5-10 LBX Company, LLC

CHAPTER 5 - LUBRICATION, FILTERS, AND FLUIDS
GREASING THE TURNTABLE TEETHEvery 500 hours, remove the bolts (1) that hold the tool box to the frame (2), remove the second plate (3) and the 2 screws (4), check for damage on the gear teeth and also the general condition of the gear teeth.
If the gear surface is not well greased, add grease.
If the grease is white due to moisture content, etc. replace it with new grease.
If water accumulation is found:1. Remove the protective panel from the lower
central area.2. Remove the plug.3. Discharge the water or contaminated grease.4. Install the plug.5. Insert new grease through the port, then install
the plate (3) and tool box (2).
Figure 10
3
1
2
5-11LBX Company, LLC

CHAPTER 5 - LUBRICATION, FILTERS, AND FLUIDS
FLUID LEVELSEVERY 10 HOURS
NOTE: The numbers within brackets on the right of the description indicate the number of levels.Coolant solution expansion reservoir . . . . . . . . . . (1)
Figure 11Engine oil . . . . . . . . . . . . . . . . . . . . . . . . . . . . . . . (1)
Figure 12
Hydraulic reservoir . . . . . . . . . . . . . . . . . . . . . . . . (1)
Figure 13Every 250 HoursTravel reduction gears. . . . . . . . . . . . . . . . . . . . . . (2)
Figure 14
5-12 LBX Company, LLC

CHAPTER 5 - LUBRICATION, FILTERS, AND FLUIDS
ENGINES
SERVICE SPECIFICATIONSEngine oil level check .....................................................................................................Every 10 hours or every dayInitial oil change............................................................................................................................. After first 50 hoursOil change .........................................................................................................................................Every 500 hoursOil filter replacement..........................................................................................................................Every 500 hoursOil capacity .................................................................................................................................... 6.1 gal (23.1 liters)Oil type .............................................................................................................................. See Fluids and Lubricants
LEVEL1. Park the excavator on flat, horizontal ground.
Shut down the engine and remove the starter switch key.
2. When the engine has been stopped for fifteen minutes, remove the dipstick (1), wipe it with a clean cloth and replace it in the guide tube as far as it will go. Then take it out again.
Figure 15
3. If the level is situated between the marks (A) and (B) of the dipstick, the level is correct.
Figure 16
4. If the oil level is at mark (B) (min.) or below, remove the filling plug and add oil up to mark (A) (max) of the dipstick then install the plug.
NOTE: The level should not be higher than the mark (A) (maximum on the dipstick).
Figure 17
DRAINING, REPLACING THE OIL FILTER, AND FILLING NOTE: Change the oil while the engine is still warm. The oil will flow more easily.
1. Park the excavator on flat, horizontal ground. Shut down the engine and remove the starter switch key.
2. Remove the oil filler cap (1).
Figure 18
1
A B
1
5-13LBX Company, LLC

CHAPTER 5 - LUBRICATION, FILTERS, AND FLUIDS
3. Remove the cover under the rear of the machine.
4. Remove the cap (2) and place a receptacle under the machine, connect the oil drain hose (3) to the green p lug (4) . When the hose is connected the oil will start to flow out the oil drain hose.
CT02D031 Figure 19
5. Open the right side door where the oil filter is located. Remove the old filter. The old filter will have some oil left in it, if you spill any of the oil be sure to wipe up any residue.
CT02D011 Figure 20
6. Coat the seal of the new filter with a fine film of oil.
7. Install the new filter. Turn the filter until the seal comes into contact with the filter head then tighten one full turn with the filter wrench.
8. After draining the oil remove the oil drain hose (3) and put the cap (2) back on the drain plug. Be sure to wipe any old reside off the bottom of the engine.
9. Fill the engine with new engine oil (6.1 gal).Run the engine for a few minutes and check that there are no leaks. Check the level again and top up if necessary.
IMPORTANT: Always wait fifteen minutes to allow the oil to return to the sump before checking the oil level.
3
2
2
43
5-14 LBX Company, LLC

CHAPTER 5 - LUBRICATION, FILTERS, AND FLUIDS
COOLING SYSTEM
SERVICE SPECIFICATIONSExpansion tank reservoir check......................................................................................Every 10 hours or every dayChecking the tightening of clamps, of radiator hoses..........................................Every 250 hours or every 6 monthsDraining the system (long duration)......................................................................Every 1000 hours or every 2 yearsDraining the system (with anti-freeze) (spring and autumn)....................................................................Twice a yearSystem capacity ............................................................................................................................ 6.7 gal (25.2 liters)
COOLANT SOLUTIONPut only ethylene-glycol coolant solution in the cooling system. Use good quality ethylene-glycol that has a high boiling point, with no additives to prevent leakage. Do not use non-approved ant i - rust additives. Anti-rust additives and ethylene-glycol can mix and work against each other, thereby reducing anti-corrosion protection, forming deposits in the cooling system and causing damage to the cooling system and radiator.
LEVELThe level of coolant solution should be checked when the engine is cold. On flat, level ground the level in the expansion reservoir should be between the Full (1) and Low (2) marks. If not, see Filling.
LBX063 Figure 21
DRAINING
1. Remove the radiator cap (1).2. Remove the panel located under the
upperstructure and open the radiator bleed plug (2).
3-0019 Figure 22
WARNING: Boiling coolant solution can spray out if the radiator cap is removed while the system is still hot. To remove the cap, allow the system to cool down, turn the cap to the first notch and wait until there is no more pressure. Then remove the cap.
WARNING: Check and service the cooling system according to the instructions given in this manual.
2
1
WARNING: Do not remove the radiator cap when the engine is hot. The system is still under pressure and you could be scalded.
1
2
5-15LBX Company, LLC

CHAPTER 5 - LUBRICATION, FILTERS, AND FLUIDS
3. Open the drain plug (3) located on the engine block.
NOTE: Have a receptacle of a suitable capacity ready.
CT02D029 Figure 23
RINSING1. Close the bleed plug when the radiator is
completely empty. Install the plug on the engine block.
2. Fill the system with clean water. Install the radiator cap.
3. Start the engine. Let the engine run in low idle position for ten minutes to bring the engine temperature to about 80°C.
4. Drain the system once more.5. Repeat Steps 1 to 4 until the water drained is
clear.6. Install the panel under the upperstructure.
FILLING1. Fill with coolant solution via the radiator until
overflowing and install the radiator cap.
CT02D022 Figure 24
2. Fill the expansion tank to the Full mark and install the plug.
IMPORTANT: Use the correct coolant solution.3. Run the engine at idle speed for about five
minutes. Add coolant solution if the level in the expansion reservoir drops.
IMPORTANT: Do not fill the expansion tank above the Full mark.
3
5-16 LBX Company, LLC

CHAPTER 5 - LUBRICATION, FILTERS, AND FLUIDS
FUEL SYSTEM
SERVICE SPECIFICATIONSFuel reservoir bleeding ................................................................................................ Every 50 hours or every week Draining water from the fuel main filter........................................................................ Every 50 hours or every weekDraining water from the fuel pre-filter .......................................................................... Every 50 hours or every weekFuel main filter replacement ..............................................................................................................Every 500 hoursFuel pre-filter replacement.................................................................................................................Every 250 hoursReplacing the fuel hoses ................................................Every 2 years or every 4000 hours (whichever comes first)Fuel tank capacity ...................................................................................................................... 108.3 gal (410 liters)Fuel type............................................................................................................................ See Fluids and Lubricants
IMPORTANT: With the Tier III engine, proper fuel maintenance and service is vital to the machine.
FUEL SYSTEM COMPONENTS
LBX065 Figure 25
1. Fuel Pre-Filter2. Electronic Fuel Transfer Pump3. Fuel Main Filter4. Fuel Shut-Off Valve
FUEL SYSTEM AIR BLEEDIt is necessary to bleed the system when:• The tank has been completely emptied.• The fuel filter has been replaced.• Parts of the fuel system have been removed for
servicing or repair work.• The excavator has been in storage for a fairly long
period.1. Loosen the air bleeding plug (2) on the fuel main
filter.
Figure 26
2. Turn the key to the ON position. This engages the electronic fuel priming pump.
3. Turn the mechanical priming pump (1) counterclockwise until it springs out.
4. Press the pump (1) inwards a few times until air bubbles are loose in the fuel flow line (3).
1
3
4
2
1
2
3
4
5-17LBX Company, LLC

CHAPTER 5 - LUBRICATION, FILTERS, AND FLUIDS
3-0017 Figure 27
5. Tighten the air bleed plug (2). Press the pump inward again until the pump becomes difficult to push.
6. Press the pump in and turn the pump to the right to tighten it back to the original position
Figure 28
DRAINING THE FUEL TANK1. Remove the fuel cap (1) and fuel strainer (2).2. Position a drain pan under the drain plug.3. Open the drain valve (3) located at the bottom of
the tank and drain the accumulated sediment and water.
4. After draining the sediment and water, close the drain valve (3).
5. Reinstall the fuel strainer (2) and fuel cap (1).
Figure 29
WARNING: Completely wipe off any spilled fuel after replacing a filter element or bleeding the system.
2
WARNING: Completely wipe off any spilled fuel. It may cause a fire.
2
1
3
5-18 LBX Company, LLC

CHAPTER 5 - LUBRICATION, FILTERS, AND FLUIDS
FUEL PRE-FILTER COMPONENTS
Figure 30
1. Air Bleeding Plug2. Head3. Case4. Float5. Drain Plug6. O-ring7. Element8. O-ring
DRAINING WATER FROM THE FUEL PRE-FILTER1. When the float reaches the bottom of the
element (7): 2. Position a drain pan under the drain plug (5).3. Loosen the air bleeding plug (1) and drain the
water and sediment.4. When the float (4) settles on the bottom, tighten
the air bleeding plug (1).5. Verify that there are no fuel leaks.
REPLACING THE FUEL PRE-FILTER1. Turn the fuel shut-off valve (9) clockwise 90
degrees to close the fuel supply.2. Clean the area around the filter head.3. Loosen the air bleeding plug (1).4. Place a receptacle of a suitable capacity under
the drain plug (5) and drain the fuel.5. Remove the case (3) counterclockwise. Remove
the element (7).6. Remove and replace the o-rings (6 and 8).7. Before installing the new element, apply a thin
coat of diesel fuel to the packing of the element.8. Install the new element (7). Turn the case until
the seal comes into contact with the head (2) and tighten to 20.3-.23.1 lbf ft (27.5-31.3 N m).
9. Tighten the drain plug (5) and the air bleeding plug (1).
10. Turn the fuel shut-off valve (9) counterclockwise 90 degrees to open the fuel supply as seen in the figure 32.
Figure 31
11. After installing the new element, bleed the air form the lines. See Fuel System Air Bleed.
WARNING: Completely wipe off any spilled fuel. It may cause a fire.
1
2
5
6
7
8
4
3
WARNING: Completely wipe off any spilled fuel. It may cause a fire.
9
5-19LBX Company, LLC

CHAPTER 5 - LUBRICATION, FILTERS, AND FLUIDS
FUEL MAIN FILTER COMPONENTS
Figure 32
1. Air Bleeding Plug2. Head3. Case4. O-ring5. Drain Plug6. O-ring7. Element8. Priming pump
DRAINING WATER FROM THE FUEL MAIN FILTER
1. Loosen the air bleeding plug (1). 2. Position a drain pan under the drain plug (5).3. Loosen the drain plug (5) and drain the water
and sediment.4. After all the water and sediments are gone,
tighten the drain plug (5) and the air bleeding plug (1).
5. Verify that there are no fuel leaks.
REPLACING THE FUEL MAIN FILTER1. Turn the fuel shut-off valve (9) clockwise 90
degrees to close the fuel supply.2. Clean the area around the filter head.3. Loosen the air bleeding plug (1).4. Place a receptacle of a suitable capacity under
the drain plug (5) and drain the fuel.5. Remove the case (3) counterclockwise. Remove
the element (7).6. Remove and replace the o-rings (6 and 8).7. Before installing the new element, apply a thin
coat of diesel fuel to the packing of the element.8. Install the new element (7). Turn the case until
the seal comes into contact with the head (2) and tighten to 20.3-.23.1 lbf ft (27.5-31.3 N m).
9. Tighten the drain plug (5) and the air bleeding plug (1).
10. Turn the fuel shut-off valve (9) counterclockwise 90 degrees to open the fuel supply as seen in the figure 34.
Figure 33
11. After installing the new element, bleed the air form the lines. See Fuel System Air Bleed.
WARNING: Completely wipe off any spilled fuel. It may cause a fire.
1
2
5
7
8
4
3
6
WARNING: Completely wipe off any spilled fuel. It may cause a fire.
9
5-20 LBX Company, LLC

CHAPTER 5 - LUBRICATION, FILTERS, AND FLUIDS
FILLING THE FUEL TANK1. Clean carefully around the filling cap (1).
Remove the cap.2. Fill the tank, make sure that no water or dust
enters the tank.
IMPORTANT: Never remove the tank strainer (2) for filling.
IMPORTANT: In cold weather, use fuel corresponding to the ambient temperature. See Lubrication and Fluids section. Fill the fuel tank after each working day to prevent the formation of condensation.
3. Install the filler cap.
IMPORTANT: Make sure that the cap is correctly locked.
3-0012 Figure 34
ELECTRONIC FUEL TRANSFER PUMP COMPONENTS
Figure 35
1. Cover2. Gasket3. Filter4. Gasket5. Body6. Magnet
The electronic fuel transfer pump has a metal screen to catch any impurities in the fuel. Proper care of the electronic fuel transfer pump improves performance of the excavator.
CLEANING THE ELECTRONIC FUEL TRANSFER PUMP
1. Turn the cover (1) counterclockwise.2. Remove the larger gasket (2), filter (3) and
smaller gasket (4).3. Inspect the filter for any damage to the mesh. If it
is damaged replace the filter. To clean it use clean diesel fuel or compressed air.
4. Clean the cover (1), magnet (6), and the body (5).
5. Replace the gaskets (2 + 4),6. Instal the small gasket (4) in the body (5), then
the filter (3), and lastly the large gasket (2).7. Install the cover (6) clockwise.
WARNING: Never refuel when the engine is running. Never smoke when refueling.
2
1
12
3
4
5
6
5-21LBX Company, LLC

CHAPTER 5 - LUBRICATION, FILTERS, AND FLUIDS
RELEASING PRESSURE IN THE HYDRAULIC SYSTEMIMPORTANT: Before carrying out any work on the hydraulic system, there should be no pressure in any of the circuits.
1. Place the excavator on flat, level ground, lower the attachment to the ground and stop the engine.
2. Turn the starter switch key to the ON position.
Figure 36
3. Lower the gate lock lever.
Figure 37
4. Operate the control levers from right to left and front to rear a dozen times approximately.
Figure 38
5. Turn the starter switch key to the OFF position.6. Press the button (1) to release any possible
pressure.
Figure 39
WARNING: Stop the engine, press the pressure release button and completely bleed air from the reservoir.
WARNING: Make sure that you don’t get scalded with the hydraulic fluid under high pressure. The temperature should not exceed 40°C.
1
5-22 LBX Company, LLC

CHAPTER 5 - LUBRICATION, FILTERS, AND FLUIDS
HYDRAULIC SYSTEM
SERVICE SPECIFICATIONSCheck the hydraulic reservoir fluid level ..........................................................................Every 10 hours or each dayCheck the lines ....................................................................................................................................Every 50 hoursDraining water and sediment from the hydraulic reservoir ................................................................Every 250 hoursCheck the condition of the hydraulic fluid ........................................................................................Every 1000 hoursReplace the pilot filter ....................................... Every 2000 hours (after the first 250 hours during the run-in period)Replace the reservoir breather ........................................................................................................Every 1000 hoursClean the suction filter .....................................................................................................................Every 2000 hoursReplace the suction filter .................................................................................................................Every 5000 hoursReplace the return filter .................................... Every 2000 hours (after the first 250 hours during the run-in period)Change the hydraulic fluid ...............................................................................................................Every 5000 hoursCapacity of the hydraulic tank....................................................................................................... 38.8 gal (147 liters)Total capacity of the system.......................................................................................................... 66.0 gal (250 liters)Oil type .............................................................................................................................. See Fluids and LubricantsReplace the hoses..........................................................Every 2 years or every 4000 hours (whichever comes first)
NOTE: If the excavator is new or if a major component has been overhauled or replaced in the hydraulic system, replace the pilot filter and return filter after 50 hours of operation. After that, replace these filters at the stipulated interval.
IMPORTANT: Every 1000 operating hours, it is necessary to have the hydraulic fluid analyzed. See your LBX Link-Belt dealer.
IMPORTANT: After replacing the hydraulic fluid, it is necessary to bleed all air from the hydraulic components. See Bleeding air from the hydraulic components.
IMPORTANT: If metal filings are discovered in the replaced filters, see your LBX Link-Belt dealer.
WARNING: Before carrying out any service work on the hydraulic system it is necessary to allow it to cool down (the temperature should not be more than 40°C).
WARNING: Hydraulic fluid or grease injected into your skin can cause severe injury or death. Keep your hands and body away from any pressurized leak. Use cardboard or paper to check for a leak. If fluid is injected into your skin, see a doctor immediately and have the fluid removed.
WARNING: Before carrying out any operation on the hydraulic filters or the hydraulic system, the pressure must be released from the system. Failure to observe this instruction can cause injury. See Releasing pressure in the hydraulic system.
5-23LBX Company, LLC

CHAPTER 5 - LUBRICATION, FILTERS, AND FLUIDS
LEVEL IN THE RESERVOIR1. Park the excavator on flat, horizontal ground.
Retract the bucket and arm cyl inder rod completely. Lower the attachment to the ground. Shut down the engine and remove the starter switch key.
2. Using the starter switch key, open the right-hand side door.
3. The oil must be located in the middle of the indicator. Top up if necessary. See Filling.
Figure 40
FILLING THE HYDRAULIC RESERVOIR
1. Release all pressure in the hydraulic reservoir. See Releasing pressure in the hydraul ic reservoir.
2. Clean the plate and also around the plate. Remove the 4 screws (1) and the plate (2) and the o-ring. Add hydraulic fluid as required.
CT02D068 Figure 41
3. Check the maximum and minimum level by monitoring the indicator. Install the plate (2) and the 4 screws (1). Replace the o-ring if required.
IMPORTANT: When refilling the hydraulic oil, prevent dust, water, or other contaminants from entering the tank.
1
2
5-24 LBX Company, LLC

CHAPTER 5 - LUBRICATION, FILTERS, AND FLUIDS
PILOT FILTER REPLACEMENT1. Release all pressure in the hydraulic system.
See Releasing Pressure in the Hydraul ic System.
2. Use a spanner wrench on the bottom (2) of the filter body (1) to loosen it.
3. Remove the old filter (1).4. Coat the new filter (1) with clean hydraulic fluid
and install the filter on the head (3).5. Install the filter body (1) and tighten the bottom of
the filter (2) with a spanner wrench.
Tightening torque: 21.7 - 28.9 lbf-ft (29.4-39.2 N-m)
LBX082 Figure 42
REPLACING THE RESERVOIR BREATHER1. Press the button (1) to release all pressure in the
hydraulic reservoir.2. Remove the nut (2) and the cover (3) from the
breather.3. Remove and discard the used filter (4).4. Install a new element, making sure the seal (5) is
facing upwards.5. Install the cover (3) as well as the nut (2).
CS00E528
1
3
2
1
4
3
5
2
5-25LBX Company, LLC

CHAPTER 5 - LUBRICATION, FILTERS, AND FLUIDS
RETURN FILTER REPLACEMENT1. Release all pressure in the hydraulic reservoir.
See Releasing Pressure in the Hydraul ic System.
2. Clean the top of the hydraulic reservoir and clean the return filter cover.
3. Remove the cover (1) and O-ring (2).4. Take out the spring (3), valve (4), and return filter
(5) from the tank.5. Install a new filter (5). Clean the spring (2) and
valve (3) and install them.6. Check O-ring (2) and replace it if worn or
damaged.7. Install the cover (1).8. Check the level of the hydraulic fluid and add
more if necessary. See Filling the reservoir.
3-0031 Figure 43
CLEANING AND REPLACEMENT OF THE SUCTION FILTER
1. Release all pressure in the hydraulic reservoir. See Releasing Pressure in the Hydraul ic System.
2. Clean the top of the hydraulic reservoir and clean the inlet filter cover.
3. Remove the cover (6), O-ring (7) and spring (8) on the top of the inlet filter rod assembly.Remove the inlet filter (9) and clean with solvent. Dry it completely and check it for any damage. If there is any damage on the surface, replace it with a new one.
4. Install a new O-ring (7) and install the inlet filter (9), spring (8) and rod assembly.
5. Install the cover (1).6. Check the level of the hydraulic fluid and add
more if necessary. See Filling the reservoir.
NOTE: Install a new suction filter every 5000 hours of operation or when the hydraulic fluid is replaced.
1
7
6
8
5
3
2
4
9
5-26 LBX Company, LLC

CHAPTER 5 - LUBRICATION, FILTERS, AND FLUIDS
REPLACING THE HYDRAULIC FLUID1. Release all pressure in the hydraulic reservoir.
See Releasing Pressure in the Hydraul ic System.
2. Using a pump, remove the fluid from the hydraulic reservoir. Have a container with a suitable capacity ready.
3. Remove the cover (1) and the o-ring (2).4. Remove the drain plug (5) to remove the
remaining fluid from the reservoir.
3-0007 Figure 44
5. Replace the suction filter (3) and the return filter (4). See Cleaning and replacement of the suction fi l ter and Return fi l ter replacement on the previous page.
6. Install the reservoir drain plug (5).7. Put new hydraulic fluid into the reservoir. See
Filling the Reservoir.8. Install a new o-ring(2).9. Install the cover plate (1).
10. Before you start the engine, it is very important that you b leed a i r f rom al l the hydrau l ic components . See B leed ing A i r f rom the Hydraulic Components.
11. Start and run the engine with no load for approximately five minutes. Move each control several times to remove any air in the system. Swing the upperstructure evenly left to right two complete turns or more.
12. Place the excavator in the hydraulic oil check position and then stop the engine.
13. Check the oil level in the hydraulic reservoir and add oil as required and check that there are no air bubbles in the hydraulic reservoir.
21
3
5
4
5-27LBX Company, LLC

CHAPTER 5 - LUBRICATION, FILTERS, AND FLUIDS
BLEEDING AIR FROM THE HYDRAULIC COMPONENTSIMPORTANT: After bleeding air from the components, stop the engine for five minutes and check there are no bubbles at the surface of the hydraulic fluid in the reservoir.
HYDRAULIC PUMP1. Using a solvent, clean the upper surface of the
pump and the air bleed plug. Check to see if oil is coming out of the air bleeding port. If it is not remove the air bleed plug (1).
2. Fill the air bleed port with hydraulic fluid. Install the air bleed plug (1).
3. Start the engine and run it at low speed. Loosen the air bleed plug (1) on the pump. Tighten the plug when air free fluid comes out of the bleed plug hole. Clean the area completely.
Figure 45
ATTACHMENT CYLINDERS1. Start and run the engine at low idle speed.2. Extend and retract the attachment cylinder rods
four or five times without bringing them to end of stroke.
3. Then repeat the operation three or four times, this time bringing the cylinder rods to end of stroke.
Swing Reduction Gear1. Start and run the engine at low idle speed. 1. Loosen the air bleed plug (1) and make sure
hydraulic fluid runs out through this port. If required, shut down the engine and add oil via this port.
2. Install the plug without tightening, then start and run the engine at low idle, leaving it to run until oil begins to run from the orifice.
3. Tighten the air bleed plug (1) completely. Swing the upperstructure three times completely to the right and three times completely to the left.
3-0030 Figure 46
1To Engine
1
5-28 LBX Company, LLC

CHAPTER 5 - LUBRICATION, FILTERS, AND FLUIDS
HYDRAULIC BREAKER (OPTIONAL) - REPLACING HYDRAULIC FLUID AND FILTERSWITH STANDARD HYDRAULIC FLUID
CS99A860A Figure 47
HYDRAULIC FLUID• When using the hydraulic breaker, hydraulic fluid
deteriorates more quickly than during ordinary digging. Check the hydraulic fluid level more frequently. In addition, when replacing the filters, also check the condition of the hydraulic fluid.
• Replace the hydraulic fluid and filter element using the following graph as a reference, depending on the operation frequency of the hydraulic breaker.
• Replace the return filter for the hydraulic breaker at the same interval as the element.
Checking the Hydraulic System lines
Make sure there are no leaks from the hydraulic system hoses, pipes, plugs, connections and fittings and check that all nuts and screws are correctly tightened. In the event of problems, repair, replace or tighten the component(s) concerned.
1. PERCENTAGE OF USE 2. INTERVAL IN HOURS 3. REPLACING HYDRAULIC FLUID 4. REPLACING HYDRAULIC FILTERS
4
3
1
2
5-29LBX Company, LLC

CHAPTER 5 - LUBRICATION, FILTERS, AND FLUIDS
AIR FILTER
SERVICE SPECIFICATIONSInspect and clean the outer element ................... Every 250 hours or when AIR FILTER is indicated on the monitorReplace the outer element ....................................................................Every 1000 hours or after cleaning six timesReplace the inner element...............................................................................................................Every 1000 hours
IMPORTANT: The primary element can be cleaned. The secondary element cannot be cleaned and must be replaced.
IMPORTANT: Observe the air filter service intervals shown above. Clean filters mean longer engine life.
INSPECTIONBe sure to carry out regular checks on the air filter, intake manifold, seals, and hoses. At the same time, check the intake manifold screws and hose clamps for tightness.
The hoses should be replaced before they are worn.
CLEANING THE OUTER ELEMENT1. Unlatch the fasteners and remove the cover (1).2. Remove the outer element(2).
CT02D115 Figure 48
3. Clean the outer element.
If you use:• Air - use compressed air (100 psi or less) to the
outer element along it flutes from the inside.• Water - if the element is contaminated due to
smoke, soot, or oil materials etc. wash it with element detergent (consult your LBX Link-Belt dealer)
IMPORTANT: Allow the element to dry completely before installing it. It is advisable to keep a spare, clean element ready for installation on the air filter while the cleaned element is drying.
INSPECTING THE ELEMENTCheck the element for damage by placing an inspection lamp inside the element.
IMPORTANT: Replace the element if light can be seen through a hole, however small.
PDE0378 Figure 49
REPLACING THE ELEMENTS1. Release the fasteners and remove the cover.
LBX084 Figure 50
1
3
2
5-30 LBX Company, LLC

CHAPTER 5 - LUBRICATION, FILTERS, AND FLUIDS
2. Remove the outer element.
LBX086 Figure 51
3. Remove the inner element if it needs replacing.
IMPORTANT: The inner element must be replaced, not cleaned.
LBX085 Figure 52
4. Insert the new inner element. Wipe down the sides of the air cleaner
IMPORTANT: Do not let any dust or debris get in the air line when you replace the inner element.
5. Install the outer element.6. Install the cover with the dust port at the bottom.
Figure 53
7. Check the dust port to make sure it is not clogged up and working properly.
5-31LBX Company, LLC

CHAPTER 5 - LUBRICATION, FILTERS, AND FLUIDS
SWING REDUCTION GEAR
SERVICE SPECIFICATIONSOil level check ...................................................................................................................................Every 250 hoursDraining ............................................................ Every 1000 hours (after the first 250 hours during the run-in period)Grease.............................................................................................................................................Every 2000 hoursOil capacity .................................................................................................................................... 2.56 gal (9.7 liters) Oil type .............................................................................................................................. See Fluids and Lubricants
LEVEL1. Remove the dipstick (1). The level should come
up to the hatched area (2). If necessary, top up through the filler port (3).
Figure 54
DRAINING AND REFILLING1. Park the excavator on flat, horizontal ground.
Stop the engine and remove the starter switch key.
2. Remove the dipstick (1).3. Place a receptacle of a suitable capacity under
the upperstructure and remove the drain plug (4).4. After draining the oil, reinstall the drain plug (4).
NOTE: The oil takes a relatively long time to drain.
IMPORTANT: Check the condition of the drained oil. If it contains metal filings or foreign matter, see your LBX Link-Belt dealer.
5. Remove the filler plug(3) and add the oil (1.3 gal).6. After about 10 minutes check the oil level, if the
oil is satisfactory then install the filler plug (3).
WARNING: Wait till all components have cooled down before carrying out any operation.
WARNING: Loosen the dipstick slowly to release pressure, otherwise there is a risk of oil spurting out.
1
2
3
4
5-32 LBX Company, LLC

CHAPTER 5 - LUBRICATION, FILTERS, AND FLUIDS
TRAVEL REDUCTION GEARS
SERVICE SPECIFICATIONSOil level check ...................................................................................................................................Every 250 hoursDraining .............................................................................. Every 1000 hours (after the first 250 hours of operation)Oil capacity ...................................................................................................................................... 1.2 gal (4.5 liters)Oil type .............................................................................................................................. See Fluids and Lubricants
LEVEL1. Park the excavator on flat, horizontal ground.2. Move the excavator so that drain plug (1) is in
the lowest possible position.
LBX044 Figure 55
3. Stop the engine and remove the starter switch key.
4. Remove the level plug (2) and check the oil level. The level must come up to the lower edge of the hole. If required, remove the fill plug (3) and add through this hole (3) until oil comes up to the bottom edge of the level hole (2).
CT02D141 Figure 56
5. Install the plugs (2) and (3).
6. Repeat Steps 2 to 5 for the other travel reduction gear.Travel slowly with the excavator and make sure there are no leaks.
DRAINING AND REFILLING1. Park the excavator on flat, horizontal ground.2. Move the excavator so that drain plug (1) is in
the lowest possible position.3. Shut down the engine and remove the starter
switch key.
Figure 57
4. Place a receptacle of a suitable capacity under the travel reduction gear and remove the three plugs (3), (2) and (1).
5. Allow the oil to drain.
IMPORTANT: Check the condition of the drained oil. If it contains metal filings or foreign matter, see your LBX Link-Belt dealer.
6. Install the drain plug (1), fill with oil through the oil filler plug (3) until oil comes up to the bottom edge of level plug hole (2), then install the plugs (2) and (3).
7. Repeat Steps 2 to 6 for the other travel reduction gear. Travel slowly with the excavator and make sure there are no leaks.
1
2
3
2
3
1
5-33LBX Company, LLC

CHAPTER 5 - LUBRICATION, FILTERS, AND FLUIDS
NOTES
5-34 LBX Company, LLC

CHAPTER 6 - MAINTENANCE AND ADJUSTMENTS
Chapter 6MAINTENANCE AND ADJUSTMENTS
TABLE OF CONTENTS
Tracks . . . . . . . . . . . . . . . . . . . . . . . . . . . . . . . . . . . . . . . . . . . . . . . . . . . . . . . . . . . . . . . . . . . . . . . . . . . . . 6-3Maintenance Specifications . . . . . . . . . . . . . . . . . . . . . . . . . . . . . . . . . . . . . . . . . . . . . . . . . . . . . . . . . . . 6-3Cleaning . . . . . . . . . . . . . . . . . . . . . . . . . . . . . . . . . . . . . . . . . . . . . . . . . . . . . . . . . . . . . . . . . . . . . . . . . 6-3Checking the Tension . . . . . . . . . . . . . . . . . . . . . . . . . . . . . . . . . . . . . . . . . . . . . . . . . . . . . . . . . . . . . . . 6-3Adjusting the Tension . . . . . . . . . . . . . . . . . . . . . . . . . . . . . . . . . . . . . . . . . . . . . . . . . . . . . . . . . . . . . . . 6-4To Reduce Tension . . . . . . . . . . . . . . . . . . . . . . . . . . . . . . . . . . . . . . . . . . . . . . . . . . . . . . . . . . . . . . . . . 6-4
Track Rollers and Idler Wheels . . . . . . . . . . . . . . . . . . . . . . . . . . . . . . . . . . . . . . . . . . . . . . . . . . . . . . . . . . 6-5Maintenance Specification . . . . . . . . . . . . . . . . . . . . . . . . . . . . . . . . . . . . . . . . . . . . . . . . . . . . . . . . . . . . 6-5
Radiator and Oil Cooler . . . . . . . . . . . . . . . . . . . . . . . . . . . . . . . . . . . . . . . . . . . . . . . . . . . . . . . . . . . . . . . . 6-6Maintenance Specifications . . . . . . . . . . . . . . . . . . . . . . . . . . . . . . . . . . . . . . . . . . . . . . . . . . . . . . . . . . . 6-6Cleaning . . . . . . . . . . . . . . . . . . . . . . . . . . . . . . . . . . . . . . . . . . . . . . . . . . . . . . . . . . . . . . . . . . . . . . . . . 6-6
Fan and Alternator Drive Belt . . . . . . . . . . . . . . . . . . . . . . . . . . . . . . . . . . . . . . . . . . . . . . . . . . . . . . . . . . . . 6-7Maintenance Specifications . . . . . . . . . . . . . . . . . . . . . . . . . . . . . . . . . . . . . . . . . . . . . . . . . . . . . . . . . . . 6-7Checking the Tension . . . . . . . . . . . . . . . . . . . . . . . . . . . . . . . . . . . . . . . . . . . . . . . . . . . . . . . . . . . . . . . 6-7Adjusting the Tension . . . . . . . . . . . . . . . . . . . . . . . . . . . . . . . . . . . . . . . . . . . . . . . . . . . . . . . . . . . . . . . 6-7Replacing the Belt . . . . . . . . . . . . . . . . . . . . . . . . . . . . . . . . . . . . . . . . . . . . . . . . . . . . . . . . . . . . . . . . . . 6-7
Inspecting and Cleaning the Excavator . . . . . . . . . . . . . . . . . . . . . . . . . . . . . . . . . . . . . . . . . . . . . . . . . . . . 6-8Maintenance Specifications . . . . . . . . . . . . . . . . . . . . . . . . . . . . . . . . . . . . . . . . . . . . . . . . . . . . . . . . . . . 6-8
Checking for Cylinder Leakage . . . . . . . . . . . . . . . . . . . . . . . . . . . . . . . . . . . . . . . . . . . . . . . . . . . . . . . . . . 6-8Replacing a Bucket . . . . . . . . . . . . . . . . . . . . . . . . . . . . . . . . . . . . . . . . . . . . . . . . . . . . . . . . . . . . . . . . . . . 6-9
Removal . . . . . . . . . . . . . . . . . . . . . . . . . . . . . . . . . . . . . . . . . . . . . . . . . . . . . . . . . . . . . . . . . . . . . . . . . 6-9Installation . . . . . . . . . . . . . . . . . . . . . . . . . . . . . . . . . . . . . . . . . . . . . . . . . . . . . . . . . . . . . . . . . . . . . . . . 6-9
Fire Extinguisher (Not Supplied) . . . . . . . . . . . . . . . . . . . . . . . . . . . . . . . . . . . . . . . . . . . . . . . . . . . . . . . . 6-10Welding on the Excavator . . . . . . . . . . . . . . . . . . . . . . . . . . . . . . . . . . . . . . . . . . . . . . . . . . . . . . . . . . . . . 6-10Plastic and Resin Parts . . . . . . . . . . . . . . . . . . . . . . . . . . . . . . . . . . . . . . . . . . . . . . . . . . . . . . . . . . . . . . . 6-10Air Conditioning . . . . . . . . . . . . . . . . . . . . . . . . . . . . . . . . . . . . . . . . . . . . . . . . . . . . . . . . . . . . . . . . . . . . . 6-11
Maintenance Specification . . . . . . . . . . . . . . . . . . . . . . . . . . . . . . . . . . . . . . . . . . . . . . . . . . . . . . . . . . . 6-11Hardware Torque Inspection . . . . . . . . . . . . . . . . . . . . . . . . . . . . . . . . . . . . . . . . . . . . . . . . . . . . . . . . . . . 6-13
Maintenance Specification . . . . . . . . . . . . . . . . . . . . . . . . . . . . . . . . . . . . . . . . . . . . . . . . . . . . . . . . . . . 6-13
6-1LBX Company, LLC

CHAPTER 6 - MAINTENANCE AND ADJUSTMENTS
6-2 LBX Company, LLC

CHAPTER 6 - MAINTENANCE AND ADJUSTMENTS
TRACKS
MAINTENANCE SPECIFICATIONSClean ........................................................................ Periodically and when the excavator has been working in mudCheck tension........................................................................................................................................... PeriodicallyCheck Shoe Bolt torques...................................... Every 250 hours (after the first 50 hours during the run-in period)
IMPORTANT: If the tracks are too tight, they wear quickly. If tracks are not tight enough, they wear quickly and the links can catch on the sprocket wheel or slide off the idler wheel or the sprocket wheel. Clean the tracks after work.
CLEANINGWhen the excavator has been working in mud, a reduction in temperature can cause the mud to solidify.
1. Place the upperstructure at right angles to the undercarriage. Use the attachment to press on the ground and lower the boom until the track is raised off the ground.
Figure 1
2. Put the engine throttle button in the SP (1) mode and select the High speed travel(2).
Figure 2
3. Operate the travel control lever for the raised track forwards and then in reverse, to remove the mud.
4. Repeat Steps 1 to 4 for the other track.
CHECKING THE TENSION1. Park the excavator on flat, horizontal ground.2. Clean the tracks.3. Place the upperstructure at right angles to the
undercarriage. Use the attachment to press on the ground and lower the boom until the track is raised off the ground.
4. Place a block under the undercarriage to keep the excavator from drifting down.
Figure 3
5. Use the travel control lever to operate the raised track in reverse for a few moments.
6. Stop the engine and remove the starter switch key.
Figure 4
7. Measure the slack between the base of the undercarriage and the upper part of the track tread. See Track Tension Value on the next page.
1
2
6-3LBX Company, LLC

CHAPTER 6 - MAINTENANCE AND ADJUSTMENTS
Track Tension ValueTrack Tension: 11.0" - 11.8" (280-300 mm)
8. Adjust the tension if necessary and then lower the raised track to the ground.
9. Repeat Steps 3 to 7 for the other track
ADJUSTING THE TENSIONThis operation is to be carried out after the tension has been checked.
TO INCREASE TENSION1. With the track raised, clean the grease fitting
adaptor and the grease fitting.2. Connect the grease pump. Inject grease to
obtain the right amount of track sag. See Track tension value.
3. Remove the grease pump and clean the grease fitting.
4. Repeat Steps 1 to 3 for the other track.
CT02D177 Figure 5
TO REDUCE TENSION1. With the track in raised position, loosen the
grease fitting adaptor about three turns to allow grease to flow out of the cylinder.
2. As soon as the right track sag is obtained, tighten the adaptor. See Track Tension Value.
3. Clean the grease adaptor and fitting and then lower the raised track to the ground.
4. Repeat Steps 1 to 3 for the other track.
IMPORTANT: If the grease fitting adaptor is damaged, grease may leak out. Check the condition of the grease fitting adaptor regularly and replace it if necessary.
CT02D178 Figure 6
TIGHTENING TORQUE OF THE TRACK SHOE
The tightening torque of the bolts should be between:
After tightening to 67.4 lbf (300 Nm) turn 120 degrees more.
Follow the prescribed order.
CS00E504 Figure 7
WARNING: Never unscrew the grease fitting adaptor completely to speed up the flow of grease. The grease in the cylinder is under high pressure.
1 3
24
6-4 LBX Company, LLC

CHAPTER 6 - MAINTENANCE AND ADJUSTMENTS
TRACK ROLLERS AND IDLER WHEELS
MAINTENANCE SPECIFICATIONCheck ................................................................................................................................................Every 250 hours
The upper (1) and lower rollers (2) and idler wheels (3) use a permanent floating seal type sealing mechanism. The service life normally lasts until overhaul, but check visually from time to time before work for oil leakage. If oil leakage is found, component replacement is necessary. See your LBX Link-Belt dealer.
Figure 8
13 2
6-5LBX Company, LLC

CHAPTER 6 - MAINTENANCE AND ADJUSTMENTS
RADIATOR AND OIL COOLER
MAINTENANCE SPECIFICATIONSCheck for leakage...........................................................................................................Every 10 hours or every dayClean .................................................................................................................................................Every 250 hours
CLEANING
Shut down the engine, remove the starter switch key, open the rear left-hand side door and the engine hood.
Clean the radiator and the oil cooler:Dry dust: use compressed air.Mud: use a water jet.Greasy dust: use perchlorethylene.
The use of trichlorethylene is strictly forbidden.
1. Loosen the 8 wing nuts (1) and remove the 2 protective grilles (2) to access the radiator.
2. Install the grills (2) and the wing nuts (1) then close the engine hood and the rear left-hand side door.
CT02D187 Figure 9
WARNING: Wear safety goggles when using compressed air.
CAUTION: When using a pressure washer, keep the wand at a safe distance from the fins. Using the pressure washer can damage the fins and limit the effectiveness of the radiator.
21
6-6 LBX Company, LLC

CHAPTER 6 - MAINTENANCE AND ADJUSTMENTS
FAN AND ALTERNATOR DRIVE BELT
MAINTENANCE SPECIFICATIONSVisual check ...................................................................................................................Every 10 hours or every dayCheck belt tension .............................................................................................................................Every 250 hours
CHECKING THE TENSIONUse your finger to exert pressure of around 20 lbs on the center of the drive belt. The tension slack should be between about 1/2".NOTE: Check if there are any signs of wear damage to the pulleys or the belt. Check carefully to ensure that the belt is correctly positioned in the pulley grooves. If the belt is stretched, cracked or frayed, it must be replaced.
IMPORTANT: If the engine runs with the belt slack, the belt can slip in its housing and cause the engine to overheat or the battery to receive insufficient charge.
CS98M560 Figure 10
ADJUSTING THE TENSIONLoosen the upper and lower bolts (1). Use the adjustment screws (2) to move the alternator outwards until belt tension is correct. Tighten the alternator mounting bolts (1).
Figure 11
REPLACING THE BELTIf a belt breaks, the battery load indicator lights up on the instrument panel. Shut down the engine, remove the starter switch key and change the belt.
1. Remove the mounting bolts (1). Use the adjustment screw (2) to push the alternator inward.
2. Remove the belt that is worn out.3. Install the new belt.4. Adjust the belt using the screw (2).5. Tighten the mounting bolts (1).6. Run the engine for about an hour and then check
the belt tension again.
1
1
2
6-7LBX Company, LLC

CHAPTER 6 - MAINTENANCE AND ADJUSTMENTS
INSPECTING AND CLEANING THE EXCAVATOR
MAINTENANCE SPECIFICATIONSInspect and clean ..................................................................................................................................... Periodically
Or whenever oil or grease has been spilled on the excavator. Clean off with steam or a high pressure water jet.
Look for any leaks and check the condition of all pipes and hoses.
Take the opportunity during this operation to make a visual check of all the welded components (in case of appearance of cracks), the attachment linkages and check the teeth and tooth tips for correct retention and for wear.
CHECKING FOR CYLINDER LEAKAGE
A cylinder rod should be slightly oily. Check that there are no leaks after a period of work, when the whole hydraulic system is at normal operating temperature.
1. Wipe clean the rod and bearing on the cylinder to be cleaned.
2. Operate normally for five or ten minutes.
3. Extend the cylinder rod.
4. Carry out the leak test.
ROD APPEARANCE TEST CONCLUSION
Dry Slight traces of oil when a piece of paper is wiped over 1 inch of the rod. Normal
Slightly greasy Paper remains stuck to rod when run over rod. Normal
Oily Paper remains stuck when placed on rod. Normal
Very oily or weeping Each time the cylinder rod is extended, a ring of oil can be seen on the rod. See your LBX Link-Belt dealerLeakage Each time the rod retracts, the excess oil drips from the gland.
6-8 LBX Company, LLC

CHAPTER 6 - MAINTENANCE AND ADJUSTMENTS
REPLACING A BUCKET
REMOVAL1. Place the bucket flat on flat, horizontal ground.
Operate the attachment controls so that the arm/bucket linkage pin is not gripped by the weight of the arm.
2. Stop the engine and remove the starter switch key.
3. Remove the snap rings and retaining pins then remove the pins from the bucket.
4. Start the engine.5. Disengage the attachment from the bucket and
save the linkage seals.
CT02E005 Figure 12
INSTALLATION1. Install the linkage seals on the arm bushing
shoulders. Change them if necessary.2. Start the engine. Extend the bucket cylinder rod
to bring it into its housing. Stop the engine and remove the starter switch key.
3. Install the arm/bucket linkage pin, then the retaining pins and the rings.
CT02E005A Figure 13
4. Start the engine. Remove the bucket cylinder rod to bring it in its housing, shut down the engine and remove the starter switch key.
5. Install the connecting rod/bucket linkage pin then the retaining pins and the snap rings.
6. Push the seals back into their housings.7. Grease the linkage pins.
CT02E005B Figure 14
6-9LBX Company, LLC

CHAPTER 6 - MAINTENANCE AND ADJUSTMENTS
FIRE EXTINGUISHER (NOT SUPPLIED)It is recommended that you have a fire extinguisher on your excavator. The fire extinguisher is available from your dealer and can be installed on the excavator.
MAINTENANCE SPECIFICATIONEvery month ........................................................... examine the fire extinguisher and make sure it is not damaged.Every six months .......................... have an approved specialist empty and refill the powder in the fire extinguisher.Every year ..................................................................... have an approved specialist examine the fire extinguisher.
CS98M573 Figure 15
WELDING ON THE EXCAVATORWhenever carrying out a welding operation on the undercarriage or upperstructure carriage as authorized by the manufacturer and in accordance with his instructions, disconnect the batteries, disconnect the alternator B+ and D+ terminal wires, and connect the welding apparatus ground cable to the component on which the welding operation is to be performed.Never connect the welding apparatus to the undercarriage when welding on the upperstructure (or vice-versa). Never connect the welding apparatus ground to a component of the hydraulic system.
PLASTIC AND RESIN PARTSWhen cleaning the plastic windows, the console, the instrument panel, the indicators, etc. do not use gasoline, kerosene, paint solvents, etc. Only use water, soap and a soft cloth.The use of gasoline, kerosene, paint solvents, etc. will cause discoloration, cracks or deformation of these parts.
WARNING: Any unauthorized modifications made to this excavator can cause serious injury. Do not undertake any modifications without first consulting your LBX Link-Belt dealer.
6-10 LBX Company, LLC

CHAPTER 6 - MAINTENANCE AND ADJUSTMENTS
AIR CONDITIONING
MAINTENANCE SPECIFICATIONClean the intake filter...........................................................................................................................Every 50 hoursClean the air recycling filter .................................................................................................................Every 50 hoursHave checked by a specialist .............................................................................................................Every 6 months
The components of the air conditioning system need servicing at regular intervals. Make sure these intervals are respected, in order to ensure the air conditioning functions correctly and with maximum effectiveness. The air conditioning system contains gas which is subject to strict legislation. Any defect in the system must be fixed rapidly.
Operate the air conditioning system at least once a week, if only for a short time.
INSPECTION
In order to ensure the air conditioning functions correctly, inspect the air conditioner using the procedure outlined below before starting work.
CLEANLINESS OF THE CONDENSER
If the condenser is dirty it will not dissipate heat properly. Clean the condenser in water.
Never use water under pressure to clean the condenser.
CHECKING THE BELT TENSION
CT02D230 Figure 16
Use your finger to exert pressure of around 20 lbs (10 kg) on the center (A) of the drive belt (1). The tension slack should be between about .24"-.31" (6 and 8 mm). If necessary, adjust the belt tension.
Tension Adjustment
1. Loosen the pulley mounting bolt (B).
2. Use the adjustment screw (C) to move the pulley outward until belt tension is correct and tighten pulley mounting bolt (B).
CHECKING THE LINES
Make a visual check of the lines and make sure there are no accumulations of dust, grease, etc.
A C
B
6-11LBX Company, LLC

CHAPTER 6 - MAINTENANCE AND ADJUSTMENTS
CLEANING THE FRESH AIR INTAKE FILTERS
3-0083 Figure 17
1. To change the fresh air intake filter open the left side door and remove the cover plate behind the cab.
2. Remove the thumbscrews on the filter cover.
CT02D233 Figure 18
3. Take out the filter(1) and use compressed air to clean the filter. If it is damaged, replace it.
IMPORTANT: Always protect your face before using compressed air.
4. Place the filter back in housing and close the cover door. Tighten the thumbscrews on the cover.
5. Reinstall the cover plate.
CLEANING THE INSIDE AIR INTAKE FILTER
CT02D232 Figure 19
1. Remove the cover behind the operator’s seat.
Figure 20
2. Take out the filter and use compressed air to clean the filter. If it is damaged, replace it.
CHECKING THE CHARGE STATE OF THE SYSTEM
1. Turn on the air conditioning system, increase engine speed slightly 1400 to 1600 rpm and look for bubbles through the sight glass (1).
2. This check should be made approximately one minute after turning on the air conditioning.A. Very few bubbles observed, then transparent
at first, then whitish: "Normal".B. The bubbles are numerous: check the unions
and consult your LBX Link-Belt dealer.C. No bubbles are visible: check the unions and
consult your LBX Link-Belt dealer.
Check if the hydraulic line and air-conditioning hose connectors are dirty, dusty or in need of replacing.
1
6-12 LBX Company, LLC

CHAPTER 6 - MAINTENANCE AND ADJUSTMENTS
HARDWARE TORQUE INSPECTION
MAINTENANCE SPECIFICATIONCheck ................................................................................................................................................Every 250 hours
(after the first 50 hours during the run-in period)At the end of each working day, check all mounting nuts and screws for tightness and tighten if necessary. Make sure no hardware items are missing. Replace them, if necessary.
NOTE: Use Loctite 262, or the equivalent, on screws marked (*).
Component Screw(Ø)
Wrench(mm)
Torque setting(Nm)
Travel reduction gear (*) M16 24 267-312Drive sprocket (*) M16 24 267-312Idler wheel (*) M16 24 267-312Upper roller (*) M20 30 521-608qLower roller (*) M18 27 371-432
Track shoe M20 30 300, then turn 120°Counterweight M33 50 1862-2058Turntable (undercarriage) M20/M24 30/36 468-545/784-919Turntable (upperstructure) M20/M24 30/36 468-545/784-919Swing reduction gear (*) M20/M24 30/36 539-630/784-919Engine (*) M16 24 206-247Engine mounts (*) M10 17 64-74Radiator M16 24 147-177
Hydraulic pump (*) M10M12
17Male
63-73 367-496
Hydraulic reservoir (*) M16 24 232-276Fuel tank (*) M16 24 232-276Control valve (*) M16 24 330-360Hydraulic swivel (*) M12 19 107-188Cab M16 24 157Batteries M10 17 20-29
6-13LBX Company, LLC

CHAPTER 6 - MAINTENANCE AND ADJUSTMENTS
NOTES
6-14 LBX Company, LLC

CHAPTER 7 - ELECTRICAL
Chapter 7ELECTRICAL
TABLE OF CONTENTS
Fuses . . . . . . . . . . . . . . . . . . . . . . . . . . . . . . . . . . . . . . . . . . . . . . . . . . . . . . . . . . . . . . . . . . . . . . . . . . . . . . 7-3Battery . . . . . . . . . . . . . . . . . . . . . . . . . . . . . . . . . . . . . . . . . . . . . . . . . . . . . . . . . . . . . . . . . . . . . . . . . . . . . 7-5
Maintenance Specification . . . . . . . . . . . . . . . . . . . . . . . . . . . . . . . . . . . . . . . . . . . . . . . . . . . . . . . . . . . . 7-5Access to the Batteries . . . . . . . . . . . . . . . . . . . . . . . . . . . . . . . . . . . . . . . . . . . . . . . . . . . . . . . . . . . . . . 7-5Checking a Battery . . . . . . . . . . . . . . . . . . . . . . . . . . . . . . . . . . . . . . . . . . . . . . . . . . . . . . . . . . . . . . . . . 7-6Replacing a Battery . . . . . . . . . . . . . . . . . . . . . . . . . . . . . . . . . . . . . . . . . . . . . . . . . . . . . . . . . . . . . . . . . 7-6
Connecting One or Two Booster Batteries . . . . . . . . . . . . . . . . . . . . . . . . . . . . . . . . . . . . . . . . . . . . . . . . . 7-7Alternator . . . . . . . . . . . . . . . . . . . . . . . . . . . . . . . . . . . . . . . . . . . . . . . . . . . . . . . . . . . . . . . . . . . . . . . . . . . 7-7
Maintenance Specification . . . . . . . . . . . . . . . . . . . . . . . . . . . . . . . . . . . . . . . . . . . . . . . . . . . . . . . . . . . . 7-7Starter Motor . . . . . . . . . . . . . . . . . . . . . . . . . . . . . . . . . . . . . . . . . . . . . . . . . . . . . . . . . . . . . . . . . . . . . . . . 7-7
Maintenance Specification . . . . . . . . . . . . . . . . . . . . . . . . . . . . . . . . . . . . . . . . . . . . . . . . . . . . . . . . . . . . 7-7Replacing a Bulb . . . . . . . . . . . . . . . . . . . . . . . . . . . . . . . . . . . . . . . . . . . . . . . . . . . . . . . . . . . . . . . . . . . . . 7-8
Operator’s Compartment Lighting . . . . . . . . . . . . . . . . . . . . . . . . . . . . . . . . . . . . . . . . . . . . . . . . . . . . . . 7-8Working Lights on the Cab and on the Attachment . . . . . . . . . . . . . . . . . . . . . . . . . . . . . . . . . . . . . . . . . 7-8
7-1LBX Company, LLC

CHAPTER 7 - ELECTRICAL
NOTES
7-2 LBX Company, LLC

CHAPTER 7 - ELECTRICAL
FUSESIMPORTANT: Before changing fuses or relays, turn the starter key switch to the Shut down position.
IMPORTANT: Never replace a fuse with a fuse of a different amperage.The fuse box is located in the operator’s compartment at the back on the left-hand side.
Figure 1
To access the fuses, remove the cover of the box.A notice on the cover gives the function and amperage of each fuse.
NOTE: To remove and install a fuse, use the plastic pliers located inside the box.
NOTE: Two spare fuses (10 amp and 20 amp) are to be found on the inside of the cover.
Figure 2
7-3LBX Company, LLC

CHAPTER 7 - ELECTRICAL
Fuse Location
CT02D248 Figure 3
7-4 LBX Company, LLC

CHAPTER 7 - ELECTRICAL
BATTERY
MAINTENANCE SPECIFICATION
Checking the charge state. . . . . . . . . Every 50 hours
NOTE: If the excavator needs to be started using a booster battery, see Connecting One Or Two Booster Batteries.
SA046
SB032
SA033
SB034
ACCESS TO THE BATTERIESTo access the batteries, open the rear left-hand side door.
Remove the two bolts to remove the protective plate from the batteries.
CT02D251 Figure 4
WARNING: Batteries give off explosive gases. Keep all open flames, sparks and cigarettes away. Ensure adequate ventilation when charging batteries or when using in a confined place. Always protect your eyes when working near batteries.
WARNING: Do not reverse battery terminals. Connect positive cable ends to positive (+) terminals and negative cable ends to negative terminals (-).
WARNING: Before you service a battery, always wear face protection, protective gloves and protective clothing. Battery acid or battery explosion can cause serious injuries.
WARNING: Battery acid causes severe burns. Batteries contain sulfuric acid. Avoid contact with skin, eyes or clothing. Antidote - EXTERNAL: flush with water.INTERNAL: drink large quantities of water or milk. Follow with milk of magnesia, beaten egg or vegetable oil. Call physician immediately.EYES: flush with water for 15 minutes and get prompt medical attention.
WARNING: When the battery electrolyte is frozen, the battery can explode if, (1) you try to charge the battery, or (2) you try to jump start and run the engine. To prevent the battery electrolyte from freezing, try to keep the battery at full charge. If you do not follow these instructions, you or others in the area can be injured.
WARNING: Before any operation on the components of the electrical circuit, put the key switch in the shut down position. When disconnecting the battery cables, always disconnect the negative (-) cable first. When reconnecting the battery cables, always connect the negative (-) cable last.
WARNING: Connecting auxiliary cables wrongly or short-circuiting batteries terminals can cause an accident. Connect auxiliary starting cables as per the following instructions.
WARNING: Sparks or flame can cause hydrogen gas in a battery to explode. To prevent an explosion, do the following:
1. When you DISCONNECT the battery cables, always disconnect the negative (1) battery cable first.
2. When you CONNECT the battery cables, always connect the negative (-) cable last.
3. Do not short circuit the battery posts with metal items.
4. Do not weld, grind, or smoke near a battery.
WARNING: Always store batteries in a safe place, out of the reach of children.
7-5LBX Company, LLC

CHAPTER 7 - ELECTRICAL
CHECKING A BATTERYMake sure the battery terminals are clean and coated with grease and that the cables are properly tightened.
Checking the charging state and the electrolyte level is carried out using the indicator:
Green: Normal.Black: Recharge the battery.White: Change the battery.
CT02C065A Figure 5
To check the battery state look through the two holes on the cover.
REPLACING A BATTERY IMPORTANT: When you change a battery replace both batteries at the same time. If you only change one it will shorten the life of the new battery.
REMOVAL1. Remove the plate.
CT02D259 Figure 6
2. Remove the terminal sleeves, disconnect the cable (negative terminals) then the cable (positive terminals)
CT02D260 Figure 7
3. Remove the batteries.4. Clean the battery compartment, remove all
foreign bodies, clean any spilled electrolyte.
INSTALLATION1. Install a new battery. Clean the cables and
battery terminals and coat them with grease.2. Set the batteries in the machine. Make sure the
positive and negative post are in the same location as the picture.
3. Connect the cable (positive terminals), the cable (negative terminal) then install the terminal sleeves.
WARNING: Do not invert battery terminals. Connect positive cable ends to positive (+) terminals and negative cable ends to negative terminals (-).
WARNING: Always store batteries in a safe place, out of the reach of children.
-
-+
+
-
-+
+
7-6 LBX Company, LLC

CHAPTER 7 - ELECTRICAL
CONNECTING ONE OR TWO BOOSTER BATTERIES
Make sure that the booster ba t tery vo l tage corresponds to the voltage system of the excavator.
1. Connect the positive (+) auxiliary cable to the positive (+) terminal of the discharged battery of the excavator (1).
2. Connect the positive (+) auxiliary cable to the positive (+) terminal of the booster battery (2).
3. Connect the negative (-) auxiliary cable to the negative (-) terminal of the booster battery (3).
4. Connect the other negative (-) auxiliary cable to the discharged excavator’s upper rotating frame away from the battery (4).
LBX0225 Figure 8
5. Start the engine of the booster machine and wait four to five minutes.
6. Try starting the excavator. If it does not start let the booster machine run for four or five minutes longer.
7. Disconnect the negative (-) auxiliary cable from the excavator’s upper rotating frame (4).
8. Disconnect the negative (-) auxiliary cable from the negative (-) terminal of the booster battery(3).
9. Disconnect the positive (+) auxiliary cable from the positive (+) terminal of the booster battery (2).
10. Disconnect the positive (+) auxiliary cable from the positive (+) terminal of the other battery (1).
ALTERNATOR
MAINTENANCE SPECIFICATIONCheck . . . . . . . . . . . . . . . . . . . . . .Every 1000 hours
Do not use steam cleaning equipment or a cleaning solvent to clean the alternator.
Ask your LBX Link-Bel t Dealer to check the alternator.
Make sure that the terminal protectors are correctly installed.
STARTER MOTOR
MAINTENANCE SPECIFICATIONCheck . . . . . . . . . . . . . . . . . . . . . .Every 1000 hours
Ask your LBX Link-Belt dealer to check the starter motor.
NOTE: Make sure that the terminal protectors are correctly installed.
WARNING: Connecting auxiliary cables wrongly or short-circuiting battery terminals can cause an accident. Connect auxiliary starting cables as per the following instructions.
WARNING: Whenever carrying out a welding operation on the excavator (authorized by the manufacturer and in accordance with his instructions) or any repairs on the electrical system, disconnect the B+ and D+ wires from the alternator. When reconnecting, check the markings on the wires.
7-7LBX Company, LLC

CHAPTER 7 - ELECTRICAL
REPLACING A BULB
OPERATOR’S COMPARTMENT LIGHTING1. Remove the cover.
CT02C058 Figure 9
2. Remove the bulb and install a bulb of the same wattage (6 W).
3. Install the lens.
WORKING LIGHTS ON THE CAB AND ON THE ATTACHMENT
1. Remove the 4 retaining screws (1).2. Tilt the working light forward and disconnect the
plug.
‘CT02D262 Figure 10
3. Pull the clip (2) outwards, remove the bulb and install a bulb of the same wattage:
CT02D263 Figure 11
IMPORTANT: Never put your fingers on a tungsten iodide bulb.
4. Install the clip and reconnect the plug.5. Put the working light back into position and install
the mounting screws.Figure 12
2
1
7-8 LBX Company, LLC

CHAPTER 8 - SPECIFICATIONS
Chapter 8SPECIFICATIONS
TABLE OF CONTENTS
Engine . . . . . . . . . . . . . . . . . . . . . . . . . . . . . . . . . . . . . . . . . . . . . . . . . . . . . . . . . . . . . . . . . . . . . . . . . . . . . 8-3Electrical Systems . . . . . . . . . . . . . . . . . . . . . . . . . . . . . . . . . . . . . . . . . . . . . . . . . . . . . . . . . . . . . . . . . . . . 8-3Hydraulic System . . . . . . . . . . . . . . . . . . . . . . . . . . . . . . . . . . . . . . . . . . . . . . . . . . . . . . . . . . . . . . . . . . . . . 8-3Undercarriage . . . . . . . . . . . . . . . . . . . . . . . . . . . . . . . . . . . . . . . . . . . . . . . . . . . . . . . . . . . . . . . . . . . . . . . 8-4Capacity of Systems and Components . . . . . . . . . . . . . . . . . . . . . . . . . . . . . . . . . . . . . . . . . . . . . . . . . . . . 8-4Weights . . . . . . . . . . . . . . . . . . . . . . . . . . . . . . . . . . . . . . . . . . . . . . . . . . . . . . . . . . . . . . . . . . . . . . . . . . . . 8-4Boom . . . . . . . . . . . . . . . . . . . . . . . . . . . . . . . . . . . . . . . . . . . . . . . . . . . . . . . . . . . . . . . . . . . . . . . . . . . . . . 8-4Arms . . . . . . . . . . . . . . . . . . . . . . . . . . . . . . . . . . . . . . . . . . . . . . . . . . . . . . . . . . . . . . . . . . . . . . . . . . . . . . . 8-4Digging Force . . . . . . . . . . . . . . . . . . . . . . . . . . . . . . . . . . . . . . . . . . . . . . . . . . . . . . . . . . . . . . . . . . . . . . . . 8-4Excavator Overall Dimensions . . . . . . . . . . . . . . . . . . . . . . . . . . . . . . . . . . . . . . . . . . . . . . . . . . . . . . . . . . . 8-5Working Range . . . . . . . . . . . . . . . . . . . . . . . . . . . . . . . . . . . . . . . . . . . . . . . . . . . . . . . . . . . . . . . . . . . . . . 8-6Lifting Capacities . . . . . . . . . . . . . . . . . . . . . . . . . . . . . . . . . . . . . . . . . . . . . . . . . . . . . . . . . . . . . . . . . . . . . 8-8
240X2 With 9' 10" (3.00 m) Arm Lifting Capacities . . . . . . . . . . . . . . . . . . . . . . . . . . . . . . . . . . . . . . . . . 8-9240X2 With 8' 2" (2.50 m) Arm Lifting Capacities . . . . . . . . . . . . . . . . . . . . . . . . . . . . . . . . . . . . . . . . . 8-10240X2 With 11' 6" (3.50 m) Arm Lifting Capacities . . . . . . . . . . . . . . . . . . . . . . . . . . . . . . . . . . . . . . . . 8-11
8-1LBX Company, LLC

CHAPTER 8 - SPECIFICATIONS
NOTES
8-2 LBX Company, LLC

CHAPTER 8 - SPECIFICATIONS
ENGINEMake................................................................................................................................................................. ISUZUType........................................................................................................................................................... AH-4HK1XNumber of cylinders...................................................................................................................................................4SAE net horsepower.................................................................................................. 177 HP (132 kW) @ 2,000 rpmDisplacement.......................................................................................................................................................5.2 LMaximum Torque ....................................................................................................469 lbf-ft (636 N-m) @ 1,500 rpmStarter ...................................................................................................................................................... 24 V-5.0 kW
ELECTRICAL SYSTEMSCircuit ............................................................................................................................................................. 24 voltsBattery ...................................................................................................................................................92 amp hoursAlternator .........................................................................................................................................................50 amp
HYDRAULIC SYSTEM Open-center system, two variable displacement axial piston pumps and one gear pump for pilot controls, main control valve with one 4-spool valve and one 5-spool valve with auxiliary spool - stackable, oil cooler, auto power boost, boom and arm holding valveless, o-ring face seals, 6 micron return filter, firewall.
Main pump max flow .................................................................................................. 2 x 61.8 gpm (2 x 234 l/min) Pilot pump max flow ...................................................................................................................5.3 gpm (20 l/min)
Relief valves pressures:Boom/Arm/Bucket ....................................................................................................................4,970 psi (343 bar)In Power Boost Mode................................................................................................................5,340 psi (368 bar)Swing ........................................................................................................................................4,190 psi (289 bar)Travel ........................................................................................................................................4,970 psi (343 bar)
Hydraulic cylinders:Bore x Rod x Stroke
Boom ......................................................................................................................................... 5.1" x 3.5" x 52.6"Arm............................................................................................................................................. 5.7" x 4.1" x 65.4"Bucket ........................................................................................................................................ 5.1" x 3.5" x 42.1"
Hydraulic Oil Filtration:Return filter................................................................................................................................................ 6 micronPilot filter ................................................................................................................................................... 8 micronSuction screen ...................................................................................................................................... 155 micron
Control Valves:Five control valve sections for left-hand travel, boom, arm, auxiliary circuit and swing acceleration.Four control valve sections for right-hand travel, boom, arm and bucket acceleration.Boom/arm load holding valves.
Swing
Fixed flow, piston-type pump.Upperstructure swing speed ................................................................................................................. 0-10.7 rpmTail Swing .......................................................................................................................................... 9' 8" (2.95 m)Swing Torque ...................................................................................................................55,243 lbf-ft (74.9 kN-m)
TravelVariable flow hydraulic motors with axial pistons. Planetary reduction gears.Two speeds controlled from the instrument panel.
Low speed...................................................................................................................0 to 2.2 mph (0 to 3.5 km/h)High speed ...................................................................................................................0 to 3.4 mph (0 to 5.5km/h)Drawbar pull ............................................................................................................................. 45,254 lbf (201 kN)
8-3LBX Company, LLC

CHAPTER 8 - SPECIFICATIONS
UNDERCARRIAGE
SPECIFICATIONS PER TRACK ASSEMBLYNumber of upper rollers ........................................................................................................................................2Number of lower rollers .........................................................................................................................................9Number of track pads............................................................................................................................ 51 per sideType of track pads.............................................................................................................................Triple grouserWidth of standard track pads.......................................................................................................... 31.5" (800 mm)Ground pressure ..........................................................................................................................5.37 psi (.37 bar)Gradeability ......................................................................................................................................................70%
CAPACITY OF SYSTEMS AND COMPONENTSHydraulic tank............................................................................................................................... 38.8 gal (147 liters)Hydraulic system ........................................................................................................................ 66.04 gal (250 liters)Final drive (each)............................................................................................................................. 1.2 gal (4.5 liters)Swing Drive ................................................................................................................................... 2.56 gal (9.7 liters)Engine oil (with filter change) ........................................................................................................ 6.1 gal (23.1 liters)Fuel tank................................................................................................................................... 108.31 gal (410 liters)Cooling system............................................................................................................................ 6.66 gal (25.2 liters)
WEIGHTSWorking weight with 31.5" (800 mm) shoes,19' 2" (5.85 m) boom, 9' 10" (3.0 m) arm, 1,790 lb (810 kg) bucket................................................................................................................................................. 54,895 lbs (24,900 kg)
BOOMMono.................................................................................................................................................... 19' 2" (5.85 m)
ARMSLength.................................................................................................. 8' 2" (2.50 m), 9' 10" (3.00 m), 11' 6" (3.50 m)
DIGGING FORCE8' 2" (2.50 m) arm ......................................................................................................................... 31,700 lbf (141 kN)
with auto power boost mode applied........................................................................................ 33,950 lbf (151 kN)9' 10" (3.00 m) arm ....................................................................................................................... 26,980 lbf (120 kN)
with auto power boost mode applied........................................................................................ 29,000 lbf (129 kN)11' 6" (3.50 m) arm ....................................................................................................................... 24,050 lbf (107 kN)
with auto power boost mode applied.........................................................................................25,850 lbf (115 kN)Bucket digging force ..................................................................................................................... 36,420 lbf (162 kN)
with auto power boost mode applied........................................................................................ 39,120 lbf (174 kN)
NOTE: Digging force ratings are based on ISO 6015, “Earthmoving Machinery - Hydraulic Excavators - Tool Forces
8-4 LBX Company, LLC

CHAPTER 8 - SPECIFICATIONS
EXCAVATOR OVERALL DIMENSIONS
Figure 1
8-5LBX Company, LLC

CHAPTER 8 - SPECIFICATIONS
WORKING RANGE
Figure 2
8-6 LBX Company, LLC

CHAPTER 8 - SPECIFICATIONS
WORKING RANGES
9' 10" (3.00 m) Arm 8' 2" (2.50 m) Arm 11' 6" (3.52 m) Arm
A. Maximum Reach 33' 9" (10.28 m) 32' 3" (9.82 m) 35' 5" (10.79 m)
B. Maximum Reach @ Ground Level 33' 2" (10.10 m) 31' 7" (9.63 m) 34' 10" (10.62 m)
C. Maximum Digging Depth 22' 8" (6.90 m) 21' 0" (6.40 m) 24' 4" (7.42 m)
D. Maximum Dig Height 32' 0" (9.76 m) 31' 4" (9.56 m) 33' 0" (10.07 m)
E. Maximum Dump Height 22' 2" (6.76 m) 21' 6" (6.55 m) 23' 2" (7.06 m)
F. Digging Depth - 8' Level Bottom 22' 1" (6.74 m) 20' 4" (6.21 m) 23' 10" (7.27 m)
G. Bucket Rotation 175° 175° 175°H. Maximum Vertical Wall Depth 20' 2" (6.14 m) 18' 8" (5.70 m) 21' 11" (6.68 m)
8-7LBX Company, LLC

CHAPTER 8 - SPECIFICATIONS
LIFTING CAPACITIES
B9408252 Figure 3
1. LIFT POINT HEIGHT2. LIFT POINT RADIUS3. SWING PIVOT4. GROUND LINE5. LIFT POINT ON BUCKET
• Lift capacities shown should not be exceeded. The weight of all lifting accessories and the weight of all other auxiliary attachment devices such as couplers and thumbs must be deducted from the above lift capacities.
• Lift capacities are based on the machine sitting on a firm uniform level supporting surface. The user must make allowances for job conditions such as soft or uneven ground.
• The lift capacities shown do not exceed 75% of the minimum tipping loads or 87% of the hydraulic capacities. Capacities marked with an asterisk (*) are limited by hydraulic capacities.
• Lift capacities shown are with Auto Power Boost engaged.
• The least stable position is over the side.
• The operator should be fully acquainted with the Link-Belt Excavator Operator's Manual and the Hydraulic Excavator Safety Manual furnished by LBX before operating the machine.
• Lift capacities apply only to excavators as originally manufactured and normally equipped by LBX Company, LLC. Lift capacities must be adjusted for excavators equipped with buckets other than that specified on the lift chart and for excavators equipped with thumbs and couplers.
• Lift capacity ratings are based on SAE J1097, reissued DEC2005, "Hydraulic Excavator Lift Capacity Calculation and Test Procedure".
8-8 LBX Company, LLC

CHAPTER 8 - SPECIFICATIONS
240X2 WITH 9' 10" (3.00 M) ARM LIFTING CAPACITIES
IMPORTANT: All weights are in pounds.
IMPORTANT: Capacities marked with asterisk (*) are limited by hydraulic capacities.
Load (Lift) Point Height
Load Radius
End Side End Side End Side End Side
10 ft 15 ft 20 ft 25 ft
25 ft
20 ft 9,800* 9,550
15 ft 13,000* 13,000* 12,200* 9,400
10 ft 27,950* 27,950* 19,400* 19,400* 15,350* 13,100 13,400* 9,000
5 ft 23,500* 23,500* 25,300* 19,150 17,900* 12,250 13,250 8,600
Ground Level 21,800* 21,800 28,500* 17,950 18,350 11,600 12,850 8,200
−5 ft 27,000* 27,000* 28,950* 17,550 17,950 11,250 12,600 8,000
−10 ft 37,950* 35,150* 28,150* 17,650 17,900 11,200 12,600 8,000
−15 ft 36,350* 36,00* 25,150* 18,050 18,100 11,450
−20 ft 25,500* 25,500* 17,350* 17,350*
Load (Lift) Point Height
Load Radius
End Side End Side
30 ft Capacity @ Max Reach
25 ft 5,800* 5,800*
20 ft 5,500* 5,500*
15 ft 5,400* 5,400*
10 ft 7,850* 6,450 5,550* 5,550
5 ft 9,750 6,250 5,850* 5,400
Ground Level 9,600 6,100 6,400* 5,600
−5 ft 7,350* 6,200
−10 ft 9,000* 7,600
−15 ft 10,600* 10,600*
−20 ft
8-9LBX Company, LLC

CHAPTER 8 - SPECIFICATIONS
240X2 WITH 8' 2" (2.50 M) ARM LIFTING CAPACITIES
IMPORTANT: All weights are in pounds.
IMPORTANT: Capacities marked with asterisk (*) are limited by hydraulic capacities.
Load (Lift) Point Height
Load Radius
End Side End Side End Side End Side
10 ft 15 ft 20 ft 25 ft
25 ft
20 ft
15 ft 14,200* 13,550 13,150* 9,200
10 ft 32,600* 32,600* 21,350* 20,350 16,450* 12,900 13,600 8,900
5 ft 26,150* 18,800 18,750* 12,100 13,150 8,500
Ground Level 19,400* 19,400* 29,000 17,850 18,300 11,550 12,800 8,200
−5 ft 27,700* 27,700* 28,950* 17,650 18,000 11,300 12,650 8,050
−10 ft 40,100* 36,550* 27,550* 17,850 18,050 11,350 12,800 8,150
−15 ft 33,300* 33,300* 23,450* 18,400 16,450* 11,750
Load (Lift) Point Height Load Radius
End Side
Capacity @ Max Reach
25 ft 8,250* 8,250*
20 ft 7,850* 7,550
15 ft 7,750* 6,500
10 ft 7,900* 6,000
5 ft 8,350* 5,900
Ground Level 9,100* 6,150
−5 ft 10,400* 6,900
−10 ft 12,750* 8,700
−15 ft
8-10 LBX Company, LLC

CHAPTER 8 - SPECIFICATIONS
240X2 WITH 11' 6" (3.50 M) ARM LIFTING CAPACITIES
IMPORTANT: All weights are in pounds.
IMPORTANT: Capacities marked with asterisk (*) are limited by hydraulic capacities.
Load (Lift) Point Height
Load Radius
End Side End Side End Side End Side
10 ft 15 ft 20 ft 25 ft
25 ft
20 ft 10,100* 9,750
15 ft 11,200* 9,550
10 ft 14,150* 13,350 12,450* 9,100
5 ft 33,500* 33,500* 23,200* 19,600 16,850 12,450 13,350 8,650
Ground Level 22,850* 22,850* 27,500* 18,150 18,450 11,700 12,850 8,200
−5 ft 26,450* 26,450* 28,250* 17,450 17,950 11,200 12,550 7,950
−10 ft 34,050* 34,050* 28,450* 17,450 17,750 11,050 12,450 7,850
−15 ft 38,850* 36,250* 26,350* 17,750 17,950 11,200 12,700 8,050
−20 ft 30,150* 30,150* 20,750* 18,450 13,550* 11,900
Load (Lift) Point Height Load Radius
End Side End Side
30 ft Capacity @ Max Reach
25 ft 4,800* 4,800*
20 ft 4,550* 4,550*
15 ft 7,050* 6,650 4,450* 4,450*
10 ft 10,050 6,500 4,550* 4,550*
5 ft 9,800 6,250 4,800* 4,800*
Ground Level 9,550 6,050 5,250* 5,050
−5 ft 9,400 5,900 6,000* 5,550
−10 ft 7,250* 6,600
−15 ft 9,800* 9,050
−20 ft
8-11LBX Company, LLC

CHAPTER 8 - SPECIFICATIONS
NOTES
8-12 LBX Company, LLC

CHAPTER 9 - INDEX
Chapter 9
INDEX
AAir Conditioner ..................................................... 3-8Air Conditioner Auto Mode ................................ 3-16Air Conditioning ................................................. 6-11Air Conditioning Switch ...................................... 3-16Air Filter ............................................................. 5-30Air Flow Direction .............................................. 3-16Air Vents ............................................................ 3-27Alternator ............................................................. 7-7Anti-Theft Protection Device .............................. 3-11Arm Cylinder Foot Pin ......................................... 5-9Arm Cylinder Top Pin ........................................ 5-10Armrest ................................................................ 3-7Arms .................................................................... 8-4Auto-Idle Switch ................................................... 3-9Auxiliary Hydraulic ............................................. 4-16
BBattery ................................................................. 7-5Bleeding Air from the Hydraulic Components .... 5-28Boom and Bucket Right-hand Control Lever ................................................................... 3-18, 3-19Boom Cylinder Foot Pin ....................................... 5-9Boom Tip Linkage .............................................. 5-10Booms ................................................................. 8-4Bucket ................................................................ 5-10Bucket Cylinder Foot Pin ................................... 5-10Bucket Linkage .................................................. 5-10Bulb Replacement ............................................... 7-8
CCab ...................................................................... 3-3Cab Light ........................................................... 3-21Cab Radio .......................................................... 3-23Capacity of Systems and Components ............... 8-4Checking for Cylinder Leakage ........................... 6-8Computer Monitor Display ................................. 3-10Connecting One or Two Booster Batteries .......... 7-7Control Pattern Selector Valve .......................... 3-17Controls Locking Lever ...................................... 3-14Cooling System ................................................. 5-15
DDaily inspections .................................................. 5-4Decals ................................................................ 2-10Dimensions .......................................................... 8-5
EEmergency Stop ...................................................4-7Engine ........................................................ 5-13, 8-3Engine Hood .......................................................3-29Engine Operation .................................................4-6Engine Stop Switch ............................................3-14Engine Throttle Button ..........................................3-8Environment .........................................................5-7Excavator Components ........................................1-3Excavator Storage ..............................................4-18Excavator Travel ..................................................4-9
FFan and Alternator Drive Belt ...............................6-7Fire Extinguisher ................................................6-10Fluid and Lubricant Capacities and Specifications ..............................................................................5-8Fluid Levels ........................................................5-12Fluids and Lubricants ...........................................5-6Front Console .....................................................3-15Fuel System .......................................................5-17Fuel Tank ...........................................................3-29Fuse Box ............................................................3-24Fuses ....................................................................7-3
GGate Lock Lever .................................................3-21General Information ..............................................1-1Greasing the Turntable Teeth ............................5-11
HHand Signals ......................................................2-16Hardware Torque Inspection ..............................6-13Headrest ...............................................................3-7Horn ....................................................................3-14Horn Volume Control ............................................3-9Hourmeter .................................................... 3-9, 5-4Hydraulic System ....................................... 5-23, 8-3
IIdentification Numbers ..........................................1-5Inspecting and Cleaning the Excavator ................6-8Instrument Panel ..................................................3-9
LLeft-hand Control Arm ........................................3-14Lifting Capacities ..................................................8-8
9-1LBX Company, LLC

CHAPTER 9 - INDEX
Lifting the Excavator .......................................... 4-12Lower Front Window .......................................... 3-26Lowering the Attachment in the Event of a Machine
Failure ......................................................... 4-15Lubrication Chart ................................................. 5-5Lubrication Points ................................................ 5-9Lumbar Support ................................................... 3-7
MMessage Display List ......................................... 3-12
OOne-touch Idle Speed .......................................... 3-8Operating Temperature
Bringing the Excavator Up to .......................... 4-6Operating the Bucket ......................................... 4-14Operating the Excavator in Cold Weather ........... 4-8Operating the Excavator in Hot Weather ............. 4-8Operating the Excavator In Water ..................... 4-12Operating the Excavator on Sloping Ground ..... 4-13Operating the Machine ........................................ 4-3Operator’s Compartment Controls and Accessories .............................................................................. 3-5Operator’s Seat ................................................... 3-6
PParking the Excavator ....................................... 4-12Plastic and Resin Parts ..................................... 6-10Product Identification Number ............................. 1-5
QQuick Coupler Operation ................................... 4-19
RRadiator and Oil Cooler ....................................... 6-6Rear View Mirrors .............................................. 3-28Rear Window ..................................................... 3-27Recirculate/Fresh Air Button .............................. 3-16Reclining Adjustment ........................................... 3-7Releasing Pressure in the Hydraulic System .... 5-22Replacing a Bucket .............................................. 6-9Right-hand Control Arm and Instrument Panel .... 3-8Run-in period ....................................................... 4-4
SSafety Area .......................................................... 2-3Safety/Decals/Hand Signals
Safety Rules .................................................... 2-3Utility Safety .................................................... 2-4
Seat Adjustment .................................................. 3-7Seat Height Adjustment ....................................... 3-7
Seatbelt ................................................................3-7Serial Numbers .....................................................1-5Servicing Instructions ...........................................5-3Side Doors ..........................................................3-30Sides of the Excavator
Right-hand, Left-hand, Front, and Rear ...........1-4Single Pedal Travel ............................................3-20Speakers ............................................................3-23Starter Motor ........................................................7-7Starter Switch .......................................................3-8Starting the Engine ...............................................4-4Steps and Access Handles ..................................3-4Stopping the Engine .............................................4-7Storing the Machine ...........................................4-18Suction Filter ......................................................5-23Swing Lock ...........................................................4-8Swing Reduction Gear .......................................5-32
TTemperature .......................................................3-16Towing Point .......................................................3-31Towing the Excavator .........................................4-13Tracks ...................................................................6-3Transporting the Excavator ................................4-11Travel Alarm Switch .............................................3-8Travel Control ........................................... 3-19, 3-20Travel Mode .........................................................3-9Travel Reduction Gears .....................................5-33Trip Control ...........................................................3-9
UUndercarriage .......................................................8-4Utility Safety Rules Message ................................2-4
VVentilation ...........................................................3-16
WWeights ................................................................8-4Welding on the Excavator ..................................6-10Window Washer Control .......................................3-9Window Wipers Control ........................................3-9Windshield ..........................................................3-25Windshield defroster ...........................................3-16Windshield Washer Reservoir ............................3-32Working Light Control ...........................................3-9Working Range .....................................................8-6
9-2 LBX Company, LLC
