2.2 Use Excel and Sheets t ogether - Haysville USD 261
29
2.1 Work with Excel files in Drive There are different ways to work with Microsoft Excel files. You can: Import Excel data into Sheets. Learn more Convert Excel files to Sheets. Learn more Edit Excel files in Drive without converting them. Learn more Convert Sheets files to Excel or other formats. Learn more 2.2 Use Excel and Sheets together If your team uses Microsoft Excel and Sheets, here are some best practices for when to use each product. Convert existing Excel spreadsheets to Sheets if: You need to collaborate or simultaneously edit with your team. Your dataset is 5 million cells or fewer. Continue working in your existing Excel spreadsheets if: Your dataset is greater than 5 million cells. You’re using the Hyperion add-on with Excel. If you use rare chart types, such as 3D pyramid charts or pie-of-pie charts. ® ®
Transcript of 2.2 Use Excel and Sheets t ogether - Haysville USD 261

2.1 Work with Excel files in Drive
There are different ways to work with Microsoft Excel files. You can:
Import Excel data into Sheets. Learn more
Convert Excel files to Sheets. Learn more
Edit Excel files in Drive without converting them. Learn more
Convert Sheets files to Excel or other formats. Learn more
2.2 Use Excel and Sheets togetherIf your team uses Microsoft Excel and Sheets, here are some best practices for when to use each product.
Convert existing Excel spreadsheets to Sheets if:
You need to collaborate or simultaneously edit with your team.
Your dataset is 5 million cells or fewer.
Continue working in your existing Excel spreadsheets if:
Your dataset is greater than 5 million cells.
You’re using the Hyperion add-on with Excel.
If you use rare chart types, such as 3D pyramid charts or pie-of-pie charts.
® ®

2.3 Edit Excel files in SheetsOpen an Excel file from Drive and edit it in Sheets. Any changes you make are saved in the original Excel format.
Chrome Browser only
1. Make sure the Office Editing for Docs, Sheets, & Slides extension is not installed:a. Open Chrome Browser and in the top-right corner, click More More Tools Extensions.
b. If you see the Office Editing for Docs, Sheets, & Slides extension, click Remove.
2. In Drive, double-click an Excel file.A preview of your file opens.
3. At the top, click Open with Google Sheets.
You can now edit, share, view version history, collaborate in real-time with others, and more. All changes you makeare saved to the original Microsoft Office file.
2.4 Import Excel data into Sheets
You can import data from an Excel file to a new (or existing) Sheets file. Your Excel file won’t be changed, even as youchange the Sheets file.
1. In Sheets, create a new or open an existing spreadsheet.
2. Click File Import.
3. Choose the Excel file and click Select.
4. Choose an import option:Create new spreadsheet
Insert new sheet(s)
Replace spreadsheet
5. Click Import data.
6. If prompted, click Open now.
2.5 Convert Excel files to Sheets

Instead of importing data, you can convert an Excel file to Sheets and keep working on it in Sheets. Your Excel filewon’t be changed.
1. Open Driveand double-click an Excel file.A preview of your file opens.
2. At the top, click Open with Google Sheets.
3. Click File Save as Google Sheets.
To automatically convert all future uploads of Office files to Google Sheets:
1. In Drive, at the top, click Settings Settings.
2. Next to Convert uploads, turn on Convert uploaded files to Google Docs editor format.
Note: Previously uploaded files will not be converted.
In Drive, you’ll see the Excel file and the new Sheets file. You can keep the Excel file or delete it. If you keep the Excelfile, to avoid confusion, you can rename it to something like [Archived] My doc.xls.Tip: Use these icons to quickly differentiate Sheets and Excel files in Drive:
Sheets Excel
2.6 Share a copy of a Sheets file in Excel format
You can work on a spreadsheet in Sheets and then send a copy by email as an Excel file (or a PDF).
1. In Sheets, open the file.
2. Click File Email as attachment.
3. Under Attach as, choose Microsoft Excel.
4. Enter the email address, subject, and message.
5. (Optional) Check the Send a copy to myself box.
6. Click Send.
You can also download a copy of the Sheets file in Excel, PDF, CSV, ODS, or other formats.
1. In Sheets, click File Download as.
2. Select the file format you want to download.


3.1 Perform basic operationsMost basic operations work the same way in Sheets and Microsoft Excel , such as:
Moving rows and columns
Adding or removing rows or columns
Adding functions (function names are the same)
Printing spreadsheets
Copying and pasting data
3.2 Search for data
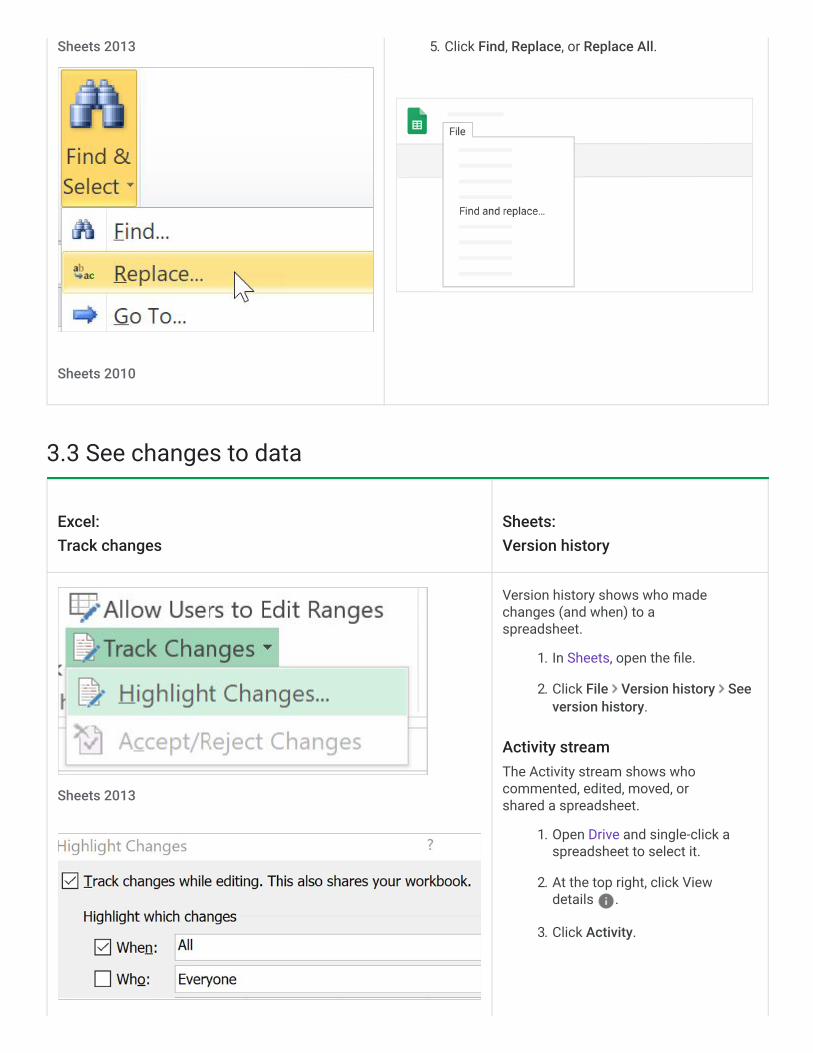
Excel: Find and select
Sheets: Find and replace
1. In Sheets, open the file and click Edit Find andreplace.
2. Enter the word you want to find.
3. (Optional) To replace the word, enter the newword.
4. (Optional) To narrow your search, specify:Where to search (all sheets, this sheet, aspecific range).
How to search (match case, match theentire cell, use
regular expressions, or search informulas).
® ®
Sheets 2013
Sheets 2010
5. Click Find, Replace, or Replace All.
3.3 See changes to data
Excel: Track changes
Sheets: Version history
Sheets 2013
Version history shows who madechanges (and when) to a
spreadsheet.
1. In Sheets, open the file.
2. Click File Version history Seeversion history.
Activity streamThe Activity stream shows whocommented, edited, moved, or
shared a spreadsheet.
1. Open Drive and single-click aspreadsheet to select it.
2. At the top right, click Viewdetails .
3. Click Activity.

Sheets 2010
3.4 Restrict data sharingSheets: Restrict sharing options
1. In a spreadsheet you own, click Share.
2. Click Advanced.
3. Check one or both of these boxes:Prevent editors from changing access and adding new people
Disable options to download, print, and copy for commenters and viewers
4. Click Save changes.
5. Click Done.
3.5 Use keyboard shortcutsSheets: See a complete list of shortcuts
1. Open Sheets.
2. For Windows and Chrome OS, press Ctrl+/.
3. For Mac, press ⌘+/.
For more details, see Keyboard shortcuts for Google Sheets.
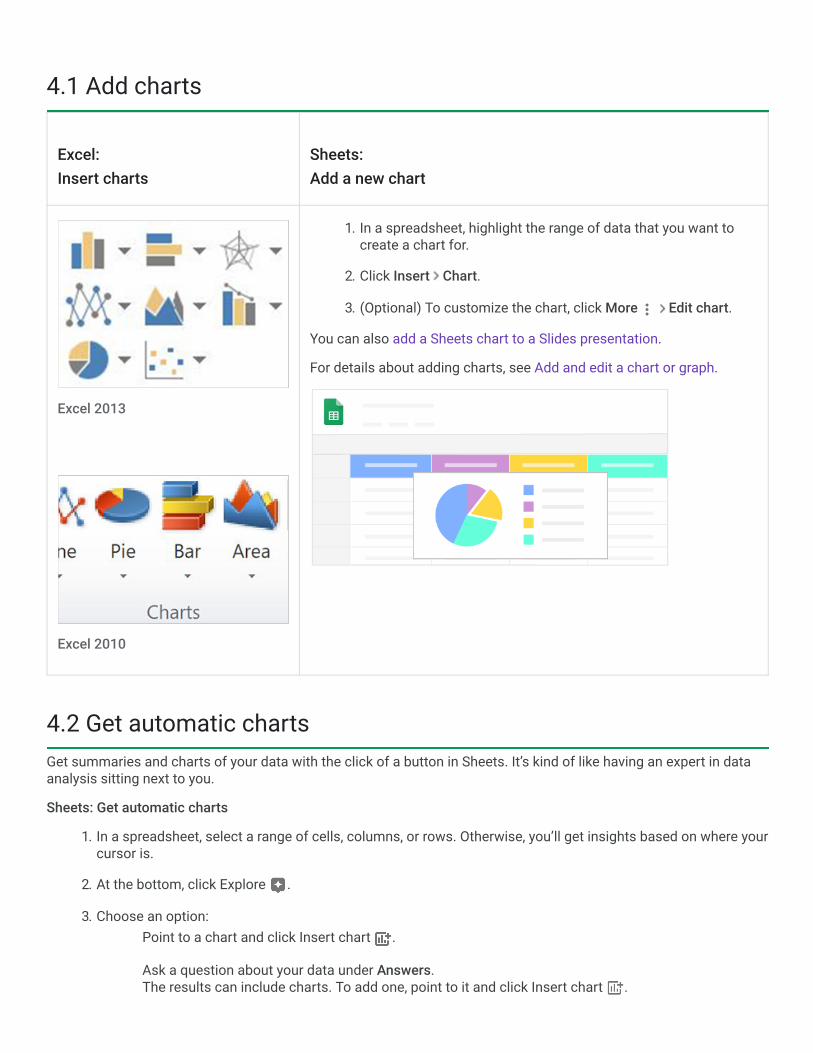
4.1 Add charts
Excel: Insert charts
Sheets: Add a new chart
Excel 2013
Excel 2010
1. In a spreadsheet, highlight the range of data that you want tocreate a chart for.
2. Click Insert Chart.
3. (Optional) To customize the chart, click More Edit chart.
You can also add a Sheets chart to a Slides presentation.
For details about adding charts, see Add and edit a chart or graph.
4.2 Get automatic chartsGet summaries and charts of your data with the click of a button in Sheets. It’s kind of like having an expert in dataanalysis sitting next to you.
Sheets: Get automatic charts
1. In a spreadsheet, select a range of cells, columns, or rows. Otherwise, you’ll get insights based on where yourcursor is.
2. At the bottom, click Explore .
3. Choose an option:Point to a chart and click Insert chart .
Ask a question about your data under Answers. The results can include charts. To add one, point to it and click Insert chart .

Tip: To customize a chart, click More Edit chart Customize.
4.3 Add charts to Docs and Slides
Excel: Copy and paste
Sheets: Copy and paste
Excel 2013 and 2010
Help people visualize data in a presentation or document by adding charts from Sheets. If the source data changes, you can update the chart with the click of a button.
1. In Sheets, open the spreadsheet and in the chart, click More Copy chart.
2. In Docs or Slides, paste the chart.
3. Choose an option:To update the chart if the source data changes, keep Link tospreadsheet selected. Then, if source data changes, at the top of thechart, click Update.
To keep the chart unlinked (not updated), select Paste unlinked.
4. Click Paste.
4.4 Functions in Sheets and Excel

Most Excel functions are the same in Sheets. For a list of common functions, see the Sheets Cheat Sheet.
Some unique functions in Sheets:
FILTER Returns a filtered version of the source range, returning only rows or columnsthat meet specified conditions.
SORTN Returns a specified number of items in a data set after a sort.
SPARKLINE Creates a miniature chart in a single cell.
QUERY Runs a Google Visualization API Query Language query across data.
GOOGLEFINANCE Gets current or historical securities information from Google Finance.
GOOGLETRANSLATE Translates text from one language into another.
IMPORTRANGE Imports a range of cells from a specified spreadsheet.
For a list of all functions in Sheets, see the Google Sheets function list.
4.5 Add pivot tables
Excel: Insert a pivot table
Sheets: Add a new pivot table
Excel 2013 and 2010
1. Highlight data in your spreadsheet.
2. Click Data Pivot table. A pivot table opens in a new sheet (tab).
3. In the Pivot table editor, add rows, columns, values, and filters.
For details, see Create & use pivot table.

4.6 Get automatic pivot tables
Excel: Insert a pivot
table
Sheets: Get automatic pivot tables
Excel 2013 and2010
1. In your spreadsheet containing the source data, click Explore .
2. Choose an option:Point to a pivot table and click Insert pivot table .
Ask a question about your data under Answers. The results can includepivot tables. To add one, point to it and click Insert pivot table .
For details, see Create & use pivot table.

1.1 Get Sheets on your devices
You can open Sheets in any of the following ways:
Any web browser—Go to sheets.google.com.
Google Drive—Click New Google Sheets and create from scratch or from a template.
Most Google pages—In the upper-right corner, click the App Launcher Sheets.
Android devices—Install and open the Android app.
Apple iOS devices—Install and open the iOS app.
1.2 (Optional) Add multiple Google Accounts
Have multiple Google Accounts? Quickly switch between them with Chrome profiles.
Note: Don’t have Chrome Browser yet? See instructions on how to install Chrome.
1. In Chrome Browser, in the top-right corner next to the address bar, click your profile image.
2. Click Manage People.
3. Click Add Person.
4. Enter a name, choose an image, and click Add.
5. Sign in with the Google Account you're adding. All settings and bookmarks automatically sync.
6. Click your profile image and choose a different profile to switch between accounts.
If you’re unsure which account you’re currently using, click your name and see which profile is at the top.
® ®

1.3 Create a browser bookmark
1. In Chrome Browser, open Sheets.Note: If you prefer to open spreadsheets from Google Drive, open Drive instead.
2. In the top-right corner, click More Bookmarks.
3. Make sure that Show Bookmarks Bar has a check next to it.
4. In the address bar, click Bookmark .
If you’re not using Chrome, follow your browser’s instructions to bookmark sheets.google.com.
1.4 Add a Sheets desktop shortcut (Windows only)
If you’re using Microsoft Windows , you can add a shortcut to Sheets on your desktop.
1. Go to your desktop and right-click.
2. Choose New Shortcut.
3. For the location, enter https://sheets.google.com.
4. (Optional) To name your shortcut, enter a name.
5. Click Finish.
® ®

1.5 Work offline (Chrome only)
When you turn on offline access, your most recent files are automatically saved for offline use.
1. Install the Google Docs Offline extension.
2. In Drive, click Settings Settings.
3. In the Offline section, check the Create, open, and edit your recent Google files while offline box.
4. Click Done.
5. Right-click a file and turn on Available offline.
To learn how to access files offline from your desktop or mobile, see Access stored Drive files without the internet.

5.1 Automate tasks with macros
Excel: Individual messages
Sheets: Macros and Google Apps Script
Excel 2013 and 2010
Automate repetitive tasks with macros in Sheets. Or, if you need custom functions,menus, or windows, you can create them with Google Apps Script.
Record a macro:
1. In Sheets, open a spreadsheet and click Tools Macros Record macro.
2. Select the type of cell reference to use.
3. Complete the task you want to record and click Save.
4. Name the macro and click Save.
5. Click Tools Macros your macro to run the macro.
Create a script:
1. Click Tools Script editor.
2. Create your script.
For more information, see Overview of Google Apps Script.
5.2 Do more with add-ons
Excel: Reading pane
Sheets: Add-ons
Use ready-made add-ons to do more with Sheets. Here’s a few things you can do:

Excel 2013
Excel 2010
Use the Data connector for Salesforce to connect with Salesforce.
Use Supermetrics to connect with MySQL and Oracle.
Use Copper CRM Custom Report Builder to integrate Copper CRM data.
Use Greenhouse Report Connector to integrate Greenhouse recruiting data.
Download add-ons:
1. Click Add-ons Get add-ons.
2. (Optional) To see a description of the add-on, point to it or click it for afull description.
3. Click the add-on you want to install and click Free.
4. If needed, review the access message and click Allow.

6.1 Share spreadsheets
Excel: Share workbook
Sheets: Share with specific people or using a link
Excel 2013
Excel 2010
Share with specific people:
1. Open the file you want to share (that you own or have edit access to).
2. Click Share.
3. Enter the email addresses or groups that you want to share with.
4. Choose what kind of access you want to give people: Can edit, Cancomment, or Can view.
5. Click Send.
Share using a link:
1. Open the file and click Share.
2. At the top right, click Get shareable link.
3. Next to Anyone with the link, click the Down arrow and choose thelevel of access you want to give people.
4. Copy and paste the link in an email or any place you want to share it.
For more details, see Share files from Google Drive.
6.2 Add comments and assign tasks
Excel: Sheets:

Comment Add comments and assign tasks
Excel 2013
Excel 2010
1. Open the spreadsheet and select the text you'd like to comment on.
2. Click Comment Add comment .
3. Enter your comment in the box.
4. (Optional) To direct your task or comment to a specific person, enter a plus sign(+) followed by their email address. You can add as many people as you want.Each person will get an email with your comment and a link to the file.
5. (Optional) To assign the comment to a specific person, check the Assign to box.
6. Click Comment or Assign.
6.3 Email collaborators
Excel: Send Using E-mail
Sheets: Email collaborators
Excel 2013
To follow up on a conversation that’s too long forcomments, email collaborators right from Sheets.
1. Click File Email collaborators.
2. (Optional) To remove a collaborator from theemail, uncheck the box next to their name.
3. Add a subject and message.
4. (Optional) To send a copy of the email toyourself, check the Send a copy box.
5. Click Send.
Excel 2010
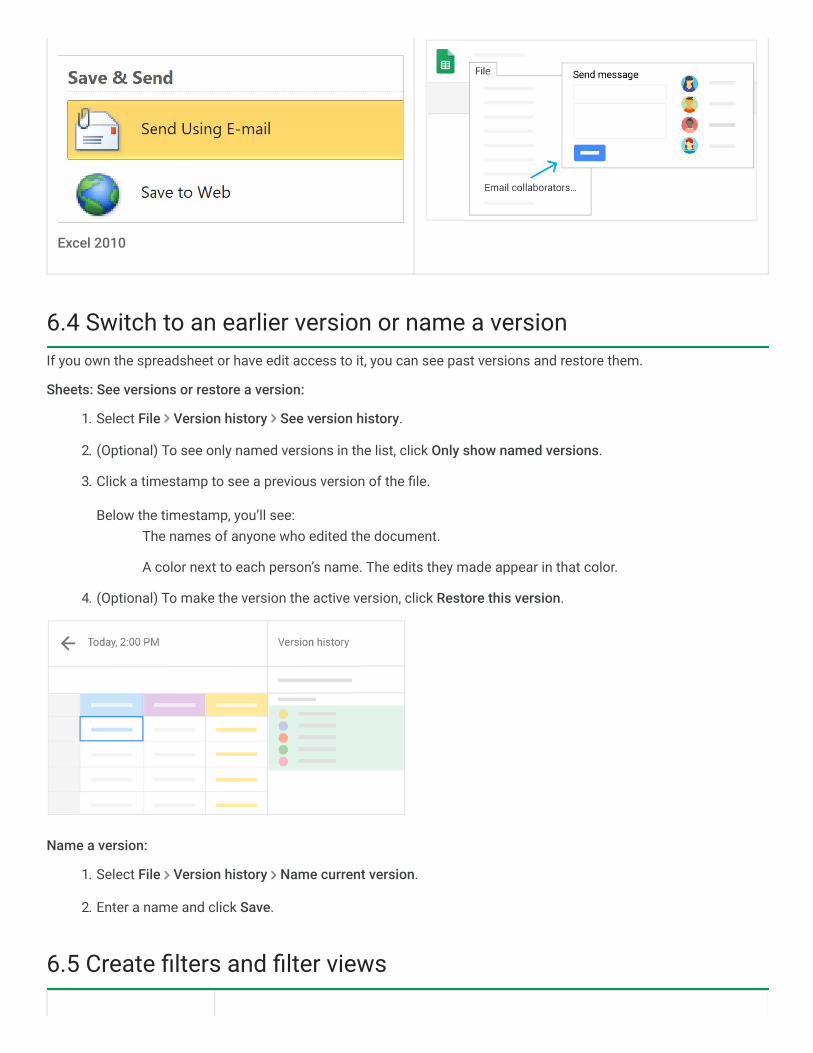
6.4 Switch to an earlier version or name a versionIf you own the spreadsheet or have edit access to it, you can see past versions and restore them.
Sheets: See versions or restore a version:
1. Select File Version history See version history.
2. (Optional) To see only named versions in the list, click Only show named versions.
3. Click a timestamp to see a previous version of the file.
Below the timestamp, you’ll see:The names of anyone who edited the document.
A color next to each person’s name. The edits they made appear in that color.
4. (Optional) To make the version the active version, click Restore this version.
Name a version:
1. Select File Version history Name current version.
2. Enter a name and click Save.
6.5 Create filters and filter views

Excel: Filters data
Sheets: Filters and filter views
Excel 2013
Excel 2010
To filter out data in a spreadsheet, create a filter. If you want filters that don’t affectanyone else’s view, create filter views.
Create a filter:
1. Select a range of cells.
2. Click Data Create a filter.
3. Go to the top of the range and click Filter to see the filter options.
Create a filter view:
1. Click a cell that has data.
2. Click Data Filter views Create new filter view.
3. In a column header, click a list and select the data you want to filter. Or, in thesearch box, enter text to search for the data you want to filter.
4. Click OK.
5. In the Name box, enter a name for your filter view.
6. Click Data Filter views to open your filter view anytime.
For more information, see Sort & filter your data and Create, name, and save a filterview.
6.6 Protect content
Excel: Protect Sheet or
Workbook
Sheets: Protected sheets and ranges
If you have sensitive content in a spreadsheet, you can restrict people fromupdating it.

Excel 2013
Excel 2010
1. Open the sheet and click Data > Protected sheets and ranges.
2. Click +Add a sheet or range.
3. Click Range to protect a range of content or Sheet to protect a wholesheet.
4. Click Set permissions and choose whether to show a warning or restrictwho can edit the content.
5. Click Done.
For details, see Protect content in a spreadsheet.
6.7 Limit sharing, downloading, printing, or copying
Excel: Encrypt with Password
Sheets: Limit sharing options
Excel 2013
If you have sensitive content in a spreadsheet, you can prevent people fromdownloading, printing, or copying it.
1. At the top of the spreadsheet, click Share.
2. At the bottom, click Advanced.
3. Check the Disable options to download, print, & copy for commentersand viewers box.
4. Click Done.

Excel 2010
6.8 Set an expiration date for sharing
Sheets: Set sharing expirationsWhen you’re working with people outside of your organization, such as clients or agencies, you might want to restricttheir access to certain files when your projects are complete.
Set an expiration date:
1. At the top of the spreadsheet, click Share.
2. If the file isn’t already shared, share it.
3. Click Advanced.
4. Hover over a person’s name and click Set expiration .
5. Change the access expiration date.
6. Click Save changes Done.
Note: You can’t set the expiration for the current day. If you need to restrict access immediately, just unshare the file.
6.9 See who's viewed a spreadsheet

Sheets: See who's viewed a spreadsheetIn Sheets, if you have edit access to a spreadsheet, you can see:
Who it’s shared withWho viewed itA chart of viewers over time
To see the Activity dashboard, at the top right, click Activity dashboard .
If you don’t want your view history to appear in the Activity dashboard, you can change the privacy settings.

7.1 Print spreadsheets
Excel: Print
Sheets: Print
Excel 2013
Excel 2010
To print your spreadsheet do one of the following:
Click File Print.
Click Print .
You can choose which sheets to print, what features to include, andwhich layout you want.
7.2 Download in different formats
Excel: Save As
Sheets: Download
Excel 2013
You can download your spreadsheet and open it in other programs.
Click File Download as and choose one of the followingformats:
Microsoft Excel (.xlsx)
OpenDocument format (.odt)
Adobe PDF document (.pdf)
Comma-separated values (.csv)
Tab-separated values (.tsv)
Web page (.zip)
®

Excel 2010
7.3 Make a copy
Excel: Copy
Sheets: Make a copy
Excel 2013 and2010
Copying a spreadsheet is useful for creating templates. For example, if you write a lot ofproject plans, make copies of one plan. Then, update each copy for a new project withouthaving to format it again.
1. Click File Make a copy.
2. (Optional) You can rename the copy, change where you save it in Drive, and shareit with the same collaborators.
7.4 Email a copy
Excel: Send as Attachment
Sheets: Email as attachment
If you need to collaborate with someone on your spreadsheet in your oldprogram or format, such as PDF or Excel, you can email it as an attachment.

Excel 2013
Excel 2010
1. Open the spreadsheet and click File Email as attachment.
2. Select a format.
3. Enter the email addresses or groups you want to send copies to.
4. Add a message.
5. Click Send.

8.1 Import data from Forms
Analyze data from Google Forms by sending it to Sheets.
1. In Forms, open the form with the data you want to import.
2. At the top, click Responses.
3. Click More Select response destination.
4. Create a new spreadsheet or select an existing one.
5. Click Create or Select.
8.2 Save time with templates
If you’re creating the same types of files over and over, such as expense reports and purchase orders, save time witha template.
Sheets: Choose an existing template:
1. Open Sheets and at the top, click Template Gallery.
2. Click the template you want to open it.
Create your own template:
1. Open Sheets and at the top, click Template Gallery.
2. At the top of the gallery, click your organization’s name.
3. Click Submit Template.
4. Click Select a spreadsheet, and choose the template file you created, and then click Open.
5. Select a category for your file.
6. Click Submit.
Your new template appears in the Template Gallery under your organization’s name.

8.3 Find out if someone changes a spreadsheet
Notification rules let you know when any changes are made to a spreadsheet.
Sheets: Create notification rules:
1. In Sheets, open the spreadsheet where you want to set notifications.
2. Click Tools Notification rules.
3. Select when and how you want to receive notifications.
4. Click Save.
8.4 Add checkboxes to cells
Use checkboxes to make Sheets more interactive. You can use checkboxes with charts, filters, pivot tables, andformulas.
Sheets: Add or remove checkboxes:
1. In Sheets, open a spreadsheet and select the cells where you want checkboxes.
2. Click Insert Checkbox.Note: In formulas, unselected checkboxes have a value of FALSE (exclude) and selected checkboxes have avalue of TRUE (include). You can see the value in the Formula bar. You can also change this value.
3. (Optional) To delete checkboxes, select the checkboxes you want to remove and press Delete.