2014 Sea-Legs Installation Guide - Triple Tube Installation Guide - Triple Tube.pdf · Sea-Legs...
12
The Pontoon Lift that Goes Where You Go Installation Guide Triple Tube 2014
Transcript of 2014 Sea-Legs Installation Guide - Triple Tube Installation Guide - Triple Tube.pdf · Sea-Legs...

The Pontoon Lift that Goes Where You Go
Installation Guide Triple Tube
2014
Sea-Legs Triple Toon Installation Guide 2014 Page 2 of 12
Sea-Legs Installation Guide
Sea-Legs is a hydraulic pontoon lift that attaches to a pontoon boat, making it the lift that goes where you go. This guide gives you step-by-step procedures for the installation of Sea-Legs on 22 foot to 30 foot triple-tube pontoons. For larger boats, contact Sea-Legs for assistance. Installation requires two people. For many tasks, it is advisable to have one person on the boat and one under the boat. Installation by two installers should take about 3-4 hours per boat – depending on experience. Sea-Legs installation should be done indoors on a flat asphalt or cement surface. Installers must have access to the underside of the boat, either on creepers or standing or squatting (if a boat hoist is used). There must be up to 6 feet of clearance above the boat to fully extend Sea-Legs and bleed air from the system. * Pre-installation note: The sheathing must be completely removed from the underside of the pontoon. There must be at least 12” of clearance between the tubes at the point where the pontoon meets the cross member and at least 10” between the narrowest points within the tubes measured from 18-24” from the rear of the pontoon. The narrowest point may be the inside of each lifter strake.
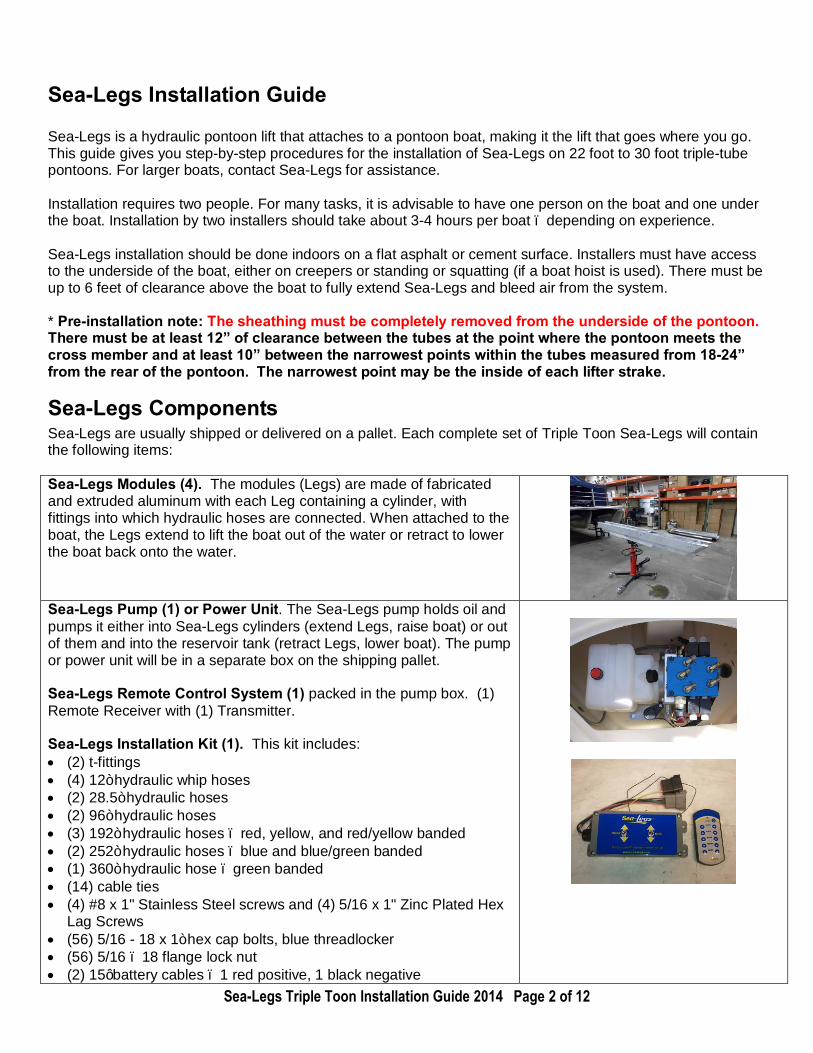
Sea-Legs Components Sea-Legs are usually shipped or delivered on a pallet. Each complete set of Triple Toon Sea-Legs will contain the following items: Sea-Legs Modules (4). The modules (Legs) are made of fabricated and extruded aluminum with each Leg containing a cylinder, with fittings into which hydraulic hoses are connected. When attached to the boat, the Legs extend to lift the boat out of the water or retract to lower the boat back onto the water.
Sea-Legs Pump (1) or Power Unit. The Sea-Legs pump holds oil and pumps it either into Sea-Legs cylinders (extend Legs, raise boat) or out of them and into the reservoir tank (retract Legs, lower boat). The pump or power unit will be in a separate box on the shipping pallet. Sea-Legs Remote Control System (1) packed in the pump box. (1) Remote Receiver with (1) Transmitter. Sea-Legs Installation Kit (1). This kit includes: • (2) t-fittings • (4) 12” hydraulic whip hoses • (2) 28.5” hydraulic hoses • (2) 96” hydraulic hoses • (3) 192” hydraulic hoses – red, yellow, and red/yellow banded • (2) 252” hydraulic hoses – blue and blue/green banded • (1) 360” hydraulic hose – green banded • (14) cable ties • (4) #8 x 1" Stainless Steel screws and (4) 5/16 x 1" Zinc Plated Hex
Lag Screws • (56) 5/16 - 18 x 1” hex cap bolts, blue threadlocker • (56) 5/16 – 18 flange lock nut • (2) 15’ battery cables – 1 red positive, 1 black negative
Sea-Legs Triple Toon Installation Guide 2014 Page 3 of 12
Sea-Legs Oil (3). Sea-Legs use approximately 11 quarts of environmentally-safe Chevron Clarity oil. Each set is shipped with three gallons of oil. Please use this and only this oil for your Sea-Legs installation. If you have oil left over after installation, you may keep it in your shop for future use. If you run out, call Sea-Legs to order more oil.
IF YOU ARE MISSING ANYTHING OR HAVE DAMAGED PARTS, PLEASE CALL SEA-LEGS IMMEDIATELY AT 952-934-7000 FOR REPLACEMENT INFORMATION.
Step 1: Place Pontoon on Blocks, Prepare Boat
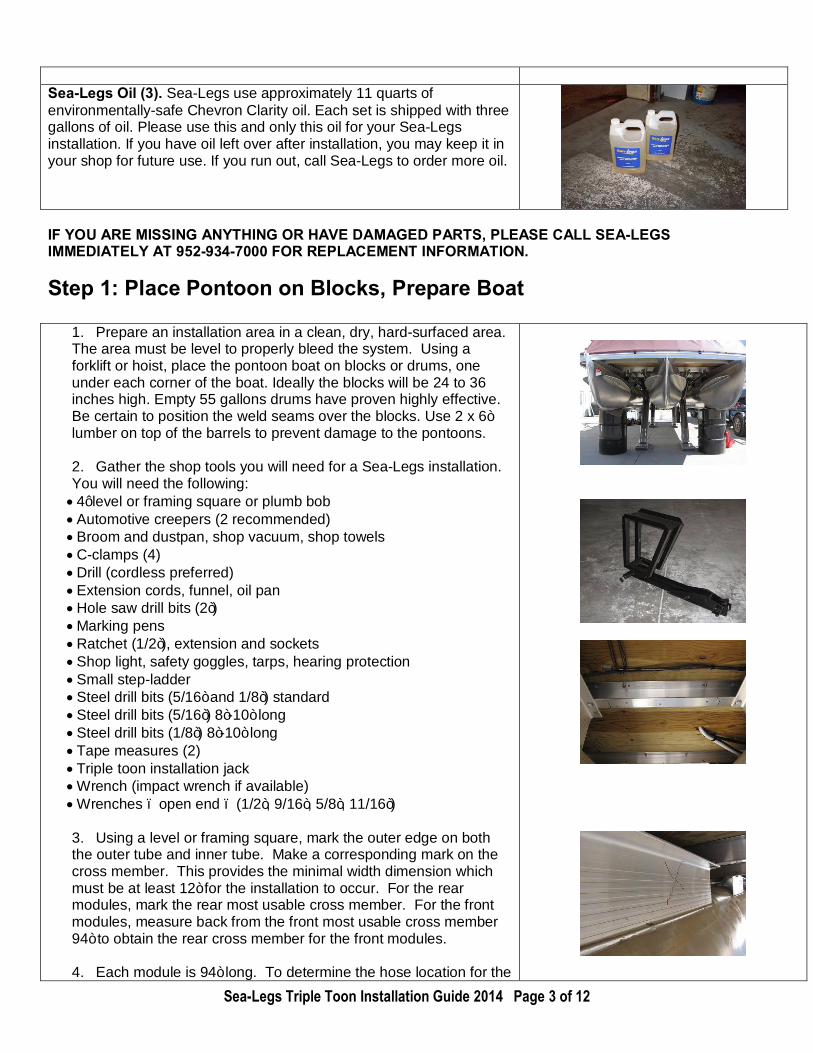
1. Prepare an installation area in a clean, dry, hard-surfaced area. The area must be level to properly bleed the system. Using a forklift or hoist, place the pontoon boat on blocks or drums, one under each corner of the boat. Ideally the blocks will be 24 to 36 inches high. Empty 55 gallons drums have proven highly effective. Be certain to position the weld seams over the blocks. Use 2 x 6” lumber on top of the barrels to prevent damage to the pontoons. 2. Gather the shop tools you will need for a Sea-Legs installation. You will need the following:
• 4’ level or framing square or plumb bob • Automotive creepers (2 recommended) • Broom and dustpan, shop vacuum, shop towels • C-clamps (4) • Drill (cordless preferred) • Extension cords, funnel, oil pan • Hole saw drill bits (2”) • Marking pens • Ratchet (1/2”), extension and sockets • Shop light, safety goggles, tarps, hearing protection • Small step-ladder • Steel drill bits (5/16” and 1/8”) standard • Steel drill bits (5/16”) 8”-10” long • Steel drill bits (1/8”) 8”-10” long • Tape measures (2) • Triple toon installation jack • Wrench (impact wrench if available) • Wrenches – open end – (1/2”, 9/16”, 5/8”, 11/16”)
3. Using a level or framing square, mark the outer edge on both the outer tube and inner tube. Make a corresponding mark on the cross member. This provides the minimal width dimension which must be at least 12” for the installation to occur. For the rear modules, mark the rear most usable cross member. For the front modules, measure back from the front most usable cross member 94” to obtain the rear cross member for the front modules. 4. Each module is 94” long. To determine the hose location for the

Sea-Legs Triple Toon Installation Guide 2014 Page 4 of 12
rear modules, measure from the rear most usable cross member approximately 52” forward. Mark this location with an “X”. 5. For the front modules, measure from the front most usable cross member approximately 42”. Mark this location with an “x”.
6. Place protective tarps or cloths on the boat’s carpeting and seats, and clear the area around, underneath and above the boat. Remember that you will need a minimum of 6 feet above the boat – watch out for ceiling beams, lights, trees or wires. (Lower your bimini top!).
Step 2: Place Sea-Legs Pump and Route Hoses
Sea-Legs are powered by a pump that sits in the corner seat of the boat. The Sea-Legs pump is powered by a standard boat battery (minimum 850 CCA required). 1. Locate the above-deck boat compartment in which you will set the Sea-Legs pump. The best spot is typically in the corner seat storage area. Make sure the compartment is clear and clean and that there is room on both sides and top of the pump along with the remote receiver and bypass rocker switch.
2. Place the pump in your chosen compartment, and select a spot near it through which to drill a hole to feed the Sea-Legs hydraulic hoses under the boat. Remove the pump and drill a 1/8” pilot hole to insure clearance above and below deck – be extremely careful not to puncture the pontoons nor hit any wiring. If the pilot hole proves satisfactory, drill a 2” hole through which to feed the hoses.
3. With one person above the boat and one below, feed one end of each Sea-Legs hose through the 2” hole, routing them through the pontoon support brackets.
4. The hoses with blue and green bands are longer (252”) and route to the front “X” marked earlier. The blue banded hose and the blue/green banded hose stay on the passenger side of the boat. The green banded hose (360”) gets routed across the center tube to the driver’s side.

Sea-Legs Triple Toon Installation Guide 2014 Page 5 of 12
5. The hoses with red and yellow bands are shorter (192”) and route to the rear “X” marked earlier. The red banded hose and the red/yellow banded hose stay on the passenger side of the boat. The yellow banded hose gets routed across the center tube to the driver’s side.
6. Route the (2) 96” hoses across the center tube - 1 for the rear modules and 1 for the front modules. This will connect to the driver’s side retract fitting on the cylinder and to the loose t-fitting on the passenger side. Route each to the point where the hoses should connect to the modules.
7. Run the red and black battery cables through the same hole. Route them along the backside of a cross member under the boat to an area near the transom, then up through the transom and into the battery compartment.
8. Using the 1” stainless steel screws, secure the remote control receiver to a sidewall in the pump compartment.
9. Place the pump assembly back into your selected location. Bolt the pump assembly to the floor using the (4) 5/16” x 1” lags bolts provided. Pre-drilling is recommended.
10. Connect the red battery wire to the lower stud on one of the trombetta starter switches. Connect the black battery wire to the wing nut on the pump mounting bracket. Tighten both wires. Do not connect to the battery.
11. Connect the color-coded ends of the hoses to the proper fittings on the manifold as shown in the photo. Tighten all fittings snugly. The ports are identified on the top and side of the manifold:
DRE – Driver Rear Extend – Yellow PRE – Passenger Rear Extend – Red RR – Rear Retract – Yellow/Red DFE – Driver Front Extend – Green PFE – Passenger Front Extend – Blue FR – Front Retract – Green/Blue
Sea-Legs Triple Toon Installation Guide 2014 Page 6 of 12
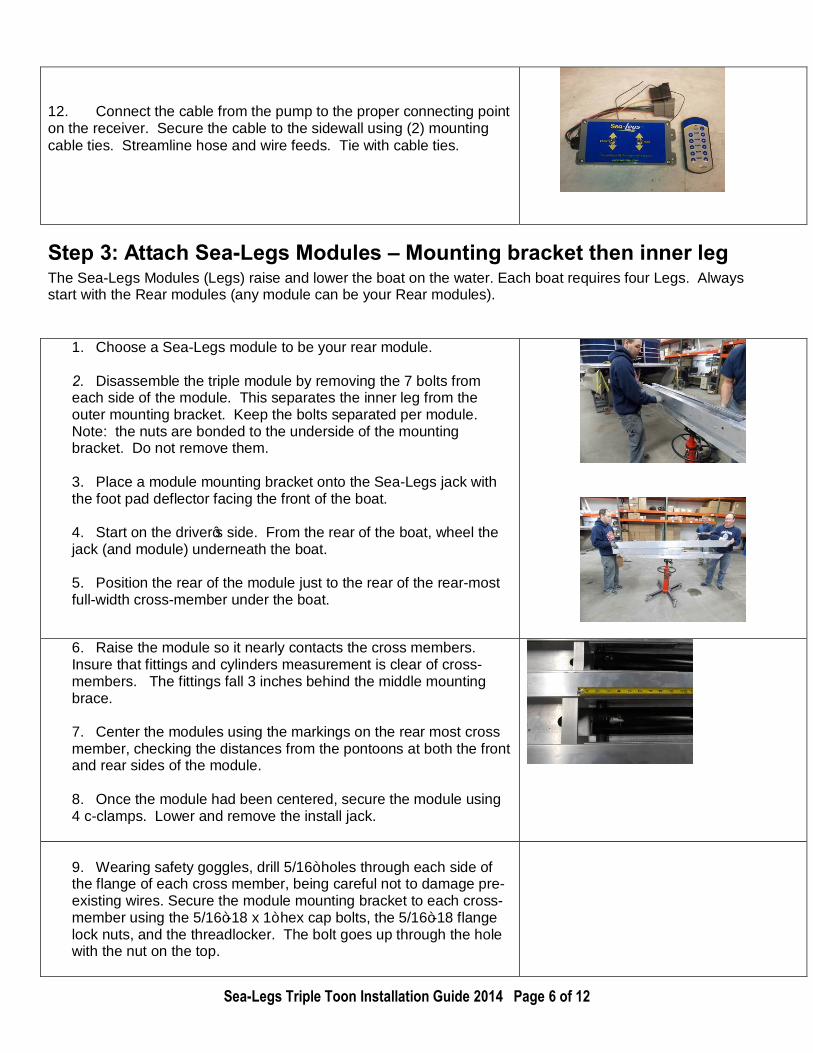
12. Connect the cable from the pump to the proper connecting point on the receiver. Secure the cable to the sidewall using (2) mounting cable ties. Streamline hose and wire feeds. Tie with cable ties.
Step 3: Attach Sea-Legs Modules – Mounting bracket then inner leg The Sea-Legs Modules (Legs) raise and lower the boat on the water. Each boat requires four Legs. Always start with the Rear modules (any module can be your Rear modules).
1. Choose a Sea-Legs module to be your rear module. 2. Disassemble the triple module by removing the 7 bolts from each side of the module. This separates the inner leg from the outer mounting bracket. Keep the bolts separated per module. Note: the nuts are bonded to the underside of the mounting bracket. Do not remove them.
3. Place a module mounting bracket onto the Sea-Legs jack with the foot pad deflector facing the front of the boat. 4. Start on the driver’s side. From the rear of the boat, wheel the jack (and module) underneath the boat.
5. Position the rear of the module just to the rear of the rear-most full-width cross-member under the boat.
6. Raise the module so it nearly contacts the cross members. Insure that fittings and cylinders measurement is clear of cross-members. The fittings fall 3 inches behind the middle mounting brace. 7. Center the modules using the markings on the rear most cross member, checking the distances from the pontoons at both the front and rear sides of the module.
8. Once the module had been centered, secure the module using 4 c-clamps. Lower and remove the install jack.
9. Wearing safety goggles, drill 5/16” holes through each side of the flange of each cross member, being careful not to damage pre-existing wires. Secure the module mounting bracket to each cross-member using the 5/16”-18 x 1” hex cap bolts, the 5/16”-18 flange lock nuts, and the threadlocker. The bolt goes up through the hole with the nut on the top.
Sea-Legs Triple Toon Installation Guide 2014 Page 7 of 12
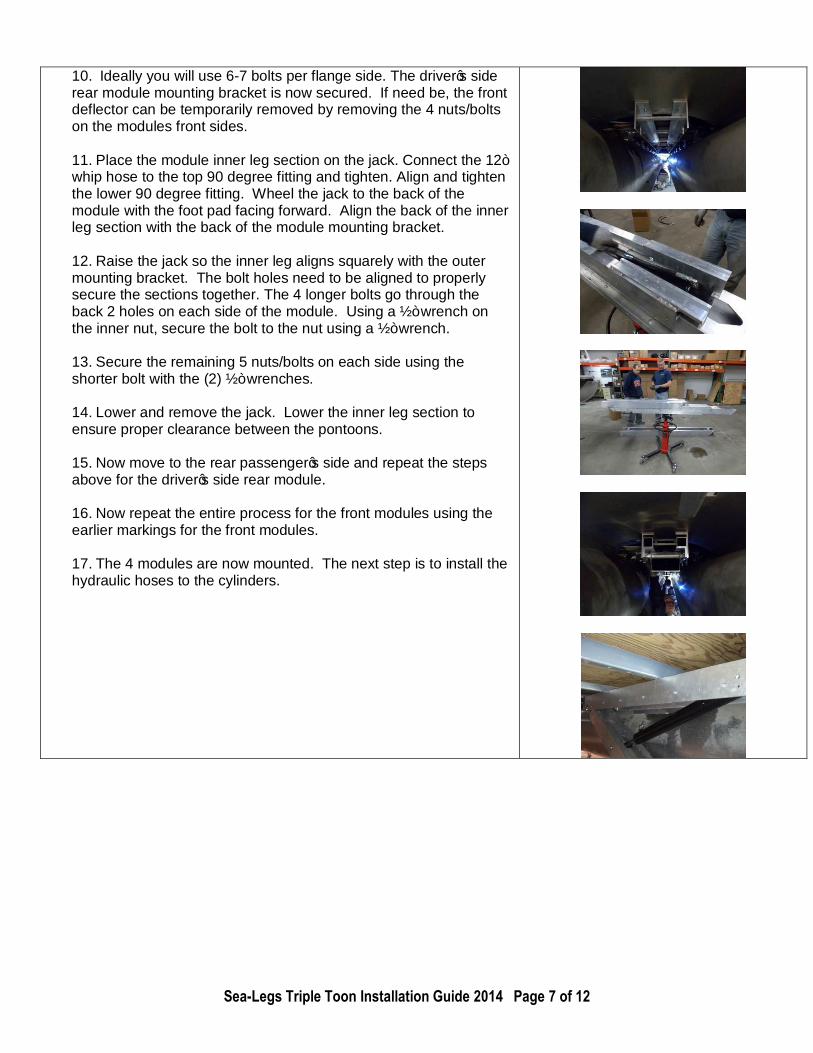
10. Ideally you will use 6-7 bolts per flange side. The driver’s side rear module mounting bracket is now secured. If need be, the front deflector can be temporarily removed by removing the 4 nuts/bolts on the modules front sides.
11. Place the module inner leg section on the jack. Connect the 12” whip hose to the top 90 degree fitting and tighten. Align and tighten the lower 90 degree fitting. Wheel the jack to the back of the module with the foot pad facing forward. Align the back of the inner leg section with the back of the module mounting bracket.
12. Raise the jack so the inner leg aligns squarely with the outer mounting bracket. The bolt holes need to be aligned to properly secure the sections together. The 4 longer bolts go through the back 2 holes on each side of the module. Using a ½” wrench on the inner nut, secure the bolt to the nut using a ½” wrench.
13. Secure the remaining 5 nuts/bolts on each side using the shorter bolt with the (2) ½” wrenches.
14. Lower and remove the jack. Lower the inner leg section to ensure proper clearance between the pontoons.
15. Now move to the rear passenger’s side and repeat the steps above for the driver’s side rear module.
16. Now repeat the entire process for the front modules using the earlier markings for the front modules.
17. The 4 modules are now mounted. The next step is to install the hydraulic hoses to the cylinders.

Sea-Legs Triple Toon Installation Guide 2014 Page 8 of 12
Step 4: Connect the Hydraulic Hoses
1. Start on the driver’s side rear. 2. Connect and tighten the 96” un-banded hose to the rod end of the cylinder. This is the open 90 degree fitting on the end opposite the whip hose.
3. Connect and tighten the Yellow banded hose to the 12” whip hose located near the piston end of the cylinder. This is the driver rear extend hydraulic line
4. Tie wrap the 96” hose near the piston end of the cylinder to secure it to avoid it getting pinched.
5. Move to the passenger’s side rear. 6. Connect the 28.5” hose to the rod end 90 degree hydraulic fitting. Connect the t-fitting to the remaining end of this hose.
7. Connect and tighten the open end of the 96” un-banded hose to one end of the loose t-fitting on the 28.5” hose.
8. Connect and tighten the Yellow/Red banded hose to the remaining open port on the t-fitting. This is the common rear retract hydraulic line.
9. Connect and tighten the Red banded hose to the 12” whip hose located near the piston end of the cylinder. This is the passenger rear extend hydraulic line
10. Tie wrap the 28.5” hose near the piston end of the cylinder to secure it to avoid it getting pinched.
11. The rear modules are complete.
12. Now move to the front modules. 13. Start on the driver’s side front.
14. Connect and tighten the 96” un-banded hose to the rod end of the cylinder. This is the open 90 degree fitting on the end opposite the whip hose.
15. Connect and tighten the Green banded hose to the 12” whip hose located near the piston end of the cylinder. This is the driver front extend hydraulic line.
16. Tie wrap the 96” hose near the piston end of the cylinder to secure it to avoid it getting pinched.

Sea-Legs Triple Toon Installation Guide 2014 Page 9 of 12
17. Move to the passenger’s side front. 18. Connect the 28.5” hose to the rod end 90 degree hydraulic fitting. Connect the t-fitting to the remaining end of this hose. 19. Connect and tighten the open end of the 96” un-banded hose to one end of the loose t-fitting on the 28.5” hose.
20. Connect and tighten the Blue/Green banded hose to the remaining open port on the t-fitting. This is the common front retract hydraulic line
21. Connect and tighten the Blue banded hose to the piston end of the cylinder. This is the passenger front extend hydraulic line.
22. Tie wrap the 28.5” hose near the piston end of the cylinder to secure it to avoid it getting pinched.
23. The front modules are complete.
Step 6: Fill the Hydraulic System and Bleed the Lines Now that Sea-Legs are attached to the boat, it is time to add oil to the system and bleed the lines. A key to performing this procedure correctly is to work slowly and patiently. A major obstacle to a smoothly functioning hydraulic system is air in the hoses or lines. Thus, when filling the reservoir tank or raising the boat, don’t rush. Patience now saves potential time and trouble later.
1. Connect the battery wires to the proper battery terminals. Red is to positive, black to negative. Sea-Legs requires a battery with at least 850 cold cranking amps. Connect the battery to a battery charge to ensure continuous power during the bleeding procedure. 2. Note: Some dealers prefer to wire a second battery in parallel, and/ or to include an on-board charger for Sea-Legs.
3. A typical Sea-Legs installation uses approximately 11 quarts of Chevron Clarity AW 32 oil. You received 3 gallons of this oil with each set of Sea-Legs. This oil has been approved as “environmentally friendly.” ONLY use this oil for your Sea-Legs pump; if you need more oil, call Sea-Legs at 952-934-7000.
4. Check all hoses and fittings on the pump to make sure they are tight. 5. Be sure to keep an eye on the pump for any oil leaks that occur during the bleeding process. 6. Never operate the Sea-Legs pump without oil in the reservoir. 7. Slowly fill the oil reservoir to within 1/2” of the top of the reservoir tank.

Sea-Legs Triple Toon Installation Guide 2014 Page 10 of 12
8. Test both of the toggles switches on the remote receiver to make sure they operate as intended. 9. Press the BOAT DOWN button on the remote control transmitter. This will retract all of the module cylinders and draw oil into the hoses and cylinders. 10. Add oil as needed; do not allow the reservoir to drop below 1/4 full. NOTE: It is advisable to have someone looking under the boat while you are filling with oil, to watch for oil leaks around the fittings or cylinders.
11. Continue BOAT DOWN until all modules fully retract under the boat and the alarm sounds. STOP. NOTE: the alarm will only sound when using the Boat Down button. 12. Check the oil level in your reservoir; fill (as needed) to within 1” of the top of the reservoir tank. 13. Press the BOAT UP switch on the remote control. This will extend all 4 modules and draw oil into those cylinders. 14. Add oil as needed; do not allow the reservoir to drop below 1/2 full.
15. Press FRONT UP switch on the remote. This will start to raise your boat off the shop floor (or ground). Continue raising the boat until it begins to lift off of the front blocks. STOP. Check all front hoses/fittings under the boat for leaks. 16. Press REAR UP switch on the remote. This will start to raise your boat off the shop floor (or ground). Continue raising the boat until it begins to lift off of the rear blocks. STOP. Check all rear hoses/fittings under the boat for leaks. 17. Press BOAT DOWN until all modules fully retract under the boat and the alarm sounds. STOP. NOTE: As you are lowering the boat, it may help to have someone on the ground guide you, to make sure the blocks have not been moved and/or to make sure the blocks are still lined up on the pontoons’ weld seams. 18. Check for clearance above the boat. If clear, press BOAT UP to raise the boat. Make sure the reservoir tank is ½ full of oil.
19. Raise the boat (BOAT UP) to its full height, or as high as ceiling or vertical clearance will allow. (As before, add oil if needed keeping the reservoir tank approximately 1/2 full). STOP. You may need to toggle between FRONT UP and REAR UP to raise the boat levelly.
20. Walk underneath the boat (fully extended) and use cable ties to

Sea-Legs Triple Toon Installation Guide 2014 Page 11 of 12
tie up all hoses. Clip tie wrap ends and push hoses as far under boat and out of sight as possible. Use a cable tie to secure the hose to each cylinder. 21. Press the BOAT DOWN button on your remote to lower the boat. Always keep an eye on the oil level in the reservoir tank, and continue to add oil if it drops below half full. At this point you only want a half full tank as the oil is flowing back into the reservoir tank. 22. Continue lowering the boat (BOAT DOWN, FRONT DOWN and/or REAR DOWN buttons on the remote), until it comes to rest on the blocks. NOTE: As you are lowering the boat, it may help to have someone on the ground guide you, to make sure the blocks have not been moved and/or to make sure the blocks are still lined up on the pontoons’ weld seams.
23. Continue pressing the BOAT DOWN button until you hear each module snap up underneath the boat deck. You will hear an alarm sound when the modules snap up fully underneath the boat.
NOTE: You may find that the front of the boat rises faster than the rear. This is normal and to be expected, as the majority of the boat’s weight (particularly if fully rigged) is in the rear of the boat. In order to keep the boat level during ascent and descent, you may need to toggle between FRONT UP and REAR UP buttons on the remote
Step 7: Final Cycle Test and Cleanup With the Legs fully extended and then fully retracted, most if not all air should be bled from your lines. All that is left is a few testing and clean-up steps.
1. Cycle the boat up and down to clear all air from the hydraulic lines and cylinders. Remember to go slowly and/or pause to let air escape lines, cylinders and reservoir tank. Two full cycles up and down should be sufficient. NOTE: make sure the hoses are clear of the legs so they do not become pinched while the legs are in motion. 2. Check and fill the reservoir tank to within approximately 1” of the top; carefully install reservoir cap.
3. Troubleshoot any remaining issues. If there is anything you do not understand, feel free to call Sea-Legs at 952-934-7000 for assistance.
4. Clean the area around and below the boat. In particular, you will have metal shavings under the boat to sweep up.
Place the Sea-Legs brochure, owners manual and warranty form (all included in the installation kit) and remote control transmitter in the pump compartment for the customer.

Sea-Legs Triple Toon Installation Guide 2014 Page 12 of 12
Congratulations! You have finished your Sea-Legs install, and the boat is ready for the water. With some experience, install time should be approximately 3-4 hours (for a two-person crew – depending on experience).