2013 Owners Manual - Hydraulic Swim Platform Lift by 2013_General Information.pdf · table of...
43
2013 Owners Manual
Transcript of 2013 Owners Manual - Hydraulic Swim Platform Lift by 2013_General Information.pdf · table of...

2013 Owners Manual

TABLE OF CONTENTS
Page 2 TABLE OF CONTENTSPage 3 SAFETY INSTRUCTIONSPage 4 GUIDELINES FOR INSTALLING PWCPage 5 WARRANTYPage 6 GENERAL DESCRIPTION OF SYSTEMPage 7 OPERATIONAL PROCEDURESPage 8 EMERGENCY PROCEDURESPage 9 -10 SERVICE (Hyd oil, Valves, Filter, Grease)Page 11 RADIO REMOTE PROGRAMMINGPage 12-13 TROUBLE SHOOTING CHARTPage 14 HYDRAULIC PUMP IDENTIFICATION Page 15 PUMP ASSEMBLY SILVER VALVE BODY First Generation Page 16-17 PUMP ASSEMBLY BLUE VALVE BODYPage 18 PUMP ASSEMBLY BLUE VALVE BODY WITH ANTI-FLOATPage 19-20 PUMP ASSEMBLY GREEN VALVE BODYPage 21-22 PUMP ASSEMBLY RED VALVE BODYPage 23 PUMP ASSEMBLY BLACK VALVE BODYPage 24-25 PUMP ASSEMBLY ORANGE VALVE BODYPage 26 PUMP ASSEMBLY PURPLE VALVE BODYPage 27-28 PUMP ASSEMBLY GREEN VALVE BODY WITH SECOND FUNCTIONPage 29 PUMP ASSEMBLY YELLOW VALVE BODY WITH SECOND FUNCTIONPage 30-31 PUMP ASSEMBLY SILVER VALVE BODY Second Generation Page 32 CONTROLS, FIRST GENERATION HARD WIREDPage 33 CONTROLS, NEW SOLID STATE (CURRENT)Page 34-37 ELECTRICAL SCHEMATICS IN DIFFERENT RUN STATESPage 38-39 BLEEDING PROCEDUREPage 40-43 MATERIAL SAFETY DATA SHEETS
GENERAL
HYDRAULIC
SOLUTIONS INC.
10601 47TH STREET NORTH
CLEARWATER, FL. USA 33762
TOLL FREE NUMBER, 1-855-791-0128
LOCAL NUMBER, 727-571-1065
FAX NUMBER, 727-561-7415
EMAIL: [email protected]
www.ghslift.com
HOURS OF BUSINESS
MONDAY / THURSDAY 6:30 AM to 5:00 PM EST
CLOSED, FRIDAY, SATURDAY & SUNDAY
PAGE 2

INSTRUCTIONS FOR THE SAFE USE OF THE
GHS HYDRAULIC PLATFORM LIFT
General Hydraulic Solutions (GHS) manufactures a line of hydraulic swim platform lift systems for
the marine industry. All lift systems are designed to safely and efficiently lift and support a static
load of 700 pounds on the swim platform of a variety of marine vessels. The systems are
designed with a safety factor of 5, which means that the system will support a static load of 4500
pounds without failure when the load is placed midway between the transom and the aft end of
the swim platform (30” aft of the transom). Independent testing has confirmed that the unit will
withstand a 4500-pound static load without failure. As the load increased or moves aft, the
margin of safety decreases and the ability of the lift to perform is degraded. Also, as the load is
increased or moves aft, the ability of the transom to resist the increased moment becomes
another safety concern. GHS recommends that the swim platform load be limited to 700 pounds
and that the load is centered midway fore and aft on the swim platform. GHS offers an optional
set of chocks that is specifically designed to support a PWC within these parameters. Other
chock systems are not recommended.
The following are some recommendations that should be followed for the safety of the vessel and
personnel when the vessel is equipped with the optional swim platform lift system:
1 NEVER operate the lift with people on the platform or in the water in the vicinity of the platform.
2 The Power switch (location of this switch will vary according to the boat manufacturer specs)
provides electrical power to the Hydraulic Pump Unit (HPU). This switch should be in the “OFF”
position at all times except when the lift is in actual operation. When the PWC (Personal Water
Craft) is released in the water, the lift should be returned to the water line or all the way up and the
Power switch returned to the “OFF” position. All GHS systems are wired for optional radio
transmitters and a receiver that have a range of approximately 60-100 ft. under ideal conditions.
Returning the rocker switch to the “OFF” position will prevent the accidental and unintentional
movement of the platform.
3 The system includes 2 audible alarms that sound whenever the hydraulic system is activated.
This alarm is very annoying and is intended to be so. It alerts everyone in the vicinity that
platform is moving and caution is to be observed.
4 After launching your PWC, NEVER leave the platform in the down position. Always return the
platform to the waterline or all the way up. As a point of interest, most large swim platforms have
an area of approx 70 sq. ft.. When the platform is just 12” below the surface, there is a potential
load 4500 pounds on top of it. With the boat at anchor, we can experience acceleration loads that
exceed the limits of the system-so ALWAYS MOVE THE LIFT BACK TO AT LEAST THE
WATERLINE.
5 Never travel with a PWC or Dingy unless it is covered and the drain plug is pulled, a high volume
bilge pump is also recommended. Water weighs approximately 8 lbs per gallon. Your watercraft
can weigh 1000’s of lbs if full of water.
PAGE 3

SECURING YOUR PERSONAL WATERCRAFT (PWC)
TO THE SWIM PLATFORM
1 The optional chock system on your yacht is designed to safely support most Personal Watercraft
on the centerline of the swim platform. The system is also designed to be easily removed when a
PWC is not being used. By loosing only 4 ½” nuts, the chocks will slide aft and free of the tracks,
leaving the platform clear of all obstacles to use your platform for other activities. This feature is
only for easy removal and not intended to allow the PWC to be stowed anywhere but on the
centerline of the swim platform (See fig. 1 & 1A). Figure 1B shows an incorrect PWC installation.
CAUTION Moving the center of gravity of the PWC aft of the centerline of the swim platform can
cause damage or failure of either the lift assembly or the transom of the yacht.
2 Make certain that the chocks fit the bottom of the PWC hull. When the upper chock fits the PWC
bottom perfectly you will need to tighten the 4 ½” nuts (with a wrench) to the track. With the PWC
in place and all four ratchet straps tight, you will need to move the 3” round disc along the bottom
chock until it is tight against the top chock and the hole in the disc & bottom chock line up.
Secure these two into position with the ¼” fastener. Now line drill the disc and top chock with a
17/64” dill and secure with the fastener provided. Repeat this with all four chocks (See Fig. 2).
3 Secure the PWC to the chock system using the Stainless Steel ratchet straps provided with the lift
system option package. If you are going to stow anything other than a small two place PWC, you
should purchase the optional “HEAVY DUTY” tie down assembly. This assembly consists of 4
each 1” wide straps and Stainless Steel ratchets plus 5 additional “D” tie down rings. The “D”
rings are to be installed by the dealer and should be installed as in fig.1 so that the PWC cannot
move Port to Starboard, Fore and Aft, or rock in the chocks.
4 When the yacht is in transit and a PWC is stowed on the platform, it is prudent to occasionally
check the condition of the stowed PWC and if sea conditions worsen, the vessel should be
slowed to an appropriate speed.
PAGE 4

GENERAL HYDRAULIC SOLUTIONS
PRODUCT AND WARRANTY REGISTRATION
2013
WARNING:
It is important that all personal watercraft or tenders that will be stored on the lift have a cover
and all drain plugs removed. Water weighs 8 lbs. per gallon and excessive weight can damage the
lift and/or the transom of your boat. Your tender can weigh 1000’s of pounds if full of water.
Please read and understand this owner’s manual thoroughly before operating your lift system.
General Hydraulic Solutions is continually upgrading its product line and would like to inform
owner-operators of safety information and upgrades to the lift system.If the owner-operator would complete the enclosed warranty registration card we will keep you
informed of any improvements. Also record the information on the space below for your records.
GENERAL HYDRAULIC SOLUTIONS WARRANTIES YOUR LIFT SYSTEM AGAINST ANY DEFECTS
IN WORKMANSHIP OR MATERIALS FOR A PERIOD OF ONE YEAR FROM THE DATE THAT THE
SYSTEM IS PUT INTO SERVICE. THIS WARRANTY COVERS ALL PARTS, EXCEPT ZINC
ANODES, AND EXTERNAL STAINLESS STEEL HOSES. THESE SHOULD BE INSPECTED EVERY
6 MONTHS AND REPLACED AS NEEDED.
Mail to :
GENERAL HYDRAULIC SOLUTIONS INC.
10601 47th, ST. NorthCLEARWATER, FL. 33762
WARRANTY REGISTRATION CARD NAME
ADDR1:
ADDR2:
CITY,ST,ZIP
PHONE
HULL#
HIN#
BOAT MAKE
DATE BUILT
LIFT IN SERVICE DATE
GHS SERIAL #
PAGE 5

GENERAL HYDRAULIC SOLUTIONS, INC.
HYDRAULIC PLATFORM LIFT
PRODUCT DESCRIPTION
The GHS Hydraulic Platform Lift is an electric/hydraulic system designed to safely lower your swim
platform below the water surface in order to launch various watercrafts. Your yacht builder has designed
and strengthened the transom of your yacht to allow the GHS Hydraulic Platform Lift system to be
attached to the transom and to operate with very specific maximum loads. Make certain that you consult
your yacht “Owners Manual” for this information. Operating the Lift outside of the designed maximum
limit may result in STRUCTURAL damage to the transom.
The Platform Lift System consists of the following major components:
A Power Unit Assembly
B Platform lift assembly
C Control Unit
The Power Unit Assembly is an integrated unit combining a 12V DC or a 24V DC electric motor, a
hydraulic pump, a hydraulic manifold, a manual hydraulic pump and the necessary valves and relays to
allow the unit to function. The hydraulic manifold is a complex unit that routes and controls the flow of
fluid to the four hydraulic cylinders. All of the valves in the manifold are preset at the factory to function
at very precise pressures and are not to be adjusted in the field by anyone other than a factory authorized
representative. Any readjusting of these valves by someone other than an authorized representative will
void the warranty on the entire Lift Assembly and may cause serious damage to the lift and the vessel.
The Platform Lift Assembly consists of the following major components:
A Transom Brackets
B Platform Brackets
C Lift Cylinders
D Locking Cylinders
E Lift Arms
The above components are designed to act as one unit to allow hydraulic pressure to lower and raise the
swim platform under controlled conditions. Extreme caution must be exercised when this unit is moving
either up or down. The locking and lift cylinders are very powerful, operating pressures as high as 2500
PSI. A warning horn signals when the platform is moving in either the up or down direction to caution all
in the vicinity that the platform is moving and all should remain clear. The lift should never be operated
when personnel are on the platform.
The remote control unit is a hand-held UP/DOWN switch that is hard-wired to the Power Unit Assembly
through a disconnect mounted in the vicinity of the transom. In addition to the standard hard-wired
control, there is available an Optional Radio Remote Control that can operate the platform lift from
distances of approximately 60-100 feet.
SYSTEM FEATURES
1 Integrated Power unit-motor, pump, manifold, manual pump, valves and electronics
2 Hydraulic fluid filter
3 One year warranty
4 Manual/automatic selector valves
5 Manual emergency hydraulic pump-integral to the power unit
6 Heavy duty DC motor and pump
7 Compensating and equalizing valves to equalize and control pressure to the lift cylinders
8 Lift capacity approximately 700 pounds-depending on model
9 Total lift of 28 thru 46 inches depending on model
10 100% type 316L stainless steel and naval brass construction
11 All stainless steel is electro polished or bottom painted for additional corrosion resistance
12 Platform is positively locked in the “UP” position using two locking hydraulic cylinders and mechanical locks
13 Adjustable platform supports that level platform fore & aft after installation
14 Simple one button operation to unlock and lower platform and one button to raise and lock platform
15 Optional radio remote capability
16 Audible horn sounds when lift is moving in the up and down direction
PAGE 6

OPERATIONAL PROCEDURES
NORMAL PROCEDURES
The GHS Hydraulic Platform Lift is designed for simple one hand operation. To safely LOWER the
platform, the following procedure MUST be followed: AFTER MAKING SURE THAT THE
PLATFORM AND AREA ARE CLEAR
1 Plug the hand held control unit into the receptacle located in the area of the transom. The
receptacle is located in this area so that the operator will have a clear view of the platform and the
adjacent areas.2 Make sure that the yacht’s engines are “OFF”.3 Make sure that the platform has ample room to operate. The platform will move approximately 24
inches aft as it rotates to the down position.4 Make sure that there is no debris or foreign matter in the two transom bracket mechanisms that
will affect the operation as the arms rotate. Serious damage may result from foreign matter
interference.5 Make sure that no one is on the platform or in the water in the vicinity of the platform when it is in
operation. Serious injury is possible when the platform is moving.6 After making certain that the platform area is clear, turn the lift Power switch to the ”ON” position
(location of this switch will vary according to the boat manufacturer specs). This will provide DC
power to the hydraulic power unit via the latching solenoid. The light on the Power switch
indicates that power is actually supplied to the Hydraulic Power Unit (HPU).7 The current Hydraulic Power Units (boats built after Mar 2004) have a solid state controller. This
system must be Powered up prior to operation. To do this depress and hold the up or down
button for approximately five seconds, you should hear the audible alarm sound (beep). This is
required everytime the unit is Powered up .
`
8 While standing at the transom and observing that the platform area is clear, lower the platform
into the water to the desired depth by pushing the “DN” button on the hand held unit. It is good
practice not to pulse the unit as that will put unneeded loads on the Electrical /Hydraulic system.
Try to keep the button pressed until the platform is fully deployed / stowed.
9 When raising the platform, the same safety procedures must be followed as described in #2 thru
#6 of the above operational procedures. ABOVE ALL ELSE, BE ABSOLUTELY POSITIVE THAT
THE AREA IS CLEAR OF PEOPLE BEFORE RAISING PLATFORM.10 When the lift is not in operation, the lift power rocker switch should be turned to the “off”
position. This will prevent any accidental operation of the lift. For instance, if a personal
watercraft has been lowered into the water and will be in the water for an extended period, the
rocker switch should be turned to "OFF” position.
IT IS THE OPERATOR’S RESPONSIBILITY TO INSURE THAT ALL SAFETY ITEMS ARE CONSIDERED BEFORE
OPERATING THE PLATFORM LIFT. THE OPERATOR SHOULD BE INFORMED OF ALL SAFETY PRECAUTIONS
AND SHOULD BE AWARE OF THE PHYSICAL DAMAGE THAT CAN OCCUR IF MATERIAL OR PEOPLE ARE IN THE
NEAR VICINITY OF THE LIFT WHEN IT IS IN OPERATION.
Warning: Do not operate yacht when platform is not up & locked.
PAGE 7

Emergency Procedures
The Hydraulic Platform is designed to give you years of trouble-free service but in the event of a failure, the
following procedures should be followed:
LOSS OF ELECTRICAL POWER OR FAILURE OF PUMP MOTOR
A Check circuit breaker usually located on the main DC circuit breaker panel in the engine room.
B If the unit has been run repeatedly in a short period of time, let the unit cool down for 10 minutes and try the lift
again. In the event that your DC power supply or the pump motor fails, the lift cannot be operated in the “normal”
mode. It may be operated in the manual mode. To operate the unit in the manual mode, locate the Hydraulic
Power Unit Assembly (most often it is located in the engine room close to the transom) then do the following:
1 To manually raise the platform:
Insert the Emergency pump handle (black metal handle approx. 18” long) into the Manual Pump located on the
Hyraulic Power Unit (HPU). Turn the “knurled” red knob, located on the “UP” Solenoid, counterclockwise until it
pops up (about ¼ of a turn). You are now in the manual “UP” mode. Using the handle, pump until the unit is
completely up. You should hear the two locking cylinders engage the lock pins and the gage pressure should
approach 2500 PSI. When you are sure that the unit is locked in the up Position, push the red knob down &
clockwise until it returns to the original position. This procedure may take several minutes because of the low
flow rate of the hand pump. NOTE: When using manual mode, only one solenoid is allowed to be in “manual” at
a time.
2 To manually lower platform:
Insert the handle (black metal handle, approximately 18”Long) into the Manual Pump located on the side of the
power unit. Turn the “knurled” red knob, located on the “DN” solenoid, counterclockwise until it pops up (about
¼ of a turn). You are now in the manual “DN” mode. Pump the handle until the unit unlocks and lock plates are
clear of locking pins on arms. Adjust sequence valve all the way out (count turns of set screw to redo setting)
pump to desired depth. When you are sure that the unit is down to the desired depth, turn the red knob down &
clockwise until it returns to the original position, reset sequence valve. You are now back into the normal mode.
NOTE: When either of the manual modes are selected, the pump will not operate in the normal (electric) mode
even though the motor may run.
3 UNEVEN MOVEMENT
One side of the platform moves faster than the other side.There is a possibility that one side of platform will move
at a different rate than the other. The Hydraulic Manifold contains combiner-divider valves (see page 17-31) that
regulate and equalize fluid flow to both lift cylinders. This valve is only 90% efficient, so you will notice some
slight difference in the movement of the individual sides. However this difference will be minimal and should not
affect the normal operation of the platform. If there is a significant difference in the rate of movement, try shifting
the load toward the faster side. If the problem persists, follow the recommendations in the “TROUBLE
SHOOTING GUIDE”.
4 LEAKING OR BROKEN HYDRAULIC LINE-DO NOT ATTEMPT TO OPERATE THE LIFT
If the platform is in the up position, and any line is broken or leaking DO NOT OPERATE THE LIFT. Contact your
dealer or GHS for help in determining if there is a serious problem. If the platform is down, it must be raised
before the engines are started. A broken or leaking hose must be replaced prior to operation.
5 PHYSICAL DAMAGE TO EITHER THE PLATFORM OR LIFT ASSEMBLY.
If the swim platform assembly has been damaged due to an accident etc., have the damage assessed by your
Dealer before operating the lift. Serious damage to the hull can result from operating the lift when it is
misaligned. If the Lift should ever have any operational problems please reference the Owner’s manual /Trouble-
Shooting Guide to determine the cause of these problems and their solutions. General Hydraulic Solutions has all
necessary parts to help get your lift back in operation.
PAGE 8
PUMP RED KNURLED KNOBS
PUMP HANDLE INSERTED INTO EMERGENCY PUMP
UP
DOWN

SERVICE
1 VALVE SETTINGS
All valves have been pre-set at the factory to ensure that the lift functions properly. Any readjustment of these
valves by anyone other than a factory-authorized representative will void the warranty and possibly cause damage
to the lift or structure of the boat.
2 HYDRAULIC FLUID
General Hydraulic Solutions recommends using an ISO 46 (aw) hydraulic fluid. This fluid is compatible with all
valves and pumps used in the power unit assembly. The reservoir in the power unit should be checked for proper
level every 200 cycles or every 6 months. The level should be approx. 1” from the top when the unit is in the “UP”
position. If the level of the fluid falls below a certain point in the reservoir, the pump has the potential to fail and /
or introduce air into the system. This will affect the operation of the unit drastically. If air is introduced into the
system whether from a broken hose or the fluid level being too low, simply refill the reservoir with fluid, make
sure there are no leaks on the inside or outside of the boat, then run the unit up and down 1 time only. Recheck
the fluid level then let the unit sit for 2 hrs or longer to allow all air bubbles to escape from the fluid in the
reservoir. Run the unit again 1 time and repeat the process outlined above. This may take several times to clear all
air in the system.**See page 10 for information to help select the oil that will work best for you in your area
3 GREASE FITTINGS
There are 2 grease fittings positioned on the top of the lift cylinders. (see page 38) These fittings should be
greased once a year with a good moly based grease.
4 OVERALL APPEARANCE AND SYSTEM CLEANLINESS
The General Hydraulic Solutions lift platform is constructed of 316L stainless steel and 464 naval brass. All parts
that will be below the waterline have either been electro polished or bottom painted. This should give years of
trouble free service. The overall appearance of the system should be inspected once or twice a year during haul
out. All cylinders, both lifting and locking, should be inspected for leaking of seals and general appearance. All
cylinder rods should be checked in the down position for excessive wear. All bushings should be checked for
excessive play. The hydraulic system should be checked once a year also.The hydraulic system should be
checked once a year also. The fluid should be checked for cleanliness. Any fluid that looks milky or other than an
amber like color should be replaced and the system flushed out. All hoses should be checked for fraying or
leakage. All fittings both internally and externally should be checked for leaking or looseness and should be
tightened at this time.
The zinc anodes should be checked periodically (quarterly) and replaced when corrosion is evident. Excessive
degeneration of this anode could lead to premature corrosion problems in the lift. General Hydraulic Solutions
uses a CAMP T-20 anode, Part # HW021 (see Tab Parts List -Page 1). These can be purchased through GHS.
5 HYDRAULIC FILTER
There is a 10-micron hydraulic filter (see page 17-31) built into the manifold in the pump assembly unit. This filter
should be changed once a year to prevent possible contamination of the system. This filter should be changed
during all maintenance or repair of the system. Filters can be purchased through General Hydraulic Solutions.
6 SERVICE CONTACTS
Please Contact Us General Hydraulic Solutions can answer any questions
General Hydraulic Solutions (GHS)10601 47TH STREET NORTH
CLEARWATER, FL. USA 33762
# 727-571-1065 FX 727-561-7415
EMAIL: [email protected]
www.ghslift.com
MONDAY / THURSDAY HRS 6:30 AM to 5:00 PM EST
PAGE 9
Recommended Hydraulic Oil For G.H.S. Hydraulic Swim Platform Lifts
1We highly recommend using a NZ (non-zinc), AW (Anti-Wear) hydraulic oil. This material is not
expected to be harmful to aquatic organisms. The ECOTOXICITY hazard is based on an evaluation
of data for the components or a similar material and provides the lubrication your pump needs.
Use Mineral-Based or Synthetics with Lubricating Properties at Viscosities of 7.4 to 420 cST ( 50 to 2000 sus )
Viscosities of 7.4 to 420 cST = ISO Grade of 10, 15, 22, 32, 46, 68, 100, 150, 220, and 320. NO higher than 320
Viscosities of 50 to 2000 sus = ISO Grade of 10, 15, 22, 32, 46, 68, 100, 150, 220, and 320. NO higher than 320
Ask your local oil sales person to help pick the oil that will work best for you in your area and operating conditions.
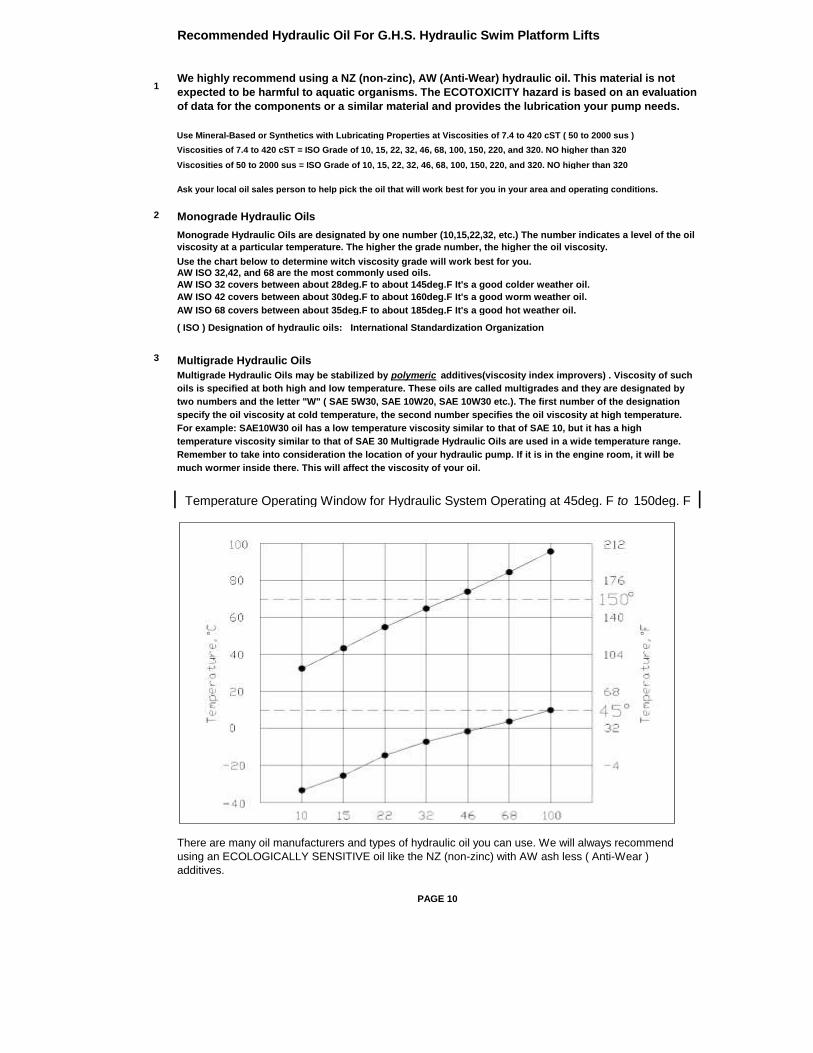
2 Monograde Hydraulic Oils
Monograde Hydraulic Oils are designated by one number (10,15,22,32, etc.) The number indicates a level of the oil
viscosity at a particular temperature. The higher the grade number, the higher the oil viscosity.
Use the chart below to determine witch viscosity grade will work best for you.AW ISO 32,42, and 68 are the most commonly used oils.
AW ISO 32 covers between about 28deg.F to about 145deg.F It's a good colder weather oil.
AW ISO 42 covers between about 30deg.F to about 160deg.F It's a good worm weather oil.
AW ISO 68 covers between about 35deg.F to about 185deg.F It's a good hot weather oil.
( ISO ) Designation of hydraulic oils: International Standardization Organization
3 Multigrade Hydraulic Oils
Multigrade Hydraulic Oils may be stabilized by polymeric additives(viscosity index improvers) . Viscosity of such
oils is specified at both high and low temperature. These oils are called multigrades and they are designated by
two numbers and the letter "W" ( SAE 5W30, SAE 10W20, SAE 10W30 etc.). The first number of the designation
specify the oil viscosity at cold temperature, the second number specifies the oil viscosity at high temperature.
For example: SAE10W30 oil has a low temperature viscosity similar to that of SAE 10, but it has a high
temperature viscosity similar to that of SAE 30 Multigrade Hydraulic Oils are used in a wide temperature range.
Remember to take into consideration the location of your hydraulic pump. If it is in the engine room, it will be
much wormer inside there. This will affect the viscosity of your oil.
Temperature Operating Window for Hydraulic System Operating at 45deg. F to 150deg. F
There are many oil manufacturers and types of hydraulic oil you can use. We will always recommend
using an ECOLOGICALLY SENSITIVE oil like the NZ (non-zinc) with AW ash less ( Anti-Wear )
additives.
PAGE 10

OPTIONAL RADIO REMOTE CONTROL
1 General Hydraulic Solutions uses an optional 2-channel radio remote for wireless operation of the
lift platform. The system consists of a receiver unit and two 2-button transmitter units. The remote
is FCC approved. These transmitters are water resistant and good for a range of 60-100 feet.
These transmitters should provide years of trouble free service, however, if the transmitters are
lost or damaged new ones may be purchased through General Hydraulic Solutions.
2 IMPORTANT : In order to program up to 4 Transmitters to one remote you must first “CLEAR” the
memory.
* Locate the program switch as shown below
* Press and hold the program switch for 10 seconds (the LED will go out).
* The unit is now clear
3 REMOTE PROGRAMMING (programming must be completed within 10 seconds)
* Push the program switch till LED lights solid, then release.* Push button one on remote transmitter until LED goes out, then release* Push button one again the LED should flash slowly, then release * Your remote is now programmed. Repeat for each transmitter.
Note : If the new remote does not work, make sure that the indicator LED on the remote is flashing and that the
batteries are good. Repeat step 3
PAGE 11
TRANSMITTER NEW STYLE
TRANSMITTER OLD STYLE
LED
PROGRAMMING BUTTON
LED
PROGRAMMING
NEW STYLE RECEIVER
OLD STYLE RECEIVER

GENERAL HYDRAULIC SOLUTIONS
TROUBLE SHOOTING GUIDE
**REFERENCE PAGE 15
PAGE 12
CHECK MAIN DC CIRCUIT
IF “ON”-CHECK LIFT PLATFORM ROCKER SWITCH “ON”
IF “OFF”- RESET SWITCH TO “ON”. INDICATOR LIGHT SHOULD BE ON.
IF GREEN LED IS “ON” &
MOTOR DOES NOT RUN-
CHECK VOLTAGE AT OUT
PUT SIDE OF MOTOR RUN
SOLENOID
IF FUSE IS BAD-REPLACE FUSE
IF GREEN COIL LED LIGHT NOT ON AND
PUMP MOTOR RUNS WITH PRESSURE
GAGE BETWEEN 1000-2500PSI REPLACE
COIL ON SOLENOID
IF THE PROPER VOLTAGE IS NOT
PRESENT CHECK VOLTAGE ON
MOTOR RUN SOLENOID ACTIVATOR
WIRES
IF LIGHT IS “ON”- ACTIVATE THE HAND
HELD CONTROLLER UNIT BY PRESSING
UP/DWN BUTTON FOR 5 SECONDS UNTIL
IF “OFF” RESET
CIRCUIT
BREAKER
IF “ON”-CHECK LIGHT ON ROCKER SWITCH
IF “ON”- PRESS “UP” BUTTON. THE GREEN LED ON THE “UP” SOLENOID VALVE SHOULD GLOW.
IF BOTH LEDS ON SOLENOIDS GOOD, CONTROL BOX GOOD, PUMP MOTOR RUNS IN BOTH DIRECTIONS AND PRESSURE GAGE READS ZERO. REPLACE COMPLETE PUMP UNIT
IF MOTOR RUNS-REPLACE CONTROL
BOX. (TERMINALS 1 IN THE EVENT
THAT ONE SIDE OF THE CONTROL
BOX FAILS, THE LIFT CAN FUNCTION
IN THE FAILED DIRECTION BY
SWITCHING THE GREEN (DOWN) AND
BLUE (UP) WIRES ON THE CONTROL
BOX.. SEE PAGE 14 OF THE MANUAL
FOR LOCATION OF TERMINALS 1 & 2)
UNIT DOES NOT OPERATE
IF FUSE IS GOOD-CHECK WIRING &
CONNECTIONS BETWEEN PLUGS ON
ROCKER SWITCH & PUMP. CHECK
VOLTAGE ON INPUT & OUTPUT SIDES OF
LATCHING RELAY.
IF VOLTAGE ON INPUT SIDE & NOT ON OUTPUT SIDE, CHECK VOLTAGE ON PRIMARY WINDING OF RELAY
IF VOLTAGE
ON PRIMARY
WINDING-
REPLACE
RELAY
IF NO VOLTAGE-RECHECK WIRING & CONNECTIONS
IF SWITCH LIGHT DOESN'T LIGHT, CHECK FUSES ON LOWER SIDE OF LATCHING SOLENOID

PAGE 13
GREEN
GREEN LED
FUSE FOR ROCKER
FUSE FOR LIGHT ON
LATCHING
MOTOR RUN SOLENOID
BATTERY
OUT-PUT SIDE, CONNECTS TO MOTOR, BATTERY POWER
GROUND WIRE
HAND HELD CONTROL FUSE
RADIO REMOTE FUSE
ROCKER SWITCH FUSE HOLDER
POWER WIRE FROM HAND HELD CONTROL AND RADIO REMOTE
ROCKER SWITCH POWER
FUSE
BATTERY POWER TERMINAL

GHS HYDRAULIC PUMP IDENTIFICATION
SILVER MANIFOLD First Generation 2000 BLACK MANIFOLD
BLUE MANIFOLD BLUE WITH ANTI FLOAT MANIFOLD
GOLD WITH ANTI FLOAT MANIFOLD PURPLE WITH ANTI FLOAT MANIFOLD
RED MANIFOLD GREEN WITH ANTI FLOAT MANIFOLD
YELLOW MANIFOLD SILVER MANIFOLD 2012 -CURRENT MODEL
PAGE 14

SILVER HYDRAULIC PUMP First Generation
C1 LOCK CYLINDER HOSE #1
C2 LOCK CYLINDER HOSE #2
A1 #1 LIFT CYLINDER HOSE FITTING BLIND END
B1 #1 LIFT CYLINDER HOSE FITTING ROD END
A2 #2 LIFT CYLINDER HOSE FITTING BLIND END
B2 #2 LIFT CYLINDER HOSE FITTING ROD END
SILVER HYDRAULIC PUMPGHS PART NUMBER QTY.HY010 1 Silver Control ManifoldHY015 2 2-pos, 3-way directional valve cartridge with locking Manual ovr'dHY019 1 Valve hand pumpHY021 1 Flow dividerHY022 2 Counterbalance valve inline valve bodyHY026 1 Sintered bronze filter elementHY027 1 Sintered bronze filter element springHY028 1 0-3,000 psig glycerin filled pressure gauge #316SSHY031 1 12 VDC Base Hydraulic unitHY032 1 24 VDC Base Hydraulic unitHY033 2 DIN connector cable with LED & surge suppressorHY035 1 Check ValveHY037 1 Pressure Sequence valve cartridgeHY056 2 12 VDC solenoid valve coil.HY057 2 24 VDC solenoid valve coil.HY068 1 Pump Handle
PAGE 15
HY010
HY015
HY015
HY021
HY022HY022HY037
HY026HY027
HY028
HY031HY032
HY031HY032
HY010
HY033
HY033
HY035
HY056HY057
HY068
HY035
HY019
B1
A1B2
A2C2
C1

BLUE HYDRAULIC PUMP
C1 LOCK CYLINDER HOSE #1
C2 LOCK CYLINDER HOSE #2
A1 #1 LIFT CYLINDER HOSE FITTING BLIND END
B1 #1 LIFT CYLINDER HOSE FITTING ROD END
A2 #2 LIFT CYLINDER HOSE FITTING BLIND END
B2 #2 LIFT CYLINDER HOSE FITTING ROD END
Continued on next page
PAGE 16
BLUE HYDRAULIC PUMP CONTINUED
HY031
HY031
HY015 HY015
HY015
HY014
HY014
HY026
HY056
HY056
HY034
HY034
HY037
HY037
HY019
B2
C1
C2
A1
B1
A2
#1
#2

GHS PART NUMBER QTY. BLUE HYDRAULIC PUMP
HY014 1 Blue Control Manifold with Anti-float accessories
HY015 2 2-pos, 3-way directional valve cartridge with locking Manual ovr'd
HY019 1 Valve hand pump
HY020 1 Flow divider
HY023 2 Counterbalance valve inline valve body
HY024 4 5 Gpm restricted Sealed Pilot Counterbalance valve cartridge
HY026 1 Sintered bronze filter element
HY027 1 Sintered bronze filter element spring
HY028 1 0-3,000 psig glycerin filled pressure gauge #316SS
HY031 1 12 VDC Base Hydraulic unit
HY032 1 24 VDC Base Hydraulic unit
HY034 2 DIN connector cable with LED & surge suppressor
HY037 1 Pressure Sequence valve cartridge
HY056 2 12 VDC solenoid valve coil.
HY057 2 24 VDC solenoid valve coil.
HY068 1 Pump Handle (NOT SHOWN)
PAGE 17
HY031HY032
HY020
HY024
HY024
HY056
HY028

Blue Anti-Float
C1 LOCK CYLINDER HOSE #1C2 LOCK CYLINDER HOSE #2A1 #1 LIFT CYLINDER HOSE FITTING BLIND ENDB1 #1 LIFT CYLINDER HOSE FITTING ROD ENDA2 #2 LIFT CYLINDER HOSE FITTING BLIND ENDB2 #2 LIFT CYLINDER HOSE FITTING ROD END
GHS PART NUMBER QTY. Blue Anti-Float
HY014 1 Blue Control Manifold with Anti-float accessories
HY015 2 2-pos, 3-way directional valve cartridge with locking Manual ovr'd
HY019 1 Valve hand pump
HY020 1 Flow divider
HY023 2 Counterbalance valve inline valve body
HY024 4 5 Gpm restricted Sealed Pilot Counterbalance valve cartridge
HY026 1 Sintered bronze filter element
HY027 1 Sintered bronze filter element spring
HY028 1 0-3,000 psig glycerin filled pressure gauge #316SS
HY031 1 12 VDC Base Hydraulic unit
HY032 1 24 VDC Base Hydraulic unit
HY034 2 DIN connector cable with LED & surge suppressor
HY037 1 Pressure Sequence valve cartridge
HY056 2 12 VDC solenoid valve coil.
HY057 2 24 VDC solenoid valve coil.
HY068 1 Pump Handle (NOT SHOWN)
PAGE 18
HY014
HY014
HY015
HY015
HY020
HY024
HY037HY024
HY023
HY024
HY024
HY023
HY026
HY031
HY031HY032
HY034
HY056HY057
HY023
HY019
HY028
C2
B1 B2
A1
C1
A2
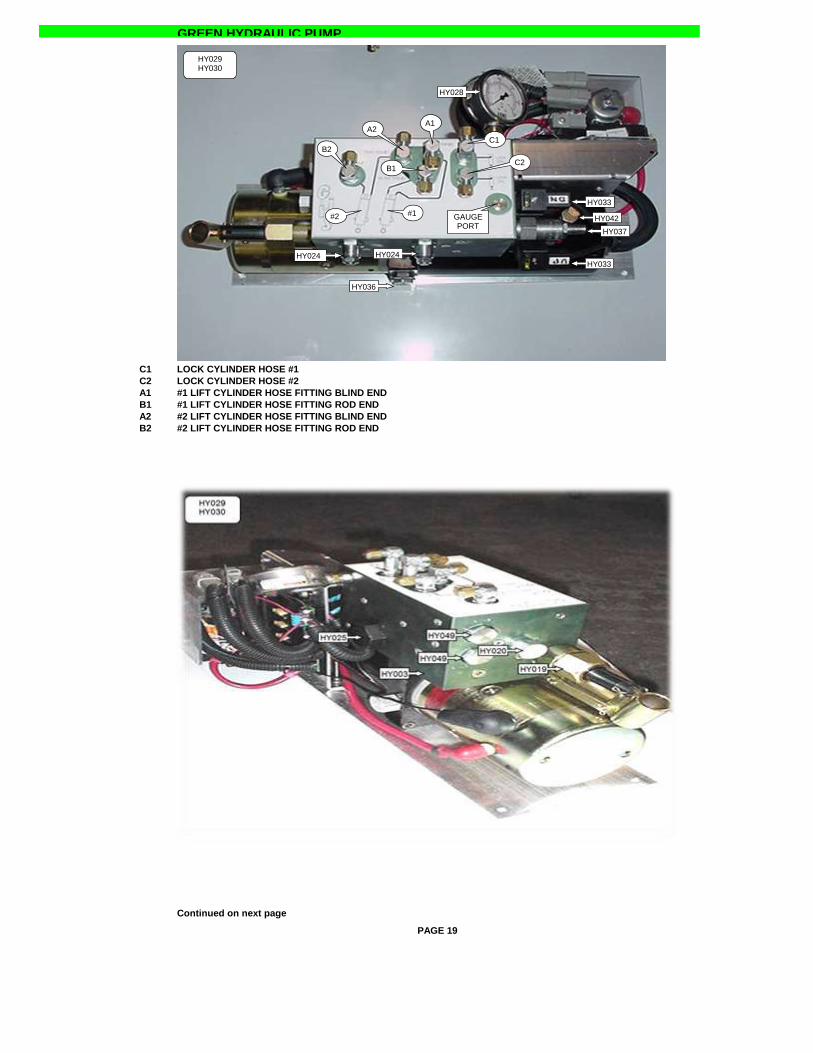
GREEN HYDRAULIC PUMP
C1 LOCK CYLINDER HOSE #1
C2 LOCK CYLINDER HOSE #2
A1 #1 LIFT CYLINDER HOSE FITTING BLIND END
B1 #1 LIFT CYLINDER HOSE FITTING ROD END
A2 #2 LIFT CYLINDER HOSE FITTING BLIND END
B2 #2 LIFT CYLINDER HOSE FITTING ROD END
Continued on next page
PAGE 19
HY003HY019
HY049
HY042
HY037
HY036
HY028
HY025
HY024HY024
HY020
HY029HY030
HY033
HY033
HY049
C1
C2
A1A2
B1
B2
#1#2 GAUGEPORT

GREEN HYDRAULIC PUMP CONTINUED
GHS PART NUMBER QTY. GREEN HYDRAULIC PUMP
HY003 1 Green Control Manifold
HY015 2 2-pos, 3-way directional valve cartridge with locking Manual ovr'd
HY019 1 Hand pump cartridge
HY020 1 Flow divider
HY024 2 or 4 5 Gpm restricted Sealed Pilot Counterbalance valve cartridge
HY025 1 Filter element cartridge 10 MICRON
HY028 1 0-3,000 psig glycerin filled pressure gauge #316SS
HY029 1 12 VDC Base Hydraulic unit
HY030 1 24 VDC Base Hydraulic unit
HY033 2 DIN connector cable with LED & surge suppressor
HY036 1 Check valve
HY037 1 Pressure Sequence valve cartridge
HY042 1 Sintered Bronze 3/8" reservoir breather cap.
HY049 0 or 2 Cavity Plug used only without Anti-float option
HY056 2 12 VDC solenoid valve coil.
HY057 2 24 VDC solenoid valve coil.
HY068 1 Pump Handle (NOT SHOWN)
PAGE 20
HY015
HY033
HY029HY030
HY037
HY056HY057
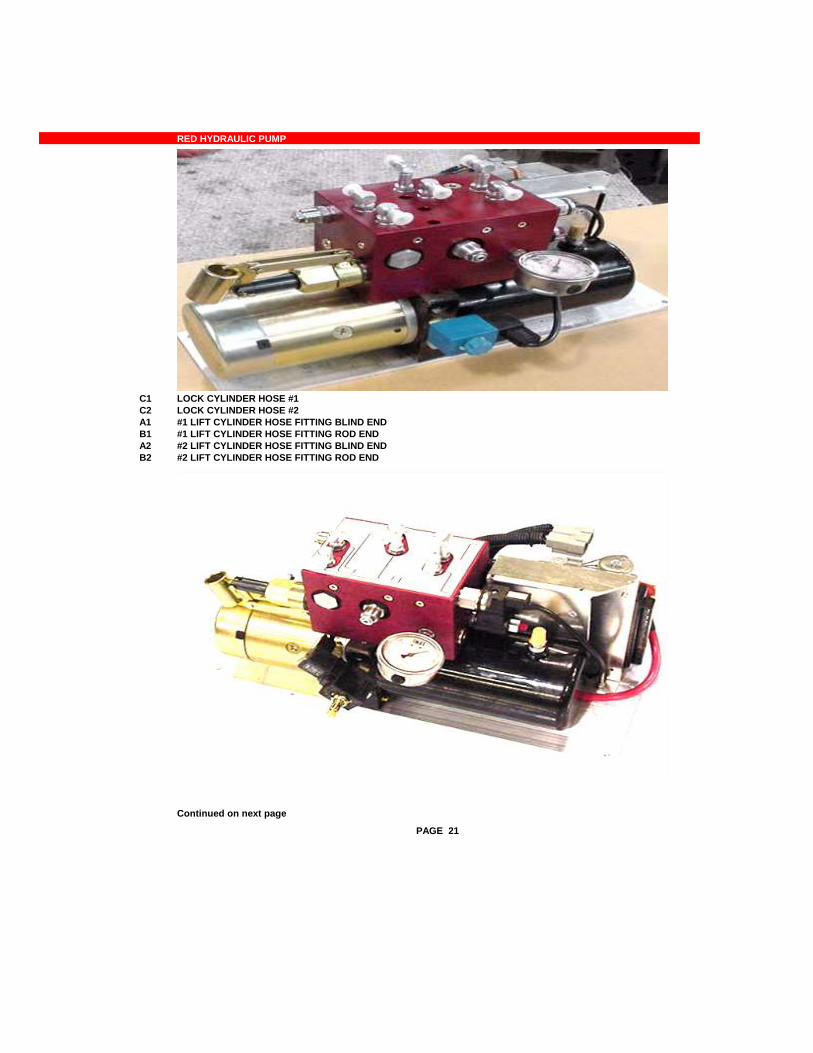
RED HYDRAULIC PUMP
C1 LOCK CYLINDER HOSE #1
C2 LOCK CYLINDER HOSE #2
A1 #1 LIFT CYLINDER HOSE FITTING BLIND END
B1 #1 LIFT CYLINDER HOSE FITTING ROD END
A2 #2 LIFT CYLINDER HOSE FITTING BLIND END
B2 #2 LIFT CYLINDER HOSE FITTING ROD END
Continued on next page
PAGE 21
HY042
HY038
HY036
HY033HY028
HY024
HY021
HY017
HY016
HY004
HY004
HY029HY030
HY029HY030
HY033
HY033HY066
HY056HY057
HY066
HY016
HY024
#1#2
A2
A1
B2
B1
C1
C2

RED HYDRAULIC PUMP CONTINUED
GHS PART NUMBER QTY. Red
HY004 1 Red Control Manifold
HY016 1 2-way N.O. directional valve cartridge.
HY017 1 2-pos, 4-way directional valve cartridge with locking manual ovr'd
HY019 1 Hand pump cartridge
HY021 1 Flow divider
HY022 2 Standard counterbalance valve
HY025 1 Filter element cartridge 10 MICRON
HY028 1 0-3,000 psig glycerin filled pressure gauge #316SS
HY029 1 12 VDC Base Hydraulic unit
HY030 1 24 VDC Base Hydraulic unit
HY033 2 DIN connector cable with LED & surge suppressor
HY036 1 Check valve
HY038 1 3-way pilot operated logic valve
HY042 1 Sintered Bronze 3/8" reservoir breather cap.
HY056 1 12 VDC solenoid valve coil.
HY057 1 24 VDC solenoid valve coil.HY066 1 2-way valve 12 VDC CoilHY068 1 Pump Handle (NOT SHOWN)
PAGE 22
HY004
HY025
HY019
HY029HY030

BLACK HYDRAULIC PUMP
BLACK HYDRAULIC PUMP
C1 LOCK CYLINDER HOSE #1
C2 LOCK CYLINDER HOSE #2
A1 #1 LIFT CYLINDER HOSE FITTING BLIND END
B1 #1 LIFT CYLINDER HOSE FITTING ROD END
A2 #2 LIFT CYLINDER HOSE FITTING BLIND END
B2 #2 LIFT CYLINDER HOSE FITTING ROD END
GHS PART NUMBER QTY. BLACK HYDRAULIC PUMPHY011 1 Black Control ManifoldHY018 2 2-pos, 3-way directional valve cartridge with locking Manual ovr'dHY020 1 Flow dividerHY022 2 Standard counterbalance valveFLDA-XDN 1 Filter element ( SUN HYDRAULICS )HY028 1 0-3,000 psig glycerin filled pressure gauge #316SSHY031 1 12 VDC Base Hydraulic unitHY032 1 24 VDC Base Hydraulic unitHY034 2 DIN connector cable with LED & surge suppressorHY037 1 Pressure Sequence valve cartridgeHY064 2 12 VDC solenoid valve coil.HY065 2 24 VDC solenoid valve coil.HY024 2 Counterbalance valve cartridgeHY068 1 Pump Handle
PAGE 23
HY011
HY011
HY024
HY024
HY037
HY064HY065
HY034
HY028
FLDA-XDN
HY020
HY018HY018
HY031HY032
HY031HY032
HY034
HY019
B2
B1
A2
A1
C2
C1
C2
C1
A2B1 A1

ORANGE HYDRAULIC PUMP
C1 LOCK CYLINDER HOSE #1
C2 LOCK CYLINDER HOSE #2
A1 #1 LIFT CYLINDER HOSE FITTING BLIND END
B1 #1 LIFT CYLINDER HOSE FITTING ROD END
A2 #2 LIFT CYLINDER HOSE FITTING BLIND END
B2 #2 LIFT CYLINDER HOSE FITTING ROD END
continued on next page
PAGE 24
HY033
HY028
HY025
HY092
HY020
HY015
HY019
HY015
HY092
HY037
HY029HY030
HY029HY030
HY033
HY049
B2
B1
A1
#2
C2
C1
A2
#1

ORANGE HYDRAULIC PUMP CONTINUED
GHS PART NUMBER QTY. ORANGE HYDRAULIC PUMP
HY014 1 ORANGE Control Manifold
HY015 2 2-pos, 3-way directional valve cartridge with locking Manual ovr'd
HY019 1 Hand pump cartridge
HY020 1 Flow divider
HY092 2 or 4 Counterbalance valve cartridge
HY025 1 Filter element cartridge 10 MICRON
HY028 1 0-3,000 psig glycerin filled pressure gauge #316SS
HY029 1 12 VDC Base Hydraulic unit
HY030 1 24 VDC Base Hydraulic unit
HY033 2 DIN connector cable with LED & surge suppressor
HY037 1 Pressure Sequence valve cartridge
HY049 0 or 2 Cavity Plug used only without Anti-float option (SHOWN)
HY056 2 12 VDC solenoid valve coil.
HY057 2 24 VDC solenoid valve coil.
HY068 1 Pump Handle (NOT SHOWN)
PAGE 25
HY029HY030
HY033
HY037
HY092HY092
HY049
HY020
HY056HY057

Purple Anti-Float
C1 LOCK CYLINDER HOSE #1
C2 LOCK CYLINDER HOSE #2
A1 #1 LIFT CYLINDER HOSE FITTING BLIND END
B1 #1 LIFT CYLINDER HOSE FITTING ROD END
A2 #2 LIFT CYLINDER HOSE FITTING BLIND END
B2 #2 LIFT CYLINDER HOSE FITTING ROD END
GHS PART NUMBER QTY. Purple Anti-Float
HY014 1 Purple Control Manifold with Anti-float
HY015 2 2-pos, 3-way directional valve cartridge with locking Manual ovr'd
HY020 1 Flow divider
HY049 0 or 2 Cavity Plug
HY024 4-Feb 5 Gpm restricted Sealed Pilot Counterbalance valve cartridge
HY026 1 Sintered bronze filter element
HY027 1 Sintered bronze filter element spring
HY028 1 0-3,000 psig glycerin filled pressure gauge #316SS
HY031 1 12 VDC Base Hydraulic unit
HY032 1 24 VDC Base Hydraulic unit
HY034 2 DIN connector cable with LED & surge suppressor
HY037 1 Pressure Sequence valve cartridge
HY056 2 12 VDC solenoid valve coil.
HY057 2 24 VDC solenoid valve coil.
HY068 1 Pump Handle (NOT SHOWN) PAGE 26
HY031HY032
HY031HY032
HY031HY032
HY015 HY015
HY020
HY037
HY034
HY028
HY026
HY024
HY049
HY049
HY024
HY034
HY056HY056HY057C1
#1
A1
A2
B2 B1
#2
C2
HY015

GREEN HYDRAULIC PUMP WITH SECOND FUNCTION
DO NOT ATTEMPT TO MAKE ANY ADJUSTMENTS TO THIS STYLE PUMP!
ADJUSTMENTS TO THE SWIM PLATFORM SIDE OF THE PUMP AFFECT THE TRIM SIDE AND ADJUSTMENTS TO TRIM SIDE
AFFECT SWIM PLATFORM SIDE. This pump is pre set at G.H.S and should only be worked on by otherwise persons only, with
direct contact with G.H.S. Transom and or lift failure can occur
continued on next page
PAGE 27
GREEN HYDRAULIC PUMP WITH SECOND FUNCTION CONTINUED
SECOND FUNCTION FLOW DIVIDER
SECOND FUNCTION COUNTER BALANCE
SECOND FUNCTION COUNTER BALANCE
BLIND END OF TRIM TILT CYLINDER B
BLIND END OF TRIM TILT CYLINDER A
"T" FITTING"T" FITTING
"T" FITTING
90deg Elbow FITTING

PAGE 21
PAGE 28

YELLOW HYDRAULIC PUMP WITH SECOND FUNCTION
PAGE 22
GHS PART NUMBER QTY. YELLOW HYDRAULIC PUMP
HY056 2 12 VDC solenoid valve coil.
HY057 2 24 VDC solenoid valve coil.
HY015 2 2-pos, 3-way directional valve cartridge with locking Manual ovr'd
HY020 1 Flow divider
HY024 2 5 Gpm restricted Sealed Pilot Counterbalance valve cartridge
HY037 1 Pressure Sequence valve cartridge
HY026 1 Sintered bronze filter element
HY027 1 Sintered bronze filter element spring
HY094 1 Filler Cap
PAGE 29

SILVER HYDRAULIC PUMP Second Generation
continued on next page
PAGE 30
HY037
HY028
HY024
HY024HY024
HY024
HY026
HY026
HY020
HY037
HY015
HY034
HY056
Battery Cable Connection Ground (-)
Solid State Controls - see page 33
HY019
Battery Cable Connection Positve (+)
HY094

GHS PART NUMBER QTY. SILVER HYDRAULIC PUMP Second Generation
HY015 2 2-pos, 3-way directional valve cartridge with locking Manual ovr'd
HY019 1 Hand pump Cartridge
HY020 1 Flow divider (Sun)
HY024 2 or 4 5 Gpm Counterbalance valve cartridge (Pump shown has AntiFloat Feature)
HY026 1 Filter sintered bronze element
HY028 1 0-3,000 psig glycerin filled pressure gauge #316SS
HY034 2 DIN connector cable with LED & surge suppressor
HY037 1 Pressure Sequence valve cartridge
HY056 2 12 VDC Solenoid valve coil.
HY057 2 24 VDC Solenoid valve coil.
HY068 1 Pump Handle (NOT SHOWN)
HY094 1 Filler Cap
10053-B2 1 12VDC Pump Assembly (Includes Pump, Manifold, Solid State controls)
10052-B3 1 24VDC Pump Assembly (Includes Pump, Manifold, Solid State controls)
PAGE 31

CONTROLS, FIRST GENERATION HARD WIRED
Page 32
LATCHING SOLENOID. THIS TURNS ON AND OFF BATTERY POWER TO THE HYDRAULIC PUMP UNIT BY
USE OF THE ROCKER SWITCH
BATTERY POWER TERMINAL FROM MAIN CIRCUIT BREAKER. IF SOLENOID IS GRAY IN CULLER IT IS 24 VOLT. IF SOLENOID IS BLACK, IT IS 12 VOLT
MOTOR RUN SOLENOID, TURNS ON AND OFF POWER TO THE ELECTRIC PUMP MOTOR BY USE OF
THE HARD WIRED HAND HELD CONTROL AND, OR THE RADIO
REMOTE CONTROLLER

CONTROLS, NEW SOLID STATE (CURRENT)
PAGE 33
DOWN DIN CONNECTOR CABLE GROUND TERMINAL
DOWN DIN CONNECTOR CABLE POSITIVE TERMINAL
UP DIN CONNECTOR CABLE GROUND TERMINAL
UP DIN CONNECTOR CABLE
ALARM FUSE3 AMP / 5 AMP MAX
HARD WIRED HAND HELD CONTROL FUSE 5
RADIO REMOTE CONTROL FUSE
ROCKER SWITCH INDICATOR LIGHT FUSE
ROCKER SWITCH MAIN POWER FUSE
5 AMP MAX
P/C BOARD FUSE10 AMP MAX
THIS FUSE, ON EARLY MODELS, IS FOR THE INTERNAL PUMP ALARM.
5 AMP MAX
THIS FUSE, ON LATER MODELS, IS THE P/C BOARD PRIMARY
FUSE, 10 AMP MAX
EARLY MODELS ARE IDENTIFIED BY THIS LARGE DIAMETER WIRE FEEDING THE P/C BOARD
EXTRA FUSES IN FUSE HOLDER
BATTERY POWER TERMINAL FROM MAIN CIRCUIT BREAKER. IF SOLENOID IS GRAY IN CULLER IT IS 24 VOLT. IF SOLENOID IS BLACK, IT IS 12 VOLT.
MOTOR RUN SOLENOID, TURNS ON AND OFF POWER TO THE ELECTRIC PUMP MOTOR BY USE OF
THE HARD WIRED HAND HELD CONTROL AND, OR THE RADIO
REMOTE CONTROLLER
THIS TERMINAL CONNECTS TO THE HYDRAULIC PUMP MOTER POSITIVE TERMINAL
LATCHING SOLENOID. THIS TURNS ON AND OFF BATTERY POWER TO THE HYDRAULIC PUMP UNIT BY
USE OF THE ROCKER SWITCH

ELECTRICAL SCHEMATICS IN THE DIFFERENT STATES OF OPERATION
PAGE 34

PAGE 35

PAGE 36

PAGE 37

BLEEDING PROCEDURE NOTE: DURING THIS PROCEDURE DO NOT RUN PUMP FOR MORE THAN 4
MINUTES WITHOUT ALLOWING COOL DOWN OF PUMP MOTOR.
TOOLS NEEDED: 2 HOSES THAT WILL REACH FROM BLEED FITTING ON
LOWER END OF CYLINDER TO BLIND END BULKHEAD
FITTING, WRENCHES 9/16 & 5/8
WITH LIFT IN UP POSITION CHECK OIL LEVEL TO INSURE OIL LEVEL IS ONE INCH FROM BOTTOM OF FILLER
NECK.
LOWER LIFT TILL ARMS ON BOTH SIDE BOTTOM OUT ON BOTTOM PIN OR ON EARLY MODELS 1999 THRU MID
2000 CYLINDER WILL BOTTOM OUT.
REMOVE SS HOSES FROM BLIND END OF CYLINDER (OIL THAT FLOWS TO LOWER THE LIFT
NOTE: BOTH SIDES MUST BE HOOKED UP TO BLEED THE SYSTEM WITH THIS PROCEDURE
NOTE: IF THIS PROCEDURE IS BEING DONE WHILE THE BOAT IS FLOATING
PRE-FILL HOSES WITH ISO 32 HYDRAULIC OIL AND PLUG ONE END
OF HOSE TO MINIMIZE THE AMOUNT OF SEAWATER THAT COULD
GET IN SYSTEM.
REMOVE CAP FROM BLEED FITTING ATTACH HOSE TO BLEED FITTING AT LOWER END OF CYLINDER,
INSTALL CAP THAT WAS REMOVED TO BLIND END OF CYLINDER FITTING,IF BOAT IS FLOATING REPEAT THIS OPERATION TO OTHER SIDE DO NOT ATTACH HOSE TO BULKHEAD
FITTING TILL BOTH SIDE ARE INSTALLED
POWER SYSTEM UP AND BUMP THE UP BUTTON THIS WILL PURGE ANY CONTAMINATE THAT ENTERED HOSE
WHILE INSTALLING UNDERWATER
INSTALL OTHER END OF HOSE TO BULKHEAD FITTING
POWER UP SYSTEM, PUSH UP BUTTON RUN SYSTEM FOR 1-1/2 MINUTES THIS WILL RECIRCULATE THE OIL
THRU THE ROD END CAVITY OF THE CYLINDERS.
PAGE 38
HOOK HOSE TO BLEED PORT ON LIFT CYLINDER
HOOK HOSE TO BLIND END FITTING ON BULK HEAD FITTING
BLIND ENDROD END
REMOVE BLIND END STAINLESS STEEL HOSE FOR THIS OPERATION
CAP CYLINDER FITTING DURING BLEEDING. YOU CAN USE THE CAP REMOVED FROM THE BLEEDER PORT

PAGE 39
BY PASS HOSES
HOOK HOSE TO BLEED PORT ON LIFT CYLINDER
HOOK HOSE TO BLIND END FITTING ON BULK HEAD FITTING

Material Safety Data SheetsSECTION 1 PRODUCT AND COMPANY IDENTIFICATION
Chevron Clarity® Hydraulic Oil AW Product Number(s): CPS230340, CPS230341, CPS230342
Synonyms: Chevron Clarity® Hydraulic Oil AW ISO 46
Company Identification
Chevron Texaco Global Lubricants
6001 Bollinger Canyon Rd.
San Ramon, CA 94583
United States of America
www.chevron-lubricants.com
Transportation Emergency Response
CHEMTREC: (800) 424-9300 or (703) 527-3887
Health Emergency
Chevron Texaco Emergency Information Center: Located in the USA. International collect calls accepted. (800) 231-
0623 or (510) 231-0623Product Information
email : [email protected]
Product Information: (800) LUBE TEK
MSDS Requests: (800) 414-6737
Chevron Clarity® Hydraulic Oils AW ISO 32, 46, 68
Chevron Clarity Hydraulic Oils AW are ashless (zinc-free) oils that meet or exceed the performance requirements
of conventional anti-wear fluids while providing an additional level of environmental safety. All grades are
approved Denison HF-O, while ISO 32 and 46 are approved against Cincinnati Milacron P-68 and P-70,
respectively. ISO 46 meets both the Vickers anti-wear requirements of M-2950-S for mobile hydraulic systems and
I-286-S for industrial hydraulic systems. Chevron Clarity Hydraulic Oils AW are inherently biodegradable and pass
the EPA's acute aquatic toxicity (LC-50) test. These oils have substantially better oxidation stability than
conventional hydraulic fluids (18,000 hour TOST life) which equates to greatly extended oil life in severe service
applications. The hydraulic oils are designed for use in the vane-, piston-, and gear-type pumps of mobile and
stationary hydraulic equipment in environmentally sensitive areas. They are especially well suited for applications
that exceed 5000 psi as found in axial piston pumps.
SECTION 2 COMPOSITION/ INFORMATION ON INGREDIENTS
COMPONENTS / CAS NUMBER / AMOUNT
Non-hazardous additive blend in refined oil / MIXTURE / 100%weight
SECTION 3 HAZARDS IDENTIFICATION
IMMEDIATE HEALTH EFFECTS
Eye: Not expected to cause prolonged or significant eye irritation.
Skin: Contact with the skin is not expected to cause prolonged or significant irritation. Not expected to be harmful
to internal organs if absorbed through the skin. High-Pressure Equipment Information: Accidental high-velocity
injection under the skin of materials of this type may result in serious injury. Seek medical attention at once
should an accident like this occur. The initial wound at the injection site may not appear to be serious at first; but,
if left untreated, could result in disfigurement or amputation of the affected part.Ingestion: Not expected to be harmful if swallowed.
Inhalation: Not expected to be harmful if inhaled. Contains a petroleum-based mineral oil. May cause respiratory
irritation or other pulmonary effects following prolonged or repeated inhalation of oil mist at airborne levels above
the recommended mineral oil mist exposure limit. Symptoms of respiratory irritation may include coughing and
difficulty breathing.
SECTION 4 FIRST AID MEASURES
Eye: No specific first aid measures are required. As a precaution, remove contact lenses, if worn, and flush eyes
with water.Skin: No specific first aid measures are required. As a precaution, remove clothing and shoes if contaminated. To
remove the material from skin, use soap and water. Discard contaminated clothing and shoes or thoroughly clean
before reuse.Ingestion: No specific first aid measures are required. Do not induce vomiting. As a precaution, get medical
advice.Inhalation: No specific first aid measures are required. If exposed to excessive levels of material in the air, move
the exposed person to fresh air. Get medical attention if coughing or respiratory discomfort occurs.Note to Physicians: In an accident involving high-pressure equipment, this product may be injected under the
skin. Such an accident may result in a small, sometimes bloodless, puncture wound. However, because of its
driving force, material injected into a fingertip can be deposited into the palm of the hand. Within 24 hours, there
is usually a great deal of swelling, discoloration, and intense throbbing pain. Immediate treatment at a surgical
emergency center is recommended.SECTION 5 FIRE FIGHTING MEASURES
Leaks/ruptures in high pressure system using materials of this type can create a fire hazard when in the vicinity of
ignition sources (eg. open flame, pilot lights, sparks, or electric arcs).FIRE CLASSIFICATION:
OSHA Classification (29 CFR 1910.1200): Not classified by OSHA as flammable or combustible.
NFPA RATINGS: Health: 0 Flammability: 1 Reactivity: 0
FLAMMABLE PROPERTIES:
PAGE 40
Flashpoint: (Cleveland Open Cup) 190 °C (374 °F) (Min)
Auto ignition: NDA
Flammability (Explosive) Limits (% by volume in air): Lower: NA Upper: NA
EXTINGUISHING MEDIA: Use water fog, foam, dry chemical or carbon dioxide (CO2) to extinguish flames.
PROTECTION OF FIRE FIGHTERS:

Fire Fighting Instructions: This material will burn although it is not easily ignited. For fires involving this material,
do not enter any enclosed or confined fire space without proper protective equipment, including self-contained
breathing apparatus.Combustion Products: Highly dependent on combustion conditions. A complex mixture of airborne solids,
liquids, and gases including carbon monoxide, carbon dioxide, and unidentified organic compounds will be
evolved when this material undergoes combustion.SECTION 6 ACCIDENTAL RELEASE MEASURES
Protective Measures: Eliminate all sources of ignition in vicinity of spilled material.
Spill Management: Stop the source of the release if you can do it without risk. Contain release to prevent further
contamination of soil, surface water or groundwater. Clean up spill as soon as possible, observing precautions in
Exposure Controls/Personal Protection. Use appropriate techniques such as applying non-combustible absorbent
materials or pumping. Where feasible and appropriate, remove contaminated soil. Place contaminated materials in
disposable containers and dispose of in a manner consistent with applicable regulations.
Reporting: Report spills to local authorities and/or the U.S. Coast Guard's National Response Center at (800) 424-
8802 as appropriate or required.SECTION 7 HANDLING AND STORAGE
Precautionary Measures: DO NOT USE IN HIGH PRESSURE SYSTEMS in the vicinity of flames, sparks and hot
surfaces. Use only in well ventilated areas. Keep container closed.General Handling Information: Avoid contaminating soil or releasing this material into sewage and drainage
systems and bodies of water.Static Hazard: Electrostatic charge may accumulate and create a hazardous condition when handling this
material. To minimize this hazard, bonding and grounding may be necessary but may not, by themselves, be
sufficient. Review all operations which have the potential of generating and accumulating an electrostatic charge
and/or a flammable atmosphere (including tank and container filling, splash filling, tank cleaning, sampling,
gauging, switch loading, filtering, mixing, agitation, and vacuum truck operations) and use appropriate mitigating
procedures. For more information, refer to OSHA Standard 29 CFR 1910.106, 'Flammable and Combustible
Liquids', National Fire Protection Association (NFPA 77, 'Recommended Practice on Static Electricity', and/or the
American Petroleum Institute (API) Recommended Practice 2003, 'Protection Against Ignitions Arising Out of
Static, Lightning, and Stray Currents'.Container Warnings: Container is not designed to contain pressure. Do not use pressure to empty container or it
may rupture with explosive force. Empty containers retain product residue (solid, liquid, and/or vapor) and can be
dangerous. Do not pressurize, cut, weld, braze, solder, drill, grind, or expose such containers to heat, flame,
sparks, static electricity, or other sources of ignition. They may explode and cause injury or death. Empty
containers should be completely drained, properly closed, and promptly returned to a drum reconditioner or
disposed of properly.SECTION 8 EXPOSURE CONTROLS/PERSONAL PROTECTION
GENERAL CONSIDERATIONS:
Consider the potential hazards of this material (see Section 3), applicable exposure limits, job activities, and other
substances in the work place when designing engineering controls and selecting personal protective equipment.
If engineering controls or work practices are not adequate to prevent exposure to harmful levels of this material,
the personal protective equipment listed below is recommended. The user should read and understand all
instructions and limitations supplied with the equipment since protection is usually provided for a limited time or
under certain circumstances.ENGINEERING CONTROLS:
Use in a well-ventilated area.
PERSONAL PROTECTIVE EQUIPMENT
Eye/Face Protection: No special eye protection is normally required. Where splashing is possible, wear safety
glasses with side shields as a good safety practice.Skin Protection: No special protective clothing is normally required. Where splashing is possible, select
protective clothing depending on operations conducted, physical requirements and other substances in the
workplace. Suggested materials for protective gloves include: 4H (PE/EVAL), Nitrile Rubber, Silver Shield, Viton.
Respiratory Protection: No respiratory protection is normally required.
If user operations generate an oil mist, determine if airborne concentrations are below the occupational exposure
limit for mineral oil mist. If not, wear an approved respirator that provides adequate protection from the measured
concentrations of this material. For air-purifying respirators use a particulate cartridge.Use a positive pressure air-supplying respirator in circumstances where air-purifying respirators may not provide
adequate protection.Occupational Exposure Limits:
Component
Non-hazardous additive blend in refined oil
Non-hazardous additive blend in refined oil
Component / Agency / TWA / STEL / Ceiling / Notation
Non-hazardous additive blend in refined oil / ACGIH / 5mg/m3 / 10 mg/m3 / /
Non-hazardous additive blend in refined oil / OSHA Z-1 / 5 mg/m3 / / /
SECTION 9 PHYSICAL AND CHEMICAL PROPERTIES
Attention: the data below are typical values and do not constitute a specification.
Color: Colorless
Physical State: Liquid
Odor: Petroleum odor PAGE 41
pH: NA
Vapor Pressure: <0.01 mmHg @ 37.8°C (100°F)
Vapor Density (Air = 1): >1
Boiling Point: >315.6°C (600°F)
Solubility: Soluble in hydrocarbon solvents; insoluble in water.
Freezing Point: NA
Melting Point: NA
Specific Gravity: 0.86 - 0.87 @ 15.6°C (60.1°F) / 15.6°C (60.1°F)
Viscosity: 32 cSt - 61.2 cSt @ 40°C (104°F) (Min)
SECTION 10 STABILITY AND REACTIVITY

Chemical Stability: This material is considered stable under normal ambient and anticipated storage and handling
conditions oftemperature and pressure.
Incompatibility With Other Materials: May react with strong acids or strong oxidizing agents, such as chlorates,
nitrates,peroxides, etc.
Hazardous Decomposition Products: None known (None expected)
Hazardous Polymerization: Hazardous polymerization will not occur.
SECTION 11 TOXICOLOGICAL INFORMATION
IMMEDIATE HEALTH EFFECTS
Eye Irritation: The eye irritation hazard is based on evaluation of data for similar materials or product
components.Skin Irritation: The skin irritation hazard is based on evaluation of data for similar materials or product
components.Skin Sensitization: No product toxicology data available.
Acute Dermal Toxicity: The acute dermal toxicity hazard is based on evaluation of data for similar materials or
productcomponents.
Acute Oral Toxicity: The acute oral toxicity hazard is based on evaluation of data for similar materials or product
components.Acute Inhalation Toxicity: The acute inhalation toxicity hazard is based on evaluation of data for similar materials
or productcomponents.
ADDITIONAL TOXICOLOGY INFORMATION:
This product contains petroleum base oils which may be refined by various processes including severe solvent
extraction, severe hydro cracking, or severe hydro treating. None of the oils requires a cancer warning under the
OSHA Hazard Communication Standard (29 CFR 1910.1200). These oils have not been listed in the National
Toxicology Program (NTP) Annual Report nor have they been classified by the International Agency for Research
on Cancer (IARC) as; carcinogenic to humans (Group 1), probably carcinogenic to humans (Group 2A), or
possibly carcinogenic to humans (Group 2B). These oils have not been classified by the American Conference of
Governmental Industrial Hygienists (ACGIH) as: confirmed human carcinogen (A1), suspected human carcinogen
(A2), or confirmed animal carcinogen with unknown relevance to humans (A3).
SECTION 12 ECOLOGICAL INFORMATION
ECOTOXICITY
This material is not expected to be harmful to aquatic organisms. The ECOTOXICITY hazard is based on an
evaluation of data for the components or a similar material. ENVIRONMENTAL FATE
This material is not expected to be readily biodegradable.
SECTION 13 DISPOSAL CONSIDERATIONS
Oil collection services are available for used oil recycling or disposal. Place contaminated materials in containers
and dispose of in a manner consistent with applicable regulations. Contact your sales representative or local
environmental or health authorities for approved disposal or recycling methods.SECTION 14 TRANSPORT INFORMATION
The description shown may not apply to all shipping situations. Consult 49CFR, or appropriate Dangerous Goods
Regulations, for additional description requirements (e.g., technical name) and mode-specific or quantity-specific
shipping requirements.DOT Shipping Name: NOT REGULATED AS A HAZARDOUS MATERIAL FOR TRANSPORTATION UNDER 49 CFR
DOT Hazard Class: NOT APPLICABLE
DOT Identification Number: NOT APPLICABLE
DOT Packing Group: NOT APPLICABLE
Additional Information: NOT HAZARDOUS BY U.S. DOT. ADR/RID HAZARD CLASS NOT APPLICABLE.
IMO/IMDG Shipping Name: NOT REGULATED AS DANGEROUS GOODS FOR TRANSPORTATION UNDER THE
IMDG CODEIMO/IMDG Hazard Class: NOT APPLICABLE
IMO/IMDG Identification Number: NOT APPLICABLE
IMO/IMDG Packing Group: NOT APPLICABLE
SECTION 15 REGULATORY INFORMATION
EPCRA 311/312 CATEGORIES: 1. Immediate (Acute) Health Effects: NO
2. Delayed (Chronic) Health Effects: NO
3. Fire Hazard: NO
4. Sudden Release of Pressure Hazard: NO
5. Reactivity Hazard: NO
REGULATORY LISTS SEARCHED:
01-1=IARC Group 1 03=EPCRA 313
01-2A=IARC Group 2A 04=CA Proposition 65
01-2B=IARC Group 2B 05=MA RTK
02=NTP Carcinogen 06=NJ RTK
07=DOT Marine Pollutant
08=PA RTK
No components of this material were found on the regulatory lists above.
PAGE 42
CHEMICAL INVENTORIES:
AUSTRALIA: All the components of this material are listed on the Australian Inventory of Chemical Substances
(AICS).CANADA: All the components of this material are on the Canadian DSL or have been notified under the New
Substance Notification Regulations, but have not yet been published in the Canada Gazette.EUROPEAN UNION: All the components of this material are in compliance with the EU Seventh Amendment
Directive 92/32/EEC.JAPAN: This material contains components that require notification before sale or importation into Japan.
KOREA: All the components of this product are on the Existing Chemicals List (ECL) in Korea.
PHILIPPINES: All the components of this product are listed on the Philippine Inventory of Chemicals and
Chemical Substances (PICCS).UNITED STATES: All of the components of this material are on the Toxic Substances Control Act (TSCA) Chemical
Inventory.NEW JERSEY RTK CLASSIFICATION:
Under the New Jersey Right-to-Know Act L. 1983 Chapter 315 N.J.S.A. 34:5A-1 et. seq., the product is to be
identifiedas follows: PETROLEUM OIL (Hydraulic oil)
WHMIS CLASSIFICATION:

This product is not considered a controlled product according to the criteria of the Canadian Controlled Products
Regulations. SECTION 16 OTHER INFORMATION
NFPA RATINGS: Health: 0 Flammability: 1 Reactivity: 0
HMIS RATINGS: Health: 1 Flammability: 1 Reactivity: 0
(0-Least, 1-Slight, 2-Moderate, 3-High, 4-Extreme, PPE:- Personal Protection Equipment Index recommendation, *-
Chronic Effect Indicator). These values are obtained using the guidelines or published evaluations prepared by
the National Fire Protection Association (NFPA) or the National Paint and Coating Association (for HMIS ratings).
REVISION STATEMENT: This revision updates the following sections of this Material Safety Data Sheet: 1-16
ABBREVIATIONS THAT MAY HAVE BEEN USED IN THIS DOCUMENT:
TLV-Threshold Limit Value TWA - Time Weighted Average
STEL - Short-term Exposure Limit PEL - Permissible Exposure Limit
CVX - Chevron Texaco CAS - Chemical Abstract Service Number
NDA - No Data Avabile NA -Not Applicable
<= - Less Than or Equal To >= - Greater Than or Equal To
Prepared according to the OSHA Hazard Communication Standard (29 CFR 1910.1200) and the ANSI MSDS
Standard (Z400.1) by the Chevron Texaco Energy Research & Technology Company, 100 Chevron Way, Richmond,
California 94802.
The above information is based on the data of which we are aware and is believed to be correct as of the date
hereof. Since this information may be applied under conditions beyond our control and with which we may be
unfamiliar and since data made available subsequent to the date hereof may suggest modifications of the
information, we do not assume any responsibility for the results of its use. This information is furnished upon
condition that the person receiving it shall make his own determination of the suitability of the material for his
particular purpose.
PAGE 43