2011 The New NPS LATEX Report and Thesis Format - … NAVAL POSTGRADUATE SCHOOL MONTEREY, CALIFORNIA...
52
Calhoun: The NPS Institutional Archive Reports and Technical Reports All Technical Reports Collection 2011 The New NPS LATEX Report and Thesis Format Garfinkel http://hdl.handle.net/10945/25589
Transcript of 2011 The New NPS LATEX Report and Thesis Format - … NAVAL POSTGRADUATE SCHOOL MONTEREY, CALIFORNIA...
Calhoun: The NPS Institutional Archive
Reports and Technical Reports All Technical Reports Collection
2011
The New NPS LATEX Report and
Thesis Format
Garfinkel
http://hdl.handle.net/10945/25589

NPS-CS-11-011
NAVALPOSTGRADUATE
SCHOOL
MONTEREY, CALIFORNIA
THE NEW NPS LATEX REPORT AND THESIS FORMAT
by
Simson L. GarfinkelTravis W. Axtell
October 5, 2011
Approved for public release; distribution is unlimited
THIS PAGE INTENTIONALLY LEFT BLANK
iii
NAVAL POSTGRADUATE SCHOOL
Monterey, California 93943-5000
Daniel T. Oliver Leonard A. Ferrari
President Executive Vice President and
Provost
Further distribution of all or part of this report is authorized.
This report was prepared by:
Simson L. Garfinkel
Department of Computer Science
Travis W. Axtell
Department of Computer Science
Reviewed by:
Peter Denning
Chairman
Department of Computer Science
Released by:
Karl A. van Bibber, Ph.D.
Vice President and Dean of Research

THIS PAGE INTENTIONALLY LEFT BLANK
iv

REPORT DOCUMENTATION PAGE Form ApprovedOMB No. 0704–0188
The public reporting burden for this collection of information is estimated to average 1 hour per response, including the time for reviewing instructions, searching existing data sources,gathering and maintaining the data needed, and completing and reviewing the collection of information. Send comments regarding this burden estimate or any other aspect of this collectionof information, including suggestions for reducing this burden to Department of Defense, Washington Headquarters Services, Directorate for Information Operations and Reports (0704–0188),1215 Jefferson Davis Highway, Suite 1204, Arlington, VA 22202–4302. Respondents should be aware that notwithstanding any other provision of law, no person shall be subject to any penaltyfor failing to comply with a collection of information if it does not display a currently valid OMB control number. PLEASE DO NOT RETURN YOUR FORM TO THE ABOVEADDRESS.
1. REPORT DATE (DD–MM–YYYY)2. REPORT TYPE 3. DATES COVERED (From — To)
4. TITLE AND SUBTITLE 5a. CONTRACT NUMBER
5b. GRANT NUMBER
5c. PROGRAM ELEMENT NUMBER
5d. PROJECT NUMBER
5e. TASK NUMBER
5f. WORK UNIT NUMBER
6. AUTHOR(S)
7. PERFORMING ORGANIZATION NAME(S) AND ADDRESS(ES) 8. PERFORMING ORGANIZATION REPORTNUMBER
9. SPONSORING / MONITORING AGENCY NAME(S) AND ADDRESS(ES) 10. SPONSOR/MONITOR’S ACRONYM(S)
11. SPONSOR/MONITOR’S REPORTNUMBER(S)
12. DISTRIBUTION / AVAILABILITY STATEMENT
13. SUPPLEMENTARY NOTES
14. ABSTRACT
15. SUBJECT TERMS
16. SECURITY CLASSIFICATION OF:
a. REPORT b. ABSTRACT c. THIS PAGE
17. LIMITATION OFABSTRACT
18. NUMBEROFPAGES
19a. NAME OF RESPONSIBLE PERSON
19b. TELEPHONE NUMBER (include area code)
NSN 7540-01-280-5500 Standard Form 298 (Rev. 8–98)Prescribed by ANSI Std. Z39.18
5–10–2011 Technical Report 2008-01-01—2011-09-31
The New NPS LATEX Report and Thesis Format
Simson L. Garfinkel, Travis W. Axtell
Naval Postgraduate SchoolMonterey, CA 93943 NPS-CS-11-011
Approved for public release; distribution is unlimited
The views expressed in this report are those of the author and do not reflect the official policy or position of the Department ofDefense or the U.S. Government.
This paper the NPS LATEX templates that can be used to produce a master’s thesis, a Ph.D. dissertation, and a technical report.The template can produce a variety of documents, including unclassified, For Official Use Only (FOUO), and classified.Additional information on using LATEX is also provided.
NPS Thesis, NPS Technical Report
Unclassified Unclassified Unclassified UU 51
i

THIS PAGE INTENTIONALLY LEFT BLANK
ii

Table of Contents
1 Introduction to LATEX 31.1 Reasons to use LATEX . . . . . . . . . . . . . . . . . . . . . . . . . 3
1.2 The Purpose of this Document . . . . . . . . . . . . . . . . . . . . . 4
1.3 Installation . . . . . . . . . . . . . . . . . . . . . . . . . . . . . 5
1.4 Additional Applications for LATEX . . . . . . . . . . . . . . . . . . . 6
1.5 Running LATEX . . . . . . . . . . . . . . . . . . . . . . . . . . . 7
1.6 Basic LATEX formatting . . . . . . . . . . . . . . . . . . . . . . . . 8
1.7 Typing Special Characters . . . . . . . . . . . . . . . . . . . . . . . 9
1.8 Fonts . . . . . . . . . . . . . . . . . . . . . . . . . . . . . . . 12
1.9 Math . . . . . . . . . . . . . . . . . . . . . . . . . . . . . . . 14
1.10 Spacing, Frameboxes, and Centering . . . . . . . . . . . . . . . . . . 17
1.11 Lists . . . . . . . . . . . . . . . . . . . . . . . . . . . . . . . 19
1.12 Labels and Captions . . . . . . . . . . . . . . . . . . . . . . . . . 20
1.13 Tables. . . . . . . . . . . . . . . . . . . . . . . . . . . . . . . 20
1.14 Graphics. . . . . . . . . . . . . . . . . . . . . . . . . . . . . . 22
1.15 BibTEX and Citations. . . . . . . . . . . . . . . . . . . . . . . . . 24
2 The NPS LATEX Template 252.1 Getting the Template . . . . . . . . . . . . . . . . . . . . . . . . . 25
2.2 Editing the Temlate . . . . . . . . . . . . . . . . . . . . . . . . . 26
2.3 Labels. . . . . . . . . . . . . . . . . . . . . . . . . . . . . . . 30
2.4 Including Photos and Figures . . . . . . . . . . . . . . . . . . . . . 31
2.5 Changing the Template Font . . . . . . . . . . . . . . . . . . . . . . 32
2.6 Going Further . . . . . . . . . . . . . . . . . . . . . . . . . . . 32
3 Helpful Information for Your Report or Thesis 35
iii
3.1 Style Information for Theses . . . . . . . . . . . . . . . . . . . . . . 35
3.2 Additional Writing Tips. . . . . . . . . . . . . . . . . . . . . . . . 35
3.3 Additional Software . . . . . . . . . . . . . . . . . . . . . . . . . 37
3.4 NPS Thesis Guidance . . . . . . . . . . . . . . . . . . . . . . . . 38
Appendices 41
A Using the NPS LyX Template 41A.1 Get LATEX . . . . . . . . . . . . . . . . . . . . . . . . . . . . . 41
A.2 Get LyX . . . . . . . . . . . . . . . . . . . . . . . . . . . . . . 41
A.3 Editing your SF298 . . . . . . . . . . . . . . . . . . . . . . . . . 41
iv

Abstract
This paper the NPS LATEX templates that can be used to produce a master’sthesis, a Ph.D. dissertation, and a technical report. The template can produce avariety of documents, including unclassified, For Official Use Only (FOUO), andclassified. Additional information on using LATEX is also provided.
1
THIS PAGE INTENTIONALLY LEFT BLANK
2
CHAPTER 1:Introduction to LATEX
LATEX is a text formatting system created by Leslie Lamport in the early 1980s. The programis based on the TEX text formatting system created by Donald Knuth in 1978. With LATEX youcreate your document by editing a text input file using a program such as EMACS, vim, oranother editor. You then give this input file to LATEX (or, more accurately, to a program calledpdflatex). This program then literally compiles your input file into a PDF file.
Although most documents at NPS are prepared with Microsoft R© Word, LATEX is widely usedoutside of NPS in the sciences to create conference papers, journal articles, and even full-lengthbooks. The program is especially popular in computer science. With the NPS template youcan use LATEX to produce an NPS thesis. Because LATEX provides for consistent formatting andautomatic updating of references, many students who write technical documents at NPS thatuse LATEX find that they save time—even when they take into account the time that they spendlearning to use LATEX in the first place!
1.1 Reasons to use LATEXThere are many reasons to use LATEX for preparing a technical report, journal article, or master’sthesis:
• Formatting for paragraphs, quotations, lists, tables, and so on are performed automat-ically. The numbers used for numbered sections are automatically updated when newmaterial is added or when sections are used. As a result, formatting is more consistentwith LATEX than with Microsoft R©Word.• References within your document to numbered chapters, appendices, sections, figures,
tables, equations and references are updated automatically each time a PDF file is pro-duced.• Unlike Microsoft R© Word, LATEX gives you precise control over the placement of the
text on the page. You can easily make global changes to your document and have themreflected everywhere.• The BibTEX system produces consistent citations and bibliography. References are pulled
from a bibliographic database that is maintained separately. Records for the bibliographicdatabase can be downloaded from many online services, helping to assure that they areconsistent. The citation format is maintained separately from the citation contents, mak-ing it easy to change citation styles when submitting to different conferences or journals.• LATEX allows you to directly include other files at the time that the PDF is created. This
makes it easy to automatically incorporate the results of experiments or graphing pro-grams directly into your final document, without having to retype anything. Softwarecode can be included with pretty syntax and line numbers from the original files.
3

• pdflatex, the version of LATEX we recommend at NPS, also allows you to embed at-tachments into the PDF file. This makes it easy to preserve your experimental data,spreadsheets, or other information.• Because the LATEX input file is plain ASCII, you can store your document using a revision
control system such as Subversion [1]. This allows multiple people to work on the samedocument at the same time; Subversion automatically merges the changes together. Ifyou save your thesis work daily, it is possible retrieve previous revisions of your thesisand undo changes made.• LATEX is free software and runs on PCs, Macs, and Unix systems. This means that you
can produce your documents on practically every computer you have, without having topurchase anything else.
NPS has developed this template for preparing NPS reports and theses. If you are using LATEXat NPS, there are many reasons for using the report template:
• The template has been in use since 2007. Numerous NPS faculty members have workedwith the NPS Thesis Processor to assure that the documents produced are acceptable forstudent and faculty use.• The template supports the creation of unclassified, For Official Use Only (FOUO), and
classified documents. In particular, the template supports classification labels for para-graphs, captions, and references.• The cover page, signature page, and Standard Form 298 are automatically generated.• Combined with the program Subversion (SVN), the template makes it possible for stu-
dents and their advisors to collaborate on a document without the need to pass files backand forth.
1.2 The Purpose of this DocumentThis document does not to duplicate the depth of information available on LATEX, but does pro-vide you with the minimum amount of information required to use LATEX to produce a master’sthesis or technical report at NPS.
If you wish to learn more about LATEX, there are many good reference books and online tutorialsfor LATEX.
We recommend:
1. http://en.wikibooks.org/wiki/LaTeX, a wikibook that discusses many aspects ofLATEX.
2. http://www.ctan.org/, the Comprehensive TEX Archive Network, a collection of mod-ules and documentation for extending LATEX.
3. http://en.wikipedia.org/wiki/Comparison_of_TeX_editors, a web page on Wikipediathat discusses different programs available for editing LATEX input files.
4. http://tex.stackexchange.com/, a question-and-answer website for TEX and LATEX
4

problems.
1.3 InstallationBefore you can use LATEX, you will need to install two critical pieces of software:
1. The LATEX system itself.2. A program for editing the .tex input files.
Here once again there are many options. For both LATEX and text editors there are both free andcommercial distributions. This document makes specific recommendations that were known towork as of the document’s date of publication. You are free to explore on your own as well.
1.3.1 Installation on MacOS 10.5 and aboveThere are many ways to get LATEX running on the Mac. The easiest is to download an installerfor the most recent distribution from http://www.tug.org/mactex.
For ease-of-use, we recommend installing from TuG using MacTEX. TUG’s MacTEX distribu-tion will install LATEX in the /usr/texbin/pdflatex directory and will update your startupfiles to include this directory in your path. If you chose this strategy, be sure to click “Cus-tomize” in the installer and select that all of the optional packages be installed:
You can also install the program from sources using the MacPorts or Fink installer system, butthis is not recommended.
You are free to download and install a tool for editing the .tex and .bib files. However, youcan also edit these files using EMACS, an editor that is built-in to MacOS.
1.3.2 Installing on LinuxFor most Linux systems there is a complete LATEX distribution that can be downloaded as partof the texlive-latex3 package. This package can be downloaded in source from the http:
//tug.org/ website and compiled locally, or installed directly using a package managementcommand. In either case you will need to the installation as the superuser; this is typically donewith the sudo command.
For Debian or Ubuntu Linux, use the apt-get command:
% sudo apt-get install texlive-latex3
For Fedora, RedHat, or Centos, use the yum command:
% sudo yum install texlive-latex3
5
We have noticed that the install command occasionally fails. If it does, try it again. If that stilldoes not work, you will want to download and install from source.
1.3.3 Installation on Microsoft R©WindowsOne of the most popular distributions for Microsoft R© Windows machines is called MiKTeX,which can be downloaded from http://www.miktex.org/.
1.3.4 Creating classified documentsIf you are producing a classified thesis, you should download and install the complete distri-bution on the computers authorized to handle classified information. This will minimize anyadditional package installation needed for producing your thesis.
1.4 Additional Applications for LATEXIn addition to downloading and installing LATEX, you will need an editor for editing the .tex
input files. These programs are sometimes called front ends, although the term is impreciseand probably incorrect. You can use any editor for editing a .tex file, even Microsoft R©Word.Indeed, most of the front ends for LATEX are really just text editors with syntax highlighting,although some will automatically compile your document and even jump to errors in the inputfile when they are encountered.
1.4.1 Selection of an EditorText editors offer a variety of features. Some are easier for beginners, such as Notepad++,LEd, TeXnicCenter. Advanced editors for skilled users include emacs, vim, and Texlipse.A thorough comparison of text editor options are available at http://en.wikipedia.org/wiki/Comparison_of_TeX_editors and the users should choose the one they prefer the most.Learning about the various features of the text editors can really improve your writing efficiency.
If you are running LATEX on MacOS, you already have a powerful editor installed on yourcomputer: EMACS, which can be run from within the Macintosh Terminal application. Youcan run the tutorial for EMACS by starting Terminal, typing emacs and enter at the commandprompt, and then typing control-h followed by a “t” to start the tutorial.
1.4.2 LyX: An alternative LATEX systemLyX is a program that provides a WYSIWYG1 graphical user interface for LATEX. Instead ofediting the .tex file directly, however, you edit an intermediate form which is a restricted setof LATEX. LyX then runs LATEX for you and produces the results.
While LyX is easier to use than LATEX, it does not have the power or the flexibility.
LyX is free and open source, and available for a variety of platforms, including Mac, Win-dows, and Linux. It is actively supported, and a new version 2.0 release with more features is
1What You See Is What You Get
6

scheduled for release in 2011. LyX provides a GUI interface for floating figures and tables, for-matting, fonts, labels, chapters, sections, subsections, math equations, tables, and much more. Italso has built-in features for supporting BibTEX bibliographies, citations, and cross-references,and generally supports anything that can be done with LATEX.
LyX can be downloaded from http://www.lyx.org/ and is available for Linux, MacOS andWindows. If you want spell-checking, you will also need to installed the aspell package.
An NPS thesis and dissertation template developed by CDR Michael Bilzor is available for usewith LyX. It can be be obtained from http://simson.net/npsthesis/lyxthesis.zip.
Further information about the LyX template can be found in Appendix A.
1.4.3 Selection of an editorText editors offer a variety of features. Some are easier for beginners, such as Notepad++,LEd, TeXnicCenter. Advanced editors for skilled users include EMACS, vim, and Texlipse.A thorough comparison of text editor options are available at http://en.wikipedia.org/wiki/Comparison_of_TeX_editors and the users should choose the one they prefer the most.Learning about the various features of the text editors can really improve your writing efficiency.
1.5 Running LATEXLATEX is a command-line program that converts your .tex file into a PDF file for display inAdobe Acrobat or a similar .pdf viewing programs. However, LATEX is actually a set of pro-grams. For creating a thesis at NPS you will use several programs:
pdflatex This program read the input file (e.g., thesis.tex) and produces a PDF file (e.g.,thesis.pdf) as an output. This program also produces a number of intermediate files(thesis.aux, thesis.bbl, thesis.toc, etc.).
latex This is an older version of the pdflatex program that produces .dvi files. The .dvi
file must then be transformed into either a .ps or a .pdf file. In practice you shouldnot run latex unless you need to use a special graphics module called PStricks. Thatmodule is beyond the scope of this document.
bibtex This program reads the thesis.bbl file and produces a bibliography in a file calledthesis.bst which includes the bibliography. The thesis.bst then gets read the nexttime pdflatex is run.
authorindex.pl a program in perl that produces the author index from the thesis.bbl file.The authorindex is saved in the file thesis.ain.
fixbbl.py It turns out that there is a bug in BibTEX which causes URLs longer than 53characters to be improperly split. This program unsplits them. You do not need to usethis program if you do not have long URLs in bibliographic entries
Normally you would run LATEX commands in this order:
1. pdflatex thesis
7

2. bibtex thesis
3. python fixbbl.py thesis
4. pdflatex thesis
5. pdflatex thesis
Running pdflatex the additional times ensures that internal document references are correct.The first run of pdflatex updates the .aux files. The subsequent runs ensure the output iscorrect on these references. Some editors, such as TEXlipse, will run these commands as neededon behalf of the user. Each command has a thesis argument, which is referring to the filethesis.tex without the .tex file extension.
1.6 Basic LATEX formattingHere is a simple document:
\documentclass{article}
\begin{document}
Hello World!
\end{document}
Normally with LATEX, you just type text. Leave a blank line between each paragraph. LATEXthen formats it into beautiful paragraphs. LATEX will ignore the space at the beginning of eachline.
So if you type this:
\documentclass{article}
\begin{document}
In December 1951, in a move virtually unparalleled in the history of
academe, the Postgraduate School moved lock, stock and wind tunnel
across the nation, establishing its current campus in Monterey,
Calif.
The coast-to-coast move involved 500 students, about 100
faculty and staff and thousands of pounds of books and research
equipment. Rear Adm.\ Ernest Edward Herrmann supervised the move that
pumped new vitality into the Navy’s efforts to advance naval science
and technology.
% This is comment. Nobody will see it.
Today the school, known as the ‘‘Naval Postgraduate School,’’ is the
Navy’s preeminent institution of graduate education and advanced
8

research. Approximately 1 in 10 of the students are in the top 10\% of
their classes.
\end{document}
LATEX will format it into a document that looks like this:
In December 1951, in a move virtually unparalleled in the history of academe, thePostgraduate School moved lock, stock and wind tunnel across the nation, establishing itscurrent campus in Monterey, Calif. The coast-to-coast move involved 500 students, about100 faculty and staff and thousands of pounds of books and research equipment. RearAdm. Ernest Edward Herrmann supervised the move that pumped new vitality into theNavy’s efforts to advance naval science and technology.
Today the school, known as the “Naval Postgraduate School,” is the Navy’spreeminent institution of graduate education and advanced research. Approximately 1 in10 of the students are in the top 10% of their classes.
This sample document illustrates a few important points about LATEX:
• LATEX will automatically re-wrap your text as necessary to format the paragraphs. Inden-tion is determined by the style of the current document, not by whether or not you actuallyindent the paragraph.• LATEX ignores space at the beginning of lines; breaks between paragraphs are marked with
blank lines.• What you type is not what you get! In particular, opening double quote marks are typed
as two backquotes (‘‘) and closing double quote marks are entered as two apostrophes(’’). You will also note that the period following Rear Adm. Ernest Edward Herrmann’sname is followed by a backslash (\) and a space, rather than just a space. This tells LATEXthat the period does not mark the end of a sentence.• Commands begin with a backslash (\) and contain only uppercase and lowercase letters.• A command can have zero or more arguments. The arguments are enclosed within braces
({}). The \documentclass command begins the document; it’s argument is the kind ofdocument you are making.• The \begin command introduces an environment. Every document has at last one en-
vironment, the document environment. Every \begin must have a matching \end thatnames the same environment. Environments can be nested.• Comments can be embedded in your document with a percent sign (%). Anything after
the percent sign will not print. To print a percent sign, prefix it with a backslash (\%).
1.7 Typing Special CharactersThis section provides information on how to type special characters in LATEX. In each sectionwe will have a table that shows what to type and how it displays in your final PDF file. If the
9

above text were put into a table, it would look like this:
Typed Displayed Typed Displayed‘‘ “ ’’ ”
The left entry of the table is the backquotes, which on the keyboard shares the tilde key. Theright entry is the single quotes, which shares the double quote marks key.
1.7.1 Typing QuotesTo type quotes, you should not use the double-quote character. Instad, LATEX uses the backquote (‘) and the forward quote (’) to type quotes.
Typed Displayed Typed Displayeddon’t don’t 3’2” 3’2’ ’‘‘this’’ “this” ‘is’ ‘is’‘‘\,‘special’\,’’ “ ‘special’ ”
1.7.2 Controlled Special CharactersUnlike Microsoft R©Word and other programs, LATEX uses special characters embedded in yourtext to control formatting. The most common of these characters is the backslash (\). All ofspecial characters are listed below:
Special Character Why it is special\ Introduces a command{ Introduces arguments in commands} Closes arguments in commands or the beginning of a group.% The comment character; LATEX ignores the rest of the line.# Used for parameter substitution inside macros.~ Enters a hard, non-breaking space& Used for delimiting columns in a table$ Turns on/off math mode (see §1.9)_ Used for subscript in math mode^ Used for superscript in math mode
To enter the special characters into your document you must use a special sequence that beingswith a backslash. Most (but not all) of these special sequences are the character itself. If youare curious, inside LATEX, each of these sequences is actually a command that causes LATEX tooutput the character that has been quoted:
10

Typed Displayed Typed Displayed\$ $ \& &\{ { \} }\% % \_
\# # \^{} ˆ\~{} ˜ $\backslash$ \
1.7.3 Accented, Dottless and Slashed VowelsWith LATEX most accented vowls are entered combining an accent character with a vowel. Theangstrom symbol is not, however, as shown below:
Typed Displayed Typed Displayed\’{o} o \~{o} o\’{o} o \={o} o\^{o} o \.{o} o\"{o} o \d{o} o.\c{o} o \u{o} o\b{o} o
¯\aa a \AA A\i ı \j
\o ø \O Ø\ae æ \AE Æ\oe œ \OE Œ\v{o} o \H{o} o\t{oo} �oo
1.7.4 SymbolsLATEX has literally hundreds of symbols that you can include in your document. These sym-bols include the copyright symbol, currency symbols, foreign language characters, and manymore. Special characters are placed in documents using macros. This is how a text documentcan support a large variety of non-standard text characters. A complete guide to the availablesymbols in LATEX is available online at http://ctan.math.utah.edu/ctan/tex-archive/info/symbols/comprehensive/symbols-letter.pdf .
Typed Displayed Typed Displayed\l ł \L Ł\S § \ss ß\P ¶ \pounds £?‘ ¿ \copyright c©!‘ ¡ \texttrademark TM
\textregistered R©\dag † \ddag ‡
11

1.8 Fonts1.8.1 Changing Font SizeAlthough LATEX allows you to use fonts of any size, the built-in templates provides eleven built-in sizes. These sizes automatically adjust depending on if you are creating a document with12-point font (NPS standard), 11-point font, or 10-point font.
When you change the font size, that change stays in effect until you change it again. You canconfine your font change by placing the text you want resized within braces, as shown in theexample below.
Size Point Size Typed Displayed\tiny 6 {\tiny This is tiny} This is tiny
\scriptsize 8 {\scriptsize scriptsize} scriptsize
\footnotesize 10 {\footnotesize footnotesize} footnotesize\small 11 {\small This is small} This is small
\normalsize 12 {\normalsize normalsize} normalsize
\large 14 {\large This is large} This is large
\Large 17 {\Large This is Large} This is Large
\LARGE 20 {\LARGE This is LARGE} This is LARGE
\huge 25 {\huge This is huge} This is huge
\Huge 25 {\Huge This is Huge} This is Huge
Notice that with the NPS template there is no difference between \huge and \Huge.
You can pick an arbitrary size by using the \fontsize and \selectfont commands. The\fontsize command takes two arguments: the size of the font and the size of the leading,
12
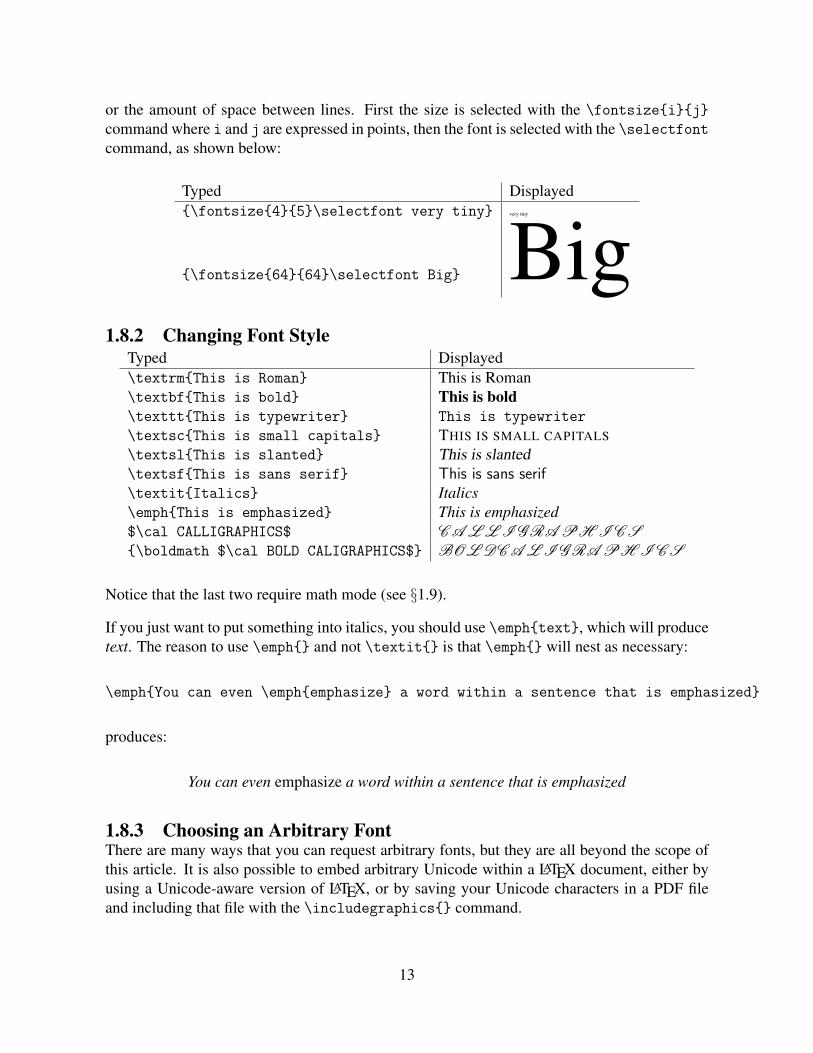
or the amount of space between lines. First the size is selected with the \fontsize{i}{j}
command where i and j are expressed in points, then the font is selected with the \selectfontcommand, as shown below:
Typed Displayed{\fontsize{4}{5}\selectfont very tiny} very tiny
{\fontsize{64}{64}\selectfont Big} Big1.8.2 Changing Font Style
Typed Displayed\textrm{This is Roman} This is Roman\textbf{This is bold} This is bold\texttt{This is typewriter} This is typewriter
\textsc{This is small capitals} THIS IS SMALL CAPITALS
\textsl{This is slanted} This is slanted\textsf{This is sans serif} This is sans serif\textit{Italics} Italics\emph{This is emphasized} This is emphasized$\cal CALLIGRAPHICS$ C A L L I G RA PH I C S{\boldmath $\cal BOLD CALIGRAPHICS$} BOL DC A L I G RA PH I C S
Notice that the last two require math mode (see §1.9).
If you just want to put something into italics, you should use \emph{text}, which will producetext. The reason to use \emph{} and not \textit{} is that \emph{} will nest as necessary:
\emph{You can even \emph{emphasize} a word within a sentence that is emphasized}
produces:
You can even emphasize a word within a sentence that is emphasized
1.8.3 Choosing an Arbitrary FontThere are many ways that you can request arbitrary fonts, but they are all beyond the scope ofthis article. It is also possible to embed arbitrary Unicode within a LATEX document, either byusing a Unicode-aware version of LATEX, or by saving your Unicode characters in a PDF fileand including that file with the \includegraphics{} command.
13

1.9 MathTypsetting mathematics is one of the primary design goals of LATEX. The program actuallyhas more features for typsetting math than typsetting text. There is also a powerful set ofmathematical extensions by the American Mathematical Society called amsmath. For moredetailed information, please see:
• The LATEX wikibook, http://en.wikibooks.org/wiki/LaTeX/Mathematics.• The User’s guide for the amsmath package is available at: ftp://ftp.ams.org/ams/
doc/amsmath/amsldoc.pdf
• The short math guide, available at ftp://ftp.ams.org/ams/doc/amsmath/short-math-guide.pdf.
What follows here is necessarily very brief.
1.9.1 Math ModeTo typset math you must enter math mode. There are two easy ways to enter math mode.
• You can put your math between two dollar signs. For example, entering $1+1=2$ in yourdocument will produce 1+1 = 2.• You can put the equation on a line by itself with the \begin{equation} and \end{equation}
commands. This creates an equation environment, which is a block that is typeset in mathmode and includes a numbered equation. For example:
\begin{equation}
1+1=2
\end{equation}
1+1 = 2 (1.1)
1.9.2 Simple Math in Math ModeAs the examples above show, you can pretty much type simple math in math mode and get whatyou want. In general, variables (the letters a through z), the plus (+), minus (-) and equals (=)all just typeset properly when you type them between dollar signs. But there are some caveats:
• Spaces are ignored in math mode. If you want a space, you probably want to have multipleequations.• If you wish to typeset a multiplication symbol, use \times instead of an asterisk (*).• If you wish to typeset division, use \div or \frac instead of /.
The table below shows some examples:
14

Typed Displayed$1+2=3$ 1+2 = 3$10\times10=100$ 10×10 = 100$10 \times 10 = 100$ 10×10 = 100$a=3$ a = 3$a=f/m$ a = f/m$a=f \div m$ a = f ÷m$a=\frac{f}{m}$ a = f
m
Math mode is generally used in theses while in a paragraph to show a simple equation or discussa symbol used in the equation environment. It adds a noticable distinction to the text that helpsthe reader to understand.
An example without math mode is f(t), but simply placing dollar signs around the f (t) addsclarity to the reader; this is a function of the independent variable t, but not t (outside of mathmode).
1.9.3 Parenthesis and BracketsYou can use regular parentheses in math mode, but they do not stack nicely:
Typed Displayed$((1))$ ((1))$[((1))]$ [((1))]
You probably want the outer brackets and parenthesis to be bigger than the inner ones. You cando that using the \left and \right commands. Following these macros is another character,such as a parenthesis or bracket. These macros place the correctly sized specified characterinto the equation. They will automatically get bigger as necessary, especially in the equationenvironment.
For example, here is what you get with the conventional parenthesis:
\begin{equation}
A = ( \sum_{i=1}^{10}i\times\sin(i) )
\end{equation}
A = (10
∑i=1
i× sin(i)) (1.2)
15

\begin{equation}
A = \left( \sum_{i=1}^{10}i\times\sin(i) \right)
\end{equation}
A =
(10
∑i=1
i× sin(i)
)(1.3)
1.9.4 Superscripts and subscriptsWhen in math mode, the caret (^) is used for superscript and the underbar (_) is used forsubscript (this is why the characters are special). The characters only superscript or subscriptthe following character; if you want to superscript or subscript multiple characters you need tomake them a group by enclosing them in braces.
Here are some examples:
Typed Displayed$a^2+b^2=c^2$ a2 +b2 = c2
$N_A$ is Avogadro’s constant NA is Avogadro’s constant$A^{B^C}$ ABC
$A^{B^{C^D}}$ ABCD
$a_k$ and $b_k$ ak and bk$a_k$ and $b_k$ ak and bk
Many math symbols use subscripts and superscripts to represent a common group. This includes\int which is used to create integrals and \sum which is used to create sums. Below are someexamples with the Fourier series.
Typed Displayed
$a_k=\frac{1}{\pi} ak =1π
∫π
−πf (x)cos(kx)dx
\int_{-\pi}^{\pi}f(x)cos(kx)dx$
$b_k=\frac{1}{\pi} bk =1π
∫π
−πf (x)sin(kx)dx
\int^{\pi}_{-\pi}f(x)\sin(kx)dx$
$f(x)=\sum_{k=-\infty}^{\infty} f (x) = ∑∞k=−∞
cke− jkx
c_k e^{-jkx}$
16
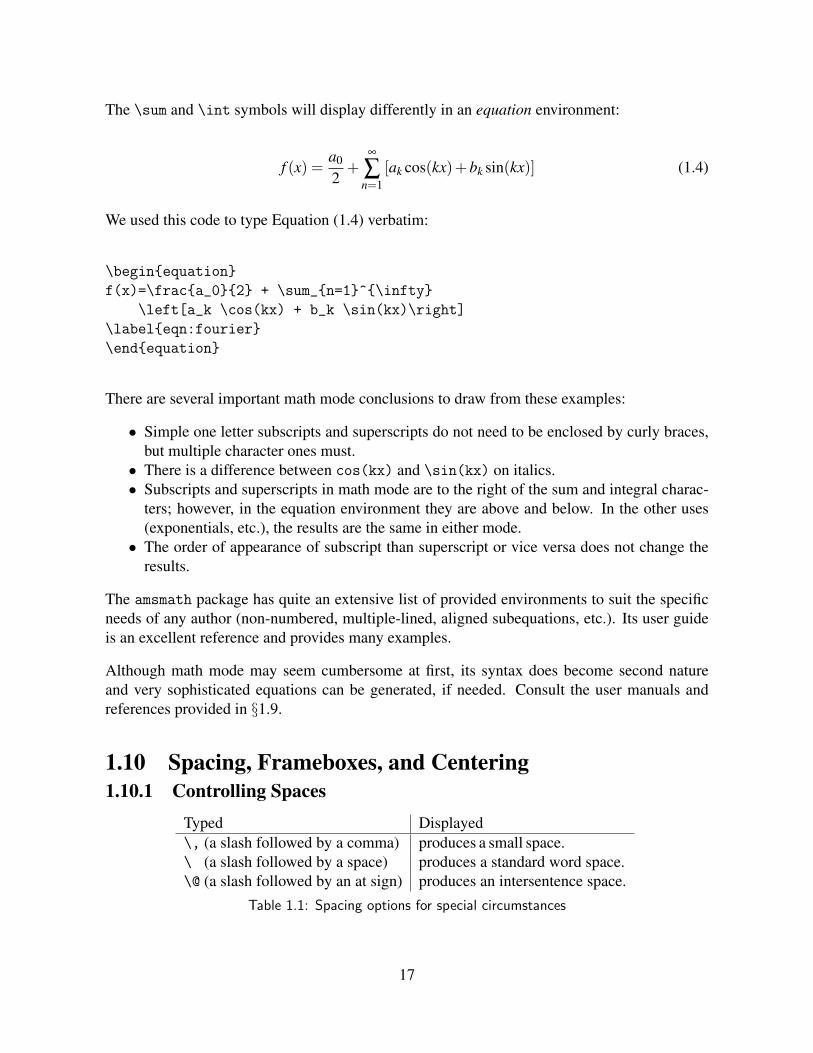
The \sum and \int symbols will display differently in an equation environment:
f (x) =a0
2+
∞
∑n=1
[ak cos(kx)+bk sin(kx)] (1.4)
We used this code to type Equation (1.4) verbatim:
\begin{equation}
f(x)=\frac{a_0}{2} + \sum_{n=1}^{\infty}
\left[a_k \cos(kx) + b_k \sin(kx)\right]
\label{eqn:fourier}
\end{equation}
There are several important math mode conclusions to draw from these examples:
• Simple one letter subscripts and superscripts do not need to be enclosed by curly braces,but multiple character ones must.• There is a difference between cos(kx) and \sin(kx) on italics.• Subscripts and superscripts in math mode are to the right of the sum and integral charac-
ters; however, in the equation environment they are above and below. In the other uses(exponentials, etc.), the results are the same in either mode.• The order of appearance of subscript than superscript or vice versa does not change the
results.
The amsmath package has quite an extensive list of provided environments to suit the specificneeds of any author (non-numbered, multiple-lined, aligned subequations, etc.). Its user guideis an excellent reference and provides many examples.
Although math mode may seem cumbersome at first, its syntax does become second natureand very sophisticated equations can be generated, if needed. Consult the user manuals andreferences provided in §1.9.
1.10 Spacing, Frameboxes, and Centering1.10.1 Controlling Spaces
Typed Displayed\, (a slash followed by a comma) produces a small space.\ (a slash followed by a space) produces a standard word space.\@ (a slash followed by an at sign) produces an intersentence space.
Table 1.1: Spacing options for special circumstances
17
In Table 1.1, the small space and standard word space is used between the words in the rightcolumn. An intersentence space is needed to correct the following error where a sentence endsin a capital letter.
1.10.2 Controlling Line Breaks and SpacingYou can force a blank line using \\ and have the option to force a specific length using \\[3pt].
Typed DisplayedThis is\\ This isan example. an example.
This is\\[3pt] This isan example. an example.
You can add or remove space on a page with \enlargethispage. For example, to squeezeanother line onto the current page, insert this command onto the page:
\enlargethispage{1pc}
You can also shorten a page by a line, forcing a dangling widow onto the next page:
\enlargethispage{-1pc}
You can insert vertical or horizontal space (or take it away) with this. For example:
\vspace{1in}\hspace{2in}Here is some text moved two inches.
Here is some text moved two inches.
This might be used to place text at a specific spot on a page under a special circumstance.
18
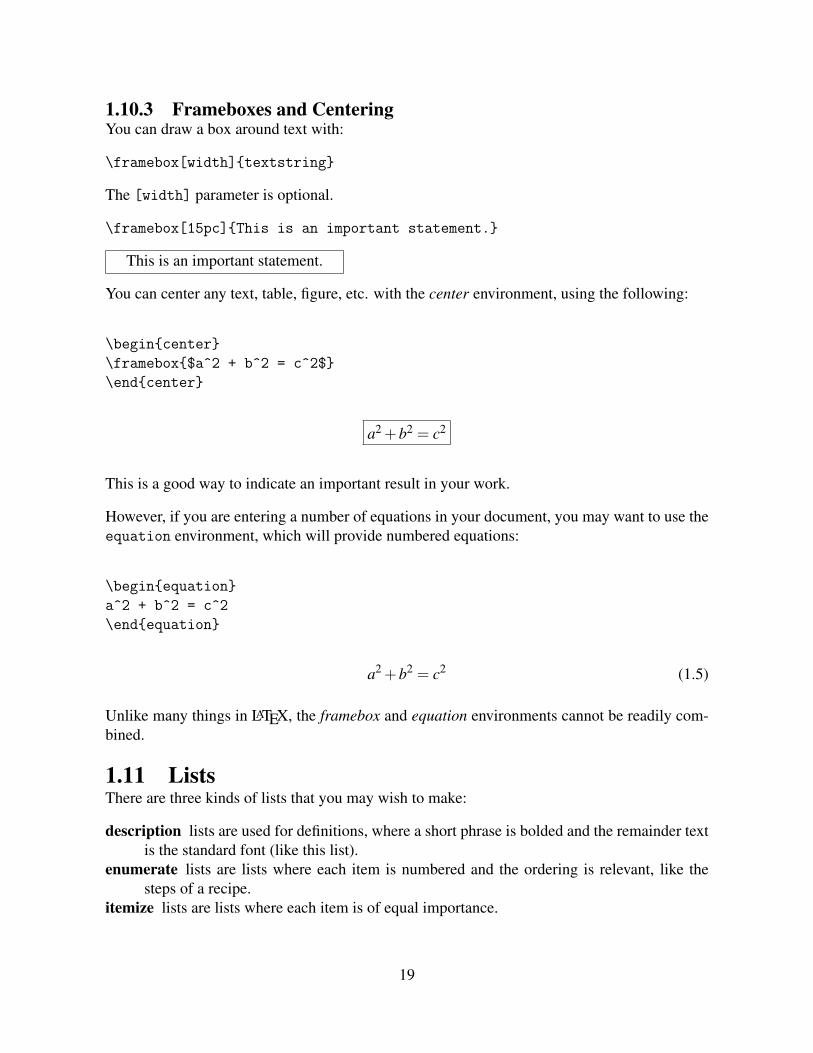
1.10.3 Frameboxes and CenteringYou can draw a box around text with:
\framebox[width]{textstring}
The [width] parameter is optional.
\framebox[15pc]{This is an important statement.}
This is an important statement.
You can center any text, table, figure, etc. with the center environment, using the following:
\begin{center}
\framebox{$a^2 + b^2 = c^2$}
\end{center}
a2 +b2 = c2
This is a good way to indicate an important result in your work.
However, if you are entering a number of equations in your document, you may want to use theequation environment, which will provide numbered equations:
\begin{equation}
a^2 + b^2 = c^2
\end{equation}
a2 +b2 = c2 (1.5)
Unlike many things in LATEX, the framebox and equation environments cannot be readily com-bined.
1.11 ListsThere are three kinds of lists that you may wish to make:
description lists are used for definitions, where a short phrase is bolded and the remainder textis the standard font (like this list).
enumerate lists are lists where each item is numbered and the ordering is relevant, like thesteps of a recipe.
itemize lists are lists where each item is of equal importance.
19
Lists are implemented as LATEX environments, which means that they begin with a \begin{listname}and end with an \end{listname}.
\begin{description}
\item[Earth] Third Planet.
\item[Mars] Fourth Planet.
\item[Venus] Second Planet.
\end{description}
Earth Third Planet.Mars Fourth Planet.Venus Second Planet.
\begin{enumerate}
\item Wake up.
\item Go to work.
\item Go home.
\item Go to sleep.
\item Repeat.
\end{enumerate}
1. Wake up.2. Go to work.3. Go home.4. Go to sleep.5. Repeat.
\begin{itemize}
\item Hamburgers
\item Hotdogs
\item Chips
\end{itemize}
• Hamburgers• Hotdogs• Chips
1.12 Labels and CaptionsLabels are hidden markers in your .tex files created by the \label{name} command. Thesemarkers are never shown directly in the output files. However, correctly placing these markersin your file allows you to reference chapters, appendices, sections, figures, tables and equations.Label marker names can have a prefix such as chap:, sec:, fig:, tab: and eqn: to logicallyidentify and sort labels. See §2.2 for information on how to reference labels.
Captions are the text that appears below a figure or table to provide context for the informationpresented. Captions are indicated by the command \caption{Sentence.} Sometimes longercaptions can look poorly in the Lists of Figures and Tables, so a caption for the table can alsobe specified by using \caption[Short Sentence.]{Longer Sentence.} Examples of theiruse is included in Table 1.2
1.13 TablesTables provide a valuable means to display data in an organized manner. Using tables in LATEXis easy once the syntax is understood, although tables can be incredibly complex as well. Tosee plenty of examples and explanation of options, visit http://en.wikibooks.org/wiki/LaTeX/Tables. There are also many add-on packages which provide additional functionality.
20
Here is a simple table:
\begin{center}
\begin{tabular}{|lcr}
Left Justified & Center Justified & Right Justified \\
\hline
Each & Column & Entry \\
Spaces & Do not & Matter \\
But & May & Assist you. \\
\end{tabular}
\end{center}
And here is how it formats:
Left Justified Center Justified Right JustifiedEach Column EntrySpaces Do not MatterBut May Assist you.
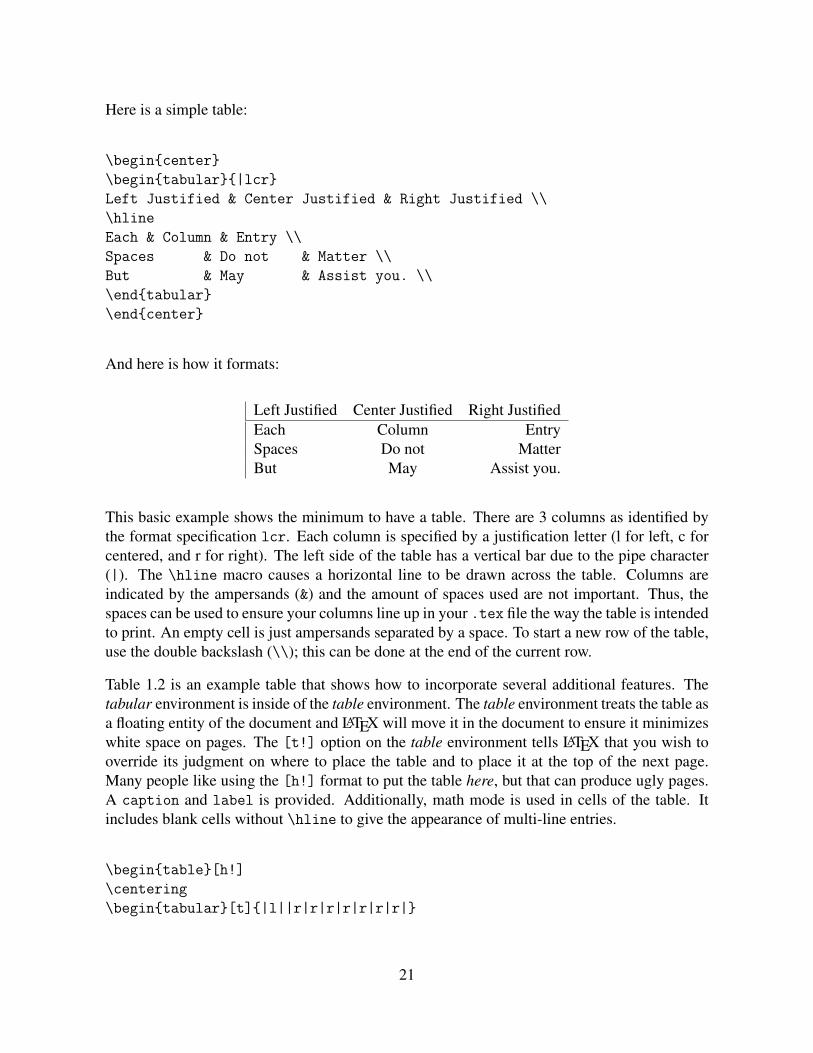
This basic example shows the minimum to have a table. There are 3 columns as identified bythe format specification lcr. Each column is specified by a justification letter (l for left, c forcentered, and r for right). The left side of the table has a vertical bar due to the pipe character(|). The \hline macro causes a horizontal line to be drawn across the table. Columns areindicated by the ampersands (&) and the amount of spaces used are not important. Thus, thespaces can be used to ensure your columns line up in your .tex file the way the table is intendedto print. An empty cell is just ampersands separated by a space. To start a new row of the table,use the double backslash (\\); this can be done at the end of the current row.
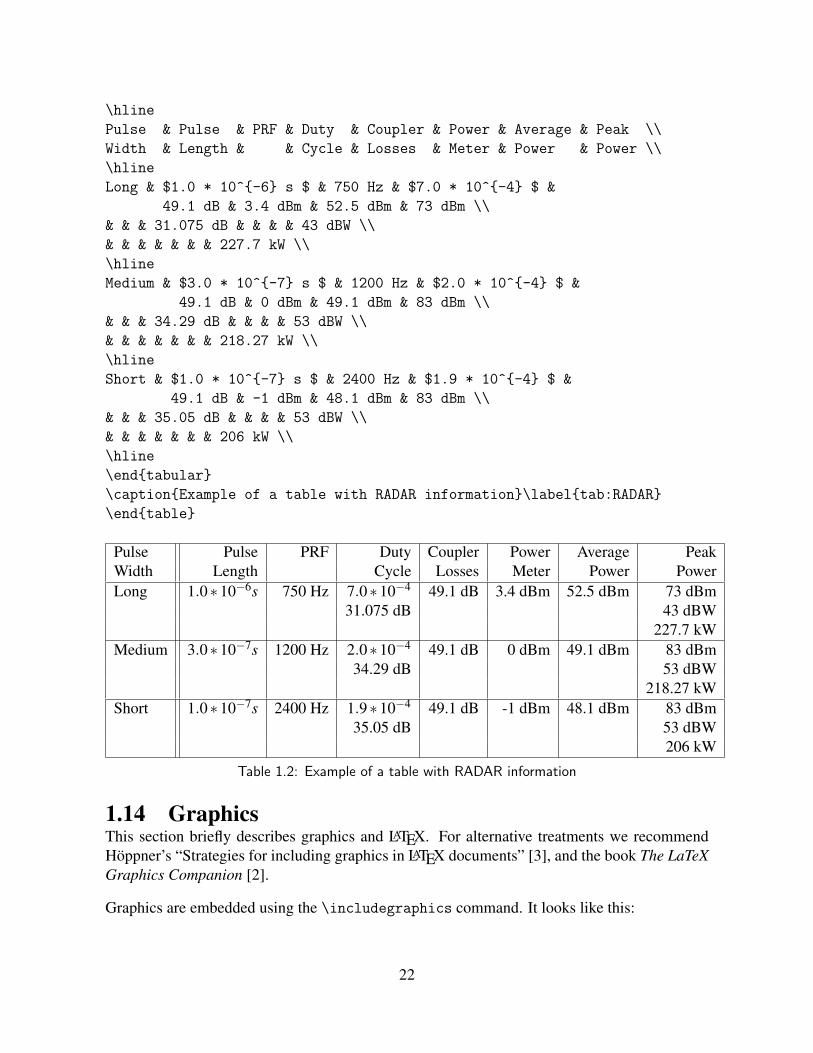
Table 1.2 is an example table that shows how to incorporate several additional features. Thetabular environment is inside of the table environment. The table environment treats the table asa floating entity of the document and LATEX will move it in the document to ensure it minimizeswhite space on pages. The [t!] option on the table environment tells LATEX that you wish tooverride its judgment on where to place the table and to place it at the top of the next page.Many people like using the [h!] format to put the table here, but that can produce ugly pages.A caption and label is provided. Additionally, math mode is used in cells of the table. Itincludes blank cells without \hline to give the appearance of multi-line entries.
\begin{table}[h!]
\centering
\begin{tabular}[t]{|l||r|r|r|r|r|r|r|}
21
\hline
Pulse & Pulse & PRF & Duty & Coupler & Power & Average & Peak \\
Width & Length & & Cycle & Losses & Meter & Power & Power \\
\hline
Long & $1.0 * 10^{-6} s $ & 750 Hz & $7.0 * 10^{-4} $ &
49.1 dB & 3.4 dBm & 52.5 dBm & 73 dBm \\
& & & 31.075 dB & & & & 43 dBW \\
& & & & & & & 227.7 kW \\
\hline
Medium & $3.0 * 10^{-7} s $ & 1200 Hz & $2.0 * 10^{-4} $ &
49.1 dB & 0 dBm & 49.1 dBm & 83 dBm \\
& & & 34.29 dB & & & & 53 dBW \\
& & & & & & & 218.27 kW \\
\hline
Short & $1.0 * 10^{-7} s $ & 2400 Hz & $1.9 * 10^{-4} $ &
49.1 dB & -1 dBm & 48.1 dBm & 83 dBm \\
& & & 35.05 dB & & & & 53 dBW \\
& & & & & & & 206 kW \\
\hline
\end{tabular}
\caption{Example of a table with RADAR information}\label{tab:RADAR}
\end{table}
Pulse Pulse PRF Duty Coupler Power Average PeakWidth Length Cycle Losses Meter Power PowerLong 1.0∗10−6s 750 Hz 7.0∗10−4 49.1 dB 3.4 dBm 52.5 dBm 73 dBm
31.075 dB 43 dBW227.7 kW
Medium 3.0∗10−7s 1200 Hz 2.0∗10−4 49.1 dB 0 dBm 49.1 dBm 83 dBm34.29 dB 53 dBW
218.27 kWShort 1.0∗10−7s 2400 Hz 1.9∗10−4 49.1 dB -1 dBm 48.1 dBm 83 dBm
35.05 dB 53 dBW206 kW
Table 1.2: Example of a table with RADAR information
1.14 GraphicsThis section briefly describes graphics and LATEX. For alternative treatments we recommendHoppner’s “Strategies for including graphics in LATEX documents” [3], and the book The LaTeXGraphics Companion [2].
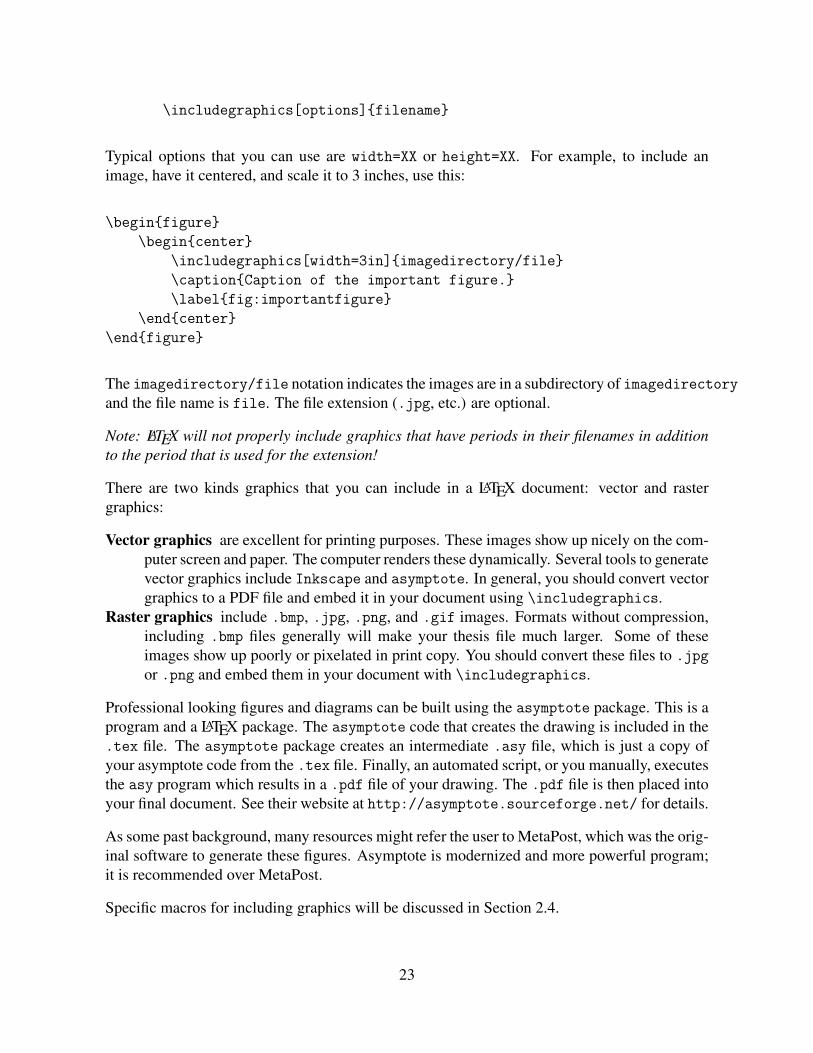
Graphics are embedded using the \includegraphics command. It looks like this:
22
\includegraphics[options]{filename}
Typical options that you can use are width=XX or height=XX. For example, to include animage, have it centered, and scale it to 3 inches, use this:
\begin{figure}
\begin{center}
\includegraphics[width=3in]{imagedirectory/file}
\caption{Caption of the important figure.}
\label{fig:importantfigure}
\end{center}
\end{figure}
The imagedirectory/file notation indicates the images are in a subdirectory of imagedirectoryand the file name is file. The file extension (.jpg, etc.) are optional.
Note: LATEX will not properly include graphics that have periods in their filenames in additionto the period that is used for the extension!
There are two kinds graphics that you can include in a LATEX document: vector and rastergraphics:
Vector graphics are excellent for printing purposes. These images show up nicely on the com-puter screen and paper. The computer renders these dynamically. Several tools to generatevector graphics include Inkscape and asymptote. In general, you should convert vectorgraphics to a PDF file and embed it in your document using \includegraphics.
Raster graphics include .bmp, .jpg, .png, and .gif images. Formats without compression,including .bmp files generally will make your thesis file much larger. Some of theseimages show up poorly or pixelated in print copy. You should convert these files to .jpg
or .png and embed them in your document with \includegraphics.
Professional looking figures and diagrams can be built using the asymptote package. This is aprogram and a LATEX package. The asymptote code that creates the drawing is included in the.tex file. The asymptote package creates an intermediate .asy file, which is just a copy ofyour asymptote code from the .tex file. Finally, an automated script, or you manually, executesthe asy program which results in a .pdf file of your drawing. The .pdf file is then placed intoyour final document. See their website at http://asymptote.sourceforge.net/ for details.
As some past background, many resources might refer the user to MetaPost, which was the orig-inal software to generate these figures. Asymptote is modernized and more powerful program;it is recommended over MetaPost.
Specific macros for including graphics will be discussed in Section 2.4.
23
1.15 BibTEX and CitationsBibliography and citation are important in your thesis. Each department has different expecta-tions on citation styles. Even if you select the wrong style initially, changing the format to thecorrect option is only a one-line change for LATEX – unlike a complete nightmare for Microsoft R©Word users.
See http://en.wikibooks.org/wiki/LaTeX/Bibliography_Management andhttp://stefaanlippens.net/bibentry
Many common citation reference organizers and websites output BibTEX formatted citations in.bib files. This is a time saver, as rather than retyping information, you can download the .bibfile and copy its contents into your thesis master .bib file. The master .bib file contains allof your citations, even ones that you have not yet cited. When you reference these citations inyour thesis, BiBTEX can generate the references list for you. To cite a specific reference usethe \cite{name} command. After your first run of pdflatex, you follow with the bibtex
command as in §1.5.
24
CHAPTER 2:The NPS LATEX Template
This chapter describes how to get the template and how to use it.
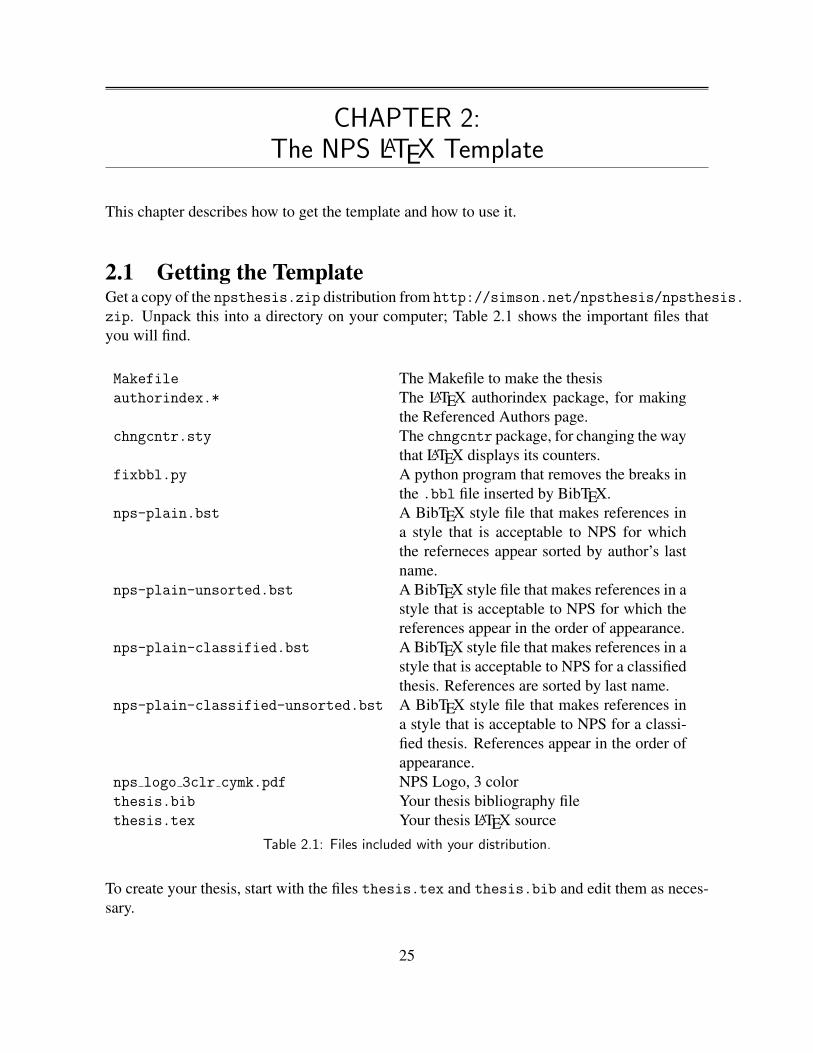
2.1 Getting the TemplateGet a copy of the npsthesis.zip distribution from http://simson.net/npsthesis/npsthesis.
zip. Unpack this into a directory on your computer; Table 2.1 shows the important files thatyou will find.
Makefile The Makefile to make the thesisauthorindex.* The LATEX authorindex package, for making
the Referenced Authors page.chngcntr.sty The chngcntr package, for changing the way
that LATEX displays its counters.fixbbl.py A python program that removes the breaks in
the .bbl file inserted by BibTEX.nps-plain.bst A BibTEX style file that makes references in
a style that is acceptable to NPS for whichthe referneces appear sorted by author’s lastname.
nps-plain-unsorted.bst A BibTEX style file that makes references in astyle that is acceptable to NPS for which thereferences appear in the order of appearance.
nps-plain-classified.bst A BibTEX style file that makes references in astyle that is acceptable to NPS for a classifiedthesis. References are sorted by last name.
nps-plain-classified-unsorted.bst A BibTEX style file that makes references ina style that is acceptable to NPS for a classi-fied thesis. References appear in the order ofappearance.
nps logo 3clr cymk.pdf NPS Logo, 3 colorthesis.bib Your thesis bibliography filethesis.tex Your thesis LATEX source
Table 2.1: Files included with your distribution.
To create your thesis, start with the files thesis.tex and thesis.bib and edit them as neces-sary.
25
2.2 Editing the TemlateThe skeletal thesis.tex file consists of two main parts: the prologue (everything beforethe \begin{document}) and the body (everything between the \begin{document} and the\end{document}). The body is further split into two parts: the main body and the postmat-ter (the appendices, bibliography, and distribution list). You will typically create your thesisby editing each. Some students put their entire thesis into the thesis.tex file, while othersput each chapter into its own .tex file and include them using the \include{filename.tex}command.
The remainder of this section will show a skeletal thesis template for each of these three parts(the prologue, the main body and the postmatter), and then will explain the purpose of eachcommand.
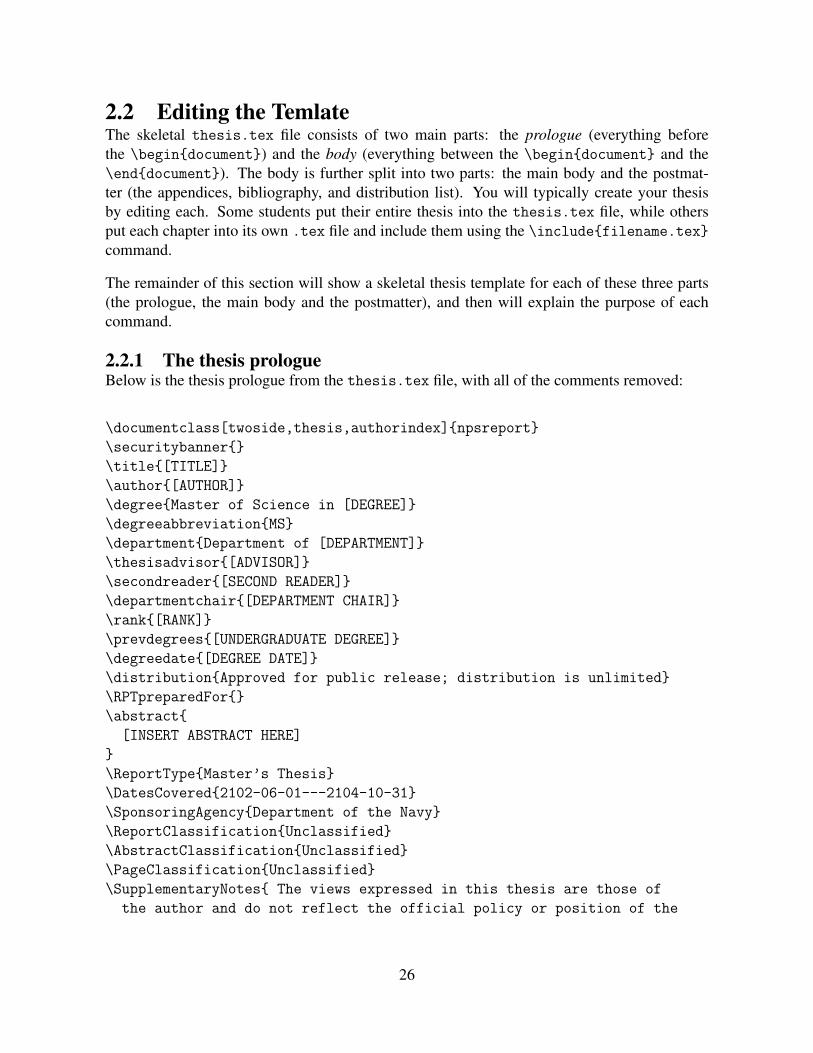
2.2.1 The thesis prologueBelow is the thesis prologue from the thesis.tex file, with all of the comments removed:
\documentclass[twoside,thesis,authorindex]{npsreport}
\securitybanner{}
\title{[TITLE]}
\author{[AUTHOR]}
\degree{Master of Science in [DEGREE]}
\degreeabbreviation{MS}
\department{Department of [DEPARTMENT]}
\thesisadvisor{[ADVISOR]}
\secondreader{[SECOND READER]}
\departmentchair{[DEPARTMENT CHAIR]}
\rank{[RANK]}
\prevdegrees{[UNDERGRADUATE DEGREE]}
\degreedate{[DEGREE DATE]}
\distribution{Approved for public release; distribution is unlimited}
\RPTpreparedFor{}
\abstract{
[INSERT ABSTRACT HERE]
}
\ReportType{Master’s Thesis}
\DatesCovered{2102-06-01---2104-10-31}
\SponsoringAgency{Department of the Navy}
\ReportClassification{Unclassified}
\AbstractClassification{Unclassified}
\PageClassification{Unclassified}
\SupplementaryNotes{ The views expressed in this thesis are those of
the author and do not reflect the official policy or position of the
26

Department of Defense or the U.S. Government.%
\footnotesize IRB Protocol Number: XXXX}
\makeatletter\@removefromreset{footnote}{chapter}\makeatother
documentclassThe documentclass specifies the thesis to use the npsreport.cls file and all settingscontained therein. It has several optional parameters, each separated by comma.
article, thesis, or dissertation choose the appropriate one for the case, most likely the-sis.
twoauthors, threeauthors, or fourauthors only if you have several authors. Single au-thors need no option.
twoside prints on both sides of the same sheet of paper, recommended.traditional prints in a style that the thesis processors have used. However, the newer
style is approved and looks quite nice when no option is given.singlespace if you prefer single-spaced paragraphs, though it may be a little harder to
read.classified if you are using an approved computer system to write your thesis on sensitive
research.authorindex if you are including an author index page of your thesis references.twoadvisors if you have two advisors rather than a second reader.tight Causes the spacing between paragraphs and paragraph indentation to be smaller
than standard.
securitybannerLeave blank unless producing a classified thesis. Whatever text appears between thebraces is placed at the top and bottom of pages of the thesis.
titleYour thesis title phrase
degree Your planned NPS degree written out as in “Master of Science in Electrical Engineer-ing” (no quotation marks)
degreeabbreviationMA, MS, MBA, or other shorthand notation
prevdegreesWritten out as “B.S., Degree, School, Year” as in “B.S., Electrical Engineering, ClemsonUniversity, 2007” (no quotation marks)
degreedateWritten as “Month Year” as in “June 2011” (no quotation marks)
distributionOne of the approved Department of Defense distrubtion statements (A through F or Ex-port Control). These are listed out on the thesis release form that must also be submittedwith your thesis.
abstractYour entire abstract goes here. New paragraphs can be started by a blank line, just like
27

the rest of your thesis.supplementarynotes
If your thesis does not have an Institutional Review Board (IRB) protocol number, replacethe XXXX with N/A, otherwise fill in the appropriate number. This is needed for thesisthat use human subjects to collect data. Ask your advisor for more information if thisapplies.
2.2.2 The thesis main bodyBelow is the thesis body, with all of the comments that appear on lines by themselves removed:
\begin{document}
\NPScover % Cover
\NPSsftne % SF298
\NPSthesistitle % Title page
\NPSabstractpage % Abstract Page
\NPSfrontmatter % NPS front matter follows
\renewcommand{\chaptermark}[1]{
\markboth{\MakeUppercase{\chaptername}\ \thechapter.\ #1}{}}
\NPSTableOfContents
\NPSListOfFigures
\NPSListOfTables
\NPSListOfAcronyms{
\begin{description}
\item[NPS] Naval Postgraduate School
\item[USG] United States Government
\end{description}
}
\acknowledgements{
[ACKNOWLEDGEMENTS]
}
\NPSbody
\chapter{[CHAPTER ONE TITLE]}
[CHAPTER BODY]
This is the beginning of your thesis. Don’t be a Micky
Mouse\cite{mm2}: Always have text between every head and subhead.
\section{Your First Section}
[Section One Body]
\section{Your Second Section}
[Section Two Body]
\section{Your Third Section}
[Section Three Body]
28
\chapter{[CHAPTER TWO TITLE]}
[CHAPTER BODY]
This is the beginning of the second chapter.
Always have text between every head and subhead.
\section{Your First Section}
[Chapter two Section One Body]
\section{Your Second Section}
[Chapter two Section Two Body]
\section{Your Third Section}
[Chapter two Section Three Body]
NPScoverPrints the coversheet page.
NPSsftnePrints the Standard Form 298 completely filled out with the provided information.
NPSthesistitlePrints the signature page.
NPSabstractpagePrints the abstract page.
NPSfrontmatterApplies some thesis settings for the remainder of the document.
NPSTableOfContentsCreates the Table of Contents that lists chapters and subsections.
NPSListOfFigures and NPSListOfTablesThese lists are automatically created based on the content of the thesis, using the figureand table environments.
NPSListOfAcronymsThis has to be performed manually, unless you use the acronym package.
AcknowledgementsSay your piece.
NPSbodyThesis chapters follow.
2.2.3 The thesis postmatter\def\showURL{}
\bibliographystyle{nps-plain-unsorted}
\bibliography{thesis}
\NPSappendix % Appendices follow
\chapter{[APPENDEX NAME]}
[APPENDEX BODY]
\NPSend
\chapter*{Initial Distribution List}
29
\addcontentsline{toc}{chapter}{Initial Distribution List}
\singlespace
\begin{enumerate}
\item Defense Technical Information Center\\Ft. Belvoir, Virginia
\item Dudly Knox Library\\Naval Postgraduate School\\Monterey, California
\item Marine Corps Representative\\Naval Postgraduate School\\Monterey, California
\item Directory, Training and Education, MCCDC, Code C46\\Quantico, Virginia
\item Marine Corps Tactical System Support Activity (Attn: Operations
Officer)\\Camp Pendleton, California
\end{enumerate}
\end{document}
bibliographystyleCan be one of the provided styles (nps-plain, nps-plain-classified, nps-plain-classified-unsorted, nps-plain-unsorted) or others commonly used (acm, acmtrans, amsalpha, am-splain, apa-good, ieeetr, ieeetrans, TK)
bibliographySpecifies your master .bib file, in this case, thesis.bib. All cited references should bekept in this file.
NPSappendixTreat all following chapter entries as appendicies.
NPSendIncludes the authorindex, if the option was specified in the documentclass. Concludesthe content of the thesis.
2.3 LabelsLabels are hidden markers in your .tex files created by \label{name}. These markers arenever shown directly in the output files. However, correctly placing these in your file allowsyou to reference chapters, appendices, sections, figures, tables and equations. Label markernames can have a prefix such as chap:, sec:, fig:, tab: and eqn: to logically identify andsort labels.
• Chapters, Appendices and Sections should have the label directly after the curly bracesof \chapter{} or \section{}.• Figures should have the label inside the curly braces of the \caption{}.• Tables and Equations should have the label inside of the table and equation environ-
ments.
The vref commands in Table 2.2 can also automatically swap “on page 4” for “on the preceed-ing page” and other phrases.
30
Built in to LATEX:\ref{l} General reference of the label that places the label’s number in the docu-
ment.
Provided by npsreport.cls:\chapref{l} Chapter reference that formats as “Chapter 3”\chapvref{l} Chapter reference that formats as “Chapter 3 on page 4”\secref{l} Section reference that formats as “Section 3.” You can use this for sections,
subsections, and so on.\secvref{l} Section reference that formats as “Section 3 on page 4”\figref{l} Figure reference that formats as “Figure 3”\figvref{l} Figure reference that formats as “Figure 3 on page 4”\tabref{l} Table reference that formats as “Table 3”\tabvref{l} Table reference that formats as “Table 3 on page 4”\eqnref{l} Equation reference that formats as “Equation (3.1)”\eqnvref{l} Equation reference that formats as “Equation (3.1) on page 4”\eqnsref{l,m} Equation reference that formats as “Equations (3.1) and (3.5)”\eqnsvref{l,m} Equation reference that formats as “Equations (3.1) and (3.5) on page 4”\appref{l} Appendix reference that formats as “Appendix 3”\appvref{l} Appendix reference that formats as “Appendix 3 on page 4”
Table 2.2: Reference commands included in the thesis.tex demo file.
2.3.1 Tables and FiguresTables and figures are floating objects that LATEX moves around as necessary to make your thesislook better. Tables are inserted with the \begin{table} command while figures are insertedwith \begin{figure}. Here are some rules to consider:
• Every table and figure should have a caption, created with the \caption{text} com-mand.• Every table and figure should have a unique label, created with the \label{marker}
command.• Every table and figure should be referred to in the main body of your text. LATEX pro-
vides a command called \ref{marker}; this template provides additional commands\tabref{marker} and \figref{marker}. All of the reference commands are shown inTable 2.2.• Do not assume that figures and tables will be on the same text as your page. Always refer
to the figures and tables by their numbering.
2.4 Including Photos and FiguresThis section shows how you can easily include photos.
Using the \sgraphic{filename}{caption} command you bring in a photo from a given file-
31
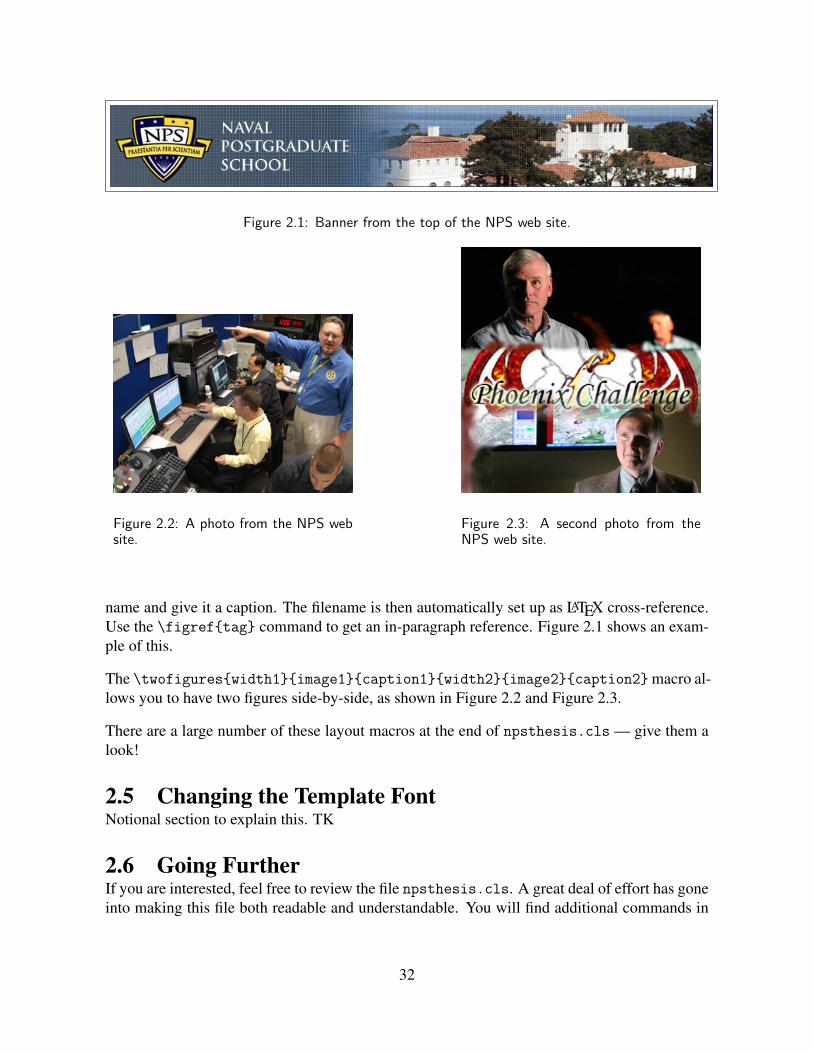
Figure 2.1: Banner from the top of the NPS web site.
Figure 2.2: A photo from the NPS website.
Figure 2.3: A second photo from theNPS web site.
name and give it a caption. The filename is then automatically set up as LATEX cross-reference.Use the \figref{tag} command to get an in-paragraph reference. Figure 2.1 shows an exam-ple of this.
The \twofigures{width1}{image1}{caption1}{width2}{image2}{caption2}macro al-lows you to have two figures side-by-side, as shown in Figure 2.2 and Figure 2.3.
There are a large number of these layout macros at the end of npsthesis.cls — give them alook!
2.5 Changing the Template FontNotional section to explain this. TK
2.6 Going FurtherIf you are interested, feel free to review the file npsthesis.cls. A great deal of effort has goneinto making this file both readable and understandable. You will find additional commands in
32

this file and you may even have thoughts on changes to make. Please let us know what youcome up with!
You may find the following packages useful:
multirow – Allows a single table cell to extend to multiple rows.
ifthen – Allows you to put conditions in your thesis. It is a bit easier than using the if that’sbuilt in to TEX.
acronym – A great package for automatically generating acronym lists. It can track the usageof acronyms to correctly use the long name of the acronym on its first use.
makeidx – For creating an index of key words and phrases in your document.
mcode – Places a MATLAB R© .m file contents directly into the output. The package performssyntax highlighting and line numbering if desired. This package is not in the CTAN and doc-umentation may be obtained from the MATLAB R© Central website at http://tinyurl.com/3wgcufr.
33
THIS PAGE INTENTIONALLY LEFT BLANK
34
CHAPTER 3:Helpful Information for Your Report or Thesis
This chapter discusses elements of writing and style that are helpful when writing a report orthesis at NPS. This chapter is based on a publication that was distributed by the NPS ThesisProcessor in 2009.
3.1 Style Information for Theses3.1.1 English Grammar Tips
1. Punctuation (periods and commas) go inside quotation marks.2. When using i.e., e.g., or etc. always put a comma before and after, e.g., like this. You can
also use the \ie, \eg and \etc macros that the thesis template provides.3. Master’s degree has an apostrophe and Postgraduate is one word.4. If you use “however,” make sure there’s a comma before and after, unless you start a
sentence with it. However, it’s best not to start a sentence with “however.” And while weare on the subject, you should try to avoid starting a sentence with “and” or “because.”
5. When typing a date, do not use “st” or “th.” Instead, just note the date: July 4, 1776, isIndependence Day. Commas go after Month/date, year. No comma between month/yr.
6. Spell out numbers 1 through 9 as one to nine. Larger numbers remain as digits.7. Capitalize C in Chapter, F in Figure and T in Table when referring to chapters, figures or
tables in the text and use roman numerals vs numbers or spelling out, etc. for chapters.Even better, use the referencing commands described in Table 2.2 on page 31.
8. Footnote numbers go outside the punctuation.9. Ibid cannot be the first footnote on the page.
10. When typing equations in text and use “where” or “if,” etc. and it’s not a new paragraphthe word starts at the margin.
11. When inserting symbols, use the proper symbols commands. Avoid trying to include thecharacter directly in the .tex file.
12. Avoid writing in the first person!13. Avoid dangling participles. Wrong: Substituting (12) into (14) gives...; Correct: Substi-
tuting (12) into (14), we get...14. Contractions are not used in formal writing. Cannot is one word.15. Chapters, figures and tables do not show things. Instead, things are shown or illustrated
in figures and tables. Things are discussed in chapters or sections.
3.2 Additional Writing Tips1. Displayed equations must be numbered, part of a sentence and properly punctuated. This
means your equation may have a period as the last character to indicate the sentence hasended.
2. In-line equations in paragraphs must be simple and use “/” to indicate division.
35
3. All figure captions should be complete sentences with a period at the end of the caption.4. Figures and tables should display the units associated with quantities being displayed.5. Axes in figures should be clearly labeled with quantities and units.6. Discuss all figures and tables in your thesis.7. Acronyms need to be defined in the acronyms list, in the abstract, in the executive sum-
mary, and the first time they are used in the thesis. They do not need to be defined forevery chapter.
8. The introduction should provide the background that allows the reader to understand whyhe or she should be interested in the problem. Provide a discussion of related work withreferences. State clearly and explicitly the goal(s) or objective(s) of your work. Discusshow your work differs from the previous works.
9. Abstracts briefly summarize the work and helps the reader to ascertain the purpose of thethesis. It may include the problem at hand, the technique used to solve the problem, andthe indicate the conclusion of the results.
10. Some departments require an an additional section called the Executive Summary. It ismore comprehensive than the abstract and generally 2-10 pages in length. The ExecutiveSummary must stand alone from the rest of the document. Figures and tables are num-bered independently from the thesis content and do not appear in the List of Figures orList of Tables. Additionally, references in the Executive Summary are independent fromthe thesis and there is a separate list of references at the end of the Executive Summary.
11. Conclusions summarize the results obtained in your research and emphasize your originalcontributions. Recommended future work should include any new questions arising fromyour research.
3.2.1 LATEX Tips1. Do not use “*” or “x” to indicate multiplication. X = Y Z is sufficient.2. If you must use multiplication, please do so using \times in math mode. That is, type
$X=Y\times Z$ to produce X = Y ×Z.3. Use the LATEX \begin{figure} and \begin{table} environment to create floating fig-
ures and tables. Use the \caption command to create your captions. Label your cap-tions with the \label{marker} command inside the caption itself. Captions are shownin the paper as text. Labels are internal LATEX identifiers that can be referenced with the\ref{marker} reference command.
4. Do not split text around a figure or table. Write complete paragraphs, since LATEX willplace figures in your document to efficiently use the paper.
5. When there is more than one reference, put them both into the \cite command:\cite{john1,john2,john3}. The additional cite package can improve the multiplecitations result from [6,7,8] to [6-8].
6. Make sure there’s at least one and a half lines of text at the top of the page—if LATEXgives you a hard time, you may need to add or remove text so that everything works outproperly.
7. Don’t use math mode as a general italics—use \emph{}.
36

8. Do not make tables too wide in columns or they can be drawn off the right-side of thepaper.
9. Use automatic numbering and lettering by using the appropriate environments, such asenumerate, itemize or list.
10. There can only be one label entry for a section, figure, etc.. Trying to have more than onewill cause a problem in the automatic numbering. If you need to troubleshoot numbering,look in the generated .toc files.
3.3 Additional Software3.3.1 Scripts Included with the NPS Thesis TemplateThere are several scripts included with the template that may be useful for your writing needs.
make – Included with the template is the Makefile that Mac and Linux users will readily enjoy.Typing make on the command prompt will perform all necessary commands to produce yourdocument.
build.py – An alternate script to make that can be used for Windows users.
authorindex.pl – This perl script is used to generate the authorindex. You will need to usethis script if you are generating your document with the authorindex option (see §2.2.1). Anadditional install of a perl interpreter is required for Microsoft R© Windows (ActivePerl R© isrecommended).
fixerrors.py – This python script will correct .bib file entries for URLs that contain longURLs and also corrects errors in the authorindex .ain files.
xls_extract.py – This python script extracts all excel terms from an NPS budget spreadsheetand write LATEX variables. Although it is unlikely you will need to use the script exactly, it canbe a reference of how to do something similar if needed for your document.
xls_covert_to_pdf.py – Converts the Excel workbook to PDF file format.
3.3.2 Citation Management SoftwareOrganizing your thesis citations is critical to a successful thesis. Legacy techniques includedusing index cards. In modern times, software is available to help you accomplish this task. Acomplete list of the available options is at http://en.wikipedia.org/wiki/Comparison_of_reference_management_software . NPS has a site-license for Refworks. Other highlyrecommended options are Zotero and Mendeley. See http://www.zotero.org/ and http:
//www.mendeley.com/ for additional details.
3.3.3 Revision Control Systems and SubversionRevision control software such as subversion (svn), mercurial (hg), git, and others are excel-lent modern choices. Consult their websites to determine which one best suits your needs.
37
You will note that LATEX creates many temporary files. These files should not be included inyour subversion repository. Because they are generated on a per-machine basis, you can getconflicts if different files are created and then committed on different machines.
If you are using subversion to manage your thesis, you should instruct it to ignore these files.This can be done with the make ignore target in the Makefile.
ignore:
svn propget svn:ignore . > /tmp/ignore
echo thesis.pdf >> /tmp/ignore
echo ’*.ain’ >> /tmp/ignore
echo ’*.aux’ >> /tmp/ignore
echo ’*.asy’ >> /tmp/ignore
echo ’*.bbl’ >> /tmp/ignore
echo ’*.blg’ >> /tmp/ignore
echo ’*.lof’ >> /tmp/ignore
echo ’*.log’ >> /tmp/ignore
echo ’*.lot’ >> /tmp/ignore
echo ’*.sow’ >> /tmp/ignore
echo ’*.toc’ >> /tmp/ignore
echo ’*.zip’ >> /tmp/ignore
sort /tmp/ignore | uniq | grep . | svn propset svn:ignore -F -
.
@echo "
@echo Will ignore:
svn propget svn:ignore .
@/bin/rm -f /tmp/ignore
3.4 NPS Thesis Guidance3.4.1 Section Order of Appearance
1. Table of Contents2. List of Figures*3. List of Tables*4. List of Acronyms*5. Executive Summary*6. Acknowledgements*7. Chapters8. Appendices9. Index*
10. References11. Initial Distribution List
38

In the above list, the starred items do not appear in Table of contents. Not all theses will have anindex, but that can be generated automatically with LATEX. If your thesis only has one appendix,then it is not lettered, but just referred as the appendix (even in the table of contents). If youhave multiple, then they are lettered. If you do not have any tables, then the list of tables is notincluded. This also applies to list of figures and acronyms.
3.4.2 Initial Distribution List RecipientsEach thesis contains a list at the end of the original recipients of the thesis. You may addadditional names to this list for professional or personal reasons. When you submit your thesis,you will provide an email address for the individuals on the list, and they will receive an emailwhen the thesis has been posted.
1. Defense Technical Information CenterFt. Belvoir, Virginia
2. Dudly Knox LibraryNaval Postgraduate SchoolMonterey, California
3. Your department chairNaval Postgraduate SchoolMonterey, California
4. Your advisorNaval Postgraduate SchoolMonterey, California
5. Your 2nd reader/coadvisorNaval Postgraduate SchoolMonterey, California
6. Each authorNaval Postgraduate SchoolMonterey, California
Marine officer students are required to show:7. Marine Corps Representative
Naval Postgraduate SchoolMonterey, California
8. Directory, Training and Education, MCCDC, Code C46Quantico, Virginia
9. Marine Corps Tactical System Support Activity (Attn: Operations Officer)Camp Pendleton, California
Officer students in the Operations Research Program are also required to show:10. Director, Studies and Analysis Division, MCCDC, Code C45
Quantico, Virginia
39
Officer students in the Space Ops/Space Engineering Program or in the Information War-fare/Information Systems and Operations are also required to show:
11. Head, Information Operations and Space Integration Branch,PLI/PP&O/HQMC, Washington, DC
3.4.3 Documentation submitted with thesisThe Thesis processors will require some additional forms to accept your thesis and give you agreen card. These forms are available on their website at http://www.nps.edu/research/research1.html.
• Thesis release form• Thesis color page request form• Special Abstract• Completed Signature Page
40

APPENDIX A:Using the NPS LyX Template
The NPS LyX Dissertation Template was developed by CDR Michael Bilzor is available for usewith LyX. The template can be obtained from http://simson.net/npsthesis/lyxthesis.
zip. The remainder of this section was written by CDR Bilzor and describes using the template.
Using the NPS LyX Dissertation Template
A.1 Get LATEXDownload and install, if necessary, a LATEX installation package. For Mac, I recommend usingMacTEX - it includes some extras like BibDesk and gives you a good basic LATEX editor. (http://www.tug.org/mactex/2009/)
A.2 Get LyXDownload it, install it, and tell it about your LATEX installation. (If the lack of a spell-checkeris bugging you, an easy way to add one is via MacPorts (http://www.macports.org/) - once apackage like aspell has been ported in, you can point LyX to it and it’ll use it).
A.3 Editing your SF298Edit the standard sf298 style file, or use a modified version.
A.3.1 Option 1 - modify the standard sf298 file (permanent fix)I don’t have Windows-specific directions for this task, but it has been tested on MacOS andUbuntu.
Find the copy of your LATEX distro’s sf298.sty file:
MacOS /usr/local/texlive/2010/texmf-dist/tex/latex/sf298/sf298.sty
Ubuntu /usr/share/texmf-texlive/tex/latex/sf298/sf298.sty
These files are read-only, and may be hidden. To make the file read-write, do a chmod at thecommand line (Unix gurus), or use Get Info (Command-I) from the Finder and click the lockicon; you’ll be prompted for the admin password and can then make canges to the permissions.
(The template includes a modified copy of the sf298.sty file in the /styles folder, in caseyou just want to set permissions, delete the old one, and replace it with this one).
Open sf298.sty in a text editor (I recommend TextWrangler for Mac; I had issues with stan-dard text editor in saving the file, but TextWrangler was obedient).
Locate and comment out the following line (as shown below, now with a % at the beginning):
41

%\ExecuteOptions{config,nofloatlongboxes}
Skip the next line, then comment out the following three lines as shown:
%\if Y\sf@config
% \InputIfFileExists{sf298.cfg}{}{}
%\fi
Save the file and exit. Lyx will default to using the LATEX distribution copy of sf298.sty unlessyou explicitly point it to the location of a different copy of sf298.sty in your \usepackagestatement. Unmodified, you will get at least two errors compiling the NPS dissertation file.With sf298.sty modified, it will now compile the NPS LATEX dissertation format without theerrors.
A.3.2 Option 2 - use the custom-named nps sf298 style file and keep acopy of it in your dissertation’s working directory (easy fix).
Open up the LATEX Preamble in LyX, using Document/Settings. Once there, change the state-ment \usepackage{sf298} to \usepackage{nps_sf298}, and be sure there is always a copyof nps_sf298.sty in your dissertation’s working directory.
Open up the Template. The file is called Sample_nps_phd.lyx. It uses the files in the /imagesdirectory, as well as the bibliography file Sample.bib. Typeset a PDF file to check it out. Ifeverything works, you can use this as a template and edit your dissertation using the LyX editor.
Notes:
• This template takes most of the formatting from the npsphd.cls file (from Prof. Sim-son Garfinkel and MAJ Rob Harder), and ads the necessary parts into a LyX field called“LATEX Preamble,” which is accessible under document settings. The basic class is ”re-port”, and the master fonts are set to Times New Roman. To add more style files, add\usepackage statements to the ones already in the Preamble.• Be sure that the fields you use for Title, Name, etc. exactly match between where they’re
entered in the document in multiple places (i.e., in the sf298 fields).• Sections like the Abstract, Acknowledgments, etc. are implemented as unnumbered chap-
ters (chapter* in the pulldown).• hyperref support is available throug the native LyX GUI interface.• The document class in LyX is just “report,” and all the customization comes from the
LATEX preamble. LyX has a way to create what it calls a “layout” which is LyX-speak fora locally-defined custom LATEX document class. I haven’t done this, but it’s probably agood “future work” project.
42
REFERENCES
[1] Apache Software Foundation. Apache subversion. http://subversion.apache.org/,August 2011.
[2] Michel Goossens. The LaTeX graphics companion: illustrating documents with TeX andPostScript. Addison-Wesley, Reading Ma., 1997.
[3] Klaus Hoppner. Strategies for including graphics in latex documents. TUGboat, 26(1),2005.
Initial Distribution List
1. Defense Technical Information CenterFt. Belvoir, Virginia
2. Dudly Knox LibraryNaval Postgraduate SchoolMonterey, California
43


![Alternate ACM SIG Proceedings Paper in LaTeX Format? … · 2014. 3. 30. · Alternate ACM SIG Proceedings Paper in LaTeX Format?[Extended Abstract] ? Ben Trovato? G.K.M. Tobin? Institute](https://static.fdocuments.in/doc/165x107/60ba8e06e7c786539260e3a0/alternate-acm-sig-proceedings-paper-in-latex-format-2014-3-30-alternate-acm.jpg)