2007 HUMMER H3 Navigation System M - General Motors€¦ · 2007 HUMMER H3 Navigation System M 1....
72
Overview ........................................................ 3 Overview .................................................. 4 Features and Controls ................................ 15 Features and Controls ............................ 16 Navigation Audio System ............................ 57 Navigation Audio System ........................ 58 Index ............................................................ 69 2007 HUMMER H3 Navigation System M 1
Transcript of 2007 HUMMER H3 Navigation System M - General Motors€¦ · 2007 HUMMER H3 Navigation System M 1....

Overview ........................................................ 3Overview .................................................. 4
Features and Controls ................................ 15Features and Controls ............................ 16
Navigation Audio System ............................ 57Navigation Audio System ........................ 58
Index ............................................................ 69
2007 HUMMER H3 Navigation System M
1

GENERAL MOTORS, GM, the GM Emblem,HUMMER, and the name HUMMER are registeredtrademarks; and H3 is a trademark of GeneralMotors Corporation.
The information in this manual supplements theowner manual. This manual includes the latestinformation available at the time it was printed.We reserve the right to make changes inthe product after that time without notice.For vehicles first sold in Canada, substitute thename General Motors of Canada Limited forHUMMER whenever it appears in this manual.
Keep this manual with the owner manual in thevehicle, so it will be there if it is needed. If thevehicle is sold, leave this manual in the vehicle.
Canadian OwnersFor Canadian owners that would like to obtain aFrench language manual, see “Canadian Owners”in the Index of your vehicle’s owner manual.
Litho in U.S.A.Part No. 15891547 A First Printing ©2006 General Motors Corporation. All Rights Reserved.
2

Overview ......................................................... 4Navigation System Overview ......................... 4Getting Started .............................................. 6Cleaning the Video Screen .......................... 13
Section 1 Overview
3
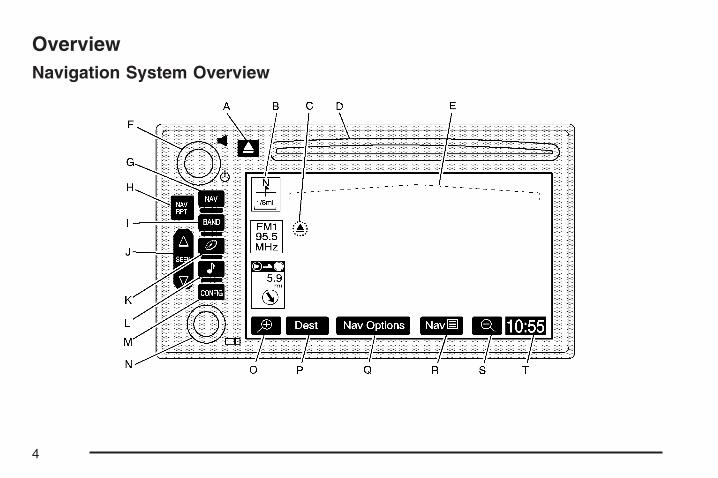
OverviewNavigation System Overview
4

A. X (Tilt Open/CD Eject) Key. See “Hard Keys”under Using the Navigation System on page 16.
B. Directional Indicator. See Symbols on page 22.
C. X (DVD Eject) Key. See “Hard Keys” underUsing the Navigation System on page 16.
D. CD Loading Slot. See CD Player on page 66.E. DVD Loading Slot. See “Loading a DVD
Map Disc” under Getting Started on page 6.
F. P (Power/Volume) Knob. See “Hard Keys”under Using the Navigation System on page 16.
G. NAV (Navigation) Key. See “Hard Keys” underUsing the Navigation System on page 16.
H. NAV RPT (Navigation Repeat) Key. See “HardKeys” under Using the Navigation Systemon page 16.
I. BAND Key. See “Playing the Radio” underNavigation Audio System on page 58.
J. w SEEK x Key. See “Finding a Station”under Navigation Audio System on page 58or CD Player on page 66.
K. B (CD) Key. See CD Player on page 66.
L. e (Audio) Key. See Navigation Audio Systemon page 58.
M. CONFIG (Configure) Key. See “Hard Keys”under Using the Navigation System on page 16.
N. O (Tuning) Knob. See “Finding a Station”under Navigation Audio System on page 58.
O. V (Zoom In) Screen Button. See “TouchSensitive Screen Buttons” under Usingthe Navigation System on page 16.
P. Dest (Destination) Screen Button. See“Touch Sensitive Screen Buttons” underUsing the Navigation System on page 16.
Q. Nav (Navigation) Options Screen Button.See “Touch Sensitive Screen Buttons” underUsing the Navigation System on page 16.
R. Nav y (Navigation Menu) Screen Button.See “Touch Sensitive Screen Buttons” underUsing the Navigation System on page 16.
S. U (Zoom Out) Screen Button. See“Touch Sensitive Screen Buttons” underUsing the Navigation System on page 16.
T. Clock. See “Clock” under Configure Menuon page 50.
5

Getting StartedBefore you begin to operate the navigationsystem, read this manual thoroughly to becomefamiliar with it and to understand how thesystem works.
Keeping your mind on the drive is importantfor safe driving. See “Defensive Driving” in theIndex of your vehicle’s owner manual formore information. Get familiar with your vehicle’snavigation system so you can use it with lesseffort and take full advantage of its features.Your navigation system includes not onlynavigation, but also audio functions. While yourvehicle is parked:
• Familiarize yourself with all of its controls:hard keys on the faceplate and touch-sensitivescreen buttons.
• Familiarize yourself with its operation.
• Set up your audio by presetting your favoritestations, setting the tone, and adjusting thespeakers. Then, when driving conditionspermit, you can tune to your favorite stationsusing the presets and steering wheelcontrols (if equipped).
• Set up the navigation features that can onlybe done before you begin driving, such asentering an address or a preset destination.
Entering a destination or alphanumeric textrequires many steps, so you can only performthese operations when the vehicle is in PARK (P).You will notice that touch-sensitive screenbuttons leading to the alphanumeric keyboardare dimmed out while driving.
Other functions may also be locked out whiledriving and they too will appear grayed out on thescreen — but all functions are available whenparked. Some functions can be performed whiledriving, as long as you can do so without divertingtoo much of your attention from your driving.
6

{CAUTION:
This system provides you with a far greateraccess to audio stations and song listings.Giving extended attention to entertainmenttasks while driving can cause a crash andyou or others can be injured or killed.Always keep your eyes on the road andyour mind on the drive — avoid engagingin extended searching while driving.
{CAUTION:
Looking at the moving map on thenavigation screen frequently or for toolong while driving can cause a crash andyou or others can be injured or killed.
CAUTION: (Continued)
CAUTION: (Continued)
Keep your eyes and mind on the roadand avoid looking too long or too oftenat the moving map on the navigationscreen. Use the voice guidance directionswhenever possible.
The navigation system allows you to do thefollowing:
• Plan a route with provided turn-by-turn routeand map guidance with voice prompts.
• Select a destination using various methodsand choices.
The information in the system may not always becomplete. Road conditions such as prohibitedturns, detours, and construction zones, changefrequently. It is important to consider whether youcan follow the directions given by the systemfor the current conditions.
7

Every fifty times the vehicle is started and thenavigation system is turned on, the CAUTIONscreen will appear. Touch the Next screen buttonfor the map DVD information to load. You canalso select to change the language, Eng (English)or Fr (French). See “Language” under ConfigureMenu on page 50 for more information.
When getting started, you may set the navigationsystem to your preference using various options.You will also need to know how to perform variousfunctions to begin route guidance. Referencethe following topics for further information:
Setting Radio Station PresetsTo set preset radio stations, do the following:1. Press the power/volume knob to turn
the system on.2. Press the BAND hard key to access the band
menu and select the desired band (AM, FM1,FM2, XM1, or XM2 (if equipped).
3. Use the tuning knob or the SEEK hard keyarrows to select a station.
4. Touch and hold one of the six screen buttonsat the bottom of the screen until you heara beep or see the station displayed onthe selected preset button.
Setting the TimeTo set the time, do the following:1. Press the power/volume knob to turn the
system on.2. Press the CONFIG hard key.3. Touch the Clock screen button.4. Scroll through the Time Zones until the
desired time zone is highlighted.5. Touch the Daylight Savings screen button.
8

The time is now set. Touch the Manual Adjustscreen button if you need to further adjust the time.The radio will use the GPS satellite to set thetime. The vehicle needs to be in an open areato receive the signal. See Global PositioningSystem (GPS) on page 53 for more information.
Loading a DVD Map DiscTo load a DVD map disc, do the following:1. Press the power/volume knob to turn the
system on.2. Press and hold the eject key to tilt the
screen forward.3. Insert the DVD map disc into the DVD slot.
Notice: Pressing directly on the navigationscreen may cause damage. Repairs would notbe covered by your warranty. Do not pressdirectly on the navigation screen.
4. To close the screen, slightly push up on thetwo outer top corners until the screen is inposition, then push the screen in, by pushingon the four outer corners, until you hear a click.
5. A notice may appear. Touch the Next screenbutton to proceed.
Entering an Address, Point of Interest,Home, and Preset DestinationsBefore entering an Address, Point of Interest,Home, or Preset Destination, select theappropriate search area that contains the finaldestination. Your vehicle must be in PARK (P)to perform this operation.
Setting the Search AreaTo set the search area, do the following:
1. If a DVD map disc is not currently loaded,see “Loading a DVD Map Disc” earlier inthis section. If a map disc is currently loaded,proceed to Step 2.
2. Press the power/volume knob to turn thesystem on.
3. Touch the Dest screen button.4. Touch the Change screen button.5. Touch the appropriate Search Area numbered
screen button that contains your finaldestination.
The system will return to the Destination menu.
9

Entering an AddressYou can set a destination by entering an address.To enter an address, do the following:
1. If a DVD map disc is not currently loaded,see “Loading a DVD Map Disc” earlier inthis section. If a map disc is currently loaded,proceed to Step 2.
2. Press the power/volume knob to turn thesystem on.
3. Touch the Dest screen button.4. Verify that the selected Search Area is correct.5. Touch the Address screen button.6. Enter the city name using the alpha keypad
on the screen.7. Select the city name from the list by
touching the screen button next to thecorrect city name.
8. Enter the street name using the alpha keypadon the screen.Do not enter directional information or streettype, and use the space symbol screenbutton ( U ) between street or city names.
For example, the street name N. Royal OakRd. should be entered as royal U oak.Use the backspace ( V ) screen button ifan incorrect character has been entered.
9. Select the desired street name from the listby touching the screen button next to thecorrect street name.
10. Enter the address number using the numerickeypad on the screen. You may first have toselect the correct range for the addressnumber, then enter the desired address andtouch the OK screen button. The mapscreen will display.
11. Touch the Set Destination screen button.The address entry is now complete.
12. Touch the Route screen button.
13. Touch the Start screen button.
14. Once you begin driving you will hear an audioprompt to “Proceed to the highlighted route.”You are now in route guidance mode.
10

Entering a Point of Interest (POI)To set a destination by entering a Point ofInterest (POI), do the following:
1. If a DVD map disc is not currently loaded,see “Loading a DVD Map Disc” earlier inthis section. If a map disc is currently loaded,proceed to Step 2.
2. Press the power/volume knob to turn thesystem on.
3. Touch the Dest screen button.
4. Verify that the selected Search Area is correct.
5. Touch the POI screen button.
6. Enter the specific title of the POI in the Namespace (i.e. Washington Monument) using thealpha keypad on the screen.
• If there are POIs with the same name,spell out the name and then touch theList screen button (McDonald’s restaurantvs. McDonald corporate office).
• Select the business desired.
• The system will list the POIs in alphabeticalorder or, if there are multiple POIs with thesame name, the system will list the POIsin order of distance from your location.
• Touch the screen button next to the addressof the POI desired.
7. Touch the Set Destination screen button.The POI entry is now complete.
8. Touch the Route screen button.
9. Touch the Start screen button.
10. Once you begin driving you will hear an audioprompt to “Proceed to the highlighted route.”You are now in route guidance mode.
Using the Category or City selections will aid thesystem in finding the POI by limiting the searchoptions.
11
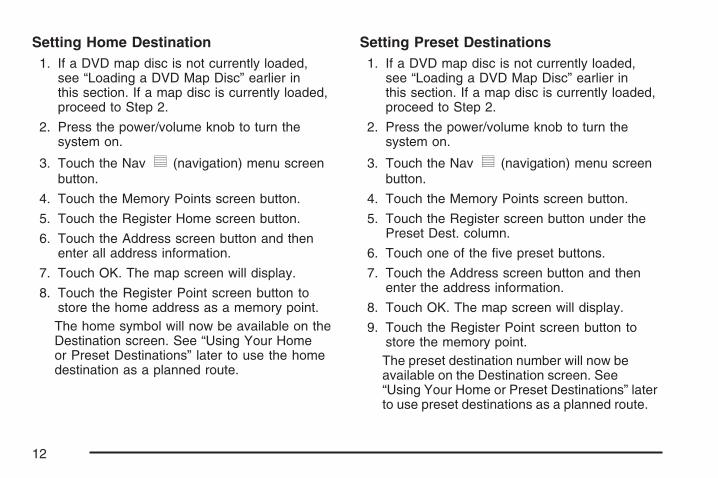
Setting Home Destination1. If a DVD map disc is not currently loaded,
see “Loading a DVD Map Disc” earlier inthis section. If a map disc is currently loaded,proceed to Step 2.
2. Press the power/volume knob to turn thesystem on.
3. Touch the Nav y (navigation) menu screenbutton.
4. Touch the Memory Points screen button.
5. Touch the Register Home screen button.
6. Touch the Address screen button and thenenter all address information.
7. Touch OK. The map screen will display.
8. Touch the Register Point screen button tostore the home address as a memory point.The home symbol will now be available on theDestination screen. See “Using Your Homeor Preset Destinations” later to use the homedestination as a planned route.
Setting Preset Destinations1. If a DVD map disc is not currently loaded,
see “Loading a DVD Map Disc” earlier inthis section. If a map disc is currently loaded,proceed to Step 2.
2. Press the power/volume knob to turn thesystem on.
3. Touch the Nav y (navigation) menu screenbutton.
4. Touch the Memory Points screen button.
5. Touch the Register screen button under thePreset Dest. column.
6. Touch one of the five preset buttons.
7. Touch the Address screen button and thenenter the address information.
8. Touch OK. The map screen will display.
9. Touch the Register Point screen button tostore the memory point.The preset destination number will now beavailable on the Destination screen. See“Using Your Home or Preset Destinations” laterto use preset destinations as a planned route.
12

Using Your Home or PresetDestinationsThese destinations are available for selectionwhile driving.
1. If a DVD map disc is not currently loaded,see “Loading a DVD Map Disc” earlier inthis section. If a map disc is currently loaded,proceed to Step 2.
2. Press the power/volume knob to turn thesystem on.
3. Touch the Dest screen button.
4. Touch the L (Home symbol) or one ofthe available Preset Destination symbolsat the bottom of the Destination screen.The map screen will display.
5. If currently driving on a route, touch theSet Destination screen button. The systemwill calculate the new route. If you arenot currently driving on a route, the systemwill automatically calculate a route to thehome or preset destination selected.
6. Touch the Route screen button.
7. Touch the Start screen button.
8. Once you begin driving, or if you arealready driving, you will hear an audioprompt to “Proceed to the highlighted route.”You are now in route guidance mode.
Canceling GuidanceGuidance will be canceled once you arrive at yourfinal destination. To cancel guidance prior toarrival at the final destination, do the following:
1. From the map screen, touch the Nav Optionsscreen button.
2. Touch the Cancel Route screen button.
3. Touch the Yes screen button to confirmcancellation.
Cleaning the Video ScreenWhen cleaning the video screen, use only a softclean cotton cloth dampened with clean water.
13

✍ NOTES
14

Features and Controls .................................. 16Using the Navigation System ....................... 16Maps ........................................................... 20Symbols ...................................................... 22Navigation Menu ......................................... 23Destination .................................................. 34Colors on the Screen .................................. 49Configure Menu ........................................... 50
Global Positioning System (GPS) ................ 53Vehicle Positioning ...................................... 54Problems with Route Guidance ................... 55If the System Needs Service ....................... 55Ordering Map DVDs .................................... 56Database Coverage Explanations ................ 56
Section 2 Features and Controls
15
Features and Controls
Using the Navigation SystemThis section includes the basic information tooperate the navigation system.
The main navigation menu displays a numberof options which offer information on a varietyof topics. See Navigation Menu on page 23for more information.
Use the hard keys located on the navigationsystem along with the available touch-sensitivescreen buttons on the navigation screen tooperate the system.
Once the vehicle is moving, various functionswill be disabled to reduce driver distractions.
Hard KeysThe following hard keys are located to the left ofthe navigation screen:
P / v (Power/Volume Knob): Press thepower/volume knob to turn the audio andnavigation system on and off. Turn the knob toincrease or decrease the volume to the audiosystem.
NAV RPT (Navigation Repeat): Press theNAV RPT key to repeat the current voice guidancenavigation prompt.
NAV (Navigation): If you are in a menu andare not on the map screen, press the NAV keyto view the map showing your vehicle’s currentposition.
If a route has not been planned, press this keyto display the map screen and the followinginformation:
• North or Heading Up symbol
• Time
• Map scale
16

If a route has been planned, press this key todisplay the map screen and the followinginformation:
• Number of miles/kilometers betweencurrent vehicle position and the destination.See “Route Overview Menu” underDestination on page 34 for more information.
• Estimated travel time to the destination.See “Route Overview Menu” underDestination on page 34 for more information.
• Highlighted route or turn-by-turn instructions.See “Map Appearance” under NavigationMenu on page 23 for more information.
You will find more information on each featurefound on a map screen later in this manual.
BAND: Press the BAND key to access the BANDscreen and to switch between AM, FM1, FM2,XM1, or XM2, if equipped. See “Finding a Station”under Navigation Audio System on page 58.
x SEEK w: Press the SEEK up or down arrowsto go to the next or previous radio station or trackson a CD. See “Finding a Station” under NavigationAudio System on page 58 or CD Player on page 66.
B (CD): Press the CD key to play a CD. TheCD screen will display. See CD Player on page 66.
e (Audio): Press the audio key to access theAudio menu. See Navigation Audio Systemon page 58.
CONFIG (Configure): Press the CONFIG keyto access the Configure menu. See ConfigureMenu on page 50 for more information.
O (Tuning) Knob: Turn the tuning knob to goto the next or previous frequency. See “Findinga Station” under Navigation Audio Systemon page 58.
X (Tilt Open/CD Eject) Key: Press the ejectkey located next to the CD slot to eject a CD.
Press and hold the eject key to tilt the screenforward to access the map DVD slot. See “Loadinga DVD Map Disc” under Getting Started on page 6for more information on loading the map DVD.
X (DVD Eject) Key: Once the screen is tiltedforward, press this eject button to eject themap DVD.
17

Alpha-Numeric KeypadLetters of the alphabet, symbols, punctuation,and numbers will display on the navigation screenas an alpha or numeric keypad. The appropriatekeypad will automatically display wheneverthe system needs information from you. Thealpha keypad will display when the system needsinput of a city or street name. The numerickeypad will display when the system needsinput of a phone number or house address.
Touch a character on the screen to select it.You may also touch the 0 - 9 screen button atany time from the alpha keypad to accessthe numeric keypad.
U (Space): Touch this screen button toenter a space between characters or the wordsof a name.
V (Backspace): Touch this screen button ifan incorrect character has been selected.
To make name selections easier, the system willonly allow you to select a character which canfollow the last one entered. For example, if a Z isentered, a T will not be available to select. Thesystem will highlight the available characters.
If a name is not available after input, it may needto be inputted differently, the map DVD databasemay not contain that information, or the correctsearch area has not been selected. See DatabaseCoverage Explanations on page 56.
Touch-Sensitive Screen ButtonsTouch-sensitive buttons, or screen buttons, arelocated on the screen. After selecting a button onthe screen, a beep will sound. This feature canbe turned off. See Configure Menu on page 50for more information. Screen buttons will behighlighted when available. There are sometoggle screen buttons that will be light in colorwhen active.
18
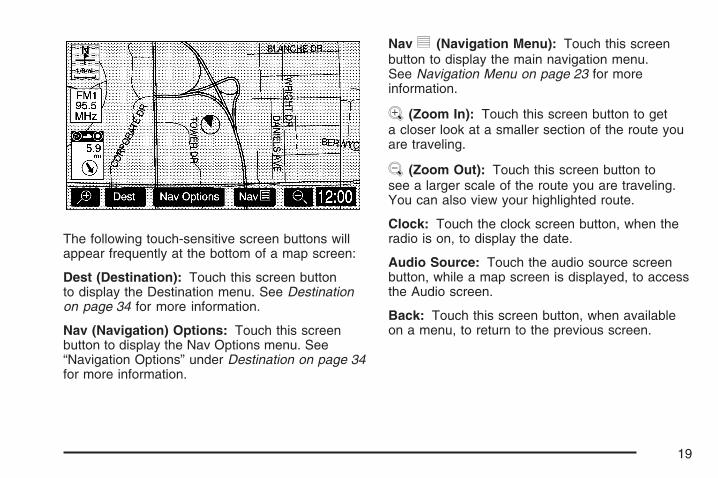
The following touch-sensitive screen buttons willappear frequently at the bottom of a map screen:
Dest (Destination): Touch this screen buttonto display the Destination menu. See Destinationon page 34 for more information.
Nav (Navigation) Options: Touch this screenbutton to display the Nav Options menu. See“Navigation Options” under Destination on page 34for more information.
Nav y (Navigation Menu): Touch this screenbutton to display the main navigation menu.See Navigation Menu on page 23 for moreinformation.
V (Zoom In): Touch this screen button to geta closer look at a smaller section of the route youare traveling.
U (Zoom Out): Touch this screen button tosee a larger scale of the route you are traveling.You can also view your highlighted route.
Clock: Touch the clock screen button, when theradio is on, to display the date.
Audio Source: Touch the audio source screenbutton, while a map screen is displayed, to accessthe Audio screen.
Back: Touch this screen button, when availableon a menu, to return to the previous screen.
19

MapsThis section includes basic information aboutthe map database.
The maps are stored on a DVD-ROM. The48 contiguous United States, Hawaii, and Canadaare contained on one disc. The map databaseincludes interstate freeways, state highways,country roads, and major and general streets.
Refer to the “Navigation System Map Disc” manualto view the explanation of map coverage. The mapdisc manual will be in the map DVD case whenthe vehicle is delivered from the factory.
Installing the DVD Map DiscYour dealer may have installed the map DVD.If the DVD was not installed, do the following:
1. Turn the ignition on.
2. Press and hold the eject key to tilt thescreen forward.
3. Load the map DVD into the DVD slot byinserting it partway. The system will pull it in.
Notice: Pressing directly on the navigationscreen may cause damage. Repairs would notbe covered by your warranty. Do not pressdirectly on the navigation screen.
4. To close the screen, slightly push up on thetwo outer top corners until the screen is inposition, then push the screen in, by pushingon the four outer corners, until you heara click.
Once the screen is closed, you will have thefollowing two language choices:
• ENG (English)
• FR (French)
Select the language at this time. See “Language”under Configure Menu on page 50 for moreinformation. Once a language has been selected,touch the NEXT screen button to plan a route.The map will appear showing your current vehicleposition.
20

Ejecting the DVD Map DiscWhen the DVD map disc is not loaded, you willnot be able to use the navigation portion ofthe system.
1. Turn the ignition on.
2. Press and hold the eject key to tilt thescreen forward.
3. Once the screen is tilted forward, press theeject key next to the DVD map disc slot.The disc will eject.
Notice: Pressing directly on the navigationscreen may cause damage. Repairs would notbe covered by your warranty. Do not pressdirectly on the navigation screen.
4. To close the screen, slightly push up on thetwo outer top corners until the screen is inposition, then push the screen in, by pushingon the four outer corners, until you heara click.
Map Adjustments and ScalesThe system allows you to adjust the scale of viewon the map. The map will scroll automaticallybased on the direction you are traveling.
To view a larger or smaller scale of the map,touch zoom in or zoom out. The scale of a mapcan range from 1/32 of a mile (0.05 km) to128 miles (206 km). See “Hard Keys” underUsing the Navigation System on page 16 formore information.
21
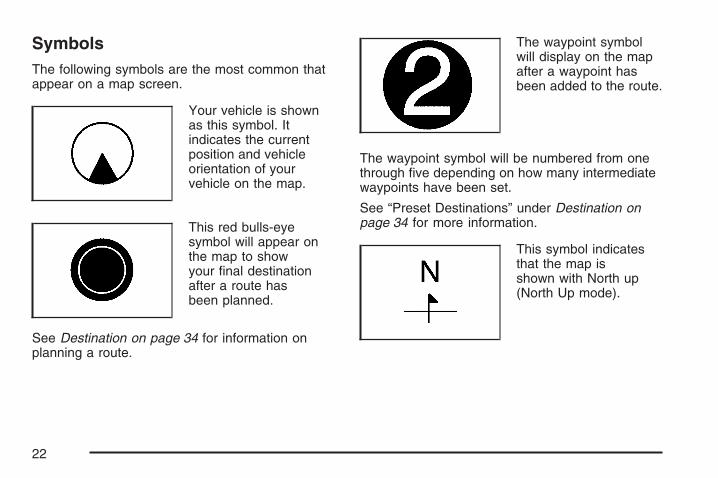
SymbolsThe following symbols are the most common thatappear on a map screen.
Your vehicle is shownas this symbol. Itindicates the currentposition and vehicleorientation of yourvehicle on the map.
This red bulls-eyesymbol will appear onthe map to showyour final destinationafter a route hasbeen planned.
See Destination on page 34 for information onplanning a route.
The waypoint symbolwill display on the mapafter a waypoint hasbeen added to the route.
The waypoint symbol will be numbered from onethrough five depending on how many intermediatewaypoints have been set.
See “Preset Destinations” under Destination onpage 34 for more information.
This symbol indicatesthat the map isshown with North up(North Up mode).
22

While in North Up mode, North will always be atthe top of the map screen regardless of whichdirection the vehicle is traveling. Touch this screenbutton to switch between North Up and HeadingUp modes. See “Map Appearance” underNavigation Menu on page 23 for more information.
This symbol indicatesthat the map is shownwith the vehicletravel direction up(Heading Up mode).
The shaded triangle indicates North. While inHeading Up mode, the direction your vehicle istraveling will always be at the top of the mapscreen. Touch this screen button to switchbetween Heading Up and North Up modes.See “Map Appearance” under Navigation Menuon page 23 for more information.
Navigation Menu
Nav y (Navigation Menu): Touch the navigationmenu screen button at the bottom of the mapscreen to access the main navigation menu.
The main navigation menu allows you to choosefrom a list of options and to use the available touchscreen buttons to make system adjustments andplan routes.
23
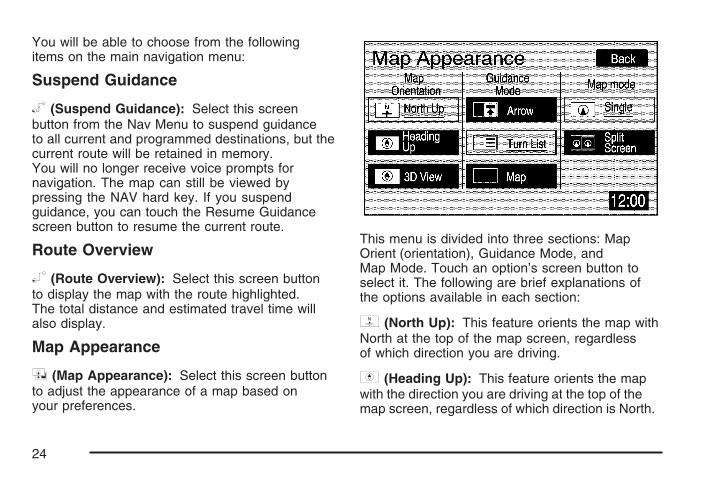
You will be able to choose from the followingitems on the main navigation menu:
Suspend Guidance
} (Suspend Guidance): Select this screenbutton from the Nav Menu to suspend guidanceto all current and programmed destinations, but thecurrent route will be retained in memory.You will no longer receive voice prompts fornavigation. The map can still be viewed bypressing the NAV hard key. If you suspendguidance, you can touch the Resume Guidancescreen button to resume the current route.
Route Overview
z (Route Overview): Select this screen buttonto display the map with the route highlighted.The total distance and estimated travel time willalso display.
Map Appearance
v (Map Appearance): Select this screen buttonto adjust the appearance of a map based onyour preferences.
This menu is divided into three sections: MapOrient (orientation), Guidance Mode, andMap Mode. Touch an option’s screen button toselect it. The following are brief explanations ofthe options available in each section:
y (North Up): This feature orients the map withNorth at the top of the map screen, regardlessof which direction you are driving.
u (Heading Up): This feature orients the mapwith the direction you are driving at the top of themap screen, regardless of which direction is North.
24
u (3D view): This feature gives maps a3-dimensional view, and will remain in theHeading Up position.
s (Arrow): This feature continually displaysdirectional turn guidance for your next maneuver.
R (Turn list): This feature lists informationon your next three maneuvers, including thedistance to the turn, and street names.
? (Map): This feature will display your vehicle’scurrent position, with the calculated routehighlighted.
P (Single): This feature allows one map to bedisplayed.
| (Split Screen): This feature allows two mapsto be displayed, which can be independentlyadjusted in both scale and map orientation.
For more information on the symbols thatcan appear on a map screen, see Symbolson page 22.
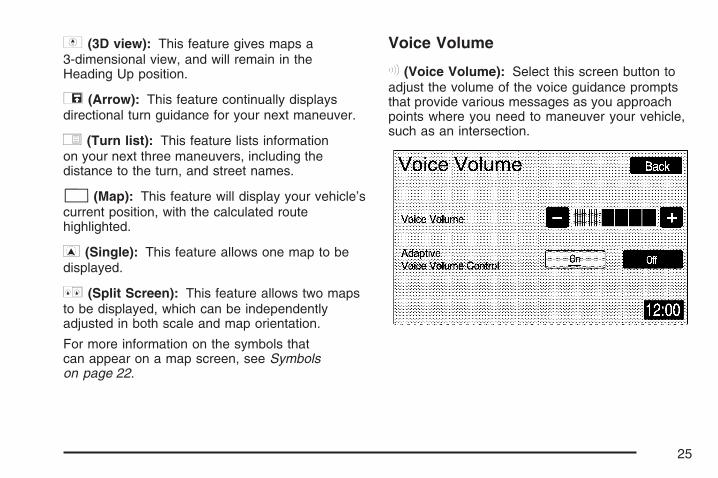
Voice Volume
! (Voice Volume): Select this screen button toadjust the volume of the voice guidance promptsthat provide various messages as you approachpoints where you need to maneuver your vehicle,such as an intersection.
25
To adjust the volume of the voice prompts, do thefollowing:
1. Touch the Voice Volume screen button.
2. Touch the plus (+) or minus (−) sign screenbuttons to increase or decrease the volume.The voice prompt will come on with eachadjustment to give you an idea of the volumeat each level.
3. Once you have reached the desired volumelevel, touch the Back screen button to returnto the previous screen.
Adaptive Voice Volume Control: The volumeof voice prompts will increase automaticallyonce the vehicle exceeds 50 mph (80 km/hr).Touch the On screen button to activate thisfeature, or the Off screen button to turn thisfeature off.
If voice guidance is not needed, lower the volumeas far as it will go, so the voice prompts arenot heard.
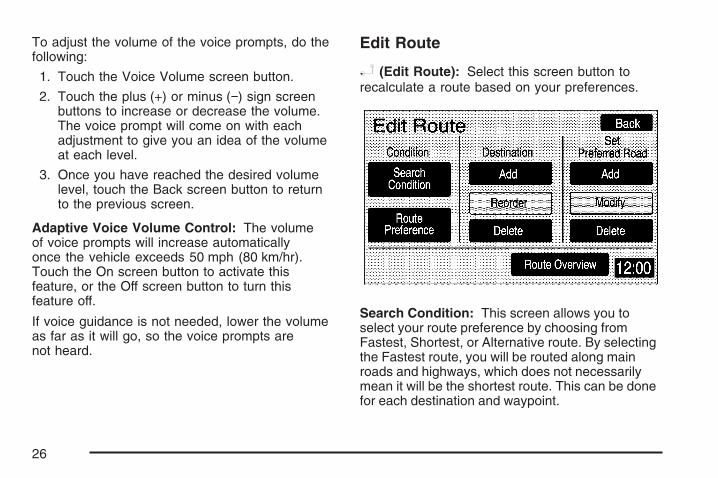
Edit Route
t (Edit Route): Select this screen button torecalculate a route based on your preferences.
Search Condition: This screen allows you toselect your route preference by choosing fromFastest, Shortest, or Alternative route. By selectingthe Fastest route, you will be routed along mainroads and highways, which does not necessarilymean it will be the shortest route. This can be donefor each destination and waypoint.
26
Route Preference: This screen allows you toselect your road preferences by setting whichtypes of roads you want to use or avoid.
Freeway: This option allows the system touse major roads when calculating a route.
Toll Road: This option allows the system touse toll roads when calculating a route.
Ferry: This option allows the system to useferries when calculating a route.
Restricted Road: This option allows the systemto use time restricted roads when calculatinga route.
Destination: This feature allows you to add,reorder, or delete destinations.
Add: See Destination on page 34 for informationon creating a destination.
Reorder: When waypoints have been added,select this screen button to change the orderof the waypoints and the final destination onthe route.
1. Touch the Reorder screen button next tothe destination.
2. Touch the OK screen button when finishedreordering.
3. Touch the Back screen button, then theRoute Overview screen button. The mapscreen will display.
4. Touch the Route screen button and thesystem will recalculate the route.
5. Touch the Start screen button to startroute guidance.
27
Delete: Press this button to delete the currentdestination.
Set Preferred Road: This feature allows you toadd, modify, or delete road preference settings.
Add: Press this screen button to add a road.The map screen will display. Touch the map toscroll to the preferred road. Select the OK screenbutton. Press the Enter screen button to setthe road as a road to be added to the currentdestination or the Next screen button to changethe road type.
Modify: Press this screen button to changethe preferred road. Follow the directions forthe “Add” screen button.
Delete: Press this button to delete roadpreference settings.
Route Overview: Touch this screen buttonto access the Route Overview menu. See“Route Overview” under Destination on page 34.
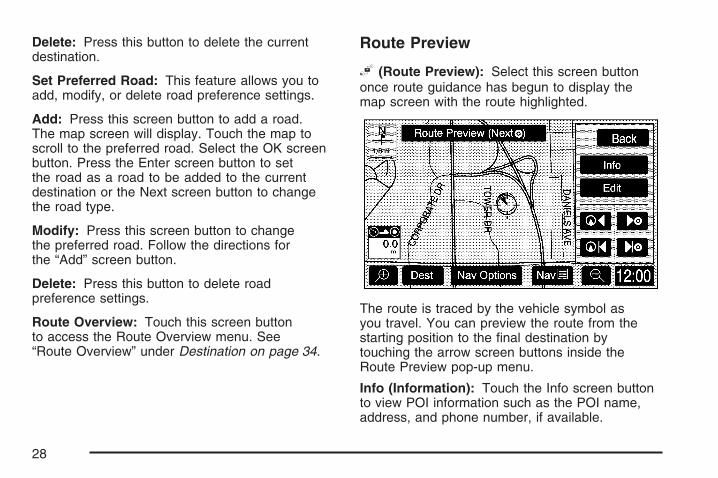
Route Preview
{ (Route Preview): Select this screen buttononce route guidance has begun to display themap screen with the route highlighted.
The route is traced by the vehicle symbol asyou travel. You can preview the route from thestarting position to the final destination bytouching the arrow screen buttons inside theRoute Preview pop-up menu.
Info (Information): Touch the Info screen buttonto view POI information such as the POI name,address, and phone number, if available.
28

Edit: Touch the Edit screen button to select aPOI as the next destination you would liketo preview.
To preview a POI’s destination instead of the finaldestination, do the following:
1. Touch the Edit screen button.
2. Touch the Select POI screen button.
3. Touch the screen button of the desiredPOI category.
4. Touch the icon screen button of thedesired POI.
5. Touch the Back screen button twice to get tothe Edit Route Preview screen.
6. Touch the Next POI screen button, then touchthe OK screen button.
7. Touch the Back screen button to return to theRoute Preview screen.Now when you touch the arrow screen buttonsto preview the route, it will trace the route tothe next selected POI rather than the route tothe final destination.
To return to previewing the route to the finaldestination, do the following:
1. Touch the Edit screen button.
2. Touch the Next screen button.
3. Touch the OK screen button, then theBack screen button to return to the RoutePreview screen.Now when you touch the arrow screenbuttons to preview the route, it will tracethe route to the final destination rather thanthe route to the next POI.
Use the following arrow screen buttons from theRoute Preview pop-up menu to trace a route:
Iq (Preview to current location): Touch thisscreen button to preview the route traveling towardthe vehicle’s current location. This button togglesbetween fast and slow.
rh (Preview to final destination): Touchthis screen button to view the route travelingtoward the final destination. This button togglesbetween fast and slow.
29
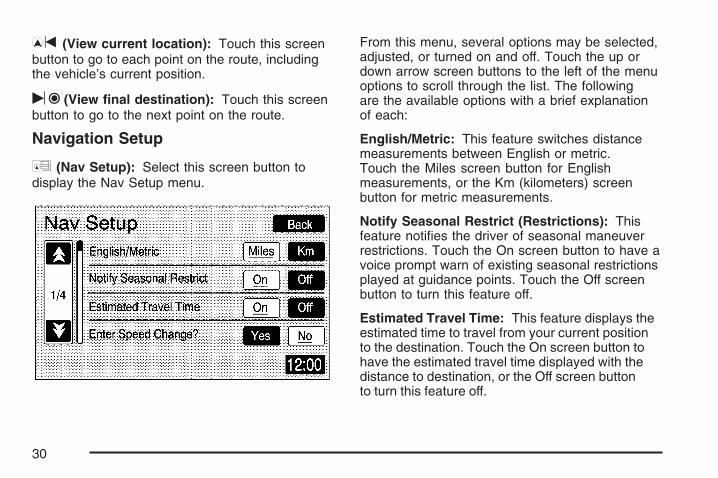
It (View current location): Touch this screenbutton to go to each point on the route, includingthe vehicle’s current position.
uh (View final destination): Touch this screenbutton to go to the next point on the route.
Navigation Setup
x (Nav Setup): Select this screen button todisplay the Nav Setup menu.
From this menu, several options may be selected,adjusted, or turned on and off. Touch the up ordown arrow screen buttons to the left of the menuoptions to scroll through the list. The followingare the available options with a brief explanationof each:
English/Metric: This feature switches distancemeasurements between English or metric.Touch the Miles screen button for Englishmeasurements, or the Km (kilometers) screenbutton for metric measurements.
Notify Seasonal Restrict (Restrictions): Thisfeature notifies the driver of seasonal maneuverrestrictions. Touch the On screen button to have avoice prompt warn of existing seasonal restrictionsplayed at guidance points. Touch the Off screenbutton to turn this feature off.
Estimated Travel Time: This feature displays theestimated time to travel from your current positionto the destination. Touch the On screen button tohave the estimated travel time displayed with thedistance to destination, or the Off screen buttonto turn this feature off.
30

Enter Speed Change?: This feature allowsyou to adjust estimated speeds for Freeway,Main street, or Residential driving. These speedvalues are used to calculate estimated traveltime. To change estimated speeds, touch theYes screen button. The Change Speed menu willappear. Touch the arrow screen buttons undereach road type to increase or decrease thespeed. The maximum allowable speed to set is95 mph (150 km). You may also touch theDefault screen button to choose factory defaultspeed settings as your choice. When youradjustments are complete, touch the Backscreen button to return to the Nav Setup menu.
Auto Reroute: With this feature on, the navigationsystem will automatically recalculate a route ifyou drive off course. Touch the Off screen buttonto turn this feature off.
Voice Guide in All Mode: Touch the On screenbutton to hear navigation voice prompts whilein Audio mode. Touch the Off screen button toturn this feature off.
Current Street Name: Touch the On screenbutton to display the current street name thatthe vehicle is traveling on. Touch the Off screenbutton to turn this feature off.
Exit Information: This feature will displaymap icons which can be selected to displaythe next exit’s information, including Point ofInterest (POI) facilities such as gas stations,restaurants, and lodging. Touch the On screenbutton to display exit information icons, ortouch the Off screen button to cancel thedisplay of exit information icons.
Map Color (Day): This feature allows you toadjust the daytime map appearance. Choosebetween Normal, Auto, 1, 2, 3, or 4. The numberedsettings vary the color scheme of the mapdisplay. The Auto setting will change the mapappearance automatically every three months.When the desired color setting has been selected,press the NAV hard key to view the adjustedmap color.
Map Color (Night): This feature allows you toadjust the nighttime map appearance. Choosebetween Normal, Auto, 1, 2, 3, or 4. The numberedsettings vary the color scheme of the mapdisplay. The Auto setting will change the mapappearance automatically every three months.When the desired color setting has been selected,press the NAV hard key to view the adjustedmap color.
31
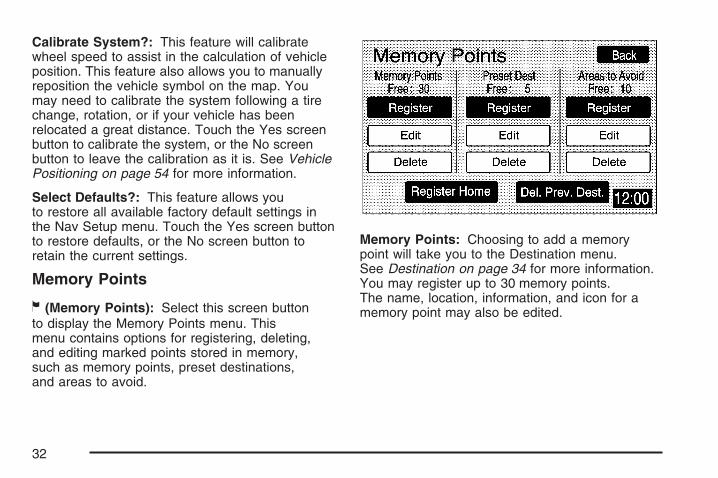
Calibrate System?: This feature will calibratewheel speed to assist in the calculation of vehicleposition. This feature also allows you to manuallyreposition the vehicle symbol on the map. Youmay need to calibrate the system following a tirechange, rotation, or if your vehicle has beenrelocated a great distance. Touch the Yes screenbutton to calibrate the system, or the No screenbutton to leave the calibration as it is. See VehiclePositioning on page 54 for more information.
Select Defaults?: This feature allows youto restore all available factory default settings inthe Nav Setup menu. Touch the Yes screen buttonto restore defaults, or the No screen button toretain the current settings.
Memory Points
w (Memory Points): Select this screen buttonto display the Memory Points menu. Thismenu contains options for registering, deleting,and editing marked points stored in memory,such as memory points, preset destinations,and areas to avoid.
Memory Points: Choosing to add a memorypoint will take you to the Destination menu.See Destination on page 34 for more information.You may register up to 30 memory points.The name, location, information, and icon for amemory point may also be edited.
32

Preset Dest (Destination): Five presetdestinations, as well as one for home, may beregistered or edited. The five preset destinationsand home are the only destination selectionsavailable from the Destination menu whilethe vehicle is moving. These presets are shownas the home symbol and numbered presets1 through 5 at the bottom of the Destination menu.See Destination on page 34 for more informationon how to register Memory Points and presetdestinations.
Areas to Avoid: Up to 10 areas to avoid mayalso be registered from the Memory Points menu.Areas to avoid include areas such as hightraffic areas, construction areas, or any mainroads, or intersections you want to avoid.When registering or editing an area to avoid,the size of the area may also be increasedor decreased by touching the up or down arrowscreen buttons on the scroll bar.
Register Home: Touch this screen button toaccess the Register Home screen. Choosea method of destination entry and enter thedestination you would like to store as home.
Once your entry is complete, touch the RegisterPoint screen button to store this point ashome. Each time you touch the home symbolfrom the bottom of the Destination screen,this destination will be calculated.
Once you have stored a destination as home,the Register Home screen button will change toread Delete Home. You may then touch thisscreen button to delete the destination you havestored as home.
Del. Prev. Dest. (Delete Previous Destination):Touch this screen button to delete a previousdestination. A list of previous destinationswill display on the Delete Previous Dest screen.Touch the screen button next to the previousdestination you wish to delete. You will be askedto confirm your decision. Touch the Yes screenbutton to delete the destination or touch theNo screen button to cancel the deletion.
You may also touch the Del. All screen buttonfrom the Delete Previous Dest screen to deleteall previous destinations listed. Touch the Yesscreen button to delete all previous destinations ortouch the No screen button to cancel the deletion.
33

DestinationThe Destination menu gives several ways to plana route by entering destination points.
Touch the Dest screen button at the bottom of themap screen to display the Destination menu.
Search Area: The Destination menu allowsyou to select the area to be searched foryour destination. A map of the 48 contiguousUnited States, including Hawaii, and Canada willbe shown. The map is divided into nine regions.
Before selecting a destination, review the searcharea map on the right side of the menu tomake sure your destination is located in thehighlighted region.
Change: Touch this screen button to see a moredetailed search area map with a list of states orto change the search area. The Search Area screenwill appear. Touch the numbered screen buttonto the left of the map that corresponds with thenumbered region you wish to choose.
34

Delete Dest (Destination): Touch the DeleteDest screen button on the Destination menu.Touch the screen button next to the destinationto delete. Select Yes to confirm.
k / l (Up and Down Arrows): Touch the up ordown arrow screen buttons, on the Destinationmenu, to scroll through the pages of the menu.
Once your destination entry is complete, a screenwith the destination preview menu will display.See “Destination Preview Menu” later in thissection for more information.
To enter a destination, choose from one of thefollowing destination entry methods:
Preset DestinationsThe preset destination entry method allows youto select destinations that were registered aspresets 1 through 5.
These presets, along with the home symbolpreset, are located at the bottom of each page ofthe Destination menu. Besides the home presetdestination, these are the only presets availablefor selection while the vehicle is moving.
35

AddressThe Address destination entry method allows youto input an address by providing the systemwith a city name, street name, and house number.
Input the city name using the alpha keypad or touchthe Recent screen button to view the last five citiesentered and the nearest five cities to the currentlocation. Touch the screen button by the desiredcity name to select the city. See “Alpha-NumericKeypad” under Using the Navigation System onpage 16 for more information.
Use the same city name that you would use whenmailing a letter. The system will search for anentry exactly as you have entered it. If you did notinclude a space between words where necessary,the system may not be able to find the desiredlocation. As information is entered, the systemwill automatically search for available names,and the List screen button will become available.Touch the List screen button to view namechoices and select the desired city name, or touchthe Back screen button to continue to spell thecity name, further reducing the number of availableitems. The box at the end of the Street entryfield will contain the number of city namesavailable in the current generated list. If you donot know the city, proceed to entering thestreet name by pressing the Street screen button.
36
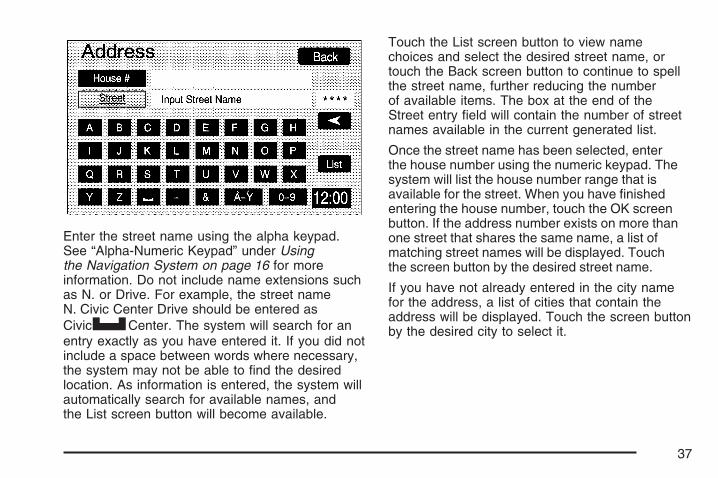
Enter the street name using the alpha keypad.See “Alpha-Numeric Keypad” under Usingthe Navigation System on page 16 for moreinformation. Do not include name extensions suchas N. or Drive. For example, the street nameN. Civic Center Drive should be entered asCivicUCenter. The system will search for anentry exactly as you have entered it. If you did notinclude a space between words where necessary,the system may not be able to find the desiredlocation. As information is entered, the system willautomatically search for available names, andthe List screen button will become available.
Touch the List screen button to view namechoices and select the desired street name, ortouch the Back screen button to continue to spellthe street name, further reducing the numberof available items. The box at the end of theStreet entry field will contain the number of streetnames available in the current generated list.
Once the street name has been selected, enterthe house number using the numeric keypad. Thesystem will list the house number range that isavailable for the street. When you have finishedentering the house number, touch the OK screenbutton. If the address number exists on more thanone street that shares the same name, a list ofmatching street names will be displayed. Touchthe screen button by the desired street name.
If you have not already entered in the city namefor the address, a list of cities that contain theaddress will be displayed. Touch the screen buttonby the desired city to select it.
37
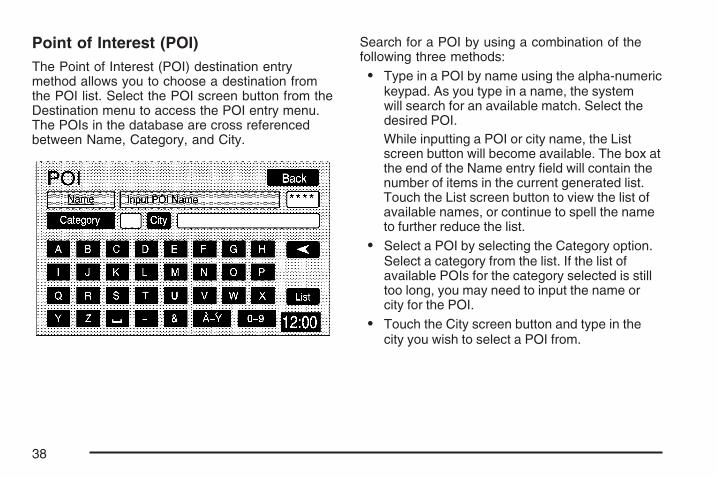
Point of Interest (POI)The Point of Interest (POI) destination entrymethod allows you to choose a destination fromthe POI list. Select the POI screen button from theDestination menu to access the POI entry menu.The POIs in the database are cross referencedbetween Name, Category, and City.
Search for a POI by using a combination of thefollowing three methods:
• Type in a POI by name using the alpha-numerickeypad. As you type in a name, the systemwill search for an available match. Select thedesired POI.While inputting a POI or city name, the Listscreen button will become available. The box atthe end of the Name entry field will contain thenumber of items in the current generated list.Touch the List screen button to view the list ofavailable names, or continue to spell the nameto further reduce the list.
• Select a POI by selecting the Category option.Select a category from the list. If the list ofavailable POIs for the category selected is stilltoo long, you may need to input the name orcity for the POI.
• Touch the City screen button and type in thecity you wish to select a POI from.
38

If an arrow appears to the right or left of the itemname, the complete name is too long for thedisplay. Touch the right or left arrow screen buttonsto scroll to the end or beginning of the name.
The POI for Restaurant is broken down intoseveral categories. Select the Restaurant screenbutton from the POI choices. A list of cuisinetypes will then appear.
Memory PointsThe Memory Points destination entry methodallows you to select a destination by selectingfrom a list of marked points on the map thatwere previously marked. Memory points include up to 30 saved points,
five preset destinations, and a home destination.Select the Memory Points screen button, from theDestination screen, to select any one of the markedpoints as the active destination. Marked points canbe sorted by icon, date saved, or alphabetically.
If a memory point has been registered you canselect an icon to correspond with that memorypoint. To register that memory point with a sound,touch the With Sound screen button, then selecta sound. See “Memory Points” under NavigationMenu on page 23 for more information onregistering, editing, and deleting memory points.
39

Previous DestinationThe Previous Destination entry method allows youto select a destination by selecting from the listof previously entered destinations.
Touch the number next to the destination to selectit as a destination or a waypoint.
EmergencyThe Emergency destination entry method allowsyou to select a destination by selecting from a list ofemergency facilities. The list will vary by area.
Selecting Police Station or Hospital will displaya list. Select a destination from the list, selectSet Destination, Route, then Start to start routeguidance. The list can be changed to appearin alphabetical order or in order by distance fromyour vehicle’s location.
This screen also provides the address and mapcoordinates of your vehicle’s current position.
40

MapThe Map destination entry method displays thelast location on the map, and the road preference.
Scroll across and touch the map at the locationyou would like to set as your destination. Once youhave located the desired destination, touch OKscreen button, then the Set Destination screenbutton. The route will then be calculated. Begindriving to start route guidance or touch the Routescreen button and then the Start screen button.
You can zoom out to view the entire regional map.See “Touch-Sensitive Screen Buttons” underUsing the Navigation System on page 16 for moreinformation. However, if you zoom out as muchas possible and scroll around the map, some partsof the map will appear to be missing becausethey are not readable in larger scales.
Previous Start PointThe Previous start point destination entry methodallows you to select the last start point as adestination. Select the destination and the mapscreen will display with the location on themap. Select the Set destination screen button,then Route, then the Start screen button to startroute guidance.
41
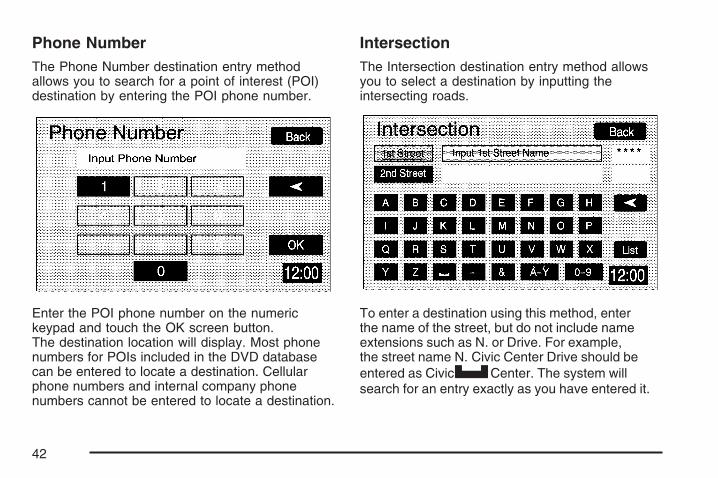
Phone NumberThe Phone Number destination entry methodallows you to search for a point of interest (POI)destination by entering the POI phone number.
Enter the POI phone number on the numerickeypad and touch the OK screen button.The destination location will display. Most phonenumbers for POIs included in the DVD databasecan be entered to locate a destination. Cellularphone numbers and internal company phonenumbers cannot be entered to locate a destination.
IntersectionThe Intersection destination entry method allowsyou to select a destination by inputting theintersecting roads.
To enter a destination using this method, enterthe name of the street, but do not include nameextensions such as N. or Drive. For example,the street name N. Civic Center Drive should beentered as CivicUCenter. The system willsearch for an entry exactly as you have entered it.
42
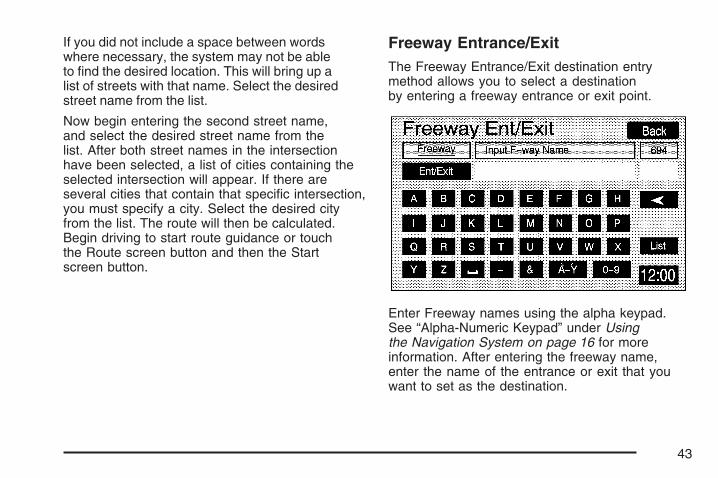
If you did not include a space between wordswhere necessary, the system may not be ableto find the desired location. This will bring up alist of streets with that name. Select the desiredstreet name from the list.
Now begin entering the second street name,and select the desired street name from thelist. After both street names in the intersectionhave been selected, a list of cities containing theselected intersection will appear. If there areseveral cities that contain that specific intersection,you must specify a city. Select the desired cityfrom the list. The route will then be calculated.Begin driving to start route guidance or touchthe Route screen button and then the Startscreen button.
Freeway Entrance/ExitThe Freeway Entrance/Exit destination entrymethod allows you to select a destinationby entering a freeway entrance or exit point.
Enter Freeway names using the alpha keypad.See “Alpha-Numeric Keypad” under Usingthe Navigation System on page 16 for moreinformation. After entering the freeway name,enter the name of the entrance or exit that youwant to set as the destination.
43

Destination Preview Menu
Each time a destination is entered, a screenwith the destination preview menu will appear.This screen will display a zoomed in view of thedestination, as well as the following options:
Set Destination: Touch this screen button toset the current destination as the only destinationin the system. The route will be calculated andthe Route Preview screen will display.
Add Waypoint: Touch this screen button toadd the current destination to your current trip.The Add Waypoint screen will display. Touch theAdd screen button that corresponds with whereyou would like to add the current destination.Up to five waypoints can be added.
Info (Information): When a POI icon is selectedon the screen, touch this screen button todisplay the name, address, and telephone number,if available, for the selected POI. See “NavigationOptions” later in this section for more informationon POIs and their icons.
Route Preference: This option will displaythe Route Preference screen. To adjust routepreferences, touch Change. See “Edit Route”under Navigation Menu on page 23 for moreinformation.
Once the desired adjustments from the destinationpreview menu are complete, the route overviewmenu can be displayed. See “Route OverviewMenu” following in this section for moreinformation.
44
Once you have entered your destination bytouching the Enter Destination screen button,you can do one of the following:
• Press the NAV hard key to begin routeguidance.
• Start driving to begin route guidance.
• Touch the Route screen button on the mapscreen displaying the new destination tomake further changes. See “Route Overview”following in this section for more information.
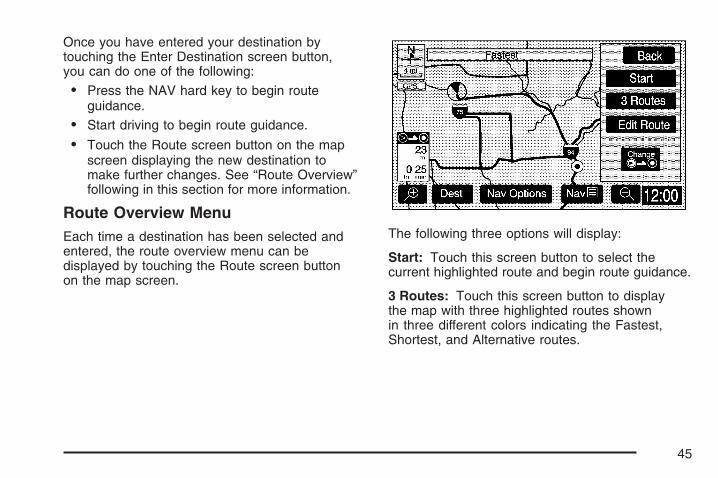
Route Overview MenuEach time a destination has been selected andentered, the route overview menu can bedisplayed by touching the Route screen buttonon the map screen.
The following three options will display:
Start: Touch this screen button to select thecurrent highlighted route and begin route guidance.
3 Routes: Touch this screen button to displaythe map with three highlighted routes shownin three different colors indicating the Fastest,Shortest, and Alternative routes.
45

After selecting one of the three routes, the roaddistance and estimated travel time will display.The Fastest route means you will be routedalong main roads and highways, but does notnecessarily mean it is the shortest route. Touchthe Time & Distance screen button to viewthe road distance and estimated travel time foreach of the three routes.
Edit Route: Touch this screen button to changethe route preferences. See “Edit Route” underNavigation Menu on page 23 for more information.
Press Back at any time to return to the previousscreen.
Navigation Options
Once a destination is selected and you beginyour route, touch the Nav Options screen buttonto view a menu with additional route options.Select from the following route options:
POI Icon On/Off: This option allows you to turnPoint of Interest (POI) icons on or off of the map.
POI Selection: This option allows you to selectwhich types of POIs will be displayed on the map.
Nav Options Menu shown with a Set Destination
46

After selecting POI Selection, the POI Selectionscreen will appear and display the differentPOI categories. You can select up to five differentPOI categories by touching the categories onthe screen. Touch the More screen button toview more categories. The icons for the selectedcategories will appear at the top of the screenand will display on the map.
To delete the POI category from the display,select that category from the POI Selectionscreen again. Press the Delete All screen buttonto delete all selected POI categories from themap screen.
To view a list of local POIs, touch the Local POIList screen button. The Local POI List screenwill list the closest POIs from the categoriesyou have selected. You can sort these POIs bydistance, icon/category, or name. Touch theRoute screen button to display POIs along yourcurrent route. Once you select the desired POI,a map of the area with a symbol marking thedestination will display.
47
Suspend/Resume Guidance: This option allowsyou to suspend or resume active route guidancefor all current and programmed destinations.See “Suspend Guidance” under Navigation Menuon page 23 for more information.
Cancel Route: This option allows you to cancelthe current or first destination. The secondprogrammed destination will then be used ifone is available.
3D Icon On/Off: This option allows the 3D iconsto be turned on or off. The 3D icons are forcertain structures (buildings, monuments, statecapitols, etc.). If this option is on, a 3D iconwill appear on the map. Select the icon toreceive information such as: the name of whatthe structure is and how far your vehicle isfrom that structure. Not all cities have 3D icons.
Register Point: This option allows you toregister a marked point or memory point.See “Memory Points” under Navigation Menuon page 23 for more information.
Right Screen: If a split-screen is currentlydisplayed, this option allows you to adjust optionsfor the right screen.
Change Route: This option allows you to changethe route search condition while the vehicle ismoving. The following options may be available:
• Detour for 1 mile?: Touch the Yes screenbutton to recalculate your route and detourone mile around the vehicle’s current position.
• Detour for 3 miles?: Touch the Yes screenbutton to recalculate your route and detourthree miles around the vehicle’s currentposition.
• Change to fastest?: Touch the Yes screenbutton to recalculate to the fastest route.
• Change to shortest?: Touch the Yes screenbutton to recalculate to the shortest route.
• Reroute from adjacent road?: Touch theYes screen button to recalculate from anotherroad on your route, near the vehicle’scurrent position.
48

If the position on the map is away from the currentvehicle position, touch the Nav Options screenbutton, to select from the following four options:
POI Icon On/Off: This option allows you to turnPoint of Interest (POI) icons on or off of the map.
Set Destination: This option allows you to set alocation you have chosen on the map as yourdestination. See “Map” earlier in this sectionfor more information on this destination entrymethod.
Add Waypoint: This option allows you to add themap destination to your current destinations.
Register Point: This option allows you registera marked point or memory point. See “MemoryPoints” under Navigation Menu on page 23for more information.
Colors on the ScreenWhen a route has been planned, it will behighlighted on the screen in blue.
Different colors are also used to distinguishbetween interstate freeways, state highways,county roads, major streets, and secondarystreets. Highways will be shown as a thickerline than a general street.
49

Configure MenuThe Configure menu allows you to set up andadjust such things as screen color, appearance,and language of the display for the navigationsystem. Press the CONFIG hard key to accessthe Configure menu.
Contrast/Brightness/Mode
Contrast: Touch the plus (+) or minus (–)sign screen buttons to increase or decreasethe contrast of the screen.
Brightness: Touch the plus (+) or minus (–)sign screen buttons to increase or decreasethe brightness of the screen.
AUTO (Automatic): Touch this screen buttonfor the system to automatically adjust the screenbackground depending on exterior lightingconditions.
Day: Touch this screen button and the systemwill make the screen background brighten.
Night: Touch this screen button and the systemwill make the screen background darken.
BeepWith this feature on, a beep will sound everytime a screen button is pressed on the navigationscreen. Select Off to turn the beeps off.
50
Vehicle Chime
Notice: The chime signals related to seat belts,parking brake, and other functions of yourvehicle operate through the navigation/radiosystem. If that equipment is replaced oradditional equipment is added to your vehicle,the chimes may not work. Make sure thatreplacement or additional equipment iscompatible with your vehicle before installing it.
This feature allows you to adjust the chimevolume level in your vehicle. Touch the Normalscreen button for normal chime volume or theLoud screen button for a louder chime volume.
LanguageYour vehicle has been set for the English language,but you may also select French for all instructionaltext and voice prompts. However, names on themap when using the navigation functions willnot change.
To change the language, the map DVD mustbe inserted. Then, do the following:
1. Touch the Language screen button.A caution will display.
2. Touch the desired language, Eng (English)or Fr (French), to select it.
3. Touch the Next screen button to changethe display back to the map screen.
If the language is changed from English, themenu screens will not match word-for-word asthey appear in this manual.
If you accidentally select a language you donot understand, press the CONFIG hard key,then the Language screen button, then selectthe desired language.
51

Clock
To adjust the time displayed and other time options,touch the Clock screen button. This will take you tothe Adjust Clock screen.You may also touch the time display in the lowerright corner of the navigation screen to brieflydisplay the date.To change the hours and minutes on the clock,do the following:1. Touch the Manual Adjust screen button.2. Touch the up or down arrow screen buttons to
increase or decrease the hours and minutes.3. Touch the Back screen button to return to the
previous screen.
12Hr/24Hr: This feature allows you to choosewhether the time is displayed in standard or militarytime. Touch the 12Hr screen button for standardtime or the 24Hr screen button for military time.
Auto GPS Update: With this feature on, thenavigation system time will be set to match thecurrent GPS time. The time will be updated withthe GPS time when the ignition is turned on. Touchthe Off screen button to turn this feature off.
Daylight Savings: With this feature on, thenavigation system will automatically adjust thetime for Daylight Savings. Touch the Off screenbutton to turn this feature off.
Time Zone: This feature allows you to selectfrom eight different time zones: EST (Eastern),AST (Atlantic), NST (Newfoundland), HAST(Hawaii-Aleutian), AKST (Alaska), PST (Pacific),MST (Mountain), and CST (Central). Touchthe arrow screen buttons to scroll through thelist, until the desired time zone is highlighted.
52

Display OffTo turn the navigation screen off, touch theDisp Off screen button on the Configure menu.To turn the screen back on, press any hard keyto the left of the navigation screen.
Global Positioning System (GPS)The Navigation System determines the positionof your vehicle by using satellite signals, variousvehicle signals and map data.
At times, other interferences such as the satellitecondition, road configuration, the condition ofthe vehicle and/or other circumstances caninterfere with the Navigation’s ability to determinethe accurate position of the vehicle.
The GPS shows the accurate current position ofyour vehicle using signals sent by the GPSSatellites of the United States Department ofDefense. When your vehicle is not receivingsignals from the satellites, a symbol will appearon the map screen.
This system may not be available/or interferencemay occur if the following happens:
• Signal obstructions caused by tall buildings,large trucks, tunnels,
• objects located on top of the instrument panel,
• satellites will not send signals if they arebeing repaired or improved,
• after-market glass tinting has been applied tothe vehicle’s windows.
Notice: Do not apply after-market glass tintingto the vehicle’s windows. Glass tinting willinterfere with the system’s ability to receiveGPS signals and cause the system tomalfunction. You might have to replace thewindow to correct the problem. This wouldnot be covered by your warranty.
For more information if you are experiencing aproblem, see If the System Needs Serviceon page 55 and Problems with Route Guidanceon page 55.
53

Vehicle PositioningAt times, the position of the vehicle on the mapmay be inaccurate due to one or more of thefollowing reasons:
• The road system has changed.
• The vehicle is driving on slippery roadsurfaces such as in sand, gravel and/or snow.
• The vehicle is traveling on winding roads.
• The vehicle is on a long straight road.
• The vehicle is approaching a tall buildingor a large vehicle.
• The surface streets run parallel to a freeway.
• The vehicle has just been transferred bya vehicle carrier or a ferry.
• The current position calibration is setincorrectly.
• The vehicle is traveling at high speed.
• The vehicle changes directions more thanonce, or when the vehicle is turning on aturn table in a parking lot.
• The vehicle is entering and/or exiting aparking lot, garage or a lot with a roof.
• The GPS signal is not received.
• A roof carrier is installed on your vehicle.
• The vehicle is equipped with tire chains.
• The tires are replaced.
• The tire pressure for your tires is incorrect.
• The tires are worn.
• The first time the map DVD is inserted.
• The battery is disconnected for several days.
• The vehicle is driving in heavy traffic wheredriving is at low speeds, and the vehicle isstopped and started repeatedly.
If you experience problems with your system,see “Navigation Setup” under Navigation Menuon page 23 to calibrate the system.
54
Problems with Route GuidanceInappropriate route guidance may occur underone or more of the following conditions:
• You have not turned onto the road indicated.
• Route guidance may not be availablewhen using automatic rerouting for the nextright or left turn.
• The route may not be changed when usingautomatic rerouting.
• There is no route guidance when turning atan intersection.
• Plural names of places may be announcedoccasionally.
• It may take a long time to operate automaticrerouting during high-speed driving.
• Automatic rerouting may display a routereturning to the set waypoint if you areheading for a destination without passingthrough a set waypoint.
• The route prohibits the entry of a vehicledue to a regulation by time or season orany other regulation which may be given.
• Some routes may not be searched.
• The route to the destination may not beshown if there are new roads, if roadshave recently changed or if certain roadsare not listed on the map DVD. SeeOrdering Map DVDs on page 56.
To recalibrate the vehicle’s position on the map,see “Navigation Setup” under Navigation Menuon page 23 to calibrate the system.
If the System Needs ServiceIf your system needs service and you havefollowed the steps listed here and still areexperiencing problems, see your dealer forassistance.
55

Ordering Map DVDsYou will receive two free DVD map disc updateswith the purchase of your new vehicle. Updatesare necessary to make sure that your vehicle’snavigation system has the most accurateinformation available about streets/roads, pointsof interest, and business locations.
The updates are provided by the GM Nav DiscCenter at the first and second anniversary datesof your vehicle’s delivery date. About four tosix weeks before those anniversary dates, youwill receive a post card from the GM NavDisc Center reminding you that a free update isavailable. The center will request confirmationof your mailing address either by having youcontact the toll-free number, 1–877–NAV–DISC(1–877–628–3472), or the center’s website,www.gmnavdisc.com. After verifying your addressyou should receive the updated disc in abouttwo weeks. After receiving the updated disc,replace the old disc in the navigation system.See “Installing the DVD Map Disc” and “Ejectingthe DVD Map Disc” under Maps on page 20.Dispose of the old disc to avoid confusion aboutwhich disc is the most current.
If you have any questions about the operation ofthe navigation system or the update process,call the GM Nav Disc Center or go to the center’swebsite. If you need any future updates or areplacement disc, because the current disc is lost,damaged, or needs to be updated, call theGM Nav Disc Center or order a new disc online.To order a disc, have your Vehicle IdentificationNumber (VIN) available. This helps the centermake sure you receive the correct and mostup to date DVD map disc for your vehicle.See “Vehicle Identification Number (VIN)” inthe Index of your vehicle’s owner manual formore information.
Database Coverage ExplanationsCoverage areas vary with respect to the level ofmap detail available for any given area. Someareas will feature greater levels of detail thanothers. If this happens, it does not mean there isa problem with the system. As the map DVDis updated, more detail may become availablefor areas which previously had limited detail.See Ordering Map DVDs on page 56.
56

Navigation Audio System ............................. 58CD Player ................................................... 66
Section 3 Navigation Audio System
57

Navigation Audio SystemNotice: Before adding any sound equipmentto your vehicle, such as an audio system, CDplayer, CB radio, mobile telephone, or two-wayradio, make sure that it can be added bychecking with your dealer. Also, check federalrules covering mobile radio and telephoneunits. If sound equipment can be added, it isvery important to do it properly. Added soundequipment may interfere with the operation ofyour vehicle’s engine, radio, or other systems,and even damage them. Your vehicle’s systemsmay interfere with the operation of soundequipment that has been added.
Notice: The chime signals related to seat belts,parking brake, and other functions of yourvehicle operate through the navigation system.If that equipment is replaced or additionalequipment is added to your vehicle, the chimesmay not work. Make sure that replacement oradditional equipment is compatible with yourvehicle before installing it. See “Accessoriesand Modifications” in the Index of yourvehicle’s owner manual.
Your vehicle has a feature called RetainedAccessory Power (RAP). With RAP, the audiosystem will continue to play even after theignition is turned off. See “Retained AccessoryPower (RAP)” in the Index of your vehicle’sowner manual for more information.
The audio system is operated using navigationsystem menus.
Playing the Radio
O (Power/Volume): Press this knob to turn theaudio and navigation system on and off. Turnthe knob to increase or decrease the volume.
Finding a Station
BAND: Press this hard key to access the bandscreen and to switch between AM, FM1, FM2,XM1, and XM2, if equipped.
O (Tuning) Knob: Turn the tuning knob tochange radio frequencies.
w SEEK x: Press the SEEK up or the downarrow to go to the next or previous station andstay there.
58

To scan stations, press and hold the SEEK upor down arrow for two seconds until you heara beep. The radio will go to a station, play fora few seconds, then go on to the next station.Press either SEEK arrow again to stop scanning.
To scan preset stations, press and hold the SEEKup or down arrow for more than four seconds.You will hear two beeps and PSCAN will appearon the display, along with the highlighted preset.The radio will go to the next preset station, playfor a few seconds, then go on to the next presetstation. Press either SEEK arrow again to stopscanning presets.
The radio will only seek and scan stations witha strong signal that are in the selected band.
Setting Preset StationsUp to 30 stations, six AM, six FM1, six FM2,six XM1, and six XM2, if equipped, can beprogrammed using the six screen buttons on thebottom of each band menu. To set preset stations,do the following:
1. Turn the audio system on.
2. Press the BAND hard key to select AM, FM1,FM2, XM1, or XM2, if equipped.
3. Tune in the desired station using the SEEKhard key or the tuning knob.
4. Press and hold one of the six preset screenbuttons until you hear a beep. Whenever thatscreen button is pressed, the station thatwas set will return.
5. Repeat the steps for each preset and source.
59

Band MenuIf the radio is on while the navigation system isnot in use, this band menu will display the currentaudio information, as well as list the presets forthe current band.
If the radio is on while the navigation system is inuse, a smaller band menu will appear, locatedon the left side of the map screen. This audioscreen will display the current audio information,such as band and station. Touch the smaller bandmenu screen button to access the full screenband menu.
FM1 Source shown, Other Sources similarFM1 Source shown, Other Sources similar
60

Audio Menu
e (Audio): Press this hard key to display theAudio menu. Several adjustment options areavailable from this menu.
Tone (Bass/Midrange/Treble): Touch the plus (+)and minus (–) sign screen buttons to increase ordecrease the Bass, Midrange, or Treble. If a stationis weak or noisy, decrease the treble.
Speakers (Balance/Fade): Touch the L (left)or R (right) screen buttons to adjust the balancebetween the left and right speakers. Touchthe Front or Rear screen buttons to adjust thefade between the front and rear speakers.
Speed Compensated Volume (SCV): With SCV,the audio system will adjust automatically tomake up for road and wind noise as you drive,by increasing the volume as vehicle speedincreases. Touch the down arrow screen buttonto access the second page of the Audio menu.Set the volume at the desired level, thenselect Low, Med, or High. Touch the Off screenbutton to turn this feature off.
EQ (Equalizer): Use the screen buttons labeledEQ1 through EQ5 to choose preset bass,midrange, and treble equalization settings.The Custom screen button allows you to chooseand set your own equalization levels. To set acustom equalization setting, adjust each settingto the desired level, then touch the Customscreen button until you hear a beep.
After adjustments are made, press the BANDhard key to go back to the preset station menu.Now that you have preset the station and theEQ setting, you can assign the EQ to the presetstation. To do this, touch the desired presetstation screen button until you hear a beep.The EQ setting will now be assigned to thatpreset unless you decide to change it.
61

If you were at the CD screen before setting anEQ and you press the CD hard key, you willbe returned to the CD screen, and the EQ willbe set to that screen until you change it.
See “Theft-Deterrent Feature”, “Radio Reception”,and antenna information in the Index of yourvehicle’s owner manual for more information.
Radio Data Systems (RDS)The audio system has a Radio Data System (RDS).RDS features are available for use only on FMstations that broadcast RDS info. With RDS, theradio can do the following:
• Display station names• Display messages from radio stations• Display song title and artist names
This system relies on receiving specific informationfrom these stations and will only work when theinformation is available. In rare cases, a radiostation may broadcast incorrect information thatwill cause the radio features to work improperly.If this happens, contact the radio station.
While the radio is tuned to an RDS station, thestation name, will appear on the display withthe frequency.
Touch the Info screen button on the band menuto receive information the selected radio station iscurrently broadcasting.
XM™ Satellite Radio ServiceXM™ is a satellite radio service that is based inthe 48 contiguous United States and Canada.XM™ offers a large variety of coast-to-coastchannels including music, news, sports, talk,traffic/weather (U.S. subscribers), and children’sprogramming. XM™ provides digital qualityaudio and text information that includes thechannel name and number, song title, andartist name. A service fee is required in order toreceive the XM™ service. For more information,contact XM™; In the U.S. at www.xmradio.comor call 1-800-852-XMXM (9696) or in Canadaat www.xmradio.ca or call 1-877-GET-XMSR(438-9677).
Press the BAND key repeatedly until you reachthe XM™ selection. When XM™ is active,the channel name and number, song title,and artist will display on the screen.
Touch the XM Info screen button to displayadditional XM station information.
62

XM™ OptionsTouch the XM Options screen button to accessthe XM Options menu.
This menu allows you to seek or scan for stationsbased on their category. Touch the On screenbutton next to XM Info Timeout to hide XM™information after a certain amount of timehas passed. Touch Off to turn this feature off.
While in this menu, turn XM Category Seek/Scanon to scroll through the categories you want toseek to. This option will take you to the firstavailable channel in that category.
63
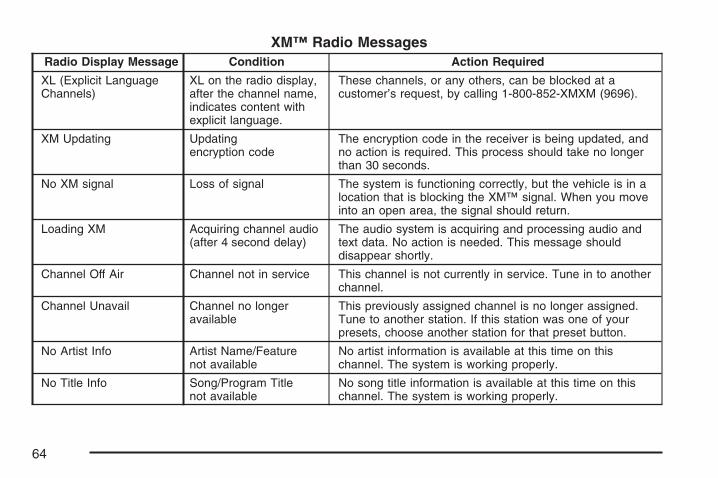
XM™ Radio MessagesRadio Display Message Condition Action Required
XL (Explicit LanguageChannels)
XL on the radio display,after the channel name,indicates content withexplicit language.
These channels, or any others, can be blocked at acustomer’s request, by calling 1-800-852-XMXM (9696).
XM Updating Updatingencryption code
The encryption code in the receiver is being updated, andno action is required. This process should take no longerthan 30 seconds.
No XM signal Loss of signal The system is functioning correctly, but the vehicle is in alocation that is blocking the XM™ signal. When you moveinto an open area, the signal should return.
Loading XM Acquiring channel audio(after 4 second delay)
The audio system is acquiring and processing audio andtext data. No action is needed. This message shoulddisappear shortly.
Channel Off Air Channel not in service This channel is not currently in service. Tune in to anotherchannel.
Channel Unavail Channel no longeravailable
This previously assigned channel is no longer assigned.Tune to another station. If this station was one of yourpresets, choose another station for that preset button.
No Artist Info Artist Name/Featurenot available
No artist information is available at this time on thischannel. The system is working properly.
No Title Info Song/Program Titlenot available
No song title information is available at this time on thischannel. The system is working properly.
64
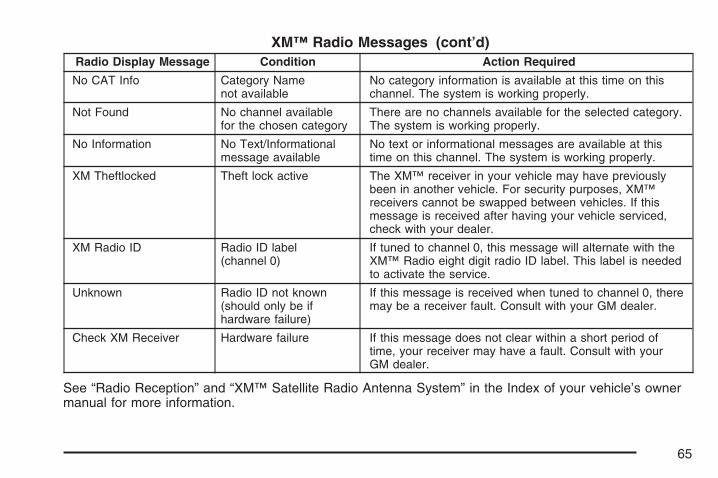
XM™ Radio Messages (cont’d)Radio Display Message Condition Action Required
No CAT Info Category Namenot available
No category information is available at this time on thischannel. The system is working properly.
Not Found No channel availablefor the chosen category
There are no channels available for the selected category.The system is working properly.
No Information No Text/Informationalmessage available
No text or informational messages are available at thistime on this channel. The system is working properly.
XM Theftlocked Theft lock active The XM™ receiver in your vehicle may have previouslybeen in another vehicle. For security purposes, XM™receivers cannot be swapped between vehicles. If thismessage is received after having your vehicle serviced,check with your dealer.
XM Radio ID Radio ID label(channel 0)
If tuned to channel 0, this message will alternate with theXM™ Radio eight digit radio ID label. This label is neededto activate the service.
Unknown Radio ID not known(should only be ifhardware failure)
If this message is received when tuned to channel 0, theremay be a receiver fault. Consult with your GM dealer.
Check XM Receiver Hardware failure If this message does not clear within a short period oftime, your receiver may have a fault. Consult with yourGM dealer.
See “Radio Reception” and “XM™ Satellite Radio Antenna System” in the Index of your vehicle’s ownermanual for more information.
65

CD PlayerInsert a CD partway into the CD slot, labelside up. The system will pull it in.
There will be a 12 to 15 second delay while theCD is read, before it begins to play. When theplayer begins to read a CD, the Disc Check inProcess message will appear briefly to remindyou of the delay.
If the ignition or radio is turned off with a CD inthe player, it will stay in the player. When theignition or radio is turned on, the CD will startplaying where it stopped, if it was the lastselected audio source.
If playing a CD-R the sound quality may bereduced due to CD-R quality, the method ofrecording, the quality of the music that has beenrecorded, and the way the CD-R has beenhandled. There may be an increase in skipping,difficulty in finding tracks, and/or difficulty in loadingand ejecting. If these problems occur, checkthe bottom surface of the CD. If the surface ofthe CD is damaged, such as cracked, broken,or scratched, the CD will not play properly.
If the surface of the CD is soiled, see “Care ofYour CDs” in the Index of your vehicle’s ownermanual.
If there is no apparent damage, try a knowngood CD.
Notice: If you add any label to a CD, insertmore than one CD into the slot at a time, orattempt to play scratched or damaged CDs,you could damage the CD player. When usingthe CD player, use only CDs in good conditionwithout any label, load one CD at a time, andkeep the CD player and the loading slot freeof foreign materials, liquids, and debris.
Do not add any label to a CD, it could get caughtin the CD player. If a CD is recorded on apersonal computer and a description label isneeded, try labeling the top of the recorded CDwith a soft marker instead.
Do not add paper labels to CDs, they couldget caught in the CD player.
If an error appears on the display, see“CD Messages” later in this section.
66
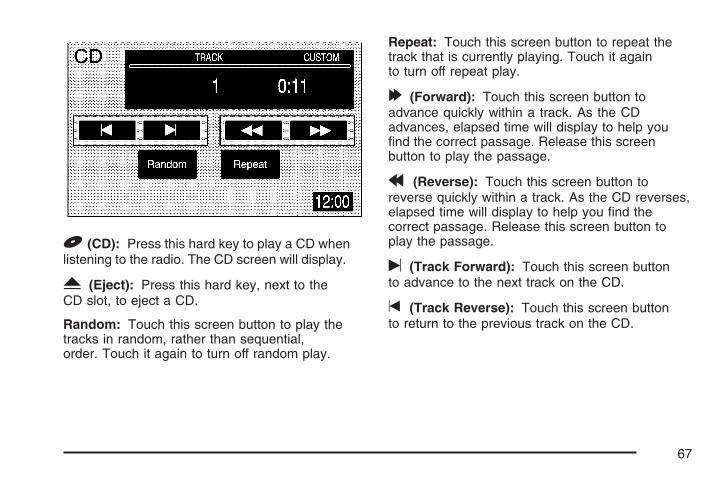
B (CD): Press this hard key to play a CD whenlistening to the radio. The CD screen will display.
Y (Eject): Press this hard key, next to theCD slot, to eject a CD.
Random: Touch this screen button to play thetracks in random, rather than sequential,order. Touch it again to turn off random play.
Repeat: Touch this screen button to repeat thetrack that is currently playing. Touch it againto turn off repeat play.
[ (Forward): Touch this screen button toadvance quickly within a track. As the CDadvances, elapsed time will display to help youfind the correct passage. Release this screenbutton to play the passage.
r (Reverse): Touch this screen button toreverse quickly within a track. As the CD reverses,elapsed time will display to help you find thecorrect passage. Release this screen button toplay the passage.
u (Track Forward): Touch this screen buttonto advance to the next track on the CD.
t (Track Reverse): Touch this screen buttonto return to the previous track on the CD.
67
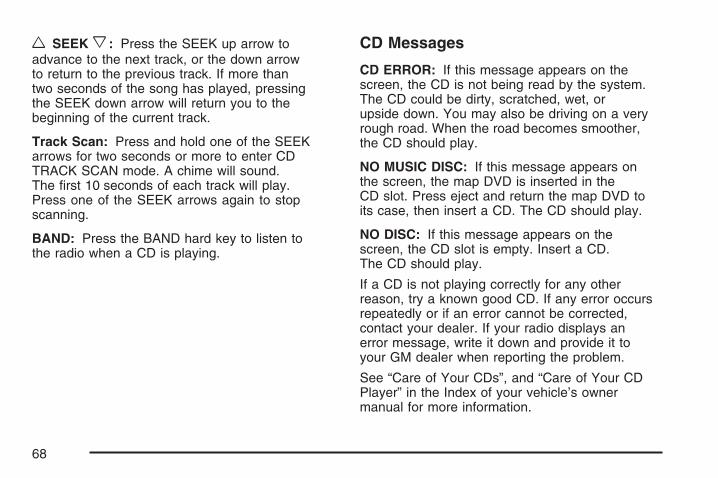
w SEEK x: Press the SEEK up arrow toadvance to the next track, or the down arrowto return to the previous track. If more thantwo seconds of the song has played, pressingthe SEEK down arrow will return you to thebeginning of the current track.
Track Scan: Press and hold one of the SEEKarrows for two seconds or more to enter CDTRACK SCAN mode. A chime will sound.The first 10 seconds of each track will play.Press one of the SEEK arrows again to stopscanning.
BAND: Press the BAND hard key to listen tothe radio when a CD is playing.
CD Messages
CD ERROR: If this message appears on thescreen, the CD is not being read by the system.The CD could be dirty, scratched, wet, orupside down. You may also be driving on a veryrough road. When the road becomes smoother,the CD should play.
NO MUSIC DISC: If this message appears onthe screen, the map DVD is inserted in theCD slot. Press eject and return the map DVD toits case, then insert a CD. The CD should play.
NO DISC: If this message appears on thescreen, the CD slot is empty. Insert a CD.The CD should play.
If a CD is not playing correctly for any otherreason, try a known good CD. If any error occursrepeatedly or if an error cannot be corrected,contact your dealer. If your radio displays anerror message, write it down and provide it toyour GM dealer when reporting the problem.
See “Care of Your CDs”, and “Care of Your CDPlayer” in the Index of your vehicle’s ownermanual for more information.
68
AAddress ........................................................ 36Alpha-Numeric Keypad .................................. 18Audio Menu .................................................. 61Audio System ................................................ 58
BBand Menu ................................................... 60Beep ............................................................. 50
CCanadian Owners ........................................... 2Canceling Guidance ...................................... 13CD
Player ........................................................ 66CD Messages ............................................... 68CD Player ..................................................... 66
Cleaning the Video Screen ............................ 13Clock ............................................................ 52Colors on the Screen .................................... 49Contrast/Brightness/Mode .............................. 50
DDatabase Coverage Explanations .................. 56Destination .................................................... 34Destination Preview Menu ............................. 44Display Off .................................................... 53
EEdit Route ..................................................... 26Ejecting the DVD Map Disc ........................... 21Emergency .................................................... 40Entering an Address, Point of Interest,
Home, and Preset Destinations .................... 9
69

FFinding a Station ........................................... 58Freeway Entrance/Exit ................................... 43
GGetting Started, Navigation .............................. 6Global Positioning System (GPS) .................. 53
HHard Keys ..................................................... 16
IInstalling the DVD Map Disc ......................... 20Intersection ................................................... 42
LLanguage ...................................................... 51Loading a DVD Map Disc ............................... 9
MMap .............................................................. 41Map Adjustments and Scales ........................ 21Map Appearance ........................................... 24Maps ............................................................ 20Memory Points ....................................... 32, 39Menu
Navigation .................................................. 23
70

NNavigation
Getting Started ............................................ 6Menu ......................................................... 23System Overview ......................................... 4Using the System ...................................... 16
Navigation Options ........................................ 46Navigation Setup ........................................... 30
OOrdering
Map DVDs ................................................. 56Overview, Navigation System .......................... 4Owners, Canadian .......................................... 2
PPhone Number .............................................. 42Playing the Radio .......................................... 58Point of Interest (POI) ................................... 38Preset Destinations ....................................... 35Previous Destination ...................................... 40Previous Start Point ...................................... 41Problems with Route Guidance ..................... 55
RRadio ............................................................ 58Radio Data Systems (RDS) ........................... 62Route Overview ............................................ 24Route Overview Menu ................................... 45Route Preview ............................................... 28
71
SSetting Preset Stations .................................. 59Setting Radio Station Presets .......................... 8Setting the Time ............................................. 8Suspend Guidance ........................................ 24Symbols ........................................................ 22System Needs Service, If .............................. 55
TTouch-Sensitive Screen Buttons .................... 18
UUsing Your Home or Preset Destinations ....... 13
VVehicle Chime ............................................... 51Vehicle Positioning ........................................ 54Video Screen, Cleaning ................................. 13Voice Volume ................................................ 25
XXM™ Options ............................................... 63XM™ Satellite Radio Service ........................ 62
72