2005 Range Rover Audio System Handbook
66
AUDIO SYSTEM Publication Part No. LRL 18 03 55 502 © Land Rover 2004
-
Upload
phineas-magellan -
Category
Documents
-
view
116 -
download
0
description
2005 Range Rover Audio System Handbook
Transcript of 2005 Range Rover Audio System Handbook

R
AUDIO SYSTEM
Publication Part No. LRL 18 03 55 502
© Land Rover 2004
2
L
IntroductionThis handbook describes the operation of the Range Rover Audio System and, together with the other books in your literature pack, provides all the information that you need to derive maximum pleasure from owning and driving your new vehicle.
For your convenience, the handbook is divided into sections, each dealing with a different aspect of the Audio System. These are listed on the Handbook Contents page and you will find it worthwhile to take a little time to read each one and get to know your Audio System as soon as you possibly can. The more you understand prior to using the system, the easier it will be to gain full use of the systems features.
The specification of each vehicle will vary according to territorial requirements and also from model to model within the vehicle range. Some of the information published in this handbook may not apply to your particular vehicle.
To include changes made after the handbook is printed, it is sometimes necessary to issue one or more handbook supplements. When reading this handbook, check the literature pack for possible supplements.
Any further updates will be posted on the Land Rover internet site and can be accessed at www.landrover.com in the Owner Information area.
* An asterisk appearing within the handbook text identifies features or items of equipment that are either optional, or are only fitted to some vehicles in the model range.
Land Rover operates a policy of constant product improvement and therefore reserves the right to change specifications without notice at any time. Whilst every effort is made to ensure complete accuracy of the information in this handbook, no liabilities for inaccuracies or the consequences thereof can be accepted by the manufacturer or the retailer, except in respect of personal injury caused by the negligence of the manufacturer or the retailer.
All rights reserved. No part of this publication may be reproduced, stored in a retrieval system or transmitted, in any form, electronic, mechanical, photocopying, recording or other means without prior written permission from the Service Division of Land Rover.
As part of Land Rover’s environmental policy, this publication is printed on paper made from chlorine-free pulp.

Handbook Contents
R
QUICK OVERVIEWQuick Overview . . . . . . . . . . . . . . . . . . . . . . 5
GENERAL INFORMATIONRadio Reception. . . . . . . . . . . . . . . . . . . . . . 9Care of Compact Discs. . . . . . . . . . . . . . . . 10Touch Screen Care. . . . . . . . . . . . . . . . . . . 11System Controls. . . . . . . . . . . . . . . . . . . . . 12System Settings . . . . . . . . . . . . . . . . . . . . . 13System Volume Settings . . . . . . . . . . . . . . 20On Board Computer (OBC). . . . . . . . . . . . . 28
RADIORadio . . . . . . . . . . . . . . . . . . . . . . . . . . . . . 37Radio Operation . . . . . . . . . . . . . . . . . . . . . 38Radio Broadcast Data System . . . . . . . . . . 45News Information. . . . . . . . . . . . . . . . . . . . 46
COMPACT DISC PLAYERCompact Disc Player . . . . . . . . . . . . . . . . . 48
AUDIO VOICE RECOGNITION*Audio Voice Recognition* . . . . . . . . . . . . . 56General Commands* . . . . . . . . . . . . . . . . . 58Rear Seat Entertainment Commands* . . . . 59Radio Commands. . . . . . . . . . . . . . . . . . . . 60CD Commands . . . . . . . . . . . . . . . . . . . . . . 64
A comprehensive index is located at the back of this handbook.
3

L
4

Quick Overview
R
QUICK OVERVIEW
GENERAL OPERATION
Steering wheel controls*
1. Channel/track - up
2. Volume up
3. Volume down
4. Channel/track - down
5. Audio/phone
6. Voice recognition
Switching on the audio unit
To turn on the audio unit, press the audio on/off button.
Volume control
To increase or decrease the volume level, rotate the control.
H4085
1
2
3
4
5
6 INFO
ICE1969 ENG
INFO
ICE1970 ENG
5

Quick Overview
L
RADIO OPERATION
To access radio mode, either touch the ‘Audio Video’ icon on the home menu, or press the MODE button and turn the rotary control until ‘Radio’ is highlighted.
Alternarively, if any other audio source is in use, touch the Radio icon from those identified above.
Auto store
Touch and hold the ‘FM A’ icon to start the auto store scan process.
To access a stored station, briefly press the appropriate pre-set number.
On-Road Info
Settings
4x4 Info
Phone
Navigation
Audio Video
Home Menu
ICE1764 ENG
31.5
h min
mi
M 4 0
B4100
B4100
B4450 >M40
22
GAYDONGAYDON
1.1ml
0.5ml
0.3ml
Radio CD TV
AUX
Audio Mode
1/2 mi
M 4 0
B4100
B4100
B4450 >M40
22
GAYDONGAYDON
1.1ml
0.5ml
0.3ml
ICE 2075 ENG
A/V OFF
To turn on Audio press
Or Select a source below:
DVDCDRadio AUX
ICE2145 NAS
DVDCDRadio AUX
Radio
FM
FM A
Band
FM
KSAN
90.7 KALX
KFIKCEO
KQEDKKFS
KXJZKLFFKCSM
KALX
ICE2146 NAS
6

Quick Overview
R
CD OPERATION
Inserting a CD
The CD changer is located in the glovebox compartment.
Fully open the sliding cover (3) to remove magazine (2). Press button (1) to eject the magazine.
Hold magazine with arrow uppermost, pull out each tray in turn by its ‘tab’ and place a disc (label side uppermost) onto each tray. Correctly align the tray with the parallel slots on each side of the magazine and slide the tray fully into the magazine.
Insert the magazine in the direction of the arrow marked on the magazine casing and push it fully into the CD changer. Close the sliding cover
There will be a short pause whilst the player reads the information from the disc, which will then be displayed on the screen. Play will commence at the first track on the newly inserted disc.
ICE2077 LHD
ICE1972 ENG
1 2 3
ICE1966 ENG
ICE1971 ENG
7

Quick Overview
L
Playing a CD
To select CD as the audio source, press the MODE button, which will display the Audio Mode pop-up. CD can be selected as the audio source by rotating the audio control until CD is highlighted.
Once the magazine has loaded and the discs have been read, play will commence with disc one, track one.
Track selection: With a CD playing, briefly press the right hand button to select the next track or the left hand button to return to the start of the previous track. Press either button repeatedly to reach the desired track.
Disc selection: With CD selected, touch the appropriate icon to select the desired disc from the changer.
INFOTAINMENT SYSTEM HANDBOOKSAs there are a wide range of features and sub-systems available within the Infotainment System, a number of other handbooks have been supplied with your vehicle. Systems such as Voice Control, Telephone, Satellite Navigation etc., are covered in separate handbooks contained within the literature pack.
31.5
h min
mi
M 4 0
B4100
B4100
B4450 >M40
22
GAYDONGAYDON
1.1ml
0.5ml
0.3ml
Radio CD TV
AUX
Audio Mode
1/2 mi
M 4 0
B4100
B4100
B4450 >M40
22
GAYDONGAYDON
1.1ml
0.5ml
0.3ml
ICE 2079 ENG
CD
CD1 Tr 01
CD1 2
5 64
3
No Disc
CDCD
CD
MP3
MP3
DVDCDRadio AUX
06 : 32
ICE2147 NAS
CD
CD1 Tr 01
CD1 2
5 64
3
No Disc
CDCD
CD
MP3
MP3
DVDCDRadio AUX
06 : 32
ICE2148 NAS
CD
CD3
Brothers In Arms
02 - Money For Noth~ 02:16
MP332
5 64 No Disc
CDCD
CD MP3
DVDCDRadio AUX
1 MP3
ICE2149 NAS
8

9
Radio Reception
R
GENERAL INFORMATIONRadio Reception
RADIO RECEPTIONA car radio receives signals whilst on the move and may experience widely differing reception characteristics. Because of this, some interference is to be expected from time to time during a journey.
FM transmitters can only broadcast over a limited range and good clear signals will only be received in the immediate area of the transmitter. When travelling, occasionally it may be necessary to re-tune the radio to offset the effects of moving from one transmitter area to another.
While RDBS automatic retuning helps to reduce the effects of signal changes, some manual retuning may still be required (especially for local stations) in areas of weak reception.
The broadcast range for good stereo reception is within approximately 48 - 64 Kms (30 - 40 miles) of the transmitter.
FM Signals travel in a straight line, so large obstacles, such as tall buildings, can shield the car from the signal, causing distortion or loss of reception (known as dead spots).
Distortion can also occur if FM signals, received directly from the transmitter, mix with signals deflected by obstructions such as mountains, hills and tall buildings (this is known as multi-path distortion).
Note: Although distortion, interference and lack of signal clarity are sometimes attributed to a fault in the radio, this is rarely the case.
ICE 1527

Care of Compact Discs
10
L
Care of Compact Discs
CARE OF COMPACT DISCSDirt, dust, condensation and heat can damage discs. Always observe the following precautions:
NEVER touch the playing surface (the unlabelled side) of a disc. Handle discs by holding the outer edges, or the edge of the central hole and the outer edge, between finger and thumb.
ALWAYS return discs to their case after use, to prevent contamination reducing playback quality.
NEVER leave the disc or case exposed to excessive heat or direct sunlight.
NEVER use a solvent or abrasive cleaner. Dust or dirt should be removed from the playing surface by wiping with a clean, dry, lint-free cloth. Always wipe in a straight line from the centre to the edge of the disc.
If left, minor scratches on the surface of a compact disc can cause skipping or mistracking. It may be possible to use CD restorer polish to remove the scratches and improve the performance of the disc. When using CD restorer polish, always follow the manufacturers instructions.
Note: Some music CD manufacturers are using data encryption to 'copy-protect' their recordings and prevent the production of counterfeit copies. These CD's differ from the internationally agreed CD audio standard, RedBook, a standard that serves as the operating basis for all CD players and changers. Copy-protected CDs may fail to play in your CD changer or may be played subject to various limitations, e.g. sound quality may be impaired. If you do experience a problem, try the CD in other players before contacting the CD vendor.
ICE 0022
SOLV
ENT
CLEA
NER

11
Touch Screen Care
R
Touch Screen Care
TOUCH SCREEN CARE
Care pointsThe touch screen fitted to your Range Rover allows control of the Infotainment systems from a single point. To ensure that it continues to operate correctly, some basic care points are listed below.
• Clean only with a lightly moistened soft cloth.
• Do not use chemical agents, or domestic cleaners, to clean any part of the touch screen or its surround.
• Only use your finger to operate the touch screen. Ensure that only one finger at a time is in contact with the screen, to prevent incorrect entries.
• A short, light press is sufficient to operate functions. Do not use excessive pressure.
• Do not allow any sharp, hard or abrasive objects to come into contact with the screen.
• Where possible, avoid exposing the touch screen to direct sunlight for long periods.
Note: None of the functions of the Infotainment touch screen are operated by ‘dragging’ icons.
INFO
On-Road Info
Settings
4x4 Info
Phone
Navigation
Audio Video
Home Menu
ICE 1719

System Controls
12
L
System Controls
CONTROLS
1. On-road information
2. Settings
3. Climate set indicator (auxiliary heater)
4. Off-road information
5. Touch screen display
6. A/V (audio/video)
7. Light sensor
8. Navigation
9. Telephone
10. Up/increase
11. Mode
12. Down/decrease
13. Audio
14. Volume
15. Info
16. Audio on/off
17. Tone
18. Audio on/off indicator
Note: The Infotainment system is operated by a combination of physical buttons on the touch screen surround, and ‘virtual’ buttons displayed on the touch screen. To avoid confusion when reading this handbook, the physical buttons are referred to as ‘buttons’ and the on screen buttons as ‘icons’.
INFO
ICE 1516
1 2 3 4 5 6 7 8 9
101112131415161718

13
System Settings
R
System Settings
SYSTEM SETTINGS
Switching the display screen onTo switch on the system, press the On/Off button.
The first time the system is switched on, the home menu will be displayed. Switching the system on subsequently, will display the screen or menu that was in use when the system was switched off.
Personalising the system settingsYour vehicle is delivered with the system settings (language etc.) tailored to the market for which the vehicle is intended.
These settings can be altered to suit your preferences.
To access the System Settings screen press the Settings button (arrowed) on the screen surround.
Alternatively, press the ‘Settings’ icon from the Home menu.
Changing language setting
To change the language used by the system press the ‘Language’ icon on the System Settings menu.
The language choices are displayed as a list. Scroll up or down through the list using the on-screen arrows. The current language will be indicated by an orange icon.
INFO
ICE1720 ENG
On-Road Info
Settings
4x4 Info
Phone
Navigation
Audio Video
Home Menu
ICE1721 ENG
SettingsSystem
Language Units AudibleFeedback
Clock
SystemSettings
ScreenSettings
VoiceSettings
TimedClimate
ICE2027 NAS
LanguageSystem
EnglishUK
EnglishUS M
EnglishUS F
Italiano
Français
ICE2028 NAS
System Settings
14
L
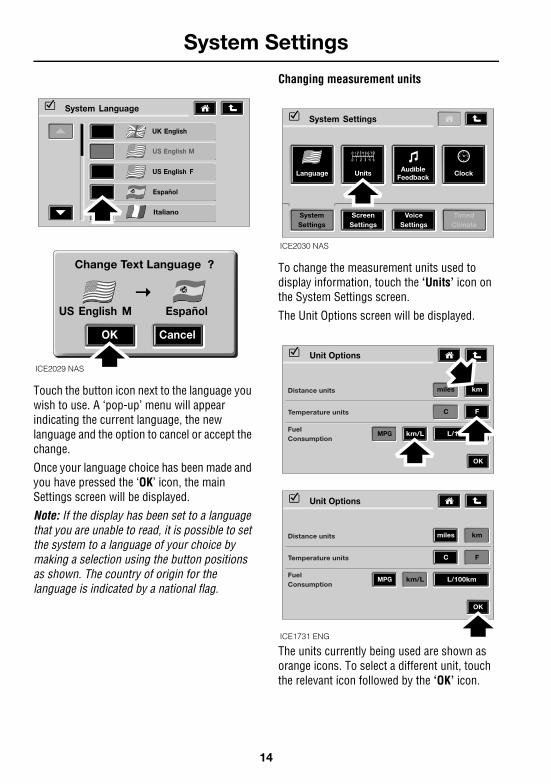
Touch the button icon next to the language you wish to use. A ‘pop-up’ menu will appear indicating the current language, the new language and the option to cancel or accept the change.
Once your language choice has been made and you have pressed the ‘OK’ icon, the main Settings screen will be displayed.
Note: If the display has been set to a language that you are unable to read, it is possible to set the system to a language of your choice by making a selection using the button positions as shown. The country of origin for the language is indicated by a national flag.
Changing measurement units
To change the measurement units used to display information, touch the ‘Units’ icon on the System Settings screen.
The Unit Options screen will be displayed.
The units currently being used are shown as orange icons. To select a different unit, touch the relevant icon followed by the ‘OK’ icon.
Change Text Language ?
OK Cancel
EnglishUS
LanguageSystem
EnglishUK
EnglishUS M
EnglishUS F
Italiano
M Español
Español
ICE2029 NAS
SettingsSystem
Language Units AudibleFeedback
Clock
SystemSettings
ScreenSettings
VoiceSettings
TimedClimate
ICE2030 NAS
Unit Options
Distance units
Temperature units
FuelConsumption
km
F
km/L L/100km
OK
miles
C
MPG
Unit Options
Distance units
Temperature units
FuelConsumption
L/100km
OK
km
F
miles
C
km/LMPG
ICE1731 ENG

15
System Settings
R
Audible feedback on/off
To change your audible feedback preferences (information messages etc.), touch the ‘Audible Feedback’ icon on the System Settings menu.
From the Audible Feedback menu, touch the ‘All Feedback on’, ‘Touch Feedback only’ or ‘All Feedback off’ icon as required, followed by the ‘OK’ icon to confirm your choice.
Time and date settings
To set/change the time and date, touch the ‘Clock’ icon on the System Settings menu.
Audible Feedback
OK
All Feedback on
Touch feedback only
All Feedback off
SettingsSystem
Language Units AudibleFeedback
Clock
SystemSettings
ScreenSettings
VoiceSettings
TimedClimate
ICE2031 NAS
Set Clock
OK
Format
12hr mm/dd
Set Date
15 3224hr dd/mm
Set Clock
SettingsSystem
Language Units AudibleFeedback
Clock
SystemSettings
ScreenSettings
VoiceSettings
TimedClimate
ICE2032 NAS
System Settings
16
L
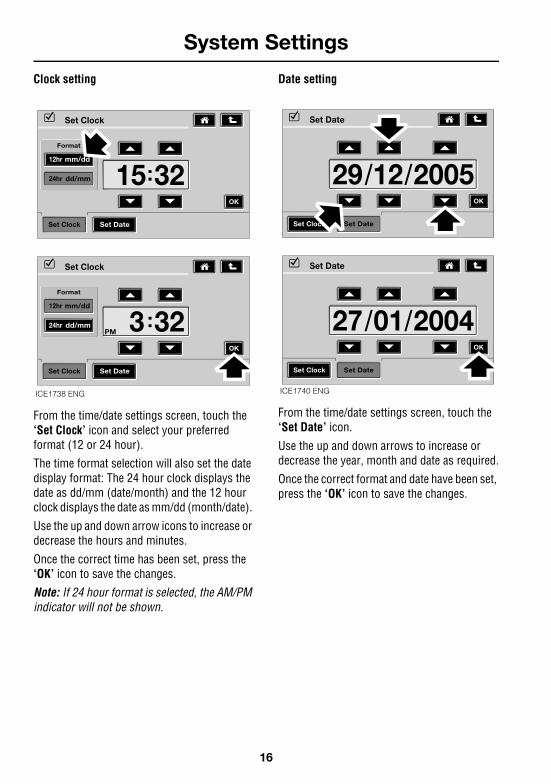
Clock setting
From the time/date settings screen, touch the ‘Set Clock’ icon and select your preferred format (12 or 24 hour).
The time format selection will also set the date display format: The 24 hour clock displays the date as dd/mm (date/month) and the 12 hour clock displays the date as mm/dd (month/date).
Use the up and down arrow icons to increase or decrease the hours and minutes.
Once the correct time has been set, press the ‘OK’ icon to save the changes.
Note: If 24 hour format is selected, the AM/PM indicator will not be shown.
Date setting
From the time/date settings screen, touch the ‘Set Date’ icon.
Use the up and down arrows to increase or decrease the year, month and date as required.
Once the correct format and date have been set, press the ‘OK’ icon to save the changes.
Set Clock
OK
Format
Set Date
3 32Set Clock
Set Clock
OK
Format
12hr mm/dd
Set Date
15 3224hr dd/mm
Set Clock
PM
12hr mm/dd
24hr dd/mm
ICE1738 ENG
Set Date
OK
Set DateSet Clock
27 01 2004
Set Date
OK
Set DateSet Clock
29 12 2005
ICE1740 ENG

17
System Settings
R
Screen settings
From the main menu, touch the ‘Screen Settings’ icon.
Occasionally, it may be preferable to listen to an audio source with the touch screen turned off - when driving at night, for example.
To turn off the touch screen display, touch the ‘Screen Off’ icon.
To turn on the touch screen display, touch the screen at any point.
SettingsScreen
VoiceSettings
TimedClimate
SystemSettings
ScreenSettings
Screen Off DisplaySettings
SettingsSystem
Language Units AudibleFeedback
Clock
SystemSettings
ScreenSettings
VoiceSettings
TimedClimate
ICE2033 NAS
SettingsScreen
VoiceSettings
SystemSettings
ScreenSettings
Screen Off DisplaySettings
TimedClimate
INFO
ICE1748 ENG

System Settings
18
L
Display settings
From the Screen Settings menu, touch the ‘Display Settings’ icon.
Note: If Navigation is fitted and a map disc inserted, an example navigation screen will be displayed as a preview when adjusting the display settings. If Navigation is not fitted, the preview screen will display ‘No Map Available’.
Contrast is adjusted by touching the ‘+’ or ‘-’ icons, to increase or decrease the contrast. Touching the ‘Reset’ icon will return the contrast control to the centre position.
Two colour sets can be selected by touching either the ‘Set 1’ or the ‘Set 2’ icon. Adjustments can be made to the contrast level for each colour set. This allows a quick change of settings with a single press, which may be useful for day and night settings, for example.
Voice settings
From the main menu, touch the ‘Voice Settings’ icon.
SettingsScreen
VoiceSettings
TimedClimate
SystemSettings
ScreenSettings
Screen Off DisplaySettings
Display Settings
Reset
Set 2
Colour Set
Contrast
Set 1
ASTON
ICE1744 ENG
SettingsVoice
SystemSettings
TimedClimate
VoiceSettings
ScreenSettings
Voice AddName
VoiceLanguage
SettingsSystem
Language Units AudibleFeedback
Clock
SystemSettings
ScreenSettings
VoiceSettings
TimedClimate
ICE2034 NAS

19
System Settings
R
Voice language
From the Voice Settings screen, touch the ‘Voice Language’ icon.
It should be noted that the Voice Language icon is only available with the “extended voice” and not with “basic voice”.
Touch the up and down arrows to scroll through the list of available languages.
Select the required language, by touching the relevant icon.
Touch the button icon next to the language you wish to use. A ‘pop-up’ menu will appear, indicating the current language, the new language and the option to cancel or accept the change.
Once your language choice has been made and you have pressed the ‘OK’ icon, the main settings screen will be displayed.
SettingsVoice
SystemSettings
TimedClimate
VoiceSettings
ScreenSettings
Voice AddName
VoiceLanguage
LanguageVoice
EnglishUK
EnglishUS M
EnglishUS F
Italiano
Français
ICE1755 ENG
Change Voice Language ?
OK Cancel
LanguageSystem
EnglishUK
EnglishUS M
EnglishUS F
Italiano
Français
English M English F
ICE2035 NAS

System Volume Settings
20
L
System Volume Settings
VOLUME ADJUSTMENT
To access the volume set up menu, press and hold the Tone button until the volume set up menu is displayed. The icons to the left, allow you to choose a setting to adjust (‘AVC’, ‘INFO’, ‘NAV’, ‘Phone’ and ‘Voice’). The boxes to the right of the icons show the values currently set for each option. The bar graph and +/– icons are used to change the settings and show the changes.
Note: If no change is made within ten seconds, the volume set up menu will disappear.
Automatic Volume Control (AVC)Automatic Volume Control adjusts the volume level as the vehicle speed increases. This compensates for the increase in noise at increased speeds.
From the volume set up menu, press the ‘AVC’ icon to display the settings for Automatic Volume Control.
The bar graph represents the amount by which the volume level may increase. If the smallest bar is selected, the AVC function will be turned off. In this state the volume will not increase with vehicle speed. The remaining bars (from 1 to 9) will increase the volume level up to the maximum level selected.
To increase the level of volume change, press the ‘+’ icon. Each press will select the next bar to the right, up to the maximum (9).
INFO
31.5
h min
mi
M 4 0
B4100
B4100
B4450 >M40
22
GAYDONGAYDON
1.1ml
0.5ml
0.3ml
1/2 mi
INFO
NAV
Phone
1
1
10
10 Reset AllVoice
AVC Automatic VolumeControl Level
Volume Increaseswith road speed
Volume Set Up Menu
1
1
ICE2083 ENG
INFO
NAV
Phone
1
1
10
10 Reset AllVoice
AVC
Off
Automatic VolumeControl Level
Volume Increaseswith road speed
Off
INFO
NAV
Phone
1
1
10
10 Reset AllVoice
AVC
3
Automatic VolumeControl Level
Volume Increaseswith road speed
3
Volume Set Up Menu
Volume Set Up Menu
ICE2084 ENG
21
System Volume Settings
R
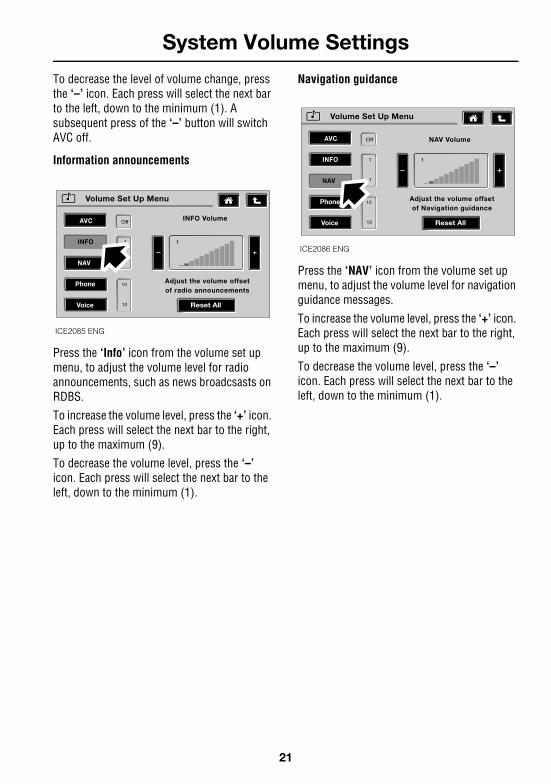
To decrease the level of volume change, press the ‘–’ icon. Each press will select the next bar to the left, down to the minimum (1). A subsequent press of the ‘–’ button will switch AVC off.
Information announcements
Press the ‘Info’ icon from the volume set up menu, to adjust the volume level for radio announcements, such as news broadcsasts on RDBS.
To increase the volume level, press the ‘+’ icon. Each press will select the next bar to the right, up to the maximum (9).
To decrease the volume level, press the ‘–’ icon. Each press will select the next bar to the left, down to the minimum (1).
Navigation guidance
Press the ‘NAV’ icon from the volume set up menu, to adjust the volume level for navigation guidance messages.
To increase the volume level, press the ‘+’ icon. Each press will select the next bar to the right, up to the maximum (9).
To decrease the volume level, press the ‘–’ icon. Each press will select the next bar to the left, down to the minimum (1).
NAV
Phone
1
1
10
10 Reset AllVoice
1
INFO Volume
Adjust the volume offsetof radio announcements
OffAVC
INFO
Volume Set Up Menu
ICE2085 ENG
Phone
1
1
10
10 Reset AllVoice
1
NAV Volume
Adjust the volume offsetof Navigation guidance
OffAVC
INFO
NAV
Volume Set Up Menu
ICE2086 ENG

System Volume Settings
22
L
Telephone volume
Press the ‘PHONE’ icon from the volume set up menu, to adjust the volume level for the telephone.
To increase the volume level, press the ‘+’ icon. Each press will select the next bar to the right, up to the maximum (25).
To decrease the volume level, press the ‘–’ icon. Each press will select the next bar to the left, down to the minimum (5).
INFO
NAV
1
1
10
10 Reset AllVoice
Phone Volume
Adjust the volume levelof phone calls
Off
Phone
AVC
10
Volume Set Up Menu
ICE2087 ENG
23
System Volume Settings
R
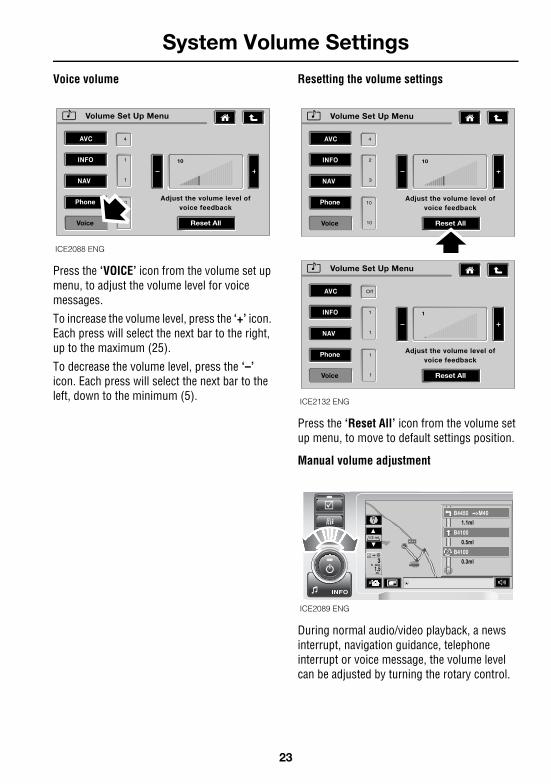
Voice volume
Press the ‘VOICE’ icon from the volume set up menu, to adjust the volume level for voice messages.
To increase the volume level, press the ‘+’ icon. Each press will select the next bar to the right, up to the maximum (25).
To decrease the volume level, press the ‘–’ icon. Each press will select the next bar to the left, down to the minimum (5).
Resetting the volume settings
Press the ‘Reset All’ icon from the volume set up menu, to move to default settings position.
Manual volume adjustment
During normal audio/video playback, a news interrupt, navigation guidance, telephone interrupt or voice message, the volume level can be adjusted by turning the rotary control.
10INFO
AVC
NAV
Phone
1
1
10
10
4
Voice Reset All
Adjust the volume level ofvoice feedback
Volume Set Up Menu
ICE2088 ENG
1INFO
AVC
NAV
Phone
1
1
1
1
Off
Voice Reset All
Adjust the volume level ofvoice feedback
Volume Set Up Menu
10INFO
AVC
NAV
Phone
2
3
10
10
4
Voice Reset All
Adjust the volume level ofvoice feedback
Volume Set Up Menu
ICE2132 ENG
INFO
31.5
h min
mi
M 4 0
B4100
B4100
B4450 >M40
22
GAYDONGAYDON
1.1ml
0.5ml
0.3ml
1/2 mi
ICE2089 ENG

System Volume Settings
24
L
TONE ADJUSTMENT
Press the Tone button (arrowed) to display the Tone menu. From this menu, the settings for Balance,
Fade, LOGIC7*, Bass, Treble and Sub-woofer can be adjusted/enabled.
Note: If no change is made within ten seconds, the screen will revert to that which was displayed prior to selecting the volume set up menu.
Bass, treble and sub-woofer
With the tone menu displayed, press the ‘Tone’ icon in the bottom left hand corner. The adjustments for Bass, Treble and Sub-woofer are made, using the ‘+’ and ‘–’ icons to increase or decrease the settings, as required.
Balance/Fader
Reset All
Bass
Treble
Sub - woofer level:
LOGIC 7
SourceMemory
Tone
Tone
INFO
31.5
h min
mi
M 4 0
B4100
B4100
B4450 >M40
22
GAYDONGAYDON
1.1ml
0.5ml
0.3ml
1/2 mi
ICE2090 ENG
Balance/Fader
Reset All
Bass
Treble
Sub - woofer level:
LOGIC 7
SourceMemory
Tone
Tone
Balance/Fader
Reset All
Bass
Treble
Sub - woofer level:
LOGIC 7
SourceMemory
Tone
Tone
ICE2131 ENG

25
System Volume Settings
R
Tone reset all
With the Tone menu displayed, press the ‘Reset All’ icon. The settings revert to the mid position.
Source memory
Source memory allows settings to be adjusted and memorized for individual audio sources. Further explanation can be obtained by pressing the ‘Source Memory’ icon.
Balance/Fader
Reset All
Bass
Treble
Sub - woofer level:
LOGIC 7
SourceMemory
Tone
Tone
Balance/Fader
Reset All
Bass
Treble
Sub - woofer level:
LOGIC 7
SourceMemory
Tone
Tone
ICE2093 ENG
Balance/Fader
Reset All
Bass
Treble
Sub - woofer level:
LOGIC 7
SourceMemory
Tone
Balance/Fader
Reset All
Bass
Treble
Sub - woofer level:
LOGIC 7
SourceMemory
Tone
Source Memory
Turning on Source Memory wil l storedifferent tone sett ings for each
audio source.Are you sure you want to activate this
feature?
NoYes
Tone
Tone
ICE2091 ENG

System Volume Settings
26
L
LOGIC7*
LOGIC7 delivers audio source output using a seven channel feed. This provides a three dimensional audio effect, by controlling the vehicle speakers individually. This allows instruments, sound effects and dialogue within recorded or broadcast audio sources, to be clearly placed around the passenger cabin.
To turn LOGIC7 on or off, press the ‘LOGIC7’ icon.
Balance and fade
To access the Balance and Fade adjustment screen, press the ‘Balance/Fader’ icon on the Tone menu screen.
Balance/Fader
Reset All
Bass
Treble
Sub - woofer level:
LOGIC 7
SourceMemory
Tone
Tone
ICE2092 ENG
Balance/Fader
Reset All
Bass
Treble
Sub - woofer level:
LOGIC 7
SourceMemory
Tone
Tone
Balance/Fader
Reset All
LOGIC 7
SourceMemory
Tone
Balance / Fader
ICE2094 ENG
27
System Volume Settings
R
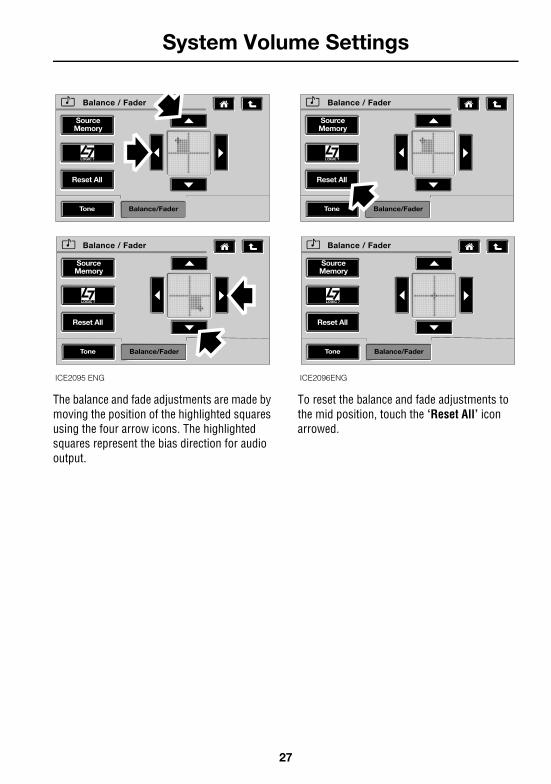
The balance and fade adjustments are made by moving the position of the highlighted squares using the four arrow icons. The highlighted squares represent the bias direction for audio output.
To reset the balance and fade adjustments to the mid position, touch the ‘Reset All’ icon arrowed.
Balance/Fader
Reset All
LOGIC 7
SourceMemory
Tone
Balance/Fader
Reset All
LOGIC 7
SourceMemory
Tone
Balance / Fader
Balance / Fader
ICE2095 ENG
Balance/Fader
Reset All
LOGIC 7
SourceMemory
Tone
Balance/Fader
Reset All
LOGIC 7
SourceMemory
Tone
Balance / Fader
Balance / Fader
ICE2096ENG
On Board Computer (OBC)
28
L
On Board Computer (OBC)
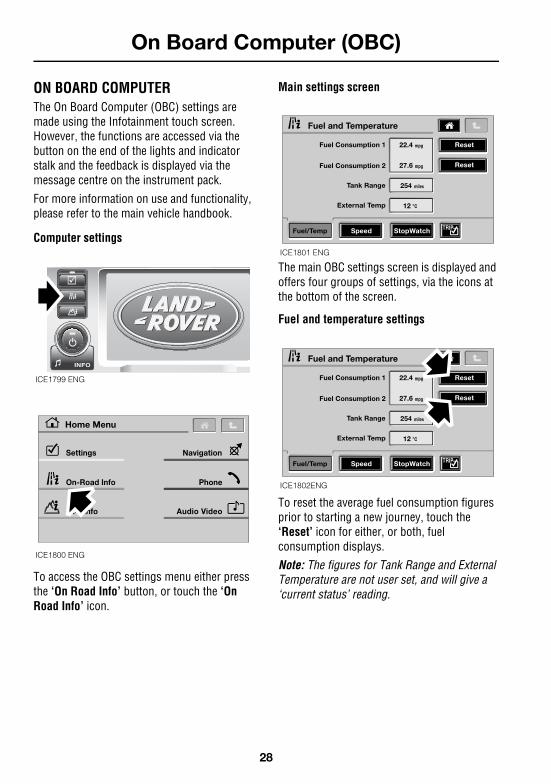
ON BOARD COMPUTERThe On Board Computer (OBC) settings are made using the Infotainment touch screen. However, the functions are accessed via the button on the end of the lights and indicator stalk and the feedback is displayed via the message centre on the instrument pack.
For more information on use and functionality, please refer to the main vehicle handbook.
Computer settings
To access the OBC settings menu either press the ‘On Road Info’ button, or touch the ‘On Road Info’ icon.
Main settings screen
The main OBC settings screen is displayed and offers four groups of settings, via the icons at the bottom of the screen.
Fuel and temperature settings
To reset the average fuel consumption figures prior to starting a new journey, touch the ‘Reset’ icon for either, or both, fuel consumption displays.
Note: The figures for Tank Range and External Temperature are not user set, and will give a ‘current status’ reading.
INFO
ICE1799 ENG
On-Road Info
Settings
4x4 Info
Phone
Navigation
Audio Video
Home Menu
ICE1800 ENG
Fuel and Temperature
Fuel/Temp Speed StopWatch
Reset
Reset
Fuel Consumption 1
Fuel Consumption 2
Tank Range
External Temp
22.4 mpg
27.6 mpg
254 miles
12 C
ICE1801 ENG
Fuel and Temperature
Fuel/Temp Speed StopWatch
Reset
Reset
Fuel Consumption 1
Fuel Consumption 2
Tank Range
External Temp
22.4 mpg
27.6 mpg
254 miles
12 C
ICE1802ENG

29
On Board Computer (OBC)
R
Speed settings (with navigation)
From the main OBC settings screen, touch the ‘Speed’ icon.
To reset the average speed (the current reading will be from a previous journey), touch the ‘Reset’ icon.
Fuel and Temperature
Fuel/Temp Speed StopWatch
Reset
Reset
Fuel Consumption 1
Fuel Consumption 2
Tank Range
External Temp
22.4 mpg
27.6 mpg
254 miles
12 C
Speed
StopWatch
Set
Reset
Speed Warning
Average Speed
62 miles
49.4 mph
SpeedFuel/Temp
ICE1803 ENG
Speed
StopWatch
Set
Reset
Speed Warning
Average Speed
Off
mph
SpeedFuel/Temp
Speed
StopWatch
Set
Reset
Speed Warning
Average Speed
Off
49.4 mph
SpeedFuel/Temp
ICE1806 ENG

On Board Computer (OBC)
30
L
To adjust the speed at which the warning chime is heard, use the up and down arrows. Once the display shows the correct speed, touch the ‘OK’ icon to accept the changes and turn on the speed warning feature.
To turn the speed warning feature off, touch the ‘Warning Off’ icon.
Speed
StopWatch
Set
Reset
Speed Warning
Average Speed
62 miles
49.4 mph
SpeedFuel/Temp
Speed Warning
WarningOff
OK
62 mph
Speed Warning
WarningOff
OK
70 mph
ICE1804 ENG
Speed Warning
WarningOff
OK
62 mph
Speed
StopWatch
Set
Reset
Speed Warning
Average Speed
Off
49.4 mph
SpeedFuel/Temp
ICE1805 ENG

31
On Board Computer (OBC)
R
Speed settings (without navigation)
From the main OBC settings screen, touch the ‘Speed’ icon.
To reset the average speed (the current reading will be from a previous journey), touch the ‘Reset’ icon.
Fuel and Temperature
Fuel/Temp Speed StopWatch
Reset
Reset
Fuel Consumption 1
Fuel Consumption 2
Tank Range
External Temp
22.4 mpg
27.6 mpg
254 miles
12 C
Speed
StopWatch
Set
Reset
Speed Warning
Average Speed
62 miles
49.4 mph
SpeedFuel/Temp
ICE1940 ENG
Set
Arrival Time
Distance
11:43 AM
153 miles
Speed
StopWatch
Set
Reset
Speed Warning
Average Speed
Off
mph
SpeedFuel/Temp
Speed
StopWatch
Set
Reset
Speed Warning
Average Speed
Off
49.4 mph
SpeedFuel/Temp
ICE1943 ENG
Set
Arrival Time
Distance
11:43 AM
153 miles
Set
Arrival Time
Distance
11:43 AM
153 miles

On Board Computer (OBC)
32
L
To adjust the speed warning (the speed at which the warning chime is heard), use the up and down arrows to set the desired speed. Once the display shows the correct speed, touch the ‘OK’ icon to accept the changes and turn on the speed warning feature.
To turn the speed warning feature off, touch the ‘Warning Off’ icon.
Speed
StopWatch
Set
Reset
Speed Warning
Average Speed
62 miles
49.4 mph
SpeedFuel/Temp
Speed Warning
WarningOff
OK
62 mph
Speed Warning
WarningOff
OK
70 mph
ICE1941 ENG
Set
Arrival Time
Distance
11:43 AM
153 miles
Speed Warning
WarningOff
OK
62 mph
Speed
StopWatch
Set
Reset
Speed Warning
Average Speed
Off
49.4 mph
SpeedFuel/Temp
ICE1942 ENG
Set
Arrival Time
Distance
11:43 AM
153 miles

33
On Board Computer (OBC)
R
Distance to destination (without navigation)
To set distance, press the ‘Set’ icon alongside the Distance entry, which takes you to the Distance To Destination screen.
On the Distance To Destination screen, press the ‘C’ icon to backspace/clear the existing distance. Enter the new distance to destination by pressing the number icons. Press the ‘OK’ icon to set the value entered and return to previous screen.
Distance To Destination
Speed
StopWatch
Set
Reset
Speed Warning
Average Speed
Off
49.4 mph
SpeedFuel/Temp
1 2 3
4 5 6
7 8 9
0
Distance to Destination
153 miles
C
OK
ICE1946 ENG
Set
Arrival Time
Distance
11:43 AM
153 miles
Distance To Destination
1 2 3
4 5 6
7 8 9
0
Distance to Destination
1034 miles
C
OK
Distance To Destination
1 2 3
4 5 6
7 8 9
0
Distance to Destination
103 miles
C
OK
ICE1947 ENG

On Board Computer (OBC)
34
L
Stopwatch settings
To access the Stopwatch settings menu, touch the ‘StopWatch’ icon.
To start or stop the stopwatch, touch the ‘Start-Stop’ icon and, to reset the stop watch to zero, touch the ‘Reset’ icon.
To time an individual lap, or event within a series, touch the ‘Lap’ icon.
Trip display settings (with navigation)
To access the trip computer settings, touch the ‘Trip’ icon.
Fuel and Temperature
Fuel/Temp Speed StopWatch
Reset
Reset
Fuel Consumption 1
Fuel Consumption 2
Tank Range
External Temp
22.4 mpg
27.6 mpg
254 miles
12 C
Stopwatch
Fuel/Temp StopWatchSpeed
Lap
ResetStartStop
00.00000 : :
0000 000
ICE1807 ENG
Stopwatch
Fuel/Temp StopWatchSpeed
Lap
ResetStartStop
00.00000 : :
0006127
ICE1809 ENG
0000 000
Stopwatch
Fuel/Temp StopWatchSpeed
Lap
ResetStartStop
21.50600 : :
00 06 215
ICE1810 ENG
Fuel and Temperature
Fuel/Temp Speed StopWatch
Reset
Reset
Fuel Consumption 1
Fuel Consumption 2
Tank Range
External Temp
22.4 mpg
27.6 mpg
254 miles
12 C
Trip Settings
Limit
Range
Time
Consumption 1
Average Speed
Date
Consumption 2
OKTrip Items oninstrument display
ICE1811 ENG

35
On Board Computer (OBC)
R
The information centre on the instrument pack, is able to display individual values chosen from a list.
To select which items make up the list, touch the square icon adjacent to each of your choices. Once you have made your selections, touch the ‘OK’ icon.
Trip display settings (without navigation)
To access the trip computer settings, touch the ‘Trip’ icon.
Trip Settings
Limit
Range
Time
Consumption 1
Average Speed
Date
Consumption 2
OKTrip Items oninstrument display
Trip Settings
Limit
Range
Time
Consumption 1
Average Speed
Date
Consumption 2
OKTrip Items oninstrument display
ICE1812 ENG
Fuel and Temperature
Fuel/Temp Speed StopWatch
Reset
Reset
Fuel Consumption 1
Fuel Consumption 2
Tank Range
External Temp
22.4 mpg
27.6 mpg
254 miles
12 C
Trip Settings
Limit
Range
Time
Consumption 1
Average Speed
Date
Consumption 2
OKTrip Items oninstrument display
Arrival Time
Distance
ICE1944 ENG

On Board Computer (OBC)
36
L
The information centre on the instrument pack is able to display individual values chosen from a list.
To select which items make up the list, touch the square icon adjacent to each of your choices. Once you have made your selections, touch the ‘OK’ icon.
Trip Settings
Limit
Range
Time
Consumption 1
Average Speed
Date
Consumption 2
OKTrip Items oninstrument display
Trip Settings
Limit
Range
Time
Consumption 1
Average Speed
Date
Consumption 2
OKTrip Items oninstrument display
Arrival Time
Distance
Arrival Time
Distance
ICE1945 ENG
37
Radio
R
RADIO
RADIO CONTROLS
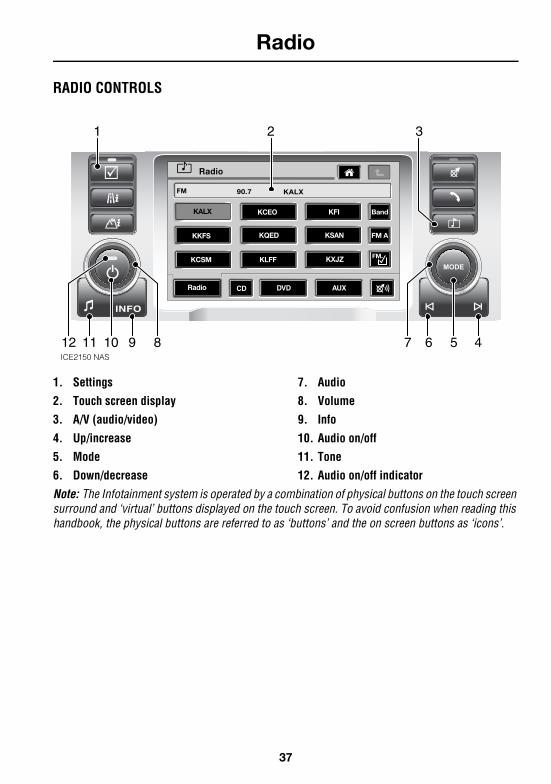
1. Settings
2. Touch screen display
3. A/V (audio/video)
4. Up/increase
5. Mode
6. Down/decrease
7. Audio
8. Volume
9. Info
10. Audio on/off
11. Tone
12. Audio on/off indicator
Note: The Infotainment system is operated by a combination of physical buttons on the touch screen surround and ‘virtual’ buttons displayed on the touch screen. To avoid confusion when reading this handbook, the physical buttons are referred to as ‘buttons’ and the on screen buttons as ‘icons’.
INFO
DVDCDRadio AUX
Radio
FM
FM A
Band
FM
KSAN
90.7 KALX
KFIKCEO
KQEDKKFS
KXJZKLFFKCSM
KALX
ICE2150 NAS
12
1
10
2 3
811 6 5 479

Radio Operation
38
L
Radio Operation
RADIO OPERATION
To access the radio mode, either touch the ‘Audio Video’ icon on the home menu, or press the MODE button and turn the rotary control until Radio is highlighted.
Note: When the Audio system is operating in ‘1-HOUR’ mode, the audio controls on the steering wheel do not function.
Band selection
When in radio mode, touch the ‘Band’ icon repeatedly, until the required band is selected (FM or AM).
On-Road Info
Settings
4x4 Info
Phone
Navigation
Audio Video
Home Menu
ICE1764 ENG
31.5
h min
mi
M 4 0
B4100
B4100
B4450 >M40
22
GAYDONGAYDON
1.1ml
0.5ml
0.3ml
Radio CD TV
AUX
Audio Mode
1/2 mi
M 4 0
B4100
B4100
B4450 >M40
22
GAYDONGAYDON
1.1ml
0.5ml
0.3ml
ICE 2098 ENG
Radio
FM
DVDCDRadio AUX
FM A
Band
FM
KSAN
KFIKCEO
KQEDKKFS
KXJZKLFFKCSM
KALX
90.7 KALX
ICE2151 NAS
FM AM
FM A AM A
39
Radio Operation
R
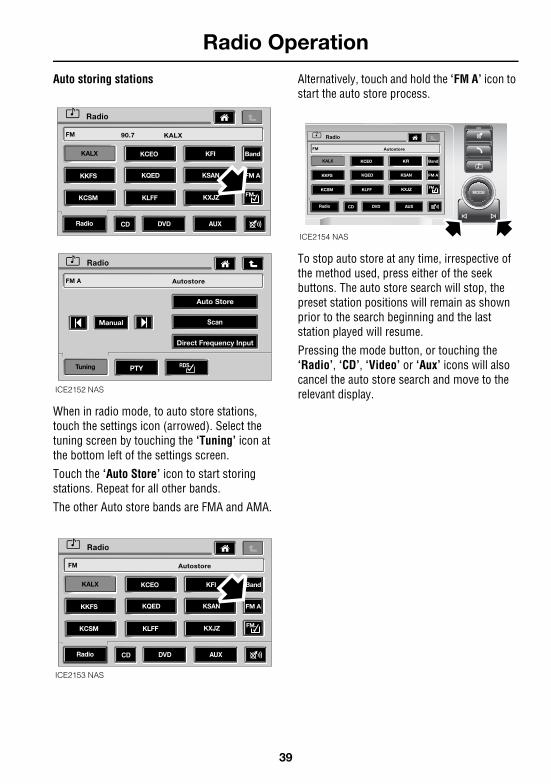
Auto storing stations
When in radio mode, to auto store stations, touch the settings icon (arrowed). Select the tuning screen by touching the ‘Tuning’ icon at the bottom left of the settings screen.
Touch the ‘Auto Store’ icon to start storing stations. Repeat for all other bands.
The other Auto store bands are FMA and AMA.
Alternatively, touch and hold the ‘FM A’ icon to start the auto store process.
To stop auto store at any time, irrespective of the method used, press either of the seek buttons. The auto store search will stop, the preset station positions will remain as shown prior to the search beginning and the last station played will resume.
Pressing the mode button, or touching the ‘Radio’, ‘CD’, ‘Video’ or ‘Aux’ icons will also cancel the auto store search and move to the relevant display.
Radio
FM A Autostore
Tuning
Scan
Direct Frequency Input
Auto Store
PTY RDS
Manual
DVDCDRadio AUX
Radio
FM
FM A
Band
FM
KSAN
90.7 KALX
KFIKCEO
KQEDKKFS
KXJZKLFFKCSM
KALX
ICE2152 NAS
DVDCDRadio AUX
Radio
FM A
Band
FM
KSAN
KFIKCEO
KQEDKKFS
KXJZKLFFKCSM
KALX
FM Autostore
ICE2153 NAS
DVDCDRadio AUX
Radio
FM A
Band
FM
KSAN
KFIKCEO
KQEDKKFS
KXJZKLFFKCSM
KALX
FM Autostore
ICE2154 NAS

Radio Operation
40
L
Selecting preset stationsOnce the station frequencies have been auto stored, they can be selected by touching the icon for the required station.
Alternatively, rotate the audio control. The first click displays the current station and each subsequent click moves to the next station. Clockwise rotation moves up, anti-clockwise moves down.
Note: See also ‘Quick Overview’ section at the front of this book.
Seeking stations
Press the ‘up’ or ‘down’ seek button to skip to the next available station in that direction.
DVDCDRadio AUX
Radio
FM
FM A
Band
FM
KSAN
90.7 KALX
KFIKCEO
KQEDKKFS
KXJZKLFFKCSM
KALX
DVDCDRadio AUX
Radio
FM
FM A
Band
FM
KSAN
83.9 KKFS
KFIKCEO
KQED
KXJZKLFFKCSM
KKFS
KALX
ICE2155 NAS
31.5
h min
mi
M 4 0
B4100
B4100
B4450 >M40
22
GAYDONGAYDON
1.1ml
0.5ml
0.3ml
1/2 mi
Radio Preset
1 2 74 5 63 98
105.7
M 4 0
B4100
B4100
B4450 >M40
22
GAYDONGAYDON
1.1ml
0.5ml
0.3ml
ICE 2104 ENG
31.5
h min
mi
M 4 0
B4100
B4100
B4450 >M40
22
GAYDONGAYDON
1.1ml
0.5ml
0.3ml
1/2 mi
ICE2105 ENG

41
Radio Operation
R
When seeking from the main radio screen, the station information will be displayed in the data display at the top of the screen.
When seek is enabled from any view other than audio/video, the station information is displayed briefly as a pop-up.
Manual tuning
To manually input a frequency, touch the FM settings icon (arrowed), to display the settings screen. A new frequency may be selected by touching the icons indicated.
DVDCDRadio AUX
Radio
FM
FM A
Band
FM
KSAN
90.7 KALX
KFIKCEO
KQEDKKFS
KXJZKLFFKCSM
KALX
ICE2156 NAS
SEEK
31.5
h min
mi
M 4 0
B4100
B4100
B4450 >M40
22
GAYDONGAYDON
1.1ml
0.5ml
0.3ml
Radio Information
1/2 mi FM 90.7 KALX
ICE 2157 NAS
SEEK
Radio
FM SCAN
Tuning
Scan
Direct Frequency Input
Auto Store
PTY RDS
Manual
87.2 KQED
DVDCDRadio AUX
Radio
FM
FM A
Band
FM
KSAN
90.7 KALX
KFIKCEO
KQEDKKFS
KXJZKLFFKCSM
KALX
ICE2158 NAS

Radio Operation
42
L
Touch the ‘Direct Frequency Input’ icon and a pop-up will be displayed to allow the frequency to be entered using the numeric key pad.
Note: Only some of the digits will be enabled on the pop-up screen. These are the only digits available to start the frequency. When the first digits have been input further available digits will be displayed.
When the desired frequency has been entered, press the ‘OK’ icon to confirm.
Once the frequency has been set, the station information (if available) will be displayed in the information display.
To save the station frequency as a preset, touch and hold a location icon for approximately three seconds. After a short delay the station name will be displayed at that preset location.
Radio
FM A 87.5
Tuning
Scan
Direct Frequency Input
Auto Store
PTY RDS
Manual
Radio
FM A 87.5
Tuning
Scan
Direct Frequency Input
Auto Store
PTY RDS
Manual
8 9
1
0
4
7
2
5
3
6
C
OK
Direct Freq Input
Radio
FM A 87.5
Tuning
Scan
Direct Frequency Input
Auto Store
PTY RDS
Manual
Direct Freq Input
C
8
1
4
7
2
5
3
6
97.1
0
9
OK
ICE2109 ENG
Radio
TV DVDCDRadio AUX
FM
KALX
KQED
87.2 KQED
DVDCDRadio AUX
Radio
FM
FM A
Band
FM
KSAN
KFIKCEO
93.9KKFS
KXJZKLFFKCSM
KALX
87.2 KQED
DVDCDRadio AUX
FM A
Band
FM
KSAN
KFIKCEO
93.9
KXJZKLFFKCSM
ICE2159 NAS

43
Radio Operation
R
Program search by type (PTY)
It is possible to search for stations of a certain type, for example Rock Music. From the settings screen, touch the ‘PTY’ icon.
Note: The PTY menu is NOT available when the vehicle is moving.
A menu screen is displayed, which allows you to scroll up or down through a list of programme types. To select a type, touch the box icon to the left of the program type required. ‘Searching’ will then be displayed in the information display.
Note: To cancel the search, press either of the seek buttons.
Radio
FM A 90.7
Tuning
Scan
Direct Frequency Input
Auto Store
PTY RBDS
Manual
ICE2020 NAS
Radio
RBDS
FM A 90.7
Rock Music
Easy Listening
Pop Music
Tuning PTY
Radio
RBDS
FM A Searching
Rock Music
Easy Listening
Pop Music
Tuning PTY
ICE2021 NAS

Radio Operation
44
L
PTY PROGRAMME TYPESThe following list contains examples of programme types. Specific titles may vary.
Program types available to search, are subject to change.
Note: TEST and ALERT emergency broadcast stations may not be available currently. When the ALERT stations are available they will broadcast important information in the event of an emergency. TEST will broadcast a test signal for the emergency information to allow the public and emergency services to ensure that emergency procedures can be practised without causing alarm.
Note: If no control is pressed within 5 seconds of PTY being selected, programme type tuning will be cancelled automatically.
NONE No programme type defined
NEWS News services
SPORTS Sport
ROCK Rock music
SOFT RCK Soft rock music
TOP 40 Top 40 (chart music)
COUNTRY Country music
JAZZ Jazz music
CLASSICL Classical music
R&B R&B (Rhythm and Blues)
SOFT R&B Soft R&B
REL MUSIC Religious music
REL TALK Religious talk
WEATHER Weather information
TEST Emergency test
ALERT! Emergency information

45
Radio Broadcast Data System
R
Radio Broadcast Data System
RADIO BROADCAST DATA SYSTEM (RBDS)Your radio is equipped with RBDS, which enables the audio unit to receive additional information with the normal radio signals.
Note: Not all FM radio stations broadcast RBDS. If a non-RBDS station is received, RBDS features will not be available.
Selecting RBDS
To access the RBDS settings menu from the main radio screen, touch the FM settings icon (arrowed).
When the settings menu is displayed, touch the RBDS settings icon (arrowed).
RBDS can be turned on or off as required, by touching the ‘On’ or ‘Off’ icons.
Radio
FM
FM A
Band
FM
Radio
FM A 90.7
Tuning
Scan
Direct Frequency Input
Auto Store
PTY RBDS
Manual
Radio CD TV
KSAN
90.7 KALX
KFIKCEO
KQEDKKFS
KXJZKLFFKCSM
KALX
ICE2016NAS
Radio
FM A 90.7
Tuning
Scan
Direct Frequency Input
Auto Store
PTY RBDS
Manual
ICE2022 NAS
Radio Settings
FM A 90.7
Tuning
RBDS 0ff0n
RBDSPTY
Radio Settings
FM A 90.7
Tuning
RBDS On Off
RBDSPTY
ICE2023 NAS

News Information
46
L
News Information
INFORMATION BROADCASTSOn the FM waveband, RBDS enables the radio to receive news information broadcasts. RBDS also allows the radio to automatically re tune to stations that are linked to the same network.
With the RBDS feature selected, any available news information broadcasts can be selected automatically, as and when they occur (even during CD play).
NEWS INFORMATION
Selecting news informationPress and hold the information button for more than 2 seconds, to select or de-select News Information - the word ‘NEWS’ will appear in, or disappear from, the display accordingly.
During news broadcasts, the display flashes ‘NEWS’ alternately with the name of the radio station providing the news information.
Radio
FM A 90.7
Tuning
Scan
Direct Frequency Input
Auto Store
PTY RBDS
Manual
ICE2022 NAS
Radio Settings
FM A 90.7
Tuning
RBDS 0ff0n
RBDSPTY
Radio Settings
FM A 90.7
Tuning
RBDS On Off
RBDSPTY
ICE2023 NAS
Radio
FM A
Band
FM
KFI Band
News
News
i
Radio CD TV
KSAN
FM 90.7 KALX
KFIKCEO
KQEDKKFS
KXJZKLFFKCSM
KALX
ICE2024 NAS

47
News Information
R
News information during CD playWhen the news information mode is active, CD play will be interrupted by news information broadcasts automatically, whenever they occur.
The display will “pop up” the station name and ‘NEWS’. At the end of each broadcast, CD play will resume from the point at which CD play was interrupted.
Switching off news informationPress and hold the information button for more than 2 seconds (‘NEWS OFF’ appears in the display). This action will prevent future news broadcasts from being received until the feature is reselected.
Unwanted news information broadcasts can be aborted by briefly pressing the information button. In this case, because the feature is being disabled DURING an information broadcast, disablement is permanent and the NEWS icon is removed.
Press the information button for more than 2 seconds to restore the NEWS icon.
Compact Disc Player
48
L
COMPACT DISC PLAYER
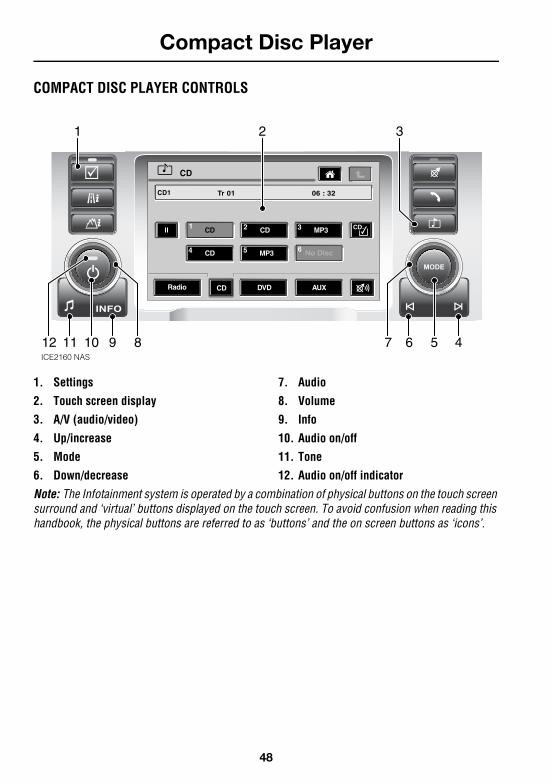
COMPACT DISC PLAYER CONTROLS
1. Settings
2. Touch screen display
3. A/V (audio/video)
4. Up/increase
5. Mode
6. Down/decrease
7. Audio
8. Volume
9. Info
10. Audio on/off
11. Tone
12. Audio on/off indicator
Note: The Infotainment system is operated by a combination of physical buttons on the touch screen surround and ‘virtual’ buttons displayed on the touch screen. To avoid confusion when reading this handbook, the physical buttons are referred to as ‘buttons’ and the on screen buttons as ‘icons’.
INFO
CD
CD1 Tr 01
CD1 2
5 64
3
No Disc
CDCD
CD
MP3
MP3
DVDCDRadio AUX
06 : 32
ICE2160 NAS
12
1
10
2 3
811 6 5 479

49
Compact Disc Player
R
CD AUTOCHANGER
The CD changer is located in the glovebox compartment.
Fully open the sliding cover (3) to insert or remove the magazine (2). Keep the cover closed at all other times, to prevent dirt and dust from entering the CD changer unit.
Press button (1) to eject the magazine.
Loading and unloading the magazine
To unload the magazine, hold the magazine with the arrow uppermost, pull out each tray in turn by its ‘tab’ (see arrow above), while holding the tray securely so as not to drop the disc. Unload one disc at a time and handle only the edge and centre of the disc.
ICE1965 ENG 1 2 3
ICE2077 LHD
ICE1966 ENG

Compact Disc Player
50
L
Place a disc (label side uppermost) onto each tray, holding ONLY the outside edge and centre hole of the disc. Load only one disc in each tray.
Correctly align the tray with the parallel slots on each side of the magazine and slide the tray fully into the magazine. Insert the magazine in the direction of the arrow marked on the magazine casing and push it fully into the CD changer. Close the sliding cover.
Important:
• The CD autochanger should only be used as described - any other application or method of use could result in the user being exposed to invisible laser radiation, exceeding the limit of laser Class 1.
• Use standard 12 cm CDs only.
• DO NOT use irregularly shaped or damaged CDs - these may damage the compact disc changer unit.
• 8 cm CD singles must NOT be used, even if a CD adaptor is fitted.
• Closed session CD-R and CD-RW discs can be played.
• The CD autochanger should not be used in temperatures outside the range -10oC to +60oC (14oF to 140oF). If the CD autochanger reaches temperatures higher than recommended for normal use, ‘HIGH TEMP’ appears in the display. If this occurs, stop using the CD player, eject the magazine and allow the autochanger to cool down. If the problem persists, consult your Retailer.
Note: Additional magazines can be obtained from a Land Rover Retailer.
CD autochanger maintenanceThe manufacturers do not recommend the use of lens cleaning discs.
ICE1967 ENG

51
Compact Disc Player
R
CD CONTROLS
Selecting CD audio source
To select CD as the audio source, press the MODE button, which will display the Audio Mode pop-up. ‘CD’ can be selected as the audio source by rotating the audio control, until ‘CD’ is highlighted.
Alternatively, if any other audio source is currently in use, press the ‘CD’ icon.
Playing CDs
If CD mode is selected prior to inserting the magazine, the display will show ‘No Cartridge’. Once the magazine has been inserted, there will be a short delay whilst the system reads the discs, during which ‘Please Wait - Loading’ will be displayed.
Once the magazine has loaded and the discs have been read, play will commence with disc one, track one.
31.5
h min
mi
M 4 0
B4100
B4100
B4450 >M40
22
GAYDONGAYDON
1.1ml
0.5ml
0.3ml
Radio CD TV
AUX
Audio Mode
1/2 mi
M 4 0
B4100
B4100
B4450 >M40
22
GAYDONGAYDON
1.1ml
0.5ml
0.3ml
ICE 2117 ENG
A/V OFF
To turn on Audio press
Or Select a source below:
DVDCDRadio AUX
ICE2161 NAS
CD
CD1 Tr 01
CD1 2
5 64
3
No Disc
CD
CD
No Disc1
6
CD2
54
3No Disc
No Disc No Disc
No Disc
No Disc
CD
No Cartridge
No Disc1
6
CD2
54
3No Disc
No Disc No Disc
No Disc
No Disc
Please Wait - Loading
DVDCDRadio AUX
DVDCDRadio AUX
DVDCDRadio AUX
ICE2162 NAS

Compact Disc Player
52
L
Selection/search controls
Track selection: With a CD playing, briefly press the right hand seek button to skip to the beginning of the next track, or the left seek button to return to the start of the current track. Press either button repeatedly, to reach the desired track.
Track search (fast forward/reverse): Press and hold either seek button to play rapidly, forward or back, through one or more tracks. Normal playback will resume as soon as the button is released.
PauseTouch the pause icon to suspend play; touch the icon again to resume play from the point at which it was suspended.
Disc selection buttons (1-6)With the CD changer selected, press the appropriate icon to select a disc from the changer. Playback will start from the beginning of that disc and progress sequentially through all the discs in the disc changer.
Note: The audio system can only recognise a disc type after it has read the disc at least once.
An empty compartment cannot be selected because the icon will be grey. If a CD is inserted upside down or a faulty CD inserted then the icon for that compartment remains at ‘--’ and the display shows ‘INVALID DISC’. Another disc must then be selected.
INFO
CD
CD1 Tr 01
CD1 2
5 64
3
No Disc
CD
DVDCDRadio AUX
03 : 27
CD MP3
CD
ICE2163 NAS

53
Compact Disc Player
R
• Icon - 1Shows the currently playing CD.
• Icons - 2 & 5Position occupied by CD.
• Icon - 3Position occupied by MP-3 disc.
• Icon - 4Various reasons, eg - disc not read yet or faulty disc or upside down disc etc.
• Icon - 6No disc in this position.
Playback features
A selection of additional playback features are made available by touching the CD settings icon.
• Random The track order of play from the current disc is randomly selected by the CD player.
• Repeat The CD player plays the current track continuously, from start to finish, again and again until repeat is cancelled.
• CD Scan CD scan will play each track on the current disc in turn for ten seconds, until all tracks have been played. Play then resumes with the track from which Scan was initiated. This enables the user to sample each track before choosing one to listen to.
CD1 2
5 64
3
No Disc
CD MP3
CD
CD1 2
5 64
3
No Disc
CD MP3
CD
CD1 2
5 64
3
No Disc
CD MP3
CD
CD1 2
5 64
3
No Disc
CD MP3
CD
CD1 2
5 64
3
No Disc
CD MP3
CD
ICE2121 ENG
CD
Random Repeat CD Scan
CD1 Tr 01 Repeat00:25
CD
CD1 Tr 01
CD1 2
5 64
3
No Disc
CD
DVDCDRadio AUX
03 : 27
CD MP3
CD
ICE2164 NAS
Random Repeat Scan

Compact Disc Player
54
L
To cancel any of the playback features:-
• Touch the feature icon that is in use.
• Select another playback feature.
• Press the forward or reverse buttons.
• Switch off the audio unit or the ignition switch.
• Eject the CD magazine.
Playing MP3 Discs
The CD unit is capable of playing MP3 discs, which are loaded into the magazine in the usual way.
Note: A mixture of both CDs and MP3 discs can be loaded into the magazine at the same time.
During playback of an MP3 disc (1), an additional information screen is displayed (2). If the MP3 disc has been recorded with the music files contained within folders, then the additional information screen will display folder information.
To move between tracks in a folder, use the up/down buttons.
CD
CD1
Brothers In Arms
02 - Money For Noth~ 02 : 23
MP31 2
5 64
3
No Disc
CD
DVDCDRadio AUX
CD CD
MP3CD
ICE2165 NAS
1 2CD
CD1
Brothers In Arms
04 - Your Latest Tr~ 00 : 14
MP31 2
5 64
3
No Disc
CD
DVDCDRadio AUX
CD CD
MP3CD
CD
CD1
Brothers In Arms
02 - Money For Noth~ 02 : 23
MP31 2
5 64
3
No Disc
CD
DVDCDRadio AUX
CD CD
MP3CD
ICE2166 NAS

55
Compact Disc Player
R
To move between folders, use the left/right icons alongside the additional information screen.
Track or file information is displayed in the usual way, via the top information screen.
MP3 folder and track formatA CD-R or CD-RW can have MP3 folders and tracks recorded in many different ways with many layers of folders, with tracks distributed throughout the folder structure. To minimise the loading on the system, a rigid folder structure is required. Therefore, only one level (or layer) of folders is permitted. Up to 20 folders, with a maximum of 20 characters per folder title, are permitted in this level. Up to 50 tracks can exist in the root directory and up to 50 tracks can exist in each folder.
Note: Any folder located within a folder will be ignored.
Note: Any CD containing a mixture of MP3 and CD-DA tracks will be treated as a CD (any MP3 tracks will be ignored).
Note: The CD autochanger may take a long time (1 minute or more) to load a disc, if the disc contains several sessions. The customer can create CDs with up to 40 sessions, but this will result in a long loading time.
Note: The CD player is not guaranteed to play every disc available on the market, because of variations in the quality of discs available.
CD
CD1
Come Away With Me
01 - Don't Know Why~ 00 : 16
MP31 2
5 64
3
No Disc
CD
DVDCDRadio AUX
CD CD
MP3CD
CD
CD1
Brothers In Arms
02 - Money For Noth~ 02 : 23
MP31 2
5 64
3
No Disc
CD
DVDCDRadio AUX
CD CD
MP3CD
ICE2167 NAS

Audio Voice Recognition*
56
L
AUDIO VOICE RECOGNITION*VOICE CONTROL
Note: Please familiarise yourself with the operation of the audio system, before using voice control.
Making yourself clearly understoodThe voice control system includes a hands-free microphone, mounted in the roof lining at the front of your vehicle. Although the microphone filters out some ambient noise, there are a few points to observe to ensure that the system understands your commands:
• Speak continuously and at normal volume, avoiding unnatural emphasis and pauses between words.
• Do not speak while the voice control system itself is giving an output. The voice system displays LISTENING on the message centre and gives a beep when it is waiting for a speech input.
• It is possible that noise interference from outside the vehicle could affect commands. To avoid this, keep the doors, windows, and sunroof closed.
• If a command is not heard, or misunderstood, the voice system responds with;
>Sorry<,
>Command not recognised< or
>No speech detected<.
If this happens repeat the command.
• Avoid causing background noise in the vehicle while you are speaking and ask your passengers not to talk while you are issuing voice commands.
• The hands-free microphone is positioned to pick up the driver’s voice. Commands made by other occupants may be picked up, but clarity and accuracy will be reduced.
IMPORTANT
Voice control provides a safe and convenient way of operating the audio system, without the need to operate the controls manually. This enables you to concentrate fully on driving the vehicle and removes the need to divert your attention from the road ahead, in order to change settings or receive feedback from the system.A number of voice commands are available and with a little experience you will find them easy and convenient to use. Whenever you issue one of the defined commands with the system active, the voice control system converts your command into a control signal for the audio system. Your inputs take the form of dialogues or commands. You are guided through these dialogues by announcements or questions.

57
Audio Voice Recognition*
R
Activating the system
To activate voice control:
• Briefly press the button (the audio system will mute at this point). A brief acoustic signal will be heard and LISTENING will be displayed on the main message centre, to indicate that the system is now waiting for a voice command.
Note: It is only necessary to use the steering wheel voice control button at the beginning of each voice session.
Defined voice commandsThe voice control system understands predefined commands, which need to be quoted word for word.
An audio reminder of voice commands is available. To activate the reminder, press the voice control button briefly and give one of the following commands:
• ‘Voice help’ - to list all commands.
• ‘Radio help’ - to list Radio commands.
• ‘CD help’ - to list CD commands.
• ‘Navigation help’ - to list navigation commands. Refer to Navigation Handbook for operating instructions.
• ‘Notepad help’ - to list Notepad commands. Refer to the Owners Handbook for operating instructions.
• ‘Display help’ - to list Display commands.
Note: It is important to recognise that the Voice Recognition Commands follow a hierarchy, as per the following example:-
Device (e.g. Radio);
followed by -
Function (e.g. Radio play);
followed by -
Setting (e.g. Radio tune 96.9 FM).
H5837

General Commands*
58
L
General Commands*GENERAL COMMANDS
Activating the user help functionSay the command ‘Radio help’ - the audio system recites a list of Radio commands.
Say the command ‘CD help’ - the audio system recites a list of CD changer commands.
Interrupting voice controlA command can be interrupted by saying the word ‘Cancel’ or by pressing the voice control button until the system responds by saying >Command cancelled<.
If you receive a telephone call (or Navigation route guidance instruction/news announcement) while conducting a dialogue by voice control, the voice control dialogue is interrupted.
Command not recognisedIf a command is not recognised by the speech recognition system, it responds with >Sorry<.
Please say your command again.
Activating the user help function
You say System response Message centre display
‘Radio help’ Quotes the list of radio commands
RADIO HELP
‘CD help’ Quotes the list of CD commands
CD HELP

59
Rear Seat Entertainment Commands*
R
Rear Seat Entertainment Commands*REAR SEAT ENTERTAINMENT COMMANDS
Requesting auxilliaries or headphonesThe following commands are only available when Rear Seat Entertainment is fitted to the vehicle.
Activating rear seat entertainment commands
You say System response Message centre display
‘Radio auxilliary on or Radio auxilliary play’
Selects auxilliary input for external device
AUXILLIARY PLAY
‘Headphones on or Headphones play’
Switches on both headphone outputs
HEADPHONES PLAY
‘Headphones off’ Switches off both headphone outputs
HEADPHONES OFF

Radio Commands
60
L
Radio Commands
Station tuning
Starting a dialogueHold the voice control button on the multi-functional steering wheel until the acoustic signal is heard. Any audio sources in the vehicle are muted.
Radio stationsFrequencies are said as in the following examples:
• ‘Radio Tune five thirty one AM’, or ‘Radio Tune five thirty one’ (531).
• ‘Radio Tune nine hundred’ (900).
• ‘Radio Tune fourteen forty’ (1440).
• ‘Radio Tune fifteen oh three AM’ (1503).
• ‘Radio Tune fifteen ten AM’ (1510).
• ‘Radio Tune ten eighty’ (1080).
• ‘Radio Tune eighty nine point nine FM’ or ‘Radio Tune eighty nine point nine’ (89.9).
• ‘Radio Tune eighty seven point nine FM’, or ‘Radio Tune eighty seven point nine’ (87.9).
• ‘Radio Tune ninety point zero’ or ‘Radio Tune ninety’ (90.0).
• ‘Radio Tune ninety point one’ (90.1).
• ‘Radio Tune one hundred point five’ (100.5).
• ‘Radio Tune one oh one point one FM’ (101.1).
• ‘Radio Tune one oh eight point oh’, ‘Radio Tune one oh eight point zero’, or ‘Radio Tune one oh eight’ (108.0).
• ‘Radio Tune one oh seven point nine’ (107.9).
In place of ‘Tune’, you can use the command ‘Select’.
Tuning to a radio station
You say System response Message centre display
‘Radio play’ Radio play RADIO PLAY
‘Radio tune ninety six point nine (96.9)’
Radio tunes to 96.9 FM 96.9 FM
‘Radio tune <name tag>’ Radio tunes to the named station
Station frequency

61
Radio Commands
R
STORING RADIO STATIONS
Storing via voice commandOnce you have tuned to a Radio station, it is possible to store that station for future use as a preset.
The command ‘Radio store preset’ <say number>(1-9), calls up the dialogue for storing a preset station.
The command ‘Radio band autostore’, enters the autostore function for the selected frequency band (e.g. FM).
Name tagsName tags are a unique name or phrase of your choice, which can be used to recall a radio station. The name tags used can be the station name or a completely separate name of your choosing.
The names are stored in a directory by using the ‘Radio store name’ command. The system responds with >Name please<. You the say the name that you have chosen (e.g. Radio 1).
The system will read out a list of current name tags when given the command ‘Radio directory’.
‘Radio tune’ <name tag> is used to select a station that has been previously stored.
Storing via voice command
You say System response Message centre display
‘Radio store preset <preset number> (1-9)’
Radio store preset <preset number>
RADIO STORE PRESET (1-9).
‘(1) Radio store name .......(3) <name>’
(2) Radio store name ........<name><frequency>
RADIO STORE NAME, .....NAME PLEASE.
‘Radio autostore’ Radio autostore RADIO AUTOSTORE

Radio Commands
62
L
RADIO PLAY DIRECTORY
Tune / delete from the radio directoryThe commands ‘Radio play directory’ or ‘Radio directory’, enable you to have all your radio name tag entries in your voice recognition radio directory, read out in stored order.
Commands can be entered during the system response.
ReplayAfter a name tag has been read out by the system, give the command ‘Replay’ and the name tag will be repeated.
TuneAfter a name tag has been read out by the system, give the command ‘Tune’ and the radio tunes to the station saved under that name tag.
DeleteAfter a name tag has been read out by the system, give the command ‘Delete’ and the name tag will be removed from the directory.
CancelAfter a name tag has been read out by the system, give the command ‘Cancel’ and the current voice session will end.
Tuning from the radio directory
You say System response Message centre display
‘Radio play directory’ Radio play directory. You can say ‘Replay’, ‘Tune’, ‘Delete’ or ‘Cancel’ after each name. The system reads out radio directory entries.
RADIO DIRECTORY <Station frequency>

63
Radio Commands
R
RADIO DELETE DIRECTORY
Deleting the directoryThe command ‘Radio delete directory’, deletes all entries in the radio directory.
Deleting the radio directory
You say System response Message centre display
1. ‘Radio delete directory’ 1. Radio delete directory confirm yes or no
1. DELETE DIRECTORY SAY YES OR NO
2. ‘Yes’ 2. Are you sure you want to delete the whole directory?
2. SAY YES OR NO
3. ‘Yes’ 3. Directory deleted 3. DIRECTORY DELETED

CD Commands
64
L
CD Commands
Selecting Disc and track numbersFor CD player commands, say disc and track numbers as in the following examples:
• ‘CD play Disc one’.
• ‘CD play Disc six track ten’.
• ‘CD play Track twenty five’.
• ‘CD play Track forty seven’.
Operating the CD player via voice command
You say System response Message centre display
‘CD help’ List of CD commands CD HELP
‘CD play’ CD play CD PLAY
‘CD play disc <say number> (1-6)’
CD play disc <say number> (1-6)
DISC <disc number> (1-6)
‘CD play next disc’ CD play next disc CD NEXT DISC
‘CD play previous disc’ CD play previous disc CD PREVIOUS DISC
‘CD play track <say number> (1-99)’
CD play track <say number> (1-99)
CD TRACK <track number> (1-99)
‘CD play disc <say number> (1-6), track <say number> (1-99)’
CD play disc <say number> (1-6), track <say number> (1-99)
DISC <disc number> (1-6) TRACK <track number> (1-99)

Index
65
R
CCare of compact discs . . . . . . . . . . . . . . . . 10Care of touch screen . . . . . . . . . . . . . . . . . 11CD autochanger . . . . . . . . . . . . . . . . . . . . . 49CD controls
MP3 discs . . . . . . . . . . . . . . . . . . . . . . . 54playback features. . . . . . . . . . . . . . . . . . 53playing CDs . . . . . . . . . . . . . . . . . . . . . . 51selecting CD. . . . . . . . . . . . . . . . . . . . . . 51selection/search. . . . . . . . . . . . . . . . . . . 52
CD data encryption. . . . . . . . . . . . . . . . . . . 10CD faults . . . . . . . . . . . . . . . . . . . . . . . . . . 10CD playback functions
CD scan . . . . . . . . . . . . . . . . . . . . . . . . . 53disc selection. . . . . . . . . . . . . . . . . . . . . 52pause. . . . . . . . . . . . . . . . . . . . . . . . . . . 52playback . . . . . . . . . . . . . . . . . . . . . . . . 51random . . . . . . . . . . . . . . . . . . . . . . . . . 53repeat . . . . . . . . . . . . . . . . . . . . . . . . . . 53track selection . . . . . . . . . . . . . . . . . . . . 52tracksearch . . . . . . . . . . . . . . . . . . . . . . 52
CD player controls . . . . . . . . . . . . . . . . . . . 48CD sound quality . . . . . . . . . . . . . . . . . . . . 10Compact discs - care of . . . . . . . . . . . . . . . 10Controls - audio unit . . . . . . . . . . . . . . 12, 37Copy protected CDs . . . . . . . . . . . . . . . . . . 10MMP3 discs . . . . . . . . . . . . . . . . . . . . . . . . . 54
playback . . . . . . . . . . . . . . . . . . . . . . . . 54NNews information. . . . . . . . . . . . . . . . . . . . 46PPersonalising settings . . . . . . . . . . . . . . . . 13RRadio Broadcast Data System (RBDS). . . . 45Radio operation
band selection . . . . . . . . . . . . . . . . . . . . 38manual tuning . . . . . . . . . . . . . . . . . . . . 41presets. . . . . . . . . . . . . . . . . . . . . . . . . . 40PTY (program types) . . . . . . . . . . . . . . . 44
seeking stations . . . . . . . . . . . . . . . . . . . 40selecting preset stations. . . . . . . . . . . . . 40station auto-store. . . . . . . . . . . . . . . . . . 39
Radio reception . . . . . . . . . . . . . . . . . . . . . . 9RBDS
information broadcasts . . . . . . . . . . . . . 46selecting. . . . . . . . . . . . . . . . . . . . . . . . . 45
Reception - radio . . . . . . . . . . . . . . . . . . . . . 9SSettings
audible feedback . . . . . . . . . . . . . . . . . . 15audio system . . . . . . . . . . . . . . . . . . . . . 13clock. . . . . . . . . . . . . . . . . . . . . . . . . . . . 16computer - main screen . . . . . . . . . . . . . 28date . . . . . . . . . . . . . . . . . . . . . . . . . . . . 16display language . . . . . . . . . . . . . . . . . . 13display screen . . . . . . . . . . . . . . . . . . . . 17distance to destination (without
navigation). . . . . . . . . . . . . . . . . . . . . 33fuel and temperature . . . . . . . . . . . . . . . 28speed (with navigation) . . . . . . . . . . . . . 29speed (without navigation). . . . . . . . . . . 31stopwatch. . . . . . . . . . . . . . . . . . . . . . . . 34time and date . . . . . . . . . . . . . . . . . . . . . 15trip display (with navigation) . . . . . . . . . 34trip display (without navigation). . . . . . . 35units of measure . . . . . . . . . . . . . . . . . . 14voice language . . . . . . . . . . . . . . . . . . . . 18
TTone adjustment. . . . . . . . . . . . . . . . . . . . . 24
balance and fade . . . . . . . . . . . . . . . . . . 26bass, treble and sub-woofer. . . . . . . . . . 24LOGIC7. . . . . . . . . . . . . . . . . . . . . . . . . . 26source memory . . . . . . . . . . . . . . . . . . . 25tone reset all. . . . . . . . . . . . . . . . . . . . . . 25
Touch screen care . . . . . . . . . . . . . . . . . . . 11

Index
66
L
VVoice recognition
activating the system . . . . . . . . . . . . . . . 57CD commands . . . . . . . . . . . . . . . . . . . . 64defined commands. . . . . . . . . . . . . . . . . 57general commands. . . . . . . . . . . . . . 58, 59help function . . . . . . . . . . . . . . . . . . 58, 59important information . . . . . . . . . . . . . . 56interrupting . . . . . . . . . . . . . . . . . . . . . . 58making yourself understood. . . . . . . . . . 56radio commands . . . . . . . . . . . . . . . . . . 60radio tuning . . . . . . . . . . . . . . . . . . . . . . 60storing radio stations . . . . . . . . . 61, 62, 63
Volume adjustment. . . . . . . . . . . . . . . . . . . 20Automatic Volume Control (AVC). . . . . . 20information announcements . . . . . . . . . 21manual . . . . . . . . . . . . . . . . . . . . . . . . . . 23navigation guidance . . . . . . . . . . . . . . . . 21resetting the volume settings . . . . . . . . . 23telephone . . . . . . . . . . . . . . . . . . . . . . . . 22voice. . . . . . . . . . . . . . . . . . . . . . . . . . . . 23
WWaveband selection . . . . . . . . . . . . . . . . . . 38