200023-b TrainNet Teacher Manual (0703)
51
TrainNet Teacher User Manual Catalog #200023, rev. B November 2008
-
Upload
udochiododo -
Category
Documents
-
view
206 -
download
2
Transcript of 200023-b TrainNet Teacher Manual (0703)
TrainNet Teacher
User Manual Catalog #200023, rev. B
November 2008

Copyright © 2008 Intelitek Inc. TrainNet Teacher User Manual Catalog #200023, rev. B
November 2008
Every effort has been made to make this book as complete and accurate as possible. However, no warranty of suitability, purpose, or fitness is made or implied. is not liable or responsible to any person or entity for loss or damage in connection with or stemming from the use of the application and/or the information contained in this publication.
bears no responsibility for errors that may appear in this publication and retains the right to make changes to the application and manual without prior notice.
INTELITEK INC. 444 East Industrial Park Drive Manchester NH 03109-5315 Tel: (603) 625-8600 Fax: (603) 625-2137 Web site: www.intelitek.com

User Manual i TrainNet Teacher 0811
Table of Contents 1 Overview ................................................................................... 1
Introduction.........................................................................................................1
Real-Time Student Interaction ..........................................................................2
Software Requirements ......................................................................................2 Teacher PC.................................................................................................. 2 Studio .......................................................................................................... 2 Utilities........................................................................................................ 2
2 Preparing to Broadcast............................................................. 3
Starting the Video Server...................................................................................4
Starting Return Video Application ...................................................................5
Starting Application Projection Server ............................................................6
Logging In............................................................................................................6
3 The Teacher Console Interface................................................ 8
Introduction.........................................................................................................8 Teacher Main Toolbar................................................................................. 8 Outline Panel............................................................................................... 8 Applications Panel ...................................................................................... 9 Chat Panel ................................................................................................... 9 Content Browser Panel ............................................................................... 9
Controlling Student PCs.....................................................................................9 Controlling Video Display.......................................................................... 9 Controlling Students’ PCs......................................................................... 12
Controlling Teacher Display............................................................................14 Attendance ................................................................................................ 14 Student Connection Indicator ................................................................... 16 Raised Hands List ..................................................................................... 17
Request Column............................................................................ 18 Content Browser Control .......................................................................... 19 E-Mail Messages List ............................................................................... 20 Hide/Unhide Chat Window....................................................................... 22 Instant Questions....................................................................................... 22 Creating Question File .............................................................................. 26 Anonymous Instant Answers .................................................................... 27

User Manual ii TrainNet Teacher 0811
4 Running the Lesson ................................................................ 28
Introduction.......................................................................................................28
Getting Started ..................................................................................................28
Delivering Content ............................................................................................29 Outline Panel............................................................................................. 29 Synchronizing the Display........................................................................ 30 Invisible Slides.......................................................................................... 31 Disabled Course Outline ........................................................................... 31 Sending Files............................................................................................. 31 Launching Applications ............................................................................ 31
Start ............................................................................................... 32 Stop ............................................................................................... 33
Projecting Applications............................................................................. 33 Start ............................................................................................... 33 Stop ............................................................................................... 35
Content Browser Toolbar.......................................................................... 35 Whiteboard.................................................................................... 36 Adding PC Screen Image to Course Outline ................................ 38 Displaying Pages from the Internet............................................... 41 Activating Controls on Displayed Pages ...................................... 42
Obtaining Feedback..........................................................................................43 Course Builder Questions ......................................................................... 43
Leaving the Lesson............................................................................................45
User Manual 1 TrainNet Teacher 0811 Introduction
1 Overview
Introduction The TrainNet system is comprised of a suite of powerful software applications for delivery of instructional and informational content. With TrainNet, the teacher can not only present the content through a variety of channels, but also interact directly with the students in real time. TrainNet Teacher is the control console.
Depending on the requirements of the presentation, you may be assisted by one or more studio technicians to control the lighting and the zoom/pan/tilt of the cameras, respond to e-mail questions from the students, and so on.
TrainNet Teacher is part of an interactive, collaborative learning experience. Live feedback from the students makes the lesson more dynamic and more effective. On the teacher’s side, the presentation includes any or all of the following elements:
• Live video and audio
• Slides prepared by the Course Builder application
• External Web pages
• Live whiteboard, controlled by both the teacher and any selected student
• Live text chat
• Projected applications
• Applications on the students’ PCs, controlled by the teacher
• Exchange of files or messages via e-mail
• Quizzes, either prepared in advance or on the spot
• Instant feedback of quiz results In addition, the teacher has the power to control certain aspects of the operation of the students’ own PCs in order to manage the environment of the virtual classroom, such as during a quiz. These features include:
• Opening or closing applications residing on the students’ PCs
• Changing the size of the video display containing the live feed from the studio
• Activating or deactivating part of the students’ feedback interface, including mouse and keyboard
User Manual 2 TrainNet Teacher 0811 Real-Time Student Interaction
Real-Time Student Interaction TrainNet students interact with the teacher in all of the following ways:
• Asking for permission to speak, then responding via remote microphone, webcam and whiteboard
• Responding to the teacher’s yes/no questions
• Responding to quizzes
• Sending public or private messages through the chat window
• Sending e-mail messages or files to the teacher
Software Requirements This section provides an overview of the software components of the TrainNet studio.
Teacher PC The following software must be installed on the Teacher PC for full functionality:
• TrainNet Teacher The following software is required only for using the Chat feature:
• Java Virtual Machine
Studio The following software must be installed on one or more of the computers in the TrainNet studio:
• TrainNet Video Server
• System Manager The following software is required only when you need to use specific features:
• TrainNet AV Player (required for receiving video and audio from students)
• TrainNet Application Projection Server (required only for projecting applications)
• TrainNet Help Desk (if desired)
• TrainNet Student (for monitoring transmission and recording, if desired)
Utilities The following supplementary software is required for preparing the course outline which forms the backbone of the TrainNet Teacher presentation. It should be installed and used on the TrainNet server, but can also be run from any other computer.
• Course Builder

User Manual 3 TrainNet Teacher 0811 Software Requirements
2 Preparing to Broadcast
Before you can begin transmitting your live lecture, you must start certain components and verify that they are configured properly.
• Video Server: This software is installed on one of the PCs in the Studio. It must be running in order for your audio/video signal to be transmitted to the students. Follow the instructions below to ensure that it is correctly configured.
• TrainNet AV Player: This software is installed on one of the PCs in the Studio. It is required only if you desire to connect students’ individual webcams to the virtual classroom. It can be started or stopped at any time during the live lesson.
• Application Projection Server: This software is installed on one of the PCs in the Studio. Note that the Start and Stop functions are controlled remotely from the Teacher PC. This software is required only if you desire to project applications during the course of the live lesson. It can be started or stopped at any time.
• System Manager: Using the System Manager, the TrainNet system administrator must change the status of your course from Locked or Async to Live. This must be done before the scheduled start time.
• Database Connection: In your Windows Control Panel, your ODBC connection must be correctly configured. If TrainNet Teacher does not launch, giving you an error message that reads Connection to database failed. Closing Teacher application, you must contact your system administrator for assistance.
Important: All student PCs must be set to the same screen resolution as the Teacher PC. The default value is 1024 x 768. It is possible to run TrainNet with a lower resolution, but it is not recommended.
User Manual 4 TrainNet Teacher 0811 Starting the Video Server
Starting the Video Server Before beginning, make sure that you have a video source running and correctly connected.
From the Start menu or from the Desktop on the PC which is controlling the video feed, select the Video Server application.
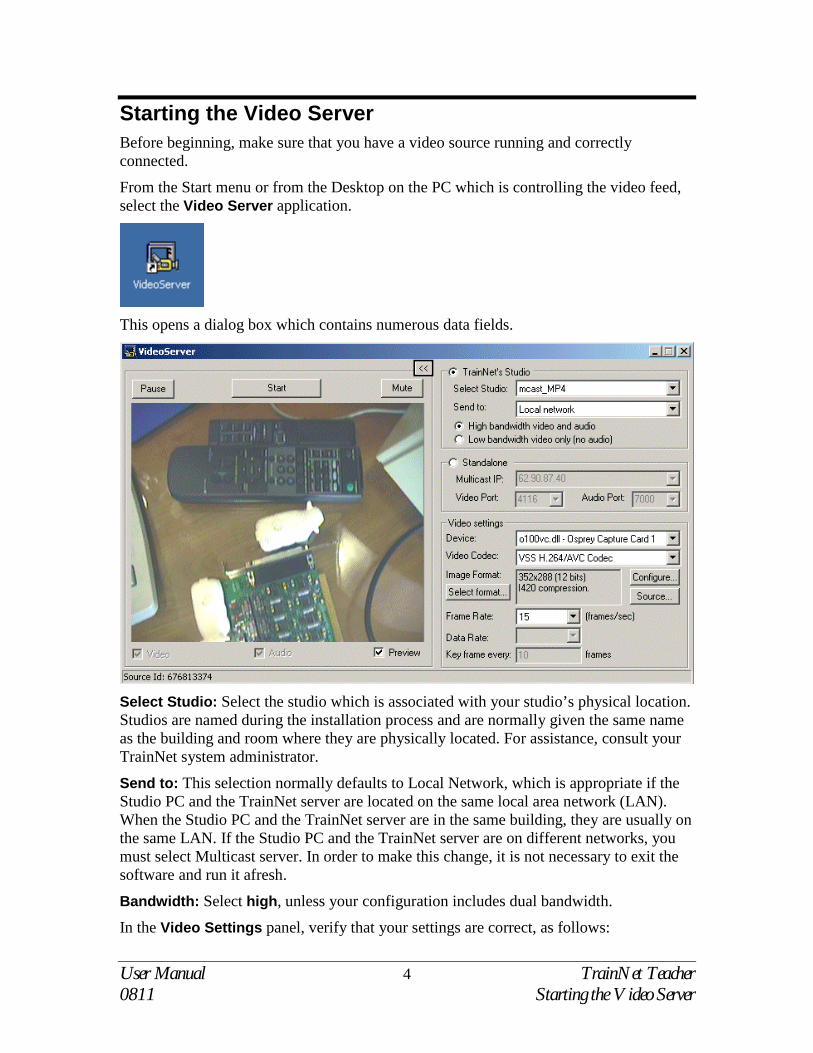
This opens a dialog box which contains numerous data fields.
Select Studio: Select the studio which is associated with your studio’s physical location. Studios are named during the installation process and are normally given the same name as the building and room where they are physically located. For assistance, consult your TrainNet system administrator.
Send to: This selection normally defaults to Local Network, which is appropriate if the Studio PC and the TrainNet server are located on the same local area network (LAN). When the Studio PC and the TrainNet server are in the same building, they are usually on the same LAN. If the Studio PC and the TrainNet server are on different networks, you must select Multicast server. In order to make this change, it is not necessary to exit the software and run it afresh.
Bandwidth: Select high, unless your configuration includes dual bandwidth.
In the Video Settings panel, verify that your settings are correct, as follows:
User Manual 5 TrainNet Teacher 0811 Starting Return Video Application
Device: This refers to the hardware interface between your computer and your video system. If you are using a webcam connected through your USB port, you will see a generic Windows driver. Normally, only one device will show here.
Video Codec: For most systems, VSS H.264/AVC is the best selection. However, for systems that have a bandwidth of 50 kilobits or less, MPEG-4 produces better results. If you must change the selection on the fly, be sure to close all the students’ video displays first. See Controlling Video Display on page 9. To make changes to the codec or the bandwidth, click on the button labeled Configure.
Image Format: You must have a screen resolution of 352 x 288 (CIF), and I420 compression. If you choose any other selection, you will see an error message in the Image Format box instead of 352 x 288 I420 compression. To make changes, click on the button labeled Select Format.
Frame Rate: You may choose 2, 5, 10, 15, 20, 22, 25 or 30 frames per second.
Note: In most configurations, best results are obtained with 15 fps. 30 fps is not recommended, as this uses the full bandwidth and may interfere with other functions.
Click Start. The video signal is now transmitted.
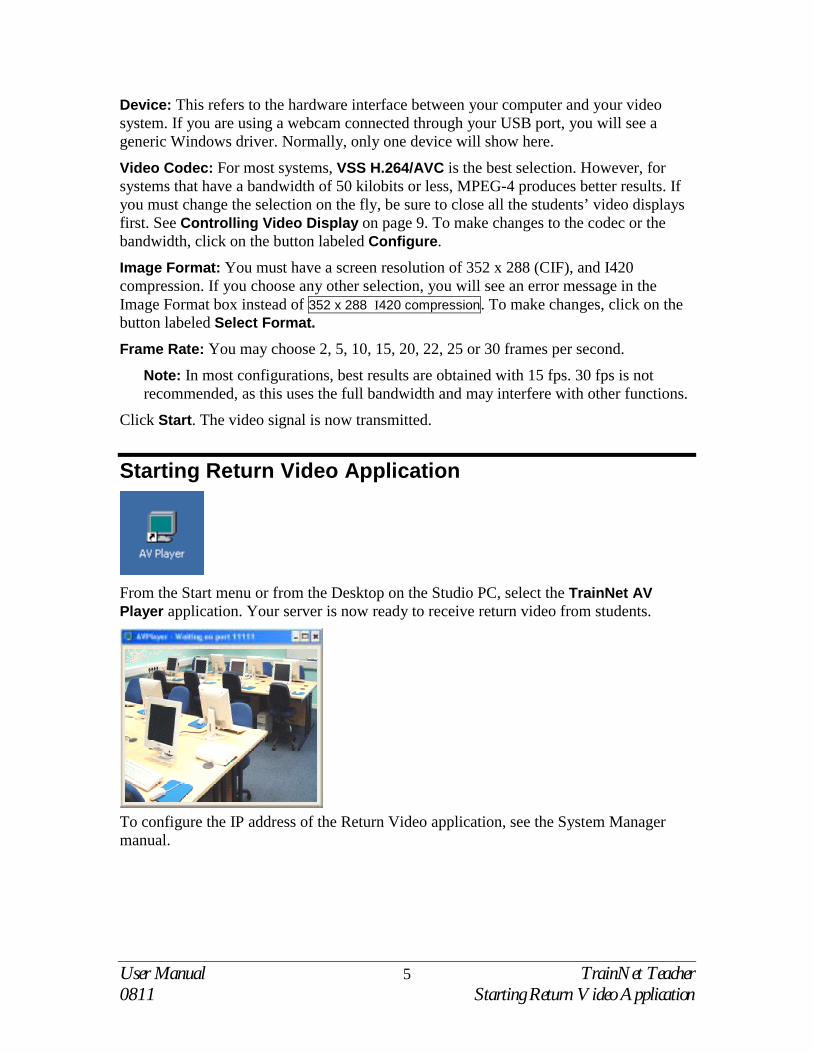
Starting Return Video Application
From the Start menu or from the Desktop on the Studio PC, select the TrainNet AV Player application. Your server is now ready to receive return video from students.
To configure the IP address of the Return Video application, see the System Manager manual.

User Manual 6 TrainNet Teacher 0811 Starting Application Projection Server
Starting Application Projection Server
If you intend to project an application during the presentation, you must first launch the Application Projection Server. You may start the Application Projection Server at any time before or during the lesson, and you may switch from one projected application to another at any time by repeating steps 2 through 4 as described here. See Projecting Applications on page 33.
1. From the Start menu or from the Desktop, select the TrainNet Application Projection Server.
2. Start the software program that you want to demonstrate.
3. Click on the Select Window button in the Application Projection Server window.
4. Drag the circular icon from the Projection Server window to the open window of the application to be projected. If desired, you can select only one panel displayed in this window.
See Projecting Applications on page 33 for using this feature in a lesson.
Note: Selecting Full Screen may use excessive bandwidth. If you find that your application has slowed too much, consider selecting only the relevant window.
Logging In From the Start menu or from the Desktop, select the Teacher application.
This opens the Teacher Main toolbar along the top of your screen. Click on the Enter/Leave button in the upper left corner. A menu drops down.
User Manual 7 TrainNet Teacher 0811 Logging In
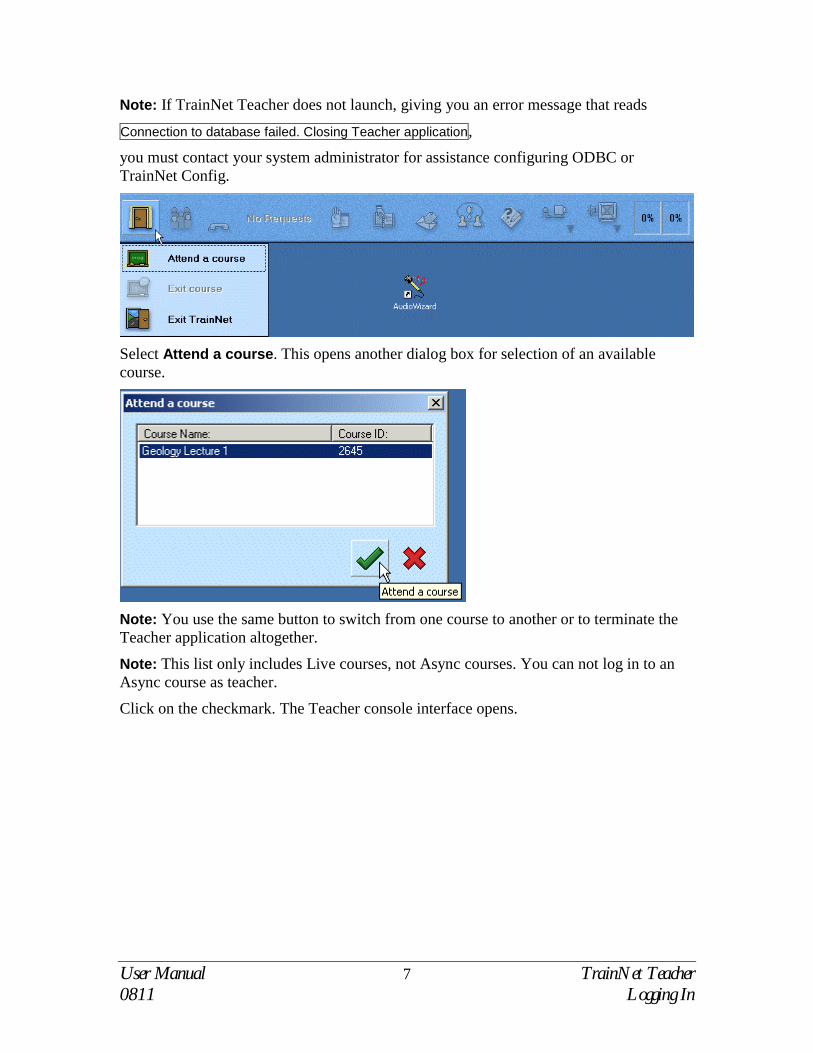
Note: If TrainNet Teacher does not launch, giving you an error message that reads
Connection to database failed. Closing Teacher application, you must contact your system administrator for assistance configuring ODBC or TrainNet Config.
Select Attend a course. This opens another dialog box for selection of an available course.
Note: You use the same button to switch from one course to another or to terminate the Teacher application altogether.
Note: This list only includes Live courses, not Async courses. You can not log in to an Async course as teacher.
Click on the checkmark. The Teacher console interface opens.
User Manual 8 TrainNet Teacher 0811 Introduction
3 The Teacher Console Interface
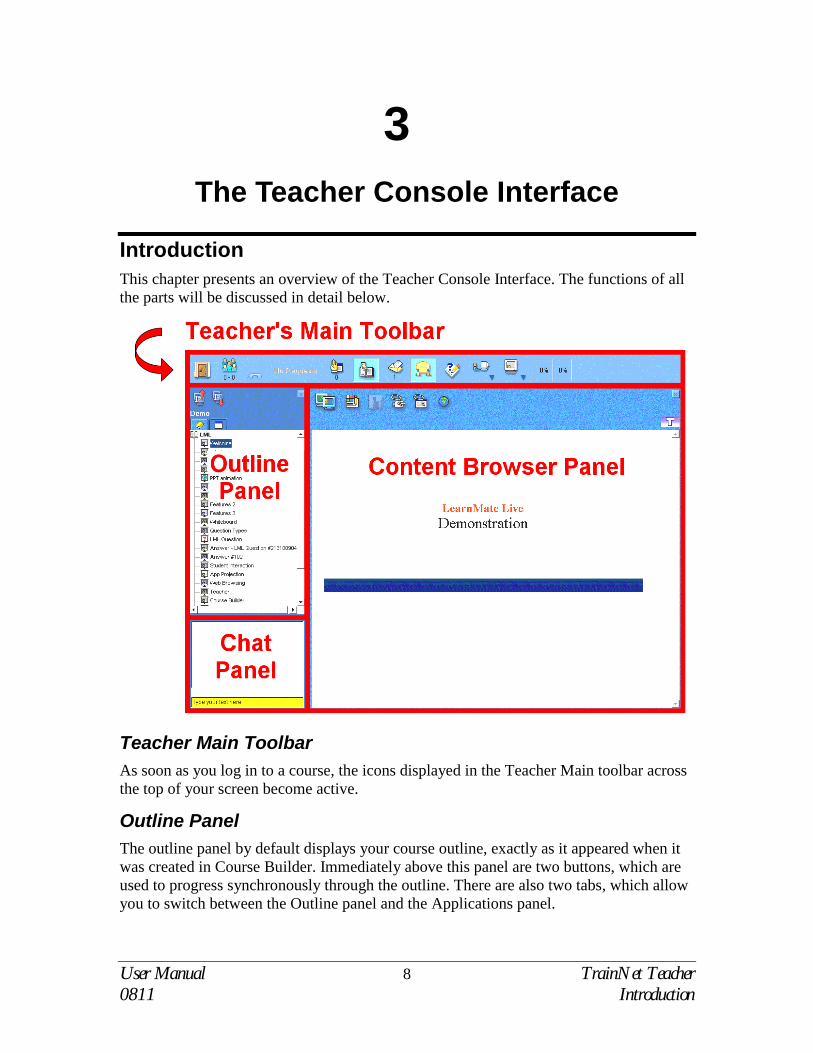
Introduction This chapter presents an overview of the Teacher Console Interface. The functions of all the parts will be discussed in detail below.
Teacher Main Toolbar As soon as you log in to a course, the icons displayed in the Teacher Main toolbar across the top of your screen become active.
Outline Panel The outline panel by default displays your course outline, exactly as it appeared when it was created in Course Builder. Immediately above this panel are two buttons, which are used to progress synchronously through the outline. There are also two tabs, which allow you to switch between the Outline panel and the Applications panel.
User Manual 9 TrainNet Teacher 0811 Controlling Student PCs
Applications Panel The Applications panel displays the applications which you control from the Teacher PC. This includes both launched applications and projected applications. See Launching Applications on page 31 and Projecting Applications on page 33.
Chat Panel In the lower left of your screen, you have a chat window. See Hide/Unhide Chat Window on page 22.
Note: It takes approximately 15 to 25 seconds for the chat server to connect. When this process is complete, the chat window displays the message Chat room joined. Whenever you activate the whiteboard functionality, the Chat panel is moved upwards to make room for the whiteboard tools. See Whiteboard on page 36.
Content Browser Panel This panel is the largest, and is used for presentation of your slides. When students first log in, they see the course’s default slide, as specified when the course was added to the TrainNet server. If you have already logged in and synchronized the lesson, they see whichever slide was last synchronized.
Various aspects relating to the Content Browser panel are controlled by the buttons on the toolbar across the top. See Content Browser Toolbar on page 35.
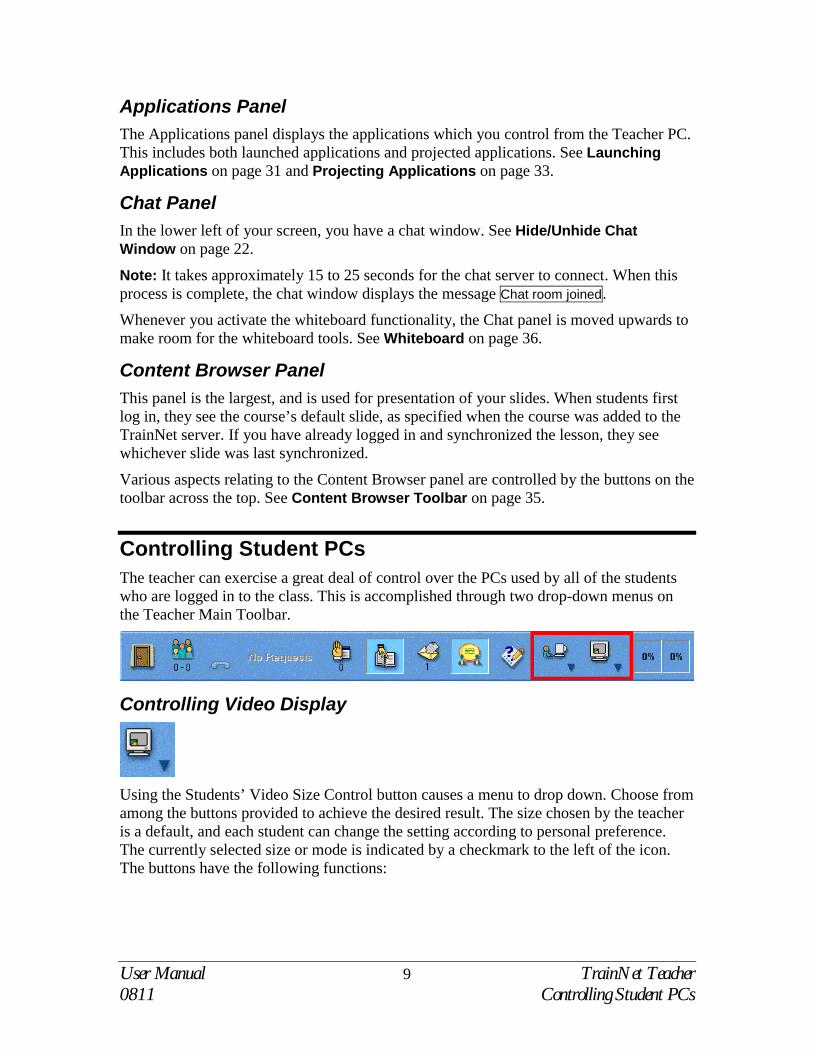
Controlling Student PCs The teacher can exercise a great deal of control over the PCs used by all of the students who are logged in to the class. This is accomplished through two drop-down menus on the Teacher Main Toolbar.
Controlling Video Display
Using the Students’ Video Size Control button causes a menu to drop down. Choose from among the buttons provided to achieve the desired result. The size chosen by the teacher is a default, and each student can change the setting according to personal preference. The currently selected size or mode is indicated by a checkmark to the left of the icon. The buttons have the following functions:
User Manual 10 TrainNet Teacher 0811 Controlling Student PCs
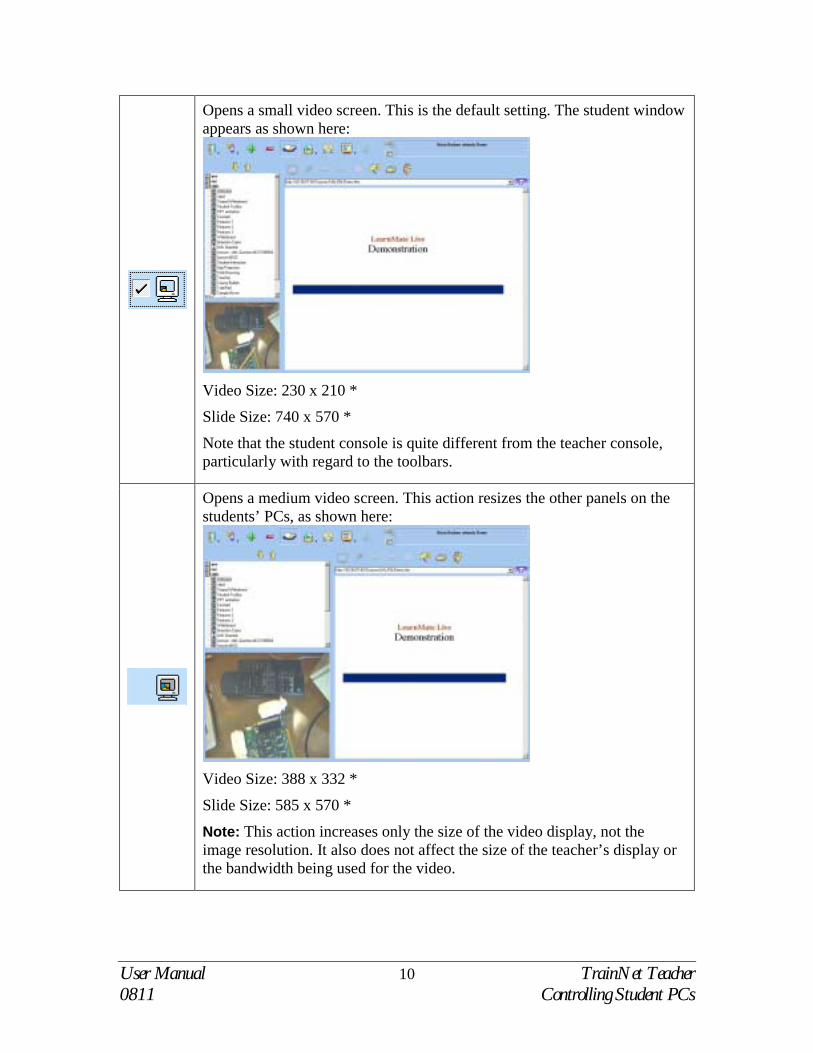
Opens a small video screen. This is the default setting. The student window appears as shown here:
Video Size: 230 x 210 *
Slide Size: 740 x 570 *
Note that the student console is quite different from the teacher console, particularly with regard to the toolbars.
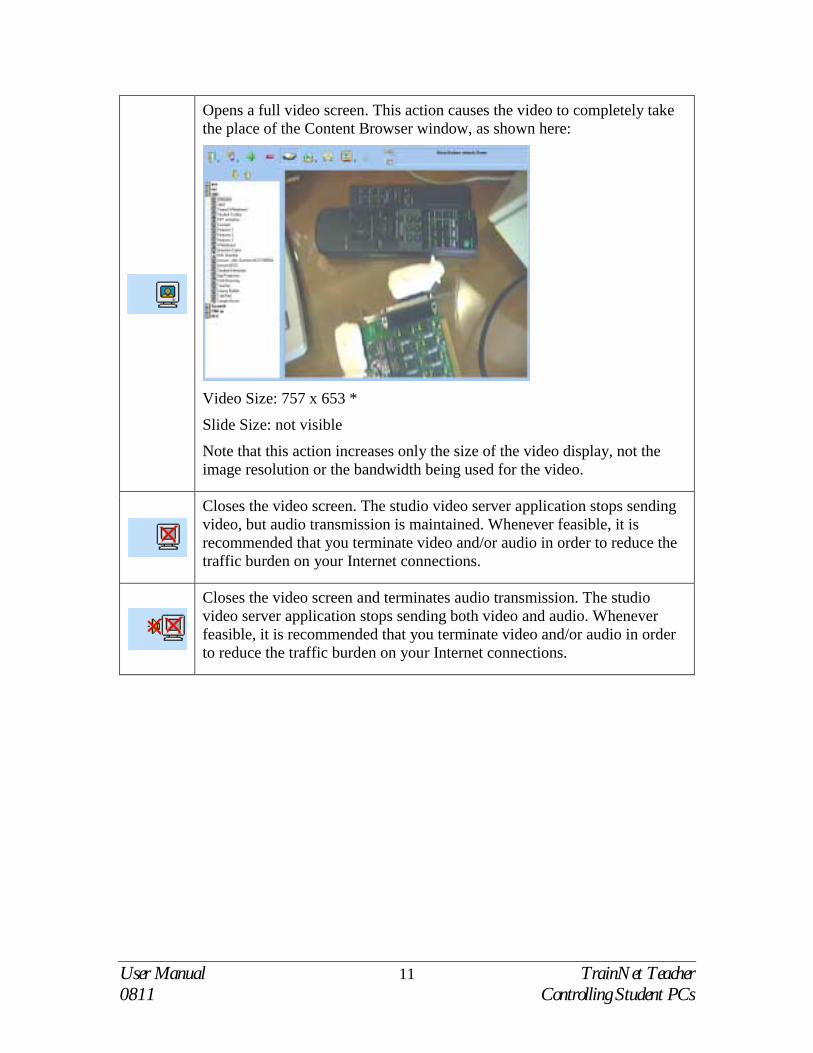
Opens a medium video screen. This action resizes the other panels on the students’ PCs, as shown here:
Video Size: 388 x 332 *
Slide Size: 585 x 570 *
Note: This action increases only the size of the video display, not the image resolution. It also does not affect the size of the teacher’s display or the bandwidth being used for the video.
User Manual 11 TrainNet Teacher 0811 Controlling Student PCs
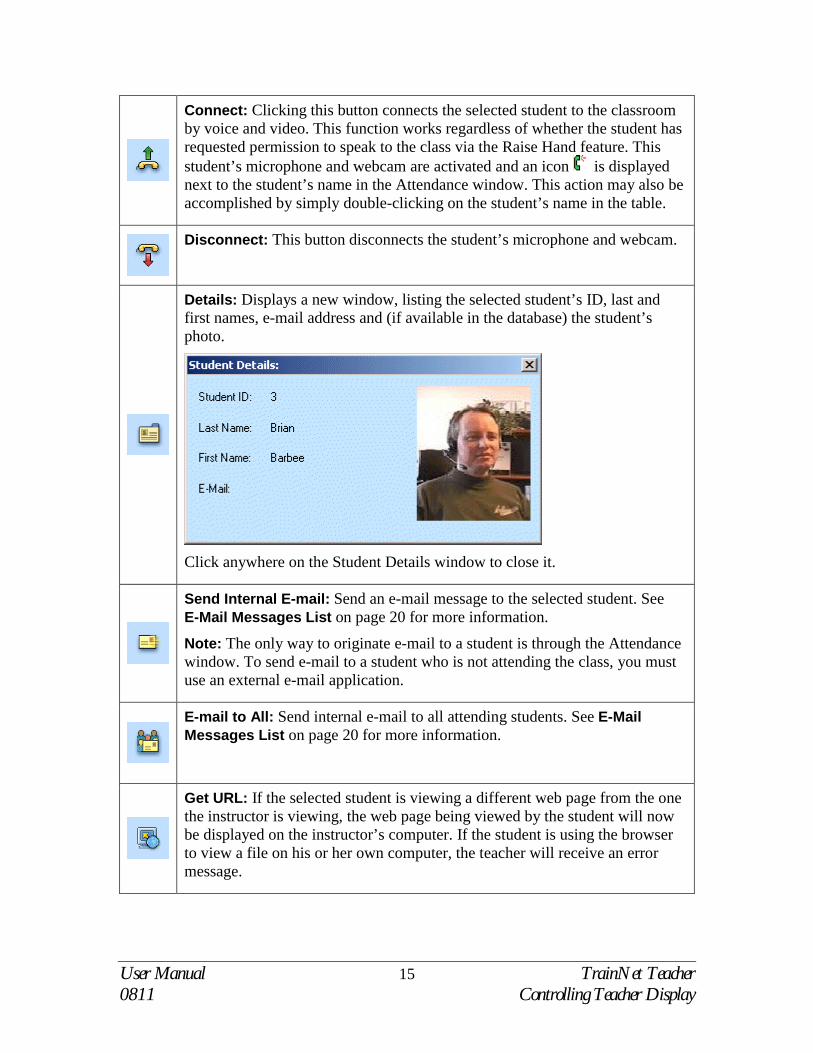
Opens a full video screen. This action causes the video to completely take the place of the Content Browser window, as shown here:
Video Size: 757 x 653 *
Slide Size: not visible
Note that this action increases only the size of the video display, not the image resolution or the bandwidth being used for the video.
Closes the video screen. The studio video server application stops sending video, but audio transmission is maintained. Whenever feasible, it is recommended that you terminate video and/or audio in order to reduce the traffic burden on your Internet connections.
Closes the video screen and terminates audio transmission. The studio video server application stops sending both video and audio. Whenever feasible, it is recommended that you terminate video and/or audio in order to reduce the traffic burden on your Internet connections.

User Manual 12 TrainNet Teacher 0811 Controlling Student PCs
The contents of the Content Browser window are displayed in full-screen mode, and the video is moved to a separate window, which can be moved by each individual student according to preference, or hidden behind the main window.
Video Size: 230 x 210 * – student can hide the video by clicking on the slide.
Slide Size: 990 x 670 *
Tip: Students can return to the normal browser display by pressing <escape>. Note: This action also does not affect the size of the teacher’s display or the bandwidth being used for the video.
* Note: The sizes given here assume a screen resolution of 1024 x 768. If you or your students are using a different screen resolution, use these numbers as a rough guide.
Controlling Students’ PCs In addition to changing the sizes of the various screen elements, there are numerous ways you can control the students’ use of their PCs during the live lecture.
On the Teacher’s Main Toolbar, you will find the Students’ PC Control icon:
When one or more of the students’ controls have been disabled or restricted, a red X appears below this icon.

User Manual 13 TrainNet Teacher 0811 Controlling Student PCs
Enable/Disable Video Window: Click once to disable students’ control over the size of their own video window. When selected, a red X appears to the left of this icon. Click again to enable students’ control.
Enable/Disable Mouse and Keyboard Control: Click once to disable students’ control over their own keyboard and mouse. When selected, a red X appears to the left of this icon. Click again to enable students’ control.
Enable/Disable Browser: Click once to hide students’ Course Outline and Content Window. When selected, a red X appears to the left of this icon. Click again to redisplay these elements.
Enable/Disable Chat: Click once to disable students’ access to the chat functions. If the chat window has been opened, this button closes it. When selected, a red X appears to the left of this icon. Click again to give students access to the chat feature. This second click does not automatically open the chat window.
Open Students’ Chat: Click to open the chat window on all the students’ PCs. When you first start the lesson, the chat window is not open on the students’ PCs. If you have previously disabled chat, clicking this button also re-enables it.
Enable/Disable Request to Speak: Click once to disable students’ access to the Raise Hand functions. When selected, a red X appears to the left of this icon. Click again to enable students’ control.
Divert Messages to Help Desk: All messages from students’ PCs are diverted to the Help Desk PC running the Help Desk application. If there is no Help Desk application, this button is grayed out and inactive.
Fast Request: When Request to Speak is enabled, students’ requests are delivered to the teacher or the help desk in abbreviated form, listing only the student’s name. Fast Request and Detailed Request are radio buttons; at all times, one or the other is selected. If Request to Speak is disabled, this selection is irrelevant.
Detailed Request: When Request to Speak is enabled, students are able to add a text message to their request. This allows the teacher or the help desk to select among students on the Wait list, skipping duplicate questions or off-topic questions.

User Manual 14 TrainNet Teacher 0811 Controlling Teacher Display
Controlling Teacher Display There are a number of tools which allow you to control different parts of your own display. Some of them hide or unhide panels of the Teacher console interface, while others operate through popup windows.
Attendance
The Attendance button on the Teacher Main Toolbar displays the number of students currently connected to the lesson. This number appears to the left of the hyphen. The number to the right of the hyphen indicates the number of site controllers for TrainNet TV mode (not relevant to PC-based system).
When you click on the Attendance button, the Attendance window opens. This window consists of a toolbar and a table which lists all students who are currently attending. When no student is selected, some of the buttons on the toolbar are disabled.
You can sort the names in the list according to First Name, Last Name or Site. This is accomplished by clicking in the corresponding column in the header row.
When you select the name of one of the students, all of the buttons become active. The row containing the selected student changes from white to yellow.
The buttons in the Attendance Window Toolbar have the functions described in the following table:
User Manual 15 TrainNet Teacher 0811 Controlling Teacher Display
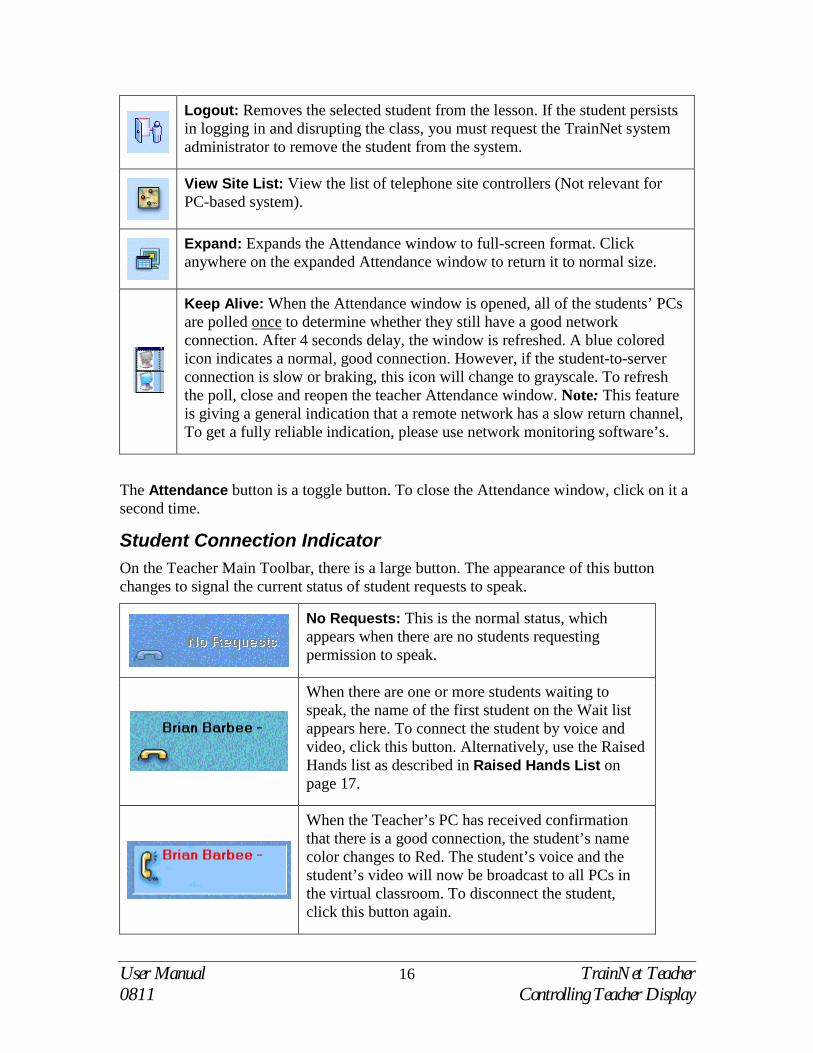
Connect: Clicking this button connects the selected student to the classroom by voice and video. This function works regardless of whether the student has requested permission to speak to the class via the Raise Hand feature. This student’s microphone and webcam are activated and an icon is displayed next to the student’s name in the Attendance window. This action may also be accomplished by simply double-clicking on the student’s name in the table.
Disconnect: This button disconnects the student’s microphone and webcam.
Details: Displays a new window, listing the selected student’s ID, last and first names, e-mail address and (if available in the database) the student’s photo.
Click anywhere on the Student Details window to close it.
Send Internal E-mail: Send an e-mail message to the selected student. See E-Mail Messages List on page 20 for more information.
Note: The only way to originate e-mail to a student is through the Attendance window. To send e-mail to a student who is not attending the class, you must use an external e-mail application.
E-mail to All: Send internal e-mail to all attending students. See E-Mail Messages List on page 20 for more information.
Get URL: If the selected student is viewing a different web page from the one the instructor is viewing, the web page being viewed by the student will now be displayed on the instructor’s computer. If the student is using the browser to view a file on his or her own computer, the teacher will receive an error message.
User Manual 16 TrainNet Teacher 0811 Controlling Teacher Display
Logout: Removes the selected student from the lesson. If the student persists in logging in and disrupting the class, you must request the TrainNet system administrator to remove the student from the system.
View Site List: View the list of telephone site controllers (Not relevant for PC-based system).
Expand: Expands the Attendance window to full-screen format. Click anywhere on the expanded Attendance window to return it to normal size.
Keep Alive: When the Attendance window is opened, all of the students’ PCs are polled once to determine whether they still have a good network connection. After 4 seconds delay, the window is refreshed. A blue colored icon indicates a normal, good connection. However, if the student-to-server connection is slow or braking, this icon will change to grayscale. To refresh the poll, close and reopen the teacher Attendance window. Note: This feature is giving a general indication that a remote network has a slow return channel, To get a fully reliable indication, please use network monitoring software’s.
The Attendance button is a toggle button. To close the Attendance window, click on it a second time.
Student Connection Indicator On the Teacher Main Toolbar, there is a large button. The appearance of this button changes to signal the current status of student requests to speak.
No Requests: This is the normal status, which appears when there are no students requesting permission to speak.
When there are one or more students waiting to speak, the name of the first student on the Wait list appears here. To connect the student by voice and video, click this button. Alternatively, use the Raised Hands list as described in Raised Hands List on page 17.
When the Teacher’s PC has received confirmation that there is a good connection, the student’s name color changes to Red. The student’s voice and the student’s video will now be broadcast to all PCs in the virtual classroom. To disconnect the student, click this button again.

User Manual 17 TrainNet Teacher 0811 Controlling Teacher Display
If the system detects any problems with the audio/video connection, the student’s name changes from red to black. In this event, you must either wait for the connection to reestablish itself or disconnect the student.
Raised Hands List
When one or more students have requested permission to speak, this button becomes enclosed in a rectangular, red border and the number below the hand changes to indicate the number of students on the Wait list. As a convenience to the teacher, when the number on this button changes from zero to one, a small sound is played. This sound does not play at any other time.
Click on this button to open the Raised Hands window.
This window is similar to the Attendance window, except that there are three new buttons in the toolbar at the top, and one more column in the table. See Attendance on page 14 for more information. The new buttons work as follows:
Reset: The list of raised hands is cleared.
Delete: The selected student is removed from the list.
Note: If the student is currently addressing the class, neither the video nor the audio is disconnected.

User Manual 18 TrainNet Teacher 0811 Controlling Teacher Display
Connect Students Automatically: When this feature is activated, the student’s microphone and webcam are automatically connected as soon as he or she requests permission to speak. The button stays depressed, and the Raised Hands button on the Teacher Main Toolbar changes to indicate Automatic status.
As soon as the talking student is disconnected (either by the teacher or the student), the next student on the list is automatically connected.
Request Column This column displays the text of any message that the student has sent along with the raised hand request. If you have set the Raised Hand feature to Fast Request, this column will simply be blank.
The Raised Hands button is a toggle button. To close the Raised Hands window, click on it a second time.

User Manual 19 TrainNet Teacher 0811 Controlling Teacher Display
Content Browser Control
This button controls whether the Content Browser panel and Outline panel appear on the teacher’s console. This button does not affect the students’ consoles. When selected, the button appears depressed:
The Content Browser panel and Outline panel are hidden, which allows the teacher to access icons on the desktop or other running applications.
User Manual 20 TrainNet Teacher 0811 Controlling Teacher Display
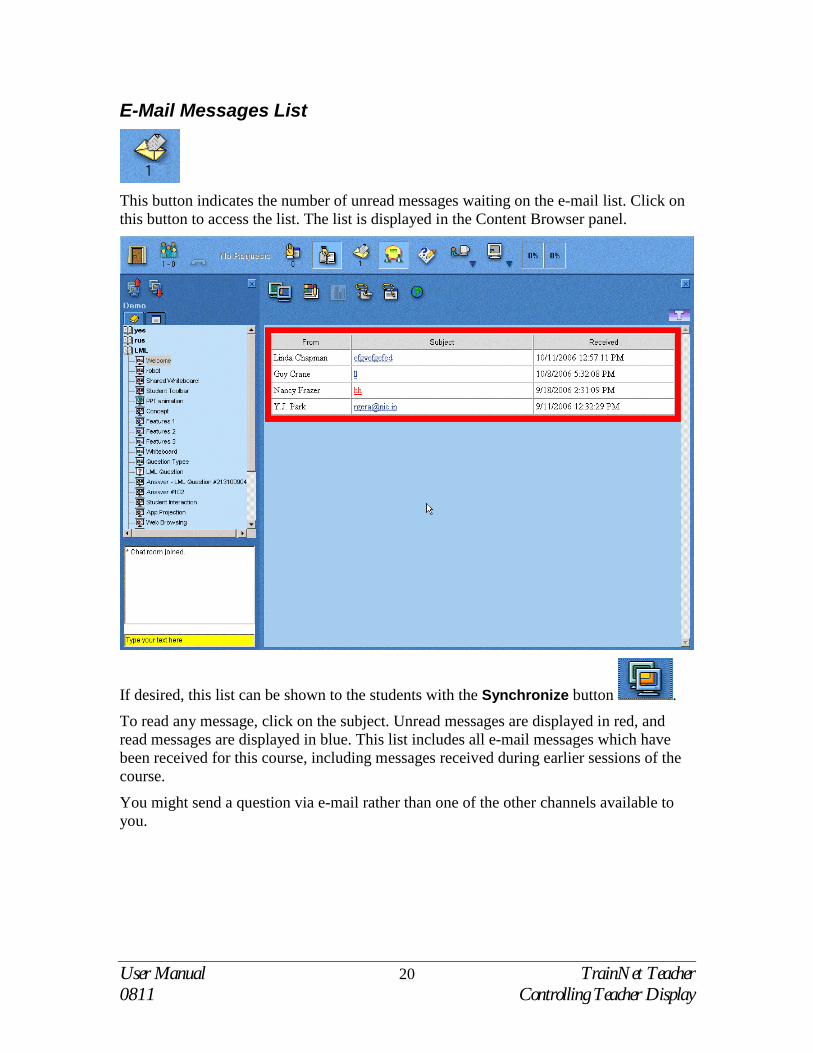
E-Mail Messages List
This button indicates the number of unread messages waiting on the e-mail list. Click on this button to access the list. The list is displayed in the Content Browser panel.
If desired, this list can be shown to the students with the Synchronize button . To read any message, click on the subject. Unread messages are displayed in red, and read messages are displayed in blue. This list includes all e-mail messages which have been received for this course, including messages received during earlier sessions of the course.
You might send a question via e-mail rather than one of the other channels available to you.
User Manual 21 TrainNet Teacher 0811 Controlling Teacher Display
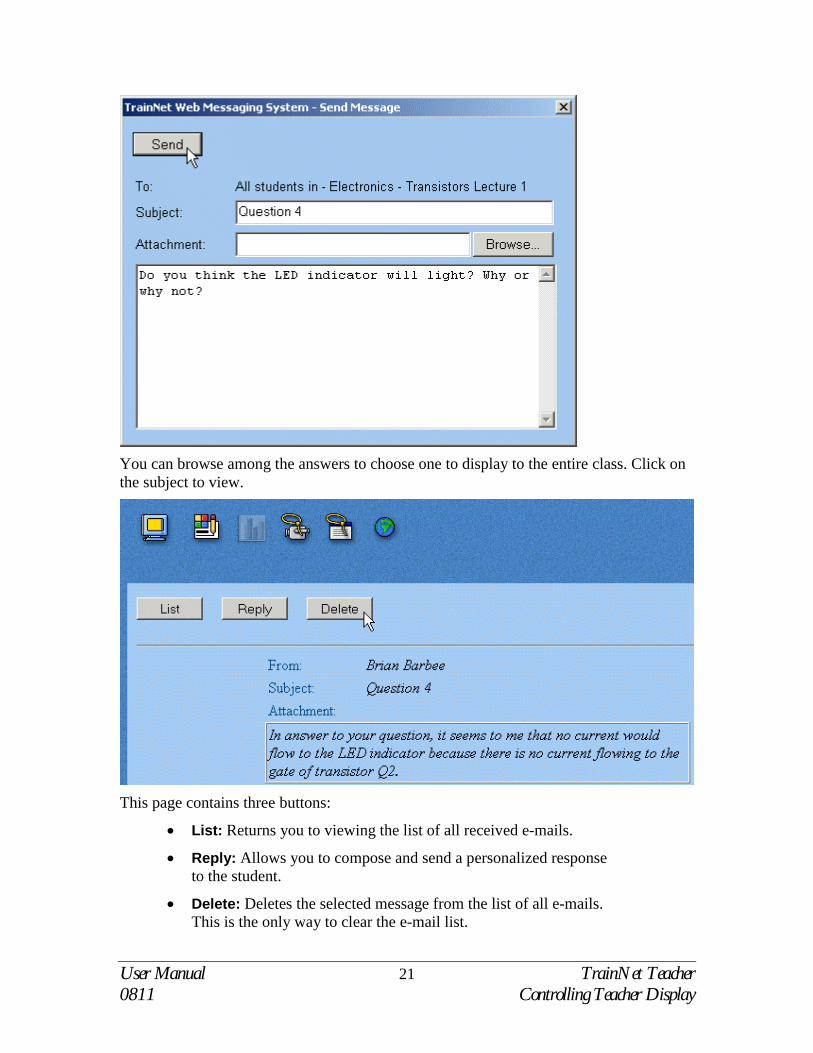
You can browse among the answers to choose one to display to the entire class. Click on the subject to view.
This page contains three buttons:
• List: Returns you to viewing the list of all received e-mails.
• Reply: Allows you to compose and send a personalized response to the student.
• Delete: Deletes the selected message from the list of all e-mails. This is the only way to clear the e-mail list.
User Manual 22 TrainNet Teacher 0811 Controlling Teacher Display
This page also shows several buttons from the Content Browser window. See Content Browser Toolbar on page 35.
Note: If desired, this list and/or any message can be synchronized so that all students may see what is displayed here. See Synchronizing the Display on page 30.
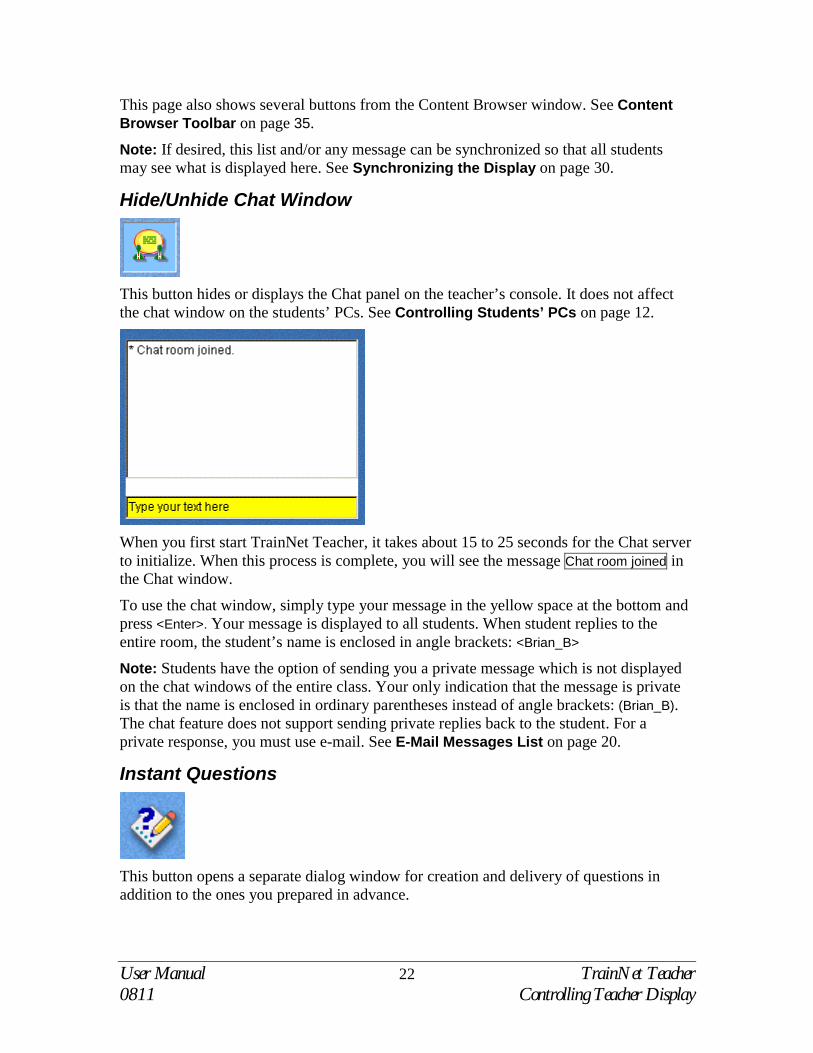
Hide/Unhide Chat Window
This button hides or displays the Chat panel on the teacher’s console. It does not affect the chat window on the students’ PCs. See Controlling Students’ PCs on page 12.
When you first start TrainNet Teacher, it takes about 15 to 25 seconds for the Chat server to initialize. When this process is complete, you will see the message Chat room joined in the Chat window.
To use the chat window, simply type your message in the yellow space at the bottom and press <Enter>. Your message is displayed to all students. When student replies to the entire room, the student’s name is enclosed in angle brackets: <Brian_B>
Note: Students have the option of sending you a private message which is not displayed on the chat windows of the entire class. Your only indication that the message is private is that the name is enclosed in ordinary parentheses instead of angle brackets: (Brian_B). The chat feature does not support sending private replies back to the student. For a private response, you must use e-mail. See E-Mail Messages List on page 20.
Instant Questions
This button opens a separate dialog window for creation and delivery of questions in addition to the ones you prepared in advance.
User Manual 23 TrainNet Teacher 0811 Controlling Teacher Display
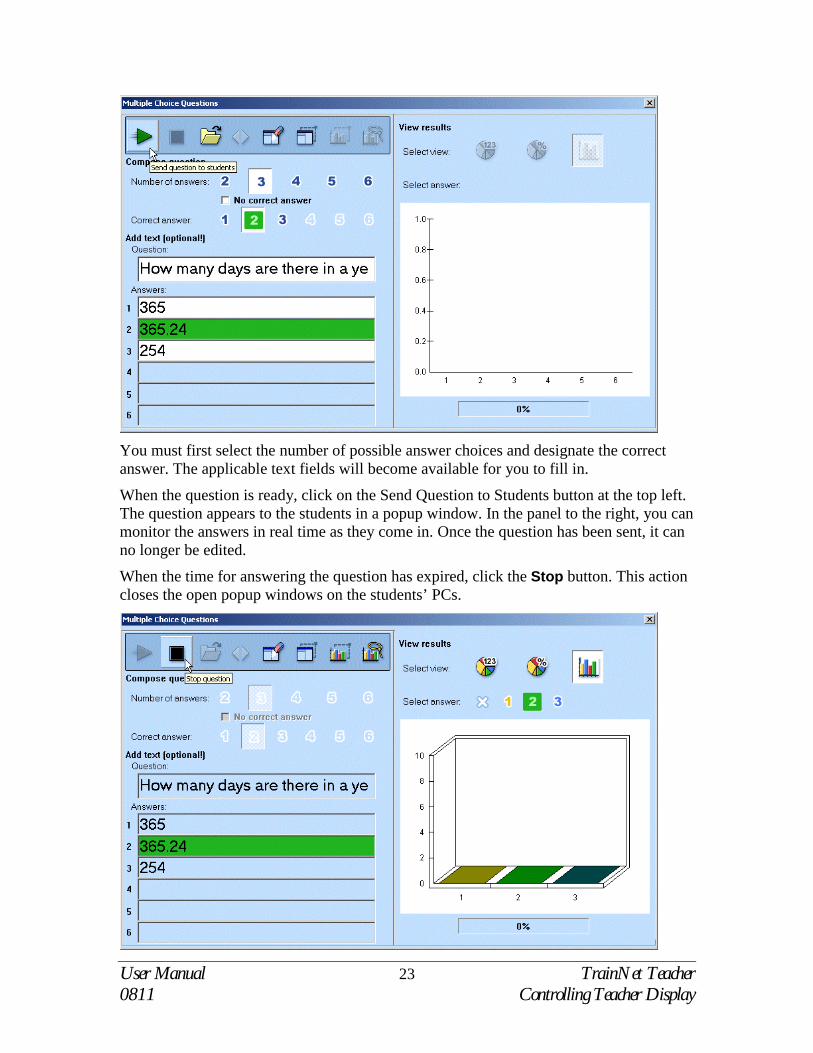
You must first select the number of possible answer choices and designate the correct answer. The applicable text fields will become available for you to fill in.
When the question is ready, click on the Send Question to Students button at the top left. The question appears to the students in a popup window. In the panel to the right, you can monitor the answers in real time as they come in. Once the question has been sent, it can no longer be edited.
When the time for answering the question has expired, click the Stop button. This action closes the open popup windows on the students’ PCs.
User Manual 24 TrainNet Teacher 0811 Controlling Teacher Display
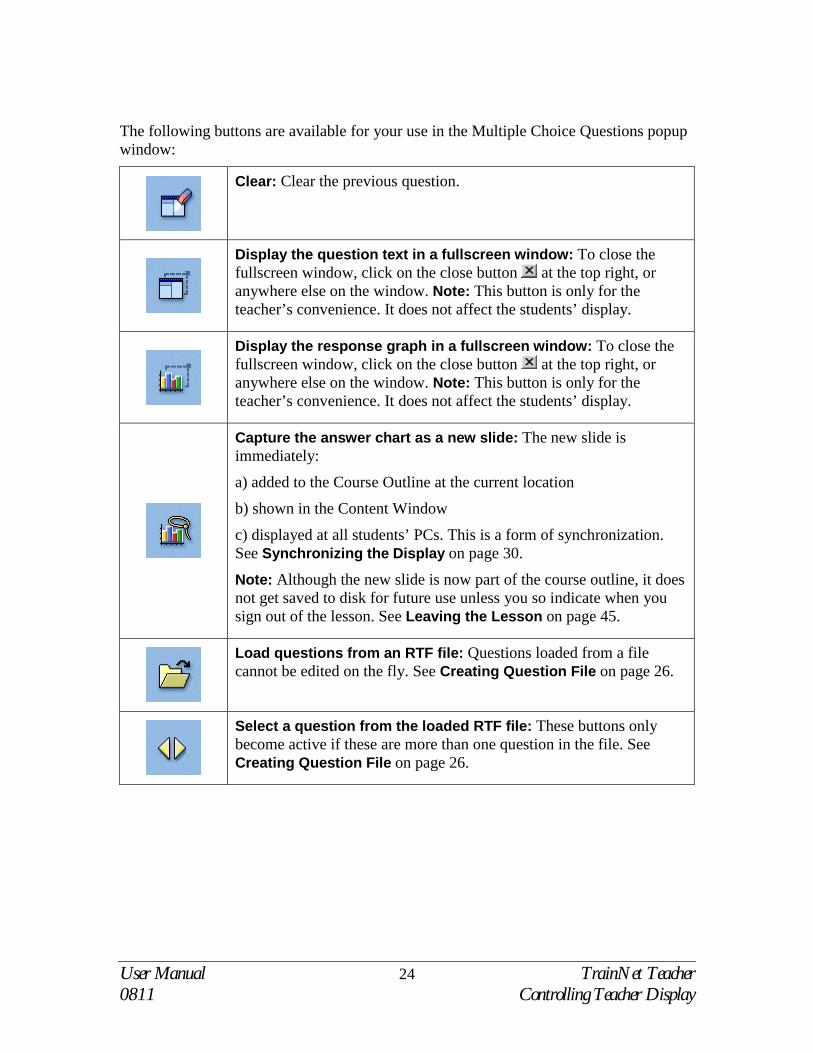
The following buttons are available for your use in the Multiple Choice Questions popup window:
Clear: Clear the previous question.
Display the question text in a fullscreen window: To close the fullscreen window, click on the close button at the top right, or anywhere else on the window. Note: This button is only for the teacher’s convenience. It does not affect the students’ display.
Display the response graph in a fullscreen window: To close the fullscreen window, click on the close button at the top right, or anywhere else on the window. Note: This button is only for the teacher’s convenience. It does not affect the students’ display.
Capture the answer chart as a new slide: The new slide is immediately:
a) added to the Course Outline at the current location
b) shown in the Content Window
c) displayed at all students’ PCs. This is a form of synchronization. See Synchronizing the Display on page 30.
Note: Although the new slide is now part of the course outline, it does not get saved to disk for future use unless you so indicate when you sign out of the lesson. See Leaving the Lesson on page 45.
Load questions from an RTF file: Questions loaded from a file cannot be edited on the fly. See Creating Question File on page 26.
Select a question from the loaded RTF file: These buttons only become active if these are more than one question in the file. See Creating Question File on page 26.
User Manual 25 TrainNet Teacher 0811 Controlling Teacher Display
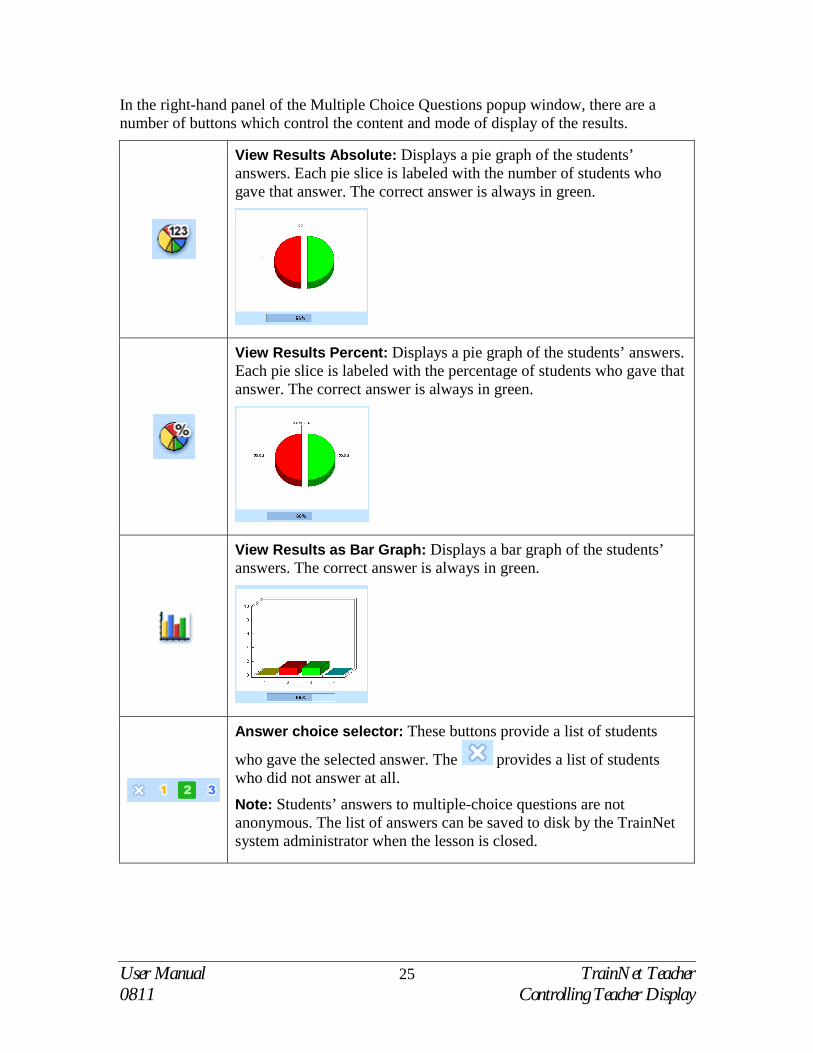
In the right-hand panel of the Multiple Choice Questions popup window, there are a number of buttons which control the content and mode of display of the results.
View Results Absolute: Displays a pie graph of the students’ answers. Each pie slice is labeled with the number of students who gave that answer. The correct answer is always in green.
View Results Percent: Displays a pie graph of the students’ answers. Each pie slice is labeled with the percentage of students who gave that answer. The correct answer is always in green.
View Results as Bar Graph: Displays a bar graph of the students’ answers. The correct answer is always in green.
Answer choice selector: These buttons provide a list of students
who gave the selected answer. The provides a list of students who did not answer at all.
Note: Students’ answers to multiple-choice questions are not anonymous. The list of answers can be saved to disk by the TrainNet system administrator when the lesson is closed.

User Manual 26 TrainNet Teacher 0811 Controlling Teacher Display
Creating Question File To create a file of questions in advance for use with the Question feature, use a word processor which can save text in RTF format. There is no limit to the number of questions you can include.
Each question must follow a specific format:
\!! Indicates the body of the question
\@@ Indicates a possible answer
\## Indicates the correct answer Questions must have a body and between 2 and 6 possible answer choices. You may indicate no more than one correct answer, but you may create a question that does not have any correct answer at all.
The TrainNet system presents the answer choices in the order given; there is no automatic randomizing.
Note: Questions may also be prepared in advance using the Course Builder application.

User Manual 27 TrainNet Teacher 0811 Controlling Teacher Display
Anonymous Instant Answers TrainNet provides a mechanism for instantaneous anonymous feedback for yes/no questions or any other questions which have only two possible answers. The students have large plus-sign and minus-sign icons which they can press at any time in response to verbal questions from the teacher.
Examples:
• Indicate plus if you think the LED will light and minus if you think it will not.
• Indicate plus if you need more time, and minus if you are finished.
• Can you hear me now?
The students indicate either + or – and the results show up on the Main Toolbar of the teacher’s console in the form of a bar graph.
Plus responses show up in green on the left, and minus responses show up in red on the right. In addition, the exact numeric percentage of attending students is given in each column. To clear this display at any time, double-click anywhere on the bar graph.
Unlike the other feedback mechanisms in the TrainNet system, there is no way to determine which students provided which response.
Students can change their response from plus to minus or vice versa and the results graph on the teacher console is updated immediately. Click anywhere inside the graph to clear it.
Note: The Teacher console does not have the plus and minus buttons which the students see.
User Manual 28 TrainNet Teacher 0811 Introduction
4 Running the Lesson
Introduction The course outline you prepared in advance with Course Builder can be followed closely or you can improvise during the course of the lecture. The feedback you obtain from the students not only provides a tool for immediate assessment of the students’ understanding, but it may also guide you in how you present your material.
In addition to presenting a sequence of slides with audio/visual narration, you can run an application and project it to all the students’ PCs. You can even force the students’ PCs to launch or terminate a separate application such as a spreadsheet or word processor.
Getting Started Log in as described above in Logging In on page 6.
The first thing you should do after logging in as teacher is to set the controls of your students’ PCs, as detailed in Controlling Student PCs on page 9. You can change these settings at any time during the lesson.
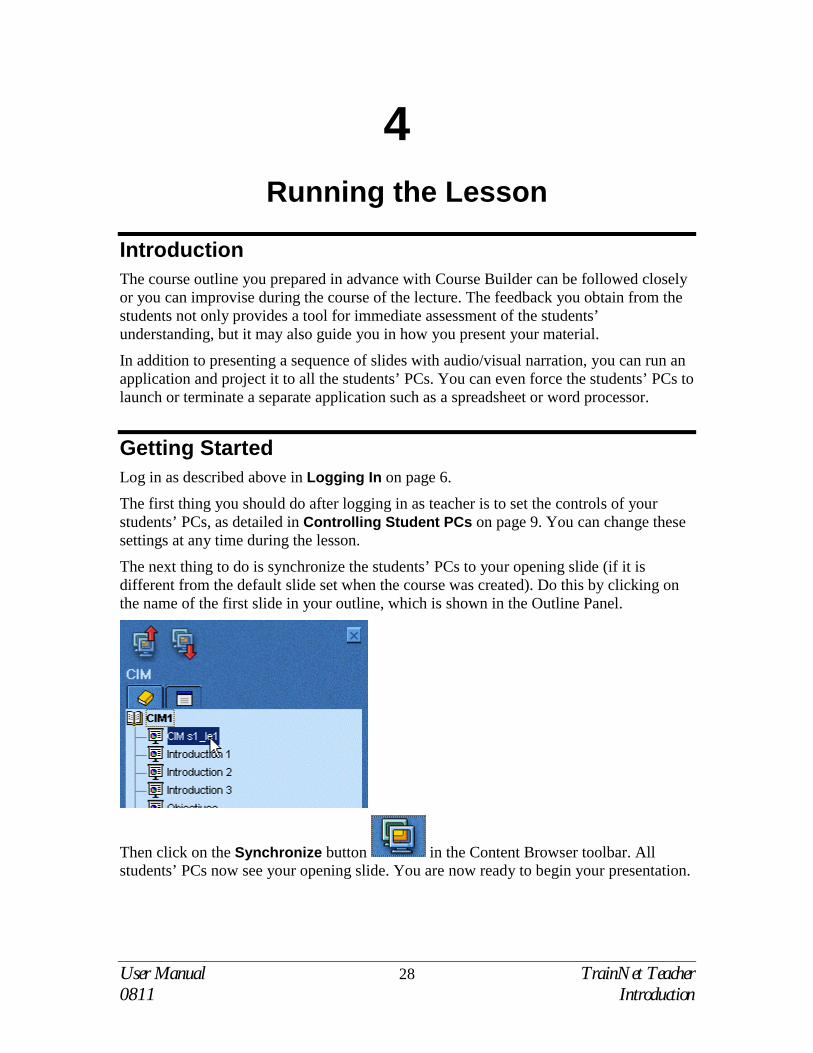
The next thing to do is synchronize the students’ PCs to your opening slide (if it is different from the default slide set when the course was created). Do this by clicking on the name of the first slide in your outline, which is shown in the Outline Panel.
Then click on the Synchronize button in the Content Browser toolbar. All students’ PCs now see your opening slide. You are now ready to begin your presentation.

User Manual 29 TrainNet Teacher 0811 Delivering Content
Delivering Content Course content is delivered to the students in the Content Browser panel and the video panel. The attributes of these panels can be controlled by the teacher using the buttons on the Teacher Main toolbar. See Controlling Student PCs on page 9.
Outline Panel The Content Browser presents slides which are prepared in advance. However, it is also used for new material which is prepared during the lesson itself.
In order to have a course outline, you must first prepare it using Course Builder, which is a separate computer application from TrainNet Teacher. A properly prepared outline is the backbone of your course, and it appears in the Outline panel. The name of your course appears below the navigation buttons and above the tabs for switching between outline and applications.
The Outline panel has two tabs at the top:
• Outline tab
• Application Projection/Launch tab To view the outline at any time, click on the Outline tab. The icons in the course outline itself provide visual clues to the type of element, as follows:
Section (no actual content, but provides a grouping structure)
URL (Internet address)
Normal slide (HTML)
Question. To see the students’ answers, press the Answers button in the Browser window. See Content Browser Toolbar on page 35.

User Manual 30 TrainNet Teacher 0811 Delivering Content
You can open any Section that appears closed by clicking on it. To close an open Section, however, you must double-click.
To move sequentially through the outline, use the two buttons at the top of the Outline panel.
These buttons perform two functions simultaneously:
• The teacher’s Content Browser window is moved one slide up or down on the outline.
• The students’ Content Browser windows are all automatically synchronized to the same slide.
Note: You can also use the <F7> and <F8> keys to move up and down through the outline, automatically synchronizing the students’ screens.
Synchronizing the Display From time to time, you may find it necessary to jump forward or back several slides in the outline. You do this by clicking directly on the name of the slide of interest. Because this search is not synchronized, you can review many different slides before selecting the one which the students will see. During this search, you will notice that the synchronize button is now animated, which indicates that the students are no longer synchronized to your display.
This animation starts every time you have different content than what is being sent to your students. Keep an eye on it.
When you click on the synchronize button, whatever you see in your Content Browser window is transmitted to the entire class, and it changes back to a static icon:
Note: If the students’ capability to browse independently is enabled, their changes do not affect the synchronization of the entire class. Once you have synchronized a slide, the system considers the slide synchronized, even though some individual students may start roaming around through the outline.

User Manual 31 TrainNet Teacher 0811 Delivering Content
Invisible Slides There are two ways to prevent students from browsing to other slides during your presentation.
• Individual slides
• Entire course (see Disabled Course Outline on page 31.) Individual slides can be made invisible using the Course Builder application. They appear on the outline panel with gray lettering instead of the usual black. Students can see them listed on their outline but can not browse to them. As soon as the lecturer shows such a slide to the class, it becomes visible and remains visible until the end of the lesson. This way, the instructor can allow students to view slides which have been previously presented, while still restricting future slides.
To make a slide visible, simply present it to the class as usual, either sequentially or out of order.
Once a slide has been made visible, it can not be changed back to invisible during the current session. However, upon exiting the lesson, you can choose not to save the changes to invisibility. See Leaving the Lesson on page 45.
Disabled Course Outline To make the entire course invisible, you must disable the course outline using System Manager. Following this procedure only affects the course when it is presented in Live mode. When the course is made available in Asynchronous mode, the entire outline is available. Consult your TrainNet system administrator for assistance.
Any individual slides which have been made invisible remain invisible for students attending the Asynchronous course.
When you disable the course outline for a Live course, the students will be able to see it, grayed out, but will be unable to browse any slides independent of the teacher’s presentation. After being presented, the slides remain invisible, and when you exit the course, there are no changes to slide invisibility to be saved. See Leaving the Lesson on page 45.
Sending Files To send files to the students, use the TrainNet E-Mail feature. Attach the required file as an attachment.
The default file size limit is 100 kB. If you need to send larger files, contact your TrainNet system administrator to reconfigure the http timeout in the TrainNet website.
Launching Applications TrainNet gives you the capability of launching any application which is installed on your students’ computers. This gives you an extra layer of control over the presentation of the lesson.

User Manual 32 TrainNet Teacher 0811 Delivering Content
Start To launch an application on the students’ PCs:
1. Click on the Application Projection/Launch tab near the top of the Outline panel.
The Outline panel changes to a display of applications which have been registered with the TrainNet System Manager. Consult your TrainNet system administrator for assistance in editing this list.
2. Click on the name of the application you would like to launch.
3. Click on the Start button.
The selected application immediately opens on all students’ PCs. On the teacher’s display, the running application is indicated by a small icon :
You can run several applications simultaneously, but you can not run more than one instance of a given application. Start each one using steps 1-3.

User Manual 33 TrainNet Teacher 0811 Delivering Content
Stop To stop a running application, select the name of the application and click on the Stop button. Alternatively, you can press <Control><Alt><F3>.
Projecting Applications One of TrainNet’s most exciting and innovative features is the ability to run another application and project the exact same screen to all the students in the virtual classroom. The procedure for projecting applications is very similar to the procedure for launching them, with the following differences:
• You must first start the Application Projection Server, as described above in Starting Application Projection Server on page 6.
• You have the option of automatically disabling the video transmission in order to save on bandwidth.
It is recommended that you run the application from a second PC in the studio. Consult your TrainNet system administrator for assistance.
Start To project an application:
1. Start the Application Projection Server. See Starting Application Projection Server on page 6.
2. Select the application to be projected.
3. In TrainNet Teacher, click on the Application Projection/Launch tab near the top of the Outline panel.
User Manual 34 TrainNet Teacher 0811 Delivering Content
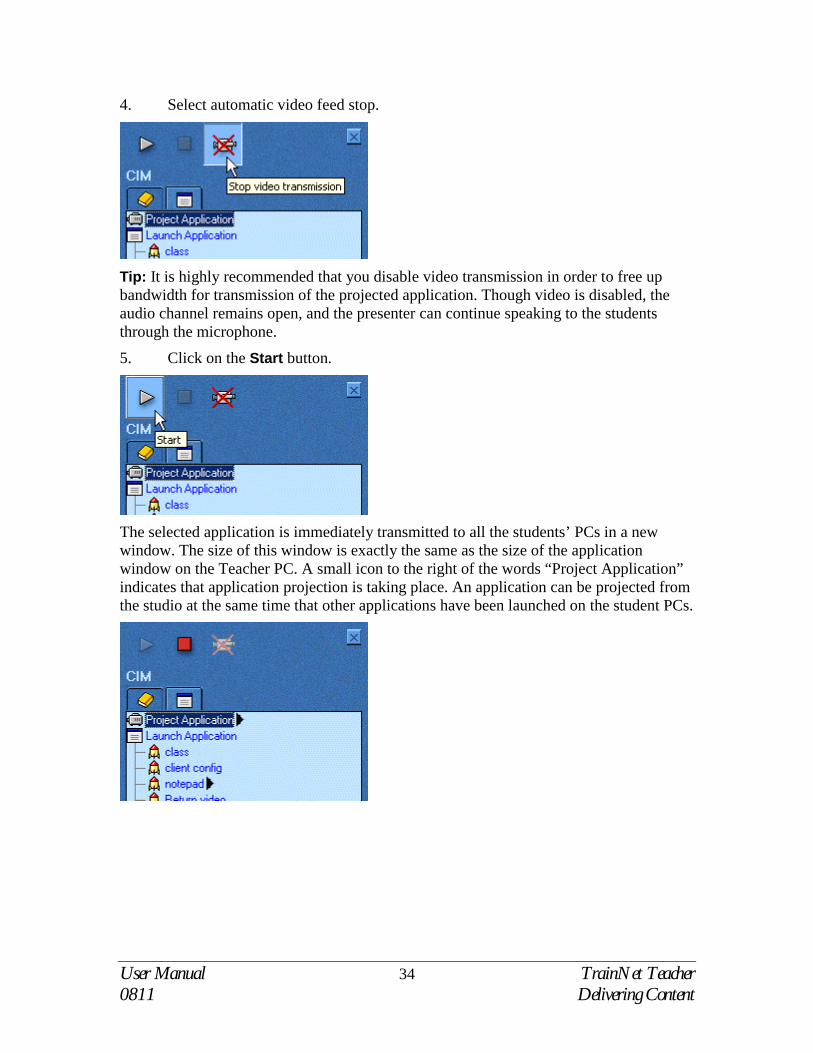
4. Select automatic video feed stop.
Tip: It is highly recommended that you disable video transmission in order to free up bandwidth for transmission of the projected application. Though video is disabled, the audio channel remains open, and the presenter can continue speaking to the students through the microphone.
5. Click on the Start button.
The selected application is immediately transmitted to all the students’ PCs in a new window. The size of this window is exactly the same as the size of the application window on the Teacher PC. A small icon to the right of the words “Project Application” indicates that application projection is taking place. An application can be projected from the studio at the same time that other applications have been launched on the student PCs.
User Manual 35 TrainNet Teacher 0811 Delivering Content
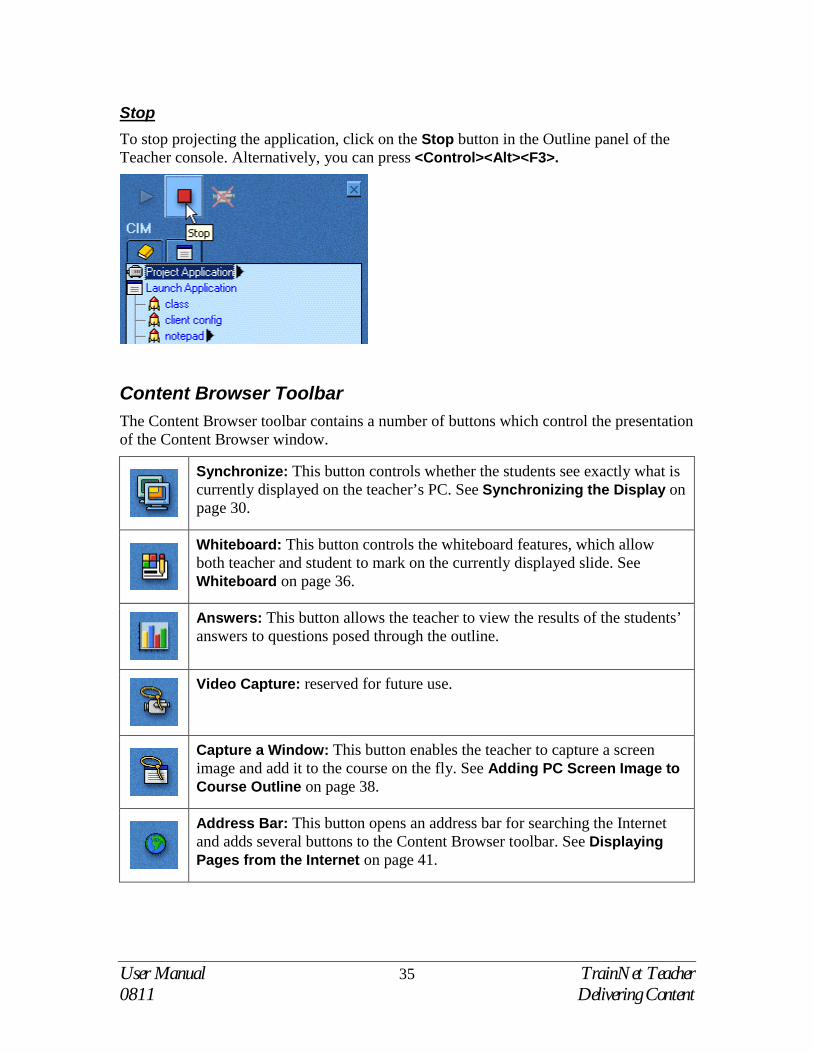
Stop To stop projecting the application, click on the Stop button in the Outline panel of the Teacher console. Alternatively, you can press <Control><Alt><F3>.
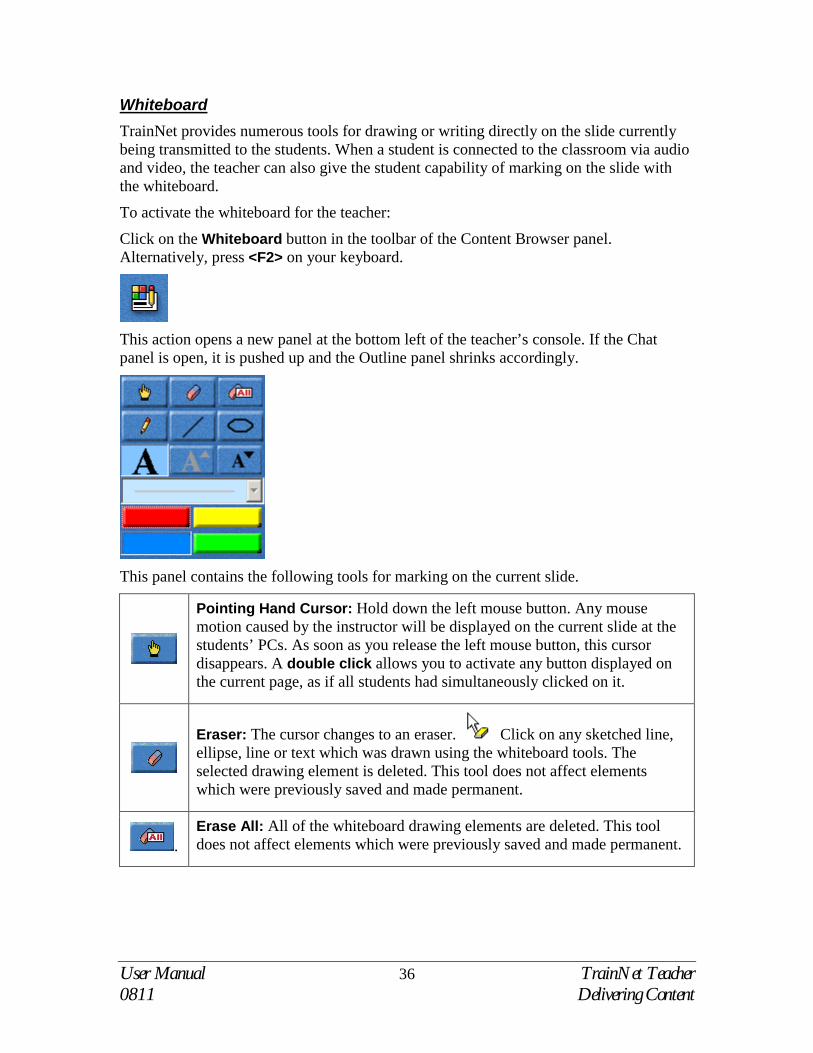
Content Browser Toolbar The Content Browser toolbar contains a number of buttons which control the presentation of the Content Browser window.
Synchronize: This button controls whether the students see exactly what is currently displayed on the teacher’s PC. See Synchronizing the Display on page 30.
Whiteboard: This button controls the whiteboard features, which allow both teacher and student to mark on the currently displayed slide. See Whiteboard on page 36.
Answers: This button allows the teacher to view the results of the students’ answers to questions posed through the outline.
Video Capture: reserved for future use.
Capture a Window: This button enables the teacher to capture a screen image and add it to the course on the fly. See Adding PC Screen Image to Course Outline on page 38.
Address Bar: This button opens an address bar for searching the Internet and adds several buttons to the Content Browser toolbar. See Displaying Pages from the Internet on page 41.
User Manual 36 TrainNet Teacher 0811 Delivering Content
Whiteboard TrainNet provides numerous tools for drawing or writing directly on the slide currently being transmitted to the students. When a student is connected to the classroom via audio and video, the teacher can also give the student capability of marking on the slide with the whiteboard.
To activate the whiteboard for the teacher:
Click on the Whiteboard button in the toolbar of the Content Browser panel. Alternatively, press <F2> on your keyboard.
This action opens a new panel at the bottom left of the teacher’s console. If the Chat panel is open, it is pushed up and the Outline panel shrinks accordingly.
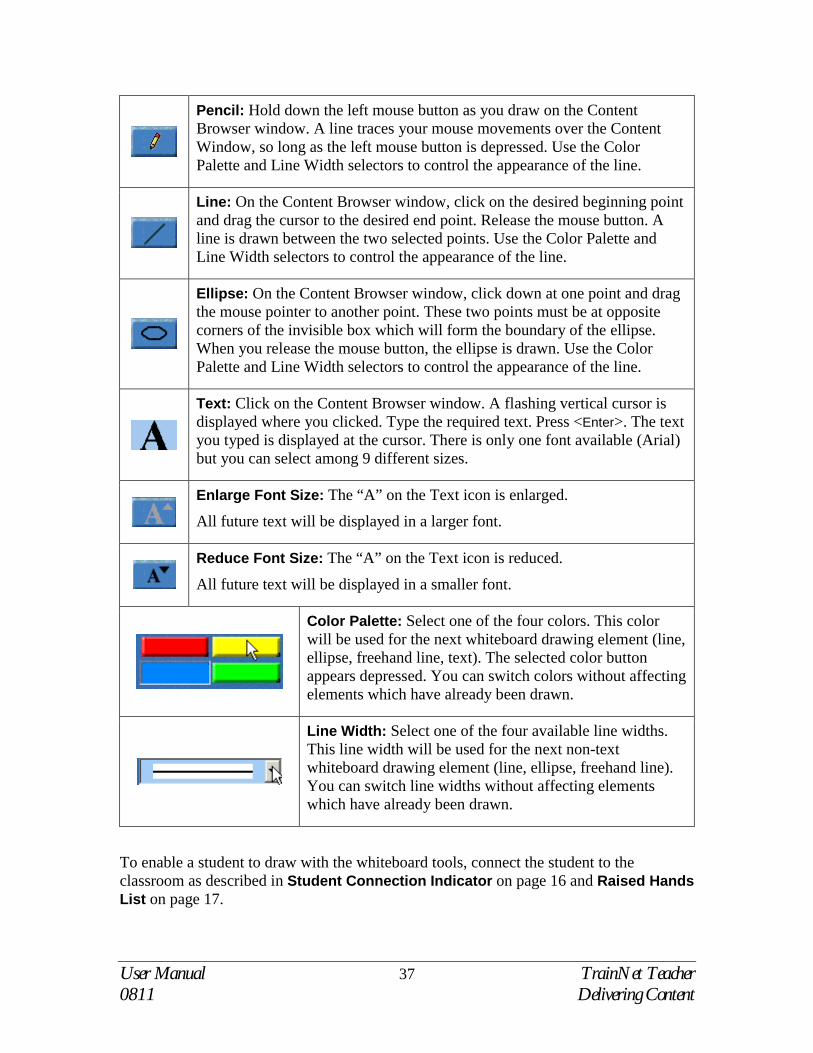
This panel contains the following tools for marking on the current slide.
Pointing Hand Cursor: Hold down the left mouse button. Any mouse motion caused by the instructor will be displayed on the current slide at the students’ PCs. As soon as you release the left mouse button, this cursor disappears. A double click allows you to activate any button displayed on the current page, as if all students had simultaneously clicked on it.
Eraser: The cursor changes to an eraser. Click on any sketched line, ellipse, line or text which was drawn using the whiteboard tools. The selected drawing element is deleted. This tool does not affect elements which were previously saved and made permanent.
. Erase All: All of the whiteboard drawing elements are deleted. This tool does not affect elements which were previously saved and made permanent.
User Manual 37 TrainNet Teacher 0811 Delivering Content
Pencil: Hold down the left mouse button as you draw on the Content Browser window. A line traces your mouse movements over the Content Window, so long as the left mouse button is depressed. Use the Color Palette and Line Width selectors to control the appearance of the line.
Line: On the Content Browser window, click on the desired beginning point and drag the cursor to the desired end point. Release the mouse button. A line is drawn between the two selected points. Use the Color Palette and Line Width selectors to control the appearance of the line.
Ellipse: On the Content Browser window, click down at one point and drag the mouse pointer to another point. These two points must be at opposite corners of the invisible box which will form the boundary of the ellipse. When you release the mouse button, the ellipse is drawn. Use the Color Palette and Line Width selectors to control the appearance of the line.
Text: Click on the Content Browser window. A flashing vertical cursor is displayed where you clicked. Type the required text. Press <Enter>. The text you typed is displayed at the cursor. There is only one font available (Arial) but you can select among 9 different sizes.
Enlarge Font Size: The “A” on the Text icon is enlarged.
All future text will be displayed in a larger font.
Reduce Font Size: The “A” on the Text icon is reduced.
All future text will be displayed in a smaller font.
Color Palette: Select one of the four colors. This color will be used for the next whiteboard drawing element (line, ellipse, freehand line, text). The selected color button appears depressed. You can switch colors without affecting elements which have already been drawn.
Line Width: Select one of the four available line widths. This line width will be used for the next non-text whiteboard drawing element (line, ellipse, freehand line). You can switch line widths without affecting elements which have already been drawn.
To enable a student to draw with the whiteboard tools, connect the student to the classroom as described in Student Connection Indicator on page 16 and Raised Hands List on page 17.
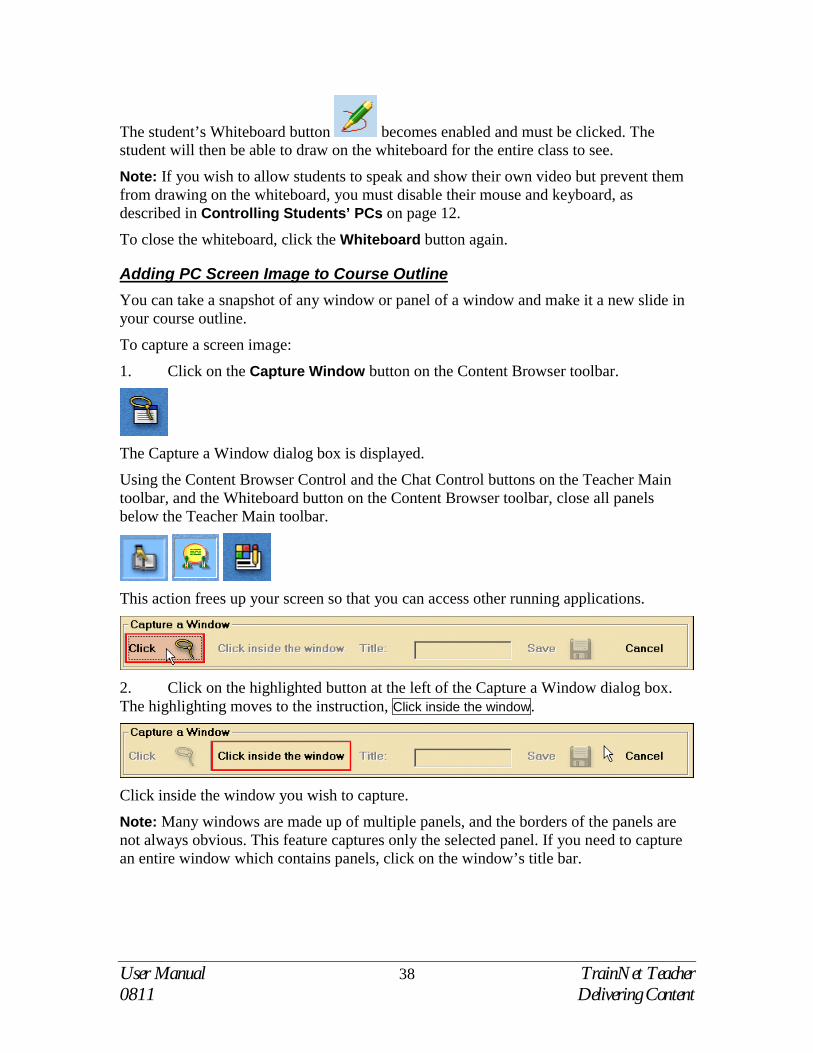
User Manual 38 TrainNet Teacher 0811 Delivering Content
The student’s Whiteboard button becomes enabled and must be clicked. The student will then be able to draw on the whiteboard for the entire class to see.
Note: If you wish to allow students to speak and show their own video but prevent them from drawing on the whiteboard, you must disable their mouse and keyboard, as described in Controlling Students’ PCs on page 12.
To close the whiteboard, click the Whiteboard button again.
Adding PC Screen Image to Course Outline You can take a snapshot of any window or panel of a window and make it a new slide in your course outline.
To capture a screen image:
1. Click on the Capture Window button on the Content Browser toolbar.
The Capture a Window dialog box is displayed.
Using the Content Browser Control and the Chat Control buttons on the Teacher Main toolbar, and the Whiteboard button on the Content Browser toolbar, close all panels below the Teacher Main toolbar.
This action frees up your screen so that you can access other running applications.
2. Click on the highlighted button at the left of the Capture a Window dialog box. The highlighting moves to the instruction, Click inside the window.
Click inside the window you wish to capture.
Note: Many windows are made up of multiple panels, and the borders of the panels are not always obvious. This feature captures only the selected panel. If you need to capture an entire window which contains panels, click on the window’s title bar.
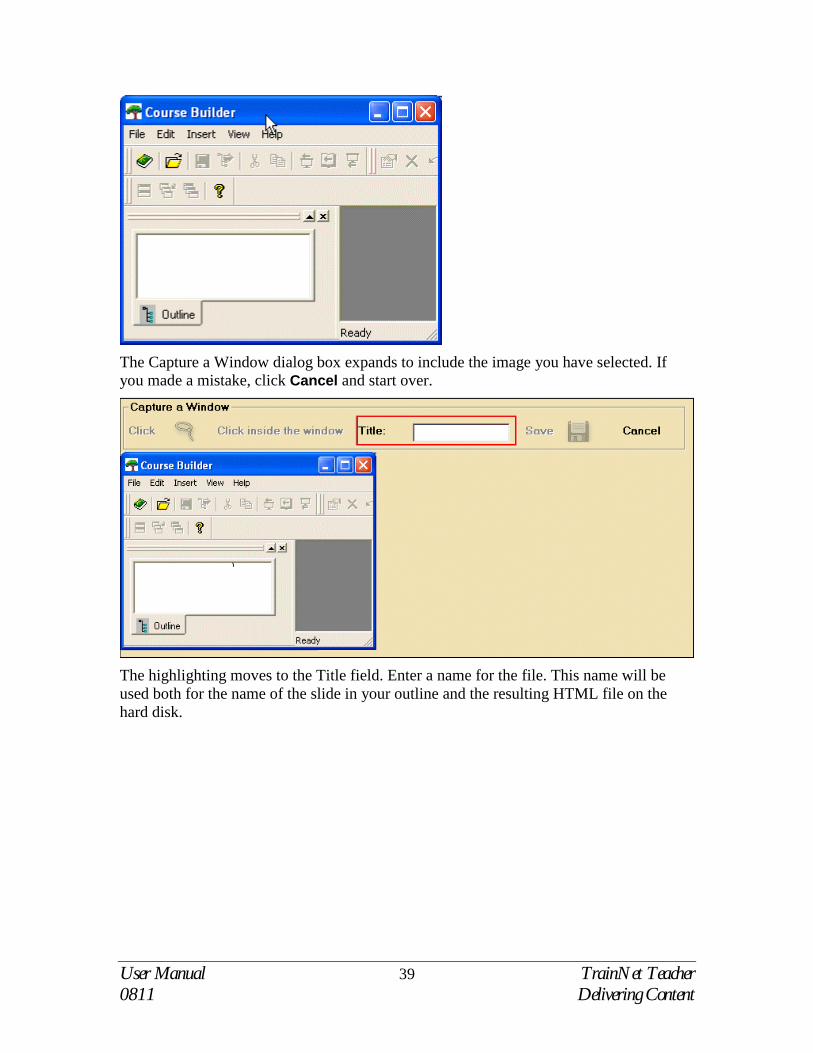
User Manual 39 TrainNet Teacher 0811 Delivering Content
The Capture a Window dialog box expands to include the image you have selected. If you made a mistake, click Cancel and start over.
The highlighting moves to the Title field. Enter a name for the file. This name will be used both for the name of the slide in your outline and the resulting HTML file on the hard disk.
User Manual 40 TrainNet Teacher 0811 Delivering Content
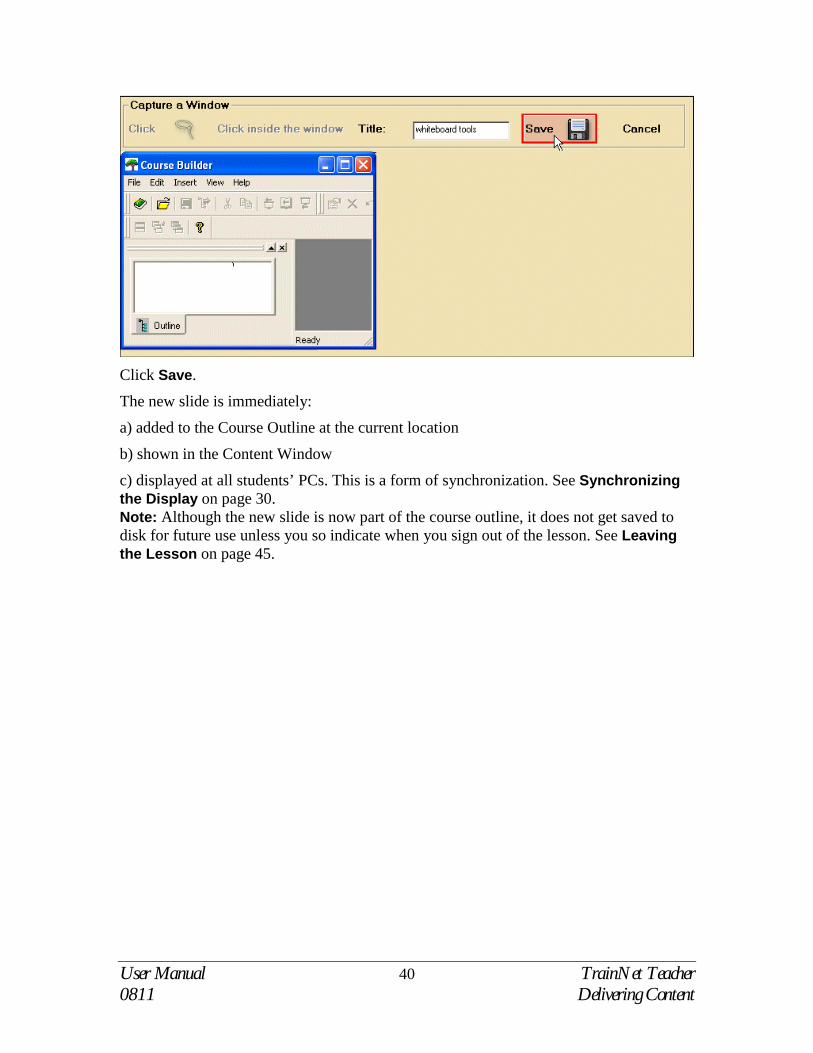
Click Save.
The new slide is immediately:
a) added to the Course Outline at the current location
b) shown in the Content Window
c) displayed at all students’ PCs. This is a form of synchronization. See Synchronizing the Display on page 30. Note: Although the new slide is now part of the course outline, it does not get saved to disk for future use unless you so indicate when you sign out of the lesson. See Leaving the Lesson on page 45.

User Manual 41 TrainNet Teacher 0811 Delivering Content
Displaying Pages from the Internet You can supplement your course materials with live pages from the Internet.
In your Content Browser panel, click on the Address Bar button on the Content Browser toolbar.
This action opens up an address bar which you can use for browsing the Internet. Type a full URL in the Address Bar and press <Enter>. The browser will then show your
selected page in your Content Browser window. Click the Synchronize button to show the page to the students.
Clicking on the Address Bar button also reveals several new buttons on the Content Browser toolbar:
Back: Return to the Internet page previously shown in the Content Browser window.
Forward: Return to the next Internet page on the list of pages previously shown in the Content Browser window.
Stop: Stop the current search. Use this option if it appears that your search is taking too much time.
Search: Click this button to open an Internet search page. By default, the system opens to google.com, but your System Administrator can reconfigure this button to show any other search engine.
Print: Print the currently showing Web page using one of the printers currently installed for your computer.
To make a Web page into a new static slide for your outline, use the procedure described in Adding PC Screen Image to Course Outline on page 38. If you need to preserve the functionality of user controls such as slider bars and checkboxes, use Course Builder.
User Manual 42 TrainNet Teacher 0811 Delivering Content
Activating PPT animation on Displayed Pages Your course presentation may include pages with animation, that is, clickable buttons, either as part of your prepared outline or on pages from the Internet. all you have to do is synchronize the page. See Synchronizing the Display on page 30. 1. Open your whiteboard. See Whiteboard on page 36 2. Click on the Pointing Hand Cursor icon. 3. Hold your mouse pointer over the animation you wish to activate and Double-click. This double-click functions the same as a single click in the ordinary web environment. The TrainNet connection causes this click to make all the students simultaneously click on the same place on their slide. Note: for activation in-line Animation on Power Point slides, you will need to install the Microsoft free PPT Animation plug-in, you can download this file from: http://62.90.102.214/Downloads/pptaniIE/msorun.exe
User Manual 43 TrainNet Teacher 0811 Obtaining Feedback
Obtaining Feedback TrainNet provides numerous avenues for teachers to assess their students’ progress through the material.
• Verbal (audio) feedback: See Raised Hands List on page 17.
• E-mail feedback: See E-Mail Messages List on page 20.
• Text chat: See Hide/Unhide Chat Window on page 22.
• Multiple-Choice Questions (on-the-fly): See Instant Questions on page 22.
• Multiple-Choice Questions (RTF Files): See Creating Question File on page 26.
• Anonymous yes/no questions. See Anonymous Instant Answers on page 27.
• Whiteboard feedback: See Whiteboard on page 35.
• Multiple-choice Questions (created by Course Builder): See Course Builder Questions immediately below.
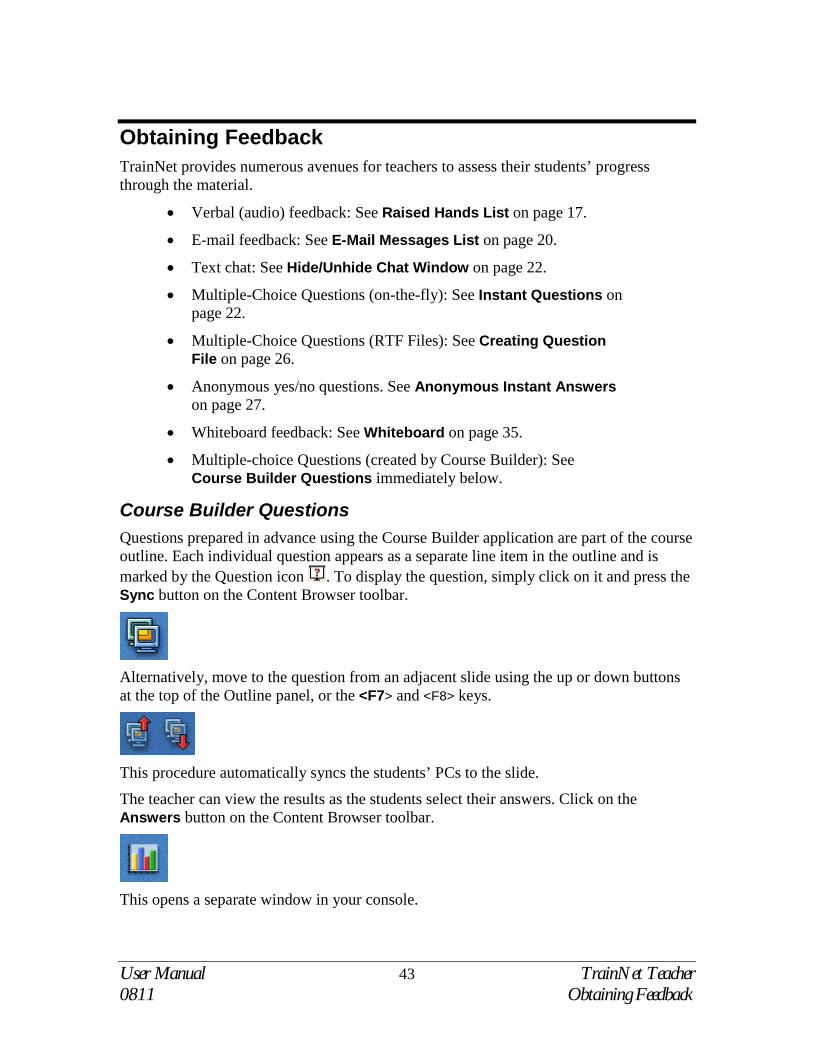
Course Builder Questions Questions prepared in advance using the Course Builder application are part of the course outline. Each individual question appears as a separate line item in the outline and is marked by the Question icon . To display the question, simply click on it and press the Sync button on the Content Browser toolbar.
Alternatively, move to the question from an adjacent slide using the up or down buttons at the top of the Outline panel, or the <F7> and <F8> keys.
This procedure automatically syncs the students’ PCs to the slide.
The teacher can view the results as the students select their answers. Click on the Answers button on the Content Browser toolbar.
This opens a separate window in your console.

User Manual 44 TrainNet Teacher 0811 Obtaining Feedback
This window is the same as the right-hand panel of the window used for Instant Questions, except that it has an additional button: Capture Window.
Use this button to create a new slide in the course outline so that the students can see the graph of their own answers.
For a detailed description of the other buttons in this dialog box, see Instant Questions on page 22.

User Manual 45 TrainNet Teacher 0811 Leaving the Lesson
Leaving the Lesson To leave the lesson, click on the Enter/Exit button at the left end of the Teacher Main toolbar.
A drop-down menu appears with several choices.
Select Exit course if you wish to leave the course but keep the TrainNet Teacher application running. Choose this option if you wish to access a different course.
Select Exit TrainNet if you wish to leave TrainNet altogether.
If you have not altered your course outline in any way, you will be immediately logged out.
If you have created new slides or made whiteboard markings, you will be presented with a dialog box which allows you to choose whether to save the new slides as a permanent part of your outline.
Check the checkbox to make the new or altered slides a permanent part of your course outline.
If your course had one or more slides which were created as invisible slides, and which have now been shown to the students, you will be given the option of selecting the checkbox for Save invisible slides as visible.

User Manual 46 TrainNet Teacher 0811 Leaving the Lesson
Check the checkbox to make the slides permanently visible in your outline.
Note: Once the slides have been made visible, this operation can not be reversed and there is no Undo function.
When you have made your selections, click on the checkmark. You will be logged out.

User Manual 47 TrainNet Teacher 0811 Leaving the Lesson
Appendix A - Student Toolbars Attend: Log in to a lesson, leave a lesson, or exit the TrainNet Student application.
Browser buttons
Request to Speak: Display or hide a text box in which you can type a question, answer or comment, and send it to the teacher.
Synchronize: Synchronize the slide displayed in the content browser with the slide that the teacher is currently projecting.
Positive Feedback: Send positive feedback to the teacher, for example when the teacher asks a Yes/No question.
Whiteboard Toolbar: Activate the whiteboard toolbar (when connected by the instructor) to point and draw on in the content browser. You drawings are visible to all the class participants.
Negative Feedback: Send negative feedback to the teacher, for example when the teacher asks a Yes/No question
Previous: Move to the last page viewed in the content browser.
Open Content Window: Display or hide the course outline window and the browser window in which the course content is displayed.
Next: Move to the next available page in the content browser.
E-mail: Access your inbox to read e-mail sent to you by other users in the system, or to send e-mail to other people currently logged in to the class.
Stop: Stop the page currently loading in the content browser.
Chat: Display or hide the class chat window. Browse: Search the Internet.
Video Window: Display, resize or hide the video window.
Print: Print the slide currently active in the content browser.
Voice Connection Indicator: Indicates when the instructor has connected you (the icon is enabled). You can then speak to the instructor and other students. You can also activate the whiteboard toolbar to draw in the content window.
Attendee List: Display a list of students currently participating in the course, together with identifying information and pictures.