
2 Installing Jaspersoft Studio 3 MindSphere - Siemens AG · 2 Installing Jaspersoft Studio 3...
50
MindSphere TIBCO Jaspersoft Service System Manual Introduction to Jaspersoft 1 Jaspersoft access rights 2 Installing Jaspersoft Studio 3 Installing a license 4 Configuring Jaspersoft Studio for MindSphere 5 Creating reports with templates 6 Create reports 7 Providing reports 8 Calling Reports 9
Transcript of 2 Installing Jaspersoft Studio 3 MindSphere - Siemens AG · 2 Installing Jaspersoft Studio 3...
MindSphere
TIBCO Jaspersoft Service
System Manual
Introduction to Jaspersoft 1
Jaspersoft access rights 2
Installing Jaspersoft Studio 3
Installing a license 4
Configuring Jaspersoft Studio for MindSphere
5
Creating reports with templates
6
Create reports 7
Providing reports 8
Calling Reports 9

Siemens AG Division Digital Factory Postfach 48 48 90026 NÜRNBERG GERMANY
Ⓟ 10/2017 Subject to change
Copyright © Siemens AG . All rights reserved
Legal information Warning notice system
This manual contains notices you have to observe in order to ensure your personal safety, as well as to prevent damage to property. The notices referring to your personal safety are highlighted in the manual by a safety alert symbol, notices referring only to property damage have no safety alert symbol. These notices shown below are graded according to the degree of danger.
DANGER indicates that death or severe personal injury will result if proper precautions are not taken.
WARNING indicates that death or severe personal injury may result if proper precautions are not taken.
CAUTION indicates that minor personal injury can result if proper precautions are not taken.
NOTICE indicates that property damage can result if proper precautions are not taken.
If more than one degree of danger is present, the warning notice representing the highest degree of danger will be used. A notice warning of injury to persons with a safety alert symbol may also include a warning relating to property damage.
Qualified Personnel The product/system described in this documentation may be operated only by personnel qualified for the specific task in accordance with the relevant documentation, in particular its warning notices and safety instructions. Qualified personnel are those who, based on their training and experience, are capable of identifying risks and avoiding potential hazards when working with these products/systems.
Proper use of Siemens products Note the following:
WARNING Siemens products may only be used for the applications described in the catalog and in the relevant technical documentation. If products and components from other manufacturers are used, these must be recommended or approved by Siemens. Proper transport, storage, installation, assembly, commissioning, operation and maintenance are required to ensure that the products operate safely and without any problems. The permissible ambient conditions must be complied with. The information in the relevant documentation must be observed.
Trademarks All names identified by ® are registered trademarks of Siemens AG. The remaining trademarks in this publication may be trademarks whose use by third parties for their own purposes could violate the rights of the owner.
Disclaimer of Liability We have reviewed the contents of this publication to ensure consistency with the hardware and software described. Since variance cannot be precluded entirely, we cannot guarantee full consistency. However, the information in this publication is reviewed regularly and any necessary corrections are included in subsequent editions.

TIBCO Jaspersoft Service System Manual, 3
Table of contents
1 Introduction to Jaspersoft ............................................................................................................... 5
2 Jaspersoft access rights ................................................................................................................. 7
2.1 Introduction to access rights ................................................................................................ 7
2.2 Managing access rights ....................................................................................................... 8
2.3 Adapting access rights ........................................................................................................ 9
3 Installing Jaspersoft Studio ........................................................................................................... 11
4 Installing a license ....................................................................................................................... 13
5 Configuring Jaspersoft Studio for MindSphere ................................................................................ 15
5.1 Default settings in Jaspersoft Studio .................................................................................. 15
5.2 Connecting with JasperReports Server .............................................................................. 18
5.3 Creating a data adapter ..................................................................................................... 21
6 Creating reports with templates ..................................................................................................... 23
7 Create reports ............................................................................................................................. 27
7.1 Introduction to creating reports .......................................................................................... 27
7.2 Creating a new report ........................................................................................................ 28
7.3 Importing data from MindSphere ........................................................................................ 29 7.3.1 Creating parameters for start and end point ....................................................................... 30 7.3.2 Creating Jaspersoft parameters for import ......................................................................... 32 7.3.3 Configuring a data source .................................................................................................. 34 7.3.4 Definition of the data fields for import in the "Fields" tab ..................................................... 36 7.3.5 Checking the data in the "Data Preview" tab. ..................................................................... 38
7.4 Designing the dashboard ................................................................................................... 39 7.4.1 Introduction to designing the dashboard ............................................................................ 39 7.4.2 Creating a new diagram..................................................................................................... 40 7.4.3 Integrate read-out data fields into the diagram template ..................................................... 41 7.4.4 Generate report in the preview?......................................................................................... 44
8 Providing reports ......................................................................................................................... 45
8.1 Providing reports on JasperReports Server........................................................................ 45
8.2 Checking the report upload in MindSphere ........................................................................ 47
9 Calling Reports ........................................................................................................................... 49

Table of contents
TIBCO Jaspersoft Service 4 System Manual,

TIBCO Jaspersoft Service System Manual, 5
Introduction to Jaspersoft 1
TIBCO® Jaspersoft® is a business intelligence solution. The software helps in the analysis of data and offers tools for creating dashboards and visualizations.
In cooperation with Siemens, TIBCO® offers Jaspersoft® a tool for creating reports within the industrial IoT ecosystem MindSphere.
With Jaspersoft you have the option of generating reports from the TimeSeries data of MindSphere.
You can create templates for the reports of several customers with Jaspersoft.
Jaspersoft MindApps MindSphere provides the MindApps "Jaspersoft User Management" and "TIBCO Jaspersoft™ Online" for the use of Jaspersoft.
The MindApp "Jaspersoft User Management" manages the access rights to the MindApp "TIBCO Jaspersoft™ Online" and makes Jaspersoft Studio available for download to administrators.
With the MindApp "TIBCO Jaspersoft™ Online" users can open and edit reports within MindSphere.
Jaspersoft Studio As an administrator you have the option of using TIBCO Jaspersoft Studio® to create reports for your users.
Additional information More information about Jaspersoft Studio can be found under the following links:
● Getting Started with Jaspersoft Studio (https://community.jaspersoft.com/documentation/v640/tibco-jaspersoft-studio-user-guide)
● Jaspersoft Community (https://community.jaspersoft.com/answers)
● Jaspersoft Community Wiki (https://community.jaspersoft.com/wiki/jaspersoft-community-wiki-0)

Introduction to Jaspersoft
TIBCO Jaspersoft Service 6 System Manual,

TIBCO Jaspersoft Service System Manual, 7
Jaspersoft access rights 2 2.1 Introduction to access rights
Within the launch pad of MindSphere, administrators have access to the MindApp "Jaspersoft User Management". As an administrator you can manage several users for using Jaspersoft.
The user can open his reports via the MindApp "TIBCO Jaspersoft™ Online". Jaspersoft provides an automatic folder structure for each advanced user. The JasperReports Server takes care of rights management for the folder structure from MindSphere.

Jaspersoft access rights 2.2 Managing access rights
TIBCO Jaspersoft Service 8 System Manual,
2.2 Managing access rights The MindApp "Jaspersoft User Management" manages the access rights for the MindApp "TIBCO Jaspersoft™ Online". As administrator, you can open the MindApp "Jaspersoft User Management" in the launchpad of MindSphere.
Within the MindApp "Jaspersoft User Management" you have the option to define the access rights for administrators, advanced users and users.
To activate a user for the MindApp "TIBCO Jaspersoft™ Online", activate the option "Enable TIBCO Jaspersoft™ usage" for the user in question.
The graphic below shows the user interface of the MindApp "Jaspersoft User Management":

Jaspersoft access rights 2.3 Adapting access rights
TIBCO Jaspersoft Service System Manual, 9
2.3 Adapting access rights As an administrator you have the option of changing the access rights within the folder structure of Jaspersoft Studio for your advanced users.
Note
If you change the access rights of the folder structure, there is the risk of unwanted data sharing of the reports amongst your advanced users.

Jaspersoft access rights 2.3 Adapting access rights
TIBCO Jaspersoft Service 10 System Manual,

TIBCO Jaspersoft Service System Manual, 11
Installing Jaspersoft Studio 3
Jaspersoft Studio is an editing software program for creating reports.
To create reports for MindSphere, you must install Jaspersoft Studio.
Procedure To install Jaspersoft Studio on your local computer, proceed as follows:
1. Log into the MindSphere launchpad.
2. Open the MindApp "Jaspersoft User Management".
3. To download Jaspersoft Studio, click on the download link "Download Jaspersoft™
Studio for MindSphere".
4. Execute the downloaded file and follow the instructions on the screen.
5. Start Jaspersoft Studio.

Installing Jaspersoft Studio
TIBCO Jaspersoft Service 12 System Manual,

TIBCO Jaspersoft Service System Manual, 13
Installing a license 4
You need a valid license to use Jaspersoft Studio. The "License Manager" of Jaspersoft Studio manages the licenses.
Jaspersoft Studio stores the license in the following folder within the installation directory you selected: "..TIBCO\Jaspersoft Studio Professional-6.X.X."
Procedure To install a new license of Jaspersoft Studio, follow these steps:
1. Open Jaspersoft Studio.
2. Select "Help > License Manager" in the main navigation.
3. Click "Install new license".
4. Select the new license.
5. Click "Open".
Note
If your license is no longer valid, the "License Manager" automatically opens after Jaspersoft Studio is started.

Installing a license
TIBCO Jaspersoft Service 14 System Manual,

TIBCO Jaspersoft Service System Manual, 15
Configuring Jaspersoft Studio for MindSphere 5 5.1 Default settings in Jaspersoft Studio
To use Jaspersoft Studio in connection with MindSphere, you must make certain default settings in Jaspersoft Studio.
Note
To clarify whether you need a proxy server connection for access to the Internet, contact your IT department.

Configuring Jaspersoft Studio for MindSphere 5.1 Default settings in Jaspersoft Studio
TIBCO Jaspersoft Service 16 System Manual,
Network Connections To set a proxy server for the network connection in Jaspersoft Studio, follow these steps:
1. Open the "Preferences" window in Jaspersoft Studio under "Window > Preferences".
2. Open the "Network-Connections" under "General > Network-Connections".
3. In the "Active Provider" drop-down menu, select the entry "Manual".
4. To change the proxy settings for HTTP and HTTPS, select the line in question and then click "Edit".
5. Enter the host, e.g. "ProxyHost".
6. Enter the port, e.g. "1111".
The graphic below shows the example data entered in the "Network Connections" menu:

Configuring Jaspersoft Studio for MindSphere 5.1 Default settings in Jaspersoft Studio
TIBCO Jaspersoft Service System Manual, 17
Global Settings To set up the suitable default settings for Jaspersoft Studio in the "Global Settings" menu, follow these stops:
1. Open the "Preferences" window in Jaspersoft Studio under "Window > Preferences".
2. To open the settings "Global-Settings", click "Global Settings" in the "Jaspersoft Studio" menu.
3. Activate the "Enable the internal JSS console (*)" option.
The graphic below shows the activated options in the "Global Settings" menu:

Configuring Jaspersoft Studio for MindSphere 5.2 Connecting with JasperReports Server
TIBCO Jaspersoft Service 18 System Manual,
5.2 Connecting with JasperReports Server In order to provide the reports created in Jaspersoft Studio within MindSphere, you need a connection to the JasperReports-Server.
Set up the connection to the JasperReports-Server in the program window "Repository Explorer" in Jaspersoft Studio.
Procedure To set up a connection to the JasperReports-Server , follow these steps:
1. Open the program window "Respository Explorer".
2. Select the "Server".
3. Select the "Create JasperReports Server Connection" command in the shortcut menu.
The "Server Profile Wizard" window is opened.
4. Display "Advanced Settings" in the "Server Profile Wizard" window.
5. Select the entry "MindSphere" from the "Authentication" drop-down menu.

Configuring Jaspersoft Studio for MindSphere 5.2 Connecting with JasperReports Server
TIBCO Jaspersoft Service System Manual, 19
6. Enter the parameters using the following table:
Parameter Description URL Enter the URL for your JasperReports-Server . The URL is structured as
follows: https://<TenantName>.apps.mindsphere.io/apps/JasperSoftPRO/ . Replace the <TenantName> with your assigned Tenant-Namen.
Organization Enter the Tenant-Name. User Enter your MindSphere user name. Password Enter your MindSphere password.
The graphic below shows the "Server Profile Wizard" window with the example data entered:
Configuring Jaspersoft Studio for MindSphere 5.2 Connecting with JasperReports Server
TIBCO Jaspersoft Service 20 System Manual,
7. To test the connection, click "Test Connection".
If the connection attempt was successful, a window appears with the server certificate.
8. To confirm the certificate, click "Trust".
9. To complete the server configuration, click "Finish".
Result ● Jaspersoft Studio displays the set up JasperReports Server in the "Repository Explorer"
window.
● You have access to the server structure.

Configuring Jaspersoft Studio for MindSphere 5.3 Creating a data adapter
TIBCO Jaspersoft Service System Manual, 21
5.3 Creating a data adapter The data adapter configures the data source for the data query of MindSphere.
After successful setup, you can use the data from MindSphere for creating reports.
Procedure To set up the interface with the data adapter, follow these steps:
1. Open the program window "Repository Explorer".
2. Select the "Data Adapter".
3. Select the "Create Data Adapter" command in the shortcut menu.
The "Data Adapters" window is opened.
4. In the "Data Adapters" window, select the entry "Web Service".
5. Click "Next".
6. Enter the parameters for "Web Service" using the following table:
Parameter Description Name Enter the name of the interface, for example MindSphere API. Server URI Enter the URI of your MindSphere system provided to you. The URI is struc-
tured as follows: https://<TenantName>.apps.mindsphere.io/api . Replace the <TenantName> with your assigned Tenant name.
Connection type Select "get" from the drop-down menu. Language Select "jsonql" from the drop-down menu. Authentication Select "MindSphere Authentication" from the drop-down menu.
7. To enter your MindSphere user name and password as authentication data, click .
8. Enter your user name and the password.

Configuring Jaspersoft Studio for MindSphere 5.3 Creating a data adapter
TIBCO Jaspersoft Service 22 System Manual,
9. To check your connection data, click "Test Connection".
The following diagram shows the info window after a successful connection test:
10. Click Finish to save the connection data.
11. To create the MindSphere API, click "Finish" in the "Data Adapter" window.

TIBCO Jaspersoft Service System Manual, 23
Creating reports with templates 6
You have the option of using templates to create a report. This enables a quick introduction to visualizations of your data from MindSphere.
Requirement ● You have connected Jaspersoft Studio to the JasperReports-Server.
● You have created a Data Adapter.
Procedure Proceed as follows to create a report with a template:
1. Open the folder structure of your Jaspersoft Server in the "Repository Explorer" program window.
2. Select a report, e.g. "Sample Report_1_measure" in the folder "Templates".
3. Double-click the report file, e.g. "Main.jrxml" to open the report.
4. To open the preview of the report, click in the "Main Report" program window on the "Preview" tab.
5. Select the data adapter, e.g. "MindSphere API" using the drop-down menu "One Empty Record".

Creating reports with templates
TIBCO Jaspersoft Service 24 System Manual,
6. Enter your Asset data and the time period for the visualization in the "Input Parameters" program window.

Creating reports with templates
TIBCO Jaspersoft Service System Manual, 25
7. To open the preview of the report, click .
8. The following graphic shows the report created with a template:

Creating reports with templates
TIBCO Jaspersoft Service 26 System Manual,

TIBCO Jaspersoft Service System Manual, 27
Create reports 7 7.1 Introduction to creating reports
You can create and lay out reports with the graphical interface of Jaspersoft Studio.
This documentation provides you with a brief insight into the options of Jaspersoft Studio and the creation of reports. You can find additional information on creating dashboards in the Jaspersoft Studio documentation.
Create reports 7.2 Creating a new report
TIBCO Jaspersoft Service 28 System Manual,
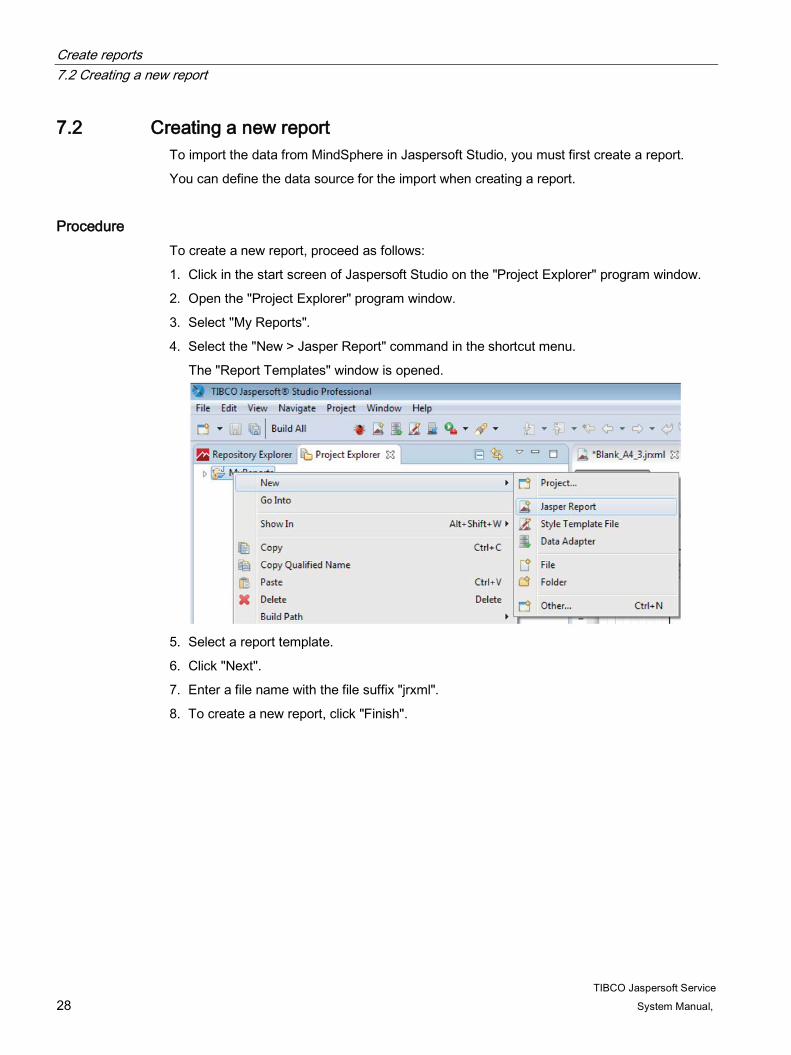
7.2 Creating a new report To import the data from MindSphere in Jaspersoft Studio, you must first create a report.
You can define the data source for the import when creating a report.
Procedure To create a new report, proceed as follows:
1. Click in the start screen of Jaspersoft Studio on the "Project Explorer" program window.
2. Open the "Project Explorer" program window.
3. Select "My Reports".
4. Select the "New > Jasper Report" command in the shortcut menu.
The "Report Templates" window is opened.
5. Select a report template.
6. Click "Next".
7. Enter a file name with the file suffix "jrxml".
8. To create a new report, click "Finish".

Create reports 7.3 Importing data from MindSphere
TIBCO Jaspersoft Service System Manual, 29
7.3 Importing data from MindSphere You have the option of integrating data from MindSphere into your reports. The following call uses API Time Series to read out the data. Further information on the API can be found in the MindSphere API documentation.
To import the data from MindSphere with Jaspersoft Studio, you must perform the following steps:
1. Create parameters for start and end point (Page 30)
2. Create Jaspersoft parameters for import (Page 32)
3. Configure a data source (Page 34)
4. Definition of the data fields for import in the "Fields" tab (Page 36)
5. Check the data in the "Data Preview" tab (Page 38)
Requirement ● You have created a data adapter for MindSphere.
● You have created a new report in Jaspersoft Studio.
Create reports 7.3 Importing data from MindSphere
TIBCO Jaspersoft Service 30 System Manual,
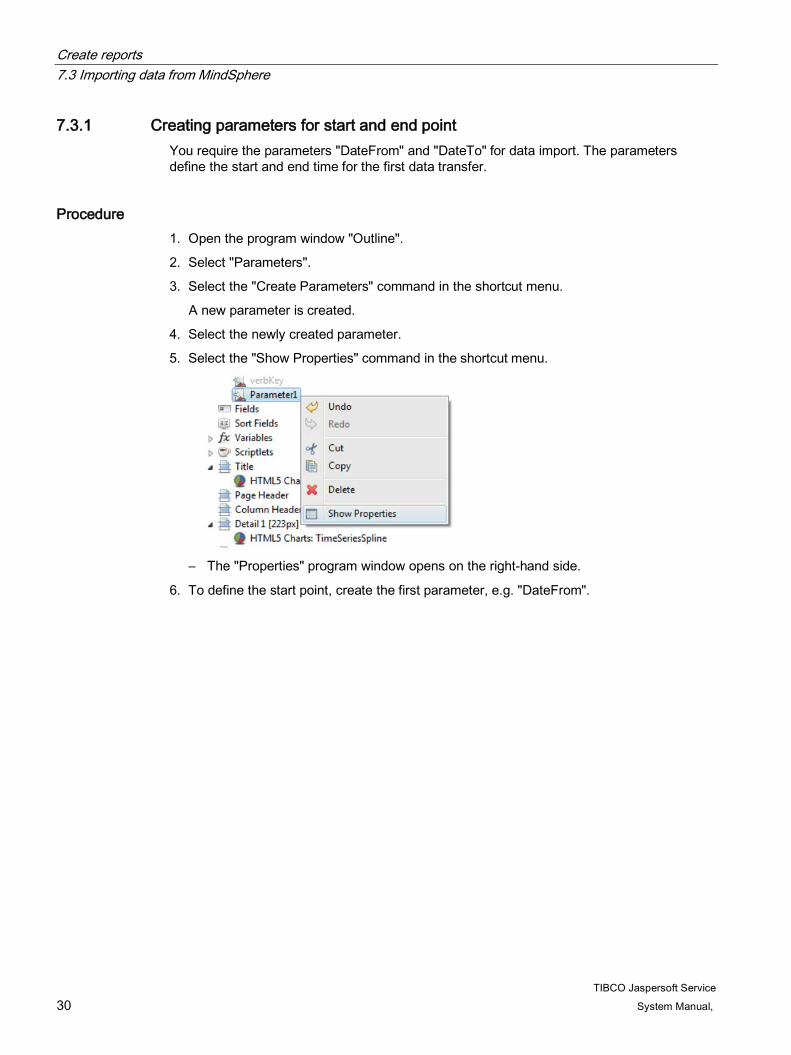
7.3.1 Creating parameters for start and end point You require the parameters "DateFrom" and "DateTo" for data import. The parameters define the start and end time for the first data transfer.
Procedure 1. Open the program window "Outline".
2. Select "Parameters".
3. Select the "Create Parameters" command in the shortcut menu.
A new parameter is created.
4. Select the newly created parameter.
5. Select the "Show Properties" command in the shortcut menu.
– The "Properties" program window opens on the right-hand side.
6. To define the start point, create the first parameter, e.g. "DateFrom".

Create reports 7.3 Importing data from MindSphere
TIBCO Jaspersoft Service System Manual, 31
7. The following table shows the parameters to be entered in the "Properties" program window:
Parameter Description Name Select a name for the parameter, e.g. "DateFrom". Class Displays the Java class, e.g. java.util.Date. Description Enter a description for the parameter, e.g. Start date Is For Prompting Queries the parameters when the report is called. Default Value Expression
Defines the default setting for the parameter, e.g. "DATE(2017,02,01)", "NOW()", " DATERANGE("MONTH-3").getStart()".
The graphic below shows the parameters entered for the parameter "DateFrom":
8. To define the end point for the parameter "DateTo", repeat steps 1 to 7.

Create reports 7.3 Importing data from MindSphere
TIBCO Jaspersoft Service 32 System Manual,
7.3.2 Creating Jaspersoft parameters for import You require the Jaspersoft parameters "Filter", "AssetID" and "AspectName" for data import.
Procedure 1. Open the program window "Outline".
2. Select "Parameters".
3. Select the "Create Parameters" command in the shortcut menu.
A new parameter is created.
4. Select the newly created parameter.
5. Select the "Show Properties" command in the shortcut menu.
The "Properties" program window opens on the right-hand side.
6. Create the first Jaspersoft parameter in the "Properties"program window, e.g. Filter.
7. The following table shows the parameters to be entered in the "Properties" program window for the Jaspersoft parameters "Filter", "AssetID" and "AspectName":
Parameter Description Name Select a name for the parameter, e.g. Filter. Class Displays the Java class, e.g. java.sql.Timestamp. Enter the following Java
classes for the parameters: Filter AssetID AspectName java.lang.String java.lang.String java.lang.String
Description Enter a description for the parameter, e.g. Filter. Is For Prompting Queries the parameters when the report is called.
Filter AssetID AspectName Deactivate the option. Deactivate the
option. Deactivate the option.
Default Value Expression
Filter AssetID AspectName Enter the program code below for the parameter Filter.
Enter the ID of your Asset , e.g. "17247272C5024F9AB961B8F4C5344A93"
Enter the name of the Aspects , e.g. "OutputAnalysis"
Evaluation Time Filter AssetID AspectName Enter the value "<ZERO>". Enter the value
"<ZERO>". Enter the value "<ZERO>".
8. Repeat steps 1 to 7 for the other Jaspersoft parameters, e.g. AssetID and AspectName.

Create reports 7.3 Importing data from MindSphere
TIBCO Jaspersoft Service System Manual, 33
Program code parameter Filter JavaScript javax.json.Json.createObjectBuilder() .add("time", javax.json.Json.createObjectBuilder() .add("ge", javax.json.Json.createObjectBuilder() .add("value",DATEFORMAT($P{DateFrom},"yyyy-MM-dd'T'00:00:00'Z'")) ) .add("le", javax.json.Json.createObjectBuilder() .add("value",DATEFORMAT($P{DateTo},"yyyy-MM-dd'T'00:00:00'Z'")) ) ) .build() .toString()

Create reports 7.3 Importing data from MindSphere
TIBCO Jaspersoft Service 34 System Manual,
7.3.3 Configuring a data source To read out the data for a report, you must configure the data source in the "Dataset and Query Dialog" program window.
Procedure 1. Open the newly created report.
2. To open the "Dataset and Query Dialog" program window, click in the "Main Report" program window.
3. In the drop-down menu, select the created Data Adapter for MindSphere, e.g.
"MindSphere API - Web Service".
4. Enter the "Base URL".
The structure of the Base URL is described in the MindSphere API documentation and is dependent on the API. An example of the composition of the Base URL is TimesSeries API:
/timeSeries/api/assets/$P{AssetID}/aspects/$P{AspectName}/timeseries
The following table describes the individual parameters of the TimeSeries API:
Parameter Description AssetID Shows the name of the requested Assets. AspectName Shows the name of the requested Aspect.
5. In the ""Content Type" drop-down menu, select the content type "GET Parameters".

Create reports 7.3 Importing data from MindSphere
TIBCO Jaspersoft Service System Manual, 35
6. To create the "Get parameters", click the "Add" button below the content type.
7. The following table shows the "Get Parameter" to be entered and their values:
Parameter Value Description filter $P{Filter} Defines die transfer for the data. all true Defines the transfer of all data.
Note
The MindSphere API uses paging in order to transfer large volumes of data in pages. The setting all = false only reads the first page. The setting all = true reads as long as the last page has been loaded. The limit is restricted to 100 pages, which correspond to 200,000 data points.
The graphic below shows the "Get Parameter"entered in the "Dataset and Query Dialog" program window:

Create reports 7.3 Importing data from MindSphere
TIBCO Jaspersoft Service 36 System Manual,
7.3.4 Definition of the data fields for import in the "Fields" tab
Procedure To configure the data fields for import, proceed as follows:
1. Next to the "Request" tab, click the "Fields" tab.
2. To retrieve the data via the Web Service, click "Get Server Response".
– You receive a JSON structure as the reply.
– You can select the individual data fields within the JSON structure.
– You can change the amount of data to be imported via the "First 10 records" shortcut menu. The setting "All" loads all data. This may result in delayed data retrieval.
3. To use the "Root Path", double-click a list element.
4. To display the available fields of a root path, click the arrow next to the list element.
5. To add a field to the "Root Path", click "Add" next to the "Fields" area. You can also drag and drop the field in the "Fields" area.
6. Enter a name in the "Field Definition" window.
Note
Accept the names from the field "Expression".

Create reports 7.3 Importing data from MindSphere
TIBCO Jaspersoft Service System Manual, 37
7. To import the data fields and the "Class Type", click "Read Fields".
The graphic below shows the created fields in the "Dataset and Query Dialog" program window:
8. To change the "Class Type", select the data field and click .
9. To complete data import, click "OK".

Create reports 7.3 Importing data from MindSphere
TIBCO Jaspersoft Service 38 System Manual,
7.3.5 Checking the data in the "Data Preview" tab.
Procedure To check the import data, proceed as follows:
1. Click on the "Data preview" tab.
2. You can change the number of data fields to be displayed via the "First 10 Records" shortcut menu.
3. To receive a preview of the data to be imported, click "Refresh Preview Data".
The graphic below shows a preview of the "Data preview" program window:

Create reports 7.4 Designing the dashboard
TIBCO Jaspersoft Service System Manual, 39
7.4 Designing the dashboard
7.4.1 Introduction to designing the dashboard With Jaspersoft Studio you can design your own dashboards and display them with data from MindSphere. This documentation is limited to individual functions for the creation of a Jaspersoft dashboard. Depending on the diagram type, the maximum number of data fields for a diagram is restricted.
You can find additional information on creating dashboards in the Jaspersoft Studio (https://community.jaspersoft.com/documentation/v640/tibco-jaspersoft-studio-user-guide) documentation.
To create a dashboard in Jaspersoft Studio with data from MindSphere, you must perform the following steps:
1. Create a new diagram (Page 40)
2. Integrate read-out data fields into the diagram template (Page 41)
3. Generate report in the preview (Page 44)
Requirement ● You have created a Data Adapter for MindSphere.
● You have created a new report.
● You have defined the Data Source.
● You have imported data from MindSphere.
● You have defined the data fields for import.

Create reports 7.4 Designing the dashboard
TIBCO Jaspersoft Service 40 System Manual,
7.4.2 Creating a new diagram
Procedure Proceed as follows to create a new dashboard:
1. Drag and drop the "HTML5 Charts" button from the "Palette > Components" area to the dashboard.
2. In the "HTML5 Chart type selection" program window, select a standard template, e.g. TimeSeriesSpline.
3. Adjust the diagram in the work area, e.g. in the "Summary Band" area.
4. Select the "Size to Container > Fit Both" command in the shortcut menu to automatically adjust the diagram.

Create reports 7.4 Designing the dashboard
TIBCO Jaspersoft Service System Manual, 41
7.4.3 Integrate read-out data fields into the diagram template To create a dashboard in Jaspersoft Studio with data from MindSphere, you must integrate the read-out data fields into the diagram template. Within the "Chart properties" you can define the data fields as a series for the diagram.
Procedure To integrate the data fields into the diagram template, follow these steps:
1. Open the shortcut menu of the diagram.
2. Click "Edit Chart properties".
3. Select the "Data Configuration > Data" tabs in the "HTML5 Chart Edit Dialog" program
window.
4. Click next to "Expression" to change the Data Expression .
Create reports 7.4 Designing the dashboard
TIBCO Jaspersoft Service 42 System Manual,
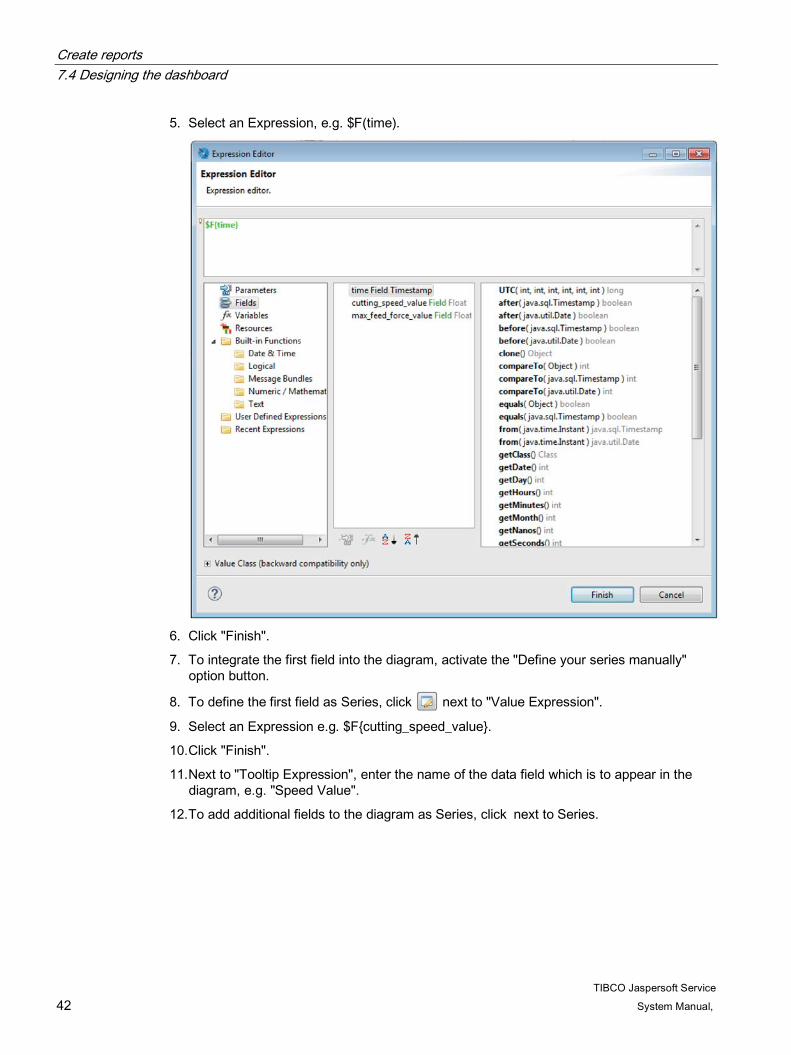
5. Select an Expression, e.g. $F(time).
6. Click "Finish".
7. To integrate the first field into the diagram, activate the "Define your series manually" option button.
8. To define the first field as Series, click next to "Value Expression".
9. Select an Expression e.g. $F{cutting_speed_value}.
10. Click "Finish".
11. Next to "Tooltip Expression", enter the name of the data field which is to appear in the diagram, e.g. "Speed Value".
12. To add additional fields to the diagram as Series, click next to Series.

Create reports 7.4 Designing the dashboard
TIBCO Jaspersoft Service System Manual, 43
13. Repeat steps 8 to 11 to integrate the new field.
The graphic below shows the displayed as " Series":
14. To see a preview of the diagram, click "Show Chart Preview".
15. To leave the settings for the diagram, click "OK".

Create reports 7.4 Designing the dashboard
TIBCO Jaspersoft Service 44 System Manual,
7.4.4 Generate report in the preview?
Procedure To create a dashboard in the work area, proceed as follows:
1. Click the "Preview" tab in the work area.
2. Select the time period for the diagram in the "Input Parameters " program window.
3. To view the report in the preview, click .
The graphic below shows the preview of a dashboard:

TIBCO Jaspersoft Service System Manual, 45
Providing reports 8 8.1 Providing reports on JasperReports Server
You can provide the report from Jaspersoft Studio on the JasperReports-Server within MindSphere. Jaspersoft provides you with an automatic folder structure. Within the folder structure you can create a folder on the JasperReports-Server in Jaspersoft Studio. The folder can be seen by all persons authorized for access on the server. To provide a report, save the report in the folder.
The folder structure makes the "Organizations" folder available to administrators. Administrators can store the reports for advanced users and users in this folder.
Creating folders for report To create a folder on the JasperReports-Server , proceed as follows:
1. Open the shortcut menu of your server, e.g. "JasperReportsServer Pro".
2. Click "New".
3. Select the "Folder list item in the Add Resource wizard" program window.
4. Click "Next".
5. Enter a name for the folder on the server.
6. To create a folder on the server, click "Finish".

Providing reports 8.1 Providing reports on JasperReports Server
TIBCO Jaspersoft Service 46 System Manual,
Upload report Proceed as follows to upload a report:
1. Open the report in the Main Report program window.
2. To open the "Report Publishing Wizard" program window, click .
3. In the "Publish to JasperReports Server" program window, select the folder in which you want to upload the report.
4. Click "Next".
5. In the next program window, select the data fields you wish to overwrite from "Publish to JasperReports Server".
6. Click "Next".
7. Activate the "Data Source from Repository" option button in the "Datasource" tab.
8. To select the data source, click " ".
9. Select the connector "MindSphere API" in the "Public"folder.
10. Click "Finish" to accept the data source.
11. To finish configuration and upload the report, click "Finish" in the window "Report Publishing Wizard".

Providing reports 8.2 Checking the report upload in MindSphere
TIBCO Jaspersoft Service System Manual, 47
8.2 Checking the report upload in MindSphere You can check the publication of a report on the JasperReports-Server via MindSphere.
Log into your MindSphere account and open the MindApp "TIBCO Jaspersoft™ Online".
User interface MindApp "TIBCO Jaspersoft™ Online" The start screen of the MindApp "TIBCO Jaspersoft™ Online" shows the folders created and released in Jaspersoft Studio.
You will obtain a list of all available reports via "Library".

Providing reports 8.2 Checking the report upload in MindSphere
TIBCO Jaspersoft Service 48 System Manual,
The "Repository" program window shows the uploaded reports within the folder structure. You reach the "Repository" program window via "View > Repository".
The graphic below shows the folder structure in the "Repository" program window:

TIBCO Jaspersoft Service System Manual, 49
Calling Reports 9
To retrieve the provided reports in MindSphere, open the MindApp "TIBCO Jaspersoft™ Online" in the launchpad.
You have several options for retrieving your reports within the MindApp:
● You obtain an overview of recently created reports on the left-hand side of the start screen.
● You obtain a list of all available reports in the "Library" program window.
● You obtain a folder structure of Jaspersoft Studio with all uploaded reports via "View > Repository".

Calling Reports
TIBCO Jaspersoft Service 50 System Manual,