1.GENERAL INFORMATION MINI ATV 1-1 SAFETYabsolutelyscooters.net/manuals/CPI MINI ATV Service...
48
1.GENERAL INFORMATION MINI ATV 1-1 SAFETY 1.If the engine must be kept running to service the unit, make sure the area is well-ventilated. Never run the engine in a closed area. 2.The battery generates hydrogen which can be highly explosive. Do not smoke or allow flame and spark near the battery, especially while charging. 3.Gasoline is extremely flammable and is explosive under certain conditions. Do not smoke or allow flames and sparks in working area. 4.The battery electrolyte contains sulfuric acid. Keep the acid away from your eyes, skin and clothing. In case of contact, flush thoroughly with water and \seek immediate medical attention. 1-2 MODEL IDENTIFICATION FRAME SERIAL NUMBER ENGINE SERIAL NUMBER The frame serial number is stamped on the forward part of the frame. The engine serial number is stamped n the left bottom crankcase. PDF created with pdfFactory Pro trial version www.pdffactory.com
Transcript of 1.GENERAL INFORMATION MINI ATV 1-1 SAFETYabsolutelyscooters.net/manuals/CPI MINI ATV Service...

1.GENERAL INFORMATION MINI ATV
1-1 SAFETY
1.If the engine must be kept running to service the unit, make sure the area is well-ventilated.
Never run the engine in a closed area.
2.The battery generates hydrogen which can be highly explosive. Do not smoke or allow flame
and spark near the battery, especially while charging.
3.Gasoline is extremely flammable and is explosive under certain conditions. Do not smoke or
allow flames and sparks in working area.
4.The battery electrolyte contains sulfuric acid. Keep the acid away from your eyes, skin and
clothing. In case of contact, flush thoroughly with water and \seek immediate medical
attention.
1-2 MODEL IDENTIFICATION
FRAME SERIAL NUMBER ENGINE SERIAL NUMBER
The frame serial number is stamped on the forward part of the frame.
The engine serial number is stamped n the left bottom crankcase.
PDF created with pdfFactory Pro trial version www.pdffactory.com

1.GENERAL INFORMATION MINI ATV
1-3 Tightening Specifications for Fasteners ENGINE
Item Quantity Thread
Diameter (mm)
TORQUE: N.m(kg-m,ft-lb)
Cam chain tensioner mounting bolt 1 6 8-12(0.8-1.2) Intake pipe mounting bolt 2 6 8-12(0.8-1.2) Cylinder head bolt 4 8 28-32(2.8-3.2) Starter motor mounting bolt 2 6 8-12(0.8-1.2) Valve adjusting screw lock nut 2 5 7-10(0.7-1.0,5-7) Spark plug 1 10 7-10(0.7-1.0) Cylinder head cover nut 4 6 9-12(0.9-1.2) Flywheel nut 1 10 30-38(3.0-3.8) Oil drain plug 1 12 20-25(2.0-2.5)
FRAME
Item Quantity Thread
Diameter (mm)
TORQUE: N.m(kg-m,ft-lb)
Handlebar upper holder bolt 4 6 8-12(0.8-1.2) Steering shaft nut 1 14 50-60(5.0-6.0)
Steering shaft bushing holder nut 2 8 18-25(1.8-2.5) Wheel hub nut 8 10 25-30(2.5-3.0) Tie rod lock nut 4 10 35-43(3.5-4.3)
Ball joint nut 4 10 35-43(3.5-4.3) Handlebar lower holder nut 2 8 20-30(2.0-3.0)
Front axle castle nut 2` 14 50-60(5.0-6.0) Front brake arm nut 2 6 8-12(0.8-1.2)
Rear axle & Rear wheel bolt castle nut 2 14 80-100(8.0-10) Rear brake panel bolt 2 8 20-25(2.0-2.5)
Exhaust muffler mounting bolt 1 10 30-35(3.0-3.5) Engine hanger bolt 2 10 30-40(3.0-4.0)
Torque specifications listed above are for important area points. For other fasteners, use the standards
given below.
STANDARD TORQUE VALUES
Item TORQUE:
N.m(kg-m,ft-lb) Item
TORQUE: N.m(kg-m,ft-lb)
5mm bolt, nut 4.5-6(0.45-0.6,3-4) 5mm screw 3.5-5(0.35-5,2-4)
6mm bolt, nut 8-12(0.8-1.2,6-9) 6mm screw and 6mm bolt with 8mm head
7-11(0.7-1.1,5-8)
8mm bolt, nut 18-25(1.8-2.5, 13-18) 6mm flange bolt, nut 10-14(1.0-1.4,7-10) 10mm bolt, nut 30-40(3.0-4.0,22-29) 8mm flange bolt, nut 24-30(2.4-3.0,17-22) 12mm bolt, nut 50-60(5.0-6.0,36-43) 10mm flange bolt, nut 35-45(3.5-4.5,25-33)
PDF created with pdfFactory Pro trial version www.pdffactory.com

1.GENERAL INFORMATION MINI ATV
1-4.SPECIFICATIONS: Item Data
DIMENSIONS Overall length(mm) 1210 Overall width 730 Overall height 810 Wheel base Dry weight(KG)
FRAME Type Swing arm Rim size Front tire size Rear tire size Fuel tank capacity 2.61L
ENGINE Type O.H.C. Displacement Bore and stroke Max. power output Max. torque Oil capacity Valve clearance(cold) Intake Exhaust Idle speed
CARBURETOR Type Venturi dia.
DRIVE TRAIN Clutch 1st ratio 2nd ratio Final reduction
Electrical Ignition Ignition timing Battery Spark plug Fuse Headlight Tail light
PDF created with pdfFactory Pro trial version www.pdffactory.com
2.TROUBLE SHOOTING MINI ATV
ENGINE WILL NOT START OR IS HARD TO START FLOW PATH BAD SITUATION PROBABLE CAUSE
1
CHECK IF FUEL REACHES CARBURETOR FUEL REACHES CARBURETOR
FUEL DOES NOT REACH CARBURETOR
(1) NO FUEL IN TANK (2) CLOGGED FUEL LINE BETWEEN FUEL
TANK AND CARBURETOR (3) CLOGGED FUEL VALVE (4) CLOGGED FUEL TANK CAP BREATHER
HOLE
2
REMOVE SPARK PLUG AND TEST SPARK GOOD SPARK
WEAK OR NO SPARK (1) FAULTY OR FOULED PLUG (2) FAULTY C.D.I. (3) BROKEN OR SHORTED HIGH TENSION CORD (4) FAULTY IGNITION SWITCH (5) INCORRECT IGNITION TIMING
3
TEST CYLINDER COMPRESSION NORMAL COMPRESSION
LOW COMPRESSION (1) ENGINE NOT CRANKED (2) NO VALVE CLEARANCE (3) VALVE STUCK OPEN (4) WORN CYLINDER AND PISTON RINGS (5) BLOWN CYLINDER HEAD GASKET (6) FLAW IN CYLINDER HEAD (7) INCORRECT VALVE TIMING (8) BURNED VALVE
4
START ENGINE ENGINE FIRES
ENGINE FIRES, BUT DOES NOT START
(1) CHOKE VALVE OPEN (2) CARBURETOR PILOT SCREW OPEN (3) AIR LEAKING THROUGH IN TAKE PIPE (4) INCORRECT IGNITION TIMING
5 REMOVE SPARK PLUG DRY PLUG
WET PLUG (1) FLOODED CARBURETOR (2) CHOKE VALVE CLOSED
6 START ENGINE WITH CHOKE CLOSED
ENGINE LACKS POWER
FLOW PATH BAD SITUATION PROBABLE CAUSE
1
RAISE WHEELS OFF GROUND AND SPIN WHEELS SPIN FREELY
WHEELS DO NOT SPIN FREELY
(1) DRAGGING BRAKE (2) FAULTY WHEEL BEARING (3) OVERTIGHTENED DRIVE CHAIN (4) WHEEL BEARING NOT LUBRICATED PROPERLY
2
CHECK TIRE PRESSURE NORMAL PRESSURE
INCORRECT TIRE PRESSURE
(1) PUNCTURED TIRE (2) FAULTY TIRE VALVE
PDF created with pdfFactory Pro trial version www.pdffactory.com
2.TROUBLE SHOOTING MINI ATV
3
RAPIDLY ACCELERATE FROM LOW TO SECOND ACCELERATES
DOES NOT ACCELERATE WITH ENGINE SPEED RAISED
(1) SLIPPING CLUTCH (2) WORN OR UNEVEN CLUTCH FACINGS (3) CLUTCH PLATE WARPED
4
REV UP GRADUALLY ENGINE SPEED INCREASES
ENGINE SPEED DOES NOT INCREASE
(1) CARBURETOR CHOKE CLOSED (2) CLOGGED AIR CLEANER (3) CLOGGED FUEL LINE (4) CLOGGED FUEL TANK CAP BREATHER HOLE (5) CLOGGED MUFFLER
5
CHECK IGNITION TIMING CORRECT TIMING
INCORRECT TIMING
INCORRECT TIMING ADJUSTMENT
6
CHECK VALVE CLEARANCE CORRECT VALVE CLEARANCE
INCORRECT VALVE
(1) INCORRECT VALVE CLEARANCE (2) WORN VALVE SEAT
7
TEST CYLINDER COMPRESSION NORMAL COMPRESSION
LOSS OF COMPRESSION (1)VALVE STUCK OPEN (2) WORN CYLINDER AND PISTON RINGS (3) BLOWN CYLINDER HEAD GASKET (4) INCORRECT VALVE TIMING (5) FLAWS IN CYLINDER HEAD OR
CYLINDER
8
CHECK CARBURETOR FOR CLOGGING CARBURETOR NOT CLOGGED
CARBURETOR CLOGGED (1) CARBURETOR JETS CLOGGED
9 REMOVE SPARK PLUG PLUG FOULED OR
DISCOLORED COLORED (1) FOULED PLUG (2) INCORRECT HEAT RANGE PLUG
10
CHECK OIL LEVEL AND CONDITION CORRECT ENGINE OIL LEVEL
OIL DIRTY OR LEVEL INCORRECT
(1) LEVEL TOO LOW OR HIGH (2) CONTAMINATED OIL
PDF created with pdfFactory Pro trial version www.pdffactory.com

2.TROUBLE SHOOTING MINI ATV
11
REMOVE CYLINDER HEAD COVER AND CHECK SUFFICIENTLY LUBRICATION
INSUFFICIENTLY LUBRICATED
(1) CLOGGED OIL PASSAGE (2) POOR OIL PUMP DELIVERY
12
CHECK IF ENGINE OVERHEATS ENGINE DOES NOT OVERHEAT
ENGINE OVERHEATS
(1) EXCESSIVE CARBON IN COMBUSTION CHAMBER (2) INCORRECT FUEL (3) SLIPPING CLUTCH
3
RAPIDLY ACCELERATE OR URN AT HIGH SPEEDS ENGINE DOES NOT KNOCK
ENGINE KNOCKS
(1) WORN PISTON OR CYLINDER (2) MIXTURE TOO LEAN (3) INCORRECT FUEL (4) EXCESSIVE CARBON IN COMBUSTION
CHAMBER (5) LGNITION TIMING TOO EARLY
POOR PERFORMANCE AT IDLE AND LOW SPEEDS
FLOW PATH BAD SITUATION PROBABLE CAUSE
1
CHECK IGNITION TMING AND VALVE CLEARANCE CORRECT TIMING AND CLEARANCE
INCORRECT TIMING AND CLEARANCE
(1) INCORRECT TIMING ADJUSTMENT (2) INCORRECT VALVE CLEARANCE
2
CHECK CARBURETOR PILOT SCREW ADJUSTMENT CORRECTLY ADJUSTED
INCORRECTLY ADJUSTED
(1) MIXTURE TOO LEAN (2) MIXTURE TOO RICH
3
CHECK FOR AIR LEAKS NO AIR LEAKS
AIR LEAKS
(1) FAULTY CARBURETOR PACKING (2) CARBURETOR NOT SECURELY TIGHTENED (3) FAULTY INTAKE PIPE GASKET
4 REMOVE SPARK PLUG AND TEST SPARK
WEAK OR INTERMITTENT SPARK
(1) FAULTY OR FOULED PLUG (2) FAULTY C.D.I. (3) MAGNET AT FAULT
PDF created with pdfFactory Pro trial version www.pdffactory.com
2.TROUBLE SHOOTING MINI ATV
POOR PERFORMANCE AT HIGH SPEED
FLOW PATH BAD SITUATION PROBABLE CAUSE
1
CHECK IGNITION TIMING AND VALVE CLEARANCE CORRECT TIMING AND CLEARANCE
INCORRECT TIMING AND CLEARANCE
(1) INCORRECT TIMING ADJUSTMENT (2) INCORRECT VALVE CLEARANCE
2
DISCONNECT FUEL LINE AT CARBURETOR AND CHECK FOR CLOGGING UNRESTRICTED FUEL FLOW
RESTRICTED FUEL FLOW
(1) EMPTY FUEL TANK (2) CLOGGED FUEL LINE (3) CLOGGED FUEL TANK CAP
BREATHER HOLE (4) CLOGGED FUEL PETCOCK
3
CHECK FUEL FILTER, FUEL VALVE AND CARBURETOR JET FOR CLOGGING NOT CLOGGED
CLOGGED (1) CLOGGED JET (2) CLOGGED FUEL FILTER (3) CLOGGED FUEL VALVE
4
REPLACE CARBURETOR MAIN JET CONDITION IMPROVED CONDITION
AGGRAVATED
(1) JET SIZE TOO SMALL (2) IF CONDITION IS IMPROVED WITH
SMALL JET: A) CLOGGED AIR CLEANER B) CHOKE NOT OPENED FULLY
5
CHECK VALVE TIMING CORRECT
INCORRECT INCORRECT VALVE TIMING ADJUSTMENT
6 CHECK VALVE SPRING TENSION SPRING TENSION CORRECT
WORN OR BROKEN SPRING
FAULTY VALVE SPRING
SMOKY EXHAUST
FLOW PATH BAD SITUATION PROBABLE CAUSE
1
RUN MOTORCYCLE A LONG DISTANCE AT HIGH SPEED THIN EXHAUST EMITTED BLACK SMOKE EMITTED
(1) WORN CYLINDER AND PISTON RINGS
(2) OIL LEVEL TOO HIGH (3) PISTON RINGS INCORRECTLY
INSTALLED (4) FAULTY PISTON OR CYLINDER (5) FLAWS IN CYLINDER HEAD
2
RETURN THROTTLE GRIP QUICKLY
WHITE SMOKE EMITTED
(1) WORN INTAKE VALVE GUIDE OR STEM
(2) EXCESSIVE VALVE-TO-GUIDE CLEARANCE
PDF created with pdfFactory Pro trial version www.pdffactory.com

2.TROUBLE SHOOTING MINI ATV
POOR HANDLING
FLOW PATH BAD SITUATION PROBABLE CAUSE
1
IF STEELING IS HEAVY
CHECK TIRE PRESSURE
(1) STEERING HEAD ADJUSTER TOO TIGHT
(2) DAMAGED STEERING CONES OR STEEL BALLS
2
IF EITHER WHEEL IS WOBBLING
(1) EXCESSIVE WHEEL BEARING PLAY (2) DISTORTED RIM (3) IMPROPERLY INSTALLED WHEEL
HUB (4) SWING ARM PIVOT BUSHING
EXCESSIVELY WORN (5) DISTORTED FRAME (6) IMPROPER DRIVE CHAIN TENSION
OR ADJUSTMENT
3
IF THE MOTORCYCLE PULLS TO ONE SIDE
(1) MISAPPLIED SHOCK ABSORBER (2) FRONT AND REAR WHEELS NOT
ALIGNED (3) BENT FRONT FORK (4) BENT SWING ARM
PDF created with pdfFactory Pro trial version www.pdffactory.com

3.MAINTENANCE MINI ATV
3-1.SERVICE INFORMATION SPECIFICATIONS
Ignition timing:
13°BTDC/2000±100rpm
Spark plug
Spark plug gap 0.6-0.7mm(0.024-0.028in)
Recommended spark plugs BP7SC
Valve clearance(cold): 0.1mm
Intake/Exhaust: 0.1mm
Throttle lever free play:. 5-10mm(3/16-3/8in)
Idle speed: 1700±100rpm
Cylinder compression
Standard: 14kg/cm
Brake lever free play: 12mm(0.4in)
Drive chain slack: 10-20mm(0.37-0.75in)
Drive chain length(52pins) Standard:
600mm(23.6in) Service limit: 617mm(24in)
Drive chain tensioner guide roller O.D.
Standard: N.A.
Service limit:
Front/rear rim size: 145/70-6
Front/rear tire size: 145/70-6
Front/rear tire pressure: 2.2psi(0.15kg/cm ,2.15kpa)
Front/rear tire circumference
Standard: Toe-in:
- 5±10mm(0.2±0.4in)
2
2
PDF created with pdfFactory Pro trial version www.pdffactory.com

3.MAINTENANCE MINI ATV
3-2.MAINTENANCE SCHEDULE Periodic Service/Lubrication
INITIAL EVERY 1 3 6 6 1
ITEM ROUINE Month Moths Months Months Year
Valves * Check valve clearance * Adjust if necessary ○ ○ ○ ○
Spark plug * Check condition * Adjust gap and clean * Replace if necessary
○ ○ ○ ○ ○
Air filter * Clean * Replace if necessary
Every 20~40 hours (more often in wet or dusty areas.)
Carburetor * Check idle speed/starter operation * Adjust if necessary ○ ○ ○ ○
Cylinder head cover breather system
* Check breather hose for cracks or damage * Replace if necessary ○ ○ ○
Exhaust system * Check leakage * Retighten if necessary * Replace gasket if necessary
○ ○ ○
Fuel line * Check fuel hose for cracks or damage * Replace if necessary ○ ○ ○
Engine oil * Check oil level weekly * Replace(Warm engine before draining) ○ ○ ○ ○
Engine oil strainer * Clean ○ ○ ○ Brake * Check operation/fluid leakage
* Correct if necessary ○ ○ ○ ○ ○
Tires * Check pressure and wear * Replace if damaged ○ ○ ○ ○ ○
Wheel bearings * Check bearing assembly for looseness/damage
* Replace if damaged ○ ○ ○ ○
Steering system * Check operation * Replace if damaged * Check toe-in * Adjust if necessary
○ ○ ○ ○ ○
Battery * Check specific gravity * Check that the breather hose is positioned
properly * Check liquid height
○ ○ ○ ○ ○
PDF created with pdfFactory Pro trial version www.pdffactory.com

3.MAINTENANCE MINI ATV
3-3 Fuel Line & Fuel Filter Check the fuel lines for deterioration, damage or leakage and replace if necessary.
3-4 Throttle Operation Check for smooth throttle lever operation and opening also ensure that it automatically fully closes in al steering positions. Make sure there is no deterioration, damage or kink in the throttle cable. Replace any damaged parts. Disconnect the throttle cable at the upper end and thoroughly lubricate the cable and pivot with cable lubricant to prevent premature wear. Install the throttle cable in the reverse order of removal. Make sure the throttle lever free play is 3-5mm (0.12-0.20in.)at the tip of the throttle lever.
3-5 Spark plug Disconnect the spark plug cap and remove the spark plug. Visually inspect the spark plug electrodes for wear. The center electrode should have square edges and the side electrode should have a constant thickness. Discard the spark plug if there is apparent wear or if the insulator is cracked or chipped. Measure the gap with a feeler gauge and adjust by carefully bending the side electrode. SPARK PLUG GAP: 0.6-0.7mm(0.024-0.028 in) RECOMMENDED SPARK PLUGS: Standard: BP7SC Check the sealing washer and replace with a new one if damaged. With the sealing washer and replace with a new one if damaged. With the sealing washer attached, thread the spark plug in by hand to prevent cross-threading. Tighten the spark plug to specified torque. TORQUE:12-19 N.m.(1.2-1.9kg-m,9-14 ft-lb) Connect the spark plug cap.
PDF created with pdfFactory Pro trial version www.pdffactory.com

3.MAINTENANCE MINI ATV
3-6 Valve Clearance NOTE Inspect and adjust valve clearance while the engine is cold (below 35ºC, 95ºF). Remove cylinder head cover.
Turn the flywheel counterclockwise and align the “T” mark with the index mark.
Make sure the piston is at T.D.C. on the compression stroke. Check the valve clearances by inserting a feeler gauge between the adjusting screw and valve stem. VALVE CLEARANCES: INTAKE/EXHAUST:0.1mm(0.004in) Adjust by loosening the lock nut and turning the adjusting screw until there is a slight drag on the feeler gauge. Hold the adjusting screw and tighten the lock nut. TORQUE:7-10 N-m(0.7-1.0kg-m, 5-7ft-lb)
3-7 CARBURETOR-IDLE SPEED Warm up the engine and connect a tachometer. Turn the throttle stop screw as requires obtaining the specified idle speed. Idle speed:1,700±100 rpm. NOTE: Inspect and adjust the carburetor idle speed after all. Other engine adjustments are within specification.
PDF created with pdfFactory Pro trial version www.pdffactory.com
3.MAINTENANCE MINI ATV
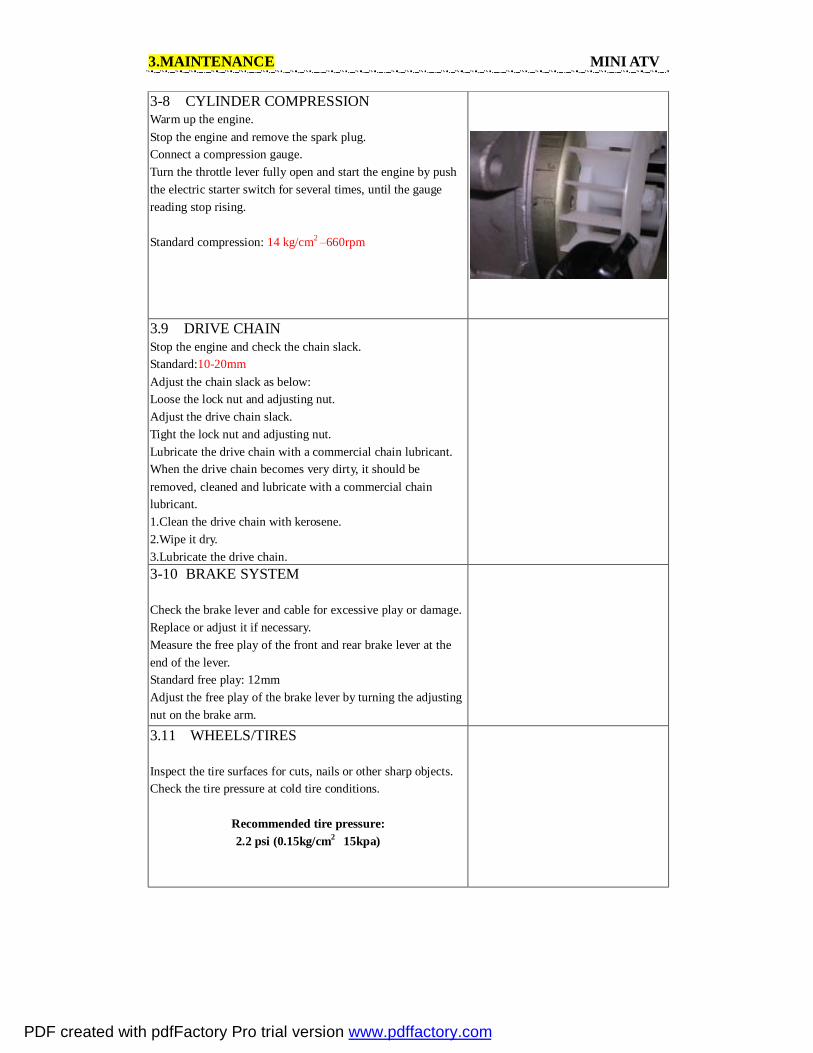
3-8 CYLINDER COMPRESSION Warm up the engine. Stop the engine and remove the spark plug. Connect a compression gauge. Turn the throttle lever fully open and start the engine by push the electric starter switch for several times, until the gauge reading stop rising. Standard compression: 14 kg/cm2 –660rpm
3.9 DRIVE CHAIN Stop the engine and check the chain slack. Standard:10-20mm Adjust the chain slack as below: Loose the lock nut and adjusting nut. Adjust the drive chain slack. Tight the lock nut and adjusting nut. Lubricate the drive chain with a commercial chain lubricant. When the drive chain becomes very dirty, it should be removed, cleaned and lubricate with a commercial chain lubricant. 1.Clean the drive chain with kerosene. 2.Wipe it dry. 3.Lubricate the drive chain.
3-10 BRAKE SYSTEM Check the brake lever and cable for excessive play or damage. Replace or adjust it if necessary. Measure the free play of the front and rear brake lever at the end of the lever. Standard free play: 12mm Adjust the free play of the brake lever by turning the adjusting nut on the brake arm.
3.11 WHEELS/TIRES Inspect the tire surfaces for cuts, nails or other sharp objects. Check the tire pressure at cold tire conditions.
Recommended tire pressure: 2.2 psi (0.15kg/cm2 15kpa)
PDF created with pdfFactory Pro trial version www.pdffactory.com

3.MAINTENANCE MINI ATV
3.12 STEERING SYSTEM Check the free play of the steering shaft with the front wheels turned straight ahead. When there is excessive play, inspect the tie-rod, kingpin bushing and ball joint.
3.13 TOE-IN Place the vehicle on level ground with the front wheels facing straight ahead. Mark the centers of the tires to indicate the axle center height. Measure the distance between the marks. Slowly move the vehicle back, let the wheels turned 180º, so the marks on the tires are aligned with the axle center height. Measure the distance between the marks. Calculate the difference in the front and rear measurements. Toe – in: 5±10mm.
PDF created with pdfFactory Pro trial version www.pdffactory.com

4.LUBRICATION SYSTEM MINI ATV
4-1 ENGINE OIL/ OIL FILTER OIL LEVEL *Put the vehicle on flat ground when inspecting the level of the engine oil. *Start and stop the engine 2-3 minutes each time before checking the oil level. Remove oil gauge and check the oil level shown on the gauge. When oil level is shown in the low level, add 10W-40 motorcycle grade engine oil to bring to the appropriate level on the oil gauge.
4-2 OIL CHANGE Oil will flow easily after warming the engine. Take off oil drain plug to let the oil drain out completely. Take off the oil filter cap and oil filter. Wash the filter with high pressuring air.
Check the O-ring on the oil filter and change with anew one if it is defective. Take off the oil filter and cap with spring. Torque:1.5Kg-m Start the engine and run idle for few minutes, then check the oil volume again. 4-3 OIL PUMP Remove the oil pump Remove the exhaust muffler Remove the A.C. Generator fly wheel Remove the A.C. Generator coil & Pulsar Remove the setting bolts of the right crankcase cover Remove the gasket & dowel pins Remove the clip of pump driven gear Remove the pump driven gear.
PDF created with pdfFactory Pro trial version www.pdffactory.com

4.LUBRICATION SYSTEM MINI ATV
Remove the pump setting bolts Remove the oil pump.
Take off the 2 O-rings and check them for defects or lack of elasticity.
Disassemble the oil pump Remove 3 setting screws Disassemble the oil pump
OIL PUMP INSPECTION Measure the rotor-to body clearance. Service limit:0.12mm
Measure the pump tip clearance. Service limit:0.12mm
Measure the pump end clearance. Service limit: 0.2mm
PDF created with pdfFactory Pro trial version www.pdffactory.com

4.LUBRICATION SYSTEM MINI ATV
ASSEMBLY OF THE OIL PUMP Install rotors and pump shaft into pump body.
Close pump by pump cap and tighten it by screws.
INSTALL OIL PUMP ON CRACK CASE. Put 2 O-rings back into pump circle hole
Add oil into oil pump and mount back to crank case Tighten 3 bolts.
Install the pump driven gear and fix by nut. Torque: 0.8-1.2kg-m
Install right-crank case cover and tighten it by bolts. Install the A.C. Generator. Coil & pulsar Install the A.C. Generator. Fly wheel
PDF created with pdfFactory Pro trial version www.pdffactory.com

5.FUEL SYSTEM MINI ATV
REMOVE CARBURETOR 1. Release fuel drain screw. 2. Drain out gasoline from the float chamber. 3. Remove fuel tube and vacuum tube.
4. Remove the nut of the fuel adjusting cable. 5. Remove fuel adjusting cable. 6. Loosen the screw of the intake manifold clip and screw of
air-cleaner connecting pipe. 7. Remove carburetor.
STARTER PLUNGER INSPECTION 1. Check the starter plunger wire for continuity. Standard: 5Ω(check it when engine has cooled for 10 minutes). If the value is over or under the standard, replace with a new starter plunger.
2. Remove the carburetor and let it cool down for 30 minutes. 3. Blow air into the drain tube to check current air passage. 4. Connect a fully charged battery to the starter plunger wire for five minutes. 5. Check the air current passage as shown.
REMOVE STARTER PLUNGER 1. Remove screw to take off setting plate. 2. Remove starter plunger from carburetor.
PDF created with pdfFactory Pro trial version www.pdffactory.com
5.FUEL SYSTEM MINI ATV
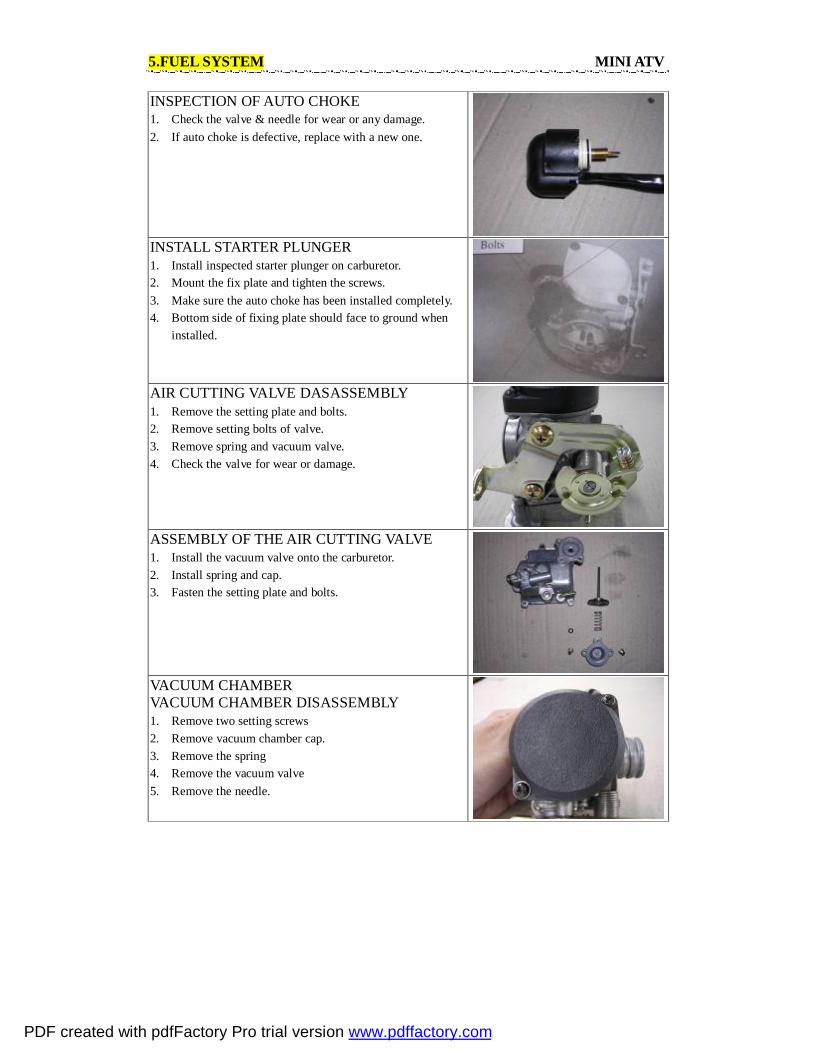
INSPECTION OF AUTO CHOKE 1. Check the valve & needle for wear or any damage. 2. If auto choke is defective, replace with a new one.
INSTALL STARTER PLUNGER 1. Install inspected starter plunger on carburetor. 2. Mount the fix plate and tighten the screws. 3. Make sure the auto choke has been installed completely. 4. Bottom side of fixing plate should face to ground when
installed.
AIR CUTTING VALVE DASASSEMBLY 1. Remove the setting plate and bolts. 2. Remove setting bolts of valve. 3. Remove spring and vacuum valve. 4. Check the valve for wear or damage.
ASSEMBLY OF THE AIR CUTTING VALVE 1. Install the vacuum valve onto the carburetor. 2. Install spring and cap. 3. Fasten the setting plate and bolts.
VACUUM CHAMBER VACUUM CHAMBER DISASSEMBLY 1. Remove two setting screws 2. Remove vacuum chamber cap. 3. Remove the spring 4. Remove the vacuum valve 5. Remove the needle.
PDF created with pdfFactory Pro trial version www.pdffactory.com

5.FUEL SYSTEM MINI ATV
Remove spring and vacuum valve.
Remove needle and plastic plug Note: Do not damage the diaphragm.
VACUUM CHAMBER INSPECTION Inspect the needle, vacuum valve and membrane for any damage.
VACUUM CHAMBER ASSEMBLY 1. Install the vacuum valve onto the carburetor body. 2. Install the spring 3. Install the vacuum chamber cap 4. Fasten the screws Note: Do not damage the membrane while installing the gap. FLOAT CHAMBER FLOAT CHAMBER DISASSEMBLY 1. Remove the 3 setting bolts 2. Remove the chamber cap.
PDF created with pdfFactory Pro trial version www.pdffactory.com

5.FUEL SYSTEM MINI ATV
3. Remove the float pin 4. Remove the float 5. Remove the float valve
FLOAT CHAMBER 1. Inspect the float valve & valve seat for wear or clogging. 2. Remove the main jet, slow jet, needle seat and pilot screw.
3. Clean all the jets and clean all of the openings by using
compressed air.
FLOAT CHAMBER ASSEMBLY 1. Install the slow jet, needle seat, main jet and pilot screw.
2. Install the float, float valve and float pin 3. Install the chamber cap.
PDF created with pdfFactory Pro trial version www.pdffactory.com

5.FUEL SYSTEM MINI ATV
FUEL HEIGHT INSPECTION Measure the fuel height by using a gauge. Standard: 20.5mm
CARBURETOR INSTALLATION 1. The installation sequence is essentially the reverse of
removal. 2. Adjust the clearance of the throttle valve cable 3. Adjust the pilot screw
Standard:2 1/2±1/4 turns out
4. Adjust the idle speed
Standard:1700±100 R.P.M.
Float height measurement Measure the distance between the mating surface of the float chamber and top of the float using a gauge.
Standard:10.5mm
pilot screw
PDF created with pdfFactory Pro trial version www.pdffactory.com
6. ENGINE REMOVAL MINI ATV
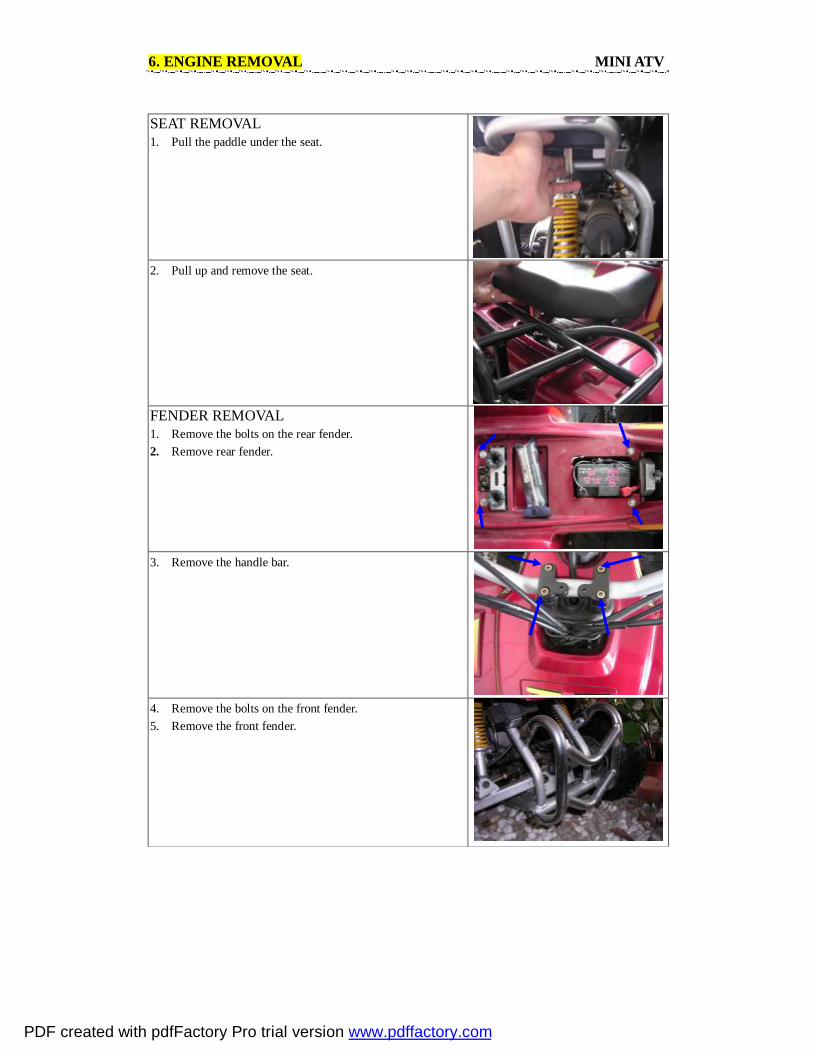
SEAT REMOVAL 1. Pull the paddle under the seat.
2. Pull up and remove the seat.
FENDER REMOVAL 1. Remove the bolts on the rear fender. 2. Remove rear fender.
3. Remove the handle bar.
4. Remove the bolts on the front fender. 5. Remove the front fender.
PDF created with pdfFactory Pro trial version www.pdffactory.com

6. ENGINE REMOVAL MINI ATV
Life up rear side of vehicle. Remove the chain clip and remove the chain.
Remove the setting bolts of chain guard and rear axial. Remove chain guard.
Remove the setting bolt of rear shock absorber. Remove rear axial.
PDF created with pdfFactory Pro trial version www.pdffactory.com

6. ENGINE REMOVAL MINI ATV
Switch off the fuel cock.
Remove the fuel pipe front carburetor. Note: watch out that the left fuel in the pipe does not flow out.
Remove the setting bolt of intake manifold.
Remove the throttle cable. Remove the gas recycle pipe from cylinder head cover.
Remove setting bolts of muffler and exhaust pipe. Remove muffler and exhaust pipe.
PDF created with pdfFactory Pro trial version www.pdffactory.com
6. ENGINE REMOVAL MINI ATV
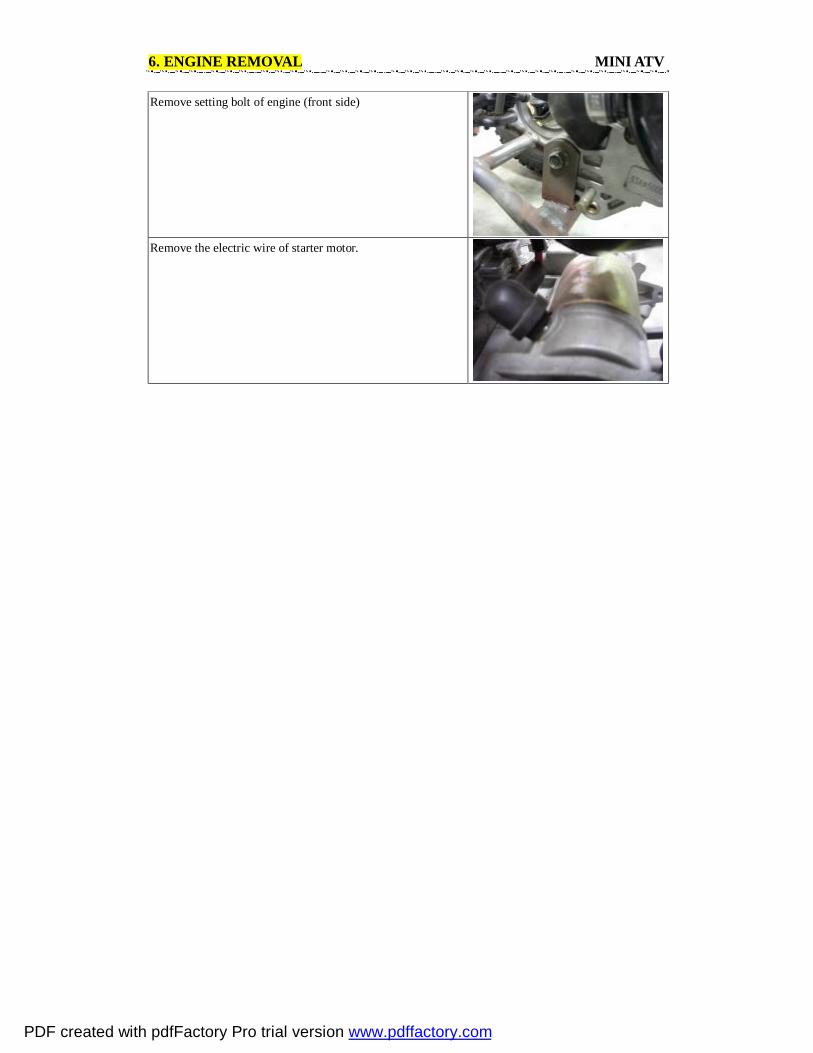
Remove setting bolt of engine (front side)
Remove the electric wire of starter motor.
PDF created with pdfFactory Pro trial version www.pdffactory.com

7.CYLINDER HEAD/VALVE MINI ATV
CAMSHAFT REMOVAL 1. Remove the cylinder head cover.
2. Remove the shroud grommet & the pan screw.
3. Rotate the fly wheel clockwise and align the “T” on the fly
wheel with the index mark on the right crankcase cover. 4. Make sure the “O” hole on the cam sprocket is on the top
position.
5. Remove the setting nuts & washers of the camshaft holder.
PDF created with pdfFactory Pro trial version www.pdffactory.com

7.CYLINDER HEAD/VALVE MINI ATV
6. Remove the camshaft holder & dowel pins.
7. Remove the camshaft from cam chain.
CAMSHAFT INSPECTION 1. Measure the height of cam lobe.
Service limits: IN: 24.688mm EX:25.24mm
2. Inspect the bearing for loosening & wear.
CAMSHAFT HOLDER DISASSEMBLY 1. Remove the rocker arms by using a 5mm bolt.
PDF created with pdfFactory Pro trial version www.pdffactory.com

7.CYLINDER HEAD/VALVE MINI ATV
2. Inspect the holder, rocker arm shaft for wear and/or damage.
Measure the rocker arm I.D. Service limits: 10.10 mm Measure the rocker arm shaft O.D. Service limits: 9.91 mm
CYLINDER HEAD REMOVAL 1. Remove the two setting bolts
2. Remove the cylinder head 3. Remove the dowel pins & the cylinder head gasket
CYLINDER HEAD DISASSEMBLY Remove the valve cotter, valve spring retainer, valve spring and valve spring seat by using a compressor.
CYLINDER HEAD FLATNESS INSPECTION Service limits:0.05mm
PDF created with pdfFactory Pro trial version www.pdffactory.com
7.CYLINDER HEAD/VALVE MINI ATV
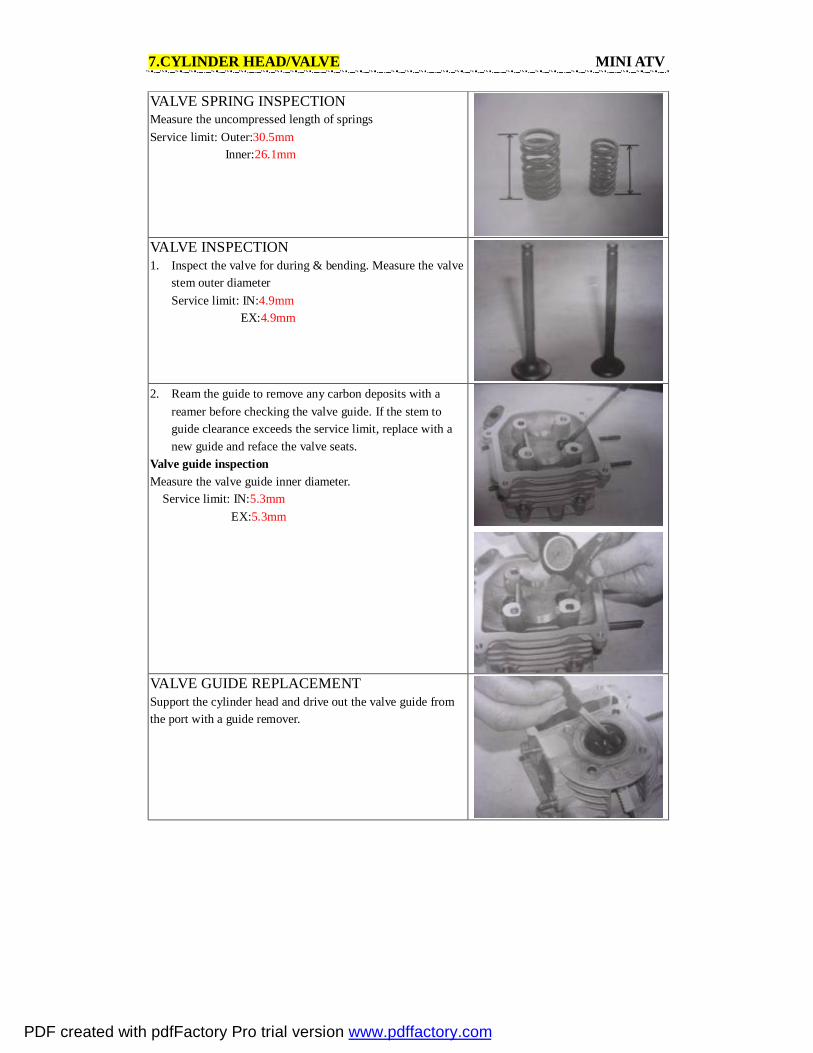
VALVE SPRING INSPECTION Measure the uncompressed length of springs Service limit: Outer:30.5mm Inner:26.1mm
VALVE INSPECTION 1. Inspect the valve for during & bending. Measure the valve
stem outer diameter Service limit: IN:4.9mm EX:4.9mm
2. Ream the guide to remove any carbon deposits with a
reamer before checking the valve guide. If the stem to guide clearance exceeds the service limit, replace with a new guide and reface the valve seats.
Valve guide inspection Measure the valve guide inner diameter. Service limit: IN:5.3mm EX:5.3mm
VALVE GUIDE REPLACEMENT Support the cylinder head and drive out the valve guide from the port with a guide remover.
PDF created with pdfFactory Pro trial version www.pdffactory.com

7.CYLINDER HEAD/VALVE MINI ATV
VALVE SEAT GRINDING 1. Using a 45 degree cutter, remove the roughness and
irregularities from the seat.
2. Using a 32 degree cutter, remove 1/4 of the existing valve
seat material.
3. Using a 60 degree cutter remove the bottom 1/4 of the old seat
4. Install a 45 degree finish cutter and cut the seat to proper width. Standard: 1.0mm
INSPECT THE CONTACT AREA OF VALVE SEAT Apply a thin coating of Prussian blue to the valve seat. Press the valve through the valve guide and on the contact area on the valve, the seat must be lowered using a 45 degree flat cutter. If the contact area is too low the valve, the seat must be raised using a 60 degree inner cutter. Note: Refresh the seat to specifications using a 45 degree finish cutter the seat, apply lapping compound to the valve face, and lap the valve using light pressure after lapping. Wash all residual compounds off the cylinder head and valve.
PDF created with pdfFactory Pro trial version www.pdffactory.com

7.CYLINDER HEAD/VALVE MINI ATV
CYLINDER HEAD ASSEMBLY Lubricate each valve stem and stem seal with engine oil. Insert the valve stem seal and stems into the guides. Install the valve spring washers and retainers. Compress the valve spring with a cotter into the retainer. Note: Install the new valve spring when disassembly.
PDF created with pdfFactory Pro trial version www.pdffactory.com

8.CYLINDER/PISTON MINI ATV
CYLINDER REMOVAL 1. Remove the cylinder head 2. Remove the lifter of cam chain tensioner
To see CYLINDER HEAD/VALVE
3. Remove the cam chain guide
4. Remove the cylinder
5. Remove the cylinder gasket & dowel pin Note: Clean all the material of the cylinder gasket with a scraper
Piston remove 1. Remove the piston pin clip Note: Do not allow the clip fall into the crankcase
PDF created with pdfFactory Pro trial version www.pdffactory.com

8.CYLINDER/PISTON MINI ATV
2. Remove the piston pin 3. Remove the piston
PISTON/PISTON RING INSPECTION 1. Remove the piston rings
2. Clean the grooves for carbon deposit completely. Note: Do not damage the piston ring during removal. Measure the piston ring groove clearance with a feeler gauge. Service limits: TOP:0.09mm SECOND:0.09mm Insert each piston ring into the cylinder with the piston and measure the ring end gap in the cylinder to a point 10mm (0.4in) from the bottom. Service Limits: TOP/SECOND:0.45mm
Measure piston pin bore inner diameter in two directions at right angle to each other. Service Limits: 13.04mm
Measure the piston pin outer diameter at the front, center and rear and in tow directions across from each other. Service limit: 12.96mm
PDF created with pdfFactory Pro trial version www.pdffactory.com
8.CYLINDER/PISTON MINI ATV
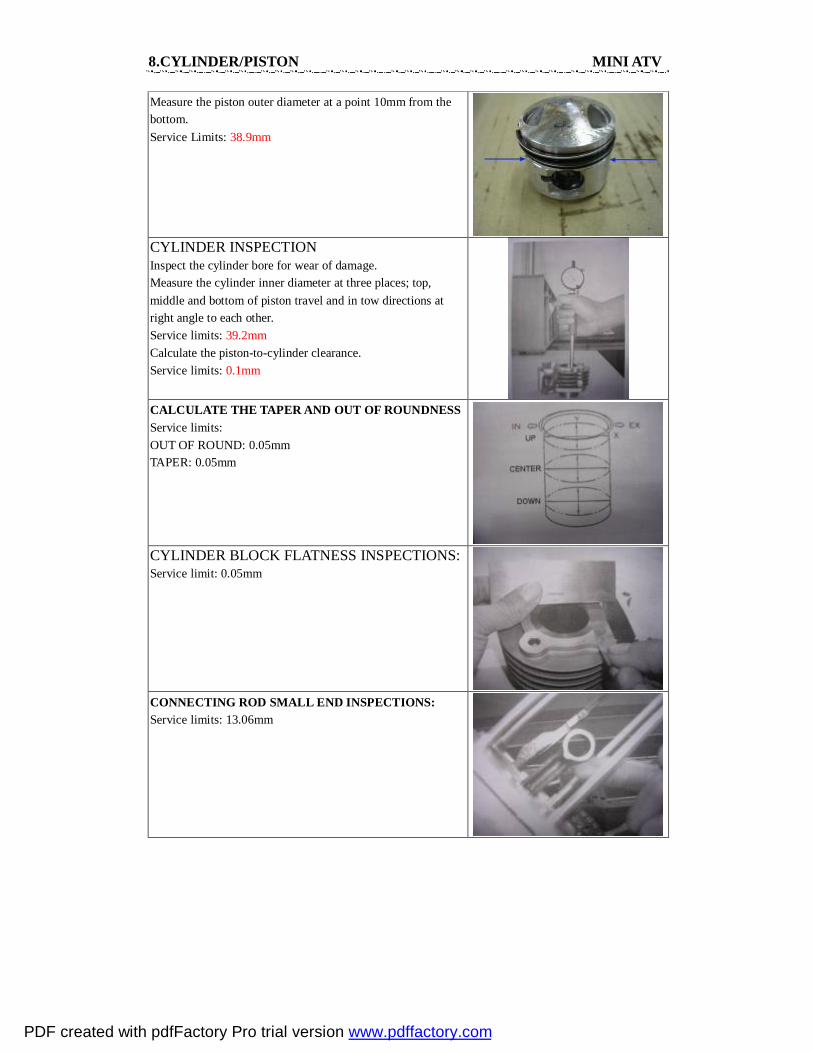
Measure the piston outer diameter at a point 10mm from the bottom. Service Limits: 38.9mm
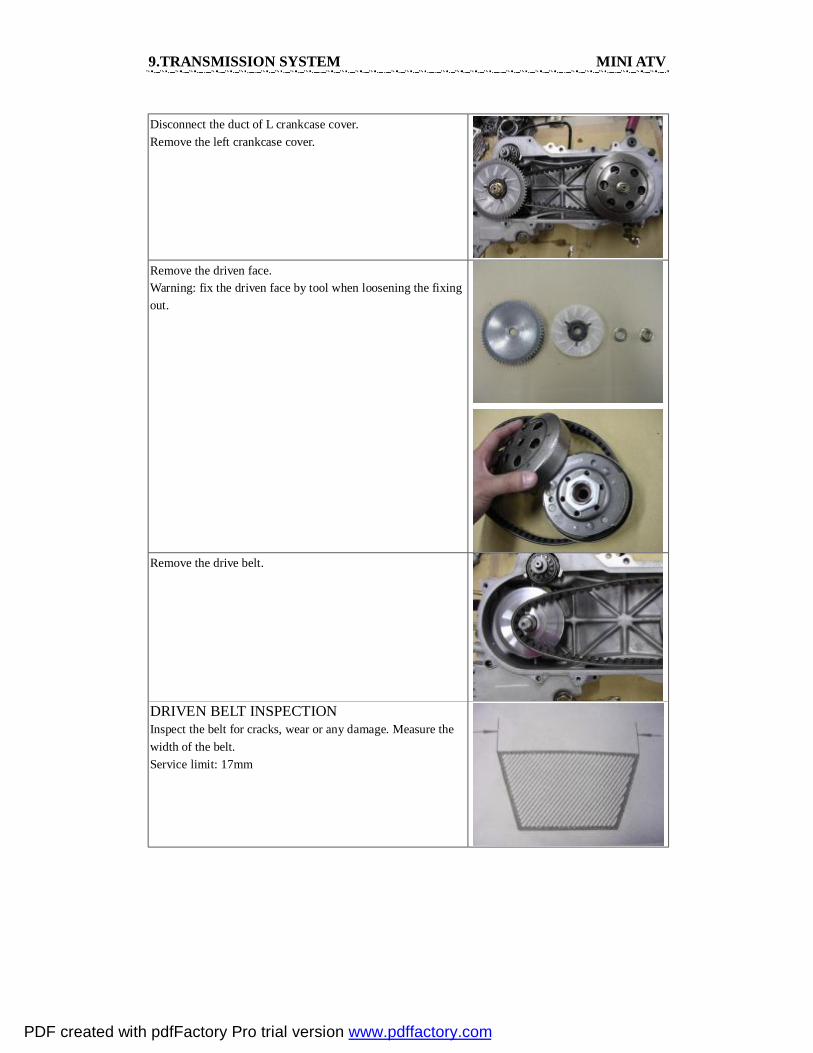
CYLINDER INSPECTION Inspect the cylinder bore for wear of damage. Measure the cylinder inner diameter at three places; top, middle and bottom of piston travel and in tow directions at right angle to each other. Service limits: 39.2mm Calculate the piston-to-cylinder clearance. Service limits: 0.1mm
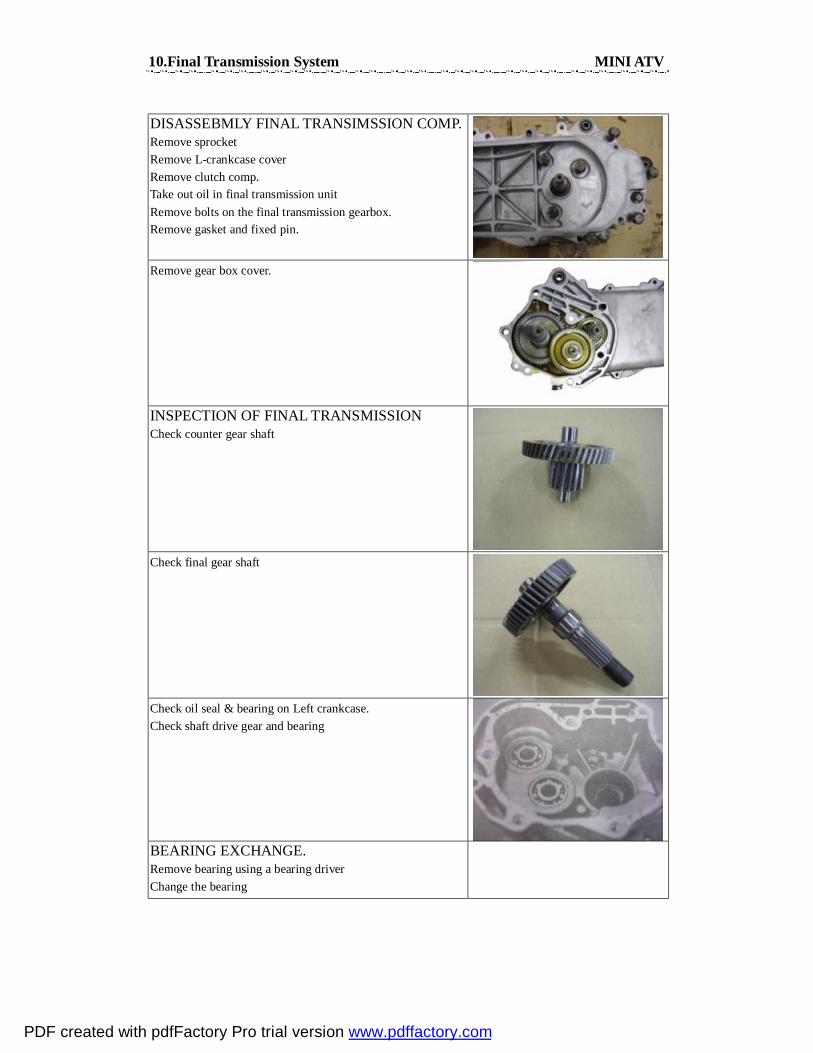
CALCULATE THE TAPER AND OUT OF ROUNDNESS Service limits: OUT OF ROUND: 0.05mm TAPER: 0.05mm
CYLINDER BLOCK FLATNESS INSPECTIONS: Service limit: 0.05mm
CONNECTING ROD SMALL END INSPECTIONS: Service limits: 13.06mm
PDF created with pdfFactory Pro trial version www.pdffactory.com

8.CYLINDER/PISTON MINI ATV
PISTON RING INSTALLATION: Clean the piston ring grooves thoroughly. Install the piston ring. Space the piston ring end gaps 120 degrees apart. The gap of the three-piece oil ring should correspond with the gaps of the spacer. When installing the oil ring, install the spacer first. Next, install the rails Note: Ø Avoid piston and piston ring damage during installation. Ø All rings should be installed with the markings facing up. Ø After installation, the piston rings should be free to rotate
in the grooves. Ø Do not mix the top and second rings. Piston installation Install the piston, piston pin and new piston pin clips. Note: Ø Position the “IN” mark on the intake valve side. Ø Do not let the piston pin clip fall into the crankcase.
CYLINDER INSTALLATION Install the cylinder gasket and dowel pins. Coat the cylinder and piston rings with engine oil. Install the cylinder.
PDF created with pdfFactory Pro trial version www.pdffactory.com
9.TRANSMISSION SYSTEM MINI ATV
Disconnect the duct of L crankcase cover. Remove the left crankcase cover.
Remove the driven face. Warning: fix the driven face by tool when loosening the fixing out.
Remove the drive belt.
DRIVEN BELT INSPECTION Inspect the belt for cracks, wear or any damage. Measure the width of the belt. Service limit: 17mm
PDF created with pdfFactory Pro trial version www.pdffactory.com

9.TRANSMISSION SYSTEM MINI ATV
MOVABLE DRIVEN FACE INSPECTION Measure the movable driven face inner diameter. Service limit: 24.06mm
WEIGHT ROLLER INSPECTION Measure the weight roller of the outer diameter. Service limit: 12.4mm
PIN OF DRIVEN FACE INSPECTION Measure the pin inner diameter. Service limit:33.94mm
Remove the clutch outer cover. Remove the driven pulley.
CLUTCH OUTER INSPECTION Measure clutch outer cover inner diameter. Service limit: 107.5mm
CLUTCH LINING INSPECTION Measure the lining thickness. Service limit: 2.0mm
PDF created with pdfFactory Pro trial version www.pdffactory.com

9.TRANSMISSION SYSTEM MINI ATV
DRIVEN PULLEY DISASSEMBLY Fix the driven pulley in the compressor. Remove the special nut (28mm) Release the compressor. Remove the driven plate assy. Torque: 5.0~6.0kg-m
REMOVE MOVABLE DRIVEN FACE Remove spring collar spring seal collar.
DRIVEN FACE SPRING INSPECTION Measure the spring uncompressed length Service limit: 92.8mm
DRIVEN FACE INSPECTION Measure the driven face outer diameter. Service limit: 33.94mm
MOVABLE DRIVEN FACE INSPECTION Measure the movable drive face inner diameter. Service limit: 34.06mm
PDF created with pdfFactory Pro trial version www.pdffactory.com
10.Final Transmission System MINI ATV
DISASSEBMLY FINAL TRANSIMSSION COMP. Remove sprocket Remove L-crankcase cover Remove clutch comp. Take out oil in final transmission unit Remove bolts on the final transmission gearbox. Remove gasket and fixed pin.
Remove gear box cover.
INSPECTION OF FINAL TRANSMISSION Check counter gear shaft
Check final gear shaft
Check oil seal & bearing on Left crankcase. Check shaft drive gear and bearing
BEARING EXCHANGE. Remove bearing using a bearing driver Change the bearing
PDF created with pdfFactory Pro trial version www.pdffactory.com

10.Final Transmission System MINI ATV
GEAR BOX ASSEMBLY Install drive shaft in the final transmission gear box.Install final shaft in the final transmission gear box. Install counter shaft and washer in the gear box. Install resin-washer on counter shaft. Install fix pin on the gear box case. Install gear box cover.
Tighten gear box cover with bolts.
Inject oil in the box. Possess should be done on a flat surface. Oil type SAE 90# Volume of gear box Disassembly: 0.11L Exchange: 0.09L Torque: 1.0~1.5kg-m Start engine and check if oil is leaking Check the volume of oil Check oil volume from checking hole, add oil if volume is low
1 2
3
PDF created with pdfFactory Pro trial version www.pdffactory.com

11.Crank & Crankcase MINI ATV
CRANKCASE DISASSEMBLY Remove the cam chain tensioned pivot Remove the cam chain tensioner
Remove the crankcase setting bolts
Separate the right crankcase and left crankcase Remove the gasket & dowel pin
Remove the crank from the crankcase Remove the cam chain
Clean the crankcase connecting surface of any gasket material with scraper Do not damage the surface
PDF created with pdfFactory Pro trial version www.pdffactory.com

11.Crank & Crankcase MINI ATV
Remove the seal from the left crankcase
Remove the seal from the right crankcase
CRANKSHAFT INSPECTION Measure the connecting rod big end side clearance with a feeler gauge. Service limit: 0.55mm
Measure the connecting rod big end radial clearance at two different points across from each other. Service limit: 0.05mm
Place the crankshaft on a stand or V-blocks and measure the run out using a dial gauge. Actual bend is 1/2 of total indicator reading. Service limit: 0.1mm
Check the crankshaft bearing play by placing the crankshaft in a V-block and spinning the crankshaft by hand. If they are noisy or have excessive play, replace with a new crankshaft assembly.
PDF created with pdfFactory Pro trial version www.pdffactory.com

11.Crank & Crankcase MINI ATV
CRANKCASE ASSEMBLY Install the seals of right & left crankcase Install the cam chain to the left crankcase Install the crankcase to the left crankcase & connect with the cam chain
Install the gasket & dowel pin Install the right crankcase & the setting bolts
Install the cam chain tensioner & the pivot Lubricate the o-ring Tight the chain tension bolt.
PDF created with pdfFactory Pro trial version www.pdffactory.com

12.SUSPENSION SYSTEM MINI ATV
REPLACING THE FRONT SHOCK ABSORBER 1. Lift up the frame 2. Remove the lug nuts (4 pieces) from the wheel.
3. Remove the nut and bolt. (2 pieces) from the shock
absorber.
4. Install a new shock absorber. 5. Lock up the fixed screws (2 pieces) 6. Install the tire and tighten the lug nuts. 7. Take off the lifter.
REPLACING THE REAR SHOCK ABSORBER 1. Lift up the frame. 2. Take off the castle nut and the bolts. (2 pieces) 3. Remove the shock absorber. 4. Install a new shock absorber. 5. Lock up the screws and the castle nut. 6. Take down the lift.
REPLACING TIE-ROD 1. Lift up the frame. 2. Remove the lug nuts (4 pieces) from the tire.
PDF created with pdfFactory Pro trial version www.pdffactory.com
12.SUSPENSION SYSTEM MINI ATV
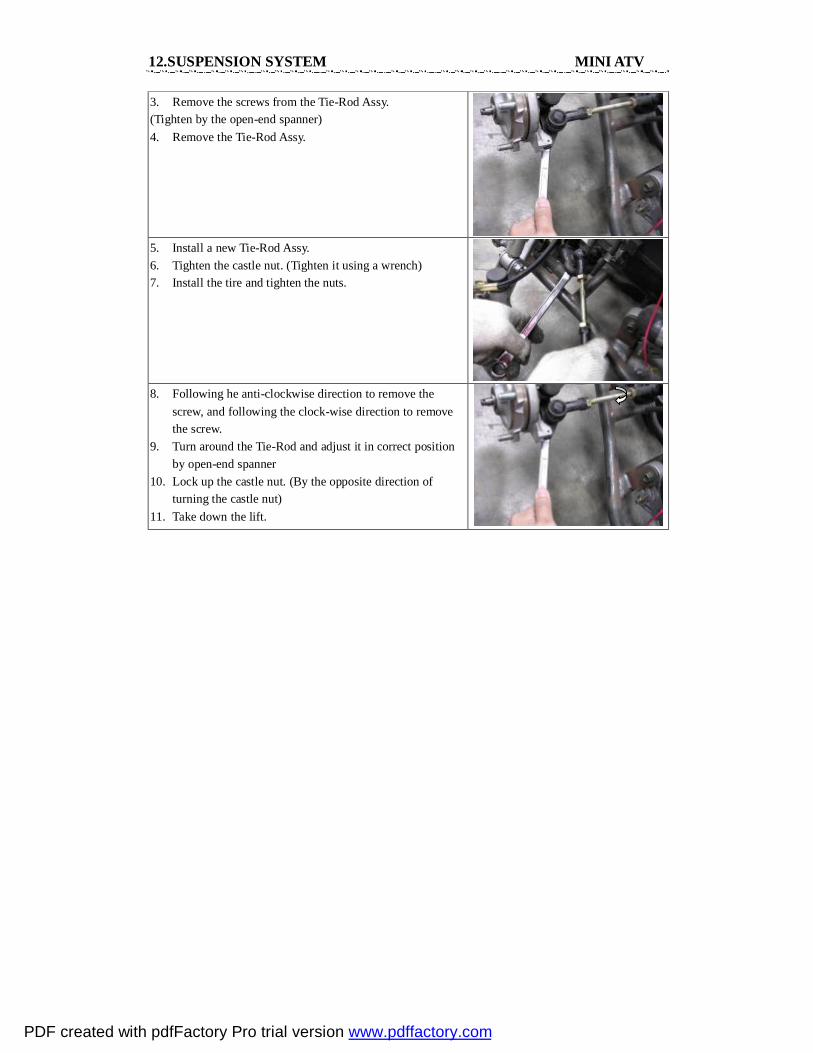
3. Remove the screws from the Tie-Rod Assy. (Tighten by the open-end spanner) 4. Remove the Tie-Rod Assy.
5. Install a new Tie-Rod Assy. 6. Tighten the castle nut. (Tighten it using a wrench) 7. Install the tire and tighten the nuts.
8. Following he anti-clockwise direction to remove the
screw, and following the clock-wise direction to remove the screw.
9. Turn around the Tie-Rod and adjust it in correct position by open-end spanner
10. Lock up the castle nut. (By the opposite direction of turning the castle nut)
11. Take down the lift.
PDF created with pdfFactory Pro trial version www.pdffactory.com

13.BRAKE SYSTEM MINI ATV
DISASSEMBLY FRONT DRUM BRAKE Remove the cover of the brake assy.
Push the brake lever to bottom out Take off the brake caliper
Use a screwdriver to pull open the spring
Remove the brake shoes as the picture Check the brake shoes. If the surface of shoes is becoming worn or thin, replace with new pads.
ASSEMBLY BRAKE CALIPER Put the brake shoes as the picture’s sequence. Put the spring on the brake shoes and buckle it into the pin
1 2
PDF created with pdfFactory Pro trial version www.pdffactory.com

13.BRAKE SYSTEM MINI ATV
DISASSEMBLY REAR DRUM BRAKE Use an adjustable spanner to loose the nut on the axle.
Take off the drum
Remove the brake shoes as the picture Check the brake pad. If the surface of shoes is becoming worn or thin, replace with new shoes.
ASSEMBLY BRAKE CALIPER Assemble the brake shoe Combine the drum and tight the nut on the axle
Assemble the wheel and tight the nuts.
PDF created with pdfFactory Pro trial version www.pdffactory.com


![ATV +Service+Manual[1]](https://static.fdocuments.in/doc/165x107/577d247a1a28ab4e1e9c8b59/atv-servicemanual1.jpg)


![[XLS] · Web viewE3_Powersports E3_Powersports MAKE MODEL GAP ATV ACTION Mini-Bikes Attack (1998-96) E3.32.025 Outlaw (1998-96) ALSPORT Atv's All Models w/171R Hirth Engs..020 All](https://static.fdocuments.in/doc/165x107/5aa2796b7f8b9a436d8d02b2/xls-viewe3powersports-e3powersports-make-model-gap-atv-action-mini-bikes-attack.jpg)