
1504 e book-outline-knit-n-crochet_knitting-techniques_v2
13
Essential Techniques for Beginning Knitters Fulfilling Your itch to Stitch Fulfilling Your itch to Stitch Essential Techniques for Beginning Knitters
-
Upload
knit-n-crochet -
Category
Art & Photos
-
view
53 -
download
0
Transcript of 1504 e book-outline-knit-n-crochet_knitting-techniques_v2

EssentialTechniques for
Beginning Knitters
Fulfilling Youritch to Stitch
Fulfilling Youritch to Stitch
EssentialTechniques for
Beginning Knitters

This e-book is presented by:

INTRODUCTION
THE SINGLE CAST ON
THE LONG TAIL CAST ON
THE KNITTED CAST ON
THE KNIT STITCH
THE PURL STITCH
CONCLUSION
CONTACT INFORMATION
SOURCES
1
2
3
5
6
7
8
9
10
Table ContentsOf Table Contents

IntroductionIntroductionIn 2014, John Lewis, a chain of department stores in Great Britain, sold enough yarn to go around the world twice. That length is sure to grow as the global community of knitters expands, constantly taking on new fans, young and old.
Whether you are a beginner picking up your first pair of needles or a seasoned yarn bomber, brushing up on basic knitting techniques will help you refine your stitch and prepare you for more advanced patterns and designs. Let’s take a look at some beginner techniques to refresh your skills.
1

Casting on refers to creating a foundation row of stitches on your needle. Every knitting project begins with a cast on, and the single cast on is one of the easiest. Use the single cast on, which is also known as the e-loop, e-wrap, or backward loop cast on, when you need a quick, easy way to get started or want to add more stitches to a work in progress. The single cast on also produces a thin, loose, stretchy edge that accommodates projects featuring laces.
Chapter 1
The Single Cast OnThe Single Cast On
Every cast on starts with a simple slipknot. Slip this over a knitting needle, keeping it tight enough that it stays on, but not so tight
that you’ll have trouble undoing it.
Insert the knitting needle into the loop around your thumb from below. Just remove your thumb and you’ll have a new
loop on your needle.
With the needle with the slipknot in your right hand, hold the working yarn (i.e., the yarn connected to the ball) in your left
hand, your thumb over the yarn.
When the loop is on the needle, pull the yarn to keep the loop snug around the needle. Don’t tighten it too much. Just
enough that it won’t fall o� the needle.
Loop the yarn around your thumb and bring your hand up into an upright position. Slightly arch your thumb to
create some tension.
Repeat until you’ve cast on the number of stitches you need.
2
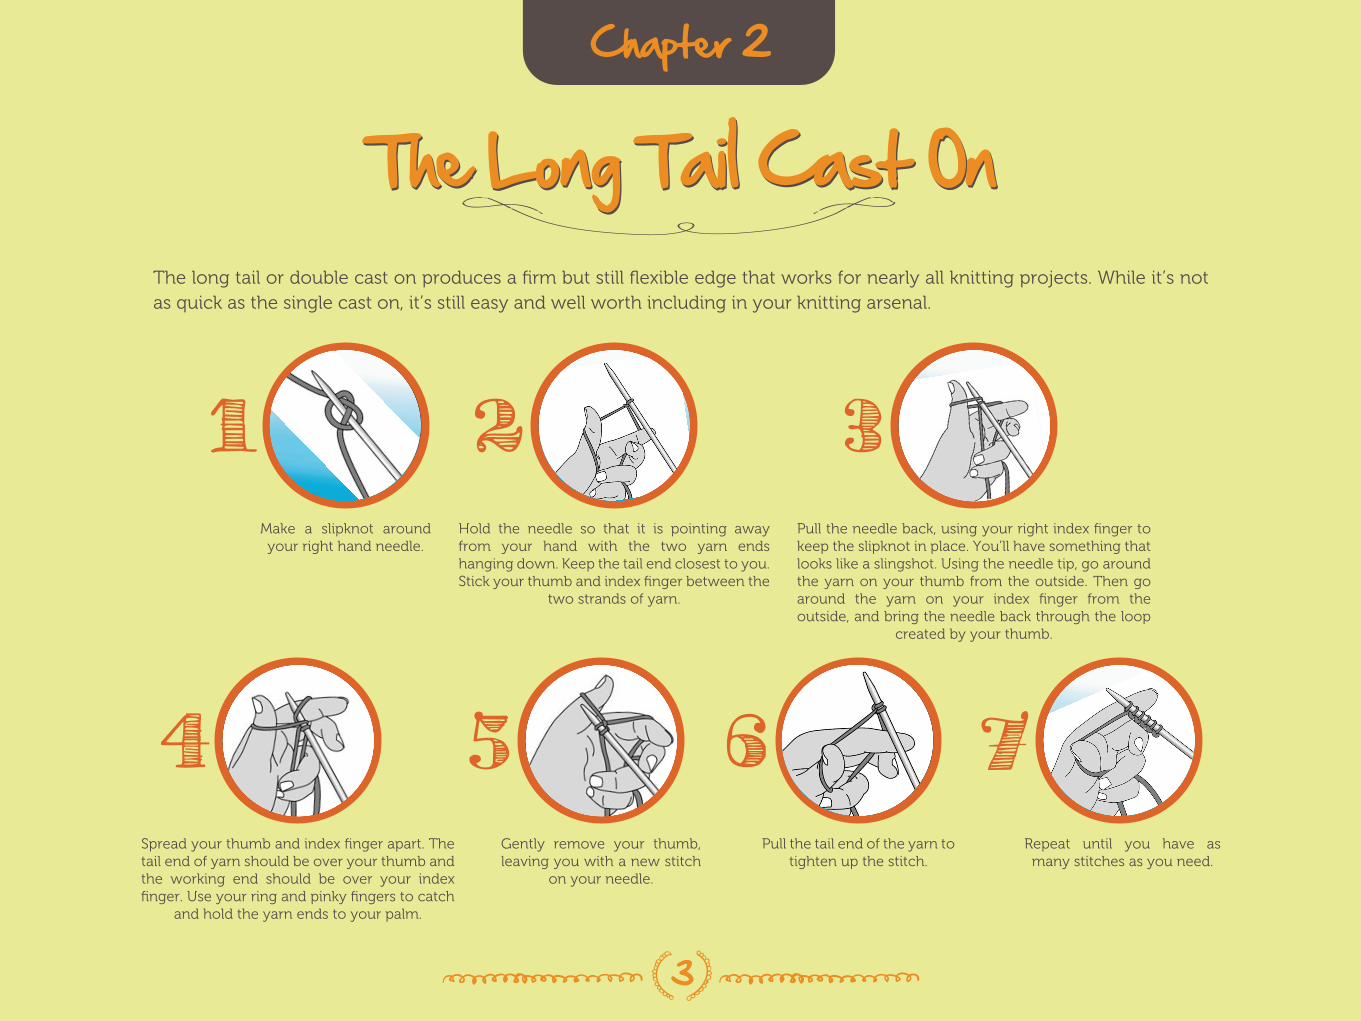
The long tail or double cast on produces a firm but still flexible edge that works for nearly all knitting projects. While it’s not as quick as the single cast on, it’s still easy and well worth including in your knitting arsenal.
Chapter 2
The Long Tail Cast OnThe Long Tail Cast On
Make a slipknot around your right hand needle.
Hold the needle so that it is pointing away from your hand with the two yarn ends hanging down. Keep the tail end closest to you. Stick your thumb and index finger between the
two strands of yarn.
Pull the needle back, using your right index finger to keep the slipknot in place. You’ll have something that looks like a slingshot. Using the needle tip, go around the yarn on your thumb from the outside. Then go around the yarn on your index finger from the outside, and bring the needle back through the loop
created by your thumb.
Gently remove your thumb, leaving you with a new stitch
on your needle.
Pull the tail end of the yarn to tighten up the stitch.
Spread your thumb and index finger apart. The tail end of yarn should be over your thumb and the working end should be over your index finger. Use your ring and pinky fingers to catch
and hold the yarn ends to your palm.
Repeat until you have as many stitches as you need.
3
The only challenge with this cast on is that you have to make sure you have a long enough tail to cast on all your stitches. This usually means measuring out your yarn before you start.
4
You can estimate about an inch per stitch plus 4 to 6 inches for weaving in, so if you need 30 stitches, you’d measure out 34 to 36 inches of yarn. Keep the yarn a little loose while measuring.
You can also wrap the yarn around the needle, considering each loop as one stitch. For instance, if you need 30 stitches, wrap the yarn around the needle 30 times and measure that length.
If you have trouble estimating the length, you can avoid measuring altogether by using either two balls of yarn or using both ends of one ball of yarn. Simply tie the two ends into a slipknot. When you have all the stitches you need (do not count the slipknot as a stitch), cut one end of yarn. Start knitting your row. When you reach the slipknot, simply remove your needle from the slipknot, undo the knot, and keep going.

5
The knitted cast on creates two stitches out of one, creating a stretchy edge that is easy to knit and useful for when you need to add extra stitches into the middle of a row. It’s also a good alternative to the long tail cast on if you’re worried about not having enough length. A knitted cast on also gets you started with some of the steps involved in a knit stitch.
Chapter 3
The Knitted Cast On The Knitted Cast On
Insert your right needle into the slipknot. The right needle should be behind
the left needle.
Wrap the working end of yarn around the right needle, keeping
it snug but not too tight.
This time start with the slipknot around the left
needle.
Simply transfer the stitch from your right needle to your left needle by pushing the left needle through the
loop in the right needle.
Repeat until you have as many stitches as you need.
Bring the right needle through the loop in your left needle. This creates
a new stitch on your right needle.

6
Now that you know how to cast on, you can start knitting. The knit stitch is the most basic stitch, providing a versatile and easy foundation for all other stitches. In learning to knit stitch, you also learn to garter stitch, which is when you create a stitch on every row.
When you reach the end of the row, simply move the right needle to your left hand and the now empty needle to your right hand and start over.
Chapter 4
The Knit Stitch The Knit Stitch
Start by casting on 10 stitches.
Hold the needle with the cast on stitches in your left hand and the empty needle in your right hand. Make sure the ball of
yarn is placed behind your work.
Insert the empty needle into the first loop of the cast on needle. Push the right needle in so that is behind the left needle.
Push the right needle into first loop on the left needle and you’ve completed a new stitch.
Gently drop the first stitch o� the left knitting needle. It has
been worked.
Wrap the working yarn counter clockwise around the right needle, bringing it snug
between the two needles.
Continue until you have worked all the stitches.

7
The purl stitch is the milk to the knit stitch’s cereal, but many knitters, veterans and beginners, avoid the purl stitch. It is essentially the opposite of the knit stitch, making it feel a little awkward, but knowing both the knit and purl stitches allows you to make essentially anything.
Purl stitches tend to feel a little looser, so hold your yarn a little tighter or give each worked stitch an extra tug to keep it snug.
Chapter 5
The Purl Stitch The Purl Stitch
Insert the right needle down into the first left needle loop, starting from the top. In this stitch, the right knitting needle will be in front of the left
instead of behind.
Wrap the working yarn counterclockwise around
the right needle.
The setup for the purl stitch is exactly the same as the knit stitch. Keep the cast on needle in your left hand and the empty needle in your right hand. However, keep
the yarn ball in front of your work.
Drop the first stitch on the left needle as it has now been worked.
Continue until you’ve worked all the stitches.
Slide the right needle through the first loop on the left needle,
completing your first purl stitch.

Knitting is a great and a�ordable hobby that allows you to make a wide range of clothing, décor, and other items for yourself and the people you love. Knitting is an incredibly meditative activity that calms your mind, eliminates your stress, and keeps your hands busy, and it’s just plain fun. With enough practice, you’ll have a colorful collection of knit goods in no time.
ConclusionConclusion
8

Knit-n-Crochet o�ers a large selection of knitting supplies, including the finest yarns and fibers, patterns, needles, and more. We also provide knitting and crocheting classes for all interests and skill levels.
Get in touch with us:
• Visit http://www.knit-n-crochet.com/ and fill out our contact form
• Call (208) 676-9276
• Email [email protected]
Contact InformationContact Information
9

http://www.ukhandknitting.com/knitting_statistics.php
http://www.simple-knitting.com/single-cast-on.html
http://www.bhg.com/crafts/knitting/basics/knitting-101/ http://www.dummies.com/how-to/content/how-to-cast-on-with-the-twostrand-method.navId-380585.html http://www.dummies.com/how-to/content/how-to-use-the-cable-caston-method.pageCd-storyboard,pageNum-6.html#slideshow
http://www.simple-knitting.com/knitted-cast-on.html
http://www.bhg.com/crafts/knitting/basics/knitting-101/
http://www.simple-knitting.com/knit-stitch.html
http://www.simple-knitting.com/how-to-purl.html
SourcesSources
10


![HEARTLINE KNIT WRAP | KNIT · 2018. 5. 11. · HEARTLINE KNIT WRAP | KNIT 2 of 2 HEARTLINE KNIT WRAP | KNIT CAK0126-010003M measures approx 58" [147.5 cm], ending on a WS row with](https://static.fdocuments.in/doc/165x107/5fd034989f28e2726c32dbf7/heartline-knit-wrap-knit-2018-5-11-heartline-knit-wrap-knit-2-of-2-heartline.jpg)


