130824406-Abap-Hr-Doc
77
SAP ABAP HR ABAP- HR DOCUMENTATION
-
Upload
vinayistha -
Category
Documents
-
view
81 -
download
1
description
abap related doc
Transcript of 130824406-Abap-Hr-Doc

SAP ABAP HR
ABAP- HR DOCUMENTATION

Page 1 of 77
ABAP- HR DOCUMENTATION
Human Resource [HR] – It is a department, which will take care of Employee day to day activity from hiring to exit.
SAP_HR contains 16 different sub modules.
1. Personnel Administration- Will take care of Employee personal details like address, family, dependant details, Education e.t.c.
2. Organization Management- It describes where specific employee sits in company structure.
3. Recruitment- It converts applicant into Employee. Takes care of hiring process.4. Payroll- Employee salary components and payslips.5. Time Management- Employee leaves, absents and quotas.
Some other sub modules are—
Benefits Training and Event Management Travel Management Health Insurance Compensation Management Personal Development
Prerequisites of ABAP-HR
Data Dictionary Internal Tables Reporting (Events) BDC (10%)
Concepts of ABAP-HR
Infotypes Data Structures (PA/OM/RE) Reporting (PA/OM/RE/PY) Dynamic Actions Interfaces (Inbound/Outbound) User Exits

Page 2 of 77
Note:-
PA- Personnel Administration
OM- Organisation Management
RE- Recruitment
PY-Payroll
INFOTYPESIn ABAP-HR, we will be working with Infotypes and not tables; the way we have in other SAP modules.
Now, what is an Infotype?
Infotype- is an information type, contains group of logically related fields on a single screen, which are bound by time constraint.
Another definition- An infotype is a unit of information or information unit containing group of logically related fields on a single screen and which are bound by time constraint.
Note: - We will go through the concept of Time Constraint soon in the document.
Components of Infotype
Fields Tables Screens Module Pool Infotype Number [For each Infotype there will be a 4 digit Infotype No] Time Constraint
Table naming convention for Infotypes is as follows-
PAXXXX- Where ‘XXXX’ stands for the 4 digit Infotype number.
Personnel Administration Infotypes start with ‘PA’ followed by 4 digit infotype number.
Similarly, Recruitment Infotypes start with the ‘PB’ followed by 4 digit infotype number.
Organisation Management Infotypes start with ‘HRP’ followed by 4 digit infotype number.

Page 3 of 77
Example-
PA0000 – Actions
PA0001- Org. Assignment
PB4000- Applicant Events
PB4001- Applications
HRP1000- Objects
HRP1001- Relations
Ranges for the Infotypes or Infotype Number Ranges
PA Infotypes or Personnel Administration Infotypes come under the range 0000-0999.
Ex- PA0006- Address
Organisation Management Infotypes come under the range 1000-1999.
Ex- HRP1001- Relations
Time Management Infotypes come under the range 2000-2999.
Ex- PA2006-Absence Quotas.
Note: - They also start with the letters ‘PA’.
Recruitment Infotypes come under the range 4000-4999 and also 0000-0999.
Ex- PB4000- Applicant Events
PB0022- Education [Comes under PA and PB both]
Custom Infotypes come under the range 9000-9999.
Note: -Therefore, we can assume that 0000-8999 are all Standard Infotypes
And 9000 to 9999 are all Custom Infotypes.
Note: - As of now there are 618 custom Infotypes under various Implementations. Thisnumber may have changed.

Page 4 of 77
Infotypes (PA):-
Some of the standard Infotypes in PA are-
0000- Actions
0001- Organisation Assignment
0002- Personal Data
0003- Payroll Status
0006- Address
0008- Basic Pay
0009- Bank Details
0014- Recurring payment or Deductions
0021- Family or Dependant data
0022- Education
0024- Skill Sets
0025- Appraisal
0032- Internal Data
0041- Date Specification
0105- Communication
Each PA Infotype consists of 4 structures-
1. PAKey- Personnel Administration key fieldsIt holds infotype key fields’ data like Personnel No, Start date, End date e.t.c.
2. PSHD1- It contains Infotype log details like change date (AEDTM), user details etc.
3. PSxxxx- It contains the Infotype related specific fields. In other words, fields related to that particular Infotype.Note: - Developer can create this structure.
4. CI_Pxxxx- It will exist only for standard Infotypes. CI stands for ‘Custom Include’. By using this structure, we can enhance a standard Infotype. The standard infotype will then have the custom fields on screen along with standard SAP fields.

Page 5 of 77
Data Structures in (PA/RE/OM)
PA RE OMTables- PAxxxx
PAkey PSHD1 PSxxxx CI_Pxxxx
Pxxxx Qxxxx
PA0000 to PA0999 (PA)PA2000 to PA2999 (TM)
Tables- PBxxxx PBkey PSHD1 PSxxxx CI_Pxxxx
Pxxxx Qxxxx
PB4000 to PB4999 &PB0000 to PB0999
Tables- HRPxxxx HRIkey HRIADMIN HRIxxxx CI_Pxxxx Pxxxx Qxxxx
HRP1000 to HRP1999
Note: - Go to SE11 and give the infotype name in database table and have a look at the structures.
Note: - Structure Pxxxx: It contains infotype key fields and all of the data fields from structure PSxxxx.
Structure Qxxxx: It contains the fields on the screenScreens: -
System will generate 3 screens-1000 -> Initialization or Dummy Screen.2000 -> Infotype or Single Screen.3000 -> list or Overview Screen.Note: - 2000 Screen is where the End User actually enters values on the screen.
To view the entries in a particular Infotype—First go to SE11, and then opt for list or Overview screen Display no. of entries of Employee in a particular Infotype.
Module Pool
Infotype consists of main module pool with the naming convention “MPxxxx00” where ‘xxxx’ is infotype number.
Ex- Infotype 9671 MP967100
It contains 5 custom Includes/Programs and
3 standard Includes/Programs.
Another Example- 0000 -> MP000000
9672 -> MP967200

Page 6 of 77
Custom Includes
MPxxxx00
MPxxxx10 Data Definitions
MPxxxx20 Default Values or Initialization [PBO]
MPxxxx30 PAI [Validations/Input Checks]
MPxxxx40 Sub routines
MPxxxx50 List or overview screen Coding.
Standard Includes
MPPDAT00 Global Data Definitions
FP50PPSB Buffering Infotype Data
MPPERS00 Maintaining Selection Screen Data
Time Constraints
Assigning a Start date and End date to each record is called as Time Constraint.
There are various types of Time Constraints.
Time Constraint 1 Records are created without overlapping and gaps.
Example: - Address – PA0006
START DATE END DATE LOCATION/PLACE01-01-2005 31-12-2006 KPHB COLONY01-01-2007 31-12-9999 MEHDIPATNAM
In the above example there are no gaps between the 2 records and there is no overlapping of the dates.
Time Constraint 2 Records are created without overlapping but gaps are permitted.
Example: -Education PA0022
START DATE END DATE QUALIFICATION01-01-2002 31-12-2006 B.E01-07-2007 31-12-2009 M.E

Page 7 of 77
In the above example there is a gap between the end date of the first record and the start date of the second record.
Time constraint 2 therefore allows gaps between records but does not allow overlapping of the dates in the records.
From the above example we can infer that a student cannot be doing his/her B.E and M.E in the same duration.
Time Constraint 3 Records are created with overlaps and gaps.
Example – Work
START DATE END DATE PROJECT01-01-2005 31-12-2006 NESTLE01-01-2006 31-01-2007 MARS01-04-2007 31-12-2007 TIMEX
In the above example there is overlapping of dates between the first and second record
And there is also a gap between the second and third record.
From the above example we can infer that the candidate was working on 2 projects simultaneously and there was a gap before he/she started working on their third project.
We can now assume the below-
OVERLAP GAPTC- 1 NO NOTC -2 NO YESTC -3 YES YES
There are some other Time Constraints also like A, B, T, Z and 0.
Time Constraint A-Only one record can exist per employee in an infotype. Validity period is always from Jan 1, 1800 to Dec 31 9999. Example- 0003 – Payroll Status
Time Constraint B-Only one record can exist per employee in an infotype. But, record can be deleted. Validity period is always from Jan 1, 1800 to Dec 31 9999.
Example -– 0031—Reference Personnel No’s
Page 8 of 77
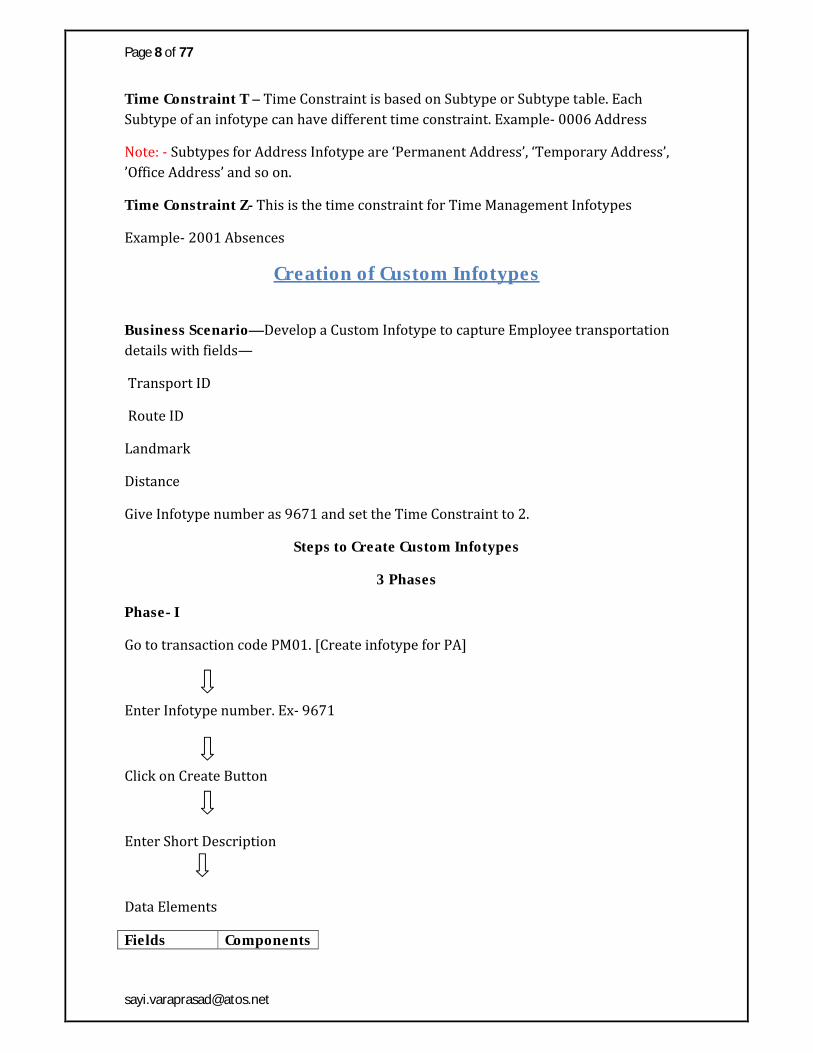
Time Constraint T – Time Constraint is based on Subtype or Subtype table. Each Subtype of an infotype can have different time constraint. Example- 0006 Address
Note: - Subtypes for Address Infotype are ‘Permanent Address’, ‘Temporary Address’, ’Office Address’ and so on.
Time Constraint Z- This is the time constraint for Time Management Infotypes
Example- 2001 Absences
Creation of Custom Infotypes
Business Scenario—Develop a Custom Infotype to capture Employee transportation details with fields—
Transport ID
Route ID
Landmark
Distance
Give Infotype number as 9671 and set the Time Constraint to 2.
Steps to Create Custom Infotypes
3 Phases
Phase- I
Go to transaction code PM01. [Create infotype for PA]
Enter Infotype number. Ex- 9671
Click on Create Button
Enter Short Description
Data Elements
Fields Components

Page 9 of 77
Zztrid NUMC5Zzrouid NUMC3Zzlamark CHAR30Zzdist NUM2
Then, SAVE, CHECK and ACTIVATE.
Phase 2
Go to the Initial screen i.e. (PM01)
Click on Button.
Note: - By clicking on “ALL” button; system will generate Tables, Screens and Module Pool.
Phase 3
Go to Initial Screen i.e. (PM01)
Click on
Go to Change mode
Choose any Standard Infotype. Ex- Personal Data- 0002
Click on “Copy As”
Replace standard Infotype no. and description with
Custom Infotype No and description. [EX-9671]
All
INFOTYPE CHARACTERISTICS

Page 10 of 77
Enter
Select custom Infotype [Ex-9671]
Click on “Details”
Replace Time Constraint with ‘2’.
Save.
Testing: - Go to transaction code PA30 [Maintain HR Master Data]
Enter the employee number. Example- 1700
And the infotype number. [9671] and hit “Enter”.
Click on “create” button.
And you should see the custom fields on the screen.
Exercise -Another Business scenario for you to develop—
Develop a custom infotype to capture Employee Hospital details with the fields—
Hosp. Name
Doct. Name
Disease
Benefit Amount
Give the Custom Infotype the number 9672 and set the time constraint as ‘3’.
Page 11 of 77
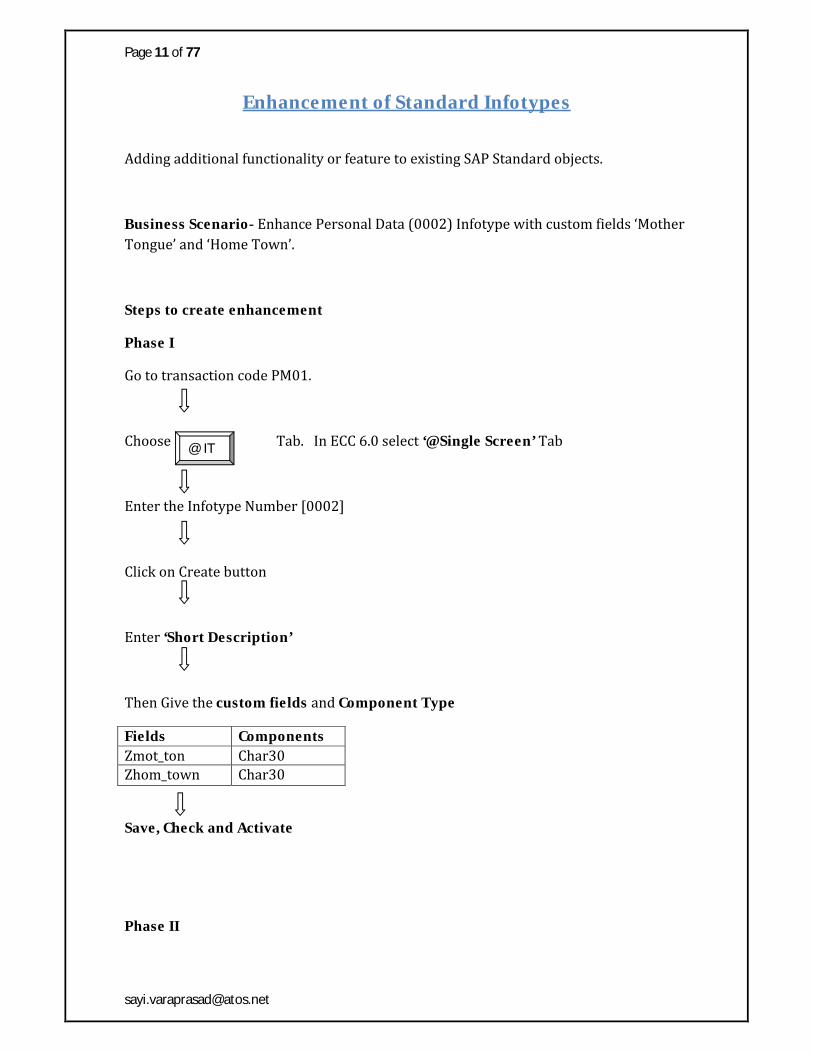
Enhancement of Standard Infotypes
Adding additional functionality or feature to existing SAP Standard objects.
Business Scenario- Enhance Personal Data (0002) Infotype with custom fields ‘Mother Tongue’ and ‘Home Town’.
Steps to create enhancement
Phase I
Go to transaction code PM01.
Choose Tab. In ECC 6.0 select ‘@Single Screen’ Tab
Enter the Infotype Number [0002]
Click on Create button
Enter ‘Short Description’
Then Give the custom fields and Component Type
Fields ComponentsZmot_ton Char30Zhom_town Char30
Save, Check and Activate
Phase II
@ IT
Page 12 of 77
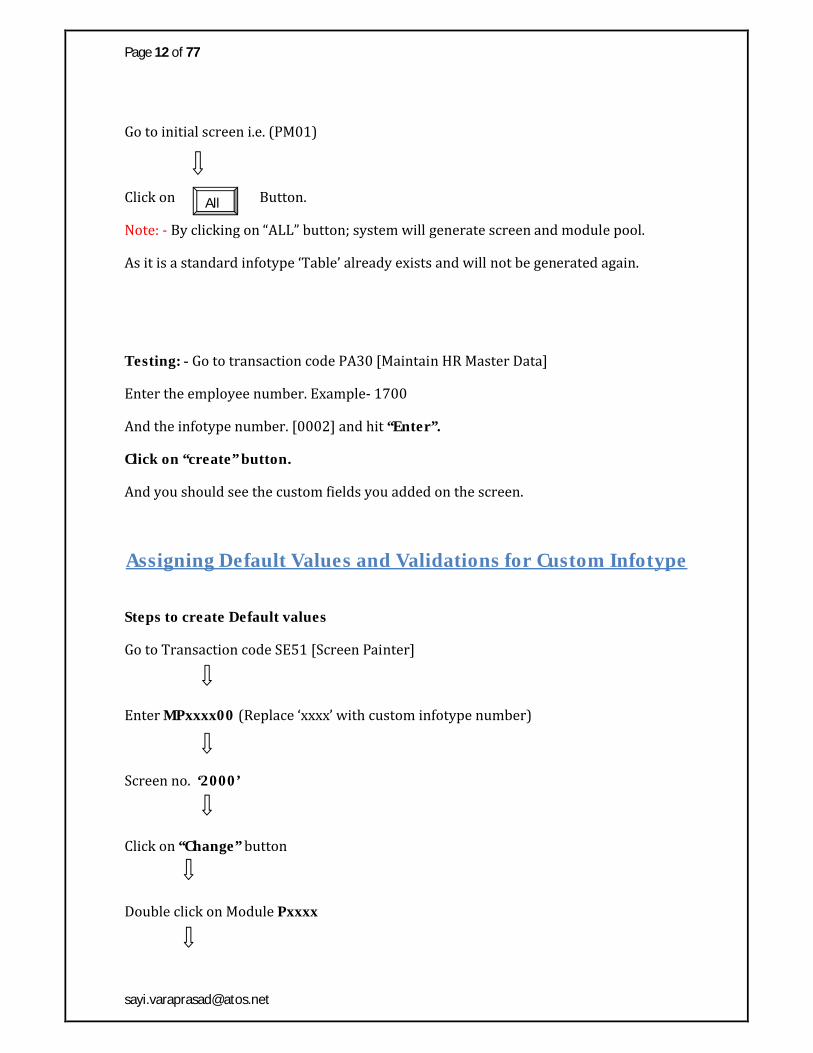
Go to initial screen i.e. (PM01)
Click on Button.
Note: - By clicking on “ALL” button; system will generate screen and module pool.
As it is a standard infotype ‘Table’ already exists and will not be generated again.
Testing: - Go to transaction code PA30 [Maintain HR Master Data]
Enter the employee number. Example- 1700
And the infotype number. [0002] and hit “Enter”.
Click on “create” button.
And you should see the custom fields you added on the screen.
Assigning Default Values and Validations for Custom Infotype
Steps to create Default values
Go to Transaction code SE51 [Screen Painter]
Enter MPxxxx00 (Replace ‘xxxx’ with custom infotype number)
Screen no. ‘2000’
Click on “Change” button
Double click on Module Pxxxx
All

Page 13 of 77
Uncomment a subroutine called ‘GET_DEFAULT’
Double click on “Perform GET_DEFAULT”
Select MPxxxx40 (Replace ‘xxxx’ with custom infotype number)
Enter
Form GET_DEFAULT
Pxxxx-(fieldname) = “Default value”.
Ex- P9672-zzhospname = “Apollo”.
End Form.
Save, Check and Activate
Testing: - Go to transaction code PA30 [Maintain HR Master Data]
Enter the employee number. Example- 1700
And the Custom infotype number. [9672] and hit “Enter”.
Click on “create” button.
And you should see the default value in the field on the screen.
Validations
Go to SE51
Enter ‘MPxxxx00’
Yes

Page 14 of 77
Screen no. ‘2000’
Click on Change
Insert module ‘Pxxxx_checks’ after a commented partition. Insert check module here.
In PAI
* Insert Check Modules here:
Module P9672_checks.
Double click on the module P9672_checks
Click ‘Yes’
Choose ‘MPxxxx30’
We will be in the screen MPxxxx30
Declare a subroutine called (GET_VALIDATIONS)
Module p9672_checks
Perform GET_VALIDATIONS.
End Module.
Double click on GET_VALIDATIONS
Create ‘Yes’
Select MPxxxx40 (stands for subroutines)
Page 15 of 77
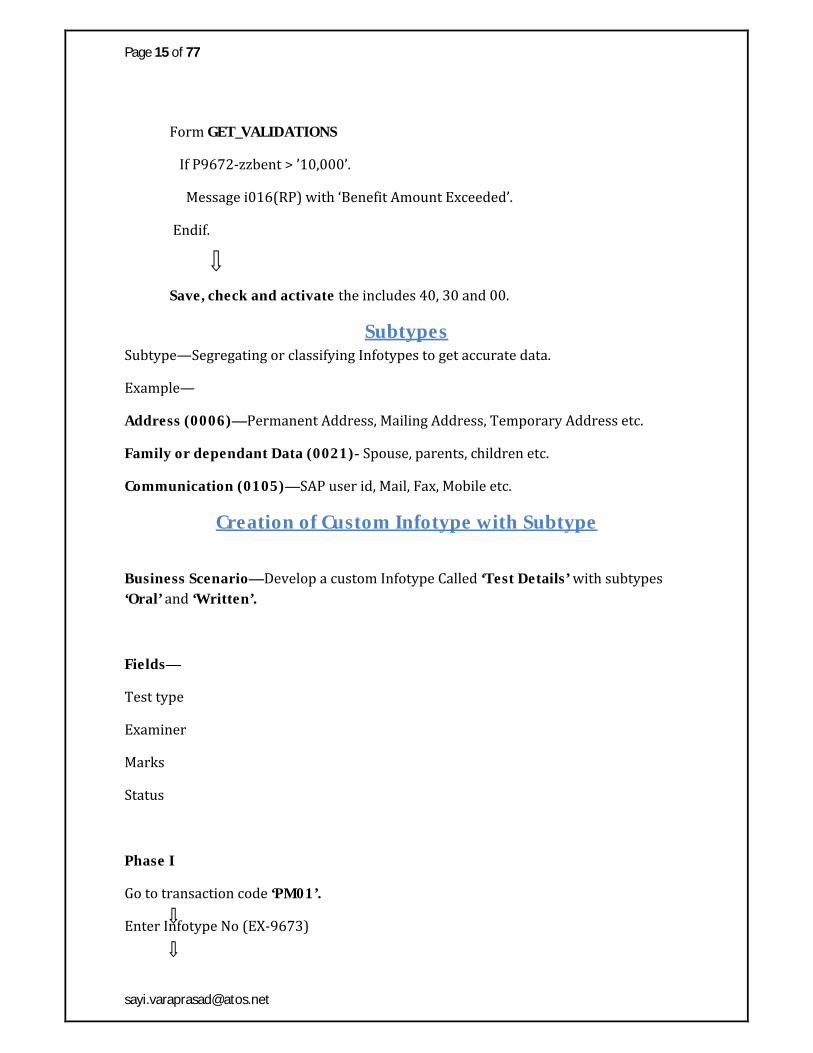
Form GET_VALIDATIONS
If P9672-zzbent > ’10,000’.
Message i016(RP) with ‘Benefit Amount Exceeded’.
Endif.
Save, check and activate the includes 40, 30 and 00.
SubtypesSubtype—Segregating or classifying Infotypes to get accurate data.
Example—
Address (0006)—Permanent Address, Mailing Address, Temporary Address etc.
Family or dependant Data (0021)- Spouse, parents, children etc.
Communication (0105)—SAP user id, Mail, Fax, Mobile etc.
Creation of Custom Infotype with Subtype
Business Scenario—Develop a custom Infotype Called ‘Test Details’ with subtypes ‘Oral’ and ‘Written’.
Fields—
Test type
Examiner
Marks
Status
Phase I
Go to transaction code ‘PM01’.
Enter Infotype No (EX-9673)

Page 16 of 77
Click Create
Give the Description
Then give the fields & components (Data Elements)
Fields ComponentsZztype Subtyzexamnr Char30zmarks Num3zstatus Char6
IMP Note: - First field component type/ data element need to be of “subty”
Save, check and activate
Phase II
Go to initial screen i.e. PM01
Click on Button
Note: - By clicking on “ALL” button system will generate Tables, Screens and Module pools.
Phase III
Go to Initial screen i.e. PM01
Click on
Change
Select any standard Infotype. Ex- 0002
ALL
Infotype Characteristics

Page 17 of 77
Select “Copy As”
Replace Standard Infotype and Description with custom Infotype.
Enter
Select custom Infotype (Ex- 9673)
Click on Details
Replace Time Constraint with ‘2’
SAVE
Phase IV
Go to transaction code PM01
From the menu bar select “Go To” and then click “Subtype Characteristics”
Click on Change and then select “New Entries”
Enter subtype and description
Subtype Description01 Oral Exam02 Written Exam
Save

Page 18 of 77
Note: - All the SUBTYPE values will be stored in the Table T591A.
Go to Initial Screen i.e. PM01
Click on “Technical Attributes”
Click on change
Select Custom Infotype [EX-9673] and click on “Details”
Enter the following--
Subtype Field ZZTYPE
Subtype table T591A
Subtype text Tab T591S
Time Constraint tab T591A
SAVE
Testing: - Go to transaction code PA30 [Maintain HR Master Data]
Enter the employee number. Example- 1700
And the infotype number. [9673] and hit “Enter”.
Click on “create” button.
And you should see the subtype field you added on the screen.
Place the cursor in the subtype field and press ‘F4’.
The options ‘oral’ and ‘written’ will be shown.
Another scenario for you to practice: Develop a custom infotype with Employee share details with subtype- Annual Shares and Special Auction Shares.

Page 19 of 77
Fields-
Share type
No of shares
Maturity Amount
Bonus Benefit
Enhancements
Exits – It acts like a hook, where we can place our own functionality.
Enhancements Modification
User Exits Customer Exits
Adding the feature changing the existing feature
Field Exit
Table Exit
Menu Exit
Screen Exit
Function Exit
Steps to create Function Exit
Business Scenario: Enhance the standard infotype 0006 with default values & validation.
Steps: - Go to transaction code CMOD [Customer Modification]
Enter Project Name [ZZHR_PA30]
Click on Create
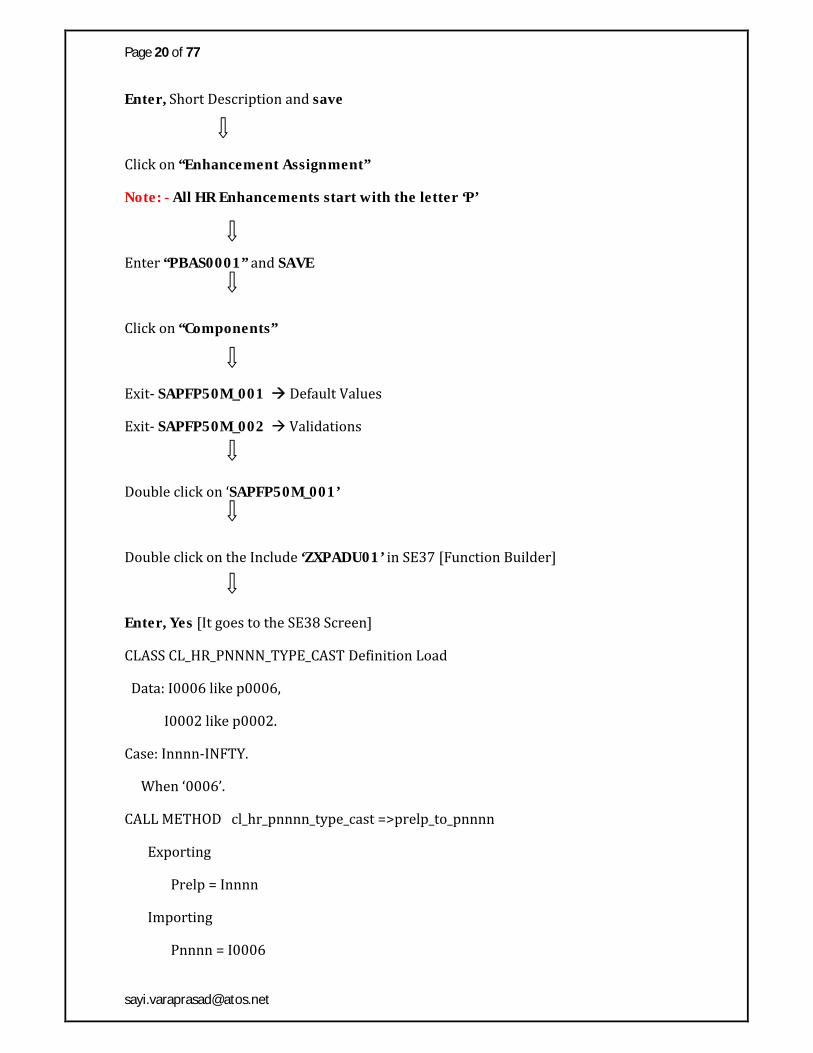
Page 20 of 77
Enter, Short Description and save
Click on “Enhancement Assignment”
Note: - All HR Enhancements start with the letter ‘P’
Enter “PBAS0001” and SAVE
Click on “Components”
Exit- SAPFP50M_001 Default Values
Exit- SAPFP50M_002 Validations
Double click on ‘SAPFP50M_001’
Double click on the Include ‘ZXPADU01’ in SE37 [Function Builder]
Enter, Yes [It goes to the SE38 Screen]
CLASS CL_HR_PNNNN_TYPE_CAST Definition Load
Data: I0006 like p0006,
I0002 like p0002.
Case: Innnn-INFTY.
When ‘0006’.
CALL METHOD cl_hr_pnnnn_type_cast =>prelp_to_pnnnn
Exporting
Prelp = Innnn
Importing
Pnnnn = I0006

Page 21 of 77
I0006-stras = ‘Ameerpet’.
I0006-oct01 = ‘Hyderabad’.
Call Method cl_hr_pnnnn_type_cast => pnnnn_to_prelp
Exporting
Pnnnn = I0006
Importing
Prelp = Innnn.
Note: - In the above example we have done for default values. Similarly, validations can be done.
The whole process can be drawn in the following way—
CMOD
Project
Enhancement
Components
F.M (Exit)
Include
Code

Page 22 of 77
Recruitment Infotype Creation
Business Scenario: Develop a custom infotype to capture Applicant Physical fitness details, with the following fields—
Height
Weight
Sports
And additional weightage
To create Recruitment Infotype
1st choose “Applicant Infotype” radio button in transaction code ‘PM01’.
2nd – Test the Infotype in transaction code ‘PB30’
Note: - Process of creating Recruitment infotype is same as creating a PA infotype
OM Infotypes
OM Infotype—Store /capture information of objects.
Object is an entity in an Organization Management which will be linked to another entity.
There are 19 different objects.
O Organisation Unit
S Position
C Job
T Task
AWork Center
Q Qualification
P Person/Employee
E External Resource

Page 23 of 77
Example Diagram of OM Objects and how different objects are linked to each other
O
P
Q
S C T
Note: - O, S, C, T and P are important objects
Business Scenario: Develop a custom infotype to capture eligibility details for objects Position and Org Unit with fields—
Qualification
Expertise
Years of Experience
And Current Position
Steps to Create OM Infotype
Phase I
Go to transaction code SE11 [Data Dictionary]
Choose ‘Data type’
Enter ‘HRIxxxx’ Ex-HRI9561 [HRI-Human Resource Include]
Click on create button
Choose structure

Page 24 of 77
Enter ‘Short Description’
Fields Component TypeZquali Char30Zexpt Char4Zexp Numc3Zcur_pos Char30
Save, check and activate
Phase II
Go to transaction code PPCJ
Enter infotype number. Ex- 9561
Description
Click Button
Click on “Create” button, then click “Yes”.
Note: - 1. Transaction codes from PPCI to PPCM are meant for OM/PP Infotypes.
PP stands for Personnel Planning.
PPCI – Personnel Planning Creation of Infotype
2. Make sure that HRIxxxx is created/ exists. Otherwise repeat phase I.
3. By clicking on “Create” button system will generate Tables, screens and module pools.
Phase III
Setting Time constraint
Click on button
Check
Check

Page 25 of 77
Select ‘T777I’ table [Table for OM Infotype Time Constraint and Infotype per object type]
Click on “Change” button
SM30
Click on Maintenance button
Select custom Infotype 9561
Double click on “Time Constraint” and click “New Entries”.
Enter—Obj Type--- *
Infotype--- 9561
Subtype---
Time Constraint--- 2
SAVE
Phase IV
Double click on “Infotype per Object Type”
“New Entries”
Enter the Obj. Type and Infotype
Obj Object InfotypeO Organisation 9561S Position 9561
SAVE

Page 26 of 77
For each object SAP has given corresponding transaction code.
From PO01 to PO19
PO01 Maintain Work Centre
PO02 Maintain Training Program
PO03 Maintain Job C
PO04 Maintain Business Event Type
PO05 Maintain Business Event
PO06 Maintain Location
PO07 Maintain Resource
PO08 Maintain External Person
PO09 Maintain Business Event Group
PO10 Maintain Organizational Unit O
PO11 Maintain Qualification
PO12 Maintain Resource Type
PO13 Maintain Position S
PO14 Maintain Task
PO15 Maintain Company
PO16 Maintain Services
PO17 Maintain Requirements Profile
PO18 Maintain Resource Room
PO19 Maintain External Instructor

Page 27 of 77
Exercise- Business Scenario: Create a custom infotype to capture position matrix for objects C & S [Job and Position] with fields—
Supervisor
Business Area
Personnel No.
Company Code
OM REPORTING
Step by step process to get the OM (organization management) reporting:-
Terms used in the OM programming:-
1). RELATIONSHIP (1001): - it explains how the object is linked with another object.
2). RELATE (relationship –id):- it is the 3didgit code which explains the exact relationship between 2 objects.
Example:-
002-holds.
004-reports to.
3).RSIGN (relationship sign):- it indicates the hierarchy of the object relationship.
Two types of the rsign’s
A- Top down B- Inverse or bottom up.
Select the LDB as ‘PCH ‘in the attributes of the report program
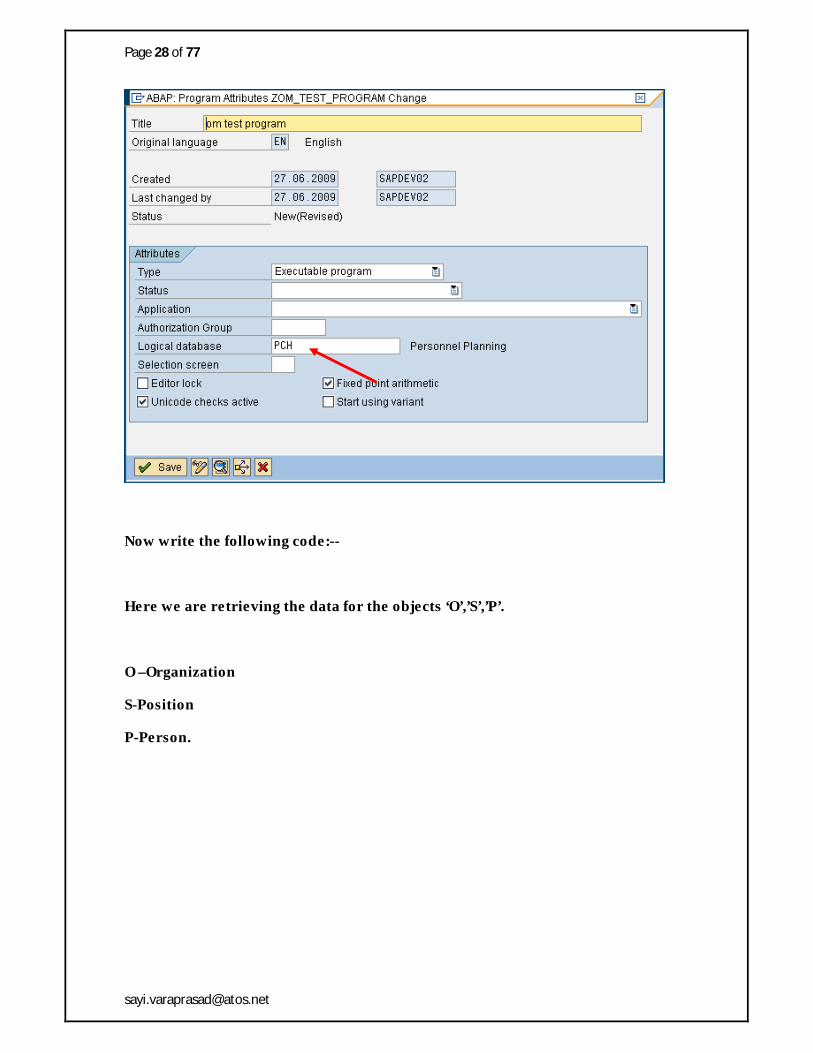
Page 28 of 77
Now write the following code:--
Here we are retrieving the data for the objects ‘O’,’S’,’P’.
O –Organization
S-Position
P-Person.

Page 29 of 77
Code: ---
*************************************************************************** *** DESCRIPTION: TO GENERATE SIMPLE REPORT FOR THE ORGANISATION
MANAGEMENT ** Logical DATABASE- PCH.************************************************************************
Report ZHR_TEST_OM.
*****************************Database Table****************************TABLES: OBJEC, GDSTR.
*****************************Infotypes****************************INFOTYPES: 1000, 1001, 1007.
*******************************START-OF-SELECTION******************************START-OF-SELECTION.
GET objec.
IF objec-otype = 'O'.
FORMAT COLOR 4.
WRITE : / objec-objid, objec-stext.
FORMAT COLOR OFF.
ENDIF.
IF objec-otype = 'S'.
FORMAT COLOR 5.
WRITE : / objec-objid, objec-stext.
FORMAT COLOR OFF.
ENDIF.
IF objec-otype = 'P'.
FORMAT COLOR 6.

Page 30 of 77
WRITE : / objec-objid, objec-stext.
FORMAT COLOR OFF.
ENDIF.
*******************************END-OF-SELECTION******************************END-OF-SELECTION.
IN THE SELECTION SCREEN :--
Select the evaluation path as ‘O-S-P’.
Object-type as ‘O’.
Plan version as ‘01’.

Page 32 of 77
Logical Database [LDB]
LDB is a selection program, which will fetch data in hierarchical format or node by node format.
For each LDB there will be a corresponding program. It starts with SAPDB* (* indicates LDB name). Ex- SAPDBPNP
LDB provides selection screen, source code, structures and search helps. LDB retrieves data from database in record by record format. By using LDB, we can include 2 more events in program.
Get <NODE> Get <NODE> Late
LDB will take care of authorization (Implicit) and validations and verifications. [Selection screen conditions]
For SAP-HR module [PA/RE/OM], SAP has provided standard LDB’s.
Note: - PNPce – Concurrent Employment
Transaction code for LDB’s is SE36.
ABAP HR ReportingReporting
Extraction of data from database based on business logics and displaying it in user required format.
4- Phases of reporting
1. Input Selection Screen2. Extraction Tables/ fields3. Validations Business Logic4. Output Classical/Interactive/ALV
Module LDB StructurePA PNP/PNPce PERNRRE PAP APPLICANTOM PCH OBJEC/GDSTR

Page 33 of 77
Differences between ABAP and ABAP HR
ABAP ABAP-HR1. Extraction of data from transparent
tables.2. Retrieval by using select statement.
3. Explicit authorizations.4. Validations and verifications are
done by programming conditions
5. Read table and loop on internal tables.
6. Module pool or transaction programming.
7. Sy-subrc to check success or failure
1. Transparent as well as cluster tables
2. Retrieval by using select statements, MACRO’s, Function Modules, Import/Export statements and LDB’s
3. Implicit authorization by LDB.4. Selection screen conditions by LDB
5. RP_PROVIDE [MACRO], PROVIDE statement to read infotype internal tables.
6. Module pool or Infotype programming
7. PNP_SW_FOUND and PAP_SW_FOUND to check for success or failure.
MACRO
Macro is a tiny part of program which contains processing block as steps, these can be called internally or externally/outside the program.
Example—
DATA: A TYPE NUMC3,
B TYPE NUMC3,
C TYPE NUMC3.
A = 10, B = 20.
ADDITION A B C. “(Placeholders)
Write: C.
DEFINE ADDITION.
&3 = &1 + &2.

Page 34 of 77
END-OF-DEFINITION.
Some of the standard Macro’s in HR—
1. RP_PROVIDE_FROM_LAST2. RP_PROVIDE_FROM_FIRST3. RP_UPDATE4. RP_READ_ALL_TIME_INFTY5. RP_READ_INFTY6. RP_AUS_SEL_INFTY
All standard MACRO’s are stored in the table “TRMAC”
Note: - Have a look at TRMAC in SE11. It’s very important.
6 step procedure to generate PA reports
1. TABLES: PERNR. [It is going to highlight LDB selection screen of PNP]2. INFOTYPES: 0000,0001,0002,0006.
* Infotype statement will create Infotype Internal tables with naming convention Pxxxx.
* System will write internal syntax.
DATA: BEGIN OF Pxxxx OCCURS 0.
INCLUDE STRUCTURE Pxxxx.
DATA: END OF Pxxxx.
3. GET: PERNR. “[Imp] System will fetch data from LDB to program in record by record format Whenever GET: PERNR is triggered, it’s going to fetch one/1 Employee data
[record] for the declared Infotypes and pass the data into the Infotype internal tables.
4. RP_PROVIDE_FROM_LAST <Infty> <Subty> PN-BEGDA<Begin date> PN-ENDDA<End date>.To read last valid record from infotype internal table we need to go with MACRO RP_PROVIDE.
Note: - In almost all cases last record is the most valid record in Infotype internal table. If no date is passed, it will take default date.

Page 35 of 77
5. PNP-SW-FOUND*It acts like success statement. Similar to sy-subrc. 1 = Success 1 ≠ Failure
6. END-OF-SELECTION
* Whenever END-OF-SELECTION is triggered, it is going to refresh Infotype Internal table and pass the cursor to GET PERNR.
Note: - Very very Imp—From GET PERNR to END-OF SELECTION is ONE LOOP.
Business Scenario: Generate Active Employees report to display
Employee personal details [First name, Last Name, Date of Journey]
Organisation Management [Company Code, position, Org.unit, job, Payroll area]
And Address [Street, city, postal code] who are under company code ‘001’.
Solution :
Go to transaction code ‘SE38’.
Give program name ‘ZHR_PA_REPORT’.
Create
Description
Type: Executable. Application: HR. LDB- PNP.
TABLES: PERNR
INFOTYPES: 0000,0001,0002,0006.
START-OF-SELECTION.
GET PERNR.
RP_PROVIDE_FROM_LAST P0000 SPACE PN-BEGDA PN-ENDDA.
IF PNP-SW-FOUND EQ 1.
WRITE:/ P0001-BUKRS, P0001-ORGEH, P0001-ABKRS.

Page 36 of 77
ENDIF.
RP_PROVIDE_FROM_LAST P0002 SPACE PN-BEGDA PN-ENDDA.
IF PNP-SW-FOUND EQ 1.
WRITE:/ P0002-VORNA, P0002-NACHN.
ENDIF.
RP_PROVIDE_FROM_LAST P0006 SPACE PN-BEGDA PN-ENDDA.
IF PNP-SW-FOUND EQ 1.
WRITE:/ P0002-STRAS, P0006-ORT01, P0006-PSTLZ.
ENDIF.
END-OF-SELECTION.
Note: - From GET PERNR to END-OF-SELECTION was one loop.
Another example for PA reporting—
REPORT z_pa_sample.
TABLES : pernr.
*&----------------------------------------------*
*& Infotypes *
*&----------------------------------------------*
INFOTYPES : 0000, 0001, 0002, 0006.
*&----------------------------------------------*
*& Types *
*&----------------------------------------------*
TYPES : BEGIN OF t_final,
pernr TYPE pernr_d,
stat2 TYPE stat2,
vorna TYPE vorna,

Page 37 of 77
nachn TYPE nachn,
gbdat TYPE gbdat,
bukrs TYPE bukrs,
orgeh TYPE orgeh,
abkrs TYPE abkrs,
stras TYPE stras,
ort01 TYPE ort01,
pstlz TYPE pstlz,
END OF t_final.
*&----------------------------------------------*
*& Internal Tables *
*&----------------------------------------------*
DATA : it_final TYPE STANDARD TABLE OF t_final.
*&----------------------------------------------*
*& Work Areas *
*&----------------------------------------------*
DATA : wa_final TYPE t_final.
START-OF-SELECTION.
GET pernr.
*Sub routine to fetch emp data from infotype internal tables.
PERFORM f_fetch_data_from_infty.
END-OF-SELECTION.
*Sub routine to display data.
PERFORM f_display_data.
*&---------------------------------------------------------------------*
*& Form f_fetch_data_from_infty
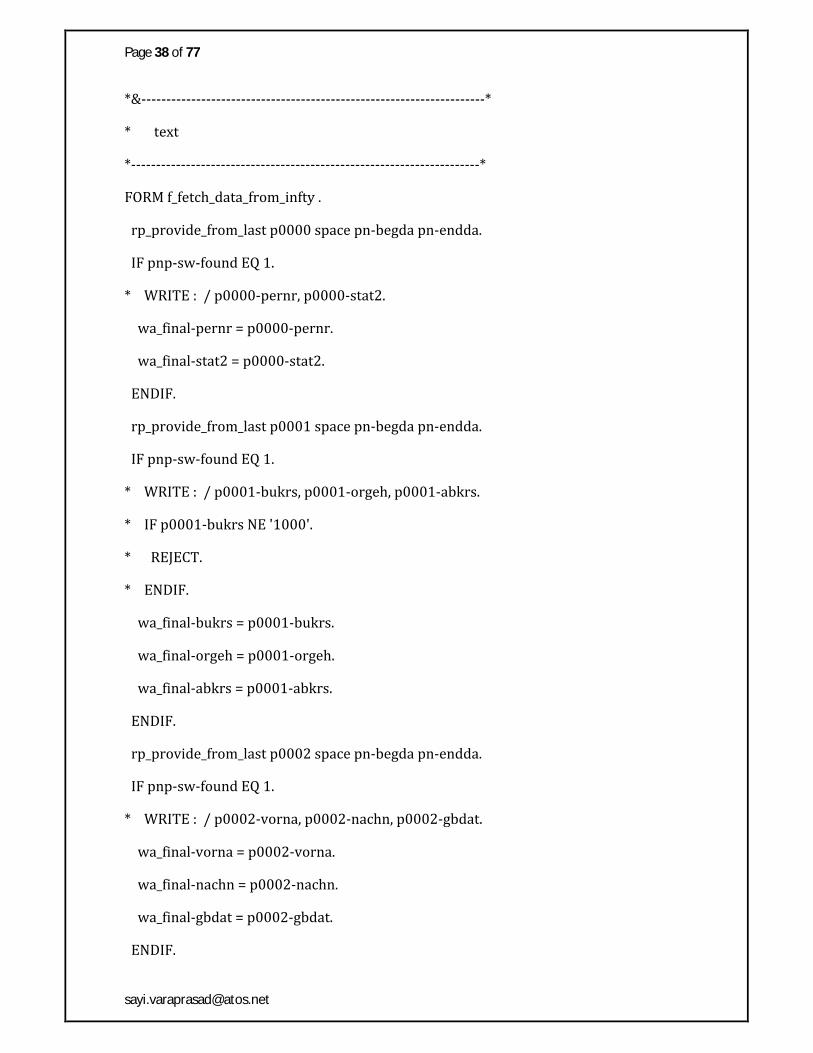
Page 38 of 77
*&---------------------------------------------------------------------*
* text
*----------------------------------------------------------------------*
FORM f_fetch_data_from_infty .
rp_provide_from_last p0000 space pn-begda pn-endda.
IF pnp-sw-found EQ 1.
* WRITE : / p0000-pernr, p0000-stat2.
wa_final-pernr = p0000-pernr.
wa_final-stat2 = p0000-stat2.
ENDIF.
rp_provide_from_last p0001 space pn-begda pn-endda.
IF pnp-sw-found EQ 1.
* WRITE : / p0001-bukrs, p0001-orgeh, p0001-abkrs.
* IF p0001-bukrs NE '1000'.
* REJECT.
* ENDIF.
wa_final-bukrs = p0001-bukrs.
wa_final-orgeh = p0001-orgeh.
wa_final-abkrs = p0001-abkrs.
ENDIF.
rp_provide_from_last p0002 space pn-begda pn-endda.
IF pnp-sw-found EQ 1.
* WRITE : / p0002-vorna, p0002-nachn, p0002-gbdat.
wa_final-vorna = p0002-vorna.
wa_final-nachn = p0002-nachn.
wa_final-gbdat = p0002-gbdat.
ENDIF.

Page 39 of 77
rp_provide_from_last p0006 space pn-begda pn-endda.
IF pnp-sw-found EQ 1.
* WRITE : / p0006-stras, p0006-ort01, p0006-pstlz.
wa_final-stras = p0006-stras.
wa_final-ort01 = p0006-ort01.
wa_final-pstlz = p0006-pstlz.
ENDIF.
APPEND wa_final TO it_final.
CLEAR wa_final.
ENDFORM. " f_fetch_data_from_infty
*&---------------------------------------------------------------------*
*& Form f_display_data
*&---------------------------------------------------------------------*
* text
*----------------------------------------------------------------------*
FORM f_display_data .
LOOP AT it_final INTO wa_final.
AT FIRST.
WRITE : / 'Emp No',
10 'First Name',
25 'Company'.
ENDAT.
WRITE : / wa_final-pernr, "'Emp No',
10 wa_final-vorna, "'First Name',
25 wa_final-bukrs. "'Company'.
ENDLOOP.
ENDFORM. " f_display_data

Page 40 of 77
There are 2 types of conditions.
1. Programming conditions2. Selection-screen conditions
Programming conditions: Hard coding the values in programs to remove unwanted data.
Ex- If P0001-BUKRS NE ‘1000’.
REJECT
ENDIF.
*** REJECT will drop the current process of employee and pass the cursor to GET PERNR.
Selection Screen Conditions: Entering the values on selection-screen for required fields and saving it as a variant
Reporting Recruitment
Some standard Infotypes in Recruitment Module—
4000 Applicant Event
4001 Applications
4002 Vacancy Assignment
4003 Applicant Activities
4004 Status of recurring Task
4005 Applicant’s personnel Number
REPORT Z_HR_RE_REPORT
TABLES APPLICANT
INFOTYPES: 4000, 4003,0002.
START-OF-SELECTION.
GET APPLICANT.
PAP_PROVIDE_FROM_LAST P4000 SPACE PA$BEGDA PA$ENDDA.
IF PAP-SW-FOUND EQ 1.

Page 41 of 77
WRITE:/ P4000-PERNR,P4000-STREA.
ENDIF.
PAP_PROVIDE_FROM_LAST P0002 SPACE PA$BEGDA PA$ENDDA.
IF PAP-SW-FOUND EQ 1.
WRITE:/ P0002-NACHN,P0002-NACHN.
ENDIF.
PAP_PROVIDE_FROM_LAST P4003 SPACE PA$BEGDA PA$ENDDA.
IF PAP-SW-FOUND EQ 1.
WRITE:/ P4003-OBJID,P4003-REFID.
ENDIF.
END-OF-SELECTION.
Differences between LOOP and PROVIDE statements
LOOP PROVIDERead multiple records All records from Infotype Internal tableRead Internal table and Infotype Internal table
Can read only Infotype Internal tables
Loop on single Internal table On multiple Infotype Internal tables, projections, joins and views can be performed
Only ‘where’ condition to filter junk data Apart from ‘where’ condition, we can use ‘BETWEEN’ ‘AND’ to filter unwanted data within date ranges.
SY_SUBRC to check whether success or failure
Pnnnn_Valid to check whether 2 infotype Internal Tables contain common record or not.
Syntax:Loop }Endloop
Syntax:Provide * from Pxxxx * From PxxxxBetween PN-BEGDA and PN-ENDDA. If pnnnn_Valid EQ ‘X’. { Do Statement } Endif.End Provide.
Page 42 of 77
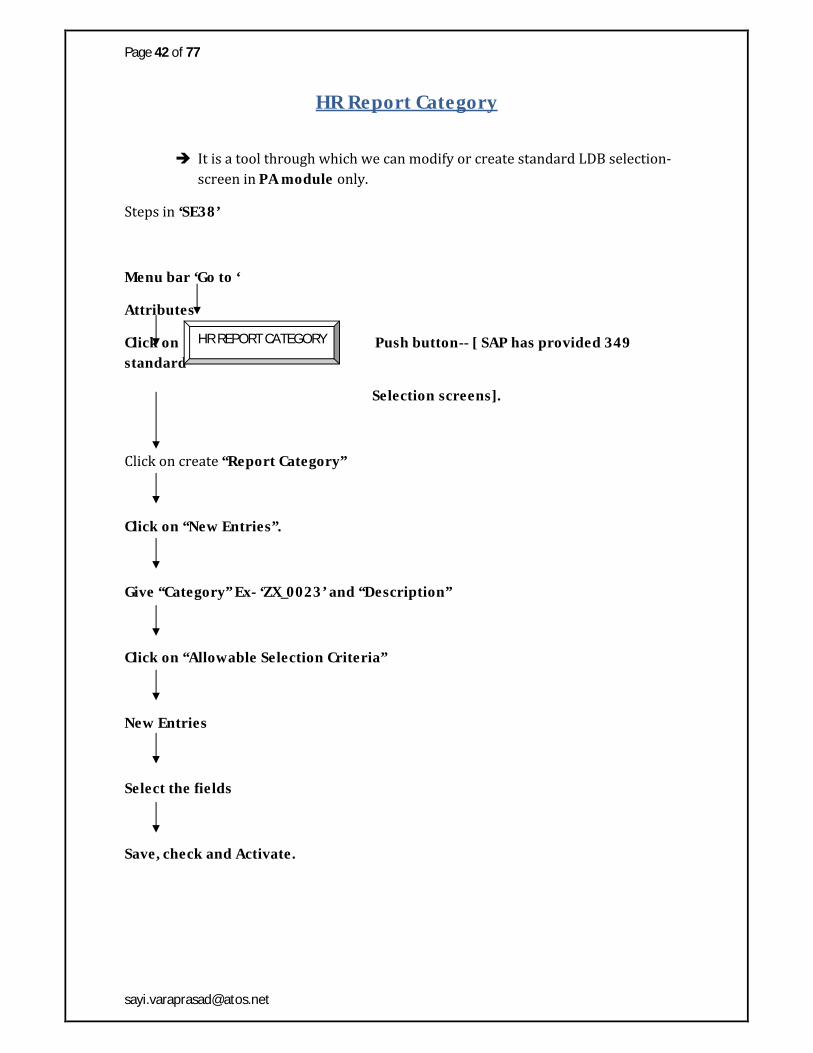
HR Report Category
It is a tool through which we can modify or create standard LDB selection-screen in PA module only.
Steps in ‘SE38’
Menu bar ‘Go to ‘
Attributes
Click on Push button-- [ SAP has provided 349 standard
Selection screens].
Click on create “Report Category”
Click on “New Entries”.
Give “Category” Ex- ‘ZX_0023’ and “Description”
Click on “Allowable Selection Criteria”
New Entries
Select the fields
Save, check and Activate.
HR REPORT CATEGORY

Page 43 of 77
DYNAMIC ACTIONS
Creating a record in one infotype based on action or operation of another Infotype, without user interaction.
In simple words, creating an entry in one infotype based on action performed on another infotype.
Ex- Retirement date calculation (Depends on Date of Birth)
So, the Retirement Date will be automatically calculated and populated with the help of DOB provided in 0002 infotype.
Steps to create Dynamic Actions
Go to SM30 [Maintenance View]
Enter table Name –T588Z -- [Table where dynamic action will be configured]
First 3 fields are meant for filtering conditions and are also called Base Infotype fields.
Infotype Subtype FieldEX- 0006 2 STRAS
4TH field is called Function Character [FC]
FC indicates the operation on base Infotype.
There are different types of operations.
02 Change04 Create08 Delete06 Change or Create
(02 + 04)10 Change or Delete
(02 + 08)12 Create or Delete
(04 + 08)
5th Column: No [Number]
It is the sequence no. which will be incremented by 1 for each row.
XXX- 3 digits Ex- 000, 999

Page 44 of 77
6th Column: Step Indicator [S]
There are 6 different steps in Step Indicator. They are--
P Condition checks.
It acts like an “If” condition.
Ex- If P0006-ort01 = ‘HYD’.
I Stands for Infotype Maintenance.
It has the following—
Insert
Delete
Modify
Copy
EX-
Infotype Subtype Field FC No S0006 2 STRAS 04 101 I INS 9381
Note: - ‘INS’ stands for ‘Insert’.
Similarly, we have DEL, MOD and COP
‘I’ stands for Infotype Maintenance
‘9381’ is the infotype number.
W Assigning Values
Assigning values for some infotype fields.
Ex-
Infotype Subtype Field FC No S0006 2 STRAS 04 203 W P9381-ZZLAND = P0006-
STRAS.
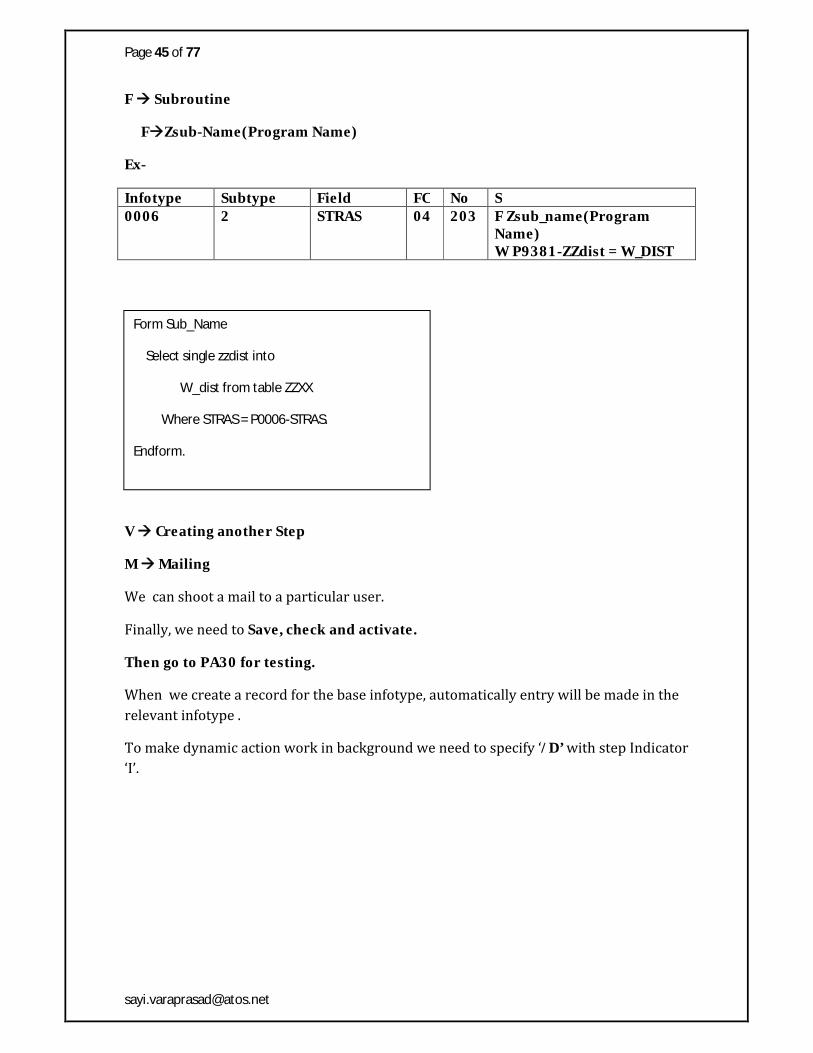
Page 45 of 77
F Subroutine
FZsub-Name(Program Name)
Ex-
Infotype Subtype Field FC No S0006 2 STRAS 04 203 F Zsub_name(Program
Name)W P9381-ZZdist = W_DIST
V Creating another Step
M Mailing
We can shoot a mail to a particular user.
Finally, we need to Save, check and activate.
Then go to PA30 for testing.
When we create a record for the base infotype, automatically entry will be made in the relevant infotype .
To make dynamic action work in background we need to specify ‘/D’ with step Indicator ‘I’.
Form Sub_Name
Select single zzdist into
W_dist from table ZZXX
Where STRAS = P0006-STRAS.
Endform.

Page 46 of 77
Inbound Interfaces
To upload data from Non SAP to SAP.
Prerequisites for Inbound Interfaces.
Identify source and target fields Identify fixed and constant values Map internal table fields with screen fields with the help of structure
‘BDCDATA’. Choose one of the methods i.e. ‘call transaction’ or ‘session method’ to
upload. Maintain error log for failure records.
Example
*&---------------------------------------------------------------------*
*& Report ZHR_DLPK_COMPLEXINBOUND_AS_PS *
*& *
*&----------------------------------------------------------------------*
REPORT ZHR_DLPK_COMPLEXINBOUND_AS_PS NO STANDARD PAGE HEADING LINE-SIZE 200.
types : begin of i_input,
pernr type PERNR_D,
CHOIC type CHOIC,
begda type char12,
stras type PAD_STRAS,
ort01 type ort01,
land1 type land1,
pstlz type PSTLZ_HR,
slart type slart,
insti type insti,
Page 47 of 77
sltp1 type fach1,
end of i_input,
begin of i_raw,
line type char100,
end of i_raw.
*&---------------------------------------------------------------------*
*& INTERNAL TABLES *
*&---------------------------------------------------------------------*
data : it_input type standard table of i_input,
it_raw type standard table of i_raw,
it_error type standard table of bdcmsgcoll.
*&---------------------------------------------------------------------*
*& WORK AREAS *
*&---------------------------------------------------------------------*
data : wa_input type i_input,
wa_raw type i_raw.
DATA : FNAM(50) VALUE 'C:\upload.txt'.
include : bdcrecxy.
SELECTION-SCREEN BEGIN OF BLOCK B1 WITH FRAME TITLE TEXT-001.
PARAMETER : p_pser radiobutton group X modif id AAA,
p_aser radiobutton group X modif id BBB,
P_ESER RADIOBUTTON GROUP X modif id CCC.
SELECTION-SCREEN END OF BLOCK B1.
start-of-selection.
if p_pser eq 'X'.
perform upload_data_from_ps.
perform f_data_mapping1.
Page 48 of 77
perform f_data_mapping2.
elseif p_aser eq 'X'.
perform upload_data_from_as.
perform f_data_mapping1.
perform f_data_mapping2.
elseif p_eser eq 'X'.
perform upload_data_from_ps.
endif.
end-of-selection.
*&---------------------------------------------------------------------*
*& Form upload_data_from_ps
*&---------------------------------------------------------------------*
form upload_data_from_ps.
CALL FUNCTION 'GUI_UPLOAD'
EXPORTING
filename = 'C:/upload.txt'
FILETYPE = 'ASC'
tables
data_tab = it_raw.
IF sy-subrc eq 0.
loop at it_raw into wa_raw.
split wa_raw
at '/'
into wa_input-pernr
wa_input-choic
wa_input-begda
wa_input-stras

Page 49 of 77
wa_input-ort01
wa_input-land1
wa_input-pstlz
wa_input-slart
wa_input-insti
wa_input-sltp1.
append wa_input to it_input.
write : / wa_raw,
/ wa_input.
clear : wa_input, wa_raw.
endloop.
ENDIF.
endform. " upload_data_from_ps
*&---------------------------------------------------------------------*
*& Form upload_data_from_as
*&---------------------------------------------------------------------*
form upload_data_from_as .
OPEN DATASET FNAM FOR INPUT IN TEXT MODE ENCODING DEFAULT.
DO 3 TIMES.
READ DATASET FNAM INTO WA_RAW.
split wa_raw
at '/'
into wa_input-pernr
wa_input-choic
wa_input-begda
wa_input-stras
wa_input-ort01

Page 50 of 77
wa_input-land1
wa_input-pstlz
wa_input-slart
wa_input-insti
wa_input-sltp1.
append wa_input to it_input.
write : / wa_raw,
/ wa_input.
clear : wa_input, wa_raw.
ENDDO.
CLOSE DATASET FNAM.
endform. " upload_data_from_as
*&---------------------------------------------------------------------*
*& Form f_data_mapping1
*&---------------------------------------------------------------------*
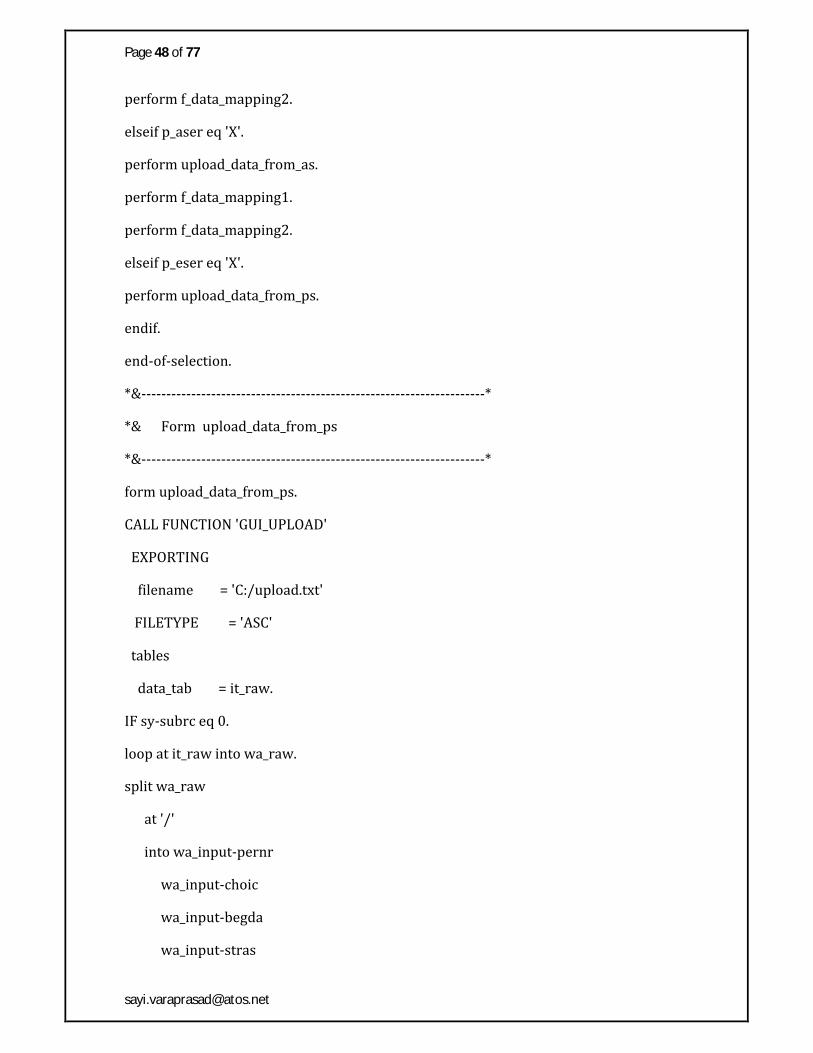
form f_data_mapping1 .
loop at it_input into wa_input.
perform bdc_dynpro using 'SAPMP50A' '1000'.
perform bdc_nodata using space.
perform bdc_field using 'RP50G-PERNR'
wa_input-PERNR.
perform bdc_field using 'RP50G-TIMR6'
'X'.
perform bdc_field using 'RP50G-CHOIC'
'0006'.
Page 51 of 77
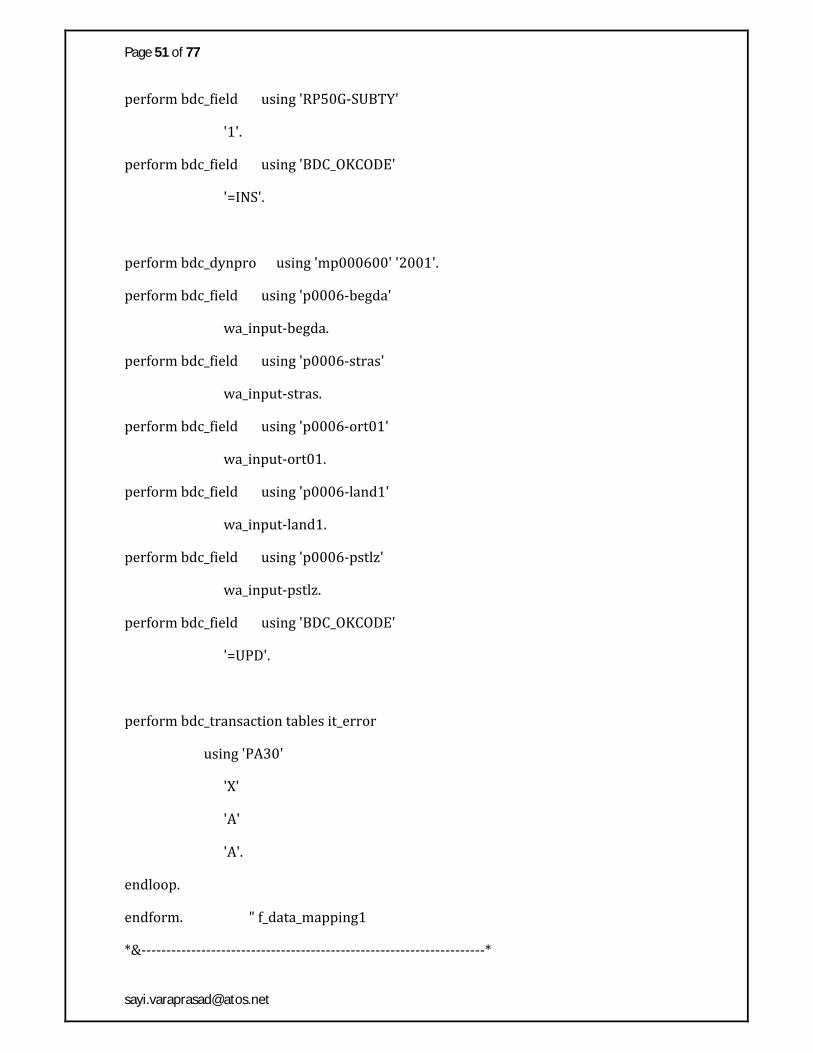
perform bdc_field using 'RP50G-SUBTY'
'1'.
perform bdc_field using 'BDC_OKCODE'
'=INS'.
perform bdc_dynpro using 'mp000600' '2001'.
perform bdc_field using 'p0006-begda'
wa_input-begda.
perform bdc_field using 'p0006-stras'
wa_input-stras.
perform bdc_field using 'p0006-ort01'
wa_input-ort01.
perform bdc_field using 'p0006-land1'
wa_input-land1.
perform bdc_field using 'p0006-pstlz'
wa_input-pstlz.
perform bdc_field using 'BDC_OKCODE'
'=UPD'.
perform bdc_transaction tables it_error
using 'PA30'
'X'
'A'
'A'.
endloop.
endform. " f_data_mapping1
*&---------------------------------------------------------------------*

Page 52 of 77
*& Form f_data_mapping2
*&---------------------------------------------------------------------*
form f_data_mapping2 .
loop at it_input into wa_input.
perform bdc_dynpro using 'SAPMP50A' '1000'.
perform bdc_nodata using space.
perform bdc_field using 'RP50G-PERNR'
wa_input-PERNR.
perform bdc_field using 'RP50G-TIMR6'
'X'.
perform bdc_field using 'RP50G-CHOIC'
'0022'.
perform bdc_field using 'RP50G-SUBTY'
'50'.
perform bdc_field using 'BDC_OKCODE'
'=INS'.
perform bdc_dynpro using 'MP002200' '2000'.
perform bdc_field using 'p0022-begda'
wa_input-begda.
perform bdc_field using 'p0022-endda'
'31.12.9999'.
perform bdc_field using 'p0022-slart'
wa_input-slart.
Page 53 of 77
perform bdc_field using 'p0022-insti'
wa_input-insti.
perform bdc_field using 'p0022-sltp1'
wa_input-sltp1.
perform bdc_field using 'BDC_OKCODE'
'=UPD'.
perform bdc_transaction tables it_error
using 'PA30'
'X'
'A'
'A'.
endloop.
endform. " f_data_mapping2
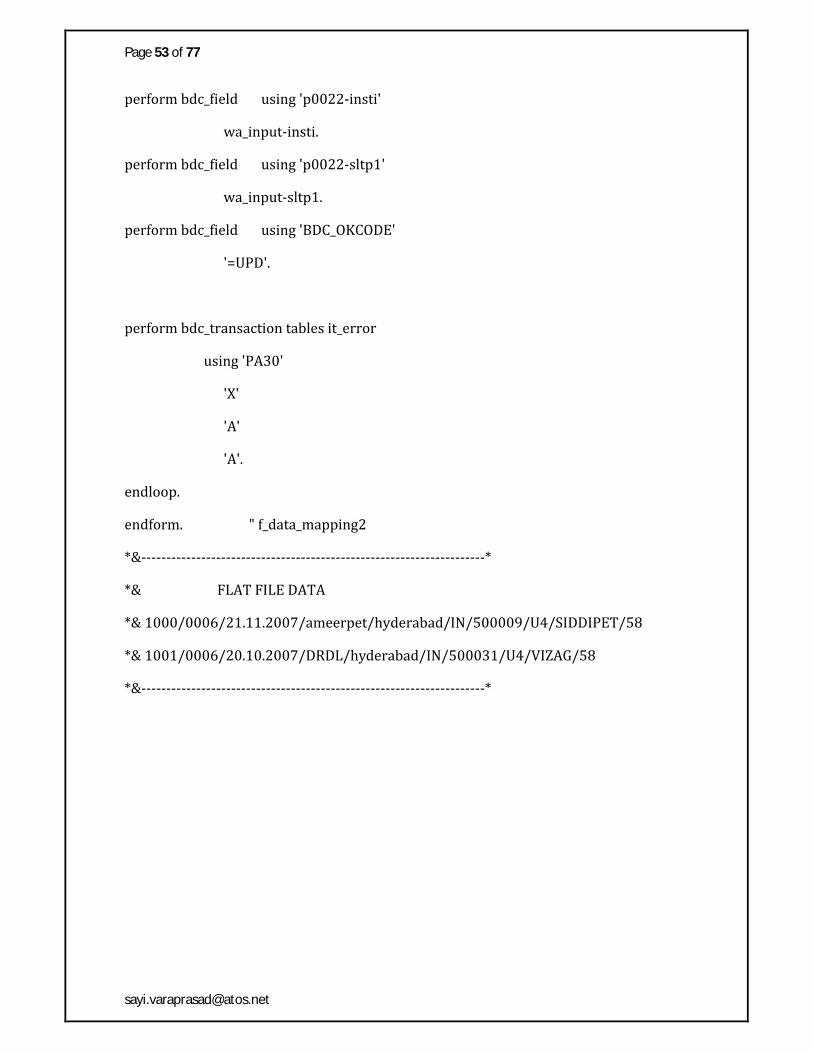
*&---------------------------------------------------------------------*
*& FLAT FILE DATA
*& 1000/0006/21.11.2007/ameerpet/hyderabad/IN/500009/U4/SIDDIPET/58
*& 1001/0006/20.10.2007/DRDL/hyderabad/IN/500031/U4/VIZAG/58
*&---------------------------------------------------------------------*

Page 54 of 77
PAYROLL
Payroll Driver
It is a program which will fetch employee master and transactional data and do calculations on base of PCR’s[Personal Calculation Rules], SCHEMA’s, FUNCTIONS and OPERATIONS to generate Payroll result.
* = PAYROLL RESULT
Payroll Drivers
Programs start with H*CAL*
Payroll Area
Employee’s are segregated or grouped on the basis of pay frequency.
Example:- Annually, Half Yearly, Quarterly, Monthly, Biweekly, weekly
Payroll Period [T549Q]
Start Date and End Date of payroll runs.
Payroll Runs
Master
+
Transaction Data
Calculations, PCR’s
SCHEMA’s
Functions
Page 55 of 77
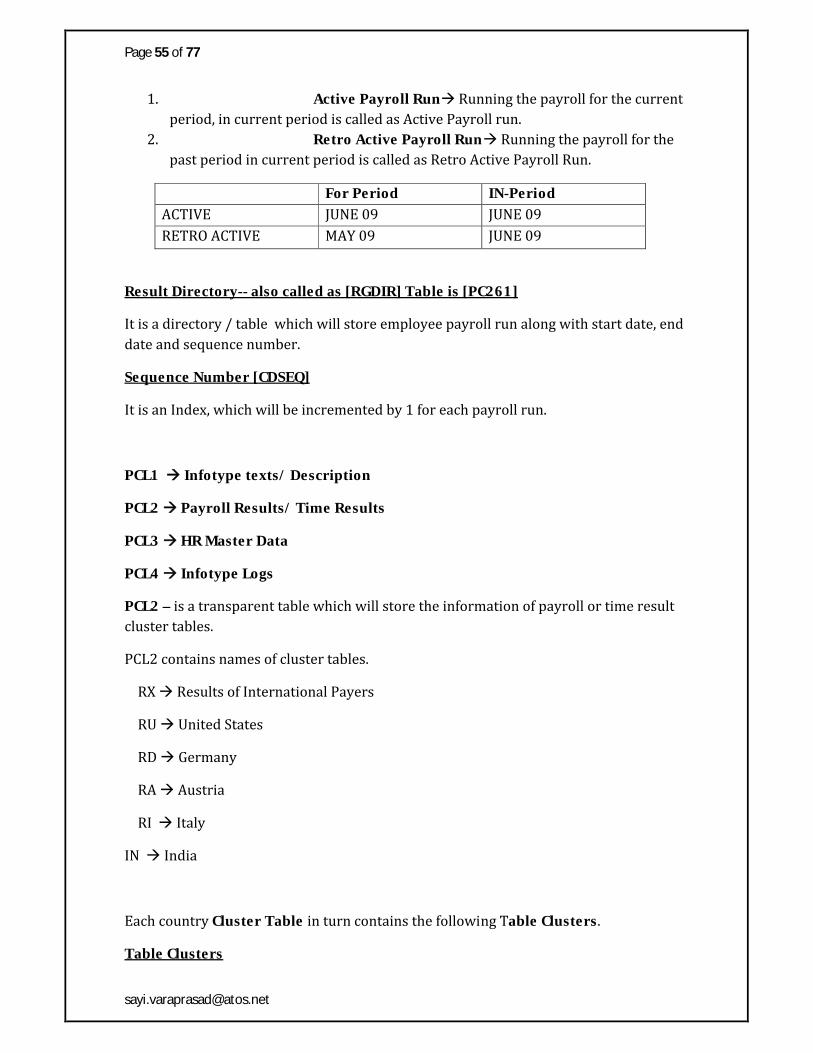
1. Active Payroll Run Running the payroll for the current period, in current period is called as Active Payroll run.
2. Retro Active Payroll Run Running the payroll for the past period in current period is called as Retro Active Payroll Run.
For Period IN-PeriodACTIVE JUNE 09 JUNE 09RETRO ACTIVE MAY 09 JUNE 09
Result Directory-- also called as [RGDIR] Table is [PC261]
It is a directory / table which will store employee payroll run along with start date, end date and sequence number.
Sequence Number [CDSEQ]
It is an Index, which will be incremented by 1 for each payroll run.
PCL1 Infotype texts/ Description
PCL2 Payroll Results/ Time Results
PCL3 HR Master Data
PCL4 Infotype Logs
PCL2 – is a transparent table which will store the information of payroll or time result cluster tables.
PCL2 contains names of cluster tables.
RX Results of International Payers
RU United States
RD Germany
RA Austria
RI Italy
IN India
Each country Cluster Table in turn contains the following Table Clusters.
Table Clusters

Page 56 of 77
RT -- Result Table
CRT -- Cumulative Result Table
WPBP -- Work Center Basic Pay
AERKS -- Arrears
BT -- Bank transactions
BP -- Bank payments
ST -- Social Tax
SI -- Social Insurance
ECRT -- Error Cumulative Result Table
Cluster tables contain the payroll results.
MOLGA[T500L]-- Country Key
For each country SAP has assigned a 2 digit unique ID/No.
T500L contains MOLGA and corresponding Cluster table.
MOLGA COUNTRY RELID/COUNTRY GROUPING/CLUSTER TABLE NAME
01 GERMANY RD10 U.S RU40 INDIA IN
Note: - RELID/COUNTRY GROUPING/CLUSTER TABLE NAME. They are all the same.
For Period : Period for which payroll is running.
In Period : Period in which payroll is running.

Page 57 of 77
5 Step Procedure to Retrieve Payroll Results
Data Declarations
Variables
DATA: W_PERNR TYPE PERNR_D,
W_MOLGA TYPE MOLGA,
W_SEQNO TYPE CDSEQ,
W_RELID TYPE RELID-PCL2.
***INTERNAL TABLES
DATA: IT_RGDIR LIKE STANDARD TABLE OF PC262,
IT_RESULT TYPE PAY99_RESULT.
***WORK AREAS
DATA: W_RT TYPE PC207,
W_CRT TYPE PC208.
Regarding PAY99_RESULT—It is a deep structure which contains 2 structures and one field.
The structures are—EVP—Type of PC261 [i.e. Result Directory]
INTER – Type of PAY99_International.
Field
NAT for country
STEP 1
Read employee payroll run from the Result Directory using Function Modules.
CD_RGDIR------- 2 types
CD_READ_RGDIR CU_READ_RGDIRInput—W_PERNROutput—IT_RGDIR
Input—W_PERNROutput—It_RGDIR W_MOLGA
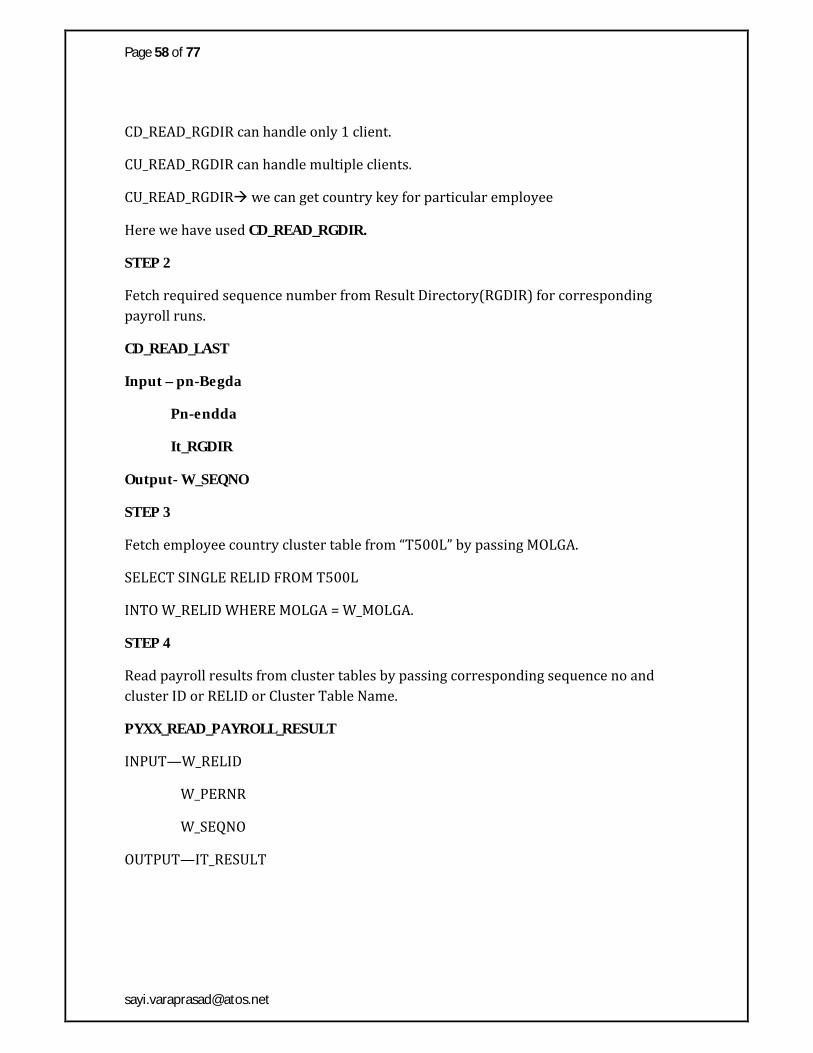
Page 58 of 77
CD_READ_RGDIR can handle only 1 client.
CU_READ_RGDIR can handle multiple clients.
CU_READ_RGDIRwe can get country key for particular employee
Here we have used CD_READ_RGDIR.
STEP 2
Fetch required sequence number from Result Directory(RGDIR) for corresponding payroll runs.
CD_READ_LAST
Input – pn-Begda
Pn-endda
It_RGDIR
Output- W_SEQNO
STEP 3
Fetch employee country cluster table from “T500L” by passing MOLGA.
SELECT SINGLE RELID FROM T500L
INTO W_RELID WHERE MOLGA = W_MOLGA.
STEP 4
Read payroll results from cluster tables by passing corresponding sequence no and cluster ID or RELID or Cluster Table Name.
PYXX_READ_PAYROLL_RESULT
INPUT—W_RELID
W_PERNR
W_SEQNO
OUTPUT—IT_RESULT

Page 59 of 77
Regarding Wage type [T512T]
Each component of salary is assigned to particular wage type [LGART]
Wage type holds wage amount [BETRG]
STEP 5
LOOP AT IT_RESULT-INTER-RT INTO
WA_RT.
IF WA_RT-LGART EQ ‘,810’.
WRITE:/ ‘CAR AMOUNT’
WA_RT-BETRG.
ENDIF.
Read wage amount for corresponding wage type from deep structure internal table.
Note: - PC_PAYRESULT is a transaction code through which we can display the payroll result of given employee.
Schemas and Functions:-
A schema is just a collection of functions executed in a specific order – each one passing its results on to the next. Schemas are always created and edited via transaction PE01, but are actually stored as a collection of rows in tables T52C0 (SAP standard schemas) and T52C1 (customer-created schemas and modified SAP-standard schemas). The payroll driver reads the lines in T52C0/T52C1 and executes the functions one by one.
Functions provide the high-level logic for payroll calculations. Functions perform general processing – such as calculating payroll taxes on a given set of wages, reading wage types from specific Infotypes, calculating benefits premiums, and storing the results of the payroll calculation. There are dozens of functions in SAP payroll, some are country-specific and others are not. Each function is defined and documented via transaction PE04; you can also view the function documentation via transaction PDSY in releases 4.5 and greater, or with report RPDSYS00 in earlier versions. In SAP Payroll functions are executed within a schema by the payroll driver program (let’s assume RPCALCU0).
In transaction PE04 we can see the ABAP code associated with every function. The function name in the schema correlates to an ABAP form – for example payroll function WPBP maps to the ABAP form ‘fuwpbp’; function USTAX maps
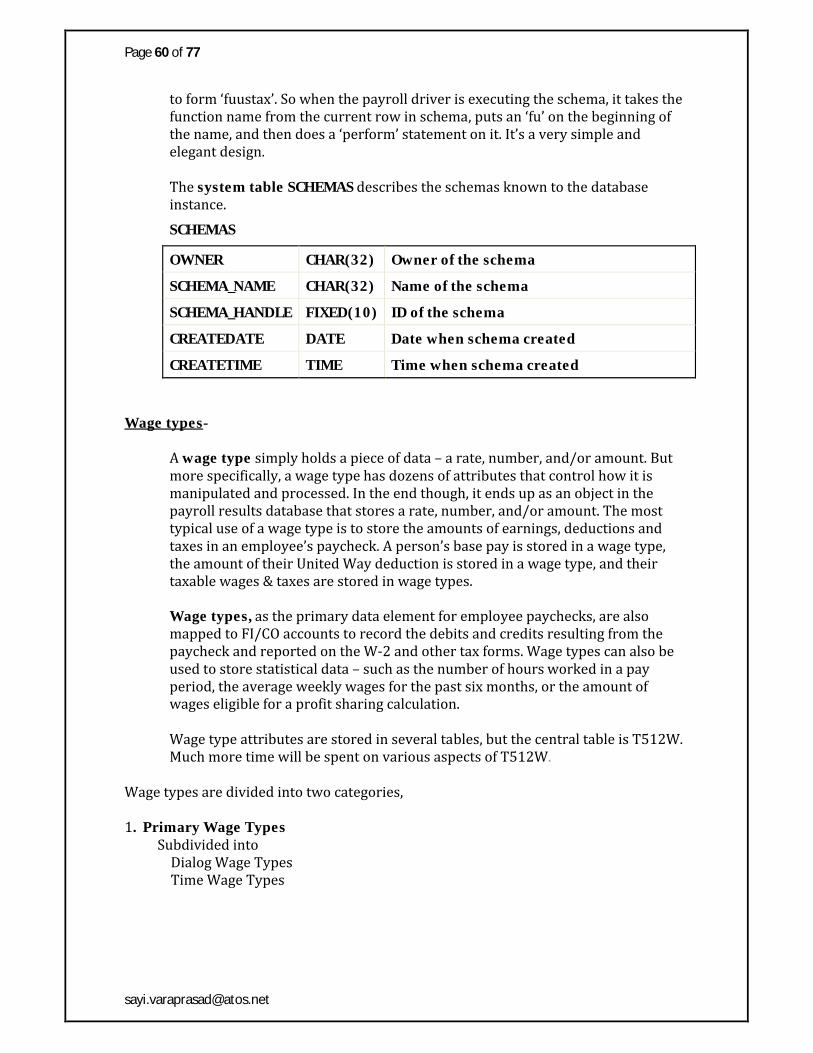
Page 60 of 77
to form ‘fuustax’. So when the payroll driver is executing the schema, it takes the function name from the current row in schema, puts an ‘fu’ on the beginning of the name, and then does a ‘perform’ statement on it. It’s a very simple and elegant design.
The system table SCHEMAS describes the schemas known to the databaseinstance.
SCHEMAS
OWNER CHAR(32) Owner of the schema
SCHEMA_NAME CHAR(32) Name of the schema
SCHEMA_HANDLE FIXED(10) ID of the schema
CREATEDATE DATE Date when schema created
CREATETIME TIME Time when schema created
Wage types-
A wage type simply holds a piece of data – a rate, number, and/or amount. But more specifically, a wage type has dozens of attributes that control how it is manipulated and processed. In the end though, it ends up as an object in the payroll results database that stores a rate, number, and/or amount. The most typical use of a wage type is to store the amounts of earnings, deductions and taxes in an employee’s paycheck. A person’s base pay is stored in a wage type, the amount of their United Way deduction is stored in a wage type, and their taxable wages & taxes are stored in wage types.
Wage types, as the primary data element for employee paychecks, are also mapped to FI/CO accounts to record the debits and credits resulting from the paycheck and reported on the W-2 and other tax forms. Wage types can also be used to store statistical data – such as the number of hours worked in a pay period, the average weekly wages for the past six months, or the amount of wages eligible for a profit sharing calculation.
Wage type attributes are stored in several tables, but the central table is T512W. Much more time will be spent on various aspects of T512W.
Wage types are divided into two categories,
1. Primary Wage Types Subdivided into Dialog Wage Types Time Wage Types
Page 61 of 77
Dialog wage types:
Wage types that you can enter online, i.e. when maintaining master data. Eg. · Basic Pay (0008) · Recurring Payments/Deductions (0014) · Additional Payments (0015) · Leave Compensation (0083)
Time wage types:
Time wage types are primary wage types created by the System when predefined conditions are met. This occurs During time evaluation via time wage type selection.Eg. Overtime bonus 50% wage type.
2. Secondary Wage Types
Secondary wage types are not entered online. Instead, they are created during the payroll run or, derived from particular factors. Secondary wage types also include wage types used to cumulate several other wage types, or to store interim results on a temporary basis.
The technical name of secondary wage types included in the standard system begins with "/",
E.g. /101 for Total Gross Amount. (Cumulative all of the wage types that pertain to an employee's total gross amount).
The wage type distribution is the list that gives an overview of the wage types in the in-period view. The system evaluates the payroll results from results from result table RT and CRT and determines the original payroll result and the retroactive accounting results created in the period.
The system also evaluates the employee’s organizational assignment. This is included in the payroll results .this data is taken from the Work Center Basic Pay Table (WPBP).
The following evaluation options can be used when creating the wage type statement
Ø Individual Evaluation :-
This type of evaluation is performed for each personal number .the number and the amount printed for each wage type .the individual evaluation can be stored according to personal number or employee name within the org assignment .
Ø Total Evaluation:-
Page 62 of 77
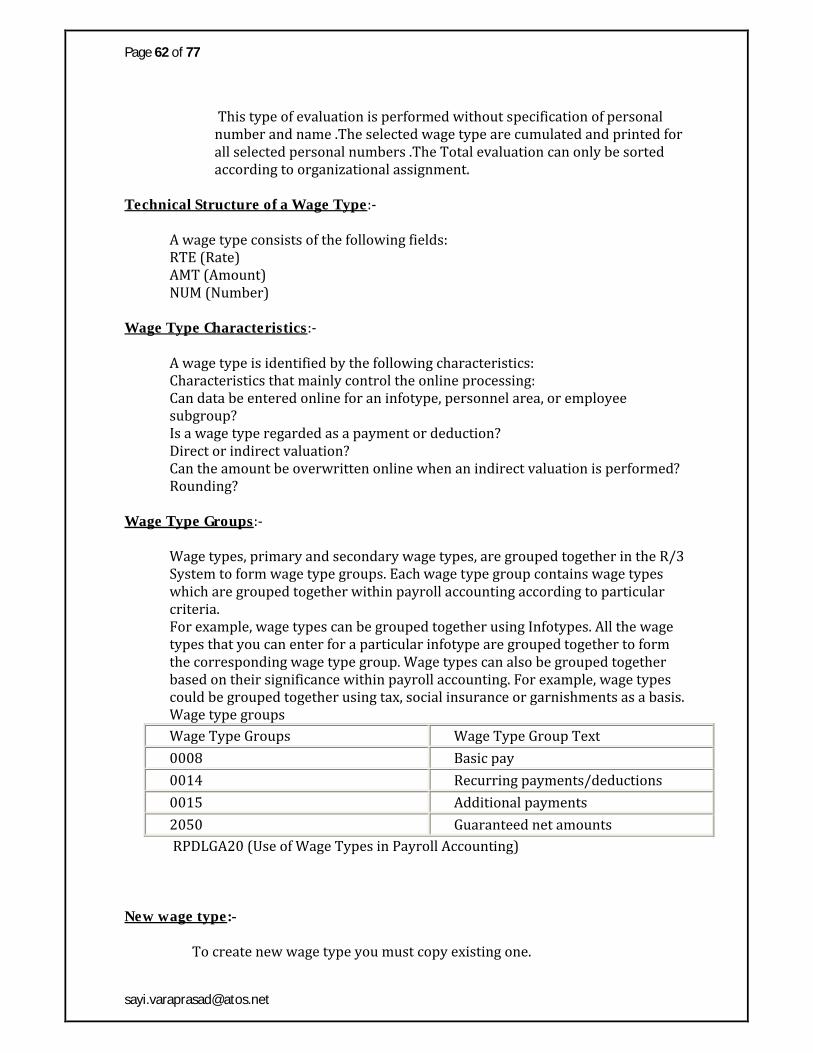
This type of evaluation is performed without specification of personal number and name .The selected wage type are cumulated and printed for all selected personal numbers .The Total evaluation can only be sorted according to organizational assignment.
Technical Structure of a Wage Type:-
A wage type consists of the following fields:RTE (Rate) AMT (Amount) NUM (Number)
Wage Type Characteristics:-
A wage type is identified by the following characteristics:Characteristics that mainly control the online processing:Can data be entered online for an infotype, personnel area, or employee subgroup? Is a wage type regarded as a payment or deduction? Direct or indirect valuation? Can the amount be overwritten online when an indirect valuation is performed? Rounding?
Wage Type Groups:-
Wage types, primary and secondary wage types, are grouped together in the R/3 System to form wage type groups. Each wage type group contains wage types which are grouped together within payroll accounting according to particular criteria.For example, wage types can be grouped together using Infotypes. All the wage types that you can enter for a particular infotype are grouped together to form the corresponding wage type group. Wage types can also be grouped together based on their significance within payroll accounting. For example, wage types could be grouped together using tax, social insurance or garnishments as a basis.Wage type groupsWage Type Groups Wage Type Group Text
0008 Basic pay
0014 Recurring payments/deductions
0015 Additional payments
2050 Guaranteed net amountsRPDLGA20 (Use of Wage Types in Payroll Accounting)
New wage type:-
To create new wage type you must copy existing one.

Page 63 of 77
SAP HR contains model wage types. If these sample wage types meet some of your company's requirements you can use the wage type copier. You then use these copies as your wage types and can modify them so that they meet your specific requirements. REMEMBER: Customer defined dialog wage type codes must start with digit.
The wage types that you create via the copy method are included in all of the wage type groups and tables as the original wage type from which you copied. You can use the log to check what was copied.
Transaction for wage types copying: OH11 or use SPRO path:
Rules and Operations:-
Rules contain the most basic logic used in SAP Payroll. Where a schema is a collection of functions, a rule is a collection of operations. An operation is a very basic piece of logic that is used, mostly, to manipulate wage types. For example, operation MULTI multiplies the number and rate fields of a wage type to determine the amount to pay an employee. Operation OUTWP retrieves specific data about an employee so that another operation can make a decision on how to process it. For example, if the work contract on infotype 1 is UA then do ‘x’, if it is UB then do ‘y’, otherwise do ‘z’.
Operations can also be viewed in transactions PE04 and PDSY, and are edited with transaction PE02. Where a function’s ABAP equivalent form starts with ‘fu’, an operation’s ABAP form starts with ‘op’. For example, operation MULTI would have an ABAP form ‘opmulti’.
Rules, like schemas, are stored in a table – rules are stored in T52C5. The more senior SAP consultants who have been working with computer systems for many years often find similarities between payroll rules and programming mainframe computers in Assembly language. While there is nothing fancy about operations, when used correctly together they can be very powerful.
Hopefully we’ve presented a good but brief overview that makes sense. In our next SAP Payroll Technical Basics article we will get into more detail on the common functions used in Sap’s payroll schema.
Types of Operations:-
Like functions, documentation for operations can be found via transactions PDSY or PE04. Operations can be placed in two broad groups - those that make decisions and those that manipulate wage types. Some of them fit into both groups. Manipulating Wage types working with wage types in a rule is sort of like working with internal tables in ABAP. The function that called the rule (PIT, PRT, P0014 or whatever) loops through the table, placing each row, one at a time, in a

Page 64 of 77
'header' space. You work with the wage type in that header space, and when finished add it back to the table.
Common Operations:-
MULTI, DIVID These operations let you multiply two fields of a wage type andstore it in a third. The fields you can work with are AMT, RTE and NUM. MULTI RNA would multiply the rate by the number and store the result in the amount field. DIVID ANA would divide the amount field by the number and store it back in the amount field.
NUM, RTE and AMT These are very basic and powerful operations that manipulate the content of their respective fields. The F1 help documentation is very useful since there are so many ways to use these operations. On a basic level, you set values like NUM=1 or AMT=2.50 - though that it is bad practice to do this. Use constants instead - create a constant in T511K called ZNUM and then do NUM=KZNUM (set number field to the constant ZNUM). Since constants are date-effective and rules are not, this will give you more flexibility when the number has to change.
You can set the field of the wage type in the header equal to the corresponding field of another wage type - AMT=E9XXX sets the amount equal to the amount field of wage type 9XXX in the RT. AMT< 9XXX sets the amount field to 9XXX in the IT only if it is less than what is already in the amount field (takes the minimum of the two values). Finally, you can use arithmetic on the values. RTE*100 multiplies the contents of the rate field by 100 and stores it back in the rate field. AMT*KZNUM multiplies the amount by whatever is in constant ZNUM.
ADDWT So by now we've set the values of our wage type using MULTI, DIVID, AMT, RTE and NUM. ADDWT transfers the wage type in the header to some other table - enabling us to save all that work before the next wagetype goes to the header. The basic idea is that you transfer the wage type to another table, with or without changing the wage type number. ADDWTE* adds the wage type to the RT without changing the wage type number. ADDWTE9XXX transfers it to the RT and renames it to 9XXX. Again, the F1 help documentation will tell you all the tables that you can transfer to.
ELIMI and RESET Splits are attributes of wage types that link them to some other table in payroll. Sometimes you have to remove certain splits when doing work in a rule - that's what ELIMI does (ELIMInate splits). After you eliminate splits on a wage type, within the same rule you can restore them with RESET. Generally you should avoid eliminating splits - it can lead to problems in pro-ration and reporting. So use with caution and test your work well.
FILLF This simple operation resets the value of a wage type field. For example, FILLF A resets the amount back to what it was when the rule was first called. So, here's how you would put these all together to calculate a deduction that is fixed percentage of base pay (there are several ways to do this, here's just one). Let's assume base pay is in the IT, the percentage is stored as a whole number in

Page 65 of 77
constant ZNUM, and you've made a rule that has a section for wage type **** and for base pay, '0BAS' in this case. The deduction will be 4XXX. So in the schema we will do a PIT on rule Z001: PIT Z001. In the rule: Wagetype ****: ADDWT * (if it's not 0BAS we just want to pass it on without changing it) Wagetype 0BAS: ADDWT *, NUM=KZNUM, MULTI ANA, AMT/-100, ADDWT 4XXX (pass 0BAS on to the output table so we don't lose it, set the number field equal to constant ZNUM, multiply the number by the amount, divide the amount by -100 since we store the percentage as a whole number and we want deductions to be negative, and store the result as wage type 4XXX)
Making Decisions
Many times we only want to take action if certain conditions exist - for example we only want to calculate deduction 4XXX for certain types of employees. For these cases, decision operations let us choose when to take that action. Decisions put their results into what is called the variable key - think of this like a case statement with wildcards. If I put the company code in the variable key, then the line that has 1234 will execute for company code 1234, 2*** will execute for any company that begins with 2, and **** will execute for companies that match neither.
OUTWP This operation lets us make decisions based on various data elements in the WPBP table in payroll - roughly the infotype 0 and 1 data. There are many elements to look at, via the F1 help documentation. As an example, you could look at the company code via OUTWPCOMPY - this puts the contents of the company code field into the variable key.
VAKEY Like OUTWP this places certain data in the variable key - see the F1 help documentation for all the possibilities. NUM, RTE and AMT Here they are again, as decisions. If I say AMT?0, it will compare the value in the amount field to zero and return either >, <, or =. Or you could compare it to a constant or another wagetype using the same concepts mentioned above.
VWTCL This operation returns the value of a certain processing class for the current wage type. For example, VWTCL 93 places in the variable key the value of processing class 93. Rule X023 is a good example of how processing class values are used. In our previous example we calculated deduction 4XXX for every person who had base pay wage type 0BAS. Using OUTWP you could decide to calculate it only for people in certain personnel areas/subareas or for certain employee subgroups for example. Let's say that you only want to calculate it when someone has entered wage type 4XXX in infotype 14 or 15. Assume herethat the wage type is entered in the infotype with something required in the number field. Here are the steps you could do: Wagetype 0BAS: ADDWT *, NUM= 4XXX, do a decision on NUM?0 and if = then do nothing, otherwise (the * condition) do NUM=KZNUM, MULTI ANA, AMT/-100, ADDWT 4XXX. Depending on how your wage type splits are setup at this point, you might want to ELIMI R just before NUM=4XXX and RESET R before ADDWT 4XXX.
Employee groups:-

Page 66 of 77
Employee group are created as a result of distinction of employees registered in the system according to their pay calculation. Groups are also one of the ways of dividing employees due to HR reporting reasons.Group code can be written in 1 digit, name – max. 20 digits.
Enterprise Structure -> Definition -> Human Resources Management -> Employee groups
Employee sub-groups:-
Employee subgroups are more detailed than employee groups. Subgroups make groups more detailed and they are also a steering element for system operation.
Employee subgroup sets following indicators:
- The employee subgroup grouping for the work schedule allows you to define which work schedules are valid for which employees
- The employee subgroup grouping for primary wage types controls the validity of wage types at the employee subgroup level
- The employee subgroup grouping for the personnel calculation rule controls how the system processes an employee's payroll, for example, whether an employee is to be paid on an hourly or monthly basis.
Enterprise Structure:-
The following elements define the SAP enterprise structure for Personnel Administration: Client Company code Personnel area Personnel sub area.
Client:-
Client 000 contains the original SAP system, and you cannot change it. Client 001 is also delivered to customers. Both systems are identical when they are delivered.
The system contains both client-independent (used in all clients) and client-specific elements (used in certain special clients).
The following are defined as client-independent: Data structures such as field definitions, table structures and file structures, client-independent tables, transactions, programs, standard evaluations, authorization objects, help documentation and user-defined programs.

Page 67 of 77
The following are defined as client-specific: Client-specific tables: you must copy these from the original client, HR master record, user master records and authorization profiles.
Personnel area:-
Personnel area is used in Personnel Administration. Is unique in each client. Personnel areas include all employees. They represent separate areas which for legal reasons should be split off according to existing business entities (self-financing unit). Split for personnel areas enables appropriate grouping of all employees.
Personnel area code can be written in 4 digits, name – max. 30. Configuration under following path (transaction SPRO):
Enterprise Structure -> Definition -> Human Resources Management -> Personnel Areas
There must be Company code assigned to each personnel area. In configuration you set also a country assignment in this place.
Enterprise Structure -> Assignment -> Human Resources Management -> Assignment of Personnel Areas to Company Code
Personnel sub area:-
Personnel subarea represents the whole organization in aspects of personnel management, time management and payroll. Personnel subareas could represent company's locations.
Personnel subarea defines following indicators:
- Default values for pay scale area and pay scale type
- Assignment of personnel subarea to a public holiday calendar
- Grouping of personnel subareas for vacation, work schedule, attendance and absence types, substitution and availability types, attendance and absence counting, time recording, time quota and premiums
- Personnel subarea grouping for permissibility of primary wage types
- Grouping of personnel subareas for appraisals
Personnel subarea code can be written in 4 digits, name – max. 15
Work Schedule Configuration:-Groupings

Page 68 of 77
Before start of TM configuration you have to define time specific groupings, both for employee subgroups and personnel subareas.
Firstly you define Personnel Subarea Grouping for Work Schedule and Daily Work Schedule, which controls whether a work schedule is permitted within the personnel subareas
Time Management -> Work Schedules -> Personnel Subarea Grouping -> Group Personnel Subarea for Work Schedule
and
Group Personnel Subarea for Daily Work Schedule Daily Work ScheduleThen you have to define all Daily Work Schedules (DWS) which exist in your company. DWS describes a working day of employee with start and end of working time, planned working hours, and scheduled breaks. To define a day-off we use also appropriate DWS (in attributes a day-off flag is set). You can also add variants to the daily work schedule, e.g. a shorter version of the day.
Example:
NORM – DWS for normal office workday 9.00-17.00
1SHT – DWS for 1st shift 6.00-14.00
OFF – DWS for day-off
Time Management -> Work Schedules -> Daily Work Schedules
Period Work Schedule:-
After you have defined DWS you need to define Period Work Schedules (PWS). PWS is the work pattern defined using appropriate DWS set in specific sequence. PWS covers one week or even more weeks (e.g. in case of shifts) and is the basis for generating a work schedule.
Example:
NORM, NORM, NORM, NORM, NORM, OFF, OFF
Day type:-
Next step is to define Day types. They determine whether employees must work on a specific day and whether or not they are paid. Possible values: Working and paid day Not working but paid day

Page 69 of 77
Not working and not paid day Other, customer specific day
Personnel Calculation Rule :( PCR)
It is the instructions to execute defined tasks in Time Management and Payroll. A Personnel Calculation Rules consist of one or more operations. It also contains one or more subareas. A personnel calculation rule is a frame of work instruction that is checked with the existing conditions and a resulting action is performed. The Personnel Calculation rule allows one wage type to be processed in different ways in payroll accounting. The value of the standard pay wage type should be used as a basis of valuation for hourly wage earners. The value of the standard pay wage type should be divided by the planned working hours before being used as a basis of valuation for salaried employees.
1 – Hourly wage earner2 – Monthly wage earner3 – Salaried employees
Definition:-
Statement for the execution of defined tasks in Time Management and Payroll. Personnel calculation rules (or rules) consist of one or more operations. They consist of statements for calculating values in the payroll run and define the sequence of these statements. Rules have a decision tree structure. A rule is called within a personal calculation schema to process special subtasks. If you are in a personnel calculation rule and want to create an overview of all operations, choose the Maintain Functions and Operations transaction (PE04), and then choose F4 on the Name field.
Structure:-
Each step within a rule corresponds to one operation. Further rules can be accessed via special operations. These are known as subrules.A rule can consist of several subareas. The subareas are defined for a specific combination of employee subgroup groupings for personnel calculation rules and wage types or time wage types. A subarea has the same attributes as the complete rule.
Modifiable attributes:-
When you create a personnel calculation rule, you must maintain the following attributes:
· Short text to describe the rule· Program class

Page 70 of 77
With the Program class attribute, you specify whether the rule is used in Payroll (C) or in Time Management (T).
· Country grouping
With the Country grouping attribute, you specify the country assignment for the rule. If you use country grouping * , the rule is assigned to all countries. It is only possible to assign a rule to a particular country if it has the program class Payroll. For rules with the Time Management program class, you can only assign the country grouping All countries.
The assignment of the country grouping also effects how the options and their accompanying parameters are used. You can only use the options and parameters that are permitted for this country grouping.
· Person responsible for the rule· Change authorization for the rule
With the Changes only by person responsible attribute, you specify whether the rule can only be changed by the person(s) responsible.
You can change these attributes at any time.
Administrative information
When you create a rule, the system also creates the following administrative data :
· The date on which the rule was created· Last person to change rule· Date on and time at which the last change was made
Example of PCR’S:-
The international calculation rule Recurring Payments and Deductions and Supplementary Payments (X011) reads the Recurring Payments /Deductions (0014) and Supplementary Payments (0015) Infotypes. The rule places the wage types included in these Infotypes in the wage type table (OT) for further processing.
Source Text in Table Display: Personnel Calculation Rule X011
VarKey NL T Operation Operation Operation Operation Operation Operation
000010 AMT=BETRG NUM=ANZHL NEXTR
000020 1 D VAKEYZEINH
000030 *** D VWTCL 47
000040 *** * OPIND ADDWT *
000050 *** A OPIND ADDWT * FORCE BANK TRANSFER

Page 71 of 77
000060 *** Q ELIMI * ADDWTE * ADDWT&MY10
000070 010 D VWTCL 47 <DAYS>
000080 010 * OPIND ADDWT *
000090 012 D VWTCL 47 <MONTHS>
000100 012 * OPIND ADDWT *
HR InfoSets for InfoSet Query
To access data stored in the system, InfoSet Query uses an InfoSet. It provides you with a view of data in specific parts of HR that is structured by infotype. On the initial InfoSet Query screen, the InfoSet is displayed with its field groups as an overview tree. This overview tree enables you to choose selection fields and output fields.
The InfoSets used in InfoSet Query are created and managed in SAP Query. When you create an InfoSet, you select a logical database on which the InfoSet is based, and determine which infotypes are included in the InfoSet. They are displayed in the InfoSet as field groups. After you have selected the infotypes, you can determine which fields are included in the field groups for each infotype.
In the standard system, all infotype-specific fields of the selected infotypes are included in the InfoSet. You are advised to check the selection of fields carefully, and adapt the selection to your reporting concept. Appropriately adjusted InfoSets are user-friendly, which makes working with InfoSet Query much simpler.
The InfoSet determines the objects that you can select with InfoSet Query. The following scenarios are possible:
The InfoSet is based on logical database PNP
InfoSets based on this logical database enable you to use InfoSet Query to select employees. You can use data from Personnel Administration and Time Management and payroll infotypes as selection criteria. From a technical perspective, this means you can use fields from infotypes 0000 to 0999 and 2000 to 2999 and payroll infotypes as selection criteria. For example, you can use the InfoSet to run a report that determines which employees have a particular place of residence.
Page 72 of 77
Furthermore, you can create InfoSets on the basis of this logical database that enable you to report on the infotypes of related objects using InfoSet Query. For example, you can select persons who participated in a particular business event, and output the qualifications of the persons selected. To do this, you must select infotypes from Personnel Planning as well as infotypes from Personnel Administration when you create the InfoSet.
The InfoSet is based on logical database PAP
InfoSets based on this database enable you to use InfoSet Query to select applicants. You can use data from Recruitment as selection criteria and for output. From a technical perspective, this means you can use fields from specific Personnel Administration infotypes (such as 0001 and 0002) and fields from infotypes 4000 to 4999 as selection and output fields.
The InfoSet is based on logical database PCH
Provided that object selection is switched on, InfoSets based on this database enable you to use InfoSet Query to select objects of one object type, such as business events, qualifications, and positions. You can use all of the fields of infotypes allowed for the object in question, and all of the object types and their allowed infotypes that can be related with the selected object type, as selection criteria and for output.
When you create an InfoSet, you determine the object type that you can select using an InfoSet. The generated InfoSet can only be used to select this particular object type. If you want to create reports for business events, qualifications, or positions, for example, you must create three separate InfoSets. This means the reports can only be executed separately.
If you do not select an object type when you create the InfoSet, you can only use the InfoSet for InfoSet Query if object selection has been switched off.
See also:
InfoSets in the HR Application
InfoSets in the HR Application
You can use SAP Query in HR to report on HR data. Queries are maintained as described in Creating Queries. The special features of queries created for HR are described in Maintaining Queries in the Human Resources Application. The maintenance procedure for HR InfoSets differs from the described procedure inasmuch as HR data fields are grouped together in infotypes.
InfoSet management in SAP Query is also used for InfoSet Query. For further information, see Functions for Managing InfoSets.

Page 73 of 77
If you want to create InfoSets for HR, you can use logical databases PNP, PAP, and PCH (see HR Logical Databases). The database you must use to create your InfoSet depends on the component in which the data you want to report on is stored.
The reports you can execute using InfoSets based on logical databases PNP or PCH are similar, but differ in that they can select different objects. The following table describes the connection between the logical database, and the infotypes you can include in an InfoSet. It also provides you with one or two examples of reports that you can execute using the appropriate InfoSets.
Logical database
PNP PCH PAP
Selection of Persons Objects from Personnel Planning
Applicants
Infotypes that can be included in the InfoSet
Infotypes for
Personnel Administration (0000-0999)
Time Management (2000-2999)
Payroll infotypes
Infotypes for Personnel Planning objects that can be related to persons
If the object type is specified:
Infotypes for the object type
Infotypes for objects that can be related to the specified object type
If the object type is not specified:
All infotypes
Infotypes for Recruitment (4000-4999)
Some infotypes for Personnel Administration (such as 0001 and 0002)
Customer infotypes
Reporting examples
Selection of all persons who participated in a specific business event, output of prices for reserved business events
Selection of all persons assigned to a specific personnel area, output of
Selection of all business events held in London in March, output of all persons who participated in these business events
Selection of all positions assigned to a specific organizational
Selection of all applicants hired last year to work on special projects, output of addresses for the applicants selected
Page 74 of 77
qualifications held by these persons
unit, output of all persons assigned to the positions
Creating InfoSets
The maintenance procedure for HR InfoSets differs from the procedure described so far in this section inasmuch as HR data fields are grouped together in infotypes. To set up an InfoSet for the HR application, proceed as follows:
1. On the initial screen for maintaining InfoSets, enter a name for the InfoSet and choose Create.
2. On the next screen, enter a name for the InfoSet and select one of the HR logical databases in accordance with your reporting requirements.
Customer infotypes can be created on all HR logical databases. In each individual case, therefore, you must decide which database to select so that you can report on customer infotypes.
This screen enables you to enter an authorization group. All of the queries that are subsequently created using this InfoSet can only be executed by persons who have this authorization group.
3. Choose .
This takes you to the Infotype Selection for InfoSet <InfoSet name> dialog box. It contains all of the infotypes that you can access using the selected logical database.
If you use logical database PCH to create an InfoSet with which to select objects in InfoSet Query, select the object type first.
Once you have selected the object type, you can select the object type's infotypes. Furthermore, all of the object types that can be related to the selected object type are listed below Infotypes of related objects. The next level in this tree outputs all of the relationships that can exist between the object type in question and the object type that can be selected. All of the selected object type’s infotypes are displayed on the last level.
If you use logical database PNP to create an InfoSet, you can use the infotypes from Personnel Administration. They are grouped
Page 75 of 77
together according to the current user group in Personnel Administration.
Furthermore, all of the object types that can be related to the persons object are listed below Infotypes of related objects. The next level in this tree outputs all of the relationships that can exist between the respective object type and the person object type. The following relationships, for example, can exist between persons and qualifications: fulfils, has potential for, interests and preferences, anddislikes. All of the selected object type’s infotypes are displayed on the last level.
If you use logical database PAP to create an InfoSet, you can use the infotypes from Recruitment and some infotypes from Personnel Administration.
4. Choose the infotypes that are required in the InfoSet.
A field group is created in the InfoSet for each infotype that you select. The name of the field groups corresponds to the name of the infotype or consists of the object name, relationship name, and infotype name (for example, qualification/fulfils/object).
5. Choose .
This takes you to the Change Infoset <InfoSet name> screen. You now have the option of creating field groups and assigning fields as required for non-HR InfoSets. Field groups that correspond to infotypes and already contain fields, however, are always created for HR InfoSets. The field groups are displayed in an overview tree in the top right section of the screen.
The infotypes that you included in the InfoSet are displayed in an overview tree on the left of the screen. The infotype fields that are already included in field groups are displayed in a different color, and the field group ID is displayed.
In the standard system, a field group is created automatically for each infotype that you included in the InfoSet (a field group corresponds to an infotype).
In the standard system, each field group contains the infotype-specific fields. To ensure that working with the InfoSet is as easy as possible, you are advised to restrict your use of fields in each field group to those you really require. This means you should remove fields that are not required.
An infotype's fields must only be assigned to the pertinent field group. Make sure this assignment is correct. If the assignment is incorrect, the InfoSet could be rendered unusable.

Page 76 of 77
When an InfoSet is created, the following fields are transferred automatically to the first field group:
Logical database PNP Personnel number Logical database PAP Applicant number Logical database PCH Object ID, plan version,
and object type
6. Determine the fields that must be included in the field groups of your InfoSet. If you require further information, see Assigning Fields to a Field Group.
If you want, you can change the default sequence of field groups and fields as required using drag & drop.
7. To save the InfoSet, choose .8. To generate the InfoSet, choose .
On the Change InfoSet (InfoSet name) screen, you can choose Edit � Change infotype selection to add more infotypes to the InfoSet, or to remove infotypes from the InfoSet. Remember to regenerate the InfoSet afterwards.
This screen also enables you to update InfoSets if, for example, the system contains new additional fields for specific key values. To do so, choose InfoSet � Additional functions � Update additional HR fields.
9. Go back to the initial screen for InfoSet maintenance.10. Choose User group assignment.11. Select a user group, and save your entry.