12d Model installing Hardlock...Select File =>Exit to exit the Aladdin Monitor program. The Hardlock...
26
12D SOLUTIONS PTY LTD ACN 101 351 991 PO Box 351 Narrabeen NSW Australia 2101 Australia Telephone (02) 9970 7117 Fax (02) 9970 7118 International Telephone 61 2 9970 7117 Fax 61 2 9970 7118 email [email protected] web page www.12d.com Installing Network Dongles January 2007 12d Model
Transcript of 12d Model installing Hardlock...Select File =>Exit to exit the Aladdin Monitor program. The Hardlock...

12D SOLUTIONS PTY LTD ACN 101 351 991
PO Box 351 Narrabeen NSW Australia 2101
Australia Telephone (02) 9970 7117 Fax (02) 9970 7118
International Telephone 61 2 9970 7117 Fax 61 2 9970 7118
email [email protected] web page www.12d.com
Installing Network Dongles
January 2007
12d Model

12d Model Installing Network Dongles
2 January 2007
Disclaimer12d Model is supplied without any express or implied warranties whatsoever.
No warranty of fitness for a particular purpose is offered.
No liabilities in respect of engineering details and quantities produced by 12d Model are accepted.
Every effort has been taken to ensure that the advice given in this manual and the program 12d MODEL is correct, however, no warranty is expressed or implied by 12D SOLUTIONS PTY LTD.
CopyrightThis manual is copyrighted and all rights reserved.
This manual may not, in whole or part, be copied or reproduced without the prior consent in writing from 12D Solutions Pty Ltd.
Copies of 12d Model software must not be released to any party, or used for bureau applications without the written permission of 12D Solutions Pty Ltd.
Copyright (c) 1989-2007 by 12D Solutions Pty Ltd
Sydney, New South Wales, Australia.
ACN 101 351 991
All rights reserved.

Table of Contents
February 2005 3
Installing Hardlock Network Dongles............................................................................................ 5A Guide to the Notes ................................................................................................................ 5Installing the Hardlock Dongle Drivers................................................................................. 6Installing the Network Administration Server ..................................................................... 7
Copying the "Hardlock New" Folder.......................................................................... 7Installing the Network Device Drivers....................................................................... 8Installing the Aladdin Network Monitoring Software........................................... 12Adding the Hardlock Dongle to the Monitor .......................................................... 15
Updating env.4d and nodes.4d ............................................................................................. 17Updating env.4d........................................................................................................... 17Updating nodes.4d ...................................................................................................... 18
Monitoring Network Dongles ............................................................................................... 19Replacing an Existing Network Dongle............................................................................... 22

12d Model Installing Network Dongles
4 February 2005

January 2007 5A Guide to the Notes
Installing Hardlock Network DonglesWARNING
Do not attach the network dongle to your computer until after you have installed the dongle drivers.
A Guide to the Notes
12d Model uses a Hardlock network dongle for controlling the number of copies of 12d Model that are available and being used on a computer network. The Hardlock network dongle can be either a USB dongle, or a parallel dongle for attaching to the older parallel (printer) ports.
These notes are for installing a new parallel or USB hardlock network dongle, for swapping network dongles or for monitoring network dongles.
To install/swap the network dongle you will need the 12d Model 7 Installation CD and the network dongle supplied by 12D Solutions Pty Ltd.
An Adobe Acrobat (PDF) copy of these notes is on the 12d Model Installation CD in the directory
Documentation\Installing network dongle new
WARNING - if you were previously using the HLSADMIN Hardlock Server software to install and monitor your hardlock network dongle then you need to remove the existing network dongle, stop and remove the service (use Hardlock\Hlserver\Nt_95\Hlsadmin.exe) and uninstall the Hardlock Server software, any Aladdin monitor and Aladdin diagnostic software and Hardlock drivers before proceeding. If you do not uninstall the old Aladdin Hardlock software before trying to install this new software, then the new software will not install correctly.
Please continue to the next section if your are installing a Hardlock network dongle on the computer for the first time. If you already have a network dongle and are replacing it by a new network dongle, please go the section “Replacing an Existing Network Dongle” on page 22.

12d Model Installing Network Dongles
6 January 2007Installing the Hardlock Dongle Drivers
Installing the Hardlock Dongle DriversWARNING - Do not attach the network dongle to your computer until after you have installed the dongle drivers.
This section is only for installing a Hardlock network dongle onto the computer for the first time. If you already have a network dongle and are replacing it by a new network dongle, please go the section “Replacing an Existing Network Dongle” on page 22.
The first step is that the dongle drivers for the Hardlock dongle must be installed on the computer that the network dongle will be attached to.
The dongle drivers are installed from the 12d Model 7 Installation CD
Insert the 12d Model 7 Installation CD into the CD drive.
On inserting the CD, the 12d Model Installation program automatically begins.
If it doesn’t, simply double click on the program "setup.exe" from the CD.
The Install 12d Model Release screen will appear.
Follow Steps 1 and 2 to install and check the Hardlock drivers for the parallel/USB port that the network dongle is to be attached to.
At the end of Step 2, your network dongle should be attached to the appropriate parallel/USB port and be visible when running the Check program. If you are having any problems, please contact your 12d Model Distributor.

Chapter Installing Hardlock Network Dongles
January 2007 7Installing the Network Administration Server
Installing the Network Administration ServerThis section is only for installing a Hardlock network dongle onto the computer for the first time. If you already have a network dongle and are replacing it by a new network dongle, please go the section “Replacing an Existing Network Dongle” on page 22.
The Hardlock network dongle supplied by 12D Solution should now have been attached to the appropriate port (USB or parallel printer port) and Checked. If this has not been done, please refer to the previous section “Installing the Hardlock Dongle Drivers” on page 6.
Note that the dongle must be attached to the port at all times, otherwise 12d Model sessions will stop running.
Copying the "Hardlock New" Folder
From the 12d Model Installation CD copy the folder
Hardlock new
onto the Computer that the network dongle is attached to.
Folders on 12d Installation CD
12d Model Installing Network Dongles
8 January 2007Installing the Network Administration Server
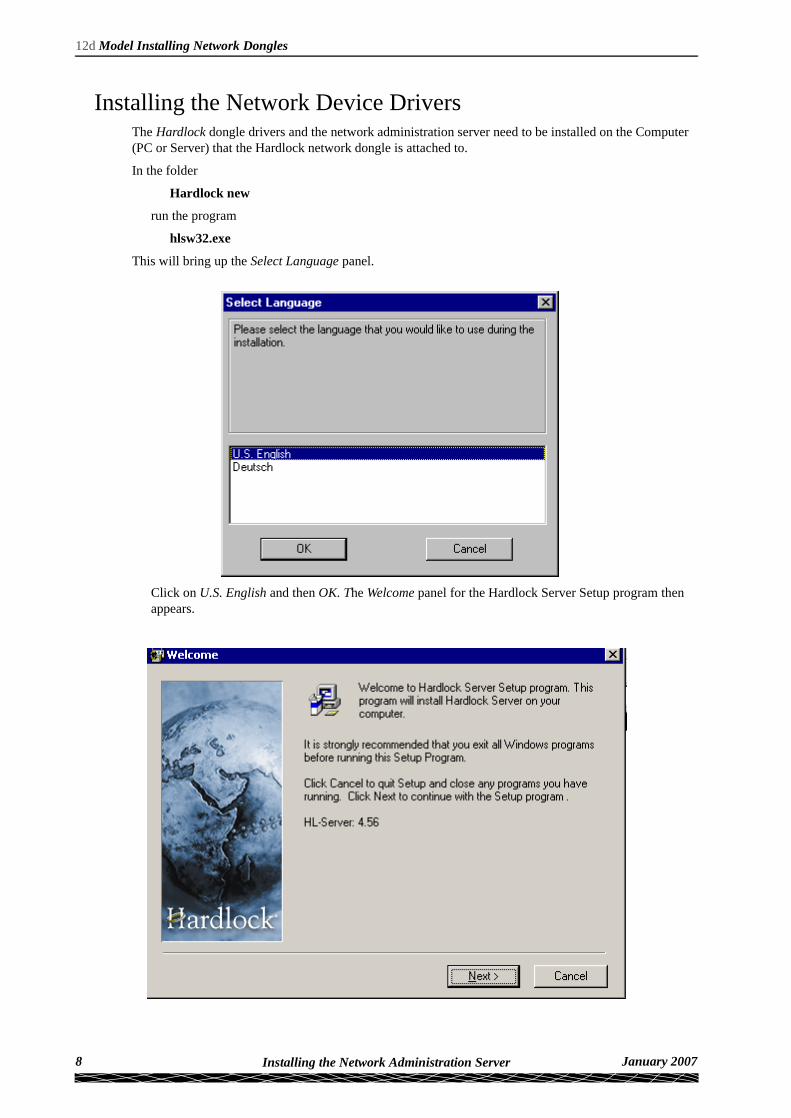
Installing the Network Device DriversThe Hardlock dongle drivers and the network administration server need to be installed on the Computer (PC or Server) that the Hardlock network dongle is attached to.
In the folder
Hardlock new
run the program
hlsw32.exe
This will bring up the Select Language panel.
Click on U.S. English and then OK. The Welcome panel for the Hardlock Server Setup program then appears.
Chapter Installing Hardlock Network Dongles
January 2007 9Installing the Network Administration Server
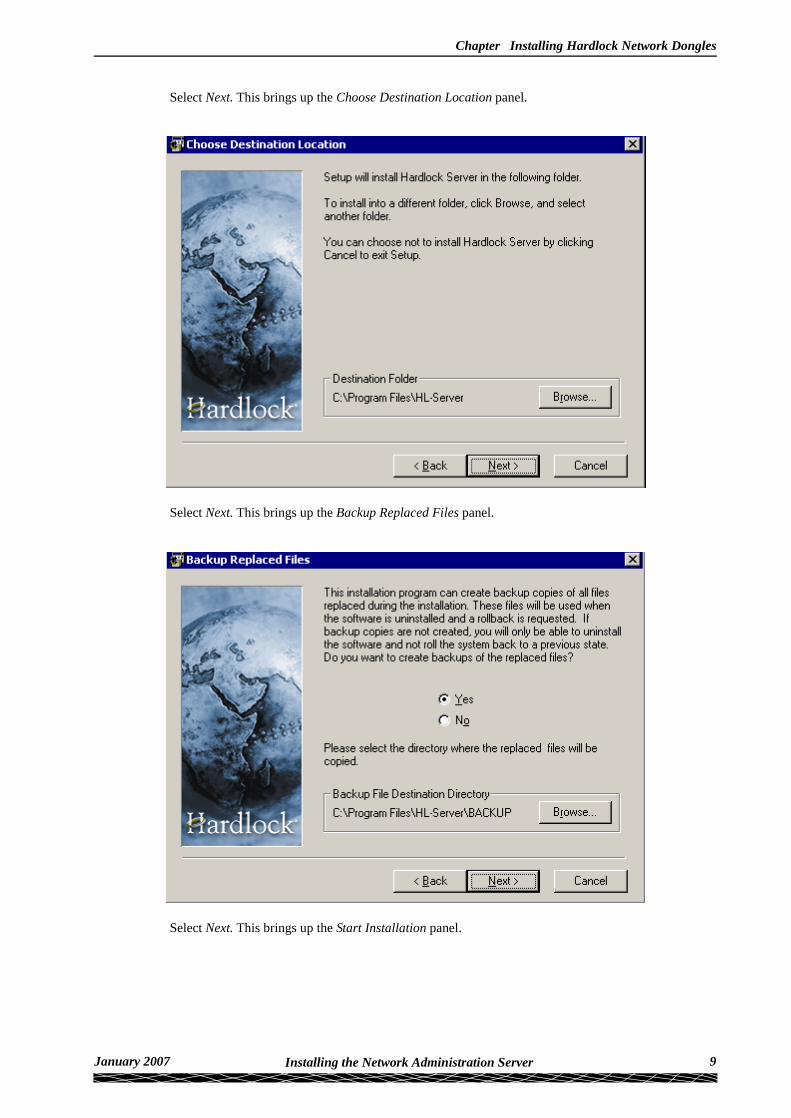
Select Next. This brings up the Choose Destination Location panel.
Select Next. This brings up the Backup Replaced Files panel.
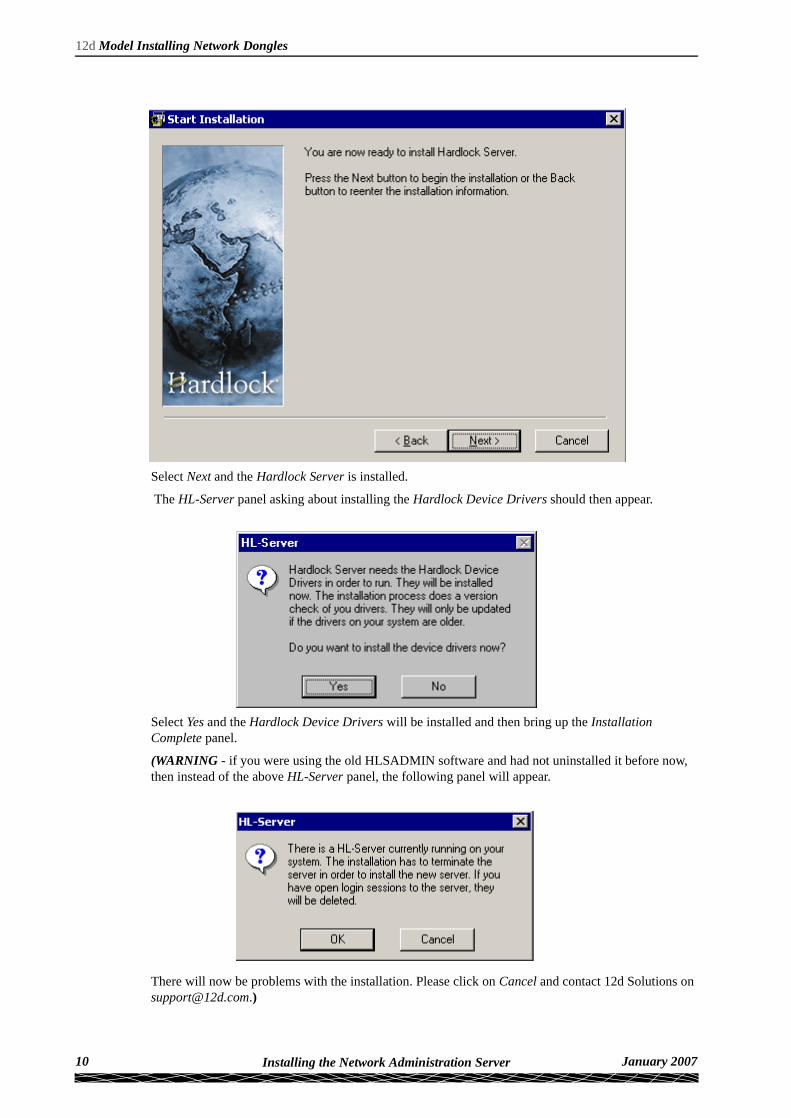
Select Next. This brings up the Start Installation panel.
12d Model Installing Network Dongles
10 January 2007Installing the Network Administration Server
Select Next and the Hardlock Server is installed.
The HL-Server panel asking about installing the Hardlock Device Drivers should then appear.
Select Yes and the Hardlock Device Drivers will be installed and then bring up the Installation Complete panel.
(WARNING - if you were using the old HLSADMIN software and had not uninstalled it before now, then instead of the above HL-Server panel, the following panel will appear.
There will now be problems with the installation. Please click on Cancel and contact 12d Solutions on [email protected].)

Chapter Installing Hardlock Network Dongles
January 2007 11Installing the Network Administration Server
Select Finish to end the Hardlock Device Drivers installation.

12d Model Installing Network Dongles
12 January 2007Installing the Network Administration Server
Installing the Aladdin Network Monitoring SoftwareIn the folder
Hardlock new
run the program
askmon32.exe
This will bring up the Select Language panel.
Click on U.S. English and then OK. The Welcome panel for the Aladdin Monitor Setup program then appears.
Select Next. This brings up the Choose Destination Location panel.

Chapter Installing Hardlock Network Dongles
January 2007 13Installing the Network Administration Server
Select Next. This brings up the Backup Replaced Files panel.
Select Next. This brings up the Start Installation panel.

12d Model Installing Network Dongles
14 January 2007Installing the Network Administration Server
Select Next and the Aladdin Monitor is installed and the Installation Complete panel appears.
Select Finish to end the Aladdin Monitor installation.

Chapter Installing Hardlock Network Dongles
January 2007 15Installing the Network Administration Server
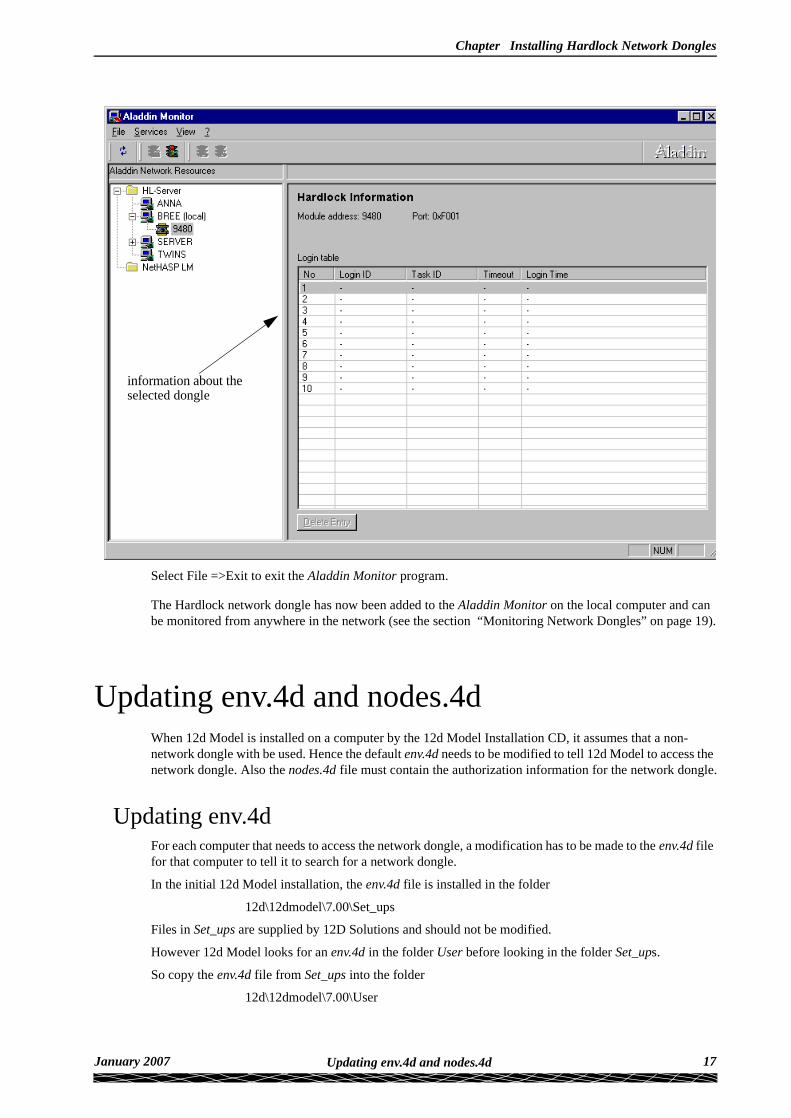
Adding the Hardlock Dongle to the MonitorNow that the Aladdin Monitoring Software is installed, the dongle needs to be added to the Monitoring software on the local machine.
On the Windows tool, select
Start => Programs =>Aladdin =>Monitor =>AKS Monitor
to bring up the Aladdin Monitor panel.
The Aladdin Monitor is used to monitor all the Hardlock network dongles in the network but before a dongle can be monitored, it must be added to the Monitor on its local computer (that is, on the computer that the dongle is attached to).
the local computer
12d Model Installing Network Dongles
16 January 2007Installing the Network Administration Server
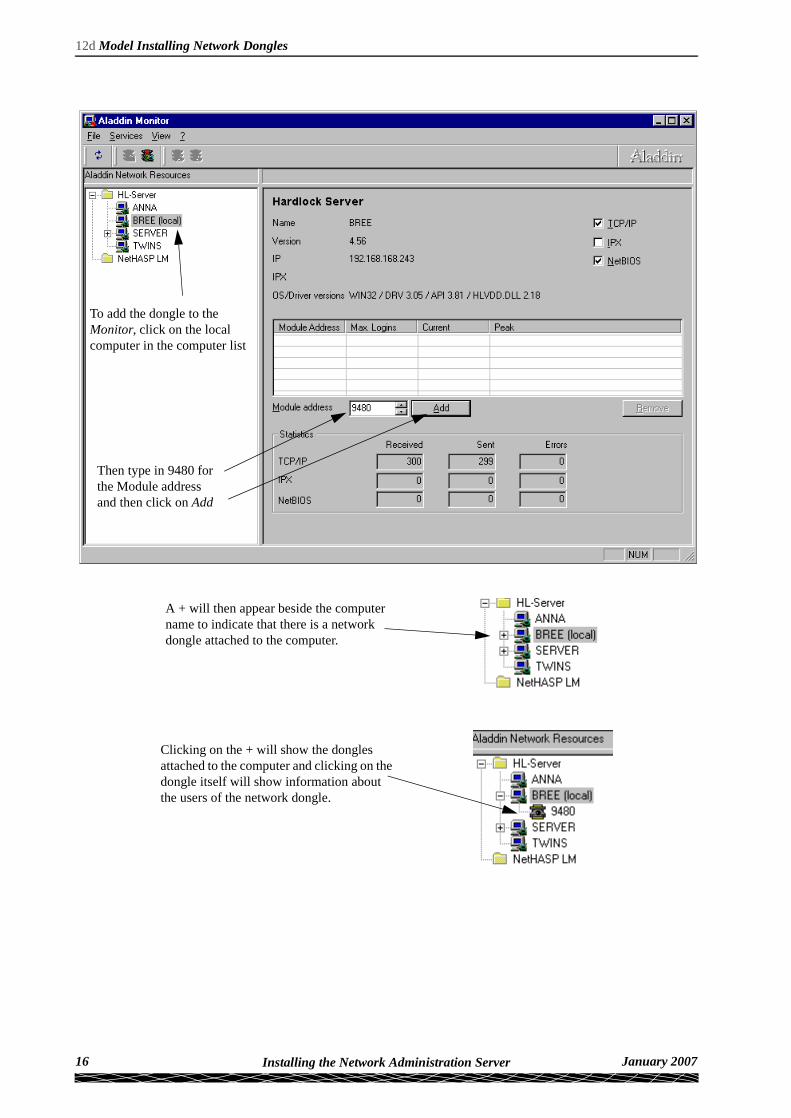
To add the dongle to the Monitor, click on the local computer in the computer list
Then type in 9480 for the Module address and then click on Add
A + will then appear beside the computer name to indicate that there is a network dongle attached to the computer.
Clicking on the + will show the dongles attached to the computer and clicking on the dongle itself will show information about the users of the network dongle.
Chapter Installing Hardlock Network Dongles
January 2007 17Updating env.4d and nodes.4d
Select File =>Exit to exit the Aladdin Monitor program.
The Hardlock network dongle has now been added to the Aladdin Monitor on the local computer and can be monitored from anywhere in the network (see the section “Monitoring Network Dongles” on page 19).
Updating env.4d and nodes.4dWhen 12d Model is installed on a computer by the 12d Model Installation CD, it assumes that a non-network dongle with be used. Hence the default env.4d needs to be modified to tell 12d Model to access the network dongle. Also the nodes.4d file must contain the authorization information for the network dongle.
Updating env.4dFor each computer that needs to access the network dongle, a modification has to be made to the env.4d file for that computer to tell it to search for a network dongle.
In the initial 12d Model installation, the env.4d file is installed in the folder
12d\12dmodel\7.00\Set_ups
Files in Set_ups are supplied by 12D Solutions and should not be modified.
However 12d Model looks for an env.4d in the folder User before looking in the folder Set_ups.
So copy the env.4d file from Set_ups into the folder
12d\12dmodel\7.00\User
information about theselected dongle

12d Model Installing Network Dongles
18 January 2007Updating env.4d and nodes.4d
and edit the env.4d file in User.
Now in the env.4d file add the line:
DONGLE_4D parameters // where each parameter is separated by at least one space
where the parameters for DONGLE_4D include:
-network_first look for a network dongle first
-network_last look for a local dongle first and then network dongle last
-no_network don’t look for a network dongle
-local look for a local dongle
-no_local don’t look for a local dongle
-login_retires number_of_retries which defines how many retries are made to see the dongle
-login_wait seconds_to_wait number of seconds to wait between retries.
For example,
DONGLE_4D -network_first // would look for a network dongle first and then a local dongle
or DONGLE_4D -network_last // would look for a local dongle first and then a network dongle
or DONGLE_4D -network_first -no_local // looks for a network dongle only, no local dongle
Note that it is possible to set env.4d up so that if there is a standard local dongle on the computer then it will be used by 12d Model but if no standard local dongle exists, then 12d Model uses the network dongle.
To make searching for the dongle faster on large networks, or if more than one 12d Model dongle is on the network, then the IP address of the computer with the network dongle can be included in the env.4d file.
Simply add the line
HLS_IPADDR IP address for the machine with the network dongle
For example,
DONGLE_4D -network_last
HLS_IPADDR 192.9.200.110
Updating nodes.4dFor each computer that accesses the network dongle, the authorization information for the network dongle must be added to the nodes.4d file accessed by 12d Model on the computer.
The default folder for the nodes.4d file is
12d\12dmodel\7.00
or, the environment variable AUTHORIZATION_4D in the env.4d used by 12d Model on that computer can be set to point to a nodes.4d file with the network dongle authorization information in it.
Note that nodes.4d can contain the authorization information for more than one dongle (standard or network dongles).

Chapter Installing Hardlock Network Dongles
January 2007 19Monitoring Network Dongles
Monitoring Network DonglesThe Aladdin Monitoring software can be used to monitor all the Hardlock network dongles on the network. It displays how many licenses are available for each network dongle, how many licenses are being used and the IP address of the users on a network dongle.
The Aladdin Monitoring software can be run on any computer in the network, not just those with Hardlock network dongles attached. If the Aladdin Monitoring software is not installed on the computer, simply follow the installation instructions in the previous section “Installing the Aladdin Network Monitoring Software” on page 12.
To start the Aladdin Monitoring software, on the Windows taskbar, select
Start => Programs =>Aladdin =>Monitor =>AKS Monitor
The Aladdin Monitoring software will start, scan the network for any Hardlock network dongles and display the results in the Aladdin Monitor panel.
Computers with a + beside their name have one or more network dongles attached to them
By clicking on the computer name, all the Hardlock network dongles attached to that computer are displayed along with the maximum number of licenses available for that dongle and the current number of users.

12d Model Installing Network Dongles
20 January 2007Monitoring Network Dongles
all the network dongleson the selected computer
note that all 12d Modelnetwork dongles havethe number 9480
To display the information for a particular dongle on a computer, simply click on the + beside the computer name to show all the network dongles attached to the computer
and then click on the dongle itself to show information about the users of that network dongle.

Chapter Installing Hardlock Network Dongles
January 2007 21Monitoring Network Dongles
The Hardlock Information table for the selected dongle includes the number of 12d Model licenses available, the number of licenses currently being used, the IP address for each user and the login time and date.
Users of the network dongle can be removed from the dongle by clicking on the entry in the table and then selecting the Delete Entry button.
NOTE -There may be more than one Hardlock network dongle on the network and Hardlock network dongles from software vendors other than 12d Solutions. The Hardlock network dongles issued by 12d Solutions for 12d Model have the number 9480.
all the users on the selectednetwork dongle on SERVER
total number of licenses

12d Model Installing Network Dongles
22 January 2007Replacing an Existing Network Dongle
Replacing an Existing Network DongleWhen the number of 12d Model licenses for a network dongle is increased, the current Hardlock network dongle needs to be replaced by a new network dongle which is configured with more licenses. The new Hardlock network dongle must be received from 12D Solutions before preceding.
This section of the notes explains how to swap the two Hardlock network dongles.
NOTE: you can’t just physically swap the network dongles on the computer.
Step 1 Make sure no one is using the network dongle
To check if the network dongle is being used, see the previous section on Monitoring Network Dongles.
If there are any users on the network dongle, get them to exit 12d Model before proceeding.
Step 2 Removing the existing network dongle from the Aladdin Monitoring software
On the Windows taskbar, select
Start => Programs =>Aladdin =>Monitor =>AKS Monitor
The Aladdin Monitoring software will start, scan the network for any hardlock network dongles and display the results in the Aladdin Monitor panel.
There may be more than one Hardlock dongle on the network and Hardlock dongles from software vendors other than 12d Solutions. The Hardlock dongles issued by 12d Solutions for 12d Model have the number 9480.

Chapter Installing Hardlock Network Dongles
January 2007 23Replacing an Existing Network Dongle
Step 3 Physically exchange the network dongles
Physically remove the Hardlock network dongle from the computer and then attach the new Hardlock network dongle to the computer.
Step 4 Adding the new network dongle to the Aladdin Monitoring software
On the Aladdin Monitoring panel, click on the + beside the name of the computer to remove the network dongle from. This will display all the network dongles on this computer.
Then right click on the dongle itself and select Remove from Server
Select Yes and thedongle is removedfrom the Monitoringsoftware

12d Model Installing Network Dongles
24 January 2007Replacing an Existing Network Dongle
To add the dongle to the Monitor, click on the local computer in the computer list
Then type in 9480 for the Module address and then click on Add
A + will then appear beside the computer name to indicate that there is a network dongle attached to the computer.
And the new dongle will be displayed showing the maximum number of licenses

Chapter Installing Hardlock Network Dongles
January 2007 25Replacing an Existing Network Dongle
Step 5 Updating nodes.4d
The new network dongle will have a new 12d Model dongle number and hence need new authorization information to go with it. This is normally supplied in a new nodes.4d file.
For each computer that accesses the new network dongle, the authorization information for the new network dongle must be added to the nodes.4d file accessed by 12d Model on the computer.
Or, the environment variable AUTHORIZATION_4D in the env.4d used by 12d Model can be set to point to the nodes.4d file with the new network dongle authorization information in it.
Note that nodes.4d can contain the authorization information for more than one dongle (standard or network dongles).

12d Model Installing Network Dongles
26 January 2007Replacing an Existing Network Dongle