12642718 JA Btm Frz Trilingual - Sears Parts Direct · • Slide trim down until piece locks into...
24
G U I D E J ENN-AIR B OTTOM F REEZER REFRIGERATOR U SER U SER G U I D E ABLE OF CONTENTS T Form No. B/10/02 Part No. 12642718 MCS No. 16021782 Printed in U.S.A. ©2002 Maytag Appliances Sales Co. Introduction ...........................................................................2 Important Safety Information ............................................3 Installation Instructions ...................................................4-9 How to Remove the Doors and Hinges .....................4 How to Reverse Refrigerator Door .............................5 How to Install and Remove Handles ............................5 How to Replace the Doors and Hinges ......................6 How to Install and Remove Panels ...............................6 How to Remove and Install the Pullout Drawer .......7 How to Connect the Water Supply ..............................8 How to Level Your Refrigerator ....................................9 Temperature Controls ......................................................10 Fresh Food Features....................................................11-12 Water Dispenser .............................................................11 Interior Shelves ................................................................11 Door Storage ...................................................................11 Climate-Controlled Drawers .......................................12 Accessories .......................................................................12 Freezer Features ................................................................13 Automatic Ice Maker ......................................................13 Drawers .............................................................................13 Accessories .......................................................................13 Water Filtration .................................................................14 Water Filter Data ..............................................................15 Hints and Care ...................................................................16 Cleaning Instructions......................................................16 How to Remove and Replace Light Bulbs ................17 Food Storage Tips ..............................................................18 Food Storage Chart ..........................................................19 Normal Operating Sounds ..............................................20 Before You Call For Service ......................................21-22 Warranty ..............................................................................23 Guide de L’Utilisateur .......................................................25 Guía del Usuario ................................................................49
Transcript of 12642718 JA Btm Frz Trilingual - Sears Parts Direct · • Slide trim down until piece locks into...

G U I D E
JENN-AIR BOTTOM FREEZER REFRIGERATOR
USERUSERG U I D E
ABLE OF CONTENTST
Form No. B/10/02 Part No. 12642718 MCS No. 16021782 Printed in U.S.A.©2002 Maytag Appliances Sales Co.
Introduction...........................................................................2Important Safety Information............................................3Installation Instructions...................................................4-9
How to Remove the Doors and Hinges .....................4How to Reverse Refrigerator Door.............................5How to Install and Remove Handles............................5How to Replace the Doors and Hinges ......................6How to Install and Remove Panels ...............................6How to Remove and Install the Pullout Drawer.......7How to Connect the Water Supply..............................8How to Level Your Refrigerator ....................................9
Temperature Controls ......................................................10Fresh Food Features....................................................11-12Water Dispenser .............................................................11Interior Shelves................................................................11Door Storage ...................................................................11Climate-Controlled Drawers .......................................12Accessories .......................................................................12
Freezer Features ................................................................13Automatic Ice Maker ......................................................13Drawers.............................................................................13Accessories .......................................................................13
Water Filtration .................................................................14Water Filter Data ..............................................................15Hints and Care ...................................................................16
Cleaning Instructions......................................................16How to Remove and Replace Light Bulbs ................17
Food Storage Tips ..............................................................18Food Storage Chart ..........................................................19Normal Operating Sounds ..............................................20Before You Call For Service ......................................21-22Warranty..............................................................................23Guide de L’Utilisateur .......................................................25Guía del Usuario ................................................................49

2
INTRODUCTION
Congratulations on the purchase of a Jenn-Air refrigerator!We appreciate your purchase decision and feel confident you will be happy with thisappliance for years to come. For best results, please read this guide carefully.You willfind instructions on the proper operation and maintenance of your refrigerator.Additionally, food storage information has been included for you.Should you ever need our future assistance with your refrigerator, a complete modeland serial number recorded in the spaces below will be extremely helpful. Thesenumbers are found on a data plate inside the refrigerator compartment on theupper surface.
Model Number ______________________________________________________
'P' Number __________________________________________________________
Serial Number________________________________________________________
Purchase Date _______________________________________________________
Dealer Name ________________________________________________________
Dealer Address _______________________________________________________
Dealer Phone ________________________________________________________
BEFORE CALLING FORSERVICE...If something seems unusual, please check the“Before You Call For Service” section, whichis designed to help you solve basic problemsbefore calling a servicer.
WHAT IF THESE FEATURESARE DIFFERENT FROMMINE?This book is intended to show the variety offeatures that are available in the productline. If your refrigerator does not have all theoptions that are shown, many of theseoptions may be purchased by contacting theConsumer Affairs Department. If you havequestions, write us (include your modelnumber and phone number) or call:
Maytag Appliances Sales CompanyAttn: CAIR® CenterP.O. Box 2370Cleveland,TN 37320-2370U.S. and Canada 1-800-JENNAIR
(1-800-536-6247)1-800-688-2080 (U.S.A.TTY forhearing or speech impaired)(Mon.-Fri., 8 am-8 pm Eastern Time)Internet: http://www.maytag.com

CAUTION – Hazards or unsafepractices which COULD result inminor personal injury.
CAUTION:
3
IMPORTANT SAFETY INFORMATION
WHAT YOU NEED TOKNOW ABOUT SAFETYINSTRUCTIONSWarning and Important SafetyInstructions appearing in this manual arenot meant to cover all possibleconditions and situations that may occur.Common sense, caution, and care mustbe exercised when installing, maintaining,or operating refrigerator.
Always contact your dealer, distributor,service agent, or manufacturer aboutproblems or conditions you do notunderstand.
SAVE THESE INSTRUCTIONS
DANGER – Immediate hazardswhich WILL result in severepersonal injury or death.
DANGER:
WARNING – Hazards or unsafepractices which COULD result insevere personal injury or death.
WARNING:
To reduce risk of fire, electric shock, serious injury or death when using your refrigerator, follow these basicprecautions, including the following:
WARNING:
To reduce risk of injury or death,follow basic precautions, includingthe following:
IMPORTANT: Child entrapmentand suffocation are not problems of thepast. Junked or abandoned refrigeratorsare still dangerous – even if they sit outfor “just a few days.” If you are gettingrid of your old refrigerator, pleasefollow the instructions below to helpprevent accidents.
Before you throw away your oldrefrigerator or freezer:
➢ Take off the doors.
➢ Leave the shelves inplace so childrenmay not easily climbinside.
DANGER:RECOGNIZE SAFETYSYMBOLS,WORDS, LABELS
1. Read all instructions before using the refrigerator.2. Observe all local codes and ordinances.3. Be sure to follow grounding instructions.4. Check with a qualified electrician if you are not sure this
appliance is properly grounded.5. DO NOT ground to a gas line.6. DO NOT ground to a cold-water pipe.7. Refrigerator is designed to operate on a separate 103 to
126 volt, 15 amp., 60 cycle line. DO NOT modify plug onpower cord. If plug does not fit electrical outlet, haveproper outlet installed by a qualified electrician.
8. DO NOT use a two-prong adapter, extension cord orpower strip.
9. DO NOT remove warning tag from power cord.10. DO NOT tamper with refrigerator controls.11. DO NOT service or replace any part of refrigerator unless
specifically recommended in Owner’s Manual or published
user-repair instructions. DO NOT attempt service ifinstructions are not understood or if they are beyond personalskill level.
12. Always disconnect refrigerator from electrical supplybefore attempting any service. Disconnect power cord bygrasping the plug, not the cord.
13. Install refrigerator according to Installation Instructions.Allconnections for water, electrical power and groundingmust comply with local codes and be made by licensedpersonnel when required.
14. Keep your refrigerator in good condition. Bumping ordropping refrigerator can damage unit or cause unit tomalfunction or leak. If damage occurs, have refrigeratorchecked by qualified service technician.
15. Replace worn power cords and/or loose plugs.16. Always read and follow manufacturer’s storage and ideal
environment instructions for items being stored inrefrigerator.

1. Unplug power cord from powersource.
2. Remove toegrille andbottom bracketcovers.
3. Remove the top trim offresh food door with Phillipsscrewdriver.
• Retain screws and trim forreplacement.
4. Unscrew 5⁄16" hexhead screws fromtop hinge toremove hinge.
• Retain all screws for later use.
5. Lift refrigerator door from centerhinge pin.
6. Remove centerhinge pin with a 5⁄16"hex nut driver.
• Retain hinge pinfor later use.
7. Remove Phillipsscrews to removecenter hinge.
• Retain all screws for later use.
8. Remove both stabilizing brackets with3⁄8" hex head driver.
• Retain screws for later use.
4
INSTALLATION INSTRUCTIONS
These instructions were provided to aidyou in the installation of your refrigerator.
MEASURING THEOPENINGA 1⁄2" of air space should be provided forthe back of the unit to allow for thepower cord and water line. Wheninstalling your unit, measure carefully.
Subflooring or floor coverings (i.e.carpet, tile, wood floors, rugs) may makeyour opening smaller than anticipated.
Some clearance may be gained by usingthe leveling procedure on page 9.
IMPORTANT: If unit is to be installedinto a recess where top of unit iscompletely covered, use dimensions fromfloor to top of hinge cap to verify properclearance.
TRANSPORTING YOUREFRIGERATORFollow these tips when moving the unitto final location:
➢ NEVER transport unit on its side. Ifan upright position is not possible, layunit on its back. Allow unit to situpright for approximately 30 minutesprior to plugging unit in to assure oilreturn to the compressor. Pluggingunit in immediately may cause damageto internal parts.
➢ Use an appliance dolly when movingunit. ALWAYS truck unit from itsside–NEVER from its front or back.
➢ Protect outside finish of unit duringtransport by wrapping cabinet inblankets or inserting padding betweenthe unit and dolly.
➢ Secure unit to dolly firmly with strapsor bungee cords. Thread strapsthrough handles when possible. DONOT overtighten. Overtighteningrestraints may dent or damageoutside finish.
SELECTING THE BESTLOCATION➢ Allow for a free flow of air through
the front base grille.
➢ Install the refrigerator where theroom temperature will not go below55° F. With temperatures below 55° F,the refrigerator will not runfrequently enough to maintain propertemperature in the freezer.
➢ Locate the refrigerator away fromheat producing appliances such as therange or dishwasher, heat vents anddirect sunlight.
➢ A minimum of 1⁄2" clearance is requiredat the back. Allow 1⁄2" at the sides forease of installation. If refrigerator isplaced with the door hinge side againsta wall, you may want to allowadditional space.
➢ Use caution when installing therefrigerator on vinyl or hardwoodfloors so as not to mark or otherwisedamage the flooring. A piece ofplywood, a rug or other materialshould be used to protect the floorwhile positioning the refrigerator.
HOW TO REMOVE THEDOOR AND HINGESSome installations require door removalto transport refrigerator to its finallocation.
To remove drawer, see instructions onpage 7.
To avoid electrical shock which cancause severe personal injury or death,observe the following:
➢ Disconnect power to refrigeratorbefore removing doors. Connectpower only after replacing doors.
WARNING:
To avoid damage to walls and flooring,protect soft vinyl or other flooringwith cardboard, rugs or otherprotective material.
CAUTION:

5
HOW TO REVERSEREFRIGERATOR DOOR
DOORS WITH TRIM ANDPANELS1. Perform all steps listed in How to
Remove the Door and Hinges.
2. Perform removal steps listed in Howto Remove and Install Handles.
3. Transfer cabinetplugs and screws toopposite side ofcabinet.
4. Remove plugs withflat blade ofs c r e w d r i v e rwrapped in maskingtape.
5. Remove center mullion screws with5⁄16" hex head driver.
6. Locate door stop (B) and door cap (A)on bottom edge of fresh food door.Remove with a Phillips screwdriver.
• Retain all items for later replacement.
7. Remove side door trim (A) andhandle side trim (B) from door bytapping bottom edges upward with asoft rubber mallet.
• Trim will slide up approximately 3⁄4"and release fromdoor.
8. Rotate door panel180° and tape in place.
9. Remove top doorextension with 1⁄4" hexhead driver. Flip doorextension (A) so notched cornerturns in toward interior of door (B).
10. Retrieve alternate side door trimshipped with refrigerator. Install trimby aligning notches of trim withmetal mounting tabs on side of door.
• Slide trim down until piece locksinto place.
• Tap top of trim with rubber malletto insure snug fit.
• Repeat same procedure to installhandle side trim removed in step 7.
11. Replace bottom door cap (A)removed in step 6. Install door stop(B) on opposite side of door.
12. Remove tape from panels.
13. Proceed to next column to reinstallhandle.
To avoid possible injury and damage toproperty, tape decorative panels (somemodels) securely into place beforeremoving side door trim and handles.
WARNING:
�
�
�
�
����
�
�
Note:When working directly on door, laythe interior side of the door downflat, nonabrasive surface. If using afloor or table, prepare workingsurface with rugs or towels to avoiddamage to door finish.
HOW TO INSTALL ANDREMOVE HANDLESIn some cases, handles may need to beremoved to transport unit through tightspaces, reverse doors, or install panels.
Some models may come with handlesshipped separate from the refrigeratordoor.
INSTALLING HANDLES1. Retrieve handle from shipping
material (some models).
2. Locate handlemounting posts onface of door.
3. Position handle over mountingposts.
4. Tighten set screws (A)with a 3⁄32" Allenwrench
REMOVING HANDLES1. Locate set screws in handle and
loosen set screws with a 3⁄32" Allenwrench.
2. Lift handle from handle mountingposts to remove.
Note:In cases of doorreversal, panel installation, or panelremoval, the mounting posts must beremoved. Use a 1⁄4" hex head driverto remove the post from the door.
�

INSTALLATION INSTRUCTIONS, CONT.
TO INSTALL PANELS:1. Perform the handle removal
instructions in How to Install andRemove the Handles, includinginstructions to remove mountingposts from door face.
2. Remove top door trim.
3. Remove handle side door trim.
4. Slide panel in the handle side of door,by using grooves provided by bottomdoor cap and side door trim.
5. Replace mounting posts, handles, andtrim.
TO REMOVE PANELS:1. Perform the handle removal
instructions in How to Install andRemove the Handles, includinginstructions to remove mountingposts from door face.
2. Remove top door trim.
3. Remove handle side door trim.
4. Slide panel out the handle side ofdoor.
HOW TO REPLACE THEDOOR AND HINGES1. Install center hinge with Phillips
screws.
2. Install stabilizing brackets with 3⁄8" hexhead screws.
3. Replace centerhinge pin.
4. Place hinge side ofrefrigerator door on center hinge pin.
5. While holdingrefrigerator doorupright, tightendown top hingewith 5⁄16" hex headdriver.
6. Install top door trim of fresh fooddoor with a Phillips screwdriver.
To avoid personal injury or propertydamage, fresh food panel should notweigh more than 30 lbs (14 kgs) andfreezer panel should not weigh morethan 15 lbs (7 kgs).
HOW TO INSTALL ANDREMOVE PANELS(SOME MODELS)
WARNING:
6
Note:If fresh food door is being reversed,install alternate top hinge fromliterature assembly.
WHAT IF I AMINSTALLING RAISEDPANELS?Please see recommended dimensions forpaneling. All panel holes are 1⁄4" diameter.
������������� ������
������
������������
������������
�����������
��� �������
�������������
�������������
�������������
�������������
HOW DO I MOUNTHANDLES ON RAISEDPANELS?The refrigerator is shipped with thehandle mounting posts attached to thedoor with 1⁄4" hex head screw that isapproximately 11⁄2" long. This length isnecessary to safely secure the mountingpost to the door.
If handles are being mounted to a raisedsurface, the factory supplied hex headscrews will have to be replaced with alonger version. To determine how longthe replacement screw must be, add thethickness of the raised panel to the 11⁄2"measurement. See example below.
11⁄2" long 1⁄4" hexhead screw (factoryinstalled)
1" thick raisedpanel = 21⁄2" long1⁄4" hex head screw
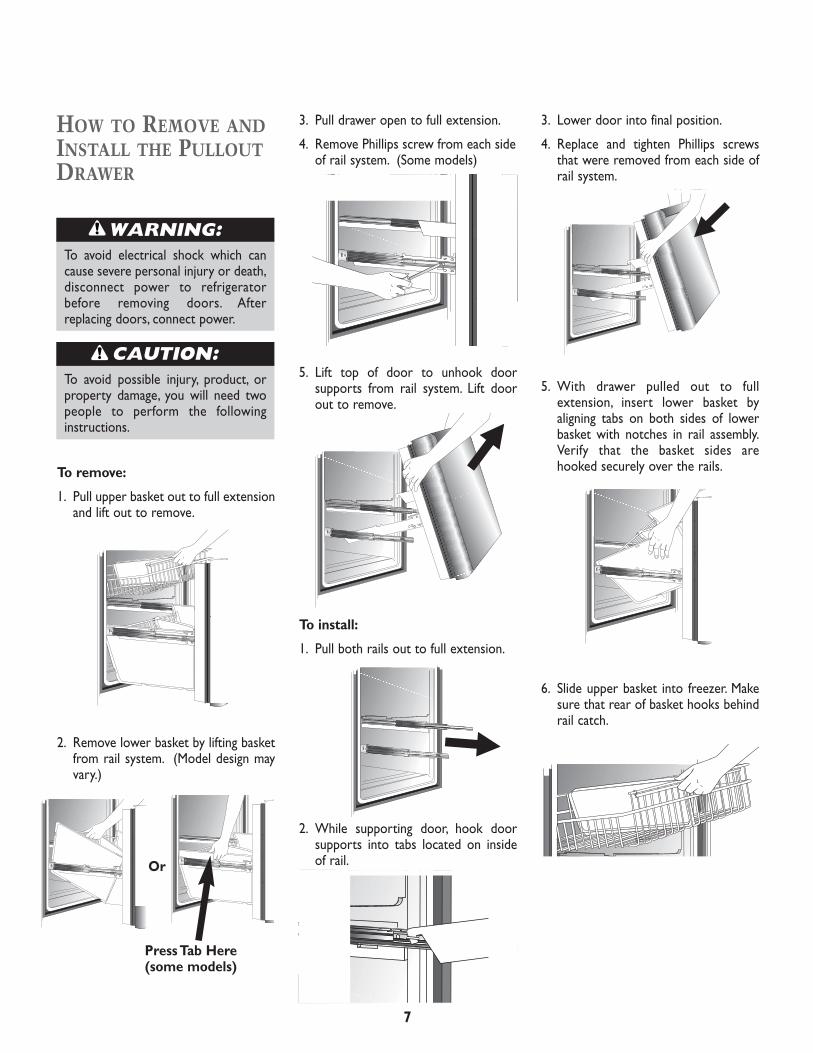
HOW TO REMOVE ANDINSTALL THE PULLOUTDRAWER
To avoid electrical shock which cancause severe personal injury or death,disconnect power to refrigeratorbefore removing doors. Afterreplacing doors, connect power.
To avoid possible injury, product, orproperty damage, you will need twopeople to perform the followinginstructions.
7
WARNING:
CAUTION:
3. Pull drawer open to full extension.
4. Remove Phillips screw from each sideof rail system. (Some models)
2. Remove lower basket by lifting basketfrom rail system. (Model design mayvary.)
5. Lift top of door to unhook doorsupports from rail system. Lift doorout to remove.
To install:
1. Pull both rails out to full extension.
5. With drawer pulled out to fullextension, insert lower basket byaligning tabs on both sides of lowerbasket with notches in rail assembly.Verify that the basket sides arehooked securely over the rails.
6. Slide upper basket into freezer. Makesure that rear of basket hooks behindrail catch.
3. Lower door into final position.
4. Replace and tighten Phillips screwsthat were removed from each side ofrail system.
To remove:
1. Pull upper basket out to full extensionand lift out to remove.
2. While supporting door, hook doorsupports into tabs located on insideof rail.
Press Tab Here(some models)
Or

INSTALLATION INSTRUCTIONS, CONT.
4. Place end of copper tubing into watervalve inlet port. Shape tubing slightly –DO NOT KINK – so that tubing feedsstraight into inlet port.
5. Slide brass nut over sleeve and screwnut into inlet port. Tighten nut withwrench.
IMPORTANT: DO NOT overtighten.Cross threading may occur.
6. Pull on tubing to confirm connectionis secure. Connect tubing to framewith water tubing clamp (C) and turnon water supply. Check for leaks andcorrect, if present.
7. Monitor water connection for 24hours. Correct leaks, if necessary.
HOW TO CONNECTTHE WATER SUPPLY
To reduce the risk of injury ordeath, follow basic precautions,including the following:➢ Read all instructions before
installing device.➢ DO NOT attempt installation if
instructions are not understood orif they are beyond personal skilllevel.
➢ Observe all local codes andordinances.
➢ DO NOT service device unlessspecifically recommended inowner’s manual or published user-repair instructions.
➢ Disconnect power to unit prior toinstalling device.
To avoid property damage orpossible injury, follow basicprecautions, including thefollowing:➢ Consult a plumber to connect
copper tubing to householdplumbing to assure compliancewith local codes and ordinances.
➢ Confirm water pressure to watervalve is between 20 and 100pounds per square inch. If waterfilter is installed, water pressure towater valve must be a minimum of35 pounds per square inch.
➢ DO NOT use a self-piercing, or 3⁄16"saddle valve! Both reduce waterflow, become clogged with time,and may cause leaks if repair isattempted.
➢ Tighten nuts by hand to preventcross threading. Finish tighteningnuts with pliers and wrenches. Donot overtighten.
➢ Wait 24 hours before placing unitinto final position to check andcorrect any water leaks.
MATERIALS NEEDED ➢ 1⁄4" outer diameter flexible copper
tubing
➢ Shut-off valve (requires a 1⁄4" hole tobe drilled into water supply beforevalve attachment)
➢ Adjustable wrench
➢ 1⁄4" hex nut driver
1. Create service loop with tubing usingcare to avoid kinks in tubing.
2. Remove plastic cap from water valveinlet port.
3. Place brass nut (A) and sleeve (B) oncopper tube end as illustrated.
��
8
WARNING:
CAUTION:
�
Note:Add 8' to tubing length needed toreach water supply for creation ofservice loop.
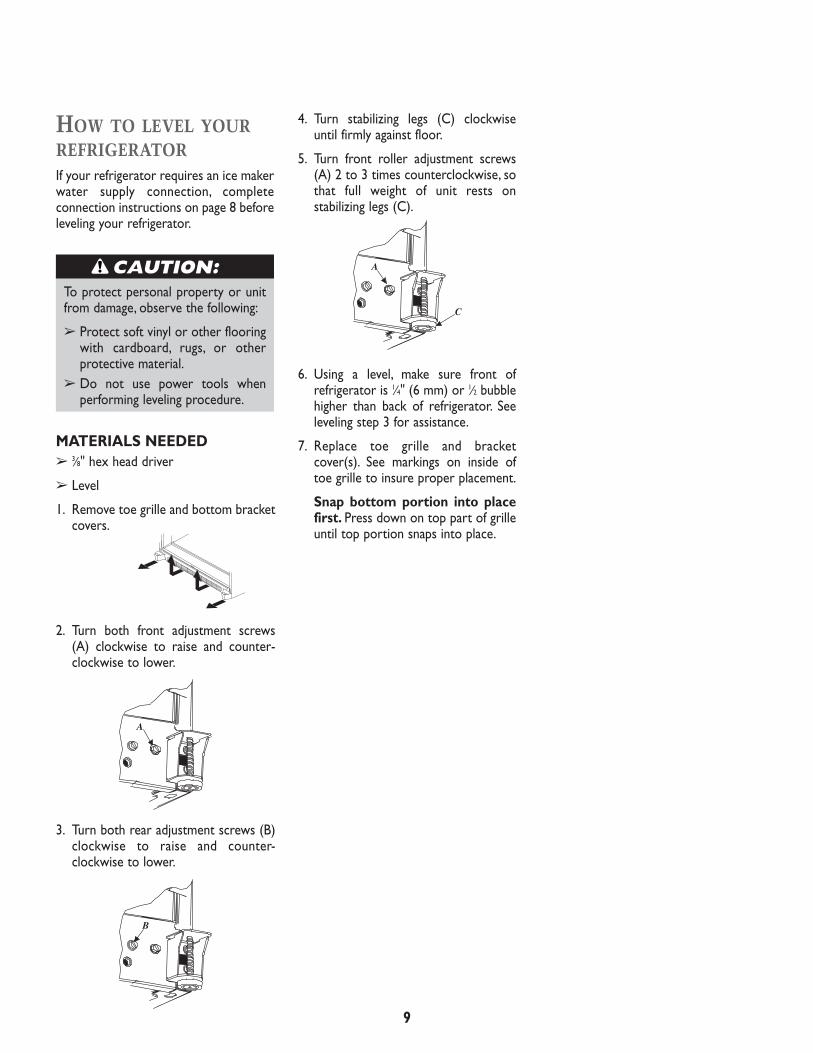
HOW TO LEVEL YOURREFRIGERATORIf your refrigerator requires an ice makerwater supply connection, completeconnection instructions on page 8 beforeleveling your refrigerator.
To protect personal property or unitfrom damage, observe the following:
➢ Protect soft vinyl or other flooringwith cardboard, rugs, or otherprotective material.
➢ Do not use power tools whenperforming leveling procedure.
MATERIALS NEEDED➢ 3⁄8" hex head driver
➢ Level
1. Remove toe grille and bottom bracketcovers.
2. Turn both front adjustment screws(A) clockwise to raise and counter-clockwise to lower.
3. Turn both rear adjustment screws (B)clockwise to raise and counter-clockwise to lower.
4. Turn stabilizing legs (C) clockwiseuntil firmly against floor.
5. Turn front roller adjustment screws(A) 2 to 3 times counterclockwise, sothat full weight of unit rests onstabilizing legs (C).
6. Using a level, make sure front ofrefrigerator is 1⁄4" (6 mm) or 1⁄2 bubblehigher than back of refrigerator. Seeleveling step 3 for assistance.
7. Replace toe grille and bracketcover(s). See markings on inside oftoe grille to insure proper placement.
Snap bottom portion into placefirst. Press down on top part of grilleuntil top portion snaps into place.
�
�
�
�
CAUTION:
9
TEMPERATURE CONTROLS
The controls are located at the top front of the refrigerator and freezer compartments. NOTE: The freezer control turns thecooling system on. Neither section will cool if freezer control is set to off.
INITIAL CONTROLSETTINGSAfter plugging the refrigerator in, set thecontrols.
➢ To adjust the controls, turn thecontrol knob to the left or right asdesired.
• Initially set the refrigerator controlon 4.
• Initially set the freezer control on 4.
• Let the refrigerator run at least 8-12hours before adding food.
WARM CABINETSURFACESAt times, the front of the refrigeratorcabinet may be warm to the touch. Thisis a normal occurrence that helpsprevent moisture from condensing onthe cabinet. This condition will be morenoticeable when you first start therefrigerator, during hot weather and afterexcessive or lengthy door openings.
TEMPERATURE CONTROL GUIDE
Refrigerator too warm Turn the refrigerator control to next higher number.
Refrigerator too cold Turn the refrigerator control to next lower number.
Freezer too warm Turn the freezer control to next higher number.
Freezer too cold Turn the freezer control to next lower number.
Turn refrigerator OFF Turn the freezer control to OFF.
NOTE: Turning freezer control to OFF stops cooling in both compartments. It does not shut off powerto the refrigerator.
ADJUSTING THECONTROLS➢ Twenty-four hours after adding food,
you may decide that one or bothcompartments should be colder orwarmer. If so, adjust the control(s) asindicated in the table below.
➢ Do not change either control morethan one number at a time whenadjusting controls.
➢ Allow 5-8 hours for temperatures tostabilize.
➢ Changing either control will havesome effect on the temperature ofthe other compartment.
Refrigerator Control
Freezer Control
10

FRESH FOOD COMPARTMENT
WATER DISPENSER(SOME MODELS)
A water dispenser islocated on the leftside wall of the freshfood section. Thisdesign is for coldwater dispensing only.
To dispense water:
➢ Hold container under spout and pressdispenser pad, as illustrated.
INTERIOR SHELVES
SPILL-CATCHER™ SHELVES(SOME MODELS)Spill-Catcher™ shelves feature theconvenience of easy cleaning with apullout design to reach items in the back.For ease of cleaning, glassshelf may be removed bypulling to fullextension andlifting out offrame.
➢ To remove shelves, lift up and out.
➢ To install shelves, reverse aboveprocedure.
To avoid personal injury or propertydamage, observe the following:
➢ Confirm shelf is secure beforeplacing items on shelf.
➢ Handle tempered glass shelvescarefully. Shelves may breaksuddenly if nicked, scratched, orexposed to sudden temperaturechange.
REAR SHELF EXTENSIONS(SOME MODELS)Rear Shelf Extensions help preventarticles from falling off the back of theshelf.
To remove and install shelfextension:
➢ To remove,pull extensionstraight upfrom rear ofshelf.
➢ To install, insert posts of the shelfextension into holes in the shelfframe.
DOOR STORAGE
DAIRY COMPARTMENTThe covered Dairy Compartmentprovides convenient storage for itemssuch as butter, yogurt, cheese, etc. Thiscompartment is an adjustable featurelocated in the door. Itcan be moved to severaldifferent locations toaccommodate storageneeds.
➢ To remove, open dairy door, pullupward and tilt out.
➢ To install, reverse above procedure.
DOOR BINSDoor Bins adjust to meet individualstorage needs.
➢ To remove, slide bins upand pull straight out.
➢ To install,reverse aboveprocedure.
FULL WIDTH DOOR SHELFThe lower shelf on the door is full widthand not adjustable.
To remove for cleaning:
➢ Lift shelf up and out.
To reinstall:
➢ Reverse aboveprocedure.
11
CAUTION:

CLIMATE-CONTROLLEDDRAWERS
CRISPER DRAWERSThe Crispers provide storage for fruitand vegetables.There is a humiditycontrol located on the crisper shelfabove each of the crisper drawers.➢ For fruit storage,
slide the crispercontrol towardthe center toprovide lowerh u m i d i t yconditions in the drawer.
➢ For vegetable storage, slide the crispercontrol away from the center toprovide higher humidity conditions inthe drawer.
To remove and install crisperdrawers:
➢ To removedrawer, pulldrawer outto fullex tens ion .Tilt up front of drawer and pullstraight out.
➢ To install, insert drawer into framerails and push back into place.
ACCESSORIES
EGG CRADLE(SOME MODELS)The Egg Cradle holds a“dozen plus” eggs. It canbe removed to carry to awork area or to be washed.
WINE TRIVET/CAN RACK(SOME MODELS)The Wine Trivet/Can Rack accessoryfits in the bottomof most drawerassemblies.
Bottles can be laidcrosswise, or a single bottle may be laidin the center depression. Cans may alsobe stored horizontally.
GOURMET BAY™
The Gourmet Bay™ provides a full-width drawer with a variabletemperature control that keeps thecompartment up to 5° F (3° C) colderthan refrigerator temperature. Thisdrawer can be used for large party trays,deli items, or beverages.
Gourmet Bay™ Control
The control, located onthe right of the drawer,regulates the airtemperature inside thedrawer. Set control to‘cold’ to provide normal refrigeratortemperature. Use the ‘coldest’ setting formeats or other deli items.
To remove and install drawer:
➢ To removedrawer, pulldrawer out to fullextension. Tilt upfront of pantryand pull straight out.
➢ To install, pushmetal glide rails tothe back of theunit. Place draweronto rails and slidedrawer back until itfalls into place.
HOW DO I REMOVE THEGLASS AND CRISPER FRAMEIF I WANT TO CLEAN IT?➢ Remove the drawers as instructed at
left.
➢ Place hand beneath frame to push upglass from underneath. Lift glass out.
➢ Lift frame from refrigerator liner rails.
➢ To install, repeat above instructions inreverse order.
Note:Cold air directed to the drawer candecrease refrigerator temperature.Refrigerator control may need to beadjusted.
12
GOURMET BAY™ DIVIDER(SOME MODELS)The Gourmet Bay™
Divider is used toorganize theGourmet Bay™ intosections.
To remove and replace divider:
➢ To remove, raise front of divider tounhook divider from rear wall ofdrawer, and pull out.
➢ To install,hook back of divider over rearwall of drawer and lower into place.
Note:For easiest removal and replacement,remove drawer. If removal is notpossible, pull drawer open to itsfullest extension.
GOURMET BAY™ TRAYThe Gourmet Bay™ Trayallows for a removabletray within the full-width storagedrawer.
FRESH FOOD COMPARTMENT, CONT.

FREEZER COMPARTMENT
AUTOMATICICE MAKER(SOME MODELS)
Using Ice Maker for the First Time
1. Confirm ice bin is inplace and ice makerarm is down.
2. After freezer section reachesbetween 0° to 2° F (-18° to -17° C),ice maker fills with water and beginsoperating.
3. Allow approximately 24 hours afterinstallation to receive first harvest ofice.
4. Discard ice created within first 12hours of operation to verify system isflushed of impurities.
Operating Instructions
1. Confirm ice bin is in place and icemaker arm is down.
2. After freezer section reaches 0° to 2° F (-18° to -17° C), ice maker fillswith water and begins operating. Youwill have a complete harvest of iceapproximately every 3 hours.
3. Stop ice productionby raising ice makerarm until click isheard.
4. Ice maker will remain in the offposition until arm is pushed down.
To avoid property damage, observethe following:
➢ Do not force ice maker arm downor up.
➢ Do not place or store anything inice storage bin.
To prevent accidental childentrapment or suffocation risk, DONOT remove the divider in the topfreezer basket.
DRAWERS
PULLOUT DRAWERBASKETS(Door assembly of drawer removedfrom illustration for visual clarity)
To remove and replace baskets:
➢ See page 7 for basket removal andreplacement instructions.
ACCESSORIES
LOWER BASKET DIVIDER The Lower Basket Divider allows theoption to organize the basket area intosections.
To remove and replace divider:
➢ To remove, pull divider straight up.
➢ To install, hook top corners of dividerover top horizontal basket rungs.
ICE BIN (SOME MODELS)The Ice Bin is useful storage for ice,frozen concentrate, etc.
LOWER BASKET TRAYThe Basket Tray is a removable plasticitem that rests on the bottom of thelower pullout basket to catch spills andsmall food items before they can fallthrough to the freezer compartment.
The tray can be removed for easycleaning by lifting the tray from thebasket.
CAUTION:
DANGER:
13

FILTRATION SYSTEM
WATER FILTER REMOVALAND INSTALLATION
INITIAL INSTALLATIONOF WATER FILTER1. Remove blue bypass cap and retain for
later use.
2. Remove sealing label from end of filterand insert into filter head.
• Rotate gently clockwise until filterstops and snap filter cover closed.
3. Reduce water spurts by flushing airfrom system. Run water continuouslyfor 2 minutes through dispenser untilwater runs steady.
• Additional flushing may be requiredin some households where water isof poor quality.
REPLACING WATERFILTERIMPORTANT: Air trapped in systemmay cause water and cartridge to eject.Use caution when removing.
1. Turn filter counterclockwise until itreleases from filter head.
2. Drain water from filter into sink anddispose in normal household garbage.
3. Wipe up excess water in filter cover.
4. Remove sealing label from end of filterand insert into filter head.
• Rotate gently clockwise until filterstops and snap filter cover closed.
5. Reduce water spurts by flushing airfrom system. Run water continuouslyfor 2 minutes through dispenser untilwater runs steady.
• Additional flushing may be requiredin some households where water isof poor quality.
WHEN DO I CHANGETHE WATER FILTER?Filter should be changed every 6 months.
IMPORTANT: Condition of water andamount used determines life span ofwater filter cartridge. If water use is high,or if water is of poor quality, replacementmay need to take place more often.
HOW DO I ORDER AREPLACEMENT FILTERCARTRIDGE?For OW51 replacement filter cartridgesor for service, contact your dealer or Maytag Appliances Sales Company,Jenn-Air Customer Assistance, U.S.and Canada: 1-800-JENNAIR (1-800-536-6247).
I’M TRYING TODISPENSE WATER TOFLUSH THE SYSTEM.WHERE’S THE WATER?During initial use, allow about a 1- to 2-minute delay in water dispersal to allowinternal water tank to fill.
WHAT IF I CHOOSENOT TO USE THEWATER FILTRATIONSYSTEM?Dispenser feature may be used withoutwater filter cartridge. If you choose thisoption, replace filter with blue bypasscap.
➢ Bypass cap DOES NOT filterwater. Be sure to have replacementcartridge available when filterchange is required.
➢ If water filtration system has beenallowed to freeze, replace filtercartridge.
➢ If system has not been used forseveral months, and water has anunpleasant taste or odor, flushsystem by dispensing 2-3 glasses ofwater. If unpleasant taste or odorpersists, change filter cartridge.
To avoid serious illness or death, donot use unit where water is unsafe orof unknown quality without adequatedisinfection before or after use of filter.
WARNING:
CAUTION:
14

WATER FILTER DATA
GENERAL USE CONDITIONSRead this Performance Data Sheet andcompare the capabilities of this unit withyour actual water treatment needs.
DO NOT use this product wherewater is microbiologically unsafe orof unknown quality withoutadequate disinfection before orafter the system. System certifiedfor cyst reduction may be used ondisinfected water that may containfilterable cysts.
Use only with cold water supply.Check for compliance with thestate and local laws and regulations.
The retractable water filtration systemuses a OWF51 replacement cartridge.Timely replacement of filter cartridge isessential for performance satisfactionfrom this filtration system. Please refer tothe applicable section in this owner’smanual for general operation,maintenance requirements andtroubleshooting.
Replacement Elements: OWF51
This system has been tested according toANSI/NSF 42 and 53 for reduction of thesubstances listed below. Theconcentration of the indicated substancesin water entering the system was reducedto a concentration less than or equal tothe permissible limit for water leaving thesystem, as specified in ANSI/NSF 42 and53.
Tested using a flow rate of 0.75 GPM (2.83 L/min.) and a maximum pressure of 120 psi (827 kPa) under standardlaboratory conditions, however, actual performance may vary. Health Claim Performance tested and certified by NSFInternational
*Particle size range classification of test. Particles used were 0.5 –1 microns.
Influent Challenge Effluent Average % Maximum Min. Required InletSubstance Concentration Average Reduction Effluent Reduction pH
Lead 0.15 mg/L +/- 10% 0.001 mg/L 99.33% 0.001 mg/L 0.010 mg/L 6.5
Lead 0.15 mg/L +/- 10% 0.002 mg/L 98.66% 0.003 mg/L 0.010 mg/L 8.5
Cyst Minimum 50,000/L 1count/mL 99.99% 3 count/mL > 99.95% NA
Turbidity 11+/-1 NTU 0.12 NTU 98.98% 0.18 NTU 0.5 NTU NA
Lindane 0.002 mg/L +/- 10% 0.00005 mg/L 97.62% 0.00005 mg/L 0.00002 mg/L NA
Atrazine 0.009 mg/L +/- 10% 0.0002 mg/L 97.93% 0.0006 mg/L 0.003 mg/L NA
Chlorine 2.0 mg/L +/- 10% 0.09 mg/L 95.26% 0.17 mg/L �75% NA
Particulate* at least 10,000 900 count/mL 99.68% 2400 count/mL �85% NAparticles/mL
2,4-D 0.210 mg/L +/- 10% 45.45 ug/L 84.42% 100 ug/L 0.0017 mg/L NA
Asbestos 107 to 108 fibers/L; fibers greater 0.16 MFL/mL 99.96% 0.16 MFL/mL 99% NAthan 10 micometers in length
PERFORMANCE DATA
SYSTEM SPECIFICATION AND PERFORMANCE DATA SHEETREFRIGERATOR WATER FILTER CARTRIDGE MODEL OWF51SpecificationsService Flow Rate (maximum) ......................................................0.75 GPM (2.83 L/min)Rated Service Life OWF50-NI300 (maximum).........................300 gallons/1135 litersRated Service Life OWF50-WI500 (maximum)........................500 gallons/1892 litersMaximum Operating Temperature ...............................................100° F/38° CMinimum Operating Temperature ................................................33° F/1° CMinimum Pressure Requirement ..................................................35 psi/138 kPaMaximum Operating Pressure.......................................................120 psi/827 kPa
1000 Apollo RoadEagan, Minnesota U.S.A.EPA EST #35917-MN-1
Standard No. 53: Health EffectsChemical Reduction UnitLead,Atrazine, Lindane and 2, 4-D ReductionMechanical Filtration UnitCyst,Turbidity and Asbestos Reduction
Tested and certified by NSF International against ANSI/NSF Standards 42 and 53 in modelsOWF50-WI500 and OWF50-NI300 for the reduction of:
Standard No. 42:Aesthetic EffectsTaste and Odor ReductionChlorine ReductionMechanical Filtration UnitParticulate Reduction Class 1
15
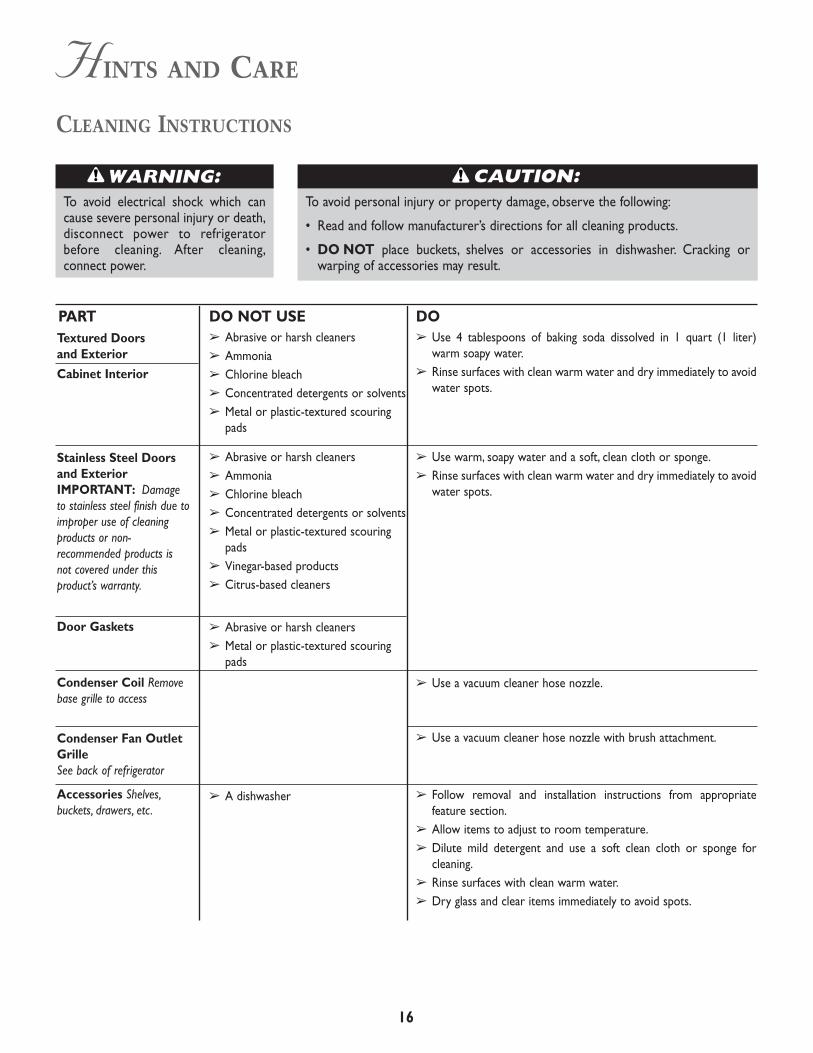
HINTS AND CARE
PART DO➢ Use 4 tablespoons of baking soda dissolved in 1 quart (1 liter)
warm soapy water.➢ Rinse surfaces with clean warm water and dry immediately to avoid
water spots.
➢ Use warm, soapy water and a soft, clean cloth or sponge.➢ Rinse surfaces with clean warm water and dry immediately to avoid
water spots.
➢ Use a vacuum cleaner hose nozzle.
➢ Use a vacuum cleaner hose nozzle with brush attachment.
➢ Follow removal and installation instructions from appropriatefeature section.
➢ Allow items to adjust to room temperature.➢ Dilute mild detergent and use a soft clean cloth or sponge for
cleaning.➢ Rinse surfaces with clean warm water.➢ Dry glass and clear items immediately to avoid spots.
DO NOT USE➢ Abrasive or harsh cleaners➢ Ammonia➢ Chlorine bleach➢ Concentrated detergents or solvents➢ Metal or plastic-textured scouring
pads
➢ Abrasive or harsh cleaners➢ Ammonia➢ Chlorine bleach➢ Concentrated detergents or solvents➢ Metal or plastic-textured scouring
pads➢ Vinegar-based products➢ Citrus-based cleaners
➢ Abrasive or harsh cleaners➢ Metal or plastic-textured scouring
pads
➢ A dishwasher
Textured Doorsand Exterior
Cabinet Interior
Stainless Steel Doorsand ExteriorIMPORTANT: Damageto stainless steel finish due toimproper use of cleaningproducts or non-recommended products isnot covered under thisproduct’s warranty.
Door Gaskets
Condenser Coil Removebase grille to access
Condenser Fan OutletGrilleSee back of refrigerator
Accessories Shelves,buckets, drawers, etc.
To avoid personal injury or property damage, observe the following:
• Read and follow manufacturer’s directions for all cleaning products.
• DO NOT place buckets, shelves or accessories in dishwasher. Cracking orwarping of accessories may result.
To avoid electrical shock which cancause severe personal injury or death,disconnect power to refrigeratorbefore cleaning. After cleaning,connect power.
CLEANING INSTRUCTIONS
16
WARNING: CAUTION:

REMOVING ODORSFROM REFRIGERATOR1. Remove all food.
2. Disconnect refrigerator.
3. Clean the following items using theappropriate instructions in the Careand Cleaning table on page 16.
– Walls, floor and ceiling of cabinetinterior
– Drawers, shelves and gasketsaccording to the instructions inthis section.
4. Pay special attention to clean allcrevices by completing the followingsteps.
– Dilute mild detergent and brushsolution into crevices using aplastic bristle brush.
– Let stand for 5 minutes.– Rinse surfaces with warm water.
Dry surfaces with a soft, cleancloth.
5. Wash and dry all bottles, containersand jars. Discard spoiled or expireditems.
6. Wrap or store odor-causing foods intightly sealed containers to preventreoccurring odors.
7. Connect power to refrigerator andreturn food to unit.
8. After 24 hours, check if odor has beeneliminated.
If odor is still present:1. Remove drawers and place on top
shelf of refrigerator.
2. Pack refrigerator and freezer sections– including doors – with crumpledsheets of black and white newspaper.
3. Place charcoal briquettes randomlyon crumpled newspaper in bothfreezer and refrigeratorcompartments.
4. Close doors and let stand 24-48hours.
To avoid personal injury or propertydamage, observe the following:
➢ Allow light bulb to cool.➢ Wear gloves when replacing light
bulb.
To avoid electrical shock which cancause severe personal injury or death,disconnect power to refrigeratorbefore replacing light bulb. Afterreplacing light bulb, connect power.
ENERGY SAVING IDEAS➢ Avoid overcrowding refrigerator
shelves. This reduces air circulationaround food and causes refrigeratorto run longer.
➢ Avoid adding too much warm food tounit at one time. This overloadscompartments and slows rate ofcooling.
➢ Do not use aluminum foil, wax paper,or paper toweling as shelf liners.Thisdecreases air flow and causes unit torun less efficiently.
➢ A freezer that is 2⁄3 full runs mostefficiently.
➢ Locate refrigerator in coolest part ofroom. Avoid areas of direct sunlight,or near heating ducts, registers orother heat producing appliances. Ifthis is not possible, isolate exterior byusing a section of cabinet or an addedlayer of insulation.
➢ Refer to recommended controlsettings on page 10.
➢ Clean door gaskets every threemonths according to cleaninginstructions on page 16. This willassure that door seals properly andunit runs efficiently.
➢ Take time to organize items inrefrigerator to reduce time that dooris open.
➢ Be sure your doors are closingsecurely by leveling unit as instructedon page 9.
➢ Clean condenser coils as instructedon page 16 every 3 months.This willincrease energy efficiency and coolingperformance.
REMOVE AND REPLACELIGHT BULBS
FRESH FOOD SECTION1. Slide shield toward back of
compartmentto release fromlight assembly.
2. Remove light bulbs.
3. Replace with appliance bulbs nogreater than 40 watts.
4. Replace light bulbcover by insertingtabs on lightshield into liner holes on each side oflight assembly. Slide shield towardfront of unit until it locks into place.DO NOT force shield beyondlocking point. Doing so may damagelight shield.
FREEZER1. Pinch rear tabs on light cover and pull
straight down.
2. Remove light bulb.
3. Replace bulb withappliance bulb nogreater than 40watts.
4. Insert front tabs of light cover intofreezer liner and snap rear portionover light assembly until rear tabsengage.
�
�
WARNING:
CAUTION:
17
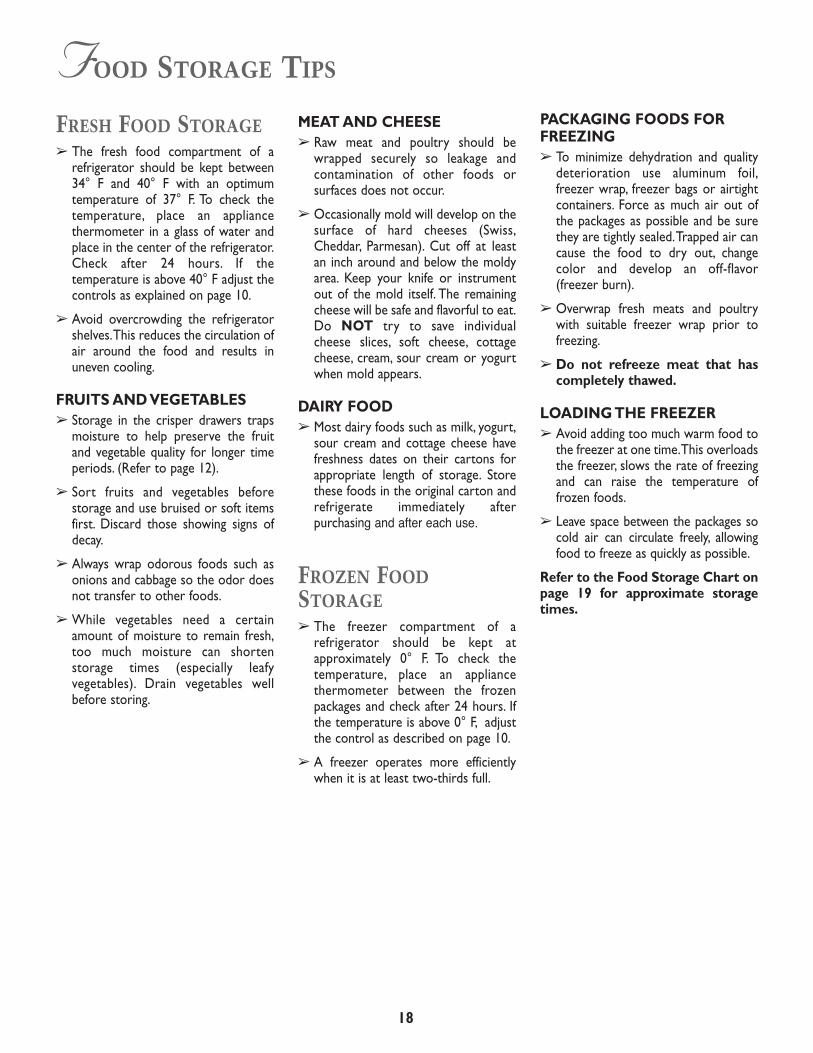
FOOD STORAGE TIPS
FRESH FOOD STORAGE➢ The fresh food compartment of a
refrigerator should be kept between34° F and 40° F with an optimumtemperature of 37° F. To check thetemperature, place an appliancethermometer in a glass of water andplace in the center of the refrigerator.Check after 24 hours. If thetemperature is above 40° F adjust thecontrols as explained on page 10.
➢ Avoid overcrowding the refrigeratorshelves.This reduces the circulation ofair around the food and results inuneven cooling.
FRUITS AND VEGETABLES➢ Storage in the crisper drawers traps
moisture to help preserve the fruitand vegetable quality for longer timeperiods. (Refer to page 12).
➢ Sort fruits and vegetables beforestorage and use bruised or soft itemsfirst. Discard those showing signs ofdecay.
➢ Always wrap odorous foods such asonions and cabbage so the odor doesnot transfer to other foods.
➢ While vegetables need a certainamount of moisture to remain fresh,too much moisture can shortenstorage times (especially leafyvegetables). Drain vegetables wellbefore storing.
MEAT AND CHEESE➢ Raw meat and poultry should be
wrapped securely so leakage andcontamination of other foods orsurfaces does not occur.
➢ Occasionally mold will develop on thesurface of hard cheeses (Swiss,Cheddar, Parmesan). Cut off at leastan inch around and below the moldyarea. Keep your knife or instrumentout of the mold itself. The remainingcheese will be safe and flavorful to eat.Do NOT try to save individualcheese slices, soft cheese, cottagecheese, cream, sour cream or yogurtwhen mold appears.
DAIRY FOOD➢ Most dairy foods such as milk, yogurt,
sour cream and cottage cheese havefreshness dates on their cartons forappropriate length of storage. Storethese foods in the original carton andrefrigerate immediately afterpurchas�������������������
FROZEN FOODSTORAGE➢ The freezer compartment of a
refrigerator should be kept atapproximately 0° F. To check thetemperature, place an appliancethermometer between the frozenpackages and check after 24 hours. Ifthe temperature is above 0° F, adjustthe control as described on page 10.
➢ A freezer operates more efficientlywhen it is at least two-thirds full.
PACKAGING FOODS FORFREEZING➢ To minimize dehydration and quality
deterioration use aluminum foil,freezer wrap, freezer bags or airtightcontainers. Force as much air out ofthe packages as possible and be surethey are tightly sealed.Trapped air cancause the food to dry out, changecolor and develop an off-flavor(freezer burn).
➢ Overwrap fresh meats and poultrywith suitable freezer wrap prior tofreezing.
➢ Do not refreeze meat that hascompletely thawed.
LOADING THE FREEZER➢ Avoid adding too much warm food to
the freezer at one time.This overloadsthe freezer, slows the rate of freezingand can raise the temperature offrozen foods.
➢ Leave space between the packages socold air can circulate freely, allowingfood to freeze as quickly as possible.
Refer to the Food Storage Chart onpage 19 for approximate storagetimes.
18
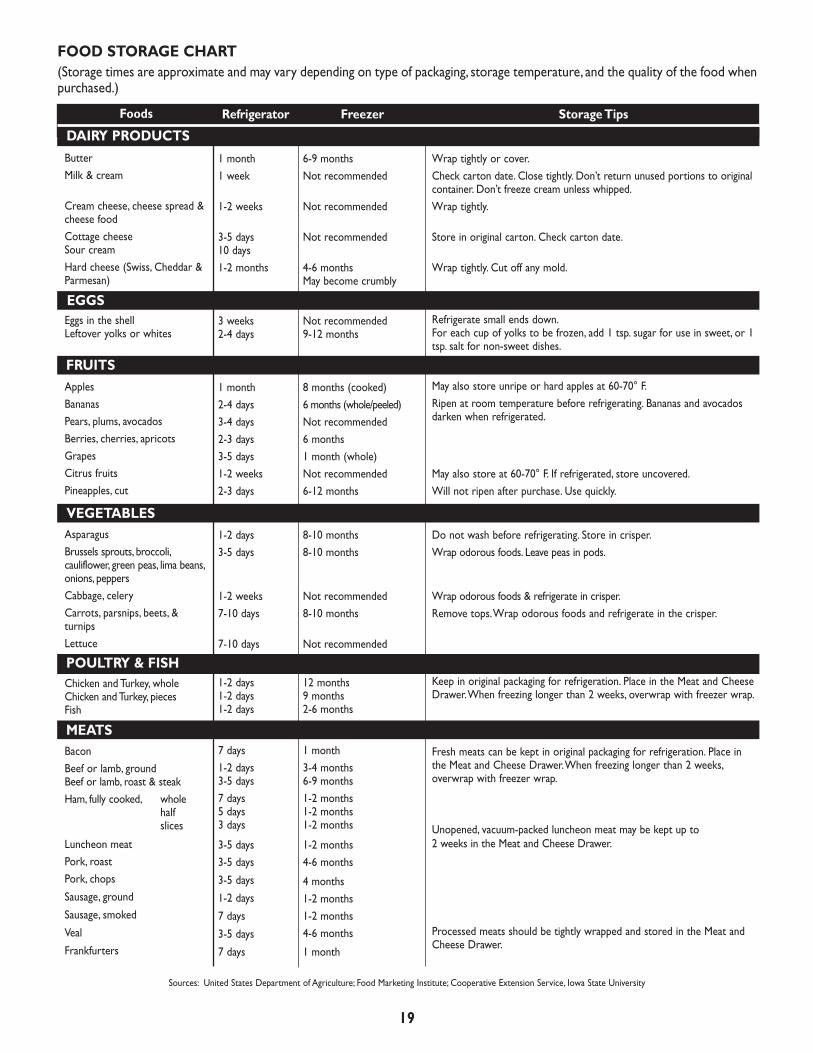
FOOD STORAGE CHART(Storage times are approximate and may vary depending on type of packaging, storage temperature, and the quality of the food whenpurchased.)
Foods
ButterMilk & cream
Cream cheese, cheese spread &cheese foodCottage cheeseSour creamHard cheese (Swiss, Cheddar &Parmesan)
Eggs in the shellLeftover yolks or whites
ApplesBananasPears, plums, avocados Berries, cherries, apricotsGrapesCitrus fruitsPineapples, cut
AsparagusBrussels sprouts, broccoli,cauliflower, green peas, lima beans,onions, peppersCabbage, celeryCarrots, parsnips, beets, &turnipsLettuce
Chicken and Turkey, wholeChicken and Turkey, piecesFish
BaconBeef or lamb, groundBeef or lamb, roast & steakHam, fully cooked, whole
halfslices
Luncheon meatPork, roastPork, chops
Sausage, ground
Sausage, smoked
Veal
Frankfurters
Refrigerator
1 month1 week
1-2 weeks
3-5 days10 days1-2 months
3 weeks2-4 days
1 month2-4 days3-4 days2-3 days3-5 days1-2 weeks2-3 days
1-2 days3-5 days
1-2 weeks7-10 days
7-10 days
1-2 days1-2 days1-2 days
7 days1-2 days3-5 days7 days5 days3 days
3-5 days3-5 days
3-5 days
1-2 days
7 days
3-5 days
7 days
Freezer
6-9 monthsNot recommended
Not recommended
Not recommended
4-6 monthsMay become crumbly
Not recommended9-12 months
8 months (cooked)6 months (whole/peeled)Not recommended6 months1 month (whole)Not recommended6-12 months
8-10 months8-10 months
Not recommended8-10 months
Not recommended
12 months9 months2-6 months
1 month3-4 months6-9 months1-2 months1-2 months1-2 months
1-2 months4-6 months
4 months1-2 months1-2 months4-6 months
1 month
Storage Tips
Wrap tightly or cover.Check carton date. Close tightly. Don’t return unused portions to originalcontainer. Don’t freeze cream unless whipped.Wrap tightly.
Store in original carton. Check carton date.
Wrap tightly. Cut off any mold.
Refrigerate small ends down.For each cup of yolks to be frozen, add 1 tsp. sugar for use in sweet, or 1tsp. salt for non-sweet dishes.
May also store unripe or hard apples at 60-70° F.Ripen at room temperature before refrigerating. Bananas and avocadosdarken when refrigerated.
May also store at 60-70° F. If refrigerated, store uncovered.Will not ripen after purchase. Use quickly.
Do not wash before refrigerating. Store in crisper.Wrap odorous foods. Leave peas in pods.
Wrap odorous foods & refrigerate in crisper.Remove tops.Wrap odorous foods and refrigerate in the crisper.
Keep in original packaging for refrigeration. Place in the Meat and CheeseDrawer.When freezing longer than 2 weeks, overwrap with freezer wrap.
Fresh meats can be kept in original packaging for refrigeration. Place inthe Meat and Cheese Drawer.When freezing longer than 2 weeks,overwrap with freezer wrap.
Unopened, vacuum-packed luncheon meat may be kept up to2 weeks in the Meat and Cheese Drawer.
Processed meats should be tightly wrapped and stored in the Meat andCheese Drawer.
EGGS
FRUITS
DAIRY PRODUCTS
Sources: United States Department of Agriculture; Food Marketing Institute; Cooperative Extension Service, Iowa State University
VEGETABLES
MEATS
POULTRY & FISH
19
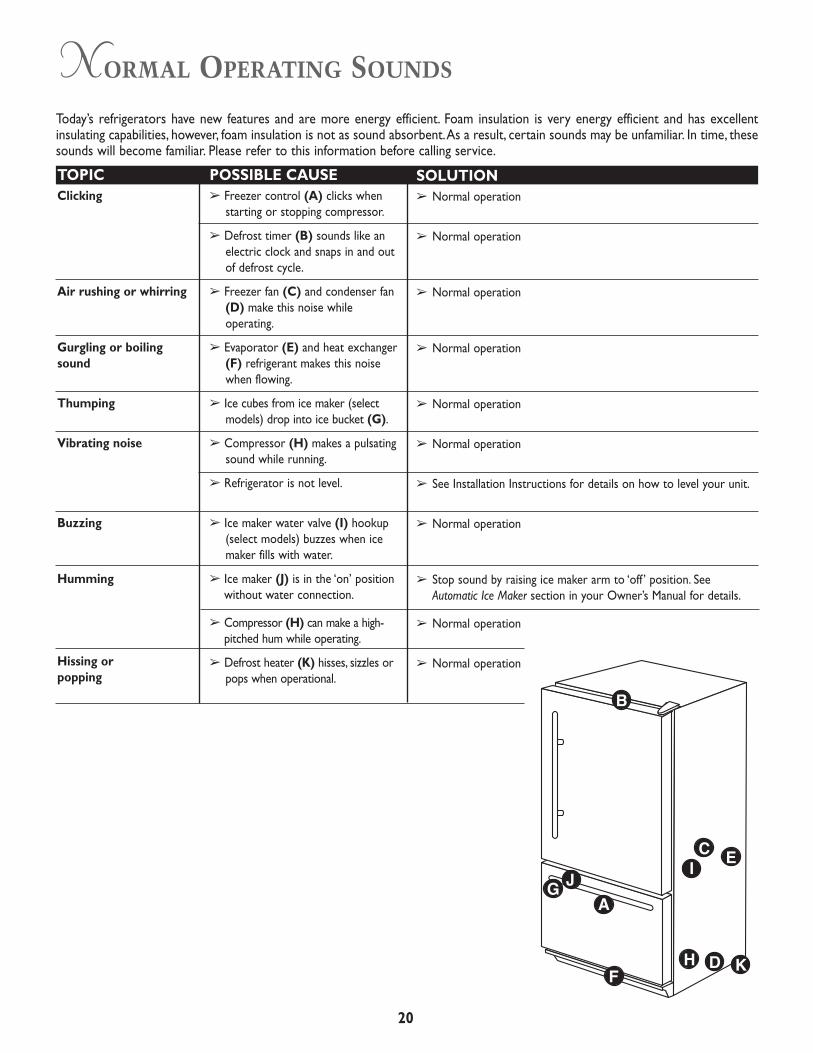
NORMAL OPERATING SOUNDS
Today’s refrigerators have new features and are more energy efficient. Foam insulation is very energy efficient and has excellentinsulating capabilities, however, foam insulation is not as sound absorbent.As a result, certain sounds may be unfamiliar. In time, thesesounds will become familiar. Please refer to this information before calling service.
�
�
��
�
��
��
SOLUTION➢ Normal operation
➢ Normal operation
➢ Normal operation
➢ Normal operation
➢ Normal operation
➢ Normal operation
➢ See Installation Instructions for details on how to level your unit.
➢ Normal operation
➢ Stop sound by raising ice maker arm to ‘off ’ position. SeeAutomatic Ice Maker section in your Owner’s Manual for details.
➢ Normal operation
➢ Normal operation
POSSIBLE CAUSE➢ Freezer control (A) clicks when
starting or stopping compressor.
➢ Defrost timer (B) sounds like anelectric clock and snaps in and outof defrost cycle.
➢ Freezer fan (C) and condenser fan(D) make this noise whileoperating.
➢ Evaporator (E) and heat exchanger(F) refrigerant makes this noisewhen flowing.
➢ Ice cubes from ice maker (selectmodels) drop into ice bucket (G).
➢ Compressor (H) makes a pulsatingsound while running.
➢ Refrigerator is not level.
➢ Ice maker water valve (I) hookup(select models) buzzes when icemaker fills with water.
➢ Ice maker (J) is in the ‘on’ positionwithout water connection.
➢ Compressor (H) can make a high-pitched hum while operating.
➢ Defrost heater (K) hisses, sizzles orpops when operational.
TOPICClicking
Air rushing or whirring
Gurgling or boilingsound
Thumping
Vibrating noise
Buzzing
Humming
Hissing orpopping
20

BEFORE YOU CALL FOR SERVICE
PROBLEM POSSIBLE CAUSES WHAT TO DOFreezer control and lights Refrigerator is in defrost mode. Normal operation.Wait 40 minutes to see if refrigerator restarts.are on, but compressor is not operating
Refrigerator does not Refrigerator is not plugged in. Plug in unit.operate Freezer control is not on. See page 10.
Fuse is blown, or circuit breaker needs Replace blown fuses. Reset circuit breaker.to be reset.Power outage has occurred Call local power company listing to report outage.
Refrigerator still won’t Unit is malfunctioning. Unplug refrigerator and transfer food to another refrigerator. If operate another unit is not available, place dry ice in freezer section to
preserve food.Warranty does not cover food loss.Contact service for assistance.
Refrigerator has an odor Compartment is dirty or has odor-causing See page 17.food.
Crisper drawers do not Contents of drawer, or positioning of items Reposition food items and containers.close freely in the surrounding compartment could be
obstructing drawer.Drawer is not in proper position. See page 12 for proper crisper placement.Refrigerator is not level. See page 9.Drawer channels are dirty or need Clean drawer channels with warm, soapy water. Rinse and dry.treatment. Apply a thin layer of petroleum jelly to drawer channels.
Refrigerator runs too Doors have been opened frequently or Minimize door openings.frequently for long periods of time.
Humidity or heat in surrounding area is Normal operation.high.Food has recently been added. Allow time for recently added food to reach refrigerator or
freezer temperature.Refrigerator is exposed to heat by Evaluate your refrigerator’s environment. Refrigerator may environment or by appliances nearby. need to be moved to run more efficiently.Condenser coils are dirty. Clean according to cleaning instructions. See page 16.Controls need to be adjusted. See page 10.Door is not closing properly. Refrigerator is not level. See page 9.Today’s refrigerators start and stop more Check gaskets for proper seal. Clean, if necessary. See page 16.often to maintain even temperatures. Check to see if something is preventing door from closing.
Noise, sounds and Normal operation. See page 20.vibrations Cabinet not level. Level cabinet. See page 9.Food temperature Condenser coils are dirty. Clean according to cleaning instructions. See page 16.is too cold Refrigerator or freezer controls are set See page 10.
too high.Food temperature Door is not closing properly. Refrigerator is not level. See page 9.is too warm Check gaskets for proper seal. Clean, if necessary. See page 16.
Check to see if something is preventing door from closing.Controls need to be adjusted. See page 10.Condenser coils are dirty. Clean according to cleaning instructions. See page 16.Rear air grille is blocked. Check the positioning of food items in refrigerator to make sure
grille is not blocked. Rear air grilles are located under crisper drawers.
Prolonged door openings. Minimize door openings.
Review this chart of troubleshooting tips first…you may not need to call for service at all.
GEN
ERA
L O
PER
AT
ION
NO
ISE
TEM
PERA
TURE
21

PROBLEM POSSIBLE CAUSES WHAT TO DORefrigerator is leaking Plastic tubing was used to complete water Use copper tubing for installation. Plastic is less durable andwater connection. can cause leakage.Ice forms in inlet tube to Improper water valve was installed. Check water connection procedure in the Installation ice maker Instructions. Self-piercing and 3⁄16" saddle valves cause low
water pressure and may clog the line over time.Water pressure is low. Water pressure must be between 20 to 100 pounds per square
inch to function properly.Water flow is slower than Freezer temperature is too high. See page 7. Freezer temperature should be approximatelynormal 0° F (-18° C).
Water pressure is low. Water pressure must be between 20 to 100 pounds per square inch to function properly.
Improper water valve was installed. Check water connection procedure in the Installation Instructions. Self-piercing and 3⁄16" saddle valves cause low water pressure and may clog the line over time.
Water droplets form on Check gaskets for proper seal. Clean, if necessary. See page 16.outside of refrigerator Humidity levels are high. Normal during times of high humidity.
Controls require adjustment. See page 10.Water droplets form on Humidity levels are high or door has been Minimize door openings.inside of refrigerator been opened frequently.
Check gaskets for proper seal. Clean, if necessary. See page 16.
ICE
MO
IST
UR
E
22
BEFORE YOU CALL FOR SERVICE, CONT.

REFRIGERATOR WARRANTY
Full One Year WarrantyFor one (1) year from the date of original retailpurchase, any part which fails in normal homeuse will be repaired or replaced free of charge.Ice Maker – when purchased with therefrigerator and installed by the dealer the icemaker will be considered part of the refrigeratorfor warranty purposes.Limited Warranty — Major RefrigerationComponentsSecond thru Fifth Year:After the first year from the date of original retailpurchase, through the end of the fifth year,Maytag Appliances will repair or replace, at itsoption, free of charge for parts and labor, anypart of the sealed refrigeration system(consisting of the compressor, evaporator,condenser, drier and connecting tubing) and thecabinet liner (exclusive of the door liner) whichfail in normal home use. Mileage andtransportation charges, if required, shall be theresponsibility of the owner.Limited Warranty –– Water Filter:With regard to the water filter cartridge, MaytagAppliances will replace any part of the waterfilter cartridge which fails due to a defect inworkmanship or materials, for a period of ThirtyDays from the date of original purchase. This is afull 30 day warranty, and during this warrantyperiod we will also provide free of charge, alllabor and in-home service required to replacethe defective part.
Limited Warranty — Other Parts:Second Year:Parts other than major refrigerationcomponents which fail in normal home useduring the second year following the date oforiginal retail purchase will be repaired orprovided free of charge for the part itself, withthe owner paying all other costs, including labor,mileage and transportation.Please note: The full warranty and the limitedwarranties apply when the refrigerator is locatedin the United States or Canada. Refrigeratorslocated elsewhere are covered by the limitedwarranties only including parts that fail duringthe first year.
LIMITATIONS OF LIABILITYThe warrantor shall not be liable for anyincidental or consequential damages, includingfood loss. Some states do not allow the exclusionor limitation of consequential damages, so theabove limitation or exclusion may not apply toyou.
The specific warranties expressed aboveare the ONLY warranties provided by themanufacturer. This warranty gives youspecific legal rights, and you may also haveother rights that vary from state to state.
TO RECEIVE WARRANTY SERVICETo locate an authorized service company in your area contact theJenn-Air dealer from whom your appliance was purchased; or callMaytag Appliances Sales Company, Jenn-Air Customer Assistanceat the number listed below. Should you not receive satisfactorywarranty service, please call or write:
Maytag Appliances Sales CompanyAttn: CAIR® CenterP.O. Box 2370Cleveland,TN 37320–2370U.S. and CANADA 1-800-JENNAIR (1-800-536-6247)U.S. customers using TTY for deaf, hearing impairedor speech impaired, call 1-800-688-2080.
NOTE: When writing about an unsolved service problem, pleaseinclude the following information:
(a) Your name, address and telephone number;(b) Model number, serial number, and revision number (found
on the top front interior of the refrigeratorcompartment);
(c) Name and address of your dealer and the date theappliance was bought;
(d) A clear description of the problem you are having.(e) Proof of purchase (sales receipt).
User’s Guides, service manuals and parts catalogs are availablefrom Maytag Appliances Sales Company, Jenn-Air CustomerAssistance.
WHAT IS NOT COVERED BY THESEWARRANTIES:1. Conditions and damages resulting from any of the following:
a. Improper installation, delivery, or maintenance.b. Any repair, modification, alteration or adjustment not
authorized by the manufacturer or an authorized servicer.c. Misuse, abuse, accidents, or unreasonable use.d. Incorrect electric current, voltage or supply.e. Improper setting of any control.
2. Warranties are void if the original serial numbers have beenremoved, altered, or cannot be readily determined.
3. Light bulbs.4. Products purchased for commercial or industrial use.5. The cost of service or service call to :
a. Correct installation errors.b. Instruct the user on proper use of the product.c.Transport the appliance to the servicer.
6. Consequential or incidental damages sustained by any personas a result of any breach of these warranties.
Some states do not allow the exclusion or limitation ofconsequential or incidental damages, so the above exclusion maynot apply.
23

Jenn-Air • 403 West Fourth Street North • P.O. Box 39 • Newton, Iowa 50208
24


![Trilingual Adverb.ppt [äº æ 㠢㠼ã ]fukui-vrf-memo.news.coocan.jp/Trilingual/Trilingual...³ í. ^ a , $ · ¥ ÷ ! ,. =](https://static.fdocuments.in/doc/165x107/5f11cae5a4a28a032039a004/trilingual-fukui-vrf-memonewscoocanjptrilingualtrilingual.jpg)