10 Steps to Build an SOE - Red Hat Customer Portal · 10 Steps to Build an SOE ... By using this...
344
10 Steps to Build an SOE How Red Hat Satellite 6 Supports Setting up a Standard Operating Environment Dirk Herrmann Principal Software Engineer Benjamin Kruell Senior Domain Architect Version 1.0 19th August 2015
Transcript of 10 Steps to Build an SOE - Red Hat Customer Portal · 10 Steps to Build an SOE ... By using this...
10 Steps to Build an SOE
How Red Hat Satellite 6 Supports Setting up a Standard Operating Environment
Dirk Herrmann
Principal Software Engineer
Benjamin Kruell
Senior Domain Architect
Version 1.0
19th August 2015

100 East Davie StreetRaleigh NC 27601 USAPhone: +1 919 754 3700Phone: 888 733 4281Fax: +1 919 754 3701PO Box 13588Research Triangle Park NC 27709 USA
Linux is a registered trademark of Linus Torvalds. Red Hat, Red Hat Enterprise Linux and the Red Hat "Shadowman" logo are registered trademarks of Red Hat, Inc. in the United States and other countries.
Microsoft and Windows are U.S. registered trademarks of Microsoft Corporation.
UNIX is a registered trademark of The Open Group.
Intel, the Intel logo and Xeon are registered trademarks of Intel Corporation or its subsidiaries in the United States and other countries.
VMware, VMware Tools, vSphere, vCetner, and ESXi are registered trademarks of VMware, Inc.
Docker and the Docker logo are trademarks or registered trademarks of Docker, Inc.
ITIL® is a Registered Trade Mark of AXELOS Limited.
All other trademarks referenced herein are the property of their respective owners.
© 2015 by Red Hat, Inc. This material may be distributed only subject to the terms and conditions set forth in the Open Publication License, V1.0 or later (the latest version is presently available at http://www.opencontent.org/openpub/).
The information contained herein is subject to change without notice. Red Hat, Inc. shall not be liable for technical or editorial errors or omissions contained herein.
Distribution of modified versions of this document is prohibited without the explicit permission of Red Hat Inc.
Distribution of this work or derivative of this work in any standard (paper) book form for commercial purposes is prohibited unless prior permission is obtained from Red Hat Inc.
The GPG fingerprint of the [email protected] key is:CA 20 86 86 2B D6 9D FC 65 F6 EC C4 21 91 80 CD DB 42 A6 0E
www.redhat.com ii [email protected]

Executive SummaryOver time the complexity of IT infrastructures increases. Businesses that used to run on a small number of physical servers a decade ago have had to add more servers to grow and keep up with new technology. The advent of virtualization adds another layer of complexity to an already complicated, multi-vendor environment. The result is an environment that is difficult to navigate and control and increasing labor costs. With labor costs making up nearly 60% of overall IT infrastructure costs, the price of complexity adds up quickly.
Standardized operating environments help businesses operate effectively and efficiently. Red Hat solutions provide additional benefits, such as improved Total Cost of Ownership (TCO), better IT productivity, and increased agility, which all drive your business forward. Red Hat Enterprise Linux with Red Hat Satellite provides an ideal platform for standardized operating environments with lower TCO and greater IT efficiency and productivity. We can improve yourbottom line and increase your business' agility and competitiveness.
This solution guide provides an example of an implementation based on a sample customer scenario that includes a distributed datacenter topology, sample applications, and an exampleof an IT organization and its roles. It is an end-to-end story starting with a fresh installation of Satellite 6 and a step-by-step configuring of all necessary Satellite 6 entities, up to an up-and-running infrastructure with servers and applications and their ongoing maintenance. Most parts of the setup can be automated with the powerful hammer command-line interface, which is documented in this reference architecture. Nearly all Satellite entities are covered. For the most critical ones (content views, host groups, and lifecycle environments), multiple scenarios are illustrated. By using this comprehensive documentation, customers can configure Red Hat Satellite 6 in a way that best fits their needs.
The following sections provide a brief overview of each of the ten steps and include the core content items, the Satellite 6 entities covered, and the achievements for each step.
Step 1: Set up your System Management Infrastructure. Perform a basic configuration of Sat6 and its embedded Capsule. We also create an organization and import the subscription manifest. Corresponding Satellite 6 Entities: Satellite 6 Installer, Organization, and Subscription Manifest Outcome: You now have an up-and-running system management infrastructure and your Red Hat subscription manifest uploaded and activated.
Step 2: Map your Location and Datacenter Topology. Configure two datacenters with different underlying virtualization platforms (RHEV and RHELOSP), one with a DMZ.
[email protected] III www.redhat.com
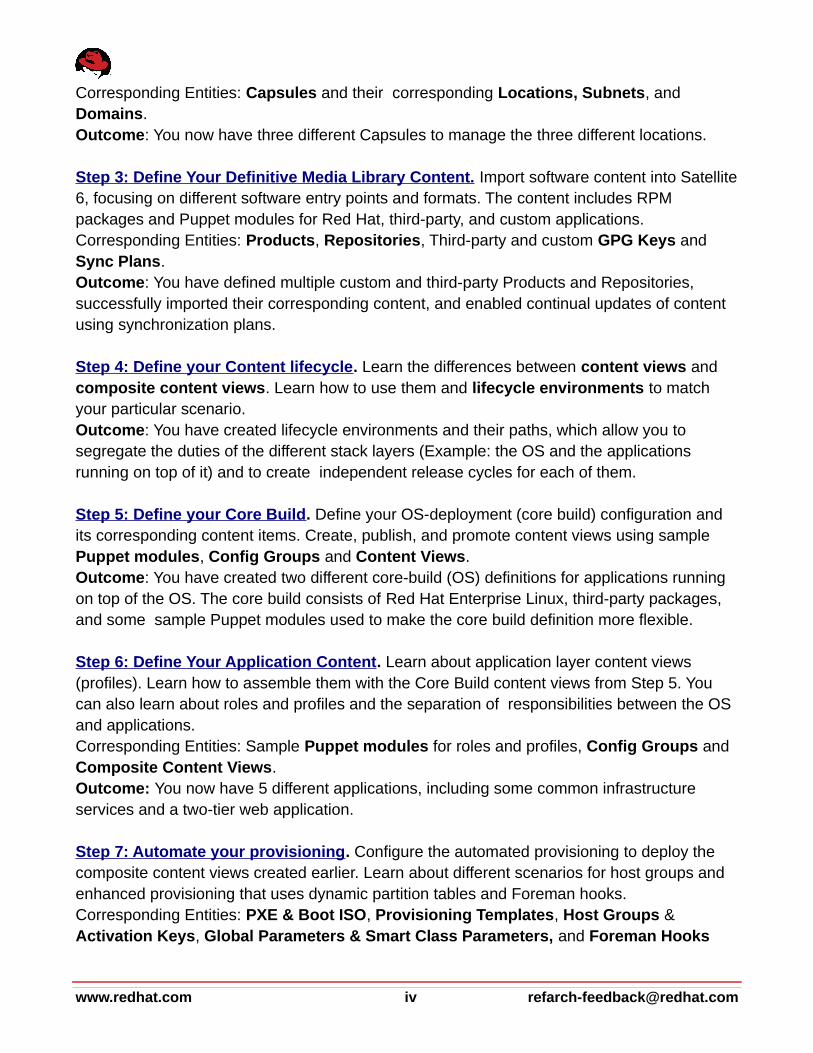
Corresponding Entities: Capsules and their corresponding Locations, Subnets, and Domains. Outcome: You now have three different Capsules to manage the three different locations.
Step 3: Define Your Definitive Media Library Content. Import software content into Satellite6, focusing on different software entry points and formats. The content includes RPM packages and Puppet modules for Red Hat, third-party, and custom applications. Corresponding Entities: Products, Repositories, Third-party and custom GPG Keys and Sync Plans. Outcome: You have defined multiple custom and third-party Products and Repositories, successfully imported their corresponding content, and enabled continual updates of content using synchronization plans.
Step 4: Define your Content lifecycle. Learn the differences between content views and composite content views. Learn how to use them and lifecycle environments to match your particular scenario. Outcome: You have created lifecycle environments and their paths, which allow you to segregate the duties of the different stack layers (Example: the OS and the applications running on top of it) and to create independent release cycles for each of them.
Step 5: Define your Core Build. Define your OS-deployment (core build) configuration and its corresponding content items. Create, publish, and promote content views using sample Puppet modules, Config Groups and Content Views. Outcome: You have created two different core-build (OS) definitions for applications running on top of the OS. The core build consists of Red Hat Enterprise Linux, third-party packages, and some sample Puppet modules used to make the core build definition more flexible.
Step 6: Define Your Application Content. Learn about application layer content views (profiles). Learn how to assemble them with the Core Build content views from Step 5. You can also learn about roles and profiles and the separation of responsibilities between the OS and applications. Corresponding Entities: Sample Puppet modules for roles and profiles, Config Groups and Composite Content Views. Outcome: You now have 5 different applications, including some common infrastructure services and a two-tier web application.
Step 7: Automate your provisioning. Configure the automated provisioning to deploy the composite content views created earlier. Learn about different scenarios for host groups and enhanced provisioning that uses dynamic partition tables and Foreman hooks. Corresponding Entities: PXE & Boot ISO, Provisioning Templates, Host Groups & Activation Keys, Global Parameters & Smart Class Parameters, and Foreman Hooks
www.redhat.com iv [email protected]

Outcome: You have configured all entities required to provision new servers and to deploy the composite content views created earlier by using Satellite 6 provisioning templates and parameters.
Step 8: Map your IT organization and roles to your Satellite setup. Map typical IT organizations and roles to Satellite 6 roles and the RBAC model. Corresponding Entities: Users & User Groups, Roles and RBAC (roles, permissions, filters).Outcome: You have 5 sample roles that reflect the typical roles of a two-dimensional responsibility matrix. This matrix is used to separate responsibilities and to reduce the complexity of visible entities in the UI.
Step 9: Manage the Content Lifecycle Continuously. Manage the Satellite 6 content lifecycle, including errata management, content view update operations, and puppet module changes. Corresponding Entities: Errata Management, including Errata notification emails, Content Dashboard and Incremental Updates. Outcome: You know how to execute different content update scenarios and the new errata management features of Satellite 6.1.
Step 10: Automate and extend your setup outlines possible enhancements (based on the setup chosen in earlier steps). Some examples include: Importing existing hosts, Using the host discovery features, Using Satellite 6 to support various IT processes. Outcome: You have some ideas for enhancing the setup created in the earlier steps of this document.
[email protected] v www.redhat.com

Table of Contents Executive Summary.......................................................................................... III
About this Document.......................................................................................... 1
Target Audience...................................................................................................................... 1
ACME as a customer (and content) journey.......................................................................... 2
Comments and Feedback...................................................................................................... 2
Staying In Touch..................................................................................................................... 2
Recommended Red Hat Training Offerings........................................................................... 3
Recommended Red Hat Consulting Offerings....................................................................... 4
Legal Disclaimer..................................................................................................................... 4
Acknowledgments................................................................................................................... 5
Introduction......................................................................................................... 6
Standard Operating Environment (SOE) Overview............................................................... 6
Red Hat Satellite 6 Overview................................................................................................. 8
Red Hat Satellite 6 System Architecture.............................................................................. 10
ACME Intro............................................................................................................................ 11
ACME IT Organization Overview....................................................................................... 12 ACME Datacenter Topology Overview............................................................................... 13 ACME Application Architecture Overview.......................................................................... 14
Naming Conventions Overview............................................................................................ 15
Step 1: Set up your System Management Infrastructure.................................. 16
Installing Red Hat Satellite 6.1............................................................................................. 16
Satellite 6 Installation............................................................................................................ 17
DNS, DHCP, and TFTP Recommendations...................................................................... 17 Red Hat Content Delivery Network (CDN)........................................................................ 19
Hammer Command Line Interface....................................................................................... 20
Install and Configure Hammer on a Remote Host............................................................. 21 Creating a New Satellite 6 Organization.............................................................................. 22
Importing your Red Hat Subscription Manifest..................................................................... 24
Setting Up Your Revision Control Server (git)...................................................................... 25
Setting Up Your Monitoring Server....................................................................................... 26
www.redhat.com vi [email protected]

Step 2: Map your Location and Datacenter Topology....................................... 27
Red Hat Satellite 6 Capsule Server Overview..................................................................... 28
Sample Datacenter Topology Scenarios.............................................................................. 30
Scenario A) Centralized Management - One Red Hat Satellite for All Segments............. 30 Scenario B) Segregated Network Zones Within a Datacenter.......................................... 31 Scenario C) Geographically Separate Locations.............................................................. 32 Scenario D) Disconnected / Isolated................................................................................. 33
Sample ACME Datacenter Scenario.................................................................................... 33
Locations.............................................................................................................................. 34
Red Hat Satellite 6 Compute Resources............................................................................. 36
Configuring Your Virtualization and Cloud Infrastructures as Compute Resources.......... 37 Location Munich: Configuring RHEV as Compute Resource............................................ 38 Location Boston: Configuring RHEL OpenStack Platform as a Compute Resource........ 40 Configuring VMware vSphere as a Compute Resource.................................................... 42
Domains................................................................................................................................ 43
Subnets................................................................................................................................. 44
Red Hat Capsule Installation................................................................................................ 47
Sample Capsule 1: Munich DMZ in the RHEV Datacenter............................................... 47 Sample Capsule 2: Boston Remote Location Using RHEL OpenStack Platform............. 54 User Data........................................................................................................................... 55
Step 3: Define Your Definitive Media Library Content...................................... 63
Software Entry Points and Formats...................................................................................... 63
Satellite Content Types......................................................................................................... 64
Satellite Products and Repositories..................................................................................... 65
Red Hat Satellite Product and Repository Recommendations............................................ 65
Product and Repositories Naming Conventions.................................................................. 66
GPG Keys for Red Hat, Third-party and Custom Software.................................................. 67
Red Hat GPG Keys............................................................................................................ 68 Third-party GPG Keys........................................................................................................ 68 Custom GPG Keys............................................................................................................. 68 Importing GPG Keys into Satellite 6.................................................................................. 69
Importing Red Hat Software into Satellite 6......................................................................... 70
How to Enable Red Hat Software Repositories................................................................. 70 Selecting the Appropriate Repositories............................................................................. 72 Synchronize Repositories.................................................................................................. 73
[email protected] vii www.redhat.com

Importing (RPM) Packaged Third-party Software into Satellite 6........................................ 76
Creating a new product in Red Hat Satellite...................................................................... 76 Situation 1. Importing Third-party RPM Packages from an Existing yum Repository....... 77 Situation 2. Importing Third-party RPM Packages Without an Existing yum Repository. . 78
Importing Other (Not RPM-packaged) Software into Satellite 6.......................................... 80
Deploying Unpackaged Files Using Puppet (as Part of Satellite 6).................................. 81 Packaging as RPM and Deploying Using Satellite 6 Software Management................... 81
Importing Puppet Content into Satellite 6............................................................................. 81
Importing Docker Container Images into Satellite 6............................................................. 84
Configuring Regular Repository Synchronization by Using Sync Plans.............................. 85
Step 4: Define your Content lifecycle............................................................... 88
Satellite 6 Content Views...................................................................................................... 88
Satellite 6 Content View Lifecycle Overview........................................................................ 89
Content View and Composite Content View Scenarios....................................................... 90
Scenario A) The “All in one” Content View........................................................................ 91 Scenario B) Host-Specific or Server Type Content Views................................................. 92 Scenario C) Host Specific Composite Content Views....................................................... 94 Scenario D) Component-Based Composite Content Views.............................................. 95
Satellite 6 Content View Recommendations........................................................................ 96
How Filters Work................................................................................................................ 96 Recommendations for Filters............................................................................................. 97 Recommendations for Content Views............................................................................... 97 Recommendations for Composite Content Views (CCV).................................................. 98 Multiple Snapshots (Clones) of Content Views................................................................. 98 CCVs in a Dedicated Life-Cycle Environment................................................................... 99 How Content Views work with Products and Repositories................................................ 99
Content View Naming Conventions.................................................................................... 103
Basic Guidelines for Naming Conventions...................................................................... 103 Content Views Versus Composite Content Views........................................................... 104 How to Name Components/Profiles (based on CVs)...................................................... 104 How to name Final Deployment Configurations/Roles (based on CCVs)....................... 104
Typical lifecycle stages....................................................................................................... 105
Red Hat Satellite lifecycle Environments........................................................................... 105
The Special Role of the Library.......................................................................................... 105
The Special Role of the RHEL Core Build.......................................................................... 106
Lifecycle Specific Adaptations............................................................................................ 106
www.redhat.com viii [email protected]

Typical Lifecycle Environment Scenarios........................................................................... 107
Scenario A) One lifecycle stage for everything................................................................ 107 Scenario B) One Lifecycle Environment Path for All Apps and OS................................. 108 Scenario C) dedicated lifecycle path for particular applications...................................... 110 Scenario D) Deviant Lifecycle Paths Require an Overall Mapping................................. 111
ACME Scenario................................................................................................................... 111
Step 5: Define your Core Build....................................................................... 113
Benefits of Red Hat Enterprise Linux for Core Builds........................................................ 113
Red Hat ABI and API compatibility commitment.............................................................. 114 Core Build Overview........................................................................................................... 115
Core Build Recommendations............................................................................................ 115
How to Define Your Core Builds......................................................................................... 119
Core Build Naming conventions......................................................................................... 120
Core Build Software Repositories...................................................................................... 121
ACME Core Build Sample Puppet Modules....................................................................... 123
Sample Puppet Module for /etc/motd File....................................................................... 124 Sample Puppet Module for Additional RPM Packages................................................... 126 Sample Puppet Module for the ntp Configuration........................................................... 127 Sample Puppet Module: Zabbix Monitoring Agent Configuration.................................... 127 Sample Puppet Module for rsyslog Configuration (here: client)...................................... 128 Puppet Labs Modules stdlib and concat.......................................................................... 128 Adding All Core Build Puppet Modules to the Core Build Content View......................... 129
Red Hat Satellite 6 Config Groups..................................................................................... 129
Naming Conventions........................................................................................................ 130 Core Build Config Group.................................................................................................. 130
Publishing and Promoting the Core Build Content Views.................................................. 131
Step 6: Define Your Application Content......................................................... 137
ACME’s Sample Application Architecture........................................................................... 138
Sample Application 1: git Server........................................................................................ 139
Example: Puppet Module for git (Server and Client)....................................................... 139 Content View for git Server Profile................................................................................... 140 Composite Content View for the gitserver Role............................................................... 147
Sample Application 2: Container Host................................................................................ 151
Sample Puppet Module for Docker Host Compute Resource......................................... 152 Content View for Docker Profile....................................................................................... 152
[email protected] ix www.redhat.com

Composite Content View for Containerhost Role............................................................ 153 Post-Installation Hook for Containerhost......................................................................... 154
Sample Application 3: Central loghost Server.................................................................... 154
Sample Application 4: Satellite 6 Capsule.......................................................................... 155
Content View for Satellite 6 Capsule Profile.................................................................... 155 Composite Content View for Satellite 6 Capsule Role.................................................... 156
Sample Application 5: ACME Website................................................................................ 157
Sample Puppet Module for MariaDB server profile......................................................... 158 Sample Puppet Module for ACME Web Role.................................................................. 159 ACME Web Config Groups.............................................................................................. 159 Content View for MariaDB Profile.................................................................................... 161 Content View for the WordPress profile........................................................................... 162 Composite Content View for ACME Web Role................................................................ 163
Step 7: Automate your provisioning................................................................ 166
Provisioning Recommendations......................................................................................... 166
Provisioning Methods......................................................................................................... 172
Parameters......................................................................................................................... 173
Global Parameters........................................................................................................... 174 Smart Class Parameters.................................................................................................. 176 Define Global Parameters............................................................................................... 176
Templates........................................................................................................................... 179
Template type overview:.................................................................................................. 179 Clone a Provisioning Template........................................................................................ 181
Partition Tables................................................................................................................... 183
Create the Custom Partition Table................................................................................... 184 Provisioning Setup.............................................................................................................. 188
Provisioning Workflow........................................................................................................ 197
One-time actions.............................................................................................................. 198 Repeatable actions.......................................................................................................... 198
Foreman Hooks.................................................................................................................. 202
Foreman Hook Script Sample 1: Containerhost.............................................................. 203 Foreman Hook Script Sample 2: New Host Notification.................................................. 204 Foreman Hook Script Sample 2: ITSM Tool Integration (Monitoring).............................. 204
Activation Keys................................................................................................................... 205
Naming Conventions........................................................................................................ 205 Create Activation Keys..................................................................................................... 206
www.redhat.com x [email protected]
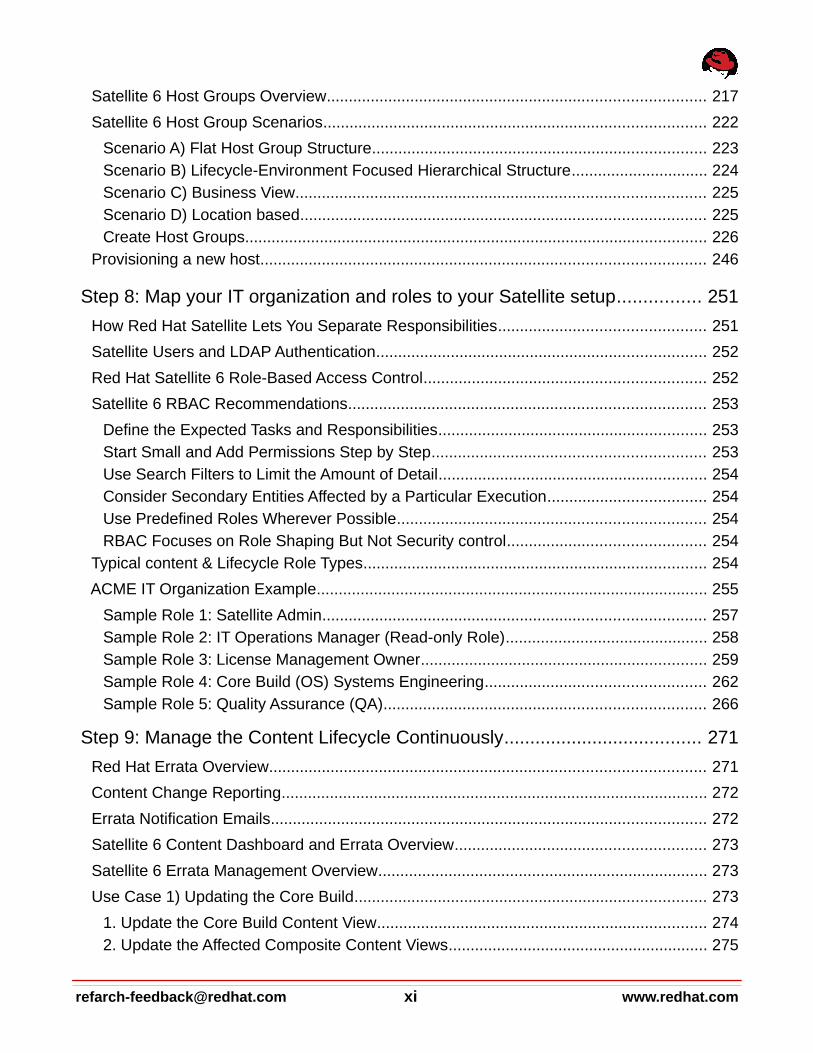
Satellite 6 Host Groups Overview...................................................................................... 217
Satellite 6 Host Group Scenarios....................................................................................... 222
Scenario A) Flat Host Group Structure............................................................................ 223 Scenario B) Lifecycle-Environment Focused Hierarchical Structure............................... 224 Scenario C) Business View............................................................................................. 225 Scenario D) Location based............................................................................................ 225 Create Host Groups......................................................................................................... 226
Provisioning a new host..................................................................................................... 246
Step 8: Map your IT organization and roles to your Satellite setup................ 251
How Red Hat Satellite Lets You Separate Responsibilities............................................... 251
Satellite Users and LDAP Authentication........................................................................... 252
Red Hat Satellite 6 Role-Based Access Control................................................................ 252
Satellite 6 RBAC Recommendations................................................................................. 253
Define the Expected Tasks and Responsibilities............................................................. 253 Start Small and Add Permissions Step by Step.............................................................. 253 Use Search Filters to Limit the Amount of Detail............................................................. 254 Consider Secondary Entities Affected by a Particular Execution.................................... 254 Use Predefined Roles Wherever Possible...................................................................... 254 RBAC Focuses on Role Shaping But Not Security control............................................. 254
Typical content & Lifecycle Role Types.............................................................................. 254
ACME IT Organization Example......................................................................................... 255
Sample Role 1: Satellite Admin....................................................................................... 257 Sample Role 2: IT Operations Manager (Read-only Role).............................................. 258 Sample Role 3: License Management Owner................................................................. 259 Sample Role 4: Core Build (OS) Systems Engineering.................................................. 262 Sample Role 5: Quality Assurance (QA)......................................................................... 266
Step 9: Manage the Content Lifecycle Continuously...................................... 271
Red Hat Errata Overview................................................................................................... 271
Content Change Reporting................................................................................................. 272
Errata Notification Emails................................................................................................... 272
Satellite 6 Content Dashboard and Errata Overview......................................................... 273
Satellite 6 Errata Management Overview........................................................................... 273
Use Case 1) Updating the Core Build................................................................................ 273
1. Update the Core Build Content View........................................................................... 274 2. Update the Affected Composite Content Views........................................................... 275
[email protected] xi www.redhat.com

3. Promote the Composite Content view Through the Corresponding Lifecycle Stages 276 4. Update All Affected Hosts That Belong to the Corresponding Host Groups............... 276
Use Case 2) New Version of the Application CV with an Unchanged Core Build............. 278
Use Case 3) Core Build and Application CVs Updated Simultaneously............................ 279
Use Case 4) Incremental Updates - Apply Selected Errata to Hosts................................. 279
Use Case 5) Adding a New Puppet Module to an Existing Content View......................... 282
Adding a New Version or a New Class............................................................................ 283 4. Optional: Add the New Puppet Classes to a Config Group......................................... 285 5. Add the New Puppet Classes to All Host Groups with Which the Adapted CV is Associated........................................................................................................................ 285
Step 10: Automate and extend your setup..................................................... 287
Talk to us!............................................................................................................................ 287
Importing existing hosts...................................................................................................... 287
Improve your bare metal provisioning using the Discovery Plugin.................................... 288
Integration of Backup Management and Systems Management....................................... 289
How Satellite 6 Supports Your Security Management Process......................................... 290
How Satellite 6 Supports Your Service Validation & Testing (QA) Process....................... 290
How Satellite 6 Supports Your Asset & Configuration Management Process................... 291
How Satellite 6 Supports Your Incident Management Process.......................................... 291
Appendix I - Sample Puppet Modules used inside......................................... 292
Sample Puppet module for ntp configuration.................................................................. 292 Sample Puppet Module for Zabbix Monitoring agent configuration................................ 295 Sample Puppet Module for rsyslog configuration (both client and server)...................... 302 Sample Puppet Module for additional rpm packages: corebuildpackages..................... 308 Sample Puppet Module for Docker configuration............................................................ 308 Sample Puppet Module for git configuration (both client and server)............................. 310 Sample Puppet Module for rhevagent............................................................................. 314 Sample Puppet Module for vmwaretools......................................................................... 315 Sample Puppet Module for acmeweb (frontend and backend)....................................... 316
Appendix II: Scripts......................................................................................... 322
Foreman Hook 1: 05_containerhost.sh.............................................................................. 322
Foreman Hook 2: 10_logger.sh.......................................................................................... 323
Foreman Hook 3: 01_zabbix_host_create.sh.................................................................... 323
Appendix III: Naming Convention................................................................... 326
www.redhat.com xii [email protected]
Appendix IV: Software Versions Overview..................................................... 328
Appendix V: Contributor List........................................................................... 330
[email protected] xiii www.redhat.com
About this DocumentThe primary goal of this solution guide is to provide an end-to-end example of software lifecycle management using Red Hat Satellite 6. It is based on an sample customer scenario including sample application architecture, sample datacenter topology and IT organization and roles. We’ve tried to describe a simple but realistic scenario and to explain all mandatory and additionally some advanced Satellite 6 capabilities and its configuration.
Our focus has been more on the “why” instead of the “how”. Therefore a significant proportionof this solution guide is committed to explain the non-technical concepts behind. Nevertheless and given the characteristics of a Red Hat Reference Architecture / Solution Guide the implementation has been engineered, configured and validated in our lab.
Some tools used and items documented inside are not covered by Red Hat’s Global Support Services support contracts and coverage. We’ve marked all items which are not supported byRed Hat Global Support Services to avoid confusion about it.
We’ve tried to provide in each particular area different potential scenarios to deal with and their advantages and disadvantages. In each of these areas we’ve picked one scenario and documented its technical implementation.
Most of the automation we’ve used and provided inside this solution guide is based on a naming convention which will be explained in detail each time it is used it and summarized at the end of this document.
Target AudienceThe target audience of this solution guide are primarily customers and partners who are new to Satellite 6. Additionally we try to help architects in different areas of responsibility and interest to make some general design decisions if they’ve not been made yet. The multiple scenarios described in each section are supposed to let the audience decide which ofthese scenarios and in consideration of the documented advantages and disadvantages are the best fit for their environment or scenario. Additionally we describe the technical implementation of one complete configuration to satisfy the needs of people responsible for the technical implementation as well. The documentation of CLI based implementation is supposed to help customers more focusing on automation or integration of Satellite 6 capabilities into their environment.
[email protected] 1 www.redhat.com
ACME as a customer (and content) journeyThe idea of using an sample company with a very limited complexity and declared as just founded is to provide a customer journey which will be expanded over time. This solution guide is supposed to become kind of a starting point or foundation document while other steps of this customer journey will follow over time.
Due to resource and time limitations and to reduce the complexity and content length of this document we’ve had to define some topics which are out of scope for this document. The purpose of the following list of excluded topics is to avoid disappointed readers who are primarily looking for these topics we do not cover inside this solution guide. The following RedHat Satellite capabilities are either only covered very superficially or not at all:
● Red Hat Satellite 6 multi-org capabilities● Red Hat Satellite 6 compute profiles● Red Hat Satellite 6 Discovery feature● openSCAP capabilities of Satellite 6.1● Red Hat Access Insights capabilities of Satellite 6.1● Subscription Management using virt-who● Docker Imager Management capabilities of Satellite 6.1
Some other areas are so complex for its own and are worth to be covered in more details thatwe consider to write dedicated documents targeting these advanced use cases or scenarios. The goal of Step 10 is to provide some ideas about these advanced scenarios we might will cover in upcoming documents.
Comments and FeedbackIn the spirit of open source, we invite anyone to provide feedback and comments on any solution guides. Although we review our papers internally, sometimes issues or typographical errors are encountered. Feedback allows us to not only improve the quality of the papers we produce, but allows the reader to provide their thoughts on potential improvements and topic expansion to the papers.
Feedback on the papers can be provided by emailing refarch - feedback @ redhat . com. Please refer to the title within the email.
Staying In TouchJoin us on some of the popular social media sites where we keep our audience informed on new reference architectures and solution guides as well as offer related information on things we find interesting.
www.redhat.com 2 [email protected]

Like us on Facebook: https :// www . facebook . com / rhrefarch
Follow us on Twitter: https :// twitter . com / RedHatRefArch
Plus us on Google+: https :// plus . google . com / u /0/ b /114152126783830728030/
Recommended Red Hat Training OfferingsAccompanying to this solution guide Red Hat offers and recommends various trainings and certifications around the topics discussed inside this document.
The following Red Hat training courses are recommended and cover technologies used in thereference guide::
Red Hat Satellite 6 Administration - RH 403
Red Hat Satellite 6 Administration is a lab-based course that explores the concepts and methods necessary for successful large-scale management of Red Hat® Enterprise Linux® systems. Course participants will learn how to install Red Hat Satellite 6 on a server and populate it with software packages.
Further Details: https :// www . redhat . com / en / services / training / rh 403- red - hat - satellite -6- administration
Red Hat Server Hardening - RH 413
Red Hat® Server Hardening (RH413) builds on a student's Red Hat Certified Engineer (RHCE®) certification or equivalent experience to provide an understanding of how to secure a Red Hat Enterprise Linux® system to comply with security policy requirements.
Further Details: https :// www . redhat . com / en / services / training / rh 413- red - hat - server - hardening
Red Hat Certified System Administrator Certification Path
An IT professional who has earned the Red Hat Certified System Administrator (RHCSA) is able to perform the core system administration skills required in Red Hat Enterprise Linux environments. The credential is earned after successfully passing the Red Hat Certified System Administrator (RHCSA) Exam (EX200).
Further Details: https :// www . redhat . com / en / services / certification / rhcsa
[email protected] 3 www.redhat.com

Red Hat Certified Engineer Certification Path
A Red Hat® Certified Engineer (RHCE®) is a Red Hat Certified System Administrator (RHCSA) who possesses the additional skills, knowledge, and abilities required of a senior system administrator responsible for Red Hat Enterprise Linux® systems.
Further Details: https :// www . redhat . com / en / services / certification / rhce
Recommended Red Hat Consulting OfferingsRed Hat Consulting has refined an automated, modular, enterprise-focused configuration management strategy that gives you full visibility and control across your environments.
There are various offerings available which are complementary to this solution guide and primarily focusing on design, build, and deploy an SOE to allow:
● Seamlessly adopt new business initiatives, platforms, services, and capabilities.● Reduce time to implementation.● Establish standard, modular, flexible, and automated processes.● Mitigate the cost of changing business drivers.
Further information including whitepaper, datasheets and customer references could be foundhere: http :// www . redhat . com / en / services / consulting / infrastructure # standardize
Legal DisclaimerThis solution guide has been provided by Red Hat, but some parts of it are outside the scope of the posted Service Level Agreements and support procedures (https://access.redhat.com/support/offerings/production/). The information is provided as-is and any configuration settings or installed applications made from the information in this article could make the Operating System unsupported by Red Hat Global Support Services. The intent of this solution guide is to provide information to accomplish the system's needs. Use of the information in this article at the user's own risk.
Primarily third party software components used to reflect a typical customer environment are excluded from being supported by Red Hat. Additionally, the scripts used and provided inside this solution guide are not supported by Red Hat and distributed without any warranty. Each time a potentially unsupported item is covered a dedicated disclaimer has been added to the affected section.
www.redhat.com 4 [email protected]

AcknowledgmentsEven if there are two authors listed on the cover page this reference is based on the ideas and contributions of many talented and highly skilled people inside and outside of Red Hat.The content is based on a long-term experience of various contributors gathered over years and in a huge number of projects. Writing down these ideas, reviewing and publishing it wouldnot have been possible without the valued input, creativity and guidance provided by a lot of different people. We’ve tried to add a complete list of contributors inside Appendix V: Contributor List. We would like to thank each and everyone mentioned in this list.
[email protected] 5 www.redhat.com

Introduction
The following chapter provides an overview of some important items that are explained in more detail within the solution guide.
Standard Operating Environment (SOE) OverviewWith a variety of operating system vendors and versions, server hardware configurations, andmanagement software tools, system and infrastructure administration becomes difficult at best. This complexity requires a large IT staff with deep expertise in all areas of the environment, further increasing costs.
In addition to interoperability issues, these management challenges lead to increased downtime and availability concerns with less visibility and control of assets. These issues increase security and compliance risks. When you have a multitude of disparate processes for each configuration or operating system version, the process of provisioning new tools, applications, virtual machines, and servers becomes slow and tedious and often hinders IT and business agility.
Many of these issues can be greatly diminished or even eliminated by reducing complexity and standardizing part or all of the IT environment on a set of processes and procedures. Management is simplified in a standardized operating environment (SOE), significantly increasing IT staff productivity and scalability. Because labor costs contribute significantly to overall IT costs, improving staff efficiency and productivity can lead to compelling savings anda lower total cost of ownership (TCO). Standard operating environments also benefit user productivity in terms of increased availability of services and less downtime. With standard operating processes and procedures, applications, virtual machines, and hardware can all be deployed and configured quickly, increasing flexibility, scalability, and business agility and productivity. Moreover, reduced infrastructure complexity allows better control of IT assets, improves security, and reduces compliance risks.
Standardization hinges on increasing consistency and reducing complexity within an operating environment. The ideal SOE implements a defined set of components, interfaces, and processes to be used throughout the entire IT infrastructure. While it may seem counter intuitive, standardization does not imply that all systems will be exactly the same; it simply means that all systems will have a defined, known foundation upon which a set of applications, virtual machines, and tools can be built.
Therefore standardization focuses on three main areas: simplification of the IT infrastructure,
www.redhat.com 6 [email protected]
automation, and streamlining of management and administration tasks.
Simplified, consistent infrastructure
Reducing the number of variations in core technologies such as operating systems, administration tools, and security and compliance requirements creates an environment that is easier to manage.
Streamlined Operation
When a limited number of operating system versions are deployed in an IT infrastructure, it is possible to define a single, standard set of operating procedures and processes. This approach simplifies and streamlines operation.
Automation
Increased consistency and reduced complexity effectively enable environment automation. With only a few variations in the core system features, many repetitive, non-strategic tasks can be automated.
Moving your IT environment to a simplified, consistent architecture opens the door to many benefits.
Reduced Downtime
Fewer OS variations decrease the statistical likelihood of operational and security issues that cause downtime. Better management practices, resulting from increased infrastructure consistency, catch issues before they bring down systems and applications. Simplified patch management ensures that systems are kept up-to-date and online.
Lower Operational Costs
As labor costs contribute significantly to overall IT costs, improving staff efficiency and productivity can lead to compelling savings and lower total cost of ownership (TCO).More Efficient IT Staff: Streamlined operations and processes allow a smaller staff to administer a larger number of physical and virtual systems more easily and efficiently. Extremely favorable administrator-to-system and -user ratios are possible with SOEs.
Increased Productivity
Because each administrator can manage a larger number of servers and users, the
[email protected] 7 www.redhat.com

infrastructure can grow and scale without bringing on additional staff. Because deep expertisein multiple operating systems and kernel development is not required, IT staff can afford to focus on core business applications. Automation also returns valuable time to strategic tasks that move the business forward.
Reduced Help Desk Workloads
With more consistent services, fewer help desk tickets are filed, reducing the amount of time IT spends on help desk workloads, and increasing user productivity and uptime.Faster IT Response Times: With automation, new applications can be deployed to a large number of systems in a fraction of the time needed for manual deployment. Servers and virtual machines can be provisioned in a matter of hours and minutes, instead of days and hours.
Increased Infrastructure Security and Control
Reduced infrastructure complexity allows better control of IT assets, improves security, and reduces compliance risks.
Greater Business Alignment and Agility
On the business level, enhanced infrastructure agility facilitates increased competitiveness and alignment with goals, while reduced operational costs benefit the bottom line.
Red Hat Enterprise Linux with Red Hat Satellite provides an ideal platform for standardization.These two key components—the operating system, Red Hat Enterprise Linux, and the systems management platform, Red Hat Satellite—work together to further enhance the benefits of standardized operating environments.
Red Hat Satellite 6 OverviewRed Hat Satellite is a system management solution that makes Red Hat infrastructure easier to deploy, scale, and manage across physical, virtual, and cloud environments. Satellite helpsusers provision, configure, and update systems to ensure they run efficiently, securely, and in compliance with various standards. By automating most tasks related to maintaining systems,Satellite helps organizations increase efficiency, reduce operational costs, and enable IT to better respond to strategic business needs.
Red Hat Satellite automates many tasks related to system management and easily integrates into existing workflow frameworks. The centralized console provides administrators one place
www.redhat.com 8 [email protected]

for accessing reports and for provisioning, configuring, and updating systems.
Provisioning
Provision on bare metal, virtualized infrastructure, and on public or private clouds—all from one centralized console and with one simple process.
● Quickly provision and update your entire bare-metal infrastructure.● Easily create and manage instances across virtualized infrastructure or private and
public clouds.● Create complex Kickstart and PXE scenarios with powerful variables and snippets.● Discover and search across non-provisioned hosts for rapid deployment.
Configuration management
Analyze and automatically correct configuration drift and control, and enforce the desired hostend-state, all from the Red Hat Satellite user interface (UI). This lets you configure Red Hat Enterprise Linux systems more efficiently for more agility.
● Integrate synchronizing Puppet modules. This integration provides the ability to manage, promote, and distribute configuration easily across your environment.
● Automatically correct system state with complete reporting, auditing, and history of changes.
Software management
Red Hat Satellite helps ensure a systematic process is used to apply content (including patches) to deployed systems— whether they are deployed on physical, virtual, or cloud infrastructure—in all stages from dev to production. This ensures better consistency and availability of systems, freeing IT to quickly respond to business needs and vulnerabilities.
● Content views are collections of RPMs, container content, or Puppet modules refined with filters and rules. Content views are published and promoted throughout lifecycle environments, enabling end-to-end system management. While Satellite 5 used channels and cloning, content views in Satellite 6 contain both software and configuration content in one place, greatly simplifying managing the lifecycles of systems.
● Integrated with the Red Hat Content Delivery Network (CDN) to let users control synchronization of Red Hat content straight from the user interface.
● Distribution and federation of provisioning, configuration, and content delivery via Red
[email protected] 9 www.redhat.com

Hat Satellite Capsule Server.
Subscription management
Easily report and map your Red Hat products to registered systems for end-to-end subscription consumption visibility.
● Easily import and manage the distribution of your Red Hat software subscriptions.● Report and map your purchased products to registered systems within Red Hat
Satellite for end-to-end subscription usage visibility.
Red Hat Satellite 6 System ArchitectureRed Hat Satellite 6 is based upon several open source projects arranged in the followingarchitecture.
Foreman
Foreman is an open source application used for provisioning and lifecycle management of physical and virtual systems. Foreman automatically configures these systems using various methods, including kickstart and Puppet modules. Foreman also provides historical data for
www.redhat.com 10 [email protected]

reporting, auditing, and troubleshooting.
Katello
Katello is a subscription and repository management application. It provides a means to subscribe to Red Hat repositories and download content. You can create and manage different versions of this content and apply them to specific systems within user-defined stages of the application lifecycle.
Candlepin
Candlepin is a service within Katello that handles subscription management.
Pulp
Pulp is a service within Katello that handles repository and content management.
Hammer
Hammer is a CLI tool that provides command line and shell equivalents of most Web UI functions.
REST API
Red Hat Satellite 6 includes a RESTful API service that allows system administrators and developers to write custom scripts and third-party applications that interface with Red Hat Satellite.
Capsule
Red Hat Satellite Capsule Server acts as a proxy for some of the main Satellite functions including repository storage, DNS, DHCP, and Puppet Master configuration. Each Satellite Server also contains integrated Capsule Server services.
Further documentation could be found here: https :// access . redhat . com / products / red - hat - satellite / overview
ACME IntroWe’re using a company called ACME as an example. ACME is supposed to represent a typical customer environment.
[email protected] 11 www.redhat.com
Note: All scenarios and people are fictional, and any resemblance to any person living or dead is purely coincidental.
ACME has just been founded, and the business model is not finally defined yet. The current focus is to establish an e-commerce platform for various consumer goods. The web shop system is currently in the design phase and is not covered in this solution guide. Instead, we focus on setting up the required infrastructures and the systems and application managementcapabilities.
ACME IT Organization OverviewBecause ACME is brand new, the IT Organization is still quite small. Nevertheless, ACME hasdecided to use a traditional approach to segregating tasks while structuring its IT departments.
Although ACME has additional departments, such as Human Resources, Legal, and Finance, we are focusing primarily on the following three main departments and their teams:
● IT Operations● Software Development● IT Services Management
The IT Operations department is taking care of all data-center management tasks and owns the entire production environment. They build and oversee all infrastructure layers, including computing (both physical and virtual), storage and network resources. These responsibilities include monitoring, incident management and backup / restore as well. In addition, they are responsible for all operating-system-related items, including OS upgrades and security patching.
The Software Development Department creates custom software and integrates it with 3rd-party software components. Their responsibilities include all application-specific building and testing activities and configuration management.
IT Services Management is responsible for all architecture and process areas in IT. Theseinclude Service Validation and Testing (QA), Release Management, and Security Management as the key processes. This department also acts as a bridge between Businessand IT and between IT Operations and Software Development. To be better prepared for the future, it recently founded an Emerging Technologies (ET) Department to investigate upcoming trends and technologies early.
www.redhat.com 12 [email protected]
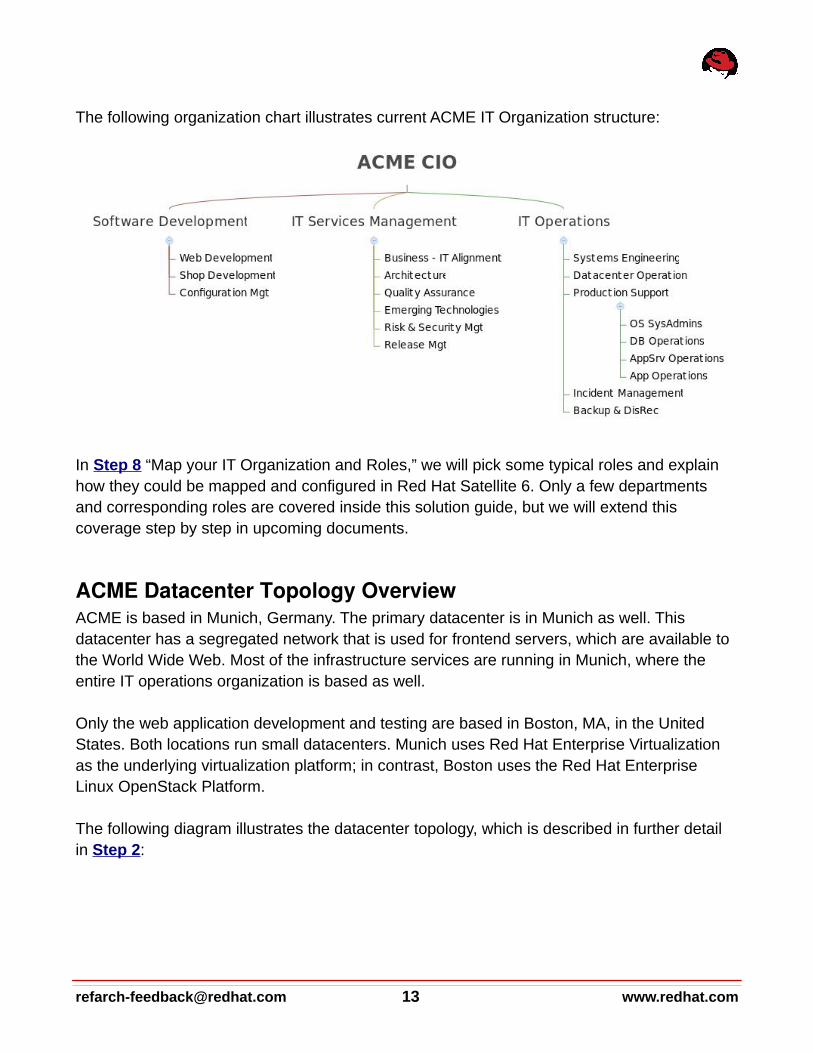
The following organization chart illustrates current ACME IT Organization structure:
In Step 8 “Map your IT Organization and Roles,” we will pick some typical roles and explain how they could be mapped and configured in Red Hat Satellite 6. Only a few departments and corresponding roles are covered inside this solution guide, but we will extend this coverage step by step in upcoming documents.
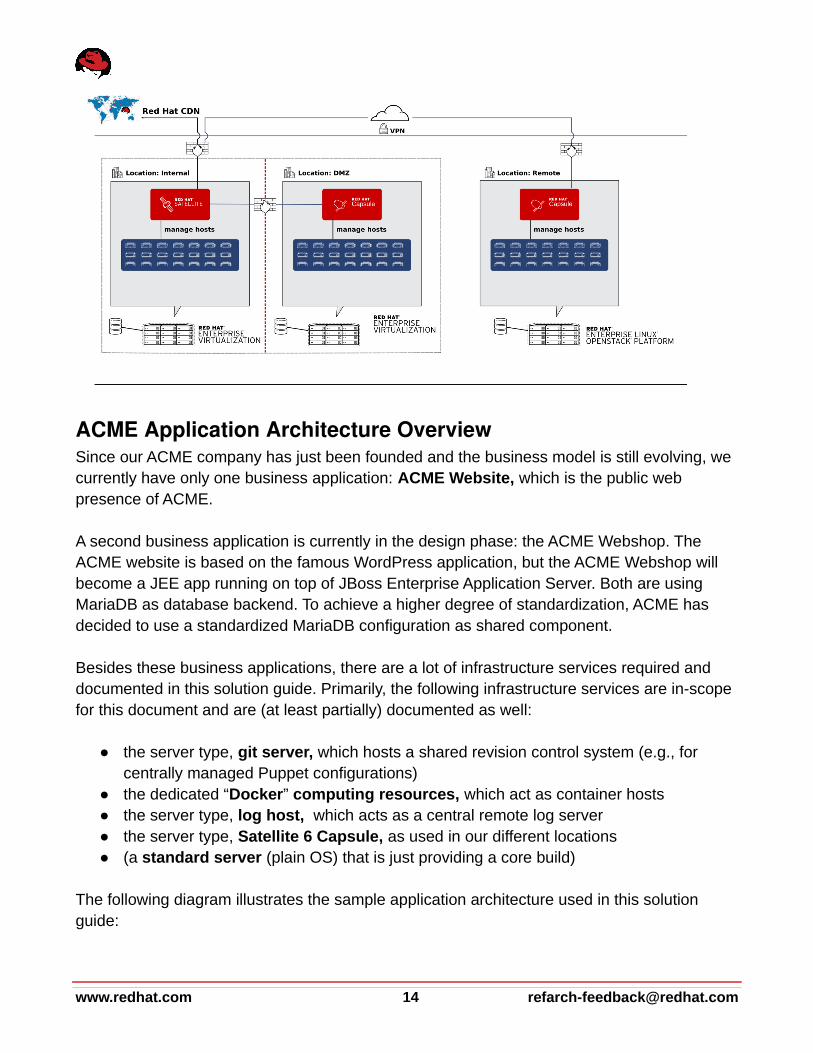
ACME Datacenter Topology OverviewACME is based in Munich, Germany. The primary datacenter is in Munich as well. This datacenter has a segregated network that is used for frontend servers, which are available to the World Wide Web. Most of the infrastructure services are running in Munich, where the entire IT operations organization is based as well.
Only the web application development and testing are based in Boston, MA, in the United States. Both locations run small datacenters. Munich uses Red Hat Enterprise Virtualization as the underlying virtualization platform; in contrast, Boston uses the Red Hat Enterprise Linux OpenStack Platform.
The following diagram illustrates the datacenter topology, which is described in further detail in Step 2:
[email protected] 13 www.redhat.com
ACME Application Architecture OverviewSince our ACME company has just been founded and the business model is still evolving, we currently have only one business application: ACME Website, which is the public web presence of ACME.
A second business application is currently in the design phase: the ACME Webshop. The ACME website is based on the famous WordPress application, but the ACME Webshop will become a JEE app running on top of JBoss Enterprise Application Server. Both are using MariaDB as database backend. To achieve a higher degree of standardization, ACME has decided to use a standardized MariaDB configuration as shared component.
Besides these business applications, there are a lot of infrastructure services required and documented in this solution guide. Primarily, the following infrastructure services are in-scope for this document and are (at least partially) documented as well:
● the server type, git server, which hosts a shared revision control system (e.g., for centrally managed Puppet configurations)
● the dedicated “Docker” computing resources, which act as container hosts● the server type, log host, which acts as a central remote log server● the server type, Satellite 6 Capsule, as used in our different locations● (a standard server (plain OS) that is just providing a core build)
The following diagram illustrates the sample application architecture used in this solution guide:
www.redhat.com 14 [email protected]
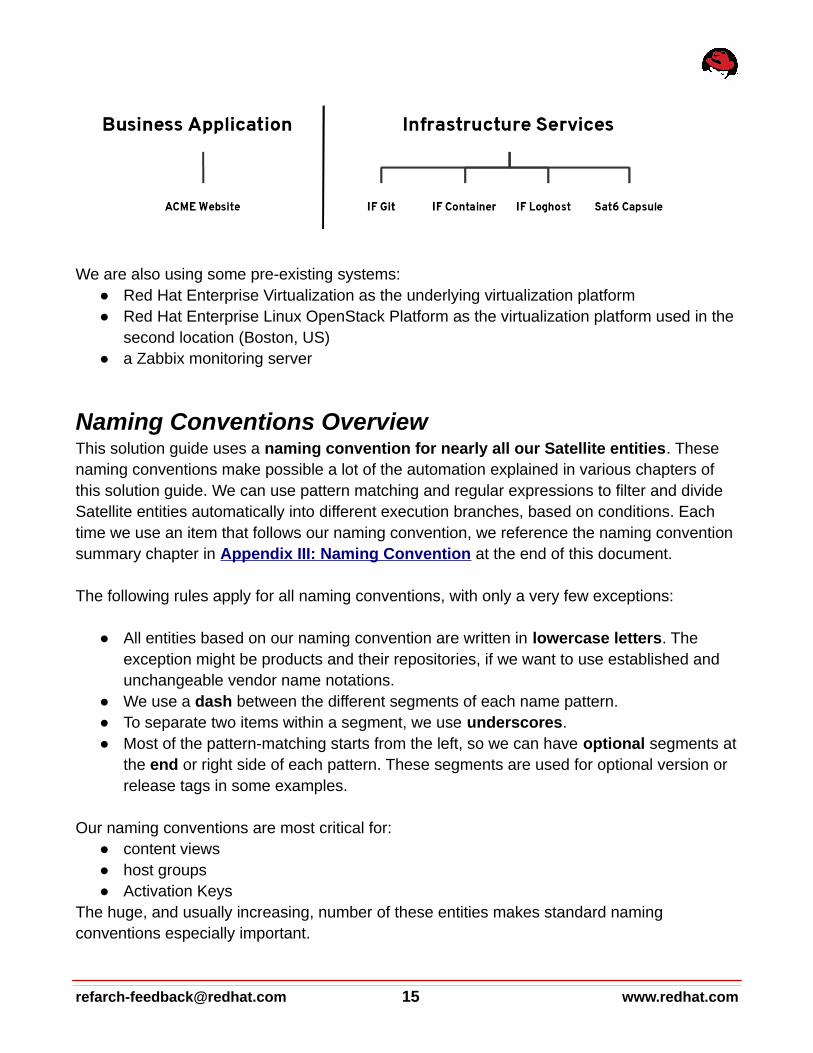
We are also using some pre-existing systems:● Red Hat Enterprise Virtualization as the underlying virtualization platform● Red Hat Enterprise Linux OpenStack Platform as the virtualization platform used in the
second location (Boston, US)● a Zabbix monitoring server
Naming Conventions OverviewThis solution guide uses a naming convention for nearly all our Satellite entities. These naming conventions make possible a lot of the automation explained in various chapters of this solution guide. We can use pattern matching and regular expressions to filter and divide Satellite entities automatically into different execution branches, based on conditions. Each time we use an item that follows our naming convention, we reference the naming convention summary chapter in Appendix III: Naming Convention at the end of this document.
The following rules apply for all naming conventions, with only a very few exceptions:
● All entities based on our naming convention are written in lowercase letters. The exception might be products and their repositories, if we want to use established and unchangeable vendor name notations.
● We use a dash between the different segments of each name pattern. ● To separate two items within a segment, we use underscores.● Most of the pattern-matching starts from the left, so we can have optional segments at
the end or right side of each pattern. These segments are used for optional version or release tags in some examples.
Our naming conventions are most critical for: ● content views● host groups ● Activation Keys
The huge, and usually increasing, number of these entities makes standard naming conventions especially important.
[email protected] 15 www.redhat.com

Step 1: Set up your System Management InfrastructureFirst we need to set up the basic components required to begin our setup. In most customer environments, some of these components already exist.
Installing Red Hat Satellite 6.1
To install and configure Red Hat Satellite, follow the instructions in chapter 2 of the Red Hat Satellite 6 Installation Guide:
https :// access . redhat . com / documentation / en - US / Red _ Hat _ Satellite /6.1/ html / Installation _ Guide / chap - Red _ Hat _ Satellite - Installation _ Guide - Installing _ Red _ Hat _ Satellite _ Server . html
The Installation Guide lists the hardware and software requirements recommended for running Red Hat Satellite.
How We Have Satellite 6 Set Up in Our Lab
In our lab setup we’re using these components: ● Satellite 6 on top of Red Hat Enterprise Linux 7 as a Virtual Machine running on top of
Red Hat Enterprise Virtualization● XFS as a file system (especially for pulp), because of an automatically increasing
number of inodes.
We made these decisions based on the key recommendations in the Performance Tuning Guide for Satellite 6 and Capsules, which you can find here: https :// access . redhat . com / articles /1380493
This table summarizes the system characteristics.
Item Specification
Satellite Server Release 6.1 Public Beta
Operating Systems Release Red Hat Enterprise Linux 7.1 x86_64
Underlying Virt Platform Release Red Hat Enterprise Linux Virtualization 3.4
www.redhat.com 16 [email protected]

Memory 16384 MB
CPU 4 vCPU
Disk Size 200 GB
Satellite 6 InstallationThe assumption made is that a Red Hat Satellite Server 6 is already installed.
Note:If Red Hat Satellite Server 6 is not installed yet, just follow the instructions inside the Getting Started Guide which could be found here: https :// access . redhat . com / products / red - hat - satellite /get - started Note:For network communication between Satellite, Capsule and Hosts see:https :// access . redhat . com / documentation / en - US / Red _ Hat _ Satellite /6.1/ html / Installation _ Guide / sect - Red _ Hat _ Satellite - Installation _ Guide - Prerequisites . html # form - Red _ Hat _ Satellite - Installation _ Guide - Prerequisites - Required _ Network _ Ports
and https :// access . redhat . com / articles /1447533
DNS, DHCP, and TFTP RecommendationsThis solution guide uses the built-in DNS, DHCP, and TFTP features, which can be configured on any Red Hat Satellite Capsule (Satellite Server 6 has an embedded Capsule).
If you have not configured the DNS, DHCP, and TFTP capabilities of Satellite Server 6.1, we recommend that you do.
Satellite Server is installed and configured through Puppet. Because of this configuration, the katello-installer can be safely executed again.
# katello-installer \ --capsule-tftp true \ --capsule-dhcp true \ --capsule-dhcp-gateway <GATEWAY IP> \ --capsule-dhcp-interface <Interface to listen on> \ --capsule-dhcp-nameservers <DNS1,DNS2> \ --capsule-dhcp-range <START END> \ --capsule-dns true \
[email protected] 17 www.redhat.com
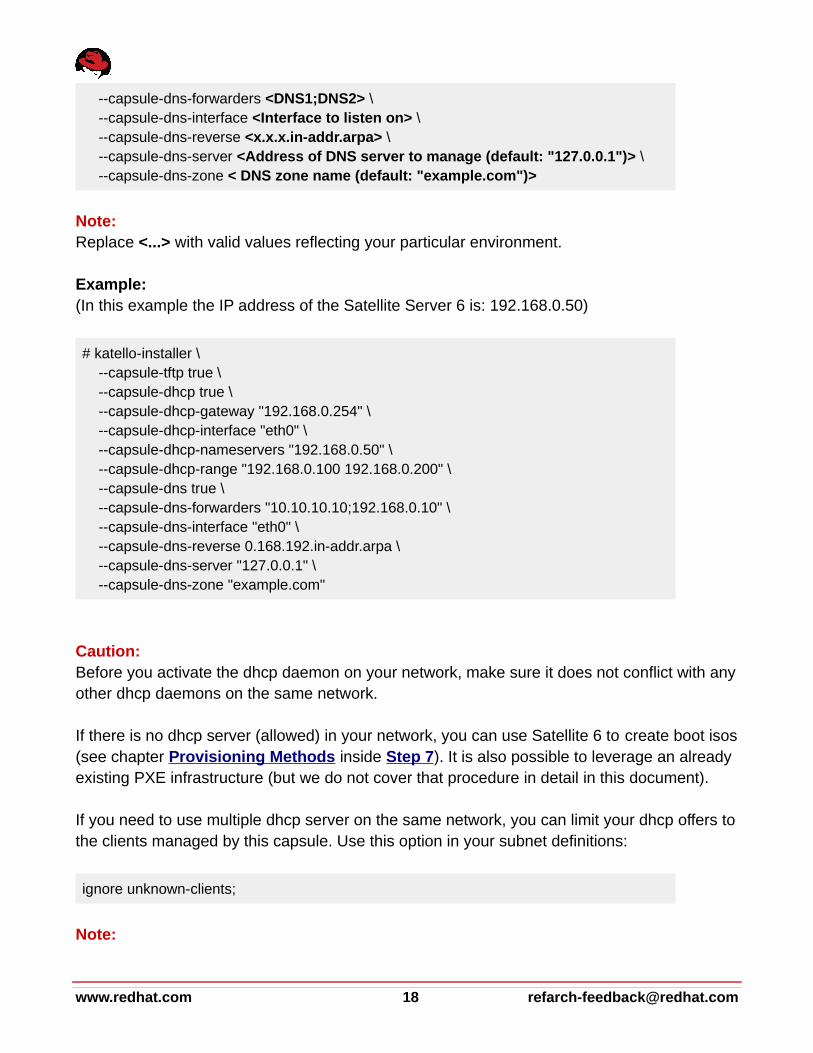
--capsule-dns-forwarders <DNS1;DNS2> \ --capsule-dns-interface <Interface to listen on> \ --capsule-dns-reverse <x.x.x.in-addr.arpa> \ --capsule-dns-server <Address of DNS server to manage (default: "127.0.0.1")> \ --capsule-dns-zone < DNS zone name (default: "example.com")>
Note: Replace <...> with valid values reflecting your particular environment.
Example:(In this example the IP address of the Satellite Server 6 is: 192.168.0.50)
# katello-installer \ --capsule-tftp true \ --capsule-dhcp true \ --capsule-dhcp-gateway "192.168.0.254" \ --capsule-dhcp-interface "eth0" \ --capsule-dhcp-nameservers "192.168.0.50" \ --capsule-dhcp-range "192.168.0.100 192.168.0.200" \ --capsule-dns true \ --capsule-dns-forwarders "10.10.10.10;192.168.0.10" \ --capsule-dns-interface "eth0" \ --capsule-dns-reverse 0.168.192.in-addr.arpa \ --capsule-dns-server "127.0.0.1" \ --capsule-dns-zone "example.com"
Caution: Before you activate the dhcp daemon on your network, make sure it does not conflict with anyother dhcp daemons on the same network.
If there is no dhcp server (allowed) in your network, you can use Satellite 6 to create boot isos(see chapter Provisioning Methods inside Step 7). It is also possible to leverage an already existing PXE infrastructure (but we do not cover that procedure in detail in this document).
If you need to use multiple dhcp server on the same network, you can limit your dhcp offers tothe clients managed by this capsule. Use this option in your subnet definitions:
ignore unknown-clients;
Note:
www.redhat.com 18 [email protected]
Do not use this option if you need to assign ip addresses dynamically for clients that are not already configured on your dhcp server.
Warning:Since the “ignore unknown-clients;” stanza in the dhcpd.conf configuration file is not part of the Puppet template being used when running the katello-installer, ignore unknown-clients; is removed from the dhcpd.conf file when the katello-installer is executed a second time.
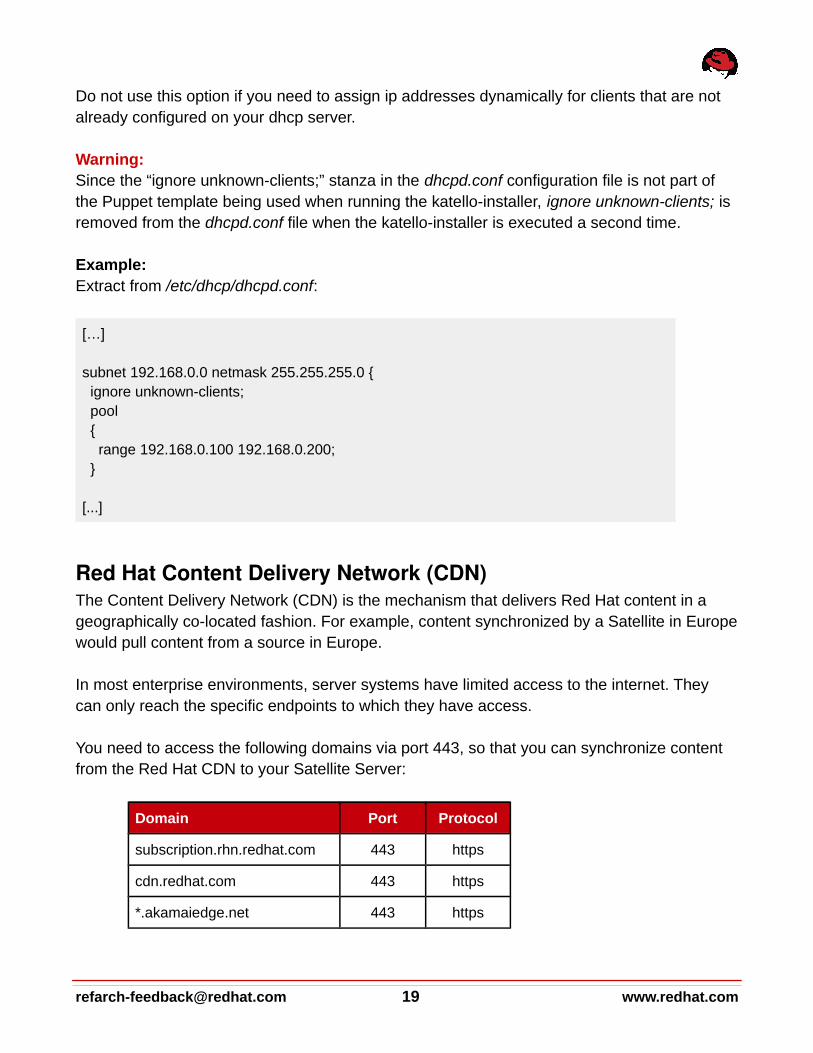
Example:Extract from /etc/dhcp/dhcpd.conf:
[…]
subnet 192.168.0.0 netmask 255.255.255.0 { ignore unknown-clients; pool { range 192.168.0.100 192.168.0.200; }
[...]
Red Hat Content Delivery Network (CDN) The Content Delivery Network (CDN) is the mechanism that delivers Red Hat content in a geographically co-located fashion. For example, content synchronized by a Satellite in Europewould pull content from a source in Europe.
In most enterprise environments, server systems have limited access to the internet. They can only reach the specific endpoints to which they have access.
You need to access the following domains via port 443, so that you can synchronize content from the Red Hat CDN to your Satellite Server:
Domain Port Protocol
subscription.rhn.redhat.com 443 https
cdn.redhat.com 443 https
*.akamaiedge.net 443 https
[email protected] 19 www.redhat.com
Note:We recommend that you do not specify the IP addresses, because the packages are distributed through the Akamai network, and the IP addresses can change. However, if your firewall cannot use hostname filtering, Red Hat provides a pool of IP addresses for CDN delivery. For further details see here: https :// access . redhat . com / documentation / en - US / Red _ Hat _ Subscription _ Management /1/ html /RHSM / location - aware . html
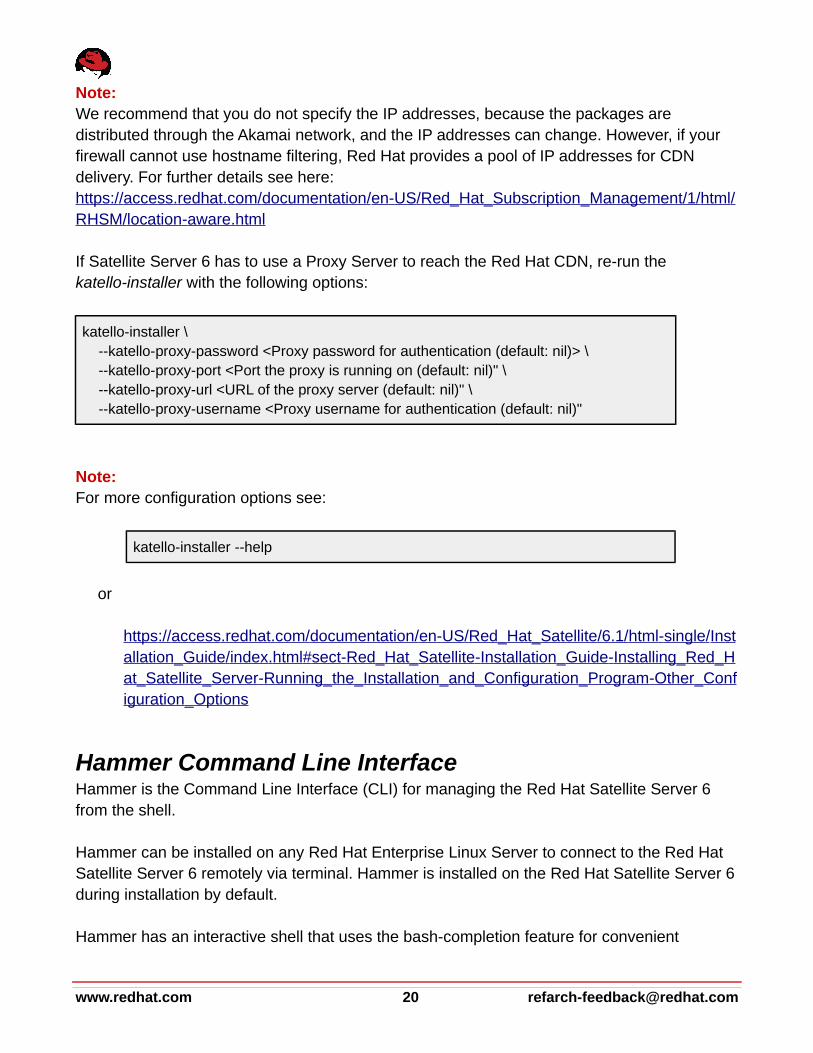
If Satellite Server 6 has to use a Proxy Server to reach the Red Hat CDN, re-run the katello-installer with the following options:
katello-installer \ --katello-proxy-password <Proxy password for authentication (default: nil)> \ --katello-proxy-port <Port the proxy is running on (default: nil)" \ --katello-proxy-url <URL of the proxy server (default: nil)" \ --katello-proxy-username <Proxy username for authentication (default: nil)"
Note: For more configuration options see:
katello-installer --help
or
https :// access . redhat . com / documentation / en - US / Red _ Hat _ Satellite /6.1/ html - single / Installation _ Guide / index . html # sect - Red _ Hat _ Satellite - Installation _ Guide - Installing _ Red _ Hat _ Satellite _ Server - Running _ the _ Installation _ and _ Configuration _ Program - Other _ Configuration _ Options
Hammer Command Line InterfaceHammer is the Command Line Interface (CLI) for managing the Red Hat Satellite Server 6 from the shell.
Hammer can be installed on any Red Hat Enterprise Linux Server to connect to the Red Hat Satellite Server 6 remotely via terminal. Hammer is installed on the Red Hat Satellite Server 6during installation by default.
Hammer has an interactive shell that uses the bash-completion feature for convenient
www.redhat.com 20 [email protected]

interactive usage as well as the history function.
Red Hat Satellite also provides a Representational State Transfer (REST) API. The API gives software developers and system administrators control of their Red Hat Satellite environment outside of the standard web interface. The REST API is useful for developers and administrators who want to integrate Red Hat Satellite with custom scripts or external applications that access the API via the standard Hypertext Transfer Protocol (HTTP).
For more information see: https :// access . redhat . com / documentation / en - US / Red _ Hat _ Satellite /6.0/ html / API _ Guide / index . html
Note:This solution guide includes instructions for using the Hammer Command Line Interface for each step.
Install and Configure Hammer on a Remote HostThe hammer command line interface is installed on the Satellite 6 server by default but could be installed on any other host as well. The required RPM package rubygem-hammer_cli and its dependencies are part of the Satellite 6 Tools repository which will be included in our Core Build definition in Step 5 and therefore available to all hosts managed by Satellite 6.
You need to run the following command on any host you want to use to manage Satellite 6 remotely using hammer CLI:
# yum install rubygem-hammer_cli
By default hammer requires authentication using your Satellite 6 login credentials:
# hammer -u <user> -p <password> --help
In order to permanently store username and password a configuration file cli_config.yml can be created and made available either system wide or for an individual user. Hammer CLI is bydefault looking for its configuration in the following directories, loaded in this order:
• RbConfig::CONFIG['sysconfdir']/hammer/ (The actual value depends on your
operatingsystem and ruby defaults.)• /etc/hammer/
• ~/.hammer/
• ./config/ (config dir in CWD)
[email protected] 21 www.redhat.com

• custom location (file or directory) specified on command line -c CONF_FILE_PATH
The following example has been created for the local system user rpmbuild using the Satellite6 user admin via hammer CLI:
$ cat /home/rpmbuild.hammer/cli_config.yml
:foreman: # Enable/disable foreman commands :enable_module: true
# Your foreman server address :host: 'https://satellite6.example.com/' :username: 'admin’ :password: ‘secret’
Creating a New Satellite 6 OrganizationSatellite 6 uses organizations to divide hosts into logical groups based on ownership, purpose, content, security level, or other divisions. You can view, create, and manage multipleorganizations by using either the web interface or the Hammer command line interface. Software and host entitlements can be allocated across many organizations, and access to those organizations controlled.
Each organization must be created and used by a single Red Hat customer account, but eachaccount can manage multiple organizations. Subscription manifests can only be imported intoa single organization.
Warning:Satellite will not upload a manifest that has already been uploaded into a different organization.
By default, Red Hat Satellite creates one organization (called Default Organization), which you can modify to suit your own installation or delete. In our solution guide setup, we have deleted the default organization created during Satellite 6 installation and created a new organization “ACME.” Note that we are not using Satellite 6’s multi-org feature in this solution guide.
To create a new Satellite 6 organization:1. Login as the Satellite admin or a user with the corresponding role. 2. Click on “Administer -> Organizations -> New Organization”
www.redhat.com 22 [email protected]
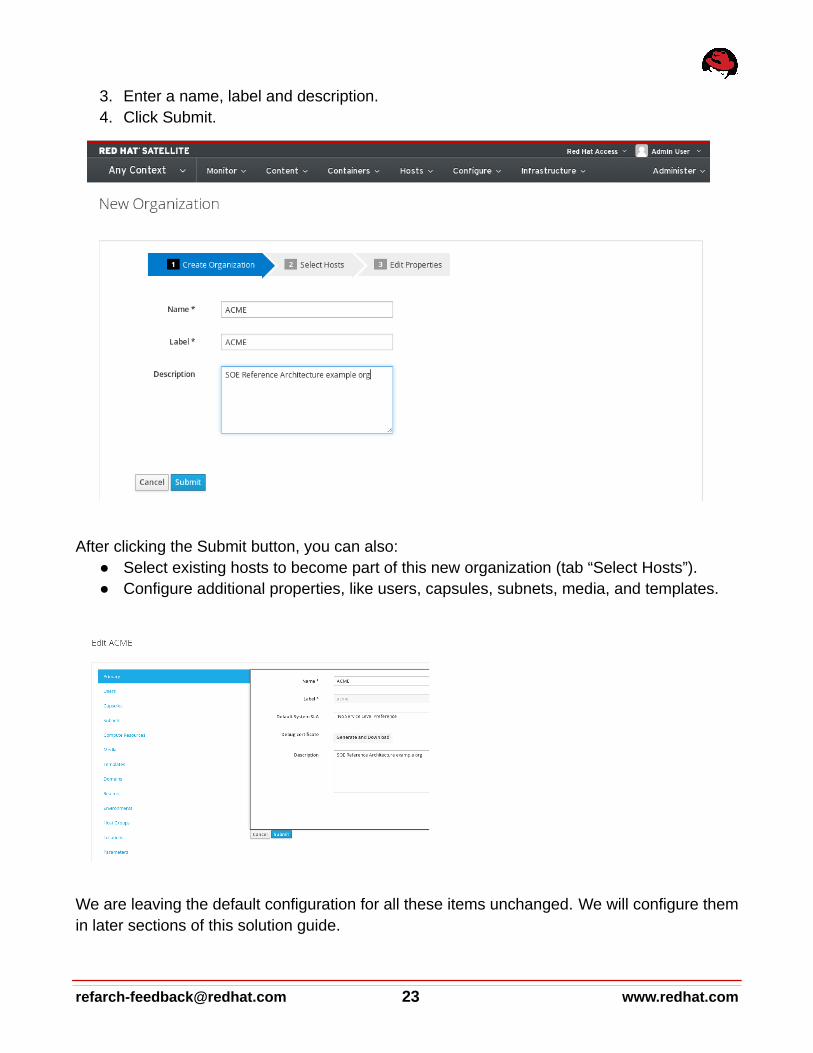
3. Enter a name, label and description. 4. Click Submit.
After clicking the Submit button, you can also: ● Select existing hosts to become part of this new organization (tab “Select Hosts”). ● Configure additional properties, like users, capsules, subnets, media, and templates.
We are leaving the default configuration for all these items unchanged. We will configure themin later sections of this solution guide.
[email protected] 23 www.redhat.com

Via HammerYou can also use a simple hammer CLI command to create a new organization:
hammer organization create --name "ACME" --label "ACME" --description "SOE Reference Architecture example org"
Importing your Red Hat Subscription ManifestRed Hat Satellite 6 includes subscription management capabilities for all Satellite-managed systems. In contrast to Satellite 5, each organization administrator can now maintain all subscriptions within the designated Satellite 6 organization.
Satellite Server requires a source for Red Hat content. The content is configured by uploadinga subscription manifest file to the Satellite. You can obtain this file through the Red Hat Customer Portal, or by contacting Red Hat Support. Manifests provide subscriptions to client hosts through the Red Hat Satellite rather than through Red Hat Network.
To obtain the subscription manifest from the Red Hat Customer Portal:
1. Log in to the Customer Portal.2. Click Subscriptions. 3. On the Red Hat Subscription Management Page, scroll down and click Subscription
Management Applications, and then click Satellite.4. On the upper right corner of the Subscriptions Management Applications page, click
Register a Satellite.5. Create a name to distinguish your Satellite from the other Satellite systems in your
account.6. Select Satellite 6.0 from the drop-down menu as the Satellite version. It is important to
select the correct version as each version requires a certain subset of packages.7. Click Register.8. Click Attach a subscription, add the subscriptions required for Red Hat Satellite, and
then click Attach Selected. Note:The minimum requirements for generating a manifest are:● A valid Red Hat Satellite subscription on your Customer Portal account● At least one Red Hat Enterprise Linux subscription to attach to the manifest
9. Click Download manifest to generate an archive in .zip format that contains the manifest for Red Hat Satellite.
www.redhat.com 24 [email protected]
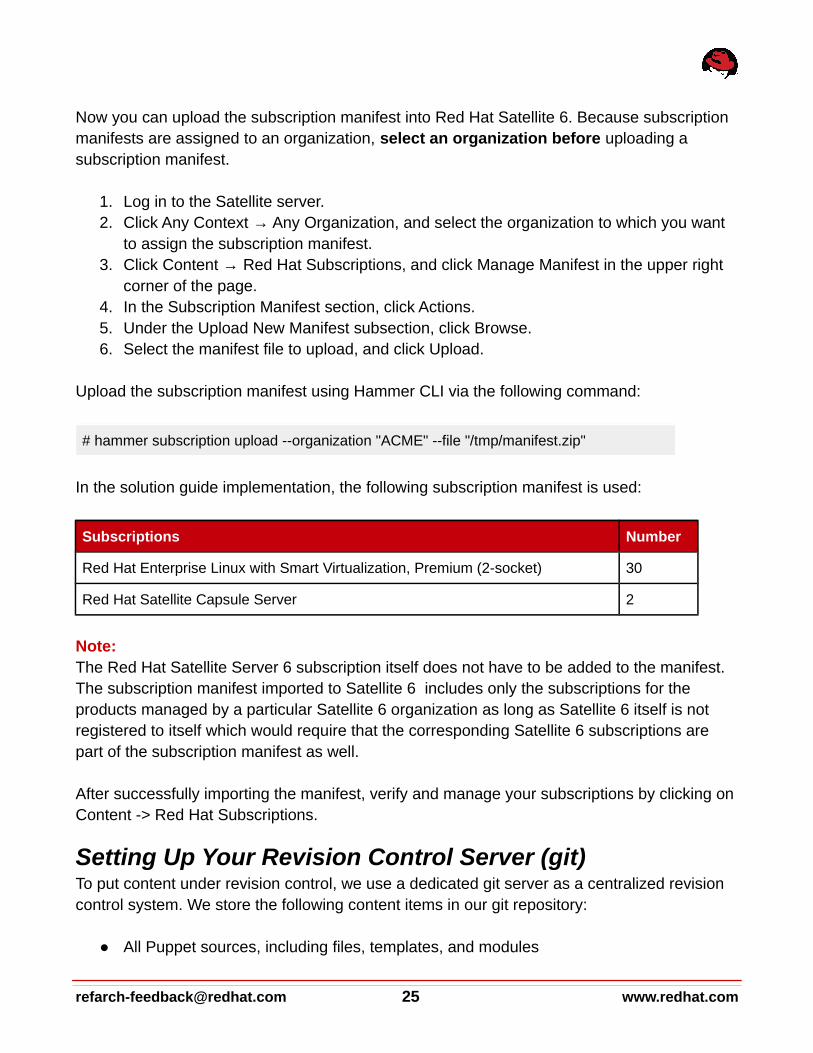
Now you can upload the subscription manifest into Red Hat Satellite 6. Because subscription manifests are assigned to an organization, select an organization before uploading a subscription manifest.
1. Log in to the Satellite server.2. Click Any Context → Any Organization, and select the organization to which you want
to assign the subscription manifest.3. Click Content → Red Hat Subscriptions, and click Manage Manifest in the upper right
corner of the page.4. In the Subscription Manifest section, click Actions.5. Under the Upload New Manifest subsection, click Browse.6. Select the manifest file to upload, and click Upload.
Upload the subscription manifest using Hammer CLI via the following command:
# hammer subscription upload --organization "ACME" --file "/tmp/manifest.zip"
In the solution guide implementation, the following subscription manifest is used:
Subscriptions Number
Red Hat Enterprise Linux with Smart Virtualization, Premium (2-socket) 30
Red Hat Satellite Capsule Server 2
Note:The Red Hat Satellite Server 6 subscription itself does not have to be added to the manifest. The subscription manifest imported to Satellite 6 includes only the subscriptions for the products managed by a particular Satellite 6 organization as long as Satellite 6 itself is not registered to itself which would require that the corresponding Satellite 6 subscriptions are part of the subscription manifest as well.
After successfully importing the manifest, verify and manage your subscriptions by clicking onContent -> Red Hat Subscriptions.
Setting Up Your Revision Control Server (git)To put content under revision control, we use a dedicated git server as a centralized revision control system. We store the following content items in our git repository:
● All Puppet sources, including files, templates, and modules
[email protected] 25 www.redhat.com

● All custom software, including spec files, source rpms, and binary rpms● All scripts used in this solution guide
Note: Though this solution guide uses git, other revision control systems can be used as well (for example, cvs, subversions and others).
If you do not have a revision control server in your environment yet, all required configurationsto set up a git-based RCS server are explained in this document.
Setting Up Your Monitoring ServerIn our solution guide setup, we use Zabbix as the monitoring application. The Zabbix server itself is already in place, so we do not cover the installation and configuration procedure here.
For a typical sample setup, follow the installation documentation: https :// www . zabbix . com / documentation /3.0/ manual / installation / install _ from _ packages
www.redhat.com 26 [email protected]

Step 2: Map your Location and Datacenter TopologyIn this step we introduce different datacenter topologies that require different Satellite 6 configurations. This particular network topology of an environment has even more impact thanfederated locations. You can use Satellite 6 to provide network infrastructure services, or you can leverage existing ones and reflect existing domains and subnets in the configuration settings.
The following Satellite 6 entities are explained in this step:
● Red Hat Satellite 6 Capsules○ Capsule Infrastructure Services (DNS, DHCP, TFTP)
● Red Hat Satellite 6 Compute Resources○ Red Hat Enterprise Virtualization○ RHEL OpenStack Platform
● Red Hat Satellite 6 Locations● Red Hat Satellite 6 Domains● Red Hat Satellite 6 Subnets
The following diagram illustrates the relationship between the underlying virtualization platforms configured as compute resources, subnets and domains, locations and the associated Satellite 6 Capsules in our setup.
[email protected] 27 www.redhat.com

Red Hat Satellite 6 Capsule Server OverviewThe Red Satellite Capsule Server is a Satellite component that provides federated services todiscover, provision, and configure hosts outside of the primary Satellite server. A Satellite Capsule Server provides the following features:
Content Delivery Node features, including:
● Repository synchronization
Repository synchronization allows a Red Hat Capsule to synchronize content (yum andPuppet) from the Satellite Server to be used for content delivery.
● Content delivery
A Red Hat Capsule located on a remote site can be configured as a content delivery node. This allows hosts configured to use this capsule to fetch content from the Capsule rather than having to fetch it from the central Satellite 6 server.
Red Hat Satellite Provisioning Smart Proxy features, including:
● DHCP, including ISC DHCP servers
A Red Hat Capsule can act as a DHCP server or integrate with an existing DHCP server. Since DHCP requests are done through broadcast, they are normally not propagated between subnets and for this reason a DHCP server needs to be present on every subnet (alternatively a dhcp helper service can be used). If no DHCP server exists on a certain subnet and connecting the central Red Hat Satellite 6 server to this subnet is not feasible, putting a Red Hat Capsule on this subnet can resolve the problem.
● DNS, including Bind
A Red Hat Satellite 6 Capsule can integrate with a DNS or Realm server. If the DNS or Realm server are not reachable from the Red Hat Satellite 6, a Red Hat Capsule can be used instead.
● TFTP server
www.redhat.com 28 [email protected]
A Red Hat Capsule can function as a TFTP server. If network restrictions prohibit the clients from using TFTP towards the central Satellite, they can be configured to used a locally place Red Hat Capsule instead.
● Puppet Master, including Puppet CA to manage certificate signing and cleaning
The Red Hat Capsule provides an integrated Puppet Master for configuration management and acts as an External Node Classifier (ENC). A node checks in at regular basis to query the ENC for its configuration (Puppet Class assignment). When using the Puppet configuration management system, each time a client checks in, some fairly resource-intensive tasks need to be done on the Puppet master. For scalability reasons, clients can be configured to check in with a Red Hat Capsule ratherthan with the central Satellite thereby lightening the load on the main Satellite server.
● Baseboard Management Controller (BMC) for power management
A Red Hat Satellite 6 Capsule has the ability to control clients BMCs, thereby poweringthem on and off for provisioning purpose. If network restrictions prevent the main Satellite from reaching the clients BMCs, a Red Hat Satellite 6 Capsule located near the BMCs can be used instead.
The Satellite Capsule Server can be used to solve various challenges. While the primary purpose is to manage federated network configurations more efficiently, it can be additionally used to scale out the Satellite installation. Organizations can create various capsules in different geographical locations where datacenters are located. These are centrally managed through the Satellite Server. This feature allows hosts in distributed locations to communicate to the capsule instead of directly to the Satellite 6 server itself.
Additionally, it allows you to select which particular content subset is managed by a specific capsule and, therefore, made available to the hosts behind the capsule. For example, a capsule associated with a particular lifecycle environment only provides the content (views) available in this environments to its hosts.
Further Information for scaling purposes can be found in the product documentation:
https :// access . redhat . com / documentation / en - US / Red _ Hat _ Satellite /6.1/ html / Installation _ Guide / chap - Red _ Hat _ Satellite - Installation _ Guide - Installing _ Red _ Hat _ Satellite _ Capsule _ Server . html
Satellite 6.1 introduces a couple of new features around isolations of communications between managed hosts and Satellite 6 server and capsules. An overview of the Satellite 6
[email protected] 29 www.redhat.com

capsule communications and the differences between Satellite 6.0 and 6.1 can be found here: https :// access . redhat . com / articles /1447533
Sample Datacenter Topology ScenariosEven if there are many more types and possible combinations, we will focus on the following architecture types ( which are prevalent in many customer environments):
Scenario A) Centralized Management One Red Hat Satellite for All SegmentsThe architecture with the lowest complexity is using a single Red Hat Satellite Server to manage all segments for all locations and the datacenter. This requires a setup where the Red Hat Satellite is installed in one of these segments, and the segments can be based on:
● Network Zones (Subnets)● Lifecycle Environments● Domains● Datacenters● Compute Resources
Red Hat Satellite has direct network access to all other segments. All managed systems and end users have access to Red Hat Satellite
www.redhat.com 30 [email protected]
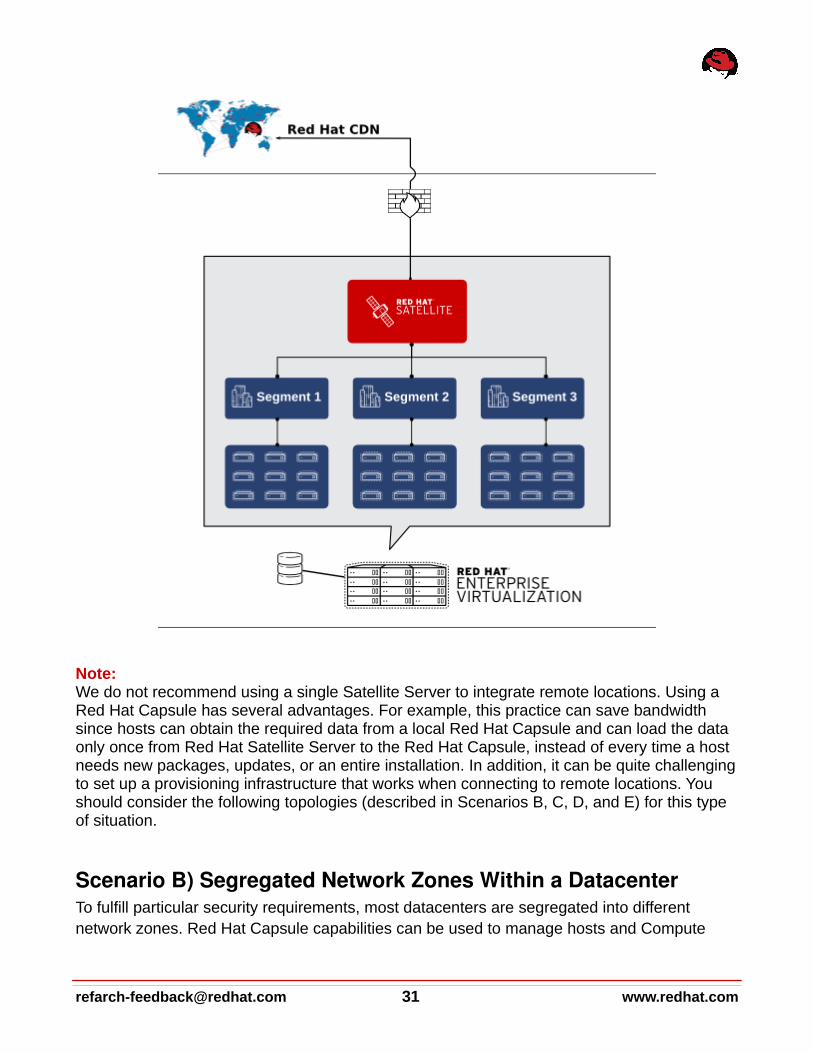
Note:We do not recommend using a single Satellite Server to integrate remote locations. Using a Red Hat Capsule has several advantages. For example, this practice can save bandwidth since hosts can obtain the required data from a local Red Hat Capsule and can load the data only once from Red Hat Satellite Server to the Red Hat Capsule, instead of every time a host needs new packages, updates, or an entire installation. In addition, it can be quite challengingto set up a provisioning infrastructure that works when connecting to remote locations. You should consider the following topologies (described in Scenarios B, C, D, and E) for this type of situation.
Scenario B) Segregated Network Zones Within a DatacenterTo fulfill particular security requirements, most datacenters are segregated into different network zones. Red Hat Capsule capabilities can be used to manage hosts and Compute
[email protected] 31 www.redhat.com

Resources in those segregated networks to ensure that they only have to access the Red HatCapsule Server for provisioning, configuration, errata, and general management. The Red Hat Capsule Server is the only system that does need direct communication with the Red Hat Satellite Server in this situation.
Note:The DMZ Compute Resource can be another datacenter managed in the same Virtualization Manager or be a completely separate entity. A Compute Resource has to be created for each datacenter existing in both cases (or tenant in case of RHELOSP).
Scenario C) Geographically Separate LocationsHosts in a remote location typically get their own provisioning and update infrastructure as a way to lower bandwidth consumption between geographically separate locations.You can easily manage hosts and Compute Resources in remote locations with a Red Hat Capsule.
www.redhat.com 32 [email protected]

Scenario D) Disconnected / IsolatedMany users of Red Hat Satellite deploy in disconnected or air gapped environments. In these secured environments, the Satellite is on a network where it cannot reach the Red Hat Content Delivery Network (cdn.redhat.com). As such, the Satellite is unable to retrieve content “over the wire.” The following Knowledgebase article provides recommended practices for a user who is setting up Red Hat Satellite in such an environment.
Information on how to setup a disconnected Satellite Server can be found here:https :// access . redhat . com / articles / 1375133
Note: This disconnected Satellite scenario is not covered in this document.
Sample ACME Datacenter Scenario In our ACME scenario all hosts in the primary datacenter in Munich are directly connected to the built-in Capsule based on the Satellite 6 server itself. Hosts running inside segregated networks (DMZ) and in the secondary datacenter in Boston are connected to dedicated Capsules.
The Satellite Server will be placed in the location munich in Germany, the dmz capsule is in the location munich-dmz, and the remote capsule is placed in boston.
The following table provides an overview of the Red Hat Capsule mapping to location,
[email protected] 33 www.redhat.com

Compute Resource, domain and subnet.
Type Location Domain Subnet Compute Resource
Red Hat Satellite munich example.com 172.24.96.0/24 RHEV (acme-rhev-munich)
Red Hat Capsule munich-dmz dmz.example.com 172.24.99.0/24 RHEV (acme-rhev-munich-dmz)
Red Hat Capsule boston novalocal 10.0.40.0/24(managed in RHELOSP)
RHELOSP(acme-rhelosp-boston)
LocationsA Location is collection of default settings that represent a physical place. These can be nested so that you can set up an hierarchical collection of locations.
Note:Most Satellite 6 entities can be associated to more than one location and one location can be associated to more than one entity (for example, capsules, compute resources, host groups, roles).
One of the advantages of using locations is that you can assign Subnets, Domains, Compute Resources etc. to prevent incorrect host placement or configuration. For example, you cannotassign a subnet, domain or compute resources to a capsule but only to a location. This restriction means that capsules, domains, subnets and compute resources are assigned to a particular location. The location is therefore the logical grouping for all four of these objects. You need to ensure that these relationships are valid (for example, the subnet and domain are available for this particular compute resource).
Create the location through the WebUI:
1. Administer ➤ Locations ➤ New Location add location name submit➤ ➤
www.redhat.com 34 [email protected]

2. Click on the location to edit select ➤ Organizations on the left side select your ➤Organization to add it to the location
Via hammer:
ORG="ACME"
[email protected] 35 www.redhat.com

LOCATIONS="munich munich-dmz boston"
for LOC in ${LOCATIONS}do hammer location create --name "${LOC}"done
Because the Satellite Server can manage multiple organizations, we also have to specify the Organization to which the location should belong. The following Hammer command assigns all three locations created earlier to our ACME organization:
for LOC in ${LOCATIONS}do hammer location add-organization --name "${LOC}" --organization "${ORG}"done
Red Hat Satellite 6 Compute ResourcesRed Hat Satellite can provision and manage systems across bare-metal, private, and public clouds. Red Hat Satellite Compute resources are hardware abstractions from virtualization and cloud providers. Satellite uses compute resources to provision virtual machines and containers. Supported private providers include Red Hat Enterprise Virtualization, oVirt, OpenStack, VMware, Libvirt, and Docker. Supported public cloud providers include Amazon EC2, Google Compute Engine, and Rackspace.
We’ve recently published a solution guide describing the deployment of the Red Hat Cloud Infrastructure (RHCI) components using Satellite 6: https :// access . redhat . com / articles /1434843
www.redhat.com 36 [email protected]

For this solution guide we assume that you already have an existing Red Hat Enterprise Virtualization and Red Hat Enterprise Linux OpenStack Platform setup.
Configuring Your Virtualization and Cloud Infrastructures as Compute ResourcesIn order to provision systems on top of the platforms described here, you have to configure them as compute resources.
We used the following infrastructure architecture for this solution guide:
Although the emulated datacenter location in Munich, Germany is using Red Hat Enterprise Virtualization, the second virtual datacenter in Boston, US is using Red Hat Enterprise Linux Openstack Platform as the underlying virtualization platform. The installation and configuration of these virtualization platforms is not covered in this document.
The benefit of using Compute Resource is that the Virtual Machine Container is automatically created and started based on a Compute Profile or individual settings. New hosts can be managed through a single interface, which saves administration time. Additionally, the console of the VM can also be accessed through the Satellite WebUI.
To be able to connect a Compute Resource to the Satellite Server, the following port(s) have to be open:
[email protected] 37 www.redhat.com

Initiator Endpoint Endpoint Detail
Port Protocol SELinux Type
Satellite Server Compute Resource
RHEV-Manager 443 https https_port_t
Satellite Server Compute Resource
RHELOSP 5000 http commplex_main_port_t
Note:Currently, a direct communication between the Satellite 6 server and all compute resources isrequired, even if hosts running on top of the corresponding compute resource are using a Satellite 6 capsule to communicate. This includes network connections to all affected admin services like the Red Hat Enterprise Linux Openstack service end-points. Usually they have to be on the same network as the Satellite 6 server itself.
A detailed list of all required required network ports could be found here: https :// access . redhat . com / documentation / en - US / Red _ Hat _ Satellite /6.1/ html / Installation _ Guide / sect - Red _ Hat _ Satellite - Installation _ Guide - Prerequisites . html # tabl - Red _ Hat _ Satellite - Installation _ Guide - Prerequisites - Required _ Network _ Ports
Location Munich: Configuring RHEV as Compute ResourceAs stated in the introduction chapter, we assume that Red Hat Enterprise Virtualization is already installed and configured. The setup and configuration of RHEV is documented in detail in the earlier reference architecture “ Deploying Red Hat Enterprise Virtualization ( RHEV ) for Servers ”. We also have other reference architectures that:
● Are related to particular use cases and use RHEV as the underlying virtualization platform, like scaling SAP or scaling LAMP stacks
● Show 3rd party integrations of Symantec Veritas Cluster or Symantec Net Backup ● Explain various migration paths
For a full list of all published reference architectures, go to: https :// access . redhat . com / search /#/ knowledgebase ?q =& p =1& sort = relevant & language = en & article _ type = Reference%20 Architecture & documentKind = Solution , Article
To configure RHEV as a compute resource of Red Hat Satellite 6, you need the followingcredentials:
● URL of RHEV-M (for example, https :// rhev - m . acme . com / api) ● Login Credentials to this RHEV environment (username, password)
www.redhat.com 38 [email protected]
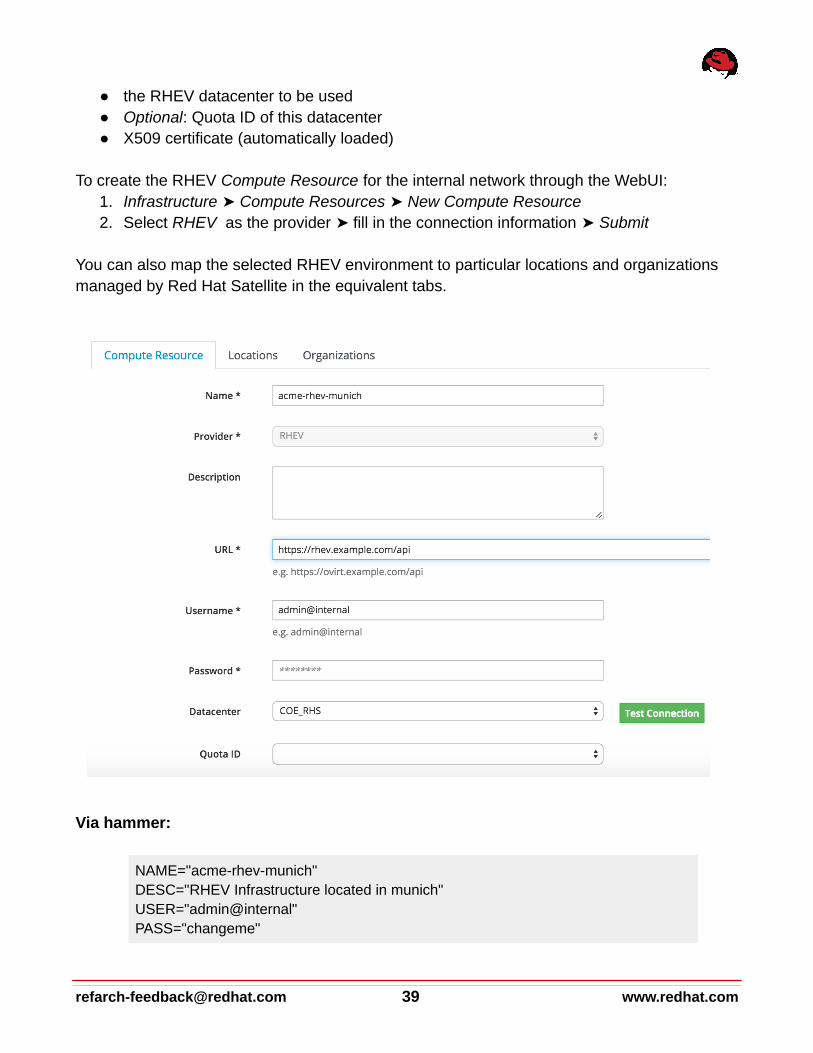
● the RHEV datacenter to be used● Optional: Quota ID of this datacenter● X509 certificate (automatically loaded)
To create the RHEV Compute Resource for the internal network through the WebUI:1. Infrastructure ➤ Compute Resources ➤ New Compute Resource2. Select RHEV as the provider fill in the connection information ➤ ➤ Submit
You can also map the selected RHEV environment to particular locations and organizations managed by Red Hat Satellite in the equivalent tabs.
Via hammer:
NAME="acme-rhev-munich"DESC="RHEV Infrastructure located in munich"USER="admin@internal"PASS="changeme"
[email protected] 39 www.redhat.com
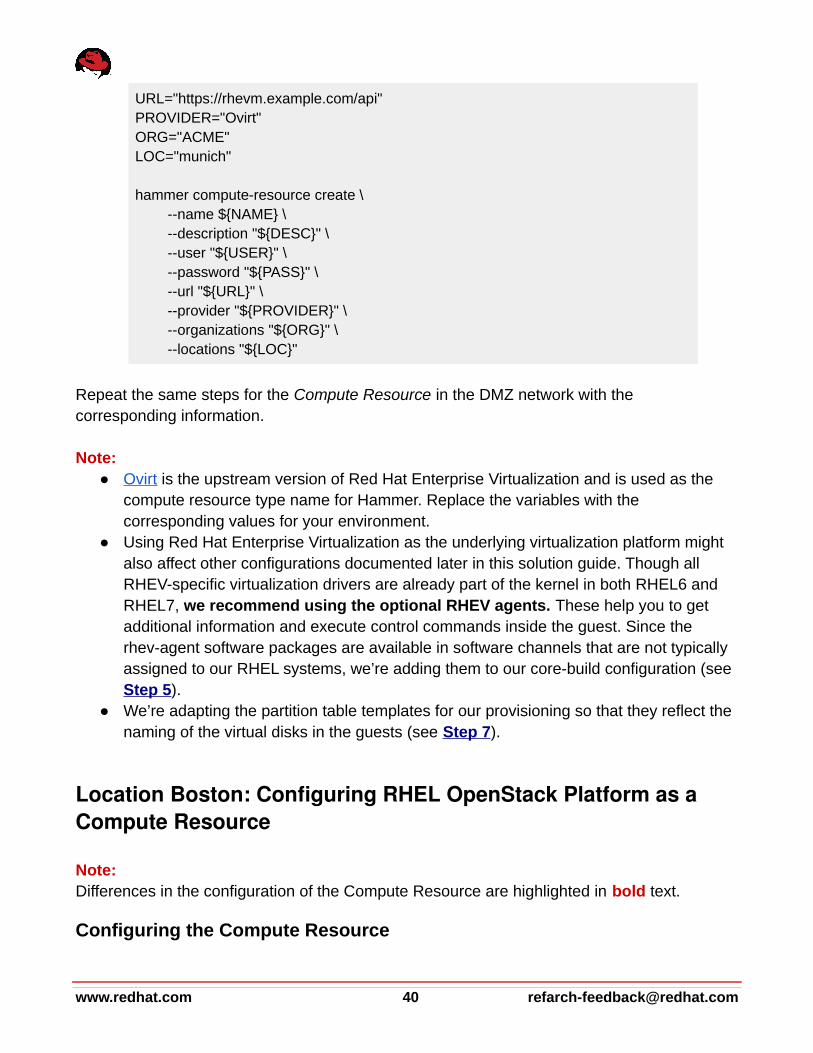
URL="https://rhevm.example.com/api"PROVIDER="Ovirt"ORG="ACME"LOC="munich"
hammer compute-resource create \ --name ${NAME} \ --description "${DESC}" \ --user "${USER}" \ --password "${PASS}" \ --url "${URL}" \ --provider "${PROVIDER}" \ --organizations "${ORG}" \ --locations "${LOC}"
Repeat the same steps for the Compute Resource in the DMZ network with the corresponding information.
Note: ● Ovirt is the upstream version of Red Hat Enterprise Virtualization and is used as the
compute resource type name for Hammer. Replace the variables with the corresponding values for your environment.
● Using Red Hat Enterprise Virtualization as the underlying virtualization platform might also affect other configurations documented later in this solution guide. Though all RHEV-specific virtualization drivers are already part of the kernel in both RHEL6 and RHEL7, we recommend using the optional RHEV agents. These help you to get additional information and execute control commands inside the guest. Since the rhev-agent software packages are available in software channels that are not typically assigned to our RHEL systems, we’re adding them to our core-build configuration (see Step 5).
● We’re adapting the partition table templates for our provisioning so that they reflect the naming of the virtual disks in the guests (see Step 7).
Location Boston: Configuring RHEL OpenStack Platform as a Compute Resource
Note:Differences in the configuration of the Compute Resource are highlighted in bold text.
Configuring the Compute Resource
www.redhat.com 40 [email protected]

To create the Red Hat Enterprise Linux OpenStack Platform Compute Resource through the WebUI:1. Infrastructure ➤ Compute Resources ➤ New Compute Resource2. Select RHEL OpenStack Platform as the provider fill in the connection information ➤ ➤Submit
Via hammer:
NAME="acme-rhelosp-boston"DESC="Red Hat Enterprise Linux OpenStack Platform located in boston"USER="acmeadmin"PASS="changeme"URL="http://rhelosp.bos.example.com:5000/v2.0/tokens"PROVIDER="Openstack"TENANT="r&d"ORG="ACME"LOC="boston"
[email protected] 41 www.redhat.com
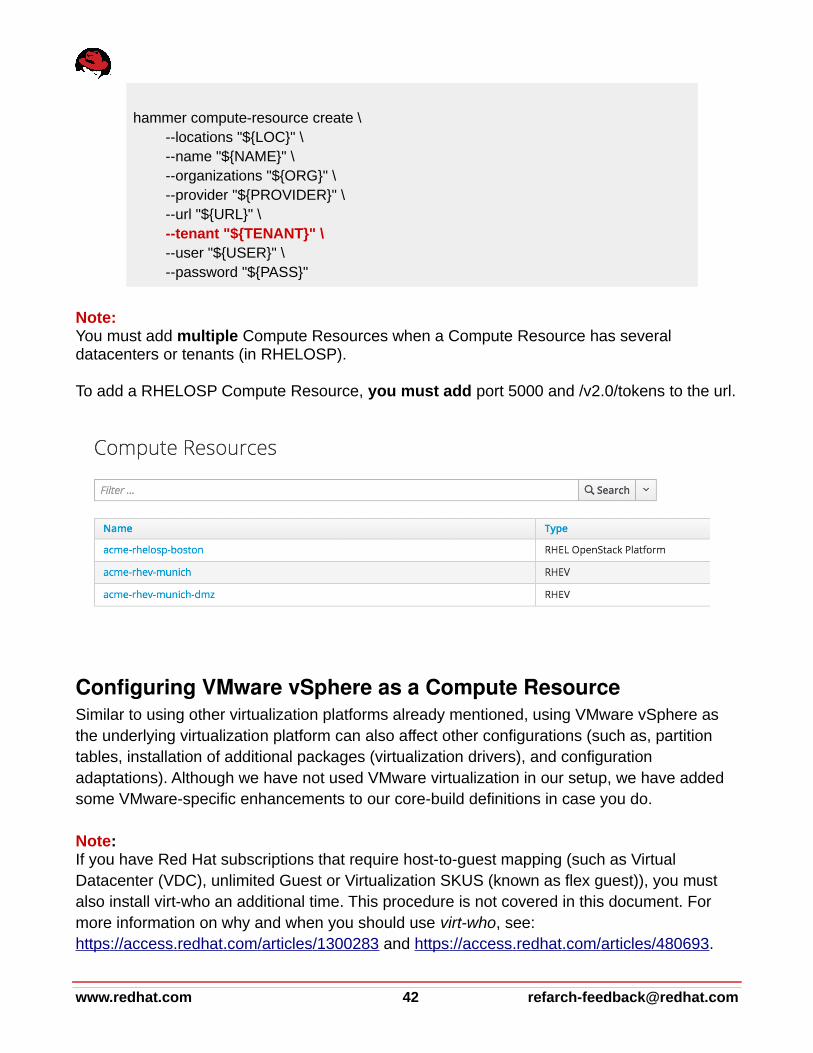
hammer compute-resource create \ --locations "${LOC}" \ --name "${NAME}" \ --organizations "${ORG}" \ --provider "${PROVIDER}" \ --url "${URL}" \ --tenant "${TENANT}" \ --user "${USER}" \ --password "${PASS}"
Note:You must add multiple Compute Resources when a Compute Resource has several datacenters or tenants (in RHELOSP).
To add a RHELOSP Compute Resource, you must add port 5000 and /v2.0/tokens to the url.
Configuring VMware vSphere as a Compute ResourceSimilar to using other virtualization platforms already mentioned, using VMware vSphere as the underlying virtualization platform can also affect other configurations (such as, partition tables, installation of additional packages (virtualization drivers), and configuration adaptations). Although we have not used VMware virtualization in our setup, we have added some VMware-specific enhancements to our core-build definitions in case you do.
Note:If you have Red Hat subscriptions that require host-to-guest mapping (such as Virtual Datacenter (VDC), unlimited Guest or Virtualization SKUS (known as flex guest)), you must also install virt-who an additional time. This procedure is not covered in this document. For more information on why and when you should use virt-who, see: https :// access . redhat . com / articles /1300283 and https :// access . redhat . com / articles /480693.
www.redhat.com 42 [email protected]
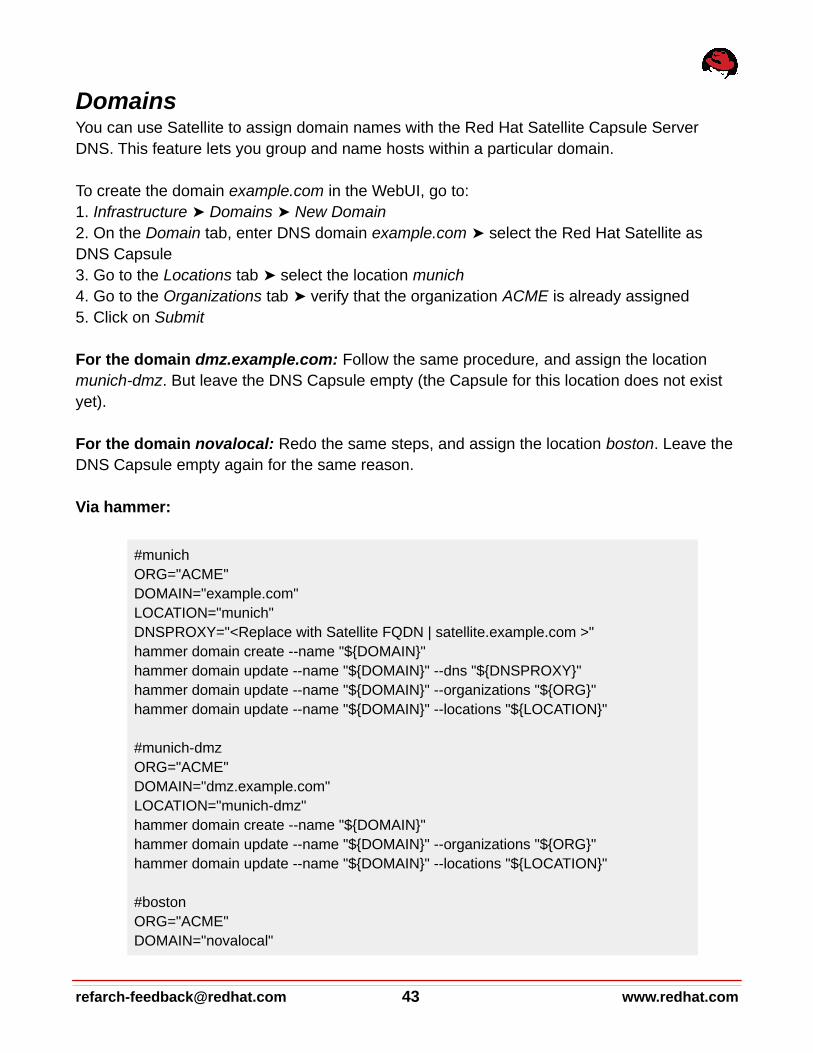
DomainsYou can use Satellite to assign domain names with the Red Hat Satellite Capsule Server DNS. This feature lets you group and name hosts within a particular domain.
To create the domain example.com in the WebUI, go to:1. Infrastructure ➤ Domains ➤ New Domain2. On the Domain tab, enter DNS domain example.com select the Red Hat Satellite as ➤DNS Capsule3. Go to the Locations tab select the location ➤ munich4. Go to the Organizations tab verify that the organization ➤ ACME is already assigned5. Click on Submit
For the domain dmz.example.com: Follow the same procedure, and assign the location munich-dmz. But leave the DNS Capsule empty (the Capsule for this location does not exist yet).
For the domain novalocal: Redo the same steps, and assign the location boston. Leave the DNS Capsule empty again for the same reason.
Via hammer:
#munichORG="ACME"DOMAIN="example.com"LOCATION="munich"DNSPROXY="<Replace with Satellite FQDN | satellite.example.com >"hammer domain create --name "${DOMAIN}"hammer domain update --name "${DOMAIN}" --dns "${DNSPROXY}"hammer domain update --name "${DOMAIN}" --organizations "${ORG}"hammer domain update --name "${DOMAIN}" --locations "${LOCATION}"
#munich-dmzORG="ACME"DOMAIN="dmz.example.com"LOCATION="munich-dmz"hammer domain create --name "${DOMAIN}"hammer domain update --name "${DOMAIN}" --organizations "${ORG}"hammer domain update --name "${DOMAIN}" --locations "${LOCATION}"
#bostonORG="ACME"DOMAIN="novalocal"
[email protected] 43 www.redhat.com

LOCATION="boston"hammer domain create --name "${DOMAIN}"hammer domain update --name "${DOMAIN}" --organizations "${ORG}"hammer domain update --name "${DOMAIN}" --locations "${LOCATION}"
SubnetsSatellite can create networks for groups of systems. Subnets use standard IP-address settings to define the network and use the Red Hat Satellite Capsule Server's DHCP features to assign IP addresses to systems within the subnet.
To create the subnet 172.24.96.0/24 with the WebUI, go to:1. Infrastructure ➤ Subnets ➤ New Subnet2. On the Domain tab, enter DNS domain example.com select the Red Hat Satellite as ➤DNS Capsule3. Go to the Locations tab select the location ➤ munich4. Go to the Organizations tab verify that the organization ➤ ACME is already assigned5. click on Submit
Note: If the Red Hat Capsule handles the IP address management (IPAM) for the subnet, you can choose one of two options:
● DHCPThe DHCP service on the associated Red Hat Capsule manages entries for hosts (mac address + ip address and the next-server to point to the TFTP server). If you choose DHCP, the DHCP range configured during capsule-installer must match the range specified on the WebUI.
● Internal DBThe Red Hat Capsule provides ip addresses based on the range provided in the subnet configuration; no external service is configured (for example, DHCP). If the hoststill should be provisioned via PXE, you must add a record manually or via foreman_hooks (see Step 7) to the DHCP server used. Use this option with the Boot mode static.
Via hammer:
DOMAIN="example.com"ORG="ACME"LOC="munich"DNS_PRIMARY=""SUBNET_MASK=""
www.redhat.com 44 [email protected]

SUBNET_NETWORK=""SUBNET_IPAM_START=""SUBNET_IPAM_END=""
CAPSULE_ID=1hammer subnet create --name "${DOMAIN}" \ --organizations "${ORG}" \ --locations "${LOC}" \ --domains "${DOMAIN}" \ --boot-mode "Static" \ --dns-primary "${DNS_PRIMARY}" \ --mask "${SUBNET_MASK}" \ --network "${SUBNET_NETWORK}" \ --gateway "${SUBNET_GATEWAY}" \ --from "${SUBNET_IPAM_START}" \ --to "${SUBNET_IPAM_END}" \ --ipam "DHCP" \ --dhcp-id "${CAPSULE_ID}" \ --dns-id "${CAPSULE_ID}" \ --tftp-id "${CAPSULE_ID}"
Note:You can acquire the Red Hat Capsule ID with the command:
hammer --output csv capsule list \ --search "capsule-munich.dmz.example.com" \ | grep -vi '^Id' | cut -d',' -f1
Create the subnet to be managed by the Red Hat Capsule capsule-munich.dmz.example.com:
1. Infrastructure ➤ Subnets ➤ New Subnet2. On the Subnet Tab fill in the corresponding information. For IPAM select ➤ DHCP and for the Boot mode static.
Via hammer:
DOMAIN="dmz.example.com"ORG="ACME"LOC="munich-dmz"DNS_PRIMARY=""SUBNET_MASK=""SUBNET_NETWORK=""
[email protected] 45 www.redhat.com

SUBNET_IPAM_START=""SUBNET_IPAM_END=""
hammer subnet create --name "${DOMAIN}" \ --organizations "${ORG}" \ --locations "${LOCATIONS}" \ --domains "${DOMAIN}" \ --boot-mode "Static" \ --dns-primary "${DNS_PRIMARY}" \ --mask "${SUBNET_MASK}" \ --network "${SUBNET_NETWORK}" \ --gateway "${SUBNET_GATEWAY}" \ --from "${SUBNET_IPAM_START}" \ --to "${SUBNET_IPAM_END}" \ --ipam "DHCP"
3. On the second tab Domains check the domain ➤ dmz.example.com4. On the fourth tab Locations add the location ➤ dmz.example.com to the right side5. Verify that ACME is already added to the Organizations tab.
For RHEL OSP you need to create the subnet so that the DNS Capsule can create DNS reverse records (PTR) as the domain is only responsible to create the forward record.
To create the subnet that the Red Hat Capsule capsule-boston.novalocal will manage:
1. Infrastructure ➤ Subnets ➤ New Subnet2. On the Subnet Tab add the Name, Network Address and Network Mask➤3. On the Domains Tab flag the checkbox ➤ novalocal4. Submit
Via hammer:
DOMAIN="novalocal"ORG="ACME"LOC="munich-dmz"SUBNET_NETWORK=””SUBNET_MASK=””
hammer subnet create --name "${DOMAIN}" \ --mask "${SUBNET_MASK}" \ --network "${SUBNET_NETWORK}" \ --organizations "${ORG}" \
www.redhat.com 46 [email protected]

--locations "${LOCATIONS}" \ --domains "${DOMAIN}"
The Red Hat Capsule features for the subnets for boston and munich-dmz will be added oncethe Red Hat Capsule installation is complete.
Note:If a Red Hat Capsule actively provides network infrastructure services (DNS, DHCP), it can (currently) manage only one subnet (DHCP service) and one domain (DNS service). Otherwise, a Capsule can be associated with multiple subnets and/or domains, as long as thenetwork infrastructure services are provided externally.
Red Hat Capsule InstallationWe assume that no provisioning infrastructure is available in the remote location for installing Red Hat Capsules. We recommend that you install a plain RHEL 7.1+ system without any additional packages and that has at least 200 GB of disk space for the /var filesystem.
For detailed Red Hat Capsule prerequisites, see:
https :// access . redhat . com / documentation / en - US / Red _ Hat _ Satellite /6.1/ html / Installation _ Guide / sect - Red _ Hat _ Satellite - Installation _ Guide - Red _ Hat _ Satellite _ Capsule _ Server _ Prerequisites . html
Because the Red Hat Satellite 6 Capsule is one of our sample infrastructure services in this document, we cover content views and host groups used to manage Capsule content definitions in additional steps.
Sample Capsule 1: Munich DMZ in the RHEV DatacenterYou need to ensure that the forward-and-reverse DNS resolution works in both directions:
● To the Red Hat Satellite Server from the Red Hat Capsule ● From the Red Hat Satellite Server to the Red Hat Capsule
Warning:If you do not have the DNS resolution set correctly, the capsule-installer fails and displays the message:
The capsule-installer is failing with error Could not set 'present' on ensure: Unprocessable Entity at :/usr/share/katello-installer/modules/foreman_proxy/manifests/register.pp" see the
[email protected] 47 www.redhat.com

following knowledge base article for more information:https :// access . redhat . com / solutions /1230493
Configure the firewall with the required Red Hat Capsule ports:
firewall-cmd --permanent \ --add-port="443/tcp" \ --add-port="5671/tcp" \ --add-port="80/tcp" \ --add-port="8140/tcp" \ --add-port="9090/tcp" \ --add-port="8080/tcp"firewall-cmd --reload
Install the Red Hat Satellite Certificate on the Red Hat Capsule Server:
SATELLITE-FQDN="satellite.example.com"rpm -Uvh http://${SATELLITE-FQDN}/pub/katello-ca-consumer-latest.noarch.rpm
Register the Red Hat Capsule to Satellite using an activation key.
Example:This example uses the dedicated activation key for Capsules that belong to the lifecycle environment PROD, which we create later in Step 7:
ORG="ACME"subscription-manager register --org "${ORG}" \ --activationkey=act-prod-infra-capsule-x86_64
Note:The activation key ensures that the following two required yum repositories are enabled (and no other repositories):
● rhel-7-server-rpms● rhel-server-7-satellite-capsule-6-beta-rpms
These repositories are provided through the ccv-infra-capsule Composite Content-View.
The Red Hat Capsule should be installed on a RHEL 7.1 or newer. We recommend running the following command to ensure that all updates have been applied:
yum -y update
www.redhat.com 48 [email protected]

Install the Red Hat Capsule installer:
yum -y install capsule-installer
Before the Red Hat Capsule can be configured, you need to create the corresponding certificates for the Capsule on the Red Hat Satellite Server.
To create these certificates, use the following commands to connect to the Red Hat Satellite Server, create the certificates, and copy them to the Red Hat Capsule Server
CAPSULE-FQDN="capsule-munich.dmz.example.com"capsule-certs-generate --capsule-fqdn ${CAPSULE-FQDN} \ --certs-tar ~/${CAPSULE-FQDN}-certs.tar
scp ~/${CAPSULE-FQDN}-certs.tar root@${CAPSULE-FQDN}:/root/
Note:You must use the output generated from the capsule-certs-generate command, so that the capsule-installer can successfully register the Red Hat Capsule on the Red Hat Satellite Server.
Red Hat Capsule ConfigurationSimilar to our main Satellite server itself, the Red Hat Capsule for the location munich-dmz serves the DHCP, TFTP, and DNS services for provisioning.
Run the capsule-installer command with the output from the capsule-cert-generate commandand with these additional options:
capsule-installer --parent-fqdn "<replace>"\ --register-in-foreman "true"\ --foreman-oauth-key "<replace>"\ --foreman-oauth-secret "<replace>"\ --pulp-oauth-secret "<replace>"\ --certs-tar "<replace>"\ --puppet "true"\ --puppetca "true"\ --pulp "true"\ --qpid-router "true"\ --reverse-proxy "true"\
[email protected] 49 www.redhat.com

--templates "true"\ --tftp "true"\ --dhcp "true"\ --dhcp-gateway "<replace>"\ --dhcp-nameservers "<replace>"\
--dhcp-range "<replace>"\ --dhcp-interface "<replace>"\ --dns "true"\
--dns-forwarders "<replace>"\ --dns-interface "<replace>"\
--dns-zone "<replace>"\ --dns-reverse "<replace>"
The following table outlines which switches to use to ensure that a host has to communicate with the Red Hat Capsule only for provisioning:
Switch Function
--pulp stores synchronized content on the Red Hat Capsule
--qpid-router is used for content (yum, Puppet) synchronization
--reverse-proxy is used to ensure that traffic from a host ist sent to the satellite via the capsule
--templates store provisioning templates on the capsule
--tftp, --dhcp, --dns to enable full provisioning features
Note: If you see the following error message: "`puppet_parse': invalid byte sequence in US-ASCII (ArgumentError)", make sure that LANG & LC_CTYPE is set to "en_US.UTF-8":
export LANG=en_US.UTF-8export LC_CTYPE=en_US.UTF-8
After successfully running the capsule-installer command, initiate content synchronization from the Red Hat Satellite to the Red Hat Capsule.
(On the Red Hat Satellite)List all available capsules:
hammer capsule list
www.redhat.com 50 [email protected]
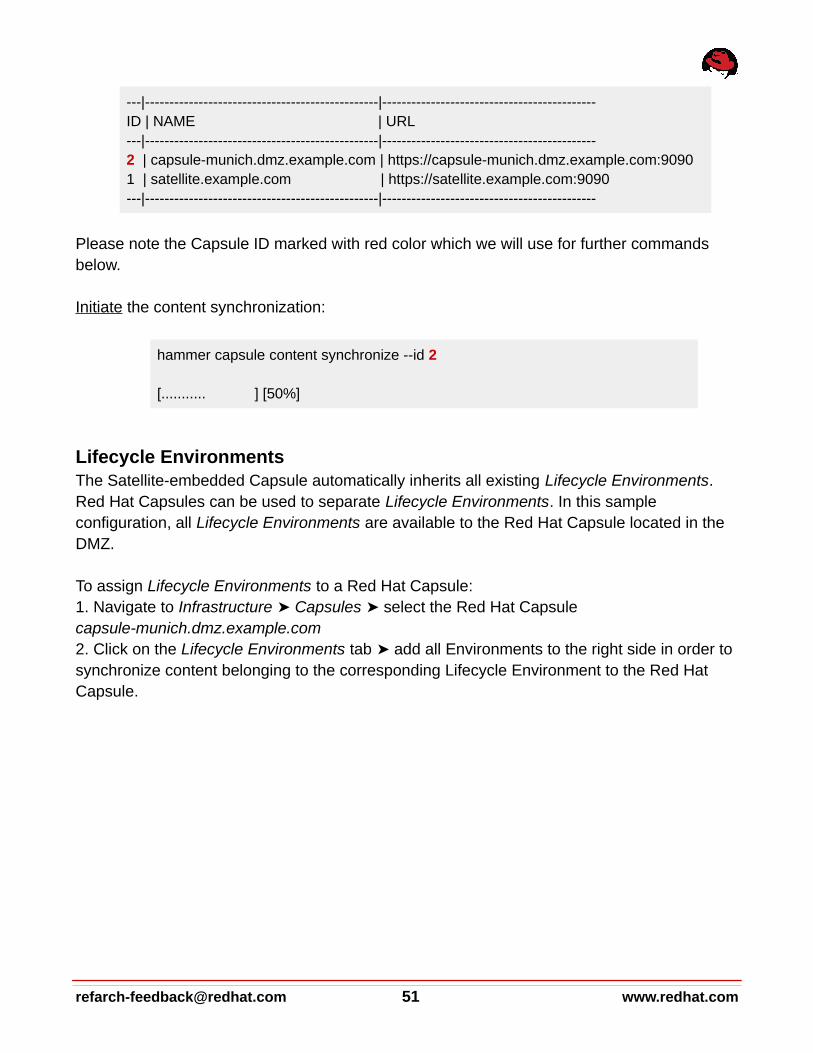
---|------------------------------------------------|--------------------------------------------ID | NAME | URL---|------------------------------------------------|--------------------------------------------2 | capsule-munich.dmz.example.com | https://capsule-munich.dmz.example.com:90901 | satellite.example.com | https://satellite.example.com:9090---|------------------------------------------------|--------------------------------------------
Please note the Capsule ID marked with red color which we will use for further commands below.
Initiate the content synchronization:
hammer capsule content synchronize --id 2
[........... ] [50%]
Lifecycle EnvironmentsThe Satellite-embedded Capsule automatically inherits all existing Lifecycle Environments. Red Hat Capsules can be used to separate Lifecycle Environments. In this sample configuration, all Lifecycle Environments are available to the Red Hat Capsule located in the DMZ.
To assign Lifecycle Environments to a Red Hat Capsule: 1. Navigate to Infrastructure ➤ Capsules select the Red Hat Capsule ➤capsule-munich.dmz.example.com2. Click on the Lifecycle Environments tab add all Environments to the right side in order to ➤synchronize content belonging to the corresponding Lifecycle Environment to the Red Hat Capsule.
[email protected] 51 www.redhat.com

Note:At the time of this writing, it was not possible to complete this step via hammer CLI.
3. Click on the Locations tab add the location ➤ munich-dmz to the right side
Via Hammer:
hammer location add-smart-proxy \ --smart-proxy "capsule-munich.dmz.example.com" \ --name "munich-dmz"
SubnetAdd the Red Hat Capsule to the Subnet dmz.example.com:1. From Infrastructure ➤ Subnets select the subnet ➤ dmz.example.com 2. On the third tab Capsules add ➤ capsule-munich.dmz.example.com as the DHCP,TFTP and DNS Capsule
Via Hammer (verify the ProxyID first):
ProxyID=$(hammer --output csv proxy list | grep "capsule-munich.dmz.example.com" | cut -d',' -f1)SUBNET=dmz.example.comLOCATION=munich-dmzhammer subnet update --name "${SUBNET}" \ --dns-id "${ProxyID}" \ --dhcp-id "${ProxyID}" --ipam "DHCP" \ --tftp-id “${ProxyID}” \
www.redhat.com 52 [email protected]

--locations “${LOCATION}”
DomainAdd the Red Hat Capsule capsule-munich.dmz.example.com to the domain dmz.example.com. This addition allows you to manage DNS records automatically for the domain dmz.example.com.
1. From Infrastructure ➤ Domains select the previously created domain ➤ dmz.example.com2. On the Domain tab select the Red Hat Capsule ➤ capsule-munich.dmz.example.com from the DNS Capsule drop-down menu Submit➤
Via Hammer (verify ProxyID first):
ProxyID=$(hammer --output csv proxy list | grep "capsule-munich.dmz.example.com" | cut -d',' -f1)DOMAIN=”dmz.example.com”hammer domain update --dns-id “${ProxyID}” --name "${DOMAIN}”
LocationsVerify that the Red Hat Capsule, Subnet and Domain is added to the corresponding location:
1. Administer ➤ Locations select location ➤ munich-dmz verify that the Capsule, Subnet ➤and Domain is added to the location
The Red Hat Capsule capsule-munich.dmz.example.com is now fully configured and
[email protected] 53 www.redhat.com

operational for provisioining new hosts.
Sample Capsule 2: Boston Remote Location Using RHEL OpenStack PlatformFor the RHEL OpenStack Platform, the Red Hat Capsule features and templates being used are different than for the Red Hat Capsules managing the Red Hat Enterprise Virtualization Environment.
● DHCP and TFTP services are not used. The RHEL OpenStack Platform manages the subnets itself and follows an image-based approach for provisioning.
● The Domain (including the DNS feature) is configured so that the hosts can reach the Red Hat Capsule capsule-boston.novalocal.
To be able to provision a new host based on an image already existing in RHEL OSP, you must add the image to the list of images that the Red Hat Satellite Server can use.
Note:You can acquire a cloud-based RHEL 7.1 image called "KVM Guest Image" used on RHEL OpenStack Platform here:https :// access . redhat . com / downloads / content /69/ ver =/ rhel ---7/7.1/ x 86_64/ product - downloads
1. From Infrastructure ➤ Compute Resources select the Compute Resource ➤acme-rhelosp-boston2. Navigate to the Images tab ➤ New Image3. Fill in the corresponding information for the new image. Make sure to select the checkbox "User data" and add the username "cloud-user".
Note:The root user is deactivated by default on the KVM Guest Image. Add the Username cloud-user for the new image.
www.redhat.com 54 [email protected]

Example:
Note:At the time of this writing, it is not possible to use hammer CLI to create or update an image toflag the "User data" checkbox.
User DataUse User Data to pass information contained in a local file (the provisioning template from thetype user data) to an instance at launch time. If you have configured the virtual machine to run the corresponding service at boot time, it retrieves the user data information from the metadata services and takes action based on the user data content. The correct tool for this iscloud-init. In particular, cloud-init is compatible with the Compute metadata service, as well as the Compute config drive.
The Red Hat Satellite Server also provides a provisioning template for User Data called "Satellite Kickstart Default User Data". After you have booted a system from a template, the provisioning template will be executed to further configure the system (for example, to register
[email protected] 55 www.redhat.com

the system at the satellite install and to configure the katello-agent and Puppet agent). When you use the "User Data" template, the host initiates communication to the assigned Red Hat Capsule.
Note:To be able to login to a system provisioned via RHEL OSP with the KVM Guest Image, you must add the parameter "sshkey" to the host with the corresponding public sshkey.
An alternate approach would be to clone the User data template and then change it accordingto your specific needs.
To add the provisioning template “Satellite Kickstart Default User Data” for cloud based provisioning:1. From Hosts ➤ Provisioning templates select the template ➤ Satellite Kickstart Default UserData2. Navigate to the Association tab assign the Red Hat Enterprise Linux versions to be used➤on OpenStack ➤ Submit
www.redhat.com 56 [email protected]
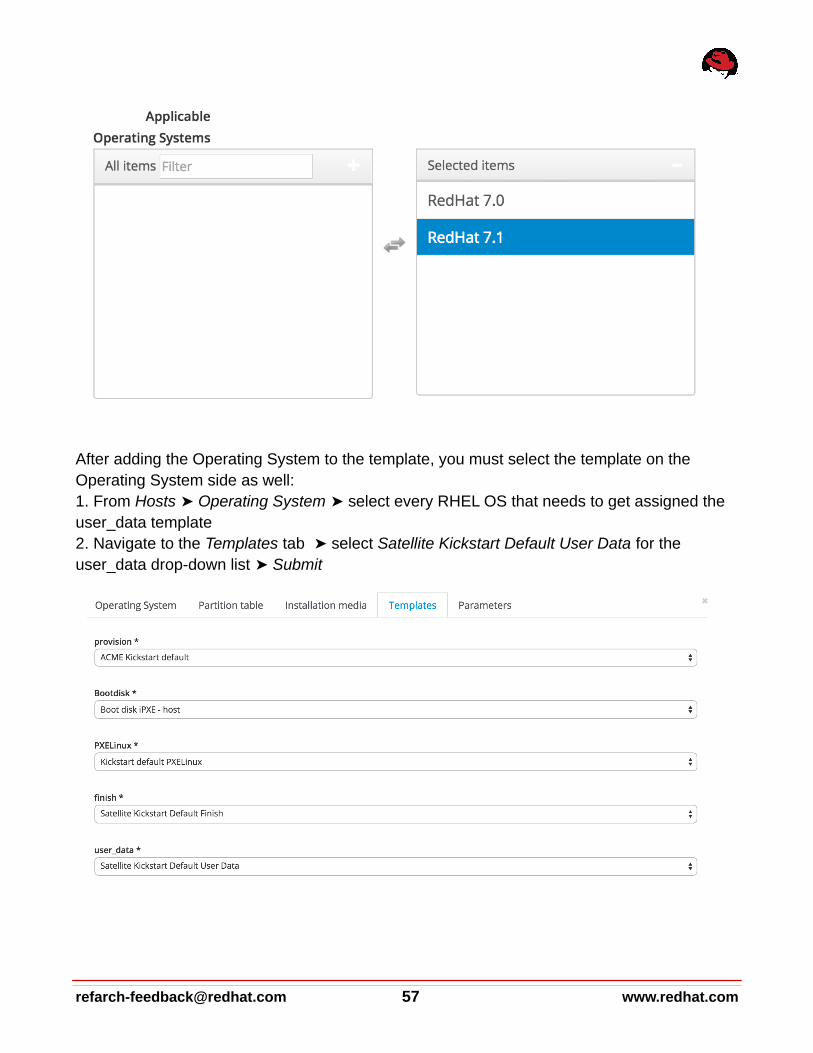
After adding the Operating System to the template, you must select the template on the Operating System side as well:1. From Hosts ➤ Operating System select every RHEL OS that needs to get assigned the ➤user_data template2. Navigate to the Templates tab select ➤ Satellite Kickstart Default User Data for the user_data drop-down list ➤ Submit
[email protected] 57 www.redhat.com

Fulfill the following prerequisites in Red Hat Enterprise Linux OpenStack:● Install a Red Hat Enterprise Linux on persistent storage● Configure the floating IP Range that has to be added to the Red Hat Capsule server● Configure the network tenant with the router to an external network (outside RHEL
OSP to reach the Red Hat Satellite)● Add the IP address of the host that becomes the Red Hat Capsule server as the DNS
server in the DHCP configuration.● In the DHCP configuration, add the IP address of the Red Hat Capsule server as the
DNS server.● Configure the Security Group for incoming and outgoing traffic
Advanced Firewall Configuration: https :// access . redhat . com / documentation / en - US / Red _ Hat _ Satellite /6.1/ html / Installation _ Guide / sect - Red _ Hat _ Satellite - Installation _ Guide - Prerequisites . html # idp 3202184
For detailed list of Red Hat Capsule prerequisites, see:
https :// access . redhat . com / documentation / en - US / Red _ Hat _ Satellite /6.1/ html / Installation _ Guide / sect - Red _ Hat _ Satellite - Installation _ Guide - Red _ Hat _ Satellite _ Capsule _ Server _ Prerequisites . html
As with other sample capsules configured earlier, you need to ensure that the forward-and-reverse DNS resolution works in both directions:
● To the Red Hat Satellite Server from the Red Hat Capsule ● From the Red Hat Satellite Server to the Red Hat Capsule
Warning:If you do not have the DNS resolution set correctly, the capsule-installer fails and displays the message:
The capsule-installer is failing with error Could not set 'present' on ensure: Unprocessable Entity at :/usr/share/katello-installer/modules/foreman_proxy/manifests/register.pp" see the following knowledge base article for more information:https :// access . redhat . com / solutions /1230493
Install the Red Hat Satellite certificate on the Red Hat Capsule Server:
SATELLITE-FQDN="satellite.example.com"rpm -Uvh http://${SATELLITE-FQDN}/pub/katello-ca-consumer-latest.noarch.rpm
Register the Red Hat Capsule to Satellite using an activation key. In this example, we are using a dedicated activation key for Capsules. This key belongs to the lifecycle environment
www.redhat.com 58 [email protected]

PROD we create in Step 7:
ORG="ACME"subscription-manager register --org "${ORG}" \ --activationkey=act-prod-infra-capsule-x86_64
Install the Red Hat Capsule should on RHEL 7.1+ with the newest update level:
yum -y update
Install the Red Hat Capsule installer:
yum -y install capsule-installer
Before you can configure the Red Hat Capsule can be configured, you must create certificates for the Capsule on the Red Hat Satellite Server.
● Connect to the Red Hat Satellite Server, create the certificates, and copy them to the Red Hat Capsule Server:
CAPSULE-FQDN="capsule-boston.novalocal"capsule-certs-generate --capsule-fqdn ${CAPSULE-FQDN} \ --certs-tar ~/${CAPSULE-FQDN}-certs.tar
scp ~/${CAPSULE-FQDN}-certs.tar root@${CAPSULE-FQDN}:/root/
Note:You must use the output generated from the capsule-certs-generated command for the capsule-installer to successfully register the Red Hat Capsule on the Red Hat Satellite Server.
Red Hat Capsule ConfigurationRun the capsule-installer command with the output from the capsule-cert-generate command,along with the following additional commands:
capsule-installer --parent-fqdn "<replace>"\--register-in-foreman "true"\--foreman-oauth-key "<replace>"\--foreman-oauth-secret "<replace>"\--pulp-oauth-secret "<replace>"\--certs-tar "<replace>"\
[email protected] 59 www.redhat.com

--puppet "true"\--puppetca "true"\--pulp "true"\--qpid-router "true"\--reverse-proxy "true"\--templates "true"\--dns "true"\--dns-forwarders "<replace>"\--dns-interface "<replace>"\--dns-zone "novalocal"\--dns-reverse "<replace>"
Note:We used an image-based provisioning method for Red Hat Enterprise Linux OpenStack Platform. This method does not require the dhcp and tftp features.
Initiate content synchronization from the Red Hat Satellite to the Red Hat Capsule after successfully running the capsule-installer command.
(On the Red Hat Satellite)List all available capsules:
hammer capsule list---|--------------------------------|--------------------------------------------ID | NAME | URL---|--------------------------------|--------------------------------------------
3 | capsule-boston.novalocal | https://capsule-boston.novalocal:90902 | capsule-munich.dmz.example.com | https://capsule-munich.dmz.example.com:90901 | satellite.example.com | https://satellite.example.com:9090---|--------------------------------|--------------------------------------------
Initiate the content synchronization:
hammer capsule content synchronize --id 3
[........... ] [50%]
www.redhat.com 60 [email protected]

Lifecycle EnvironmentsThe Satellite embedded Capsule automatically inherits all existing Lifecycle Environments. A Red Hat Capsule can be used to segregate different Lifecycle Environments. As outlined in the introduction, Boston is responsible for the development and quality assurance of the web platform. We set up a Red Hat Capsule for our secondary datacenter Boston, so that we could segregate responsibilities based on Lifecycle Environments. Web-Dev and Web-QA arethe only Lifecycle Environments available to the Red Hat Capsule located in Boston.
To assign Lifecycle Environments to a Red Hat Capsule:1. Navigate to Infrastructure ➤ Capsules select the Red Hat Capsule ➤capsule-boston.novalocal2. Click on the Lifecycle Environments tab add the ➤ Web-Dev and Web-QA environments to the right side to synchronize content that belongs to the corresponding Lifecycle Environments in the Red Hat Capsule
Note:This step could not be done via hammer at the time of writing.
3. Click the Locations tab add the location ➤ boston to the right side
Via Hammer:
hammer location add-smart-proxy --smart-proxy "capsule-boston.novalocal" --name "boston"
[email protected] 61 www.redhat.com

SubnetAdd the Red Hat Capsule to the Subnet novalocal:1. Infrastructure ➤ Subnets select the subnet ➤ novalocal 2. On the third tab Capsules add ➤ novalocal as DNS Capsule
Add the DNS Capsule for PTR record creation:
ProxyID=3SUBNET=novalocalLOCATION=bostonhammer subnet update --name "${SUBNET}" \ --dns-id "${ProxyID}" \ --locations “${LOCATION}”
DomainAdd the Red Hat Capsule capsule-boston.novalocal to the domain novalocal, so that you can automatically manage DNS records for the domain novalocal.
1. From Infrastructure ➤ Domains select the previously created domain ➤ novalocal2. On the Domain tab select the Red Hat Capsule ➤ capsule-boston.novalocal from the DNS Capsule drop-down menu ➤ Submit
LocationsVerify that the Red Hat Capsule and Domain are added to the corresponding location:
1. Administer Locations select location boston verify that the Capsule and Domain are ➤ ➤ ➤added to the location
The Red Hat Capsule capsule-boston.novalocal is now fully configured and ready to provisionnew hosts.
www.redhat.com 62 [email protected]

Step 3: Define Your Definitive Media Library Content.In a controlled IT environment, it is crucial that only authorized software and configuration versions are used in production. A Definitive Media Library is a repository that stores and protects the definitive, authorized versions of software and configurations. The corresponding change-and-release management process ensures that these configurations are tested and quality-assured before they are deployed to production.
Software Entry Points and FormatsSoftware comes along in various formats. Some of them depend primarily on their associated license models.
The following diagram illustrates a sample software-format lifecyle and highlights some steps that are required before Satellite 6 can manage these individual software types:
[email protected] 63 www.redhat.com

If we divide the software lifecycle into the 9 steps visualized in the grey chevrons, we can divide it into the following software-entry formats:
● Red Hat software already packaged as rpm and GPG-key signed. This model applies to all Red Hat products in the diagram: Red Hat Enterprise Virtualization, Red Hat Enterprise Linux and Red Hat JBoss Enterprise Application Platform (though all Red Hat products are open source and available as source code or source rpm packages we are focusing on the binary rpm packages here).
● Software already packaged as RPM and GPG key signed from a 3rd-party vendor● Proprietary software which is not available in source-code format but only as binary
build, partially not packaged as rpm and GPG-key signed● Open source tools available as source code (and usually as binary builds for common
operating systems as well)● Custom applications usually available as source code
Software that is available as source code and binary format but not packaged as rpm and GPG-key signed requires additional steps when being built (resulting format: binaries), packaged (resulting format: rpm), GPG-key signed (resulting format: GPG-key-signed rpm package) and tested before we can import it into Satellite 6 as part of our Definitive Media Library.
Satellite Content TypesYou can use Red Hat Satellite to manage various content types by using different content formats and entry points. Red Hat Satellite can act as the Definitive Software Library (DSL, ITIL ® v2) as part of the Definitive Media Library (DML, ITIL ® v3), following the ITIL® definition.
We recommend that all content deployed to systems managed by Red Hat Satellite is also stored, maintained and deployed via Satellite.
Red Hat Satellite supports the following types of content:
1. Software packaged and signed as RPM, including both Red Hat and foreign software2. Software and configurations packaged as Puppet modules3. Docker container images, including both Red Hat and foreign images
In addition to these deployment content types, Red Hat Satellite manages Red Hat errata updates, kickstart trees, and installation images.
In this document we use software provided by Red Hat and third-party vendors or
www.redhat.com 64 [email protected]
communities, as well as custom software, to demonstrate how these different software types should be configured/handled differently.
Note: All non-Red Hat and custom software used here is not a part of Red Hat Enterprise Linux anddoes not fall under our Production Support Scope of Coverage. These repositories and packages are considered optional and have not been tested by our quality engineers. More more information about the support coverage of EPEL, see: https :// access . redhat . com / solutions /410753
Satellite Products and RepositoriesRed Hat Satellite 6 uses Satellite Products to assemble particular repositories that belong to these products together. A product can consist of multiple repositories. In the opposite to content views explained later which are supposed to be user-modifiable products are kind of amaster copy of the original repositories. Products are also used to handle subscriptions. For Red Hat software synchronized to Red Hat Satellite 6 the corresponding products are automatically created.
Red Hat Satellite Product and Repository RecommendationsIf you have custom or third-party software and Puppet content, you must manually create yourSatellite Products. Since you can use Products to bundle various repositories that might be split off later into different content views, we recommend that you create as few Products as possible.
The minimum required number of Products is determined by the GPG keys used to sign the RPM packages inside the repositories. Because you can only assign one GPG to a Product, you need to have at least one Product for each GPG-key signature.
You can split different versions and architectures of ISV or custom software into different Products, but we recommend that you bundle all Products and variants of each software within one Product as long as they use the same GPG key (see above). This bundling is stillvalid if these different versions and variants are managed by different roles (separation of responsibilities) and might therefore be split into different content views later.
Another determining factor for the total number of Products are the synchronization plans (explained later in this chapter). When creating a Product, you can select the appropriate synchronization plan for this product.
[email protected] 65 www.redhat.com
When you enable Red Hat repository synchronization (Content -> Red Hat Repositories), Satellite 6 automatically creates the corresponding Products and includes the selected repositories. Unlike custom Products, you cannot modify these Red Hat Products (for example, by using a different name or syncing twice). In contrast to Satellite 5, Satellite 6 does not allow you to clone repositories and Products.
Red Hat Satellite Products are used for inherent Satellite 6 subscription management. Because subscriptions are mapped to Products instead of Repositories, you could create individual Products for all third-party software, if you want to track their usage on an individualbasis. For instance, if you are using different versions of a third-party product that are based on different contracts and license or subscription fees, we recommend creating individualproducts for each of them to better track their license or subscription consumption.
Note:Independent of its license or subscription type, Red Hat and all other Products (third party and even custom products) and their associated software repositories need to be managed using the Satellite 6 subscription management. Each of these Products and repositories needs to be explicitly enabled inside an activation key. Please see the relatedactivation key section in Step 7.
Because you cannot use the same repository inside multiple content views that are stacked together as a composite content view, some scenarios may force you to create two Productswith the same repository (not shared but actually configured and synchronized twice). For more details, see the EPEL example inside the Content View Recommendations chapter.
If software repositories share the same GPG key and sync plan you can create a RHEL-major-version-independent product containing repositories for different RHEL major releases. We’ve create a single Product for Zabbix monitoring software containing both RHEL6 and RHEL7 Zabbix software repositories.
Because products for Red Hat software are created automatically in the next steps, we have to create Products only for third-party software (divided by each vendor) and one Product for all ACME custom software. We also plan to create a single Product for all custom ACME content that contains one more more software (yum) and configuration (Puppet) repositories.
Product and Repositories Naming ConventionsAs stated earlier, we are using a naming convention in this solution guide that better supports automation by enabling filtering and pattern matching. Because Satellite 6 primarily uses Products to track software consumption (such as, license or subscription management), Product names are not significantly important. As a result, we are using a simple and
www.redhat.com 66 [email protected]
non-binding naming convention for Products, primarily consisting of the vendor or upstream project name and the product name or purpose. If the product is specific to a particular major or minor release of Red Hat Enterprise Linux (for example, because different GPG keys are used to sign it), we add an optional third segment:
< vendor or upstream project > - < product name or purpose > [ - < RHEL release > ]
Note: Product and repository names for Red Hat Products and their associated repositories are automatically created based on names defined by Red Hat.
In most cases Product and repositories names have to be used in conjunction (for example, while adding a repository to a content view). Only a few operations are done directly on a repository level (for example, adding a filter rule). Note: Even if the name and label of a repository configured as part of the Product have to be uniqueonly inside that particular Product, we are using unique labels for all repositories across products.
Rather than having a strict naming convention for Products and repositories, we have tried to reduce the total number of Products and repositories. If you have a smaller number of customProducts and repositories, the naming convention becomes less important, at least comparedto other entities like host groups, content views, or activations, which all occur frequently.
GPG Keys for Red Hat, Third-party and Custom SoftwareGPG keys are used by Red Hat and many third-party software vendors to sign rpm packages.They are used to verify the origin and integrity of rpm packages. By default Red Hat Enterprise Linux allows you to install only those rpm packages that are GPG key signed and for which the related GPG key has been imported to the local rpm database.
You can display all GPG keys imported to a system rpm database with the following command:
rpm -q gpg-pubkey --qf '%{name}-%{version}-%{release} --> %{summary}\n'
Red Hat Satellite supports GPG-key management, which includes importing and associating the keys to one or more repositories and deploying and importing them into the rpm databases of target systems.
[email protected] 67 www.redhat.com

The following subsections describe how to manage the different GPG keys used in this solution guide.
Red Hat GPG KeysFor all Red Hat Enterprise Linux systems managed by Red Hat Satellite, the Red Hat GPG Keys (https :// access . redhat . com / security / team / key) have already been installed during the provisioning of these systems. The advantage is you don’t need to take care of importing and deploying Red Hat GPG keys to your clients systems. However, you cannot change these keys and their deployment.
Thirdparty GPG KeysFor third-party software and custom software, you have to create or download the GPG key used to sign the corresponding rpm packages and import them into Satellite. Typically, the GPG keys are either published at the website of your software vendor and / or are part of the RPM package repository provided by this vendor.
Custom GPG KeysEven though it is technically feasible to work with unsigned rpm packages on both Red Hat Satellite and its client systems, we strongly recommended that you use a custom GPG key to sign your custom rpm packages.
For comprehensive documentation about custom GPG keys available, see:
https :// access . redhat . com / documentation / en - US / Red _ Hat _ Satellite /5.7/ html / Getting _ Started _Guide / sect - Digital _ Signatures _ for _ Red _ Hat _ Network _ Packages . html
In order to use RPM package-signing capabilities for ACME internal software as well, we’ve created an ACME GPG key to sign custom packages. We’ve created a new user ‘rpmbuild’ onour build host system and created and exported a GPG key using the following commands:
mkdir -p ~/.gnupggpg --gen-key
# output truncated (default values used)
gpg --list-keys --fingerprint/home/rpmbuild/.gnupg/pubring.gpg---------------------------------pub 2048R/54855126 2015-05-24 Key fingerprint = 7C92 2C37 48BA 8963 13C1 175C 4B34 E18F 5485 5126
www.redhat.com 68 [email protected]

uid ACME RPM Build Service <[email protected]>sub 2048R/FCB2981E 2015-05-24
gpg --export --armor "ACME RPM Build Service <[email protected]>" > GPG-ACME
Importing GPG Keys into Satellite 6Red Hat Satellite acts as a Definitive Media Library and allows you to store and deploy GPG keys for its target systems. As a result, you need to upload all GPG keys that belong to the software you want Satellite 6 to manage. Take these steps:
1. Click on Content -> GPG Keys 2. Click on New GPG Key3. Enter an appropriate name, for example “GPG-EPEL-RHEL7”4. Select “Paste GPG Key Contents” and paste in the content from
https :// dl . fedoraproject . org / pub / epel / RPM - GPG - KEY - EPEL -75. Click Save
Repeat the procedure above for all GPG keys that belong to the products and signed RPM packages you want to manage using Satellite 6. In our reference-architecture implementation,we’ve configured the following GPG keys:
GPG Key Name Source
GPG-VMware-RHEL6
http :// packages . vmware . com / tools / keys / VMWARE - PACKAGING - GPG - DSA - KEY . pub
GPG-EPEL-RHEL6 https :// dl . fedoraproject . org / pub / epel / RPM - GPG - KEY - EPEL -6
GPG-EPEL-RHEL7 https :// dl . fedoraproject . org / pub / epel / RPM - GPG - KEY - EPEL -7
GPG-ZABBIX http :// repo . zabbix . com / RPM - GPG - KEY - ZABBIX
GPG-ACME <internal as described above>
The following commands download and import the key for the RHEL7 repository of EPEL as an example:
wget -O /tmp/EPEL7.key https://dl.fedoraproject.org/pub/epel/RPM-GPG-KEY-EPEL-7
[email protected] 69 www.redhat.com
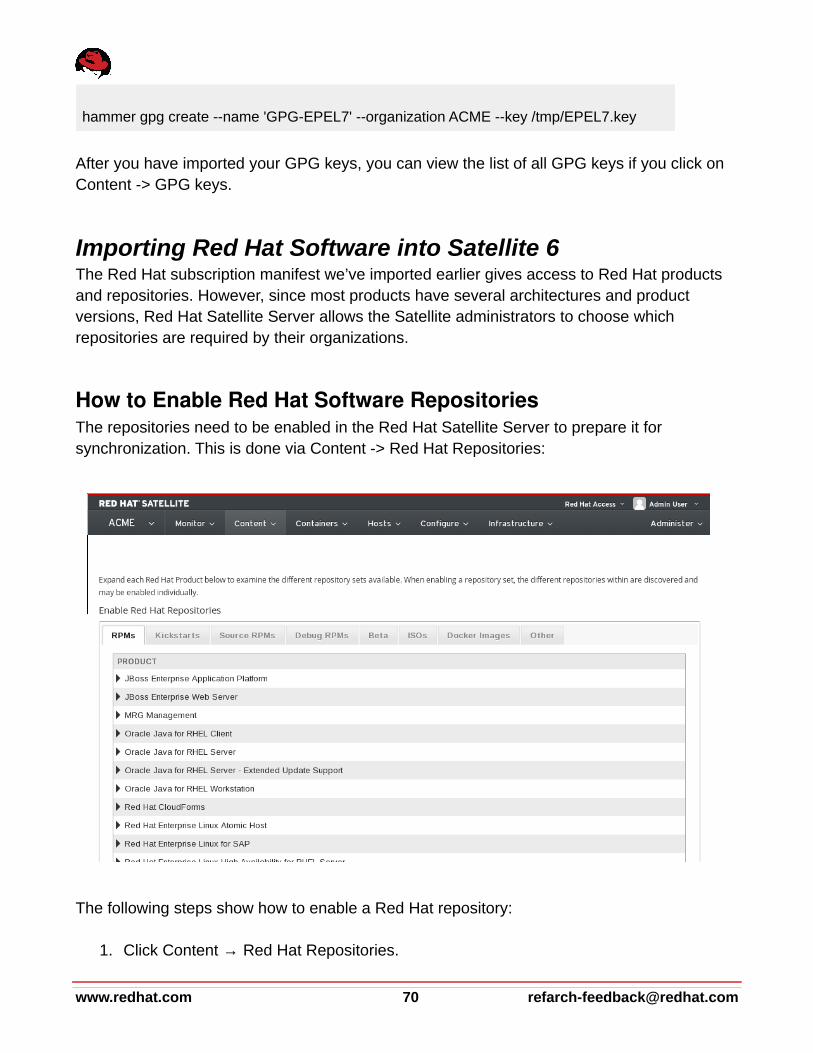
hammer gpg create --name 'GPG-EPEL7' --organization ACME --key /tmp/EPEL7.key
After you have imported your GPG keys, you can view the list of all GPG keys if you click on Content -> GPG keys.
Importing Red Hat Software into Satellite 6The Red Hat subscription manifest we’ve imported earlier gives access to Red Hat products and repositories. However, since most products have several architectures and product versions, Red Hat Satellite Server allows the Satellite administrators to choose which repositories are required by their organizations.
How to Enable Red Hat Software RepositoriesThe repositories need to be enabled in the Red Hat Satellite Server to prepare it for synchronization. This is done via Content -> Red Hat Repositories:
The following steps show how to enable a Red Hat repository:
1. Click Content → Red Hat Repositories.
www.redhat.com 70 [email protected]

2. Click on the tab of the type of content to be enabled. The tabs are: RPMs, Source RPMs, Debug RPMs, Beta, ISOs, Docker Images, Other.
3. Expand each Red Hat product to examine the different repository sets available by clicking on the arrow by the product name.
4. Choose which Red Hat repository sets you wish to add. Choosing it will automatically enable that repository for your Red Hat Satellite server.
5. For example, a common basic set of subscriptions which contain repositories with the latest packages for Red Hat Enterprise Linux 6 would be:
6. Red Hat Enterprise Linux 6 Server Kickstart x86_64 6Server Repository7. Red Hat Enterprise Linux 6 Server RPMs x86_64 6Server Repository
Note: The Red Hat Satellite Tools repository must be enabled, because it provides client systems registered to the Satellite Server katello-agent and Puppet packages.
[email protected] 71 www.redhat.com

Selecting the Appropriate RepositoriesIn our solution guide implementation, we’ve synchronized the following repositories:
● Red Hat Enterprise Linux 7 Server RPMS x86_64 7Server● Red Hat Enterprise Linux 7 Server Kickstart x86_64 7.1● Red Hat Enterprise Linux 7 Server – Optional RPMs x86_64 7Server● Red Hat Enterprise Linux 7 Server - Extras RPMS x86_64 7Server● Red Hat Satellite Tools 6 Beta (for RHEL 7 Server) (RPMs) 7Server● Red Hat Software Collections RPMs for Red Hat Enterprise Linux 7 Server● Red Hat Enterprise Linux 6 Server RPMs x86_64 6.5● Red Hat Enterprise Linux 6 Server Kickstart x86_64 6.5● Red Hat Enterprise Linux 6 Server – Optional RPMs x86_64 6.5● Red Hat Enterprise Linux 6 Server – Extras RPMs x86_64 6.5● Red Hat Satellite Tools 6 Beta (for RHEL 6 Server) (RPMs) 6.5● Red Hat Software Collections RPMs for RHEL 6 Server x86_64 6.5● Red Hat Enterprise Virtualization Agents for RHEL 6 Server (RPMs) 6.5
After selecting the Red Hat repositories under Content -> Red Hat Repositories, the corresponding Red Hat products are automatically created. In our solution guide setup, you should now see a product called “Red Hat Enterprise Linux Server” beside other Red Hat products.
Note: You cannot change the name of automatically created Red Hat products, and you cannot clone or sync them twice with Satellite 6.
To enable the synchronization of Red Hat Software repositories using the hammer CLI, you need to know the following labels of each Red Hat product you want to synchronize:
● label of Product● label of repository● basearch of the repository● release version of the repository
The following screenshots illustrate which item under Content -> Red Hat Repositories provides which label. These screenshots are based on an example of an older version of
www.redhat.com 72 [email protected]
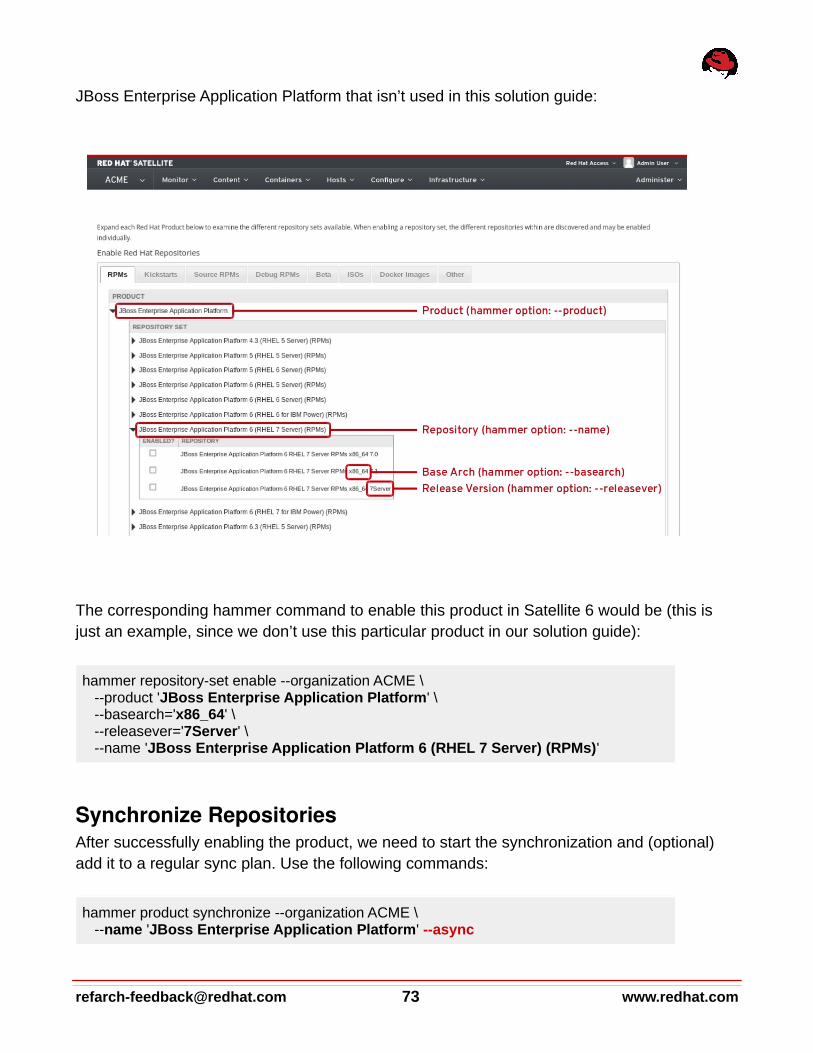
JBoss Enterprise Application Platform that isn’t used in this solution guide:
The corresponding hammer command to enable this product in Satellite 6 would be (this is just an example, since we don’t use this particular product in our solution guide):
hammer repository-set enable --organization ACME \ --product 'JBoss Enterprise Application Platform' \ --basearch='x86_64' \ --releasever='7Server' \ --name 'JBoss Enterprise Application Platform 6 (RHEL 7 Server) (RPMs)'
Synchronize RepositoriesAfter successfully enabling the product, we need to start the synchronization and (optional) add it to a regular sync plan. Use the following commands:
hammer product synchronize --organization ACME \ --name 'JBoss Enterprise Application Platform' --async
[email protected] 73 www.redhat.com

hammer product set-sync-plan --organization $ORG \ --name 'JBoss Enterprise Application Platform' \ --sync-plan 'daily sync at 3 a.m.'
Note:We use the --async option to run the repository synchronization in the background. If this option is not used, you must wait until the synchronization is finished before the second command associates the product with our sync plan. Using --async allows us to enable and sync other products in parallel.
Warning: A Product or other entity can have one label during initial repository enabling and a different repository label used to add it to a content view. In this example, the repository labels for initial enabling are not the same ones used later while creating content views. The following hammer commands create a content view for the JBoss Enterprise Application Platform repository enabled above. Note how the highlighted repository name differs from the repository name we used to enable this Red Hat product repository earlier.
hammer content-view create --name "cv-app-jbosseap7" \ --description "JBoss EAP 7 Content View" \ --organization "$ORG"
hammer content-view add-repository --organization "$ORG" \ --repository 'JBoss Enterprise Application Platform 6.4 RHEL 7 Server RPMs x86_64 7Server' \ --name "cv-app-jbosseap7" \ --product 'JBoss Enterprise Application Platform'
Note: Especially products with a long lifecycle like Red Hat Enterprise Linux will consume a lot of disk space to store all corresponding packages. You need to ensure that the directory or mountpoint Satellite 6 uses to store packages (/var/lib/pulp)has a sufficient space before enabling and synching these repositories. The following knowledgebase article provides examples for some typical software repositories and expected space required: https :// access . redhat . com / solutions /1458933
The following hammer commands have been used to enable and synchronize all Red Hat products used inside this solution guide:
# RHEL7 reposhammer repository-set enable --organization "$ORG" \ --product 'Red Hat Enterprise Linux Server' \
www.redhat.com 74 [email protected]

--basearch='x86_64' --releasever='7.1' \ --name 'Red Hat Enterprise Linux 7 Server (Kickstart)'
hammer repository-set enable --organization "$ORG" \ --product 'Red Hat Enterprise Linux Server' \ --basearch='x86_64' --releasever='7Server' \ --name 'Red Hat Enterprise Linux 7 Server (RPMs)' hammer repository-set enable --organization "$ORG" \ --product 'Red Hat Enterprise Linux Server' \ --basearch='x86_64' --releasever='7Server' \ --name 'Red Hat Enterprise Linux 7 Server - RH Common (RPMs)'
hammer repository-set enable --organization "$ORG" \ --product 'Red Hat Enterprise Linux Server' \ --basearch='x86_64' --releasever='7Server' \ --name 'Red Hat Enterprise Linux 7 Server - Extras (RPMs)'
hammer repository-set enable --organization "$ORG" \ --product 'Red Hat Enterprise Linux Server' \ --basearch='x86_64' --releasever='7Server' \ --name 'Red Hat Satellite Tools 6 Beta (for RHEL 7 Server) (RPMs)'
hammer repository-set enable --organization "$ORG" \ --product 'Red Hat Software Collections for RHEL Server' \ --basearch='x86_64' --releasever='7Server' \ --name 'Red Hat Software Collections RPMs for Red Hat Enterprise Linux 7 Server'
# RHEL6 repos, here only RHEL 6.5 to provide a legacy core build examplehammer repository-set enable --organization "$ORG" \ --product 'Red Hat Enterprise Linux Server' \ --basearch='x86_64' --releasever='6.5' \ --name 'Red Hat Enterprise Linux 6 Server (Kickstart)'
hammer repository-set enable --organization "$ORG" \ --product 'Red Hat Enterprise Linux Server' \ --basearch='x86_64' --releasever='6.5' \ --name 'Red Hat Enterprise Linux 6 Server (RPMs)'
hammer repository-set enable --organization "$ORG" \ --product 'Red Hat Enterprise Linux Server' \ --basearch='x86_64' --releasever='6.5' \ --name 'Red Hat Enterprise Linux 6 Server - Extras (RPMs)'
hammer repository-set enable --organization "$ORG" \ --product 'Red Hat Enterprise Linux Server' \ --basearch='x86_64' --releasever='6Server' \ --name 'Red Hat Satellite Tools 6 Beta (for RHEL 6 Server) (RPMs)'
hammer repository-set enable --organization "$ORG" \
[email protected] 75 www.redhat.com

--product 'Red Hat Software Collections for RHEL Server' \ --basearch='x86_64' --releasever='6.5' \ --name 'Red Hat Software Collections RPMs for Red Hat Enterprise Linux 6 Server'
# if we are using RHEV we need the RHEV agents in the dedicated channel for RHEL6# while RHEL7 packages are included in RH Commonhammer repository-set enable --organization "$ORG" \ --product 'Red Hat Enterprise Linux Server' \ --basearch='x86_64' --releasever='6.5' \ --name 'Red Hat Enterprise Virtualization Agents for RHEL 6 Server (RPMs)'# sync all RHEL packageshammer product synchronize \ --name 'Red Hat Enterprise Linux Server' \ --organization "$ORG" --asynchammer product synchronize \ --name 'Red Hat Software Collections for RHEL Server' \ --organization "$ORG" --async
Note: Synchronizing all these huge repositories can take a few hours. You can monitor the current synchronization using Content -> Synchronization Status. We need to wait until all repositories have been successfully synchronized before creating our content views in the next steps.
Importing (RPM) Packaged Third-party Software into Satellite 6Red Hat Satellite lets you manage any RPM-packaged and signed content and is not limited to Red-Hat-provided software. For all non-Red-Hat content, we need to create Products first.Then, we can later add them to content views.
Creating a new product in Red Hat SatelliteClick Content → Products.
1. Click +New Product .2. Type in the name of the new Product in the Name field.3. Type in label for the new Product in the Label field.4. Select a GPG key from the GPG Key drop-down menu.5. Select a synchronization plan from the Sync Plan drop-down menu. Alternatively,
select the +New Sync Plan link to create a new synchronization plan.6. Type in a description of the new Product in the Description field.7. Click the Save button to save your new Product.
www.redhat.com 76 [email protected]

The following hammer commands create a custom product and repository of type yum for our ACME custom rpm packages:
hammer product create --name="$ORG" --organization="$ORG"
hammer repository create --name="$ORG RPM Repo" \ --organization="$ORG" --product="$ORG" \ --content-type='yum' --publish-via-http=true \ --url="$CUSTOM_YUM_REPO"
Because we import RPM-packaged software on a yum repository level, we need to distinguish between these two situations:
● Situation 1. The software vendor provides access to a repo.● Situation 2. You have to manually create a repository consisting of these software
packages.
Situation 1. Importing Thirdparty RPM Packages from an Existing yum RepositorySatellite 6 provides automated repository synchronization for both: Red Hat and 3rd party software. You can use the synchronization capabilities for all existing yum repositories.
The easiest way to configure repositories and Products is with the repository discovery feature of Satellite 6. The following procedure describes how to set up a product called “RHEL6 VMware Tools” and details syncing the repository of the corresponding packages for RHEL6.
1. Click Content -> Product2. Click on the “Repo Discovery Button”3. Enter the URL http :// packages . vmware . com / tools / esx /5.1 u 2/ inside the field “URL to
discover”, and click Discover4. Select ‘rhel6/x86_64/index.html’ (and corresponding 32bit repo if used) from the
resulting list, and click the Create selected button5. Select a new product 6. Enter a name, label, and description7. Select the appropriate GPG key (created earlier)8. Click Create
[email protected] 77 www.redhat.com
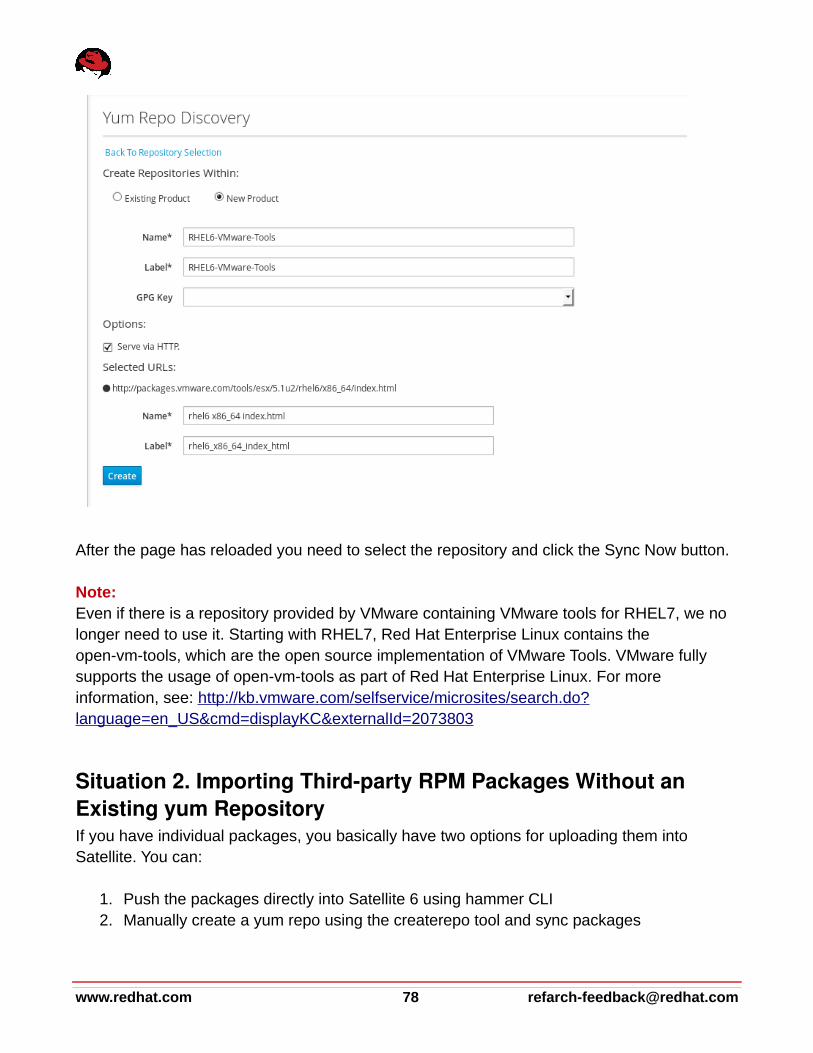
After the page has reloaded you need to select the repository and click the Sync Now button.
Note: Even if there is a repository provided by VMware containing VMware tools for RHEL7, we no longer need to use it. Starting with RHEL7, Red Hat Enterprise Linux contains the open-vm-tools, which are the open source implementation of VMware Tools. VMware fully supports the usage of open-vm-tools as part of Red Hat Enterprise Linux. For more information, see: http :// kb . vmware . com / selfservice / microsites / search . do ?language = en _ US & cmd = displayKC & externalId =2073803
Situation 2. Importing Thirdparty RPM Packages Without an Existing yum RepositoryIf you have individual packages, you basically have two options for uploading them into Satellite. You can:
1. Push the packages directly into Satellite 6 using hammer CLI2. Manually create a yum repo using the createrepo tool and sync packages
www.redhat.com 78 [email protected]

Note: We recommend that you put all your custom and foreign packages under a revision control similar to your (Puppet) configuration for both options.
Via HammerTo upload a custom package via the hammer command line interface (option 1), use this command:
hammer repository upload-content --product "$ORG" \ --organization $ORG --name "$ORG RPM Repo" \ --path /tmp/acme-baseconfig-0.1.rpm
Note: Currently, you can upload only one package at a time using the upload-content option. If you provide a regular expression like /tmp/acme-*, which would match to more than one package /file, the upload fails. The following script snippet provides a workaround for this limitation:
for package in $(ls -1 /path/to/your/packages/*.rpm)do
hammer repository upload-content --organization $ORG --name "$ORG RPM Repo" --product ACME --path "$package"
done
As an alternative, you can can manually create a yum repository structure out of a directory ofyour custom or foreign rpm packages by using the createrepo tool, which is available via the Red Hat Enterprise Linux base channel:
1. Download the sources (if not packaged yet)2. Create a rpmbuild spec file (if not packaged yet)3. Build the binary rpm using rpmbuild command (if not packaged yet)4. Sign the rpm using a GPG key (if not signed yet)5. Store the resulting rpm(s) in a directory6. Create a local yum repository using createrepo7. Make this repository available via http8. Configure this repository inside Satellite 6
Because the Red Hat Portal already has documentation about these topics, we do not cover them in this solution guide. See these links for more details:
[email protected] 79 www.redhat.com

● createrepo usage: https :// access . redhat . com / solutions /9892● enable http export: https :// access . redhat . com / articles /1343513
Importing Other (Not RPM-packaged) Software into Satellite 6For software not yet packaged as a RPM, you basically have two options:
● Deploy unpackaged files using Puppet (as part of Satellite 6)-or-
● Package the software as RPMs and deploy using Satellite 6 software management
Advantages and disadvantagesThe advantage of using Puppet for binary deployment is that you don’t have to deal with packaging and its (slight) complexity. You can use exec statements in Puppet to download, extract, and execute installer scripts. Especially for binary installers (usually only supported from the vendor if the installer has been used for deployment), the advantage is that even if you package the binary results of the installer, you still might be in a grey area regarding vendor support. For an overview of how to use Puppet to deploy binary files and installers, see: https :// puppetlabs . com / presentations / puppet - camp - portland -2014- wrangling -3 rd - party - installers - puppet .
Despite the additional efforts required for rpm packaging an application, this approach has some significant advantages, and we prefer this option. Using RPM as the deployment formatprovides the following (additional) benefits:
● Unattended install / uninstall● Upgrades and downgrades supported● Version controls and a changelog● Automatic resolution of dependencies● Conflict detection / handling● No build tools required on target systems (only on the build host)● Querying, checksum and verification capabilities● Ability to sign RPMs with GPG (preferred)
Given this comprehensive list of advantages, we recommended that you consider packaging your third-party and custom applications as RPMs. However, we will explain the tar.gz based scenario inside this solution guide using the WordPress as a sample application. We are using latest version of WordPress (http :// wordpress . org / latest . tar . gz), 4.1.1 at the time of this writing.
www.redhat.com 80 [email protected]
https://puppetlabs.com/presentations/puppet-camp-portland-2014-wrangling-3rd-party-installers-puppet
https://puppetlabs.com/presentations/puppet-camp-portland-2014-wrangling-3rd-party-installers-puppet
https://puppetlabs.com/presentations/puppet-camp-portland-2014-wrangling-3rd-party-installers-puppet
https://puppetlabs.com/presentations/puppet-camp-portland-2014-wrangling-3rd-party-installers-puppet
https://puppetlabs.com/presentations/puppet-camp-portland-2014-wrangling-3rd-party-installers-puppet
https://puppetlabs.com/presentations/puppet-camp-portland-2014-wrangling-3rd-party-installers-puppet
https://puppetlabs.com/presentations/puppet-camp-portland-2014-wrangling-3rd-party-installers-puppet
https://puppetlabs.com/presentations/puppet-camp-portland-2014-wrangling-3rd-party-installers-puppet
https://puppetlabs.com/presentations/puppet-camp-portland-2014-wrangling-3rd-party-installers-puppet
https://puppetlabs.com/presentations/puppet-camp-portland-2014-wrangling-3rd-party-installers-puppet
https://puppetlabs.com/presentations/puppet-camp-portland-2014-wrangling-3rd-party-installers-puppet
https://puppetlabs.com/presentations/puppet-camp-portland-2014-wrangling-3rd-party-installers-puppet
https://puppetlabs.com/presentations/puppet-camp-portland-2014-wrangling-3rd-party-installers-puppet
https://puppetlabs.com/presentations/puppet-camp-portland-2014-wrangling-3rd-party-installers-puppet
https://puppetlabs.com/presentations/puppet-camp-portland-2014-wrangling-3rd-party-installers-puppet
https://puppetlabs.com/presentations/puppet-camp-portland-2014-wrangling-3rd-party-installers-puppet
https://puppetlabs.com/presentations/puppet-camp-portland-2014-wrangling-3rd-party-installers-puppet
https://puppetlabs.com/presentations/puppet-camp-portland-2014-wrangling-3rd-party-installers-puppet
https://puppetlabs.com/presentations/puppet-camp-portland-2014-wrangling-3rd-party-installers-puppet
https://puppetlabs.com/presentations/puppet-camp-portland-2014-wrangling-3rd-party-installers-puppet
https://puppetlabs.com/presentations/puppet-camp-portland-2014-wrangling-3rd-party-installers-puppet
https://puppetlabs.com/presentations/puppet-camp-portland-2014-wrangling-3rd-party-installers-puppet
https://puppetlabs.com/presentations/puppet-camp-portland-2014-wrangling-3rd-party-installers-puppet

Deploying Unpackaged Files Using Puppet (as Part of Satellite 6)Because Puppet modules can consist of both text and binary, one option is to use Puppet to deploy binary files as part of Puppet modules. Because we recommend using RPM packages to deploy binary files, this solution guide does not cover this use case.
Packaging as RPM and Deploying Using Satellite 6 Software ManagementThe following procedure describes the required steps to transform unpackaged software into Satellite-manageable RPM content.
1. Download the tar.gz file from vendors / open source project website2. Package it using the rpmbuild command3. Sign it with your custom GPG key (should be uploaded to Satellite)4. Push the package into Satellite’s custom channel or create a repository using
createrepo tool and synchronize it as explained above
In our solution guide setup, we have not used custom RPM packages. However, we have created a custom repository as part of our ACME product, which you could use in your environment.
Importing Puppet Content into Satellite 6Puppet is a tool for applying and managing system configurations. Puppet collects system information, or facts, and uses this information to create a customized system configuration using a set of modules. These modules contain parameters, conditional arguments, actions, and templates. Puppet is used as either a local system command line tool or in a client-serverrelationship where the server acts as the Puppet master and applies configuration to multiple client systems using a Puppet agent. This provides a way to automatically configure newly provisioned systems, either individually or simultaneously to create a certain infrastructure.
Satellite 6 uses Puppet in several ways:
● Satellite 6 imports Puppet modules used to define the system configuration. This includes control over module versions and their environments.
● Satellite 6 can import sets of parameters, from parameterized Puppet classes, from Puppet modules. Users can accept the default values from Puppet classes or provide their own at a global or system-specific level.
● Satellite 6 triggers the execution of Puppet between the master and the respective
[email protected] 81 www.redhat.com

agents on each system. Puppet runs can occur either:○ Automatically, such as after the provisioning process completes or as a daemon
that checks and manages the machine's configuration over its lifecycle.○ Manually, such as needing to trigger an immediate Puppet run.
● Satellite 6 collects reports from Puppet after the configuration workflow completes. Thishelps with auditing and archiving system configuration over long term periods.
These functions provide an easy way for users to control system configuration aspects of the application lifecycle using Puppet.
Many Puppet modules are available from Puppet Forge and can be used in conjunction with Satellite 6. To synchronize the Puppet Forge repository with Satellite 6, see these instructions:https :// access . redhat . com / solutions /1290513
Note:Currently, you cannot limit which subset of a repository you want to synchronize. In the case of Puppetforge, you must sync the entire repository, which currently contains 3280 modules.
We will create some sample Puppet modules in Steps 5 and 6. This chapter primarily focuses on importing existing modules.
In order to import Puppet modules into Satellite 6, we have two options:
Option 1. Directly push the module to the corresponding Satellite 6 product repositoryOption 2. Store the module in git and use the git repository synchronization of Satellite6
For both options the final destination of our Puppet module in Satellite 6 is the Puppet repository (as part of the ACME Product created earlier).
The following hammer command directly pushes the Puppet module into the repository (option 1):
hammer -v repository upload-content --organization “ACME” --product ACME --name "ACME Puppet Repo" --path acme-motd.tgz
However, we recommend using option 2:
Storing the resulting Puppet modules in git to ensure version control and then synchronizing the git repo or selected modules by using Satellite 6 sync plans or manual sync.
www.redhat.com 82 [email protected]

If we assume that there is already one (or sometimes more) git servers or repositories in place, the next steps focus on using the existing git repository(ies) in conjunction with Red Hat Satellite 6. If you do not have an existing git repository or dedicated server in place, Step 6 describes how to setup and configure a server like that.
To allow automatically and regular synchronization using Satellite 6 sync plans of this git repository, we have to transform the git repository into a format that Satellite 6 can use for synchronization. For instructions, see: https :// access . redhat . com / solutions /1173803
The required tool, pulp-puppet-module-builder, is already installed on the Satellite 6 server by default. Because we want to use our git server as the single source of Puppet modules, we need to install this package on our git servers as well. See the following Knowledgebase article for the required procedure: https :// access . redhat . com / solutions /1378663
After installing this tool, we create the module repository:
yum -y install pulp-puppet-module-buildermkdir /var/www/html/modules/chmod 755 /var/www/html/modules/pulp-puppet-module-builder --output-dir=/var/www/html/modules/ [email protected]:mymodules.git --branch=develop
Finally, we have to add a repository (type: ‘puppet’) that belongs to the ACME generic productthat we created earlier and synchronize it with our git host:
hammer repository create --name="$ORG Puppet Repo" \ --organization="$ORG" --product="$ORG" \ --content-type='puppet' --publish-via-http=true \ --url="$CUSTOM_PUPPET_REPO"
hammer repository synchronize --organization "$ORG" --product "$ORG" --async
Note: Although the pulp-puppet-module-builder performs both the puppet-module build and the pulp-manifest creation, there is a simpler way to create just the pulp manifest. If you have already built your Puppet modules successfully, you can use the following script to create the PULP_MANIFEST file required for the Satellite 6 repository synchronization:
#!/usr/bin/env bash
[email protected] 83 www.redhat.com

for file in $@do echo $file,`sha256sum $file | awk '{ print $1 }'`,`stat -c '%s' $file`done
Unlike the pulp-puppet-module-builder tool, this approach lets you store the resulting Puppet modules in different subdirectories. We’re using this approach as part of a git hook to automatically create the pulp manifest (in case a new Puppet module is checked in). For moredetails, see the related Puppet configuration, which is described as part of the ACME git server configuration example in Step 6.
Importing Docker Container Images into Satellite 6Docker is an open source project that automates deploying applications inside Linux Containers, and lets you package an application with its runtime dependencies into a container. Linux containers enable rapid application deployment and simpler testing, maintenance, and troubleshooting while improving security. For more information see the Get Started with Docker Formatted Container Images on Red Hat Systems article on the Red Hat Customer Portal.
Satellite 6.1 introduces new management capabilities related to containers that enable organizations to deploy applications rapidly. With Satellite, users can easily manage, version and deploy Docker content.
Importing content and managing the lifecycle of container images are similar to managing other content types (rpm and Puppet). You have to configure repositories that can be bundled with Products and then use those repositories inside content views, similar to RPM packages or Puppet modules.
You can define the following Docker image repositories / registries:
● Red Hat Docker Image Registry (registry.access.redhat.com)● DockerHub (https :// registry . hub . docker . com)● Custom (e.g. internal) Docker image registries
Note: At the time of this writing, the new Red Hat repository management (Content -> Red Hat Repositories) tab called “Docker Images” does not contain container images. Currently, the Red Hat container image registry has to be configured as an “external registry”.
www.redhat.com 84 [email protected]

The main purpose of Satellite 6 in the area of container management is to provide Satellite 6 content-lifecycle management capabilities to this specific content type, similar to traditional rpm and Puppet based content. This capability also includes container image content management, which allows you to perform local caching on container hosts. For this particularsolution guide, container image management is out of scope.
All the Docker-management capabilities are documented in the Satellite 6.1 User Guide in a dedicated chapter called Working with Containers.
Note: In Red Hat Satellite, you can deploy containers only on a Docker compute resource. As a result, when you attempt to view or create containers for the first time, Satellite prompts you to create a Docker compute resource. This solution guide explains how to create the required content views, Puppet modules, host groups and compute resource in Step 5, Step 6 andStep 7.
Configuring Regular Repository Synchronization by Using Sync PlansRegular, frequent synchronization is required to maintain data integrity between packages as well as making sure that packages are updated to the latest security fixes. Red Hat Satellite provides the ability to create scheduled synchronization plans that allow package updates at intervals convenient to the organization.
The followings procedure describes how to create a new sync plan:
1. Click Content → Sync Plans.2. Click the New Sync Plan link to create a new synchronization plan.3. Enter the Name, Description and other details for the plan.4. Click Save to create the synchronization plan.
After you have created a synchronization plan, you need to associate products with that plan to create a synchronization schedule. The following procedure describes how to create a synchronization schedule in Red Hat Satellite 6.
1. Click Content → Sync Plans and select the synchronization plan you want to implement.
2. Click Products → Add in the synchronization plan main page.3. Select the checkbox of the product to associate with the synchronization plan.4. Click Add Selected.
[email protected] 85 www.redhat.com
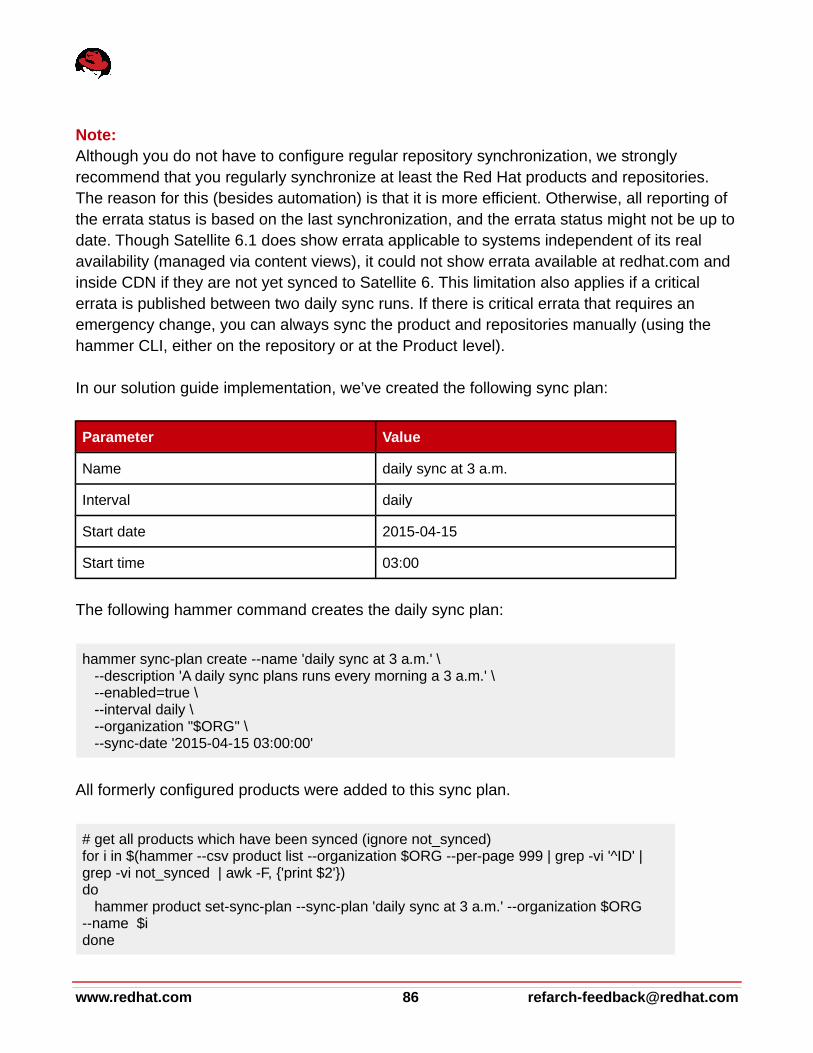
Note: Although you do not have to configure regular repository synchronization, we strongly recommend that you regularly synchronize at least the Red Hat products and repositories. The reason for this (besides automation) is that it is more efficient. Otherwise, all reporting of the errata status is based on the last synchronization, and the errata status might not be up todate. Though Satellite 6.1 does show errata applicable to systems independent of its real availability (managed via content views), it could not show errata available at redhat.com and inside CDN if they are not yet synced to Satellite 6. This limitation also applies if a critical errata is published between two daily sync runs. If there is critical errata that requires an emergency change, you can always sync the product and repositories manually (using the hammer CLI, either on the repository or at the Product level).
In our solution guide implementation, we’ve created the following sync plan:
Parameter Value
Name daily sync at 3 a.m.
Interval daily
Start date 2015-04-15
Start time 03:00
The following hammer command creates the daily sync plan:
hammer sync-plan create --name 'daily sync at 3 a.m.' \ --description 'A daily sync plans runs every morning a 3 a.m.' \ --enabled=true \ --interval daily \ --organization "$ORG" \ --sync-date '2015-04-15 03:00:00'
All formerly configured products were added to this sync plan.
# get all products which have been synced (ignore not_synced)for i in $(hammer --csv product list --organization $ORG --per-page 999 | grep -vi '^ID' | grep -vi not_synced | awk -F, {'print $2'}) do hammer product set-sync-plan --sync-plan 'daily sync at 3 a.m.' --organization $ORG --name $idone
www.redhat.com 86 [email protected]

After you import content from different sources and add all products to the synchronization plan, content will be updated regularly every morning. You can monitor the synchronization status if you go to Content -> Sync Status and then click on Expand All. You should see a full list of all your Products and their repositories. You will also see when syncing was started, how long it took and if it has been completed:
[email protected] 87 www.redhat.com

Step 4: Define your Content lifecycleSatellite 6 introduces new concepts that support advanced software lifecycle management. Besides the Red Hat software repository and errata, the following new concepts have been introduced with Satellite 6:
● Capsules that provide federated management of content (see Step 2)● Advanced synchronization management for software (yum), Puppet (git) and Docker
image (registry) repositories (see Step 3)● Library (stage) that acts as a Definitive Media Library (DML) (see Step 3)● Products as repository bundles to track their consumption, such as for license
management purposes (covered in this step)● content views (CVs) and composite content views (CCVs) (covered in this step)● Lifecycle Environments and Lifecycle Environment Paths (covered in this step)
These concepts allow for the implementation of advanced lifecycle management.
Satellite 6 Content Views
DefinitionContent views are managed selections of content that contain one or more repositories (yum /Puppet) and that allow optional filtering. Filters can be either inclusive or exclusive. Use filters to:
● Tailor a system view of content for lifecycle management● Customize content to be made available to client systems
If You Are Familiar with Satellite 5For customers familiar with Satellite 5 and software channel concepts, the content views are comparable to or a refinement of the combination of channels and cloning from Satellite 5 /Spacewalk. Further information about differences between Satellite 5 and 6 and recommendations how to migrate can be found in the transition guide: https :// access . redhat . com / documentation / en - US / Red _ Hat _ Satellite /6.1/ html / Transition _ Guide/ index . html
Lifecycle EnvironmentsContent views are moved through the defined lifecycle environments explained in this chapter. This diagram shows how to create and promote content views through lifecycle environments:
www.redhat.com 88 [email protected]
https://access.redhat.com/documentation/en-US/Red_Hat_Satellite/6.1/html/Transition_Guide/index.html
https://access.redhat.com/documentation/en-US/Red_Hat_Satellite/6.1/html/Transition_Guide/index.html
https://access.redhat.com/documentation/en-US/Red_Hat_Satellite/6.1/html/Transition_Guide/index.html
https://access.redhat.com/documentation/en-US/Red_Hat_Satellite/6.1/html/Transition_Guide/index.html
https://access.redhat.com/documentation/en-US/Red_Hat_Satellite/6.1/html/Transition_Guide/index.html
https://access.redhat.com/documentation/en-US/Red_Hat_Satellite/6.1/html/Transition_Guide/index.html
https://access.redhat.com/documentation/en-US/Red_Hat_Satellite/6.1/html/Transition_Guide/index.html
https://access.redhat.com/documentation/en-US/Red_Hat_Satellite/6.1/html/Transition_Guide/index.html
https://access.redhat.com/documentation/en-US/Red_Hat_Satellite/6.1/html/Transition_Guide/index.html
https://access.redhat.com/documentation/en-US/Red_Hat_Satellite/6.1/html/Transition_Guide/index.html
https://access.redhat.com/documentation/en-US/Red_Hat_Satellite/6.1/html/Transition_Guide/index.html
https://access.redhat.com/documentation/en-US/Red_Hat_Satellite/6.1/html/Transition_Guide/index.html
https://access.redhat.com/documentation/en-US/Red_Hat_Satellite/6.1/html/Transition_Guide/index.html
https://access.redhat.com/documentation/en-US/Red_Hat_Satellite/6.1/html/Transition_Guide/index.html
https://access.redhat.com/documentation/en-US/Red_Hat_Satellite/6.1/html/Transition_Guide/index.html
https://access.redhat.com/documentation/en-US/Red_Hat_Satellite/6.1/html/Transition_Guide/index.html
https://access.redhat.com/documentation/en-US/Red_Hat_Satellite/6.1/html/Transition_Guide/index.html
https://access.redhat.com/documentation/en-US/Red_Hat_Satellite/6.1/html/Transition_Guide/index.html
https://access.redhat.com/documentation/en-US/Red_Hat_Satellite/6.1/html/Transition_Guide/index.html
https://access.redhat.com/documentation/en-US/Red_Hat_Satellite/6.1/html/Transition_Guide/index.html
https://access.redhat.com/documentation/en-US/Red_Hat_Satellite/6.1/html/Transition_Guide/index.html
https://access.redhat.com/documentation/en-US/Red_Hat_Satellite/6.1/html/Transition_Guide/index.html
https://access.redhat.com/documentation/en-US/Red_Hat_Satellite/6.1/html/Transition_Guide/index.html
https://access.redhat.com/documentation/en-US/Red_Hat_Satellite/6.1/html/Transition_Guide/index.html
https://access.redhat.com/documentation/en-US/Red_Hat_Satellite/6.1/html/Transition_Guide/index.html
https://access.redhat.com/documentation/en-US/Red_Hat_Satellite/6.1/html/Transition_Guide/index.html
https://access.redhat.com/documentation/en-US/Red_Hat_Satellite/6.1/html/Transition_Guide/index.html

Content views provide an inherent versioning. Starting with Satellite 6.1 a content view version is divided between major and minor versions. For further details see the content view life-cycle management examples provided inside Step 9.
Content Views Versus Provisioning Definition DefinitionsContent views are often mixed up with the deployment blueprint definitions. Content views only define the content made available to a particular set of systems. The final subset of content that is deployed to particular target systems is defined either as part of the provisioning definition (see Step 7) or as a combination of both provisioning template and Puppet configuration files that are part of a content view. The mapping between target systems and particular deployment configuration is done through host groups. Content views and host groups are brought together via activation keys. Step 7 shows a step-by-step procedure for all required entities and should clarify what to do.
Warning:Content views can become very complex within a very short timeframe and require effort to maintain them. Using too small or too many content views can lead to CV sprawl. In these situations, you may have a large number of content views with somewhat similar content that you must maintain regularly.
Satellite 6 Content View Lifecycle OverviewThe content view lifecycle has the following stages:
1. Create a new or adapt an existing content view 2. Publish the new (version of the) content view3. Promote the content view to the next life-cycle stage(s)4. Retire (delete) a (particular version of a) content view
[email protected] 89 www.redhat.com

Publishing a content view makes it available inside the Library. Assuming that (nearly) all hosts are subscribed to a particular lifecycle environment using host groups, the publishing step does not affect existing hosts.
As the default, a version of a content view always flows from left to right in the life-cycle environment path.
Warning:You cannot skip a particular life-cycle environment / stage within a promotion path. However, the same content view can be associated to more than one life-cycle environment path and to different stages within these environment paths.
The exception for this is the system level or emergency errata feature. Starting with Satellite 6.1 you can select and apply errata to individual hosts independent of the current content inside the content view. Using this new feature a minor version of a content view will be created and automatically promoted only to the lifecycle environment the host belongs to.This includes skipping of multiple lifecycle environments. Further details can be found in Step 9 Use Case 4) Incremental Updates - Apply Selected Errata to Hosts covering this emergency errata feature.
Example:The same content view can be promoted to Dev, QA and Prod in one path but remain in stageApp-Dev in a second life-cycle environment path.
Step 9 covers different content view lifecycle scenarios in detail. We create content views in the next section.
Content View and Composite Content View ScenariosYou can use content views and composite content views to achieve more than one type of goal. This diagram shows four common scenarios how content views and composite content views can be used:
www.redhat.com 90 [email protected]
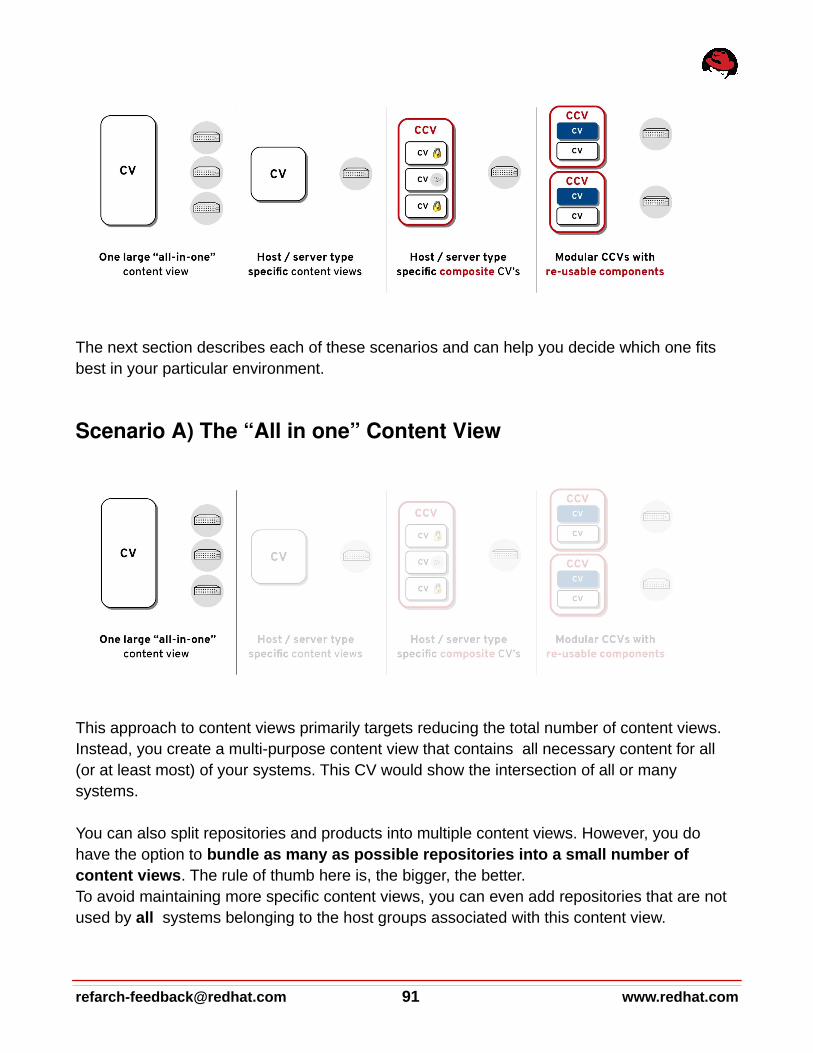
The next section describes each of these scenarios and can help you decide which one fits best in your particular environment.
Scenario A) The “All in one” Content View
This approach to content views primarily targets reducing the total number of content views. Instead, you create a multi-purpose content view that contains all necessary content for all (or at least most) of your systems. This CV would show the intersection of all or many systems.
You can also split repositories and products into multiple content views. However, you do have the option to bundle as many as possible repositories into a small number of content views. The rule of thumb here is, the bigger, the better. To avoid maintaining more specific content views, you can even add repositories that are not used by all systems belonging to the host groups associated with this content view.
[email protected] 91 www.redhat.com

Advantages
● You have a small number of content views to manage. If creating and maintaining content views is a big challenge (for example, you do not have the time, resources, or disk capacity), this option provides an alternative for at least some environments or subset of systems.
● Content views can include different Red Hat (and third party) products. Since each
repository can be individually subscribed using activation keys (covered in Step 7) this
might contain repositories not every systems needs to be subscribed to as well.
Note:● Content views define only the content set that can be split into specific products (and
therefore repositories). Each product is associated with an assigned subscription that is activated with an activation key.
● This option would reduce the number of content views, but it would also increase the number of activation keys.
Disadvantages
This scenario limits your flexibility and the degree to which you can use the content view capabilities.
Examples:● You might be unable to use filters, or they might become huge and difficult to maintain. ● Time-based snapshots (an important purpose of content views) might become difficult
to use. If different content sets (repositories) are changed at the same time, this change can affect a huge number of systems.
● difficult since different content sets (repositories) might get changed at the same time and affect a huge number of systems.
Scenario B) HostSpecific or Server Type Content Views
www.redhat.com 92 [email protected]
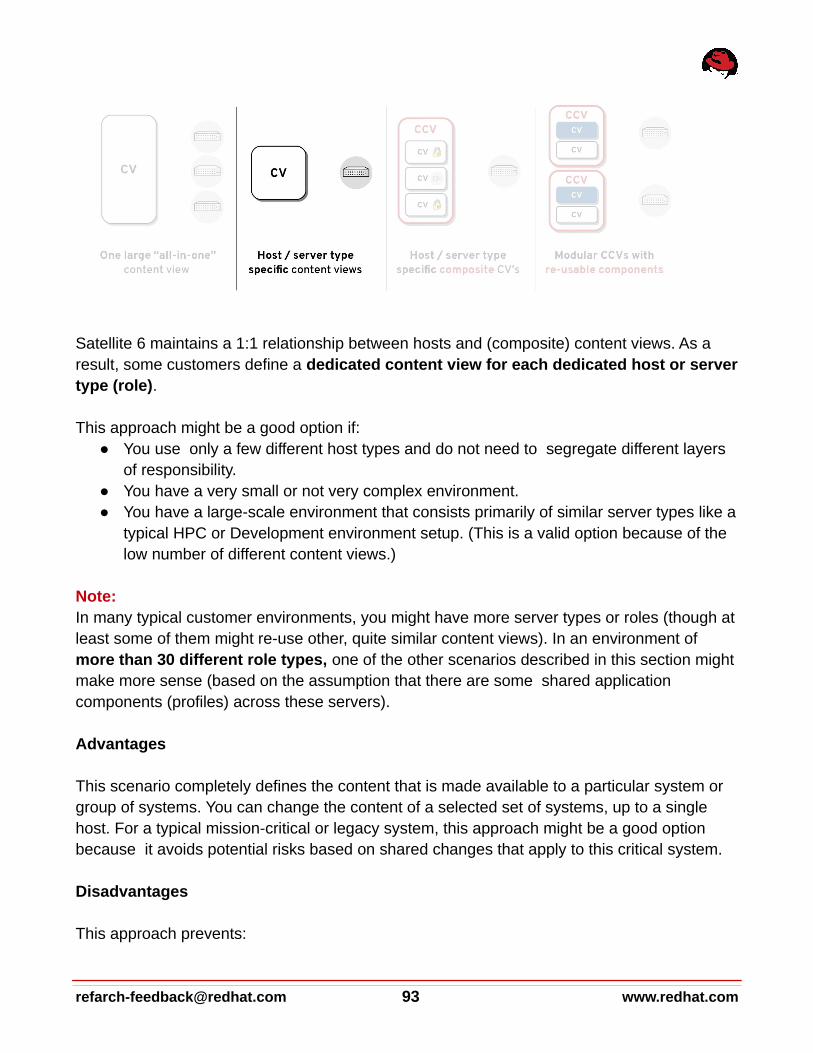
Satellite 6 maintains a 1:1 relationship between hosts and (composite) content views. As a result, some customers define a dedicated content view for each dedicated host or servertype (role).
This approach might be a good option if: ● You use only a few different host types and do not need to segregate different layers
of responsibility.● You have a very small or not very complex environment.● You have a large-scale environment that consists primarily of similar server types like a
typical HPC or Development environment setup. (This is a valid option because of the low number of different content views.)
Note:In many typical customer environments, you might have more server types or roles (though atleast some of them might re-use other, quite similar content views). In an environment of more than 30 different role types, one of the other scenarios described in this section mightmake more sense (based on the assumption that there are some shared application components (profiles) across these servers).
Advantages
This scenario completely defines the content that is made available to a particular system or group of systems. You can change the content of a selected set of systems, up to a single host. For a typical mission-critical or legacy system, this approach might be a good option because it avoids potential risks based on shared changes that apply to this critical system.
Disadvantages
This approach prevents:
[email protected] 93 www.redhat.com

● the reuse of content that is shared across several systems. ● The segregation of layers of duties (for example, the division between the operating
system and the applications on top of it).
To ensure consistency of updates to all these different host-type-specific content views, you need to ensure that each update of particular content items (for example, a particular security errata) becomes part of all affected content views that use the software package being updated. This means that you have to perform the content view update operation (change or adapt filter, publish and promote) for each and every affected content view.
Note:Even using automation like hammer CLI usage we do not recommend this scenario becauseit can lead to higher maintenance efforts. In addition, if the updates cannot be done simultaneously, this problem might result in different content sets or different time-based snapshots of specific content views if content has changed between these different content view updates.
The rule of thumb here is: The higher the degree of standardization is, the less this scenario is the best option. Nevertheless it might be a valid alternative for some (!) specialor critical systems.
Scenario C) Host Specific Composite Content Views
Another approach that targets host or server type specific content is to create composite content views for each server type or role. Using composite content views means you can change just a particular subset of the content made available to a host or host group but leaveother content unchanged. Although this approach is possible by using content views and filters for individual repositories, it is much harder to maintain filter rules than just select a
www.redhat.com 94 [email protected]

particular content view version.
A typical scenario is to have a dedicated content view for just the Puppet configuration. This CV is typically updated more frequently than the software content that remains unchanged. You would change only the Puppet content view version inside the composite content view while leaving the software-content-related content view version unchanged.
Advantages Using composite content views makes it easier deal with widely diverged release cycles when different content subsets are encapsulated in dedicated content views.
Disadvantages
● Your view of the content is host and not application specific.● It can be difficult to achieve a certain level of standardization, depending on how many
different server types/roles are used inside an environment.
Scenario D) ComponentBased Composite Content Views
This scenario can help you: ● achieve the highest degree of standardization of commonly used application
components. ● Get a different perspective on content segregation using Red Hat Satellite 6 content
views.
In contrast to previous scenarios, this one has an application-component view instead of a host-centric or server-type-specific view.
[email protected] 95 www.redhat.com
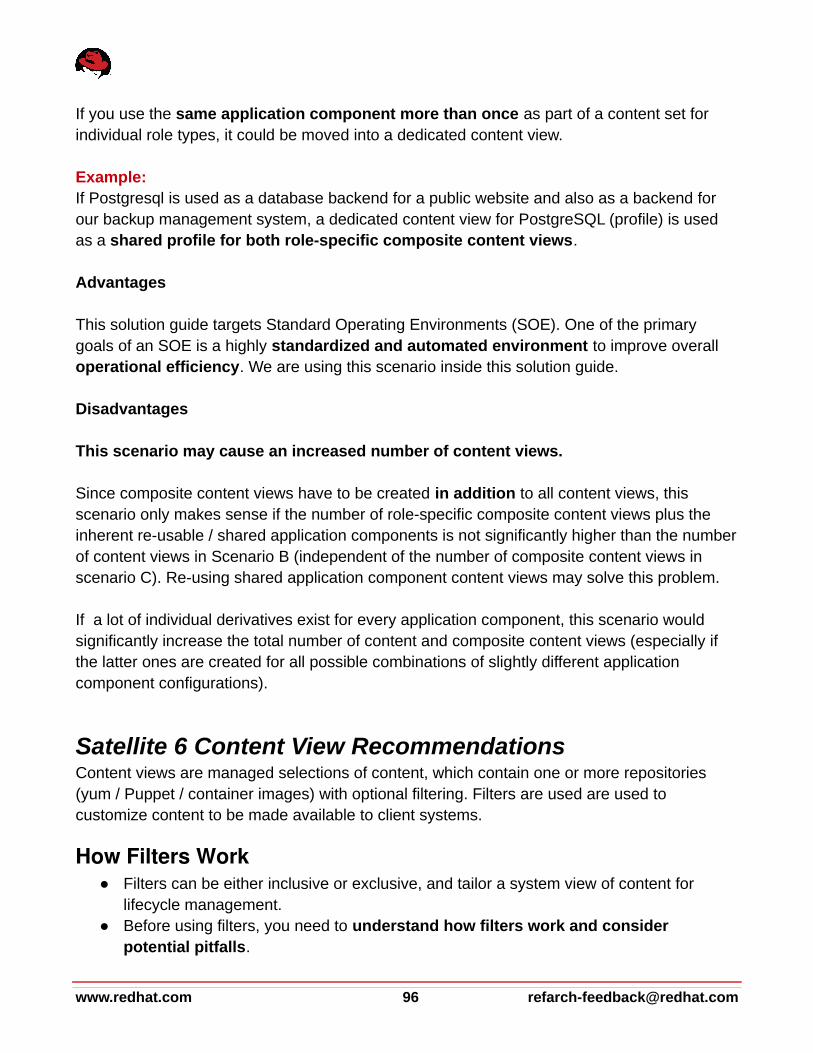
If you use the same application component more than once as part of a content set for individual role types, it could be moved into a dedicated content view.
Example:If Postgresql is used as a database backend for a public website and also as a backend for our backup management system, a dedicated content view for PostgreSQL (profile) is used as a shared profile for both role-specific composite content views.
Advantages
This solution guide targets Standard Operating Environments (SOE). One of the primary goals of an SOE is a highly standardized and automated environment to improve overall operational efficiency. We are using this scenario inside this solution guide.
Disadvantages
This scenario may cause an increased number of content views.
Since composite content views have to be created in addition to all content views, this scenario only makes sense if the number of role-specific composite content views plus the inherent re-usable / shared application components is not significantly higher than the numberof content views in Scenario B (independent of the number of composite content views inscenario C). Re-using shared application component content views may solve this problem.
If a lot of individual derivatives exist for every application component, this scenario would significantly increase the total number of content and composite content views (especially if the latter ones are created for all possible combinations of slightly different application component configurations).
Satellite 6 Content View RecommendationsContent views are managed selections of content, which contain one or more repositories (yum / Puppet / container images) with optional filtering. Filters are used are used to customize content to be made available to client systems.
How Filters Work ● Filters can be either inclusive or exclusive, and tailor a system view of content for
lifecycle management.● Before using filters, you need to understand how filters work and consider
potential pitfalls.
www.redhat.com 96 [email protected]
● If no filter is applied to a content view all content (“everything”) of the associated repositories at the time of publishing is included in this content view
● Filters apply only to software content (yum repositories) but not to Puppet modules. ● You can use multiple filters for each content view. For example using an “include” filter
adds only the package (group)s you’ve selected and excludes all other packages. ● Including filters does not resolve any dependencies of the packages listed in the
filters.
Recommendations for Filters● Test which packages are required by the packages you want to put inside the “include”
filter. You should also test if all dependencies could be satisfied with your content view definition.
● Do not use “include filter” inside the OS/core build content view to avoid missing dependencies that might prevent a successful kickstart of new servers.
● If you use include filters, you should make a regular habit of selecting each individual repository affected by this filter rule. By default a filter applies to all repositories (present and future) belonging to this content view. If you create an “include” filter for a particular package belonging to one of the associated repositories and don’t select this particular repository, only the package defined in this filter rule will be part of this content view. No other packages from the other repositories will be available since the include filter excludes all other packages from all repositories inside this content view.
● Use exclude filters to strip down the available content and to exclude packages, package groups, or errata. We will provide an example package that has the exclude filter as part of our core build content view definition.
● If you use additional software that might not be extensively tested and supported by a vendor (for example, the Extra Packages for Enterprise Linux (EPEL) repositories) we recommend that you use include filters to provide only the packages you need for your systems, instead of all of the repositories. (Note: You also need to include the dependencies of these packages.) You will find an example for this scenario in chapterContent View for git Server Profile.
Recommendations for Content Views● Content views can consist of any combination of any content type Satellite can
manage, including: ○ RPM software packages○ Errata○ Puppet modules ○ Docker container images
[email protected] 97 www.redhat.com
Even if you can create a dedicated content view for each individual repository or content type, we recommend that you bundle together as many repositories as possible to reduce the total number of content views (unless these content types have widely divergent release cycles). See the Puppet example in Scenario C) Host Specific Composite Content Views.
● The only content type which should not be part of a content view are kickstart trees. All kickstart tree repositories have “Kickstart” included in their label, for example “Red Hat Enterprise Linux 6 Server Kickstart x86_64 6.5”. These packages are only for host provisioning and must not be included in content views and composite content views.
● Content views also can contain multiple RHEL versions and architecture repositories. For example, one CV can contain RHEL 6 32bit + RHEL 6 64bit + RHEL 7 64bit. Using multiple RHEL versions and architectures significantly reduces the numbers of content views, especially if CCVs are used (see below). Subscription manager automatically assigns the corresponding RHEL major version and architecture. On the other hand this increases the number of packages inside the content view, especially in large volume repositories like Red Hat Enterprise Linux with several thousands packages inside. This has an additional impact on all content view related operations like content view publishing and promoting.
Recommendations for Composite Content Views (CCV)You can bundle multiple content views together as a composite content view.
● Because of the current requirement of a one-to-one relationship between a host (group) and content view / composite content view, you must use composite content views if you have independent content views with independent ownership and release cycles.
● Only a CCV can define the final content that is made available to target systems.. We recommend that you create CCVs only for the actually relevant combinations of CVs. Do not create CCVs for all possible combinations of content views.
Warning:All typical configuration options of a content view like repositories, filters, Puppet modules,container images are not available as configurable option in a composite content view. Acomposite content view just combines two or more content views together. All these configuration options have to be set inside the underlying content view definitions.
Multiple Snapshots (Clones) of Content Views
Advantages
www.redhat.com 98 [email protected]
You can use content views to provide multiple snapshots of the same repository at the same time. You can use the same content source repositories and can create different snapshots based on different timestamps and filters of the same content set. You can also create multiple (for instance, quarterly snapshots) of the same content and make it availableto different clients that require different content sets.
DisadvantagesUsing content views to provide snapshots increases the total number of content views. Youcan use composite content views to achieve the same result. Make content views of different time-based snapshots and just select the corresponding version of these content views insidea CCV. You cannot use this method if you need different filters since you cannot apply filters at a CCV level. However, if you’re using content views only as snapshots, filters are unnecessary.
CCVs in a Dedicated LifeCycle EnvironmentYou can associate a CCV with a dedicated life-cycle environment path, independent from its internal content views. Using CCVs for a content life cycle might make promoting the contained content views through life-cycle environments obsolete (see Step 9 for details).
Notes:● A CCV is an additional content view to maintain. If you must maintain a content view
within a CCV, you may need to change the CCV as well. As a result, if you release the content views within a CCV often, the CCV would also have to be updated frequently.
● Satellite 6 does not limit which particular CV version is used inside a CCV. A CCV doesnot enforce using the most current CV version within a particular life-cycle stage and could even contain versions that have not passed a test or QA stage and/or are currently only in the Library.
How Content Views work with Products and RepositoriesA product (and its repositories) can be part of one or more content views. You can also create multiple content views with the same content (products and repositories) in parallel. This feature is helpful if you need different content snapshots or want to use different filters (for example, time-based filters), especially if one of the content views must not contain a particular package (exclude filter).
You cannot use the same repository more than once inside a composite content view. For example if you use the same repository to bundle two content views, you cannot put both content views into a single CCV.
[email protected] 99 www.redhat.com

Operating-System (OS) contentTo separate OS content from application content, you must ensure that the OS-relevant content repositories (including RHEL base and child channels, as well as kickstart trees) arepart of only the OS / Core Build CV and not part of any other (application) CV.
Red Hat Software Collections (RHSCL)RHSCL provide newer versions of common software packages that could be installed in parallel to the default (older) versions that are part of the relevant RHEL version. If your application requires RHSCL, you should:
● Either define them as part of the CoreBuild (then they will be available to all applications)
● Or (recommended) you can add the correct repository to each application content view that requires RHSCL software packages. You cannot do both.
Puppet ModulesYou cannot use the same Puppet module more than once inside a CCV (for example, if you have a dual-purpose module like the one we are using for our rsyslog configuration (seeStep 7).
Although we can add the Puppet module ‘loghost’ to our core build content view and add it to the application-specific content view for loghosts (cv-app-rsyslog), we cannot assemble both content views together for our role-specific CCV (ccv-infra-loghost) because of this limitation with Puppet. We should remove the module from the application-specific module and instead use the core build content view. For more details see chapter Sample Application 3: Centralloghost Server, where we create and use this module and content views.
Warning:If you must use the same repository more than once with different filters and inside different content views (deployed to a particular system ) by using CCVs, you may need to duplicate the repository.
How These Repository Limitations Relate to Our Solution Guide ExampleIn our solution guide example, we originally wanted to use packages from EPEL repositories within different layers of our application architecture. We wanted to use the nagios-plugins within EPEL as part of the core build and WordPress for our ACME website application. At thesame time, we did not want to make the entire EPEL repository available to all our hosts and to have to use filters. Although we were able to two different content views containing the
www.redhat.com 100 [email protected]

EPEL repository and use different filters for each of them, we were not able to create a Composite content view of both because of the repository conflict.
Basically we had three options to achieve our goal:
Option 1. Make the entire EPEL repository available to all hosts (required since we use it as part of the core build), but use two filters for the Nagios and WordPress packages. In this scenario we would have to add a third filter if any other application running on top of the core build required an additional package within the EPEL repository. This option would also require us to update, publish, and promote our core build content view each time we introduce a new application and would increase our maintenance efforts.
Option 2. Make the entire EPEL repository available to all hosts (required since we use it as part of the core build) without using filters. This approach would avoid the additional maintenance efforts described in Option 1. Since the content view defines only the content availability and not the deployment definition, the additional (eventually undesirable) packages are available to all systems but not deployed. You should decide between options 1 and 2 by looking at current risk evaluations.
Option 3. Create manually a dedicated repository and use the hammer repository upload-content command (see Step 3 Situation 2 for an example) to push only the required packages (including dependencies) into this repository. This needs to be doneeach time the upstream repository content will be updated.
Option 4. Duplicate the entire EPEL repository and use these different repositories inside the different content views by using different filters.
Now that we have moved to using Zabbix for monitoring our hosts, this particular challenge has disappeared, and we do not need to sync the EPEL repository twice. However, we’ve intentionally left this information in this document in case you are facing a similar challenge.
Puppet and Content ViewsThe configuration files that are managed with Puppet can either be part of the software-focused content view or separated from it. Some customers prefer separating the Puppet configuration from the software content management because of the different / shorter release cycles or other reasons. You can also combine multiple software-focused content views (for example, one for the core build and another for the application server) with one aggregated Puppet-focused content view. This CV can consist of a configuration for bothstack layers (n:1 relation of software:config).
[email protected] 101 www.redhat.com

Note:If you don’t manage your Puppet configuration inside a dedicated content view, each Puppet module change automatically causes a software change at the same time, if the software repositories have changed since the last update. If we manage the Puppet configuration by using a Satellite 6 content view and the life-cycle management feature (and not by using custom Puppet environments), we must publish and promote a new version of the appropriate content views that contain the new or adapted Puppet modules. Even if you don’t use static date filters for all software repositories inside a particular content view, the software content in the Library is automatically added to this content view while publishing. If the way you have implemented your particular change and release management process requires you to manage independent configuration changes without simultaneously software changes, the best option is to use dedicated content views for Puppet configuration.
You should try not to split the software and configuration into separate content views. This practice increases the number and complexity of content views and can lead to “CV sprawl.”
In this solution guide we are not using dedicated content views for Puppet configuration. We made this decision based on risk estimation through using the life-cycle management to test changes before applying them to production systems. Stalled software changes would only postpone the potential problems and not solve them.
How Content Views Are UpdatedContent views are supposed to be continuously updated if newer content is available in the appropriate repositories (and synced to the Library using sync plans). Currently only the most current version of each content view is available within a particular stage. You cannot use former versions of a content view within a particular life-cycle stage.
When the content inside a CV is updated, the version number is also incremented (this feature provides inherent version control of content views). Beginning with version 6.1 of Satellite, you can update the content incrementally. See Step 9 Use Case 4) Incremental Updates - Apply Selected Errata to Hosts for further details.
Because of the availability of only the most current version, you might have scenarios in which it makes sense to copy a content view and allow for multiple versions of the same content view in parallel within the same life-cycle stage.
Some customers are creating monthly or quarterly snapshots of content (for example, for RedHat Enterprise Linux (RHEL)) to offer multiple update levels of RHEL in parallel. For example,
www.redhat.com 102 [email protected]

they need the most recent version of RHEL for frontend servers but an old(er) version for some legacy applications. To avoid CV sprawl, you should use this approach only when absolutely necessary.
Currently, content views move unchanged through the defined life-cycle environments. Sometimes life-cycle-specific adaptations are required. For instance, you may need to install additional debugging packages or use different debugging or logging configurations in Dev orQA. You must make life-cycle-environment-specific changes inside the Puppet configuration to ensure that content views remain consistent in all life-cycle stages.
As mentioned earlier Satellite 6 does not limit which particular CV version is used inside a CCV. A CCV does not enforce using the most current CV version within a particular life-cycle stage and could even contain versions that have not passed a test or QA stage and/or are currently only in the Library. We also recommend that you delete any content view versionsthat have not successfully passed a particular test or QA stage. This precaution preventsthese CVs being selected as part of a CCV in production.
Repositories inside a content view display as yum repositories to Red-Hat-Satellite-managed clients. Currently, you cannot use the yum-priorities plugin to order or prioritize them. Therefore, we recommend that you do NOT associate multiple repositories that contain similar software packages with multiple versions of a content view. This problem is not likely to occur with Red Hat software repositories, but it might happen with third-party software repositories. You still can define specific package versions as part of Puppet configuration but this needs to continuously updated.
Content View Naming ConventionsBecause content views are a central item of Red Hat Satellite 6, we recommend that you use a naming convention for your content views that allows automation (to be introduced later). For instance, the role-based access control model explained in Step 8 is based on these naming conventions. Appendix III: Naming Convention provides an overview of all naming conventions used in this solution guide.
Basic Guidelines for Naming Conventions● The particular RHEL version is not part of our naming conventions. When creating
content views, we try to create CVs independent of RHEL releases. (If you want to create OS-specific content views, add an additional segment that defines the OS version.)
● If you do not specify a version or release, the content view is supposed to be
[email protected] 103 www.redhat.com

continuously updated. If you need to provide multiple versions of the content in parallel,add a specific version or release tag.
Content Views Versus Composite Content ViewsWhen naming components/profiles (based on CVs) and final deployment configurations/roles (based on CCVs), we add a string to distinguish between the two. The name will then begin with either:
CV or CCV
How to Name Components/Profiles (based on CVs)Use this table to distinguish between the different types of components/profiles.
If we are naming . . . Then we use this string in the name . . .
Operating systems (core build) os
Applications running on top of the operating system
app
These naming convention lead to the following schema:
cv - < os|app > - < profile name > [ - < version or release > ]
How to name Final Deployment Configurations/Roles (based on CCVs)Use this table to distinguish between the different types of deployment configurations/roles.
If we are naming . . . Then we use this string in the name . . .
Business applications biz
Infrastructure Services infra
All roles that will be configured as composite content views use the following schema:
ccv - < biz|infra > - < role name > [ - < version or release > ]
Note: The same string used in composite content views for role name is used as the host group name in Step 7.
www.redhat.com 104 [email protected]

Typical lifecycle stagesMost IT organizations divide the life-cycle stages of operating systems and applications into 3 stages:
1. Dev for stage Development2. QA for stage Test & Quality Assurance3. Prod for stage Production
Some organizations may use Plan - Build - Run instead or have more than just three stages (Example: Dev - Test - UAT - INT - Prod).
This solution guide focuses on some common scenarios, starting with a simple setup and continuing with some typical enhancements. See Step 9 (REF) for examples of how to use these life-cycle environments in conjunction with some content (view) life-cycle scenarios.Step 5 and Step 6 show how to create the related content views and composite content views.
Red Hat Satellite lifecycle EnvironmentsThe application lifecycle is divided into lifecycle environments, which mimic each stage of the lifecycle. These lifecycle environments are linked in an environment path. You can promote content along the environment path to the next life-cycle stage when required. For example, ifdevelopment completes on a particular version of an application, you can promote this version to the testing environment and start development on the next version.
The Special Role of the LibraryThe Library is a built-in stage of Red Hat. All content that is synchronized into Satellite manually or periodically using sync plans is stored inside the Library. Therefore, the Library is similar to ITIL®’s Definitive Media Library for all software components. Every software and configuration component maintained using Red Hat Satellite is stored inside the Library.
The content inside the Library is updated on a regular basis. If you’re using synchronization plans, we do not recommend subscribing systems directly to this stage. There might be two exceptions:
● very simple setup without any lifecycle management requirements● the Library used for regular testing of new Core Build releases (see Chapter “The
special role of Core Build” below), especially in combination with nightly builds (not covered inside this document)
[email protected] 105 www.redhat.com
The Special Role of the RHEL Core Build Usually, software life-cycle management focuses on a business perspective that is primarily a top-down view looking from the top-level application downwards to the underlying components (for example, application platform, operating system and infrastructure). Typically, a core build is the smallest common denominator for all or a particular subset of your Red Hat Enterprise Linux Systems. For further information see also the detailed information in Step 5: Define your Core Build.
The core build itself has a special role in the lifecycle-management area. From the perspective of the team who maintains the Core Build, every stage outside of their own (lab) environment is “production,” by definition. Even the stages called “dev” or “qa” are (from an ITOps perspective) “prod” stages, independent of their application-centric labels.
We deal with this exception in a number of ways, including:
● IT Ops uses the Library Stage itself for their initial testing of a core build. If we assumethat this initial testing doesn’t take too long, the risk of changed content during these tests might be acceptable.
● IT Ops uses a dedicated pre-stage at the stage next to Library but before the application-centric stage for all or most of the life-cycle environment paths (for example, Library -> Ops Test -> Dev -> QA -> Prod).
● IT Ops uses a dedicated life-cycle environment path to build and test the core build. This life-cycle environment path might be used by other applications or infrastructure services owned by IT Ops as well.
Because we’re using at least one dedicated life-cycle environment path for our business application, we’re using the third option inside this solution guide.
Lifecycle Specific AdaptationsSatellite 6 follows the principle of content consistency across environments. This means that content flows unchanged through the defined life-cycle environments using content views. Nevertheless, in some customer scenarios, life-cycle specific adaptations are required (for instance, the additional installation of debugging packages or different debug or logging configuration in Dev or QA). These changes could be handled inside the Puppet configuration that is part of the content (views) flowing through the life-cycle environments.
www.redhat.com 106 [email protected]
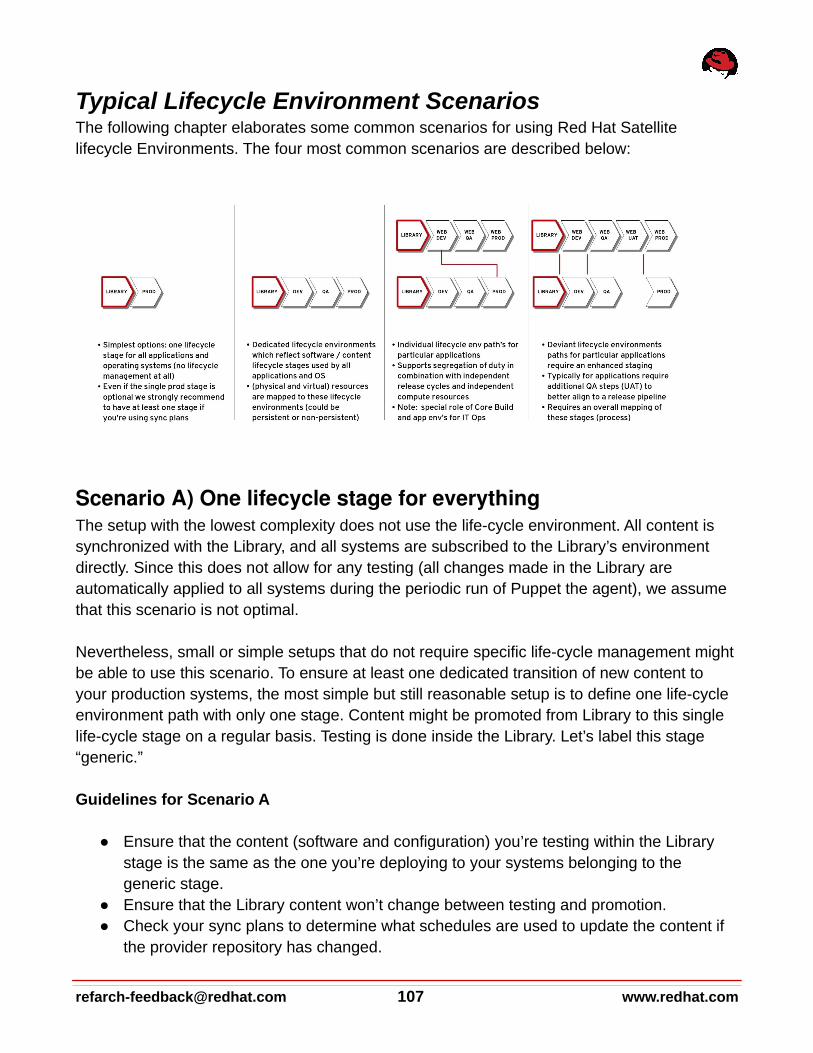
Typical Lifecycle Environment ScenariosThe following chapter elaborates some common scenarios for using Red Hat Satellite lifecycle Environments. The four most common scenarios are described below:
Scenario A) One lifecycle stage for everythingThe setup with the lowest complexity does not use the life-cycle environment. All content is synchronized with the Library, and all systems are subscribed to the Library’s environment directly. Since this does not allow for any testing (all changes made in the Library are automatically applied to all systems during the periodic run of Puppet the agent), we assume that this scenario is not optimal.
Nevertheless, small or simple setups that do not require specific life-cycle management mightbe able to use this scenario. To ensure at least one dedicated transition of new content to your production systems, the most simple but still reasonable setup is to define one life-cycle environment path with only one stage. Content might be promoted from Library to this single life-cycle stage on a regular basis. Testing is done inside the Library. Let’s label this stage “generic.”
Guidelines for Scenario A
● Ensure that the content (software and configuration) you’re testing within the Library stage is the same as the one you’re deploying to your systems belonging to the generic stage.
● Ensure that the Library content won’t change between testing and promotion. ● Check your sync plans to determine what schedules are used to update the content if
the provider repository has changed.
[email protected] 107 www.redhat.com
To create a life-cycle environment:1. Click on Content -> Lifecycle Environments -> New Environment Path 2. Type in a name, label and description.3. Click the Save button.
The following hammer CLI commands creates a new life-cycle environment path that containsjust the single generic stage:
hammer lifecycle-environment create --name='Generic' \ --prior='Library' \ --organization=ACME
Advantages and Disadvantages
● This scenario lets you avoid the additional complexity and effort of life-cycle management.
● If you don’t have a dedicated software development environment and you have limited or no internal QA capabilities, this scenario would let you deploy software to your systems without testing a great deal beforehand. This approach might be especially relevant for IT organizations focused on resiliency (fast mean time to resolution) instead of robustness (extensive testing before deploying it to production). In a resiliency-focused environment additional life-cyle stages would slow down the push ofthe resolution through the (unnecessary) additional stages.
Scenario B) One Lifecycle Environment Path for All Apps and OSThis scenario leverages the content promotion capabilities of Satellite 6, but it does not make a distinction between different applications and operating systems managed by Red Hat Satellite. This means that all (composite) content views (assuming we still divide the OS and applications using different content views) are using the same content promotion path. Our solution guide uses these three stages:
1. Dev for stage Development2. QA for stage Test & Quality Assurance3. Prod for stage Production
The following hammer CLI commands creates the new promotion path and includes these three environments:
hammer lifecycle-environment create --organization "ACME" --name "DEV" --description
www.redhat.com 108 [email protected]

"development" --prior "Library"hammer lifecycle-environment create --organization "ACME" --name "QA" --description "Quality Assurance" --prior "DEV"hammer lifecycle-environment create --organization "ACME" --name "PROD" --description "Production" --prior "QA"
If you click on Content -> Lifecycle Environments, you should see this view:
In this scenario, all content views use the same lifecycle environments and are promoted through them. This scenario still allows for independent release cycles for different OS versions or applications, because promotion is done on an individual CV level. For instance, you can promote the content view for RHEL6 to QA or Prod more frequently than you do the application server (and keep its old version) and vice versa.
Advantages and disadvantages
This scenario divides our software release cycle into different stages that are mapped to dedicated compute environments (servers) and are clearly distinguished from each other. Usually, we have clearly defined transition or handover procedures between these stages as part of the Change or Release Management process definition. Satellite 6 lifecycle environments would reflect these process steps inside the systems management infrastructure.
The primary goal for this lifecycle management approach is to avoid issues that affect your production systems by testing extensively beforehand. The wider the test coverage is, the lower the risk of the remaining issues, even you do not have 100% coverage of potential
[email protected] 109 www.redhat.com

difficulties.One disadvantages is that such a regulated process requires extra effort. In addition, the Dev and QA environment require additional resources.
Besides, the compute resources required for these additional environments and the human and technological efforts necessary to establish an efficient QA scenario are large and require a significant investment in test automation.
In a resiliency-focused IT organization deploying newer versions of software and configurationvery frequently, having to push through these additional stages might slow down implementation.
Scenario C) dedicated lifecycle path for particular applicationsIn the typical scenario described above we’ve only had one single content promotion path for all operating systems and applications. In many customer environments this might be not sufficient due to additional requirements as listed below:
● requirement for having segregated release pipelines for (specific) applications to allow independent release cycles for particular applications
● dedicated owner (usually the application owner) who defines which particular combination of OS (Core Build) and application is used in each stage
● dedicated compute environments (physical or virtual) owned by these dedicated owners to execute specific tests or to divide production ownership as well
Note: The name and label of each life-cycle environment must be unique within one but not across multiple organizations. In our solution guide we’re adding a prefix for each application type which owns a dedicated life-cycle environment path. Further details you can find in the naming convention explained in Appendix III: Naming Convention.
Advantages and disadvantages
The advantage of this scenario is the additional degree of freedom for particular applications to work in individual lifecycle environments and release cycles. It also allows to define more fine granular access level for individual users and roles based on filters (see Step 8).
The disadvantage is the increased level of complexity to maintain these life-cycle environmentpaths and the additional flows of content (views) across these additional stages.
www.redhat.com 110 [email protected]

Scenario D) Deviant Lifecycle Paths Require an Overall MappingSome customer environments have additional requirements in terms of the lifecycle environment paths. These deviant lifecycle environments could have a different number of stages or the stages may be be subdivided (for example, a dedicated user acceptance testing(UAT) stage for some but not for all stages or no stage dev for COTS applications).
Advantages and disadvantages
This scenario may better reflect a company’s needs for required life-cycle stages, appropriatecompute environments or individual applications. This scenario might work best for customerswho have an internal software development department but also use some COTS applications that do not require specific test stages. These customers might benefit from defining the optimal number of lifecycle stages for each individual application.
Currently, however, Satellite 6 does not provide overall grouping or mapping of some stages and their relationships. In fact, the lifecycle environment paths are completely independent of each other. To have a specific flow through the development stages, you must have your own regulated formal process outside of Satellite 6. The ACME scenario in the next section describes potential flows to follow.
ACME ScenarioOur ACME organization has these relevant requirements:
● Our individual application owners (of business applications) require a dedicated release pipeline, independent of our core build and other infrastructure services managed by the ACME IT Operations team. (see also chapter ACME IT Organization Overview)
● These individual application owners are responsible for deciding which combination of current and former core build releases are bundled together with current or former application releases (using the composite content view feature of Satellite 6). (We will cover this in Step 5, Step 6 and the corresponding roles in Step 8.)
● in addition to generic Dev-QA-Prod stages, our business applications require a dedicated UAT stage.
[email protected] 111 www.redhat.com

The ACME Life-cycle Environment Overview looks like this:
We use the following commands to create these life-cycle environment paths:
# create the generic lifecycle env pathhammer lifecycle-environment create --organization "$ORG" --name "DEV" --description "development" --prior "Library"hammer lifecycle-environment create --organization "$ORG" --name "QA" --description "Quality Assurance" --prior "DEV"hammer lifecycle-environment create --organization "$ORG" --name "PROD" --description "Production" --prior "QA"
# create the dedicated lifecycle env path for acme-webhammer lifecycle-environment create --organization "$ORG" --name "Web-DEV" --description "development" --prior "Library"hammer lifecycle-environment create --organization "$ORG" --name "Web-QA" --description "Quality Assurance" --prior "Web-DEV"hammer lifecycle-environment create --organization "$ORG" --name "Web-UAT" --description "Production" --prior "Web-QA"hammer lifecycle-environment create --organization "$ORG" --name "Web-PROD" --description "Production" --prior "Web-UAT"
www.redhat.com 112 [email protected]
Step 5: Define your Core BuildA key goal of setting up a Standard Operating Environment is to increase the standardization in all the different stack layers of an application architecture. The stack layer with the widest usage is the underlying operating system. The core build is the streamlined, standardized Red Hat Enterprise Linux configuration.
Benefits of Red Hat Enterprise Linux for Core BuildsA key goal of setting up a Standard Operating Environment is to increase the standardization in all the different stack layers of an application architecture. The stack layer with the widest usage is the underlying operating system. The core build is the streamlined, standardized Red Hat Enterprise Linux configuration. There are a couple of benefits of using Red Hat Enterprise Linux as the operating system standard in an enterprise environment. Red Hat Enterprise Linux sets the standard and provides the best set of features for standardization.
Stability and support
Enterprise applications and services require a stable foundation with a defined lifecycle. Red Hat Enterprise Linux features a 10-year lifecycle with ongoing support and updates from launch to retirement.
Security
Because a security issue in a standardized operating system will affect the entire environment, it is critical that any security issues are mitigated quickly. Red Hat fixes 95% of all critical security issues in Red Hat Enterprise Linux within 24 hours.
Reliability
According to an IDC study, companies that standardized on Red Hat Enterprise Linux experience significantly less downtime than those operating mixed or primarily non-paid Linuxdistributions due to better management practices and regression testing by both Red Hat and its partner community. Further details can be found here: http :// www . redhat . com / promo / standardize / rhs . html
OEM and ISV certification
Red Hat’s large, well-established OEM and ISV communities ensure that customers can be confident that recent hardware innovations are supported. They can choose from over 14,000
[email protected] 113 www.redhat.com

certified software offerings to meet their needs without compromising security, reliability, or support.
ABI and API compatibility
Application stability is maintained with ABI and API compatibility between Red Hat Enterprise Linux version upgrades. Applications written for a version of Red Hat Enterprise Linux will run unmodified on any minor release until the retirement of the version.
Red Hat ABI and API compatibility commitmentDuring the life cycle of a major release, Red Hat makes commercially reasonable efforts to maintain binary compatibility for the core runtime environment across all minor releases and errata advisories. If necessary, Red Hat may make exceptions to this compatibility goal for critical impact security or other significant issues. Furthermore major releases of Red Hat Enterprise Linux contain a limited set of backward-compatible libraries included in previous major releases to allow for the easy migration of applications.
Typically, Red Hat applies changes in such a way as to minimize the amount of change and tomaintain binary compatibility. Exceptions may apply for controlled package re-bases under certain circumstances.
Packages in Red Hat Enterprise Linux are classified under one of four compatibility levels. Many important programming languages and runtimes like python, perl and ruby are part of compatibility levels which means that their ABIs and APIs are stable within one major release of Red Hat Enterprise Linux. Further details are provided inside Red Hat Customer Portal: https :// access . redhat . com / articles / rhel - abi - compatibility
This compatibility commitment significantly reduces the technical risk of applying changes to the underlying operating system for the applications running on top of it. Additionally it ensures that from an application perspective there is no difference if the OS is running on bare or on any other supported virtualization platform.
Based on ABI/API stability in many customer environments changes of Red Hat Enterprise Linux software are defined as ITIL (R) Standard Changes. A Standard Change is a pre-defined and pre-authorized change which is considered relatively low risk or impact, follows a documented process or procedure and typically performed frequently.
This allows more frequently changes with lower risk while Red Hat Satellite provides the technology to define, deploy, maintain and verify these changes over time.
www.redhat.com 114 [email protected]

Further information around ABI/API stability could be found here: https :// access . redhat . com / articles / rhel - abi - compatibility
Core Build Overview Our goal is to achieve highest possible standardization of the operating system layer. The core build should fulfill these requirements. It should:
● Provide the smallest common denominator of all Red Hat Enterprise Linux servers● Be infrastructure (hardware and virtualization) agnostic● Provide an application or platform-independent OS configuration● Be a universal size that allows scaling up to all the sizes used● Be based on a minimal installation● Contain a partitioning schema and default filesystem layout● Contain all Red Hat, third-party and custom software required on all systems● Contain all configuration settings required on all systems● Typically include basic hardening
Core Build RecommendationsTypically, a core build is created during server provisioning by using kickstart technology. Mostof the core build characteristics are therefore created while you are defining your provisioning (documented in the next chapter: Step 7: Automate your provisioning). This section focuses on the content portions of the core build. These include the applicable content views and Puppet modules.
The following diagram describes the relationship between (basic) provisioning, the core build and the applications running on top of the core build:
[email protected] 115 www.redhat.com

The software and configuration deployed to your target systems during provisioning are part of the core build. As a result, the software and configuration set used during provisioningmust be smaller than the core build definition.
We recommend that you use the smallest possible software and configuration set for provisioning and the smallest common denominator of all systems to define the core build.
In our scenario we’re using the @Core package group inside the provisioning template and some sample Puppet modules to install all additional packages which are part of the core build. If we extend the package set later, we do not need to reprovision our existing servers since the Puppet module will be applied to all existing and upcoming servers. The final core build configuration, including all the applicable Puppet modules, are associated with a dedicated config group. This config group will be associated with all corresponding host groups in Step 7.
Although provisioning the configuration does not have a life-cycle management component, the lifecycle of the core build is managed using the Satellite 6 content view lifecycle management. For more information about content view lifecycle management, seeStep 9.
The core build provides the foundation (operating system) of all your Red Hat Enterprise Linux systems and might also contain packages / dependencies for some of the applications running on top of the core build. As a result, you should update it quite frequently. For
www.redhat.com 116 [email protected]

further information, see also the application and core build life-cycle management example inStep 9.
Because of Red Hat’s ABI/API Commitment (explained earlier), the associated risk of making software changes to Red Hat Enterprise Linux is comparatively small. We recommend that you do not postpone updating your software. Instead, you should invest in testing and rollback capabilities.
If Satellite 6 is used to manage just the operating system but not the applications running on top of it, it might make sense to use composite content views instead of content views for defining a core build. This approach would let you manage all (Puppet) configurations within a dedicated content view to support individual release cycles for fast-changing configurations and (mostly slow changing) software content.
The following system-specific adaptations should be made outside the core build definition (inside the parameter-based, application-specific or host-group-specific definitions):
● location, datacenter, region or country-specific adaptations (for example, keyboard layout, timezone, etc.)
● lifecycle-stage-specific adaptations (The core build is not supposed to be stage specific.)
● any application-specific adaptations (These should be part of the application’s content view)
● any system-specific adaptations (These should be part of the host-group definition.)
As explained earlier, the core build should be hardware and virtualization technology agnostic.
Because of the current limitations of the static relationship between hosts and (composite) content views, additional content views could not be dynamically assigned during provisioning and the life-cycle management of core builds. The core build content view should contain all required hardware and virtualization drivers for all target systems.
Nevertheless, you can use kickstart templates and Puppet modules inside the core build to deploy particular hardware or a virt driver automatically; these kickstart templates and Puppet modules use dynamic environment detection and content. See Step 7 for more information.
To install the appropriate virtualization drivers we need to configure the following items:
● adding additional software repositories to our core build definitions
[email protected] 117 www.redhat.com
● enabling these repositories using activation keys● using a Puppet module to automatically install VMware drivers or RHEV agents
depending on Puppet fact values
Typically, core builds do contain required management software components (for example, backup, monitoring or scheduling agents). If your management software provides different agents for particular applications (for example, a special monitoring or backup agent for a particular database), the core build should contain the generic software (agent) and configuration, whereas the application specific agents and configurations should be part of the application content (view).
Note:You may also need to split the repositories because Satellite 6 currently does not let you usethe same repositories in multiple content views for a system. In our solution guide setup, our RHEL core build contains software packages for various virtualization platforms and the Zabbix monitoring agents.
While defining core builds, you must be aware of (application) dependencies. Currently you cannot assign / use the same software repository multiple times in the same system, independent of the content or composite content views (see also chapter Content View Recommendations). This limitation does not allow you to define a very limited content set while you are defining the core build and then add application dependencies inside application-specific content views. In other words, the core build content definition has to contain all dependencies for all applications running on top of core build.
In practice, this means that we would recommend that you exclude the EPEL repository fromthe core build. Originally, we used Nagios, which is not included in RHEL but is part of EPEL. At that time, we wanted to use EPEL. Because the monitoring agents needed to be installed on every system, we included the EPEL repository in the core build . If we want to use a filter that restricts the content made available from the EPEL repository to Nagios packages, we would have an issue if a particular application (for example, our ACME website, which is based on WordPress, coming from the EPEL repository) required additional content from the EPEL repo. We cannot assign the EPEL repository more than once (for example, as part of the core build content view and also as part of the ACME Web content view).
We recommend that you use filters to restrict content availability, at least for non-enterprise-grade repositories like EPEL. This approach may require a new content view version with adapted / enhanced filters each time a new application needs additional packages.
www.redhat.com 118 [email protected]

Note: Containers make this particular challenge significantly easier. The principle of layered applications (where both apps and their dependencies are in individual layers) significantly reduces the complexity of managing application dependencies.
The core build should also contain the basic / minimum required hardening for all systems,including:
● common software package exclusions (for example, network sniffers)● common software package inclusions (for example, iptables, IDS software, etc.)● a default firewall configuration (for example, only specific ports open like SSH +
Satellite 6 required ports)● a default SElinux policy (for example, enforcing mode), which might be lifted up for
some applications later● common policies and hardening configurations● tools for policy management and verification (for example, openSCAP)
How to Define Your Core Builds
Method 1: The Easy ApproachThe easiest and most common way to define a core build is just to define the absolute minimum of required packages and configurations. And then proceed step-by-step to add the most common configurations you are using on your systems.
Method 2: Start Where You AreAnother approach is to start where you are currently, compare all the existing hosts, and look for similarities, so that you can identify the smallest common denominator. Of course, you canuse Satellite 6 capabilities, because Red Hat Satellite can provide all the necessary information about the software and configurations of your hosts.
To see a list of all currently installed packages using the Satellite 6 WebUI: 1. go to Hosts -> All Host and select one host. 2. Click on the Content button on the top left.3. Select the Packages tab.
Note:As an alternative, you can use the Satellite 6 REST API to get a list of all installed packages of a host. At the time of this writing, Hammer CLI does not support this action.
[email protected] 119 www.redhat.com

Some packages that are not part of all system definitions might be worth installing on all systems (especially if the associated risk classification of these packages is low). For example, if only a particular group within your organization is using vim-enhanced instead of the pure vi package, you might consider adding vim-enhanced to all systems.
Keep in mind that the goal of defining core builds is to reduce the absolute number of derivatives in your software architecture. Of course, this approach is also valid for the application and platform standardization we cover in the next section.
Core Build Naming conventionsBased on the two-layer segregation-of-duties concept explained earlier, we distinguish between the operating system (core build) and any applications running on top of it. We use the strings ‘os’ and ‘app’ to make this distinction. Our core build definitions reflect a particular RHEL release (major and minor), even if the minor release is the latest and greatest. We recommend that you have both major and minor releases of RHEL and that you build RHEL-independent content views for the applications running on top of RHEL. Even if technically feasible, we’ve decided not to use an aggregated core build definition across RHEL major releases (only feasible if a content view is used for multiple RHEL releases). A composite content view consisting of multiple RHEL core build variants is not possible in our scenario because of the overlapping Puppet modules.
Since most of our application content views are RHEL-independent and do not use the optional version or release tag, we’re adding it here to divide our different core builds.
This approach leads to the following naming convention definition for our core build content views:
cv-os-rhel - < 7Server | 6Server >
In most customer environments, some applications need to remain on an older minor release version of Red Hat Enterprise Linux (usually because of certification and support contract provisions). Typically, these are proprietary applications from big software vendor companies. In some cases, this restriction is more a contract-related than a technical risk due to Red Hat’s ABI/API Stability Commitment (see chapter XYZ for further details). In these cases, we recommended you create an additional core build based on a particular minor release versionof Red Hat Enterprise Linux. Instead of using 7Server or 6Server, the naming convention for the core build for these legacy applications would specifically look like this:
cv-os-rhel - < 6.3 | 7.0 >
www.redhat.com 120 [email protected]

An additional option can be to have a nightly build that would use the creation date or something similar as the core build release version:
cv-os-rhel - < 20150519 | Q2CY2015 >
Inside this solution guide we will provide examples for both types of core builds.
Core Build Software RepositoriesAs stated earlier, core builds define the smallest common denominator for software and configurations shared across all (or at least most) of your systems. Because Satellite 6 cannotreuse the same repositories in two content views assembled together into a composite content view (see also the Content View Recommendations section), our core build does not include repositories used by application-specific content views (especially if these views require different filters). We do not include the following repositories even if they arepart of the enhanced set of software repositories belonging to the Red Hat Enterprise Linux product (excluding the Red Hat Software Collections, which is shipped as a dedicated product):
● Red Hat Enterprise Linux Extras● Red Hat Enterprise Linux Optional● Red Hat Enterprise Linux Supplementary● Red Hat Software Collections
Our core builds consist primarily of software packages that are part of the Red Hat Enterprise Linux base repository. We’re also adding some non-Red Hat repositories, primarily common tools used for system management (backup, monitoring) purposes. We are adding the following software repositories to our core build:
● Red Hat Enterprise Linux Server RPMs (base operating system)● Red Hat Enterprise Linux Server Kickstart (required for provisioning)● Red Hat Satellite 6 Tools (client tools used in conjunction with Satellite 6)● Zabbix Repository (includes the Zabbix monitoring agents)
Note:In contrast to Satellite 6.0 the Red Hat Enterprise Linux Common RPMs repository is not required anymore. All Satellite 6 related client tools (for example katello-agent, puppet) have been moved into the new Red Hat Satellite 6 Tools repository. For further information see: https://access.redhat.com/solutions/1427513
[email protected] 121 www.redhat.com
Additionally we are adding the following repositories depending on the virtualization platform:
● in case of Red Hat Enterprise Virtualization○ RHEL7: Red Hat Enterprise Linux Common RPMs○ RHEL6: Red Hat Enterprise Virtualization Agents for RHEL 6 Server RPMs
● in case of VMware vSphere○ RHEL6: VMware Tools Repository for RHEL6○ RHEL7: - nothing (included in RHEL7) -
The following hammer commands create the core build content view and add the repositories belonging to our RHEL7 core build:
hammer content-view create --name "cv-os-rhel-7Server" \ --description "RHEL Server 7 Core Build Content View" --organization "$ORG"
# software repositorieshammer content-view add-repository --organization "$ORG" \ --name "cv-os-rhel-7Server" \ --repository 'Red Hat Enterprise Linux 7 Server Kickstart x86_64 7Server' \ --product 'Red Hat Enterprise Linux Server'
hammer content-view add-repository --organization "$ORG" \ --name "cv-os-rhel-7Server" \ --repository 'Red Hat Enterprise Linux 7 Server RPMs x86_64 7Server' \ --product 'Red Hat Enterprise Linux Server'
hammer content-view add-repository --organization "$ORG" \ --name "cv-os-rhel-7Server" \ --repository 'Red Hat Satellite Tools 6 Beta for RHEL 7 Server RPMs x86_64 7Server' \ --product 'Red Hat Enterprise Linux Server'
hammer content-view add-repository --organization "$ORG" \ --name "cv-os-rhel-7Server" \ --repository 'Red Hat Enterprise Linux 7 Server - RH Common RPMs x86_64 7Server' \ --product 'Red Hat Enterprise Linux Server'
hammer content-view add-repository --organization "$ORG" \ --name "cv-os-rhel-7Server" \ --repository 'Zabbix-RHEL7-x86_64' \ --product 'Zabbix-Monitoring'
hammer content-view add-repository --organization "$ORG" \ --name "cv-os-rhel-7Server" \ --repository 'Bareos-RHEL7-x86_64' \ --product 'Bareos-Backup-RHEL7'
www.redhat.com 122 [email protected]

We are also using an exclude filter to filter out particular packages that we do not want to make available to our target hosts. As an example, we are excluding the emacs packages (although there is nothing wrong with emacs). To reduce the number of available packages inside your core build, you can also exclude entire package groups instead of just individual packages.
The following hammer command creates the filter and filter rule.
Note:Until BZ #1228890 is fixed you, need to use the repository ID instead of its name.
# exclude filter example using emacs package# due to https://bugzilla.redhat.com/show_bug.cgi?id=1228890 you need to provide # repository ID instead of name otherwise the filter applies to all repos REPOID=$(hammer --csv repository list --name 'Red Hat Enterprise Linux 7 Server RPMs x86_64 7Server' \ --organization $ORG | grep -vi '^ID' | awk -F',' '{print $1}')
hammer content-view filter create --type rpm --name 'excluding-emacs' \ --description 'Excluding emacs package' --inclusion=false \ --organization "$ORG" --repository-ids ${REPOID} \ --content-view "cv-os-rhel-7Server"
hammer content-view filter rule create --name 'emacs*' \ --organization "$ORG" --content-view "cv-os-rhel-7Server" \ --content-view-filter 'excluding-emacs'
Before publishing our content view, we must add the required Puppet modules that belong to our core build.
ACME Core Build Sample Puppet ModulesThe following section provides some basic examples of Puppet modules used in this solution guide. Since it covers only basic examples and not all of them are the best ways to tackle a particular problem with Puppet, experienced Puppet users might want to skip this section.
Starting with Satellite 6.1, Red Hat has included a dedicated Puppet Guide as part of the Satellite 6 product documentation:
https://access.redhat.com/documentation/en-US/Red_Hat_Satellite/6.1/html/Puppet_Guide/index.html
[email protected] 123 www.redhat.com

As explained in the Core Build Recommendations section, we are adding some sample Puppet modules to achieve the goals of our core build configuration described earlier. This solution guide uses the following sample Puppet modules:
● A module ‘motd’ to manage the message of the day file in /etc/motd● A module to install additional rpm packages called ‘corebuildpackages’● A module called ‘ntp’ to set the right ntp servers, depending on the location or lifecycle
environments, since we’re using different ntp servers in some of them● A module called ‘loghost’ to configure rsyslog remote logging (client option)● A module called ‘zabbix’ to configure the Zabbix monitoring client
Sample Puppet Module for /etc/motd FileTo demonstrate a typical Puppet module lifecycle in Satellite 6, we’re starting with a simple Puppet module for managing the /etc/motd file . Any user on any system could take the following steps.
1. Create an initial Puppet module that creates a metadata template for us.
$ puppet module generate acme-motdWe need to create a metadata.json file for this module. Please answer thefollowing questions; if the question is not applicable to this module, feel freeto leave it blank.
Puppet uses Semantic Versioning (semver.org) to version modules.What version is this module? [0.1.0]-->
Who wrote this module? [acme]-->
What license does this module code fall under? [Apache 2.0]-->
How would you describe this module in a single sentence?--> basic motd configuration as part of our core build definition
Where is this module's source code repository?-->
Where can others go to learn more about this module?-->
Where can others go to file issues about this module?-->
www.redhat.com 124 [email protected]

----------------------------------------{ "name": "acme-motd", "version": "0.1.0", "author": "acme", "summary": "basic motd configuration as part of our core build definition", "license": "Apache 2.0", "source": "", "project_page": null, "issues_url": null, "dependencies": [ { "name": "puppetlabs-stdlib", "version_range": ">= 1.0.0" } ]}----------------------------------------
About to generate this metadata; continue? [n/Y]--> Y
Notice: Generating module at /home/puppetdev/acme-motd...Notice: Populating ERB templates...Finished; module generated in acme-motd.acme-motd/Rakefileacme-motd/manifestsacme-motd/manifests/init.ppacme-motd/specacme-motd/spec/classesacme-motd/spec/classes/init_spec.rbacme-motd/spec/spec_helper.rbacme-motd/testsacme-motd/tests/init.ppacme-motd/README.mdacme-motd/metadata.json
2. Define file attributes and the templates to use. We adapted the file acme-motd/manifests/init.pp to make it look like this:
class motd { file { '/etc/motd': ensure => file, content => template("${module_name}/motd.erb"), owner => root, group => root, mode => '0644', }
[email protected] 125 www.redhat.com
}
3. Create a template and adapt it using some basic Puppet facts. This step demonstrates how to use certain variables.
-------------------------------------------------Welcome to the host named <%= hostname %><%= operatingsystem %> <%= operatingsystemrelease %> <% if has_variable?("architecture") then %><%= architecture %><% end %>-------------------------------------------------Puppet: <%= puppetversion %>Facter: <%= facterversion %>
FQDN: <%= fqdn %>IP: <%= ipaddress %>
<% if has_variable?("processor0") then -%>Processor: <%= processor0 %><% end -%><% if has_variable?("memorysize") then -%>Memory: <%= memorysize %><% end -%>
Note:For more information about using Puppet facts, go to: https :// access . redhat . com / documentation / en - US / Red _ Hat _ Satellite /6.1/ html / User _ Guide / sect- Red _ Hat _ Satellite - User _ Guide - Storing _ and _ Maintaining _ Host _ Information . html # sect - Red _Hat _ Satellite - User _ Guide - Storing _ and _ Maintaining _ Host _ Information - Using _ Facter _ and _ Facts
4. Build the Puppet module:
puppet module build acme-motd
Once you have successfully built the Puppet module, you can find the resulting module package in tar.gz format inside the acme-motd/pkg folder.
Sample Puppet Module for Additional RPM Packages As explained inside the chapter Core Build Recommendations, the software definitions inside the provisioning templates should contain only the minimal required set of packages.Additional software packages can be maintained inside the core build content view to make it easier to adapt the software definition of all hosts without reprovisioning or manual installing new or additional packages in all existing hosts.
www.redhat.com 126 [email protected]
We are using a very simple Puppet module that contains just the few additional packages we want to see installed on all our hosts.
The array inside the manifest contains four additional packages and can be overridden by using the Ifa Red Hat Satellite 6 Smart Class Parameter.
class corebuildpackages ( $pkgs = [ vim-enhanced, screen, strace, tree ]) { package{ $pkgs: ensure => installed }}
More documentation for this sample Puppet module is in Appendix I.
Sample Puppet Module for the ntp ConfigurationAs a second example, we’ve created a module that uses ntp to configure the time synchronization of all the systems. This example uses Satellite 6 Smart Variables.
This module:● Installs the ntp rpm package● Starts the ntp daemon● Enables the ntp daemon for autostart
○ The ntp daemon is restarted automatically if the configuration is changed.● Configures ntp to synchronize either a single server or a list of servers
○ This configuration is done with a template.○ It uses “pool.ntp.org” as default, but it can be overridden with Smart Class
Parameters.
More documentation for this sample Puppet module is in Appendix I.
Sample Puppet Module: Zabbix Monitoring Agent Configuration
This sample module installs the required monitoring agent packages and starts and enables the corresponding zabbix-daemon. In addition to earlier examples, we’ve used the ‘latest’ definition inside the packages section of this module to demonstrate the impact of this configuration. Using the ‘latest’ option inside a Puppet module, the corresponding packages will be automatically updated during the next Puppet run if the new content view version containing an updated version of this package has been promoted to the life-cycle
[email protected] 127 www.redhat.com

environment the target system lives in. There is no further action required to update this particular package using the WebUi or CLI or API.
More documentation for this sample Puppet module is in Appendix I.
Sample Puppet Module for rsyslog Configuration (here: client)As an example for a multi-purpose Puppet module, we’ve created a sample module to manage the rsyslog log management configuration. We are using the same module to manage both the client and server configurations but are using different Puppet classes for them. Because the client configuration should be deployed on all hosts and is therefore part of the core build definition, we’ve added the module to the core build content view.
Note: As explained in the Satellite 6 Content View Recommendations section, if the same module is part of multiple content views, you cannot assemble more than one of them together into a composite content view. Therefore, the loghost server content view (see Step 6) does not contain this multi-purpose module because it is already part of the core build content view.
More documentation for this sample Puppet module is in Appendix I.
Puppet Labs Modules stdlib and concatSince we are using some modules from Puppet L abs for our applications we have added to common dependency modules to our core build definition:
● stdlib module (standard library of resources for Puppet modules)● concat module (to construct files from multiple fragments of text)
Therefore we download and push them into the ACME Puppet repository using hammer CLI:
# download and push into custom puppet repo the puppetlabs modules we needwget -O /tmp/puppetlabs-stdlib-4.6.0.tar.gz https :// forgeapi . puppetlabs . com / v 3/ files / puppetlabs - stdlib -4.6.0. tar . gz
wget -O /tmp/puppetlabs-concat-1.2.3.tar.gz https :// forgeapi . puppetlabs . com / v 3/ files / puppetlabs - concat -1.2.3. tar . gz
www.redhat.com 128 [email protected]

# add these modules to ACME Puppet repohammer repository upload-content --organization “ACME” \ --product ACME --name "ACME Puppet Repo" \ --path /tmp/puppetlabs-stdlib-4.6.0.tar.gz
hammer repository upload-content --organization “ACME” \ --product ACME --name "ACME Puppet Repo" \ --path /tmp/puppetlabs-concat-1.2.3.tar.gz
Adding All Core Build Puppet Modules to the Core Build Content ViewThe following hammer commands add the Puppet modules explained above to our RHEL7 core build content view:
for module in 'motd' 'ntp' 'corebuildpackages' 'loghost' 'zabbix' 'vmwaretools' 'rhevagent' 'stdlib' 'concat'do
hammer content-view puppet-module add --name ${module} \ --content-view cv-os-rhel-7Server \ --organization $ORG
done
Red Hat Satellite 6 Config GroupsSatellite 6 Config Groups let you associate multiple Puppet classes to a host group or to a single host. These are usually used to define profiles (for example, to configure an entire application stack).
Config Groups are not specific to an environment, so all Puppet classes that are available under Configure ➤ Puppet classes can be assigned to a Config Group.
Note:● Be aware that Puppet classes assigned to a Config Group may not be available in the
environment where a host is placed. This issue can result in the host not being able to consume that particular Puppet class.
● Puppet classes that are not available to a host assigned from a Config Group are greyed out.
Changes made on a Config Group are automatically changed for every Host Group that uses that Config Group, meaning that a change only needs to be made in a single place (and not multiple places) where the same Puppet classes are used.
[email protected] 129 www.redhat.com
Naming ConventionsWe are using the prefix cfg to mark all config groups; you can use any text you prefer after cfg-.
cfg - < name >
Core Build Config GroupWe create a Config Group called cfg-corebuild that will be assigned to every host group. The cfg-corebuild Config Group uses the following Puppet classes for the corebuild configuration of a host:
● ntp● motd● zabbix● git::client● loghost::client● corebuildPackages● rhevagent● vmwaretools
To create the Config Group, go to:
1. Configure ➤ Config groups ➤ New Config Group2. Insert the Name: cfg-corebuild3. From available classes select the corresponding Puppet classes from the list above4. Click on Submit
www.redhat.com 130 [email protected]

Note: The required dependencies stdlib and concat have not been added to these config groups. However, you still need to ensure that they are inside the same Puppet environment. This is automatically done since they are part of the same content view.
Publishing and Promoting the Core Build Content ViewsAfter we’ve added all required software repositories and Puppet modules belonging to our core builds, we can finally publish them and promote using our default life-cycle environment path (consisting of Dev -> QA -> Prod stages).
To publish and promote these content views:1. Click on the blue Publish New Version button.2. Provide a description. 3. Click Save.
The content view will be published.
[email protected] 131 www.redhat.com

We need to wait until the publishing step has been completed before promoting it to the Dev stage.
Note:If you get an error message “Validation failed: Puppet environment can't be blank” while publishing a content view you need to run the following command to fix this:
foreman-rake console
The same requirement applies if hammer CLI is used to publish and promote a content view. Therefore, we’re not using the hammer --async option while publishing.
www.redhat.com 132 [email protected]

To promote a content view using hammer CLI, you must have an additional option: the content view version ID (in the example below: 28).
Note:Content view ID and content view version ID are two different items. Look at the following output of the hammer command (in this example, we already have two versions published, and we’re using the base output format for better readability):
hammer --output base content-view list --name cv-os-rhel-7Server --organization ACMEContent View ID: 3Name: cv-os-rhel-7ServerLabel: cv-os-rhel-7ServerComposite: Repository IDs: 1, 2, 3, 10, 9
hammer --output base content-view version list --content-view-id 3ID: 28Name: cv-os-rhel-7Server 2.0Version: 2.0Lifecycle Environments: Library
ID: 3Name: cv-os-rhel-7Server 1.0Version: 1.0Lifecycle Environments:
To publish and promote our RHEL7 core build content view using the most current version of the content view using hammer, you must execute the following commands:
hammer content-view publish --name "cv-os-rhel-7Server" --organization "$ORG"
CVID=$(hammer --csv content-view list --name cv-os-rhel-7Server --organization ${ORG} |grep -vi '^Content View ID,' | awk -F',' '{print $1}' )
VID=`hammer content-view version list --content-view-id ${CVID} | awk -F'|' '{print $1}' | sort -n | tac | head -n 1`
hammer content-view version promote --content-view-id $CVID \ --organization "$ORG" \ --to-lifecycle-environment DEV \ --id $VID \ --asyncContent view is being promoted with task 177f9d0b-43af-4b4f-aa4f-d047866eab99
[email protected] 133 www.redhat.com
Now we have successfully created our RHEL7 core build. You can create, publish and promote the entire RHEL6 core build in a similar fashion by using the following hammer commands:
hammer content-view create --name "cv-os-rhel-6Server" \ --description "RHEL Server 6 Core Build Content View" \ --organization "$ORG"
# software repositorieshammer content-view add-repository --organization "$ORG" \ --name "cv-os-rhel-6Server" \ --repository 'Red Hat Enterprise Linux 6 Server Kickstart x86_64 6.5' \ --product 'Red Hat Enterprise Linux Server'
hammer content-view add-repository \ --organization "$ORG" \ --name "cv-os-rhel-6Server" \ --repository 'Red Hat Enterprise Linux 6 Server RPMs x86_64 6.5' \ --product 'Red Hat Enterprise Linux Server'
# there is an inconsistency here between RHEL7 and RHEL6: RHEL6 repo name without 6Server at the end hammer content-view add-repository --organization "$ORG" \ --name "cv-os-rhel-6Server" \ --repository 'Red Hat Satellite Tools 6 Beta for RHEL 6 Server RPMs x86_64' \ --product 'Red Hat Enterprise Linux Server'
hammer content-view add-repository --organization "$ORG" \ --name "cv-os-rhel-6Server" \ --repository 'Zabbix-RHEL6-x86_64' \ --product 'Zabbix-Monitoring'
hammer content-view add-repository --organization "$ORG" \ --name "cv-os-rhel-6Server" \ --repository 'Bareos-RHEL6-x86_64' \ --product 'Bareos-Backup-RHEL6'
# exclude filter example using emacs package# due to https://bugzilla.redhat.com/show_bug.cgi?id=1228890 you need to provide repository ID # instead of name otherwise the filter applies to all repos REPOID=$(hammer --csv repository list --name 'Red Hat Enterprise Linux 6 Server RPMs x86_64 6.5' \ --organization $ORG | grep -vi '^ID' | awk -F',' '{print $1}')
hammer content-view filter create --type rpm \ --name 'excluding-emacs' --description 'Excluding emacs package' \ --inclusion=false --organization "$ORG" --repository-ids ${REPOID} \
www.redhat.com 134 [email protected]

--content-view "cv-os-rhel-6Server"
hammer content-view filter rule create --name 'emacs*' --organization "$ORG" \ --content-view "cv-os-rhel-6Server" --content-view-filter 'excluding-emacs'
# add vmware tools and rhev agent reposhammer content-view add-repository --organization "$ORG" --name "cv-os-rhel-6Server" \ --repository 'VMware-Tools-RHEL6-x86_64' --product 'VMware-Tools-RHEL6'
hammer content-view add-repository --organization "$ORG" --name "cv-os-rhel-6Server" \ --repository 'Red Hat Enterprise Virtualization Agents for RHEL 6 Server RPMs x86_64 6.5' \ --product 'Red Hat Enterprise Linux Server'
# Puppet modules which are part of core build # Note: since all modules are RHEL major release independent we're adding the same modules as for RHEL 7 Core Buildfor module in 'motd' 'ntp' 'corebuildpackages' 'loghost' 'zabbix' 'vmwaretools' 'rhevagent'do
hammer content-view puppet-module add --name ${module} \ --content-view cv-os-rhel-7Server \ --organization $ORG
done
# CV publish without --async option to ensure that the CV is published before we create CCVs in the next stephammer content-view publish --name "cv-os-rhel-6Server" --organization "$ORG"
# promote it to DEV,QA,PRODexport RHEL6_CB_VID=`get_latest_version cv-os-rhel-6Server`export RHEL6_CVID=$(hammer --csv content-view list --name cv-os-rhel-6Server \ --organization ${ORG} | grep -vi '^Content View ID,' | awk -F',' '{print $1}' )
echo "Identified VERSION ID ${RHEL6_CB_VID} as most current version of our RHEL6 Core Build."echo "Promoting it now to DEV, QA and PROD. This might take a while."hammer content-view version promote --content-view-id $RHEL6_CVID \ --organization "$ORG" --to-lifecycle-environment DEV --id $RHEL6_CB_VIDhammer content-view version promote --content-view-id $RHEL6_CVID \ --organization "$ORG" --to-lifecycle-environment QA --id $RHEL6_CB_VIDhammer content-view version promote --content-view-id $RHEL6_CVID \ --organization "$ORG" --to-lifecycle-environment PROD --id $RHEL6_CB_VID
Notes: ● For legacy applications that require a dedicated and usually older minor release
version of Red Hat Enterprise Linux (due to ISV-specific support or certification limitations) you might want to create an additional dedicated core build variant. We do not cover this operation here, because the procedure is similar to the examples above.
[email protected] 135 www.redhat.com

● We did not create a composite content view containing all core build content views, because we are using the same Puppet modules in multiple core build content views. As a result, we could not assemble them together.
www.redhat.com 136 [email protected]

Step 6: Define Your Application Content In the earlier chapters we described how to define and deploy an enhanced operating systemdefinition (core build) on top of an existing virtualization infrastructure. In a cloud context this describes an Infrastructure as a Service (IaaS) setup. Though core build management is the focus area of Red Hat Satellite, enhancing these capabilities to a Platform as a Service (PaaS) setup (at least for infrastructure and backend services) is just an additional layer on top of the setup described earlier. The integration of Puppet as a configuration management tool makes it significantly easier to define, deploy and manage both the operating system and applications running on top of it.
Note: Application deployment is not the primary target of Satellite 6, even if technically feasible. We recommend using a dedicated PaaS tool for this use case, such as Red Hat OpenShift Enterprise.
All Red Hat Satellite 6 entities and procedures explained earlier can be used identically for application life-cycle management as for operation system / core build life-cycle management.In this section we will adapt the current configuration accordingly.
Since we have already created the two different operating systems content views for RHEL 6 and 7, we now need to create the content views for the applications running on top of RHEL. Afterwards, we will assemble them into a composite content view.
We will call all final server personalities "roles" and all included components (independent of shared or single-purpose) "profiles." This means that all business applications and infrastructure services are roles, but the inherent components (for example, MariaDB, Git, WordPress, and also our core build itself) are profiles.
If we map this principle (primarily coming from Puppet) to our Satellite 6 objects, all roles have dedicated composite content views that contain one or more content views of profiles. The main reason for this approach is that the final server personality is configured as a host group, and each host group can only be associated to a single content view or a composite content view. It is not possible to assign multiple content views (for example, WordPress + MariaDB + CoreBuild) at this time. For further details, see the Content View Recommendations chapter.
The procedure for creating a content view for an application is similar to what we described earlier when creating our core build content views. The main difference between the OS (CoreBuild) content view and the application content views is primarily how we answer some
[email protected] 137 www.redhat.com
design questions. In addition to the general discussion about using an application-specific content view, composite content view, or assembled composite content view (consisting of reusable component content views as discussed in Step 4), we need to make another design decision inside the application layer. Multi-tier applications consisting of different subcomponents or stack layers (for example, front-end, mid-tier, database backend) can be installed in two different ways:
● as a single-host / all-in-one setup where all components are deployed with the same server
● as a multi-host / federated setup where at least some components are installed in a federated way
These design criteria might influence the content view design decision as well. Although usingan all-in-one content view that consists of all inherent components reduces the total number of content views, it also increases the number of required control parameters. If we create an all-in-one content view and do not want to execute a single-host (but instead a federated setup), we need to control the deployment of the particular components that you should installon a target host by using parameters handed over during the new host definition. In our solution guide, we’ve decided to use component-based content views, because our application architecture has been designed to be a multi-host deployment.
ACME’s Sample Application ArchitectureAll our ACME applications run on top of Red Hat Enterprise Linux. Although most of the applications run on top of RHEL 7, we still use RHEL 6 for some servers. The following diagram illustrates the relationship between the applications and the operating system versions:
www.redhat.com 138 [email protected]

Sample Application 1: git ServerGit is a fast, scalable, distributed revision control system. The corresponding software packages are part of Red Hat Enterprise Linux, and newer versions are also available in Red Hat Software Collections.
We are using multiple git servers as dedicated revision control systems to centrally manage various software and configuration items. These include:
● all Puppet modules deployed by Red Hat Satellite 6● all scripts used to automate specific use cases● all templates we have created or adapted inside Satellite 6● all software (source code) and configuration files used by ACME software development
departments
We are using Red Hat Satellite 6 to provision and maintain various git servers automatically, to enable better support of our ACME software development efforts and projects.
Example: Puppet Module for git (Server and Client)Similar to the core build Puppet modules in Step 5, the following subsection provides some basic examples of Puppet modules used inside this solution guide. Since it covers only basic examples and not all of them are necessarily the best way to tackle a particular problem with Puppet, experienced Puppet users might want to skip this chapter.
The primary goal of this module is to provide a simple example of a multi-purpose Puppet module, used for both the server and client configuration of the git revision control system. In
[email protected] 139 www.redhat.com

our ACME sample scenario, we use only the server component to provision the git Puppet module repository server (explained in Step 1).
Basically, the Puppet module performs the following tasks:
● Installs the required software packages and all its dependencies○ the git19-git package from the Red Hat Software Collections repository if it is
acting as a git server (default)○ the default git package as part of Red Hat Enterprise Linux if it is acting as a git
client○ or any other package name provided as a Smart Class Parameter
● Installs the Apache http server package to make the git repository available via http (required for regular repository synchronization in conjunction with Satellite 6)
● Starts and permanently enables starting the http daemon● Integrates the git binary path into profile.d configuration● Creates a particular directory for git repository data, if the directory does not already
exist○ Initializes a git repository inside the directory, if the repository does not already
exist● Provides a git hook to create the PULP_MANIFEST file automatically (required for
regular repository synchronization in conjunction with Satellite 6)○ Only adds Puppet modules that are built to the PULP_MANIFEST
The detailed documentation for this sample Puppet module is in Appendix I.
Content View for git Server ProfileWe will now create content views for each application type and assemble them with our core build content views (created earlier) to construct server-type-specific composite content views.
In order to install a git server on top of our already configured core build, we need to install one or more additional software packages and do some configuration. Both should become part of our content view called ‘cv-app-git’, which follows our naming convention.
We’re using the Satellite 6 content search functionality to figure out which versions of git areavailable in which of the software repositories that we synchronized during Step 2. The following procedure describes how to search for a package called ‘git*’:
1. Go to Content -> Content Search2. Select ‘Packages’ from the drop-down menu
www.redhat.com 140 [email protected]
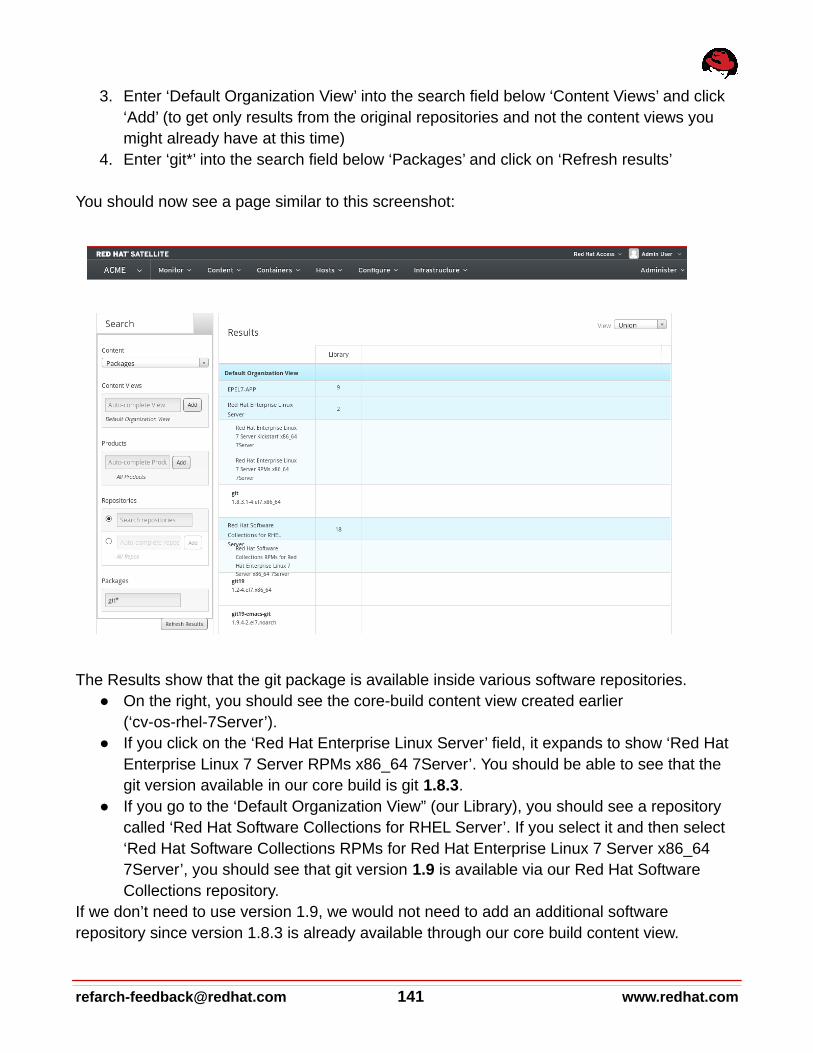
3. Enter ‘Default Organization View’ into the search field below ‘Content Views’ and click ‘Add’ (to get only results from the original repositories and not the content views you might already have at this time)
4. Enter ‘git*’ into the search field below ‘Packages’ and click on ‘Refresh results’
You should now see a page similar to this screenshot:
The Results show that the git package is available inside various software repositories. ● On the right, you should see the core-build content view created earlier
(‘cv-os-rhel-7Server’). ● If you click on the ‘Red Hat Enterprise Linux Server’ field, it expands to show ‘Red Hat
Enterprise Linux 7 Server RPMs x86_64 7Server’. You should be able to see that the git version available in our core build is git 1.8.3.
● If you go to the ‘Default Organization View” (our Library), you should see a repository called ‘Red Hat Software Collections for RHEL Server’. If you select it and then select ‘Red Hat Software Collections RPMs for Red Hat Enterprise Linux 7 Server x86_64 7Server’, you should see that git version 1.9 is available via our Red Hat Software Collections repository.
If we don’t need to use version 1.9, we would not need to add an additional software repository since version 1.8.3 is already available through our core build content view.
[email protected] 141 www.redhat.com

In both scenarios our Puppet configurations should be able to handle both versions of git. Being able to handle both versions means that Satellite 6 must be able to deal with the difference between the installation of an RPM (which is part of Red Hat Enterprise Linux) and the usage of Red Hat Software Collections. In our ACME scenario we’ve decided to use the newer version of git, 1.9.
Basically, the application-specific content view for our git server must let you:
● access and enable the Red Hat Software Collections repository● install the git rpm package● configure a git repository (if one does not already exist) ● provide http access to the git repository to allow regular content synchronization
Except for the content provisioning of the Red Hat Software Collections repository, all other tasks are done inside the Puppet module created earlier.
Creating the content view1. Create a content view called ‘cv-app-git’ following our naming convention, and click
Save.
www.redhat.com 142 [email protected]

2. Add the Red Hat Software Collection Repository. ○ In the screenshot below, we’ve selected the corresponding product to shorten
the list of available repositories:
○ Select the repository, and click on ‘Add Repositories’. Now the entire content of the Red Hat Software Collections repository is available through this content view.
3. Limit the content availability to just git packages by creating a filter and a rule:○ Click on ‘Yum Content’ and ‘Filters’. There should be no filter at this time. ○ Click on the +New Filter button, and fill-in a name, in our case
‘git-packages-only’. ○ Select Content Type ‘Package’ and Filter Type ‘Include’ and add a description as
in the example below.○ Click Save.
[email protected] 143 www.redhat.com

If you enter ‘git’ in the Packages field, a list of all packages matching this string displays:
Warning: It is not enough to select a particular package listed in the screenshot above. If you select the git19-git-all package and try to use the content, you will notice that the installation of git fails, due to missing dependencies. As explained in the Content View
www.redhat.com 144 [email protected]

Recommendations chapter, filters do not resolve dependencies. To figure out which dependencies a particular package has, start with a content view without filters and note the additional packages that have been installed for dependency reasons. After that, you can adapt your filter rules accordingly--either by using wildcards or by creating additional filter rules for each additional dependency. After testing it using the content view without a filter, we’ve noticed that all dependencies match the following pattern: git19-*. Therefore, we did not select a particular item in the list of packages but entered the pattern in the Package Name field. Since more than one package is covered by this pattern, we leave Detail field set to ‘All Versions’ and click the +Add button.
Though in our scenario it is not critical (since we only have one repository), you should make a regular habit of specifying the affected repositories in the corresponding tab. Otherwise, this filter rule applies to all repositories belonging to this content view. In short, other repositories (to which you don’t want to apply filters) are also affected by this Include filter. If they don’t provide the package(s) defined in our filter rule, none of the packages inside these other repositories are available to hosts associated with this content view. For further details, see chapter Content View Recommendations.
4. Click on the ‘Affected repositories’ tab, and select the option: ‘This filter applies only to a subset of repositories in the content view.’ Select the Red Hat Software Collections repository. If we were to add other repositories to this content view later in its lifecycle, the filter rule would still be valid:
[email protected] 145 www.redhat.com

5. Add the Puppet modules created earlier. Click the ‘Puppet Modules’ tab, and then click the +Add New Module button. You should see the module called git in the list of available Puppet modules. If you have several Puppet modules, you can use the filter field. Select git module, and click ‘Select version’. Select ‘Use Latest version’ to avoid having to update the filter rule each time you update the module.
Publishing the Content ViewNow we’ve finally configured our content view and can publish it.
www.redhat.com 146 [email protected]

1. Click the Publish New Version button.2. Provide a description.3. Click Save.
After the content view has been successfully published, it is available in the Library stage.
4. Use hammer CLI to execute the following command to create the content view and publish it:
hammer content-view create --name "cv-app-git" \ --description "The application specific content view for git." \ --organization "$ORG"
# add the RHSCL repo plus filter for git packages onlyhammer content-view add-repository --organization "$ORG" \ --name "cv-app-git" \ --repository 'Red Hat Software Collections RPMs for Red Hat Enterprise Linux 7 Server x86_64 7Server' \ --product 'Red Hat Software Collections for RHEL Server'
hammer content-view filter create --type rpm --name 'git-packages-only' \ --description 'Only include the git rpm packages' --inclusion=true \ --repositories 'Red Hat Software Collections RPMs for Red Hat Enterprise Linux 7 Server x86_64 7Server' \ --content-view "cv-app-git" --organization "$ORG"
hammer content-view filter rule create --name 'git19-*' \ --content-view "cv-app-git" \ --content-view-filter 'git-packages-only' --organization "$ORG"
# add Puppet modules from $ORG product repo to this CVhammer content-view puppet-module add --name git \ --content-view "cv-app-git" --organization $ORG
# no async anymore, we need to wait until its published to created the CCVhammer content-view publish --name "cv-app-git" --organization "$ORG"
As explained in the content view lifecycle overview chapter, we do not need to promote this application-specific content view to other lifecycle stages since we only promote the final composite content view (consisting of both the application-specific and core-build content views) through the corresponding lifecycle environment path.
But first we need to create the composite content view.
Composite Content View for the gitserver Role
[email protected] 147 www.redhat.com

1. Click ‘Content’ -> ‘Content Views’. 2. Click +Create New View.
Following our naming convention, we fill-in ‘ccv-infra-gitserver’ in the Name and Label fields and provide a description. This time we check the ‘Composite View’ select box:
3. Select the two content views to assemble together: the ‘cv-app-git’ content view created earlier and the ‘cv-os-rhel-7Server’ core build content view created during Step5. If there are already multiple versions available for these content views, select the appropriate (probably newest) one and click +Add Content Views. You can double check if you’ve selected the right content views and versions by clicking the ‘List / Remove’ tab. Our sample scenario already has a version 2.0. Therefore, we have selected a version 2.0 for our core build content view:
www.redhat.com 148 [email protected]

4. Click the Publish New Version button, fill in a description, and click Save.
Because we need both a content view ID and a content view version ID to assemble multiple content views together into a composite content view and we need the content view version ID again to promote it, we’ve written the following function to determine the most current version ID of a content view:
function get_latest_version {CVID=$(hammer --csv content-view list --name $1 --organization ${ORG} | grep -vi
'^Content View ID,' | awk -F',' '{print $1}' )VID=`hammer content-view version list --content-view-id ${CVID} | awk -F'|' '{print
$1}' | sort -n | tac | head -n 1`echo $VID
[email protected] 149 www.redhat.com

return 0}
If we assume that we want to use all the most current versions of the inherent content views, the following command determines the version IDs of both the core build and git application content views and uses them to create and publish a composite content view:
RHEL7_CB_VID=`get_latest_version cv-os-rhel-7Server`APP_CVID=`get_latest_version cv-app-git`
hammer content-view create --name "ccv-infra-gitserver" \ --composite --description "CCV for Infra git server" \ --organization $ORG --component-ids ${RHEL7_CB_VID},${APP_CVID}
hammer content-view publish --name "ccv-infra-gitserver" --organization "$ORG"
After it is successfully published, the composite content view is available in the Library and can be promoted to our Dev stage. Click the Promote button, and select the ‘Dev’ stage in ourdefault life-cycle environment path (which is used for all infrastructure services):
Click the Promote Version button. Using hammer CLI, you need to execute the following command to promote the composite content view to stage Dev:
www.redhat.com 150 [email protected]

CVID==$(hammer --csv content-view list --name ‘ccv-infra-gitserver --organization ${ORG}| grep -vi '^Content View ID,' | awk -F',' '{print $1}' )
VID=`get_latest_version ccv-infra-gitserver`hammer content-view version promote --organization "$ORG" \ --content-view-id $CVID \ --to-lifecycle-environment DEV \ --id $VID --async
You have now successfully promoted the composite content view to our Dev stage, so that it can be tested on systems associated with this lifecycle environment and composite content view. Therefore, we need to create additional host groups. Before creating those, we will use the same procedure to create a few other content views and composite content views.
Sample Application 2: Container HostOur ACME Emerging Technologies (ET) Department investigates new technologies and their potential to improve the efficiency or effectiveness of ACME IT and Business.
Containers are one of the most exciting technology developments in recent years. Containers provide application portability, facilitate modern application design concepts like micro-services, and support agile development and DevOps. Red Hat has been at the forefront of bringing container technology to the enterprise, with our extensive development work on projects like Linux, Docker, and Kubernetes. Container technologies, such as Docker,can provide tremendous value on their own, but to truly enable innovation at scale it must be delivered and managed as part of an automated, orchestrated, and intelligent system.
Currently, the Emerging Technology department is investigating if and how container technology can support the new ACME web shop application, which is currently under development. ACME ET is primarily looking for a solution that supports the following goals:
● Accelerates development and delivery● Provides for efficient use of infrastructure● Gives developers choice● Offers multiple interaction models
A current favorite of this investigation is the new Red Hat OpenShift Enterprise, Version 3: https :// www . redhat . com / en / technologies / cloud - computing / openshift
To start becoming familiar with the underlying base technologies, ACME ET has asked the Systems Engineering team to provide a couple of test systems that can act as simple a container host based on Docker technology (which is included in Red Hat Enterprise Linux 7).
[email protected] 151 www.redhat.com

In order to provision container hosts in an automated fashion, ACME Systems Engineering has provided three items:
1. a Puppet module to configure the container host accordingly2. a content view containing the required software packages and configuration3. a post-provisioning hook to integrate new hosts automatically into the Satellite 6
compute resources
Sample Puppet Module for Docker Host Compute ResourceThis module is used to configure a RHEL7 host to become a Satellite 6 compute resource for the Docker type. It:
● Installs the required Docker package and ensures that it is updated if a newer version is available, by using the ‘latest’ option (which can be overridden by using a Smart Class Parameter)
● Configures the /etc/sysconfig/docker configuration file according to the documentation in the Satellite 6 User Guide
● Starts the Docker daemon and enables the daemon’s automatic starting
For more detailed documentation about this sample Puppet module, see Appendix I.
Content View for Docker ProfileThe following content view has been created for the Docker profile:
CV Name cv-app-docker
CV Label cv-app-docker
CV Description Docker Host Content View
Composite CV? no
YUM Repositories Red Hat Enterprise Linux 7 Server Extras RPMs
Puppet Modules docker
Filters include: docker*
Life-cycle Env Path DEV -> QA -> PROD
The following hammer commands create the content view, add the corresponding Puppet
www.redhat.com 152 [email protected]
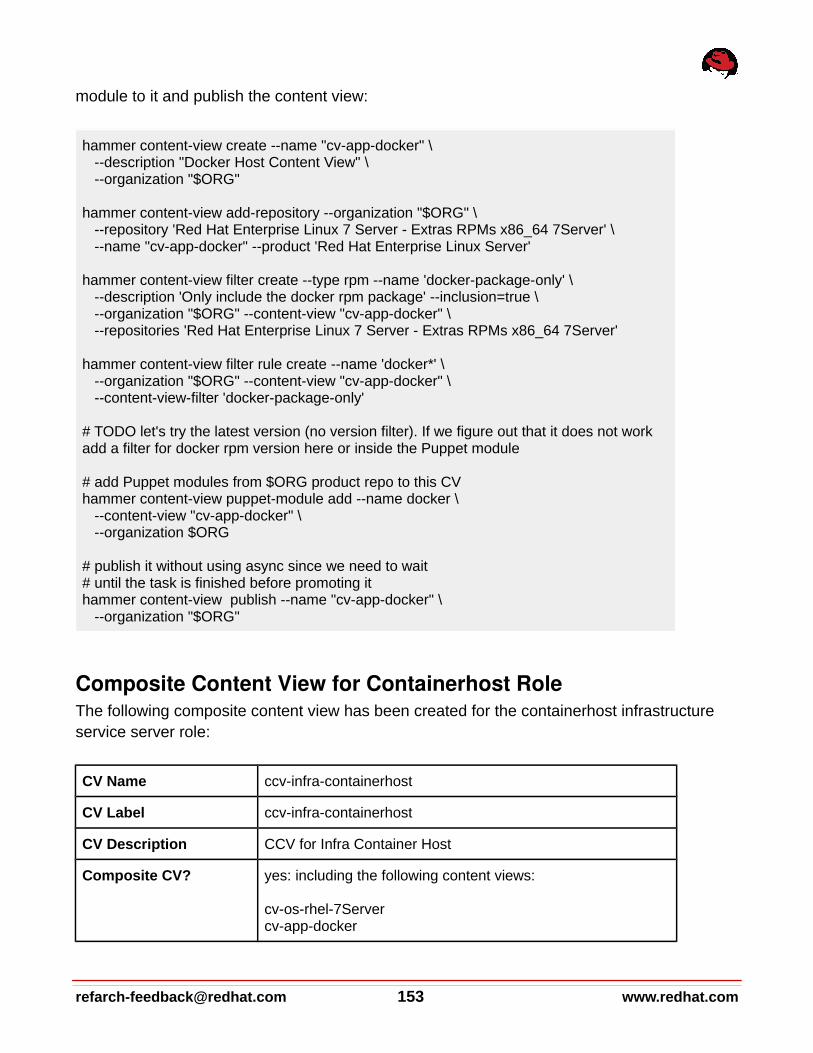
module to it and publish the content view:
hammer content-view create --name "cv-app-docker" \ --description "Docker Host Content View" \ --organization "$ORG"
hammer content-view add-repository --organization "$ORG" \ --repository 'Red Hat Enterprise Linux 7 Server - Extras RPMs x86_64 7Server' \ --name "cv-app-docker" --product 'Red Hat Enterprise Linux Server'
hammer content-view filter create --type rpm --name 'docker-package-only' \ --description 'Only include the docker rpm package' --inclusion=true \ --organization "$ORG" --content-view "cv-app-docker" \ --repositories 'Red Hat Enterprise Linux 7 Server - Extras RPMs x86_64 7Server'
hammer content-view filter rule create --name 'docker*' \ --organization "$ORG" --content-view "cv-app-docker" \ --content-view-filter 'docker-package-only'
# TODO let's try the latest version (no version filter). If we figure out that it does not work add a filter for docker rpm version here or inside the Puppet module
# add Puppet modules from $ORG product repo to this CVhammer content-view puppet-module add --name docker \ --content-view "cv-app-docker" \ --organization $ORG
# publish it without using async since we need to wait # until the task is finished before promoting ithammer content-view publish --name "cv-app-docker" \ --organization "$ORG"
Composite Content View for Containerhost RoleThe following composite content view has been created for the containerhost infrastructure service server role:
CV Name ccv-infra-containerhost
CV Label ccv-infra-containerhost
CV Description CCV for Infra Container Host
Composite CV? yes: including the following content views:
cv-os-rhel-7Servercv-app-docker
[email protected] 153 www.redhat.com

YUM Repositories N/A
Puppet Modules N/A
Filters N/A
Life-cycle Env Path DEV -> QA -> PROD
The following hammer commands then create the composite content view, publish and promote it to the lifecycle environment DEV:
APP_CVID=`get_latest_version cv-app-docker`hammer content-view create --name "ccv-infra-containerhost" \ --composite --description "CCV for Infra Container Host" \ --organization $ORG --component-ids ${RHEL7_CB_VID},${APP_CVID}
hammer content-view publish --name "ccv-infra-containerhost" \ --organization "$ORG"
VID=`get_latest_version ccv-infra-containerhost`hammer content-view version promote --organization "$ORG" \ --content-view "ccv-infra-containerhost" \ --to-lifecycle-environment DEV \ --id $VID --async
PostInstallation Hook for ContainerhostIn addition to the Puppet module, a post-installation hook automatically configures a new host of this type to become a Satellite 6 Docker compute resource using a foreman hook and the hammer CLI. For further information, see the documentation about this hook in Step 8.
Sample Application 3: Central loghost ServerRsyslogd is a system utility that provides support for message logging. The corresponding software packages are part of Red Hat Enterprise Linux. We are using multiple logservers in different environments. For example, we have dedicated logservers inside our DMZ environment, and we are running dedicated logservers for high volume logfiles in our QA environment, because we need to use debugging log levels here.
We use this as an example of a special type of an application that requires neither a content view nor a composite content view. This special case is valid for all applications and daemons that:
● require only software that is already part of our core-build definition
www.redhat.com 154 [email protected]
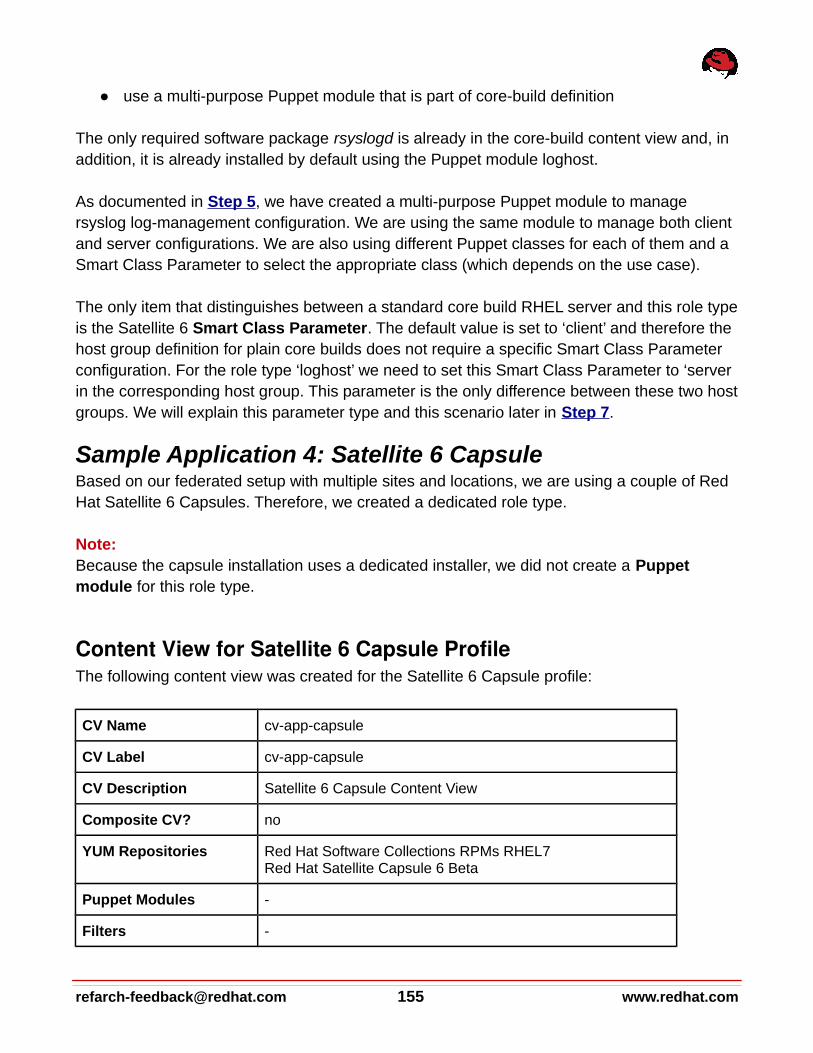
● use a multi-purpose Puppet module that is part of core-build definition
The only required software package rsyslogd is already in the core-build content view and, in addition, it is already installed by default using the Puppet module loghost.
As documented in Step 5, we have created a multi-purpose Puppet module to manage rsyslog log-management configuration. We are using the same module to manage both client and server configurations. We are also using different Puppet classes for each of them and a Smart Class Parameter to select the appropriate class (which depends on the use case).
The only item that distinguishes between a standard core build RHEL server and this role typeis the Satellite 6 Smart Class Parameter. The default value is set to ‘client’ and therefore the host group definition for plain core builds does not require a specific Smart Class Parameter configuration. For the role type ‘loghost’ we need to set this Smart Class Parameter to ‘server in the corresponding host group. This parameter is the only difference between these two hostgroups. We will explain this parameter type and this scenario later in Step 7.
Sample Application 4: Satellite 6 CapsuleBased on our federated setup with multiple sites and locations, we are using a couple of Red Hat Satellite 6 Capsules. Therefore, we created a dedicated role type.
Note: Because the capsule installation uses a dedicated installer, we did not create a Puppet module for this role type.
Content View for Satellite 6 Capsule ProfileThe following content view was created for the Satellite 6 Capsule profile:
CV Name cv-app-capsule
CV Label cv-app-capsule
CV Description Satellite 6 Capsule Content View
Composite CV? no
YUM Repositories Red Hat Software Collections RPMs RHEL7Red Hat Satellite Capsule 6 Beta
Puppet Modules -
Filters -
[email protected] 155 www.redhat.com

Life-cycle Env Path DEV -> QA -> PROD
Note: When this document was written, Satellite 6.1 was in Beta phase. Therefore, we have used the corresponding channel. This needs to be adapted after Satellite 6.1 GA.
The following hammer commands create the content view, add the corresponding Puppet module to it, and then publish the content view:
hammer content-view create --name "cv-app-capsule" \ --description "Satellite 6 Capsule Content View" \ --organization "$ORG"
hammer content-view add-repository --organization "$ORG" \ --repository 'Red Hat Software Collections RPMs for Red Hat Enterprise Linux 7 Server x86_64 7Server' \ --name "cv-app-capsule" --product 'Red Hat Software Collections for RHEL Server'
echo -e "\n\n\nWe enable the Satellite 6 Capsule Repo for ****BETA**** here. "echo -e "POST GA please change this inside step6.sh to the final repository.\n\n\n"
hammer content-view add-repository --organization "$ORG" \ --repository 'Red Hat Satellite Capsule 6 Beta for RHEL 7 Server RPMs x86_64' \ --name "cv-app-capsule" --product 'Red Hat Satellite Capsule Beta'
# Note: we do not use a Puppet module herehammer content-view publish --name "cv-app-capsule" --organization "$ORG"
Composite Content View for Satellite 6 Capsule RoleThe following composite content view was created for the container host infrastructure serviceserver role:
CV Name ccv-infra-capsule
CV Label ccv-infra-capsule
CV Description CCV for Satellite 6 Capsule
Composite CV? yes: including the following content views:
cv-os-rhel-7Servercv-app-capsule
YUM Repositories N/A
www.redhat.com 156 [email protected]
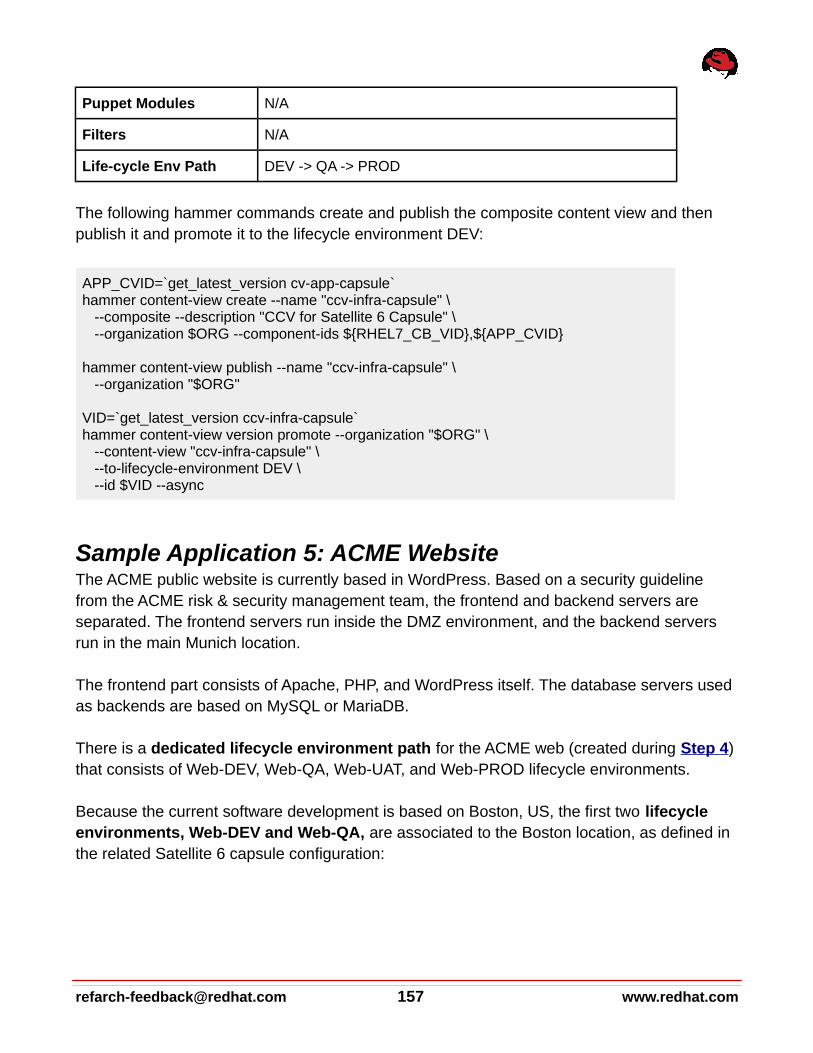
Puppet Modules N/A
Filters N/A
Life-cycle Env Path DEV -> QA -> PROD
The following hammer commands create and publish the composite content view and then publish it and promote it to the lifecycle environment DEV:
APP_CVID=`get_latest_version cv-app-capsule`hammer content-view create --name "ccv-infra-capsule" \ --composite --description "CCV for Satellite 6 Capsule" \ --organization $ORG --component-ids ${RHEL7_CB_VID},${APP_CVID}
hammer content-view publish --name "ccv-infra-capsule" \ --organization "$ORG"
VID=`get_latest_version ccv-infra-capsule`hammer content-view version promote --organization "$ORG" \ --content-view "ccv-infra-capsule" \ --to-lifecycle-environment DEV \ --id $VID --async
Sample Application 5: ACME WebsiteThe ACME public website is currently based in WordPress. Based on a security guideline from the ACME risk & security management team, the frontend and backend servers are separated. The frontend servers run inside the DMZ environment, and the backend servers run in the main Munich location.
The frontend part consists of Apache, PHP, and WordPress itself. The database servers used as backends are based on MySQL or MariaDB.
There is a dedicated lifecycle environment path for the ACME web (created during Step 4) that consists of Web-DEV, Web-QA, Web-UAT, and Web-PROD lifecycle environments.
Because the current software development is based on Boston, US, the first two lifecycle environments, Web-DEV and Web-QA, are associated to the Boston location, as defined in the related Satellite 6 capsule configuration:
[email protected] 157 www.redhat.com
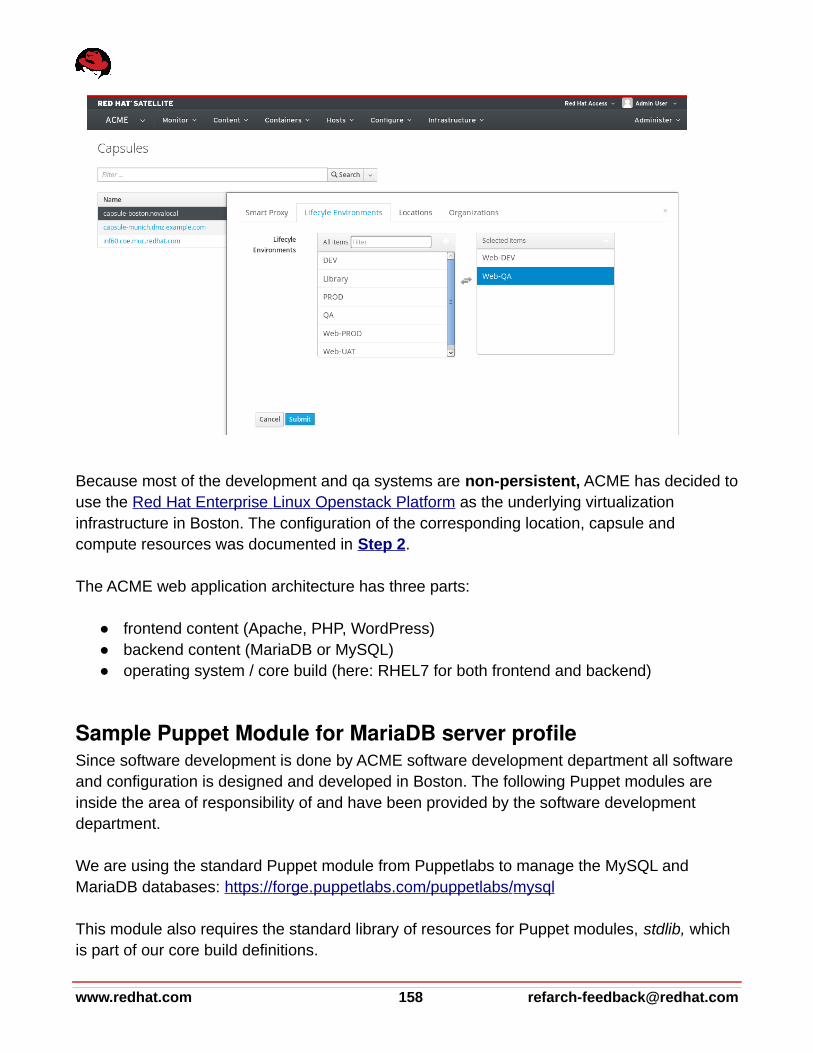
Because most of the development and qa systems are non-persistent, ACME has decided touse the Red Hat Enterprise Linux Openstack Platform as the underlying virtualization infrastructure in Boston. The configuration of the corresponding location, capsule and compute resources was documented in Step 2.
The ACME web application architecture has three parts:
● frontend content (Apache, PHP, WordPress)● backend content (MariaDB or MySQL)● operating system / core build (here: RHEL7 for both frontend and backend)
Sample Puppet Module for MariaDB server profileSince software development is done by ACME software development department all software and configuration is designed and developed in Boston. The following Puppet modules are inside the area of responsibility of and have been provided by the software development department.
We are using the standard Puppet module from Puppetlabs to manage the MySQL and MariaDB databases: https :// forge . puppetlabs . com / puppetlabs / mysql
This module also requires the standard library of resources for Puppet modules, stdlib, which is part of our core build definitions.
www.redhat.com 158 [email protected]

Sample Puppet Module for ACME Web RoleFollowing the roles-profiles model explained earlier, the top layer of the entire application stack has to contain the role (Puppet) configuration. In our scenario, we created a mixed type module that contains both: the role definition and a profile definition for the WordPress application itself.
This module installs and configures the ACME website application. It allows us to distribute the application on two hosts, one for the frontend (Apache+PHP) and one for the backend (MySQL/MariaDB).
The frontend definition does the following items:
● Installs the Apache + PHP packages using the standard Puppet module from Puppetlabs to manage the Apache webserver: https :// forge . puppetlabs . com / puppetlabs / apache
● Extracts the currently latest WordPress version, which is shipped as a file through the Puppet module (version: 4.2.2)
● Configures /var/www/html/wp-config.php with the backend connection parameter, usingthe Satellite 6 Smart Class Parameters
This module also requires the standard library of resources for the Puppet module stdlib and the concat module, which are already part of our core build definitions.
Detailed documentation for this sample Puppet module is in Appendix I.
ACME Web Config GroupsJust as we created our core-build definition, we need to assemble the Puppet classes that belong to our ACME web roles and combine them with a config group. We distinguish between the frontend and backend, just as we did with our content view definitions.
The corresponding config group for frontend servers consists of the following Puppet classes:
[email protected] 159 www.redhat.com

The corresponding config group for backend servers consists of the following Puppet classes:
www.redhat.com 160 [email protected]

Note: The required dependencies stdlib and concat have not been added to these config groups. However, you still need to ensure that they are inside the same Puppet environment. This is automatically done since they are part of the same composite content view.
Content View for MariaDB ProfileThe following content view has been created for the MariaDB profile:
CV Name cv-app-mariadb
CV Label cv-app-mariadb
CV Description MariaDB Content View
Composite CV? no
YUM Repositories Red Hat Software Collections RPMs for RHEL6
Puppet Modules mysql
Filters -
Life-cycle Env Path - (remains in Library)
The following hammer commands create the content view, add the corresponding Puppet module to it, and publish the content view:
hammer content-view create --name "cv-app-mariadb" \ --description "MariaDB Content View" \ --organization "$ORG"
# since MariaDB is included in RHEL7 (and therefore in RHEL7 Core Build) we only need to add RHSCL if we use RHEL6if [ "$RHEL6_ENABLED" -eq 1 ]then
hammer content-view add-repository --name "cv-app-mariadb" \ --repository 'Red Hat Software Collections RPMs for Red Hat Enterprise Linux 6
Server x86_64 7Server' \ --product 'Red Hat Software Collections for RHEL Server' \ --organization "$ORG"
fi
# download puppetlabs mysql module and push it to ACME Puppet Repowget -O /tmp/puppetlabs-mysql-3.4.0.tar.gz https://forgeapi.puppetlabs.com/v3/files/puppetlabs-mysql-3.4.0.tar.gz
[email protected] 161 www.redhat.com
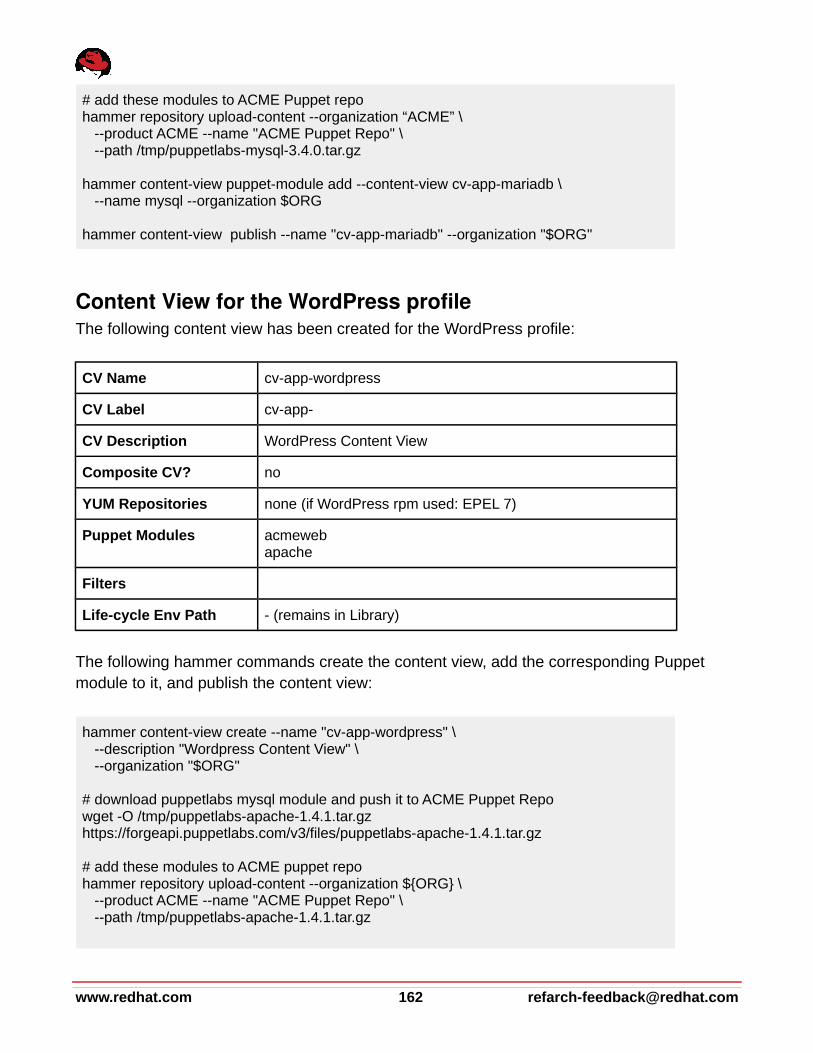
# add these modules to ACME Puppet repohammer repository upload-content --organization “ACME” \ --product ACME --name "ACME Puppet Repo" \ --path /tmp/puppetlabs-mysql-3.4.0.tar.gz
hammer content-view puppet-module add --content-view cv-app-mariadb \ --name mysql --organization $ORG
hammer content-view publish --name "cv-app-mariadb" --organization "$ORG"
Content View for the WordPress profileThe following content view has been created for the WordPress profile:
CV Name cv-app-wordpress
CV Label cv-app-
CV Description WordPress Content View
Composite CV? no
YUM Repositories none (if WordPress rpm used: EPEL 7)
Puppet Modules acmewebapache
Filters
Life-cycle Env Path - (remains in Library)
The following hammer commands create the content view, add the corresponding Puppet module to it, and publish the content view:
hammer content-view create --name "cv-app-wordpress" \ --description "Wordpress Content View" \ --organization "$ORG"
# download puppetlabs mysql module and push it to ACME Puppet Repowget -O /tmp/puppetlabs-apache-1.4.1.tar.gz https://forgeapi.puppetlabs.com/v3/files/puppetlabs-apache-1.4.1.tar.gz
# add these modules to ACME puppet repohammer repository upload-content --organization ${ORG} \ --product ACME --name "ACME Puppet Repo" \ --path /tmp/puppetlabs-apache-1.4.1.tar.gz
www.redhat.com 162 [email protected]

# add puppet modules from $ORG product repo to this CVhammer content-view puppet-module add --name apache \ --content-view "cv-app-wordpress" \ --organization $ORG
# role specific module for acmeweb (includes wordpress profile)hammer content-view puppet-module add --name acmeweb \ --content-view "cv-app-wordpress" \ --organization $ORG
hammer content-view publish --name "cv-app-wordpress" --organization "$ORG"
Composite Content View for ACME Web RoleThe following composite content view has been created for the ACME Web service server role:
CV Name ccv-biz-acmeweb
CV Label ccv-biz-acmeweb
CV Description CCV for ACME including WordPress and MariaDB
Composite CV? yes: including the following content views:
cv-os-rhel-7Servercv-app-mariadbcv-app-wordpress
YUM Repositories N/A
Puppet Modules N/A
Filters N/A
Life-cycle Env Path Web-DEV -> Web-QA -> Web-UAT -> Web-PROD
The following hammer commands create the composite content view, publish it, and promote it to the lifecycle environment DEV:
APP1_CVID=`get_latest_version cv-app-mariadb`APP2_CVID=`get_latest_version cv-app-wordpress`hammer content-view create --name "ccv-biz-acmeweb" --composite \ --description "CCV for ACME including WordPress and MariaDB" \ --component-ids ${RHEL7_CB_VID},${APP1_CVID},${APP2_CVID} \
[email protected] 163 www.redhat.com

--organization $ORG
hammer content-view publish --name "ccv-biz-acmeweb" --organization "$ORG"
VID=`get_latest_version ccv-biz-acmeweb`hammer content-view version promote --organization "$ORG" \ --content-view "ccv-biz-acmeweb" \ --to-lifecycle-environment Web-DEV \ --id $VID --async
Click on Content -> Content Views to see a long list of content views and composite content views.
To list all the content views we’ve created so far, use hammer commands:
Note:This list provides some additional information that might be relevant to you. Besides the
www.redhat.com 164 [email protected]
content view type (composite, true, or empty), you can also see content views that have no repository IDs associated with them (composite content views have no repositories associated with them by default). These are our content views that use the core build repositories for software (for example MariaDB as part of Red Hat Enterprise Linux) and that only contain Puppet modules.
[email protected] 165 www.redhat.com

Step 7: Automate your provisioningA high degree of automatization is one of the key factors for successfully establishing your Standard Operating Environment (SOE). The Red Hat Satellite Server 6 offers many features that help you to automate your provisioning:
● Parameterization for provisioning templates and managing configurations (improves the re-usability of provisioning templates and Puppet classes to achieve different configurations based on the parameters at a host level)
● Provisioning Templates (for example, a customizable Kickstart for unattended installations)
● Configuration management with Puppet (defines the target state of a host through its entire lifecycle)
● Host Groups for standardized provisioning of server roles
By the time you finish this section, the Red Hat Satellite Server will be configured to provision the Core Build based on a Red Hat Enterprise Linux 7 Server with the following sample configuration:
● Customized partition layout● Additional RPM packages to the @core package group through Puppet● Static network configuration● Sample service configuration for ntp and remote logging● A host configuration for monitoring with zabbix, as an example
In this chapter we will set up all required Satellite 6 entities to deploy all the sample services and applications we have created in the previous two steps:
● A plain OS / Core Build server● A server acting as a container host● A server acting as a Satellite 6 capsule server● A server acting as a git server● A server acting as a loghost● A server acting as a (database) backend server for ACME web application● A server acting as a (WordPress-based) frontend server for ACME web application
Provisioning RecommendationsThe server provisioning configuration is one of the most powerful and complex configurations in Red Hat Satellite 6.
The primary goal is to provision new servers based on a pre-defined configuration with the
www.redhat.com 166 [email protected]

highest possible degree of standardization and automation, as well as up to the highest possible abstraction layer (typically the application).
Even if provisioning of the operation system (core build) is the most common use case in many customer environments, Red Hat Satellite provides the capability to provision servers that are ready to be used in production. This capability includes both:
● The provisioning of operating systems and the applications running on top of the OS ● The integration into the entire management tool chain
This provisioning produces what we call "ready2run systems." These systems are completely configured and can be used in production and test environments immediately. Even if many customers have not implemented these capabilities yet, you would need to have them in place in a cloud scenario where servers (and primarily applications running on top of them) can be accessed through a self-service portal.
The diagram below illustrates the basic workflow of this enhanced provisioning. The main goals of this fully automated server provisioning are:
[email protected] 167 www.redhat.com

● To be able to provision a server within a few minutes
● To include the OS (IaaS) and
application platform (PaaS) 1
● Not to require manual intervention
● Not to require manual postprocessing
● To have hardware / virtualization specific adaptations handled automatically
● To integrate the system fully integrated into the ITSM tool chain
● To have the system tested and production ready after reboot
The effort required to implement such a fully automated provisioning might be extensive. But in terms of synergy, it can be it: while initial provisioning might be a seldomly used use case, at least in production, the technology core is similar to three other use cases:
1 * (Application deployment is not the primary target of Satellite 6, even though it is technicallyfeasible. Instead, we recommend that you use a dedicated PaaS tool for this use case, such as Red Hat OpenShift Enterprise)
www.redhat.com 168 [email protected]

● Disaster Recovery Procedures: The main difference between initial provisioning and performing a restore is that the data restore could be triggered at the end of provisioning.
● System Cloning: Lets you create production clones (for example, for testing changes and reproducing incidents). The main differences are the environment-specific adaptations (for example, different connection credentials for subsystems), which should be covered anyway in the server configuration, because the content (view) is promoted unchanged through the different lifecycle environments (see chapterContent View Recommendations for further details)
● Dynamic (horizontal) Scale-Out: Lets you add additional / similar systems of the same type to achieve horizontal scalability. The main difference is that the new system has to be added with a load balancer in front of it. If a load balancer has been used already, this might be already covered in the deployment configuration.
In order to re-use (initial) provisioning capabilities for restore / disaster recovery procedures, we recommend that you use a split partitioning schema to divide between the software and data disks. We will explain this in the Partition Tables section below.
Because most of the automation discussed in this solution guide relies heavily on a working kickstart configuration, every change in all related objects should be considered carefully
[email protected] 169 www.redhat.com

and tested before you apply it to the production configuration. The following section provides some guidance on how to reduce the complexity of the provisioning configuration and how to maintain it efficiently.
The complete installation and configuration of the system might not be enough for it to be used in production. You must also integrate this system into the system management toolchain, primarily focusing on monitoring, backup, scheduling, incident management and so on.Specifically this integration means that the new host must be added to our monitoring configuration, in addition to the monitoring-related software installation and the configuration of the client. This integration might also include remote executions running as hooks on different servers than the recently provisioned host (for example, on the backup management server). In our solution guide, we're demonstrating this integration based on the monitoring use case. Further enhancements are listed in Step 10.
The primary goal therefore is to reduce the total number of kickstart configurations to an absolute minimum. The flexibility and dynamic adoptions (both parameter based or automatically detected) help to cover as many options and variants as possible within one single kickstart file, used by all servers. On the other hand, and given the importance of provisioning for all the 4 use cases mentioned above, we recommend that you create at least one test clone for each production kickstart file. Use this test clone to validate changes before applying them to a configuration used in production. The validation of a newer version of a kickstart configuration should test as options as possible that are covered by the provisioning configuration (such as, different hardware and virtualization platforms and different application types).
Red Hat Satellite ships with a lot of different templates for provisioning that might already be sufficient for many customer environments. Before you clone and adapt these templates, we recommend that you verify that you actually need to adapt them. In most cases, you may only need to create one or two additional custom templates. For maintenance reasons, it is easier to add custom templates (which might be based on the pre-configured ones / clones of them) than to adapt the original template.
As an alternative to adding functionality to the kickstart files and templates, consider adding this functionality to the content managed inside content views instead. Step 5 outlines that the core build can contain most of these capabilities that might be easier to maintain because the content view is using the inherent lifecycle management capabilities. See Step 5for more details.
Though it is much easier to add a “yum -y install <yourpackage>” line into kickstart than it is towrite a Puppet module and add it to a content view, the main disadvantage of adding this line is that then it applies only to systems that are provisioned. If you want to add the required
www.redhat.com 170 [email protected]

packages to an already existing server, you would have to re-provision it. Sure, you could manually add the packages later using the WebUI, but that option defeats the goal of repeatability.
To avoid an unnecessary complexity in content views and host groups, we recommend that you make the provisioning configuration flexible enough to deal with all options that are primarily based on the different hardware and virtualization platforms used in your environment. Most of them can be automatically detected, and you can use the conditional statements in the kickstart configuration to adapt how these actions are automatically executed. If you are using different hardware platforms that require different partition tables (for example, /dev/sda for standard hardware but /dev/cciss for older HP servers), we recommend that you create a dynamic environment that handles all these options, instead of creating different kickstart configurations for all of them.
Red Hat Satellite currently only provides a version control that includes diff and change-reverting capabilities for individual templates. If you adapt a template, you can view the diffs and revert changes by selecting the template under Host -> Provisioning Templates -> Your Template and clicking on the History tab:
If you are using advanced provisioning setups that include a lot of modified and enhanced templates, we recommend that you back up and version control these items on a regular
[email protected] 171 www.redhat.com

basis. Either before importing them into Satellite or using the API to gather, download and store all related objects in a revision control system.
Provisioning MethodsSatellite Server 6 offers multiple ways to boot a host into the Anaconda installer to initiate the provisioning phase.
● PXE
The Satellite Server automatically manages a Pre-boot eXecution Environment (PXE) through the Red Hat Capsule features (TFTP and DHCP). The DHCP Server assigns the host its network configuration and directs the host to the TFTP Server.By default, the TFTP Server is managed through the Kickstart default PXELinux template to create a tftp boot record that points the host to its installation configuration.
● Boot ISO
As an alternative, you can use Boot ISOs. By default, Boot ISOs are generated with the Boot disk iPXE - host template.
To generate a host specific Boot ISO, navigate to (after you have already created the new host entry):
Hosts ➤ All Hosts select host to generate boot iso for select ➤ ➤ Boot disk select ➤Host '%name' image
Note:Boot ISOs have the disadvantage that they have to be manually uploaded to a Compute Resource or to the Board Management Controller of a physical server in order to provision a host.
● Image Based
Another method is Image-based provisioning. This is only available when a host is provisioned through Compute Resources. Images that are available in the image store on a Compute Resource have to be flagged so that you can use them with the Red HatSatellite.
Two different provisioning types are available when image-based provisioning is being used.
● Type finish (Satellite Kickstart Default Finish)A custom post-installation script that requires the Red Hat Satellite Server to
www.redhat.com 172 [email protected]
connect to the host via SSH in order to execute the script.
● Type user_data (Satellite Kickstart Default User Data)When a Compute Resource like OpenStack or EC2 is used, the user_data template can be used for a role-specific configuration after image deployment. The user_data template is a post script where the host connects to the Red HatSatellite Server to register itself with the assigned activation key to get access toits content. The user_data type has a mandatory requirement for user_data capable images (for example, cloud-init or another metadata-receiving script).
Note:This method is covered in the Scenario C) implementation at the end of Step 2 of this document.
To assign images to be used by Red Hat Satellite for provisioning, go to:1. Infrastructure ➤ Compute Resources select the Compute Resource that ➤contains the image2. Navigate to the Images tab ➤ New Image3. Fill in the corresponding information for the new image. If the image is capable to execute user_data scripts, Make sure to check the "User data" checkbox.
● Using the Satellite 6 Discovery Feature
Red Hat Satellite’s Discovery functionality allows automatic bare-metal discovery of unknown nodes on the provisioning network. New nodes self-register into and upload hardware facts so that they can be provisioned. The registered nodes can then be provisioned.
Satellite 6.1 extends this capability to allow the administrator to
• Define rules which govern how these discovered systems are provisioned. This
allows provisioning to occur automatically and without further intervention• Enable Discovery to work via Satellite Capsules via the Isolated Capsule
feature.• Integrate Discovery with existing workflows via its new Hammer CLI plugin.
Further details can be found here: https://access.redhat.com/articles/1450723
Parameters
[email protected] 173 www.redhat.com
Parameters are key/value pairs that can be used in Provisioning templates as well as for configuration management (Puppet). Parameters can be defined in several places in a hierarchical manner. If the same key is used in more than one of those places, the most specific one to the host will be used.
The Red Hat Satellite Server manages two different types of parameters, global parameters and smart class parameters.
Global ParametersGlobal parameters are accessible for use in Red Hat Satellite as well as for Puppet configuration management.
You can access global parameters to use in Red Hat Satellite wherever ERB templating is being used. You can access the value of global parameters in:
● Any type of provisioning template● Partition tables
The recommended way to access Global Parameters in a Puppet manifest is $::variable, but $variable works as well.
Parameters available to a host for provisioning or configuration management with Puppet can be reviewed at:
● Hosts ➤ All Hosts Select the host for which you want to view the available ➤parameters.
● Click on the YAML button.
Note:No matter at which level parameters are defined in the hierarchy, in the end the parameters are always made available on a per host basis. For this reason, they can always be accessed with the variable host.params[‘parameter_name’].
The following graphic outlines the global parameter hierarchy.
www.redhat.com 174 [email protected]
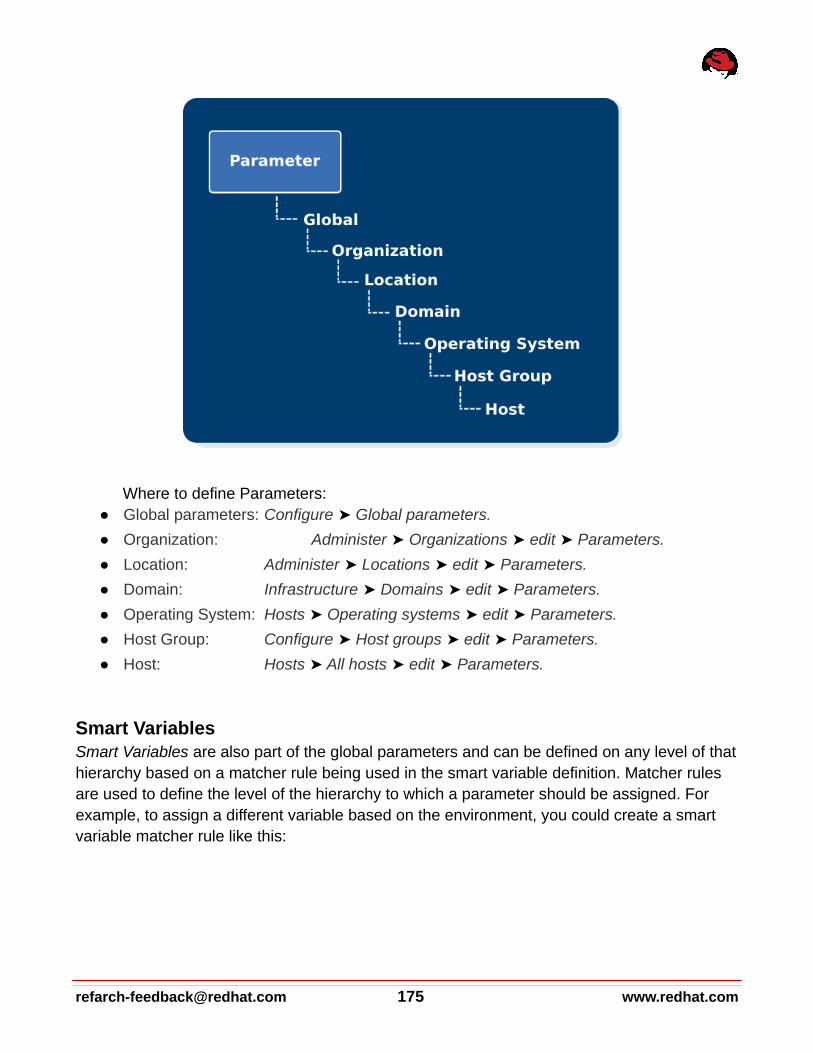
Where to define Parameters:● Global parameters: Configure ➤ Global parameters.
● Organization: Administer ➤ Organizations ➤ edit ➤ Parameters.
● Location: Administer ➤ Locations ➤ edit ➤ Parameters.
● Domain: Infrastructure ➤ Domains ➤ edit ➤ Parameters.
● Operating System: Hosts ➤ Operating systems ➤ edit ➤ Parameters.
● Host Group: Configure ➤ Host groups ➤ edit ➤ Parameters.
● Host: Hosts ➤ All hosts ➤ edit ➤ Parameters.
Smart VariablesSmart Variables are also part of the global parameters and can be defined on any level of thathierarchy based on a matcher rule being used in the smart variable definition. Matcher rules are used to define the level of the hierarchy to which a parameter should be assigned. For example, to assign a different variable based on the environment, you could create a smart variable matcher rule like this:
[email protected] 175 www.redhat.com

Note:It is important to flag the checkbox “override” to tell Red Hat Satellite to manage the variable.
Smart Variables are used in Puppet manifests and can be configured under ● Configure ➤ Smart Variables
Smart Class ParametersThese parameters are scoped (assigned) to a single Puppet class. Other than global parameters, class parameters are available only inside the Puppet class where the parameteris defined.
Define Global ParametersTo reach a high level of standardization, ACME is using a single provisioning template for allhosts, no matter the location or role of the host. To be able to configure hosts differently basedon the location, ACME uses the location parameters to set the timezone and language:
Location Parameter: Key Parameter: Value
boston time-zone America/New_York
language en_US.UTF-8
munich time-zone Europe/Berlin
language en_US.UTF-8
munich-dmz time-zone Europe/Berlin
language en_US.UTF-8
www.redhat.com 176 [email protected]

To define the location-based parameters that will be used in the Provisioning template section of this chapter, navigate to:
Location munich:
5. Administer ➤ Locations select the location ➤ munich on the left pane select ➤Parameters
6. Add the key: time-zone and the value: Europe/Berlin7. Add the key: language and the value: en_US.UTF-8
Location munich-dmz:
● Administer ➤ Locations select the location ➤ munich-dmz on the left pane select ➤Parameters
● Add the key: time-zone and the value: Europe/Berlin● Add the key: language and the value: en_US.UTF-8
Location boston:
9. Administer ➤ Locations select the location ➤ munich-dmz on the left pane select ➤Parameters
10.Add the key: time-zone and the value: America/New_York11. Add the key: language and the value: en_US.UTF-8
[email protected] 177 www.redhat.com
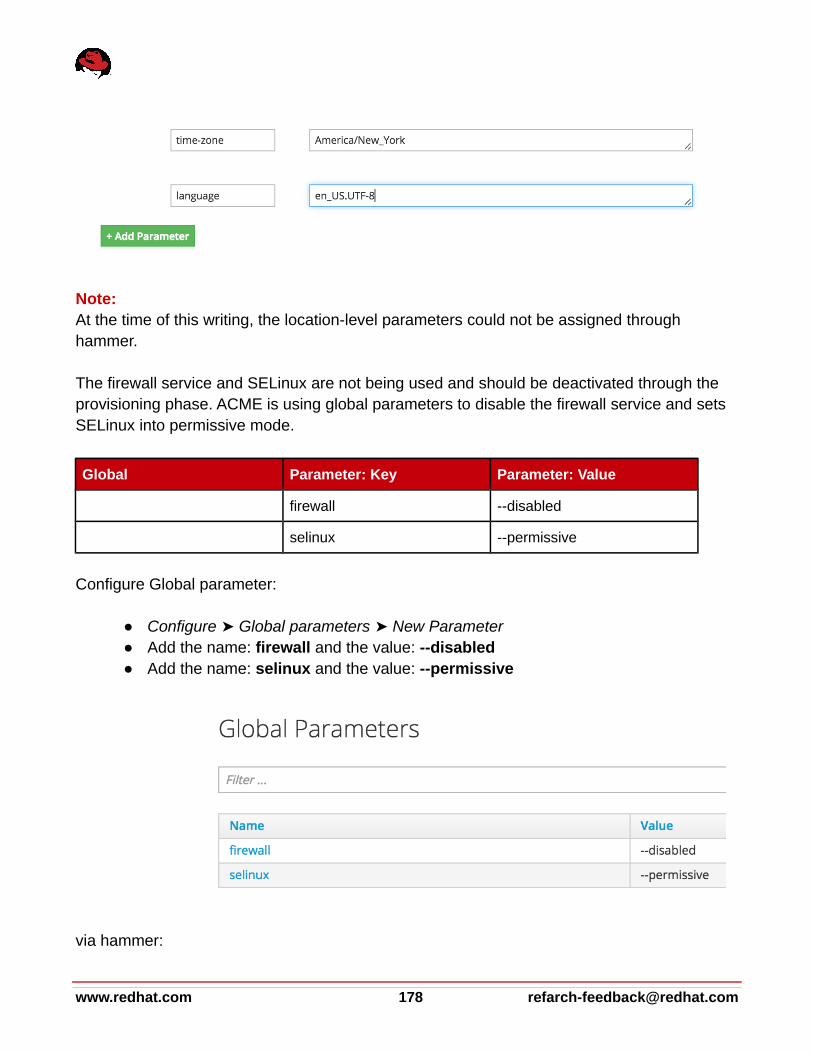
Note:At the time of this writing, the location-level parameters could not be assigned through hammer.
The firewall service and SELinux are not being used and should be deactivated through the provisioning phase. ACME is using global parameters to disable the firewall service and sets SELinux into permissive mode.
Global Parameter: Key Parameter: Value
firewall --disabled
selinux --permissive
Configure Global parameter:
● Configure ➤ Global parameters ➤ New Parameter● Add the name: firewall and the value: --disabled● Add the name: selinux and the value: --permissive
via hammer:
www.redhat.com 178 [email protected]
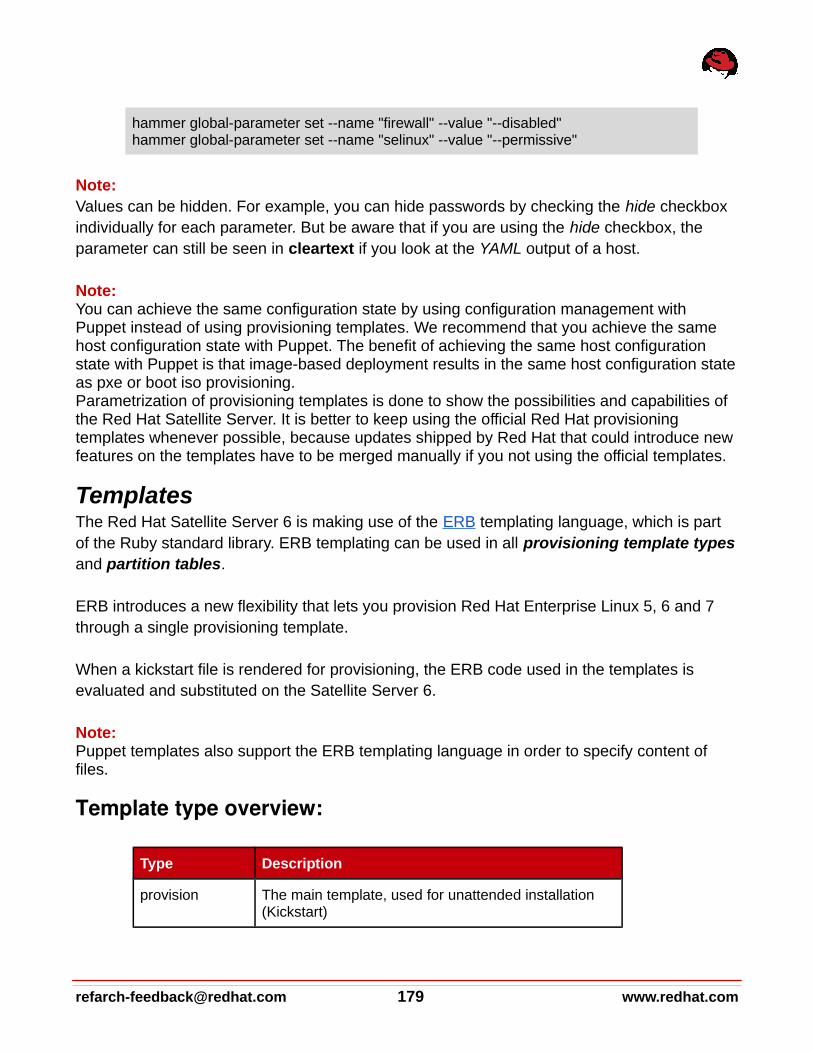
hammer global-parameter set --name "firewall" --value "--disabled"hammer global-parameter set --name "selinux" --value "--permissive"
Note:Values can be hidden. For example, you can hide passwords by checking the hide checkbox individually for each parameter. But be aware that if you are using the hide checkbox, the parameter can still be seen in cleartext if you look at the YAML output of a host.
Note:You can achieve the same configuration state by using configuration management with Puppet instead of using provisioning templates. We recommend that you achieve the same host configuration state with Puppet. The benefit of achieving the same host configuration state with Puppet is that image-based deployment results in the same host configuration stateas pxe or boot iso provisioning. Parametrization of provisioning templates is done to show the possibilities and capabilities of the Red Hat Satellite Server. It is better to keep using the official Red Hat provisioning templates whenever possible, because updates shipped by Red Hat that could introduce new features on the templates have to be merged manually if you not using the official templates.
TemplatesThe Red Hat Satellite Server 6 is making use of the ERB templating language, which is part of the Ruby standard library. ERB templating can be used in all provisioning template typesand partition tables.
ERB introduces a new flexibility that lets you provision Red Hat Enterprise Linux 5, 6 and 7 through a single provisioning template.
When a kickstart file is rendered for provisioning, the ERB code used in the templates is evaluated and substituted on the Satellite Server 6.
Note:Puppet templates also support the ERB templating language in order to specify content of files.
Template type overview:
Type Description
provision The main template, used for unattended installation (Kickstart)
[email protected] 179 www.redhat.com
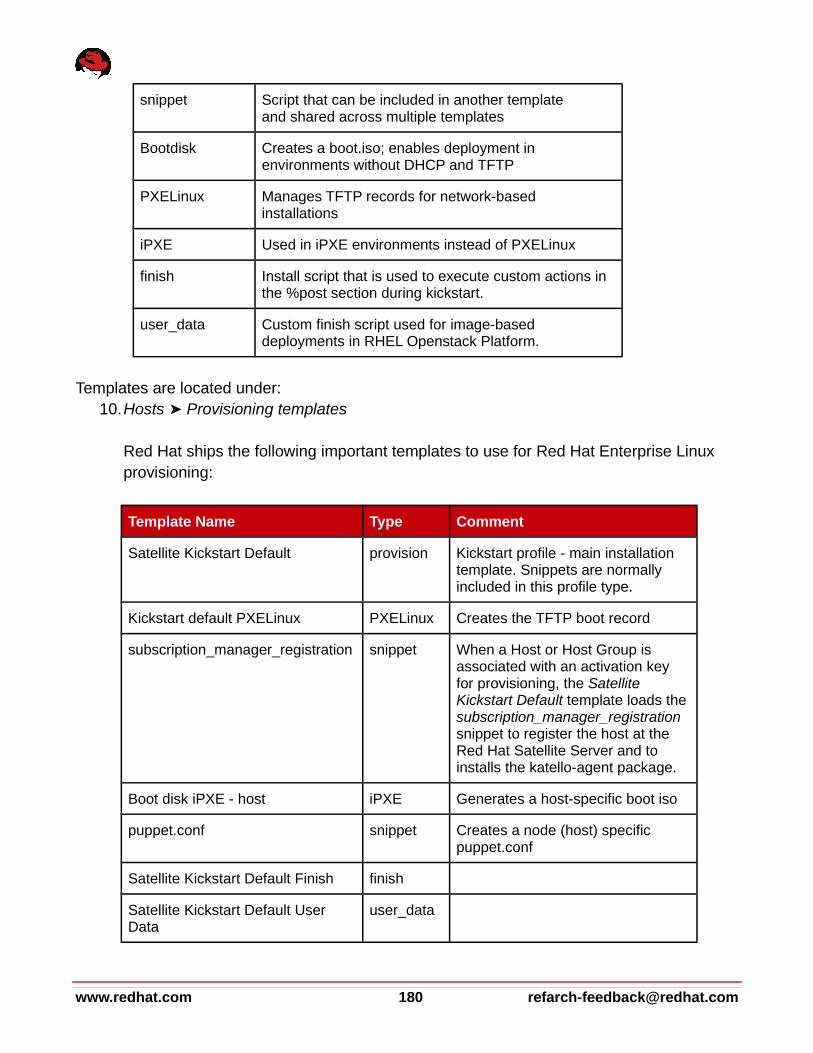
snippet Script that can be included in another templateand shared across multiple templates
Bootdisk Creates a boot.iso; enables deployment in environments without DHCP and TFTP
PXELinux Manages TFTP records for network-based installations
iPXE Used in iPXE environments instead of PXELinux
finish Install script that is used to execute custom actions in the %post section during kickstart.
user_data Custom finish script used for image-based deployments in RHEL Openstack Platform.
Templates are located under:10.Hosts ➤ Provisioning templates
Red Hat ships the following important templates to use for Red Hat Enterprise Linux provisioning:
Template Name Type Comment
Satellite Kickstart Default provision Kickstart profile - main installation template. Snippets are normally included in this profile type.
Kickstart default PXELinux PXELinux Creates the TFTP boot record
subscription_manager_registration snippet When a Host or Host Group is associated with an activation key for provisioning, the Satellite Kickstart Default template loads thesubscription_manager_registration snippet to register the host at the Red Hat Satellite Server and to installs the katello-agent package.
Boot disk iPXE - host iPXE Generates a host-specific boot iso
puppet.conf snippet Creates a node (host) specific puppet.conf
Satellite Kickstart Default Finish finish
Satellite Kickstart Default User Data
user_data
www.redhat.com 180 [email protected]

Note:For an overview of the kickstart options that can be used in the provisioning template, see:https :// access . redhat . com / documentation / en - US / Red _ Hat _ Enterprise _ Linux /7/ html / Installation _ Guide / sect - kickstart - syntax . html
Clone a Provisioning TemplateProvisioning templates that are shipped by Red Hat are not allowed to be edited directly. The templates are locked to ensure that a host can always be successfully provisioned with these templates. Moreover, the templates may be enhanced when the Red Hat Satellite Server will be updated.
To change a provisioning template or use a parameter inside it, it must be cloned.
In this document the template Satellite Kickstart Default is the only one that will be cloned andadapted to use the previously defined parameters at the global and location level.
To clone a template, navigate to:7. Hosts ➤ Provisioning templates8. On the row with the name Satellite Kickstart Default, go to the right side and click on
the clone button9. On the New Template page fill in the name ACME Kickstart Default10.Replace the variables
a. replace language with: lang <%= @host.params[‘language’] %>b. replace selinux with: selinux <%= @host.params[‘selinux’] %>c. replace firewall with: firewall <%= @host.params[‘firewall’] %>d. note that the parameter time-zone is already used by default if available.
[email protected] 181 www.redhat.com

via hammer:
● Download the existing Provisioning template
hammer template dump --name "Satellite Kickstart Default" > "/tmp/tmp.skd"
● Edit the file /tmp/tmp.skd to replace the variables listed above
● Import the template under the new name
ORG=ACMEhammer template create \ --file /tmp/tmp.skd \ --name "${ORG} Kickstart default" \ --organizations "${ORG}" \ --type provision
Note:All necessary Provisioning templates should already be assigned to the Organization by default, if your template is missing, navigate to:
Administer ➤ Organizations select ➤ Organization select ➤ Templates on the left side ➤check the missing template in the left box to assign it to the Organization click the ➤ Submit button
www.redhat.com 182 [email protected]

Partition TablesPartition tables are a type of provisioning template. They are located under another section because it is often the case that the same host template is being used with different partition layouts based on the role assigned to a host.
Partition tables are created under:● Hosts ➤ Partition tables
There are two kinds of partition tables, static and dynamic.
Static Partition Table
As the name implies, static partition tables contain a fixed partition layout.
Dynamic Partition Tables
Dynamic partition tables enable an administrator to create a different partition layout dynamically with only one partition table. A dynamic partition table can make use of ERB & Bash. In these cases, ERB is evaluated on the Red Hat Satellite and the Bash code is executed on the host itself during installation.
For example, the swap size of a partition can be a different size, based on the memory available.
To inform the Red Hat Satellite Server that a partition table should be dynamic, place hashtag(#)Dynamic at the top of the partition table.
#Dynamic
<partition table configuration>
A Dynamic partition table has to be located at /tmp/diskpart.cfg on the filesystem of a host at the %pre section of the kickstart process.
Example:
#Dynamiccat <<EOF > /tmp/diskpart.cfgzerombr yesclearpart --all --initlabelpart swap --size 2048
[email protected] 183 www.redhat.com

part /boot --fstype ext4 --size 500 --asprimarypart / --fstype xfs --size 4096 --growEOF
Create the Custom Partition Table
Warning:The following information has been provided by Red Hat, but is outside the scope of the posted Service Level Agreements and support procedures. The information in this article could make the Operating System unsupported by Red Hat Global Support Services. In this chapter we show an example of how powerful using dynamic partition tables can be. However, use of the information is at the user's own risk.
We create a dynamic partition table with the following capabilities:
● Uses Red Hat Enterprise Linux 6 and 7○ for RHEL6, uses the ext4 filesystem○ for RHEL7, uses the xfs filesystem
● Uses the same partition layout for the Operating System and a different application layout on a second disk based on additional snippets
● When a second disk is available, loads a nested partition table○ the first disk is used for the Operating System only○ the second disk is used for the data (application) only
■ the nested partition table is loaded when a parameter called @host.params[‘ptable’] is available.
● the nested partition table is a snippet located under the provisioning templates and follows this naming convention:
ptable - < org > - < ptable name >
Example: ptable-acme-git
■ when the host is re-provisioned, the filesystem layout and the data on thesecond disk remain available.
Note:ERB code (<%...%>) is evaluated on the Red Hat Satellite Server.Bash code is executed on the client in the %pre section of the Kickstart file.
www.redhat.com 184 [email protected]

To create the dynamic partition table for Red Hat Enterprise Linux 6 and 7, go to:● Hosts ➤ Partition tables ➤ New Partition Table● Enter the name: ptable-acme-os-rhel-server● Copy & paste the partition layout from the box below into the Layout text field● Select the OS family Red Hat ● Submit
#Dynamic
<% if @host.operatingsystem.major.to_i > 6 %> <% fstype = "xfs" %><% else %> <% fstype = "ext4" %><% end %>
PRI_DISK=$(awk '/[v|s]da|c0d0/ {print $4 ;exit}' /proc/partitions)grep -E -q '[v|s]db|c1d1' /proc/partitions && SEC_DISK=$(awk '/[v|s]db|c1d1/ {print $4 ;exit}' /proc/partitions)grep -E -q '[v|s]db1|c1d1p1' /proc/partitions && EXISTING="true"
echo zerombr >> /tmp/diskpart.cfgecho clearpart --drives ${PRI_DISK} --all --initlabel >> /tmp/diskpart.cfg
echo part /boot --fstype <%= fstype %> --size=512 --ondisk=${PRI_DISK} --asprimary >> /tmp/diskpart.cfgecho part pv.65 --size=1 --grow --ondisk=${PRI_DISK} >> /tmp/diskpart.cfgecho volgroup vg_sys --pesize=32768 pv.65 >> /tmp/diskpart.cfg<% if @host.params['ptable'] %> <%= snippet "ptable-acme-#{@host.params['ptable']}" %><% end %>echo logvol / --fstype <%= fstype %> --name=lv_root --vgname=vg_sys --size=2048 --fsoptions="noatime" >> /tmp/diskpart.cfgecho logvol swap --fstype swap --name=lv_swap --vgname=vg_sys --size=2048 >> /tmp/diskpart.cfgecho logvol /home --fstype <%= fstype %> --name=lv_home --vgname=vg_sys --size=2048 --fsoptions="noatime,usrquota,grpquota" >> /tmp/diskpart.cfgecho logvol /tmp --fstype <%= fstype %> --name=lv_tmp --vgname=vg_sys --size=1024 --fsoptions="noatime" >> /tmp/diskpart.cfgecho logvol /usr --fstype <%= fstype %> --name=lv_usr --vgname=vg_sys --size=2048 --fsoptions="noatime">> /tmp/diskpart.cfgecho logvol /var --fstype<%= fstype %> --name=lv_var --vgname=vg_sys --size=2048 --fsoptions="noatime" >> /tmp/diskpart.cfg
[email protected] 185 www.redhat.com
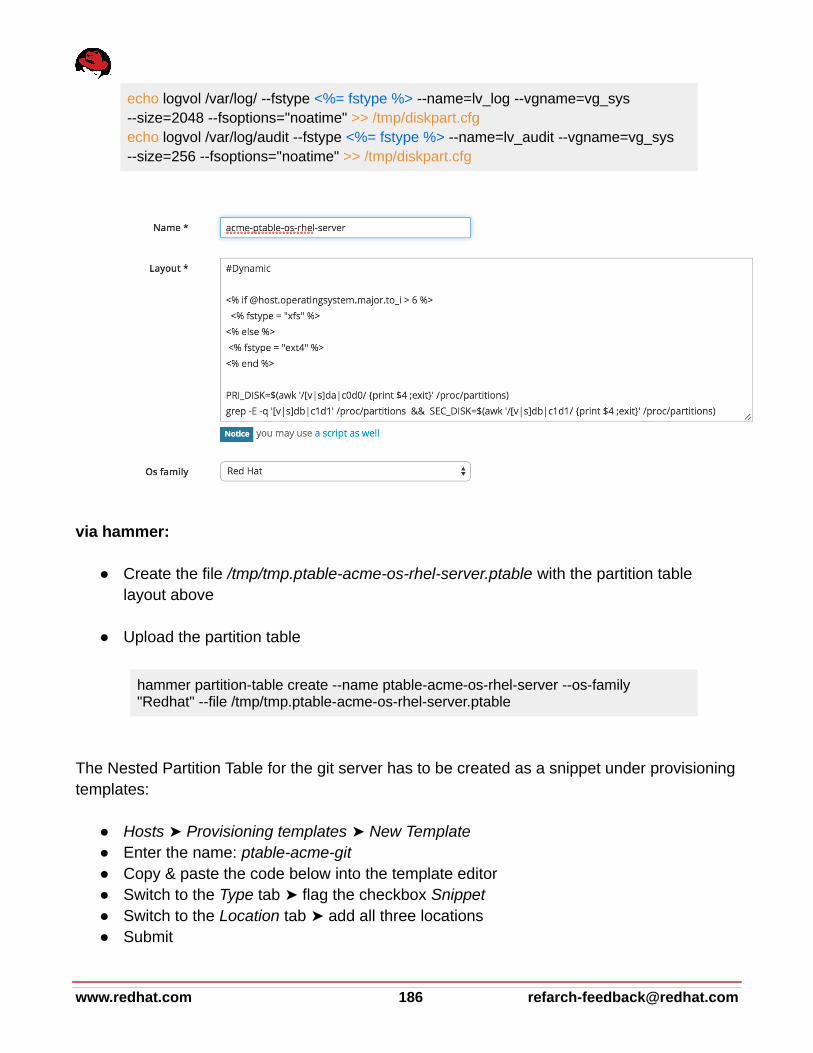
echo logvol /var/log/ --fstype <%= fstype %> --name=lv_log --vgname=vg_sys --size=2048 --fsoptions="noatime" >> /tmp/diskpart.cfgecho logvol /var/log/audit --fstype <%= fstype %> --name=lv_audit --vgname=vg_sys --size=256 --fsoptions="noatime" >> /tmp/diskpart.cfg
via hammer:
● Create the file /tmp/tmp.ptable-acme-os-rhel-server.ptable with the partition table layout above
● Upload the partition table
hammer partition-table create --name ptable-acme-os-rhel-server --os-family "Redhat" --file /tmp/tmp.ptable-acme-os-rhel-server.ptable
The Nested Partition Table for the git server has to be created as a snippet under provisioningtemplates:
● Hosts ➤ Provisioning templates ➤ New Template● Enter the name: ptable-acme-git● Copy & paste the code below into the template editor ● Switch to the Type tab flag the checkbox ➤ Snippet● Switch to the Location tab add all three locations➤● Submit
www.redhat.com 186 [email protected]

<% if @host.operatingsystem.major.to_i > 6 %> <% fstype = "xfs" %><% else %> <% fstype = "ext4" %><% end %>if [[ -z ${EXISTING} ]]; thenecho volgroup vg_data --pesize=32768 pv.130 >> /tmp/diskpart.cfgecho part pv.130 --fstype="lvmpv" --size=1 --grow --ondisk=${SEC_DISK} >> /tmp/diskpart.cfgecho logvol /srv/git --fstype <%= fstype %> --name=lv_git --vgname=vg_data --size=1 --grow --fsoptions="noatime" >> /tmp/diskpart.cfgelif [[ -n ${SEC_DISK} ]]; thenecho logvol /srv/git --fstype <%= fstype %> --name=lv_git --vgname=vg_data --size=1 --grow --fsoptions="noatime" --noformat >> /tmp/diskpart.cfgfi
via hammer:
● Create the file /tmp/tmp.ptable-acme-git.ptable with the partition table layout above
[email protected] 187 www.redhat.com

● Upload the partition table
hammer partition-table create --name ptable-acme-git --os-family "Redhat" --file /tmp/tmp.ptable-acme-git.ptable
Note:● ERB code is written in blue.● Bash code is written in orange.
Provisioning SetupBefore a host can be provisioned through the Red Hat Satellite Server, several objects have to be configured and combined. The following graphic outlines how these objects are combined, and the next section gives a step-by-step explanation of the process:
To be able to provision a host, you must go through the following setup:● Assign the Operating System to a Provisioning Template
Associate the Operating Systems with the Provisioning template you plan to use. You must first associate an Operating System with a Provisioning template before that Template can be selected in the Operating System menu.
www.redhat.com 188 [email protected]

Add the Operating System:● Hosts ➤ Provisioning Templates● Follow the same steps for the following templates:
○ ACME Kickstart default○ Boot disk iPXE - host○ Kickstart default PXELinux○ Satellite Kickstart Default User Data
● Select the template switch to the ➤ Association tab add all Operating Systems➤● Switch to the Locations tab add all locations➤● Switch to the Organizations tab verify that the organization is already assigned or ➤
assign it● Submit
via hammer:
ORG=”ACME”
hammer os list | awk -F "|" '/RedHat/ {print $2}' | sed s'/ //' | while read RHEL_Release do hammer template add-operatingsystem \ --name "${ORG} Kickstart default" \ --operatingsystem "${RHEL_Release}"
hammer template add-operatingsystem \ --name "Kickstart default PXELinux" \ --operatingsystem "${RHEL_Release}"
hammer template add-operatingsystem \ --name "Boot disk iPXE - host" \ --operatingsystem "${RHEL_Release}"
hammer template add-operatingsystem \ --name "Satellite Kickstart Default User Data" \ --operatingsystem "${RHEL_Release}" done
● Assign the Architecture, Templates, and Partition Table to an Operating System
[email protected] 189 www.redhat.com

Add the Architecture, Provisioning templates and Partition table:● Hosts ➤ Operating systems ● For each Operating system that needs to be synchronized, follow these steps:
○ On the Operating System tab flag the checkbox ➤ x86_64○ Switch to the Partition Table tab flag the ➤ ptable-acme-os-rhel-server and
Kickstart default○ Switch to the Installation media tab flag the Installation media corresponding ➤
to the selected Operating System○ Switch to the Templates tab select the following templates:➤
■ provision: ACME Kickstart default■ Bootdisk: Boot disk iPXE - host■ PXELinux: Kickstart default PXELinux■ user_data: Satellite Kickstart Default User Data
○ Submit
via hammer:
ORG=”ACME”
hammer os list | awk -F "|" '/RedHat/ {print $2}' | sed s'/ //' | while read RHEL_Release do hammer os add-architecture --title "${RHEL_Release}" \ --architecture x86_64
hammer os add-ptable --title "${RHEL_Release}" \ --partition-table "ptable-acme-os-rhel-server"
hammer os add-ptable --title "${RHEL_Release}" \ --partition-table "Kickstart default"
hammer os add-config-template --title "${RHEL_Release}" \ --config-template "Kickstart default PXELinux"
hammer os add-config-template --title "${RHEL_Release}" \ --config-template "${ORG} Kickstart default"
hammer os add-config-template --title "${RHEL_Release}" \
www.redhat.com 190 [email protected]

--config-template "Boot disk iPXE - host"
hammer os add-config-template --title "${RHEL_Release}" \ --config-template "Satellite Kickstart Default User Data" done
● Assign the Capsule Features to a Subnet
A Red Hat Capsule has to be assigned to a Subnet if the Capsule needs to:● manage IP addresses (IPAM), next-server and host records - Capsule (DHCP)● manage TFTP boot records - Capsule (TFTP)● create a reverse dns lookup (PTR) record on the DNS - Capsule (DNS)
Add a Red Hat Capsule to a subnet:3. Infrastructure ➤ Subnets4. Configure each subnet according to the following table:
Subnet tab Capsules tab Locations tab
example.com for DHCP, TFTP and DNS Capsule:● satellite.example.com
munich
dmz.example.com for DHCP, TFTP and DNS Capsule:● capsule-munich.dmu.example
.com
munich-dmz
novalocal for DNS Capsule: ● capsule-boston.novalocal
boston
5. Submit
via hammer:
● Query the Red Hat Capsule ID
[email protected] 191 www.redhat.com

hammer capsule list
Output:---|--------------------------------|--------------------------------------------ID | NAME | URL ---|--------------------------------|--------------------------------------------1 | satellite.example.com | https://satellite.example.com:9090 ---|--------------------------------|--------------------------------------------
● Assign the Red Hat Capsule to a corresponding Subnet
#example.com ProxyID=1 SUBNET=example.com LOCATION=munich hammer subnet update --name "${SUBNET}" \ --dns-id "${ProxyID}" \ --dhcp-id "${ProxyID}" --ipam "DHCP" \ --tftp-id “${ProxyID}” \ --locations “${LOCATION}”
● Assign the Red Hat Capsule to a Domain
A Red Hat Capsule must be assigned to a Domain if the Capsule manages an A recordon the DNS Server.
Add a Red Hat Capsule to a Domain:● Infrastructure ➤ Domains● Configure each domain according to the following table:
Domain Domain tab Locations tab
example.com DNS Capsule:● satellite.example.com
munich
dmz.example.com DNS Capsule:● capsule-munich.dmu.example.com
munich-dmz
www.redhat.com 192 [email protected]
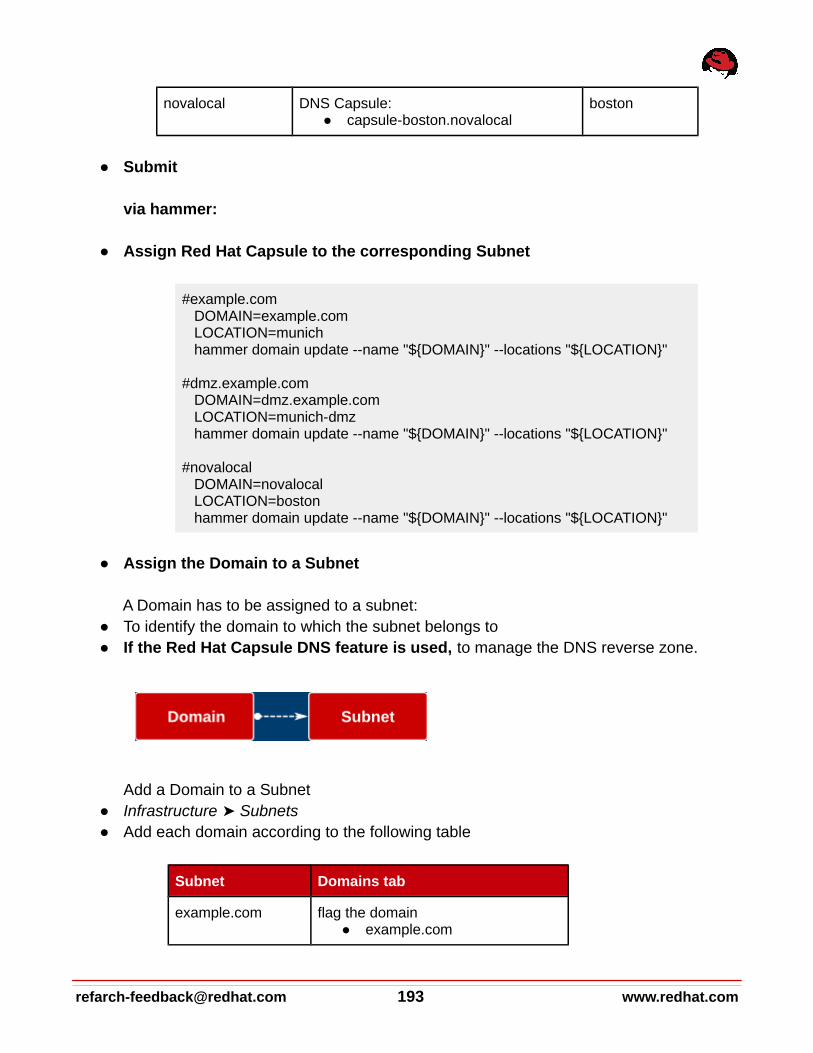
novalocal DNS Capsule: ● capsule-boston.novalocal
boston
● Submit
via hammer:
● Assign Red Hat Capsule to the corresponding Subnet
#example.com DOMAIN=example.com LOCATION=munich hammer domain update --name "${DOMAIN}" --locations "${LOCATION}"
#dmz.example.com DOMAIN=dmz.example.com LOCATION=munich-dmz hammer domain update --name "${DOMAIN}" --locations "${LOCATION}"
#novalocal DOMAIN=novalocal LOCATION=boston hammer domain update --name "${DOMAIN}" --locations "${LOCATION}"
● Assign the Domain to a Subnet
A Domain has to be assigned to a subnet:● To identify the domain to which the subnet belongs to● If the Red Hat Capsule DNS feature is used, to manage the DNS reverse zone.
Add a Domain to a Subnet● Infrastructure ➤ Subnets● Add each domain according to the following table
Subnet Domains tab
example.com flag the domain● example.com
[email protected] 193 www.redhat.com

dmz.example.com flag the domain● dmz.example.com
novalocal flag the domain● novalocal
● Submit
via hammer:
#example.com SUBNET=example.com DOMAIN=example.com hammer subnet update --name "${SUBNET}" \ --domains “${DOMAIN}”
#dmz.example.com SUBNET=dmz.example.com DOMAIN=dmz.example.com hammer subnet update --name "${SUBNET}" \ --domains “${DOMAIN}”
#novalocal SUBNET=novalocal DOMAIN=novalocal hammer subnet update --name "${SUBNET}" \ --domains “${DOMAIN}”
● Verify the Compute Resource’s Organization and Location
You can limit the use of a Compute Resource by assigning it to an organization and to specific locations.
www.redhat.com 194 [email protected]

To verify the Compute Resource’s organization and location assignment:4. Administer ➤ Organizations ➤ACME
a. select Compute Resources on the left pane verify all ➤ Compute Resources areadded
b. Submit5. Administer ➤ Locations for every location (munich, munich-dmz and boston)➤
a. select Compute Resources on the left pane verify that the ➤ Compute Resource for this location is added.
b. Submit
via hammer:
ORG=”ACME”LOCATIONS=”munich,munich-dmz,boston”
COMPUTE_RESOURCE=”acme-rhev-munich”hammer compute-resource update --organizations “${ORG}” --locations “${LOCATIONS}” --name “${COMPUTE_RESOURCE}”
COMPUTE_RESOURCE=”acme-rhev-munich-dmz”hammer compute-resource update --organizations “${ORG}” --locations “${LOCATIONS}” --name “${COMPUTE_RESOURCE}”
COMPUTE_RESOURCE=”acme-rhelosp-boston”hammer compute-resource update --organizations “${ORG}” --locations “${LOCATIONS}” --name “${COMPUTE_RESOURCE}”
● Assign the Location to an Organization
[email protected] 195 www.redhat.com

To add a location to an organization:6. Administer ➤ Organizations ➤ ACME7. select Locations on the left pane8. Add the three location munich, munich-dmz and boston to the selected items9. Submit
via hammer:
ORG=”ACME”
LOC=”munich”hammer location add-organization --name “${LOC}” --organization “${ORG}”
LOC=”munich-dmz”hammer location add-organization --name “${LOC}” --organization “${ORG}”
LOC=”boston”hammer location add-organization --name “${LOC}” --organization “${ORG}”
● Assign and verify location assignments
Verify that the following objects are assigned to the corresponding location; otherwise, they have to be added.
www.redhat.com 196 [email protected]

To verify the object assignment:8. Administer ➤ Locations for every location➤9. Ensure that the elements required for the location are added
a. for every object on the list select the object on the left pane➤i. Media: ACME/Library/*ii. Organization: ACMEiii. Capsule: select the Capsule for the locationiv. Environments: flag the checkbox All environmentsv. Subnet : select the Subnet for the location
vi. Templates: flag the checkbox All templates vii. Domains: select the Domain for the locationviii. Host Groups: flag the checkbox All host groupsix. Compute Resources: select the Compute Resource for the
location10.Submit
Note:Environments are published content (content-views) and not the Lifecycle Environment.
The Capsule for the locations munich-dmz and boston will be assigned after they are installed.
Provisioning WorkflowThe provisioning workflow gives an overview of the steps that a host executes during provisioning.
[email protected] 197 www.redhat.com

For provisioning we differentiate between two different types of action, one-time actions and repeatable actions across an entire host lifecycle.
Onetime actionsActions that are executed only once on a host during provisioning and are expected not to change during the whole lifecycle of a host. One-time actions are configured in templates on Satellite Server 6.
Some examples of one-time actions:
Action
Partitioning
System Language
System Timezone
Repeatable actionsActions to ensure a system’s target state during the whole lifecycle of a host. Use repeatable actions if the configuration on a host could change after initial provisioning. Repeatable actions are executed through Satellites configuration management.
Some examples of repeatable actions:
Action
DNS configuration
NTP configuration
System hardening
Note:We recommend that you configure everything on a host through configuration management whenever possible.
Provisioning Workflow overview
www.redhat.com 198 [email protected]

Define a host record on the Red Hat Satellite Server, where the host’s role is assigned,as well as host specific information (Hostname, Domain, Subnet, IP,...)
Note:Because of the Capsule feature of the Red Hat Satellite Server used in this solution guide, TFTP, DHCP and DNS records are created automatically, based on the information provided from the host record.
2. Create a VM
The Satellite Server connects to the configured Compute Resource and creates a virtual machine (VM) based on the specification from the Compute Profile that you have used or through a manual definition during host creation. Afterwards, the VM is started so that it can perform the installation.
Note:If any step is not executed successfully during the host creation on the Satellite Server or VM creation on the Compute Resource, the integrated workflow engine (https :// github . com / Dynflow / dynflow /) rolls back the changes and displays a notificationthat describes what went wrong.
3. PXE or Boot ISO
The host is configured with the network information for loading the Anaconda installer and for loading and using the Kickstart profile.
Note:A Boot ISO can be used to boot the host into Anaconda if DHCP for PXE cannot be used in your environment.
4. Bootstrap Anaconda
Initialise Anaconda (Red Hat’s installation program)
6. Query the Server Definition
Anaconda will request the host’s Kickstart profile from the Satellite Server.
7. Generate Kickstart
On the Satellite Server, the Provisioning template(s) will be rendered fora host-specific
www.redhat.com 200 [email protected]

Kickstart profile. The templates will be rendered with the information provided during 1.Create a New Host in Satellite in this procedure.
Note:To review a Kickstart profile before performing the actual installation (it is useful to check a Kickstart profile for syntax errors, for example, or if it can be rendered successfully) navigate to:
Hosts ➤ All Hosts select host for which to render the kickstart template select the ➤ ➤Templates tab for the provisioning template, click on the arrow down button select➤ ➤review
8. Retrieve the Kickstart Profile
Anaconda retrieves the Kickstart profile and will execute it.
9. Apply the Filesystem Layout
Anaconda will configure the filesystem corresponding to the layout, as specified in the Kickstart profile.
10. Install Minimal Software
Install the Red Hat Enterprise Linux Server with the minimal set of packages.
11. Configure the Static Network
[email protected] 201 www.redhat.com

Before the system can register itself on the Satellite Server, static networking must be configured.
12. Register at Satellite
The host will use Activation Keys to register itself to the Satellite Server. Once it is registered, it can access its (Composite) Content-View on the Lifecycle Environment associated with that Activation Key.
13. Execute Puppet Modules
All components that are assigned to the host through its role will be installed and configured. These also include the components defined in the Core Build as those that are inherited to every host.
14. Configure a remote server (optional)
This step allows you to execute a custom script on the Red Hat Satellite Server in different stages of the provisioning phase. The custom script could, for example, connect to a remote server, or it could create a host record on the monitoring server.
Foreman HooksForeman hooks are a plugin engine used by Red Hat Satellite that lets you run custom hook scripts on Foreman events. These hooks can be used to trigger various actions on the Satellite Server itself or on external systems. These allow an easy integration with various other tools used inside an environment.
More detailed information about Foreman hooks can be found on the official project page: https :// github . com / theforeman / foreman _ hooks
In this solution guide, we provide three sample hooks to demonstrate the functionality of Foreman hooks and to provide examples for potential use cases:
● a hook script that adds a new host as a Satellite compute resource of type Docker if it belongs to the appropriate host group (containerhost)
● a hook script integrating an additional logging or auditing tool that generates log messages each time Foreman is provisioning a new server
● a hook script to add a new host to Zabbix monitoring automatically
www.redhat.com 202 [email protected]
A hook is executed under the Foreman user and always gets executed with two arguments. The first argument is the event (create, update, destroy) the second argument is the object that was hooked (in this example, the hostname of a host).
Foreman Hook Script Sample 1: ContainerhostHooks located in the same directory are executed in alphabetical order. We recommend that you use a numerical naming convention to ensure the proper execution order.
You must create a specific subdirectory structure on the Red Hat Satellite where the Foremanhooks are stored. The subdirectory for the object must contain another subdirectory for the event.
Note: before_provision event is started after a host has completed its Operating System installation.
To create the subdirectory structure:
● Login on the Red Hat Satellite Server through ssh and create the directory structure:
mkdir -p /usr/share/foreman/config/hooks/host/managed/before_provision/
8. Place the script 05_containerhost.sh from the Appendix II into the just created directory, change the ownership to Foreman, and mark it as executable:
chown foreman.foreman /usr/share/foreman/config/hooks/host/managed/before_provision/05_containerhost.shchmod u+x /usr/share/foreman/config/hooks/host/managed/before_provision/05_containerhost.sh
● By default, the Red Hat Satellite Server is running in SELinux mode enforcing. This mode ensures that the SELinux context is set correctly for the scripts to be executed:
restorecon -RvF /usr/share/foreman/config/hooks
Note: The corresponding SELinux context is foreman_hook_t. Since this is an alias to bin_t context you will see the latter if you verify the SELinux context.
[email protected] 203 www.redhat.com

Foreman Hook Script Sample 2: New Host NotificationAs we said earlier, this hook script creates additional log messages each time Foreman provisions a new server. It can be used to debug or test foreman hook capabilities, and it also can be used to integrate an additional logging or auditing tool that is notified each time a new server is created.
The hook script itself is quite simple since it includes only a single command using the two arguments it was executed with (action and host):
logger $1 $2
Similar to the other example the script needs to be placed in the appropriate directory and made executable. Additionally the SELinux security context needs to be restored as well.
Because the logger command requires a certain permission, we need to create a sudoers rulefor it inside the /etc/sudoers configuration file:
foreman ALL=(ALL) NOPASSWD:/usr/bin/logger
Foreman Hook Script Sample 2: ITSM Tool Integration (Monitoring)The third sample script automatically adds a new host to the Zabbix monitoring configuration by using the Zabbix API. This approach allows us to put each new server under monitoring control. If necessary, this script can be extended to use filter rules to apply only to particular servers (for example, only for servers belonging to the PROD lifecycle environment but not to DEV or QA). The containerhost sample explained earlier can be reused therefore, because it includes this kind of condition.
This sample script you can find inside Appendix II figures out MAC addresses of this host viahammer CLI and handovers hostname and MAC addresses to the Zabbix monitoring server to enable and configure some basic predefined checks.
Note: The Zabbix Group IDs and template IDs for ICMP ping test and Linux OS templates are hardcoded and need to be adapted to your environment.
www.redhat.com 204 [email protected]
Activation KeysActivation Keys are a registration token used in a Kickstart file to control actions at registration. These are similar to Activation Keys in Red Hat Satellite 5, but provide only a subset of features because Puppet controls package and configuration management after registration.
Activation Keys are used to subscribe a host against the Katello part of the Red Hat Satellite Server, so the host can access the software repositories inside the (composite) content-views.As mentioned in Step 3, explicit subscription and repository management (to enable or disable) is required for all products (including Red Hat, third party, and custom products).
Multiple Activation Keys can be used in a comma separated list to register a host on the Satellite Server.
The first key on the left side has a special role and determines:9. The Lifecycle Environment to which a host belongs10.The (Composite) Content-View assigned to a host
Every key (the first and all the following keys) in the list can:3. Add the host to Host Collections4. Add subscriptions for the host to consume5. Enable Product Content repositories belonging to the (Composite) Content-View
Note:Even if other keys in the list have a Content-View and/or Lifecycle Environment, if it is not the first key in the list, this information is ignored for registration.
By default the registration will be done through the template snippet called subscription_manager_registration and uses the Activation Keys listed in the parameter kt_activation_keys.
Naming Conventions
• Activation Keys start with the prefix act as an abbreviation for Activation Key.
• The next part of the name details lifecycle environment to which the host is assigned.
• The third (biz|infra) defines which composite content-view to use.
• The fourth part (role name) is the Host Group name including its meta parent if used.
[email protected] 205 www.redhat.com

• The fifth part defines the architecture.
As a result, the activation keys have the following naming structure:
act - < lifecycle environment > - < biz|infra|os > - < role name > - < architecture >
Create Activation KeysTo create activation keys:
● Navigate to: Content ➤ Activation keys ➤ New Activation Key● Add the name for the activation key select the Lifecycle Environment select the ➤ ➤
Content-View● Save● Switch to the Subscription tab click on the sub-tab ➤ Add assign subscriptions ➤
(needed to access Product Content) ➤ Add Selected● Switch to the Product Content) tab enable repositories ➤
○ For the solution guide the following activation keys have to be created:
Name Environment Content-View Subscription Product Content
act-dev-infra-capsule-x86_64
DEV ccv-infra-capsule -) Red Hat Enterprise Linux
-) Red Hat SatelliteCapsule
-) Zabbix Monitoring
-) Red Hat Satellite Tools 6
-) Red Hat Enterprise Linux 7 Server
-) Red Hat Satellite Capsule 6.1
-) Zabbix-Monitoring
act-qa-infra-capsule-x86_64 QA
act-prod-infra-capsule-x86_64
PROD
act-dev-infra-gitserver-x86_64
DEV ccv-infra-gitserver -) Red Hat Enterprise Linux
-) Zabbix Monitoring
-) Red Hat Satellite Tools 6
-) Red Hat Enterprise Linux 7 Server
-) Red Hat Software Collections
-) Zabbix-Monitoring
act-qa-infra-gitserver-x86_64
QA
www.redhat.com 206 [email protected]

Name Environment Content-View Subscription Product Content
act-prod-infra-gitserver-x86_64
PROD
act-dev-infra-loghost-x86_64
DEV cv-os-rhel-6Server -) Red Hat Enterprise Linux
-) Zabbix Monitoring
-) Red Hat Satellite Tools 6
-) Red Hat Enterprise Linux 6 Server
-) Red Hat Software Collections
-) Zabbix-Monitoring
act-qa-infra-loghost-x86_64 QA
act-prod-infra-loghost-x86_64
PROD
act-dev-infra-containerhost-x86_64
DEV ccv-infra-containerhost -) Red Hat Enterprise Linux
-) Zabbix Monitoring
-) Red Hat Enterprise Linux 7 Server
-) Red Hat Enterprise Linux 7 Server - Extras
-) Zabbix-Monitoring
act-qa-infra-containerhost-x86_64
QA
act-prod-infra-containerhost-x86_64
PROD
act-dev-infra-corebuild-rhel-6server-x86_64
DEV cv-os-rhel-6Server -) Red Hat Enterprise Linux
-) Zabbix Monitoring
-) Red Hat Satellite Tools 6
-) Red Hat Enterprise Linux 6 Server
-) Zabbix-Monitoring
act-qa-infra-corebuild-rhel-6server-x86_64
QA
act-prod-infra-corebuild-rhel-6server-x86_64
PROD
act-dev-infra-corebuild-rhel-7server-x86_64
DEV cv-os-rhel-7Server -) Red Hat Enterprise Linux
-) Zabbix Monitoring
-) Red Hat Satellite Tools 6
-) Red Hat Enterprise Linux 7 Server
-) Zabbix-Monitoring
act-qa-infra-corebuild-rhel-7server-x86_64
QA
[email protected] 207 www.redhat.com

Name Environment Content-View Subscription Product Content
act-prod-infra-corebuild-rhel-7server-x86_64
PROD
act-web-dev-biz-acmeweb-frontend-x86_64
Web-DEV ccv-biz-acmeweb -) Red Hat Enterprise Linux
-) Zabbix Monitoring
-) EPEL7-APP
-) Red Hat Satellite Tools 6
-) Red Hat Enterprise Linux 7 Server
-) Zabbix-Monitoring
-) EPEL7-APP
act-web-qa-biz-acmeweb-frontend-x86_64
Web-QA
act-web-uat-biz-acmeweb-frontend-x86_64
Web-UAT
act-web-prod-biz-acmeweb-frontend-x86_64
Web-PROD
act-web-dev-biz-acmeweb-backend-x86_64
Web-DEV ccv-biz-acmeweb -) Red Hat Enterprise Linux
-) Zabbix Monitoring
-) EPEL7-APP
-) Red Hat Satellite Tools 6
-) Red Hat Enterprise Linux 7 Server
-) Zabbix-Monitoring
-) EPEL7-APP
act-web-qa-biz-acmeweb-backend-x86_64
Web-QA
act-web-uat-biz-acmeweb-backend-x86_64
Web-UAT
act-web-prod-biz-acmeweb-backend-x86_64
Web-PROD
via hammer:
#Create Host CollectionsORG="ACME" for HC in 6Server 7Server RHEL infra biz gitserver containerhost capsule loghost acmeweb acmeweb-frontend acmeweb-backend x86_64 do hammer host-collection create --name ${HC} --organization "${ORG}" done
hammer lifecycle-environment list --organization "${ORG}" | awk -F "|" '/[[:digit:]]/ {print $2}' | sed s'/ //' | while read LC_ENV do
www.redhat.com 208 [email protected]

hammer host-collection create --name $(echo ${LC_ENV} | tr '[[:lower:]' '[[:upper:]]') --organization "${ORG}" done #rhel-7server ORG="ACME" ARCH="x86_64" TYPE="os" ROLE="rhel-7server" LC_ENVS="DEV QA PROD" SubRHEL=$(hammer --csv --csv-separator '#' subscription list --per-page 9999 --organization ${ORG} | awk -F"#" "(\$1 ~ /^Red Hat Enterprise Linux with Smart Virtualization/) {print \$8}") SubZabbix=$(hammer --csv --csv-separator '#' subscription list --per-page 9999 --organization ${ORG} | awk -F"#" "(\$1 ~ /^Zabbix-Monitoring$/) {print \$8}") SubACME=$(hammer --csv --csv-separator '#' subscription list --per-page 9999 --organization ${ORG} | awk -F"#" "(\$1 ~ /^ACME$/) {print \$8}") for LC_ENV in ${LC_ENVS} do LC_ENV_LOWER=$(echo ${LC_ENV} | tr '[[:upper:]' '[[:lower:]]') LC_ENV_UPPER=$(echo ${LC_ENV} | tr '[[:lower:]' '[[:upper:]]')
hammer activation-key create \ --name "act-${LC_ENV_LOWER}-${TYPE}-${ROLE}-${ARCH}" \ --content-view "cv-os-rhel-7Server" \ --lifecycle-environment "${LC_ENV}" \ --organization "${ORG}"
SubIDs="${SubRHEL} ${SubZabbix} ${SubACME}" for SubID in ${SubIDs} do hammer activation-key add-subscription \ --name "act-${LC_ENV_LOWER}-${TYPE}-${ROLE}-${ARCH}" \ --subscription-id "${SubID}" \ --organization "${ORG}" done
HostCollection="RHEL 7Server x86_64 ${LC_ENV_UPPER}" for COLLECTION in ${HostCollection} do hammer activation-key add-host-collection \ --name "act-${LC_ENV_LOWER}-${TYPE}-${ROLE}-${ARCH}" \ --host-collection "${COLLECTION}" \ --organization "${ORG}" done
ContentLabels="ACME_Zabbix-Monitoring_Zabbix-RHEL7-x86_64 rhel-7-server-rpms" for CLABEL in ${ContentLabels} do hammer activation-key content-override \
[email protected] 209 www.redhat.com

--content-label ${CLABEL} \ --name "act-${LC_ENV_LOWER}-${TYPE}-${ROLE}-${ARCH}" \ --organization "${ORG}" \ --value "1" done done
#rhel-6server ORG="ACME" ARCH="x86_64" TYPE="os" ROLE="rhel-6server" LC_ENVS="DEV QA PROD" SubRHEL=$(hammer --csv --csv-separator '#' subscription list --per-page 9999 --organization ${ORG} | awk -F"#" "(\$1 ~ /^Red Hat Enterprise Linux with Smart Virtualization/) {print \$8}") SubZabbix=$(hammer --csv --csv-separator '#' subscription list --per-page 9999 --organization ${ORG} | awk -F"#" "(\$1 ~ /^Zabbix-Monitoring$/) {print \$8}") SubACME=$(hammer --csv --csv-separator '#' subscription list --per-page 9999 --organization ${ORG} | awk -F"#" "(\$1 ~ /^ACME$/) {print \$8}") for LC_ENV in ${LC_ENVS} do LC_ENV_LOWER=$(echo ${LC_ENV} | tr '[[:upper:]' '[[:lower:]]') LC_ENV_UPPER=$(echo ${LC_ENV} | tr '[[:lower:]' '[[:upper:]]')
hammer activation-key create \ --name "act-${LC_ENV_LOWER}-${TYPE}-${ROLE}-${ARCH}" \ --content-view "cv-os-rhel-6Server" \ --lifecycle-environment "${LC_ENV}" \ --organization "${ORG}"
SubIDs="${SubRHEL} ${SubZabbix} ${SubACME}" for SubID in ${SubIDs} do hammer activation-key add-subscription \ --name "act-${LC_ENV_LOWER}-${TYPE}-${ROLE}-${ARCH}" \ --subscription-id "${SubID}" \ --organization "${ORG}" done
HostCollection="RHEL 6Server x86_64 ${LC_ENV_UPPER}" for COLLECTION in ${HostCollection} do hammer activation-key add-host-collection \ --name "act-${LC_ENV_LOWER}-${TYPE}-${ROLE}-${ARCH}" \ --host-collection "${COLLECTION}" \ --organization "${ORG}" done
ContentLabels="ACME_Zabbix-Monitoring_Zabbix-RHEL6-x86_64 rhel-6-server-rpms"
www.redhat.com 210 [email protected]
for CLABEL in ${ContentLabels} do hammer activation-key content-override \ --content-label ${CLABEL} \ --name "act-${LC_ENV_LOWER}-${TYPE}-${ROLE}-${ARCH}" \ --organization "${ORG}" \ --value "1" done done
#CONTAINERHOST ORG="ACME" ARCH="x86_64" TYPE="infra" ROLE="containerhost" LC_ENVS="DEV QA PROD" SubRHEL=$(hammer --csv --csv-separator '#' subscription list --per-page 9999 --organization ${ORG} | awk -F"#" "(\$1 ~ /^Red Hat Enterprise Linux with Smart Virtualization/) {print \$8}") SubZabbix=$(hammer --csv --csv-separator '#' subscription list --per-page 9999 --organization ${ORG} | awk -F"#" "(\$1 ~ /^Zabbix-Monitoring$/) {print \$8}") SubACME=$(hammer --csv --csv-separator '#' subscription list --per-page 9999 --organization ${ORG} | awk -F"#" "(\$1 ~ /^ACME$/) {print \$8}") for LC_ENV in ${LC_ENVS} do LC_ENV_LOWER=$(echo ${LC_ENV} | tr '[[:upper:]' '[[:lower:]]') LC_ENV_UPPER=$(echo ${LC_ENV} | tr '[[:lower:]' '[[:upper:]]')
hammer activation-key create \ --name "act-${LC_ENV_LOWER}-${TYPE}-${ROLE}-${ARCH}" \ --content-view "ccv-infra-containerhost" \ --lifecycle-environment "${LC_ENV}" \ --organization "${ORG}"
SubIDs="${SubRHEL} ${SubZabbix} ${SubACME}" for SubID in ${SubIDs} do hammer activation-key add-subscription \ --name "act-${LC_ENV_LOWER}-${TYPE}-${ROLE}-${ARCH}" \ --subscription-id "${SubID}" \ --organization "${ORG}" done
HostCollection="containerhost RHEL 7Server x86_64 ${LC_ENV_UPPER}" for COLLECTION in ${HostCollection} do hammer activation-key add-host-collection \ --name "act-${LC_ENV_LOWER}-${TYPE}-${ROLE}-${ARCH}" \ --host-collection "${COLLECTION}" \ --organization "${ORG}" done
[email protected] 211 www.redhat.com

ContentLabels="ACME_Zabbix-Monitoring_Zabbix-RHEL7-x86_64 rhel-7-server-rpms rhel-7-server-extras-rpms" for CLABEL in ${ContentLabels} do hammer activation-key content-override \ --content-label ${CLABEL} \ --name "act-${LC_ENV_LOWER}-${TYPE}-${ROLE}-${ARCH}" \ --organization "${ORG}" \ --value "1" done done
#CAPSULE ORG="ACME" ARCH="x86_64" TYPE="infra" ROLE="capsule" LC_ENVS="DEV QA PROD" SubRHEL=$(hammer --csv --csv-separator '#' subscription list --per-page 9999 --organization ${ORG} | awk -F"#" "(\$1 ~ /^Red Hat Enterprise Linux with Smart Virtualization/) {print \$8}") SubZabbix=$(hammer --csv --csv-separator '#' subscription list --per-page 9999 --organization ${ORG} | awk -F"#" "(\$1 ~ /^Zabbix-Monitoring$/) {print \$8}") SubACME=$(hammer --csv --csv-separator '#' subscription list --per-page 9999 --organization ${ORG} | awk -F"#" "(\$1 ~ /^ACME$/) {print \$8}") SubCapsule=$(hammer --csv --csv-separator '#' subscription list --per-page 9999 --organization ${ORG} | awk -F"#" "(\$1 ~ /^Red Hat Satellite Capsule Server$/) {print \$8}") for LC_ENV in ${LC_ENVS} do LC_ENV_LOWER=$(echo ${LC_ENV} | tr '[[:upper:]' '[[:lower:]]') LC_ENV_UPPER=$(echo ${LC_ENV} | tr '[[:lower:]' '[[:upper:]]')
hammer activation-key create \ --name "act-${LC_ENV_LOWER}-${TYPE}-${ROLE}-${ARCH}" \ --content-view "ccv-infra-capsule" \ --lifecycle-environment "${LC_ENV}" \ --organization "${ORG}"
SubIDs="${SubRHEL} ${SubZabbix} ${SubACME} ${SubCapsule}" for SubID in ${SubIDs} do hammer activation-key add-subscription \ --name "act-${LC_ENV_LOWER}-${TYPE}-${ROLE}-${ARCH}" \ --subscription-id "${SubID}" \ --organization "${ORG}" done
HostCollection="capsule RHEL 7Server x86_64 ${LC_ENV_UPPER}" for COLLECTION in ${HostCollection}
www.redhat.com 212 [email protected]

do hammer activation-key add-host-collection \ --name "act-${LC_ENV_LOWER}-${TYPE}-${ROLE}-${ARCH}" \ --host-collection "${COLLECTION}" \ --organization "${ORG}" done
ContentLabels="ACME_Zabbix-Monitoring_Zabbix-RHEL7-x86_64 rhel-7-server-rpms" for CLABEL in ${ContentLabels} do hammer activation-key content-override \ --content-label ${CLABEL} \ --name "act-${LC_ENV_LOWER}-${TYPE}-${ROLE}-${ARCH}" \ --organization "${ORG}" \ --value "1" done done
#LOGHOST ORG="ACME" ARCH="x86_64" TYPE="infra" ROLE="loghost" LC_ENVS="DEV QA PROD" SubRHEL=$(hammer --csv --csv-separator '#' subscription list --per-page 9999 --organization ${ORG} | awk -F"#" "(\$1 ~ /^Red Hat Enterprise Linux with Smart Virtualization/) {print \$8}") SubZabbix=$(hammer --csv --csv-separator '#' subscription list --per-page 9999 --organization ${ORG} | awk -F"#" "(\$1 ~ /^Zabbix-Monitoring$/) {print \$8}") SubACME=$(hammer --csv --csv-separator '#' subscription list --per-page 9999 --organization ${ORG} | awk -F"#" "(\$1 ~ /^ACME$/) {print \$8}") for LC_ENV in ${LC_ENVS} do LC_ENV_LOWER=$(echo ${LC_ENV} | tr '[[:upper:]' '[[:lower:]]') LC_ENV_UPPER=$(echo ${LC_ENV} | tr '[[:lower:]' '[[:upper:]]')
hammer activation-key create \ --name "act-${LC_ENV_LOWER}-${TYPE}-${ROLE}-${ARCH}" \ --content-view "cv-os-rhel-6Server" \ --lifecycle-environment "${LC_ENV}" \ --organization "${ORG}"
SubIDs="${SubRHEL} ${SubZabbix} ${SubACME}" for SubID in ${SubIDs} do hammer activation-key add-subscription \ --name "act-${LC_ENV_LOWER}-${TYPE}-${ROLE}-${ARCH}" \ --subscription-id "${SubID}" \ --organization "${ORG}" done
[email protected] 213 www.redhat.com

HostCollection="loghost RHEL 6Server x86_64 ${LC_ENV_UPPER}" for COLLECTION in ${HostCollection} do hammer activation-key add-host-collection \ --name "act-${LC_ENV_LOWER}-${TYPE}-${ROLE}-${ARCH}" \ --host-collection "${COLLECTION}" \ --organization "${ORG}" done
ContentLabels="ACME_Zabbix-Monitoring_Zabbix-RHEL6-x86_64 rhel-6-server-rpms" for CLABEL in ${ContentLabels} do hammer activation-key content-override \ --content-label ${CLABEL} \ --name "act-${LC_ENV_LOWER}-${TYPE}-${ROLE}-${ARCH}" \ --organization "${ORG}" \ --value "1" done done
#GITSERVER ORG="ACME" ARCH="x86_64" TYPE="infra" ROLE="gitserver" LC_ENVS="DEV QA PROD" SubRHEL=$(hammer --csv --csv-separator '#' subscription list --per-page 9999 --organization ${ORG} | awk -F"#" "(\$1 ~ /^Red Hat Enterprise Linux with Smart Virtualization/) {print \$8}") SubZabbix=$(hammer --csv --csv-separator '#' subscription list --per-page 9999 --organization ${ORG} | awk -F"#" "(\$1 ~ /^Zabbix-Monitoring$/) {print \$8}") SubACME=$(hammer --csv --csv-separator '#' subscription list --per-page 9999 --organization ${ORG} | awk -F"#" "(\$1 ~ /^ACME$/) {print \$8}") for LC_ENV in ${LC_ENVS} do LC_ENV_LOWER=$(echo ${LC_ENV} | tr '[[:upper:]' '[[:lower:]]') LC_ENV_UPPER=$(echo ${LC_ENV} | tr '[[:lower:]' '[[:upper:]]')
hammer activation-key create \ --name "act-${LC_ENV_LOWER}-${TYPE}-${ROLE}-${ARCH}" \ --content-view "ccv-infra-gitserver" \ --lifecycle-environment "${LC_ENV}" \ --organization "${ORG}"
SubIDs="${SubRHEL} ${SubZabbix} ${SubACME}" for SubID in ${SubIDs} do hammer activation-key add-subscription \ --name "act-${LC_ENV_LOWER}-${TYPE}-${ROLE}-${ARCH}" \
www.redhat.com 214 [email protected]
--subscription-id "${SubID}" \ --organization "${ORG}" done
HostCollection="gitserver RHEL 7Server x86_64 ${LC_ENV_UPPER}" for COLLECTION in ${HostCollection} do hammer activation-key add-host-collection \ --name "act-${LC_ENV_LOWER}-${TYPE}-${ROLE}-${ARCH}" \ --host-collection "${COLLECTION}" \ --organization "${ORG}" done
ContentLabels="ACME_Zabbix-Monitoring_Zabbix-RHEL7-x86_64 rhel-7-server-rpms rhel-server-rhscl-7-rpms" for CLABEL in ${ContentLabels} do hammer activation-key content-override \ --content-label ${CLABEL} \ --name "act-${LC_ENV_LOWER}-${TYPE}-${ROLE}-${ARCH}" \ --organization "${ORG}" \ --value "1" done done
#ACMEWEB-FRONTEND ORG="ACME" ARCH="x86_64" TYPE="biz" ROLE="acmeweb-frontend" LC_ENVS="Web-DEV Web-QA Web-UAT Web-PROD" SubRHEL=$(hammer --csv --csv-separator '#' subscription list --per-page 9999 --organization ${ORG} | awk -F"#" "(\$1 ~ /^Red Hat Enterprise Linux with Smart Virtualization/) {print \$8}") SubZabbix=$(hammer --csv --csv-separator '#' subscription list --per-page 9999 --organization ${ORG} | awk -F"#" "(\$1 ~ /^Zabbix-Monitoring$/) {print \$8}") SubACME=$(hammer --csv --csv-separator '#' subscription list --per-page 9999 --organization ${ORG} | awk -F"#" "(\$1 ~ /^ACME$/) {print \$8}") SubEPEL7APP=$(hammer --csv --csv-separator '#' subscription list --per-page 9999 --organization ${ORG} | awk -F"#" "(\$1 ~ /^EPEL7-APP$/) {print \$8}") for LC_ENV in ${LC_ENVS} do LC_ENV_LOWER=$(echo ${LC_ENV} | tr '[[:upper:]' '[[:lower:]]') LC_ENV_UPPER=$(echo ${LC_ENV} | tr '[[:lower:]' '[[:upper:]]')
hammer activation-key create \ --name "act-${LC_ENV_LOWER}-${TYPE}-${ROLE}-${ARCH}" \ --content-view "ccv-biz-acmeweb" \ --lifecycle-environment "${LC_ENV}" \ --organization "${ORG}"
[email protected] 215 www.redhat.com

SubIDs="${SubRHEL} ${SubZabbix} ${SubACME} ${SubEPEL7APP}" for SubID in ${SubIDs} do hammer activation-key add-subscription \ --name "act-${LC_ENV_LOWER}-${TYPE}-${ROLE}-${ARCH}" \ --subscription-id "${SubID}" \ --organization "${ORG}" done
HostCollection="acmeweb acmeweb-frontend RHEL 7Server x86_64 ${LC_ENV_UPPER}" for COLLECTION in ${HostCollection} do hammer activation-key add-host-collection \ --name "act-${LC_ENV_LOWER}-${TYPE}-${ROLE}-${ARCH}" \ --host-collection "${COLLECTION}" \ --organization "${ORG}" done
ContentLabels="ACME_Zabbix-Monitoring_Zabbix-RHEL7-x86_64 rhel-7-server-rpms ACME_EPEL7-APP_EPEL7-APP-x86_64" for CLABEL in ${ContentLabels} do hammer activation-key content-override \ --content-label ${CLABEL} \ --name "act-${LC_ENV_LOWER}-${TYPE}-${ROLE}-${ARCH}" \ --organization "${ORG}" \ --value "1" done done
#ACMEWEB-BACKEND ORG="ACME" ARCH="x86_64" TYPE="biz" ROLE="acmeweb-backend" LC_ENVS="Web-DEV Web-QA Web-UAT Web-PROD" SubRHEL=$(hammer --csv --csv-separator '#' subscription list --per-page 9999 --organization ${ORG} | awk -F"#" "(\$1 ~ /^Red Hat Enterprise Linux with Smart Virtualization/) {print \$8}") SubZabbix=$(hammer --csv --csv-separator '#' subscription list --per-page 9999 --organization ${ORG} | awk -F"#" "(\$1 ~ /^Zabbix-Monitoring$/) {print \$8}") SubACME=$(hammer --csv --csv-separator '#' subscription list --per-page 9999 --organization ${ORG} | awk -F"#" "(\$1 ~ /^ACME$/) {print \$8}") SubEPEL7APP=$(hammer --csv --csv-separator '#' subscription list --per-page 9999 --organization ${ORG} | awk -F"#" "(\$1 ~ /^EPEL7-APP$/) {print \$8}") for LC_ENV in ${LC_ENVS} do LC_ENV_LOWER=$(echo ${LC_ENV} | tr '[[:upper:]' '[[:lower:]]') LC_ENV_UPPER=$(echo ${LC_ENV} | tr '[[:lower:]' '[[:upper:]]')
www.redhat.com 216 [email protected]
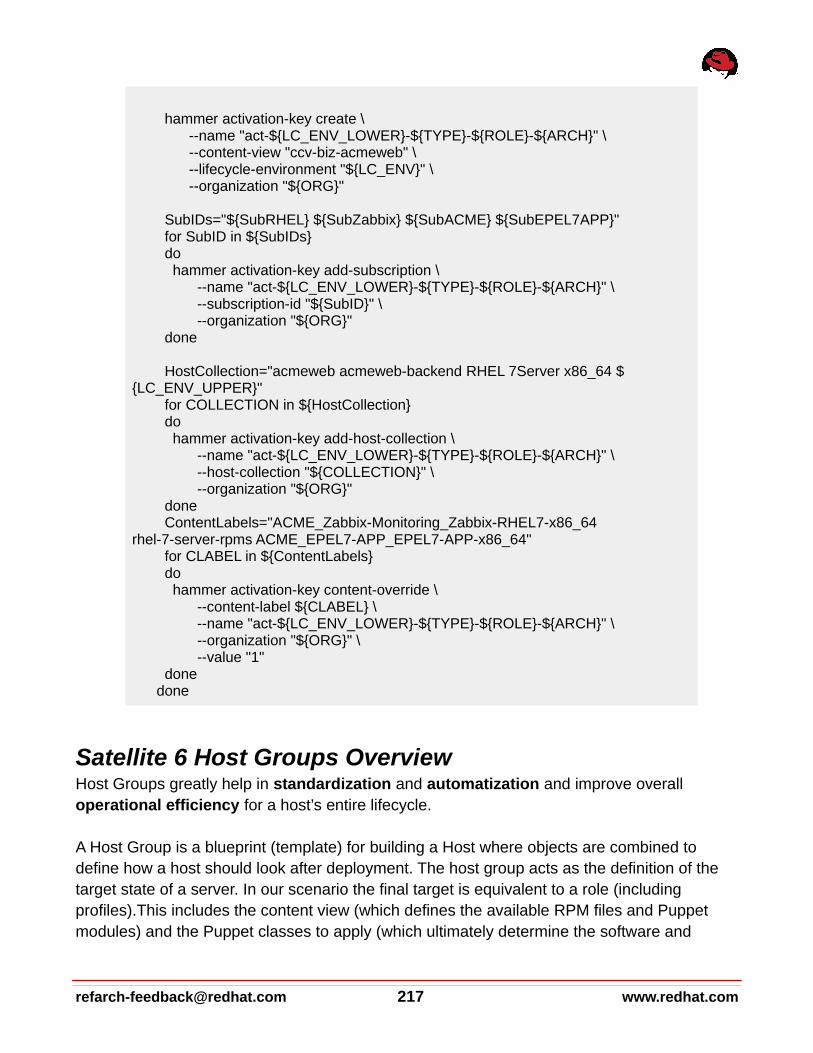
hammer activation-key create \ --name "act-${LC_ENV_LOWER}-${TYPE}-${ROLE}-${ARCH}" \ --content-view "ccv-biz-acmeweb" \ --lifecycle-environment "${LC_ENV}" \ --organization "${ORG}"
SubIDs="${SubRHEL} ${SubZabbix} ${SubACME} ${SubEPEL7APP}" for SubID in ${SubIDs} do hammer activation-key add-subscription \ --name "act-${LC_ENV_LOWER}-${TYPE}-${ROLE}-${ARCH}" \ --subscription-id "${SubID}" \ --organization "${ORG}" done
HostCollection="acmeweb acmeweb-backend RHEL 7Server x86_64 ${LC_ENV_UPPER}" for COLLECTION in ${HostCollection} do hammer activation-key add-host-collection \ --name "act-${LC_ENV_LOWER}-${TYPE}-${ROLE}-${ARCH}" \ --host-collection "${COLLECTION}" \ --organization "${ORG}" done ContentLabels="ACME_Zabbix-Monitoring_Zabbix-RHEL7-x86_64 rhel-7-server-rpms ACME_EPEL7-APP_EPEL7-APP-x86_64" for CLABEL in ${ContentLabels} do hammer activation-key content-override \ --content-label ${CLABEL} \ --name "act-${LC_ENV_LOWER}-${TYPE}-${ROLE}-${ARCH}" \ --organization "${ORG}" \ --value "1" done done
Satellite 6 Host Groups OverviewHost Groups greatly help in standardization and automatization and improve overall operational efficiency for a host’s entire lifecycle.
A Host Group is a blueprint (template) for building a Host where objects are combined to define how a host should look after deployment. The host group acts as the definition of the target state of a server. In our scenario the final target is equivalent to a role (including profiles).This includes the content view (which defines the available RPM files and Puppet modules) and the Puppet classes to apply (which ultimately determine the software and
[email protected] 217 www.redhat.com

configuration).
Host Groups are used to define “ready2run systems” as explained in the Provisioning Recommendations section.
Host Groups can be nested. When a Host Group gets a parent assigned, all defined objects are inherited to the child. See the section Host Group Scenarios for an explanation of the advantages of the nested Host Group feature.
The following graphic gives an overview of all objects that can be defined in a single Host Group. As you can see host groups are a key element of Satellite 6 assembling many entities we have configured earlier together.
Host Group● Parent
When a parent is assigned to a Host Group, all defined objects are inherited by that parent.
● NameEnter the name of the Host Group.
● Lifecycle EnvironmentSelect the lifecycle environment to which the Host provisioned with this Host Group should belong.
● Content ViewYou must select a lifecycle environment before you can select a content view.
www.redhat.com 218 [email protected]

● Puppet EnvironmentWhen a content view is selected, the Red Hat Satellite automatically assigns the Puppet environment that belongs to it. The Puppet Classes tab is hidden until a Lifecycle Environment and a Content View are chosen.
● Puppet ClassesAssign Puppet Classes to a Host Group.
Puppet Modules often contain subclasses that exist only for the internal Puppet modulestructure and are not intended for direct consumption. Subclasses that are not intended for direct consumption can be excluded by a filter, so only classes that are intended to be assigned to a host can be seen.
Module example:
ntp/ manifests/ init.pp install.pp params.pp
The Red Hat Satellite Server offers to assign any of the following classes to a host or host group:
ntpntp::installntp::params
To exclude the classes ntp::install and ntp::params from the selection, since they should not be assigned alone to a host or host group, create the following file:
5. Create file
cat << EOF > /usr/share/foreman/config/ignored_environments.yml:filters: - !ruby/regexp '/params$/' - !ruby/regexp '/install$/'EOF
● Config GroupsAdd a Config Group to a Host Group.
[email protected] 219 www.redhat.com

When Puppet classes are assigned to a Config Group, all Puppet classes available can be assigned to the class no matter through which content view or Puppet environment they are made available. When the Config Group is assigned to a Host Group, only the Puppet classes available in the Puppet environment are really used by the host / host group. Puppet classes that cannot be used because they are not available in the Puppet environment should be greyed out.
Network
● DomainSelect a Domain. The Domain is used to configure a Hosts FQDN. If the DNS Capsule feature is configured, the associated domain is used to create an A record.
● SubnetSubnets are available to be selected only if they are assigned to the Domain.
● RealmWhen a realm is configured, a computer account can be automatically configured.Note:This feature is not covered in this solution guide.
Operating System
● ArchitectureSelect the Operating System architecture.
● Operating System
www.redhat.com 220 [email protected]

All Operating Systems that offer the selected architecture are displayed for selection.
● Partition TableOnly the partition tables that were previously assigned to the Operating System can beselected.
Parameter
Parameters of a Host Group level are defined here.
We are using the parameter ptable, for example, to define which partition table snippet shouldbe used to set up a second hard disk.
When a parameter is changed on a Host Group, it is also directly inherited by hosts already provisioned through the Host Group and also by any host assigned to the Host Group after provisioning.
Activation Keys
A comma-separated list of activation keys is added here.
The Activation Keys tab is hidden until a Lifecycle Environment and a Content View are selected. The Activation key tab lets you add the parameter kt_activation_keys with a specified value, which is used by the snippet subscription_manager_register during the provisioning phase.
[email protected] 221 www.redhat.com

Locations
Every location where the Host Group is provisioned is added here.
Organizations
Because Host Groups can be shared between organizations, you need to add the organizations that use the Host Group.
Satellite 6 Host Group ScenariosThe following section describes multiple host group scenarios. Because there is no one-size-fits-all approach and each customer environment has different requirements and priorities, we describe four different host group scenarios with their individual advantages and disadvantages. The primary difference between scenarios B, C and D is that each one offers a different perspective on how to structure or separate your host and application divisions. One scenario that could come very close to a perfect world would be to combine these three scenarios and include a multi-dimensional view of this setup. Unfortunately, because this approach is currently not possible, we cannot document it here. If you switched to a multi-dimensional view, the current 1:1 relationship between host groups and hosts would have to be removed.
Note: Mixing these different hierarchy types is possible and might be the best option in a typical customer environment where some server roles should be divided into one of these types andother server roles into another. For example, you could use the business view in scenario C
www.redhat.com 222 [email protected]

for business applications but divide infrastructure services based on scenario D, or even A. You can use different structure types side-by-side but not for the same host (group).
The following four scenarios are described in further detail below:
Scenario A) Flat Host Group StructureA typical starting point for using host groups is to start with a completely flat structure. In this approach, all host groups are created side by side, and no nesting is used. If your environment is similar to our ACME sample scenario and you are using different lifecycle stages and multiple combinations of applications and OS versions, you need to create host groups for each relevant combination of these 3 items. The purpose of an activation key is to assign a content view or composite content view to a particular host. Since the association with a particular lifecycle environment determines which content views are available inside this environment, you must have an activation key.
In our sample flat host group structure, we are using the following naming convention:
< LC ENV > - < infra | biz > - < profile > - < OS release and architecture >
You might need to adapt this to your needs.
Advantages
The primary advantage of a flat structure is the limited complexity because you avoid using
[email protected] 223 www.redhat.com

hierarchical and inheritance models. In an environment with a high degree of standardization or with only a few different roles types or hosts, this scenario is the best option.
Disadvantages
The main disadvantage is not using inheritance. Therefore, you could end up creating a huge number of nearly similar host groups that have more commonalities than differences.
Scenario B) LifecycleEnvironment Focused Hierarchical StructureThis scenario uses inheritance. It divides the lifecycle environments inside the first level of thehierarchy tree. Then, the second level splits out the OS release version and the architecture. Finally, the third level contains the role type. You could swap the second and third level.
The idea behind this approach is that the top level contains the lifecycle environments, which are required to select a particular content view that has been promoted into this lifecycle environment. All lifecycle-environment-specific parameters are assigned to the first host-grouplevel. This approach can be an advantage in customer scenarios where responsibilities are divided among lifecycle environments (for example, if there is a dedicated owner for the Dev, QA and Prod stages).
The second level defines the particular core build definition (for example, for RHEL 7). All common configurations belonging to the individual core build definitions are applied here. TheOperating System and activation keys, which enable access to these subscriptions and repositories, are selected and applied here.
The third level adds the application-specific configurations and parameters and defines the final definition of the target systems. Typically, the configuration groups with levels like this example are used to simplify the Puppet configuration management in this area.
Advantages
The main advantage of this approach is that the inheritance models follow the relationship models in Satellite 6. The lifecycle environment defines the available content views. Putting the operating system / core build on top of the application level allows better standardization on the OS level. Moreover, this scenario lets you separate responsibilities across lifecycle stages.
Disadvantages
www.redhat.com 224 [email protected]

One disadvantage is that this hierarchical structure might not be intuitive for somebody who islooking from the top down-- either from an application- (business) or from a host-perspective. Additionally, this scenario increases the maintenance efforts for all application-relevant configurations, because each application owner now has up to 6 host groups to manage (assuming that there are 3 lifecycle stages and 2 different core-build versions). This approach might be best for advanced Puppet users who are following Puppet best practices, because all Puppet configurations are both lifecycle-stage and OS-type independent.
Scenario C) Business ViewIn this scenario the host group hierarchy is following the business- or application-centric view, which looks from the top (application level) down (operating system + lifecycle stage). In our example (provided above and documented in this solution guide), we have added an additional layer of separation between the top and bottom layers. This layer lets you group thedifferent server types (for example, the backend and frontend servers), because this in-between layer either affects or is affected by the location and network relationship (frontendservers are inside a DMZ, but backend servers are not).
Advantages
This approach allows us to segregate different relevant characteristics of the final hosts and show how the final hosts are associated with the host groups in the bottom level of the hierarchy. It allows additional layers for segregating network or security, and better supports the Puppet-focused management of complex configurations (assuming that Puppet modules are OS-independent and support multi-tier definitions using a roles / profile pattern).
Disadvantages
The disadvantage (based on the mandatory assignment of a particular lifecycle environment to a content view) is that the lowest hierarchy level must include the lifecycle stage or needs to be the lifecycle stage (if you add a dedicated layer at the bottom). Therefore, content or composite content views can be assigned only to hosts at this level. The other levels are primarily for parameters and configurations shared across the inherent objects.
Scenario D) Location basedThis approach is best for global customers who have a lot of federated locations (for example,in the retail vertical). In these cases, it makes sense to structure the host groups based on locations.
[email protected] 225 www.redhat.com

Advantages
The main advantage is that the distribution of locations / datacenters and the resources insidethem is aligned to the host group structure. If a location is associated to a Capsule and additionally to particular host groups, the data-center topology and host group structure follows the same logic. In a scenario where the data-center topology or federations determine many other attributes, this approach would be the best option.
Disadvantages
This scenario complicates the standardization of core builds and applications across locationsor subsidiaries. In complex environments with a huge number of applications and different configurations, the number of host group changes that are required for each configuration change increases significantly.
In our solution guide, we’ve decided to use scenario B (explained in further detail below).
Create Host GroupsScenario B) Lifecycle-Environment-focused hierarchical structure is the host-group scenario implemented in this solution guide document.
To create a Host Group, go to:5. Configure ➤ Host groups ➤ New Host Group6. Specify the information according to the table below
(The specified entries are defaults that you can change when a new host is provisioned.)
7. Submit
For the solution guide, create the following Host Groups:
Lifecycle Environments
Object Value
Host Group Parent: Name: Lifecycle Environment: Content View: Puppet Environment: Capsule Settings: Content Source: Puppet CA:
devdev
satellite.example.comsatellite.example.com
www.redhat.com 226 [email protected]
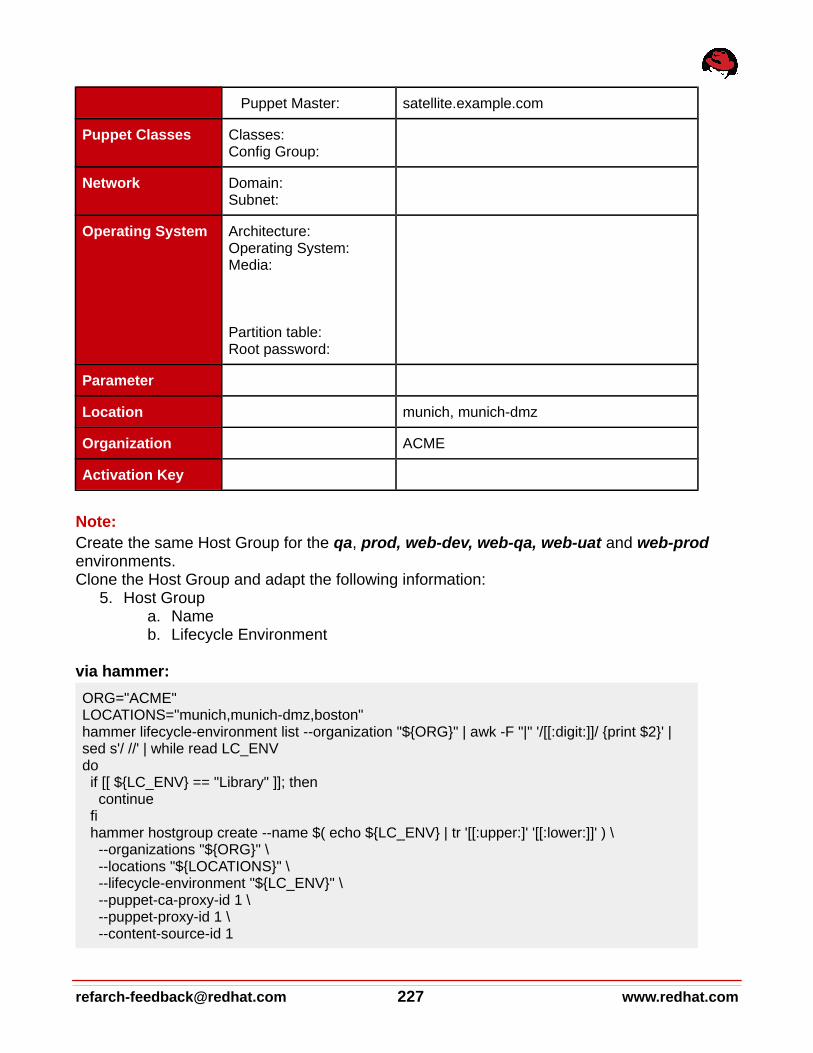
Puppet Master: satellite.example.com
Puppet Classes Classes:Config Group:
Network Domain:Subnet:
Operating System Architecture:Operating System:Media:
Partition table:Root password:
Parameter
Location munich, munich-dmz
Organization ACME
Activation Key
Note:Create the same Host Group for the qa, prod, web-dev, web-qa, web-uat and web-prod environments.Clone the Host Group and adapt the following information:
5. Host Groupa. Nameb. Lifecycle Environment
via hammer:
ORG="ACME"LOCATIONS="munich,munich-dmz,boston"hammer lifecycle-environment list --organization "${ORG}" | awk -F "|" '/[[:digit:]]/ {print $2}' | sed s'/ //' | while read LC_ENVdo if [[ ${LC_ENV} == "Library" ]]; then continue fi hammer hostgroup create --name $( echo ${LC_ENV} | tr '[[:upper:]' '[[:lower:]]' ) \ --organizations "${ORG}" \ --locations "${LOCATIONS}" \ --lifecycle-environment "${LC_ENV}" \ --puppet-ca-proxy-id 1 \ --puppet-proxy-id 1 \ --content-source-id 1
[email protected] 227 www.redhat.com

done
Red Hat Enterprise Linux 6
Object Value
Host Group Parent: Name: Lifecycle Environment: Content View: Puppet Environment: Capsule Settings: Content Source: Puppet CA: Puppet Master:
devrhel-6server-x86_64devcv-os-rhel-6server(automatically assigned)
satellite.example.comsatellite.example.comsatellite.example.com
Puppet Classes Classes:Config Group: cfg-corebuild
Network Domain:Subnet:
example.com172.24.96.0/24
Operating System Architecture:Operating System:Media:
Partition table:Root password:
x86_64RedHat 6.6ACME/Library/Red_Hat_Server/Red_Hat_Enterprise_Linux_6_Server_Kickstart_x86_64_6Server
ptable-acme-os-rhel-server********
Parameter
Location munich, munich-dmz
Organization ACME
Activation Key act-dev-os-rhel-6server-x86_64
Note:At the time this document was written, the Config Group cfg-corebuild could not be assigned via hammer. Please add it manually to every Red Hat Enterprise Linux Host Group if the hammer command is used to create the structure.
Create the same Host Group for the qa, prod environment.Clone the Host Group and adapt the following information:
1. Host Group
www.redhat.com 228 [email protected]
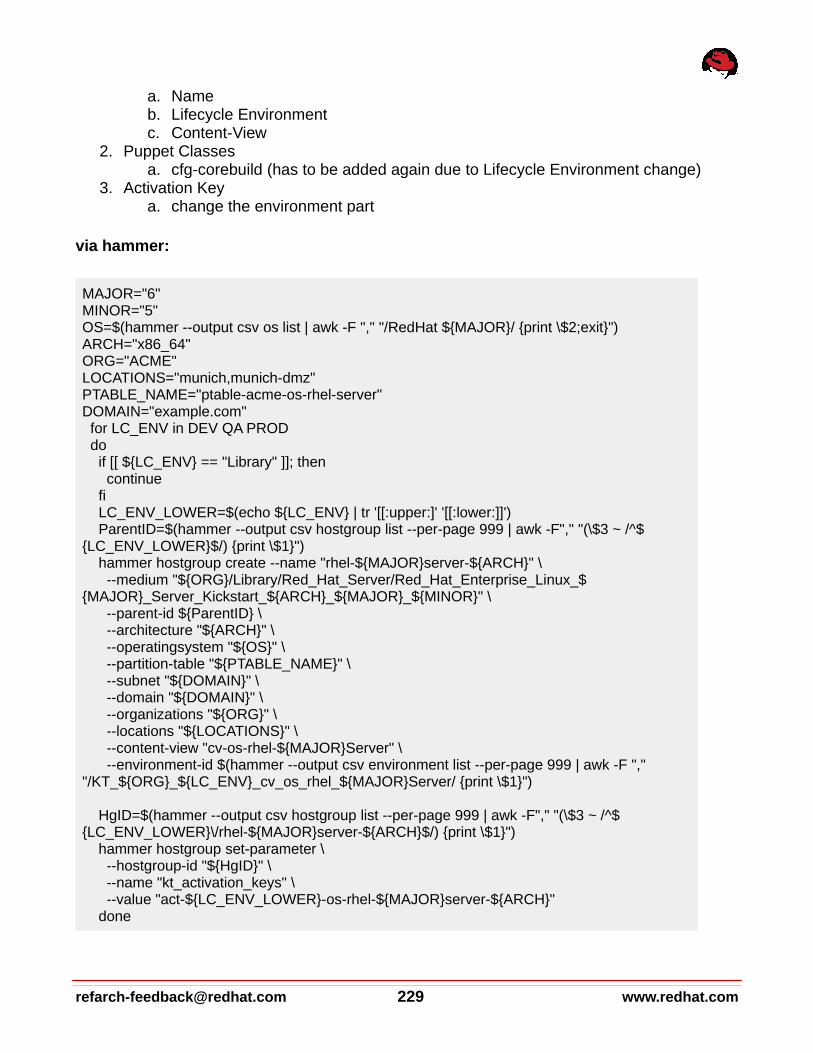
a. Nameb. Lifecycle Environmentc. Content-View
2. Puppet Classesa. cfg-corebuild (has to be added again due to Lifecycle Environment change)
3. Activation Keya. change the environment part
via hammer:
MAJOR="6"MINOR="5"OS=$(hammer --output csv os list | awk -F "," "/RedHat ${MAJOR}/ {print \$2;exit}")ARCH="x86_64"ORG="ACME"LOCATIONS="munich,munich-dmz"PTABLE_NAME="ptable-acme-os-rhel-server"DOMAIN="example.com" for LC_ENV in DEV QA PROD do if [[ ${LC_ENV} == "Library" ]]; then continue fi LC_ENV_LOWER=$(echo ${LC_ENV} | tr '[[:upper:]' '[[:lower:]]') ParentID=$(hammer --output csv hostgroup list --per-page 999 | awk -F"," "(\$3 ~ /^${LC_ENV_LOWER}$/) {print \$1}") hammer hostgroup create --name "rhel-${MAJOR}server-${ARCH}" \ --medium "${ORG}/Library/Red_Hat_Server/Red_Hat_Enterprise_Linux_${MAJOR}_Server_Kickstart_${ARCH}_${MAJOR}_${MINOR}" \ --parent-id ${ParentID} \ --architecture "${ARCH}" \ --operatingsystem "${OS}" \ --partition-table "${PTABLE_NAME}" \ --subnet "${DOMAIN}" \ --domain "${DOMAIN}" \ --organizations "${ORG}" \ --locations "${LOCATIONS}" \ --content-view "cv-os-rhel-${MAJOR}Server" \ --environment-id $(hammer --output csv environment list --per-page 999 | awk -F "," "/KT_${ORG}_${LC_ENV}_cv_os_rhel_${MAJOR}Server/ {print \$1}")
HgID=$(hammer --output csv hostgroup list --per-page 999 | awk -F"," "(\$3 ~ /^${LC_ENV_LOWER}\/rhel-${MAJOR}server-${ARCH}$/) {print \$1}") hammer hostgroup set-parameter \ --hostgroup-id "${HgID}" \ --name "kt_activation_keys" \ --value "act-${LC_ENV_LOWER}-os-rhel-${MAJOR}server-${ARCH}" done
[email protected] 229 www.redhat.com

Red Hat Enterprise Linux 7
Object Value
Host Group Parent: Name: Lifecycle Environment: Content View: Puppet Environment: Capsule Settings: Content Source: Puppet CA: Puppet Master:
devrhel-7server-x86_64devcv-os-rhel-6server(automatically assigned)
satellite.example.comsatellite.example.comsatellite.example.com
Puppet Classes Classes:Config Group: cfg-corebuild
Network Domain:Subnet:
example.com172.24.96.0/24
Operating System Architecture:Operating System:Media:
Partition table:Root password:
x86_64RedHat 7.1ACME/Library/Red_Hat_Server/Red_Hat_Enterprise_Linux_7_Server_Kickstart_x86_64_7Server
ptable-acme-os-rhel-server********
Parameter
Location munich, munich-dmz, boston
Organization ACME
Activation Key act-dev-os-rhel-7server-x86_64
Note:At the time this document was written, the Config Group cfg-corebuild could not be assigned via hammer. Please add it manually to every Red Hat Enterprise Linux Host Group if the hammer command is used to create the structure.
Create the same Host Group for the qa, prod, web-dev, web-qa, web-uat and web-prod environments.Clone the Host Group and adapt the following information:
1. Host Groupa. Nameb. Lifecycle Environmentc. Content-View
2. Puppet Classes
www.redhat.com 230 [email protected]
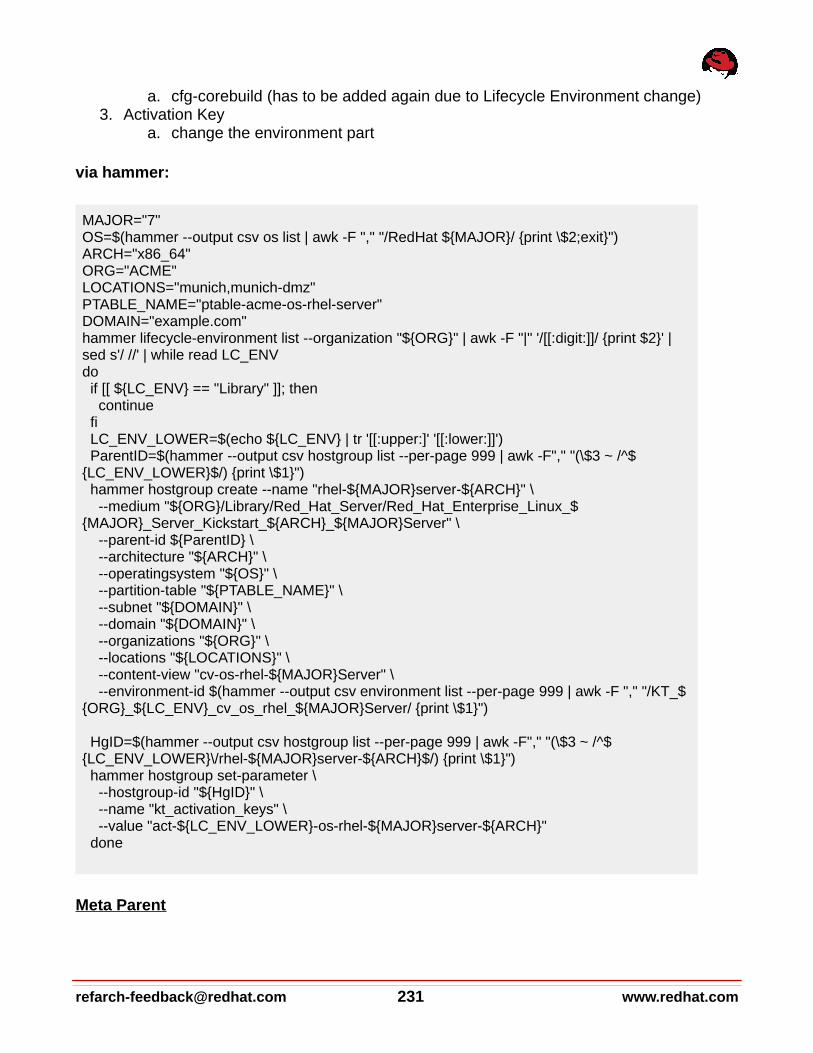
a. cfg-corebuild (has to be added again due to Lifecycle Environment change)3. Activation Key
a. change the environment part
via hammer:
MAJOR="7"OS=$(hammer --output csv os list | awk -F "," "/RedHat ${MAJOR}/ {print \$2;exit}")ARCH="x86_64"ORG="ACME"LOCATIONS="munich,munich-dmz"PTABLE_NAME="ptable-acme-os-rhel-server"DOMAIN="example.com"hammer lifecycle-environment list --organization "${ORG}" | awk -F "|" '/[[:digit:]]/ {print $2}' | sed s'/ //' | while read LC_ENVdo if [[ ${LC_ENV} == "Library" ]]; then continue fi LC_ENV_LOWER=$(echo ${LC_ENV} | tr '[[:upper:]' '[[:lower:]]') ParentID=$(hammer --output csv hostgroup list --per-page 999 | awk -F"," "(\$3 ~ /^${LC_ENV_LOWER}$/) {print \$1}") hammer hostgroup create --name "rhel-${MAJOR}server-${ARCH}" \ --medium "${ORG}/Library/Red_Hat_Server/Red_Hat_Enterprise_Linux_${MAJOR}_Server_Kickstart_${ARCH}_${MAJOR}Server" \ --parent-id ${ParentID} \ --architecture "${ARCH}" \ --operatingsystem "${OS}" \ --partition-table "${PTABLE_NAME}" \ --subnet "${DOMAIN}" \ --domain "${DOMAIN}" \ --organizations "${ORG}" \ --locations "${LOCATIONS}" \ --content-view "cv-os-rhel-${MAJOR}Server" \ --environment-id $(hammer --output csv environment list --per-page 999 | awk -F "," "/KT_${ORG}_${LC_ENV}_cv_os_rhel_${MAJOR}Server/ {print \$1}")
HgID=$(hammer --output csv hostgroup list --per-page 999 | awk -F"," "(\$3 ~ /^${LC_ENV_LOWER}\/rhel-${MAJOR}server-${ARCH}$/) {print \$1}") hammer hostgroup set-parameter \ --hostgroup-id "${HgID}" \ --name "kt_activation_keys" \ --value "act-${LC_ENV_LOWER}-os-rhel-${MAJOR}server-${ARCH}" done
Meta Parent
[email protected] 231 www.redhat.com

Object Value
Host Group Parent: Name: Lifecycle Environment:
rhel6-server-x86_64infradev
Object Value
Host Group Parent: Name: Lifecycle Environment:
rhel7-server-x86_64infradev
Note:Create the same Host Group for the qa and prod environments for rhel6-server-x86_64 and rhel7-server-x86_64.Clone the Host Group and adapt the following information:
1. Host Groupa. Name
via hammer:
MAJOR="7" ARCH="x86_64" ORG="ACME" LOCATIONS="munich,munich-dmz" for LC_ENV_LOWER in dev qa prod do ParentID=$(hammer --output csv hostgroup list --per-page 999 | awk -F"," "(\$3 ~ /^${LC_ENV_LOWER}\/rhel-${MAJOR}server-${ARCH}$/) {print \$1}") hammer hostgroup create --name "infra" \ --parent-id ${ParentID} \ --organizations "${ORG}" \ --locations "${LOCATIONS}" done
MAJOR="6" ARCH="x86_64" ORG="ACME" LOCATIONS="munich,munich-dmz,boston" for LC_ENV_LOWER in dev qa prod do ParentID=$(hammer --output csv hostgroup list --per-page 999 | awk -F"," "(\$3 ~ /^${LC_ENV_LOWER}\/rhel-${MAJOR}server-${ARCH}$/) {print \$1}") hammer hostgroup create --name "infra" \ --parent-id ${ParentID} \
www.redhat.com 232 [email protected]

--organizations "${ORG}" \ --locations "${LOCATIONS}" done
Gitserver
Object Value
Host Group Parent: Name: Lifecycle Environment: Content View: Puppet Environment: Capsule Settings: Content Source: Puppet CA: Puppet Master:
dev/rhel-7server-x86_64/infragitserverdevccv-infra-gitserver(selected automatically)
(inherited)(inherited)(inherited)
Puppet Classes Classes:Config Group:
git::server
Network Domain:Subnet:
(inherited)(inherited)
Operating System Architecture:Operating System:Media:
Partition table:Root password:
(inherited)(inherited)(inherited)
(inherited)******
Parameter ptable git
Location munich, munich-dmz
Organization ACME
Activation Key act-dev-infra-gitserver-x86_64
Note:Create the same Host Group for the qa and prod environments.Clone the Host Group and adapt the following information:
1. Host Groupa. Nameb. Lifecycle Environment
2. Puppet Classes
[email protected] 233 www.redhat.com

a. Re-select the Puppet classes (they have to be selected again because the Puppet Environment changed)
3. Activation Key
via hammer:
MAJOR="7"ARCH="x86_64"ORG="ACME"LOCATIONS="munich,munich-dmz" for LC_ENV in DEV QA PROD do LC_ENV_LOWER=$(echo ${LC_ENV} | tr '[[:upper:]' '[[:lower:]]') ParentID=$(hammer --output csv hostgroup list --per-page 999 | awk -F"," "(\$3 ~ /^${LC_ENV_LOWER}\/rhel-${MAJOR}server-${ARCH}\/infra$/) {print \$1}") hammer hostgroup create --name "gitserver" \ --parent-id ${ParentID} \ --organizations "${ORG}" \ --locations "${LOCATIONS}" \ --content-view "ccv-infra-gitserver" \ --environment-id $(hammer --output csv environment list --per-page 999 | awk -F "," "/KT_${ORG}_${LC_ENV}_ccv_infra_gitserver/ {print \$1}") \ --puppet-classes 'git::server' HgID=$(hammer --output csv hostgroup list --per-page 999 | awk -F"," "(\$3 ~ /^${LC_ENV_LOWER}\/rhel-${MAJOR}server-${ARCH}\/gitserver\/infra$/) {print \$1}") hammer hostgroup set-parameter \ --hostgroup-id "${HgID}" \ --name "kt_activation_keys" \ --value "act-${LC_ENV_LOWER}-infra-gitserver-x86_64" done
Containerhost
Object Value
Host Group Parent: Name: Lifecycle Environment: Content View: Puppet Environment: Capsule Settings: Content Source: Puppet CA: Puppet Master:
dev/rhel-7server-x86_64/infracontainerhostdevccv-infra-containerhost(selected automatically)
(inherited)(inherited)(inherited)
Puppet Classes Classes:Config Group:
docker(inherited)
www.redhat.com 234 [email protected]
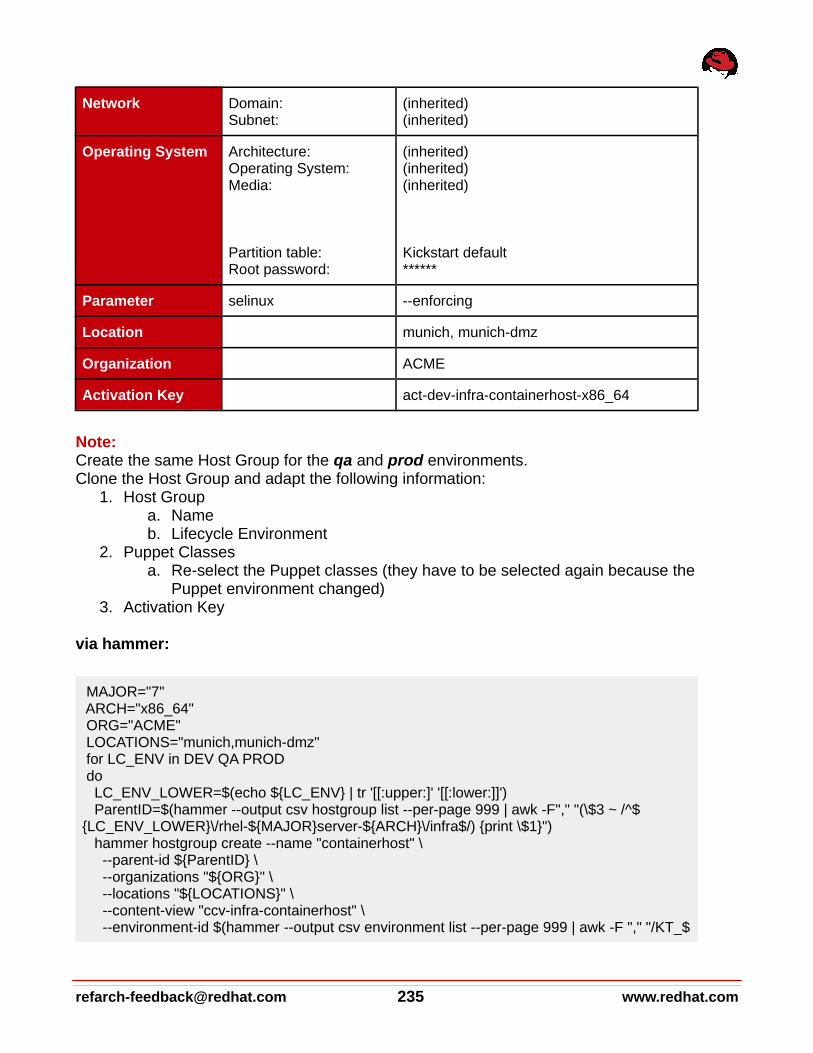
Network Domain:Subnet:
(inherited)(inherited)
Operating System Architecture:Operating System:Media:
Partition table:Root password:
(inherited)(inherited)(inherited)
Kickstart default******
Parameter selinux --enforcing
Location munich, munich-dmz
Organization ACME
Activation Key act-dev-infra-containerhost-x86_64
Note:Create the same Host Group for the qa and prod environments.Clone the Host Group and adapt the following information:
1. Host Groupa. Nameb. Lifecycle Environment
2. Puppet Classesa. Re-select the Puppet classes (they have to be selected again because the
Puppet environment changed)3. Activation Key
via hammer:
MAJOR="7" ARCH="x86_64" ORG="ACME" LOCATIONS="munich,munich-dmz" for LC_ENV in DEV QA PROD do LC_ENV_LOWER=$(echo ${LC_ENV} | tr '[[:upper:]' '[[:lower:]]') ParentID=$(hammer --output csv hostgroup list --per-page 999 | awk -F"," "(\$3 ~ /^${LC_ENV_LOWER}\/rhel-${MAJOR}server-${ARCH}\/infra$/) {print \$1}") hammer hostgroup create --name "containerhost" \ --parent-id ${ParentID} \ --organizations "${ORG}" \ --locations "${LOCATIONS}" \ --content-view "ccv-infra-containerhost" \ --environment-id $(hammer --output csv environment list --per-page 999 | awk -F "," "/KT_$
[email protected] 235 www.redhat.com

{ORG}_${LC_ENV}_ccv_infra_containerhost/ {print \$1}") \ --puppet-classes 'docker' HgID=$(hammer --output csv hostgroup list --per-page 999 | awk -F"," "(\$3 ~ /^${LC_ENV_LOWER}\/rhel-${MAJOR}server-${ARCH}\/containerhost\/infra$/) {print \$1}") hammer hostgroup set-parameter \ --hostgroup-id "${HgID}" \ --name "kt_activation_keys" \ --value "act-${LC_ENV_LOWER}-infra-containerhost-x86_64" done
Capsule
Object Value
Host Group Parent: Name: Lifecycle Environment: Content View: Puppet Environment: Capsule Settings: Content Source: Puppet CA: Puppet Master:
dev/rhel-7server-x86_64/infracapsuledevccv-infra-capsule(selected automatically)
(inherited)(inherited)(inherited)
Puppet Classes Classes:Config Group:
Network Domain:Subnet:
Operating System Architecture:Operating System:Media:
Partition table:Root password:
(inherited)(inherited)(inherited)
Kickstart default
Parameter
Location munich
Organization ACME
Activation Key act-dev-infra-capsule-x86_64
Note:
www.redhat.com 236 [email protected]

Create the same Host Group for the qa and prod environments.Clone the Host Group and adapt the following information:
1. Host Groupa. Nameb. Lifecycle Environment
2. Puppet Classesa. Re-select the Puppet classes (they have to be selected again because the
Puppet environment changed)3. Activation Key
via hammer:
MAJOR="7" ARCH="x86_64" ORG="ACME" LOCATIONS="munich" for LC_ENV in DEV QA PROD do LC_ENV_LOWER=$(echo ${LC_ENV} | tr '[[:upper:]' '[[:lower:]]') ParentID=$(hammer --output csv hostgroup list --per-page 999 | awk -F"," "(\$3 ~ /^${LC_ENV_LOWER}\/rhel-${MAJOR}server-${ARCH}\/infra$/) {print \$1}") hammer hostgroup create --name "capsule" \ --parent-id ${ParentID} \ --organizations "${ORG}" \ --locations "${LOCATIONS}" \ --content-view "ccv-infra-capsule" \ --environment-id $(hammer --output csv environment list --per-page 999 | awk -F "," "/KT_${ORG}_${LC_ENV}_ccv_infra_capsule/ {print \$1}") HgID=$(hammer --output csv hostgroup list --per-page 999 | awk -F"," "(\$3 ~ /^${LC_ENV_LOWER}\/rhel-${MAJOR}server-${ARCH}\/capsule\/infra$/) {print \$1}") hammer hostgroup set-parameter \ --hostgroup-id "${HgID}" \ --name "kt_activation_keys" \ --value "act-${LC_ENV_LOWER}-infra-capsule-x86_64" done
Loghost
Object Value
Host Group Parent: Name: Lifecycle Environment: Content View: Puppet Environment: Capsule Settings:
dev/rhel-6server-x86_64/infraloghostdevccv-infra-loghost(selected automatically)
[email protected] 237 www.redhat.com
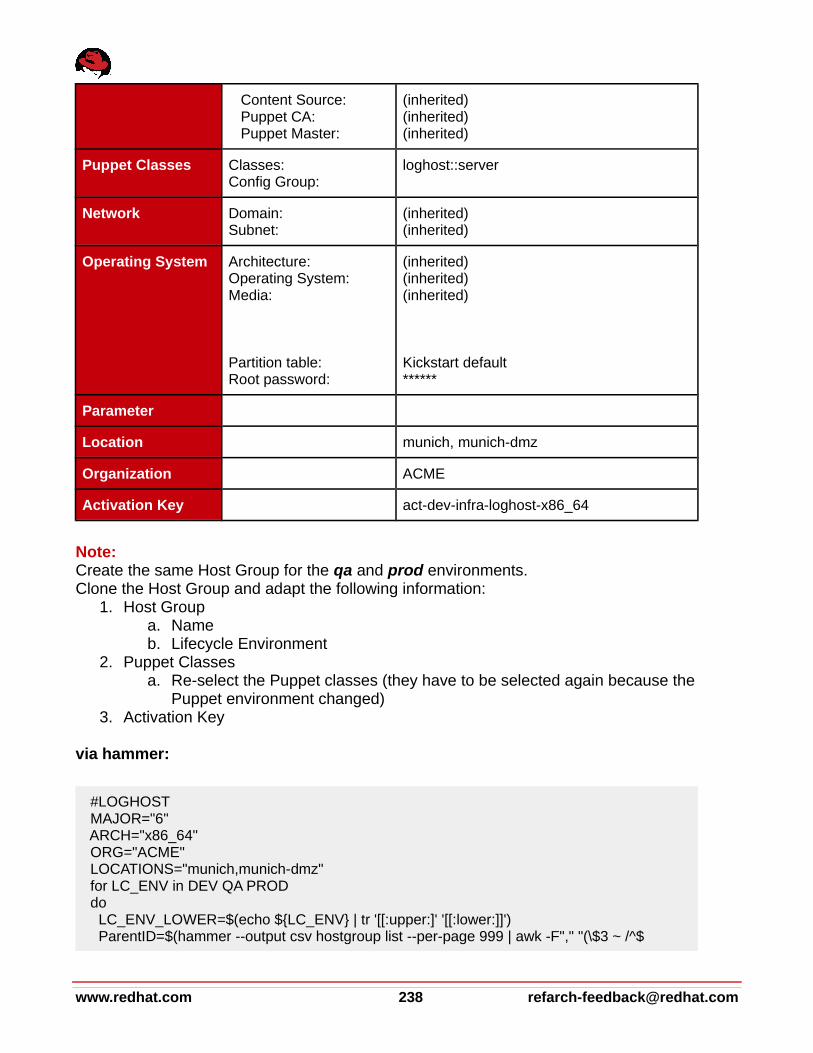
Content Source: Puppet CA: Puppet Master:
(inherited)(inherited)(inherited)
Puppet Classes Classes:Config Group:
loghost::server
Network Domain:Subnet:
(inherited)(inherited)
Operating System Architecture:Operating System:Media:
Partition table:Root password:
(inherited)(inherited)(inherited)
Kickstart default******
Parameter
Location munich, munich-dmz
Organization ACME
Activation Key act-dev-infra-loghost-x86_64
Note:Create the same Host Group for the qa and prod environments.Clone the Host Group and adapt the following information:
1. Host Groupa. Nameb. Lifecycle Environment
2. Puppet Classesa. Re-select the Puppet classes (they have to be selected again because the
Puppet environment changed)3. Activation Key
via hammer:
#LOGHOST MAJOR="6" ARCH="x86_64" ORG="ACME" LOCATIONS="munich,munich-dmz" for LC_ENV in DEV QA PROD do LC_ENV_LOWER=$(echo ${LC_ENV} | tr '[[:upper:]' '[[:lower:]]') ParentID=$(hammer --output csv hostgroup list --per-page 999 | awk -F"," "(\$3 ~ /^$
www.redhat.com 238 [email protected]
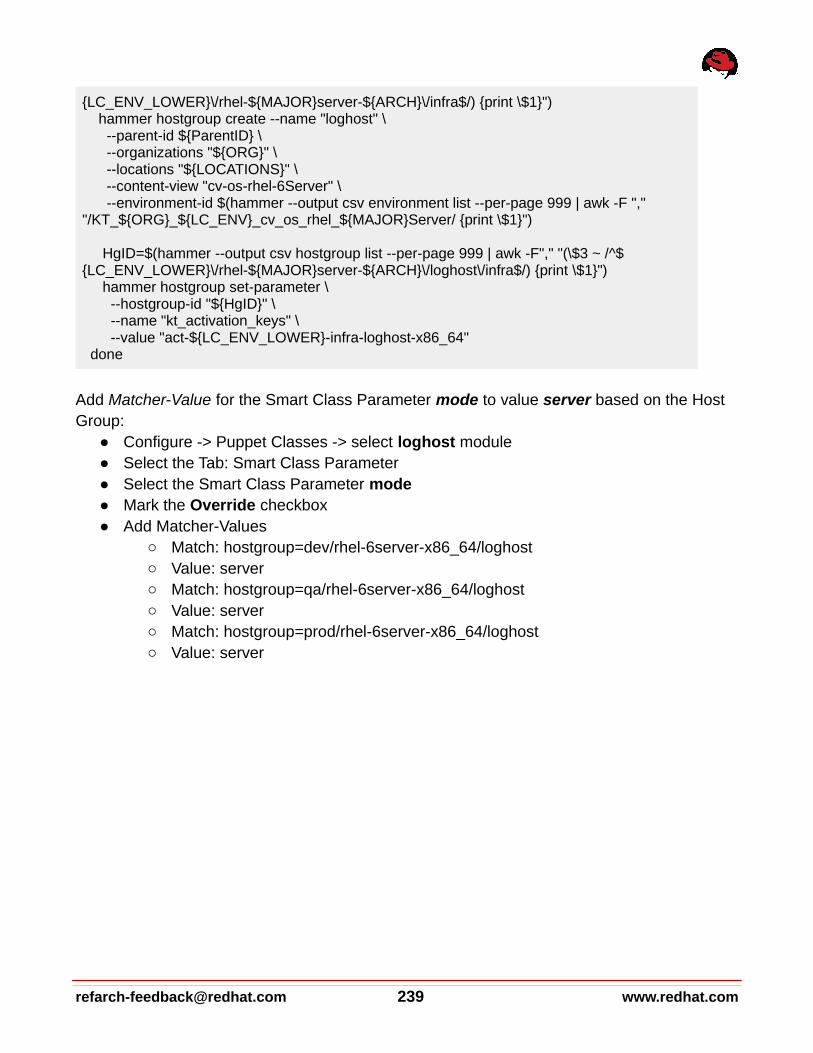
{LC_ENV_LOWER}\/rhel-${MAJOR}server-${ARCH}\/infra$/) {print \$1}") hammer hostgroup create --name "loghost" \ --parent-id ${ParentID} \ --organizations "${ORG}" \ --locations "${LOCATIONS}" \ --content-view "cv-os-rhel-6Server" \ --environment-id $(hammer --output csv environment list --per-page 999 | awk -F "," "/KT_${ORG}_${LC_ENV}_cv_os_rhel_${MAJOR}Server/ {print \$1}") HgID=$(hammer --output csv hostgroup list --per-page 999 | awk -F"," "(\$3 ~ /^${LC_ENV_LOWER}\/rhel-${MAJOR}server-${ARCH}\/loghost\/infra$/) {print \$1}") hammer hostgroup set-parameter \ --hostgroup-id "${HgID}" \ --name "kt_activation_keys" \ --value "act-${LC_ENV_LOWER}-infra-loghost-x86_64" done
Add Matcher-Value for the Smart Class Parameter mode to value server based on the Host Group:
● Configure -> Puppet Classes -> select loghost module● Select the Tab: Smart Class Parameter● Select the Smart Class Parameter mode● Mark the Override checkbox● Add Matcher-Values
○ Match: hostgroup=dev/rhel-6server-x86_64/loghost○ Value: server○ Match: hostgroup=qa/rhel-6server-x86_64/loghost○ Value: server○ Match: hostgroup=prod/rhel-6server-x86_64/loghost○ Value: server
[email protected] 239 www.redhat.com
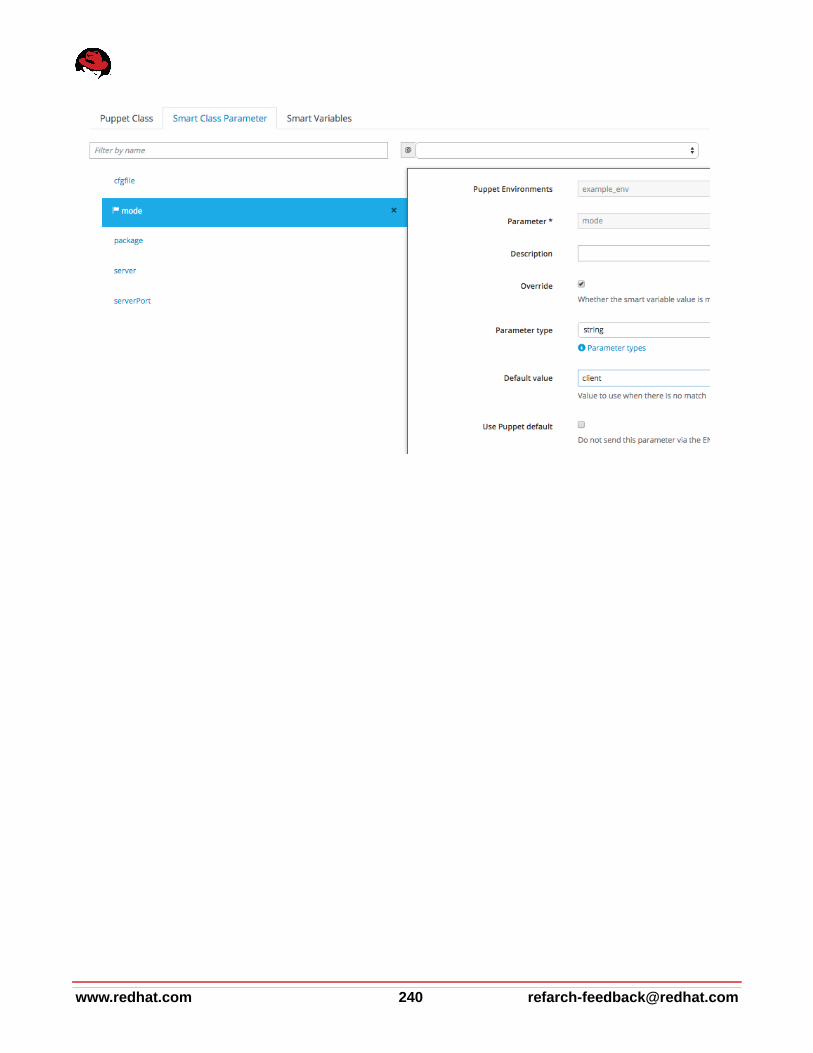
www.redhat.com 240 [email protected]

[email protected] 241 www.redhat.com

Note:At the time of writing a Matcher-Value had to be added for every loghost Host Group entry.
acmeweb
Object Value
Host Group Parent: Name: Lifecycle Environment: Content View: Puppet Environment: Capsule Settings: Content Source: Puppet CA: Puppet Master:
dev/rhel-7server-x86_64/acmewebweb-devccv-acmeweb(selected automatically)
(inherited)(inherited)(inherited)
Puppet Classes Classes:Config Group:
Network Domain:Subnet:
(inherited)(inherited)
Operating System Architecture:Operating System:Media:
Partition table:Root password:
(inherited)(inherited)
Kickstart default******
Parameter
Location munich, munich-dmz, boston
Organization ACME
Activation Key
Note:Create the same Host Group for the web-qa, web-uat and web-prod environments.Clone the Host Group and adapt the following information:
1. Host Groupa. Nameb. Lifecycle Environment
www.redhat.com 242 [email protected]

via hammer:
MAJOR="7" ARCH="x86_64" ORG="ACME" LOCATIONS="munich,munich-dmz,boston" for LC_ENV in Web-DEV Web-QA Web-UAT Web-PROD do LC_ENV_LOWER=$(echo ${LC_ENV} | tr '[[:upper:]' '[[:lower:]]') ParentID=$(hammer --output csv hostgroup list --per-page 999 | awk -F"," "(\$3 ~ /^${LC_ENV_LOWER}\/rhel-${MAJOR}server-${ARCH}$/) {print \$1}") hammer hostgroup create --name "acmeweb" \ --parent-id ${ParentID} \ --organizations "${ORG}" \ --locations "${LOCATIONS}" \ --content-view "ccv-biz-acmeweb" \ --environment-id $(hammer --output csv environment list --per-page 999 | awk -F "," "/KT_${ORG}_${LC_ENV}_ccv_biz_acmeweb/ {print \$1}") done
acmeweb frontend
Object Value
Host Group Parent: Name: Lifecycle Environment: Content View: Puppet Environment: Capsule Settings: Content Source: Puppet CA: Puppet Master:
dev/rhel-7server-x86_64/acmewebfrontendweb-devccv-acmeweb(selected automatically)
(inherited)(inherited)(inherited)
Puppet Classes Classes:Config Group:
acmeweb::frontend
Network Domain:Subnet:
(inherited)(inherited)
Operating System Architecture:Operating System:Media:
Partition table:Root password:
(inherited)(inherited)
Kickstart default******
Parameter
[email protected] 243 www.redhat.com

Location munich, munich-dmz, boston
Organization ACME
Activation Key act-dev-biz-acmeweb-x86_64
Note:Create the same Host Group for the web-qa, web-uat and web-prod environments.Clone the Host Group and adapt the following information:
1. Host Groupa. Nameb. Lifecycle Environment
2. Puppet Classesa. Re-select the Puppet classes (they have to be selected again because the
Puppet environment changed)3. Activation Key
via hammer:
MAJOR="7" ARCH="x86_64" ORG="ACME" LOCATIONS="munich,munich-dmz,boston" for LC_ENV in Web-DEV Web-QA Web-UAT Web-PROD do LC_ENV_LOWER=$(echo ${LC_ENV} | tr '[[:upper:]' '[[:lower:]]') ParentID=$(hammer --output csv hostgroup list --per-page 999 | awk -F"," "(\$3 ~ /^${LC_ENV_LOWER}\/rhel-${MAJOR}server-${ARCH}\/acmeweb$/) {print \$1}") hammer hostgroup create --name "frontend" \ --parent-id ${ParentID} \ --organizations "${ORG}" \ --locations "${LOCATIONS}" \ --puppet-classes 'acmeweb::frontend'
HgID=$(hammer --output csv hostgroup list --per-page 999 | awk -F"," "(\$3 ~ /^${LC_ENV_LOWER}\/rhel-${MAJOR}server-${ARCH}\/acmeweb\/frontend$/) {print \$1}") hammer hostgroup set-parameter \ --hostgroup-id "${HgID}" \ --name "kt_activation_keys" \ --value "act-${LC_ENV_LOWER}-biz-acmeweb-x86_64" done
acmeweb backend
Object Value
Host Group Parent: dev/rhel-7server-x86_64/acmeweb
www.redhat.com 244 [email protected]

Name: Lifecycle Environment: Content View: Puppet Environment: Capsule Settings: Content Source: Puppet CA: Puppet Master:
backendweb-devccv-acmeweb(selected automatically)
(inherited)(inherited)(inherited)
Puppet Classes Classes:Config Group:
acmeweb::backend
Network Domain:Subnet:
(inherited)(inherited)
Operating System Architecture:Operating System:Media:
Partition table:Root password:
(inherited)(inherited)(inherited)
Kickstart default******
Parameter
Location munich, munich-dmz, boston
Organization ACME
Activation Key act-dev-biz-acmeweb-x86_64
Note:Create the same Host Group for the web-qa, web-uat and web-prod environments.Clone the Host Group and adapt the following information:
1. Host Groupa. Nameb. Lifecycle Environment
2. Puppet Classesa. Re-select the Puppet classes (they have to be selected again because the
Puppet environment changed)3. Activation Key
via hammer:
MAJOR="7" ARCH="x86_64" ORG="ACME" LOCATIONS="munich,munich-dmz,boston"
[email protected] 245 www.redhat.com
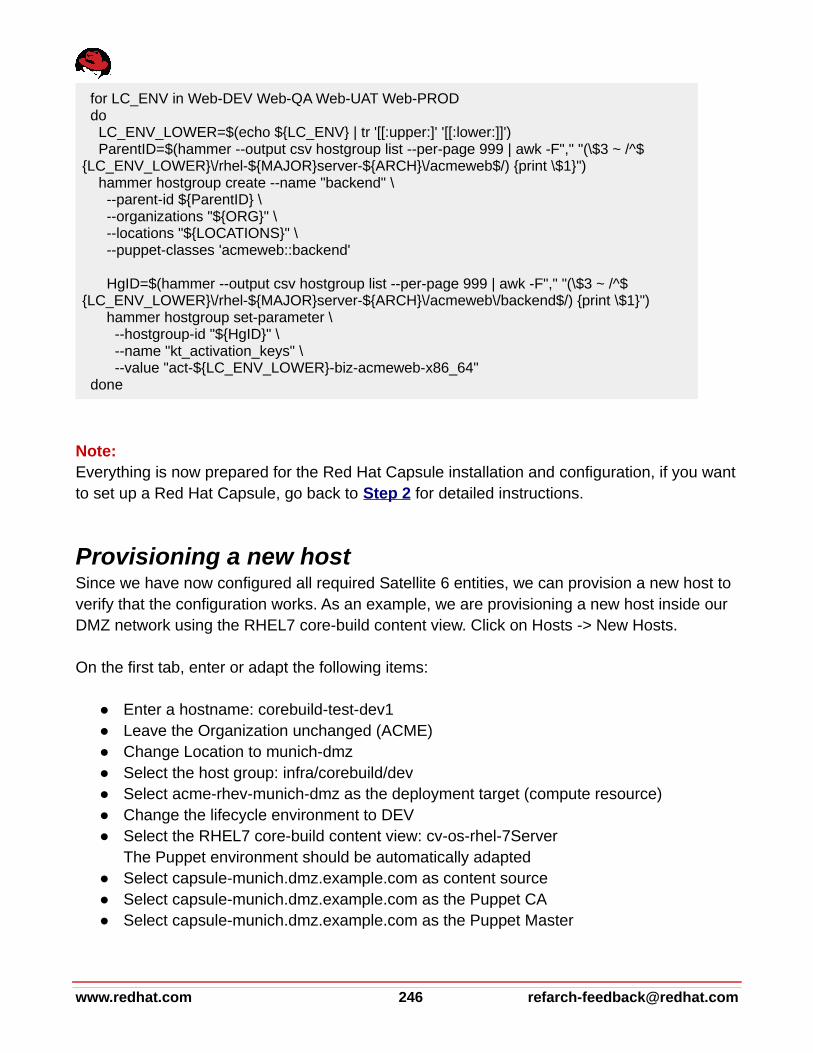
for LC_ENV in Web-DEV Web-QA Web-UAT Web-PROD do LC_ENV_LOWER=$(echo ${LC_ENV} | tr '[[:upper:]' '[[:lower:]]') ParentID=$(hammer --output csv hostgroup list --per-page 999 | awk -F"," "(\$3 ~ /^${LC_ENV_LOWER}\/rhel-${MAJOR}server-${ARCH}\/acmeweb$/) {print \$1}") hammer hostgroup create --name "backend" \ --parent-id ${ParentID} \ --organizations "${ORG}" \ --locations "${LOCATIONS}" \ --puppet-classes 'acmeweb::backend'
HgID=$(hammer --output csv hostgroup list --per-page 999 | awk -F"," "(\$3 ~ /^${LC_ENV_LOWER}\/rhel-${MAJOR}server-${ARCH}\/acmeweb\/backend$/) {print \$1}") hammer hostgroup set-parameter \ --hostgroup-id "${HgID}" \ --name "kt_activation_keys" \ --value "act-${LC_ENV_LOWER}-biz-acmeweb-x86_64" done
Note:Everything is now prepared for the Red Hat Capsule installation and configuration, if you wantto set up a Red Hat Capsule, go back to Step 2 for detailed instructions.
Provisioning a new hostSince we have now configured all required Satellite 6 entities, we can provision a new host to verify that the configuration works. As an example, we are provisioning a new host inside our DMZ network using the RHEL7 core-build content view. Click on Hosts -> New Hosts.
On the first tab, enter or adapt the following items:
● Enter a hostname: corebuild-test-dev1● Leave the Organization unchanged (ACME)● Change Location to munich-dmz● Select the host group: infra/corebuild/dev● Select acme-rhev-munich-dmz as the deployment target (compute resource)● Change the lifecycle environment to DEV● Select the RHEL7 core-build content view: cv-os-rhel-7Server
The Puppet environment should be automatically adapted● Select capsule-munich.dmz.example.com as content source● Select capsule-munich.dmz.example.com as the Puppet CA● Select capsule-munich.dmz.example.com as the Puppet Master
www.redhat.com 246 [email protected]

The final New Host configuration should look like this:
Select the Puppet Classes tab. Because the config group cfg-corebuild was assigned to the host group selected in the first step, we don’t need to change anything here.
[email protected] 247 www.redhat.com

Select the Network tab, and change both Domain and Subnet to dmz.example.com. The IP address suggestion should be automatically adapted to the corresponding IP range.
www.redhat.com 248 [email protected]

Select the Operating System tab. Since all items listed on this tab are already defined in the corresponding host group definition, all you need to do here is enter the root password for thisserver.
Select the Virtual Machine tab. Here we need to make the following changes:
5. Optional: Adapt the number of virtual CPU cores of the VM (we are using 2)6. Adapt the virtual memory of the VM (we are using 2 GB, minimum is 1 GB)7. Click on Add Interface to add a network interface to this VM
a. Enter a name (eth0)b. Select the corresponding network (here: our VLAN 99)
8. Click on Add Volumea. Enter the disk size (our customized partition table ptable-acme-os-rhel-server
requires at least 20 GB). We are using 25 GB (by default, thin provisioning is used, and, as long as the Preallocate Disk checkbox is not selected, the real disk space consumption will be lower than 25 GB).
b. Select the bootable radio button
[email protected] 249 www.redhat.com

Note: It might be confusing. In addition to the third tab, Network, we need to explicitly add a networkinterface here. You must do the same with the volume. However, if the provisioning method asconfigured in the operating system tab is network based instead of image based and these two items are required to create a virtual machine, the current version of Satellite 6 does not automatically provide empty or predefined fields to configure these required values.
We leave the last two tabs (Parameters and Additional Information) unchanged and then click Submit. After a couple of minutes, our newly created host should be listed under the Hosts -> Content Hosts tab.
www.redhat.com 250 [email protected]

Step 8: Map your IT organization and roles to your Satellite setupIT organizations are in a state of constant flux. In spite of this environment, many IT organizations base their current structure on particular technologies or products. This type of structuring can severely limit an IT organization, since many software vendors have significantly expanded their product use cases and the products they offer. Plus, many emerging technologies have disrupted how customers work with particular products, such as software-defined networks or storage.
A typical IT organization is divided into units with different roles and responsibilities. Depending on the size and structure of an IT organization, the roles and responsibilities can be organized in many different ways. Some of them are directly related to how Red Hat Satellite Server is used, some of them not. In the following section we will describe some common roles and how Red Hat Satellite supports them.
How Red Hat Satellite Lets You Separate ResponsibilitiesRed Hat Satellite offers various options to support roles. Red Hat Satellite:
● Supports both users and roles. Satellite can assign default organizations and environments to users, so that when users create new entities, these defaults are automatically used. Users can also be assigned a default role, which defines their permissions and access levels. Users’ assigned roles give them rights to see and manage organizations and environments.
● Supports aggregating different organization (units) within one single Satellite server by using Red Hat Satellite Multi-Org concepts
● Provides the capability to isolate the ownership of systems (deployment targets) from the actual content (deployment content, such as OS or application content)
● Allows the independent lifecycle management of Content Views to support individual ownership of particular system stack layers (for example, the OS, platform and application layers). Satellite also supports aggregating formerly independent ownerships into Composite Content Views.
● Offers independent software-lifecycle environment paths to create independent lifecycle stages and environments for individual ownership and release cycles
● Supports the granular definition of access levels for all objects managed within Satellite. This feature supports role-based access control (RBAC) concepts.
[email protected] 251 www.redhat.com

Satellite Users and LDAP AuthenticationA Satellite 6 user defines a set of details for individuals who use the system. Users can be associated with organizations and environments, so that when they create new entities, the default settings are automatically used. Users can also have one or more roles attached, which grant them rights to view and manage organizations and environments.
Red Hat Satellite includes the option to use a Lightweight Directory Access Protocol (LDAP) service for user information and authentication, using one or more LDAP directories. The required steps to configure LDAP authentication are documented in the Red Hat Satellite User Guide.
In our solution guide, we are not using LDAP authentication.
Red Hat Satellite 6 Role-Based Access Control Red Hat Satellite features a fine-grained access control system that allows you to customize sets of roles to precisely the desired allowed actions. Each action on a resource type (host, host collection, lifecycle environment, content view, etc.) can be controlled within each role, and you can restrict the individual objects via a search query.
Some predefined roles are available with a pre-defined set of filters. To see this list of predefined roles, click on Administer -> Roles:
These templates can be cloned and adapted or enhanced to specific needs. Alternatively, you
www.redhat.com 252 [email protected]
can create new roles from scratch: Start with an empty role, and then add all required filters.
For each of the 46 different resource types, you can select one or more permissions that belong to a particular resource type (e.g. view, edit, create, delete). In addition, you can applyfilters to restrict these permissions to a particular subset of elements. For further details, see the corresponding chapter in the Satellite 6 User Guide: https :// access . redhat . com / documentation / en - US / Red _ Hat _ Satellite /6.1/ html / User _ Guide / chap - Users _ and _ Roles . html
Note: Because of its granular model for defining roles and based on Puppet’s powerful configuration-management capabilities, Satellite 6 can manage both operating systems and platforms running on top of Red Hat Enterprise Linux. Satellite 6 can also be used to manage applications, but Red Hat offers a dedicated tool for managing platforms and applications, Red Hat OpenShift Enterprise.
Satellite 6 RBAC RecommendationsSatellite 6’s Role-Based Access Control (RBAC) lets you assign granular permissions and access controls to all Satellite 6 objects. Because of the huge number of objects (indicated bythe 46 different resource types), trying to define an enhanced permission set can become a trial and error journey. The following recommendations should help you define custom roles and their permissions.
Define the Expected Tasks and ResponsibilitiesA good way to begin is to think about what a particular role is supposed to do and which Satellite 6 entities might be affected by these tasks. You could think about the responsibilities of this role and how you would define the border between two roles. For example, if a user associated with this role is supposed to execute an action limited to a particular subset of an entity, you need to define this subset. Our QA and SysEng sample roles might help here. The differences between them define the boundaries between two sets of responsibilities. You canuse filters to limit the associated permissions.
Start Small and Add Permissions Step by StepIf tests of a role have not gone well, start with a very limited set of permissions and then add additional permissions step by step. Once the execution is successful, review your filters and check if some of them are unnecessary. If you are unsure, remove a filter or permission and test again to see if the execution still works. Usually you need more “view” permissions and
[email protected] 253 www.redhat.com

“edit” or “delete” permissions. If you remove unnecessary view permissions, the number of visible items decreases, and the complexity of the user interface decreases as well.
Use Search Filters to Limit the Amount of DetailMany roles in a traditional IT organization have a very limited area of responsibility. However, there might be a wider area of interest. For example, the application server owner is responsible for the application server but might have an interest to see (read-only access) thecurrent core build development to get earlier access to information about potential upcoming changes. Usually, areas of interest should be handled more on a cross-team communication and collaboration plan, but the read-only permissions in Satellite 6 would also help users get an overview about other areas of interest.
Consider Secondary Entities Affected by a Particular ExecutionSometimes, you need to consider which secondary entities are affected. For example, a content view promotion automatically creates new (or changes existing) Puppet environmentsfor this lifecycle environment and content view combination. Therefore, you need to add create and edit permissions for the resource type (Puppet) “Environment,” if this role is expected to promote content views. For further details, see “Sample Role 5: Quality Assurance (QA)” in this chapter.
Use Predefined Roles Wherever PossibleAs mentioned, earlier Satellite 6 ships some predefined roles that can be used alone or as part of a role combination. For further details, see “Sample Role 2” and “Sample Role 4” in this chapter.
RBAC Focuses on Role Shaping But Not Security controlThe current focus of Satellite 6’s role-based access control is more on role shaping in the UI (soft settings) than on securing or limiting access (hard settings / enforcement) to various objects or tasks. The examples provided in this chapter primarily focus on hiding unnecessaryobjects from users who are not supposed to deal with all Satellite 6 entities.
Typical content & Lifecycle Role TypesThere are various criteria for distinguishing among different roles within an IT organization. In this solution guide, we will focus on the following 3 types of roles:
www.redhat.com 254 [email protected]

● Roles belonging to a particular owner of an application or specific parts of IT services (for example, different owners of Red Hat Enterprise Linux as the operating system versus owners of application servers and database servers)
● Roles belonging to a particular stage of the software lifecycle. These roles usually havededicated requirements and tasks and in most cases also using dedicated compute resources to fulfill these tasks (for example, the roles could be divided among the plan - build - run phases, where each phase has one or more owners)
● Roles belonging to specific tasks that are partially independent from the roles described above (for example, security manager, license managers)
The following picture illustrates the different areas of responsibilities in a fragmented IT organization with individual roles for each lifecycle stage of each stack layer:
ACME IT Organization ExampleAs mentioned in the introduction, our example, the ACME IT Organization, is structured as follows:
[email protected] 255 www.redhat.com

Primarily, we divide responsibility areas into operating systems and application responsibilities. In addition, we have a couple of cross-functional roles that take care of various typical IT process areas.
Note: Currently, you need to use the permissions’ IDs instead of their names when using hammer CLI to configure the roles and filters until the following bug is fixed:
https :// bugzilla . redhat . com / show _ bug . cgi ? id =1230884
The following hammer commands list all the available permissions and their IDs:
hammer filter available-permissions --per-page 500----|-------------------------------------------------|------------------------ID | NAME | RESOURCE ----|-------------------------------------------------|------------------------1 | view_architectures | Architecture 2 | create_architectures | Architecture 3 | edit_architectures | Architecture 4 | destroy_architectures | Architecture 5 | view_audit_logs | Audit 6 | view_authenticators | AuthSourceLdap 7 | create_authenticators | AuthSourceLdap 8 | edit_authenticators | AuthSourceLdap 9 | destroy_authenticators | AuthSourceLdap 10 | view_bookmarks | Bookmark
[...]
www.redhat.com 256 [email protected]

232 | rh_telemetry_view | (Miscellaneous) 233 | rh_telemetry_configurations | (Miscellaneous) 234 | download_bootdisk | (Miscellaneous) ----|-------------------------------------------------|------------------------
Note: Some of these permission IDs have changed with Satellite 6.1 (even between the private and public beta). So if you have used permissions already, you might need to adapt them accordingly.
Sample Role 1: Satellite AdminThe Satellite Admin is the top-level admin role with unlimited access control to all Satellite objects, including all managed objects (systems and applications). Therefore, the least complex setup is to use the Satellite Admin role for all users working with Red Hat Satellite.
Each user can be assigned to the Admin role just by selecting the corresponding checkbox while creating users under the Roles tab:
In addition to the master Admin role, Satellite 6 ships with two additional predefined roles called ‘Manager’ and ‘Site Manager’, which also include a lot of privileges and might be sufficient for most administrative tasks as well.
Although this setup might be sufficient for smaller IT organizations that have only limited (or
[email protected] 257 www.redhat.com

even no) access control or separation of responsibilities, we strongly recommend that you notuse the Admin role (or an associated user) as the permanent user to login and work with Red Hat Satellite in a role-segregated environment.
Sample Role 2: IT Operations Manager (Readonly Role)Let’s start with a simple example. Our IT Operations Manager is not supposed to use Satellite6 or manage items inside Satellite 6. Nevertheless, he wants to get an overview about variousitems handled by Satellite 6. Since this role is not expected to make any changes, a read-onlyrole would be sufficient for it.
What Is This Role Supposed to Do?
● View all Satellite 6 entities in read-only mode
RBAC Configuration for this Role
Based on the expected tasks for this role, we add the predefined Viewer role to this user. To see the (long) list of associated permissions that are defined for this role, go to Administer -> Roles and click on the Filter inside the Viewer row.
Role Resource Type Permission Filter
Viewer predefined permission set
You can assign this predefined role to a new or existing user if you go to Administer -> Users and then select the existing user or create a new one. Inside the roles tab select the Viewer role:
www.redhat.com 258 [email protected]

Role Creation Using Hammer CLI
The following hammer commands create a user and role and add the corresponding permissions to the role:
hammer user create --firstname jim \ --lastname opsmgr \ --login jimopsmgr \ --mail [email protected] \ --password 'redhat' \ --auth-source-id="1" \ --organizations ${ORG}
# add the predefined Viewer role to this userhammer user add-role --login jimopsmgr --role Viewer
Sample Role 3: License Management OwnerInside the Risk & Security Management team, there is a role for taking care of license and subscription management to satisfy various compliance requirements. Though this might not be a typical Satellite user, this role can benefit from Satellite 6 subscription management and reporting capabilities. Using very restrictive permission filters, we can hide the complexity of
[email protected] 259 www.redhat.com

managed objects inside Satellite and just focus on the specific tasks with which this role is associated.
What Is This Role Supposed to Do?
● upload new subscription manifests (downloaded from the Red Hat Customer Portal) into Satellite 6
● monitor the subscription utilization for Red Hat products● monitor the subscription utilization for 3rd-party products● monitor the utilization of different support-level-specific subscriptions (for example,
monitor how much the host is using premium vs. standard support level agreements)
RBAC Configuration for this Role
Based on the expected tasks for this role, we add the following permissions to it. Since this describes a minimum set of permissions, you might want to add some more.
Role Resource Type Permission Filter
Miscellaneous access_dashboardmy_organizationsview_statistics
Products and Repositories view_products
Organization Import_manifestdelete_manifestattach_subscriptionsunattach_subscriptionsview_subscriptionsview_organizations
Reports view_reports
Host/managed view_hosts
The final permissions configuration can be reviewed under Administer -> Roles. Select the role, and click on Filters:
www.redhat.com 260 [email protected]

Role Creation Using Hammer CLI
The following hammer commands create a user and role and add the corresponding permissions to the role:
hammer user create --firstname license --lastname manager \ --login licensemgr \ --mail [email protected] \ --password 'xD6ZuhJ8' \ --auth-source-id=’1’ \ --organizations ${ORG}
hammer role create --name license-mgrhammer user add-role --login licensemgr --role license-mgr
# view_hostshammer filter create --permission-ids 74 --role license-mgr # view_reportshammer filter create --permission-ids 124 --role license-mgr # view_productshammer filter create --permission-ids 209 --role license-mgr # my_organizations,access_dashboard,view_statisticshammer filter create --permission-ids 223,38,142 --role license-mgr # view_subscriptions,attach_subscriptions,unattach_subscriptions, import_manifest,delete_manifesthammer filter create --permission-ids 214,215,216,217,218 --role license-mgr
If we login as this user, we can see that the navigation bar has been significantly reduced to only a few items that are relevant for this user:
[email protected] 261 www.redhat.com

Sample Role 4: Core Build (OS) Systems EngineeringThe next role works inside the IT Operations department as part of the Systems Engineering team. This team defines and creates new versions of our core build definitions and is taking care of the corresponding Puppet configurations that are part of the core build content views.
Since QA is a team that consists of a couple of team members, we use user groups instead of individual users here and assign the role to this user group.
What Is This Role Supposed to Do?
● control software imports by using repository synchronization● control Puppet module imports by using repository synchronization or direct push● define, create, and edit core-build content views● publish content views and promote them to the DEV stage, which is the test stage for
IT Operations● create and edit all items relevant for provisioning (provisioning templates, parameters,
images, partition tables, etc.)● build, create, edit, and destroy hosts to test new content on non-persistent hosts● view, edit, and compute to manage the underlying compute infrastructure in stage DEV● view and edit host groups and config groups to test Puppet configuration changes
www.redhat.com 262 [email protected]
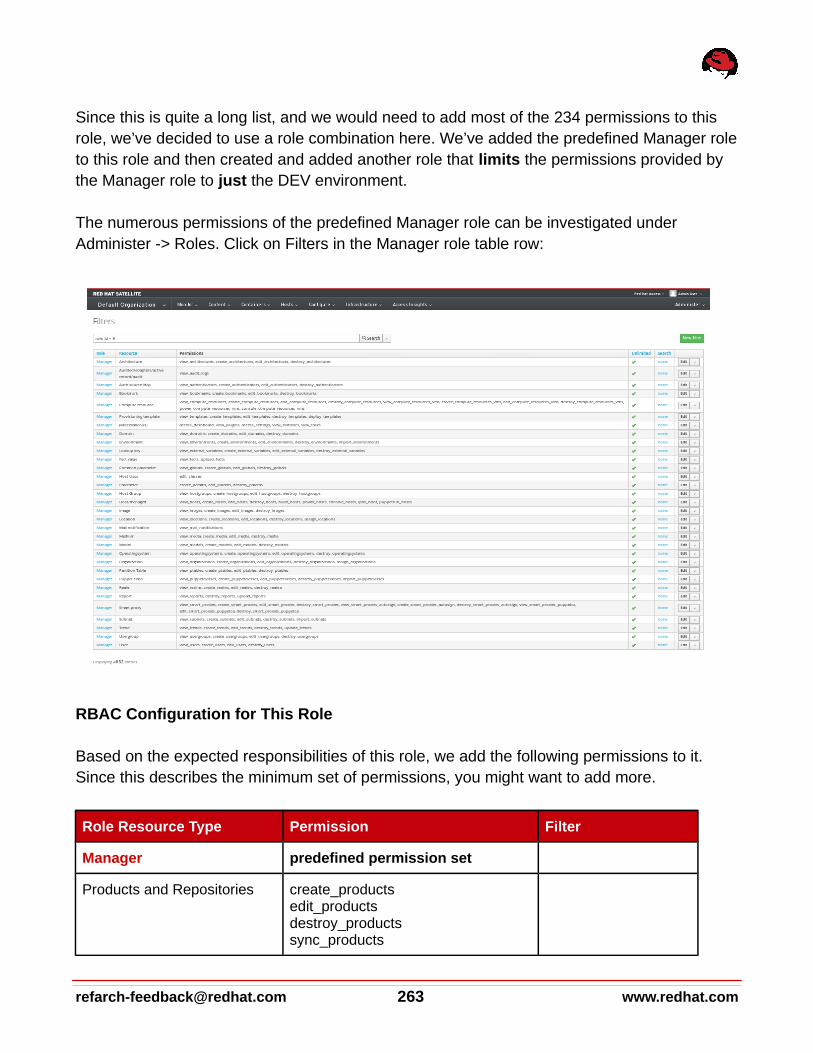
Since this is quite a long list, and we would need to add most of the 234 permissions to this role, we’ve decided to use a role combination here. We’ve added the predefined Manager roleto this role and then created and added another role that limits the permissions provided by the Manager role to just the DEV environment.
The numerous permissions of the predefined Manager role can be investigated under Administer -> Roles. Click on Filters in the Manager role table row:
RBAC Configuration for This Role
Based on the expected responsibilities of this role, we add the following permissions to it. Since this describes the minimum set of permissions, you might want to add more.
Role Resource Type Permission Filter
Manager predefined permission set
Products and Repositories create_productsedit_productsdestroy_productssync_products
[email protected] 263 www.redhat.com

Content Views view_content_viewscreate_content_viewsedit_content_viewspublish_content_viewspromote_or_remove_content_views
name ~ cv-os*
Lifecycle Environments promote_or_remove_content_views_to_environments
name ~ DEV
Lifecycle Environments view_lifecycle_environments
Puppet class view_puppetclassescreate_puppetclassesedit_puppetclassesdestroy_puppetclassesimport_puppetclasses
The final permissions configuration can be reviewed under Administer -> Roles. Select the role, and click on Filters:
Note:this screenshot shows only the additional permissions that are part of the syseng role. Since we’ve added this extended permission set and also used the predefined Manager role permissions, the final permission set is an intersection of both.
Role Creation Using Hammer CLI
The following hammer commands create a user and role and add the corresponding permissions to the role:
www.redhat.com 264 [email protected]
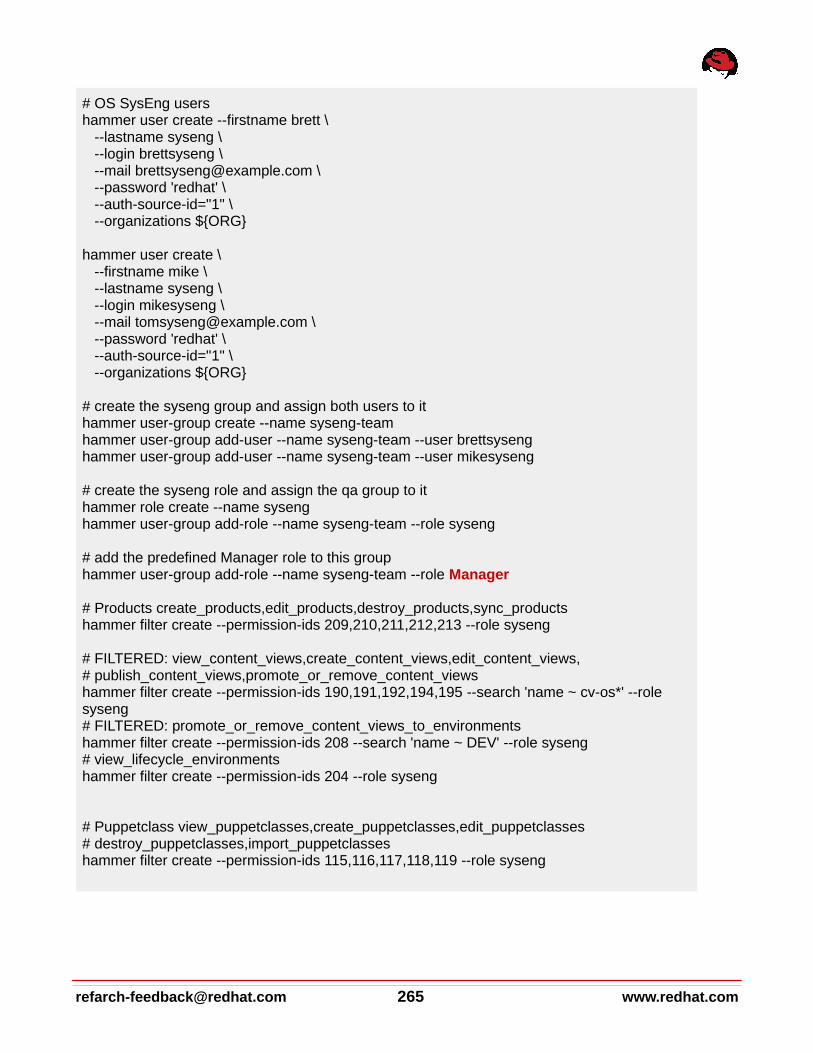
# OS SysEng usershammer user create --firstname brett \ --lastname syseng \ --login brettsyseng \ --mail [email protected] \ --password 'redhat' \ --auth-source-id="1" \ --organizations ${ORG}
hammer user create \ --firstname mike \ --lastname syseng \ --login mikesyseng \ --mail [email protected] \ --password 'redhat' \ --auth-source-id="1" \ --organizations ${ORG}
# create the syseng group and assign both users to ithammer user-group create --name syseng-teamhammer user-group add-user --name syseng-team --user brettsysenghammer user-group add-user --name syseng-team --user mikesyseng
# create the syseng role and assign the qa group to ithammer role create --name sysenghammer user-group add-role --name syseng-team --role syseng
# add the predefined Manager role to this grouphammer user-group add-role --name syseng-team --role Manager
# Products create_products,edit_products,destroy_products,sync_productshammer filter create --permission-ids 209,210,211,212,213 --role syseng
# FILTERED: view_content_views,create_content_views,edit_content_views,# publish_content_views,promote_or_remove_content_viewshammer filter create --permission-ids 190,191,192,194,195 --search 'name ~ cv-os*' --role syseng # FILTERED: promote_or_remove_content_views_to_environmentshammer filter create --permission-ids 208 --search 'name ~ DEV' --role syseng# view_lifecycle_environmentshammer filter create --permission-ids 204 --role syseng
# Puppetclass view_puppetclasses,create_puppetclasses,edit_puppetclasses# destroy_puppetclasses,import_puppetclasseshammer filter create --permission-ids 115,116,117,118,119 --role syseng
[email protected] 265 www.redhat.com
Sample Role 5: Quality Assurance (QA)This role is part of the IT Services Management department and is supposed to ensure that everything is tested properly before being deployed to production. QA has its own dedicated lifecycle stages and a dedicated environment with compute resources, which they use to test all new content and configurations. This role has only limited edit permissions for content, since this department is not supposed to fix issues but only detect and report them.
Since QA is a team that consists of a couple of team members, we are using user groups instead of individual users, and we will assign the role to the user group.
What Is This Role Supposed to Do?
● import content into the QA stage. The content has been marked as “ready to test” by the software development and systems engineering teams
● create and edit composite content views. These CCVs should define new or adapted combinations of immutable content and configuration definitions in the inherent content views (the CCVs should exclude edit permissions on an individual content viewlevel).
● read-only access to all required items that QA is supposed to use but not edit● create, build ,and destroy hosts to test software and configurations
Note: Don’t be confused because the content view promotion permission uses a filter that limits the promotion to the QA stage, instead of PROD. If content is promoted to a particular stage, this newer content is automatically picked up by all hosts associated to this content view and lifecycle environment (at least the Puppet configuration). As of today, there is no way to segregate content transition into a stage / environment and the deployment itself. If content is promoted to an environment it will be automatically picked up all hosts associated to this environment if the version=Latest option is used inside Puppet configurations. Since only the IT Operations Production Support team is responsible for the PROD environment, the QA team must not be allowed to promote content to the PROD stage. This applies for other roles in earlier stages as well. Only the QA team itself is allowed to promote content in the QA environment BUT the owners of DEV are not allowed to.
RBAC Configuration for This Role
Based on the expected responsibilities of this role, we add the following permissions to it. Since this describes a minimum set of permissions, you might want to add more.
www.redhat.com 266 [email protected]

Role Resource Type Permission Filter
Organization view_organizations
Environment view_environmentscreate_environmentsedit_environmentsdestroy_environmentsimport_environments
Miscellaneous view_tasksview_statisticsaccess_dashboard
Environment view_environmentscreate_environmentsedit_environmentsdestroy_environmentsimport_environments
Host class edit_classes
Host Group view_hostgroupsedit_hostgroups
Host/managed view_hostscreate_hostsedit_hostsdestroy_hostsbuild_hostspower_hostsconsole_hostsipmi_bootpuppetrun_hosts
Location view_locations
Puppet class view_puppetclasses
Smart proxy view_smart_proxiesview_smart_proxies_autosignview_smart_proxies_puppetca
Miscellaneous my_organizations
Products and Repositories view_products
Host class edit_classes
Lifecycle Environment view_lifecycle_environmentsedit_lifecycle_environments
[email protected] 267 www.redhat.com

Lifecycle Environment promote_or_remove_content_views_to_environments
name ~ QA
Content Views view_content_viewscreate_content_viewsedit_content_viewspublish_content_viewspromote_or_remove_content_views
name ~ ccv*
The final permissions configuration can be reviewed under Administer -> Roles. Select the role, and click on Filters:
Role Creation Using Hammer CLI
The following hammer commands create a user and role and add the corresponding permissions to the role:
hammer user create --firstname jane \ --lastname qa --login janeqa \ --mail [email protected] \ --password 'redhat' \ --auth-source-id='1' \
www.redhat.com 268 [email protected]
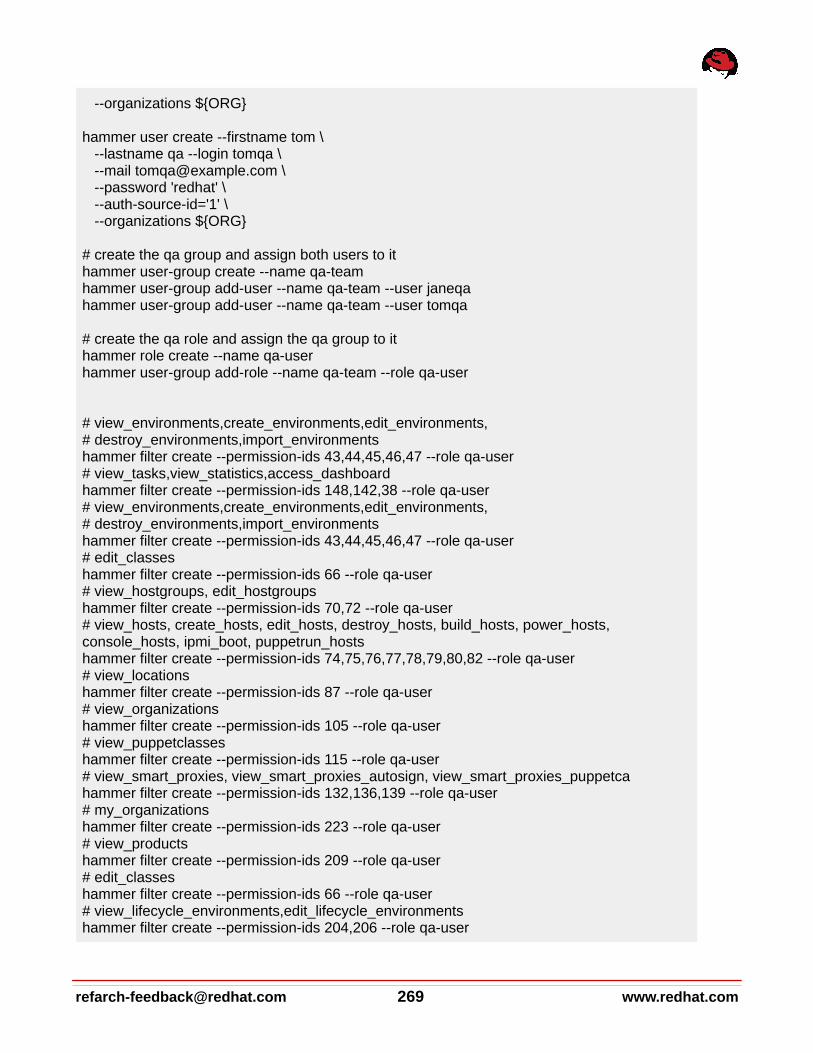
--organizations ${ORG}
hammer user create --firstname tom \ --lastname qa --login tomqa \ --mail [email protected] \ --password 'redhat' \ --auth-source-id='1' \ --organizations ${ORG}
# create the qa group and assign both users to ithammer user-group create --name qa-teamhammer user-group add-user --name qa-team --user janeqahammer user-group add-user --name qa-team --user tomqa
# create the qa role and assign the qa group to ithammer role create --name qa-userhammer user-group add-role --name qa-team --role qa-user
# view_environments,create_environments,edit_environments,# destroy_environments,import_environmentshammer filter create --permission-ids 43,44,45,46,47 --role qa-user # view_tasks,view_statistics,access_dashboardhammer filter create --permission-ids 148,142,38 --role qa-user # view_environments,create_environments,edit_environments,# destroy_environments,import_environmentshammer filter create --permission-ids 43,44,45,46,47 --role qa-user # edit_classeshammer filter create --permission-ids 66 --role qa-user # view_hostgroups, edit_hostgroupshammer filter create --permission-ids 70,72 --role qa-user # view_hosts, create_hosts, edit_hosts, destroy_hosts, build_hosts, power_hosts, console_hosts, ipmi_boot, puppetrun_hostshammer filter create --permission-ids 74,75,76,77,78,79,80,82 --role qa-user # view_locationshammer filter create --permission-ids 87 --role qa-user # view_organizationshammer filter create --permission-ids 105 --role qa-user # view_puppetclasseshammer filter create --permission-ids 115 --role qa-user # view_smart_proxies, view_smart_proxies_autosign, view_smart_proxies_puppetcahammer filter create --permission-ids 132,136,139 --role qa-user # my_organizationshammer filter create --permission-ids 223 --role qa-user# view_productshammer filter create --permission-ids 209 --role qa-user# edit_classeshammer filter create --permission-ids 66 --role qa-user# view_lifecycle_environments,edit_lifecycle_environmentshammer filter create --permission-ids 204,206 --role qa-user
[email protected] 269 www.redhat.com

# FILTERED: view_content_views,create_content_views,edit_content_views,# publish_content_views,promote_or_remove_content_viewshammer filter create --permission-ids 190,191,192,194,195 --search 'name ~ ccv*' --role qa-user # FILTERED: promote_or_remove_content_views_to_environmentshammer filter create --permission-ids 208 --search 'name ~ QA' --role qa-user
www.redhat.com 270 [email protected]

Step 9: Manage the Content Lifecycle ContinuouslyThis section focuses on lifecycle management over time. This section assumes that:
● All recently created content and composite content views are in place.● The hosts associated to these composite content views are up and running.● Our nightly content-synchronization plan ensures that Red Hat and third-party software
repositories are updated continuously.
Red Hat Errata OverviewSoftware changes to most Red Hat products are delivered via individual updates known as errata advisories (through the Red Hat Customer Portal or other authorized portals). Errata advisories can be released individually on an as-needed basis or aggregated as a minor release. Red Hat has three different update types:
● Red Hat Security Advisory (RHSA)● Red Hat Bugfix Advisory (RHBA)● Red Hat Enhancement Advisory (RHEA)
In addition, security errata are classified into 4 different impact levels following the Common Vulnerability Scoring System (CVSS) scoring model:
● Critical Impact● Important Impact● Moderate Impact● Low Impact
The following links provide further details about these topics:
● Issue Severity Classification: https :// access . redhat . com / security / updates / classification ● Red Hat Security Data Metrics: https :// www . redhat . com / security / data / metrics / ● Red Hat CVE - Errata Database: https :// access . redhat . com / security / cve /
Red Hat Errata are part of the content set within the Red Hat repositories, similar to RPM packages, kickstart trees, and installation images. They are synced with Satellite 6, along withits associated packages, during repository sync. In our solution guide, they are synced every night at 3 a.m. using the sync plan defined in Step 3: Define Your Definitive Media Library Content..
[email protected] 271 www.redhat.com

Content Change ReportingIf you want to see how many new packages have been synced during the daily / night sync, you can check by using the the synchronization status overview: Content -> Sync Status. The following screenshot provides an example of what happens when content changes. In this particular scenario, only the Satellite 6 Capsule Beta repository has changed, and the Red Hat Software Collections for RHEL have remained unchanged. (Because we wrote the document before Satellite 6.1 GA, the example uses a beta repository.)
Errata Notification EmailsSynchronization notification emails can be configured for each user. To configure emails:
● As a Satellite Administrator, navigate to Administer → Users● Click the username of the user you want to edit. ● On the Mail Preferences tab, select Mail enabled to enable updates.● Select the type of notifications the user will receive.
Note: ● To receive notifications about changed content sets after synchronizing a repository,
select the ‘Satellite sync errata’ notification item. ● If you create a new user, you will not be able to see the checkboxes for these three
www.redhat.com 272 [email protected]

different notifications until you’ve submitted the new user and reselected him.
Satellite 6 Content Dashboard and Errata OverviewSatellite 6 Content Dashboard provides an overview that includes both sync status and errata overview widgets. In addition, under Content -> Errata, you can see a detailed list of errata and the affected content hosts.
Satellite 6 Errata Management OverviewRed Hat Satellite provides tools to inspect and filter errata, allowing for precise update management. This way, you can select relevant updates and propagate them through contentviews to selected content hosts.
In Red Hat Satellite, two keywords describe errata with regard to their relationship to the available content hosts:
● Applicable: errata applies to one or more content hosts, which means it updates packages present on the content host. Applicable errata are not yet accessible by the content host.
● Installable: errata applies to one or more content hosts and it has been made available to the content host. Installable errata are present in the content host’s life cycle environment and content view, but are not yet installed. This way, errata can be installed by users that have permissions to manage content hosts, but are not entitled for errata management at higher levels.
The following section explains different scenarios and how to fulfill these using Red Hat Satellite 6.
Note: Currently, Errata are only available for Red Hat Products (and the EPEL repository). Third-party software and custom software usually do not ship errata, and custom errata are not in Satellite 6 yet. This limitation primarily affects Use Case 4) Incremental Updates - Apply Selected Errata to Hosts in this Step. All other use cases work for all software sources.
Use Case 1) Updating the Core BuildDuring step 5 we defined our different core builds (shared content sets used by all hosts). Primarily the core build contains a core set of packages that are part of Red Hat Enterprise Linux as the operating system. Errata affecting one or more core builds automatically
[email protected] 273 www.redhat.com
affect a huge number of systems. Therefore, these updates are more critical than those that affect only a small subset of systems.
In this scenario we assume that all Puppet configurations remain unchanged. Only the software packages inside the content view for the core build are updated. We will cover changes to Puppet configurations in another scenario. For more recommendations about Puppet-related changes, see “Use Case 5) Adding a New Puppet Module to an Existing Content View in this Step.
The core build content view has the following end-to-end update cycle:
● Update the core-build content view.● Update the affected composite content views.● Promote the composite content views through the appropriate lifecycle stages.● Update the host(s) that belong to the host groups.
1. Update the Core Build Content ViewSatellite updates its software repositories every night by using the sync planes created during Step 1. To apply all content available at a certain time, publish a new content view version; all content that has been synchronized into Satellite since the last time this content view was published is now automatically added to its content. When we say “automatically,” we means that the total number of packages and errata in the updated content view will be higher than inthe old version, if the content has changed. (Red Hat repositories grow continuously because we do not remove packages, but only add newer ones).
To update the Core Build Content View:
● Go to Content -> Content View● Select the core build content view ‘cv-os-rhel-7Server’ ● Click the Publish new version button. ● Enter an appropriate description (for instance, ‘unfiltered content update May 26th
2015’, and click Submit. The new content view version is published. You should see a higher number of packages.
After we’ve successfully updated the core build content view for RHEL 7, we can promote through the dedicated lifecycle environment path used by IT Operations (DEV->QA->PROD) and execute the associated tasks associated to this environment or lifecycle stage (primarily testing).
The following hammer commands publish and promote the newest version to stage Dev:
www.redhat.com 274 [email protected]

hammer content-view publish --name "cv-os-rhel-7Server" --organization ACME
CVID=$(hammer --csv content-view list --name "cv-os-rhel-7Server" --organization ${ORG} | grep -vi '^Content View ID,' | awk -F',' '{print $1}' )
VID=`hammer content-view version list --content-view-id $CVID | awk -F'|' '{print $1}' | sort -n |tac | head -n 1`
hammer content-view version promote --content-view-id $CVID --organization ACME --async --to-lifecycle-environment DEV --id $VID
Note: Until you have updated the composite content views that contain the RHEL 7 core build content to the current version, all operations executed previously have no impact on the applications running on top of the core build.
2. Update the Affected Composite Content ViewsTo make the content change relevant to applications and hosts using the RHEL 7 core build, we need to update the corresponding composite content views now. First we need to figure out which composite content view is using our recently updated core-build content view.
Using the Web UI, you need to investigate each composite content view to identify if it is using the core build content view we’re looking for:
● Click on Content -> Content Views.● Select a composite content view.● Click on the Content Views tab to see the inherent content views inside.
(Each Content View that uses our RHEL7 Core Build needs to be updated.) ● Click the Edit button next to the version of the core-build content view, and select our
new version. ● Click on Publish New Version.
After you have successfully published the composite content view, you can promote it to the next lifecycle stage.
Note: In future releases of Red Hat Satellite, you might have the option to automatically use the latest version of a content view inside a composite content view. The corresponding RFE for this feature is here: https :// bugzilla . redhat . com / show _ bug . cgi ? id =1177766
[email protected] 275 www.redhat.com

3. Promote the Composite Content view Through the Corresponding Lifecycle StagesAfter successfully publishing the composite content view, you must promote it through the corresponding lifecycle environment path. As mentioned in previous Steps, you do not need to promote the the inherent content views, because the entire content of the composite content view is promoted. This is also true in conjunction with capsules, in cases where capsules are associated to particular lifecycle environments (for example, in our case, the stages ‘Web-DEV’ and ‘Web-QA’ are associated to the capsule in the Boston location).
4. Update All Affected Hosts That Belong to the Corresponding Host GroupsAfter you have successfully promoted the composite content view to further lifecycle environments, the content automatically becomes available to all host (groups) associated to this (composite) content view and lifecycle environment.
If you click on Hosts -> Content Host, you can see a list of all Satellite 6 managed hosts, including the installable errata available to these hosts. In the example below, you can see several errata in our new version of the content view. These errata are available to the third host corebuild-testsrv7.dmz.example.com.
After selecting this host and clicking on the Errata tab, we can also see a list of these installable errata. Note that we left the “Show from” selection as “Current Environment.” As a result, we see the 24 errata in total that are installable to this host.
www.redhat.com 276 [email protected]

To demonstrate the difference between installable and applicable errata, we now change the “Show From” list to “Library Synced Content.” The number of available errata increases from 24 to 31. This change means that there are 7 additional errata in the Library that are notpart of the content view version in this environment (Prod).
[email protected] 277 www.redhat.com

Because we plant to describe the applicable errata in “Use Case 4) Incremental Updates - Apply Selected Errata to Hosts,” let’s change the Show from field back to “Current Environment”. Now we can select particular errata or all 24 errata at the same time. After you select all and click on “Apply Selected,” Satellite 6 asks if you are sure.
Click Apply. You will see a progress bar and a list of the errata that are currently applied to the selected host. If the operation has been successfully completed, go back to the Hosts -> Content Hosts overview page. Now all 3 test systems have no remaining installable errata. The systems updated to their current content view version in this lifecycle environment.
Use Case 2) New Version of the Application CV with an Unchanged Core BuildUse Case 2 is similar to the core build scenario explained above. The same steps apply except for those involving the application content view:
● Update the application-specific content view● Update the affected composite content views
www.redhat.com 278 [email protected]

● Promote the composite content view through the corresponding lifecycle stages● Update your host belonging to the host groups
In our ACME scenario, we assume that the dedicated owners of the application stack layer perform these operations. See Step 8 for further details.
Use Case 3) Core Build and Application CVs Updated SimultaneouslyIn this scenario the release unit is the full application stack. All software components are updated at the same time. The procedure now includes updating all inherent content views. The order in which you update the core build and the application-specific content view doesn’tmatter. The procedure has these steps:
● Update the core-build content view● Update the application-specific content view● Update the affected composite content views● Promote the composite content view through the corresponding lifecycle stages● Update the host belonging to the host groups
Use Case 4) Incremental Updates - Apply Selected Errata to HostsThe three previous scenarios start with the content and then move to the target hosts. Satellite 6.1 provides an additional way to update servers by starting from a host and then moving to the content. The overview page under Content -> Errata lists all errata available to certain hosts in your environment. As explained earlier, this page shows both applicable and installable errata. In these previous scenarios, we updated the content views and made the content available to the affected hosts. We selected ‘Installable’ and unselected ‘Applicable’ toshow only the updates managed by our recently updated content views.
In this use case, we did not update the content views but instead applied (critical) errata to theaffected hosts. Satellite 6 automatically creates, publishes, and promotes a new content viewminor version to the lifecycle environments with which the host (group) is associated.
Instead of using the Errata overview under Content -> Errata, start with Hosts -> Content Hosts. In the third column “Installable Errata,” you can see the errata that are available but have not yet been installed on this particular content host. You can see the type of errata (RHSA, RHBA, RHEA) and the total number of available errata of each type.
[email protected] 279 www.redhat.com

Because Use Case 1) already describes how to apply installable errata, we’re going to assume that you no longer have installable errata and your screen looks like this:
If we now change the Show From list to “Library Synced Content,” we can see a single security errata in the Library. But this errata is not yet in the content view version in this lifecycle environment. In contrast to the procedure in Use Case 1), we cannot select and apply this errata, because it is not in the content view version.
The link in this information points to the Content -> Errata overview page. If we click the link
www.redhat.com 280 [email protected]
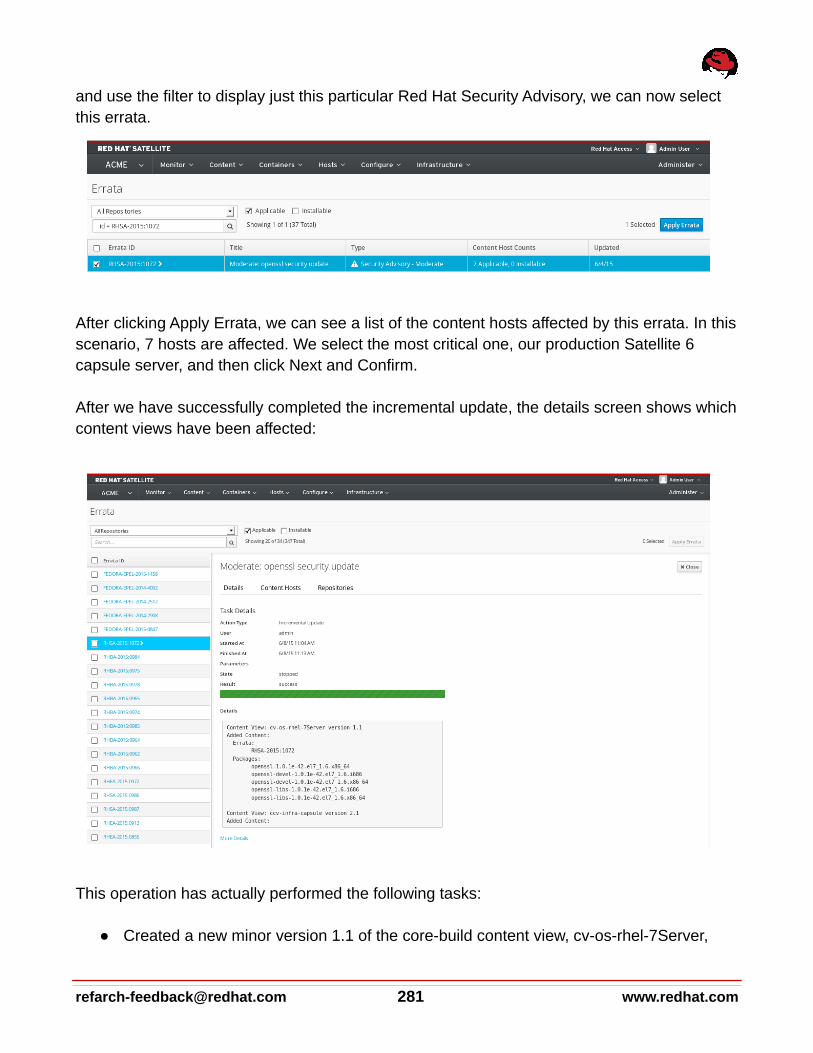
and use the filter to display just this particular Red Hat Security Advisory, we can now select this errata.
After clicking Apply Errata, we can see a list of the content hosts affected by this errata. In thisscenario, 7 hosts are affected. We select the most critical one, our production Satellite 6 capsule server, and then click Next and Confirm.
After we have successfully completed the incremental update, the details screen shows whichcontent views have been affected:
This operation has actually performed the following tasks:
● Created a new minor version 1.1 of the core-build content view, cv-os-rhel-7Server,
[email protected] 281 www.redhat.com

where the openssl packages are part of the repositories inside this content view. ● Created a new minor version 2.1 of the composite content view, ccv-infra-capsule,
which is the composite content view associated with this host within this host group● Promoted the content view to the PROD lifecycle environment, where the selected host
is located
The difference between the composite content view version 2.0 and the newer version 2.1 are the five packages associated with this errata as listed in the previous screenshot. While the former CV version 2.0 contains only 14091 packages, the new minor version 2.1 contains all these plus the 5 new packages (14096).
Warning: When you go to a host and update it with errata, be sure to select the host and content viewcheckbox. Otherwise, even if you select particular errata and specific hosts to update, each update creates a new minor version of the associated content view or composite content view. The incremental update management creates, publishes, and promotes a new minor version of the affected content or composite content view. All host groups and hosts associated to this content view and lifecycle environment now have access to this newcontent at the same time. The content is not limited to the hosts originally selected for this operation.
Use Case 5) Adding a New Puppet Module to an Existing
www.redhat.com 282 [email protected]

Content ViewThe biggest difference between the software package changes in the previous scenarios and the Puppet configuration change in this use case is that each Puppet change automatically implies a software change at the same time, if the software repositories have changed. See the Content View Recommendations chapter for more details.
Our Solution Guide and Dedicated Content ViewsIn this solution guide, we are not using dedicated content views for Puppet configuration. Our setup follows this process:
● You make a change to the Puppet configuration● That change is published automatically to the content view. All software packages
synced to Sat6 since the last time the content view was published are now part of that content view.
In our opinion the advantages of our setup outweigh the disadvantages. Stalled software changes would only postpone the potential issues, not solve them.
Adding a New Version or a New ClassThe following procedures are the same for these similar use cases:
● Adding a new version of an existing Puppet module● Adding a new class inside an existing Puppet module
You would take these basic steps to perform one of these use cases related to Puppet module changes:(These steps assume the new (version of a) Puppet module is already pushed or synchronized into the custom Puppet repository. See Step 3 for further information.)
4. Add the new Puppet module or change the version (if not set to Latest) of an existing module inside the content view, and publish the new version of the content view (core build or application specific). (Make these changes on the Puppet Modules tab.)
5. Update the affected composite content views.6. Promote the composite content view through the corresponding lifecycle stages.7. Optional: Add the new Puppet classes to a config group.8. Add the new Puppet classes to all host groups with which the adapted CV is
associated.
These additional steps are required only if you add new Puppet modules or new classes to existing modules.
[email protected] 283 www.redhat.com
The following sections provide more details about each of these steps.
1. Add a New Puppet Module or Adapt an Existing VersionBefore you can add a new module or select a newer version of it, the module must be pushedto or synced with Red Hat Satellite. See Step 3 for further details.
If it is an existing module and the Puppet module version inside the content view has been set to latest, you do not need to adapt the version of this module on the Puppet Moduletab of the content view.
If it is a new module (either in a particular content view or in general), you need to add this Puppet module initially to this content view:
● Click the Puppet Modules tab inside the content view.● Click the Add New Module button.
A (potentially long) list of all Puppet modules available in Satellite displays. ● Use the filter field to make it easier to find the module. ● Click the Select Version button of the module you want to add.
A new page that contains all available versions of the module displays● You can either:
○ Select a particular version -or-
○ Set it to Use Latest.
Note: If you set it to Use Latest, a newer version of the Puppet module automatically becomes part of the content view if the content is published. Each time a new content view version is published and if there is also a newer version of the Puppet module available, the newer version of the module automatically becomes part of the new content view version.
If the newer version of the module contains new Puppet classes, you do not need to do anything else. The content view manages the entire Puppet module, including all its inherent classes. However, if you create a new class, you must take an additional step in thehost group and / or make adaptations to the config group as explained in the next section.
2. Update the Affected Composite Content ViewsThis step is similar to updating composite content views in the previous use cases. You can take the same basic steps as in “1. Add a New Puppet Module or Adapt an Existing Version.”
3. Promote the Composite Content View Through the Corresponding Lifecycle StagesIn earlier use cases in this section, we explain how to promote a composite content view
www.redhat.com 284 [email protected]
through the corresponding lifecycle stages. You can take the same basic steps here.
As a part of content view creation and promotion, Red Hat Satellite 6 automatically creates a new Puppet environment for each combination of a content view and a lifecycle environment. This Puppet environment should now contain our module. You can view this new Puppet environment on the Configure → Environments page.
Tip: If you have successfully imported a Puppet module, added it to the content view and promoted the content view through lifecycle stages but can’t see the module inside the corresponding Puppet environments you might have a typo inside your Puppet module. If you can see the module inside the same Puppet environment on the filesystem on Satellite 6 server in /etc/puppet/environments but not using the WebUI on Configure -> Environments a typo inside the Puppet could be the cause. In our case a missing comma at the end of a line led to this scenario.
4. Optional: Add the New Puppet Classes to a Config GroupIn Step 7 we created some config groups. Though config groups are not mandatory, they make it easier to manage an increasing number of Puppet modules and their inherent classes. Instead of selecting individual Puppet classes inside a host group or while provisioning new hosts, you can assemble different classes into a config group. This process makes it easier to assign host groups and hosts.
Notes:● If you are creating a new Puppet module or a newer version of a module that
contains new Puppet classes, you need to adapt the associated config groups. ● If you make changes to an existing Puppet class, you do not have to adapt config
group.
5. Add the New Puppet Classes to All Host Groups with Which the Adapted CV is Associated The same basic rules apply for host groups as for config groups:
● If you are creating a new Puppet module or a newer version of a module that contains new Puppet classes, you need to adapt the associated host groups.
● If you make changes to an existing Puppet class, you do not have to adapt the host group.
To adapt a host group’s association:
[email protected] 285 www.redhat.com

4. Go to Configure -> Puppet Classes. To the right of each Puppet class, you see the currently associated host groups. If we assume that we are talking about a new class (in an existing or as part of a new Puppet module), the list of host groups should be empty at this time.
5. Click on the Puppet class name.6. On the new screen, select the host groups to which the Puppet class should be
assigned..7. If you are using Smart Class Parameter or Smart Variables in the module, select the
corresponding tabs and adapt accordingly. 8. Click Submit.
The Puppet class is now associated with the corresponding host groups.
Warning: Once you click Submit, no further action is required for the target systems. All changes are immediately available to the corresponding client systems. By default all the client systems should be updated with these changes in the next 30 minutes (this is the default interval of a Puppet run, defined inside /etc/puppet/puppet.conf otherwise).
If you want to apply the changes immediately without waiting on the next run, you can log intothe host and enforce an immediate run by using the following command:
puppet agent --no-daemonize --onetime --verbose;
You can also monitor all changes on the Satellite 6 Dashboard.
www.redhat.com 286 [email protected]
Step 10: Automate and extend your setupThis step should provide some ideas about potential extensions of the setup we completed in previous steps. Some of them go beyond the primary purpose of Satellite 6 and the targeted use cases. However, Satellite 6, and especially its CLI and API capabilities, allow a lot of potential enhancements, further automation, and integration of Satellite 6 as part of a wider orchestration of the tool chain.
We have not completed and documented all possible enhancements. But at least some of these extensions and further automations might become parts of upcoming documents.
The scenarios mentioned below are outside of the the scope of the posted Service Level Agreements and support procedures (https :// access . redhat . com / support / offerings / production /). They provide an overview about potential enhancements, as partially seen in various customer projects and environments.
Talk to us!If you have other use cases you want us to cover or have tips/tricks that you would like to share with the Satellite 6 community, contact us at [email protected]. We’d love to hear from you. If we use your work, we will add you to our contributor list.
Importing existing hostsTypically, an organization may have hosts that have not been managed by Satellite 6 in the past. These hosts cannot be managed by Red Hat Satellite server unless they are imported first. Usually these hosts have been managed over Red Hat Network (RHN) in the past, whichis the default registration point for all Red Hat Enterprise Linux installations. For Red Hat Satellite 5 customers want to migrate their hosts from Satellite 5 to Satellite 6 Red Hat provides a dedicated transition documentation: https :// access . redhat . com / knowledge / articles /1187643
To register an existing host to your Red Hat Satellite 6 server, take the following steps:
● Ensure that the registration prerequisites have been fulfilled.● Ensure a proper time synchronization (usage of ntpd or chrony recommended).● Install the Red Hat Satellite 6 CA certificate.● Register the host using subscription-manager. Designate the corresponding
organization and activation key parameters.● Install the katello-agent package.● Install and configure Puppet.
[email protected] 287 www.redhat.com

The prerequisites and all following steps are documented in detail inside the Red Hat Satellite6 User Guide: https :// access . redhat . com / documentation / en - US / Red _ Hat _ Satellite /6.1/ html / User _ Guide / index . html # sect - Red _ Hat _ Satellite - User _ Guide - Configuring _ Hosts _ for _ Registration
Warning: It’s important to be aware of the host group and the content view associated with the activation key used during registration. This host and especially the Puppet classes associated with this host group (and all configurations defined inside) automatically applies to this host during the next Puppet run.
This association between the Puppet classes and the host groups might lead to unforeseeable and critical changes to the host configuration. In fact, the system and its application could become unusable. Before registering a system, you need to ensure that all configurations defined primarily in the equivalent host group definitions won’t overwrite anddamage any existing configurations of this host.
Although this point is not as critical, be careful that the content view associated to the host group with which the activation key is associated provides all required software repositories which are currently used by these hosts. The same thinking applies to the inherent update level. Missing software repositories or older update levels than the already installed ones might prevent your systems from being properly updated during software maintenance.
Improve your bare metal provisioning using the Discovery PluginThe Foreman Discovery plug-in in Red Hat Satellite Server adds Metal-as-a-Service (MaaS) features. Bare-metal hosts on Satellite Server-managed networks can be booted over the network through PXE into stripped-down Red Hat Enterprise Linux systems running from memory to collect and send hardware facts to the Satellite Server.
After they have booted, these systems appear as discovered hosts on the Satellite Server. Administrators can use these collected hardware facts to provision systems, removing the need to manually collect MAC addresses and other hardware information and reducing the time required to provision hosts.
After the provisioning configuration is complete, the Foreman discovery plug-in sends a reboot command to the discovered host and the installation begins. The host then moves from the Discovered Hosts list in the Satellite Server to the All Hosts list.
www.redhat.com 288 [email protected]

For more information, see: https :// access . redhat . com / documentation / en - US / Red _ Hat _ Satellite /6.1/ html / User _ Guide / index . html # chap - Red _ Hat _ Satellite - User _ Guide - Using _ the _ Foreman _ Discovery _ Plug _ in
Satellite 6.1 extends this capability and allows the administrator to define rules that govern how these discovered systems are provisioned. Provisioning can occur automatically and without further intervention.
Detailed documentation is available here: https :// access . redhat . com / comment /923233
Integration of Backup Management and Systems ManagementSimilar to the monitoring integration as described inside this solution guide, a second typical integration point is backup management. If the particular backup-management setup requires host- or application-specific configurations,they might become part of the host or application-specific content and configuration definitions. More precisely, the following potential integration points are supported by Red Hat Satellite 6:
4. deploying backup-management agents on particular hosts5. configuring the client-side backup management configuration files so that they
correspond to pre-defined configuration templates for individual applications6. deploying the client-side configuration to run regular backups (chron)7. automatically adding new hosts to the server-side backup configuration by using
foreman hooks8. installing and configuring the backup-management server9. installing and configuring software-based scale-out storage used as backend storage
for backup (for example, Red Hat Gluster Storage)10.backing up the Satellite 6 configuration and data
Some of the items mentioned above are part of upcoming documentation that is currently in progress.
Starting with version 6.1, Red Hat Satellite ships with two new scripts, katello-backup for backing up and katello-restore for restoring a Satellite 6 server.
See the Satellite 6 User Guide for details on how to back up and restore the Satellite 6 configuration files and data: https :// access . redhat . com / documentation / en - US / Red _ Hat _ Satellite /6.0/ html / User _ Guide / sect
[email protected] 289 www.redhat.com

- Disaster _ Recovery . html
How Satellite 6 Supports Your Security Management ProcessRed Hat provides a huge number of security-related technologies that help customers ensure that their systems can be protected against various types of security risks efficiently. Just a few of these technologies include: Security Enhanced Linux, firewalls, sVirt, auditd, SSSD, Idm, openSCAP, file system encryptions, and many many more. In addition, Red Hat has many security-specific certifications of various Red Hat products, and other vendors also provide a broad ecosystem of complementary security-related products. Red Hat provides security-related training and documentation, such as the “Red Hat Enterprise Linux Security Guide” or the “Server Hardening Training Course ( RH 413)”.
Satellite supports security management in various areas:
● errata notifications and reporting● efficient update and errata management ● errata management independent of the current content availability set (applicable vs.
installable), including automated content-set adaptations (content-view minor releases)● openSCAP integration for verifying the presence of patches, checking system-security
configuration settings, and examining systems for signs of compromise● deployment and configuration of various security-related technologies and
configurations● verification of deployed packages and configurations using built-in verification
capabilities of rpm format and Puppet● segregation of duty and fine-granular access control for all Satellite 6 entities
How Satellite 6 Supports Your Service Validation & Testing (QA) ProcessSatellite 6 can be used in various ways to support QA/QE activities as part of the Service Validation and Testing process. The following scenarios leverage the various capabilities provided by Red Hat Satellite 6:
● creating copies of existing production systems to reproduce errors and test fixes● considering lifecycle-stage-specific adoption (for example, the additional installation of
testing tools or adapted configurations for test systems using parametrization and environment-specific configurations)
● using automated system provisioning (required for the fast spin-up of test systems and
www.redhat.com 290 [email protected]

environments, especially for non-persistent test environments)● managing roles and access based on RBAC features to support role concepts and
approval workflows● decoupling release cycles through independent release management and lifecycle
environments to support smaller and faster changes● and many more
Some customers have implemented efficient testing (up to Continuous-Integration-like environments) based on Satellite 6 and some enhancements that leverage its API- and CLI-automation capabilities.
How Satellite 6 Supports Your Asset & Configuration Management ProcessSatellite 6 acts as a central system management tool across different hardware and virtualization platforms and includes all software and configuration assets managed by your Satellite. It also has access to and provides a lot of information around its managed entities. The following list provides some examples of how Satellite 6 can be used to support this core process of IT Service Management:
● overview of all assets managed by Satellite 6, including bare-metal and virtual assets and their general information (for example, vendor, mainboard, pci devices, memory, cpu, etc.)
● detailed overview of all software and configuration objects for each individual system● defined release definitions that use content views as time-based snapshots of content● fine-granular access control of each configuration object type ,including read-only roles
for reporting / auditing● enhanced configuration management, including drift management and reporting based
on Puppet● provisioning of all information via CLI and API to allow export to or sync with external
configuration management systems or tools
How Satellite 6 Supports Your Incident Management ProcessSatellite 6 can support the incident management process in various ways:
● centralized overview of all systems including reporting (dashboard)● detailed information of each system, including the event history of recent changes● integration of Red Hat Access Insights as a new feature of Satellite 6.1
[email protected] 291 www.redhat.com

Appendix I Sample Puppet Modules used insideThis sections lists all Puppet modules used in the solution guide including a short description what they configure and which parameters they require.
Sample Puppet module for ntp configuration
Configures:● Installation of ntp rpm package● Starting ntp daemon● Enabling ntp daemon for autostart
○ Will be restarted automatically if configuration is changed● Configure ntp to synchronize from a single or list of servers
○ Configuration through template○ Uses “pool.ntp.org” as default, can be overridden through Smart Class
Parameter
Manifest(init.pp):
class ntp ( $ntpServers = 'pool.ntp.org' ) {
package { 'ntp': ensure => installed, }
file { '/etc/ntp.conf': ensure => file, content => template('ntp/ntp.erb'), require => Package['ntp'], owner => 'root', group => 'root', mode => '0644', notify => Service['ntpd'], }
service { 'ntpd': ensure => 'running', enable => true, hasstatus => true, hasrestart => true, }
www.redhat.com 292 [email protected]

}
Template(ntp.erb):
# For more information about this file, see the man pages# ntp.conf(5), ntp_acc(5), ntp_auth(5), ntp_clock(5), ntp_misc(5), ntp_mon(5).
driftfile /var/lib/ntp/drift
# Permit time synchronization with our time source, but do not# permit the source to query or modify the service on this system.restrict default kod nomodify notrap nopeer noqueryrestrict -6 default kod nomodify notrap nopeer noquery
# Permit all access over the loopback interface. This could# be tightened as well, but to do so would effect some of# the administrative functions.restrict 127.0.0.1restrict -6 ::1
# Hosts on local network are less restricted.#restrict 192.168.1.0 mask 255.255.255.0 nomodify notrap
# Use public servers from the pool.ntp.org project.# Please consider joining the pool (http://www.pool.ntp.org/join.html).#server 0.rhel.pool.ntp.org iburst#server 1.rhel.pool.ntp.org iburst#server 2.rhel.pool.ntp.org iburst#server 3.rhel.pool.ntp.org iburst
<% [@ntpServers].flatten.each do |server| -%>server <%= server %><% if @iburst_enable == true -%> iburst<% end %><% end -%>
#broadcast 192.168.1.255 autokey # broadcast server#broadcastclient # broadcast client#broadcast 224.0.1.1 autokey # multicast server#multicastclient 224.0.1.1 # multicast client#manycastserver 239.255.254.254 # manycast server#manycastclient 239.255.254.254 autokey # manycast client
# Undisciplined Local Clock. This is a fake driver intended for backup# and when no outside source of synchronized time is available.#server 127.127.1.0 # local clock#fudge 127.127.1.0 stratum 10
# Enable public key cryptography.#crypto
[email protected] 293 www.redhat.com

includefile /etc/ntp/crypto/pw
# Key file containing the keys and key identifiers used when operating# with symmetric key cryptography.keys /etc/ntp/keys
# Specify the key identifiers which are trusted.#trustedkey 4 8 42
# Specify the key identifier to use with the ntpdc utility.#requestkey 8
# Specify the key identifier to use with the ntpq utility.#controlkey 8
# Enable writing of statistics records.#statistics clockstats cryptostats loopstats peerstats
Required Smart Class Parameter:
Parameter Comment
ntpServers(optional)
can be a string (single server) or array (multiple servers)Example:ntpServer = ‘ntp.example.com’ntpServer = [ ‘ntp1.example.com’,’ntp2.example.com’,’ntp3.example.com’ ]
For Smart Class Parameter configuration see section Smart Class Parameters.
ntp tree:ntp/|-- checksums.json|-- manifests| `-- init.pp|-- metadata.json|-- Rakefile|-- README.md|-- spec| |-- classes| | `-- init_spec.rb| `-- spec_helper.rb|-- templates| `-- ntp.erb
www.redhat.com 294 [email protected]

`-- tests `-- init.pp
Sample Puppet Module for Zabbix Monitoring agent configuration
Configures:● Install zabbix-agent package
○ Latest available by default● Start zabbix-agent daemon● Enable zabbix-agent daemon for autostart
○ Will be restarted automatically if configuration is changed● Configure
○ Configuration through template
Manifest(init.pp):
class zabbix ( $version = 'latest', $server = '', $package = 'zabbix-agent', $cfgfile = '/etc/zabbix/zabbix_agentd.conf',) {
package { $package: ensure => $version, }
file { $cfgfile: ensure => file, content => template('zabbix/zabbix_agentd.erb'), require => Package[$package], owner => 'root', group => 'root', mode => '0644', notify => Service['zabbix-agent'] }
service { 'zabbix-agent': ensure => 'running', enable => true, hasstatus => true, hasrestart => true, }}
[email protected] 295 www.redhat.com

Template(zabbix_agent.erb):
# This is a config file for the Zabbix agent daemon (Unix)# To get more information about Zabbix, visit http://www.zabbix.com
############ GENERAL PARAMETERS #################
PidFile=/var/run/zabbix/zabbix_agentd.pid
LogFile=/var/log/zabbix/zabbix_agentd.log
### Option: LogFileSize# Maximum size of log file in MB.# 0 - disable automatic log rotation.## Mandatory: no# Range: 0-1024# Default:# LogFileSize=1
LogFileSize=0
### Option: DebugLevel# Specifies debug level# 0 - basic information about starting and stopping of Zabbix processes# 1 - critical information# 2 - error information# 3 - warnings# 4 - for debugging (produces lots of information)## Mandatory: no# Range: 0-4# Default:# DebugLevel=3
### Option: SourceIP# Source IP address for outgoing connections.## Mandatory: no# Default:# SourceIP=
### Option: EnableRemoteCommands# Whether remote commands from Zabbix server are allowed.# 0 - not allowed# 1 - allowed#
www.redhat.com 296 [email protected]

# Mandatory: no# Default:# EnableRemoteCommands=0
### Option: LogRemoteCommands# Enable logging of executed shell commands as warnings.# 0 - disabled# 1 - enabled## Mandatory: no# Default:# LogRemoteCommands=0
##### Passive checks related
### Option: Server# List of comma delimited IP addresses (or hostnames) of Zabbix servers.# Incoming connections will be accepted only from the hosts listed here.# If IPv6 support is enabled then '127.0.0.1', '::127.0.0.1', '::ffff:127.0.0.1' are treated equally.## Mandatory: no# Default:# Server=
Server=<%= server %>
### Option: ListenPort# Agent will listen on this port for connections from the server.## Mandatory: no# Range: 1024-32767# Default:# ListenPort=10050
### Option: ListenIP# List of comma delimited IP addresses that the agent should listen on.# First IP address is sent to Zabbix server if connecting to it to retrieve list of active checks.## Mandatory: no# Default:# ListenIP=0.0.0.0
### Option: StartAgents# Number of pre-forked instances of zabbix_agentd that process passive checks.# If set to 0, disables passive checks and the agent will not listen on any TCP port.## Mandatory: no# Range: 0-100
[email protected] 297 www.redhat.com

# Default:# StartAgents=3
##### Active checks related
### Option: ServerActive# List of comma delimited IP:port (or hostname:port) pairs of Zabbix servers for active checks.# If port is not specified, default port is used.# IPv6 addresses must be enclosed in square brackets if port for that host is specified.# If port is not specified, square brackets for IPv6 addresses are optional.# If this parameter is not specified, active checks are disabled.# Example: ServerActive=127.0.0.1:20051,zabbix.domain,[::1]:30051,::1,[12fc::1]## Mandatory: no# Default:# ServerActive=
ServerActive=127.0.0.1
### Option: Hostname# Unique, case sensitive hostname.# Required for active checks and must match hostname as configured on the server.# Value is acquired from HostnameItem if undefined.## Mandatory: no# Default:# Hostname=
Hostname=Zabbix server
### Option: HostnameItem# Item used for generating Hostname if it is undefined. Ignored if Hostname is defined.# Does not support UserParameters or aliases.## Mandatory: no# Default:# HostnameItem=system.hostname
### Option: HostMetadata# Optional parameter that defines host metadata.# Host metadata is used at host auto-registration process.# An agent will issue an error and not start if the value is over limit of 255 characters.# If not defined, value will be acquired from HostMetadataItem.## Mandatory: no# Range: 0-255 characters# Default:# HostMetadata=
### Option: HostMetadataItem
www.redhat.com 298 [email protected]

# Optional parameter that defines an item used for getting host metadata.# Host metadata is used at host auto-registration process.# During an auto-registration request an agent will log a warning message if# the value returned by specified item is over limit of 255 characters.# This option is only used when HostMetadata is not defined.## Mandatory: no# Default:# HostMetadataItem=
### Option: RefreshActiveChecks# How often list of active checks is refreshed, in seconds.## Mandatory: no# Range: 60-3600# Default:# RefreshActiveChecks=120
### Option: BufferSend# Do not keep data longer than N seconds in buffer.## Mandatory: no# Range: 1-3600# Default:# BufferSend=5
### Option: BufferSize# Maximum number of values in a memory buffer. The agent will send# all collected data to Zabbix Server or Proxy if the buffer is full.## Mandatory: no# Range: 2-65535# Default:# BufferSize=100
### Option: MaxLinesPerSecond# Maximum number of new lines the agent will send per second to Zabbix Server# or Proxy processing 'log' and 'logrt' active checks.# The provided value will be overridden by the parameter 'maxlines',# provided in 'log' or 'logrt' item keys.## Mandatory: no# Range: 1-1000# Default:# MaxLinesPerSecond=100
############ ADVANCED PARAMETERS #################
### Option: Alias# Sets an alias for an item key. It can be used to substitute long and complex item key
[email protected] 299 www.redhat.com
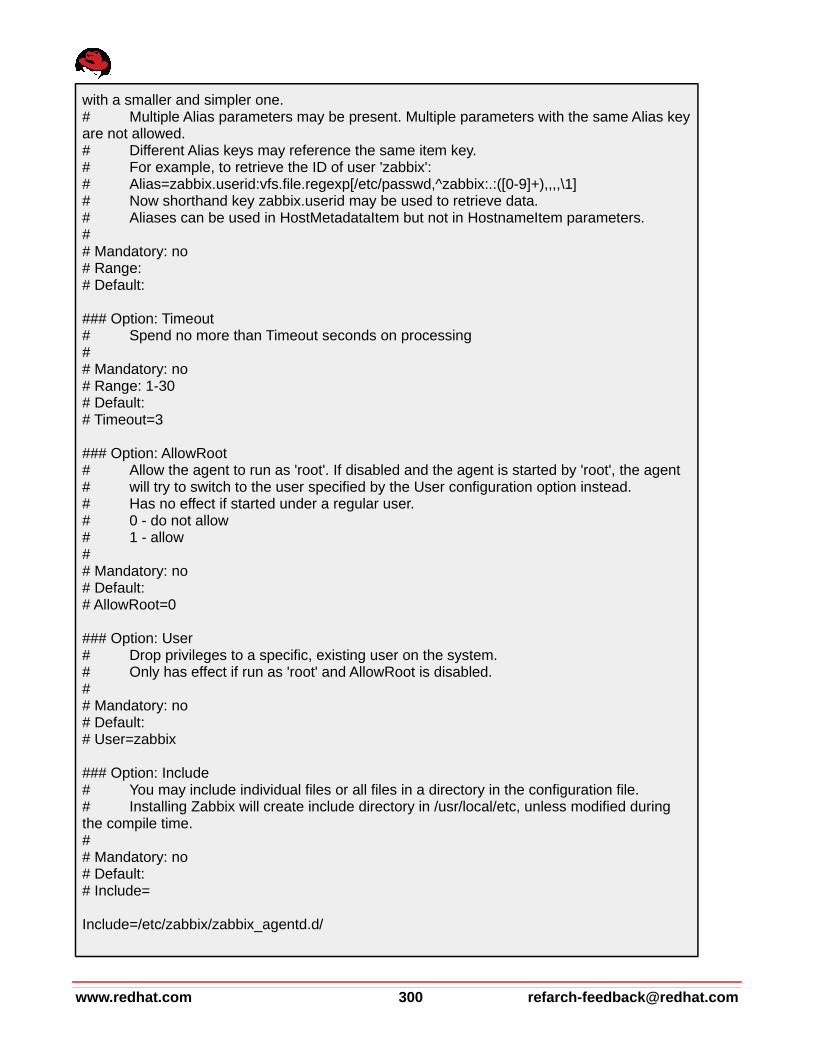
with a smaller and simpler one.# Multiple Alias parameters may be present. Multiple parameters with the same Alias keyare not allowed.# Different Alias keys may reference the same item key.# For example, to retrieve the ID of user 'zabbix':# Alias=zabbix.userid:vfs.file.regexp[/etc/passwd,^zabbix:.:([0-9]+),,,,\1]# Now shorthand key zabbix.userid may be used to retrieve data.# Aliases can be used in HostMetadataItem but not in HostnameItem parameters.## Mandatory: no# Range:# Default:
### Option: Timeout# Spend no more than Timeout seconds on processing## Mandatory: no# Range: 1-30# Default:# Timeout=3
### Option: AllowRoot# Allow the agent to run as 'root'. If disabled and the agent is started by 'root', the agent# will try to switch to the user specified by the User configuration option instead.# Has no effect if started under a regular user.# 0 - do not allow# 1 - allow## Mandatory: no# Default:# AllowRoot=0
### Option: User# Drop privileges to a specific, existing user on the system.# Only has effect if run as 'root' and AllowRoot is disabled.## Mandatory: no# Default:# User=zabbix
### Option: Include# You may include individual files or all files in a directory in the configuration file.# Installing Zabbix will create include directory in /usr/local/etc, unless modified during the compile time.## Mandatory: no# Default:# Include=
Include=/etc/zabbix/zabbix_agentd.d/
www.redhat.com 300 [email protected]

# Include=/usr/local/etc/zabbix_agentd.userparams.conf# Include=/usr/local/etc/zabbix_agentd.conf.d/# Include=/usr/local/etc/zabbix_agentd.conf.d/*.conf
####### USER-DEFINED MONITORED PARAMETERS #######
### Option: UnsafeUserParameters# Allow all characters to be passed in arguments to user-defined parameters.# 0 - do not allow# 1 - allow## Mandatory: no# Range: 0-1# Default:# UnsafeUserParameters=0
### Option: UserParameter# User-defined parameter to monitor. There can be several user-defined parameters.# Format: UserParameter=<key>,<shell command># See 'zabbix_agentd' directory for examples.## Mandatory: no# Default:# UserParameter=
####### LOADABLE MODULES #######
### Option: LoadModulePath# Full path to location of agent modules.# Default depends on compilation options.## Mandatory: no# Default:# LoadModulePath=${libdir}/modules
### Option: LoadModule# Module to load at agent startup. Modules are used to extend functionality of the agent.# Format: LoadModule=<module.so># The modules must be located in directory specified by LoadModulePath.# It is allowed to include multiple LoadModule parameters.## Mandatory: no# Default:# LoadModule=
Required Smart Class Parameter:4. version
a. default is latest, package inclusive version could be added here to pin to a
[email protected] 301 www.redhat.com

specific version5. server
a. add the Zabbix monitoring server IP/Name6. package
a. monitoring package name (default: zabbix-agent)7. cfgfile
a. configuration file for monitoring agent (default: /etc/zabbix/zabbix_agent.conf)
zabbix tree:zabbix/|-- checksums.json|-- manifests| `-- init.pp|-- metadata.json|-- Rakefile|-- README.md|-- spec| |-- classes| | `-- init_spec.rb| `-- spec_helper.rb|-- templates| `-- zabbix_agentd.erb`-- tests `-- init.pp
Sample Puppet Module for rsyslog configuration (both client and server)
Manifest(init.pp):
class loghost ( $mode = 'client', $server = '', $serverPort = '514', $package = 'rsyslog', $cfgfile = '/etc/rsyslog.conf',) {
if $mode == "client" { $template = "client"
www.redhat.com 302 [email protected]

} elsif $mode == "server" { $template = "server" }
package{ $package: ensure => installed, }
file{ $cfgfile: ensure => file, content => template("loghost/loghost_${template}.erb"), require => Package['rsyslog'], owner => 'root', group => 'root', mode => '0644', notify => Service['rsyslog'], }
service { 'rsyslog': ensure => 'running', enable => true, hasstatus => true, hasrestart => true, }}
Template(loghost_server.erb):
# rsyslog configuration file
# For more information see /usr/share/doc/rsyslog-*/rsyslog_conf.html# If you experience problems, see http://www.rsyslog.com/doc/troubleshoot.html
#### MODULES ####
# The imjournal module bellow is now used as a message source instead of imuxsock.$ModLoad imuxsock # provides support for local system logging (e.g. via logger command)$ModLoad imjournal # provides access to the systemd journal#$ModLoad imklog # reads kernel messages (the same are read from journald)#$ModLoad immark # provides --MARK-- message capability
# Provides UDP syslog reception#$ModLoad imudp#$UDPServerRun 514
# Provides TCP syslog reception$ModLoad imtcp$InputTCPServerRun 514
[email protected] 303 www.redhat.com

$template DynaFile,"/var/log/system-%HOSTNAME%.log"*.* -?DynaFile
#### GLOBAL DIRECTIVES ####
# Where to place auxiliary files$WorkDirectory /var/lib/rsyslog
# Use default timestamp format$ActionFileDefaultTemplate RSYSLOG_TraditionalFileFormat
# File syncing capability is disabled by default. This feature is usually not required,# not useful and an extreme performance hit#$ActionFileEnableSync on
# Include all config files in /etc/rsyslog.d/$IncludeConfig /etc/rsyslog.d/*.conf
# Turn off message reception via local log socket;# local messages are retrieved through imjournal now.$OmitLocalLogging on
# File to store the position in the journal$IMJournalStateFile imjournal.state
#### RULES ####
# Log all kernel messages to the console.# Logging much else clutters up the screen.#kern.* /dev/console
# Log anything (except mail) of level info or higher.# Don't log private authentication messages!*.info;mail.none;authpriv.none;cron.none /var/log/messages
# The authpriv file has restricted access.authpriv.* /var/log/secure
# Log all the mail messages in one place.mail.* -/var/log/maillog
# Log cron stuffcron.* /var/log/cron
# Everybody gets emergency messages*.emerg :omusrmsg:*
# Save news errors of level crit and higher in a special file.
www.redhat.com 304 [email protected]

uucp,news.crit /var/log/spooler
# Save boot messages also to boot.loglocal7.* /var/log/boot.log
# ### begin forwarding rule #### The statement between the begin ... end define a SINGLE forwarding# rule. They belong together, do NOT split them. If you create multiple# forwarding rules, duplicate the whole block!# Remote Logging (we use TCP for reliable delivery)## An on-disk queue is created for this action. If the remote host is# down, messages are spooled to disk and sent when it is up again.#$ActionQueueFileName fwdRule1 # unique name prefix for spool files#$ActionQueueMaxDiskSpace 1g # 1gb space limit (use as much as possible)#$ActionQueueSaveOnShutdown on # save messages to disk on shutdown#$ActionQueueType LinkedList # run asynchronously#$ActionResumeRetryCount -1 # infinite retries if host is down# remote host is: name/ip:port, e.g. 192.168.0.1:514, port optional#*.* @@remote-host:514# ### end of the forwarding rule ###
Template(loghost_client.erb):
rsyslog configuration file
# For more information see /usr/share/doc/rsyslog-*/rsyslog_conf.html# If you experience problems, see http://www.rsyslog.com/doc/troubleshoot.html
#### MODULES ####
# The imjournal module bellow is now used as a message source instead of imuxsock.$ModLoad imuxsock # provides support for local system logging (e.g. via logger command)$ModLoad imjournal # provides access to the systemd journal#$ModLoad imklog # reads kernel messages (the same are read from journald)#$ModLoad immark # provides --MARK-- message capability
# Provides UDP syslog reception#$ModLoad imudp#$UDPServerRun 514
# Provides TCP syslog reception#$ModLoad imtcp#$InputTCPServerRun 514
#### GLOBAL DIRECTIVES ####
[email protected] 305 www.redhat.com

# Where to place auxiliary files$WorkDirectory /var/lib/rsyslog
# Use default timestamp format$ActionFileDefaultTemplate RSYSLOG_TraditionalFileFormat
# File syncing capability is disabled by default. This feature is usually not required,# not useful and an extreme performance hit#$ActionFileEnableSync on
# Include all config files in /etc/rsyslog.d/$IncludeConfig /etc/rsyslog.d/*.conf
# Turn off message reception via local log socket;# local messages are retrieved through imjournal now.$OmitLocalLogging on
# File to store the position in the journal$IMJournalStateFile imjournal.state
#### RULES ####
# Log all kernel messages to the console.# Logging much else clutters up the screen.#kern.* /dev/console
# Log anything (except mail) of level info or higher.# Don't log private authentication messages!*.info;mail.none;authpriv.none;cron.none /var/log/messages
# The authpriv file has restricted access.authpriv.* /var/log/secure
# Log all the mail messages in one place.mail.* -/var/log/maillog
# Log cron stuffcron.* /var/log/cron
# Everybody gets emergency messages*.emerg :omusrmsg:*
# Save news errors of level crit and higher in a special file.uucp,news.crit /var/log/spooler
# Save boot messages also to boot.loglocal7.* /var/log/boot.log
www.redhat.com 306 [email protected]
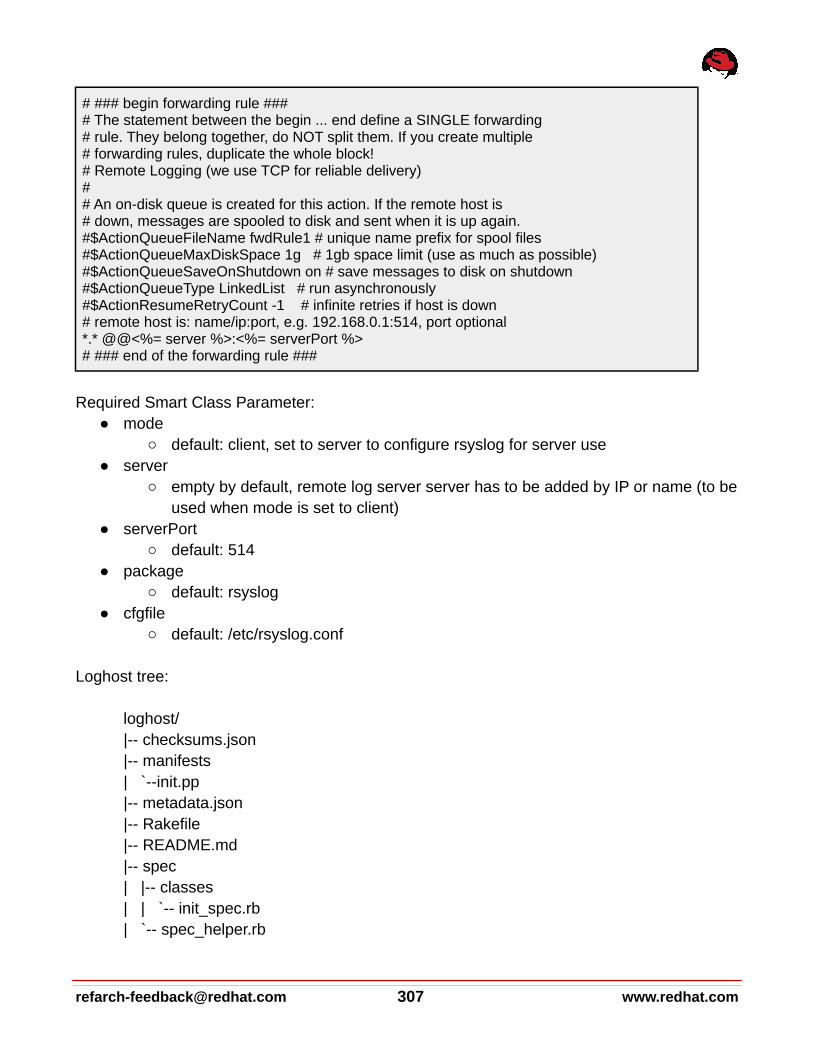
# ### begin forwarding rule #### The statement between the begin ... end define a SINGLE forwarding# rule. They belong together, do NOT split them. If you create multiple# forwarding rules, duplicate the whole block!# Remote Logging (we use TCP for reliable delivery)## An on-disk queue is created for this action. If the remote host is# down, messages are spooled to disk and sent when it is up again.#$ActionQueueFileName fwdRule1 # unique name prefix for spool files#$ActionQueueMaxDiskSpace 1g # 1gb space limit (use as much as possible)#$ActionQueueSaveOnShutdown on # save messages to disk on shutdown#$ActionQueueType LinkedList # run asynchronously#$ActionResumeRetryCount -1 # infinite retries if host is down# remote host is: name/ip:port, e.g. 192.168.0.1:514, port optional*.* @@<%= server %>:<%= serverPort %># ### end of the forwarding rule ###
Required Smart Class Parameter:● mode
○ default: client, set to server to configure rsyslog for server use● server
○ empty by default, remote log server server has to be added by IP or name (to beused when mode is set to client)
● serverPort○ default: 514
● package○ default: rsyslog
● cfgfile○ default: /etc/rsyslog.conf
Loghost tree:
loghost/|-- checksums.json|-- manifests| `--init.pp|-- metadata.json|-- Rakefile|-- README.md|-- spec| |-- classes| | `-- init_spec.rb| `-- spec_helper.rb
[email protected] 307 www.redhat.com

|-- templates| |-- loghost_client.erb| `-- loghost_server.erb`-- tests `-- init.pp
Sample Puppet Module for additional rpm packages: corebuildpackages
Manifest:
class corebuildpackages ( $pkgs = [ vim-enhanced, screen, strace, tree ]) { package{ $pkgs: ensure => installed }}
Required Smart Class Parameter:1. pkgs
a. default: array, installing: vim-enhanced, screen, strace, tree
corebuildpackage tree:
corebuildpackages/|-- manifests| `-- init.pp|-- metadata.json|-- Rakefile|-- README.md|-- spec| |-- classes| | `-- init_spec.rb| `-- spec_helper.rb`-- tests `-- init.pp
Sample Puppet Module for Docker configuration
manifest(init.pp):
www.redhat.com 308 [email protected]

class docker (
$version = 'latest'
) { notify {"Installing version $version":}
package { 'docker':ensure => $version,
}
file { '/etc/sysconfig/docker': ensure => file,require => Package['docker'],source => 'puppet:///modules/docker/docker',owner => 'root',group => 'root',mode => '640',notify => Service['docker'],
}
service { 'docker':ensure => running,enable => true,hasrestart => true,hasstatus => true,require => Package['docker'],
}}
file(docker):
# /etc/sysconfig/docker
# Modify these options if you want to change the way the docker daemon runsOPTIONS='--selinux-enabled -H 0.0.0.0:4243 -H unix://var/run/docker.sock --insecure-registry registry.access.redhat.com'DOCKER_CERT_PATH=/etc/docker
# On an SELinux system, if you remove the --selinux-enabled option, you# also need to turn on the docker_transition_unconfined boolean.# setsebool -P docker_transition_unconfined 1
# Location used for temporary files, such as those created by# docker load and build operations. Default is /var/lib/docker/tmp# Can be overriden by setting the following environment variable.
[email protected] 309 www.redhat.com

# DOCKER_TMPDIR=/var/tmp
# Controls the /etc/cron.daily/docker-logrotate cron job status.# To disable, uncomment the line below.# LOGROTATE=false
Required Smart Class Parameter:1. version
a. default: latest, can be used to pin Docker to a specific package version
docker tree:docker|-- checksums.json|-- files| `-- docker|-- manifests| `-- init.pp|-- metadata.json|-- Rakefile|-- README.md|-- spec| |-- classes| | `-- init_spec.rb| `-- spec_helper.rb`-- tests `-- init.pp
Sample Puppet Module for git configuration (both client and server)
Manifest(init.pp):Class is empty, it is a “meta class” to be able to directly choose subclass git::client or git::server.
class git {}
git::server
Manifest(server.pp):
www.redhat.com 310 [email protected]

class git::server ( $repo = 'puppet-modules', $repodir= '/srv/git', $gitpackage = 'git19-git', $package_ensure = 'installed',) {
exec { "rhscl_activate_git": require => Package["$gitpackage"], command => "scl enable git19 bash", path => "/usr/bin/", }
file { "/etc/profile.d/sclgit.sh": ensure => file, mode => "644", owner => "root", group => "root", source => "puppet:///modules/git/sclgit.sh", }
package { "$gitpackage": ensure => $package_ensure, }
package { "httpd": ensure => $package_ensure, }
service { "httpd": ensure => "running", require => Package["httpd"], }
file { "$repodir": ensure => directory, owner => "root", group => "root", mode => "775", }
exec { "git_init_bare": command => "git init --bare ${repodir}/${repo}.git", path => [ '/opt/rh/git19/root/usr/bin/', '/usr/bin/' ], onlyif => "test ! -d ${repodir}/${repo}.git/objects", require => [ Package["$gitpackage"], File["$repodir"], Exec["rhscl_activate_git"] ], before => File["${repodir}/${repo}.git/hooks/post-receive"], }
exec { "git_www_clone":
[email protected] 311 www.redhat.com

command => "git clone ${repodir}/${repo}.git", cwd => "/var/www/html/", path => [ '/opt/rh/git19/root/usr/bin/', '/usr/bin/' ], onlyif => "test ! -d /var/www/html/${repo}", require => [ Package["$gitpackage"], Package["httpd"], Exec["git_init_bare"] ], }
file { "${repodir}/${repo}.git/hooks/post-receive": ensure => file, owner => "root", group => "root", mode => "755", source => "puppet:///modules/git/post-receive", }
}
Files(post-receive):
#!/usr/bin/env bash
cd /var/www/html/puppet-modules && git pull
truncate -s 0 PULP_MANIFEST
for file in $(find . -i wholename "*/pkg/*.tar.gz")do echo $file,`sha256sum $file | awk '{ print $1 }'`,`stat -c '%s' $file` >> PULP_MANIFESTdone
Files(sclgit.sh):
#!/bin/bashsource /opt/rh/git19/enableexport X_SCLS="`scl enable git19 'echo $X_SCLS'`"
Required Smart Class Parameter:● repo
○ Repository name, default: ‘puppet-modules'● repodir
○ Directory where the “repo” is placed, default: ‘/srv/git’● gitpackage
○ Red Hat Software Collection git package version, default: 'git19-git'● package_ensure
○ Define wether package should be installed or removed, default: 'installed'
git::clientManifest(client.pp):
www.redhat.com 312 [email protected]
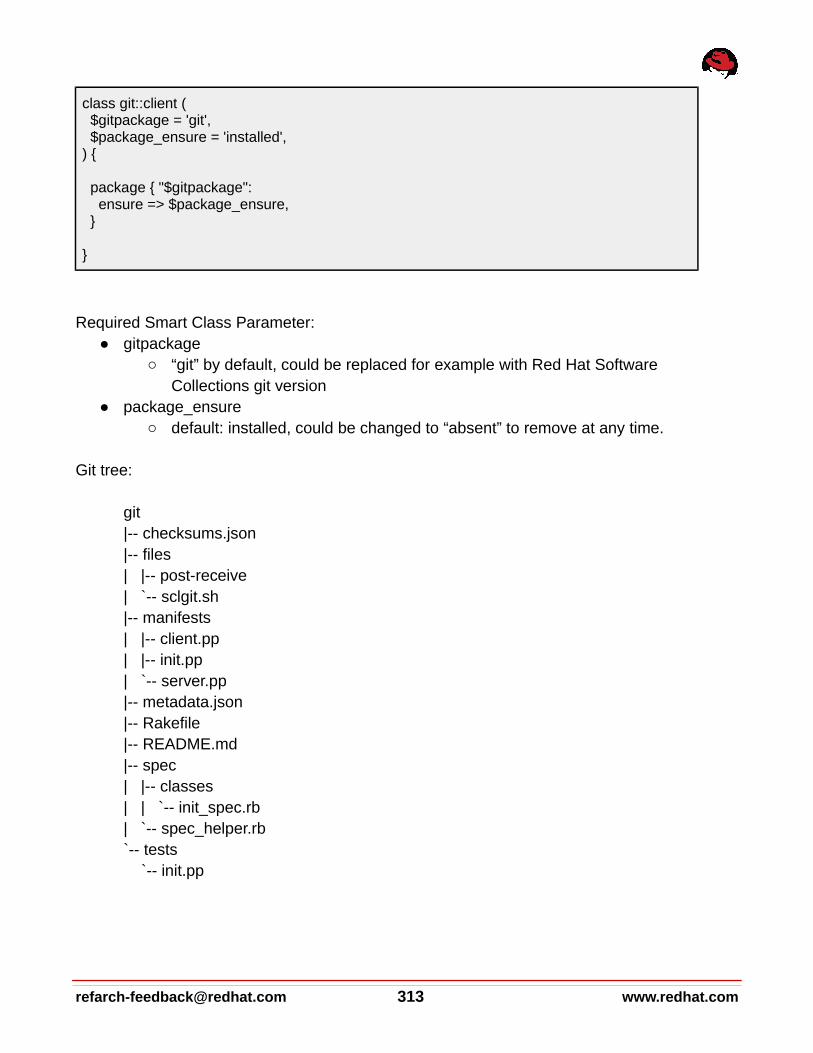
class git::client ( $gitpackage = 'git', $package_ensure = 'installed',) {
package { "$gitpackage": ensure => $package_ensure, }
}
Required Smart Class Parameter:● gitpackage
○ “git” by default, could be replaced for example with Red Hat Software Collections git version
● package_ensure○ default: installed, could be changed to “absent” to remove at any time.
Git tree:
git|-- checksums.json|-- files| |-- post-receive| `-- sclgit.sh|-- manifests| |-- client.pp| |-- init.pp| `-- server.pp|-- metadata.json|-- Rakefile|-- README.md|-- spec| |-- classes| | `-- init_spec.rb| `-- spec_helper.rb`-- tests `-- init.pp
[email protected] 313 www.redhat.com

Sample Puppet Module for rhevagent
● Install rhevm-guest-agent package only if the system is running on RHEV Hypervisor, therefore it can be assigned to absolutely every host.
● Sets the package name to rhevm-guest-agent-common for RHEL7 and rhevm-guest-agent for RHEL6.
● Enables and starts the service
Manifest(init.pp):
class rhevagent {
if $productname == "RHEV Hypervisor" {
case $operatingsystemmajrelease { '7': {
$pkg = "rhevm-guest-agent-common" }
/(5|6)/: {$pkg = "rhevm-guest-agent"
} }
package { $pkg: ensure => present, before => Service['ovirt-guest-agent'], }
service { 'ovirt-guest-agent': ensure => running, enable => true, hasrestart => true, hasstatus => true, } }
}
rhevagent tree:
rhevagent|-- checksums.json|-- manifests| `-- init.pp|-- metadata.json|-- Rakefile
www.redhat.com 314 [email protected]

|-- README.md|-- spec| |-- classes| | `-- init_spec.rb| `-- spec_helper.rb`-- tests `-- init.pp
Sample Puppet Module for vmwaretools
● Install vmware tools package only if the system is running on vmware, therefore it can be assigned to absolutely every host.
● Sets the package name to open-vm-tools for RHEL7 and vmware-tools for RHEL6.● Enables and starts the service
Manifest(init.pp):
class vmwaretools {
if $virtual == "vmware" {
case $operatingsystemmajrelease { '7': {
$pkg = "open-vm-tools" $servicename = "vmtoolsd"
$providertype = "systemd" }
'6': {$pkg = ["vmware-tools-core","vmware-tools-esx-nox"]$servicename = "vmware-tools-services"$providertype = "upstart"
} }
package { $pkg: ensure => present, before => Service[$servicename], }
service { $servicename: ensure => running, provider => $providertype, enable => true, hasrestart => true, hasstatus => true,
[email protected] 315 www.redhat.com

} }
}
vmwaretools tree:vmwaretools|-- checksums.json|-- manifests| `-- init.pp|-- metadata.json|-- Rakefile|-- README.md|-- spec| |-- classes| | `-- init_spec.rb| `-- spec_helper.rb`-- tests `-- init.pp
Sample Puppet Module for acmeweb (frontend and backend)
● Installs and configures the acme website, distributed on two hosts, one for the frontend(apache+php) and one for the backend (mysql/mariadb)
○ Frontend:■ Installs apache + php packages■ Extracts the currently latest WordPress version shipped as a file through
puppet module (version: 4.2.2)■ Copies the WordPress files to /var/www/html/ if they do not already exist
there■ Configures /var/www/html/wp-config.php with backend connection
parameter● Mandatory to set smart class parameter for backend connection
○ Backend:■ Installs mysql/mariadb■ Configures backend database (database name, user and password)
based on smart class parameter● Mandatory to set smart class parameter for backend configuration
Manifest(init.pp):
www.redhat.com 316 [email protected]

Class is empty, it is a “meta class” to be able to directly choose subclass acmeweb::frontend or acmeweb::backend.
class acmeweb {}
Manifest(frontend.pp):
class acmeweb::frontend (
$db_name = $acmeweb::params::db_name, $db_user = $acmeweb::params::db_user, $db_password = $acmeweb::params::db_password, $db_host = $acmeweb::params::db_host
) {
include acmeweb::web
file { '/tmp/latest.tar.gz': ensure => present, source => "puppet:///modules/acmeweb/latest.tar.gz" }
exec { 'extract': cwd => "/tmp", command => "tar -xvzf latest.tar.gz", creates => "/tmp/wordpress", require => File['/tmp/latest.tar.gz'], path => ['/bin'], }
exec { 'copy': command => "cp -r /tmp/wordpress/* /var/www/html/", require => Exec['extract'], creates => "/var/www/html/wp-content", path => ['/bin'], }
file { '/var/www/html/wp-config.php': ensure => present, require => Exec['copy'], content => template("acmeweb/wp-config.php.erb") }}
Required Smart Class Parameter:● db_name
○ default: wordpress, set to override default database name
[email protected] 317 www.redhat.com
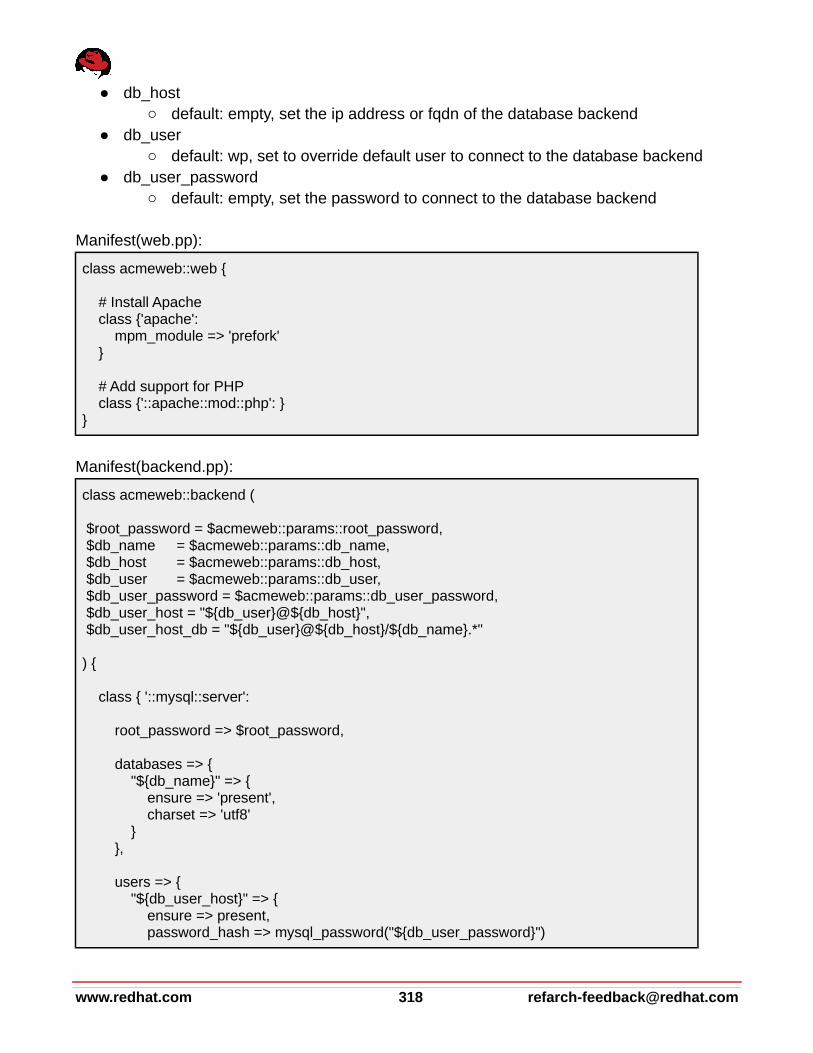
● db_host○ default: empty, set the ip address or fqdn of the database backend
● db_user○ default: wp, set to override default user to connect to the database backend
● db_user_password○ default: empty, set the password to connect to the database backend
Manifest(web.pp):
class acmeweb::web {
# Install Apache class {'apache': mpm_module => 'prefork' }
# Add support for PHP class {'::apache::mod::php': }}
Manifest(backend.pp):
class acmeweb::backend ( $root_password = $acmeweb::params::root_password, $db_name = $acmeweb::params::db_name, $db_host = $acmeweb::params::db_host, $db_user = $acmeweb::params::db_user, $db_user_password = $acmeweb::params::db_user_password, $db_user_host = "${db_user}@${db_host}", $db_user_host_db = "${db_user}@${db_host}/${db_name}.*"
) {
class { '::mysql::server':
root_password => $root_password,
databases => { "${db_name}" => { ensure => 'present', charset => 'utf8' } },
users => { "${db_user_host}" => { ensure => present, password_hash => mysql_password("${db_user_password}")
www.redhat.com 318 [email protected]
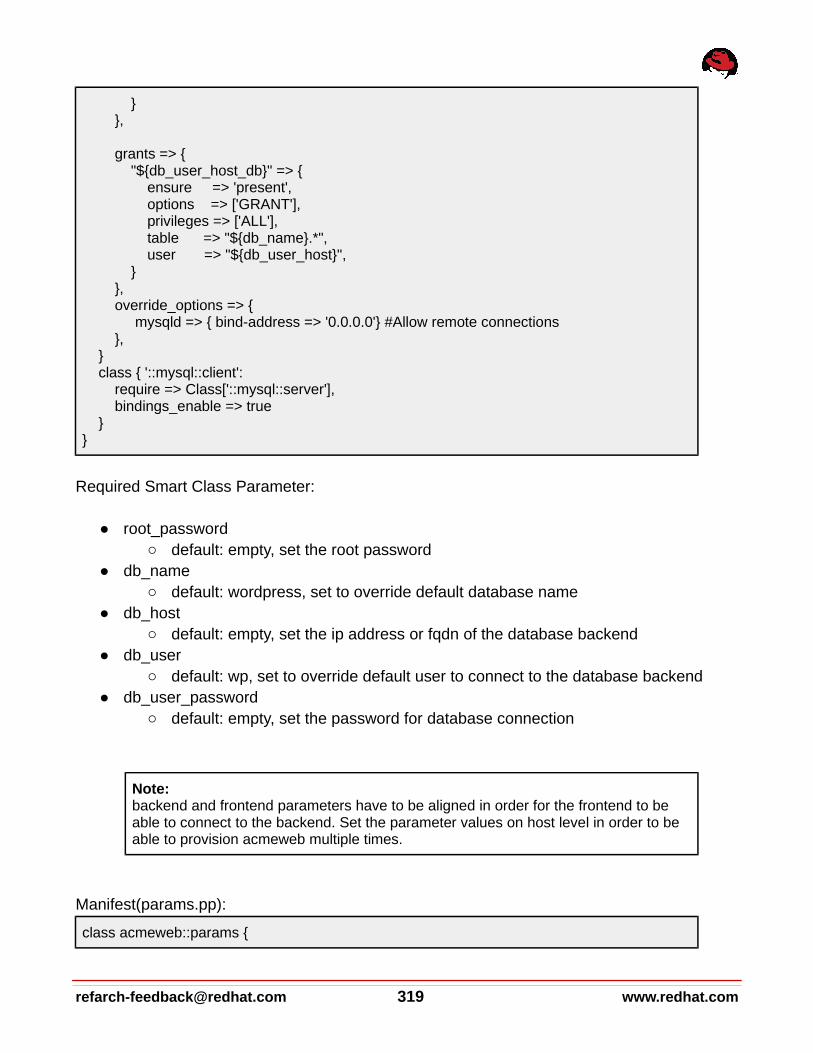
} },
grants => { "${db_user_host_db}" => { ensure => 'present', options => ['GRANT'], privileges => ['ALL'], table => "${db_name}.*", user => "${db_user_host}", } }, override_options => { mysqld => { bind-address => '0.0.0.0'} #Allow remote connections }, } class { '::mysql::client': require => Class['::mysql::server'], bindings_enable => true }}
Required Smart Class Parameter:
● root_password○ default: empty, set the root password
● db_name○ default: wordpress, set to override default database name
● db_host○ default: empty, set the ip address or fqdn of the database backend
● db_user○ default: wp, set to override default user to connect to the database backend
● db_user_password○ default: empty, set the password for database connection
Note:backend and frontend parameters have to be aligned in order for the frontend to be able to connect to the backend. Set the parameter values on host level in order to be able to provision acmeweb multiple times.
Manifest(params.pp):
class acmeweb::params {
[email protected] 319 www.redhat.com

$root_password = '' $db_name = 'wordpress' $db_user = 'wp' $db_user_password = '' $db_host = ''}
Templates(wp-config.php.erb):
<?phpdefine('DB_NAME', '<%= @db_name %>');define('DB_USER', '<%= @db_user %>');define('DB_PASSWORD', '<%= @db_user_password %>');define('DB_HOST', '<%= @db_host %>');define('DB_CHARSET', 'utf8');define('DB_COLLATE', '');
define('AUTH_KEY', 'put your unique phrase here');define('SECURE_AUTH_KEY', 'put your unique phrase here');define('LOGGED_IN_KEY', 'put your unique phrase here');define('NONCE_KEY', 'put your unique phrase here');define('AUTH_SALT', 'put your unique phrase here');define('SECURE_AUTH_SALT', 'put your unique phrase here');define('LOGGED_IN_SALT', 'put your unique phrase here');define('NONCE_SALT', 'put your unique phrase here');
$table_prefix = 'wp_';
define('WP_DEBUG', false);
if ( !defined('ABSPATH') ) define('ABSPATH', dirname(__FILE__) . '/');
require_once(ABSPATH . 'wp-settings.php');
Files(latest.tar.gz):● WordPress Version 4.2.2: latest.tar.gz
acmeweb tree:acmeweb|-- checksums.json|-- files| `-- latest.tar.gz|-- manifests| |-- backend.pp| |-- frontend.pp
www.redhat.com 320 [email protected]

| |-- init.pp| |-- params.pp| `-- web.pp|-- metadata.json|-- Rakefile|-- README.md|-- spec| |-- classes| | `-- init_spec.rb| `-- spec_helper.rb|-- templates| `-- wp-config.php.erb`-- tests `-- init.pp
[email protected] 321 www.redhat.com

Appendix II: Scripts
Foreman Hook 1: 05_containerhost.sh
In order for the script 05_contrainerhost.sh to work the foreman user needs a user to to execute hammer without password.
/usr/share/foreman/.hammer/cli_config.yml :foreman: :host: localhost :username: admin :password: ***** :organization: ACME
additionally the user foreman wants to write temporary information into a .cache folder in his home directory. Sadly foreman cannot create the directory because he is not the owner of his own home directory. Thus we have to create the .cache directory and give foreman the ownership in order for the hook script to be executed.
mkdir /usr/share/foreman/.cachechown foreman /usr/share/foreman/.cache
● Add the script under /usr/share/foreman/config/hooks/host/managed/before_provision/ ● chown to foreman● chmod u+x● restorecon -RvF /usr/share/foreman/config/hooks
containerhost=$2HG=$(hammer --output csv host list | awk -F "," "/$containerhost/ {print \$4}")if [ -n $HG ] then if [[ $HG =~ "containerhost" ]] then sleep 600 ORG="" LOC="" hammer compute-resource create \ --name "${containerhost}" \ --description "containerhost ${containerhost}" \ --url "https://${containerhost}:4243" \
www.redhat.com 322 [email protected]
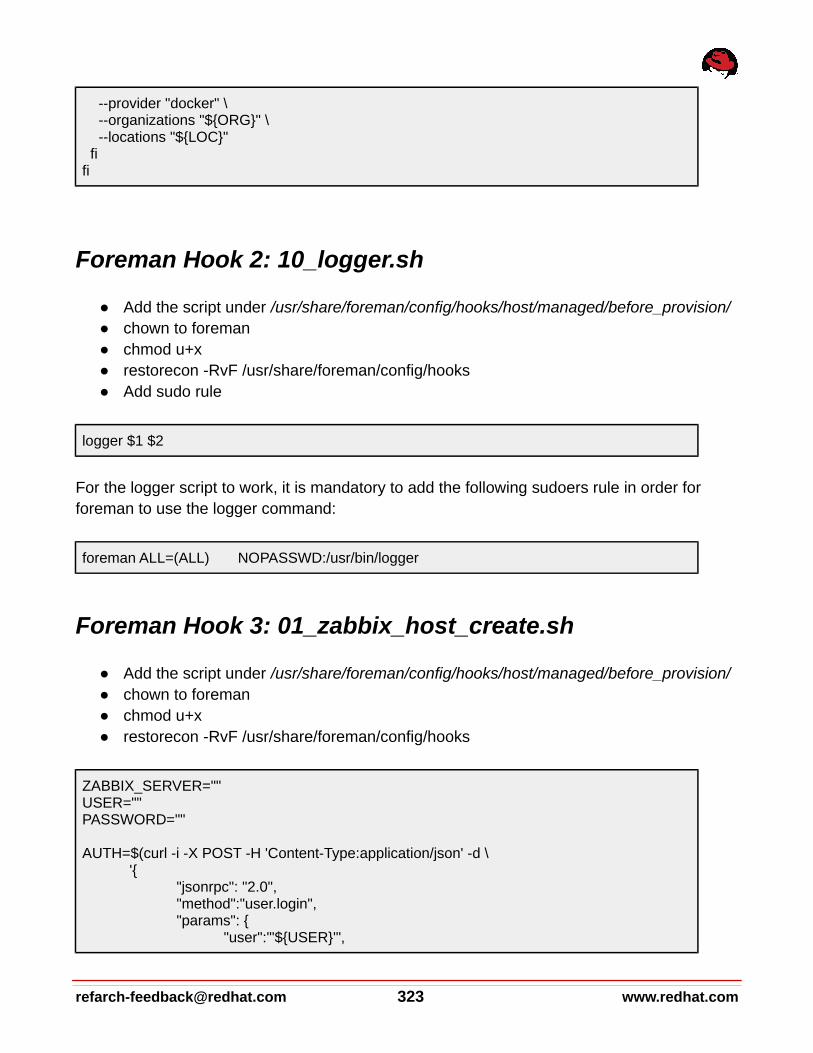
--provider "docker" \ --organizations "${ORG}" \ --locations "${LOC}" fifi
Foreman Hook 2: 10_logger.sh
● Add the script under /usr/share/foreman/config/hooks/host/managed/before_provision/ ● chown to foreman● chmod u+x● restorecon -RvF /usr/share/foreman/config/hooks● Add sudo rule
logger $1 $2
For the logger script to work, it is mandatory to add the following sudoers rule in order for foreman to use the logger command:
foreman ALL=(ALL) NOPASSWD:/usr/bin/logger
Foreman Hook 3: 01_zabbix_host_create.sh
● Add the script under /usr/share/foreman/config/hooks/host/managed/before_provision/ ● chown to foreman● chmod u+x● restorecon -RvF /usr/share/foreman/config/hooks
ZABBIX_SERVER=""USER=""PASSWORD=""
AUTH=$(curl -i -X POST -H 'Content-Type:application/json' -d \'{
"jsonrpc": "2.0", "method":"user.login", "params": {
"user":"'${USER}'",
[email protected] 323 www.redhat.com

"password":"'${PASSWORD}'" }, "id":1
}' http://${ZABBIX_SERVER}/zabbix/api_jsonrpc.php )
TOKEN=$(echo $AUTH | awk -F "," '{print $3}' | awk -F ":" '{print $2}')
FQDN="${2}"IP=$(hammer --output csv host list --search "name = ${FQDN}" | awk -F "," "(\$2 ~ /${FQDN}/){print \$5}")MAC=$(hammer --output csv host list --search "name = ${FQDN}" | awk -F "," "(\$2 ~ /${FQDN}/) {print \$6}")MACA=$(echo ${MAC} | awk -F ":" '{print $1 $2 $3}')MACB=$(echo ${MAC} | awk -F ":" '{print $4 $5 $6}')#Group ID 7 = Linux server#Template ID 10104 = Template ICMP Ping#Template ID 10001 = Template OS Linux
# ---------- NOTICE -------------# If the hook does fail make sure the IDs are the same in Zabbix otherwise adjust the IDs# -------------------------------
curl -i -X POST -H 'Content-Type:application/json' -d \'{ "jsonrpc": "2.0", "method": "host.create", "params": { "host": "'${FQDN}'", "interfaces": [ { "type": 1, "main": 1, "useip": 1, "ip": "'${IP}'", "dns": "", "port": "10050" } ], "groups": [ { "groupid": "7" } ], "templates": [ { "templateid": "10104",
"templateid": "10001" } ], "inventory": { "macaddress_a": "'${MACA}'", "macaddress_b": "'${MACB}'"
www.redhat.com 324 [email protected]

} }, "auth": '${TOKEN}', "id": 1}' http://${ZABBIX_SERVER}/zabbix/api_jsonrpc.php
[email protected] 325 www.redhat.com

Appendix III: Naming Convention
Item Naming Convention
Product < vendor or upstream project > - < product name or purpose > [ - < RHEL release > ]
example:● Zabbix-Monitoring● VMware-Tools-RHEL6
Repositoryfor RPMs
< vendor > - < product > - < os > - < variant > - < version > - < architecture > - < repo type >
Example:vmware-tools-rhel-server-6-x86_64-rpms
Repository for Puppet Modules
If you have multiple puppet supplier (vendor or internal teams):generic:<vendor>-<product>-<repo type>
example:zabbix-monitoring-puppetwebteam-acmeweb-puppet
Life-cycle Environment
[ < path name > - ] DEV | QA | [UAT | ] PROD
example:DEV -> QA -> PRODWeb-DEV -> Web-QA -> Web-UAT -> Web-PROD
Content-View cv - < os|app > - < profile name > [ - < version or release > ]
example:● cv-os-rhel - < 7Server | 6Server > ● cv-app-git
Composite-Content-View
ccv - < biz|infra > - < role name > [ - < version or release > ]
example:● ccv-infra-containerhost● ccv-biz-gitserver
Activation-Key act - < lifecycle environment > - < biz|infra|os > - < role name > - < architecture >
example:5. act-dev-os-rhel-7server-x86_646. act-qa-infra-containerhost-x86_647. act-prod-biz-acmeweb-x86_64
Host-Group This depends on the host group hierarchy model used (see chapter ‘Host Group Scenarios’ for further details).. If you are using a flat structure which requires at least 3 types (LC ENV, APP-TYPE, RHEL VERSION):
www.redhat.com 326 [email protected]

<stage> - <category> - <app-type> - <rhel major release>
Provisioning Template
< org > < provisioning template name >
example:ACME Kickstart Default
Partition Tables ptable - < org > - < ptable name >
example:ptable-acme-gitserver
Compute Resources
< org > - < compute resource name > - < location >
example:acme-rhelosp-boston
Puppet Modules < author > - <module name>
example:ITOps-git
[email protected] 327 www.redhat.com
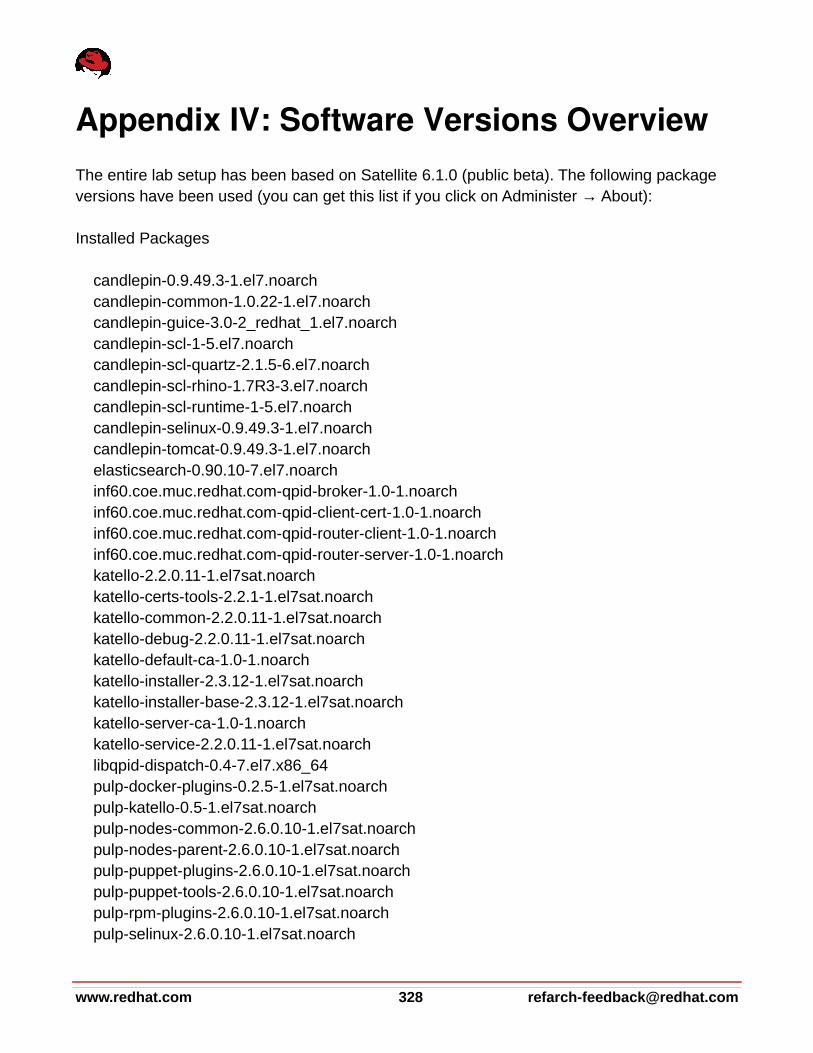
Appendix IV: Software Versions OverviewThe entire lab setup has been based on Satellite 6.1.0 (public beta). The following package versions have been used (you can get this list if you click on Administer → About):
Installed Packages
candlepin-0.9.49.3-1.el7.noarch candlepin-common-1.0.22-1.el7.noarch candlepin-guice-3.0-2_redhat_1.el7.noarch candlepin-scl-1-5.el7.noarch candlepin-scl-quartz-2.1.5-6.el7.noarch candlepin-scl-rhino-1.7R3-3.el7.noarch candlepin-scl-runtime-1-5.el7.noarch candlepin-selinux-0.9.49.3-1.el7.noarch candlepin-tomcat-0.9.49.3-1.el7.noarch elasticsearch-0.90.10-7.el7.noarch inf60.coe.muc.redhat.com-qpid-broker-1.0-1.noarch inf60.coe.muc.redhat.com-qpid-client-cert-1.0-1.noarch inf60.coe.muc.redhat.com-qpid-router-client-1.0-1.noarch inf60.coe.muc.redhat.com-qpid-router-server-1.0-1.noarch katello-2.2.0.11-1.el7sat.noarch katello-certs-tools-2.2.1-1.el7sat.noarch katello-common-2.2.0.11-1.el7sat.noarch katello-debug-2.2.0.11-1.el7sat.noarch katello-default-ca-1.0-1.noarch katello-installer-2.3.12-1.el7sat.noarch katello-installer-base-2.3.12-1.el7sat.noarch katello-server-ca-1.0-1.noarch katello-service-2.2.0.11-1.el7sat.noarch libqpid-dispatch-0.4-7.el7.x86_64 pulp-docker-plugins-0.2.5-1.el7sat.noarch pulp-katello-0.5-1.el7sat.noarch pulp-nodes-common-2.6.0.10-1.el7sat.noarch pulp-nodes-parent-2.6.0.10-1.el7sat.noarch pulp-puppet-plugins-2.6.0.10-1.el7sat.noarch pulp-puppet-tools-2.6.0.10-1.el7sat.noarch pulp-rpm-plugins-2.6.0.10-1.el7sat.noarch pulp-selinux-2.6.0.10-1.el7sat.noarch
www.redhat.com 328 [email protected]

pulp-server-2.6.0.10-1.el7sat.noarch python-gofer-qpid-2.6.2-2.el7sat.noarch python-isodate-0.5.0-4.pulp.el7sat.noarch python-kombu-3.0.24-5.pulp.el7sat.noarch python-pulp-bindings-2.6.0.10-1.el7sat.noarch python-pulp-common-2.6.0.10-1.el7sat.noarch python-pulp-docker-common-0.2.5-1.el7sat.noarch python-pulp-puppet-common-2.6.0.10-1.el7sat.noarch python-pulp-rpm-common-2.6.0.10-1.el7sat.noarch python-qpid-0.30-6.el7.noarch python-qpid-qmf-0.30-5.el7.x86_64 qpid-cpp-client-0.30-9.el7.x86_64 qpid-cpp-client-devel-0.30-9.el7.x86_64 qpid-cpp-server-0.30-9.el7.x86_64 qpid-cpp-server-linearstore-0.30-9.el7.x86_64 qpid-dispatch-router-0.4-7.el7.x86_64 qpid-java-client-0.30-3.el7.noarch qpid-java-common-0.30-3.el7.noarch qpid-proton-c-0.9-4.el7.x86_64 qpid-qmf-0.30-5.el7.x86_64 qpid-tools-0.30-4.el7.noarch ruby193-rubygem-katello-2.2.0.51-1.el7sat.noarch ruby193-rubygem-qpid_messaging-0.30.0-1.el7sat.x86_64 rubygem-hammer_cli_katello-0.0.7.15-1.el7sat.noarch rubygem-smart_proxy_pulp-1.0.1.2-1.el7sat.noarch
[email protected] 329 www.redhat.com
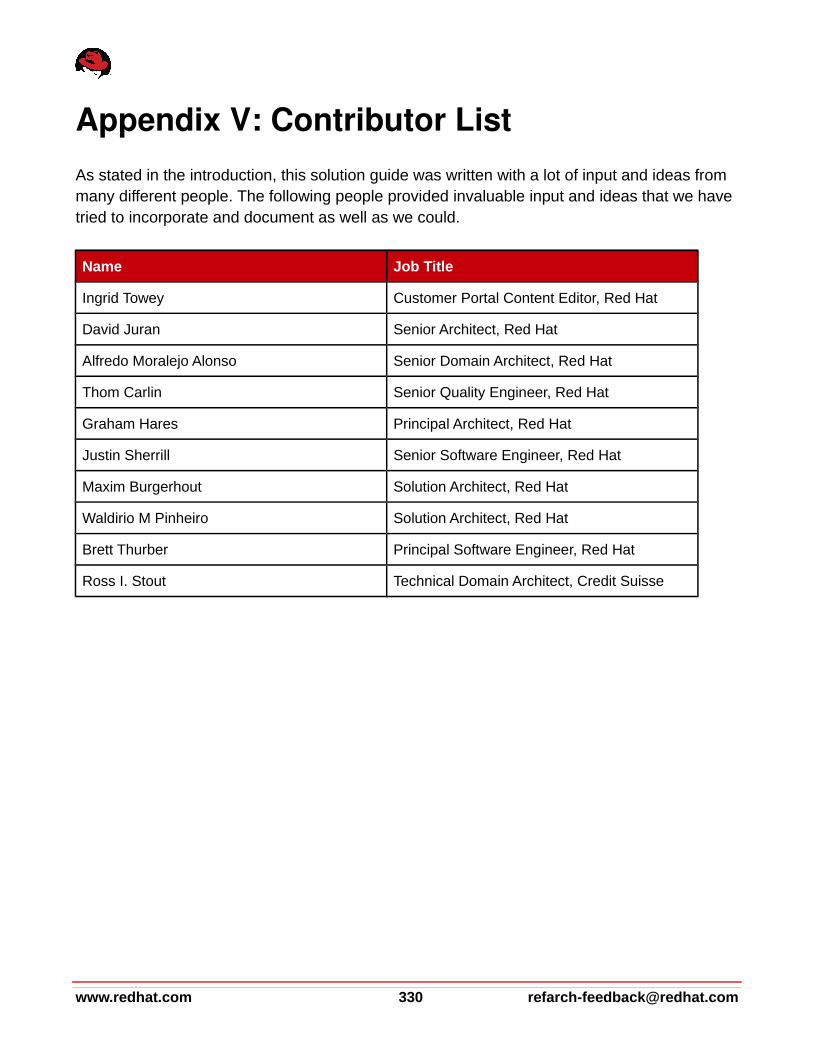
Appendix V: Contributor ListAs stated in the introduction, this solution guide was written with a lot of input and ideas from many different people. The following people provided invaluable input and ideas that we have tried to incorporate and document as well as we could.
Name Job Title
Ingrid Towey Customer Portal Content Editor, Red Hat
David Juran Senior Architect, Red Hat
Alfredo Moralejo Alonso Senior Domain Architect, Red Hat
Thom Carlin Senior Quality Engineer, Red Hat
Graham Hares Principal Architect, Red Hat
Justin Sherrill Senior Software Engineer, Red Hat
Maxim Burgerhout Solution Architect, Red Hat
Waldirio M Pinheiro Solution Architect, Red Hat
Brett Thurber Principal Software Engineer, Red Hat
Ross I. Stout Technical Domain Architect, Credit Suisse
www.redhat.com 330 [email protected]

[email protected] 331 www.redhat.com