10 POWERPOINT - Pitt
51
ESSENTIAL MICROSOFT OFFICE 2016: Tutorials for Teachers Copyright © Bernard John Poole, Lorrie Jackson, 2016. All rights reserved 342 10 POWERPOINT BEYOND THE BASICS Making interactive, non-linear slide shows and enhancing formatting LEARNING OUTCOMES In the first PowerPoint tutorial, you learned how to create and save a new presentation (the Screenbeans slide show). You saw a sample slide show (The Tudor Monarchs). You learned how to prepare an outline, you typed text for each slide, added clip art, and set timings. You added an effect to enhance the slide transition, you selected a color scheme, and may have even created a new background effect. You changed the printer settings so that you can print out handouts rather than just individual slides of your shows. For many classrooms and for most K-12 students, what you learned in chapter 8 is just fine. But, if you're ready to take the next step and learn some more advanced skills with PowerPoint, or if you teach computer-savvy students who want more challenging skills to master, this chapter's for you. Most PowerPoint presentations you see in school or at work are what are called linear presentations. That is, each slide is designed to proceed one slide right after another. The first slide transitions to the second, which transitions to the third, and so forth. For many educational tasks, this is fine. But, what if... What if you want your students to create an interactive story, where, for example, younger kids could read about a dragon on Slide One, then choose, on Slide Two, any one of three possible places that the dragon could go? By clicking on the word "desert," the show would move to a slide describing what happens to the dragon in the desert. If the student clicks the word "forest," another slide appears with another ending. The learner thus participates, not by simply clicking on slide after slide in one, linear direction, but by making choices that affect what slide comes next, thus making the presentation interactive and non-linear.
Transcript of 10 POWERPOINT - Pitt
ESSENTIAL MICROSOFT OFFICE 2016: Tutorials for Teachers
Copyright © Bernard John Poole, Lorrie Jackson, 2016. All rights reserved
342
10 POWERPOINT BEYOND THE BASICS Making interactive, non-linear slide shows and enhancing formatting
LEARNING OUTCOMES In the first PowerPoint tutorial, you learned how to create and save a new presentation (the
Screenbeans slide show). You saw a sample slide show (The Tudor Monarchs). You learned how
to prepare an outline, you typed text for each slide, added clip art, and set timings. You added an
effect to enhance the slide transition, you selected a color scheme, and may have even created a
new background effect. You changed the printer settings so that you can print out handouts rather
than just individual slides of your shows.
For many classrooms and for most K-12 students, what you learned in chapter 8 is just fine.
But, if you're ready to take the next step and learn some more advanced skills with PowerPoint, or
if you teach computer-savvy students who want more challenging skills to master, this chapter's
for you.
Most PowerPoint presentations you see in school or at work are what are called linear
presentations. That is, each slide is designed to proceed one slide right after another. The first slide
transitions to the second, which transitions to the third, and so forth. For many educational tasks,
this is fine.
But, what if...
What if you want your students to create an interactive story, where, for example, younger kids
could read about a dragon on Slide One, then choose, on Slide Two, any one of three possible
places that the dragon could go? By clicking on the word "desert," the show would move to a slide
describing what happens to the dragon in the desert. If the student clicks the word "forest," another
slide appears with another ending. The learner thus participates, not by simply clicking on slide
after slide in one, linear direction, but by making choices that affect what slide comes next, thus
making the presentation interactive and non-linear.
Lesson 10: PowerPoint Presentations Beyond the Basics
343
A more common application of non-linear PowerPoint presentations is when reviewing
knowledge—what you might call interactive Drill & Practice. This lesson will teach you how to
do that.
Teachers (and even older students) can create quizzes using PowerPoint. In these slide shows,
students are asked questions and then click on what they think is the answer. If the answer is
correct, the show moves to the next question. If the student answers incorrectly, the show moves
the student back to re-answer the question or, if the question is of the True/False variety, explains
why the answer was incorrect before moving them on to the next step in the show.
The movement from one slide to another is not one-way, not linear, but rather non-linear, the
pathway through the show determined by the student's interaction with it.
In this tutorial you will be introduced to the basics of non-linear interactive PowerPoint slide
shows, along with some more advanced formatting and impact-enhancing tools. Amongst the skills
you will learn are:
Using Action Buttons, Hidden Slides, and Hyperlinks
Formatting and enhancing graphics
Inserting sounds, clip art, movies, and hyperlinks (including E-mail links)
A caveat before you begin: If you have not completed the tutorial in Chapter 9 but feel fairly comfortable with the basics of
PowerPoint, feel free to tackle this chapter. If you are not sure you know the basics of PowerPoint,
however, skim Chapter 9 to make sure you're ready to begin. Good luck!
10.1 ADDING ACTION BUTTONS AND HIDDEN SLIDES TO AN EXISTING PRESENTATION Action buttons
For the sake of uniformity, you are going to work with a version of the Screenbeans presentation
that has been created for this tutorial.
In the PowerPoint File menu click on Open
Navigate on your USB drive to the Work Files for Office 2016 folder > PowerPoint Files folder, then double click on the file Problems and Solutions to open it
Action Buttons allow you to control the sequencing of the slides in a slide show. They also allow
you to go to slides that would otherwise be hidden from the user’s view and passed over when the
slide show is running. You will learn about such Hidden Slides in the next section of this tutorial.
Action Buttons also can be used to direct the user back to a previous slide, or forward to the
next slide, or to go directly to the first or last slide, or anywhere in between. Later in this tutorial
you will learn about other PowerPoint tools that can be used to call up a movie clip or some other
kind of multimedia document.

ESSENTIAL MICROSOFT OFFICE 2016: Tutorials for Teachers
Copyright © Bernard John Poole, Lorrie Jackson, 2016. All rights reserved
344
You're going to put Action Buttons on each of the slides in the Problems and Solutions
presentation. These action buttons will make it easy for the user to go back to the previous slide or
forward to the next slide, and so forth.
The first slide will have just one Action Button—to go to the next slide. The last slide will
have two Actions Buttons, one to go to the previous slide and another to go back to the beginning
of the slide show (Home). Every other slide will have an Action Button to go to the previous slide,
an Action Button to go to the next slide, and an Action Button to go to the first (Home) slide in the
presentation.
Fig. 10.1 shows you how the Title slide will look after you've added the Action Button.
Fig. 10.1 The Action Button on the Title slide
To use Action Buttons, you must be in the Normal view so you can work on individual slides.
In the Slide View toolbar (lower right of your PowerPoint window—Fig. 10.2) click on Normal view
Fig. 10.2 The Slide View toolbar
Then, in the left hand frame of the PowerPoint window, click on Slide 1 (the Title slide) to select it in Normal View
Lesson 10: PowerPoint Presentations Beyond the Basics
345
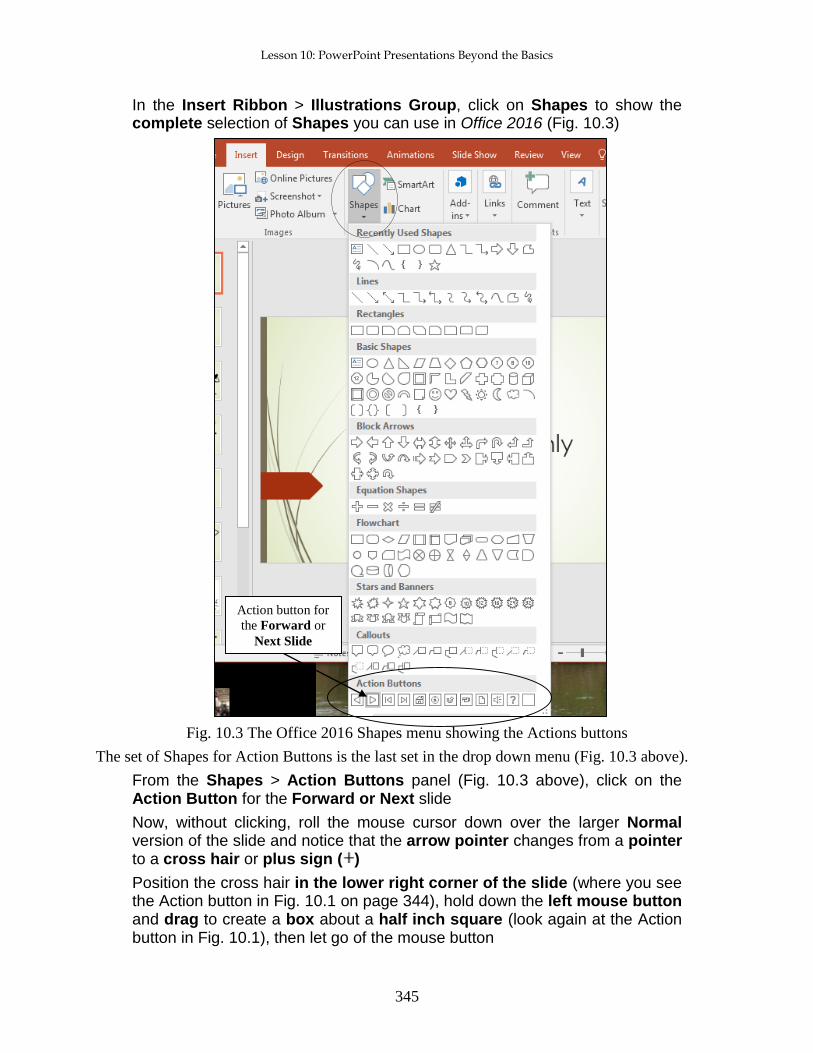
In the Insert Ribbon > Illustrations Group, click on Shapes to show the complete selection of Shapes you can use in Office 2016 (Fig. 10.3)
Fig. 10.3 The Office 2016 Shapes menu showing the Actions buttons
The set of Shapes for Action Buttons is the last set in the drop down menu (Fig. 10.3 above).
From the Shapes > Action Buttons panel (Fig. 10.3 above), click on the Action Button for the Forward or Next slide
Now, without clicking, roll the mouse cursor down over the larger Normal version of the slide and notice that the arrow pointer changes from a pointer to a cross hair or plus sign ( )
Position the cross hair in the lower right corner of the slide (where you see the Action button in Fig. 10.1 on page 344), hold down the left mouse button and drag to create a box about a half inch square (look again at the Action button in Fig. 10.1), then let go of the mouse button
Action button for
the Forward or
Next Slide

ESSENTIAL MICROSOFT OFFICE 2016: Tutorials for Teachers
Copyright © Bernard John Poole, Lorrie Jackson, 2016. All rights reserved
346
PowerPoint displays the Action Settings dialog box (Fig. 10.4).
Fig. 10.4 The Action Settings dialog box
If you don’t see the Action Settings dialog box, right click on the Action Button and, from the pop up context menu, select Edit Hyperlink…
You want the Action Button to go from the Title slide to the Next Slide, which is the default setting
in the Hyperlink to: box, but before you click on OK, let’s opt to play a sound which the users will
hear when they click on the Action button (Fig. 10.4 above)
Click to put a check mark (tick) in the box next to Play sound: then click on the down arrow at the end of the Play Sound box and, from the menu of sounds, select Arrow, then click on OK
You can adjust the size of an action button any time you want by clicking on it and dragging on
the handles around it.
If the button you have created looks too large or too small, go ahead now and click on it to select it, grab one or other of the handles and adjust the size
When you’re done making any adjustments, you should have a professional-looking Action
Button. We’ll test it shortly.
If you ran the slide show right away and clicked on the Action Button, it would advance you
to the next slide with the whoosh sound of an arrow for good measure. You’re going to copy and
paste this same button onto the next seven slides.
Let’s start by copying it to Slide 2.
First click to put a
check mark in the
Play Sound box Next click on this
arrow to bring
down the list of
sounds
Lesson 10: PowerPoint Presentations Beyond the Basics
347
Make sure you still have the handles around the Action button (just click on the button to get the handles), then press Ctrl+c to copy the Action button to the clipboard
Click (in the left hand pane) on Slide 2, then hit Ctrl+v to paste a copy of the Action button from the first slide onto Slide 2
As you see, the copied button is pasted into exactly the same position as it was in on Slide 1. This
is fine, as long as it doesn’t cover any of the Screenbean figurine. Here’s what you do if it partially
covers any of the figurine.
Click on the figurine to get the handles around it, then drag the image and/or change its size so that it no longer is covered anywhere by the Action button
You're going to put two more Action Buttons on Slide 2, one to go back to the previous slide, and
another to go back to the beginning of the slide show (a Home Action Button). Once you have all
three buttons on Slide 2, you’re then going to copy and paste all three of the Action Buttons onto
each of the next seven slides.
But first let’s continue adding the two other Action Buttons to Slide 2.
In the Insert Ribbon > Illustrations Group click on the Shapes icon
From the Action Buttons panel (Fig. 10.3 on page 345), select the Action Button for Back or Previous slide
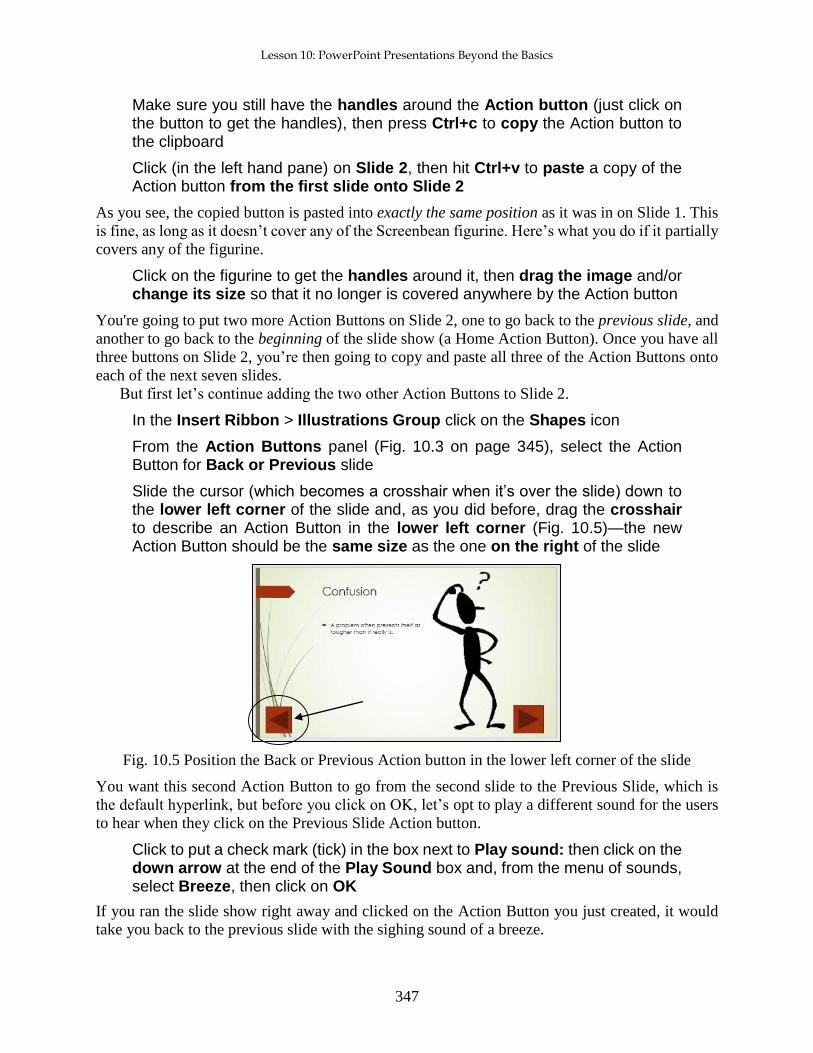
Slide the cursor (which becomes a crosshair when it’s over the slide) down to the lower left corner of the slide and, as you did before, drag the crosshair to describe an Action Button in the lower left corner (Fig. 10.5)—the new Action Button should be the same size as the one on the right of the slide
Fig. 10.5 Position the Back or Previous Action button in the lower left corner of the slide
You want this second Action Button to go from the second slide to the Previous Slide, which is
the default hyperlink, but before you click on OK, let’s opt to play a different sound for the users
to hear when they click on the Previous Slide Action button.
Click to put a check mark (tick) in the box next to Play sound: then click on the down arrow at the end of the Play Sound box and, from the menu of sounds, select Breeze, then click on OK
If you ran the slide show right away and clicked on the Action Button you just created, it would
take you back to the previous slide with the sighing sound of a breeze.

ESSENTIAL MICROSOFT OFFICE 2016: Tutorials for Teachers
Copyright © Bernard John Poole, Lorrie Jackson, 2016. All rights reserved
348
Finally, still on Slide 2, in the Insert Ribbon > Illustrations Group, select the Shapes menu and locate the Action Buttons panel at the bottom of the menu
In the Action Buttons panel, click the Action Button for the Home slide (it looks like a little house), and once again, on the slide itself, drag to describe an Action Button in the lower center of the slide (Fig. 10.6)
Fig. 10.6 The Home Action button
You want the Action Button to go to the Home Slide (the First slide in the show), which is the
default hyperlink in the Action Settings dialog box, but before you click on OK you need to have
PowerPoint play another, different, sound.
In the Action Settings dialog box that pops up, click to put a check mark (tick) in the box next to Play sound: then click on the down arrow at the end of the Play Sound box and, from the menu of sounds, select Chime, then click on OK
If necessary, with the Home Action Button still selected, use the arrow keys on the keyboard to move into position in the bottom center of the slide
Slide 2 should now look something like Fig. 10.6 above.
Copying the Action buttons to the other slides
Once you have created a set of buttons for a slide, if you need to do the same on other slides in the
presentation, all you have to do is copy and paste them. This is a lot quicker than recreating them
on each succeeding slide and it is very simple to do.
Hold down the Shift key on the keyboard, then click on each of the new buttons on the Confusion slide so that all three buttons are selected
Press Ctrl+c on the keyboard to copy them to the clipboard
Now, in the left hand frame, click on the thumbnail for slide 3 so that it comes up in the Normal View, and press Ctrl+v to paste the buttons onto the third (Contusion) slide
Notice that the buttons are pasted into the exact same place on Slide 3.
If necessary, if any part of the figurine is covered by an Action button, click on the figurine to select it and move it and/or change its size

Lesson 10: PowerPoint Presentations Beyond the Basics
349
Now go to each of the remaining six (6) slides in the presentation and do the same (click to select the next slide and hit Ctrl+v then, if necessary, make any adjustments to the figurine)
Better Save your work to this point (Ctrl+s)
Acknowledgements slide
The Problems and Solutions presentation is missing one final slide—the Acknowledgements slide,
which should accompany any presentation where you use information or audio-visual material that
is not your own. Adding a new slide to a presentation is easy.
First, you want the Acknowledgements slide to be the last slide in the show, so, in the left hand frame, use the mouse to click immediately after the thumbnail for Slide 9 (you’ll see a dark grey bar flashing on and off to indicate that this is where the new slide will go)
Now, on the keyboard, hold down the Ctrl key and, at the same time, press the letter ‘m’ (Ctrl+m), or, in the Slides Group of the Home Ribbon, click on the New Slide button
For the Acknowledgements slide it will be best if it is a Title and Content slide layout.
In the Home Ribbon > Slides Group, click on the Layout option to bring down the Layout menu, then, in the Layout menu, select the Title and Content layout
The buttons are slightly different on this last slide. You still want the Action Button to go back to
the previous slide, and you need the one that returns you to the beginning—the Home Action
Button. But you don’t need a button to go to the next slide.
You’ve just pasted the three Action buttons onto each of the previous 7 slides, so the buttons
are still available on the clipboard for you to paste onto the new last slide
On Slide 10, now the last slide in the show, hit Ctrl+v to paste the three Action buttons there, too
Now, click anywhere on the slide to remove the handles from (deselect) all three action buttons, then click on the Action button in the lower right corner of the slide (the Next Action Button) to select it, and hit the Del(ete) key to remove it from the slide
Next, click where you see “Click to add title,” and in the Title box type Acknowledgements
Finally, click in the large box below the Title box to add text and, by way of Acknowledgements, type the following (centered) on the last slide:
The Screenbeans image are courtesy Microsoft Corporation’s Clip Art Gallery.
The presentation design owes much to the Microsoft Office 2016 PowerPoint application.
The text is copyright © Bernard John Poole. All rights reserved.
You don’t want the bullets with the text so, when you’ve typed in the three lines of acknowledgements, hit Ctrl+a to select all the text in the Content box then, in the Home Ribbon > Paragraph Group, click once on the Bulleted List tool to toggle the bullets off (or select None from the Bullets menu)
ESSENTIAL MICROSOFT OFFICE 2016: Tutorials for Teachers
Copyright © Bernard John Poole, Lorrie Jackson, 2016. All rights reserved
350
Hit Ctrl+s to save the Problems and Solutions presentation
Hidden Slides
Hidden Slides are slides that are designed to be bypassed unseen, as the user clicks through a
presentation, unless the user clicks on an Action Button that sends them to the Hidden Slide.
Here are the steps to create an Action Button on a slide which will take the user to a specific
Hidden Slide in the Screenbeans slide show.
Make sure you still have the Normal View, so that you can see the thumbnails of your slides in the left hand frame, then click on the thumbnail of Slide 2 (the Confusion slide) to make it the active slide
Click to position the cursor at the end of the text you typed in the slide’s left-hand text placeholder (after the words …tougher than it really is.)
Hit Enter to go to a new line, then type Click if you’d like to read a quote about problem-solving.
In the Home Ribbon > Slides Group, select New Slide (or press Ctrl+m) to insert a new slide right after Slide 2—the Confusion slide
Immediately, PowerPoint inserts a new slide right after the second slide in the show.
Next, in the Home Ribbon > Slides Group, click on the Layout button, locate the Title slide layout in the selection of slide layout options, and click on it to select it as the layout for the new slide
You want this new slide to be a Hidden Slide.
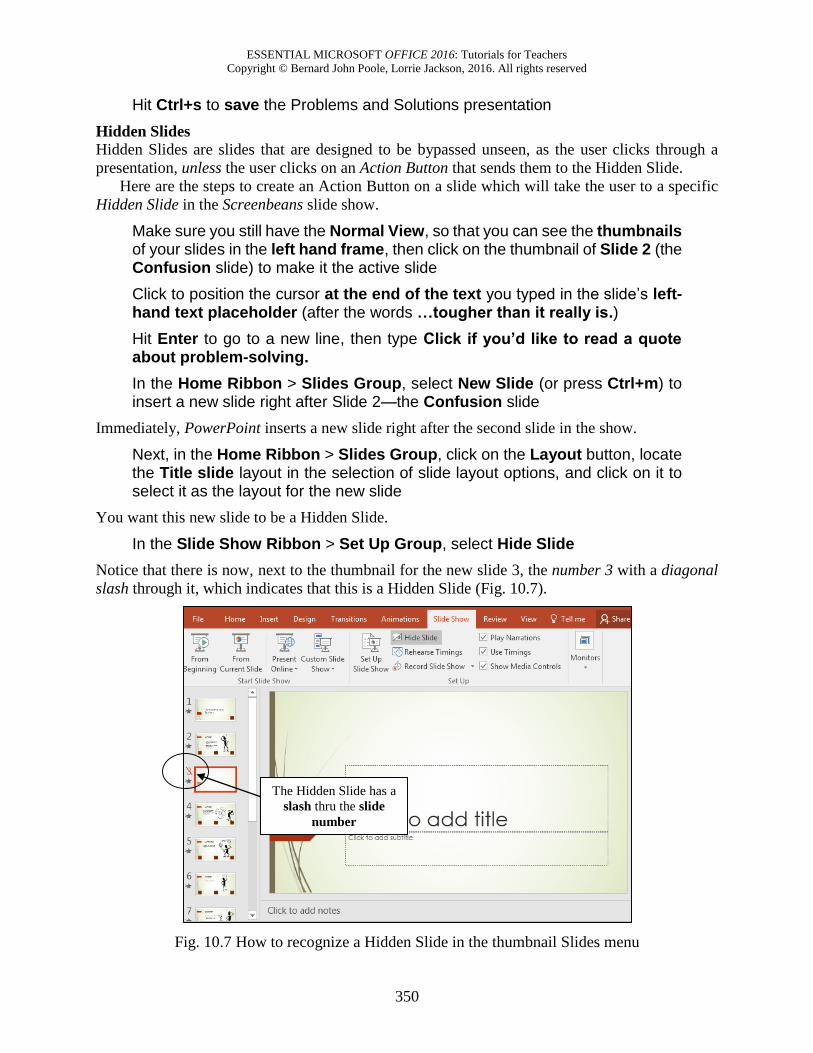
In the Slide Show Ribbon > Set Up Group, select Hide Slide
Notice that there is now, next to the thumbnail for the new slide 3, the number 3 with a diagonal
slash through it, which indicates that this is a Hidden Slide (Fig. 10.7).
Fig. 10.7 How to recognize a Hidden Slide in the thumbnail Slides menu
The Hidden Slide has a
slash thru the slide
number

Lesson 10: PowerPoint Presentations Beyond the Basics
351
Click in the title placeholder on the new slide (where it says Click to add title), and type the following quotation (including the quotes): “Quality is in the details.”
Click in the subtitle placeholder on the new slide (immediately beneath the title placeholder) and type the following: Bernie Poole, Esq.
The Hidden Slide with the quote is now complete, but it’s hidden, so you have to give PowerPoint
(and the user) a way to find it by creating an Action button that links to it.
In the left hand thumbnail view of the slides, click on the thumbnail for Slide 2 (the Confusion slide)
In the Insert Ribbon > Illustrations Group, select the Shapes button > Action Buttons and, from the Action Buttons panel, click the Action button for Forward or Next slide
Without clicking the mouse button, roll the mouse cursor down over the slide and notice that the arrow pointer changes to a cross hair ( )
Position the cross hair near the end of the text that you typed in the slide’s text placeholder, at the end of "Click if you’d like to read a quote about problem-solving" (Fig. 10.8), then hold down the left mouse button and drag to create a small Action button that you are going to use to link to the hidden slide (which will be slide 3)
Fig. 10.8 Placement of action button linking to the hidden slide
Let go of the mouse button when the shape looks the same as Fig. 10.8
Position the action
button here

ESSENTIAL MICROSOFT OFFICE 2016: Tutorials for Teachers
Copyright © Bernard John Poole, Lorrie Jackson, 2016. All rights reserved
352
PowerPoint immediately displays the Action Settings dialog box (Fig. 10.9). The default
Hyperlink is to the Next Slide, but this is not what you want.
In the Action Settings dialog box, click on the arrow to the right of the Hyperlink to: box (Fig. 10.9) to show the drop down menu of Hyperlink to: options
Fig. 10.9 The Action Settings dialog box
Choose Slide... from this drop-down menu (Fig. 10.9 above)
Now you will see a list of the slides in the presentation, including the hidden slide (Fig. 10.10).
Fig. 10.10 The Hyperlink to Slide dialog box
First, click on this down
arrow to see the Hyperlink
to: options
Next, click on
Slide… to go to a
particular slide in
the presentation
Lesson 10: PowerPoint Presentations Beyond the Basics
353
Remember that Slide 3 is a hidden slide (check the slash across the slide’s number).
In the list of slide titles in the Hyperlink to Slide dialog box (Fig. 10.10 above), click to select slide 3 (“Quality is in the details.”), click on OK, then click on OK again to exit the Action Settings dialog box
This new Action Button now provides a link from slide 2 in the show to the hidden slide 3. When
you run the show shortly and get to slide 2, if you do not click on this Action Button, slide 3 will
be bypassed and the show will go directly to Slide 4.
You have to do one more thing to complete the content on the hidden slide (slide 3). You need
to put an action button on there to go to the next slide. Can you remember how to do it yourself?
If so, go ahead; but if you need help, here are the steps to follow:
Click on the thumbnail for slide 2 (the Confusion slide)
Now click once on the action button in the lower right corner of the slide (the button to go the next slide), then press Ctrl+c on the keyboard to copy the action button to the clipboard
Next click, in the left hand frame, on the thumbnail for slide 3 (the hidden slide), and press Ctrl+v on the keyboard to paste the action button onto the lower right corner of the hidden slide
Better Save all the good work you’ve done so far
Animation Schemes
PowerPoint Animation is a way of bringing objects, such as text and pictures, to life on the screen,
controlling and sequencing how text and other objects on a slide emerge onto the screen during a
presentation—sliding in from the right or left, or fading in, and so forth. Let's apply some of the
PowerPoint Animations in Slide 3.
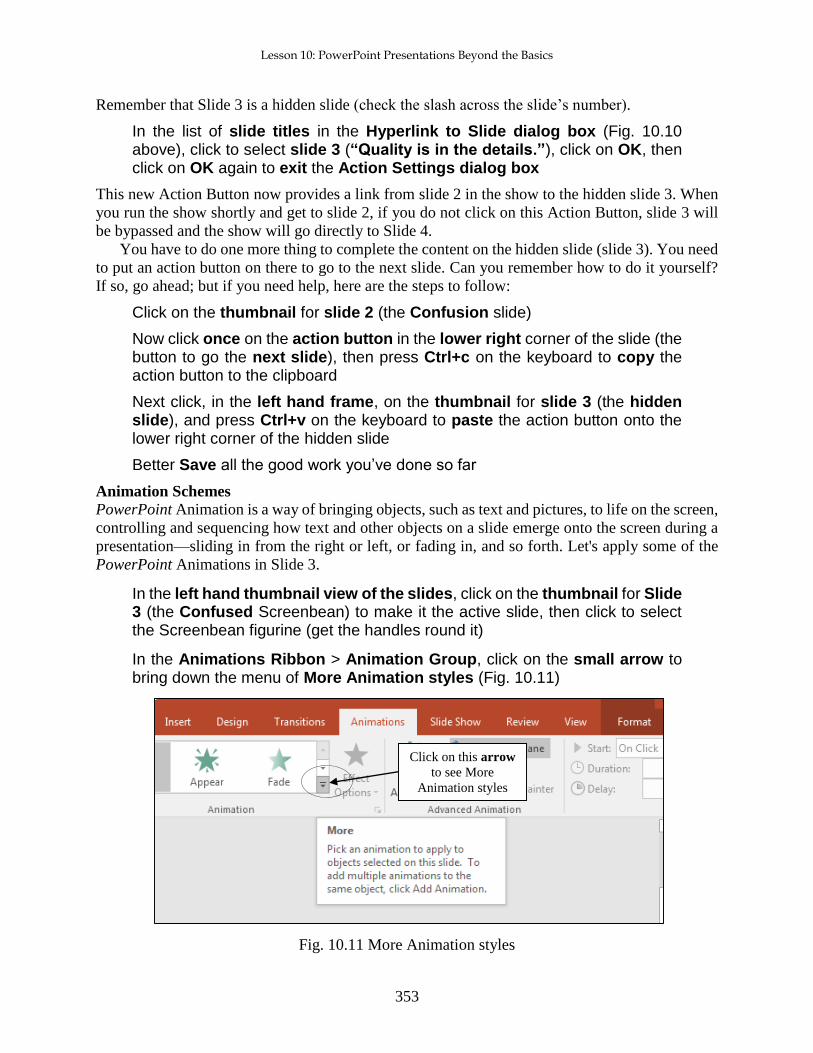
In the left hand thumbnail view of the slides, click on the thumbnail for Slide 3 (the Confused Screenbean) to make it the active slide, then click to select the Screenbean figurine (get the handles round it)
In the Animations Ribbon > Animation Group, click on the small arrow to bring down the menu of More Animation styles (Fig. 10.11)
Fig. 10.11 More Animation styles
Click on this arrow
to see More
Animation styles

ESSENTIAL MICROSOFT OFFICE 2016: Tutorials for Teachers
Copyright © Bernard John Poole, Lorrie Jackson, 2016. All rights reserved
354
This will bring down the Animation styles menu (Fig. 10.12).
Fig. 10.12 Animation Effects menu
In the Entrance section of the menu, select the Float In animation, and watch as PowerPoint gives you a demo of the effect
Now click anywhere in the text box to the left of the figurine and try out a few other animations to get a feel for what is available
When you are done, Save the Problems and Solutions presentation
Notice that PowerPoint indicates the sequencing of the animations (Fig. 10.13), the figurine first,
followed by the text.
Fig. 10.13 Animations sequence
You can control this sequence, as well as when you want the animation to occur.

Lesson 10: PowerPoint Presentations Beyond the Basics
355
Hold down the Shift key and at the same time click on each of the animation numbers (1, 2, 3), so that all three are selected (Fig. 10.14)
Fig. 10.14 Timing the animation
In the Animations Ribbon > Timing Group >Start box, click on the arrow to bring down the menu of Start options, and select the option After Previous (Fig. 10.14), which will cause the animations to start automatically, in sequence, immediately following the previous slide (Slide 1)
Try this now: in the Slide Show Ribbon > Start Slide Show Group, click on From Beginning and go through the first two slides to see how the animations work
Now, just for practice, visit each of the other slides that have a figurine (Slides 4-9), and apply the Float In animation to the figurine, in the same way as you just did on Slide 2 above (the directions start on page 353)
For the record, if you ever need to deactivate an animation scheme, you can do so by selecting
the item that has an animation you want to remove, then click on None at the top of the
Animation Effects menu (see Fig. 10.12 previous page).
You can experiment with different schemes, try them out, remove them if you don’t like
them, and start over—all part of the design process. You can change any sequence, and you can
also sequence the items to come onto the screen all at once, and so forth.
There will be occasions when you will want to alter the sequence because, for example, you
may decide that you want to talk about one topic ahead of another.
ESSENTIAL MICROSOFT OFFICE 2016: Tutorials for Teachers
Copyright © Bernard John Poole, Lorrie Jackson, 2016. All rights reserved
356
Also, you may want the presentation to be presented as a running display in a conference
room or in the lobby of a building. You can also determine the time you want each item to stay
on the screen before the next animation is to come up. To do this, you would use the other tools
in the Animations Ribbon. It is beyond the scope of this tutorial to dwell further on this topic, but
you should find the time to play around with the tools available to you so that you can become an
expert in the use of this teaching tool.
Bear in mind that it’s not a good idea to apply Animation Schemes on all the slides. Animations
are best used sparingly, to highlight specific ideas, or to spice things up in a presentation. But too
much spice can overwhelm a presentation and take away from its enjoyment or effectiveness.
Later in this lesson you’ll learn how to customize animation schemes, but first let’s create a
basic interactive PowerPoint presentation from scratch.
Save then Close the Problems and Solutions presentation
10.2 INTERACTIVE POWERPOINT AT WORK Let’s start by looking at an example of an interactive PowerPoint presentation.
In the computer you should still have your USB drive with the Work Files for Office 2016
In the File menu select Open
Browse to the Work Files for Office 2016 folder, open the PowerPoint Files folder, then double click to open the Mammal Test presentation
You are going to examine the Mammal Test interactive presentation which has been prepared for
you and which will demonstrate the various features of what makes a presentation interactive and
non-linear.
In the Slide Show Ribbon > Start Slide Show Group, click on From Beginning to view the presentation
Use the mouse (or space bar or right arrow key) to move through the slides—be sure to click on the Action Buttons or answers when indicated
Answer at least one question incorrectly so you can see how the presentation takes you back to re-answer a question should you get it wrong
Notice also the sound, clip art, and animation clip that are added to this show
Features to look out for in the demonstration presentation General layout of an Interactive PowerPoint used for assessing knowledge
Think of a test in your classroom. You start with a title on your test, so the students know what the
test is on and who wrote it. Then you have an introduction, which might define the subject matter
for the test. Alternatively, if used as a review, the introduction might summarize the concept being
tested.
A good interactive slide show thus begins with a title and an introduction slide (Fig. 10.15).

Lesson 10: PowerPoint Presentations Beyond the Basics
357
Fig. 10.15 Title and Introduction Slides
You then move to the set of directions which tell the user how to complete the test. The test
questions follow right on after the directions.
An effective interactive slide show should have a directions slide because a good teacher never
assumes that all the students know how to take a particular test. After the directions come the
question slides, which contain the questions themselves and the options for answers (See Fig.
10.16).
Fig. 10.16 Directions and Question One Slide
An interactive PowerPoint presentation has the same elements as any PowerPoint presentation,
with one significant addition: question slides and feedback slides. In your class, you grade papers
and return them, giving the students feedback on their answers.

ESSENTIAL MICROSOFT OFFICE 2016: Tutorials for Teachers
Copyright © Bernard John Poole, Lorrie Jackson, 2016. All rights reserved
358
So, in the Mammal Test slide show, we have feedback slides that tell the user "You're Right" or
"Sorry. Try Again" (Fig. 10.17).
Fig. 10.17 Question and Feedback Slides
Lastly, in any interactive PowerPoint it's appropriate to have a concluding slide which tells the
students they’re done, followed by an acknowledgements slide (Fig. 10.18).
Fig. 10.18 Ending and Acknowledgment Slides
In this way, you set a good precedent for citing sources, and you also clue your audience to the
fact that it's over! We'll talk more about the layout of an interactive PowerPoint as you begin
creating your own.
Action Buttons and Hyperlinks
In order to move outside the linear box of traditional PowerPoints, we've used Action Buttons and
Hyperlinks. Action Buttons are the square boxes with arrows in them that let you either move on

Lesson 10: PowerPoint Presentations Beyond the Basics
359
to the next question or re-answer the previous one. These were discussed briefly in the previous
chapter, but we'll pay special attention to them in the subsequent activities.
A PowerPoint Hyperlink takes you directly from one place to another: if you are on the Web,
the hyperlinks take you from one Web site to another, or from a website to your email program; if
you are in a PowerPoint, the hyperlink might take you from a slide to your E-mail program, or
from one slide in your presentation to another, or from a slide in your PowerPoint presentation to,
say, a page on the Web.
Notice the absence of transitions and animations in this Mammal Test presentation. The
presentation has a simple, clean style. In the previous lesson, you learned how to use different
effects for Slide Transitions and earlier in this lesson you were introduced to animations.
These are certainly valuable tools that engage your viewers and can keep their interest. But
everything has a time and a place, and in a testing situation, the bells and whistles aren't needed.
They may, indeed, be an unwanted distraction.
So much for an overview of using an interactive PowerPoint show. It's time to create your own
interactive quiz.
One final word before you begin: if you are a practicing teacher using this tutorial, and you
consider yourself an experienced user of the computer, why don’t you create, or use an existing
quiz of your own, a quiz based on your grade level or subject matter using the upcoming steps as
your guide? Experienced computer-using teachers should have little trouble doing this. But if
you're even the least bit fuzzy on how an interactive show works, stick with the mock test below
for your first try. Then practice it later with your own curriculum!
Hit Esc on the keyboard to exit the slide show, then close (File > Close) the Mammal Test presentation when you are ready to continue with the tutorial
10.3 BUILDING THE PRESENTATION You are going to use PowerPoint to prepare a simple test about the U.S. states and capitals, which
will give you the experience to prepare more detailed interactive tests on your own.
PowerPoint should still be open on your screen, so go to File > New and click on the Blank Presentation icon (or simply hit Ctrl+n) to start a new slide show
You’ll remember that it’s always a good idea to immediately save a new document
Go to File > Save, Browse to your USB drive > Work Files for Office 2016 > Data Files folder > PowerPoint Presentations folder, give the new presentation the name States and Capitals Quiz, and click on the Save button
It is usually a good idea to create the text outline for your slides before you select a template for
your design theme, slide transitions, animations and so forth. This is because different templates
have different slide layouts (bigger title boxes, less room for bulleted lists, and so on). So you will
want to get a feel for the text on each slide before you proceed with design considerations.
This brings to mind a good rule of thumb when creating anything that is designed to provide
information for the purpose of effective communication: Substance Before Style! Or, to put it
another way, Content Counts! Keep this in mind when developing any PowerPoint presentation.

ESSENTIAL MICROSOFT OFFICE 2016: Tutorials for Teachers
Copyright © Bernard John Poole, Lorrie Jackson, 2016. All rights reserved
360
Building the introductory slides
Let's get to work. Figure 10.19 illustrates the content you will be entering for the first three slides
of the U.S. States and Capitals quiz.
Fig. 10.19 Content for the first three slides
In Lesson 9 you learned how to use the Outline View to enter the text onto each slide. Feel free to
use the Outline View again for this exercise. However, so that you learn an alternative way to do
it, you are going to enter the text directly onto each slide, using the large version of the slide on
the right hand side of the window, as illustrated in Fig. 10.20.
Fig. 10.20 Enter the text directly onto the slide
Either way works fine, so long as you follow the rule of thumb that it’s best to type in the text
before playing with the slide design features of PowerPoint.
Entering data directly onto slides can be tricky because you have to be careful how you use the
Enter and Tab keys, so follow the directions carefully.
Click inside the Title box on the slide itself (Fig. 10.20 above) and type U.S. States and Capitals Quiz, then hit Ctrl+Enter to move the cursor down to the sub-title box
Now type, By ______ (type your name in the blank), then hit Enter and, in the Insert Ribbon > Text Group, click on Date and Time, then double-click on the date format of your choice
You can type the text directly
into the text box on the slide
Lesson 10: PowerPoint Presentations Beyond the Basics
361
Hit Ctrl+Enter (or Ctrl+m) to automatically insert a new slide, then, in the Home Ribbon > Slides Group > Layout menu select the Title and Content layout—the layout you’ll use for the remaining slides in the presentation
Get to know the Keyboard Shortcuts
You'll quickly learn that hitting Enter moves you to the next line within a text box. Ctrl+Enter
moves you to the next text box.
Continue to type the information for the next 2 slides (see Fig. 10.19 above), pressing Ctrl+Enter to move from one text box to the next (for example, from a slide's title to its bulleted list, or from one slide's bulleted list to the next slide's title box), and hit Enter to go to the next line in the same text box
Get used to using these keyboard shortcuts rather than reaching for the mouse, clicking on
each slide, or selecting New Slide from the toolbar or from the Insert menu, and so on. For
the more experienced user, Keyboard Shortcuts are a faster way to go!
Question and Feedback slides
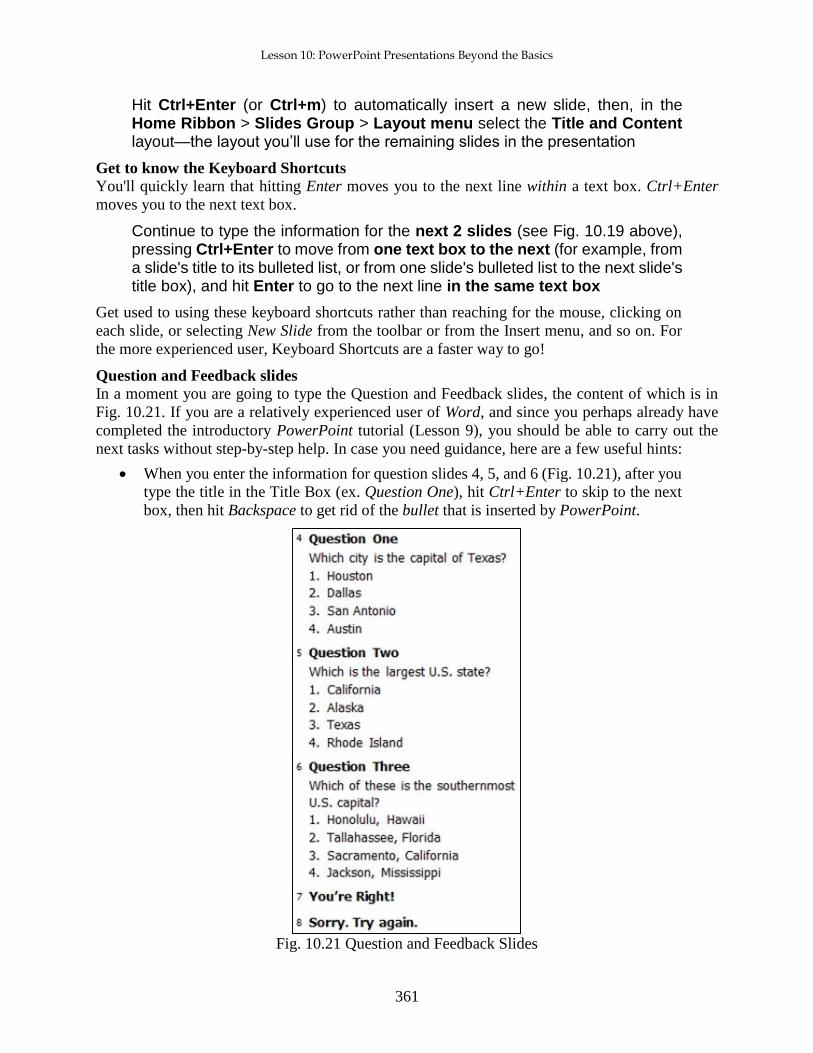
In a moment you are going to type the Question and Feedback slides, the content of which is in
Fig. 10.21. If you are a relatively experienced user of Word, and since you perhaps already have
completed the introductory PowerPoint tutorial (Lesson 9), you should be able to carry out the
next tasks without step-by-step help. In case you need guidance, here are a few useful hints:
When you enter the information for question slides 4, 5, and 6 (Fig. 10.21), after you
type the title in the Title Box (ex. Question One), hit Ctrl+Enter to skip to the next
box, then hit Backspace to get rid of the bullet that is inserted by PowerPoint.
Fig. 10.21 Question and Feedback Slides

ESSENTIAL MICROSOFT OFFICE 2016: Tutorials for Teachers
Copyright © Bernard John Poole, Lorrie Jackson, 2016. All rights reserved
362
Before typing the first of the answers on each slide, click on the numbering icon in
the toolbar (Fig. 10.22) to have the program automatically number your answers.
Fig. 10.22 The Numbered List icon in the Paragraph Group of the Home Ribbon
If you want to further modify the numbering, you can click on the arrow in the
Numbering tool (Home Ribbon > Paragraph Group) and double-click on the
number format of your choice.
After the question slides, type the content for the two feedback slides: You're Right
(slide 7) and Sorry. Try Again (slide 8). Wait; don't we need these feedback slides
after each question? Yes, so you'll make copies of these two slides and paste them in
the right places in the slide show. We'll change the slide layout later as well.
Now go ahead and type the five Question and Feedback slides (slides 4 through 8) illustrated in Fig. 10.21 on the previous page
For any PowerPoint show, it is important to have a slide that signals the end of the main body of
content (such as the end of testing in the case of our show). PowerPoint presentations that end
abruptly can be disconcerting to a viewer. Also, it is important to give credit where credit is due.
So, at the conclusion to most any slide show you should include an acknowledgements slide.
These are your next two tasks.
Type the content for slides 9 and 10 as in Fig. 10.23
Fig. 10.23 End of Test and Acknowledgement Slides
Go to File > Save (or hit Ctrl+a)

Lesson 10: PowerPoint Presentations Beyond the Basics
363
Before you proceed to the next section of the tutorial
It is always wise to check your work as you proceed. So let’s take stock. Make sure you have 10
slides, in the order shown in Table 10.1.
Slide Content
1 Title Slide
2 Introduction
3 Directions
4 Question One
5 Question Two
6 Question Three
7 You're Right!
8 Sorry. Try Again.
9 Great Job, Class!
10 Acknowledgements
Table 10.1 Order and content for the States and Capitals slide show
It is going to get tricky for a little while, so double-check your work as you go along. If any of the
slides are missing, go back through the steps above.
10.4 MAKING THE PRESENTATION INTERACTIVE You are now going to tackle the three hardest steps in this lesson. They are:
1. making duplicate feedback slides and sorting them correctly;
2. hyperlinking each possible answer to the appropriate feedback slide;
3. creating Action Buttons that send the viewer to the next question when they get the
answer correctly or to the previous question when they get the answer wrong.
Duplicating and Positioning the Feedback Slides
You are now going to copy the You’re Right slide and the Sorry. Try Again. slides together and
place a copy of both of these Feedback slides after each of the three Question slides.
Follow these steps to do this.
In the Slide View toolbar (lower right of your PowerPoint window—Fig. 10.24) click on Slide Sorter View
Fig. 10.24 The PowerPoint Slide View tools

ESSENTIAL MICROSOFT OFFICE 2016: Tutorials for Teachers
Copyright © Bernard John Poole, Lorrie Jackson, 2016. All rights reserved
364
Click on the You’re Right! slide (slide 7), hold down the Shift key, then click on the Sorry. Try again. slide (slide 8) to have both slides 7 & 8 selected at the same time
Now copy the slides (Ctrl+c) to the clipboard, then click between the Question One slide and the Question Two slide (Slide 4 and Slide 5)
You should see a vertical reddish bar appear where you clicked (Fig. 10.25).
Fig. 10.25 Bar showing where the Feedback Slides will be pasted
Paste (Ctrl+v) the Feedback slides where the vertical line appears
Next click to position the cursor immediately after the slide for Question Two (what will now be Slides 7 and 8) and Paste (Ctrl+v) the Feedback slides where the vertical line appears
You should now have THREE sets of feedback slides, each following the Question One, Question
Two, and Question Three slides, and the presentation now has a total of 14 slides.
Check your work and Save the slide show again
Do you have 14 total slides, with two feedback slides (You’re Right and Sorry. Try Again) right
after each question slide? If so, pat yourself on the back. If not, re-read the section above on
Duplicating and Positioning the Feedback Slides and try again.
Hyperlinking the Answers to the Appropriate Slides
Time for some fun. Let’s now hyperlink each of the four answers on each of three Question slides
to the appropriate feedback slide, so the students will know if they got their answer right or wrong.
You should still be in Slide Sorter view.
Double-click on slide 4 (Question One) to switch to Normal View

Lesson 10: PowerPoint Presentations Beyond the Basics
365
Now, double-click on the word Houston to select it, then, in the Insert Ribbon > Links Group, click on the Action Tool (Fig. 10.26)
Fig. 10.26 The Action tool in the Links Group of the Insert Ribbon
You will now see the Action Settings dialog box (Fig. 10.27).
Fig. 10.27 Action Settings dialog box
Step 1 Step 2
Step 3
ESSENTIAL MICROSOFT OFFICE 2016: Tutorials for Teachers
Copyright © Bernard John Poole, Lorrie Jackson, 2016. All rights reserved
366
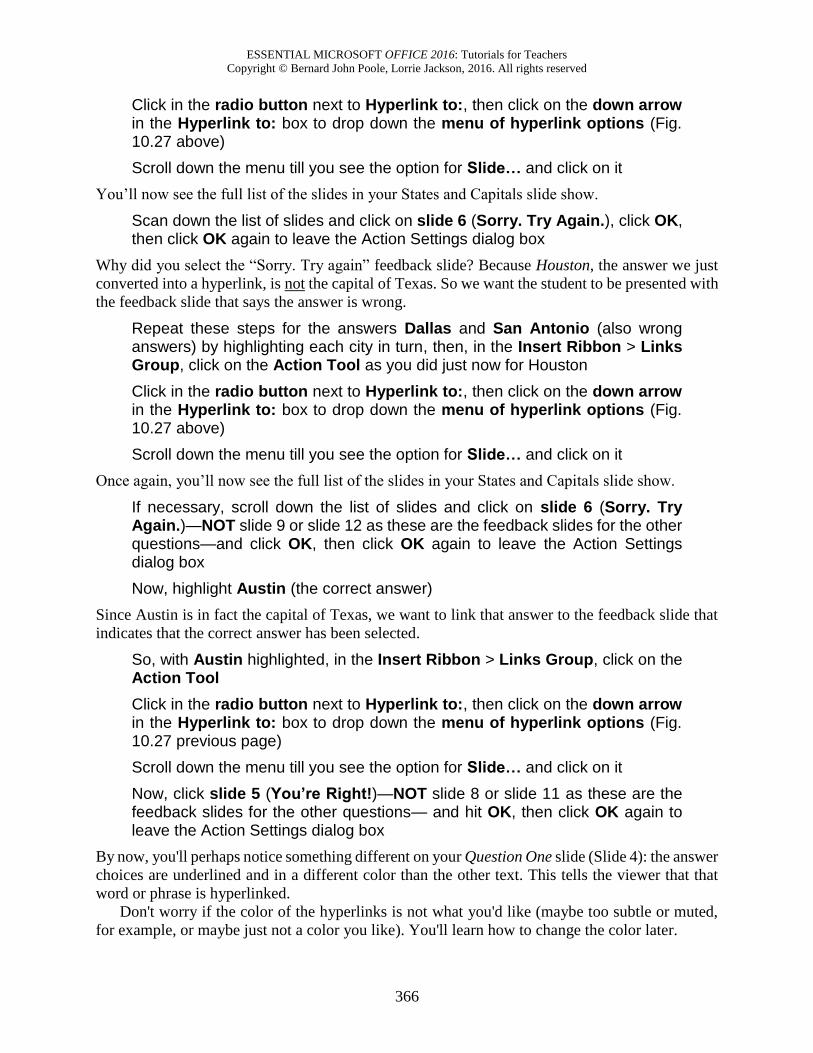
Click in the radio button next to Hyperlink to:, then click on the down arrow in the Hyperlink to: box to drop down the menu of hyperlink options (Fig. 10.27 above)
Scroll down the menu till you see the option for Slide… and click on it
You’ll now see the full list of the slides in your States and Capitals slide show.
Scan down the list of slides and click on slide 6 (Sorry. Try Again.), click OK, then click OK again to leave the Action Settings dialog box
Why did you select the “Sorry. Try again” feedback slide? Because Houston, the answer we just
converted into a hyperlink, is not the capital of Texas. So we want the student to be presented with
the feedback slide that says the answer is wrong.
Repeat these steps for the answers Dallas and San Antonio (also wrong answers) by highlighting each city in turn, then, in the Insert Ribbon > Links Group, click on the Action Tool as you did just now for Houston
Click in the radio button next to Hyperlink to:, then click on the down arrow in the Hyperlink to: box to drop down the menu of hyperlink options (Fig. 10.27 above)
Scroll down the menu till you see the option for Slide… and click on it
Once again, you’ll now see the full list of the slides in your States and Capitals slide show.
If necessary, scroll down the list of slides and click on slide 6 (Sorry. Try Again.)—NOT slide 9 or slide 12 as these are the feedback slides for the other questions—and click OK, then click OK again to leave the Action Settings dialog box
Now, highlight Austin (the correct answer)
Since Austin is in fact the capital of Texas, we want to link that answer to the feedback slide that
indicates that the correct answer has been selected.
So, with Austin highlighted, in the Insert Ribbon > Links Group, click on the Action Tool
Click in the radio button next to Hyperlink to:, then click on the down arrow in the Hyperlink to: box to drop down the menu of hyperlink options (Fig. 10.27 previous page)
Scroll down the menu till you see the option for Slide… and click on it
Now, click slide 5 (You’re Right!)—NOT slide 8 or slide 11 as these are the feedback slides for the other questions— and hit OK, then click OK again to leave the Action Settings dialog box
By now, you'll perhaps notice something different on your Question One slide (Slide 4): the answer
choices are underlined and in a different color than the other text. This tells the viewer that that
word or phrase is hyperlinked.
Don't worry if the color of the hyperlinks is not what you'd like (maybe too subtle or muted,
for example, or maybe just not a color you like). You'll learn how to change the color later.

Lesson 10: PowerPoint Presentations Beyond the Basics
367
Make sure each answer on the Question One slide is hyperlinked (underlined and in a different color), then double click on slide 7—Question Two
Highlight California and, in the Insert Ribbon > Links Group, click on the Action Tool
Click in the radio button next to Hyperlink to:, then click on the down arrow in the Hyperlink to: box to drop down the menu of hyperlink options (Fig. 10.27 previous page)
Scroll down the menu till you see the option for Slide… and click on it
Once again, you’ll see the full list of the slides in your States and Capitals slide show.
If necessary, scroll down the list of slides and click on slide 9 (Sorry. Try Again.)—NOT slide 6 or slide 12 as these are the feedback slides for the other questions—and click OK, then click OK again
It’s important to link to slide 9 and not another one of the Sorry. Try Again slides, since we want
our Action Button (which you'll be inserting later) to take us back to the slide 7in the show
(Question Two), not to slide 4 (Question One).
Repeat this process for the Texas and Rhode Island answers, which are also incorrect
For the correct answer Alaska, link it to slide 8 (You’re Right)—NOT slide 5 or slide 11—since Alaska is the largest state and thus the correct answer
Try tackling the last question slide on your own.
Scroll down to Question Three, highlight and link all wrong answers to slide 12 and highlight and link the right answer (Honolulu, Hawaii) to slide 11
Creating Action Buttons
You’ve now linked your answers to your feedback slides. You’re almost finished with the tough
stuff. Now it’s time to use Action Buttons to navigate from the feedback slides to the next slide in
the show. You’re doing good. Hang in there!
Stop and think for a moment.
Let’s say your student is reading Question One and believes that Dallas is the capital of Texas.
The student clicks on Dallas and, because of your hyperlinking, is whisked to the Sorry. Try Again.
slide. She’s ready to try again, but how does she get back to Question One? If she clicks or presses
the space bar, she moves on to the next slide in sequence and doesn’t get to retest. So, what can
we do? This is where Action buttons come in handy once again.
Action Buttons are great tools to help us break the linear (one slide after another) nature of
PowerPoint presentations. With Action Buttons, you can jump from slide to slide in any order you,
the creator of the presentation, decide (i.e. in a non-linear fashion).
We’ll insert an Action Button on each feedback slide to help the student get to where they need
to go next—back to the question slide or forward to the next question or to the concluding slides.
Go to Slide 5 by scrolling to it in Normal View and clicking on it (or double click on Slide 5 in the Thumbnail Slides frame on the left side of the screen)—this is the You’re Right! slide, immediately after Question One

ESSENTIAL MICROSOFT OFFICE 2016: Tutorials for Teachers
Copyright © Bernard John Poole, Lorrie Jackson, 2016. All rights reserved
368
In the Insert Ribbon > Illustrations Group, click on the Shapes icon to show the selection of Shapes you can use in Office 2016 (Fig. 10.28)
Fig. 10.28 The Shapes menu showing the Actions buttons
The Action buttons are right at the bottom of the menu of Shapes. Since we’re on the You’re Right
slide, we want to reward our smart student by using an Action Button that moves them forward in
the show to the next question.
Action button for
the Forward or
Next Slide
Lesson 10: PowerPoint Presentations Beyond the Basics
369
In the Shapes menu > Action Buttons, click on the Action Button with the arrow that points to the right (Forward or Next)
Now, without pressing the mouse button yet, slide the mouse over the large version of slide 5 and position the crosshair cursor where you want the Action Button to appear (the bottom right corner is a common location for Action Buttons that send you forward to the next slide in a show, but you can put it anywhere you want)
Hold down the left mouse button and drag down and to the right to draw the button (it can be as large or small as you wish, though the larger it is, the more it will draw attention to itself, which what you want to do)
You’ll now see the Action Settings dialog box again—the dialog box illustrated in Fig. 10.26 on
page 335 a couple of pages back.
Click the small black arrow at the right end of the Hyperlink to: box to show the drop down menu of hyperlink options
Notice how easy it would be to link to the beginning (First Slide) or end (Last Slide) of a slide
show, even to Web sites (URLs…) or other PowerPoint presentations (see Fig. 10.26 again).
But you want to have the new Action Button send the user to a specific slide in the show.
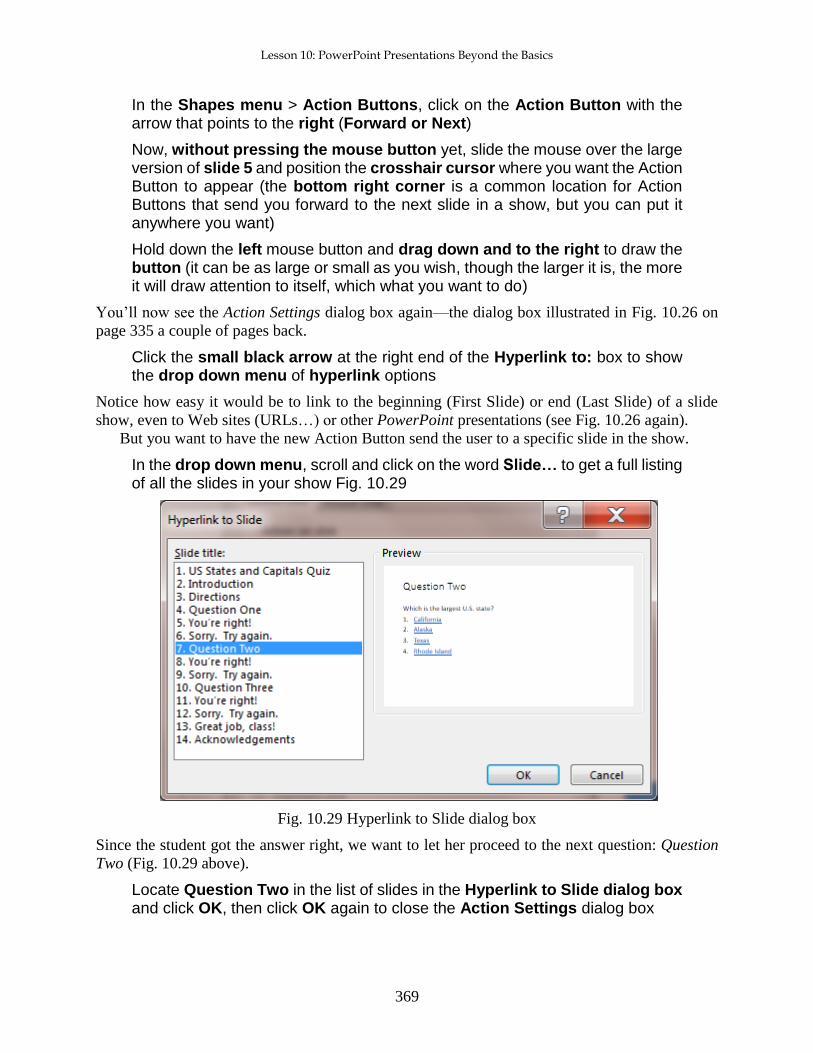
In the drop down menu, scroll and click on the word Slide… to get a full listing of all the slides in your show Fig. 10.29
Fig. 10.29 Hyperlink to Slide dialog box
Since the student got the answer right, we want to let her proceed to the next question: Question
Two (Fig. 10.29 above).
Locate Question Two in the list of slides in the Hyperlink to Slide dialog box and click OK, then click OK again to close the Action Settings dialog box

ESSENTIAL MICROSOFT OFFICE 2016: Tutorials for Teachers
Copyright © Bernard John Poole, Lorrie Jackson, 2016. All rights reserved
370
Notice that your Action Button is a solid color now. To make the button bigger or smaller, or to
move it around, you need to select it first, by clicking on it.
Click once on the new Action Button
Hold down the left mouse button, grab one of the handles around the button, and drag to enlarge or reduce the size of the button or change its shape in other ways (it can be as large or small as you wish, so feel free to use the handles around the Action Button to resize it to whatever shape you want)
Practice moving the Action Button by grabbing it with the mouse anywhere inside the border (NOT on the handles) and sliding it around on the screen
Changing the Action Button’s Color Scheme
If you double-click on any Action Button you will activate the Drawing Tools Format Ribbon,
which will allow you to change the color scheme to meet your design preferences (Fig. 10. 30).
Fig. 10.30 The Drawing Tools > Format Ribbon
Let’s try this now.
Lesson 10: PowerPoint Presentations Beyond the Basics
371
Go ahead, double click on the Action Button on Slide 5 to bring up the Drawing Tools > Format Ribbon and, in the Drawing Group, experiment with tools to change the Action Button’s Shape Fills, Shape Outlines, and Shape Effects—you can even rotate the button, if you want, using the rotate shape handle
Forcing the user to click on an Action button
For the feedback slides we must make sure that the user can only proceed by clicking on the Action
Button you’ve just created for them, otherwise, when they click the mouse anywhere else on the
slide they will advance to the next slide (slide 6 in this case) instead of going forward to Question
Two. Here’s how you can force the user to click on the Action Button in order to proceed to
Question Two (Slide 7).
In the Transitions Ribbon > Timing Group, click to remove the check mark (tick) next to On Mouse Click
Now, for just this one slide, the user will have to click on the Action button to proceed to the next
slide, which in this case will be to go to Question Two. Perfect!
Next you're going to repeat the above steps to create an Action Button on Slide 6 which will
move the student who selects an incorrect answer for Question One back to Question One to try
again.
Scroll to the next slide (slide 6—Sorry. Try Again) and, in the Insert Ribbon > Illustrations Group click on the Shapes icon
At the bottom of the menu of shapes, click on the left arrow Action Button (Back or Previous)
Again, without pressing the mouse button yet, position the crosshair cursor on slide 6 near the bottom left corner of the slide
Hold down the left mouse button and drag down and to the right to draw the button (it can be as large or small as you wish)
Once again, you’ll see the Action Settings dialog box.
In the Action Settings dialog box, click the down arrow at the end of the Hyperlink to: box, in the drop down menu select Slide…, and click on the Question One slide
Finally, hit OK twice, then, in the Transitions Ribbon > Timing Group, click to remove the check mark (tick) next to On Mouse Click
This is a good time to save your work once again.
Go to File > Save or hit Ctrl+s
This also is a good time to test the work you’ve done to this point to make sure it works the way
you want it to.
Go to Slide Show Ribbon > Start Slide Show Group > From Beginning and pretend you’re a student using this presentation
Answer Question One incorrectly first, and watch as the hyperlink takes you to the wrong answer
ESSENTIAL MICROSOFT OFFICE 2016: Tutorials for Teachers
Copyright © Bernard John Poole, Lorrie Jackson, 2016. All rights reserved
372
Click on the Action Button to return to Question One, and test all your answers and buttons to make sure they work appropriately
Also test to make sure that when you click anywhere on the slide other than on the Action button the show doesn’t go anywhere
Now, go back and create Action Buttons for each of the other four feedback slides, two for Question Two and two for Question Three, and remember to go to Transitions Ribbon > Timing Group to turn off the On Mouse Click switch for each of the feedback slides
Use the instructions above as your guide.
Remember that if you’re on the You’re Right slide, you need a right arrow Action Button and
you will want to select the Question Three slide if they just answered Question Two, or the Great
Job, Class! slide if they just answered Question Three.
If you’re on the Sorry. Try Again slide, make sure you use the left arrow Action Button that
gets them either back to Question Two or Question Three.
Save your work, and view the show again (Slide Show Ribbon > Start Slide Show Group > From Beginning)
Give yourself a round of applause if everything worked correctly. If, on the other hand, a hyperlink
or Action Button doesn’t work, don’t panic. If an Action Button doesn’t work the way you want it
to, you can remove it by simply clicking on it and hitting the DEL key. Or you can right-click on
it and select Edit Hyperlink to change where a button takes you.
Follow the steps above again carefully, and you should be able to straighten things out.
10.5 FORMATTING YOUR PRESENTATION Selecting a Design Template
Office 2016 makes it easy to select a background, font type and style, and color scheme for the
slides in your presentation. All these features are combined into what PowerPoint calls your
Design Template.
Earlier we mentioned that, while you could start your new presentation by picking the Design
Theme before even typing in the text, sometimes it is best to wait to select a Design Theme until
you have an idea of where text should be on the slides and how much text is on each slide. Some
Design Themes, for example, have graphics that take more space on the slide than others and use
fonts that might make it hard to read your text.
This is a good time to address the issue of what makes a quality PowerPoint slide show, what
tips or rules of thumb should you bear in mind when you design your show. Garr Reynolds, and
internationally acclaimed communication expert and author of the best-seller “Presentation Zen,”
has a website where he lists the Top Ten Slide Tips. You would do well to look it over here:
http://www.garrreynolds.com/preso-tips/design/ and bookmark it on your computer for future
reference.
Go to http://www.garrreynolds.com/preso-tips/design/ and spend a few minutes reading over Garr Reynolds Top Ten Tips before proceeding with this tutorial
Now is the time to improve the appearance of your slide show. Let’s make your U.S. States and
Capitals quiz a bit more attractive.

Lesson 10: PowerPoint Presentations Beyond the Basics
373
Hit Esc if necessary to exit the U.S. States and Capitals Quiz slide show, return to Normal View and, in the Thumbnail slides in the left frame of the PowerPoint window, scroll to Slide 1 and click on it to select it
In the Design Ribbon > Themes Group, click on the arrow which allows you to select from More Design Themes (Fig. 10.31)
Fig. 10.31 More Design Themes
When you click on the More button you will see a menu of all the available Design Themes that
come with your installation of Office 2016 (Fig. 10.32).
Fig. 10.32 Menu of Design Themes
Remember that a Design Theme includes the background (color, shapes, and graphics behind any
and all text in your show); plus font style, size, and type; plus the overall color schemes of your
show (what color each bullet and piece of text is). Right now, you’ve a white background with
black text (probably a default sans serif font such as Arial)—a very basic color scheme.
Click here to
see more
Design Themes
ESSENTIAL MICROSOFT OFFICE 2016: Tutorials for Teachers
Copyright © Bernard John Poole, Lorrie Jackson, 2016. All rights reserved
374
To get a feel for how the different design themes look, just click on any of the design theme icons in the menu to preview them on the thumbnails of the slides in the left hand frame of the PowerPoint window
Preview several Design Themes before deciding which one to use
If you want to see more Design Themes for Microsoft Office in general, including Word, Excel or
PowerPoint, and you are working online, you can go to this website:
http://office.microsoft.com/en-us/templates/CT010336615.aspx?CTT=5&origin=HA010359443.
If you want to see more Design Themes for PowerPoint in particular, and you’re working
online, you can go to this website: https://templates.office.com/en-us/templates-for-PowerPoint.
Try this if you’re working online; check out some of the Design Themes
As time goes along, Microsoft will add lots more You’ll find dozens of pre-designed slides to
choose from, any of which you can download and add to your own presentations.
When you’ve decided which Design Theme you want to use (and you can change your mind later; nothing’s ever chiseled in stone in PowerPoint), click on it to select it for your presentation, then Save the presentation
Replacing fonts
Whether you use a standard PowerPoint Design Theme or create your own background, you can
always easily change the font you're using for the text.
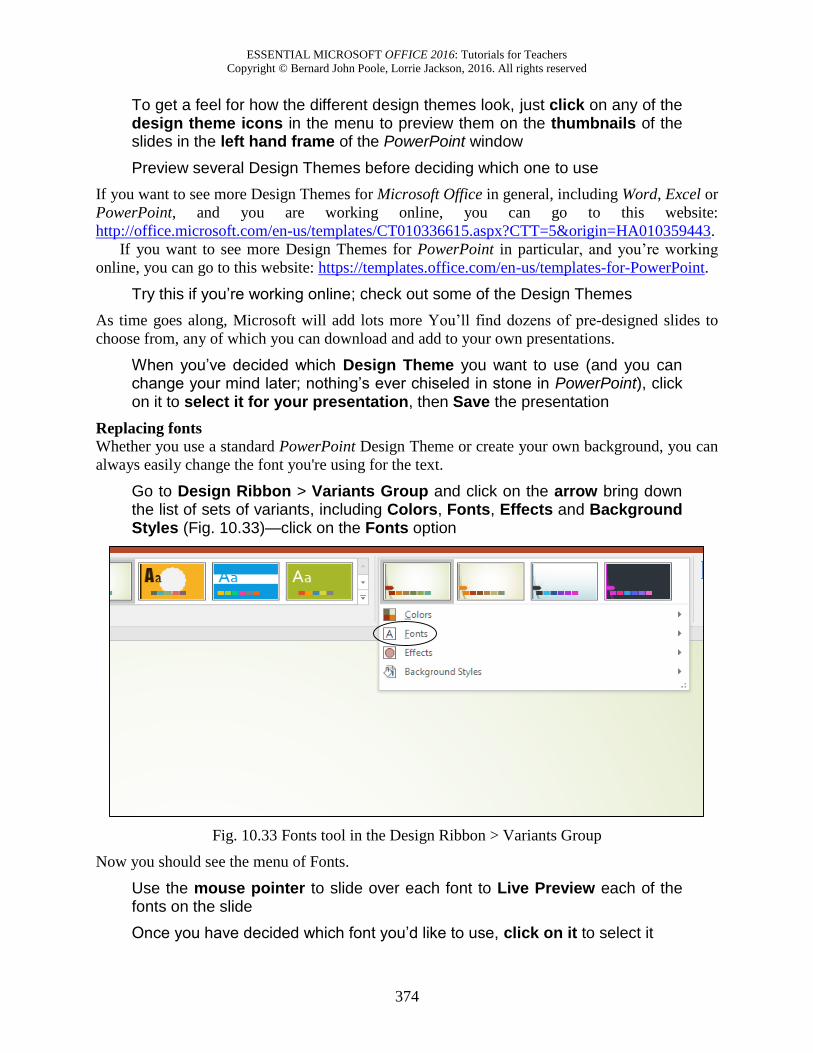
Go to Design Ribbon > Variants Group and click on the arrow bring down the list of sets of variants, including Colors, Fonts, Effects and Background Styles (Fig. 10.33)—click on the Fonts option
Fig. 10.33 Fonts tool in the Design Ribbon > Variants Group
Now you should see the menu of Fonts.
Use the mouse pointer to slide over each font to Live Preview each of the fonts on the slide
Once you have decided which font you’d like to use, click on it to select it

Lesson 10: PowerPoint Presentations Beyond the Basics
375
The font will be changed on every slide in your presentation since it is part of your Design Theme.
Save the presentation once again
Changing the Color Scheme
The final formatting change you're going to make is to the show's Color Scheme. When you choose
a Design Template in PowerPoint, the program decides what colors to use for the slide titles,
bullets, hyperlinks, and so forth.
Depending on your taste, printing needs, and the lighting conditions of your room, you may
want to change these. For example, many colors schemes use light blue to highlight hyperlinks
that have been clicked, but if a viewer does click a link, then prints the show, that light blue may
be difficult if not impossible to see on paper.
Changing the color scheme is as simple as changing the font.
In the Design Ribbon > Variants Group click on the down arrow once again to bring down the list of sets of variants, then click on the Colors tool to bring down the palette of Color Schemes (Fig. 10.34)
Fig. 10.34 Colors palette in the Design Ribbon > Variants Group
There is a wide choice of color schemes you can choose from. These are pre-set color combinations
that make it easy for you to change the look of your presentation. You may well find some of the
combinations to be either boring or, worse, ugly! After all, everyone's taste is different. A word to
ESSENTIAL MICROSOFT OFFICE 2016: Tutorials for Teachers
Copyright © Bernard John Poole, Lorrie Jackson, 2016. All rights reserved
376
the wise, however: the color schemes have been designed by professionals, so think twice before
you go your own way!
Use the mouse pointer by sliding it over each color scheme to do a Live Preview of how each color scheme will look if you select it
Actually, they’re quite beautiful. Notice that the basic Design Theme does not change when you
change the color scheme. Only the color scheme will change.
Once you have decided which color scheme you’d like to use, click on it to select it
The color scheme will be changed on every slide in your presentation and it becomes part of your
Design Theme.
If you do want more control in choosing a color scheme of your own, you can go to the bottom
of the Color Scheme menu and click Customize Colors…. Let’s do this now.
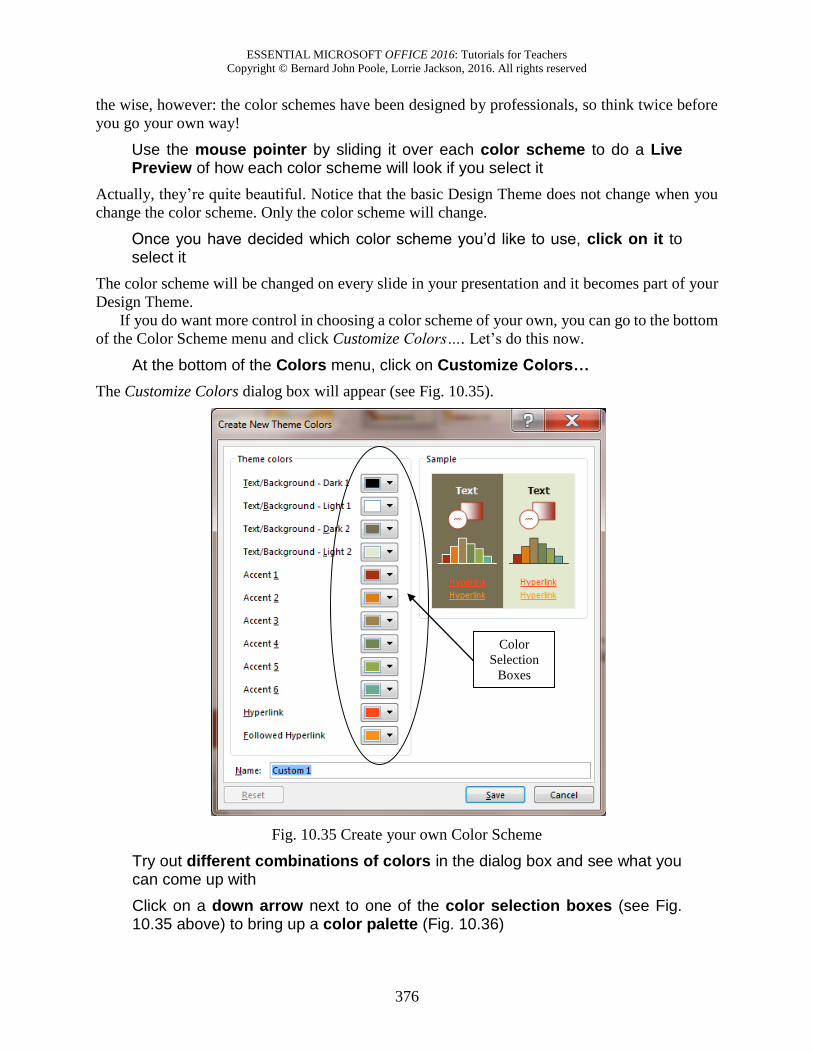
At the bottom of the Colors menu, click on Customize Colors…
The Customize Colors dialog box will appear (see Fig. 10.35).
Fig. 10.35 Create your own Color Scheme
Try out different combinations of colors in the dialog box and see what you can come up with
Click on a down arrow next to one of the color selection boxes (see Fig. 10.35 above) to bring up a color palette (Fig. 10.36)
Color
Selection
Boxes
Lesson 10: PowerPoint Presentations Beyond the Basics
377
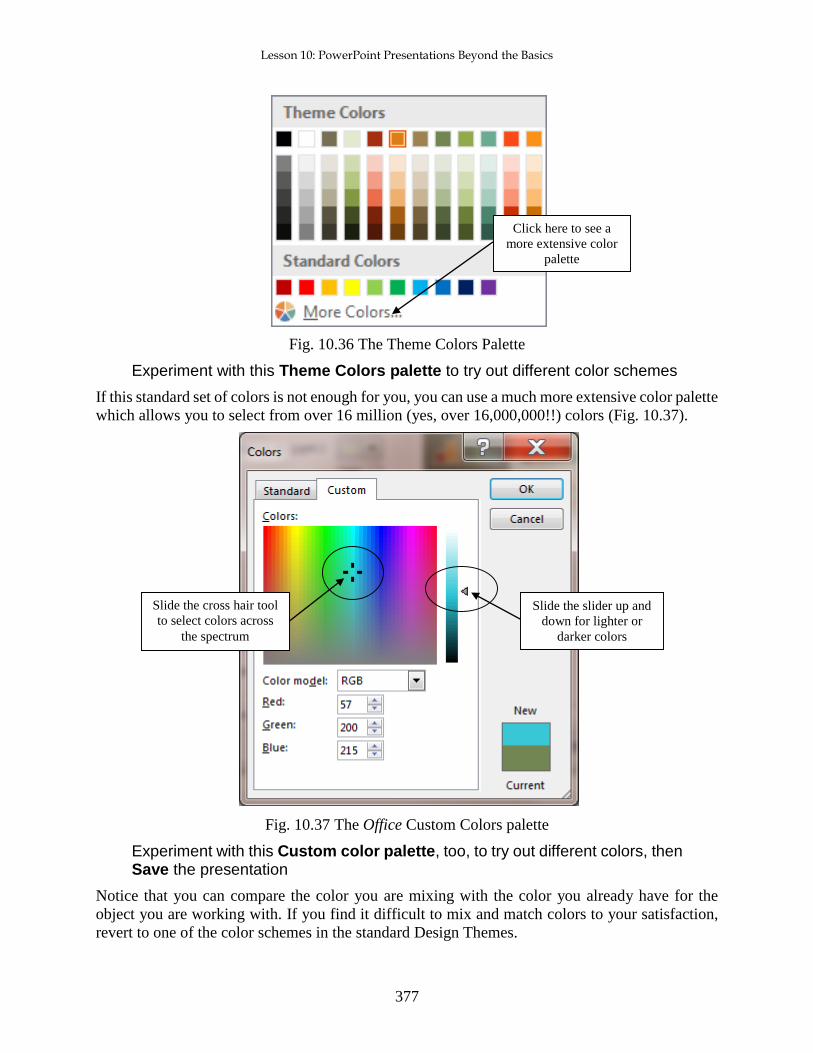
Fig. 10.36 The Theme Colors Palette
Experiment with this Theme Colors palette to try out different color schemes
If this standard set of colors is not enough for you, you can use a much more extensive color palette
which allows you to select from over 16 million (yes, over 16,000,000!!) colors (Fig. 10.37).
Fig. 10.37 The Office Custom Colors palette
Experiment with this Custom color palette, too, to try out different colors, then Save the presentation
Notice that you can compare the color you are mixing with the color you already have for the
object you are working with. If you find it difficult to mix and match colors to your satisfaction,
revert to one of the color schemes in the standard Design Themes.
Slide the slider up and
down for lighter or
darker colors
Click here to see a
more extensive color
palette
Slide the cross hair tool
to select colors across
the spectrum
ESSENTIAL MICROSOFT OFFICE 2016: Tutorials for Teachers
Copyright © Bernard John Poole, Lorrie Jackson, 2016. All rights reserved
378
Another piece of advice about formatting your presentation. Always, keep in mind your
audience when selecting slide formats. A first grade classroom learning about dinosaurs and a
graduate education class learning about Piaget will require different levels of sophistication and
creativity in backgrounds, fonts, and colors.
How the show will be viewed should also influence your design choices. Eye care professionals
recommend dark backgrounds and light text whenever a presentation is viewed on a lighted surface
(i.e. a computer screen or projected image on a board or wall). However, for most viewers, this is
a bit jarring since we are accustomed to dark text on light backgrounds.
You might want to test your presentation with a member of your future audience to make sure
they are happy with what you've done and can comfortably read the display.
Applying different Design Themes to certain slides in a show
Most of the time, we want our show to look the same on every slide. But if you do need to vary
the Design Theme you use for different slides, here's what you do.
Let's say, for example, that you want a different Design Theme for the first slide and the last
slide.
Change your view to Slide Sorter View, click on the first slide and then hold down the Ctrl button as you click on the last slide, to select just those two slides
In the Design Ribbon > Themes Group click on the button to see More Design Themes, and you'll see thumbnails of the various Design Themes available to you
Click on one of the Theme thumbnails to Live Preview it; do this for a few themes that look good to you and, when you’ve made up your mind, click on your chosen Theme to select it
Notice that only those slides you selected have that specific Design Theme. You can do this for
just one slide or several slides. You’re the boss!
Applying customized backgrounds to the slides
For most users, the Design Themes provided by PowerPoint 2016 are more than sufficient to meet
their design needs. Other Design Themes can be purchased online or on CDs, or you can search
for others on the Web, as indicated on page 374 above.
If you prefer to create your own background, or wish to create a standard Design Theme for
your school or class, you can use PowerPoint’s Background, Replace Fonts, and Color Schemes
options to customize your presentation further.
You learned how to customize background colors and background effects in Lesson 3 when
you learned about the Office 2016 Drawing Tools. Here's an exercise to give you a quick reminder.
In the Normal View > Thumbnail slides view, in the left hand frame, click on the last-to-one slide in your presentation—the Concluding slide
Now, in the Design Ribbon > Customize Group, click on the Format Background option to bring up, on the right of the PowerPoint window, the Format Background frame (Fig. 10.38)

Lesson 10: PowerPoint Presentations Beyond the Basics
379
0.38 The Design Ribbon > Customize Group > Format Background frame
As you see, you can have a ball trying out different background Fills, Colors, Patterns and
Gradients. You can also use your own choice of Picture (image or photograph) or Texture for a
slide background.
Take a few minutes now to play around with the various options in this Format Background dialog box—try out lots of possibilities and Live Preview your ideas
When you think you’re ready, Close (X out of) the Format Background dialog box (Don’t click on Apply to All!!)
Now Save the presentation once again so that, when you send the presentation to your instructor, he or she can check out your background design ideas!
10.6 INSERTING CONTENT PowerPoint 2016 has simplified the process of inserting pictures, clip art, tables, SmartArt
graphics, media sound and movie clips, and charts. You learned about this in Lesson 9, but it will
be good to review what you learned. You’ll also learn here how to insert a clickable e-mail address.
Click on the X to
exit the Format
Background frame

ESSENTIAL MICROSOFT OFFICE 2016: Tutorials for Teachers
Copyright © Bernard John Poole, Lorrie Jackson, 2016. All rights reserved
380
Inserting Clip Art
Make sure you’re in Normal View, then scroll to slide 2 (Introduction slide)
Click on the Home Ribbon > Slides Group > Layout and, in the Slide Layout menu, click to select the Two Content layout
Slide two now has the bulleted text on the left with a box on the right for content of various kinds
(Fig. 10.39).
Fig. 10.39 Content Selector Tools in the Two Content slide layout
Click on the lower center Content Selector tool (the Online Pictures icon Fig. 10.40)
Fig. 10.40 The Content Selector tools annotated
A Bing Image Search dialog box will pop up so that you can search on the Web for pictures on the
topic of your choice (Fig. 10.40).
Content
Selector
tools

Lesson 10: PowerPoint Presentations Beyond the Basics
381
Fig. 10.40 Selection of maps of the USA for you to use on Slide 2
Click on any USA map of your choice, then click on Insert (or, if for some reason that doesn’t work, right click on the picture of the map and, in the context menu, select Copy then, in the Content Selector box on Slide 2, right click and in the Context menu select Paste)
If the map you chose is either very small or large, use the handles around it to resize it to fit the area of the Context Selector box
Fig. 10.41 illustrates how your map might look when you’re done.
Fig. 10.41 Placement of USA map on the slide after selection from the Web
When everything looks good on the slide, Save the presentation with your new USA map illustration

ESSENTIAL MICROSOFT OFFICE 2016: Tutorials for Teachers
Copyright © Bernard John Poole, Lorrie Jackson, 2016. All rights reserved
382
Inserting (importing) other pictures or pictures of your own
You are not limited to Microsoft’s Bing search engine to search for pictures. Once you are
comfortable using the search tool to insert pictures into your show, try finding pictures and other
graphics to import. It is simple to insert onto a slide a digital picture that you’ve saved on your
computer.
Let’s try this now. If you have a digital picture of yourself that you’d like to use for this
exercise, feel free to do so as long as you have it saved on disk or on your USB drive. If you do
not have a picture of your own, you can use a picture of the author which is saved in the Work
Files for Office 2016.
First select Slide 1—the Title slide—and, in the Insert Ribbon > Images Group, select Pictures, then navigate to the Work Files for Office 2016 folder > Miscellaneous Files > Practice Documents folder, and double click on BJPoole
The picture will immediately appear on the slide, with the handles around it so that you can move
it to wherever you want on the slide and resize it to fit the space where you want it to go, as
illustrated in Fig. 10.42.
Fig. 10.42 The Title slide with the picture of the author inserted onto it
Inserting sound
Earlier versions of Microsoft Office had a feature that helped you search for audio clip art from
Microsoft’s online library. This service has been discontinued for Office 2016. But there are many
websites online where you will find audio clips of everything under the sun. For the following
exercise, audio clips have been saved in the Work for Office 2016 folder, where you will access
them at the appropriate time.
Lesson 10: PowerPoint Presentations Beyond the Basics
383
First, make sure you have the Audio turned on on your computer so that you can hear the sounds you are about to use
In the U.S. States and Capitals show, we want to give our students a reward for getting each answer
correct. So, we’re going to insert applause onto every You’re Right! slide.
Scroll to Slide 5 (the first You’re Right! slide)
Because we used the Title and Content layout for our slides, all the feedback slides have a text box
below the feedback sentence. First you need to remove this Content textbox.
Click the text box so that the white handles appear around it, then either click on the border of the text box, or click on any one of the handles around the text box, then hit Backspace or Delete
The text box will disappear!
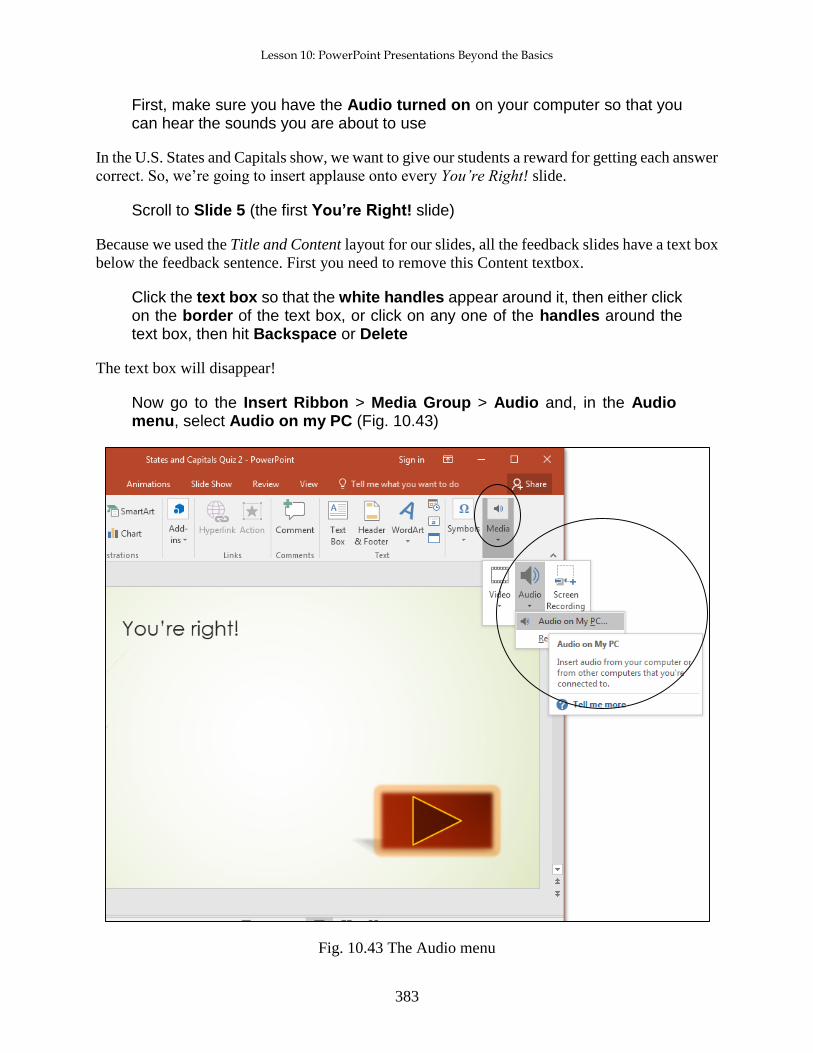
Now go to the Insert Ribbon > Media Group > Audio and, in the Audio menu, select Audio on my PC (Fig. 10.43)
Fig. 10.43 The Audio menu
ESSENTIAL MICROSOFT OFFICE 2016: Tutorials for Teachers
Copyright © Bernard John Poole, Lorrie Jackson, 2016. All rights reserved
384
When the Insert Audio dialog box hat comes up on the screen, navigate to your USB drive > Work Files for Office 2016 > Miscellaneous Files > Practice Documents folder, then double click on the file named Audience_Applause to insert it onto Slide 5
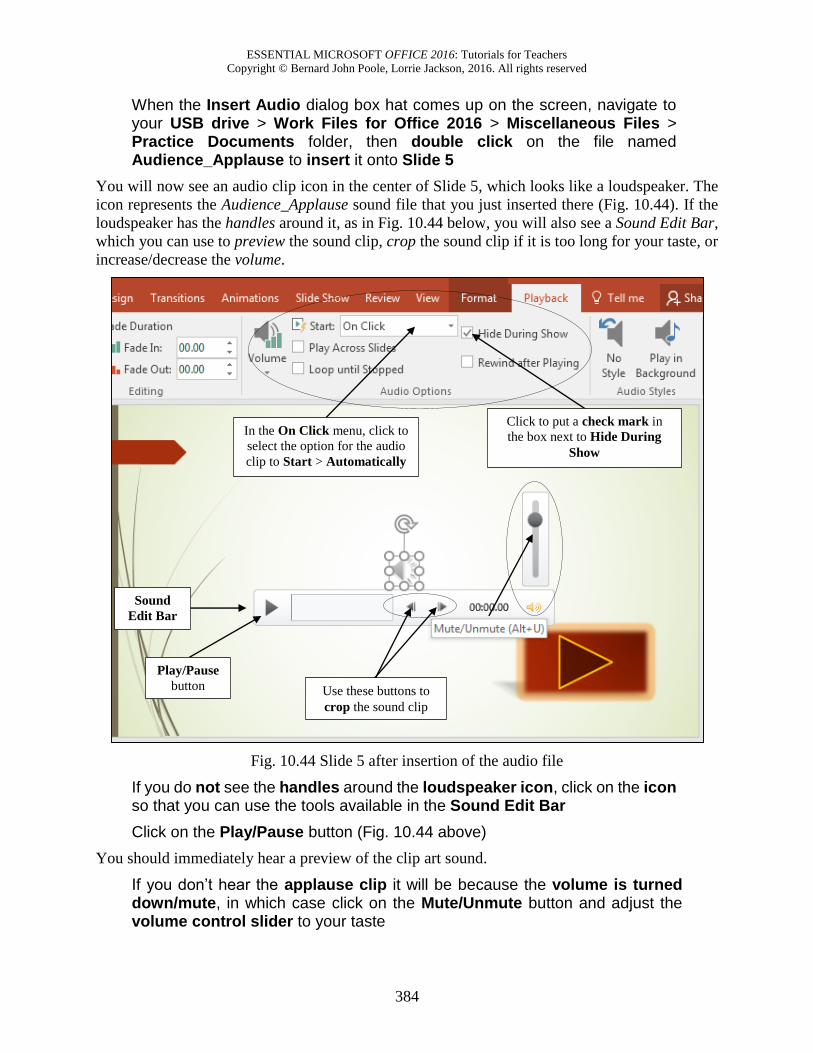
You will now see an audio clip icon in the center of Slide 5, which looks like a loudspeaker. The
icon represents the Audience_Applause sound file that you just inserted there (Fig. 10.44). If the
loudspeaker has the handles around it, as in Fig. 10.44 below, you will also see a Sound Edit Bar,
which you can use to preview the sound clip, crop the sound clip if it is too long for your taste, or
increase/decrease the volume.
Fig. 10.44 Slide 5 after insertion of the audio file
If you do not see the handles around the loudspeaker icon, click on the icon so that you can use the tools available in the Sound Edit Bar
Click on the Play/Pause button (Fig. 10.44 above)
You should immediately hear a preview of the clip art sound.
If you don’t hear the applause clip it will be because the volume is turned down/mute, in which case click on the Mute/Unmute button and adjust the volume control slider to your taste
Click to put a check mark in
the box next to Hide During
Show
In the On Click menu, click to
select the option for the audio
clip to Start > Automatically
Play/Pause
button Use these buttons to
crop the sound clip
Sound
Edit Bar
Lesson 10: PowerPoint Presentations Beyond the Basics
385
If you want, you can grab the speaker with the mouse (not on the handles) and move it to wherever on the slide looks good to you—grab the handles if you want to resize the speaker, too
Couple of other things you need to do. The first is to tell PowerPoint to hide the loudspeaker icon
during the show and the second is to tell PowerPoint to play the sound automatically when,
because the user answers the question correctly, the hyperlink links to this You’re right! feedback
slide.
With the loud speaker icon still selected (it has the handles around it), go to the Playback Ribbon > Audio Options Group and click to put a checkmark (or tick) in the box next to Hide During Show (Fig. 10.44 above), then in the On Click menu of Start options, click to select Automatically (again see Fig. 10.44 above)
All you have to do now is copy the Audio Clip Icon that you set up on Slide 5, along with the
various settings you just applied, and then paste it onto Slides 8 and 11—the other two You’re
Right! Feedback slides.
On Slide 5, right click on the Audio Clip Icon (the loudspeaker) and, in the context menu, select Copy
Now, in turn, visit slide 8 and Slide 11 and Paste the edited audio clip onto each slide
You should now have audience applause on each of your positive feedback slides.
Save the presentation with your new sound clip
A caveat (warning) about sound. Like any bell or whistle, it’s easy to get carried away with sounds.
Stay focused on the purpose of your show and your audience’s needs. A kindergarten class will
welcome lots of sounds, for example, but in a presentation to the Board of Education a more
professional approach may be required!
Be especially careful that your negative feedback slide is LESS engaging than your positive
feedback slide. A sad face with an “aw shucks” sound will get the students’ attention, but they may
deliberately answer incorrectly to see and hear it again.
Motivate your students to succeed by including the cool stuff only on the positive feedback
slides. Not that they shouldn’t have fun even when they make a mistake! You also may want to
vary the sounds so students don’t know exactly what sound they’ll get when they answer correctly.
Keep ‘em guessing; also, as they say, variety is the spice of life!
Inserting Video
Inserting movies (or video) is just as easy as inserting still images (pictures), clip art or audio
(sound files). Whether it’s an animated clip or a short video clip, the steps are the same.
Go to Slide 13 (Great Job, Class!)
Click on the border (edge) of the Content text box, or click on any one of the handles around the text box, then hit Backspace or Delete
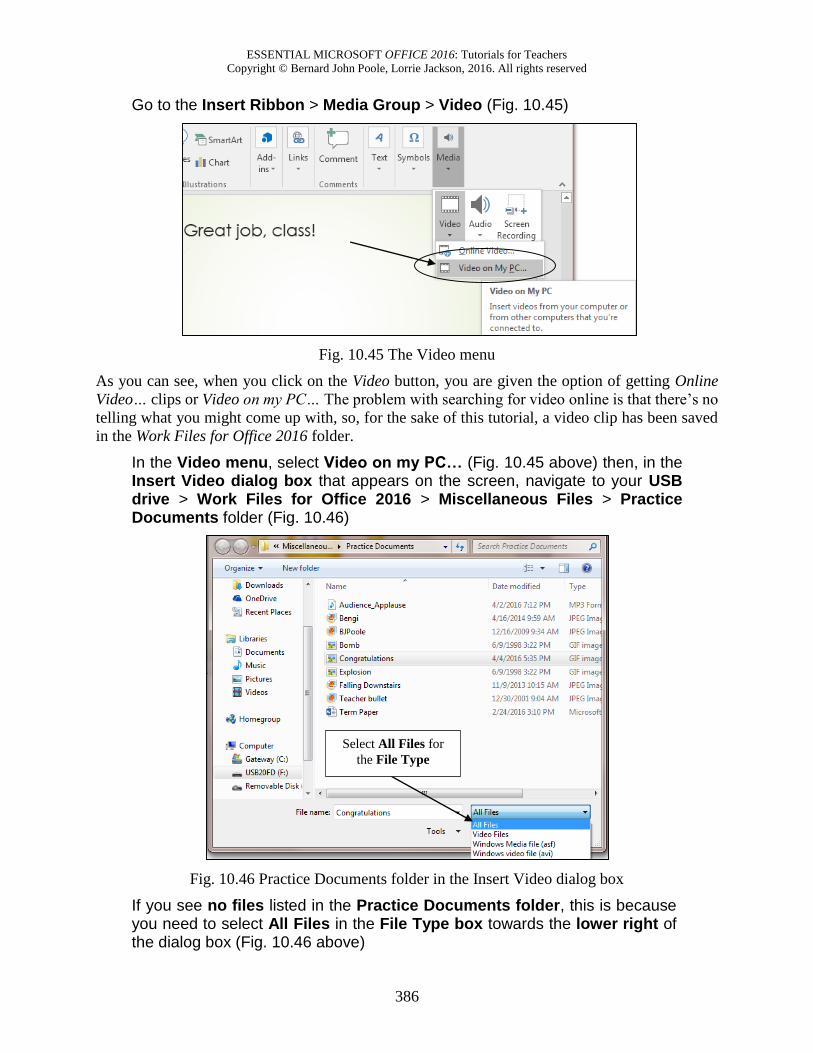
ESSENTIAL MICROSOFT OFFICE 2016: Tutorials for Teachers
Copyright © Bernard John Poole, Lorrie Jackson, 2016. All rights reserved
386
Go to the Insert Ribbon > Media Group > Video (Fig. 10.45)
Fig. 10.45 The Video menu
As you can see, when you click on the Video button, you are given the option of getting Online
Video… clips or Video on my PC… The problem with searching for video online is that there’s no
telling what you might come up with, so, for the sake of this tutorial, a video clip has been saved
in the Work Files for Office 2016 folder.
In the Video menu, select Video on my PC… (Fig. 10.45 above) then, in the Insert Video dialog box that appears on the screen, navigate to your USB drive > Work Files for Office 2016 > Miscellaneous Files > Practice Documents folder (Fig. 10.46)
Fig. 10.46 Practice Documents folder in the Insert Video dialog box
If you see no files listed in the Practice Documents folder, this is because you need to select All Files in the File Type box towards the lower right of the dialog box (Fig. 10.46 above)
Select All Files for
the File Type
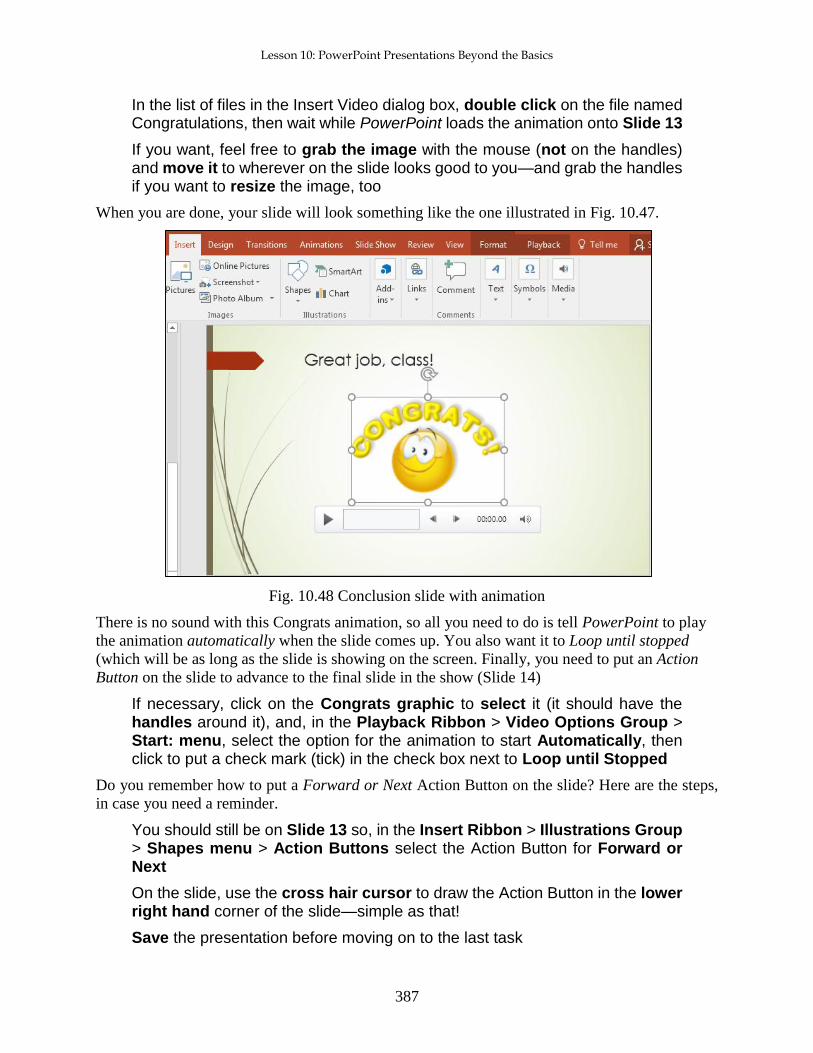
Lesson 10: PowerPoint Presentations Beyond the Basics
387
In the list of files in the Insert Video dialog box, double click on the file named Congratulations, then wait while PowerPoint loads the animation onto Slide 13
If you want, feel free to grab the image with the mouse (not on the handles) and move it to wherever on the slide looks good to you—and grab the handles if you want to resize the image, too
When you are done, your slide will look something like the one illustrated in Fig. 10.47.
Fig. 10.48 Conclusion slide with animation
There is no sound with this Congrats animation, so all you need to do is tell PowerPoint to play
the animation automatically when the slide comes up. You also want it to Loop until stopped
(which will be as long as the slide is showing on the screen. Finally, you need to put an Action
Button on the slide to advance to the final slide in the show (Slide 14)
If necessary, click on the Congrats graphic to select it (it should have the handles around it), and, in the Playback Ribbon > Video Options Group > Start: menu, select the option for the animation to start Automatically, then click to put a check mark (tick) in the check box next to Loop until Stopped
Do you remember how to put a Forward or Next Action Button on the slide? Here are the steps,
in case you need a reminder.
You should still be on Slide 13 so, in the Insert Ribbon > Illustrations Group > Shapes menu > Action Buttons select the Action Button for Forward or Next
On the slide, use the cross hair cursor to draw the Action Button in the lower right hand corner of the slide—simple as that!
Save the presentation before moving on to the last task
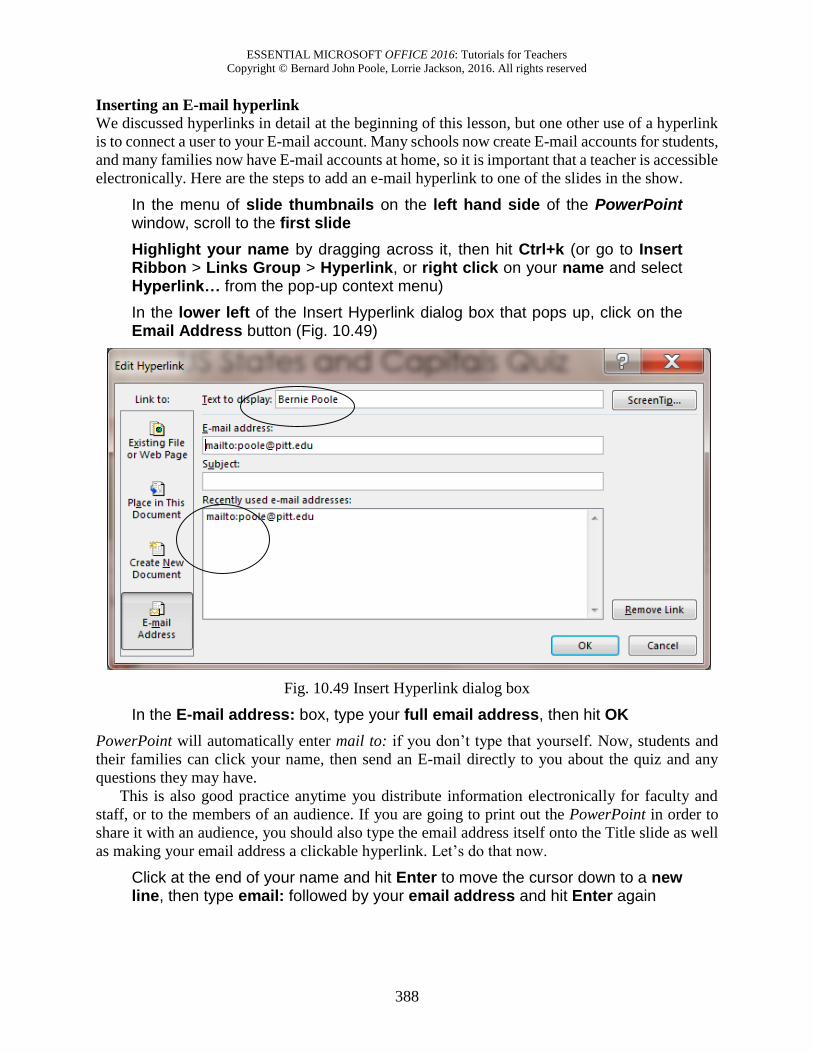
ESSENTIAL MICROSOFT OFFICE 2016: Tutorials for Teachers
Copyright © Bernard John Poole, Lorrie Jackson, 2016. All rights reserved
388
Inserting an E-mail hyperlink
We discussed hyperlinks in detail at the beginning of this lesson, but one other use of a hyperlink
is to connect a user to your E-mail account. Many schools now create E-mail accounts for students,
and many families now have E-mail accounts at home, so it is important that a teacher is accessible
electronically. Here are the steps to add an e-mail hyperlink to one of the slides in the show.
In the menu of slide thumbnails on the left hand side of the PowerPoint window, scroll to the first slide
Highlight your name by dragging across it, then hit Ctrl+k (or go to Insert Ribbon > Links Group > Hyperlink, or right click on your name and select Hyperlink… from the pop-up context menu)
In the lower left of the Insert Hyperlink dialog box that pops up, click on the Email Address button (Fig. 10.49)
Fig. 10.49 Insert Hyperlink dialog box
In the E-mail address: box, type your full email address, then hit OK
PowerPoint will automatically enter mail to: if you don’t type that yourself. Now, students and
their families can click your name, then send an E-mail directly to you about the quiz and any
questions they may have.
This is also good practice anytime you distribute information electronically for faculty and
staff, or to the members of an audience. If you are going to print out the PowerPoint in order to
share it with an audience, you should also type the email address itself onto the Title slide as well
as making your email address a clickable hyperlink. Let’s do that now.
Click at the end of your name and hit Enter to move the cursor down to a new line, then type email: followed by your email address and hit Enter again

Lesson 10: PowerPoint Presentations Beyond the Basics
389
Something else you can do, if you have a Home Page on the web, is to include this web URL on
the Title slide, again as a clickable hyperlink. Fig. 10.50 illustrates this final version of the Title
slide for our US States and Capitals Quiz PowerPoint presentation.
Fig. 10.50 Final version of the Title slide
Save the presentation one last time
Keep in mind, as always, that you should exercise moderation with regard to content such as clip
art, sounds, and movies. Your topic (the Function), not the style (the Form) of your show, is the
main focus.
Tips on color choices for printing
Lesson 9 covered the topic of printing PowerPoint presentations (see Lesson 9 at
http://www.pitt.edu/~poole/Office2016Tutorials/2016Lesson9.pdf and scroll to page 339. This is
a good time to mention the issue of editing your background for printing on paper.
Many of the Design Themes are attractive to look at; however, when you print handouts or
slides in black ink, the dark backgrounds make some text hard to read. If you plan to print out your
show (for a handout to an audience, perhaps), you want to choose a lighter background. Then when
you are ready to print, hit Ctrl+p or File > Print. In the Color/Grayscale box in the Print window,
click the arrow and choose either black and white or grayscale.
This reduces the background to plain white with black text, making it easier to read than color.
It will also save a lot of money on the ink cartridges for the printer!
10.7 SOME FINAL THOUGHTS ABOUT PRESENTATIONS Think you're ready to make some engaging and relevant interactive PowerPoint shows? Before
you jump in, consider the following suggestions.
Notice that no mention has been made of animation schemes (including slide transitions and
custom animation). In interactive PowerPoint shows, you do not want slides to automatically

ESSENTIAL MICROSOFT OFFICE 2016: Tutorials for Teachers
Copyright © Bernard John Poole, Lorrie Jackson, 2016. All rights reserved
390
proceed to the next slide, nor do you want text in motion to interfere with the students' ability to
read and complete the quiz. Save the animation for other, non-interactive shows.
It's inevitable: PowerPoint is so easy to use and fun to play with that every beginning user from
ages 6 to 96 wants to use all the tricks and tools available. Yet, always remember the golden rule:
Substance before Style. Garbage, no matter how colorfully arrayed and beautifully orchestrated,
is still garbage.
Keep your focus on your content, then use only those tools that are appropriate for your
audience and task. Got a group of sleepy students that don't seem thrilled about photosynthesis?
Sure, throw in lots of sound and moving text. But for test-taking and concept review, make the
presentation simple, clean, and succinct.
Next, remember the four steps of creating a PowerPoint presentation from the previous
chapter: plan, plan, plan, and plan? This is even more vital in the interactive show, when one
bookmark linking the wrong answer (My teacher is NOT a mammal.) could have unexpected
consequences. Some of us learn better when we can visualize our task, so you may want to sketch
out your ideas on paper or on a Word document until you feel comfortable with this new testing
method.
Lastly, just because you've created your presentation doesn't mean you've finished. After
planning a presentation and creating the show, you need to spend time practicing using it. Take
the test yourself. Dummy-proof your show as much as your grade-level dictates (more Action
Buttons on the introductory slides for example for younger children). The beauty of all digital
content such as a PowerPoint presentation is that it is easy to fix problems you may find, easy to
update, easy to improve, easy to maintain. So take the trouble to fine-tune your work when you
see that it needs further work.
LOOKING BACK You've viewed and created your own interactive PowerPoint presentation. You've mastered
hyperlinks and Action Buttons as a way to break free of the traditional linear nature of PowerPoint
shows. You've changed the design and inserted content into your presentation. Finally, you've
learned some tips on how to keep the focus on what the students need to learn, not on how pretty
the presentation is.
Creating an interactive PowerPoint presentation can be time-consuming and, for that reason,
should be used only occasionally. But, learning how to create such shows is not difficult, and
numbers of teachers are now using this strategy not just to make reviewing material more fun, but
also as a student activity.
Students in grades 5 and up at least can be taught how to create interactive PowerPoint
presentations in a fairly short amount of time. One Language Arts teacher in middle school has her
students create interactive novels using this strategy. The middle school students write stories that
have several options for plot, then have younger students read and play around with the stories.
For example, a dragon may have three caves he can go inside. Click on one cave, and the dragon
meets up with a knight with sword in hand. Click on another cave, and the dragon meets his long
lost mother.
Because hyperlinks do not have to be linked to text but can be linked to clip art or pictures,
interactive PowerPoint shows can be used with grades preK-2 with ease. The title of a slide might
be "What color is the ball?" An image of a red ball is on the slide, along with four squares, each
containing a different color. If the student clicks on the red square, the square's hyperlink takes her

Lesson 10: PowerPoint Presentations Beyond the Basics
391
to a slide with the word Red on it and the red square. Depending on the students' computer skills,
teachers can project such a show for the whole class to walk through together, put the show on one
computer in the classroom, or place the show on lab computers for whole class instruction.
As you consider how to apply interactive shows in your classroom, make sure you take into
account when and how each student will access the show, and weigh time considerations against
learning benefit. These shows can be a great motivator during the winter doldrums or following a
particularly intense unit. Use them occasionally and perhaps have your students create some. You'll
be surprised at how much fun they have and how much learning takes place.
LOOKING FORWARD ESSENTIAL Microsoft Office 2016 has introduced you to many of the fundamental features of
the PowerPoint integrated software package. But there are many more advanced features for you
to learn. Your challenge now is to capitalize on your hard work in two ways.
1. Use the Office programs as much as possible in order to consolidate your skills and sharpen
them to the point where they become second nature.
2. Extend your knowledge by studying the software beyond what you know. Step out on the
path that leads to your becoming a power user of productivity software such as this. Get
hold of the Microsoft Office 2016 reference manual. Discover what else the software can
do to improve the quality of your work and make you more productive. Knowledge is
power. You will be surprised to discover what else Office in particular, and the computer
in general, can do for you.
SKILL CONSOLIDATION 1. Prepare an interactive presentation that introduces yourself to your class at the start of a new
school year. Have five silly questions about your education, hobbies, family, etc. Students will
enjoy learning about you and will have a great introduction into your class. Use any graphics
and sounds you like. Be sure to have a Title slide, an Intro slide, and an Acknowledgements
slide.
2. Prepare an interactive presentation that reviews a basic concept that must be memorized in your
class (times tables, grammar rules, Spanish vocabulary, periodic table). Have five questions
related to the topic. Depending on your class, have the presentation on a classroom computer,
E-mail it to your students to study with from home, or run it in the computer lab. Use any
graphics and sounds you like. Be sure to have a Title slide, an Intro slide, and an
Acknowledgements slide.
3. Modify the steps in this chapter and teach your students how to make an interactive PowerPoint
presentation. Have them create a quiz on a hobby or sport of their choosing. This not only
teaches them advanced computer skills, but it helps them synthesize and organize information.
The hyperlink and Action Button steps require clear organization skills and logical thinking,
great practice for real classroom learning. Use any graphics and sounds you like. Be sure to
have a Title slide, an Intro slide, and an Acknowledgements slide.
4. Prepare a presentation that works like an Internet scavenger hunt. Choose your own topic (say,
Dinosaurs). Come up with five questions related to the topic. On each of the five Question
slides, make each question a hyperlink to a Web site with the answer on it. Then have four
possible answers to each question, only one of which is correct. Follow the steps in this chapter

ESSENTIAL MICROSOFT OFFICE 2016: Tutorials for Teachers
Copyright © Bernard John Poole, Lorrie Jackson, 2016. All rights reserved
392
to make the presentation interactive. For each question you will need two hidden slides with the
answer, one Correct and the other Incorrect. After the title slide, you will have an introductory
slide which explains to the student how to proceed with the exercise. Thus, your PowerPoint
will have 18 slides in all—a Title slide, an Introductory slide, 15 Question and Answer slides,
and an Acknowledgements slide. Students will have to search the linked sites for the
information, requiring more sophisticated thinking skills than simply memorizing facts. As in
the lesson (US States and Capitals), when the student clicks on an answer, the slide sends them
to a hidden slide which indicates whether the answer is right or wrong. If the answer is wrong,
a button on that slide sends the student back to the question slide. If the answer is correct, a
button sends the student to the next Question slide in the presentation. Use any graphics and
sounds you like.