1 V jl WCDDWO - ia802605.us.archive.org
144
TT 1 Jr\ Jivi V jl WCDDWO LJVI.ROEHL
Transcript of 1 V jl WCDDWO - ia802605.us.archive.org

TT
1 Jr\ Jivi V jl
WCDDWOLJVI.ROEHL

Class__TlTVg
Book._____Zg_n' a(iop>TigIitNi
CORMGHT DEPOSIT.


Farm Shop Work Bench and Farm Woodworking TooSs.

Farm Woodworkby
Louis M. Roehl«
Supervisor of Farm Shop Work, New York State College
of Agriculture at Cornell University,
Ithaca, N. Y.
With an Introduction by George A. Works, Head of the
Department of Rural Education, New YorkState College of Agriculture.
The Bruce Publishing CompanyMilwaukee, Wis.

rr
Copyright, 1919
The Bruce Publishing CompanyMilwaukee, Wis.
OC? -4 !9I9

Introduction
This book is designed primarily for use as a text or reference book
in connection with farm shop courses in agricultural schools or in the
agricultural departments of rural high schools. The problems that this
work presents are many and their seriousness is accentuated by the fact
that commonly the farm shop instruction is offered by the teacher of
agriculture. This arrangement has an advantage in the fact, that it
makes possible a more intimate relationship between the shop work andthe various phases of the agricultural work, but it presents serious teach-
ing difficulties and makes necessary such assistance for the teacher as is
to be found in this book.
This book and Agricultural Woodworking by the same author are
in marked contrast with the early efforts that were made to organize
courses in farm shop work. For the most part they consisted mainly
of a bodily transposition of manual training and drawing courses fromcity schools to the schools of the rural community. Commonly there waslittle or no relationship between the drawing and construction work.
Usually the drawing consisted of a segment of a drafting course and the
wood work centered around "exercises," necktie holders, and Morris
chairs. The authors of these attempts lost sight of the fact that the
farmer is neither a draftsman nor a cabinet maker. His skill in the use
of the hammer, saw, plane, and pencil should be developed in connection
with problems of rough carpentry. He must be a "jack of all trades"
in repair and simple construction work.
The error of this procedure has been realized by many who are nowendeavoring to select construction problems adapted to farm conditions.
As a result there has been a decided improvement in the character of the
work done in the farm shop course but the movement has not gone far
enough. The content of the high school course in farm crops is deter-
mined in a large measure by the crops raised in the immediate vicinity
of the school. In a similar manner there should be a recognition of the
influence of local farming conditions in the determination of the content
of the farm shop course. The woodworking problems that are presented
to the truck farmer are quite different from those that are presented to
the dairyman, poultryman, or general farmer. The instruction offered
in the farm shop course should reflec.t ,this ^fference to a much greater
extent than is usually the case. '"
'• ' '^''
Since the farm shop course is quite commonly taught by the teacher
of agriculture, it is especially desirable that he should have a large num-ber of carefully prepared shop problems from which selections may be
made so that the work will be adapted to local conditions. In the prep-
aration of this book the author has borne this fact in mind. It is not
offered as a course adapted to any community but rather as a book, whichwith .the preceding volume, will form the basis of many courses for

FARM WOODWORK
schools situated in widely divergent farming conditions. It is expected
that the teacher will supplement the problems he selects by repair workbrought in by the pupils from their home farms.
The author's extensive farm experience, technical training, several
years of experience as a teacher of shop work to farm boys and morerecently his efforts in instructing jirospective teachers of vocational agri-
culture in farm shop work have made an excellent background for such
an undertaking as is represented by this volume. As a result he has
prepared a book that contains practical problems, carefully analyzed
and skillfully presented. Wise use of this volume is certain to result in
a marked advance in the character of work done in farm shop courses
in agricultural departments and schools.
GEORGE A. WORKS.

FARM WOODWORK
TABLE OF CONTENTS
PageAdjustable Wagon Jack 40-41
Apple Box Press 106-107
Bag Holder 65
Berry Stand for Six Boxes. . . .116-117
Bird Houses 63-61
Carpentry Apron 30-31
Contents of a Course in FarmWoodwork 8
Dog House 56-57
Double Deck Berry Stand for
Tw^elve Boxes 116-117
Farm Carpentry Tocls 9
Farm Shop Equipment for
Schools 11
Wood Working Tocls 11-12
Blacksmiths' Tools 12-13
Pipe Fitting Tools 13
Tinning Tools 13
Harness Repair Tools and
Equipment 13-14
Farm Shopwork Bench 16-19
Farm Tool Box 48-49
Folding Bench 34-35
Fruit Can Rack 52
Fruit Step Ladder 110-112
Handy Ladder 71
Harness Hook 105
Hay Rack 80-83
Introduction 5
Jointing, Setting and Filing a
Cross Cut Saw 129
Kitchen Table 54-55
List of Builders' Hardware .... 133
Lumber Measurement Table. . . 134
Lumber Rack 28-29
Milking Stool 58-61
Milk Test Bottle Holder 79
Miter Box 36-37
Nail and Staple Box 32-33
Nails and Screws 135
Orchard Ladder 108-109
Orchard Ladder 113-115
Packing Table for Barrel of
Apples 120-121
Packing Table for Box Apples. 118-119
PagePlane Table and Leveling Rod. 127
Playground Swing 66-67
Poultry Carrying Crate 78
Poultry Catching Hook 79
Poultry Feed Box 74
Poultry Feed Box 76-77
Poultry Feed Hopper for 25
Birds 75-77
Poultry Feed Hopper for EO
Birds 77
Poultry Feeding Trough 72-73
Poultry Show Crate 78
Poultry Sticking Knife 79
Rafter Framing 128
Root Study Case 125
Rural School Work Bench 20-24
Saw Filing Clamp 46-47
Saw Horse 44-45
Saws and Saw Fitting 130-131
Seed Corn Rack 38-39
Seed Corn Testing Box 38-39
Self Feeder for Hogs 90-91
Sheep and Hog Shipping Crate 96-97
Sheep Feeding Rack 93
Sled 70
Soil Sieve 125
Stitching Horse 98-104
Stock Rack for Wagon Box . . . 88-89
Support Racks for Soil Tubes. 124
Table of Bit Sizes for WoodScrews 136
Take-Down Horse 42-43
Teeter-Totter 68-69
Tool Cabinet for Wood Shop ... 25
Top, Wagon Box 86-87
Vise and Bench Step 22-24
Vise Handle 122-123
Wagon Box 84-85
Wall Sheep Feeding Rack 94
Waste Basket 36-37
Water Trough 126
Wire Tightener 71
Wood Basket 53
Wood Box 50-51
Wood Working Tool Rack 26-27
A COURSE IN FARM WOODWORKIt should fulfill the following conditions
:
a. Each project must be useful on the farm when completed.
b. The course must give practice in all of the carpentry tool operations.
Carpentry Tool Operations
1. Rip sawing
2. Cross grain sawing
3. Leveling
4. Plumbing
5. Erecting
6. Tool sharpening
a. Saw filing
b. Grinding
7. Measuring
8. Squaring a line at right angles
9. Planing
10. Laying out chamfer
11. Laying out and cutting bevel.
12. Boring
13. Doweling
14. Mitering
15. Chiseling
a. With grain
b. Cross grain
16. Nailing
17. Nail setting
18. Nail pulling
19. Screw driving
20. Screw drawing
21. Counter sinking
22. Tapering
23. Scraping
24. Sanding
25. Round surface edging
26. Mortising
27. Wood filing

FARM CARPENTRY TOOLS
The following is a complete list of farm carpentry tools. With these
tools at hand it is possible to do the ordinary construction and repair
work which require wood working tools on the farm.
As a means to aid in preventing the loss of tools and to conserve time
ofttimes wasted in looking for tools which have been mislaid it is advis-
able to have a definite place for the tools in the farm shop, granary,
implement shed or other convenient place and also to have a definite place
on the wall for each tool. This place for each tool may be indicated
by a silhouette of the tool being painted on the wall where the tool is
to hang. The picture of the tool on the wall serves as a reminder that
the tool is out.
It is far better to have the tools hang on the wall over the workbench where they may be placed and removed instantly than to havethem thrown into a tool box where time is consumed and patience taxeddigging around for what is desired.
Woodworking tools to work efficiently must be free from rust. Thismay be accomplished by having handy a dry rag or handful of waste andwiping the tools as they are brought in and then covering them with acoat of oil. The oiling may be accomplished quickly by wiping the sawsand other tools with a rag or handful of waste soaked in oil. A thin coatof any oil will prevent rust.
Fig. 1 illustrates the wall of the farm shop over the work bench.
Fig. 1. Farm Shop Woodwork Tool Rack with Tools Removed.

10 FARM WOODWORK
FARM CARPENTRY TOOLS
1—26" Cross Cut Saw1—26" Rip Saw1—Jack plane—14" with 2" cutter
1—Carpenter's draw knife
1—Marking gauge
1—8" try square
1—Mallet1—Saw set
l_Set of Auger Bits, 4/16" to 16/16"
inclusive
1—Expansion bit
1—Ratchet Brace
2—Screwdrivers, 1 large, 1 small
1—Countersink
1—Steel rafter framing square
1—Pair pliers
1—10" flat file
1—Auger bit file
1—8" Triangular file
1—6" slim tapered triangular file
1—12" Half-round wood file
1—8" Oblong carborundum oil stone
1—16-oz. Straight claw hammer1—24" Carpenter's level
1—Putty knife
1—Nail set
4—Socket firmer chisels, %", V2", 1'
IV2"
1—2-lb. 2-oz. Bench hatchet
1-^2-ft., four-fold boxwood rule
1—Cross cut saw tool
1—Pinch bar
1—Spoke shave
1—Screwdriver bit
1—Pair 8" winged dividers

FARM WOODWORK 11
FARM SHOP EQUIPMENT FOR SCHOOLSWood Working
Necessary Equipment
Amount Item1 —1^ inch brad awl1 —Set bits yi inch, 5/16 inch, ^ inch, ^^ inch, ^ inch, ^ inch % inch
% inch, 1 inch • •
1 —Countersink, Rose2 —Screwdriver bits, % inch tip and 5/16 inch tip
2 —Bit braces, 8 inch sweep12—Chisels, socket, firmer, 2-1/4 inch, 1-% inch, 4-1/2 inch, 1-% inch, 3-%
inch, 1-1 inch
4 —Dividers, 8 inch, loose leg, wing •
1 —Set twist drills, }i, }ihy 32nds, square shank1 —File, mill cut, 6 inch
1 —File, mill cut, 10 inch
6 —Files, slim taper, triangular, b inch
2 —Files, slim taper, 5 inch
1 —File, auger bit
1 —File card (cleaner)
6 —Gauges, marking, plain
1 —Glass cutter, turret head1 —Grindstone, 2"x24", ball-bearing, mounted with foot pedal1*—Carpenter's hammers, equal number bell face, adze eye^ curved claw;
and plain face, straight claw. . . . =
1 —Drawing knife, 8 inch
1 —Level and plumb, wood, 26 inch
1 —Level stand and sights
1 —Mallet (or more if home made)3 —Nail sets (assorted)
1 —Oiler1 —12 inch half round wood file
4 —Wood screAvs (adjustable) two 8 inch, two 12 inch
2 —4 ft. steel bar carpenter's clamps
1 -—Oilstone, coarse and fine face carborundum1 —Oilstone, round edge slip
1*—Plane, jack, 14 inch iron, 2 inch cutter
3 —Pliers (assorted)
1 —Punch, center
1 —Putty knife
2 —Saws, cross cut, 22 inch, 10 point
3 —Saws, cross cut, 24 inch, 10 point
1 -—Saw, cross cut, 26 inch, 8 point
2 —Saws, rip, 26 inch 5 point
1 —Saw, compass, 16 inch
2 —Saws, coping, metal handle

12 FARMWOODWOEK
1 —Saw, hack, 10 inch, with one doz. blades
1 —Saw set
1 —Saw vise (home made)3 —Screwdrivers, 4 inch, 8 inch and 10 inch
3 —Sliding T bevels, two 6 inch, one 8 inch
2 —Squares, steel 18 inch x 24 inch, polished, (rafter framing)
1*—Squares, try, 8-inch blades, wood handle
1 —Square, mitre (blade fixed at angle of 45°)
Tape in case—100 ft
1-inch iron bench screw for home made bench vise. (1 for each vise
needed. )
1 —Blacksmith's vise, 314-inch jaw1*—Bench stops (home made)1 —10-inch monkey wrench1*—Two-foot rules, four fold
1*—Bench hook (home made)Equipment needed in sets of one for each boy.
Additional Desirable Equipment
1 —11/2-inch scratch awl
1 —Expansion bit % inch, 3 inch
1 —Bit brace, 12-inch sweep (ratchet with jaws holding square shank
drills)
1 —Chalk line with reel to fit scratch awl
1 —Carpenter's chalk
1 —File, bastard cut, 8 inch
1 —File, bastard cut, 12 inch
1 —File, round, 10 inch
1 —Gauge, mortise
1 —Gauge, 1/2 inch, inside firmer
1 —Hand axe
1 —Cross cut saw tool
1 —Cross cut set gauge
1 —Cross cut saw set
2 —Planes, block, 6 inch adjustable
1 —Plane, smooth, 9-inch iron, 2-inch cutter
1 —Plane, fore, 18-inch iron, 2-inch cutter
1 —Plumb bob1 —Spoke shave, two cutters, 1 straight, 1 curved
1 —Floor brush
Blacksmith's Tools
Necessary Equipment
1 —Anvil, 80 or 100 lbs., steel Avith hardened face
1 —Hardie to fit anvil
6 —Cold chisels (assorted sizes % inch to % inch)
1 —Set of drills, % inch to 1/2 inch by 16ths, with square shank to fit bit
stock

FARM WOODWORK 13
1 —Breast drill with chuck to take square shank fitting bit stock
1 —Forge, portable, with hood and tub
1 —Hammer, blacksmith's 2 lb
1 —Hammer, ball pein, 24 oz
1 —Hammer, riveting 10 oz
1 —Punch, center
1 —Tongs, 18-inch length, straight lip, i/4-inch opening1 —Tongs, bolt % inch, V2-inch opening
1 —Tongs, 18-inch length, fluted jaw, for i/4 inch, 5/6-inch iron
1 —Emery or carborundum high-geared grinder with 1 coarse and 1
medium grit wheel
1 —Steel square 8 inch x 12 inch
1 —Set, stock, dies and taps fV inch, 26 threads, 14 inch, 20, 5/16 inch,
18, 7/16 inch, I/2 inch, 14 for threading bolts and nuts
Desirable Equipment1 —Drill, % inch, I/2 inch shank1 —Drill press, self feed, with chuck to take square shank twist drills ...
Pipe Fitting (Desirable)Necessary Equipment
1 —Cutter, 3 wheel, cutting 14 inch, 2 inch
1 —Stock and dies, Armstrong type, cutting 14 inch, 1/0 inch, % inch,
1 inch, 11/4 inch, II/2 inch, and 2 inch threading pipe
1 —Pipe vise, capacity 14 inch, 2 inch
1 —Wrench, 18-inch Stillson pattern, iron handle1 —Wrench, 12-inch Stillson pattern, iron handle
TinningNecessary Equipment
1 —Soldering scraper
1 —Blow torch
2 —Coppers, 2 lb
1 —Snips, 314-inch cut
1 —Bar solder, half and half
Muriatic acid and zinc
1 —Sal ammoniac
Harness RepairNecessary Equipment
1 —Claw tool
1 —Pricking wheel12—Sewing awls, assorted
6 —Awl hafts
1 —Knife, harness maker's straight
1 —Punch, revolving 4 tube1/4—lb. Black shoemaker's wax2 —Paper needles assorted sizes '
6 —Balls harness thread No. 10 white
1 —Box 50 assorted split rivets

14 FARMWOODWORK
1 —Round knife, 5 inch
1 —Rex riveting machine
1 —Common edge tool
1 —Finishing wheel No. 40
1 —Single edge creaser
1 —Rivet set
Harness Repair Parts
Harness oil
6 —1 inch sham roller buckles
6 —1 inch wire bent heel harness buckles
6 —Repair clips for end of hames6 —Wrought iron % inch hame clips
2 —Doz. % inch hame staples with washers. .....
6 —Bottom hame repair loops
4 —Common line rings and studs
4 —Pairs, hold back plates and rings
1 —lb 11/4 inch soft iron hame rivets . . .
1 —Pair over top wood hames 20 inch
1 —Black, % pound cake harness soap
4 —Boxes tubular harness rivets (assorted)
2 —Doz. Conway loops assorted
1 —Box screw cockeyes 1% inch
1/2—Doz. Wrot Concord Clips
1 —Box assorted repair dees
y'2—Doz. 1 inch buckle shield No. 1
1 —Doz. repair roller buckles
1 ^Doz. assorted snaps1/4—Doz. team trace splicers
1 —qt. Miller's edge ink
1 —Doz. hame buckles and loops
1 —Doz. 1 inch halter squares
1 —Doz. assorted rings %, yg inch, 1 inch (black)
.
2 —Doz. assorted %, %> 1 inch leather slide loops.
1 —Side harness leather for general work1 —Package y^ inch swede tacks1/4—lb. Soft iron rivets assorted % inch to % inch. ,

FARM SHOP PROBLEMS

16 FARM WOODWORK

FARM WOODWORK 17
FARM SHOP WORK BENCHBill of Material
Lumber for bench:

18 FARMWOODWORK
angles between the legs and sills.
4. Fasten the cross braces to the legs using two 1%" No. 8 or 9
flat head screAvs at each joint.
5. Cut the long braces to dimensions and fasten them in place,
using five 6d common nails at each joint. Make sure that the legs stand
at right angle to the long braces.
6. Cut the middle cross brace to length ISy^' and fasten to the two
long braces Avith two 1%" No. 8 or 9 flat head screws at each end.
7. Cut an opening in the upper edge of the front apron 18" long and6" deep, 24" from the front end of the board for the drawer.
8. Fasten the aprons to the legs, using three 1%" No. 8 or 9 flat
head screws at each leg except the vise leg on which the middle screw is
omitted because of the bench scrcAv.
9. Lay out the mortises on the front apron for the horizontal braces
of the vise so that the top of the mortises are 7" from the top of the bench
or 51/i" from the top of the apron, and so that the inside of the mortises
fall flush with the sides of the legs. The mortises should be made slightly
larger than the braces to proAdde a free working of the braces through
the mortises.
10. Locate and bore a hole for the bench screAv Avith a bit 1/16"
larger than the bench screAv thru the apron and legs on a center line
of the leg 71/2" from the top of the bench, or 5%'' from the top of the
apron.
11. Place the bench scrcAv through the hole and fasten the screAv
Avasher in place on the inside of the leg Avith tAvo 1%" No. 12 flat head
Avood scrcAvs.
12. The braces for the vise are assembled at the half lap joint and
placed thru the apron from the inside and fastened to the jaAv of the vise
Avith tAvo No. 12 flat head Avood scrcAvs at each brace.
13. Assemble the draAver guides as shown in the detail drawing,
using six 4d common nails for each guide, and fasten in position, using
tAvo 1%" No. 8 or 9 flat head sercAvs at each end of each piece.
14. The methods of constructing a draAver depends somcAvhat upon
the tools and machines at hand. If a grooving plane, buzz saAv or dado
saAv are at hand, the method suggested in the detail draAvings is to be
preferred.
It Avill be noted that grooA^es are cut in the side pieces near the loAver
edge and also near the rear end to receive the bottom and end pieces. Agroove is also cut in the draAver front at the inside near the bottom to
receive the front end of the bottom. The draAver front should be con-
structed at both ends as shoAvn in the detail draAA^ngs. If the aboA^e
tools are not at hand this may be done Avith saAv, chisel and mallet
Simple box construction Avhere only butt joints are used makes a A-ery
substantial draAver if securely nailed. Six penny finishing nails maybe used.
15. For a draAver pull in tliis place an opening 1" Avide by 4" long

FARM WOODWOEK 19
is preferable to a drawer pull which is fastened to the outside of the
drawer, as it is out of the way.
16. Lay the top plank in place, clamp tightly, and draw lines across
over the center of the cross sills.
17. On each line just drawn locate two points; one l^/o" from the
back edge and one 3i/4" from the front edge.
18. Bore holes %'' deep on points just located with %" bit.
19. Continue holes thru planks and into sills with %" bit.
20. Remove planks and continue holes thru sill.
21. Place planks in position and fasten with %" x 7" carriage bolts,
using one washer for each bolt.
22. Plug the holes in the top of the plank.
23. Fasten the top board by using three 1%" No. 8 or 9 flat headscrews thru the board into each sill.
Fig. 2. Another View of tlie Farm Shop Work Bench and Farm Woodworking Tools.

DETAILS OF DOUBLE
WORK BENCH
OE--'ji|i.
CE-i
%-.':c
-01-
°"^-
CumH
. _ j'l^i't
Hi^

FARM WOODWORK 21
A SIX STUDENT WORKBENCH FOR THERURAL HIGH SCHOOL
•A demand for a woodworking bench, at which a number of boys can
work, caused the bench illustrated in Figs. 3 and 4 and described here to
be designed and built. The bench has been made and used successfully
in a number of rural high schools where space and funds will not allow
the purchase and use of the familiar individual type of bench.
Bench Stop—Bill of MaterialPieces Dimensions Use Material
1 %"xl"x8" Leftside Softwood1 %"x4y2"x8" Wedge Softwood1 %"x4"x8" Right side Softwood
5 flat head, bright wood screws 1%" No. 8 or 9.
Vise
—
Bill of MaterialPieces
1
22
DimensionsI%"x7y2"x24"
UseJaw
ii"x2"xl7"il"x2"x2'7y2"
1 iron bench screw
r. MaterialOak, mapleor hard pineOak or mapleOak or maple
Horizontal braceDiagonal brace
%", r or iVs".4 flat head, bright wood screws 1^/^", No. 12, for fastening vise to jaw.8 flat head, bright wood screws 2", No. 12, for fastening braces to jaw.8 flat head, bright wood screws %", No. 8, for fastening braces at joint.
Workbench^Bill of MaterialUse Material
Top Hard woodLegs Soft woodSills Soft woodEnd cross braces at bottom Soft woodCross braces at bottom Soft woodMiddle horizontal braces at bottom Soft woodHorizontal braces at bottom Soft woodAprons
32 carriage bolts %"x7" with washers for bolting top to sills.
16 carriage bolts %"x6%" with washers for bolting sills to legs.
4% dozen flat head, bright wood screws 1%", No. 8 or 9, for fasteningbraces and aprons to legs.
16 8d finishing nails for toenailing the two middle cross braces to the legs.
Pieces

22 FARM WOODWORK

FAEM WOODWORK 23
Directions
All lumber for tlie bench should be thoroly dry. The top can best
be made of hard pine planks which should be planed on both sides andjointed. If they are gotten out at a mill it is well to have them dressed
to exactly ten inches in width and matched at the mill so that they will
draw up to tight joints and make a top of exactly forty inches.
Pieces narrov.-er than ten inches cannot be used for the top of a
double bench where this kind of vise is used as the upper ends of the
horizontal braces interfere with each other. It may be noted in the
illustration that the points have been sawed off so as to prevent inter-
ference when opposite vises are closed at the same time.
Fig. 5. Rural .School Work Bench with Six Vises.
1. Cut the eight legs to exactly the same length, 2' 7" and lay out
the mortises 1%" x 5%" on one edge at one end of each piece and cut
the mortises with the cross-cut saw and rip saw. (Do not split out the
Avood for the mortises.)
2. Cut the four sills to exactly the same length, 3' 2%", and fasten
to the legs with two %" x 6V2" carriage bolts at each joint. It is well
to measure the exact width of the four planks and the thickness of the
two aprons and regulate the length of the sills accordingly. Any devia-
tion from the widths called for in the drawing must be corrected here.
3. Measure and cut the two lower end cross braces to the samelength as the sills, 3' 23/3", and fasten with two IV2'' No. 8 or 9 flat headwood screws at each end of each piece.
4. Measure and cut the horizontal braces to the lengths called for
in the above bill of material and fasten to the legs with three IMi"No. 8 or 9 .flat head wood screws at each end of each piece. The twomiddle lower cross braces should be cut to their length, 4' llfV", andplaced in position at the same time as the lower horizontal braces as
they butt against the legs between the horizontal braces. They shouldbe fa&tened by toenailing with t^o 8d finishing nails from each side.

24 FARM WOODWORK
5. Fasten the aprons in the positions Avith three IV2" ^^o- 8 or 9
flat head wood screws. Avoid placing a screw in the center where it
will interfere with the bench screw.
6. Lay out the mortises in the apron for the horizontal braces of
the vise so that the top of the mortises are 7" from the top of the bench
or 51/4'' from the top of the apron and so that the inside of the mortises
falls flush with the sides of the legs. The mortises should be made slight-
ly larger than the braces so that the braces will work thru them freely.
7. Locate and bore a hole for the bench screws with a bit 1/16"
larger than the bench screw thru the aprons and legs on a center line
of the leg, 7I/2'' from the top of the bench, or 5%" from the top of the
apron.
Fiy. 6. Inside View of Vise.
8. Place the bench screw thru the hole and fasten the screw washer
in place on the inside of the leg with two 1%" No. 12 flat h^ad woodscrews.
9. The braces for the vise are assembled at the half-lap joint and
placed thru the apron from the inside and fastened to the jaw of the
vise with two 2" No. 12 flat head Avood screws at each brace.
10. Lay the top planks in place, clamp tightly, and draw lines
across over the center of the cross sills.
11. Locate points on lines just drawn, li/^" from each edge of each
plank, excepting the outside edge of the outside planks which are 3i/4''.
12. Bore holes %" deep on points just located with %" bit.
13. Continue holes thru planks and into sills with %" bit.
14. Remove planks and continue holes thru sills.
15. Place planks in position and fasten with bolts, usini; one washer
for each bolt.
16. Plug the holes in the top of the bencli.

FARM WOODWORK 25

26 FARM WOODWORK
u^^/r
2 u
P^
5
0) ^ lO CT
^ <n o e cr^*^> w -^, a; c - —
9P
O D^ C
o
(0

FARM WOODWORK 27
It is recommended that the tool racks which are dimensioned on p.
26 be made of oak, maple or other hardwood. These racks are in use in
the author's shop and not only hold the tools but hold them in such a
way that they may be removed quickly and without loss of motion. It
may be noted that the saw rack, Fig. 7, holds the saws in such a way
that the workman may talvc a saw from the rack and use it without
change of position of the hand.
As indicated by the silhouette of the draw shave on p. 26, it is very
desirable to paint a silhouette of all tools where they are to hang. It
encourages having a place for each tool and keeping it in that place
when not in use.
Fig. 7. Detail of Raf-k for WoodworkingTools.

28 FARM WOODWORK
CO
VJ-
toK . X
cu
9b "cb
^ ^ rr, fT) CO, ri ^
!^'-L^
=5 <n(,^?0|Ti-'<^l^coj-^Vol-^Jr,|^hlTi-'^H-
D

FARM WOODWORK 29
LUMBER RACKIn school shops and on the farms it is highly desirable that a place
be provided for the storage of lumber and that this place be such as
may be gotten at easily and so arranged that any piece of lumber maybe taken from the stock on hand without moving large quantities.
The particular arrangement of a shop makes a situation peculiar to
that shop, due to space, light, windows, stairs, doors, benches, etc. andeach farm presents a problem of its OM^n. One farm may have space
for lumber in the attic of the farm shop, while on another it may be
required to store it in the implement shed, granary or elsewhere.
The draM'ing is one of a simple, yet serviceable, rack which maybe placed in any of the above places. It is seldom that a large quantity
of one kind of lumber need be kept on hand, but a variety is desirable.
This rack, as may be noted, is provided with ten shelves to make this
provision.
In some instances on farms, the 4'' x 4" posts may be extended upand fastened to a joist, rafter or collar beam above and thus dispense
Avith the long horizontal members.
It is difficult and often impossible to make a desirable finished article
in farm wood work either in the school shop or home farm shop out of
warped, weatherbeaten, knotty lumber or dry goods boxes. If it is de-
sired in the school shop or home farm shops to make farm devices or
appliances which will promote the mechanical end of farming it seems
advisable to first obtain a quantity of such lumber, as a first-class car-
penter would need to construct the desired articles and store it in a dry
place on a lumber rack.

10 FARM WOODWORK
Corpent rij Apron

FARM WOODWORK 31
CARPENTRY APRONDenim or ticking is the material most commonly used. An apron oi"
this size requires about I14 yards. No. 40 thread may be used, and the
sewing machine should be set so as to make ten or twelve stitches to
the inch.
Cut the apron to the measurements called for in the drawing. Themeasurements given in the drawing are for the finished apron and there-
fore %" must be allowed on all edges to make a 14" hem.
When dividing the apron at the bottom do not take a piece out,
simply cut the slash the given length.
Turn and baste a 1/4'' hem around the apron. As the hem is basted,
slip the unfinished end of a strap under the hem at the correct place
so that, when the hem is stitched, the strap is also stitched into place.
Reinforce the corner of the slash at the bottom by facing it in a slight
curve with a bias piece of material or by facing it with a shaped piece.
Stitch the hem in place.
Bring the straps up at right angles to the edge of the apron andfasten them to the outer edge.
Press the apron.
Cut and hem the pockets. Crease a I/4" turn around the unfinished
edges. Press them and sew them in place.

32 FARM WOODWOEK

FARMWOODWORK 33
NAIL AND STAPLE BOXMaterial Required
1 piece of any soft wood I"x9%"xl4%",1 piece of any soft wood l^"xl0"x26".
1 piece hard wood %"x%"xll%".
Hardware2 flat head bright wood screws 1%" No. 10.
32 5d finishing nails.
2 1" No. 16 brads.
Stock Bill
Pieces Dimensions Use2 %"x9"x7" Ends2 y2"x4-15/32"xl0y2" Sides1 y2"x5,lTxlOy2" Bottom1 y2"x3}r'xlOy2" Partition
2 y2"x3ii"x3-25/32" Cross Partitions
1 %" round xll" Handle
Directions
1. Reduce all pieces to finished dimensions.
2. Lay out an end piece by drawing a line across each edge 4"
from the bottom end and two lines across the bottom end II/2" from
edge. Connect lines across edges with lines across ends. Draw a center
line lengthwise of stock on each side. At a point on center line on one
side, %" from the top, bore a %" hole y^' deep to receive handle. At a
point on the centerline on the opposite side of the stock %" from end,
swing an arc with a %" radius.
Draw lines on both sides of the stock from the lines across the edges
tangent to the arc.
Remove stock to lines with the saw and smooth with the plane.
Smooth the rounding end of the stock with the chisel.
3. With the T bevel set at 12" on the beam and 41/2" on the blade of
the steel square lay out the bevels at the bottom edges of the sides, and
both edges of the bottom and remove stock to line with plane.
4. With the T bevel set as above, lay off the slant for the cross
partitions and remove the stock with the saAv.
5. Take the %" square piece of hardwood and at each end lay out
an octagon as shown in the detail drawing, mark off the octagonal
lines on the sides of the stock and remove the stock to lines with the
plane. Continue rounding the stock by planing the corners.
6. Assemble the box by placing the handle in position and securing
it Avith one 1%" No. 10 flat head wood screw at each end and then fasten-
ing the sides to the ends by using three 5d finishing nails at each end
of each piece spaced as shown in the draAving.
7. Place the box on the bench and lay the bottom in place, securing
it with tAvo 5d, finishing nails at each end.
8. On the centerlines which are at the ends of .the end pieces, drive
tAvo 5d nails to hold the partition in place. Fasten the partition to the
bottom by driving four nails into the partition from the bottom of the box.
3^ FARM WOODWORK

FARM WOODWORK 35
9. The cross partitions are fastened by use of three nails thru the
side of the box and one from the bottom. A 1" brad is used to toenail
it to the long partition.
10. Finish by applying two coats of paint, allowing the first coat
several days to dry before the second coat is applied.
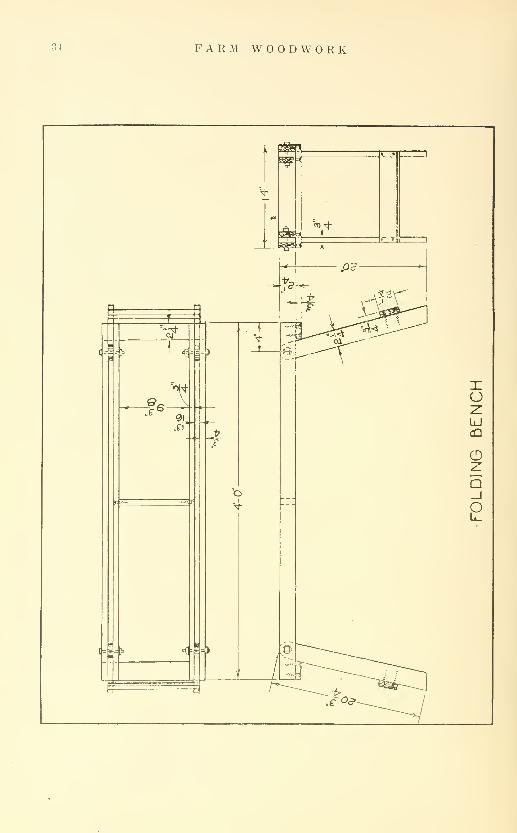
FOLDING BENCHStock Bill
Pieces Dimensions Use
4 %"x2%"x4'0" Platform
2 %"x2%"xl4" Ends
4 %"x2%"x20%" Legs
2 %"x2^/i"xl2y2" Braces for legs
1 %"x2i/4"x9%" Center brace
Hardware: 28 flat head wood screws 2%" No. 10.
4 machine bolts %"x3" with two washers for each bolt.
Directions
Cypress lumber is desirable as it is not affected as much as most
other soft woods by the constant drying and wetting which the bench
is subjected to.
Fig. 8A. Folding Bench.
Fig. 8B. Bench Partly Folded.

36 FARM WOODWORK

FARMWOODWORK 37
MITER BOXIn farm woodwork it is in most instances unnecessary to plane the
side of a board merely to remove the planer marks when the board is
already of the required thickness. It is also unnecessary to plane the
ends of a board if a good cut has been made with the saw. Much endplaning indicates poor sawing, and it is suggested that one who cannotmake an end cut on a board so that the end w^ill be square with the side
and edge, had better take a piece of scrap lumber and practice sawinguntil he can produce the desired result with the saw and not be required
to fix it up with the plane. The result of each saAV cut should be care-
fully analyzed and the error traced to its cause and overcome by direc-
tion thru the muscles of hand and arm.
To do this requires skill, care and time. The miter box is a meansof accomplishing the same result in less time, without skill or care. Forthe sake of time and convenience it is recommended that it be used only
after one has acquired the skill to saw an end square at every attempt.
If he does not acquire the skill but depends on the mitre box entirely,
he will need to take the box with him wherever skill is required. It is
easier to carry the skill.
WASTE BASKETA waste basket with solid sides is to be preferred to one made of
slats, as it is more likely to fulfill the purpose of the basket which is to
hold waste. The bottom should project enough to reduce to a minimumthe possibility of the basket tipping over. Stock %" thick, if it is avail-
able, is heavy enough for the sides. Cypress, basswood or other soft
wood free from knots, being lighter than the hardwood, is to be pre-
ferred. Both sides of the stock should be planed smooth and lightly
sanded, drawing the sandpaper lengthwise of the grain of the wood only.
The basket may be finished by applying two coats of shellac. Allow
the first coat at least 24 hours to dry before the second coat is applied.
Fig. 9. Waste Basket ofWood.

38 FARM WOODWORK
Wo

FARM WOODWORK 39
SEED CORN TESTING BOXLumber Required
Any softwood lumber may be used, though cypress is preferable as
it is affected least by change of moisture content. Matched flooring is
desirable for the bottom as it will hold the moisture better than un-
matched lumber, but any lumber will do if the edges are jointed smooth.
Hardware Required8 1%" No. 9 flat head bright wood screws for corners.
24 1%" No. 8 flat head bright wood screws for floor.
3 doz. 8d. finishing nails for assembling box.
Stock Bill
Pieces Dimensions Use4 . ii"x9"x3' 0" Floor2 fl"x3"x3'l%" Sills
2 ir'x4"x3'l%" Sides2 i3"x4"x3' %" Ends
DirectionsIt is not necessary that boards exactly 9" wide be used for the floor.
Any width of boards at hand Avill do just as Avell.
A cheaper method of fastening the floor to the sills is that of using
6d. common nails instead of the screws. These nails will need to be
clinched as they are 2" long, M'hich is %" longer than the thickness of
the sill and floor.
SEED CORN RACKStock Bill
Pieces Dimensions Use2 }r'x4"x3'5%" Uprights1 ir'x4"x3' %" Top1 ^r'x4"x3' 0" Bottom2 ii"x4"xl6" Feet
Hardware: 50 yds. No. 18 annealed wire (3 coils of stove pipe Avire).
8 1%" No. 9 flat head bright wood screws.10 1%" No. 8 flat head bright wood screws.68 3d fine shingle nails.
DirectionsIt should be noted that the top is set into the upright at top 3/16".
This makes a shoulder for the top to rest on instead of being supported
entirely by screws.
In fastening the wire, begin by fastening the Avire securely to the.
nail at the lower corner and then draw the Avire as indicated by the
arroAA' points. Use the pliers and draAv the AA'ire tight. In placing the
Avire the opposite way it should be woven above and below the first
wires, this Avill hold all wires more rigid.
Use of Rack and Testing BoxThe roAvs are numbered at the top and lettered at the left so that
any ear of corn in the rack may be specified as lA, IB, 2C, 3D, 8F, 12A etc.
Mark a cloth checkerboard fashion into 3" squares and number andletter the squares as on the rack.
Place about 2" of saAvdust in the testing box, moisten it and cover
it AA-ith the checkered cloth. Place six seeds from space lA on the rack
40 FARM WOODWORK
^^ i^^^A
^_?,
"vQ
(0
oSI
"<oicO
f-icO

FARM WOODWORK 41
in square lA in the box. Place six seeds from each ear in the correspond-
ing square on the cloth in the box.
Cover the seeds with another cloth and spread 1" of damp sawdustover the top. This top covering is easier to handle if made into a saw-
dust pad 1" thick.
Poor ears may be located by this method and discarded.
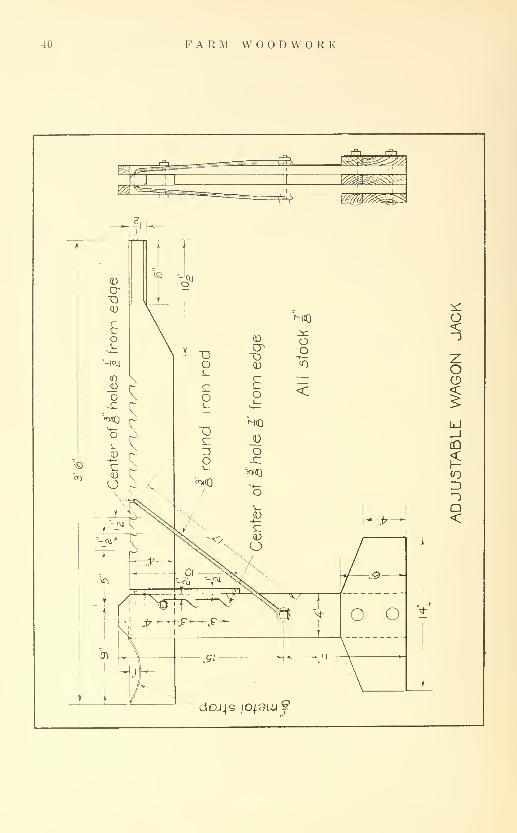
ADJUSTABLE WAGON JACKStock Bill
Lumber: Oak, maple or other hardwood.
Pieces Dimensions Use
3 y8"x6"xl4" Base
2 %"x4"x26" Posts
1 %"x4"x3' 6" Lever
2 Vi."xy8"xlO" Guides for lever bolt
2 carriage bolts %"x5^' with washers to bolt posts to base.
1 machine bolt %"x3%" with two washers, fulcrum for lever.
1 machine bolt W's.A'^A" with two washers for holding rod to posts.
1 piece of iron %"x%"x8" to place on top of lever at axle end.
1 piece of iron rod %"x3' 4".
4 flat head wood screws %" No. 7 to fasten iron at top of lever.
6 flat head wood screws IV2" No. 9 to fasten guides for lever bolt to posts.
A machine bolt Wy^^Vz" may be used as a fulcrum for the lever. In thatevent V2" holes must be made instead of %".
Fig. 10. Wagon Jack.

42 FARM WOODWORK
o
„or-
en
orOCO"
CO
LJ
OX
r;r.-;jfays.i

FARM WOODWORK 43
TAKE-DOWN HORSE FOR TABLES, CRATES, ETC.Stock Bill
ieces

44 FARM WOODWORK

F A R M W O O D W O R K 45
SAW HORSE

46 FARM WOODWORK

FARM WOODWORK 47
SAW FILING CLAMPStock Bill
2 I%"x3%"x4'0" Posts
3 ii"x3V2"x22' Braces
2 ii"x4"x2' 8" Clamps
1 iy2"xlV2"xl%" Hardwood block for tapping clamps
in slot to hold saw.
18 6d common nails to fasten braces.
2 carriage bolts i/4"x4" to strengthen posts at top.
24" of a heavy cord to attach hardwood block.
2 poultry netting staples to fasten cord to block and top brace.
Directions
The height of the posts, which is four feet, is a convenient size for
a person of average size. It may be varied to suit the individual.
The clamps as called for in the drawing and stock bill are 32" long.
This is a size suitable for the average handsaAvs. Longer clamps and
deeper cuts at top of posts will be found more satisfactory for big cross-
cut saws.
The hardwood block is a convenience for tapping the clamps in the
notches Avhen the saw is in place between the clamps. It is placed over
the saw and clamps directly over the posts and tapped firmly with a
hammer. By its use the saw is not hit with or the clamps marred bythe hammer.

48 FARM WOODWORK

FARM WOODWORK 49
FARM TOOL BOXBill of Material
Use hardwood for handle and any soft wood for rest of box.
Pieces Dimensions Use
2 %"xl0"xl2" Ends
1 y2"x6%"x20y2'' Bottom of box
2 y2"x35s"x20y2" Sides of box
1 ^/^"x2%"x20V2" Bottom of nail tray
2 y2"x2y2"x20y2" sides of nail tray
3 l^"xl%"x4ys" Partitions in nail tray
1 %" round x21" long Handle
Hardware: 2 flat head bright wood screws 2" No. 10 for handle.
2 doz. 6d. finishing nails.
4 doz. 4d. finishing nails.
Directions
For fastening handle see direction on "Berry Stand."
For construction of handle see "Vise Handle."
The purpose of this tool box is to furnish a means of carrying a
quantity of tools, nails, screws, staples, etc, to any point about the farmwhere work is to be done. For example, a repair and construction job
may require the following: cross-cut saw, pinch bar, hand ax, claw ham-mer, staple puller, wire stretcher, nails and staples. These tools may all
be placed in the box and carried conveniently as well as kept together.
Fig. 13. Farm Tool Box.

50 FARM WOODWORK

FARMWOODWORK 51
WOOD BOXLumber Stock Bill
Lumber: (6
Pieces

52 FARM WOODWORK
diock Bill
Pieces Dimensions
6 a'/ 2" X 10"
6 ax io"x 3-10/
# lb. ed common
UsePostsCleatsShelvesnails
Fruit Can Rack

FARM WOODWORK 53
a
o
I-
CD
QOO
(D
O <J^ 05 (O "9 ''^
•^ -D C O 2 OX) (T) 0) CL-^ O

54 FARM WOODWORK
V?H

FARMWOODWORK 55
KITCHEN TABLE
The frames of kitchen tables are usually made of hard Mood, maple,
birch or oak. Maple or birch make a very desirable top though bass-
wood is used for this purjDose extensively and is very satisfactory.
The legs of kitchen tables are frequently 2I/4" or 2V2" square at top
and tapered at bottom. The drawing calls for legs which are 1%'' x 2V2"at top and tapered on the two edges only so as to be 1%" square at the
bottom. This has been done to make it possible to saw the legs out of
an ordinary 2" plank.
The sides and ends are fastened to the legs with mortise and tenon
joints, Fig. A. The joints should be glued with hot glue. The corners
are further stiffened with braces as shoAvn in the detail drawing, Fig. A.
These braces should be fastened to the side and end pieces with at least
three flat head wood screws at each end of each brace.
A piece 16'' long is cut out of the front side piece for a drawerfront. This piece is then shaped at the ends as shown in Fig. B.
The drawer sides are y^' x 4" x 16" and are provided with two1/^" X \" X 16" cleats fastened to the outside as shown in Fig. C. Quarter
inch stock is used for the drawer bottom. If means are at hand for
plowing a groove on the insides of the side pieces I/4" wide and 1/4"
from the bottom edge of the side pieces it is desirable to do so. Other-
wise the bottom is merely nailed in place.
Two pieces of stock y<^" x 4" are extended between sides at right
and left of the drawer respectively. They are fastened to the sides of
the table by use of blocks and screws as shown in Fig. D. A cleat
1/2" X 1" X 16" is fastened to the inside of the two guides. This cleat
fits between the two cleats which are on the outside of the drawer andholds the drawer in place.
The drawer need not be provided with a draw pull as it is aseasily opened by clasping it at the bottom.
The top may be constructed of three or more boards.
These boards are carefully jointed, held even with dowel pins andglued.
The top is held to the table by use of blocks as indicated in Fig. E.
At least ten such blocks should be used—two at each end and three at
each side.
When the table is assembled the legs, sides and ends should bescraped clean with a cabinet scraper and then sanded. The top shouldalso be cleaned with sandpaper.
The top of the table is left white. The rest of the table may befinished with two coats of shellac, or one coat of shellac and a coat ofvarnish.

56 FARM WOODWORK
CD(OZ)
OX
oQ
Q.-ICO

FARMWOODWORK 57
DOG HOUSEMaterial Required
Pieces Dimensions Use2 . %"x4"x2'6" Sills
6 %"x5%"x2'6" Floor
4 2"x4"xl8" Corner posts
4 2"x4"x24" Rafters
9 y8"x5%"x2'7%" Sides
10 %"x5%"x2'6" Ends
4 y8"x5%"xlO" Ends at front
2 y8"x3"x23" Door posts
10 %"x5Vi"x3'6"
Roof boards
2 pieces of prepared ropfing 3' 8" long or V2 bundle of shingles.
If shingles are used two pieces of wood %"x4"x3' 6" are required for, asaddle board and also V2 lb. of shingle nails.
1 lb. 6d common nails.
A quantity of outside paint.
Directions
Before starting the construction of the framework of the clog house
it is suggested that the subject of rafter framing be studied. Obtain a
piece of 2" x 4" or 2" x 6" x 10, 12, 14 or 16 ft. long. Select a building
with any span of roof and decide on a pitch of roof. Lay out the rafter
as shown in the plate on rafter framing. Do not cut the rafter unless
you are actually going to use the piece in a building. In like mannerlay off the rafter on the same piece for other pitches and spans.
When thoroly familiar with the use of the steel square for laying out
rafters, lay out the rafter for the dog house as indicated on the drawingof the dog house.
Matched lumber is preferable for the construction of a dog house.
It may be noted that not all matched lumber is of the same width. If the
lumber which is being used is other than %" thick and 5i/4" face, as
called for in the stock bill, it is suggested that a new stock bill be madeout.
If shingles are used, a double layer is used for the first row at the
eaves. They may project over the roof boards one inch at the bottomand also at the ends. They are laid 4" or 41/0" to the weather and should
break joints at least 1". The points projecting over the peak are sawedoff and the peak finished wdth a saddle board.
If roofing paper is used it should be bent over the ends and edges
of the roof and nailed with roofing nails spaced not more than 2" apart.
'Finish the house by applying at least two coats of paint.

58 FARM WOODWORK

F A R M W O O D W O R K 59

60 FARM WOODWORK

F A R M W O O D W O R K 61
A MILKING STOOLMaterial
1 piece of any soft wood, preferably white pine, %"xl0"x5' 1".
12 flat head bright vrood screws 1%" No. 10.
8 flat head bright wood screws 1^/^" No. 8.
Tools
bi'ace.

62 FARM WOODWORK
fOI'^
IDOXzucr
ID
QX
CO
CQO

FARM WOODWORK 63
BIRD HOUSESRobin Nesting Shed
Material Required1 piece of any soft wood %"x5"xl2".1 piece of any soft wood ^^"x5%"x2' 6".
2 flat head bright wood screws IV^" No. 7.
2 doz. brads iy2" No. 18.
1 round head blued wood screw, 1%" No. 10, for fastening to a tree orshed.
Small quantity of outside paint.
Stock Bill
Pieces

64 FARM WOODWORK
1/4" chisel and a mallet or hamnier. The pot is fastened to the boardby placing and clinching a heavy wire as shown in the side view of the
draAving and draAving the pot tight against the board with the fourpieces of light Avire. lioles may be made thru the board Avith a 6d nail
for AA'ire to pass thru. The Avire is draAvn tightly so as to bring the
pot snugly against the board and fastened Avith poultry netting staples
as shoAA'n in the illustration.
FLICKER OR WOODPECKER HOUSEMaterial Required
1 piece of any soft wood %"x6"x2' 10".
1 piece of any soft Avood V2"x7V2"x6' 6'.
4doz. 1-2 " No. 18 brads.A small quantity paint.
Stock Bill
1 %"x6"x2'3%" Back2 V?"x6%"x23^/4" Sides1 y2"x7"xl9i2" . Front1 y2"x9"xl2" Roof
Directions
This house may be made for the Hicker, red-headed, golden-fronted,
hairy or doAvny Avoodpeckers, chickadees, nuthatches or titmice. Thediameter of entrance for the A^arious birds shall be as foIIoavs :
Ficker—2V2"; Red-headed Avoodpecker
—
2" Golden fronted wood-pecker—2"; Hairy Avoodpecker—li/^"; DoAvny Avoodpecker
—
^V^' \ Chick-
adee—IVs"; Nuthatch—li/s"; Titmouse—l".A color of paint should be used Avhich closely resembles the color of
the bark of a tree, so as to make the house as inconspiciious as possible.
Lumber:
Fig-. 1; Bag Holder.

F'ARM WOODWORK 65
>
Xoran3D
uc^
^

66 FARM WOODWORK

Pieces

68 FARM WOODWORK

FARM WOODWORK 69

70 FARM WOODWORK

FARM WOODWORK 71

72 FARM WOODWORK

FARM WOODWORK
POULTRY FEEDING TROUGHStock Bill
Pieces

74 FARM WOODWORK

FARM WOODWORK 75
POULTRY FEED HOPPER (FOR 25 BIRDS)Bill of Material
Pieces

76 FARM WOODWORK

FARMWOODWORK 77
It is understood that the box may be increased to any length to suit
the size of flock.
POULTRY FEED HOPPER (FOR 50 BIRDS)Bill of Material
Pieces

FARM WOODWORK
Oo"O
coto<D
o
a-
1)
Handle
nj
rr

FARM WOODWORK 79
S'flal fileAVv.\,v,\..A«\V\mv.A\\.\\\\\V\
, „ , .^. .^ w .......-^
(^^W^^WfWWW
c f^-2"
-6-6"
Hands,
niL.
zMeasuring vStandard for Horses
Ti nil I i Ti I I h I iTi I I 1 I I IT
Inches :z^ li


FARM WOODWORK 81
HAY RACKMaterial Required
Pieces222
81
5
4862221
Dimensions2"x4"xl6' 0"
2"x4"xll' 10"
2"x4"x3' 2"
I%"x4"x3'2"1 %"x6"x3' 2"
y8"x6"x3'2"%"x9"xl6' 0"
I%"x4"x6'2"y8"x6"xl6' 0"
I%"x4"x6'4"I%"x4"x5' 4"
y8"x3"x2' 11"
y8"x3"x2' 2"
y8"x3"x2oy2"
y8"x3"xi6y2"I%"x4"x6"
UseUpper stringersLower stringersLower stringers at frontCross ties
Floor sill at rearFloor sills
FloorArmsTop boardsFront standardRear standardsRear standard cross barsFront standard cross barbottom
Front standard cross barmiddle
Front standard cross bar topFurring
Hardware2 pieces of iron %"xl%"x33^4" trusses (old wagon tire).
2 carriage bolts %"xl3" front.
2 carriage bolts %"xl3V2" rear.
4 carriage bolts i%"xll" cross ties.
4 carriage bolts %"xll%" cross ties and truss.
4 carriage bolts %"x5" truss.
24 carriage bolts y4"x5^/2" boards to arms.14 carriage bolts ^/4"x4i/^" standards.2 %"x3' 3" rods for standards at bottom.
72 6q common nails for floor.
Directions
In making the iron truss for the wheel, clearance space measure-
ments should be made of the combined thickness of the floor sill and
cross tie and width of stringers. Any deviation from the dimensions
given on the drawing must be made in dimensions of the truss. If an old
wagon tire is available it will serve as well as new iron.
Quarter inch bolts are placed thru the upright members of the
standards at the lower ends to prevent their splitting.
Flat head wood screws may be used to fasten the floor boards to the
floor sills instead of the 6d common nails.

82 FARM WOODWORK
^
//h7'P -A-
o<

FARM WOODWORK 83
Pieces24
8
3621
21
1
1
HAY RACKBill of Material
Dimensions2"x8"xl6' 0"
2"x8"x3' 4"
2"x4"x5' 6"
l"xll%"xl6'0"I"x6"xl6' 0"
2"x4"x2' 6"
2"x4"x2' 10%"2"x4"x6' 0"
l"x3"xl' 11"
l"x3"xl' 7"
l"x3"xl' 3"
Hardware
UseStringersSills
ArmsFloorTop boardsFront postsCross bar at front postsFront standardsCross bar at front standardCross bar at front standardCross bar at front standard
16 carriage bolts %"x5" to fasten inside boards on arms.12 cari'iage bolts %"x4%" to fasten outside boards on arms, posts to
stringers and standards to posts.4 carriage bolts %"x6" to fasten cross bar to front standard.6 8d common nails to fasten cross bars into front standard.4 U bolts as shown in the detail drawing.
16 40d spikes to fasten sills to stringers.

84 FARM WOODWORK
— D
r-

FARM WOODWORK 85
WAGON BOXLumber: Poplar or basswood are desirable woods.
Pieces3
1
2
24
121
1
2
Stock Bill
Dimensions2"x4"x4' 2"
2"x4"x3' 2"
y8"xll"xl2' 0"
%"xll"x3' %"l"x9V2"xl2'0"%"x2"xll"%"x6"x2' 101/2"
I"xl0"x3' 2" oak or otherI"x3"x3' 2" hardwood
Hardware
UseCross sills
Front cross sill
SidesEnd gatesFloorCleatsFoot bof>vd
Axle supportAxle guides
32 wagon box rivets %"x3i,2" for floor boai'ds.
12 wagon box rivets %"x2" for rear end gate and side cleats.
16 wagon box rivets \i"yilV2" for rub irons, braces and foot boards.2 wagon box rivets %"x2i/^" for rear end braces.
8 wagon box rivets %"x2%" braces for front end gate and front side
cleats.
6 braces as shown in detail drawing.2 rub irons shown in detail drawing.4 rectangular washers as shown in detail drawing.8 wagon box strap irons as shown in detail drawing.2 front end gate braces as shown in detail drawing.2- wagon box rods.
4 doz. flat head wood screws for fastening axle support to box and axleguides to axle support.
31 ft. of beveled or half oval wagon box strap iron with screws.
Wagon boxes "usually wear out at the part over the rear axle. This may beprevented by fastening a 10" board beneath the box where it rests on the axle.
To hold the box in place cleats are fastened beneath the 10" board so that one will
be in front of and the other back of the axle. The distance between cleats is 3V2",3%" or 4" as determined by the width of the axle.
'^ttlg««'^ 'V'< : i*iis v._*'-fc!
"'/-"
Fig. J 8. Wagon Box.
Fit'. 19. Bottom of Wagon Box.

FARM WOODWORK
(
i
P.c-
:SlJi
13
=^^
u-

FARM WOODWORK 87
TOP WAGON BOXStock Bill
Pieces
2
2
Dimensions
%"xl0"xl2' 0"
%"xl0"x3' V4"
y8"x2"xl8"
%"x2"xl0"
T8"x4"xl8'
Use
Sides
End gates
Braces
Cleats at ends outside and
end gates
Cleats at ends inside
Hardware
24 wagon box rivets ^/4"x2".
8 wagon box rivets %"x2%".4 rectangular washers as for wagon box.
2 wagon box rods with winged nuts.
31 feet of half oval or beveled wagon box strap iron with screws for
fastening.
Fig. 20. Wagon Box with Top Box in Place.
Fig. 21. Top, Wagon Box.

FARM WOODWORK
I'4-'^*=='—*-
gj
-c'->-
^.Q a*9J».9 U^_9 J^_9U^_9J*-_9-L--,Q-.-
If.
iik-*^ -tiki-^^

FARM WOODWORK 89
STOCK RACK FOR WAGON BOXStock Bill
Pieces
16
4
Dimensions%"x6"xl2'0''y8"x6"x3' %"%"x4"x4'2"%"x4"x3' 6"
y8"x2"x3' 2"
UseSidesEnd gatesUprights for sides
Uprights for end gatesCleats at ends of sides
Hardware32 carriage bolts fV"xo" for fastening uprights to sides.
48 carriage bolts {s"x2^'2" for fastening end uprights and cleats at ends of
sides.
4 rectangular washers as for wagon box.2 wagon box rods with winged nuts.
Fig. 22. Stock Rack and Vv^agon Box.
Fig. 23. Stock Rack Knocked Down.
Fig. 24. Stock Rack for Wagon Box Assembled.

90 FARM WOODWORK
cO
•S!lb
c
^d^
<3I>
'.JoA^^A-y^s^. '|-i?^^^-^
T
'i^^s^^i^^i^'j^/y^-
f . ^-<«33=«->ec=Or--?^-.
^%^c-< t-i^^^-"'-^-^^^^^
3 OJ
_ 0)
0:5o
^ 3-D

FARM WOODWORK 91
SELF FEEDER FOR HOGSMany farmers claim distinct advantages in the self feeder for hogs.
Among others the following points are raised: (a) Less labor is required
than by the hand-feeding system, .(b) A smaller amount of feed is used
in making pork, (c) It allows the pigs to eat as often as they choose
and gives them free choice regarding the proportions and amounts of
the different feeds, consequently they are never hungry or gorged with
feed.
The size of a self feeder can only be determined by the needs of the
individual farmer.
Material Required
•2 pieces 2"xl0"xl2' 0" matched flooring.
1 piece 2"x4"xl2' 0" skids.
2 pieces 2"x4"xl0' 0" rafters and studs.
1 piece 2"x4"xl2 0" for triangular strips in comers of troughs.15 pieces l"x6"x]2'0" matched flooring (actual measurements iil"x5%"x
12' 0".
5 pieces I"x6"xl4' 0" matched flooring for roof.
2 pieces I"x6"xl2' 0" unmatched lumber, ridge board, sides and ends.2 pieces I"xl0"xl2' 0" unmatched lumber for slides, triangular blocks,
guides for slides, cleats for door.Lumber for desired cross partitions.
68 square feet of roofing paper.6 heavy strap hinges.1 lb. lOd. common nails.
2% lb. 6d. common nails.
4 2l^" bolts with thumb nuts.
Directions
If it is so desired the skids may be cut from a piece of 2" x 4" x 14' 0"
and allowed to project out at the ends of the feeder. By boring holes
thru the skids near the ends means are provided for hitching a team of
horses and dragging the feeder to any desired location.
Matched lumber which is designated V x 6" varies in width of
face. Some manufacturers make it 5i/^" face, others 5i/2"- The size,
514'' appears most frequently the dimension used and is the measure-
ment used in the drawing.
Cross partitions have purposely been omitted from the drawing as
the variety and amounts of the various feeds rest Avith the farmer. Amethod of constructing a cross partition is shown in the detail drawing.
The rooting should be placed over the hinges. A separate piece
should be placed over each door and the piece at top should lap downonto the door from IV2'' to 2".
The size of opening may be varied for different feeds from 1/0" to
S'^'^by use of the adjustable slides.

92 FARM WOODWORK
¥III- ~n TS^W
:.s^^r---^T7T7;M^
OzQ
auX01
"^X~i
El_ -t!j

F A R M W O O D W O R K 03
SHEEP FEEDING RACKBill of Material
UsePostsBasesEndsEndsEndsEndsEnds of trcughEnds below troughSides of trc ughTrough pai tition
Trough bol torn
Top boardsSlats
Lumber:

94 FARM WOODWORK
T
A
'^='^^^S^iii^i 'f^^'ii=hi'^(-^J^^^<^^£^
o
CDzQLJLJL_
CLLJLJH
<
UIMl
y- o .:
."
' 6uipig dojQ

FARMWOODWORK 95
kinds shown and thru his school farm shop Avork has acquired the knowl-
edge of tool manipulation to make it and thru his study of animal
husbandry in the classroom has acquired a desire to build it, the agricul-
tural high school has done much toward adding one valuable youngfarmer to the community's general worth.

96 FARM WOODWORK
O
QO
CC
o->—
DO
-dh-
4-'1^-
roT^
ro|>0
9"4
y
f
^B^
^SS3 EE
IT^(
g^vJ ksES3 te zr_
.G3-
h^^-L--J--L--1-1---
I I II I
Oo
aQ.
CO
o31
T5coauun00
->^ >^ .e
KWWM t^?=?'<J

FARM WOODWORK 97
Lumber:Pieces
21
744
261
1
1
SHEEP AND HOG SHIPPING GRATEBill of Material
Dimensionsii"x9%"x4' 0"
ii"x6"x23"ii"x4"x23"ii"x4"x21%"ig"x4"x2'
4"
il''x6"x4' 0"
ii"x4"x4' 0"
ig"x4"xl9%"irx6"x2' 6iV'%" round x4"
Hardware: 1 pound of 6d common nails.
UseBottomFront end at bottomEnds and top at endsTopCorner postsSides at bottomSidesGate support at bottomGatePin to lock gate

98 FARM WOODWORK

FARM WOODWORK 99
STITCHING HORSEBill of Materials
Lumber: Oak, maple, beech, birch or other hardwood.Pieces Dimensions Use
1 I%"xl0i^"x26" Seat4 li/4"xl%"x24i/4" Legs1 VA"xlVi"x21.%" Brace (left side)
1 %"x%"x23%" Brace (right side)
2 %"x%"xl3%" Braces (end)
1 %"xli^"x22" Lever1 iy2"x5"x20%" Post1 Ii/2"x5"xl6%" Clamp1 l"xl%"x5" Key
Hardware6 flat head bright wood screws 2^/2" No. 12 for fastening legs to seat and
brace to legs at left side,
6 flat head bright wood screws 1%" No. 9 for fastening braces at endsand right side.
7 round head blued wood screws 1" No. 9 to fasten lock on leg and catchto lever.
2 machine bolts i%"x3%" to fasten clamp to post.
2 fast joint steel butts \y2."y.\h'i".
1 coil spring l"x3".1 leather strap l"x44".1-1" harness buckle.3 lining nails to fasten end of strap to clamp.1 piece of heavy wire 2 ¥2" long to
hold strap in place on lever.
1 piece of metal ^"xli/^"x5" for
the lock.
1 piece of metal %"xl^/^"x2%" for
the catch.1 piece of metal %"xl"x5V2" for
the U iron.
2 machine bolts %"x2" to hold theL" iron to brace and lever in Uiron.
Directions1. Reduce all pieces to finished di-
mensions.
2. Dra-w a centerline lengtliwise of
the seat piece and also lines across the
stock 514" from each end, and at the
intersection of lines swing arcs with a
51/4" radius.
3. With the compass set at 9%".
swing an arc at each side tangent to
the arcs at each end.
4. Remove stock to line with a lui'u-
ing saw\ keyhole saw, or by makingsaw kerfs to the line and removing the
stock Avith the draw shave. The edge
may be smoothed with a wood file.
5. The stock on the upper side of
the seat Avhere the worker's legs rest
on the seat may be further removedwith the draAv shave and smoothedW'lth the AVOOd file. p;g ^3. Front Vitw of Stitchinff Horse.

100 FARM WOODWORK

FARMWOODWORK 101
6. To lay out the mortise for the post on the seat locate a point onthe line across the front end of the seat 1/4'' from the centerline as shownin the detail drawing. Set the T bevel at Yg pitch using the figures 12
and 3 or 4 and 1 on the steel square and draw lines for the sides of the
mortise. The end lines of the mortise are at right angles to the sides.
The mortise extends thru the seat at the above angle and the T bevelmay be used as a guide in boring out the stock.
7. Remove the stock for the mortise with bit, chisel and mallet.
It may be noted in the detail drawing that the mortise is 1%" x 3i^''.
8. Set the T bevel at 2214" and 4%" on the steel square and lay out
the cuts at both ends of the legs and left side brace. A shoulder is cut at
the upper end of the legs 1" from the end so that the end will go into
the %" holes which are bored in the lower side of the seat.
9. At a point 6" from the lower end of the left legs and on the
inside lay out gains I/4" deep and II/4" wide across the stock to receive
the ends of the left side brace. The stock may be removed Avith the sawand chisel, making the saAv kerfs close together. Use the T bevel as
set for the ends of the legs. This will place the top and bottom edge of
the brace parallel to the floor when the horse is assembled.
10. Assemble the brace and left legs by the use of one 2^/2" No. 12
flat head bright wood screw at each joint. The holes for all flat headscrews should be countersunk so as to place the screws sligltly beloAv
the surface of the wood. In placing screws it is well to use two woodtwist drills; one the diameter of the wire of the screw to bore a hole as
deep as the screw up to the thre id on the screw and another ^^2'' smaller
to bore the hole slightly deeper.
11. Locate points on the inside of all four legs on a centerline
and 8'' from the bottom end of the legs and bore %" holes %" deep for
the ends of the end braces. The holes are bored at the same angle as
is used for the ends of the legs. The ends of the braces are roui'ded
so as to draw snugly into the %" holes.
12. Locate points on the two right legs 31/^'' from the bottom (mdsand bore %f' holes for the right side brace.
13. Fasten the braces to the legs by using one 1%" No. 9 flat headbright wood screw at each joint.
14. Lay the seat on the bench with the bottom side up. D^'aw a
centerline lengthwise of the stock and lines across the stock 51/4'' fromeach end. Locate two points on each line across the stock 4" frcm the
centerline. At these points bore %" holes 1" deep, using the T bevel
set as for the ends of the legs for a guide.
15. With a twist drill of the size of 2i/^" No. 12 screws continue
the holes thru the seat from the same side. Countersink the hole } fromthe upper side of the seat,
16. Place the legs in position and with a twist drill ^V smaller
than the above bore a hole into the top end of each leg for the screws.

102 FARM WOODWORK
17. Fasten tlie seat to the legs using one 21/2" No. 12 flat headscreAv at eaeli joint.
18. By use of the T bevel as set for the mortise thru the seat lay
out the loAver end of the clamp and post and remove the stock M'ith
saws as shoAvn in the detail drawing of clamp.
19. Lay out the mortise for the key thru the post at the dimensions
sho\\n in the detail drawing cf the clamp. Remove the stock with bit>
chisel and mallet.
Fig. 24. Side View of Stitching Horse.
20. To lay out the clearance space on the clamp and post, dra\v
seven lines across the inside and both edges of each as shown in the
detail drawing; the first %" from the end and the others 2" apart.
Locate points on the lines across the edges as shown in the detail drawingand lay out the curves free hand. The stock may be removed by making-
saw kerfs close together acrcss the stock and removing the wood with
the chisel and draw shave. The surface may be smoothed with a woodtile.
21. Draw lines across the upper ends of the post and clamp 1/4" fromthe inside edge and a liiu' across 1he outside of each 2%" from the end.

FARMWOODWORK 103
Lay out a curve free hand for rounding the corners and remove the stockwith the draw shave. The surface may be smoothed with the wood file.
22. Draw a line across the outside of the clamp, 10" from the
loAver end, and on this line make an opening for the strap thru bothclamp and post, using the %" bit as shown in the detail drawing.
23. Bolt the clamp and post together with two 5/16" x 31/2" machinebolts placed as indicated in the detail drawing.
24. Place the two steel butts as shown in the detail drawing 4"
from the lower end of the clamp.
25. Remove the hinges and saw the clamps in two below the center
of the hinges; then replace the hinges. If it were sawed first and then
the hinges pliiccd in position the claniD would drop down the thickness
of the saw kerf and not match at the top with the post.
26. Shape the key as shown in the detail drawing of the key.
27. On a line drawn parallel to the side of the mortise and 2%"from the side of the seat and 6" from the front end of the seat, make a
slot through the seat 5/16" wide and IVs" loi^g for the strap to pass thru.
28. The coil spring is placed directly below the strap between the
clamp and post. It may be held in place by bending al)out %" of one
end of a Avire at a right angle to the length of the spHng and forcing
this l)ent end into a hole in the post.
29. Cut a piece of galvanized iron or other heavy sheet metal 1"
X II/4" and bend to a right angle as shown in the detail drawing; place
it in the strap opening in the post and fasten with two small flat headscrcAvs.
30. With the hack saw cu^ a piece of metal for the lock I/4." x II/2"
X 5". The notches are I/2" deep and shaped as indicated in the detail
drawing. They are cut with the hack saw and the corners are rounded"with an iron file. Centerpunch for holes for the screws as shown anddrill 3 16" holes, using the drill press or breast drill. Fasten the clampto the right front leg Avith four 1" No. 9 round head blued r>creAvs so
that the loAver end is 51/4" from the bottom of the leg.
31. By use of the hack saAv cut a piece of metal for ihe catch
14" X 11/2" X 21/^", heat to a cherry red heat and forge to the formshoAA-n in the detail draAving. If a forge is not available it may be filed
or ground to the foim and bent slightly Avith hammer and \dse. Centei--
punch for three holes and drill f\j-" holes. Fasten to the top edge of the
lever Avith three 1" No. 9 round head blued scrcAA^s.
32. Cut a piece of metal AAdth the hack saAv I/4" x li/^" x 5I/2". Cen-
terpunch for the holes and bore three 1/4" holes as indicated. Heat the
metal to a cherry red heat and bent to a U form to the dimensions shoA\'ii
in the detail draAAdng.
33. Bore a y^' hole thru the left horizontal brace at a point 2"
from the front end and fasten the U iron in place Avith a 1,4" x 2"
machine bolt.

104 FARMWOODWORK
34. Bore a i/4" hole thru the left end of the lever and fasten into
the U iron with a i/4" x 2" machine bolt.
35. rile both ends of the 2I/2" heavy steel wire to a point; bendI/2'' of each end at a right angle. Drill holes and fasten to the lower edge
of the lever so as to hold the strap at 7" from the lower end of the lever.
36. Fasten the buckle to the end of the strap; strip a leather loop
on the strap ; draw the strap around the lever thru the bent wire guide
and again thru tlie leather loop and thru the buckle. Draw it up thru
the slots in the seat, post and clamp and fasten to the outside of the
clamp with three lining nails.
37. With the belt punch make holes in the strap 1" apart anddraw the strap up so that the lever works the clamp and locks it.
38. Wood deteriorates in value and strength as it constantly in-
creases and decreases in moisture content. This may be largely pre-
vented by covering with a coat of paint or shellac. It is suggested that
the stitching horse be finished Avith two coats of shellac.

FARM WOODWORK 105
Bill of Materia
1 piece i|'x34Aia' softwood
2 pieces ^J|')(4|x 14' hardwoodI piece ]|'a 2^x3^ hardwood
10 -i|"No 12 flaf head screws
£- 4' lag screws fo>' fasten-
mq io post or wall
harne:55 hook

106 FARM WOODWORK

F A R M W D W R K 107
APPLE BOX PRESSBill of Material
Pieces Dimensions Use1 I%"xl2"x5'0" Sill
4 y8"x4"x2' 6%" Legs2 %"x3"x23%" End leg braces at bottom1 %"x3"x2' 4" Leg brace, bottom at back2 % "x2"x2' 4" Leg braces at front2 I%"x4"xl5^/^" Upper cross braces1 l%"xl%"x24" Lever1 I%"x5%"x2'4" Upper lever
4 I%"x3%"x5%" Cross pieces at top2 %"x2"xl2" Box rests at top2 V2"xl"x8" Nail tray1 y2"xl"xll" Nail tray
Hardware
3 ft. T^;" round iron for draw rod, eyebolt, staple and hook.6 ft. 4 in. rectangular iron % "xl% " for draw bars, clamps, locks and plate.
3 -ixs" nuts and washers for draw rod and eye bolt.
2 carriage bolts %"x6" to fasten lower end of draw bar to ends of upperle^'er.
2 machine bolts ^/i"x2^/4" to fasten hook to foot lever.
4 machine bolts %"xlV2" to fasten lock to front cross bars and staple to
back leg brace.4 iron rivets with counter sunk head to assemble draw bars and clamps.
3 %" No. 7 round head blued wood screws to fasten plate to top of footlever at lock.
2 doz. flat head wood screws 2" No. 10 to fasten legs to sill and uppercross braces.
26 flat head wood screws 1^/^" No. 9 for fastening all leg braces.1^/2 doz. 1%" No. 16 brads to fasten pieces of the nail tray.
8 8d common nails to fasten cross pieces at top.
4 6d common nails to fasten box rests.
2 coil bed springs or heavy coil push springs.
Directions
After the box has been packed it is placed on the box press. Thebox rests set the box up %" from the sill and as the pressure is applied
on the clamps the bulge in the bi3x is distributed evenly between top andbottom of the box. If 20" boxes are used pieces narrower than 2" maybe used for the rests.
The draA^- l^ar should be provided with several holes at the bottom
end so as to provide for different sizes of boxes.
Oblong openings are cut thru the sill for the draw bar. These
openings must be long enough to permit the clamps to fall away fromthe box when the pressure is removed.
The sill is purposely made long so as to provide a shelf where boards
and cleats for the top may be conveniently placed.

108 FARM WOODWORK
'2
^Chamter-
'2'
Ovc)^\o\-c^ \.o(:^6e.r

FARMWOODWORK 109
ORCHARD LADDERMaterial Required
Oak, ash, maple or other hardvi'ood is recommended.Pieces Dimensions Use
2 T4'x4" tapered to 2"x9'4" Main standards
1 %"x2''x2'2" Point of ladder2 %"x4"x2'8^" Bottom braces1 %"x2"x21%" Bottom step
7 y8"x2y2"xl4" steps1 %"x3" tapered to 2"x8' 10" Back standard1 %"x2"x5' 6" Top member of back
standard3 carriage bolts %"x3" to bolt point between main standard and to pivot
top of back standard,1 carriage bolt %"x3%" to fasten chain to main standards.1 large screw hook.
40 flat head wood screws 2V2" No. 12 for fastening steps and top memberof back standard.
6 flat head wood screws 1^/^" No. 9 for fastening upper ends of bottombraces to main standards.
4' 6" of a substantial chain.
Directions
1. Reduce all pieces to the required dimensions.
2. Lay out and cut gains I/4'" deep and 2" wide for the steps in the
upper edges of the main standards.
3. Shape the upper edge of all steps except the bottom one as
shown in the detail drawing. This is a means of preventing the feet
from slipping from the ends of the steps.
4. Place the point between the main standards at the upper endand fasten in place with two y^" x 3" carriage bolts,
5. Fasten all steps in place using two 21/2^' No. 12 flat head screws
at each joint. The two main standards are left 1" apart at the bottomso that the back standard will drop between them freely.
6. Place the bottom braces in position and mark off the places for
the gains for the first and second steps. Cut the gains for the steps andfasten the braces to the main standards with three II/2" No. 9 screws at
the top and two 21/2" No. 12 screws for the bottom step.
7. Place the top member of the back standard on the top edge of
the back standard and fasten by using five 2I/2" No. 12 fiat head Avood
screw^s.
8. Fold the back standard in between the main standards and bore
i. 1/4" hole at top for pivot. It will be noted that the hole for the bolt
does not go thru the center. Fasten back standard in place.
9. With the back standard folded in bore a hole for the I/4" bolt
which is to hold the chain at a point half way between the fourth andfifth steps and %" from the front edge of the standards. Fasten one
end of the chain in place.
10. Fasten the large screw hook into the bottom edge of the backstandard so that when the ladder is folded the hook will come betweentlie fourth step and the chain bolt.
11. Finish the ladder by applying at least two coats of paint.

110 FARM WOODWORK

FARM V/ O O D W R K 111
Pieces21
1
1
1
1
2
FRUIT STEP LADDERStock Bill
Dimensions

112 FARM WOODWORK

FARM WOODWORK 113
ORCHARD LADDER
Pieces221
1
4221
Many ladders of diversified de-
sign, are used for orchard purposes,
For orchard purposes the common
step-ladder has the disadvantage of
four supports and narrow spread of
standards which make it unstable
on uneven ground. The painters' lad-
der needs to be supported at the up-
per end by leaning against the limbs
of the tree which is often harmful to
the tree and usually rather unstable.
The three-legged ladder with wide
spread of standards has the advant-
age of stability on uneven ground
as well as on the fiat surface. It is
also light and tall enough for most
orchard purposes.Fig. 26. Orchard Ladder.
Dimensionsfi"x4"x4' 2"
}i"x4"x2' 8"
Ii-"x8y2"xl5"il"x4%"x24y2"ii"x4%"xl0%"ii"x3"x8"Ii"x2y2"x8^4"
Bill of MaterialUse
StandardsBottom standardsTopBottom stepStepsUpper rod braceCleats
MaterialWhite pine,
cypress, bass-wood, orother soft
wood.
'x3" tapered to 2"x5' 2" Brace
Hardware1 iron rod %"xl4i^" with two nuts and two washers.
38 flat head bright wood screws 1%" No. 9 or 10.
18 flat head bright wood screws 1%" No. 8 or 9, for cleats and upper rodbrace.
2 pieces flat iron %"xl"x8" for braces.1 machine or stove bolt %"xl%''.2 flat head stove bolts 1%".1 piece substantial chain 1%", 20" long, or 1 piece canvas strap 1%",
20" long.
Directions1. Reduce all pieces to finished dimensions.
2. Set the T bevel at 1" on the blade and Si/g" on the tongue of the
steel square and lay out both ends of all standards, and remove the stock
to line with the cross-cut saw.
3. With the T bevel set at the same angle as for the standards, lay
out a dado 3/16'' deep for each end of each step on the inside of each

114 FARM WOODWORK
main staiulard at the lueasuremeiils shown on the drawing and remove
the stock with a %" or %" chisel.
4. Using the T bevel as set for the above lay out the ends of the
cleats and remove the stock to line with the saw.
5. Lay off the upper end of the upper rod braces with the T ])evel
set as for the standards and remove stock to line with the saw.
5. Cut a slant to the lower ends of the upper rod braces as shownon the drawing so that they may be fastened to the standards with
sercAvs. Remove stock wdth saw^ and smooth with plane.
7. Round the upper end of the brace. To do this, draw a center
line lengtliAvise of the stock on both sides and on this center line swing
an arc with a l^/o" radius IV2" from the end. Remove stock Avith saw
and smooth with chisel.
8. Set the T bevel at 2" on the blade and 41/8'" on the tongue of the
steel square and lay out the lower end of the brace. Remove the stock
to line with the saw.
9. The cheek cut on the inside of the bottom standards at top is
laid out by use of the steel square. Lay the square on an edge of the
stock, using the figures 12'^ and 4^^". Place the figures 12" on the outside
edge at the end and the figure 4^2" on the same edge dowai on the stock
and draw the line. Lay out on both edges. Remove the stock Avith the
saAv.
10. Bend the irons for the braces as shoA\n in the draAving. Theymay be bent cold if securely held in a metal vise.
11. Centerpunch for the holes and bore %" holes at upper ends and1,4" holes at the loAver ends of the braces, using the drill press or breast
drill.
12. Bore a %" hole thru the upper end of the brace at center to
receiA^e the rod.
13. The first parts to be assembled are. the steps and main standards.
Use two 1%" No. 9 or 10 flat head Avood screws at each joint. Bore holes
for the screAvs, using a tAA'ist drill, thru the standards and countersink
the holes. Clamp the parts firmly in place and force the screAA^s into the
ends of the steps.
14. Fasten the bottom step to the loAver ends of the front standards
by use of tAvo 1%" No. 9 or 10 Avood sereAvs.
15. Fasten the bottom standards to the ends of the bottom step
by using tAvo 1%" No. 9 or 10 Avood scrcAvs for each joint and three
similar screAvs to secure the upper ends of the bottom standards to the
sides of the upper standard.
16. The top is fastened by using eight scrcAvs, four at each end, tAvo
thru the top and into the lop end of the standards and two into the
upper rod brace.
17. Fasten the cleats to the upper I'od brace and standards l)y use
of eight lyo'' No. 8 or 9 Avood scr('A\s as show n in the draAving.

FARM WOODWORK 115
18. Bore a %" hole thru the cleat and upper rod brace at eachside at point shown in the drawing and assemble brace, iron braces androd. It may be noted that the rod is threaded at both ends. This is
easier to make than to forge a head on a rod and is quite as satisfactory.
19. Bore a 1/4" hole thru the brace and fasten the iron braces to
brace with 14" x 1%'' bolt.
20. Stand the ladder in upright position with the top level, measurelength of chain required for position indicated in the drawing and fasten
to step and back standard with stove bolts.
21. Finish the ladder by applying two coats of exterior paint, allow-
ing the first coat several days to become thoroly dry.

116 FARM WOODWORK
Double Deck Qerrij Stand(for twelve boxes)
IZL.
3 '
-npf4n -a 61 n -< 1
\3^ 12'
derrtj Siand(for 5lx boxes)

FARM WOODWORK 117
Fig. 27. Double Deck Berry Stand.
DOUBLE DECK BERRY STAND (For Twelve Boxes)Bill of Material
Pieces Dimensions Use2 %"xl2"xl5" Ends4 %"x2%"xl9V2" Sides8 %"x2%''xl8" Bottom1 %" round 18 1^" long HandleAn old broom handle makes an excellent handle.
Hardware: 2 flat head bright wood screws 2" No. 10 for fastening handle.6 doz. 6d finishing nails.
Slats %" instead of \%" may be used for sides and bottom.
BERRY STAND (For Six Boxes)
Bill of MaterialPieces

118 FARM WOODWORK

FARM WOODWORK 119
APPLE PACKING TABLE FOR BOX APPLESMaterial Required
Lumber: Any soft wood.Pieces Dimensions Use
4 2"x4"x3' 0" Legs6 y8"x3"x4' 3" Braces2 %"x6"x4'0" Ends2 y8"x6"x3' 10%" Sides2 T3"x6"x'i'0" Rests for box4 y8"x2"xlO" Shelf brackets2 y8"xl0"x3'6%"
^^ ^
Shelves2 pieces of canvas or ticking 3' 2"x4' 2".
^'2 lb. 6d. common nails.
1 package tacks.
Directions
This apple i)ackino' table is one Avhich has been found quite satis-
factory where box jjaeking of apples is done. It is designed for twopackers ; one at each side, with a box before him which rests in a tilting
position on the two boards provided for that purpose.
Shelves are placed iniderneath at one end of the tal)le wliere sup-
plies of lining paper, layer paper and wrapping paper may be kept.
More and wider shelves may be provided if desired.
The inside corners of the legs at the top are sawed off to prevent
their bruising the apples.
The first layer of canvas is tacked securely all round the top edge
of the table. The upper piece is tacked at one end only. This enables
the packer to shake off quickly any dirt which may accumulate on the
table.
The sizes of boxes are usually used
:
a. Standard, IOV2" x 111,4" x 18" inside measurement.
b. Special, 10" x 11" x 20" inside measurement.
The detail draAving shows a hod for holding the wrapping paper.
The angle irons at the open end hook over the edge of the box and hold
it in place.
The hod may be made of iv." or %" nmterial so as to make it light
and facilitate its placing on and removal from the liox.
This makes it convenient for the packer to pick up a sheet of wrap-
ping paper with one hand while the other hand picks up an apple.

120 FARM WOODWORK

FARM WOODWORK 121
PACKING TABLE FOR BARREL APPLES

122 FARM WOODWORK

FARM WOODWORK 123
A VISE HANDLE
Material Required
1 piece of oak, maple, ash or other hardwood %"x%"xl2".1 piece of oak, maple, ash or other hardwood l%"xlV2"x4".2 flat head bright wood screws %" No. 7.
Directions for the Knobs
1. Reduce a piece of stock to the dimensions called for in Fig. 1.
2. Lay out an octagon at an end of the stock as shown in Fig. 6.
3. Draw lines on the sides of the stock as indicated in Fig. 2.
4. Remove the corners as shown in Fig. 3 using the plane ; when
the four corners are removed thus making an octagonal stick, plane off
the new edges until the stick is round as shoAvn in Fig. 4. The plane
should be set fine for the last cuts.
Directions for Handle
1. Reduce a piece of hardwood to the dimensions called for in Fig. 7.
2. Lay out octagons at both ends as indicated in Fig. 8.
3. Draw lines on sides of stock as show^n in Fig. 9.
4. Bore a %" hole %'' deep in each end of the piece of stock as
indicated in Fig. 9.
5. Plane the corners so as to make the stock octagonal in shape
Fig. 10 and continue planing the corners until the stock is round, Fig. 11.
6. Saw the block in two in the center as shoAvn in Fig. 11 and
round the ends as indicated in Fig. 12.
7. Place one knob on the stick and fasten witli a %" No. 7 flat head
screw. Fig. 5.
8. Place the handle on the vise and fasten the other knob in place.
Since vises vary in diameter of handle required it is suggested that
measurement be taken before starting the handle and the diameter of
stick regulated accordingly.
It is also suggested that this method be used Avherever it is required
to make a round stick of any size.

124 FARM WOODWORK

FARM WOODWORK 125
Root 51udLj
Soil Sieve

126 FARM WOODWORK
5i ^cn rn ^ ^ ^ ^ O
O) O- ^ P co o _to "^ X
CU (D
CU c\J g^ QQ b -^— .*< - X .^ X X XD ^TN-'^Tf^ V V ^C .^ X X
Ol fU CU
Ooo
oQ_
o
a
_ o] ^ ^t- Ql -!!y (/)

FARM WOODWORK 127
ESI
Table j x la" x 24'
Washer
Thumb nut
33^ -^ Cleat Jxs"aio"
Tripod table ^xa'xio"
Target and Clamp
Prow spring
^m/kTarget Rod
5" \^e\o\ forget
-^i^
P\on& Table ond Leveling l?od

128 FARM WOODWORK
Q-

FARMWOODWORK 129
SAW FITTINGThere are many cross cut saws of varying designs in use in the lum-
bering industry, but for general farm use selection may be made from
the four illustrated in the drawing. Figures A, B, and C are of saws
suited for general use. Fig. D shows a shape of tooth better suited for
knotty lumber.
The tools required for cross-cut-saw fitting are as follows
:
1 cross-cut-saw tool which consists of a jointer, a raker-tooth
gauge and a tooth set gauge.
1 saw set.
Several flat files.
The essential features of a well fitted saw are
:
1. All teeth must be of the same length and all points come to the
same plane so that each tooth will do the same work as each other tooth.
2. All rakers must be not less than 1-100 nor more than 1-32 of an
inch shorter than the cutting teeth and must be filed to sharp chisel-
shaped edges.
3. All teeth must be filed to a sharp point.
4. All teeth must be uniformly set so that the saw^ draws freely
thru the wood.
JOINTING, SETTING AND FILING A GROSS CUT SAWThere are four operations in bringing a cross cut saw to a good cut-
ting condition: (1) jointing; (2) filing down the rakers; (3) setting the
cutting teeth; (4) filing the rakers and cutting teeth.
A saw is jointed by holding the file in the saw tool as shown in
Fig. 29 and, holding the file on the teeth and the saw tool tightly against
the side of the saw, drawing the file lengthwise over the saw until all
teeth and rakers have been touched.
To file down the rakers the saw tool is placed on the teeth so that a
pair of rakers projects up thru the slot in the tool. Fig. 30. All that part
of the rakers which projects up thru the slot is filed off so that the points
of the rakers will be below the points of the cutting teeth. The distance
which the rakers are below the points of the cutting teeth may be varied
according to the kind of wood which the saw is to be used for. The rak-
ers should be not less than 1-100 of an inch nor more than 1-32 of aninch shorter than the teeth. Soft woods may have a greater distance
than hard woods. If the saw has a tendency to jump when in use the
rakers are too long and need to be filed down and sharpened.
About 1/4" of the point of each tooth is set. This consists of placing
the saw set on a tooth and pressing the tooth out so as to make the sawkerf wider than the blade of the saw. Begin at one end and set everyother tooth to one side, then reverse the saw and set the other teeth in
the opposite direction. The amount of set to give a saw is determined bythe use that the saw is to have. Green and wet lumber require more set
than dry lumber. The set of the saw is regulated by the set screw at the
bottom of the saw set.

130 FARM WOODWORK

FARM WOODWORK 131
The rakers arc filed to a chisel point. Effort should be made to
keep all of the rakers the same shape and size and the filing regulatedwith this in mind. Since the purpose of the rakers is not to cut but to
draw the cut particles of ^\ood lengthwise of the saw kerf and out, theyshould be kept true and straight and may be filed from one side of the
saw. The file is held straight across the saw. Great care must be takennot to bring either tlie rakers or the cutting teeth below the surface to
which they have been jointed as that will render them out of cutting or
rakinsr service.
Fig. 29. Fig. 30.
To file the teeth, the saw is placed low in the clamp so as to hold it
firmly and minimize the vibration. All the teeth projecting aw^ay fromthe filer are filed from one side. Both edges of the tooth are filed the
same because the saAv is to cut both ways. The file is held at an angle
asr shown by the points of the cutting teeth in Fig. C. and by forwardstrokes of the file the tooth is brought to a point. When all the teeth
projecting to one side have been filed the saw is reversed and the teeth
projecting in the opposite direction are filed in the same w^ay.
If a saw has been used extensively and filed so that the teeth are
short it should be gummed. This consists of grinding a slot down into
the lilade between the teeth with a thin emery grinder.
When not in use, the blade of the saw should be covered mth a coat
of oil to prevent rusting. If a saw has become rusty it should not be
cleaned with coarse emery cloth or coarse sand paper or other substance
or preparation that will scratch the surface of the metal. No. or 00
sand paper or 00 emery cloth or kerosene oil may be used.
FITTING HAND SAWSThe tools required for fitting hand saws are
:
1 flat file.
Several slim taper triangular files—size determined by the fine-
ness of saw.
1 saw set.
The first point to observe in fitting a saw is to make sure that the
points of all teeth are in the same plane, so that no tooth projects out
farther than any other. This is accomplished by running the side of a flat
fife lengthwise over the teeth and is called jointing the saw. The file is

132 F A R M W O O D W O R K
run over the teeth enough times to file all teeth down to the same plane
as that of the point of the lowest tooth. The file is held so that the side
of the file stands at right angles to the side of the saw. The file is held
in both hands with the thumbs and balls of the thumbs resting on the file
and the index fingei's closed and under the file. The saw fits up betAveen
the index fingers. By holding the saw^ in this way it is under the control
of the operator.
The second point in fittiiig a hand saw^ is setting the saw. This
should be done before filing it. All teeth must have an equal amount of
set to make all do the same amount of work. The set should not go be-
low half the length of the tooth. Soft and wet woods require more set
than dry or hard woods. Setting a saw consists of bending the teeth
outward, every alternate tooth to the same side. In cross cut saws the
teeth are bent away from the bevel side of the teeth.
The third operation in fitting a hand saw is that of filing the teeth.
Care should be taken when filing to keep the teeth of a uniform size andshape. This is accomplished by bringing the pressure of the file to bear
on the large tooth and not on the small ones. In sharpening a cross cut
saw the point of the file should point toward the handle of the saw andbe held at an angle of about 45 degrees. The filer works against the front
or cutting edge of the teeth. Every alternate tooth is filed the whole
length of the saw, then the saw is reversed in the clamj) and the alter-
nate teeth are filed. Only forward strokes of the file are used.
The angle or pitch at which the teeth of a cross cut saw are filed
depends on the use which is to be made of the saw. Fig. F in the draw-
ing shows the angle best adapted for genei-al work. Hardwoods require
less pitch than softwoods.
The bevel of the teeth of a saw is determined by the use to he madeof the saw. Hardwoods require less bevel than softwoods. The bevel is
regulated by the position or angle at which the file is held across the saw.
For a general purpose crosscut saw the file is held at an angle of about
45 degrees. This Avill result in a bevel as shown in Fig. F in the drawing.
Buck saws may be filed Avith the file at 80 degrees to the side of the
blade. The angles of the teeth which are 56 and 62 degrees are illus-
1i-a1c(l ill Fig. E in 1lio drawing. These angles vary in different makesol saws.
As illuslraled in Fig. D in the drawing the angles of the teeth of rip
saws ai'c 90 and (iO degrees. In filing, the file is held straight across the
saw which makes a sei-ies of chisels of the saw jioints. The thrust of the
saw in ripping should be at an angle of about 45 degrees.
Saws are designated by the length of blade and the number of teeth
to the inch. Rip saws are to be had ni :>. SV^, 4, iVi, 5 and 5yo points
to the inch. For hardwoods, medium hardwoods, and for fine work the
5 or 51/) point rip saw is to be preferred.
It may be noted that the saws shown in Figs. F and G in the drawingare 5 point saws.
Cross cut saws are to be had in 4, 5, 6, 7, 8, 9, 10, 11 and 12 points to
the inch, l-'oi' general use a 7 or S ])()in1 is to be i)refei']'ed. For fin^
work a 10, 11 or 12 point gives belter sei'vice.

FARM WOODWORK 133
LIST OF BUILDERS' HARDWARE EVERY BOYSHOULD KNOW
Lock:rim lockpad lock
mortise lockrim door latchcupboard lockdrawer lockscreen door catchesbarn door latchgate latchthumb latchscreen door latchscreen hangersdoor button
Hasps and staplesSafety gate hooksBarn door pulls
Eye bolt
Hitching ringBai'n door bolt
Barn door catchBarn door trackBarn door rollers
Barn door stay rollers
Steel hay carrier trackHay carrier
Rafter bracket for hanging hay car-
rier track
Hay carrier track hanging tool
Floor hookSwivel rope hitch
Wood frame pulley
Floor pulley
Cast fi-ame plain pulley
Cast frame knot-passing pulley
Windows, common sizes of glass andnumber of panes to window.
Cellar window set, i. e., one pair butts;one hook and eye
Sash cordSash pulleySash lifts
Sash weightsWrought barrel bolts
Carriage bolts
Machine bolts
Stove bolts
Plow bolts
Expansion shieldsCommon nails
Casing nails
Finishing nails
Round head blue wood screwsFlat head bright wood screwsWashersLock washersWagon box rivets
Oval head rivets
Set screwsSpiral door spring with screen door
set hook and eyeDoor pull
Hinges:loose pin buttsriveted pin buttsheavy T hingeslight T hingesheavy strap hingeslight strap hingesstrap hingeshook and eye hinges

134 FARM WOODWORK
LUMBER MEASUREMENT TABLE

FARM WOODWORK 135
NAILS AND SCREWSWire nails is an ordinary name applied to common nails, casing nails,
and brads, or finishing nails. They are made from steel wire. Commonnails have flat heads and are used where the heads are to be left flush
with the surface of the wood. Casing and finishing nails are used whenit is desirable to have them as inconspicuous as possible, as for inside
finish. They are sunk, or "set," into the wood and the holes are later
filled with putty.
The size of a nail is specified by the term penny (d), prefixed by a
number; as, 6d, lOd. This term had its origin in England, where it for-
merly represented the price per pound in terms of pence.
Number of Nails to the PoundNumber per pound
Size

136 FARM WOODWORK
Fascia 8d casingFraming lOd, 16d and 20d commonFrieze lOd casingFinish floor 8d casingHandrail 4d and 6d casingInside Casing 6d and 8d finishing
Inside mouldings 6d finishing
Lath 3d fine
Lap siding 6d casing and commonNewel post 8d casingOutside moulding 8d and 6d casingOutside casing 8d and lOd casing'Plancher 8d casingRoof boards 8d commonRafters lOd and 16d spikes
Ridge board 8d commonRough flooring 8d commonRisers 8d commonSaddle board 8d and lOd commonShingles 3d coarse galvanizedSheathing 8d commonStair stringers 16d commonTreads 8d casingWainscoting 6d commonWindow frame 8d commonWater table 8d common
Other fastenings which are most extensively used in carpentry workare dow^els and flat and round-head screws. In timber framing, the joints
are usually fastened with dowels made of hardwood, preferably maple.
Flat-head bright screws are most commonly used. Hinges are usually
fastened with screw^s of this kind, as the head of the screw sets flush with
the surface. Round-head blued screws are used where it is not necessary
to have the heads flush wdth the surface, and when the screws become a
part of the decorative scheme.
TABLE OF BIT SIZES FOR WOOD SCREWS


LIBRARY OF CONGRESS
013 974 055 5 •