1. TORIMON-USB Information - NIDEC-SHIMPO CORPORATION · 1. TORIMON-USB Information Toriemon USB is...
23
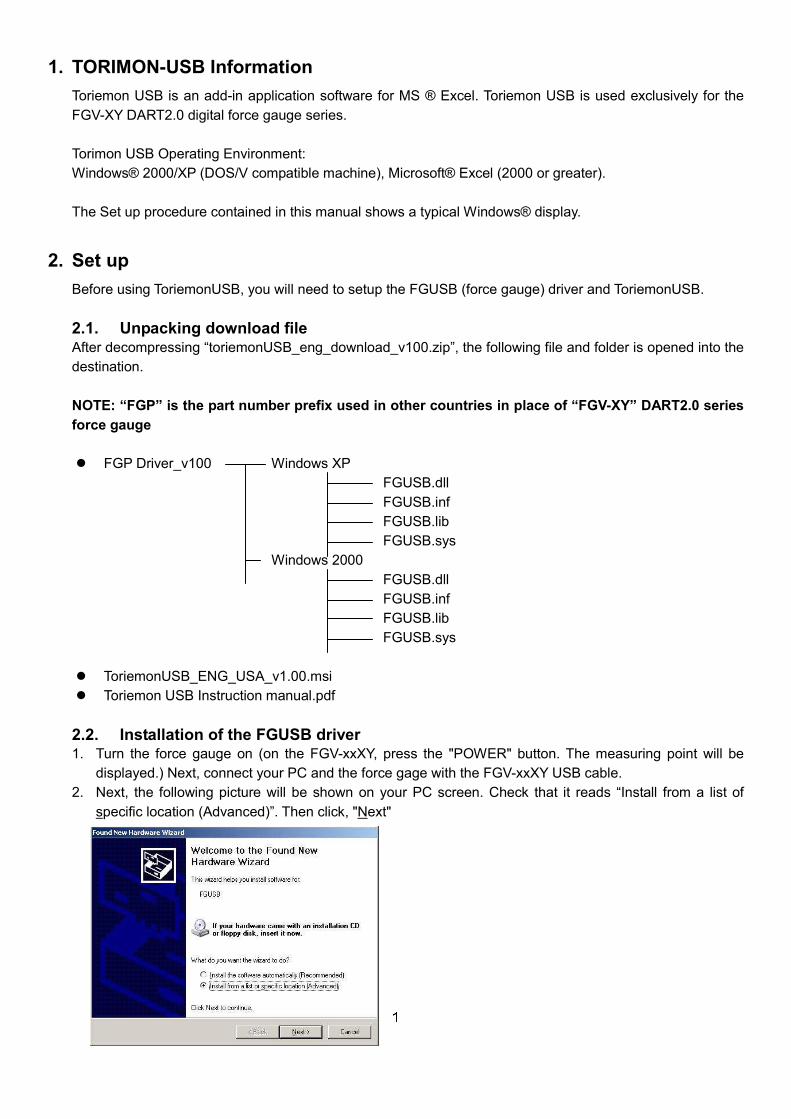
1. TORIMON-USB Information Toriemon USB is an add-in application software for MS ® Excel. Toriemon USB is used exclusively for the FGV-XY DART2.0 digital force gauge series. Torimon USB Operating Environment: Windows® 2000/XP (DOS/V compatible machine), Microsoft® Excel (2000 or greater). The Set up procedure contained in this manual shows a typical Windows® display. 2. Set up Before using ToriemonUSB, you will need to setup the FGUSB (force gauge) driver and ToriemonUSB. 2.1. Unpacking download file After decompressing “toriemonUSB_eng_download_v100.zip”, the following file and folder is opened into the destination. NOTE: “FGP” is the part number prefix used in other countries in place of “FGV-XY” DART2.0 series force gauge FGP Driver_v100 Windows XP FGUSB.dll FGUSB.inf FGUSB.lib FGUSB.sys Windows 2000 FGUSB.dll FGUSB.inf FGUSB.lib FGUSB.sys ToriemonUSB_ENG_USA_v1.00.msi Toriemon USB Instruction manual.pdf 2.2. Installation of the FGUSB driver 1. Turn the force gauge on (on the FGV-xxXY, press the "POWER" button. The measuring point will be displayed.) Next, connect your PC and the force gage with the FGV-xxXY USB cable. 2. Next, the following picture will be shown on your PC screen. Check that it reads “Install from a list of s pecific location (Advanced)”. Then click, "N ext"
Transcript of 1. TORIMON-USB Information - NIDEC-SHIMPO CORPORATION · 1. TORIMON-USB Information Toriemon USB is...
�
1. TORIMON-USB Information Toriemon USB is an add-in application software for MS ® Excel. Toriemon USB is used exclusively for the FGV-XY DART2.0 digital force gauge series. Torimon USB Operating Environment: Windows® 2000/XP (DOS/V compatible machine), Microsoft® Excel (2000 or greater). The Set up procedure contained in this manual shows a typical Windows® display.
2. Set up Before using ToriemonUSB, you will need to setup the FGUSB (force gauge) driver and ToriemonUSB. 2.1. Unpacking download file After decompressing “toriemonUSB_eng_download_v100.zip”, the following file and folder is opened into the destination. NOTE: “FGP” is the part number prefix used in other countries in place of “FGV-XY” DART2.0 series force gauge l FGP Driver_v100 Windows XP
FGUSB.dll FGUSB.inf FGUSB.lib FGUSB.sys
Windows 2000 FGUSB.dll FGUSB.inf FGUSB.lib FGUSB.sys
l ToriemonUSB_ENG_USA_v1.00.msi l Toriemon USB Instruction manual.pdf
2.2. Installation of the FGUSB driver 1. Turn the force gauge on (on the FGV-xxXY, press the "POWER" button. The measuring point will be
displayed.) Next, connect your PC and the force gage with the FGV-xxXY USB cable. 2. Next, the following picture will be shown on your PC screen. Check that it reads “Install from a list of
specific location (Advanced)”. Then click, "Next"
�
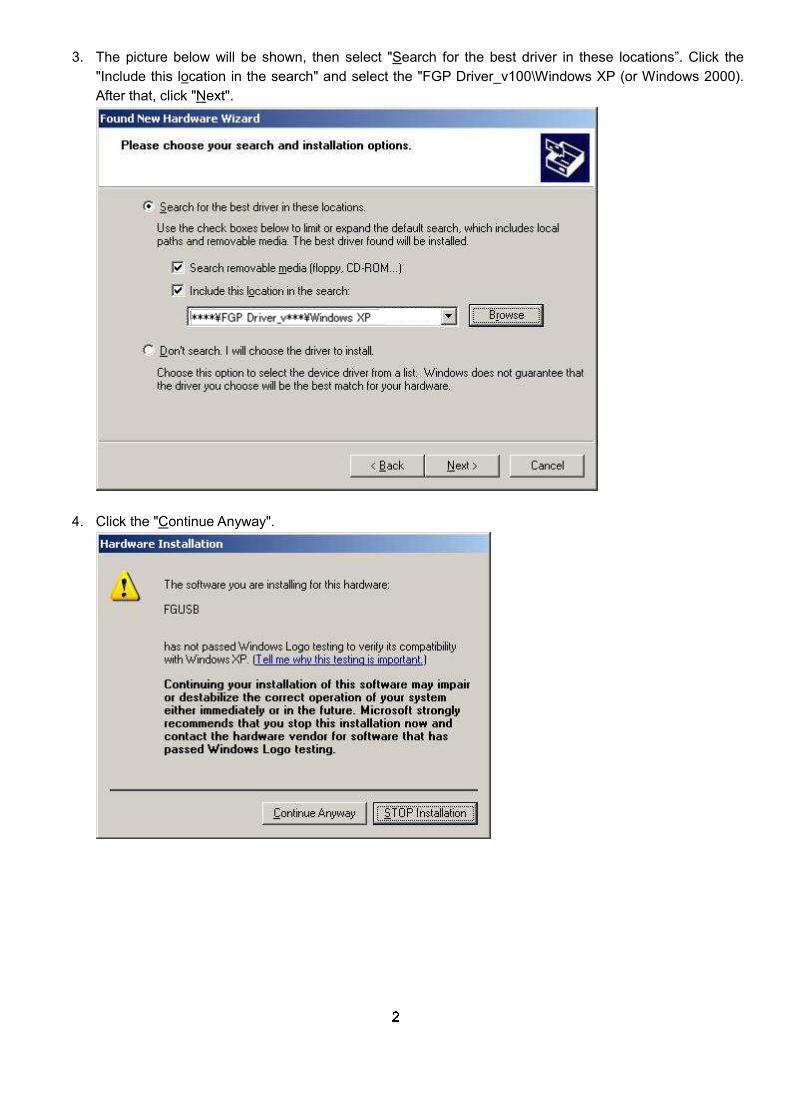
3. The picture below will be shown, then select "Search for the best driver in these locations”. Click the "Include this location in the search" and select the "FGP Driver_v100\Windows XP (or Windows 2000). After that, click "Next".
4. Click the "Continue Anyway".
�
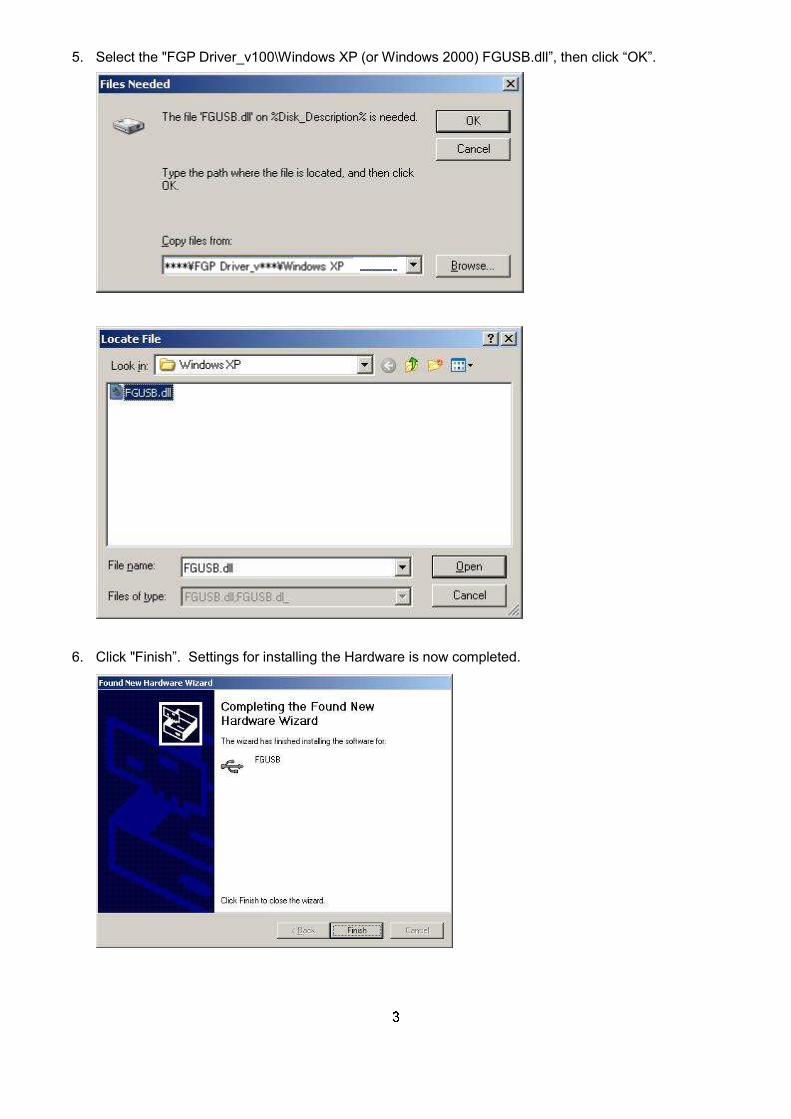
5. Select the "FGP Driver_v100\Windows XP (or Windows 2000) FGUSB.dll”, then click “OK”.
6. Click "Finish”. Settings for installing the Hardware is now completed.
�
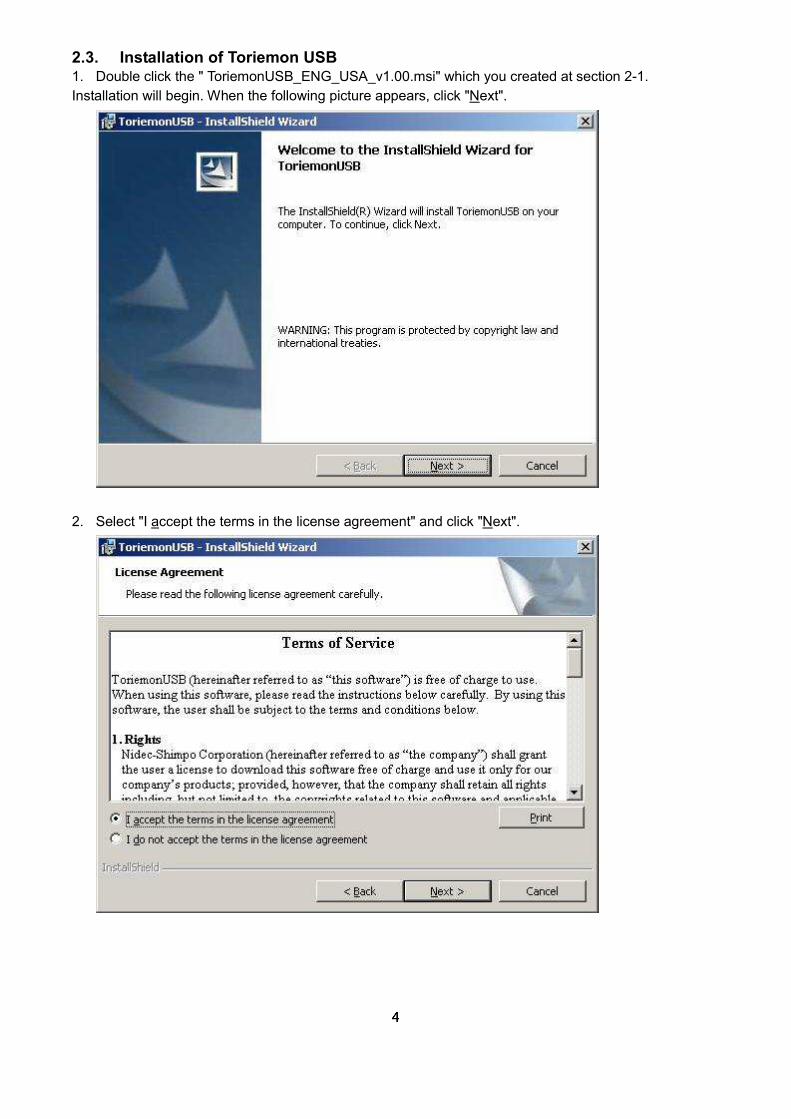
2.3. Installation of Toriemon USB 1. Double click the " ToriemonUSB_ENG_USA_v1.00.msi" which you created at section 2-1. Installation will begin. When the following picture appears, click "Next".
2. Select "I accept the terms in the license agreement" and click "Next".
�
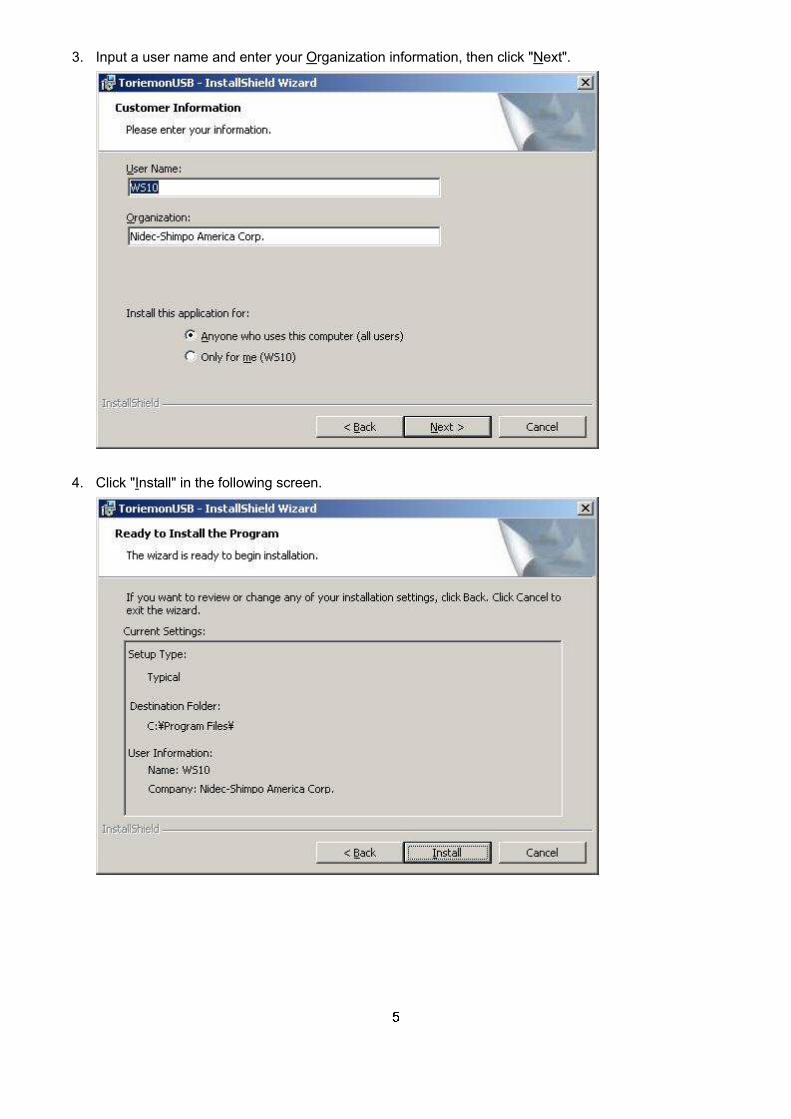
3. Input a user name and enter your Organization information, then click "Next".
4. Click "Install" in the following screen.
�
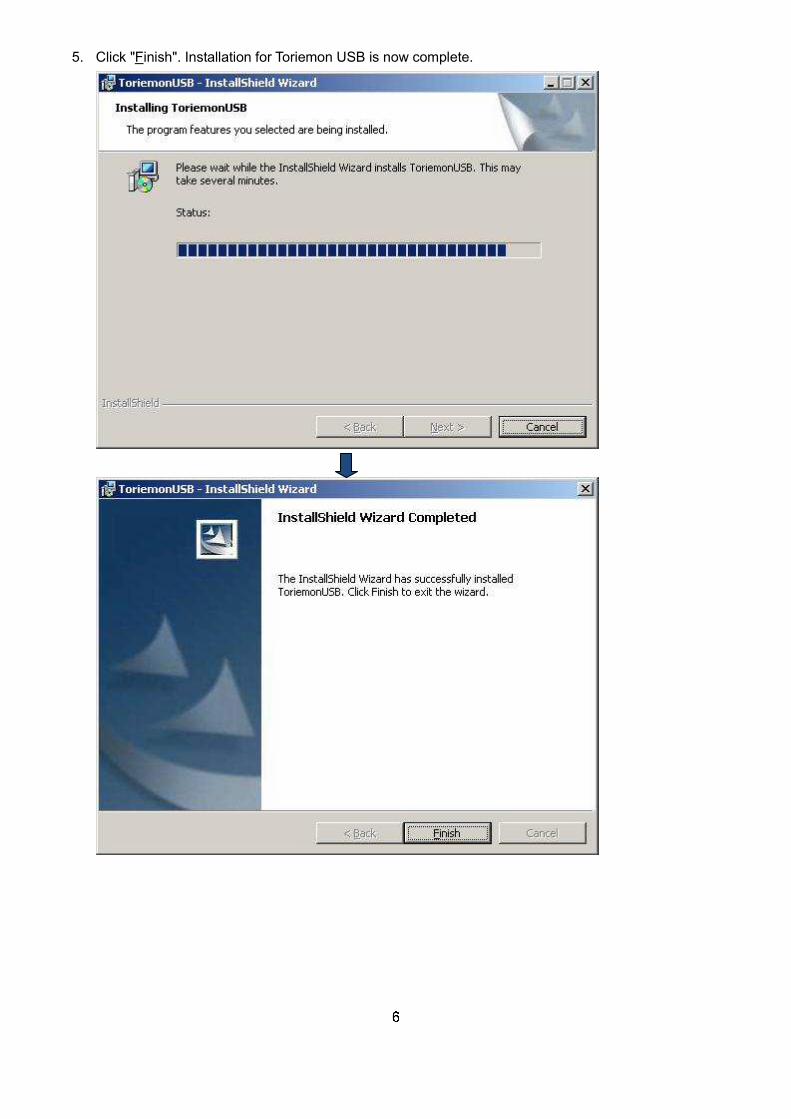
5. Click "Finish". Installation for Toriemon USB is now complete.
�
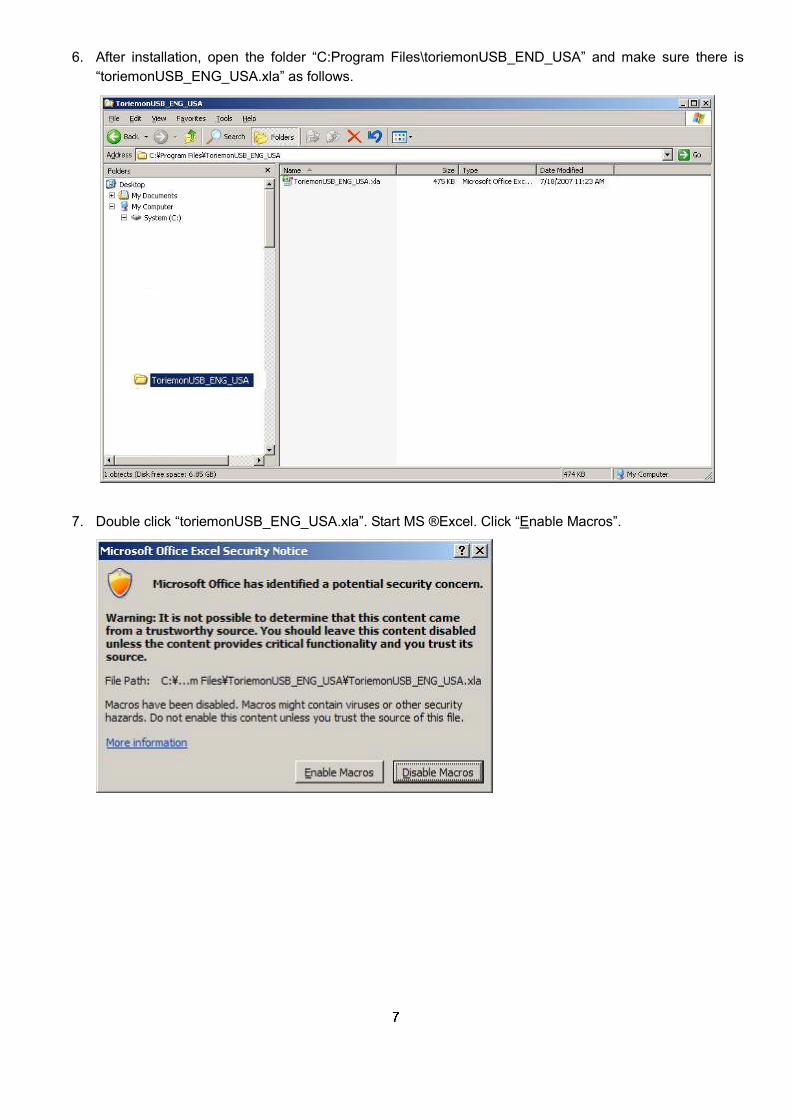
6. After installation, open the folder “C:Program Files\toriemonUSB_END_USA” and make sure there is “toriemonUSB_ENG_USA.xla” as follows.
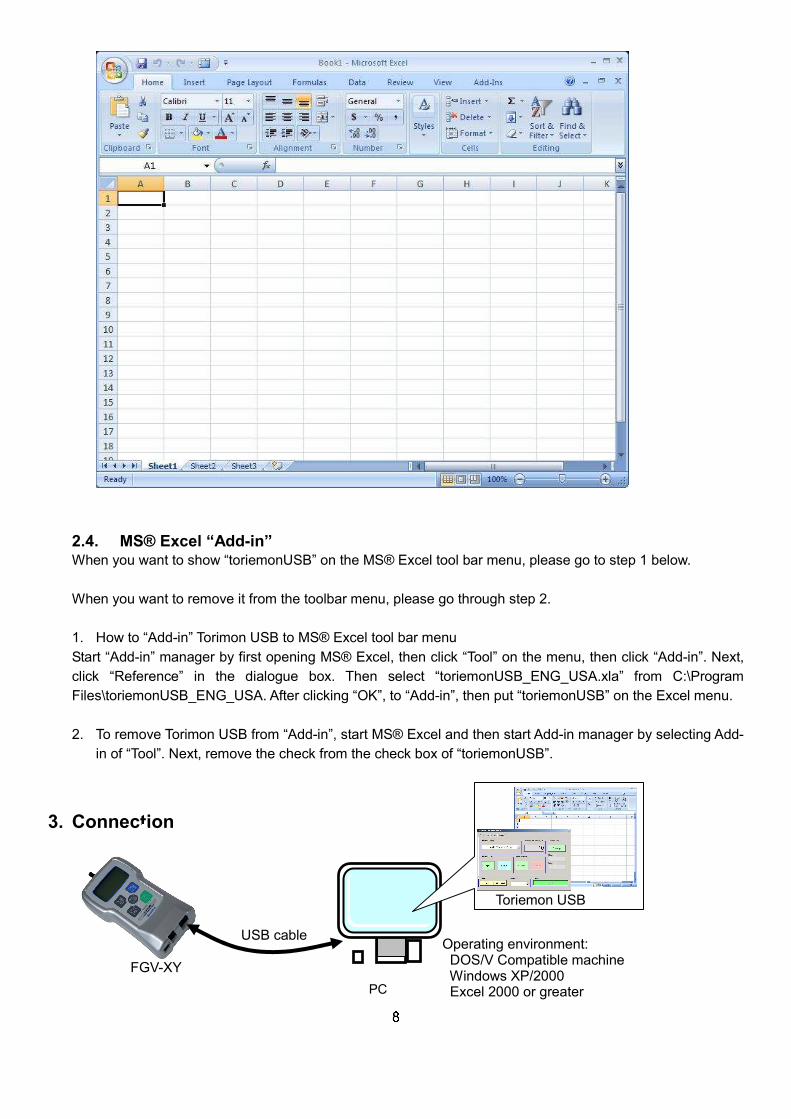
7. Double click “toriemonUSB_ENG_USA.xla”. Start MS ®Excel. Click “Enable Macros”.
�
2.4. MS® Excel “Add-in” When you want to show “toriemonUSB” on the MS® Excel tool bar menu, please go to step 1 below. When you want to remove it from the toolbar menu, please go through step 2. 1. How to “Add-in” Torimon USB to MS® Excel tool bar menu Start “Add-in” manager by first opening MS® Excel, then click “Tool” on the menu, then click “Add-in”. Next, click “Reference” in the dialogue box. Then select “toriemonUSB_ENG_USA.xla” from C:\Program Files\toriemonUSB_ENG_USA. After clicking “OK”, to “Add-in”, then put “toriemonUSB” on the Excel menu. 2. To remove Torimon USB from “Add-in”, start MS® Excel and then start Add-in manager by selecting Add-
in of “Tool”. Next, remove the check from the check box of “toriemonUSB”.
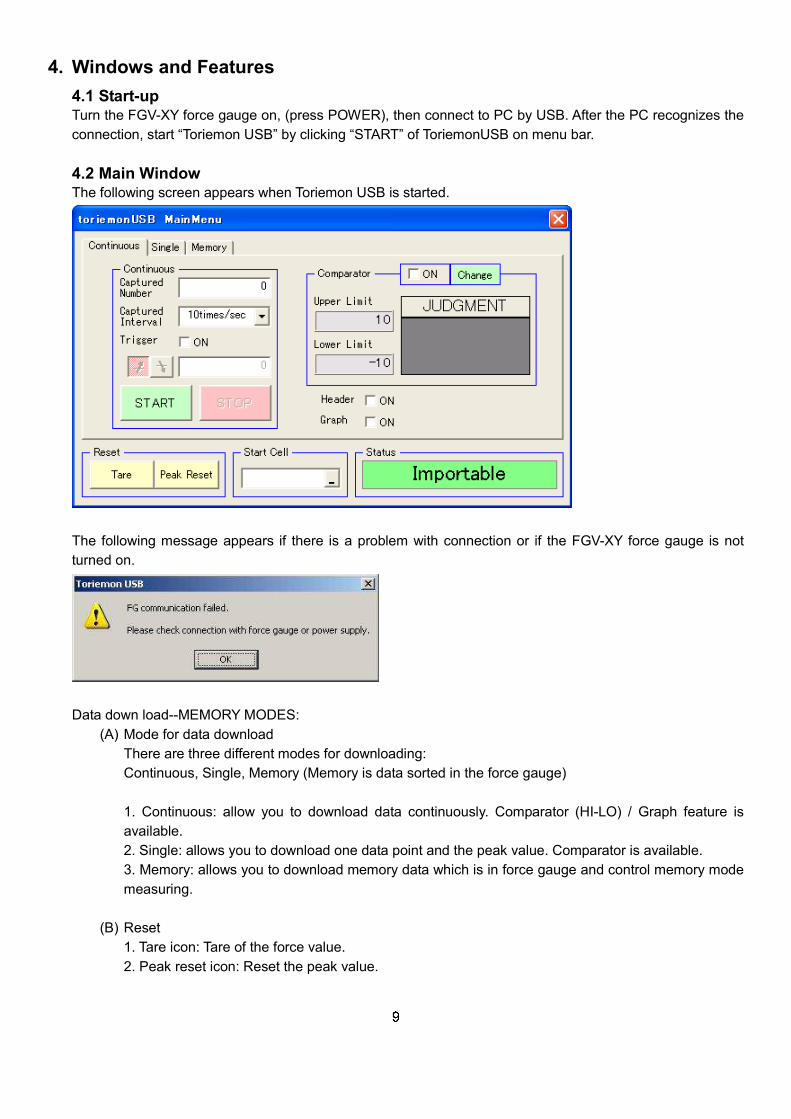
3. Connection
USB cable Operating environment: DOS/V Compatible machine Windows XP/2000 Excel 2000 or greater PC
Toriemon USB
FGV-XY
�
4. Windows and Features
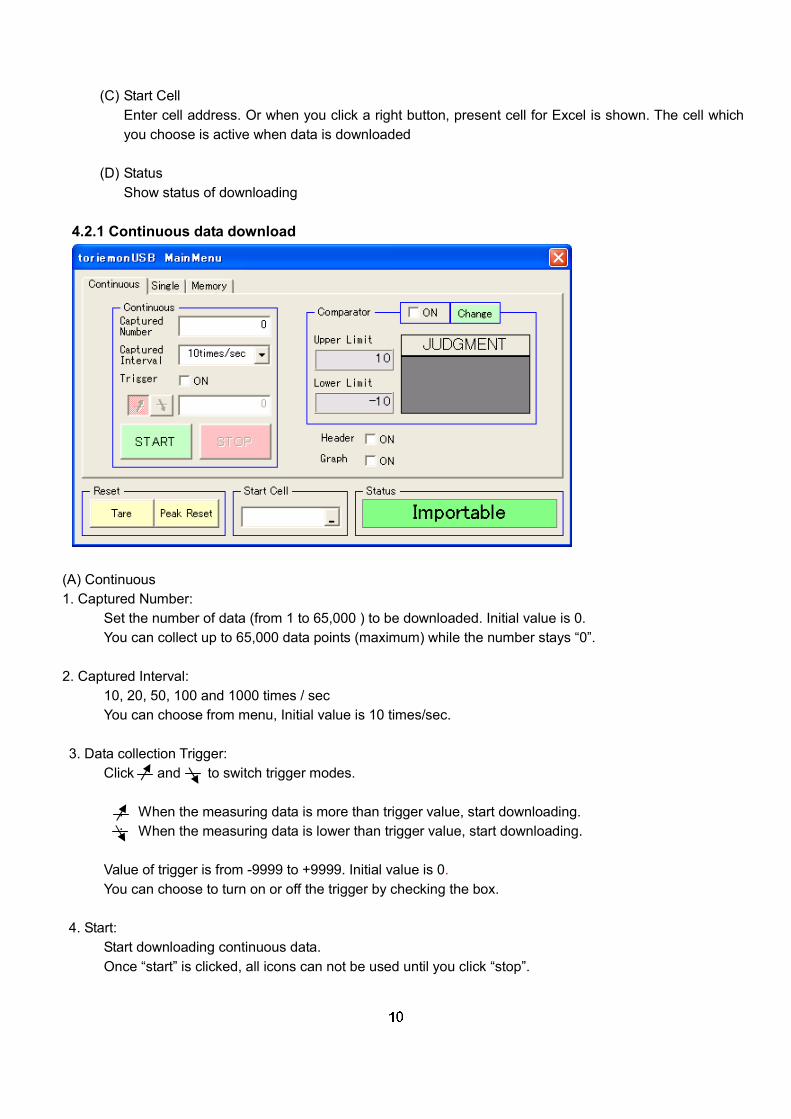
4.1 Start-up Turn the FGV-XY force gauge on, (press POWER), then connect to PC by USB. After the PC recognizes the connection, start “Toriemon USB” by clicking “START” of ToriemonUSB on menu bar. 4.2 Main Window The following screen appears when Toriemon USB is started.
The following message appears if there is a problem with connection or if the FGV-XY force gauge is not turned on.
Data down load--MEMORY MODES:
(A) Mode for data download There are three different modes for downloading: Continuous, Single, Memory (Memory is data sorted in the force gauge) 1. Continuous: allow you to download data continuously. Comparator (HI-LO) / Graph feature is available. 2. Single: allows you to download one data point and the peak value. Comparator is available. 3. Memory: allows you to download memory data which is in force gauge and control memory mode measuring.
(B) Reset 1. Tare icon: Tare of the force value. 2. Peak reset icon: Reset the peak value.
�
(C) Start Cell Enter cell address. Or when you click a right button, present cell for Excel is shown. The cell which you choose is active when data is downloaded
(D) Status Show status of downloading
4.2.1 Continuous data download
(A) Continuous 1. Captured Number:
Set the number of data (from 1 to 65,000 ) to be downloaded. Initial value is 0. You can collect up to 65,000 data points (maximum) while the number stays “0”.
2. Captured Interval: 10, 20, 50, 100 and 1000 times / sec You can choose from menu, Initial value is 10 times/sec.
3. Data collection Trigger: Click and to switch trigger modes. : When the measuring data is more than trigger value, start downloading. : When the measuring data is lower than trigger value, start downloading. Value of trigger is from -9999 to +9999. Initial value is 0. You can choose to turn on or off the trigger by checking the box.
4. Start: Start downloading continuous data. Once “start” is clicked, all icons can not be used until you click “stop”.
��
5. Stop: Stop the data download (only available during “continuous” data download).
(B) Comparator (Hi and Lo limits) 1. Check the box for comparator ON / OFF 2. Upper/Lower limit:
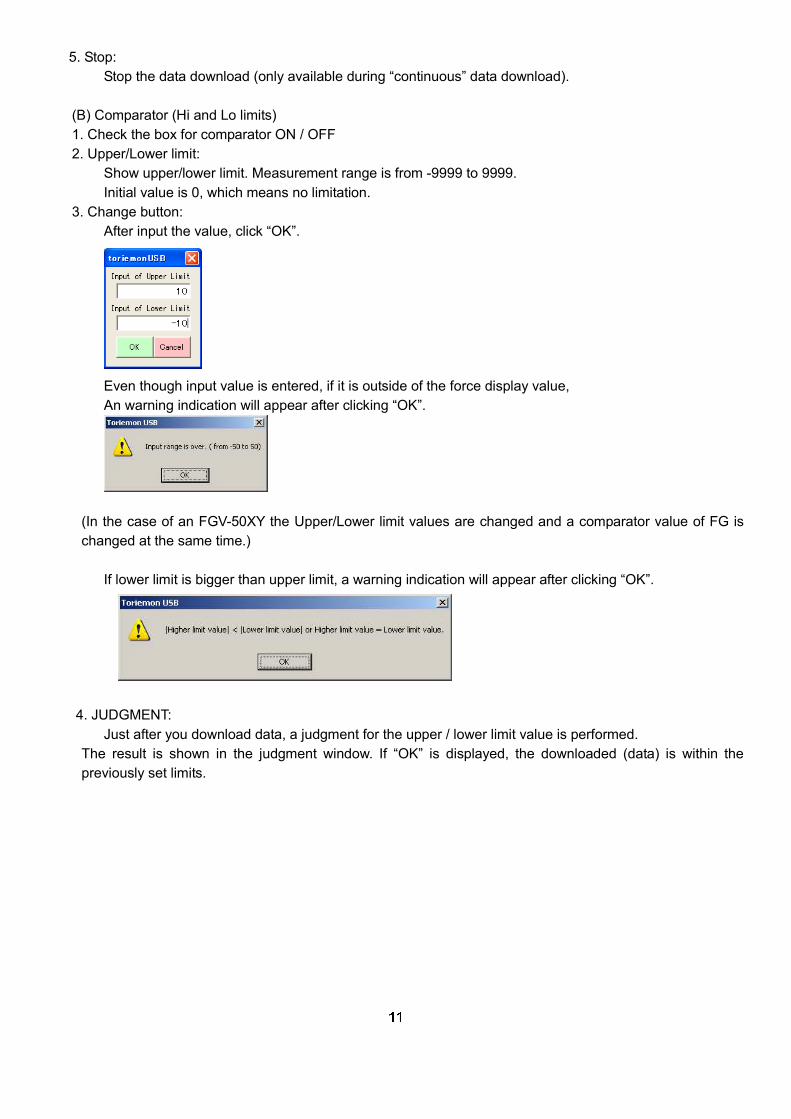
Show upper/lower limit. Measurement range is from -9999 to 9999. Initial value is 0, which means no limitation.
3. Change button: After input the value, click “OK”.
Even though input value is entered, if it is outside of the force display value, An warning indication will appear after clicking “OK”.
(In the case of an FGV-50XY the Upper/Lower limit values are changed and a comparator value of FG is changed at the same time.)
If lower limit is bigger than upper limit, a warning indication will appear after clicking “OK”.
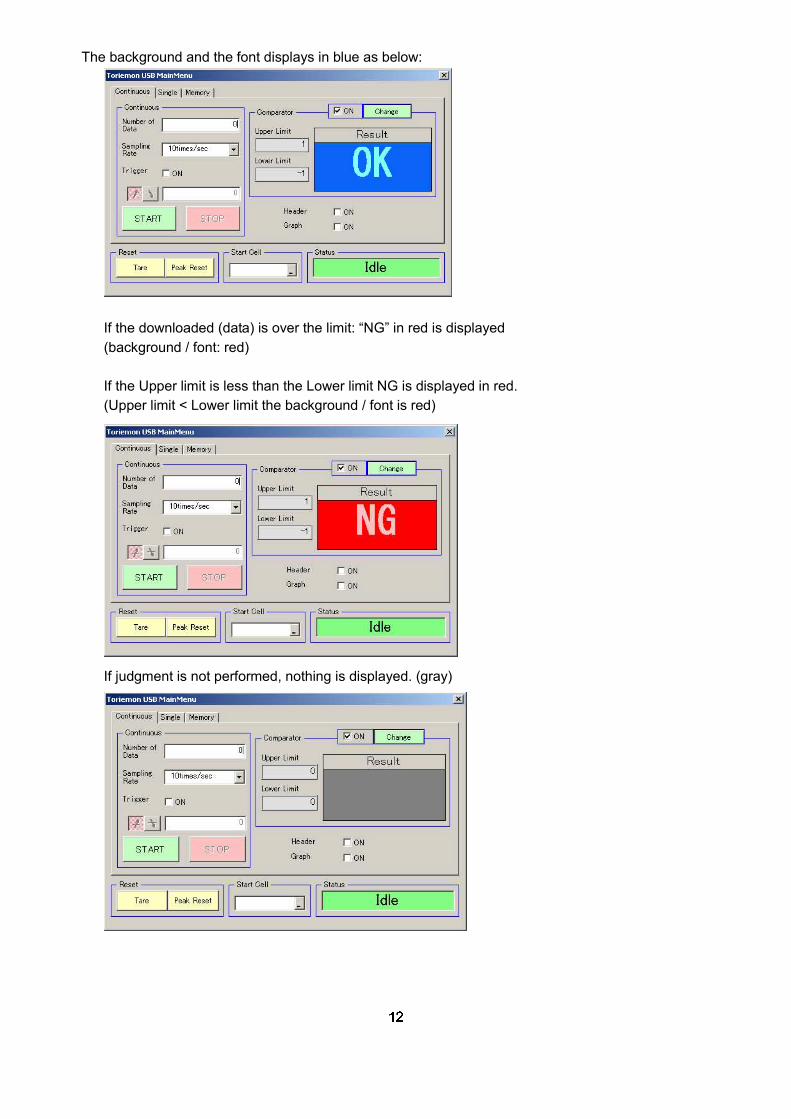
4. JUDGMENT: Just after you download data, a judgment for the upper / lower limit value is performed.
The result is shown in the judgment window. If “OK” is displayed, the downloaded (data) is within the previously set limits.
��
The background and the font displays in blue as below:
If the downloaded (data) is over the limit: “NG” in red is displayed (background / font: red) If the Upper limit is less than the Lower limit NG is displayed in red. (Upper limit < Lower limit the background / font is red)
If judgment is not performed, nothing is displayed. (gray)
��
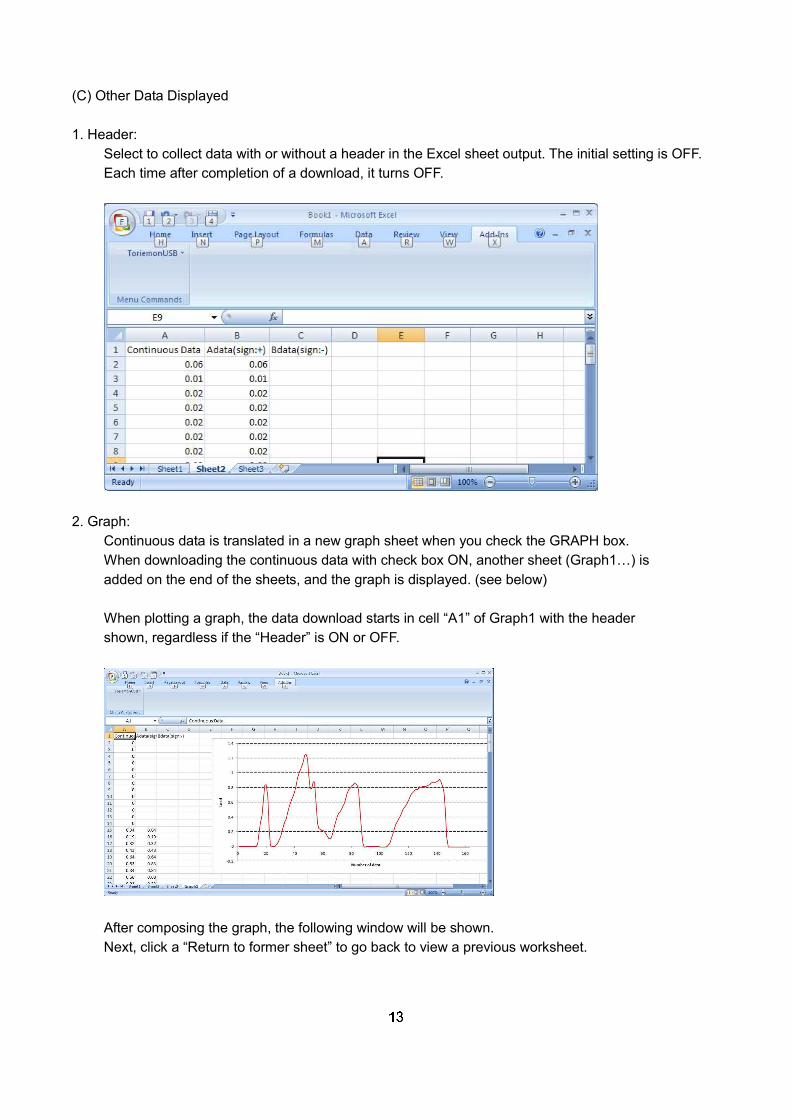
(C) Other Data Displayed 1. Header:
Select to collect data with or without a header in the Excel sheet output. The initial setting is OFF. Each time after completion of a download, it turns OFF.
2. Graph:
Continuous data is translated in a new graph sheet when you check the GRAPH box. When downloading the continuous data with check box ON, another sheet (Graph1…) is added on the end of the sheets, and the graph is displayed. (see below) When plotting a graph, the data download starts in cell “A1” of Graph1 with the header shown, regardless if the “Header” is ON or OFF.
After composing the graph, the following window will be shown. Next, click a “Return to former sheet” to go back to view a previous worksheet.

��
Judge is performed Judge is not performed
��
4.2.2 Single data download
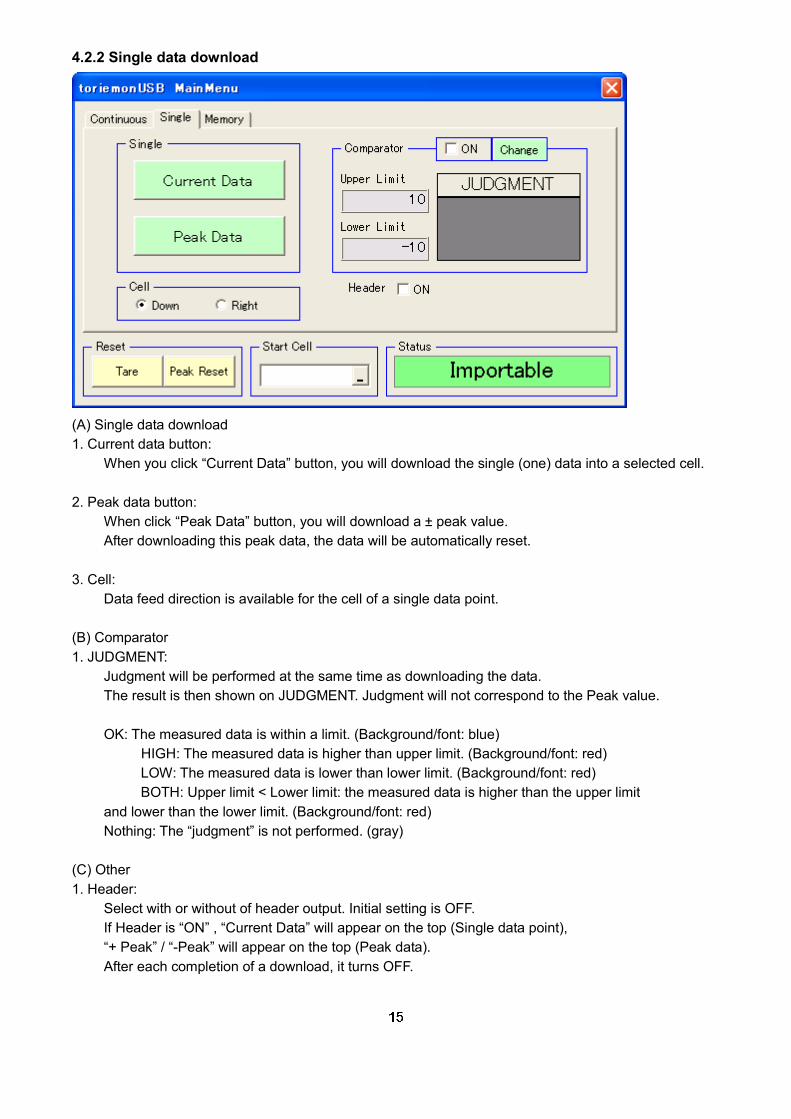
(A) Single data download 1. Current data button:
When you click “Current Data” button, you will download the single (one) data into a selected cell. 2. Peak data button:
When click “Peak Data” button, you will download a ± peak value. After downloading this peak data, the data will be automatically reset.
3. Cell:
Data feed direction is available for the cell of a single data point. (B) Comparator 1. JUDGMENT: Judgment will be performed at the same time as downloading the data. The result is then shown on JUDGMENT. Judgment will not correspond to the Peak value. OK: The measured data is within a limit. (Background/font: blue)
HIGH: The measured data is higher than upper limit. (Background/font: red) LOW: The measured data is lower than lower limit. (Background/font: red) BOTH: Upper limit < Lower limit: the measured data is higher than the upper limit
and lower than the lower limit. (Background/font: red) Nothing: The “judgment” is not performed. (gray)
(C) Other 1. Header:
Select with or without of header output. Initial setting is OFF. If Header is “ON” , “Current Data” will appear on the top (Single data point), “+ Peak” / “-Peak” will appear on the top (Peak data). After each completion of a download, it turns OFF.
��
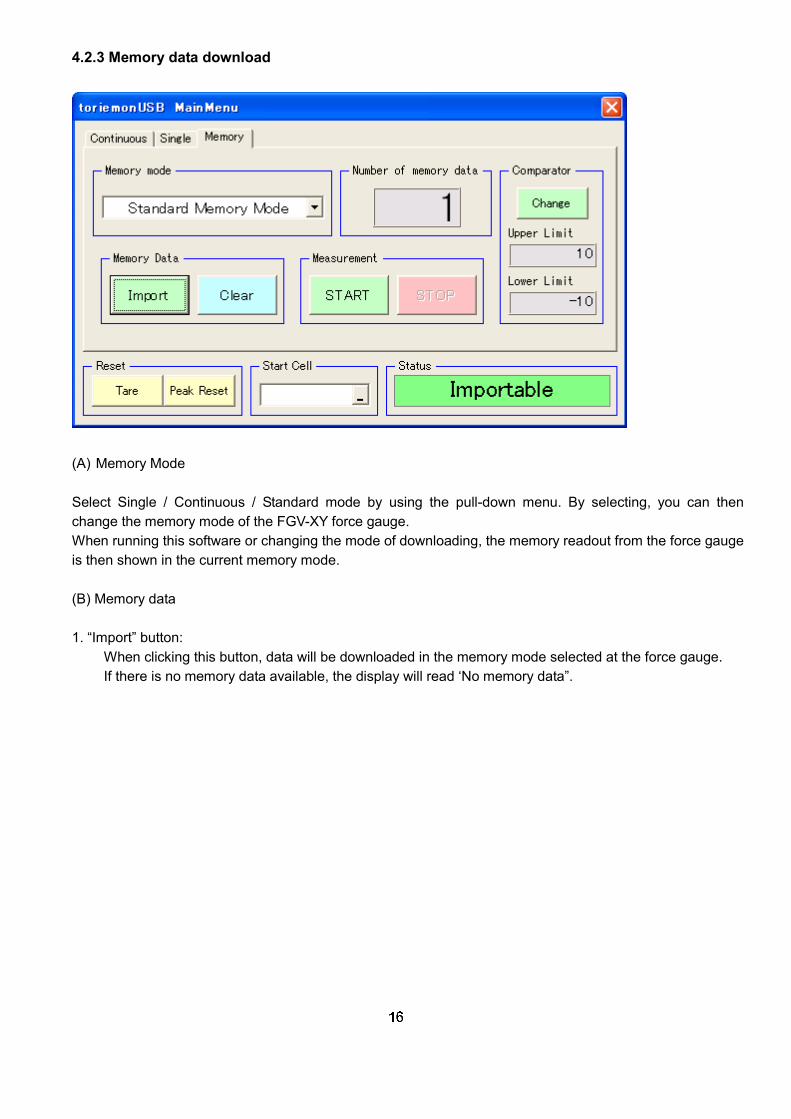
4.2.3 Memory data download
(A) Memory Mode Select Single / Continuous / Standard mode by using the pull-down menu. By selecting, you can then change the memory mode of the FGV-XY force gauge. When running this software or changing the mode of downloading, the memory readout from the force gauge is then shown in the current memory mode. (B) Memory data 1. “Import” button: When clicking this button, data will be downloaded in the memory mode selected at the force gauge. If there is no memory data available, the display will read ‘No memory data”.
��
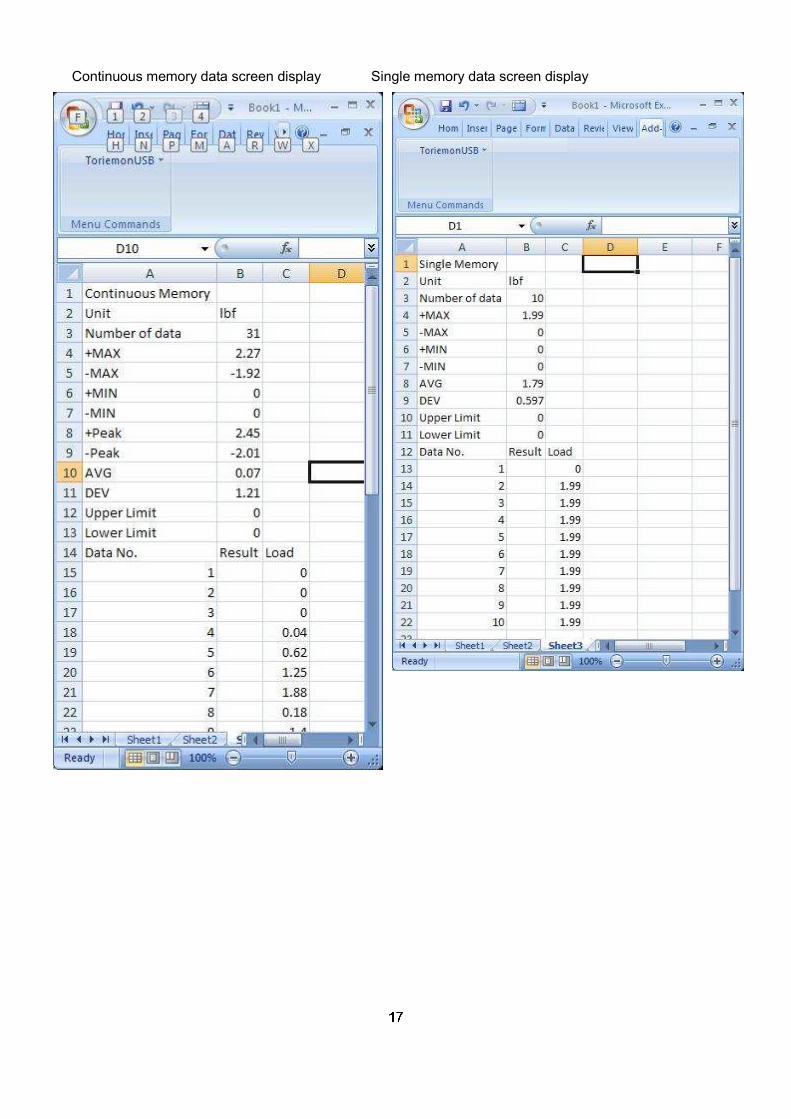
Continuous memory data screen display Single memory data screen display
��
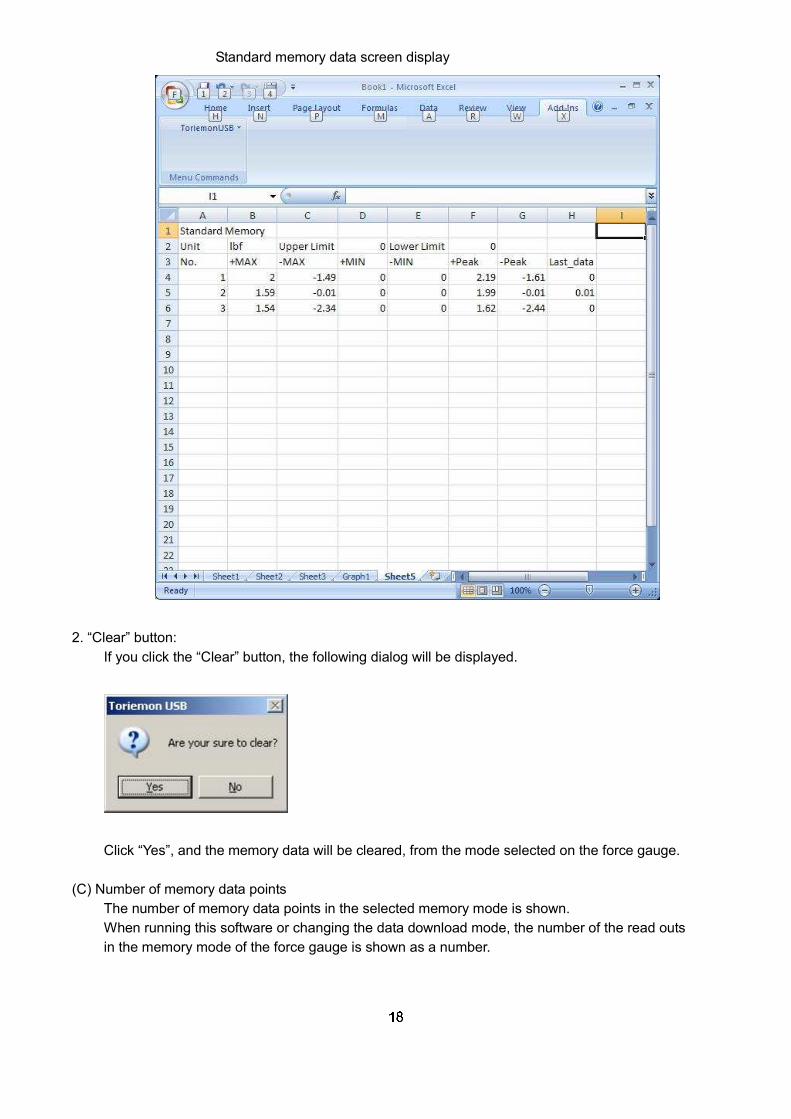
Standard memory data screen display
2. “Clear” button:
If you click the “Clear” button, the following dialog will be displayed.
Click “Yes”, and the memory data will be cleared, from the mode selected on the force gauge.
(C) Number of memory data points The number of memory data points in the selected memory mode is shown. When running this software or changing the data download mode, the number of the read outs
in the memory mode of the force gauge is shown as a number.
��
(D) Measurement 1. “START” button:
In the selected memory mode, start downloading the memory data from the force gauge. In the case of Continuous/Standard memory mode, stop the data collection/measuring by clicking STOP. If the memory is full, “Limitation for loading number” is displayed. Measuring cannot start.
2. “STOP” button:
When you click this button while measuring, stop measuring. (Unavailable in single mode)
(E) Comparator Setting and showing the upper / lower limit value. (same as in section 4.2.1)
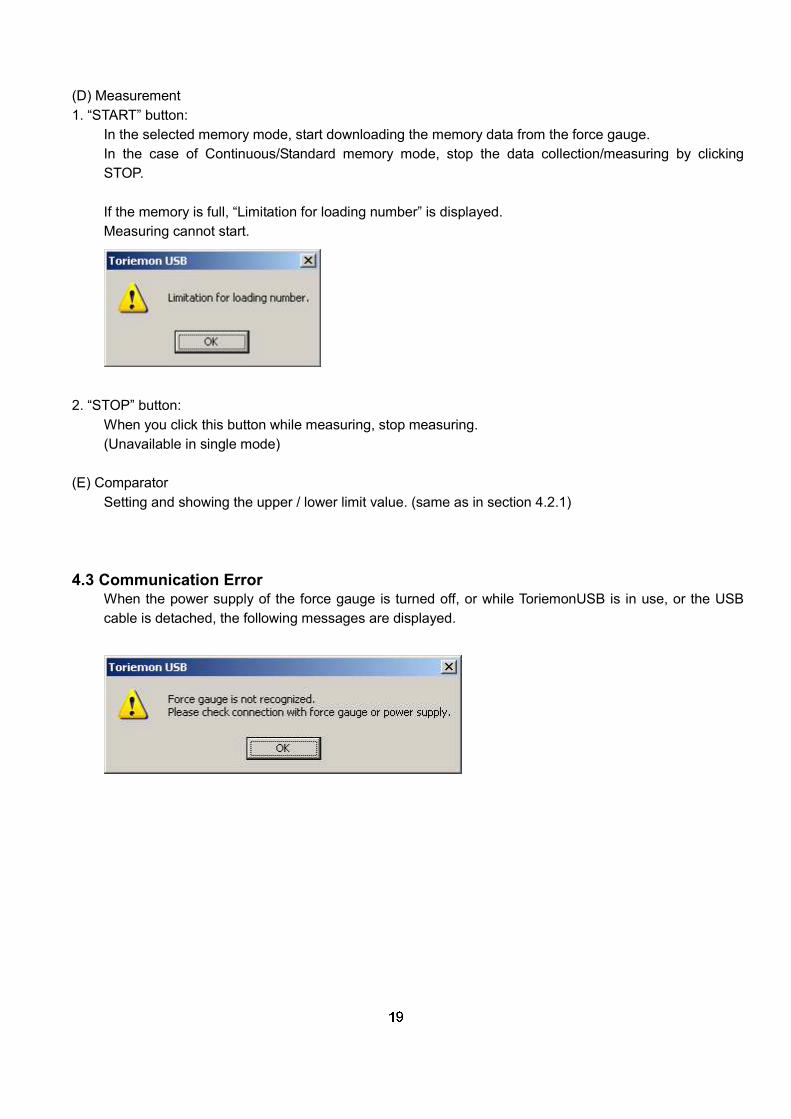
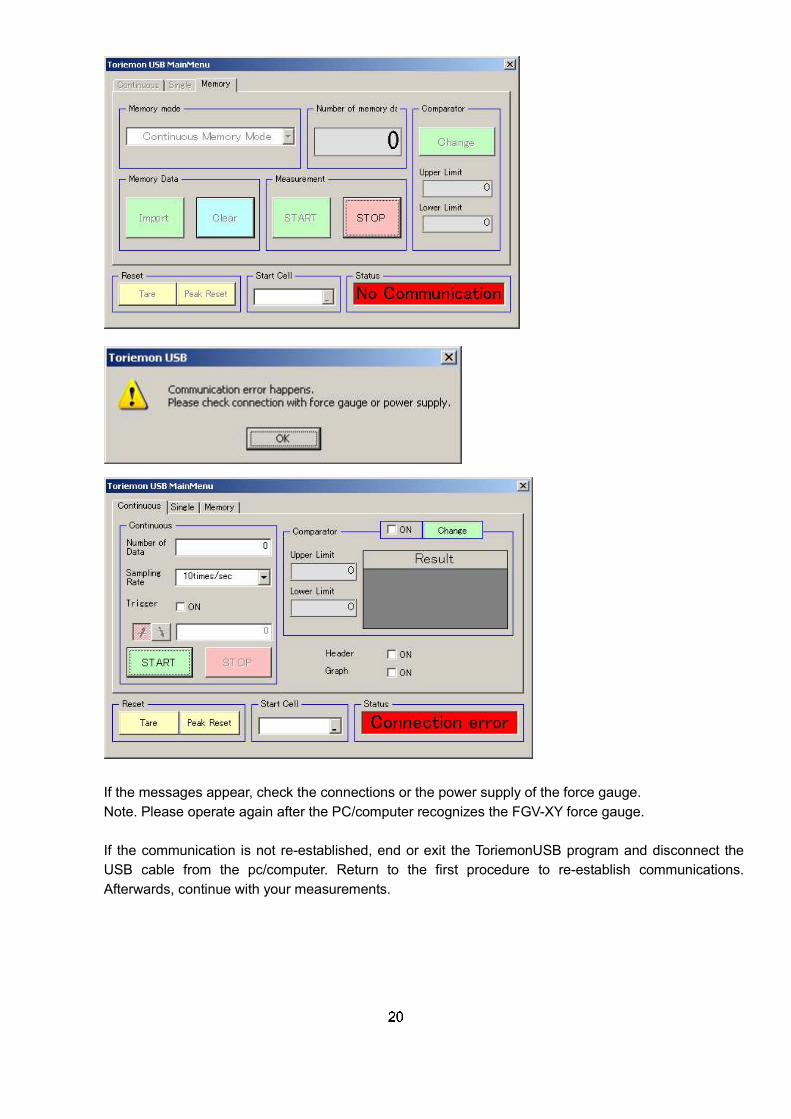
4.3 Communication Error
When the power supply of the force gauge is turned off, or while ToriemonUSB is in use, or the USB cable is detached, the following messages are displayed.
�
If the messages appear, check the connections or the power supply of the force gauge. Note. Please operate again after the PC/computer recognizes the FGV-XY force gauge. If the communication is not re-established, end or exit the ToriemonUSB program and disconnect the USB cable from the pc/computer. Return to the first procedure to re-establish communications. Afterwards, continue with your measurements.
��
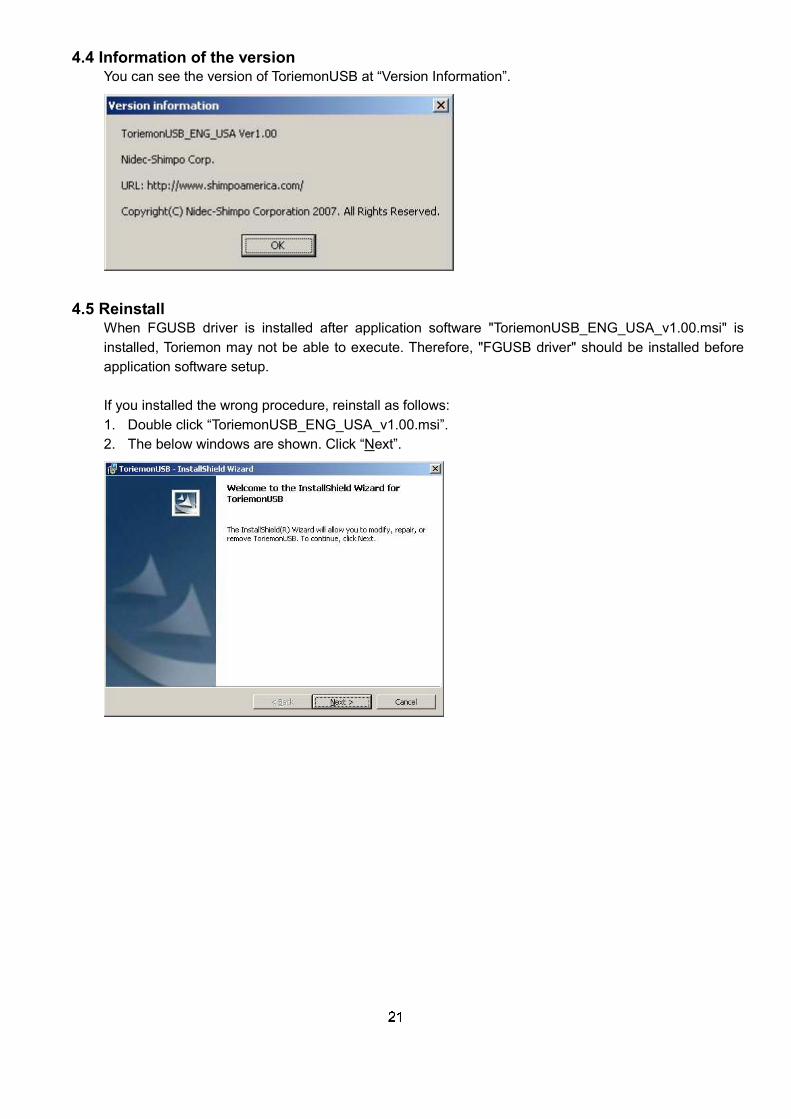
4.4 Information of the version You can see the version of ToriemonUSB at “Version Information”.
4.5 Reinstall
When FGUSB driver is installed after application software "ToriemonUSB_ENG_USA_v1.00.msi" is installed, Toriemon may not be able to execute. Therefore, "FGUSB driver" should be installed before application software setup. If you installed the wrong procedure, reinstall as follows: 1. Double click “ToriemonUSB_ENG_USA_v1.00.msi”. 2. The below windows are shown. Click “Next”.
��
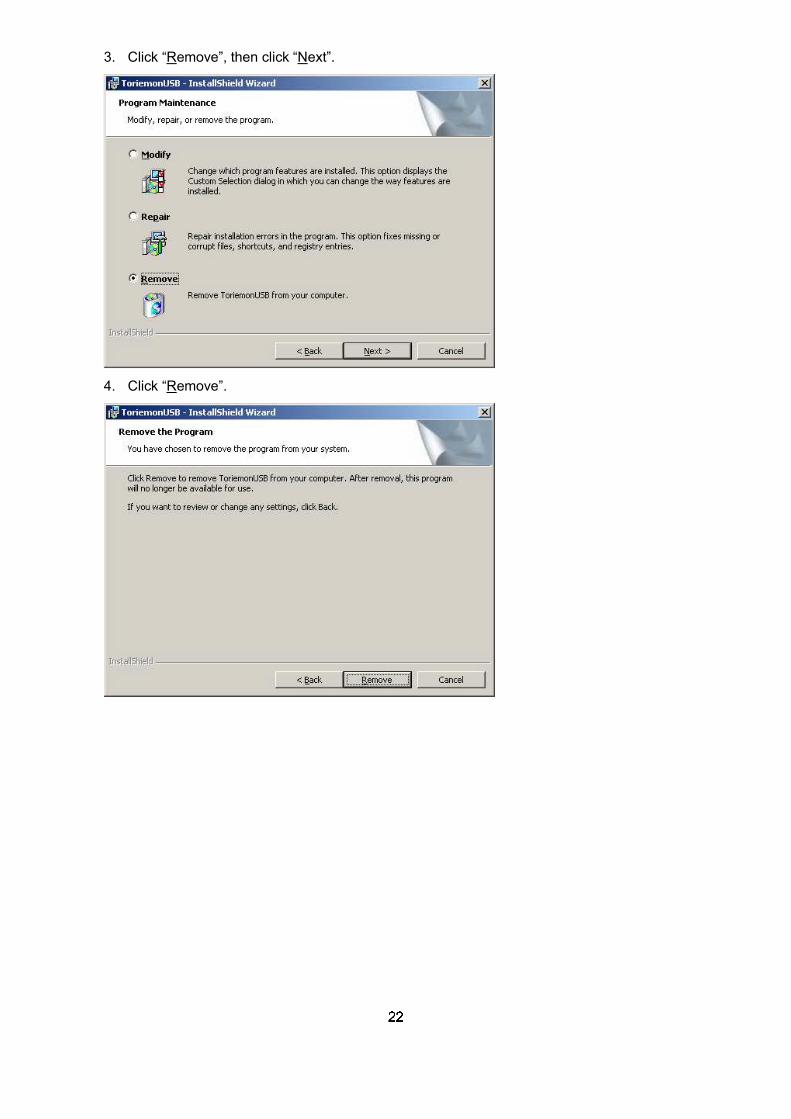
3. Click “Remove”, then click “Next”.
4. Click “Remove”.

��
5. Click “Finish”.
6. Reinstall application software "ToriemonUSB_ENG_USA_v1.00.msi".