HUMAN POSTURE AND CAR-SEAT DESIGN A Drivers Guide to avoiding back and neck pain.

Extend arm to the side
Imagine there is a wall, gently bend your arm and almost straighten it, while moving your hand toward and away from the imaginary wall
Now repeat with palm up
1. Neural Exercise
Place hand on doorway
Gently lean forward and feel the stretch across the front of your chest
2. Pectoral stretch 3. Thoracic spine stretch
Start with elbows bent, and fingers clasped behind your head
Raise the top elbow up and turn your chest towards the ceiling
Now straighten the arms and repeat the stretch
Stretch one arm under and across to the other side.
Push the back of hand into the floor. You should feel the stretch under the shoulder blade
4. Mid-back stretch
5. Side neck stretch
Sit on your hand palm facing up
Place other hand over your head
Pull gently down with your shoulder
Bend the trunk to increase the stretch on the neck
Stand against a wall, feet slightly away from the wall
Now outstretch the arms
Engage the muscles between the shoulder blades; arms should touch the wall
Think to stand, initiate this movement
Then relax
Use your hands on the side of the chair and push up gently to maintain your lumbar lordosis
6. Standing mid-back stretch 8. Sitting posture correction
Lie on back with knees bent
Place hand on the strap muscle at front of neck
Be sure it stays relaxed as you tuck the chin in slightly and push the back of the head gently into the floor
Hold 10 sec; repeat 2-3 times
Special instructions
Therapist / Practice
Lie face down with your forehead in your hands
Engage the muscles very slightly between the shoulder blades; keep breathing
Progress to “thinking about lifting the head off the floor”
Maintain this gentle lift for 5 breaths
9. Isometric neck exercises
© Exercises extracted from The Back Pain Handbook & New Bodyworks Book (NBW) Author Francine St George www.physiocoachingacademy.com
11. Neck extensors
1. Neck and Mid-back Stretches and Stability Posture Tips
Pg 48 Pg 155 Pg 52 Pg 156
Pg 146 Pg 144 Pg 77 NBW
Place your fingers at the base of the neck
Engage the neck muscles as you look up all 8 directions
Hold 10 sec each position
Progression: Eyes look right, head turns right. Then eyes back to midline, head back to midline. Repeat in all 8 directions
Pg 151 Pg 153 Pg 153
Stand tall
Relax and breathe
Imagine a marble under the arch of your foot. Gently lift your arch up but do NOT claw the toes
Now keep your neck relaxed as you flutter your hand
7. Posture check and Flutter
10. Deep neck flexors
SAMPLE O
NLY

Extend arm to the side
Imagine there is a wall, gently bend your arm and almost straighten it, while moving your hand toward and away from the imaginary wall
1. Nerve mobility
Place hand on the wall and gently stretch the body away
Now place your hand on a doorway frame and lean forward
Pull the shoulder back and down
2. Neck and pectoral stretch 3. Advanced shoulder stretch
Place your hand up high on a wall with fingers outstretched
Now move your hand back and stretch even higher
Place other hand under the shoulder being stretched and rotate the body away from the wall
Place feet at right angles to each other with one foot against a wall
Place back of hand onto mid-shin level
Outstretch the top arm
Be sure to look to the front
4. Yoga stretch
Place a towel under your elbow and squeeze
Keep upper trapezius relaxed as you lift the weight up
Set shoulders back and down; start with 1.5 kilos
Stand with your back against a wall
Position the shoulder back and down
Flutter the hand for stability endurance; 0-30°, 30-60°, 60-90°
Rest when you fatigue then repeat
Secure an exercise band to a door handle
Set the shoulder, then outwardly rotate the hand 0-90°
Gradually progress to 90-180°
Repeat 6—8 times
7. External rotation 8. Mid-back strengthening6. Side-lying shoulder stability:Serratus
Special instructions
Therapist / Practice
While sitting use a light weight (1–2kg)
Press elbow into towel or books
‘Set’ the shoulder
Do a modified biceps curl 0-45°
Control the movement both ways
Repeat 8 times
With the band tied to the door and holding each end, start with elbows at 90°, set shoulders and extend the elbows
Repeat 8 times
Progress to using straight arms
9. Mid-back strengthening
© Exercises from The Back Pain Handbook & New Bodyworks Book (NBW) created by Francine St George www.physiocoachingacademy.com
11. Pulley10. Biceps curl
2. Shoulder Stretches, Stability and Basic Strengthening
5. Shoulder set plus flutter
Secure a pulley up high with the door closed
Set the shoulders
Keep the elbows slightly bent as you pull the pulley down and control the movement as the arms are raised
Repeat 8 times
Hold band in both hands, and set your shoulders
Keep elbows by sides, turn arms out, and then control the movement back in
Wrap band behind back, and wrap around both thumbs. Lift up and forward, then back down
Pg 48 Pg 155 Pg 76 NBW
Pg 77 NBW Pg 78 NBW Pg 159
Pg 243
SAMPLE O
NLY

Lie with one knee bent and out to one side
Gently let the front of the hip release and relax on to the floor. There must be no pain!
1. Quads stretch
Place foot on to a table or chair
Do Not overarch the lower back
Tuck the abdomen in (posterior pelvic tilt)
Bend the other knee to increase the stretch
2. Hip flexor stretch 3. Advanced hip flexors
While kneeling tuck the abdomen in (posterior pelvic tilt)
Isometrically draw the heel and knee together
Shift your body forward without overarching your back to improve the stretch
Start with both knees bent
Point and flex your foot
Progress to using a belt around the foot and gradually straighten the knee
7. Hamstring stretch 8. ITB (Iliotibial Band)
Point toes, with belt around foot
Take the leg across the body approx. 30°
Face the kneecap away from the body
Push the hip into the floor
Both knees bent with belt or your hand around the foot
Now take this leg across the body
Keep the knee close to the opposite shoulder
Push the hip into the floor
Place foot on a table, keep back straight, and lean forward
Be sure the heel is directly in front of the hip
Lean your upper body onto the table to increase the stretch
Place hands on a table, legs wide, bend one knee and drop into this hip
Can be done without using a table and just place hands on your hips
6. Outer hip stretch5. Standing hip stretch
4. Inner thigh stretch
Standing on edge of step drop the heel down
Turn the foot in, then out to improve the stretch
For achilles, progress to doing the same exercise with a bent knee
Special instructions
Therapist / Practice
While sitting place one hand on to the outside of the other knee
Now stretch the other hand over the head and look under this arm
Be gentle! Progress to using a belt
Kneeling place the foot onto a wall
Draw the abdomen in and tuck the pelvis and tailbone in and under
You should feel the stretch on your quads
9. Anterior hip release
© Exercises extracted from The Back Pain Handbook & New Bodyworks Book (NBW) Author Francine St George www.physiocoachingacademy.com
11. Side trunk stretch10. Calf and achilles stretch
3. Hip and Leg Stretches
Pg 130 NBW Pg 133 Pg 133 Pg 129
Pg 120 NBW Pg 127 Pg 125
Pg 134 Pg 148 NBW Pg 158
Pg 129 NBW
SAMPLE O
NLY

Place both feet over a chair or the lounge
Tighten the quads, relax, and then relax them again
Keep breathing
Goal is to relax the hip flexors as much as possible
1. Hip flexor release
Lying on your side with both knees bent, pillow in between
Place you hand behind on your back muscles and keep them relaxed as you straighten your knee and flex and point your foot
2. Nerve mobility 3. Back release
On hands and knees gently let the back drop down then curve upwards
Now with knees wide, keep the arms outstretched as you release the lower back
Propped up on your elbows draw your chest upwards and forward
Alternatively lying on your back and stretch over a towel
4. Gentle extension
5. Outer hip stretch
Cross one leg over the other
Hug the knee to the chest
You will feel a stretch on your outer hip
Breathe in and as you breathe out engage PF
Keep breathing
Hold for 5-10 seconds
Repeat 4-5 times
Breath in and as you breath out engage PF and TA
Keep breathing
Repeat 5-10 times
Maintain the muscles engaged for 5-10 seconds
6. Breathing basics 7. Pelvic Floor (PF) 8. Pelvic floor + TransversusAbdominus (TA)
On hands and knees let the abdomen drop down; maintain normal curve of the back
Now draw PF/TA in, keep breathing
Progress to extending then lifting opposite arm and leg
Special instructions
Therapist / Practice
While lying on the back engage PF/TA and then extend opposite arm and leg
Progress by repeating the exercise on a soft beam or roller
Keep back and pelvis stable
While maintaining PF/TA let the knee drop outwards approx 30°
Repeat both sides
Now do this exercise again while breathing in a relaxed manner
Keep back and pelvis stable without bracing
9. PF/TA: Knee dropout
© Exercises extracted from The Back Pain Handbook & New Bodyworks Book (NBW) Author Francine St George www.physiocoachingacademy.com
11. Supine stability10. PF/TA four point kneel
4. Hip Flexor and Back Releases; Nerve Mobility and Basic Stability
Specific instructions:
Lying on back, neck and shoulders relaxed, place one hand on the chest, the other on the lower abdomen
Breathe in to the abdomen and laterally into the diaphragm
Keep the upper chest relaxed
Pg 56 Pg 51 Pg 118 Pg 118
Pg 94 Pg 95 Pg 96
Pg 96 Pg 103 Pg 100
SAMPLE O
NLY

Lying on side let the top knee relax on to the floor
Place your hand on to your hip and feel the muscle as you shorten the femur and lift the knee 30° above the midline
Lying on back, neck and shoulders relaxed, place one hand on the chest, the other on the lower abdomen
Breathe in to the abdomen and laterally into the diaphragm
Keep the upper chest relaxed
1. Breathing
Breathe in and then out. As you exhale engage PF and TA
Progress to single knee drop outs
Keep back and pelvis stable, do not over arch the back
2. Pelvic floor/TA with leg dropout
3. PF/TA four point kneel
On hands and knees let the abdomen relax
Maintain the slight curve in your back
Now draw PF/TA gently upwards; continue to breathe
Progress to extending one leg, then to opposite arm and leg
Relaxed spine, do not flatten the back
Now engage TA/PF and progress to extending opposite arm and leg
Repeat 4-5 times on each side
4. PF/TA with opposite arm andleg
5. Quadratus Femoris (QF)
Lie on your side with a towel between your knees
Place your hand between your hip bone and sitting bone
Drew the femur into the socket while pushing heels together
Tap the foot
Do a small lift of the top knee
Draw an imaginary band from one hip to the other together into the midline
Next raise the hips and do 10 small glute lifts
Sets …………..
Do not hyperextend the back
Lie prone breathe in and as you breathe out engage and TA
Check if your deep back muscles engage as you do this
Progression:
Think of lifting one leg
Next repeat while standing and raising one arm
6. Gluteus Minimus 7. Gluteus Medius (advanced) 8. Multifidus
Using either a chair or fit ball
Think about going to stand up, initiate the movement, now relax there
Add hand flutter
Progress to raising one arm then the other while core is still engaged
Special instructions
Therapist / Practice
When you are standing go to sit down and let the arms float upwards
Return to standing
It should feel natural and you will feel the stability muscles engage
Progression:
Press your fingertips together and repeat
Stand on the beam
Breath as you maintain stability
Flutter one hand will assist with balance
Progress by walking along a beam slowly
Hold a dura disc in one hand
9. Using beam with flutter
© Exercises extracted from The Back Pain Handbook & New Bodyworks Book (NBW) Author Francine St George www.physiocoachingacademy.com
11. Stability with mini squats 10. Sitting stability with flutter
5. Back and Hip Stability - Level 1
Pg 94 Pg 96 Pg 103 Pg 101
Pg 106 Pg 107 Pg 108 Pg 103 & 99
Pg 146 NBW Pg 239 Pg 108
SAMPLE O
NLY

Band around feet
Step sideways
Do a biceps curl
Return to midline
Repeat each side x…………….
1. Single leg stability
Place a band under each foot
Stabilise theraband on each hip
Step sideways but control the band as you return back to the middle.
Repeat x 10 each side
2. Hip stability 3. Gluteal strengthening plusbicep curl
Start standing, cross one leg over the other
Now progress to extending the leg out behind
Try to stay parallel to the floor
Hold ……..
4. Gluteal strengthening intoextension
5. Push ups and progress to plank
Place band around your opposite foot
In a slight squat position now take the band across the body, up and outwards
Maintain a straight spine as you start push ups on your knees. Repeat 8 times
Progress to a full plank position. Hold ……. Progression: Take one leg off the floor
Keep chin tucked in and eyes looking ahead
Maintain a straight spine and look ahead
Use glutes to lift and bring bar to waist level, then to chest height
Return bar to floor
Repeat
Secure a band on a door
Tuck the chin in and gently roll down
Use your abdominals not your arms to curl back up again
6. Gluteal strengthening
9. Glute and leg strengthening 10. Supported roll-downs Special instructions
Therapist / Practice
Hold a 1.5kg weight with your finger tips.
Go to sit on a chair but stop just short of it
Repeat 8 times
7. Sit to stand
© Exercises extracted from The Back Pain Handbook & New Bodyworks Book (NBW) Author Francine St George www.physiocoachingacademy.com
11. Glute Mid & Med strengthening
8. Sword draw
6. Back and Hip - Stability and Strengthening - Level 2
Place knee against a ball that is against a wall
Other foot turned 30° inwards
Now use your gluts to outwardly rotate the standing leg
Hold ………….
Repeat ………….
With a band around ankles take a step in one direction dropping into slight squat position
Repeat each side x……….
Progress to stepping backwards approx. 45°
Sit on the ball and roll down so your head is resting on the ball
Use the glutes to lift your pelvis
Progress to doing on toes and extending both arms
Pg 110 Pg 243 Pg 244
Pg 80 Pg 241 Pg 251
Pg 249
SAMPLE O
NLY
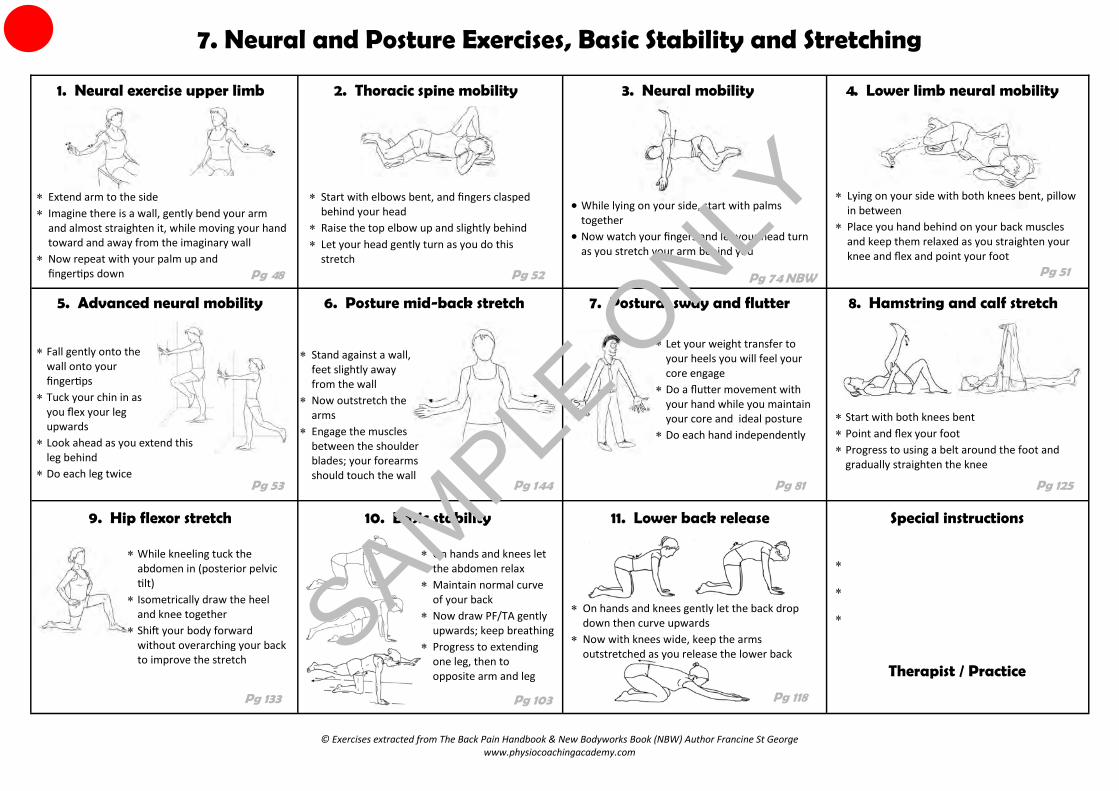
Extend arm to the side
Imagine there is a wall, gently bend your arm and almost straighten it, while moving your hand toward and away from the imaginary wall
Now repeat with your palm up and fingertips down
1. Neural exercise upper limb
Start with elbows bent, and fingers clasped behind your head
Raise the top elbow up and slightly behind
Let your head gently turn as you do this stretch
2. Thoracic spine mobility 3. Neural mobility
While lying on your side, start with palms together
Now watch your fingers and let your head turn as you stretch your arm behind you
Lying on your side with both knees bent, pillow in between
Place you hand behind on your back muscles and keep them relaxed as you straighten your knee and flex and point your foot
4. Lower limb neural mobility
5. Advanced neural mobility
Fall gently onto the wall onto your fingertips
Tuck your chin in as you flex your leg upwards
Look ahead as you extend this leg behind
Do each leg twice
Stand against a wall, feet slightly away from the wall
Now outstretch the arms
Engage the muscles between the shoulder blades; your forearms should touch the wall
Let your weight transfer to your heels you will feel your core engage
Do a flutter movement with your hand while you maintain your core and ideal posture
Do each hand independently
Start with both knees bent
Point and flex your foot
Progress to using a belt around the foot and gradually straighten the knee
6. Posture mid-back stretch 7. Postural sway and flutter 8. Hamstring and calf stretch
On hands and knees let the abdomen relax
Maintain normal curve of your back
Now draw PF/TA gently upwards; keep breathing
Progress to extending one leg, then to opposite arm and leg
Pg 103
Special instructions
Therapist / Practice
On hands and knees gently let the back drop down then curve upwards
Now with knees wide, keep the arms outstretched as you release the lower back
While kneeling tuck the abdomen in (posterior pelvic tilt)
Isometrically draw the heel and knee together
Shift your body forward without overarching your back to improve the stretch
9. Hip flexor stretch
© Exercises extracted from The Back Pain Handbook & New Bodyworks Book (NBW) Author Francine St George www.physiocoachingacademy.com
11. Lower back release10. Basic stability
7. Neural and Posture Exercises, Basic Stability and Stretching
Pg 48 Pg 52 Pg 74 NBW Pg 51
Pg 53 Pg 144 Pg 81
Pg 133 Pg 118
Pg 125
SAMPLE O
NLY

Place 3 fingers on the outside of the jaw
Push very gently into your fingers as you open and close the mouth a few millimetres only
1. TMJ alignment
Place your thumbs under your chin as you open your mouth
Control the movement and maintain alignment
2. Resisted Opening / Closing 2(Cont). Resisted Opening / Closing
Place the tongue on the roof of your mouth
Watch in the mirror as you maintain alignment as you open and close
3. Lateral Stability
4. Tongue Twisters
These are stretches for the tongue and TMJ muscles
1.Swipe the flat of the tongue along the
roof of the mouth, from the back to the
front.
2.Reach the tip of the tongue toward the
tip of the nose.
5. Tongue Movements
8. Neck Exercise - Fingers pointingup
9. Neck Exercise - Fingers down Special instructions
Therapist / Practice
Do small, circular, gentle massage around the jaw, laterally towards the ears and your temples
Also massage underneath along jaw-line from chin to your ears
Next
Focus on breathing deep, slow breaths
Be sure to unclench the jaw and relax the face muscles whenever you can throughout the day
6. Facial Muscles Strengthening
© Exercises extracted from The Back Pain Handbook & New Bodyworks Book (NBW) Author Francine St George www.physiocoachingacademy.com
10. Isometric neck exercises
7. Self Massage & Relaxation
8. TMJ and Basic Neural and Eye/Neck Stability Exercises
Try these to improve TMJ muscle activation and stability
1.“Tick tick tick”, “Chuck chuck chuck”,
“Cluck cluck cluck”
2.“Le la, le la, le la, le la, le la”
3.“The Big Black Bug Bled Black Blood”
Blow out the cheeks and let a small stream of air through pursed lips
Repeat 2 – 3 times
Practice grinning, then turning the lips down at the sides
Now place your index fingers on the top of your chin as you close your mouth
Repeat this open and closing movement 8 times
Extend your arm to the side, palm and fingers upwards
Bend your wrist up and down 2 or 3 times
Start with the elbow bent and then gently try to straighten it
Pg 49
Extend your arm to the side
Gently bend your elbow and almost straighten it, while moving your hand towards and away from your body
Start in line with your waist, and progress to moving the arm a little behind your body
Progression: Turn your head & watch your fingers as you flex and extend the wrist Recommendations: TMJ Corrective Exercise Videos
www.physiocoachingacademy.com/products/
Place your fingers at the base of the neck
Engage the neck muscles as you lookup all 8 directions
Hold 10 sec each position
Progression: Eyes look right, head turns right. Then eyes back to midline, head back to midline. Repeat in all 8 directions
Pg 59 NBW Pg 59 NBW Pg 59 NBW
Pg 48 Pg 151
SAMPLE O
NLY