1 D pong - 8085projects.in8085projects.in/wp-content/uploads/2016/12/8and30repo… · Web view1 D...
25
ECE-316 MICROPROCESSOR LAB PROJECT 1 D pong 8085 8085 A tennis like game based on 8085. This project not only let you play THE GAME but also gives the option of practice mode to become pro in this game before actual going in field against “rival”. Most interesting part of this game is perfect timing will give you corresponding speed. So sit tight this game test your reflexes. NSI T
Transcript of 1 D pong - 8085projects.in8085projects.in/wp-content/uploads/2016/12/8and30repo… · Web view1 D...

ECE-316 MICROPROCESSOR LAB PROJECT
Ankush Vashisht (30/EC/13) Abhishek Kr. Pandey (8/EC/13)
1 D pong
8085
8085 A tennis like game based on 8085. This project not only let you play THE GAME but also gives the option of practice mode to become pro in this game before actual going in field against “rival”. Most interesting part of this game is perfect timing will give you corresponding speed. So sit tight this game test your reflexes.
NSIT

Motivation and justification
This project came in my mind when we were searching something good and a project which can justify 8085 microprocessor. As this project requires proper coding skill to make this project neither so predictable and easy on the other side it should nor very hard to play. So seeing challenges coming brought that inner feeling to let’s make a game which we would like to play and never feel bored. So, here we are with our final project and we are pretty sure this game will not disappoint you.
Question is, does this much hardware and time spent justify this project?
Answer is yes. As project’s primary purpose was to make us learn and experience all the steps and needs in making a project from starting which includes schematic, block diagrams and what not till debugging and final in casing.
Apart from learning, this project gave us insight of ourselves that yes we can conclude or at least try in full throttle whatever assigned to us.
Not only this, during all the time span helping other people in there projected as “CEDT wale” gave us immense pleasure and learning experience to tackle weird! Really weird issues In there code and hardware (luckily ours worked first time without any issue).
So yes this project gave us so much as person, as a learner and as an engineer.

Project Description
It is a game like table tennis. Just like tennis to and fro motion of ball is implemented using series of LED's. As this game is strictly one dimensional so we gave it a name like 1D pong, this pong came from the game ping pong (a similar kind of game).This game is all about pressing the button at the right time and perfect analogy of it in real world would be hitting the ball at the right time in any game.
This game let you choose between two modes
-Play mode
-Practice mode
The Practice mode will let you to get your hands dirty before going to play.
The Play mode takes you to the real excitement because GAME IS ON. Miss will increase the score of other player and whoever score 9 first will win.

An animation showing front side of 1 D pong.

GAME BEGINS…..
Set up and initialisation:
1. Connect power cable and wait for system peripherals to initialise 2. System gives 5-6 sec to select mode. Set the slide switch in desired mode. 3. After this system will automatically starts the selected mode.
What next ?
Suppose selected mode is practice mode:
This mode helps in improvement of timing of strokes.One time run of this game gives 6 shot and at last final score of out of 6.
Play mode:
This mode gives you option to play with your friend/rival face to face .Player scoring the 9 first will win the game.

BLOCK DIAGRAM

Schematic – layer 2 (lower)

Schematic layer 1 (upper)
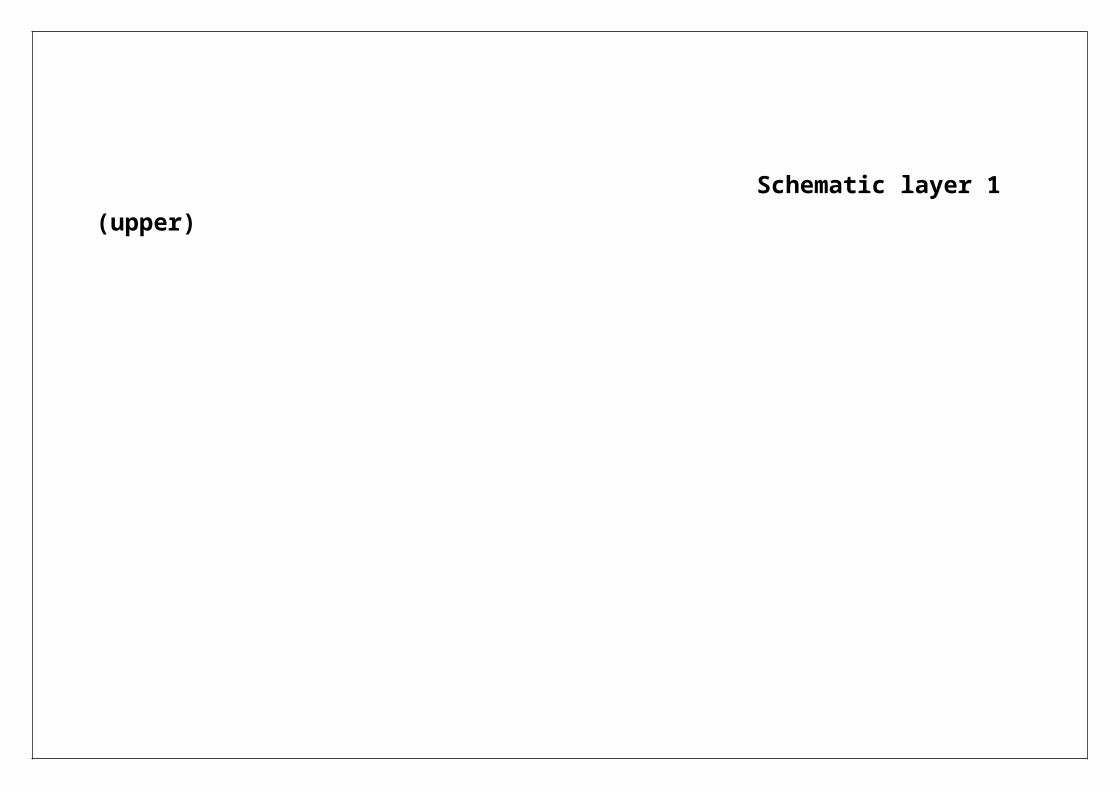
Pictures1.Board 1 - This board is designed with the help of EAGLE software and then sent to
PCB power for fabrication. Here are few pictures showing soldered board.
2. Board 2 – This board is the main interfacing board of our game. Board is designed and fabricated by us in CEDT lab. Here below are few pictures

3. Pictures showing both board side by side as well as stacked.

3. In casing.

Flow chart

No. of bytes-2180
No. of lines -999
No. of constants-16

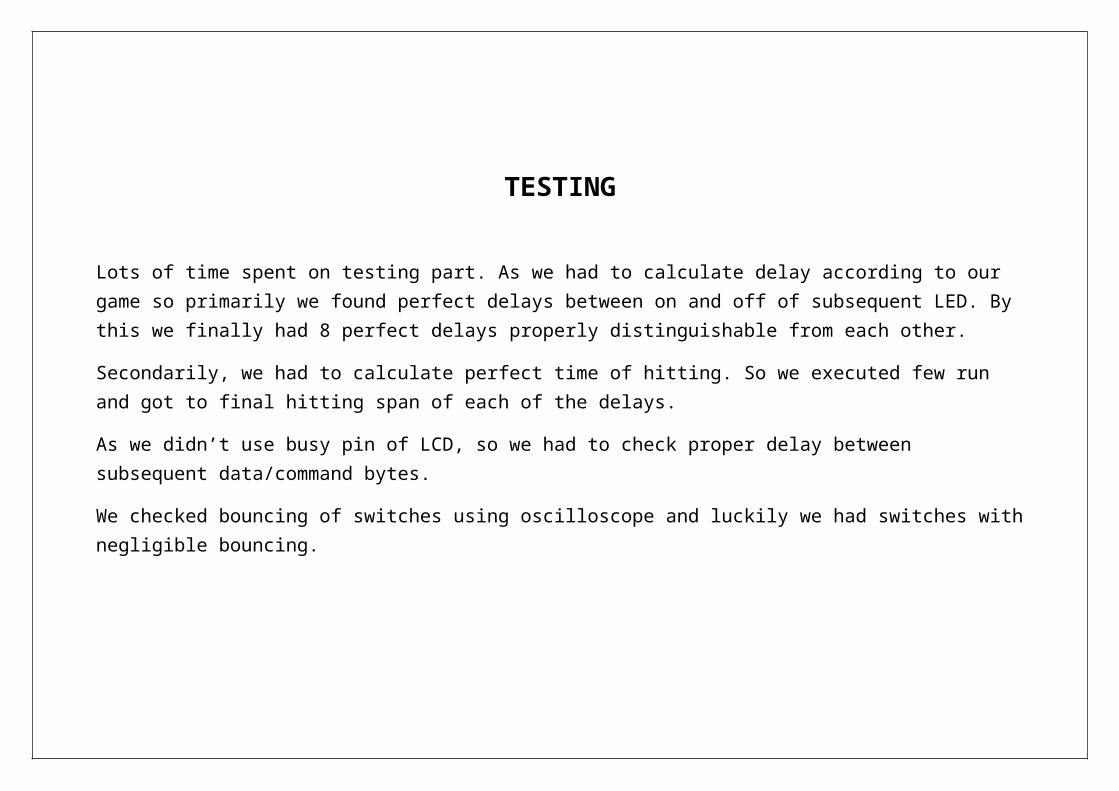
TESTING
Lots of time spent on testing part. As we had to calculate delay according to our game so primarily we found perfect delays between on and off of subsequent LED. By this we finally had 8 perfect delays properly distinguishable from each other.
Secondarily, we had to calculate perfect time of hitting. So we executed few run and got to final hitting span of each of the delays.
As we didn’t use busy pin of LCD, so we had to check proper delay between subsequent data/command bytes.
We checked bouncing of switches using oscilloscope and luckily we had switches with negligible bouncing.

Gantt chart (expected)-

Schedule actually followed
Beginning date End date Duration Task12th jan,2016 20th jan,2016 8 days Studied the concepts
integral to the understanding of the project
Finalized the block diagram.
21st jan,2016 4th feb,2016 14 days Made rough circuit Tested logic circuit on
proteus.
5th feb,2016 19th feb,2016 14 days Made the schematic. Made flow diagram and
pseudo code.21st feb,2016 8th march,2016 16 days Mid sems preparation.
Mid sems.10th march,2016 1st april,2016 22 days Routed board 1.
Routed board 2.

8th april,2016 18th april,2016 10 days Send board 1 to be manufactured in PCB power.
Fabrication of second board in CEDT lab.
18th april,2016 30th april,2016 12 days Soldering of both boards. Mode 1 (play mode)
worked absolutely fine
1st may,2016 26th may,2016 27days End sems preparation and end sems.
27th may ,2016 1st june,2016 4 days Mode 2 made to work and merged both of them in single code.
Report and video formation.
Tools used:
Software tools :
1. EAGLE 7.3.0 – for schematic and board layout
2. 8085 Simulator IDE by OshonSoft
3. EEPROM programmer software.
4. Proteus.
Hardware Tools :
1. Soldering Iron
2. Solder
3. Multimeter
4. +5V DC Power Supply
5. EEPROM Programmer.
6. Cutter, Tweezer, Hand Files, etc.

BIBLIOGRAPHY
“Microprocessor Architecture, Programming, and Applications with 8085”
5th edition
Author: Ramesh S. Gaonkar
Publisher: Penram International Publishing (India) Pvt. Ltd.
ISBN: 81-87972-09-2

Conclusion
We concluded that there is no bar in thinking a great project and implementing it successfully given we have proper guidance and proper facilities.