1 COMPUTER FUNDAMENTALS - allebooks.inallebooks.in/computers/COMPUTER FUNDAMENTALS.pdf · COMPUTER...
21
1 COMPUTER FUNDAMENTALS COMPUTER:- Computer is one of the Electronic device, which takes input data, process the data and it gives out put to the user. BLOCK DIAGRAM OF COMPUTER CPU CPU: - Central Processing Unit ALU: - Arithmetic Logical Unit CU: - Control Unit MU: - Memory Unit IN PUT: - When ever we give the data through keyboard is set to be input. PROCESS: - CPU will process the given input data only. OUT PUT: - After the processing of data gives the output to the user through Monitor only. ALU: - The Arithmetic calculations and logical calculations of data will be Manipulated in ALU only. CU: - While the calculations are going on control unit will transfers the data from one place to another place. MU: - The capability of remembering the data given to it is set to be memory unit Memory is of 2 types. 1. Primary memory, 2. Secondary memory. Primary memory is also said to be a temporary storage device it is of 2 types they are; ALU CU MU IN PUT OUT PUT
Transcript of 1 COMPUTER FUNDAMENTALS - allebooks.inallebooks.in/computers/COMPUTER FUNDAMENTALS.pdf · COMPUTER...

1
COMPUTER FUNDAMENTALS
COMPUTER:- Computer is one of the Electronic device, which takes input data, process the data and it gives out put to the user.
BLOCK DIAGRAM OF COMPUTER
CPU
CPU: - Central Processing Unit ALU: - Arithmetic Logical Unit CU: - Control Unit MU: - Memory Unit IN PUT: - When ever we give the data through keyboard is set to be input. PROCESS: - CPU will process the given input data only. OUT PUT: - After the processing of data gives the output to the user through Monitor only. ALU: - The Arithmetic calculations and logical calculations of data will be Manipulated in ALU only. CU: - While the calculations are going on control unit will transfers the data from one place to another place. MU: - The capability of remembering the data given to it is set to be memory unit
Memory is of 2 types.
1. Primary memory, 2. Secondary memory. Primary memory is also said to be a temporary storage device it is of 2 types they are;
ALU
CU
MU
IN PUT
OUT PUT
2 1. RAM: - Random Access Memory. 2. ROM: - Read Only Memory RAM: - In this we can enter the data and also we can modify the data ROM; - It is only used for reading purpose. Secondary storage device: - It is also said to a permanent storage device. Eg; hard disc- CD Rom- floppy drives. Computer is categorized in to 3 components. Soft ware-hard ware- user. Software: - The set of programs is said to be software. It is of 2 types 1. Application software 2. System software. Application Soft ware: - For some specific application we used in
application software; Eg:- Railway reservation - E- Seva counters. System software: - Multy users can access the software is said to be a
system software Eg;- Internet Hardware: - The physical components of the system, which we
can touch is said to be hardware. Operating system: - The mediator or interface between user and
computer is said to an operating system. Eg:- Windows 98, 2000, windows XP and 2003.
WINDOWS
1. CHANGING THE DATE AND TIME: - Double click on the taskbar date and time_ apply the month, date, year and also we can change the time _click on apply and click on OK. Changing the background of desktop.
2. Applying screen saver. 3. Changing the size of Icons 4. Changing the size of date& time 5. Changing the size of mouse pointers 6. Desk top items 7. Note pad.

3 CHANGING THE BACKGROUND OF THE DESKTOP: - Right click on the desktop_ click on properties _click on desktop_ select any background_ click on apply. If we wand to change the background as a single colour background click on none and select any color and click on apply. APPLYING SCREEN SAVERS: - Right click on the desktop_ click on properties _ click on screen saver _select any one of the screen saver set the time. If we want to see the preview _click on preview and click on apply. Eg;- Select the 3D text screen saver option, click on settings, type the name in costumes text, choose the font, select the rotation type and select the colour also click on OK. CHANGING THE SIZE OF THE ICON: - Right click on the desktop click on properties _click on apprience_ click on advanced _select CHANGING THE MOUSE POINTERS: - Click on start _click on settings_ click on control panel- double click on mouse- click on points options, select any mouse point option- click on apply or click on Browse -select any pointer click on open- click on apply. DESK TOP ITEMS:- (Default items) My Computer- My Document- Internet explorer- Recycle bin- My network Places. MY COMPUTER:-In my computer we are having different type of Drives. By using this drives we can store files, folders etc Eg;- C-Drive ,D, E, ,and F drive. MY DOCUMENTS:-In my documents when ever we save the file defaultly that file will be stored in to the my documents .Eg:- Note pad, MS word, Excel. INTERNET EXPLORER:-If we want to se any information related to the Web site then we use internet explorer Eg;- www.yahoo.com, www.gmail.com etc. RECYCLE BIN: - When ever we delete any files that files will be stored into the recycle bin only. If we want to restore it again, right click on the file and click on restore. NOTE;- For permanent deletion press shift +delete. CREATING FOLDERS: - Right click on the location where we want to create a folder- click on new -click on folder- type the name of the folder. NOTE: - In one folder we can create multiple folders.
4 RENAMING THE FOLDER: - Select the folder- right click on the folder- click on rename- type the name. HOW TO OPEN THE FOLDER: - Double click on the selected folder or Right click on the folder- click on Open. DELETING THE FOLDER: - Select the folder and delete. OR right click on the folder- click on delete option. SEARCHING FILES OR FOLDERS: - Click on start -click on search- click on file or folders - click on all files& folders- type the folder or file name then click on search. -If we want to find picture click on All pictures- again click on pictures - click on search. HOW TO SETDOWN THE SYSTEM: - Click on start click on set down select the option -set down and click on OK.
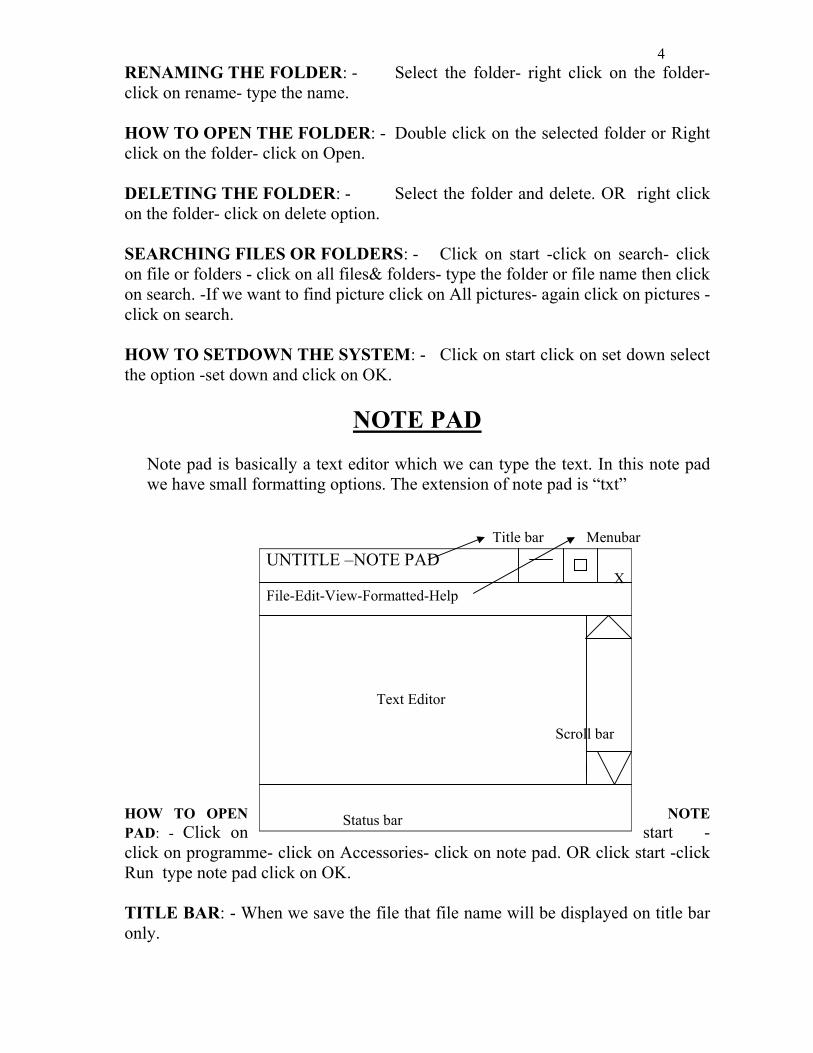
NOTE PAD Note pad is basically a text editor which we can type the text. In this note pad we have small formatting options. The extension of note pad is “txt”
Title bar Menubar HOW TO OPEN NOTE PAD: - Click on start - click on programme- click on Accessories- click on note pad. OR click start -click Run type note pad click on OK. TITLE BAR: - When we save the file that file name will be displayed on title bar only.
UNTITLE –NOTE PAD X
File-Edit-View-Formatted-Help Text Editor Scroll bar Status bar

5 MENUBAR: - In menu bar we have 5menu options each menu will have different options. TEXT EDITOR: - By using this text editor we can type the text only. STATUS BAR: - Status bar will show the status of the curser. SCROLE BAR: - If we type last data then the scroll bar will be displayed on the right side of the bottom. MINIMIZE: - If we want to minimize the current note pad window on the taskbar then we use minimize option (--). MAXIMIZE: - If we want to maximize the current notepad window on the taskbar then we use maximize option ( ). CLOSE: - If we want to close the current note pad window on the taskbar then we use close option (X). HOW TO OPEN A NEW NOTE PAD: - If we want to open a new note pad then we use “NEW” option. Click on file and click on new. HOW TO OPEN AN EXISTING FILE OR OLD FILES: - Click on file -click on open and select the file and click on open. SAVING THE FILE: - If we want to see the existing note pad again and again then we have to save the file. Click on file -click on save and select the save location - type the file name and click on Save. SAVE AS: - If we want to save the same file in another location then we use “Save as” option click on file - click on save as and select the save in location click on save. EXIT: - If we want to close the document then we use exit option. Click on file and click on Exit. EDIT UNDO: - If we want to get the previous deletion then we use Undo option. Click on edit and undo- type the text - select any text- delete the text- click on Edit and Undo.
6 CUT: - When ever we cut the text that text will be stored in the paste option. Type some text- select where we want to replace the text -click on edit and click on paste. COPY: - Whenever we copy the text - the text will be stored in the paste option. Type some text- select the text -click on edit - click on copy - place the curser where we want to paste the text -click on edit and click on paste. DELETE: - Select the text, which we want to delete click on edit and click on Delete. FINDING THE CHARACTER OR WORDS FROM THE DOCUMENT: - If we want to find the existing words or letters from the current document then we use “Find option. Click on edit -click in find -type the text - click on find next. REPLACING THE TEXT: - Click on edit- click on replace- type the existing word - type the replaced word - click on replace or replace all. GO TO: - If we want to find the line numbers then we use GO TO option. Click on edit - click on GOTO- enter the line number- click on OK SELECT ALL: - If we want to select all the data from the existing notepad then we use select all option. Click on edit- click on select all. FORMAT:- HOW TO APPLY FONT: - Click on format- click on font -select the font type size- click on OK HELP: - If you want to know about notepad then we use help option. Click on help menu - click on help topics- click on contents- click on notepad- select any one of the option it will display about the selected option.
M S WORD
Microsoft Company introduces MS word. The purpose of using MS word is we can create documentations, Resumes, question papers, and also we can create tables, and M S word is advanced to notepad. In this MS word we are having so many toolbars by using this toolbars we can create documentation. The extension of MS word is..”Doc”

7 HOW TO OPEN MS WORD: - Click on Start -click on programme -click on MS word OR click on start- click on Run - type win word. By using formatting toolbar we can apply font options and alignment to the selected text. MENU’S IN MS WORD:- File- edit- View- Format- Insert- Tools- Tables- Window - and Help menu. NORMAL LAYOUT: - If you want to save any data for reading purpose then we use normal layout only. After the completion of the 1st page the curser will automatically entered into the second page. Between page to page the dotted line break will be displayed. Click on view- click on normal layout. PRINT LAYOUT: - If you want to take print out of the current document then we use print layout option. Print layout will have 2 ruler bars (Top and Left) between page-to-page are break will be displayed. Click on View -click on print layout. WEB LAY OUT: - When we use web layout all existing pages will combined in to a single page. The status bars will not display the status of the web layout. Click on View click on web layout. HOW TO APPLY MARGINES AND INDENTS TO THE SELECTED TEXT If we want to apply margins i.e right, left, top, bottom margins then we use page set up option. Type some text click on file- click on page setup- click on margines - click on apply the magrines. Eg: Top=1inch, bottom=1 Right=1.25, left=1.25 like that. Select the orientation (landscape or port ate) click on pager select the paper size, click on OK. PRINT PREVIEW: - If you want to see preview of the current pages then we use print preview option click on file -click on print preview. HOW TO PRINT THE PAGES: - If you want to print the current document then we use print option. Click on file click- on print -select page range- apply the copies click on OK.
SHORT CUT KEYS
Alt +F = File menu Alt + E = Edit menu Alt + V = View menu Alt + O = Format menu Alt + A =Table menu Alt + T =Tools menu Alt + H =Help menu Alt + D = Data menu (Excel)

8 Alt + D = Slide show (Power point) Alt + F4 = Shut down/ closing the window Alt + Space +C = Shut down/ closing the window Ctrl + N = New Ctrl + S = Save Ctrl + P = Print Ctrl + F2 = Print preview Ctrl + Z =Undo Ctrl + X =Cut Ctrl + C = Copy Ctrl + V = Paste Ctrl + A = Select all Ctrl + F = Find Ctrl + G = Go To Ctrl + H = Replace Ctrl + B = Bold Ctrl + U = Underline Ctrl + I = Italic Ctrl + D = Font Ctrl +] = Increasing font size Ctrl + [=Decreasing font size Ctrl ++ = Super script Ctrl + shift ++ = sub script Shift + Arrow keys = Selecting the data F1 = Help F7 = Checking spelling and grammar Control + Space + N = Minimizing the window Alt + Tab = Maximizing the window Ctrl + E = Centre Align Ctrl + L = Left Align Ctrl + R = Right Align ---------------------------------------------------------------------------------- INSERTING THE TABLES: - Click on table menu- click on insert - click on table - enters the NO. Of rows and NO. Of columns click on OK. ADDING COLUMNS TO THE EXHISTING TABLEWS: - Place the curser where you want to insert the column to the right or left, click on table menu - click on insert- click on column to the right or left. ADDING ROWS TO THE EXHISTING: -Place the curser where you want to insert the rows to above or below click on table- click on insert -click on row above or below.
9 ADDING THE CELL: - Place the curser where you want to add the cell click on insert - click on table - click on cell. DELETING THE TABLE: - Select the table- click on table menu- click on delete- click on table. DELETING ROWS OR COLUMNS: - Select the required row or column click on table menu- click on delete rows or columns. MERGING CELL: - By using this option we can combine the No. Of cells into a single cell. Select the cells which you want to merge, click on table menu- click on merge cells. SPLITING CELLS: - Place the curser where you want to split the cell click on table -click on split cells- enter the no of rows or columns click on OK. TABLE AUTO FORMAT: - Select the table click on table menu- click on table auto format. AUTO FIT: - Select the table- click on table menu- click on auto fit- click on auto fit to contents. HEADING ROW REPEAT: - Insert a table- type the feel names- if you want to continue the same feel names (heading) in the second page - then place the curser in the 1st row -click on table- click on heading row repeat. CONVERTING THE TEXT INTO TABLEAND TABLE INTO TEXT: - Select the table data- click on table menu- click on convert- click on table to text option- similarly we can convert the text into table. SORTING: - Ascending—A-Z Descending ---Z-A If you want to sort the data numbers then we use sort option. Select any column clicks on table menu- click on sort -select the option ascending or descending- click on OK. NOTE: - When we use this sort option that particular related data will also changed.

10 APPLYING FORMALAS: - Type some table data- place the curser in the result cell- click on table menu- click on formula - select the required function by using paste functions Eg;- Type = Sum(left) or = Max(above) click on OK. MAIL MERGE: - click on tools menu - click on letters and mailings- click on mail merge wizard - click on letters from the mail merge task pad (right side) Starting document- click on use the current document- select recipients type a new list- create customize- delete the files if you are not required (select the field, click on delete). If you want to add the fields click on add- type the field name click on OK. Again click on ok.- Then fill the address information for the 1st record- click on new entry for the 2nd record and so on. Click on close. Save the file - click on ok.. Click on insert merge fields from the mail merge toolbar - select the fields- click on insert -one by one …… click on close. After that click on merge to new document from the mail merge tool bar- click on ALL click on Ok. PROTECTING THE DOCUMENT: -1. External protection
2. Internal protection By using this external protection we can see the data- but we cannot modify the data with out using correct pass word. Type some text - click on tools- click on protect document - click on forms- type the pass wor- click on ok.- Again retype the same password click on ok. UNPROTECT DOCUMENT: - Click on tools menu- click on unprotect document- type the correct pass word what you have given earlier click on ok. INTERNAL PROTECTION: - By using this protection we cannot see the data with out using correct password. Click on tools - click on options- click on -security - type the password in password to open area- click on ok.. Retype the same password- click on OK. And save the file in a particular location whenever you open the document it will ask the password. FORMATING TEXT APPLYING FONT TO THE SELECTING TEXT: - Type some text select the text click on format- click on font - apply font style - type colour,-size- apply font effects- click on text effects- select any one of the effect,-click on OK. REMOVING THE TEXT EFFECTS: - Again select the data -click format click on font- click on text effects- click on none option –click on ok.

11 APPLYING BULLETS AND NUMBERING TO THE TEXT:- Type some text place the curser where you want to insert the bullets or number. Click on format- click on bullets & numbering- click on bulleted option or numbered option select any one of the style click on ok. REMOVING BULLETS &NUMBERING OPTION Select the text- click on format- click on bullets &numbering select none option. BOARDERS AND SHADING: - In borders and shadings consists of 3 options
1. Applying text borders 2. Page borders 3. Text shading
Type some text, select the text click on format- click on borders and shadings click on borders- select the border style –colour- after that click on page border select the page border style - click on shading- select the shading colour- click on OK. CONVERTINGTHE TEXT FROM UPPER TO LOWER: - Type some text (lowercase-small letters) select the text - click on format - click on change case click on upper case - click on OK. In the same way we can use lower case- title case and sentence case. APPLYING DROP CAPS: - Type some text- place the curser when you want to insert the drop cap - click on format - clock on drop cap -select drop or inmargine option - apply the line numbers- click on OK. REMOVING THE DROP CAP: - Select the drop cap letter- click on format click on drop cap - select the None option - click on OK. INSERTING THE PAGE NUMBERS: - Click on insert - click on page numbers- select the position top or bottom - select the Alignment right- left- or centre -click on format - select the number format - click on Ok SYMBOLS:- If you want to insert mathematical symbols or currency symbols or subscript and super scripts or special symbols. Then we use this symbols option. Place the curser where you want to insert the symbol- click on insert - click on symbols - select any symbol - click on insert- click on close. INSERTING DATE AND TIME: - Click on insert - click on pictures - click on clip Art- click on search - select the required picture- right click on the selected picture- click on edit picture. We can modify the picture colour by selecting the each part. Right click on the selected part- click on format auto shape - select the color - click on OK

12 HEADERS & FOOTERS: - If you want to apply headings or titles and footer text to the pages- then we use header and footer option. Click on view - click on Headers & Footer - Type the heading in header area- press down arrow key- type the footer text in footer area - click on close. When we apply this header and footer option automatically for the next pages also it will apply. INSERTING HYPER LICK: - If you want to link the one document to another document then we use hyperlink option. Only the existing documents files will be opened. Click on insert - click on hyperlink - select the file- click on OK. To open the hyper link file - press Ctrl + click on that file ZOOM: - If you want to zoom the text then we use zoom option. Type some text click on view - click on zoom - select the percentage- click on ok.- Default we use 100% FULL SCREEN: - If you want to display the text then we use full screen option. When we use this full screen the tool bars will not be displayed. Click on view click on full screen. If you want to close click on close full screen. PAGE BREAK: - If you want to move the text from one page to another page then we use page break option. Place the curser from where you want to move the text - click on insert - click on break- click on page break - click on OK. AUTO TEXT: - For inserting auto text minimum is 4 letters, max is 256 letters. When we type the starting 4 letters after pressing enter key- the remaining word will be displayed - click on insert- click on auto text - click on auto text- type the required word - click on add- click on ok- when we type the starting 4 letters in the document - after press enter key the remaining word will displayed.
MS EXCELL
MS Excel is introduced by Microsoft company- Excel work sheet is also said to be a spread sheet - the purpose of using MS Excel is, we can create student mark list- employees salary sheet - by using estimations we can create charts also.defaultly Excel worksheet have 3 sheets every sheet consists of no of rows and no of columns - rows are indicated with numbers i.e 1 to 65536 - and columns are indicated with alphabets i.e A to IV(256) every sheet will have one formula bar - every formula should with ‘=’symbol the extension of MS excel is .’xls’.

13 EX-CEL SHEET ROWS
COLUMNS HOW TO OPEN MS EXCEL.;- Click on start- click on programme - click on MS Excel- OR click on start - click on RUN- type Excel -click on OK FILLING SERIES; - Enter any two numbers for e g. enter 1&2 in A1cell and A2 cell - select the O2 cells- place the curser at the corner - and drag it up to which exten you want- similarly we can apply months, dates, and also days etc . APPLYING CUSTOM LIST: - Click on tool- click on options- click on custom list - click on list- type the list- eg; Names dates etc…. after the typing the list - click on Add - click on OK. Type the starting towards- select theword- place the curser at corner and drag the mouse curser. INSERTING ROWS: - Select the specific cell - click on insert- click on rows similarly columns. INSERTING SHEET: - Click on insert- click on work sheet. DELETING ROWS OR COLUMNS: - Select the row or column which you want to delete- click on Edit -click on Delete- click on row or entire column. RENAMING THE SHEET: - Select the sheet- right click on the sheet name -click on rename- type the name. DELETING THE SHEET: - Right click on the sheet name- click on delete or click on edit - click on delete sheet. INCREASING THE ROW HEIGHT: - Select the rows for which you want to apply the height- click on format- click on rows- click on height - type the row height - click on OK.
A B C D
1
2
3
4

14 INCREASING THE COLUMN WIDTH; - Click on format- click on column click on width - type the column width - click on OK. CHANGING THE BACK GROUND; - Click on format- click on sheet - click on back ground - select the required back ground- click on insert. DELETE BACK GROUND: - Click on format- click on sheet- click on delete Back ground. HIDING THE CURRENT SHEET: - Click on format- click on sheet - click on hide. UNHIDING THE CURRENT SHEET: - Click on format click on sheet select the hided sheet click on ok. INSERTING FUNCTION: - Type some data - select the result cell when you want to insert the function - click on insert - click on function - select the category as most recently used functions - select the required function ( eg. Sun, average, min, max, product etc) click on OK click on OK. TOTAL: - C2 + D2+E2+F2+G2+ Or =Sum (C2:G2) or =Auto sum (press sigma) AVERAGE: - =C2+D2+E2+F2+G2/5 OR =Average (C2:G2) OR H2/5; h2=total cell (total) 5 =No of subjects. RESULT: - If(an(C2>35=, D2>=20, E2>=35, F2>=35, G2>=35,)”PASS” “FAIL’) GRADE: - If (or(C2<3, D2<20, E2<35, F2<35 G2<35), “FAIL” If (Avg J2>=80, “A”, If(J2>=60, “B” If (J2>=40, “C”)))) (j=average) CONDITIONAL FORMAT:- By using this option we can give colour to the selected text, select the marks- click on format- click on conditional formatting select the condition as between - enter the values(eg;0-34) click on format- select the color- click on OK- Click on Add- for adding the next condition -select the required condition- enter the values (foreg; 80-100, click on format- select the color- click on OK) Similararly =”Pass” and +Pass” –one color “=Fail” and +”Fail”—another color APPLYING AUTO FORMAT TO THE SELECTED TABLE: - Select the hole table - click on format- click on auto format - select the require format - click on OK.

15 FORMATING CELLS: - APPLYING NUMBER FORMATING Select the data click on format- click on cell- select the category (Eg; number, text, currency date & time) select the type- click on OK. ALIGNMENT: - Select the text - click on format - click on cell- by using the mouse pointer, change the text direction - apply the alignment- click on OK. MERGING CELLS: -Select more then one cell - click on format- click on cell click on alignment - merge cells for removing also. WRAPING THE TEXT; -Type some large data in single cell - select the cell click on format - click on cells - click on alignment- click on wrap text for removing also same. APPLYING FONT OPTIONS TO THE TEXT; -Select the data- click on format -click on cells- click on font- click on apply font style - type font size- color- click on OK’ . APPLYING BOARDER TO THE SELECTED TABLE’:--Select the table data - click on format- click on cells- click on borders - select the border color width – style- click on OK OR we can directly use borders tool bar options . PATTERNS’- (Back ground color of the table) select the table data- click on format -click on cells- click on patterns- select the colour -select the required patterns -click on OK . PROTECTING SHEE: - ’-Select the sheet which you want to protect - click on tool - click on protection - click on protect sheet- type the pass ward - click on ok . Type the same password - click on OK. UN PROTECTING SHEET: - Click on tools- click on protection- click on un protection sheet - type the password - click on OK. GOAL SEEK: - (Reaching the target value) Type some table data- select the result cell - click on tools - click on goal seek type the target value- place the curser in changing cell - select the cell from the sheet which you want to change- click on OK. APPLYING AUDITING: - Type some data- select the result cell -click on tools click on format auditing -click on trace precedents.

16 REMOVE ALL ARROWS: - Click on tools - click on formula auditing- click on remove all arrows. SORTING THE DATA: - Ascending order- 1-100 Descending order -100-1 Select any column that which you want to sort - click on data- click on sort - expand the selection when we use this option that column related data will also sorted OR chick on current selection- when we use this option only the selected data will be sorted - click on ok. Select ascending or descending order - click on OK.. APPLYING AUTO FILTER: - Type some table data- select the serial number cell -click on data- click on filter- click on auto filter -select the custom option from the serial list box enter the required serial no click on ok. Select any one of the serial numbers from the serial no list box, that related data only displayed on the sheet. REMOVING AUTO FILTER: - Click on data - click on filter- click on auto filter- click on remove auto filter. ADVANCED FILTER: - Type the condition (eg total,.400) select the hole table click on data - click on data- click on filter- click on advanced filter- place the curser in credit aria range- select the condition from the sheet - click on copy to another location- place the curser in copy to area- select the location from the sheet- click on OK. FORMS: - Click on data- click on forms by using scroll bar we can see the inserted records if you want to add new record - click on new - click on filter data - click on credit aria- if you want to delete any records - select the required records- click on delete- click on OK. APPLYING VALIDATIONS: - Select the location or specific cell - click on data - click on validation- select the category (eg whole umbers decimal numbers date- time -text length etc.) type the minimum value and max. Value - click on ok - whenever we type non-valuation values it will show the error. APPLYING FREEZE PANES: - When we use this option we can hide the data select the specific cell- click on window - click on freeze panes - by using the scroll bar we can hide the data. REMOVING FREEZE PANES: - Click on window - click on unfreeze panes.

17
CHARTS INSERTING CHARTS: - Type some table data- select the data -click on insert -click on charts- select the chart type - click on next -select the series in rows or columns -click on next- type the chart title -type category of “x” axis and “Y” axis -click on next- choose the option as new sheet or select the sheet numbers -click on finish. APPLYING SCENARIOUS: - If you want to apply dupplicate values to the selected data -then we use scenarios option. Select the data -click on tools- click on scenarios- click on add- type the scenarios name -click on ok.. Change the values- click on ok -click on show. When you want to show this duplicate values again- click on tools- click on scenarios -select the scenarios name- click on show WORD: - F7—SPELLING & GRAMMER. Red color is indicating for spelling mistake and green color is indicating grammar mistake. Type some word (spelling mistake) select the word -click on tools -click on spelling & grammar- select any one of the correct suggestion- change if it is not -then click on ignore once or ignore all. GRAMMAR MISTAKE: - In the same way we can check the grammar mistake also. INSERTING COMMENTS: - Select the word -click on insert -click on comment – type the comment. DELETING THE COMMENT: - Right click on that comment- click on delete Comment. TREASURUS (SYNONYMUS)-SHIFT +F7. Type the word -select the word- click on tools- click on language -click on thesaurus -select any one of the related meaning -click on replace. THEMES: -Themes is nothing but predefined background. -Click on format click on themes -select any one of the theme- click on OK. COMMENTS IN (XLS): - Type some word in a cell -select the cell -click on insert- click on comment- type the comment.
18 EDITING THE COMMENT:- Right click on the comment -click on edit comment. DELETING THE COMMENT: - Right click on the comment- click on delete comment.
POWER POINT
The purpose of using MS Power point is we can create presentations throw slides, by using the slides we can create animation to the pictures and to the titles and so…on The extension of power point is “. PPT’ HOW TO OPEN MS POWER POINT: - Click on start -click on programme- click on MS power point –OR click on start -click on Run -type power point -click on OK. CREATING THE NEW PRESENTATION -; Click on file -click on view -click on blank presentation from the task pane. INSERTING THE NEW SLIDE: - click on insert -click on new slide -select any slide from the slide layout task pane (CTRL +M). APPLYING DUPLICATE SLIDE: - Select the slide click on Edit -click on duplicate. (CTRL+D). DELETING SLIDE: - Select the slide -click on delete. APPLYING THE BLOCK&WHITE COLOR TO THE SELECTED SLIDE: - Insert any slide- apply color- fonts to the slide- click on view -click on color/grace scale option -click on gray scale or pure black & white option. SLIDE SORTER: - By using this option we can move the slides from one place to another place. Click on view -click on slide sorter by using mouse pointer we can move the slides from one place to another place. SLIDE SHOW/VIEW SHOW (F5): - Insert more than 3 slides -click on view menu -click on slide show or press F5 by pressing enter or arrow keys we can see the slides one by one.

19 APPLYING SLIDE NUMBERS: - Insert more than 3 slides- click on insert -click on slide numbers- select the slide number option -click on apply or apply to all. INSERTING PICTURES: - Click on insert -click on picture- click on clip art -click on search- select any of the picture. UNGROUPING: - Right click on the selected picture- click on grouping- click on ungroup by selecting each part we can change the color by using fill color option. GROUPING: - Select the whole picture -right clicks on the picture- click on group. INSERTING ORGANIZATION CHART: - Click on insert -click on pictures click on organization chart -select the shape and- click on insert shape . If you want to change the format of the organization chart - click on auto format- from the tool bar ,-select the required style -click on apply. INSERTING AUTO SHAPES: - By using this auto shape we can create flow charts- click on insert -click on picture -click on auto shapes- select any auto shape from the tool bar by using mouse pointer we can insert the shape. If you want to add the text -right click on the selected shape -click on add text and type the text. DELETING THE AUTO SHAPE: - Select the auto shape and press delete key. INSERTING WORD ARTS: - If you want to inser predefined color text format then we use word art option -click on insert- click on picture -click in word art -click on select any required word art style -click on ok -if you want to edit the text -click on edit the tool bar . FOR CHANGING COLOR OF THE WORD ART:- Click on format word art select the color- click on more colors or fill effects -click on ok -if you want to change the word art shape- click on word art shape from the tool bar and select the word art shape. INSERTING TEXT BOX ‘-Click on insert -click on text box -type the text DELETING THE TEXT BOX ; -Select the existing text box and press delete key. INSERTING DIAGRAMS ‘:- Click on insert- click on diagram -select organization chart or cycle diagram or pyramid or ven diagram etc. click on ok- if you want to add another shape -click on insert shape from the tool bar if you want to delete -select the shape and press delete key .if you want to change the color the diagram -click on auto format -select the diagram style -click on apply.

20 APPLYING SLIDE DISIGNES –‘Insert any slide- select the slide- click on format- click on slide design -select any design template from the task pane- if you want to apply design template for a single slide- right click on the selected design template- click on apply to selected slide. REMOVING SLIDE DESIGNS ‘-Select the existing slides- click on none option from the taskpane APPLYING COLOR SCHEME :--Select the slide -click on color scheme from the task pane - select any one of the color scheme or if you want more color -click on edit color scheme -click on change color -select the color- click on apply APPLYING ANIMATION SCHEME :- -Click on animation scheme -select the slide- select any animation from the task pane- click on play and press F5, if you want to apply for all the slides- click on apply to all slide. REHARSE TIMINGS: - by using this option we can set the time to each slide -insert more than 4slides -click on slide show menu -click on rehearse timings -set the time for 1st slide -click on next set the time for 2nd slide -click on next 3rd so………on click on yes and press F5. CUSTOM ANIMATION: - -By using this option we can apply animation to the selected text and selected pictures- insert any slide- insert picture and word art styles -select the picture for which you want to create animation -click on slide show- click on custom animation- click on add effects from the custom animation task pane- select any animation. if we want to see the preview -click on play and press F5.similarly we can create for titles and to the text so……. On. SLIDE TRANSATION: - If you want to apply same timings to each slide then we use slide transition option -click on slide show -click on slide transition click on automatically after set the time- click on apply to all slides and press F5 . CUSTOM SHOW:- Click on slide show menu- click on custom shows -click on new- select the required slide that which you want to show -click on add- click on OK -click on show.

21
INTERNET WWW = WORLD WIDE WEB
WWW. GOOGLE.company information not required space
www.yahoo mail.com Www. Rediffmail.com These are for sending e.mails
www.gmail.com E mail ID
CREATE ID WWW.YAHOO.COM Click on mail click on sign up click on first name write last name select India write gender.
FOR RE OPEN THE ID
WWW. Yahoo. Com click on user id wire pass word
HOW TO CREATE E-MAIL ID Double clck on internet exploure- type the web site- name as www.yahoomail.com- press enter key – click on sign up and fill the registration form as per conditions apply- click on I Agree.
HOW TO OPEN E-MAIL ID:- Double click on internet explore- type the website name as WWW.Yahoomail.Com press enter key -type the ID and pass word and- click on sign in. If you want to check the mails- click on inbox. To open the mail -click on subject. If you want to forward the mail -click on forward
type the TO address for which you want to see and you can type the text and click on send.- If you want to reply to the sender- click on reply and type the reply text -click on send. DELETING THE MAIL: - Select the mail -click on delete-
GREETINGS
WWW.123greetings.Com select any card click on personalize this card -type from address (E-mail ID) type To address (E-mail ID) type the message -click on preview- and send this card and choose the data and- click on send this card on choose on date Note”- If you want to sign out (close) your E-Mail ID click on sign out.