1 8/16/2015 Haier Side By Side Refrigerator HRF-660/661/662/663 Training Material Haier Refrigerator...
90
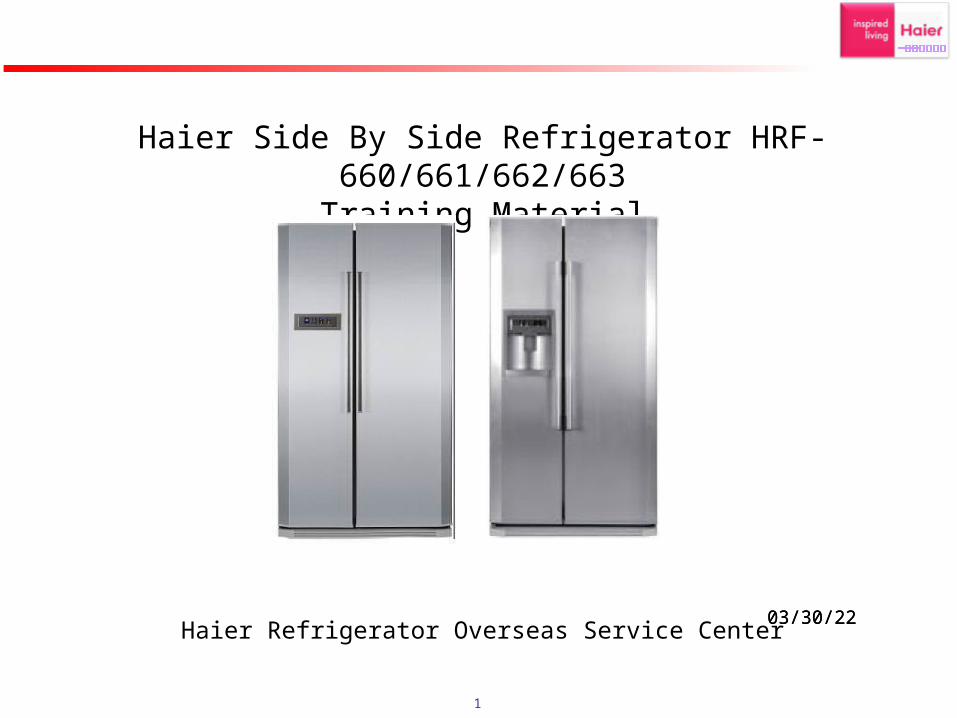
1 03/30/22 Haier Side By Side Refrigerator HRF- 660/661/662/663 Training Material Haier Refrigerator Overseas Service Center 03/30/22
-
Upload
angelina-newman -
Category
Documents
-
view
329 -
download
34
Transcript of 1 8/16/2015 Haier Side By Side Refrigerator HRF-660/661/662/663 Training Material Haier Refrigerator...
1
04/19/23
Haier Side By Side Refrigerator HRF-660/661/662/663Training Material
Haier Refrigerator Overseas Service Center04/19/23
2
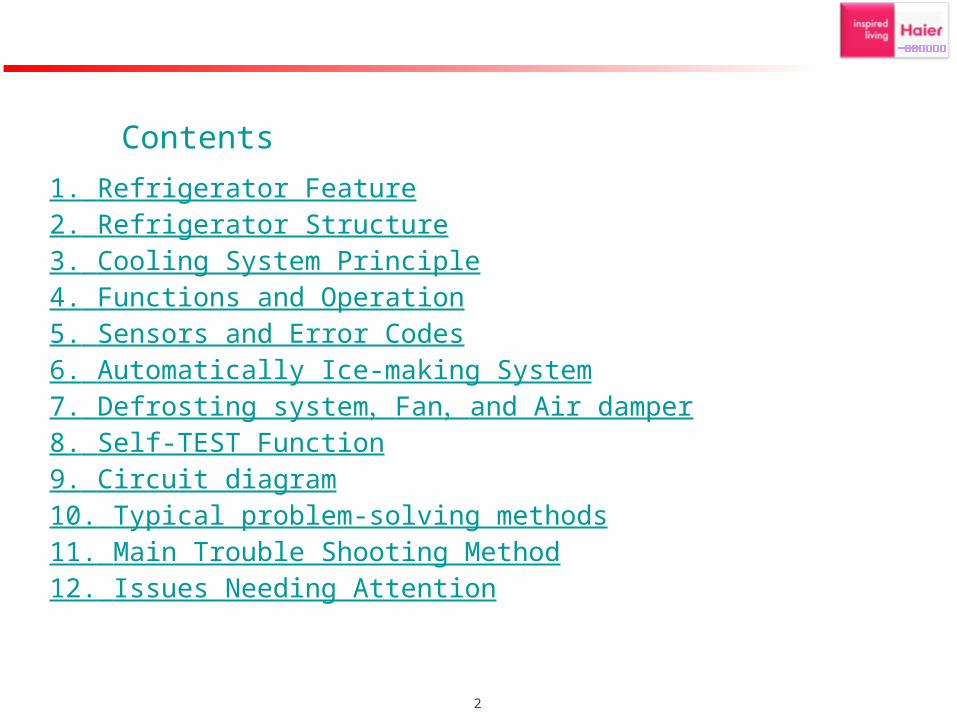
1. Refrigerator Feature2. Refrigerator Structure3. Cooling System Principle4. Functions and Operation5. Sensors and Error Codes6. Automatically Ice-making System7. Defrosting system,Fan,and Air damper
8. Self-TEST Function9. Circuit diagram10. Typical problem-solving methods11. Main Trouble Shooting Method12. Issues Needing Attention
Contents
3
1. Whole air-cooling computer control system, there is a freezer evaporator
and a fan in freezing room, fridge room through the air circulation blowing
by fan to carry on the refrigeration,, fridge room is controlled through the
ON/OFF of electronic damper to achieve temperature control, control
freezing room temperature through the run and stop of compressor.
2. Large LED digital display to show each inner room temperature 。
3. AI control function. Chamber temperature can control automatically
according to the ambient temperature, and no need human intervene.
4. Malfunction self-diagnosis function. It can shows error codes automatically
to help solving problems in time when system does not work properly.
5. Open-Door warning function: If the door is not properly closed, or the door
is opened for an extended period , the appliance buzzer will sounds at an
interval.
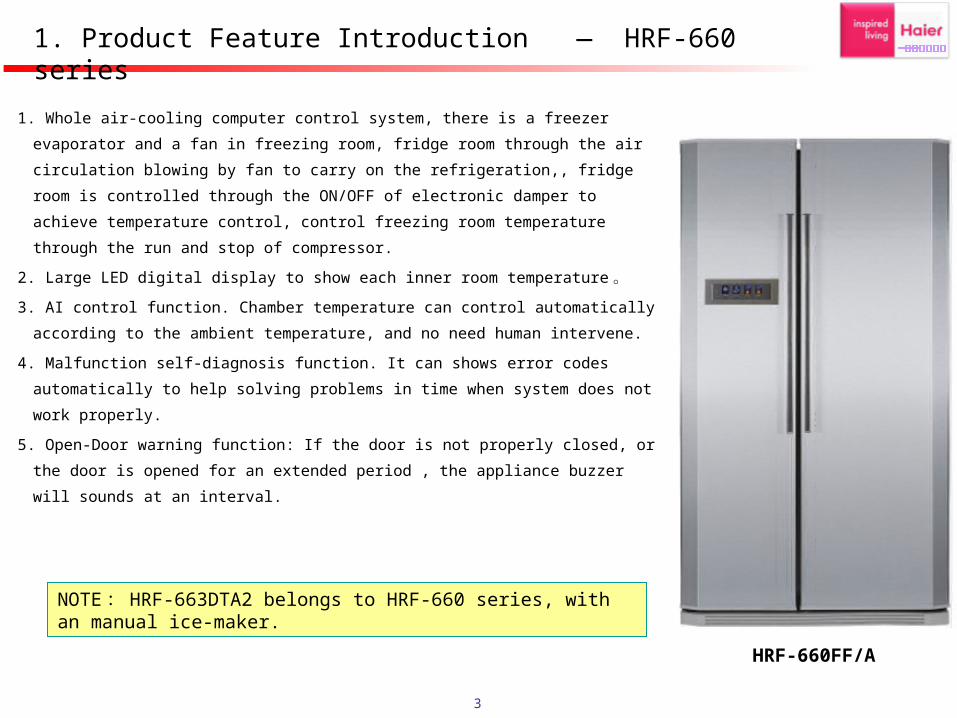
1. Product Feature Introduction — HRF-660 series
HRF-660FF/A
NOTE : HRF-663DTA2 belongs to HRF-660 series, with an manual ice-maker.
4
1. Whole air-cooling computer control system, there is a freezer evaporator
and a fan in freezing room, fridge room through the air circulation blowing
by fan to carry on the refrigeration,, fridge room is controlled through the
ON/OFF of electronic damper to achieve temperature control, control
freezing room temperature through the run and stop of compressor.
2.Large LED digital display to show each inner room temperature.
3. Automatically ice-making function: Can making ice through connecting
refrigerator to home water supply, and get ice, ice cubes or cold water
through dispenser selection operation .
4. Malfunction self-diagnosis function. It can shows error codes
automatically to help solving problems in time when system does not work
properly.
5. Open-Door warning function: If the door is not properly closed, or the
door is opened for an extended period , the appliance buzzer will sounds
at an interval.
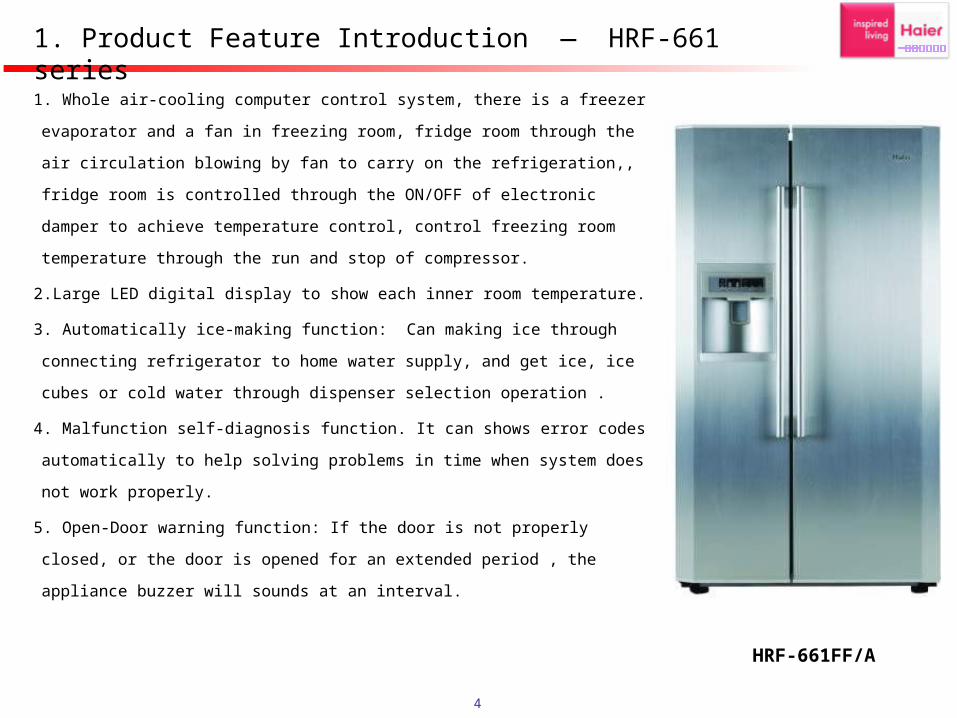
1. Product Feature Introduction — HRF-661 series
HRF-661FF/A
5
1.Whole air-cooling computer control system, there is a freezer evaporator
and a fan in freezing room, fridge room through the air circulation blowing by
fan to carry on the refrigeration,, fridge room is controlled through the
ON/OFF of electronic damper to achieve temperature control, control
freezing room temperature through the run and stop of compressor.
2.Large LED digital display to show each inner room temperature.
3.Automatically ice-making function: Can making ice through connecting
refrigerator to home water supply, and get ice, ice cubes or cold water
through dispenser selection operation .
4.Malfunction self-diagnosis function. It can shows error codes automatically
to help solving problems in time when system does not work properly.
5.Open-Door warning function: If the door is not properly closed, or the door is
opened for an extended period , the appliance buzzer will sounds at an
interval.
6.Mini bar function: It with a mini bar, user can take storing food but no need
opening door, this can reduce cold air loss and saving energy.
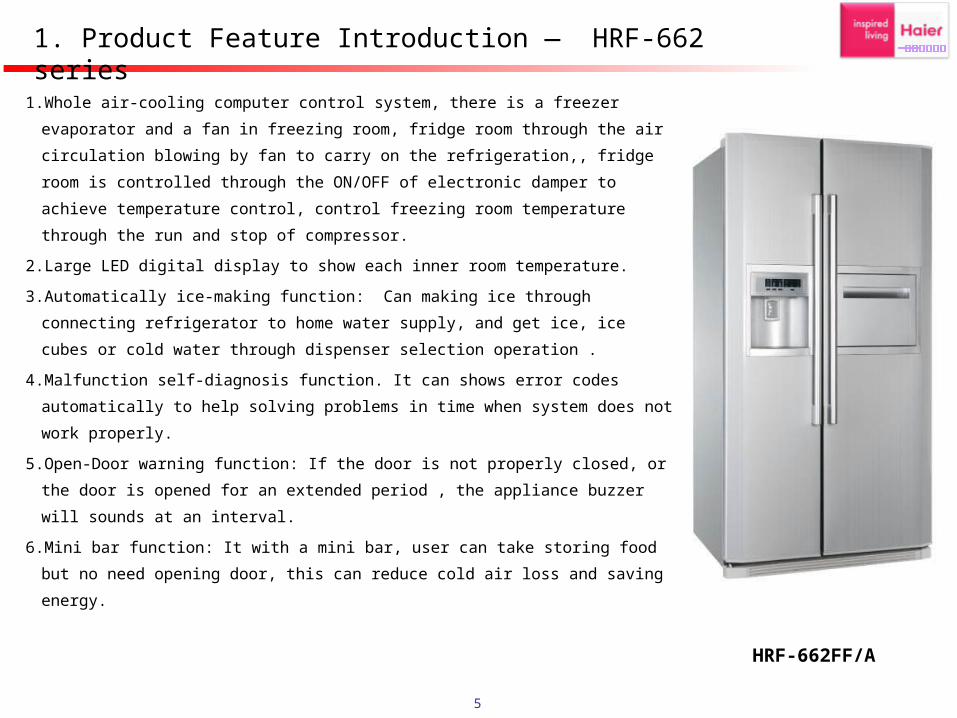
1. Product Feature Introduction — HRF-662 series
HRF-662FF/A
6
1.Product Feature Introduction — HRF-663 series
1.Whole air-cooling computer control system, there is a freezer evaporator
and a fan in freezing room, fridge room through the air circulation blowing by
fan to carry on the refrigeration,, fridge room is controlled through the
ON/OFF of electronic damper to achieve temperature control, control
freezing room temperature through the run and stop of compressor.)
2.Large LED digital display to show each inner room temperature
3.Automatically ice-making function: Can making ice through connecting
refrigerator to home water supply, and get ice, ice cubes or cold water
through dispenser selection operation.
4.Malfunction self-diagnosis function. It can shows error codes automatically
to help solving problems in time when system does not work properly
5.Open-Door warning function: If the door is not properly closed, or the door is
opened for an extended period , the appliance buzzer will sounds at an
interval.
6.Mini bar function: It with a mini bar, user can take storing food but no need
opening door, this can reduce cold air loss and saving energy.
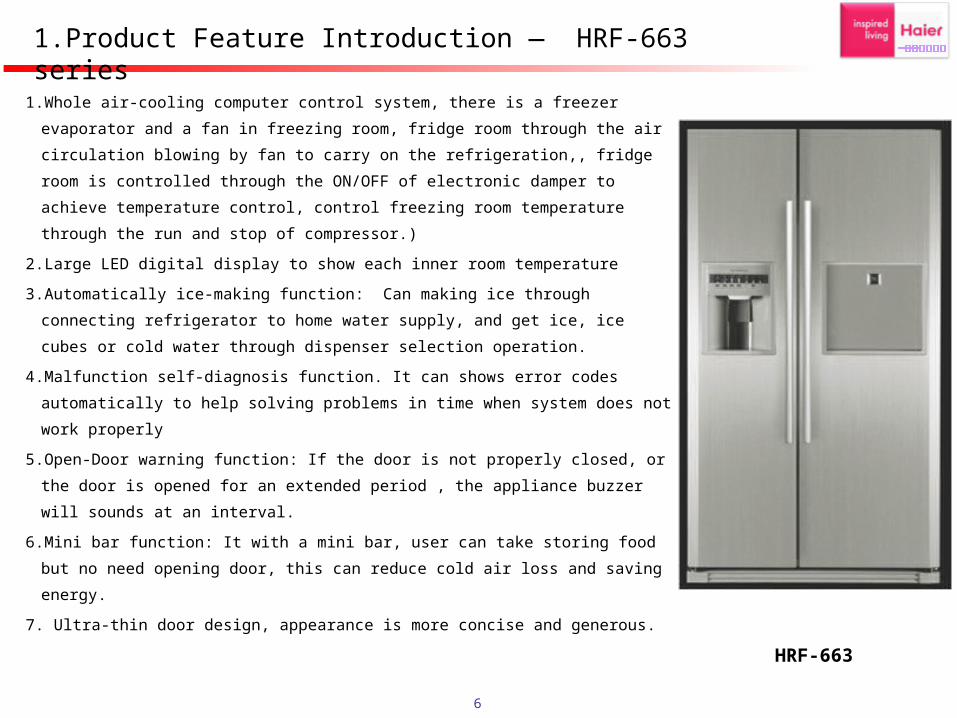
7. Ultra-thin door design, appearance is more concise and generous.HRF-663
7
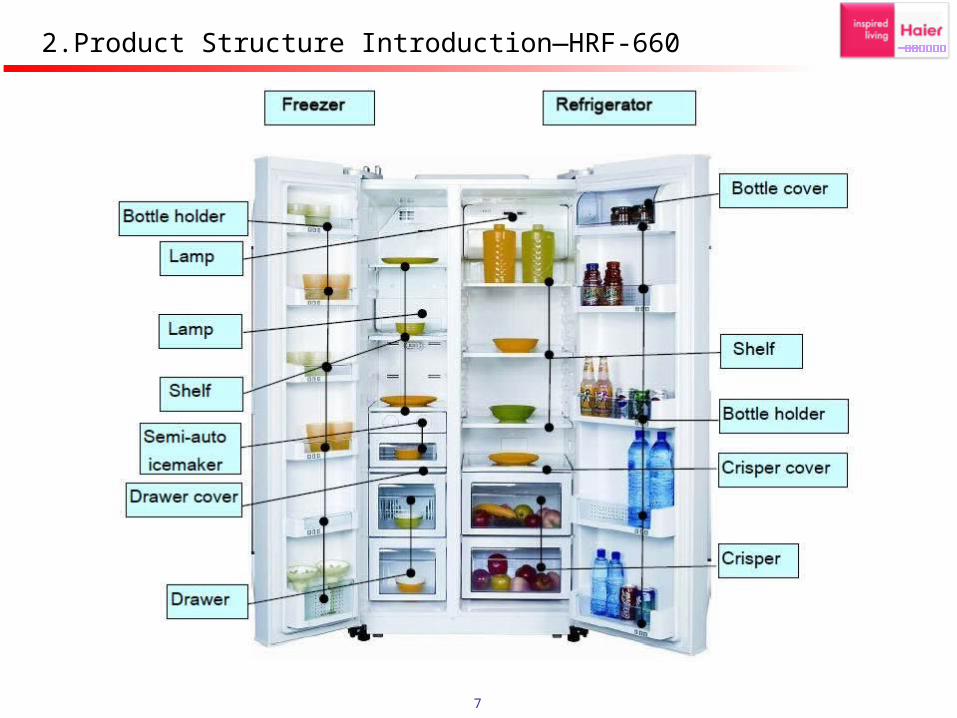
2.Product Structure Introduction—HRF-660
8
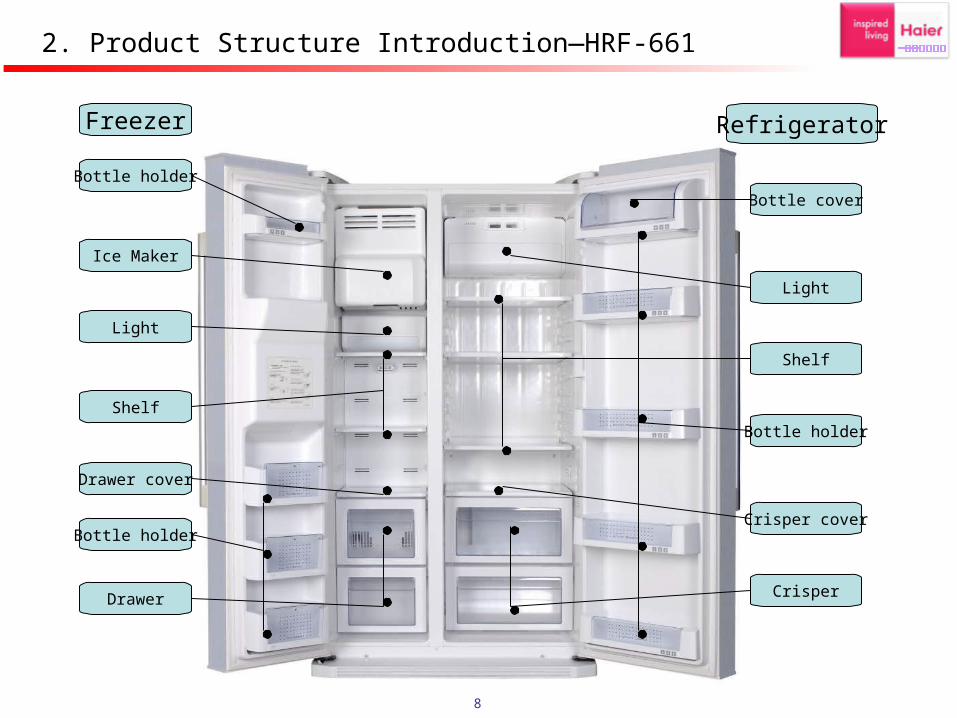
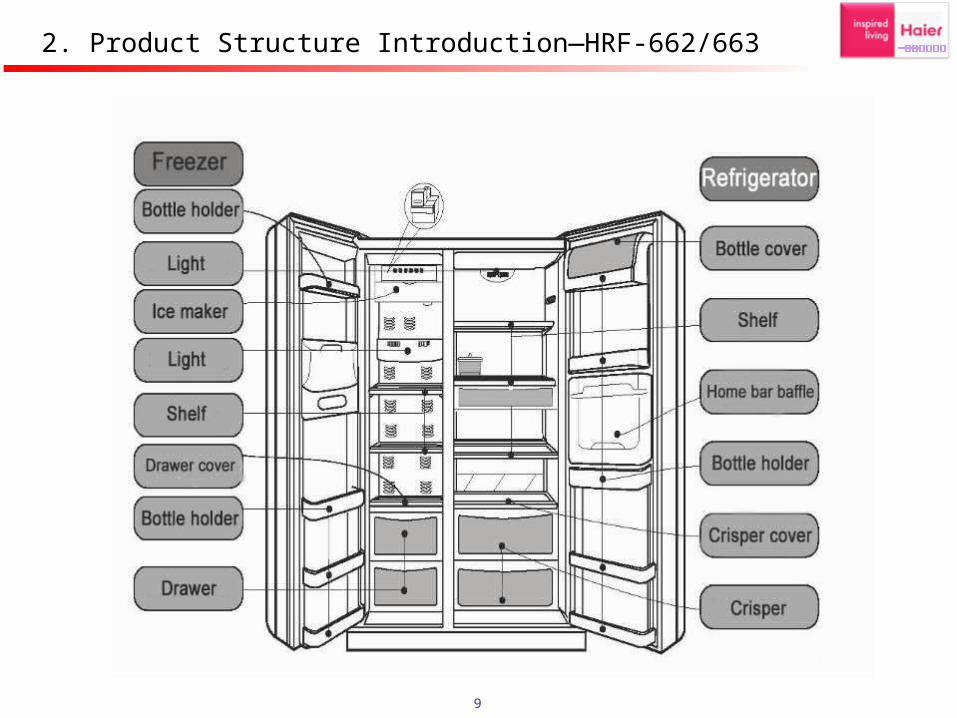
Freezer
Bottle holder
Light
Ice Maker
Shelf
Drawer cover
Light
Bottle cover
Drawer
Bottle holder
Shelf
Bottle holder
Crisper cover
Crisper
Refrigerator
2. Product Structure Introduction—HRF-661
9
2. Product Structure Introduction—HRF-662/663
10
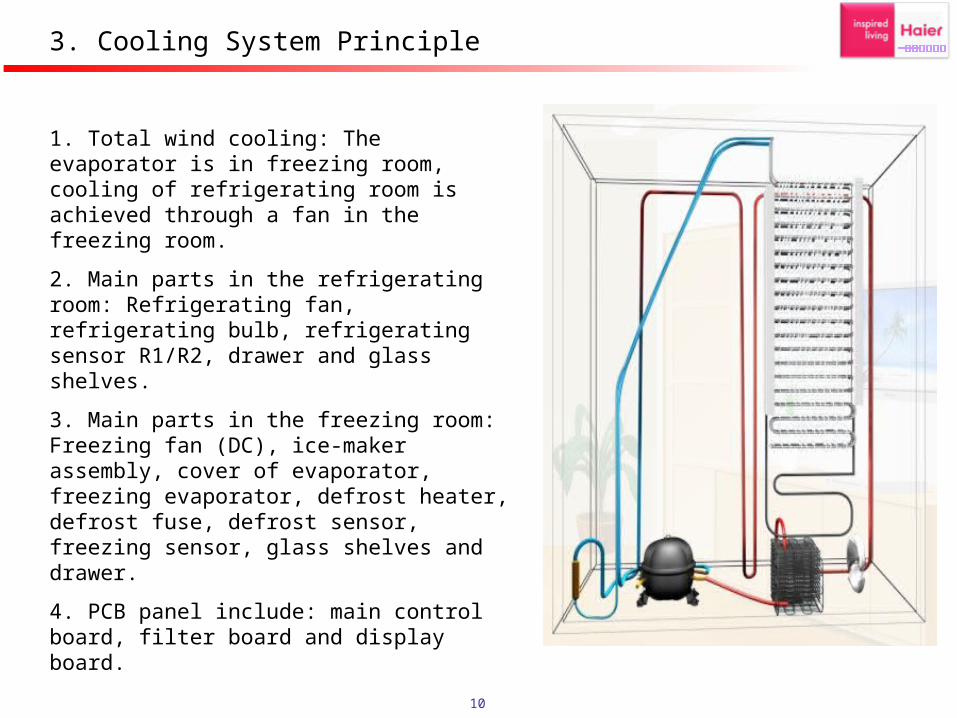
3. Cooling System Principle
1. Total wind cooling: The evaporator is in freezing room, cooling of refrigerating room is achieved through a fan in the freezing room.
2. Main parts in the refrigerating room: Refrigerating fan, refrigerating bulb, refrigerating sensor R1/R2, drawer and glass shelves.
3. Main parts in the freezing room: Freezing fan (DC), ice-maker assembly, cover of evaporator, freezing evaporator, defrost heater, defrost fuse, defrost sensor, freezing sensor, glass shelves and drawer.
4. PCB panel include: main control board, filter board and display board.
11
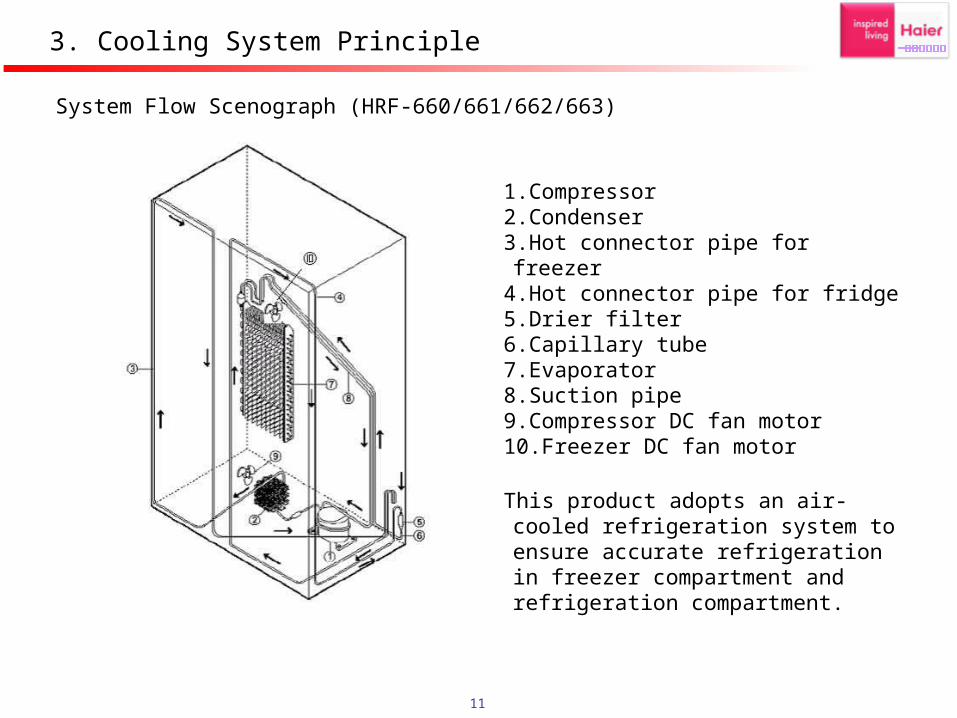
3. Cooling System Principle
System Flow Scenograph (HRF-660/661/662/663)
1.Compressor2.Condenser3.Hot connector pipe for freezer4.Hot connector pipe for fridge5.Drier filter6.Capillary tube7.Evaporator8.Suction pipe9.Compressor DC fan motor10.Freezer DC fan motor
This product adopts an air-cooled refrigeration system to ensure accurate refrigeration in freezer compartment and refrigeration compartment.
12
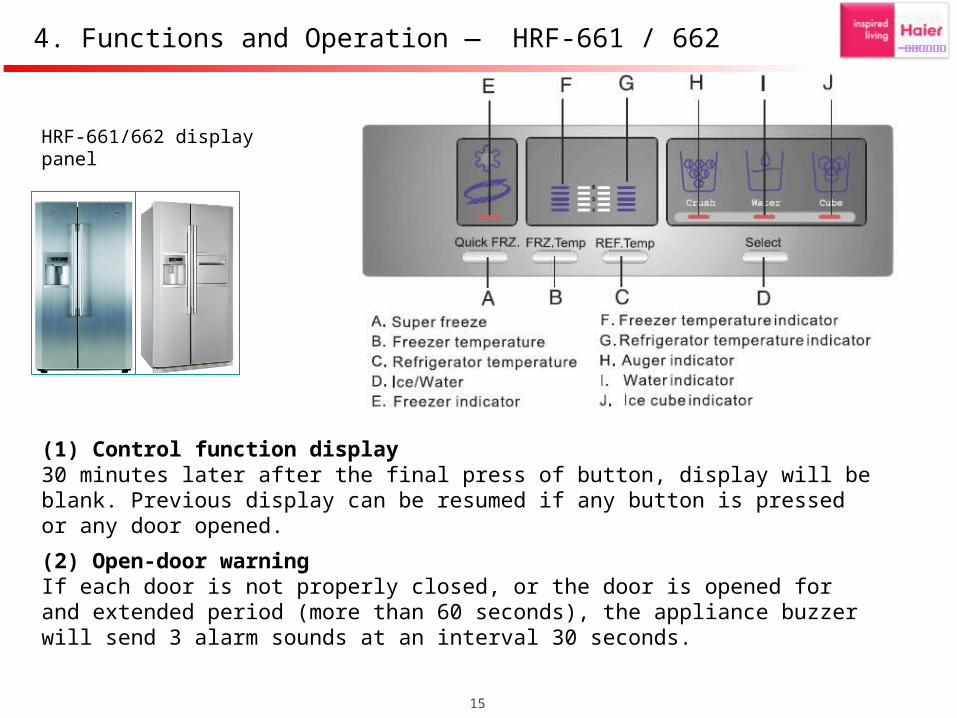
4. Functions and Operation — HRF-660
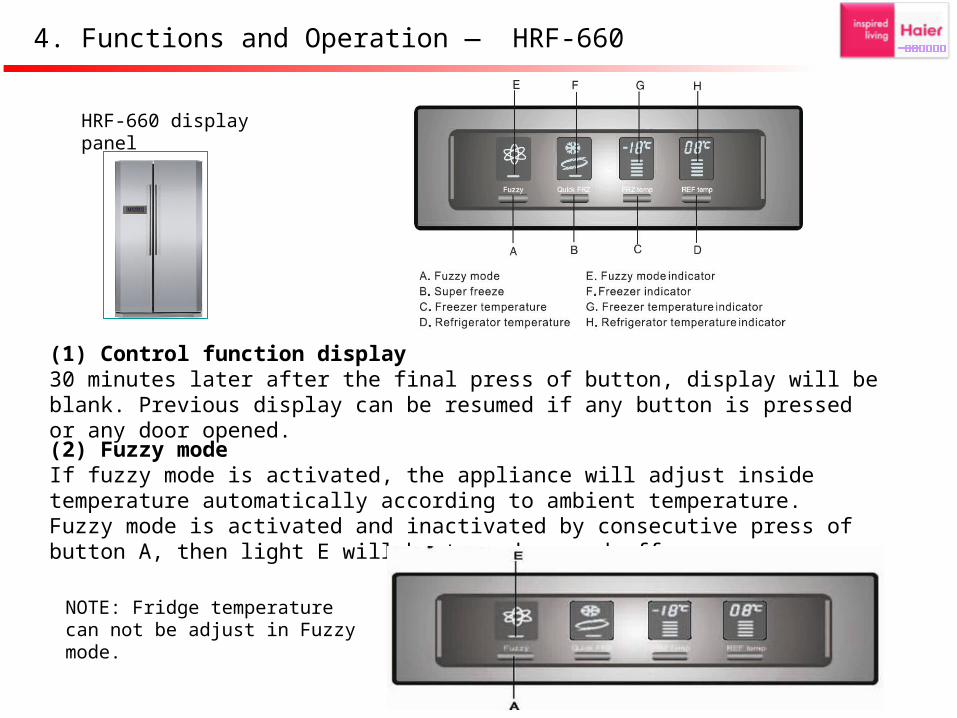
HRF-660 display panel
(1) Control function display30 minutes later after the final press of button, display will be blank. Previous display can be resumed if any button is pressed or any door opened.
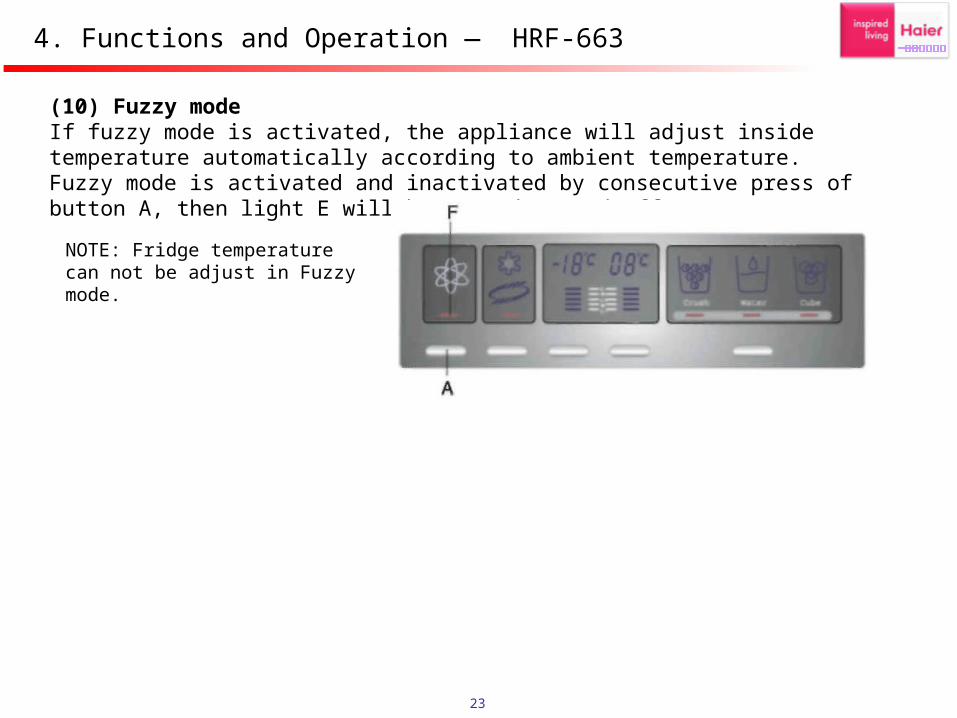
(2) Fuzzy modeIf fuzzy mode is activated, the appliance will adjust inside temperature automatically according to ambient temperature. Fuzzy mode is activated and inactivated by consecutive press of button A, then light E will be turned on and off.
NOTE: Fridge temperature can not be adjust in Fuzzy mode.
13
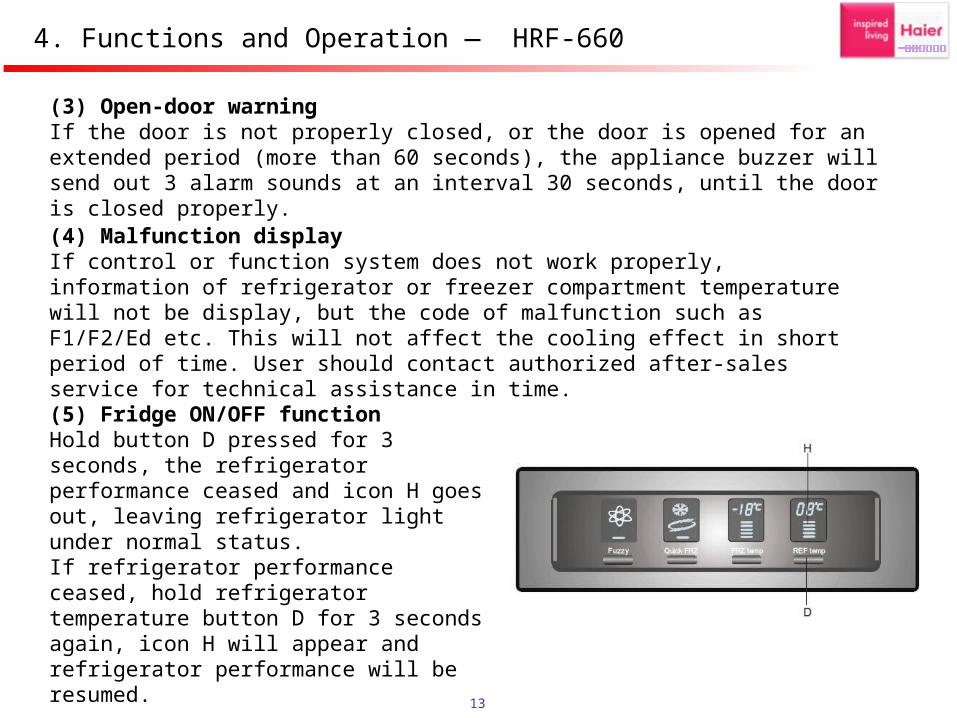
(3) Open-door warningIf the door is not properly closed, or the door is opened for an extended period (more than 60 seconds), the appliance buzzer will send out 3 alarm sounds at an interval 30 seconds, until the door is closed properly.
(4) Malfunction displayIf control or function system does not work properly, information of refrigerator or freezer compartment temperature will not be display, but the code of malfunction such as F1/F2/Ed etc. This will not affect the cooling effect in short period of time. User should contact authorized after-sales service for technical assistance in time.
(5) Fridge ON/OFF functionHold button D pressed for 3 seconds, the refrigerator performance ceased and icon H goes out, leaving refrigerator light under normal status. If refrigerator performance ceased, hold refrigerator temperature button D for 3 seconds again, icon H will appear and refrigerator performance will be resumed.
4. Functions and Operation — HRF-660
14
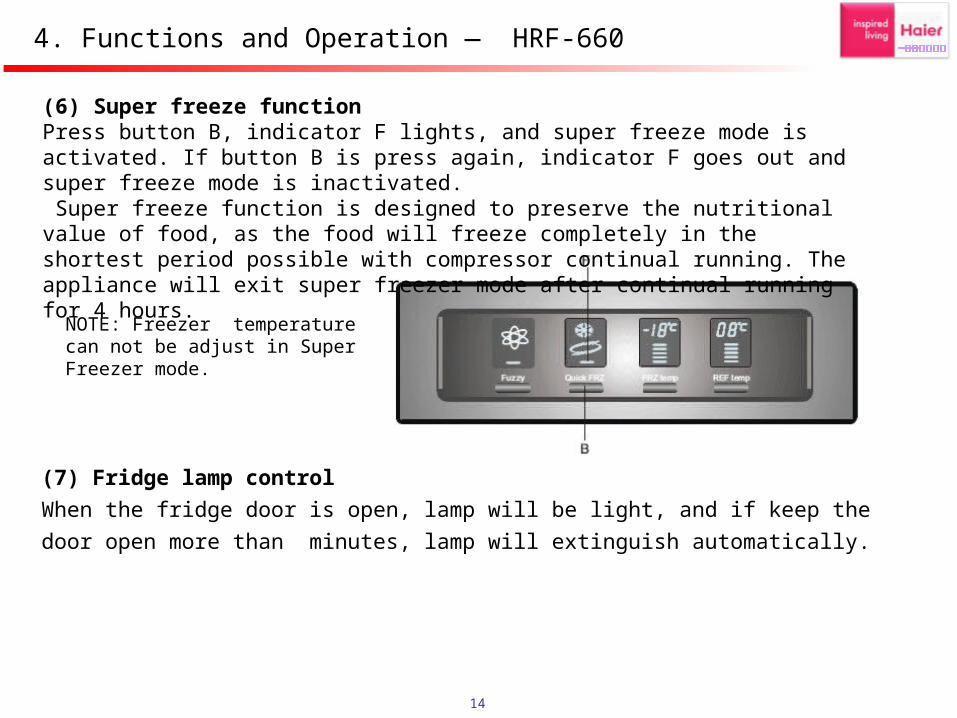
(6) Super freeze functionPress button B, indicator F lights, and super freeze mode is activated. If button B is press again, indicator F goes out and super freeze mode is inactivated. Super freeze function is designed to preserve the nutritional value of food, as the food will freeze completely in the shortest period possible with compressor continual running. The appliance will exit super freezer mode after continual running for 4 hours.
NOTE: Freezer temperature can not be adjust in Super Freezer mode.
(7) Fridge lamp control
When the fridge door is open, lamp will be light, and if keep the door open more than
minutes, lamp will extinguish automatically.
4. Functions and Operation — HRF-660
15
(1) Control function display30 minutes later after the final press of button, display will be blank. Previous display can be resumed if any button is pressed or any door opened.
(2) Open-door warningIf each door is not properly closed, or the door is opened for and extended period (more than 60 seconds), the appliance buzzer will send 3 alarm sounds at an interval 30 seconds.
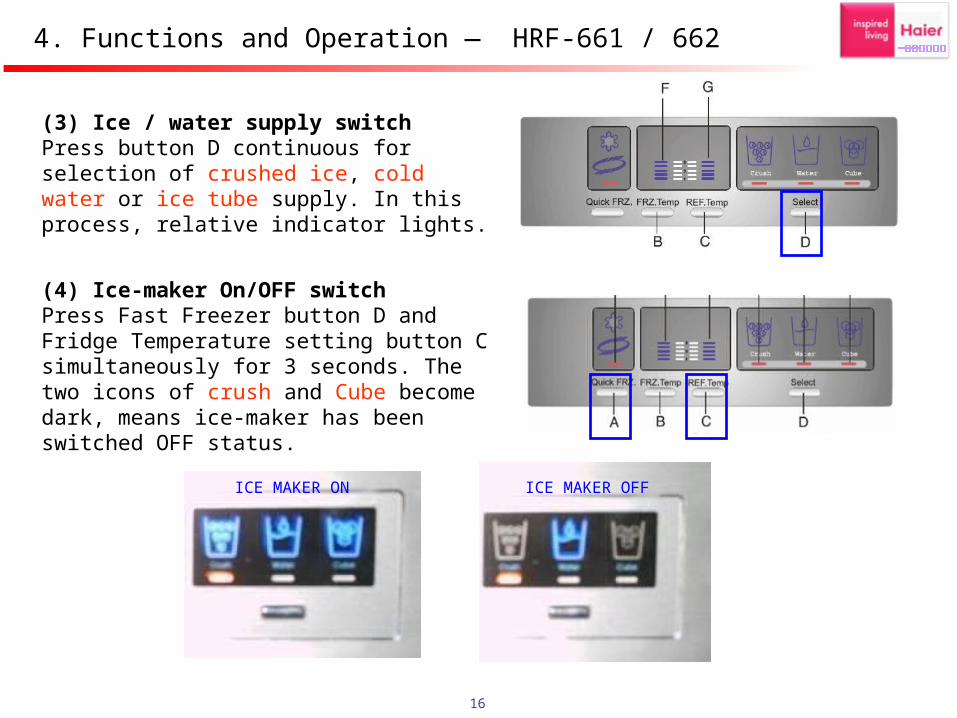
HRF-661/662 display panel
4. Functions and Operation — HRF-661 / 662
16
(3) Ice / water supply switchPress button D continuous for selection of crushed ice, cold water or ice tube supply. In this process, relative indicator lights.
(4) Ice-maker On/OFF switchPress Fast Freezer button D and Fridge Temperature setting button C simultaneously for 3 seconds. The two icons of crush and Cube become dark, means ice-maker has been switched OFF status.
ICE MAKER ON ICE MAKER OFF
4. Functions and Operation — HRF-661 / 662
17
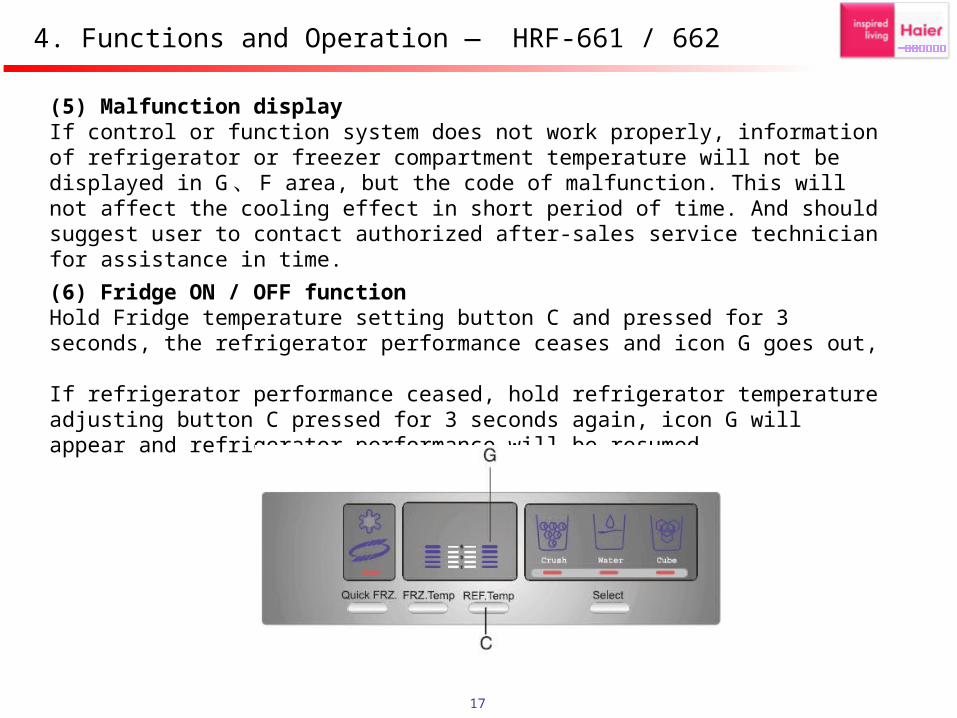
(5) Malfunction displayIf control or function system does not work properly, information of refrigerator or freezer compartment temperature will not be displayed in G 、 F area, but the code of malfunction. This will not affect the cooling effect in short period of time. And should suggest user to contact authorized after-sales service technician for assistance in time.
(6) Fridge ON / OFF functionHold Fridge temperature setting button C and pressed for 3 seconds, the refrigerator performance ceases and icon G goes out, If refrigerator performance ceased, hold refrigerator temperature adjusting button C pressed for 3 seconds again, icon G will appear and refrigerator performance will be resumed.
4. Functions and Operation — HRF-661 / 662
18
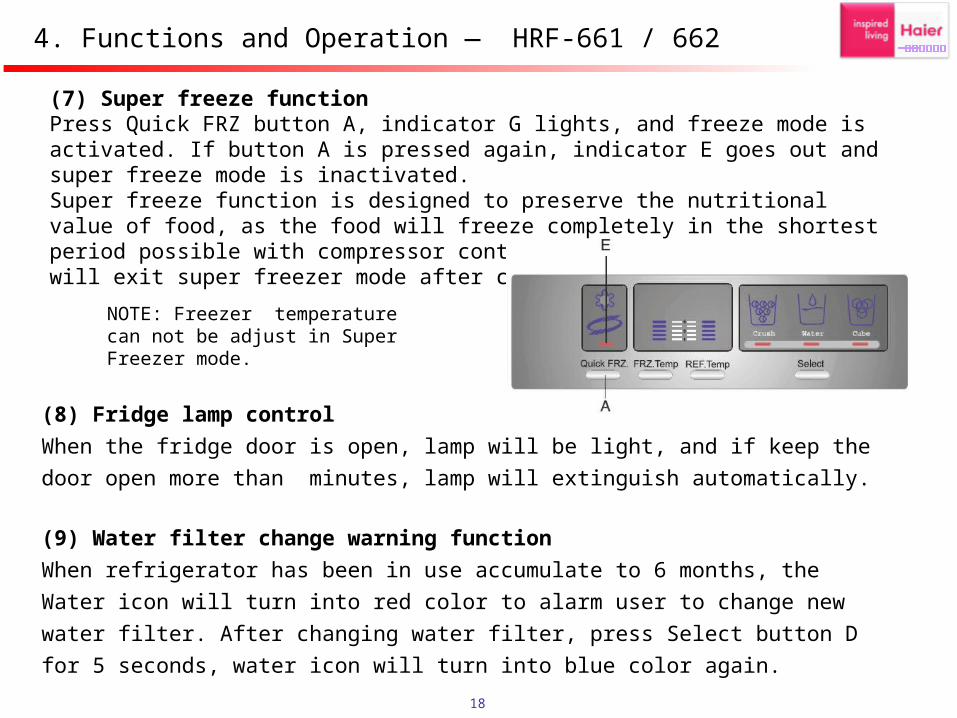
(7) Super freeze functionPress Quick FRZ button A, indicator G lights, and freeze mode is activated. If button A is pressed again, indicator E goes out and super freeze mode is inactivated.Super freeze function is designed to preserve the nutritional value of food, as the food will freeze completely in the shortest period possible with compressor continual running. The appliance will exit super freezer mode after continual running for 4 hours.
NOTE: Freezer temperature can not be adjust in Super Freezer mode.
(8) Fridge lamp control
When the fridge door is open, lamp will be light, and if keep the door open more than
minutes, lamp will extinguish automatically.
(9) Water filter change warning function
When refrigerator has been in use accumulate to 6 months, the Water icon will turn into
red color to alarm user to change new water filter. After changing water filter, press Select
button D for 5 seconds, water icon will turn into blue color again.
4. Functions and Operation — HRF-661 / 662
19
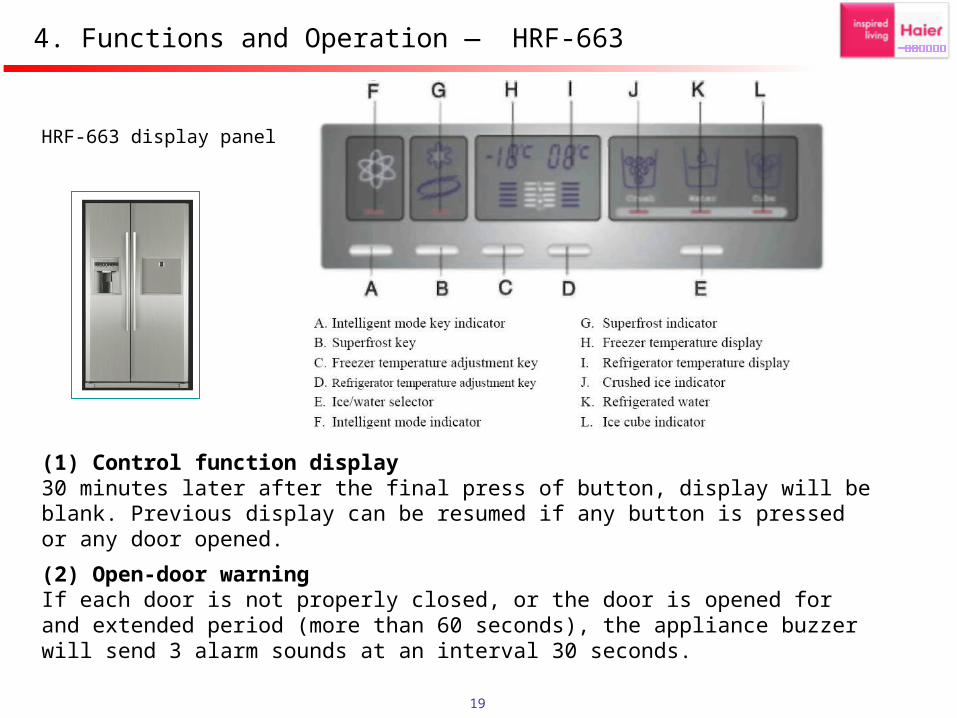
HRF-663 display panel
4. Functions and Operation — HRF-663
(1) Control function display30 minutes later after the final press of button, display will be blank. Previous display can be resumed if any button is pressed or any door opened.
(2) Open-door warningIf each door is not properly closed, or the door is opened for and extended period (more than 60 seconds), the appliance buzzer will send 3 alarm sounds at an interval 30 seconds.
20
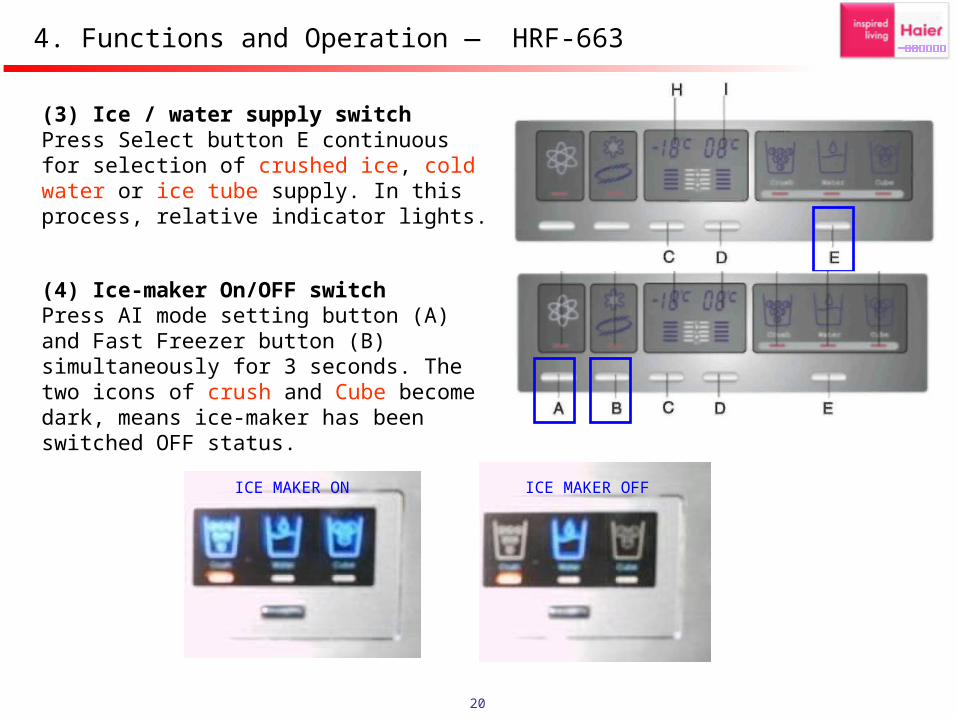
(3) Ice / water supply switchPress Select button E continuous for selection of crushed ice, cold water or ice tube supply. In this process, relative indicator lights.
(4) Ice-maker On/OFF switchPress AI mode setting button (A) and Fast Freezer button (B) simultaneously for 3 seconds. The two icons of crush and Cube become dark, means ice-maker has been switched OFF status.
ICE MAKER ON ICE MAKER OFF
4. Functions and Operation — HRF-663
21
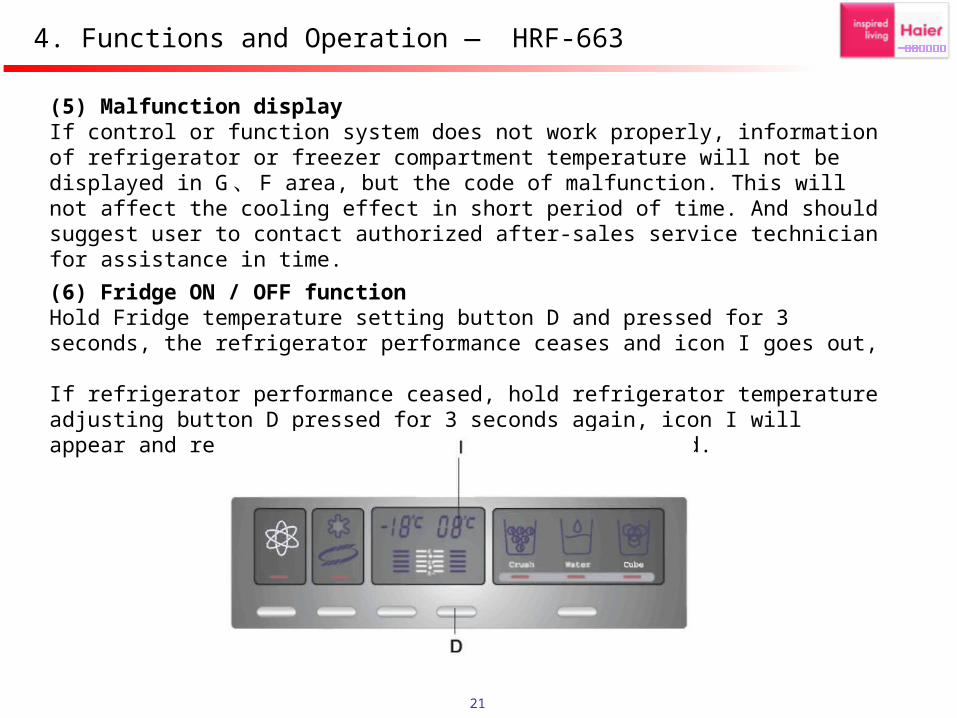
(5) Malfunction display If control or function system does not work properly, information of refrigerator or freezer compartment temperature will not be displayed in G 、 F area, but the code of malfunction. This will not affect the cooling effect in short period of time. And should suggest user to contact authorized after-sales service technician for assistance in time.
(6) Fridge ON / OFF functionHold Fridge temperature setting button D and pressed for 3 seconds, the refrigerator performance ceases and icon I goes out, If refrigerator performance ceased, hold refrigerator temperature adjusting button D pressed for 3 seconds again, icon I will appear and refrigerator performance will be resumed.
4. Functions and Operation — HRF-663
22
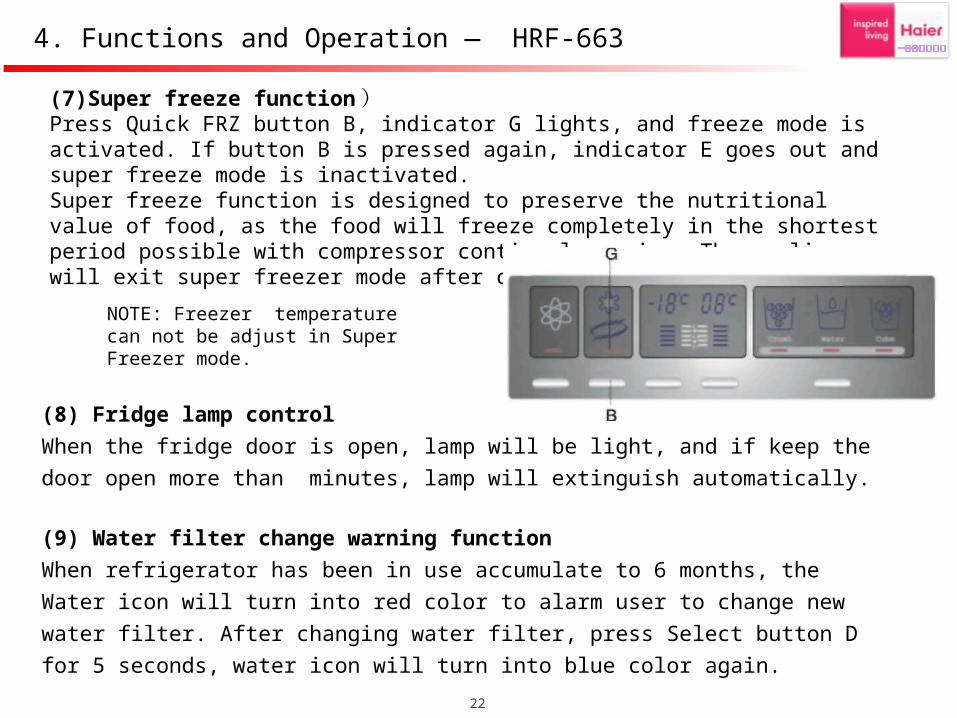
(7)Super freeze function)Press Quick FRZ button B, indicator G lights, and freeze mode is activated. If button B is pressed again, indicator E goes out and super freeze mode is inactivated.Super freeze function is designed to preserve the nutritional value of food, as the food will freeze completely in the shortest period possible with compressor continual running. The appliance will exit super freezer mode after continual running for 4 hours.
NOTE: Freezer temperature can not be adjust in Super Freezer mode.
(8) Fridge lamp control
When the fridge door is open, lamp will be light, and if keep the door open more than
minutes, lamp will extinguish automatically.
(9) Water filter change warning function
When refrigerator has been in use accumulate to 6 months, the Water icon will turn into
red color to alarm user to change new water filter. After changing water filter, press Select
button D for 5 seconds, water icon will turn into blue color again.
4. Functions and Operation — HRF-663
23
(10) Fuzzy modeIf fuzzy mode is activated, the appliance will adjust inside temperature automatically according to ambient temperature. Fuzzy mode is activated and inactivated by consecutive press of button A, then light E will be turned on and off.
NOTE: Fridge temperature can not be adjust in Fuzzy mode.
4. Functions and Operation — HRF-663
24
Operation Summary for 660/661/662/663 :① 30 minutes later after last operation of display control board, the display will
be blank automatically. Press any button or open any door, the display will resume.
② Refrigerating room switch on/off function: Press the Refrigerating Temperature button for 3 seconds, after one beep, the refrigerating room is shut down. The refrigerating temperature on the display panel turns off and the refrigerating air damper turns off. Press the Refrigerating Temperature button for 3 seconds, after one beep, the refrigerating room is turned on.
③ The light will turn off automatically if the refrigerating door or the bar door is opened more than 7 minutes.
④ The freezing fan works or stops is consistent with the compressor: when compressor start to work or stop, the freezing fan also start to work or stop.
⑤ The bar heater starts to work when the ambient temperature is more than 12 .℃
4. Functions and Operation
25
5. Sensors and Error Codes
Disp. (F)
(D)
(ICE)
(R1)
(R2)
(RT)
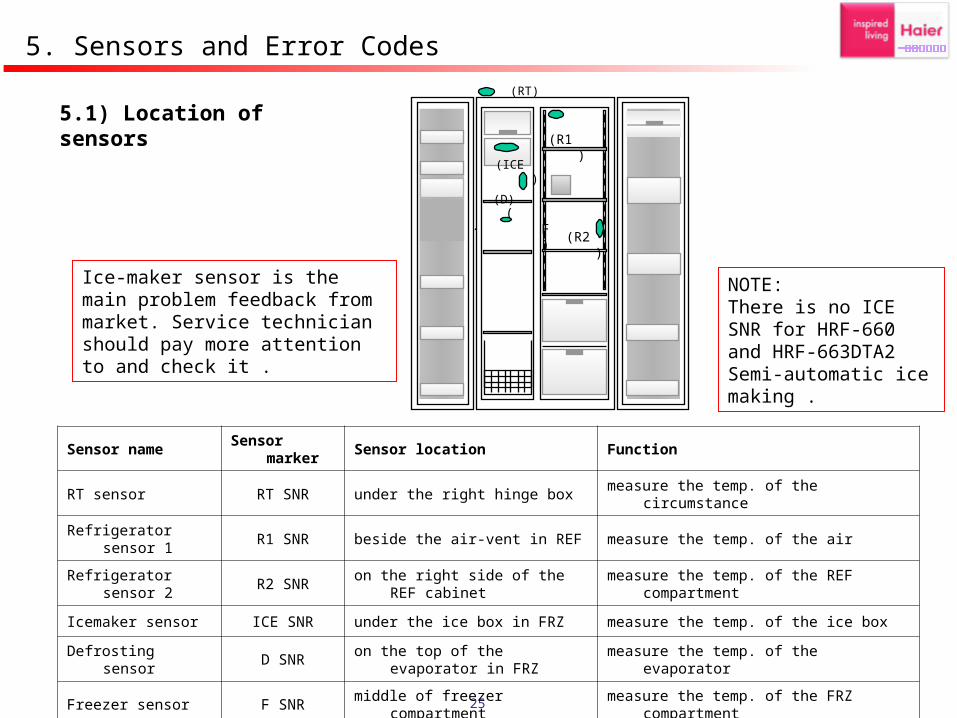
5.1) Location of sensors
Sensor name Sensor marker Sensor location Function
RT sensor RT SNR under the right hinge box measure the temp. of the circumstance
Refrigerator sensor 1 R1 SNR beside the air-vent in REF measure the temp. of the air
Refrigerator sensor 2 R2 SNR on the right side of the REF cabinet measure the temp. of the REF compartment
Icemaker sensor ICE SNR under the ice box in FRZ measure the temp. of the ice box
Defrosting sensor D SNR on the top of the evaporator in FRZ measure the temp. of the evaporator
Freezer sensor F SNR middle of freezer compartment measure the temp. of the FRZ compartment
Ice-maker sensor is the main problem feedback from market. Service technician should pay more attention to and check it .
NOTE:There is no ICE SNR for HRF-660 and HRF-663DTA2 Semi-automatic ice making .
26
5.2) Error Codes
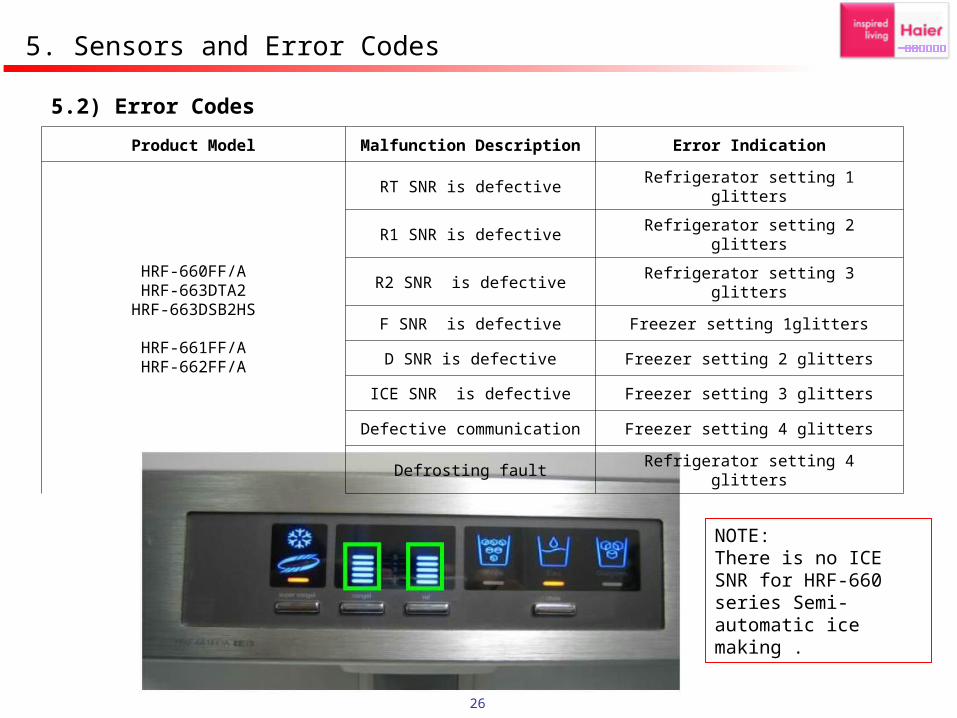
Product Model Malfunction Description Error Indication
HRF-660FF/AHRF-663DTA2
HRF-663DSB2HS
HRF-661FF/AHRF-662FF/A
RT SNR is defective Refrigerator setting 1 glitters
R1 SNR is defective Refrigerator setting 2 glitters
R2 SNR is defective Refrigerator setting 3 glitters
F SNR is defective Freezer setting 1glitters
D SNR is defective Freezer setting 2 glitters
ICE SNR is defective Freezer setting 3 glitters
Defective communication Freezer setting 4 glitters
Defrosting fault Refrigerator setting 4 glitters
NOTE:There is no ICE SNR for HRF-660 series Semi-automatic ice making .
5. Sensors and Error Codes
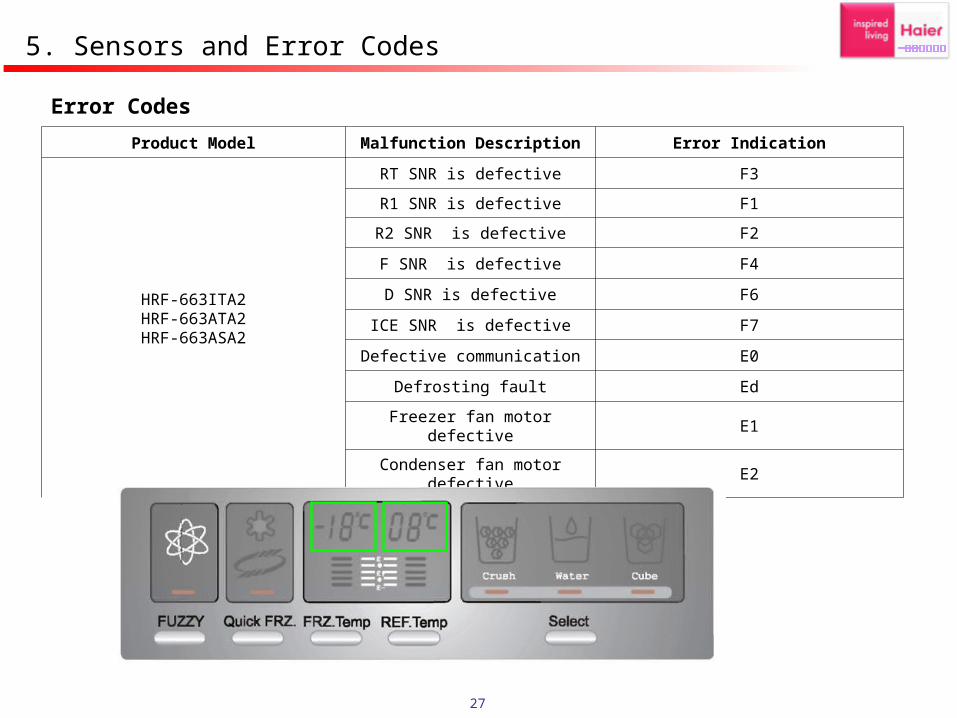
27
Error Codes
Product Model Malfunction Description Error Indication
HRF-663ITA2HRF-663ATA2HRF-663ASA2
RT SNR is defective F3
R1 SNR is defective F1
R2 SNR is defective F2
F SNR is defective F4
D SNR is defective F6
ICE SNR is defective F7
Defective communication E0
Defrosting fault Ed
Freezer fan motor defective E1
Condenser fan motor defective E2
5. Sensors and Error Codes
28
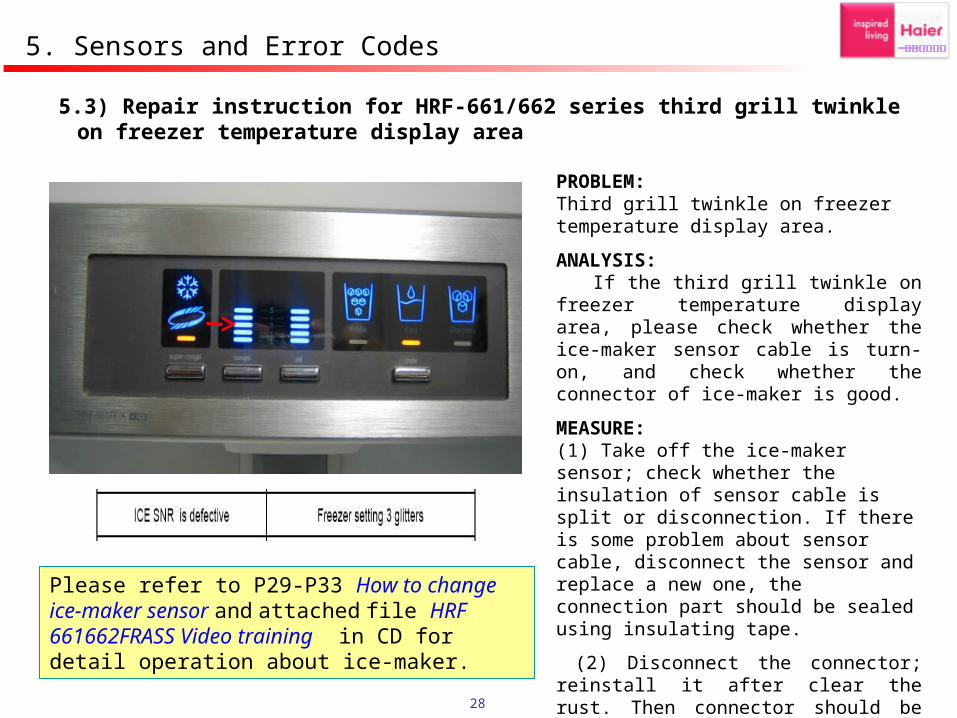
5.3) Repair instruction for HRF-661/662 series third grill twinkle on freezer temperature display area
PROBLEM: Third grill twinkle on freezer temperature display area.
ANALYSIS: If the third grill twinkle on freezer temperature display area, please check whether the ice-maker sensor cable is turn-on, and check whether the connector of ice-maker is good.
MEASURE:(1) Take off the ice-maker sensor; check whether the insulation of sensor cable is split or disconnection. If there is some problem about sensor cable, disconnect the sensor and replace a new one, the connection part should be sealed using insulating tape.
(2) Disconnect the connector; reinstall it after clear the rust. Then connector should be sealed using insulating tape.
5. Sensors and Error Codes
Please refer to P29-P33 How to change ice-maker sensor and attached file HRF 661662FRASS Video training in CD for detail operation about ice-maker.
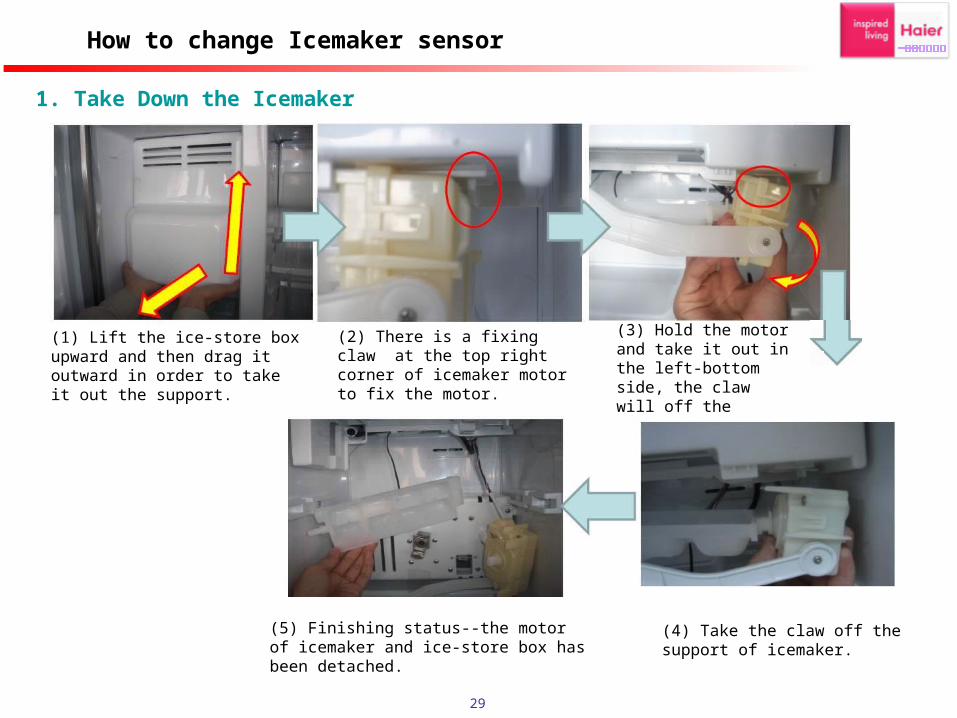
29
1. Take Down the Icemaker
(1) Lift the ice-store box upward and then drag it outward in order to take it out the support.
(2) There is a fixing claw at the top right corner of icemaker motor to fix the motor.
(3) Hold the motor and take it out in the left-bottom side, the claw will off the icemaker. (Note: Don’t break the claw)
(5) Finishing status--the motor of icemaker and ice-store box has been detached.
(4) Take the claw off the support of icemaker.
How to change Icemaker sensor
30
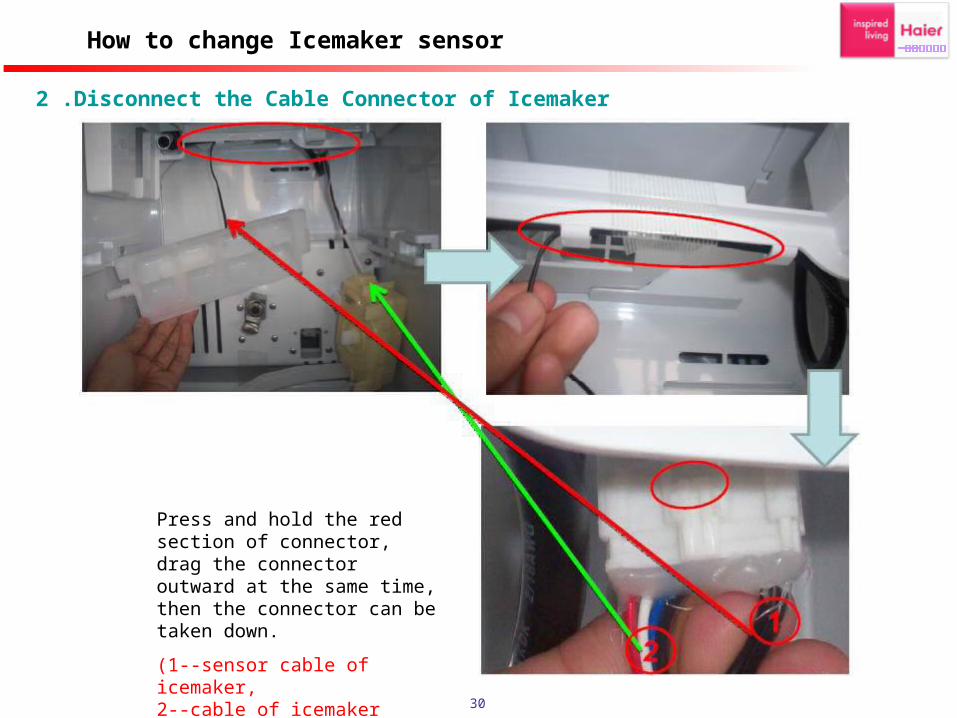
2 .Disconnect the Cable Connector of Icemaker
Press and hold the red section of connector, drag the connector outward at the same time, then the connector can be taken down.
(1--sensor cable of icemaker, 2--cable of icemaker motor)
How to change Icemaker sensor
31
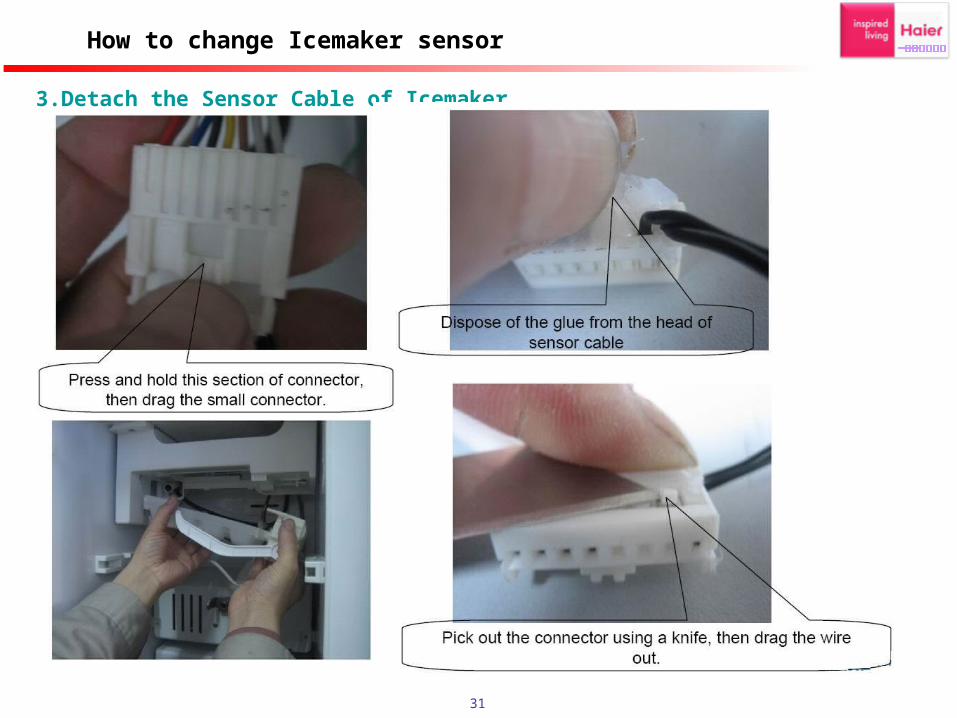
3.Detach the Sensor Cable of Icemaker
How to change Icemaker sensor
32
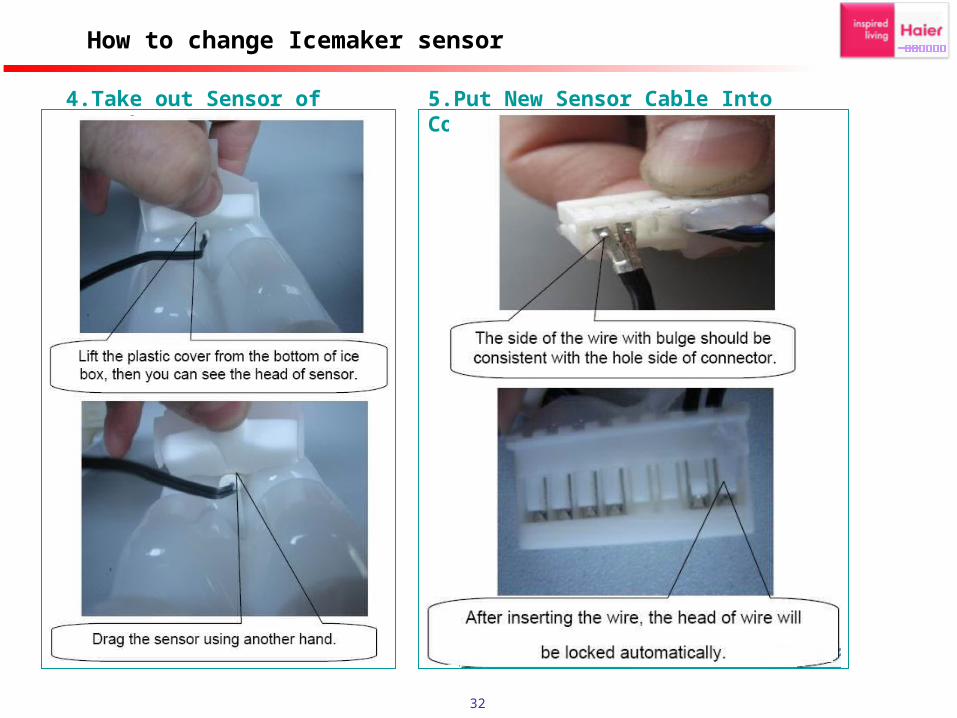
4.Take out Sensor of Icemaker 5.Put New Sensor Cable Into Connector
How to change Icemaker sensor
33
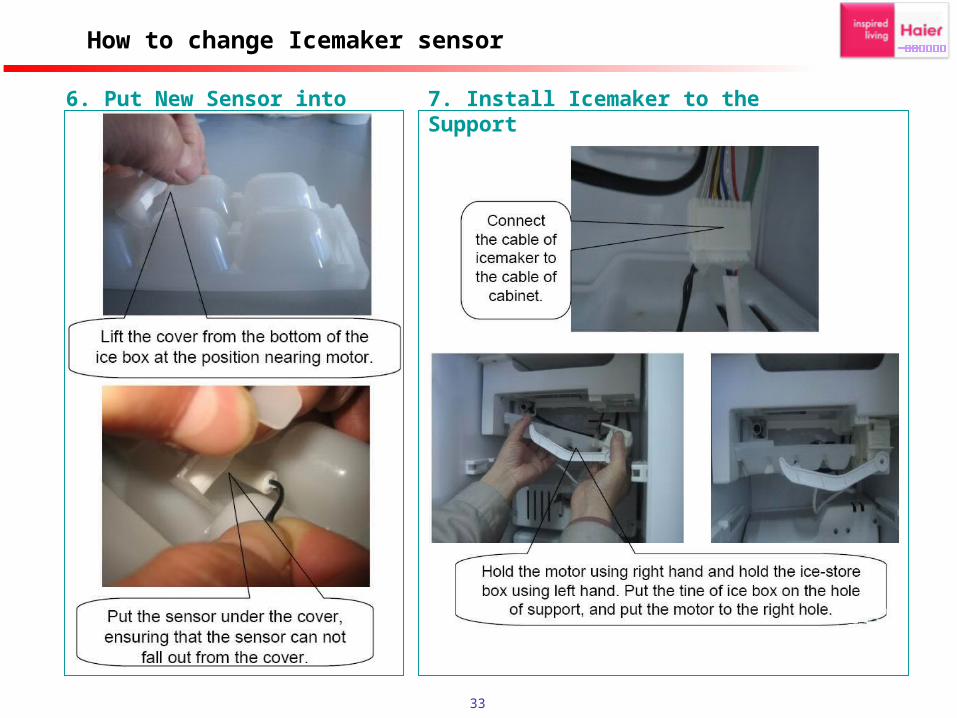
6. Put New Sensor into Icemaker 7. Install Icemaker to the Support
How to change Icemaker sensor

34
5.4) Control Under Malfunction Status
5. Sensors and Error Codes
35
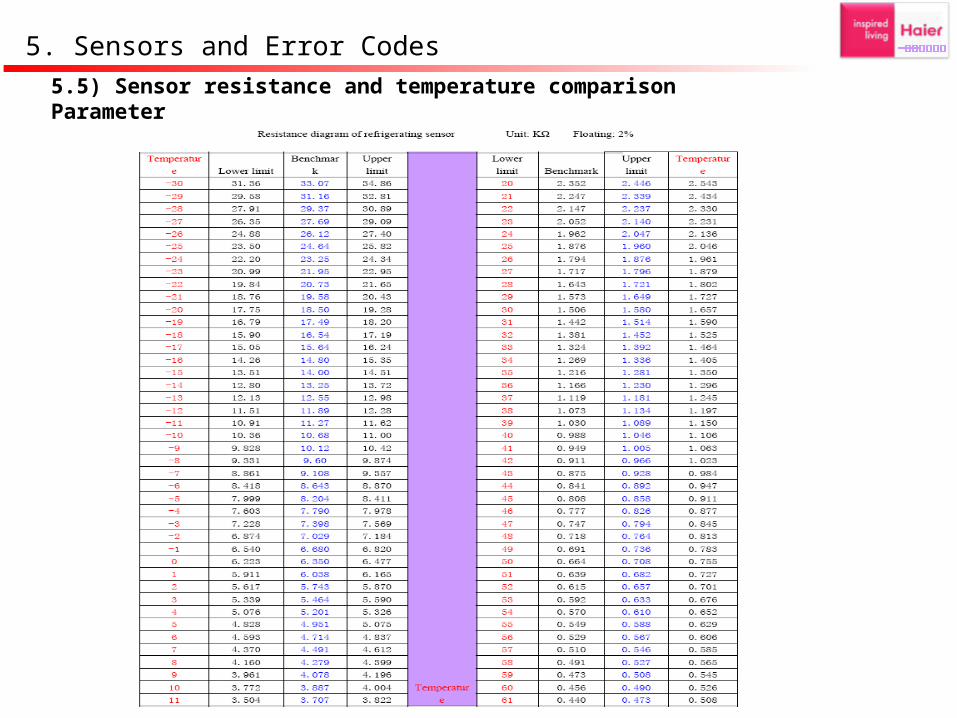
5.5) Sensor resistance and temperature comparison Parameter
5. Sensors and Error Codes
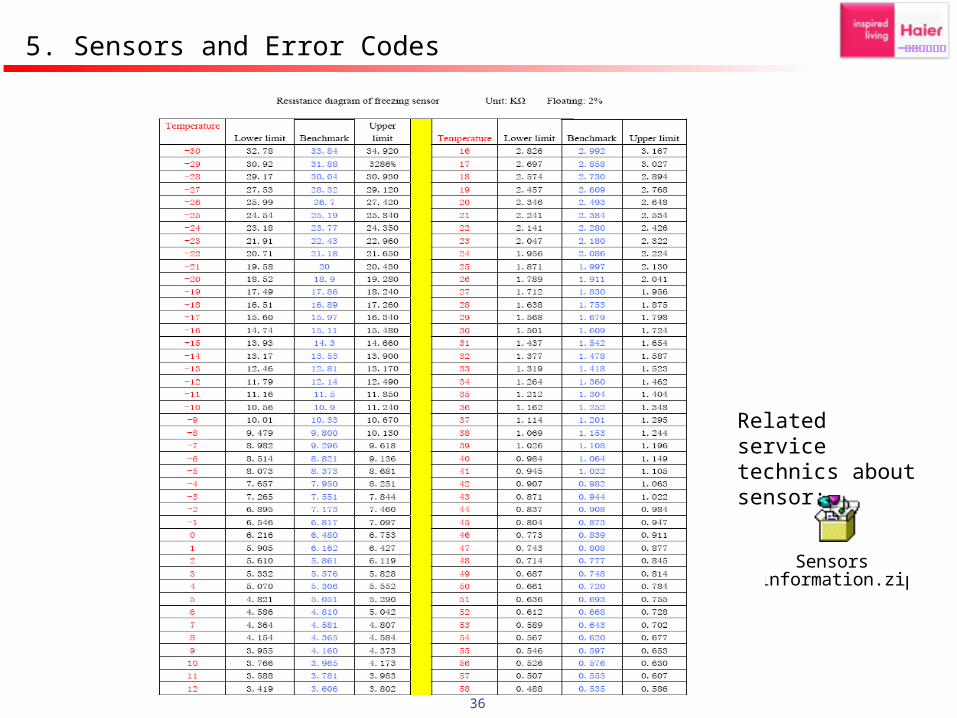
36
Sensors information.zip
Related service technics about sensor:
5. Sensors and Error Codes

37
Fridge sensor R1 failure, Detection methods :
1. Remove fridge lamp cover assembly ,then check whether the contact of sensor connector is in good condition.
2. Disconnect connector, test the resistance between two white wire, normal resistance should be about 1 ~ 6K ohms, if the resistance is infinite or 0, it indicate sensor failure.
After above test , plug the connector to socket in order to detect in next step.
5. Sensors and Error Codes
5.6) Check guide related error codes of 661/662
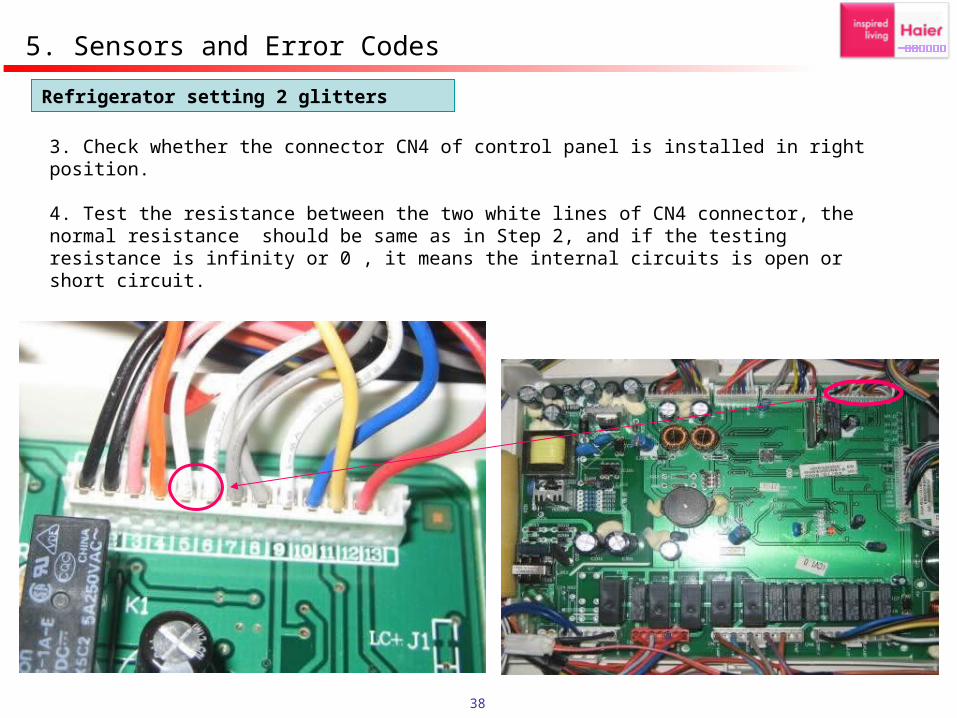
(5.6.1) Refrigerator setting 2 glitters
38
3. Check whether the connector CN4 of control panel is installed in right position.
4. Test the resistance between the two white lines of CN4 connector, the normal resistance should be same as in Step 2, and if the testing resistance is infinity or 0 , it means the internal circuits is open or short circuit.
5. Sensors and Error Codes
Refrigerator setting 2 glitters
39
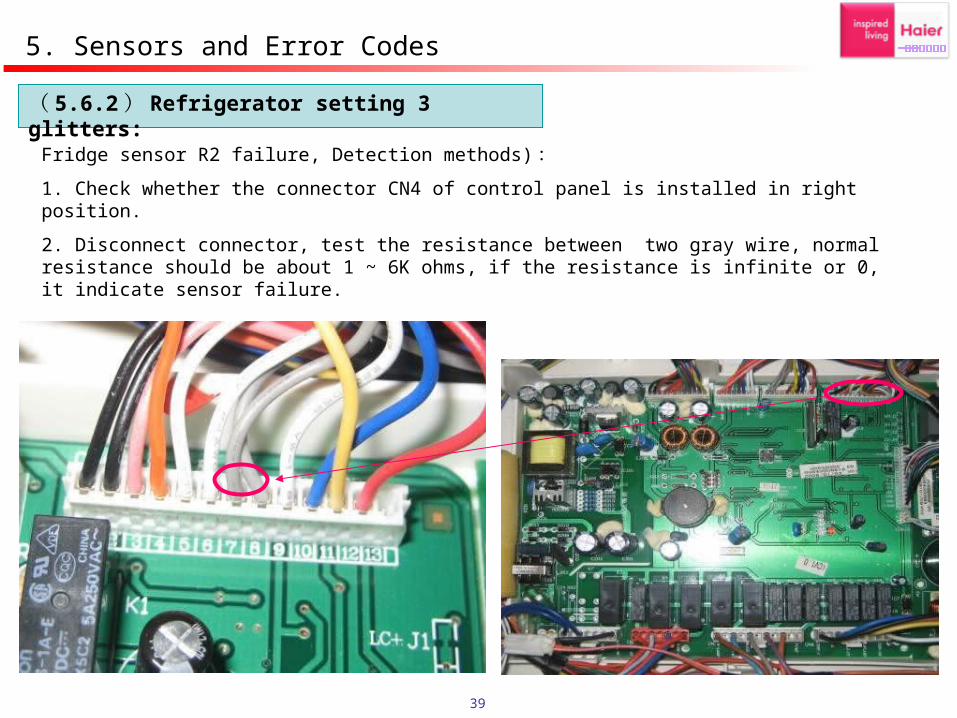
( 5.6.2 ) Refrigerator setting 3 glitters:
Fridge sensor R2 failure, Detection methods) :
1. Check whether the connector CN4 of control panel is installed in right position.
2. Disconnect connector, test the resistance between two gray wire, normal resistance should be about 1 ~ 6K ohms, if the resistance is infinite or 0, it indicate sensor failure.
5. Sensors and Error Codes

40
3. If above detection is abnormal, open the sensor cover, disconnect the sensor, test if sensor is failure, replace the sensor if the sensor is defective, re-wiring sealed then put back.
5. Sensors and Error Codes
( 5.6.2 ) Refrigerator setting 3 glitters:
41
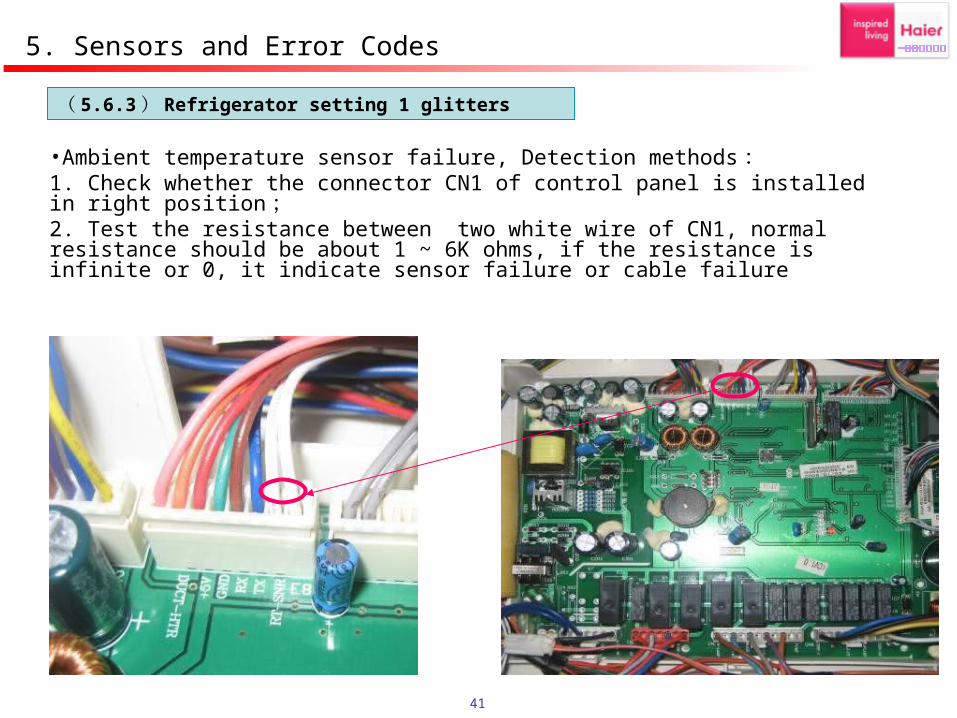
•Ambient temperature sensor failure, Detection methods :1. Check whether the connector CN1 of control panel is installed in right position ;2. Test the resistance between two white wire of CN1, normal resistance should be about 1 ~ 6K ohms, if the resistance is infinite or 0, it indicate sensor failure or cable failure
5. Sensors and Error Codes
( 5.6.3 ) Refrigerator setting 1 glitters

42
3.If the result of above detection is abnormal, open the freezer door hinge box, disconnect the sensor to detect the if there is a sensor problem, replace the sensor if the sensor is defective, re-wiring sealed back.
5. Sensors and Error Codes
Refrigerator setting 1 glitters
43
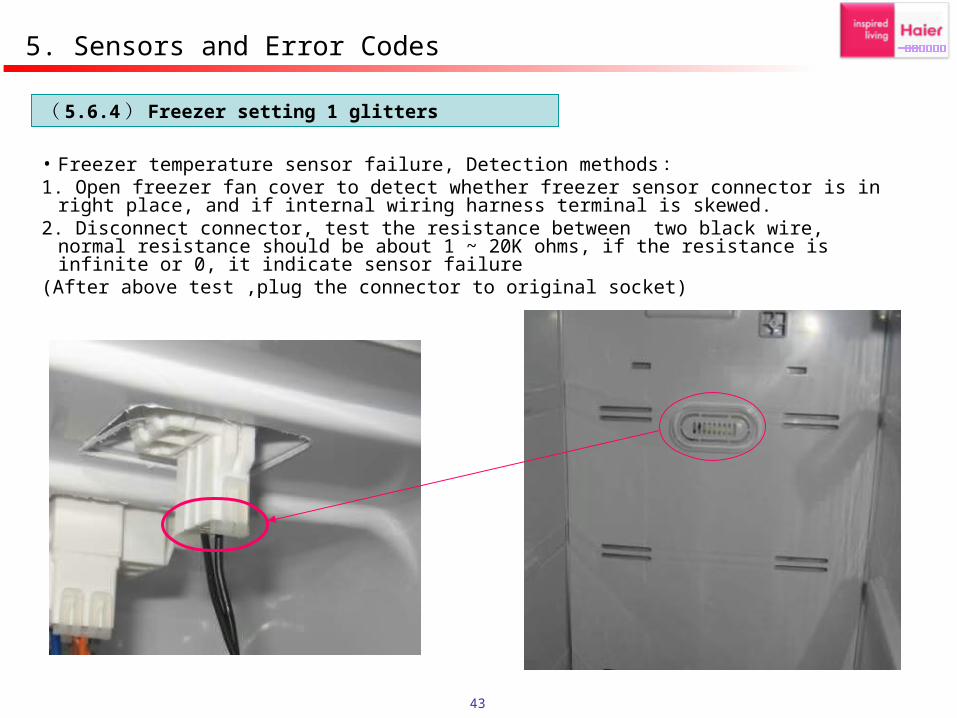
• Freezer temperature sensor failure, Detection methods :1. Open freezer fan cover to detect whether freezer sensor connector is in right place,
and if internal wiring harness terminal is skewed.2. Disconnect connector, test the resistance between two black wire, normal resistance
should be about 1 ~ 20K ohms, if the resistance is infinite or 0, it indicate sensor failure(After above test ,plug the connector to original socket)
5. Sensors and Error Codes
( 5.6.4 ) Freezer setting 1 glitters
44
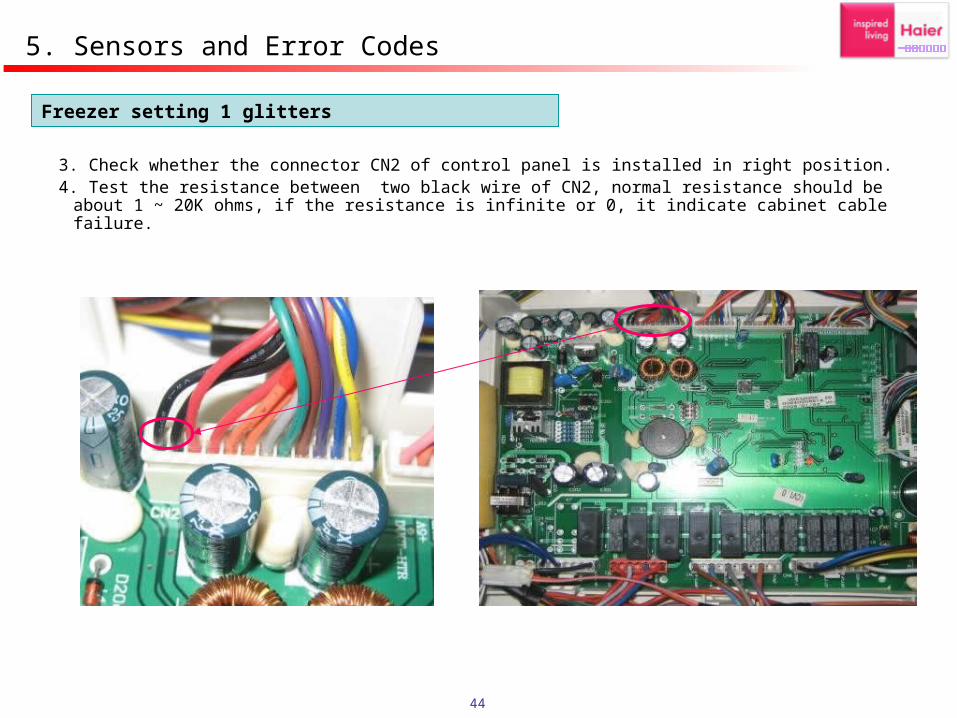
3. Check whether the connector CN2 of control panel is installed in right position.4. Test the resistance between two black wire of CN2, normal resistance should be
about 1 ~ 20K ohms, if the resistance is infinite or 0, it indicate cabinet cable failure.
5. Sensors and Error Codes
Freezer setting 1 glitters
45
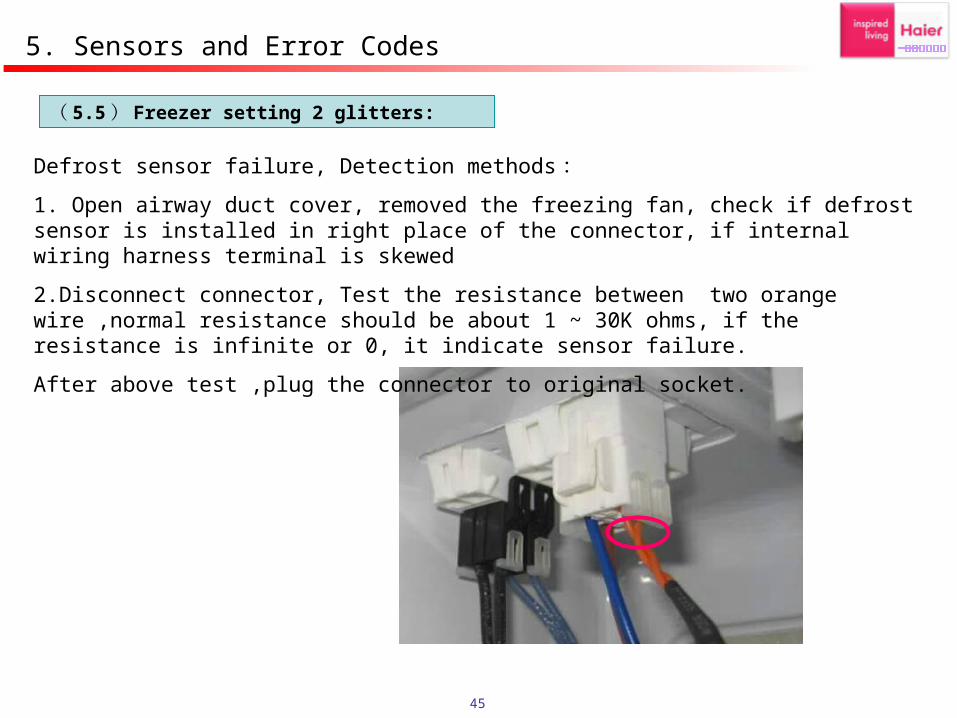
Defrost sensor failure, Detection methods :
1. Open airway duct cover, removed the freezing fan, check if defrost sensor is installed in right place of the connector, if internal wiring harness terminal is skewed
2.Disconnect connector, Test the resistance between two orange wire ,normal resistance should be about 1 ~ 30K ohms, if the resistance is infinite or 0, it indicate sensor failure.
After above test ,plug the connector to original socket.
5. Sensors and Error Codes
( 5.5 ) Freezer setting 2 glitters:
46
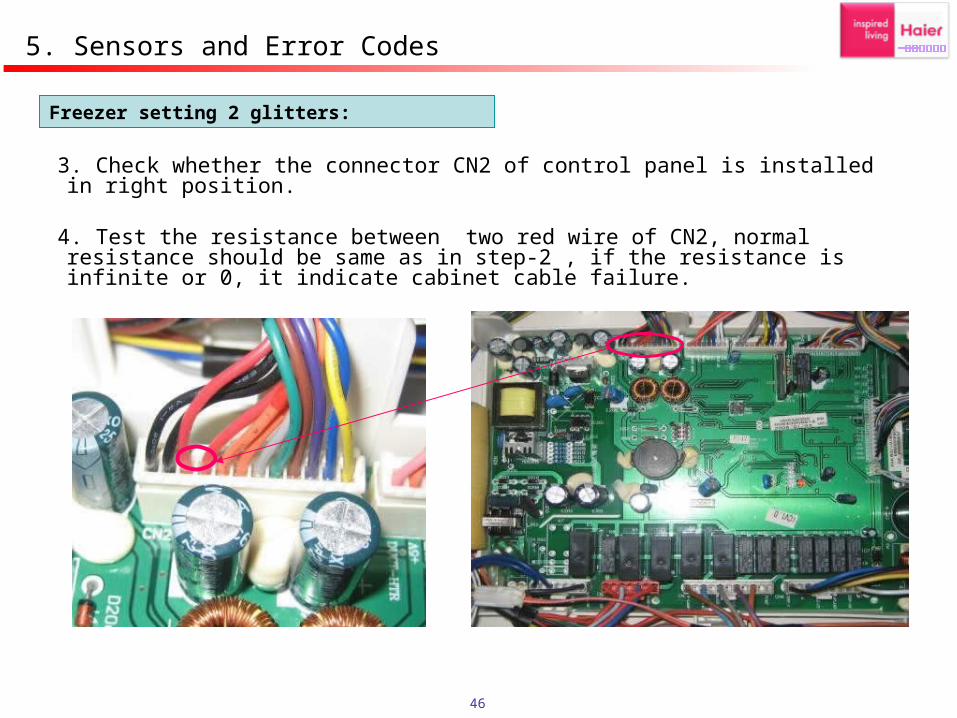
3. Check whether the connector CN2 of control panel is installed in right position.
4. Test the resistance between two red wire of CN2, normal resistance should be same as in step-2 , if the resistance is infinite or 0, it indicate cabinet cable failure.
5. Sensors and Error Codes
Freezer setting 2 glitters:
47
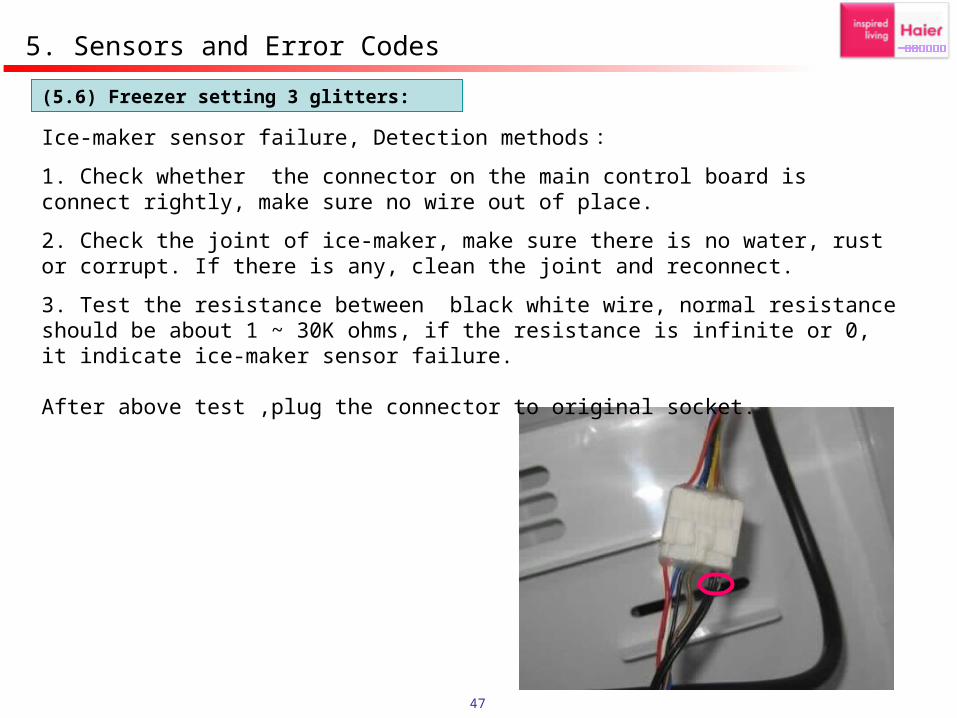
Ice-maker sensor failure, Detection methods :
1. Check whether the connector on the main control board is connect rightly, make sure no wire out of place.
2. Check the joint of ice-maker, make sure there is no water, rust or corrupt. If there is any, clean the joint and reconnect.
3. Test the resistance between black white wire, normal resistance should be about 1 ~ 30K ohms, if the resistance is infinite or 0, it indicate ice-maker sensor failure.
After above test ,plug the connector to original socket.
5. Sensors and Error Codes
(5.6) Freezer setting 3 glitters:
48
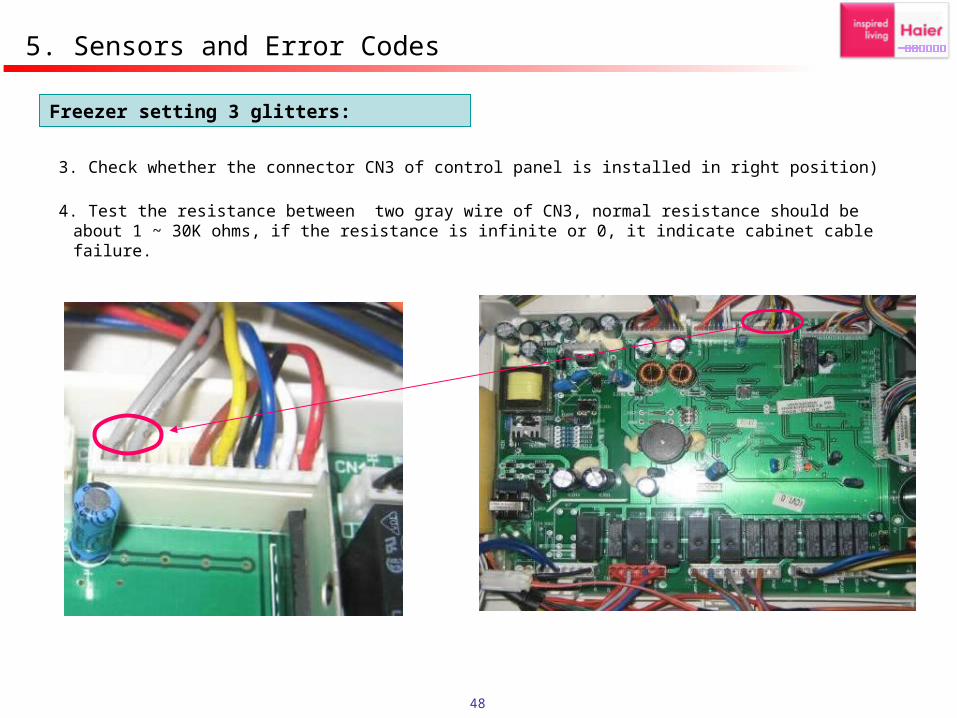
3. Check whether the connector CN3 of control panel is installed in right position)
4. Test the resistance between two gray wire of CN3, normal resistance should be about 1 ~ 30K ohms, if the resistance is infinite or 0, it indicate cabinet cable failure.
5. Sensors and Error Codes
Freezer setting 3 glitters:
49
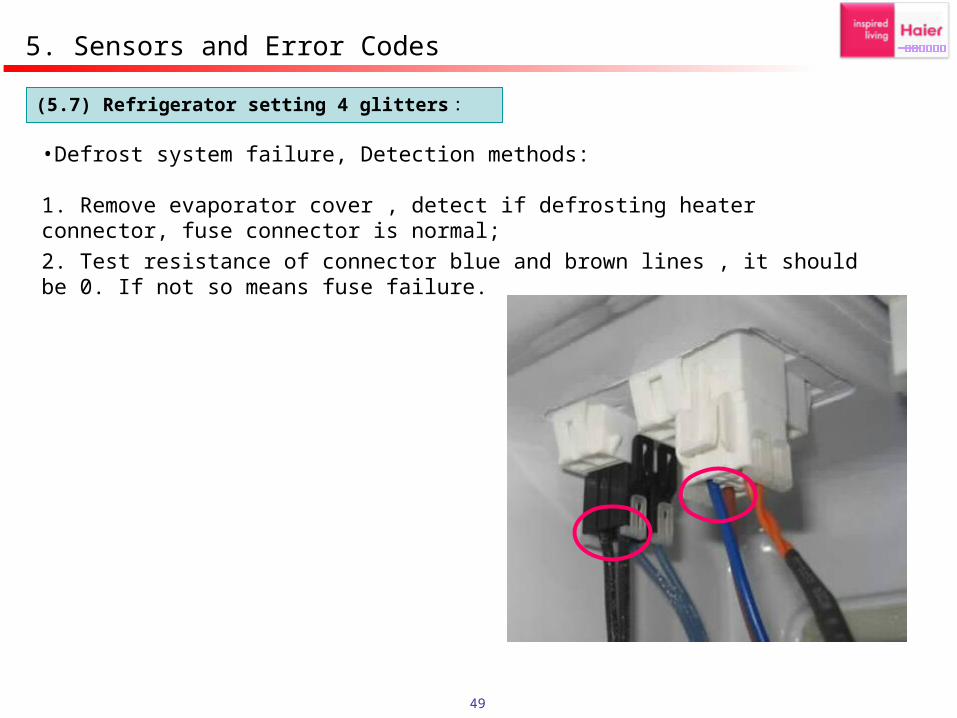
•Defrost system failure, Detection methods:
1. Remove evaporator cover , detect if defrosting heater connector, fuse connector is normal;
2. Test resistance of connector blue and brown lines , it should be 0. If not so means fuse failure.
5. Sensors and Error Codes
(5.7) Refrigerator setting 4 glitters:
50
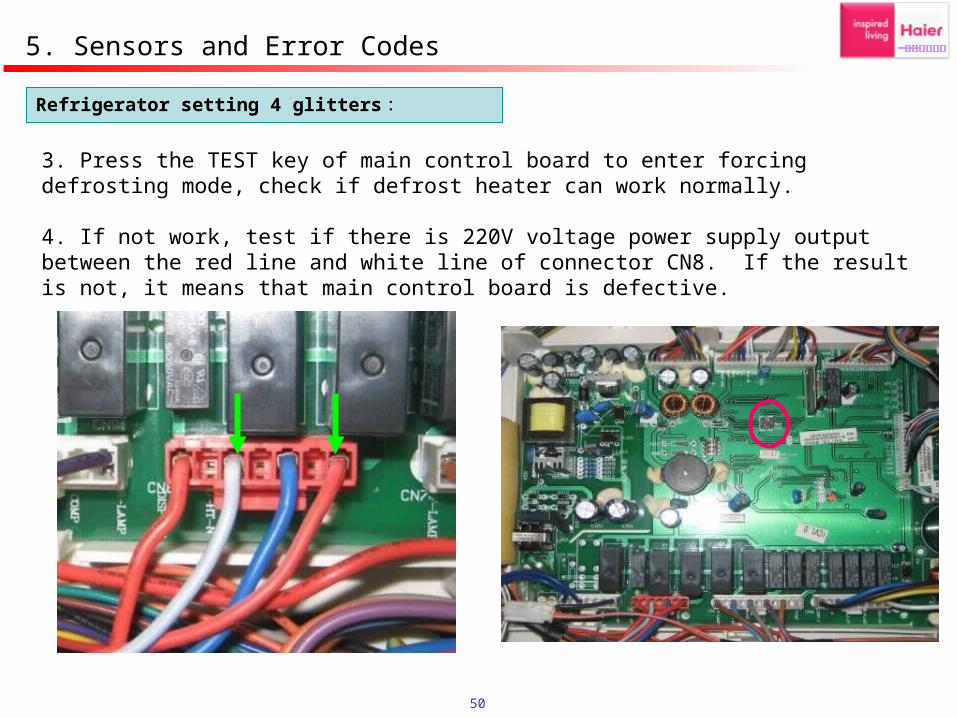
Refrigerator setting 4 glitters:
3. Press the TEST key of main control board to enter forcing defrosting mode, check if defrost heater can work normally. 4. If not work, test if there is 220V voltage power supply output between the red line and white line of connector CN8. If the result is not, it means that main control board is defective.
5. Sensors and Error Codes
51
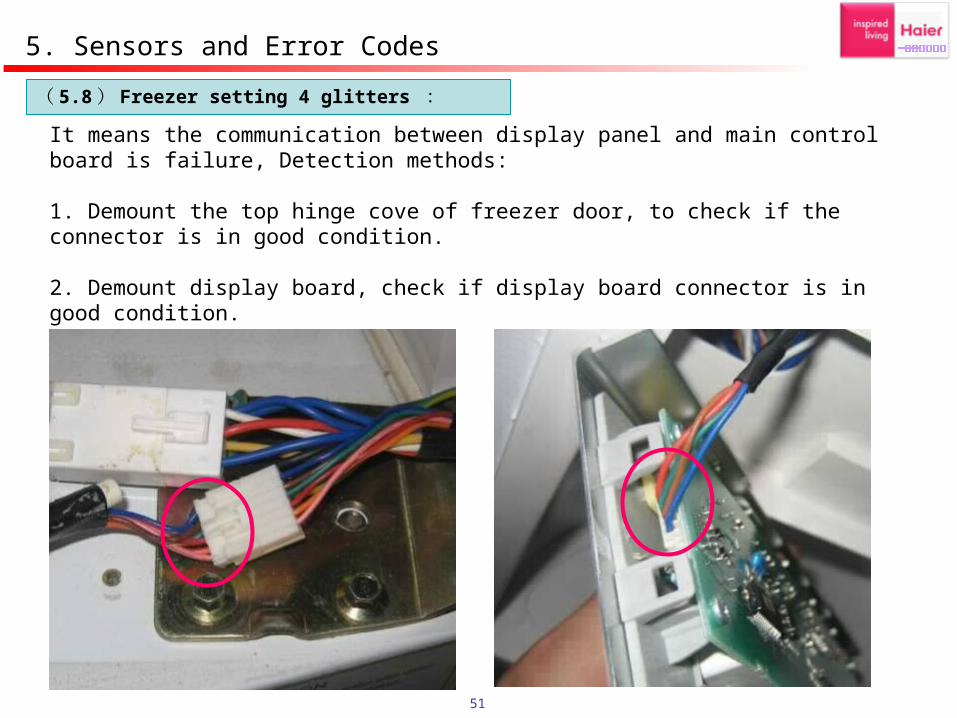
It means the communication between display panel and main control board is failure, Detection methods:
1. Demount the top hinge cove of freezer door, to check if the connector is in good condition.
2. Demount display board, check if display board connector is in good condition.
5. Sensors and Error Codes
( 5.8 ) Freezer setting 4 glitters :

52
Freezer setting 4 glitters :
3. Check whether the connector CN1 of control panel is installed in right position.
4. Test if each wires of CN1 connecting to display board is thorough.
5. Sensors and Error Codes
53
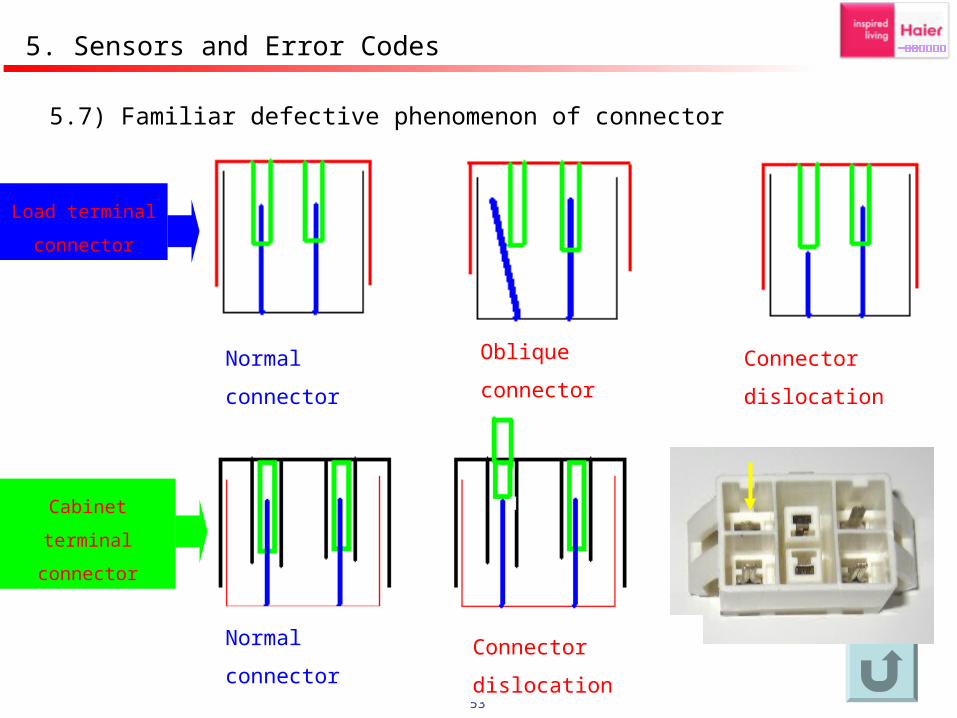
Load terminal
connector
Cabinet
terminal
connector
Normal connector Oblique connector Connector dislocation
5.7) Familiar defective phenomenon of connector
Normal connector Connector dislocation
5. Sensors and Error Codes
54
1. Ice-maker principle
6. Automatically Ice-making System
When the water enter into the ice box, machine test the ice-maker sensor after 100 minutes. If the temperature of ice-maker sensor is below -14 , ice-maker starts rotate, and the ice-℃measure staff starts work to test if the ice in ice-store box is full. If the ice-store box is no full of ice, ice box turn over continually to release ice, then come back to original horizontal position. The water valve open again let water enter into ice-maker, then continue a new ice-making process.
55
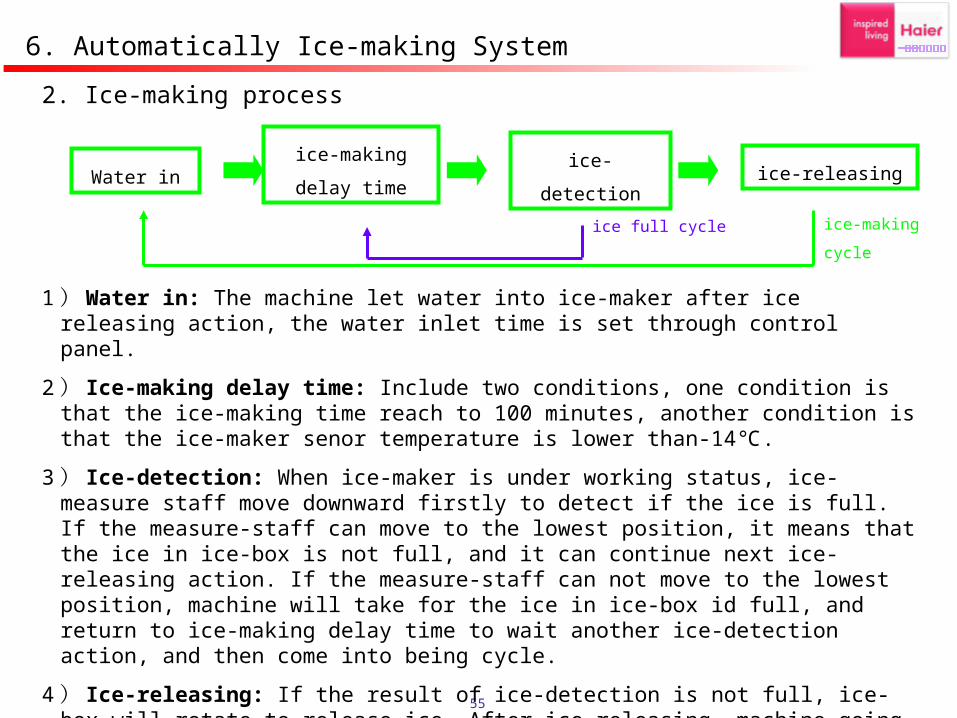
Water inice-making delay
timeice-detection ice-releasing
1 ) Water in: The machine let water into ice-maker after ice releasing action, the water inlet time is set through control panel.
2 ) Ice-making delay time: Include two conditions, one condition is that the ice-making time reach to 100 minutes, another condition is that the ice-maker senor temperature is lower than-14 .℃
3 ) Ice-detection: When ice-maker is under working status, ice-measure staff move downward firstly to detect if the ice is full. If the measure-staff can move to the lowest position, it means that the ice in ice-box is not full, and it can continue next ice-releasing action. If the measure-staff can not move to the lowest position, machine will take for the ice in ice-box id full, and return to ice-making delay time to wait another ice-detection action, and then come into being cycle.
4 ) Ice-releasing: If the result of ice-detection is not full, ice-box will rotate to release ice. After ice-releasing, machine going on another water in action, and then come into being cycle.
ice-making cycleice full cycle
2. Ice-making process
6. Automatically Ice-making System

56
3. Refrigerator waterway
The water is divided into two ways from water valve, one way to ice-maker, and another way to water tank, then flow to dispenser for get cold water.
1 ) Cold water principle
Water enter into water tank of fridge compartment, then water getting to cold in fridge compartment for drink use from dispenser
2 ) Ice-maker principle
Water enter into ice-maker from water valve which at the back of cabinet, then after some time, the ice-maker test if the ice box if full, and pushing ice. Then let water into ice-maker again to continue a new ice-making process.
6. Automatically Ice-making System
57
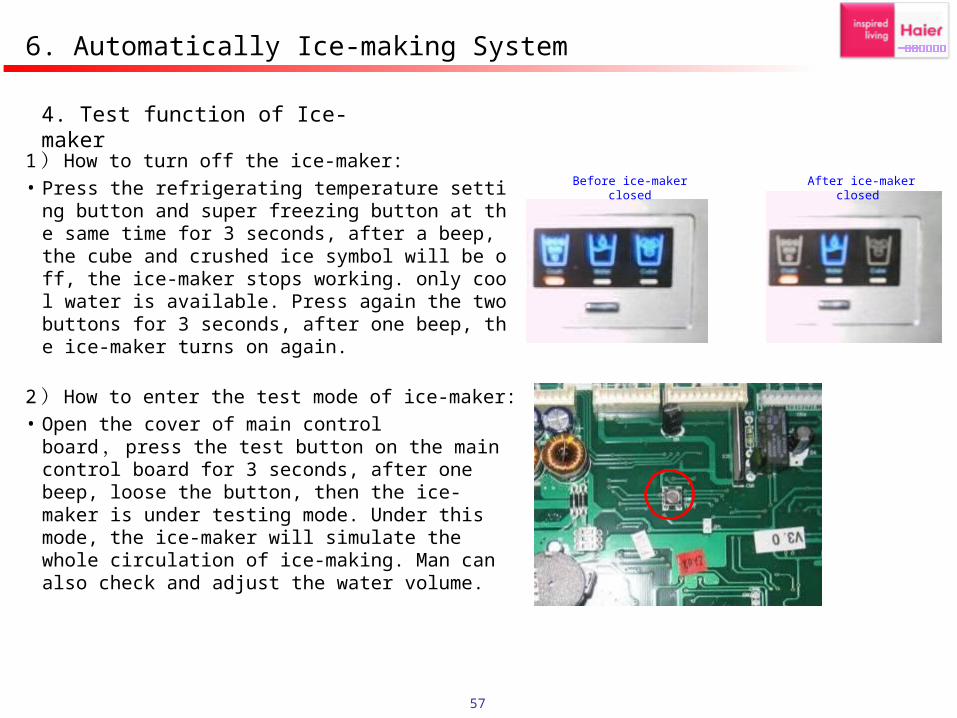
4. Test function of Ice-maker
1 ) How to turn off the ice-maker:• Press the refrigerating temperature setting button
and super freezing button at the same time for 3 seconds, after a beep, the cube and crushed ice symbol will be off, the ice-maker stops working. only cool water is available. Press again the two buttons for 3 seconds, after one beep, the ice-maker turns on again.
2 ) How to enter the test mode of ice-maker:• Open the cover of main control board , press the
test button on the main control board for 3 seconds, after one beep, loose the button, then the ice-maker is under testing mode. Under this mode, the ice-maker will simulate the whole circulation of ice-making. Man can also check and adjust the water volume.
Before ice-maker closed After ice-maker closed
6. Automatically Ice-making System
58
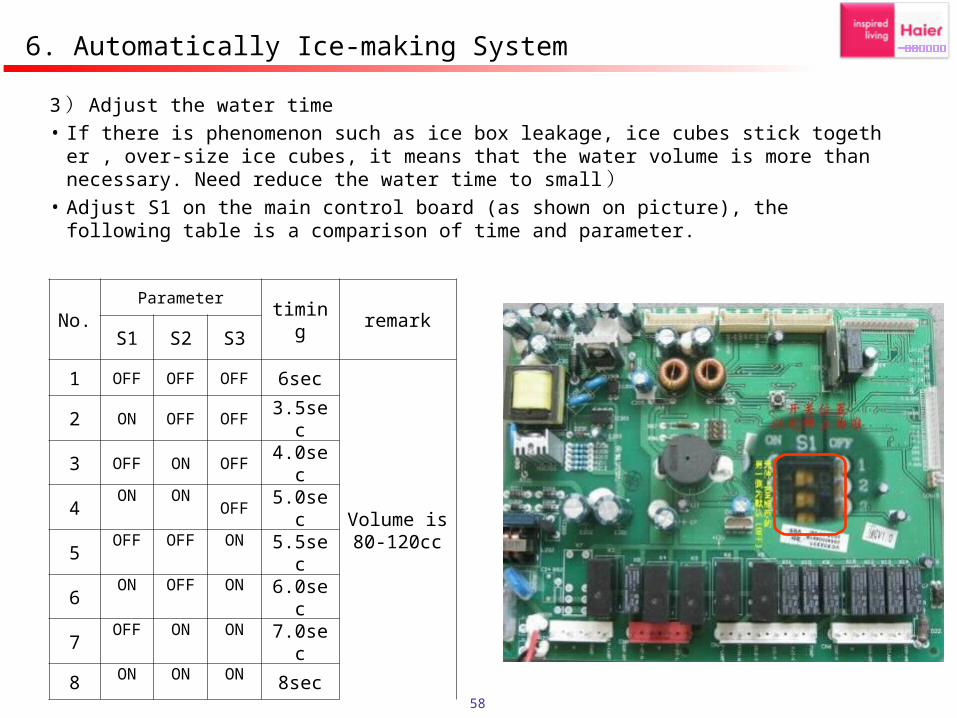
3 ) Adjust the water time• If there is phenomenon such as ice box leakage, ice cubes stick together , over-size ice cube
s, it means that the water volume is more than necessary. Need reduce the water time to small )
• Adjust S1 on the main control board (as shown on picture), the following table is a comparison of time and parameter.
No.Parameter
timing remarkS1 S2 S3
1 OFF OFF OFF 6sec
Volume is80-120cc
2 ON OFF OFF 3.5sec
3 OFF ON OFF 4.0sec
4 ON ON OFF 5.0sec
5 OFF OFF ON 5.5sec
6 ON OFF ON 6.0sec
7 OFF ON ON 7.0sec
8 ON ON ON 8sec
6. Automatically Ice-making System
59
1. Normally defrost:
Automatic defrost. After added up to 7 hours of compressor running, defrost will be switched on. When defrost SNR temperature reaches 7 , defrost will be over.℃
If the defrosting time is more than 120 minutes, and defrost sensor still can not reach to 7ºC, it will stop defrosting process and alarm--refrigerator setting 4 glitters.
2. Easily failure components of defrosting system:
1 ) Defrosting fuse: It is located in the left side of evaporator. If the fuse is open circuit, means it is defective.
2 ) Connectors: The frequently failure phenomenon is that pin of connectors is dislocation or oblique.
3 ) Defrosting sensor: It is located in the upper right side of evaporator, the sensor control the defrosting time.
7. Defrosting system , Fan , and Air damper

60
7.Defrosting system , Fan , and Air damper
3. Control of fan motor
Control of freezing fan:• When open the refrigerating door, the refrigerating air damper will be
turned on, and the freezing fan will be working, after 2 minutes the refrigerating air damper will be turned off.
• When open the freezing door, If the freezing fan works at a speed of 1500 RPM, the freezing fan will keep working but switch to 1300 RPM. If the fan works at a speed of 1300 RPM, it will shut off when the freezing door is open.
Control of refrigerating fan: This fan is working in-phase with the compressor and at a fixed speed of 1100 RPM.
61
7. Defrosting system , Fan , and Air damper
4. Control of air damper
• Refrigerating sensor R1 controls the startup and shutdown of air damper in refrigerator compartment.
• The air damper is closed (in order to prevent the compartment from freezing) within 15 minutes from the beginning to the finishing of defrosting.
• Force the air damper to be opened and closed once if it can not be opened within 1 hour. After that, decide whether open or close it according to R1 sensor.
• The air damper heater and ice dispenser heater work in-phase.
• Environment temperature is above 12 , the heater of bar will be on, when lower than 10 ℃, heater will be off.℃
• Dispenser heater and water drain pipe heater will be off for 10 minutes and 30 minutes on, thus a circulation.
62
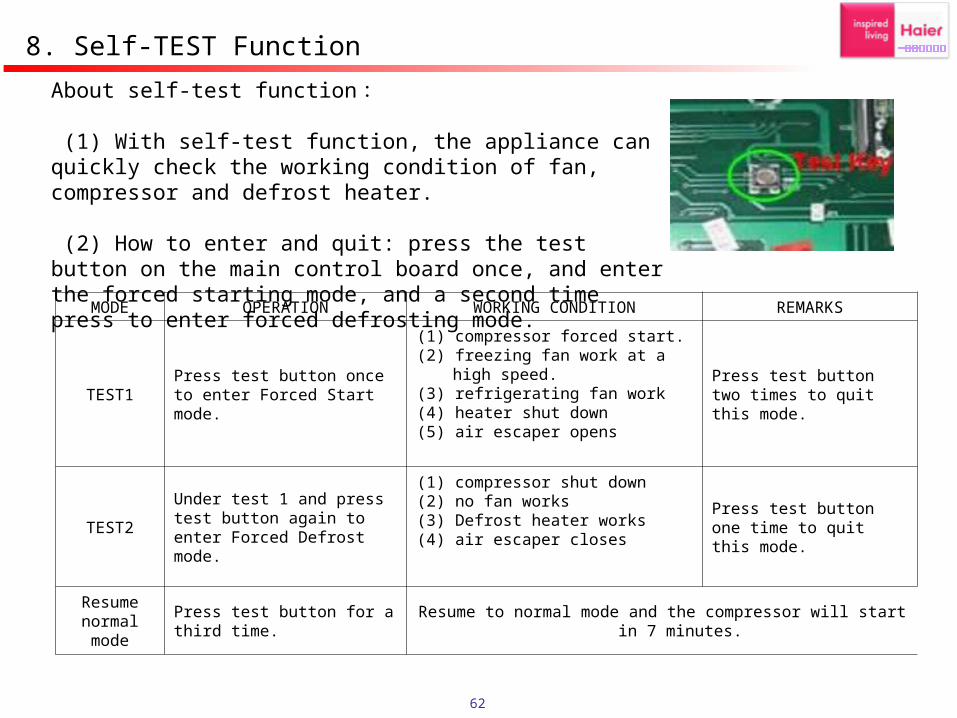
MODE OPERATION WORKING CONDITION REMARKS
TEST1Press test button once to enter Forced Start mode.
(1) compressor forced start. (2) freezing fan work at a high speed.(3) refrigerating fan work(4) heater shut down(5) air escaper opens
Press test button two times to quit this mode.
TEST2Under test 1 and press test button again to enter Forced Defrost mode.
(1) compressor shut down(2) no fan works(3) Defrost heater works(4) air escaper closes
Press test button one time to quit this mode.
Resume normal mode
Press test button for a third time.
Resume to normal mode and the compressor will start in 7 minutes.
About self-test function :
(1) With self-test function, the appliance can quickly check the working condition of fan, compressor and defrost heater.
(2) How to enter and quit: press the test button on the main control board once, and enter the forced starting mode, and a second time press to enter forced defrosting mode.
8. Self-TEST Function
63
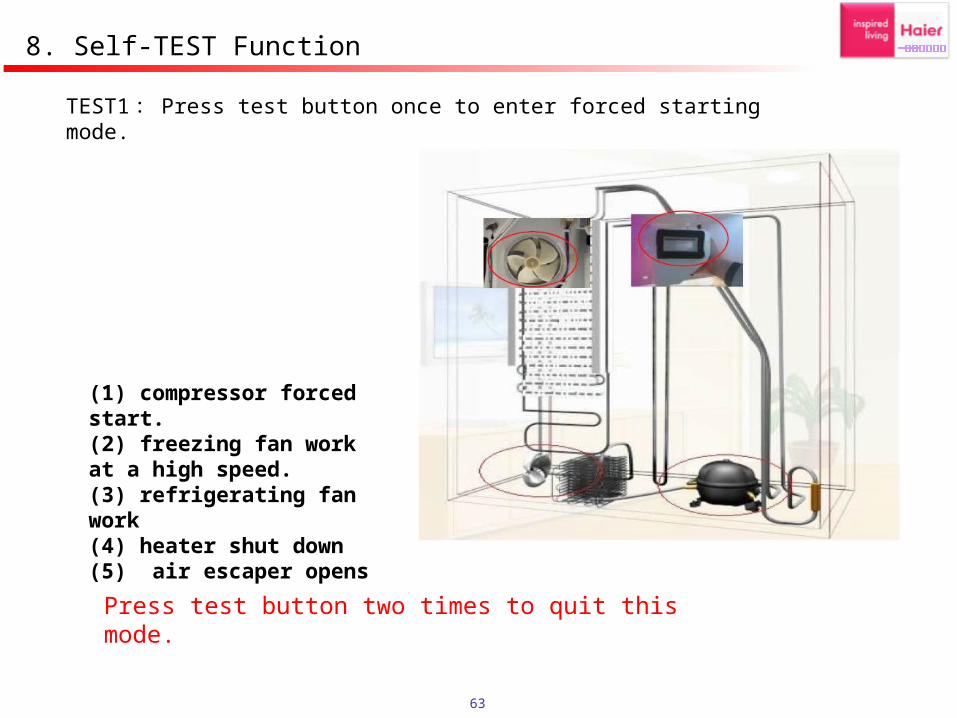
TEST1 : Press test button once to enter forced starting mode.
(1) compressor forced start. (2) freezing fan work at a high speed.(3) refrigerating fan work(4) heater shut down(5) air escaper opens
Press test button two times to quit this mode.
8. Self-TEST Function
64
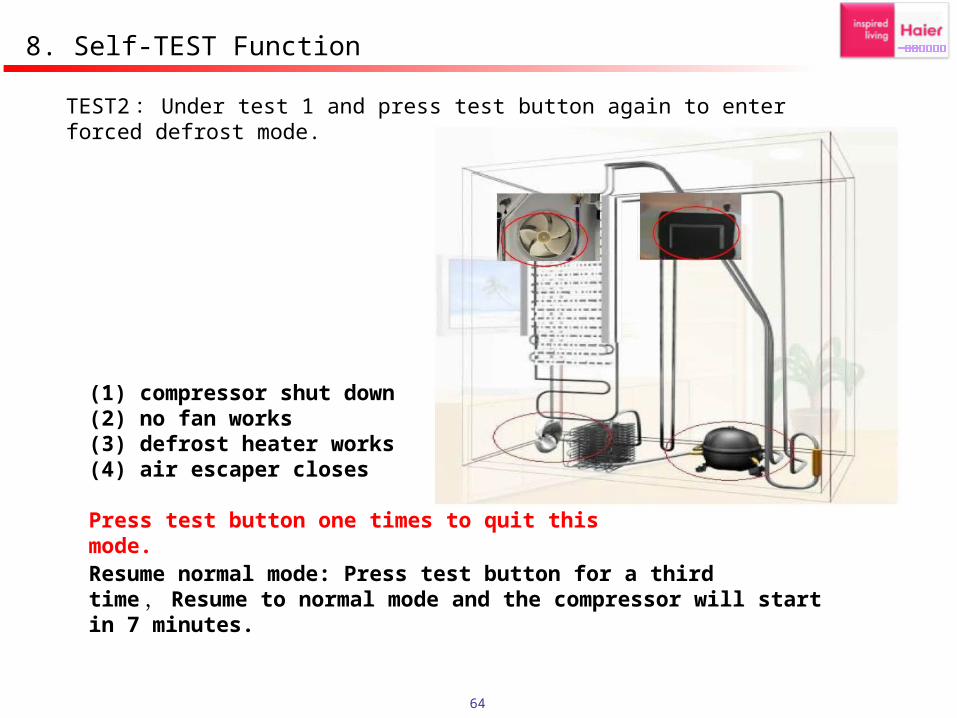
TEST2 : Under test 1 and press test button again to enter forced defrost mode.
(1) compressor shut down(2) no fan works(3) defrost heater works(4) air escaper closes
Press test button one times to quit this mode.
Resume normal mode: Press test button for a third time , Resume to normal mode and the compressor will start in 7 minutes.
8. Self-TEST Function
65
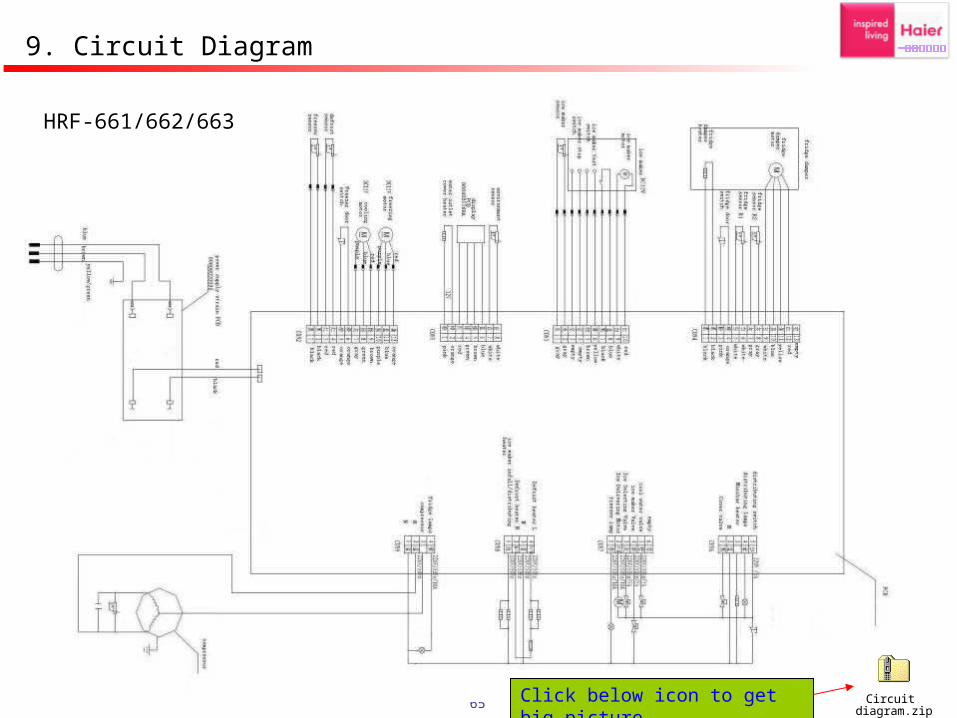
9. Circuit Diagram
HRF-661/662/663
Click below icon to get big picture Circuit diagram.zip
66
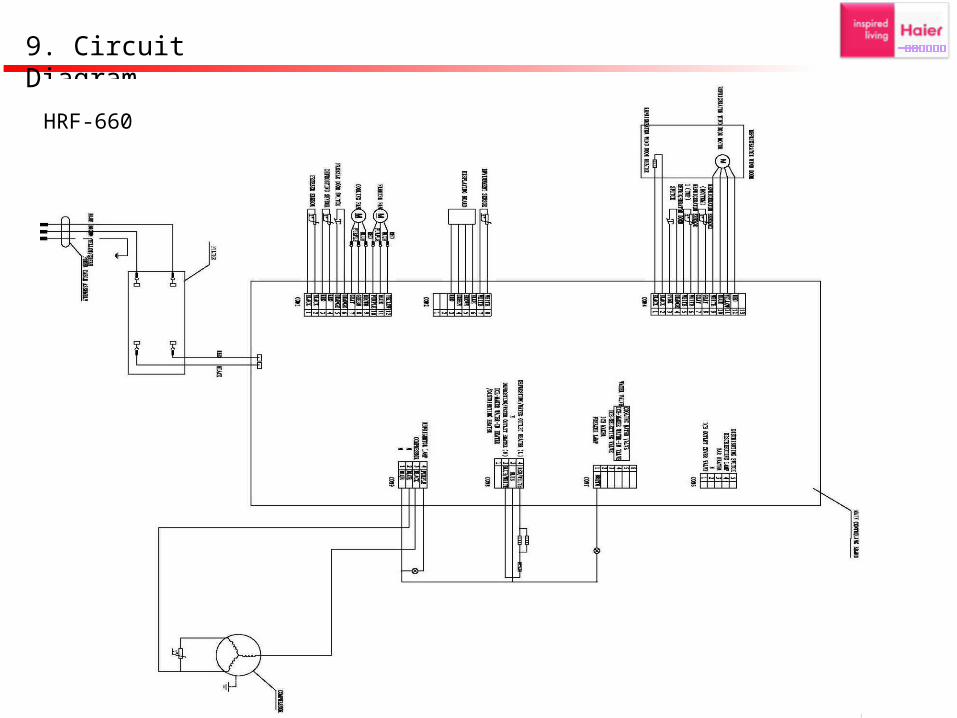
9. Circuit Diagram
HRF-660
67
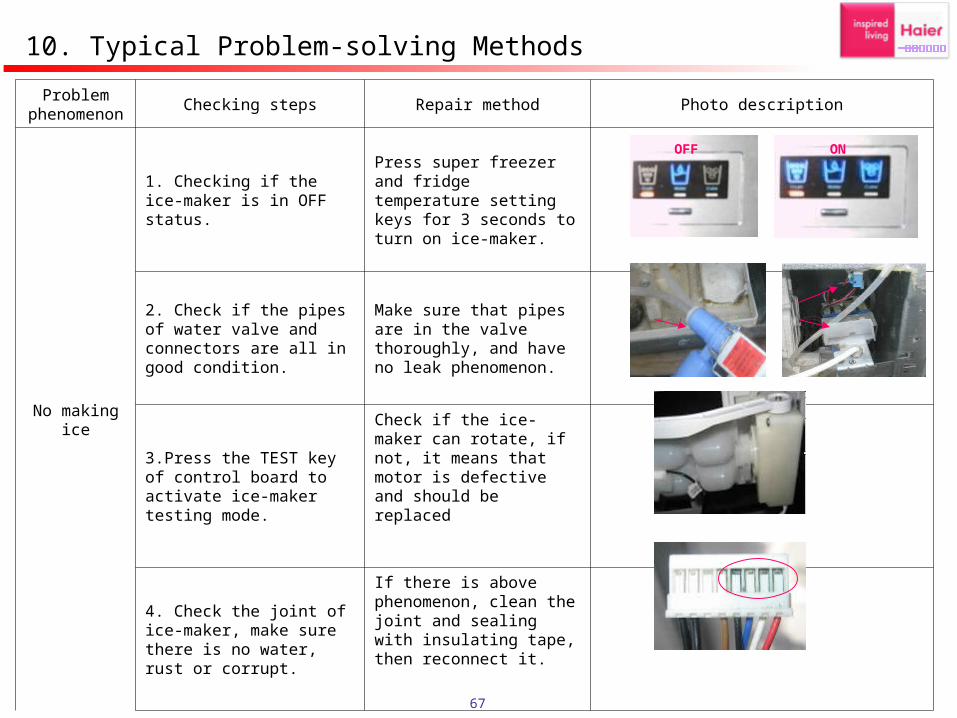
Problem phenomenon
Checking steps Repair method Photo description
No making ice
1. Checking if the ice-maker is in OFF status.
Press super freezer and fridge temperature setting keys for 3 seconds to turn on ice-maker.
2. Check if the pipes of water valve and connectors are all in good condition.
Make sure that pipes are in the valve thoroughly, and have no leak phenomenon.
3.Press the TEST key of control board to activate ice-maker testing mode.
Check if the ice-maker can rotate, if not, it means that motor is defective and should be replaced
4. Check the joint of ice-maker, make sure there is no water, rust or corrupt.
If there is above phenomenon, clean the joint and sealing with insulating tape, then reconnect it.
OFF ON
10. Typical Problem-solving Methods

68
Problem phenomenon
Checking steps Repair method Photo description
Ice-maker noise
Press the TEST key of control board to activate ice-maker testing mode.
Check if ice-maker touches the water pipe when turns over, if so, disassemble the ice-maker, move supporting bracket forward a little and re-fix it. Check if there is loud noise when ice-maker turns over, if so, there might be a fault of ice-maker motor itself, and need replace the ice-maker motor.
Frost in freezing compartment
1. Check the sealing condition around freezing door, if exist cooling air leakage.
Use one hair drier blow the door gasket to repair, or replace a new door gasket.
\
2. Check if the sealing condition of ice outlet cover is good.
If sealing condition is not good, demount the cover of dispenser, and adjust spring to strength it’s force.
10. Typical Problem-solving Methods
69
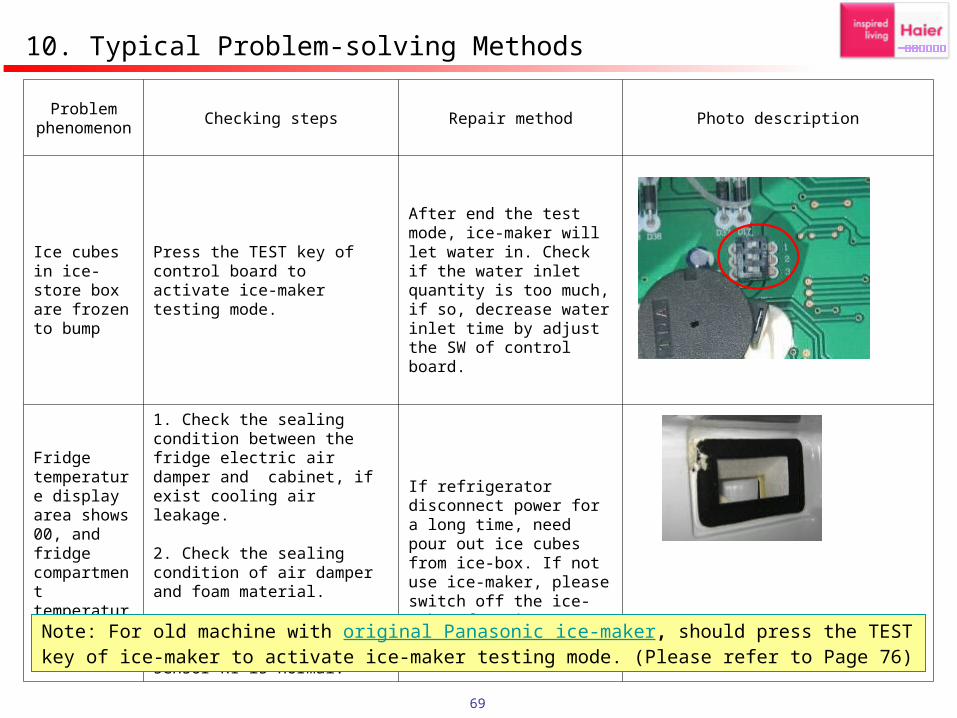
Problem phenomenon
Checking steps Repair method Photo description
Ice cubes in ice-store box are frozen to bump
Press the TEST key of control board to activate ice-maker testing mode.
After end the test mode, ice-maker will let water in. Check if the water inlet quantity is too much, if so, decrease water inlet time by adjust the SW of control board.
Fridge temperature display area shows 00, and fridge compartment temperature is lower
1. Check the sealing condition between the fridge electric air damper and cabinet, if exist cooling air leakage.
2. Check the sealing condition of air damper and foam material.
3. Check if the resistance of fridge sensor R1 is normal.
If refrigerator disconnect power for a long time, need pour out ice cubes from ice-box. If not use ice-maker, please switch off the ice-maker function.
10. Typical Problem-solving Methods
Note: For old machine with original Panasonic ice-maker, should press the TEST key of ice-maker to activate ice-maker testing mode. (Please refer to Page 76)
70
• Fault 1 : no ice-making• Checking steps:• 1 ) Test whether the temperature of freezing room reaches the set temperature.• 2 ) Check if the ice-maker is shut down.• 3 ) Press the test button on the main control board for 3 seconds, enter the ice-maker
testing mode to see if the ice-maker can turn over automatically.• 4 ) If unable to turn over, disconnect the joint connector of ice-maker to see if there is
any water, rust or corrupt. Clean the joint connector and reinstall it, then enter the testing mode again to check whether the ice-maker can turn over.
• 5 ) If the ice-maker still can not turn over, use a multimeter to check if every wire from CN3 on the main control board to the ice-maker in freezing room is ok. If wire connection is normal, this may be caused by fault of ice-maker or main control board. Use a new spare part or the testing tool to test the ice-maker.
• 6) If the ice-maker can turn over, check the water valve, connect the water valve to 220 voltage AC power, if the valve can open, that means the valve is ok. If not, this means the valve is wrong. )
• 7 ) If the water valve is normal and the water can run into the ice-maker under testing mode, then check the sensor of ice-maker.)
11. Main Trouble Shooting Method – Icemaker
71
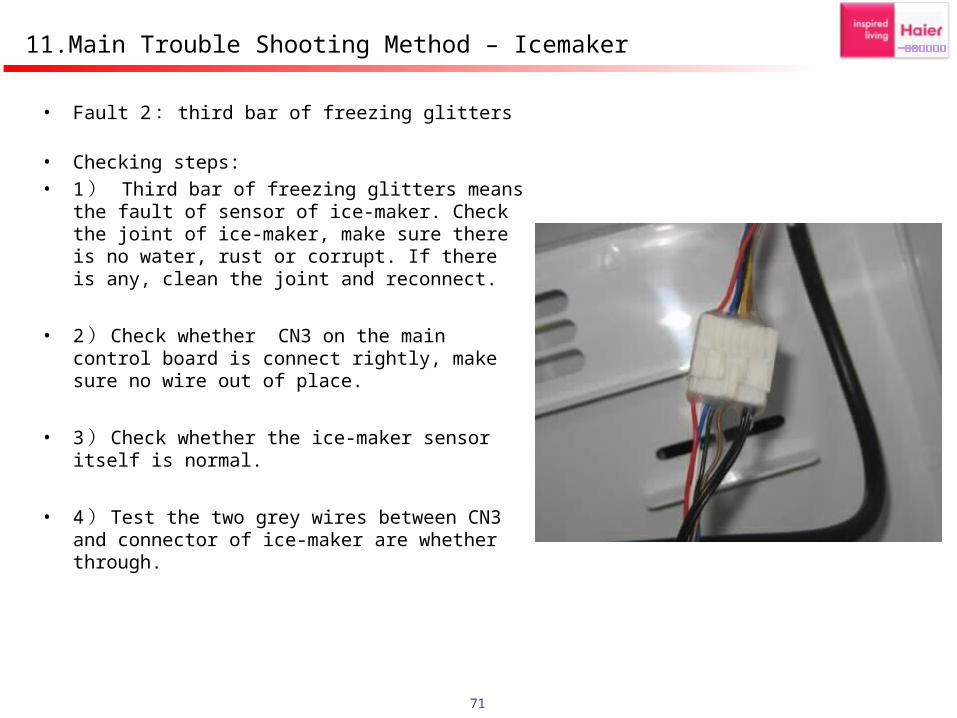
• Fault 2 : third bar of freezing glitters
• Checking steps:• 1 ) Third bar of freezing glitters means the
fault of sensor of ice-maker. Check the joint of ice-maker, make sure there is no water, rust or corrupt. If there is any, clean the joint and reconnect.
• 2 ) Check whether CN3 on the main control board is connect rightly, make sure no wire out of place.
• 3 ) Check whether the ice-maker sensor itself is normal.
• 4 ) Test the two grey wires between CN3 and connector of ice-maker are whether through.
11.Main Trouble Shooting Method – Icemaker

72
• Fault 3 : no crushed ice
• Checking steps:• 1 ) Open the freezing door, make sure
the selecting bar under the storage box is good shape or not stick into the selecting valve.
• 2 ) Disassemble the ice storage box, make sure the ice blade is in fine shape.
11. Main Trouble Shooting Method – Icemaker
73
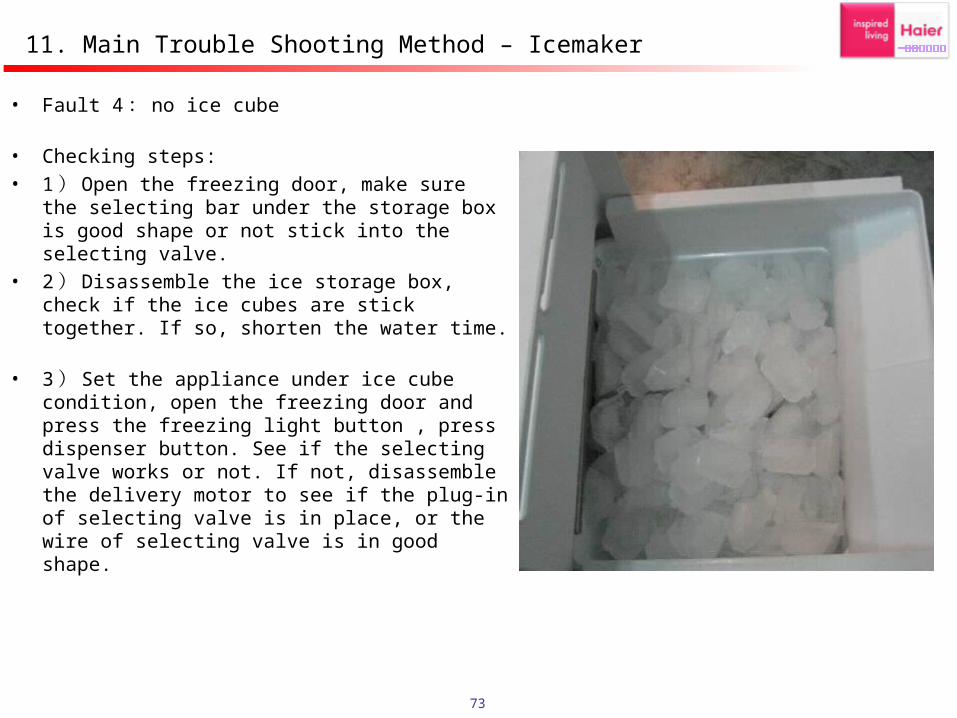
• Fault 4 : no ice cube
• Checking steps:• 1 ) Open the freezing door, make sure the
selecting bar under the storage box is good shape or not stick into the selecting valve.
• 2 ) Disassemble the ice storage box, check if the ice cubes are stick together. If so, shorten the water time.
• 3 ) Set the appliance under ice cube condition, open the freezing door and press the freezing light button , press dispenser button. See if the selecting valve works or not. If not, disassemble the delivery motor to see if the plug-in of selecting valve is in place, or the wire of selecting valve is in good shape.
11. Main Trouble Shooting Method – Icemaker
74
• Fault 5 : Abnormal noise of ice-maker
• Checking steps:• Enter the test mode of ice-maker, see if the ice-maker touches the water pipe when
turns over. If so, disassemble the ice-maker, move it forward a little and re-fix it.
• See if there is loud noise when ice-maker turns over, if so, there might be a fault of ice-maker itself.
• See if the ice box touches the hinge when turns over, or the shape of hinge is destroyed. If so, check and make sure the hinge is fixed properly.
11. Main Trouble Shooting Method – Icemaker
75
• Fault : refrigerating temperature is too low, food frozen.
• Checking steps• Press the refrigerating adjust button for more than 3 seconds, until the light turns off,
which means refrigerating room is shut down. • Open the refrigerating door, see if there is cool air near the air damper• If there is no cold air blows out, test the resistance of refrigerating sensor R1 is
normal or not. • If there is little cold air blows out, disassemble the refrigerating air damper, test the
foamed assemble of air damper and the cabinet is sealed properly, or the seal is damaged.
• Disassemble the foamed assemble of air damper, make sure the air damper and the foaming material is sealed properly.
• Test the sheet of air damper can be closed well, if not, link sensor R1, open and close the refrigerating room, check if the sheet of air damper can be closed properly.
• If the sheet of air damper does not move, use a multimeter to test wire ( of the same color ) between the plug of air damper and CN4 on the main control board is through or not. If the wire is through, the fault may be in the air damper or on the main control board. Use a new spare part or air damper testing tool to locate the fault part.
11. Main Trouble Shooting Method - Air Damper
76
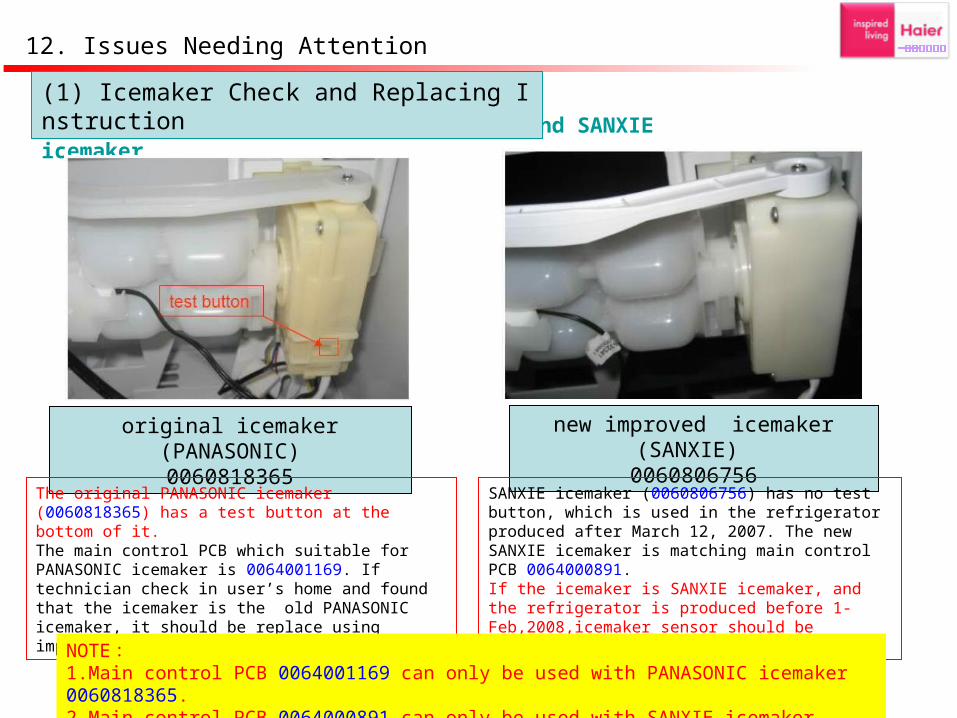
How to distinguish PANASONIC icemaker and SANXIE icemaker
original icemaker (PANASONIC)0060818365
new improved icemaker (SANXIE) 0060806756
The original PANASONIC icemaker (0060818365) has a test button at the bottom of it. The main control PCB which suitable for PANASONIC icemaker is 0064001169. If technician check in user’s home and found that the icemaker is the old PANASONIC icemaker, it should be replace using improved SANXIE icemaker.
SANXIE icemaker (0060806756) has no test button, which is used in the refrigerator produced after March 12, 2007. The new SANXIE icemaker is matching main control PCB 0064000891.If the icemaker is SANXIE icemaker, and the refrigerator is produced before 1-Feb,2008,icemaker sensor should be replaced.
NOTE :1.Main control PCB 0064001169 can only be used with PANASONIC icemaker 0060818365.2.Main control PCB 0064000891 can only be used with SANXIE icemaker 0060806756.
12. Issues Needing Attention
(1) Icemaker Check and Replacing Instruction
77
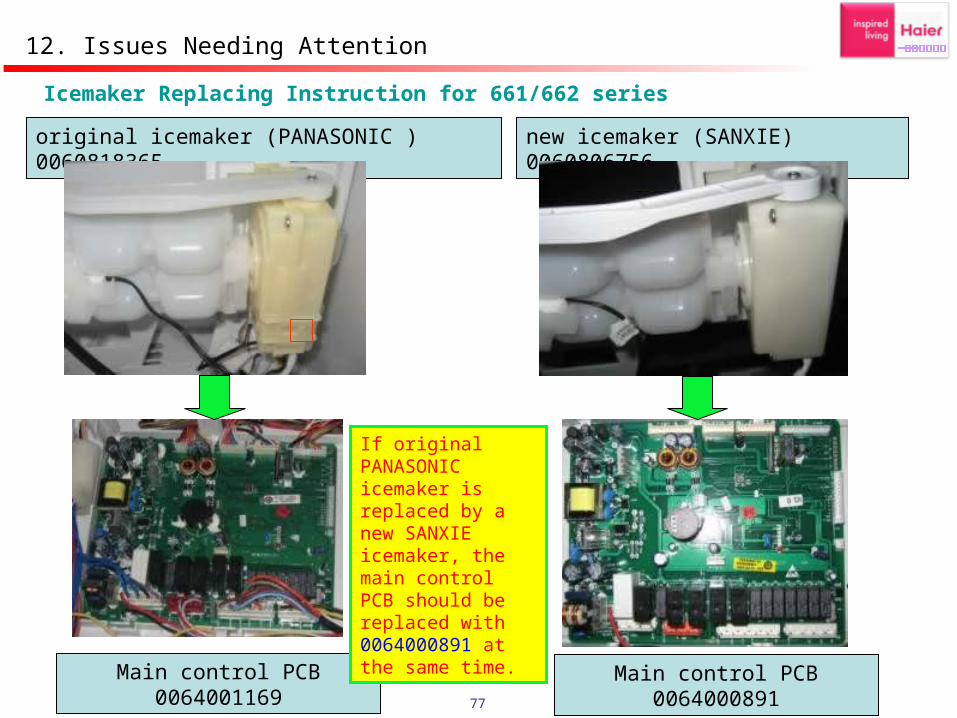
Icemaker Replacing Instruction for 661/662 series
original icemaker (PANASONIC ) 0060818365 new icemaker (SANXIE) 0060806756
Main control PCB 0064001169 Main control PCB 0064000891
If original PANASONIC icemaker is replaced by a new SANXIE icemaker, the main control PCB should be replaced with 0064000891 at the same time.
12. Issues Needing Attention
78
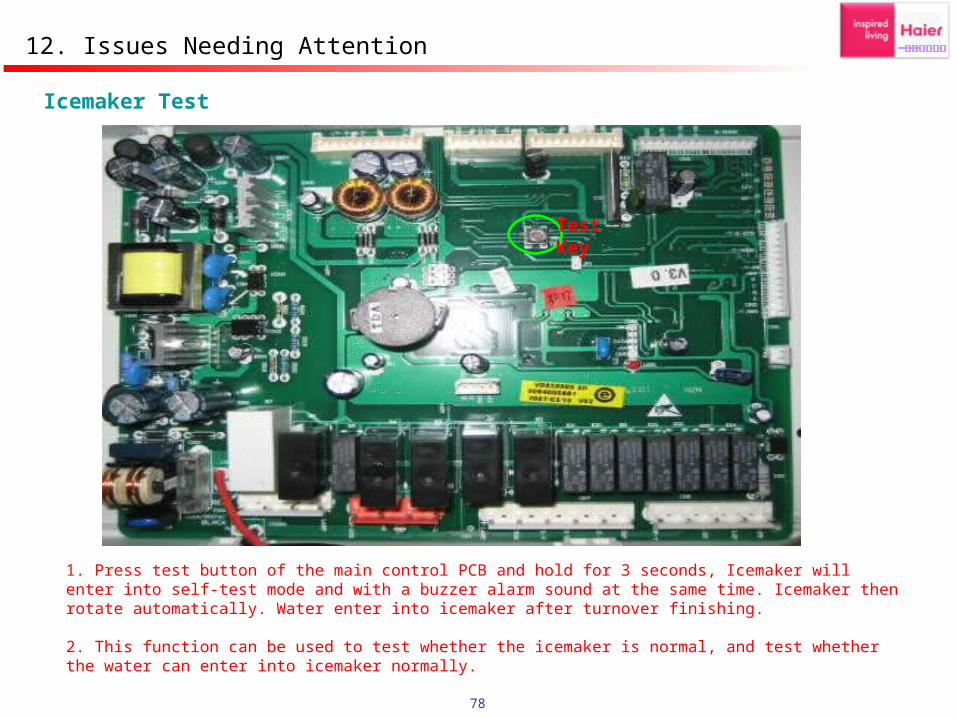
Icemaker Test
1. Press test button of the main control PCB and hold for 3 seconds, Icemaker will enter into self-test mode and with a buzzer alarm sound at the same time. Icemaker then rotate automatically. Water enter into icemaker after turnover finishing.
2. This function can be used to test whether the icemaker is normal, and test whether the water can enter into icemaker normally.
Test Key
12. Issues Needing Attention
79
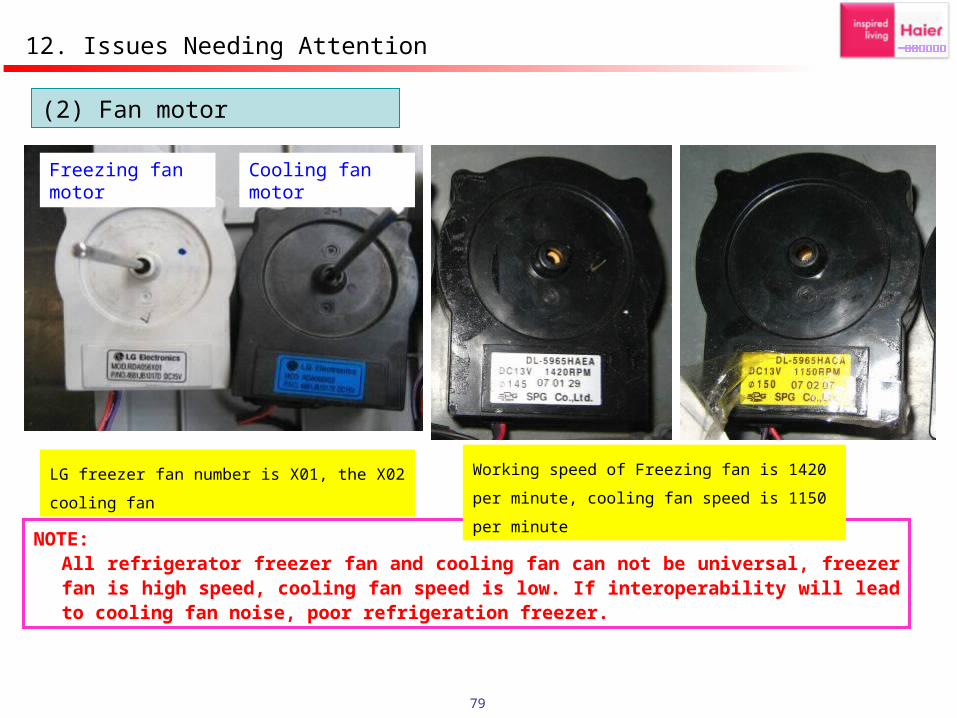
NOTE:All refrigerator freezer fan and cooling fan can not be universal, freezer fan is high speed, cooling fan speed is low. If interoperability will lead to cooling fan noise, poor refrigeration freezer.
LG freezer fan number is X01, the X02 cooling
fan
Working speed of Freezing fan is 1420 per minute,
cooling fan speed is 1150 per minute
Freezing fan motor
Cooling fan motor
12. Issues Needing Attention
(2) Fan motor

80
1. Open bar door, on the left
side there is a slot.
2. Put one screwdriver into the hole, move the pin to the right side.
3. At the same time, pull out the bar door, then remove the bar door.
12. Issues Needing Attention
(3) Disassembly of bar door

81
Preparative Work Before Installation:
•Before connecting water pipe to water supply, please firstly close water supply main switch in user’s home, then open it again after installation is completed.
•The length of water pipe included in the accessories is 11 meter. Please measure and cut properative length of water pipe required from the refrigerator to the water supply.
Note for water way installation:•The location of the refrigerator placed should be as close as possible to the location of water. Water pipes should not be set too long sources
•For home users equipped with water purification equipment, water supply pressure must be tested strictly and no more than0.85Mpa.Otherwise, water leakage accident may occurred.
(4) Water Way Installation Instruction (HRF-661/662/663)
12. 需要注意的问题 Issues Needing Attention
82
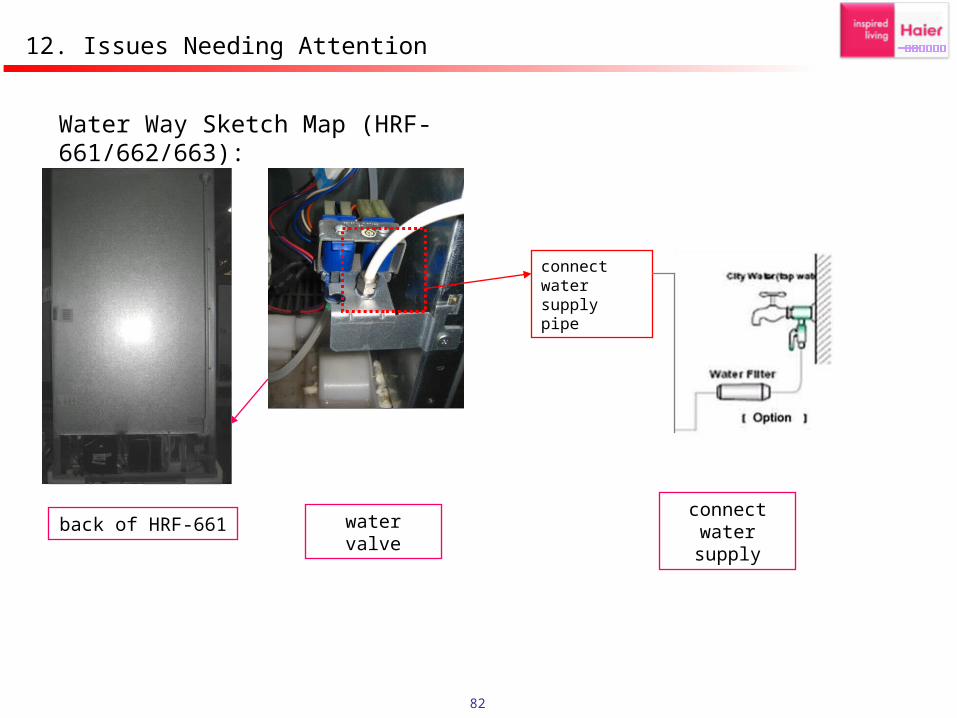
Water Way Sketch Map (HRF-661/662/663):
connect water supply pipe
back of HRF-661 water valveconnect water
supply
12. Issues Needing Attention
83
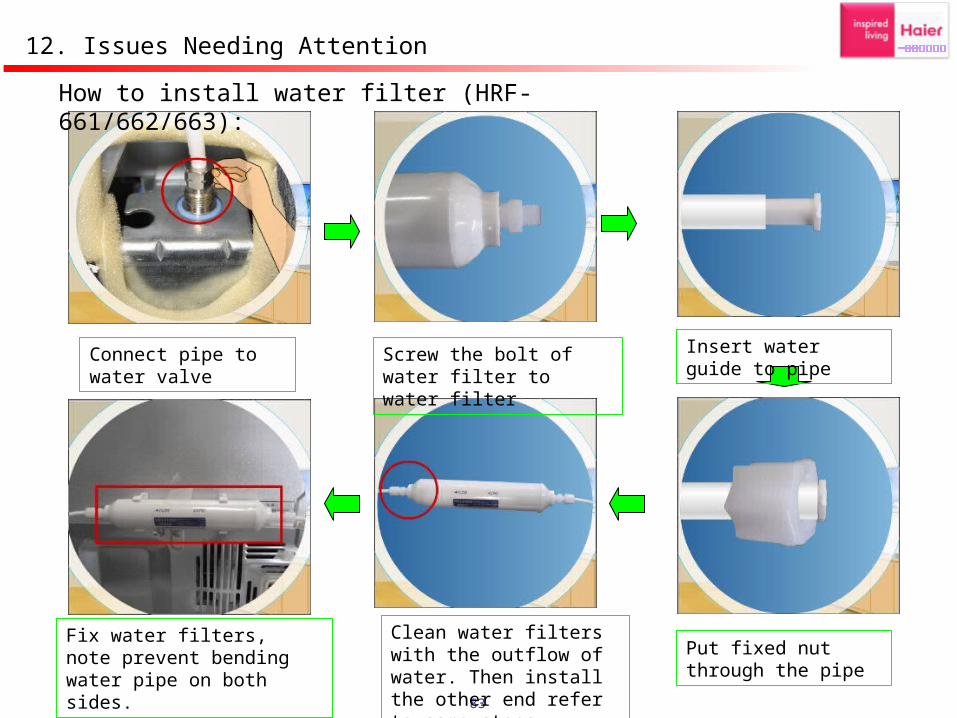
Connect pipe to water valve
Screw the bolt of water filter to water filter
Insert water guide to pipe
Put fixed nut through the pipe
Clean water filters with the outflow of water. Then install the other end refer to same steps.
Fix water filters, note prevent bending water pipe on both sides.
How to install water filter (HRF-661/662/663):
12. Issues Needing Attention
84
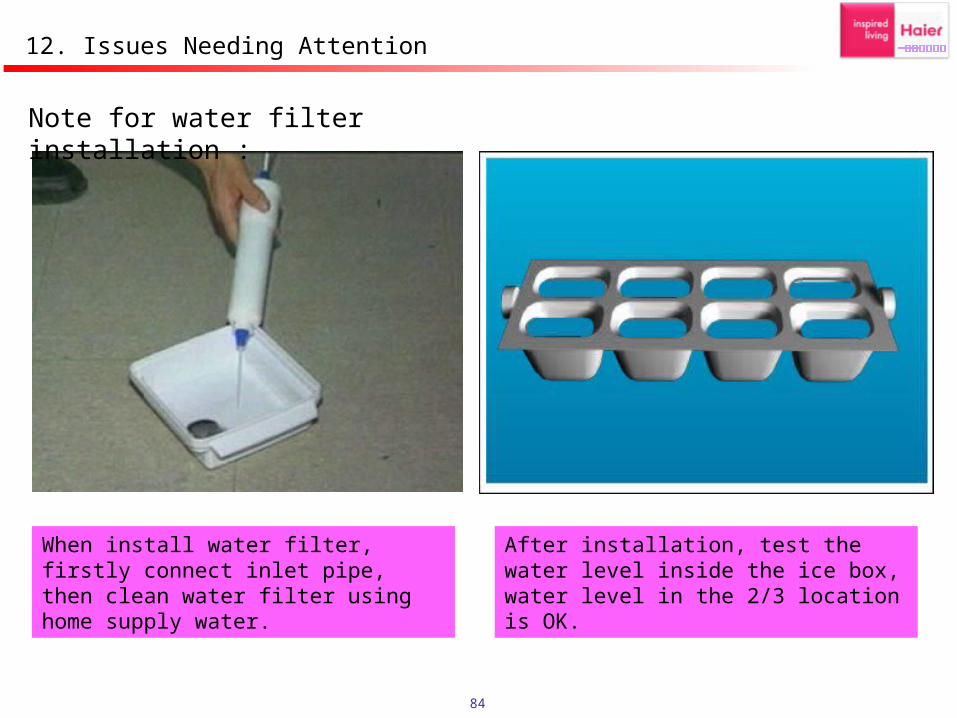
When install water filter, firstly connect inlet pipe, then clean water filter using home supply water.
After installation, test the water level inside the ice box, water level in the 2/3 location is OK.
Note for water filter installation :
12. Issues Needing Attention
85
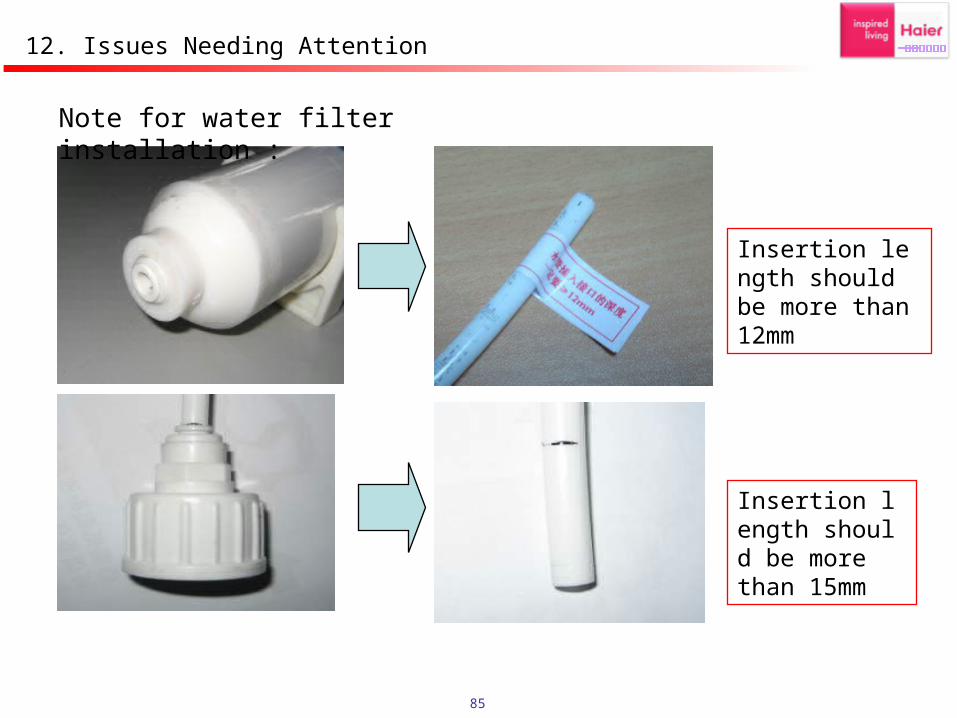
Insertion length should be more than 12mm
Insertion length should be more than 15mm
Note for water filter installation :
12. Issues Needing Attention
86
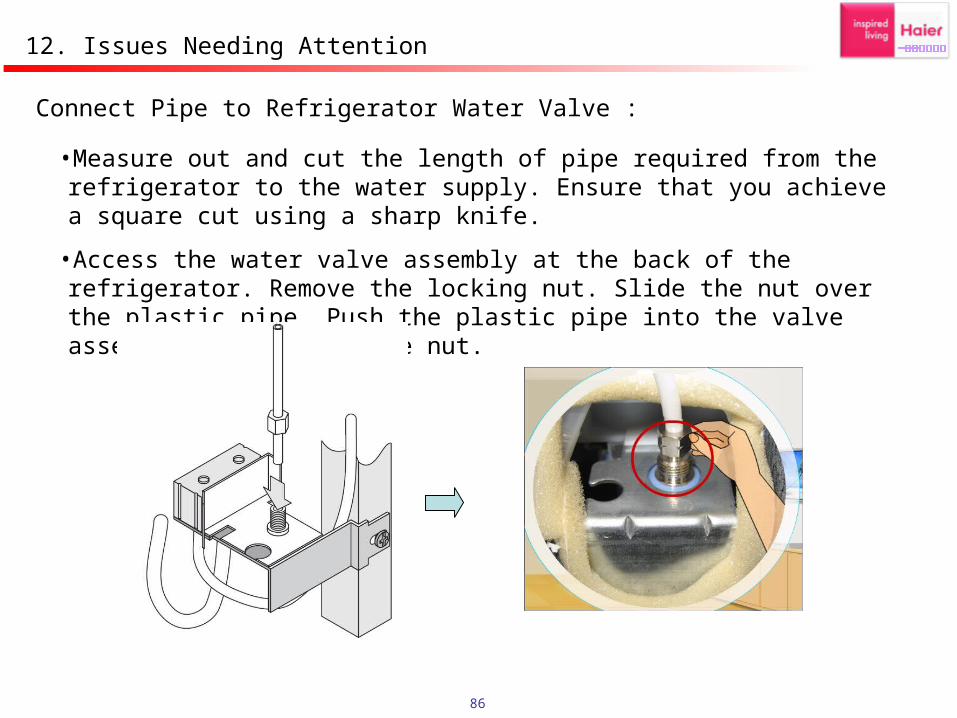
•Measure out and cut the length of pipe required from the refrigerator to the water supply. Ensure that you achieve a square cut using a sharp knife.
•Access the water valve assembly at the back of the refrigerator. Remove the locking nut. Slide the nut over the plastic pipe. Push the plastic pipe into the valve assembly and tighten the nut.
Connect Pipe to Refrigerator Water Valve :
12. Issues Needing Attention
87
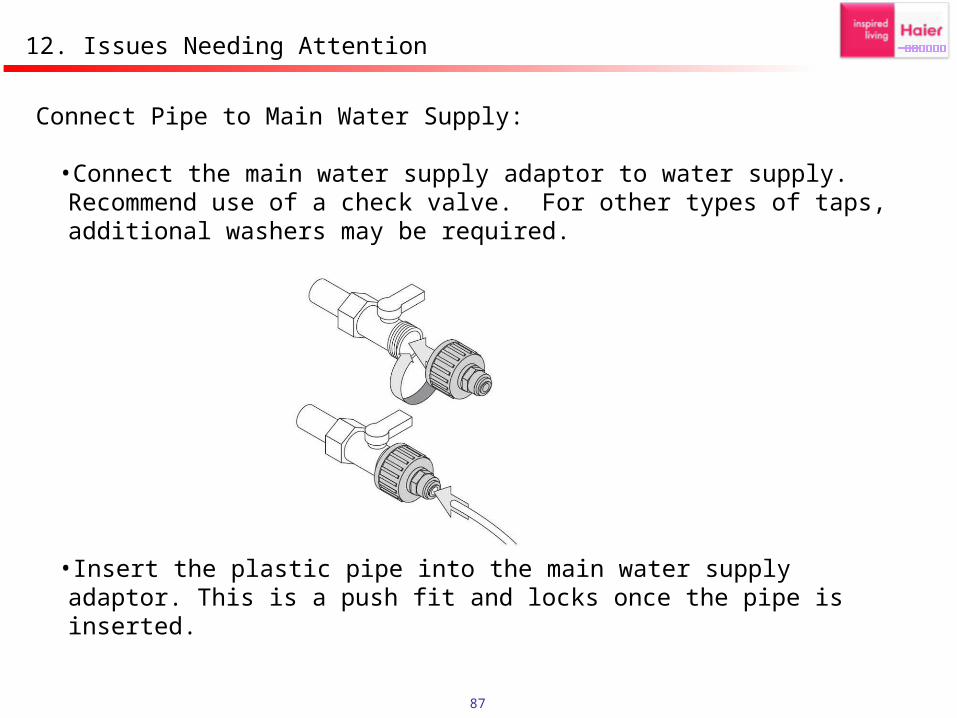
Connect Pipe to Main Water Supply:
•Connect the main water supply adaptor to water supply. Recommend use of a check valve. For other types of taps, additional washers may be required.
•Insert the plastic pipe into the main water supply adaptor. This is a push fit and locks once the pipe is inserted.
12. Issues Needing Attention
88
(1) Forcing start:
Press the TEST key of control panel, the machine enter into Forcing Start running mode with one buzzer sound, compressor and fan motor is in running status, while heaters sops work.
(2) Forcing defrost:
Under above status as described in (1), press TEST key again, defrosting heater starts to work with one buzzer sound, and compressor and the fan motor stop.
(3) Switch Off icemaker:
Press the fridge temperature setting key and super freezer setting key and last for 3 seconds. the cube and crushed ice symbol will be off, the ice-maker stops working. Press again the two buttons for 3 seconds, after one beep, the ice-maker turns on again.
(4) Adjust the water inlet time:Adjusting the water inlet time by the adjusting switch S1S2S3 of control panel.
(4) Functions Relating Check Machine
12. Issues Needing Attention
89
(5) Ice-maker test mode:
Press the TEST key of main control panel and last for 3 seconds, loose the key when one buzzer sound is heard. Now the ice-maker is in test mode.
(6) Water filter alarm indicator
When the machine working time accumulate to 6 months, cold water icon will turn into red color to hint user to change new filter. Press SELECT button more than 5 seconds can reset water icon to blue color.
(7) On/Off of freezing fan motor
Freezing fan motor stops running only both the temperature of fridge compartment and freezing compartment reach to required setting temperature. When the temperature of freezing compartment reach to required setting temperature, the compressor stops work.
(8) When the door opening time is more than 1 minutes, machine will send out 3 alarm sound. When the door opening time is more than 7 minutes, the inner lamp will extinguish automatically.
12. Issues Needing Attention
90
If you have any question when refer to this instruction, please freely mail your question to us [email protected]
Thanks for your support!