
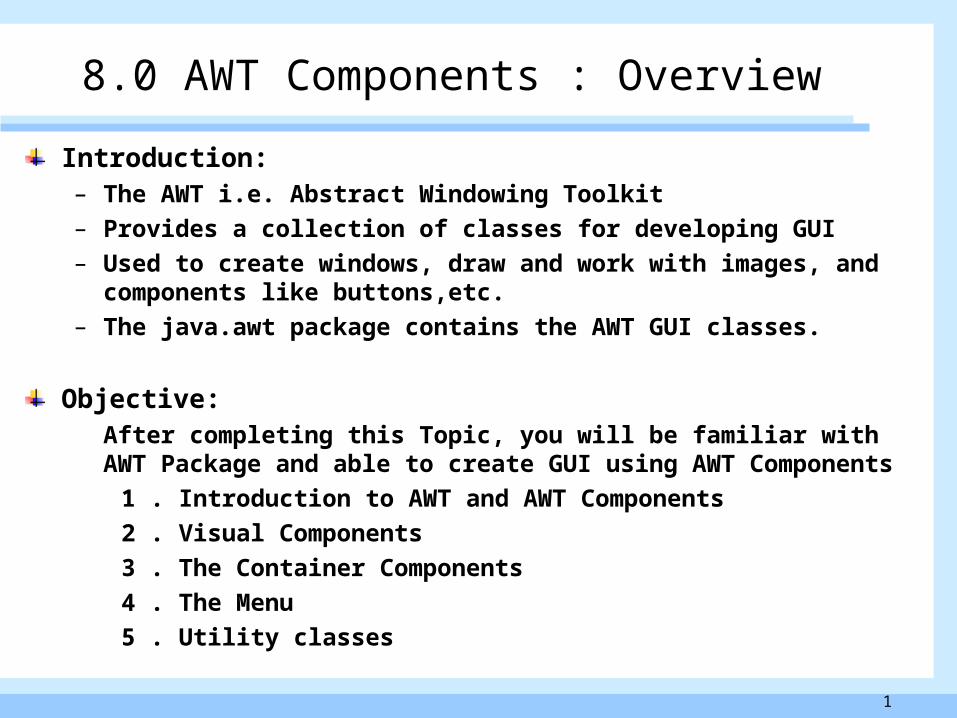
1 8.0 AWT Components : Overview Introduction: –The AWT i.e. Abstract Windowing Toolkit –Provides...
83
1 8.0 AWT Components : Overview Introduction: – The AWT i.e. Abstract Windowing Toolkit – Provides a collection of classes for developing GUI – Used to create windows, draw and work with images, and components like buttons,etc. – The java.awt package contains the AWT GUI classes. Objective: After completing this Topic, you will be familiar with AWT Package and able to create GUI using AWT Components 1 . Introduction to AWT and AWT Components 2 . Visual Components 3 . The Container Components 4 . The Menu 5 . Utility classes
-
Upload
scarlett-fox -
Category
Documents
-
view
227 -
download
0
Transcript of 1 8.0 AWT Components : Overview Introduction: –The AWT i.e. Abstract Windowing Toolkit –Provides...
1
8.0 AWT Components : Overview
Introduction:– The AWT i.e. Abstract Windowing Toolkit
– Provides a collection of classes for developing GUI
– Used to create windows, draw and work with images, and components like buttons,etc.
– The java.awt package contains the AWT GUI classes.
Objective:After completing this Topic, you will be familiar with AWT Package and able to create GUI using AWT Components
1 . Introduction to AWT and AWT Components
2 . Visual Components
3 . The Container Components
4 . The Menu
5 . Utility classes
2
AWT and AWT Components
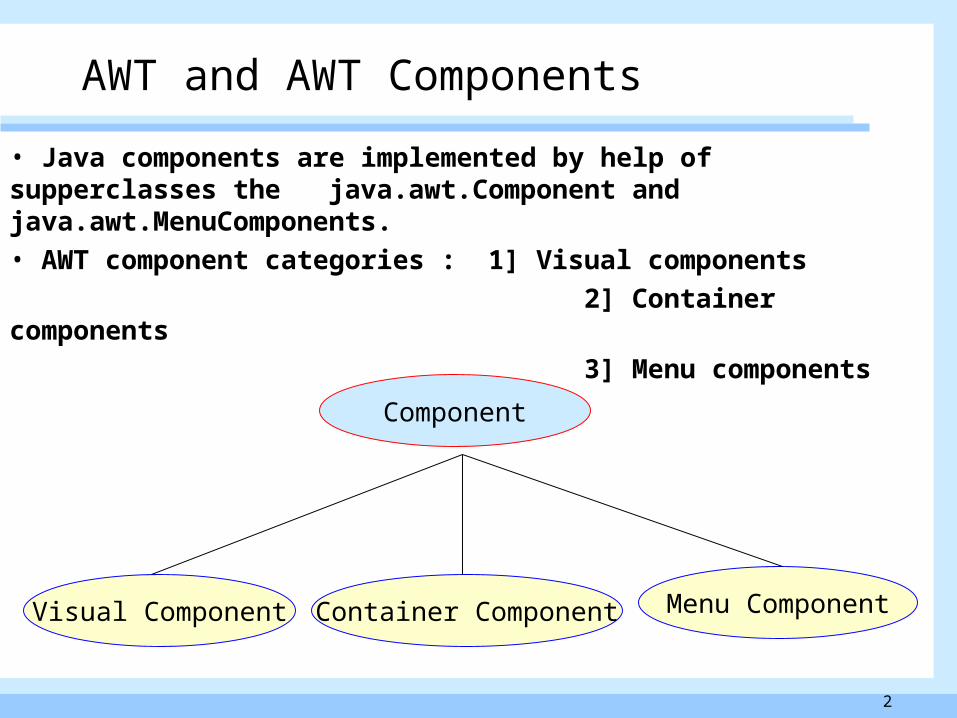
• Java components are implemented by help of supperclasses the java.awt.Component and java.awt.MenuComponents. • AWT component categories : 1] Visual components
2] Container components
3] Menu components
Component
Visual Component Container Component Menu Component
3
AWT and AWT Components
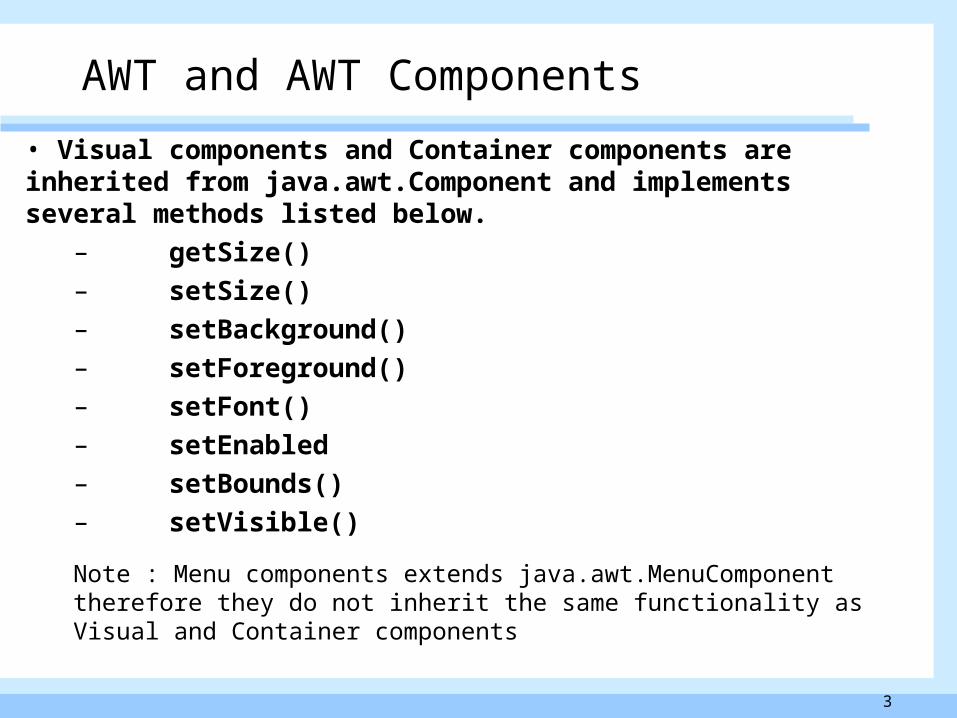
• Visual components and Container components are inherited from java.awt.Component and implements several methods listed below.
– getSize()– setSize()– setBackground()– setForeground()– setFont()– setEnabled– setBounds()– setVisible()
Note : Menu components extends java.awt.MenuComponent therefore they do not inherit the same functionality as Visual and Container components

4
AWT and AWT Components
Screen snapshots for setEnabled method Button
button.setEnabled(true);
figure 1
button.setEnabled(false);
figure 2
5
Visual Components
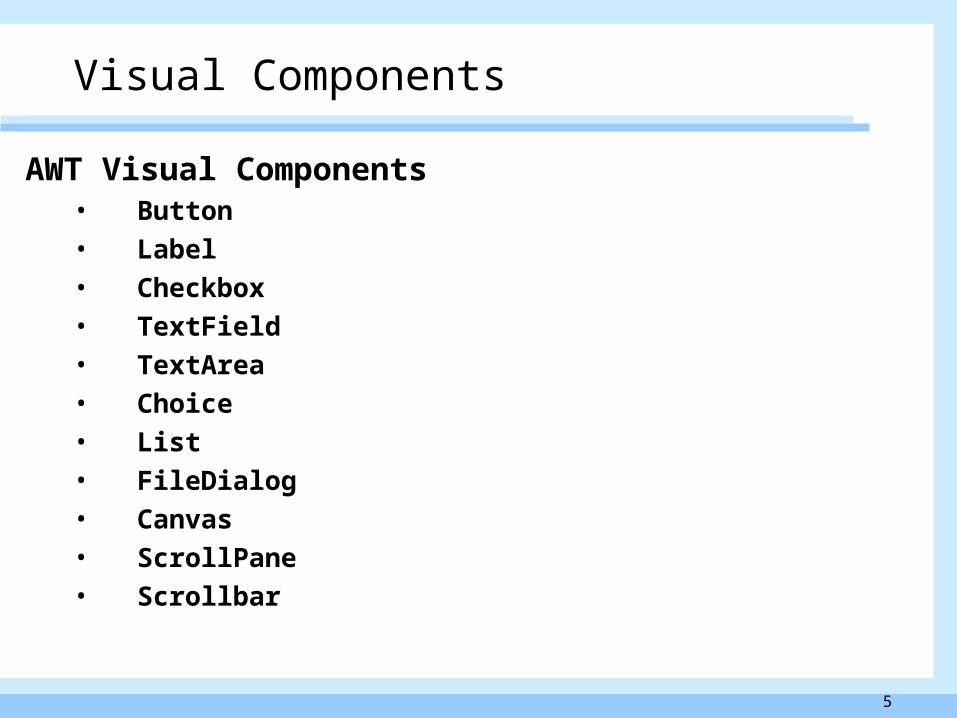
AWT Visual Components• Button• Label• Checkbox• TextField• TextArea• Choice• List• FileDialog• Canvas• ScrollPane• Scrollbar
6
Visual Components
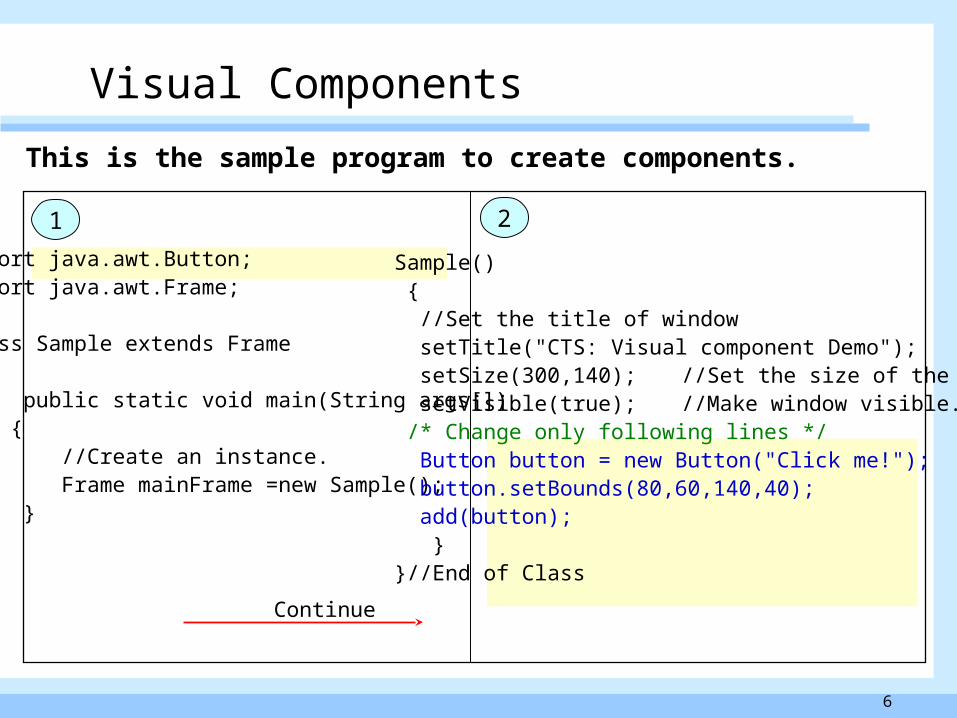
This is the sample program to create components.
import java.awt.Button;import java.awt.Frame;
class Sample extends Frame{ public static void main(String args[]) { //Create an instance. Frame mainFrame =new Sample(); }
Sample() { //Set the title of window setTitle("CTS: Visual component Demo"); setSize(300,140); //Set the size of the frame. setVisible(true); //Make window visible. /* Change only following lines */ Button button = new Button("Click me!"); button.setBounds(80,60,140,40); add(button); } }//End of Class
Continue
1 2

7
Button • The button class implements push button
Button button = new Button("Click me!");
• Constructor :
public Button()
public Button(String label)
Visual Components
8
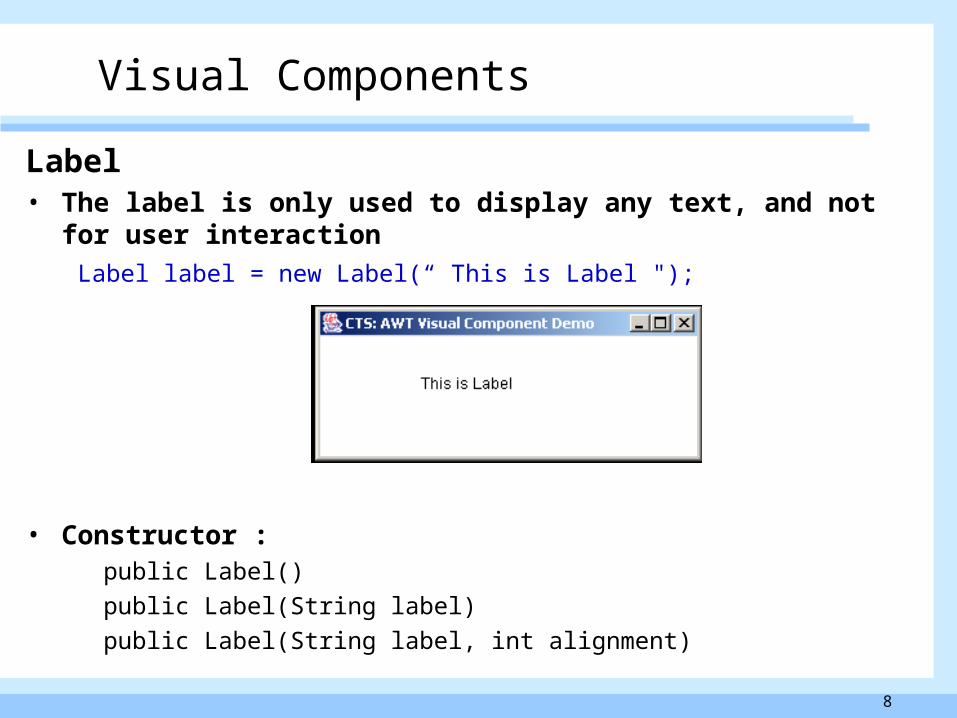
Label• The label is only used to display any text, and not for user
interaction
Label label = new Label(“ This is Label ");
• Constructor : public Label()
public Label(String label)
public Label(String label, int alignment)
Visual Components
9
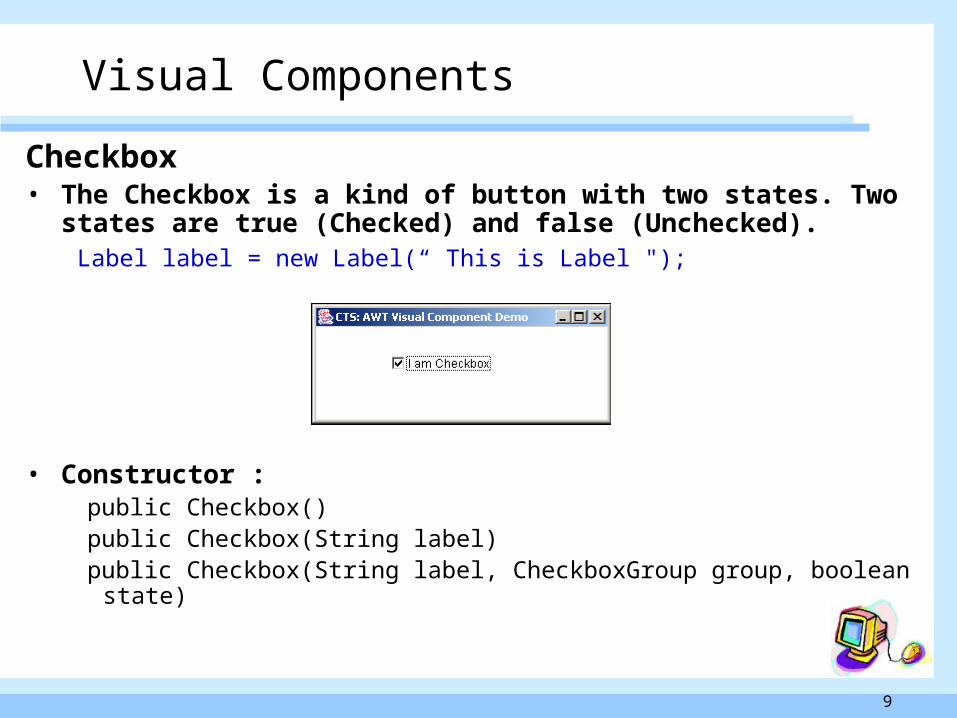
Checkbox• The Checkbox is a kind of button with two states. Two states are
true (Checked) and false (Unchecked). Label label = new Label(“ This is Label ");
• Constructor : public Checkbox() public Checkbox(String label) public Checkbox(String label, CheckboxGroup group, boolean state)
Visual Components

10
TextField• The TextField is used to accept text from user
TextField textfield = new TextField (“ Input here");
• Constructor : public TextField()
public TextField(int cols)
public TextField(String text)
public TextField(String text, int cols)
Visual Components
11
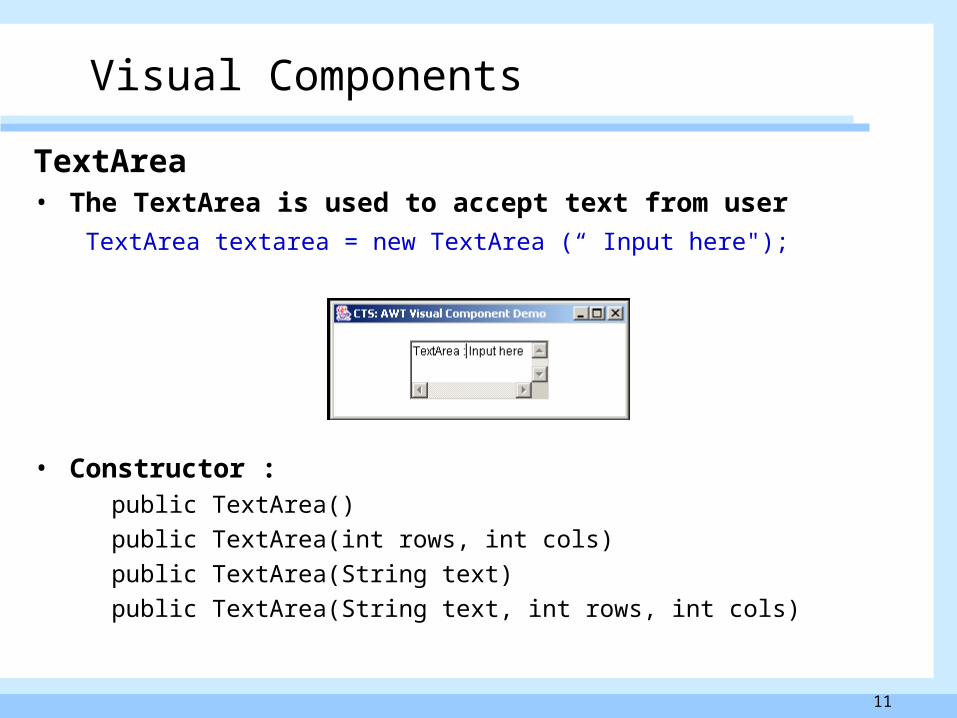
TextArea• The TextArea is used to accept text from user
TextArea textarea = new TextArea (“ Input here");
• Constructor : public TextArea()
public TextArea(int rows, int cols)
public TextArea(String text)
public TextArea(String text, int rows, int cols)
Visual Components
12
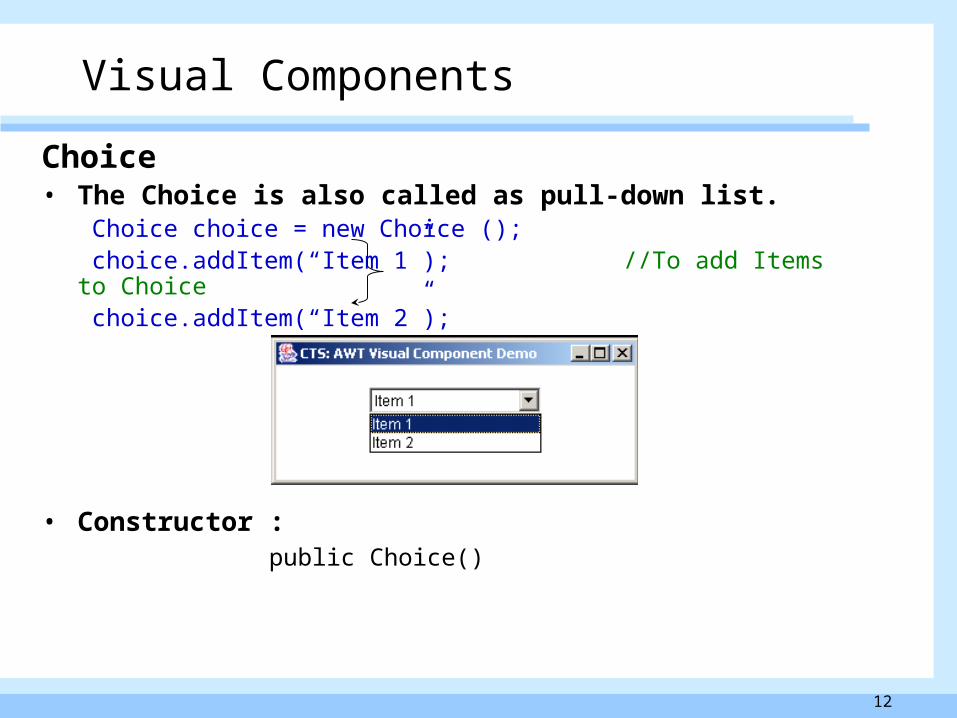
Choice• The Choice is also called as pull-down list.
Choice choice = new Choice (); choice.addItem(“Item 1”); //To add Items to Choice choice.addItem(“Item 2”);
• Constructor : public Choice()
Visual Components

13
List• The List is a collection of text items. List can be used for single
selection or multi selection
List list = new List();
list.add(“List Item 1”);
list.add(“List Item 2”);
• Constructor : public List()
public List(int rows)
public List(int rows, boolean isMultipleSelections)
Visual Components
14
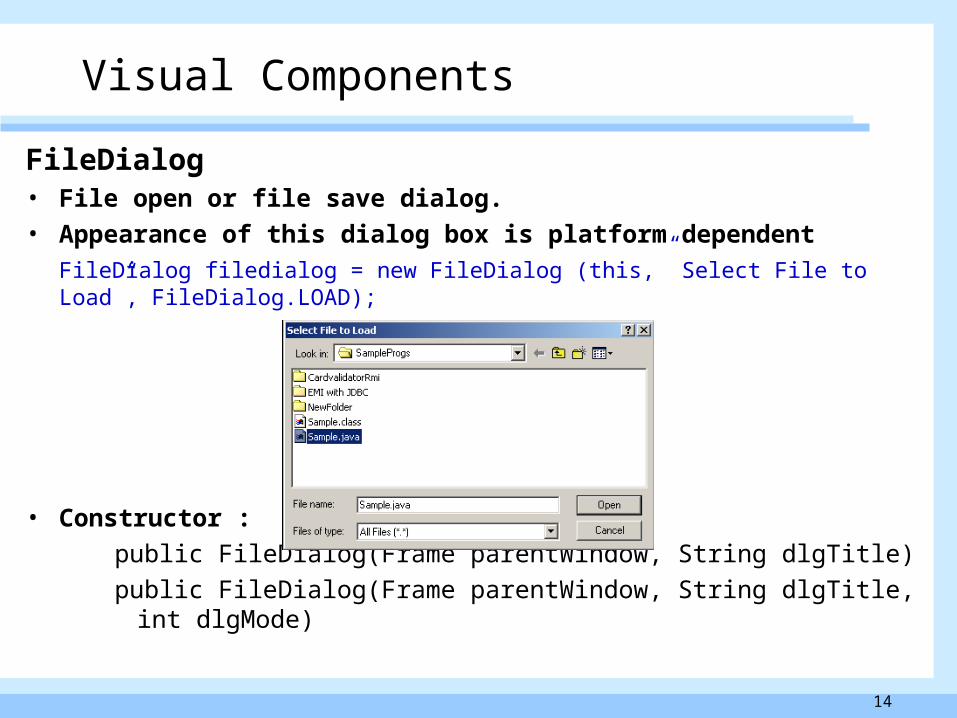
FileDialog• File open or file save dialog.• Appearance of this dialog box is platform dependent
FileDialog filedialog = new FileDialog (this,” Select File to Load”, FileDialog.LOAD);
• Constructor :
public FileDialog(Frame parentWindow, String dlgTitle)
public FileDialog(Frame parentWindow, String dlgTitle, int dlgMode)
Visual Components
15
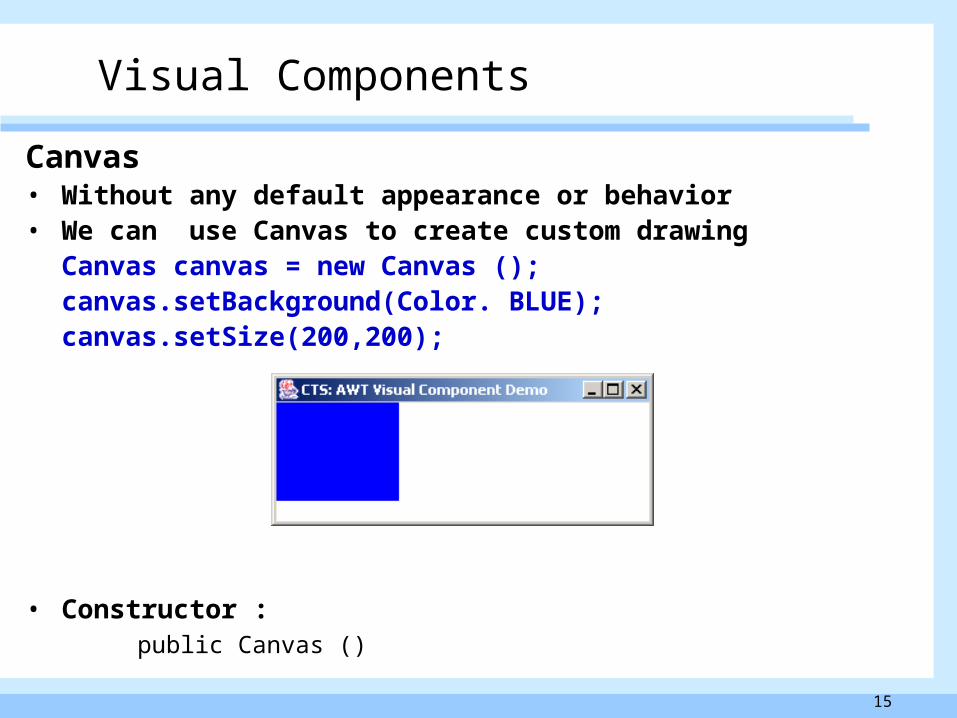
Canvas• Without any default appearance or behavior• We can use Canvas to create custom drawing
Canvas canvas = new Canvas ();canvas.setBackground(Color. BLUE);canvas.setSize(200,200);
• Constructor : public Canvas ()
Visual Components
16
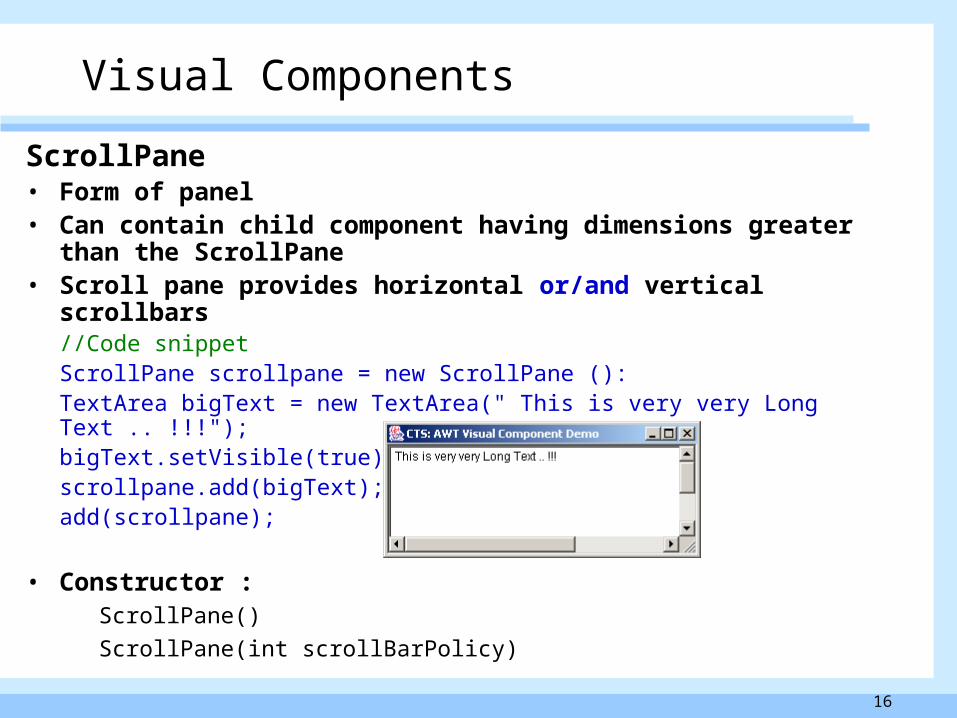
ScrollPane• Form of panel• Can contain child component having dimensions greater than the
ScrollPane • Scroll pane provides horizontal or/and vertical scrollbars
//Code snippet ScrollPane scrollpane = new ScrollPane ():TextArea bigText = new TextArea(" This is very very Long Text .. !!!");bigText.setVisible(true);scrollpane.add(bigText);add(scrollpane);
• Constructor : ScrollPane()
ScrollPane(int scrollBarPolicy)
Visual Components
17
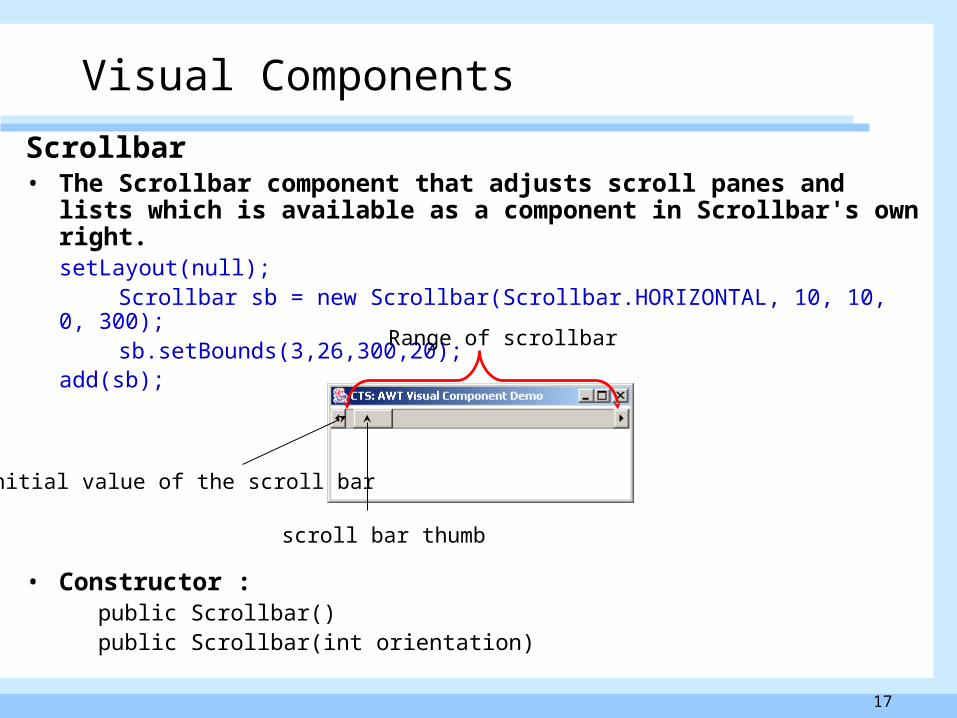
Scrollbar• The Scrollbar component that adjusts scroll panes and lists which
is available as a component in Scrollbar's own right. setLayout(null);
Scrollbar sb = new Scrollbar(Scrollbar.HORIZONTAL, 10, 10, 0, 300); sb.setBounds(3,26,300,20);
add(sb);
• Constructor : public Scrollbar()
public Scrollbar(int orientation)
initial value of the scroll bar
scroll bar thumb
Range of scrollbar
Visual Components

18
Container Components
AWT Container Components • Applet • Frame• Panel• Dialog
19
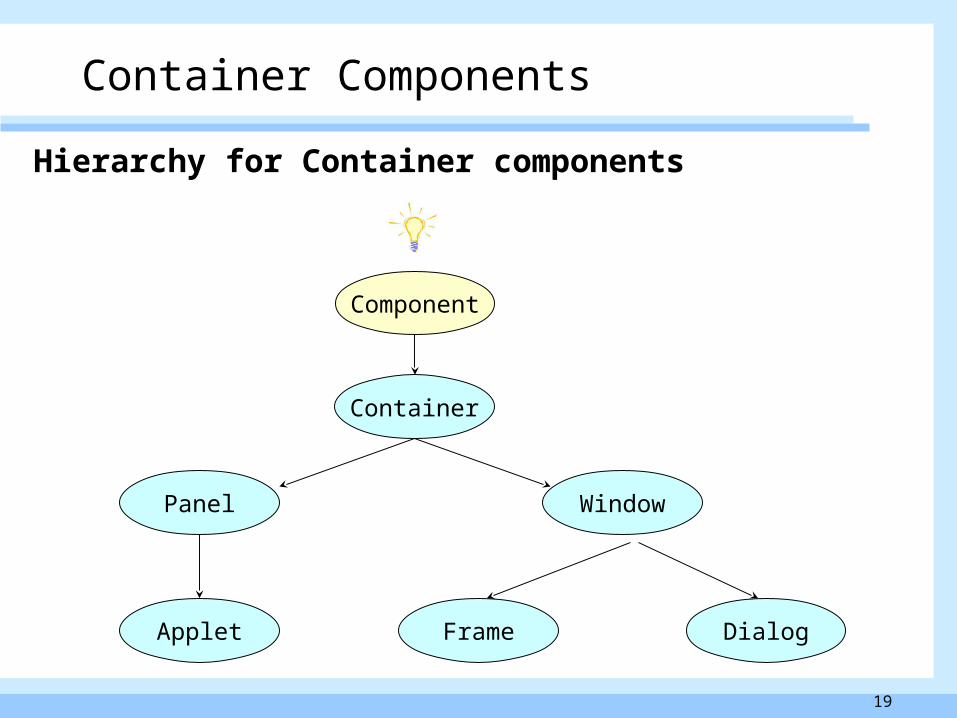
Container Components
Hierarchy for Container components
Container
Component
Dialog
WindowPanel
FrameApplet
20
Applet • Applets are Java programs that are integrated in Web pages.• Every applet is implemented by creating a subclass of the Applet
class.• Import java.applet.*;
• Java.applet package contains - 1 class : Applet
- 3 interfaces : AppletContext, AppletStub, and AudioClip
Container Components
21
Rules for Applet / Restriction on Applet :
• Applet can not execute any program on local machine• Applet can not access any file on local machine• Applet can not open socket connection to any one other than
from where it is down loaded• If any Applet opens any new window then that window gives
warning and message box
Container Components
22
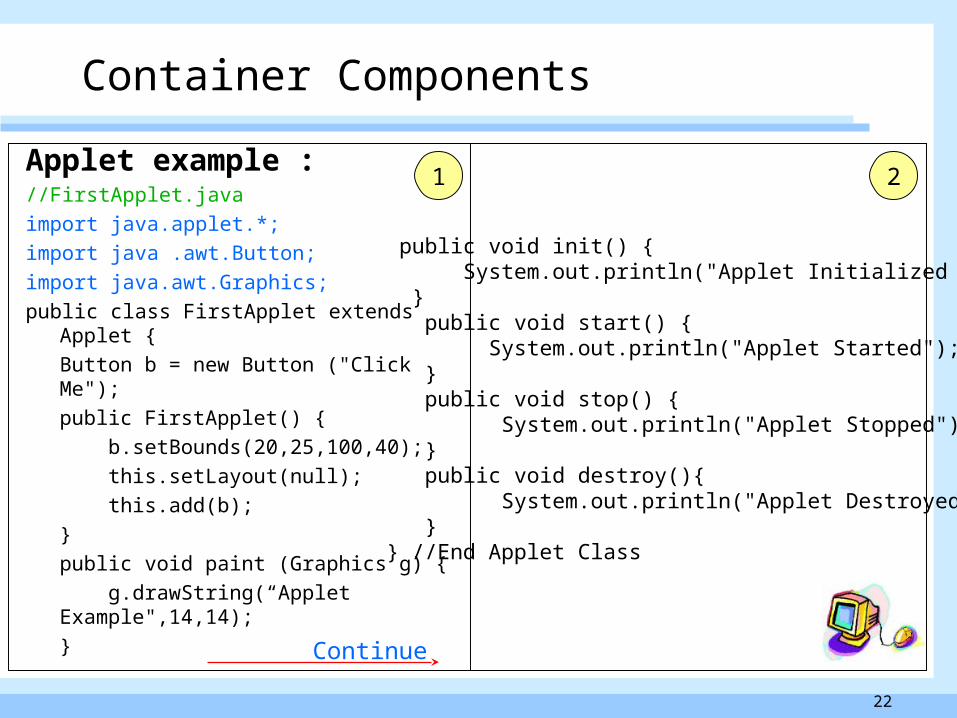
Applet example : //FirstApplet.java
import java.applet.*;
import java .awt.Button;
import java.awt.Graphics;
public class FirstApplet extends Applet {
Button b = new Button ("Click Me");
public FirstApplet() {
b.setBounds(20,25,100,40);
this.setLayout(null);
this.add(b);
}
public void paint (Graphics g) {
g.drawString(“Applet Example",14,14);
}
public void init() { System.out.println("Applet Initialized "); } public void start() { System.out.println("Applet Started"); } public void stop() { System.out.println("Applet Stopped"); } public void destroy(){ System.out.println("Applet Destroyed"); }} //End Applet Class
1 2
Continue
Container Components
23
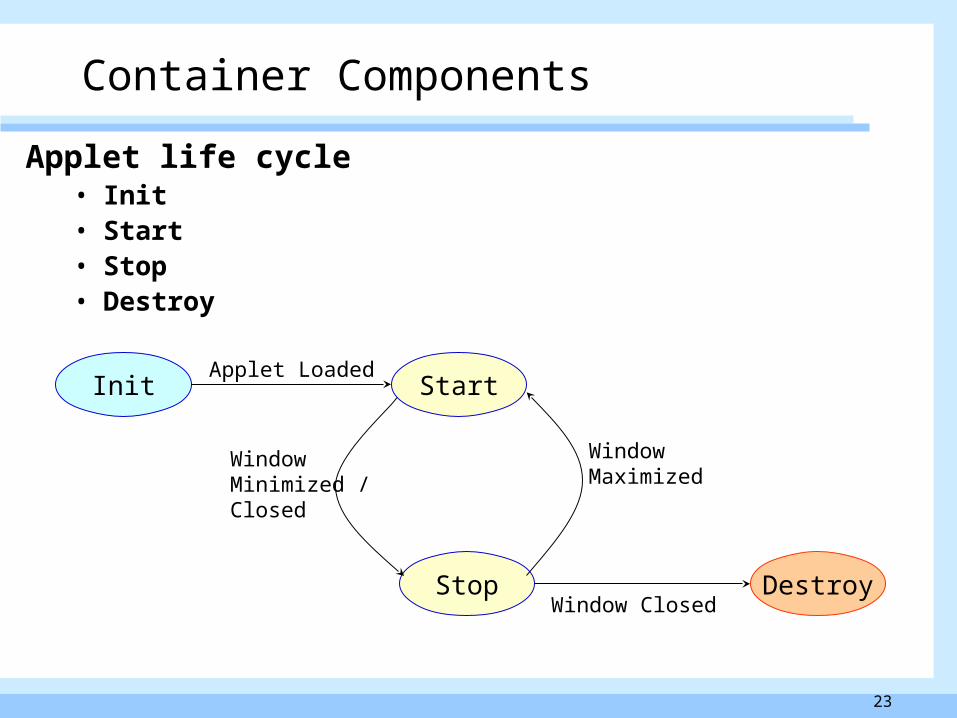
Applet life cycle • Init• Start• Stop• Destroy
Init
Stop Destroy
StartApplet Loaded
Window Closed
Window Minimized /Closed
Window Maximized
Container Components
24
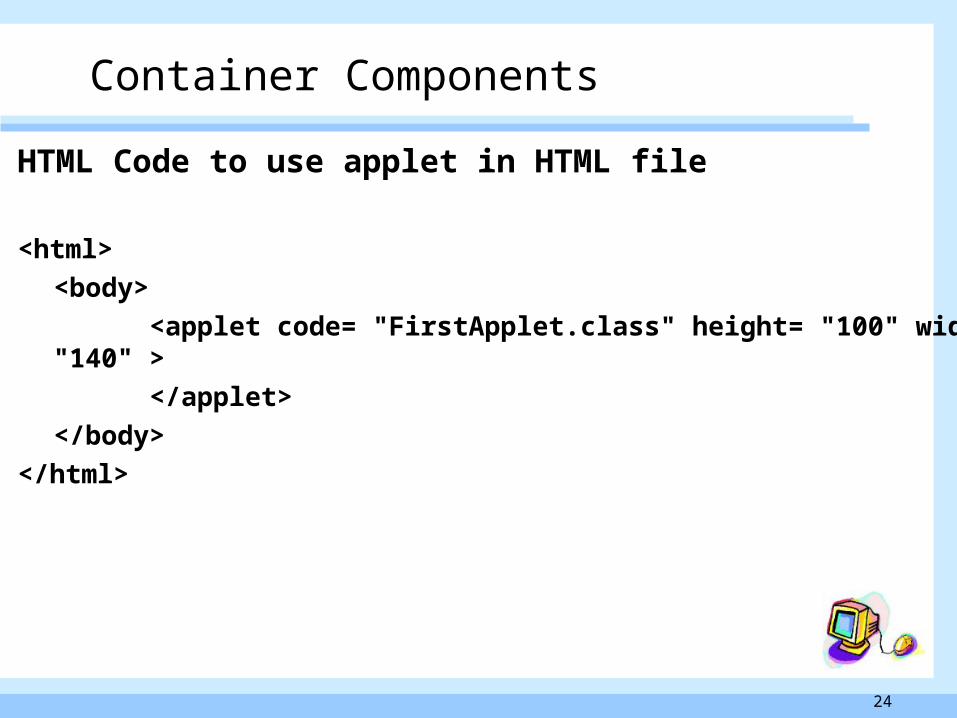
HTML Code to use applet in HTML file
<html>
<body>
<applet code= "FirstApplet.class" height= "100" width = "140" >
</applet>
</body>
</html>
Container Components
25
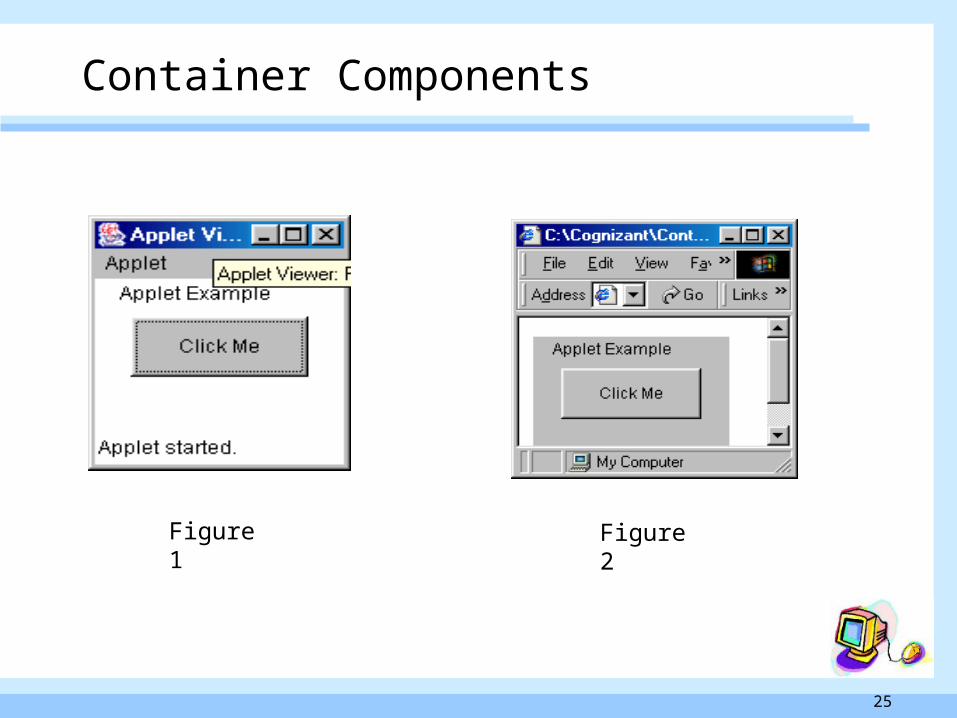
Figure 1 Figure 2
Container Components
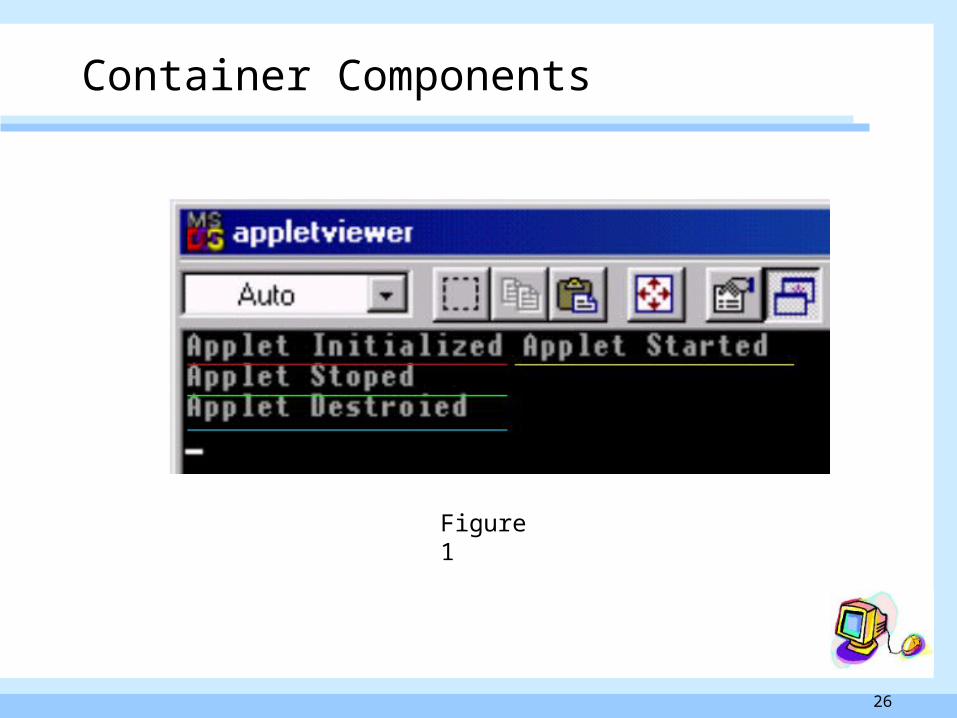
26
Figure 1
Container Components
27
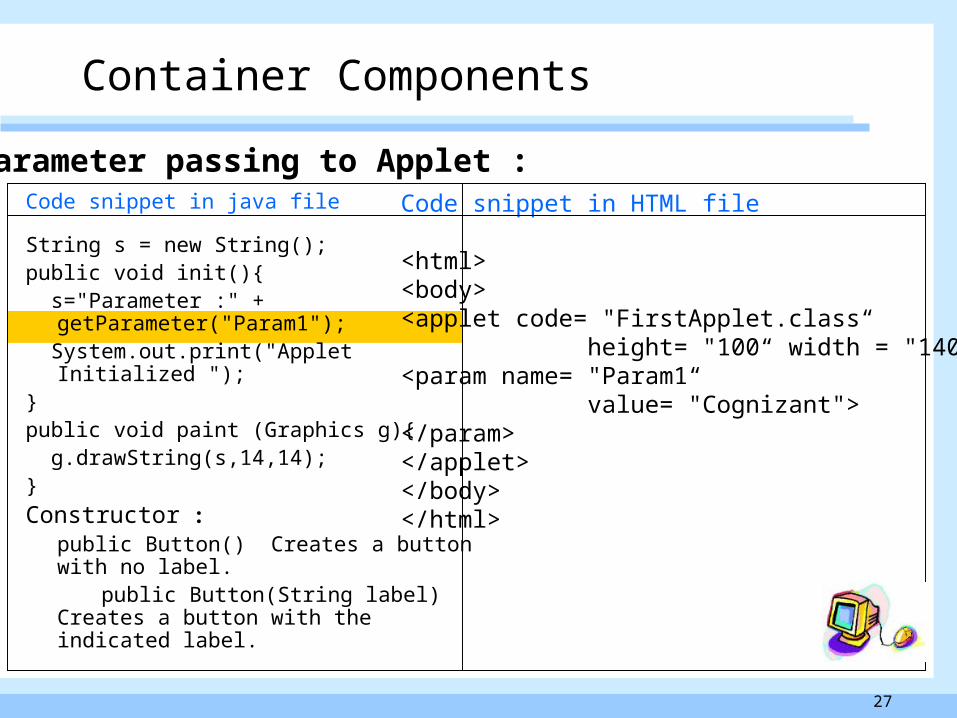
Code snippet in java file
String s = new String();public void init(){ s="Parameter :" +
getParameter("Param1"); System.out.print("Applet Initialized ");}public void paint (Graphics g){ g.drawString(s,14,14);}
Constructor : public Button() Creates a button with no label.
public Button(String label) Creates a button with the indicated label.
Code snippet in HTML file
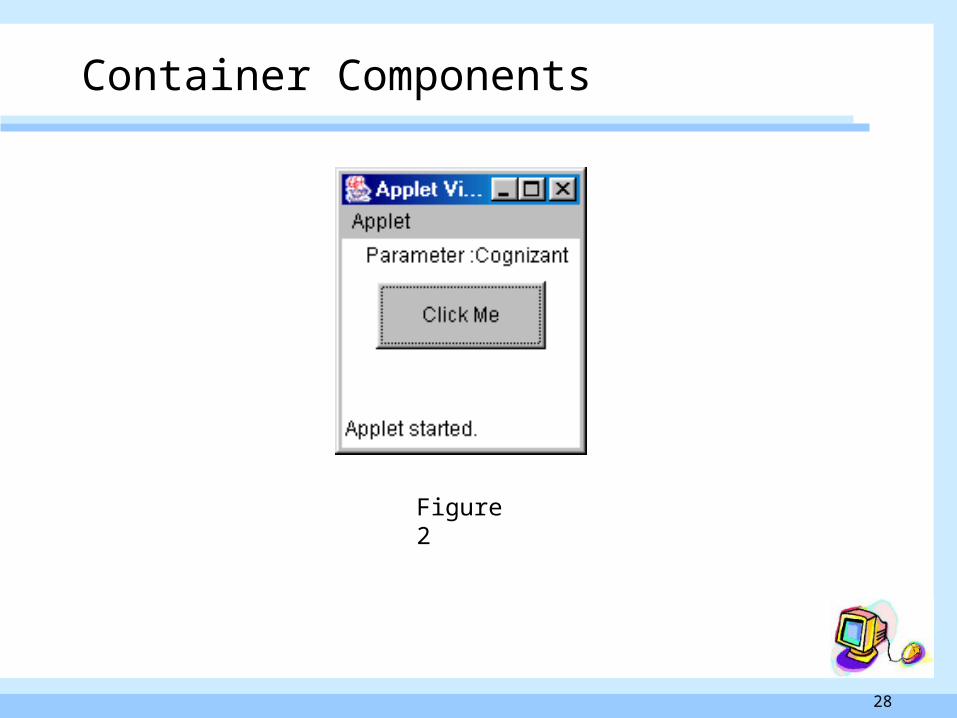
<html><body><applet code= "FirstApplet.class“ height= "100“ width = "140" ><param name= "Param1“ value= "Cognizant"></param></applet></body></html>
Container Components
Parameter passing to Applet :
28
Figure 2
Container Components
29
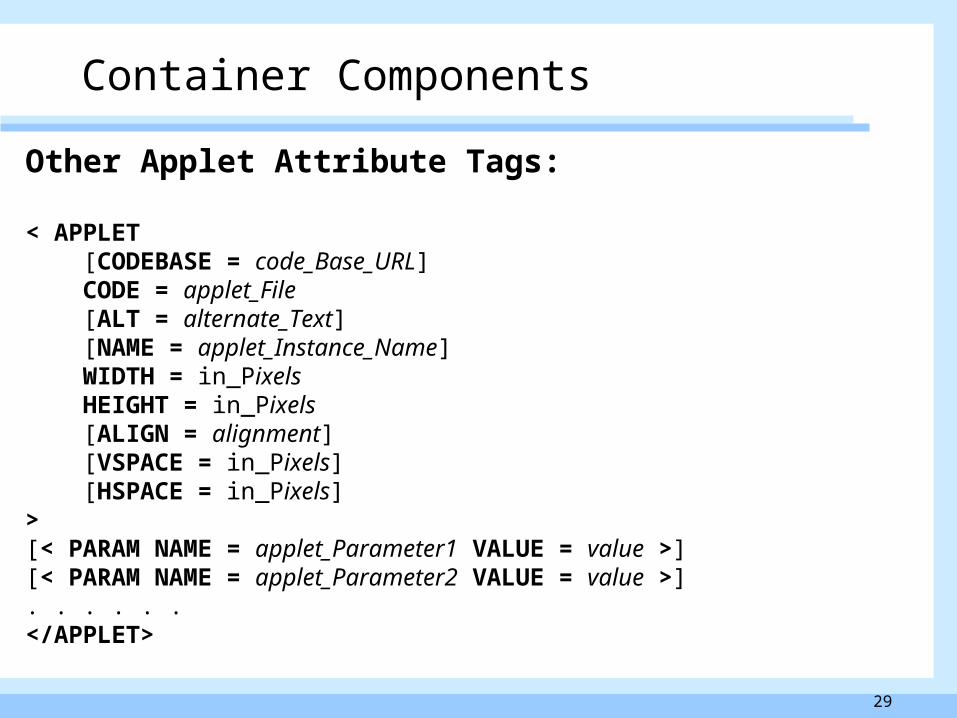
Other Applet Attribute Tags:
< APPLET [CODEBASE = code_Base_URL] CODE = applet_File [ALT = alternate_Text] [NAME = applet_Instance_Name] WIDTH = in_Pixels HEIGHT = in_Pixels [ALIGN = alignment] [VSPACE = in_Pixels] [HSPACE = in_Pixels]>[< PARAM NAME = applet_Parameter1 VALUE = value >][< PARAM NAME = applet_Parameter2 VALUE = value >]. . . . . .</APPLET>
Container Components
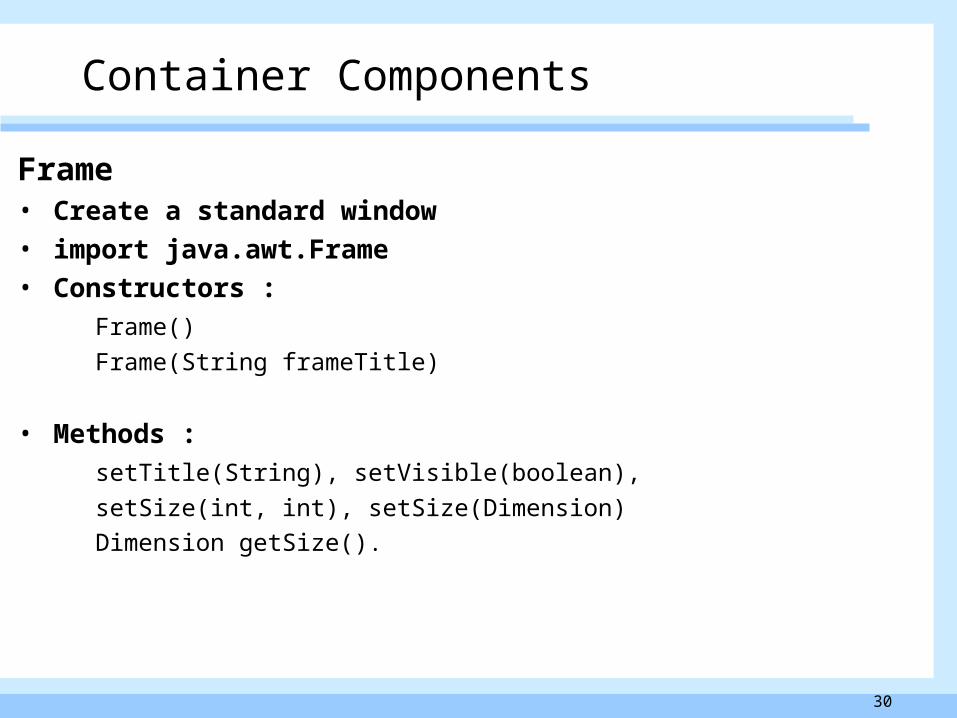
30
Frame • Create a standard window• import java.awt.Frame • Constructors :
Frame()
Frame(String frameTitle)
• Methods :
setTitle(String), setVisible(boolean),
setSize(int, int), setSize(Dimension)
Dimension getSize().
Container Components
31
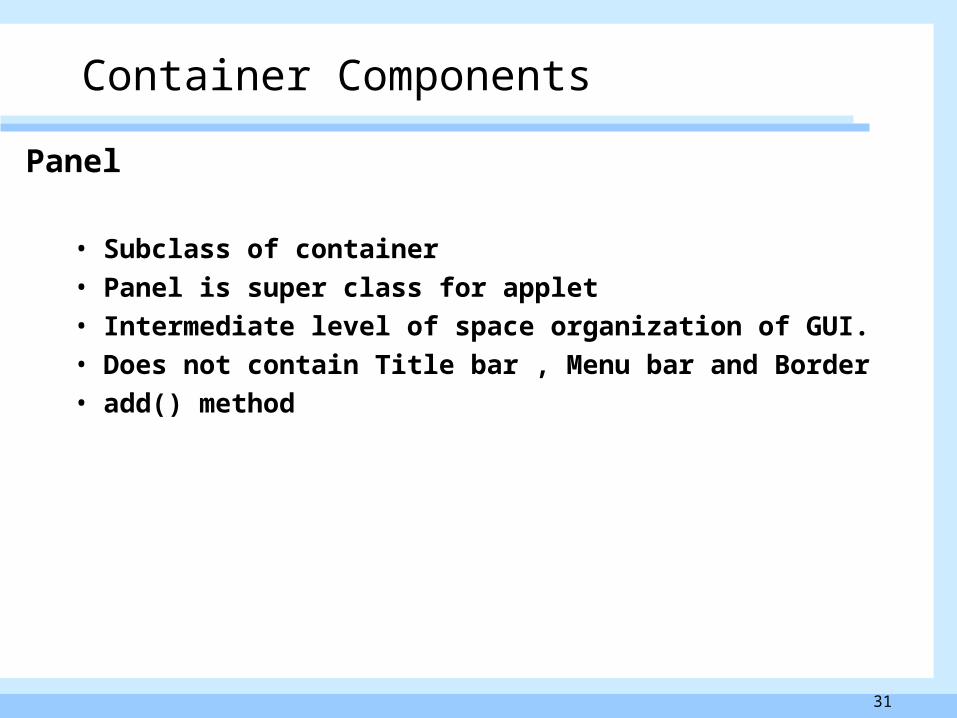
Panel
• Subclass of container• Panel is super class for applet• Intermediate level of space organization of GUI.• Does not contain Title bar , Menu bar and Border• add() method
Container Components
32
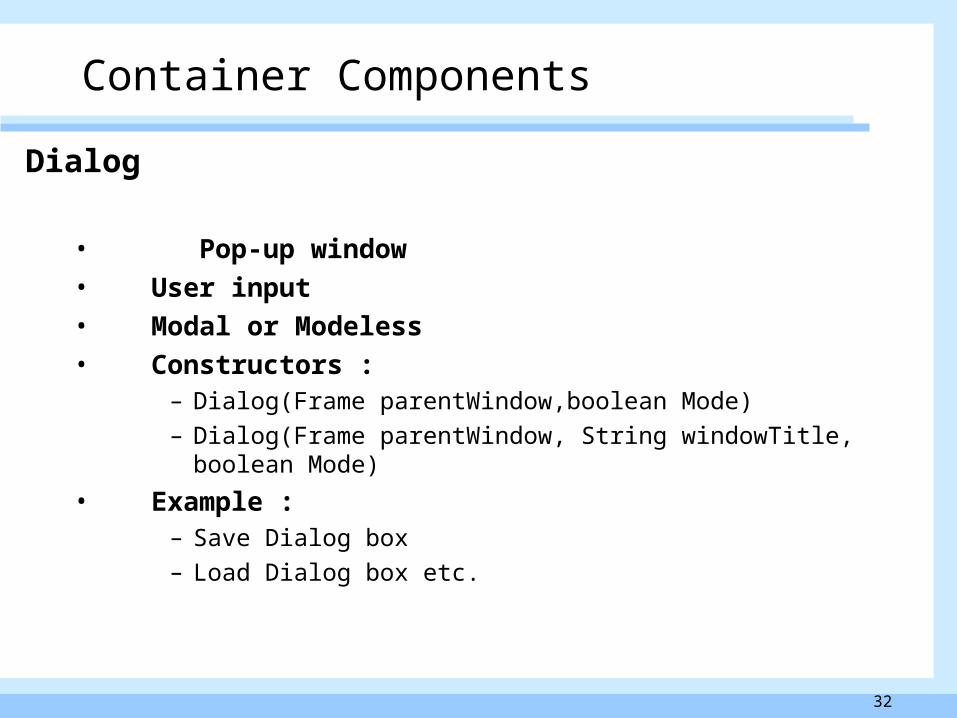
Dialog
• Pop-up window• User input• Modal or Modeless• Constructors :
– Dialog(Frame parentWindow,boolean Mode)
– Dialog(Frame parentWindow, String windowTitle, boolean Mode)
• Example : – Save Dialog box
– Load Dialog box etc.
Container Components

33
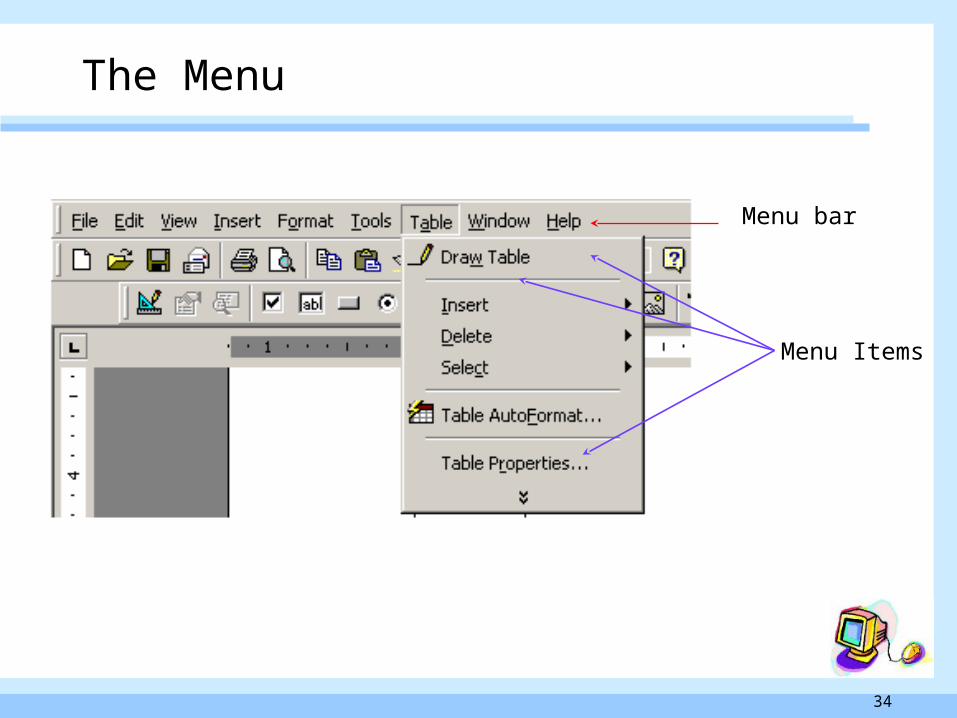
The Menu
Menus • Pull-down menus
– Tear-off menu.
• Pop-up menus• Classes used
– Menu Class– MenuBar Class– MenuComponet Class– MenuItem Class
Note : Menu can only be set to Frame
34
The Menu
Menu bar
Menu Items
35
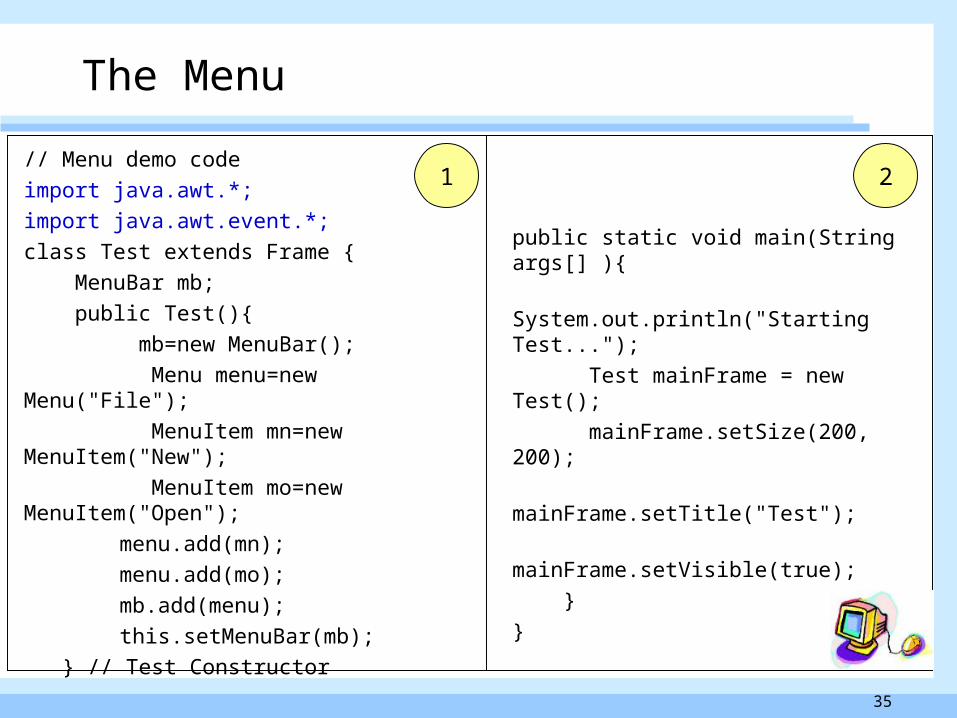
// Menu demo code
import java.awt.*;
import java.awt.event.*;
class Test extends Frame {
MenuBar mb;
public Test(){
mb=new MenuBar();
Menu menu=new Menu("File");
MenuItem mn=new MenuItem("New");
MenuItem mo=new MenuItem("Open");
menu.add(mn);
menu.add(mo);
mb.add(menu);
this.setMenuBar(mb);
} // Test Constructor
public static void main(String args[] ){
System.out.println("Starting Test...");
Test mainFrame = new Test();
mainFrame.setSize(200, 200);
mainFrame.setTitle("Test");
mainFrame.setVisible(true);
}
}
1 2
The Menu
36
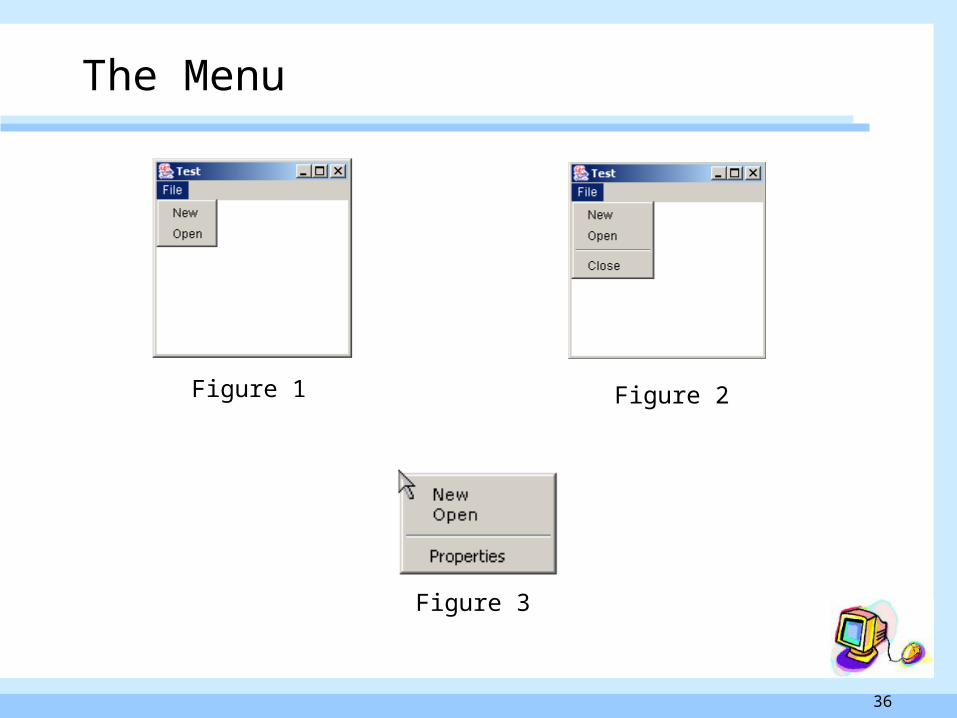
Figure 1 Figure 2
Figure 3
The Menu
37
• A PopupMenu class implements a menu which can be dynamically popped up at a specified position within a component.
• public class PopupMenu extends Menu
• As the inheritance hierarchy suggests, a PopupMenu can be used anywhere a Menu can be used. However, if you use a PopupMenu like a Menu (e.g., We add it to a MenuBar), then you can not call show on that PopupMenu.
• We can show Popup Menu to specified location using show() method
• void show(Component origin, int x, int y) Shows the popup menu at the x, y position relative to an origin component.
The Menu
38
Utility classes
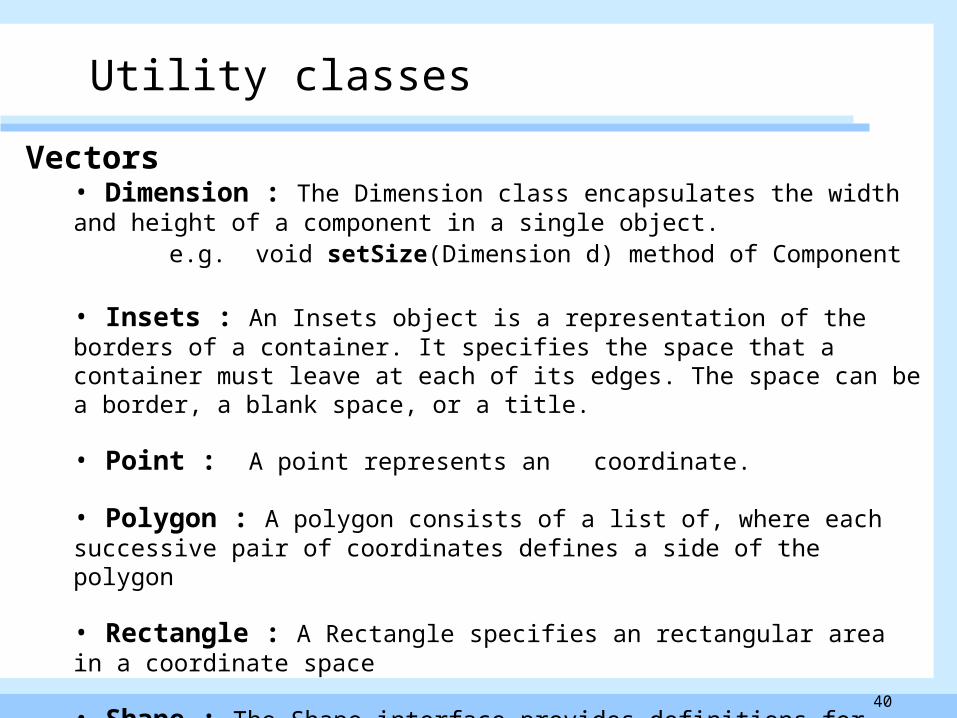
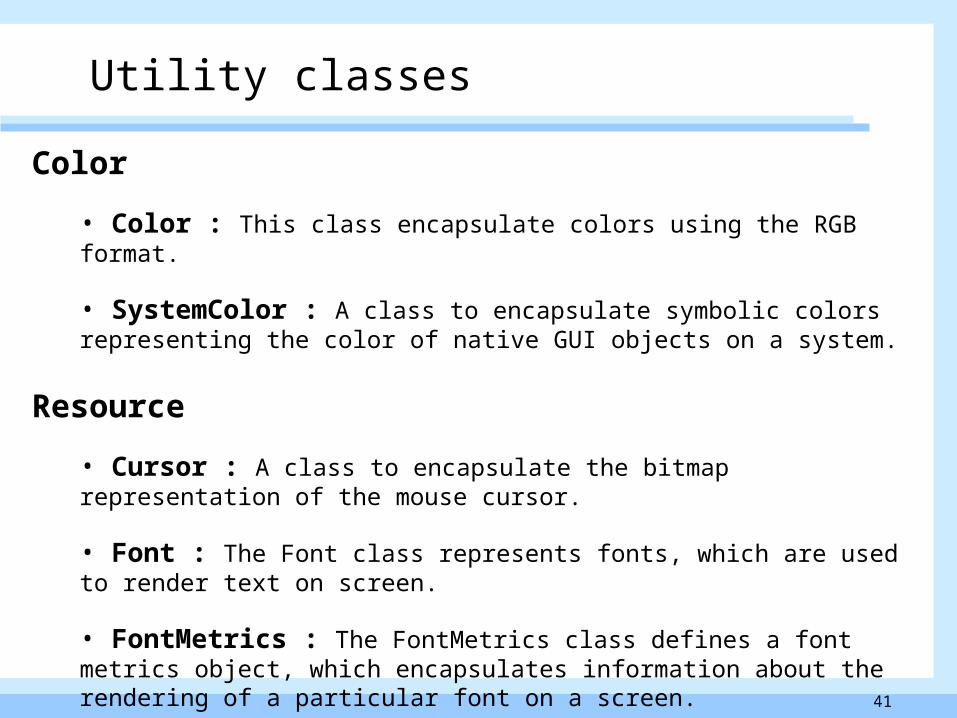
Vectors•Dimension•Insets•Point•Polygon•Rectangle•Shape
Color•Color•SystemColor
39
Utility classes
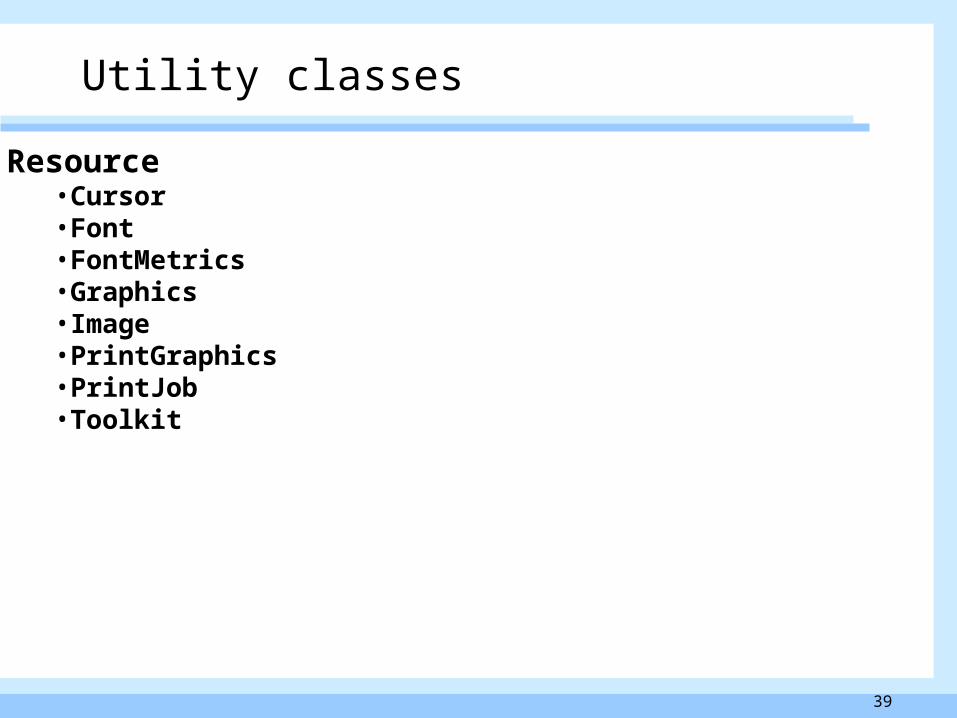
Resource•Cursor•Font•FontMetrics•Graphics•Image•PrintGraphics•PrintJob•Toolkit
40
Vectors• Dimension : The Dimension class encapsulates the width and height of a component in a single object.
e.g. void setSize(Dimension d) method of Component
• Insets : An Insets object is a representation of the borders of a container. It specifies the space that a container must leave at each of its edges. The space can be a border, a blank space, or a title.
• Point : A point represents an coordinate.
• Polygon : A polygon consists of a list of, where each successive pair of coordinates defines a side of the polygon
• Rectangle : A Rectangle specifies an rectangular area in a coordinate space
• Shape : The Shape interface provides definitions for form of geometric shape.
Utility classes
41
Color
• Color : This class encapsulate colors using the RGB format.
• SystemColor : A class to encapsulate symbolic colors representing the color of native GUI objects on a system.
Resource
• Cursor : A class to encapsulate the bitmap representation of the mouse cursor.
• Font : The Font class represents fonts, which are used to render text on screen.
• FontMetrics : The FontMetrics class defines a font metrics object, which encapsulates information about the rendering of a particular font on a screen.
Utility classes
42
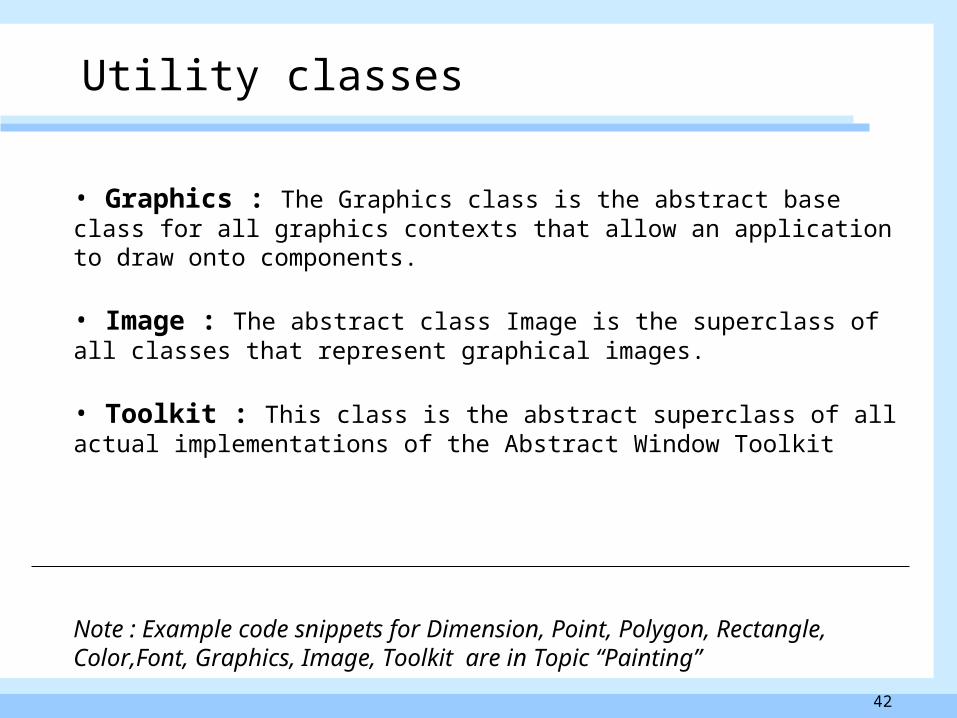
• Graphics : The Graphics class is the abstract base class for all graphics contexts that allow an application to draw onto components.
• Image : The abstract class Image is the superclass of all classes that represent graphical images.
• Toolkit : This class is the abstract superclass of all actual implementations of the Abstract Window Toolkit
Note : Example code snippets for Dimension, Point, Polygon, Rectangle, Color,Font, Graphics, Image, Toolkit are in Topic “Painting”
Utility classes
43
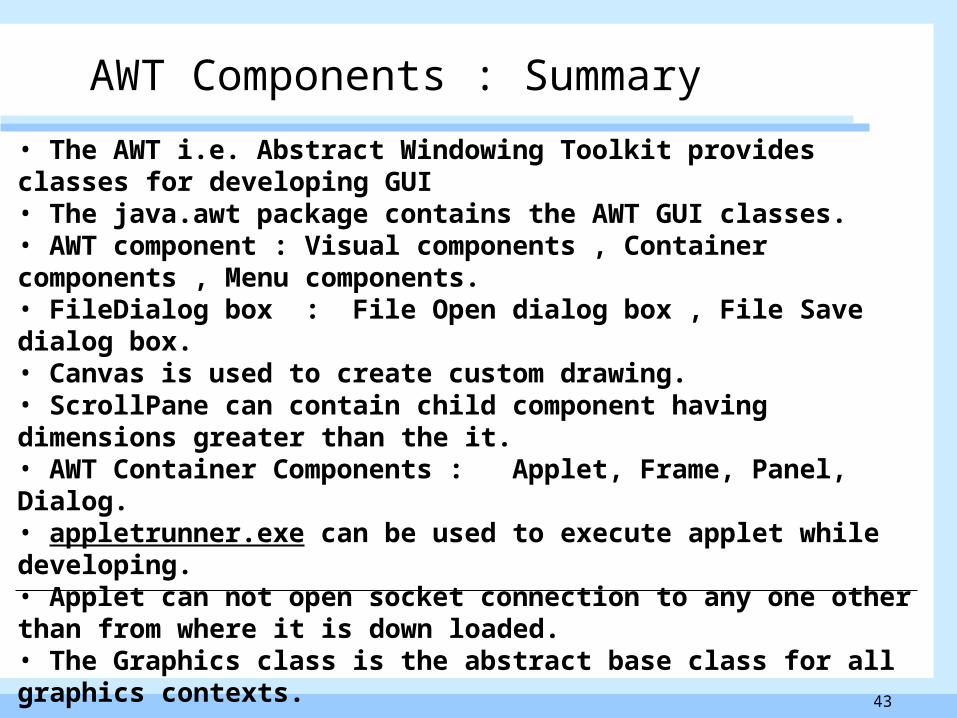
AWT Components : Summary
• The AWT i.e. Abstract Windowing Toolkit provides classes for developing GUI• The java.awt package contains the AWT GUI classes.• AWT component : Visual components , Container components , Menu components.• FileDialog box : File Open dialog box , File Save dialog box.• Canvas is used to create custom drawing.• ScrollPane can contain child component having dimensions greater than the it.• AWT Container Components : Applet, Frame, Panel, Dialog.• appletrunner.exe can be used to execute applet while developing.• Applet can not open socket connection to any one other than from where it is down loaded.• The Graphics class is the abstract base class for all graphics contexts.
Now in next Topic “Events” we will learn about how to handle user interaction with AWT components
44
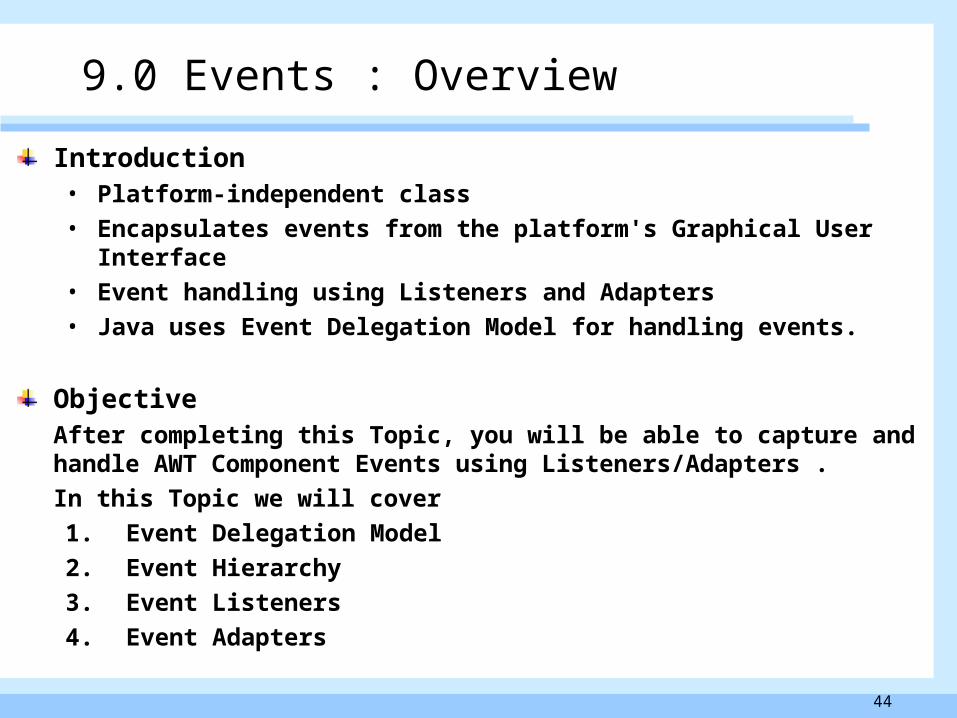
9.0 Events : Overview
Introduction• Platform-independent class
• Encapsulates events from the platform's Graphical User Interface
• Event handling using Listeners and Adapters
• Java uses Event Delegation Model for handling events.
ObjectiveAfter completing this Topic, you will be able to capture and handle AWT Component Events using Listeners/Adapters .
In this Topic we will cover
1. Event Delegation Model
2. Event Hierarchy
3. Event Listeners
4. Event Adapters
45
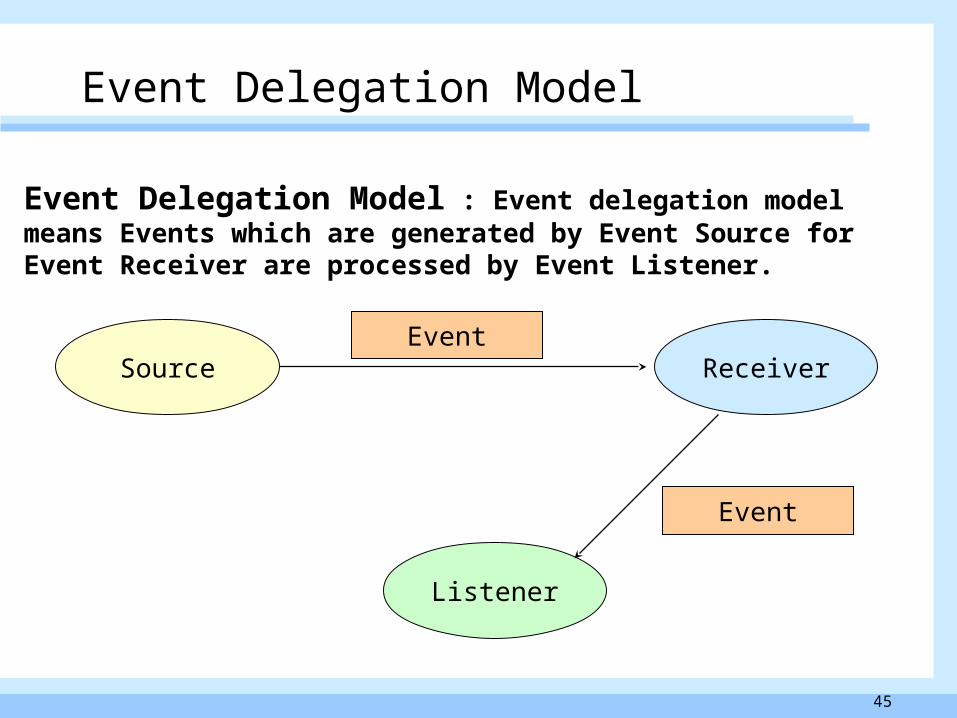
Event Delegation Model
Event Delegation Model : Event delegation model means Events which are generated by Event Source for Event Receiver are processed by Event Listener.
Source Receiver
Listener
Event
Event
46
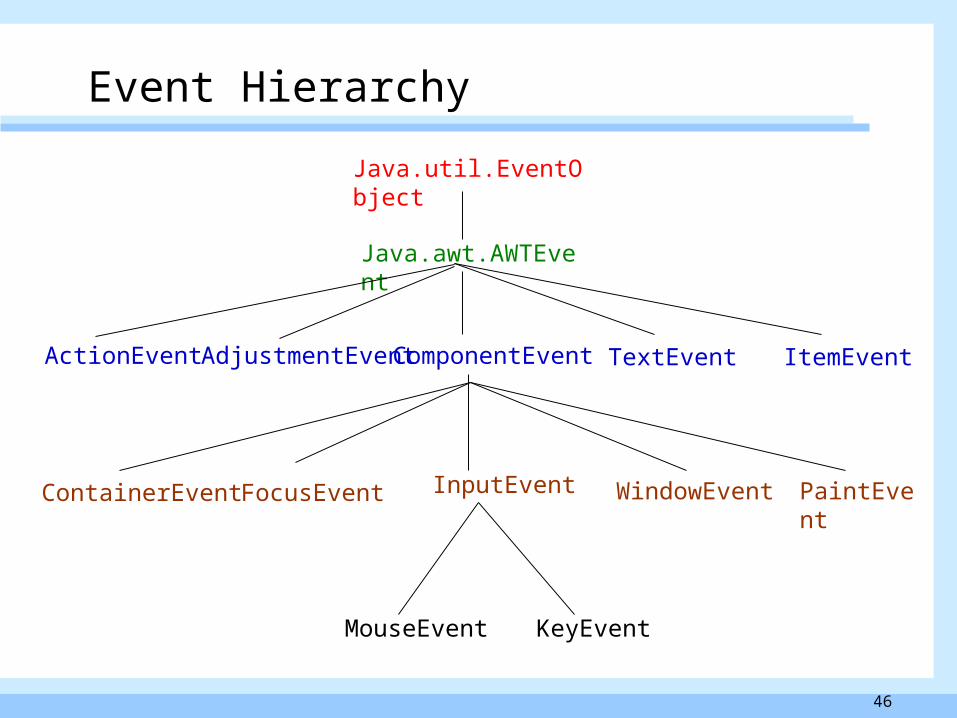
Event Hierarchy
Java.util.EventObject
Java.awt.AWTEvent
ItemEventComponentEventActionEvent AdjustmentEvent
MouseEvent KeyEvent
TextEvent
PaintEventInputEventContainerEvent FocusEvent WindowEvent
47
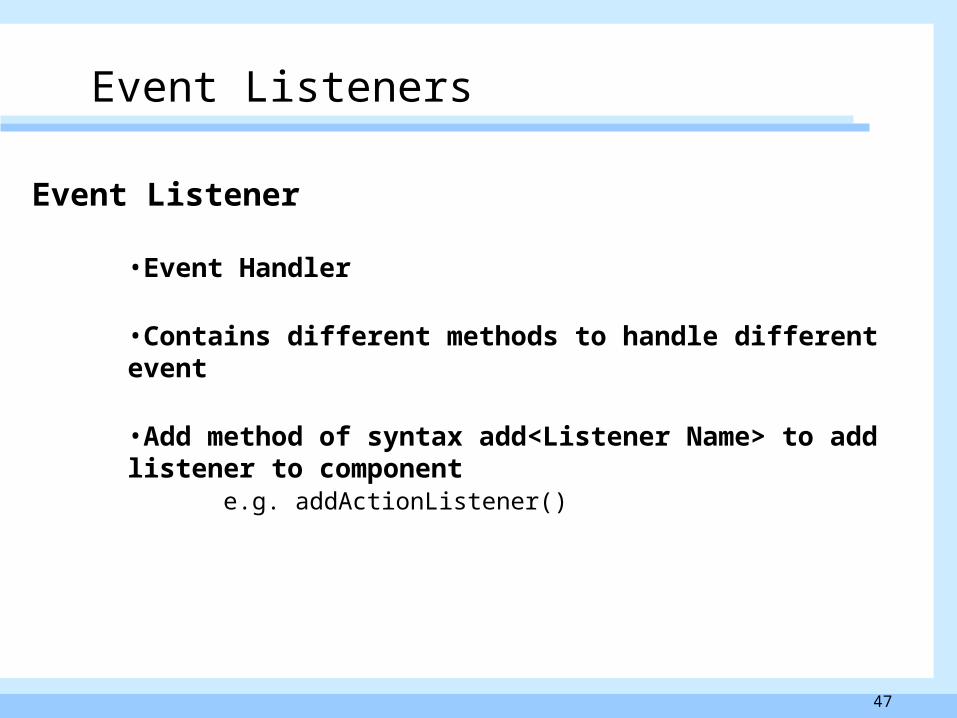
Event Listeners
Event Listener
•Event Handler
•Contains different methods to handle different event
•Add method of syntax add<Listener Name> to add listener to component
e.g. addActionListener()
48
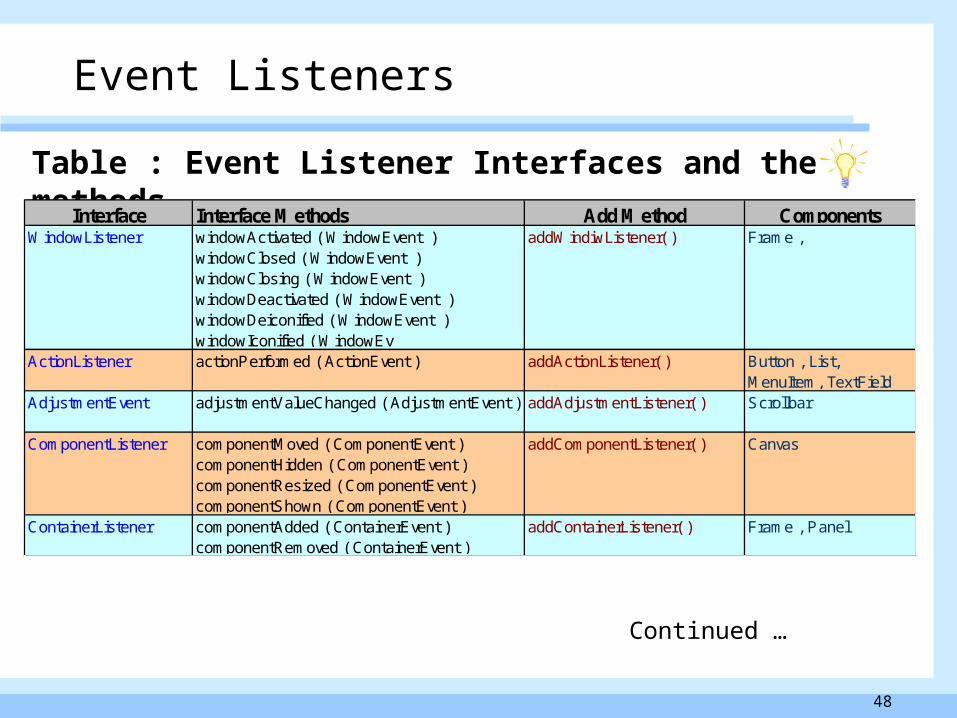
Event Listeners
Table : Event Listener Interfaces and their methods
Continued …
Interface Interface Methods Add Method ComponentsWindowListener windowActivated ( WindowEvent )
windowClosed ( WindowEvent ) windowClosing ( WindowEvent ) windowDeactivated ( WindowEvent ) windowDeiconified ( WindowEvent ) windowIconified ( WindowEv
addWindiwListener( ) Frame ,
ActionListener actionPerformed ( ActionEvent ) addActionListener( ) Button , List, MenuItem, TextField
AdjustmentEvent adjustmentValueChanged ( AdjustmentEvent ) addAdjustmentListener( ) Scrollbar
ComponentListener componentMoved ( ComponentEvent ) componentHidden ( ComponentEvent ) componentResized ( ComponentEvent ) componentShown ( ComponentEvent )
addComponentListener( ) Canvas
ContainerListener componentAdded ( ContainerEvent ) componentRemoved ( ContainerEvent )
addContainerListener( ) Frame , Panel
49
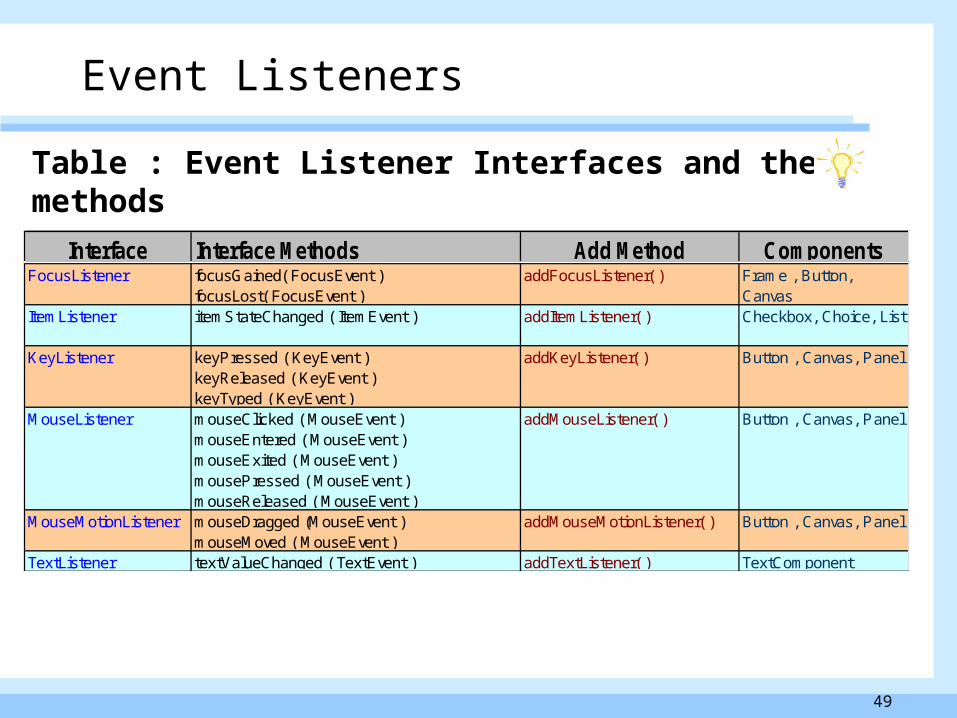
Table : Event Listener Interfaces and their methods
FocusListener focusGained( FocusEvent ) focusLost( FocusEvent )
addFocusListener( ) Frame , Button, Canvas
ItemListener itemStateChanged ( ItemEvent ) addItemListener( ) Checkbox, Choice, List
KeyListener keyPressed ( KeyEvent ) keyReleased ( KeyEvent ) keyTyped ( KeyEvent )
addKeyListener( ) Button , Canvas, Panel
MouseListener mouseClicked ( MouseEvent ) mouseEntered ( MouseEvent ) mouseExited ( MouseEvent ) mousePressed ( MouseEvent ) mouseReleased ( MouseEvent )
addMouseListener( ) Button , Canvas, Panel
MouseMotionListener mouseDragged (MouseEvent ) mouseMoved ( MouseEvent )
addMouseMotionListener( ) Button , Canvas, Panel
TextListener textValueChanged ( TextEvent ) addTextListener( ) TextComponent
Interface Interface Methods Add Method Components
Event Listeners
50
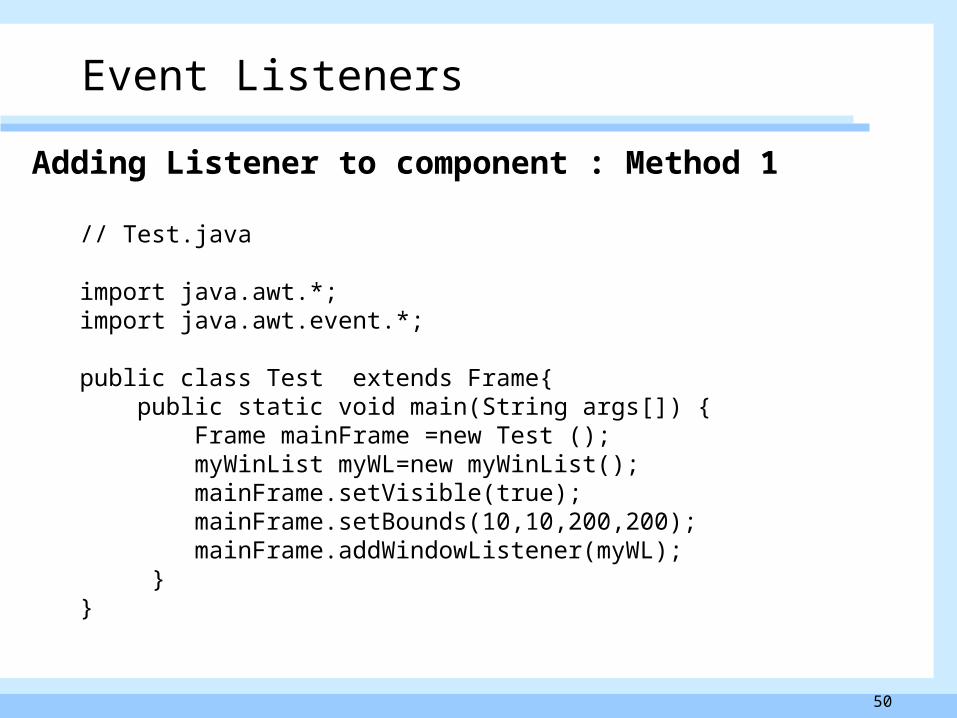
Adding Listener to component : Method 1
// Test.java
import java.awt.*;import java.awt.event.*;
public class Test extends Frame{ public static void main(String args[]) { Frame mainFrame =new Test (); myWinList myWL=new myWinList(); mainFrame.setVisible(true); mainFrame.setBounds(10,10,200,200); mainFrame.addWindowListener(myWL); }}
Event Listeners
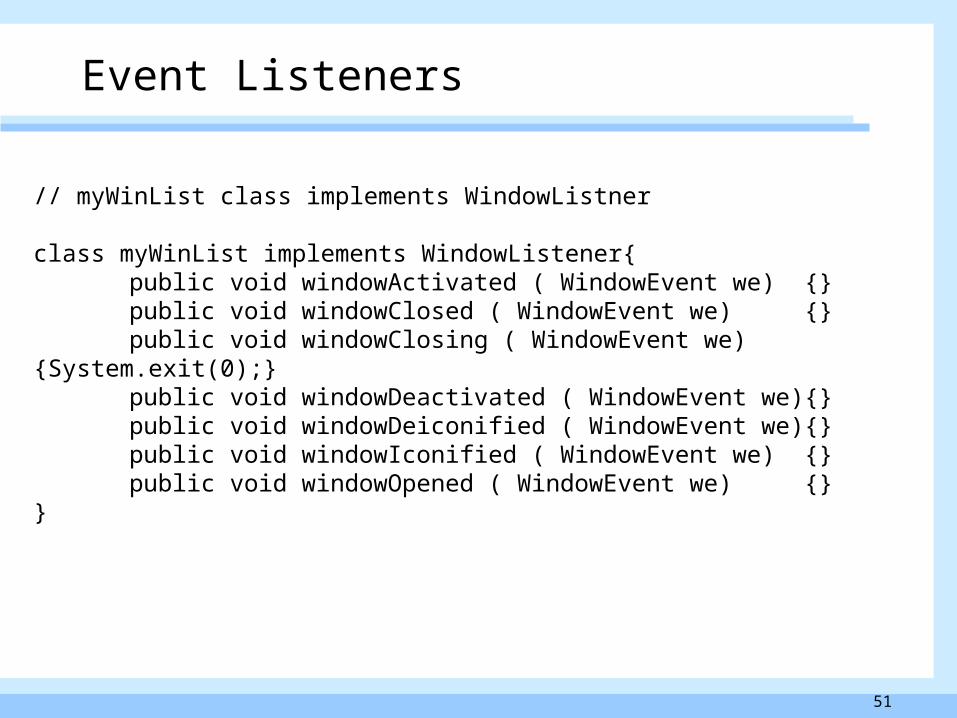
51
// myWinList class implements WindowListner
class myWinList implements WindowListener{public void windowActivated ( WindowEvent we) {}public void windowClosed ( WindowEvent we) {}public void windowClosing ( WindowEvent we) {System.exit(0);}public void windowDeactivated ( WindowEvent we){} public void windowDeiconified ( WindowEvent we){}public void windowIconified ( WindowEvent we) {} public void windowOpened ( WindowEvent we) {}
}
Event Listeners
52
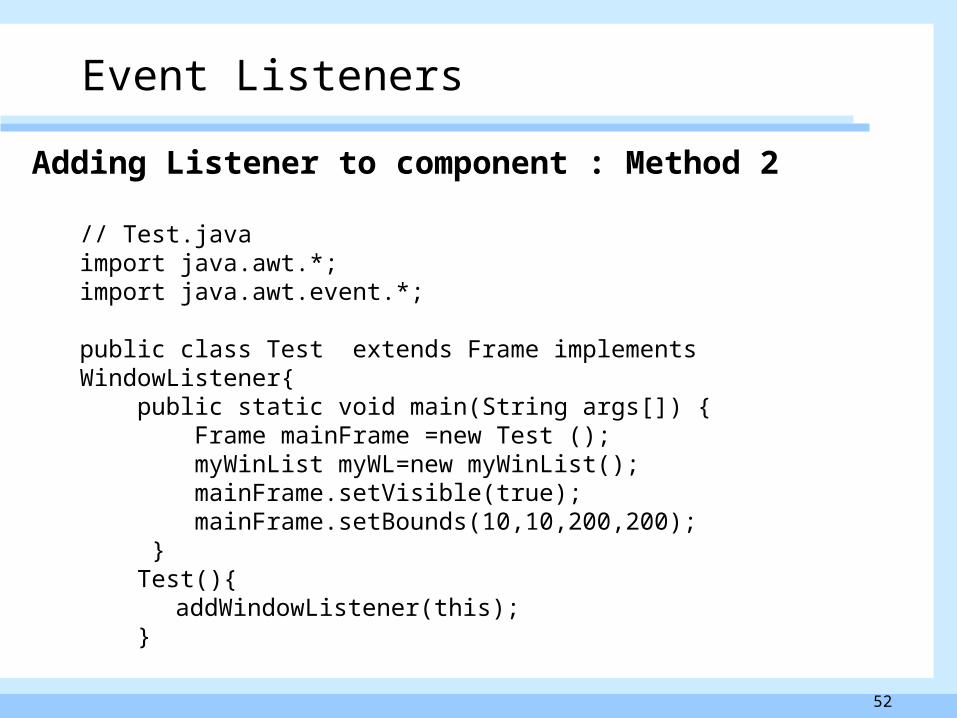
Adding Listener to component : Method 2
// Test.javaimport java.awt.*;import java.awt.event.*;
public class Test extends Frame implements WindowListener{ public static void main(String args[]) { Frame mainFrame =new Test (); myWinList myWL=new myWinList(); mainFrame.setVisible(true); mainFrame.setBounds(10,10,200,200); } Test(){ addWindowListener(this); }
Event Listeners
53
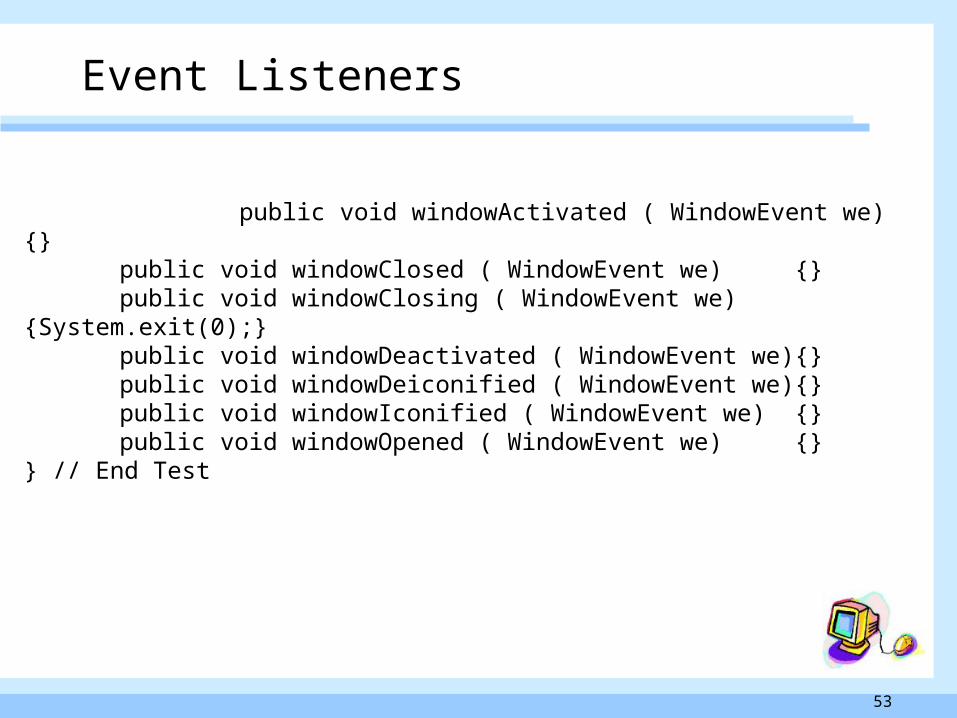
public void windowActivated ( WindowEvent we) {}public void windowClosed ( WindowEvent we) {}public void windowClosing ( WindowEvent we) {System.exit(0);}public void windowDeactivated ( WindowEvent we){} public void windowDeiconified ( WindowEvent we){}public void windowIconified ( WindowEvent we) {} public void windowOpened ( WindowEvent we) {}
} // End Test
Event Listeners
54
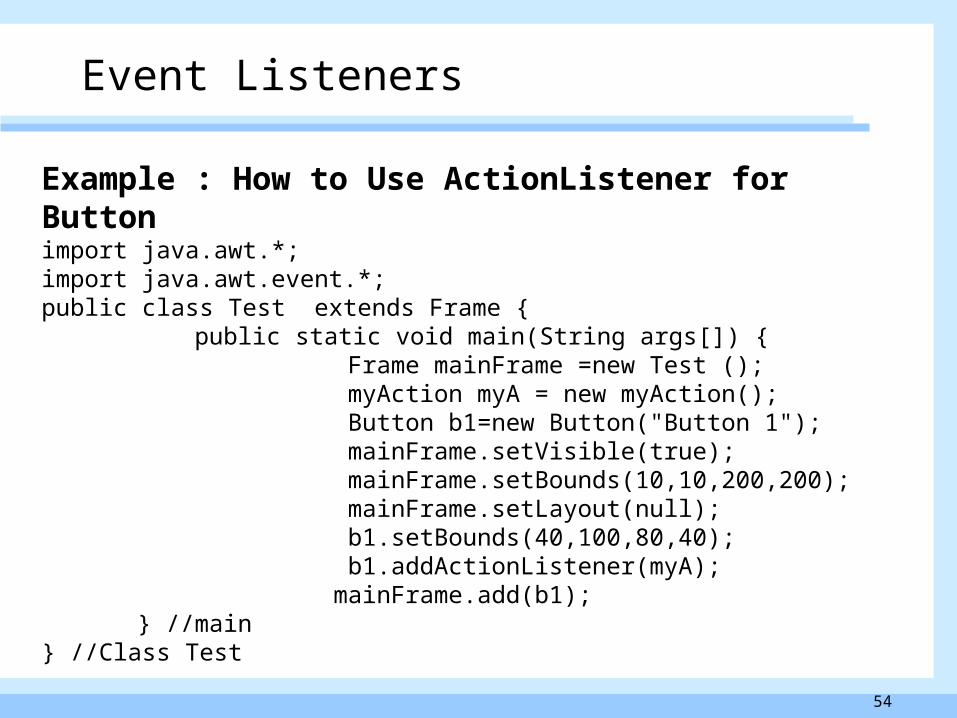
Example : How to Use ActionListener for Buttonimport java.awt.*;import java.awt.event.*;public class Test extends Frame {
public static void main(String args[]) { Frame mainFrame =new Test (); myAction myA = new myAction(); Button b1=new Button("Button 1"); mainFrame.setVisible(true); mainFrame.setBounds(10,10,200,200); mainFrame.setLayout(null); b1.setBounds(40,100,80,40); b1.addActionListener(myA); mainFrame.add(b1);
} //main} //Class Test
Event Listeners
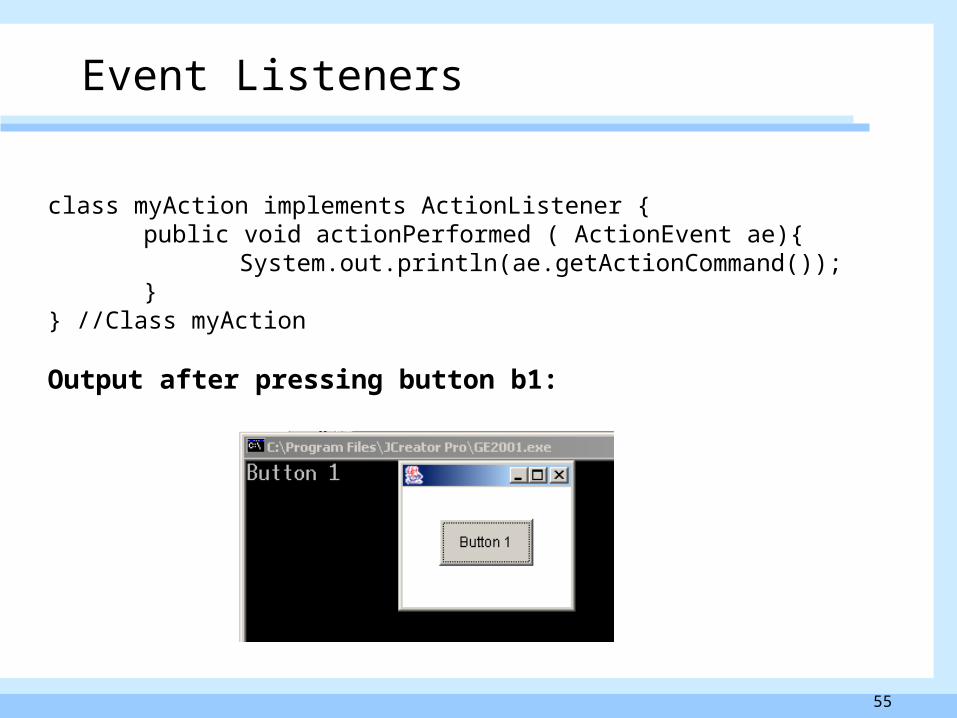
55
class myAction implements ActionListener {public void actionPerformed ( ActionEvent ae){
System.out.println(ae.getActionCommand()); }} //Class myAction
Output after pressing button b1:
Event Listeners
56
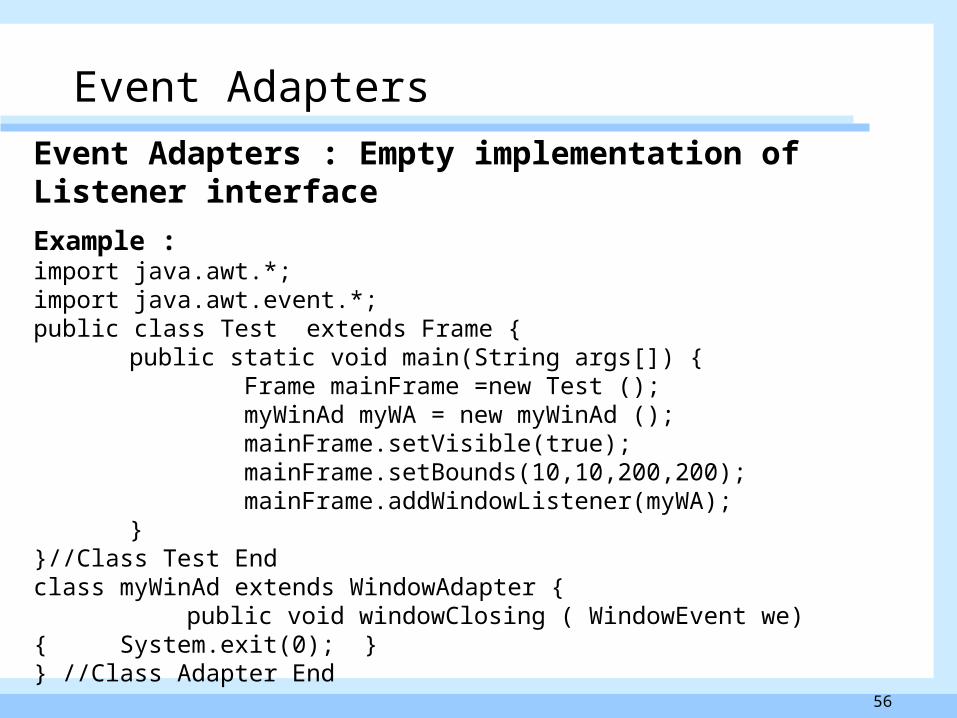
Event Adapters
Event Adapters : Empty implementation of Listener interface
Example :import java.awt.*;import java.awt.event.*;public class Test extends Frame { public static void main(String args[]) {
Frame mainFrame =new Test (); myWinAd myWA = new myWinAd (); mainFrame.setVisible(true); mainFrame.setBounds(10,10,200,200); mainFrame.addWindowListener(myWA);
}}//Class Test Endclass myWinAd extends WindowAdapter {
public void windowClosing ( WindowEvent we){ System.exit(0); }} //Class Adapter End
57
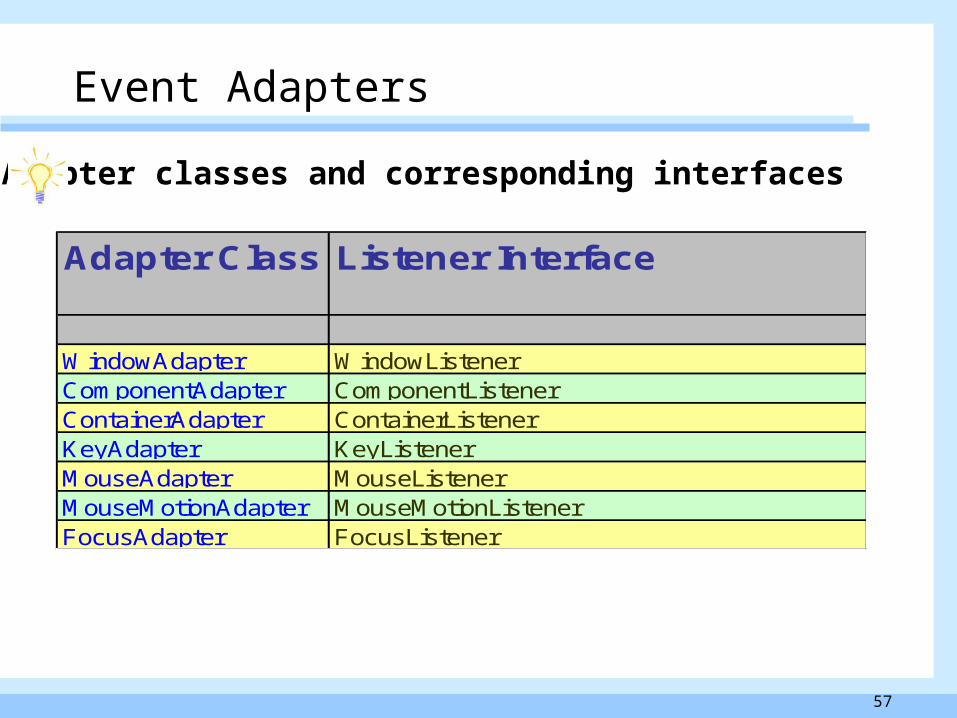
Event Adapters
Adapter Class Listener Interface
WindowAdapter WindowListenerComponentAdapter ComponentListenerContainerAdapter ContainerListenerKeyAdapter KeyListenerMouseAdapter MouseListenerMouseMotionAdapter MouseMotionListenerFocusAdapter FocusListener
Adapter classes and corresponding interfaces
58
Events : Summary
• Event is a platform-independent class
• Event handling is done by using Listeners and Adapters
• Event delegation model entities : Event, Source, Receiver and Listener
• Event listener Contains different methods to handle different event
• Using add<Listener Name> method of component we can add listener
• Event Adapters : Empty implementation of Listener interface
59
: Quiz
• Which are the entities in Event-Delegation model ?
• What is the use of event listeners ?
• Which method of component is used to attach event listener to
component ?
• What getActionCommand() method returns ?
• What are event adapters ?
60
10.0 Layout Managers : Overview
Introduction
Layout Managers defines the interface to set Layout for containers
Performs layout management for the components within the container
Objective
After completing this Topic, you will be able to create GUI with specified appearance robust by handling runtime exceptions.
In this Topic we will cover1. Types of Layout Managers
2. GrigBag Layout Manager
61
Layout Manager Overview
Layout Manager
• Defines the interface for classes that know how to lay out Containers.• Recommend that we use layout managers• We can perform layout without them.• By setting a container's layout property to null, we make the container use no layout manager (absolute positioning).• In absolute positioning, we must specify the size and position of every component within that container.• Drawback of absolute positioning :It doesn't adjust well when the top-level container is resized
62
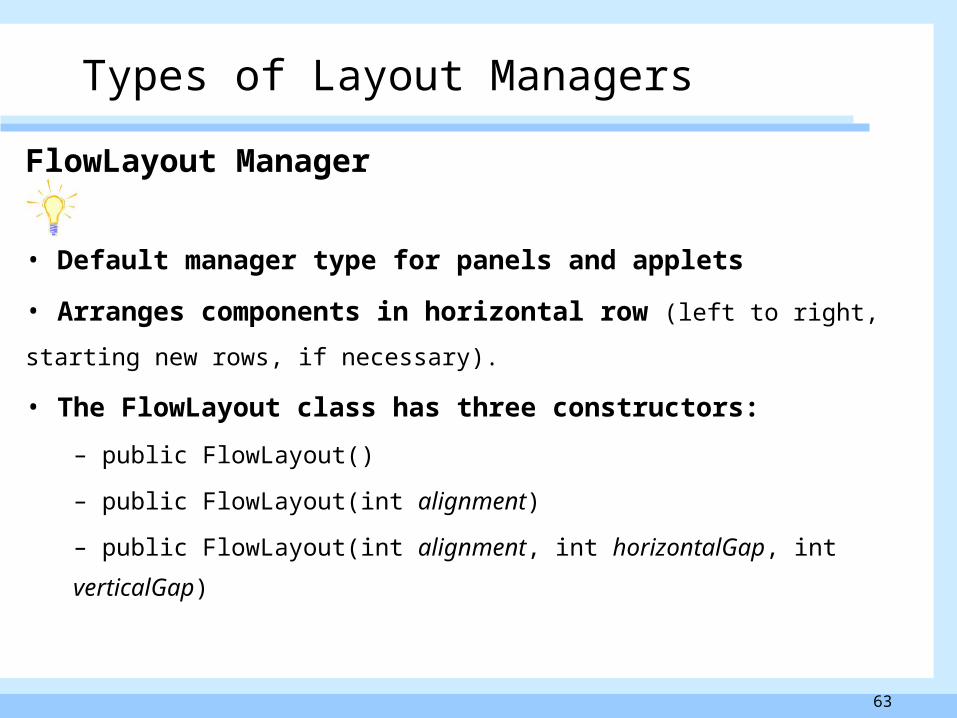
Types of Layout Managers
Types of Layout Managers
• FlowLayout Manager
• GridLayout Manager
• BorderLayout Manager
• CardLayout Manager
• GridBagLayout Manager
63
FlowLayout Manager
• Default manager type for panels and applets
• Arranges components in horizontal row (left to right, starting new rows, if
necessary).
• The FlowLayout class has three constructors:
– public FlowLayout()
– public FlowLayout(int alignment)
– public FlowLayout(int alignment, int horizontalGap, int verticalGap)
Types of Layout Managers
64
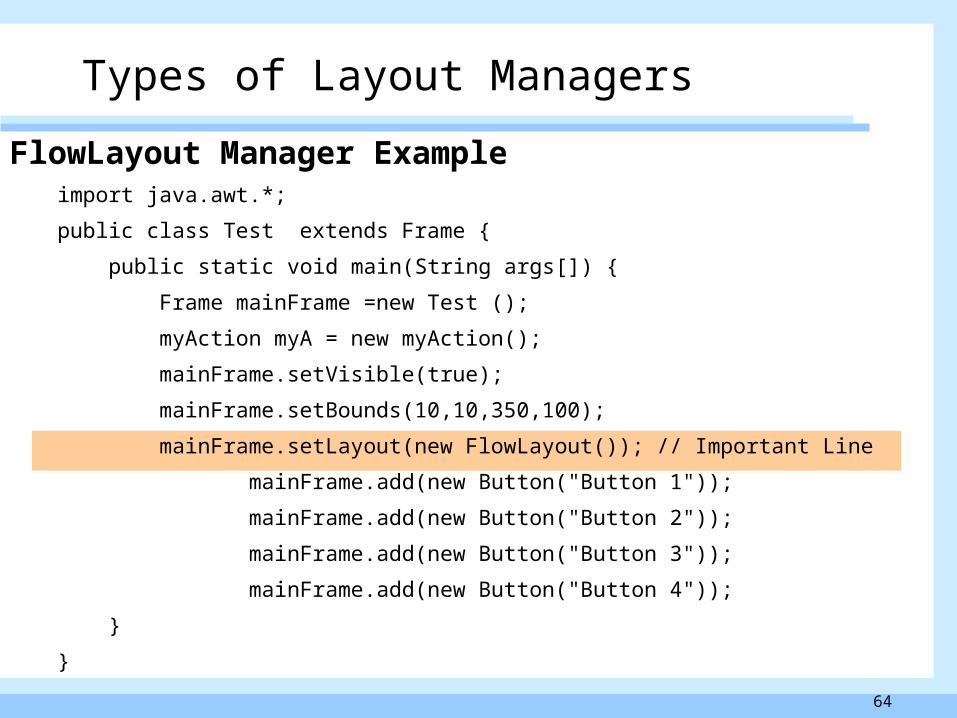
FlowLayout Manager Exampleimport java.awt.*;
public class Test extends Frame {
public static void main(String args[]) {
Frame mainFrame =new Test ();
myAction myA = new myAction();
mainFrame.setVisible(true);
mainFrame.setBounds(10,10,350,100);
mainFrame.setLayout(new FlowLayout()); // Important Line
mainFrame.add(new Button("Button 1"));
mainFrame.add(new Button("Button 2"));
mainFrame.add(new Button("Button 3"));
mainFrame.add(new Button("Button 4"));
}
}
Types of Layout Managers
65
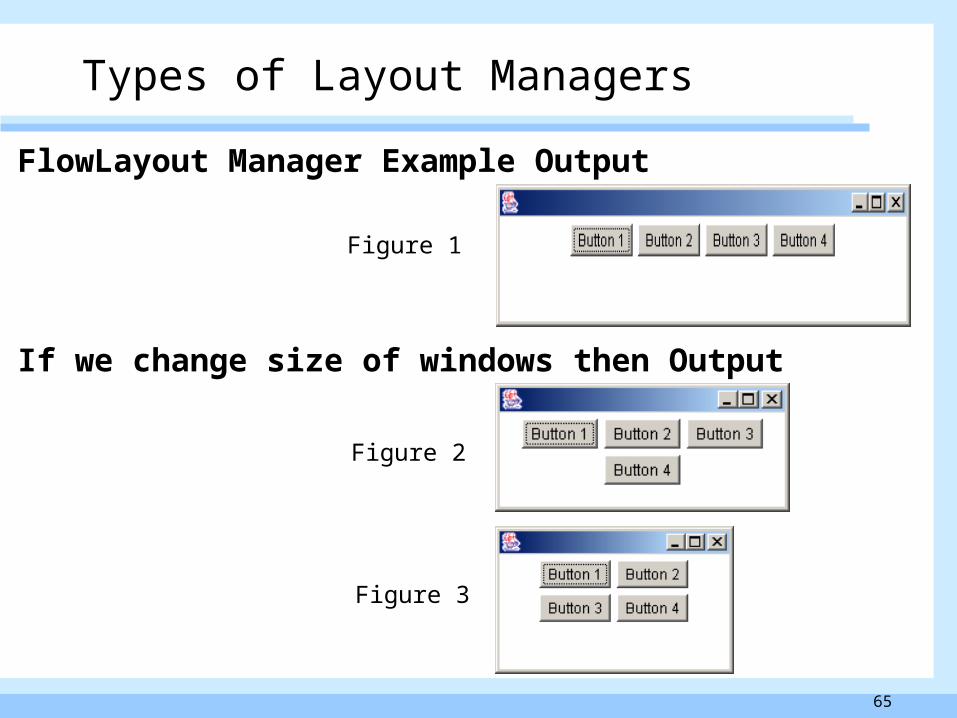
FlowLayout Manager Example Output
Types of Layout Managers
If we change size of windows then Output
Figure 1
Figure 2
Figure 3

66
Types of Layout Managers
Figure 1
Figure 2
FlowLayout Manager If we change line commented as //Important Line mainFrame.setLayout(new FlowLayout()); mainFrame.setLayout(new FlowLayout(0));
67
Types of Layout Managers
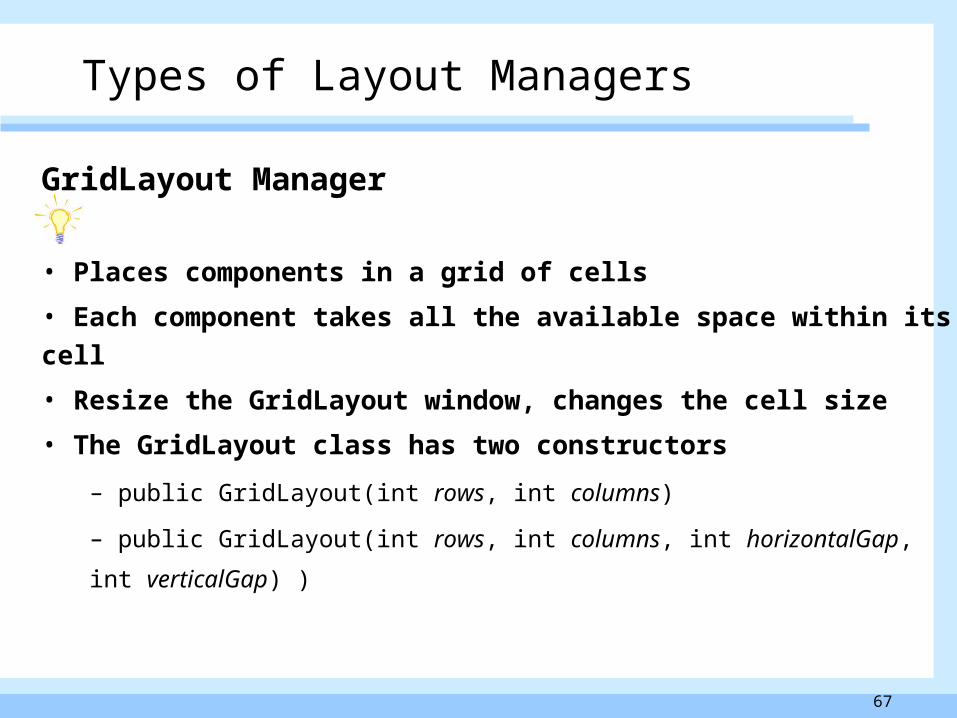
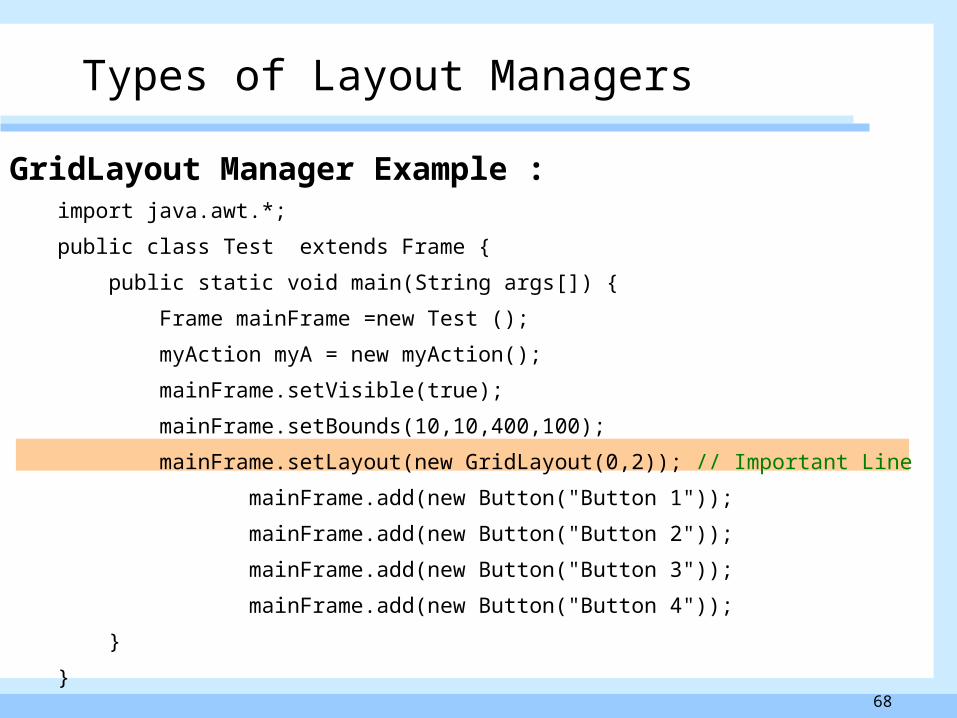
GridLayout Manager
• Places components in a grid of cells
• Each component takes all the available space within its cell
• Resize the GridLayout window, changes the cell size
• The GridLayout class has two constructors
– public GridLayout(int rows, int columns)
– public GridLayout(int rows, int columns, int horizontalGap, int verticalGap) )
68
Types of Layout Managers
GridLayout Manager Example :import java.awt.*;
public class Test extends Frame {
public static void main(String args[]) {
Frame mainFrame =new Test ();
myAction myA = new myAction();
mainFrame.setVisible(true);
mainFrame.setBounds(10,10,400,100);
mainFrame.setLayout(new GridLayout(0,2)); // Important Line
mainFrame.add(new Button("Button 1"));
mainFrame.add(new Button("Button 2"));
mainFrame.add(new Button("Button 3"));
mainFrame.add(new Button("Button 4"));
}
}
69
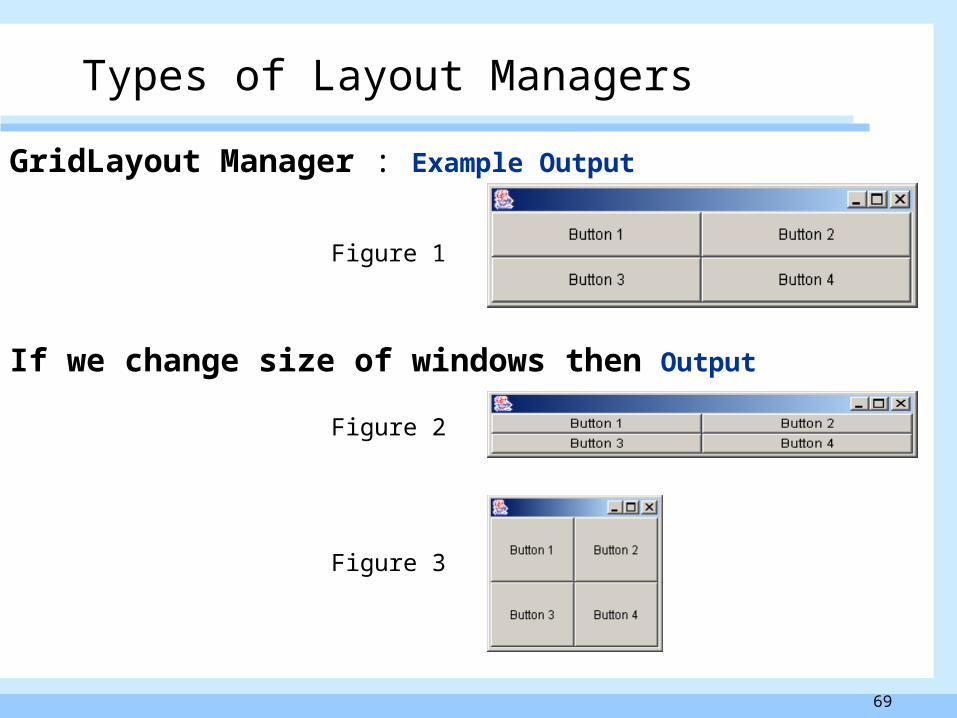
GridLayout Manager : Example Output
Types of Layout Managers
If we change size of windows then Output
Figure 1
Figure 2
Figure 3
70
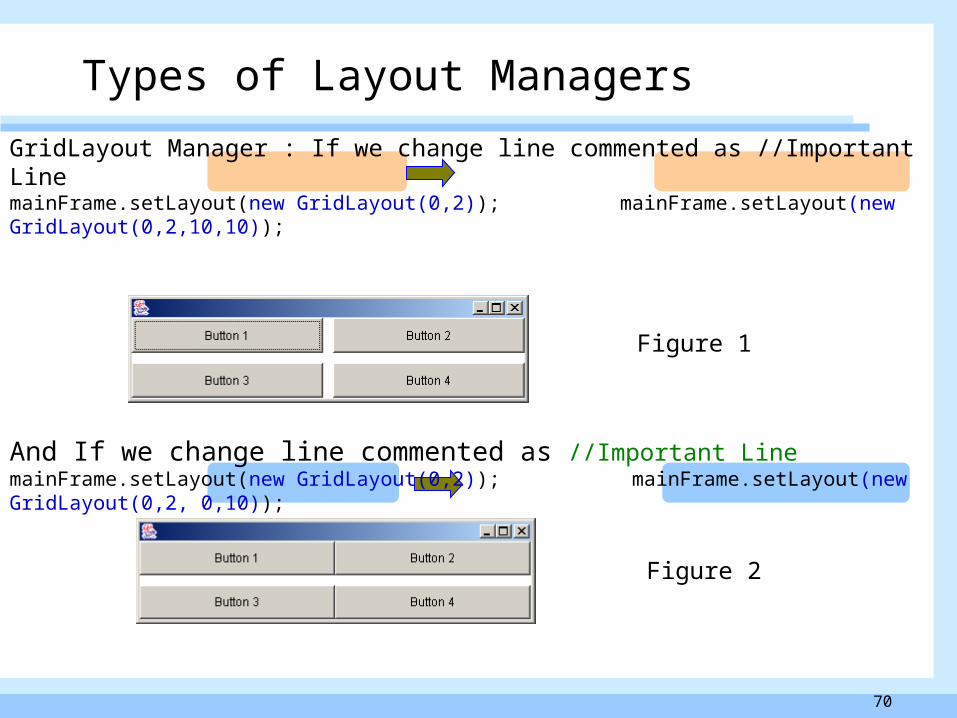
GridLayout Manager : If we change line commented as //Important Line mainFrame.setLayout(new GridLayout(0,2)); mainFrame.setLayout(new GridLayout(0,2,10,10));
Types of Layout Managers
Figure 1
Figure 2
And If we change line commented as //Important Line mainFrame.setLayout(new GridLayout(0,2)); mainFrame.setLayout(new GridLayout(0,2, 0,10));
71
Types of Layout Managers
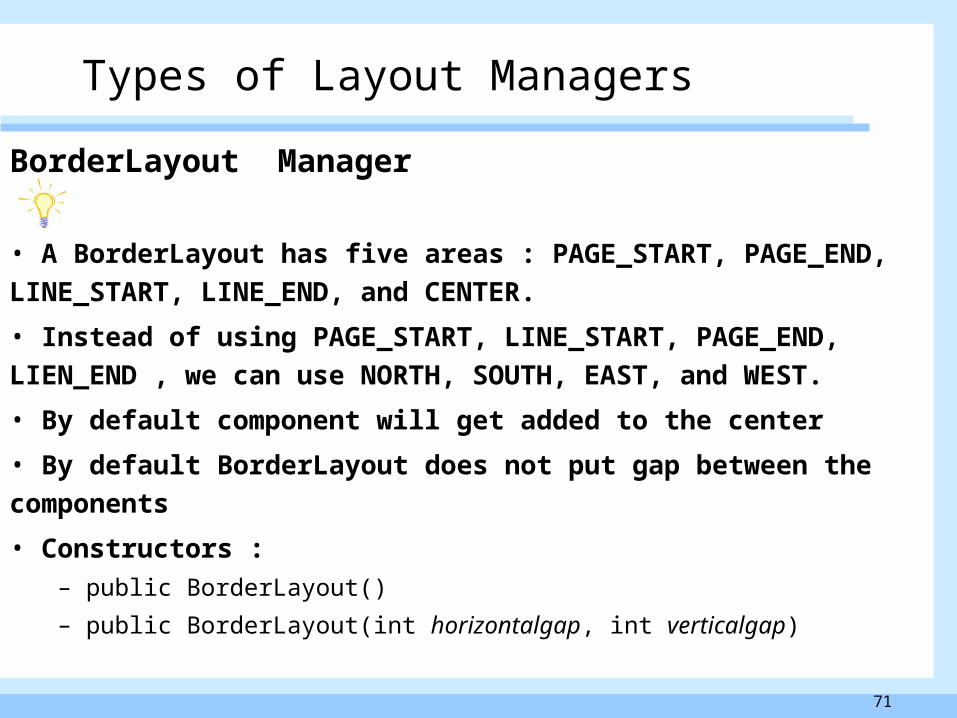
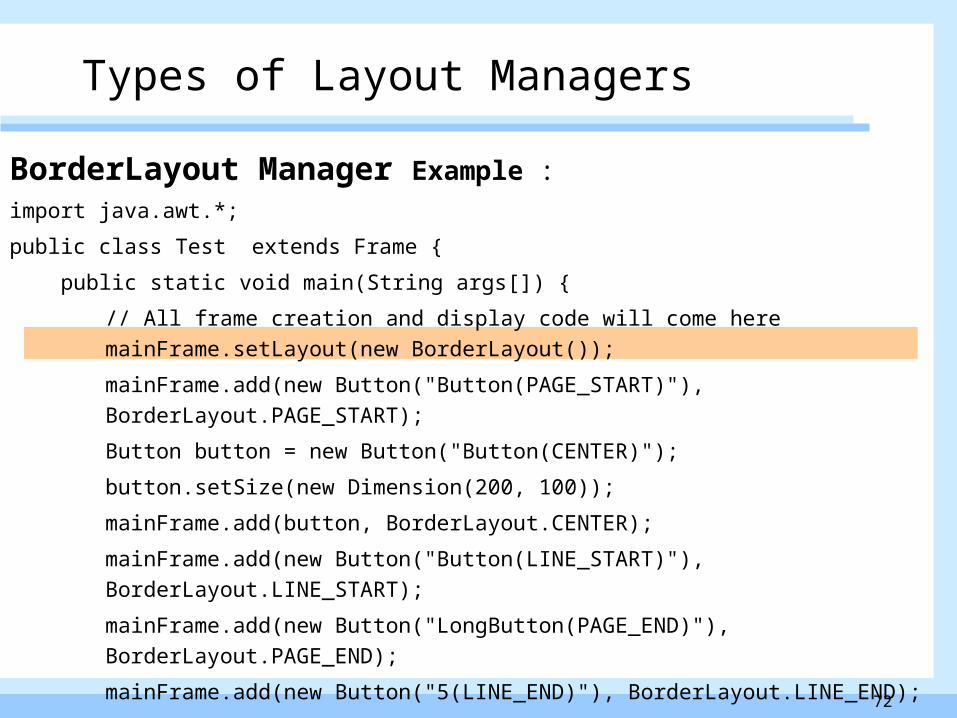
BorderLayout Manager
• A BorderLayout has five areas : PAGE_START, PAGE_END,
LINE_START, LINE_END, and CENTER.
• Instead of using PAGE_START, LINE_START, PAGE_END, LIEN_END ,
we can use NORTH, SOUTH, EAST, and WEST.
• By default component will get added to the center
• By default BorderLayout does not put gap between the components
• Constructors :– public BorderLayout()
– public BorderLayout(int horizontalgap, int verticalgap)
72
BorderLayout Manager Example :
import java.awt.*;
public class Test extends Frame {
public static void main(String args[]) {
// All frame creation and display code will come here
mainFrame.setLayout(new BorderLayout());
mainFrame.add(new Button("Button(PAGE_START)"), BorderLayout.PAGE_START);
Button button = new Button("Button(CENTER)");
button.setSize(new Dimension(200, 100));
mainFrame.add(button, BorderLayout.CENTER);
mainFrame.add(new Button("Button(LINE_START)"), BorderLayout.LINE_START);
mainFrame.add(new Button("LongButton(PAGE_END)"), BorderLayout.PAGE_END);
mainFrame.add(new Button("5(LINE_END)"), BorderLayout.LINE_END);
}
}
Types of Layout Managers
73
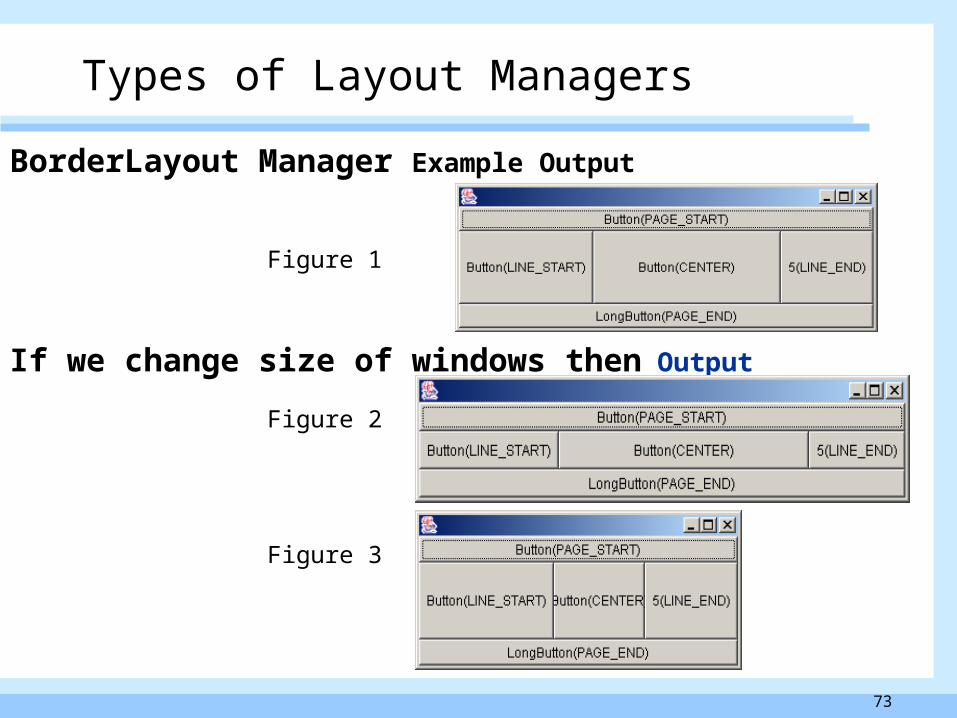
BorderLayout Manager Example Output
Types of Layout Managers
If we change size of windows then Output
Figure 1
Figure 2
Figure 3
74
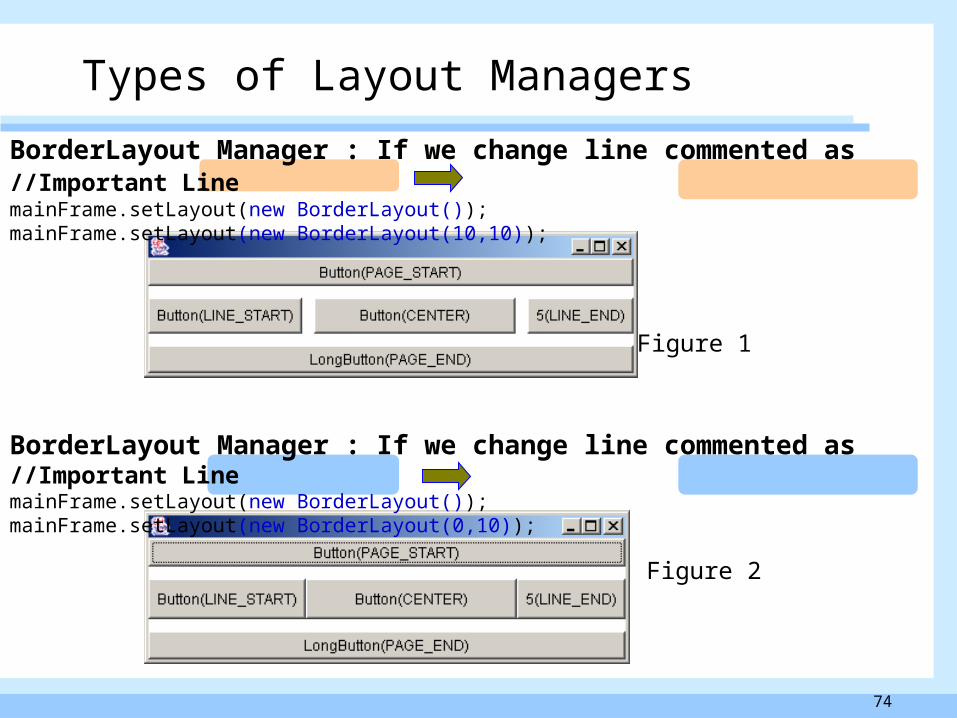
Types of Layout Managers
Figure 1
Figure 2
BorderLayout Manager : If we change line commented as //Important Line mainFrame.setLayout(new BorderLayout()); mainFrame.setLayout(new BorderLayout(10,10));
BorderLayout Manager : If we change line commented as //Important Line mainFrame.setLayout(new BorderLayout()); mainFrame.setLayout(new BorderLayout(0,10));

75
Types of Layout Managers
CardLayout Manager • CardLayout treats each component in the container as a card.• Only one card is visible at a time, and the container acts as a stack of cards.• The first component added to a CardLayout object is the visible component when the container is first displayed.• The CardLayout API :
– void first(Container)– void next(Container)– void previous(Container)– void last(Container) – void show(Container, String)
• Constructors :– public CardLayout()
– public CardLayout(int horizontalgap, int verticalgap)

76
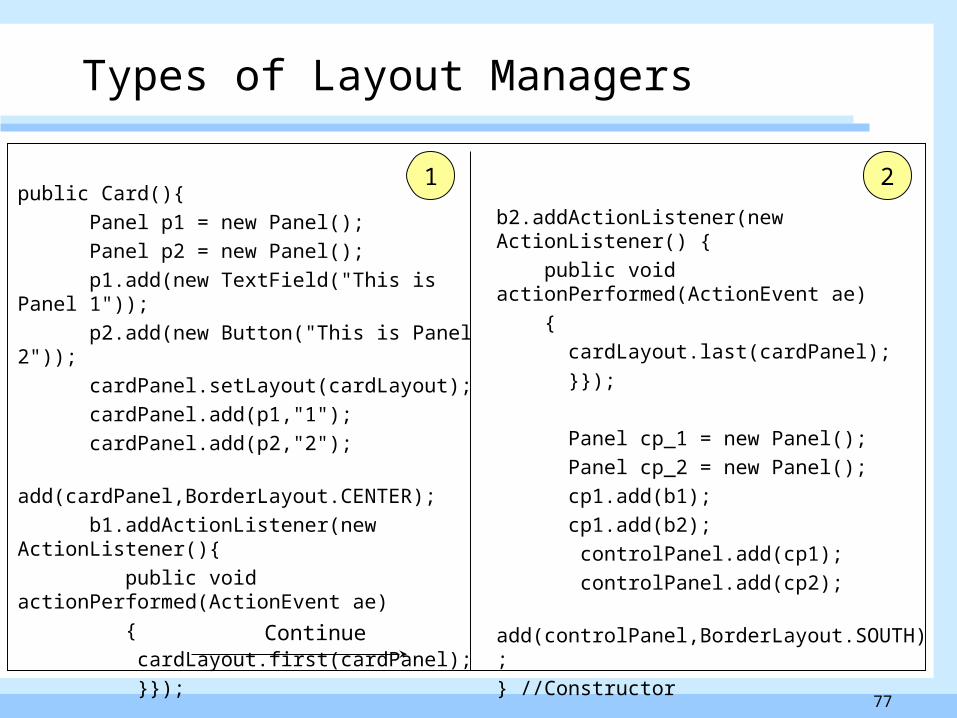
CardLayout Manager
Example :import java.awt.*;import java.awt.event.*;public class Card extends Panel {
private Panel cardPanel = new Panel ();
private CardLayout cardLayout= new CardLayout();
private Panel controlPanel = new Panel();
private Button b1 = new Button ("Panel 1");
private Button b2 = new Button ("Panel 2");
// Constructor here
public static void main(String args[]){
Frame f= new Frame("Example");
Card card = new Card (); // Check the Constructor on next slide
f.add(card);
f.pack();
f.setVisible(true);
} //Main
} //Class
Types of Layout Managers
77
public Card(){
Panel p1 = new Panel();
Panel p2 = new Panel();
p1.add(new TextField("This is Panel 1"));
p2.add(new Button("This is Panel 2"));
cardPanel.setLayout(cardLayout);
cardPanel.add(p1,"1");
cardPanel.add(p2,"2");
add(cardPanel,BorderLayout.CENTER);
b1.addActionListener(new ActionListener(){
public void actionPerformed(ActionEvent ae)
{
cardLayout.first(cardPanel);
}});
b2.addActionListener(new ActionListener() {
public void actionPerformed(ActionEvent ae)
{
cardLayout.last(cardPanel);
}});
Panel cp_1 = new Panel();
Panel cp_2 = new Panel();
cp1.add(b1);
cp1.add(b2);
controlPanel.add(cp1);
controlPanel.add(cp2);
add(controlPanel,BorderLayout.SOUTH);
} //Constructor
Continue
1 2
Types of Layout Managers
78
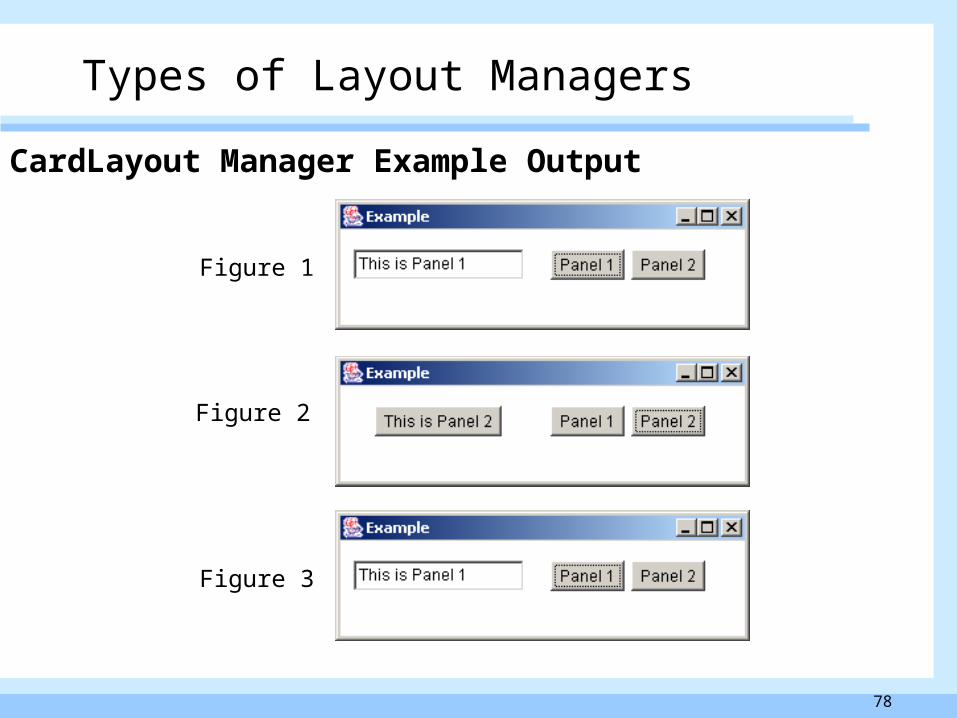
CardLayout Manager Example Output
Types of Layout Managers
Figure 1
Figure 2
Figure 3
79
GridBagLayout Manager
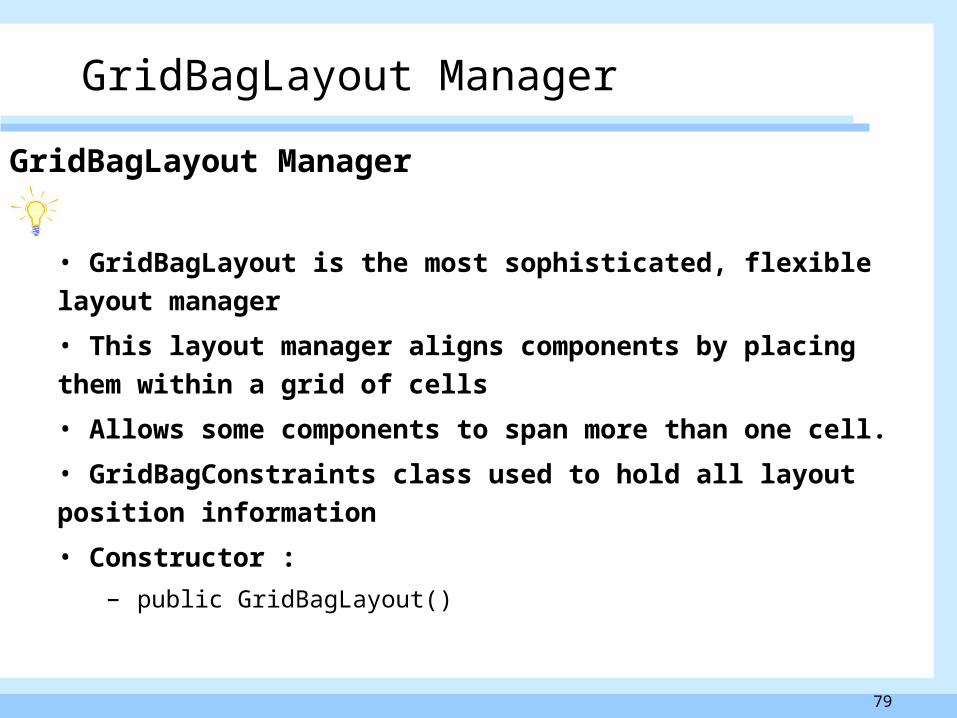
GridBagLayout Manager
• GridBagLayout is the most sophisticated, flexible layout manager
• This layout manager aligns components by placing them within a
grid of cells
• Allows some components to span more than one cell.
• GridBagConstraints class used to hold all layout position
information
• Constructor :
– public GridBagLayout()
80
GridBagLayout Manager
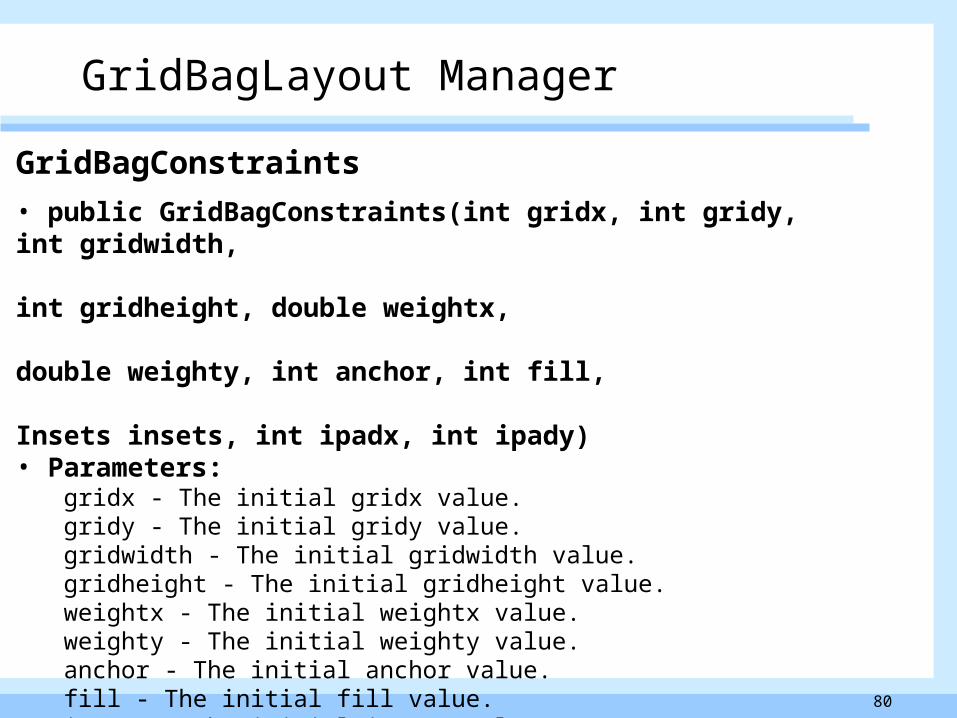
GridBagConstraints
• public GridBagConstraints(int gridx, int gridy, int gridwidth, int gridheight, double weightx, double weighty, int anchor, int fill, Insets insets, int ipadx, int ipady) • Parameters:
gridx - The initial gridx value. gridy - The initial gridy value. gridwidth - The initial gridwidth value. gridheight - The initial gridheight value. weightx - The initial weightx value. weighty - The initial weighty value. anchor - The initial anchor value. fill - The initial fill value. insets - The initial insets value. ipadx - The initial ipadx value. ipady - The initial ipady value.
81
GridBagLayout Manager
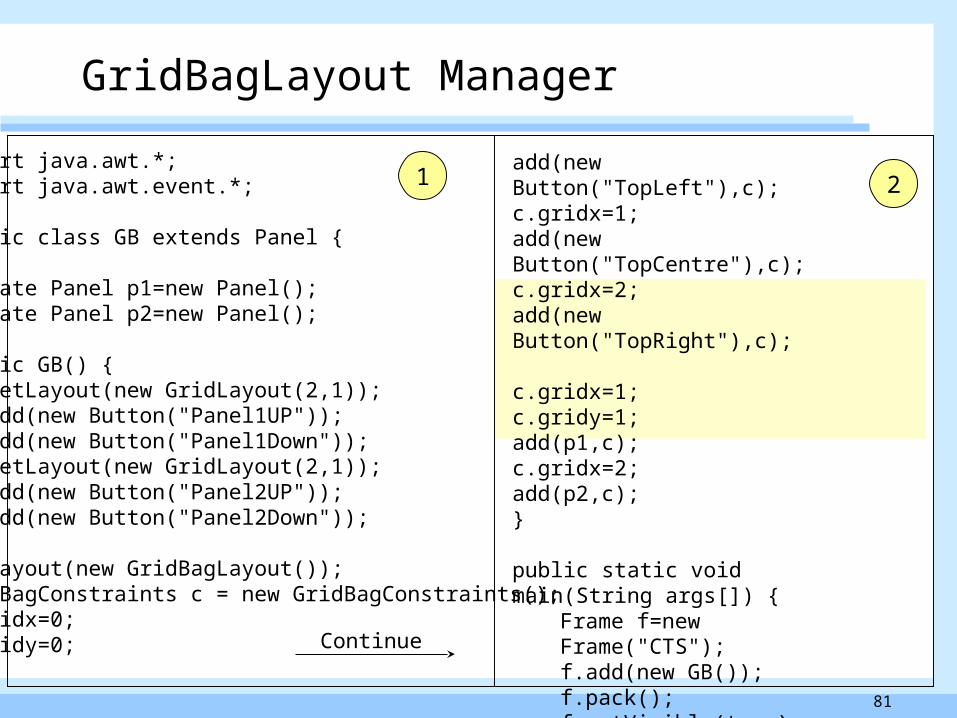
import java.awt.*;import java.awt.event.*;
public class GB extends Panel {
private Panel p1=new Panel();private Panel p2=new Panel();
public GB() {p1.setLayout(new GridLayout(2,1));p1.add(new Button("Panel1UP"));p1.add(new Button("Panel1Down"));p2.setLayout(new GridLayout(2,1));p2.add(new Button("Panel2UP"));p2.add(new Button("Panel2Down"));
setLayout(new GridBagLayout());GridBagConstraints c = new GridBagConstraints();c.gridx=0;c.gridy=0;
add(new Button("TopLeft"),c);c.gridx=1;add(new Button("TopCentre"),c);c.gridx=2;add(new Button("TopRight"),c);
c.gridx=1;c.gridy=1;add(p1,c);c.gridx=2;add(p2,c);}
public static void main(String args[]) {
Frame f=new Frame("CTS");f.add(new GB());f.pack();f.setVisible(true);
}}
1 2
Continue

82
GridBagLayout Manager
Controlling the cell size for a component• How to specify if a component occupies multiple cells ?• The gridwidth and gridheight parameters
• Example – In the previous example if we modify the code to make ‘panel1’ occupy first
and second columns, the output will look as -– The code is like this
c.gridx=0;c.gridy=1;c.gridwidth=2;add(p1,c);c.gridx=2;c.gridwidth=1;add(p2,c);
83
Summary : Layout Managers
• Layout Managers defines the interface for classes that know how to layout Containers.• Types of LayoutManager : FlowLayout Manager, GridLayout Manager, BorderLayout Manager, CardLayout Manager, GridBagLayout Manager. • FlowLayout Manager is default manager type for panels and applets.• FlowLayout Manager arranges components in horizontal row .• GridLayout Manager places components in a grid of cells.• In GridLayout Manager each component takes all the available space within its cell.• BorderLayout has 5 areas: PAGE_START, PAGE_END, LINE_START, LINE_END, and CENTER.• In BorderLayout By default component will get added to the center.• CardLayout treats each component in the container as a card.• While using CardLayout Only one card is visible at a time.• A GridBagConstraints object is associated with every component that contains detail information regarding the position of the component.


![[PPT]Java Swing - Home | InfoVis Lab @ Virginia Techinfovis.cs.vt.edu/oldsite/GUI/java/Java2-Swing.ppt · Web viewJava Swing Chris North cs3724: HCI AWT to Swing AWT: Abstract Windowing](https://static.fdocuments.in/doc/165x107/5aa188237f8b9a1f6d8c0035/pptjava-swing-home-infovis-lab-virginia-viewjava-swing-chris-north-cs3724.jpg)


