1 4 - Home - Kids 'R' Kids
9
Transcript of 1 4 - Home - Kids 'R' Kids


1 4 Balloon Laminar Flow Laminar Flow: the uninterrupted flow in a fluid near a solid boundary in which the direction of flow at every point remains constant.
Materials: water balloons, water, container, duct tape or heavy-duty packing tape, scissors, pin or small nail (make sure it is sharp) Preparation: Gather materials. Watch this video on how the experiment works and learn some new scientific knowledge: https://www.youtube.com/watch?v=vsccjAGU7mo Instructions: 1. First, fill up your balloons with water. Fill up about half a dozen to about half capacity. 2. Next, dry the balloons so your tape sticks better. Move your balloons outside. 3. Gather a pin or nail, a bowl, and your duct tape or scotch tape. 4. Make a hashtag pattern on the balloon with your tape. Leave the center opening (about ½” or less).
This will make the flow better than a larger opening. 5. Place the balloon in your bowl or container. 6. Now prick the balloon with the pin or nail in the center opening. The water should start to flow out
evenly.
1 34

1 4 Hand Crank Winch Materials: two cardboard tubes (paper towel tubes work great), spool (i.e. empty ribbon spool), straw or pencil, string, tape, scissors, small basket Preparation: Gather materials. Instructions: 1. Tape two cardboard tubes to a solid surface. Use your straw as a reference tool for how far apart they
should be placed from each other. 2. Make two cuts at the top of each cardboard tube just big enough of the straw or pencil to rest and be
able to spin. 3. Put your spool on the straw or pencil. Now if you don’t have a spool, you can simply secure your rope
to the straw or pencil with a piece of tape. (If you are using a straw, you can even thread another straw into it and use the bendy part to make a handle!) You still have a hand crank winch! If you do use a spool, make sure to secure it with tape to the straw or pencil.
4. Secure your rope or string to the spool with a piece of tape (or to the straw directly if you don’t have a spool) and tie your basket or object to the bottom of the string.
5. Now, it is time to test out your hand crank winch. What can you pull up with it? Does this make lifting heavy things easier?
6. If needed, use the link below for a detailed step-by-step guide of this experiment.
https://littlebinsforlittlehands.com/build-a-winch-simple-machine-recycled-stem-activity/
1 34

1 4 Sculpture Balancing Act What do you think: Can you find the sweet spot to make your structure balance? This will take patience and trial and error.
Materials: cardboard, craft paint, cardboard tube, 5-inch square piece of cardboard, hot glue (adult supervision or assistance needed), pipe cleaners (you can also florist wire), beads, 12-inch bamboo skewer with sharp ends snipped off, paint, beads Preparation: Gather materials. Instructions: 1. First, cut the cardboard into shapes. Then paint the pieces and cardboard tube whatever colors you
choose. 2. After all pieces are dry, flatten one end of the cardboard tube and staple closed. Cut a small V-shaped
notch in the center of the flattened end. This will be the fulcrum - the place where the lever pivots. It is one of the three parts or actions that work together in a lever.
3. Glue the open end of the cardboard tube to the cardboard square. Let dry. 4. Thread cardboard shapes, pipecleaners, and beads onto a long skewer, balancing and adjusting it on
the notch. Continue adjusting, using tape if needed for security, until sculpture is balanced.
2 34

1 4 Stomp Juice Pouch Rocket Materials: empty juice pouch, juice pouch straw, one flexible straw, colored paper (any color), scissors, washi tape (optional), glue, pencil Preparation: Gather materials. Instructions: 1. First, snip off the end of the flexible straw on an angle so that it has a point. Remove the straw that
came with the juice pouch. 2. Insert the pointed end of the straw into the straw hole of the juice pouch. This will be your launcher. 3. Now cut 3” x 3” piece of paper. Roll it over a pencil to make a paper tube. 4. Then, tape along the seam and remove the pencil from the paper tube. 5. It is time to make the fins. Cut three equal strips of paper (approximately ¾” wide x 2½” long). Using
your glue stick, glue two ends of two of the strips together. 6. Next, tape the rocket body to the two fins. 7. Add the third fin by gluing it to the flaps of the other two fins. Trim the ends at an angle. 8. Now, add a piece of tape to seal the top of the rocket. 9. Launching Time!!
First, inflate the juice pouch by blowing into the flexible straw. Place the straw rocket over the end of the juice pouch straw and bend the flexible straw to aim the
rocket up. Place the juice pouch/rocket on the ground. Stomp down on the juice ouch to launch the rocket up into the air. (You can use your hand to press
down on the pouch and launch the rocket.)
3 34
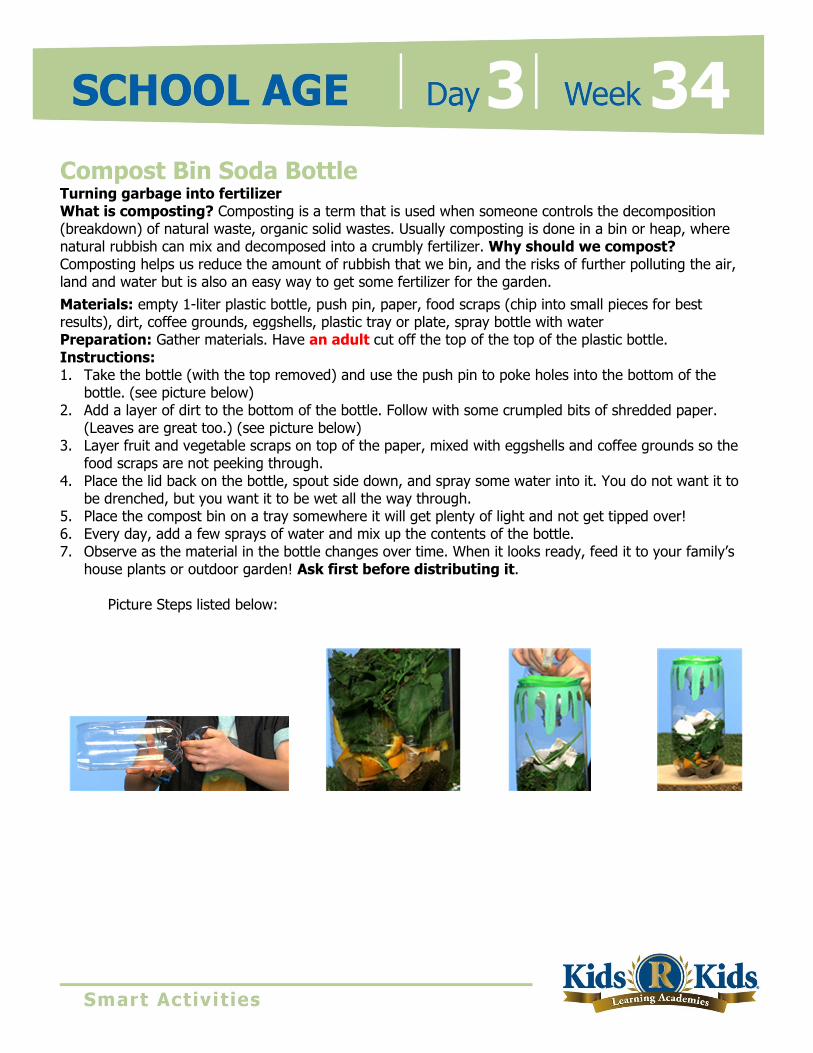
1 4 Compost Bin Soda Bottle Turning garbage into fertilizer What is composting? Composting is a term that is used when someone controls the decomposition (breakdown) of natural waste, organic solid wastes. Usually composting is done in a bin or heap, where natural rubbish can mix and decomposed into a crumbly fertilizer. Why should we compost? Composting helps us reduce the amount of rubbish that we bin, and the risks of further polluting the air, land and water but is also an easy way to get some fertilizer for the garden.
Materials: empty 1-liter plastic bottle, push pin, paper, food scraps (chip into small pieces for best results), dirt, coffee grounds, eggshells, plastic tray or plate, spray bottle with water Preparation: Gather materials. Have an adult cut off the top of the top of the plastic bottle. Instructions: 1. Take the bottle (with the top removed) and use the push pin to poke holes into the bottom of the
bottle. (see picture below) 2. Add a layer of dirt to the bottom of the bottle. Follow with some crumpled bits of shredded paper.
(Leaves are great too.) (see picture below) 3. Layer fruit and vegetable scraps on top of the paper, mixed with eggshells and coffee grounds so the
food scraps are not peeking through. 4. Place the lid back on the bottle, spout side down, and spray some water into it. You do not want it to
be drenched, but you want it to be wet all the way through. 5. Place the compost bin on a tray somewhere it will get plenty of light and not get tipped over! 6. Every day, add a few sprays of water and mix up the contents of the bottle. 7. Observe as the material in the bottle changes over time. When it looks ready, feed it to your family’s
house plants or outdoor garden! Ask first before distributing it. Picture Steps listed below:
3 34

1 4 Diving Fish You will be making a cartesian diver. A cartesian diver is a small hollow glass figure placed in a vessel of water that has an elastic cover so arranged that by an increase of pressure the water can be forced into the figure producing the effects of suspension, sinking, and floating as the pressure varies. This experiment will help show you how fish can rise and sink in the water due to their air bladder inside their stomachs allowing them to move upward and downward.
Materials: clear water bottle, vegetable oil, ketchup packets, permanent markers, hot glue gun (adult assistance needed) or glue sticks Preparation: Gather materials. Remove the label from your water bottle using vegetable oil and then wash the bottle with warm, soapy water and set aside. Instructions: 1. Take your ketchup packets and transform them to look like fish by turning the two narrow corners of
the packet inward (like you are making a paper airplane). 2. Hot glue the folded corners (tabs) in place. (adult assistance needed) You can use a glue stick, but it
does not always hold the tabs in place. 3. Gently squeeze the center of the packet and glue down the outer edges of the packet in the very
center. This will make the packet look like it has a body and a tail like a fish. Your ketchup packets should look like the picture below once completed.
4. Color your fish with permanent markers. Add small fish details and your fish are complete. 5. Gently push the ketchup packet into the bottle. Fill it with water all the way to the top of the bottle. If
the packet sinks, then you will need to remove it and distribute the air inside the packet. 6. Screw on the bottle lid and squeeze the sides firmly. The fish will dive to the bottom of your bottle
ocean floor. Release the pressure and the fish will float to the top.
4 34

1 4 Edible Gummies Materials: 2 cups fruit juice, 4 packets gelatin, honey (to taste), saucepan, bowl, stove top, square 9” pan or silicone candy molds Preparation: Gather materials. Instructions: 1. Pour 1½ cups of juice into a small saucepan. Heat over medium heat until it reaches a gentle boil. (An
adult must do this step.) 2. While the juice is heating up, pour remaining ½ cup of juice into a small bowl. 3. Now, add the gelatin and let bloom (the granule becomes enlarged - helps ensure a smooth texture). 4. Then, add the gelatin mix to heated juice and stir until fully dissolved. 5. Of course, take a quick taste of the juice mixture to make sure it is sweet enough. Now begin to honey
to your taste. 6. Pour mixture into a 9” square pan (or if you happen to have a silicone candy mold, you can pour it in
there). 7. Chill for 2 hours and remove from pan or mold. If gummies don’t come out easily, chill for another half
hour. 8. If you use the pan, cut into squares of desired size once the gummy is out. 9. You can store this in the refrigerator for up to 4 days. Enjoy your homemade gummies.
5 34

1 4 Colorful Inspiring Message Painting Materials: blank white cards, crayons, masking tape, clear detergent, black acrylic paint, paintbrush, small mixing bowl, spoon, coin (optional) Preparation: Gather materials. Cover your table surface. Instructions: 1. First, tape down your blank white card using the masking tape around the edges. 2. Then color the card completely with a rainbow of colors using the crayons. 3. Mix 2 Tbsp black acrylic paint and 2 Tbsp clear detergent in a small bowl. 4. Paint the card with the mixture and allow it time to dry. Make sure to do at least two coats, allowing to
dry between coats. 5. When the card is completely dry, slowly and carefully peel the masking tape away. 6. Think of an inspiring message you would like to appear on your card. Scratch your message into the
card with a coin or the pointed edge of the paintbrush. What colors were revealed? Will you give this card to someone or keep it for inspiration? (You can also do this and draw a picture)
5 34