01 - Helpful Tips and Getting Started
13
Helpful Tips and Getting Started Table of Contents Introduction................................................................................................................................2 Access to CHRS Recruiting ............................................................................................................2 Enable Pop-ups ...........................................................................................................................2 Access the Main Menu ..................................................................................................................5 Identify Mandatory Fields .............................................................................................................6 Use Binocular and Magnifying Glass Field Search .............................................................................6 Manage Multiple Pages of Information ............................................................................................9 Print a Page ................................................................................................................................9 Expandable Information Box ....................................................................................................... 10 Explore the Top Navigation Bar ................................................................................................... 12 Role-Based Interface Differences ................................................................................................. 13
Transcript of 01 - Helpful Tips and Getting Started

Helpful Tips and Getting Started
Table of Contents
Introduction ................................................................................................................................ 2
Access to CHRS Recruiting ............................................................................................................ 2
Enable Pop-ups ........................................................................................................................... 2
Access the Main Menu .................................................................................................................. 5
Identify Mandatory Fields ............................................................................................................. 6
Use Binocular and Magnifying Glass Field Search ............................................................................. 6
Manage Multiple Pages of Information ............................................................................................ 9
Print a Page ................................................................................................................................ 9
Expandable Information Box ....................................................................................................... 10
Explore the Top Navigation Bar ................................................................................................... 12
Role-Based Interface Differences ................................................................................................. 13

Page 2 of 13 9/1/2021
Introduction
This guide is an introduction to the CHRS Recruiting system for end-users. If you are new to the CHRS
Recruiting system, this guide will provide fundamental skills that you need to know to be successful in
utilizing the CHRS Recruiting system.
Access to CHRS Recruiting
The CHRS Recruiting system is a single system that serves all CSU campuses. Your campus user name
and password identify you as an internal CSU user. Only internal users can access the system.
SSO stands for single sign-on, also known as our campus portal. With SSO enabled, you do not need to
log in to separate websites because you have already logged in to the CSU intranet.
Depending on your user role, there are fields shown throughout this guide that are accessible for your
review. If your access is limited, a request must be submitted to Chris Schloffer at
Enable Pop-ups
Many browsers include pop-up blockers. Sometimes, these pop-up blockers are on by default. Pop-up
blockers prevent some CHRS Recruiting interface elements from displaying. You must enable pop-ups
for the CHRS Recruiting site to use all features of the system.
1. Open a web browser
(Google Chrome is
recommended)
IMPORTANT: POP-UP
Blocker needs to be
turned-off.

Page 3 of 13 9/1/2021
2. You can keep pop-ups
blocked globally if you
enable pop-ups for the
PageUp website.
• In Google Chrome,
open the “Customize”
menu by clicking the 3-
dot icon.
• Click Settings and
expand the “Advanced”
options at the bottom of
the page.
• In “Content Settings,”
click Pop-ups and
redirects. Then click
“Add” in the “Allow”
area.
• Enter the following text:
[*.]pageuppeople.com
and click “Add.”
Pop-up windows are now
enabled for CHRS
Recruiting
3. Log into the Portal and
enter your username
and password
Page 4 of 13 9/1/2021
Apple Safari – Enable Pop-ups
Safari for macOS has no per-website control over blocking pop-up windows. Pop-ups are either
blocked, or they are not. To allow pop-ups:
From the Safari menu, choose Preferences > Click the Security tab > Ensure the Block pop-up
windows option is not checked > To block pop-ups once again, check the Block pop-up
windows checkbox.
Pop-up Guidelines
• If possible, enable pop-ups for the CHRS Recruiting site to avoid security issues when you visit
other sites.
• Consider using a dedicated Chrome browser just for CHRS Recruiting.
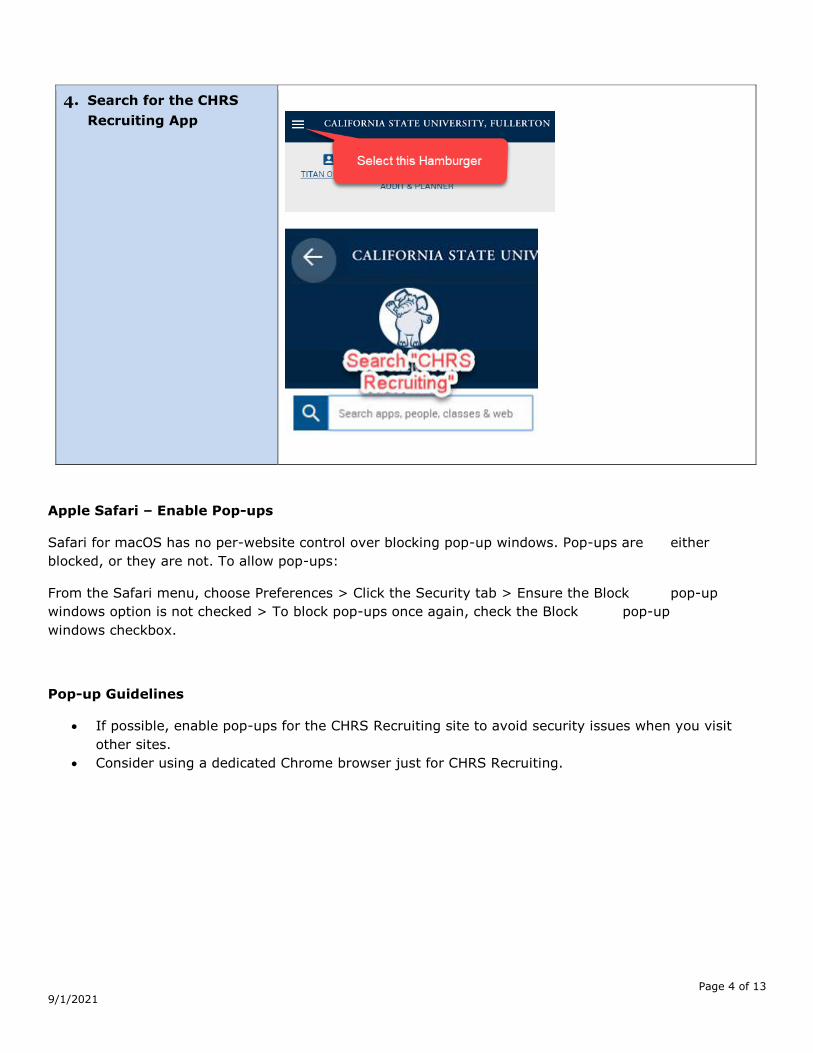
4. Search for the CHRS
Recruiting App
Page 5 of 13 9/1/2021
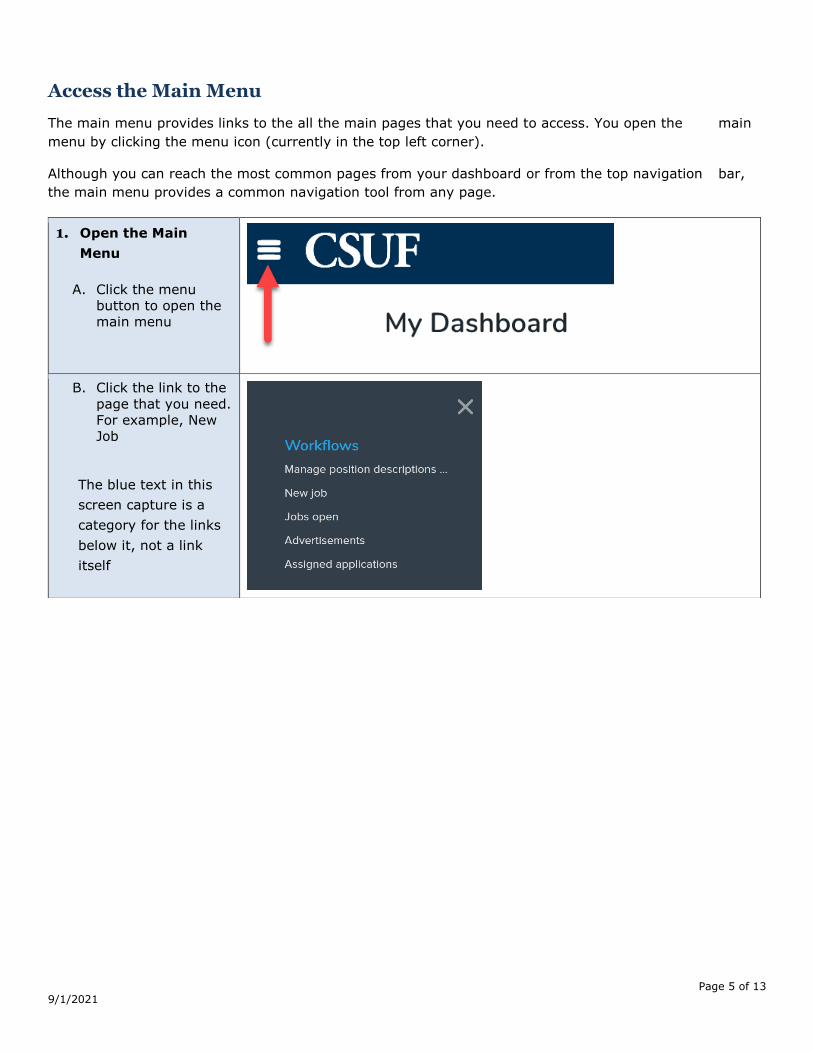
Access the Main Menu
The main menu provides links to the all the main pages that you need to access. You open the main
menu by clicking the menu icon (currently in the top left corner).
Although you can reach the most common pages from your dashboard or from the top navigation bar,
the main menu provides a common navigation tool from any page.
1. Open the Main
Menu
A. Click the menu
button to open the
main menu
B. Click the link to the
page that you need.
For example, New
Job
The blue text in this
screen capture is a
category for the links
below it, not a link
itself

Page 6 of 13 9/1/2021
Identify Mandatory Fields
When you complete online forms, some fields are mandatory. If you attempt to submit the form with
mandatory fields left blank, you will be required to find the field and to provide a value.
Fields can be mandatory for several reasons:
• CSU Policy, Federal, or state law
• PageUp system requirements
• CSU reporting
Guidelines
• Become familiar with the forms that you are using.
• Have all required data available before you complete the form.
• You can save a draft without completing all the mandatory fields, but some fields are mandatory,
even for drafts.
Use Binocular and Magnifying Glass Field Search
When you need to select an item from a long list, the field provides a binocular or magnifying glass icon.
You can use this icon to open a search window.
Binocular and magnifying glass fields have nearly identical functionality. When you click the button, a
window pops up that provides a search interface.
How to identify
mandatory fields
Mandatory fields are
marked with an
asterisk (*) on all
forms.
Asterisk location Example Required by
End of the Field Name
Recruitment Status* CSU or PageUp

Page 7 of 13 9/1/2021
1. Binocular and
magnifying glass
field search
A. Click the binocular
or magnifying
glass button
B. Enter your search
criteria
C. Click the Search
button
D. Click “Okay” at the
bottom of the
window OR click
the Select link next
to the item that
you want to select
E. Use the eraser
button to clear the
search field
2. Prefix to find items
A. In many cases,
you need to use
our campus 2-
letter prefix (FL) to
find items
B. When selecting a
magnifying glass
to search for a
position number on
the job requisition
card, entering FL
in the “Number
Field” and then
selecting search
will populate
results that are
specific to Cal
State Fullerton
C. If you do not see
an “Okay” button,
use the scroll bar
to scroll down to
find the button
Page 8 of 13 9/1/2021
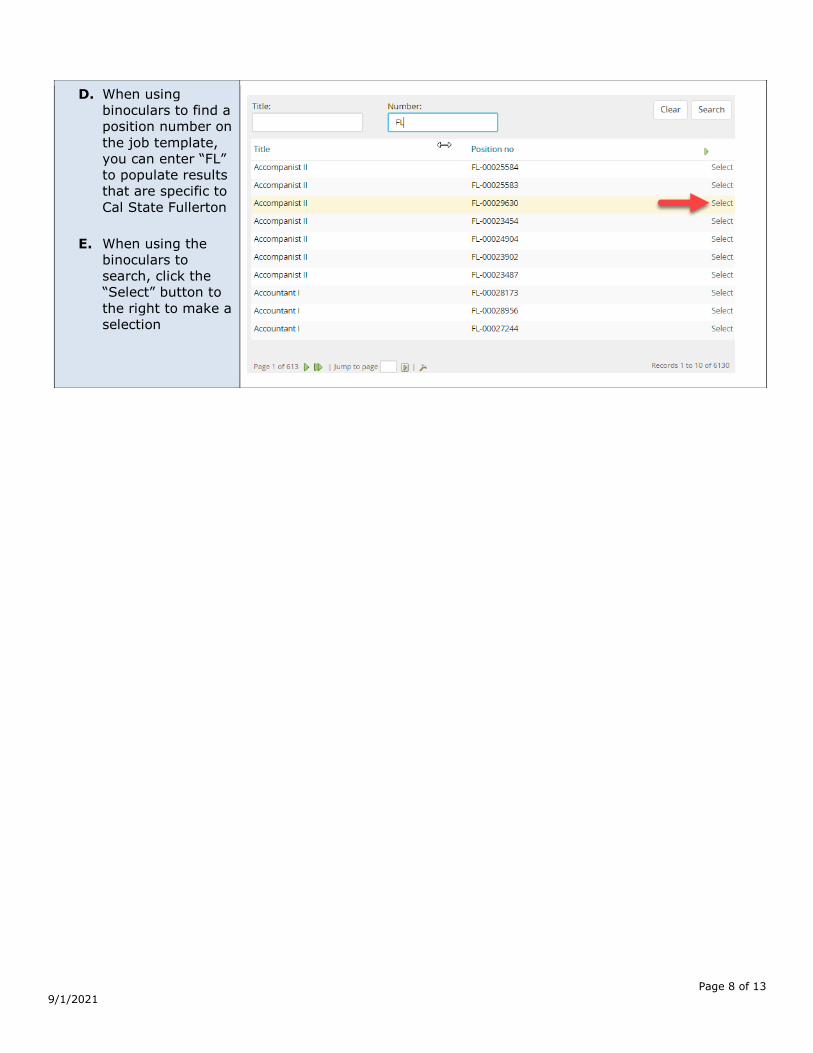
D. When using
binoculars to find a
position number on
the job template,
you can enter “FL”
to populate results
that are specific to
Cal State Fullerton
E. When using the
binoculars to
search, click the
“Select” button to
the right to make a
selection

Manage Multiple Pages of Information
Some lists are too long to see in a single page, so lists include controls for navigating and customizing
your view. Use the list controls whenever you view a large list of items that cannot be presented on a
single page.
Print a Page
If you need to print a page from the CHRS Recruiting system, you can use the print function. The print
function prints the entire page.
3. Navigate pages and
configure settings
A. Navigate Pages
arrows page
forward and back
through the list
B. You can type a
page directly into
the Jump to page
field
C. Use the Hammer
icon to open the
settings for the
search to configure
the following:
• Columns to display
• Number of results
to display on a
page
4. Print a page
A. Click the Question
mark icon in the
top right
B. Select Print
C. Specify printer
settings
D. Click Print

Page 10 of 13 9/1/2021
Expandable Information Box
Some fields have expandable information that you can display by clicking on them. These are sometimes
referred to as “blue boxes.” They display data that is related to the field value above it.
PeopleSoft HCM Integration
CHRS Recruiting is one part of the CSU common human resources system, which uses PeopleSoft HCM.
The following data from PeopleSoft HCM is integrated into CHRS Recruiting.
Data Description
Users All active employees are set up in CHRS Recruiting and can sign in with Single Sign On. Use your campus email address and password to log in to CHRS Recruiting.
Positions Position information is imported from the CHRS Recruiting system. Position IDs are searchable.
Hierarchy The campus organizational structure is represented in CHRS Recruiting.
Sites Campus locations are configured in CHRS Recruiting, including customization for each campus. A site includes a main campus and any satellite sites where positions can be recruited for.
Pay Scale CSU Pay Scale, standard across the system, is integrated with CHRS Recruiting.
5. Recognize an
expandable
information box
Blue boxes are blue
shaded regions below
the data field that
include a field value
and an expansion
arrow
Click the blue bar
under the field to view
more information
about the field

Page 11 of 13 9/1/2021
Recruiting Process Overview
Job Creation
Job Template
Position Description
Job Requisition
Source Candidates
Selection Offer Onboarding
Job Creation: The recruiting process begins with the creation of a job. If the job requires a
position description, then you start with one. Job templates can shorten the time to create a new
job.
Source Candidates: After the job is created and approved, you post the job to make it available
for applicants. Recruiters can also search through existing talent pools and invite applicants.
Selection: Applications are reviewed and shortlisted. Some applicants are moved forward in a
recruitment process.
Offer: When an applicant is selected for the position, an offer is created, approved, and made.
Onboarding: After the applicant has accepted the offer, onboarding tasks begin.
New Hire data from CHRS Recruiting system is sent to PeopleSoft HCM to record employment
transactions and to generate pay.

Page 12 of 13 9/1/2021
Explore the Top Navigation Bar
1. Navigation bar
• The menu icon opens
the side menu. The
side menu provides
navigation to all other
pages.
• Your campus logo
opens the Dashboard
or Home page.
• Quick links open the
most commonly-used
pages for your role.
• Your account shows
your account name
and provides a link to
log out.
• Recent Items displays
the most recent items
that you viewed in
your account.
• The question mark
icon provides links to
the PageUp
Knowledge Portal,
Support services, and
print function.

Page 13 of 13 9/1/2021
Role-Based Interface Differences
Every user who logs in to the CHRS Recruiting system is assigned to one or more roles. Your role
determines what you can see within the CHRS Recruiting system dashboards and menus, including:
• Links available in Quick Links
• Links available in the Navigation menu
• Dashboards
• Buttons, links and controls to perform certain tasks (such as create a job)
Example of role differences
Different roles have access to different dashboards and menu items.
Search Committee Chair menu Additional viewer menu


![Skaffold - storage.googleapis.com · [getting-started getting-started] Hello world! [getting-started getting-started] Hello world! [getting-started getting-started] Hello world! 5.](https://static.fdocuments.in/doc/165x107/5ec939f2a76a033f091c5ac7/skaffold-getting-started-getting-started-hello-world-getting-started-getting-started.jpg)