009-1410-04 Pro Remote User Guidesav-documentation.s3.amazonaws.com/Product User...
23
Savant Pro Remote User Guide 1 of 23 Copyright 2018 Savant Systems., LLC 009-1410-04 | 180228 Pro Remote User Guide REM-1000/1000I | REM-2000/2000I Document Number: 009-1410-04 Document Date: February 2018 Document Supports: Savant Pro Remote da Vinci 8.7 or higher Table of Contents To access the link to the topics in this document, select the topic page. 1. Welcome to Savant Pro Remote ............................................ 2 2. Hardware Overview ...................................................................... 3 3. Introduction to the Pro Remote Screens ............................ 5 4. User Log In/Log Out .................................................................... 6 5. SETTINGS .......................................................................................... 7 6. SCENES .............................................................................................. 8 7. SERVICES.........................................................................................12 8. Sleep Timer .....................................................................................15 9. FAVORITES .................................................................................... 16 10. Voice Commands..........................................................................17 11. Multi-Room Remote (REM-2000) ........................................ 18 12. Software Updates (OTA) ........................................................ 20
Transcript of 009-1410-04 Pro Remote User Guidesav-documentation.s3.amazonaws.com/Product User...

Savant Pro Remote User Guide 1 of 23 Copyright 2018 Savant Systems., LLC 009-1410-04 | 180228
Pro Remote User Guide REM-1000/1000I | REM-2000/2000I
Document Number: 009-1410-04
Document Date: February 2018
Document Supports: Savant Pro Remote da Vinci 8.7 or higher
Table of Contents To access the link to the topics in this document, select the topic page.
1. Welcome to Savant Pro Remote ............................................ 2 2. Hardware Overview ...................................................................... 3 3. Introduction to the Pro Remote Screens ............................ 5 4. User Log In/Log Out .................................................................... 6 5. SETTINGS .......................................................................................... 7 6. SCENES .............................................................................................. 8 7. SERVICES .........................................................................................12 8. Sleep Timer .....................................................................................15 9. FAVORITES .................................................................................... 16 10. Voice Commands..........................................................................17 11. Multi-Room Remote (REM-2000) ........................................ 18 12. Software Updates (OTA) ........................................................ 20

Savant Pro Remote User Guide 2 of 23 Copyright 2018 Savant Systems., LLC 009-1410-04 | 180228
1. Welcome to Savant Pro Remote Welcome to the Savant Pro Remote. This User Guide is an overview of the hardware, software, and how to use the touchscreen to navigate through the various main screens. Read the Pro Remote User Guide in its entirety prior to operating the Pro Remote to take full advantage of the control options available for your Savant Pro system.
Networking – Local Wi-Fi® Network supporting 802.11 b/g/n 2.4 GHz, (5.0 GHz REM-2000 only) – Local Wi-Fi® Network Security – WPA1™, WPA2™, WPA1™ + WPA2™
Gestures The Savant Pro Remote User Guide instructs a user to tap, press and hold, and swipe left, right, up or down on the LED screen.
Tap Touch and release (tap) a button or icon.
Touch and Hold Touch and hold a button or icon on the screen until a pop-up menu or some other feature appears.
Swipe Right Touch and swipe your finger to the right.
Swipe Left Touch and swipe your finger to the left.
Swipe Left or Right
Touch and swipe your finger to the left or right.
Swipe Up Touch and swipe your finger toward the top of the screen.
Swipe Down Touch and swipe your finger toward the bottom of the screen.
Swipe Up or Down
Touch and swipe your finger up or down.
Customer Support – For additional assistance with the Savant Pro Remote or other Savant Products, refer to information on the Savant Customer Community -or-
Call your Integrator for assistance.

Savant Pro Remote User Guide 3 of 23 Copyright 2018 Savant Systems., LLC 009-1410-04 | 180228
2. Hardware Overview Hardware information and button descriptions are described below.
REM-1000
Power Button Press/Release: – Powers on the Remote. Remote will take 5-7
seconds before Savant logo appears. – With Remote powered on, the power button
will toggle the last used A/V Service on or off. Press/Hold (5 sec.) – Powers remote Off.
Microphone Used for voice commands and is positioned behind small hole on top of remote. IMPORTANT: Do not insert objects into the microphone opening.
Touchscreen Display
High resolution LCD display with multiple screens for viewing and control of your Savant System. – Motion Activated – One touch and swipe operation – Controls for Services
Volume Increase or decrease volume of the Service shown on the touchscreen display.
Channel Channel up or down the service selected on the touchscreen display (if applicable).
Navigation (D-pad)
– Standard up, down, left, and right arrows used for on-screen control.
– Press and hold the up/down arrows to page up or down the on-screen menus.
– Press Select button to select the highlighted item.
Voice Command Activate services, scenes, environmental controls, and various other functions using voice commands. See the Voice Commands section.
Remote Base Charging Station
Charges the battery when the Remote is set into the Remote Base.
Service Control Generic Service buttons for basic control over Audio/Video services. Function is dependent on Active Service. NOTE: Some buttons may do nothing for the active service.
Wi-Fi Communicates with the Savant Pro system over the local Wi-Fi network.
Bluetooth Communicates with the Remote Base using Bluetooth v4.0 Bluetooth Communicates with the Pro
Remote using Bluetooth v4.0
Infrared (IR) The Remote Base can be used to transmit IR commands.

Savant Pro Remote User Guide 4 of 23 Copyright 2018 Savant Systems., LLC 009-1410-04 | 180228
REM-2000
Power Button Press/Release – Powers on the Remote. Remote will take 5-7
seconds before Savant logo appears. – With Remote powered on, the power button
will toggle the last used A/V Service on or off. Press/Hold (5 sec.) – Powers remote Off.
Microphone Used for voice commands and is positioned behind small hole on top of remote. IMPORTANT: Do not insert objects into the microphone opening.
Touchscreen Display
High resolution LCD display with multiple screens for viewing and control of your Savant System. – Motion Activated – One touch and swipe operation – Controls for Services
Volume Increase or decrease volume of the Service shown on the touchscreen display.
Channel Channel up or down the service selected on the touchscreen display (if applicable).
Navigation (D-pad)
– Standard up, down, left, and right arrows used for on-screen control.
– Press and hold the up/down arrows to page up or down the on-screen menus.
– Press Select button to select the highlighted item.
Voice Command Activate services, scenes, environmental controls, and various other functions using voice commands. See the Voice Commands section.
Remote Base Charging Station Charges the battery when the Remote is set into the Remote Base.
Service Control Generic Service buttons for basic control over Audio/Video services. Function is dependent on Active Service. NOTE: Some buttons may do nothing for the active service.
Wi-Fi Communicates with the Savant Pro system over the local Wi-Fi network.

Savant Pro Remote User Guide 5 of 23 Copyright 2018 Savant Systems., LLC 009-1410-04 | 180228
3. Introduction to the Pro Remote Screens The Pro Remote has several main screens. The diagram below shows how to navigate through these screens. Refer to the appropriate section for additional information for each screen.
HELPFUL INFO! – From the User Log in/Log out
screen, tap a User to log out the active user and log in the selected user.
– Swipe right on the User Log in screen to return to the SETTINGS screen.
– To traverse the FAVORITES, SERVICES, and SCENES screens, simply swipe left or right.
– Scenes created on the Pro Remote are synced to the Savant Pro 8 App and vice versa.
– Users added in the Savant Pro 8 App are synced to the Pro Remote.
– Swipe up or down to scroll through the fields of any screen.
– The Scenes and Favorites available to each user are the Scenes and Favorites set up for that user. Each user has their own set of Scenes and Favorites to choose from.
- A device is On and streaming audio, video, or both. This icon will be animated when the service is playing. The animation will pause if the service is Muted or Paused. Taping this icon will bring you to the active service screen.
- Battery Level Indicator.
- Wi-Fi Signal Indicator. Only displays on the REM-2000
For additional information on each screen, refer to the appropriate
sections below.

Savant Pro Remote User Guide 6 of 23 Copyright 2018 Savant Systems., LLC 009-1410-04 | 180228
4. User Log In/Log Out The Remote's Log in screen is opened when the Remote is first powered on. Any User Accounts created in the Savant Pro 8 App will be synced to and appear on the Remote.
Users (Configured Cloud User Accounts) After creating a Savant Pro 8 App Cloud User account in the existing Savant Pro system, the new user is automatically synced to the Pro Remote (made available). In addition, any other users who were granted access through the Savant Pro 8 App will sync to the Pro Remote as well.
– There are three types of Users (Admin, Household, and Guest). All permissions are set up through the Savant Pro 8 App and synced to the Remote. Refer to the Savant Pro 8 App User Guide on the Savant Customer Community for more information on User types.
– The active user (logged in) has the words Log out visible just below it. This indicates which is the active user.
– Only one user can be active at a time. – Swipe right on the User Log in screen to return to the SETTINGS screen.
– Select the icon to open the last viewed screen. This will be SETTINGS screen. The left arrow functions like the swipe right action above.
– To log on, tap the appropriate user. This will automatically log out the active user and log on the selected user.
– To log out, tap the active user and that user is logged out.
– Tap the icon on the SERVICES screen to open the SETTINGS screen.
HELPFUL INFO - Savant User (Default User Profile) If the Savant Pro system that the Remote is being added to does not have an iOS® or Android® device with the Savant Pro 8 App and a Savant Cloud account created, the user available on the Pro Remote defaults to user: Savant User. The Savant User on the Remote has limited access. Basic functions such as adjusting the functions in the SETTINGS screen and controlling the available Services in the SERVICES screen are enabled.
Functions that require the Remote to sync with the Savant Pro 8 App are not enabled. For example: – Favorites that exist in the cloud are not available. – A Scene can be captured using the Remote but additional functions such as deleting or modifying that scene cannot be done since the Savant Pro 8
App is where that functionality exists. Since the Remote has such limited access and functionality, the Remote should be synced to a User Account on the Savant Cloud Server. To do this, download and install the Savant App to an iOS or Android® device and create an account. Once the account created is associated with the Savant Pro system (Savant Host) the Remote will automatically sync to the system and display the associated cloud accounts. From there a User can be selected. For information on Downloading, Installing, and Creating a User for the Savant Pro 8 App, refer to the Savant Pro 8 App User Guide (009-1399-xx) on the Savant Customer Community or contact your integrator for assistance.

Savant Pro Remote User Guide 7 of 23 Copyright 2018 Savant Systems., LLC 009-1410-04 | 180228
5. SETTINGS In the SETTINGS screen, a user can view and modify hardware related functions. Adjusting sleep timers, screen brightness and viewing versioning information are a few of the actions available.
About The About page gives specific versioning and FCC information about the Pro Remote Model: Model Number of the Pro Remote (SUR-1000) is displayed. Version: Version of software loaded on the Pro Remote. S/N: Serial number of the Pro Remote FCC ID: / IC: Regulatory information Software Update: A software updated can be manually triggered from this screen, if the Host has it available.
Commands Only available if custom workflows are configured and visible in this room.
Users User Accounts created in the Savant Pro 8 App will be synced to and appear on the Remote. Scenes and Favorites are saved per User.
Wi-Fi Information (REM-2000 only) Network: Displays the name of the SSID. IP Address: Provides the IP Address of the Remote. Strength: Wi-Fi single strength displays in a fraction out of 4 and the measured db strength. Channel: SSID channel with the frequency. Frequency: Shows the frequency band that the Remote is assigned to. CONFIGURE WI-FI: Resets the Wi-Fi configuration. Removing the saved SSID information.
Brightness Tap to access the Brightness adjustment screen. In this screen, there are five levels of intensity to choose from. Set the brightness level by selecting more or fewer dots. Selecting more dots indicate a brighter screen. NOTE: Fewer dots will extend the battery life.
Wake Sensitivity Wake Sensitivity is the amount of movement required to wake up the Remote after it has gone to Sleep. Tap to access the Wake Sensitivity field. In the Wake Sensitivity adjustments screen, select Low, Medium, or High. A setting of High will require less movement of the Remote to wake it up.
Sleep Sets the amount of time the Remote will stay active without moving or pressing a button before going to sleep or into power saver mode. Tap to access the Sleep adjustments screen. Select the time for the remote to stay active. The selections range from 10 seconds to 2 minutes. NOTE: Shorter times will extend the battery life.
Send Diagnostics When troubleshooting a problem, the Savant Support Team may require the embedded logs from the Remote. Pressing the Send Diagnostics field will upload the log files to the Savant Host. Full communications between the Remote, Remote Base, and Host are required. With the log files loaded in the Host, the Savant Support Team can view the files and take any necessary actions required.
Factory Reset (REM-2000 only) This will remove user data and Wi-Fi information from the remote and reboot the device.
BACK ARROW Select the left arrow to revert back to the Services screen.

Savant Pro Remote User Guide 8 of 23 Copyright 2018 Savant Systems., LLC 009-1410-04 | 180228
6. SCENES Scenes make it easy to control one or more Services using a button press or tap. The Pro Remote can capture a Scene using the current states and levels of the devices in the Savant Pro system. Once the Scene is created, it will be available in the SCENE screen. Before describing how to create a Scene, it is important to know the following: – Any Scenes captured on the Remote are automatically synced to the Savant Pro 8 App. – When capturing a scene on the Remote there is the option to Share the scene with all other users and devices that can access the system. – Deleting or modifying a Scene is set in the Savant Pro 8 App only. Once completed, the modifications are synced back to the Pro Remote. – The Remote will only capture Lighting and Media Services when building a Scene. All other Services that are not Media and Lighting related need to be
set up in a Scene on the Savant Pro 8 App. – Timers, schedules, and Fade adjustments can't be set up in the Remote. Those functions are set up in the Savant Pro 8 App and automatically synced
back to the Remote.
Scene Icons
Shared Scene This is a Shared Scene. It can be used by all users and devices that can use this Savant System.
Schedule Enabled This Scene activates at a scheduled time and day.
Schedules can be activated/deactivated by tapping the Schedule icon.
Schedule Disabled This scene has a Schedule and it is not currently active.
Schedules can activated/deactivated by tapping the Schedule icon.
Timer Active This scene has a set amount of time before it is activated once pressed.
A countdown clock will display on the Scene.
Timer Not Active This scene has a timer and is not currently active.
6.1. Adjust Services to the Desired Levels The first step is to set the levels and states of the Services (ceiling light and Cable TV in this example) to the desired levels. This can be completed using the Savant Pro App or the Savant Pro Remote. (Any Savant control method that gets the Services to their desired levels and states is supported.)

Savant Pro Remote User Guide 9 of 23 Copyright 2018 Savant Systems., LLC 009-1410-04 | 180228
6.2. Capture the Current Service Levels and States Once the levels and states of the Services are set, the current settings can be captured. 1. From the SCENES screen, tap + icon to start the CAPTURE process (See image below). Also the Voice command “Capture” can be used to start
this process.

Savant Pro Remote User Guide 10 of 23 Copyright 2018 Savant Systems., LLC 009-1410-04 | 180228
2. In the CAPTURE screen that opens, the Remote displays the captured Services. The captured Services are the active (switched on) Services in the room where the Remote is set up.
– If the captured Services in the checked room are the only Services being added to the Scene, skip this step and move to step 3 below. – If the captured Services will need to be modified or if any additional Services from other rooms need to be added, refer to the information
below in this step.
A. The Remote captures a snapshot of the following: – All active (switched on) Services from the room that the Remote is
set up in. These Services are automatically added to the Scene being created.
– Services from other rooms that can be captured on the Remote. These Services are NOT selected.
B. To expand any room, tap the text for that room. In the image to the left, the Living Room has been expanded to display all the captured Services.
C. Any of the captured Services can be deselected by tapping that Service in the list. In this example, the CABLE TV and LIGHTING has been selected.
D. To select or deselect a room with all of its Services, tap the room icon to add a check mark. This adds the room with all its Services to the Scene. For example, tapping the Master Bedroom icon in the image to the left adds the Master Bedroom with all its Services to the Scene.
E. If adding a room to the Scene, the room can be expanded and each of the Services displayed in that room can be removed from the Scene.
3. Select the NEXT button when all Services are added or removed. 4. In the SCENE NAME screen that opens, select a name for the Scene from the list of default scene names available.
5. Select the NEXT button once the name has been selected.

Savant Pro Remote User Guide 11 of 23 Copyright 2018 Savant Systems., LLC 009-1410-04 | 180228
6. Select if desired SHARED SCENE. This will share this Scene with all devices and users on the system.
7. Select SAVE to save the Scene. The Scene is now saved and is available in the SCENES screen of the Remote. In addition, a default image will be
added. The images are the same images available in the Savant Pro 8 App. 8. Test your newly created Scene and verify it works as intended. Modifications to the Scene will now need to be modified using the Savant Pro 8
App. All modifications made in the App will be synced back to the Remote.
Savant Pro Remote User Guide 12 of 23 Copyright 2018 Savant Systems., LLC 009-1410-04 | 180228
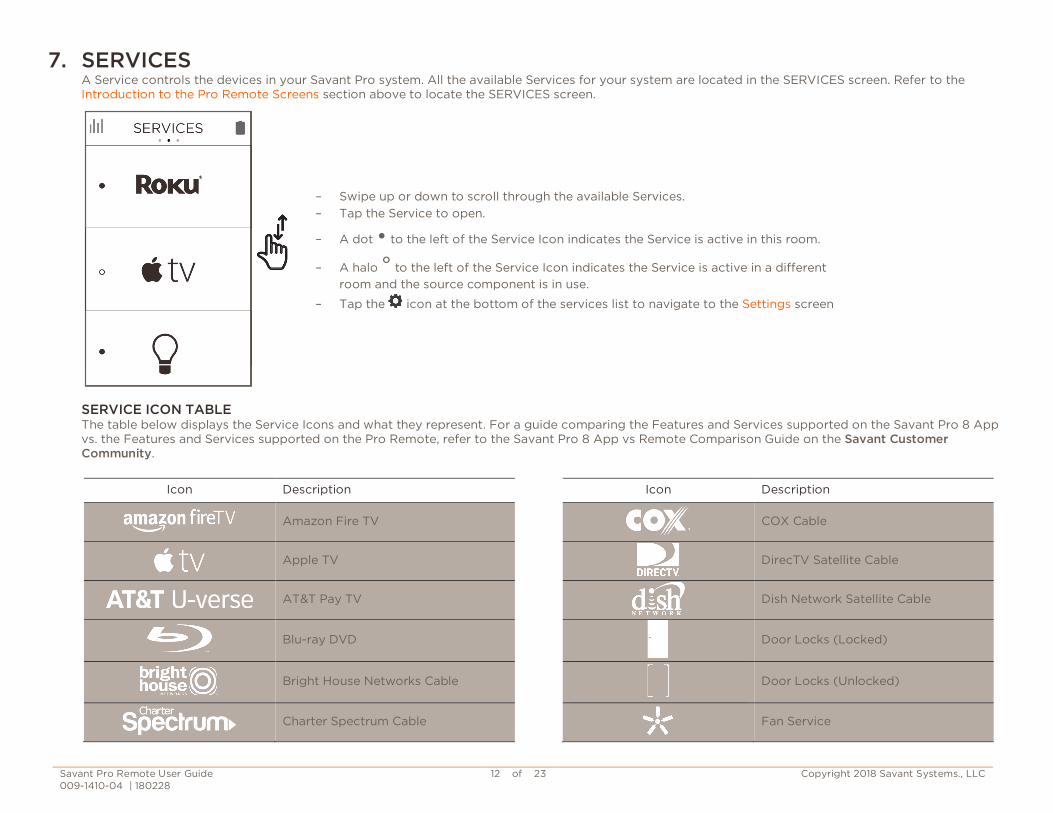
7. SERVICES A Service controls the devices in your Savant Pro system. All the available Services for your system are located in the SERVICES screen. Refer to the Introduction to the Pro Remote Screens section above to locate the SERVICES screen.
– Swipe up or down to scroll through the available Services. – Tap the Service to open.
– A dot • to the left of the Service Icon indicates the Service is active in this room.
– A halo ° to the left of the Service Icon indicates the Service is active in a different room and the source component is in use.
– Tap the icon at the bottom of the services list to navigate to the Settings screen
SERVICE ICON TABLE The table below displays the Service Icons and what they represent. For a guide comparing the Features and Services supported on the Savant Pro 8 App vs. the Features and Services supported on the Pro Remote, refer to the Savant Pro 8 App vs Remote Comparison Guide on the Savant Customer Community.
Icon Description Icon Description
Amazon Fire TV
COX Cable
Apple TV
DirecTV Satellite Cable
AT&T Pay TV
Dish Network Satellite Cable
Blu-ray DVD
Door Locks (Locked)
Bright House Networks Cable
Door Locks (Unlocked)
Charter Spectrum Cable
Fan Service

Savant Pro Remote User Guide 13 of 23 Copyright 2018 Savant Systems., LLC 009-1410-04 | 180228
Icon Description Icon Description
Garage Door (Closed)
Lighting
Garage Door (Open) Optimum Cable
Generic Audio
PlayStation 1
Generic Cable PlayStation 2
Generic CD PlayStation 3
Generic DVI PlayStation 4
Generic DVD
Radio Service
Generic Game
Radio (AM)
Generic HDMI
Radio (FM)
Generic Media
Radio (Satellite)
Generic Satellite
RCN Cable
Generic Video
Relay and Trigger
Google Chromecast
ROKU
Google Fiber
Savant Music
Shades (Open) SONOS
Shades (Half Open)
Time Warner Cable
Shades (Closed)
TiVo

Savant Pro Remote User Guide 14 of 23 Copyright 2018 Savant Systems., LLC 009-1410-04 | 180228
Icon Description Icon Description
VCR Wii Game
VGA
Wii U Game
Xfinity Cable
Xbox Game
Version FIOS Xbox One Game
68° CLIMATE
Climate (Displays current Temp) Xbox 360 Game
Powering Off an Audio/Video (A/V) service Within all A/V services there is a power button on the bottom right corner of the screen. With changes made in da Vinci 8.1 software, this on screen button now has a menu that allows the user to choose to power off the service or the entire room (including both A/V and Lighting Services). Tapping the on-screen power button brings up the following menu.
NOTE: See the Sleep Timer section below for more information on the sleep timer function and its use.

Savant Pro Remote User Guide 15 of 23 Copyright 2018 Savant Systems., LLC 009-1410-04 | 180228
8. Sleep Timer The Sleep Timer will power off an active service after the desired amount of time.
8.1. Activate Sleep Timer From any active Service
1. Tap the on the screen 2. Tap Sleep Timer on the pop up.
3. Select the amount of time before the service will power off.
Once the Sleep timer is active the Power Off button changes to .
8.2. Adjust/Cancel Sleep Timer Tap the icon and the Sleep Timer can be adjusted or canceled.

Savant Pro Remote User Guide 16 of 23 Copyright 2018 Savant Systems., LLC 009-1410-04 | 180228
9. FAVORITES The FAVORITES screen is where favorites for a Cable or Satellite Provider are added. Refer to the Introduction to the Pro Remote Screens section above to locate the FAVORITES screen.
– Swipe up or down to scroll through the available Favorites. – Favorites can't be added using the Pro Remote. – Favorites are added using either the Savant Pro 8 App or the Channel Listing Editor in RacePoint
Blueprint (Tools > Channel Listings Editor). – Favorites are synced from the Savant Pro 8 App to the Pro Remote. – There is no limit to the number of Favorites that can be added. However, Savant recommends
the number of favorites be limited to around 50.

Savant Pro Remote User Guide 17 of 23 Copyright 2018 Savant Systems., LLC 009-1410-04 | 180228
10. Voice Commands Your Savant Remote makes it easy to control various Services in your Savant Pro system through a series of simple voice commands.
10.1. Activate a Command To utilize the Voice Command function, do the following:
1. Press and hold the voice command button on the front of the Remote for a few seconds till the voice command ready icon appears.
TIP! Speak clearly with the Remote about 12 inches away from your mouth.
2. Say the command and release the button (Microphone is on top near power button). For example, you could say Watch Cable. The touchscreen will display the command back to you.
The spoken command will be performed.
HELPFUL INFO! If the Remote chose the wrong command either quickly tap the “Cancel” Button or press the button. The Remote has a delay before the command is performed to allow the spoken command to be confirmed.
10.2. List of Voice Commands For a list of supported voice commands for this system, do the following: 1. Press and hold the Voice Command button and say, “Voice Commands”. A VOICE CONTROL screen will appear with a list of categories. 2. Swipe up or down and select a category. 3. In the screen that opens, a list of voice commands is displayed. Swipe up or down to scroll through the list of commands.

Savant Pro Remote User Guide 18 of 23 Copyright 2018 Savant Systems., LLC 009-1410-04 | 180228
11. Multi-Room Remote (REM-2000) This section highlights the additional features of the Savant Pro Remote Multi-Room.
11.1. Change Room
1. From any room, select the drop-down disclosure triangle.
2. Select another room from the list of rooms. Once selected, the new room will open displaying the services in that room.

Savant Pro Remote User Guide 19 of 23 Copyright 2018 Savant Systems., LLC 009-1410-04 | 180228
11.2. Reset Wi-Fi If the SSID or password of the local network is changed the steps below describe how to update the Wi-Fi information to the new settings.
1. From any room, scroll to the bottom of the page and select the Gear Icon.
2. Select Wi-Fi Information from list in the SETTINGS page.
3. Select CONFIGURE WI-FI button.
4. Select RESET. The remote will scan the area and list all available networks. Scroll through the list, select the appropriate network, and connect to that network with the new credentials.

Savant Pro Remote User Guide 20 of 23 Copyright 2018 Savant Systems., LLC 009-1410-04 | 180228
12. Software Updates (OTA) The software in the Pro Remote is pre-installed at the factory. The next few sections describe how these devices are updated if there are updates available after installing into the Savant Pro system.
12.1. REM-1000 Updates Once the Pro Remote and Base are configured and installed into the Savant Pro system, the Remote is eligible to receive Over The Air (OTA) software updates. OTA updates typically happen automatically with no interaction by the user. If however, the update process is interrupted and the software downloads but doesn't install, it can be finished manually by selecting the UPDATE button that appears on the touchscreen to allow a user to complete the process. This section describes the automatic update process. OTA updates may include fixes and new features.
1. Savant releases an Over the Air update and it is loaded into the Savant Host. 2. Once the update is loaded on the Host, the Host initiates a download to the Pro Remote as long as the following criteria is met:
– Pro Remote must have at least a 60% charge on its rechargeable batteries – Pro Remote must be cradled in the Pro Remote Base. – No A/V Services are active or switched on. – Pro Remote must be signed in to a Cloud User Account. If all of these criteria are met, the Host automatically downloads and installs the update after 2:00am. The download to the Pro Remote can take a few hours.
TIP! It is good practice to cradle the Pro Remote in its Base overnight. The overnight hours are a good time for the Pro Remote to download and update itself without any interruptions. However, the download to the Pro Remote can begin at any time as long as the criteria above are met.
3. After the Remote is updated, the software version can be verified through the About screen on the Pro Remote. (From the Remote's Main User Log on/Log out screen select > About)
Manual Update 1. Savant released a software update via the Cloud and it installs on the Savant Host. 2. The Remote checks every hour to see if there is a new update on the Host (power cycling the Remote will force this check to occur). 3. An Update button appears in the “About” screen in the Remotes Settings. Tap this button and follow the instruction on the Remotes to force the
update to occur immediately.
In this case, the software update is loaded onto the Remote but waiting to get installed. If this occurs, an UPDATE button appears in the About screen (select > About). If the UPDATE button appears in this screen, select it and the updated software will install. This will take a few minutes and the Remote will not be usable till after the update completes.
HELPFUL INFO! If the Remote is picked up or a service is activated in the room the Update will pause. It can be resumed from the About screen. Tap the RESUME UPDATE button.

Savant Pro Remote User Guide 21 of 23 Copyright 2018 Savant Systems., LLC 009-1410-04 | 180228
12.2. REM-2000 Updates
Criteria for Download The Pro Remote Multi-Room can receive software updates only if the following criteria is met: – The remote must be communicating with a Savant Pro System. – A user must be signed in on the remote and that user must be registered with the Savant cloud. – The Remote must have at least 50% charge left on its rechargeable battery. – The Host determines there is an updated version of software on the Savant cloud than what is running on the Remote. If the criteria are met, the update process begins. To update, there are two pieces: 1. Software gets downloaded to remote. 2. Software gets installed onto remote.
Overview of Download and Install Process 1. To begin the process, one of the following needs to be achieved
to initiate a software update: a. A new version of software for the remote is loaded onto the
Savant cloud. During normal operation, the Host determines the updated version of software is available from the Savant cloud and initiates the download.
b. The da Vinci runtime software on the Host is updated. The da Vinci update now points to a newer version of remote software on the Savant Cloud and the software download to the remote is then started.
c. A new remote is added to the system and the version of software on the remote differs from the version of software on the Savant cloud and a download to the remote is started.
With the download process to the remote started, the process can be viewed using the System Status page of System Monitor. HELPFUL! The complete remote download, install, and reboot process takes about 5-10 minutes depending on network speeds. See Appendix B: System Monitor section below for more information.

Savant Pro Remote User Guide 22 of 23 Copyright 2018 Savant Systems., LLC 009-1410-04 | 180228
Download and Install Remote Software The download of the remote software was started by one of the methods described in section 7.2 above. Follow the instructions below to install the software onto the remote.
1. At any time during the download of software to the remote, navigate to the About page ( > About) and select the RESUME UPDATE/UPDATE AVAILABLE button. Pressing this button opens a DOWNLOADING screen and tells the remote to install the software immediately after the download is complete.
2. Once the software is downloaded onto the remote, the remote automatically installs the updated software. See image below.
3. Once installed, the remote will reboot and finish the software install.
4. When finished, navigate to the ABOUT page ( > About).
5. The updated software (Version:) is listed on the ABOUT page
Additional Information: – The RESUME UPDATE button indicates there is software currently downloading or the software has already downloaded and is staged on the
remote. Pressing the RESUME UPDATE button ensures the following: o If the software is downloaded on the remote, pressing the RESUME UPDATE button starts the installation process -OR- o If the software is downloading, pressing the RESUME UPDATE button during the download ensures the software install process starts once
the download process ends. – If the RESUME UPDATE button is NOT pressed during or after the software download, the remote automatically initiates the installation of the
software at 2:00 AM the next morning. – The complete remote download, install, and reboot process takes about 5-10 minutes depending on the speed of the network.

Savant Pro Remote User Guide 23 of 23 Copyright 2018 Savant Systems., LLC 009-1410-04 | 180228
Important Notice
Disclaimer Savant Systems, LLC. reserves the right to change product specifications without notice, therefore, the information presented herein shall not be construed as a commitment or warranty. Savant Systems, LLC. shall not be liable for any technical or editorial errors or omissions contained herein or for incidental or consequential damages resulting from the performance, furnishing, reliance on, or use of this material.
Patents Certain equipment and software described in this document is protected by issued and pending U.S. and foreign patents. All products and services are trademarks or registered trademarks of their respective manufacturer.
Copyright This document contains confidential and proprietary information protected by copyright. All rights reserved. Copying or other reproduction of all or parts of this document is prohibited without the permission of Savant Systems.
Trademarks © 2018 Savant Systems, LLC. All rights reserved. Savant, Savant App, Savant Host, Now You Can, RacePoint Blueprint, Single App Home, TrueCommand, TrueControl, and the Savant logo are trademarks of Savant Systems, LLC. AirPlay, Apple, AirPort Express, AirPort Extreme, Apple TV, Apple Remote Desktop, FireWire, iMac, iTunes, iPad, iPad mini, iPad Air, iPhone, MacBook, Mac and OS X are trademarks or trade names of Apple Inc. iOS is a trademark of Cisco®. Android, Google, Google Play, and other Google marks are trademarks of Google, Inc. Wi-Fi is a registered trademark of the Wi-Fi Alliance®. HDMI® is a trademark of HDMI Licensing, LLC. Autonomic® and TuneBridge® are registered trademarks of Autonomic Controls, Inc. MOTU® is a registered trademark of Mark of the Unicorn, Inc. Luxul® is a registered trademark of Luxul Wireless. All other brand names, product names, and trademarks are the property of their respective owners.
Technical and Sales Support Savant Systems, LLC is dedicated to providing prompt and effective support in a timely and efficient manner. – To contact Savant Support, access the Savant Customer Community and enter a support Case ticket. – To contact Savant Sales, visit Savant.com and select Contact Us to locate a local sales representative in your area.