1033 H000 A11000 019 XXXX XXXX(Construction Manual for Final) Rev 00

Operation Manual 3-100-1120 Rev. E
IQspiro®
Version 10.0

2 3-100-1120 © Midmark Corporation 2016
Notice
The information in this manual is subject to change without notice.
Midmark Corporation shall not be liable for technical or editorial omissions made herein, nor for incidental or
consequential damages resulting from the furnishing, performance, or use of this guide.
This document may contain proprietary information protected by copyright. No part of this document may be
photocopied or reproduced in any form without prior written consent from Midmark Corporation.
IQecg, IQholter, IQspiro, IQvitals, Zone, IQmanager, and IQpath are trademarks of Midmark Corporation.
Microsoft and Windows are registered trademarks of Microsoft Corporation in the United States and other countries.
Intel and Intel Core are trademarks of Intel Corporation in the United States and other countries.
Citrix and ICA are trademarks of Citrix Systems, Inc. and/or one or more of its subsidiaries, and may be registered in the United States Patent and Trademark Office and in other countries.
Part number for this Operation Manual: 3-100-1120 Rev. E
Caution Federal Law restricts this device to sale by or on order of a physician or properly
licensed practitioner.

3 3-100-1120 © Midmark Corporation 2016
Table of Contents
Related Documents ....................................................................................... 6
Precautions .................................................................................................... 6
Contents Checklist ........................................................................................ 8
I. General Information ................................................................................... 9
A. Introduction .......................................................................................................... 9
B. Description ......................................................................................................... 11
C. Product Overview ............................................................................................... 12
D. Necessary Computer Skills ................................................................................ 12
E. Configurations .................................................................................................... 12
F. Thin Client Configurations ................................................................................... 13
G. System Specifications ........................................................................................ 16
II. System Installation .................................................................................. 17
A. Minimum Computer Requirements ..................................................................... 17
B. Software Installation ........................................................................................... 18
C. Installation Steps for IQmanager® ........................................................................................................................... 19
D. Hardware Setup ................................................................................................. 20
E. Configuring IQspiro® ............................................................................................................................................................... 21
F. Calibration ........................................................................................................... 34
G. Starting a New Calibration.................................................................................. 36
III. Operation ................................................................................................ 40
A. Starting IQmanager® .............................................................................................................................................................. 40
B. Opening Screen ................................................................................................. 40
C. Creating a New Patient Profile ........................................................................... 41
D. Pre-Test Preparation .......................................................................................... 48
E. Performing an FVC or FVC Loop ........................................................................ 49
F. Observation Notes .............................................................................................. 50
G. Patient Instructions ............................................................................................ 51
H. Step-by-Step Spirometry Instructions ................................................................. 52
IV. Reviewing Patient Reports .................................................................... 58
A. Review Spirometry Reports ................................................................................ 58
B. Spirometry Analysis and Reports ........................................................................ 59
C. Trending .................................................................................................................. 60
V. Maintenance and Storage ....................................................................... 68
Cleaning ................................................................................................................. 68

4 3-100-1120 © Midmark Corporation 2016
VI. Appendices ............................................................................................. 70
A. Appendix A - Screen Summary ........................................................................... 70
B. Appendix B – Troubleshooting IQspiro® and IQmanager®............................................................... 71
C. Appendix C - Safety and International Symbols .................................................. 74
D. Appendix D - Interpretation – ATS ................................................................................ 75
E. Appendix E - Interpretation – NHANES III........................................................... 77
F. Appendix F - Reference Values - Adult ................................................................ 78
G. Appendix G - Reference Values - Pediatric ........................................................ 87
H. Appendix H - Adjustments to Reference Values Equations ................................. 98
I. Appendix I - Spirometry Measurement Parameters .............................................. 99
J. Appendix J – COPD Risk Assessment Calculation .............................................. 99
K. Appendix K - Lung Age Calculation .................................................................. 101
L. Appendix L - Performing a Pre/Post FVC Test - Quick Reference User’s Guide 102
M. References ...................................................................................................... 104
VII. Customer Support and Warranty Information .................................. 106
Warranty ............................................................................................................... 106
Return Materials Authorization .............................................................................. 106
VIII. EMC Requirements for the IQspiro® Digital Spirometer .................. 107
IX. Contact Information .............................................................................. 111

5 3-100-1120 © Midmark Corporation 2016
Physician’s Responsibility
The interpretations provided by the Midmark IQspiro® Digital Spirometer are for the exclusive use of licensed
physicians or personnel under their direct supervision. The suggested interpretation, including numerical and
graphical results, should be examined with respect to the patient’s overall clinical condition. Final analysis
should always be determined and verified by a physician.
Spirometry is an effort-dependent test. It is the responsibility of the physician to ensure proper administration
of the test, making a diagnosis, obtaining expert opinions on the results, and instituting the correct treatment,
if indicated.
Caution Federal Law restricts this device to sale by or on the order of a physician.

6 3-100-1120 © Midmark Corporation 2016
Related Documents
The following documents may be needed in order to operate Midmark diagnostic devices and software
products with the IQspiro® Digital Spirometer:
• IQmanager® Software Operation Manual (Part number: 62-78-0001)
• Setup Manual: Midmark Products over Thin Client using IQpath™ or COM port mapping
(Part number: 61-78-0001)
All documents referenced above are located on the Midmark Operation Manuals CD (part number:
3-100-2000), included with every device. All product Operation Manuals can also be downloaded from
midmark.com. For additional information contact Midmark Technical Service at (800) 624-8950 or (844) 856-
1230, option 2.
Precautions
Read and observe the following precautions to ensure proper operation of the IQspiro®.
1. Become familiar with the operations and procedures of the instrument prior to use.
2. It is recommended that the user be trained in the methods of administrating spirometry tests to a
patient by an organization that is certified by a recognized agency.
3. Installation location and maintenance of the device:
• Avoid installing the device in direct sunlight.
• Install and keep the device away from splashing fluids.
• Do not install the device where it may be affected by significant or extreme changes in humidity,
ventilation, airborne particles containing dust, salt, sulfur, etc.
4. Prepare the device for operation according to instructions in this operation manual.
5. Observe the patient closely while using the device. If any abnormality is observed, proper action,
which may include stopping the test, should be taken immediately.
6. The software turns off the device power according to programmed procedures.
7. Keep the device clean at all times to ensure trouble-free operation.
8. In case of a malfunction, call Midmark Technical Service and be prepared to describe the problem
precisely.
9. Perform routine inspections on the device.
10. Keep all items in a clean environment.
11. Do not make any modifications to the device; any modifications made will void the warranty.
12. Do not attempt to open the IQspiro® handle. Refer servicing to qualified service personnel.

7 3-100-1120 © Midmark Corporation 2016
Adverse Reactions
The IQspiro® is a non-invasive device and is safe in both construction and use. This has been confirmed by
the performance of Verification and Validation Testing, Biocompatibility Testing, Risk Assessment Analysis,
and ATS testing.
The following minor complications can occur with all diagnostic Spirometers:
1. Infection or injury due to the use of a non-sterile mouthpiece over open wounds,
2. Skin or mucous membrane abrasion caused by prolonged rubbing or excessive use of the
mouthpiece (not related to biocompatibility issues),
3. Nasal, oral, or dental pain,
4. Drying of oral or pharyngeal mucosa,
5. Congestion or irritation of Eustachian tubes,
6. Gastric distention or flatulence from ingested air,
7. Slight discomfort during test procedures,
8. Decreased secretion clearance during test procedures,
9. Aspiration of secretions,
10. Hyperventilation and possible dizziness.
Caution To ensure accurate patient testing, only use the accessories recommended by Midmark for
this product.
Caution Electronic devices can be damaged by exposure to liquids. Do not use or store the IQspiro®
near any type of liquids.
Caution Midmark IQspiro®, when used with specific Midmark disposable mouthpieces, is designed
and tested to meet regulatory and industry standards. Midmark can only warrant product
performance and accuracy if the IQspiro® is used as intended in its unaltered form, and when
recommended practice guidelines are followed. Any modification to the Midmark IQspiro®
mouthpiece, including but not limited to the use of an adapter or filter, is considered an
alteration to the design of the product.
Caution The American Thoracic Society (ATS) Standardization of Spirometry recommends the use
of gloves when replacing disposable mouthpieces (DMs), and hand-washing after touching
DMs.
8 3-100-1120 © Midmark Corporation 2016
A sitting position is recommended during testing as it may be safer for the patient if they experience syncope
or dizziness while performing the forced expiratory maneuver. Should the patient wish to stand for a
maneuver place a sturdy chair behind them in case they should become dizzy or lightheaded.
If prior testing took place with the patient standing, a new test can be performed with the patient sitting, just
be sure to make a note of the change (see Section III-F, Observation Notes).
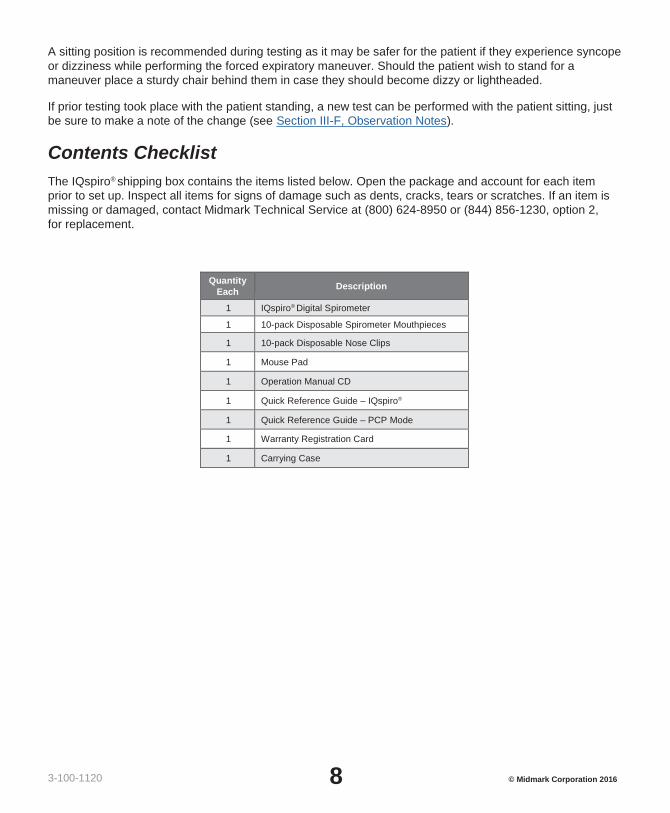
Contents Checklist
The IQspiro® shipping box contains the items listed below. Open the package and account for each item
prior to set up. Inspect all items for signs of damage such as dents, cracks, tears or scratches. If an item is
missing or damaged, contact Midmark Technical Service at (800) 624-8950 or (844) 856-1230, option 2,
for replacement.
Quantity
Each Description
1 IQspiro® Digital Spirometer
1 10-pack Disposable Spirometer Mouthpieces
1 10-pack Disposable Nose Clips
1 Mouse Pad
1 Operation Manual CD
1 Quick Reference Guide – IQspiro®
1 Quick Reference Guide – PCP Mode
1 Warranty Registration Card
1 Carrying Case

9 3-100-1120 © Midmark Corporation 2016
I. General Information
A. Introduction
The information in this Operation Manual is provided for users of Spirometer models Midmark IQspiro®
Digital Spirometer. Future reference of IQspiro® in this document may include the following part numbers:
Model Connection Type Device Part Number Kit Part Number
Midmark IQspiro®
USB
1-100-1225
4-000-0026 w/syringe
4-000-0025
Serial*
1-100-1205*
4-000-0021* w/syringe
4-000-0020*
*No longer in production.
The IQspiro® Digital Spirometer is intended for use as a prescription-use-only clinical diagnostic spirometer
for pulmonary function evaluation and data management. The IQspiro® is for use in hospitals and physician/
clinician offices by individuals that have received instruction or training in the administration of spirometry
tests. The IQspiro® operates with a Windows-compatible computer using a serial or USB port connection
and the IQmanager® Software.
Caution Midmark IQspiro®, when used with specific Midmark disposable mouthpieces, is designed
and tested to meet regulatory and industry standards. Midmark can only warrant product
performance and accuracy if the IQspiro® is used as intended in its unaltered form, and when
recommended practice guidelines are followed. Any modification to the Midmark IQspiro®
mouthpiece, including but not limited to the use of an adapter or filter, is considered an
alteration to the design of the product.

10 3-100-1120 © Midmark Corporation 2016
The IQspiro® is indicated for use with male and female adult and pediatric patients to evaluate, assess,
describe, measure or monitor:
• Symptoms, signs or abnormal laboratory tests.
• Effects of disease on pulmonary function.
• Individuals at risk for pulmonary disease.
• Preoperative risk.
• Post-surgical prognosis.
• Pre-treatment health status.
• Therapeutic interventions.
• The course of disease affecting lung function.
• Persons exposed to pollutants.
• Adverse reactions to drugs with known pulmonary toxicity.
• Rehabilitation programs.
• Risks as part of an insurance evaluation.
• Individuals for legal reasons.
• Epidemiological surveys.
• Derivation of reference equations.
Contraindications
The disposable mouthpieces (DMs) are clean but not sterile and should not be placed over open wounds
that are prone to infection. There are no other known medical contraindications other than the physical
limitations of the patient.
Conformance to Standards
The IQspiro® conforms to the following standards:
• Industry Standards: ATS/ERS 2005, NLHEP, NIOSH, SSD, OSHA, ECCS
• Quality System Regulations: FDA QSR, ISO 10993-5, ISO 10993-10, EN 60601-1-2, CAN/CSA
STD C22.2 601.1-M90
• Product Testing Regulations: IEC 60601-1-1, IEC 601-1, IEC 60601-1-2
Note This list of indications is taken from: American Thoracic Society.
1995. Standardization of Spirometry 1994 Update. Am. J.
Respiratory Crit. Care Med. 152:1108.
11 3-100-1120 © Midmark Corporation 2016
B. Description
The IQspiro® Digital Spirometer is a portable device that performs Forced Vital Capacity (FVC), Vital
Capacity (VC) and Maximal Voluntary Ventilation (MVV) testing. It provides real-time display of flow volume
curves as well as inspiratory and expiratory measurements.
Together with IQmanager®, the IQspiro® makes it easy to record, interpret, and archive spirometry efforts for
future reference.
This manual describes how to use the various IQspiro® features and the operational sequence most
users will follow. This does not mean that a user is restricted to following this particular sequence. There
are certain sequences that must always be followed, such as entering a patient’s medical data prior to
performing a spirometry test. However, this program is designed to be both user-friendly and flexible.
Many of the features are interconnected and can be accessed from more than one screen. The bottom or
right side of each screen has a menu bar that lists other screens that may be accessed. To visit any of these
screens, click the appropriate button.
Note This manual is intended for IQmanager® Diagnostic Workstation
software users. If using the IQspiro® through an EMR, please
contact Midmark Technical Service for assistance with installation,
setup and operation.

12 3-100-1120 © Midmark Corporation 2016
C. Product Overview
Before conducting any spirometry testing, install IQmanager® on a Windows-compatible computer. Once
IQmanager® has been installed connect the IQspiro® device to the computer via the COM or USB port,
depending on which version is being used.
A Pulmonary Function Test (PFT) is a widely used term for spirometry. People may refer to the IQspiro®
as a PFT machine. A spirometer is a device used by a patient to perform a PFT. In this manual, the words
spirometer and spirometry are used when referring to the Midmark IQspiro® device and its operation.
D. Necessary Computer Skills
This manual is intended for a user capable of using Microsoft® Windows® applications, has some
understanding of PC operations, and is familiar with the basic operations of Windows®.
This Operation Manual is designed as a comprehensive guide, designed to educate the user on the
operation and functions of the IQspiro® device. The information in this manual includes all options that are
available with IQspiro®.
E. Configurations
Typical PC Configuration
The block diagram below (see Figure 1-1) illustrates the standard configuration of the IQspiro® system. The
primary components are a Windows®-based PC, a printer, and the IQspiro® acquisition module. A portable
computer is recommended if mobility is a consideration. Please refer to this block diagram when setting up
the IQspiro® system:
Figure 1-1
Printer
(optional)
IQspiro
module
Windows-based
computer

13 3-100-1120 © Midmark Corporation 2016
F. Thin Client Configurations
If working in a thin client environment, install the IQmanager® software on the Terminal Server and operate
the IQspiro® through a thin client terminal.
IQspiro® supports two thin client configurations:
• IQpath™ Software Solution, and
• COM port mapping.
IQpath™ works with either USB or serial port versions of the IQspiro® in high-latency, limited bandwidth
network configurations with Windows-based PC clients. For non-Windows thin client devices on low-latency
high-speed networks, use the serial port versions of the IQspiro® and connect to client devices via COM port
mapping.
Setting up any application in a network environment typically requires special access rights and knowledge
of the network. Please have a system administrator install and configure IQmanager® to the office
environment.
Thin Client Using the IQpath™ Software Solution
IQpath™ utilizes a dedicated flow control scheme to provide the following advantages over COM port
mapping:
• Improved performance on high-latency, low-bandwidth, high-loss networks.
− Microsoft Terminal Services: Improvement is approximately 10-to-1 in latency tolerance.
− VMware VDI: Improvement is approximately 10-to-1 in latency tolerance.
− Citrix® ICA® protocol: Improvement is approximately 40-to-1 in latency tolerance.
• No COM port mapping is required.
• The USB version of the IQspiro® module is compatible.
• Improved device auto-configuration and diagnostics.
The following block diagram describes IQpath™. In this thin client environment, the client computers must
be running Windows® 10, 8, and 7:
Note IQpath™ has specific requirements for computer hardware,
software and network performance. System administrators should
read Setup Manual: Midmark Products over Thin Client using
IQpath™ or COM port mapping before installing, configuring and
using this software in a thin client environment.

14 3-100-1120 © Midmark Corporation 2016
Figure 1-2
To use IQpath™, load IQmanager® or equivalent software on the terminal server and install one
of the following software components on each client PC that will be used for data acquisition:
• IQpath™ for Microsoft Terminal Services: if using Microsoft Terminal Services (Microsoft RDP).
• IQpath™ for Citrix ICA protocol: if using Citrix software on your clients and servers.
• IQpath™ for VMware: If using VMware VDI software on the clients and servers.
These software products are provided separately and may be obtained by contacting Midmark Technical
Service at (800) 624-8950 or (844) 856-1230, option 2.
Once the software is installed on the client server network and PCs, IQmanager® must be configured as
described in Section II-D, Hardware Setup and Section II-E, Configuring IQspiro®, or refer to the IQmanager
Operation Manual, Section VI-F, Configuring Client Server Networks.
Thin Client Using COM Port Mapping
COM port mapping refers to a configuration in which the IQspiro® connects to a serial port of the client and
the server is configured so that logical COM ports on the terminal server are mapped to the physical COM
ports of the client.
If using non-Windows®-based thin client terminal devices on a low-latency, high-speed network, use the
serial port versions of the IQspiro® and configure the thin client server for COM port mapping.
Terminal server
Network
IQspiro
module
Windows-
based
clients
Windows-
based
clients
USB
or
serial
15 3-100-1120 © Midmark Corporation 2016
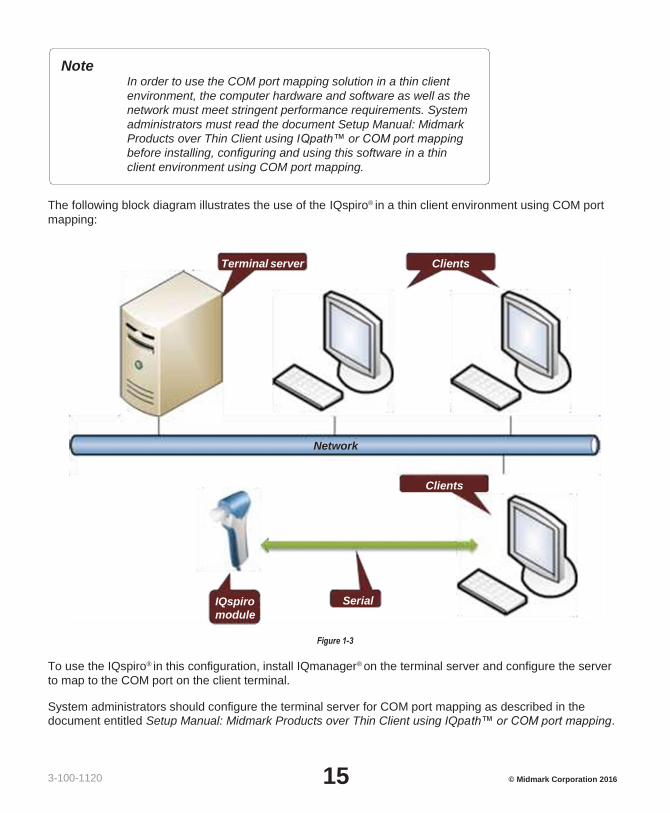
The following block diagram illustrates the use of the IQspiro® in a thin client environment using COM port
mapping:
Figure 1-3
To use the IQspiro® in this configuration, install IQmanager® on the terminal server and configure the server
to map to the COM port on the client terminal.
System administrators should configure the terminal server for COM port mapping as described in the
document entitled Setup Manual: Midmark Products over Thin Client using IQpath™ or COM port mapping.
Note In order to use the COM port mapping solution in a thin client
environment, the computer hardware and software as well as the
network must meet stringent performance requirements. System
administrators must read the document Setup Manual: Midmark
Products over Thin Client using IQpath™ or COM port mapping
before installing, configuring and using this software in a thin
client environment using COM port mapping.
Terminal server Clients
Network
Clients
IQspiro module
Serial

16 3-100-1120 © Midmark Corporation 2016
G. System Specifications
IQspiro® Performance Specifications
Category Specification
Intended Use To provide diagnostic spirometry results that a licensed practitioner can use to interpret the current condition of a patient’s lungs.
Dimensions 7.75” x 2.5” x 1.75” (191 x 64 x 44mm)
Device style RS232 (serial port) USB
Weight 9.5 oz. 9.0 oz.
Batteries Two 1.5V AAA alkaline N/A
Connection Standard serial port (DB9 or DB25 w/ adapter)
USB port
Anatomical Sites Non-invasive device
Patient Contact Disposable mouthpiece (DM)
Safety Parameters Double-insulated handle
Spirometry Acquisition
• Fleisch Pneumotach: Differential pressure reading of flow with a DM
• Volume determined by flow integration
Ranges
• Flow: +/- 14 L/s
• Volume: +/- 8 L
Environmental Conditions (temperature and humidity)
• Temperature: 15°C to 40°C
• Humidity, non-condensing: 10% to 90%
BTPS • Automatic BTPS Correction
Analysis & Measurement
• Automatic Back Extrapolation calculation
• Automatic spirometry parameter calculation
• Automatic comparison to published spirometry predicted equations (Reference Values)
• Automatic interpretation of test results
Parameters Measured • See Appendix I - Spirometry Measurement Parameters
Reference Values Sets • See Appendix F - Reference Values - Adult and Appendix G - Reference Values
- Pediatric
Interpretations
• ATS (1991): (See Appendix D - Interpretation – ATS)
• NHANES III (NLHEP 1999): (See Appendix E - Interpretation – NHANES III)
Printer • Windows® compatible inkjet or laser printer
Paper • 8.5” x 11” (Letter size) or 210mm x 297mm (A4 size)

17 3-100-1120 © Midmark Corporation 2016
II. System Installation
Midmark Technical Service can be reached at (800) 624-8950 or (844) 856-1230, option 2.
A. Minimum Computer Requirements
This section describes the minimum computer resources and hardware components needed when using
new Midmark devices and software. As is the nature of technology to change often, these requirements will
be evaluated and modified periodically. We suggest always referring to the most recent Minimum Computer
Requirements document at www.midmark.com, or contact Midmark Technical Service at (800) 624-8950 or
(844) 856-1230, option 2, for additional information.
IQspiro® Minimum Computer Requirements
Item Requirement
Operating Systems
Windows® 10, Professional and Enterprise, 32-bit and 64-bit Windows® 8, Professional and Enterprise, 32-bit and 64-bit Windows® 7, 32-bit and 64-bit
Hardware Requirements Windows® compatible personal computer.
CPU Intel® Core™ 2 Duo Processor E4300 (2M Cache, 1.80 GHz, 800 MHz FSB) (x86) or 64-bit (x64) processor or faster
Disk 2 GB of free disk space or greater
Memory Minimum 2GB of system memory
Input/Output Ports
One (1) USB port or one (1) serial port:
• One Universal Serial Bus (USB) port if using USB version of the IQ product
Or
• One RS-232 Serial Port if using serial port version of IQ product.
The above computer port is required for new test acquisitions. It is not required to review and/or edit a test.
Additional USB ports as needed for keyboard, mouse, printer, etc.
Note Contact Midmark Technical Service before installing and setting
up the IQspiro®. Computers today are more complex with more
software and hardware options than before, making each
computer almost unique. Midmark wants to make sure that your
IQspiro® device is installed and configured as quickly and easily
as possible.
Note If updating existing computer systems currently being used with
older Midmark devices and software, please contact Midmark
Technical Service before doing so.

18 3-100-1120 © Midmark Corporation 2016
IQspiro® Minimum Computer Requirements
Item Requirement
Pointing Device Windows® compatible mouse.
Keyboard Windows® compatible keyboard.
Display 1024x768 or higher resolutions for the real time acquisition screen. 16-bit color. Wide-screen (1680x1050) is highly recommended.
Printer Microsoft Windows® compatible inkjet or laser printer.
Surge Protector One (1) hospital-grade power surge protector for the computer system.
B. Software Installation
IQspiro® uses the IQmanager® software to manage patient records. Other Midmark products can also be
accessed from IQmanager®, such as, IQecg®, IQholter®, IQvitals®, IQvitals® PC and Weight/Scale Interfaces.
Contact the Midmark Sales Department for the latest information on available Midmark products or visit
midmark.com.
Before installing IQmanager® on a computer, it is important that the user understand and carry out the
following tasks:
Note The above is the minimum computer requirement specification for
operating the IQspiro® through IQmanager®. A faster CPU and/or
more memory may be required if planning to operate the IQspiro®
through an EMR or install additional software.
Note USB ports/contacts can become worn with repeated use. The
IQspiro® may not function with a worn USB port.
Note The following software installation information refers to
IQmanager® only. If using the IQspiro® through an EMR, please
contact Midmark Technical Service for assistance with installation
and setup.
Note If IQmanager® is already installed on the computer and the user
is now either upgrading or adding a new Midmark product, please
skip this section and refer to the IQmanager® Operation Manual
for installation information.

19 3-100-1120 © Midmark Corporation 2016
Windows Taskbar
IQmanager® is designed to run as a full-screen program. For best results, the Windows Taskbar should not
be displayed in order to provide maximum display area. Place the mouse pointer on the blank portion of the Taskbar on the bottom of the screen, then right-click and select Properties. Check the Auto-hide the taskbar
box to hide the taskbar when it is not in use; to display the taskbar when it is hidden, move the mouse cursor
over the area where the taskbar is normally set, and it will reappear.
Screen Saver
If a screen saver or any energy saving feature is enabled on the computer, make sure that it does not
activate and interfere with data acquisition during patient testing. Refer to the user’s computer or software
manual for these settings.
Important Computer Date Information
The IQspiro® uses the current date from the computer and the patient’s birth date as entered by the user
to calculate the patient’s age. Since the IQspiro® equations and interpretive analysis use the patient’s age
to produce appropriate diagnostic statements, it is important that the computer’s current date is accurate.
Contact the system administrator if the computer’s date is incorrect.
C. Installation Steps for IQmanager®
1. Do not connect any devices to the computer before running the software installation.
2. Double-click the IQmanager® setup file. The installation starts automatically.
3. Follow the instructions on the screen. For detailed installation, setup and detailed operation
instructions, please refer to the IQmanager® Operation Manual.
4. Once installation is complete connect the IQspiro® module to the computer with the steps outlined in
the following section.
5. If there are any new licenses, add them to the licensing server. For any questions on adding licenses
please refer to the IQmanager® operation manual.
Note Close all Windows programs before running this software
installation. Do not interrupt the installation program while it is
running. The installation should take less than five minutes.
Note The Midmark IQspiro® requires software to operate. The following
instructions use the IQmanager® software. Please contact
Midmark at 1-800-624-8950 to purchase the required software
license.

20 3-100-1120 © Midmark Corporation 2016
D. Hardware Setup
Connecting the Serial-Type IQspiro® Module
If using the serial-type IQspiro®, attach the female end of the 9-pin communication cable to an available
serial port. You may also use a 9-pin to 25-pin adapter as necessary. Secure the connections with the
thumbscrews. Do not over-tighten.
Battery Installation for Serial (RS232)
• The battery compartment is located at the bottom of the IQspiro®. Hold the IQspiro® upside down so
that the cable is aiming up.
• Press down on the battery door and slide it out until the cover pops up when released.
• Insert two (2) AAA batteries into the battery holder, according to the icon.
• Close the battery compartment door by holding it down while sliding it back in place.
Low Battery Sensor
The low battery detection circuit monitors the battery voltage and alerts the micro controller when the energy
in the batteries is low. The micro controller causes the LED on the IQspiro® to glow RED and sends a LOW
BATTERY message that is displayed on the screen by IQmanager®. The user can complete the current
testing session with confidence but should replace the batteries before starting a new test.
Connecting the USB IQspiro Module
DO NOT plug the USB IQspiro® into the computer until IQmanager® has been installed. Once the software is
installed, plug the USB connector into any available USB port and the software will automatically detect the
device.
Inserting a Disposable Mouthpiece in the IQspiro®
• Open the IQspiro® door by unlatching the door at the side of the spirometer and hold the door open
with one hand, using your index finger.
Note If using a 25-pin serial port, connect the 25-pin (female) to 9-pin
(male) adapter to the port on back of the computer. Then connect
the female end of the 9-pin connector on the communication cable
to the 9-pin port on the adapter.
Note If using a USB version of the IQspiro®, no batteries are needed
and there will be no battery door at the bottom of the unit.

21 3-100-1120 © Midmark Corporation 2016
• The following diagram shows the three ports in the top of the IQspiro®. Line the pins of the DM up
with the ports of the IQspiro® and firmly press the DM in place, making sure that the DM is securely
anchored in the ports. Close and latch the IQspiro® door.
Figure 3-1 Inserting the IQspiro® disposable mouthpiece
E. Configuring IQspiro®
IQmanager® and the IQspiro® can be customized by using the configuration settings. Access the
Configuration Settings by using the following steps:
Click on the SETTINGS button in the upper right side of the IQmanager® opening screen .
Note The DM must be firmly pressed into place to ensure a proper seal.
The DM is not correctly pressed into place it may not seat flush
against the IQspiro® cradle.

22 3-100-1120 © Midmark Corporation 2016
The IQmanager Settings window appears:
Complete the Institution Name and Address boxes with information about the user’s medical practice.
IQmanager® will display your institution name on each of the procedure screens and on printed reports.
Enter a name that describes your practice or operation to enable other medical personnel to identify your
reports.
Choose between Metric and English units of measurement, 24- and 12-hour time standard. When done, press Save.
The Spirometry Settings dialog box can be accessed in several ways: it can be accessed by selecting the
spirometer settings button from the Devices tab of the IQmanager Settings;
or by clicking Settings in the New Test or Spirometry Review and Edit screens within IQmanager®. The
following configuration menu will appear:

23 3-100-1120 © Midmark Corporation 2016
Configuration Tab
If the profile listed in the Configuration Profile box is Default, highlight Default and click Add New. Create
a new name for the profile and click OK. The Default profile cannot be modified. Global settings (Institution
Name, etc.) must be set in the IQmanager® Configuration program.
Manage Lists enables the user to modify the Spirometry Indications List and the Bronchodilator List. Add or
delete items from either list.

24 3-100-1120 © Midmark Corporation 2016
Spirometry Lists Dialog Box
• To add to a list, click Add under the appropriate list box and type a new item.
• To delete an item, highlight the item in the list box and click Delete.

25 3-100-1120 © Midmark Corporation 2016
For example, if a doctor uses only Albuterol for a bronchodilator, this list can be modified so that Albuterol is
the only selection available. The list always appears in alphabetical order.
Reports Tab
Select which reports will be printed when Print is clicked from the Reports tab. For each box checked in any
of the Reports areas, the printed report will include a page for that report.
If the Cover Page box is selected and no boxes within the Reports area are selected, only a onepage report
will print because no additional Reports boxes are selected.
For example, in the Reports tab shown below, the Cover Page box is checked and three report boxes are
selected (Best 3 Pre-BD FVC; Pre and Post BD FVC; Pre and Post BD MVV). If a test session only contains
Pre-BD FVC tests, clicking Print will print a three page report. The first page is the Cover Page, the second
page is the Best 3 Pre-BD FVC tests performed and the third page is the best Pre-BD test.
Spirometry Settings – Reports Tab
If the patient has Pre- and Post-Bronchodilator, FVC, VC and MVV tests saved, all applicable selected reports will print when Print is clicked.
Note The indication list in the spirometry settings are no longer used.
Instead the indications are stored in IQmanager. Refer to the
IQmanager operation manual for details.
Note For the recommended wait time between bronchodilator
administration and postspirometer testing, refer to the
manufacturer’s package insert.

26 3-100-1120 © Midmark Corporation 2016
From this tab the user may select the Calibration Report. If this box is checked, every time the user prints a
patient’s report, the calibration that was performed prior to that test is printed with the report. This is helpful if
proof of calibration is required.
There are five options at the left of this tab:
• Vol/Time Predicted Curve,
• Flow/Vol Predicted Curve,
• Use ATS Graph Scales,
• Print Test Quality Statements (only affects the printed reports but not the Cover Page), and
• Print Using Color (affects all reports, including the Cover Page)
For example, if the Predicted Curve boxes are selected, the predicted Volume/Time and predicted Flow/
Volume graphs for the patient are printed on the secondary report pages and will also print on the cover
page graphs.
The Cover Page Settings tab has separate selections for Smoking History, COPD Risk, Lung Age and Test
Quality Statements. See Section II-E, Configuring IQspiro® for additional information about the cover page.
Cover Page, Best 3 Pre and Best 3 Post Selected

27 3-100-1120 © Midmark Corporation 2016
ATS Recommended Graph Size
The ATS recommends that a Volume Time graph be at least 20 mm per second and 10 mm per liter when
hand measurements are required. Some government agencies and insurance carriers require this for
reimbursement.
In order to create a one page report, all Cover Page graphs will not print to this scale size. However, all
reports from the Reports tab will if Use ATS Graph Scales is selected here. These graphs will print on the
pages following the cover page.
Use this setting if requested from the user’s carrier or for government agencies.
Enable ATS Graph Scales
Cover Page Settings Tab
The Cover Page Settings tab enables the user to customize the cover page. Selections on this tab only
change the look of the cover page: they do not affect the report pages. The first selection determines
whether the volume-time and flow-volume graphs are printed on this page.
When the check box is selected that states “Table and Graphs (All Measurements)” the user can print out all
selected measurements with the volume-time and flow volume graphs.
The Pre and Post BD Table Format selections determine whether the report includes only the Best Pre and
Best Post BD test or the Best 3 Pre and Best 3 Post BD tests. This option is available when both Pre and
Post BD tests have been saved.
If the patient has performed only Pre or only Post BD tests, the Pre Or Post BD Table Format selections will
take effect.
The check box selections at the bottom of this tab (Print Smoking History, Print COPD Risk, Print Lung Age,
Print Test Quality Statements) determine the additional information to appear in the patient demographics
field and graph section of the cover page.

28 3-100-1120 © Midmark Corporation 2016
Spirometry Settings – Cover Page Settings Tab
Interpretation Tab
Select which Reference Equations set to use as the default for Adults and Pediatrics from the Interpretation tab. Not every spirometry measurement (FVC, FEV
1, etc) is available in every reference equation. The
secondary reference equations can be used to complete missing measurements. For example, if the user’s primary reference equation does not have an equation for FEF
25, select a secondary reference equation that
does to complete the report.
29 3-100-1120 © Midmark Corporation 2016
Spirometry Settings – Interpretation Tab
The user can control the Auto. Interpretation feature from this tab, which allows the user to select the ATS
Logic or the NHANES III logic. If the user does not wish to have the software automatically interpret the
spirometry tests, clear the Auto. Interpretation box. The Primary Care Practitioner (PCP) Mode overrides
Reference Equation and Interpretation selections, as discussed below.
The FVC Settings enable the user to define the acceptable length of test required. Reducing this number will
affect the length of test acceptability error code. The ATS recommends that the minimum length of test be
set to 6 seconds.
Primary Care Practitioner (PCP) Mode
The PCP Mode automatically selects the NHANES III reference equations and interpretation logic and
modifies the test acquisition screen, the test review screen and the printed reports. To set the IQspiro® into
PCP Mode, click on the Configuration tab. Select PCP Mode from the pull-down list In the Configuration
Profile dialog box and click OK.

30 3-100-1120 © Midmark Corporation 2016
As recommended by the National Lung Health Education Program (NLHEP), this mode simplifies the test
procedure, measurements displayed and report options. For the test procedure, it eliminates the inhalation
side of the flow volume loop and stops the test at 6 seconds of exhalation. It also eliminates the VC and
MVV test selection.
After each test maneuver is performed, the software will give a quality control grade for the test session. The
quality control grade displayed will be A, B, C, D or F. A test session must be graded A, B or C to generate
an interpretation and the results of Pre-FVC and Post-FVC tests are only compared if both the Pre and
Post sessions are graded A, B or C. To have the software display Good Test Session, you must acquire two
acceptable tests that match, according to the criteria listed here.
QC Grade Criteria
A At least two acceptable maneuvers with the largest FEV
1 values matching within 100 ml and the largest two FEV
6
values matching within 100 ml.
B At least two acceptable maneuvers with FEV1 measurements that match between 101 and 150 ml.
C At least two acceptable maneuvers with FEV1 measurements that match between 151 and 200 ml.
D Only one acceptable maneuver or more than one acceptable maneuver, but the FEV
1 values don’t match within
200 ml.
F No acceptable maneuvers
If the FVC maneuver is less than 6 seconds because the operator ended the test, but the end of test volume is less than 100 ml during the last 0.5 seconds, then the software will set the FEV
6 value equal to the FVC
value, if the FVC measurement is valid.
Checking the Primary Care Practitioner (PCP) Mode box with a profile other than PCP Mode selected on the
Configuration tab will enable test grading and remove VC and MVV from the test screen, but will not limit the
measurement parameters displayed. This allows the user to customize the report. To remain in PCP Mode
without customization, select PCP Mode from the Configuration Profile box.
Measurements Tab
The Measurements tab enables the user to customize which measurements to appear on the cover page,
the test screen and the review screen. At least one measurement must be selected.
If the user has selected the Tables and Graphs setting for the Cover Page, only the first 9 measurements
selected will be displayed on the Cover Page. If the Only Table setting is selected, up to 28 measurements
can be displayed.
Note In the PCP mode, the IQspiro® measures the FEV , but on all
6
reports and displays it is labeled as the FVC.

31 3-100-1120 © Midmark Corporation 2016
Spirometry Settings – Measurement Tab
Measurements can be placed in any order by clicking Add, Insert, Remove or Clear List. Highlight the
measurement and choose the desired function:
• Add: Move the selected item from the Available Measurements list to the bottom of the Selected
Measurements list.
• Insert: Move the selected item from the Available Measurements list above the highlighted item in
the Selected Measurements list.
• Remove: Moves the selected item from the Selected Measurements list to the Available
Measurements list.
• Clear List: Moves all of the items from the Selected Measurements list to the Available
Measurements list.

32 3-100-1120 © Midmark Corporation 2016
Incentive/Miscellaneous Tab
The Incentive/Miscellaneous tab enables the user to customize the incentive that the patient will see when
performing a test. The default selection is Candles. Since spirometry is a patient effort-dependent test, these
incentives help some patients complete their exhalation and perform the test properly.
The user can select from the following choices:
• Thermometer
• Tree and Leaves
• Tree, Leaves and Monkeys
• Tree, Leaves and Pinwheel
• Candles
• No incentive (see below)
If the user prefers that no incentive appear during a patient test, un-check the box marked “Use Spirometer
Incentive”. No graphic incentive will display during the test maneuver, however, the following dialog box will
be displayed.

33 3-100-1120 © Midmark Corporation 2016
Trending Tab
The Trending tab enables you to customize the Trending report. Select which volume, flow and/ or percent
parameters to display. For additional information on this feature, see Section IV-C, Trending.
Spirometry Settings – Trending Tab
Ethnic Adjustments Tab
The Ethnic Adjustments tab enables the user to set what the predicted value equations are adjusted to
when testing a specific ethnic code. When the Use Default Settings box is checked, the program will set
the percentages to the default; when the box is clear, the values may be adjusted. See Appendix H -
Adjustments to Reference Values Equations for the default values and additional information.

34 3-100-1120 © Midmark Corporation 2016
Spirometry Settings – Ethnic Adjustments Tab
It is highly recommended to use the default ethnic settings for testing.
F. Calibration
Midmark recommends calibrating all spirometers daily before use. The IQspiro® automates this process for
quick and accurate calibration of the instrument.
Calibrating the IQspiro® requires a 3-Liter syringe. Midmark strongly recommends using the Midmark 3-Liter
syringe with the Midmark Syringe Adapter.
1. Access the Calibration screen from the IQmanager® Opening Screen by selecting the Calibrate
button .
2. A list of devices that support calibration is shown. Select Spirometer from the list by choosing the
calibration icon on the right.
Note The IQspiro® must be calibrated with a DM; the DM must be
calibrated with a syringe adapter that fits over the outside
diameter of the DM. Never calibrate the device with a syringe
that fits inside the DM.

35 3-100-1120 © Midmark Corporation 2016
Spirometry Calibration Utility Screen
3. The following calibration screen is shown:
Calibration Screen
4. Check to see if Sensor: Ready is displayed in the upper-right corner of the graph window. To print the
calibration report, select Print in the bottom left.
Barometric Pressure
The barometric pressure must be set prior to the first time the system is calibrated.
It must be changed only if the location of the instrument is changed and/or the altitude changes.
Click Settings to open the Spirometry Settings dialog box. Select the Calibration tab and enter the
barometric pressure in the Default Barometric Pressure text box. If the barometric pressure is not known,
select Calculate Barometric Pressure From Altitude and enter the altitude. The software will automatically
calculate and store the usual barometric pressure for that altitude.
Note Place the DM into the IQspiro® before opening the Calibration or
Test screens. See Section II-D, Hardware Setup.
Note The proper barometric pressure or altitude MUST be entered to
assure a proper calibration.

36 3-100-1120 © Midmark Corporation 2016
Spirometry Settings – Calibration Tab
Check the Calibration Reminder box to remind the user when the IQspiro® has not been calibrated for the
interval set in the Calibration Expiration Interval box.
G. Starting a New Calibration 1. Click New Cal on the Calibration screen to begin a new calibration.
2. Attach the 3-Liter syringe to the large end of the syringe adapter then attach the small end of the
adapter to the DM.
Figure 3-1 IQspiro® with a 3-Liter syringe attached
3. Check that the DM is properly attached to the IQspiro®.
4. The first time the IQspiro® is calibrated; the serial numbers for the syringe and the spirometer handle
need to be entered in the appropriate boxes.
5. Click Start Cal. The sensor will zero itself and then the Calibration Pump screen appears:
Adapter Plunger handle
Spirometer
37 3-100-1120 © Midmark Corporation 2016
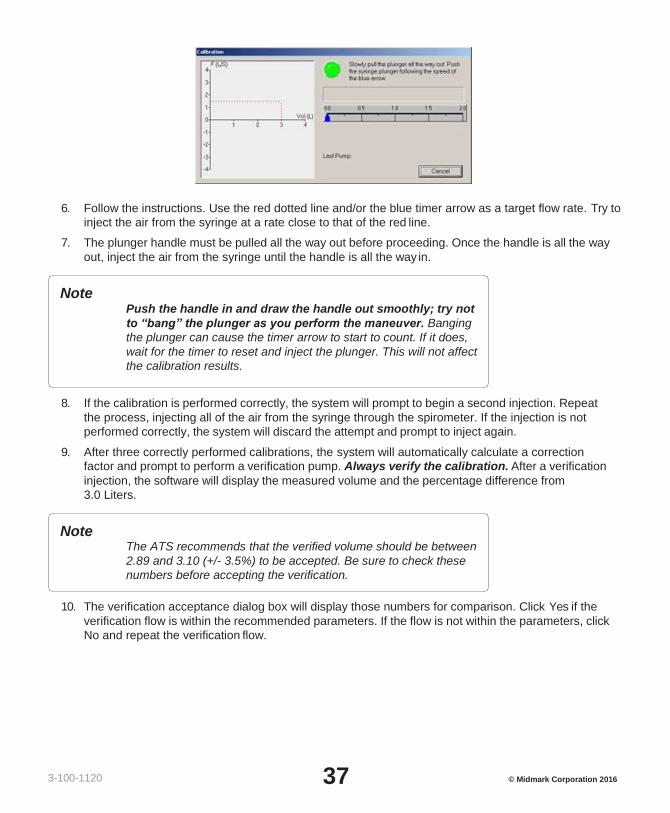
6. Follow the instructions. Use the red dotted line and/or the blue timer arrow as a target flow rate. Try to
inject the air from the syringe at a rate close to that of the red line.
7. The plunger handle must be pulled all the way out before proceeding. Once the handle is all the way
out, inject the air from the syringe until the handle is all the way in.
8. If the calibration is performed correctly, the system will prompt to begin a second injection. Repeat
the process, injecting all of the air from the syringe through the spirometer. If the injection is not
performed correctly, the system will discard the attempt and prompt to inject again.
9. After three correctly performed calibrations, the system will automatically calculate a correction
factor and prompt to perform a verification pump. Always verify the calibration. After a verification
injection, the software will display the measured volume and the percentage difference from
3.0 Liters.
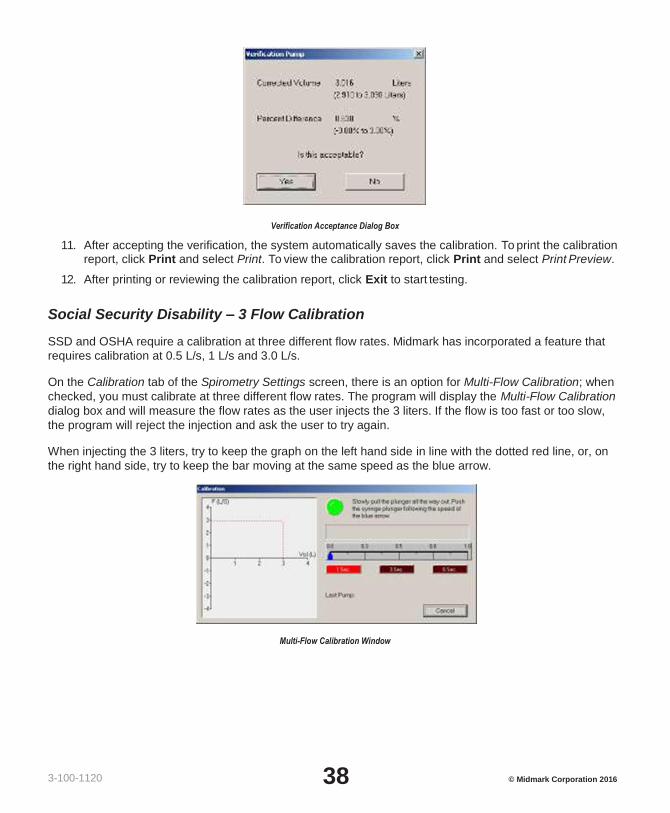
10. The verification acceptance dialog box will display those numbers for comparison. Click Yes if the
verification flow is within the recommended parameters. If the flow is not within the parameters, click
No and repeat the verification flow.
Note Push the handle in and draw the handle out smoothly; try not
to “bang” the plunger as you perform the maneuver. Banging
the plunger can cause the timer arrow to start to count. If it does,
wait for the timer to reset and inject the plunger. This will not affect
the calibration results.
Note The ATS recommends that the verified volume should be between
2.89 and 3.10 (+/- 3.5%) to be accepted. Be sure to check these
numbers before accepting the verification.
38 3-100-1120 © Midmark Corporation 2016
Verification Acceptance Dialog Box
11. After accepting the verification, the system automatically saves the calibration. To print the calibration report, click Print and select Print. To view the calibration report, click Print and select Print Preview.
12. After printing or reviewing the calibration report, click Exit to start testing.
Social Security Disability – 3 Flow Calibration
SSD and OSHA require a calibration at three different flow rates. Midmark has incorporated a feature that
requires calibration at 0.5 L/s, 1 L/s and 3.0 L/s.
On the Calibration tab of the Spirometry Settings screen, there is an option for Multi-Flow Calibration; when
checked, you must calibrate at three different flow rates. The program will display the Multi-Flow Calibration
dialog box and will measure the flow rates as the user injects the 3 liters. If the flow is too fast or too slow,
the program will reject the injection and ask the user to try again.
When injecting the 3 liters, try to keep the graph on the left hand side in line with the dotted red line, or, on
the right hand side, try to keep the bar moving at the same speed as the blue arrow.
Multi-Flow Calibration Window

39 3-100-1120 © Midmark Corporation 2016
OSHA Regulations
OSHA regulations are outlined in the Recommended Standardized Procedures for Pulmonary Function
Testing, published in the Federal Register. At a minimum, OSHA requires:
• Calibration with both spirometer and syringe at the same temperature.
• Proper calibration of the spirometer daily (three different flow rates).
• Calibration for volume and time or flow and time (we provide volume and time).
• Calibration before each shift.
• Calibration whenever the spirometer is transported.
• Calibration after every thirty tests or sooner (2-3 hours) under field test conditions.
Please refer to the Federal Register or your OSHA representative for additional details about occupational
testing.

40 3-100-1120 © Midmark Corporation 2016
III. Operation
A. Starting IQmanager®
The software application for operating the IQspiro® is called IQmanager® and is located on the computer
desktop as a shortcut icon. Double-click on this icon to start IQmanager®.
B. Opening Screen
Midmark IQmanager®
When starting IQmanager®, the opening screen will appear:

41 3-100-1120 © Midmark Corporation 2016
Opening Screen Functions
Button Function
Search for patients previously entered into the database; selecting a patient from the list allows access to, edit, add and delete data from that patient’s records and view data from previous tests.
Acquire any STAT test before entering patient demographics or selecting a patient.
Register a New Patient. Refer to the appropriate device Operation Manual for a description of the patient details required for specific tests.
Calibrate a Midmark device.
View patient details from a patient selected from the Search Results screen.
Go directly to the test selection screen for the selected patient, bypassing the Patient Data screen.
Enable users to configure the program to meet their needs. (See “Configuring IQmanager®” for more information).
Receive assistance regarding the use, operation and troubleshooting of IQmanager®
and other Midmark products.
Exits the program and returns to the Windows desktop.
C. Creating a New Patient Profile
To create a new patient file, click the New Patient icon on the Opening screen. This opens the Patient
Details screen to enter the patient’s specific data.
Opening Screen

42 3-100-1120 © Midmark Corporation 2016
Click in any text box or press the Tab key on the computer keyboard to enter information and move from field
to field. This information may not be essential for every test performed, however, it is important to complete
each of these fields as accurately as possible. Each diagnostic test has its own patient data requirements,
which may affect the computer-generated interpretation of the test; it is important to refer to each device’s
Operation Manual when completing this screen.
Important Computer Date Information
The IQspiro® uses the current date from the computer and the patient’s birth date (entered by the user) to
calculate the patient’s age. Since the IQspiro® equations and interpretive analysis use the patient’s age to
produce appropriate diagnostic statements, it is important that computer’s current date is accurate. Contact
the system administrator if your computer’s date is incorrect.
Note A patient name and DOB must be entered to start a new test. It is
highly recommended to enter all information available, including
patient ID.

43 3-100-1120 © Midmark Corporation 2016
The following table provides a brief description of the function for each field. Fields that play a diagnostic role
in the interpretive program are noted.
Patient Data Fields
Field Diagnostic Role Description
Patient Information
• First Name • Middle Name • Last Name
Required (except Middle Name)
Used for identification purposes.
Letters and numbers may be used.
Date of Birth Format: MM/DD/ YYYY
Required for ECG and Spirometry
Used for information and diagnostic purposes in ECG and Spirometry. IQmanager® uses this data to calculate the age of the patient.
Format may be changed in the Configuration Settings.
Gender Required for ECG and Spirometry
Used for identification and diagnostic purposes in ECG and Spirometry.
Race
Required for Spirometry
Used for information and diagnostic purposes in Spirometry.
Select from the pull-down menu one of the following: Unspecified, Caucasian, Black, Asian, American Indian, Hispanic, African- American, or African- European.
If the patient’s race is not listed, not known, or the patient is of multiracial origin, select the race as identified by the patient.
ID #
Recommended
Used for identification purposes.
Letters and numbers may be used.
Contact Information
Address
(Contact Info tab)
Used for identification and/or contacting purposes.
Letters and numbers may be used.
Home Phone
Cell Phone
Work Phone
Smoking History
Year Start Smoking Recommended for Spirometry (Smoking History tab)
For diagnostic purposes in Spirometry.
Enables the operator to enter smoking history.
Year Quit Smoking
Cigarette/Day
Risk Factors
History of Angina
(Risk Factors tab)
Used for informational and diagnostic purposes when interpreting test results.
The information entered in this tab appears in the Patient Data Report.
Physical Activity
Resting ECG Status
• Hypertension • High Cholesterol • Obesity • Diabetes
Medical History

44 3-100-1120 © Midmark Corporation 2016
Patient Data Fields
Field Diagnostic Role Description
Pacemaker
(History tab)
Used for information purposes.
Physician
Referred By
Facility
Medication(s)
• Medications • Dosage • Schedule
Recommended for Resting ECG and Spirometry (Medications tab)
May be used as a diagnostic tool when interpreting test results.
Click Save to store the data entered or edited in the New Patient screen in the database.
Click Clear to refresh the New Patient screen and remove all existing information entered or edited.
Click Cancel to exit the New Patient screen without saving any changes.
Upon completion of the Patient Data screen, review all information to ensure that everything is
accurate and up-to-date. Once accuracy is confirmed, proceed with a new patient test.
Vitals
The Vitals drop-down provides a composite of the patient’s most recent day of data. If no vital signs have
been entered, the title of the control group title reads Vital Signs and each field is blank. If vital signs have
been previously entered, the control group title will read Vital Signs as of mm/dd/yy hh:mm:ss indicating the
date and time of data entry, and boxes will be read only. To edit vitals, click New Vitals to overwrite the data.
Additional information about the Vitals section can be found in the IQmanager® Operation Manual.
45 3-100-1120 © Midmark Corporation 2016
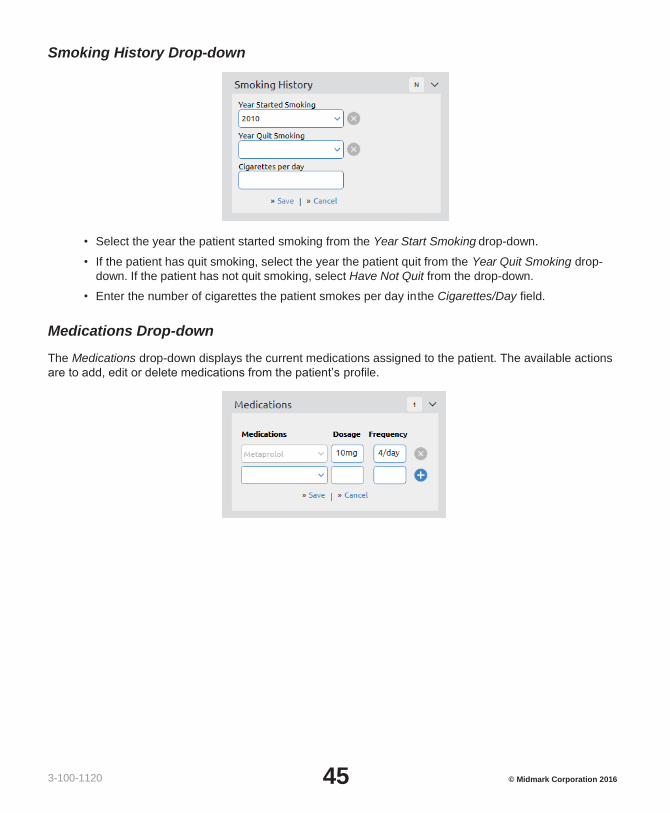
Smoking History Drop-down
• Select the year the patient started smoking from the Year Start Smoking drop-down.
• If the patient has quit smoking, select the year the patient quit from the Year Quit Smoking drop-
down. If the patient has not quit smoking, select Have Not Quit from the drop-down.
• Enter the number of cigarettes the patient smokes per day in the Cigarettes/Day field.
Medications Drop-down
The Medications drop-down displays the current medications assigned to the patient. The available actions
are to add, edit or delete medications from the patient’s profile.

46 3-100-1120 © Midmark Corporation 2016
Contact Info Drop-down
The Contact Info drop-down provides the patient’s address, phone numbers and email address.
Medical History Drop-down
Selecting the History drop-down on the Patient Details screen enables the operator to select from a number
of common conditions that may play a role in the physician’s final diagnosis.

47 3-100-1120 © Midmark Corporation 2016
Risk Factors Drop-down
The Risk Factors drop-down lists possible diagnostic factors for the physician’s use including History of
Angina, Physical Activity, Resting ECG Status, Hypertension, High Cholesterol, Obesity and Diabetes. The
data is informational only and will not affect the program’s diagnostic results.

48 3-100-1120 © Midmark Corporation 2016
D. Pre-Test Preparation 1. Calibrate the IQspiro® daily before use for accuracy.
2. Measure the patient’s height. If the patient can’t stand, measure their arm span from fingertip to
fingertip with arms outstretched against a wall.
3. Wash your hands.
4. Explain to the patient that they will be sitting for the test. If prior testing took place with the patient
standing, have them sit, but make a note of the change or have them continue to stand while being
tested.
5. Ask the patient to loosen any restrictive clothing.
6. Have the patient place loose dentures in a cup.
7. Use of a nose clip is highly suggested during the testing procedure.
8. Avoid cross-contamination by disposing of the DM and replacing it with a new one for each patient.
9. Explain to the patient that they will be performing a minimum of three and a maximum of eight testing
maneuvers.
Note Always open the package from the end closest to the single pin
on the mouthpiece. This is the exhalation side of the mouthpiece
and is safe to handle. (See figure below).
Open package
from this end.
Caution Midmark IQspiro®, when used with specific Midmark disposable mouthpieces, is designed
and tested to meet regulatory and industry standards. Midmark can only warrant product
performance and accuracy if the IQspiro® is used as intended in its unaltered form, and when
recommended practice guidelines are followed. Any modification to the Midmark IQspiro®
mouthpiece, including but not limited to the use of an adapter or filter, is considered an
alteration to the design of the product.

49 3-100-1120 © Midmark Corporation 2016
E. Performing an FVC or FVC Loop
The FVC test is usually the first spirometry test prescribed. Traditionally, the FVC test measures expiratory
flow only; the FVC Loop is a FVC test with the inspiratory portion of the test included. However, a full
expiratory and inspiratory loop is often referred to as a Flow Volume Loop, an FVC Loop or occasionally, an
FVC test. With IQspiro®, the user can perform a FVC or FVC Loop by selecting FVC.
To start a test, click New Test from the Patient Data screen. Click on the play icon next to IQspiro.
If desired, type the Technician’s name and the Physician’s name or select them from the pull-down list.
The reason for testing the patient can also be selected from the Indication list as shown in the New Test
Selection Screen.
Click on OK to open the test acquisition screen. The Spirometry Data Acquisition (Test) screen appears:
By default, FVC will be selected. For a Pre-BD test, make sure the words Pre-Bronchodilator appear in the
blue box in the middle of the screen. Also notice that Pre and FVC are bold. Do not click Start New Test
until the patient is ready.
50 3-100-1120 © Midmark Corporation 2016
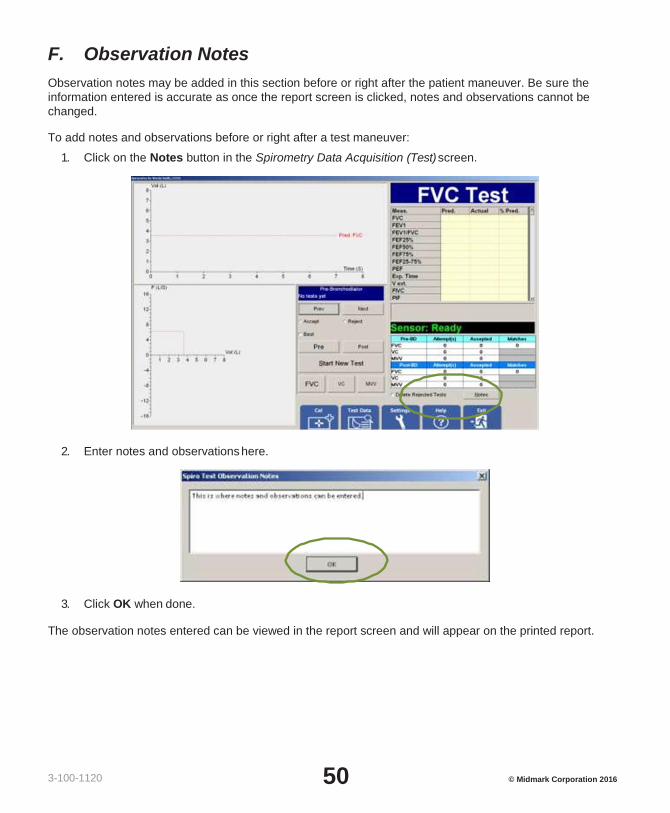
F. Observation Notes
Observation notes may be added in this section before or right after the patient maneuver. Be sure the
information entered is accurate as once the report screen is clicked, notes and observations cannot be
changed.
To add notes and observations before or right after a test maneuver:
1. Click on the Notes button in the Spirometry Data Acquisition (Test) screen.
2. Enter notes and observations here.
3. Click OK when done.
The observation notes entered can be viewed in the report screen and will appear on the printed report.

51 3-100-1120 © Midmark Corporation 2016
G. Patient Instructions
The accuracy of spirometry testing depends on proper patient instruction and coaching. Therefore, the
technician or nurse is a critical factor in achieving good spirometry results. After patient instruction is given, it
is essential that the clinician demonstrate the correct way to perform the test.
• The purpose of spirometry is to determine how much air the patient can inhale into their lungs and
how hard and fast the patient can blow out that air for at least six seconds. It should be like blowing
out candles on a birthday cake, until there is no air left to exhale.
• The patient should inhale as deeply as possible; when the lungs are completely full, have them
quickly put the DM in their mouth with the tongue under the DM, teeth and lips around it, sealing
the lips around the DM, blast out as hard and fast as possible.
Note During the initial acquisition/edit of the spirometry test, the
results can be discarded by selecting the Discard button.
Note The Sign check box allows users to electronically sign the report
after the report has been reviewed and saved. This feature
prevents any changes to be made to the signed report.
Note Text entered in the Observation Notes can only be edited while in
the live testing screen. Observation notes cannot be edited once
the test screen has been exited.

52 3-100-1120 © Midmark Corporation 2016
• The use of nose clips helps ensure that no air leaks out through the nose during testing. Air leakage
through the nose can affect the test results.
• The technician will demonstrate the FVC maneuver with the use of a DM.
− To emphasize to the maneuvers to patient have the technician do the following:
▪ Take a very deep breath, and throw the shoulders back, widen their eyes and stand on their
toes.
▪ The technician should then stick out their tongue, place the DM on top of their tongue and seal
their lips around it.
▪ The technician will then Blast out as hard and fast as possible for at least six seconds. A
vigorous demonstration will help produce a good spirometry test for the patient.
• Explain to the patient that the correct posture during testing is to have the shoulders back, chin up
and do not lean forward during exhalation.
For pediatric patients with small hands, instruct them to hold the spirometer with both hands, versus
one hand.
H. Step-by-Step Spirometry Instructions 1. Insert a new DM in the IQspiro®. See Section II-D, Hardware Setup.
Caution Midmark IQspiro®, when used with specific Midmark disposable mouthpieces, is designed
and tested to meet regulatory and industry standards. Midmark can only warrant product
performance and accuracy if the IQspiro® is used as intended in its unaltered form, and when
recommended practice guidelines are followed. Any modification to the Midmark IQspiro®
mouthpiece, including but not limited to the use of an adapter or filter, is considered an
alteration to the design of the product.
Note When explaining the maneuver to the patient, instruct them to use
the ridges on the top and bottom of the DM as a guide for how far
to insert the mouthpiece into their mouth. Good practice is for the
patient to rest their teeth gently between the ridges.
Note The patient should not block the opening of the DM with their
tongue or teeth.
Note Most patients have a normal tendency to lean forward while
exhaling forcefully. Ask the patient for permission to place a hand
on their shoulder during the test. If they start to lean forward
during the maneuver gently help correct their posture.
Have the patient visually focus on an incentive screen or an object
at eye level to help keep the chin up and posture straight.

53 3-100-1120 © Midmark Corporation 2016
2. Instruct the patient to hold the IQspiro® in either hand and then hold the device up and to the side of
their face, as illustrated in the photo below.
3. On the Patient Testing screen click Start New Test.
4. 4. The device will zero itself. Be sure that no air is traveling through the mouthpiece during
zeroing. The following box will appear while the IQspiro® is zeroing:
5. Once the zeroing is done, an incentive display appears, if one has been chosen.
6. Instruct the patient to take a maximal inhalation.
7. Instruct the patient to quickly put the DM in their mouth, with their tongue under the DM, teeth and lips
around it, sealing the lips around the DM. Have them Blast out as hard and fast as possible.
8. Encourage the patient to keep blowing out for six seconds, until no air is left to exhale.
− Optional: Have patient then forcefully inhale until lungs are full.
Note When explaining the maneuver to the patient, instruct them to use
the ridges on the top and bottom of the DM as a guide for how far
to insert the mouthpiece into their mouth. Good practice is for the
patient to rest their teeth gently between the ridges.
Note The patient’s tongue or teeth should not be blocking the opening
of the DM.

54 3-100-1120 © Midmark Corporation 2016
9. Stop the test and instruct the patient to remove DM from their mouth.
10. If necessary, instruct the patient on how to correct any technique problems.
11. Obtain three good maneuvers and two matches. Do not exceed eight maneuvers in one testing
session.
12. The program automatically assigns a quality grade to the test.
Test Accepted Dialog Box
13. After each completed test, the Test Accepted dialog box appears with either Yes or No automatically
selected. After a test is accepted or rejected, click Yes to perform another test or No to stop testing.
Acceptability Statements Seen During FVC Testing
Acceptability Statement Criteria Comment Displayed
Good test Meets all the criteria listed below Good test!
Hesitating start If BEV >150mL Don’t Hesitate
Test too short If FET <6.0 sec and EOTV >40 mL (invalid FEV
6)
Blow out longer
Poor effort If PEF match >1.0 L/s Blast out harder
Poor effort in 1st second If FEV6 match >150mL Deeper breath
Achieve two matches After two acceptable maneuvers match Good test session
Poor effort on PEFT If PEFT >120msec Blast out faster
Interrupted flow Cough or interruption detected Blast out smoothly
Abrupt stop
No plateau of duration of at least one second in which there is less than 0.050 liters of volume change
Blast out completely
Inhalation volume is greater than the Exhalation Volume
Inhale > 1.1 * exhalation if inhalation performed
Inhale deeper before starting the test
Note The acceptability statements are intended as recommendations
or guidelines and are not mandatory actions. You can override the
software selection and choose Accept or Reject for each test.

55 3-100-1120 © Midmark Corporation 2016
Acceptability Statements Seen During FVC Testing
Acceptability Statement Criteria Comment Displayed
Exhalation volume is greater than the Inhalation Volume
Exhale > 1.1 * inhalation if inhalation performed
Inhale completely at the end of the test
This acceptability statement was added by Midmark
Volume less than 0.50 Liters Volume Too Low
14. After the patient has completed the number of required tests, click Save Review in the lower-right
corner of the test screen. This will automatically save the test session and display the View Report
screen.
See Section IV, Reviewing Patient Reports for more information about the View Report screen.
Ejecting the DM from the IQspiro®
The IQspiro® eliminates the need to handle the used DM
To eject the DM from the IQspiro®:
1. Open the IQspiro® door and hold open with index finger.
Note Only one error message is displayed.
Note Use best judgment when deciding to accept or reject a test.

56 3-100-1120 © Midmark Corporation 2016
2. Hold IQspiro® over trash receptacle and use your thumb to push down on the eject lever.
3. The used DM will eject into the trash receptacle.
Quality of Test Results
Having the patient inhale at the end of the test provides measures to ensure that the patient inhaled fully
before they started the test and expired fully during the test. If a patient performs a FVL, the results of their
expiratory volume and their inspiratory volume should be within 10% of each other. If they are not, the
appropriate acceptability statement will display after the test is completed.
Post-Bronchodilator Test
The following instructions assume the Pre-BD test has been done on the patient and the bronchodilator has
been administrated.
Post-Bronchodilator Testing a Patient
From the View Report screen, select a bronchodilator from the pull-down list then click Post-BD to return
to the testing screen and perform the test. Post-BD FVC tests are performed the same way as Pre-BD FVC
tests. See Appendix L - Performing a Pre/Post FVC Test - Quick Reference User’s Guide.
Vital Capacity or Slow Vital Capacity Tests
Vital capacity (VC) or slow vital capacity (SVC) tests can determine if a patient’s lungs are trapping air during
a FVC test. Air trapping can be an indication of airway obstruction and can also be seen in older patients.
This is a very slow and deliberate test. The patient takes two or three normal tidal breaths then a slow, deep
breath, and then a slow, full exhale.
Note To assure validity of the Post-BD test, ample time should be
allowed for the medication to take effect. Refer to manufacturer’s
package insert for further information.

57 3-100-1120 © Midmark Corporation 2016
Click VC, which will be bolded. If this is a Pre-BD test, make sure the Pre-Bronchodilator message is
displayed in the blue box in the middle of the test screen. Do not click Start New Test until the patient is
ready to perform the test.
To perform a VC test, the patient must perform the following:
1. Inhale completely before placing the flow sensor mouthpiece into the mouth.
2. Instruct the patient to place the mouthpiece on top of their tongue, with their teeth and lips around the
mouthpiece. The patient must seal their lips around the DM. Let the patient get used to the feeling of
breathing with the DM in their mouth.
3. Inhale as deeply as possible, until the technician observes a plateau at the bottom of the graph.
4. Exhale slowly and evenly until the technician observes a plateau at the top of the graph or the device
signals that the end of test criteria has been met.
5. The technician should stop the test by clicking Stop or pressing Enter.
6. Remove the mouthpiece when instructed by the technician.
The patient must exhale at a faster rate during the blow out phase than during the tidal breaths. After the
patient has completed the number of tests required, click Save Review and click Yes to save the test efforts.
Maximum Voluntary Ventilation
The Maximum Voluntary Ventilation (MVV), is the measurement of a patient’s breathing when the patient
inhales and exhales maximally and rapidly for 12 to 15 seconds. The software takes this result and
extrapolates the results for a period of one minute. MVV is expressed in liters per minute (L/min). This is
a very demanding test and patients must be allowed to rest between efforts. The MVV test is required to
qualify some patients for Social Security Disability benefits.
Click MVV, which will now be bolded. For a Pre-BD test, make sure the Pre-Bronchodilator message is
displayed in the blue box in the middle of the test screen. Do not click Start New Test until the patient is
ready to perform the test.
To perform the MVV test, the patient must perform the following:
1. Instruct the patient to put DM in their mouth, with their tongue under the DM and lips sealed around it.
Take at least three normal tidal breaths.
2. Inhale and exhale maximally as quickly as possible for 12 to 15 seconds.
Coach and encourage the patient until the test time exceeds 12 seconds. Have the patient remove the DM
from their mouth and allow them to rest.
After the patient has completed the number of tests you require, click Save Review and click Yes to save
the test efforts.
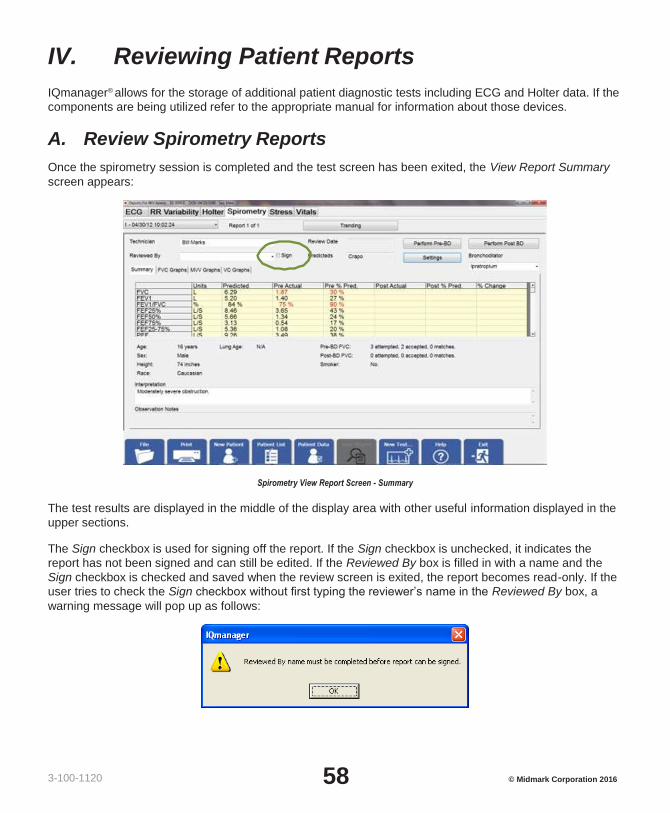
58 3-100-1120 © Midmark Corporation 2016
IV. Reviewing Patient Reports
IQmanager® allows for the storage of additional patient diagnostic tests including ECG and Holter data. If the
components are being utilized refer to the appropriate manual for information about those devices.
A. Review Spirometry Reports
Once the spirometry session is completed and the test screen has been exited, the View Report Summary
screen appears:
Spirometry View Report Screen - Summary
The test results are displayed in the middle of the display area with other useful information displayed in the
upper sections.
The Sign checkbox is used for signing off the report. If the Sign checkbox is unchecked, it indicates the
report has not been signed and can still be edited. If the Reviewed By box is filled in with a name and the
Sign checkbox is checked and saved when the review screen is exited, the report becomes read-only. If the
user tries to check the Sign checkbox without first typing the reviewer’s name in the Reviewed By box, a
warning message will pop up as follows:

59 3-100-1120 © Midmark Corporation 2016
Click Settings to select which reports to print; every report checked will be included when the print function
is selected.
In addition to the test results, the Summary tab includes the following information:
• Patient information: Age, Sex, Height, Race, Smoking History
• Lung age
• COPD (Chronic Obstructive Pulmonary Disease) risk
• Pre and Post FVC test session statement (Attemped, Accepted, Matches)
Click on the FVC Graphs, MVV Graphs or VC Graphs tab to view other data for this patient. Remember that
only the information stored is available for viewing.
Spirometry View Report Screen – FVC Graphs
B. Spirometry Analysis and Reports
Printed reports display patient demographics, test date and time, measurements, graphs, interpretations,
observation notes and additional analysis of the spirometry test results.
COPD Risk Assessment
The COPD Risk Assessment uses the Tecumseh Index. It is helpful in smoking cessation programs. If
the patient is a current smoker and that fact is entered into the Patient Data screen, the printed report will
indicate the curent COPD risk and the reduced COPD risk to the patient if they quit smoking. The COPD risk
statements are: Low, Moderate, High. See Appendix J – COPD Risk Assessment Calculation for additional
information.
Lung Age
Lung age is a smoking cessation tool that, if enabled, appears on the summary screen and provides an
indication of the health of the patient’s lungs. The program automatically calculates the lung age of the

60 3-100-1120 © Midmark Corporation 2016
patient from the patient’s sex, height and FEV1. Lung age is calculated only for patients who have been
identified as current or former smokers, from 20 to 84 and will never a value of 25 or less than the patient’s
actual age. It should be emphasized that the lung age parameter is intended to be used solely as a smoking
cessation tool and not as a diagnostic measurement. See Appendix K - Lung Age Calculation for additional
information.
C. Trending
Trending enables the comparison of the best test measurements from two or more of a patient’s spirometry
sessions.
Trending - Main Screen
Use trending to compare different spirometry measurements over time. The changes in a patient’s condition
can be more easily seen in graphical and tabular form.
The following features are standard in the Trending software:
• Date and time of each test performed is displayed
• Select one to ten different spirometry measurements to trend at one time.
• Select the length of time to compare, from a minimum of two sessions to a maximum of all test
sessions stored for that patient.
• Compare two individual tests, e.g., the best test in one session against the best test in another
session.
• Compare actual and predicted measurements.

61 3-100-1120 © Midmark Corporation 2016
• View changes over a selected period of time, e.g., the oldest test session against the latest test
session.
• Compare Pre-Bronchodilator tests only or Post-Bronchodilator tests only.
• Display tabular and graphical results for easy comparison.
• Display color-coded graphic results for easy identification.
• Print and display trend measurement in tabular format.
• Print and display graphical Flow/Volume (F/V) reports in overlay or side-by-side formats.
Selecting Reports to Trend
Click Trending from the View Report screen and the Spirometry Trend Selection dialog box appears:
Spirometry Trend Selection Dialog Box
Report Selection
• All Reports (default): View all the reports in the list.
• Select From List: Select individual reports for trending.
Test Selection
• Pre-Bronchodilator (default): All trended values are taken from the best Pre-BD test of the session.
• Post-Bronchodilator: All trended values are taken from the best Post-BD test of the session.
Action
• View Report (default): Display the Trending screen, from which the user can choose to print the
trending reports.
• Print Report: Click OK to print the trending report to the default printer. The Trending screen
displays briefly then returns to the View Report screen.
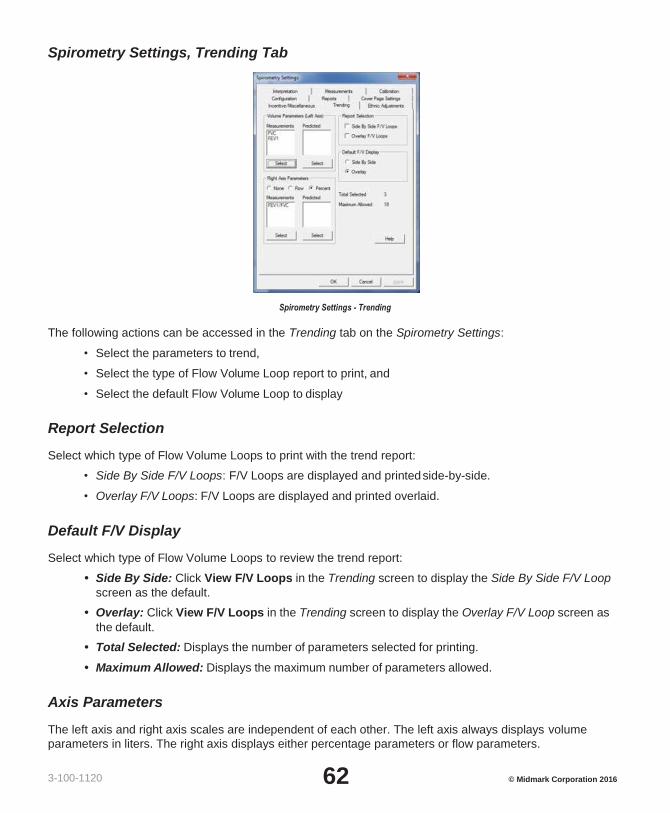
62 3-100-1120 © Midmark Corporation 2016
Spirometry Settings, Trending Tab
Spirometry Settings - Trending
The following actions can be accessed in the Trending tab on the Spirometry Settings:
• Select the parameters to trend,
• Select the type of Flow Volume Loop report to print, and
• Select the default Flow Volume Loop to display
Report Selection
Select which type of Flow Volume Loops to print with the trend report:
• Side By Side F/V Loops: F/V Loops are displayed and printed side-by-side.
• Overlay F/V Loops: F/V Loops are displayed and printed overlaid.
Default F/V Display
Select which type of Flow Volume Loops to review the trend report:
• Side By Side: Click View F/V Loops in the Trending screen to display the Side By Side F/V Loop
screen as the default.
• Overlay: Click View F/V Loops in the Trending screen to display the Overlay F/V Loop screen as
the default.
• Total Selected: Displays the number of parameters selected for printing.
• Maximum Allowed: Displays the maximum number of parameters allowed.
Axis Parameters
The left axis and right axis scales are independent of each other. The left axis always displays volume
parameters in liters. The right axis displays either percentage parameters or flow parameters.

63 3-100-1120 © Midmark Corporation 2016
Volume Parameters
• Measurements: Lists volume measurements selected for the left axis.
• Predicted: Lists predicted values for volume measurements for the left axis.
Flow and Percentage Parameters
• None: Disables the right axis trend.
• Flow: The right axis is for trending flow measurements.
• Percent: The right axis is for trending percentage measurements.
• Measurements: Lists flow or percentage measurements selected for the right axis.
• Predicted: Lists predicted values for flow or percentage measurements for the right axis.
Selecting Parameters to Trend
From the Trending tab on the Spirometry Settings screen, click Select under one of the Measurements
list boxes. The Spirometry Trend Parameters Selections dialog box appears, where the user selects which
parameters to trend. There are six possible sets of parameters:
• Volume measurements
• Volume predicted values
• Percentage measurements
• Percentage predicted values
• Flow measurements
• Flow predicted values
Spirometry Trend Parameter Selection
• Add: Highlight an item in the Available list and click Add. This will place the new item at the bottom
of the Selected list.
• Insert: Highlight an item in the Selected list. The new item will be inserted above this item.
Highlight an item in the Available list and click Insert. This will place the new item above the
highlighted item in the Selected list.
• Remove: Highlight an item in the Selected list and click Remove. This will remove that item from
the Selected list and place it on the Available list.
• Clear List: Removes all the items in the Selected list and places them on the Available list.

64 3-100-1120 © Midmark Corporation 2016
Trend Display Screen
Trending - Main Screen
The Trending screen is the main screen of the spirometry trending control. It consists of a graphical chart, a
tabular measurement grid, and trending button bar.
The graphical chart plots volume parameters on the left axis. The right axis is optional and can display either
percentage parameters or flow parameters, depending on the settings. The horizontal axis represents time,
spanning from the earliest session to the latest session.
Each parameter trended is a data series and is built from the values from the best Pre-BD or best Post-BD
test of the spirometry sessions selected. The graph created for each parameter is represented by a different
color line.
A vertical marker on the display moves left or right as the cursor is moved from left to right. The software
automatically scrolls the grid and highlights the report to which the current marker points. If on a grid row is
clicked on, the software moves the vertical marker to the data corresponding to the selected report.

65 3-100-1120 © Midmark Corporation 2016
Trending Buttons
Trending Button Bar
• Save To File: Click to open the File Save dialog box. Enter a valid filename and click OK to saves
the information in the grid in Microsoft Excel file format (*.xls).
• Print: Click to print the trend report to the currently selected printer.
• Print Setup: Click to display the Print Setup dialog box.
• Select Reports: Click to close this screen and return to the Spirometry Trend Selection screen.
• Select Items To Trend: Click to display the Trending tab from Spirometry Settings.
• View F/V Loops: Click to display the Flow/Volume loops using the default screen format or the last
screen format used.
• View Patient Info: Click to display the patient’s information for the current highlighted test.
• Help: Click to open the Help file.
Patient Information
• Review/Exit: Click to exit this screen and return to the View Report screen.
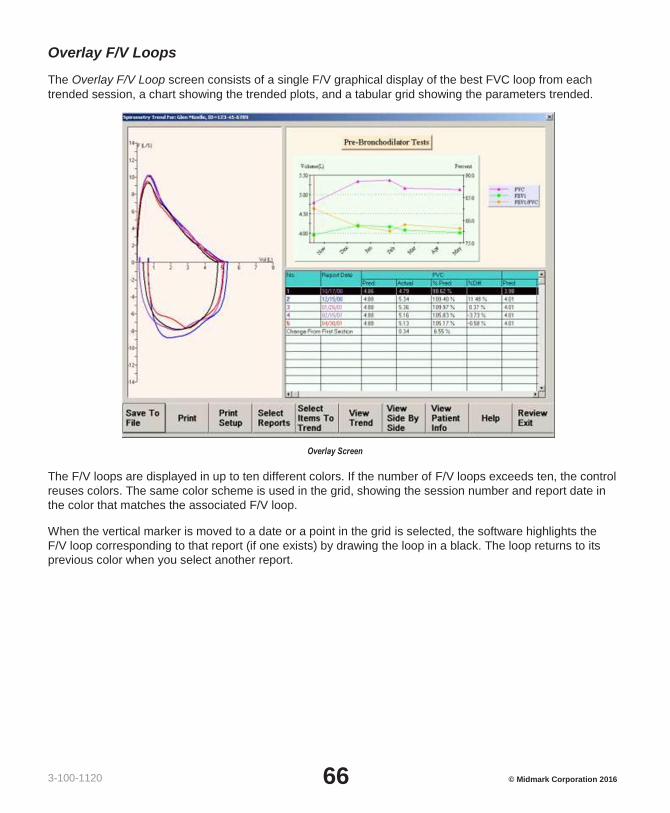
66 3-100-1120 © Midmark Corporation 2016
Overlay F/V Loops
The Overlay F/V Loop screen consists of a single F/V graphical display of the best FVC loop from each
trended session, a chart showing the trended plots, and a tabular grid showing the parameters trended.
Overlay Screen
The F/V loops are displayed in up to ten different colors. If the number of F/V loops exceeds ten, the control
reuses colors. The same color scheme is used in the grid, showing the session number and report date in
the color that matches the associated F/V loop.
When the vertical marker is moved to a date or a point in the grid is selected, the software highlights the
F/V loop corresponding to that report (if one exists) by drawing the loop in a black. The loop returns to its
previous color when you select another report.
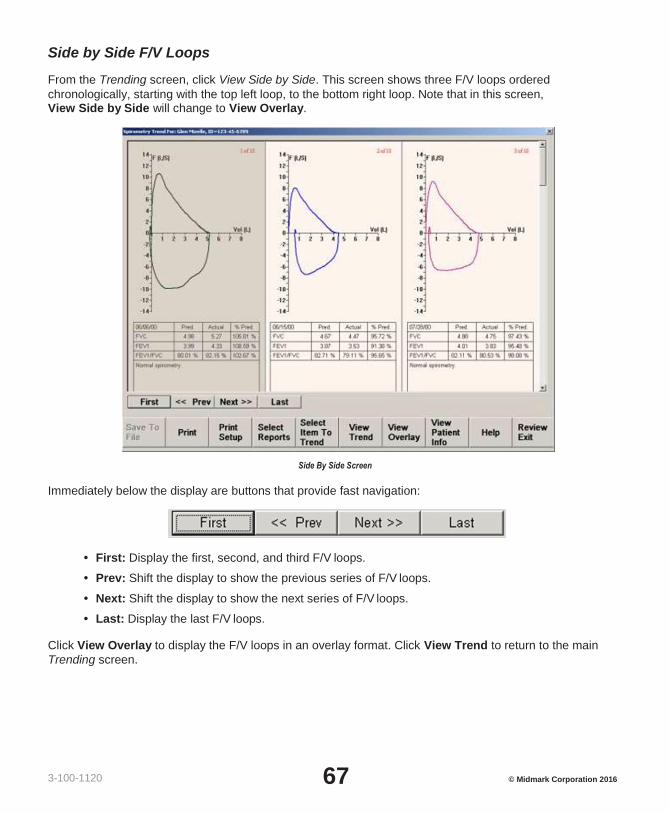
67 3-100-1120 © Midmark Corporation 2016
Side by Side F/V Loops
From the Trending screen, click View Side by Side. This screen shows three F/V loops ordered
chronologically, starting with the top left loop, to the bottom right loop. Note that in this screen, View Side by Side will change to View Overlay.
Side By Side Screen
Immediately below the display are buttons that provide fast navigation:
• First: Display the first, second, and third F/V loops.
• Prev: Shift the display to show the previous series of F/V loops.
• Next: Shift the display to show the next series of F/V loops.
• Last: Display the last F/V loops.
Click View Overlay to display the F/V loops in an overlay format. Click View Trend to return to the main
Trending screen.

68 3-100-1120 © Midmark Corporation 2016
V. Maintenance and Storage
• DO NOT REUSE DISPOSABLE MOUTHPIECES.
• For serial devices: Replace the batteries when the device LED turns red or the computer screen
displays the Low Battery message.
• Inspect the IQspiro® and calibration syringe regularly for accuracy.
• Contact Midmark for your annual calibration certifications.
The IQspiro® Digital Spirometer product is designed to operate without adjustment for the lifetime of the
device.
However, electronic equipment can be subject to wear and damage that can cause malfunctions. A
certification policy is the responsibility of the end user and is subject to the end users’ business practices
which may require it. Certification provides peace of mind that the device continues to work within our factory
specifications. Certifications can be purchased directly from Midmark.
Please contact Technical Service at (800) 624-8950 or (844) 856-1230, option 2, with any questions or to make arrangements for the certification of your IQspiro® Digital Spirometer device.
Cleaning
Preventative Cleaning
Because the IQspiro® uses disposable single-patient use mouthpieces, there is no need to routinely clean
or sterilize any part of the spirometer or cable. To clean the outside of the IQspiro®, use a mild solution of
detergent and water with a soft cloth. Do not use an excessive amount of solution. Be sure not to wet the
ports on the top of the IQspiro® or the battery compartment at the bottom (if applicable). If necessary, use a
mild sterilizing detergent with low alcohol content generally used in hospitals. Verify that all equipment,
including accessories, is completely dry before using.
Note For the greatest accuracy, Midmark recommends daily calibration
of the IQspiro® frequently.
Caution Do not use aromatic hydrocarbons, rubbing alcohol, or solvents for cleaning the IQspiro®.
69 3-100-1120 © Midmark Corporation 2016
Preventative Inspection
A preventative inspection should be done prior to each use to verify that there is no visible damage to the
unit that may cause it to malfunction. The visual inspection should include the IQspiro® and the cable for
signs of damage and deterioration, including but not limited to cracks, cuts, discoloration, or oxidation. If a
cable or other accessory exhibits any of these symptoms, call Midmark Technical Service.
Storage
Avoid extreme humidity and heat during storage.
For serial connection devices: To prevent damage to the IQspiro® handle due to battery leakage or oxidation,
remove all batteries if the device will not to be used for a long period of time.
Radio and Television Interference
This equipment does not generate or use radio frequency energy. It will not cause interference to radio or
television reception. This equipment has been tested and proved to be in compliance with the limits for a
medical device in accordance with the IEC 60601 rules, which are designed to provide reasonable protection
against such interference in a medical or hospital environment.
Caution Electronic devices can be damaged by exposure to liquids. Do not use or store the IQspiro®
near any type of liquids.

70 3-100-1120 © Midmark Corporation 2016
VI. Appendices
A. Appendix A - Screen Summary
Summary of Screens
Screen Name Screen Summary Main Functions
Opening
Access the main functions of IQmanager®.
• Access New Patient screen.
• Access Search Results.
• Configure IQmanager®
• Access Help.
• Exit to desktop.
• Run a STAT test (If IQecg® or IQvitals® is installed)
Patient Data
Enter patient information, including name, ID, vital signs, medications, smoking and medical history.
• Enter new patient data.
• Edit data for an existing patient
• Initiate a test for a patient
• Access a previously saved rest for review.
Spirometry Test
Used to acquire spirometry tests. Also used to accept or reject tests and assign the best test of a session.
• Acquires FVC, VC and MVV tests.
• Automatically “grades” tests based on the ATS recommendations.
• Compares accepted tests for reproducibility.
• Enables the user to change the settings for the IQspiro®.
Spirometry Review
Shows the interpretation for the best Pre-FVC test. Allows the user to confirm the test interpretation.
• View and analyze the spirometry test numeric and graphic results.
• Enables the user to print preview the test report.
• Enables the user to edit the interpretation.
• Enables the user to change the settings for the IQspiro®.
Trending
Compares the best test measurements from two or more spirometry sessions.
• Select the trending parameters.
• Compare individual tests, Pre-BD or Post-BD tests only, actual and predicted measurements or changes over a period of time.
• Display and/or print tabular or graphic results.
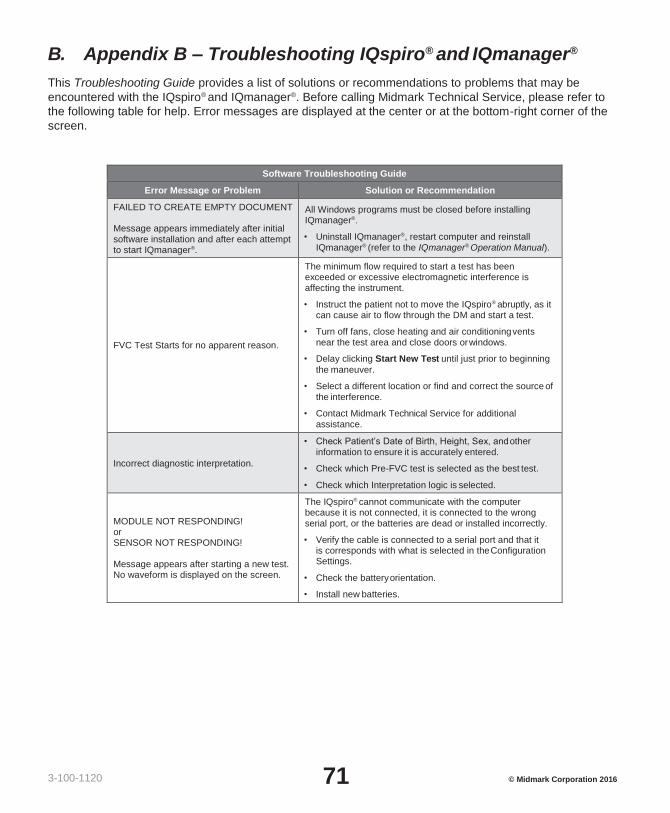
71 3-100-1120 © Midmark Corporation 2016
B. Appendix B – Troubleshooting IQspiro® and IQmanager®
This Troubleshooting Guide provides a list of solutions or recommendations to problems that may be
encountered with the IQspiro® and IQmanager®. Before calling Midmark Technical Service, please refer to
the following table for help. Error messages are displayed at the center or at the bottom-right corner of the
screen.
Software Troubleshooting Guide
Error Message or Problem Solution or Recommendation
FAILED TO CREATE EMPTY DOCUMENT
Message appears immediately after initial software installation and after each attempt to start IQmanager®.
All Windows programs must be closed before installing IQmanager®.
• Uninstall IQmanager®, restart computer and reinstall IQmanager® (refer to the IQmanager® Operation Manual).
FVC Test Starts for no apparent reason.
The minimum flow required to start a test has been exceeded or excessive electromagnetic interference is affecting the instrument.
• Instruct the patient not to move the IQspiro® abruptly, as it can cause air to flow through the DM and start a test.
• Turn off fans, close heating and air conditioning vents near the test area and close doors or windows.
• Delay clicking Start New Test until just prior to beginning
the maneuver.
• Select a different location or find and correct the source of the interference.
• Contact Midmark Technical Service for additional assistance.
Incorrect diagnostic interpretation.
• Check Patient’s Date of Birth, Height, Sex, and other information to ensure it is accurately entered.
• Check which Pre-FVC test is selected as the best test.
• Check which Interpretation logic is selected.
MODULE NOT RESPONDING! or SENSOR NOT RESPONDING!
Message appears after starting a new test. No waveform is displayed on the screen.
The IQspiro® cannot communicate with the computer because it is not connected, it is connected to the wrong serial port, or the batteries are dead or installed incorrectly.
• Verify the cable is connected to a serial port and that it is corresponds with what is selected in the Configuration Settings.
• Check the battery orientation.
• Install new batteries.

72 3-100-1120 © Midmark Corporation 2016
Software Troubleshooting Guide
Error Message or Problem Solution or Recommendation
Other operation problems
• Access the online help by clicking Help on any screen.
• Contact Midmark Technical Service. See Section VII, Customer Support and Warranty Information.
Predicted FEV1/FVC is not available or valid.
• Check the patient’s demographics. Race, Age, Sex, and Height (R.A.S.H.) must be entered to calculate a Predicted Value.
The [test] report dated [test date] for [patient name] is in use by [network computer name]
Message appears when trying to open a test report.
The Report Locking feature prevents multiple users from accessing a report simultaneously in a LAN environment where multiple workstations share a central database.
Report Locking can also be caused by improperly exiting the patient report.
• Close the test report at the [network computer name] workstation by clicking Review Exit.
This patient’s record is in use by: [network computer name]
Message appears when trying to open a specific Patient Data screen.
The Record Locking feature prevents multiple users from accessing a patient record simultaneously in a LAN environment where multiple workstations share a central database. Record Locking can also be caused by improperly exiting the patient record.
• Close the Patient Data screen at the [network computer name] workstation using Opening Screen.
Unable to create big button
Message appears when attempting to launch/start IQmanager®.
• Exit IQmanager®.
• Start MS-DOS Prompt.
• Change directory to c:\windows\system.
• Type regsvr32 threed32.ocx and press Enter.
• Exit MS-DOS Prompt and start IQmanager®.
View Report screen does not work
1. Exit IQmanager®.
2. Start MS-DOS Prompt (command).
3. Change directory to c:\windows\system.
4. Type regsvr32 msflxgrd.ocx and press Enter.
5. Type regsvr32 oleaut32.dll and press Enter.
6. Exit MS-DOS Prompt and re-start IQmanager®.
Volume numbers appear too high or too low
Ambient air pressure or temperature has changed since the last calibration, the current DM lot is slightly different from the last one, or the Use Dry Air Conditions option is checked.
• Calibrate the IQspiro®.
• Deselect the Use Dry Air Conditions option when performing patient tests. This option disables the BTPS corrections.

73 3-100-1120 © Midmark Corporation 2016
Software Troubleshooting Guide
Error Message or Problem Solution or Recommendation
Battery door will not close
Battery contact damaged.
• Call Midmark for RMA; repair IQspiro®.
Cannot install DM into IQspiro®
Leur fitting (pressure port) plugged with plastic from last DM.
• Carefully remove plastic from Leur fitting
Cannot zero IQspiro®
Air is flowing through the DM while the software is attempting to zero the IQspiro® or excessive electromagnetic interference is affecting the instrument.
A. Instruct the patient to hold the IQspiro® next to their cheek prior to starting the test and to blow after zeroing is complete.
B. Select a different location or find and correct the source of the interference.
C. Contact Midmark Technical Service for additional
assistance.
LED on the IQspiro® glows or flashes red
Batteries are low, the COM port is not communicating, or the IQspiro® is defective.
• Replace with new batteries.
• Configure the COM port.
• Repair computer COM port.
• Call for RMA. Repair IQspiro®.
LED on the IQspiro® will not turn OFF but unit functions correctly otherwise.
The COM port is defective or not compatible with IQspiro®; the installed USB-to-serial port converter is not compatible with the IQspiro®.
• Repair COM port
• Install USB COM Port.
• Install different USB to Serial Port converter.
• Contact Midmark Technical Service.
LED on the IQspiro® will not turn on.
There are no batteries in the IQspiro®, the IQspiro® is not plugged into an available COM port, the COM port is not talking with the IQspiro®, or the IQspiro® is defective.
• Install new batteries
• Plug IQspiro® into an available COM port.
• Configure the COM port.
• Call Midmark for RMA; repair IQspiro®.
LED will not turn ON, unit functions correctly.
Defective LED
• Call Midmark for RMA; repair IQspiro®.

74 3-100-1120 © Midmark Corporation 2016
C. Appendix C - Safety and International Symbols
The following symbols are used on Midmark products. Refer to this directory for details concerning the
symbols used on equipment.
Symbol Description
Follow instructions for use.
Date of manufacture.
Do Not Use for More than One Patient – Single-Patient-Use Only, however, multiple tests can be performed on the same patient with a single mouthpiece.
IEC 601-1 Medical Electric Equipment - Type BF Equipment
Equipment displaying this symbol provides the patient protection by providing isolation from earthed parts and other accessible parts of the equipment.
DC VOLTAGE – (USB CONNECTION DEVICES)
This device uses 5 Volt power and consumes 80mA when in use.
DC VOLTAGE AND BATTERY ORIENTATION– (SERIAL CONNECTION DEVICES)
This device uses 3 Volt power and consumes 70mA. Battery orientation, battery type, and power requirements.
ETL Listing Mark
Equipment displaying this symbol has been tested to comply with the following safety standards:
• Conforms to UL Std 60601-1;
• Certified to CAN/CSA Std C22.2 No. 601.1
DISPOSAL
Do not dispose of this product as unsorted municipal waste. Dispose this product in accordance with national requirements per EC Directive 2002/96.

75 3-100-1120 © Midmark Corporation 2016
1
D. Appendix D - Interpretation – ATS
The American Thoracic Society (ATS) created recommendations for the interpretation of spirometry tests.
Measurements are compared to the Lower Limit of Normal (LLN).
The IQspiro® software displays the statement Normal Spirometry if the FVC and the FEV /FVC ratio are
within the normal range (i.e., above the LLN).
Airway Obstruction
If the FEV1/FVC ratio is below the LLN, the software displays one of the following statements regarding
obstruction:
Statement (Obstruction may be a:) Criteria
Physiological variant FEV1 >= 100% Pred. FEV
1
Mild obstruction 70% Pred. FEV1 <= FEV
1 < 100% Pred. FEV
1
Moderate obstruction 60% Pred. FEV1 <= FEV
1 < 70% Pred. FEV
1
Moderately severe obstruction 50% Pred. FEV1 <= FEV
1 < 60% Pred. FEV
1
Severe obstruction 34% Pred. FEV1 <= FEV
1 < 50% Pred. FEV
1
Very severe obstruction FEV1 < 34% Pred. FEV
1
If the FVC is below the LLN, the software will add, “with low vital capacity” to the above obstruction
statements.
Lung Restriction
If there is no suggested airway obstruction, the program displays one of the following statements pertaining
to lung restriction:
Statement Criteria
Mild restriction 70% Pred. FVC <= FVC < LLN
Moderate restriction 60% Pred. FVC <= FVC < 70% Pred. FVC
Moderately severe restriction 50% Pred. FVC <= FVC < 60% Pred. FVC
Severe restriction 34% Pred. FVC <= FVC < 50% Pred. FVC
Very severe restriction FVC < 34% Pred. FVC

76 3-100-1120 © Midmark Corporation 2016
Pre/Post Bronchodilator Comparison
If both pre and post bronchodilator tests have been performed, the software performs and reports automatic
interpretation for both sets of test data.
Statement Ratio of Post-BD / Pre-BD (Post/Pre)
Post FVC/Pre FVC Post FEV1/Pre FEV1
Markedly improved >= 1.25 >= 1.25
Improved 1.15 to 1.24 1.12 to 1.24
Not clearly improved 1.05 to 1.14 1.05 to 1.11
Not improved < 1.05 < 1.05
Lower Limit of Normal (LLN)
The LLN for FVC, FEV1 and FEV
1/FVC is calculated as follows:
LLN = Valuepred − CI95%
The Valuepred
is the predicted value provided by the reference equations. The CI95%
is the 95% confidence interval for the predicted value. If the CI
95% is not reported for the predicted value, and the Standard Error of
the Estimate (SEE) is, then the CI95%
shall be calculated as follows:
CI95% = 1.645 x SEE
If the SEE is not reported and the SD% (Standard Deviation of the error) is, then the software shall calculate
the LLN as follows:
SD% 2
LLN = Valuepred x 100

77 3-100-1120 © Midmark Corporation 2016
E. Appendix E - Interpretation – NHANES III
The 3rd National Health and Nutrition Examination Survey (NHANES III) created a number of medical
recommendations including some directed at spirometry. A new set of predicted equations as well as
new calculations for LLN were developed from data collected and we have labeled these equations as
NHANES III.
The NLHEP published an interpretation table using NHANES III. We have labeled this interpretation logic as
NHANES III (or by selecting PCP Mode as the Configuration Profile, see Section II-E, Configuring IQspiro®).
It determines results as follows:
The software displays a statement that reads Normal Spirometry if the FEV
1 and the FEV
1/FEV
6 ratio are
within the normal range (i.e. above the LLN).
If the FEV1/FEV
6 ratio and the FEV
1 are below the LLN, the software will display one of the following
statements regarding obstruction.
Statement Criteria
Mild obstruction FEV1 >= 60% Pred. FEV
1
Moderate obstruction 40% Pred. FEV1 <= FEV
1 < 60% Pred. FEV
1
Severe obstruction FEV1 < 40% Pred. FEV
1
In addition, if the FEV1/FEV
6 ratio is above the LLN but the FEV6 measurement is below the LLN, the
software will output the statement: Low vital capacity, perhaps due to restriction of lung volumes

78 3-100-1120 © Midmark Corporation 2016
F. Appendix F - Reference Values - Adult
IQspiro® provides the following sets of reference equations for adult patients:
• Crapo (Crapo/Knudson compilation, aka ITS, ATS)
• Knudson (1976 & 1983 compilation)
• European Community For Coal And Steel (ECCS) (1993)
• NHANES III (aka NLHEP, Hankinson)
• Morris
• Roca
Crapo - Adult
H = Height in centimeters.
A = Age in years.
Parameter Sex Race Age Range Predicted Equation SEE CI
95% Source
VC M/F W All Predicted VC = Predicted FVC
FVC M W 15–91 0.06H - 0.0214A - 4.650 0.644 1.115 Ref. 4
F W 15–91 0.0491H - 0.0216A - 3.590 0.393 0.676 Ref. 4
FEV0.5
M W 15–91 0.0327H - 0.0152A - 1.914 0.414 0.708 Ref. 4
F W 15–91 0.0238H - 0.0185A - 0.809 0.294 0.506 Ref. 4
FEV1
M W 15–91 0.0414H - 0.0244A - 2.190 0.486 0.842 Ref. 4
F W 15–91 0.0342H - 0.0255A - 1.578 0.326 0.561 Ref. 4
FEV3
M W 15–91 0.0535H - 0.0271A - 3.512 0.587 1.017 Ref. 4
F W 15–91 0.0442H - 0.0257A - 2.745 0.360 0.620 Ref. 4
FEV1/FVC% M W 15–91 -0.13H - 0.152A + 110.49 4.78 8.28 Ref. 4
F W 15–91 -0.202H - 0.252A + 126.58 5.26 9.06 Ref. 4
FEV3/FVC% M W 15–91 -0.0627 - 0.145A + 112.09 2.68 4.64 Ref. 4
F W 15–91 -0.0937H - 0.163A + 118.16 3.11 5.36 Ref. 4
FEF25-75%
M W 15–91 0.0204H - 0.038A + 2.133 0.962 1.666 Ref. 4
F W 15–91 0.0154H - 0.046A + 2.683 0.792 1.363 Ref. 4
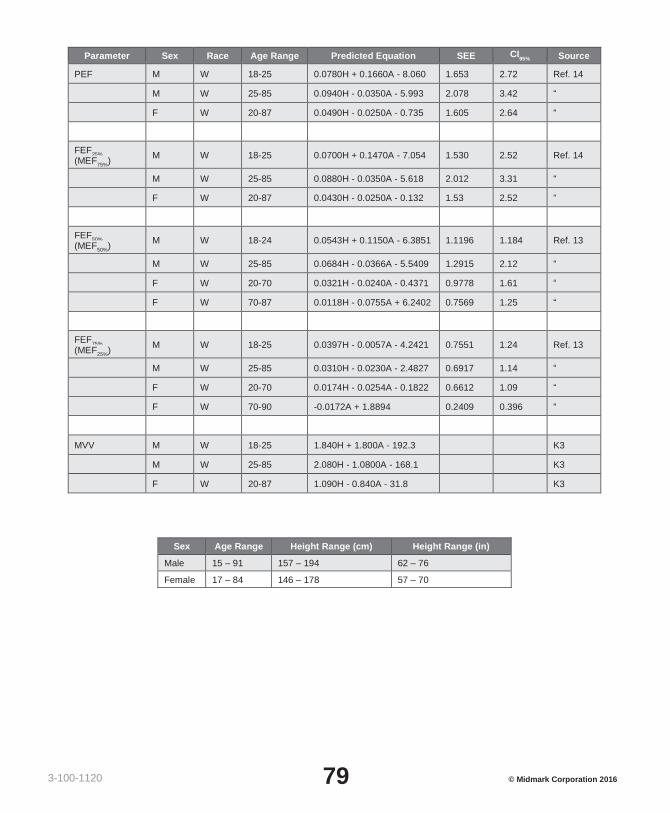
79 3-100-1120 © Midmark Corporation 2016
Parameter Sex Race Age Range Predicted Equation SEE CI95% Source
PEF M W 18-25 0.0780H + 0.1660A - 8.060 1.653 2.72 Ref. 14
M W 25-85 0.0940H - 0.0350A - 5.993 2.078 3.42 “
F W 20-87 0.0490H - 0.0250A - 0.735 1.605 2.64 “
FEF25%
(MEF75%
) M W 18-25 0.0700H + 0.1470A - 7.054 1.530 2.52 Ref. 14
M W 25-85 0.0880H - 0.0350A - 5.618 2.012 3.31 “
F W 20-87 0.0430H - 0.0250A - 0.132 1.53 2.52 “
FEF50%
(MEF50%
) M W 18-24 0.0543H + 0.1150A - 6.3851 1.1196 1.184 Ref. 13
M W 25-85 0.0684H - 0.0366A - 5.5409 1.2915 2.12 “
F W 20-70 0.0321H - 0.0240A - 0.4371 0.9778 1.61 “
F W 70-87 0.0118H - 0.0755A + 6.2402 0.7569 1.25 “
FEF75%
(MEF25%
) M W 18-25 0.0397H - 0.0057A - 4.2421 0.7551 1.24 Ref. 13
M W 25-85 0.0310H - 0.0230A - 2.4827 0.6917 1.14 “
F W 20-70 0.0174H - 0.0254A - 0.1822 0.6612 1.09 “
F W 70-90 -0.0172A + 1.8894 0.2409 0.396 “
MVV M W 18-25 1.840H + 1.800A - 192.3
K3
M W 25-85 2.080H - 1.0800A - 168.1
K3
F W 20-87 1.090H - 0.840A - 31.8
K3
Sex Age Range Height Range (cm) Height Range (in)
Male 15 – 91 157 – 194 62 – 76
Female 17 – 84 146 – 178 57 – 70

80 3-100-1120 © Midmark Corporation 2016
Knudson - Adult
Parameter Sex Race Age Range Predicted Equation SEE CI
95% Source
VC M/F W All Predicted VC = Predicted FVC
FVC M W 18-25 0.0590H + 0.0739A - 6.8865 0.4708 0.775 Ref. 13
M W 25-85 0.0844H - 0.0298A – 8.7818 0.6384 1.05 “
F W 20-70 0.0444H - 0.0169A – 3.1947 0.4831 0.795 “
F W 70-90 0.0313H – 0.0296A –0.1889 0.5745 0.945 “
FEV0.5
M W 18-25 0.030H + 0.043A – 3.0540 0.425 0.699 Ref. 14
M W 25-85 0.037H – 0.017A – 2.746 0.474 0.779 “
F W 20-87 0.019H – 0.014A – 0.406 0.388 0.638 “
FEV1
M W 18-25 0.0519H + 0.0636H - 6.1181 0.4458 0.734 Ref. 13
M W 25-85 0.0665H - 0.0292A - 6.5147 0.5241 0.862 “
F W 20-70 0.0332H - 0.0190A - 1.8210 0.3903 0.642 “
F W 70-90 0.143H – 0.0397A + 2.6539 0.3758 0.618 “
FEV3
M W 18-25 0.052H + 0.066A – 5.531 0.589 0.969 Ref. 14
M W 25-85 0.063H – 0.031A – 5.245 0.575 0.946 “
F W 20-87 0.035H – 0.023A – 1.633 0.496 0.816 “
FEV1/FVC% M W 18-25 -0.0813H + 100.4389 6.5752 10.82 Ref. 13
M W 25-85 -0.105A + 86.6862 6.2691 10.31 “
F W 20-89 -0.1852H - 0.1896A + 121.6777 7.5702 12.45 “
FEF25-75%
M W 18-25 0.0539H + 0.0749A - 6.1990 0.9861 1.62 Ref. 14
M W 25-85 0.0579H - 0.0363A - 4.5175 1.0825 1.78 “
F W 20-70 0.0300H - 0.0309A - 0.4057 0.8539 1.40 “
F W 70-90 -0.0615A + 6.3706 0.7210 1.19 “
PEF M W 18-25 0.0780H + 0.1660A - 8.060 1.653 2.72 Ref. 14
M W 25-85 0.0940H - 0.0350A - 5.993 2.078 3.42 “
F W 20-87 0.0490H - 0.0250A - 0.735 1.605 2.64 “

81 3-100-1120 © Midmark Corporation 2016
Parameter Sex Race Age Range Predicted Equation SEE CI95% Source
FEF25%
(MEF75%
) M W 18-25 0.0700H + 0.1470A - 7.054 1.530 2.52 Ref. 14
M W 25-85 0.0880H - 0.0350A - 5.618 2.012 3.31 “
F W 20-87 0.0430H - 0.0250A - 0.132 1.53 2.52 “
FEF50%
(MEF50%
) M W 18-24 0.0543H + 0.1150A - 6.3851 1.1196 1.184 Ref. 13
M W 25-85 0.0684H - 0.0366A - 5.5409 1.2915 2.12 “
F W 20-70 0.0321H - 0.0240A - 0.4371 0.9778 1.61 “
F W 70-87 0.0118H - 0.0755A + 6.2402 0.7569 1.25 “
FEF75%
(MEF25%
) M W 18-25 0.0397H - 0.0057A - 4.2421 0.7551 1.24 Ref. 13
M W 25-85 0.0310H - 0.0230A - 2.4827 0.6917 1.14 “
F W 20-70 0.0174H - 0.0254A - 0.1822 0.6612 1.09 “
F W 70-90 -0.0172A + 1.8894 0.2409 0.396 “
MVV M W 18-25 1.840H + 1.800A - 192.3
K3
M W 25-85 2.080H - 1.0800A - 168.1
K3
F W 20-87 1.090H - 0.840A - 31.8
K3
Notes:
1. CI95%
calculated using the equation CI95%
= 1.645 * SEE.
2. Race: W = white. Sex: M = male, F = female.
3. A = age in years. H = height in centimeters.
4. Height ranges are as follows
Sex Age Range Height Range (cm) Height Range (in)
Male 18-25 139.7-195.6 55-77
Male 25-85 157.5-195.6 62-77
Female 20-70 147.3-180.3 58-71
Female 70-90 147.3-167.3 58-66

82 3-100-1120 © Midmark Corporation 2016
European Community For Coal And Steel (ECCS) - Adult
H = Height in meters. A = Age in years.
Parameter Sex Race Age See Note 1
Predicted Equation RSD CI
95%
See Note 2
VC M W 18-70 6.10H - 0.028A - 4.65 0.56 0.92
F W 18-70 4.66H - 0.026A - 3.28 0.42 0.69
FVC M W 18-70 5.76H - 0.026A - 4.34 0.61 1.00
F W 18-70 4.43H - 0.026A - 2.89 0.43 0.707
FEV1
M W 18-70 4.30H - 0.029A - 2.49 0.51 0.839
F W 18-70 3.95H - 0.025A - 2.60 0.38 0.625
FEV1/FVC% M W 18-70 -0.18A + 87.21 7.17 11.79
F W 18-70 -0.192A + 89.10 6.51 10.7
FEF25-75%
M W 18-70 1.94H - 0.043A + 2.70 1.04 1.71
F W 18-70 1.25H - 0.034A + 2.92 0.85 1.398
PEF M W 18-70 6.14H - 0.043A + 0.15 1.21 1.99
F W 18-70 5.50H - 0.030A - 1.11 0.90 1.48
FEF25%
M W 18-70 5.46H - 0.029A - 0.470 1.71 2.81
(MEF75%
) F W 18-70 3.22H - 0.025A + 1.60 1.35 2.22
FEF50%
M W 18-70 3.79H - 0.031A - 0.35 1.32 2.17
(MEF50%
) F W 18-70 2.45H - 0.025A + 1.16 1.10 1.81
FEF75%
M W 18-70 2.61H - 0.026A - 1.34 0.78 1.28
(MEF25%
) F W 18-70 1.050H - 0.025A + 1.11 0.69 1.14
MVV M W 18-70 1.34H x 100 - 1.26A - 21.40
Kory
F W 18-70 0.807H x 100 - 0.57A - 5.50
Lindall
Notes:
1. If the patient age is between 18 and 25, the program shall use the equation for age = 25.
2. CI95%
calculated using the equation CI95%
= 1.645 * RSD.

83 3-100-1120 © Midmark Corporation 2016
NHANES III (Hankinson, NLHEP) - Adult
Male age range : >= 18 years
Female age range: >= 20 years
Parameter Sex Race Intercept Age Age2
Ht
prd (cm)
2 Ht
lln (cm)
2
b
0 b
1 b
2 b
3 b
3
FVC M W -0.1933 0.00064 -0.000269 0.00018642 0.00015695
M B -0.1517 -0.01821 0 0.00016643 0.00013670
M H 0.2376 -0.00891 -0.000182 0.00017823 0.00014947
F W -0.3560 0.01870 -0.000382 0.00014815 0.00012198
F B -0.3039 0.00536 -0.000265 0.00013606 0.00010916
F H 0.1210 0.00307 -0.000237 0.00014246 0.00011570
FEV1
M W 0.5536 -0.01303 -0.000172 0.00014098 0.00011607
M B 0.3411 -0.02309 0 0.00013194 0.00010561
M H 0.6306 -0.02928 0 0.00015104 0.00012670
F W 0.4333 -0.00361 -0.000194 0.00011496 0.00009283
F B 0.3433 -0.01283 -0.000097 0.00010846 0.00008546
F H 0.4529 -0.01178 -0.000113 0.00012154 0.00009890
FEV6
M W 0.1102 -0.00842 -0.000223 0.00018188 0.00015323
M B -0.0547 -0.02144 0 0.00016429 0.00013499
M H 0.5757 -0.02860 0 0.00017840 0.00015029
F W -0.1373 0.01317 -0.000352 0.00014395 0.00011827
F B -0.1981 0.00047 -0.000230 0.00013497 0.00010848
F H 0.2033 0.00020 -0.000232 0.00014106 0.00011480
PEF M W 1.0523 0.08272 -0.001301 0.00024962 0.00017635
M B 2.2257 -0.04082 0 0.00027333 0.00018938
M H 0.0870 0.06580 -0.001195 0.00030243 0.00021833
F W 0.9267 0.06929 -0.001031 0.00018623 0.00012148
F B 1.3597 0.03458 -0.00847 0.00019746 0.00012160
F H 0.2401 0.06174 -0.001023 0.00022203 0.00014611
FEF25-75
M W 2.7006 -0.04995 0 0.00010345 0.00005294

84 3-100-1120 © Midmark Corporation 2016
2 2
Parameter Sex Race Intercept Age Age2
Htprd
(cm) 2
Htlln
(cm) 2
b0
b1
b2
b3
b3
M B 2.1477 -0.04238 0 0.00010461 0.00004819
M H 1.7503 -0.05018 0 0.00014473 0.00009020
F W 2.3670 -0.01904 -0.000200 0.00006982 0.00002302
F B 2.0828 -0.03793 0 0.00008572 0.00003380
F H 1.7456 -0.01195 -0.000291 0.00009610 0.00004594
Use the following equation to calculate the predicted value for a lung function parameter (LFP).
LFP=b0 + b1 * Age + b2 * Age + b3 * Height
Height is in centimeters and age is in years. Use b3 coefficient from the Ht
prd column for the predicted value
calculation. Use the b3 coefficient from the Ht
lln column to calculate the LLN.
The following table presents the predicted values for FEV1.0
/FEV6.0
% and FEV1.0
/FVC%
Parameter Sex Race Interceptprd
Age Interceptlln
B0
b1
b0
FEV1.0
/FEV6.0
% M W 87.340 -0.1382 78.372
M B 88.841 -0.1305 78.979
M H 89.388 -0.1534 80.810
F W 90.107 -0.1563 81.307
F B 91.229 -0.1558 81.396
F H 91.664 -0.1670 83.034
FEV1/FVC% M W 88.066 -0.2066 78.388
M B 89.239 -0.1828 78.822
M H 90.024 -0.2186 80.925
F W 90.809 -0.2125 81.015
F B 91.655 -0.2039 80.978
F H 92.360 -0.2248 83.044
Use the following equation to calculate the lung function parameter (LFP).
LFP=b0 + b1 * Age
Use the b1 coefficient from the Interceptprd column to calculate the predicted value. Use the b
1 coefficient
from the Interceptlln column to calculate the lower limit of normal.

85 3-100-1120 © Midmark Corporation 2016
Morris - Adult
Parameter Sex Race Age Range Predicted Equation SEE CI
95% Source
FVC M W 20-84 .0583H – 0.025A – 4.24 0.74 1.22 Ref. 12
F W 20-84 .0453H – 0.024A – 2.85 0.52 0.855 Ref. 12
FEV1
M W 20-84 .0362H – 0.032A – 1.265 0.55 0.905 Ref. 12
F W 20-84 .0350H – 0.025A – 1.93 0.47 0.773 Ref. 12
FEF25-75%
M W 20-84 0.0185H – 0.045A + 2.513 1.12 1.84 Ref. 12
F W 20-84 0.0236H – 0.030A + 0.551 0.80 1.316 Ref. 12
Notes:
1. The height ranges are as follows:
Sex Age Range Height Range (cm) Height Range (in)
Male 20-84 147.3-203.2 58-80
Female 20-84 142.2-182.9 56-72
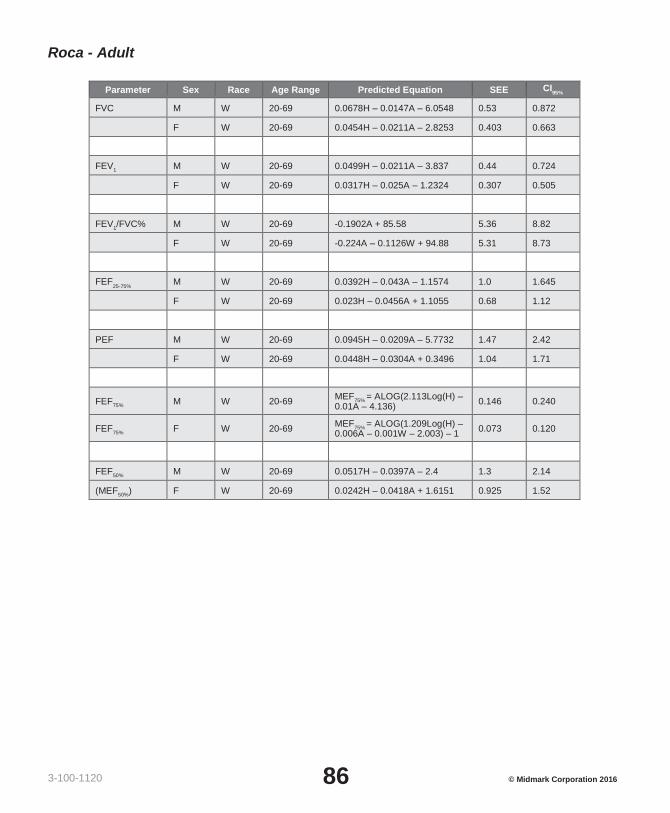
86 3-100-1120 © Midmark Corporation 2016
Roca - Adult
Parameter Sex Race Age Range Predicted Equation SEE CI
95%
FVC M W 20-69 0.0678H – 0.0147A – 6.0548 0.53 0.872
F W 20-69 0.0454H – 0.0211A – 2.8253 0.403 0.663
FEV1
M W 20-69 0.0499H – 0.0211A – 3.837 0.44 0.724
F W 20-69 0.0317H – 0.025A – 1.2324 0.307 0.505
FEV1/FVC% M W 20-69 -0.1902A + 85.58 5.36 8.82
F W 20-69 -0.224A – 0.1126W + 94.88 5.31 8.73
FEF25-75%
M W 20-69 0.0392H – 0.043A – 1.1574 1.0 1.645
F W 20-69 0.023H – 0.0456A + 1.1055 0.68 1.12
PEF M W 20-69 0.0945H – 0.0209A – 5.7732 1.47 2.42
F W 20-69 0.0448H – 0.0304A + 0.3496 1.04 1.71
FEF75%
M W 20-69 MEF
75% = ALOG(2.113Log(H) –
0.01A – 4.136) 0.146 0.240
FEF75%
F W 20-69 MEF
75% = ALOG(1.209Log(H) –
0.006A – 0.001W – 2.003) – 1 0.073 0.120
FEF50%
M W 20-69 0.0517H – 0.0397A – 2.4 1.3 2.14
(MEF50%
) F W 20-69 0.0242H – 0.0418A + 1.6151 0.925 1.52

87 3-100-1120 © Midmark Corporation 2016
G. Appendix G - Reference Values - Pediatric
The IQspiro® software provides the following sets of reference equations for pediatric patients:
• Wang (1993)
• Knudson (1976 & 1983 compilation)
• Polgar (1971)
• Hsu
• NHANES III
• Zapletal
• Eigen
Wang – Pediatric
Race/ Sex
Age (years)
InFVC InFEV1
InFEV1/FVC InFEF
25.75%
α β α β α β α β
W
hite B
oys
6 -0.024 2.470 -0.109 2.252 -0.078 -0.248 - -
7 -0.018 2.489 -0.104 2.270 -0.086 -0.220 - -
8 0.005 2.443 -0.089 2.257 -0.091 -0.199 0.264 1.505
9 0.017 2.426 -0.063 2.197 -0.086 -0.206 0.308 1.443
10 0.030 2.407 -0.057 2.212 -0.081 -0.209 0.290 1.557
11 0.009 2.468 -0.093 2.324 -0.101 -0.147 0.242 1.738
12 -0.061 2.649 -0.161 2.512 -0.101 -0.133 0.165 1.982
13 -0.175 2.924 -0.292 2.843 -0.116 -0.085 0.007 2.396
14 -0.219 3.060 -0.329 2.983 -0.106 -0.087 0.014 2.483
15 -0.079 2.859 -0.141 2.709 -0.060 -0.155 0.241 2.163
16 0.104 2.591 0.062 2.409 -0.045 -0.178 0.503 1.764
17 0.253 2.374 0.262 2.099 0.008 -0.272 0.762 1.368
18 0.296 2.316 0.251 2.129 -0.054 -0.170 0.678 1.528
MSE 0.0121 0.0129 0.0044 0.0502
LLN 83.0% 82.5% 89.0% 67.9%
W
hite G
irls
6 -0.013 2.007 -0.109 1.949 -0.097 -0.055 - -
7 -0.062 2.385 -0.144 2.243 -0.084 -0.132 - -
8 -0.055 2.381 -0.137 2.239 -0.079 -0.152 0.247 1.668
9 -0.039 2.351 -0.123 2.222 -0.084 -0.128 0.254 1.710
10 -0.068 2.458 -0.161 2.364 -0.092 -0.097 0.195 1.933
11 -0.120 2.617 -0.223 2.558 -0.102 -0.061 0.161 2.091
12 -0.174 2.776 -0.264 2.709 -0.090 -0.067 0.185 2.120
13 -0.061 2.576 -0.153 2.535 -0.093 -0.040 0.294 1.976
14 0.139 2.208 0.046 2.178 -0.096 -0.026 0.450 1.711
15 0.210 2.099 0.148 2.008 -0.062 -0.093 0.581 1.486
16 0.226 2.097 0.181 1.972 -0.048 -0.120 0.654 1.366
17 0.214 2.146 0.176 1.992 -0.038 -0.154 0.688 1.290
18 0.195 2.179 0.152 2.031 -0.069 -0.096 0.520 1.622
MSE 0.0131 0.0132 0.0040 0.0504
LLN 82.2% 82.2% 89.5% 67.9%

88 3-100-1120 © Midmark Corporation 2016
Race/ Sex
Age (years)
InFVC InFEV1
InFEV1/FVC InFEF
25.75%
α β α β α β α β
B
lack B
oys
6 -0.088 1.961 -0.166 1.723 -0.091 -0.152 - -
7 -0.040 2.040 -0.122 1.846 -0.091 -0.153 - -
8 -0.094 2.323 -0.225 2.271 -0.118 -0.104 0.097 1.544
9 -0.074 2.308 -0.142 2.059 -0.079 -0.218 0.255 1.248
10 -0.110 2.417 -0.157 2.117 -0.047 -0.303 0.230 1.428
11 -0.138 2.453 -0.176 2.166 -0.048 -0.263 0.256 1.438
12 -0.224 2.710 -0.307 2.548 -0.084 -0.162 0.085 1.936
13 -0.342 2.975 -0.486 2.962 -0.141 -0.018 -0.121 2.476
14 -0.337 3.035 -0.472 3.010 -0.123 -0.050 -0.115 2.536
15 -0.226 2.889 -0.318 2.789 -0.070 -0.140 0.170 2.120
16 0.058 2.425 0.074 2.140 0.018 -0.289 0.663 1.299
17 0.148 2.310 0.053 2.223 -0.095 -0.087 0.505 1.618
18 0.152 2.341 0.130 2.121 -0.041 -0.190 0.859 1.053
MSE 0.0150 0.0157 0.0047 0.0625
LLN 81.9% 81.2% 89.0% 66.8%
B
lack G
irls
6 -0.172 2.117 -0.288 2.182 -0.109 0.059 - -
7 -0.135 2.132 -0.250 2.158 -0.104 -0.030 - -
8 -0.176 2.362 -0.276 2.295 -0.103 -0.066 -0.283 2.990
9 -0.200 2.452 -0.294 2.330 -0.097 -0.104 0.025 2.062
10 -0.230 2.571 -0.344 2.507 -0.120 -0.043 0.051 2.028
11 -0.204 2.526 -0.308 2.460 -0.089 -0.105 0.078 2.006
12 -0.107 2.342 -0.219 2.312 -0.115 -0.021 0.225 1.804
13 -0.042 2.294 -0.117 2.196 -0.051 -0.148 0.418 1.504
14 0.105 2.021 0.041 1.920 -0.063 -0.103 0.574 1.257
15 0.253 1.787 0.203 1.662 -0.043 -0.139 0.599 1.281
16 0.111 2.098 0.129 1.824 -0.022 -0.188 0.653 1.175
17 0.205 1.930 0.273 1.547 0.048 -0.342 0.713 1.067
18 -0.042 2.423 -0.084 2.259 -0.197 0.145 -0.209 2.896
MSE 0.0160 0.0166 0.0038 0.0621
LLN 81.3% 81.0% 90.0% 67.0%
Model: ln(PF) = α + β ln (Ht), where PF is FVC (L), FEV1 (L), FEV
1/FVC, or FEF
25-75% (L/s), and Ht is height
(m). MSE, means squared error; LLN, lower limit of normal defined as the percent predicted corresponding to the 5th percentile
See reference 21.

89 3-100-1120 © Midmark Corporation 2016
Knudson – Pediatric
Parameter Sex Race Age Range Predicted Equation SEE CI
95% Source
VC M/F W All Predicted VC = Predicted FVC
FVC M W 6 - 12 0.0409H - 3.3756 0.3503 0.576 Ref. 13
M W 12 - 18 0.0590H + 0.0739A - 6.8865 0.4708 0.774 “
F W 6 - 11 0.0430H - 3.7486 0.3728 0.613 “
F W 11- 20 0.0416H + 0.0699A - 4.4470 0.4973 0.818 “
FEV0.5
M W 6 - 18 0.030H + 0.043A –3.054 0.425 0.699 Ref. 14
F W 6 - 18 0.019H + 0.061A – 1.738 0.364 0.599 “
FEV1
M 6 - 12 0.0348H - 2.8142 0.2734 0.449 Ref. 13
M 12 - 18 0.0519H + 0.0636A - 6.1181 0.4458 0.733 “
F 6 - 11 0.0336H - 2.7578 0.2697 0.444 “
F 11- 20 0.0351H + 0.0694A - 3.7622 0.4223 0.695 “
FEV1/FVC% M 6 - 18 -0.0813H + 100.4389 6.5752 10.82 Ref. 13
F 6 - 20 -0.1909H + 0.6655A + 109.9739 7.8385 12.89 “
FEF25-75% M 6 - 12 0.0338H - 2.3197 0.6263 1.03 Ref. 13
M 12 - 18 0.0539H + 0.0749A - 6.1990 0.9861 1.62 “
F 6 - 11 0.0220H - 0.8119 0.6568 1.08 “
F 11- 20 0.0279H + 0.1275A - 2.8007 0.8653 1.42 “
PEF M 6 - 18 0.078H + 0.1660A - 8.060 1.653 2.72 Ref. 14
F 6 - 20 0.0490H + 0.157A - 3.916 1.339 2.20 “
FEF25%
(MEF75%
)
M
6 - 18
0.0700H + 0.1470A - 7.054
1.530
2.52
Ref. 14
F 6 - 20 0.0440H + 0.1440A - 3.365 1.290 2.12 “
FEF50%
(MEF50%
)
M
6 - 12
0.0378H - 2.5454
0.6538
1.08
Ref. 13
M 12 - 18 0.0543H + 0.1150A - 6.3851 1.1196 1.84 “
F 6 - 11 0.1846A + 0.7362 0.6689 1.10 “
F 11- 20 0.0288H + 0.1111A - 2.3040 0.9585 1.58 “
FEF75%
(MEF25%
)
M
6 - 12
0.0171H - 1.0149
0.5037
0.829
Ref. 13

90 3-100-1120 © Midmark Corporation 2016
Parameter Sex Race Age Range Predicted Equation SEE CI95% Source
M 12 - 18 0.0397H - 0.0057A - 4.2421 0.7551 1.24 “
F 6 - 11 0.0109H - 0.1657 0.4999 0.822 “
F
11- 20 0.0243H + 0.2923A - 4.4009 - 0.0075A2
0.7202
1.18
“
MVV M 6 - 18 1.840H + 1.800A - 192.3 K3
F 6 - 19 1.090H + 3.40A - 108.1 K3
Notes:
1. The height ranges are as follows:
Sex Age Range Height Range (cm) Height Range (in)
Male 6-12 111.8-154.9 44.01 – 60.98
Male 12-18 139.7-193.0 55.00 – 75.98
Female 6-11 106.7-147.3 42.00 – 57.99
Female 11-20 132.1-182.9 52.00 – 72.00

91 3-100-1120 © Midmark Corporation 2016
Polgar – Pediatric
H = Height in centimeters.
Parameter Sex Race Age Range Predicted Equation SD%
FVC M W 4-17 0.0000044 x H2.67 13
F W 4-17 0.0000033 x H2.72
13
FEV1.0
M W 4-17 0.0000021 x H2.80 10
F W 4-17 0.0000021 x H2.80
10
FEV3.0
M W 4-17 FVCpred
* 0.98
F W 4-17 FVC
pred * 0.98
FEV1/FVC% M W 4-17 47.73 x H0.13
7
F W 4-17 63.63 x H0.08
7
FEF25-75%
M W 4-17 0.0437 x H – 3.4616
F W 4-17 0.0437 x H – 3.4616
PEF (L/s) M W 4-17 0.08738 * H – 7.0929 12.8
F W 4-17 0.08738 * H – 7.0929 12.8
MVV (L/min) M W 4-17 1.276 * H – 99.507
F W 4-17 1.276 * H – 99.507
See Reference 19.

92 3-100-1120 © Midmark Corporation 2016
Hsu – Pediatric
Parameter Sex Race Age Range Predicted Equation SD% Source
FVC M W 7-20 3.58 x 10⁻⁷x H3.18 13 Ref. 15
M B 7-20 1.07 x 10⁻⁶x H2.93 17 “
M H 7-20 1.06 x 10⁻⁶x H2.97 13 “
F W 7-20 2.57 x 10⁻⁶x H2.78 14 “
F B 7-20 8.34 x 10⁻⁷x H2.98 15 “
F H 7-20 1.25 x 10⁻⁶x H2.92 14 “
FEV1
M W 7-20 7.74 x 10⁻⁷x H3.00 13 “
M B 7-20 1.03 x 10⁻⁶x H2.92 17 “
M H 7-20 1.73 x 10⁻⁶x H2.85 13 “
F W 7-20 3.79 x 10⁻⁶x H2.68 14 “
F B 7-20 1.14 x 10⁻⁶x H2.89 15 “
F H 7-20 1.61 x 10⁻⁶x H2.85 14 “
FEF25-75% M W 7-20 7.98 x 10⁻⁷x H2.46
26 “
M B 7-20 3.61 x 10⁻⁷x H2.60 36 “
M H 7-20 9.13 x 10⁻⁷x H2.45 25 “
F W 7-20 3.79 x 10⁻⁶x H2.16 28 “
F B 7-20 1.45 x 10⁻⁶x H2.34 30 “
F H 7-20 1.20 x 10⁻⁶x H2.40 24 “
PEF M W 7-20 3.35 x 10⁻⁷x H2.79 18 “
M B 7-20 1.74 x 10⁻⁷x H2.92 22 “
M H 7-20 7.69 x 10⁻⁷x H2.63 17 “
F W 7-20 2.58 x 10⁻⁶x H2.37 18 “
F B 7-20 5.51 x 10⁻⁷x H2.68 20 “
F H 7-20 6.97 x 10⁻⁷x H2.64 18 “
Notes:
1. Race: W = white, B = black, H = Hispanic or Mexican-American
2. The original equations provide volume in milliliters and flow in milliliters per second. The above
equations are a modification of the original equations and provide volume in liters and flow in liters
per second.
3. Height (H) range is from 110.0 to 190.0 cm for male and 110.0 to 180.0 for female.

93 3-100-1120 © Midmark Corporation 2016
NHANES III (Hankinson, NLHEP) – Pediatric
Parameter Sex Race Intercept Age Age2
Ht
prd (cm)
2 Ht
lln (cm)
2
b
0 b
1 b
2 b
3 b
3
FVC M W -0.2584 -0.20415 0.010133 0.00018642 0.00015695
M B -0.4971 -0.15497 0.007701 0.00016643 0.00013670
M H -0.7571 -0.09520 0.006619 0.00017823 0.00014947
F W -1.2082 0.05916 0 0.00014815 0.00012198
F B -0.6166 -0.04687 0.003602 0.00013606 0.00010916
F H -1.2507 0.07501 0 0.00014246 0.00011570
FEV1.0
M W -0.7453 -0.04106 0.004477 0.00014098 0.00011607
M B -0.7048 -0.05711 0.004316 0.00013194 0.00010561
M H -0.8218 -0.04248 0.004291 0.00015104 0.00012670
F W -0.8710 0.06537 0 0.00011496 0.00009283
F B -0.9630 0.05799 0 0.00010846 0.00008546
F H -0.9641 0.06490 0 0.00012154 0.00009890
FEV6.0
M W -0.3119 -0.18612 0.009717 0.00018188 0.00015323
M B -0.5525 -0.14107 0.007241 0.00016429 0.00013499
M H -0.6646 -0.11270 0.007306 0.00017840 0.00015029
F W -1.1925 0.06544 0 0.00014395 0.00011827
F B -0.6370 -0.04243 0.003508 0.00013497 0.00010848
F H -1.2410 0.07625 0 0.00014106 0.00011480

94 3-100-1120 © Midmark Corporation 2016
Parameter Sex Race Intercept Age Age2
Htprd
(cm) 2
Htlln
(cm) 2
b
0 b
1 b
2 b
3 b
3
PEF M W -0.5962 -0.12357 0.013135 0.00024962 0.00017635
M B -0.2684 -0.08016 0.018202 0.00027333 0.00018938
M H -0.9537 -0.19602 0.014497 0.00030243 0.00021833
F W -3.6181 0.60644 -0.016846 0.00018623 0.00012148
F B -1.2398 0.16375 0 0.00019746 0.00012160
F H -3.2549 0.47495 -0.013193 0.00022203 0.00014611
FEF25-75
M W -1.0863 0.13939 0 0.00010345 0.00005294
M B -1.1627 0.12314 0 0.00010461 0.00004819
M H -1.3592 0.10529 0 0.00014473 0.00009020
F W -2.5284 0.52490 -0.015309 0.00006982 0.00002302
F B -2.5379 0.43755 -0.012154 0.00008572 0.00003380
F H -2.1825 0.42451 -0.012415 0.00009610 0.00004594

95 3-100-1120 © Midmark Corporation 2016
2 2
Use the following equation to calculate the predicted value for a lung function parameter (LFP).
LFP=b0 + b1 * Age + b2 * Age + b3 * Height
Height is in centimeters and age is in years. Use b3 coefficient from the Ht
prd column for the predicted value
calculation. Use the b3 coefficient from the Htlln column to calculate the lower limit of normal.
The following table presents the predicted values for FEV1.0
/FEV6.0
% and FEV1.0
/FVC %
Parameter Sex Race Interceptprd
Age Interceptlln
B0
b1
b0
FEV1.0
/FEV6.0
% M W 87.340 -0.1382 78.372
M B 88.841 -0.1305 78.979
M H 89.388 -0.1534 80.810
F W 90.107 -0.1563 81.307
F B 91.229 -0.1558 81.396
F H 91.664 -0.1670 83.034
FEV1/FVC% M W 88.066 -0.2066 78.388
M B 89.239 -0.1828 78.822
M H 90.024 -0.2186 80.925
F W 90.809 -0.2125 81.015
F B 91.655 -0.2039 80.978
F H 92.360 -0.2248 83.044
Use the following equation to calculate the lung function parameter (LFP).
LFP=b0 + b1 * Age
Use the b1 coefficient from the Interceptprd column to calculate the predicted value. Use the b
1 coefficient
from the Interceptlln column to calculate the lower limit of normal.

96 3-100-1120 © Midmark Corporation 2016
Zapletal – Pediatric
Age range is from 6 to 18 years.
H = Height in centimeters.
Parameter Sex Race Predicted Equation SEE CI
95%
FVC M W 7.9942 – 0.12509 x H + 0.000605 x H2
F W 0.1694 – 0.01217 x H + 0.000605 x H2
FEV1.0
M W 6.6314 – 0.10261 x H + 0.000499 x H2
F W -3.0378 + 0.03640 x H
FEF25%
M W -2.3069 + 0.02817 x H
F W -1.8576 + 0.02483 x H
FEF50%
M W -4.5848 + 0.05430 x H
F W -3.3655 + 0.04477 x H
FEF75%
M W -6.822 + 0.07811 x H
F W -5.1934 + 0.06367 x H
PEF M W -6.9865 + 0.08060 x H
F W -5.3794 + 0.06594 x H

97 3-100-1120 © Midmark Corporation 2016
Eigen – Pediatric
The age range is from 3-6 years and the height range is 87-127 cm (34.3 to 50 inches).
Parameter Intercept (α) Slope (β) SEE CI
95%
FVC -13.63 2.95 0.1167 0.192
FEV1
-12.26 2.63 0.1124 0.185
FEF25-75
-8.13 1.81 0.2393 0.394
FEV1/FVC
(see Note 1) 1.37 -0.31 0.0608
10.0 (see Note 2)
PEF -10.99 2.54 0.1509 0.248
Notes: 1. The FEV1/FVC predicted equation generates a fraction instead of a percentage so the
software must convert this number to a percentage. 2. The FEV1/FVC predicted equation
generates a fraction instead of a percentage so the CI95%
value has been converted to a percentage value
Patient gender was not considered in the regression analysis. The Knudson Pediatric predicted equations
will not be used for missing parameters because that study does not cover children less than 6 years old. In
addition, the Eigen equations should not be used as the default pediatric equations because of the limited
age range.

98 3-100-1120 © Midmark Corporation 2016
H. Appendix H - Adjustments to Reference Values Equations
According to the ATS recommendations specified in Reference 2 and studies cited by Enright
(Reference 23), Black and Asian adults have FVC and FEV1 values that are approximately 15% below that
of Caucasians. Black children have FVC and FEV1 values that are approximately 12% lower than Caucasian
children’s values.
The software makes the following adjustments to the reference values for Asian and Black patients if the
reference equations are only for a white patient population.
Correction of Reference Values for Blacks And Asians
Measurement Scale Factor
FEV1
0.85
FVC 0.85
FEV1/FVC% None
Correction of Reference Values Black Children
Measurement Scale Factor
FEV1
0.88
FVC 0.88
FEV1/FVC% None
The software does not use the above correction factors if the reference equations in use include the patient’s
race, e.g., Hankinson.
Not all race scale factors have been documented. At the time of this printing, many races have had some
published recommendations. The latest recommendations are as follows:
1.00 - American Indian, Caucasian, Eskimo, European-American, Hawaiian, Hispanic, Indian, Italian, Iranian,
Jordanian, Polynesian, Saudi Arabian, South American, Spanish,
0.85 - Asian, African, African-American, Black, Cambodian, Chinese, East Indian Pakistani, Filipino,
Jamaican, Japanese, Korean, Laotian, Vietnamese
However, a recent paper by Korotzer et al (Am. J. Respir. Crit. Care Med. 2000 161: 1101-1108) suggests a
0.93 correction for Asian-American.

99 3-100-1120 © Midmark Corporation 2016
I. Appendix I - Spirometry Measurement Parameters
FVC FEV0.5
FEV1.0
FEV3.0
FEV6.0
FEV1.0
/FVC FEV3.0
/FVC FEV1.0
/FEV6.0
FEV25%
FEV50%
FEV75%
FEV
25-75% FEV
75-85% FEV
200-1200 FEV0.5
/FIV0.5
PEF FIVC FIV0.5
FIF50%
PIF Exp Time V ext. MVV
MTV RR AT AT% VC ERV IRV TV
Unless otherwise noted: Volumes (capacity) are expressed in Liters BTPS (L) Flows are
expressed in Liters per second BTPS (L/s)
J. Appendix J – COPD Risk Assessment Calculation
The IQspiro® program calculates the assessment of the likelihood of the patient developing COPD in the
next ten years using the Techumseh Index as follows.
Risk = 1000 * 1
1 + 10x Equation 1
Male:
x = −2.1316 + bestFEV1
* 10.78 − Age * 0.0914 − cigs * 0.0594 predFEV1
Equation 2
If the male patient were to quit smoking…
xquit = x + cigs * 0.0297 Equation 3
Female:
x = bestFEV1
* 12.81 − 2.98 − Age * 0.0944 − cigs * 0.1065 predFEV1
Equation 4
If female patient were to quit smoking…
xquit = x + cigs * 0.0506 Equation 5

100 3-100-1120 © Midmark Corporation 2016
The program calculates the Risk factor and then uses the criteria shown in the following table to produce a
COPD risk statement.
COPD Risk Statement Criteria
Criteria COPD Risk Statement
If Risk <= 10 Low
If Male and 10 < Risk <= 70 Moderate
If Female and 10 < Risk <= 30 Moderate
If Male and 70 < Risk <= 100 High
If Female and 30 < Risk <= 100 High
If Risk > 100 See Figure 1 below
If the patient is currently smoking, the software will calculate the factor called xquit
using Equation 3 or 5 and
calculates the risk using Equation 1. The software then generates a statement indicating the reduced risk if the patient quits smoking.
Yes
Figure 1 COPD Risk Greater Than 100
Is
Best FEV1 < 0.65
* Pred FEV1
?
No
Yes
Is
(Best FEV1/Pred
FEV1) > 0.80
?
No
Yes
Output:
Risk is very high
Is
Risk > 100
?
Output:
COPD may exist.
Output:
Not Applicable.
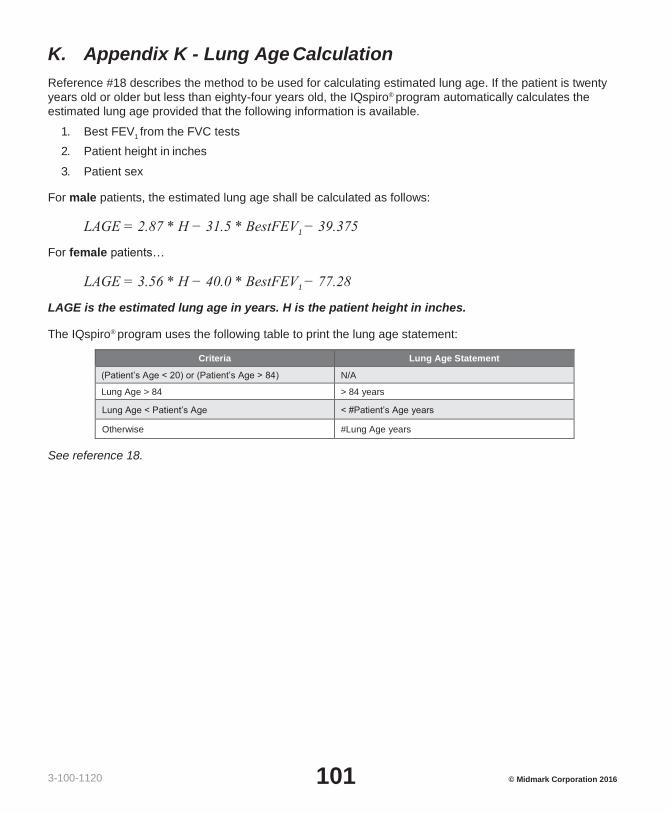
101 3-100-1120 © Midmark Corporation 2016
K. Appendix K - Lung Age Calculation
Reference #18 describes the method to be used for calculating estimated lung age. If the patient is twenty
years old or older but less than eighty-four years old, the IQspiro® program automatically calculates the
estimated lung age provided that the following information is available.
1. Best FEV1 from the FVC tests
2. Patient height in inches
3. Patient sex
For male patients, the estimated lung age shall be calculated as follows:
LAGE = 2.87 * H − 31.5 * BestFEV1 − 39.375
For female patients…
LAGE = 3.56 * H − 40.0 * BestFEV1 − 77.28
LAGE is the estimated lung age in years. H is the patient height in inches.
The IQspiro® program uses the following table to print the lung age statement:
Criteria Lung Age Statement
(Patient’s Age < 20) or (Patient’s Age > 84) N/A
Lung Age > 84 > 84 years
Lung Age < Patient’s Age < #Patient’s Age years
Otherwise #Lung Age years
See reference 18.

102 3-100-1120 © Midmark Corporation 2016
L. Appendix L - Performing a Pre/Post FVC Test -
Quick Reference User’s Guide
A condensed guide to using the IQspiro® Digital Spirometer.
1. Start IQmanager®.
2. Select the patient:
a. Search for a patient from the Opening Screen and double-click the patient name, or
b. Click New Patient from the Opening Screen.
3. Check the patient data fields to ensure Name, Date of Birth, Weight, Height, Sex and Race fields
have been entered on the Patient Data screen.
a. The R.A.S.H. (Race; Age; Sex; Height) must be entered for each patient to obtain predicted
values and interpretations.
4. When the Patient Data screen is complete, select New Test.
Click on the play icon next to IQspiro.
5. Prepare the patient for the spirometry test.
a. Explain the procedure to the patient.
b. Demonstrate the procedure to the patient.
c. Insert a new disposable mouthpiece (DM) into the IQspiro®.
d. Instruct the patient to place the DM on top of their tongue, with their teeth and lips around the
mouthpiece, sealing their lips around the DM. Let the patient get used to the feeling of breathing
with the DM in their mouth.
Note The ATS recommends that calibration be performed daily before
testing is started.

103 3-100-1120 © Midmark Corporation 2016
6. The type of test selected is displayed in bold in the upper-right corner of the screen. If this is not the
type of test required, select the required test by clicking the appropriate button (FVC, VC, MVV) and
either Pre or Post.
7. When the patient is ready, instruct the patient to hold the IQspiro® up and to the side of their face.
8. Click Start New Test - wait for the zeroing process. Do not allow airflow to pass through the
sensor during this process.
9. When the incentive box displays Start When Ready, instruct the patient to perform a full inspiration
and then to place the DM in their mouth.
10. Instruct the patient to blast out the air. Encourage the patient with verbal and body language to blast
out fast and blast out long. Ask the patient to continue to blow out until a plateau is reached on the
volume-time curve.
a. If a flow volume loop is required, have the patient inhale at the end of the expiration.
11. Click Stop or press Enter to conclude the test.
12. Accept or Reject the test based on the patient’s effort.
13. Repeat steps 8 through 11 until the appropriate number of tests has been performed. Performing
more than 8 FVC tests in one sitting will usually return diminished results.
14. Remove and discard the used DM after all tests are completed.
15. Click Save/Review to save the efforts.
16. Use the review screen to review, edit and/or print the results.

104 3-100-1120 © Midmark Corporation 2016
M. References
1. American Thoracic Society. Standardization Of Spirometry - 1994 Update. Am J Respir Crit Car Med,
Vol 152, pp. 1107-1136, 1995
2. American Thoracic Society. Lung Function Testing: Selection Of Reference Values And Interpretative
Strategies. Am Rev Respir Dis 1991; 144;1202-1218.
3. American Association for Respiratory Care (AARC). AARC Clinical Practice Guideline - Spirometry,
1996 Update. Respir Card 1996; 41(7);629-636.
4. Clinical Pulmonary Function Testing - A Manual Of Uniform Laboratory Procedures, Second Edition,
1984. Intermountain Thoracic Society. Salt Lake City, Utah.
5. Wanger, J., “Pulmonary Function Testing, A Practical Ap proach”, 2nded., 1996, Williams & Wilkins,
Baltimore.
6. Siafakas, N., et al. Optimal Assessment And Management Of Chronic Obstructive Pulmonary Disease
(COPD); A Consensus Statement of the European Respiratory Society (ERS), European Respiratory
Journal, ISSN 0903-1936, 1995.
7. Morris, J.F., Koski, Al, Johnson L.C. Spirometric Standards For Healthy Nonsmoking Adults, American
Review Of Respiratory Disease. Volume 103,1971. Pages 57-67.
8. Knudson, R. J., Lebowitz M.D., Holberg, C. J., Burrows, B., Changes in the Normal Maximal Flow-
Volume Curve With Growth And Aging, AM REV RESPIR DIS 1983; 127;725-734.
9. Knudson, R. J., Slatin R. C., Lebowitz, M. D., Burrows, B., The Maximal Expiratory Flow-Volume
Curve – Normal Standards, Variability, and Effects of Age, AM REV RESPIR DIS, 1976 113;587-600.
10. Hsu, K. H. K., Jenkins, D. E., Hsi, B. P., Bourhofer, E., et al., Ventilatory Function of Normal Children
And Young Adults – Mexican-American, White and Black, Spirometry, Journal Of Pediatrics, July 1979,
Vol. 95, No. 1, pp. 14-23.
11. “Lung Volumes And Forced Ventilatory Flows – Report Working Party – Standardization of Lung
Function Tests – European Community For Coal And Steel – Official Statement Of The European
Respiratory Society”, European Respiratory Journal, ISBN:87-16-15024-4, 1993.
12. “Guide To Pulmonary Function Studies Under The Social Security Disability Programs”, Social Security
Administration Office Of Disability, SSA Pub. No. 64-055, ICN 953760, June 1999.
13. Hankinson, J.L., Odencrantz, J.R., Fedan, K.B. Spirometric Reference Values From a Sample of the
General U.S. Population, Am J Respir. Crit. Care Med., Vol. 159. pp. 179-187, 1999.

105 3-100-1120 © Midmark Corporation 2016
14. Polgar G., Promadhat, V. Pulmonary Function Testing In Children: Techniques and Standards, W.B.
Saunders Co., Philadelphia, 1971.
15. Zapletal, A., Motoyama E.K., Van de Woestijne, K.P., Hunt, V.R., Bouhuys, A. Maximum Expiratory
Flow-Volume Curves and Airway Conductance in Children And Adolescents, Journal of Applied
Physiology, Vol. 26, No. 3, March 1969.
16. Ferguson, G.T., Enright P.L., Buist, A.S., Higgins, M.W. Office Spirometry For Lung Health Assessment
in Adults: A Consensus Statement from the National Lung Health Education Program, unpublished draft
of Aug. 17, 1999.
17. Morris, J.F., Temple, W., Spirometric “Lung Age” Estimation For Motivating Smoking Cessation,
Preventative Medicine, 0091-7435/85, 1985.
18. Enright, P. L., Hyatt, E. H., A Practical Guide to the Selection and Use Of Spirometers.
19. A 66-Year-Old Woman with Longstanding Dyspnea on Exertion; Niranjan Seshadri MD and Atul C
Mehta MD, Department of Pulmonary and Critical Care Medicine, The Cleveland Clinic Foundation,
Cleveland, Ohio, Dec 1999.
20. Petty TL, Enright PL Simple Office Spirometry for Primary care Practitioners.
21. Wang X, Pulmonary function between 6 and 18 years of Age, Pediatric Pulmonology, 15:75-88,1993.

106 3-100-1120 © Midmark Corporation 2016
VII. Customer Support and Warranty Information
For immediate help diagnosing problems with this product, refer to the online Help or Appendix B –
Troubleshooting IQspiro® and IQmanager®.
For help diagnosing problems by phone with this product, contact Midmark Technical Service at (800) 624-8950 or (844) 856-1230, option 2, Monday to Friday 5:00 am to 5:00 pm, Pacific Time.
To contact Midmark Technical Service via email: [email protected]
Self-help knowledge base and live chat can be accessed at: kb.midmark.com
Warranty
Midmark warrants IQspiro® to be free from manufacturing and material defects for 12 months from the date
of purchase. Accessories for IQspiro® are warranted for 90 days. Any misuse or abuse of a Midmark product
voids all applicable warranties.
Please refer to midmark.com for the full and current Warranty Terms and Conditions.
Return Materials Authorization
To return any product for repair, a Return Materials Authorization (RMA) number must be obtained from
Midmark Technical Service. This RMA number should be referenced on the package(s) containing the items
to be returned and in any correspondence regarding the return.
Shipping
Before shipping any unit to Midmark, be certain that an RMA number has been issued and that all guidelines
regarding this authorization are followed. We highly recommend following all guidelines for the shipment of
medical products set forth by the shipping company you choose to use. If a question should arise regarding
the appropriate method of shipment, please feel free to ask when calling for your RMA number. It is the
responsibility of the customer when shipping a product to ensure that all packages and their contents get to
Midmark safely. Midmark will not assume responsibility for damage due to improper packaging, shipment or
product use. Such actions will void all applicable warranties.
Midmark Corporation
690 Knox Street, Suite 100
Torrance, California 90502
Tel: (310) 516-6050
(800) 624-8950
Fax: (310) 516-6517

107 3-100-1120 © Midmark Corporation 2016
VIII. EMC Requirements for the IQspiro® Digital
Spirometer
Medical electrical equipment needs special precautions regarding EMC and needs to be installed and put
into service according to the EMC information provided in this Appendix.
Portable and mobile RF communications equipment can affect the operation of medical electrical equipment.
The Midmark IQspiro® are medical electrical equipment.
The IQspiro® models comply with sections 36.201 and 36.202 of the EMC Standard EIC60601-1-2 (E).
Use of cables, cable extensions or accessories other than those specified, with the exception of cables and
accessories sold by the manufacturer of the IQspiro® as replacement parts for internal components, may
result in increased EMISSIONS or decreased IMMUNITY of the IQspiro®.
Table 1 – Guidance and manufacturer’s declaration – electromagnetic emissions – for the IQspiro®
Digital Spirometer
Guidance and manufacturer’s declaration – electromagnetic emissions
The IQspiro® is intended for use in the electromagnetic environment specified below. The customer or the user of the IQspiro®
should assure that it is used in such an environment.
Emissions test Compliance Electromagnetic environment – guidance
RF emissions CISPR 11
Group 1
The IQspiro® uses RF energy only for its internal function. Therefore, its RF emissions are very low and are not likely to cause any interference in nearby electronic environment.
RF emissions CISPR 11
Class B
The IQspiro® is suitable for use in all establishments, including domestic establishments and those directly connected to the public low-voltage power supply network that supplies buildings used for domestic purposes.
Harmonic Emissions IEC 61000-3-2
Not applicable Battery-operated device
Voltage fluctuations/flicker emissions IEC 61000-3-3
Not applicable
Battery-operated device

108 3-100-1120 © Midmark Corporation 2016
Table 2 – Guidance and manufacturer’s declaration – electromagnetic immunity – for the IQspiro®
Digital Spirometer
Guidance and manufacturer’s declaration – electromagnetic immunity
The IQspiro® is intended for use in the electromagnetic environment specified below. The customer or the user of the IQspiro® should
assure that it is used in such an environment.
Immunity test IEC 60601 test level Compliance level Electromagnetic environment – guidance
Electrostatic discharge (ESD)
IEC 61000-4-2
±6 kV contact
±8 kV air
±6 kV contact
±8 kV air
Floors should be wood, concrete or ceramic tile. If floors are covered with synthetic materials, the relative humidity should be at least 30%.
Electrical fast transient/burst
IEC 61000-4-4
±2 kV for power supply lines
±1 kV for input/output lines
N/A
±1 kV for input/output lines
Battery operated device
Surge
IEC 61000-4-5
±1 kV differential mode
N/A
Battery operated device
Voltage dips, short interruptions and voltage variations on power supply input lines
IEC 61000-4-11
<5% UT (<95% dip in UT) for 0.5 cycle
40% UT 60% dip in UT) for 5 cycles
70% UT (30% dip in UT) for 25 cycles
<5% UT (<95% dip in UT) for 5 sec
N/A
Battery operated device
Power frequency (50/60 Hz) magnetic field
IEC 61000-4-8
3 A/m
3 A/m
Power frequency magnetic fields should be at levels characteristic of a typical location in a typical commercial or hospital environment.
NOTE: UT is the A.C. mains voltage prior to application of the test level.

109 3-100-1120 © Midmark Corporation 2016
Table 3 – Guidance and manufacturer’s declaration – electromagnetic immunity – for the IQspiro®
Digital Spirometer
Guidance and manufacturer’s declaration – electromagnetic immunity
The IQspiro® is intended for use in the electromagnetic environment specified below. The customer or the user of the IQspiro® should
assure that it is used in such an environment.
Immunity test IEC 60601 test level Compliance level Electromagnetic environment – guidance
Conducted RF
IEC 61000-4-6
Radiated RF
IEC 61000-4-3
3 Vrms
150 kHz to 80 MHz
3 V/m
80 MHz to 2.5 GHz
3 Vrms
3 V/m
Portable and mobile RF Communications equipment should be used no closer to any part of the IQspiro®, including cables, than the recommended separation distance calculated from the equation applicable to the frequency of the transmitter.
Recommended separation distance d = 1.2 √ P
d = 1.2 √ P 80 MHz to 800 MHz
d = 1.2 √ P 800 MHz to 2.5 GHz
where P is the maximum output power rating of the transmitter in watts (W) according to the transmitter manufacturer and d is the recommended separation distance in meters (m).
Field strengths from the fixed RF transmitters, as determined by an electromagnetic site survey, ashould be less than the compliance level in each frequency range.b
Interference may occur in the vicinity of equipment marked with the following symbol:
NOTE 1: At 80 MHz and 800 MHz, the higher frequency range applies.
NOTE 2: These guidelines may not apply in all situations. Electromagnetic propagation is affected by absorption and reflection from structures, objects and people.
a Field strengths from fixed transmitters, such as base stations for radio (cellular/cordless) telephones and land mobile radios, amateur radio, AM and FM radio broadcast and TV broadcast cannot be predicted theoretically with accuracy. To assess the electromagnetic environment due to fixed RF transmitters, an electromagnetic site survey should be considered. If the measured field strength in the location in which the IQspiro® is used exceeds the applicable RF Compliance level above, the IQspiro® should be observed to verify normal operation. If abnormal performance is observed, additional measures may be necessary, such as re- orientating or relocating the IQspiro®.
b Over the frequency range 150 kHz to 80 MHz, field strengths should be less than 3 V/m.

Table 4 – Recommended separation distances between portable and mobile RF communications and
the IQspiro® Digital Spirometer
Recommended separation distances between Portable and mobile RF communications equipment and the IQspiro® Digital
Spirometer
The IQspiro® is intended for use in an electromagnetic environment in which radiated RF disturbances are controlled. The customer or the user of the IQspiro® can help prevent electromagnetic interference by maintaining a minimum distance between portable and mobile RF communications equipment (transmitters) and the IQspiro® as recommended below, according to the maximum output power of the communications equipment.
Rated maximum output
power of transmitter
(W)
Separation distance according to frequency of transmitter
(m)
150 kHz to 80 MHz
d = 1.2 √ P
80 MHz to 800 MHz
d = 1.2 √ P
800 MHz to 2.5 GHz
d = 2.3 √ P
0.01 0.12 0.12 0.23
0.1 0.38 0.38 0.73
1 1.2 1.2 2.3
10 3.8 3.8 7.3
100 12 12 23
For transmitters rated at a maximum output power not listed above, the recommended separation distance d in meters (m) can be estimated using the equation applicable to the frequency of the transmitter, where P is the maximum output power rating of the transmitter in watts (W) according to the transmitter manufacturer.
NOTE 1: At 80 MHz to 800 MHz, the separation distance for the higher frequency range applies.
NOTE 2: These guidelines may not apply in all situations. Electromagnetic propagation is affected by absorption and reflection from structures, objects and people.
3-100-1120 110
© Midmark Corporation 2016

IX. Contact Information
Midmark Corporation
690 Knox Street, Suite 100
Torrance, California 90502
Phone: (310) 516-6050
USA: (800) 624-8950
Fax: (310) 516-6517
Email: [email protected]
Website: midmark.com
Knowledge base: kb.midmark.com
Midmark Corporation 690 Knox Street, Suite 100
Torrance, CA 90502 USA
800-624-8950
310-516-6050