003-2196-00 User Guide Procenter Cabinet Mounted Delivery Unit
26
User’s Guide For Models: 153839 (-001 thru -004) 003-2196-00 Rev AA5 (7/18/2019) Cabinet-Mounted Procenter Delivery Unit
Transcript of 003-2196-00 User Guide Procenter Cabinet Mounted Delivery Unit

User’s GuideStyle P
For Models:153839 (-001 thru -004)
Style P
003-2196-00 Rev AA5 (7/18/2019)
Cabinet-Mounted Procenter Delivery Unit
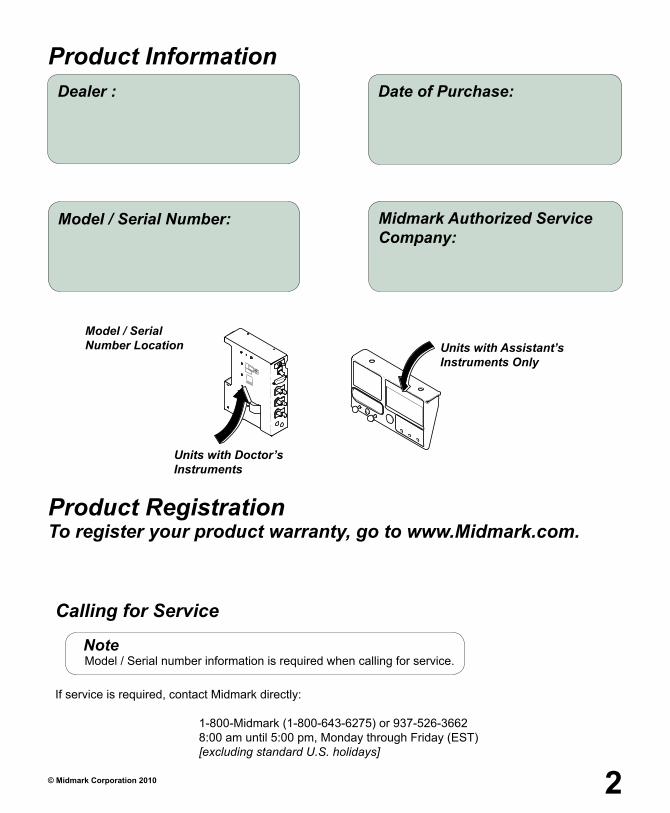
© Midmark Corporation 2010 2
Model / Serial Number:
Date of Purchase:
Midmark Authorized Service Company:
Dealer :
Product Information
Model / Serial Number Location
Calling for Service
If service is required, contact Midmark directly: 1-800-Midmark (1-800-643-6275) or 937-526-3662 8:00 am until 5:00 pm, Monday through Friday (EST) [excluding standard U.S. holidays]
Note Model / Serial number information is required when calling for service.
DA2074-2
Units with Doctor’s Instruments
Units with Assistant’s Instruments Only
Product RegistrationTo register your product warranty, go to www.Midmark.com.

© Midmark Corporation 2010 3
Table of Contents
Important InformationProduct Information & Registration .....................................................................................2Serial Number location .........................................................................................................2 Calling for Service .................................................................................................................2Safety Symbols ......................................................................................................................4Transportation / Storage / Operation Conditions ..............................................................4Intended Use ..........................................................................................................................5 Electromagnetic Interference ...............................................................................................5Disposal of Equipment ..........................................................................................................5
OperationSelf-Contained Water System .............................................................................................6Manual Shut-Off Valves for Water and Air Supply ............................................................7 Pressure Regulator Valves ......................................................................................... 8 Master On/Off Switch ................................................................................................. 9Water Selector Switch ..........................................................................................................9 HVE and Saliva Ejectors .......................................................................................... 10Operating Handpieces ........................................................................................................10Handpiece Controls.............................................................................................................11 Adjustment Knob Location (Doctors) ................................................................................12Syringe Operation and Adjustments .................................................................................13 Adjustment Knob Location (Assistants) ....................................................................14
Cleaning / MaintenanceCleaning .........................................................................................................................15 - 21Scheduled Maintenance .....................................................................................................22 Replacement Parts ..............................................................................................................23 SpecificationsSpecifications .......................................................................................................................22 Model Identification / Compliance Chart .........................................................................23 WarrantyWarranty Information .....................................................................................................24-25

© Midmark Corporation 2010 4
Important InformationSafety Symbols
WARNINg Indicates a potentially hazardous situation which could result in serious injury.
Equipment Alert Indicates a potentially hazardous situation which could result in equipment damage.
Caution Indicates a potentially hazardous situation which may result in minor or moderate injury. It may also be used to alert against unsafe practices
Proper Shipping Orientation
Fragile
Keep Dry
Transportation / Storage / Operation ConditionsTransportation / Storage Temperature Range: ........................................... 23°F to 100°F (-5°C to 38°C)Relative Humidity......................................................................................10% to 90% (non-condensing)Atmospheric Pressure ................................................................7.2 PSI to 15.3PSI (50 kPa to 106 kPa) Operating Temperature Range: ....................................................................59°F – 95°F (15°C – 35°C).
RelativeHumidity
100 F
38 C
23 F
-5 C
Transportation &StorageTemperature
AtmoshericPressure
Type B Applied Part
~ AC (alternating current)
Refer to instruction manual/booklet
Type BF, Applied Part
Manufacturer
Catalogue Number
Serial Number
These symbols may appear on your equipment and/or in the manuals Warning and cautions are provided in the manuals where applicable
© Midmark Corporation 2010 5
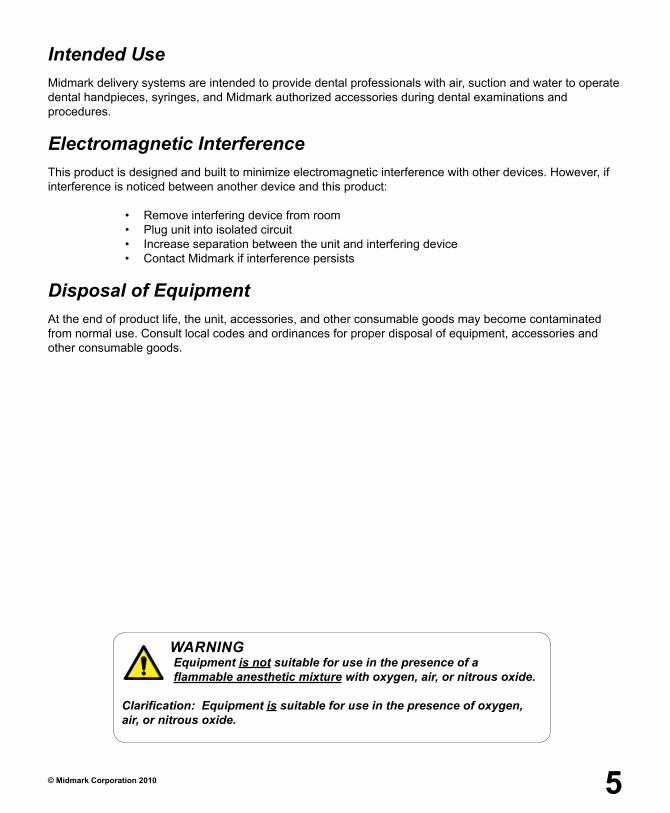
Intended UseMidmark delivery systems are intended to provide dental professionals with air, suction and water to operate dental handpieces, syringes, and Midmark authorized accessories during dental examinations and procedures.
Electromagnetic InterferenceThis product is designed and built to minimize electromagnetic interference with other devices. However, if interference is noticed between another device and this product: • Removeinterferingdevicefromroom • Plugunitintoisolatedcircuit • Increaseseparationbetweentheunitandinterferingdevice • ContactMidmarkifinterferencepersists
Disposal of EquipmentAt the end of product life, the unit, accessories, and other consumable goods may become contaminated from normal use. Consult local codes and ordinances for proper disposal of equipment, accessories and other consumable goods.
WARNINg Equipment is not suitable for use in the presence of a flammable anesthetic mixture with oxygen, air, or nitrous oxide. Clarification: Equipment is suitable for use in the presence of oxygen, air, or nitrous oxide.

© Midmark Corporation 2010 6
OperationSelf-Contained Water SystemThe Self-Contained Water System gives you control of the quality of water used in your delivery system. It also provides a means for disinfecting the system’s internal tubing.
DA101201i
gasket
Mounting Cap
Caution Residual air pressure may cause the water bottle to pop off and spill or spray the contents if not released.
To fill the Self-Contained Water System bottle... A) Unscrew water bottle. B) Fill bottle with water. C) Be sure gasket is in place (in mounting cap). D) Screw bottle into mounting cap.
Note: If Gasket is improperly sealed, you will hear a hissing noise when the system is turned ON.
Before you begin filling the water system... A) Turn master switch OFF.. B) Press syringe air button and hold until all residual air pressure is expelled. (You can hear the air being expelled.)
NOTE Distilled water is not required. Water used must meet all local requirements for drinking water.

© Midmark Corporation 2010
DA2579-1
4060
80
100
20
0
1
23
5
6
7
4
0
7
Recommended Settings:City Water Regulator Gauge Setting
30 psi
Water Bottle Regulator Setting
Factory set to 30 psi DO NOT adjust
Manual Shut-Off Valves for Water and Air Supply
Manualshut-offvalvesstopairand/orwatersupplyatthepointofinputtothe operatory.Shuttingoffvalvesisrecommendedduringextendedperiodsof non-use (ex. vacation, holidays, etc...), or in event of an equipment malfunction.
Water Bottle RegulatorDO NOT ADJUST
Air Manual Shut-off Valve
Water Manual Shut-off Valve
City Water gauge
City Water Regulator Adjustment Knob
Equipment Alert Delivery components were designed to operate at the recommended settings. Poor performance or damage to equipment may result if recommended settings are not maintained.

© Midmark Corporation 2010 8
DA2580
0
4
80
100
5
6
7
Pressure Regulator Valves
Pressure regulator valves allow you to control air and water pressure supplied to delivery instruments.
Shut-off Valves Rotate clockwise 1/4 turn to Shut off.
Turn Clockwise for more pressure
Turn Counter-Clockwise for less pressure
To Adjust the Pressure Regulators... A) Pull up knob and turn to adjust. B) Watch regulator gauge as you turn knob to achieve desired setting. C) Push knob down to lock.

© Midmark Corporation 2010 9
Master ON / OFF Switch (Air/Water)
The Master ON / OFF Switch must be ON to operate delivery system.
To select a water source... Toggle the switch to select desired water source.
Water Selector Switch
The Water Selector Switch allows you to choose the water source for the delivery system. You may select either City Water (tap water), or water from the Self-Contained Water System bottle.
DA2294-2
City Water
Self-Contained Water System
DA2597
To turn the Delivery System ON or OFF... Move the Master Switch to desired position.

© Midmark Corporation 2010 10
HVE and Saliva Ejectors
Before you begin... A) Turn facility vacuum system ON. B) Move lever to towards the OPEN position to activate and moderate suction for the HVE / Saliva Ejector.
HVE
Open
Closed
Open
Closed
Saliva Ejector
DA2308-1
Operating Handpieces
To operate handpiece... A) Turn Master Switch ON. B) Move Water Selector Switch to desired setting. C) Remove handpiece from holder. D) Press foot pedal to deliver selected drive air/water to handpiece.
DA2581
Master Switch Water Selector Switch
Handpiece & Holder
Foot Pedal

© Midmark Corporation 2010 11
Handpiece Controls
Each handpiece has its own Drive Air control knob and its own Coolant Water control knob.
There is also a Coolant Air control knob that adjusts the coolant air for all handpieces.
To adjust the Coolant Water...Rotate the Coolant Water control knob for the desired handpiece, until the desired flow is achieved.
To adjust the Drive Air pressure...Rotate the Drive Air control knob for desired handpiece, until the desired air pressure registers on pressure gauge.
Note: Refer to handpiece manufacturer’s literature for the recommended pressure setting.
To adjust the air/water Spray Pattern...Rotate Coolant Air control knob until desired pattern is achieved.
Note: If your handpiece has an internal coolant air connection this adjustment will have no effect.

© Midmark Corporation 2010 12
Adjustment Knob Locations
Pressure gauge(Drive Air)
Syringe Water Knob
Coolant Water Knob
Coolant Air Knob
Syringe AirKnob
Drive AirKnob
Doctors Instruments Control Panel
Coolant Water Knob
Drive AirKnob
© Midmark Corporation 2010 13DA2298-2
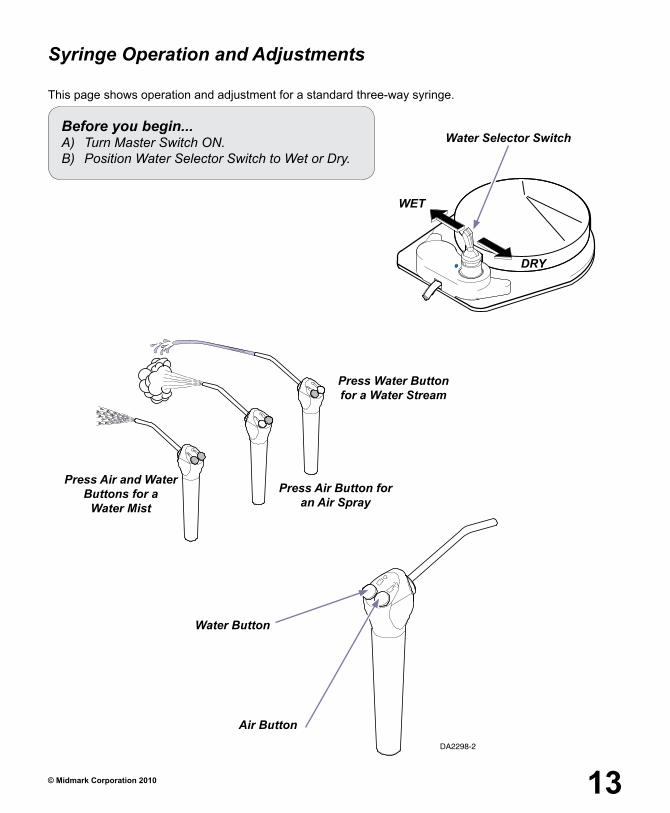
Syringe Operation and Adjustments
This page shows operation and adjustment for a standard three-way syringe.
Before you begin...A) Turn Master Switch ON. B) Position Water Selector Switch to Wet or Dry.
Water Selector Switch
Press Water Button for a Water Stream
Press Air Button for an Air Spray
Press Air and Water Buttons for a
Water Mist
Water Button
Air Button
WET
DRY

© Midmark Corporation 2010 14
Adjustment Knob Location Pedo Assistant Syringe
Syringe Air Knob
Syringe Water Knob
Used with Pedo Dr and Assistant System
Syringe Air Knob
Syringe Water Knob
Use with Pedo Assistants Only
To Adjust the Air Spray pressure and Water Spray pattern... Rotate syringe Air control knob as desired.
To Adjust the Water stream pressure and Water Spray pattern... Rotate syringe Water control knob as desired.

© Midmark Corporation 2010 15
Scheduled Maintenance ChartArea FrequencyUnit surfaces as necessaryHoses as necessaryVacuum system as necessarySolids collector dailyRegulator filters (air / water) every 3 months
Barriers Single-usebarriersanddisposableitemssignificantlyreducetheneedforchemicalcleaners,thus prolongingthelifeoftheequipment.Barriermaterialmustbeimpervioustomoisture/fluids. Examples of protective barriers: Plastic covers (available from your dealer or equipment manufacturer) •Clearplasticwrap •Plasticbag •Plasticsheets •Plastictubing •Plastic-backedpaper •Materialssimilartothoselistedhere
Cleaning and Disinfecting
Cleaning Procedures Use cleaners that are appropriate for the situation, such as warm water and mild detergents, or a 10% solution of bleach with water.
Waterline Maintenance Waterline maintenance is necessary to keep the count of heterotrophic bacteria from rising higher than desiredlevels.Thedesiredlevelforaspecificlocationshouldbedeterminedbyanylocalorregionalguidelines. For example, The United States Centers for Disease Control and Prevention (CDC) guideline for heterotrophic bacteria is less than or equal to 500 CFU/mL (colony forming units per milliliter). Midmark recommends keeping this level under 200 CFU/mL. Treatment can come in many forms. The most popular methods on the market currently are tablets and straw/cartridge based systems. Midmark recommends the use of a straw/cartridge based system that keeps the bacteria levels in check. Regular monitoring should also take place to ensure that heterotrophic bacteria is not exceeding the desired limit. If the level is higher than desired, a shock treatment of the waterlines should be performed. When performing a shock treatment, be sure to check with the manufacturer of the regular treatment regimen being used to ensure chemical compatibility. Monitoring frequency should be established by your practice. As a suggestion, Midmark would recommend that you begin by monitoring on a monthly basis, and make adjustments to the frequency based on test results. PertheCDC,routineflushingofthewaterlinesshouldbeperformedbetweeneverypatient.Extraflushingmaybe needed within Midmark equipment when tablets are used. Undissolved tablet particles can gather overtimeinplaceswithinthewaterlines,obstructingthelineandcausingwaterflowtoslow.Byflushingthewaterlines,waterflowismaximizedandshouldpushanyundissolvedparticlesthrough.
Cleaning / Maintenance
Read all labels carefully!
ATTENTION Midmark assumes no responsibility or liability for any result, expressed or implied. These are suggested practices, based on the best information available at this time this is written..

© Midmark Corporation 2010 16
Cleaning / Maintenance
Air/Oil Separator - Cleaning and Maintaining Periodicallycheckthefluidlevelinair/oilseparatorcontainer.Whencontainerisapproximately2/3full,clean air/oil separator as shown below.
To clean the air/oil separator...A) Turn master ON/OFF switch OFF.B) Remove (unscrew) air/oil separator container. C) Dispose of the fluid and saturated gauze, per local codes. D) Disinfect container and mounting cap. E) Install clean gauze and reinstall the container.
DA2332-2i
gauze
Container
Cleaning and Disinfecting Assistance For assistance with cleaning and disinfecting instructions contact the Midmark Technical Service Department at 1-800-Midmark; it is helpful to provide the delivery system model number and serial number when asking for assistance.Additional information is available from the organizations listed below:
Organization for Safety & Asepsis Procedures: http://www.osap.org
Dept. of Health & Human Resources, Centers for Disease Control & Prevention (CDC): http://www.cdc.gov
American Dental Association: http://www.ada.org
European Dental Association: http://www.eda-eu.org

© Midmark Corporation 2010 17
4060
80
100
20
0
1
23
5
6
7
4
0
KA947500-1
Cleaning / Maintenance
Step 1: Close manual valves to turn off water and air supplies to operatory.
Step 3: Unscrew retainer nut and remove filter.
Step 2: Unscrew filter cap.
Note: Use 9/16” wrench.
Step 4: Install new filter. Secure with retainer nut.
Note: Install the filter and retainer nut with the ridged side up (as shown).
Step 5: Reinstall filter cap.
Maintaining and Replacing the Regulator Filters
Filter Cap
Retainer NutFilter
Manual Shut Off Valves

© Midmark Corporation 2010 18
To clean the solids collector...A) Turn facility vacuum OFF.B) Remove lid and basket.C) Clean basket and housing. D) Re-install basket and lid.
To clean the facility vacuum system...Refer to instructions provided by the vacuum system’s manufacturer.
Cleaning / Maintenance
Assistant’s Units - Cleaning
Housing
Basket
Lid
Caution Always dispose of biohazardous debris according to local regulations.
DA2614

© Midmark Corporation 2010 19
Cleaning / MaintenanceCleaning the Delivery System
DA101201i
DA2536i
At the beginning of each day...A) Fill the Self contained water bottle with fresh water. B) Perform a Purging Procedure.
Note: See Purging Procedure described in this manual.
For each new patient...A) Replace disposable tips, instruments, etc.B) Perform a Purging Procedure.
Note: See Purging Procedure described in this manual.
Note:Water must be safe for drinking. Distilled water is not required.
DA2582
DA2582

© Midmark Corporation 2010 20
Cleaning the Delivery System -At the end of each day.
At the end of each day...
DA2536i
DA2582
A) Remove disposable tips, instruments, etc.
B) Clean and disinfect the delivery system (see Cleaning and Disinfecting instructions).
C) Fill the water bottle with fresh water and perform a perform a purging procedure. Note: See Purging Procedure described in this manual.
DA2538i
D) Turn Master Switch OFF. Press and hold the foot control pedal until all pressure is released.
© Midmark Corporation 2010 21DA2559
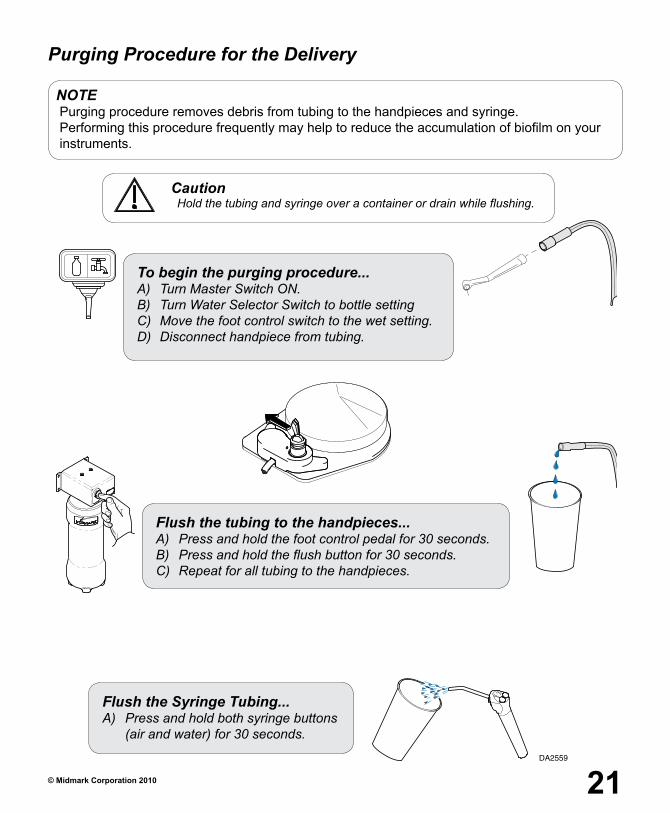
NOTE Purging procedure removes debris from tubing to the handpieces and syringe. Performing this procedure frequently may help to reduce the accumulation of biofilm on your instruments.
Caution Hold the tubing and syringe over a container or drain while flushing.
Purging Procedure for the Delivery
To begin the purging procedure...A) Turn Master Switch ON.B) Turn Water Selector Switch to bottle settingC) Move the foot control switch to the wet setting.D) Disconnect handpiece from tubing.
Flush the tubing to the handpieces...A) Press and hold the foot control pedal for 30 seconds. B) Press and hold the flush button for 30 seconds. C) Repeat for all tubing to the handpieces.
Flush the Syringe Tubing...A) Press and hold both syringe buttons (air and water) for 30 seconds.

© Midmark Corporation 2010 22
Interval Inspection / Service Description
Weekly
CleanWipe painted metal and plastic surfaces with a clean soft cloth and mild soap and water solution.
Obvious Damage Visually inspect components for damage that could result in unsafe operation.
Every 6 monthsLabels / Decals Replace any missing or illegible labels.
Hardware Check for any loose or missing fasteners. All fasteners must be present and securely fastened.
Date of Service:
Location:
Service Technician:
Model Number:
Serial Number:
Notes:
HandpieceConnection Type Midwest 4-Hole Type Handpiece
Water ModuleReservoirs Two - 1 Liter - Toggled
Pressurized System 30 PSIAseptic Non-Retracting HPC Coolant
Electrical (Illuminated Handpiece Only)Power Supply 115V~, 60Hz, 0.6 amp
Specifications
Scheduled Maintenance

© Midmark Corporation 2010 23
Model Identification / Compliance Chart
Model DescriptionComplies To:
UL / IEC 60601-1CAN / CSA C22.2 No.601.1
153839-001 Pedo Bench w/Doctor’s & Assis-tants Instruments
•
153839-002 Pedo-Bench w/ Assistant’sInstruments Only
•
153839-003 Ortho Cabinet w/Doctor’s & Assistant’s Instruments
•
153839-004 Cabinet Mount w/Doctor’s Instruments Only
•
DA2304-1
Replacement PartsThese replacement parts can be purchased from your authorized Midmark dealer.
Saliva Ejector Valve Part Number 029-3975-00
HVE Handpiece Valve Part Number 029-5101-00
Solids Collector Basket Small Assistants Cabinet Mounted (1) 118613 (50) 002-10259-00
Syringe Tip Part Number 120514
Saliva Ejector Tip Part Number 016-1116-00
Regulator Valve Filter Part Number 053-1166-00
Saliva Ejector Lever Part Number 016-1113-00
HVE Lever Part Number 016-1109-00

© Midmark Corporation 2010 24
Warranty InformationMidmark Limited Warranty - Dental ProductsSCOPE OF WARRANTY
Midmark Corporation (“ Midmark”) warrants to the original retail purchaser that it will at Midmark’s option repair or replace components of the dental products manufactured by Midmark (except for components not warranted under “Exclusions”) that are defective in material or workmanship under normal use and service. Midmark’s obligation under this limited warranty is limited to the repair or replacement of the applicable components. This limited warranty shall only apply to defects that are reported to Midmark within the applicable warranty period and which, upon examination by Midmark, prove to be defective. This warranty extends only to the first retail purchaser of a product and is not transferable or assignable. Replacement components or products may be used and/or refurbished components or products, provided they are of like quality and specifications as new components or products.
APPLICABLE WARRANTY PERIOD
The applicable warranty period, measured from the date of delivery to the original user, shall be as follows: Effective March 1, 2018 these applicable warranty periods are measured from the date of invoice to the original user, shall be as follows:
1. OPERATORY PRODUCTSa. Five (5) years for all products (except for the items in (b) through (e)).b. Two (2) years for upholstery (chairs and stools).c. “KINK-VALVE” module carries a ten (10) year warranty.d. The original light bulb on a new light carries a one (1) year warranty.e. Accessories not manufactured by Midmark are excluded including but not limited to Bien Air handpiece
systems, Dentsply Cavitron scaler, Satelec scaler and curing light, and Sopro cameras.
2. ORAL SURGERY PRODUCTS are warranted for a period of one (1) year.
3. STERILIZER PRODUCTS are warranted for a period of one (1) year.
4. ULTRASONIC CLEANER PRODUCTS are warranted for a period of two (2) years.
5. AIR AND VACUUM PRODUCTSa. PowerAir® oil-less compressors – Five (5) years or 3,500 hours of use, whichever occurs first. b.
PowerVac® and PowerVac® G dry vacuums – Five (5) years or 10,000 hours of use, whichever occurs first (except that the vacuum pump warranty term is ten (10) years or 20,000 hours of use, whichever occurs first). c. Classic Series® wet-ring vacuums – Five (5) years or 10,000 hours of use, whichever occurs first. d. PowerMax surgical suction – Two (2) years. e. Hg5 Series Amalgam Separator - One (1) year. (f) Midmark manufactured accessories - One (1) year.
6. SYNTHESIS™ DENTAL CASEWORK AND ARTIZAN® EXPRESSIONS PRODUCTa. Five (5) years for all products and components including door and drawer fronts, casters and
slides, except for the items in (b), (c) and (d).b. Three (3) years for electrical components such as task lights/LED lights, cords, controls and
accessories. c. Two (2) years for sliding track monitor mount and components and upholstery. (d) One (1) year for
countertops and resin, including accessories.

© Midmark Corporation 2010 25
Warranty Information continued...7. IMAGING PRODUCTS are warranted for a period of two (2) years except for the ClearVision CR reader
which is warranted for a period of one (1) year.
8. MIDMARK Replacement Parts and Accessories carry a ninety (90) day warranty
EXCLUSIONS
This warranty does not cover and Midmark shall not be liable for the following;1. defects, damage or other conditions caused, in whole or in part, by misuse, abuse, negligence,
alteration, accident, freight damage, negligent storage, tampering or failure to seek and obtain repairor replacement in a timely manner;
2. products which are not installed, used, and properly cleaned and maintained as required orrecommended in the Midmark “Installation” and/or “Installation/Operation Manual” for the applicableproduct, including the specified structural and operational environment conditions and electricalpower requirements;
3. products considered to be of a consumable or sterile nature;4. accessories or parts not manufactured by Midmark;5. charges by anyone for adjustments, repairs, replacement parts, installation or other work performed
upon or in connection with such products which are not expressly authorized in writing in advanceby Midmark
6. costs and expenses of routine maintenance and cleaning;7. representations and warranties made by any person or entity other than Midmark;8. matching of color, grain or texture except to commercially acceptable standards;9. changes in color caused by natural or artificial light;10. custom manufactured products;11. alterations or modifications to the product by any person or entity other than Midmark; and12. Products that would otherwise by covered under Sections 1 and 2 of this limited warranty, but are
acquired: (i) from a person or entity that is not Midmark or one of its authorized dealers; or (ii) from aMidmark dealer that is not authorized to sell the product at issue in the geographic territory where thepurchaser is located, or is not authorized to sell the product at issue within the medical, animalhealth or dental market, as the case may be, in which purchaser intends to use the product.
EXCLUSIVE REMEDY; CONSEQUENTIAL DAMAGES DISCLAIMER
MIDMARK’S ONLY OBLIGATION UNDER THIS LIMITED WARRANTY IS THE REPAIR OR REPLACEMENT OF DEFECTIVE PARTS. MIDMARK SHALL NOT BE LIABLE FOR AND HEREBY DISCLAIMS ANY DIRECT, SPECIAL, INDIRECT, INCIDENTAL, EXEMPLARY OR CONSEQUENTIAL DAMAGES OR DELAYS, INCLUDING, BUT NOT LIMITED TO, DAMAGES FOR LOSS OF PROFITS OR INCOME, LOSS OF USE, DOWNTIME, COVER AND EMPLOYEE OR INDEPENDENT CONTRACTOR WAGES, PAYMENTS AND BENEFITS.
WARRANTY DISCLAIMER
THIS LIMITED WARRANTY IS MIDMARK’S ONLY WARRANTY AND IS IN LIEU OF ALL OTHER WARRANTIES, EXPRESS OR IMPLIED.MIDMARK MAKES NO IMPLIED WARRANTIES OF ANY KIND INCLUDING ANY IMPLIED WARRANTIES OF MERCHANTABILITY OR FITNESS FOR A PARTICULAR PURPOSE. THIS WARRANTY IS LIMITED TO THE REPAIR OR REPLACEMENT OF DEFECTIVE PARTS.
STATUTE OF LIMITATIONS
No action my be brought against Midmark for breach of this limited warranty, or implied warranty, if any, or for any other claim arising out of or relating to the products, more than ninety (90) days following expiration of the limited warranty period.

Midmark Corporation60 Vista DriveVersailles, OH 45380 USA1-800-643-62751-937-526-3662