The Office in the Business World - fl01000126.schoolwires.net
AOIT Web Design
Lesson 9Using Development Tools and
Techniques
Student Resources
Resource Description
Student Resource 9.1 Guide: Template-Designed Web Pages
Student Resource 9.2 Tutorial: Preparing a Layout for a Template
Student Resource 9.3 Tutorial: Creating a Template
Student Resource 9.4 Tutorial: Creating Child Pages
Student Resource 9.5 Tutorial: Updating a Template
Student Resource 9.6 Tutorial: Creating Library Items
Student Resource 9.7 File Management Structure: Organizing Your Website’s Files
Student Resource 9.8 Assignment Sheet: Culminating Project Infrastructure
Copyright © 2008–2016 NAF. All rights reserved.
AOIT Web Design Lesson 9 Using Development Tools and Techniques
Student Resource 9.1
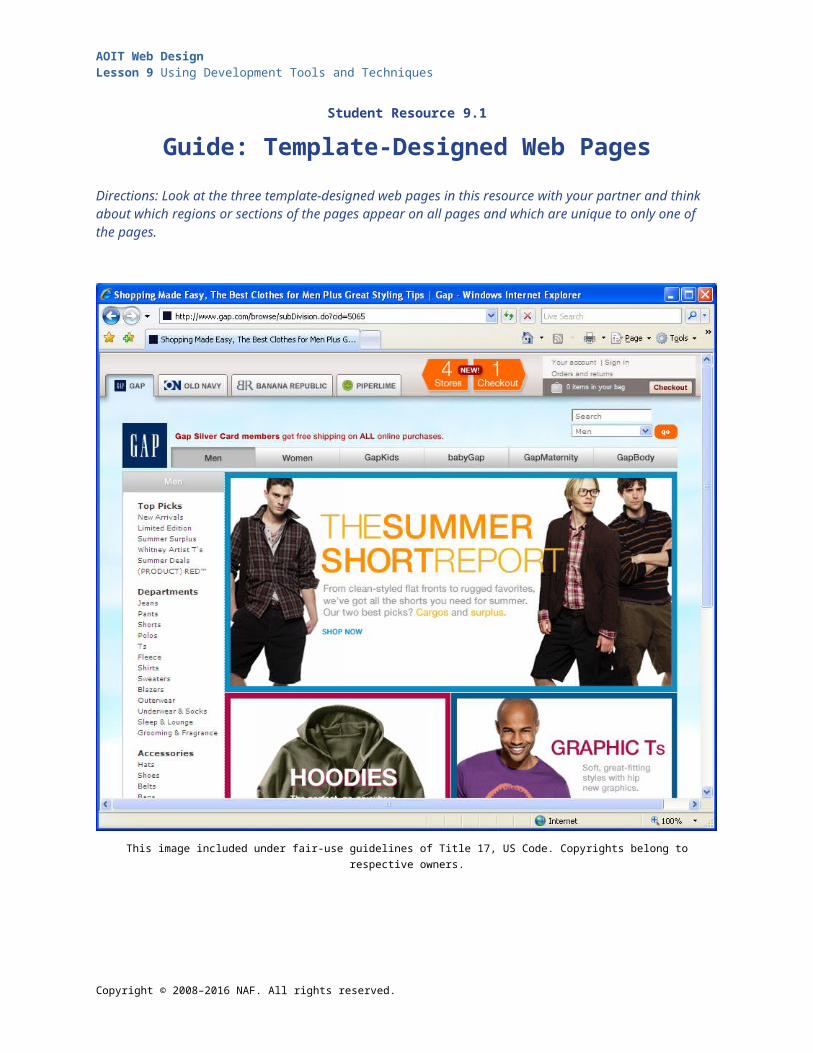
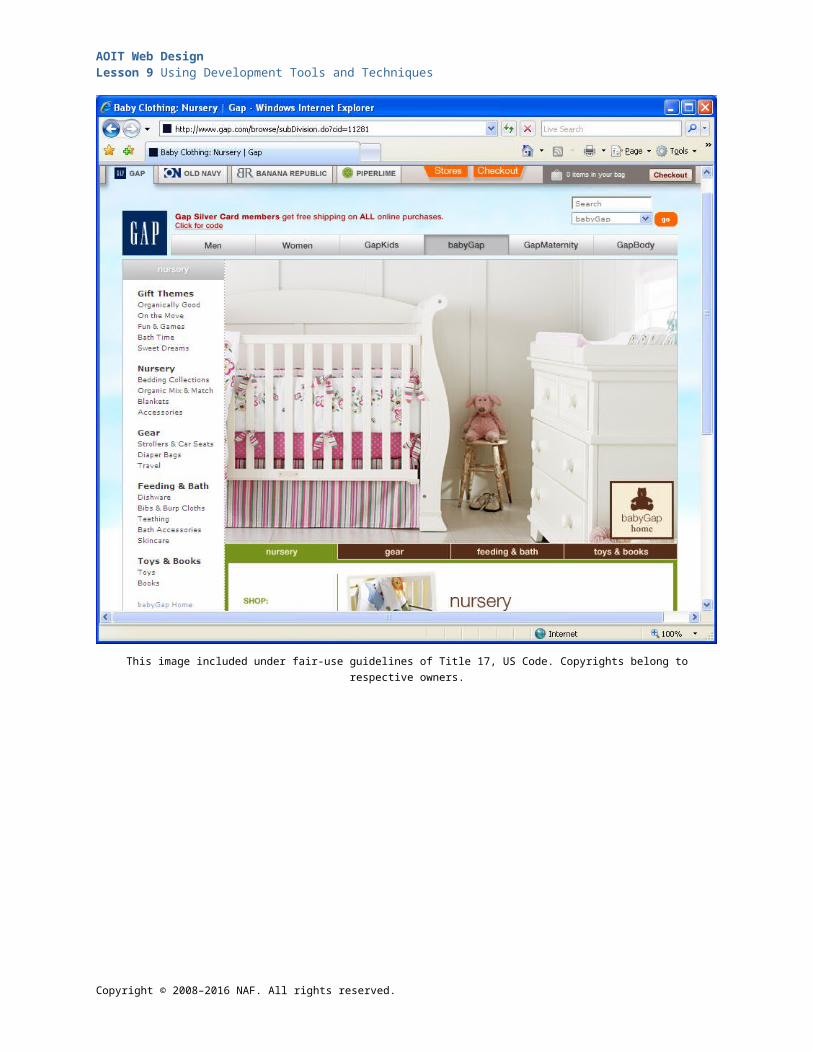
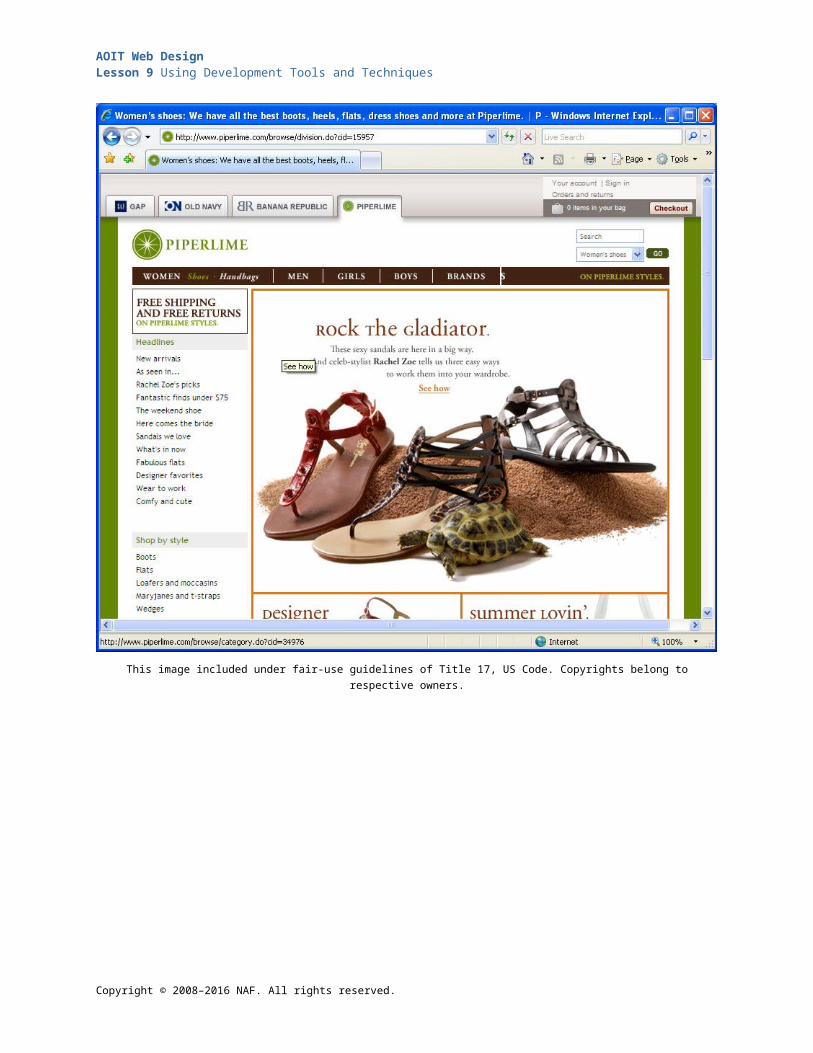
Guide: Template-Designed Web PagesDirections: Look at the three template-designed web pages in this resource with your partner and think about which regions or sections of the pages appear on all pages and which are unique to only one of the pages.
This image included under fair-use guidelines of Title 17, US Code. Copyrights belong to respective owners.
Copyright © 2008–2016 NAF. All rights reserved.
AOIT Web Design Lesson 9 Using Development Tools and Techniques
This image included under fair-use guidelines of Title 17, US Code. Copyrights belong to respective owners.
Copyright © 2008–2016 NAF. All rights reserved.
AOIT Web Design Lesson 9 Using Development Tools and Techniques
This image included under fair-use guidelines of Title 17, US Code. Copyrights belong to respective owners.
Copyright © 2008–2016 NAF. All rights reserved.
AOIT Web Design Lesson 9 Using Development Tools and Techniques
Student Resource 9.2
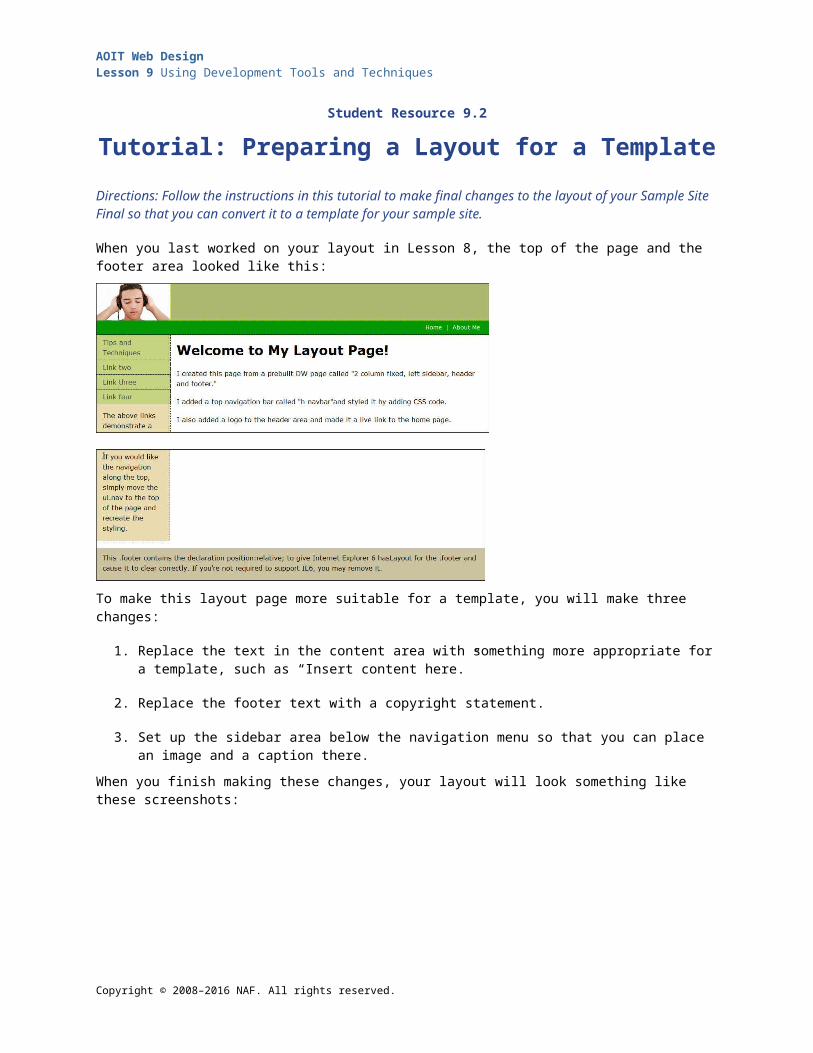
Tutorial: Preparing a Layout for a TemplateDirections: Follow the instructions in this tutorial to make final changes to the layout of your Sample Site Final so that you can convert it to a template for your sample site.
When you last worked on your layout in Lesson 8, the top of the page and the footer area looked like this:
To make this layout page more suitable for a template, you will make three changes:
1. Replace the text in the content area with something more appropriate for a template, such as “Insert content here.”
2. Replace the footer text with a copyright statement.
3. Set up the sidebar area below the navigation menu so that you can place an image and a caption there.
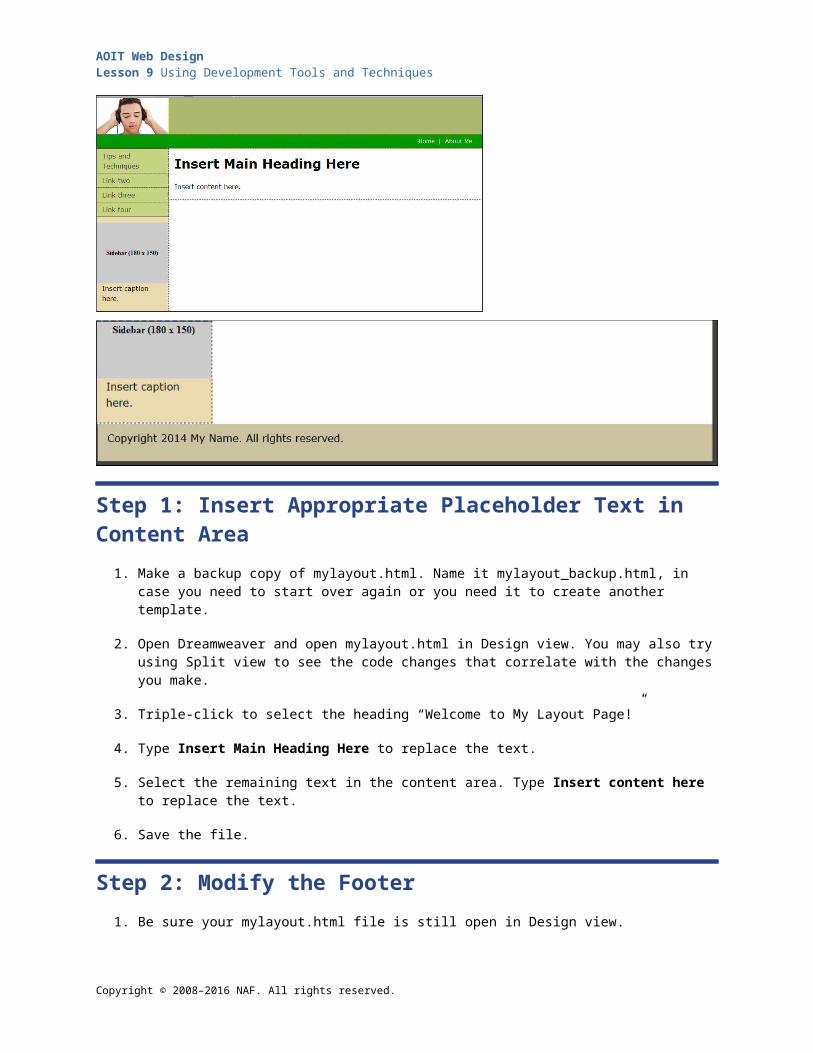
When you finish making these changes, your layout will look something like these screenshots:
Copyright © 2008–2016 NAF. All rights reserved.
AOIT Web Design Lesson 9 Using Development Tools and Techniques
Step 1: Insert Appropriate Placeholder Text in Content Area1. Make a backup copy of mylayout.html. Name it mylayout_backup.html, in case you need to start
over again or you need it to create another template.
2. Open Dreamweaver and open mylayout.html in Design view. You may also try using Split view to see the code changes that correlate with the changes you make.
3. Triple-click to select the heading “Welcome to My Layout Page!”
4. Type Insert Main Heading Here to replace the text.
5. Select the remaining text in the content area. Type Insert content here to replace the text.
6. Save the file.
Step 2: Modify the Footer1. Be sure your mylayout.html file is still open in Design view.
2. Select the placeholder text in the footer. Replace it with Copyright [year] [Your Name]. All rights reserved.
3. Save the file.
Step 3: Insert an Image Placeholder in the Sidebar1. With your mylayout.html file still open, switch to Code view.
2. In the Sidebar <div>, find the two paragraphs of text that are located directly below the navigation menu.
3. Delete the first paragraph (the longer one).
4. Replace the second paragraph (that is, the text inside the opening and closing <p> tags) with Insert caption here.
5. Place the cursor to the left of the opening paragraph tag.
Copyright © 2008–2016 NAF. All rights reserved.
AOIT Web Design Lesson 9 Using Development Tools and Techniques
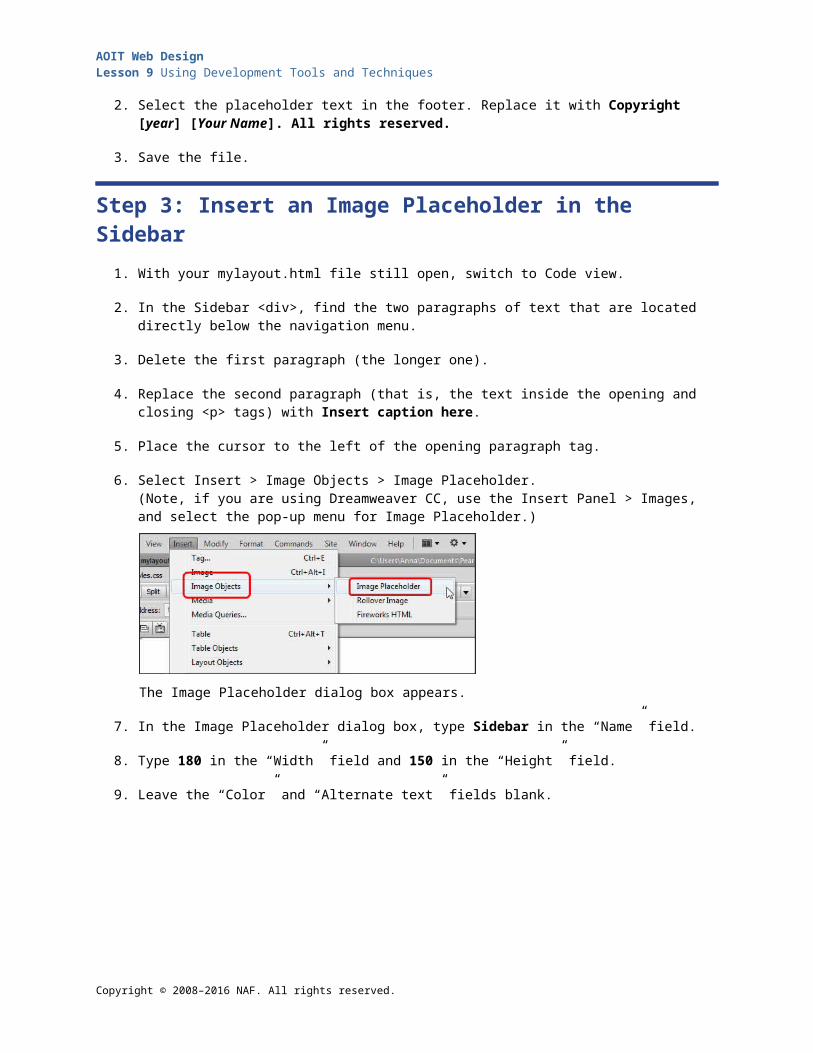
6. Select Insert > Image Objects > Image Placeholder.(Note, if you are using Dreamweaver CC, use the Insert Panel > Images, and select the pop-up menu for Image Placeholder.)
The Image Placeholder dialog box appears.
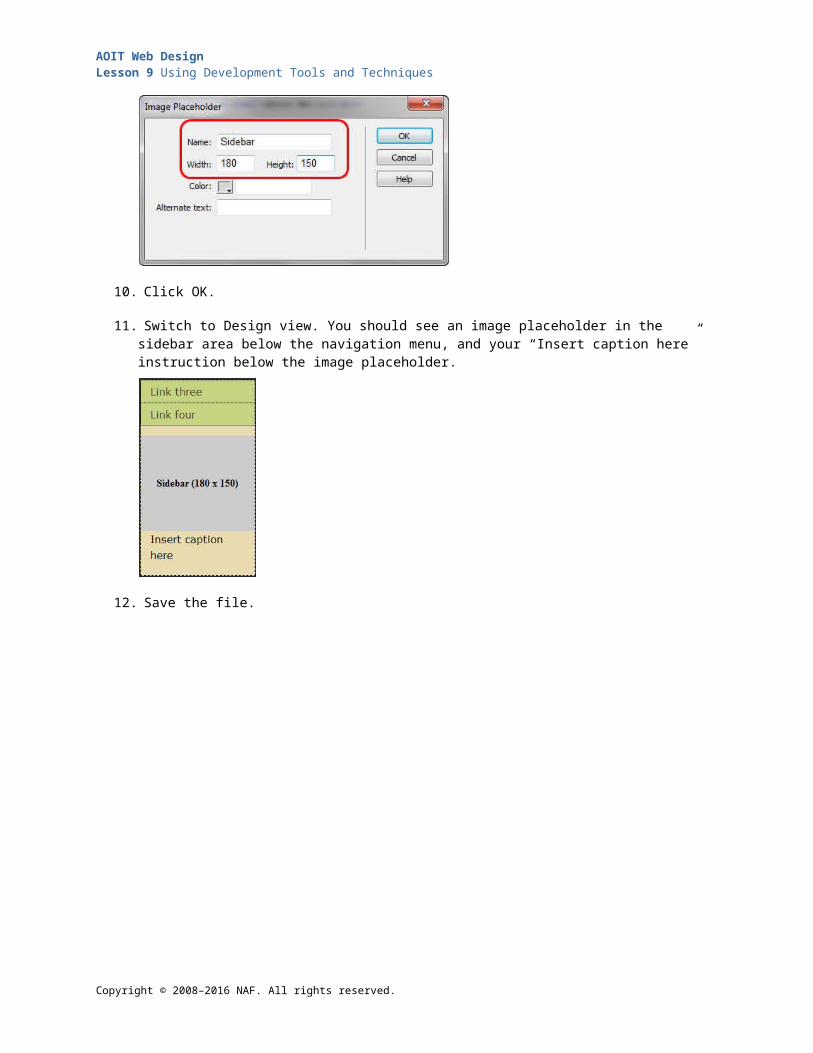
7. In the Image Placeholder dialog box, type Sidebar in the “Name” field.
8. Type 180 in the “Width” field and 150 in the “Height” field.
9. Leave the “Color” and “Alternate text” fields blank.
10. Click OK.
11. Switch to Design view. You should see an image placeholder in the sidebar area below the navigation menu, and your “Insert caption here” instruction below the image placeholder.
12. Save the file.
Copyright © 2008–2016 NAF. All rights reserved.
AOIT Web Design Lesson 9 Using Development Tools and Techniques
Student Resource 9.3
Tutorial: Creating a TemplateDirections: This tutorial guides you through the process of creating a template for your sample site, based on the layout you completed in the previous tutorial. Follow the specific instructions below.
Step 1: Create a Template from an Existing LayoutA template is a master page from which child pages are created. Most WYSIWYG editors, including Dreamweaver, provide the features you need to create a template.
1. You will create your template from the My Layout page you modified in the previous tutorial. Be sure your mylayout.html file is stored in your Sample Site Final main (root) directory and that it is available for editing in Dreamweaver.
2. Open Dreamweaver, and open your most recent version of mylayout.html.
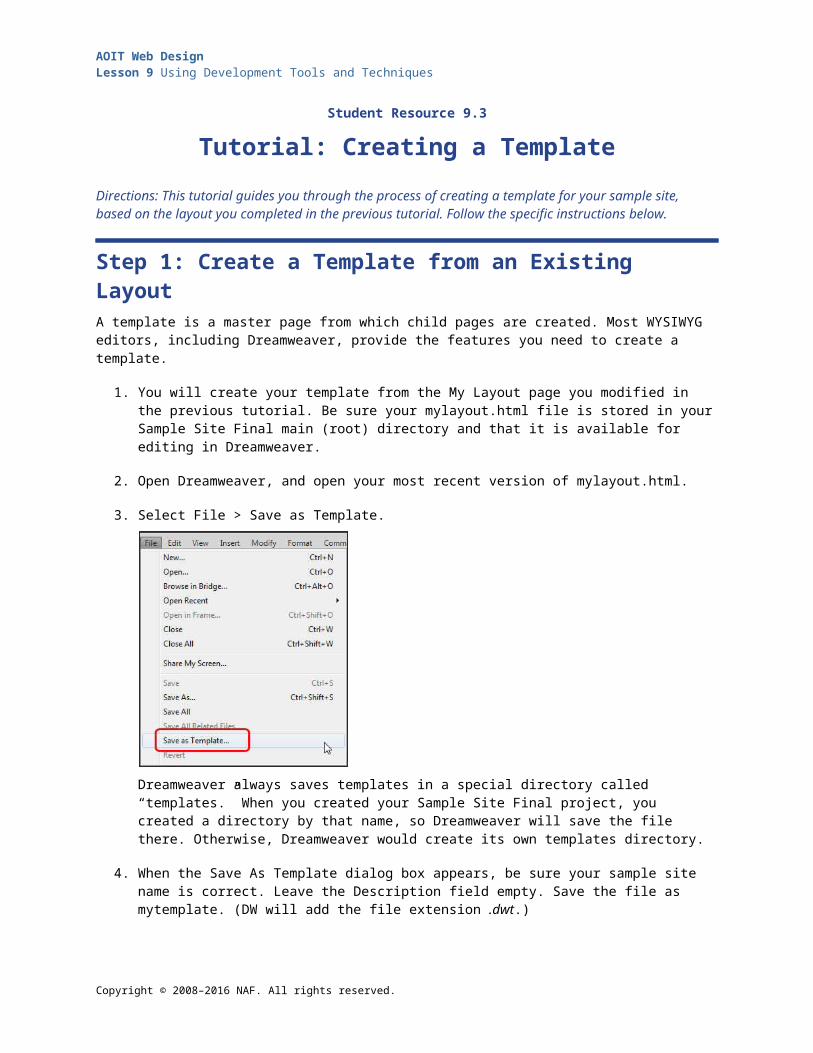
3. Select File > Save as Template.
Dreamweaver always saves templates in a special directory called “templates.” When you created your Sample Site Final project, you created a directory by that name, so Dreamweaver will save the file there. Otherwise, Dreamweaver would create its own templates directory.
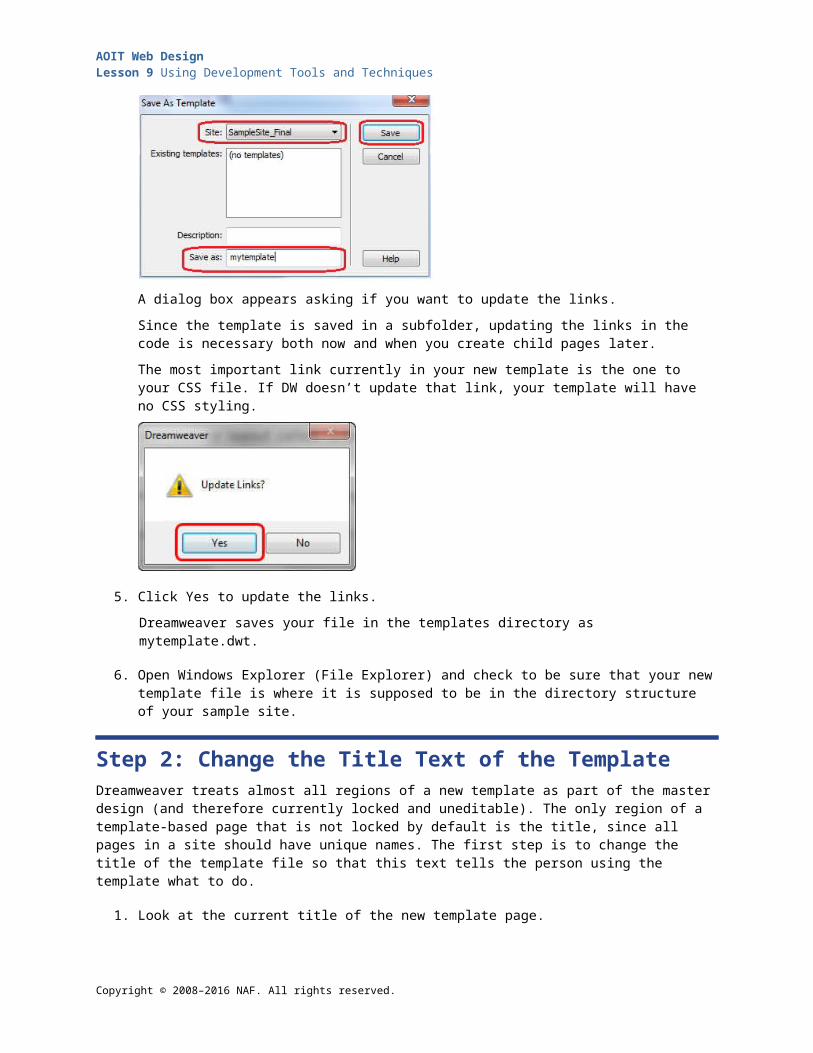
4. When the Save As Template dialog box appears, be sure your sample site name is correct. Leave the Description field empty. Save the file as mytemplate. (DW will add the file extension .dwt.)
Copyright © 2008–2016 NAF. All rights reserved.
AOIT Web Design Lesson 9 Using Development Tools and Techniques
A dialog box appears asking if you want to update the links.
Since the template is saved in a subfolder, updating the links in the code is necessary both now and when you create child pages later.
The most important link currently in your new template is the one to your CSS file. If DW doesn’t update that link, your template will have no CSS styling.
5. Click Yes to update the links.
Dreamweaver saves your file in the templates directory as mytemplate.dwt.
6. Open Windows Explorer (File Explorer) and check to be sure that your new template file is where it is supposed to be in the directory structure of your sample site.
Step 2: Change the Title Text of the Template Dreamweaver treats almost all regions of a new template as part of the master design (and therefore currently locked and uneditable). The only region of a template-based page that is not locked by default is the title, since all pages in a site should have unique names. The first step is to change the title of the template file so that this text tells the person using the template what to do.
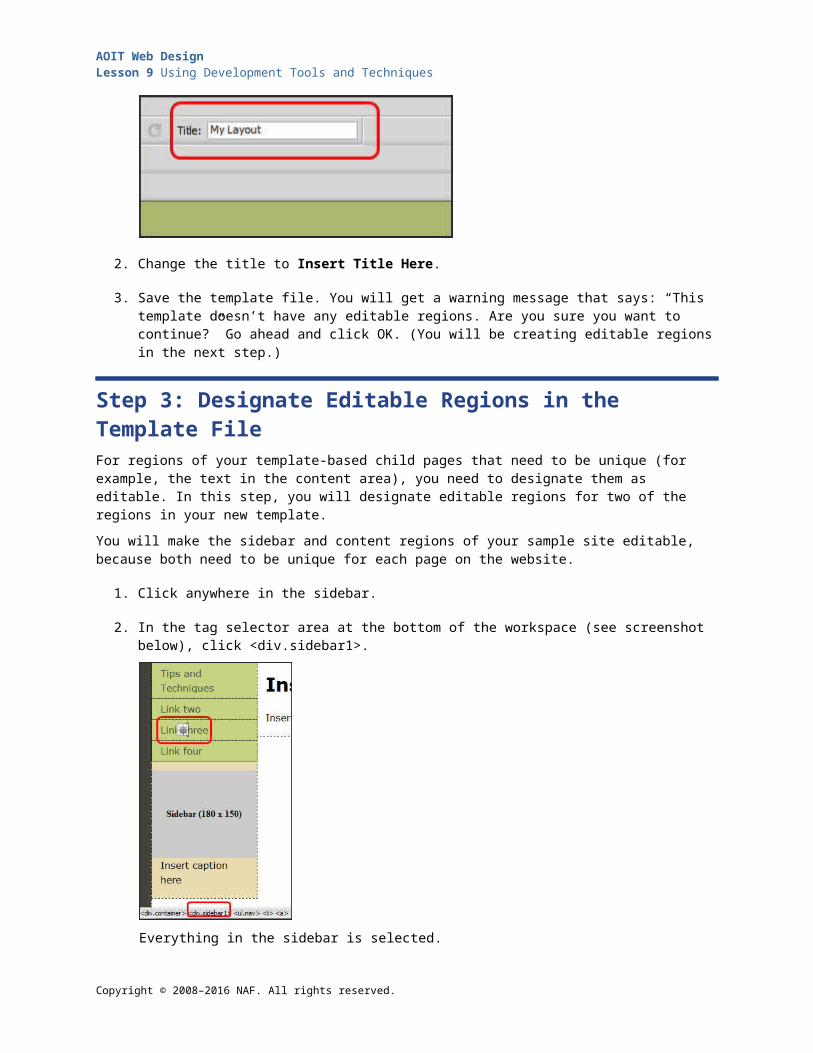
1. Look at the current title of the new template page.
Copyright © 2008–2016 NAF. All rights reserved.
AOIT Web Design Lesson 9 Using Development Tools and Techniques
2. Change the title to Insert Title Here.
3. Save the template file. You will get a warning message that says: “This template doesn’t have any editable regions. Are you sure you want to continue?” Go ahead and click OK. (You will be creating editable regions in the next step.)
Step 3: Designate Editable Regions in the Template FileFor regions of your template-based child pages that need to be unique (for example, the text in the content area), you need to designate them as editable. In this step, you will designate editable regions for two of the regions in your new template.
You will make the sidebar and content regions of your sample site editable, because both need to be unique for each page on the website.
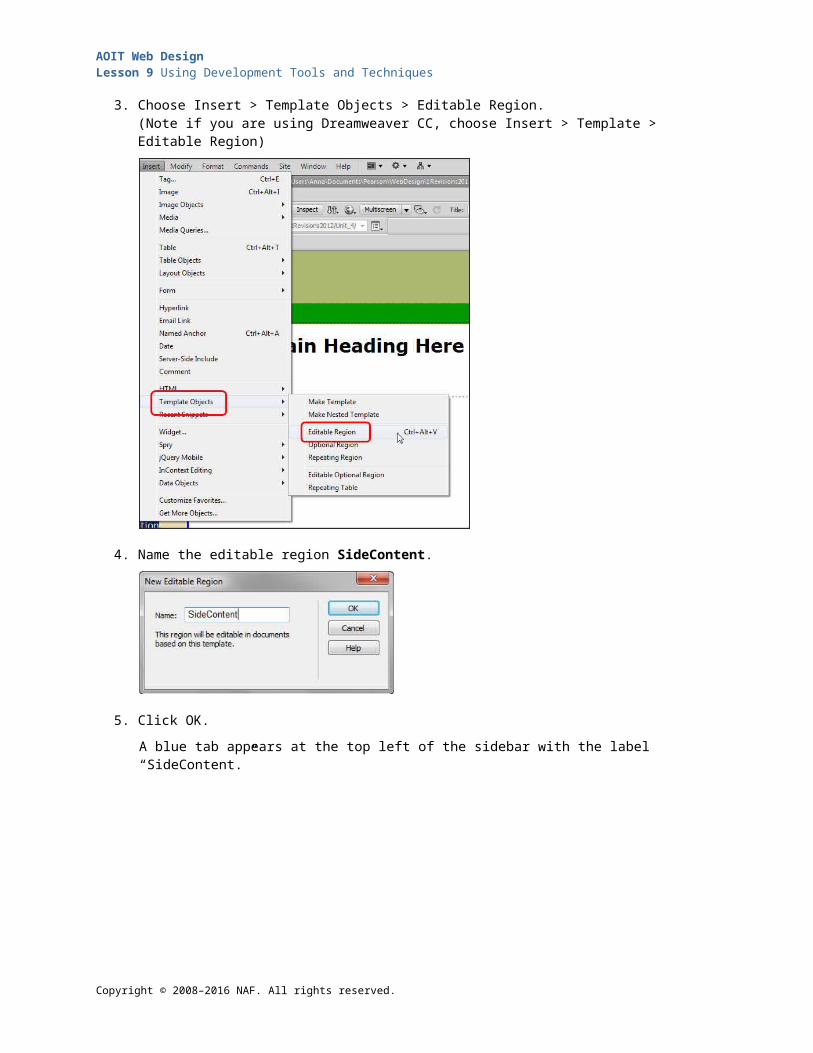
1. Click anywhere in the sidebar.
2. In the tag selector area at the bottom of the workspace (see screenshot below), click <div.sidebar1>.
Everything in the sidebar is selected.
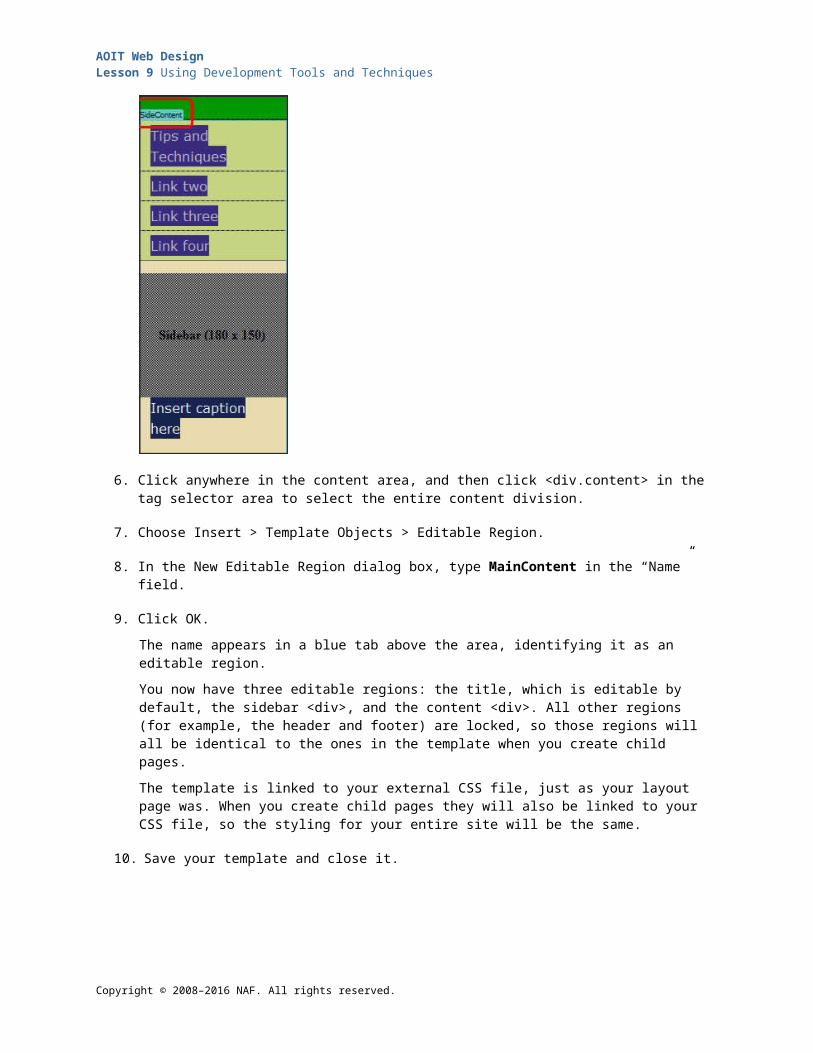
3. Choose Insert > Template Objects > Editable Region.(Note if you are using Dreamweaver CC, choose Insert > Template > Editable Region)
Copyright © 2008–2016 NAF. All rights reserved.
AOIT Web Design Lesson 9 Using Development Tools and Techniques
4. Name the editable region SideContent.
5. Click OK.
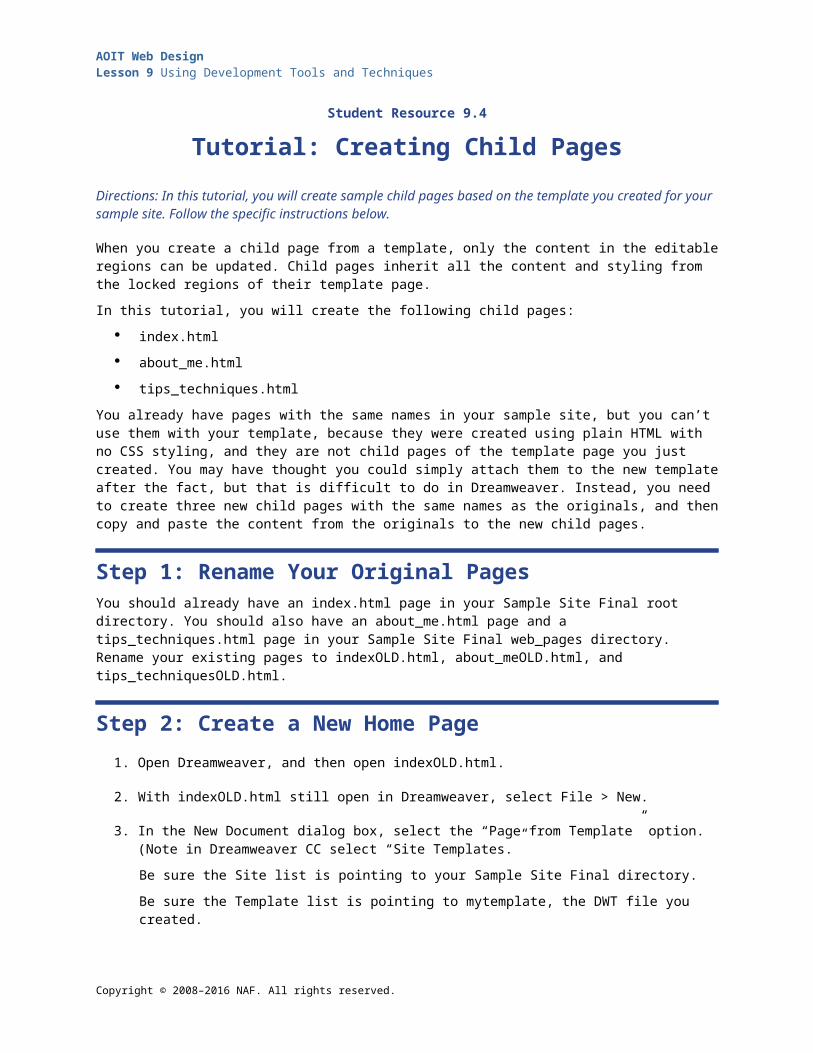
A blue tab appears at the top left of the sidebar with the label “SideContent.”
Copyright © 2008–2016 NAF. All rights reserved.
AOIT Web Design Lesson 9 Using Development Tools and Techniques
6. Click anywhere in the content area, and then click <div.content> in the tag selector area to select the entire content division.
7. Choose Insert > Template Objects > Editable Region.
8. In the New Editable Region dialog box, type MainContent in the “Name” field.
9. Click OK.
The name appears in a blue tab above the area, identifying it as an editable region.
You now have three editable regions: the title, which is editable by default, the sidebar <div>, and the content <div>. All other regions (for example, the header and footer) are locked, so those regions will all be identical to the ones in the template when you create child pages.
The template is linked to your external CSS file, just as your layout page was. When you create child pages they will also be linked to your CSS file, so the styling for your entire site will be the same.
10. Save your template and close it.
Copyright © 2008–2016 NAF. All rights reserved.
AOIT Web Design Lesson 9 Using Development Tools and Techniques
Student Resource 9.4
Tutorial: Creating Child PagesDirections: In this tutorial, you will create sample child pages based on the template you created for your sample site. Follow the specific instructions below.
When you create a child page from a template, only the content in the editable regions can be updated. Child pages inherit all the content and styling from the locked regions of their template page.
In this tutorial, you will create the following child pages:
index.html
about_me.html
tips_techniques.html
You already have pages with the same names in your sample site, but you can’t use them with your template, because they were created using plain HTML with no CSS styling, and they are not child pages of the template page you just created. You may have thought you could simply attach them to the new template after the fact, but that is difficult to do in Dreamweaver. Instead, you need to create three new child pages with the same names as the originals, and then copy and paste the content from the originals to the new child pages.
Step 1: Rename Your Original PagesYou should already have an index.html page in your Sample Site Final root directory. You should also have an about_me.html page and a tips_techniques.html page in your Sample Site Final web_pages directory. Rename your existing pages to indexOLD.html, about_meOLD.html, and tips_techniquesOLD.html.
Step 2: Create a New Home Page1. Open Dreamweaver, and then open indexOLD.html.
2. With indexOLD.html still open in Dreamweaver, select File > New.
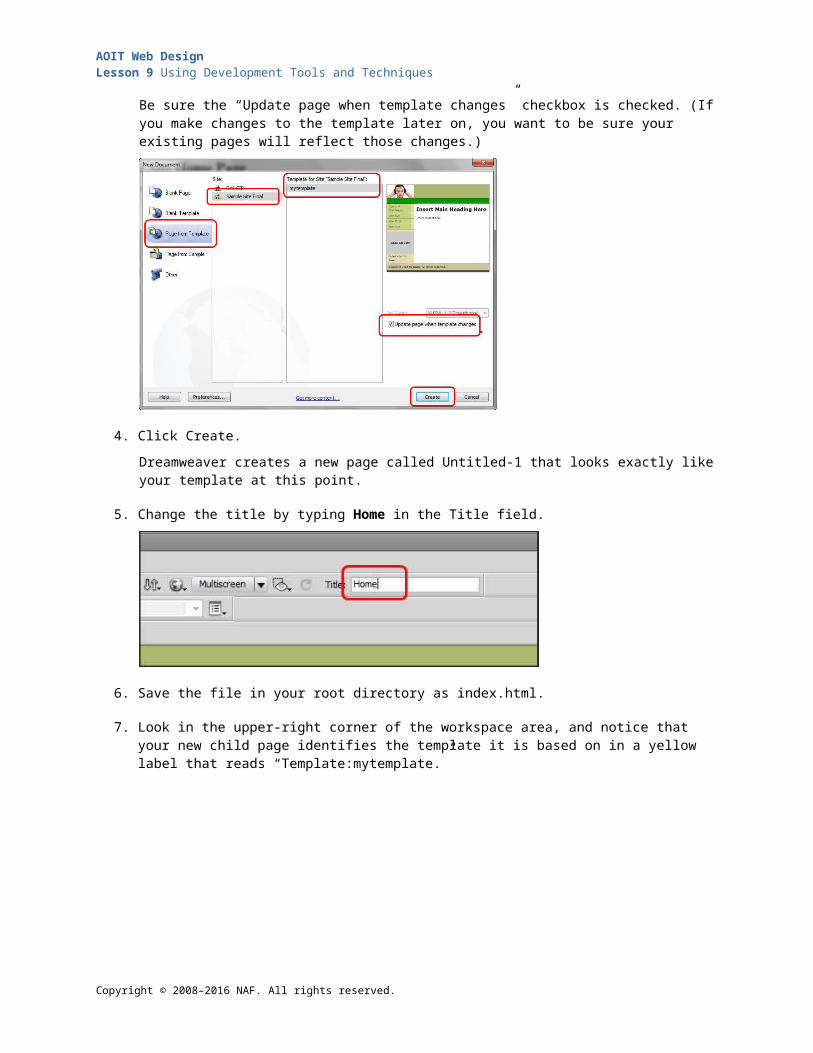
3. In the New Document dialog box, select the “Page from Template” option. (Note in Dreamweaver CC select “Site Templates.”
Be sure the Site list is pointing to your Sample Site Final directory.
Be sure the Template list is pointing to mytemplate, the DWT file you created.
Be sure the “Update page when template changes” checkbox is checked. (If you make changes to the template later on, you want to be sure your existing pages will reflect those changes.)
Copyright © 2008–2016 NAF. All rights reserved.
AOIT Web Design Lesson 9 Using Development Tools and Techniques
4. Click Create.
Dreamweaver creates a new page called Untitled-1 that looks exactly like your template at this point.
5. Change the title by typing Home in the Title field.
6. Save the file in your root directory as index.html.
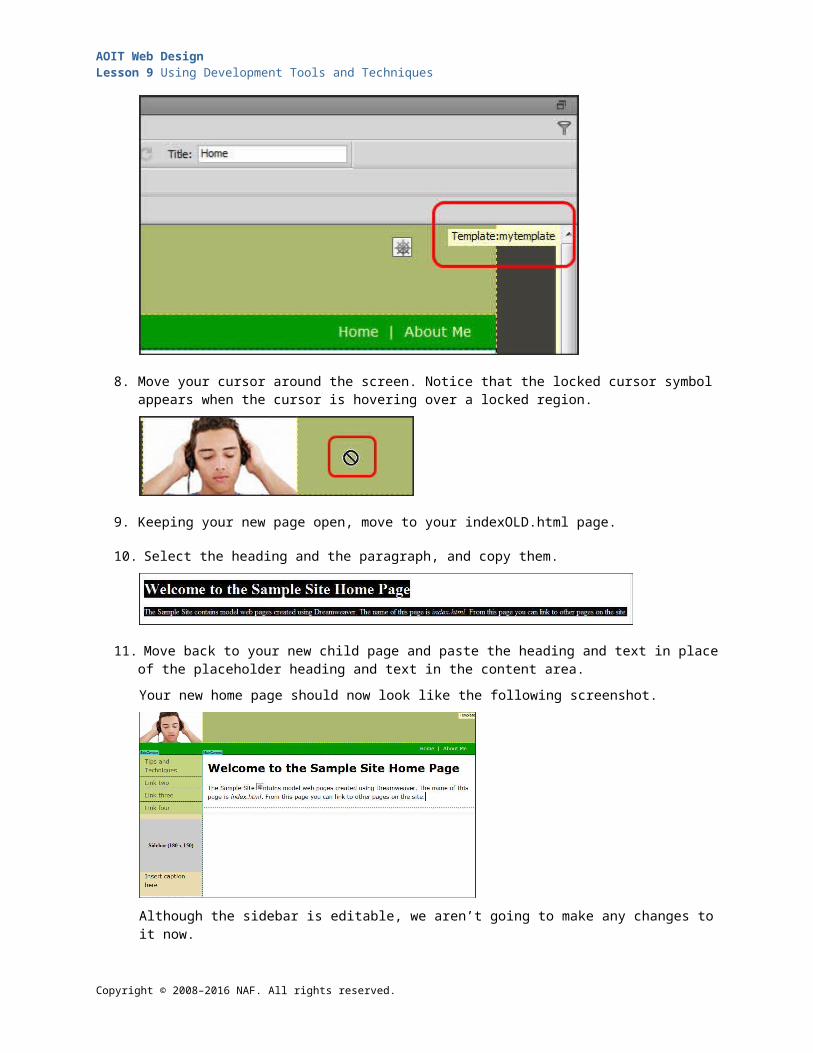
7. Look in the upper-right corner of the workspace area, and notice that your new child page identifies the template it is based on in a yellow label that reads “Template:mytemplate.”
Copyright © 2008–2016 NAF. All rights reserved.
AOIT Web Design Lesson 9 Using Development Tools and Techniques
8. Move your cursor around the screen. Notice that the locked cursor symbol appears when the cursor is hovering over a locked region.
9. Keeping your new page open, move to your indexOLD.html page.
10. Select the heading and the paragraph, and copy them.
11. Move back to your new child page and paste the heading and text in place of the placeholder heading and text in the content area.
Your new home page should now look like the following screenshot.
Although the sidebar is editable, we aren’t going to make any changes to it now.
12. Close indexOLD.html.
13. Save the changes to index.html.
Step 3: Create a New About Me Page1. Open about_meOLD.html in Dreamweaver.
2. With about_meOLD.html still open, select File > New.
3. Create a new child page using the same options you did when you created index.html.
4. Title your new page About Me.
5. Copy the content (text and images) from about_meOLD.html to about_me.html.
If you have images but you haven’t yet moved them over to your Sample Site Final directory structure, do that now. Be sure to put them in the images directory.
Copyright © 2008–2016 NAF. All rights reserved.
AOIT Web Design Lesson 9 Using Development Tools and Techniques
If you are in Design view, the Image Description (Alt Text) dialog box appears and instructs you to enter a description for each of the images. Enter alt text for each image, in the Description column.
6. Close about_meOLD.html.
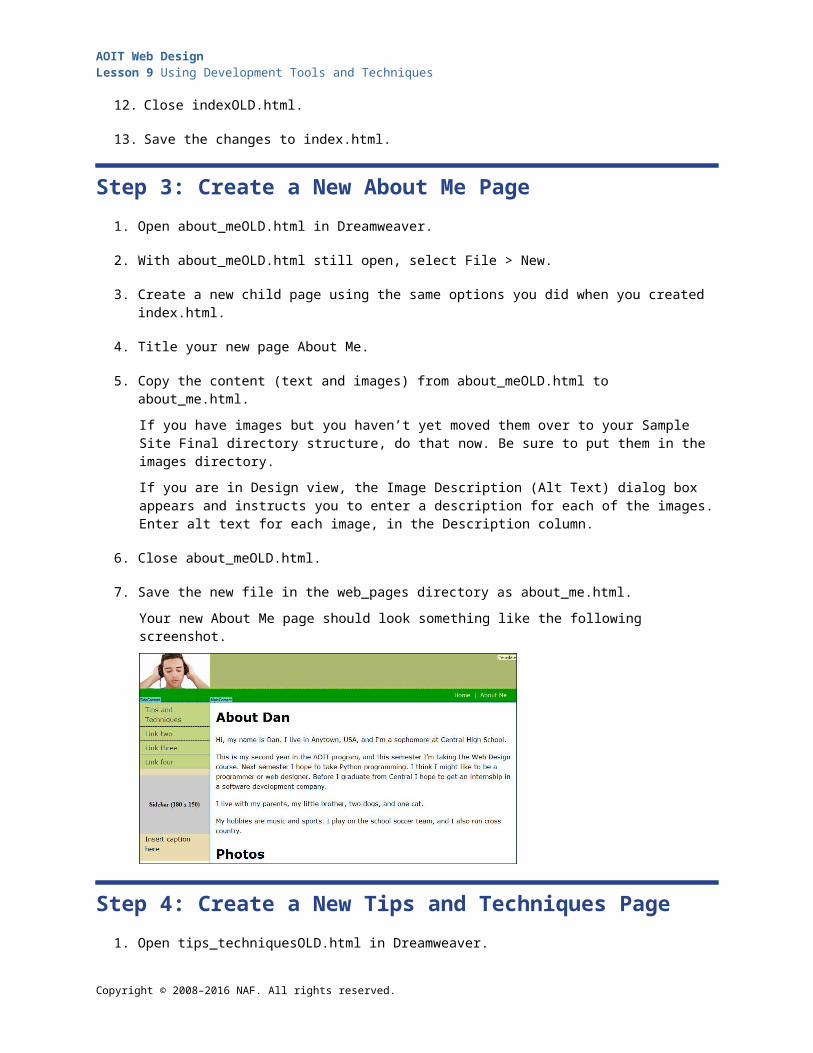
7. Save the new file in the web_pages directory as about_me.html.
Your new About Me page should look something like the following screenshot.
Step 4: Create a New Tips and Techniques Page1. Open tips_techniquesOLD.html in Dreamweaver.
2. With tips_techniquesOLD.html still open, select File > New.
3. Create a new child page using the same options you did when you created index.html and about_me.html.
4. Name your new file Tips and Techniques.
5. Copy the text from tips_techniquesOLD.html to tips_techniques.html.
6. Close tips_techniquesOLD.html.
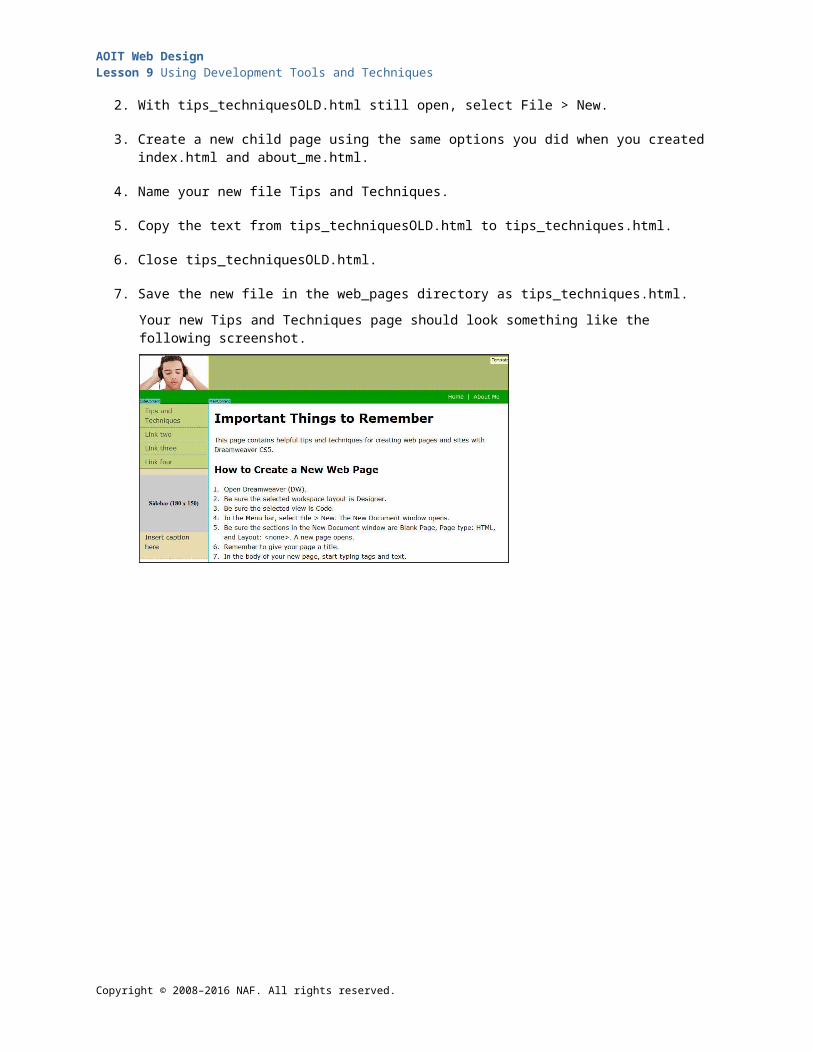
7. Save the new file in the web_pages directory as tips_techniques.html.
Your new Tips and Techniques page should look something like the following screenshot.
Copyright © 2008–2016 NAF. All rights reserved.
AOIT Web Design Lesson 9 Using Development Tools and Techniques
Student Resource 9.5
Tutorial: Updating a TemplateDirections: Follow the specific instructions below.
When a Dreamweaver template is modified, the locked regions of child pages made from the template will reflect the changes made to the template.
In this tutorial, you will modify the vertical menu on the left of your current template (mytemplate.dwt) and then see how the changes made to your template affect the child pages you created.
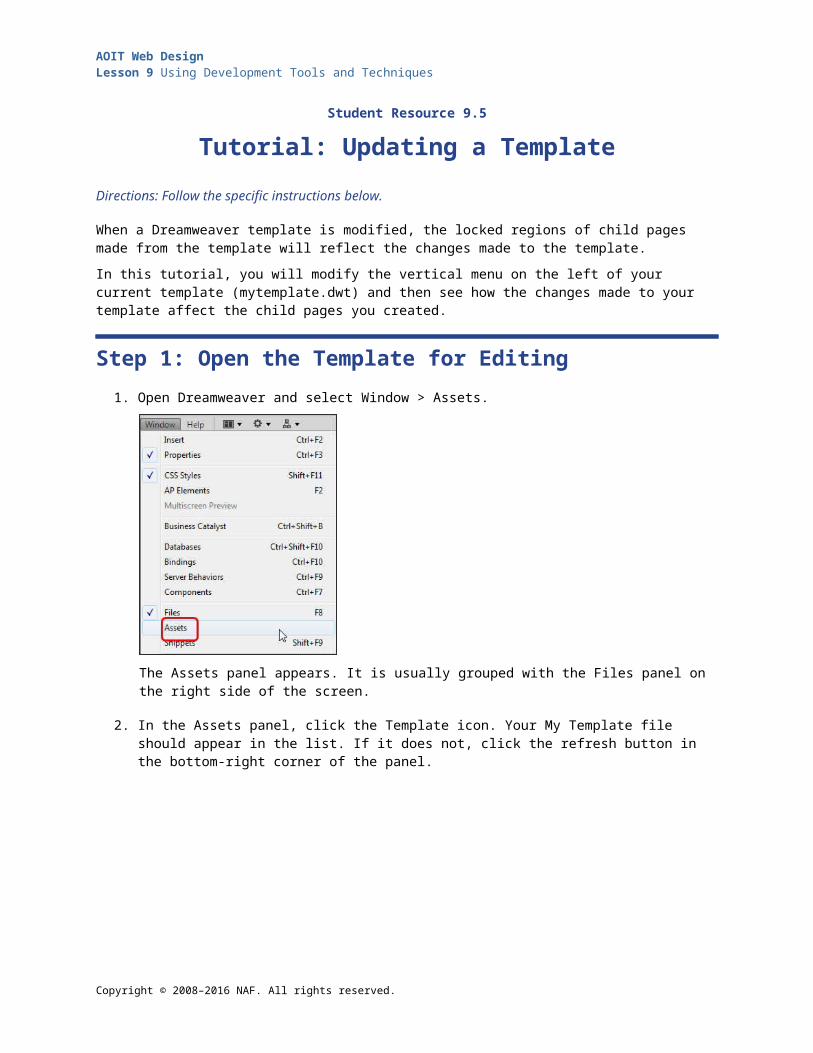
Step 1: Open the Template for Editing1. Open Dreamweaver and select Window > Assets.
The Assets panel appears. It is usually grouped with the Files panel on the right side of the screen.
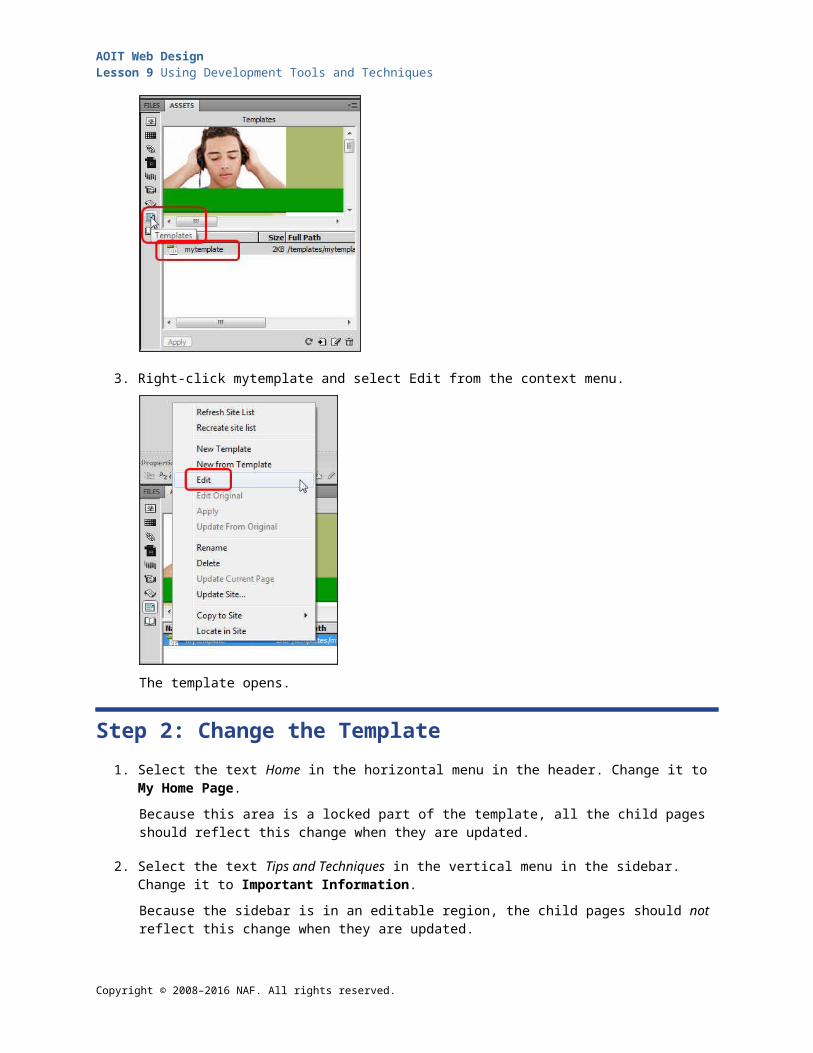
2. In the Assets panel, click the Template icon. Your My Template file should appear in the list. If it does not, click the refresh button in the bottom-right corner of the panel.
Copyright © 2008–2016 NAF. All rights reserved.
AOIT Web Design Lesson 9 Using Development Tools and Techniques
3. Right-click mytemplate and select Edit from the context menu.
The template opens.
Step 2: Change the Template1. Select the text Home in the horizontal menu in the header. Change it to My Home Page.
Because this area is a locked part of the template, all the child pages should reflect this change when they are updated.
2. Select the text Tips and Techniques in the vertical menu in the sidebar. Change it to Important Information.
Because the sidebar is in an editable region, the child pages should not reflect this change when they are updated.
3. Change every instance of the word insert to add. (There are four instances, including the page title.)
Copyright © 2008–2016 NAF. All rights reserved.
AOIT Web Design Lesson 9 Using Development Tools and Techniques
Do you expect these template changes to be reflected in the child pages, or not? Think about your answer as you observe the update behavior in Dreamweaver, next.
4. Save the template file.
The Update Template Files dialog box appears.
5. Click the Update button.
The Update Pages dialog box appears. The log window at the bottom of the dialog box (Check “Show log” if you cannot see it) tells you which files were successfully updated and which were not. Your pages should have all updated.
6. Close the Update Pages dialog box.
Step 3: See How Template Changes Affect the Child Pages1. Leave the My Template file open and open Tips and Techniques.
As you can see, the name in the horizontal menu has changed to My Home Page (because it is in a locked region), but the name in the vertical menu has not (because it is in an editable region).
Copyright © 2008–2016 NAF. All rights reserved.
AOIT Web Design Lesson 9 Using Development Tools and Techniques
2. Check the state of the other two pages: Home and About Me. Their changes should be the same as the changes to Tips and Techniques.
3. Close all open files, and also close Dreamweaver.
Copyright © 2008–2016 NAF. All rights reserved.
AOIT Web Design Lesson 9 Using Development Tools and Techniques
Student Resource 9.6
Tutorial: Creating Library itemsDirections: In this tutorial, you will learn how to create a library item, which is a chunk of HTML code that you plan to use often on your site. Follow the instructions below to create a library item for Sample Site Final.
The mytemplate.dwt file for your sample site still has one potential problem: the vertical (sidebar) menu is in an editable region. If you want that menu, with identical links, to appear on several pages of the site, it should not be in an editable region.
To fix the problem, we will replace the vertical menu with a dynamic content element called a library item. Library items are reusable chunks of HTML that you use frequently within a website. They behave similarly to a template. When you make changes to a library item, Dreamweaver automatically updates every page that uses that library item.
Step 1: Create a Library Item1. Open Dreamweaver and, just as you did in the tutorial where you updated your template, open
mytemplate.dwt from the Assets panel.
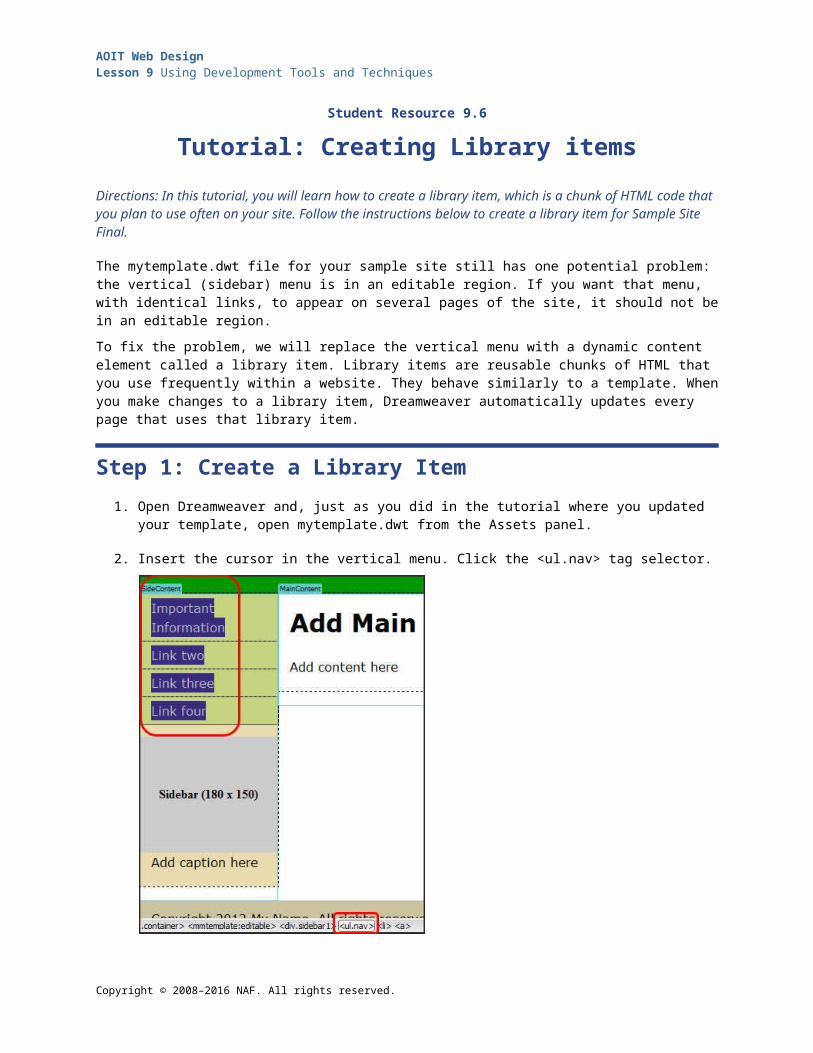
2. Insert the cursor in the vertical menu. Click the <ul.nav> tag selector.
3. Go to the Assets panel (choose Window > Assets to display the panel, if necessary).
4. Click the Library category icon (the open book icon). No library item should be visible yet.
Copyright © 2008–2016 NAF. All rights reserved.

AOIT Web Design Lesson 9 Using Development Tools and Techniques
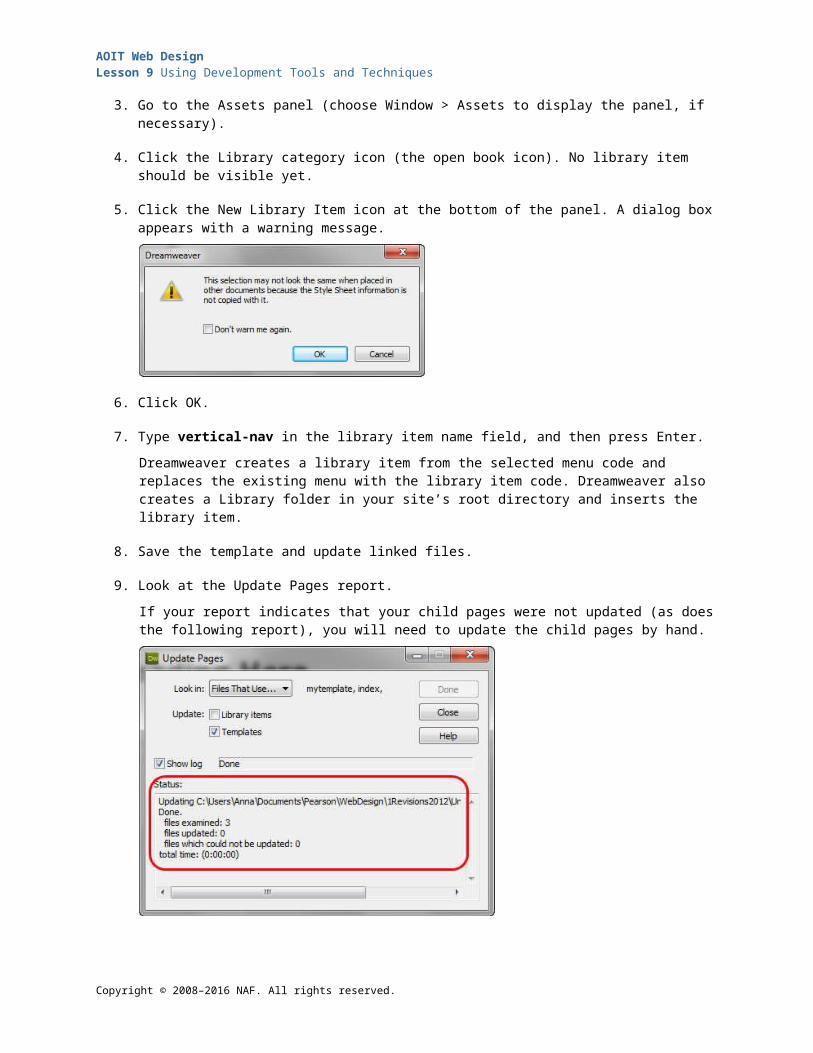
5. Click the New Library Item icon at the bottom of the panel. A dialog box appears with a warning message.
6. Click OK.
7. Type vertical-nav in the library item name field, and then press Enter.
Dreamweaver creates a library item from the selected menu code and replaces the existing menu with the library item code. Dreamweaver also creates a Library folder in your site’s root directory and inserts the library item.
8. Save the template and update linked files.
9. Look at the Update Pages report.
If your report indicates that your child pages were not updated (as does the following report), you will need to update the child pages by hand.
10. Open all three child pages (index.html, about_me.html, and tips_techniques.html).
11. Starting with index.html, click in the left navigation area, and then click the <ul.nav> tag selector.
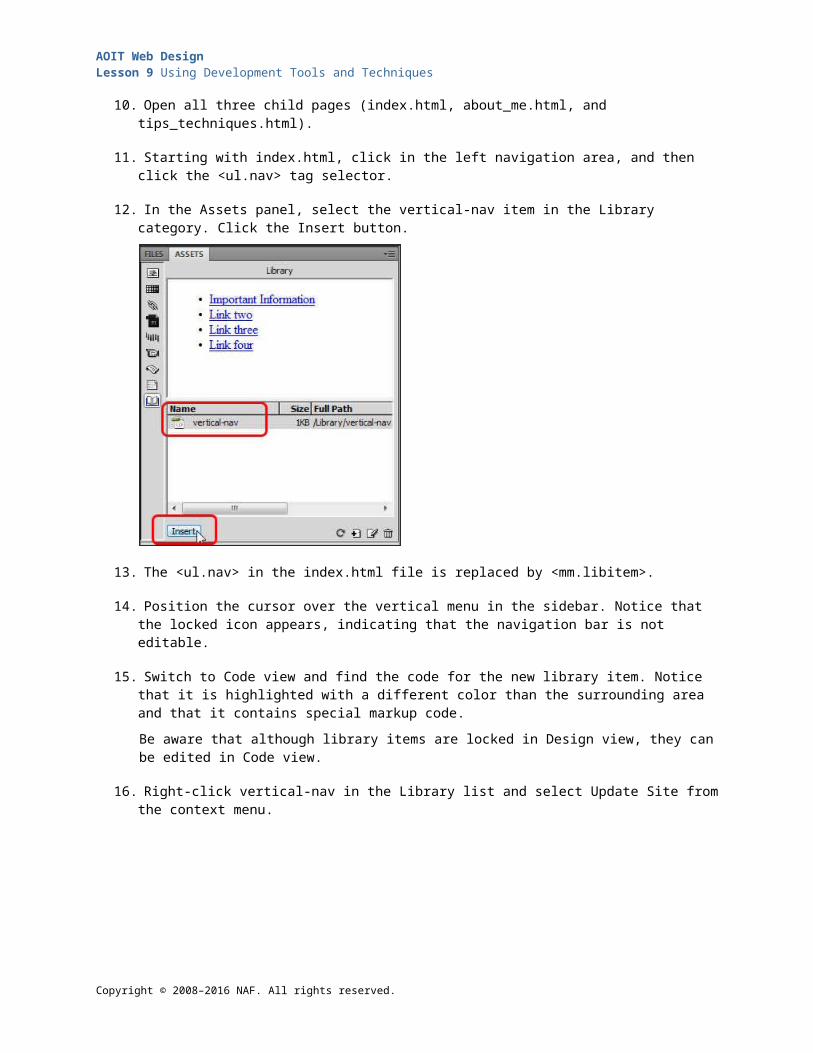
12. In the Assets panel, select the vertical-nav item in the Library category. Click the Insert button.
Copyright © 2008–2016 NAF. All rights reserved.
AOIT Web Design Lesson 9 Using Development Tools and Techniques
13. The <ul.nav> in the index.html file is replaced by <mm.libitem>.
14. Position the cursor over the vertical menu in the sidebar. Notice that the locked icon appears, indicating that the navigation bar is not editable.
15. Switch to Code view and find the code for the new library item. Notice that it is highlighted with a different color than the surrounding area and that it contains special markup code.
Be aware that although library items are locked in Design view, they can be edited in Code view.
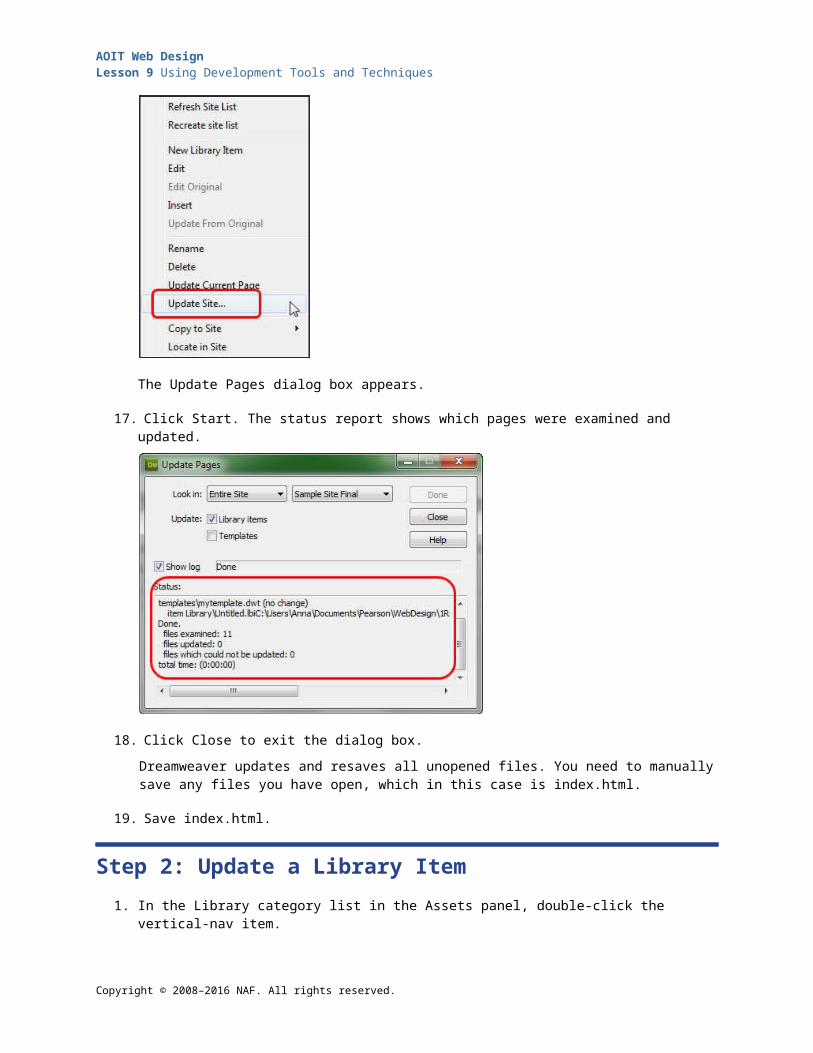
16. Right-click vertical-nav in the Library list and select Update Site from the context menu.
The Update Pages dialog box appears.
17. Click Start. The status report shows which pages were examined and updated.
Copyright © 2008–2016 NAF. All rights reserved.
AOIT Web Design Lesson 9 Using Development Tools and Techniques
18. Click Close to exit the dialog box.
Dreamweaver updates and resaves all unopened files. You need to manually save any files you have open, which in this case is index.html.
19. Save index.html.
Step 2: Update a Library Item1. In the Library category list in the Assets panel, double-click the vertical-nav item.
2. Switch to Code view.
3. Change the “Important Information” link back to “Tips and Techniques.”
4. Save the library item file.
Your three child pages and your template should update.
5. Open the four pages and check to be sure they all contain the updated library item, with the top menu item showing link text of “Tips and Techniques.”
6. Close all files, and close Dreamweaver.
Copyright © 2008–2016 NAF. All rights reserved.
AOIT Web Design Lesson 9 Using Development Tools and Techniques
Student Resource 9.7
File Management Structure: Organizing Your Website’s Files
Student Name:_______________________________________________ Date:___________
Directions: Organizing the pages and files within your website is critical to the functionality of your site. Use this worksheet to sketch out the structure of your website in the sidebar at right. Your sketch should show all of the folders that you plan to use for your website, and it should list all web pages you will have under the appropriate folder.
1. Begin your sketch with a main site folder for your site. Make sure to give the folder an appropriate name. This folder will contain your index.html file (your home page) and subfolders for the web pages and graphics that you will place on your site.
2. Using your site map as a guide, organize and create a subfolder structure. You need a subfolder to contain your web pages and another subfolder to contain graphics. If your site has multimedia, you will need a multimedia folder also.
3. Decide on naming conventions to use for your web pages and graphics, based on the best practices listed in this resource.
4. Under your folder for web pages, write down the file name for each page in your site map. You will create the pages after you have created your template; right now you need to write down the file name of each page you will create. Remember to follow your naming conventions.
5. Write down the names of any graphics that you already have, such as your logo, in the graphics folder. Remember to follow your naming conventions.
6. When you have completed your sketch, open Windows Explorer (File Explorer) and create your folder structure. Add any graphics or multimedia files that you have to the appropriate folders. Do not create your web pages here. You will create the web pages in Dreamweaver using your template.
Copyright © 2008–2016 NAF. All rights reserved.
AOIT Web Design Lesson 9 Using Development Tools and Techniques
Naming ConventionsUse the following guidelines for naming your files and folders. Professional web designers consider these guidelines to be best practice.
All file and folder names should be lowercase and without spaces.
Ideally, folder names should be the shortest English word that communicates the content, or two English words smashed together to do the same. For example, “about” is a better folder name than “aboutus.” Note that you can still title your web page whatever you want.
It is good practice to name images relatively obscurely so that they don’t interfere with desired URL names for pages.
Make sure your file management structure meets the following assessment criteria: The main site folder (the root folder) contains all other folders and files.
The hierarchy of pages, graphics, and files is appropriate and organized.
All folders and files follow a consistent, proper naming convention.
All pages in the site map are represented.
The home page sits at the top level of the file structure and is in the root folder.
Copyright © 2008–2016 NAF. All rights reserved.
AOIT Web Design Lesson 9 Using Development Tools and Techniques
Student Resource 9.8
Assignment Sheet: Culminating Project InfrastructureDirections: Follow the steps below to create a layout, a template, child pages, and at least one library item for your culminating project website. Be sure to read the entire assignment sheet before you begin work. Also, study the rubric your teacher gives you, and make sure you know how your work will be assessed.
Step 1: Create the Layout for Your Culminating Project SiteUse Dreamweaver to create a layout page of your culminating project site, based on the wireframe and the look and feel proposal you created for your client. The layout page you create for your culminating project site will be similar to the mylayout.html page you created for your sample site. When you complete your layout page, you will convert your layout page to a template. Follow the instructions below to create your layout page.
1. Open your mylayout.html page from your sample site in Dreamweaver so that you can use it as a model page as you create your client’s layout page.
2. Use the same DW layout as your mylayout.html page, or choose another that you think is more suitable.
3. Name your page Client Proposal Home.
4. Save it in the root directory of your project website directory.
5. Remove the placeholder text in the content area of your new DW layout page, and type in appropriate text.
6. Remove the placeholder text in the footer of your DW layout page, and type in an appropriate copyright statement.
7. Insert your client’s logo in the logo block, just as you did in mylayout.html.
8. Remove the placeholder text in the sidebar of your DW layout page, and replace it with any text or graphics you want to include in your proposal page.
9. Move the CSS style information from your layout page to a separate CSS file.
Tips: Make sure each region of your layout page is a separate <div>.
Think about which regions will be locked and which regions will be editable. Add the correct content (such as logo and menu items) to the regions that will be locked. These will form the basis of your template.
Step 2: Create Your TemplateUse Dreamweaver to create a template (DWT file) from your layout page. Use the same procedure you used to create a template for your sample site.
Copyright © 2008–2016 NAF. All rights reserved.
AOIT Web Design Lesson 9 Using Development Tools and Techniques
After you create your template, check to make sure that each <div> that should be locked is locked and each <div> that should be editable is editable. Also make sure that your template is linked to your CSS file.
When you save your template, don’t forget to adhere to the file structure that you created for your site.
Step 3: Create Child PagesWhen you are satisfied that your template is correct, create child pages for your website, following the same procedure you used to create child pages for your sample site. Look at your site map to see what child pages you will need.
1. Create a child page for each page on your site map. Make sure that each child page is created from the template and that each has the correct editable and locked regions on it.
2. You will fill in the editable content for these pages in future lessons. Right now you can leave all of the editable regions blank.
3. Save the child pages in the correct directory for your site.
4. If you find anything in the template that needs to be revised to make your child pages work correctly, update your template. Then check the child pages to make sure they work correctly.
Step 4: Add at Least One Library ItemTake a close look at all of your child pages and figure out how at least one library item would enhance the way your website works. Create the library item following the same procedure you used to create a library item for your sample site, and use the library item in the appropriate region of your pages.
Step 5: Test Your WorkHave all members of your group test your pages against the following checklist to make sure they work correctly, and then make any necessary revisions:
There is an index.html page for the home page of your site.
The template is linked to a CSS file.
There is a child page for every page indicated in the site map.
All child pages are connected to the template.
All pages are named correctly and in the correct folder in the site directory.
All pages open correctly and display the correct information on the correct part of the page.
All menus work correctly.
All library items work correctly.
All spelling and grammar is correct.
Make sure that your site infrastructure meets all criteria on the rubric before you submit it for assessment.
Copyright © 2008–2016 NAF. All rights reserved.