sharathbs.files.wordpress.com file · Web viewIn the “Technology File For New Library” form,...
28
Analog and Mixed Signal VLSI Lab Record
Transcript of sharathbs.files.wordpress.com file · Web viewIn the “Technology File For New Library” form,...

Analog and Mixed SignalVLSI
Lab Record
Name:
USN:

2
Open terminal
> csh> source cshrc.main> cd cadence_labs> cd cadence_analog_labs_613> virtuoso &
INVERTERCircuit Diagram
Creating a New Library
1) In library manager execute FILE-NEW-Library2) In the “New Library” form, type “name”3) The field directory is set to ~/Database/cadence_analog_labs_6134) In the “Technology File For New Library” form, select “attach to an
existing techfile”

3
5) In the “attach Design Library To technology File” form select gpdk180.
Creating a Schematic Cellview
1) In the Library Manager, execute File-New-Cellview.2) Fill the new file form as Name as “inverter”, View as “schematic”.
Adding Components to Schematic
1) In the inverter schematic window, click instance. 2) Click on the browse button.3) Select components and symbol view as give below
Library name Cell name
Properties
gpdk180 pmos M0 : Model name = pmos1,W= 2u, L=180n
gpdk180 nmos M1 : Model name = nmos1,W= 2u, L=180n
Adding Pins to Schematic
1) Click the Pin icon.2) Add the pins in the following order.
Pin names DirectionVin Input
vout Output
Adding Wires to Schematic
1) Click Wires icon in the schematic view.2) Depending on the circuit diagram do the connections.

4
Symbol Creation
1) In the inverter schematic window, execute Ceate-Cellview-From cellview.
2) The From View Name is set to “schematic”, To view name set to “symbol” and Tool/Data Type set to Schematic Symbol.
3) Modify the pin specifications based on the left, right, top and bottom pins.
4) Click ok for symbol generation.
Creating the Inverter_Test Cellview
1) In the library manager, execute File-New-Cellview.2) Click ok
Building the Inverter_Test Circuit
1) In the Inverter_Test schematic window select Create-Instance.2) Select the components properties as given below.
Library name
Cellview name
Properties
name Inverter Symbolanaloglib vpulse v1=0, v2=1.8, td=0, tr=tf=1ns,
ton=10n, T=20nanloglib vdc, gnd vdc=1.8
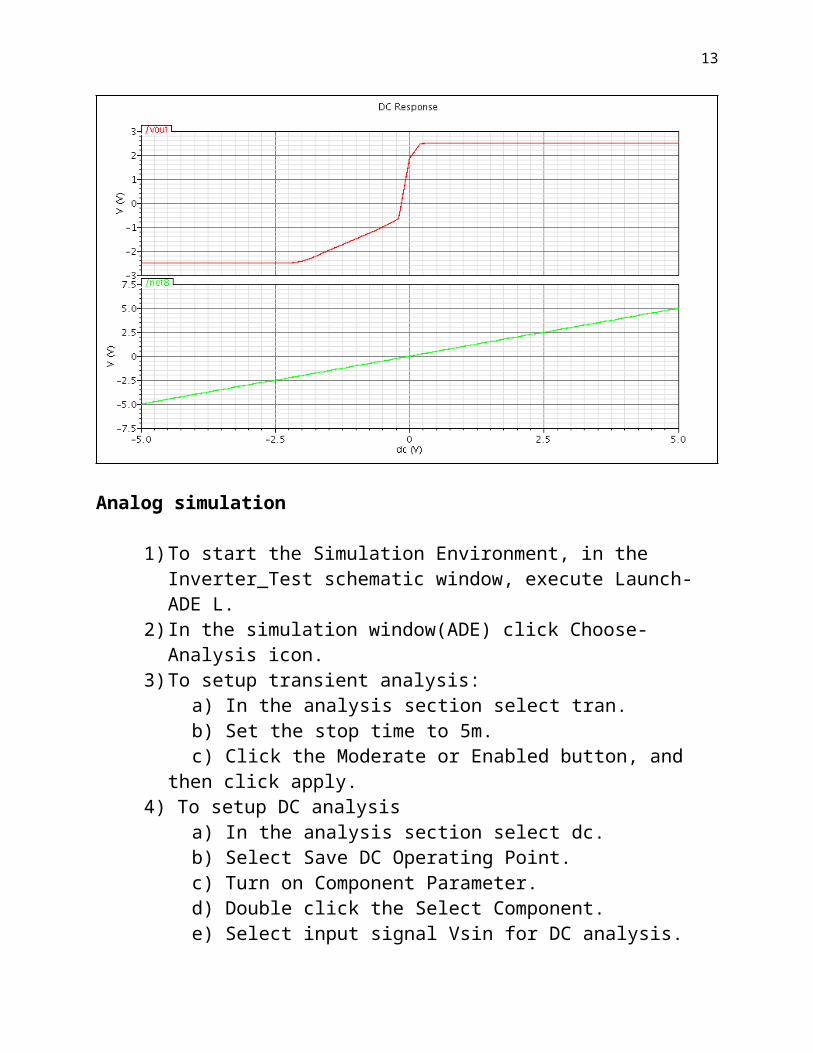
Analog simulation
1) To start the Simulation Environment, in the Inverter_Test schematic window, execute Launch-ADE L.
2) In the simulation window(ADE) click Choose-Analysis icon.3) To setup transient analysis:
a) In the analysis section select tran.b) Set the stop time to 20n.c)Click the Moderate or Enabled button, and then click apply.
4) To setup DC analysis

5
a) In the analysis section select dc.b) Select Save DC Operating Point.c) Turn on Component Parameter.d) Double click the Select Component.e) Select input signal Vpulse for DC analysis.f) Set start and stop values to 0 and 1.8 respectively.g) Click apply.
Selecting Outputs to be Plotted
Execute Outputs-To be Plotted-Select on schematic and click on output net vout and input net vin.
Running The Simulation
Execute Simulation-Netlist and Run.

6

7
DIFFERENTIAL AMPLIFIER
Creating a New Library
1. In library manager execute FILE-NEW-Library2. In the “New Library” form, type “name”3. The field directory is set to
~/Database/cadence_analog_labs_6134. In the “Technology File For New Library” form, select “attach to
an existing techfile”

8
5. In the “attach Design Library To technology File” form select gpdk180.
Creating a Schematic Cellview
1. In the Library Manager, execute File-New-Cellview.2. Fill the new file form as Name as “Diff_amp”, View as
“schematic”. Adding Components to Schematic
1) In the inverter schematic window, click instance. 2) Click on the browse button.3) Select components and symbol view as give below
Library name
Cell name
Properties
gpdk180 nmos Model Name=nmos1 (NM0,NM1), W=3u; L=1u;
gpdk180 nmos Model Name=nmos1 (NM2,NM3), W=4.5u; L=1u;
gpdk180 pmos Model Name=pmos1 (PM0,PM1), W=15u; L=1u;
Adding Pins to Schematic
1) Click the Pin icon.2) Add the pins in the following order.Pin names DirectionIdc, V1, V2 Input
Vout Outputvdd, vss Input
Adding Wires to Schematic
3) Click Wires icon in the schematic view.4) Depending on the circuit diagram do the connections.

9
Symbol Creation
5) In the inverter schematic window, execute Ceate-Cellview-From cellview.
6) The From View Name is set to “schematic”, To view name set to “symbol” and Tool/Data Type set to Schematic Symbol.
7) Modify the pin specifications based on the left, right, top and bottom pins.
8) Click ok for symbol generation.
Creating the Diff_amp_Test Cellview
1. In the library manager, execute File-New-Cellview.2. Click ok
Building the Diff_amp_Test Circuit
1) In the Diff_amp _Test schematic window select Create-Instance.2) Select the components properties as given below.Library name
Cellview name Properties
name Diff_Amp SymbolanalogLib vsin AC magnitude =1, Amplitude

10
=5m, Frequency =1K.analogLib vdd, vss, gnd Vdd=2.5, Vss=-2.5analogLib Idc Dc current = 30u

11
Analog simulation
1) To start the Simulation Environment, in the Inverter_Test schematic window, execute Launch-ADE L.
2) In the simulation window(ADE) click Choose-Analysis icon.3) To setup transient analysis:
a) In the analysis section select tran.b) Set the stop time to 5m.c) Click the Moderate or Enabled button, and then click apply.
4) To setup DC analysisa) In the analysis section select dc.b) Select Save DC Operating Point.c) Turn on Component Parameter.d) Double click the Select Component.e) Select input signal Vsin for DC analysis.f) Set start and stop values to -5 and 5 respectively.g) Click apply.
3) To setup AC analysisa) In the Analysis section select, ac.b) In AC Analysis section, turn on Frequency.

12
c) In sweep range, select start and stop frequencies as 150 to 100M.
d) Select points per decade as 20.e) Click apply.
Selecting Outputs to be Plotted
Execute Outputs-To be Plotted-Select on schematic and click on output net vout and input net vin.
Running The Simulation
Execute Simulation-Netlist and Run.
13

14
COMMON SOURCE AMPLIFIER
Schematic symbol
Creating a New Library
1) In library manager execute FILE-NEW-Library2) In the “New Library” form, type “name”3) The field directory is set to ~/Database/cadence_analog_labs_6134) In the “Technology File For New Library” form, select “attach to an
existing techfile”5) In the “attach Design Library To technology File” form select
gpdk180.
Creating a Schematic Cellview
6) In the Library Manager, execute File-New-Cellview.7) Fill the new file form as Name as “Comsrc_amp”, View as
“schematic”.

15
Adding Components to Schematic
8) In the schematic window, click instance. 9) Click on the browse button.10) Select components and symbol view as give below
Library name
Cell name
Properties
gpdk180 nmos Model Name=nmos1 (NM2,NM3), W=10u; L=1u;
gpdk180 pmos Model Name=pmos1 (PM0,PM1), W=50u; L=1u;
Adding Pins to Schematic
1) Click the Pin icon.2) Add the pins in the following order.
Pin names DirectionVin Input
Vout Outputvdd, vss Input
Adding Wires to Schematic
1) Click Wires icon in the schematic view.2) Depending on the circuit diagram do the connections.
Symbol Creation
1) In the inverter schematic window, execute Ceate-Cellview-From cellview.
2) The From View Name is set to “schematic”, To view name set to “symbol” and Tool/Data Type set to Schematic Symbol.
3) Modify the pin specifications based on the left, right, top and bottom pins.
4) Click ok for symbol generation.

16
Creating the Comsrc_amp_Test Cellview
1) In the library manager, execute File-New-Cellview.2) Click ok
Building the Comsrc _amp_Test Circuit
4) In the Comsrc_amp_Test schematic window select Create-Instance.
5) Select the components properties as given below.Library name
Cellview name Properties
name Comsrc_amp SymbolanalogLib vsin AC magnitude =1, Amplitude
=5m, Frequency =1K.analogLib vdd, vss, gnd Vdd=2.5, Vss=-2.5

17
Analog simulation
1) To start the Simulation Environment, in the Inverter_Test schematic window, execute Launch-ADE L.
2) In the simulation window(ADE) click Choose-Analysis icon.3) To setup transient analysis:
a) In the analysis section select tran.b) Set the stop time to 5m.c) Click the Moderate or Enabled button, and then click apply.
4) To setup DC analysisa) In the analysis section select dc.b) Select Save DC Operating Point.c) Turn on Component Parameter.d) Double click the Select Component.e) Select input signal Vsin for DC analysis.f) Set start and stop values to -5 and 5 respectively.g) Click apply.
5) To setup AC analysisa) In the Analysis section select, ac.b) In AC Analysis section, turn on Frequency.c) In sweep range, select start and stop frequencies as 150 to
100M.d) Select points per decade as 20.

18
e) Click apply.
Selecting Outputs to be Plotted
Execute Outputs-To be Plotted-Select on schematic and click on output net vout and input net vin.
Running The Simulation
Execute Simulation-Netlist and Run.

19
Common Drain
Creating a New Library
1) In library manager execute FILE-NEW-Library2) In the “New Library” form, type “name”3) The field directory is set to ~/Database/cadence_analog_labs_6134) In the “Technology File For New Library” form, select “attach to an
existing techfile”5) In the “attach Design Library To technology File” form select
gpdk180.
Creating a Schematic Cellview
6) In the Library Manager, execute File-New-Cellview.7) Fill the new file form as Name as “Comdrn_amp”, View as
“schematic”. Adding Components to Schematic
8) In the schematic window, click instance.

20
9) Click on the browse button.10) Select components and symbol view as give below
Library name
Cell name
Properties
gpdk180 nmos Model Name=nmos1 (NM2,NM3), W=10u; L=1u;
gpdk180 nmos Model Name=pmos1 (PM0,PM1), W=50u; L=1u;
Adding Pins to Schematic
1) Click the Pin icon.2) Add the pins in the following order.
Pin names DirectionVin,Vbias Input
Vout Outputvdd, vss Input
Adding Wires to Schematic
1) Click Wires icon in the schematic view.2) Depending on the circuit diagram do the connections.
Symbol Creation
1) In the schematic window, execute Ceate-Cellview-From cellview.2) The From View Name is set to “schematic”, To view name set to
“symbol” and Tool/Data Type set to Schematic Symbol.3) Modify the pin specifications based on the left, right, top and
bottom pins.4) Click ok for symbol generation.

21
Creating the Comdrn_amp_Test Cellview
1) In the library manager, execute File-New-Cellview.2) Click ok
Building the Comdrn _amp_Test Circuit
1) In the Comsrc_amp_Test schematic window select Create-Instance.
2) Select the components properties as given below.Library name
Cellview name Properties
name Comdrn_amp SymbolanalogLib vsin AC magnitude =1, Amplitude
=5m, Frequency =1K.analogLib vdd, vss, gnd Vdd=2.5, Vss=-2.5

22
Analog simulation
To start the Simulation Environment, in the Inverter_Test schematic window, execute Launch-ADE L.
In the simulation window(ADE) click Choose-Analysis icon.
To setup transient analysis:
1. In the analysis section select tran.2. Set the stop time to 5m.3. Click the Moderate or Enabled button, and then click apply.
To setup DC analysis
1. In the analysis section select dc.2. Select Save DC Operating Point.3. Turn on Component Parameter.4. Double click the Select Component.5. Select input signal Vsin for DC analysis.

23
6. Set start and stop values to -5 and 5 respectively.7. Click apply.
To setup AC analysis
In the Analysis section select, ac.a) In AC Analysis section, turn on Frequency.b) In sweep range, select start and stop frequencies as 150 to
100M.c) Select points per decade as 20.d) Click apply.
Selecting Outputs to be Plotted
Execute Outputs-To be Plotted-Select on schematic and click on output net vout and input net vin.
Running The Simulation
Execute Simulation-Netlist and Run.

24