az12722.vo.msecnd.netaz12722.vo.msecnd.net/.../spworkflowazure1-0/Lab.docx · Web viewCreated...
32
Hands-On Lab SharePoint 2010 & Azure: SharePoint Workflow Lab version: 1.0 Last updated: 3/7/2022
Transcript of az12722.vo.msecnd.netaz12722.vo.msecnd.net/.../spworkflowazure1-0/Lab.docx · Web viewCreated...
Hands-On LabSharePoint 2010 & Azure: SharePoint Workflow
Lab version: 1.0
Last updated: 5/9/2023
CONTENTS
SECCION 1: CREATING A WORKER ROLE AND TEST CLIENT............................................................2Exercise 1: Creating a Worker Role..........................................................................................................4
Task 1 – Creating The New Worker Role Project.................................................................................4
Task 2 – Defining An Input Endpoint....................................................................................................4
Task 3 – Setting References.................................................................................................................5
Task 4 – Coding The Worker Role........................................................................................................5
Task 5 – Publishing The Worker Role To Azure....................................................................................7
Exercise 2: Creating a Test Client...........................................................................................................10
Task 1 – Creating The New Test Client Project...................................................................................10
Task 2 – Setting References...............................................................................................................10
Task 3 – Implementing The Test Client..............................................................................................11
Summary...............................................................................................................................................13
SECTION 2: COMMUNICATING WITH THE W SUMMARY....................................................................13Exercise 1: Create a Simple Workflow...................................................................................................15
Task 1 – Creating The New Workflow Project....................................................................................15
Task 2 – Creating The Workflow Initiation Form................................................................................16
Task 3 – Calling The Worker Role.......................................................................................................17
Task 4 – Testing The Workflow..........................................................................................................19
Exercise 2: Create a Pluggable Service...................................................................................................20
Task 1 – Creating The Pluggable Service............................................................................................20
Task 2 – Deploying And Testing The Pluggable Service......................................................................27
Summary...............................................................................................................................................28
Seccion 1: Creating a Worker Role and Test Client
Overview
In this lab, you will build a Worker Role that generates Word documents and deploy it to Azure. This Worker Role will expose a TCP endpoint. You will then create a test application to use the Worker Role.
Objectives
In this lab, you will:
Learn to create a Worker Role and deploy it to Azure.
Learn to communicate with the Worker Role through a TCP endpoint.
System Requirements
You must have the following items to complete this lab:
Windows Azure SDK and Windows Azure Tools for Microsoft Visual Studio
Open XML SDK 2.0
Access to a Windows Azure account
Setup
The Windows Azure SDK (included in Windows Azure Tools for Visual Studio) installs a simulation environment on your development machine for testing Azure applications locally before deploying them to the cloud. The simulation environment consists of the development fabric to host web and worker roles, and the development storage which simulates cloud blob, table and queue storage locally.
Development storage uses SQL Server as its underlying storage mechanism, and by default the SDK will attempt to configure it to use SQL Server Express. If you do not have SQL Server Express installed before installing the SDK, or you wish to simply use an existing SQL Server instance to host the development storage database, you must run the dsinit command to select the SQL Server instance where the database will be created.
Please see instructions below for how to run dsinit.
Using dsinit to Configure Development Storage
1. Open a command prompt.
2. Edit the following command line as appropriate for your environment, where [AzureSDKInstallDrive] is the drive where you installed the Azure SDK (or Windows Azure Tools for Visual Studio), and [YourSqlInstance] is the SqlServer where you want to create the development storage database.
[AzureSDKInstallDrive]\ Program Files\Windows Azure SDK\v1.3\bin\devstore\dsinit.exe /sqlinstance:[YourSqlInstance]
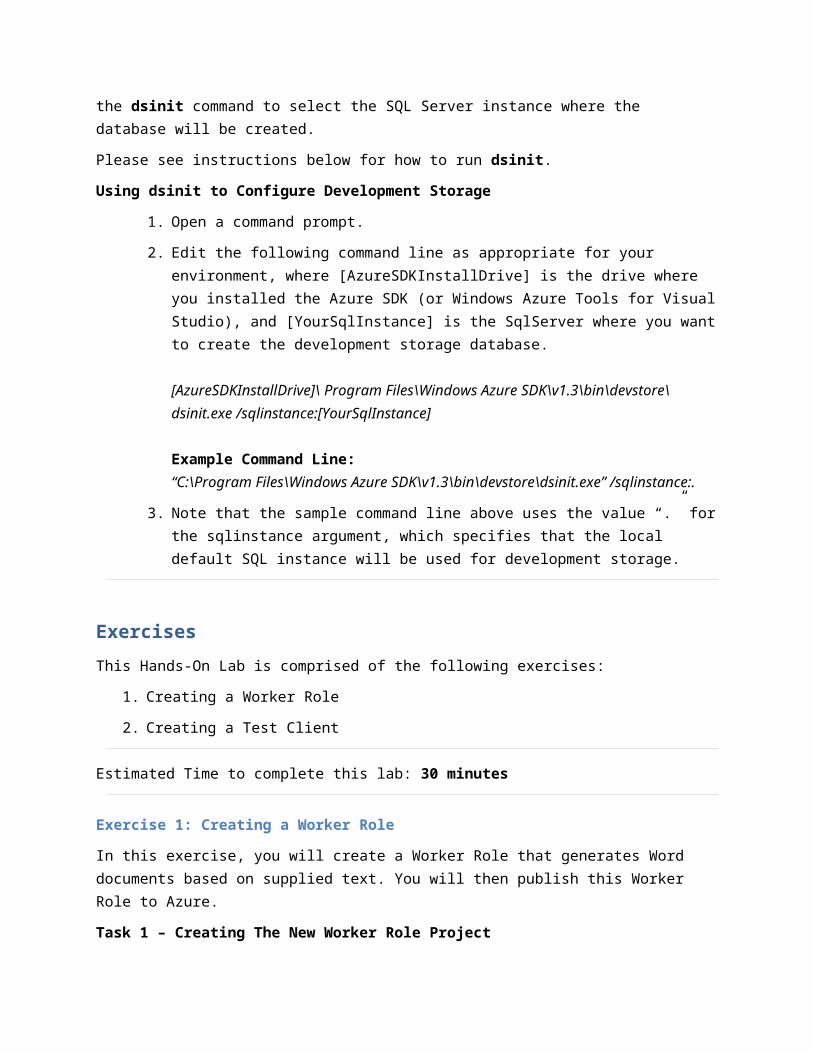
Example Command Line:“C:\Program Files\Windows Azure SDK\v1.3\bin\devstore\dsinit.exe” /sqlinstance:.
3. Note that the sample command line above uses the value “.” for the sqlinstance argument, which specifies that the local default SQL instance will be used for development storage.
Exercises
This Hands-On Lab is comprised of the following exercises:
1. Creating a Worker Role
2. Creating a Test Client
Estimated Time to complete this lab: 30 minutes
Exercise 1: Creating a Worker Role
In this exercise, you will create a Worker Role that generates Word documents based on supplied text. You will then publish this Worker Role to Azure.
Task 1 – Creating The New Worker Role Project
In this task, you will create the new Worker Role project.
1. Start Visual Studio 2010.
2. From the main menu, select File>>New>>Project.
3. In the New Project dialog, select Cloud>>Windows Azure Project.
4. Name the new project WordDocWorkerProject.
5. Click OK.
6. In the New Windows Azure Project dialog, select Worker Role and click the right arrow.
7. Rename WorkerRole1 as WordDocWorkerRole.
8. Click OK.
Task 2 – Defining An Input Endpoint
In this task, you define an Input endpoint for the Worker Role. The input endpoint will allow the Worker Role to be called directly through TCP.
1. Under the WordDocWorkerProject>>Roles folder, double-click WordDocWorkerRole.
2. Click the Endpoints tab.
3. Click Add Endpoint.
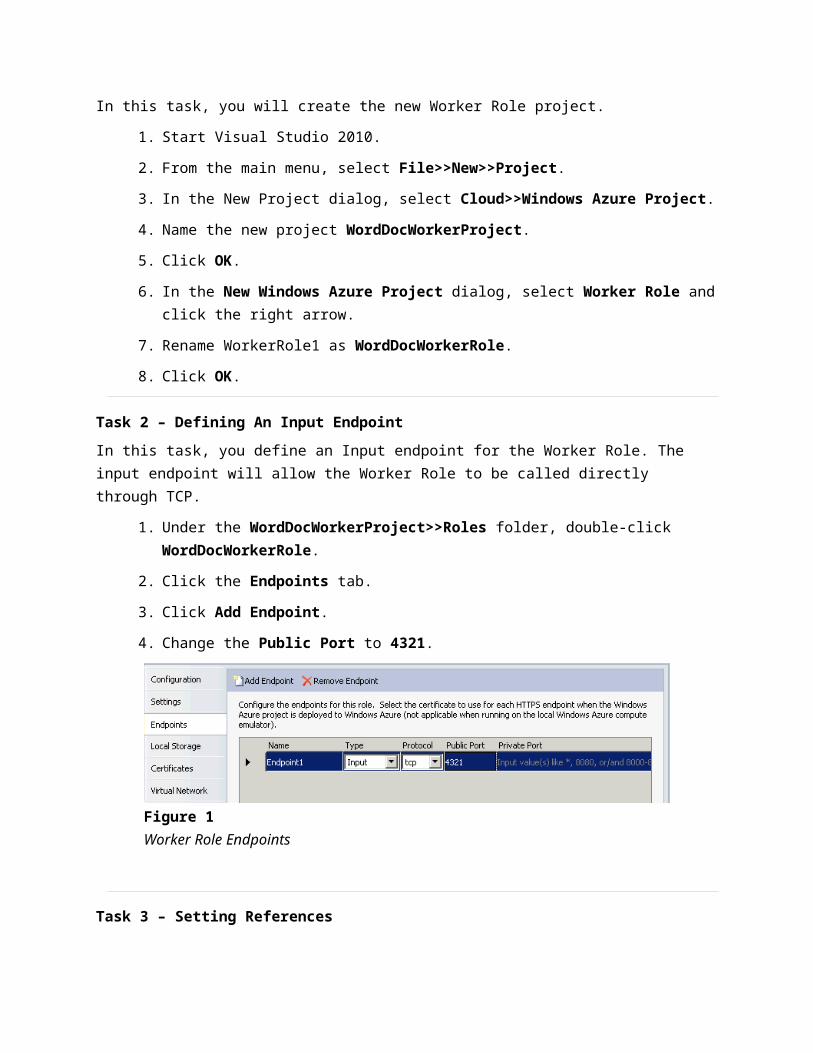
4. Change the Public Port to 4321.
Figure 1Worker Role Endpoints
Task 3 – Setting References
In this task, you will set the required references to the OpenXML libraries.
1. In the WordDocWorkerRole project, right-click the References node and select Add Reference.
2. In the Add Reference dialog, click the .NET tab.
3. Select DocumentFormat.OpenXML and WindowsBase.
4. Click OK.
5. In the Solution Explorer, under the WordDocWorkerRole project, expand the References node.
6. Click the DocumentFormat.OpenXml node.
7. In the Properties window, set the Copy Local property to True.
8. Click the WindowsBase node.
9. In the Properties window, set the Copy Local property to True.
10. Open WorkerRole.cs for editing.
11. Add the following code to the references at the top of the WorkerRole.cs file.
C#
using System.Net.Sockets;using System.IO;using DocumentFormat.OpenXml;using DocumentFormat.OpenXml.Packaging;using DocumentFormat.OpenXml.Wordprocessing;
Task 4 – Coding The Worker Role
In this task, you will implement the Worker Role. Although communication with Worker Roles is often accomplished indirectly through queues, this lab will communicate directly with the Worker Role through TCP.
1. Replace the entire body of the Run method with the following code.
C#
Trace.WriteLine("DocWorker entry point called", "Information");try{ TcpListener listener = new TcpListener( RoleEnvironment.CurrentRoleInstance. InstanceEndpoints["Endpoint1"].IPEndpoint); listener.ExclusiveAddressUse = false; listener.Start(); Trace.WriteLine("Listening", "Information");
while (true) { Thread.Sleep(1000); if (listener.Pending()) { Trace.WriteLine("Incoming Request", "Information"); TcpClient c = listener.AcceptTcpClient(); Stream s = c.GetStream(); StreamReader sr = new StreamReader(s); string text = sr.ReadLine();
if (text != null && text.Length > 0) { Trace.WriteLine("Creating Word Document", "Information");
MemoryStream ms = new MemoryStream(); using (WordprocessingDocument package = WordprocessingDocument.Create(ms, WordprocessingDocumentType.Document)) { //Create content Body body = new Body( new Paragraph( new Run( new Text(text))));
//Create package package.AddMainDocumentPart(); package.MainDocumentPart.Document = new Document(body);
package.MainDocumentPart.Document.Save(); package.Close();
}
ms.WriteTo(s); ms.Flush(); }
c.Close(); } }
}catch(Exception x){ Trace.WriteLine(x.Message, "Exception");
}
Task 5 – Publishing The Worker Role To Azure
In this task, you will publish the Worker Role to your Azure account.
1. In Visual Studio, set the deployment configuration for the solution to Release.
2. In the Solution Explorer, right click the WordDocWorkerProject solution and select Clean Solution from the context menu.
3. In the Solution Explorer, right click the WordDocWorkerProject solution and select Build Solution from the context menu.
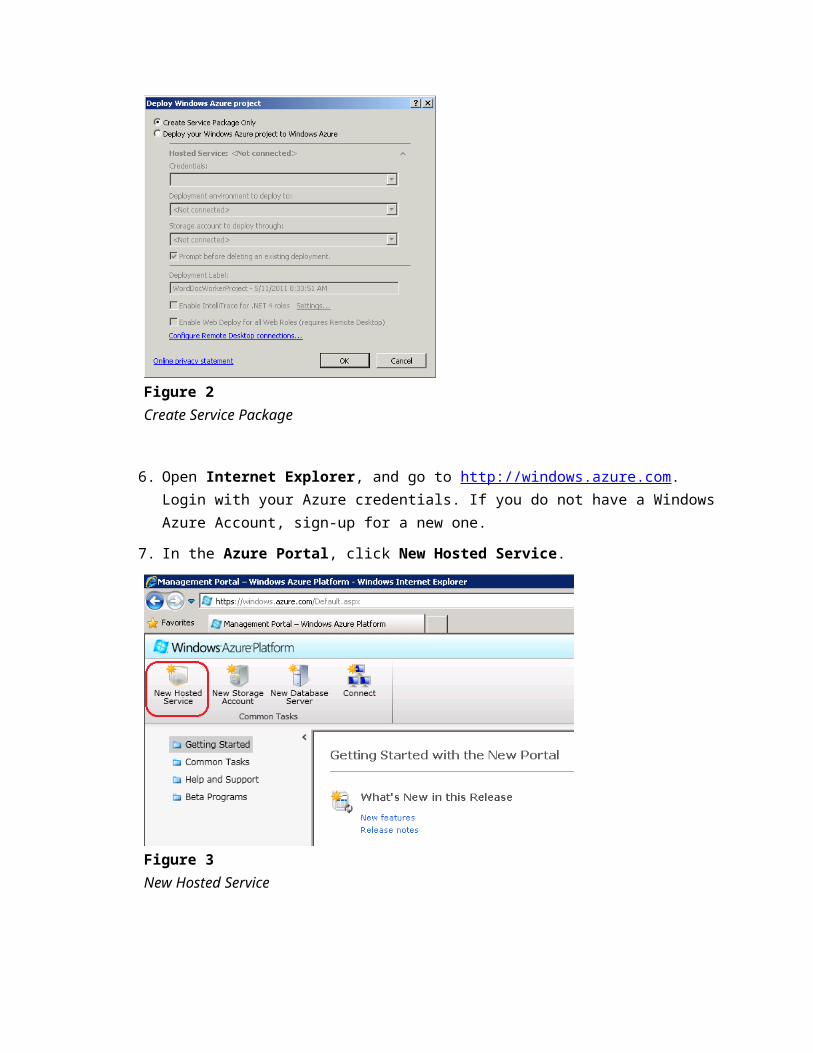
4. In the Solution Explorer, right click the WordDocWorkerProject and select Publish from the context menu.
5. In the Deploy Windows Azure Project dialog, click Create Service Package Only and click OK.

Figure 2Create Service Package
6. Open Internet Explorer, and go to http://windows.azure.com. Login with your Azure credentials. If you do not have a Windows Azure Account, sign-up for a new one.
7. In the Azure Portal, click New Hosted Service.
Figure 3New Hosted Service
8. In the Create a New Hosted Service dialog type Word Document Creator (TCP) in the Enter a Name for Your Service field.
9. In the Enter a URL Prefix for Your Service field, enter a unique prefix for the service and make note of it for later use.
10. In the Choose a Region or Affinity Group list, select a region for hosting the service.
11. In the Deployment Options, select Deploy to Stage Environment.
12. In the Deployment Name field, type Word Document Creator (TCP).
13. In the Package Location field, click Browse Locally.
14. Browse to the WordDocWorkerProject.cspkg file and click Open.
15. In the Configuration File field, click Browse Locally.
16. Browse to the ServiceConfiguration.csfg file and click Open.
17. In the Create a New Hosted Service dialog, click OK.
18. When you receive a warning that the role has only one instance, click Yes to continue.
Figure 4Warning Dialog
19. Wait for Azure to complete the creation of the new Hosted Service, which will be indicated by a Ready status.
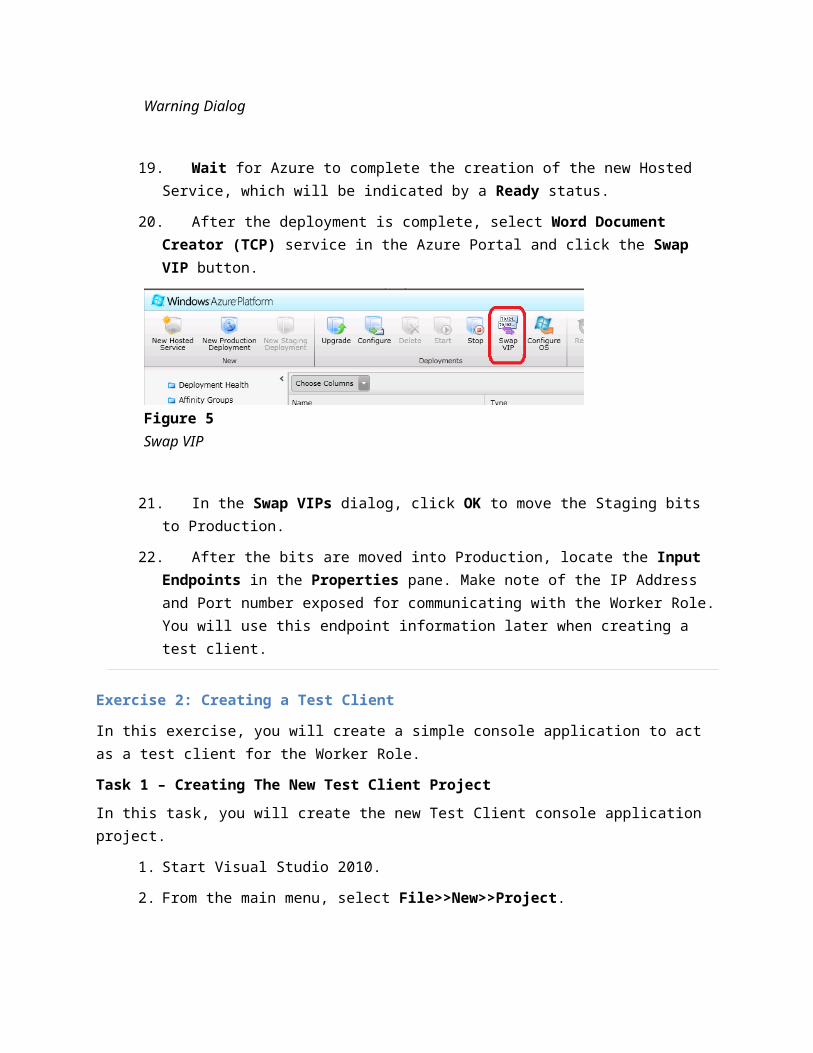
20. After the deployment is complete, select Word Document Creator (TCP) service in the Azure Portal and click the Swap VIP button.
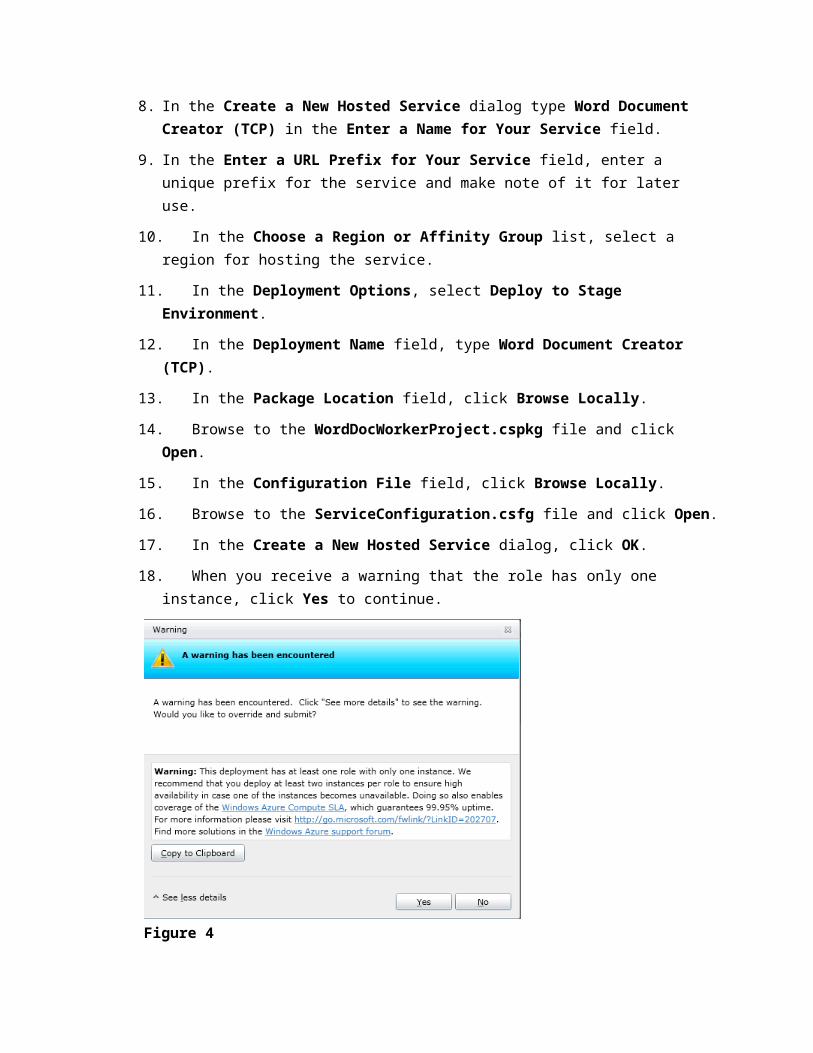
Figure 5Swap VIP
21. In the Swap VIPs dialog, click OK to move the Staging bits to Production.
22. After the bits are moved into Production, locate the Input Endpoints in the Properties pane. Make note of the IP Address and Port number exposed for communicating with the Worker Role. You will use this endpoint information later when creating a test client.
Exercise 2: Creating a Test Client
In this exercise, you will create a simple console application to act as a test client for the Worker Role.
Task 1 – Creating The New Test Client Project
In this task, you will create the new Test Client console application project.
1. Start Visual Studio 2010.
2. From the main menu, select File>>New>>Project.
3. In the New Project dialog, select Visual C#>>Windows>>Console Application.
4. Name the new project WordDocWorkerClient.
5. Click OK.
6. In the Solution Explorer, right click the WordDocWorkerClient project and select Properties from the context menu.
7. Click the Build tab.
8. Change the Platform Target to Any CPU.
Task 2 – Setting References
In this task, you will set the required references for communicating with the Worker Role.
1. Open Program.cs for editing.
2. Add the following code to the references at the top of the Program.cs file.
C#
using System.Net.Sockets;using System.IO;
Task 3 – Implementing The Test Client
In this task, you will implement the test Client. In order to communicate with the Worker Role, you will need the information for the Input Endpoint from the Azure Portal. You should have noted this information earlier in the lab.
1. Open Program.cs for editing.
2. Add the following code to the Main method ensuring that you use your endpoint information.
C#
try{ Console.WriteLine("Waiting for keyboard input..."); String text = Console.ReadLine(); Console.WriteLine("Input received");
TcpClient c = new TcpClient(); Console.WriteLine("Connecting to Azure..."); c.Connect([YOUR INPUT ENDPOINT IP ADDRESS], 4321); Console.WriteLine("Connected");
Console.WriteLine("Sending to Azure..."); Stream s = c.GetStream(); StreamWriter sw = new StreamWriter(s); sw.WriteLine(text); sw.Flush(); Console.WriteLine("Sent");
Console.WriteLine("Receiving from Azure..."); FileStream fs = new FileStream("c:\\test.docx", FileMode.Create, FileAccess.Write); byte[] b2 = new byte[256]; int bytesRead = s.Read(b2, 0, 256);
while (bytesRead > 0) { fs.Write(b2, 0, bytesRead); bytesRead = s.Read(b2, 0, 256); }
fs.Flush();
s.Close(); fs.Close(); c.Close();
Console.WriteLine("Done!");}catch (Exception x){ Console.WriteLine(x.Message);}
Console.Read();
3. Once you have coded the client, press F5 to run.
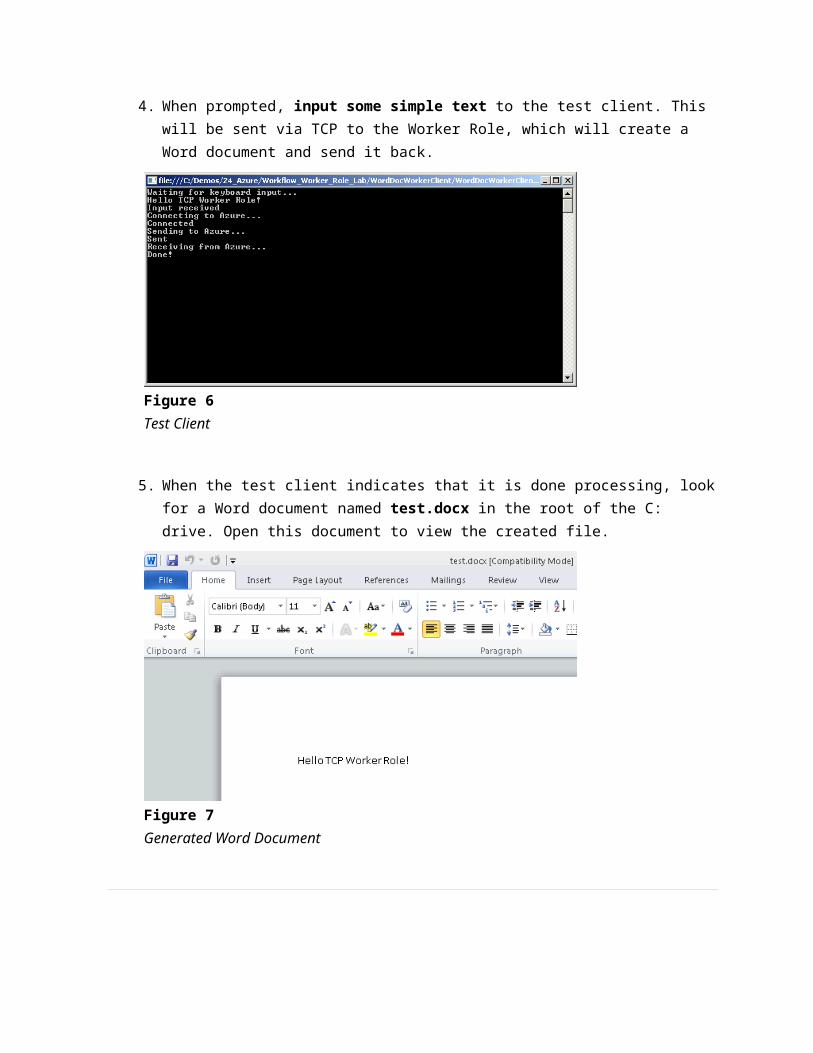
4. When prompted, input some simple text to the test client. This will be sent via TCP to the Worker Role, which will create a Word document and send it back.
Figure 6Test Client
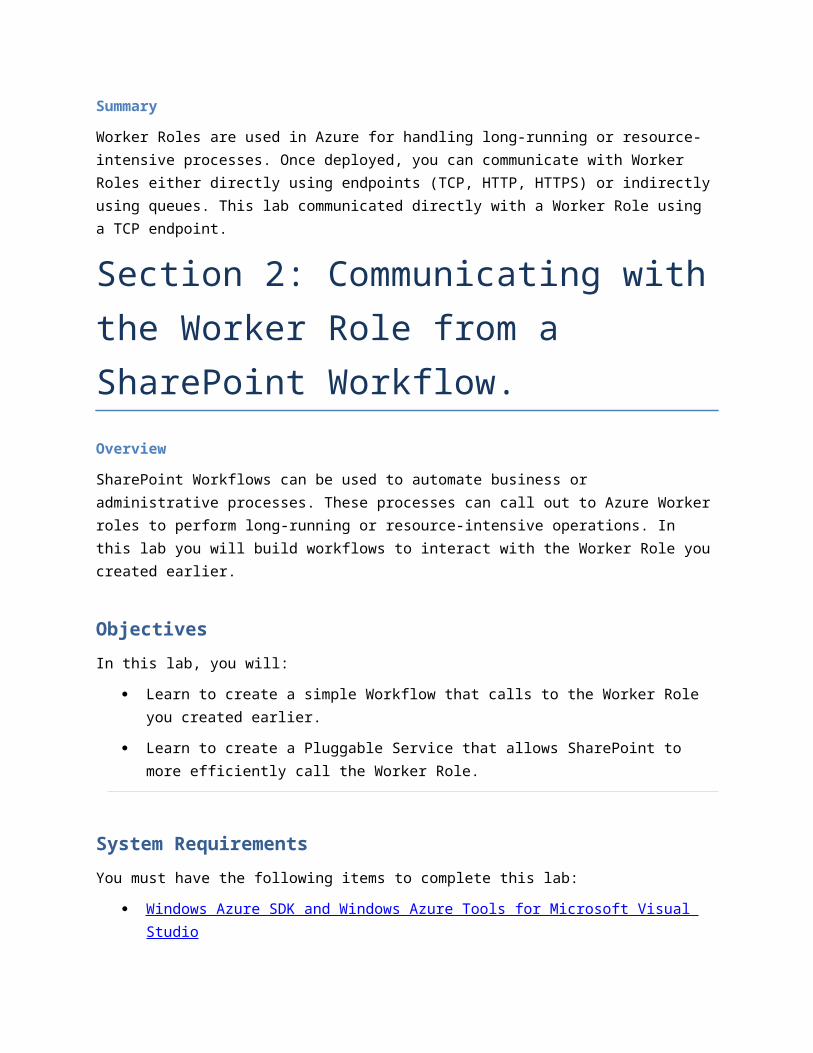
5. When the test client indicates that it is done processing, look for a Word document named test.docx in the root of the C: drive. Open this document to view the created file.
Figure 7Generated Word Document
Summary
Worker Roles are used in Azure for handling long-running or resource-intensive processes. Once deployed, you can communicate with Worker Roles either directly using endpoints (TCP, HTTP, HTTPS) or indirectly using queues. This lab communicated directly with a Worker Role using a TCP endpoint.
Section 2: Communicating with the Worker Role from a SharePoint Workflow.
Overview
SharePoint Workflows can be used to automate business or administrative processes. These processes can call out to Azure Worker roles to perform long-running or resource-intensive operations. In this lab you will build workflows to interact with the Worker Role you created earlier.
Objectives
In this lab, you will:
Learn to create a simple Workflow that calls to the Worker Role you created earlier.
Learn to create a Pluggable Service that allows SharePoint to more efficiently call the Worker Role.
System Requirements
You must have the following items to complete this lab:
Windows Azure SDK and Windows Azure Tools for Microsoft Visual Studio
Access to a Windows Azure account
Setup
The Windows Azure SDK (included in Windows Azure Tools for Visual Studio) installs a simulation environment on your development machine for testing Azure applications locally before deploying them to the cloud. The simulation environment consists of the development fabric to host web and worker roles, and the development storage which simulates cloud blob, table and queue storage locally.
Development storage uses SQL Server as its underlying storage mechanism, and by default the SDK will attempt to configure it to use SQL Server Express. If you do not have SQL Server Express installed before installing the SDK, or you wish to simply use an existing SQL Server instance to host the development storage database, you must run the dsinit command to select the SQL Server instance where the database will be created.
Please see instructions below for how to run dsinit.
Using dsinit to Configure Development Storage
1. Open a command prompt.
2. Edit the following command line as appropriate for your environment, where [AzureSDKInstallDrive] is the drive where you installed the Azure SDK (or Windows Azure Tools for Visual Studio), and [YourSqlInstance] is the SqlServer where you want to create the development storage database.
[AzureSDKInstallDrive]\ Program Files\Windows Azure SDK\v1.3\bin\devstore\dsinit.exe /sqlinstance:[YourSqlInstance]
Example Command Line:“C:\Program Files\Windows Azure SDK\v1.3\bin\devstore\dsinit.exe” /sqlinstance:.
3. Note that the sample command line above uses the value “.” for the sqlinstance argument, which specifies that the local default SQL instance will be used for development storage.
Exercises
This Hands-On Lab is comprised of the following exercises:
1. Creating a Simple Workflow
2. Creating a Pluggable Service
Estimated Time to complete this lab: 60 minutes
Exercise 1: Create a Simple Workflow
In this exercise, you will create a Site Workflow that calls the Worker Role you created in Lab 1.
Task 1 – Creating The New Workflow Project
In this task, you will create the new workflow project.
1. Start Visual Studio 2010.
2. From the main menu, select File>>New>>Project.
3. In the New Project dialog, select SharePoint>>2010>>Sequential Workflow.
4. Name the new project WordDocWorkerWorkflow.
5. Click OK.
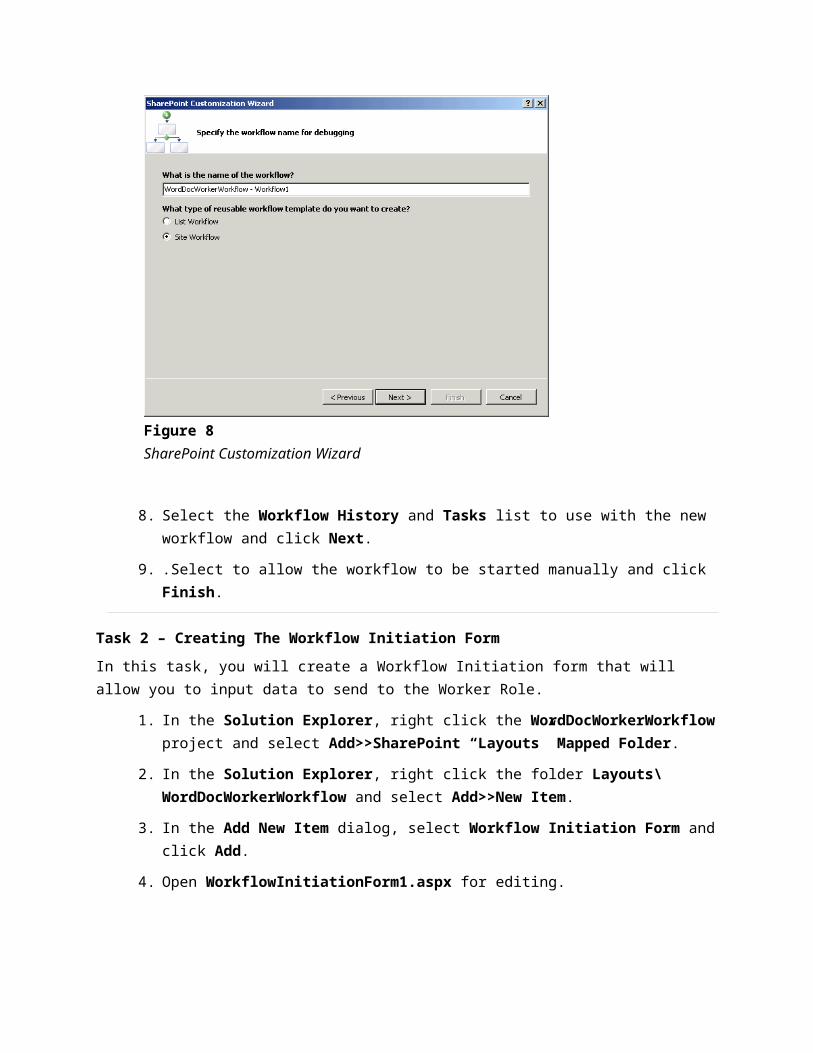
6. In the SharePoint Customization Wizard, select an appropriate Site Collection where the workflow will be deployed and click Next.
7. Accept the default name for the workflow, but select the Site Workflow option and then click Next.
Figure 8SharePoint Customization Wizard
8. Select the Workflow History and Tasks list to use with the new workflow and click Next.
9. .Select to allow the workflow to be started manually and click Finish.
Task 2 – Creating The Workflow Initiation Form
In this task, you will create a Workflow Initiation form that will allow you to input data to send to the Worker Role.
1. In the Solution Explorer, right click the WordDocWorkerWorkflow project and select Add>>SharePoint “Layouts” Mapped Folder.
2. In the Solution Explorer, right click the folder Layouts\WordDocWorkerWorkflow and select Add>>New Item.
3. In the Add New Item dialog, select Workflow Initiation Form and click Add.
4. Open WorkflowInitiationForm1.aspx for editing.
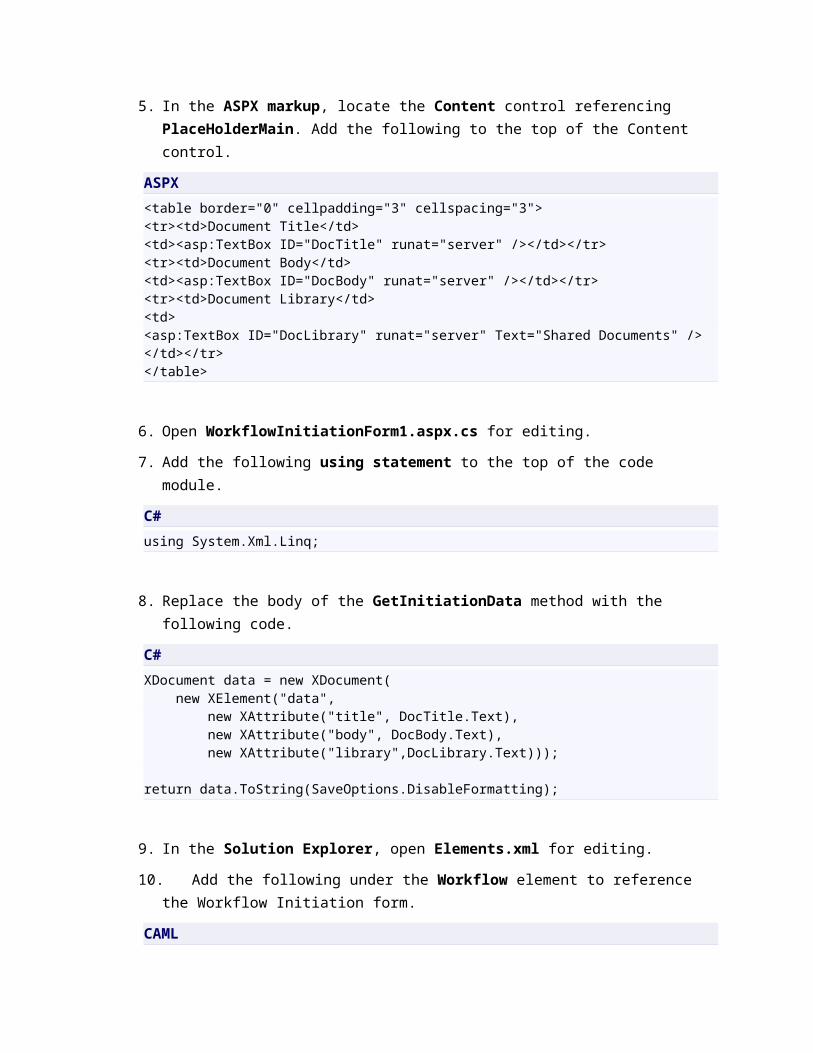
5. In the ASPX markup, locate the Content control referencing PlaceHolderMain. Add the following to the top of the Content control.
ASPX
<table border="0" cellpadding="3" cellspacing="3"><tr><td>Document Title</td><td><asp:TextBox ID="DocTitle" runat="server" /></td></tr><tr><td>Document Body</td><td><asp:TextBox ID="DocBody" runat="server" /></td></tr><tr><td>Document Library</td><td><asp:TextBox ID="DocLibrary" runat="server" Text="Shared Documents" /></td></tr></table>
6. Open WorkflowInitiationForm1.aspx.cs for editing.
7. Add the following using statement to the top of the code module.
C#
using System.Xml.Linq;
8. Replace the body of the GetInitiationData method with the following code.
C#
XDocument data = new XDocument( new XElement("data", new XAttribute("title", DocTitle.Text), new XAttribute("body", DocBody.Text), new XAttribute("library",DocLibrary.Text)));
return data.ToString(SaveOptions.DisableFormatting);
9. In the Solution Explorer, open Elements.xml for editing.
10. Add the following under the Workflow element to reference the Workflow Initiation form.
CAML
InstantiationUrl="_layouts/WordDocWorkerWorkflow/WorkflowInitiationForm1.aspx"
Task 3 – Calling The Worker Role
In this task, you will add a simple Code Activity to the workflow to call out to the Worker Role.
1. In the Solution Explorer, open Workflow1.cs in Design mode.
2. Right-click the on WorkflowActivated1 activity and select Generate Handlers from the context menu.
3. In WorkFlow1.cs add the following using statement to the top of the code module.
C#
using System.Xml.Linq;using System.IO;using System.Net.Sockets;
4. In WorkFlow1.cs, add the following member variables to the class.
C#
string title = string.Empty;string body = string.Empty;string library = string.Empty;
5. In WorkFlow1.cs, add the following code to the onWorkflowActivated1_Invoked method.
C#
XDocument data = XDocument.Parse(workflowProperties.InitiationData);
title = (from t in data.Descendants("data")
select new { title = t.Attribute("title").Value }).First().title;body = (from t in data.Descendants("data") select new { body = t.Attribute("body").Value }).First().body;library = (from t in data.Descendants("data") select new { library = t.Attribute("library").Value }).First().library;
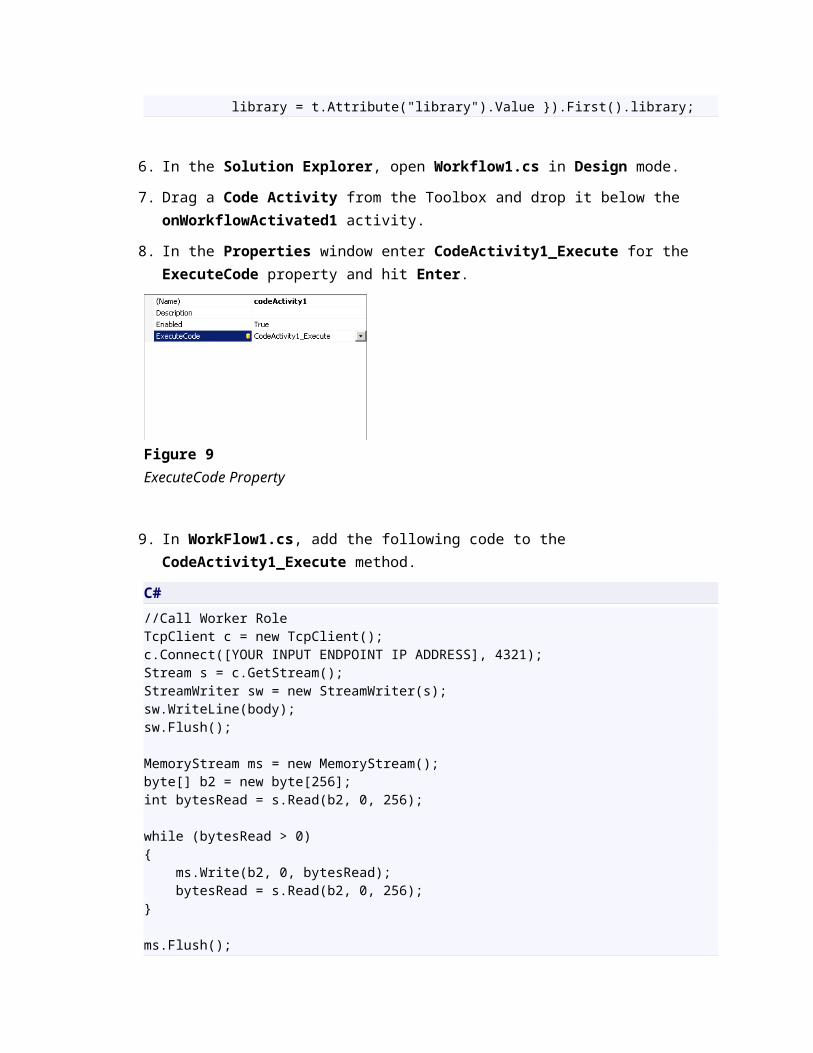
6. In the Solution Explorer, open Workflow1.cs in Design mode.
7. Drag a Code Activity from the Toolbox and drop it below the onWorkflowActivated1 activity.
8. In the Properties window enter CodeActivity1_Execute for the ExecuteCode property and hit Enter.
Figure 9ExecuteCode Property
9. In WorkFlow1.cs, add the following code to the CodeActivity1_Execute method.
C#
//Call Worker RoleTcpClient c = new TcpClient();c.Connect([YOUR INPUT ENDPOINT IP ADDRESS], 4321);Stream s = c.GetStream();StreamWriter sw = new StreamWriter(s);sw.WriteLine(body);sw.Flush();
MemoryStream ms = new MemoryStream();byte[] b2 = new byte[256];int bytesRead = s.Read(b2, 0, 256);
while (bytesRead > 0){ ms.Write(b2, 0, bytesRead); bytesRead = s.Read(b2, 0, 256);}
ms.Flush();s.Close();c.Close();
//Save Document to SharePoint LibrarySPDocumentLibrary spLib = (SPDocumentLibrary)workflowProperties.Web.Lists[library];spLib.RootFolder.Files.Add(title + ".docx", ms, true);ms.Close();ms.Dispose();
Task 4 – Testing The Workflow
In this task, you deploy and run the workflow.
1. In the Solution Explorer, right click the WordDocWorkerWorkflow project and select Build from the context menu.
2. . In the Solution Explorer, right click the WordDocWorkerWorkflow project and select Deploy from the context menu.
3. In the Internet Explorer, navigate to the Site Collection where you deployed the workflow.
4. Select Site Actions>>View All Site Content.
5. On the All Site Content page, click Site Workflows.
6. Click WordDocWorkerWorkflow - Workflow1.
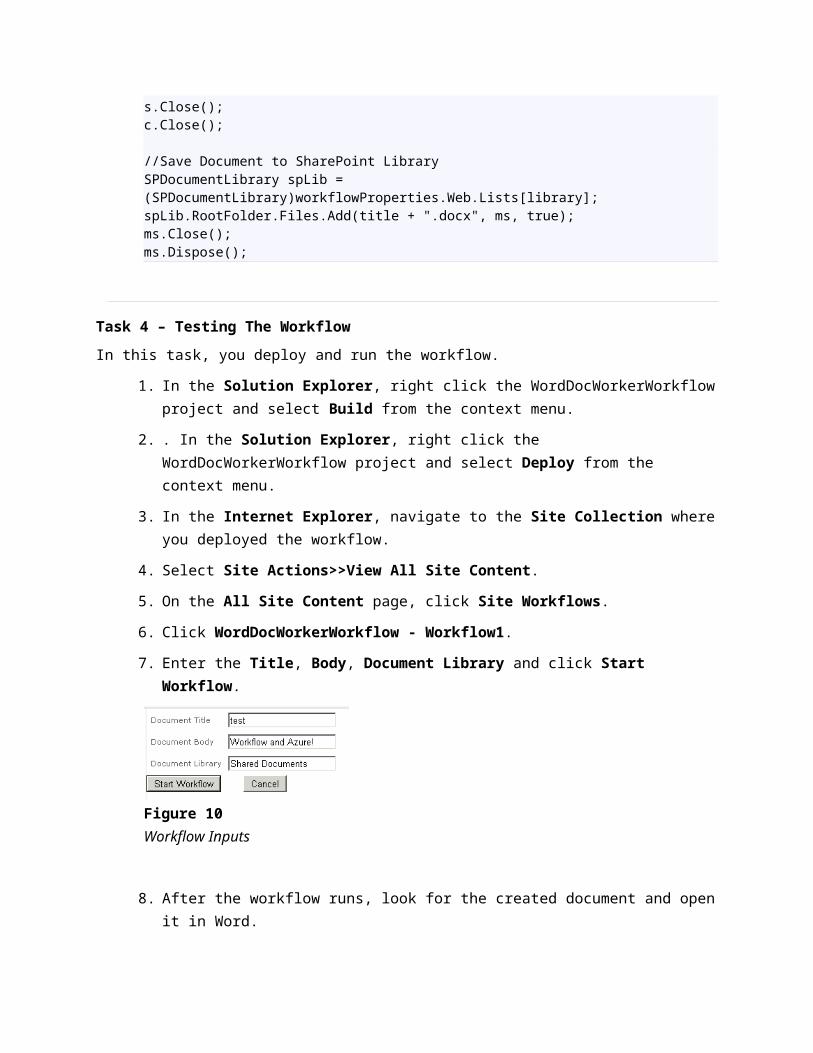
7. Enter the Title, Body, Document Library and click Start Workflow.
Figure 10Workflow Inputs
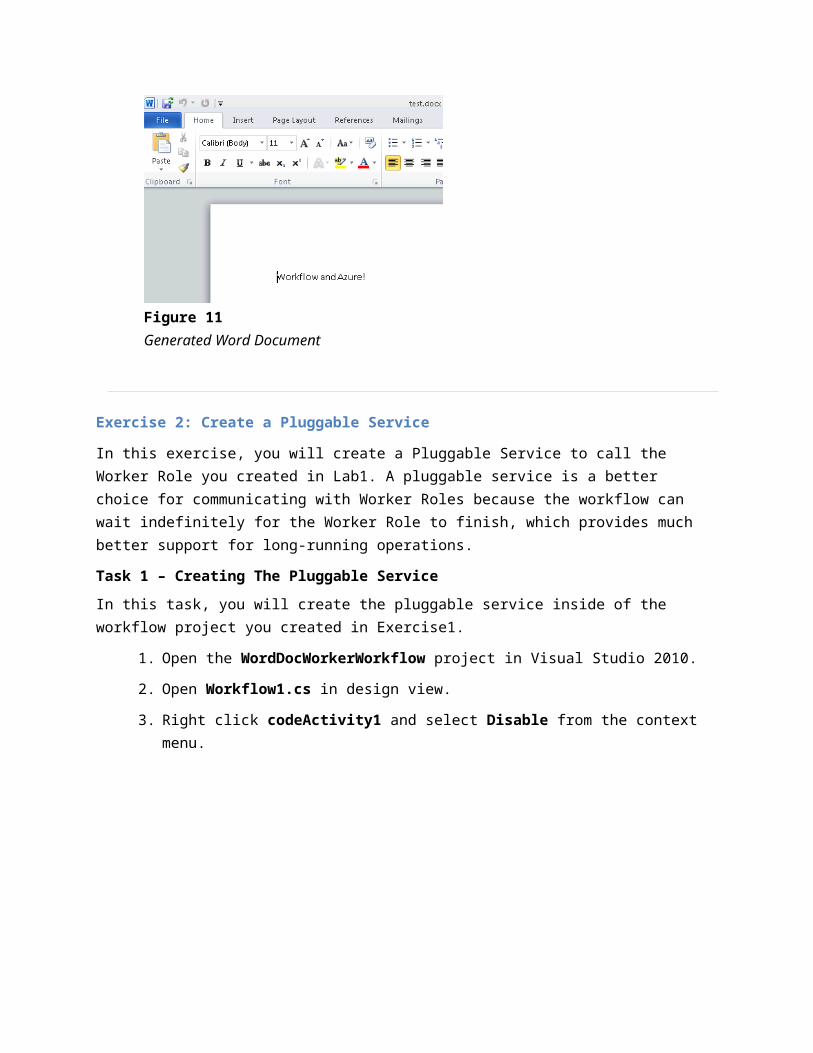
8. After the workflow runs, look for the created document and open it in Word.
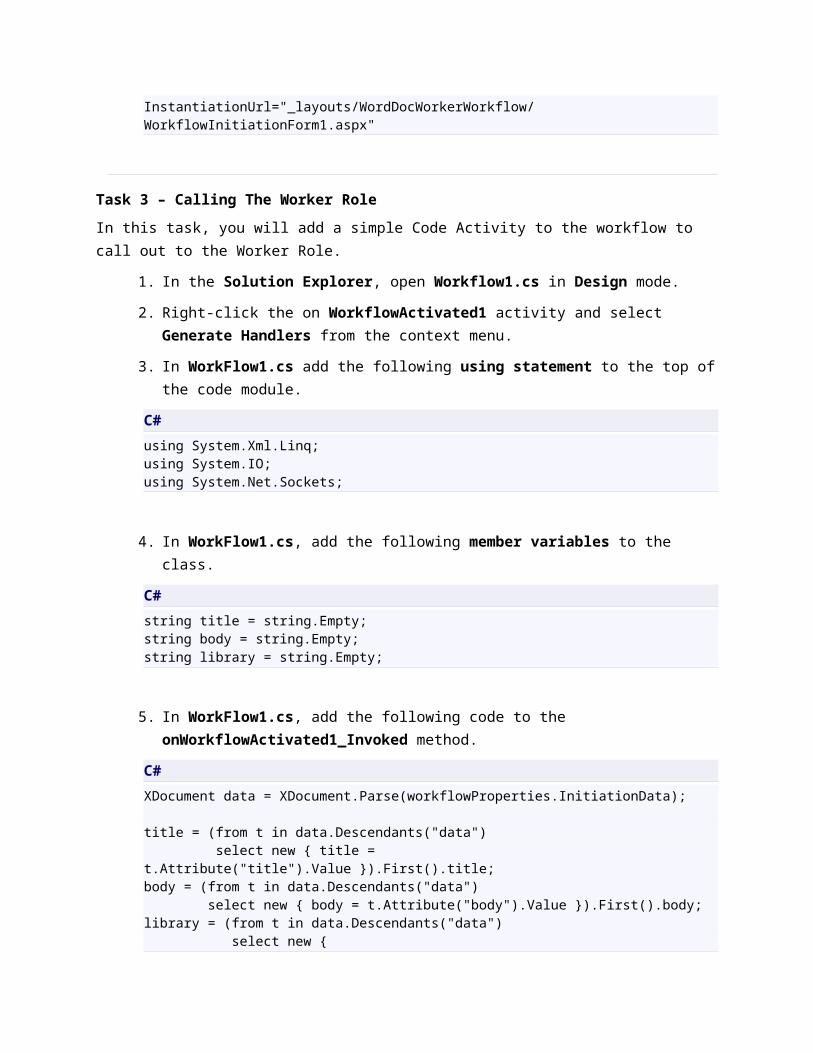
Figure 11Generated Word Document
Exercise 2: Create a Pluggable Service
In this exercise, you will create a Pluggable Service to call the Worker Role you created in Lab1. A pluggable service is a better choice for communicating with Worker Roles because the workflow can wait indefinitely for the Worker Role to finish, which provides much better support for long-running operations.
Task 1 – Creating The Pluggable Service
In this task, you will create the pluggable service inside of the workflow project you created in Exercise1.
1. Open the WordDocWorkerWorkflow project in Visual Studio 2010.
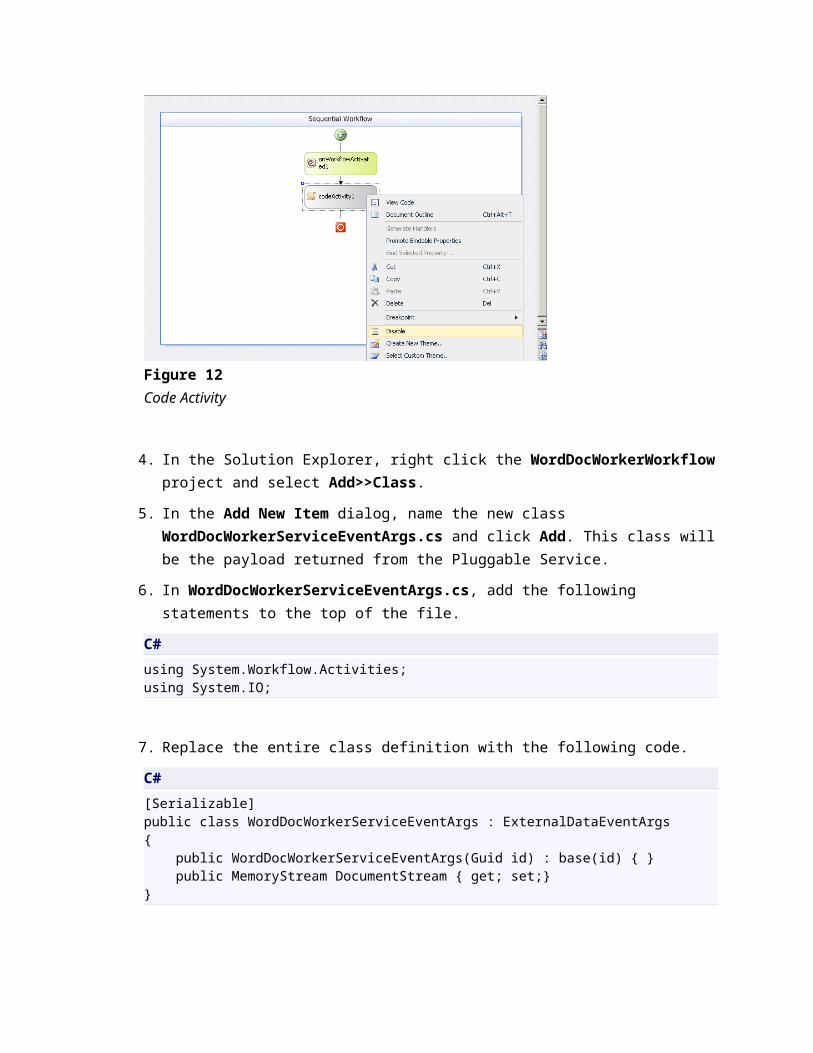
2. Open Workflow1.cs in design view.
3. Right click codeActivity1 and select Disable from the context menu.
Figure 12
Code Activity
4. In the Solution Explorer, right click the WordDocWorkerWorkflow project and select Add>>Class.
5. In the Add New Item dialog, name the new class WordDocWorkerServiceEventArgs.cs and click Add. This class will be the payload returned from the Pluggable Service.
6. In WordDocWorkerServiceEventArgs.cs, add the following statements to the top of the file.
C#
using System.Workflow.Activities;using System.IO;
7. Replace the entire class definition with the following code.
C#
[Serializable]public class WordDocWorkerServiceEventArgs : ExternalDataEventArgs{ public WordDocWorkerServiceEventArgs(Guid id) : base(id) { } public MemoryStream DocumentStream { get; set;}}
8. In the Solution Explorer, right click the WordDocWorkerWorkflow project and select Add>>Class.
9. In the Add New Item dialog, name the new class IWordDocWorkerService.cs and click Add. This will define the interface for the Pluggable Service.
10. In IWordDocWorkerService.cs, add the following statements to the top of the file.
C#
using System.Workflow.Activities;
11. Replace the entire class definition with the following code.
C#
[ExternalDataExchange]public interface IWordDocWorkerService{ event EventHandler<WordDocWorkerServiceEventArgs> MessageFromService; void MessageToService(string DocumentBody);}
12. In the Solution Explorer, right click the WordDocWorkerWorkflow project and select Add>>Class.
13. In the Add New Item dialog, name the new class WordDocWorkerService.cs and click Add. This will define the interface for the Pluggable Service.
14. In WordDocWorkerService.cs, mark the class as public and add the following statements to the top of the file.
C#
using Microsoft.SharePoint.Workflow;using System.Workflow.Runtime;using System.IO;using System.Net.Sockets;
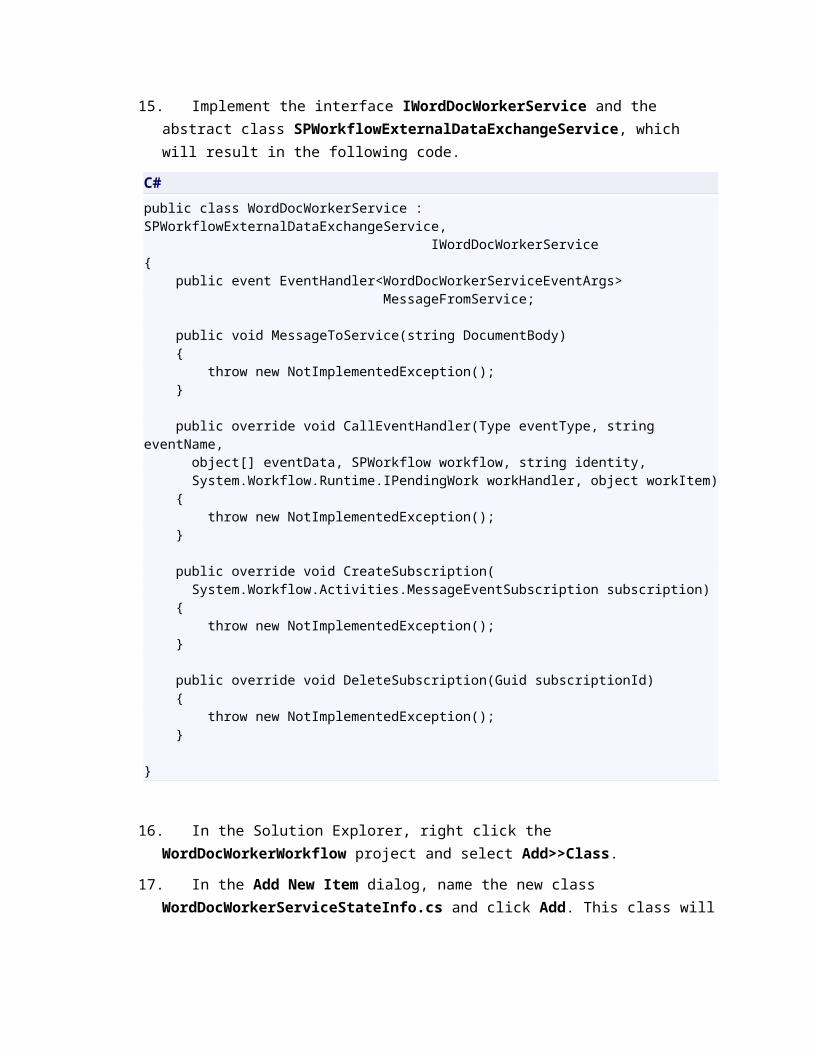
15. Implement the interface IWordDocWorkerService and the abstract class SPWorkflowExternalDataExchangeService, which will result in the following code.
C#
public class WordDocWorkerService : SPWorkflowExternalDataExchangeService, IWordDocWorkerService{ public event EventHandler<WordDocWorkerServiceEventArgs> MessageFromService;
public void MessageToService(string DocumentBody) { throw new NotImplementedException(); } public override void CallEventHandler(Type eventType, string eventName, object[] eventData, SPWorkflow workflow, string identity, System.Workflow.Runtime.IPendingWork workHandler, object workItem) { throw new NotImplementedException(); }
public override void CreateSubscription( System.Workflow.Activities.MessageEventSubscription subscription) { throw new NotImplementedException(); }
public override void DeleteSubscription(Guid subscriptionId) { throw new NotImplementedException(); }
}
16. In the Solution Explorer, right click the WordDocWorkerWorkflow project and select Add>>Class.
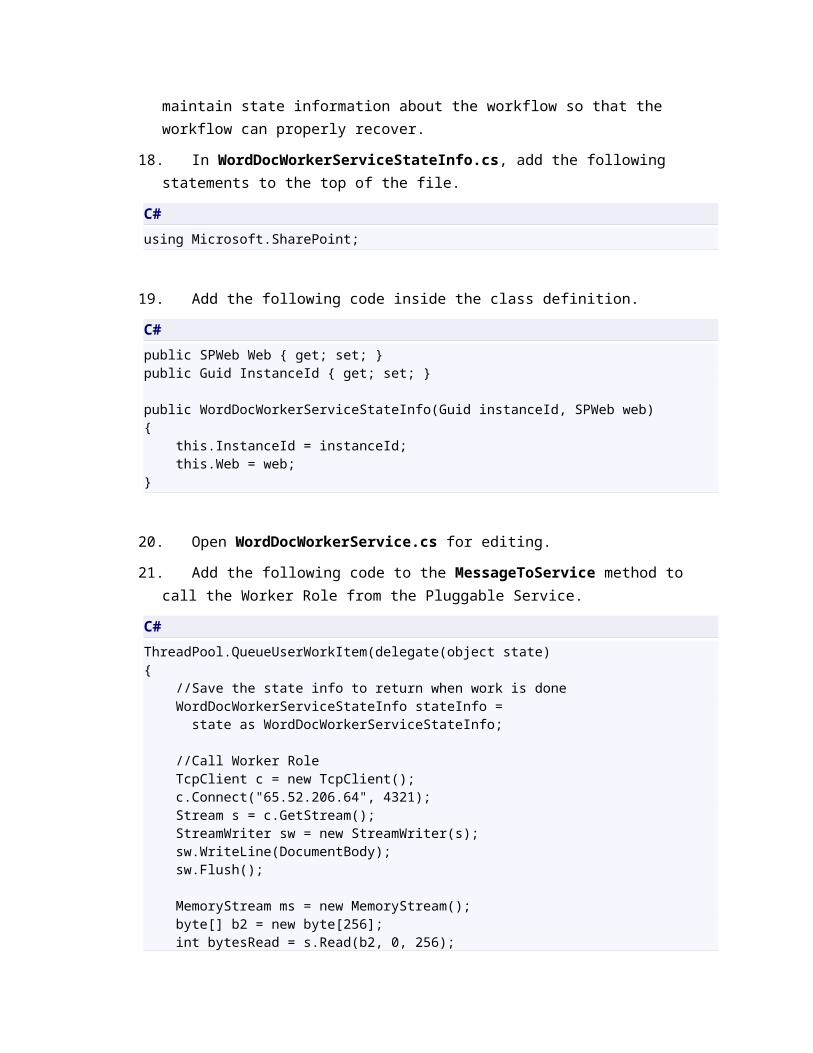
17. In the Add New Item dialog, name the new class WordDocWorkerServiceStateInfo.cs and click Add. This class will maintain state information about the workflow so that the workflow can properly recover.
18. In WordDocWorkerServiceStateInfo.cs, add the following statements to the top of the file.
C#
using Microsoft.SharePoint;
19. Add the following code inside the class definition.
C#
public SPWeb Web { get; set; }public Guid InstanceId { get; set; }
public WordDocWorkerServiceStateInfo(Guid instanceId, SPWeb web){ this.InstanceId = instanceId; this.Web = web;}
20. Open WordDocWorkerService.cs for editing.
21. Add the following code to the MessageToService method to call the Worker Role from the Pluggable Service.
C#
ThreadPool.QueueUserWorkItem(delegate(object state){ //Save the state info to return when work is done WordDocWorkerServiceStateInfo stateInfo = state as WordDocWorkerServiceStateInfo;
//Call Worker Role TcpClient c = new TcpClient(); c.Connect("65.52.206.64", 4321);
Stream s = c.GetStream(); StreamWriter sw = new StreamWriter(s); sw.WriteLine(DocumentBody); sw.Flush();
MemoryStream ms = new MemoryStream(); byte[] b2 = new byte[256]; int bytesRead = s.Read(b2, 0, 256);
while (bytesRead > 0) { ms.Write(b2, 0, bytesRead); bytesRead = s.Read(b2, 0, 256); }
ms.Flush(); byte[] buffer = ms.ToArray(); ms.Close(); s.Close(); c.Close();
//Notify workflow that work is complete//and return the document streamRaiseEvent(stateInfo.Web, stateInfo.InstanceId, typeof(IWordDocWorkerService), "MessageFromService", new object[] { buffer });
}, new WordDocWorkerServiceStateInfo( WorkflowEnvironment.WorkflowInstanceId, this.CurrentWorkflow.ParentWeb));
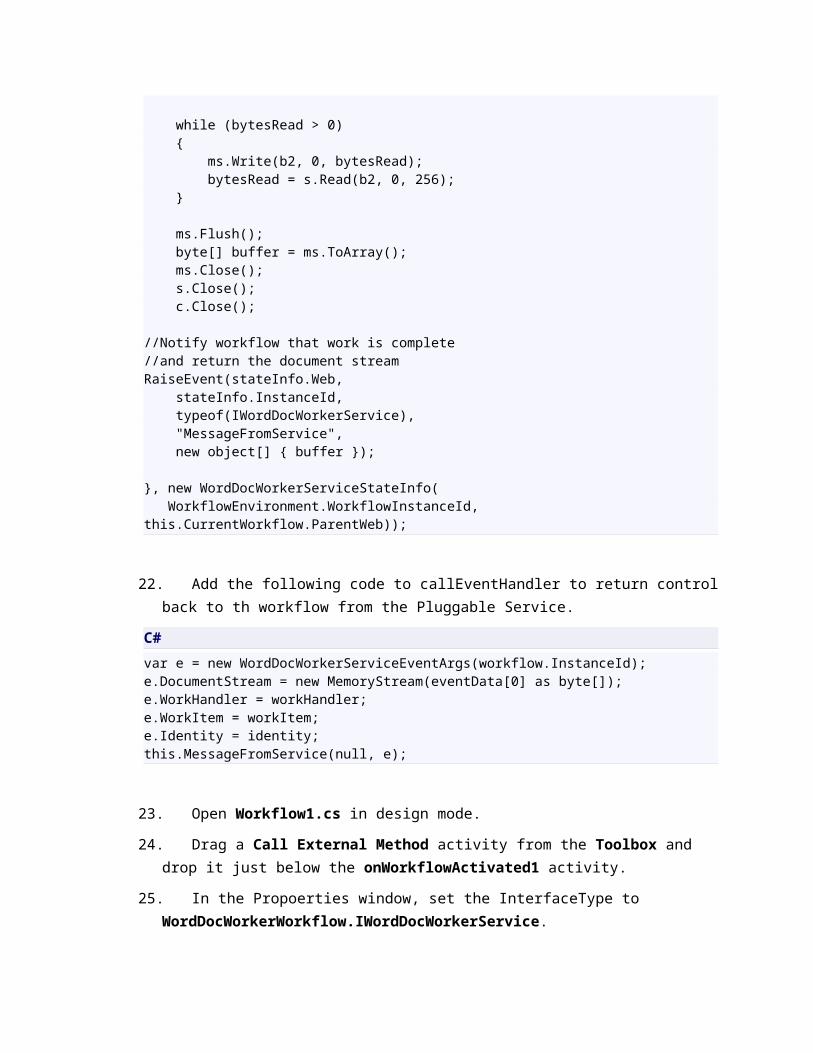
22. Add the following code to callEventHandler to return control back to th workflow from the Pluggable Service.
C#
var e = new WordDocWorkerServiceEventArgs(workflow.InstanceId);e.DocumentStream = new MemoryStream(eventData[0] as byte[]);e.WorkHandler = workHandler;e.WorkItem = workItem;e.Identity = identity;this.MessageFromService(null, e);
23. Open Workflow1.cs in design mode.
24. Drag a Call External Method activity from the Toolbox and drop it just below the onWorkflowActivated1 activity.
25. In the Propoerties window, set the InterfaceType to WordDocWorkerWorkflow.IWordDocWorkerService.
26. Set MethodName to MessageToService.
27. Click the ellipsis next to the DocumentBody property.
28. In the binding dialog, click the Bind to New Member tab.
29. Select Create Field.
30. Name the new member documentBody and click OK.
Figure 13Document Body Field
31. Ensure the Properties appear as shown.
Figure 14Properties Window
32. Drag a Handle External Event activity from the Toolbox and drop it beneath the callExternalMethodActivity1 activity.
33. In the Properties window, set the InterfaceType to WordDocWorkerWorkflow.IWordDocWorkerService.
34. Set EventName to MessageFromService.
35. Click the ellipsis next to the e property.
36. In the binding dialog, click the Bind to New Member tab.
37. Select Create Field.
38. Name the new member serviceEventArgs and click OK.
Figure 15Service Event Args Field
39. Set the Invoked property to ReceiveDocument_Invoked and press the Enter key.
Figure 16Invoked Property
40. Open Workflow1.cs for editing.
41. When you open the code window, you’ll notice that the definition for serviceEventArgs is in error because no constructor takes 0 arguments. Simply remove the new construction and leave the variable definition.
42. Add the following code to the bottom of the onWorkflowactivated1_Invoked method to set the documentBody variable.
C#
documentBody = body;
43. In the ReceiveDocument_Invoked method, add the following code to save the Word document returned from the Pluggable Service.
C#
serviceEventArgs = e as WordDocWorkerServiceEventArgs;MemoryStream ms = serviceEventArgs.DocumentStream;SPDocumentLibrary spLib = (SPDocumentLibrary)workflowProperties.Web.Lists[library];spLib.RootFolder.Files.Add(title + ".docx", ms, true);ms.Close();ms.Dispose();
Task 2 – Deploying And Testing The Pluggable Service
In this task, you will deploy and test the Pluggable Service.
1. In the Solution Explorer, right-click the WordDocWorkerWorkflow project and select Build.
2. In the Solution Explorer, right-click the WordDocWorkerWorkflow project and select Deploy.
3. In Visual Studio, open the web.config file associated with the Site Collection where the workflow was deployed.
4. In the web.config file, locate the WorkflowService section.
5. Add the following elements so that SharePoint will trust the Pluggable Service.
XML
<WorkflowService Assembly="WordDocWorkerWorkflow, Version=1.0.0.0, Culture=neutral, PublicKeyToken=[TOKEN]"Class="WordDocWorkerWorkflow.WordDocWorkerService"></WorkflowService>
6. In the Internet Explorer, navigate to the Site Collection where you deployed the workflow.
7. Select Site Actions>>View All Site Content.
8. On the All Site Content page, click Site Workflows.
9. Click WordDocWorkerWorkflow - Workflow1.
10. Enter the Title, Body, Document Library and click Start Workflow.
11. After the workflow runs, look for the created document and open it in Word.
Summary
Pluggable Services allow SharePoint workflows to make calls to external systems. These calls may be long-running operations. As a result, Pluggable Services make an excellent pattern for calling Azure Worker roles from SharePoint workflows.