- …testingmasters.com/wp-content/uploads/Maven.pdf · path of the Variable value:: maven folder...
19
www.testingmasters.com KPHB@8790002007 Madhapur Email:[email protected] 9100034464 Step1: >>Open cmd and check weather Maven install or not. >> Once got the above error your system is not set up the Maven. >> Then do the following Steps. Step2: >> Navigate to the below link. " https://maven.apache.org/download.cgi " >> Click on the above highlighted "apache-maven-3.5.2-bin.zip"
Transcript of - …testingmasters.com/wp-content/uploads/Maven.pdf · path of the Variable value:: maven folder...

www.testingmasters.com
KPHB@8790002007 Madhapur Email:[email protected] 9100034464
Step1:
>>Open cmd and check weather Maven install or not.
>> Once got the above error your system is not set up the Maven.
>> Then do the following Steps.
Step2:
>> Navigate to the below link.
" https://maven.apache.org/download.cgi "
>> Click on the above highlighted "apache-maven-3.5.2-bin.zip"

www.testingmasters.com
KPHB@8790002007 Madhapur Email:[email protected] 9100034464
>> Once download is completed , Extract the .zip file. and open extract the file.
>> Then open the bin folder and copy the entire path up to bin folder.
>> Like that " C:\Program Files\Maven\apache-maven-3.5.2\bin "
Step3:
>> Navigate to System properties.

www.testingmasters.com
KPHB@8790002007 Madhapur Email:[email protected] 9100034464
>> Click on Advanced system settings
>> Click on Environment Variables.

www.testingmasters.com
KPHB@8790002007 Madhapur Email:[email protected] 9100034464
>> Click on path and click on edit button

www.testingmasters.com
KPHB@8790002007 Madhapur Email:[email protected] 9100034464
>> Paste the maven bin path on Variable value like that.
"C:\Program Files\Maven\apache-maven-3.5.2\bin"
>> Click on ok Button

www.testingmasters.com
KPHB@8790002007 Madhapur Email:[email protected] 9100034464
>> Click on New Button Show in below.

www.testingmasters.com
KPHB@8790002007 Madhapur Email:[email protected] 9100034464
>> Se the variable name: MAVEN_HOME
Variable value:: path of the maven folder (C:\Program Files\Maven\apache-maven-3.5.2)
>> Click on 'Ok' button.
>> again click on 'ok'.
>> again click on 'ok'
Step4:
>> Now again open commend and check the maven version shown in below image.

www.testingmasters.com
KPHB@8790002007 Madhapur Email:[email protected] 9100034464
Create maven Project in Eclipse
Step5:
>> Open Eclipse => Navigate to file => New => Others
Step6:
>> Open Maven and click on Maven Project

www.testingmasters.com
KPHB@8790002007 Madhapur Email:[email protected] 9100034464
>> click on Next Button
Step7:
>> Click on Check box of Sample project and click on next Button.

www.testingmasters.com
KPHB@8790002007 Madhapur Email:[email protected] 9100034464
Step8:
>> Enter Details of the project fields like below image.
Note: Group Id:: "Company Name"
Artifact Id:: "Project Name"
>> Click on Finish button.
Click on Check box
Click N
ext B
utto
n

www.testingmasters.com
KPHB@8790002007 Madhapur Email:[email protected] 9100034464
Step9:
>> Open project and wait for up to all components are visible.
like below show in image.

www.testingmasters.com
KPHB@8790002007 Madhapur Email:[email protected] 9100034464
Step10:
>>JDK Setup in Eclipse.
>> Navigate to c:Drive => Program Files => Java => Select the JDK path.
like in this format.
Ex: " C:\Program Files\Java\jdk1.8.0_131 "

www.testingmasters.com
KPHB@8790002007 Madhapur Email:[email protected] 9100034464
Step11:
>> Navigate to Window => Preferences => Java.
>> Open java
Step12:
>> Click on Installed JREs

www.testingmasters.com
KPHB@8790002007 Madhapur Email:[email protected] 9100034464
Step13:
>> Click on Add button

www.testingmasters.com
KPHB@8790002007 Madhapur Email:[email protected] 9100034464
Step14:
>> Select on Standard CM
>> Click on Next

www.testingmasters.com
KPHB@8790002007 Madhapur Email:[email protected] 9100034464
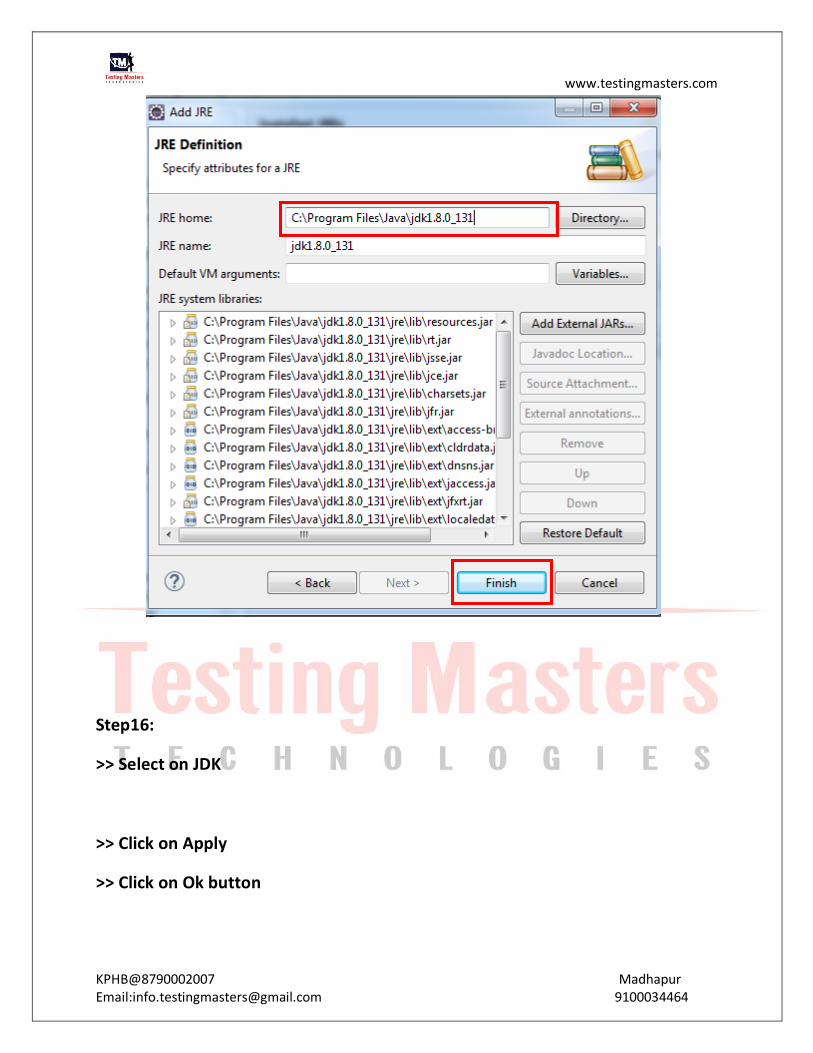
Step15:
>> Enter JRE home::path of JDK like that " C:\Program Files\Java\jdk1.8.0_131"
>> Click on Finish
www.testingmasters.com
KPHB@8790002007 Madhapur Email:[email protected] 9100034464
Step16:
>> Select on JDK
>> Click on Apply
>> Click on Ok button

www.testingmasters.com
KPHB@8790002007 Madhapur Email:[email protected] 9100034464
POM.xml:
Please Find the Below link we can find the Pox.xml file.
https://drive.google.com/open?id=1pREdJGoYjF7pkmxtB_oMfEzmogg4R6na