molbox1+™/molbox1+S molbloc Terminal - OHTE …...Fluke ) Fluke
184
© 2010 Fluke Calibration molbox1+™/molbox1+S molbloc ® Terminal (Ver. 6.00 and Higher) Operation and Maintenance Manual
Transcript of molbox1+™/molbox1+S molbloc Terminal - OHTE …...Fluke ) Fluke

© 2010 Fluke Calibration
molbox1+™/molbox1+S molbloc® Terminal
(Ver. 6.00 and Higher) Operation and Maintenance Manual

© 2010 Fluke Calibration Page II
Warning
High pressure liquids and gases are potentially hazardous. Energy stored in these liquids and gases can be released unexpectedly and with extreme force. High pressure systems should be assembled and operated only by personnel who have been instructed in proper safety practices.
© 2010 Fluke Calibration All rights reserved.
Information in this document is subject to change without notice. No part of this document may be reproduced or transmitted in any form or by any means, electronic or mechanical, for any purpose, without the express written permission of Fluke Calibration, 4765 East Beautiful Lane, Phoenix, Arizona 85044-5318 USA.
Fluke Calibration makes sincere efforts to ensure the accuracy and quality of its published materials; however, no warranty, expressed or implied, is provided. Fluke Calibration disclaims any responsibility or liability for any direct or indirect damages resulting from the use of the information in this manual or products described in it. Mention of any product or brand does not constitute an endorsement by Fluke Calibration of that product or brand. This manual was originally composed in English and was subsequently translated into other languages. The fidelity of the translation cannot be guaranteed. In case of conflict between the English version and other language versions, the English version predominates.
Fluke Calibration, FCAL, DH, DHI, molbox1, molbox1+, molbloc, molbloc-L, molbloc-S, molstic, COMPASS, CalTool are trademarks, registered and otherwise, of Fluke Corporation.
VCR is a registered trademark of the Swagelok Company. Viton is a registered trademarks of DuPont deNemours Company. Windows is a registered trademark of Microsoft Corporation.
Document No. 3540962 100927 Printed in the USA.

Page III © 2010 Fluke Calibration
Table of Contents
Table of Contents . . . . . . . . . . . . . . . . . . . . . . . . . . . . . . . . . . . . . . . . . . . . . . . . . . . . . . . . . . . . . . . . . I I I
Tables . . . . . . . . . . . . . . . . . . . . . . . . . . . . . . . . . . . . . . . . . . . . . . . . . . . . . . . . . . . . . . . . . . . . . . . . . . . . . . . . V I I
Figures . . . . . . . . . . . . . . . . . . . . . . . . . . . . . . . . . . . . . . . . . . . . . . . . . . . . . . . . . . . . . . . . . . . . . . . . . . . . . . V I I I
About This Manual . . . . . . . . . . . . . . . . . . . . . . . . . . . . . . . . . . . . . . . . . . . . . . . . . . . . . . . . . . . . . . . . IX
1. In t roduct ion . . . . . . . . . . . . . . . . . . . . . . . . . . . . . . . . . . . . . . . . . . . . . . . . . . . . . . . . . . . . . . . . . . . . . 1
1.1 Product Overview ................................................................................................................................... 1 1.1.1 molbloc Flow Elements ........................................................................................................................... 2 1.1.1.1 molbloc-L Flow Element ......................................................................................................................... 2 1.1.1.2 molbloc-S Flow Element ......................................................................................................................... 3
1.2 Specifications ......................................................................................................................................... 3 1.2.1 General Specifications ............................................................................................................................. 3 1.2.2 Reference Pressure Transducer (RPT) Specifications .......................................................................... 4 1.2.3 Temperature Measurement Specifications ............................................................................................. 4 1.2.4 MFC Control Function (Optional) Specifications ................................................................................... 5 1.2.5 Flow Measurement Specifications .......................................................................................................... 5 1.2.5.1 molbloc-L ............................................................................................................................................... 5 1.2.5.2 molbloc-S ............................................................................................................................................... 9 1.2.6 Front and Rear Panels ........................................................................................................................... 24 1.2.6.1 Front Panel .......................................................................................................................................... 24 1.2.6.2 Rear Panel ........................................................................................................................................... 24
2. Ins ta l la t ion . . . . . . . . . . . . . . . . . . . . . . . . . . . . . . . . . . . . . . . . . . . . . . . . . . . . . . . . . . . . . . . . . . . . . 25
2.1 Unpacking and Inspection ................................................................................................................... 25 2.1.1 Removing From Packaging ................................................................................................................... 25 2.1.2 Inspecting Contents ............................................................................................................................... 25
2.2 Site Requirements ................................................................................................................................ 25 2.3 Initial Setup ........................................................................................................................................... 26
2.3.1 Preparing for Operation ......................................................................................................................... 26 2.3.2 Power Connection .................................................................................................................................. 26 2.3.3 molbox1+ to molbloc Connections ....................................................................................................... 27 2.3.4 Gas Supply and Flowpath Connections ............................................................................................... 27 2.3.5 Vacuum Supply (molbloc-S only) .......................................................................................................... 28 2.3.6 Communications Connections .............................................................................................................. 28 2.3.7 MFC Control Option Connection ........................................................................................................... 29
2.4 Power UP and Verification ................................................................................................................... 29 2.4.1 Power UP ................................................................................................................................................ 29 2.4.2 Check Proper Pressure Measurement Operation................................................................................. 29 2.4.3 Check Proper Temperature Measurement Operation .......................................................................... 29 2.4.4 Check the MFC Control Function (Optional) ........................................................................................ 30 2.4.5 Leak Check ............................................................................................................................................. 30 2.4.6 Check/Set Security Level ....................................................................................................................... 30
2.5 Additional Precautions to Take Before Making Flow Measurements .............................................. 30 2.6 Short Term Storage .............................................................................................................................. 31

TABLE OF CONTENTS
© 2010 Fluke Calibration Page IV
3. Operat ion . . . . . . . . . . . . . . . . . . . . . . . . . . . . . . . . . . . . . . . . . . . . . . . . . . . . . . . . . . . . . . . . . . . . . . . 33
3.1 General Operating Principles .............................................................................................................. 33 3.1.1 molbloc Channel A & Channel B ........................................................................................................... 33 3.1.2 molbloc-L and molbloc-S Operation ..................................................................................................... 33 3.1.3 Flow Ready/Not Ready Indication ......................................................................................................... 34 3.1.3.1 molbloc-L Operation ............................................................................................................................. 34 3.1.3.2 molbloc-S Operation............................................................................................................................. 34 3.1.4 Reference Pressure Transducer (RPT) Overpressure ......................................................................... 35 3.1.5 molbloc-S BPR Limits ............................................................................................................................ 35
3.2 Main Run Screen .................................................................................................................................. 36 3.2.1 molbloc-L Operation .............................................................................................................................. 37 3.2.2 molbloc-S Operation .............................................................................................................................. 38
3.3 Manual Operation ................................................................................................................................. 39 3.3.1 Keypad Layout and Protocol ................................................................................................................. 39 3.3.2 Direct Function Keys Summary ............................................................................................................ 40
3.4 Direct Function Keys............................................................................................................................ 41 3.4.1 [K] ............................................................................................................................................................ 41 3.4.2 [GAS]....................................................................................................................................................... 42 3.4.2.1 molbloc-L Operation ............................................................................................................................. 43 3.4.2.2 molbloc-S Operation............................................................................................................................. 44 3.4.3 [UNIT] ...................................................................................................................................................... 46 3.4.3.1 Mass Flow vs. Volume Flow ................................................................................................................. 47 3.4.3.2 Volumetrically Based Mass Flow Units ................................................................................................. 48 3.4.3.3 Volumetrically Based Mass Flow Units at Various Reference Temperatures (UXXX) ........................... 49 3.4.3.4 Volume Flow Units (vlm)....................................................................................................................... 49 3.4.3.5 Customizing FLOW Units Available Under The UNIT Function ............................................................. 50 3.4.4 [TARE] ..................................................................................................................................................... 51 3.4.4.1 <1Tare> ............................................................................................................................................... 52 3.4.4.2 <2Purge> ............................................................................................................................................. 56 3.4.4.3 <3Leak Check> .................................................................................................................................... 57 3.4.4.4 <4AutoZ> ............................................................................................................................................. 64 3.4.4.5 <5BPR> (molbloc-S Operation Only) .................................................................................................... 69 3.4.5 [P&T] (Pressure and Temperature) ....................................................................................................... 70 3.4.5.1 molbloc-L Operation ............................................................................................................................. 71 3.4.5.2 MOLBLOC-S operation ........................................................................................................................ 71 3.4.6 [DISPLAY] ............................................................................................................................................... 72 3.4.6.1 <1Rate> ............................................................................................................................................... 73 3.4.6.2 <2Avg> (Average) ................................................................................................................................ 74 3.4.6.3 <3 Hi/Lo> ............................................................................................................................................. 74 3.4.6.4 <4Total> (Totalizer) .............................................................................................................................. 75 3.4.6.5 <5Unit> ................................................................................................................................................ 77 3.4.6.6 <6Deviation> ........................................................................................................................................ 78 3.4.6.7 <7Freeze> ............................................................................................................................................ 80 3.4.6.8 <8Clean> ............................................................................................................................................. 80 3.4.7 [A/B] ........................................................................................................................................................ 81 3.4.8 [MFC](Optional) ...................................................................................................................................... 81 3.4.8.1 MFC Run Screens ................................................................................................................................ 82 3.4.8.2 MFC Profiles ........................................................................................................................................ 83 3.4.8.3 Units of Measure When Using the MFC Control Option ........................................................................ 83 3.4.9 [RES] ....................................................................................................................................................... 84
3.5 [SETUP] ................................................................................................................................................. 84 3.5.1 <1molbloc> ............................................................................................................................................. 85 3.5.1.1 molbloc-L and molbloc-S Size and Range Designations ....................................................................... 86 3.5.2 <2stab> ................................................................................................................................................... 87 3.5.3 <3ADJ> ................................................................................................................................................... 87 3.5.4 <4A_B> ................................................................................................................................................... 88 3.5.4.1 General Operation (Aspects Common to Both A_B Modes) ................................................................. 89 3.5.4.2 A+B mode ............................................................................................................................................ 90 3.5.4.3 A/B Mode ............................................................................................................................................. 90 3.5.5 <5MFC> ................................................................................................................................................... 91 3.5.6 <6REG> ................................................................................................................................................... 92 3.5.7 <7FLOWU> .............................................................................................................................................. 93 3.5.8 <8PRESU> .............................................................................................................................................. 93 3.5.9 <9TEMPU> .............................................................................................................................................. 94
3.6 [SPECIAL] ............................................................................................................................................. 95 3.6.1 <1reset> .................................................................................................................................................. 95 3.6.1.1 <1sets> ................................................................................................................................................ 96 3.6.1.2 <2units> ............................................................................................................................................... 96 3.6.1.3 <3MFC> ............................................................................................................................................... 97
TABLE OF CONTENTS
Page V © 2010 Fluke Calibration
3.6.1.4 <4cal> .................................................................................................................................................. 97 3.6.1.5 <5all> ................................................................................................................................................... 97 3.6.2 <2level> ................................................................................................................................................... 98 3.6.2.1 Security Levels ..................................................................................................................................... 98 3.6.3 <3UL> .....................................................................................................................................................101 3.6.3.1 Upper Limit Alarm and Sequence ........................................................................................................102 3.6.4 <4cal>.....................................................................................................................................................102 3.6.5 <5Prefs> .................................................................................................................................................102 3.6.5.1 <1ScrSVR> .........................................................................................................................................103 3.6.5.2 <3ID> ..................................................................................................................................................103 3.6.5.3 <3Time> ..............................................................................................................................................104 3.6.6 <6REMOTE> ..........................................................................................................................................104 3.6.6.1 COM1 and COM2 ...............................................................................................................................105 3.6.6.2 IEEE-488.............................................................................................................................................105 3.6.6.3 RS232 Self-Test ..................................................................................................................................105 3.6.7 <7Drivers> .............................................................................................................................................106 3.6.8 <8Head> .................................................................................................................................................106 3.6.9 <9BPR> ..................................................................................................................................................107
4. Remote Operat ion . . . . . . . . . . . . . . . . . . . . . . . . . . . . . . . . . . . . . . . . . . . . . . . . . . . . . . . . . 111
4.1 Overview ............................................................................................................................................. 111 4.2 Interfacing ........................................................................................................................................... 111
4.2.1 RS232 Interface .....................................................................................................................................111 4.2.1.1 COM1 .................................................................................................................................................112 4.2.1.2 COM2 .................................................................................................................................................112 4.2.2 IEEE-488 (GPIB) .....................................................................................................................................113
4.3 Commands .......................................................................................................................................... 113 4.3.1 Command Syntax ..................................................................................................................................113 4.3.2 Command Summary .............................................................................................................................113 4.3.3 Error Messages .....................................................................................................................................115 4.3.4 Command Descriptions ........................................................................................................................116 4.3.4.1 IEEE Std. 488.2 Common and Status Commands ...............................................................................116 4.3.4.2 molbox1+ commands ..........................................................................................................................118
4.4 Status System ..................................................................................................................................... 138 4.4.1 Status Reporting System ......................................................................................................................138 4.4.1.1 Status Byte Register............................................................................................................................138 4.4.1.2 Standard Event Register .....................................................................................................................140
5. Maintenance , Ad jus tments and Cal ibra t ion . . . . . . . . . . . . . . . . . . . . . . 141
5.1 Product Overview ............................................................................................................................... 141 5.2 Calibration Of Reference Pressure Transducers (RPTS) .................................................................... 142
5.2.1 Principle .................................................................................................................................................142 5.2.1.1 PA and PM Coefficients ......................................................................................................................142 5.2.2 Equipment Required .............................................................................................................................143 5.2.3 Set-Up and Preparation ........................................................................................................................143 5.2.4 Viewing and Editing RPT Readings and Calibration Information .......................................................144 5.2.4.1 Viewing RPT outputs ...........................................................................................................................144 5.2.4.2 Viewing and Editing RPT PA, PM and Calibration Date ...........................................................................145 5.2.5 RPT Calibration/Adjustment Procedure Without Using CalTool for RPTs Software.........................146
5.3 MFC Control Function Adjustment ................................................................................................... 148 5.4 OHMIC Measurement [Temperature] System Verification .............................................................. 149
5.4.1 OHMIC Measurement System Calibration/Adjustment Procedure .....................................................151 5.5 molbloc Flow Adjustment .................................................................................................................. 152
5.5.1 molbloc Adjustment Procedure Without Using CalTool for molbloc Software .................................153 5.6 Reloading Embedded Software Into molbox1+ Flash Memory ............................................ 154 5.7 Reloading molbloc EEPROM File ...................................................................................................... 154 5.8 OVERHAUL ......................................................................................................................................... 154
6. Troubleshoot ing. . . . . . . . . . . . . . . . . . . . . . . . . . . . . . . . . . . . . . . . . . . . . . . . . . . . . . . . . . . . 157
6.1 Overview ............................................................................................................................................. 157

TABLE OF CONTENTS
© 2010 Fluke Calibration Page VI
7. Appendix . . . . . . . . . . . . . . . . . . . . . . . . . . . . . . . . . . . . . . . . . . . . . . . . . . . . . . . . . . . . . . . . . . . . . . 163
7.1 Conversion of Numerical Values ...................................................................................................... 163 7.1.1 Pressure ................................................................................................................................................163 7.1.2 Temperature ..........................................................................................................................................163 7.1.3 Flow .......................................................................................................................................................164
7.2 Valve Drivers ....................................................................................................................................... 166 7.3 MFC Control Function ........................................................................................................................ 168
7.3.1 MFC Connector .....................................................................................................................................168 7.3.1.1 Detailed Signal Descriptions ................................................................................................................168 7.3.1.2 Popular Configurations ........................................................................................................................169
7.4 Limited Warranty and Limitation of Liability .................................................................................... 171
8. Glossary . . . . . . . . . . . . . . . . . . . . . . . . . . . . . . . . . . . . . . . . . . . . . . . . . . . . . . . . . . . . . . . . . . . . . . 173

Page VII © 2010 Fluke Calibration
Tables Table 1. molbloc-L Pressure Dependent Calibration Types ........................................................................ 7 Table 2. molbloc-L Ranges with Low Pressure and Downstream Calibrations ........................................... 7 Table 3: molbloc-L Ranges with High Pressure Calibrations ...................................................................... 8 Table 4: molbloc-S Calibration Types ......................................................................................................... 11 Table 5: N2. molbloc-S Flow in Nitrogen at Various molbloc Upstream Pressures ................................... 13 Table 6: Ar. molbloc-S Flow in Argon at Various molbloc Upstream Pressures ........................................ 13 Table 7: He. molbloc-S Flow in Helium at Various molbloc Upstream Pressures ..................................... 14 Table 8: SF6. molbloc-S Flow in Sulfur Hexafluoride at Various molbloc Upstream Pressures ............... 14 Table 9: Xe. molbloc-S Flow in Xenon at Various molbloc Upstream Pressures ...................................... 15 Table 10: C4H10. molbloc-S Flow in Butane at Various molbloc Upstream Pressures ............................ 15 Table 11: C2H6. molbloc-S Flow in Ethane at Various molbloc Upstream Pressures .............................. 16 Table 12: C2H4. molbloc-S Flow in Ethylene at Various molbloc Upstream Pressures ........................... 16 Table 13: H2. molbloc-S Flow in Hydrogen at Various molbloc Upstream Pressures .............................. 17 Table 14: CH4. molbloc-S Flow in Methane at Various molbloc Upstream Pressures.............................. 17 Table 15: C3H8. molbloc-S Flow in Propane at Various molbloc Upstream Pressures ............................ 18 Table 16: CF4. molbloc-S Flow in Carbon Tetrafluoride at Various molbloc Upstream Pressures ........... 18 Table 17: C2F6. molbloc-S Flow in Hexafluoroethene at Various molbloc Upstream Pressures ............. 19 Table 18: CHF3. molbloc-S Flow in Trifluoromethane at Various molbloc Upstream Pressures .............. 19 Table 19: Air. molbloc-S Flow in Air at Various molbloc Upstream Pressures .......................................... 20 Table 20: CO2. molbloc-S Flow in Carbon Dioxide at Various molbloc Upstream Pressures .................. 20 Table 21: CO. molbloc-S Flow in Carbon Monoxide at Various molbloc Upstream Pressures ................. 21 Table 22: N2O. molbloc-S Flow in Nitrous Oxide at Various molbloc Upstream Pressures ..................... 21 Table 23: C4F8. molbloc-S Flow in Octafluorocyclobutane1 at Various molbloc Upstream Pressures .... 22 Table 24: O2. molbloc-S Flow in Oxygen at Various molbloc Upstream Pressures .................................. 22 Table 25: molbox1+ Parts List .................................................................................................................... 25 Table 26: Minimum molbloc-S Critical Flow (slm) in Nitrogen at Various molbloc-S Downstream
Pressures ................................................................................................................................. 36 Table 27: Summary of molbox1+ Direct Function Key Operations ............................................................ 40 Table 28. Available molbloc-L Gases ........................................................................................................ 43 Table 29. Available Flow Units ................................................................................................................... 50 Table 30. Flow Units and Corresponding Total Mass or Volume Units ..................................................... 77 Table 31. molbloc-L Size and Nominal Range Designations ..................................................................... 86 Table 32. molbloc-S Size and Pressure to Flow Conversion Ratio (KF) .................................................... 86 Table 33. Pressure Units of Measure Available ......................................................................................... 94 Table 34. Security Levels - Functions NOT Executed Per Function/Level ................................................ 99 Table 35. COM1 and COM2 Available Settings....................................................................................... 105 Table 36. COM1 DB-9F Pin Designation ................................................................................................. 112 Table 37. COM2 DB-9M Pin Designation ................................................................................................ 112 Table 38. Command Summary ................................................................................................................ 113 Table 39. Error Messages ........................................................................................................................ 115 Table 40. Status Byte Register ................................................................................................................ 138 Table 41. Standard Event Register .......................................................................................................... 140 Table 42. Troubleshooting Checklist ........................................................................................................ 157 Table 43. Pressure Unit Conversions ...................................................................................................... 163 Table 44. Temperature Unit Conversion .................................................................................................. 163

TABLES AND FIGURES
© 2010 Fluke Calibration Page VIII
Table 45. Conversions from kg/s to sccm at 0 °C for Various Gases ...................................................... 164 Table 46. Conversions from sccm at 0 °C to Other Volumetrically Based Flow Units............................. 164 Table 47. Conversions from Volumetrically Based Flow Units at 0 °C to
Corresponding Units at Another Temperature (uxxx)............................................................ 165 Table 48. Conversions from kg/s to mole/s for Various Gases ................................................................ 165 Table 49. Conversion from mole/s to pccm ............................................................................................. 165 Table 50. Conversion from sccm at 0 °C to Volume Flow Units at Another Pressure and Temperature 166 Table 51. Driver/Max Current Per Output ................................................................................................ 166 Table 52. External Drivers........................................................................................................................ 167 Table 53. Interface Cable Building Instructions ....................................................................................... 168 Table 54. Common MFC Connector Pin Out ........................................................................................... 170 Table 55. Brooks MFC Connector Pin Out .............................................................................................. 170 Table 56. Fluke Calibration Authorized Service Providers ...................................................................... 172
Figures Figure 1. molbloc-L Upstream End Flange with Integrated Filter ................................................................ 2 Figure 2. molbox1+ Front Panel ................................................................................................................. 24 Figure 3. Rear Panel .................................................................................................................................. 24 Figure 4. molbox1+ Internal Pneumatic Schematic - CHANNEL A ACTIVE, molbloc-L OPERATION ..... 33 Figure 5. Keypad Layout ............................................................................................................................ 39 Figure 6. molbox1+ Internal Pneumatic Schematic – ................................................................................ 52 Figure 7. molbox1+ Internal Pneumatic Schematic –
TARING CHANNEL A, molbloc-S OPERATION ..................................................................... 55 Figure 8. molbox1+ Internal Pneumatic Schematic – PURGING CHANNEL A ........................................ 56 Figure 9. molbox1+ Internal Pneumatic Schematic - LEAK CHECK molbox CHANNEL A ....................... 59 Figure 10. molbox1+ Internal Pneumatic Schematic - SYSTEM LEAK CHECK -
CHECKING OFFSET AND STABILITY ................................................................................... 60 Figure 11. molbox1+ Internal Pneumatic Schematic - SYSTEM LEAK CHECK ON CHANNEL A -
CHECKING OFFSET AND STABILITY ................................................................................... 63 Figure 12. molbox1+ Internal Pneumatic Schematic – molbloc-S OPERATION,
CHANNEL A, BPR ON .......................................................................................................... 108 Figure 13. molbox1+ Internal Pneumatic Schematic – molbloc-S OPERATION,
CHANNEL A, BPR OFF ........................................................................................................ 108 Figure 14. Status Byte Register ............................................................................................................... 139 Figure 15. molbox1+ Internal Pneumatic Schematic - ............................................................................. 145 Figure 16. Cable Driver Ports .................................................................................................................. 167
Page IX © 2010 Fluke Calibration
About This Manual
This manual provides the user with the information necessary to operate a molbox1+ and a molbox1+S molbloc terminal with molbloc mass flow elements to make mass flow measurements. Unless stated otherwise, references to molbox1+ also include molbox1+S. It also includes a great deal of additional information provided to help you optimize use of a molbloc/molbox1+ system and take full advantage of its many features and functions.
Before using the manual, take a moment to familiarize yourself with the Table of Contents structure. All first time molbox1+ users should read Section 1. Section 3.1 provides a comprehensive description of general molbox1+ operating principles. Section 4. is for remote operation from an external computer. Section 5 provides maintenance and calibration information. Section 6 is a quick troubleshooting guide. Use this section to troubleshoot unexpected molbox1+ behavior based on the symptoms of that behavior.
Cross references are used extensively to direct you towards additional information on a topic. Cross references are generally in parentheses and give the reference’s section number. For example: (see Section 11).
Certain words and expressions have specific meaning as they pertain to molbox1+. The Glossary Section is useful as a quick reference for exact definition of specific words and expressions as they are used in this manual.
Note
For those of you who “don’t read manuals”, go directly to section 2.3, initial setup, to set up your molbox1+. Then go to section 2.4, power up and verification. This will get you running quickly with minimal risk of causing damage to yourself or your molbox1+. Then… when you have questions or start to wonder about all the great features you might be missing, get into the manual!
Manual Conventions
Caution
“Caution” is used in throughout the manual to identify conditions or actions that could cause harm to the molbox1+ or to the devices that are connected to the molbox1+.
Warning
“Warning” is used in throughout the manual to identify actions that could pose a hazard to the user of the molbox1+.
Note
“Note” is used throughout the manual to identify operating and applications advice and additional explanations.
[ ] Indicates direct function keys (e.g., [RANGE]).
< > Indicates molbox1+ screen displays (e.g., <1yes>).

molbox1+™/molbox1+S, molbloc® TERMINAL OPERATION AND MAINTENANCE MANUAL
© 2010 Fluke Calibration Page X
Notes
Page 1 © 2010 Fluke Calibration
1. Introduction
1.1 Product Overview molbox1+ and molbox1+S are support units for making gas flow measurements using molbloc mass flow elements. Although the molbox1+ and the molbox1+S are separate products their functions and operation are virtually identical. The key difference is that molbox1+S is designed for higher flows and it only supports molbloc-S mass flow elements. A molbox1+ supports both molbloc-L and molbloc-S. Each product reads calibration data from a molbloc EEPROM and measures molbloc upstream and downstream pressure using built-in high precision Reference Pressure Transducers (RPTs). There are several RPT range specific models in the molbox1+ product line: molbox1+ A350K, molbox1+ A700K, molbox1+S A1.4M and molbox1+S A2M.
An ohmic measurement system reads the resistance of the molbloc platinum resistance thermometers from which the molbloc temperature is calculated. Using the molbloc calibration data, measured pressures and temperature and gas properties stored in memory, the flow rate of the gas flowing through the molbloc is calculated.
Internal molbox1+ valves support on-board PRESSURE TRANSDUCER TARING, molbloc-S BPR MODES, LEAK TESTING and SELF PROTECTION functions as well as a GAS PURGE routine. The molbox1+S does not support PRESSURE TRANSDUCER TARING as it does not support molbloc-L operation and does not include a bypass valve to connect the upstream and downstream RPTs.
molbox1+ provides a local user interface via a front panel key pad and display and includes advanced on-board functions. Remote communication capability is supported with RS232 and IEEE-488 interfaces.
molbox1+ is equipped to handle molblocs on two separate channels. This allows easy switching between two different molblocs as well as certain special dual channel functions. Internal valving switches the molbox1+ pressure transducers from one molbloc to the other as needed.
molbox1+ is intended for applications in which minimizing measurement uncertainty is the most important requirement and/or integrated control of mass flow controllers (MFCs) is needed. A second model, molbox RFM, is available for applications where a compact presentation and lower cost are the most dominant requirements.
molbox1+ replaces the Fluke/DHI molbox1 product line. molbox1+ introduces several product improvements over molbox1 including:
• Support for Q-RPT pressure sensor technology to improve linearity and precision on pressure measurements.
• Improved gas property uncertainty using data from NIST Reference Fluid Thermodynamic and Transport Properties Database (REFPROP).
• Support of expanded molbloc modelization and polynomial linearization data structure and calculations. This new molbloc data structure allows greatly improved flow measurement performance across the supported operating pressure and flow/Reynolds number ranges. This new model makes the Premium calibration option and resulting specifications possible.
• Support for “named” molbloc calibrations – allowing storage of multiple pressure-dependent calibrations in each gas on a molbloc. Also provides for stated operating limits of pressure, flow and Reynolds number to be stored on the molbloc so the molbox1+ can alert the user of operating conditions that are outside of the calibrated parameters, avoiding out of tolerance measurements.
molbox1+™/molbox1+S, molbloc® TERMINAL OPERATION AND MAINTENANCE MANUAL
© 2010 Fluke Calibration Page 2
• Simplified internal pneumatic design.
For easy identification, new molbox1+ terminals are produced with serial numbers of 2000 and higher. Older molbox1 terminals may be eligible for upgrade to molbox1+ hardware, software and specifications by Fluke/DHI.
1.1.1 molbloc Flow Elements Two different types of molblocs may be used with molbox1+; molbloc-L (laminar) and molbloc-S (sonic). molbox1+ supports operation with new or upgraded molblocs that have the updated data structure to take advantage of molbox1+ version 6.00 or later features, and also supports operation with older molblocs that do not have a version 6.00 data format. Premium calibrations and associated specifications are only an option for molblocs that have the version 6.00 format.
1.1.1.1 molbloc-L Flow Element
molbloc-L is the original molbloc laminar flow element. molbloc-L covers the lower portion of the molbloc/molbox1+ system flow range. The key molbloc-L measurement is the differential pressure across the element, which is roughly proportional to the mass flow rate through it. molbloc-L elements are calibrated to be used at an absolute pressure which remains nearly constant, while the differential pressure varies with flow rate. Different operating pressure options and their effect on molbloc flow range are described in Section 1.2.5.1.1.
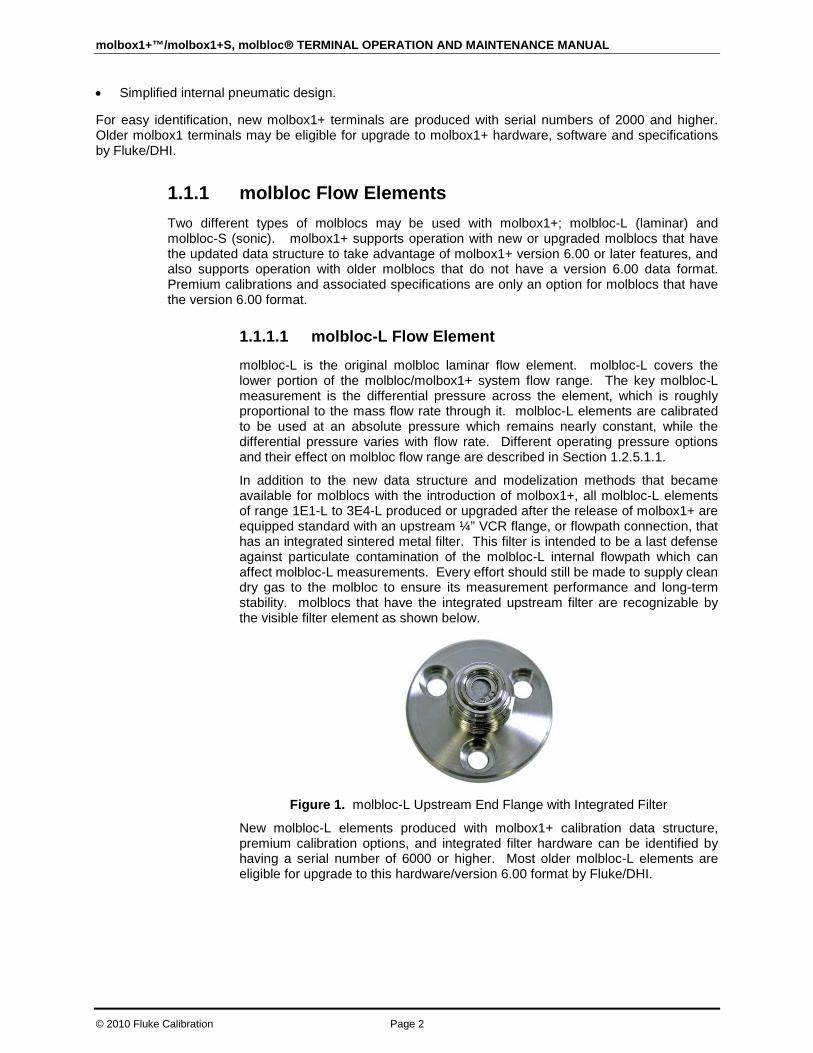
In addition to the new data structure and modelization methods that became available for molblocs with the introduction of molbox1+, all molbloc-L elements of range 1E1-L to 3E4-L produced or upgraded after the release of molbox1+ are equipped standard with an upstream ¼” VCR flange, or flowpath connection, that has an integrated sintered metal filter. This filter is intended to be a last defense against particulate contamination of the molbloc-L internal flowpath which can affect molbloc-L measurements. Every effort should still be made to supply clean dry gas to the molbloc to ensure its measurement performance and long-term stability. molblocs that have the integrated upstream filter are recognizable by the visible filter element as shown below.
Figure 1. molbloc-L Upstream End Flange with Integrated Filter
New molbloc-L elements produced with molbox1+ calibration data structure, premium calibration options, and integrated filter hardware can be identified by having a serial number of 6000 or higher. Most older molbloc-L elements are eligible for upgrade to this hardware/version 6.00 format by Fluke/DHI.

1. INTRODUCTION
Page 3 © 2010 Fluke Calibration
1.1.1.2 molbloc-S Flow Element
molbloc-S elements use critical (sonic) flow venturi nozzle technology to measure flows which overlap with the ranges of molbloc-L and cover the higher end of the molbloc/molbox1+ system flow range. The mass flow rate through a molbloc-S element is roughly proportional to the upstream absolute pressure when the flow is “choked”, so the molbloc-S operating pressure can vary widely as the mass flow rate is changed throughout the flow range. The limits of molbloc-S operating pressure and flow ranges are defined by the molbloc-S calibration type, described in Section 1.2.5.2.2.
New calibration data structure and premium calibration options for molbloc-S were also introduced along with molbox1+. molbloc-S elements produced with this support will have serial number of 4000 or higher. Older molbloc-S elements are eligible for upgrade to version 6.00 format by Fluke/DHI.
1.2 Specifications
1.2.1 General Specifications
Power Requirements 85 to 264 VAC, 50 to 60 Hz, 22 VA max. consumption
Fuse 1A/250V, slow blow, 5x20mm, NSN: 5920008930491
Operating Temperature Range 15 to 35 °C
Storage Temperature Range - 20 to 70 °C
Vibration Meets MIL-T-28800D
Weight 6.8 kg (15 lb) max.
Dimensions 32 cm W x 12 cm H x 30 cm D (12.6 in. x 4.7 in. x 11.8 in.) approx.
Microprocessor Motorola 68302, 16 MHz
Communication Ports RS232 (COM1), RS232 (COM2), IEEE-488
Reference Pressure Transducers(RPTs)
molbox1+ A350K 2 x 300 kPa (44 psia) calibrated range oscillating quartz crystal
molbox1+ A700K 2 x 600 kPa (87 psia) calibrated range oscillating quartz crystal
molbox1+S A1.4M 1 x 1200 kPa (174 psia) calibrated range oscillating quartz crystal, 1 x 300 psi silicon based
molbox1+S A2M 1 x 2000 kPa (290 psia) calibrated range oscillating quartz crystal, 1 x 300 psi silicon based
Pressure Limits molbox1+ A350K Maximum working pressure 300 kPa absolute (44 psia) Maximum pressure without damage 350 kPa absolute (50 psia)
molbox1+ A700K Maximum working pressure 600 kPa absolute (87 psia) Maximum pressure without damage 700 kPa absolute (102 psia)
molbox1+S A1.4M Maximum working pressure 1200kPa absolute (174 psia) Maximum pressure without damage 1500 kPa absolute (218 psia)
molbox1+S A2M Maximum working pressure 2000 kPa absolute (290 psia) Maximum pressure without damage 2200 kPa absolute (319 psia)
Pressure Connections Quick connectors equivalent to Swagelok® QM Series (M2-B200) Ohmic Measurement System Resolution 0.004 Ω
Accuracy ± 0.04 Ω Accuracy of 100 and 110 Ω reference resistors ± 0.01 % Stability of 100 and 110 Ω reference resistors ± 0.005 % per 3 yrs

molbox1+™/molbox1+S, molbloc® TERMINAL OPERATION AND MAINTENANCE MANUAL
© 2010 Fluke Calibration Page 4
Gases Supported molbloc-L and molbloc-S
Nitrogen (N2), dry Air, humid Air (molbloc-S only) , Argon (Ar), Butane (Butn), Carbon Monoxide (CO), Helium (He), Oxygen (O2), Carbon Dioxide (CO2), Carbon Tetrafluoride (CF4), Octofluorocyclobutane (C4F8), Ethane (C2H6), Ethylene (C2H4), Fluoroform (CHF3), Hexafluoroethane (C2F6), Hydrogen (H2), Methane (CH4), Nitrous Oxide (N2O), Propane (C3H8), Sulfur Hexafluoride (SF6), Xenon (Xe)
Flow Ranges See Section 1.2.5.
Valve Driver Option (8) 12 V outputs. Each output can sink,500 mA at 12 V, max. 1 A total (see Section 7.2).
CE Conformance Available. Must be specified.
1.2.2 Reference Pressure Transducer (RPT) Specifications Type Oscillating quartz crystal with mechanical bellows
Calibrated Range A350K 20 to 300 kPa absolute (2.9 to 44 psia)
A700K 20 to 600 kPa absolute (2.9 to 87 psia)
A1.4M 100 to 1200 kPa absolute (14.5 to 174 psia)
A2M 100 to 2000 kPa absolute (14.5 to 290 psia)
Resolution A350K 0.4 Pa (0.00005 psi)
A700K 0.7 Pa (0.0001 psi)
A1.4M 1.4 Pa (0.0002 psi)
A2M 2 Pa (0.0003 psi)
Accuracy A350K Absolute pressure1 ± (0.01 % of reading or 0.003 % Q-RPT span, whichever is greater)
Differential ± (4.2 Pa (0.0006 psi) or 0.026 % ΔP, whichever is greater)
A700K
Absolute pressure1 ± (0.01 % of reading or 0.003 % Q-RPT span, whichever is greater)
Differential ± (8.4 Pa (0.0012 psi) or 0.032 % ΔP, whichever is greater)
A1.4M Oscillating Quartz Up (HI) Absolute pressure1 ± (0.01 % of reading or 0.003 % Q-RPT span,
whichever is greater)
Silicon based Down (LO) Absolute pressure ± 0.06 % of full scale (full scale as defined by
upstream transducer)
A2M Oscillating Quartz Up (HI) Absolute pressure1 ± (0.01 % of reading or 0.003 % Q-RPT span,
whichever is greater) Silicon based Down (LO) Absolute pressure ± 0.06 % of full scale (full scale as defined by
upstream transducer) 1 With regular use of Autozero. Add 0.005 % of Q-RPT span for one year without use of AutoZero.
1.2.3 Temperature Measurement Specifications
Specifications are for molbloc mounted Platinum Resistance Thermometers (PRT) combined with molbox1+ resistance measurement system and temperature calculation.
Range 0 to 40 °C
Accuracy ± 0.05 °C
Resolution 0.01 °C
The molbox1+ internal resistance measurement system is automatically calibrated using reference 100 and 110 Ω (± 0.01 %) resistors (see Section 5.4).

1. INTRODUCTION
Page 5 © 2010 Fluke Calibration
1.2.4 MFC Control Function (Optional) Specifications Analog Output
Voltage Range 0 to 6.000 VDC Voltage Accuracy ± 0.1 % FS
Voltage Resolution 0.1 mVDC Current Range 4.01 to 20 mA
Current Accuracy ± 0.1 % FS Current Resolution 0.4 µA
Analog Input Voltage Range 0 to 5.000 VDC
Min/Max Measurable Voltage - 0.25/6.00 VDC Voltage Accuracy ± 0.1 % FS
Voltage Resolution 1 mVDC Current Range 4 to 20 mA
Current Accuracy ± 0.1 % FS Current Resolution 0.4 µA
Valve Test Point Range + 2 to + 15 VDC (in reference to - 15 VDC)
Accuracy ± 0.25 % FS Resolution 2.5 mVDC
1.2.5 Flow Measurement Specifications molbox1+ measures the flow through molbloc flow elements. There are two different types of molblocs, molbloc-L (laminar) (see Section 1.1.1.1) and molbloc-S (sonic) (see Section 1.1.1.2). Flow measurement specifications, calibration types, ranges and dimensions are detailed separately for each molbloc type in section 1.2.5.1 and 1.2.5.2. For both molbloc-L and molbloc-S elements, there are separate performance specifications given for the premium and standard calibration types that are offered. All flow measurement uncertainties are valid only for measurents in a gas for which the molbloc is calibrated, and within the range of pressures for which the calibration is specified.
1.2.5.1 molbloc-L
The flow range, useable operating pressure and absolute and differential pressure associated with molbloc-L operation depend on the molbloc used and its pressure-dependent calibration options (see Section1.2.5.1.3).
1.2.5.1.1 Standard molbloc-L Calibrations Measurement Update
Rate 1 second
Range 0 to molbloc full scale depending on gas and molbloc pressure dependent calibration type (see Section 1.2.5.1.3)
Resolution 0.0015 % FS Linearity ± 0.05 % of reading from 10 to 100 % FS,
± 0.005 % FS under 10 % FS Repeatability ± 0.05 % of reading from 10 to 100 % FS,
± 0.005 % FS under 10 % FS Precision1 ± 0.07 % of reading from 10 to 100 % FS,
± 0.007 % FS under 10 % FS Stability2
(1 year) ± 0.09 % of reading from 10 to 100 % FS, ± 0.009 % FS under 10 % FS
molbox1+™/molbox1+S, molbloc® TERMINAL OPERATION AND MAINTENANCE MANUAL
© 2010 Fluke Calibration Page 6
Measurement Uncertainty3
(N2 and any molbox1+ supported gas for which
the molbloc in use is calibrated)
± 0.2 % of reading from 10 to 100 % FS, ± 0.02 % FS under 10 % FS
1E5 molbloc ± 0.5% of reading from 25 to 100 % FS, ± 0.125 % FS under 25 % FS
1 Precision: Combined linearity, hysteresis, repeatability.
2 Stability: Maximum change in zero and span over specified time period for typical molbox1+ and molbloc used under typical conditions. As stability can only be predicted, stability for a specific molbloc and molbox1+ should be established from experience.
3 Measurement uncertainty (accuracy): Maximum deviation of the molbox1+ flow indication from the true value of the flow through the molbloc including precision, stability and Fluke calibration standard measurement uncertainty.
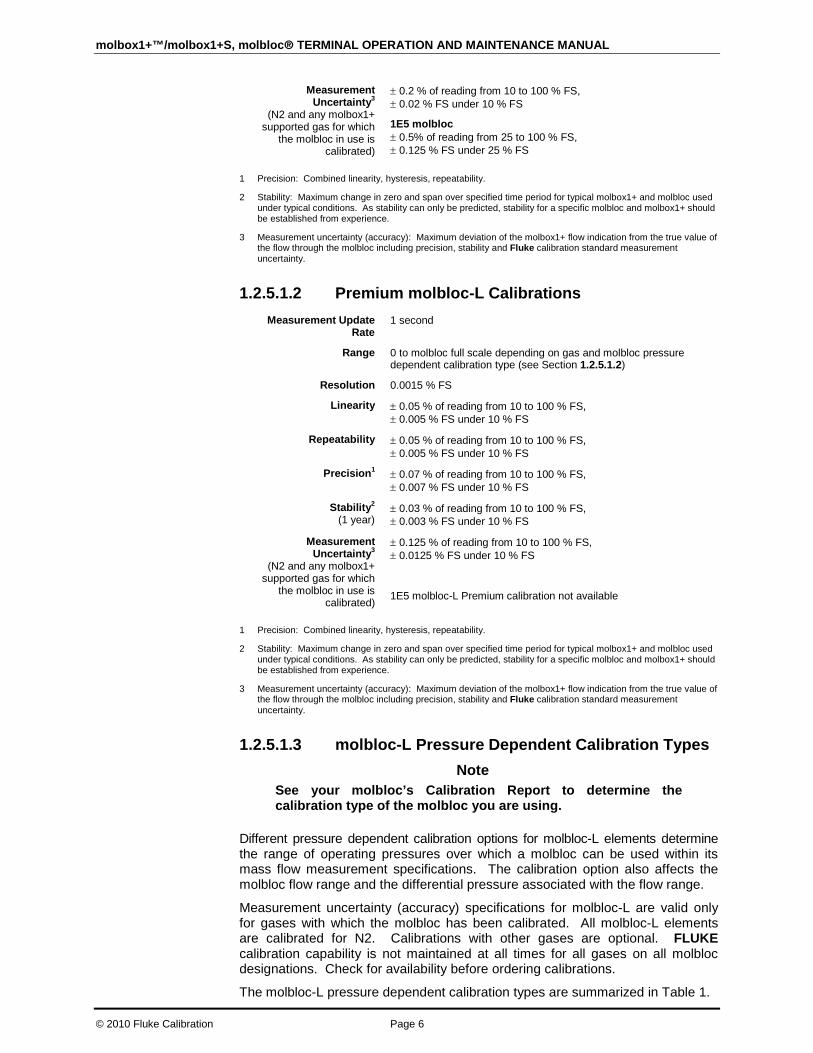
1.2.5.1.2 Premium molbloc-L Calibrations Measurement Update
Rate 1 second
Range 0 to molbloc full scale depending on gas and molbloc pressure dependent calibration type (see Section 1.2.5.1.2)
Resolution 0.0015 % FS
Linearity ± 0.05 % of reading from 10 to 100 % FS, ± 0.005 % FS under 10 % FS
Repeatability ± 0.05 % of reading from 10 to 100 % FS, ± 0.005 % FS under 10 % FS
Precision1 ± 0.07 % of reading from 10 to 100 % FS, ± 0.007 % FS under 10 % FS
Stability2
(1 year) ± 0.03 % of reading from 10 to 100 % FS, ± 0.003 % FS under 10 % FS
Measurement Uncertainty3
(N2 and any molbox1+ supported gas for which
the molbloc in use is calibrated)
± 0.125 % of reading from 10 to 100 % FS, ± 0.0125 % FS under 10 % FS
1E5 molbloc-L Premium calibration not available
1 Precision: Combined linearity, hysteresis, repeatability.
2 Stability: Maximum change in zero and span over specified time period for typical molbox1+ and molbloc used under typical conditions. As stability can only be predicted, stability for a specific molbloc and molbox1+ should be established from experience.
3 Measurement uncertainty (accuracy): Maximum deviation of the molbox1+ flow indication from the true value of the flow through the molbloc including precision, stability and Fluke calibration standard measurement uncertainty.
1.2.5.1.3 molbloc-L Pressure Dependent Calibration Types Note
See your molbloc’s Calibration Report to determine the calibration type of the molbloc you are using.
Different pressure dependent calibration options for molbloc-L elements determine the range of operating pressures over which a molbloc can be used within its mass flow measurement specifications. The calibration option also affects the molbloc flow range and the differential pressure associated with the flow range.
Measurement uncertainty (accuracy) specifications for molbloc-L are valid only for gases with which the molbloc has been calibrated. All molbloc-L elements are calibrated for N2. Calibrations with other gases are optional. FLUKE calibration capability is not maintained at all times for all gases on all molbloc designations. Check for availability before ordering calibrations.
The molbloc-L pressure dependent calibration types are summarized in Table 1.
1. INTRODUCTION
Page 7 © 2010 Fluke Calibration
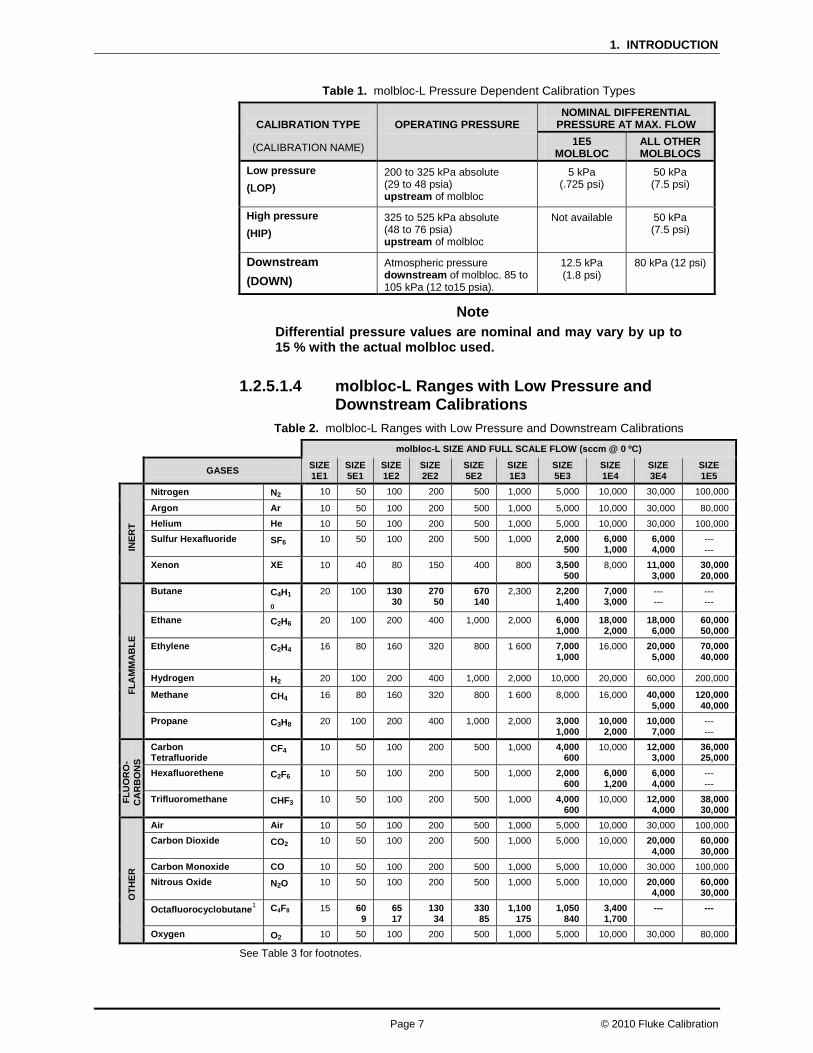
Table 1. molbloc-L Pressure Dependent Calibration Types
CALIBRATION TYPE
(CALIBRATION NAME)
OPERATING PRESSURE
NOMINAL DIFFERENTIAL PRESSURE AT MAX. FLOW
1E5 MOLBLOC
ALL OTHER MOLBLOCS
Low pressure (LOP)
200 to 325 kPa absolute (29 to 48 psia) upstream of molbloc
5 kPa (.725 psi)
50 kPa (7.5 psi)
High pressure (HIP)
325 to 525 kPa absolute (48 to 76 psia) upstream of molbloc
Not available 50 kPa (7.5 psi)
Downstream (DOWN)
Atmospheric pressure downstream of molbloc. 85 to 105 kPa (12 to15 psia).
12.5 kPa (1.8 psi)
80 kPa (12 psi)
Note Differential pressure values are nominal and may vary by up to 15 % with the actual molbloc used.
1.2.5.1.4 molbloc-L Ranges with Low Pressure and Downstream Calibrations
Table 2. molbloc-L Ranges with Low Pressure and Downstream Calibrations
molbloc-L SIZE AND FULL SCALE FLOW (sccm @ 0 ºC)
GASES SIZE 1E1
SIZE 5E1
SIZE 1E2
SIZE 2E2
SIZE 5E2
SIZE 1E3
SIZE 5E3
SIZE 1E4
SIZE 3E4
SIZE 1E5
INER
T
Nitrogen N2 10 50 100 200 500 1,000 5,000 10,000 30,000 100,000
Argon Ar 10 50 100 200 500 1,000 5,000 10,000 30,000 80,000 Helium He 10 50 100 200 500 1,000 5,000 10,000 30,000 100,000 Sulfur Hexafluoride SF6 10 50 100 200 500 1,000 2,000
500 6,000 1,000
6,000 4,000
--- ---
Xenon XE 10 40 80 150 400 800 3,500 500
8,000 11,000 3,000
30,000 20,000
FLA
MM
AB
LE
Butane C4H1
0 20 100 130
30 270 50
670 140
2,300 2,200 1,400
7,000 3,000
--- ---
--- ---
Ethane C2H6 20 100 200 400 1,000 2,000 6,000 1,000
18,000 2,000
18,000 6,000
60,000 50,000
Ethylene C2H4 16 80 160 320 800 1 600 7,000 1,000
16,000 20,000 5,000
70,000 40,000
Hydrogen H2 20 100 200 400 1,000 2,000 10,000 20,000 60,000 200,000
Methane CH4 16 80 160 320 800 1 600 8,000 16,000 40,000 5,000
120,000 40,000
Propane C3H8 20 100 200 400 1,000 2,000 3,000 1,000
10,000 2,000
10,000 7,000
--- ---
FLU
OR
O-
CA
RB
ON
S
Carbon Tetrafluoride
CF4 10 50 100 200 500 1,000 4,000 600
10,000 12,000 3,000
36,000 25,000
Hexafluorethene C2F6 10 50 100 200 500 1,000 2,000 600
6,000 1,200
6,000 4,000
--- ---
Trifluoromethane CHF3 10 50 100 200 500 1,000 4,000 600
10,000 12,000 4,000
38,000 30,000
OTH
ER
Air Air 10 50 100 200 500 1,000 5,000 10,000 30,000 100,000 Carbon Dioxide CO2 10 50 100 200 500 1,000 5,000 10,000 20,000
4,000 60,000 30,000
Carbon Monoxide CO 10 50 100 200 500 1,000 5,000 10,000 30,000 100,000 Nitrous Oxide N2O 10 50 100 200 500 1,000 5,000 10,000 20,000
4,000 60,000 30,000
Octafluorocyclobutane1 C4F8 15 60 9
65 17
130 34
330 85
1,100 175
1,050 840
3,400 1,700
--- ---
Oxygen O2 10 50 100 200 500 1,000 5,000 10,000 30,000 80,000
See Table 3 for footnotes.

molbox1+™/molbox1+S, molbloc® TERMINAL OPERATION AND MAINTENANCE MANUAL
© 2010 Fluke Calibration Page 8
1.2.5.1.5 molbloc-L Ranges with High Pressure Calibrations
Table 3: molbloc-L Ranges with High Pressure Calibrations
molbloc-L SIZE AND FULL SCALE FLOW (sccm @ 0 ºC)
GASES SIZE 1E1
SIZE 5E1
SIZE 1E2
SIZE 2E2
SIZE 5E2
SIZE 1E3
SIZE 5E3
SIZE 1E4
SIZE 3E4
SIZE 1E5
INER
T
Nitrogen N2 20 100 200 400 1,000 2,000 10,000 20,000 40,000 7,500
N/A
Argon Ar 20 100 200 400 1,000 2,000 10,000 17,000 35,000 6,000
N/A
Helium He 20 100 200 400 1,000 2,000 10,000 20,000 65,000 N/A Sulfur Hexafluoride SF6 25 100
15 120 30
250 50
600 150
2,000 300
2,000 1,400
6,200 2,800
-- --
N/A
Xenon XE 20 100 150 350 650 1,700 3,350 950
11,000 1,900
11,000 5,700
N/A
FLA
MM
AB
LE
Butane C4H10 N/A N/A N/A N/A N/A N/A N/A N/A N/A N/A
Ethane C2H6 40 200 350 50
700 100
1,800 200
4,000 6,000 2 300
20,000 4,500
20,000 13,000
N/A
Ethylene C2H4 40 200 350 700 2,000 4,000 7,000 2,000
22,000 4,000
22,000 12,700
N/A
Hydrogen H2 40 200 400 900 2,000 4,500 22,000 45,000 130,000 N/A
Methane CH4 35 175 350 700 1,700 3,500 13,000 2,000
33,000 42,000 12,000
N/A
Propane C3H8 50 200 25
200 50
400 100
1,000 250
3,500 500
3,500 2,600
11,000 5,400
-- --
N/A
FLU
OR
O-
CA
RB
ON
S
Carbon Tetrafluoride
CF4 20 100 200 400 1,000 2,000 3,700 1,200
12,000 2,400
12,000 7,300
N/A
Hexafluorethene C2F6 25 100 15
120 30
250 50
600 150
2,000 300
1,800 1,500
6,000 3,000
-- --
N/A
Trifluoromethane CHF3 25 125 240 30
450 60
1,200 150
2,500 4,000 1,500
12,000 3,000
12,000 8,800
N/A
OTH
ER
Air Air 20 100 200 400 1,000 2,000 10,000 20,000 40,000 7,200
N/A
Carbon Dioxide CO2 25 125 250 500 1,250 2,500 6,600 1,400
20,000 2,500
20,000 8,800
N/A
Carbon Monoxide CO 20 100 200 400 1,000 2,000 10,000 20,000 40,000 7,500
N/A
Nitrous Oxide N2O 25 125 250 500 1,250 2,500 11,000 1,500
20,000 3,000
20,000 9,000
N/A
Octafluorocyclobutane2 C4F8 N/A N/A N/A N/A N/A N/A N/A N/A N/A N/A
Oxygen O2 20 100 200 400 1,000 2,000 10,000 20,000 40,000 6,500
N/A
A bold value indicates that the maximum flow is limited by the maximum Reynolds number value of 1 200 which is reached before the normal differential pressure range is reached. In that case, the second value gives the minimum flow for which measurement uncertainty (accuracy) is equal to the nominal uncertainty specification. Divide the second value by 10 when using molbox RFM microrange option.
Where there is no value in the field (–), this indicates that the maximum Reynolds number is reached before the differential pressure reaches 5 kPa (1 kPa in the case of the 1E5 molbloc), therefore calibration with that gas is not useful. 1 Due to low vapor pressure, only downstream calibration type is available. 2 The operating pressure range is greater than the vapor pressure value for this gas.
1. INTRODUCTION
Page 9 © 2010 Fluke Calibration
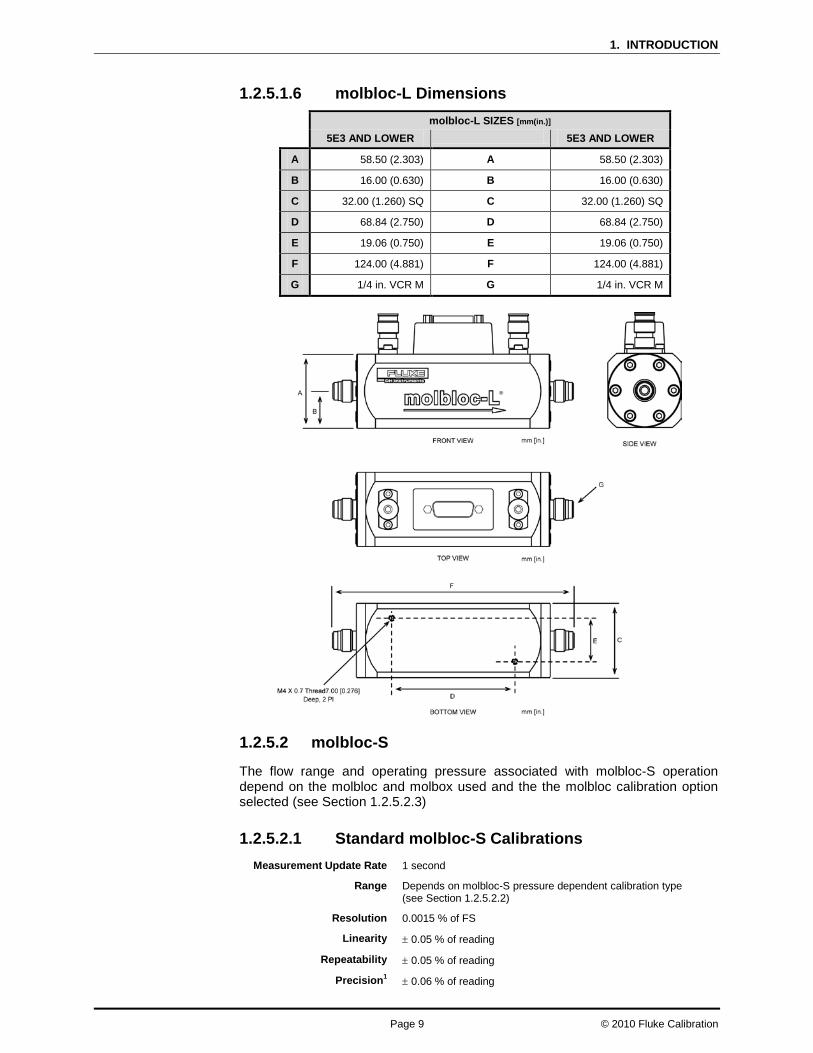
1.2.5.1.6 molbloc-L Dimensions molbloc-L SIZES [mm(in.)] 5E3 AND LOWER 5E3 AND LOWER
A 58.50 (2.303) A 58.50 (2.303)
B 16.00 (0.630) B 16.00 (0.630)
C 32.00 (1.260) SQ C 32.00 (1.260) SQ
D 68.84 (2.750) D 68.84 (2.750)
E 19.06 (0.750) E 19.06 (0.750)
F 124.00 (4.881) F 124.00 (4.881)
G 1/4 in. VCR M G 1/4 in. VCR M
1.2.5.2 molbloc-S
The flow range and operating pressure associated with molbloc-S operation depend on the molbloc and molbox used and the the molbloc calibration option selected (see Section 1.2.5.2.3)
1.2.5.2.1 Standard molbloc-S Calibrations Measurement Update Rate 1 second
Range Depends on molbloc-S pressure dependent calibration type (see Section 1.2.5.2.2)
Resolution 0.0015 % of FS
Linearity ± 0.05 % of reading
Repeatability ± 0.05 % of reading
Precision1 ± 0.06 % of reading
molbox1+™/molbox1+S, molbloc® TERMINAL OPERATION AND MAINTENANCE MANUAL
© 2010 Fluke Calibration Page 10
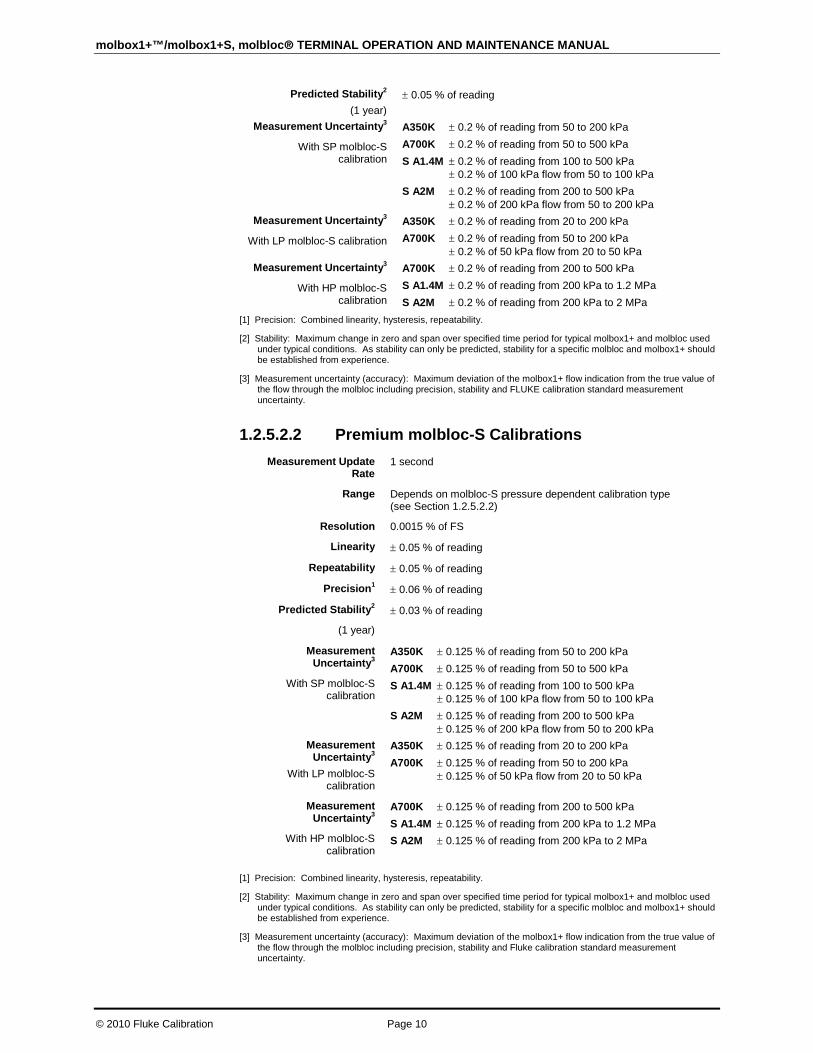
Predicted Stability2
(1 year) ± 0.05 % of reading
Measurement Uncertainty3
With SP molbloc-S calibration
A350K ± 0.2 % of reading from 50 to 200 kPa A700K ± 0.2 % of reading from 50 to 500 kPa S A1.4M ± 0.2 % of reading from 100 to 500 kPa ± 0.2 % of 100 kPa flow from 50 to 100 kPa S A2M ± 0.2 % of reading from 200 to 500 kPa ± 0.2 % of 200 kPa flow from 50 to 200 kPa
Measurement Uncertainty3
With LP molbloc-S calibration
A350K ± 0.2 % of reading from 20 to 200 kPa A700K ± 0.2 % of reading from 50 to 200 kPa ± 0.2 % of 50 kPa flow from 20 to 50 kPa
Measurement Uncertainty3
With HP molbloc-S calibration
A700K ± 0.2 % of reading from 200 to 500 kPa S A1.4M ± 0.2 % of reading from 200 kPa to 1.2 MPa S A2M ± 0.2 % of reading from 200 kPa to 2 MPa
[1] Precision: Combined linearity, hysteresis, repeatability.
[2] Stability: Maximum change in zero and span over specified time period for typical molbox1+ and molbloc used under typical conditions. As stability can only be predicted, stability for a specific molbloc and molbox1+ should be established from experience.
[3] Measurement uncertainty (accuracy): Maximum deviation of the molbox1+ flow indication from the true value of the flow through the molbloc including precision, stability and FLUKE calibration standard measurement uncertainty.
1.2.5.2.2 Premium molbloc-S Calibrations Measurement Update
Rate 1 second
Range Depends on molbloc-S pressure dependent calibration type (see Section 1.2.5.2.2)
Resolution 0.0015 % of FS
Linearity ± 0.05 % of reading
Repeatability ± 0.05 % of reading
Precision1 ± 0.06 % of reading
Predicted Stability2
(1 year)
± 0.03 % of reading
Measurement Uncertainty3
With SP molbloc-S calibration
A350K ± 0.125 % of reading from 50 to 200 kPa A700K ± 0.125 % of reading from 50 to 500 kPa S A1.4M ± 0.125 % of reading from 100 to 500 kPa ± 0.125 % of 100 kPa flow from 50 to 100 kPa S A2M ± 0.125 % of reading from 200 to 500 kPa ± 0.125 % of 200 kPa flow from 50 to 200 kPa
Measurement Uncertainty3
With LP molbloc-S calibration
A350K ± 0.125 % of reading from 20 to 200 kPa A700K ± 0.125 % of reading from 50 to 200 kPa ± 0.125 % of 50 kPa flow from 20 to 50 kPa
Measurement Uncertainty3
With HP molbloc-S calibration
A700K ± 0.125 % of reading from 200 to 500 kPa S A1.4M ± 0.125 % of reading from 200 kPa to 1.2 MPa S A2M ± 0.125 % of reading from 200 kPa to 2 MPa
[1] Precision: Combined linearity, hysteresis, repeatability.
[2] Stability: Maximum change in zero and span over specified time period for typical molbox1+ and molbloc used under typical conditions. As stability can only be predicted, stability for a specific molbloc and molbox1+ should be established from experience.
[3] Measurement uncertainty (accuracy): Maximum deviation of the molbox1+ flow indication from the true value of the flow through the molbloc including precision, stability and Fluke calibration standard measurement uncertainty.

1. INTRODUCTION
Page 11 © 2010 Fluke Calibration
1.2.5.2.3 molbloc-S Pressure Dependent Calibration Types
Note See your molbloc’s Calibration Report to determine the calibration type of the molbloc you are using.
Measurement uncertainty (accuracy) specifications for molblocs are valid only for gases with which the molbloc has been calibrated. All molbloc-S elements are calibrated in one standard gas, either air or N2, and may be calibrated in other gases. Calibrations with other gases are optional. The list of gases which can be measured by molbloc-S is the same as molbloc-L. FLUKE calibration capability is not maintained at all times for all gases on all molbloc designations. Check for availability before ordering calibrations.
molbloc-S calibrations are performed over flow ranges corresponding to one of three pressure ranges, summarized in Table 15.
Table 4: molbloc-S Calibration Types
CALIBRATION TYPE
(CALIBRATION NAME)
OPERATING PRESSURE
Low pressure (LP)
20 to 200 kPa absolute (3 to 30 psia) upstream of molbloc
Standard pressure (SP)
50 to 500 kPa absolute (7 to 70 psia) upstream of molbloc
High pressure (HP)
200 to 2000 kPa absolute (29 to 290 psia) upstream of molbloc
Note
molbloc-S flow measurements are valid only when the ratio of pressure downstream to the pressure upstream of the nozzle is low enough to assure a critical (choked) flow (see Section 3.1.5).

molbox1+™/molbox1+S, molbloc® TERMINAL OPERATION AND MAINTENANCE MANUAL
© 2010 Fluke Calibration Page 12
1.2.5.2.4 molbloc-S Ranges
molbloc-S flow ranges are defined by the molbloc’s Pressure to Flow Conversion Ratio, KF, the gas used, the absolute pressure that can be delivered upstream of molbloc-S, the downstream pressure and the acceptable back pressure ratio (see Section 3.1.5). KF is expressed in units of sccm/kPa and defines the relationship between mass flow in nitrogen and the absolute upstream pressure delivered to the molbloc-S. molbloc-S sizes are defined by the nominal KF of the molbloc-S nozzle, using scientific notation, for example a 1E3 molbloc-S has a KF of 1,000 sccm/kPa. To differentiate from molbloc-L size designations, this molbloc size is designated 1E3-S.
The molbox1+ pressure range, the molbloc-S calibration type (see Section 1.2.5.2.2) and the back pressure ratio (BPR) requirements limit the pressures, and flows, over which a molbloc-S can be used within known measurement uncertainty limits. In practice, the usable range of a molbloc-S in a given application also may depend on the available gas supply pressure, the presence and flow capacity of a vacuum pump downstream or the allowable back pressure on an upstream DUT.
The mass flow range of a molbloc-S element is dependent on the properties of the gas used, so the range of a molbloc-S is different for each supported gas. The flow ranges for each molbloc-S size at various typical operating pressures are summarized separately for each molbloc-S supported gas in the Tables below. For the common application of using a molbloc-S with its downstream pressure at or near atmospheric pressure, it is helpful to know what minimum flow can be measured before violating back pressure ratio requirements (see Section 3.1.5). In the tables below, this minimum flow value is given in the “Minimum without vacuum” column.
FLUKE calibration capability may not be available for some of the gases listed, or may be limited to less than the maximum flow rate listed. Check for availability before ordering calibrations.
The following notes apply to the range tables below: Ratio = Inverse square root density ratio of the current gas to Nitrogen KF = Pressure to Flow Conversion Ratio, sccm/kPa To estimate a flow in a given gas at a given pressure: Flow(slm) = KF * Pressure in kPa absolute / 1000 * Gas Ratio
1. INTRODUCTION
Page 13 © 2010 Fluke Calibration
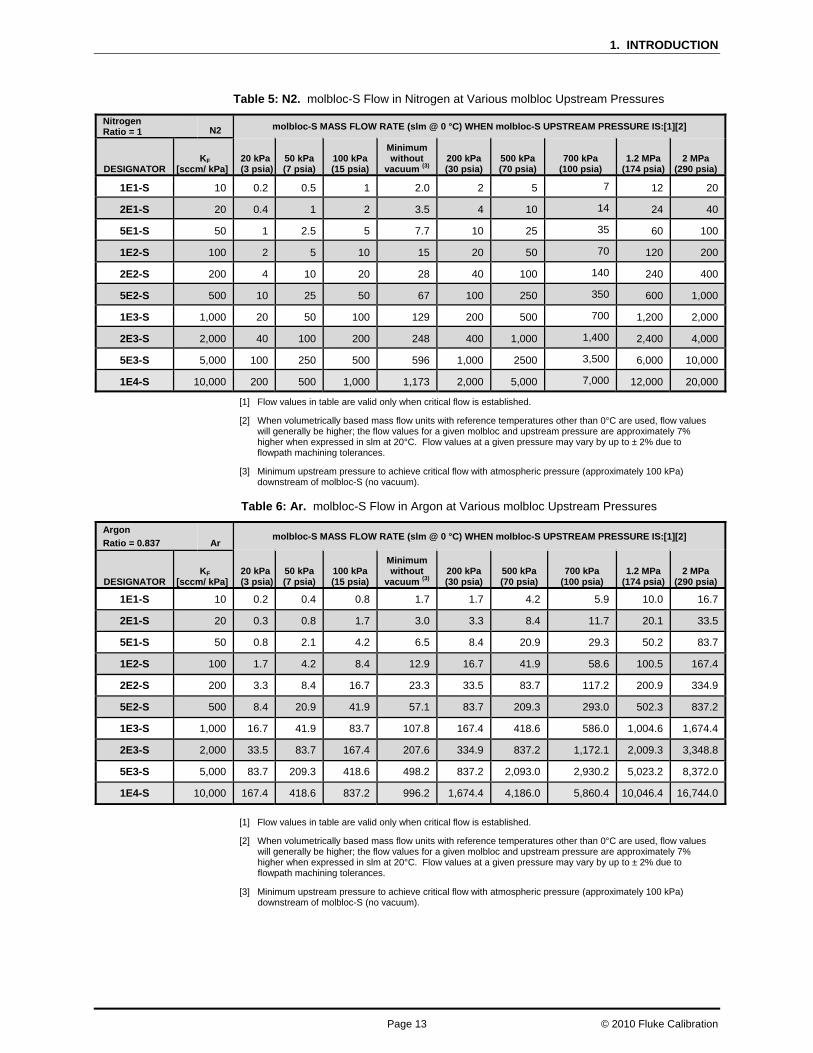
Table 5: N2. molbloc-S Flow in Nitrogen at Various molbloc Upstream Pressures
Nitrogen Ratio = 1 N2 molbloc-S MASS FLOW RATE (slm @ 0 °C) WHEN molbloc-S UPSTREAM PRESSURE IS:[1][2]
DESIGNATOR KF
[sccm/ kPa] 20 kPa (3 psia)
50 kPa (7 psia)
100 kPa(15 psia)
Minimum without
vacuum (3) 200 kPa(30 psia)
500 kPa(70 psia)
700 kPa (100 psia)
1.2 MPa(174 psia)
2 MPa (290 psia)
1E1-S 10 0.2 0.5 1 2.0 2 5 7 12 20
2E1-S 20 0.4 1 2 3.5 4 10 14 24 40
5E1-S 50 1 2.5 5 7.7 10 25 35 60 100
1E2-S 100 2 5 10 15 20 50 70 120 200
2E2-S 200 4 10 20 28 40 100 140 240 400
5E2-S 500 10 25 50 67 100 250 350 600 1,000
1E3-S 1,000 20 50 100 129 200 500 700 1,200 2,000
2E3-S 2,000 40 100 200 248 400 1,000 1,400 2,400 4,000
5E3-S 5,000 100 250 500 596 1,000 2500 3,500 6,000 10,000
1E4-S 10,000 200 500 1,000 1,173 2,000 5,000 7,000 12,000 20,000
[1] Flow values in table are valid only when critical flow is established.
[2] When volumetrically based mass flow units with reference temperatures other than 0°C are used, flow values will generally be higher; the flow values for a given molbloc and upstream pressure are approximately 7% higher when expressed in slm at 20°C. Flow values at a given pressure may vary by up to ± 2% due to flowpath machining tolerances.
[3] Minimum upstream pressure to achieve critical flow with atmospheric pressure (approximately 100 kPa) downstream of molbloc-S (no vacuum).
Table 6: Ar. molbloc-S Flow in Argon at Various molbloc Upstream Pressures
Argon
Ratio = 0.837 Ar molbloc-S MASS FLOW RATE (slm @ 0 °C) WHEN molbloc-S UPSTREAM PRESSURE IS:[1][2]
DESIGNATOR KF
[sccm/ kPa] 20 kPa (3 psia)
50 kPa (7 psia)
100 kPa(15 psia)
Minimum without
vacuum (3) 200 kPa(30 psia)
500 kPa(70 psia)
700 kPa (100 psia)
1.2 MPa(174 psia)
2 MPa (290 psia)
1E1-S 10 0.2 0.4 0.8 1.7 1.7 4.2 5.9 10.0 16.7
2E1-S 20 0.3 0.8 1.7 3.0 3.3 8.4 11.7 20.1 33.5
5E1-S 50 0.8 2.1 4.2 6.5 8.4 20.9 29.3 50.2 83.7
1E2-S 100 1.7 4.2 8.4 12.9 16.7 41.9 58.6 100.5 167.4
2E2-S 200 3.3 8.4 16.7 23.3 33.5 83.7 117.2 200.9 334.9
5E2-S 500 8.4 20.9 41.9 57.1 83.7 209.3 293.0 502.3 837.2
1E3-S 1,000 16.7 41.9 83.7 107.8 167.4 418.6 586.0 1,004.6 1,674.4
2E3-S 2,000 33.5 83.7 167.4 207.6 334.9 837.2 1,172.1 2,009.3 3,348.8
5E3-S 5,000 83.7 209.3 418.6 498.2 837.2 2,093.0 2,930.2 5,023.2 8,372.0
1E4-S 10,000 167.4 418.6 837.2 996.2 1,674.4 4,186.0 5,860.4 10,046.4 16,744.0
[1] Flow values in table are valid only when critical flow is established.
[2] When volumetrically based mass flow units with reference temperatures other than 0°C are used, flow values will generally be higher; the flow values for a given molbloc and upstream pressure are approximately 7% higher when expressed in slm at 20°C. Flow values at a given pressure may vary by up to ± 2% due to flowpath machining tolerances.
[3] Minimum upstream pressure to achieve critical flow with atmospheric pressure (approximately 100 kPa) downstream of molbloc-S (no vacuum).
molbox1+™/molbox1+S, molbloc® TERMINAL OPERATION AND MAINTENANCE MANUAL
© 2010 Fluke Calibration Page 14
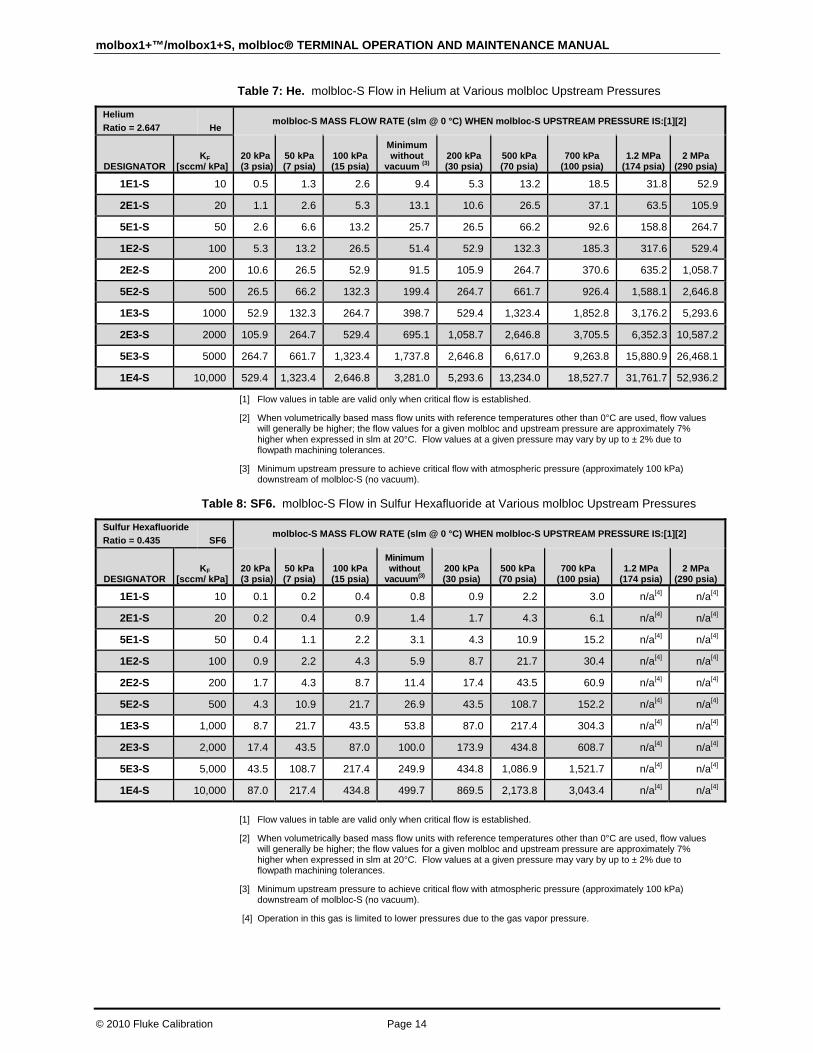
Table 7: He. molbloc-S Flow in Helium at Various molbloc Upstream Pressures
Helium
Ratio = 2.647 He molbloc-S MASS FLOW RATE (slm @ 0 °C) WHEN molbloc-S UPSTREAM PRESSURE IS:[1][2]
DESIGNATOR KF
[sccm/ kPa] 20 kPa (3 psia)
50 kPa (7 psia)
100 kPa(15 psia)
Minimum without
vacuum (3) 200 kPa(30 psia)
500 kPa(70 psia)
700 kPa (100 psia)
1.2 MPa(174 psia)
2 MPa (290 psia)
1E1-S 10 0.5 1.3 2.6 9.4 5.3 13.2 18.5 31.8 52.9
2E1-S 20 1.1 2.6 5.3 13.1 10.6 26.5 37.1 63.5 105.9
5E1-S 50 2.6 6.6 13.2 25.7 26.5 66.2 92.6 158.8 264.7
1E2-S 100 5.3 13.2 26.5 51.4 52.9 132.3 185.3 317.6 529.4
2E2-S 200 10.6 26.5 52.9 91.5 105.9 264.7 370.6 635.2 1,058.7
5E2-S 500 26.5 66.2 132.3 199.4 264.7 661.7 926.4 1,588.1 2,646.8
1E3-S 1000 52.9 132.3 264.7 398.7 529.4 1,323.4 1,852.8 3,176.2 5,293.6
2E3-S 2000 105.9 264.7 529.4 695.1 1,058.7 2,646.8 3,705.5 6,352.3 10,587.2
5E3-S 5000 264.7 661.7 1,323.4 1,737.8 2,646.8 6,617.0 9,263.8 15,880.9 26,468.1
1E4-S 10,000 529.4 1,323.4 2,646.8 3,281.0 5,293.6 13,234.0 18,527.7 31,761.7 52,936.2
[1] Flow values in table are valid only when critical flow is established.
[2] When volumetrically based mass flow units with reference temperatures other than 0°C are used, flow values will generally be higher; the flow values for a given molbloc and upstream pressure are approximately 7% higher when expressed in slm at 20°C. Flow values at a given pressure may vary by up to ± 2% due to flowpath machining tolerances.
[3] Minimum upstream pressure to achieve critical flow with atmospheric pressure (approximately 100 kPa) downstream of molbloc-S (no vacuum).
Table 8: SF6. molbloc-S Flow in Sulfur Hexafluoride at Various molbloc Upstream Pressures
Sulfur Hexafluoride
Ratio = 0.435 SF6 molbloc-S MASS FLOW RATE (slm @ 0 °C) WHEN molbloc-S UPSTREAM PRESSURE IS:[1][2]
DESIGNATOR KF
[sccm/ kPa] 20 kPa (3 psia)
50 kPa (7 psia)
100 kPa(15 psia)
Minimum without
vacuum(3) 200 kPa (30 psia)
500 kPa(70 psia)
700 kPa (100 psia)
1.2 MPa (174 psia)
2 MPa (290 psia)
1E1-S 10 0.1 0.2 0.4 0.8 0.9 2.2 3.0 n/a[4] n/a[4]
2E1-S 20 0.2 0.4 0.9 1.4 1.7 4.3 6.1 n/a[4] n/a[4]
5E1-S 50 0.4 1.1 2.2 3.1 4.3 10.9 15.2 n/a[4] n/a[4]
1E2-S 100 0.9 2.2 4.3 5.9 8.7 21.7 30.4 n/a[4] n/a[4]
2E2-S 200 1.7 4.3 8.7 11.4 17.4 43.5 60.9 n/a[4] n/a[4]
5E2-S 500 4.3 10.9 21.7 26.9 43.5 108.7 152.2 n/a[4] n/a[4]
1E3-S 1,000 8.7 21.7 43.5 53.8 87.0 217.4 304.3 n/a[4] n/a[4]
2E3-S 2,000 17.4 43.5 87.0 100.0 173.9 434.8 608.7 n/a[4] n/a[4]
5E3-S 5,000 43.5 108.7 217.4 249.9 434.8 1,086.9 1,521.7 n/a[4] n/a[4]
1E4-S 10,000 87.0 217.4 434.8 499.7 869.5 2,173.8 3,043.4 n/a[4] n/a[4]
[1] Flow values in table are valid only when critical flow is established.
[2] When volumetrically based mass flow units with reference temperatures other than 0°C are used, flow values will generally be higher; the flow values for a given molbloc and upstream pressure are approximately 7% higher when expressed in slm at 20°C. Flow values at a given pressure may vary by up to ± 2% due to flowpath machining tolerances.
[3] Minimum upstream pressure to achieve critical flow with atmospheric pressure (approximately 100 kPa) downstream of molbloc-S (no vacuum).
[4] Operation in this gas is limited to lower pressures due to the gas vapor pressure.

1. INTRODUCTION
Page 15 © 2010 Fluke Calibration
Table 9: Xe. molbloc-S Flow in Xenon at Various molbloc Upstream Pressures
Xenon
Ratio = 0.460 Xe molbloc-S MASS FLOW RATE (slm @ 0 °C) WHEN molbloc-S UPSTREAM PRESSURE IS:[1][2]
DESIGNATOR KF
[sccm/ kPa] 20 kPa (3 psia)
50 kPa (7 psia)
100 kPa(15 psia)
Minimum without
vacuum(3) 200 kPa (30 psia)
500 kPa(70 psia)
700 kPa (100 psia)
1.2 MPa (174 psia)
2 MPa (290 psia)
1E1-S 10 0.1 0.2 0.4 0.8 0.7 1.8 3.2 n/a[4] n/a[4]
2E1-S 20 0.1 0.4 0.7 1.4 1.5 3.6 6.4 n/a[4] n/a[4]
5E1-S 50 0.4 0.9 1.8 3.6 3.6 9.1 16.1 n/a[4] n/a[4]
1E2-S 100 0.7 1.8 3.6 6.5 7.3 18.2 32.2 n/a[4] n/a[4]
2E2-S 200 1.5 3.6 7.3 12.9 14.6 36.4 64.5 n/a[4] n/a[4]
5E2-S 500 3.6 9.1 18.2 29.7 36.4 91.0 161.2 n/a[4] n/a[4]
1E3-S 1,000 7.3 18.2 36.4 59.3 72.8 182.0 322.3 n/a[4] n/a[4]
2E3-S 2,000 14.6 36.4 72.8 109.6 145.6 364.0 644.6 n/a[4] n/a[4]
5E3-S 5,000 36.4 91.0 182.0 267.2 364.0 910.0 1,611.5 n/a[4] n/a[4]
1E4-S 10,000 72.8 182.0 364.0 529.2 728.0 1,819.9 3,223.1 n/a[4] n/a[4]
[1] Flow values in table are valid only when critical flow is established.
[2] When volumetrically based mass flow units with reference temperatures other than 0°C are used, flow values will generally be higher; the flow values for a given molbloc and upstream pressure are approximately 7% higher when expressed in slm at 20°C. Flow values at a given pressure may vary by up to ± 2% due to flowpath machining tolerances.
[3] Minimum upstream pressure to achieve critical flow with atmospheric pressure (approximately 100 kPa) downstream of molbloc-S (no vacuum).
[4] Operation in this gas is limited to lower pressures due to the gas vapor pressure.
Table 10: C4H10. molbloc-S Flow in Butane at Various molbloc Upstream Pressures
Butane
Ratio = 0.680 C4H10 molbloc-S MASS FLOW RATE (slm @ 0 °C) WHEN molbloc-S UPSTREAM PRESSURE IS:[1][2]
DESIGNATOR KF
[sccm/ kPa] 20 kPa (3 psia)
50 kPa (7 psia)
100 kPa(15 psia)
Minimum without
vacuum(3) 200 kPa (30 psia)
500 kPa(70 psia)
700 kPa (100 psia)
1.2 MPa (174 psia)
2 MPa (290 psia)
1E1-S 10 0.1 0.3 0.7 1.0 1.4 n/a[4] n/a[4] n/a[4] n/a[4]
2E1-S 20 0.3 0.7 1.4 1.9 2.7 n/a[4] n/a[4] n/a[4] n/a[4]
5E1-S 50 0.7 1.7 3.4 4.8 6.8 n/a[4] n/a[4] n/a[4] n/a[4]
1E2-S 100 1.4 3.4 6.8 9.0 13.6 n/a[4] n/a[4] n/a[4] n/a[4]
2E2-S 200 2.7 6.8 13.6 18.0 27.2 n/a[4] n/a[4] n/a[4] n/a[4]
5E2-S 500 6.8 17.0 34.0 42.2 68.0 n/a[4] n/a[4] n/a[4] n/a[4]
1E3-S 1,000 13.6 34.0 68.0 84.4 136.0 n/a[4] n/a[4] n/a[4] n/a[4]
2E3-S 2,000 27.2 68.0 136.0 157.0 272.0 n/a[4] n/a[4] n/a[4] n/a[4]
5E3-S 5,000 68.0 170.0 340.0 392.4 679.9 n/a[4] n/a[4] n/a[4] n/a[4]
1E4-S 10,000 136.0 340.0 679.9 784.9 1,359.8 n/a[4] n/a[4] n/a[4] n/a[4]
[1] Flow values in table are valid only when critical flow is established.
[2] When volumetrically based mass flow units with reference temperatures other than 0°C are used, flow values will generally be higher; the flow values for a given molbloc and upstream pressure are approximately 7% higher when expressed in slm at 20°C. Flow values at a given pressure may vary by up to ± 2% due to flowpath machining tolerances.
[3] Minimum upstream pressure to achieve critical flow with atmospheric pressure (approximately 100 kPa) downstream of molbloc-S (no vacuum).
[4] Operation in this gas is limited to lower pressures due to the gas vapor pressure.

molbox1+™/molbox1+S, molbloc® TERMINAL OPERATION AND MAINTENANCE MANUAL
© 2010 Fluke Calibration Page 16
Table 11: C2H6. molbloc-S Flow in Ethane at Various molbloc Upstream Pressures
Ethane
Ratio = 0.960 C2H6 molbloc-S MASS FLOW RATE (slm @ 0 °C) WHEN molbloc-S UPSTREAM PRESSURE IS:[1][2]
DESIGNATOR KF
[sccm/ kPa] 20 kPa (3 psia)
50 kPa (7 psia)
100 kPa(15 psia)
Minimum without
vacuum(3) 200 kPa (30 psia)
500 kPa(70 psia)
700 kPa (100 psia)
1.2 MPa (174 psia)
2 MPa (290 psia)
1E1-S 10 0.2 0.5 1.0 1.5 1.9 4.8 6.7 n/a[4] n/a[4]
2E1-S 20 0.4 1.0 1.9 3.0 3.8 9.6 13.4 n/a[4] n/a[4]
5E1-S 50 1.0 2.4 4.8 6.7 9.6 24.0 33.6 n/a[4] n/a[4]
1E2-S 100 1.9 4.8 9.6 13.4 19.2 48.0 67.2 n/a[4] n/a[4]
2E2-S 200 3.8 9.6 19.2 25.2 38.4 96.0 134.5 n/a[4] n/a[4]
5E2-S 500 9.6 24.0 48.0 61.9 96.0 240.1 336.1 n/a[4] n/a[4]
1E3-S 1,000 19.2 48.0 96.0 118.7 192.1 480.2 672.3 n/a[4] n/a[4]
2E3-S 2,000 38.4 96.0 192.1 228.6 384.2 960.4 1,344.6 n/a[4] n/a[4]
5E3-S 5,000 96.0 240.1 480.2 551.9 960.4 2,401.0 3,361.4 n/a[4] n/a[4]
1E4-S 10,000 192.1 480.2 960.4 1,103.8 1,920.8 4,802.0 6,722.8 n/a[4] n/a[4]
[1] Flow values in table are valid only when critical flow is established.
[2] When volumetrically based mass flow units with reference temperatures other than 0°C are used, flow values will generally be higher; the flow values for a given molbloc and upstream pressure are approximately 7% higher when expressed in slm at 20°C. Flow values at a given pressure may vary by up to ± 2% due to flowpath machining tolerances.
[3] Minimum upstream pressure to achieve critical flow with atmospheric pressure (approximately 100 kPa) downstream of molbloc-S (no vacuum).
[4] Operation in this gas is limited to lower pressures due to the gas vapor pressure.
Table 12: C2H4. molbloc-S Flow in Ethylene at Various molbloc Upstream Pressures
Ethylene
Ratio = 0.996 C2H4 molbloc-S MASS FLOW RATE (slm @ 0 °C) WHEN molbloc-S UPSTREAM PRESSURE IS:[1][2]
DESIGNATOR KF
[sccm/ kPa] 20 kPa (3 psia)
50 kPa (7 psia)
100 kPa(15 psia)
Minimum without
vacuum(3) 200 kPa (30 psia)
500 kPa(70 psia)
700 kPa (100 psia)
1.2 MPa (174 psia)
2 MPa (290 psia)
1E1-S 10 0.2 0.5 1.0 1.7 2.0 5.0 7.0 n/a[4] n/a[4]
2E1-S 20 0.4 1.0 2.0 3.1 4.0 10.0 13.9 n/a[4] n/a[4]
5E1-S 50 1.0 2.5 5.0 7.5 10.0 24.9 34.9 n/a[4] n/a[4]
1E2-S 100 2.0 5.0 10.0 13.9 19.9 49.8 69.7 n/a[4] n/a[4]
2E2-S 200 4.0 10.0 19.9 27.7 39.8 99.6 139.4 n/a[4] n/a[4]
5E2-S 500 10.0 24.9 49.8 64.2 99.6 248.9 348.5 n/a[4] n/a[4]
1E3-S 1,000 19.9 49.8 99.6 128.2 199.2 497.9 697.0 n/a[4] n/a[4]
2E3-S 2,000 39.8 99.6 199.2 237.0 398.3 995.8 1394.1 n/a[4] n/a[4]
5E3-S 5,000 99.6 248.9 497.9 572.2 995.8 2,489.5 3485.2 n/a[4] n/a[4]
1E4-S 10,000 199.2 497.9 995.8 1,144.4 1,991.6 4,978.9 6970.5 n/a[4] n/a[4]
[1] Flow values in table are valid only when critical flow is established.
[2] When volumetrically based mass flow units with reference temperatures other than 0°C are used, flow values will generally be higher; the flow values for a given molbloc and upstream pressure are approximately 7% higher when expressed in slm at 20°C. Flow values at a given pressure may vary by up to ± 2% due to flowpath machining tolerances.
[3] Minimum upstream pressure to achieve critical flow with atmospheric pressure (approximately 100 kPa) downstream of molbloc-S (no vacuum).
[4] Operation in this gas is limited to lower pressures due to the gas vapor pressure.

1. INTRODUCTION
Page 17 © 2010 Fluke Calibration
Table 13: H2. molbloc-S Flow in Hydrogen at Various molbloc Upstream Pressures
Hydrogen
Ratio = 3.730 H2 molbloc-S MASS FLOW RATE (slm @ 0 °C) WHEN molbloc-S UPSTREAM PRESSURE IS:[1][2]
DESIGNATOR KF
[sccm/ kPa] 20 kPa (3 psia)
50 kPa (7 psia)
100 kPa(15 psia)
Minimum without
vacuum (3) 200 kPa(30 psia)
500 kPa(70 psia)
700 kPa (100 psia)
1.2 MPa (174 psia)
2 MPa (290 psia)
1E1-S 10 0.7 1.9 3.7 8.3 7.5 18.6 26.1 44.8 74.6
2E1-S 20 1.5 3.7 7.5 14.5 14.9 37.3 52.2 89.5 149.2
5E1-S 50 3.7 9.3 18.6 36.2 37.3 93.2 130.5 223.8 373.0
1E2-S 100 7.5 18.6 37.3 62.5 74.6 186.5 261.1 447.6 746.0
2E2-S 200 14.9 37.3 74.6 114.5 149.2 373.0 522.2 895.2 1,491.9
5E2-S 500 37.3 93.2 186.5 280.9 373.0 932.4 1,305.4 2,237.9 3,729.8
1E3-S 1,000 74.6 186.5 373.0 508.7 746.0 1,864.9 2,610.9 4,475.8 7,459.6
2E3-S 2,000 149.2 373.0 746.0 979.6 1,491.9 3,729.8 5,221.7 8,951.5 14,919.2
5E3-S 5,000 373.0 932.4 1,864.9 2,311.7 3,729.8 9,324.5 13,054.3 22,378.8 37,297.9
1E4-S 10,000 746.0 1,864.9 3,729.8 4,623.4 7,459.6 18,649.0 26,108.6 44,757.5 74,595.9
[1] Flow values in table are valid only when critical flow is established.
[2] When volumetrically based mass flow units with reference temperatures other than 0°C are used, flow values will generally be higher; the flow values for a given molbloc and upstream pressure are approximately 7% higher when expressed in slm at 20°C. Flow values at a given pressure may vary by up to ± 2% due to flowpath machining tolerances.
[3] Minimum upstream pressure to achieve critical flow with atmospheric pressure (approximately 100 kPa) downstream of molbloc-S (no vacuum).
Table 14: CH4. molbloc-S Flow in Methane at Various molbloc Upstream Pressures
Methane
Ratio = 1.320 CH4 molbloc-S MASS FLOW RATE (slm @ 0 °C) WHEN molbloc-S UPSTREAM PRESSURE IS:[1][2]
DESIGNATOR KF
[sccm/ kPa] 20 kPa (3 psia)
50 kPa (7 psia)
100 kPa(15 psia)
Minimum without
vacuum(3) 200 kPa (30 psia)
500 kPa(70 psia)
700 kPa (100 psia)
1.2 MPa (174 psia)
2 MPa (290 psia)
1E1-S 10 0.3 0.7 1.3 2.6 2.6 6.6 9.2 15.8 26.4
2E1-S 20 0.5 1.3 2.6 4.4 5.3 13.2 18.5 31.7 52.8
5E1-S 50 1.3 3.3 6.6 10.2 13.2 33.0 46.2 79.2 132.0
1E2-S 100 2.6 6.6 13.2 20.1 26.4 66.0 92.4 158.4 264.0
2E2-S 200 5.3 13.2 26.4 36.7 52.8 132.0 184.8 316.8 528.1
5E2-S 500 13.2 33.0 66.0 88.2 132.0 330.0 462.1 792.1 1,320.2
1E3-S 1,000 26.4 66.0 132.0 170.0 264.0 660.1 924.1 1,584.2 2,640.3
2E3-S 2,000 52.8 132.0 264.0 327.3 528.1 1,320.2 1,848.2 3,168.4 5,280.6
5E3-S 5,000 132.0 330.0 660.1 785.5 1,320.2 3,300.4 4,620.5 7,920.9 13,201.5
1E4-S 10,000 264.0 660.1 1,320.2 1,517.2 2,640.3 6,600.8 9,241.1 15,841.8 26,403.0
[1] Flow values in table are valid only when critical flow is established.
[2] When volumetrically based mass flow units with reference temperatures other than 0°C are used, flow values will generally be higher; the flow values for a given molbloc and upstream pressure are approximately 7% higher when expressed in slm at 20°C. Flow values at a given pressure may vary by up to ± 2% due to flowpath machining tolerances.
[3] Minimum upstream pressure to achieve critical flow with atmospheric pressure (approximately 100 kPa) downstream of molbloc-S (no vacuum).
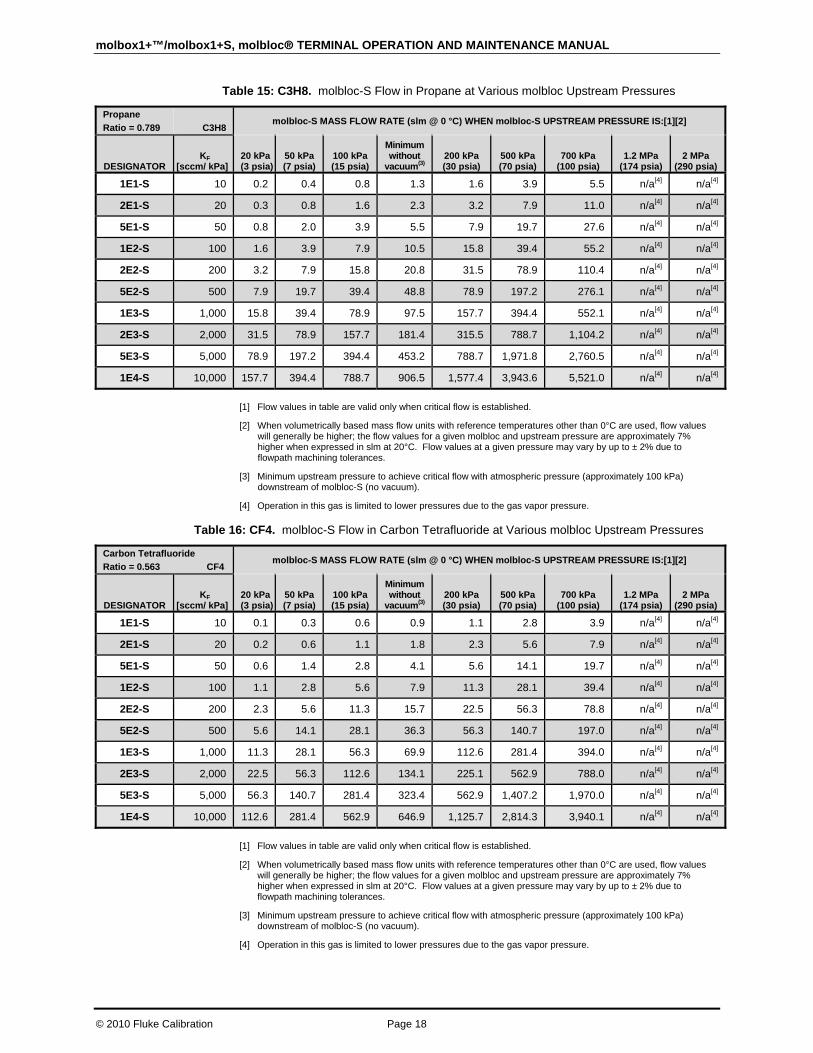
molbox1+™/molbox1+S, molbloc® TERMINAL OPERATION AND MAINTENANCE MANUAL
© 2010 Fluke Calibration Page 18
Table 15: C3H8. molbloc-S Flow in Propane at Various molbloc Upstream Pressures
Propane
Ratio = 0.789 C3H8 molbloc-S MASS FLOW RATE (slm @ 0 °C) WHEN molbloc-S UPSTREAM PRESSURE IS:[1][2]
DESIGNATOR KF
[sccm/ kPa] 20 kPa (3 psia)
50 kPa (7 psia)
100 kPa(15 psia)
Minimum without
vacuum(3) 200 kPa (30 psia)
500 kPa(70 psia)
700 kPa (100 psia)
1.2 MPa (174 psia)
2 MPa (290 psia)
1E1-S 10 0.2 0.4 0.8 1.3 1.6 3.9 5.5 n/a[4] n/a[4]
2E1-S 20 0.3 0.8 1.6 2.3 3.2 7.9 11.0 n/a[4] n/a[4]
5E1-S 50 0.8 2.0 3.9 5.5 7.9 19.7 27.6 n/a[4] n/a[4]
1E2-S 100 1.6 3.9 7.9 10.5 15.8 39.4 55.2 n/a[4] n/a[4]
2E2-S 200 3.2 7.9 15.8 20.8 31.5 78.9 110.4 n/a[4] n/a[4]
5E2-S 500 7.9 19.7 39.4 48.8 78.9 197.2 276.1 n/a[4] n/a[4]
1E3-S 1,000 15.8 39.4 78.9 97.5 157.7 394.4 552.1 n/a[4] n/a[4]
2E3-S 2,000 31.5 78.9 157.7 181.4 315.5 788.7 1,104.2 n/a[4] n/a[4]
5E3-S 5,000 78.9 197.2 394.4 453.2 788.7 1,971.8 2,760.5 n/a[4] n/a[4]
1E4-S 10,000 157.7 394.4 788.7 906.5 1,577.4 3,943.6 5,521.0 n/a[4] n/a[4]
[1] Flow values in table are valid only when critical flow is established.
[2] When volumetrically based mass flow units with reference temperatures other than 0°C are used, flow values will generally be higher; the flow values for a given molbloc and upstream pressure are approximately 7% higher when expressed in slm at 20°C. Flow values at a given pressure may vary by up to ± 2% due to flowpath machining tolerances.
[3] Minimum upstream pressure to achieve critical flow with atmospheric pressure (approximately 100 kPa) downstream of molbloc-S (no vacuum).
[4] Operation in this gas is limited to lower pressures due to the gas vapor pressure.
Table 16: CF4. molbloc-S Flow in Carbon Tetrafluoride at Various molbloc Upstream Pressures
Carbon Tetrafluoride
Ratio = 0.563 CF4 molbloc-S MASS FLOW RATE (slm @ 0 °C) WHEN molbloc-S UPSTREAM PRESSURE IS:[1][2]
DESIGNATOR KF
[sccm/ kPa] 20 kPa (3 psia)
50 kPa (7 psia)
100 kPa(15 psia)
Minimum without
vacuum(3) 200 kPa (30 psia)
500 kPa(70 psia)
700 kPa (100 psia)
1.2 MPa (174 psia)
2 MPa (290 psia)
1E1-S 10 0.1 0.3 0.6 0.9 1.1 2.8 3.9 n/a[4] n/a[4]
2E1-S 20 0.2 0.6 1.1 1.8 2.3 5.6 7.9 n/a[4] n/a[4]
5E1-S 50 0.6 1.4 2.8 4.1 5.6 14.1 19.7 n/a[4] n/a[4]
1E2-S 100 1.1 2.8 5.6 7.9 11.3 28.1 39.4 n/a[4] n/a[4]
2E2-S 200 2.3 5.6 11.3 15.7 22.5 56.3 78.8 n/a[4] n/a[4]
5E2-S 500 5.6 14.1 28.1 36.3 56.3 140.7 197.0 n/a[4] n/a[4]
1E3-S 1,000 11.3 28.1 56.3 69.9 112.6 281.4 394.0 n/a[4] n/a[4]
2E3-S 2,000 22.5 56.3 112.6 134.1 225.1 562.9 788.0 n/a[4] n/a[4]
5E3-S 5,000 56.3 140.7 281.4 323.4 562.9 1,407.2 1,970.0 n/a[4] n/a[4]
1E4-S 10,000 112.6 281.4 562.9 646.9 1,125.7 2,814.3 3,940.1 n/a[4] n/a[4]
[1] Flow values in table are valid only when critical flow is established.
[2] When volumetrically based mass flow units with reference temperatures other than 0°C are used, flow values will generally be higher; the flow values for a given molbloc and upstream pressure are approximately 7% higher when expressed in slm at 20°C. Flow values at a given pressure may vary by up to ± 2% due to flowpath machining tolerances.
[3] Minimum upstream pressure to achieve critical flow with atmospheric pressure (approximately 100 kPa) downstream of molbloc-S (no vacuum).
[4] Operation in this gas is limited to lower pressures due to the gas vapor pressure.
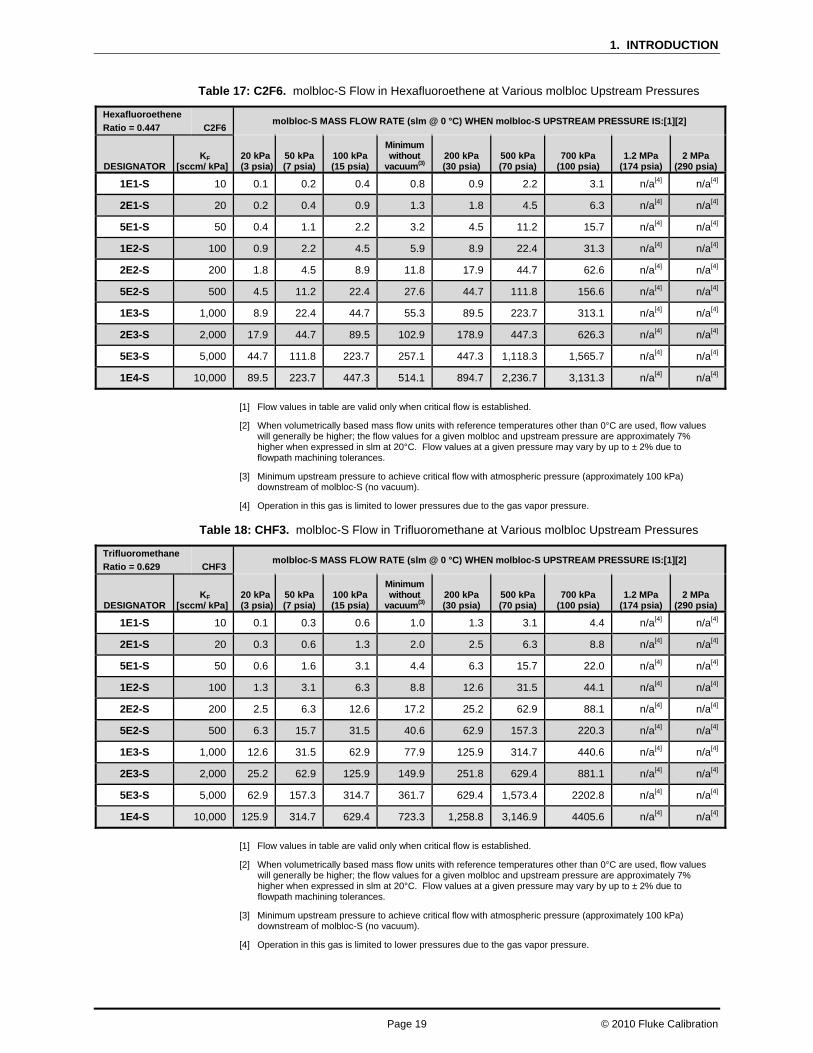
1. INTRODUCTION
Page 19 © 2010 Fluke Calibration
Table 17: C2F6. molbloc-S Flow in Hexafluoroethene at Various molbloc Upstream Pressures
Hexafluoroethene
Ratio = 0.447 C2F6 molbloc-S MASS FLOW RATE (slm @ 0 °C) WHEN molbloc-S UPSTREAM PRESSURE IS:[1][2]
DESIGNATOR KF
[sccm/ kPa] 20 kPa (3 psia)
50 kPa (7 psia)
100 kPa(15 psia)
Minimum without
vacuum(3) 200 kPa (30 psia)
500 kPa(70 psia)
700 kPa (100 psia)
1.2 MPa (174 psia)
2 MPa (290 psia)
1E1-S 10 0.1 0.2 0.4 0.8 0.9 2.2 3.1 n/a[4] n/a[4]
2E1-S 20 0.2 0.4 0.9 1.3 1.8 4.5 6.3 n/a[4] n/a[4]
5E1-S 50 0.4 1.1 2.2 3.2 4.5 11.2 15.7 n/a[4] n/a[4]
1E2-S 100 0.9 2.2 4.5 5.9 8.9 22.4 31.3 n/a[4] n/a[4]
2E2-S 200 1.8 4.5 8.9 11.8 17.9 44.7 62.6 n/a[4] n/a[4]
5E2-S 500 4.5 11.2 22.4 27.6 44.7 111.8 156.6 n/a[4] n/a[4]
1E3-S 1,000 8.9 22.4 44.7 55.3 89.5 223.7 313.1 n/a[4] n/a[4]
2E3-S 2,000 17.9 44.7 89.5 102.9 178.9 447.3 626.3 n/a[4] n/a[4]
5E3-S 5,000 44.7 111.8 223.7 257.1 447.3 1,118.3 1,565.7 n/a[4] n/a[4]
1E4-S 10,000 89.5 223.7 447.3 514.1 894.7 2,236.7 3,131.3 n/a[4] n/a[4]
[1] Flow values in table are valid only when critical flow is established.
[2] When volumetrically based mass flow units with reference temperatures other than 0°C are used, flow values will generally be higher; the flow values for a given molbloc and upstream pressure are approximately 7% higher when expressed in slm at 20°C. Flow values at a given pressure may vary by up to ± 2% due to flowpath machining tolerances.
[3] Minimum upstream pressure to achieve critical flow with atmospheric pressure (approximately 100 kPa) downstream of molbloc-S (no vacuum).
[4] Operation in this gas is limited to lower pressures due to the gas vapor pressure.
Table 18: CHF3. molbloc-S Flow in Trifluoromethane at Various molbloc Upstream Pressures
Trifluoromethane
Ratio = 0.629 CHF3 molbloc-S MASS FLOW RATE (slm @ 0 °C) WHEN molbloc-S UPSTREAM PRESSURE IS:[1][2]
DESIGNATOR KF
[sccm/ kPa] 20 kPa (3 psia)
50 kPa (7 psia)
100 kPa(15 psia)
Minimum without
vacuum(3) 200 kPa (30 psia)
500 kPa(70 psia)
700 kPa (100 psia)
1.2 MPa (174 psia)
2 MPa (290 psia)
1E1-S 10 0.1 0.3 0.6 1.0 1.3 3.1 4.4 n/a[4] n/a[4]
2E1-S 20 0.3 0.6 1.3 2.0 2.5 6.3 8.8 n/a[4] n/a[4]
5E1-S 50 0.6 1.6 3.1 4.4 6.3 15.7 22.0 n/a[4] n/a[4]
1E2-S 100 1.3 3.1 6.3 8.8 12.6 31.5 44.1 n/a[4] n/a[4]
2E2-S 200 2.5 6.3 12.6 17.2 25.2 62.9 88.1 n/a[4] n/a[4]
5E2-S 500 6.3 15.7 31.5 40.6 62.9 157.3 220.3 n/a[4] n/a[4]
1E3-S 1,000 12.6 31.5 62.9 77.9 125.9 314.7 440.6 n/a[4] n/a[4]
2E3-S 2,000 25.2 62.9 125.9 149.9 251.8 629.4 881.1 n/a[4] n/a[4]
5E3-S 5,000 62.9 157.3 314.7 361.7 629.4 1,573.4 2202.8 n/a[4] n/a[4]
1E4-S 10,000 125.9 314.7 629.4 723.3 1,258.8 3,146.9 4405.6 n/a[4] n/a[4]
[1] Flow values in table are valid only when critical flow is established.
[2] When volumetrically based mass flow units with reference temperatures other than 0°C are used, flow values will generally be higher; the flow values for a given molbloc and upstream pressure are approximately 7% higher when expressed in slm at 20°C. Flow values at a given pressure may vary by up to ± 2% due to flowpath machining tolerances.
[3] Minimum upstream pressure to achieve critical flow with atmospheric pressure (approximately 100 kPa) downstream of molbloc-S (no vacuum).
[4] Operation in this gas is limited to lower pressures due to the gas vapor pressure.

molbox1+™/molbox1+S, molbloc® TERMINAL OPERATION AND MAINTENANCE MANUAL
© 2010 Fluke Calibration Page 20
Table 19: Air. molbloc-S Flow in Air at Various molbloc Upstream Pressures
Air
Ratio = 0.983 Air molbloc-S MASS FLOW RATE (slm @ 0 °C) WHEN molbloc-S UPSTREAM PRESSURE IS:[1][2]
DESIGNATOR KF
[sccm/ kPa] 20 kPa (3 psia)
50 kPa (7 psia)
100 kPa(15 psia)
Minimum without
vacuum(3) 200 kPa (30 psia)
500 kPa(70 psia)
700 kPa (100 psia)
1.2 MPa (174 psia)
2 MPa (290 psia)
1E1-S 10 0.2 0.5 1.0 2.0 2.0 4.9 6.9 11.8 19.7
2E1-S 20 0.4 1.0 2.0 3.4 3.9 9.8 13.8 23.6 39.3
5E1-S 50 1.0 2.5 4.9 7.6 9.8 24.6 34.4 59.0 98.3
1E2-S 100 2.0 4.9 9.8 15.2 19.7 49.2 68.8 118.0 196.7
2E2-S 200 3.9 9.8 19.7 27.4 39.3 98.3 137.7 236.0 393.4
5E2-S 500 9.8 24.6 49.2 67.1 98.3 245.9 344.2 590.1 983.5
1E3-S 1,000 19.7 49.2 98.3 126.7 196.7 491.7 688.4 1,180.2 1,967.0
2E3-S 2,000 39.3 98.3 196.7 243.9 393.4 983.5 1,376.9 2,360.4 3,933.9
5E3-S 5,000 98.3 245.9 491.7 585.2 983.5 2,458.7 3,442.2 5,900.9 9,834.8
1E4-S 10,000 196.7 491.7 983.5 1,170.3 1,967.0 4,917.4 6,884.4 11,801.8 19,669.7
[1] Flow values in table are valid only when critical flow is established.
[2] When volumetrically based mass flow units with reference temperatures other than 0°C are used, flow values will generally be higher; the flow values for a given molbloc and upstream pressure are approximately 7% higher when expressed in slm at 20°C. Flow values at a given pressure may vary by up to ± 2% due to flowpath machining tolerances.
[3] Minimum upstream pressure to achieve critical flow with atmospheric pressure (approximately 100 kPa) downstream of molbloc-S (no vacuum).
Table 20: CO2. molbloc-S Flow in Carbon Dioxide at Various molbloc Upstream Pressures
Carbon Dioxide
Ratio = 0.795 CO2 molbloc-S MASS FLOW RATE (slm @ 0 °C) WHEN molbloc-S UPSTREAM PRESSURE IS:[1][2]
DESIGNATOR KF
[sccm/ kPa] 20 kPa (3 psia)
50 kPa (7 psia)
100 kPa(15 psia)
Minimum without
vacuum(3) 200 kPa (30 psia)
500 kPa(70 psia)
700 kPa (100 psia)
1.2 MPa (174 psia)
2 MPa (290 psia)
1E1-S 10 0.2 0.4 0.8 1.4 1.6 4.0 5.6 n/a[4] n/a[4]
2E1-S 20 0.3 0.8 1.6 2.5 3.2 8.0 11.1 n/a[4] n/a[4]
5E1-S 50 0.8 2.0 4.0 6.2 8.0 19.9 27.8 n/a[4] n/a[4]
1E2-S 100 1.6 4.0 8.0 11.1 15.9 39.8 55.7 n/a[4] n/a[4]
2E2-S 200 3.2 8.0 15.9 22.1 31.8 79.5 111.3 n/a[4] n/a[4]
5E2-S 500 8.0 19.9 39.8 51.2 79.5 198.8 278.4 n/a[4] n/a[4]
1E3-S 1,000 15.9 39.8 79.5 102.4 159.1 397.7 556.7 n/a[4] n/a[4]
2E3-S 2,000 31.8 79.5 159.1 189.3 318.1 795.3 1,113.4 n/a[4] n/a[4]
5E3-S 5,000 79.5 198.8 397.7 473.2 795.3 1,988.3 2,783.6 n/a[4] n/a[4]
1E4-S 10,000 159.1 397.7 795.3 914.1 1,590.6 3,976.6 5,567.2 n/a[4] n/a[4]
[1] Flow values in table are valid only when critical flow is established.
[2] When volumetrically based mass flow units with reference temperatures other than 0°C are used, flow values will generally be higher; the flow values for a given molbloc and upstream pressure are approximately 7% higher when expressed in slm at 20°C. Flow values at a given pressure may vary by up to ± 2% due to flowpath machining tolerances.
[3] Minimum upstream pressure to achieve critical flow with atmospheric pressure (approximately 100 kPa) downstream of molbloc-S (no vacuum).
[4] Operation in this gas is limited to lower pressures due to the gas vapor pressure.

1. INTRODUCTION
Page 21 © 2010 Fluke Calibration
Table 21: CO. molbloc-S Flow in Carbon Monoxide at Various molbloc Upstream Pressures
Carbon Monoxide
Ratio = 1.000 CO molbloc-S MASS FLOW RATE (slm @ 0 °C) WHEN molbloc-S UPSTREAM PRESSURE IS:[1][2]
DESIGNATOR KF
[sccm/ kPa] 20 kPa (3 psia)
50 kPa (7 psia)
100 kPa(15 psia)
Minimum without
vacuum(3) 200 kPa (30 psia)
500 kPa(70 psia)
700 kPa (100 psia)
1.2 MPa (174 psia)
2 MPa (290 psia)
1E1-S 10 0.2 0.5 1.0 2.0 2.0 5.0 7.0 12.0 20.0
2E1-S 20 0.4 1.0 2.0 3.5 4.0 10.0 14.0 24.0 40.0
5E1-S 50 1.0 2.5 5.0 7.7 10.0 25.0 35.0 60.0 100.0
1E2-S 100 2.0 5.0 10.0 15.4 20.0 50.0 70.0 120.0 200.0
2E2-S 200 4.0 10.0 20.0 27.8 40.0 100.0 140.0 240.0 400.0
5E2-S 500 10.0 25.0 50.0 68.3 100.0 250.0 350.0 600.0 1,000.0
1E3-S 1,000 20.0 50.0 100.0 128.7 200.0 500.0 700.0 1,200.0 1,999.9
2E3-S 2,000 40.0 100.0 200.0 247.9 400.0 1,000.0 1,399.9 2,399.9 3,999.9
5E3-S 5,000 100.0 250.0 500.0 595.0 1,000.0 2,499.9 3,499.9 5,999.8 9,999.6
1E4-S 10,000 200.0 500.0 1,000.0 1,190.0 1,999.9 4,999.8 6,999.7 11,999.6 19,999.3
[1] Flow values in table are valid only when critical flow is established.
[2] When volumetrically based mass flow units with reference temperatures other than 0°C are used, flow values will generally be higher; the flow values for a given molbloc and upstream pressure are approximately 7% higher when expressed in slm at 20°C. Flow values at a given pressure may vary by up to ± 2% due to flowpath machining tolerances.
[3] Minimum upstream pressure to achieve critical flow with atmospheric pressure (approximately 100 kPa) downstream of molbloc-S (no vacuum).
Table 22: N2O. molbloc-S Flow in Nitrous Oxide at Various molbloc Upstream Pressures
Nitrous Oxide
Ratio = 0.795 N20 molbloc-S MASS FLOW RATE (slm @ 0 °C) WHEN molbloc-S UPSTREAM PRESSURE IS:[1][2]
DESIGNATOR KF
[sccm/ kPa] 20 kPa (3 psia)
50 kPa (7 psia)
100 kPa(15 psia)
Minimum without
vacuum(3) 200 kPa (30 psia)
500 kPa(70 psia)
700 kPa (100 psia)
1.2 MPa (174 psia)
2 MPa (290 psia)
1E1-S 10 0.2 0.4 0.8 1.4 1.6 4.0 5.6 n/a[4] n/a[4]
2E1-S 20 0.3 0.8 1.6 2.5 3.2 8.0 11.1 n/a[4] n/a[4]
5E1-S 50 0.8 2.0 4.0 6.2 8.0 19.9 27.8 n/a[4] n/a[4]
1E2-S 100 1.6 4.0 8.0 11.1 15.9 39.8 55.7 n/a[4] n/a[4]
2E2-S 200 3.2 8.0 15.9 22.1 31.8 79.5 111.3 n/a[4] n/a[4]
5E2-S 500 8.0 19.9 39.8 51.2 79.5 198.8 278.3 n/a[4] n/a[4]
1E3-S 1,000 15.9 39.8 79.5 102.4 159.0 397.6 556.6 n/a[4] n/a[4]
2E3-S 2,000 31.8 79.5 159.0 189.3 318.0 795.1 1,113.2 n/a[4] n/a[4]
5E3-S 5,000 79.5 198.8 397.6 473.1 795.1 1,987.8 2,782.9 n/a[4] n/a[4]
1E4-S 10,000 159.0 397.6 795.1 913.7 1,590.2 3,975.6 5,565.8 n/a[4] n/a[4]
[1] Flow values in table are valid only when critical flow is established.
[2] When volumetrically based mass flow units with reference temperatures other than 0°C are used, flow values will generally be higher; the flow values for a given molbloc and upstream pressure are approximately 7% higher when expressed in slm at 20°C. Flow values at a given pressure may vary by up to ± 2% due to flowpath machining tolerances.
[3] Minimum upstream pressure to achieve critical flow with atmospheric pressure (approximately 100 kPa) downstream of molbloc-S (no vacuum).
[4] Operation in this gas is limited to lower pressures due to the gas vapor pressure.

molbox1+™/molbox1+S, molbloc® TERMINAL OPERATION AND MAINTENANCE MANUAL
© 2010 Fluke Calibration Page 22
Table 23: C4F8. molbloc-S Flow in Octafluorocyclobutane1 at Various molbloc Upstream Pressures
Octafluorocyclobutane1
Ratio = 0.367 C4F8 molbloc-S MASS FLOW RATE (slm @ 0 °C) WHEN molbloc-S UPSTREAM PRESSURE IS:[1][2]
DESIGNATOR KF
[sccm/ kPa] 20 kPa (3 psia)
50 kPa (7 psia)
100 kPa(15 psia)
Minimum without
vacuum(3) 200 kPa (30 psia)
500 kPa(70 psia)
700 kPa (100 psia)
1.2 MPa (174 psia)
2 MPa (290 psia)
1E1-S 10 0.1 0.2 0.4 0.6 0.7 n/a[4] n/a[4] n/a[4] n/a[4]
2E1-S 20 0.1 0.4 0.7 1.1 1.5 n/a[4] n/a[4] n/a[4] n/a[4]
5E1-S 50 0.4 0.9 1.8 2.4 3.7 n/a[4] n/a[4] n/a[4] n/a[4]
1E2-S 100 0.7 1.8 3.7 4.8 7.3 n/a[4] n/a[4] n/a[4] n/a[4]
2E2-S 200 1.5 3.7 7.3 9.2 14.7 n/a[4] n/a[4] n/a[4] n/a[4]
5E2-S 500 3.7 9.2 18.3 22.7 36.7 n/a[4] n/a[4] n/a[4] n/a[4]
1E3-S 1,000 7.3 18.3 36.7 43.8 73.3 n/a[4] n/a[4] n/a[4] n/a[4]
2E3-S 2,000 14.7 36.7 73.3 84.3 146.7 n/a[4] n/a[4] n/a[4] n/a[4]
5E3-S 5,000 36.7 91.7 183.3 210.7 366.7 n/a[4] n/a[4] n/a[4] n/a[4]
1E4-S 10,000 73.3 183.3 366.7 421.4 733.3 n/a[4] n/a[4] n/a[4] n/a[4]
[1] Flow values in table are valid only when critical flow is established.
[2] When volumetrically based mass flow units with reference temperatures other than 0°C are used, flow values will generally be higher; the flow values for a given molbloc and upstream pressure are approximately 7% higher when expressed in slm at 20°C. Flow values at a given pressure may vary by up to ± 2% due to flowpath machining tolerances.
[3] Minimum upstream pressure to achieve critical flow with atmospheric pressure (approximately 100 kPa) downstream of molbloc-S (no vacuum).
[4] Operation in this gas is limited to lower pressures due to the gas vapor pressure.
Table 24: O2. molbloc-S Flow in Oxygen at Various molbloc Upstream Pressures
Oxygen
Ratio = 0.935 O2 molbloc-S MASS FLOW RATE (slm @ 0 °C) WHEN molbloc-S UPSTREAM PRESSURE IS:[1][2]
DESIGNATOR KF
[sccm/ kPa] 20 kPa (3 psia)
50 kPa (7 psia)
100 kPa(15 psia)
Minimum without
vacuum(3) 200 kPa (30 psia)
500 kPa(70 psia)
700 kPa (100 psia)
1.2 MPa (174 psia)
2 MPa (290 psia)
1E1-S 10 0.2 0.5 0.9 1.9 1.9 4.7 6.5 11.2 18.7
2E1-S 20 0.4 0.9 1.9 3.4 3.7 9.4 13.1 22.5 37.4
5E1-S 50 0.9 2.3 4.7 7.3 9.4 23.4 32.7 56.1 93.5
1E2-S 100 1.9 4.7 9.4 14.4 18.7 46.8 65.5 112.3 187.1
2E2-S 200 3.7 9.4 18.7 26.4 37.4 93.5 131.0 224.5 374.2
5E2-S 500 9.4 23.4 46.8 63.8 93.5 233.9 327.4 561.3 935.4
1E3-S 1,000 18.7 46.8 93.5 120.4 187.1 467.7 654.8 1,122.5 1,870.8
2E3-S 2,000 37.4 93.5 187.1 231.9 374.2 935.4 1,309.6 2,245.0 3,741.7
5E3-S 5,000 93.5 233.9 467.7 556.6 935.4 2,338.5 3,274.0 5,612.5 9,354.2
1E4-S 10,000 187.1 467.7 935.4 1,113.1 1,870.8 4,677.1 6,547.9 11,225.0 18,708.3
[1] Flow values in table are valid only when critical flow is established.
[2] When volumetrically based mass flow units with reference temperatures other than 0°C are used, flow values will generally be higher; the flow values for a given molbloc and upstream pressure are approximately 7% higher when expressed in slm at 20°C. Flow values at a given pressure may vary by up to ± 2% due to flowpath machining tolerances.
[3] Minimum upstream pressure to achieve critical flow with atmospheric pressure (approximately 100 kPa) downstream of molbloc-S (no vacuum).

1. INTRODUCTION
Page 23 © 2010 Fluke Calibration
1.2.5.2.5 molbloc-S Dimensions molbloc-S SIZE [mm(in.)]
1E2-S AND LOWER
2E2-S THRU 1E3-S
2E3-S 5E3-S 1E4-S
A 48.0 (1.89) SQ 48.0 (1.89) SQ 48.0 (1.89) SQ 80.0 (3.15) SQ 80.0 (3.15) SQ
B 24.0 (0.94) 24.0 (0.94) 24.0 (0.94) 40.0 (1.57) 40.0 (1.57)
C 48.0 (1.89) SQ 48.0 (1.89) SQ 48.0 (1.89) SQ 80.0 (3.15) SQ 80.0 (3.15) SQ
D 80.0 (3.15) 80.0 (3.15) 80.0 (3.15) 176.0 (6.93) 176.0 (6.93)
E 28.0 (1.10) 28.0 (1.10) 28.0 (1.10) 44.0 (1.73) 44.0 (1.73)
F 167.5 (6.59) 171.0 (6.73) 175.0 (6.89) [1] 299.7 (11.80) [1] 331.0 (13.03) [1]
G KF16 FLANGE KF16 FLANGE KF16 FLANGE KF40 FLANGE KF40 FLANGE
H 100.0 (3.94) 84.0 (3.31) 84.0 (3.31) 154.0 (6.06) 154.0 (6.06)
I 128.0 (5.04) 128.0 (5.35) 128.0 (5.35) 236.0 (9.29) 236.0 (9.29)
J 73.0 (2.87) 73.0 (2.87) 73.0 (2.87) 106.0 (4.17) 106.0 (4.17)
K 167.5 (6.59) 171.0 (6.73) 171.0 (6.73) 290.0 (11.42) 290.0 (11.42)
L ¼” VCR Male[2] ½” VCR M[2] ½” VCR M[2] KF25 FLANGE[2] KF25 FLANGE[2]
[1] On some molbloc-S elements, the venturi nozzle extends beyond the molbloc downstream flange, making the overall length dimension, F, longer than the fitting to fitting length dimension, K. The nozzle overhang may interfere with some molbloc-S downstream connections or the connection of a blank off cap for leak testing, so a 40 mm diameter ISO-KF nipple is supplied with 5E3-S and 1E4-S molblocs.
[2] Default connector type is listed. Additional upstream connector options may be available. Contact your FLUKE Sales Representative for details.

molbox1+™/molbox1+S, molbloc® TERMINAL OPERATION AND MAINTENANCE MANUAL
© 2010 Fluke Calibration Page 24
1.2.6 Front and Rear Panels
1.2.6.1 Front Panel
The front panel assembly provides a 2 x 20 vacuum fluorescent display, a membrane keypad for local user interface and other LED indicators.
2x20 Display Multi-Function Keypad
Channel Indicator Remote Operation Indicator
Figure 2. molbox1+ Front Panel
1.2.6.2 Rear Panel
The rear panel assembly provides pressure and electrical connections for two molbloc mass flow elements, communications interfaces and the power connection module.
Connection for External DMM (Option) External Drivers Connection (Option) MFC Switchbox Connection RS485 Connection (not used) Host Communications (IEEE-488) MFC Analog Control Connection Host Communications (RS232)
Remote Communication for External Device (RS232) On/Off Switch Fuse molbloc Electrical Connection (Channel B) molbloc Pressure Connections (Channel B) molbloc Pressure Connections (Channel A) molbloc Electrical Connection (Channel A)
Figure 3. Rear Panel
Page 25 © 2010 Fluke Calibration
2. Installation
2.1 Unpacking and Inspection
2.1.1 Removing From Packaging
molbox1+ is delivered, along with its standard accessories, in a corrugated container with foam end caps to hold it in place.
Remove the molbox1+ and its accessories from the shipping container and remove each element from its protective plastic bag.
2.1.2 Inspecting Contents
Check that all items are present and have NO visible damage.
A molbox1+ includes:
Table 25: molbox1+ Parts List
DESCRIPTION PART #
molbox1+ mass flow terminal 3499975
molbox1+S mass flow terminal 3499975
Report of Calibration 3152121
ACCESSORIES INCLUDING:
1 Operation and Maintenance Manual 3540962
1 Power Cord (7.5 ft.) 3133781 or 3153005-CE
4 molbox to molbloc pressure connecting tubes 3069560
2 molbox to molbloc electrical/data connection cables 3068683 or 3072220-CE
2 Straight through quick connector stems 3068652*
1 MFC Cable and Connections Kit (if MFC Option included)
3114778 or 3114784-CE
1 External 12 V Drivers Connector 3069839
1 General Accessories Disk (white) (Important: Includes system support software and documentation.)
3139043
* Equivalent to Swagelok P/N SS-QM2-S-200
2.2 Site Requirements
Install the molbox1+on any stable surface at a convenient height. The front feet are extendible so that the unit can be inclined for easier viewing.

molbox1+™/molbox1+S, molbloc® TERMINAL OPERATION AND MAINTENANCE MANUAL
© 2010 Fluke Calibration Page 26
The molbox1+ can also be mounted in a standard 19 in. rack mount using the optional rack mount kit (P/N 3069903). For additional information, contact your Fluke Calibration Representative.
When installing the molbox1+, consideration should be given to where the molbloc flow measuring element and associated hardware will be located. molbox1+ may be placed on a shelf or cart at a different height than the molbloc, but the distance between the molbloc and molbox is limited by the length of the cable and pneumatic lines connecting them. If you will locate the molbox at a different height than the molbloc, the small errors that would be associated with the difference in pressure can be removed using the molbox1+ head correction (see Section 3.6.8).
If the molbloc/molbox system is being used to calibrate other devices (DUTs), the molbloc may need to be connected upstream or downstream of the DUT to operate within the pressure limits of the molbloc’s calibration type (see Sections 1.2.5.1.3, 1.2.5.2.3) and to accommodate the pressure requirements of the DUT. See the molbloc’s Calibration Report to determine the calibration type of the molbloc you are using.
If the molbloc is connected upstream of the DUT, it is important to supply the molbloc with a stable regulated gas source. The volume present between the molbloc and the device to be calibrated should be minimized, particularly for low flows.
In some cases, molbloc-S is used with a vacuum source downstream to reduce the pressure at which critical flow is reached. Consider the placement of the vacuum pump and connections. Generally, a large vacuum pump is needed that should be isolated from the work area due to noise and oil vapor considerations. If the vacuum pump and/or vacuum kit was purchased from Fluke Calibration, see the instruction sheets and/or manuals that are included with the hardware.
Optional molstics are offered for mounting molblocs. They provide a convenient means of addressing supply regulation, filtering and interconnection issues with high quality, configured hardware. For additional information, contact your Fluke Calibration Representative.
Caution
If a DUT is located upstream of the molbloc and is contaminated, contaminates may flow from the DUT to the molbloc and alter the molbloc calibration. If the DUT must be connected upstream of the molbloc, be sure it is clean before flowing and consider installing a filter between the DUT and the molbloc.
2.3 Initial Setup
2.3.1 Preparing for Operation To prepare molbox1+ for check out and operation:
Remove the plastic caps from the molbox1+ rear panel pressure connections.
Remove the protective plastic sheet from the front panel display.
Familiarize yourself briefly with the front and rear panels (see Section 1.2.6).
Follow the steps described in Sections 2.3.2 to 2.3.7.
2.3.2 Power Connection Connect the power cable supplied to molbox1+ and to a power source. Power requirements are 85 to 264 VAC, 50 to 60 Hz, 22 VA max. consumption.
2. INSTALLATION
Page 27 © 2010 Fluke Calibration
2.3.3 molbox1+ to molbloc Connections There are two molbloc connection channels on molbox1+. Each has two pressure connections (upstream and downstream) and one electrical/data connection. Select a channel to use or connect a separate molbloc to each channel.
For the pressure connections, use the molbox1+ to molbloc pressure tubes (P/N 3069560) supplied with the molbox1+. Following the color coding on the pressure lines, connect the upstream (HI) molbox1+ rear panel quick connector to the upstream port of the molbloc and the downstream (LO) quick connector to the downstream port. To connect the quick connectors, first pull back the knurled sleeve on the quick connector body, then insert the quick connector stem and push firmly on the quick connectors until they click into place to assure that the connection is properly completed.
For the electrical/data connection, use the molbox to molbloc electrical/data connection cable (P/N 3068683). Connect the cable to the molbloc and then to molbox1+ rear panel connector labeled molbloc.
Caution Avoid making or breaking molbloc electrical connections to the molbox1+ while the molbox power is ON. Damage to the molbloc EEPROM may result.
2.3.4 Gas Supply and Flowpath Connections Connect a gas supply to the molbloc. Gas supply requirements are:
• The gas supply must be clean and dry (especially free from oil and particulates) to avoid contaminating the molbloc.
• For correct measurements, the gas must be of the same species as that selected by the molbox1+ GAS function (see Section 3.4.2). Gas purity affects the measurement uncertainty of flow measurements as molbox1+ uses the thermodynamic properties of the flowing gas in its flow calculations. Generally, gases with purity of 99.9 % or better are used for molbloc measurements. Except when using ambient air with molbloc-S, the test gas should be free of any humidity (dewpoint less than – 40 °C).
• If the molbloc is connected upstream of the DUT, the supply pressure must be regulated and stable within the limits of the molbloc-L pressure dependent calibration type (see Section 1.2.5.1.2.1) or molbloc-S calibration type (see section 1.2.5.2.2). If the molbloc is connected downstream of the DUT, use regulators and valves to make sure that the pressure that is delivered to the molbloc will be within the limits of the molbloc calibration type.
• Care should also be taken to make sure that the pressure and flow supplied to the molbloc are always low enough to avoid over pressuring the molbox1+ RPTs(see Sections 1.2.2, 3.1.4). If a DUT upstream of the molbloc is operated at high pressure, a pressure reducing regulator should be connected between the DUT and the molbloc to ensure that even momentary high pressure spikes do not reach the molbox RPTs.
Caution • The gas supplied to the molbloc should be clean and dry. Contamination
of the molbloc flow passage with liquids, particulates or any other matter will alter the molbloc calibration and can lead to out of tolerance flow measurements.
• NEVER connect a pressure source to the molbloc that is greater than the overpressure limit of your molbox1+. molbox1+ A350K overpressure limit is 300kPa absolute/200 kPa gauge (44 psig/29 psig). molbox1+ A700K overpressure limit is 650 kPa absolute/550 kPa gauge (95 psia/80 psig). Overpressure can damage the molbox1+ internal RPTs (see Section 1.2.2, 3.1.4).
molbox1+™/molbox1+S, molbloc® TERMINAL OPERATION AND MAINTENANCE MANUAL
© 2010 Fluke Calibration Page 28
If you are using a DHI molstic: Install the molbloc into the molstic and connect a gas supply following the molstic instruction sheet or manual. The flow through the molbloc must be in the direction of the arrow engraved on the molbloc.
If you are NOT using a DHI molstic: Connect a gas supply to the molbloc according to the molbloc instruction sheet and the pressure limits of the molbloc calibration type. A valve should be installed between the pressure supply and the molbloc to allow flow to the molbloc to be interrupted. The flow through the molbloc must be in the direction of the arrow engraved on the molbloc.
Adaptor kits are available from Fluke Calibration to make connections from the molbloc or molstic fittings to other common connector types. Ask you Fluke Calibration Sales Representative about your specific adaptor requirements.
Caution Operating at pressures other than those of the molbloc-L pressure dependent calibration type (see Section 1.2.5.1.2) or molbloc-S calibration type may result in out of tolerance flow measurements. Refer to the molbloc Calibration Report to determine its calibration type.
2.3.5 Vacuum Supply (molbloc-S only) In some cases molbloc-S is operated with a vacuum downstream of the molbloc to reduce the back pressure so that critical flow can be reached at a lower upstream pressure (see Section 3.1.5).
There is no lower limit to the pressure that may safely be applied to molbox1+ RPTs.
If you are using DHI supplied downstream vacuum connect kit and vacuum pump: Install the kit and pump following the supplied instruction sheet or manual. Carefully follow the pump manufacturer’s recommendations for pump operation.
If you are NOT using DHI supplied downstream vacuum connect kit and vacuum pump: Carefully evaluate vacuum pump specifications to be sure that the vacuum source available has the pumping speed necessary to safely handle the planned flows and to maintain low enough pressure at planned flow rates.
Be sure to provide facilities to avoid flowing into the pump when the pump is not ON as this will cause pressure to build up on the pump and may damage it. Normally, a shut-off valve should be included between the pump and the molbloc-S.
It is preferable to install a check valve with very low cracking pressure between the molbloc and the vacuum shut-off valve.
Adaptor kits are available from Fluke Calibration to make connections from the molbloc or molstic fittings to other common connector types. Ask you Fluke Calibration Sales Representative about your specific adaptor requirements.
Caution Operating at pressures other than those of the molbloc-S calibration type may result in out of tolerance flow measurements (see Section 1.2.5.2.2). Refer to the molbloc Calibration Report to determine its calibration type.
2.3.6 Communications Connections If molbox1+ is being interfaced to a computer, connect an RS232 cable to molbox1+ COM1 or an IEEE-488 cable (cables not supplied) to the molbox1+ IEEE-488 interface. Configure the interface (see Section 3.6.6).
2. INSTALLATION
Page 29 © 2010 Fluke Calibration
2.3.7 MFC Control Option Connection If the molbox1+ is equipped with the MFC control option, a cable and connection kit will have been supplied with the molbox1+ accessories. Configure the cable correctly using the pinout information provided in Section 7.3 and information from the MFC manufacturer.
2.4 Power UP and Verification
2.4.1 Power UP Actuate the power switch on the molbox1+ rear panel. Observe the front panel display as molbox1+ initializes, error checks, calibrates its internal ohmic measurement system and goes to the main run screen (see Section 3.2). The top left side of the main run screen should display a flow value near zero or <BPR HI>. If <NO BLOC> is displayed, molbox1+ has not been able to identify a molbloc connection and load molbloc information. Verify that a valid molbloc is properly connected (see Section 2.3.3) and press [SETUP], <1molbloc> to load the molbloc (see Section 3.5.1). If molbox1+ is still unable to identify a molbloc, the molbloc may require reloading of EEPROM information or molbox1+ may require repair.
If the molbox1+ fails to reach the main run screen: Service may be required. Record the sequence of operations and displays observed and contact a Fluke Calibration Authorized Service Provider (see Section 7.4).
2.4.2 Check Proper Pressure Measurement Operation Check that the molbox pressure measurements are operating properly. Proceed as follows:
Connect the molbloc to the molbox1+ (see Section 2.3.3).
Shut off the gas supply to the molbloc and open both molbloc ends to atmospheric (ambient) pressure.
Press [P&T] and observe the display of the pressure measured by the upstream and downstream absolute RPTs (see Section 3.4.5). Observe the upstream and downstream pressures. These should indicate current atmospheric pressure and be in agreement within ± 0.02% of the nominal full scale calibrated range listed in section 1.2.2. If the two readings disagree by more than this, one or both RPTs may be out of calibration and service may be required.
Press [ESCAPE] to return to the main run screen.
Note The pressure measurements indicated in the [P&T] screen are corrected for TARE and AUTOZERO values. If the pressure readings disagree more than the values indicated above refer to the manual sections regarding these functions before considering calibration or service.
2.4.3 Check Proper Temperature Measurement Operation Check that the molbox1+ temperature measurement is operating properly. Proceed as follows:
Connect a molbloc to the molbox1+ (see Section 2.3.3).
From the molbox1+ main run screen, press [P&T] twice to arrive at the temperature display screen. Observe the temperature readings of the two molbloc PRTs (see Section 3.4.5). If the molbloc has been in a stable temperature environment for 30 to 60 minutes, the temperature indications should be roughly ambient temperature and the two indications should agree within ± 0.2 °C. If the two readings disagree by more than ± 0.2 °C, there may be a problem with the molbloc or the molbox1+ TEMPERATURE MEASUREMENT function and service may be required.

molbox1+™/molbox1+S, molbloc® TERMINAL OPERATION AND MAINTENANCE MANUAL
© 2010 Fluke Calibration Page 30
2.4.4 Check the MFC Control Function (Optional) Using the front panel keypad, display select MFC profile #1 for a voltage MFC or #2 for a current MFC (see Section 3.4.8). Using [ENTER] to select MFC setpoints and observing the MFC display screens, check that the MFC control operation is normal. If operation does not appear to be correct, check the MFC cable configuration and connection. Check the recommendations in Section 2.5 and the Troubleshooting Guide in Section 6 prior to contacting a Fluke Calibration Authorized Service Provider (Section 7.4).
2.4.5 Leak Check It is recommended that a new molbox1+ be leak checked at start-up to assure that no internal leaks developed during shipping and handling. See Section 3.4.4.3 to run the molbox1+ on-board INTERNAL LEAK CHECKING function.
2.4.6 Check/Set Security Level molbox1+ has a security system based on user levels. By default, the security system is set to “low”, which includes certain access restrictions, and there is no password required to change the security level. See Section 3.6.2 for information on the security level system. As part of the molbox1+ startup, set your desired security level and a password.
Caution molbox1+ is delivered with the security level set to “low” to avoid inadvertent altering of critical internal settings but with access to changing security levels unrestricted. It is recommended that at least the low security level be maintained at all times and password protection be implemented if control over setting of security levels is desired.
2.5 Additional Precautions to Take Before Making Flow Measurements
Before using the molbox1+ to make meaningful flow measurements, consider the following:
• The pressure measuring RPTs must be tared at the operating line pressure (see Section 3.4.4.1).
• Operating pressure and flow range should be within the limits of the molbloc calibration type and molbloc size for the flowing gas (see Section 1.2.5).
• Be sure that the gas pressure connected to the molbloc is not great enough to overpressure the molbox1+ internal RPTs.
• The gas type selected should be the gas flowing through the molbloc (see Section 3.4.2).
• For flow measurement uncertainty within molbox1+ specifications, the gas type should be a gas with which the molbloc has been calibrated (see molbloc Calibration Report) or press [SETUP], <1molbloc>, [ENTER] to see if the gas is included in the molbloc calibration gas list (see Section 3.5.1).
• Be sure the flow unit of measure you are using is correct. The default flow units of sccm and slm for any molbox1+ are referenced to 0°C and 101.325kPa per SEMI E12-96. Many different types of flow units of measure are commonly used and have similar names. Before selecting a unit of measure, familiarize yourself with Section 3.4.3 and its subsections thoroughly.
• Do not supply a gas or connect a DUT upstream of the molbloc that may contaminate the molbloc. The filter assembly inside a molbloc-L is designed to work with a clean gas supply with limited contaminants. This filter assembly should be considered a last line of defense against contamination and additional filtration should always be considered.
• Troubleshooting: For information on typically encountered start-up and operational issues, see Section 6.

2. INSTALLATION
Page 31 © 2010 Fluke Calibration
2.6 Short Term Storage The following is recommended for short term storage of molbox1+:
• Vent the molbox1+ pressure ports.
• Turn off the power.

molbox1+™/molbox1+S, molbloc® TERMINAL OPERATION AND MAINTENANCE MANUAL
© 2010 Fluke Calibration Page 32
Notes

Page 33 © 2010 Fluke Calibration
3. Operation
3.1 General Operating Principles
3.1.1 molbloc Channel A & Channel B molbox1+ supports two molbloc input channels. The main purpose of this capability is to switch conveniently between two molblocs without making and breaking connections, for example, to switch between two ranges. It also allows two molblocs to be used simultaneously (see Section 3.5.4).
The active molbox1+ channel is indicated by the lit LED under the display. The active channel can be changed by pressing the [A/B] direct function key (see Section 3.4.7). When a molbloc channel is activated, molbox1+ operates internal valves to connect the molbloc pressure ports for that channel to the molbox1+ pressure transducers. The temperature of the molbloc connected to the active channel is measured and the flow calibration data for the molbloc most recently activated on that channel is used for calculating flow.
Channel A High Isolation: Open
Channel A Low Isolation: Open
Channel B High Isolation: Closed
Channel B Low Isolation: Closed
Bypass: Closed, molbox1+-S does not use this valve or connection.
Figure 4. molbox1+ Internal Pneumatic Schematic - CHANNEL A ACTIVE, molbloc-L OPERATION
User-selected settings such as gas, units, K factor, etc. are all common between channels A and B. When one of these settings is changed while channel A is active, that setting will also be made for channel B, even if different molbloc types are connected to the two channels. The only setting that is not common to both molbloc channels is the tare value (See Section 3.4.4).
3.1.2 molbloc-L and molbloc-S Operation molbox1+ operates somewhat differently depending on whether a molbloc-L or molbloc-S is connected to the active molbox1+ channel. mobloc-L and molbloc-S operation use different displays and flow calculations and some menu items are present for only one type of molbloc.
Most molbox1+ settings, such as gas, units, K factor, etc., are common to both molbloc-L and molbloc-S operation. Changes made to these settings while operating one type of molbloc will still be in effect when the other type of molbloc is connected. The only setting that exists for both molbloc types, but is stored independently for each type, is the tare value. See section 3.4.4.1 for details on the tare function.
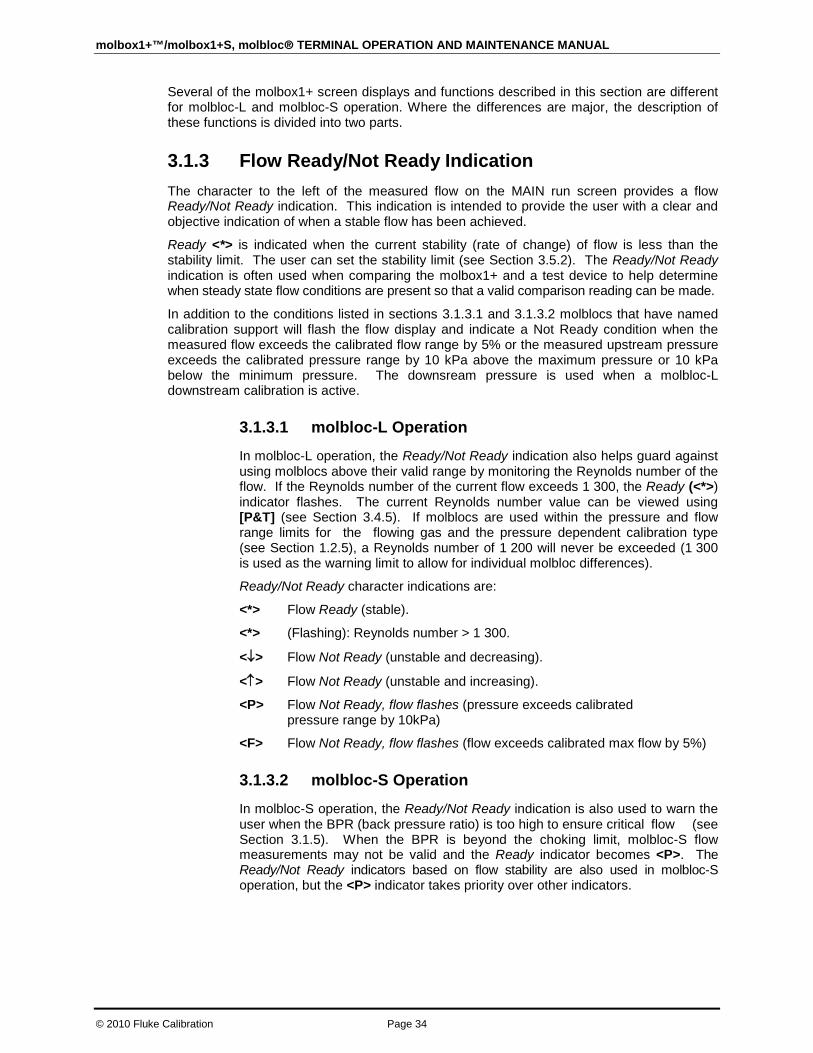
molbox1+™/molbox1+S, molbloc® TERMINAL OPERATION AND MAINTENANCE MANUAL
© 2010 Fluke Calibration Page 34
Several of the molbox1+ screen displays and functions described in this section are different for molbloc-L and molbloc-S operation. Where the differences are major, the description of these functions is divided into two parts.
3.1.3 Flow Ready/Not Ready Indication The character to the left of the measured flow on the MAIN run screen provides a flow Ready/Not Ready indication. This indication is intended to provide the user with a clear and objective indication of when a stable flow has been achieved.
Ready <*> is indicated when the current stability (rate of change) of flow is less than the stability limit. The user can set the stability limit (see Section 3.5.2). The Ready/Not Ready indication is often used when comparing the molbox1+ and a test device to help determine when steady state flow conditions are present so that a valid comparison reading can be made.
In addition to the conditions listed in sections 3.1.3.1 and 3.1.3.2 molblocs that have named calibration support will flash the flow display and indicate a Not Ready condition when the measured flow exceeds the calibrated flow range by 5% or the measured upstream pressure exceeds the calibrated pressure range by 10 kPa above the maximum pressure or 10 kPa below the minimum pressure. The downsream pressure is used when a molbloc-L downstream calibration is active.
3.1.3.1 molbloc-L Operation
In molbloc-L operation, the Ready/Not Ready indication also helps guard against using molblocs above their valid range by monitoring the Reynolds number of the flow. If the Reynolds number of the current flow exceeds 1 300, the Ready (<*>) indicator flashes. The current Reynolds number value can be viewed using [P&T] (see Section 3.4.5). If molblocs are used within the pressure and flow range limits for the flowing gas and the pressure dependent calibration type (see Section 1.2.5), a Reynolds number of 1 200 will never be exceeded (1 300 is used as the warning limit to allow for individual molbloc differences).
Ready/Not Ready character indications are:
<*> Flow Ready (stable).
<*> (Flashing): Reynolds number > 1 300.
<↓> Flow Not Ready (unstable and decreasing).
<↑> Flow Not Ready (unstable and increasing).
<P> Flow Not Ready, flow flashes (pressure exceeds calibrated pressure range by 10kPa)
<F> Flow Not Ready, flow flashes (flow exceeds calibrated max flow by 5%)
3.1.3.2 molbloc-S Operation
In molbloc-S operation, the Ready/Not Ready indication is also used to warn the user when the BPR (back pressure ratio) is too high to ensure critical flow (see Section 3.1.5). When the BPR is beyond the choking limit, molbloc-S flow measurements may not be valid and the Ready indicator becomes <P>. The Ready/Not Ready indicators based on flow stability are also used in molbloc-S operation, but the <P> indicator takes priority over other indicators.

3. OPERATION
Page 35 © 2010 Fluke Calibration
Ready/Not Ready character indications are:
<*> Flow Ready (stable).
<↓> Flow Not Ready (unstable and decreasing).
<↑> Flow Not Ready (unstable and increasing).
<P> Flow Not Ready (BPR high / sub-critical flow)
<P> [Alternate] Flow Not Ready, flow flashes (pressure exceeds calibrated pressure range by 10kPa)
<F> Flow Not Ready, flow flashes (flow exceeds calibrated max flow by 5%)
3.1.4 Reference Pressure Transducer (RPT) Overpressure molbox1+ has two absolute RPTs, one measures molbloc upstream pressure, the other measures molbloc downstream pressure and may provide a second measurement of molbloc upstream pressure in molbloc-S operation. In normal operation, they are not used at pressures greater than the following maximum working pressures:
molbox1+ A350K: 300 kPa absolute (44 psia)
molbox1+ A700K: 600 kPa absolute (87 psia)
molbox1+S A1.4M: 1400 kPa absolute (203 psia)
molbox1+S A2M: 2000 kPa absolute (290 psia)
Exposing the molbox1+ RPTs to pressures greater than the maximum operating pressure may damage them. molbox1+ has a system of warnings and alarms to protect itself from overpressure (see Section 3.6.3.1).
3.1.5 molbloc-S BPR Limits To make flow measurements within predictable measurement uncertainty limits with a molbloc-S flow element, critical (sonic) flow conditions must be present. Critical flow exists when the gas velocity reaches the local speed of sound at the throat of the molbloc-S Venturi nozzle.
molbox1+ uses the back pressure ratio, or BPR (the ratio of the molbloc-S downstream absolute pressure to the upstream absolute pressure) to determine whether the flow is critical. For Venturi nozzles in general, the BPR must remain below a certain value for critical flow to exist. Commonly accepted practice for critical flow orifice use suggests that this limiting BPR value, or “choking ratio”, is approximately 0.5. That is, the absolute pressure downstream of the nozzle must be less than one half of the absolute pressure upstream of the nozzle. Empirical study of the Venturi nozzles used in molbloc-S shows that the actual choking ratio, or maximum BPR for critical flow, varies between about 0.4 and 0.9 as a function of the Reynolds number (Re) over which the molblocs are used. molbox1+ continually calculates Re during flow measurement and can monitor the BPR to ensure that it does not exceed the choking ratio at the current Re conditions. molbox1+ uses a conservative BPR limit to indicate to the user when the BPR approaches the choking ratio, to ensure that flow measurements are only made under “safe” critical flow conditions. molbox1+ includes features to measure BPR, automatically alert the operator when the BPR is too high and prevent measurements when flow is not critical (see Sections 3.1.3.1, 3.4.4.5, 3.6.9).
Maintaining a sufficiently low BPR must be considered by molbloc-S users when selecting molbloc-S sizes and hardware setups to use for flow measurements. For example, if a molbloc-S will be used with atmospheric pressure downstream, then the molbloc can only be used over a range of upstream pressures starting at the maximum pressure for its calibration type down to a minimum pressure value at which the BPR becomes equal to the BPR limit calculated by molbox1+. Since mass flow through molbloc-S is proportional to the upstream absolute pressure, the flow range for the molbloc in this application is defined by the BPR
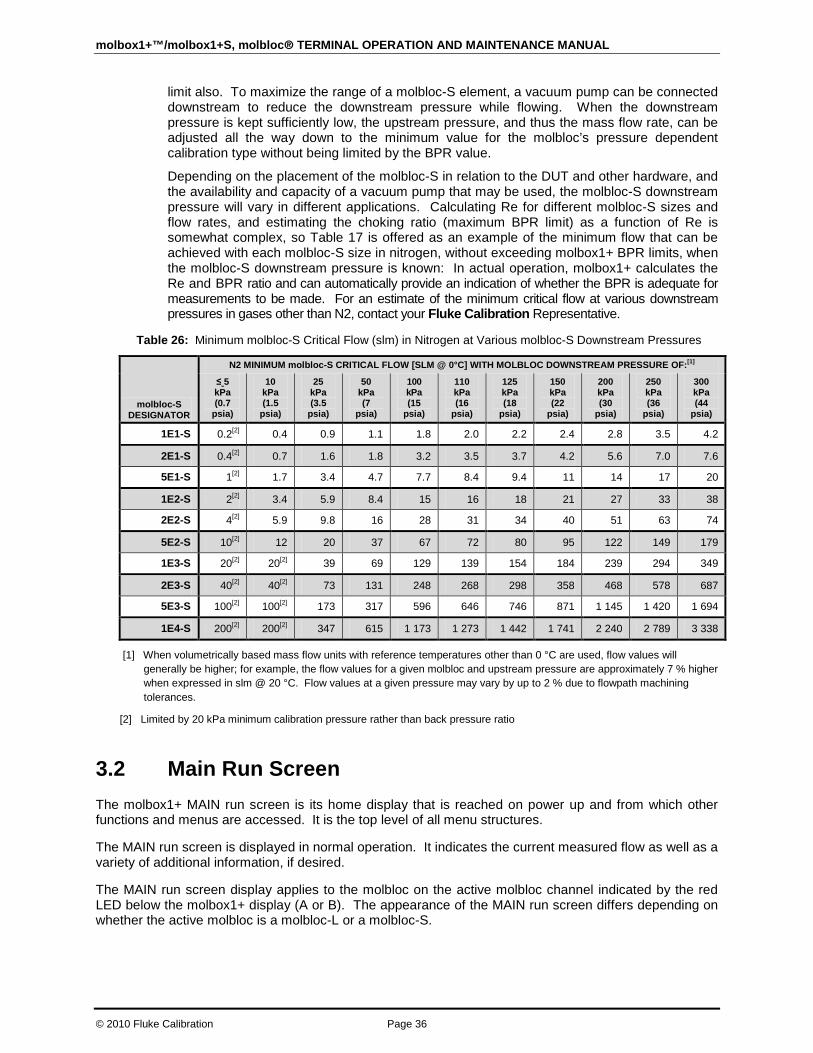
molbox1+™/molbox1+S, molbloc® TERMINAL OPERATION AND MAINTENANCE MANUAL
© 2010 Fluke Calibration Page 36
limit also. To maximize the range of a molbloc-S element, a vacuum pump can be connected downstream to reduce the downstream pressure while flowing. When the downstream pressure is kept sufficiently low, the upstream pressure, and thus the mass flow rate, can be adjusted all the way down to the minimum value for the molbloc’s pressure dependent calibration type without being limited by the BPR value.
Depending on the placement of the molbloc-S in relation to the DUT and other hardware, and the availability and capacity of a vacuum pump that may be used, the molbloc-S downstream pressure will vary in different applications. Calculating Re for different molbloc-S sizes and flow rates, and estimating the choking ratio (maximum BPR limit) as a function of Re is somewhat complex, so Table 17 is offered as an example of the minimum flow that can be achieved with each molbloc-S size in nitrogen, without exceeding molbox1+ BPR limits, when the molbloc-S downstream pressure is known: In actual operation, molbox1+ calculates the Re and BPR ratio and can automatically provide an indication of whether the BPR is adequate for measurements to be made. For an estimate of the minimum critical flow at various downstream pressures in gases other than N2, contact your Fluke Calibration Representative.
Table 26: Minimum molbloc-S Critical Flow (slm) in Nitrogen at Various molbloc-S Downstream Pressures
molbloc-S DESIGNATOR
N2 MINIMUM molbloc-S CRITICAL FLOW [SLM @ 0°C] WITH MOLBLOC DOWNSTREAM PRESSURE OF:[1]
≤ 5 kPa (0.7
psia)
10 kPa (1.5
psia)
25 kPa (3.5
psia)
50 kPa (7
psia)
100 kPa (15
psia)
110 kPa (16
psia)
125 kPa (18
psia)
150 kPa (22
psia)
200 kPa (30
psia)
250 kPa (36
psia)
300 kPa (44
psia)
1E1-S 0.2[2] 0.4 0.9 1.1 1.8 2.0 2.2 2.4 2.8 3.5 4.2
2E1-S 0.4[2] 0.7 1.6 1.8 3.2 3.5 3.7 4.2 5.6 7.0 7.6
5E1-S 1[2] 1.7 3.4 4.7 7.7 8.4 9.4 11 14 17 20
1E2-S 2[2] 3.4 5.9 8.4 15 16 18 21 27 33 38
2E2-S 4[2] 5.9 9.8 16 28 31 34 40 51 63 74
5E2-S 10[2] 12 20 37 67 72 80 95 122 149 179
1E3-S 20[2] 20[2] 39 69 129 139 154 184 239 294 349
2E3-S 40[2] 40[2] 73 131 248 268 298 358 468 578 687
5E3-S 100[2] 100[2] 173 317 596 646 746 871 1 145 1 420 1 694
1E4-S 200[2] 200[2] 347 615 1 173 1 273 1 442 1 741 2 240 2 789 3 338
[1] When volumetrically based mass flow units with reference temperatures other than 0 °C are used, flow values will generally be higher; for example, the flow values for a given molbloc and upstream pressure are approximately 7 % higher when expressed in slm @ 20 °C. Flow values at a given pressure may vary by up to 2 % due to flowpath machining tolerances.
[2] Limited by 20 kPa minimum calibration pressure rather than back pressure ratio
3.2 Main Run Screen The molbox1+ MAIN run screen is its home display that is reached on power up and from which other functions and menus are accessed. It is the top level of all menu structures.
The MAIN run screen is displayed in normal operation. It indicates the current measured flow as well as a variety of additional information, if desired.
The MAIN run screen display applies to the molbloc on the active molbloc channel indicated by the red LED below the molbox1+ display (A or B). The appearance of the MAIN run screen differs depending on whether the active molbloc is a molbloc-L or a molbloc-S.
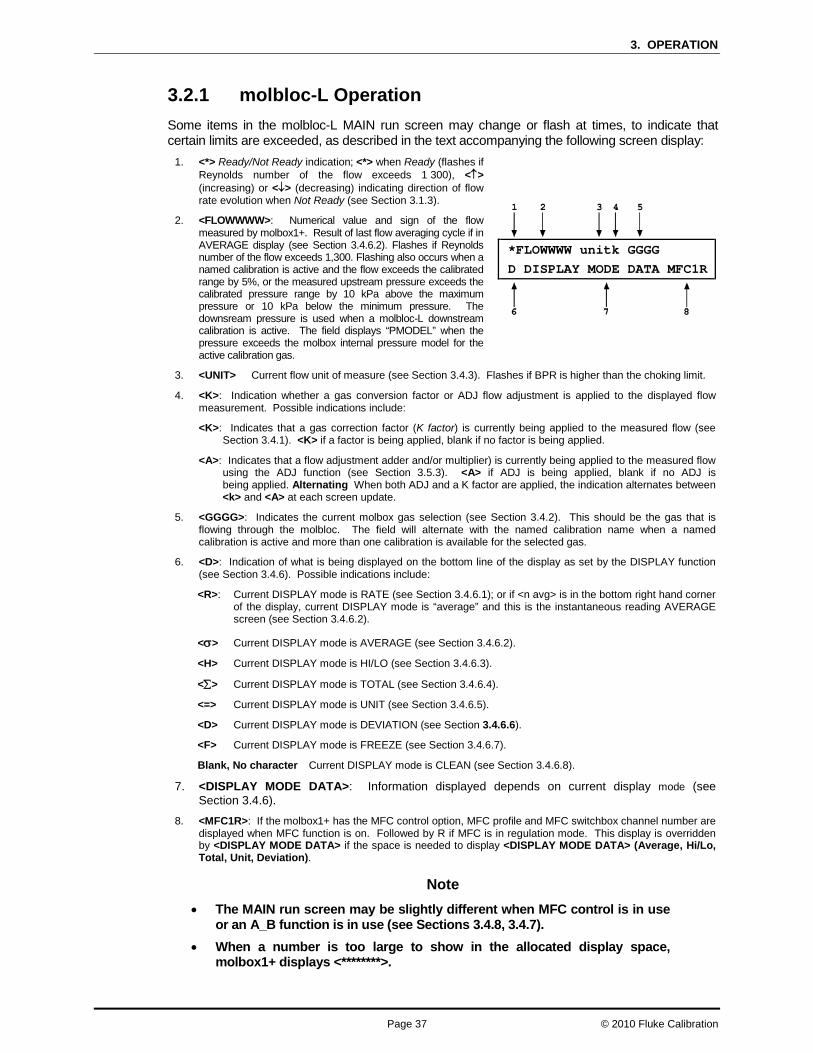
3. OPERATION
Page 37 © 2010 Fluke Calibration
3.2.1 molbloc-L Operation Some items in the molbloc-L MAIN run screen may change or flash at times, to indicate that certain limits are exceeded, as described in the text accompanying the following screen display:
1. <*> Ready/Not Ready indication; <*> when Ready (flashes if Reynolds number of the flow exceeds 1 300), <↑> (increasing) or <↓> (decreasing) indicating direction of flow rate evolution when Not Ready (see Section 3.1.3).
2. <FLOWWWW>: Numerical value and sign of the flow measured by molbox1+. Result of last flow averaging cycle if in AVERAGE display (see Section 3.4.6.2). Flashes if Reynolds number of the flow exceeds 1,300. Flashing also occurs when a named calibration is active and the flow exceeds the calibrated range by 5%, or the measured upstream pressure exceeds the calibrated pressure range by 10 kPa above the maximum pressure or 10 kPa below the minimum pressure. The downsream pressure is used when a molbloc-L downstream calibration is active. The field displays “PMODEL” when the pressure exceeds the molbox internal pressure model for the active calibration gas.
*FLOWWWW unitk GGGG D DISPLAY MODE DATA MFC1R
3. <UNIT> Current flow unit of measure (see Section 3.4.3). Flashes if BPR is higher than the choking limit.
4. <K>: Indication whether a gas conversion factor or ADJ flow adjustment is applied to the displayed flow measurement. Possible indications include:
<K>: Indicates that a gas correction factor (K factor) is currently being applied to the measured flow (see Section 3.4.1). <K> if a factor is being applied, blank if no factor is being applied.
<A>: Indicates that a flow adjustment adder and/or multiplier) is currently being applied to the measured flow using the ADJ function (see Section 3.5.3). <A> if ADJ is being applied, blank if no ADJ is being applied. Alternating When both ADJ and a K factor are applied, the indication alternates between <k> and <A> at each screen update.
5. <GGGG>: Indicates the current molbox gas selection (see Section 3.4.2). This should be the gas that is flowing through the molbloc. The field will alternate with the named calibration name when a named calibration is active and more than one calibration is available for the selected gas.
6. <D>: Indication of what is being displayed on the bottom line of the display as set by the DISPLAY function (see Section 3.4.6). Possible indications include:
<R>: Current DISPLAY mode is RATE (see Section 3.4.6.1); or if <n avg> is in the bottom right hand corner of the display, current DISPLAY mode is “average” and this is the instantaneous reading AVERAGE screen (see Section 3.4.6.2).
<σ> Current DISPLAY mode is AVERAGE (see Section 3.4.6.2).
<H> Current DISPLAY mode is HI/LO (see Section 3.4.6.3).
<∑> Current DISPLAY mode is TOTAL (see Section 3.4.6.4).
<=> Current DISPLAY mode is UNIT (see Section 3.4.6.5).
<D> Current DISPLAY mode is DEVIATION (see Section 3.4.6.6).
<F> Current DISPLAY mode is FREEZE (see Section 3.4.6.7).
Blank, No character Current DISPLAY mode is CLEAN (see Section 3.4.6.8).
7. <DISPLAY MODE DATA>: Information displayed depends on current display mode (see Section 3.4.6).
8. <MFC1R>: If the molbox1+ has the MFC control option, MFC profile and MFC switchbox channel number are displayed when MFC function is on. Followed by R if MFC is in regulation mode. This display is overridden by <DISPLAY MODE DATA> if the space is needed to display <DISPLAY MODE DATA> (Average, Hi/Lo, Total, Unit, Deviation).
Note • The MAIN run screen may be slightly different when MFC control is in use
or an A_B function is in use (see Sections 3.4.8, 3.4.7). • When a number is too large to show in the allocated display space,
molbox1+ displays <********>.
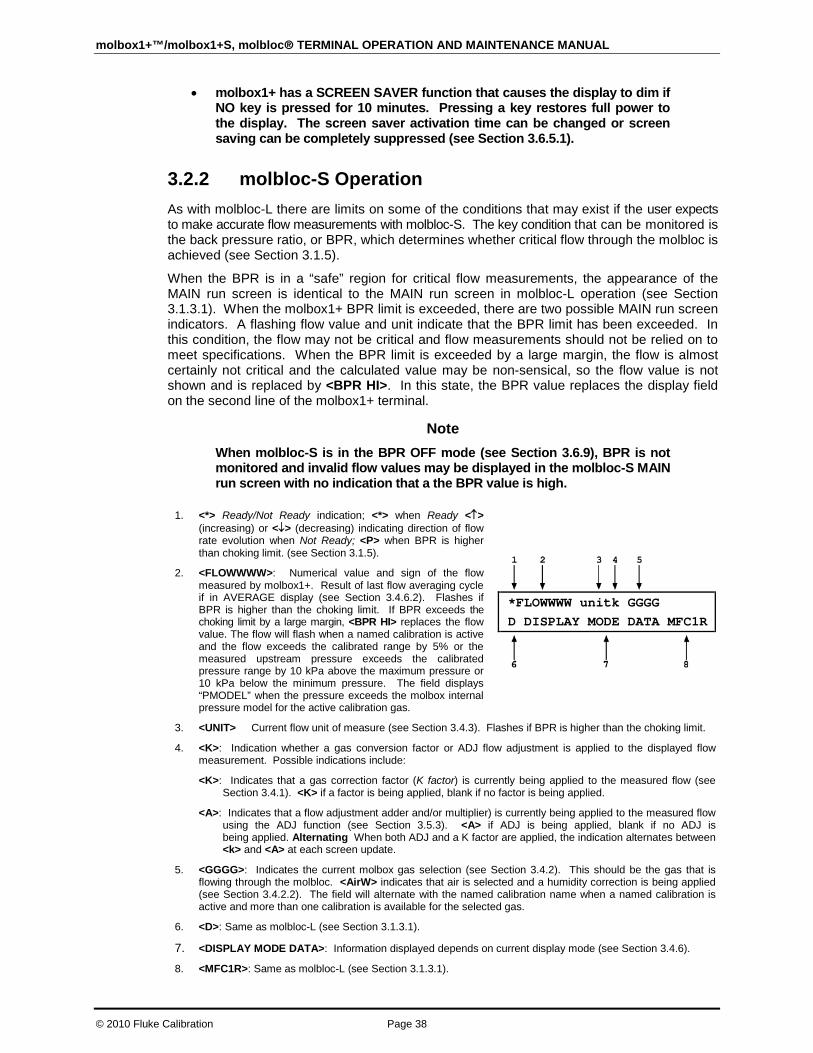
molbox1+™/molbox1+S, molbloc® TERMINAL OPERATION AND MAINTENANCE MANUAL
© 2010 Fluke Calibration Page 38
• molbox1+ has a SCREEN SAVER function that causes the display to dim if NO key is pressed for 10 minutes. Pressing a key restores full power to the display. The screen saver activation time can be changed or screen saving can be completely suppressed (see Section 3.6.5.1).
3.2.2 molbloc-S Operation As with molbloc-L there are limits on some of the conditions that may exist if the user expects to make accurate flow measurements with molbloc-S. The key condition that can be monitored is the back pressure ratio, or BPR, which determines whether critical flow through the molbloc is achieved (see Section 3.1.5).
When the BPR is in a “safe” region for critical flow measurements, the appearance of the MAIN run screen is identical to the MAIN run screen in molbloc-L operation (see Section 3.1.3.1). When the molbox1+ BPR limit is exceeded, there are two possible MAIN run screen indicators. A flashing flow value and unit indicate that the BPR limit has been exceeded. In this condition, the flow may not be critical and flow measurements should not be relied on to meet specifications. When the BPR limit is exceeded by a large margin, the flow is almost certainly not critical and the calculated value may be non-sensical, so the flow value is not shown and is replaced by <BPR HI>. In this state, the BPR value replaces the display field on the second line of the molbox1+ terminal.
Note When molbloc-S is in the BPR OFF mode (see Section 3.6.9), BPR is not monitored and invalid flow values may be displayed in the molbloc-S MAIN run screen with no indication that a the BPR value is high.
1. <*> Ready/Not Ready indication; <*> when Ready <↑> (increasing) or <↓> (decreasing) indicating direction of flow rate evolution when Not Ready; <P> when BPR is higher than choking limit. (see Section 3.1.5).
2. <FLOWWWW>: Numerical value and sign of the flow measured by molbox1+. Result of last flow averaging cycle if in AVERAGE display (see Section 3.4.6.2). Flashes if BPR is higher than the choking limit. If BPR exceeds the choking limit by a large margin, <BPR HI> replaces the flow value. The flow will flash when a named calibration is active and the flow exceeds the calibrated range by 5% or the measured upstream pressure exceeds the calibrated pressure range by 10 kPa above the maximum pressure or 10 kPa below the minimum pressure. The field displays “PMODEL” when the pressure exceeds the molbox internal pressure model for the active calibration gas.
*FLOWWWW unitk GGGG D DISPLAY MODE DATA MFC1R
3. <UNIT> Current flow unit of measure (see Section 3.4.3). Flashes if BPR is higher than the choking limit.
4. <K>: Indication whether a gas conversion factor or ADJ flow adjustment is applied to the displayed flow measurement. Possible indications include:
<K>: Indicates that a gas correction factor (K factor) is currently being applied to the measured flow (see Section 3.4.1). <K> if a factor is being applied, blank if no factor is being applied.
<A>: Indicates that a flow adjustment adder and/or multiplier) is currently being applied to the measured flow using the ADJ function (see Section 3.5.3). <A> if ADJ is being applied, blank if no ADJ is being applied. Alternating When both ADJ and a K factor are applied, the indication alternates between <k> and <A> at each screen update.
5. <GGGG>: Indicates the current molbox gas selection (see Section 3.4.2). This should be the gas that is flowing through the molbloc. <AirW> indicates that air is selected and a humidity correction is being applied (see Section 3.4.2.2). The field will alternate with the named calibration name when a named calibration is active and more than one calibration is available for the selected gas.
6. <D>: Same as molbloc-L (see Section 3.1.3.1).
7. <DISPLAY MODE DATA>: Information displayed depends on current display mode (see Section 3.4.6).
8. <MFC1R>: Same as molbloc-L (see Section 3.1.3.1).

3. OPERATION
Page 39 © 2010 Fluke Calibration
Note • The MAIN run screen may be slightly different when MFC control is in use
or an A_B function is in use (see Sections 3.4.8, 3.4.7). • When a number is too large to show in the allocated display space,
molbox1+ displays <********>. • molbox1+ has a SCREEN SAVER function that causes the display to dim if
NO key is pressed for 10 minutes. Pressing a key restores full power to the display. The screen saver activation time can be changed or screen saving can be completely suppressed (see Section 3.6.5.1).
3.3 Manual Operation molbox1+ is designed to offer the optimum balance between simple, intuitive operation and the availability of a wide variety of functions with a high level of operator discretion. The local operator interface is through the front panel’s 2 x 20 character alpha-numeric display and a 4 x 4 multi-function keypad. Remote operation by RS232 or IEEE-488 interface is also available (see Section 4).
3.3.1 Keypad Layout and Protocol molbox1+ has a 4 x 4 keypad for local operator access to direct functions, function menus and for data entry.
The Editing and Execution keys are for execution, suspending execution, backing up in menus and editing entries.
The Menu/Data keys provide access to function menus from the MAIN run screen. The menu name is on the bottom half of the key. The SETUP menu is for more frequently used functions. The SPECIAL menu is for less frequently used and internal functions. These keys enter numerical values when editing.
The Function/Data keys allow very commonly used functions to be accessed directly from the MAIN run screen by a single keystroke. The name of the function is on the bottom half of the key (see Section 3.3.2). These keys enter numerical values when editing.
Figure 5. Keypad Layout
Pressing the [ENTER] key generally causes execution or forward movement in the menu tree.
Pressing the [ESCAPE] key generally allows movement back in the menu tree and/or causes execution to cease or suspend without changes being implemented. Pressing [ESCAPE] repeatedly eventually returns to the MAIN run screen. From the MAIN run screen, pressing [ESCAPE] allows momentary viewing of the molbox1+ identification screen.
Pressing the [+/-] key changes a numerical sign when editing. It also toggles through multiple screens when available.
Pressing the [←] and [→] keys allows reverse and forward cursor movement when editing data entry. These keys are also used to scroll through choices.
Menu selections can be made by pressing the number of the selection directly or by pressing [←] and [→] to place the cursor on the number of the desired selection and pressing [ENTER].
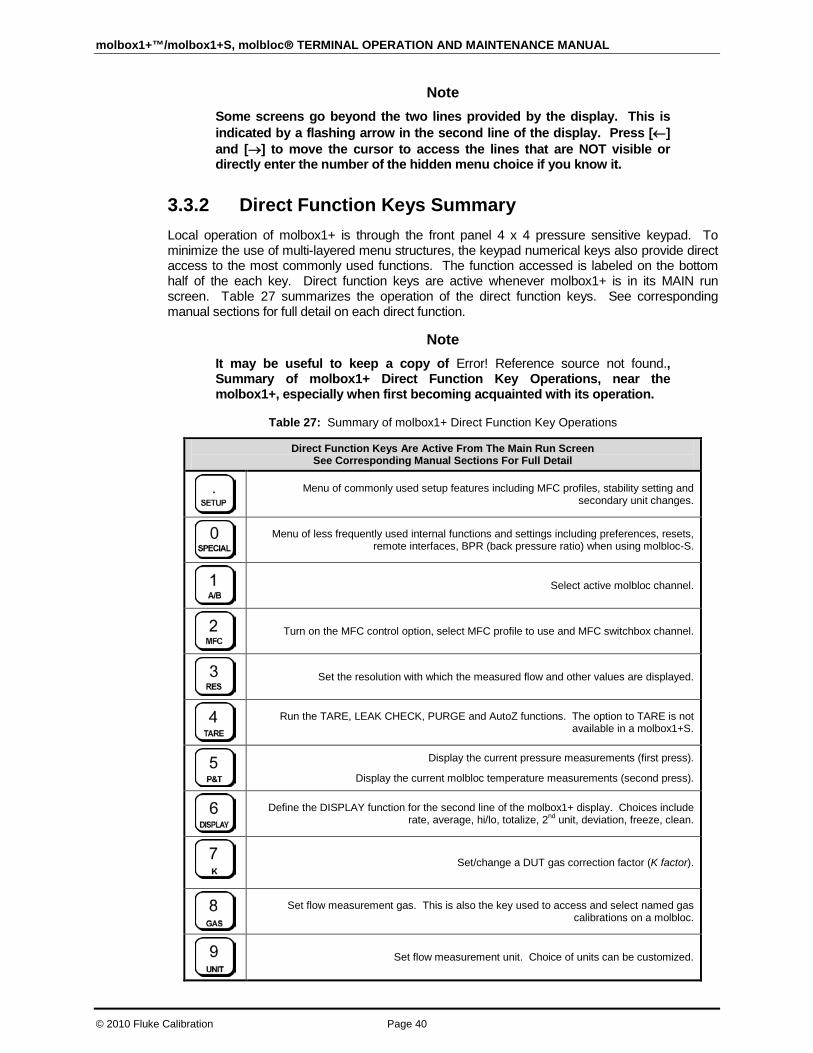
molbox1+™/molbox1+S, molbloc® TERMINAL OPERATION AND MAINTENANCE MANUAL
© 2010 Fluke Calibration Page 40
Note Some screens go beyond the two lines provided by the display. This is indicated by a flashing arrow in the second line of the display. Press [←] and [→] to move the cursor to access the lines that are NOT visible or directly enter the number of the hidden menu choice if you know it.
3.3.2 Direct Function Keys Summary Local operation of molbox1+ is through the front panel 4 x 4 pressure sensitive keypad. To minimize the use of multi-layered menu structures, the keypad numerical keys also provide direct access to the most commonly used functions. The function accessed is labeled on the bottom half of the each key. Direct function keys are active whenever molbox1+ is in its MAIN run screen. Table 27 summarizes the operation of the direct function keys. See corresponding manual sections for full detail on each direct function.
Note It may be useful to keep a copy of Error! Reference source not found., Summary of molbox1+ Direct Function Key Operations, near the molbox1+, especially when first becoming acquainted with its operation.
Table 27: Summary of molbox1+ Direct Function Key Operations
Direct Function Keys Are Active From The Main Run Screen See Corresponding Manual Sections For Full Detail
Menu of commonly used setup features including MFC profiles, stability setting and secondary unit changes.
Menu of less frequently used internal functions and settings including preferences, resets, remote interfaces, BPR (back pressure ratio) when using molbloc-S.
Select active molbloc channel.
Turn on the MFC control option, select MFC profile to use and MFC switchbox channel.
Set the resolution with which the measured flow and other values are displayed.
Run the TARE, LEAK CHECK, PURGE and AutoZ functions. The option to TARE is not available in a molbox1+S.
Display the current pressure measurements (first press).
Display the current molbloc temperature measurements (second press).
Define the DISPLAY function for the second line of the molbox1+ display. Choices include rate, average, hi/lo, totalize, 2nd unit, deviation, freeze, clean.
Set/change a DUT gas correction factor (K factor).
Set flow measurement gas. This is also the key used to access and select named gas calibrations on a molbloc.
Set flow measurement unit. Choice of units can be customized.

3. OPERATION
Page 41 © 2010 Fluke Calibration
3.4 Direct Function Keys
3.4.1 [K] PURPOSE
To cause the flow value calculated by molbox1+ to be multiplied by a factor, K. Generally used to apply a test device’s gas correction factor used when a test device is calibrated with a gas other than its normal gas.
PRINCIPLE
Frequently, when testing or calibrating a flow measuring device, it is not possible to flow the gas with which that device will normally be operated (the process gas). This may be because the process gas is toxic or corrosive or simply because it is not available. When the process gas cannot be used for calibration, it is common to use a different gas for testing or calibrating (the calibration gas). In this case, a factor representing the relationship between the calibration gas and the process gas for the test device may be applied so that the calibration gas simulates the process gas. The calibration gas that simulates the process gas is often called a surrogate gas for the process gas.
The relationship between a test device’s process gas and calibration gas is frequently called a K factor or gas conversion factor. The factor’s value depends on specific properties of the test device and determining the value is the responsibility of the device manufacturer.
For example, Silane (SiH4) is a frequently used gas in semiconductor processing. SiH4 is highly toxic and requires extensive handling precautions so it is not practical for use in calibration and testing. A major manufacturer of Mass Flow Controllers (MFCs) recommends that MFCs that are to be used with Silane be tested with Sulfur Hexafluoride (SF6), a non-toxic, non-flammable gas, using a conversion factor of 0.970. In other words:
SF6 flow x 0.970 = equivalent SiH4 flow for the MFC
The K function in molbox1+ allows a gas conversion factor to be entered by which flow values measured by molbox1+ will be multiplied. In this example, 0.970 would be entered as K so that the values indicated by molbox1+ when SF6 is flowing through the molbloc simulate the flow of SiH4 for that manufacturer's MFC.
When the K function is active, molbox1+ performs all of its flow calculations normally but multiplies the current flow value by the value of the K factor prior to displaying it.
The gas selected on molbox1+ which is displayed in the upper right corner of the molbox1+ display should always be the gas that is actually flowing through the molbloc.
Note K factors or gas conversion factors are based on the properties of the device being tested. Their availability and validity are the responsibility of that device's manufacturer. molbox/molbloc does not use factors or conversion coefficients between gases. Flow is calculated from molbloc characteristics and specific gas properties for each gas supported by molbox1+. The gas selected on molbox1+ (see Section 3.4.2) which is displayed in the upper right corner of the molbox1+ display should always be the gas that is actually flowing through the molbloc.
OPERATION
To enable a gas conversion factor press [K] from any run screen. The display is:
K Factor? 1on 2off
If <2off> is selected, no conversion factor will be applied. If <1on> is selected, the next screen is:
K Factor: 1.00000

molbox1+™/molbox1+S, molbloc® TERMINAL OPERATION AND MAINTENANCE MANUAL
© 2010 Fluke Calibration Page 42
The value of the gas conversion factor can be edited as desired. Pressing [ENTER] returns to the MAIN run screen with the entered K factor active. The letter <K> is always appended to the flow unit indication in the run screens when the K function is ON (e.g., sccmK). A K factor value of 1 is handled as if the K function were OFF.
Caution When the K function is ON, as indicated by a <K> following the current flow unit in the first line of the MAIN run screen, the current molbox1+ flow indication is: (flow as calculated by molbox1+ for the selected gas) x (the current K factor) Thus, the flow indicated is actually in error (biased) by the reciprocal of the K factor.
3.4.2 [GAS] PURPOSE
To specify the gas that is currently flowing through the molbloc so that molbox1+ uses the correct gas properties in its flow calculations.
PRINCIPLE
molbox1+ calculates the flow through a molbloc from:
• molbloc geometric characteristics
• gas pressures
• gas temperature
• specific characteristics of the flowing gas
The gas characteristics include:
• gas density under standard conditions
• change in gas density with pressure and temperature
• gas viscosity under standard conditions (when needed)
• changes in gas viscosity with pressure and temperature
Proprietary algorithms are used to calculate gas density and viscosity (when needed) under the actual flowing pressure and temperature conditions from density and viscosity under standard conditions.
The characteristics of molbox1+ supported gases and corresponding algorithms are stored in molbox1+ memory. To correctly calculate the flow of a gas, the correct information for that gas must be used. The molbox1+ GAS function allows the user to specify the flowing gas so that molbox1+ will use the correct gas information in calculating the flow through the molbloc.
Selection of a gas using the GAS function also selects the molbloc (geometric) calibration data to be used for flow calculation. If a calibration has been stored in the molbloc for the selected gas, the molbloc calibration data for that gas are used. If a gas is selected that the molbloc is not calibrated for, the molbox1+ will use the coefficients of the default gas, normally N2 for molbloc-L and Air for molbloc-S. In the case that there are multiple N2 or Air calibrations on the molbloc, the coefficients for the calibration indicated as DEFAULT on the calibration report are used. When a calibration has not been performed on the molbloc in the gas selected using the GAS function, flow measurements have NO associated uncertainty or tolerance.
The operation of the GAS function, is different for molbloc-L and molbloc-S due to the support of humid air measurements with molbloc-S. They are described separately below.
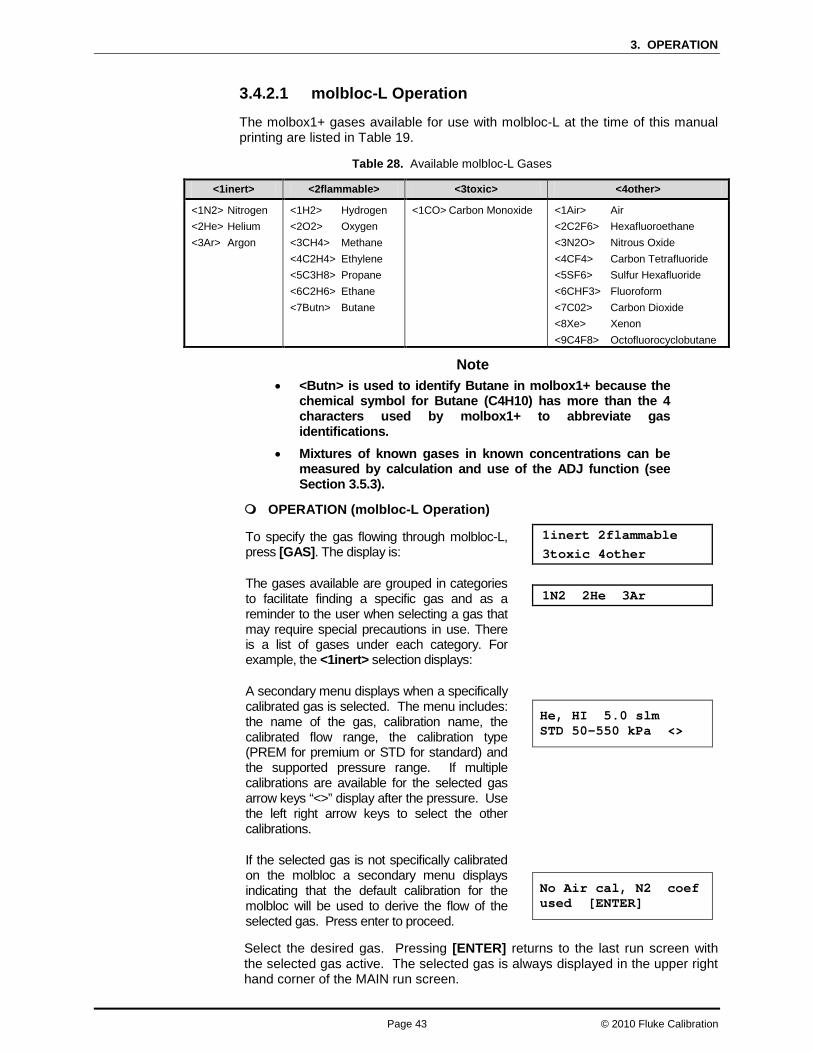
3. OPERATION
Page 43 © 2010 Fluke Calibration
3.4.2.1 molbloc-L Operation
The molbox1+ gases available for use with molbloc-L at the time of this manual printing are listed in Table 19.
Table 28. Available molbloc-L Gases
<1inert> <2flammable> <3toxic> <4other>
<1N2> Nitrogen <2He> Helium <3Ar> Argon
<1H2> Hydrogen <2O2> Oxygen <3CH4> Methane <4C2H4> Ethylene <5C3H8> Propane <6C2H6> Ethane <7Butn> Butane
<1CO> Carbon Monoxide <1Air> Air <2C2F6> Hexafluoroethane <3N2O> Nitrous Oxide <4CF4> Carbon Tetrafluoride <5SF6> Sulfur Hexafluoride <6CHF3> Fluoroform <7C02> Carbon Dioxide <8Xe> Xenon <9C4F8> Octofluorocyclobutane
Note • <Butn> is used to identify Butane in molbox1+ because the
chemical symbol for Butane (C4H10) has more than the 4 characters used by molbox1+ to abbreviate gas identifications.
• Mixtures of known gases in known concentrations can be measured by calculation and use of the ADJ function (see Section 3.5.3).
OPERATION (molbloc-L Operation)
To specify the gas flowing through molbloc-L, press [GAS]. The display is:
1inert 2flammable 3toxic 4other
The gases available are grouped in categories to facilitate finding a specific gas and as a reminder to the user when selecting a gas that may require special precautions in use. There is a list of gases under each category. For example, the <1inert> selection displays:
A secondary menu displays when a specifically calibrated gas is selected. The menu includes: the name of the gas, calibration name, the calibrated flow range, the calibration type (PREM for premium or STD for standard) and the supported pressure range. If multiple calibrations are available for the selected gas arrow keys “<>” display after the pressure. Use the left right arrow keys to select the other calibrations.
If the selected gas is not specifically calibrated on the molbloc a secondary menu displays indicating that the default calibration for the molbloc will be used to derive the flow of the selected gas. Press enter to proceed.
1N2 2He 3Ar
He, HI 5.0 slm STD 50-550 kPa <>
No Air cal, N2 coef used [ENTER]
Select the desired gas. Pressing [ENTER] returns to the last run screen with the selected gas active. The selected gas is always displayed in the upper right hand corner of the MAIN run screen.

molbox1+™/molbox1+S, molbloc® TERMINAL OPERATION AND MAINTENANCE MANUAL
© 2010 Fluke Calibration Page 44
Note The gas selected on the molbox1+ should always be the gas that is flowing through the molbloc. molbloc/molbox does not use K factors or gas conversion factors between gases. When calibrating or testing a device with a surrogate gas, molbox1+ should be set to the surrogate gas. The K factor or gas conversion factor, if used, defines the relationship between the surrogate gas and the process gas for the device being tested, not for molbox1+ (see Section 3.4.1, PRINCIPLE). The K factor is supplied by the manufacturer of the device being tested.
3.4.2.2 molbloc-S Operation
In addition to dry air, molbox1+ supports measurement of ambient (humid) air flow with molbloc-S. When Air is selected as the molbloc-S test gas, the user is prompted to enter a value of the humidity ratio (also known as the absolute humidity or water ratio) of the ambient air. The humidity ratio, W, is defined as the ratio of water mass to gas mass in the flowing air. It is different from the relative humidity value, which is usually expressed as a percentage. Typical values of W are between zero and 0.06. molbox1+ does not accept an entry for W greater than 0.1.
Typically, humidity measuring instruments report relative humidity, which is dependent on the ambient pressure and temperature. Users who do not have the W value available can use Fluke Calibration’s free Unit of Measure Converter software utility or COMPASS for molbox or COMPASS for Flow calibration software to calculate W from measured pressure, temperature, and relative humidity. Visit www.dhinstruments.com, or see your Fluke Calibration sales representative for a copy of the Unit of Measure Converter software utility. Air relative humidity, pressure and temperature are converted to the humidity ratio, W, following Dalton’s Rule and thermodynamic principals using water saturation properties:
⋅−
⋅
⋅=
100
10062188.RHPP
RHPW
gamb
g
gP is the water saturation pressure, which can be calculated as:
322
13
0 CTCTCTCP ambambambg +++=
13277609.14509
0528.530649289.0
:
3
2
1
0
−==−=
=
CCCCwhere
If dry air will be measured, then the user should enter a W value of zero when prompted. Zero is the default W value.
When a non-zero W value is entered, molbox applies a correction to its air flow measurement for the change in air density due to humidity. If a correction for W is being applied to air flow measurements, a <W> is placed to the right of the <Air> gas indication in the MAIN run screen.
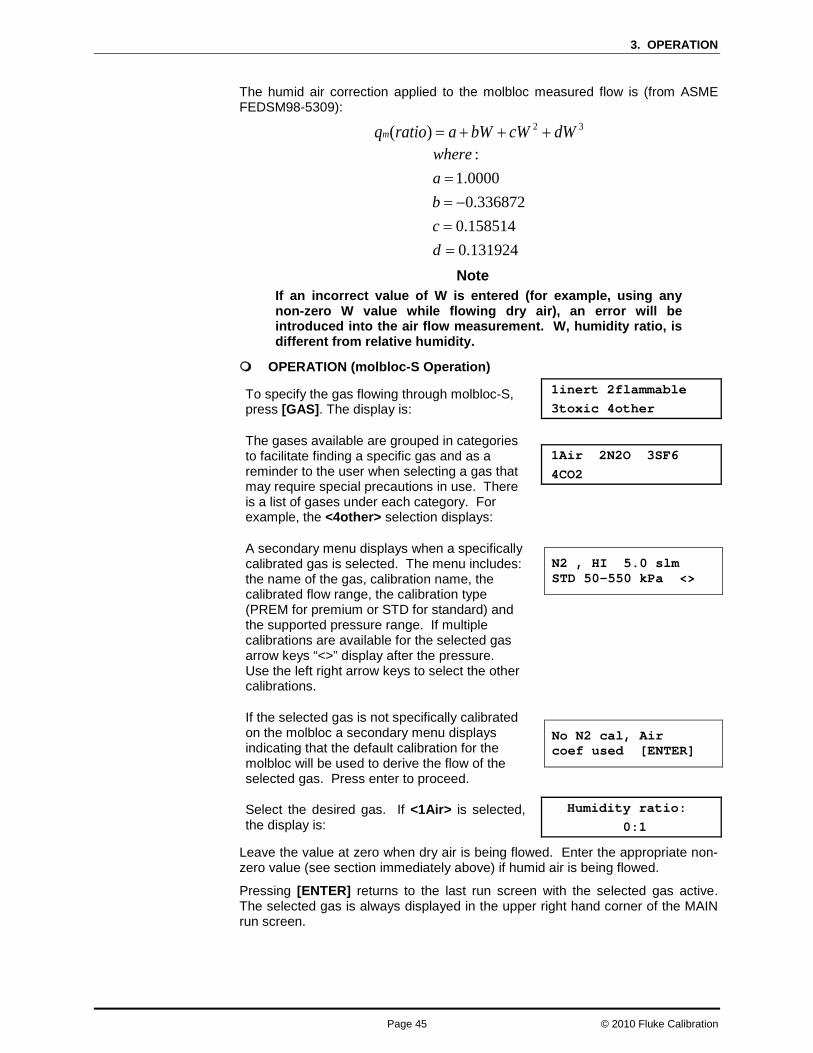
3. OPERATION
Page 45 © 2010 Fluke Calibration
The humid air correction applied to the molbloc measured flow is (from ASME FEDSM98-5309):
32)( dWcWbWaratioqm +++=
131924.0158514.0
336872.00000.1:
==−=
=
dcbawhere
Note If an incorrect value of W is entered (for example, using any non-zero W value while flowing dry air), an error will be introduced into the air flow measurement. W, humidity ratio, is different from relative humidity.
OPERATION (molbloc-S Operation)
To specify the gas flowing through molbloc-S, press [GAS]. The display is:
1inert 2flammable 3toxic 4other
The gases available are grouped in categories to facilitate finding a specific gas and as a reminder to the user when selecting a gas that may require special precautions in use. There is a list of gases under each category. For example, the <4other> selection displays:
A secondary menu displays when a specifically calibrated gas is selected. The menu includes: the name of the gas, calibration name, the calibrated flow range, the calibration type (PREM for premium or STD for standard) and the supported pressure range. If multiple calibrations are available for the selected gas arrow keys “<>” display after the pressure. Use the left right arrow keys to select the other calibrations.
If the selected gas is not specifically calibrated on the molbloc a secondary menu displays indicating that the default calibration for the molbloc will be used to derive the flow of the selected gas. Press enter to proceed.
1Air 2N2O 3SF6 4CO2
N2 , HI 5.0 slm STD 50-550 kPa <>
No N2 cal, Air coef used [ENTER]
Select the desired gas. If <1Air> is selected, the display is:
Humidity ratio: 0:1
Leave the value at zero when dry air is being flowed. Enter the appropriate non-zero value (see section immediately above) if humid air is being flowed.
Pressing [ENTER] returns to the last run screen with the selected gas active. The selected gas is always displayed in the upper right hand corner of the MAIN run screen.

molbox1+™/molbox1+S, molbloc® TERMINAL OPERATION AND MAINTENANCE MANUAL
© 2010 Fluke Calibration Page 46
Note The gas selected on the molbox1+ should always be the gas that is flowing through the molbloc. molbloc/molbox does not use K factors or gas conversion factors between gases. When calibrating or testing a device with a surrogate gas, molbox1+ should be set to the surrogate gas. The K factor or gas conversion factor, if used, defines the relationship between the surrogate gas and the process gas for the device being tested, not for molbox1+ (see Section 3.4.1, PRINCIPLE). The K factor is supplied by the manufacturer of the device being tested.
3.4.3 [UNIT] PURPOSE
To specify the flow unit of measure in which molbox1+ displays measured flow values.
PRINCIPLE
molbox1+ calculates the mass flow of various gases in kilograms/second [kg/s]. molbox1+ also supports conversions to a variety of other flow units of measure. The UNIT function allows the flow unit of measure in which molbox1+ displays measured flow to be selected. These include units of mass flow, including volumetrically based mass flow units (i.e., sccm) as well as units of volume flow (i.e., ccm). See Table 29 for a complete listing of the unit conversions available. molbox1+ can also display the measured flow in two different units of measure simultaneously (see Section 3.4.6.5).
OPERATION
If the molbox1+ is equipped with the optional MFC control function (see Section 3.4.8), the unit of measure for the molbox1+ flow display may be defined by the currently selected MFC profile. In that case, the [UNIT] function key is used to select the MFC output display unit (see Section 3.4.8.3).
• If an MFC profile other than profile #1 or #2 is active, the unit of measure is the unit of measure selected in the MFC profile. If the MFC control function is not present, or is turned OFF, or MFC profile #1 or #2 is selected, the [UNIT] function key allows direct selection of molbox1+ flow display units as described below.
• From the main run screen, press [UNIT]:
The display is: 1sccm 2slm 3uccm 4pccm 5mg/s 6vlm
Select the desired unit. For all units except <uxxx> or <vlm>, operation then returns to the run screen with the flow unit of measure changed to the selected unit. When user units (i.e., uxxx) are selected, the reference temperature must be specified before the unit is activated (see Section 3.4.3.3). When “vlm” (volume) units are selected, a menu of volume units is accessed. The desired volume unit must be selected and then the temperature and pressure of the flowing gas must be specified (see Section 3.4.3.4).
Note • If the MFC Control option is active and the MFC profile selected is NOT #1
or #2 (see Section 3.4.8), the molbox1+ flow unit is automatically the unit specified in the current MFC profile (see Section 3.4.8 and 3.5.5) and the UNIT function controls the unit used for displays of MFC set and measure values.
• See Section 7.1.3 for specific molbox1+ flow unit conversion calculations. • molbox1+ supports many more flow units of measure than the six default
units of the UNIT function. The six units available under the UNIT function can be customized to include any molbox1+ supported units in any order (see Section 3.5.8).

3. OPERATION
Page 47 © 2010 Fluke Calibration
Caution Many different types of flow units are commonly used including a wide variety of mass flow units as well as volume flow units. Please read Sections 3.4.3.1 through 3.4.3.4 for additional information on the various unit definitions and how they are handled by molbox1+ before making unit of measure selections.
3.4.3.1 Mass Flow vs. Volume Flow
Note
COMPASS for molbox software users: conversions to volume (sometimes called actual) flow units are handled in COMPASS. When using COMPASS, the molbox always operates in mass flow units.
molbox1+ measures mass flow (quantity of material per quantity of time). molbox1+ always calculates flow in terms of kg/second [kg/s]. It also supports conversions of kg/second to a variety of other flow units. These include other mass flow units such as g/s and mole/s as well as volumetrically based mass flow units (i.e., sccm and slm) (see Section 3.4.3.2). In steady state flow, mass flow is the same at different points in the flow system independent of gas pressure and temperature. Therefore, the measurement of mass flow made by the molbloc/molbox represents the mass flow at the same time at other points in a steady state flow system.
molbox1+ can also make conversions to volume flow under specific pressure and temperature conditions by dividing the mass flow by the density of the gas under the specific pressure and temperature conditions (see Section 3.4.3.4).
Note Volume flow is sometimes referred to as actual flow.
Volume flow is dependent on the actual temperature and pressure of the flowing gas at the point where volume flow is to be measured. Generally, this point is not at the molbloc, it is at another point in the flow system (e.g., at the DUT). At another point in the flow system, it is quite likely that the gas pressure and temperature are different from the gas pressure and temperature at the molbloc. Then, even in steady state flow conditions, the volume flow at the molbloc and the volume flow at another point in the system are likely to be different. Therefore, to accurately predict volume flow at another point in the system, molbox1+ must calculate volume flow based on the gas pressure and temperature at that other point, not at the molbloc. For this reason, molbox1+ requires that gas pressure and temperature conditions at the DUT be specified for volume flow measurements.
Estimating the flowing gas pressure and temperature at the point at which volume flow is to be measured may be difficult.
The relevant gas pressure when measuring volume flow is the gas’s absolute pressure. In cases in which the volume flow measurement is open to atmospheric (ambient) pressure, the volume flow pressure is atmospheric pressure. In other cases, there may be ways to estimate the pressure at the volume flow measurement point but it probably should be measured.
For temperature, if the volume flow measurement point is very near the molbloc, one possibility is to use the molbloc temperature measurement. By design, the molbloc causes the temperature of the gas that flows through the molbloc to take on the molbloc temperature. Therefore, the temperature of the gas as it exits the
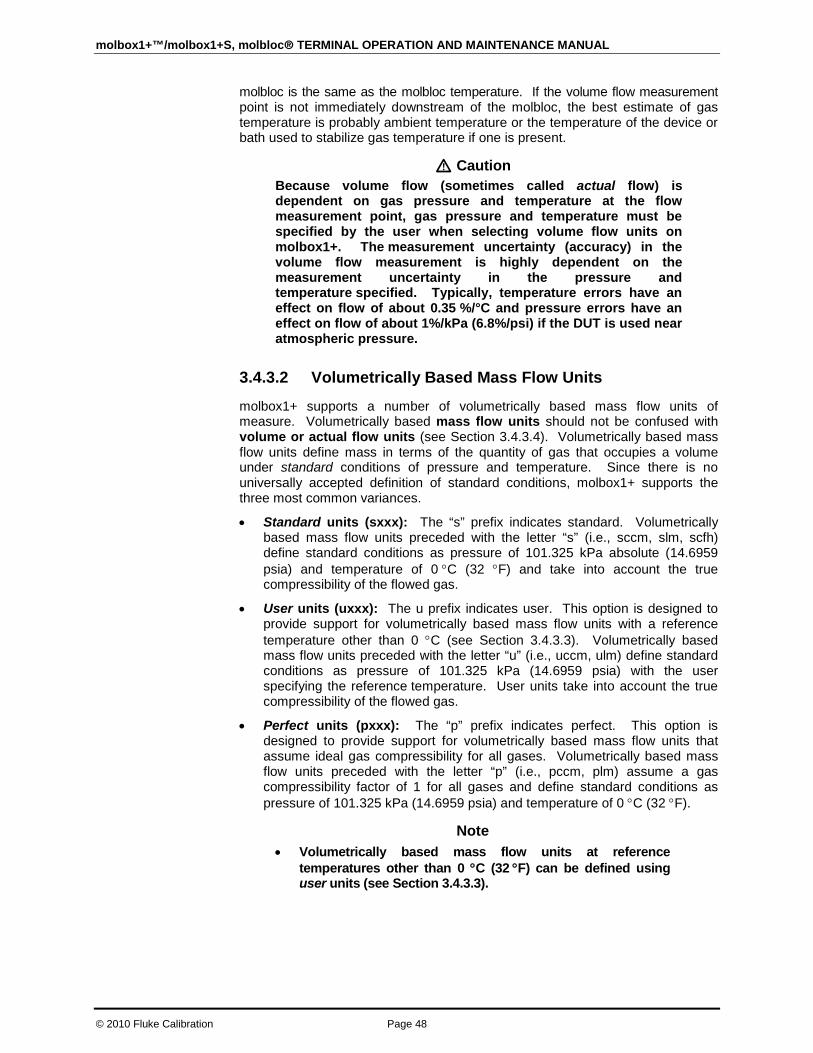
molbox1+™/molbox1+S, molbloc® TERMINAL OPERATION AND MAINTENANCE MANUAL
© 2010 Fluke Calibration Page 48
molbloc is the same as the molbloc temperature. If the volume flow measurement point is not immediately downstream of the molbloc, the best estimate of gas temperature is probably ambient temperature or the temperature of the device or bath used to stabilize gas temperature if one is present.
Caution Because volume flow (sometimes called actual flow) is dependent on gas pressure and temperature at the flow measurement point, gas pressure and temperature must be specified by the user when selecting volume flow units on molbox1+. The measurement uncertainty (accuracy) in the volume flow measurement is highly dependent on the measurement uncertainty in the pressure and temperature specified. Typically, temperature errors have an effect on flow of about 0.35 %/°C and pressure errors have an effect on flow of about 1%/kPa (6.8%/psi) if the DUT is used near atmospheric pressure.
3.4.3.2 Volumetrically Based Mass Flow Units
molbox1+ supports a number of volumetrically based mass flow units of measure. Volumetrically based mass flow units should not be confused with volume or actual flow units (see Section 3.4.3.4). Volumetrically based mass flow units define mass in terms of the quantity of gas that occupies a volume under standard conditions of pressure and temperature. Since there is no universally accepted definition of standard conditions, molbox1+ supports the three most common variances.
• Standard units (sxxx): The “s” prefix indicates standard. Volumetrically based mass flow units preceded with the letter “s” (i.e., sccm, slm, scfh) define standard conditions as pressure of 101.325 kPa absolute (14.6959 psia) and temperature of 0 °C (32 °F) and take into account the true compressibility of the flowed gas.
• User units (uxxx): The u prefix indicates user. This option is designed to provide support for volumetrically based mass flow units with a reference temperature other than 0 °C (see Section 3.4.3.3). Volumetrically based mass flow units preceded with the letter “u” (i.e., uccm, ulm) define standard conditions as pressure of 101.325 kPa (14.6959 psia) with the user specifying the reference temperature. User units take into account the true compressibility of the flowed gas.
• Perfect units (pxxx): The “p” prefix indicates perfect. This option is designed to provide support for volumetrically based mass flow units that assume ideal gas compressibility for all gases. Volumetrically based mass flow units preceded with the letter “p” (i.e., pccm, plm) assume a gas compressibility factor of 1 for all gases and define standard conditions as pressure of 101.325 kPa (14.6959 psia) and temperature of 0 °C (32 °F).
Note • Volumetrically based mass flow units at reference
temperatures other than 0 °C (32 °F) can be defined using user units (see Section 3.4.3.3).

3. OPERATION
Page 49 © 2010 Fluke Calibration
• In early 1996, SEMI (a semiconductor industry interest group) adopted standard E12-96 which specifies that perfect units be used for volumetrically based mass flow units. To comply with the SEMI standard, pccm should be used rather than sccm. To purchase a copy of the relevant SEMI standard, contact SEMI at telephone 415.964.5111 or email [email protected].
3.4.3.3 Volumetrically Based Mass Flow Units at Various Reference Temperatures (UXXX)
Units starting with the letter “u” (user units) are volumetrically based mass flow units (see Section 3.4.3.2) for which a reference temperature other than 0 °C is desired.
When a user unit is selected, the reference temperature desired must be specified. After a user unit is selected, the display is:
Temperature ref? 0ºC
Enter the reference temperature desired for the volumetrically based mass flow unit selected. The temperature unit can be changed between °C and °F by pressing [SETUP] and selecting <9tempU> (see Section 3.5.9). The temperature selected applies to all the user units.
Note Volumetrically based mass flow units, including user units (uxxx) and perfect units (pxxx), are discussed further in Section 3.4.3.2.
3.4.3.4 Volume Flow Units (vlm)
Note See Section 3.4.3.1 before using volume flow units. Volume flow is sometimes referred to as actual flow.
To measure flow in volume flow units (sometimes referred to as actual flow units), press [UNIT], <vlm> under the UNIT function. If <vlm> is not available, see Section 3.4.3.5. This selection accesses the menu of volume units available. Select the desired volume flow unit:
1. Current volume flow pressure.
2. Current volume flow temperature. Indicates <bloc> if the current setting is to use the molbloc temperature.
P:100.325 kPa T:20.1ºC Edit P&T? 1No 2Yes
To retain the current volume flow pressure and temperature, select <1no> and operation returns to the MAIN run screen with the selected volume flow unit active. To change the volume flow pressure and/or temperature select <2yes>.
The next screen gives the choice of having the volume flow gas temperature be either the molbloc temperature or a user specified temperature. If <2user> is selected, a screen to enter the temperature is presented before continuing. If <1molbloc> is selected, the volume flow temperature will automatically be taken as the molbloc temperature.
Gas temperature: 1molbloc 2user

molbox1+™/molbox1+S, molbloc® TERMINAL OPERATION AND MAINTENANCE MANUAL
© 2010 Fluke Calibration Page 50
The next screen is to edit the volume flow pressure in the current pressure unit of measure. Pressing [ENTER] accepts the edited value as the volume flow pressure and returns to the MAIN run screen with the selected volume flow unit and gas temperature and pressure active.
Volume unit gas pres 101.325 kPa
Note The temperature and pressure units of measure used to specify volume flow conditions can be changed using [SETUP], <8presU> for pressure (see Section 3.5.8) and [SETUP], <9tempU> for temperature (see Section 3.5.9).
Caution Because volume flow is dependent on gas pressure and temperature at the flow measurement point, gas pressure and temperature must be specified by the user when selecting volume flow units. The measurement uncertainty in the volume flow measurement is highly dependent on the measurement uncertainty in the pressure and temperature specified (see Section 3.4.3.1).
3.4.3.5 Customizing FLOW Units Available Under The UNIT Function
The UNIT function provides a choice of six different flow units of measure. The units that are available by default are the six indicated in Section 3.4.3. However, molbox1+ supports many other units. These other units can be made available for selection by customizing the UNIT function.
To customize the UNIT function, press [SETUP] and select <7flowU>. The display is:
Set up user unit #1
<#1> corresponds to the first of the six available selections under the UNIT function. Enter the number of the selection that you would like to change. The display becomes:
Flow unit type: 1std 2user 3perfect 4vlm
Select the flow unit type of the desired flow unit (see Table 29). Then select the desired unit.
Table 29. Available Flow Units
<1std> <2user> <3perfect> <4vlm> <1mol/s> <2kg/s>
<3mg/s> <4slm>
<5sccm> <6scfm> <7scfh> <8slh>
<9sm3h>
<1ulm> <2uccm> <3ucfm> <4ucfh>
<5um3h>
<1plm> <2pccm> <3pcfm> <4pcfh> <5plh>
<6pm3h>
<1ccm> <2lm> <3lh>
<4m3h> <6cfm> <7cfh>

3. OPERATION
Page 51 © 2010 Fluke Calibration
Note The <4vlm> unit selection embeds the selection “vlm” into the UNIT function rather than a specific volume unit. The “vlm” selection provides access to all the volume flow units. In summary the unit types are: <1std> (standard): mass flow units for which “standard” conditions are temperature of 0 °C, standard atmosphere and using the true compressibility factor of the gas. <2user>: mass flow units for which “standard” conditions are a user settable temperature, standard atmosphere and using the true compressibility factor of the gas. <3perfect>: mass flow units for which “standard” conditions are temperature of 0 °C, standard atmosphere and assuming a compressibility factor of 1 for all gases. <4vlm>: volume flow units. See Sections 3.4.3.1 to 3.4.3.4 for additional information on flow unit types.
3.4.4 [TARE] PURPOSE
[TARE] accesses five functions.
• TARE function: To zero the molbox1+ differential pressure readings in molbloc-L operation or verify the two RPTs by comparing them against each other in molbloc-S mode (see Section 3.4.4.1).
• PURGE function: To purge the molbloc connecting lines and molbox1+ internal volume of a first gas with a second gas by flowing the second gas through the molbox1+ (see Section 3.4.4.2).
• LEAK CHECK function: To check the molbox1+ internal pneumatic circuit and/or the external test circuit to which molbox1+ is connected, for leaks (see Section 3.4.4.3).
• AUTOZ function: To periodically offset the molbox1+ RPTs relative to a reference pressure value in order to compensate for possible changes in the RPT zero between full recalibrations (see Section 3.4.4.4).
• BPR function (present only in molbloc-S operation): To measure and display the molbloc-S back pressure ratio (BPR) while operating in a BPR mode which does not continuously read and display BPR (see Section 3.4.4.5).
OPERATION
Pressing [TARE] accesses a display with the choice of four functions (five functions in molbloc-S operation). Select the desired function. See the following for principles and operation:
1tare 2purge 3leak check 4AutoZ ↓ 5BPR
Note Some screens (e.g., the Tare menu) may go beyond the two lines provided by the display. This is indicated by a flashing arrow in the second line of the display. Press the [←] and [→] keys to move the cursor to access the lines that are NOT visible or directly enter the number of the hidden menu choice if you know it.

molbox1+™/molbox1+S, molbloc® TERMINAL OPERATION AND MAINTENANCE MANUAL
© 2010 Fluke Calibration Page 52
3.4.4.1 <1Tare>
The purpose and operation of the tare function is different for molbloc-L and molbloc-S operation. It is described separately for the two modes below. The molbox1+S does not support the ability to tare as it does not support laminar molblocs.
3.4.4.1.1 molbloc-L Operation
PURPOSE
To zero the molbox1+ at the molbloc operating pressure. Zeros the differential reading between the two reference pressure transducers.
PRINCIPLE The molbox1+ TARE function can be considered the equivalent of the zeroing function performed on many instruments prior to making measurements.
molbox1+ calculates the flow through a molbloc-L from the differential pressure across the molbloc. The differential pressure across the molbloc is measured by taking the difference in the absolute pressure measured by the molbox1+’s two internal RPTs. One RPT is connected to the upstream molbloc pressure port and the other to the downstream molbloc pressure port.
If a common pressure is applied to both RPTs the differential pressure indicated should be zero. If a differential pressure value is observed, the value indicated represents an offset in the differential measurement which will appear as an offset or “zero error” on the flow through molbloc-L calculated by the molbox1+. The TARE function allows the differential indication between the two RPTs to be zeroed at the molbloc operating pressure to eliminate the zero error in differential pressure measurement.
When the TARE function is activated, molbox1+’s internal valves operate to pneumatically connect together the two absolute transducers at the molbloc operating pressure (see Figure 5). The user can select whether this pressure is the upstream or downstream molbloc pressure so that the tare can be made at the pressure that will be held stable during operation (generally by a regulator or because it is open to atmosphere). Activating the tare causes molbox1+ to record the current differential as the tare value. The tare value is then used to correct all subsequent RPT readings. The tare value is the difference between the two transducer readings (hi - lo). After taring, the upstream RPT is corrected by (- tare value/2) and the downstream RPT is corrected by (+ tare value/2).
1. Channel A High Isolation: Open
2. Channel A Low Isolation: Closed
3. Channel B High Isolation: Closed
4. Channel B Low Isolation: Closed
5. Bypass: Open
Figure 6. molbox1+ Internal Pneumatic Schematic – TARING CHANNEL A, UPSTREAM molbloc-L OPERATION
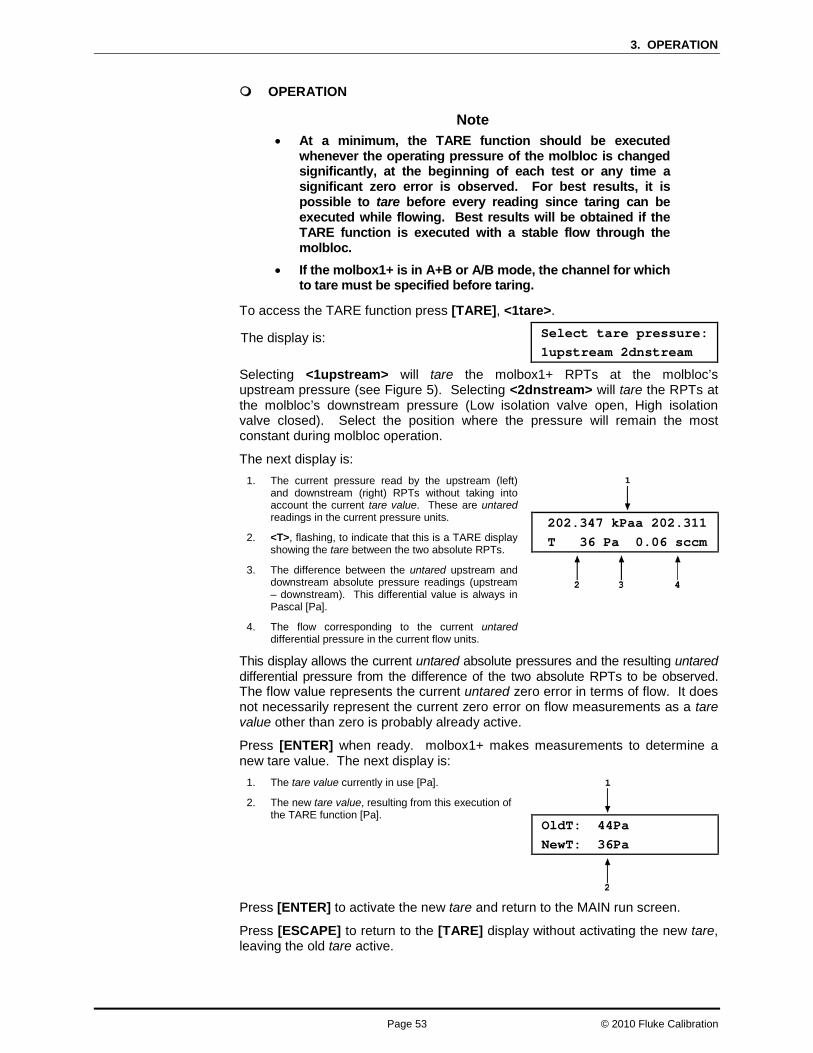
3. OPERATION
Page 53 © 2010 Fluke Calibration
OPERATION
Note • At a minimum, the TARE function should be executed
whenever the operating pressure of the molbloc is changed significantly, at the beginning of each test or any time a significant zero error is observed. For best results, it is possible to tare before every reading since taring can be executed while flowing. Best results will be obtained if the TARE function is executed with a stable flow through the molbloc.
• If the molbox1+ is in A+B or A/B mode, the channel for which to tare must be specified before taring.
To access the TARE function press [TARE], <1tare>.
The display is: Select tare pressure: 1upstream 2dnstream
Selecting <1upstream> will tare the molbox1+ RPTs at the molbloc’s upstream pressure (see Figure 5). Selecting <2dnstream> will tare the RPTs at the molbloc’s downstream pressure (Low isolation valve open, High isolation valve closed). Select the position where the pressure will remain the most constant during molbloc operation.
The next display is: 1. The current pressure read by the upstream (left)
and downstream (right) RPTs without taking into account the current tare value. These are untared readings in the current pressure units.
2. <T>, flashing, to indicate that this is a TARE display showing the tare between the two absolute RPTs.
3. The difference between the untared upstream and downstream absolute pressure readings (upstream – downstream). This differential value is always in Pascal [Pa].
4. The flow corresponding to the current untared differential pressure in the current flow units.
202.347 kPaa 202.311 T 36 Pa 0.06 sccm
This display allows the current untared absolute pressures and the resulting untared differential pressure from the difference of the two absolute RPTs to be observed. The flow value represents the current untared zero error in terms of flow. It does not necessarily represent the current zero error on flow measurements as a tare value other than zero is probably already active.
Press [ENTER] when ready. molbox1+ makes measurements to determine a new tare value. The next display is:
1. The tare value currently in use [Pa].
2. The new tare value, resulting from this execution of the TARE function [Pa].
OldT: 44Pa NewT: 36Pa
Press [ENTER] to activate the new tare and return to the MAIN run screen.
Press [ESCAPE] to return to the [TARE] display without activating the new tare, leaving the old tare active.
molbox1+™/molbox1+S, molbloc® TERMINAL OPERATION AND MAINTENANCE MANUAL
© 2010 Fluke Calibration Page 54
Note The tare screen shows the upstream and downstream RPT readings WITHOUT the current tare applied. The [P&T] screen shows the RPT readings WITH the tare applied (see Section 3.4.5).
Limits and Errors
Excessively large tare values can diagnose molbox1+ RPT malfunction, the need to recalibrate or possible poor execution of the TARE function. To protect against improper taring and to alert to possible RPT malfunction, molbox1+ checks the tare value before it is activated and displays warnings when appropriate. In the most extreme case, molbox1+ will not allow the tare value to be activated. The limits checked and their consequences are as follows:
RPT coherence test: When attempting to activate a new tare, molbox1+ checks the coherence between the two transducers and alerts the operator to excessive disagreements. The test has two levels.
• If the new tare is 200 Pa < tare < 3,000 Pa, a caution message is displayed. Pressing [ENTER] overrides the caution and activates the new tare. Pressing [ESCAPE] returns to the TARE screen.
• If the new tare is > 3,000 Pa, the new tare cannot be activated. Pressing [ENTER] or [ESCAPE] returns to the tare screen and retains the old tare. It is likely that molbox1+ needs service or a grossly incorrect adjustment has been made to one or both of the RPTs.
Note If a caution message appears or a tare cannot be activated during the taring process, repeat the taring process. If the caution persists, the calibration of the RPT(s) should be verified (see Section 5.2). If the tare still cannot be activated, the RPT(s) should be recalibrated and molbox1+ may require other service.
3.4.4.1.2 molbloc-S operation
PURPOSE
To check the molbox1+ RPT absolute pressure readings by comparing them at a common molbloc-S upstream absolute pressure. Note that the taring function is not supported by molbox1+S.
PRINCIPAL
When measuring the flow through molbloc-S, the critical pressure measured by molbox1+ is the molbloc upstream pressure. The downstream pressure is only monitored to be sure that critical flow conditions exist (see Section 3.1.5). To reduce the uncertainty on the upstream pressure measurement, molbox1+ employs internal valving to direct the upstream pressure to both RPTs, and the average of the two readings is used as the measured molbloc upstream pressure. To take advantage of this RPT averaging, the molbox1+ must be in either BPR OFF or Auto BPR mode (see Section 3.6.9).
molbox1+ dynamically tares the two RPT readings when they are connected together, so the user can view the “live” average pressure that is calculated and to allow smooth pressure and flow measurements during valve transitions in the Auto BPR mode (see Section 3.6.9). RPT taring in molbloc-S operation occurs automatically when needed and does not need to be initiated or performed by the user.
The molbloc-S TARE function is available to allow the user to conveniently verify that the two RPT measurements agree within an acceptable tolerance when a common pressure is applied to them. When the TARE function is selected, the
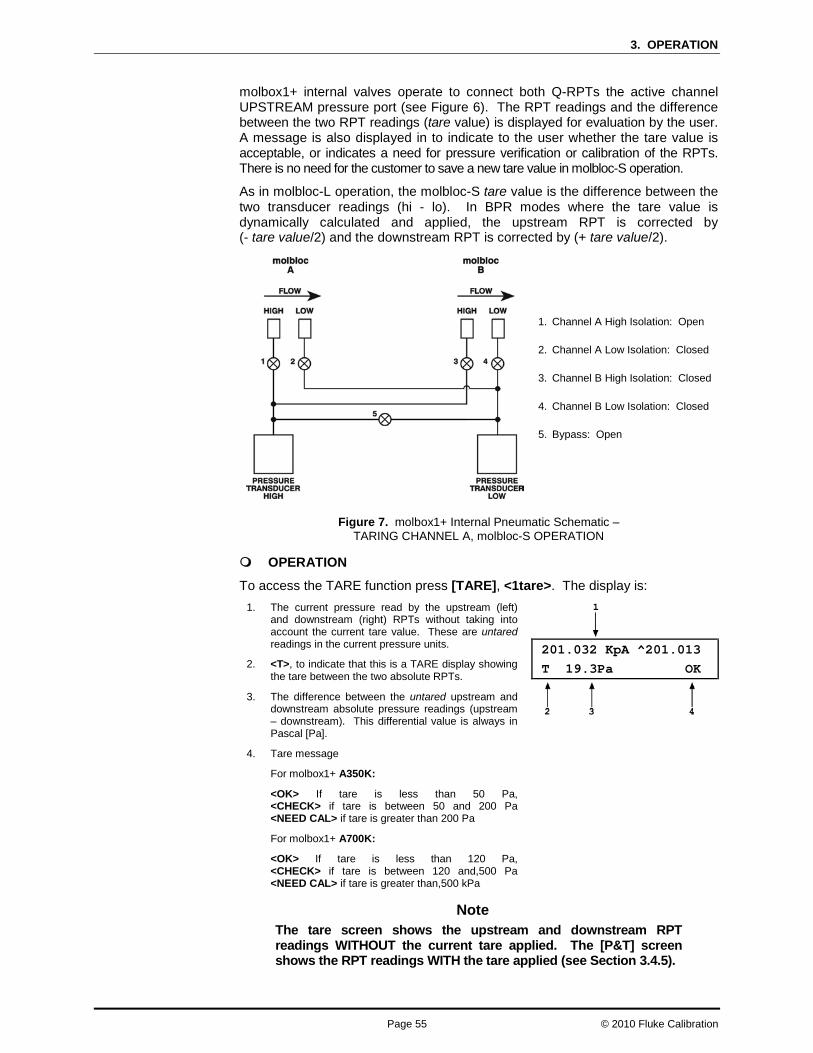
3. OPERATION
Page 55 © 2010 Fluke Calibration
molbox1+ internal valves operate to connect both Q-RPTs the active channel UPSTREAM pressure port (see Figure 6). The RPT readings and the difference between the two RPT readings (tare value) is displayed for evaluation by the user. A message is also displayed in to indicate to the user whether the tare value is acceptable, or indicates a need for pressure verification or calibration of the RPTs. There is no need for the customer to save a new tare value in molbloc-S operation.
As in molbloc-L operation, the molbloc-S tare value is the difference between the two transducer readings (hi - lo). In BPR modes where the tare value is dynamically calculated and applied, the upstream RPT is corrected by (- tare value/2) and the downstream RPT is corrected by (+ tare value/2).
1. Channel A High Isolation: Open
2. Channel A Low Isolation: Closed
3. Channel B High Isolation: Closed
4. Channel B Low Isolation: Closed
5. Bypass: Open
Figure 7. molbox1+ Internal Pneumatic Schematic – TARING CHANNEL A, molbloc-S OPERATION
OPERATION
To access the TARE function press [TARE], <1tare>. The display is: 1. The current pressure read by the upstream (left)
and downstream (right) RPTs without taking into account the current tare value. These are untared readings in the current pressure units.
2. <T>, to indicate that this is a TARE display showing the tare between the two absolute RPTs.
3. The difference between the untared upstream and downstream absolute pressure readings (upstream – downstream). This differential value is always in Pascal [Pa].
4. Tare message
For molbox1+ A350K:
<OK> If tare is less than 50 Pa, <CHECK> if tare is between 50 and 200 Pa <NEED CAL> if tare is greater than 200 Pa
For molbox1+ A700K:
<OK> If tare is less than 120 Pa, <CHECK> if tare is between 120 and,500 Pa <NEED CAL> if tare is greater than,500 kPa
201.032 KpA ^201.013 T 19.3Pa OK
Note The tare screen shows the upstream and downstream RPT readings WITHOUT the current tare applied. The [P&T] screen shows the RPT readings WITH the tare applied (see Section 3.4.5).

molbox1+™/molbox1+S, molbloc® TERMINAL OPERATION AND MAINTENANCE MANUAL
© 2010 Fluke Calibration Page 56
3.4.4.2 <2Purge>
PURPOSE
To purge the lines between the molbloc and the molbox1+ and the internal molbox1+ volumes of one gas with another gas by setting up a molbox1+ valving configuration in which gas flows through the molbox1+. Note that the purge function is not supported by molbox1+S.
PRINCIPAL
molbox1+ supports the measurement of flow of a variety of gases. To calculate the flow, the thermodynamic characteristics of the gas must be known. These are stored in molbox1+ memory. For the flow to be calculated correctly, the gas flowing through the molbloc must be the gas that is selected on the molbox1+ (see Section 3.4.2). When switching from the measurement of one gas to another, the old gas remaining in the circuit and the new gas being flowed may mix for some time so that the gas flowing through the molbloc is not purely the new gas. Erroneous measurements may result. For this reason, it is important to purge the lines upstream and downstream of the molbloc when changing gases. It is also important to purge the molbox1+ itself which, since there is normally no flow through it, may trap and hold the old gas.
The PURGE function is designed to facilitate purging the molbox1+. It sets up the molbox1+ internal valving so that flow can pass through the molbox1+ (see Figure 7). In this configuration, the lines between the molbloc and molbox1+ and the molbox1+ internal volume can be purged by simply flowing the new gas in the normal flowing configuration. The flow resistance through the molbloc creates a differential pressure which causes flow through the molbox1+ to occur, purging the molbox1+ with the new gas.
1. Channel A High Isolation: Open
2. Channel A Low Isolation: Open
3. Channel B High Isolation: Closed
4. Channel B Low Isolation: Closed
5. Bypass: Open
Figure 8. molbox1+ Internal Pneumatic Schematic – PURGING CHANNEL A
OPERATION Note
For best results, the PURGE function should be executed whenever the species of the gas flowing through the molbloc is changed. Prior to activating the PURGE function, set flow through the molbloc to the highest rate that is practical. Then, with the gas flowing, activate the PURGE function. Very small volumes of gas remain trapped (deadended) in the molbox1+ in the PURGE configuration. Therefore, it may be desirable to execute the PURGE function more than once to clear these volumes by the pressure changes caused by PURGE execution.
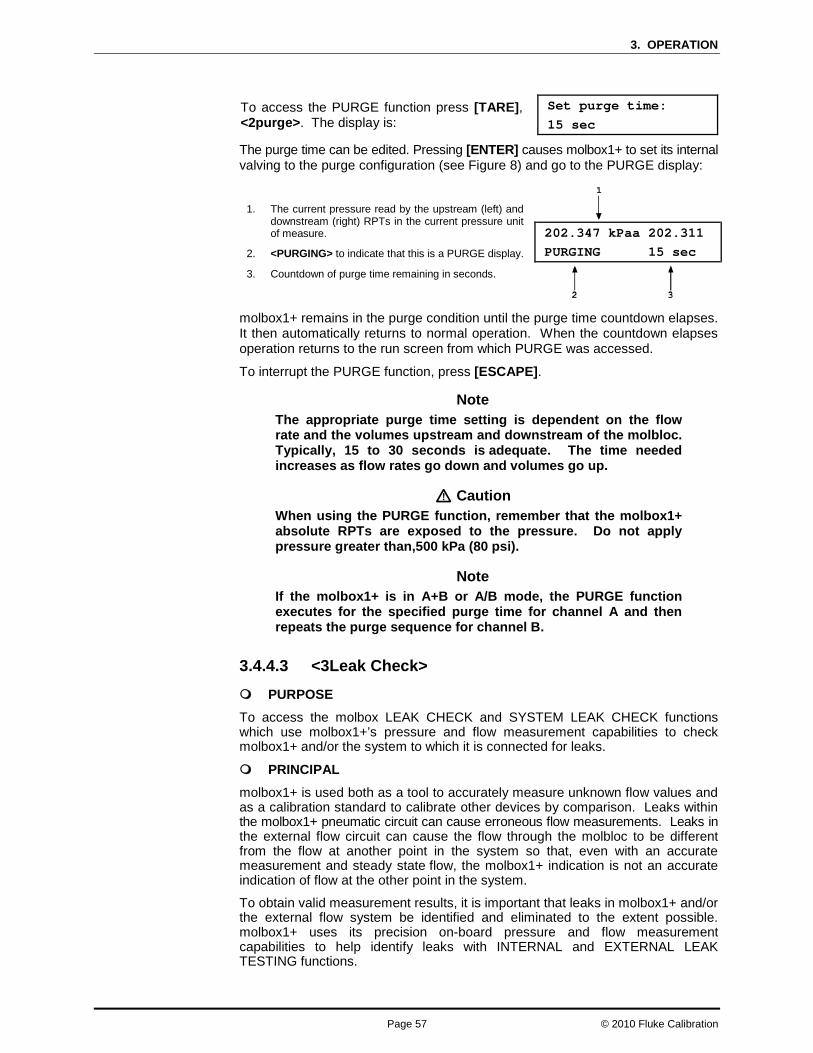
3. OPERATION
Page 57 © 2010 Fluke Calibration
To access the PURGE function press [TARE], <2purge>. The display is:
Set purge time: 15 sec
The purge time can be edited. Pressing [ENTER] causes molbox1+ to set its internal valving to the purge configuration (see Figure 8) and go to the PURGE display:
1. The current pressure read by the upstream (left) and downstream (right) RPTs in the current pressure unit of measure.
2. <PURGING> to indicate that this is a PURGE display.
3. Countdown of purge time remaining in seconds.
202.347 kPaa 202.311 PURGING 15 sec
molbox1+ remains in the purge condition until the purge time countdown elapses. It then automatically returns to normal operation. When the countdown elapses operation returns to the run screen from which PURGE was accessed.
To interrupt the PURGE function, press [ESCAPE].
Note The appropriate purge time setting is dependent on the flow rate and the volumes upstream and downstream of the molbloc. Typically, 15 to 30 seconds is adequate. The time needed increases as flow rates go down and volumes go up.
Caution When using the PURGE function, remember that the molbox1+ absolute RPTs are exposed to the pressure. Do not apply pressure greater than,500 kPa (80 psi).
Note If the molbox1+ is in A+B or A/B mode, the PURGE function executes for the specified purge time for channel A and then repeats the purge sequence for channel B.
3.4.4.3 <3Leak Check>
PURPOSE To access the molbox LEAK CHECK and SYSTEM LEAK CHECK functions which use molbox1+’s pressure and flow measurement capabilities to check molbox1+ and/or the system to which it is connected for leaks.
PRINCIPAL molbox1+ is used both as a tool to accurately measure unknown flow values and as a calibration standard to calibrate other devices by comparison. Leaks within the molbox1+ pneumatic circuit can cause erroneous flow measurements. Leaks in the external flow circuit can cause the flow through the molbloc to be different from the flow at another point in the system so that, even with an accurate measurement and steady state flow, the molbox1+ indication is not an accurate indication of flow at the other point in the system.
To obtain valid measurement results, it is important that leaks in molbox1+ and/or the external flow system be identified and eliminated to the extent possible. molbox1+ uses its precision on-board pressure and flow measurement capabilities to help identify leaks with INTERNAL and EXTERNAL LEAK TESTING functions.
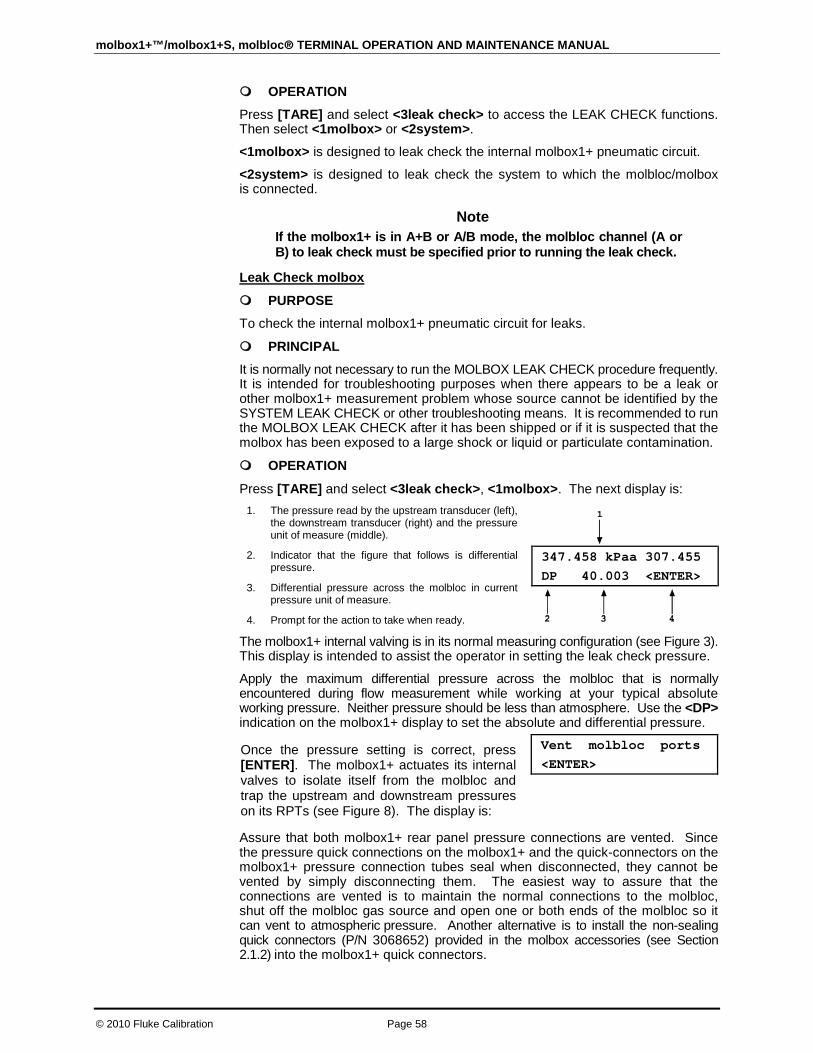
molbox1+™/molbox1+S, molbloc® TERMINAL OPERATION AND MAINTENANCE MANUAL
© 2010 Fluke Calibration Page 58
OPERATION Press [TARE] and select <3leak check> to access the LEAK CHECK functions. Then select <1molbox> or <2system>.
<1molbox> is designed to leak check the internal molbox1+ pneumatic circuit.
<2system> is designed to leak check the system to which the molbloc/molbox is connected.
Note If the molbox1+ is in A+B or A/B mode, the molbloc channel (A or B) to leak check must be specified prior to running the leak check.
Leak Check molbox
PURPOSE To check the internal molbox1+ pneumatic circuit for leaks.
PRINCIPAL It is normally not necessary to run the MOLBOX LEAK CHECK procedure frequently. It is intended for troubleshooting purposes when there appears to be a leak or other molbox1+ measurement problem whose source cannot be identified by the SYSTEM LEAK CHECK or other troubleshooting means. It is recommended to run the MOLBOX LEAK CHECK after it has been shipped or if it is suspected that the molbox has been exposed to a large shock or liquid or particulate contamination.
OPERATION
Press [TARE] and select <3leak check>, <1molbox>. The next display is: 1. The pressure read by the upstream transducer (left),
the downstream transducer (right) and the pressure unit of measure (middle).
2. Indicator that the figure that follows is differential pressure.
3. Differential pressure across the molbloc in current pressure unit of measure.
4. Prompt for the action to take when ready.
347.458 kPaa 307.455 DP 40.003 <ENTER>
The molbox1+ internal valving is in its normal measuring configuration (see Figure 3). This display is intended to assist the operator in setting the leak check pressure.
Apply the maximum differential pressure across the molbloc that is normally encountered during flow measurement while working at your typical absolute working pressure. Neither pressure should be less than atmosphere. Use the <DP> indication on the molbox1+ display to set the absolute and differential pressure.
Once the pressure setting is correct, press [ENTER]. The molbox1+ actuates its internal valves to isolate itself from the molbloc and trap the upstream and downstream pressures on its RPTs (see Figure 8). The display is:
Vent molbloc ports <ENTER>
Assure that both molbox1+ rear panel pressure connections are vented. Since the pressure quick connections on the molbox1+ and the quick-connectors on the molbox1+ pressure connection tubes seal when disconnected, they cannot be vented by simply disconnecting them. The easiest way to assure that the connections are vented is to maintain the normal connections to the molbloc, shut off the molbloc gas source and open one or both ends of the molbloc so it can vent to atmospheric pressure. Another alternative is to install the non-sealing quick connectors (P/N 3068652) provided in the molbox accessories (see Section 2.1.2) into the molbox1+ quick connectors.
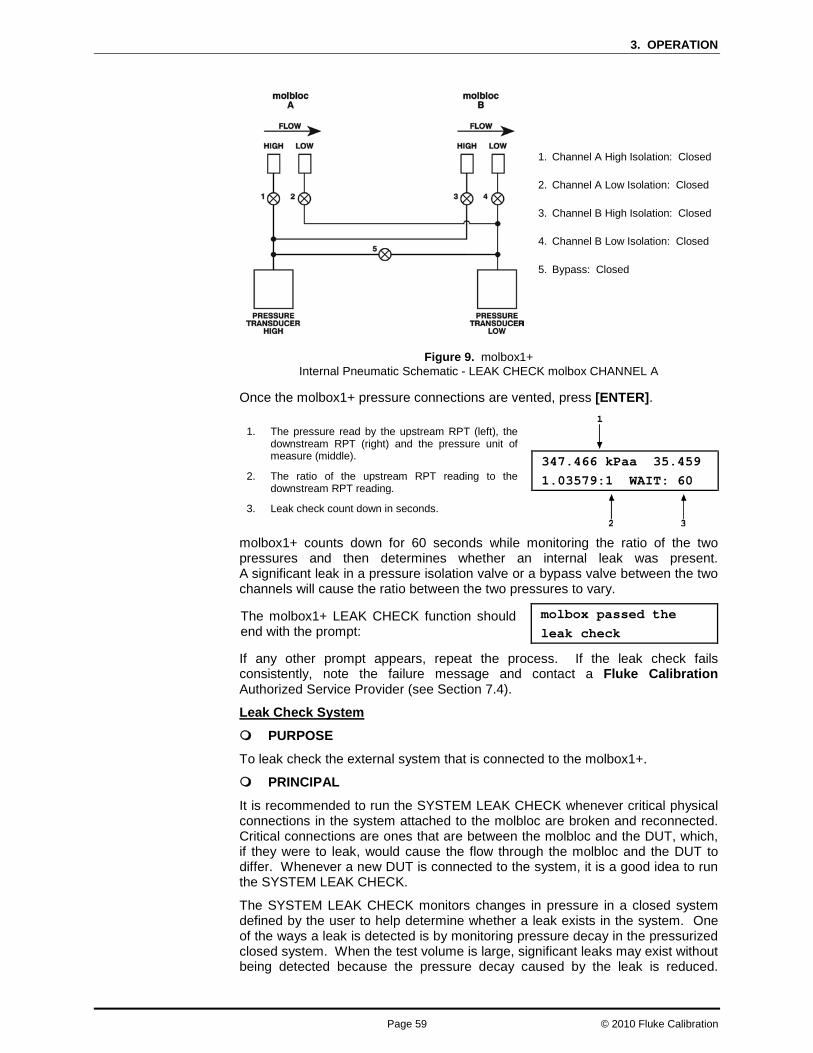
3. OPERATION
Page 59 © 2010 Fluke Calibration
1. Channel A High Isolation: Closed
2. Channel A Low Isolation: Closed
3. Channel B High Isolation: Closed
4. Channel B Low Isolation: Closed
5. Bypass: Closed
Figure 9. molbox1+ Internal Pneumatic Schematic - LEAK CHECK molbox CHANNEL A
Once the molbox1+ pressure connections are vented, press [ENTER].
1. The pressure read by the upstream RPT (left), the downstream RPT (right) and the pressure unit of measure (middle).
2. The ratio of the upstream RPT reading to the downstream RPT reading.
3. Leak check count down in seconds.
347.466 kPaa 35.459 1.03579:1 WAIT: 60
molbox1+ counts down for 60 seconds while monitoring the ratio of the two pressures and then determines whether an internal leak was present. A significant leak in a pressure isolation valve or a bypass valve between the two channels will cause the ratio between the two pressures to vary.
The molbox1+ LEAK CHECK function should end with the prompt:
molbox passed the leak check
If any other prompt appears, repeat the process. If the leak check fails consistently, note the failure message and contact a Fluke Calibration Authorized Service Provider (see Section 7.4).
Leak Check System
PURPOSE
To leak check the external system that is connected to the molbox1+.
PRINCIPAL
It is recommended to run the SYSTEM LEAK CHECK whenever critical physical connections in the system attached to the molbloc are broken and reconnected. Critical connections are ones that are between the molbloc and the DUT, which, if they were to leak, would cause the flow through the molbloc and the DUT to differ. Whenever a new DUT is connected to the system, it is a good idea to run the SYSTEM LEAK CHECK.
The SYSTEM LEAK CHECK monitors changes in pressure in a closed system defined by the user to help determine whether a leak exists in the system. One of the ways a leak is detected is by monitoring pressure decay in the pressurized closed system. When the test volume is large, significant leaks may exist without being detected because the pressure decay caused by the leak is reduced.
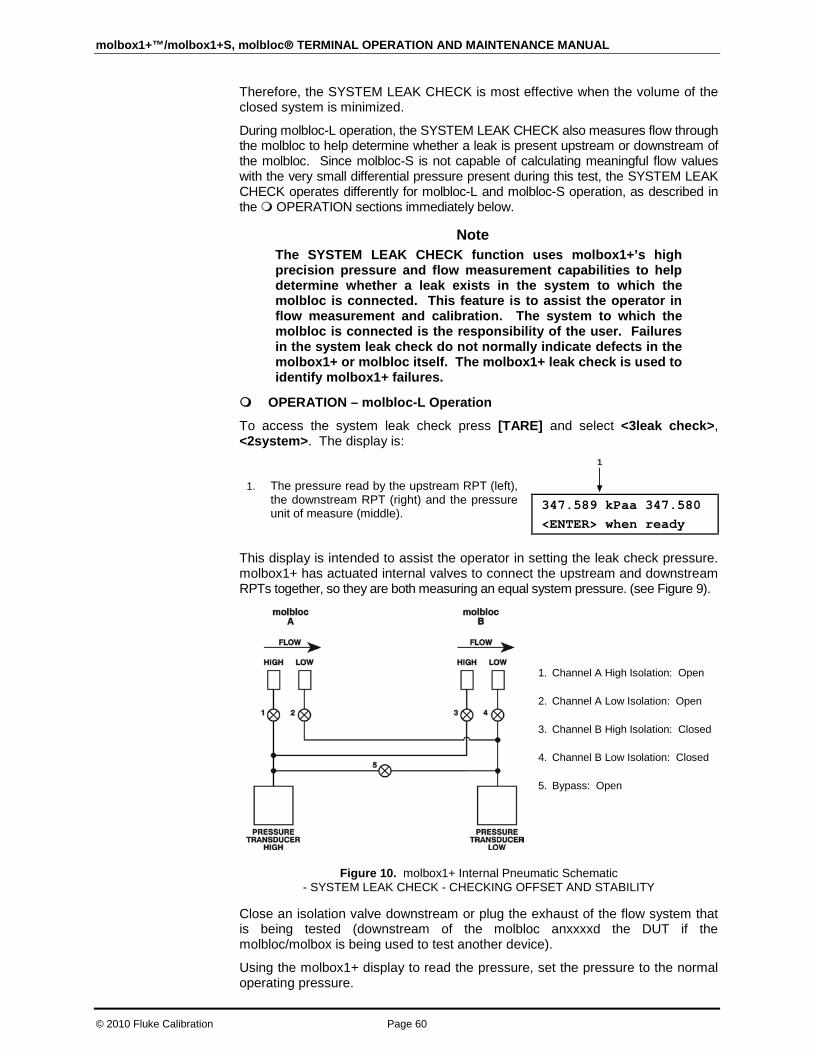
molbox1+™/molbox1+S, molbloc® TERMINAL OPERATION AND MAINTENANCE MANUAL
© 2010 Fluke Calibration Page 60
Therefore, the SYSTEM LEAK CHECK is most effective when the volume of the closed system is minimized.
During molbloc-L operation, the SYSTEM LEAK CHECK also measures flow through the molbloc to help determine whether a leak is present upstream or downstream of the molbloc. Since molbloc-S is not capable of calculating meaningful flow values with the very small differential pressure present during this test, the SYSTEM LEAK CHECK operates differently for molbloc-L and molbloc-S operation, as described in the OPERATION sections immediately below.
Note The SYSTEM LEAK CHECK function uses molbox1+’s high precision pressure and flow measurement capabilities to help determine whether a leak exists in the system to which the molbloc is connected. This feature is to assist the operator in flow measurement and calibration. The system to which the molbloc is connected is the responsibility of the user. Failures in the system leak check do not normally indicate defects in the molbox1+ or molbloc itself. The molbox1+ leak check is used to identify molbox1+ failures.
OPERATION – molbloc-L Operation
To access the system leak check press [TARE] and select <3leak check>, <2system>. The display is:
1. The pressure read by the upstream RPT (left), the downstream RPT (right) and the pressure unit of measure (middle).
347.589 kPaa 347.580 <ENTER> when ready
This display is intended to assist the operator in setting the leak check pressure. molbox1+ has actuated internal valves to connect the upstream and downstream RPTs together, so they are both measuring an equal system pressure. (see Figure 9).
1. Channel A High Isolation: Open
2. Channel A Low Isolation: Open
3. Channel B High Isolation: Closed
4. Channel B Low Isolation: Closed
5. Bypass: Open
Figure 10. molbox1+ Internal Pneumatic Schematic - SYSTEM LEAK CHECK - CHECKING OFFSET AND STABILITY
Close an isolation valve downstream or plug the exhaust of the flow system that is being tested (downstream of the molbloc anxxxxd the DUT if the molbloc/molbox is being used to test another device).
Using the molbox1+ display to read the pressure, set the pressure to the normal operating pressure.
3. OPERATION
Page 61 © 2010 Fluke Calibration
Note For systems with mass flow controllers (MFCs): Keep in mind that the valves in most MFCs are not intended to provide a complete gas shutoff and so they may not be suitable to close off the test system. If an MFC is downstream of the molbloc and its downstream port is open to atmosphere, it is best to close the system by connecting a cap to the MFC outlet fitting or by connecting a shutoff valve downstream. If the MFC valve is closed (most MFCs have normally closed valves) when the operating pressure is applied from the upstream side, most of the gas will be stopped by the MFC valve and will not immediately fill the volume between the MFC valve and the downstream cap or valve. If this happens, the gas may leak by the MFC valve to fill this volume during the test and cause a pressure decay and an apparent system leak. The solution is to send a setpoint signal to the MFC to open the MFC valve while pressurizing the system. Then close the MFC valve (remove the setpoint signal) after the system is pressurized to avoid heating of the test gas by the energized valve.
Next, close an isolation valve upstream of the molbloc so the gas supply is no longer open to the system being checked. Once the pressure has stabilized, press [ENTER]. The display is:
347.587 kPaa 347.583 WAIT: 30
The molbox1+ is checking:
• For pressure and temperature stability before running the system leak test
• That the disagreement between the two RPTs is not excessive
After 30 seconds, if the stability check is not passed, molbox1+ displays:
• If the pressure was not stable: Leak is too large to continue
• If the molbloc temperature change was too great:
Temp change was too great to find leaks
• If the offset between the RPTs was too great:
Offset excessive check tare
If any of the above three prompts occurs, check the external system for leaks and run the molbox1+ leak check before proceeding. If the tare was excessive, tare the molbox1+ RPTs before running the leak check again (see Section 3.4.4.1).
Once the 30 second pressure stability/offset check has been successfully completed, molbox1+ displays:
347.587 kPaa 347.583 0.000 sccm [ENT]
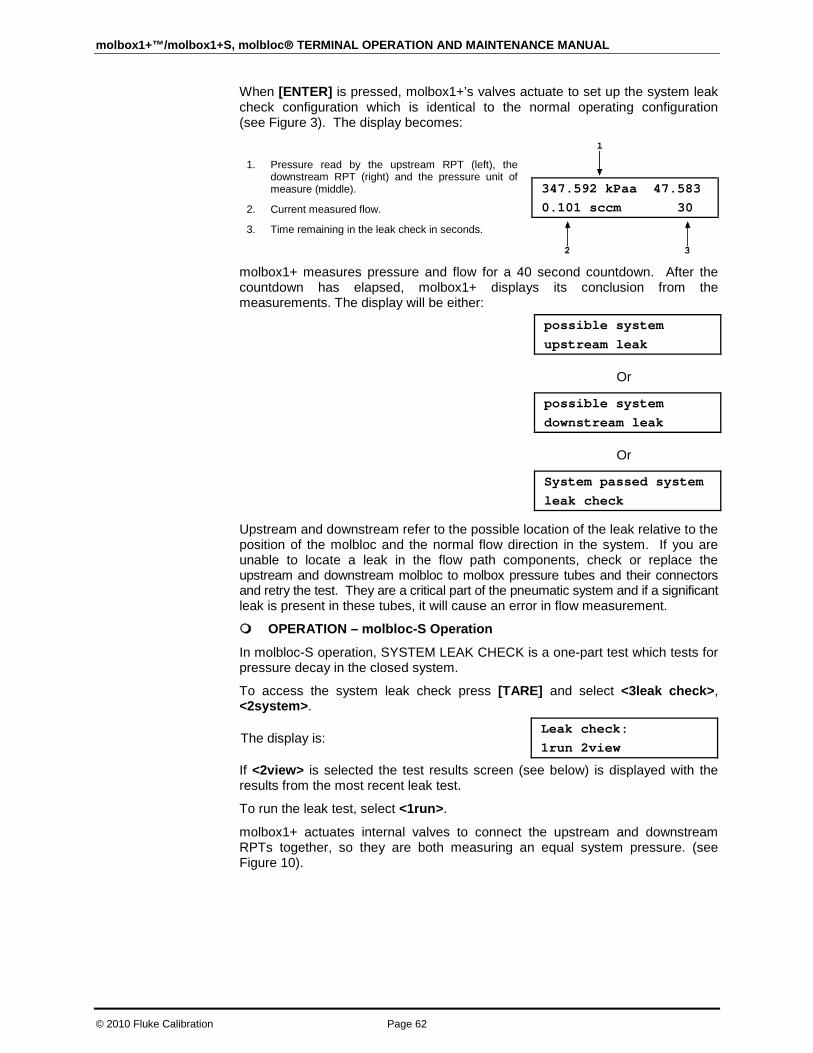
molbox1+™/molbox1+S, molbloc® TERMINAL OPERATION AND MAINTENANCE MANUAL
© 2010 Fluke Calibration Page 62
When [ENTER] is pressed, molbox1+’s valves actuate to set up the system leak check configuration which is identical to the normal operating configuration (see Figure 3). The display becomes:
1. Pressure read by the upstream RPT (left), the downstream RPT (right) and the pressure unit of measure (middle).
2. Current measured flow.
3. Time remaining in the leak check in seconds.
347.592 kPaa 47.583 0.101 sccm 30
molbox1+ measures pressure and flow for a 40 second countdown. After the countdown has elapsed, molbox1+ displays its conclusion from the measurements. The display will be either:
possible system upstream leak
Or
possible system downstream leak
Or
System passed system leak check
Upstream and downstream refer to the possible location of the leak relative to the position of the molbloc and the normal flow direction in the system. If you are unable to locate a leak in the flow path components, check or replace the upstream and downstream molbloc to molbox pressure tubes and their connectors and retry the test. They are a critical part of the pneumatic system and if a significant leak is present in these tubes, it will cause an error in flow measurement.
OPERATION – molbloc-S Operation
In molbloc-S operation, SYSTEM LEAK CHECK is a one-part test which tests for pressure decay in the closed system.
To access the system leak check press [TARE] and select <3leak check>, <2system>.
The display is: Leak check: 1run 2view
If <2view> is selected the test results screen (see below) is displayed with the results from the most recent leak test.
To run the leak test, select <1run>.
molbox1+ actuates internal valves to connect the upstream and downstream RPTs together, so they are both measuring an equal system pressure. (see Figure 10).

3. OPERATION
Page 63 © 2010 Fluke Calibration
1. Channel A High Isolation: Open
2. Channel A Low Isolation: Open
3. Channel B High Isolation: Closed
4. Channel B Low Isolation: Closed
5. Bypass: Open
Figure 11. molbox1+ Internal Pneumatic Schematic - SYSTEM LEAK CHECK ON CHANNEL A - CHECKING OFFSET AND STABILITY
Close an isolation valve downstream or plug the exhaust of the flow system that is being tested (downstream of the molbloc and the DUT if the molbloc/molbox is being used to test another device).
Open an isolation valve upstream of the molbloc to allow the working pressure to pressurize the system.
Note For systems with mass flow controllers (MFCs) Keep in mind that the valves in most MFCs are not intended to provide a complete gas shutoff and so they may not be suitable to close off the test system. If an MFC is downstream of the molbloc and its downstream port is open to atmosphere, it is best to close the system by connecting a cap to the MFC outlet fitting or by connecting a shutoff valve downstream. If the MFC valve is closed (most MFCs have normally closed valves) when the operating pressure is applied from the upstream side, most of the gas will be stopped by the MFC valve and will not immediately fill the volume between the MFC valve and the downstream cap or valve. If this happens, the gas may leak by the MFC valve to fill this volume during the test and cause a pressure decay and an apparent system leak. The solution is to send a setpoint signal to the MFC to open the MFC valve while pressurizing the system. Then close the MFC valve (remove the setpoint signal) after the system is pressurized to avoid heating of the test gas by the energized valve.
Next, close the isolation valve upstream of the molbloc so the gas supply is no longer open to the system being checked. Once the pressure has had time to stabilize, press [ENTER].
The next display is: ENTER to start 60 s leak check
Press [ENTER] to begin the test
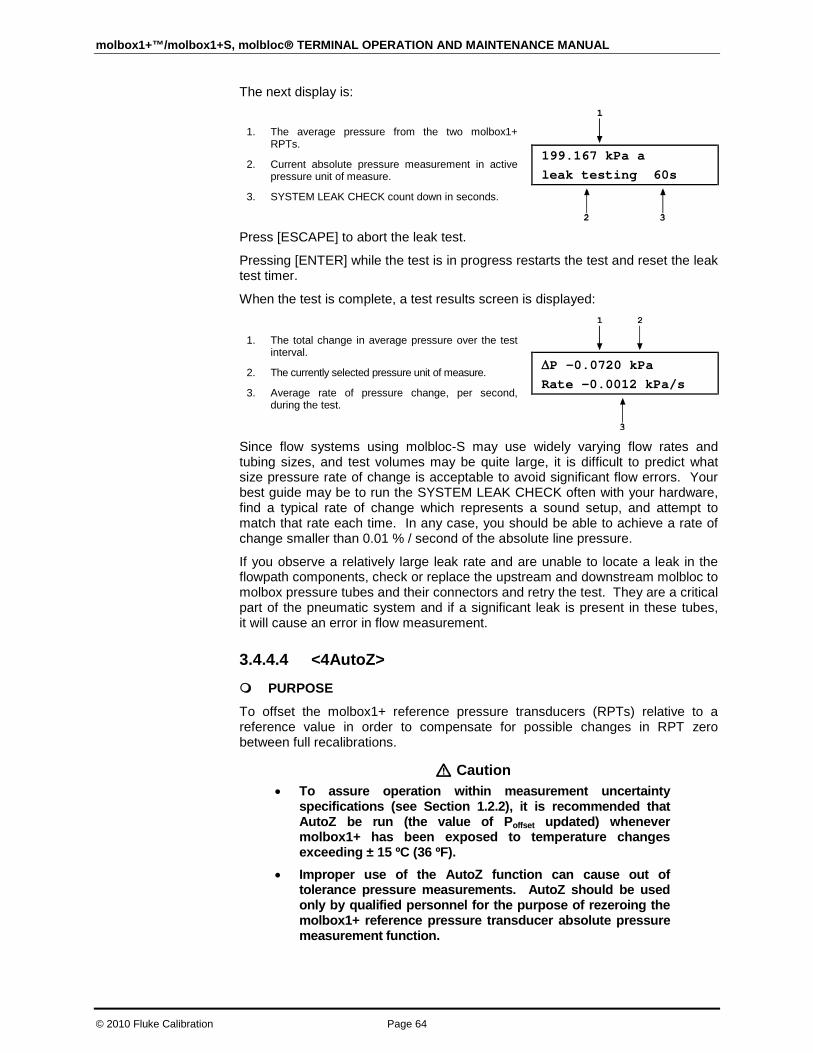
molbox1+™/molbox1+S, molbloc® TERMINAL OPERATION AND MAINTENANCE MANUAL
© 2010 Fluke Calibration Page 64
The next display is:
1. The average pressure from the two molbox1+ RPTs.
2. Current absolute pressure measurement in active pressure unit of measure.
3. SYSTEM LEAK CHECK count down in seconds.
199.167 kPa a leak testing 60s
Press [ESCAPE] to abort the leak test.
Pressing [ENTER] while the test is in progress restarts the test and reset the leak test timer.
When the test is complete, a test results screen is displayed:
1. The total change in average pressure over the test interval.
2. The currently selected pressure unit of measure.
3. Average rate of pressure change, per second, during the test.
∆P –0.0720 kPa Rate –0.0012 kPa/s
Since flow systems using molbloc-S may use widely varying flow rates and tubing sizes, and test volumes may be quite large, it is difficult to predict what size pressure rate of change is acceptable to avoid significant flow errors. Your best guide may be to run the SYSTEM LEAK CHECK often with your hardware, find a typical rate of change which represents a sound setup, and attempt to match that rate each time. In any case, you should be able to achieve a rate of change smaller than 0.01 % / second of the absolute line pressure.
If you observe a relatively large leak rate and are unable to locate a leak in the flowpath components, check or replace the upstream and downstream molbloc to molbox pressure tubes and their connectors and retry the test. They are a critical part of the pneumatic system and if a significant leak is present in these tubes, it will cause an error in flow measurement.
3.4.4.4 <4AutoZ>
PURPOSE
To offset the molbox1+ reference pressure transducers (RPTs) relative to a reference value in order to compensate for possible changes in RPT zero between full recalibrations.
Caution • To assure operation within measurement uncertainty
specifications (see Section 1.2.2), it is recommended that AutoZ be run (the value of Poffset updated) whenever molbox1+ has been exposed to temperature changes exceeding ± 15 ºC (36 ºF).
• Improper use of the AutoZ function can cause out of tolerance pressure measurements. AutoZ should be used only by qualified personnel for the purpose of rezeroing the molbox1+ reference pressure transducer absolute pressure measurement function.

3. OPERATION
Page 65 © 2010 Fluke Calibration
PRINCIPAL
AutoZ Purpose and Principle
The main component of the change over time of the molbox1+ RPTs is change in zero or offset, independent of span. Offsetting or “rezeroing” molbox1+ RPTs relative to a reference between recalibrations allows measurement uncertainty specifications to be maintained with less frequent full calibrations. The molbox1+ AutoZero function (AutoZ) provides full on-board support for the rezeroing process to simplify its application by the user.
The AutoZero function uses three values:
1. Pstd,0: The absolute pressure value indicated by the AutoZ reference, the device that is acting as the reference relative to which to offset the RPT.
The pressure at which AutoZ is performed is normally atmospheric pressure and the Pstd,0 value can be supplied a) by manual entry, or b) automatically from a DHI RPMx Reference Pressure Monitor.
2. Pu,0: The absolute pressure reading of the RPT, with no AutoZ offset, at the time AutoZ is performed.
3. Poffset: The difference between the absolute pressure reading of the RPT with no AutoZ offset (Pu,0) and the indication of the AutoZ reference (Pstd,0):
Poffset = Pu,0 - Pstd,0
Poffset represents the change in zero of the RPT relative to the AutoZ standard (Pstd,0). The AutoZ function manages the determination, storage and application of Poffset for both molbox1+ RPTs in absolute mode. The AutoZ handles both molbox1+ RPTs simultaneously as they are of the same range and always used together.
The source of Pstd,0 must be an absolute pressure, nominally atmospheric pressure, with uncertainty significantly better than that of the RPT that is being AutoZeroed (see Section 1.2.2). This can be accomplished with a variety of digital barometers or with a piston gauge able to set absolute pressure.
When the RPTs are used with AutoZ ON, absolute pressure is calculated as:
Pabs = Pu,0 - Poffset
When RPTs are used with AutoZ OFF, Poffset is ignored.
When the RPT is calibrated, Poffset is set to zero. Poffset is then redetermined at regular intervals using the AutoZ function. The most recent value of Poffset is applied to the RPT reading to correct for change in zero over time.
Recommendations for the Use of the AutoZ Function
The AutoZ function provides a powerful and easy to use tool for improving the stability over time of molbox1+ RPTs and maximizing the recalibration interval by compensating for change in zero between full recalibrations. The following simple recommendations will help assure that you use this feature to best advantage.
• Always leave AutoZ ON when operating if the AutoZ routine has been run regularly using a valid atmospheric reference.
• Run AutoZ to update Poffset only when a reference whose measurement uncertainty is known to be significantly better than that of the molbox1+ RPTs is available. Though it may not be practical and generally is not necessary, the best possible reference with which to run AutoZ in absolute measurement mode is a gas operated piston gauge (such as a DHI PG7601) applying an absolute pressure near atmospheric pressure to the molbox1+ test port. The best day to day reference is a properly calibrated DHI RPM4 with a BA100K RPT interfaced directly as an external device to the molbox1+ COM2 port.
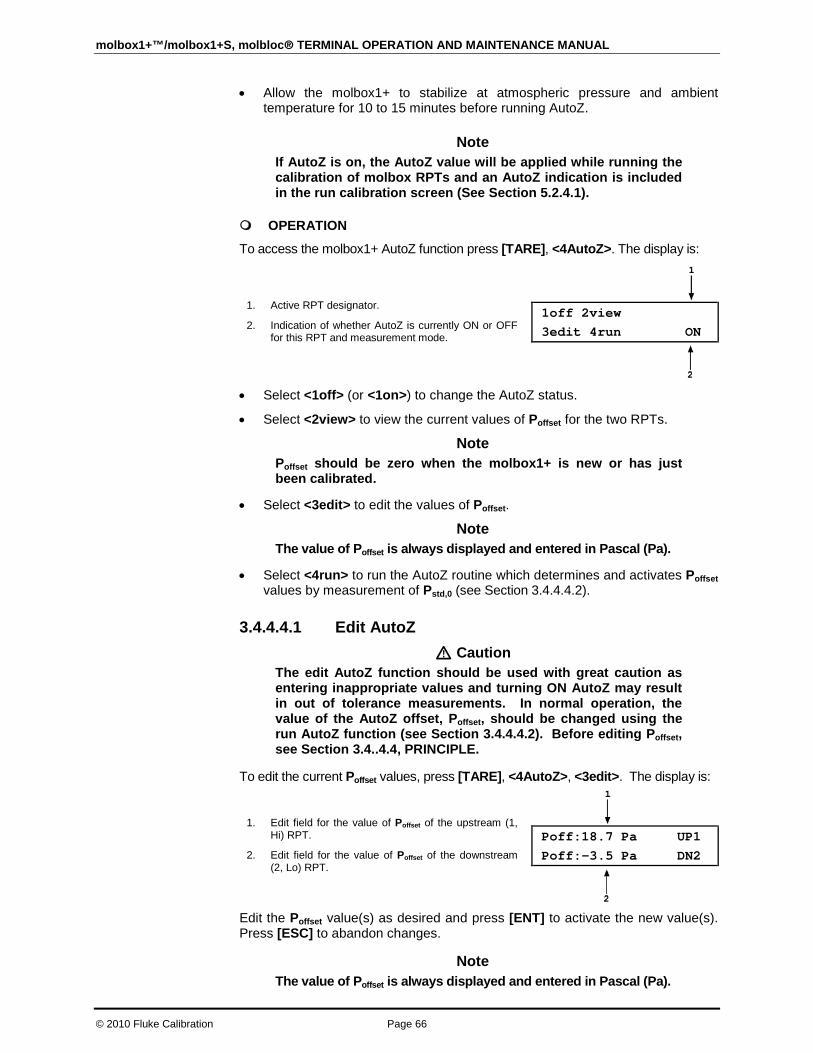
molbox1+™/molbox1+S, molbloc® TERMINAL OPERATION AND MAINTENANCE MANUAL
© 2010 Fluke Calibration Page 66
• Allow the molbox1+ to stabilize at atmospheric pressure and ambient temperature for 10 to 15 minutes before running AutoZ.
Note If AutoZ is on, the AutoZ value will be applied while running the calibration of molbox RPTs and an AutoZ indication is included in the run calibration screen (See Section 5.2.4.1).
OPERATION
To access the molbox1+ AutoZ function press [TARE], <4AutoZ>. The display is:
1. Active RPT designator.
2. Indication of whether AutoZ is currently ON or OFF for this RPT and measurement mode.
1off 2view 3edit 4run ON
• Select <1off> (or <1on>) to change the AutoZ status.
• Select <2view> to view the current values of Poffset for the two RPTs.
Note Poffset should be zero when the molbox1+ is new or has just been calibrated.
• Select <3edit> to edit the values of Poffset.
Note The value of Poffset is always displayed and entered in Pascal (Pa).
• Select <4run> to run the AutoZ routine which determines and activates Poffset values by measurement of Pstd,0 (see Section 3.4.4.4.2).
3.4.4.4.1 Edit AutoZ Caution
The edit AutoZ function should be used with great caution as entering inappropriate values and turning ON AutoZ may result in out of tolerance measurements. In normal operation, the value of the AutoZ offset, Poffset, should be changed using the run AutoZ function (see Section 3.4.4.4.2). Before editing Poffset, see Section 3.4..4.4, PRINCIPLE.
To edit the current Poffset values, press [TARE], <4AutoZ>, <3edit>. The display is:
1. Edit field for the value of Poffset of the upstream (1, Hi) RPT.
2. Edit field for the value of Poffset of the downstream (2, Lo) RPT.
Poff:18.7 Pa UP1 Poff:-3.5 Pa DN2
Edit the Poffset value(s) as desired and press [ENT] to activate the new value(s). Press [ESC] to abandon changes.
Note The value of Poffset is always displayed and entered in Pascal (Pa).

3. OPERATION
Page 67 © 2010 Fluke Calibration
3.4.4.4.2 Run AutoZ
Run AutoZ is the function by which the current RPT reading is compared to a reference, Pstd,0, at atmospheric pressure to determine a new value of Poffset. The value of Poffset is then used by AutoZ to automatically correct the RPT for possible change in zero over time (see Section 3.4.4.4, PRINCIPLE).
There are 3 program limits on the entry of Pstd,0 in place to reduce the possibility of erroneous entries from either method, limits given in kPa absolute but directly convertible to the current unit of measure:
1) The entry must be within the limits of 70-110kPa absolute;
2) If the entry is => 0.01% of nominal full scale from the current reading of either RPT, the molbox1+ will warn that the value is high for the specific transducer(s) but accept the entry;
3) If the entry is => 0.02% of nominal full scale from the current reading of either RPT, the molbox1+ will warn that the value is too high for the specific transducer(s) and reject the entry;
In the case of 3), the pressure calibration of the molbox1+ RPT’s or the accuracy or calibration of the pressure reference used to obtain Pstd,0 should be double-checked.
While an entry within the limits of 1) or 2) is acceptable, if running AutoZ results in a value of Poffset that is greater than ± 0.005 % FS of the span of the RPT that is being AutoZeroed, the RPT and/or the reference used as the source of Pstd,0 may be out of tolerance or the AutoZ process may have been faulty. Before activating a new Poffset greater than ± 0.005 % FS of the active RPT, check to be sure that both the RPT and the reference were in good working order, properly vented to stable atmospheric pressure, at the same height, and reading in the same pressure units when AutoZ was run. A good laboratory practice would be to keep a log of the resulting AutoZ Poffset values for the two transducers over time to look for trends.
To access run AutoZ, press [TARE], <4AutoZ>, <4run>. The display is:
1. Selection of source of Pstd,0 reference from which to AutoZ.
AutoZ by: 1Entry 2COM2
Selecting <1Entry> allows the value of Pstd,0 to be entered from the front panel keypad.
Selecting <2COM> allows the value of Pstd,0 to be read automatically from a DHI RPMx connected to molbox1+’s COM2 communications port.
When AutoZ is run, the molbox1+ internal valves are actuated to connect both molbox1+ RPTs to the channel A, Hi port on the molbox1+ rear panel (see Figure 14 in Section 5.2.4.1). Be sure the channel A, Hi port is fully open to atmosphere when running AutoZ. Note that the molbox1+ quick connectors and molbox1+ to molbloc pressure lines are self sealing and therefore DO NOT open to atmosphere unless a quick connector stem is inserted. Use a quick connector stem (DHI P/N 3068652, equivalent to Swagelok SS-QM2-S-200) supplied with the molbox1+ accessories to open the port to atmosphere.
Note • Allow the molbox1+ to stabilize at atmospheric pressure
and ambient temperature for 10 to 15 minutes before running AutoZ.

molbox1+™/molbox1+S, molbloc® TERMINAL OPERATION AND MAINTENANCE MANUAL
© 2010 Fluke Calibration Page 68
• If running AutoZ results in a value of Poffset that is greater than ± 0.005 % FS of the span of the RPT that is being AutoZeroed, the RPT and/or the reference used as the source of Pstd,0 may be out of tolerance or the AutoZ process may have been faulty. Before activating a new Poffset greater than ± 0.005 % FS of the active RPT, check to be sure that both the RPT and the reference were in good working order, properly vented to stable atmospheric pressure, at the same height, and reading in the same pressure units when AutoZ was run.
• When the run AutoZ selection is made, if a HEAD correction is currently active (see Section 3.6.8) the head correction is momentarily disabled while running AutoZ to avoid “zeroing out” the head value.
• The value of Poffset is always displayed and entered in Pascal (Pa).
Run AutoZ by Entry
AutoZ by entry allows the value of Pstd,0 (see Section 3.4.4.4, PRINCIPLE) to be entered directly from the molbox1+ front panel. This provides a simple way of AutoZeroing relative to an independent reference device such as a house barometer that does not interface directly with molbox1+.
To access run AutoZ by entry press [TARE], <4AutoZ>, <4run>, <1Entry>. The display is:
1. Real time reading (without head correction) of upstream (1, Hi) RPT in unit of measure on line 2.
2. Real time reading (without head correction) of downstream (2, Lo) RPT in unit of measure on line 2.
3. Entry field for the value of Pstd,0. in the current pressure unit of measure.
96.7715U 96.7778D Pstd,0:96.7752 kPa
Enter the value of the AutoZ reference (Pstd,0) in the same unit of measure as the display and press [ENT]. molbox1+ logs the readings and calculates a new AutoZ offset value. The next display is:
1. Currently active/previous value of Poffset for the upstream (1, Hi) RPT.
2. Currently active/previous value of Poffset for the downstream (2, Lo) RPT.
3. New value of Poffset for the upstream (1, Hi) RPT for the AutoZ that was just run.
4. New value of Poffset for the downstream (2, Lo) RPT for the AutoZ that was just run.
Old: 0.0 Pa 0.0 New: 3.7 Pa 2.6
Press [ENT] to activate the new values of Poffset or [ESC] to start over with entry of a new AutoZ reference (Pstd,0) value.
Note The value of Poffset is always in Pascal (Pa). The value of Pstd,0 is entered in the current pressure unit of measure.
Run AutoZ by COM2
AutoZ by COM2 allows a DHI RPMx Reference Pressure monitor connected to the molbox1+ COM2 to act as the AutoZ reference (source of Pstd,0) (see Section 3.4.4.4, PRINCIPLE). The RPMx is read and the new Poffset is calculated automatically.
To access run AutoZ by COM2 press [TARE], <4AutoZ>, <4run>, <2COM2>.
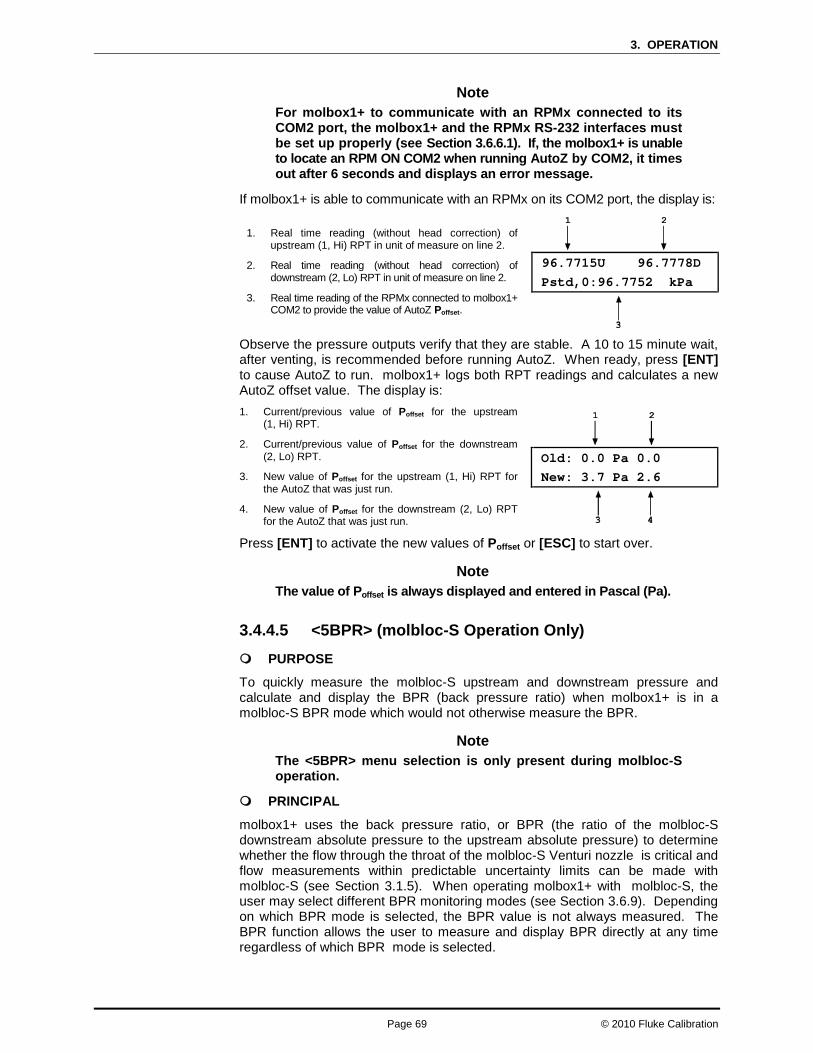
3. OPERATION
Page 69 © 2010 Fluke Calibration
Note For molbox1+ to communicate with an RPMx connected to its COM2 port, the molbox1+ and the RPMx RS-232 interfaces must be set up properly (see Section 3.6.6.1). If, the molbox1+ is unable to locate an RPM ON COM2 when running AutoZ by COM2, it times out after 6 seconds and displays an error message.
If molbox1+ is able to communicate with an RPMx on its COM2 port, the display is:
1. Real time reading (without head correction) of upstream (1, Hi) RPT in unit of measure on line 2.
2. Real time reading (without head correction) of downstream (2, Lo) RPT in unit of measure on line 2.
3. Real time reading of the RPMx connected to molbox1+ COM2 to provide the value of AutoZ Poffset.
96.7715U 96.7778D Pstd,0:96.7752 kPa
Observe the pressure outputs verify that they are stable. A 10 to 15 minute wait, after venting, is recommended before running AutoZ. When ready, press [ENT] to cause AutoZ to run. molbox1+ logs both RPT readings and calculates a new AutoZ offset value. The display is: 1. Current/previous value of Poffset for the upstream
(1, Hi) RPT.
2. Current/previous value of Poffset for the downstream (2, Lo) RPT.
3. New value of Poffset for the upstream (1, Hi) RPT for the AutoZ that was just run.
4. New value of Poffset for the downstream (2, Lo) RPT for the AutoZ that was just run.
Old: 0.0 Pa 0.0 New: 3.7 Pa 2.6
Press [ENT] to activate the new values of Poffset or [ESC] to start over.
Note The value of Poffset is always displayed and entered in Pascal (Pa).
3.4.4.5 <5BPR> (molbloc-S Operation Only)
PURPOSE
To quickly measure the molbloc-S upstream and downstream pressure and calculate and display the BPR (back pressure ratio) when molbox1+ is in a molbloc-S BPR mode which would not otherwise measure the BPR.
Note The <5BPR> menu selection is only present during molbloc-S operation.
PRINCIPAL
molbox1+ uses the back pressure ratio, or BPR (the ratio of the molbloc-S downstream absolute pressure to the upstream absolute pressure) to determine whether the flow through the throat of the molbloc-S Venturi nozzle is critical and flow measurements within predictable uncertainty limits can be made with molbloc-S (see Section 3.1.5). When operating molbox1+ with molbloc-S, the user may select different BPR monitoring modes (see Section 3.6.9). Depending on which BPR mode is selected, the BPR value is not always measured. The BPR function allows the user to measure and display BPR directly at any time regardless of which BPR mode is selected.

molbox1+™/molbox1+S, molbloc® TERMINAL OPERATION AND MAINTENANCE MANUAL
© 2010 Fluke Calibration Page 70
OPERATION
Select [TARE], <5BPR>. The display is:
1. The current pressure read by the upstream (left) and downstream (right) RPTs without taking into account the current tare value. These are untared readings in the current pressure unit of measure.
2. The current BPR (ratio of downstream to upstream absolute pressure).
259.312 kPa ↓99.5769 BPR 0.38
Press [ENTER] or [ESCAPE] to exit the BPR function and return to the previous RUN screen and BPR mode.
3.4.5 [P&T] (Pressure and Temperature) PURPOSE
To provide continuous display of the pressures measured by molbox1+, the Reynolds number of the flow through the molbloc, the temperature of the molbloc and other pressure measurement information depending on whether the molbox1+ is used with molbloc-L or molbloc-S.
PRINCIPLE
molbox1+ continuously measures pressures and molbloc temperature and uses these measurements to calculate flow.
The pressure at the molbloc upstream and downstream ports is read by two absolute Reference Pressure Transducers (RPTs). In molbloc-L operation, the flow is calculated from the differential pressure across the molbloc. The differential pressure is calculated as the difference between the two, tared (see Section 3.4.4.1.1), absolute RPTs (upstream - downstream) and is displayed in the molbloc-L mode pressure screen.
In molbloc-S mode, the flow is calculated from the molbloc-S upstream pressure. The upstream pressure may be read by either one or both of the RPTs, depending on which BPR mode is in use (see Section 3.6.9). When the molbox1+ is in a valve state called BPR OFF, the molbloc-S downstream pressure is not measured and both RPTs are used to measure the molbloc-S upstream pressure. Their readings are averaged to reduce the uncertainty of the molbloc-S upstream pressure measurement. An indicator is used next to the “downstream” RPT value to show whether the RPT is currently measuring the molbloc downstream or upstream pressure. Whenever the molbloc-S downstream pressure is measured, the BPR is calculated and shown in the P&T pressure screen. When both RPTs measure the upstream pressure (BPR OFF mode), the indicated pressure for both RPTs is adjusted to equal the average of the two using the dynamic tare and BPR is no longer displayed.
Since the displays and operation of the P&T pressure screen are different for molbloc-L and molbloc-S, they are described separately in Sections 3.4.5.1 and 3.4.5.2.
For temperature measurement, two Platinum Resistance Thermometers (PRTs) are embedded in each molbloc. These are connected to the molbox1+ by the molbox1+ to molbloc cable. The molbox1+ ohmic measurement system reads the resistance of the PRTs and calculates molbloc temperature.
molbox1+ continuously calculates the Reynolds number of the flow through the molbloc.
The molbox1+’s current pressure and temperature readings as well as the Reynolds number of the current flow can be displayed using the P&T function.

3. OPERATION
Page 71 © 2010 Fluke Calibration
3.4.5.1 molbloc-L Operation
OPERATION – molbloc-L Operation
Press [P&T] from any run screen. The display is: 1. Pressure read by the upstream RPT (left), the
downstream RPT (right) and the pressure unit of measure (middle).
2. The current differential pressure in the current pressure unit of measure. <DP> indicates the value is differential pressure.
3. Current Reynolds number of the flow through the molbloc.
97.788 kPaa 97.783 DP 0.005 Re 0.02
Pressing [P&T] again or the [+/-] key toggles between the pressure screen and the temperature screen:
1. The average molbloc temperature in the current unit of measure (upstream + downstream/2).
2. The temperature measured by the upstream molbloc platinum resistance thermometer in the current unit of measure.
3. The temperature measured by the downstream molbloc platinum resistance thermometer in the current unit of measure.
21.80ºC 21.82ºC 21.78ºC
To leave the P&T function and return to the MAIN run screen, press [ESCAPE].
Note To change the pressure and/or temperature unit of measure, see Sections 3.5.8 and 3.5.9.
3.4.5.2 MOLBLOC-S operation
OPERATION – molbloc-S operation 1. The current pressure read by the upstream (left) and
downstream (right) RPTs and the current pressure unit of measure (middle). In BPR OFF or Auto modes, tare is automatically applied to these readings. In BPR ON mode, tare is never applied.
2. <h> indicates a head pressure correction is applied or no character if no head correction.
3. Arrow to indicate which pressure is being read by the “downstream” RPT. Down arrow indicates downstream pressure, Up arrow indicates upstream pressure.
4. The current BPR (ratio of downstream to upstream absolute pressure).
5. Current Reynolds number.
259.312 kPah↓99.5769 BPR 0.38 Re 11039
Pressing [P&T] again or the [+/-] key toggles between the pressure screen and the temperature screen:
1. The average molbloc temperature in the current unit of measure (upstream + downstream/2).
2. The temperature measured by the upstream molbloc platinum resistance thermometer in the current unit of measure.
3. The temperature measured by the downstream molbloc platinum resistance thermometer in the current unit of measure.
21.80ºC 21.82ºC 21.78ºC
To leave the P&T function and return to the MAIN run screen, press [ESCAPE].
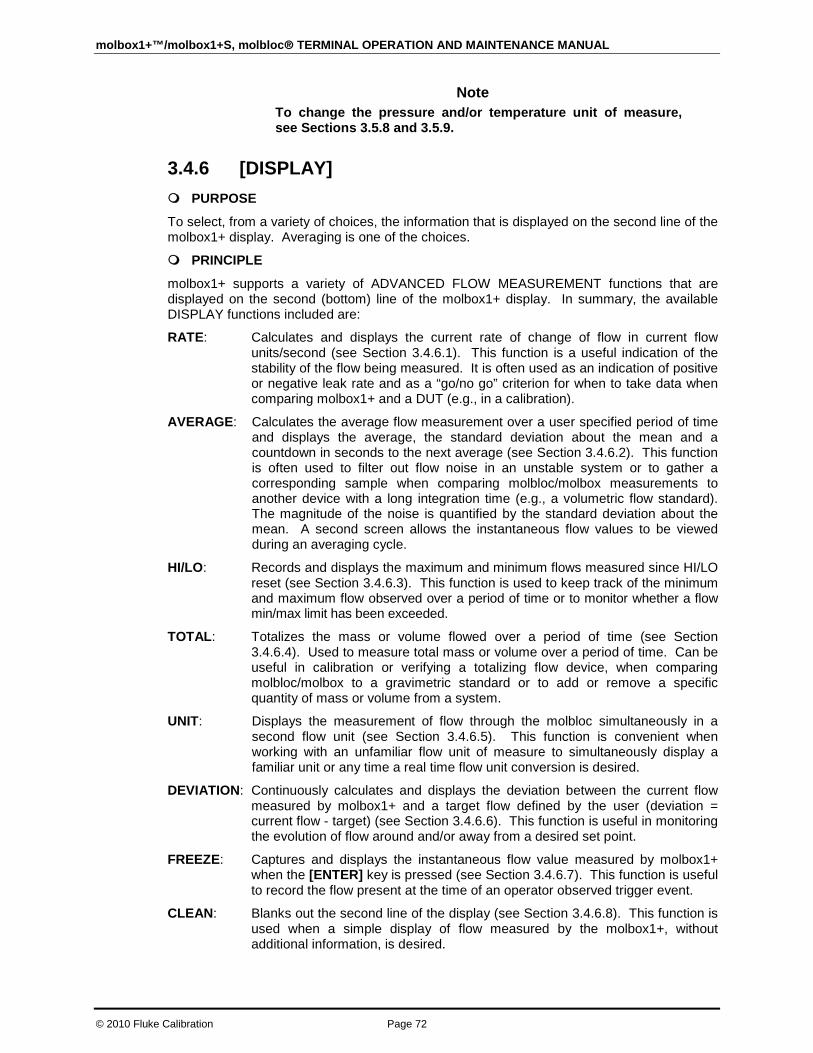
molbox1+™/molbox1+S, molbloc® TERMINAL OPERATION AND MAINTENANCE MANUAL
© 2010 Fluke Calibration Page 72
Note To change the pressure and/or temperature unit of measure, see Sections 3.5.8 and 3.5.9.
3.4.6 [DISPLAY] PURPOSE
To select, from a variety of choices, the information that is displayed on the second line of the molbox1+ display. Averaging is one of the choices.
PRINCIPLE
molbox1+ supports a variety of ADVANCED FLOW MEASUREMENT functions that are displayed on the second (bottom) line of the molbox1+ display. In summary, the available DISPLAY functions included are:
RATE: Calculates and displays the current rate of change of flow in current flow units/second (see Section 3.4.6.1). This function is a useful indication of the stability of the flow being measured. It is often used as an indication of positive or negative leak rate and as a “go/no go” criterion for when to take data when comparing molbox1+ and a DUT (e.g., in a calibration).
AVERAGE: Calculates the average flow measurement over a user specified period of time and displays the average, the standard deviation about the mean and a countdown in seconds to the next average (see Section 3.4.6.2). This function is often used to filter out flow noise in an unstable system or to gather a corresponding sample when comparing molbloc/molbox measurements to another device with a long integration time (e.g., a volumetric flow standard). The magnitude of the noise is quantified by the standard deviation about the mean. A second screen allows the instantaneous flow values to be viewed during an averaging cycle.
HI/LO: Records and displays the maximum and minimum flows measured since HI/LO reset (see Section 3.4.6.3). This function is used to keep track of the minimum and maximum flow observed over a period of time or to monitor whether a flow min/max limit has been exceeded.
TOTAL: Totalizes the mass or volume flowed over a period of time (see Section 3.4.6.4). Used to measure total mass or volume over a period of time. Can be useful in calibration or verifying a totalizing flow device, when comparing molbloc/molbox to a gravimetric standard or to add or remove a specific quantity of mass or volume from a system.
UNIT: Displays the measurement of flow through the molbloc simultaneously in a second flow unit (see Section 3.4.6.5). This function is convenient when working with an unfamiliar flow unit of measure to simultaneously display a familiar unit or any time a real time flow unit conversion is desired.
DEVIATION: Continuously calculates and displays the deviation between the current flow measured by molbox1+ and a target flow defined by the user (deviation = current flow - target) (see Section 3.4.6.6). This function is useful in monitoring the evolution of flow around and/or away from a desired set point.
FREEZE: Captures and displays the instantaneous flow value measured by molbox1+ when the [ENTER] key is pressed (see Section 3.4.6.7). This function is useful to record the flow present at the time of an operator observed trigger event.
CLEAN: Blanks out the second line of the display (see Section 3.4.6.8). This function is used when a simple display of flow measured by the molbox1+, without additional information, is desired.

3. OPERATION
Page 73 © 2010 Fluke Calibration
OPERATION
To select a DISPLAY function, press [DISPLAY] from the MAIN run screen.
The display is: 1avg 2rate 3hi/lo
4total 5unit 6dev ↓ 7freeze 8clean
The cursor is on the active DISPLAY function. Selecting a DISPLAY function returns to the MAIN run screen with the selected function active.
See Section 3.4.6, PRINCIPLE for a summary of DISPLAY functions and Sections 3.4.6.1 through 3.4.6.8 for detailed information on each DISPLAY function.
Note • In molbloc-S operation, at times, the back pressure ratio, BPR, will be
too high for molbox1+ to calculate a meaningful flow value. When this occurs, the top line of the run screen display always reads <BPR HI> and the bottom line shows the label <BPR> and the current measured BPR value. This display has priority over the appearance of the display functions described in this section, but the display will return to normal when the BPR returns to a usable level for molbloc-S measurements (see Section 3.1.5).
• The default DISPLAY function is RATE which causes the second line of the display to show <R> followed by the current rate of change of flow in current flow unit of measure per second (see Section 3.4.6.1).
3.4.6.1 <1Rate>
PURPOSE
To activate the RATE DISPLAY.
Note See Section 3.4.6, PRINCIPLE.
OPERATION
To activate the RATE DISPLAY press [DISPLAY] and select <1rate>. Selecting <1rate> returns to the MAIN run screen with the RATE DISPLAY active.
With the RATE DISPLAY active, the MAIN run screen is:
1. Standard MAIN run screen top line.
2. Current rate of change of flow in current flow unit of measure per second.
* 101.27 sccm N20 R 0.03/sec
Note • The RATE DISPLAY is different and separate from the
stability setting which is used to set the stability criterion on which the Ready/Not Ready indication is based (see Sections 3.1.3, 3.5.2). The RATE DISPLAY only causes the current rate of change to be displayed and has NO affect on the stability setting or the Ready/Not Ready condition.
• To go to a DISPLAY other than RATE, press [DISPLAY] and make a new DISPLAY choice.

molbox1+™/molbox1+S, molbloc® TERMINAL OPERATION AND MAINTENANCE MANUAL
© 2010 Fluke Calibration Page 74
3.4.6.2 <2Avg> (Average)
PURPOSE
To activate the AVERAGE DISPLAY and/or adjust the period of time over which averaging occurs.
Note See Section 3.4.6, PRINCIPLE.
OPERATION
To access the AVERAGE DISPLAY, press [DISPLAY] and select <2avg>. The display is:
1. Edit field for averaging period in seconds. Default is 20. Minimum 3, maximum 999.
Averaging Period: 20 s
Edit the averaging time period if desired. Pressing [ENTER] returns to the MAIN run screen with the AVERAGE DISPLAY active.
With the AVERAGE DISPLAY active the MAIN run screen is:
1. Average flow measured over last completed averaging period.
2. Standard deviation of last completed averaging period.
3. Countdown in seconds until completion of on-going averaging period.
* 101.99 sccm N20 δ 0.06 18 sec
The AVERAGE DISPLAY has a second screen that allows the instantaneous flow readings to be viewed while an averaging cycle is running. This screen is available only if the molbox1+ MFC control option is NOT present or OFF. If the molbox1+ MFC control option is not present or OFF, pressing [+/-] toggles between the MAIN run AVERAGE screen and the instantaneous values AVERAGE screen. If the molbox1+ MFC control option is ON, pressing [+/-] accesses the MFC averaging screens. The MFC averaging screens are the equivalent of the normal MFC screens but the values are averaged for the averaging time. The instantaneous AVERAGE screen is:
1. Instantaneous flow value at molbox1+’s normal integration rate.
2. Countdown in seconds until completion of on-going averaging period.
3. Current rate of change of flow in flow unit of measure/second..
* 101.59 sccm N20 R 0.0025 18 sec
3.4.6.3 <3 Hi/Lo>
PURPOSE
To activate the HI/LO DISPLAY.
Note See Section 3.4.6, PRINCIPLE.

3. OPERATION
Page 75 © 2010 Fluke Calibration
OPERATION
To activate the HI/LO DISPLAY press [DISPLAY] and select <3hi/lo>. Selecting <3hi/lo> resets the HI/LO values and returns to the MAIN run screen with the HI/LO DISPLAY active. With the HI/LO DISPLAY active, the MAIN run screen is:
1. Standard MAIN run screen top line.
2. Highest flow observed since HI/LO reset.
3. Lowest flow observed since HI/LO reset.
* 101.22 sccm N20 H 101.44 L99.113
The HI/LO values change each time a new HI or LO flow value occurs. The HI/LO record can be reset at any time by pressing [ENTER] allowing a HI/LO reset without going back through the DISPLAY menu.
Note • When DISPLAY is set to HI/LO, the MFC indicator of the
optional MFC function is not included on the second line of the molbox1+ display as the HI/LO DISPLAY occupies the entire second line of the molbox1+ display (see Section 3.4.8).
• The set point of the optional MFC function cannot be changed in the HI/LO display because [ENTER] is used by the DISPLAY function. MFC set point can only be entered in the RATE, UNIT or CLEAN DISPLAY functions.
• Changing the flow unit of measure, the gas, the K factor or running a TARE function while in HI/LO resets the HI/LO record.
• To go to a DISPLAY other than HI/LO, press [DISPLAY] and make a new DISPLAY choice.
3.4.6.4 <4Total> (Totalizer)
PURPOSE
To activate the TOTALIZER DISPLAY.
Note See Section 3.4.6, PRINCIPLE.
OPERATION
To activate the TOTALIZER DISPLAY, press [DISPLAY] and select <4total>. The display is:
1. Edit field for time over which to totalize (hh:mm:ss). Default period is 00:10:00; maximum 99:59:59.
Totalizing period: 00:10:00
Edit the totalizing period as desired. Pressing [ENTER] returns to the MAIN run screen with the TOTALIZER DISPLAY active.

molbox1+™/molbox1+S, molbloc® TERMINAL OPERATION AND MAINTENANCE MANUAL
© 2010 Fluke Calibration Page 76
With the TOTALIZER DISPLAY active the MAIN run screen is: 1. Standard MAIN run screen top line.
2. Total mass or volume accumulated over elapsed totalizing run time.
3. Units of measure of mass or volume (derived from the current flow unit) of the totalized value (see Table 22). The units of measure are not shown if the screen space is needed to show a large totalized value.
4. Elapsed totalizing time (hh:mm:ss). Always starts from zero and counts up until totalizing period elapses.
* 101.45 sccm N20
Σ0.00 scc 00:00:00
Press [ENTER] to start totalizing. The elapsed time counter starts and the total mass or volume begins to accumulate. Totalizing continues until the set totalize period is complete. When the totalizing period is complete, molbox1+ sounds three beeps and displays the totalizing complete screen in which the total flow or volume and elapsed totalizing time are frozen with totalizing time NOT flashing.
To start a new totalizing run from the totalizing complete screen, press [ENTER]. This clears the previous total, resets to the totalizing timer and starts totalizing.
Note • When DISPLAY is set to TOTALIZE, the MFC indicator of the
optional MFC function is not included on the second line of the molbox1+ display as the TOTALIZE DISPLAY occupies the entire second line of the molbox1+ display (see Section 3.4.8).
• The set point of the optional MFC function cannot be changed in the TOTALIZE display because [ENTER] is used by the DISPLAY function. MFC set point can only be entered in the RATE, UNIT or CLEAN DISPLAY functions.
• To view a split total and/or to start a new totalizing run with a new run time, press [ENTER] while totalizing (see Viewing a Split Total and/or Starting a New Totalizing Run with a New Run Time of this section). To change totalizing run time any other time, press [DISPLAY] and select <4total>.
• Certain functions cannot be executed while totalizing. These functions include change K, change gas, change flow unit of measure, tare. If <Access restricted while totalizing> is displayed when a function key is pressed during totalizing, the function is one that cannot be executed while totalizing. To execute the function, abort the totalizing run or wait until after the run has completed. This feature is to avoid accidentally aborting or corrupting a totalizing run.
• To set a new totalizing time without going back through the [DISPLAY] menu, press [ENTER] and select <2new> from the TOTALIZER screen. To freeze a split total without stopping the totalizing run, press [ENTER] or [ESCAPE] while totalizing (see Viewing a Split Total and/or Starting a New Totalizing Run with a New Run Time below in this section).
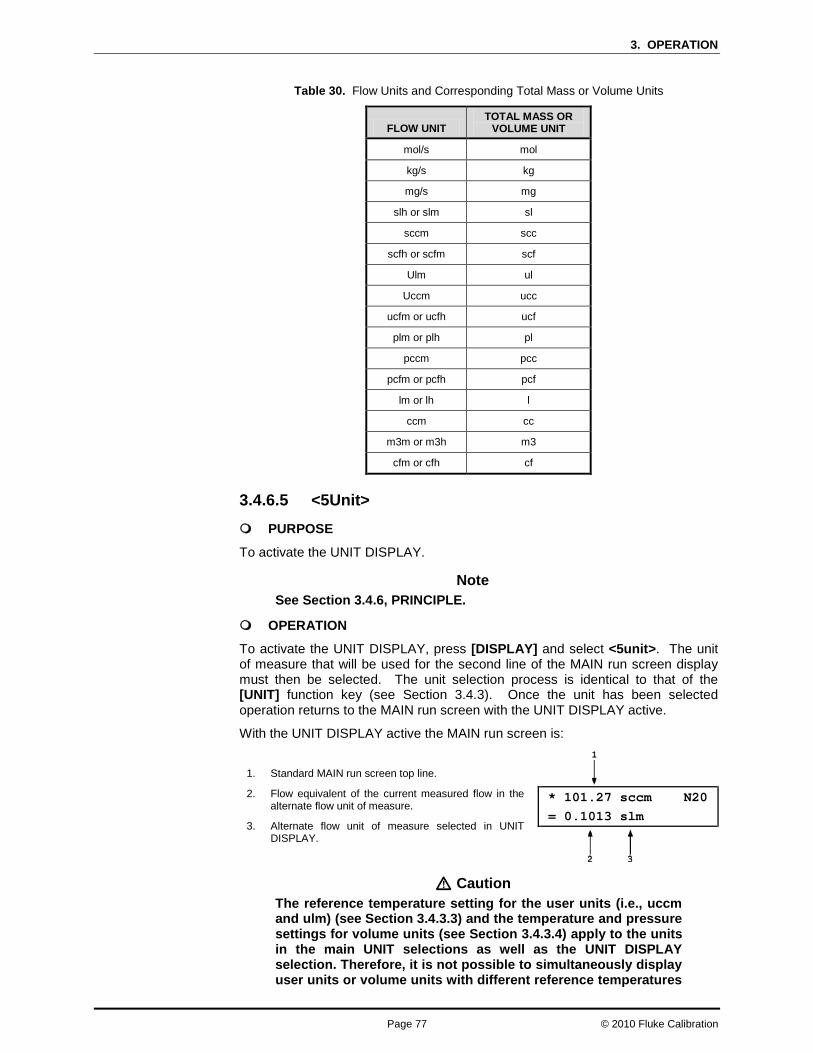
3. OPERATION
Page 77 © 2010 Fluke Calibration
Table 30. Flow Units and Corresponding Total Mass or Volume Units
FLOW UNIT TOTAL MASS OR
VOLUME UNIT
mol/s mol
kg/s kg
mg/s mg
slh or slm sl
sccm scc
scfh or scfm scf
Ulm ul
Uccm ucc
ucfm or ucfh ucf
plm or plh pl
pccm pcc
pcfm or pcfh pcf
lm or lh l
ccm cc
m3m or m3h m3
cfm or cfh cf
3.4.6.5 <5Unit>
PURPOSE
To activate the UNIT DISPLAY.
Note See Section 3.4.6, PRINCIPLE.
OPERATION
To activate the UNIT DISPLAY, press [DISPLAY] and select <5unit>. The unit of measure that will be used for the second line of the MAIN run screen display must then be selected. The unit selection process is identical to that of the [UNIT] function key (see Section 3.4.3). Once the unit has been selected operation returns to the MAIN run screen with the UNIT DISPLAY active.
With the UNIT DISPLAY active the MAIN run screen is:
1. Standard MAIN run screen top line.
2. Flow equivalent of the current measured flow in the alternate flow unit of measure.
3. Alternate flow unit of measure selected in UNIT DISPLAY.
* 101.27 sccm N20 = 0.1013 slm
Caution The reference temperature setting for the user units (i.e., uccm and ulm) (see Section 3.4.3.3) and the temperature and pressure settings for volume units (see Section 3.4.3.4) apply to the units in the main UNIT selections as well as the UNIT DISPLAY selection. Therefore, it is not possible to simultaneously display user units or volume units with different reference temperatures
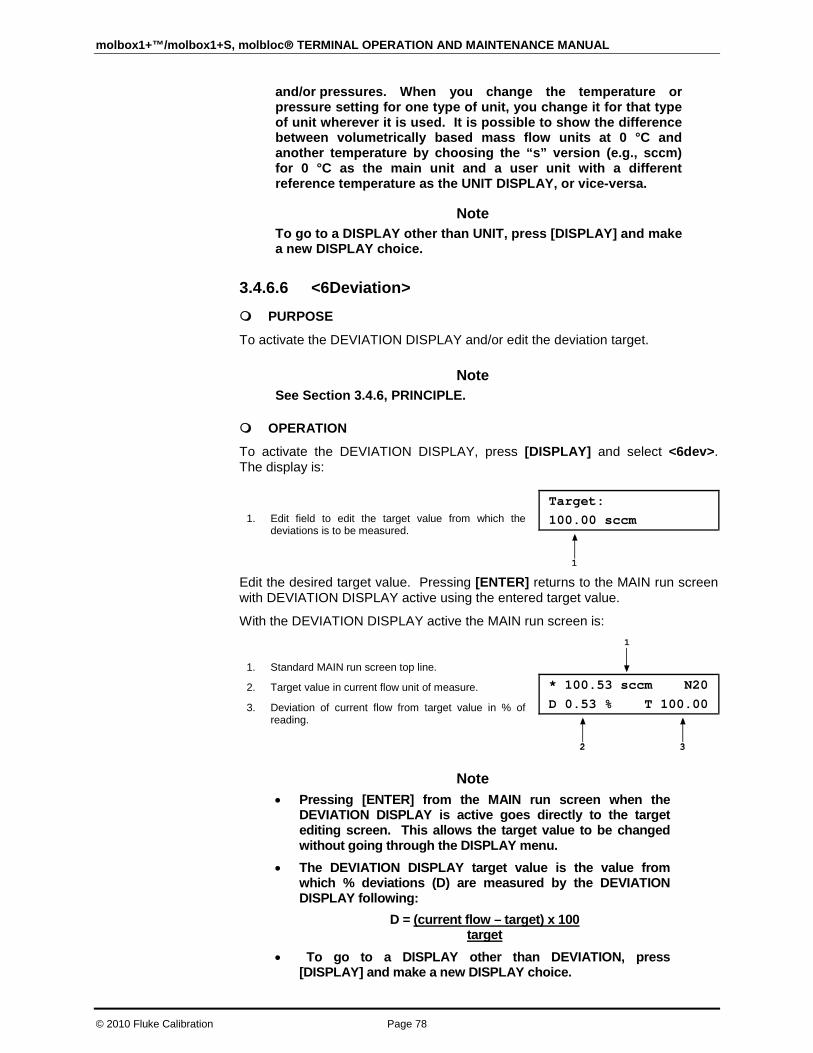
molbox1+™/molbox1+S, molbloc® TERMINAL OPERATION AND MAINTENANCE MANUAL
© 2010 Fluke Calibration Page 78
and/or pressures. When you change the temperature or pressure setting for one type of unit, you change it for that type of unit wherever it is used. It is possible to show the difference between volumetrically based mass flow units at 0 °C and another temperature by choosing the “s” version (e.g., sccm) for 0 °C as the main unit and a user unit with a different reference temperature as the UNIT DISPLAY, or vice-versa.
Note To go to a DISPLAY other than UNIT, press [DISPLAY] and make a new DISPLAY choice.
3.4.6.6 <6Deviation>
PURPOSE
To activate the DEVIATION DISPLAY and/or edit the deviation target.
Note See Section 3.4.6, PRINCIPLE.
OPERATION
To activate the DEVIATION DISPLAY, press [DISPLAY] and select <6dev>. The display is:
1. Edit field to edit the target value from which the deviations is to be measured.
Target: 100.00 sccm
Edit the desired target value. Pressing [ENTER] returns to the MAIN run screen with DEVIATION DISPLAY active using the entered target value.
With the DEVIATION DISPLAY active the MAIN run screen is:
1. Standard MAIN run screen top line.
2. Target value in current flow unit of measure.
3. Deviation of current flow from target value in % of reading.
* 100.53 sccm N20 D 0.53 % T 100.00
Note • Pressing [ENTER] from the MAIN run screen when the
DEVIATION DISPLAY is active goes directly to the target editing screen. This allows the target value to be changed without going through the DISPLAY menu.
• The DEVIATION DISPLAY target value is the value from which % deviations (D) are measured by the DEVIATION DISPLAY following:
D = (current flow – target) x 100 target
• To go to a DISPLAY other than DEVIATION, press [DISPLAY] and make a new DISPLAY choice.
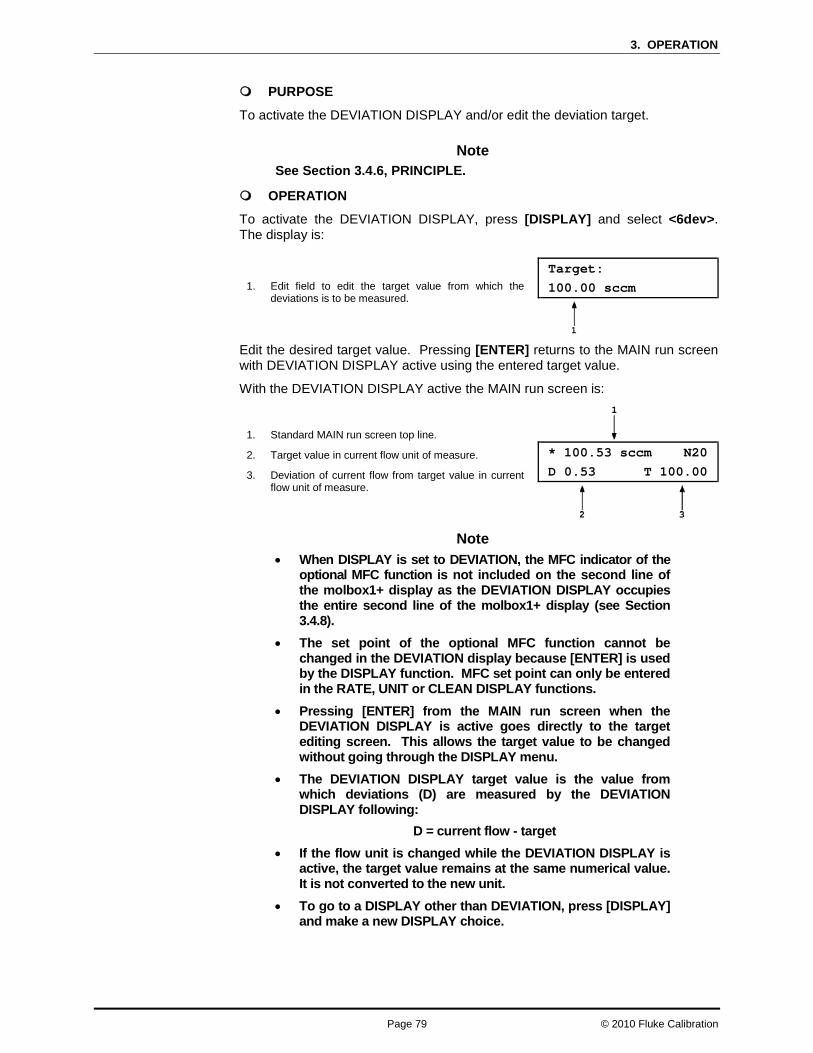
3. OPERATION
Page 79 © 2010 Fluke Calibration
PURPOSE
To activate the DEVIATION DISPLAY and/or edit the deviation target.
Note See Section 3.4.6, PRINCIPLE.
OPERATION
To activate the DEVIATION DISPLAY, press [DISPLAY] and select <6dev>. The display is:
1. Edit field to edit the target value from which the deviations is to be measured.
Target: 100.00 sccm
Edit the desired target value. Pressing [ENTER] returns to the MAIN run screen with DEVIATION DISPLAY active using the entered target value.
With the DEVIATION DISPLAY active the MAIN run screen is:
1. Standard MAIN run screen top line.
2. Target value in current flow unit of measure.
3. Deviation of current flow from target value in current flow unit of measure.
* 100.53 sccm N20 D 0.53 T 100.00
Note • When DISPLAY is set to DEVIATION, the MFC indicator of the
optional MFC function is not included on the second line of the molbox1+ display as the DEVIATION DISPLAY occupies the entire second line of the molbox1+ display (see Section 3.4.8).
• The set point of the optional MFC function cannot be changed in the DEVIATION display because [ENTER] is used by the DISPLAY function. MFC set point can only be entered in the RATE, UNIT or CLEAN DISPLAY functions.
• Pressing [ENTER] from the MAIN run screen when the DEVIATION DISPLAY is active goes directly to the target editing screen. This allows the target value to be changed without going through the DISPLAY menu.
• The DEVIATION DISPLAY target value is the value from which deviations (D) are measured by the DEVIATION DISPLAY following:
D = current flow - target • If the flow unit is changed while the DEVIATION DISPLAY is
active, the target value remains at the same numerical value. It is not converted to the new unit.
• To go to a DISPLAY other than DEVIATION, press [DISPLAY] and make a new DISPLAY choice.

molbox1+™/molbox1+S, molbloc® TERMINAL OPERATION AND MAINTENANCE MANUAL
© 2010 Fluke Calibration Page 80
3.4.6.7 <7Freeze>
PURPOSE
To activate the FREEZE DISPLAY.
Note See Section 3.4.6, PRINCIPLE.
OPERATION
To activate the FREEZE DISPLAY press [DISPLAY] and select <7freeze>. Selecting <7freeze> returns to the MAIN run screen with the FREEZE DISPLAY active.
With the FREEZE DISPLAY active, the MAIN run screen is:
1. Standard MAIN run screen top line.
2. Flow measured in the current flow units when [ENTER] was pressed (displays 0.00 by default when FREEZE DISPLAY is first activated).
* 101.75 sccm N20 F 99.24
Pressing [ENTER] causes the current flow measured by the active molbox1+ range to be captured and displayed.
Note • If the flow measurement unit is changed while the FREEZE
DISPLAY is active, the FREEZE value defaults back to zero. • The set point of the optional MFC function cannot be
changed in the FREEZE display because [ENTER] is used by the DISPLAY function. MFC set point can only be entered in the RATE, UNIT or CLEAN DISPLAY functions.
• To go to a DISPLAY other than FREEZE, press [DISPLAY] and make a new DISPLAY choice.
3.4.6.8 <8Clean>
PURPOSE
To activate the CLEAN DISPLAY.
Note See Section 3.4.6, PRINCIPLE.
OPERATION
To activate the CLEAN DISPLAY press [DISPLAY] and select <8clean>. Selecting <8clean> returns to the MAIN run screen with the CLEAN DISPLAY active.
With the CLEAN DISPLAY active, the MAIN run screen is:
1. Standard MAIN run screen top line.
2. “Clean” second line.
* 101.45 sccm N2O
3. OPERATION
Page 81 © 2010 Fluke Calibration
Note • The MFC indicator is not included in the MAIN run screen in
the CLEAN DISPLAY function (see Section 3.4.8). • To go to a DISPLAY other than CLEAN, press [DISPLAY] and
make a new DISPLAY choice.
3.4.7 [A/B] PURPOSE
To switch the active molbloc channel between channel A and channel B.
PRINCIPLE
See Section 3.1.1
OPERATION
Pressing the [A/B] key changes the active molbloc channel. The currently active channel is indicated by the lit RED LED below the molbox1+ front panel display. When the A/B function is operated, molbox1+ actuates internal valves to change the molbloc channel that is connected to the molbox1+’s internal pressure transducers. Pressing the [A/B] key also aborts any A_B mode that may be active (see Section 3.5.4).
Note When channels are changed using the A/B function, the molbloc is not initialized by the molbox1+. When the molbloc connected to a channel is changed, use <1molbloc> in the SETUP menu (see Section 3.5.1) to reinitialize. This will cause the molbox1+ to read and store the molbloc EEPROM information and assure that the newly connected molbloc is properly identified and used.
Channels, Functions and Settings
In general, molbox1+ functions and settings are channel specific. They are set and stored individually for each channel so that changing settings for one channel does not change the setting for the other.
The only functions and settings that are NOT channel specific are:
Functions: [MFC], [DISPLAY]
Setup Menu: <3adj>
Special Menu: <9BPR>
3.4.8 [MFC](Optional) PURPOSE
To turn the analog MFC control function ON and OFF and to select an MFC profile to be used when the MFC function is ON.
Note The MFC control function is an optional feature of molbox1+ that allows setting and reading an external MFC with analog voltage or current signals. If the molbox1+ does not include the MFC control function, [MFC] has no function.

molbox1+™/molbox1+S, molbloc® TERMINAL OPERATION AND MAINTENANCE MANUAL
© 2010 Fluke Calibration Page 82
OPERATION
When [MFC] is first pressed the screen prompts the operator:
SELECT MFC CHANNEL (0 DISABLES): 0
The MFC channel refers to the channel of the optional MFC switchbox that can be purchased as an accessory to molbox1+ to allow the MFC control function to be switched between up to five MFCs. Entering [0] disables the MFC control function. Entering [1], [2], [3], [4] or [5] enables the MFC function and selects the corresponding channel on the MFC switchbox. If an MFC switchbox is not being used, select channel #1 when activating the MFC function.
The operator is then prompted: SELECT PROFILE #3
The number refers to the MFC profile number (see Sections 3.4.8.2, 3.5.5). Edit the profile number to the desired profile. When the profile number is entered, a summary of the profile is displayed. When [ENTER] is pressed again, the display returns to the MAIN run screen and the MFC function is active using the profile selected. <MFC> or <MFM> (depending on the device type of the selected profile) and the active channel number may be displayed in the bottom right hand corner of the MAIN run screen depending on the current display mode (see Section 3.4.6).
When the MFC function is ON, pressing [ENTER] from the MAIN run screen or an MFC run screen allows entry and execution of the MFC set point command. When the DISPLAY MODE is AVERAGE, HI/LO, TOTAL, DEVIATION or FREEZE, [ENTER] is used for the DISPLAY MODE (see Section 3.4.6). MFC set point commands cannot be entered in these DISPLAY MODES. MFC set points can only be entered in the RATE, UNIT and CLEAN DISPLAY MODES.
Note • To [ENTER] MFC set point, the DISPLAY MODE must be RATE, UNIT or
CLEAN. In other DISPLAY MODES, [ENTER] is used by the DISPLAY MODE.
• Pressing the [] arrow key any time the MFC control function is active causes an instant display of the current MFC profile summary allowing a quick check of the characteristics of the currently active MFC profile. Pressing [ESCAPE] returns from MFC profile screen to the last run screen.
3.4.8.1 MFC Run Screens
When the MFC function is ON, the MAIN run screen is unchanged but <MFC> or <MFM> and the active MFC channel number are shown in the bottom right hand corner of the molbox1+ display (in RATE, UNIT and FREEZE DISPLAY modes only, see Section 3.4.6). Two or three, depending on the MFC profile in use, special MFC run screens can be accessed by pressing the [+/-] key. When the [+/-] key is pressed from the first MAIN run screen, the first MFC run screen is displayed:
1. Ready/not ready indication.
2. Flow value and flow unit of the flow through the active molbloc as read by the molbox1+.
3. The gas that is currently being flowed through the active molbloc.
4. MFC set point set by the molbox1+.
5. MFC output measured by the molbox1+.
6. Unit of measure of MFC setpoint and output (V, mA, % FS or blank if flow units).
* 101.001 sccm N2 S1.020 M1.03 V

3. OPERATION
Page 83 © 2010 Fluke Calibration
Pressing [+/-] from the first MFC run screen causes the second MFC run screen to be displayed (this screen is not present when MFC profile #1 or #2 is being used, see Section 3.4.8.2, 3.5.5):
1. Ready/not ready indication.
2. Flow value and flow unit of the flow through the active molbloc as calculated by the molbox1+.
3. The gas that is currently being flowed through the active molbloc.
4. The MFC measurement error in % calculate as MFC molbox1
MFC F.S.−
•100
* 101.001 sccm N2 E 0.85% F.S.
Pressing [+/-] from the second MFC run screen causes the third MFC run screen to be displayed (this is the second screen if MFC profile #1 or #2 is in use, see Section 3.4.8.2, 3.5.5).
1. Positive MFC supply voltage.
2. Negative MFC supply voltage.
3. Current MFC valve voltage.
4. Current MFC set point.
+ 15.11 V -15.15V S1.020 V 11.29V
Summary
Pressing [+/-] toggles the run screens from the MAIN run screen through the MFC run screens and back to the MAIN run screen.
3.4.8.2 MFC Profiles
MFC profiles are used by molbox1+ to configure the MFC function. MFC profiles define the analog signal range of the MFC and the relationship between the analog signal range and the flow range of the MFC. This information allows molbox1+ to operate with the correct signal for the current MFC and to convert the MFC analog signals to the corresponding flow or % FS values when desired.
MFC profiles are created and edited in [SETUP], <5MFC> (see Section 3.5.5).
3.4.8.3 Units of Measure When Using the MFC Control Option
When the MFC function is active, the molbox1+ flow units of measure are always the units of measure specified in the active MFC profile.
When the MFC function is active, unless the profile is #1 or #2, the flow unit of measure in which the flow through the molbloc is displayed is determined by the flow unit of measure in the MFC profile. The [UNIT] function key is for selection of the unit of measure of the MFC setpoint and output. The choices available are V or mA (depending on the active MFC profile's analog range), % FS or flow. The % FS selection causes MFC setpoint and output to be displayed in % FS of the MFC which molbox1+ calculates using the definition of analog range and flow range contained in the MFC profile. The flow unit selection causes MFC setpoint and output to be displayed in the flow units of the MFC calculated using the definition of analog range, flow range and flow units contained in the MFC profile.
molbox1+™/molbox1+S, molbloc® TERMINAL OPERATION AND MAINTENANCE MANUAL
© 2010 Fluke Calibration Page 84
Note MFC profiles #1 and #2 are default profiles for working with the MFC function directly in analog units without an MFC flow range or units. Profile #1 is 0 to 5 V, profile #2 is 4 to 20 mA. When the MFC function is active with profile #1 or #2 selected, the MFC units of measure are always V (profile #1) or mA (profile #2). The UNIT function selects the molbox1+ flow measurement unit.
3.4.9 [RES] PURPOSE
To set the resolution of molbox1+’s display of the flow through the molbloc and other flow display and entry values.
PRINCIPLE
The resolution with which the flow measured by molbox1+ is displayed can be adjusted. This feature can be used to reduce the resolution when lower precision measurements are being made and additional digits might confuse or distract the operator.
The resolution setting determines the number of digits with which flow is displayed. The desired resolution is calculated based on the nominal full scale range of the molbloc in the current gas and flow unit of measure and then rounded to the furthest digit to the right (i.e., resolution of 0.001 % on a 100 sccm molbloc is 0.001 sccm).
Note The default molbox1+ display resolution setting is 0.001 % of molbloc FS. The RES setting does not affect the resolution of flow information transmitted remotely. Remote information always has maximum resolution of 0.0001 % of molbloc FS.
OPERATION
To access the resolution function press [RES].
Press the [←] to decrease the resolution and [→] to increase the resolution. Each press changes the resolution by a factor of 10. Once the desired resolution is displayed, press [ENTER] to set the selected resolution and return to the main run screen.
Note The resolution setting affects the display of the measured flow as well as other indications and settings (i.e., quantities shown by the [DISPLAY] functions).
3.5 [SETUP] PURPOSE
The [SETUP] key accesses a menu of commonly used molbox1+ functions and features that do NOT have direct function keys. These functions include:
<1molbloc> To initialize a molbloc when it is connected to molbox1+ and/or to identify the molblocs currently connected to molbox1+ (see Section 3.5.1).
<2stab> To change the stability limit that serves as the criterion for the flow Ready/Not Ready indication (see Sections 3.5.2 and 3.1.3).
<3adj> To set an adder and multiplier to adjust molbox1+ flow readings (see Section 3.5.3).

3. OPERATION
Page 85 © 2010 Fluke Calibration
<4A_B> To set molbox1+ flow measurement modes that use the combination of two molblocs on channels A and B to measure flow (see Section 3.5.4).
<5MFC> To create, store and edit the MFC profiles used by the optional MFC function (see Sections 3.5.5 and 3.4.8).
<6reg> To turn regulation mode of the optional MFC function ON and OFF and to set the regulation period for the regulation mode (see Section 3.5.6).
<7flowU> To customize the flow unit choices available under [UNIT] (see Sections 3.5.7 and 3.4.3).
<8presU> To select/change the unit of measure in which molbox1+ displays pressure values (see Section 3.5.8).
<9tempU> To select/change the unit of measure in which molbox1+ displays temperature values (see Section 3.5.9).
OPERATION
To access the SETUP menu, press [SETUP] from the MAIN run screen. The display is:
1molbloc 2stab 3adj
4A-B 5MFC 6mode ↓ 7flow 8presU 9tempU
See Sections 3.5.1 to 3.5.9 for detailed information on each SETUP function.
Note
Some screens (e.g., the SETUP menu) go beyond the two lines provided by the display. This is indicated by a flashing arrow in the second line of the display. Press the [←] and [→] keys to move the cursor to access the lines that are NOT visible or directly enter the number of the hidden menu choice if you know it.
3.5.1 <1molbloc> PURPOSE
To initialize a molbloc when it is connected to molbox1+ and/or to identify the molbloc(s) currently connected to molbox1+. To determine the gases with which a molbloc has been calibrated.
PRINCIPLE
molbox1+ uses molbloc specific calibration information contained in the molbloc's EEPROM to determine whether it should operate in molbloc-L or molbloc-S mode and in its calculation of flow through the molbloc. For the molbox1+ to correctly calculate the flow through the molbloc, the molbox1+ must use information on the currently active molbloc. molbloc EEPROM information is read and stored by molbox1+ in the molbox1+ power up sequence when molbox1+ is turned on by selecting [SETUP], <1molbloc>.
The <1molbloc> function should be used each time there is a change in the molbloc connected to a channel to assure that molbox1+ uses the correct molbloc information on subsequent measurements. The <1molbloc> function can also be used to display identifying information on the molblocs currently connected to the molbox1+ channels and to determine the gases with which the molbloc has been calibrated.
OPERATION
To access the molbloc function press [SETUP],and <1molbloc>. The function activates for both channels without additional prompts or entries.

molbox1+™/molbox1+S, molbloc® TERMINAL OPERATION AND MAINTENANCE MANUAL
© 2010 Fluke Calibration Page 86
To view the gases with which the molbloc is calibrated, press [ENTER] in the molbloc identification screen to view the molbloc’s gas list. After viewing, press [ESCAPE] to return to the current run screen.
3.5.1.1 molbloc-L and molbloc-S Size and Range Designations
Until mid-1999, molbloc-L elements (molbloc-S was not available at the time) were always identified by “Range”. The molbloc-L “Range” is the molbloc’s nominal full scale flow in Nitrogen (N2) at an operating pressure of 250 kPa. Actual molbloc ranges change with the molbloc pressure dependent calibration type and gas (see Section 1.2.5.1.2). Since mid-1999, in addition to nominal range, molbloc-L elements have been designated by size with a sizing code (see Table 31).
On molbloc EEPROMs, the molbloc is still identified by its nominal range rather than by its size. The identification of the molbloc displayed by [SETUP], <1molbloc> identifies molbloc-L by both its nominal range and sizing code. molbloc-L size and range designation correspondence are given in Table 31.
Table 31. molbloc-L Size and Nominal Range Designations
molbloc “NOMINAL RANGE”
DESIGNATION molbloc-L SIZE DESIGNATION
10 sccm 1E1
50 sccm 5E1
100 sccm 1E2
200 sccm 2E2
500 sccm 5E2
1 slm 1E3
5 slm 5E3
10 slm 1E4
30 slm 3E4
100 slm 1E5
molbloc-S elements are also identified by size designations, each of which relate to a specific molbloc-S KF value. molbloc-S flow ranges depend on calibration type and the pressure limitations of the application and molbox used. For information on the possible molbloc-S flow ranges with various operating pressures, see Section 1.2.5.2.2). molbloc-S size and KF value correspondence are given in Table 32.
Table 32. molbloc-S Size and Pressure to Flow Conversion Ratio (KF)
KF (sccm/kPa)
molbloc-S SIZE DESIGNATION
10 1E1-S
20 2E1-S
50 5E1-S
100 1E2-S
200 2E2-S
500 5E2-S
1,000 1E3-S
2,000 2E3-S
5000 5E3-S
10000 1E4-S

3. OPERATION
Page 87 © 2010 Fluke Calibration
3.5.2 <2stab> PURPOSE
To change the stability limit that serves as the criterion for the flow Ready/Not Ready indication (see Section 3.1.3).
PRINCIPLE
molbox1+ continuously monitors the rate of change of flow through the molbloc to which it is connected and compares this rate to the stability limit to make a Ready/Not Ready determination (see Section 3.1.3). The STABILITY function allows the stability limit to be adjusted by the user to increase or decrease the stability required for a Ready (<*>) condition to occur.
Note • The default stability limit is + 0.1 sccm/second (or equivalent in another
flow unit). The stability limit value is automatically converted when the flow unit of measure is changed.
• The stability limit is separate and different from the RATE DISPLAY function (see Section 3.4.6.1) which allows the current rate of change of flow to be displayed.
OPERATION
To adjust the stability limit press [SETUP] and select <2stab>. The display is:
1. Entry field for setting the desired stability limit in the current flow unit of measure. Recalls the default stability limit or the last stability limit set.
Flow stability test: 0.1 sccm/s
Edit the stability limit setting as desired. Pressing [ENTER] activates the stability limit for the range and returns to the current run screen.
Note • The stability limit value is automatically converted when flow units of
measure are changed. • The [RES] setting affects the resolution of the stability limit value. If the
stability limit display does not have enough resolution to set the desired value, use [RES] to adjust the resolution (see Section 3.4.9).
3.5.3 <3ADJ> PURPOSE
To apply adder (FA) and multiplier (FM) coefficients to the flow measured by the molbox1+.
PRINCIPLE
The ADJ function gives the user the capability to adjust mass flow readings made by the molbox1+. This is accomplished by setting an adder and a multiplier.
The adder (FA) and multiplier (FM) adjust the displayed value of the flow through the molbloc as calculated by the molbox RFM following:
corrected flow = (calculated flow * FM) + FA
If a K factor is active (see Section 3.4.1), the adder and multiplier are applied to the calculated flow before the K factor is applied.
molbox1+™/molbox1+S, molbloc® TERMINAL OPERATION AND MAINTENANCE MANUAL
© 2010 Fluke Calibration Page 88
Using the Flow ADJ Function with molbloc-L to Handle a Gas Mixture
The flow ADJ function can be used to adjust flow readings to measure a gas mixture if the molecular weight and relative content of each component gas is known. Note that this method does not take into account the true viscosity, compressibility or critical flow coefficient factor of the gas mixture. The thermodynamic properties of only the highest concentration gas are used. Therefore, the uncertainty in the measured flow is increased and the method is best when the highest concentration gas is greater than 90% of the mixture.
To use this feature, set the molbox1+ [GAS] (see Section 3.4.2) to the highest concentration gas, then adjust the flow multiplier by:
molecular weight of the mixmolecular weight of the gas selected on the molbox
For example, to adjust a gas mix that is 95 % Nitrogen (N2) and 5 % Oxygen (O2):
Calculate the molecular weight of the mix.
N2 molecular weight = 28.016
O2 molecular weight = 31.999
Mix molecular weight = (28.016 x 0.95) + (31.999 x 0.05) = 28.215
Select N2, the highest concentration gas, as the molbox1+ gas.
Calculate:
Set flow multiplier in ADJ function to 1.0071.
OPERATION
To access the ADJ function press [SETUP] and select <3adj>. The display is:
Adder: 0 sccm Mult: 1.00000
Edit the values as desired. Pressing [ENTER] returns you to the MAIN run screen with the edited adder and multiplier values applied.
Caution • The adder is expressed in current flow units and is NOT automatically
converted when flow units are changed. Adder values must be entered in the current flow units. The multiplier is dimensionless.
• The flow adder and multiplier of the ADJ function, if different from 0 and 1, alter the flow readings made by the molbox1+. The ADJ function is always "ON" with no indication on the run screen of the current adder and multiplier values and will be applied to the flow value of any attached molbloc. When using adders and multipliers, great caution should be taken to ensure that they are entered and changed correctly and that they are 0 and 1 if no adder or multiplier effect is desired.
3.5.4 <4A_B> PURPOSE
To turn ON and OFF special molbox1+ operating modes that use molbox1+ channels A and B together.
PRINCIPLE
There are two A_B modes. In both of these modes molbox automatically switches between the molblocs on its two channels and uses readings from both. The two A_B modes are:
molecular weight of the mixmolecular weight of the gas selecton on the molbox = 28.215
28.016 = 1.0071

3. OPERATION
Page 89 © 2010 Fluke Calibration
• Additive mode (A+B) (see Section 3.5.4.2).
The additive mode sums the flow on channels A and B. It is designed for using two molblocs in parallel to measure flows greater than the maximum flow range of a single molbloc.
• Ratiometric mode (A/B) (see Section 3.5.4.3).
The ratiometric mode determines the ratio of the flow through two molblocs. This can provide a convenient, system controlled, method for comparing molblocs to determine the coherence between different ranges.
3.5.4.1 General Operation (Aspects Common to Both A_B Modes)
To access A_B modes, press [SETUP], <4A_B> and select the desired mode (<1A+B>, <2A/B>). Once the mode is selected, molbox1+ returns to the MAIN run screen with the selected mode active. An indication of the active A_B mode will be in the lower right of the MAIN run screen when space is available. To cancel operation of an A_B mode, press the [A/B] function key (see Section 3.4.7) and operation returns to normal single channel mode.
When operating in an A_B mode, channel A is the dominant channel so the channel specific functions applied (gas, flow unit, stability test, K factor, etc.) will be those currently selected for channel A. Tare and leak check still apply to each channel individually. Purge automatically purges channel A and then channel B (see Section 3.4.4).
When in an A_B mode, the channel indicator LED switches between channels showing the channel that is currently active. The P&T function displays (see Section 3.4.5) also switch as molbox1+ switches from channel to channel to display values for the currently active channel.
In an A_B mode, molbox1+ reads on one channel until either a Ready reading is obtained or for up to 10 seconds, whichever comes first. If the last two single channel readings were Ready, the A+B or A/B result is displayed as Ready. If one or both of the last two single channel readings was Not Ready, the A+B or A/B result is displayed as Not Ready (see Section 3.1.3).
Note • It is helpful to set the molbox1+ stability setting as low as is
practical in any A_B mode to allow for flow stabilization on each channel. To change the molbox stability setting, select [SETUP], <2stab> (see Section 3.5.2).
• In A_B mode operation, molbox1+ may stay on one channel up to 10 seconds waiting for a Ready reading. The first valid reading after entering A_B mode may require 20 seconds and subsequent readings up to 10 seconds.
• It is not possible to operate A_B modes when the active BPR mode is Auto due to internal valving conflicts. molbox1+ will deny access to the A_B modes if the current BPR mode is Auto and will not allow the user to select Auto mode when an A_B mode is active (see Section 3.6.9).
• A+B and A_B mode are supported only when molblocs of the same type are used. For example molbloc-S and molbloc-S. The option is not available for a molboc-S and molbloc-L combination
molbox1+™/molbox1+S, molbloc® TERMINAL OPERATION AND MAINTENANCE MANUAL
© 2010 Fluke Calibration Page 90
3.5.4.2 A+B mode
PURPOSE
To operate two molblocs simultaneously on molbox1+ channels A and B and obtain a flow rate which is the sum of the flow through the two molblocs.
PRINCIPLE
In A+B mode molbox1+ makes measurements on one channel and then the other channel. The flow rate displayed is the sum of the two most recent channel readings, updated each time a channel reading is complete. This allows two molblocs to be used together in parallel to measure flows greater than the range of a single molbloc.
SET UP
Best results with A+B mode are obtained when the two molblocs are mounted in parallel, symmetrically. A common regulator should be used with as little tubing, fittings, etc., as possible between the point where flow is split upstream of the two molblocs and rejoined downstream. Standard hardware setups (molstics) for A+B operation are available from Fluke Calibration.
OPERATION
To activate A+B mode, press [SETUP], select <4A_B> and then select <1A+B>. molbox1+ returns to the MAIN run screen in A+B mode. The MAIN run screen in A+B mode is:
1. Ready/Not Ready indication.
2. Sum of channel A and channel B's two most recent flow rate readings and the unit of flow.
3. The gas that is being flowed.
4. Rate of change of flow for the A+B results in units of flow per second.
5. Indication that A+B mode is active (if space is available).
* 45.0775 slm N2 R 0.002/s A+B
The MFC run screens (if the molbox1+ has the optional MFC control feature) are unchanged except that the top line indications are A+B flow.
3.5.4.3 A/B Mode
PURPOSE
To operate two molblocs simultaneously on molbox1+ channels A and B and display the ratio of their flow rates.
PRINCIPLE
In A/B mode, molbox1+ makes measurements on one channel and then the other channel. The individual flow rate measured by each channel is displayed as it is read and information on the ratio and disagreement between the two channels is also calculated and displayed.
This function is intended to provide a convenient, system controlled, means of comparing two molblocs, for example to check the coherence of measurements made by different molblocs.
SET UP
When using A/B mode to compare two molblocs, the two molblocs are connected in series. The volume between the two should be minimized and the upstream pressure regulation should be as stable as possible to facilitate the establishment of the steady state flow condition that must exist for a valid comparison to be made. When selecting the hardware setup for running an A/B mode comparison, it is
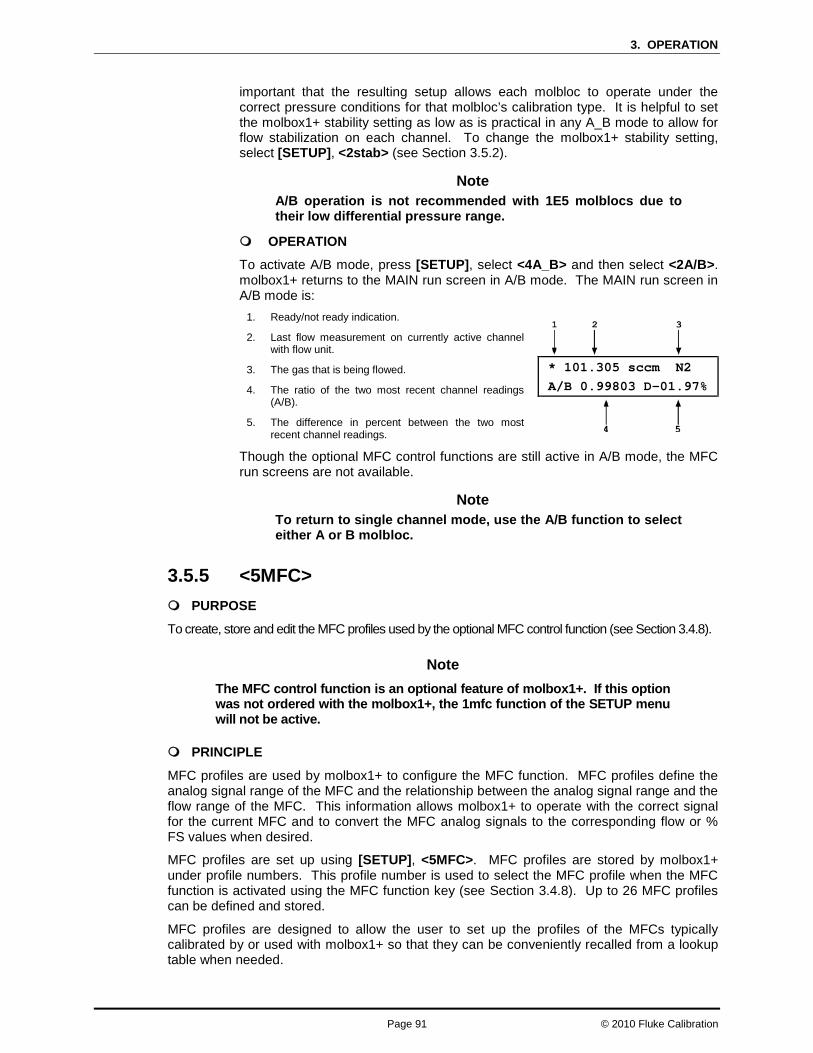
3. OPERATION
Page 91 © 2010 Fluke Calibration
important that the resulting setup allows each molbloc to operate under the correct pressure conditions for that molbloc’s calibration type. It is helpful to set the molbox1+ stability setting as low as is practical in any A_B mode to allow for flow stabilization on each channel. To change the molbox1+ stability setting, select [SETUP], <2stab> (see Section 3.5.2).
Note A/B operation is not recommended with 1E5 molblocs due to their low differential pressure range.
OPERATION
To activate A/B mode, press [SETUP], select <4A_B> and then select <2A/B>. molbox1+ returns to the MAIN run screen in A/B mode. The MAIN run screen in A/B mode is:
1. Ready/not ready indication.
2. Last flow measurement on currently active channel with flow unit.
3. The gas that is being flowed.
4. The ratio of the two most recent channel readings (A/B).
5. The difference in percent between the two most recent channel readings.
* 101.305 sccm N2 A/B 0.99803 D-01.97%
Though the optional MFC control functions are still active in A/B mode, the MFC run screens are not available.
Note To return to single channel mode, use the A/B function to select either A or B molbloc.
3.5.5 <5MFC> PURPOSE
To create, store and edit the MFC profiles used by the optional MFC control function (see Section 3.4.8).
Note The MFC control function is an optional feature of molbox1+. If this option was not ordered with the molbox1+, the 1mfc function of the SETUP menu will not be active.
PRINCIPLE
MFC profiles are used by molbox1+ to configure the MFC function. MFC profiles define the analog signal range of the MFC and the relationship between the analog signal range and the flow range of the MFC. This information allows molbox1+ to operate with the correct signal for the current MFC and to convert the MFC analog signals to the corresponding flow or % FS values when desired.
MFC profiles are set up using [SETUP], <5MFC>. MFC profiles are stored by molbox1+ under profile numbers. This profile number is used to select the MFC profile when the MFC function is activated using the MFC function key (see Section 3.4.8). Up to 26 MFC profiles can be defined and stored.
MFC profiles are designed to allow the user to set up the profiles of the MFCs typically calibrated by or used with molbox1+ so that they can be conveniently recalled from a lookup table when needed.

molbox1+™/molbox1+S, molbloc® TERMINAL OPERATION AND MAINTENANCE MANUAL
© 2010 Fluke Calibration Page 92
MFC profiles #1 and #2 are factory profiles and cannot be edited. Profile #1 sets the MFC control option to work in Volts with no flow range specified. Profile #2 sets the MFC control option to work in milliamps with no flow range specified.
OPERATION
To create or edit an MFC profile, press [SETUP], <5MFC>.
The display is: Enter profile number #4
Select the profile number to edit and press [ENTER].
Note MFC profiles #1 and #2 are factory default profiles for working with the MFC function directly in analog units without specifying MFC flow range or units. Profile #1 is 0 to 5 V, profile #2 is 4 to 20 mA (see Sections 3.4.8, 3.5.5).
The display is: Input type: 1voltage 2current
Select the analog signal type of the MFC and press [ENTER].
The next display is used to enter the full scale voltage or current. Enter the full scale voltage of current of the MFC and press [ENTER]. If the MFC signal selected was current (mA), you are also be prompted to enter the MFC 0 flow current output. molbox1+’s MFC control function does not support mixed current/voltage MFCs.
The next selection specifies the flow units of measure for this MFC profile. See Section 3.4.3 for an explanation of the unit selections.
Flow unit 1std 2user 3perfect
After the flow unit of measure has been selected the display prompts for the range which will be entered in the previously selected units. Enter the numerical value of full scale of the MFC in flow units.
Enter range 100.000 sccm
The next selection specifies whether the device is a mass flow meter that measures flow only (MFM) or a mass flow controller (MFC). Choose <1MFM> if the device for this profile measures only, choose <2MFC> if the device measures and controls flow.
Device Type 1measure 2control
Once the device type has been selected, editing is complete and a prompt to edit the next profile # is presented. Pressing [ESCAPE] returns to the MFC function. Pressing [ESCAPE] again returns to the current run screen.
Note To clear/reset all MFC profiles, except #1 and #2 factory default profiles, use [SPECIAL], <1reset>, <3mfc>.
3.5.6 <6REG> PURPOSE
To turn the MFC control regulation mode ON and OFF, and to set the regulation period for regulation mode.

3. OPERATION
Page 93 © 2010 Fluke Calibration
Note The REGE function affects the molbox1+ MFC control function. The MFC control function is an optional feature. If this option is not installed in the molbox1+, the REG function of the SETUP menu is not active.
PRINCIPLE
Regulation mode is designed to allow an MFC to be used with molbloc/molbox to precisely set flows as measured by the molbloc/molbox. This feature allows an MFC to be used to control flows to specific values as measured by the molbloc/molbox.
When the molbox1+ MFC function is active, set points can be sent to the MFC. In normal operation, the set point entered is the set point signal sent to the MFC and that set point is held constant until a new set point is given. The molbloc/molbox is used to read the flow resulting from that MFC setpoint.
Regulation mode allows a set point to be given in terms of the desired flow through the molbloc as measured by the molbox1+. In regulation mode, the molbox1+ regularly readjusts the actual set point applied to the MFC as needed to adjust flow to the desired flow value through the molbloc. At each regulation cycle, the molbox1+ corrects the set point to the MFC based on the difference between actual flow through the molbloc and the desired flow. The regulation period sets the time interval between each regulation cycle.
Note If there is a significant volume between the molbloc and the MFC, regulation will be improved by increasing the regulation period.
OPERATION
To activate or deactivate regulation mode and to set the regulation period, press [SETUP] and select <6reg>.
The display is: Regulation Period (0 disables): 0
If 0 (zero) is entered, regulation mode is inactive. If a value greater than 0 (zero) is entered, regulation mode is activated and the regulation period is value entered in seconds.
Maximum regulation period: 99 seconds
Minimum period: Single channel operation: 2 seconds A+B Mode: 10 seconds
Typical effective regulation period: Single channel operation: 5 seconds A+B Mode: 20 seconds
When the regulation mode is active, <R> is displayed in the bottom right hand corner of the MAIN run screen (when space is available).
3.5.7 <7FLOWU> PURPOSE
To customize the selection of flow units of measure that are available for selection from the [UNIT] function key (see Section 3.4.3).
PRINCIPLE/OPERATION
See Section 3.4.3.5.
3.5.8 <8PRESU> PURPOSE
To select/change the unit of measure in which molbox1+ displays pressure values.

molbox1+™/molbox1+S, molbloc® TERMINAL OPERATION AND MAINTENANCE MANUAL
© 2010 Fluke Calibration Page 94
OPERATION
To set the unit of measure in which molbox1+ displays pressure values, press [SETUP] and select <8presU>.
The display is: Pressure unit type: 1SI 2other 3user
Select the unit type desired, then select the unit desired. After the unit selection, operation returns to the run screen with the selected pressure unit of measure active.
The pressure units of measure available are listed in Table 33.
Table 33. Pressure Units of Measure Available
<1SI> <2Other> <3User>*
<1Pa>
<2kPa>
<3mPa>
<4mbar>
<5bar>
<6mmHg>
<7mmWa>
<1psi>
<2psf>
<3inHg>
<4inWa>
<5kcm2>
<1user>
*3User: User defined unit.
Note • The “user” unit is defined in terms of user units/Pa when the user unit
is selected. • See Section 7.1.1 for definition of the pressure unit conversions used
by molbox1+.
3.5.9 <9TEMPU> PURPOSE
To select the unit of measure in which molbox1+ displays temperature values.
OPERATION
To set the unit of measure in which molbox1+ displays temperature values, press [SETUP] and select <9tempU>.
The display is: Temperature unit: 1celcius 2fahrenheit
Select the desired unit. After the unit selection, operation returns to the run screen with the selected temperature unit active.
Note See Section 7.1.2 for definition of the temperature unit conversions used by molbox1+.

3. OPERATION
Page 95 © 2010 Fluke Calibration
3.6 [SPECIAL] PURPOSE
The [SPECIAL] key accesses a menu of molbox1+ functions and settings that are less commonly or not normally used in regular operation. These functions include:
<1reset> Access and execute various reset options (see Section 3.6.1).
<2level> Set user protection levels that restrict access to certain functions and to edit the user password (see Section 3.6.2).
<3ul> Set upper pressure limit alarm (see Section 3.6.3).
<4cal> View and adjust the molbox1+ pressure transducers, reference resistors and MFC analog option (see Section 3.6.4).
<5prefs> Set display screen saver time, unit ID number and date and time (see Section 3.6.5).
<6remote> View and edit molbox1+ COM port (RS232) and IEEE-488 interface settings (see Section 3.6.6).
<7drivers> Control the on/off of molbox1+’s optional 12 V drivers (see Section 3.6.7).
<8head> Set the height for the pressure fluid head correction (see Section 3.6.8).
<9BPR> Set back pressure ratio (BPR) mode (molbloc-S operation only) (see Section 3.6.9).
OPERATION
To access the SPECIAL menu, press [SPECIAL] from the MAIN run screen.
The display is: 1reset 2level 3ul
4cal 5prefs 6remote ↓ 7drivers 8head 9BPR
Select the desired function.
See Sections 3.6.1 to 3.6.9 for detailed SPECIAL function descriptions.
Note
Some screens (e.g., the SPECIAL menu) go beyond the two lines provided by the display. This is indicated by a flashing down arrow in the second line of the display. Press the [←] and [→] keys to move the cursor to access the lines that are NOT visible or directly enter the number of the hidden menu choice if you know it.
3.6.1 <1reset> PURPOSE
To reset various molbox1+ settings to default or factory values.
PRINCIPLE
molbox1+ stores its user definable settings in non-volatile memory. The reset menu allows the user to selectively or completely reset these settings to factory defaults. Reset clears settings that the user may have made, and should be used only to restore the molbox1+ to a known state. molbox1+ will go through its reboot routine after any type of reset is executed.
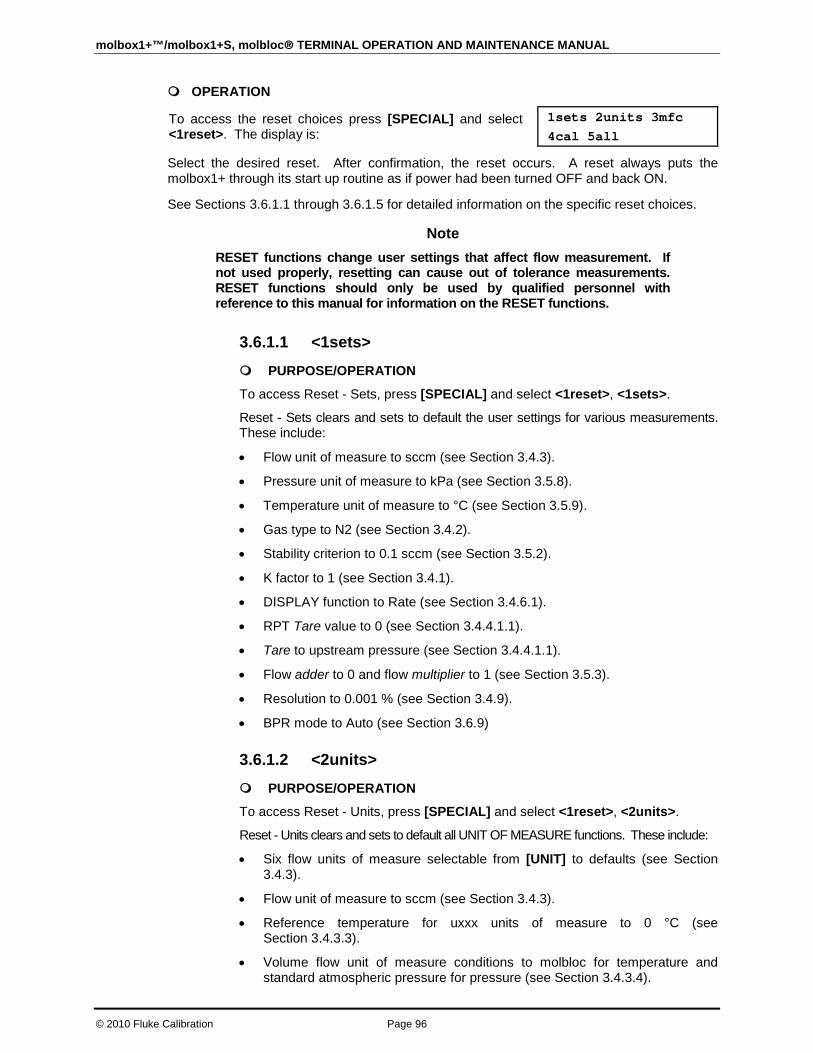
molbox1+™/molbox1+S, molbloc® TERMINAL OPERATION AND MAINTENANCE MANUAL
© 2010 Fluke Calibration Page 96
OPERATION
To access the reset choices press [SPECIAL] and select <1reset>. The display is:
1sets 2units 3mfc 4cal 5all
Select the desired reset. After confirmation, the reset occurs. A reset always puts the molbox1+ through its start up routine as if power had been turned OFF and back ON.
See Sections 3.6.1.1 through 3.6.1.5 for detailed information on the specific reset choices.
Note RESET functions change user settings that affect flow measurement. If not used properly, resetting can cause out of tolerance measurements. RESET functions should only be used by qualified personnel with reference to this manual for information on the RESET functions.
3.6.1.1 <1sets>
PURPOSE/OPERATION
To access Reset - Sets, press [SPECIAL] and select <1reset>, <1sets>.
Reset - Sets clears and sets to default the user settings for various measurements. These include:
• Flow unit of measure to sccm (see Section 3.4.3).
• Pressure unit of measure to kPa (see Section 3.5.8).
• Temperature unit of measure to °C (see Section 3.5.9).
• Gas type to N2 (see Section 3.4.2).
• Stability criterion to 0.1 sccm (see Section 3.5.2).
• K factor to 1 (see Section 3.4.1).
• DISPLAY function to Rate (see Section 3.4.6.1).
• RPT Tare value to 0 (see Section 3.4.4.1.1).
• Tare to upstream pressure (see Section 3.4.4.1.1).
• Flow adder to 0 and flow multiplier to 1 (see Section 3.5.3).
• Resolution to 0.001 % (see Section 3.4.9).
• BPR mode to Auto (see Section 3.6.9)
3.6.1.2 <2units>
PURPOSE/OPERATION
To access Reset - Units, press [SPECIAL] and select <1reset>, <2units>.
Reset - Units clears and sets to default all UNIT OF MEASURE functions. These include:
• Six flow units of measure selectable from [UNIT] to defaults (see Section 3.4.3).
• Flow unit of measure to sccm (see Section 3.4.3).
• Reference temperature for uxxx units of measure to 0 °C (see Section 3.4.3.3).
• Volume flow unit of measure conditions to molbloc for temperature and standard atmospheric pressure for pressure (see Section 3.4.3.4).
3. OPERATION
Page 97 © 2010 Fluke Calibration
• Pressure unit of measure to kPa (see Section 3.5.8).
• User pressure unit coefficient to 1.00/Pa (see Section 3.5.8).
• Temperature unit of measure to °C (see Section 3.5.9).
3.6.1.3 <3MFC>
PURPOSE/OPERATION
To access Reset - MFC, press [SPECIAL] and select <1reset>, <3MFC>.
Reset - MFC clears and sets to default all functions associated with the optional analog MFC control. These include:
• Set MFC channel to 0 (inactive) (see Section 3.4.8).
• Set regulation mode to OFF (see Section 3.5.6).
• Set MFC profile to 1 (see Section 3.4.8.2).
• Clear/delete user defined MFC profiles (see Section 3.5.5).
3.6.1.4 <4cal>
PURPOSE/OPERATION
Caution Use special caution with this reset as critical calibration data may be altered.
To access Reset - Cal, press [SPECIAL] and select <1reset>, <4cal>.
Reset - Cal clears and sets to default the user calibration coefficients for molbox1+ Reference Pressure Transducers (RPTs) (see Section 5.2). This includes:
• Upstream and downstream absolute RPTs: Adder 0 Multiplier: 1 Calibration Date: 19980101
Note Reset - Cal has NO effect on the reference resistance values used to calibrate molbox1+s internal ohmic measurement system (see Section 5.4) or on the calibration coefficients for the optional MFC control function (see Section 3.4.8).
3.6.1.5 <5all>
PURPOSE/OPERATION
To return molbox1+ to the original, as delivered factory condition. Performs the SETS, UNITS, CAL and MFC RESET functions and resets all other settable values to defaults. This includes communications port settings.
To access Reset - All, press [SPECIAL] and select <1reset>, <5all>.
Caution Use special caution with this reset as critical calibration data may be altered.

molbox1+™/molbox1+S, molbloc® TERMINAL OPERATION AND MAINTENANCE MANUAL
© 2010 Fluke Calibration Page 98
3.6.2 <2level> PURPOSE
To set user protection levels that restrict access to certain functions and to edit the password required for changing user levels.
PRINCIPLE
molbox1+’s front panel user interface provides the means to access all molbox1+ user def ined data, set t ings and funct ions inc luding cal ibrat ion data. Inadvertent, uninformed or unauthorized altering or deleting of data, settings and functions could require extensive reconfiguration by the user and might cause invalid readings. For these reasons, depending upon the application in which molbox1+ is being used, it may be desirable to restrict access to certain functions. The USER LEVEL function makes this possible. Four different levels of security are available: none, low, medium and high.
Access to changing security levels can be left open, or be protected by a password so that security levels can be used as a convenient way to avoid accidental changing of data or as a secured means of preventing tampering with molbox1+ settings.
3.6.2.1 Security Levels
The security levels are structured to support typical operating environments as follows:
None This level is intended for use only by the system manager and/or calibration facility. It allows access and editing in all areas including critical metrological information and other set t ings that af fect measurement integrity.
Low Low security is designed to protect the specific metrological information and SYSTEM DIAGNOSTIC AND MAINTENANCE functions of the system against accidental alteration. It is intended for an advanced operator performing many different tasks. Low security is the default user level setting.
Medium Medium security is designed to protect specific metrological information in the system and to assure that the molbox1+ is operated using consistent operational parameters.
High High security protects all operating parameters. It is intended to minimize operator choices (e.g., to perform repeated identical tests under consistent conditions).
Caution • molbox1+ is delivered with the security level set to low to
avoid inadvertent altering of critical internal settings but with unrestricted access to changing security level setting. It is recommended that the low security level be maintained at all times and password protection be implemented if control over setting of security levels is desired.
• If there is a risk of unauthorized changing of the security level, changing authority should be password protected (see OPERATION of this section).
• The High security level disables remote communications and returns an error message (“ERROR”) to all remote commands. All other security levels have NO effect on remote communications.
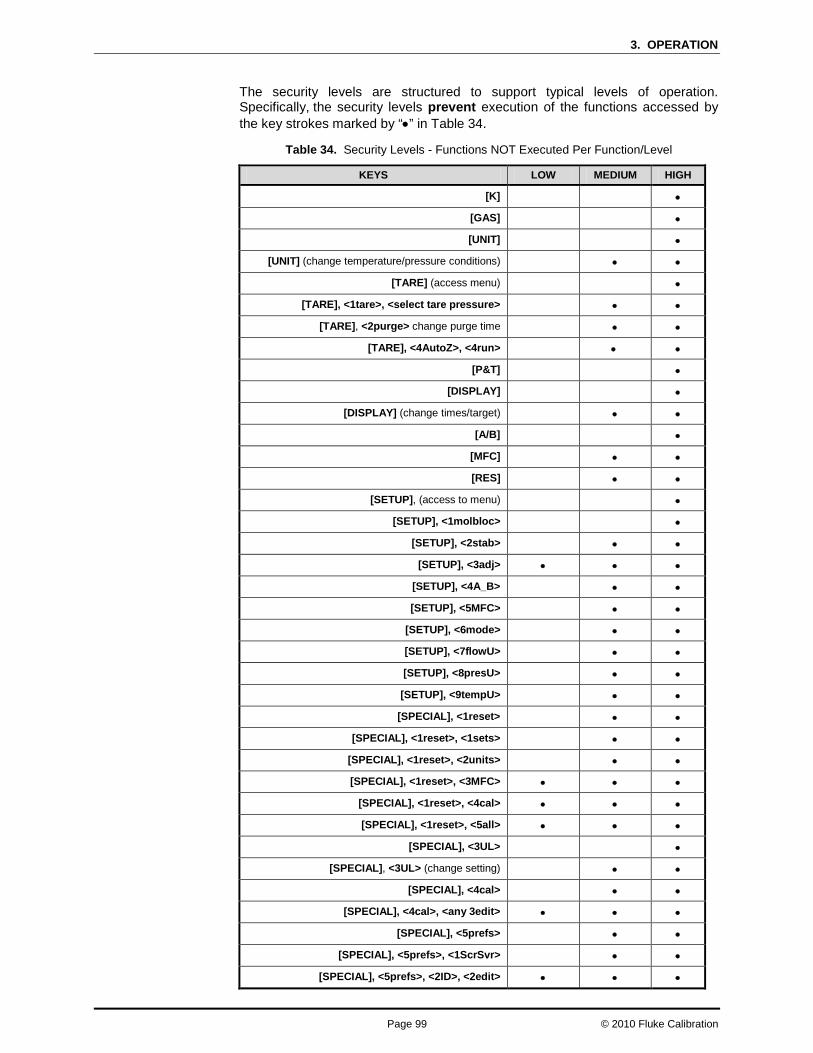
3. OPERATION
Page 99 © 2010 Fluke Calibration
The security levels are structured to support typical levels of operation. Specifically, the security levels prevent execution of the functions accessed by the key strokes marked by “•” in Table 34.
Table 34. Security Levels - Functions NOT Executed Per Function/Level
KEYS LOW MEDIUM HIGH
[K] •
[GAS] •
[UNIT] •
[UNIT] (change temperature/pressure conditions) • •
[TARE] (access menu) •
[TARE], <1tare>, <select tare pressure> • •
[TARE], <2purge> change purge time • •
[TARE], <4AutoZ>, <4run> • •
[P&T] •
[DISPLAY] •
[DISPLAY] (change times/target) • •
[A/B] •
[MFC] • •
[RES] • •
[SETUP], (access to menu) •
[SETUP], <1molbloc> •
[SETUP], <2stab> • •
[SETUP], <3adj> • • •
[SETUP], <4A_B> • •
[SETUP], <5MFC> • •
[SETUP], <6mode> • •
[SETUP], <7flowU> • •
[SETUP], <8presU> • •
[SETUP], <9tempU> • •
[SPECIAL], <1reset> • •
[SPECIAL], <1reset>, <1sets> • •
[SPECIAL], <1reset>, <2units> • •
[SPECIAL], <1reset>, <3MFC> • • •
[SPECIAL], <1reset>, <4cal> • • •
[SPECIAL], <1reset>, <5all> • • •
[SPECIAL], <3UL> •
[SPECIAL], <3UL> (change setting) • •
[SPECIAL], <4cal> • •
[SPECIAL], <4cal>, <any 3edit> • • •
[SPECIAL], <5prefs> • •
[SPECIAL], <5prefs>, <1ScrSvr> • •
[SPECIAL], <5prefs>, <2ID>, <2edit> • • •
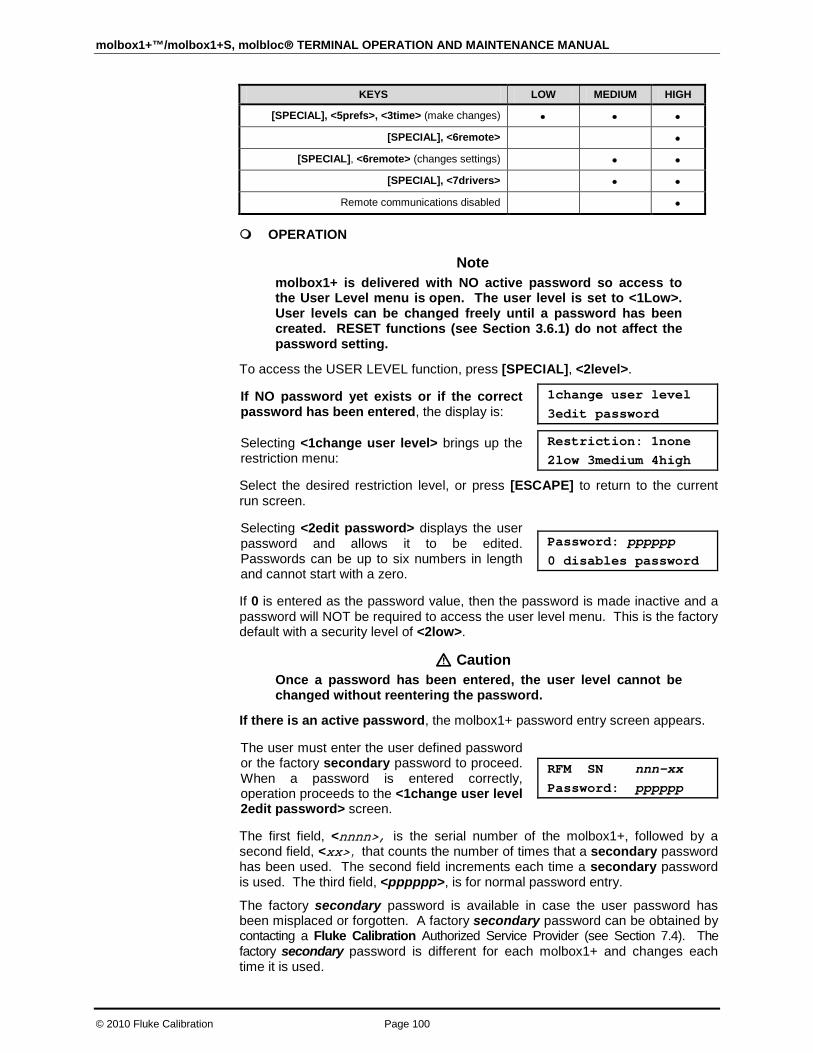
molbox1+™/molbox1+S, molbloc® TERMINAL OPERATION AND MAINTENANCE MANUAL
© 2010 Fluke Calibration Page 100
KEYS LOW MEDIUM HIGH
[SPECIAL], <5prefs>, <3time> (make changes) • • •
[SPECIAL], <6remote> •
[SPECIAL], <6remote> (changes settings) • •
[SPECIAL], <7drivers> • •
Remote communications disabled •
OPERATION
Note molbox1+ is delivered with NO active password so access to the User Level menu is open. The user level is set to <1Low>. User levels can be changed freely until a password has been created. RESET functions (see Section 3.6.1) do not affect the password setting.
To access the USER LEVEL function, press [SPECIAL], <2level>.
If NO password yet exists or if the correct password has been entered, the display is:
1change user level 3edit password
Selecting <1change user level> brings up the restriction menu:
Restriction: 1none 2low 3medium 4high
Select the desired restriction level, or press [ESCAPE] to return to the current run screen.
Selecting <2edit password> displays the user password and allows it to be edited. Passwords can be up to six numbers in length and cannot start with a zero.
Password: pppppp 0 disables password
If 0 is entered as the password value, then the password is made inactive and a password will NOT be required to access the user level menu. This is the factory default with a security level of <2low>.
Caution Once a password has been entered, the user level cannot be changed without reentering the password.
If there is an active password, the molbox1+ password entry screen appears.
The user must enter the user defined password or the factory secondary password to proceed. When a password is entered correctly, operation proceeds to the <1change user level 2edit password> screen.
RFM SN nnn-xx Password: pppppp
The first field, <nnnn>, is the serial number of the molbox1+, followed by a second field, <xx>, that counts the number of times that a secondary password has been used. The second field increments each time a secondary password is used. The third field, <pppppp>, is for normal password entry.
The factory secondary password is available in case the user password has been misplaced or forgotten. A factory secondary password can be obtained by contacting a Fluke Calibration Authorized Service Provider (see Section 7.4). The factory secondary password is different for each molbox1+ and changes each time it is used.
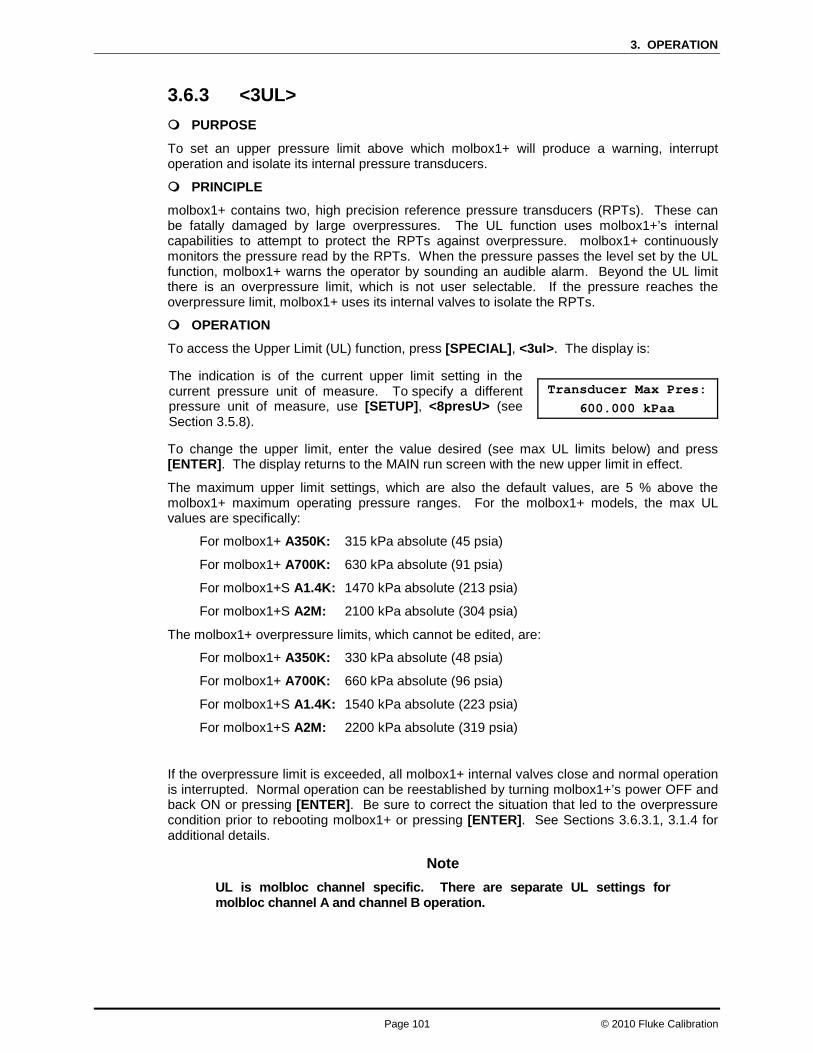
3. OPERATION
Page 101 © 2010 Fluke Calibration
3.6.3 <3UL> PURPOSE
To set an upper pressure limit above which molbox1+ will produce a warning, interrupt operation and isolate its internal pressure transducers.
PRINCIPLE
molbox1+ contains two, high precision reference pressure transducers (RPTs). These can be fatally damaged by large overpressures. The UL function uses molbox1+’s internal capabilities to attempt to protect the RPTs against overpressure. molbox1+ continuously monitors the pressure read by the RPTs. When the pressure passes the level set by the UL function, molbox1+ warns the operator by sounding an audible alarm. Beyond the UL limit there is an overpressure limit, which is not user selectable. If the pressure reaches the overpressure limit, molbox1+ uses its internal valves to isolate the RPTs.
OPERATION
To access the Upper Limit (UL) function, press [SPECIAL], <3ul>. The display is:
The indication is of the current upper limit setting in the current pressure unit of measure. To specify a different pressure unit of measure, use [SETUP], <8presU> (see Section 3.5.8).
Transducer Max Pres: 600.000 kPaa
To change the upper limit, enter the value desired (see max UL limits below) and press [ENTER]. The display returns to the MAIN run screen with the new upper limit in effect.
The maximum upper limit settings, which are also the default values, are 5 % above the molbox1+ maximum operating pressure ranges. For the molbox1+ models, the max UL values are specifically:
For molbox1+ A350K: 315 kPa absolute (45 psia)
For molbox1+ A700K: 630 kPa absolute (91 psia)
For molbox1+S A1.4K: 1470 kPa absolute (213 psia)
For molbox1+S A2M: 2100 kPa absolute (304 psia)
The molbox1+ overpressure limits, which cannot be edited, are:
For molbox1+ A350K: 330 kPa absolute (48 psia)
For molbox1+ A700K: 660 kPa absolute (96 psia)
For molbox1+S A1.4K: 1540 kPa absolute (223 psia)
For molbox1+S A2M: 2200 kPa absolute (319 psia)
If the overpressure limit is exceeded, all molbox1+ internal valves close and normal operation is interrupted. Normal operation can be reestablished by turning molbox1+’s power OFF and back ON or pressing [ENTER]. Be sure to correct the situation that led to the overpressure condition prior to rebooting molbox1+ or pressing [ENTER]. See Sections 3.6.3.1, 3.1.4 for additional details.
Note UL is molbloc channel specific. There are separate UL settings for molbloc channel A and channel B operation.
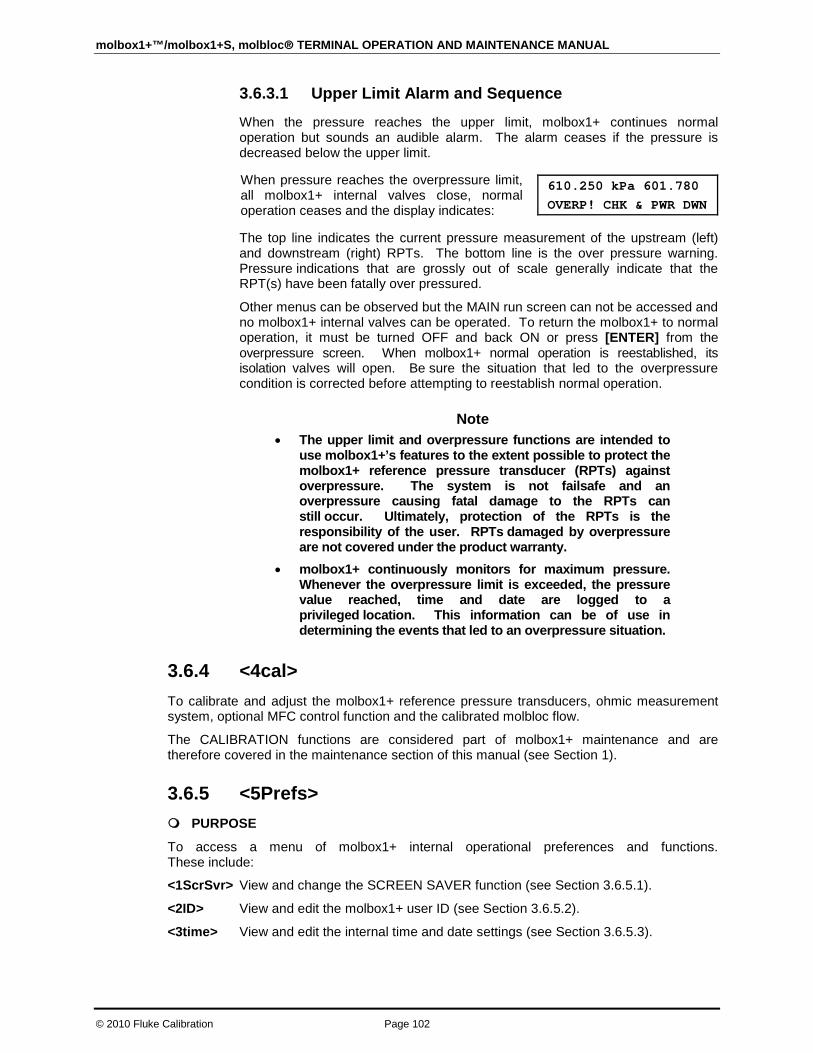
molbox1+™/molbox1+S, molbloc® TERMINAL OPERATION AND MAINTENANCE MANUAL
© 2010 Fluke Calibration Page 102
3.6.3.1 Upper Limit Alarm and Sequence
When the pressure reaches the upper limit, molbox1+ continues normal operation but sounds an audible alarm. The alarm ceases if the pressure is decreased below the upper limit.
When pressure reaches the overpressure limit, all molbox1+ internal valves close, normal operation ceases and the display indicates:
610.250 kPa 601.780 OVERP! CHK & PWR DWN
The top line indicates the current pressure measurement of the upstream (left) and downstream (right) RPTs. The bottom line is the over pressure warning. Pressure indications that are grossly out of scale generally indicate that the RPT(s) have been fatally over pressured.
Other menus can be observed but the MAIN run screen can not be accessed and no molbox1+ internal valves can be operated. To return the molbox1+ to normal operation, it must be turned OFF and back ON or press [ENTER] from the overpressure screen. When molbox1+ normal operation is reestablished, its isolation valves will open. Be sure the situation that led to the overpressure condition is corrected before attempting to reestablish normal operation.
Note • The upper limit and overpressure functions are intended to
use molbox1+’s features to the extent possible to protect the molbox1+ reference pressure transducer (RPTs) against overpressure. The system is not failsafe and an overpressure causing fatal damage to the RPTs can still occur. Ultimately, protection of the RPTs is the responsibility of the user. RPTs damaged by overpressure are not covered under the product warranty.
• molbox1+ continuously monitors for maximum pressure. Whenever the overpressure limit is exceeded, the pressure value reached, time and date are logged to a privileged location. This information can be of use in determining the events that led to an overpressure situation.
3.6.4 <4cal> To calibrate and adjust the molbox1+ reference pressure transducers, ohmic measurement system, optional MFC control function and the calibrated molbloc flow.
The CALIBRATION functions are considered part of molbox1+ maintenance and are therefore covered in the maintenance section of this manual (see Section 1).
3.6.5 <5Prefs> PURPOSE
To access a menu of molbox1+ internal operational preferences and functions. These include:
<1ScrSvr> View and change the SCREEN SAVER function (see Section 3.6.5.1).
<2ID> View and edit the molbox1+ user ID (see Section 3.6.5.2).
<3time> View and edit the internal time and date settings (see Section 3.6.5.3).
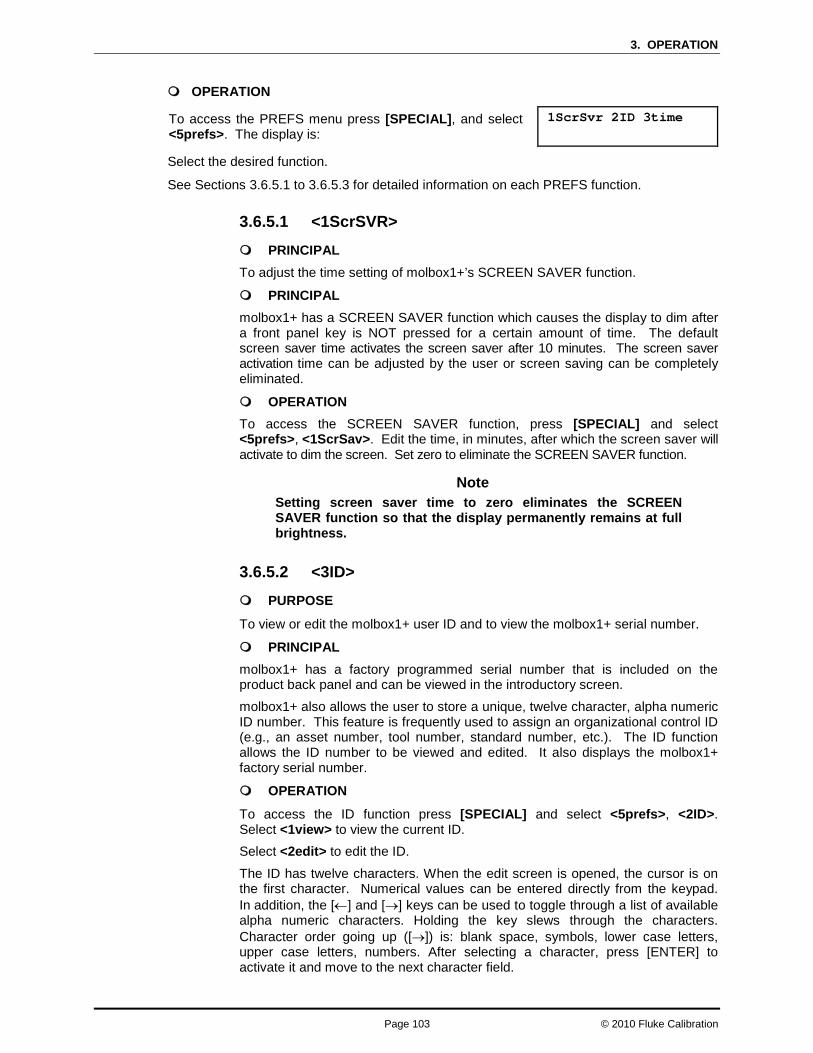
3. OPERATION
Page 103 © 2010 Fluke Calibration
OPERATION
To access the PREFS menu press [SPECIAL], and select <5prefs>. The display is:
1ScrSvr 2ID 3time
Select the desired function.
See Sections 3.6.5.1 to 3.6.5.3 for detailed information on each PREFS function.
3.6.5.1 <1ScrSVR>
PRINCIPAL To adjust the time setting of molbox1+’s SCREEN SAVER function.
PRINCIPAL molbox1+ has a SCREEN SAVER function which causes the display to dim after a front panel key is NOT pressed for a certain amount of time. The default screen saver time activates the screen saver after 10 minutes. The screen saver activation time can be adjusted by the user or screen saving can be completely eliminated.
OPERATION To access the SCREEN SAVER function, press [SPECIAL] and select <5prefs>, <1ScrSav>. Edit the time, in minutes, after which the screen saver will activate to dim the screen. Set zero to eliminate the SCREEN SAVER function.
Note Setting screen saver time to zero eliminates the SCREEN SAVER function so that the display permanently remains at full brightness.
3.6.5.2 <3ID>
PURPOSE
To view or edit the molbox1+ user ID and to view the molbox1+ serial number.
PRINCIPAL molbox1+ has a factory programmed serial number that is included on the product back panel and can be viewed in the introductory screen. molbox1+ also allows the user to store a unique, twelve character, alpha numeric ID number. This feature is frequently used to assign an organizational control ID (e.g., an asset number, tool number, standard number, etc.). The ID function allows the ID number to be viewed and edited. It also displays the molbox1+ factory serial number.
OPERATION
To access the ID function press [SPECIAL] and select <5prefs>, <2ID>. Select <1view> to view the current ID. Select <2edit> to edit the ID.
The ID has twelve characters. When the edit screen is opened, the cursor is on the first character. Numerical values can be entered directly from the keypad. In addition, the [←] and [→] keys can be used to toggle through a list of available alpha numeric characters. Holding the key slews through the characters. Character order going up ([→]) is: blank space, symbols, lower case letters, upper case letters, numbers. After selecting a character, press [ENTER] to activate it and move to the next character field.

molbox1+™/molbox1+S, molbloc® TERMINAL OPERATION AND MAINTENANCE MANUAL
© 2010 Fluke Calibration Page 104
When a character is selected the cursor moves to the next character. To leave a blank character, press [ENTER] with the field for that character blank. Use this for the trailing characters if the ID being entered is less than twelve characters. After the last of the twelve characters has been entered, the <Save ID?> option is offered. Select <1no> to return to the ID edit screen. Select <2yes> to save the edited ID.
Note The ID can be set remotely from a computer which is quite a bit more convenient than entering characters from the keyboard (see Section 4.3.4.2, ID command). The ID cannot be cleared or reset by any RESET functions (see Section 3.6.1).
3.6.5.3 <3Time>
PURPOSE
To view and edit the molbox1+ internal time and date settings.
OPERATION
To access the TIME function press [SPECIAL] and select <5prefs>, <3time>. The display is:
Edit: 1time 2date 08:32:11 am 19980101
Select <1time> to edit the time. Edit hours, then minutes, then am/pm by pressing [ENTER] at each entry. Seconds go to zero when minutes are entered. This can be used to synchronize the time with a time standard.
Select <2date> to edit the date. The date must be specified in YYYYMMDD format.
Note The molbox1+ date and time are set to United States Mountain Standard Time in the final test and inspection process at the factory. If desired, use the TIME and DATE functions to set your local time and date.
3.6.6 <6REMOTE> PURPOSE
To configure the molbox1+ COM1, COM2 and IEEE-488 communication ports. To test COM1 and COM2 communications.
PRINCIPLE
The molbox1+ has two RS232 communications ports referred to as COM1 and COM2 and a single IEEE-488 port. COM1 and the IEEE-488 port are for communicating with a host computer (see Section 4.1). COM2 is reserved for pass through communications with an external device, (e.g., a multimeter, second molbox, MFC controller, etc.). These ports can be set up from the molbox1+ front panel.
molbox1+ provides a self-test for its RS232 communication ports. The self-test allows verification that the molbox1+ RS232 ports (COM1 and COM2) are operating properly and that a valid interface cable is being used.
OPERATION
To access the communication port configurations, press [SPECIAL] and select <6remote>. Select <1COM1>, <2COM2>, or <3IEEE-488> to view and/or edit that port’s settings.
To access the RS232 self-test press [SPECIAL] and select <6remote>, <4RS232test>.

3. OPERATION
Page 105 © 2010 Fluke Calibration
3.6.6.1 COM1 and COM2
The COMx port settings can be adjusted. The settings are baud rate, parity, data bits and stop bits. The available options are listed in Table 35.
Table 35. COM1 and COM2 Available Settings
BAUD RATE 300, 600, 1 200, 2 400, 4 800, 9 600, 19 200
PARITY NONE, ODD or EVEN
DATA BITS 7 or 8
STOP BITS 1 or 2
The default COMx settings are 2400, E, 7,1 for both COM ports.
The molbox1+ appends a carriage return (<CR>) and a line feed (<LF>) to all messages that are sent out of the COM1 port to the host. It looks for a carriage return to terminate incoming messages and ignores line feeds. The user MUST wait for a reply to each message sent to the molbox1+ before sending another message to it (see Section 4.2.1).
3.6.6.2 IEEE-488
The IEEE-488 port address can be defined from 1 to 31. The default address is 10.
The molbox1+ sends a line feed (<LF>) and asserts the EOI line at the end of all transmitted messages. It looks for a line feed and/or assertion of the EOI line to terminate incoming messages (see Section 4.2.2).
3.6.6.3 RS232 Self-Test
The RS232 self-test is provided to check the molbox1+ COM ports and the interface cable independently of an external device or computer.
If you are having difficulty communicating with molbox1+ from a host computer using RS232, the RS232 self test can help establish that the molbox1+ COM1 port you are trying to communicate with and the interface cable you are using are good.
To run a self test of the RS232 ports (COM1 and COM2), press [SPECIAL] and select <6remote>, <4RS232test>.
The display prompts you to connect COM1 to COM2 using a standard pin to pin DB-9F to DB-9M RS232 cable (see Section 4.2.1.1).
Once the cable has been installed, press [ENTER] to run the self-test. The test is first executed in the COM1→COM2 direction and then in the COM2→COM1 direction.
If the COM1→COM2 test passes: <PASSED> displays briefly and the test proceeds to COM2→COM1.
If COM2→COM1 passes: <PASSED> is displayed briefly followed by the conclusion, <molbox1+ RS232 test has PASSED>.
If a test fails: Execution is suspended until [ENTER] is pressed.

molbox1+™/molbox1+S, molbloc® TERMINAL OPERATION AND MAINTENANCE MANUAL
© 2010 Fluke Calibration Page 106
Note The molbox1+ RS232 test can fail for three reasons:
1. The RS232 cable being used is incorrect (see Section 4.2.1.1 for information on the correct cable).
2. COM1 and COM2 do NOT have the same serial communications settings and therefore cannot communicate together (see Section 3.6.6.1 to set the COM ports).
3. COM1 or COM2 is defective. The reason for failed communications is almost always a cable or incorrect RS232 interface settings. Be sure that these are correct before concluding that a COM port is defective.
3.6.7 <7Drivers> PURPOSE
To control the output signals of molbox1+’s 8 channel, 12 V external drivers.
Note The <3drivers> function is an optional feature of molbox1+. If this option was not ordered with the molbox1+, the driver hardware has not been installed and the operation of <3drivers> will have no effect.
PRINCIPLE
molbox1+ external drivers are available to drive peripheral equipment in a molbox1+ system (e.g., manifolding valves for selecting gas supply to the molbloc or automatically directing flow to molbloc channel A or B). The driver electrical connections are available from a rear panel connector (see Section 7.2 for driver specifications and pin outs).
OPERATION
To access the driver control function, press [SPECIAL] and select <7drivers>.
The display is: External Drivers: 1 2 3 4 5 6 7 8
Pressing the keypad numerical key driver number turns that driver ON and OFF with either a momentary or a toggled response. An active driver is indicated by <*> immediately following the driver number. Pressing [ENTER] while in the External Drivers menu causes a menu to appear that allows selection of whether the driver actuation by selecting the driver number will be <1momentary> or <2toggle>.
3.6.8 <8Head> PURPOSE
To cause a pressure fluid head correction to be added or subtracted to the pressure measured by the molbox1+ reference pressure transducers in order to predict the pressure at height the height of the molbloc when the molbloc is at a level other than the molbox1+’s reference level.
PRINCIPLE
molbox1+ measures absolute and differential pressure in molbloc flow elements. The molbox1+ reference pressure transducers (RPTs) are calibrated with the height of the rear panel pressure quick connectors as the pressure reference level. Sometimes, when performing a calibration or test, the molbloc is at a different height than the molbox1+’s pressure reference level. This difference in height, frequently called head, can cause a

3. OPERATION
Page 107 © 2010 Fluke Calibration
significant difference between the pressure measured by the molbox1+ at its reference level and the pressure actually present at the molbloc at a different height. In this case, it is useful to make a head correction to the pressure measured by the molbox1+ in order to predict the pressure actually applied at a different height.
molbox1+ can calculate head pressures for all the gases it supports (see Section 3.4.2), over its working pressure range. The HEAD function allows the difference in height between the molbox1+ and the molbloc to be specified and causes the resulting head pressure to be added to the pressure measured at the molbox1+ rear panel quick connectors.
[SPECIAL], <8head>, is used to specify the height difference between the molbox1+ rear panel quick connectors and another height. Entering a height of zero turns the function off.
Note Use of the HEAD function to assure in tolerance measurements is most important when using molbloc-S at high pressures. Specifying the head height within ± 3 in. (7.5 cm) is adequate to assure that, even in the worst case, the uncertainty on the head correction will be insignificant relative to the tolerance of the measurement.
OPERATION
To access the HEAD function, press the [SPECIAL], <8head>. The display is:
1. Entry field for head height.
2. Current molbox1+ gas selection.
Edit head height: + 25 cm N2
Edit the head height to the desired value. Press [ENT] to return to the run screen with the new head correction active. Press [ESC] to return with no changes.
Note
The reference height of the molbox1+ pressure measurement is the middle of the molbox1+ rear panel pressure quick connectors. The head height should be entered as a positive value if the molbloc is higher than the molbox1+ and negative if it is lower.
Note • The HEAD function is NOT channel specific. The HEAD height setting and
ON or OFF status remains the same as molbloc channels are changed. • When a head correction is being applied, it is indicated by <h> to the right
of the pressure unit in the [P&T] screen (see Section 3.4.5). When the head correction is zero, the <h> is not shown.
• The head function is automatically disabled when running AutoZ (see Section 3.4.4.4.2) and in the calibration run screen (see Section 5.2.4.1).
3.6.9 <9BPR> PURPOSE
In molbloc-S operation, to select the molbox1+ BPR (back pressure ratio) measurement mode. The molbox1+S BPR measurement mode is always on; there is no option to turn it off or use the auto selection option described below.
PRINCIPLE

molbox1+™/molbox1+S, molbloc® TERMINAL OPERATION AND MAINTENANCE MANUAL
© 2010 Fluke Calibration Page 108
When molbloc-S elements are used with molbox1+ the RPT which is normally used to read molbloc downstream pressure, may be pneumatically connected to either the molbloc-S nozzle’s upstream or downstream pressure, by molbox1+ internal valving. The two RPTs are used simultaneously upstream when possible to minimize the uncertainty on molbloc-S upstream pressure measurement by averaging the two RPT readings. The upstream absolute pressure is the most critical measurement for calculation of the flow through molbloc-S.
Measurement of molbloc-S downstream pressure is only necessary to monitor the BPR (molbloc back pressure ratio). The value of BPR indicates whether the flow through the molbloc-S has achieved the necessary critical flow condition (see Section 3.1.5).
When the molbox1+ internal valves are positioned to connect one RPT upstream and the other downstream of the nozzle to determine BPR, the valve state is referred to as BPR ON (see Figure 11).
1. Channel A High Isolation: Open
2. Channel A Low Isolation: Open
3. Channel B High Isolation: Closed
4. Channel B Low Isolation: Closed
5. Bypass: Closed
Figure 12. molbox1+ Internal Pneumatic Schematic – molbloc-S OPERATION, CHANNEL A, BPR ON
When the molbox1+ internal valves are positioned to allow both RPTs to measure the molbloc-S upstream pressure, the valve state is referred to as BPR OFF (see Figure 12).
1. Channel A High Isolation: Open
2. Channel A Low Isolation: Closed
3. Channel B High Isolation: Closed
4. Channel B Low Isolation: Closed
5. Bypass: Open
Figure 13. molbox1+ Internal Pneumatic Schematic – molbloc-S OPERATION, CHANNEL A, BPR OFF
Ideally, the user is able to monitor the BPR with BPR ON while setting flows and pressures, and once the flow is established, uncertainties can be minimized by turning BPR OFF gaining the benefit of using both RPTs upstream. As an alternate to operator switching between BPR

3. OPERATION
Page 109 © 2010 Fluke Calibration
ON and BPR OFF, molbox1+ has a BPR mode called Auto that uses on-board logic to determine when to turn BPR ON and OFF. In BPR Auto mode, the molbox uses cues based on flow and pressure changes, stability, and proximity to the Reynolds number-based BPR limits to determine when to switch between the BPR ON and BPR OFF valve states (see Section 3.6.9). Auto is the default BPR mode and is considered the normal mode for manual molbloc-S/molbox1+ use.
For users who prefer to avoid automatic valving, there are two other BPR modes. BPR OFF mode keeps the molbox in the BPR OFF valve state at all times. BPR ON keeps the molbox in the BPR ON valve state at all times. BPR OFF mode should be used with caution, as it provides no monitoring of BPR to ensure that molbloc-S measurements are valid.
Note When molbox1+ is used in BPR OFF mode, molbox cannot measure the molbloc-S downstream pressure and provides no monitoring or indication of the BPR. molbox1+ cannot warn the user when the flow through molbloc-S is not critical and flow measurements are not valid. For example, when the molbloc is at rest in BPR OFF mode, and atmospheric pressure is applied to both the upstream and downstream side of molbloc-S, the molbox1+ will indicate a false flow rate approximately equal to the molbloc-S KF value times the value of atmospheric pressure in kPa. If BPR OFF mode is used, the user must make sure that a sufficiently low BPR is maintained while making molbloc-S flow measurements (see Section 3.1.5). The [TARE], <5BPR> function can be used for quick BPR checks (see Section 3.4.4.5).
OPERATION
To access the BPR mode menu, press [SPECIAL], <9BPR>.
The display is: BPR mode: 1BPRoff 2BPRon 3Auto
On a molbox1+S, BPR is always on. The menu does not provide a selection.
The display is: BPR mode: BPR ON
Making a BPR mode selection, actives the selected BPR mode and returns to the previous RUN screen. [ESCAPE] returns to the previous RUN screen without changing the BPR mode.
Selecting <1BPRoff> causes, the molbox1+ internal valves to immediately switch to the BPR OFF valve state (see Figure 12), and remain there until the user changes the BPR mode or activates a function which causes a valve change (such as the [TARE], <5BPR> function, see Section 3.4.4.5). In BPR OFF mode, the flow is calculated from the average of the two RPT pressure readings and the RPT pressures displayed in the P&T pressure screen are adjusted using the dynamic tare feature, so both pressures are displayed equal to the average value (see Section 3.1.2 and 3.4.5)
Selecting <2BPRon> causes, the molbox1+ internal valves to immediately switch to the BPR ON valve state (see Figure 11), and remain there until the user changes the BPR mode or activates a function which causes a valve change. In BPR ON mode, flow is calculated from the upstream RPT measurement only. In BPR ON mode, there is no tare applied to the RPT readings at any time.
Selecting <3Auto> does not necessarily immediately change the BPR mode.. Depending on the current BPR mode, BPR mode changes occur as follows:
In Auto mode, in the BPR ON valve state:
molbox1+ monitors the BPR value directly. If the BPR is safely below the BPR limit (calculated from empirical testing of molbloc-S choking ratios, see Section 3.1.5), then, once the flow is stable within 0.5 % of reading for 3 seconds, molbox1+ switches to BPR OFF valve state and begins live averaging of the RPT pressure values.
molbox1+™/molbox1+S, molbloc® TERMINAL OPERATION AND MAINTENANCE MANUAL
© 2010 Fluke Calibration Page 110
In Auto mode, in the BPR OFF valve state:
molbox1+ cannot monitor BPR, but based on the proximity of the most recently measured BPR to the calculated BPR limit, if the current flow value changes enough that it is likely that the BPR is approaching the limit, molbox1+ switches to BPR ON valve state to check BPR directly. It is highly unlikely that valve switching will occur during critical flow measurements because, typically, high precision flow measurements are not made when flow is changing.
In Auto mode, when the valves are in BPR OFF state, flow is calculated from the average of the two RPT pressure readings as in BPR OFF mode. When the molbox1+ valves switch to the BPR ON valve state in Auto mode, the tare can no longer be dynamically calculated because the two RPTs are not measuring the same pressure. The most recent tare that was automatically calculated during the BPR OFF valve state is used to correct the pressures used and displayed in Auto mode until the valves return to the BPR OFF state again. This assures that flow measurements remain as consistent as possible during Auto mode valve switching and that the tare value that is most likely to be correct is used at all times.
Note • It is possible to change the BPR mode by remote communication with
molbox1+ and also to disable molbox1+ valve control and switching while in any BPR mode (see Section 4.3.4.2).
• It is not possible to operate A_B modes when the active BPR mode is Auto due to internal valving conflicts. molbox1+ denies access to the A_B modes if the current BPR mode is Auto and does not allow the user to select Auto mode when an A_B mode is active (see Section 3.5.4).
Page 111 © 2010 Fluke Calibration
4. Remote Operation
4.1 Overview Most of the molbox1+’s front panel functions can also be executed by commands from a remote computer. The host computer can communicate with the molbox1+ using the molbox1+ COM1 RS232 port or the IEEE-488 port. The command syntax is the same for either port except when using the IEEE STD. 488.2 Common commands.
4.2 Interfacing Sending any command to the molbox1+ places it into a “soft” remote mode. The remote indicator in the lower right hand corner of the molbox1+ front panel is illuminated when molbox1+ is in this remote mode. The indictor also flickers when remote communication is occurring. The menus usually accessed from the front panel are locked-out while in remote mode. Pressing the [ESCAPE] key returns the molbox1+ to local operation unless the “REMOTE” command was sent to the unit. The “REMOTE” command locks out keypad operation until the “LOCAL” command is sent. In either level of remote mode the [P&T] key still responds to allow the user to change the data being viewed on the molbox1+ main run display.
Most remote commands will return a reply within,500 ms. You must wait for this reply before issuing another command to the molbox1+. This ensures that the molbox1+ has completed the command. An exception to this is the use of any of the IEEE STD. 488.2 Common Commands (see Section 4.3.4.1) via the IEEE-488 interface (common commands all start with an asterisk, “*”). The common commands only generate a reply if using the COM1 port or if the query form of the common command is used (command followed by a “?”).
The following commands take more than,500 ms to reply:
ALLR, DP, FR, PR, RATE, SR, TARE Up to 2 seconds to allow a new measurement.
GAS Up to 5 seconds to complete a change.
TARESET, DEVICE=EXT, RESET Up to 10 seconds to complete.
Note
LabVIEW drivers are available for the molbox1+. These drivers allow users of the National Instruments’ LabVIEW environment to create systems that include one or more molbox1s using LabVIEW virtual instruments instead of using the remote commands directly. The molbox1+ LabVIEW drivers are an abstraction of the remote commands into a consistent set of common and specific instrument functions. The drivers can be obtained at NO charge from the DHI worldwide web site, www.dhinstruments.com.
4.2.1 RS232 Interface To establish RS232 communications a standard pin to pin DB-9F to DB-9M RS232 cable must be used to connect the host COM port to molbox1+ COM1. The interface settings of both ports must be the same.
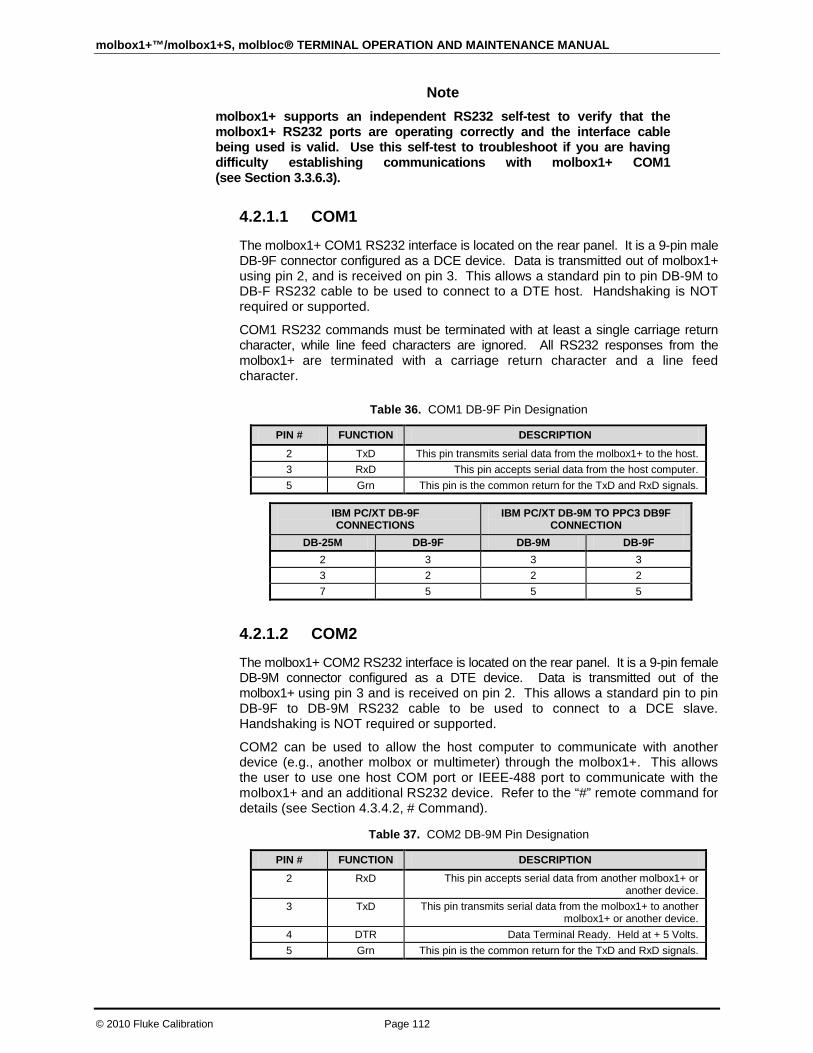
molbox1+™/molbox1+S, molbloc® TERMINAL OPERATION AND MAINTENANCE MANUAL
© 2010 Fluke Calibration Page 112
Note molbox1+ supports an independent RS232 self-test to verify that the molbox1+ RS232 ports are operating correctly and the interface cable being used is valid. Use this self-test to troubleshoot if you are having difficulty establishing communications with molbox1+ COM1 (see Section 3.3.6.3).
4.2.1.1 COM1
The molbox1+ COM1 RS232 interface is located on the rear panel. It is a 9-pin male DB-9F connector configured as a DCE device. Data is transmitted out of molbox1+ using pin 2, and is received on pin 3. This allows a standard pin to pin DB-9M to DB-F RS232 cable to be used to connect to a DTE host. Handshaking is NOT required or supported.
COM1 RS232 commands must be terminated with at least a single carriage return character, while line feed characters are ignored. All RS232 responses from the molbox1+ are terminated with a carriage return character and a line feed character.
Table 36. COM1 DB-9F Pin Designation
PIN # FUNCTION DESCRIPTION
2 TxD This pin transmits serial data from the molbox1+ to the host. 3 RxD This pin accepts serial data from the host computer. 5 Grn This pin is the common return for the TxD and RxD signals.
IBM PC/XT DB-9F CONNECTIONS
IBM PC/XT DB-9M TO PPC3 DB9F CONNECTION
DB-25M DB-9F DB-9M DB-9F 2 3 3 3 3 2 2 2 7 5 5 5
4.2.1.2 COM2
The molbox1+ COM2 RS232 interface is located on the rear panel. It is a 9-pin female DB-9M connector configured as a DTE device. Data is transmitted out of the molbox1+ using pin 3 and is received on pin 2. This allows a standard pin to pin DB-9F to DB-9M RS232 cable to be used to connect to a DCE slave. Handshaking is NOT required or supported.
COM2 can be used to allow the host computer to communicate with another device (e.g., another molbox or multimeter) through the molbox1+. This allows the user to use one host COM port or IEEE-488 port to communicate with the molbox1+ and an additional RS232 device. Refer to the “#” remote command for details (see Section 4.3.4.2, # Command).
Table 37. COM2 DB-9M Pin Designation
PIN # FUNCTION DESCRIPTION 2 RxD This pin accepts serial data from another molbox1+ or
another device. 3 TxD This pin transmits serial data from the molbox1+ to another
molbox1+ or another device. 4 DTR Data Terminal Ready. Held at + 5 Volts. 5 Grn This pin is the common return for the TxD and RxD signals.
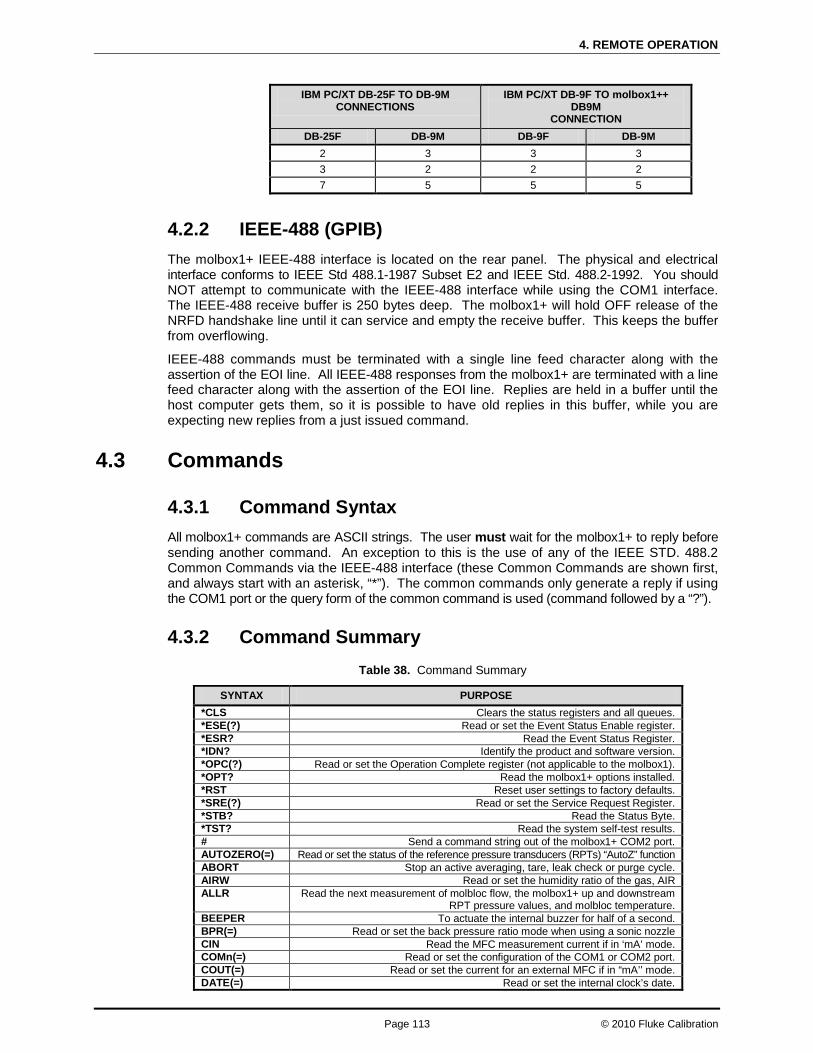
4. REMOTE OPERATION
Page 113 © 2010 Fluke Calibration
IBM PC/XT DB-25F TO DB-9M CONNECTIONS
IBM PC/XT DB-9F TO molbox1++ DB9M
CONNECTION DB-25F DB-9M DB-9F DB-9M
2 3 3 3 3 2 2 2 7 5 5 5
4.2.2 IEEE-488 (GPIB) The molbox1+ IEEE-488 interface is located on the rear panel. The physical and electrical interface conforms to IEEE Std 488.1-1987 Subset E2 and IEEE Std. 488.2-1992. You should NOT attempt to communicate with the IEEE-488 interface while using the COM1 interface. The IEEE-488 receive buffer is 250 bytes deep. The molbox1+ will hold OFF release of the NRFD handshake line until it can service and empty the receive buffer. This keeps the buffer from overflowing.
IEEE-488 commands must be terminated with a single line feed character along with the assertion of the EOI line. All IEEE-488 responses from the molbox1+ are terminated with a line feed character along with the assertion of the EOI line. Replies are held in a buffer until the host computer gets them, so it is possible to have old replies in this buffer, while you are expecting new replies from a just issued command.
4.3 Commands
4.3.1 Command Syntax All molbox1+ commands are ASCII strings. The user must wait for the molbox1+ to reply before sending another command. An exception to this is the use of any of the IEEE STD. 488.2 Common Commands via the IEEE-488 interface (these Common Commands are shown first, and always start with an asterisk, “*”). The common commands only generate a reply if using the COM1 port or the query form of the common command is used (command followed by a “?”).
4.3.2 Command Summary Table 38. Command Summary
SYNTAX PURPOSE *CLS Clears the status registers and all queues. *ESE(?) Read or set the Event Status Enable register. *ESR? Read the Event Status Register. *IDN? Identify the product and software version. *OPC(?) Read or set the Operation Complete register (not applicable to the molbox1). *OPT? Read the molbox1+ options installed. *RST Reset user settings to factory defaults. *SRE(?) Read or set the Service Request Register. *STB? Read the Status Byte. *TST? Read the system self-test results. # Send a command string out of the molbox1+ COM2 port. AUTOZERO(=) Read or set the status of the reference pressure transducers (RPTs) “AutoZ” function ABORT Stop an active averaging, tare, leak check or purge cycle. AIRW Read or set the humidity ratio of the gas, AIR ALLR Read the next measurement of molbloc flow, the molbox1+ up and downstream
RPT pressure values, and molbloc temperature. BEEPER To actuate the internal buzzer for half of a second. BPR(=) Read or set the back pressure ratio mode when using a sonic nozzle CIN Read the MFC measurement current if in ‘mA’ mode. COMn(=) Read or set the configuration of the COM1 or COM2 port. COUT(=) Read or set the current for an external MFC if in “mA’’ mode. DATE(=) Read or set the internal clock’s date.
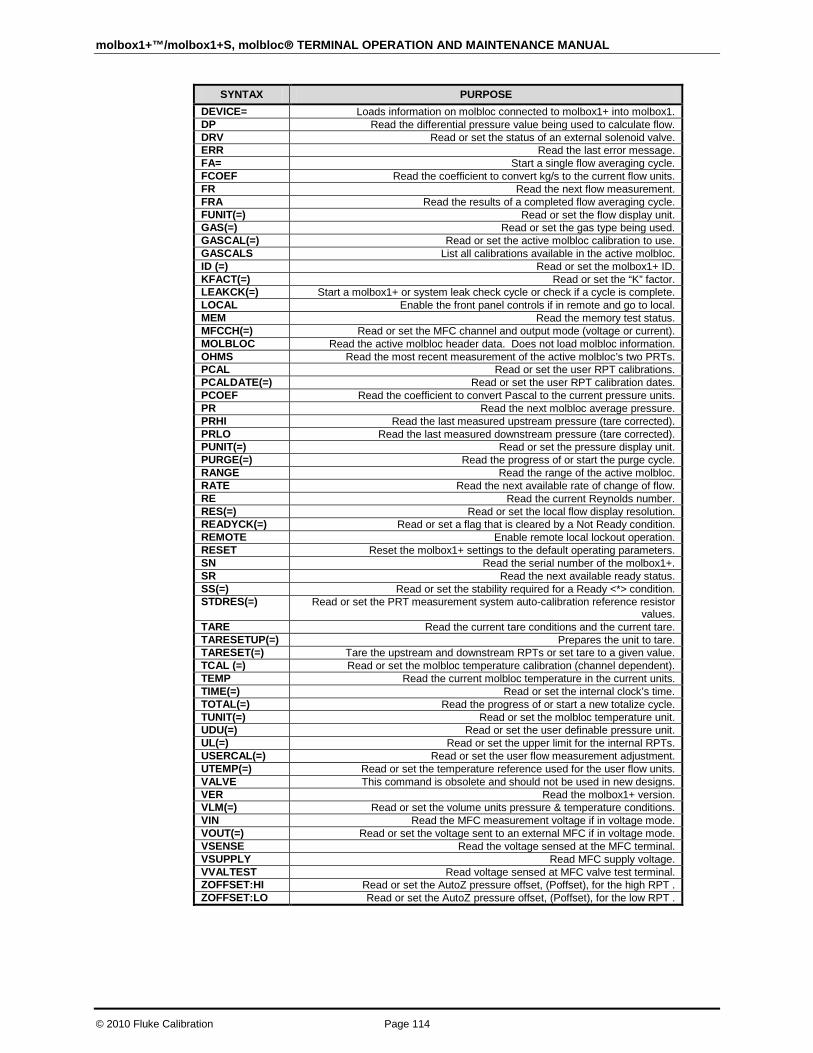
molbox1+™/molbox1+S, molbloc® TERMINAL OPERATION AND MAINTENANCE MANUAL
© 2010 Fluke Calibration Page 114
SYNTAX PURPOSE DEVICE= Loads information on molbloc connected to molbox1+ into molbox1. DP Read the differential pressure value being used to calculate flow. DRV Read or set the status of an external solenoid valve. ERR Read the last error message. FA= Start a single flow averaging cycle. FCOEF Read the coefficient to convert kg/s to the current flow units. FR Read the next flow measurement. FRA Read the results of a completed flow averaging cycle. FUNIT(=) Read or set the flow display unit. GAS(=) Read or set the gas type being used. GASCAL(=) Read or set the active molbloc calibration to use. GASCALS List all calibrations available in the active molbloc. ID (=) Read or set the molbox1+ ID. KFACT(=) Read or set the “K” factor. LEAKCK(=) Start a molbox1+ or system leak check cycle or check if a cycle is complete. LOCAL Enable the front panel controls if in remote and go to local. MEM Read the memory test status. MFCCH(=) Read or set the MFC channel and output mode (voltage or current). MOLBLOC Read the active molbloc header data. Does not load molbloc information. OHMS Read the most recent measurement of the active molbloc’s two PRTs. PCAL Read or set the user RPT calibrations. PCALDATE(=) Read or set the user RPT calibration dates. PCOEF Read the coefficient to convert Pascal to the current pressure units. PR Read the next molbloc average pressure. PRHI Read the last measured upstream pressure (tare corrected). PRLO Read the last measured downstream pressure (tare corrected). PUNIT(=) Read or set the pressure display unit. PURGE(=) Read the progress of or start the purge cycle. RANGE Read the range of the active molbloc. RATE Read the next available rate of change of flow. RE Read the current Reynolds number. RES(=) Read or set the local flow display resolution. READYCK(=) Read or set a flag that is cleared by a Not Ready condition. REMOTE Enable remote local lockout operation. RESET Reset the molbox1+ settings to the default operating parameters. SN Read the serial number of the molbox1+. SR Read the next available ready status. SS(=) Read or set the stability required for a Ready <*> condition. STDRES(=) Read or set the PRT measurement system auto-calibration reference resistor
values. TARE Read the current tare conditions and the current tare. TARESETUP(=) Prepares the unit to tare. TARESET(=) Tare the upstream and downstream RPTs or set tare to a given value. TCAL (=) Read or set the molbloc temperature calibration (channel dependent). TEMP Read the current molbloc temperature in the current units. TIME(=) Read or set the internal clock’s time. TOTAL(=) Read the progress of or start a new totalize cycle. TUNIT(=) Read or set the molbloc temperature unit. UDU(=) Read or set the user definable pressure unit. UL(=) Read or set the upper limit for the internal RPTs. USERCAL(=) Read or set the user flow measurement adjustment. UTEMP(=) Read or set the temperature reference used for the user flow units. VALVE This command is obsolete and should not be used in new designs. VER Read the molbox1+ version. VLM(=) Read or set the volume units pressure & temperature conditions. VIN Read the MFC measurement voltage if in voltage mode. VOUT(=) Read or set the voltage sent to an external MFC if in voltage mode. VSENSE Read the voltage sensed at the MFC terminal. VSUPPLY Read MFC supply voltage. VVALTEST Read voltage sensed at MFC valve test terminal. ZOFFSET:HI Read or set the AutoZ pressure offset, (Poffset), for the high RPT . ZOFFSET:LO Read or set the AutoZ pressure offset, (Poffset), for the low RPT .

4. REMOTE OPERATION
Page 115 © 2010 Fluke Calibration
4.3.3 Error Messages molbox1+ always replies to a command. If the command is incorrect or contains invalid data, an error number is returned in the form “ERR# n” where n is an integer number that represents a specific error. This allows for easy error trapping by the host computer. Table 31 is a list of the possible error numbers and the error description for each.
Table 39. Error Messages
REPLY DESCRIPTION
ERROR "The molbox1+ is in high security level and cannot accept remote commands"
ERR# 0 "OK" ERR# 1 "molbloc flow is too great" ERR# 2 "Text argument is too long" ERR# 3 "User defined coefficient cannot be 0" ERR# 4 "External device not detected" ERR# 5 "External device improperly configured" ERR# 6 "Numeric argument missing or out of range" ERR# 7 "Missing or improper command argument(s)" ERR# 8 "External device timeout error" ERR# 9 "Unknown command"
ERR# 10 "MFC not defined or selected" ERR# 11 "Command missing argument" ERR# 12 "System overpressured" ERR# 13 "Text detected in numeric field" ERR# 14 "User unit not defined" ERR# 15 "Averaging cycle not started" ERR# 16 "MFC Malfunction" ERR# 17 "Selected gas not available" ERR# 18 "Command not yet available" ERR# 21 "User device not defined" ERR# 22 "Pressure is not stable" ERR# 23 "Option not available or installed" ERR# 24 "molbloc not detected" ERR# 25 "RPT out of calibration" ERR# 26 "COM port failed to initialize" ERR# 27 "Internal device #1 timeout error" ERR# 28 "Internal device #2 timeout error" ERR# 29 "Busy averaging" ERR# 30 "Fatal mass flow calculation error" ERR# 31 "molbloc EEPROM is full" ERR# 32 "molbloc gas not found" ERR# 34 "molbloc is write protected" ERR# 35 "molbloc write error" ERR# 36 "MFC unit mismatch" ERR# 37 "Incompatible device detected"" ERR# 38 "Selected range not available" ERR# 39 "molbloc verify error" ERR# 40 "molbloc read error" ERR# 41 "molbloc invalid" ERR# 42 "PRT measurement error" ERR# 43 "Incorrect MFC mode" ERR# 44 "Entry already exists" ERR# 45 "Argument(s) not allowed" ERR# 46 "The leak is too large" ERR# 47 "Temperature change was too great" ERR# 48 "Offset was excessive. Check tare" ERR# 49 "Possible upstream leak"
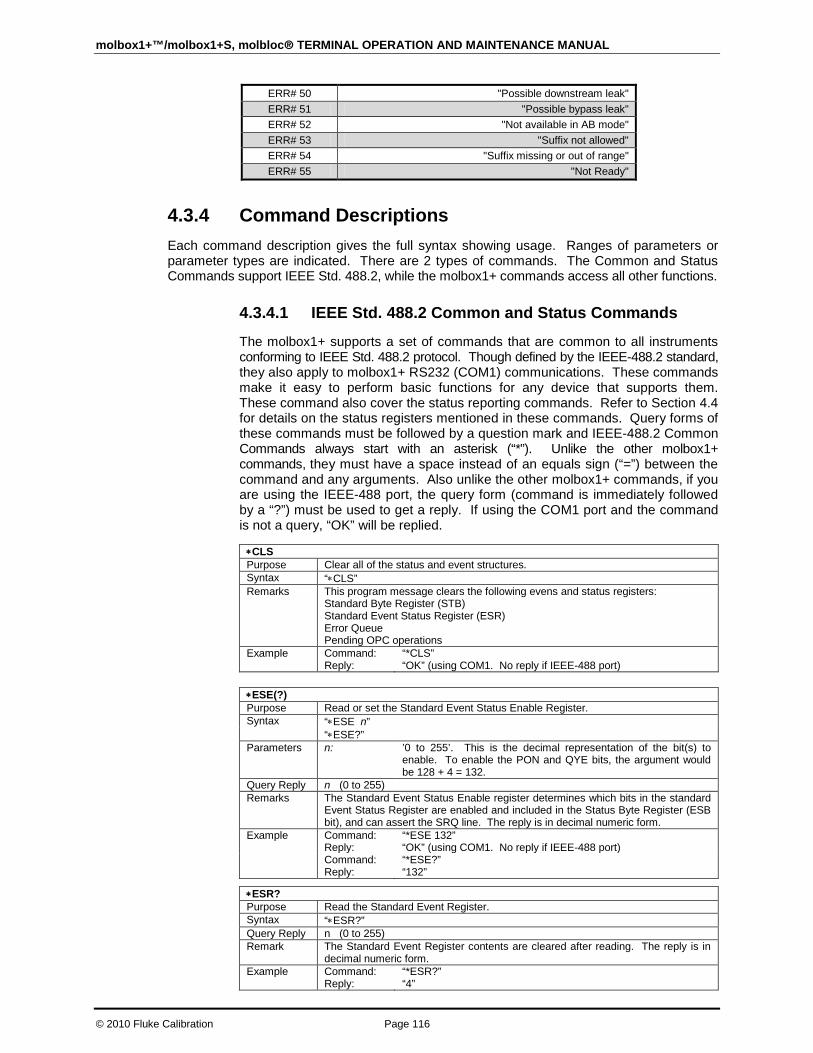
molbox1+™/molbox1+S, molbloc® TERMINAL OPERATION AND MAINTENANCE MANUAL
© 2010 Fluke Calibration Page 116
ERR# 50 "Possible downstream leak" ERR# 51 "Possible bypass leak" ERR# 52 "Not available in AB mode" ERR# 53 "Suffix not allowed" ERR# 54 "Suffix missing or out of range" ERR# 55 "Not Ready"
4.3.4 Command Descriptions Each command description gives the full syntax showing usage. Ranges of parameters or parameter types are indicated. There are 2 types of commands. The Common and Status Commands support IEEE Std. 488.2, while the molbox1+ commands access all other functions.
4.3.4.1 IEEE Std. 488.2 Common and Status Commands
The molbox1+ supports a set of commands that are common to all instruments conforming to IEEE Std. 488.2 protocol. Though defined by the IEEE-488.2 standard, they also apply to molbox1+ RS232 (COM1) communications. These commands make it easy to perform basic functions for any device that supports them. These command also cover the status reporting commands. Refer to Section 4.4 for details on the status registers mentioned in these commands. Query forms of these commands must be followed by a question mark and IEEE-488.2 Common Commands always start with an asterisk (“*”). Unlike the other molbox1+ commands, they must have a space instead of an equals sign (“=”) between the command and any arguments. Also unlike the other molbox1+ commands, if you are using the IEEE-488 port, the query form (command is immediately followed by a “?”) must be used to get a reply. If using the COM1 port and the command is not a query, “OK” will be replied.
∗CLS Purpose Clear all of the status and event structures. Syntax “∗CLS” Remarks This program message clears the following evens and status registers:
Standard Byte Register (STB) Standard Event Status Register (ESR) Error Queue Pending OPC operations
Example Command: Reply:
“*CLS” “OK” (using COM1. No reply if IEEE-488 port)
∗ESE(?) Purpose Read or set the Standard Event Status Enable Register. Syntax “∗ESE n” “∗ESE?” Parameters n: ’0 to 255’. This is the decimal representation of the bit(s) to
enable. To enable the PON and QYE bits, the argument would be 128 + 4 = 132.
Query Reply n (0 to 255) Remarks The Standard Event Status Enable register determines which bits in the standard
Event Status Register are enabled and included in the Status Byte Register (ESB bit), and can assert the SRQ line. The reply is in decimal numeric form.
Example Command: Reply:
“*ESE 132” “OK” (using COM1. No reply if IEEE-488 port)
Command: Reply:
“*ESE?” “132”
∗ESR? Purpose Read the Standard Event Register. Syntax “∗ESR?” Query Reply n (0 to 255) Remark The Standard Event Register contents are cleared after reading. The reply is in
decimal numeric form. Example Command:
Reply: “*ESR?” “4”

4. REMOTE OPERATION
Page 117 © 2010 Fluke Calibration
∗IDN? Purpose Identify the molbox1+ version, range, and serial number. Syntax “∗IDN?” Remarks The identification reply is made up of the manufacturer, the model, the serial
number, the internal RPT serial numbers and the software version. Each is separated by a comma.
Query Reply The version string. Example Command:
Reply: “*IDN?” “FLUKE, molbox1+, 620-84836-85056, Ver6.00-ngmgl”
∗OPC(?) Purpose Sets the operation complete bit when all operations have completed. Syntax “∗OPC” “∗OPC?” Remarks This command enables the molbox1+ to set the OPC bit in the Standard Event
Status Register when it has completed all pending functions. The Query replies with a “1” when all functions are complete. Since the molbox1+ does not support overlapping commands, this command has no practical use.
Query Reply “0” or “1” Example Command:
Reply: “*OPC” “OK” (using COM1. No reply if IEEE-488 port)
Command: Reply:
“*OPC?” “1”
∗OPT? Purpose Reads the list of installed molblox1 options. Syntax “∗OPT?” Remarks This Query returns any registered option(s) installed in the molbox1+. Each
option is separated by a comma. Query Reply A comma delimited text field of the installed options. Example Command:
Reply: “*OPT?” “NONE” (no options installed)
∗RST Purpose Resets the molbox1+ settings to factory settings. Syntax “∗RST” Remarks This command sets the molbox1+ settings to factory settings which is equivalent
to pressing [SPECIAL] on the front panel and selecting <5Reset>, 1sets. This does not affect the communications settings.
Example Command: Reply:
“*RST” “OK” (using COM1. No reply if IEEE-488 port)
∗SRE(?) Purpose Read or set the Service Request Enable Register. Syntax “∗SRE n” “∗SRE?” Parameters n: ‘0 to 255’. This is the decimal representation of the bit(s) to
enable. To allow the MAV and ESB bits to assert the SRQ line, the argument would be 32 + 16 = 48. Bit 6 (64) is reserved and cannot be set.
Remarks The Service Request Enable Register determines which bits of the Status Byte can set the MSS bit of the Status Byte and request service by asserting the SRQ line of the IEEE-488 interface.
Query Reply n (0 to 255) Example Command:
Reply: “*SRE 48” “OK” using COM1. No reply if IEEE-488 port)
Command: Reply:
“*SRE?” “48”
∗STB? Purpose Read the Status Byte Register. Syntax “∗STB?” Remarks The Status Byte Register reflects the general status of the molbox1+. The ‘MSS’
bit state is represented by bit 6. Query Reply n (0 to 255) Example Command:
Reply: “*STB?” “4”

molbox1+™/molbox1+S, molbloc® TERMINAL OPERATION AND MAINTENANCE MANUAL
© 2010 Fluke Calibration Page 118
∗TST? Purpose Read the power on self test status. Syntax “∗TST?”” Remarks The molbox1+ system memory stores the user settings (units, mode, resolution)
and retains them when the unit is shutoff. On power up, this memory is checked. If this memory is corrupted, all user settings are reset to default (as if the “∗RST” program message was executed), and the ∗TST query returns a ‘1’. If the molbox1+ passed the test on power up OR if the ∗TST query was used at least once since the unit was powered up the reply is ‘0’.
Query Reply “0” or “1” Example Command:
Reply: “*TST?” “1”
4.3.4.2 molbox1+ commands # Purpose To allow the Host computer to communicate with a device connected to the
molbox1+ COM2 port. Syntax “#XX” Arguments xx: The string to send out of the COM2 port. It must be less than
40 characters long. Remarks The molbox1+ COM2 port can be used to communicate to another RS232 device
(e.g., another molbox1+ or a multimeter). This allows the user to use one COM port or IEEE-488 port on the host computer to communicate with the molbox1+ and another device. A carriage return and a line feed (<CR><LF>) are added to the string. After this command is issued, the molbox1+ will reply back the first string received by the molbox1+ COM2 port that is terminated with a carriage return. Line feeds are discarded. This will discontinue when the next command is sent to the molbox1+. There is no other reply from this command. Prior to using this command, you must ensure that the molbox1+ COM2 port is correctly set up to communicate with the device. Refer to the “COM2=“ command.
Example Command: Reply:
“#VER” “FLUKE, molbox RFM Ver1.20”
ABORT Purpose To stop an active averaging, tare, purge, leak check cycle, or reset the list of gas
calibrations on a molbloc. Syntax “ABORT” Remarks This command should be used to ensure that molbox1+ in a known state. The
tare, purge, and leak check cycles put the molbox1+ into a condition where it is not usable for normal flow measurement, so the “ABORT” command should be used before general operation of the unit begins if the previous state of the unit is not known. The “ABORT” command also clears out any previous leak or tare cycle errors. If the “GASCALS” command is used to list the calibrated gases on a molbloc, the “ABORT” command resets the list back to the beginning.
Example Command: Reply:
“ABORT” “ABORT”
See Also “FA”, “TARESETUP”, “LEAKCK”, “PURGE”, “GASCALS”
AIRW(=) Purpose Read or set the humidity ratio for the gas, AIR. Syntax “AIRW=HumidityRatio”
“AIRW” Default “AIRW=0.00
00”
Arguments HumidityRatio:
The humidity ratio (0-0.1)
Remarks The humidity ratio is only used if the gas is set to specify AIR. For all other gas types, the ratio is ignored.
Example Command: Reply:
“AIRW=.01” “0.0100”
Errors ERR# 6: The humidity ratio is invalid. See Also 3.2.2, 3.4.2.2
“GAS”
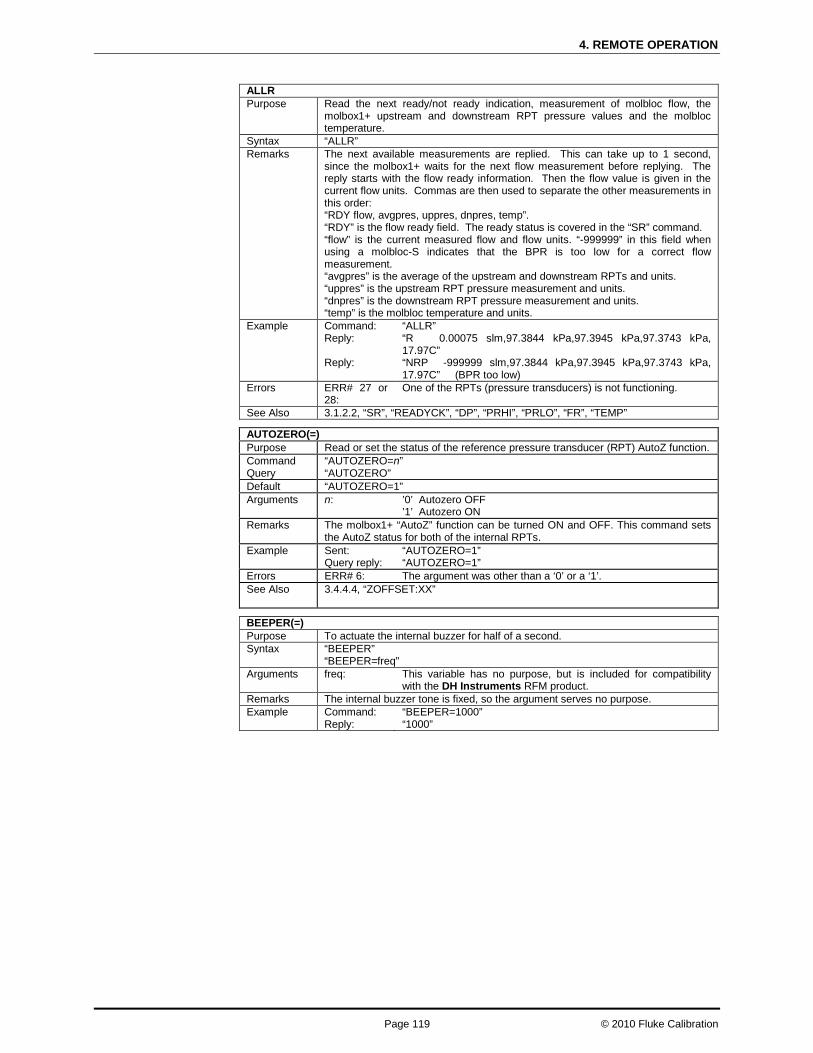
4. REMOTE OPERATION
Page 119 © 2010 Fluke Calibration
ALLR Purpose Read the next ready/not ready indication, measurement of molbloc flow, the
molbox1+ upstream and downstream RPT pressure values and the molbloc temperature.
Syntax “ALLR” Remarks The next available measurements are replied. This can take up to 1 second,
since the molbox1+ waits for the next flow measurement before replying. The reply starts with the flow ready information. Then the flow value is given in the current flow units. Commas are then used to separate the other measurements in this order: “RDY flow, avgpres, uppres, dnpres, temp”. “RDY” is the flow ready field. The ready status is covered in the “SR” command. “flow” is the current measured flow and flow units. “-999999” in this field when using a molbloc-S indicates that the BPR is too low for a correct flow measurement. “avgpres” is the average of the upstream and downstream RPTs and units. “uppres” is the upstream RPT pressure measurement and units. “dnpres” is the downstream RPT pressure measurement and units. “temp” is the molbloc temperature and units.
Example Command: Reply: Reply:
“ALLR” “R 0.00075 slm,97.3844 kPa,97.3945 kPa,97.3743 kPa, 17.97C” “NRP -999999 slm,97.3844 kPa,97.3945 kPa,97.3743 kPa, 17.97C” (BPR too low)
Errors ERR# 27 or 28:
One of the RPTs (pressure transducers) is not functioning.
See Also 3.1.2.2, “SR”, “READYCK”, “DP”, “PRHI”, “PRLO”, “FR”, “TEMP”
AUTOZERO(=) Purpose Read or set the status of the reference pressure transducer (RPT) AutoZ function. Command Query
“AUTOZERO=n” “AUTOZERO”
Default “AUTOZERO=1” Arguments n: ’0’ Autozero OFF
’1’ Autozero ON Remarks The molbox1+ “AutoZ” function can be turned ON and OFF. This command sets
the AutoZ status for both of the internal RPTs. Example
Sent: Query reply:
“AUTOZERO=1” “AUTOZERO=1”
Errors ERR# 6: The argument was other than a ‘0’ or a ‘1’. See Also 3.4.4.4, “ZOFFSET:XX”
BEEPER(=) Purpose To actuate the internal buzzer for half of a second. Syntax “BEEPER”
“BEEPER=freq” Arguments freq: This variable has no purpose, but is included for compatibility
with the DH Instruments RFM product. Remarks The internal buzzer tone is fixed, so the argument serves no purpose. Example Command:
Reply: “BEEPER=1000” “1000”
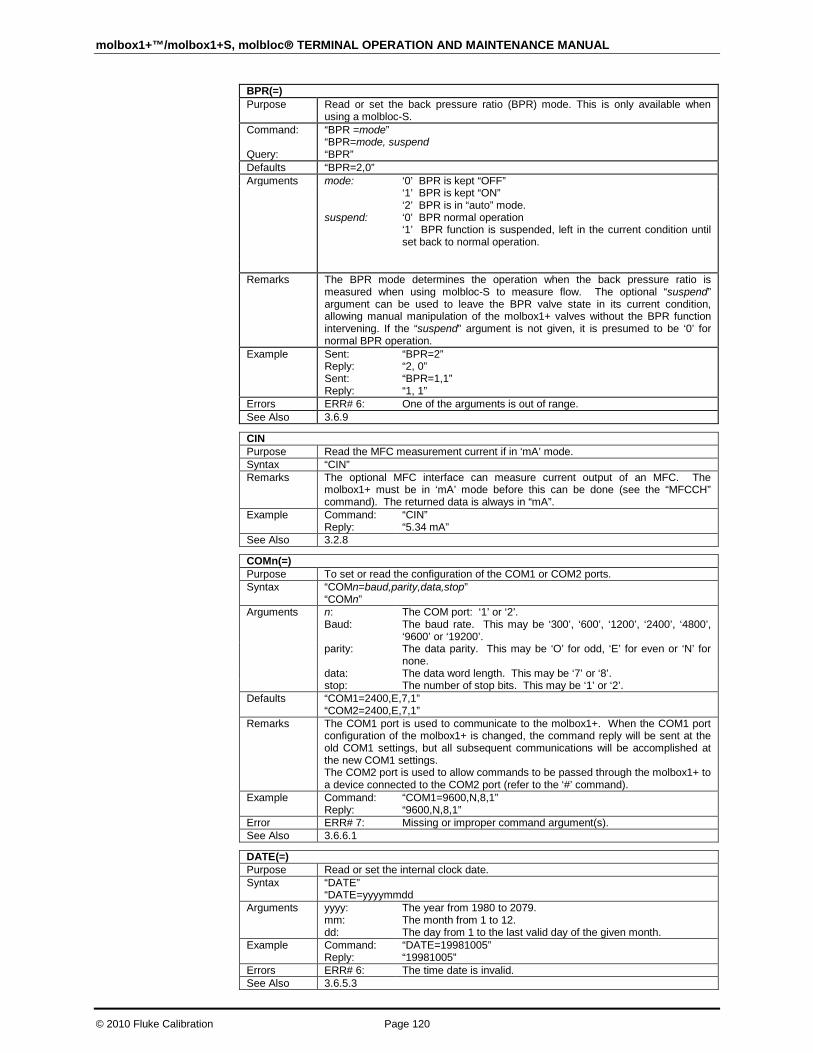
molbox1+™/molbox1+S, molbloc® TERMINAL OPERATION AND MAINTENANCE MANUAL
© 2010 Fluke Calibration Page 120
BPR(=) Purpose Read or set the back pressure ratio (BPR) mode. This is only available when
using a molbloc-S. Command: Query:
“BPR =mode” “BPR=mode, suspend “BPR”
Defaults “BPR=2,0” Arguments mode: ‘0’ BPR is kept “OFF”
suspend:
‘1’ BPR is kept “ON” ‘2’ BPR is in “auto” mode. ‘0’ BPR normal operation ‘1’ BPR function is suspended, left in the current condition until set back to normal operation.
Remarks The BPR mode determines the operation when the back pressure ratio is
measured when using molbloc-S to measure flow. The optional “suspend” argument can be used to leave the BPR valve state in its current condition, allowing manual manipulation of the molbox1+ valves without the BPR function intervening. If the “suspend” argument is not given, it is presumed to be ‘0’ for normal BPR operation.
Example
Sent: Reply: Sent: Reply:
“BPR=2” “2, 0” “BPR=1,1” “1, 1”
Errors ERR# 6: One of the arguments is out of range. See Also 3.6.9
CIN Purpose Read the MFC measurement current if in ‘mA’ mode. Syntax “CIN” Remarks The optional MFC interface can measure current output of an MFC. The
molbox1+ must be in ‘mA’ mode before this can be done (see the “MFCCH” command). The returned data is always in “mA”.
Example Command: Reply:
“CIN” “5.34 mA”
See Also 3.2.8
COMn(=) Purpose To set or read the configuration of the COM1 or COM2 ports. Syntax “COMn=baud,parity,data,stop”
“COMn” Arguments n: The COM port: ‘1’ or ‘2’. Baud: The baud rate. This may be ‘300’, ‘600’, ‘1200’, ‘2400’, ‘4800’,
‘9600’ or ‘19200’. parity: The data parity. This may be ‘O’ for odd, ‘E’ for even or ‘N’ for
none. data: The data word length. This may be ‘7’ or ‘8’. stop: The number of stop bits. This may be ‘1’ or ‘2’. Defaults “COM1=2400,E,7,1”
“COM2=2400,E,7,1” Remarks The COM1 port is used to communicate to the molbox1+. When the COM1 port
configuration of the molbox1+ is changed, the command reply will be sent at the old COM1 settings, but all subsequent communications will be accomplished at the new COM1 settings. The COM2 port is used to allow commands to be passed through the molbox1+ to a device connected to the COM2 port (refer to the ‘#’ command).
Example Command: Reply:
“COM1=9600,N,8,1” “9600,N,8,1”
Error ERR# 7: Missing or improper command argument(s). See Also 3.6.6.1
DATE(=) Purpose Read or set the internal clock date. Syntax “DATE”
“DATE=yyyymmdd Arguments yyyy:
mm: dd:
The year from 1980 to 2079. The month from 1 to 12. The day from 1 to the last valid day of the given month.
Example Command: Reply:
“DATE=19981005” “19981005”
Errors ERR# 6: The time date is invalid. See Also 3.6.5.3
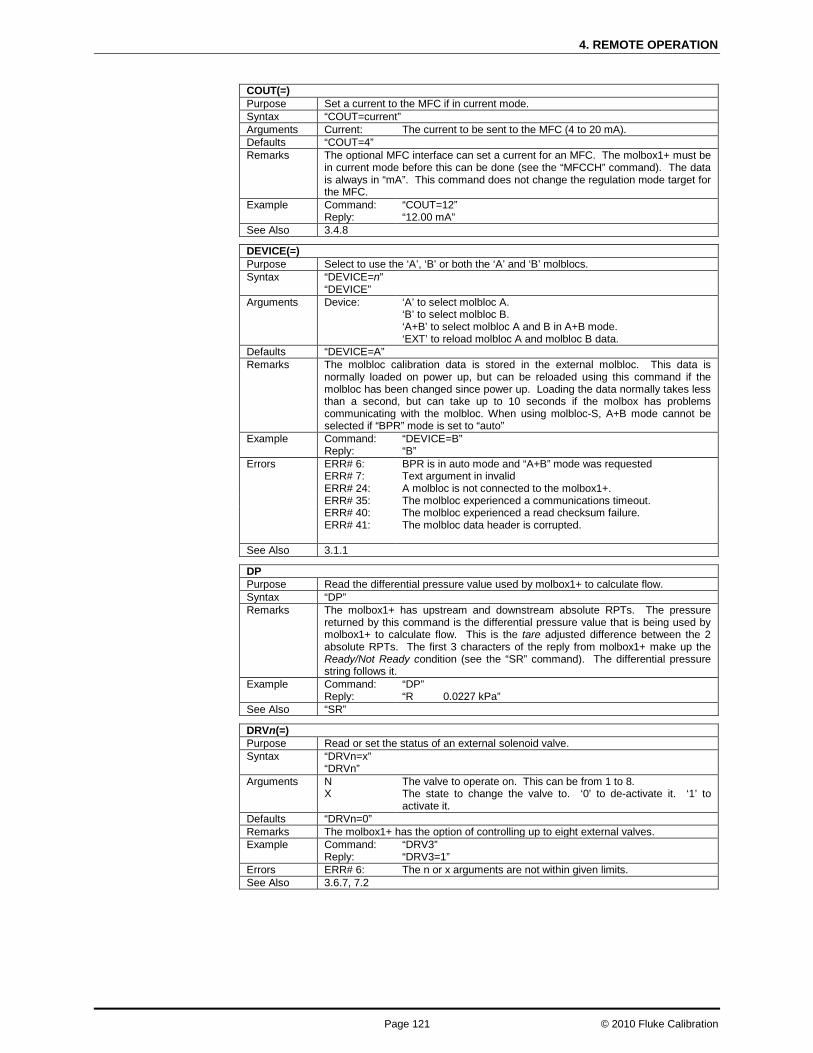
4. REMOTE OPERATION
Page 121 © 2010 Fluke Calibration
COUT(=) Purpose Set a current to the MFC if in current mode. Syntax “COUT=current” Arguments Current: The current to be sent to the MFC (4 to 20 mA). Defaults “COUT=4” Remarks The optional MFC interface can set a current for an MFC. The molbox1+ must be
in current mode before this can be done (see the “MFCCH” command). The data is always in “mA”. This command does not change the regulation mode target for the MFC.
Example Command: Reply:
“COUT=12” “12.00 mA”
See Also 3.4.8
DEVICE(=) Purpose Select to use the ‘A’, ‘B’ or both the ‘A’ and ‘B’ molblocs. Syntax “DEVICE=n”
“DEVICE” Arguments Device: ‘A’ to select molbloc A.
‘B’ to select molbloc B. ‘A+B’ to select molbloc A and B in A+B mode. ‘EXT’ to reload molbloc A and molbloc B data.
Defaults “DEVICE=A” Remarks The molbloc calibration data is stored in the external molbloc. This data is
normally loaded on power up, but can be reloaded using this command if the molbloc has been changed since power up. Loading the data normally takes less than a second, but can take up to 10 seconds if the molbox has problems communicating with the molbloc. When using molbloc-S, A+B mode cannot be selected if “BPR” mode is set to “auto”
Example Command: Reply:
“DEVICE=B” “B”
Errors ERR# 6: ERR# 7: ERR# 24:
BPR is in auto mode and “A+B” mode was requested Text argument in invalid A molbloc is not connected to the molbox1+.
ERR# 35: The molbloc experienced a communications timeout. ERR# 40: The molbloc experienced a read checksum failure. ERR# 41:
The molbloc data header is corrupted.
See Also 3.1.1
DP Purpose Read the differential pressure value used by molbox1+ to calculate flow. Syntax “DP” Remarks The molbox1+ has upstream and downstream absolute RPTs. The pressure
returned by this command is the differential pressure value that is being used by molbox1+ to calculate flow. This is the tare adjusted difference between the 2 absolute RPTs. The first 3 characters of the reply from molbox1+ make up the Ready/Not Ready condition (see the “SR” command). The differential pressure string follows it.
Example Command: Reply:
“DP” “R 0.0227 kPa”
See Also “SR”
DRVn(=) Purpose Read or set the status of an external solenoid valve. Syntax “DRVn=x”
“DRVn” Arguments N
X The valve to operate on. This can be from 1 to 8. The state to change the valve to. ‘0’ to de-activate it. ‘1’ to activate it.
Defaults “DRVn=0” Remarks The molbox1+ has the option of controlling up to eight external valves. Example Command:
Reply: “DRV3” “DRV3=1”
Errors ERR# 6: The n or x arguments are not within given limits. See Also 3.6.7, 7.2
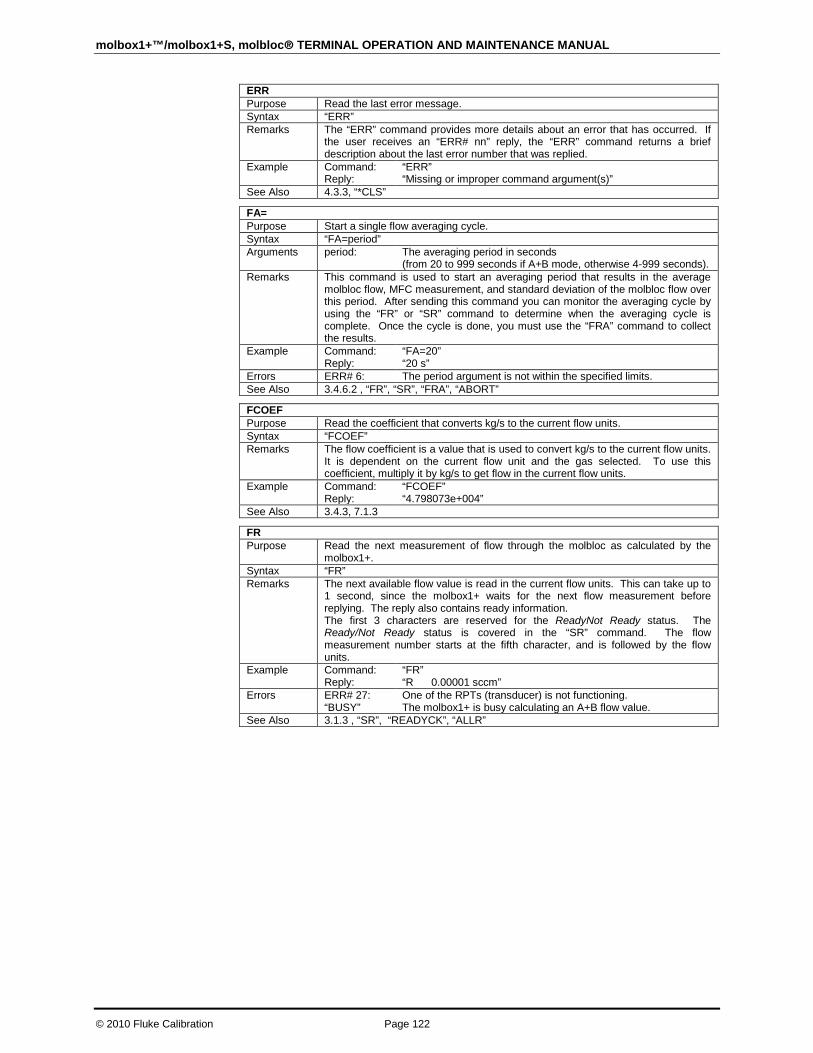
molbox1+™/molbox1+S, molbloc® TERMINAL OPERATION AND MAINTENANCE MANUAL
© 2010 Fluke Calibration Page 122
ERR Purpose Read the last error message. Syntax “ERR” Remarks The “ERR” command provides more details about an error that has occurred. If
the user receives an “ERR# nn” reply, the “ERR” command returns a brief description about the last error number that was replied.
Example Command: Reply:
“ERR” “Missing or improper command argument(s)”
See Also 4.3.3, “*CLS”
FA= Purpose Start a single flow averaging cycle. Syntax “FA=period” Arguments period: The averaging period in seconds
(from 20 to 999 seconds if A+B mode, otherwise 4-999 seconds). Remarks This command is used to start an averaging period that results in the average
molbloc flow, MFC measurement, and standard deviation of the molbloc flow over this period. After sending this command you can monitor the averaging cycle by using the “FR” or “SR” command to determine when the averaging cycle is complete. Once the cycle is done, you must use the “FRA” command to collect the results.
Example Command: Reply:
“FA=20” “20 s”
Errors ERR# 6: The period argument is not within the specified limits. See Also 3.4.6.2 , “FR”, “SR”, “FRA”, “ABORT”
FCOEF Purpose Read the coefficient that converts kg/s to the current flow units. Syntax “FCOEF” Remarks The flow coefficient is a value that is used to convert kg/s to the current flow units.
It is dependent on the current flow unit and the gas selected. To use this coefficient, multiply it by kg/s to get flow in the current flow units.
Example Command: Reply:
“FCOEF” “4.798073e+004”
See Also 3.4.3, 7.1.3
FR Purpose Read the next measurement of flow through the molbloc as calculated by the
molbox1+. Syntax “FR” Remarks The next available flow value is read in the current flow units. This can take up to
1 second, since the molbox1+ waits for the next flow measurement before replying. The reply also contains ready information. The first 3 characters are reserved for the ReadyNot Ready status. The Ready/Not Ready status is covered in the “SR” command. The flow measurement number starts at the fifth character, and is followed by the flow units.
Example Command: Reply:
“FR” “R 0.00001 sccm”
Errors ERR# 27: “BUSY”
One of the RPTs (transducer) is not functioning. The molbox1+ is busy calculating an A+B flow value.
See Also 3.1.3 , “SR”, “READYCK”, “ALLR”

4. REMOTE OPERATION
Page 123 © 2010 Fluke Calibration
FRA Purpose Read the results of a completed flow averaging cycle. Syntax “FRA” Remarks This command is used to check on the status of or collect the results of an
averaging cycle that was started earlier using the "FA=" command. During the averaging cycle, this command will reply "BUSY" until the averaging cycle is complete. Then the reply will be the results of the averaging cycle. If the cycle is aborted before it is complete (see "FA="), then the data will be lost.
The data that is returned from the command consists of multiple numeric fields delimited by commas. The flow numbers are in the current flow unit of measure. The actual data fields returned are as follows:
An "H" will appear as the first character of the reply string. An "S" will appear as the second character of the string if the flow stability stayed within the stability setting during the sequence. From the fourth position on the numeric data fields are:
Average flow over the averaging period. Standard deviation of flow over the averaging period. The minimum flow reached during the period. The maximum flow reached during the period. The MFC voltage or current target or “NA” if MFC option not enabled. The MFC voltage or current average measurement or “NA” if MFC option not enabled.
Example Command: Reply: Reply:
“FRA” “HS 0.00002 sccm,0.00000,0.00002,0.00002,0.5000 V,0.1203 V” “HS 0.00002 sccm,0.00000,0.00002,0.00002,NA, NA” (MFC disabled) “BUSY” if still averaging
Errors ERR# 15: The “F=” command was not sent previous to this command. See Also 3.4.6.2, “FR”, “SR”, “FA”
FUNIT(=) Purpose Read or set the unit of measurement for the flow through the molbloc as
calculated by the molbox1+. Syntax “FUNIT=unit”
“FUNIT” Defaults “FUNIT=sccm” Arguments unit: The flow unit used to display the measured flow. Remarks The flow unit displayed can be changed using this command. The flow unit must
be supported by the molbox1+. The flow unit protocol is the same as the front panel flow unit definitions.
Example Command: Reply:
“FUNIT=SLM” “SLM”
Errors ERR# 7: The flow unit is invalid or not supported by the molbox1+. See Also 3.4.3, “UTEMP”, “VLM”
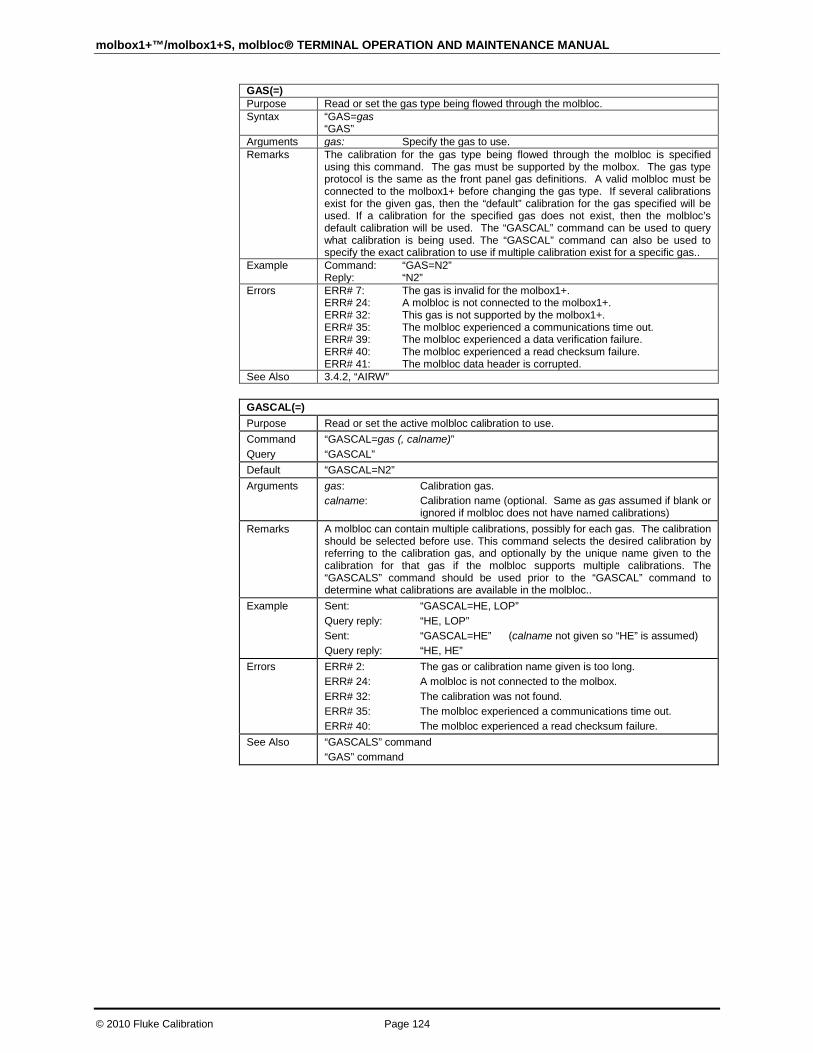
molbox1+™/molbox1+S, molbloc® TERMINAL OPERATION AND MAINTENANCE MANUAL
© 2010 Fluke Calibration Page 124
GAS(=) Purpose Read or set the gas type being flowed through the molbloc. Syntax “GAS=gas
“GAS” Arguments gas: Specify the gas to use. Remarks The calibration for the gas type being flowed through the molbloc is specified
using this command. The gas must be supported by the molbox. The gas type protocol is the same as the front panel gas definitions. A valid molbloc must be connected to the molbox1+ before changing the gas type. If several calibrations exist for the given gas, then the “default” calibration for the gas specified will be used. If a calibration for the specified gas does not exist, then the molbloc’s default calibration will be used. The “GASCAL” command can be used to query what calibration is being used. The “GASCAL” command can also be used to specify the exact calibration to use if multiple calibration exist for a specific gas..
Example Command: Reply:
“GAS=N2” “N2”
Errors ERR# 7: ERR# 24: ERR# 32: ERR# 35: ERR# 39: ERR# 40: ERR# 41:
The gas is invalid for the molbox1+. A molbloc is not connected to the molbox1+. This gas is not supported by the molbox1+. The molbloc experienced a communications time out. The molbloc experienced a data verification failure. The molbloc experienced a read checksum failure. The molbloc data header is corrupted.
See Also 3.4.2, “AIRW”
GASCAL(=) Purpose Read or set the active molbloc calibration to use. Command Query
“GASCAL=gas (, calname)” “GASCAL”
Default “GASCAL=N2” Arguments gas:
calname: Calibration gas. Calibration name (optional. Same as gas assumed if blank or ignored if molbloc does not have named calibrations)
Remarks A molbloc can contain multiple calibrations, possibly for each gas. The calibration should be selected before use. This command selects the desired calibration by referring to the calibration gas, and optionally by the unique name given to the calibration for that gas if the molbloc supports multiple calibrations. The “GASCALS” command should be used prior to the “GASCAL” command to determine what calibrations are available in the molbloc..
Example
Sent: Query reply: Sent: Query reply:
“GASCAL=HE, LOP” “HE, LOP” “GASCAL=HE” (calname not given so “HE” is assumed) “HE, HE”
Errors ERR# 2: ERR# 24: ERR# 32: ERR# 35: ERR# 40:
The gas or calibration name given is too long. A molbloc is not connected to the molbox. The calibration was not found. The molbloc experienced a communications time out. The molbloc experienced a read checksum failure.
See Also “GASCALS” command “GAS” command
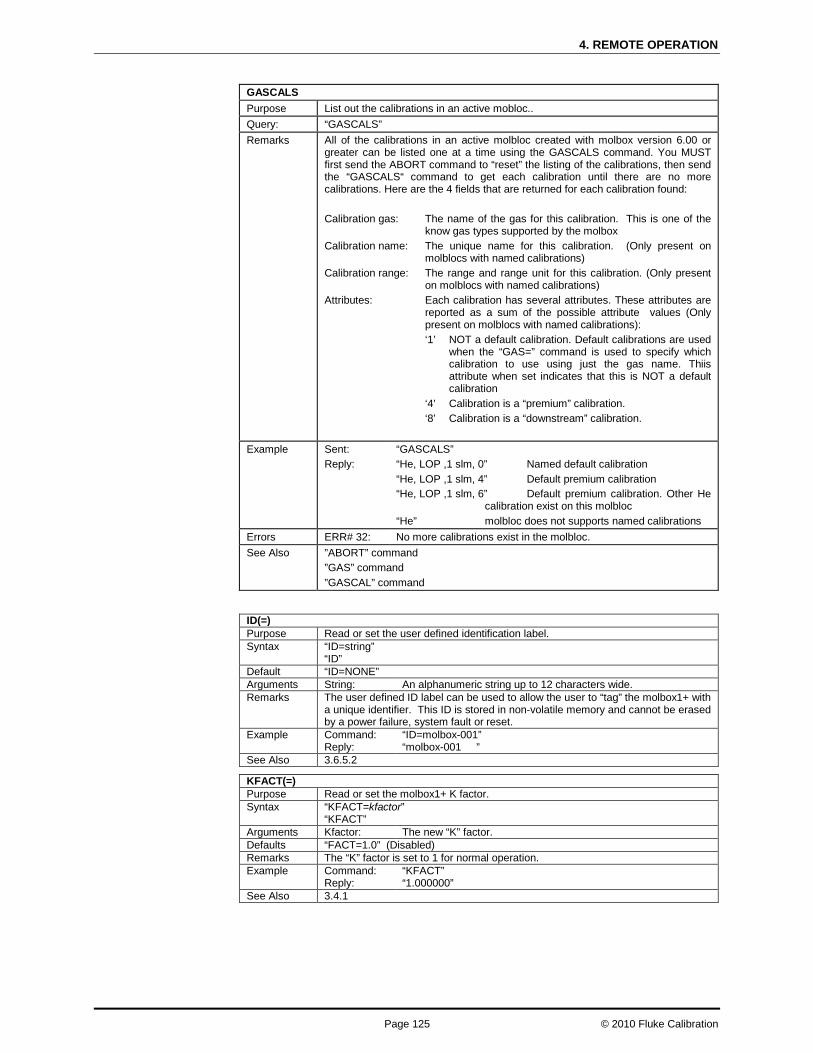
4. REMOTE OPERATION
Page 125 © 2010 Fluke Calibration
GASCALS Purpose List out the calibrations in an active mobloc.. Query: “GASCALS” Remarks All of the calibrations in an active molbloc created with molbox version 6.00 or
greater can be listed one at a time using the GASCALS command. You MUST first send the ABORT command to “reset” the listing of the calibrations, then send the “GASCALS“ command to get each calibration until there are no more calibrations. Here are the 4 fields that are returned for each calibration found: Calibration gas: The name of the gas for this calibration. This is one of the
know gas types supported by the molbox Calibration name: The unique name for this calibration. (Only present on
molblocs with named calibrations) Calibration range: The range and range unit for this calibration. (Only present
on molblocs with named calibrations) Attributes: Each calibration has several attributes. These attributes are
reported as a sum of the possible attribute values (Only present on molblocs with named calibrations):
‘1’ NOT a default calibration. Default calibrations are used when the “GAS=” command is used to specify which calibration to use using just the gas name. Thiis attribute when set indicates that this is NOT a default calibration
‘4’ Calibration is a “premium” calibration. ‘8’ Calibration is a “downstream” calibration.
Example
Sent: Reply:
“GASCALS” “He, LOP ,1 slm, 0” Named default calibration “He, LOP ,1 slm, 4” Default premium calibration “He, LOP ,1 slm, 6” Default premium calibration. Other He
calibration exist on this molbloc “He” molbloc does not supports named calibrations
Errors ERR# 32: No more calibrations exist in the molbloc. See Also ”ABORT” command
”GAS” command ”GASCAL” command
ID(=) Purpose Read or set the user defined identification label. Syntax “ID=string”
“ID” Default “ID=NONE” Arguments String: An alphanumeric string up to 12 characters wide. Remarks The user defined ID label can be used to allow the user to “tag” the molbox1+ with
a unique identifier. This ID is stored in non-volatile memory and cannot be erased by a power failure, system fault or reset.
Example Command: Reply:
“ID=molbox-001” “molbox-001 ”
See Also 3.6.5.2
KFACT(=) Purpose Read or set the molbox1+ K factor. Syntax “KFACT=kfactor”
“KFACT” Arguments Kfactor: The new “K” factor. Defaults “FACT=1.0” (Disabled) Remarks The “K” factor is set to 1 for normal operation. Example Command:
Reply: “KFACT” “1.000000”
See Also 3.4.1

molbox1+™/molbox1+S, molbloc® TERMINAL OPERATION AND MAINTENANCE MANUAL
© 2010 Fluke Calibration Page 126
LEAKCK(=) Purpose Starts a molbox1+ or system leak check cycle or checks if a cycle is complete. Syntax “LEAKCK=type”
“LEAKCK” Arguments type: “BOX”. Starts a leak check cycle on the molbox1+ internal
circuit. The molbox must be prepared for the leak check by setting pressures and venting ports before the leak check is executed. “SYS”. Starts a leak check cycle on the system connected to the molbox1+. The system must be prepared for the leak check by setting pressures and operating valves before the leak check is executed.
Remarks This command is used to start and monitor the progress of the leak check. Both “BOX” and the “SYS” leak checks take 60 seconds to complete. At the end of the leak check, the molbox1+ is returned to its normal operating state. The “ABORT” command can be used to stop a leak check cycle, clear out any previous error messages, and return the molbox1+ to its normal operating state. While the leak check cycle is executing, a ‘b’ (“busy”) will appear in the 3rd character position of the “FR” and the “SR” command replies. If the leak check failed, an error will be replied to the “LEAKCK” query until the “ABORT” command is used to abort the leak check. When the leak check has completed without an error, the “LEAKCK” query will reply “OK”. If a molbloc-S is active and a “SYS” type leak check was run, the reply is the actual average leak rate (in the current pressure units) during the leak check. The “LEAKCK” command must be completed or aborted using the “ABORT” command before performing other operations.
Example Command: Reply:
“LEAKCK=BOX,1” “BOX” (starting new molbox1+ leak check cycle including the microrange RPT)
Command: Reply:
“LEAKCK=SYS” “SYS” (starting new system leak check cycle)
Command: Reply:
“LEAKCK” “23 sec” A leak check cycle is currently running. This is the number of seconds remaining in the test.
Reply: Reply:
“OK” (The leak check cycle has completed) “0.3412 kPa/s” if a molbloc-S is active and the “SYS” type leak check has been completed.
Errors ERR# 6: ERR# 15: ERR# 46: ERR# 47: ERR# 48: ERR# 49: ERR# 50: ERR# 51:
One of the arguments is not invalid. A leak check cycle has not been started. A large leak exists. The temperature changed too much to test for a leak. The absolute RPT disagreement too great to test for a leak. Possible upstream leak. Possible downstream leak. Possible bypass leak.
See Also 3.4.4.3, “ABORT”
LOCAL Purpose Enable the front panel controls if in remote and go to local mode. Syntax “LOCAL” Remarks In LOCAL mode, all front panel operations are available. The LOCAL command
deactivates REMOTE mode. Example Command:
Reply: “LOCAL” “LOCAL”
See Also “REMOTE”
MEM Purpose Read the memory test status. Syntax “MEM” Remarks On power up a memory test is run to check the integrity of the internal data NVRAM.
If the memory has been corrupted, "FATAL MEMORY FAULT" will be displayed on power up to alert the user, and the memory test status command will return a ‘0’. The command will return a ‘1’ if the memory is OK.
Example Command: Reply:
“MEM” “0”
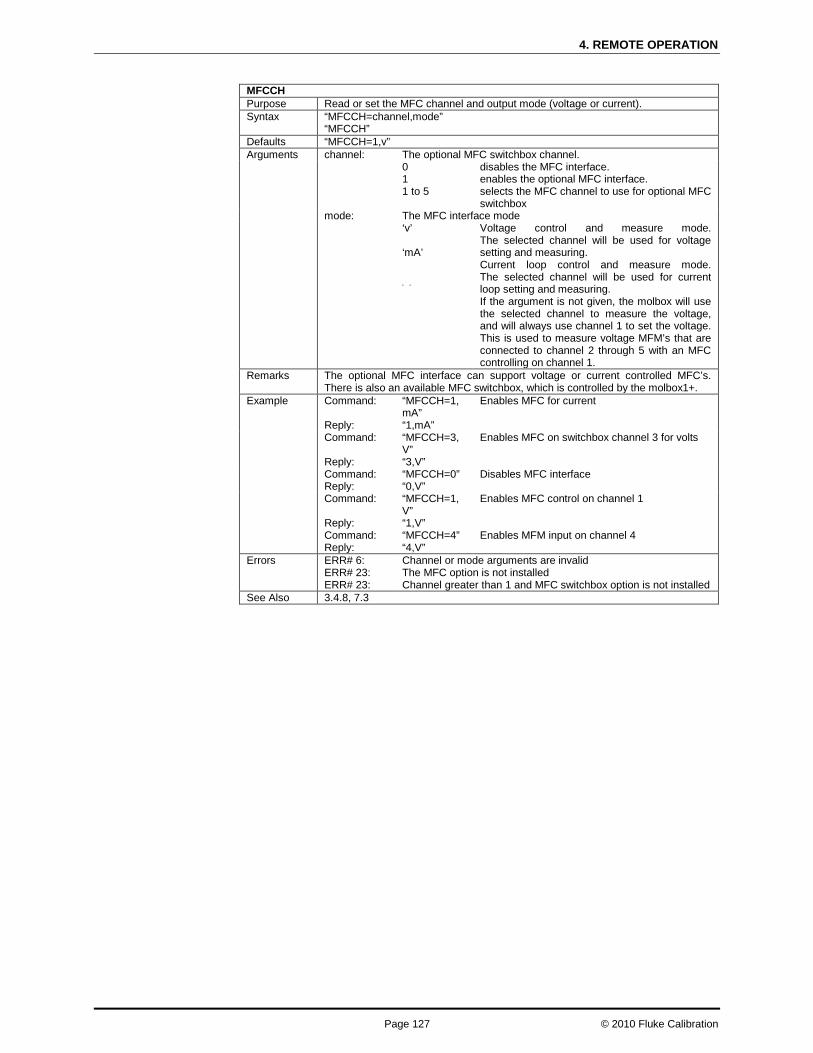
4. REMOTE OPERATION
Page 127 © 2010 Fluke Calibration
MFCCH Purpose Read or set the MFC channel and output mode (voltage or current). Syntax “MFCCH=channel,mode”
“MFCCH” Defaults “MFCCH=1,v” Arguments channel: The optional MFC switchbox channel. 0
1 1 to 5
disables the MFC interface. enables the optional MFC interface. selects the MFC channel to use for optional MFC switchbox
mode: The MFC interface mode ‘v’
‘mA’ ‘ ‘
Voltage control and measure mode. The selected channel will be used for voltage setting and measuring. Current loop control and measure mode. The selected channel will be used for current loop setting and measuring. If the argument is not given, the molbox will use the selected channel to measure the voltage, and will always use channel 1 to set the voltage. This is used to measure voltage MFM’s that are connected to channel 2 through 5 with an MFC controlling on channel 1.
Remarks The optional MFC interface can support voltage or current controlled MFC’s. There is also an available MFC switchbox, which is controlled by the molbox1+.
Example Command: Reply:
“MFCCH=1,mA” “1,mA”
Enables MFC for current
Command: Reply:
“MFCCH=3,V” “3,V”
Enables MFC on switchbox channel 3 for volts
Command: Reply:
“MFCCH=0” “0,V”
Disables MFC interface
Command: Reply: Command: Reply:
“MFCCH=1,V” “1,V” “MFCCH=4” “4,V”
Enables MFC control on channel 1 Enables MFM input on channel 4
Errors ERR# 6: ERR# 23: ERR# 23:
Channel or mode arguments are invalid The MFC option is not installed Channel greater than 1 and MFC switchbox option is not installed
See Also 3.4.8, 7.3
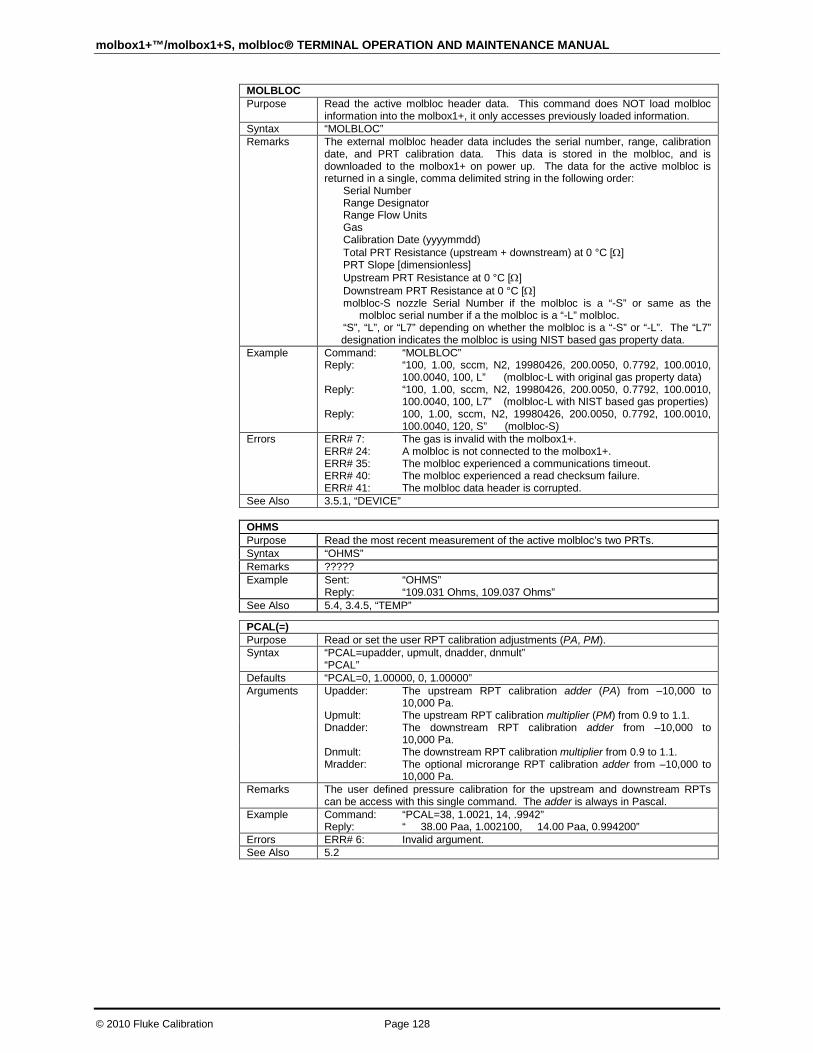
molbox1+™/molbox1+S, molbloc® TERMINAL OPERATION AND MAINTENANCE MANUAL
© 2010 Fluke Calibration Page 128
MOLBLOC Purpose Read the active molbloc header data. This command does NOT load molbloc
information into the molbox1+, it only accesses previously loaded information. Syntax “MOLBLOC” Remarks The external molbloc header data includes the serial number, range, calibration
date, and PRT calibration data. This data is stored in the molbloc, and is downloaded to the molbox1+ on power up. The data for the active molbloc is returned in a single, comma delimited string in the following order:
Serial Number Range Designator Range Flow Units Gas Calibration Date (yyyymmdd) Total PRT Resistance (upstream + downstream) at 0 °C [Ω] PRT Slope [dimensionless] Upstream PRT Resistance at 0 °C [Ω] Downstream PRT Resistance at 0 °C [Ω] molbloc-S nozzle Serial Number if the molbloc is a “-S” or same as the
molbloc serial number if a the molbloc is a “-L” molbloc. “S”, “L”, or “L7” depending on whether the molbloc is a “-S” or “-L”. The “L7” designation indicates the molbloc is using NIST based gas property data.
Example Command: Reply: Reply: Reply:
“MOLBLOC” “100, 1.00, sccm, N2, 19980426, 200.0050, 0.7792, 100.0010, 100.0040, 100, L” (molbloc-L with original gas property data) “100, 1.00, sccm, N2, 19980426, 200.0050, 0.7792, 100.0010, 100.0040, 100, L7” (molbloc-L with NIST based gas properties) 100, 1.00, sccm, N2, 19980426, 200.0050, 0.7792, 100.0010, 100.0040, 120, S” (molbloc-S)
Errors ERR# 7: ERR# 24: ERR# 35: ERR# 40: ERR# 41:
The gas is invalid with the molbox1+. A molbloc is not connected to the molbox1+. The molbloc experienced a communications timeout. The molbloc experienced a read checksum failure. The molbloc data header is corrupted.
See Also 3.5.1, “DEVICE”
OHMS Purpose Read the most recent measurement of the active molbloc’s two PRTs. Syntax “OHMS” Remarks ????? Example
Sent: Reply:
“OHMS” “109.031 Ohms, 109.037 Ohms”
See Also 5.4, 3.4.5, “TEMP”
PCAL(=) Purpose Read or set the user RPT calibration adjustments (PA, PM). Syntax “PCAL=upadder, upmult, dnadder, dnmult”
“PCAL” Defaults “PCAL=0, 1.00000, 0, 1.00000” Arguments Upadder: The upstream RPT calibration adder (PA) from –10,000 to
10,000 Pa. Upmult: The upstream RPT calibration multiplier (PM) from 0.9 to 1.1. Dnadder: The downstream RPT calibration adder from –10,000 to
10,000 Pa. Dnmult: The downstream RPT calibration multiplier from 0.9 to 1.1. Mradder: The optional microrange RPT calibration adder from –10,000 to
10,000 Pa. Remarks The user defined pressure calibration for the upstream and downstream RPTs
can be access with this single command. The adder is always in Pascal. Example Command:
Reply: “PCAL=38, 1.0021, 14, .9942” “ 38.00 Paa, 1.002100, 14.00 Paa, 0.994200”
Errors ERR# 6: Invalid argument. See Also 5.2

4. REMOTE OPERATION
Page 129 © 2010 Fluke Calibration
PCALDATE(=) Purpose Read or set the user RPT calibration dates. Syntax “PCALDATE=yyyymmdd, yyyymmdd”
“PCALDATE” Defaults “PCALDATE=19980101,19980101 Arguments yyyy:
mm: dd:
The year from 1980 to 2079. The month from 1 to 12. The day from 1 to the last valid day of the given month.
Remarks The user defined pressure calibration dates for the upstream and downstream RPTs can be access with this single command in this order.
Example Command: Reply:
“PCALDATE=19981005, 19981005” “19981005, 19981005”
Errors ERR# 7: One or more of the date(s) are invalid. See Also 5.2, “PCAL(=)”
PCOEF Purpose Read the coefficient to convert Pascal [Pa] to the current pressure units. Syntax “PR” Remarks The pressure coefficient (PCOEF) is a value that is used to convert Pascal units
to the current pressure units. To use this coefficient, multiply it by pressure in Pascal to get pressure in the current units.
Example Command: Reply:
“PCOEF” “1.000000e-003”
See Also 3.5.8, 7.1.1, “PUNIT”
PR Purpose Read the next molbloc average pressure. Syntax “PR” Remarks
The next available average upstream downstream−
2
pressure value is read in
the current pressure units. It is the average of the tare corrected upstream and the downstream transducers. The data string also contains flow ready information, and the pressure units. The first 3 characters of the reply are reserved for the flow ReadyNot Ready status. The Ready/Not Ready status is covered in the “SR” command. The pressure measurement number starts at the fifth character, and is followed by the pressure unit of measure.
Example Command: Reply:
“PR” “R 247.5982 kPa a”
See Also “READYCK”, “SR”, “DP”, “PRHI”, “PRLO”. “ALLR”
PRHI Purpose Read the last measured upstream absolute pressure (tare corrected). Syntax “PRHI” Remarks The current upstream pressure value (corrected for tare) is returned in the current
pressure unit of measure. Example Command:
Reply: “PRHI” “247.56 kPaa”
See Also “DP”, “PR”, “PRLO” . “ALLR”
PRLO Purpose Read the last measured downstream absolute pressure (tare corrected). Syntax “PRLO” Remarks The current downstream pressure value (corrected for tare) is returned in the
current pressure unit of measure. Example Command:
Reply: “PRLO” “224.67 kPaa”
See Also “DP”, “PR”, “PRHI” . “ALLR”
PUNIT(=) Purpose Read or set the pressure display unit of measure. Syntax “PUNIT=unit” Defaults “PUNIT” Arguments unit: The text corresponding to the pressure unit of measure. The
pressure unit protocol is the same as the protocol used for front panel entries and displays.
Remarks This command determines what unit of measure is used to display pressure. Example Command:
Reply: “PUNIT=KPA” “kPa a”
Errors ERR# 7: The unit is invalid. See Also 3.5.8

molbox1+™/molbox1+S, molbloc® TERMINAL OPERATION AND MAINTENANCE MANUAL
© 2010 Fluke Calibration Page 130
PURGE(=) Purpose Read the progress of or start a purge cycle. Not available on a molbox1+S. Syntax “PURGE=period”
“PURGE” Arguments Period: The period of time over which to purge (1.. 999 seconds).
“0” aborts the purge cycle and returns to normal operation. Remarks The purge cycle takes the specified time period to complete. The PURGE
command is used to first start the purge cycle, and then to query how many seconds are left or if the cycle is complete. While the purge cycle is executing, a ‘b’ (“busy”) will appear in the 3rd character position of the “FR” and the “SR” command replies. The “ABORT” command can also be used to abort a purge cycle. The “PURGE” command must be completed or aborted using the “ABORT” command before performing another operation.
Example Command: Reply: Command: Reply: Reply:
“PURGE=30” “30 sec” “PURGE” “12 sec” (purge cycle has 12 sec left) “OK” (purge cycle is complete)
Errors ERR# 6: The argument is invalid. See Also 3.4.4.2 , “SR”; “ABORT”
RANGE Purpose Read the range designation of the active molbloc. Syntax “RANGE” Remarks The range designation of the active molbloc is returned in the flow units used to
define the range. Note that the effective molbloc range is dependent on the gas being flowed and the molbloc pressure dependent calibration type. Do not assume the usable range is equal to the range designation.
Example Command: Reply:
“RANGE” “10.00 sccm”
See Also 1.2.5, 3.5.1, Table 23, Table 24, “MOLBLOC”, “DEVICE=”, “GASCALS”
RATE Purpose Read the next available rate of change of flow. Syntax ‘RATE” Remarks The next available rate change of flow in the current flow unit of measure per
second is returned. Example Command:
Reply: “RATE” “-0.01 sccm/s”
See Also 3.4.6.1
RE Purpose Read the value of Reynolds number representing the current flow through the
molbloc as calculated by the molbox1+. Syntax “RE” Remarks The Reynolds number varies with the molbloc flow. Example Command:
Reply: “RE” “82.342”
See Also 3.4.5
RES(=) Purpose Read or set the local flow display resolution.
Syntax “RES=n” “RES”
Default “RES=0.001%”
Arguments n: Resolution in %FS (1% - 0.001%)
Remarks The molbox1+’s front panel resolution can be specified with this command. The resolution of remote flow measurement replies are always 0.0001% FS.
Example
Sent: Query reply:
“RES=.01” “0.010%”
Errors ERR# 6: The argument was out of bounds.
See Also 3.4.9
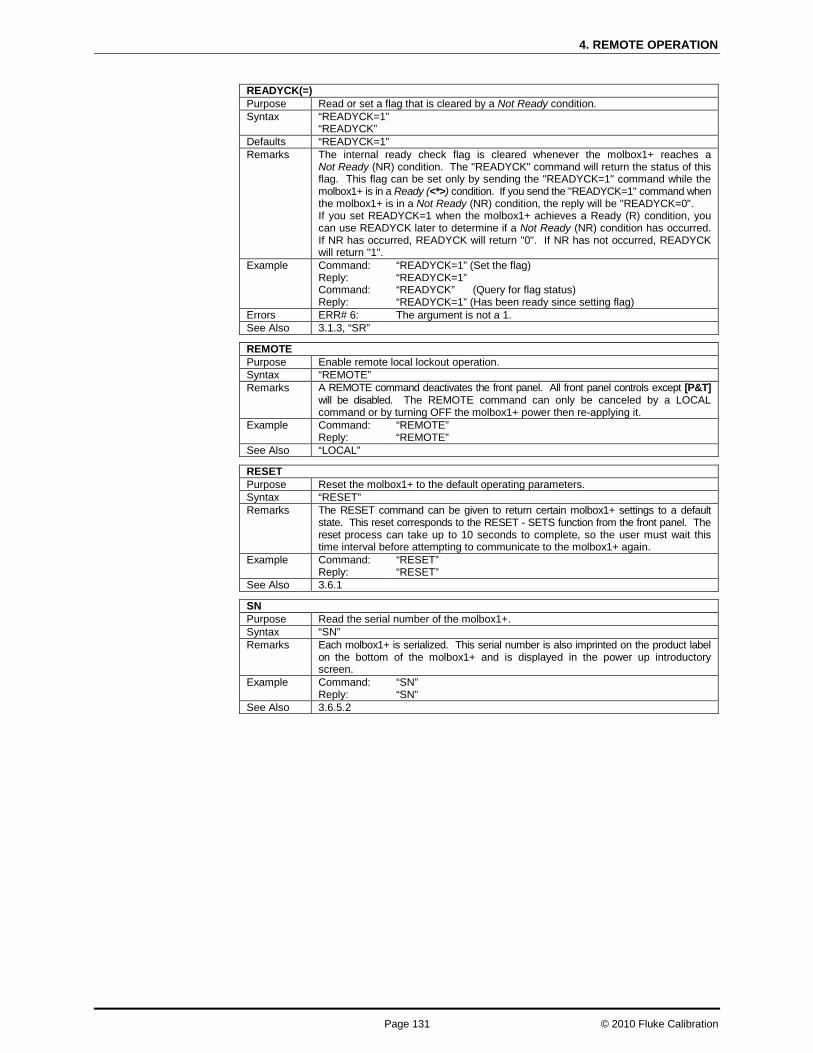
4. REMOTE OPERATION
Page 131 © 2010 Fluke Calibration
READYCK(=) Purpose Read or set a flag that is cleared by a Not Ready condition. Syntax “READYCK=1”
“READYCK” Defaults “READYCK=1” Remarks The internal ready check flag is cleared whenever the molbox1+ reaches a
Not Ready (NR) condition. The "READYCK" command will return the status of this flag. This flag can be set only by sending the "READYCK=1" command while the molbox1+ is in a Ready (<*>) condition. If you send the "READYCK=1" command when the molbox1+ is in a Not Ready (NR) condition, the reply will be "READYCK=0". If you set READYCK=1 when the molbox1+ achieves a Ready (R) condition, you can use READYCK later to determine if a Not Ready (NR) condition has occurred. If NR has occurred, READYCK will return "0". If NR has not occurred, READYCK will return "1".
Example Command: Reply: Command: Reply:
“READYCK=1” (Set the flag) “READYCK=1” “READYCK” (Query for flag status) “READYCK=1” (Has been ready since setting flag)
Errors ERR# 6: The argument is not a 1. See Also 3.1.3, “SR”
REMOTE Purpose Enable remote local lockout operation. Syntax “REMOTE” Remarks A REMOTE command deactivates the front panel. All front panel controls except [P&T]
will be disabled. The REMOTE command can only be canceled by a LOCAL command or by turning OFF the molbox1+ power then re-applying it.
Example Command: Reply:
“REMOTE” “REMOTE”
See Also “LOCAL”
RESET Purpose Reset the molbox1+ to the default operating parameters. Syntax “RESET” Remarks The RESET command can be given to return certain molbox1+ settings to a default
state. This reset corresponds to the RESET - SETS function from the front panel. The reset process can take up to 10 seconds to complete, so the user must wait this time interval before attempting to communicate to the molbox1+ again.
Example Command: Reply:
“RESET” “RESET”
See Also 3.6.1
SN Purpose Read the serial number of the molbox1+. Syntax “SN” Remarks Each molbox1+ is serialized. This serial number is also imprinted on the product label
on the bottom of the molbox1+ and is displayed in the power up introductory screen.
Example Command: Reply:
“SN” “SN”
See Also 3.6.5.2

molbox1+™/molbox1+S, molbloc® TERMINAL OPERATION AND MAINTENANCE MANUAL
© 2010 Fluke Calibration Page 132
SR Purpose Read the next available ready status. Syntax “SR” Remarks The current Ready/Not Ready status can be read directly using this command. If
the reply is "NR" then the flow is Not Ready within the limits set by the stability settings, molbloc calibration flow or pressure limits. If the reply is "R" then the flow is Ready within the limits. The status is replied when the next flow measurement is finished.
The third character indicates optional additional molbox status information:
"r" molbloc flow is over the maximum Reynolds number of 1 200 allowed for a valid measurement.
“b” molbox1+ is busy with a tare, leak check or purge cycle which does not allow normal operation.
“a” molbox1+ is currently executing an averaging cycle.
“P” molbloc-S BPR is too high or molbloc pressure exceeds molbloc calibration pressure limits by 10kPa or more (always causes a Not Ready condition).
“F” Measured flow exceeds molbloc calibration flow limit by 5% or more (always causes a Not Ready condition).
Example Command:
Reply: Reply: Reply: Reply:
“SR ” “R ” (Flow measurement is ready) “NR ” (Flow measurement is not ready) “R a” (average cycle is executing) “R b” (tare, leak check or purge cycle is executing) “NRP” (BPR is too high for a valid measurement)
See Also 3.1.3, “FA”, “FR”, “READYCK”, “SS”, “TARESET”, “PURGE”, “LEAKCK”, “ALLR”
SS(%) Purpose Read or set the flow stability required for a Ready condition to occur (flow unit/s). Syntax “SS=stab”
“SS” “SS%=stab%” “SS%”
Defaults “SS=0.1 sccm” Arguments stab:
stab%: The flow stability in flow unit/sec. The flow stability in % FS of the active molbloc.
Remarks The stability setting determines whether the flow is ready or not ready. Stability is set in terms of flow or % FS. It is always stored in terms of flow, so the % FS value will change if the molbloc range changes. If the rate of change of flow is greater than the current setting, then the status is Not Ready.
Example Command: Reply: Command: Reply:
“SS=.2” “0.20 sccm” “SS%=.1” “0.1000 %”
Errors ERR# 6: The argument is invalid. See Also 3.1.3, 3.5.2, “READYCK”, “SR”
STDRES(=) Purpose Read or set the PRT measurement system auto-calibration reference resistor
values . Syntax “STDRES=R100, R110”
“STDRES” Defaults “STDRES = 100.0000, 110.0000” Arguments R100:
R110: The actual value of the 100Ω reference resistor. The actual value of the 110Ω reference resistor.
Remarks These values are stored in the molbox’s factory data area, and should not be routinely changed due to a limitation of the number of changes allowed (100,000 changes) before the factory data area is subject to failure. Use the channel dependent “TCAL” command for adjusting the temperature calibration.
Example
Sent: Reply:
“STDRES=100.002, 109.998” “ 100.0020 Ohms, 109.9980 Ohms”
See Also 5.4, “TCAL”

4. REMOTE OPERATION
Page 133 © 2010 Fluke Calibration
TARE Purpose Read the current tare conditions and the current tare. Not available on a
molbox1+S. Syntax “TARE” Remarks The user should set the molbox1+ valves to the tare condition (see “TARESETUP”)
and check the tare conditions using this command before taring the internal transducers (see “TARESET”). The returned data will allow the user to determine if the current conditions will allow a valid tare. The reply contains three fields which are separated by commas. The first field starts with an "R" if the system is ready to tare or else an "NR". The "R" must be present to tare the transducers. The system is ready to tare only if the current difference in pressure [Pa] between the up and down stream RPTs without tare is below 3,000 Pa. The actual pressure rate of change in Pa/sec follows this text. The second field displays the current difference in pressure [Pa] between the up and down stream RPTs without tare. The third field shows the last tare value. All returned values are in Pascal [Pa]. You cannot be in A+B or A/B modes when taring. The normal order of remote commands for a tare operation: “TARESETUP=UP” or “TARESETUP=DN” configures the molbox1+ for a tare. “TARE” queries the molbox1+ for current conditions until it is ready for tare. “TARESET” tares the molbox1+ when the “TARE” query has shown it is ready. “TARESETUP=OFF” returns the molbox1+ to normal measurement mode.
Example Command: Reply:
“TARE” “R 0 Pa/s, 115.2 Pa, 108.1 Pa”
Errors ERR# 6: ERR# 52:
An argument is invalid. Cannot tare in A+B or A/B mode.
See Also 3.4.4.1, “TARESET”, “TARESETUP”
TARESETUP(=) Purpose To prepare the molbox1+ to be tared and to return the unit to normal operation
after a tare has been completed. Not available on a molbox1+S. Syntax “TARESETUP=mode
“TARESETUP” Defaults “TARESETUP=OFF” Arguments mode:
“OFF”. Allows normal operation of the molbox1+. “UP”. Connects both of the absolute RPTs to the upstream pressure. “DN”. Connects both of the absolute RPTs to the downstream pressure.
Remarks Before the molbox1+ can be tared, the “TARESETUP” command must be used to configure the internal RPT connections properly. After the tare operation is complete, the “TARESETUP” command must again be used to restore the molbox1+ to normal operation. The “ABORT” command can also return operation to normal. The normal order of remote commands for a tare operation: “TARESETUP=UP” or “TARESETUP=DN” configures the molbox1+ for a tare. “TARE” queries the molbox1+ for current conditions until it is ready for tare. “TARESET” tares the molbox1+ when the “TARE” query has shown it is ready. “TARESETUP=OFF” returns the molbox1+ to normal measurement mode.
Example Command: Reply:
“TARESETUP=UP” “UP”
Errors ERR# 6: ERR# 52:
An argument is invalid. Cannot tare in A+B or A/B mode.
See Also 3.4.4.1, “TARE”, “TARESET”; “ABORT”

molbox1+™/molbox1+S, molbloc® TERMINAL OPERATION AND MAINTENANCE MANUAL
© 2010 Fluke Calibration Page 134
TARESET(=) Purpose To automatically tare the upstream and downstream RPT or set the tare to a user
defined value. Not available on a molbox1+S. Syntax “TARESET=tare
“TARESET” Defaults “TARESET=0” Arguments tare: The tare value (-9999 to 9999 Pa). Remarks “TARESET” will automatically tare the molbox1+ only if the tare results are within
the limits given (see the “TARE” command). Use the “TARESETUP” command to prepare the unit to be tared, and the “TARE” command to check if conditions are valid. After you have completed taring the unit, use the “TARESETUP=OFF” command or the “ABORT” command to return the unit to normal operating conditions. You can also manually set the tare value using the “TARESET=tare” command. All pressure values are always in Pascal [Pa]. While the tare cycle is executing, a ‘b’ (“busy”) will appear in the third character position of the “FR” and the “SR” command replies. The normal order of remote commands for a tare operation: “TARESETUP=UP” or “TARESETUP=DN” configures the molbox1+ for a tare. “TARE” queries the molbox1+ for current conditions until it is ready for tare. “TARESET” tares the molbox1+ when the “TARE” query has shown it is ready. “TARESETUP=OFF” returns the molbox1+ to normal measurement mode. NOTE: This command typically takes 5 to 7 seconds to complete if performing a tare (no arguments given).
Example Command: Reply: Reply:
“TARESET” “66 Pa” “66 Pa, 7 Pa”
Errors ERR# 6: ERR# 25: ERR# 52:
An argument is invalid. The tare values exceed the tare limit of 3,000 Pa. Cannot tare in A+B or A/B mode.
See Also 3.4.4.1 , “TARE”, “TARESETUP”, “ABORT”
TCAL(=) Purpose Read or set the molbox1+ temperature calibration for the active channel Syntax “TCAL=adder, mult, date”
“TCAL” Arguments adder:
mult: date:
Temperature adder in the current temperature units. Temperature multiplier. Date (YYYYMMDD)
Remarks The temperature calibration for active channel is applied to the displayed molbloc temperature.
Example Command: Reply:
“TCAL=0.25, 1.003,20090226” “0.250, 1.0030,20090226”
Errors ERR# 2: The date argument is invalid See Also 3.2.2, “TUNIT”, “DEVICE”, “STDRES”
TEMP Purpose Read the temperature of the active molbloc in the current unit of measure. Syntax “TEMP” Remarks The molbloc temperature is returned in the current temperature units. The average
temperature, upstream temperature and downstream temperature is returned (in that order). An error will be returned if there is a problem reading the molbloc PRTs.
Example Command: Reply:
“TEMP” “17.85 C, 17.84 C, 17.86 C”
Errors ERR# 37: There is an error in the molbox1+ PRT measurement. See Also 3.2.5, 5.4, 3.4.5 “TUNIT”, “OHMS”, “TCAL”
TIME(=) Purpose Read or set the internal clock time. Syntax “TIME”
“TIME=hh:mm:m Arguments hh:mmxs: The time to set in the format where hh is the hours from 1 to 12,
mm is the minutes from 1 to 59 followed by “am” or “pm”. Example Command:
Reply: “TIME=1:22am” “01:22am”
Errors ERR# 7: The time given is invalid. See Also 3.6.5.3

4. REMOTE OPERATION
Page 135 © 2010 Fluke Calibration
TOTAL(=) Purpose Read the progress of or start a new totalize cycle. Syntax “TOTAL=period”
“TOTAL” Arguments period: The period to totalize 00:00:01 to 99:59:59 (HH:MM:SS).
“0” stops the totalize cycle before it is complete. Remarks The totalizing cycle accumulates the total mass or volume flowed over a set period,
or the user can stop the cycle early if desired to use a shorter period than specified. The reply to a “TOTAL” query provides the current total, and the elapsed time period in the HH:MM:SS format. The cycle is complete when the total flow is preceded by ‘R’ (Ready). If the unit is actively totalizing, an “NR” (Not Ready) proceeds the total flow.
Example Command: Reply:
“TOTAL=00:10:00” “NR 0.0000 ucc, 00:00:00” (new cycle has started)
Command: Reply: Reply:
“TOTAL” ”NR 5.2347 ucc, 00:08:21” (cycle has run 8 min, 21 sec) ”R 6.2634 ucc, 00:10:00” (cycle is complete)
Command: Reply:
“TOTAL=0” ”R 5.2347 ucc, 00:08:21” (cycle has completed early)
Errors ERR# 6: The argument is invalid. See Also 3.4.6.4
TUNIT Purpose Read or set the molbox1+ temperature unit of measure. Syntax “TUNIT=unit”
“TUNIT” Arguments unit: ‘C’ for Celsius or ‘F’ for Fahrenheit. Remarks The temperature unit is used for reporting the molbloc temperature, and for setting
various other temperature settings. Example Command:
Reply: “TUNIT” “C”
Errors ERR# 6: The unit argument is invalid. See Also 3.5.9, “TEMP”
UDU(=) Purpose Read or set the user definable pressure unit. Syntax “UDU”
“UDU=text, coef” Arguments text: The text to use to identify the unit. It can be up to four characters wide.
This will be the text used to specify the unit if selecting it remotely, and that appears on the molbox1+.
coef: The coefficient to convert Pascal [Pa] to the user unit. The pressure (in Pa) will be multiplied by this coefficient before being displayed.
Defaults “UDU=UNIT, 1” Example Command:
Reply: “UDU=Bar2, .00001” “Bar2, 0.000010”
Errors ERR# 2: ERR# 6:
The text argument is longer than four characters. The coef argument is invalid.
See Also 3.5.8, “PUNIT”
UL(=) Purpose Read or set the upper limit for the internal pressure transducers. Syntax “UL=upperlimit”
“UL” Defaults “UL=630.00 kPa” Arguments upperlimit: The upper limit in the current pressure units (0 to 500 kPa). Remarks The upper limit sets the point in which the molbox1+ reacts to protect the internal
transducers; It is in the current pressure units. Example Command:
Reply: “UL=350” “350.000 kPa”
Errors ERR# 6: The upperlimit argument is invalid. See Also 3.6.3
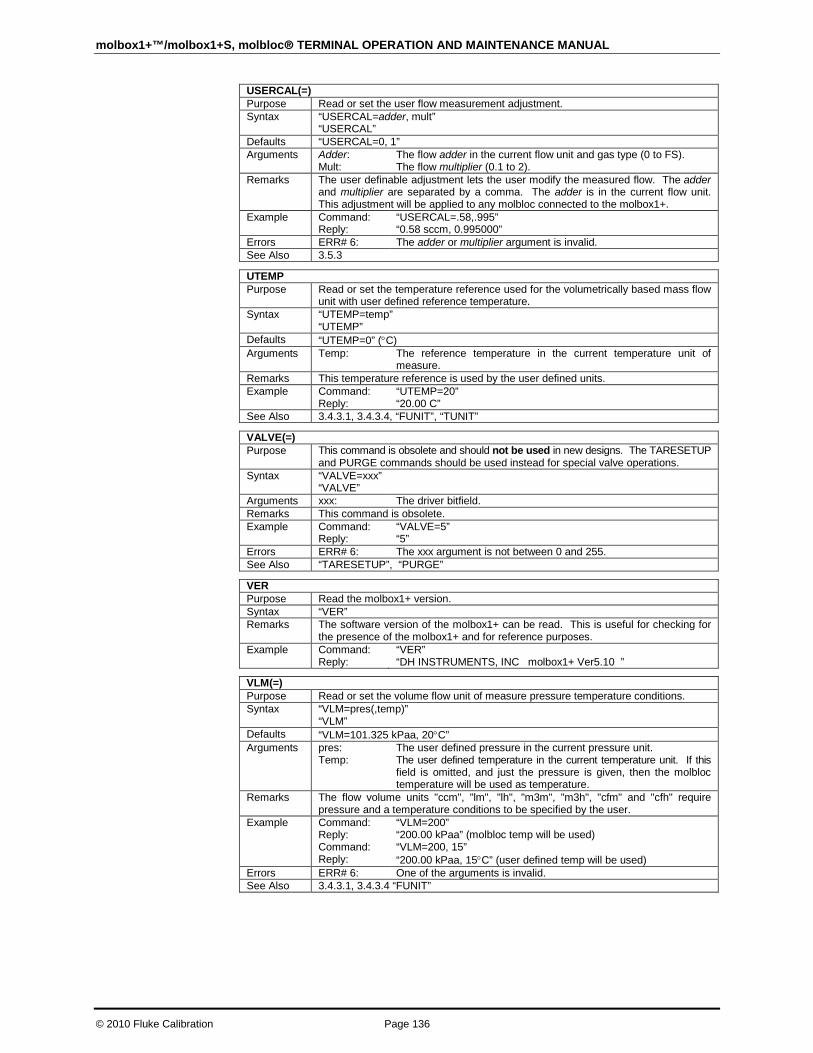
molbox1+™/molbox1+S, molbloc® TERMINAL OPERATION AND MAINTENANCE MANUAL
© 2010 Fluke Calibration Page 136
USERCAL(=) Purpose Read or set the user flow measurement adjustment. Syntax “USERCAL=adder, mult”
“USERCAL” Defaults “USERCAL=0, 1” Arguments Adder:
Mult: The flow adder in the current flow unit and gas type (0 to FS). The flow multiplier (0.1 to 2).
Remarks The user definable adjustment lets the user modify the measured flow. The adder and multiplier are separated by a comma. The adder is in the current flow unit. This adjustment will be applied to any molbloc connected to the molbox1+.
Example Command: Reply:
“USERCAL=.58,.995” “0.58 sccm, 0.995000”
Errors ERR# 6: The adder or multiplier argument is invalid. See Also 3.5.3
UTEMP Purpose Read or set the temperature reference used for the volumetrically based mass flow
unit with user defined reference temperature. Syntax “UTEMP=temp”
“UTEMP” Defaults “UTEMP=0” (°C) Arguments Temp: The reference temperature in the current temperature unit of
measure. Remarks This temperature reference is used by the user defined units. Example Command:
Reply: “UTEMP=20” “20.00 C”
See Also 3.4.3.1, 3.4.3.4, “FUNIT”, “TUNIT”
VALVE(=) Purpose This command is obsolete and should not be used in new designs. The TARESETUP
and PURGE commands should be used instead for special valve operations. Syntax “VALVE=xxx”
“VALVE” Arguments xxx: The driver bitfield. Remarks This command is obsolete. Example Command:
Reply: “VALVE=5” “5”
Errors ERR# 6: The xxx argument is not between 0 and 255. See Also “TARESETUP”, “PURGE”
VER Purpose Read the molbox1+ version. Syntax “VER” Remarks The software version of the molbox1+ can be read. This is useful for checking for
the presence of the molbox1+ and for reference purposes. Example Command:
Reply: “VER” “DH INSTRUMENTS, INC molbox1+ Ver5.10 ”
VLM(=) Purpose Read or set the volume flow unit of measure pressure temperature conditions. Syntax “VLM=pres(,temp)”
“VLM” Defaults “VLM=101.325 kPaa, 20°C” Arguments pres:
Temp: The user defined pressure in the current pressure unit. The user defined temperature in the current temperature unit. If this field is omitted, and just the pressure is given, then the molbloc temperature will be used as temperature.
Remarks The flow volume units "ccm", "lm", "lh", "m3m", "m3h", "cfm" and "cfh" require pressure and a temperature conditions to be specified by the user.
Example Command: Reply: Command: Reply:
“VLM=200” “200.00 kPaa” (molbloc temp will be used) “VLM=200, 15” “200.00 kPaa, 15°C” (user defined temp will be used)
Errors ERR# 6: One of the arguments is invalid. See Also 3.4.3.1, 3.4.3.4 “FUNIT”

4. REMOTE OPERATION
Page 137 © 2010 Fluke Calibration
VIN Purpose Read the MFC measurement voltage if in voltage mode. Syntax “VIN” Remarks The optional MFC interface can measure voltage sent from an MFC. The
molbox1+ must be in voltage mode before this can be done. The returned data is always in “v”.
Example Command: Reply:
“VIN” “1.982 V”
Errors See Also 3.4.8, 7.3, “MFCCH”, “VOUT(=)”
VOUT(=) Purpose Send a voltage to the MFC if in voltage mode. Syntax “VOUT=voltage”
“VOUT” Defaults “VOUT=0” Arguments voltage: The voltage to be sent to the MFC (0 to 5.5 V). Remarks The optional MFC interface can set a voltage sent to an MFC. The molbox1+ must
be in voltage mode before this can be done (see the “MFCCH” command). The data is always in Volts. This command does not change the regulation target set point for the MFC.
Example Command: Reply:
“VOUT=3” “3.000 V”
Errors ERR# 6: ERR# 10: ERR# 15:
The Volts argument is invalid. The MFC option is not installed or is not enabled. The molbox1+ is not in current mode.
See Also 3.4.8, 7.3, “MFCCH”, “VIN”
VSENSE Purpose Read the voltage sensed at the DUT set terminal. Syntax “VSENSE” Remarks The optional MFC interface uses a voltage sense line to measure the voltage being
sent to an external MFC at the MFC. This sense voltage is used to re-adjust the voltage sent to the MFC to compensate for line losses.
Example Command: Reply:
“VSENSE” “3.002 V”
Errors See Also 3.4.8, 7.3, “MFCCH”, “VIN”, “VOUT”
VSUPPLY Purpose Read the current ±15 Volt MFC supply voltage. Syntax “VSUPPLY” Remarks The optional MFC interface provides a ±15 Volt supply. These two measurements
are referenced to the MFC supply common, and are sensed in the molbox1+. Example Command:
Reply: “VSUPPLY” “+14.982 V, -15.231 V”
See Also 3.4.8, 7.3, “MFCCH”, “VIN”, “VOUT”
VVALTEST Purpose Read the voltage at the optional MFC interface valve test input. Syntax “VVALTEST” Remarks The optional MFC interface provides an input to measure the MFC valve test voltage.
This measurement is referenced to the MFC -15 Volt supply. Example Command:
Reply: “VVALTEST” “5.32 V”
See Also 3.4.8, 7.3, “MFCCH”, “VIN”, “VOUT”
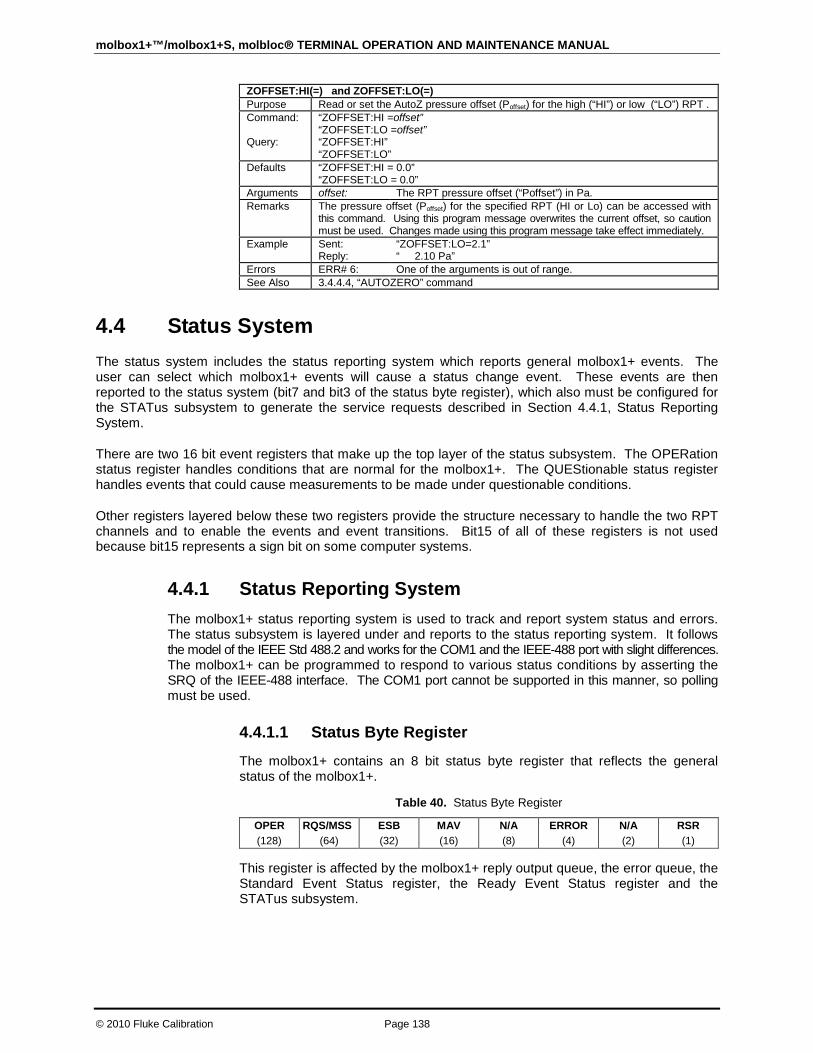
molbox1+™/molbox1+S, molbloc® TERMINAL OPERATION AND MAINTENANCE MANUAL
© 2010 Fluke Calibration Page 138
ZOFFSET:HI(=) and ZOFFSET:LO(=) Purpose Read or set the AutoZ pressure offset (Poffset) for the high (“HI”) or low (“LO”) RPT . Command: Query:
“ZOFFSET:HI =offset” “ZOFFSET:LO =offset” “ZOFFSET:HI” “ZOFFSET:LO”
Defaults “ZOFFSET:HI = 0.0” “ZOFFSET:LO = 0.0”
Arguments offset: The RPT pressure offset (“Poffset”) in Pa. Remarks The pressure offset (Poffset) for the specified RPT (HI or Lo) can be accessed with
this command. Using this program message overwrites the current offset, so caution must be used. Changes made using this program message take effect immediately.
Example
Sent: Reply:
“ZOFFSET:LO=2.1” “ 2.10 Pa”
Errors ERR# 6: One of the arguments is out of range. See Also 3.4.4.4, “AUTOZERO” command
4.4 Status System The status system includes the status reporting system which reports general molbox1+ events. The user can select which molbox1+ events will cause a status change event. These events are then reported to the status system (bit7 and bit3 of the status byte register), which also must be configured for the STATus subsystem to generate the service requests described in Section 4.4.1, Status Reporting System.
There are two 16 bit event registers that make up the top layer of the status subsystem. The OPERation status register handles conditions that are normal for the molbox1+. The QUEStionable status register handles events that could cause measurements to be made under questionable conditions.
Other registers layered below these two registers provide the structure necessary to handle the two RPT channels and to enable the events and event transitions. Bit15 of all of these registers is not used because bit15 represents a sign bit on some computer systems.
4.4.1 Status Reporting System The molbox1+ status reporting system is used to track and report system status and errors. The status subsystem is layered under and reports to the status reporting system. It follows the model of the IEEE Std 488.2 and works for the COM1 and the IEEE-488 port with slight differences. The molbox1+ can be programmed to respond to various status conditions by asserting the SRQ of the IEEE-488 interface. The COM1 port cannot be supported in this manner, so polling must be used.
4.4.1.1 Status Byte Register
The molbox1+ contains an 8 bit status byte register that reflects the general status of the molbox1+.
Table 40. Status Byte Register
OPER (128)
RQS/MSS (64)
ESB (32)
MAV (16)
N/A (8)
ERROR (4)
N/A (2)
RSR (1)
This register is affected by the molbox1+ reply output queue, the error queue, the Standard Event Status register, the Ready Event Status register and the STATus subsystem.

4. REMOTE OPERATION
Page 139 © 2010 Fluke Calibration
Status Byte Register (“∗STB?” or ”∗SRE n”)
OPER Bit7 (128)
←←← OPERation summary bit
RQS/MSS Bit6 (64)
Standard Event Status Register (“∗ESR?” or “∗ESE n”)
ESB Bit5 (32) ←←←
PON Bit7
URQ Bit6
CMD Bit5
EXE Bit4
DDE Bit3
QYE Bit2
RQC Bit1
OPC Bit0
MAV Bit4 (16) ←←←
OUTPUT QUEUE
N/A Bit3 (8)
ERROR Bit2 (4) ←←←
ERROR QUEUE
N/A Bit1 (2)
N/A Bit0 (1)
Figure 14. Status Byte Register
The status byte register can be read using the “*STB?” query, or by performing a serial poll on the IEEE-488 bus. If you read this using a serial poll then bit 6 is the RQS. If the “∗STB?” query is used, then bit 6 is the MSS bit. All of the other bits are common to both types of query.
Each of these status bits can cause a SRQ to occur. The Service Request Enable Register (“∗SRE” program message ) determines which of these flags are able to assert the SRQ line. This enable register has a matching set of bits that each will enable the designated bit to cause a SRQ, except for the RQS/MSS bit(s) which cannot cause a SRQ. If you set this register to 20 ($14 hex), an SRQ will occur if the MAV or the ERROR bit are set. The description of these bits are given as:
• OPER: OPERational event register summary bit (Bit 7) This bit is not supported by the molbox1+.
• RQS: Requested Service (Bit 6) Indicates that the SRQ line of the IEEE-488 interface has been asserted by the molbox1+. This bit is cleared when a serial poll is performed on the molbox1+, and is a part of the status byte register when read using a serial poll. This bit does not apply if the COM1 port is being used.
• MSS: Master Summary Status (Bit 6) Indicates that an event or events occurred that caused the molbox1+ to request service from the Host, much like the RQS bit. Unlike the RQS bit, it is READ ONLY and can be only cleared when the event(s) that caused the service request are cleared.
• ESB: Event Summary Bit (Bit 5) Indicates if an enabled bit in the Standard Event Status Register became set. (See Section 4.4.1.2.)
• MAV: Message Available Bit (Bit 4) Indicates that at least one reply message is waiting in the molbox1+ IEEE-488 output queue.
• ERR: Error Queue not empty (Bit 2) Indicates that at least one command error message is waiting in the molbox1+ IEEE-488 error message queue. Use the “SYSTem:ERRor?” query to get this message.

molbox1+™/molbox1+S, molbloc® TERMINAL OPERATION AND MAINTENANCE MANUAL
© 2010 Fluke Calibration Page 140
4.4.1.2 Standard Event Register
The molbox1+ contains an 8 bit Standard event register that reflects specific molbox1+ events that are not RPT dependent. Enabled events in this register will set or clear the ESB bit of the status byte register.
Table 41. Standard Event Register
PON (128)
URQ (64)
CMD (32)
EXE (16)
DDE (8)
QYE (4)
RQC (2)
OPC (1)
This register can be read using the “*ESR?” query. Each of these status bits can set the ESB bit of the status byte register, causing a SRQ to occur IF the ESB bit is enabled to do so. The Standard Event Status Enable Register (“∗ESE” program message) determines which of these flags are able to assert the ESB bit. The description of these bits are given as:
• PON: Power On (Bit 7) Indicates that the molbox1+ power has been cycled since the last time this bit was read or cleared.
• URQ: User Request (Bit 6) Indicates that the molbox1+ was set to local operation manually from the front panel by the user (pressing the ESC key).
• CMD: Command Error (Bit 5) Indicates that a remote command error has occurred. A command error is typically a syntax error in the use of a correct program message.
• EXE: Execution Error (Bit 4) Indicates if a remote program message cannot be processed due to device related condition.
• DDE: Device Dependent Error (Bit 3) Indicates that an internal error has occurred in the molbox1+ (e.g., a transducer time-out).
• QYE: Query Error (Bit 2) Indicates that an error has occurred in the protocol for program message communications. This is typically caused by a program message being sent to the molbox1+ without reading a waiting reply.
• RQC: Request Control (Bit 1) This bit is not supported as the molbox1+ cannot become the active controller in charge.
• OPC: Operation Complete (Bit 0) Indicates that the molbox1+ has completed all requested functions.
Page 141 © 2010 Fluke Calibration
5. Maintenance, Adjustments and Calibration
5.1 Product Overview molbox1+ was designed for maintenance free operation. No maintenance is required other than:
• Taring of Reference Pressure Transducers (RPTs) to zero differential for molbloc-L operation: This function is not a separate MAINTENANCE function or automatic molbox1+ activity, it is part of regular operation (see Section 3.4.4.1).
• AutoZero of Reference Pressure Transducers (RPTs): Regular rezeroing of the RPTs absolute measurement mode to a barometric reference standard using the AutoZ function is recommended (see Section 3.4.4.4).
• Reference Pressures Transducer (RPT) Calibration: An annual recalibration cycle is recommended. See Section 5.2 for RPT calibration instructions.
• Optional MFC Control Function Verification: The stability of the MFC control function analog voltage and current measurements over time is dependent upon the conditions of use. The MFC control function accuracy should be verified regularly. See Section 5.3 for instructions.
• Ohmic Measurement System Verification: A five year verification interval is recommended. See Section 5.4 for instructions.
• molbloc Calibration: molblocs can be calibrated separately from the molbox1+. A one year recalibration cycle is recommended. Calibration of a molbloc consists of comparing the mass flow measured by the combination of the molbloc and a calibrated molbox to a suitable mass flow standard flowing the gas for which the calibration is being performed. Since the molbloc is a static, stainless steel element, characterized by proprietary calibration coefficients determined in the original factory calibration, an out of tolerance molbloc is usually considered to require repair. For facilities requiring the capability to adjust molblocs to agree with their mass flow standard, CalTool for molbloc Extension to COMPASS for Flow software is available.
This section provides information on maintenance, adjustment, calibration procedures and recommended overhaul procedures.
Note
Calibration, maintenance and repair services for molbox1+ are offered by Fluke Calibration Authorized Service Providers (see Section 7.4).
Caution
• molbox1+ is a sophisticated measuring instrument with advanced on-board features and functions. Before assuming that unexpected behavior is caused by a system defect or breakdown, use this manual and other training facilities to become thoroughly familiar with molbox1+ operation. For rapid assistance in specific situations and other troubleshooting information, see Section 6.
• molbox1+ is covered by a limited 1 year warranty (see Section 7.4). Unauthorized service or repair during the warranty period is undertaken at the owner's risk and may cause damage that is NOT covered under product warranty and/or may void the product warranty.

molbox1+™/molbox1+S, molbloc® TERMINAL OPERATION AND MAINTENANCE MANUAL
© 2010 Fluke Calibration Page 142
5.2 Calibration Of Reference Pressure Transducers (RPTS)
5.2.1 Principle molbox1+ has two nominally identical, absolute Reference Pressure Transducers (RPTs) used to measure molbloc upstream and downstream pressure.
To calibrate an RPT, pressure from a pressure standard is applied to the RPTs at ascending and descending pressure increments over the RPT range. The pressure defined by the standard and the corresponding RPT readings are recorded at each point. After all of the pressures have been applied and recorded, adjustments are made to fit the RPT pressure readings to the standard. Fitting the readings means performing a least squares linear regression to arrive at the lowest value of the residual of errors of the transducer relative to the standard. The transducer readings are adjusted by user settable coefficients: PA (a pressure adder or offset) and PM (a pressure multiplier or span set) (see Section 5.2.1.1).
molbox1+ is delivered with an interactive reference pressure transducer (RPT) calibration utility software program that steps the operator through the complete RPT calibration procedure including applying pressures, collecting data automatically, calculating new PA and PM values, previewing the results of the new calibration and activating the results of the new calibration (see the CalTool for RPTs program and documentation provided on the General Accessories disk delivered with molbox1+). molbox1+ also provides complete local and remote access to RPT calibration coefficients so that RPT calibrations can be performed without using CalTool software if desired (see Section 5.2.5).
Caution CalTool for RPTs software provided with the molbox1+ supports the calibration process of molbox1+ RPTs. The CalTool program and its manual are provided on the General Accessories Disk with the new molbox1+. Most users should use CalTool software to assist in the calibration of molbox1+ RPTs.
5.2.1.1 PA and PM Coefficients
The coefficients used to adjust RPT readings are designated PA (a pressure adder or offset) and PM (a pressure multiplier or span set). The coefficients affect the RPT reading following:
Corrected reading = (uncorrected reading • PM) + PA
PA is expressed in pressure (always the SI unit, Pascal [Pa]).
PM is dimensionless.
There are individual PA and PM values for each of molbox1+’s two RPTs. The PA and PM values currently in use for each RPT can be viewed in the CALIBRATION function or the “PCAL” remote command. If adjustments are necessary when calibrating an RPT, the adjustments are made by adjusting the PA and PM values.
Caution As editing PA and PM values will change RPT calibration, they should only be edited by qualified personnel as part of the calibration process. Caution should be taken to avoid accidental editing. For information on preventing access to calibration information, see Section 3.6.2.
5. MAINTENANCE, ADJUSTMENTS AND CALIBRATION
Page 143 © 2010 Fluke Calibration
Note A new molbox1+ is delivered with all PA and PM values set to zero and 1. This does NOT mean that the molbox1+ has NOT been calibrated. For the original factory calibration, privileged factory coefficients are used for calibration adjustment. This allows a new molbox1+ to be delivered with “virgin” calibration coefficients of PA = 0 and PM = 1.
5.2.2 Equipment Required To calibrate molbox1+’s absolute reference pressure transducers (RPTs) to factory specifications, a gas operated pressure standard with the following characteristics are required:
• Able to apply absolute pressure in increments between:
• 20 to 300 kPa (3 to 45 psia) for molbox1+ A350K;
• 20 to 600 kPa (3 to 87 psia) for molbox1+ A700K;
• 100 to 1400 kPa (14 to 203 psia) for molbox1+S A1.4M;
• 100 to 2000 kPa (14 to 290 psia) for molbox1+S A2M;
• It is NOT necessary that the reference pressure standard used apply precisely the nominal pressure value of the calibration points as long as the exact value of the applied pressure is known. A different pressure range may be used if it is known that the molbox1+ will not be used outside of the different range.
• Measurement uncertainty (accuracy) of ± 0.005 % of reading or better, if normal molbox1+ flow measurement uncertainty specifications are to be obtained. A standard with higher measurement uncertainty may be used but molbox1+ flow measurement uncertainty may be proportionally degraded from published specifications.
Caution Use only a clean dry gas source when calibrating molbox1+ RPTs. Contaminating molbox1+ with liquids can cause out of tolerance measurements and may require special factory cleaning.
Note DHI piston gauge Model PG7601 is recommended as the reference pressure standard for the calibration of molbox1+ RPTs. Contact Fluke Calibration or your local representative for additional information.
5.2.3 Set-Up and Preparation To set-up and prepare the molbox1+ for calibration:
Set the molbox1+ on a stable surface near the calibration standard at a height as close as possible to the calibration standard's reference height. Consider the connections that need to be made to the molbox1+ rear panel pressure quick connectors and access to the front panel display and keypad.
Connect the calibration standard’s output to the molbox1+ rear panel CHANNEL A UP (HI) and DOWN (LO) ports. In <run> calibration mode (see Section 5.2.4.1), with a molbox1+ both absolute RPTs are connected to the CHANNEL A UP (HI) port and isolated from the DOWN (LO) port, but for a molbox1+S the absolute RPTs are independently connected to the CHANNEL A UP (HI) port and the CHANNEL A DOWN (LO) port. Use the quick connector stems (DHI P/N 3068652, equivalent to Swagelok SS-QM2-S-200) supplied with the molbox1+ accessories to make the connection(s). The fitting on the quick connector stem that must be mated to is a compression type for 1/8 in. tube.

molbox1+™/molbox1+S, molbloc® TERMINAL OPERATION AND MAINTENANCE MANUAL
© 2010 Fluke Calibration Page 144
5.2.4 Viewing and Editing RPT Readings and Calibration Information
Caution Editing RPT calibration information will affect molbox1+ pressure measurements and can cause out of tolerance flow measurements. RPT calibration information should only be edited by qualified personnel as part of the calibration process. Caution should be taken to avoid accidental editing. For information on preventing access to calibration information see Section 3.6.2.
PURPOSE
To read the output of molbox1+ RPTs in calibration mode; view and edit the calibration coefficients and calibration date.
PRINCIPLE
The molbox1+ CAL function contains all of the functions needed to perform RPT calibrations in one menu area.
This includes:
• Viewing molbox1+ RPT outputs (pressure readings) directly without the tare (see Section 3.4.4.1) or head (see Section 3.6.8) applied and configured for application of calibration pressures to run the calibration.
• Viewing PA and PM calibration coefficients and the calibration date (see Section 5.2.1.1).
• Editing PA and PM calibration coefficients and the calibration date (see Section 5.2.1.1).
Note See Sections 5.2.1 and 5.2.1.1 for information on molbox1+ calibration coefficients (PA and PM) and their proper use.
5.2.4.1 Viewing RPT outputs
OPERATION
To view the molbox1+ RPT outputs press [SPECIAL], <4cal>, <1pres>, <1upstrm or 2downstrm>, <1run>. molbox1+’s internal valves operate to connect both absolute RPTs to the upstream (HI) pressure port (see Figure 14) and the display is:
upstrm RPT dwnstrm 97.830 kPaa 97.825
The upstream absolute RPT reading is on the left and the downstream absolute reading is on the right. The values displayed are the RPT readings with the current PA and PM calibration coefficients applied but WITHOUT the tare or head applied (see Sections 3.4.4.1 and 3.6.8). Both the upstream and downstream absolute RPTs are shown together because they are nominally identical and are normally calibrated simultaneously.
Pressing [ESCAPE] or [ENTER] returns to the previous screen.

5. MAINTENANCE, ADJUSTMENTS AND CALIBRATION
Page 145 © 2010 Fluke Calibration
Note The RPT readings viewed under [SPECIAL], <4cal> DO NOT have the tare (see Section 3.4.4.1) or a head (see Section 3.6.8) correction applied and are valid for RPT calibrations. The RPT readings viewed by pressing [P&T] DO have tare and head values applied and therefore should NOT be used for taking RPT calibration data (see Section 3.4.4.1 for information on tare values).
1. Channel A High Isolation: Open
2. Channel A Low Isolation: Closed
3. Channel B High Isolation: Closed
4. Channel B Low Isolation: Closed
5. Bypass: Open
Figure 15. molbox1+ Internal Pneumatic Schematic - RUN UPSTREAM OR DOWNSTREAM ABSOLUTE RPT CALIBRATION
5.2.4.2 Viewing and Editing RPT PA, PM and Calibration Date
PURPOSE
To view or edit PA and PM calibration coefficients (see Section 5.2.1.1) and the calibration date for each Reference Pressure Transducer (RPT).
Note Capability to view and edit the values of the reference resistors used by molbox1+’s ohmic measurement system (see Section 5.4) is also provided here. This capability is normally used only by a Fluke Calibration Authorized Service Provider.
Caution Editing RPT, MFC and/or reference resistor calibration information will affect molbox1+ pressure and/or temperature measurements and can cause out-of-tolerance flow measurements. Calibration information should only be edited by qualified personnel as part of the calibration process. Caution should be taken to avoid accidental editing. For information on preventing access to calibration information see Section 3.6.2).
OPERATION
Press [SPECIAL], <4cal>, <1pres> and then <1upstrm> or <2dnstrm> to specify the RPT to be viewed/edited. Finally select <2view> to view information only or <3edit> to make changes to calibration information.
The display is:
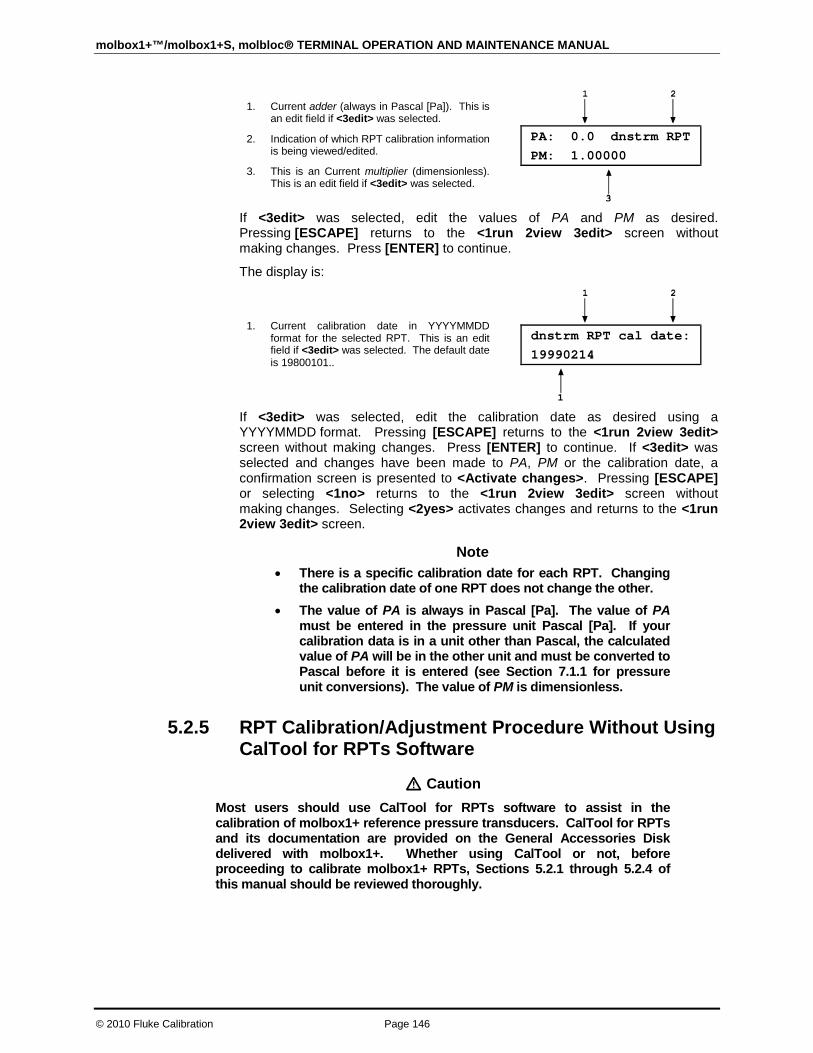
molbox1+™/molbox1+S, molbloc® TERMINAL OPERATION AND MAINTENANCE MANUAL
© 2010 Fluke Calibration Page 146
1. Current adder (always in Pascal [Pa]). This is an edit field if <3edit> was selected.
2. Indication of which RPT calibration information is being viewed/edited.
3. This is an Current multiplier (dimensionless). This is an edit field if <3edit> was selected.
PA: 0.0 dnstrm RPT PM: 1.00000
If <3edit> was selected, edit the values of PA and PM as desired. Pressing [ESCAPE] returns to the <1run 2view 3edit> screen without making changes. Press [ENTER] to continue.
The display is:
1. Current calibration date in YYYYMMDD format for the selected RPT. This is an edit field if <3edit> was selected. The default date is 19800101..
dnstrm RPT cal date: 19990214
If <3edit> was selected, edit the calibration date as desired using a YYYYMMDD format. Pressing [ESCAPE] returns to the <1run 2view 3edit> screen without making changes. Press [ENTER] to continue. If <3edit> was selected and changes have been made to PA, PM or the calibration date, a confirmation screen is presented to <Activate changes>. Pressing [ESCAPE] or selecting <1no> returns to the <1run 2view 3edit> screen without making changes. Selecting <2yes> activates changes and returns to the <1run 2view 3edit> screen.
Note • There is a specific calibration date for each RPT. Changing
the calibration date of one RPT does not change the other. • The value of PA is always in Pascal [Pa]. The value of PA
must be entered in the pressure unit Pascal [Pa]. If your calibration data is in a unit other than Pascal, the calculated value of PA will be in the other unit and must be converted to Pascal before it is entered (see Section 7.1.1 for pressure unit conversions). The value of PM is dimensionless.
5.2.5 RPT Calibration/Adjustment Procedure Without Using CalTool for RPTs Software
Caution Most users should use CalTool for RPTs software to assist in the calibration of molbox1+ reference pressure transducers. CalTool for RPTs and its documentation are provided on the General Accessories Disk delivered with molbox1+. Whether using CalTool or not, before proceeding to calibrate molbox1+ RPTs, Sections 5.2.1 through 5.2.4 of this manual should be reviewed thoroughly.

5. MAINTENANCE, ADJUSTMENTS AND CALIBRATION
Page 147 © 2010 Fluke Calibration
Both molbox1+ RPTs are normally calibrated simultaneously. The standard calibration procedure is:
Set-up and prepare the molbox1+ for calibration of the RPT(s) (see Sections 5.2.2, 5.2.3).
Press [SPECIAL], <4cal>, <1pres>, <1upstrm>, <2view> to read and record the current values of PA and PM for the upstream RPT. Then repeat the process selecting <2dnstrm> to read and record the downstream RPT PA and PM (see Section 5.2.4.2).
Press [SPECIAL], <4cal>, <1pres>, <1upstrm> or <2dnstrm>, <1run> to display the real time pressure readings of the RPT(s) to be calibrated (see Section 5.2.4.1).
Apply the calibration pressures to the RPT(s) recording the pressure applied by the standard and the molbox1+ RPT readings at each calibration point.
See the beginning of section 5.2.2 for the standard calibration range for the RPTs. Dwell at least 60 seconds after setting the reference pressure at each point to allow full stabilization. The data recorded is the "as received" data for this calibration.
Enter the calibration pressure and RPT readings for each point into a spreadsheet. Calculate the "non-corrected" RPT readings by backing out the as received PA and PM recorded in Step above, following:
non-corrected reading = (corrected reading - PA)/PM
Perform a best fit linear regression to find the offset and slope that best fit the non-corrected RPT readings to the calibration standard pressures. Most commercial spreadsheet products have a standard function to perform a linear regression. The offset, in Pascal [Pa], is the new value of PA, the slope is the new value of PM.
Press [SPECIAL], <4cal>, <1pres>, <1upstrm> or <2dnstrm>, <2edit> to write the new values of PA (always in Pascal) and PM and the new calibration date (YYYYMMDD) for the RPT that is being calibrated.
Calculate “as left data" for the calibration:
as left reading = (non-corrected reading • new PM) + new PA
If desired, verify the as left data by rerunning the calibration with the new PA(s) and PM(s) applied and checking that the disagreements between the calibration standard and the RPT readings are in tolerance.
Caution • The value of PA must be entered in the pressure unit Pascal [Pa]. If the
calibration data is in a unit other than Pascal, the calculated value of PA will be in the other unit and must be converted to Pascal before it is entered (see Section 7.1.1 for pressure unit conversions).
• If you are not familiar or comfortable with the mathematics used for PA and PM manipulation, it is recommended you verify the as left readings as suggested in Step above to provide practical confirmation of the integrity of the calculations. Note also that the CalTool for RPTs software delivered with the molbox1+ performs the necessary calculations automatically.
molbox1+™/molbox1+S, molbloc® TERMINAL OPERATION AND MAINTENANCE MANUAL
© 2010 Fluke Calibration Page 148
5.3 MFC Control Function Adjustment PURPOSE
To verify and adjust the voltage and/or current measurements made by molbox1+’s optional MFC control function.
Note
Capability to view and edit the values of the voltage references resistors used by molbox1+’s optional MFC control function is also provided here. This capability is normally used only by a Fluke Calibration Authorized Service Provider.
PRINCIPLE
molbox1+ may be delivered with an optional MFC control function. The MFC control function allows voltage of current set points to be applied to an MFC and voltage or current values to be read back from an MFC or MFM.
The MFC control function is self-calibrating using on-board 5 and 10 V references. Voltage is converted to current using a precision 250 Ω resistor.
The MFC control function signals are:
• sense (V)
• measure (V or mA)
• valve (V)
• negative power supply (V)
• positive power supply (V)
• set (V or mA)
See Section 1.2.4 for complete MFC control specifications.
Any of the MFC control signals can be adjusted using adders and multipliers in the same manner as the pressure adders and multipliers used to adjust the molbox1+ RPTs (see Section 5.2.1.1). The normal procedure, however, is to use the molbox1+ Analog Calibration software and cable provided with the accessories of a molbox1+ delivered with the optional MFC control function.
See Section 7.3 for MFC control function pin out details.
OPERATION
Note
This section describes the operation of the features available to adjust the optional molbox1+ MFC control function signals. The normal procedure for calibrating or adjusting these signals is to use the molbox1+ Analog Calibration software provide in the molbox1+ accessories. The features described here are made available for advanced users desiring to perform customized adjustments.

5. MAINTENANCE, ADJUSTMENTS AND CALIBRATION
Page 149 © 2010 Fluke Calibration
To access the MFC control function signal adders and multipliers pressure [SPECIAL], <4cal>, <3MFC>, <1cal>. The display is:
To access the MFC control function signal adders and multipliers pressure [SPECIAL], <4cal>, <3MFC>, <1cal>. The display is:
Channel1:1sense 2meas
3valve 4neg 5pos ↓ 6set
Each selection displays the signal adder and multiplier. For certain signals, <1voltage> or <2current> must be selected. In this case, there are separate and distinct adders and multipliers for voltage and current readings.
<1sense>: Set point sense. Voltage only.
<2meas>: Output from the MFC or MFM sensor. Voltage or current.
<3valve>: Valve test line to measure an MFC valve’s internal voltage. Voltage only.
<4neg>: -15 VDC power supply. Voltage only.
<5pos>: +15 VDC power supply. Voltage only.
<6set>: MFC set point command. Voltage or current.
5.4 OHMIC Measurement [Temperature] System Verification
PURPOSE
To verify the measurements made by molbox1+’s ohmic measurement system for temperature.
PRINCIPLE
molbox1+ includes an ohmic measurement system used to measure the resistance of the two Platinum Resistance Thermometers (PRTs) mounted in molblocs. The temperature of the PRTs is calculated from the resistance. The molbloc PRTs have nominal resistance at 0 °C of 100 Ω and a slope of 0.3896 following DIN Norm 43760. The calibrated Rzero corresponding to the resistance at 0 °C for each PRT is stored on the molbloc EEPROM and read by the molbox1+.
The ohmic measurement system self-calibrates using on-board 100 and 110 Ω reference resistors. On molbox1+ power up, an automated routine adjusts the ohmic measurement system relative to on-board, reference resistor readings. The on-board reference resistors used to calibrate the molbox1+ measurement system have accuracy of ± 0.01 % and stability of ± 0.0025 % for one year, ± 0.005 % for three years.
The self-calibration feature and the very high accuracy and stability of the reference resistors relative to the accuracy tolerance on the molbox1+ temperature measurements make the need to calibrate the ohmic measurement system independently unlikely. It is good practice, however, to verify the ohmic measurement system. This is most easily accomplished globally by connecting a known resistance value to the measurement circuit where the molbloc PRTs are normally connected and verifying that the molbox1+ reads the correct corresponding temperature when that resistance is connected. Reference resistors mounted in a molbloc simulator for easy connection to molbox1+ using the normal molbloc connection cable can be purchased from your Fluke Calibration Sales Representative [molbloc simulators: 100 Ω (0°C nominal) P/N 3069694, 107 Ω (18°C nominal) P/N 3069682, 110 Ω (25°C nominal) P/N 3069701)]. These are nominal resistors whose values are reported and can be measured independently if desired. The measured resistance of the reference resistors and a value for resistance at 0 °C of 100 Ω are programmed on the simulator EEPROM. Using these values, if the molbox1+ ohmic
molbox1+™/molbox1+S, molbloc® TERMINAL OPERATION AND MAINTENANCE MANUAL
© 2010 Fluke Calibration Page 150
measurement system and associated connections are working properly, when the simulator is connected the molbloc temperature indicated by molbox1+ should equal the reference temperature corresponding to the molbloc simulator reference resistors Rzero values following:
Reference temperature [°C] = (Reference resistor value [Ω] – 100) / 0.3896
The Reference temperature [°C] calculated from the actual reference resistor value is written on the molbloc simulator. The temperature value read by the molbox1+ when the molbloc simulator is connected can be observed by pressing [P&T] (see Section 3.4.5). The disagreement between the reference temperature and the molbloc indication should not exceed 0.05 °C.
Note
Because the ohmic measurement system is set up to measure two PRTs, there are two reference resistors in the molbloc simulator. Their resistance is not identical so there are actually two reference temperatures printed on the molbloc simulator and an average temperature which correspond to the three temperatures on the molbox1+ [P&T] temperature display (see Section 3.4.5).
OPERATION
To verify the molbox1+ ohmic measurement system proceed as follows:
Connect a molbloc simulator to the molbox1+ Channel A and initialize it as if connecting a molbloc (see Section 3.5.1).
Press the [P&T] button twice to display the molbox1+ temperature measurement.
Compare the three molbox1+ temperature measurements (upstream, downstream and average) to the calculated reference temperature values written on the molbloc simulator.
Repeat steps thru for the other simulators and/or for Channel B.
If all disagreements between molbox1+ indications and corresponding calculated reference temperatures are less than 0.05 °C, the ohmic measurement system verification passed.
If any disagreement between a molbox1+ indication and the corresponding calculated reference temperature is greater than 0.05 °C, the ohmic measurement system verification failed.
Possible reasons for failure include:
• faulty molbox1+ internal reference resistor(s)
• faulty molbox1+ internal relays
• faulty connections between molbox1+ and the molbloc simulator
• faulty molbloc simulator
Check the molbox1+ to molbloc simulator connections and repeat the verification.
Caution
Pressing [SPECIAL] and selecting <4cal>, <2temp> provides access to view and edit the value of molbox1+’s channel dependent temperature adders and multipliers. Altering these values can cause out of tolerance flow readings. In normal circumstances, these values are only altered by the factory when a reference resistor is replaced and great care and consideration should be used if they are to be altered by the user.

5. MAINTENANCE, ADJUSTMENTS AND CALIBRATION
Page 151 © 2010 Fluke Calibration
5.4.1 OHMIC Measurement System Calibration/Adjustment Procedure
The molbox1+ channels are calibrated individually. The standard calibration procedure requires at least two simulators and is performed as follows:
With Channel A selected, press [SPECIAL], <4cal>, <2temp> to read and record the current values of TA and TM for Channel A, then exit to the main run screen to select Channel B and repeat the process to read and record the current values of TA and TM for Channel B.
With Channel A selected, the [P&T] button twice to display the real time temperature readings.
Connect a molbloc simulator to the molbox1+ Channel A and initialize it as if connecting a molbloc (see Section 3.5.1).
Enter the average molbloc simulator calibrated temperature and the molbox1+ top row centered calibration temperature reading (the averaged temperature) for each temperature point into a spreadsheet. Repeat steps and for each simulator. Calculate the "non-corrected" temperature readings by backing out the as received TA and TM recorded in Step above, following:
non-corrected reading = (corrected reading - TA)/TM
Perform a best fit linear regression to find the offset and slope that best fit the non-corrected temperature readings to the calibrated molbloc simulator temperatures. Most commercial spreadsheet products have a standard function to perform a linear regression. The offset, in the current temperature unit, is the new value of TA, the slope is the new value of TM.
Press [SPECIAL], <4cal>, <2temp> to write the new values of TA (in the current unit of measure) and TM and the new calibration date (YYYYMMDD) for the channel that is being calibrated.
Calculate “as left data" for the calibration:
as left reading = (non-corrected reading • new TM) + new TA
If desired, verify the as left data by rerunning the calibration with the new TA and TM applied and checking that the disagreements between the molbloc simulators and the molbox1+ temperature readings are in tolerance.
Repeat steps thru for Channel B.
Caution • The value of TA must be entered in the current unit of measure, either °C
or °F, that is displayed by the molbox1+. • If you are not familiar or comfortable with the mathematics used for TA
and TM manipulation, it is recommended you verify the as left readings as suggested in Step above to provide practical confirmation of the integrity of the calculations.
• If an out-of-tolerance condition persists, the molbox1+ and/or the molbloc simulator(s) may need service.

molbox1+™/molbox1+S, molbloc® TERMINAL OPERATION AND MAINTENANCE MANUAL
© 2010 Fluke Calibration Page 152
5.5 molbloc Flow Adjustment PURPOSE
To allow linear adjustments to existing gas specific molbloc calibrations by the user.
Caution
• This correction does not take into consideration changes in the molbloc Reynolds number. It is a pure adder/multiplier applied to the molbloc flow. For a molbloc-L a variety of upstream and downstream pressure and temperature combinations may yield the same Reynolds number. It is important to calibrate the molbloc in the conditions of normal use to avoid inducing additional error associated with changes in the Reynolds number.
• For true factory style gas calibrations or addition of gas calibrations not previously on the molbloc, the use of the CalTool for molbloc Extension to COMPASS for Flow is highly preferable if access to a sufficiently accurate flow reference is available.
PRINCIPLE
The adjustments are stored on the molbloc EEPROM along with the factory calibration coefficients and does not apply to any other molbloc or gas calibration. The correction is applied whenever the specific gas calibration is selected on the adjusted molbloc when connected to a molbox1+. This feature does not support adding new calibrations to the molbloc.
The coefficients used to adjust the gas calibration are designated FA (a flow adder or offset) and FM (a flow multiplier or span set). The use of FA is not recommened as this is an offset value (% of FS) that could negatively impact the molbloc, which is a % of reading device. Whenever possible it is recommended to make all corrections with the FM. The coefficients affect the flow reading following:
Corrected reading = (uncorrected reading • FM) + FA
FA is expressed in flow (always the current unit of measure (i.e. “sccm” or “slm”).
FM is dimensionless.
The FA and FM values currently in use for the calibrated gas can be viewed in the CALIBRATION function. If adjustments are necessary when calibrating a molbloc, the adjustments are made by adjusting the FA and FM values.
Caution
As editing FA and FM values will change the molbloc gas calibration, they should only be edited by qualified personnel as part of a flow calibration process. Caution should be taken to avoid accidental editing. For information on preventing access to calibration information, see Section 3.6.2.
Note
A new molbloc is delivered with all FA and FM values set to zero and 1. This does NOT mean that the molbloc has NOT been calibrated. For the original factory calibration, privileged factory coefficients are used for calibration adjustment. This allows a new molbloc to be delivered with “virgin” calibration coefficients of FA = 0 and FM = 1.
5. MAINTENANCE, ADJUSTMENTS AND CALIBRATION
Page 153 © 2010 Fluke Calibration
5.5.1 molbloc Adjustment Procedure Without Using CalTool for molbloc Software
The standard calibration procedure is:
Set-up and prepare the molbloc for calibration of the flow by connecting it to a flow reference with the gas to be tested.
Press [SPECIAL], <4cal>, <4gas>, and select the gas calibration on the molbloc to be adjusted to read and record the current values of FA and FM.
Press [ESC] several times to return to the main run display to see the real time flow readings of the mobloc to be calibrated.
Apply the calibration flow to the molbloc recording the flow applied by the standard and the molbloc readings at each calibration point.
Dwell at least 60 seconds after setting the reference flow at each point to allow full stabilization. The data recorded is the "as received" data for this calibration.
Enter the reference flow and molbloc flow readings for each point into a spreadsheet. Calculate the "non-corrected" readings by backing out the as received FA and FM recorded in Step above, following:
non-corrected reading = (corrected reading - FA)/FM
Perform a best fit linear regression to find the offset and slope that best fit the non-corrected flow readings to the calibration reference flows. Most commercial spreadsheet products have a standard function to perform a linear regression. The offset, in the current unit of measure, is the new value of FA, the slope is the new value of FM.
Press [SPECIAL], <4cal>, <4gas>, and select the gas calibration on the molbloc to be adjusted to write the new values of FA (always in the current unit of measure) and FM and the new calibration date (YYYYMMDD) for the gas that is being calibrated.
Calculate “as left data" for the calibration:
as left reading = (non-corrected reading • new FM) + new FA
If desired, verify the as left data by rerunning the calibration with the new FA and FM applied and checking that the disagreements between the calibration standard and the RPT readings are in tolerance.
Caution • If at all possible, only use a value of FM to correct for slope changes of the
molbloc in the calibrated gas and leave FA set to 0 at all times, as FA is an offset value that does not ideally fit the % of reading design of a molbloc calibration.
• The value of FA must be entered in the flow unit of measure used to gather the data. If the calibration data is in a different unit, the calculated value of FA will be in the other unit and must be converted to the unit the data was gathered in before it is entered.
• If you are not familiar or comfortable with the mathematics used for FA and FM manipulation, it is recommended you verify the as left readings as suggested in Step above to provide practical confirmation of the integrity of the calculations. Note also that the CalTool for molbloc Extension to COMPASS for Flow software performs the necessary calculations automatically.
molbox1+™/molbox1+S, molbloc® TERMINAL OPERATION AND MAINTENANCE MANUAL
© 2010 Fluke Calibration Page 154
5.6 Reloading Embedded Software Into molbox1+ Flash Memory
molbox1+ uses FLASH memory. This allows the embedded software that controls molbox1+ operations and functions to be loaded into molbox1+ over its COM1 port from a personal computer with a simple FLASH loading utility.
To replace corrupted software or upgrade to a new version, your Fluke Calibration Authorized Service Provider can provide a FLASH memory loading utility along with a file containing the molbox1+ embedded software. These are also available for download from DHI’s worldwide web site, www.dhinstruments.com. An electronic copy of the current Operation and Maintenance Manual is also available on the website.
If the embedded software you are using is suspected of a problem, record all symptoms and contact your Fluke Calibration Authorized Service Provider.
Note
The DHI flash software loading utility, molbox1+ embedded software and the current Operation and Maintenance Manual are available for download from the “SOFTWARE” and “PRODUCTS” sections of Fluke Calibration’s worldwide web site at www.dhinstruments.com.
5.7 Reloading molbloc EEPROM File molbloc EEPROMs are programmed with:
• A molbloc identifying header with range identifier, S/N and calibration date.
• molbloc specific flow calibration coefficients for N2, and other gases if entered.
• The resistance at 0 °C of the molbloc platinum resistance thermometers (PRTs).
If the molbloc EEPROM information becomes corrupted, molbox1+ will be unable to read the molbloc EEPROM and will display <NO BLOC> when attempting to initialize the molbloc.
Fluke Calibration maintains files of the “as shipped” EEPROM contents of every molbloc delivered or recalibrated by Fluke Calibration. A molbloc EEPROM loading tool may be downloaded from the DHI worldwide web site (www.dhinstruments.com) and specific molbloc files can be obtained by email. If you believe you have a molbloc with a corrupted EEPROM, contact your Fluke Calibration Authorized Service Provider for additional information on the molbloc EEPROM loading tool and obtaining molbloc data files.
5.8 OVERHAUL Caution
If calibration of the Reference Pressure Transducers (RPTs) is included as part of the overhaul procedure, the calibration procedure should be performed last as other overhaul procedures may affect RPT calibration.
Any or all of the following items may be included as part of a system maintenance overhaul:
• Clean front panel.
• Check that rear mounted cooling fan operates when molbox1+ is powered.

5. MAINTENANCE, ADJUSTMENTS AND CALIBRATION
Page 155 © 2010 Fluke Calibration
Note
To open the molbox1+ case, fold back the screw covers on the top and bottom of the case. Then remove the eight case screws. Lift OFF the cover and bottom and place the molbox1+ on its side for easy access to internal components.
• Disassemble valving assembly and clean valve components.
• Check that internal screws, bolts and nuts are tight.
• Perform molbox1+ leak check (see Section 3.4.4.3) and verify operation by connecting a molbloc (see Section 3.5.1).
• Perform calibration of RPTs, if necessary (see Section 5.2).
• Perform calibration of MFC control function if option present (see Section 5.3).
• Verify ohmic measurement circuit if necessary (see Section 5.4).

molbox1+™/molbox1+S, molbloc® TERMINAL OPERATION AND MAINTENANCE MANUAL
© 2010 Fluke Calibration Page 156
Notes

Page 157 © 2010 Fluke Calibration
6. Troubleshooting
6.1 Overview molbox1+ is a sophisticated flow measuring instrument with advanced on-board features and functions. Before assuming that unexpected behavior is caused by a system defect or breakdown, the operator should use this manual and other training facilities to become thoroughly familiar with molbox1+ operation. This troubleshooting guide is intended as an aid in identifying the cause of unexpected molbox1+ behavior and determining whether the behavior is due to normal operation or an internal or external problem.
Identify the symptom or unexpected behavior you are observing from the SYMPTOM list in Table 42. A PROBABLE CAUSE is provided and a SOLUTION is proposed including references to manual sections that provide information that may be of assistance.
Table 42. Troubleshooting Checklist
SYMPTOM PROBABLE CAUSE SOLUTION
Will NOT power up. Blown fuse. Replace fuse.
Front panel keys seem to be disabled.
[P&T] key active only.
"Remote" command has been sent from a host computer locking out the front panel keypad.
Operation is normal. Send "local" command from host computer or cycle molbox1+ power. 4.2.2
Front panel display is dim. Screen saver option has activated. Operation is normal. Press any key to resume full screen power, adjust Screen Saver activation time if desired. 3.6.5.1
Keypad presses make no sounds. molbox1+ does not support key pad sounds.
Operation is normal.
Cannot access certain functions. Display shows:
<ACCESS RESTRICTED>.
User level setting restricts access to that function.
Operation is normal. Change user level or consult system manager. 3.6.2
Cannot establish communication over remote interface.
Computer and/or molbox1+ interface not correctly configured; incorrect or bad interface cable.
Check and correct interface configurations and cables if necessary. 3.6.6, 4.
molbox1+ unable to read molbloc. Cable not connected, molbloc data corrupted.
Check cable connections, try another molbloc, reload molbloc EEPROM. 3.5.1, 5.6
Displays <FATAL ERROR> or <FATAL FAULT>.
Encountered unresolved internal software conflict.
Cycle power to clear. Record conditions leading up to event including the numbers displayed when [ENTER] is pressed and report to Fluke Calibration Authorized Service Provider. 7.4
Displays <PRT ERROR>. molbox1+ has identified an unusually large disagreement between the temperature readings of the two molbloc PRTs which may be due to faulty molbloc PRTs or the molbox1+ ohmic measurement system.
Connect a different molbloc. If the PRT error is no longer present, the PRT system of the original molbloc is probably damaged and requires service. If the PRT error is present with different molblocs, the molbloc/molbox cable or molbox1+ ohmic measurement system is probably defective and requires services. 3.4.5, 5.4
Display <TOUT> or <TIME-OUT>. molbox1+ is having an internal communications problem with one or both of its RPTs.
Turn power off and back on and/or execute Reset – Sets being careful to reenter desired settings afterwards. If problem persists, molbox1+ needs service. 3.6.1.1

molbox1+™/molbox1+S, molbloc® TERMINAL OPERATION AND MAINTENANCE MANUAL
© 2010 Fluke Calibration Page 158
SYMPTOM PROBABLE CAUSE SOLUTION
Displays <NO BLOC>. No molbloc is connected to molbox1+ or molbox1+ is unable to read the molbloc that is connected.
Verify proper electrical connection between the molbox1+ and a valid molbloc. If <NO BLOC> is observed with one molbloc and not others, molbloc is damaged and/or EEPROM is corrupted. 3.5.1, 5.6
Displays <******> where a numerical value should go.
Number to be displayed is too large for allocated space. Usually due to an erroneous setting or measurement causing an out of limit value to be calculated.
Check settings that may be causing an out of limit measurement and adjust if necessary. 3.4.9, 3.4.1, 3.5.3
Bottom line of display has changed and you want to change it back.
The DISPLAY function has been used to change the display.
Use [DISPLAY] to set bottom line to desired display. 3.4.6
Bottom line of display is blank. DISPLAY mode is “clean”. Operation is normal. Use [DISPLAY] to change bottom line display if desired. 3.2.6.8, 3.4.6
Display is showing pressure values and flashing, beeper is sounding two second beeps.
Pressure applied to one or both of the absolute RPTs is near overpressure.
Reduce pressure applied to upstream (HI) and downstream (LO) molbloc pressure connection ports and cycle power on molbox1+. 3.6.3.1, 1.2.2
Display is showing <OVERP!>. One or both of the molbox RPTs has been overpressured.
Remove the source of overpressure and press [ENTER] to clear. Check molbox RPTs for damage. 3.6.3.1, 1.2.2
Display is showing <BPR HI> where the flow value should go.
molbox1+ is in molbloc-S mode and the ratio of downstream pressure to upstream pressure (B\PR) is to high to make a valid flow measurement.
Operation is normal. Increase flow to increase upstream pressure and/or decrease downstream pressure. 3.1.5, 3.6.9
Flow indication is flashing in molbloc-L mode
Flow is 5% or more beyond the maximum flow for a named cal molbloc gas calibration.
Operation is normal. Indicates that flow is beyond the molbloc-L calibrated range 1.2.5.1.2, 1.2.5.1.3, 3.2
Flow indication is flashing in molbloc-L mode
Pressure is 10kPa above the maximum pressure or 10kPa below the minimum pressure for a named cal molbloc gas calibration.
Operation is normal. Indicates that flow is beyond the molbloc-L calibrated range 1.2.5.1.2, 1.2.5.1.3, 3.2
Flow indication is flashing in molbloc-L mode
Reynolds number is greater than 1300
Operation is normal. Indicates that flow is beyond the molbloc-L range 1.2.5.1.2, 1.2.5.1.3, 3.2
Flow indication is flashing in molbloc-S mode
Flow is 5% or more beyond the maximum flow for a named cal molbloc gas calibration.
Operation is normal. Indicates that flow is beyond the molbloc-S calibrated range 1.2.5.1.2, 1.2.5.1.3, 3.2
Flow indication is flashing in molbloc-S mode
Pressure is 10kPa above the maximum pressure or 10kPa below the minimum pressure for a named cal molbloc gas calibration.
Operation is normal. Indicates that flow is beyond the molbloc-S calibrated range 1.2.5.1.2, 1.2.5.1.3, 3.2
Flow indication is flashing in molbloc-S mode
Back pressure ratio is too high to establish critical flow through the molbloc-S.
Operation is normal. Increase molbloc-S upstream pressure or reduce downstream pressure to reduce BPR below the BPR limit at the current Reynolds numbers. 3.1.5, 1.2.5.2.1.
Flow indicated by molbox1+ never becomes stable.
The flow through the molbloc is not stable.
The molbox1+ passively measures the flow through the molbloc. It does not control flow. Correct conditions that are causing unstable flow.
A Ready (<*>) indication is never achieved in molbloc-L mode.
Flow stability criterion is never being met and or Reynolds number limit of 1 200 is being exceeded.
Adjust stability criterion or stabilize flow. Reduce the flow rate and/or pressure to reduce the Reynolds number of the flow. 3.5.2
Ready (<*>) indication and measured flow value are flashing in molbloc-L mode.
The flow is within the stability limit but the Reynolds number of the flow exceeds the maximum acceptable limit of 1,200.
Operation is normal.

6. TROUBLESHOOTING
Page 159 © 2010 Fluke Calibration
SYMPTOM PROBABLE CAUSE SOLUTION
Pressure indicated by molbox1+ never becomes stable.
There is a leak in the molbox1+ and/or in the system to which it and the molbloc are connected.
Find and correct leak. Consider using molbox1+ LEAK CHECK functions. 3.4.4.3
Flow indication appears to be grossly incorrect.
Your assumption of flow in the system is grossly incorrect.
Check and adjust flow in the system.
Flow indication appears to be grossly incorrect.
The molbloc connected to molbox1+ has been swapped without reinitialization so molbox1+ is still using characteristics from a previous molbloc.
Reinitialize molbloc using [SETUP], <1molbloc>. 3.5.1
In molbloc-S mode, there is no flow through the molbloc but molbox1+ is indicating a large flow value.
molbox1+ is in BPR OFF mode and flow is being calculated from upstream absolute pressure without knowledge of downstream pressure.
Behavior is normal. Consider BPR when evaluating flow measurements when using molbloc-S. Also consider changing BPR mode to Auto or ON. 3.1.5, 3.6.9, 3.4.4.5
Flow indication appears to be incorrect.
molbox/molbloc and/or the device you are comparing it to are in tolerance but you have not properly evaluated the tolerance limits.
Determine flow measurement tolerance of molbloc/molbox and device you are comparing with. Evaluate “correctness” relative to the combined tolerance of the two. 1.2.5.
Flow indication appears to be incorrect.
Reference pressure transducer(s) (RPTs) are inoperable or out of calibration.
Use [P&T] to view pressure indications. Recalibrate RPTs if necessary. 3.4.5, 5.2
Flow indication appears to be incorrect.
The gas selected is not the gas flowing through the molbloc.
Select the correct gas. 3.4.2
Flow indication appears to be incorrect while using molbloc-S to measure air flow
Incorrect humidity ratio is being used.
Reselect Air as the test gas and make sure the humidity ratio W is entered properly. W should be zero for dry air and should be calculated from ambient conditions when measuring ambient air. 3.4.2.2.
Flow indication appears to be incorrect.
The gas selected is the gas flowing through the molbloc but the molbloc has not been calibrated for that gas.
Verify that the molbloc has calibration coefficients for the flowing gas, have the molbloc calibrated for the flowing gas if necessary or accept higher measurement uncertainty in the flow measurements. 3.5.1, 1.2.5
Flow indication appears to be incorrect.
Gas flowing through molbloc is not pure.
Check purity rating of gas used; purge molbox/molbloc if flowing gas was just changed. If gas is a known mix, use the flow adder and multiplier to correct for the mix. 3.4.4.2, 3.5.3
Flow indication appears to be incorrect.
The molbloc is not being used at the correct pressure for its pressure dependent calibration type.
Check molbloc Calibration Report for pressure dependent calibration type and check operating pressure. 1.2.5, 3.2.5
Flow indication appears to be incorrect.
molbox1+ pressure and/or Reynolds numbers are outside of limits.
Observe pressure and Reynolds numbers and adjust pressure/flow to be inside of limits. 1.2.5, 3.4.5
Flow indication appears to be incorrect.
Flow through molbloc is in wrong direction.
Check that flow through molbloc is in direction of arrow on molbloc. Switch if necessary.
Flow indication appears to be incorrect.
Leak in pressure lines from molbloc to molbox1+.
Check lines for leaks and correct if necessary. 3.4.4.3
Flow indication appears to be incorrect.
A flow adder or multiplier has been incorrectly or inadvertently applied.
Check and correct if necessary. 3.5.3
Flow indication appears to be incorrect.
molbloc calibration has changed due to contamination.
Check molbloc for contamination. Contact your Fluke Calibration Authorized Service Provider if liquid or particulate contamination is detected. 7.4
Flow indication appears to be incorrect by a constant offset amount.
molbox1+ needs to be correctly “zeroed” (tared) at the current operating pressure.
Tare molbox1+. Be sure to tare upstream if the upstream pressure is constant and downstream if the downstream pressure is constant. 3.4.4.1
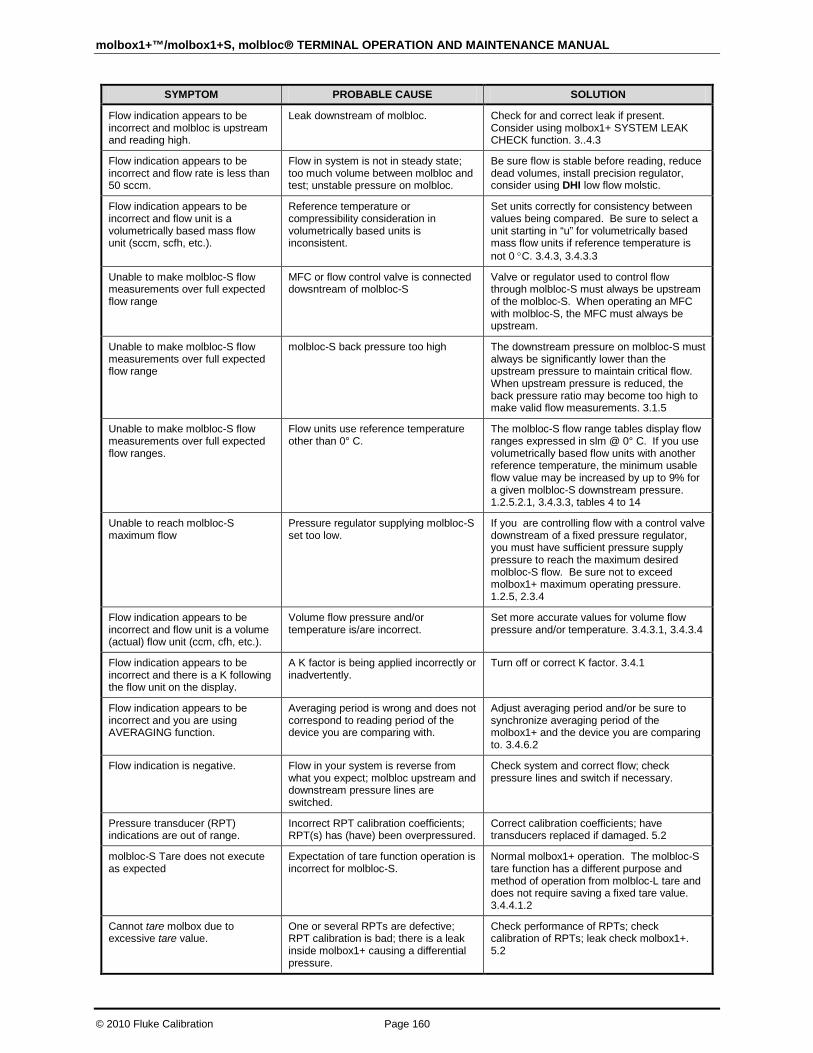
molbox1+™/molbox1+S, molbloc® TERMINAL OPERATION AND MAINTENANCE MANUAL
© 2010 Fluke Calibration Page 160
SYMPTOM PROBABLE CAUSE SOLUTION
Flow indication appears to be incorrect and molbloc is upstream and reading high.
Leak downstream of molbloc. Check for and correct leak if present. Consider using molbox1+ SYSTEM LEAK CHECK function. 3..4.3
Flow indication appears to be incorrect and flow rate is less than 50 sccm.
Flow in system is not in steady state; too much volume between molbloc and test; unstable pressure on molbloc.
Be sure flow is stable before reading, reduce dead volumes, install precision regulator, consider using DHI low flow molstic.
Flow indication appears to be incorrect and flow unit is a volumetrically based mass flow unit (sccm, scfh, etc.).
Reference temperature or compressibility consideration in volumetrically based units is inconsistent.
Set units correctly for consistency between values being compared. Be sure to select a unit starting in “u” for volumetrically based mass flow units if reference temperature is not 0 °C. 3.4.3, 3.4.3.3
Unable to make molbloc-S flow measurements over full expected flow range
MFC or flow control valve is connected dowsntream of molbloc-S
Valve or regulator used to control flow through molbloc-S must always be upstream of the molbloc-S. When operating an MFC with molbloc-S, the MFC must always be upstream.
Unable to make molbloc-S flow measurements over full expected flow range
molbloc-S back pressure too high
The downstream pressure on molbloc-S must always be significantly lower than the upstream pressure to maintain critical flow. When upstream pressure is reduced, the back pressure ratio may become too high to make valid flow measurements. 3.1.5
Unable to make molbloc-S flow measurements over full expected flow ranges.
Flow units use reference temperature other than 0° C.
The molbloc-S flow range tables display flow ranges expressed in slm @ 0° C. If you use volumetrically based flow units with another reference temperature, the minimum usable flow value may be increased by up to 9% for a given molbloc-S downstream pressure. 1.2.5.2.1, 3.4.3.3, tables 4 to 14
Unable to reach molbloc-S maximum flow
Pressure regulator supplying molbloc-S set too low.
If you are controlling flow with a control valve downstream of a fixed pressure regulator, you must have sufficient pressure supply pressure to reach the maximum desired molbloc-S flow. Be sure not to exceed molbox1+ maximum operating pressure. 1.2.5, 2.3.4
Flow indication appears to be incorrect and flow unit is a volume (actual) flow unit (ccm, cfh, etc.).
Volume flow pressure and/or temperature is/are incorrect.
Set more accurate values for volume flow pressure and/or temperature. 3.4.3.1, 3.4.3.4
Flow indication appears to be incorrect and there is a K following the flow unit on the display.
A K factor is being applied incorrectly or inadvertently.
Turn off or correct K factor. 3.4.1
Flow indication appears to be incorrect and you are using AVERAGING function.
Averaging period is wrong and does not correspond to reading period of the device you are comparing with.
Adjust averaging period and/or be sure to synchronize averaging period of the molbox1+ and the device you are comparing to. 3.4.6.2
Flow indication is negative. Flow in your system is reverse from what you expect; molbloc upstream and downstream pressure lines are switched.
Check system and correct flow; check pressure lines and switch if necessary.
Pressure transducer (RPT) indications are out of range.
Incorrect RPT calibration coefficients; RPT(s) has (have) been overpressured.
Correct calibration coefficients; have transducers replaced if damaged. 5.2
molbloc-S Tare does not execute as expected
Expectation of tare function operation is incorrect for molbloc-S.
Normal molbox1+ operation. The molbloc-S tare function has a different purpose and method of operation from molbloc-L tare and does not require saving a fixed tare value. 3.4.4.1.2
Cannot tare molbox due to excessive tare value.
One or several RPTs are defective; RPT calibration is bad; there is a leak inside molbox1+ causing a differential pressure.
Check performance of RPTs; check calibration of RPTs; leak check molbox1+. 5.2

6. TROUBLESHOOTING
Page 161 © 2010 Fluke Calibration
SYMPTOM PROBABLE CAUSE SOLUTION
Leak check does not indicate pass/fail in molbloc-S operation.
Improper expectation for molbloc-S leak check..
Normal molbox1+ operation. molbloc-S system leak check function in molbox1+ does not have pass/fail criteria assigned as molbloc-L leak check does. 3.4.4.3
Measured pressure display has too much/not enough resolution.
Resolution setting needs to be changed.
Use [RES] to change resolution setting. 3.4.9
Flow rate is changing but display of flow is not and the bottom right hand corner of the display is a numerical countdown followed by <avg>.
AVERAGE DISPLAY function is ON and pressure display is updating only with the average value at the end of each averaging cycle.
Go to a DISPLAY function other than AVERAGE or press [+/-] to get the instantaneous value AVERAGE DISPLAY. 3.4.6.2
Current flow through the molbloc is zero but reading is not zero in molbloc-L operation.
Need to run TARE function to zero molbox1+ RPTs.
Run TARE. 3.4.4.1.1
Poor flow measurement characterized by instability and sudden small jumps in flow rate.
The molbox1+ pneumatic circuit is contaminated with liquids.
Purge and clean molbox1+ and associated pneumatic systems. Contact your Fluke Calibration Authorized Service Provider. 7.4
Grossly inaccurate flow measurements and little or no response to pressure or flow changes.
RPT(s) destroyed by overpressure. View pressure readings using [P&T]. If readings are grossly inaccurate and don’t respond to pressure changes, contact your Fluke Calibration Authorized Service Provider. 3.4.5, 3.1.4, 5.2, 7.4
Apparent inaccurate pressure measurement.
Incorrect pressure units. Set desired pressure units. Consider reference temperature if unit is inWa. 3.5.8
Apparent inaccurate pressure or flow measurement.
Reference pressure transducer (RPT) calibration coefficients have been altered or lost and pressure measurements are incorrect.
Check and correct calibration coefficients if needed. 5.2
MFC connected to molbox1+ doesn’t appear to be responding.
MFC control option is not implemented on this molbox1+.
Check whether molbox1+ MFC control option was ordered and installed.
MFC connected to molbox1+ doesn’t appear to be responding.
The MFC control function is not active (OFF).
Activate MFC control function by selecting a channel other than zero. 3.4.8
MFC connected to molbox1+ doesn’t appear to be responding correctly.
molbox1+ to MFC control cable is not connected or connected incorrectly.
Check MFC cable connection and MFC cable configuration. 7.3
MFC value and/or molbox1+ flow values appear incorrect.
MFC profile does not correspond to MFC in use.
Check MFC profile and create and/or select correct one. 3.4.8.2, 3.5.5
MFC seems to be adjusting to set the requested flow value as read by the molbox.
MFC regulation mode is ON. Operation is normal. Turn MFC regulation mode OFF. 3.5.6
MFC value and/or molbox1+ flow values appear incorrect.
Incorrect or inadvertent use of K factor and/or gas selection.
Check K factor and gas selection and correct if necessary. 3.4.1, 3.4.2
[ENTER] is not going to MFC set point screen. Cannot get to MFC set point entry.
The MFC control option is not implemented on this molbox or the current DISPLAY mode does not support MFC set point entry.
Check whether molbox1+ MFC control option was ordered and installed. If MFC control option is present, use [DISPLAY] to set DISPLAY mode to RATE, UNIT or CLEAN. 3.4.6

molbox1+™/molbox1+S, molbloc® TERMINAL OPERATION AND MAINTENANCE MANUAL
© 2010 Fluke Calibration Page 162
Notes
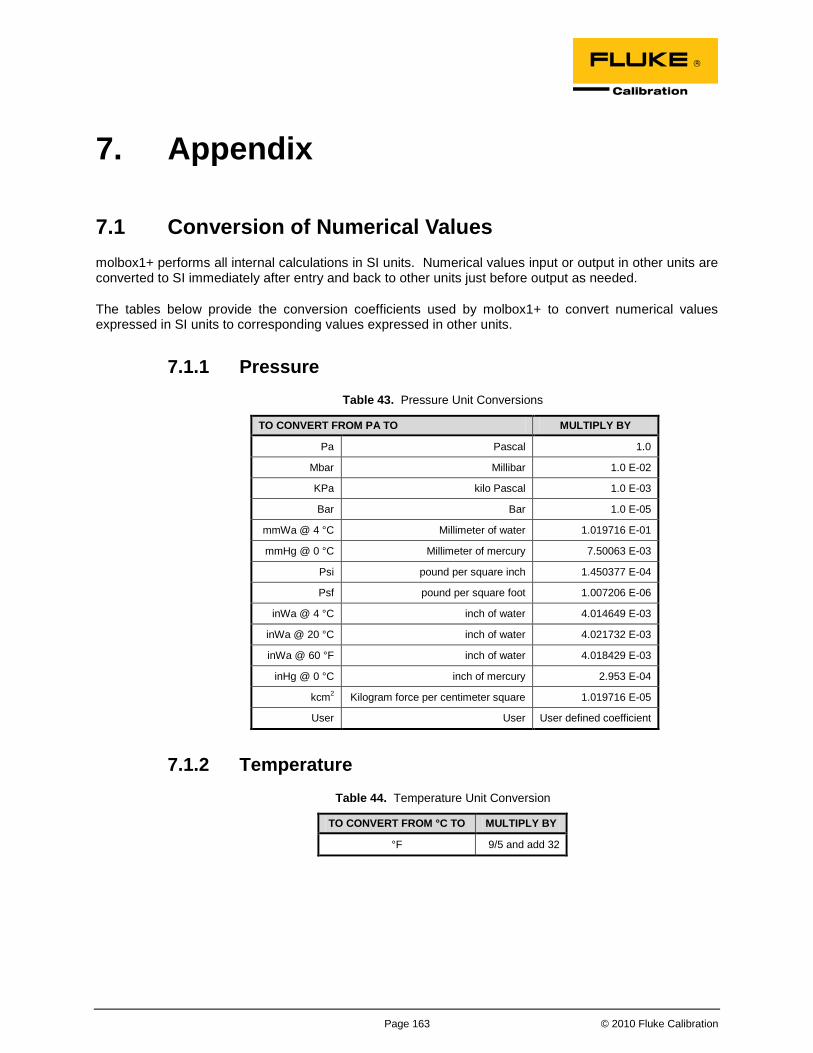
Page 163 © 2010 Fluke Calibration
7. Appendix
7.1 Conversion of Numerical Values molbox1+ performs all internal calculations in SI units. Numerical values input or output in other units are converted to SI immediately after entry and back to other units just before output as needed.
The tables below provide the conversion coefficients used by molbox1+ to convert numerical values expressed in SI units to corresponding values expressed in other units.
7.1.1 Pressure Table 43. Pressure Unit Conversions
TO CONVERT FROM PA TO MULTIPLY BY
Pa Pascal 1.0
Mbar Millibar 1.0 E-02
KPa kilo Pascal 1.0 E-03
Bar Bar 1.0 E-05
mmWa @ 4 °C Millimeter of water 1.019716 E-01
mmHg @ 0 °C Millimeter of mercury 7.50063 E-03
Psi pound per square inch 1.450377 E-04
Psf pound per square foot 1.007206 E-06
inWa @ 4 °C inch of water 4.014649 E-03
inWa @ 20 °C inch of water 4.021732 E-03
inWa @ 60 °F inch of water 4.018429 E-03
inHg @ 0 °C inch of mercury 2.953 E-04
kcm2 Kilogram force per centimeter square 1.019716 E-05
User User User defined coefficient
7.1.2 Temperature Table 44. Temperature Unit Conversion
TO CONVERT FROM °C TO MULTIPLY BY
°F 9/5 and add 32
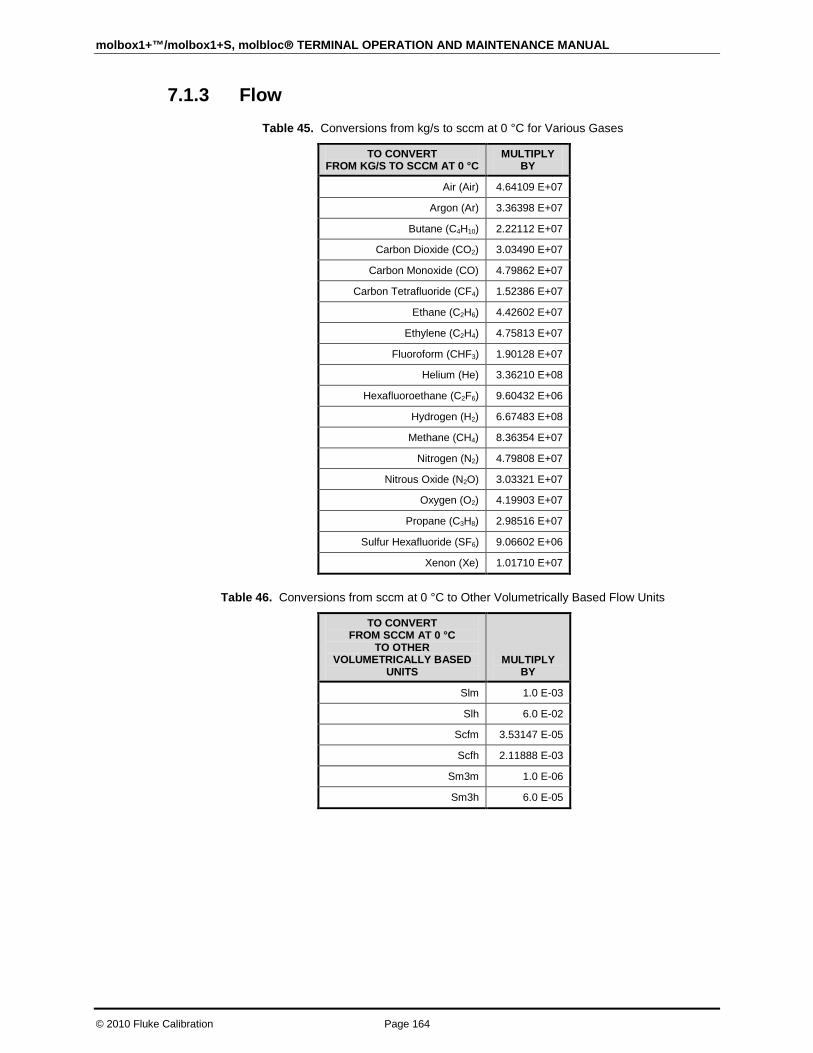
molbox1+™/molbox1+S, molbloc® TERMINAL OPERATION AND MAINTENANCE MANUAL
© 2010 Fluke Calibration Page 164
7.1.3 Flow Table 45. Conversions from kg/s to sccm at 0 °C for Various Gases
TO CONVERT FROM KG/S TO SCCM AT 0 °C
MULTIPLY BY
Air (Air) 4.64109 E+07
Argon (Ar) 3.36398 E+07
Butane (C4H10) 2.22112 E+07
Carbon Dioxide (CO2) 3.03490 E+07
Carbon Monoxide (CO) 4.79862 E+07
Carbon Tetrafluoride (CF4) 1.52386 E+07
Ethane (C2H6) 4.42602 E+07
Ethylene (C2H4) 4.75813 E+07
Fluoroform (CHF3) 1.90128 E+07
Helium (He) 3.36210 E+08
Hexafluoroethane (C2F6) 9.60432 E+06
Hydrogen (H2) 6.67483 E+08
Methane (CH4) 8.36354 E+07
Nitrogen (N2) 4.79808 E+07
Nitrous Oxide (N2O) 3.03321 E+07
Oxygen (O2) 4.19903 E+07
Propane (C3H8) 2.98516 E+07
Sulfur Hexafluoride (SF6) 9.06602 E+06
Xenon (Xe) 1.01710 E+07
Table 46. Conversions from sccm at 0 °C to Other Volumetrically Based Flow Units
TO CONVERT FROM SCCM AT 0 °C
TO OTHER VOLUMETRICALLY BASED
UNITS MULTIPLY
BY
Slm 1.0 E-03
Slh 6.0 E-02
Scfm 3.53147 E-05
Scfh 2.11888 E-03
Sm3m 1.0 E-06
Sm3h 6.0 E-05

7. APPENDIX
Page 165 © 2010 Fluke Calibration
Table 47. Conversions from Volumetrically Based Flow Units at 0 °C to Corresponding Units at Another Temperature (uxxx)
TO CONVERT VOLUMETRICALLY BASED UNITS AT 0 °C TO CORRESPONDING UNITS AT
ANOTHER TEMPERATURE, Θ, (UXXX) MULTIPLY BY
sccm
slm
slh
scfm
scfh
sm3m
sm3h
( ) ( )( )T
T
N P T
N N
N N+ ⋅
⋅
+θ
θΖ
Ζ
,
Where: =θ Alternate reference flow temperature [K].
TN = 273.15K
PN = 101325 Pa
( )( ) NTP ZZNN
;, θ+ gas dependent compressibility factors
Table 48. Conversions from kg/s to mole/s for Various Gases
TO CONVERT KG/SEC TO MOLE/S
MULTIPLY BY
Air (Air) 3.45316 E+01
Argon (Ar) 2.50325 E+01
Butane (C4H10) 1.72049 E+01
Carbon Dioxide (CO2) 2.27221 E+01
Carbon Monoxide (CO) 3.57015 E+01
Carbon Tetrafluoride (CF4) 1.13624 E+01
Ethane (C2H6) 3.32568 E+01
Ethylene (C2H4) 3.56455 E+01
Fluoroform (CHF3) 1.42837 E+01
Helium (He) 2.49838 E+02
Hexafluoroethane (C2F6) 7.24533 E+00
Hydrogen (H2) 4.96032 E+02
Methane (CH4) 6.23325 E+01
Nitrogen (N2) 3.56939 E+01
Nitrus Oxide (N2O) 2.27206 E+01
Oxygen (O2) 3.12512 E+01
Propane (C3H8) 2.26778 E+01
Sulfur Hexafluoride (SF6) 6.84697 E+00
Xenon (Xe) 7.61615 E+00
Table 49. Conversion from mole/s to pccm
TO CONVERT MOLE/SEC TO PCCM
MULTIPLY BY
Any Gas 1.34483 E+06

molbox1+™/molbox1+S, molbloc® TERMINAL OPERATION AND MAINTENANCE MANUAL
© 2010 Fluke Calibration Page 166
Note The “p” in pccm indicates “perfect” in which a gas compressibility factor of 1 is assumed for all gases. In early 1996, SEMI, a semiconductor industry group, adopted standard E12-96 which specified that this definition be used for volumetrically base mass flow units.
Table 50. Conversion from sccm at 0 °C to Volume Flow Units at Another Pressure and Temperature
TO CONVERT FROM A VOLUMETRIC MASS FLOW UNIT TO THE EQUIVALENT VOLUME FLOW UNIT AT TEMPERATURE θ AND PUSER MULTIPLY BY
sccm to ccm
slm to lm
slh to lhs
cfm to cfm
scfh to cfh
sm3m to m3m
sm3h to m3h
( ) ( )( )T
T
N P T
N N
N N+ ⋅
⋅
+θ
θΖ
Ζ
,
Where:
T KN = 27315.
Puser user pressure kPa= [ ]
[K]etemperaturuser=θ
P 101.325N = kPa
z zPuser T NN( ,( )) ;+θ = gas dependent compressibility factors
7.2 Valve Drivers The molbox1+ drivers option provides eight open collector drivers for operating external valves, solenoids, indicators, etc. When operating from the setup-driver screen, pressing enter will allow the operating mode of the drivers to be set. The two modes of operation are Momentary and Toggle. A momentary driver will be activated while the corresponding driver number on the keyboard is being pressed. In toggle mode the driver state will toggle each time the corresponding key is pressed.
Each output can sink,500 mA at 12 V. However, the total output of all the activated drivers cannot exceed 1 Amp. Therefore, if multiple drivers are being activated please refer to Table 51 as a guide.
Table 51. Driver/Max Current Per Output
# OF ACTIVE DRIVERS
MAX CURRENT PER OUTPUT
1 500 mA
2 400 mA
3 275 mA
4 200 mA
5 160 mA
6 135 mA
7 120 mA
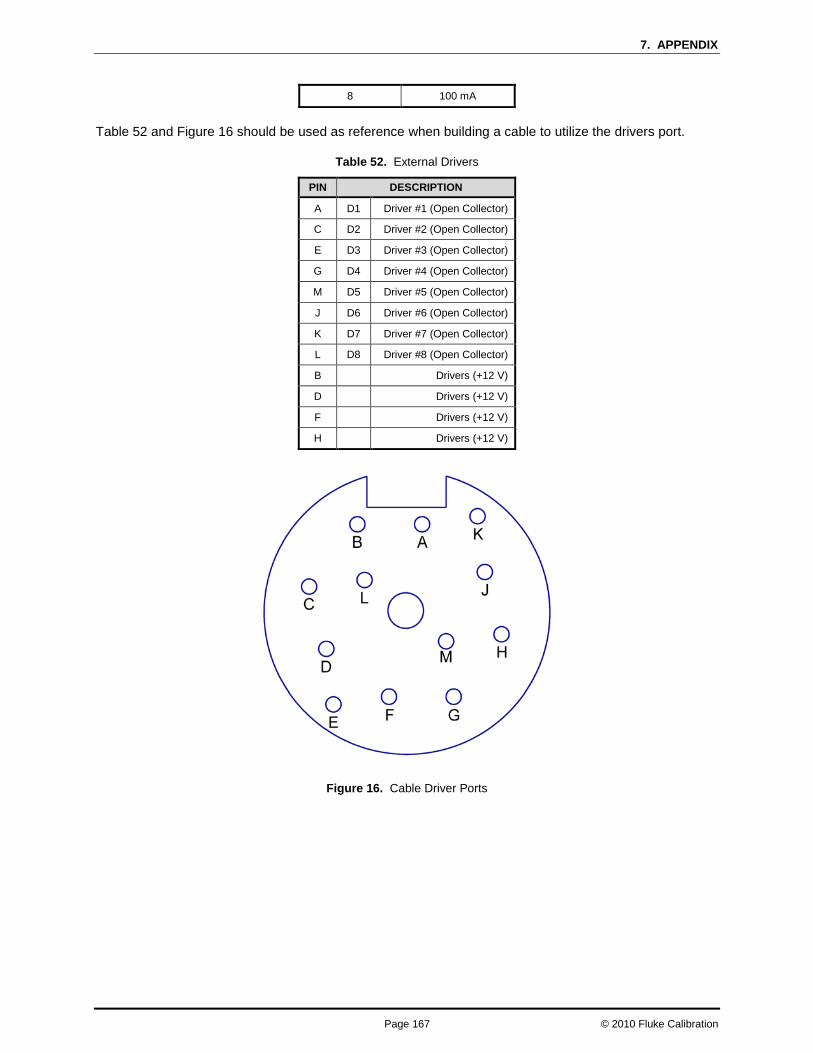
7. APPENDIX
Page 167 © 2010 Fluke Calibration
8 100 mA
Table 52 and Figure 16 should be used as reference when building a cable to utilize the drivers port.
Table 52. External Drivers
PIN DESCRIPTION
A D1 Driver #1 (Open Collector)
C D2 Driver #2 (Open Collector)
E D3 Driver #3 (Open Collector)
G D4 Driver #4 (Open Collector)
M D5 Driver #5 (Open Collector)
J D6 Driver #6 (Open Collector)
K D7 Driver #7 (Open Collector)
L D8 Driver #8 (Open Collector)
B Drivers (+12 V)
D Drivers (+12 V)
F Drivers (+12 V)
H Drivers (+12 V)
Figure 16. Cable Driver Ports

molbox1+™/molbox1+S, molbloc® TERMINAL OPERATION AND MAINTENANCE MANUAL
© 2010 Fluke Calibration Page 168
7.3 MFC Control Function
7.3.1 MFC Connector Table 53 should be used to correctly build the interfacing cable required to connect the molbox1+ to an MFC.
Table 53. Interface Cable Building Instructions
MOLBOX1+ MFC INTERFACE
CONNECTOR (25 PIN DSUB) PIN NO. SIGNAL DESCRIPTION
1 Case Ground
2 Supply Common
3 MFC Output (+)
4 +15 Volts
5 N/C
6 N/C
7 Set Point Sense (-)
8 N/C
9 N/C
10 N/C
11 Valve Test
12 Current MFC Output (+)
13 Current MFC Set (+)
14 MFC Setpoint (+)
15 MFC Setpoint (-)
16 MFC Output (-)
17 Valve Test Common
18 N/C
19 -15 Volts
20 Set Point Sense (+)
21 N/C
22 N/C
23 N/C
24 RS485 TXRX+
25 RS485 TXRX-
7.3.1.1 Detailed Signal Descriptions
• +15 Volts: This is the positive 15 Volt supply for the MFC.
• -15 Volts: The negative 15 Volt supply for the MFC.
• Current MFC Output (+): This signal is only used for current controlled MFCs. This is the 4-20 mA signal that represents the MFC’s output.
7. APPENDIX
Page 169 © 2010 Fluke Calibration
• Current MFC Set (+): This signal is only used for current controlled MFCs. This is the 4-20 mA signal that defines the desired setpoint for the MFC. It is frequently referred to as the MFC control signal or the MFC setpoint.
• MFC Output (+): This is the positive 0 to 5 Volt signal that represents the MFC’s output. It is commonly referred to as “output” or “signal output”.
• MFC Output (-): This is the ground reference for the MFC output signal. It is frequently referred to as “Signal Common”, or “Common”.
• MFC Setpoint (+): This is the desired setpoint for the MFC. It is the signal that controls the amount of gas that the MFC will flow. It is generally a 0 to 5 Volt signal where 0 Volt signal causes the valve to close (zero flow) and 5 Volt signal cause the valve to open fully resulting in full scale flow. This signal is commonly referred to as “MFC set point”, “MFC set voltage”, “MFC command”, or “MFC control”.
• MFC Setpoint (-): This is the ground reference for the MFC Setpoint signal. It is frequently referred to as “Signal Common”, or “Common”.
• N/C: This abbreviation stands for no connection. There are no signals on the lines marked N/C.
• RS485 TXRX+: This is the RS485 TXRX+ signal. It is used to communicate with digital MFCs using the RS485 communications protocol. The RS485 signals are also available on the phone jack style connector on the molbox1+.
• RS485 TXRX-: This is the RS485 TXRX+ signal. It is used to communicate with digital MFCs using the RS485 communications protocol. The RS485 signals are also available on the phone jack style connector on the molbox1+.
• Set Point Sense (+): This signal is used by the molbox1+ to detect loss along the MFC cable. It represents the positive MFC set point as seen by the MFC. This line should be connected to the same point as the MFC Setpoint (+) line at the MFC side of the cable.
• Set Point Sense (-): This is the ground reference for the MFC Setpoint sense. It should be connected to the same point as the MFC setpoint (-) line.
• Supply Common: This is the ground line for the MFC’s power connection. It is frequently referred to as “Power Common”, “Supply Common”, or just “Common”.
• Valve Test: This optional connection is used to read the valve test point signal coming from the MFC. If this signal is available at the MFC connector, it allows the user to read the internal voltage delivered to the MFC valve.
• Valve Test Common: This is the reference for the valve test signal. It may be connected to a common line or the –15V line of the MFC, depending on the instructions of the MFC manufacturer for valve voltage measurement.
7.3.1.2 Popular Configurations
The following configuration can be used with most card edge style MFCs. Any differences tend to relate to the handling of the ground (common) lines (pins 2, B and C). Most cable problems can be resolved by either shorting pins B and C or by swapping the signals connected to pin 2 of the card edge connector with the signals connected to pin B of the card edge connector. The configuration below should work with the following MFCs.
• Millipore (Tylan) model FC260, 261, 262, FM 360, 361, 362
• Qualiflow AFC 260, 261, 202, 360, 361, 302

molbox1+™/molbox1+S, molbloc® TERMINAL OPERATION AND MAINTENANCE MANUAL
© 2010 Fluke Calibration Page 170
• Aera 2600, 2610, 2620, 3600, 3610, 3620
• PFD 501
• Porter 201
• Unit Instruments models UFC 1000,1020, 1100,1200, 1400, 1500
Table 54. Common MFC Connector Pin Out
MOLBOX1+ MFC INTERFACE
CONNECTOR (25 PIN DSUB)
PIN NO. SIGNAL
DESCRIPTION
MFC CARD EDGE CONNECTOR PIN
NOS.
1 Case Ground 1 (A1)
2 Supply Common 2 (A2)
3 MFC Output (+) 3 (A3)
4 +15 Volts 4 (A4)
7 Set Point Sense (-) B (B2)
11 Valve Test D (Optional) (B4)
14 MFC Setpoint (+) A (B1)
15 MFC Setpoint (-) B (B2)
16 MFC Output (-) C (B3)
17 Valve Test Common F (Optional) (B6)
19 -15 Volts F (B6)
20 Set Point Sense (+) A (B1)
The following configuration can be used with:
• Brooks model 5850E, and 5851E
Table 55. Brooks MFC Connector Pin Out
MOLBOX1+ MFC INTERFACE
CONNECTOR (25 PIN DSUB)
PIN NO. SIGNAL
DESCRIPTION
MFC CARD EDGE
CONNECTOR PIN NOS.
MFC 15 PIN DSUB CONNECTOR PIN
NOS.
1 Case Ground 1 (A1) 14
2 Supply Common C (B3) 9
3 MFC Output (+) 3 (A3) 2
4 +15 Volts 4 (A4) 5
7 Set Point Sense (-) 2 (A2) 10
11 Valve Test D (Optional) (B4) 7 (Optional)
14 MFC Setpoint (+) A (B1) 8
15 MFC Setpoint (-) 2 (A2) 10
16 MFC Output (-) B (B2) 10
17 Valve Test Common F (Optional) (B6) 10 (Optional)
19 -15 Volts F (B6) 6
20 Set Point Sense (+) A (B1) 8
7. APPENDIX
Page 171 © 2010 Fluke Calibration
7.4 Limited Warranty and Limitation of Liability Each Fluke product is warranted to be free from defects in material and workmanship under normal use and service. The warranty period is one year and begins on the date of shipment. Parts, product repairs and services are warranted for 90 days. This warranty extends only to the original buyer or end-user customer of a Fluke authorized reseller, and does not apply to fuses, disposable batteries or to any product which, in Fluke's opinion, has been misused, altered, neglected, contaminated, or damaged by accident or abnormal conditions of operation or handling. Fluke warrants that software will operate substantially in accordance with its functional specifications for 90 days and that it has been properly recorded on non-defective media. Fluke does not warrant that software will be error free or operate without interruption.
Fluke authorized resellers shall extend this warranty on new and unused products to end-user customers only but have no authority to extend a greater or different warranty on behalf of Fluke. Warranty support is available only if product is purchased through a Fluke authorized sales outlet or Buyer has paid the applicable international price. Fluke reserves the right to invoice Buyer for importation costs of repair/replacement parts when product purchased in one country is submitted for repair in another country.
Fluke's warranty obligation is limited, at Fluke's option, to refund of the purchase price, free of charge repair, or replacement of a defective product which is returned to a Fluke authorized service center within the warranty period.
To obtain warranty service, contact your nearest Fluke authorized service center to obtain return authorization information, then send the product to that service center, with a description of the difficulty, postage and insurance prepaid (FOB Destination). Fluke assumes no risk for damage in transit. Following warranty repair, the product will be returned to Buyer, transportation prepaid (FOB Destination). If Fluke determines that failure was caused by neglect, misuse, contamination, alteration, accident or abnormal condition of operation or handling, including overvoltage failures caused by use outside the product’s specified rating, or normal wear and tear of mechanical components, Fluke will provide an estimate of repair costs and obtain authorization before commencing the work. Following repair, the product will be returned to the Buyer transportation prepaid and the Buyer will be billed for the repair and return transportation charges (FOB Shipping Point).
THIS WARRANTY IS BUYER'S SOLE AND EXCLUSIVE REMEDY AND IS IN LIEU OF ALL OTHER WARRANTIES, EXPRESS OR IMPLIED, INCLUDING BUT NOT LIMITED TO ANY IMPLIED WARRANTY OF MERCHANTABILITY OR FITNESS FOR A PARTICULAR PURPOSE. FLUKE SHALL NOT BE LIABLE FOR ANY SPECIAL, INDIRECT, INCIDENTAL OR CONSEQUENTIAL DAMAGES OR LOSSES, INCLUDING LOSS OF DATA, ARISING FROM ANY CAUSE OR THEORY.
Since some countries or states do not allow limitation of the term of an implied warranty, or exclusion or limitation of incidental or consequential damages, the limitations and exclusions of this warranty may not apply to every buyer. If any provision of this Warranty is held invalid or unenforceable by a court or other decision-maker of competent jurisdiction, such holding will not affect the validity or enforceability of any other provision.
Fluke Corporation Fluke Europe B.V. P.O. Box 9090 P.O. Box 1186 Everett, WA 98206-9090 5602 BD Eindhoven U.S.A. The Netherlands
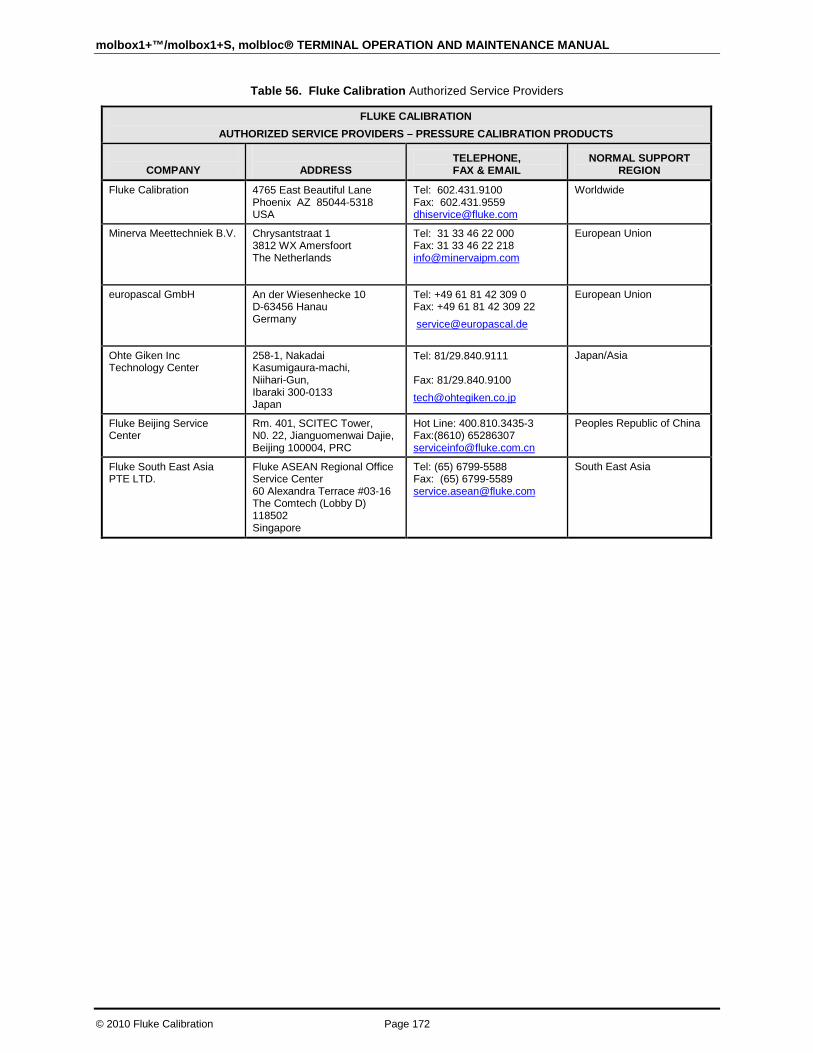
molbox1+™/molbox1+S, molbloc® TERMINAL OPERATION AND MAINTENANCE MANUAL
© 2010 Fluke Calibration Page 172
Table 56. Fluke Calibration Authorized Service Providers
FLUKE CALIBRATION AUTHORIZED SERVICE PROVIDERS – PRESSURE CALIBRATION PRODUCTS
COMPANY
ADDRESS
TELEPHONE, FAX & EMAIL
NORMAL SUPPORT REGION
Fluke Calibration
4765 East Beautiful Lane Phoenix AZ 85044-5318 USA
Tel: 602.431.9100 Fax: 602.431.9559 [email protected]
Worldwide
Minerva Meettechniek B.V. Chrysantstraat 1 3812 WX Amersfoort The Netherlands
Tel: 31 33 46 22 000 Fax: 31 33 46 22 218 [email protected]
European Union
europascal GmbH An der Wiesenhecke 10 D-63456 Hanau Germany
Tel: +49 61 81 42 309 0 Fax: +49 61 81 42 309 22 [email protected]
European Union
Ohte Giken Inc Technology Center
258-1, Nakadai Kasumigaura-machi, Niihari-Gun, Ibaraki 300-0133 Japan
Tel: 81/29.840.9111
Fax: 81/29.840.9100
Japan/Asia
Fluke Beijing Service Center
Rm. 401, SCITEC Tower, N0. 22, Jianguomenwai Dajie, Beijing 100004, PRC
Hot Line: 400.810.3435-3 Fax:(8610) 65286307 [email protected]
Peoples Republic of China
Fluke South East Asia PTE LTD.
Fluke ASEAN Regional Office Service Center 60 Alexandra Terrace #03-16 The Comtech (Lobby D) 118502 Singapore
Tel: (65) 6799-5588 Fax: (65) 6799-5589 [email protected]
South East Asia

Page 173 © 2010 Fluke Calibration
8. Glossary Absolute As in “absolute pressure”. Pressure expressed relative to vacuum.
BPR Back Pressure Ratio. The ratio of the downstream pressure to the upstream pressure on a molbloc-S critical flow based molbloc element. The BPR is used to determine whether Critical Flow conditions exist so that molbloc-S flow measurements are valid.
Critical flow Also known as “sonic flow”. Flow regime where the speed of gas is accelerated to a velocity equal to the speed of sound under current conditions and the flow rate can be predicted by measurement of the upstream pressure at the flow restriction (nozzle), the gas pressure and temperature conditions and the gas properties.
Clean A DISPLAY function in which the second line of the display is blank (clean).
Deviation A DISPLAY function in which the deviation from a target flow value is calculated and displayed. The value of the difference between the target and the current flow reading.
Differential As in “differential pressure”. Pressure expressed relative to a value other than vacuum or atmospheric pressure (see absolute and gauge). Frequently refers to the pressure drop across the molbloc.
Downstream Location of point A relative to point B in a flow system in which point A is at a different location in the direction of the flow. For example, the downstream molbloc pressure port is downstream relative to the upstream pressure port because it is at a different location from the upstream port in the direction of the flow.
DUT Device Under Test. The device being tested or calibrated.
FA (Flow Adder) Flow adder. A value that is added to the measured flow to offset the measured flow value.
FM (Flow Multiplier) Flow multiplier. A value by which the measured flow is multiplied to change the slope of the measured flow.
Freeze A DISPLAY function in which the current flow reading can be captured and displayed by pressing [ENTER].
Full Mod Calibration A molbloc calibration option which is valid over a range of operating pressure.
FS Abbreviation of "full scale". The full scale value is the maximum value or the span of a measurement range. Limits and specifications are often expressed as % FS.
Gauge As in “gauge pressure”. Pressure expressed relative to atmospheric pressure.
Head The differential pressure developed by differences in height between two points within a fluid medium.
Hi/Lo A DISPLAY function in which the highest and lowest flow observed since hi/lo reset are recorded and displayed.
K Factor A factor representing the relationship between the process gas and a surrogate gas for a DUT.
Operating Pressure The average pressure at which the molbloc is operated (average of upstream and downstream pressure) or, if the molbloc pressure is held constant by an upstream or downstream regulator, the value of the constant pressure.
PA (Pressure Adder) Pressure adder, used in calibration adjustment to offset an RPT.
Perfect Mass Flow Units Volumetrically based mass flow units of measure that assume ideal gas behavior for all gases (compressibility factor of 1).
PM (Pressure Multiplier) Pressure multiplier, used in calibration to adjust span of an RPT.
Pmax! The overpressure limit of an RPT. If the pressure measured exceeds (Pmax!) an overpressure condition occurs.
Process Gas The gas for which a device under test (DUT) is to be characterized or calibrated. The gas that will actually flow in the DUT when it is used in a process.
PRT Platinum Resistance Thermometer. The element used in molblocs to measure temperature.

molbox1+™/molbox1+S, molbloc® TERMINAL OPERATION AND MAINTENANCE MANUAL
© 2010 Fluke Calibration Page 174
Psia Pressure unit “pounds per square inch absolute”. Pressure expressed relative to vacuum.
Psig Pressure unit “pounds per square inch gauge”. Pressure expressed relative to atmospheric pressure.
Rate A DISPLAY function in which the current rate of change of the flow in flow units/second is displayed. A measure of stability of the flow. See also Stability Limit.
Ready/Not Ready Indication of when flow is stable within the stability limit and below the flow Reynolds number limit. See also Stability Limit.
Reynolds Number A ratio of the inertia forces to the viscous forces in a flowing fluid. This dimensionless number, which is dependent on fluid viscosity, density, velocity and length of the flow field, is often used to predict a boundary point between laminar and turbulent flow regimes.
RPT Reference Pressure Transducer. The pressure transducers used in molbox1+ are referred to as RPTs.
Single P Calibration A molbloc calibration option for gases other than N2 which is valid at a single specified operating pressure.
Stability Limit A limit expressed in units of flow per second (e.g., sccm/second). The stability limit is used as the Ready/Not Ready criterion Ready (<*>) if rate is less than stability limit, Not Ready (<↑> or <↓>) if rate is greater than stability limit. See also Rate.
Surrogate Gas A gas whose behavior, from the standpoint of a device under test, is similar to the process gas for which the device is to be characterized and used. A surrogate gas is often used in calibration and testing when the process gas cannot be used for safety or cost reasons.
Target The value from which deviations are measured in the DEVIATION DISPLAY function.
Test Gas The gas flowing through the molbloc that is being used to run the test or calibration. The test gas, from the standpoint of the device under test, could be a surrogate gas or the process gas.
Totalize A DISPLAY function in which the total mass or volume flowed over a period of time is accumulated.
Upstream Location of point A relative to point B in a flow system in which point A is at a different location in the opposite direction of the flow. For example, the upstream molbloc pressure port is upstream relative to the downstream pressure port because it is at a different location from the downstream port in the opposite direction of the flow.
User Level Level of security that can be set to prevent access to certain molbox1+ functions.
User Mass Flow Units Volumetrically based mass flow units of measure with a user set reference temperature.
Venturi nozzle A flow orifice using a specific shape characterized by a convergent and divergent section, used to define flow measurements by measurement of flow conditions and gas properties. A critical flow Venturi nozzle is a Venturi nozzle used to define flows within the Critical flow regime.
Volume Flow Pressure The absolute pressure of the flowing gas at the device under test for volume flow units of measure.
Volume Flow Temperature The temperature of the flowing gas at the device under test for volume flow units of measure.
Volume Flow Units Units of measure of volume (sometimes called “actual”) flow.