®® Microsoft Windows 7 for Power Users Tutorial 2 Customizing Microsoft Windows 7.
38
® ® Microsoft Windows 7 for Power Users Tutorial 2 Customizing Microsoft Windows 7
-
Upload
natalie-page -
Category
Documents
-
view
228 -
download
0
Transcript of ®® Microsoft Windows 7 for Power Users Tutorial 2 Customizing Microsoft Windows 7.
®®Microsoft Windows 7 for Power Users
Tutorial 2Customizing Microsoft
Windows 7

XPXPXPXPXPXPObjectives• Select a desktop theme, desktop background,
and window colors• Examine mouse properties• Use the ClearType Text Tuner• Choose special visual effects• Customize the Start menu
Windows 7 for Power Users Tutorial 2 2

XPXPXPXPXPXPObjectives• Customize the taskbar and notification area• Create and customize taskbar toolbars• Adjust resolution, color depth, and refresh rate• Adjust DPI scaling settings• Evaluate power management features
Windows 7 for Power Users Tutorial 2 3

XPXPXPXPXPXPCustom Desktops
Windows 7 for Power Users Tutorial 2 4

XPXPXPXPXPXPCustomizing the Graphical User Interface• Windows 7 themes–Aero themes–Basic themes–High-contrast
themes• Custom themes can
be created
Windows 7 for Power Users Tutorial 2 5
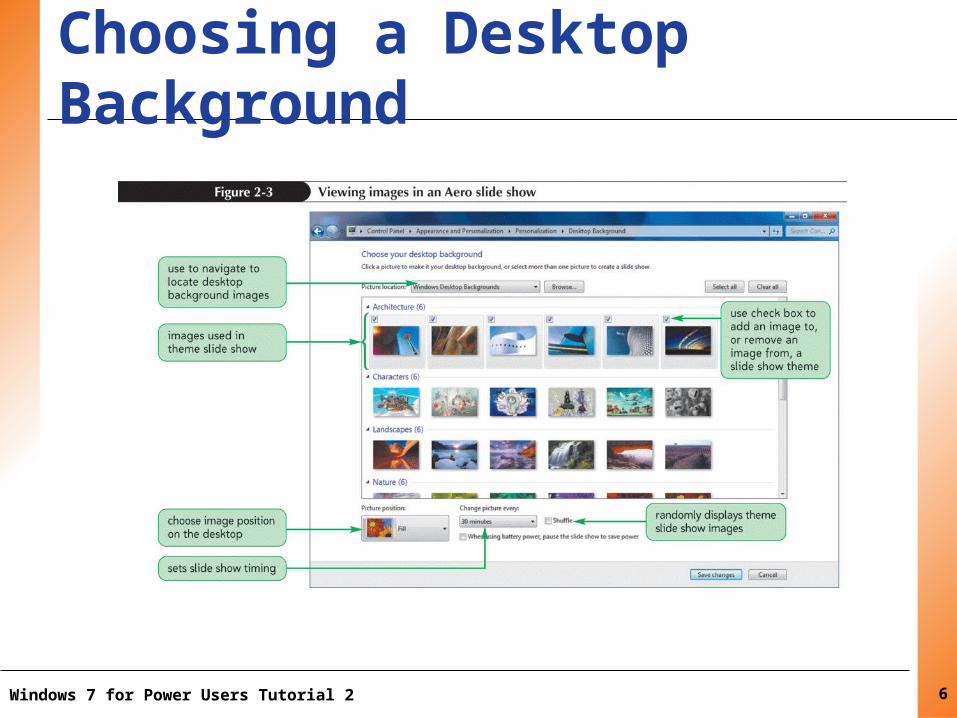
XPXPXPXPXPXPChoosing a Desktop Background
Windows 7 for Power Users Tutorial 2 6

XPXPXPXPXPXPCustomizing a Theme’s Desktop Background• Right-click the desktop, and then click Personalize• In the Personalization window, click a theme under My
Themes, Aero Themes, Basic and High Contrast Themes, or Installed Themes (if available)
• Click the Desktop Background link, and then click the Picture location button to view and select images from another location, such as Windows Desktop Backgrounds, Pictures Library, Top Rated Photos, Solid Colors, or another folder. Use the Browse button to locate a folder that contains images you want to use for a theme’s desktop background
• Click the Picture position button, and choose an option for displaying a desktop background
Windows 7 for Power Users Tutorial 2 7

XPXPXPXPXPXPCustomizing a Theme’s Desktop Background• Click the “Change picture every” button, and select a time
interval for displaying desktop background images in a theme’s slide show
• Click the Shuffle check box to display desktop background images randomly in a desktop slide show
• Click the “When using battery power, pause the slide show to save power” check box to enable or turn off the option for pausing a slide show when using a computer with battery power or a battery power backup unit
• Click the Save changes button to save your changes with the theme you chose
• Close the Personalization windowWindows 7 for Power Users Tutorial 2 8
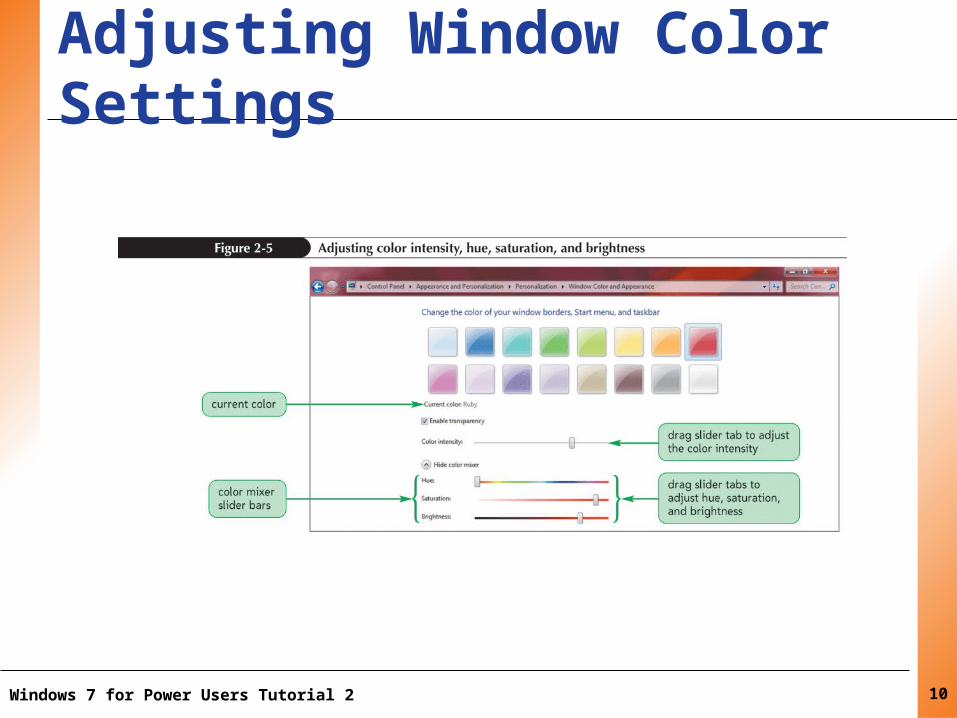
XPXPXPXPXPXPAdjusting Window Color Settings• Right-click the desktop, click Personalization, and then
click the Window Color link in the Personalization window• Click one of the 16 colors, and then drag the slider tab on
the Color Intensity to adjust the intensity of the color• Click the Show color mixer expand button, and then drag
the slider tab on the Hue, Saturation, and Brightness slider bars to fine-tune the color you prefer to use for window borders, the title bar, the Start menu, the taskbar, and taskbar buttons
• If desired, click the Enable transparency check box to disable or enable Windows Aero translucency
• Click the Save changes button to save your changes and apply your new window color settings
Windows 7 for Power Users Tutorial 2 9
XPXPXPXPXPXPAdjusting Window Color Settings
Windows 7 for Power Users Tutorial 2 10

XPXPXPXPXPXPSaving a Theme and Creating a Theme Pack• Right-click the desktop, and then click Personalize• To save changes to a theme, right-click the Unsaved
Theme icon under My Themes, click Save theme, and in the Save Theme As dialog box, type a new name for your theme in the Theme name box, and then click the Save button
• To save a theme as a theme pack, right-click a theme icon, and then click Save theme for sharing on the shortcut menu. In the Save Theme Pack As dialog box, use the Navigation pane to navigate to another folder (if necessary), type a name for your theme pack in the File name box, and then click the Save button
• Close the Personalization windowWindows 7 for Power Users Tutorial 2 11

XPXPXPXPXPXPChanging Mouse Properties• Mouse button
configuration• Double-click speed• Pointer speed• Mouse pointer shapes• Mouse wheel scrolling
Windows 7 for Power Users Tutorial 2 12

XPXPXPXPXPXPChanging Mouse Properties• If you have a Control Panel menu, open the Start menu, point
to Control Panel, and then click Mouse. If you do not have a Control Panel menu, open the Start menu, click Control Panel, click the Hardware and Sound link, and then click the Mouse link under Devices and Printers. If you are in the Personalization window, click the “Change mouse pointers” link
• Click the Buttons tab, click the “Switch primary and secondary buttons” check box under Button configuration (and add a check mark) to enable left-handed use of the mouse, and, if necessary, adjust the double-click speed setting under “Double-click speed” to make it easier to use double-clicking
Windows 7 for Power Users Tutorial 2 13

XPXPXPXPXPXPChanging Mouse Properties• Click the Pointer Options tab, adjust the mouse
pointer speed under Motion, and if necessary, click the “Enhance pointer precision” check box (and add a check mark) to improve control of the mouse pointer
• Click the Wheel tab, and adjust the setting for Vertical Scrolling so you can scroll faster within a window
• Click the Pointers tab, and use the Scheme button to display and select a mouse pointer scheme that helps you more easily see and identify mouse pointer shapes
Windows 7 for Power Users Tutorial 2 14
XPXPXPXPXPXPChanging Mouse Properties• Make and test any other changes you want to
make to other mouse settings for your particular mouse
• Click the OK button to close the Mouse Properties dialog box and, if necessary, close any other windows, such as the Hardware and Sound window or the Personalization window
Windows 7 for Power Users Tutorial 2 15

XPXPXPXPXPXPUsing the ClearType Text Tuner
Windows 7 for Power Users Tutorial 2 16
XPXPXPXPXPXPUsing the ClearType Text Tuner• Right-click the desktop, click Personalize on the
shortcut menu, and in the Personalization window, click the Display link under “See also” on the lower-left side of the window
• After Windows 7 opens the Display window, click the “Adjust ClearType text” link on the left side of the window. The ClearType Text Tuner dialog box opens. Click the Next button
• Check the information on the resolution of your monitor and the model type, adjust your resolution (if needed), and then click the Next button
Windows 7 for Power Users Tutorial 2 17

XPXPXPXPXPXPUsing the ClearType Text Tuner• In each of the next four steps, click the text
sample (if necessary) that looks best to you on the computer you are using, then click the Next button
• When Windows 7 informs you that you have finished tuning the text on your monitor, click the Finish button, and then close the Display window
Windows 7 for Power Users Tutorial 2 18
XPXPXPXPXPXPAdjusting Visual Effects• Enable aero peek• Enable desktop composition• Enable transparent glass• Show shadows under mouse pointer• Show translucent selection rectangle• Use drop shadows for icon labels on the
desktop
Windows 7 for Power Users Tutorial 2 19
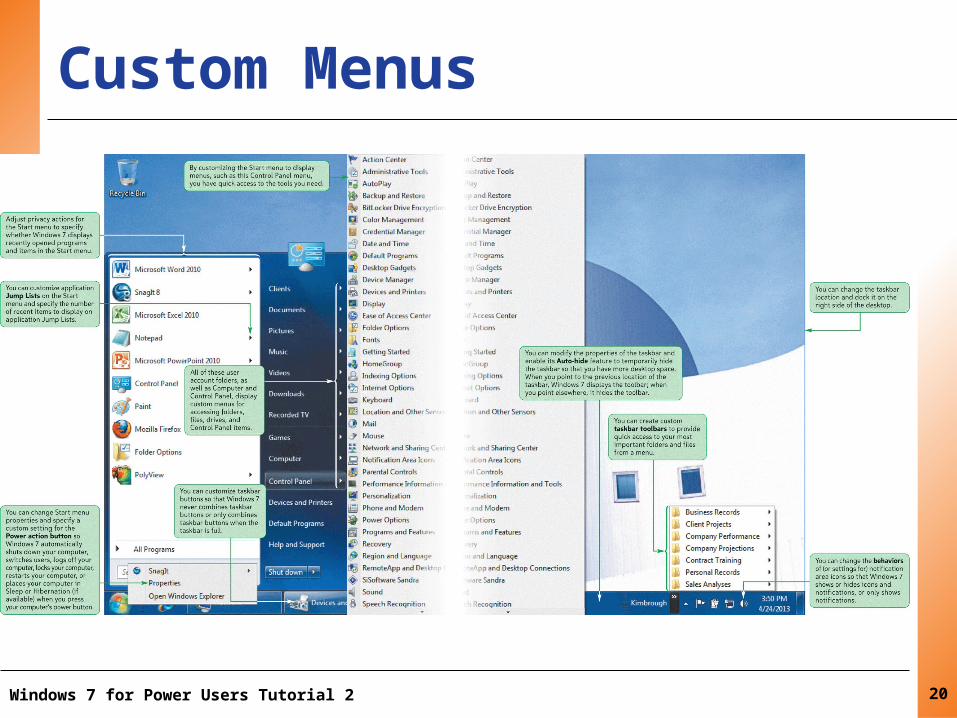
XPXPXPXPXPXPCustom Menus
Windows 7 for Power Users Tutorial 2 20
XPXPXPXPXPXPCustomizing the Start Menu• Customize the Start menu by specifying:– Privacy options– Power button action– Start menu items– Highlighting newly installed programs– Opening submenus when you pause on them with
the mouse pointer– Enable context menus and dragging and dropping– Use large icons
Windows 7 for Power Users Tutorial 2 21

XPXPXPXPXPXPCustomizing the Start Menu
Windows 7 for Power Users Tutorial 2 22
XPXPXPXPXPXPCustomizing the Taskbar and Notification Area• You can specify the following properties or
features of the taskbar:– Lock or unlock the toolbar–Auto-hide the taskbar–Keep the taskbar on top of other windows–Group similar taskbar buttons– Show Quick Launch
Windows 7 for Power Users Tutorial 2 23

XPXPXPXPXPXPCustomizing the Taskbar and Notification Area– Lock or unlock the taskbar–Use Auto-hide on the taskbar–Group similar taskbar buttons–Preview desktop with Aero Peek–Customize the notification area–Displaying toolbars on the taskbar
Windows 7 for Power Users Tutorial 2 24
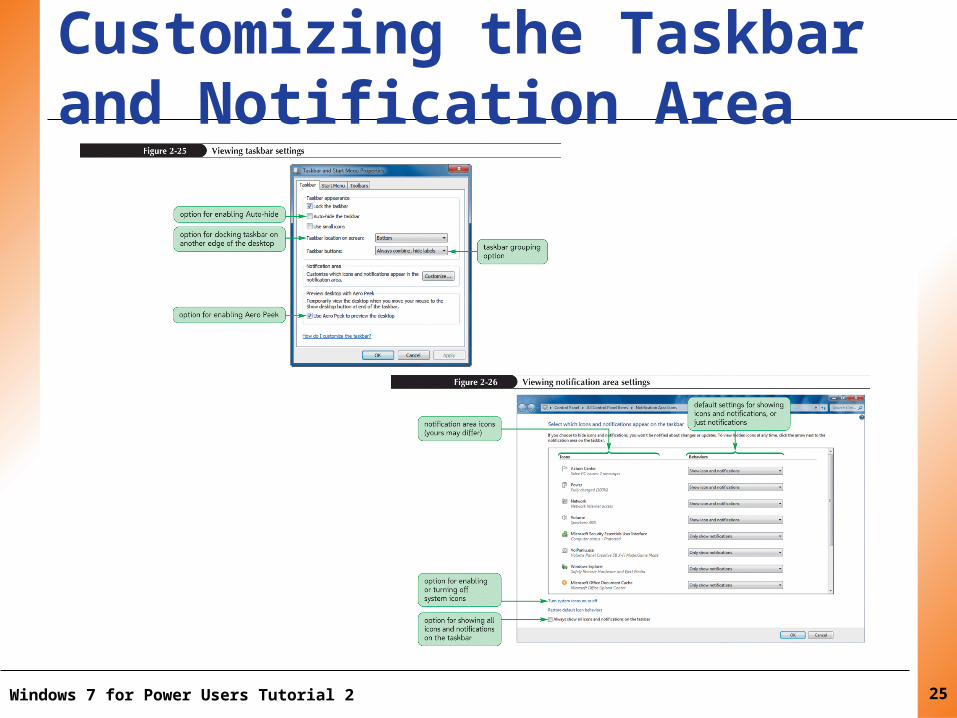
XPXPXPXPXPXPCustomizing the Taskbar and Notification Area
Windows 7 for Power Users Tutorial 2 25
XPXPXPXPXPXPDisplaying and Creating Taskbar Toolbars• Right-click the taskbar, and if the taskbar is locked, click Lock
the taskbar to remove the check mark; otherwise, if the toolbar is already unlocked, click the desktop to close the taskbar shortcut menu
• To add a built-in toolbar to the taskbar, right-click the taskbar, point to Toolbars on the taskbar shortcut menu, and then click one of the built-in toolbars on the Toolbars menu
• To create a custom toolbar from a folder, right-click the taskbar, point to Toolbars on the shortcut menu, click New toolbar, use the Navigation pane to locate the folder you want to use, select the folder, and then click the Select Folder button
Windows 7 for Power Users Tutorial 2 26

XPXPXPXPXPXPDisplaying and Creating Taskbar Toolbars• To widen a toolbar so you can display all the
options on the toolbar, point to the border resizing handle just to the left of the toolbar title, and, when the mouse pointer changes to an arrow that points to the right and left, drag the left border to the left
• Click the toolbar’s expand button to the right of the toolbar label to view a menu of options for that toolbar, and then click the option you want to open
Windows 7 for Power Users Tutorial 2 27
XPXPXPXPXPXPDisplaying and Creating Taskbar Toolbars• To display a menu of options for the toolbar,
right-click the toolbar’s title (the name of the toolbar), and then click one of the options at the top of the shortcut menu (such as View, Show text, and Show title)
• To close a custom toolbar, right-click the toolbar’s title, click Close toolbar on the shortcut menu, and then click the OK button in the Confirm Toolbar Close dialog box
Windows 7 for Power Users Tutorial 2 28

XPXPXPXPXPXP
Windows 7 for Power Users Tutorial 2 29
Video and Power Management

XPXPXPXPXPXPAdjusting Your Video Display Settings• Characteristics of your
monitor– Resolution• Native resolution
– Aspect ratio• 16:9 aspect ratio• 4:3 aspect ratio
Windows 7 for Power Users Tutorial 2 30
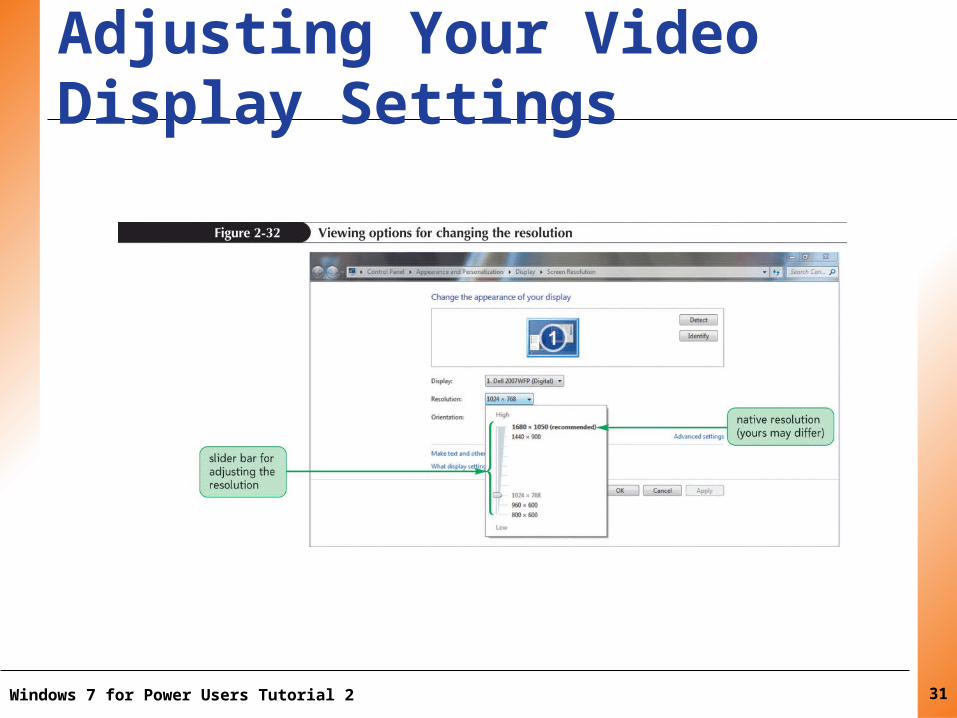
XPXPXPXPXPXPAdjusting Your Video Display Settings
Windows 7 for Power Users Tutorial 2 31

XPXPXPXPXPXPChanging the Color Depth Setting• Right-click the desktop, click Screen resolution
on the shortcut menu, and in the Screen Resolution window, click the Advanced settings link
• Click the Monitor tab in the dialog box for your monitor and video display adapter display settings
Windows 7 for Power Users Tutorial 2 32
XPXPXPXPXPXPChanging the Color Depth Setting• Click the Colors button, click the color depth setting
that you want to use, click the Apply button, examine the appearance of the desktop, and either click the Yes button to apply this new setting, or click the No button to restore your previous resolution (or wait 15 seconds for Windows 7 to restore the previous color depth setting)
• Click the OK button to close the dialog box for your monitor and video display adapter settings, and then close the Screen Resolution window
Windows 7 for Power Users Tutorial 2 33

XPXPXPXPXPXPAdjusting Your Video Display Settings• Refresh rate– Low refresh rates on older monitors cause
the image to flicker
Windows 7 for Power Users Tutorial 2 34

XPXPXPXPXPXPAdjusting the Resolution, Color Depth, and Refresh Rate• DPI (dots per inch)– Allows you to more easily see objects on the
desktop at higher resolutions
Windows 7 for Power Users Tutorial 2 35

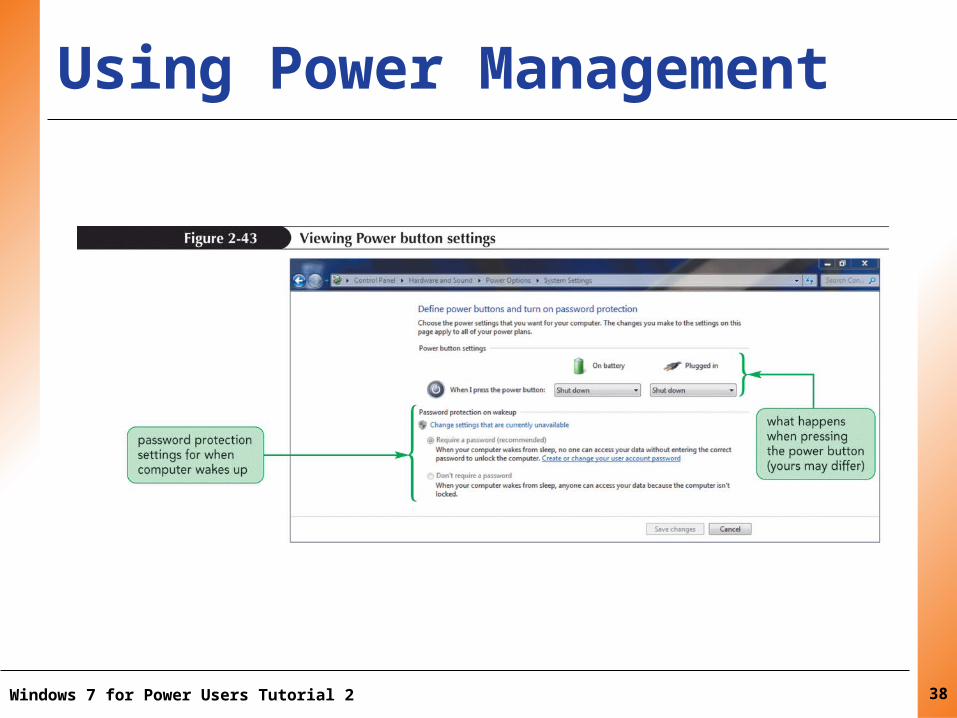
XPXPXPXPXPXPUsing Power Management• Windows 7 supports the Advanced Configuration and Power
Interface (ACPI)• Windows 7 can:– Turn off your video display and hard disk– Power plans• Balanced• Power Saver• High Performance
Windows 7 for Power Users Tutorial 2 36

XPXPXPXPXPXPUsing Power Management
Windows 7 for Power Users Tutorial 2 37
XPXPXPXPXPXPUsing Power Management
Windows 7 for Power Users Tutorial 2 38