R ISK AND Q UALITY M ANAGEMENT A DAPTED B Y : R USSEL JANSEN VAN R ENSBURG.

JasperETLpowered by Talend
User’s GuideVersion 2.1.1
Adapted for JasperETL powered by Talend version 2.1.1 and later.
User’s Guide for JasperETL powered by Talend

ii JasperETL powered by Talend Copyright © 2007-Talend Inc
CopyrightFind a copy of the GNU Free Documentation License with the source files of this documentation.

Copyright © 2007-Talend Inc JasperETL powered by Talend iii
User’s Guide for JasperETL powered by Talend
Getting started with JasperETL 9Accessing JasperETL ..........................................................................................................9Creating a project .............................................................................................................12Describing the GUI ...........................................................................................................14
Repository .....................................................................................................................14Business Models ...........................................................................................................15Job Designs ...................................................................................................................15Code ..............................................................................................................................15
Routines .....................................................................................................................15Snippets ......................................................................................................................16
Documentation .............................................................................................................16Metadata .......................................................................................................................16Recycle bin ...................................................................................................................16
Graphical workspace .....................................................................................................17Palette ...............................................................................................................................17
Changing the palette position .......................................................................................17Changing the palette layout and settings ......................................................................18
Properties, Run and Logs views .....................................................................................18Properties ......................................................................................................................18Logs ..............................................................................................................................18Run Job .........................................................................................................................18
Modules and Scheduler ....................................................................................................18Modules view ...............................................................................................................18Open Scheduler ............................................................................................................19
Outline and Code Summary panel ..................................................................................20Outline ..........................................................................................................................20Code viewer ..................................................................................................................21
Toolbar and Menus ...........................................................................................................21Quick access toolbar .....................................................................................................21Menus ...........................................................................................................................22
Configuring JasperETL preferences ...............................................................................22Perl/Java Interpreter path .................................................................................................23Status ................................................................................................................................24External components ........................................................................................................25
Designing a Business Model ........................................................................... 27Objectives ...........................................................................................................................27Opening or creating a business model .............................................................................27
Opening a business model ................................................................................................28Creating a business model ................................................................................................28
Modeling a business model ...............................................................................................29

iv JasperETL powered by Talend Copyright © 2007-Talend Inc
Shapes ...............................................................................................................................30Connecting shapes ............................................................................................................31Commenting and arranging a model ................................................................................33
Adding a note or free text .............................................................................................33Arranging the model view ............................................................................................33
Properties ..........................................................................................................................34Rulers and Grid .............................................................................................................34Appearance ...................................................................................................................35Assignment ...................................................................................................................36
Assigning repository elements to a Business Model .......................................................36Editing a Business model ..................................................................................................37
Renaming a business model .............................................................................................38Copying and pasting a business model ............................................................................38Moving a business model .................................................................................................38Deleting a business model ................................................................................................38
Saving a business model ....................................................................................................38
Designing a Job Design .................................................................................... 39Objectives ...........................................................................................................................39Opening or Creating a job ...............................................................................................39
Opening a job ...................................................................................................................40Creating a job ...................................................................................................................40
Getting started with a Job Design ....................................................................................41Showing, hiding and moving the palette ..........................................................................41Click and drop elements ...................................................................................................42Adding Notes to a job design ...........................................................................................42Changing panels position .................................................................................................43Warnings and errors on component .................................................................................44
Connecting components together .....................................................................................45Connection types ..............................................................................................................45
Row connection ............................................................................................................45Main row ....................................................................................................................45Lookup row ................................................................................................................46Output row .................................................................................................................46
Iterate connection .........................................................................................................47Trigger connections ......................................................................................................47Link connection ............................................................................................................48
Multiple Input/Output job ................................................................................................48Defining job Properties .....................................................................................................49
Main .................................................................................................................................49View .................................................................................................................................50Documentation .................................................................................................................50Properties ..........................................................................................................................51
Setting a built-in schema ..............................................................................................51Setting a repository schema ..........................................................................................52

Copyright © 2007-Talend Inc JasperETL powered by Talend v
Defining the Start component ..........................................................................................53Defining Metadata items ...................................................................................................54
Setting up a DB schema ...................................................................................................55Step 1: general properties .............................................................................................55Step 2: connection ........................................................................................................56Step 3: table upload ......................................................................................................58Step 4: schema definition .............................................................................................58
Setting up a File Delimited schema ..................................................................................59Step 1: general properties .............................................................................................59Step 2: file upload .........................................................................................................59Step 3: schema definition .............................................................................................60Step 4: final schema ......................................................................................................63
Setting up a File Positional schema ..................................................................................64Step 1: general properties .............................................................................................65Step 2: connection and file upload ...............................................................................65Step 3: schema refining ................................................................................................66Step 4: final schema ......................................................................................................66
Setting up a File Regex schema .......................................................................................67Step 1: general properties .............................................................................................67Step 2: file upload .........................................................................................................67Step 3: schema definition .............................................................................................68Step 4: final schema ......................................................................................................68
Setting up a FileLDIF schema ..........................................................................................68Step 1: general properties .............................................................................................69Step 2: file upload .........................................................................................................69Step 3: schema definition .............................................................................................70Step 4: final schema .....................................................................................................71
Setting up a FileXML schema ..........................................................................................71Step 1: general properties .............................................................................................72Step 2: file upload .........................................................................................................72Step 3: schema definition .............................................................................................72Step 4: final schema ......................................................................................................75
Creating queries using SQLBuilder ................................................................................75Database structure comparison .........................................................................................77Building a query ...............................................................................................................77Storing a query in the Repository .....................................................................................79
Mapping data flows in a job .............................................................................................80tMap operation overview .................................................................................................80tMap interface ..................................................................................................................81Setting the input flow in the Mapper ...............................................................................83
Filling in Input tables with a schema ............................................................................83Main and Lookup table content .................................................................................83Variables ....................................................................................................................84
Explicit Join ..................................................................................................................84Unique Match (java) ..................................................................................................85

vi JasperETL powered by Talend Copyright © 2007-Talend Inc
First or Last Match (java) ..........................................................................................86All Matches (java) .....................................................................................................86
Inner join ......................................................................................................................86All rows (java) ..............................................................................................................87Filtering an input flow (java) ........................................................................................87Removing Input entries from table ...............................................................................87
Mapping variables ..........................................................................................................88Accessing global or context variables ..........................................................................89Removing variables ......................................................................................................89
Output setting ..................................................................................................................89Filters ............................................................................................................................90Rejections .....................................................................................................................91Inner Join Rejection ......................................................................................................91Removing Output entries ..............................................................................................91
Expression editor ..............................................................................................................91Schema editor .................................................................................................................92
Activating/Disabling a job or sub-job .............................................................................93Disabling a Start component ............................................................................................94Disabling a non-Start component .....................................................................................94
Defining a job design context and related variables ......................................................94Adding or renaming a context ..........................................................................................95Defining the context variables ........................................................................................96
Short creation of context variables ..............................................................................97StoreSQLQuery ............................................................................................................98Storing contexts in the Repository ...............................................................................98
Defining the parameters in the Context tab ....................................................................100Running a job in selected context ..................................................................................101
Running a job ..................................................................................................................101Running in normal mode ................................................................................................102
Displaying Statistics ...................................................................................................102Displaying Traces .......................................................................................................103
Running in debug mode .................................................................................................103Saving or exporting your jobs ........................................................................................104
Saving a job ....................................................................................................................104Exporting job scripts ......................................................................................................104
Generating HTML documentation ................................................................................106Automating stats & logs use ...........................................................................................106Shortcuts and aliases .......................................................................................................107
Components ................................................................................................... 115tAggregateRow ...............................................................................................................117
tAggregateRow properties ..............................................................................................117Scenario: Aggregating values and sorting data ..............................................................118
tContextLoad ...................................................................................................................122tContextLoad properties .................................................................................................122

Copyright © 2007-Talend Inc JasperETL powered by Talend vii
Scenario: Dynamic context use in MySQL DB insert ...................................................123tCreateTable ....................................................................................................................126
tCreateTable Properties ..................................................................................................126Scenario: Creating new table in a Mysql Database ........................................................127
tAddCRCRow ..................................................................................................................129tAddCRCRow properties ...............................................................................................129Scenario: Adding a surrogate key to a file .....................................................................129
tDB2Input ........................................................................................................................133tDB2Input properties ......................................................................................................133Related scenarios ............................................................................................................133
tDB2Output .....................................................................................................................134tDB2Output properties ...................................................................................................134Related scenarios ............................................................................................................134
tDB2Row ..........................................................................................................................135tDB2Row properties .......................................................................................................135Related scenarios ............................................................................................................135
tDBInput .........................................................................................................................136tDBInput properties ........................................................................................................136Scenario 1: Displaying selected data from DB table ......................................................137Scenario 2: Using StoreSQLQuery variable ..................................................................138
tDBOutput .......................................................................................................................140DBOutput properties ......................................................................................................140Scenario: Displaying DB output ...................................................................................142
tDBSQLRow ....................................................................................................................144tDBSQLRow properties .................................................................................................144Scenario 1: Resetting a DB auto-increment ...................................................................145
tDenormalize ....................................................................................................................147Scenario 1: Denormalizing on one column in Perl ........................................................147Scenario 2: Denormalizing on multiple columns in Java ...............................................149
tDie ....................................................................................................................................152tDie properties ................................................................................................................152Related scenarios ............................................................................................................152
tDTDValidator .................................................................................................................153tDTDValidator Properties ..............................................................................................153Scenario: Validating xml files ........................................................................................153
tELTMysqlInput .............................................................................................................156tELTMysqlInput properties ............................................................................................156Related scenarios ............................................................................................................156
tELTMysqlMap ...............................................................................................................157tELTMysqlMap properties .............................................................................................158
Connecting ELT components .....................................................................................158Mapping and joining tables ........................................................................................159Adding where clauses .................................................................................................159Generating the SQL statement ....................................................................................159
Scenario1: Aggregating table columns and filtering ......................................................160

viii JasperETL powered by Talend Copyright © 2007-Talend Inc
Scenario 2: ELT using Alias table ..................................................................................163tELTMysqlOutput ..........................................................................................................167
tELTMysqlOutput properties .........................................................................................168Related scenarios ............................................................................................................169
tELTOracleInput ............................................................................................................170tELTOracleInput properties ...........................................................................................170Related scenarios ............................................................................................................170
tELTOracleMap ..............................................................................................................171tELTOracleMap properties ............................................................................................172
Connecting ELT components .....................................................................................172Mapping and joining tables ........................................................................................173Adding where clauses .................................................................................................173Generating the SQL statement ....................................................................................173
Scenario 1: Updating Oracle DB entries ........................................................................173tELTOracleOutput .........................................................................................................176
tELTOracleOutput properties .........................................................................................177Related scenarios ............................................................................................................178
tFileCompare ...................................................................................................................179Scenario: Comparing unzipped files ..............................................................................179
tFileCopy ..........................................................................................................................182tFileCopy Properties .......................................................................................................182Scenario: Restoring files from bin .................................................................................182
tFileDelete ........................................................................................................................184tFileDelete Properties .....................................................................................................184Scenario: Deleting files ..................................................................................................184
tFileFetch .........................................................................................................................186tFileFetch properties .......................................................................................................186Scenario: Fetching data through HTTP ..........................................................................186
tFileInputDelimited .......................................................................................................188tFileInputDelimited properties .......................................................................................188Scenario: Delimited file content display ........................................................................189
tFileInputMail .................................................................................................................191tFileInputMail properties ................................................................................................191Scenario: Extracting key fields from email ....................................................................191
tFileInputPositional ........................................................................................................193tFileInputPositional properties .......................................................................................193Scenario: From Positional to XML file ..........................................................................194
tFileInputRegex ...............................................................................................................197tFileInputRegex properties .............................................................................................197Scenario: Regex to Positional file ..................................................................................198
tFileInputXML ................................................................................................................201tFileInputXML Properties ..............................................................................................201Scenario: XML street finder ...........................................................................................202
tFileList ...........................................................................................................................204tFileList properties .........................................................................................................204

Copyright © 2007-Talend Inc JasperETL powered by Talend ix
Scenario: Iterating on a file directory .............................................................................204tFileOutputExcel .............................................................................................................207
Related scenario .............................................................................................................207tFileOutputLDIF .............................................................................................................208
tFileOutputLDIF Properties ...........................................................................................208Scenario: Writing DB data into an LDIF-type file .........................................................209
tFileOutputXML .............................................................................................................211tFileOutputXML properties ............................................................................................211Scenario: From Positional to XML file ..........................................................................212
tFileUnarchive .................................................................................................................213Related scenario .............................................................................................................213
tFlowMeter .......................................................................................................................214tFlowMeter Properties ....................................................................................................214Related scenario .............................................................................................................214
tFor ...................................................................................................................................215tFor Properties ................................................................................................................215Scenario: Job execution in a loop ...................................................................................215
tFTP ..................................................................................................................................218tFTP properties ...............................................................................................................218tFTP put ..........................................................................................................................218tFTP get ..........................................................................................................................219tFTP rename ...................................................................................................................219tFTP delete .....................................................................................................................219Scenario: Putting files on a remote FTP server ..............................................................219
tFuzzyMatch ....................................................................................................................221tFuzzyMatch properties ..................................................................................................221Scenario 1: Levenshtein distance of 0 in first names .....................................................222Scenario 2: Levenshtein distance of 1 or 2 in first names .............................................224Scenario 3: Metaphonic distance in first name ..............................................................225
tLogCatcher .....................................................................................................................226tLogCatcher properties ..................................................................................................226Scenario1: warning & log on entries ..............................................................................226Scenario 2: log & kill a job ............................................................................................228
tLogRow ..........................................................................................................................230tLogRow properties ........................................................................................................230Scenario: Delimited file content display ........................................................................230
tMap ................................................................................................................................231Scenario 1: Mapping with filter and simple explicit join (Perl) ....................................231Scenario 2: Mapping with Inner join rejection (Perl) ....................................................236Scenario 3: Cascading join mapping ..............................................................................241Scenario 4: Advanced mapping with filters, explicit joins and Inner join rejection (Java)
242Scenario 5: Advanced mapping with filters and a check of all rows ...........................247
tMSSqlInput ....................................................................................................................251tMSSqlInput properties ..................................................................................................251

x JasperETL powered by Talend Copyright © 2007-Talend Inc
Related scenarios ............................................................................................................251tMSSqlOutput .................................................................................................................252
tMSSqlOutput properties ................................................................................................252Related scenarios ............................................................................................................252
tMSSqlRow ......................................................................................................................253tMSSqlRow properties ...................................................................................................253Related scenarios ............................................................................................................253
tMysqlConnection ...........................................................................................................254tMysqlConnection Properties .........................................................................................254Scenario: Inserting data in mother/daughter tables ........................................................254
tMysqlCommit .................................................................................................................259tMysqlCommit Properties ..............................................................................................259Related scenario .............................................................................................................259
tMysqlInput .....................................................................................................................260tMysqlInput properties ...................................................................................................260Related scenarios ............................................................................................................260
tMysqlOutput ..................................................................................................................261tMysqlOutput properties ................................................................................................261Scenario: Adding new column and altering data ..........................................................261
tMysqlOutputBulk ..........................................................................................................263tMysqlOutputBulk properties .........................................................................................264Scenario: Inserting transformed data in MySQL database .............................................265
tMysqlBulkExec ..............................................................................................................269tMysqlBulkExec properties ............................................................................................270Related scenarios ............................................................................................................271
tMysqlOutputBulkExec ..................................................................................................272tMysqlOutputBulkExec properties .................................................................................272Scenario: Inserting data in MySQL database .................................................................273
tMysqlRollback ...............................................................................................................274tMysqlRollback properties .............................................................................................274Scenario: Rollback from inserting data in mother/daughter tables ................................274
tMysqlRow .......................................................................................................................275tMysqlRow properties ....................................................................................................275Scenario: Removing and regenerating a MySQL table index ........................................275
tMsgBox ..........................................................................................................................277tMsgBox properties ........................................................................................................277Scenario: ‘Hello world!’ type test ..................................................................................277
tNormalize ........................................................................................................................279Scenario: Normalizing data ............................................................................................279
tOracleInput ....................................................................................................................282tOracleInput properties ...................................................................................................282Related scenarios ............................................................................................................282
tOracleBulkExec .............................................................................................................283tOracleBulkExec properties ...........................................................................................283Scenario: Truncating and inserting file data into Oracle DB .........................................284

Copyright © 2007-Talend Inc JasperETL powered by Talend xi
tOracleOutput .................................................................................................................287tOracleOutput properties ................................................................................................287Related scenarios ............................................................................................................287
tOracleRow ......................................................................................................................288tOracleRow properties ....................................................................................................288Related scenarios ............................................................................................................288
tPerl .................................................................................................................................289tPerl properties ...............................................................................................................289Scenario: Displaying number of processed lines ...........................................................289
tPostgresqlInput ..............................................................................................................292tPostgresqlInput properties .............................................................................................292Related scenarios ............................................................................................................292
tPostgresqlOutput ...........................................................................................................293tPostgresqlOutput properties ..........................................................................................293Related scenarios ............................................................................................................293
tPostgresqlRow ................................................................................................................294tPostgresqlRow properties ..............................................................................................294Related scenarios ............................................................................................................294
tRowGenerator ...............................................................................................................295tRowGenerator properties ..............................................................................................295
Defining the schema ...................................................................................................296Defining the function ..................................................................................................297
Scenario: Generating random java data .........................................................................297tRunJob ............................................................................................................................300
tRunJob Properties .........................................................................................................300Scenario: Executing a remote job ...................................................................................300
tSalesforceInput ...............................................................................................................304Related scenario .............................................................................................................304
tSalesforceOutput ............................................................................................................305tSalesforceOutput Properties ..........................................................................................305Related scenario .............................................................................................................305
tSendMail ........................................................................................................................306tSendMail properties ......................................................................................................306Scenario: Email on error ................................................................................................306
tSleep ................................................................................................................................309tSleep Properties .............................................................................................................309Related scenarios ............................................................................................................309
tSortRow ..........................................................................................................................310tSortRow properties ........................................................................................................310Scenario: Sorting entries ................................................................................................311
tSQLiteInput ....................................................................................................................313tSQLiteInput Properties ..................................................................................................313Scenario: Filtering SQlite data .......................................................................................313
tSQLiteOutput .................................................................................................................316tSQLiteOutput Properties ...............................................................................................316

xii JasperETL powered by Talend Copyright © 2007-Talend Inc
Related Scenario .............................................................................................................317tSQLiteRow .....................................................................................................................318
tSQLiteRow Properties ..................................................................................................318Scenario: Updating SQLite rows ....................................................................................319
tStatCatcher .....................................................................................................................321tStatCatcher properties ...................................................................................................321Scenario: Displaying job stats log ..................................................................................321
tSugarCRMInput ............................................................................................................324tSugarCRMInput Properties ...........................................................................................324Scenario: Extracting account data from SugarCRM ......................................................324
tSugarCRMOutput .........................................................................................................326Related Scenario .............................................................................................................326
tSybaseInput ....................................................................................................................327tSybaseInput properties ..................................................................................................327Related scenarios ............................................................................................................327
tSybaseOutput .................................................................................................................328tSybaseOutput properties ...............................................................................................328Related scenarios ............................................................................................................328
tSybaseBulkExec .............................................................................................................329tSybaseBulkExec properties ...........................................................................................329Related scenarios ............................................................................................................329
tSybaseRow ......................................................................................................................331tSybaseRow properties ...................................................................................................331Related scenarios ............................................................................................................331
tSystem .............................................................................................................................332tSystem properties ..........................................................................................................332Scenario: Echo ‘Hello World!’ ......................................................................................332
tUniqRow .........................................................................................................................334tUniqRow properties ......................................................................................................334Scenario: Unduplicating entries .....................................................................................334
tWarn ...............................................................................................................................336tWarn properties .............................................................................................................336Related scenarios ............................................................................................................336
tWebServiceInput ...........................................................................................................337Scenario: Extracting images through a Webservice .......................................................338
tXSDValidator .................................................................................................................340tDTDValidator Properties ..............................................................................................340Related scenario .............................................................................................................340
tXSLT ...............................................................................................................................341tXSLT .............................................................................................................................341Scenario: Transforming XML to html using an XSL stylesheet ....................................341
Managing projects ......................................................................................... 343Importing projects ..........................................................................................................343Importing Job samples (Demos) ....................................................................................344

Copyright © 2007-Talend Inc JasperETL powered by Talend xiii
Migration tasks ................................................................................................................345Importing Repository items ...........................................................................................346Exporting projects ...........................................................................................................346

xiv JasperETL powered by Talend Copyright © 2007-Talend Inc

Copyright © 2007-Talend Inc JasperETL powered by Talend 9
—Getting started with JasperETL—
Getting started with JasperETL
Accessing JasperETLThe Setup wizard helps you to install JasperETL application. If you unzip it manually, then follow the installation instructions provided on the wiki website.
Read and accept the terms of the license agreement to continue.
A JasperETL Registration window prompts you for your email address and location. This information is optional. Click Cancel, if you do not wish to be informed for future enhancements of JasperETL.
If needed, check the box to enable HTTP Proxy parameters and fill in the fields with your proxy details. Make sure you filled in the email address field if you provide proxy details.
You can fill in or edit the registration information at any time, through Window > Preference > Talend > Install/Update.

10 JasperETL powered by Talend Copyright © 2007-Talend Inc
Getting started with JasperETLAccessing JasperETL
WARNING—Be ensured that any personal information you may provide will never be transmitted to third parties nor used for another purpose than to inform you about Talend and Talend’s products.
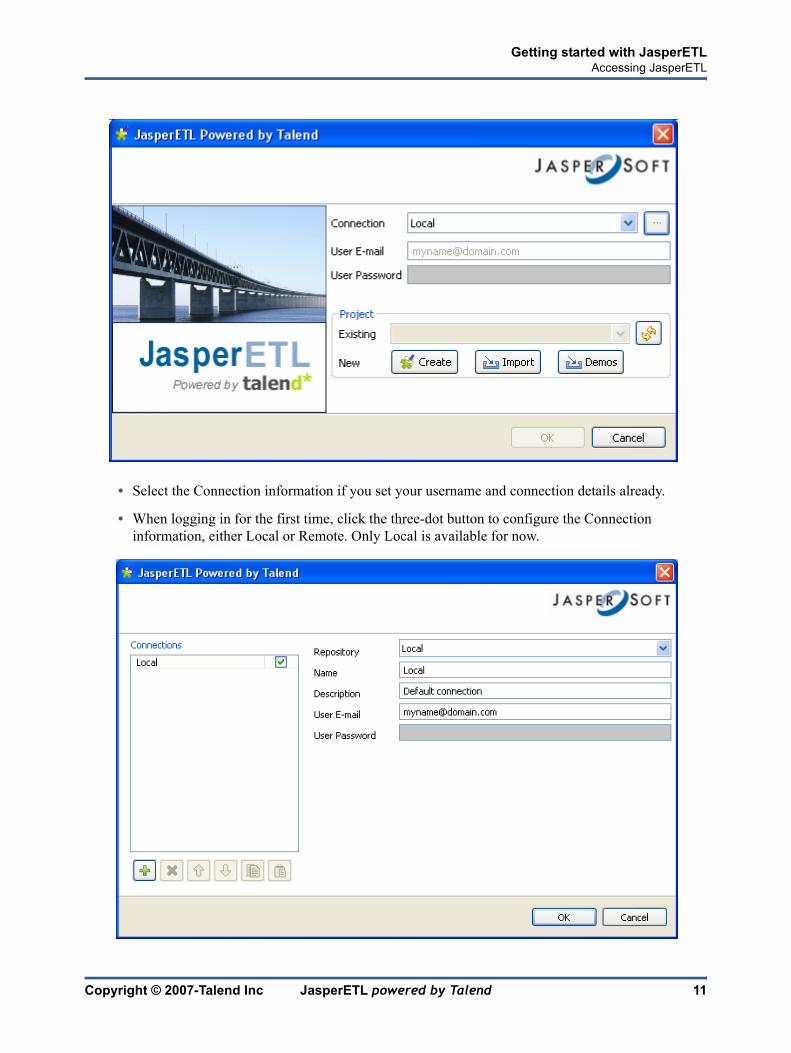
JasperETL opens up with the Login window.
Copyright © 2007-Talend Inc JasperETL powered by Talend 11
Getting started with JasperETLAccessing JasperETL
• Select the Connection information if you set your username and connection details already.
• When logging in for the first time, click the three-dot button to configure the Connection information, either Local or Remote. Only Local is available for now.

12 JasperETL powered by Talend Copyright © 2007-Talend Inc
Getting started with JasperETLCreating a project
• To add a new Repository information, click the plus (+) button on the left panel
• Type in the email address that will be used as user login. This field is compulsory to be able to use JasperETL. Be aware that the email entered is never used for other purpose than login use.
• Fill in the Password field, if needed. This field is greyed out when the connection is local.
• Click OK to validate.
Click Refresh to update the list of projects if needed. Then choose the relevant project name and click OK to open it.
If you already created projects with previous releases of JasperETL, you can import them into your current JasperETL workspace using the Import function.
Related topic: Importing projects on page 343
When creating a project for the first time, there are no default project listed. Click Create to launch the Creation wizard.
Related topic: Creating a project on page 12
You can discover JasperETL based on job samples. Install the demos project, in one click, through the Import demos button. The Demos project folder is automatically installed in your workspace. And the project is directly accessible from the login window.
When creating a new project, a folder tree is automatically created in the Workspace directory on your repository server. This will correspond to the Repository folder tree displaying on JasperETL main window.
Creating a projectWhen you create a project, you need first to fill in a name for this project. This field is mandatory.

Copyright © 2007-Talend Inc JasperETL powered by Talend 13
Getting started with JasperETLCreating a project
A contextual message pops up at the top of the window, according to the location of your cursor. It informs you about the nature of data to be filled in, such as forbidden characters.
Note: Note that numbers are not allowed to be used to start a project name.The name is not case sensitive, therefore, YourProject or YOURPROJECT are the same.
The Technical name is used by the application as file name of the actual project file. The read-only name usually corresponds to the project name, upper-cased and concatenated with underscores if needed.
Select the Generation language between Perl and Java. From then, you will be required to use the relevant code, i.e. Perl code in perl projects and java code in Java projects.
If you want to switch from one to another projects go through File > Switch Projects...
Note: We advise you though to keep Perl projects and Java projects in separate locations and workspaces to avoid language conflicts.
If you already used JasperETL and want to import projects from a previous release, see Importing projects on page 343.
In the Login window, select the project you’ve created. Click OK to launch JasperETL.
Note: A generation initialization window comes up when launching the application. Wait until the initialization is complete.

14 JasperETL powered by Talend Copyright © 2007-Talend Inc
Getting started with JasperETLDescribing the GUI
Describing the GUIJasperETL opens on a multi-panel window.
JasperETL window is composed of the following panels:
• Repository
• Graphical workspace
• Properties, Run and Logs views
• Outline and Code Viewer
The various panels and their respective features are detailed hereafter.
Repository
The Repository is a toolbox gathering all technical items that can be used either to describe business models or to design job designs.It gives access to the Business models, the job designs, as well as resusable routines or documentation.
The Repository centralizes and stores on the file system all necessary elements for any job design and business modeling contained in a project.

Copyright © 2007-Talend Inc JasperETL powered by Talend 15
Getting started with JasperETLDescribing the GUI
The repository gathers together the following components in a folder tree view:
Business Models
Under the Business Models node, are grouped all business models of the project. Double-click on the name of the model to open it on the graphical modeling workspace.
Related topic: Designing a Business Model on page 27
Job Designs
The Job designs folder shows all job flowcharts designed for the current project. Double-click on the name of the flowcharts to open it on the modeling workspace.
Related topic: Designing a Job Design on page 39
Code
The Code library groups the routines available for this project as well as snippets (to come) and other pieces of code that could be reused in the project.
Click on the relevant tree entry to develop the appropriate code piece.
Related topic: Designing a Job Design on page 39
Routines
A Routine is a piece of code which can be iterative in a technical job hence is likely to be reused several times within the same project.
Under Routines, a System folder groups all pre-defined routines. Developing this node again in the repository, various routine files display such as Dates, Misc and String gathering default pieces of codes according to their nature.
The refresh button allows you to update the tree with the last changes made
Store in the relevant folders of the Repository all your data (BMs and JDs) and metadata (Routines, snippets, DB/File connections, any meaningful Documentation...)
The Toolbar includes the following functions: Run Job, Export Project, Import Project

16 JasperETL powered by Talend Copyright © 2007-Talend Inc
Getting started with JasperETLDescribing the GUI
Double-click on one of the file. The Routines editor opens up as a new tab and can be moved around the modeling workspace by simply holding down the mouse and releasing at the target location.
Use these routines as reference for building your own or copy the one you need into the relevant properties field of your job.
To create a new routine, right-click on the Routines entry of the Repository, and select Create a routine in the pop-up menu. The routine editor opens up on a template file containing a default piece of code such as:
sub printTalend {
print "Talend\n"
Replace it with your own and when closing it, the routine is saved as a new node under Routines.
You can also create directories to classify the user’s routines.
Note: The System folder, along with its content is read-only.
Snippets
Snippets are small pieces of code that can be duplicated accross components or jobs to automate transformation for example. This feature will be available soon.
Documentation
The Documentation directory gathers all types of documents, of any format.This could be, for example, specification documents or a description of technical format of a file. Double-click to open the document in the relevant application.
Related topic: Designing a Job Design on page 39
Metadata
The Metadata folder bundles files holding redundant information you want to reuse in various jobs, such as schemas and property data.
Related topic: Defining Metadata items on page 54
Recycle bin
Drag and drop elements from the Repository tree into the recycle bin or press del key to get rid of irrelevant or obsolete items
Note that the deleted elements are still present on your filesystem, in the recycle bin, until you right-click on the recycle bin icon and select Empty Recycle bin.

Copyright © 2007-Talend Inc JasperETL powered by Talend 17
Getting started with JasperETLDescribing the GUI
Graphical workspace
The Graphical workspace is JasperETL’s single flowcharting editor, where both business models as well as job designs can be laid out.
You can open and edit both job designs and business models in this single graphical editor. Flowcharts you open display in a handy tab system.
A Palette is docked at the top of the workspace to help you draw the model corresponding to your workflow needs.
Palette
From the Palette, depending on whether you’re designing a job or modeling a business model, click and drop shapes, branchs, notes or technical components to the workspace, then define and format them using the various tools offered in the Properties panel.
Related topics:
• Designing a Business Model on page 27
• Designing a Job Design on page 39
Changing the palette position
If the Palette doesn’t show or if you want to set it apart in a panel, go to Window > Show view...> General > Palette. The Palette opens in a separate view that you can move around wherever you like within JasperETL’s window.

18 JasperETL powered by Talend Copyright © 2007-Talend Inc
Getting started with JasperETLDescribing the GUI
Changing the palette layout and settings
You can change the layout of the component list to display components in column or in list, as icons only or with short description.
You can also enlarge the component icons for better readability of the component list.
To do so, right-click and select the option in the list or click Settings to open the configuration window and fine-tune the layout.
Properties, Run and Logs views
The Properties, Run Jobs and Logs tabs gather all information relative to the graphical elements in selection in the modeling workspace or the actual execution of a complete job.
See also: Modules and Scheduler on page 18
Properties
The content of the Properties tab varies according to the selected item in the workspace.
For instance, when inserting a shape in the modeling workspace, the Properties tab offers a range of formatting tools to help you customize your business model and improve the readability of the whole business model.
In the case, you are working on a job design, the Properties tab offers you to set the operating parameters of the component and hence set this way each step of the technical job.
Logs
The Logs are mainly used for job designs. They show the results or errors of particular job design.
Note: However note that the log tab has also an informative function for Perl component operating progress for example
Run Job
The Run Job tab obviously shows the current job execution. This tab becomes a log console at the end of an execution.
For details about the job execution, see Running a job on page 101.
Modules and Scheduler
The Modules and Scheduler tabs are located in the same tab system as the Properties, Logs and Run Job tabs. Both views are independent from the active or inactive jobs open on the workspace.
Modules view
The use of some components requires specific Perl modules to be installed, check the Modules view, what modules you have or should have to run smoothly your jobs.

Copyright © 2007-Talend Inc JasperETL powered by Talend 19
Getting started with JasperETLDescribing the GUI
If the Modules tab doesn’t show on the tab system of your workspace, go to Window > Show View... > Talend, and select Modules in the developed Talend node.
The view shows if a module is necessary and required for the use of a referenced component.
The Status column points out if the modules are yet or not yet installed on your system. The warning triangle icon indicates that the module is not necessarily required for this component.
For example, the DBD::Oracle module is only required for using tDBSQLRow if the latter is meant to run with Oracle DB. The same way, DBD::Pg module is only required if you use PostgreSQL. But all of them can be necessary.
The red crossed circle means the module is absolutely required for the component to run.
If the component field is empty, the module is then required for the general use of JasperETL.
When building your job, if a component misses a module that is absolutely required, an error is generated and displays on the Problems tab.
To install any missing Perl module, refer to the relevant installation manual on http://talendforge.org/wiki/
Open Scheduler
The Open Scheduler is based on the crontab command, found in Unix and Unix-like operating systems. This cron can be also installed on any Windows system.
Open Scheduler generates cron-compatible entries allowing you to launch periodically a job via the crontab program.

20 JasperETL powered by Talend Copyright © 2007-Talend Inc
Getting started with JasperETLDescribing the GUI
If the Scheduler tab doesn’t display on the tab system of your workspace, go to Window > Show View... > Talend, and select Scheduler in the developed Talend node.
Set the time and comprehensive date details to schedule the task.
Open Scheduler automatically generates the corresponding task command that will be added to the crontab program.
Outline and Code Summary panel
The Information panel is composed of two tabs, Outline and Code Viewer, which provide information regarding the displayed diagram (either job design or business model).
Outline
The Outline tab offers a quick view of the business model or job design open on the modeling workspace and a tree view of variables. As the workspace, like any other window area can be resized upon your needs. The Outline view is convenient to check out where about on your workspace, you are located.

Copyright © 2007-Talend Inc JasperETL powered by Talend 21
Getting started with JasperETLDescribing the GUI
This graphical representation of the diagram highlights in a blue rectangle the diagram part showing in the workspace.
Click on the blue-highlighted view and hold down the mouse button. Then, move the rectangle over the job.
The view in the workspace moves accordingly.
The Outline view can also be displaying a folder tree view of components in use in the current diagram. Expand the node of a component, to show the list of variables available for this component.
To switch from the graphical outline view to the tree view, click on either icon docked at the top right of the panel.
Code viewer
The Code viewer tab provides lines of code generated for the selected component, behind the active job design view, as well the run menu including Start, Body and End elements.
Note: Note that this view only concerns the job design code, as no code is generated from business models.
Using a graphical colored code view, the tab shows the code of the component selected in the workspace. This is a partial view of the primary Code tab docked at the bottom of the workspace, which shows the code generated for the whole job.
Toolbar and Menus
At the top of JasperETL main window, a tool bar as well as various menus gather Talend commonly features along with some Eclipse functions.
Quick access toolbar
The toolbar allows you to access quickly the most commonly used functions. It slightly differs if you work at a Job or a Business Model.

22 JasperETL powered by Talend Copyright © 2007-Talend Inc
Getting started with JasperETLConfiguring JasperETL preferences
The toolbar allows a quick access to the following actions:
• Run Job: Executes the job currently shown on the design workspace. For more information about job execution, see Running a job on page 101.
• Export project: Launches the Export project wizard. For more information about project export, see Exporting projects on page 346.
• Import project: Launches the Import project wizard. For more information about project import, see Importing projects on page 343.
• Undo/Redo: Allows you to redo or undo the last action you performed.
• Zoom in/out: Select the zoom percentage to zoom in or zoom out on your Job.
Menus
JasperETL’s menus include :
• some standard functions, such as Save, Print, Exit, which are to be used at the application level.
• some Eclipse native features to be used mainly at the Job Designer level.
• as well as specific JasperETL functions.
Although standard Job or Business Model creation and edition are only available through right-click on the relevant view, some JasperETL features are offered in Menus.
In Window > Preferences > Talend, you can set your preferences. For more information about preferences, see Configuring JasperETL preferences on page 22.
In Window > Show views, you can manage the different views to display at the bottom of JasperETL.
Configuring JasperETL preferencesJasperETL opens up on a multiple panel window.
You can define various properties of JasperETL main workspace according to your needs and preferences.
First, click on the Window menu of your JasperETL, then select Preferences.
Copyright © 2007-Talend Inc JasperETL powered by Talend 23
Getting started with JasperETLConfiguring JasperETL preferences
Perl/Java Interpreter path
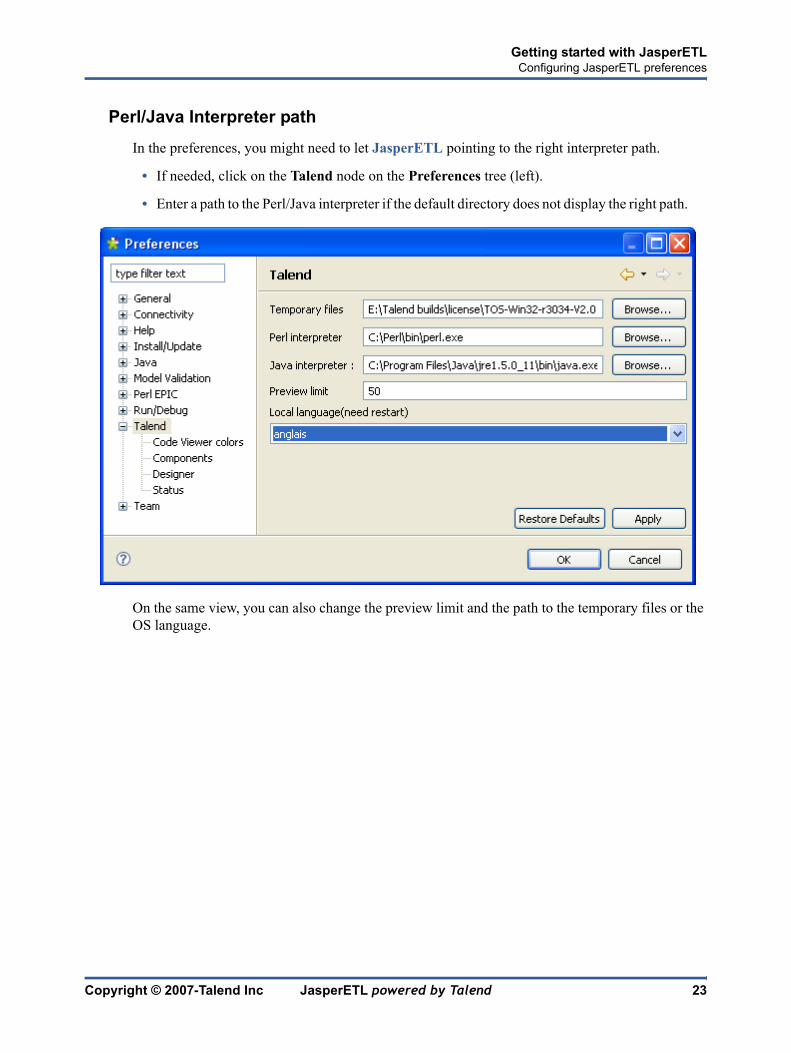
In the preferences, you might need to let JasperETL pointing to the right interpreter path.
• If needed, click on the Talend node on the Preferences tree (left).
• Enter a path to the Perl/Java interpreter if the default directory does not display the right path.
On the same view, you can also change the preview limit and the path to the temporary files or the OS language.

24 JasperETL powered by Talend Copyright © 2007-Talend Inc
Getting started with JasperETLConfiguring JasperETL preferences
Status
Under the Talend node, you can also define the Status.
• Expand the Talend node, and click on Status to define the main properties of your Repository elements.
• The main properties panel of a Repository item gathers information data such as Name, Purpose, Description, Author, Version and Status of the selected item. Most properties are free text fields, but the Status field, which is a drop-down list.
• Populate the Status list with the most relevant values, according to your needs. Note that the Code can not be more than 3-character long and the Label is required.
Talend makes a difference between two status types: Technical status and Documentation status.
The Technical status list displays classification codes for elements which are to be running on stations, such as jobs, metadata or routines.

Copyright © 2007-Talend Inc JasperETL powered by Talend 25
Getting started with JasperETLConfiguring JasperETL preferences
The Documentation status list helps classifying the elements of Repository which can be used to document processes (Business Models or documentation).
Once you completed the status setting, click OK to save.
The Status list will offer the status levels you defined here when defining the main properties of your job designs and business models.
External components
You can create/develop your own components and use them in JasperETL.
For more information about the creation and development of user components, refer to our wiki Component creation tutorial section.
In the Preferences folder tree, expand the Talend node, then select Components.

26 JasperETL powered by Talend Copyright © 2007-Talend Inc
Getting started with JasperETLConfiguring JasperETL preferences
• Fill in the User components folder path to the components to be added to the Palette of JasperETL.
• Restart JasperETL for the components to show in the Palette.

Copyright © 2007-Talend Inc JasperETL powered by Talend 27
—Designing a Business Model—
Designing a Business Model JasperETL offers the best tool to put in place the Top/Down approach allowing high stakeholders to get the grip on analytics of a project from the most general business model to the most precise details in its technical application.
This chapter aims at business managers, decision makers or developers who want to model their flow management needs at a macro level.
ObjectivesA Business model is a non technical view of a business workflow need.
Generally, a typical business model will include the strategic systems or process steps already up and running in your company as well as new needs. You can symbolise these systems, steps and needs using multiple shapes and create the connections among them. Likely, all of them can be easily described using repository attributes and formatting tools.
In the Graphical workspace of JasperETL, you can use multiple tools in order to:
• draw your business needs
• create and assign numerous repository items to your model objects
• define appearance properties of your model objects.
Opening or creating a business modelOpen JasperETL following the procedure as detailed in the paragraph Accessing JasperETL on page 9.
From the main page of JasperETL, click on the Business Models node of the Repository panel to expand the business models tree.

28 JasperETL powered by Talend Copyright © 2007-Talend Inc
Designing a Business ModelOpening or creating a business model
Select the Expand/Collapse option of the right-click menu, to display all existing business models (if any).
Opening a business model
Double-click on the name of the model to be opened.
The workspace opens up on the selected business model view.
Creating a business model
Right-click on the Business Models node and select Create Business Model.
The Creation wizard guides through the steps to create a new business model.
Select the Location folder where you want the new model to be stored in.
And fill in a Name for it. The name you allocate to the file shows as a label on the tab of the model designer.
The Modeler opens up on the empty design workspace.
You can create as many models as you want and open them all, they will display in a tab system on your workspace.

Copyright © 2007-Talend Inc JasperETL powered by Talend 29
Designing a Business ModelModeling a business model
The Modeler is made of the following panels:
• JasperETL’s graphical workspace
• a Palette of shapes and lines specific to the Business modeling
• the Properties panel showing specific information about all or part of the model.
Modeling a business modelIf you have multiple tabs opened on your designer workspace, click on the relevant tab in order to show the appropriate model information.
Note: Properties panel and Menus’ items display indeed information relative to the active model.
Use the Palette to click and drop the relevant shapes and connect them together with branches and arrange or improve the model visual aspect by zooming in or out.

30 JasperETL powered by Talend Copyright © 2007-Talend Inc
Designing a Business ModelModeling a business model
This Palette offers graphical representations for objects interacting within a business model.
The objects can be of different types, from strategic system to output document or decision step. Each one having a specific role in your business model according to the description, definition and assignment you give to it.
All objects are represented in the Palette as shapes, and can be included in the model.
Note: If the shapes do not show on the Palette, click on the business folder symbol to roll down the library of shapes.
Shapes
Select the shape corresponding to the relevant object you want to include in your business model. Double-click on it or click on the shape in the Palette and drop it in the modeling area.
Alternatively, for a quick access to the shape library, keep your cursor still on the modeling area for a couple of seconds to display the quick access toolbar:
For instance, if your business process includes a decision step, select the diamond shape in the Palette to add this decision step to your model.
Note: When you mouse over the quick access toolbar, a tooltip helps you to identify the shapes.
Then a simple click will do to make it show on the modeling area.
The shape is placed in a dotted black frame. Pull the corner dots to resize it at your own convenience.
Also, a blue-edged input box allows you to add a label to the shape. Give an expressive name in order for you to be able to identify at a glance the role of this shape in the model.
Two arrows from and to the added shape allow you to create connections with other shapes. You can hence quickly define sequence order or dependencies between shapes.
Related topic: Connecting shapes on page 31.
The available shapes include:

Copyright © 2007-Talend Inc JasperETL powered by Talend 31
Designing a Business ModelModeling a business model
Connecting shapes
When designing your business model, you want to implement relations between a source shape and a target shape;
There are two possible ways to connect shapes in your workspace:
Either select the relevant Relationship tool in the Palette. Then, in the modeling workspace, pull a link from one shape to the other to draw a connection between them.
Table 1—Callout Details
Decision The diamond shape generally represents an if condition in the model. Allows to take context-sensitive actions.
Action The square shape can be used to symbolize actions of any nature, such as transformation, translation or formatting.
Terminal The rounded corner square can illustrate any type of output terminal
Data A parallelogram shape symbolize data of any type.
Document Inserts a Document object which can be any type of document and can be used as input or output for the data processed.
Input Inserts an input object allowing the user to type in or manually provide data to be processed.
List forms a list with the extracted data. The list can be defined to hold a certain nature of data
Database Inserts a database object which can hold the input or output data to be processed.
Actor This schematic character symbolizes players in the decision-support as well technical processes
Ellipse Inserts an ellipse shape
Gear This gearing piece can be used to illustrate pieces of code programmed manually that should be replaced by a JasperSoft job for example.

32 JasperETL powered by Talend Copyright © 2007-Talend Inc
Designing a Business ModelModeling a business model
Or, you can implement both the relationship and the element to be related to or from, in few clicks.
• Simply mouse over a shape that you already dropped on your design workspace, in order to display the double connection arrows.
• Select the relevant arrow to implement the correct directional connection if need be.
• Drag a link towards an empty area of the design workspace and release to display the connections popup menu.
• Select the appropriate connection among the list of relationships to or from. You can choose among simple relationship, directional relationship or bidirectional relationship.
• Then, select the appropriate element to connect to, among the items listed.
You can create a connection to an existing element of the model. Select Existing Element in the popup menu and choose the existing element you want to connect to in the displaying list box.
The connection is automatically created with the selected shape.

Copyright © 2007-Talend Inc JasperETL powered by Talend 33
Designing a Business ModelModeling a business model
The nature of this connection can be defined using Repository elements, and can be formatted and labelled in the Properties panel, see Properties on page 34.
When creating a connection, an input box allows you to add a label to the connection you’ve created. Choose a meaningful name to help you identify the type of relationship you created.
Note: You can also add note and comment to your model in order to identify elements or connections at a later stage.
Related topic: Commenting and arranging a model on page 33
Commenting and arranging a model
The tools of the Palette allow you to customize your model:
Adding a note or free text
To add a note, select the Note tool in the Palette, docked at the right of the workspace.
Alternatively right-click on the model or the shape you want to link the note to, and select Add Note
A sticky note displays on the modeling area. If the note is linked to a particular shape, a line is automatically drawn to the shape.
Type in the text in the input box or, if the latter doesn’t show, type in directly on the sticky note.
If you want to link your notes and specific shapes of your model, click on the down arrow next to the Note tool on the Palette and select Note attachment. Pull the black arrow towards an empty area of the design workspace, and release. The popup menu offers you to attach a new Note to the selected shape.
You can also select the Add Text feature to type in free text directly in the modeling area. You can access this feature in the Note drop-down menu of the Palette or via a shortcut located next to the Add Note feature on the quick access toolbar.
Arranging the model view
You can also rearrange the look and feel of your model via the right-click menu.
Table 2—Callout Details
Select Select and move the shapes and lines around in Designer’s modeling area.
Zoom Zoom in to a part of the model. To watch more acurately part of the model. To zoom out, press Shift and click on the modeling area.
Note/Text/Note attachment
Allows comments and notes to be added in order to store any useful information regarding the model or part of it.

34 JasperETL powered by Talend Copyright © 2007-Talend Inc
Designing a Business ModelModeling a business model
Place your cursor in the design area, right-click to display the menu and select Arrange all. The shapes automatically move around to give the best possible reading of the model.
Alternatively, you can select manually the whole model or part of it.
To do so, right-click on any part of the modeling area, and click Select.
You can select :
• All shapes and connectors of the model,
• All shapes used in the design workspace,
• All connectors branching together the shapes.
From this menu you can also zoom in and out to part of the model and change the view of the model.
Properties
The Properties information corresponds to the current selection, if any. This can be the whole model if you selected all shapes of it or more specifically one of the shapes it is made of. If nothing is selected, the Properties give general formatting information about the workspace.
The Properties tab contains different type of information regarding:
• Rulers and Grid
• Appearance
• Assignment
Rulers and Grid
To display the Rulers & Grid tab, select the Select tool on the Palette, then click on any empty area of the design workspace to deselect any current selection.
Click on the Rulers & Grid tab to access the ruler and grid setting panels.

Copyright © 2007-Talend Inc JasperETL powered by Talend 35
Designing a Business ModelModeling a business model
Check the boxes to show the Ruler, the Grid or both.
Grid in front sends to the back all shapes of the model. Select the ruling unit among Centimeters, inches or pixels.
You can also choose the color as well as the style of the grid lines or restore the default settings.
Appearance
From the Appearance tab you can apply filling or border colours, change the appearance of shapes and lines in order to customize your business model or make it easier to read.

36 JasperETL powered by Talend Copyright © 2007-Talend Inc
Designing a Business ModelAssigning repository elements to a Business Model
The Properties tab includes the following formats:
• fill the shape with selected colour.
• color the shape border
• insert text above the shape
• insert gradient colours to the shape
• insert shadow to the shape
You can also move and manage shapes of your model using the edition tools. Right-click on the relevant shape to access these editing tools.
Assignment
The Assignment table displays details of the Repository attributes you allocated to a shape or a connection.
To display any assignment information in the table, select a shape or a connection in the active model.
You can modify some information. Also, if you update data from the Repository tree, assignment information gets automatically updated.
For further information about how to assign elements to a Business Model, see Assigning repository elements to a Business Model on page 36.
Assigning repository elements to a Business ModelThe Assignment table lists the components from the Repository panel of the main window.

Copyright © 2007-Talend Inc JasperETL powered by Talend 37
Designing a Business ModelEditing a Business model
You can define or describe a particular object of your Business Model, by associating to it, various types of information .
You can set the nature of the data to be assigned, thus facilitating the job design phase.
The same way as with shapes and connecting lines, simply drag and drop an item from the Repository panel to assign it to the relevant shape in the modeling workspace.
Alternatively, you can use the Un/Assign button to carry out this operation.
The Assignment table, located underneath the workspace gets automatically updated accordingly with the assigned information of the selected object.
You can remove assignments through the Un/Assign button.
The Repository offers the following types of items that you can assign:
For more information about the Repository Components, see Designing a Job Design on page 39
Editing a Business modelFollow the relevant procedure according to your needs:
Table 3—Component Details
Job designs If any available job designs developed for other projects in the same repository can be reused in the active business model
Metadata Any describing data about any of the objects used in the model. It can be connection information to a database for example.
Business Models If other business model of this repository have been designed, they can be reused in the active model.
Documentation Any type of documentation in any format. It can be a technical documentation, some guidelines in text format or a simple description of your databases.
Routines (Code) If some routines have been developed in a previous project, to automate tasks for example, they can be reused in the active model. Routines are stored in the Code folder of the Repository

38 JasperETL powered by Talend Copyright © 2007-Talend Inc
Designing a Business ModelSaving a business model
Renaming a business model
Click on the current business model label on the Repository panel, to display the corresponding Main properties information.
Then make your edits on the Name field.The label is changed automatically on the Repository and will be reflected on the Model tab of the workspace, the next time you open it.
Copying and pasting a business model
In Repository > Business model, right-click on the business model name to be copied and select Copy in the popup menu, or press Ctrl+c.
Then right-click where you want to paste your business model, and select Paste.
Moving a business model
To move a business model from a location to another in your business models project folder, select a business model in the Repository > Business Models tree.
Then simply drag and drop it to the new location.
Alternatively, right-click on the relevant business model and select Move in the popup menu.
Deleting a business model
Right-click on the name of the model to be deleted and select Delete in the popup menu.
Alternatively, simply select the relevant business model, then drag and drop it into the Recycle bin of the Repository panel.
Saving a business modelTo save a business model, click on File > Save or press Ctrl+s. The model is saved under the name you gave during the creation process.
An asterisk displays in front of the business model name tab when changes have been made to the model but not yet saved.

Copyright © 2007-Talend Inc JasperETL powered by Talend 39
—Designing a Job Design—
Designing a Job DesignThis chapter aims at programmers or IT managers who are ready to implement technical aspects of a business model (designed or not in JasperETL’s Business Modeler). JasperETL helps you to develop the job design that will allow you to put in place an up and running dataflow management.
ObjectivesA job design is the runnable layer of a business model. It translates business needs into code, routines and programs, in other words it technically implements your data flow.
The Job design is the graphical and functional view of a technical process.
From JasperETL, you can:
• put in place actions in your job design using a library of technical components.
• change the default setting of components or create new components or family of components to match your exact needs.
• set connections and relationships between components in order to define the sequence and the nature of actions
• access code at any time to edit in Perl or document your job components.
• create and add items to the Repository for reuse and sharing purposes (in other projects or jobs or with other users).
Opening or Creating a job Open JasperETL following the procedure as detailed in chapter Accessing JasperETL on page 9.
In JasperETL Repository panel, click on the Job Designs node to expand the technical job tree.
You can create folders via the right-click menu to gather together families of jobs. Right-click on the Job Designs node, and choose Create folder. Give a name to this folder and click OK.
If you have already created jobs that you want to move in this new folder, simply drag and drop them into the folder.

40 JasperETL powered by Talend Copyright © 2007-Talend Inc
Designing a Job DesignOpening or Creating a job
Opening a job
Double-click on the label of the job you want to open.
The Designer opens up on the selected job last view.
Note: You can open as many job designs as you need. They will all display in a tab system on your workspace.
Creating a job
Right-click on the Job Designs node and select Create job in the pop-up menu. The Creation wizard helps you to define the new
job main properties.

Copyright © 2007-Talend Inc JasperETL powered by Talend 41
Designing a Job DesignGetting started with a Job Design
The Designer opens an empty tab, on the workspace, showing only the job name as tab label.
Note: You can create as many job designs as you want and open them all, they will display in a tab system on your workspace.
The Designer is made of the following panels:
• JasperETL’s Graphical workspace
• a Palette of components and connections specific to the Job Designer
• a Properties panel which can be edited to change or set parameters related to a particular part or component of the model.
Getting started with a Job DesignUntil a job is created, the design workspace as well as the palette of components are greyed out.
If you’re designing a job for the first time, the workspace opens on an empty area. If you’re opening an already existing job, it opens on the last view it was saved on.
Showing, hiding and moving the palette
The Palette contains all basic elements to create the most complex jobs in the design workspace. These components are gathered in families and sub-families.
By default, the palette is hidden on the right side of your design workspace.
If you want the Palette to show permanently, click on the left arrow, at the right top corner of the designer, to make it visible at all time.
For specific component properties, see chapter Components on page 115.
You can also move around the Palette outside the workspace within JasperETL’s window. To enable the standalone Palette view, click on Window menu > Show View... > General > Palette.
Table 4—Field Description
Name Enter a name for your new job. A message comes up if you enter prohibited characters.
Purpose Enter the job purpose or any useful information regarding the job use.
Description Enter a description if need be for the job created.
Author The Author field is read-only as it shows by default the current user login.
Version The Version is also read-only. You can manually increment the version using the M and m button
Status You can define the status of a job in your preferences. By default none is defined. To define them, go to Window > Preferences > Talend >Status.

42 JasperETL powered by Talend Copyright © 2007-Talend Inc
Designing a Job DesignGetting started with a Job Design
Click and drop elements
Click on a Component or a Note to start with, on the Palette. Then click again to drop it on the workspace and add it to your job design.
If the Palette doesn’t show, see Showing, hiding and moving the palette on page 41.
Multiple information or warnings may show next to the component. Browse over the component icon to display the information tooltip. This will display until you fully completed your job design and defined each component properties.
WARNING—you will be required to use the relevant code, i.e. Perl code in perl jobs and java code in Java jobs.
Related topics:
• Connecting components together on page 45
• Warnings and errors on component on page 44
• Defining job Properties on page 49
Adding Notes to a job design
Select the relevant note tool in the list among Note, Text or Note attachment.These various note options are also available through a right-click.

Copyright © 2007-Talend Inc JasperETL powered by Talend 43
Designing a Job DesignGetting started with a Job Design
Click and drop the Note element onto the workspace to add a note to a particular component or to the whole job.
The Note shows as a sticky note on the design workspace.
The Text note allows you to type in directly onto the workspace.
The Note attachment allows you to bind the sticky note to particular element of the workspace.
Changing panels position
All panels can be moved around according to your needs.
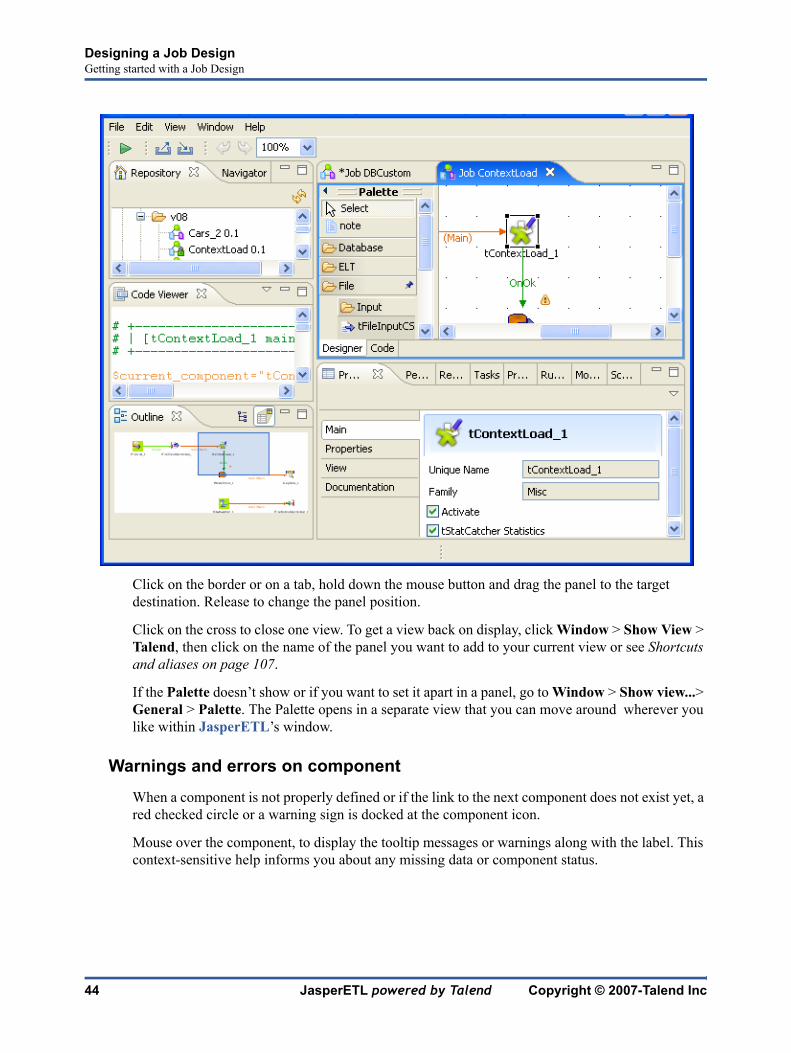
44 JasperETL powered by Talend Copyright © 2007-Talend Inc
Designing a Job DesignGetting started with a Job Design
Click on the border or on a tab, hold down the mouse button and drag the panel to the target destination. Release to change the panel position.
Click on the cross to close one view. To get a view back on display, click Window > Show View > Talend, then click on the name of the panel you want to add to your current view or see Shortcuts and aliases on page 107.
If the Palette doesn’t show or if you want to set it apart in a panel, go to Window > Show view...> General > Palette. The Palette opens in a separate view that you can move around wherever you like within JasperETL’s window.
Warnings and errors on component
When a component is not properly defined or if the link to the next component does not exist yet, a red checked circle or a warning sign is docked at the component icon.
Mouse over the component, to display the tooltip messages or warnings along with the label. This context-sensitive help informs you about any missing data or component status.

Copyright © 2007-Talend Inc JasperETL powered by Talend 45
Designing a Job DesignConnecting components together
Connecting components togetherThere are various types of connections which define either the data to be processed, the data output, or else the job logical sequence.
On your workspace, when dragging the link away from your source component towards the destination component, a graphical plug indicates if the destination component is valid or not. The black crossed circle only disappears once you reached a valid target component.
Connection types
Only the connections authorized for the selected component are listed on the right-click pop-up menu.
The types of connections proposed are different for each component according to its nature and role within the job, if the connection is meant to transfer data (from a defined schema) or if no data is handled.
The types of connections available depend also if the data come from one or multiple input files and get transferred towards one or multiple outputs.
Select a component on the workspace, and right-click to display the pop-up menu. All links available for the selected component display.
Row connection
The Row connection handles actual data transfer. The Row links can be main, lookup or output according to the nature of the flow processed.
Main row
The Main row is the most commonly used connection. It passes on data flows from one component to the other, iterating on each row and reading input data according to the component properties setting (schema).
Data transferred through main rows are characterized by a schema definition which describes the data structure in the input file.
Note: Note that you cannot connect two Input components together using a main Row connection.

46 JasperETL powered by Talend Copyright © 2007-Talend Inc
Designing a Job DesignConnecting components together
Note: Note also that only one incoming Row connection is possible per component. You will not be able to link twice the same target component using a main Row connection.
To be able to use multiple Row connections, see Multiple Input/Output job on page 48.
Lookup row
The Lookup row is a Row connecting a sub-flow component to a main flow component. This connection is used only in the case of multiple input flows.
A Lookup row can be changed into a main row at any time (and in reverse, a main row can be changed to a lookup row). To do so, right-click on the row to be changed, and on the pop-up menu, click on Set this connection as Main.
Related topic: Multiple Input/Output job on page 48.
Output row
The Output row is a Row connecting a component to the final output component. As the job output can be multiple, you get prompted to give a name for each output row created.

Copyright © 2007-Talend Inc JasperETL powered by Talend 47
Designing a Job DesignConnecting components together
Note: Note that the system remembers also deleted output link names (and properties if they were defined) to avoid you to fill in again name and property data in case you want to reuse them.
Related topic: Multiple Input/Output job on page 48.
Iterate connection
The Iterate connection can be used to loop on files contained in a directory, on rows contained in a file or on DB entries.
A component can be the target of only one Iterate link. The Iterate link is mainly to be connected to the Start component of a flow (either main or secondary).
Some components are meant to be connected through an iterate link with the next component, such as tFilelist component.
Note that the Iterate link name is read-only unlike the other connections.
Trigger connections
The trigger connections define the processing sequence. No data is handled through trigger connections.
The connection in use will create a dependency between jobs or sub-jobs which therefore will trigger one after the other according to the trigger nature.
There are two kinds of triggers: chronological trigger and contextual triggers.
ThenRun (previously Run Before and Run after) is a chronological trigger, in the way, that you run the first component and then run the next component. This connection is to be used only with Start components.
Related topic: Defining the Start component on page 53.

48 JasperETL powered by Talend Copyright © 2007-Talend Inc
Designing a Job DesignConnecting components together
Run if, Run if OK and Run if Error are contextual triggers. They can be used with any source component but are to be connected to Start component of a main or secondary job flow.
• Run if OK will only trigger the target component once the execution of the source component is complete. Its main use could be to trigger notification sub-jobs for example.
• Run if Error will trigger the sub-job or component as soon as an error is encountered in the primary job.
• Run if triggers a sub-job or component in case the condition defined is met. Click on the connection to display the If trigger Properties panel and set the condition in Perl or in Java according to the generation language you selected. The Ctrl+Space bar allows to access all global and contect variables.
Link connection
The Link connection can only be used with ELT components. The Links transfer table schema information to the ELT mapper component in order to be used in specific DB query statements.
Related topics: Components on page 115
The Link connection therefore does not handle actual data but only the metadata regarding the table to be queried on.
When right-clicking on the ELT component to be connected, select Link > New Output.
WARNING—Be aware that the name you provide to the link MUST reflect the actual table name.
In fact, the link name will be used in the SQL statement generated through the ETL Mapper, therefore the same name should never be used twice.
Multiple Input/Output job
For the time being, if you need to handle data through multiple input points and/or multiple outputs and integrate a transformation in one flow, you want to use the tMap component, which is dedicated to this use.
For further information regarding data mapping , see Mapping data flows in a job on page 80.
For properties regarding the tMap component as well as use case scenarios, see tMap on page 231.

Copyright © 2007-Talend Inc JasperETL powered by Talend 49
Designing a Job DesignDefining job Properties
Defining job PropertiesThe Properties information shows detailed data. The Main tab thus recalls information relative to the author and job name as filled in at creation stage as well as other general information. And the other tabs show more specific information about the job or the component selected.
Main
The properties panel shows the Main properties of the selected component. The values of information data are filled in automatically by the component itself and will be used in the code. Therefore all fields are read-only, but the Activate box.
The Activate box enables the component function in the job or the sub-job it belongs to, hence code related to its properties will be generated.
If the Activate box is unchecked, obviously no code will be generated for the component itself but also for all directly related branches in the job.
Table 5—Field Description
Unique Name Unique identifier, allocated automatically by the system in order for it to be reused in the code.
Version Component version, independant from the version of the whole product version.
Family Group of components relative to the same function. This field is read-write and new family can be created here.
Activate Check this box to activate the selected component and the directly linked job.
tStatCatcher Statistics Check this box to allow the tStatCatcher component to aggregate processing data as defined in the properties of tStatCatcher on page 321

50 JasperETL powered by Talend Copyright © 2007-Talend Inc
Designing a Job DesignDefining job Properties
For further information regarding the enabling/disabling job feature, see Activating/Disabling a job or sub-job on page 93.
View
The View tab of the Properties panel allows you to change the default display format of components on the workspace.
You can graphically highlight both Label and Hint text with HTML formatting tags:
• Bold: <b> YourLabelOrHint </b>
• Italic: <i> YourLabelOrHint </i>
• Return carriage: YourLabelOrHint <br> ContdOnNextLine
• Color: <Font color= ‘#RGBcolor’> YourLabelOrHint </Font>
To change your preferences of this View panel, click Window>Preferences>Talend>Designer.
Documentation
Feel free to add any useful comment or chunk of text or documentation to your component.
Table 6—Field Description
Label format Free label showing on the workspace. Variables can be set to retrieve and display values from other fields. The field tooltip usually shows the corresponding variable where the field value is stored.
Hint format Hidden tooltip, showing only when you mouse over the component.
Show hint Check this box to enable the tooltip feature.

Copyright © 2007-Talend Inc JasperETL powered by Talend 51
Designing a Job DesignDefining job Properties
The content of this Comment field will be formatted using Pod markup and will be integrated in the generated code. You can view your comment in the Code panel.
You can show the Documentation in your hint tooltip using the associated variable (_COMMENT_)
For advanced use of Documentations, you can use the Repository Documentation area in order to store and reuse any type of documentation.
Properties
Each component has specific properties shown on the Properties tab of the Properties panel. See Components on page 115 for details about how to fill in the fields.
Make sure you use the relevant code, i.e. Perl code in perl properties and java code in Java properties.
For all components you can centralize Properties information in metadata files located in the Repository Metadata directory. Select Repository as Property type and choose the metadata file holding the relevant information. Related topic: Defining Metadata items on page 54.
For all Input-type components, you can define the schema to follow in order to select data to be processed. Like the Properties data, this schema is either built-in or stored remotely in the Repository in a metadata file that you created.
Setting a built-in schema
A schema created as built in the job is meant for a single use in a job, hence cannot be reused in another job nor station.

52 JasperETL powered by Talend Copyright © 2007-Talend Inc
Designing a Job DesignDefining job Properties
Select Built-in in the list, and click on Edit Schema and create your built-in schema by adding columns and describing their content, according to the input file definition.
In all Output Properties also, you also have to define the schema of the output. To retrieve the schema defined in the Input schema, click on Sync columns button.
Note: In Java, some extra information is required. For more information about Date pattern for example, check out: http://java.sun.com/j2se/1.5.0/docs/api/index.html
Setting a repository schema
You can avoid redundancy of schema metadata and hold them together in a central place, by creating metadata files and store them in the Repository Metadata directory.
To recall a metadata file into your current job, select the Schema type Repository and select the relevant metadata file in the list. Then click on Edit Schema to check the data are appropriate.

Copyright © 2007-Talend Inc JasperETL powered by Talend 53
Designing a Job DesignDefining the Start component
You are free to edit a repository schema used for a job. However, note that the schema hence becomes built-in to the current job.
You cannot change the remotely stored schema from this window.
Related topics: Defining Metadata items on page 54
Defining the Start componentThe Start component is the trigger of a job. There can be several Start components per job design if there are several flows running in parallel. But for one flow and its connected subflows, only one component can be the Start component.
Click and drop a component onto the workspace, all possible start components take a distinctive bright green background colour. Notice that most of the components, can be Start components.
Only components which don’t make sense to trigger a flow, will not be proposed as Start components, such as tMap component for example.

54 JasperETL powered by Talend Copyright © 2007-Talend Inc
Designing a Job DesignDefining Metadata items
To distinguish which component is to be the Start component of your job, identify the main flow and the secondary flows of your job
• The main flow should be the one connecting a component to the next component using a Row type link. The Start component is then automatically set on the first component of the main flow (icon with green background).
• The secondary flows are also connected using a Row-type link which is then called Lookup row on the workspace to distinguish it from the main flow. This Lookup flow is used to enrich the main flow with more data.
Be aware that you can change the Start component hence the main flow by changing a main Row into a Lookup Row, simply through a right-click on the row to be changed.
Related topics:
• Connecting components together on page 45
• Activating/Disabling a job or sub-job on page 93
Defining Metadata itemsJasperETL is a metadata-driven solution, and can therefore help you ensure the whole job consistency and quality, through a centralized metadata warehouse.
Use the Repository to store, in the Metadata area, the recurrent information on files used to build your job and retrieve them easily from the Properties panel of any component. These metadata generally include: DB connections, File path and schemas.
Follow two main steps to setup schemas either from a DB or a File-type connection.
First step is to setup a connection to the File or to the DB. Then second step is to define the schema based on DB table or File metadata.

Copyright © 2007-Talend Inc JasperETL powered by Talend 55
Designing a Job DesignDefining Metadata items
This procedure differs slightly depending on the type of connection chosen. Below are the respective procedures to setup various connections and define multiple schemas.
Note that in any case, the connection to a file or DB serves only the purpose of copying the metadata, the schema will be based on, to your Repository (likely on your filesystem).
Click on Metadata in the Repository to expand the folder tree.
Each of the connection nodes will gather the various connections you setup.
Setting up a DB schema
For DB table based schemas, the creation procedure is in two separate but closely related operations. First Right-click on Db Connections and select Create connection on the pop-up menu.
Step 1: general properties
A connection wizard opens up. Fill in the generic Schema properties such as Schema Name and Description. The Status field is a customized field you can define in Window > Preferences.

56 JasperETL powered by Talend Copyright © 2007-Talend Inc
Designing a Job DesignDefining Metadata items
Click Next when completed, the second step requires you to fill in DB connection data.
Step 2: connection
Select the type of Database you want to connect to and some fields will be greyed out or enabled according to the DB connection detail requirements.

Copyright © 2007-Talend Inc JasperETL powered by Talend 57
Designing a Job DesignDefining Metadata items
Fill in the connection details and, check your connection by clicking on Check.
Fill in if need be, the database properties information. That’s all for the first operation on DB connection setup, click Finish to validate.
The newly created DB connection is now available in the Repository and displays four folders including Queries for SQL queries you save and Table schemas that will gathers all schema linked to this DB connection.
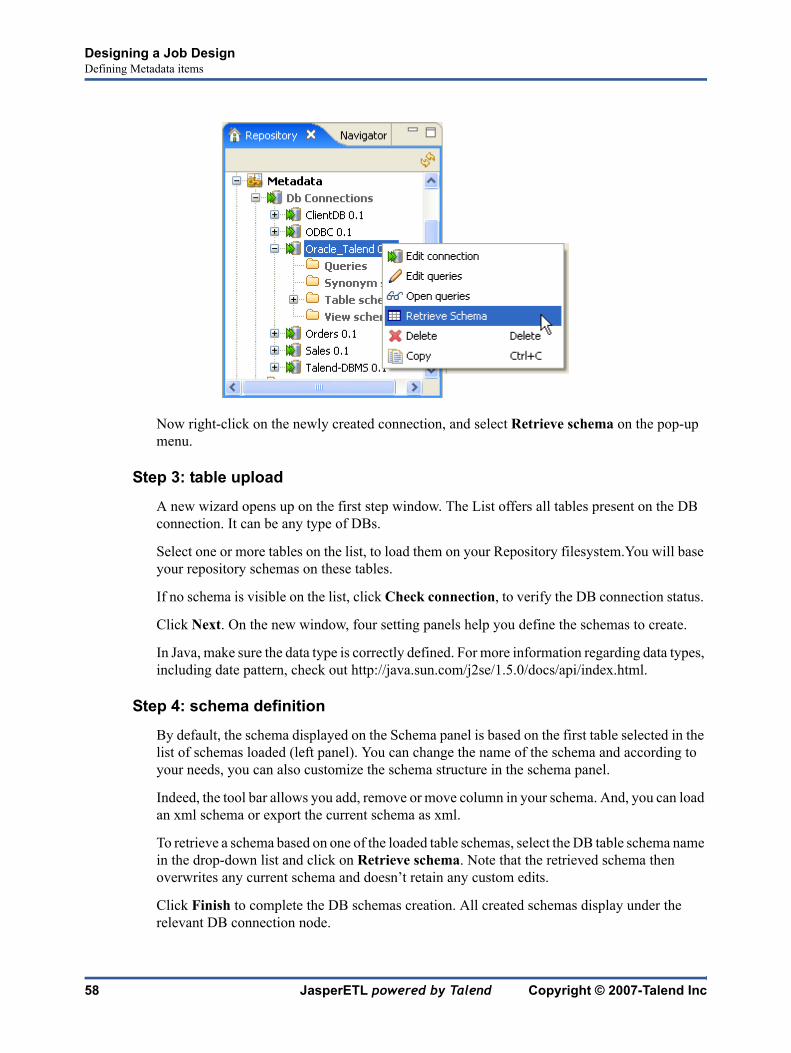
58 JasperETL powered by Talend Copyright © 2007-Talend Inc
Designing a Job DesignDefining Metadata items
Now right-click on the newly created connection, and select Retrieve schema on the pop-up menu.
Step 3: table upload
A new wizard opens up on the first step window. The List offers all tables present on the DB connection. It can be any type of DBs.
Select one or more tables on the list, to load them on your Repository filesystem.You will base your repository schemas on these tables.
If no schema is visible on the list, click Check connection, to verify the DB connection status.
Click Next. On the new window, four setting panels help you define the schemas to create.
In Java, make sure the data type is correctly defined. For more information regarding data types, including date pattern, check out http://java.sun.com/j2se/1.5.0/docs/api/index.html.
Step 4: schema definition
By default, the schema displayed on the Schema panel is based on the first table selected in the list of schemas loaded (left panel). You can change the name of the schema and according to your needs, you can also customize the schema structure in the schema panel.
Indeed, the tool bar allows you add, remove or move column in your schema. And, you can load an xml schema or export the current schema as xml.
To retrieve a schema based on one of the loaded table schemas, select the DB table schema name in the drop-down list and click on Retrieve schema. Note that the retrieved schema then overwrites any current schema and doesn’t retain any custom edits.
Click Finish to complete the DB schemas creation. All created schemas display under the relevant DB connection node.

Copyright © 2007-Talend Inc JasperETL powered by Talend 59
Designing a Job DesignDefining Metadata items
Setting up a File Delimited schema
File delimited metadata can be used for both InputFileDelimited and InputFileCSV design components as both csv and delimited files are based on the same structure.
WARNING—The File schema creation is very similar for all types of File connections: Delimited, Positional, Regex, Xml, or Ldif.
On the Repository, right-click on File Delimited tree node, and select Create file delimited on the pop-up menu.
Unlike the DB connection wizard, the Delimited File wizard gathers both file connection and schema definition in a four-step procedure.
Step 1: general properties
On the first step, fill in the schema generic information, such as Schema Name and Description.
For further information, see Step 1: general properties on page 55.
Step 2: file upload
Define the Server IP address where the file is stored. And click Browse... to set the File path.

60 JasperETL powered by Talend Copyright © 2007-Talend Inc
Designing a Job DesignDefining Metadata items
Select the OS Format the file was created in. This information is used to prefill subsequent step fields. If the list doesn’t include the appropriate format, ignore it.
The File viewer gives an instant picture of the file loaded. It allows you to check the file consistency, the presence of header and more generally the file structure.
Click Next to Step3.
Step 3: schema definition
In this view, you can refine your data description and file settings. Click on the squares below, to zoom in and get more information.

Copyright © 2007-Talend Inc JasperETL powered by Talend 61
Designing a Job DesignDefining Metadata items
Set the Encoding, as well as Field and Row separators in the Delimited File Settings.

62 JasperETL powered by Talend Copyright © 2007-Talend Inc
Designing a Job DesignDefining Metadata items
Depending on your file type (csv or delimited), you can also set the Escape and Enclosure characters to be used.
If the file preview shows a header message, you can exclude the header from the parsing. Set the number of header rows to be skipped. Also, if you know that the file contains footer information, set the number of footer lines to be ignored.
The Limit of rows allows you to restrict the extend of the file being parsed.
In the File Preview panel, you can view the new settings impact.
Check the Set heading row as column names box to transform the first parsed row as labels for schema columns. Note that the number of header rows to be skipped is then incremented of 1.

Copyright © 2007-Talend Inc JasperETL powered by Talend 63
Designing a Job DesignDefining Metadata items
Click Refresh on the preview panel for the settings to take effect and view the result on the viewer.
Step 4: final schema
The last step shows the Delimited File schema generated. You can customize the schema using the toolbar underneath the table.

64 JasperETL powered by Talend Copyright © 2007-Talend Inc
Designing a Job DesignDefining Metadata items
If the Delimited file which the schema is based on is changed, use the Guess button to generate again the schema. Note that if you customized the schema, the Guess feature doesn’t retain these changes.
Click Finish. The new schema displays on the Repository, under the relevant File Delimited connection node.
Setting up a File Positional schema
On the Repository, right-click on File Delimited tree node, and select Create file positional on the pop-up menu.

Copyright © 2007-Talend Inc JasperETL powered by Talend 65
Designing a Job DesignDefining Metadata items
Proceed the same way as for the file delimited connection. Right-click on Metadata on the Repository and select Create file positional.
Step 1: general properties
Fill in the schema generic information, such as Schema Name and Description.
Step 2: connection and file upload
Then define the positional file connection settings, by filling in the Server IP address and the File path fields.
Like for Delimited File schema creation, the format is requested for prefill purpose of next step fields. If the file creation OS format is not offered in the list, ignore this field.
The file viewer shows a file preview and allows you to place your position markers.

66 JasperETL powered by Talend Copyright © 2007-Talend Inc
Designing a Job DesignDefining Metadata items
Click on the file preview and set the marker against the ruler. The orange arrow helps you refine the position.
The Field length lists a series of figures separated by commas, these are the number of characters between markers. The asterisk symbol means all remaining characters on the row, from the preceding marker position.
The Marker Position shows the exact position of the marker on the ruler. You can change it to refine the position.
You can add as many markers as needed. To remove a marker, drag it towards the ruler.
Click Next to continue.
Step 3: schema refining
The next step opens the schema setting window. As for the Delimited File schema, you can refine the schema definition by precising the field and row separators, the header message number of lines and else...
At this stage, the preview shows the file delimited upon the markers’ position. If the file contains column labels, check the box Set heading row as column names.
Step 4: final schema
Step 4 shows the final generated schema. Note that any characters which could be misinterpreted by the program are replaced by neutral characters, like underscores replace asterisks.
You can add a customized name (by default, metadata) and make edits to it using the tool bar.
You can also retrieve or update the Positional File schema by clicking on Guess. Note however that any edits to the schema might be lost after “guessing” the file-based schema.

Copyright © 2007-Talend Inc JasperETL powered by Talend 67
Designing a Job DesignDefining Metadata items
Setting up a File Regex schema
Regex file schemas are used for files containing redundant information, such as log files.
Proceed the same way as for the file delimited or positional connection. Right-click on Metadata on the Repository and select Create file regex.
Step 1: general properties
Fill in the schema generic information, such as Schema Name and Description.
Step 2: file upload
Then define the Regex file connection settings, by filling in the Server IP address and the File path fields.
Like for Delimited File schema creation, the format is requested for prefill purpose of next step fields. If the file creation OS format is not offered in the list, ignore this field.

68 JasperETL powered by Talend Copyright © 2007-Talend Inc
Designing a Job DesignDefining Metadata items
The file viewer gives an instant picture of the loaded file. Click Next to define the schema structure.
Step 3: schema definition
This step opens the schema setting window. As for the other File schemas, you can refine the schema definition by precising the field and row separators, the header message number of lines and else...
In the Regular Expression settings panel, enter the regular expression to be used to delimit the file.
In Java: Regular expressions syntax is different in Java/Perl. Make sure you use the relevant syntax according to the generation language used.
Then click Refresh preview to take into account the changes. The button changes to Wait until the preview is refreshed.
Click next when setting is complete. The last step generates the Regex File schema.
Step 4: final schema
You can add a customized name (by default, metadata) and make edits to it using the tool bar.
You can also retrieve or update the Regex File schema by clicking on Guess. Note however that any edits to the schema might be lost after guessing the file based schema.
Click Finish. The new schema displays on the Repository, under the relevant File regex connection node.
Setting up a FileLDIF schema
LDIF files are directory files described by attributes. FileLDIF metadata centralize these LDIF type files and their attribute description.

Copyright © 2007-Talend Inc JasperETL powered by Talend 69
Designing a Job DesignDefining Metadata items
Proceed the same way as for other file connections. Right-click on Metadata on the Repository and select Create file Ldif.
Note: Make sure that you installed the relevant Perl module as described in the Installation guide. For more info, check out http://talendforge.org/wiki/doku.php
Step 1: general properties
On the first step, fill in the schema generic information, such as Schema name and description.
Step 2: file upload
Then define the Ldif file connection settings, by filling in the File path field.

70 JasperETL powered by Talend Copyright © 2007-Talend Inc
Designing a Job DesignDefining Metadata items
Note: The connection functionality to a remote server is not in operation yet for LDIF file collection.
The File viewer provides a preview of the file’s first 50 rows.
Step 3: schema definition
The list of attributes of the description file displays on the top of the panel. Select the attributes you want to extract from the LDIF description file, by checking the relevant boxes.

Copyright © 2007-Talend Inc JasperETL powered by Talend 71
Designing a Job DesignDefining Metadata items
Click Refresh Preview to include the selected attributes into the file preview.
Note: DN is omitted in the list of attributes as this key attribute is automatically included in the file preview hence in the generated schema.
Step 4: final schema
The schema generated shows the columns of the description file. You can customize it upon your needs and reload the original schema using the Guess button.
Click Finish. The new schema displays on the Repository, under the relevant File LDif connection node.
Setting up a FileXML schema
Centralize your XPath query statements over a defined XML file and gather the values fetched from it.
Proceed the same way as for other file connections. Right-click on Metadata on the Repository and select Create file XML.

72 JasperETL powered by Talend Copyright © 2007-Talend Inc
Designing a Job DesignDefining Metadata items
Step 1: general properties
On the first step, fill in the schema generic information, such as Schema name and description. Click Next when you’re complete.
Step 2: file upload
Browse to the XML File to upload and fill in the Encoding if the system didn’t detect it automatically.
The file preview shows the XML node tree structure.
Click Next to the following step.
Step 3: schema definition
Set the parameters to be taken into account for the schema definition.

Copyright © 2007-Talend Inc JasperETL powered by Talend 73
Designing a Job DesignDefining Metadata items
The schema definition window is divided into four panels:
• Source Schema: Tree view of the uploaded XML file structure
• Target Schema: Extraction and iteration information
• Preview: Target schema preview
• File viewer: Raw data viewer
In the Xpath loop expression field, enter the absolute xpath expression leading to the structure node which the iteration should apply on. You can type in the entire expression or press

74 JasperETL powered by Talend Copyright © 2007-Talend Inc
Designing a Job DesignDefining Metadata items
Ctrl+Space to get the autocompletion list.
Or else, drag and drop the node from the source structure towards the target schema Xpath field.
Note: The Xpath loop expression field is compulsory.
You can also define a Loop limit to restrict the iteration to a number of nodes. A green link is then created.
Then define the fields to extract. Simply drag and drop the relevant node to the Relative or absolute XPath expression field.
Use the plus sign to add rows to the table and select as many fields to extract, as you need. Press the Ctrl or the Shift keys for multiple selection of grouped or ungrouped nodes, and drag & drop them to the table.

Copyright © 2007-Talend Inc JasperETL powered by Talend 75
Designing a Job DesignCreating queries using SQLBuilder
In the Tag name field, give a name the column header that will display on the schema preview (bottom left panel).
The selected link is blue, and all other links are grey. You can prioritize the order of fields to extract using the up and down arrows.
Click Refresh preview to display the schema preview. The fields will then be displayed in the schema preview in the order given (top field on the left).
Step 4: final schema
The schema generated shows the selected columns of the XML file. You can customize it upon your needs or reload the original schema using the Guess button.
Click Finish. The new schema displays on the Repository, under the relevant File XML connection node.
Creating queries using SQLBuilderSQLBuilder helps you build your SQL queries and monitor the changes between DB tables and metadata tables. This editor is available in all DBInput and DBSQLRow components (specific or generic).

76 JasperETL powered by Talend Copyright © 2007-Talend Inc
Designing a Job DesignCreating queries using SQLBuilder
You can build a query using SQLbuilder whether your database table schema is stored in the repository or built-in directly in the job component.
Fill in the DB connection details and select the appropriate repository entry if you defined it.
Remove the default query statement in the Query field of the component Properties panel. Then click on the three-dot button to open the SQL Builder.
The SQL Builder editor is made of the following panels:
• Database structure
• Query editor made of editor and designer tabs
• Query execution view
• Schema view
The Database structure shows the tables for which a schema was defined either in the repository database entry or in your built-in connection.
The schema view, in the bottom right corner of the editor, shows the column description.

Copyright © 2007-Talend Inc JasperETL powered by Talend 77
Designing a Job DesignCreating queries using SQLBuilder
Database structure comparison
On the database structure panel, are shown all the tables stored in the DB connection metadata entry (Repository) or in case of built-in schema, the tables of the database itself.
Note: the connection to the database, in case of built-in schema or in case of refreshing operation of a repository schema, might take quite some time.
Click the refresh icon to display the differences found between the DB metadata tables and the actual DB tables.
The Diff icons point out that the table contains differences or gaps. Develop the table node to show the exact column containing the differences.
The red highlight shows that the content of the column contains differences or that the column is missing from the actual database table.
The blue highlight shows that the column is missing from the table stored in the repository metadata.
Building a query
The Query editor is a multiple-tab system allowing you to write or graphically design as many queries as you want.
To create a new query, right-click on the table or on the table column and select Generate Select Statement on the pop-up list.
Click on the empty tab showing by default and type in your SQL query or press Ctrl+Space to access the autocompletion list. The tooltip bubble shows the whole path to the table or table section you want to search in.

78 JasperETL powered by Talend Copyright © 2007-Talend Inc
Designing a Job DesignCreating queries using SQLBuilder
Alternatively the graphical query designer allows you to handle tables easily and have real-time generation of the corresponding query in the edit tab.
Click on Designer tab to switch from manual Edit mode to graphical mode.
Note: You may get a message while switching from one view to the other, as some SQL statements cannot be interpreted graphically.
If you selected a table, all columns are selected by default. Uncheck the box facing the relevant columns to exclude them from the selection.
Add more tables in a simple right-click. On the designer tab, right-click and select Add tables in the pop-up list then select the relevant table to be added.
If joins between these tables already exist, these joins are automatically set up graphically in the editor.
You can also very easily create a join between tables. Right-click on the first table columns to be linked and select Equal on the pop-up list, to join it with the relevant field of the second table.

Copyright © 2007-Talend Inc JasperETL powered by Talend 79
Designing a Job DesignCreating queries using SQLBuilder
The SQL statement corresponding to your graphical handlings is also displayed on the viewer part of the editor or click on the edit tab to switch back to manual Edit mode.
Note: In Designer mode, you cannot include graphically filter criteria.These need to be added in Edit mode.
Once your query is complete, execute it by clicking on the running man button.
The toolbar above the query editor allows you to access quickly usual commands such as: execute, open, save and clear.
On the Query results view, are displayed the results of the active tab’s query.
The status bar at the bottom of this panel provides information about execution time and number of rows retrieved.
Storing a query in the Repository
To be able to retrieve and reuse queries, we recommend you to store them in the Repository.
In the SQL Builder editor, click on Save (floppy disk icon on the tool bar) to bind the query with the DB connection and schema in case these are also stored in the Repository.
The query can then be accessed from the Database structure view, on the left-hand side of the editor.

80 JasperETL powered by Talend Copyright © 2007-Talend Inc
Designing a Job DesignMapping data flows in a job
Mapping data flows in a jobFor the time being, the way to handle multiple input and output flows including transformations and data re-routing is to use the tMap component. The following section gives details about the usage principles of this component, for further information or scenarii and use cases, see tMap on page 231.
tMap operation overview
tMap allows the following types of operations:
• data multiplexing and demultiplexing
• data transformation on any type of fields
• fields concatenation and interchange
• field filtering using constraints
• data rejecting
As all these operations of transformation and/or routing are carried out by tMap, this component cannot be a Start or End component in the job design.
tMap uses incoming connections to pre-fill input schemas with data in the Mapper. Therefore, you cannot create new input schemas straight in the Mapper. Instead, you need to implement as many Row connections incoming to tMap component as required, in order to create as many input schemas as needed.
The same way, create as many output row connections as required. However, you can fill in the output with content straight from the Mapper through a convenient graphical editor.
Note that there can be only one Main incoming rows. All other incoming rows are of Lookup type. Related topic: Row connection on page 45

Copyright © 2007-Talend Inc JasperETL powered by Talend 81
Designing a Job DesignMapping data flows in a job
Lookup rows are incoming connections from secondary (or reference) flows of data. These reference data might depend directly or indirectly on the primary flow. This dependency relationship is translated with an graphical mapping and the creation of an expression key.
Although the mapper requires the connections to be implemented in order to define Input and Output flows, you also need to create the actual mapping in order for the Preview to be available in the Properties panel of the workspace.
Double-click the tMap icon or click on the Map editor three-dot button to open the Mapping editor in a new window.
tMap interface
tMap is an advanced component which requires more information than other components. Indeed, the Mapper is an “all-in-one” tool allowing you to define all parameters needed to map, transform and route your data flows via a convenient graphical interface.
For all tables and the Mapper window, you can minimize and restore the window using the window icon.

82 JasperETL powered by Talend Copyright © 2007-Talend Inc
Designing a Job DesignMapping data flows in a job
The Mapper is made of several panels:
• The Input panel is the top left panel on the window. It offers a graphical representation of all (main and lookup) incoming data flows. The data are gathered in various columns of input tables. Note that the table name reflects the main or lookup row from the job design on the workspace.
• The Variable panel is the central panel on the Mapper window. It allows the centralization of redundant information through the mapping to variable and allows you to carry out transformations.
• The Output panel is the top right panel on the window. It allows mapping data and fields from Input tables and Variables to the appropriate Output rows.
• Both bottom panels are the Input and Output schemas description. The Schema editor tab offers a schema view of all columns of input and output tables in selection in their respective

Copyright © 2007-Talend Inc JasperETL powered by Talend 83
Designing a Job DesignMapping data flows in a job
panel.
• Expression editor is the edition tool for all expression keys of Input/Output data, variable expressions or filtering conditions.
The name of Input/Output tables in the mapping editor reflects the name of the incoming and outgoing flows (row connections).
Setting the input flow in the Mapper
The order of the Input tables is essential. The top table reflects the Main flow connection, and for this reason, is given priority for reading and processing through the tMap component.
For this priority reason, you are not allowed to move up or down the Main flow table. This ensures that no Join can be lost.
Although you can use the up and down arrows to interchange Lookup tables order, be aware that the Joins between two lookup tables may then be lost.
Related topic: Explicit Join on page 84.
Filling in Input tables with a schema
To fill in input tables, you need to define first the schemas of all input components connected to the tMap component on your Job Designer.
Main and Lookup table content
The order of the Input tables is essential.
The Main Row connection determines the Main flow table content. This input flow is reflected in the first table of the Mapper’s Input panel.
The Lookup connections’ content fills in all other (secondary or subordinate) tables which displays below the Main flow table. If you haven’t define the schema of an input component yet , the input table displays as empty in the Input area.
The key is also retrieved from the schema defined in the Input component. This Key corresponds to the key defined in the input schema where relevant. It has to be distinguished from the hash key that is internally used in the Mapper, which displays in a different color.

84 JasperETL powered by Talend Copyright © 2007-Talend Inc
Designing a Job DesignMapping data flows in a job
Variables
You can use global or context variables or reuse the variable defined in the Variables zone. Press Ctrl+Space bar to access the list of variables. This list gathers together global, context and mapping variables.
The list of variables changes according to the context and grows along new variable creation. Only valid mappable variables in the context show on the list.
Docked at the Variable list, a metadata tip box display to provide information about the selected column.
Related topic: Mapping variables on page 88
Explicit Join
In fact, Joins let you select data from a table depending upon the data from another table. In the Mapper context, the data of a Main table and of a Lookup table can be bound together on expression keys. In this case, the order of table does fully make sense.
Simply drag and drop column names from one table to a subordinate one, to create a Join relationship between the two tables. This way, you can retrieve and process data from multiple inputs.
The join displays graphically as a violet link and creates automatically a key that will be used as a hash key to speed up the match search.
You can create direct joins between the main table and lookup tables. But you can also create indirect joins from the main table to a lookup table, via another lookup table. This requires a direct join between one of the Lookup table to the Main one.
Note: You cannot create a Join from a subordinate table towards a superior table in the Input area.
The Expression key field which is filled in with the dragged and dropped data is editable in the input schema or in the Schema editor panel, whereas the column name can only be changed from the Schema editor panel.
You can either insert the dragged data into a new entry or replace the existing entries or else concatenate all selected data into one cell.

Copyright © 2007-Talend Inc JasperETL powered by Talend 85
Designing a Job DesignMapping data flows in a job
For further information about possible types of drag & drops, see Output setting on page 89.
Note: If you have a great number of input tables, note that you can use the minimize/maximize icon to reduce or restore the table size in the Input area. The Join binding two tables remain visible eventhough the table is minimized.
Creating a join automatically assigns a hash key onto the joined field name. The key symbol displays in violet on the input table itself and is removed when the join between the two tables is removed.
Related topics:
• Schema editor on page 92
• Inner join on page 86
Along with the explicit Join you can select whether you want to filter down to a unique match of if you allow several matches to be taken into account. In this last case, you can choose to only consider the first or the last match or all of them.
Unique Match (java)
This is the default selection when you implement an explicit Join. This means that zero or one match from the Lookup will be taken into account and passed on to the output.
If more matches are available, a warning notification displays.

86 JasperETL powered by Talend Copyright © 2007-Talend Inc
Designing a Job DesignMapping data flows in a job
First or Last Match (java)
This selection implies that several matches can be expected in the lookup. The First or Last Match selection means that in the lookup only the first encountered or the last encountered match will be taken into account and passed onto the main output flow.
The other matches will then be ignored.
All Matches (java)
This selection implies that several matches can be expected in the lookup flow. In this case, all matches are taken into account and passed on to the main output flow.
Inner join
The Inner join is a particular type of Join that distinguishes itself by the way the rejection is performed.
This option avoids that null values are passed on to the main output flow. It allows also to pass on the rejected data to a specific table called Inner Join Reject table.
If the data searched cannot be retrieved through the explicit join or the filter (inner) join, in other words, the Inner Join cannot be established for any reason, then the requested data will be rejected to the Output table defined as Inner Join Reject table if any.
Basically check the Inner Join box located at the top a lookup table, to define this table as Inner Join table.
On the Output area, click on the Inner Join Reject button to define the Inner Join Reject output.

Copyright © 2007-Talend Inc JasperETL powered by Talend 87
Designing a Job DesignMapping data flows in a job
Note: An Inner Join table should always be coupled to an Inner Join Reject table
You can also use the filter button to decrease the number of rows to be searched and improve the performance (in java).
Related topics:
• Inner Join Rejection on page 91
• Filtering an input flow (java) on page 87
All rows (java)
When you check the All rows box , the Inner Join feature gets automatically greyed out. This All rows option means that all the rows are loaded from the Lookup flow and searched against the Main flow.
The output corresponds to the Cartesian product of both table (or more tables if need be).
Filtering an input flow (java)
Click the Filter button next to the Inner join button to add a Filter area.
In the Filter area, type in the condition to be applied. This allows to reduce the number of rows parsed against the main flow, enhancing the performance on long and heterogeneous flows.
You can use the Autocompletion tool via the Ctrl+Space bar keystrokes in order to reuse schema columns in the condition statement.
This feature is only available in Java therefore the filter condition needs to be written in Java.
Removing Input entries from table
To remove Input entries, click on the red cross sign on the Schema Editor of the selected table. Press Ctrl or Shift and click on fields for multiple selection to be removed.

88 JasperETL powered by Talend Copyright © 2007-Talend Inc
Designing a Job DesignMapping data flows in a job
Note: Note that if you remove Input entries from the Mapper schema, this removal also occurs in your component schema definition.
Mapping variables
The Variable table regroups all mapping variables which are used numerous times in various places.
You can also use the Expression field of the Var table to carry out any transformation you want to, using Perl code or Java Code.
Variables help you save processing time and avoid you to retype many times the same data.
There are various possibilities to create variables:
• Type in freely your variables in Perl. Enter the strings between quotes or concatenate functions using a dot as coded in Perl.
• Add new lines using the plus sign and remove lines using the red cross sign. And press Ctrl+Space to retrieve existing global and context variables.
• Drag and drop one or more Input entries to the Var table.
Select an entry on the Input zone or press Shift key to select multiple entries of one Input table.
Press Ctrl to select either non-appended entries in the same input table or entries from various tables. When selecting entries in the second table, notice that the first selection displays in grey. Hold the Ctrl key down to drag all entries together. A tooltip shows you how many entries are in selection.
Then various types of drag and drops are possible depending on the action you want to carry out.

Copyright © 2007-Talend Inc JasperETL powered by Talend 89
Designing a Job DesignMapping data flows in a job
Accessing global or context variables
Press Ctrl+Space to access the global and context variable list.
Appended to the Variable list, a metadata list provides information about the selected column.
Removing variables
To remove a selected Var entry, click on the red cross sign. This removes the whole line as well as the link.
Press Ctrl or Shift and click on fields for multiple selection then click the red cross sign.
Output setting
On the workspace, the creation of a Row connection from the tMap component to the output components adds Output schema tables to the Mapper window.
You can also add an Output schema in your Mapper, using the plus sign from the tool bar of the Output zone.
Unlike the Input zone, the order of output schema tables does not make such a difference, as there is no subordination relationship between outputs (of Join type).
Once all connections, hence output schema tables, are created, you can select and organize the output data via drag & drops.
You can drag and drop one or several entries from the Input zone straight to the relevant output table.
Press Ctrl or Shift, and click on entries to carry out multiple selection.
How to... Associated actions
Insert all selected entries as separated variables.
Simply drag & drop to the Var table. Arrows show you where the new Var entry can be inserted. Each Input is inserted in a separate cell.
Concatenate all selected input entries together with an existing Var entry
Drag & drop onto the Var entry which gets highlighted. All entries gets concatenated into one cell. Add the required operators using Perl/Java operations signs. The dot concatenates string variables.
Overwrite a Var entry with selected concatenated Input entries
Drag & drop onto the relevant Var entry which gets highlighted then press Ctrl and release. All selected entries are concatenated and overwrite the highlighted Var.
Concatenate selected input entries with highlighted Var entries and create new Var lines if needed
Drag & drop onto an existing Var then press Shift when browsing over the chosen Var entries. First entries get concatenated with the highlighted Var entries. And if necessary new lines get created to hold remaining entries.

90 JasperETL powered by Talend Copyright © 2007-Talend Inc
Designing a Job DesignMapping data flows in a job
Or you can drag expressions from the Var zone and drop them to fill in the output schemas with the appropriate reusable data.
Note that if you make any change to the Input column in the Schema Editor, a dialog prompts you to decide to propagate the changes throughout all Input/Variable/Output table entries, where concerned.
You can add filters and rejection to customize your outputs.
Filters
Filters allow you to make a selection among the input fields, and send only the selected fields to various outputs.
Click the plus button at the top of the table to add a filter line.
You can enter freely your filter statements using Perl operators and function.
Drag and drop expressions from the Input zone or from the Var zone to the Filter row entry of the relevant Output table.
An orange link is then created. Add the required Perl/Java operator to finalize your filter formula.
You can create various filters on different lines. The AND operator is the logical conjunction of all stated filters.
Action Result
Drag & Drop onto existing expressions
Concatenates the selected expression with the existing expressions.
Drag & Drop to insertion line Inserts a or several new entries at start or end of table or between two existing lines.
Drag & Drop + Ctrl Replaces highlighted expression with selected expression.
Drag & Drop + Shift Adds to all highlighted expressions the selected fields. Inserts new lines if needed.
Drag & Drop + Ctrl + Shift Replaces all highlighted expressions with selected fields. Inserts new lines if needed.

Copyright © 2007-Talend Inc JasperETL powered by Talend 91
Designing a Job DesignMapping data flows in a job
Rejections
Reject options define the nature of an output table.
It groups data which do not satisfy one or more filters defined in the regular output tables. Note that as regular output tables, are meant all non-reject tables.
This way, data rejected from other output tables, are gathered in one or more dedicated tables, allowing you to spot any error or unpredicted case.
The Reject principle concatenates all non Reject tables filters and defines them as an ELSE statement.
Create a dedicated table and click the Output reject button to define it as Else part of the regular tables.
You can define several Reject tables, to offer multiple refined outputs. To differenciate various Reject outputs, add filter lines, by clicking on the plus arrow button.
Once a table is defined as Reject, the verification process will be first enforced on regular tables before taking in consideration possible constraints of the Reject tables.
Note that data are not exclusively processed to one output. Although a data satisfied one constraint, hence is routed to the corresponding output, this data still gets checked against the other constraints and can be routed to other outputs.
Inner Join Rejection
The Inner Join is a Lookup Join. The Inner Join Reject table is a particular type of Rejection output. It gathers rejected data from the main row table after an Inner Join could not be established.
To define an Output flow as container for rejected Inner Join data, create a new output component on your job that you connect to the Mapper. Then in the Mapper, click on the Inner Join Reject button to define this particular Output table as Inner Join Reject table.
Removing Output entries
To remove Output entries, click on the cross sign on the Schema Editor of the selected table.
Expression editor
All expressions (Input, Var or Output) and constraint statements can be viewed and edited from the Expression editor. This editor provides visual comfort to write any functions or transformation in a handy dedicated window.
Select the expression to be edited. Click on Expression editor.

92 JasperETL powered by Talend Copyright © 2007-Talend Inc
Designing a Job DesignMapping data flows in a job
Enter the Perl code or Java code according to your needs. The corresponding table expression is synchronized.
Note: Refer to the relevant Perl or Java documentation for more information regarding functions and operations.
Schema editor
The Schema Editor details all fields of the selected table.
Use the tool bar below the schema table, to add, move or remove columns from the schema.
You can also load a schema from the Repository or export it into a file.

Copyright © 2007-Talend Inc JasperETL powered by Talend 93
Designing a Job DesignActivating/Disabling a job or sub-job
Note: Note that Input metadata and Output metadata are independent from each other. You can for instance change the label of a column on the Output side without the column label of the Input schema being changed.
However, any change made to the metadata are immediately reflected in the corresponding schema on the tMap relevant (Input or Output) zone, but also on the schema defined for the component itself on the workspace.
A Red colored background shows that an invalid character has been entered. Most special characters are prohibited in order for the job to be able to interpret and use the text entered in the code. Authorized characters include lower-case, upper-case, figures except as start character.
Browse the mouse over the red field, a tooltip displays the error message.
Activating/Disabling a job or sub-jobYou can enable or disable the whole job or a sub-job directly connected to the selected component. By default, a component is activated.
In the Main properties of the selected component, check or uncheck the Activate box.
Metadata Description
Column Column name as defined on the Mapper schemas and on the Input or Output component schemas
Key The Key shows if the expression key data should be used to retrieve data through the Join link. If unchecked, the Join relation is disabled.
Type Type of data. String or Integer.
Note: This column should always be defined in Java version.
Length -1 shows that no length value has been defined in the schema.
Precision precises the length value if any is defined.
Nullable Uncheck this box if the field value should not be null
Default Shows any default value that may be defined for this field.
Comment Free text field. Enter any useful comment.

94 JasperETL powered by Talend Copyright © 2007-Talend Inc
Designing a Job DesignDefining a job design context and related variables
Alternatively, right-click on the component and select the relevant Activate/Deactivate command according to the current component status.
If you disable a component, no code will be generated, you will not be able to add or modify links from the disabled component to active or new components.
Related topic: Defining the Start component on page 53.
Disabling a Start component
In the case the component you deactivated is a Start component, components of all types and links of all nature connected directly and indirectly to it will get disabled too.
Disabling a non-Start component
When you uncheck the Activate box of a regular (non Start) component, are deactivated only the selected component itself along with all direct links.
If a direct link to the disabled component is a main Row connection to a sub-job. All components of this sub-job will also get disabled.
Defining a job design context and related variablesDepending on the circumstances the job design is being used in, you might want to manage it differently for various environment (Prod and Test for example).
For instance, there might be various stages of test, you want to perform and validate before a job design is ready to go-live for production use. Therefore, JasperETL offers you to have multiple contexts to avoid having to fill in components properties twice or more for each context of use.

Copyright © 2007-Talend Inc JasperETL powered by Talend 95
Designing a Job DesignDefining a job design context and related variables
For example, one context can be dedicated to development while another is prepared to production.The only difference between both contexts, being some critical field values and the scale of use.The production context is thus a duplicate of the development context with few changes that make the difference.
Click on the Contexts tab located next to the properties tab system, to display the context configuration view.
If the Contexts view is not offered in the tab system, go to Window > Show view > Talend, and select Contexts.
Adding or renaming a context
To change the name of an existing context, click on Rename and enter the new Context name in the dialog box showing up.
To add a new context tab, click on Copy. The default context is thus duplicated in a new tab. Enter a name for the newly created context on the dialog box.
When you copy a context, the entire default context legacy is copied over to the new context.You hence only need to edit the relevant fields to customize the context according to the targeted use.
The drop-down list Default Context shows all the contexts you created .
You can switch Default context by simply selecting the new default context on the list.

96 JasperETL powered by Talend Copyright © 2007-Talend Inc
Designing a Job DesignDefining a job design context and related variables
Note that the Default context can never be deleted. There should always be a context to run the job. This context being called Default or any other name.
Defining the context variables
In any Properties field defining a component, you can use an existing global variable or a context variables.
Press Ctrl+Space to display the whole list of global and context variables used in various predefined Perl functions. The context variables are created by the user for a particular context, whereas the global variables are a system variables.
The list grows along with new user (aka context) variable creations.
Related topic: Defining a job design context and related variables on page 94

Copyright © 2007-Talend Inc JasperETL powered by Talend 97
Designing a Job DesignDefining a job design context and related variables
Short creation of context variables
Create quickly your context variables via the F5 keystroke:
• Place your cursor on the relevant field that you want to parameterize in the current context (possibly the default one).
• Press F5 to display the context parameter dialog box:
• Give a Name to this new variable, fill in the Comment zone and choose the Type.
• Enter a Prompt to be displayed to confirm the use of this variable in the current job execution.
• Check the Prompt for value box to display the field as editable value. If you filled in a value already in the corresponding properties field, this value is displayed in the Default value field.
• Click Finish to validate. Click anywhere on your job’s design workspace, and go to the Properties tab. Notice that the context parameters lists the newly created variable.
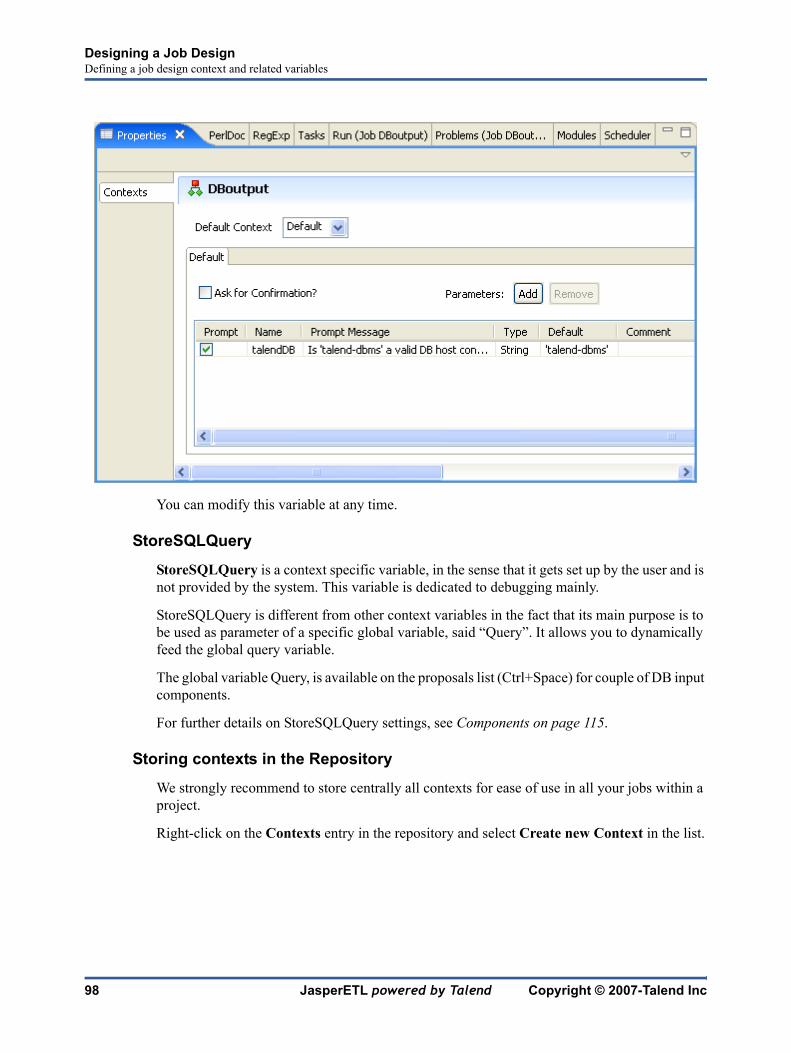
98 JasperETL powered by Talend Copyright © 2007-Talend Inc
Designing a Job DesignDefining a job design context and related variables
You can modify this variable at any time.
StoreSQLQuery
StoreSQLQuery is a context specific variable, in the sense that it gets set up by the user and is not provided by the system. This variable is dedicated to debugging mainly.
StoreSQLQuery is different from other context variables in the fact that its main purpose is to be used as parameter of a specific global variable, said “Query”. It allows you to dynamically feed the global query variable.
The global variable Query, is available on the proposals list (Ctrl+Space) for couple of DB input components.
For further details on StoreSQLQuery settings, see Components on page 115.
Storing contexts in the Repository
We strongly recommend to store centrally all contexts for ease of use in all your jobs within a project.
Right-click on the Contexts entry in the repository and select Create new Context in the list.

Copyright © 2007-Talend Inc JasperETL powered by Talend 99
Designing a Job DesignDefining a job design context and related variables
A wizard helps you to define the context parameters, that you’ll be able to select for a Job execution.
Click Finish to validate.
To apply a context to a job, click on any empty area of your relevant job workspace and in the Context tab, select Repository as Context type.

100 JasperETL powered by Talend Copyright © 2007-Talend Inc
Designing a Job DesignDefining a job design context and related variables
Then select the relevant Context from the repository. Click on the relevant tab, the selected context’s parameters show as read-only values.
Defining the parameters in the Context tab
A context is characterized by parameters. These parameters are mostly context-sensitive variables which will be added to the list of variables available for reuse in the component-specific properties through the Ctrl+Space keystrokes.
Add a parameter line to the table by clicking on Add, and fill the job’s common data.You can add as many entries as you need. The Script code field points out the corresponding variable created. It follows a script standard which depends on the Generation language you selected (Java or Perl) such as in Perl: $_context{YourParameterName}
Check the Ask for confirmation? box, if you want to be prompted for confirmation before running a job. This can be of use at the go-live stage, when the job is ready to switch from Development to Production context, for instance.
If you also check the prompt checkbox next to the variable entry, you will also be able to modify the variable for a particular job execution.

Copyright © 2007-Talend Inc JasperETL powered by Talend 101
Designing a Job DesignRunning a job
Note that the variable or parameter name should follow some typing rules and should not contain any forbidden characters, such as space char.
Running a job in selected context
You can select the context you want the job design to be executed in.
Click on Run Job tab, and in the Context area, select the relevant context among the various ones you created.
If you didn’t create any context, only the Default context shows on the list.
All the context variables you created for the selected context display, along with their respective value, in a table underneath. If you checked the Prompt box next to some variables, you will get a dialog box allowing
you to change the variable value for this job execution only.
To make a change permanent in a variable value, you need to change it on the context parameter setup panel. Related topic: Defining the parameters in the Context tab on page 100
Running a jobYou can execute a job in several ways. This mainly depends on the purpose of your job execution and on your user level.
If you are an advanced Perl/Java user and want to execute your project step by step to check and possibly modify it on the run, see Running in debug mode on page 103.
Table 7—Fields Description
Prompt Check this box, if you want the variable to be editable in the Confirmation dialog box when running the job.
Name Fill in a name for the variable. A context variable is meant to be reused in different component properties, this way it avoids repetition of data typing.
Prompt message If you asked for a confirmation to popup, fill in this field to define the message in the popup window.
Type Select in the list the type of data entered.
Default Enter the default value for this variable. Through this field you can update the value of the variable and hence update all properties calling this variable.
Comment This is a free text field.
Script code This field is read-only. A script code is generated according to the parameter name entered. This is the variable format as it shows on the Ctrl+Space bar list.

102 JasperETL powered by Talend Copyright © 2007-Talend Inc
Designing a Job DesignRunning a job
If you don’t have advanced Perl knowledge and want to execute and monitor your job in normal mode, see Running in normal mode on page 102.
Running in normal mode
Make sure you saved your job before running it in order for all properties to be taken into account.
• Click on the Run Job tab to access the panel.
• In the Context zone, select the right context for the job to be executed in. You can also check the variable values
If you haven’t defined any particular execution context, the context parameter table is empty and the context is the default one. Related topic: Defining a job design context and related variables on page 94
• Click on Run to start the execution.
• On the same panel, the log displays the progress of the execution. The log includes any error message as well as start and end messages. It also shows the job output in case of tLogRow component is used in the job design.
Before running again a job, you might want to remove the log content from the execution panel. Check the Clear before run box, for the log to be cleared each time you execute again a job.
If for any reason, you want to stop the job in progress, simply click on Kill button. You’ll need to click the Run button again, to start again the job.
JasperETL offers various informative features, such as statistics and traces, facilitating the job monitoring and debugging work.
Displaying Statistics
The Statistics feature displays each component performance rate, underneath the component icon on the design workspace.
It shows the number of rows processed and the processing time in row per second, allowing you to spot straight away any bottleneck in the data processing flow.
Note: Exception is made for external components which cannot offer this feature if their design doesn’t include it.
Check the Statistics box to activate the stats feature and click again to disable it.
The Stats calculation only starts along with the job execution launchs, and stops at the end of it.

Copyright © 2007-Talend Inc JasperETL powered by Talend 103
Designing a Job DesignRunning a job
Click Clear to remove the calculated stats displayed. Check the Clear before Run box to reset the Stats feature before each execution.
Note: The statistics thread slows down sensibly the time performance of a job execution as the job must send these stats data to the Designer in order to be displayed.
Displaying Traces
The tracking feature is relatively basic in JasperETL for the time being. But it should be enhanced in a near future.
It provides a row by row view of the component behaviour and displays the dynamic result next to the row link.
This feature allows you to monitor all components of a job, without switching to Debug mode, hence without requiring advanced Perl/Java knowledge.
The Traces function displays the content of processed rows in a table.
Note: Exception is made for external components which cannot offer this feature if their design doesn’t include it.
Click on Traces button to activate the tracking feature and click again to disable it.
The trace only launches along with the job launches, and stops at the end of it.
Click on Clear to remove the tracking data displayed.
Note: Note that the table is limited horizontally, however mouse over the table to display the whole data table. On the other hand, the table does not have any vertical limitation. This might become an issue for very long data tables.
Running in debug mode
Note that to run a job in Debug mode, you need the EPIC module to be installed.
Before running your job in Debug mode, add breakpoints to the major steps of your job flow.
This will allow you to get the job to automatically stop at each breakpoint. This way components and their respective variables can be verified individually and debugged if required.
To add breakpoints to a component, right-click on it on the Job Design workspace, and select Add breakpoint on the popup menu.
A pause icon displays next to the component where the break is added.

104 JasperETL powered by Talend Copyright © 2007-Talend Inc
Designing a Job DesignSaving or exporting your jobs
To switch to debug mode, click on the Debug button on the Run Job panel. JasperETL’s window gets reorganised for debugging.
You can then run the job step by step and check each breakpoint component for the expected behaviour and variable values.
To switch back to Talend Open Studio designer mode, click on Window, then Perspective and select Talend Open Studio.
Saving or exporting your jobs
Saving a job
When closing a job or JasperETL, a dialog box prompts you to save the currently open jobs if not already done.
In case several job were unsaved, check the box facing the jobs you want to save. The Job is saved in the relevant project folder of your workspace directory.
Alternately, click File > Save or press Ctrl+S.
Exporting job scripts
You can store and file your job scripts into an archive using the export functionality.
Right-click on the relevant job in the Repository, and select Export Job Scripts.

Copyright © 2007-Talend Inc JasperETL powered by Talend 105
Designing a Job DesignSaving or exporting your jobs
Select the type of files you want to add to your archive and give a path to the archive file to create.
If you want to reuse the job in another version of JasperETL, make sure you checked the Source files box.
Click Finish when complete.
The output file is an archive that you can store or send as you need. It contains the run.bat and run.sh needed to execute the scripts.
Note: The Export Job scripts dialog might differ slightly whether you work on a Java or a Perl version of the product.

106 JasperETL powered by Talend Copyright © 2007-Talend Inc
Designing a Job DesignGenerating HTML documentation
Generating HTML documentationJasperETL allows you to produce detailed documentation in HTML of the jobs selected.
• On the Repository, right-click on a Job entry or select several Job Designs to produce multiple documentations.
• Select Generate Doc as HTML on the pop-up menu.
• Browse to the location where the generated documentation archive should be stored.
• On the same field, type in a Name for the archive gathering all generated documents.
• Click Finish to validate the generation operation.
The archive file contains all required files along with the Html output file. Open the html file in your favourite browser.
Automating stats & logs useIf you have a great need of log, statistics and other measurement of your data flows, you are facing the issue of having too many log-related components loading your job designs. You can automate the use of tFlowMeterCatcher, tStatCatcher, tLogCatcher functionalities without using the components in your job thanks to the Stats & Logs tab.

Copyright © 2007-Talend Inc JasperETL powered by Talend 107
Designing a Job DesignShortcuts and aliases
The Stats & Logs tab is located underneath the Design workspace and prevents overloading your jobs designs by superseding the log-related components with a general log configuration.
• Click anywhere on your Job design but on the component.
• Select the Stats & Logs tab to display the configuration view.
• Set the relevant details depending on the output you prefer (console, file or database).
• Check the relevant Catch option according to your needs.
Shortcuts and aliasesBelow is a table gathering all keystrokes currently in use:

108 JasperETL powered by Talend Copyright © 2007-Talend Inc
Designing a Job DesignShortcuts and aliases
At any place of your job properties setting, you can use Ctrl+Space to set the relevant field value as context variable.
Table 8—Operation Context Shortcut
Show Properties view Global application F3
Show Run Job view Global application F4
Run current job or Show Run Job view if no job is open.
Global application F6
Show Module view Global application Ctrl + F2
Show Problems view Global application Ctrl + F3
Switch to current Job Design view Global application Ctrl + H
Show Code tab of current Job Global application Ctrl + G
Synchronize components perljet templates and associated java classes
Global application Ctrl + Shift + F3
Switch to Debug mode From Run Job view F7
Create a context variable from any properties field
From any job Properties tab view
F5
Kill current job From Run Job view F8
Refresh Modules install status From Modules view F5

Copyright © 2007-Talend Inc JasperETL powered by Talend 115
—Components—
Components This chapter details the main components’ properties provided in the Palette of JasperETL. Each component has a specific list of properties and parameters, editable through the Properties tab of the Properties panel.
In the component properties section, an icon or points out whether the component is available in Java and/or in Perl.
Click on one of the following link to jump to the relevant component datasheet:
Families Components
Business Connectors
Salesforce tSalesforceInput tSalesforceOutput
SugarCRM tSugarCRMInput tSugarCRMOutput
Data quality tFuzzyMatch tAddCRCRow
Databases DB Generic tDBInput tDBOutput tDBSQLRow
DB2 tDB2Input tDB2Output tDB2Row
MSSqlServer tMSSqlInput tMSSqlOutput tMSSqlRow
MySQL tMysqlInput tMysqlOutput tMysqlRow
tMysqlOutputBulk tMysqlBulkExec tMysqlOutputBulkExec
tMysqlConnection tMysqlCommit
SQLite tSQLiteInput tSQLiteOutput
ELT tELTMysqlInput tELTMysqlMap tELTMysqlOutput
Oracle tOracleInput tOracleOutput tOracleRow
tOracleBulkExec tELTOracleInput tELTOracleMap
tELTOracleOutput
PostgresSQL tPostgresqlInput tPostgresqlOutput tPostgresqlRow
Sybase tSybaseInput tSybaseOutput tSybaseRow
tSybaseBulkExec
File Input tFileInputDelimited tFileInputPositional tFileInputRegex
tFileInputXML tFileInputMail

116 JasperETL powered by Talend Copyright © 2007-Talend Inc
Components
Management tFileList tFileCompare tFileUnarchive
tFileCopy tFileDelete
Output tFileOutputXML tFileOutputLDIF tFileOutputExcel
Internet FTP tFTP
tSendMail tWebServiceInput
Log/Error tLogRow tStatCatcher tLogCatcher
tWarn tDie
Misc tMsgBox tRowGenerator tContextLoad
Processing tPerl tMap tAggregateRow
tSortRow tUniqRow tNormalize
tDenormalize
System tSystem tRunJob
XML tDTDValidator tXSDValidator tXSLT
Families Components

Copyright © 2007-Talend Inc JasperETL powered by Talend 117
ComponentstAggregateRow
tAggregateRow
tAggregateRow properties
Component family Processing
Function tAggregateRow receives a flow and aggregates it based on one or more columns. For each output line, are provided the aggregation key and the relevant result of set operations (min, max, sum...).
Purpose Helps to provide a set of metrics based on values or calculations.
Properties Schema type and Edit Schema
A schema is a row description, i.e., it defines the number of fields that will be processed and passed on to the next component. The schema is either built-in or remote in the Repository. !Click Edit Schema to make changes to the schema. Note that if you make changes, the schema automatically becomes built-in.
Built-in: The schema will be created and stored locally for this component only. Related topic: Setting a built-in schema on page 51
Repository: The schema already exists and is stored in the Repository, hence can be reused in various projets and job flowcharts. Related topic: Setting a repository schema on page 52
Group by Define the aggregation sets, the values of which will be used for calculations.
Output Column: Select the column label in the list offered based on the schema structure you defined. You can add as many output columns as you wish to make more precise aggregations. !Ex: Select Country to calculate an average of values for each country of a list or select Country and Region if you want to compare one country’s regions with another country’ regions.
Input Column: Match the input column label with your output columns, in case the output label of the aggregation set needs to be different.

118 JasperETL powered by Talend Copyright © 2007-Talend Inc
ComponentstAggregateRow
Scenario: Aggregating values and sorting data
The following scenario describes a four-component job. As input component, a CSV file contains countries and notation values to be sorted by best average value. This component is connected to a tAggregateRow operator, in charge of the average calculation then to a tSortRow component for the ascending sort. The output flow goes to the new csv file.
• From the File folder in the Palette, click and drop a tFileInputCSV component.
• Click on the label and rename it as Countries. Or rename it from the View tab panel
• In the Properties tab panel of this component, define the filepath and the delimitation criteria. Or select the metadata file in the repository if it exists.
Operations Select the type of operation along with the value to use for the calculation and the output field.
Output Column: Select the destination field in the list.
Function: Select the operator among: count, min, max, avg, first, last.
Input column: Select the input column from which the values are taken to be aggregated.
Usage This component handles flow of data therefore it requires input and output, hence is defined as an intermediary step. Usually the use of tAggregateRow is combined with the tSortRow component.
Limitation n/a

Copyright © 2007-Talend Inc JasperETL powered by Talend 119
ComponentstAggregateRow
• Click on Edit schema... and set the columns: Countries and Points to match the file structure. If your file description is stored in the Metadata area of the Repository, the schema is automatically uploaded when you click on Repository in Schema type field.
• Then from the Processing folder in the Palette, click and drop a tAggregateRow component. Rename it as Calculation.
• Connect Countries to Calculation via a right-click and select Row > Main.
• Double-click on Calculation (tAggregateRow component) to set the properties. Click on Edit schema and define the output schema. You can add as many columns as you need to hold the set operations results in the output flow.
• In this example, we’ll calculate the average notation value and we will display the max and the min notation for each country, given that each country holds several notations. Click OK when the schema is complete.
• To carry out the various set operations, back in the Properties panel, define the sets holding the operations in the Group By area. In this example, select Country as group by column. Note that the output column needs to be defined a key field in the schema. The first column mentioned as output column in the Group By table is the main set of calculation. All other output sets will be secondary by order of display.
• Choose the input column which the values will be taken from.
• Then fill in the various operations to be carried out. The functions are average, min, max for this use case. Select the Input columns, where the values are taken from.

120 JasperETL powered by Talend Copyright © 2007-Talend Inc
ComponentstAggregateRow
• Click and drop a tSortRow component from the Palette onto the modeling workspace. For more information regarding this component , see tSortRow properties on page 310.
• Connect the tAggregateRow to this new component using a row main link.
• On the Properties tab of the tSortRow component, define the column the sorting is based on, the sorting type and order.
• In this case, the column to be sorted by is Country, the sort type is alphabetical and the order is ascending.

Copyright © 2007-Talend Inc JasperETL powered by Talend 121
ComponentstAggregateRow
• Add a last component to your job, to set the output flow. Click and drop a tFileOutputDelimited and define it.
• Connect the tSortRow component to this output component.
• In the Properties panel, enter the output filepath. Edit the schema if need be. In this case the delimited file is of csv type. And check the Include Header box to reuse the schema column labels in your output flow.
• Press F6 to execute the job. The csv file thus created contains the aggregating result.

122 JasperETL powered by Talend Copyright © 2007-Talend Inc
ComponentstContextLoad
tContextLoad
tContextLoad properties
Component family Misc
Function tContextLoad modifies dynamically the values of the active context.
Purpose tContextLoad can be used to load a context from a flow. !This component performs also two controls. It warns when the parameters defined in the incoming flow are not defined in the context, and the other way around, it also warns when a context value is not initialized in the incoming flow.!But note that this does not block the processing.
Properties Schema type and Edit Schema
In the tContextLoad use, the schema must be made of two columns, including the parameter name and the parameter value to be loaded.!A schema is a row description, i.e., it defines the fields that will be processed and passed on to the next component. The schema is either built-in or remote in the Repository. !Click Edit Schema to make changes to the schema. Note that if you make changes, the schema automatically becomes built-in.
Built-in: The schema will be created and stored locally for this component only. Related topic: Setting a built-in schema on page 51
Repository: The schema already exists and is stored in the Repository, hence can be reused in various projets and job flowcharts. Related topic: Setting a repository schema on page 52
Print operations Check this box to display the context parameters set in the Run job view.
Usage This component relies on the data flow to load the context values to be used, therefore it requires a preceding input component and thus cannot be a start component.
Limitation tContextLoad does not create any non-defined variable in the default context.

Copyright © 2007-Talend Inc JasperETL powered by Talend 123
ComponentstContextLoad
Scenario: Dynamic context use in MySQL DB insert
This scenario is made of two subjobs. The first subjob aims at dynamically load the context parameters, and the second subjob uses the loaded context to display the content of a DB table.
• Click and drop a tFilelist, tFileInputDelimited, tContextLoad for the first subjob.
• And click and drop the tMysqlInput and a tLogRow for the second subjob.
• Connect all the components together.
• Create as many delimited files as there are different contexts and store them in a specific directory, named Contexts. In this scenario, test.txt contains the local database connection details for testing purpose. And prod.txt holds the actual production db details.
• Each file is made of two fields, contain the parameter name and the corresponding value, according to the context.
• In the tFileList component Properties panel, select the directory where both context files, test and prod, are held.
• In the tFileInputDelimited component Properties panel, press Ctrl+Space bar to access the global variable list. Select $_globals{tFileList_1}{CURRENT_FILEPATH} to loop on the context files’ directory.
• Define the schema manually (Built-in). It contains two columns defined as: Key and Value.
• Accept the defined schema to be propagated to the next component (tContextLoad).

124 JasperETL powered by Talend Copyright © 2007-Talend Inc
ComponentstContextLoad
• For this scenario, check the Print operations box in order for the context parameters in use to be displayed on the Run Job panel.
• Then double-click to open the tMySQLInput component Properties.
• For each of the field values being stored in a context file, press F5 and define the user-defined context parameter. For example: The Host field has for value parameter $_context{host}, as the parameter name is host in the context file. Its actual value being talend-dbms.
• Then fill in the Schema information. If you store the schema in the Repository Metadata, then you can retrieve by selecting Repository and the relevant entry in the list.
• And type in the SQL Query to be executed on the DB table specified. In this case, a simple select of three columns of the table, which will be displayed on the Run Job tab, through the tLogRow component.
• Eventually, press F6 to run the job.
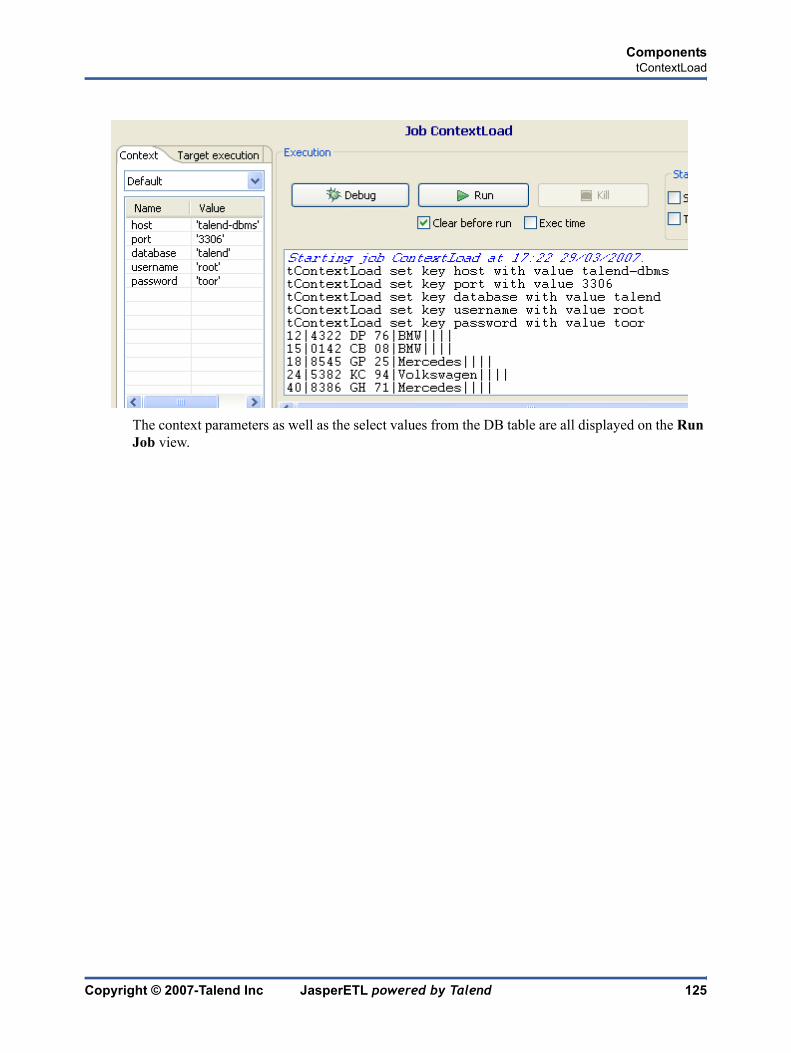
Copyright © 2007-Talend Inc JasperETL powered by Talend 125
ComponentstContextLoad
The context parameters as well as the select values from the DB table are all displayed on the Run Job view.

126 JasperETL powered by Talend Copyright © 2007-Talend Inc
ComponentstCreateTable
tCreateTable
tCreateTable Properties
Component family Databases
Function tCreateTable creates, drops and creates or clear the specified table.
Purpose This Java specific component helps create or drop any database table
Properties DB Type Select the DBMS type in the List offered.
Special Action Select the action to be carried out on the database among:!Create table: when you know already that the table doesn’t exist.!Create table when not exists: when you don’t know whether the table is already created or not!Drop and create table: when you know that the table exists already and needs to be replaced.
Use existing connection
Check this box in case you use tMysqlConnection or tOracleConnection component.
Property type Either Built-in or Repository
Built-in: No existing property data is to be retrieved
Repository: Select the Repository file where Properties are stored. The following fields are pre-filled in using fetched data.
Host Database server IP address
Port Listening port number of DB server.
Database Name of the database
Username and Password
DB user authentication data.
New table name Type in between quotes a name for the newly created table.
Schema type and Edit Schema
A schema is a row description, i.e., it defines the number of fields to be processed and passed on to the next component. The schema is either built-in or remotely stored in the Repository.
Reset the DB type by clicking the relevant button, to make sure data type is correct
Built-in: The schema is created and stored locally for this component only. Related topic: Setting a built-in schema on page 51

Copyright © 2007-Talend Inc JasperETL powered by Talend 127
ComponentstCreateTable
Scenario: Creating new table in a Mysql Database
The job described below aims at creating a table in a database, made of a dummy schema taken from a delimited file schema stored in the Repository. This job is composed of a single component.
• Click and drop a tCreateTable component from the Databases family in the Palette.
• In the Properties view, define the Database type on MySQL for this use case.
• In the Special Action list, select Create table.
Repository: The schema already exists and is stored in the Repository, hence can be reused. Related topic: Setting a repository schema on page 52
Mapping Select the correct mapping according to your Db type. This allows a check of DB type in the schema defined. If the DB type standards do not match, they will display in a different color in the Edit Schema.
Encoding Select the encoding from the list or select Custom and define it manually. This field is compulsory for DB data handling.
Usage This component offers the flexibility benefit of the DB query and covers all possibilities of SQL queries. More scenarios are available for specific DB Input components

128 JasperETL powered by Talend Copyright © 2007-Talend Inc
ComponentstCreateTable
• Check Use Existing Connection only in the case, you are using a dedicated connection component, see tMysqlConnection on page 254. In this use case, we won’t use this option.
• In the Property type field, select Repository so that all following connection fields are automatically filled in. If you didn’t define a Metadata DB connection entry for your Db connection, fill in manually the details as Built-in.
• In the New Table Name field, fill in a name for the table to be created.
• If you want to retrieve the Schema from the Metadata (it doesn’t need to be a DB connection Schema metadata), select Repository then the relevant entry.
• In any case (Built-in or Repository) click Edit Schema to check the Data type mapping.
• Click the Reset DB Types button in case the DB type column is empty or shows discrepancies marks (orange colour). This allows to map any data type to the relevant DB data type.
• Click OK.
• Then press F6 to run the job.
The table is created empty but with all columns defined in the Schema.

Copyright © 2007-Talend Inc JasperETL powered by Talend 129
ComponentstAddCRCRow
tAddCRCRow
tAddCRCRow properties
Scenario: Adding a surrogate key to a file
This scenario describes a job adding a surrogate key to a delimited file schema.
Component family Data quality
Function Calculates a surrogate key based on one or several columns and adds it to the defined schema
Purpose Providing a unique ID helps improving the quality of processed data.
Properties Schema type and Edit Schema
A schema is a row description, i.e., it defines the number of fields that will be processed and passed on to the next component. The schema is either built-in or remote in the Repository. In this component, a new CRC column is automatically added.
Built-in: The schema will be created and stored locally for this component only. Related topic: Setting a built-in schema on page 51
Repository: The schema already exists and is stored in the Repository, hence can be reused in various projects and job designs. Related topic: Setting a repository schema on page 52
Implication Tick the checkbox facing the relevant columns to be used for the surrogate key checksum.
CRC type Select the CRC type length. The longer the CRC, the least overlap.
Usage This component is an intermediary step, and requires an input flow as well as an output.
Limitation n/a

130 JasperETL powered by Talend Copyright © 2007-Talend Inc
ComponentstAddCRCRow
• Click and drop the following components: tFileInputDelimited, tAddCRCRow and tLogRow.
• Connect them using a Main row connection.
• In the tFileInputDelimited Properties view, set the File Name path and all related properties in case these are not stored in the Repository.
• Create the schema through the Edit Schema button, in case the schema is not stored already in the Repository. In Java, mind the data type column and in case of Date pattern to be filled in, check out http://java.sun.com/j2se/1.5.0/docs/api/index.html.
• In the tAddCRCRow Properties view, check the Input flow columns to be used to calculate the CRC.

Copyright © 2007-Talend Inc JasperETL powered by Talend 131
ComponentstAddCRCRow
• Notice that a CRC column (read-only) has been added at the end of the schema.
• Select CRC32 as CRC Type to get a longer surrogate key.
• In the tLogRow Properties view, check the Print values in cells of a table option to display the output data in a table on the Console.
• Then save your job and run it.

132 JasperETL powered by Talend Copyright © 2007-Talend Inc
ComponentstAddCRCRow
An additional CRC Column has been added to the schema calculated on all previouly selected columns (in this case all columns of the schema).

Copyright © 2007-Talend Inc JasperETL powered by Talend 133
ComponentstDB2Input
tDB2Input
tDB2Input properties
The properties of the generic tDBInput, apply to the tDB2Input component, therefore the properties are not detailed again here.
For detailed information about generic tDBInput properties, see tDBInput properties on page 136.
Related scenarios
Related topics in generic tDBInput scenarios:
• Scenario 1: Displaying selected data from DB table on page 137
• Scenario 2: Using StoreSQLQuery variable on page 138
Related topic in tContextLoad Scenario: Dynamic context use in MySQL DB insert on page 123.

134 JasperETL powered by Talend Copyright © 2007-Talend Inc
ComponentstDB2Output
tDB2Output
tDB2Output properties
The properties of the generic component, tDBOutput, apply to the tDB2Output component, therefore the properties are not detailed again here.
For detailed information about generic tDBOutput properties, see DBOutput properties on page 140.
Related scenarios
For tDB2Output related topics, see
• tDBOutput Scenario: Displaying DB output on page 142
• tMySQLOutput Scenario: Adding new column and altering data on page 261.

Copyright © 2007-Talend Inc JasperETL powered by Talend 135
ComponentstDB2Row
tDB2Row
tDB2Row properties
The properties of the generic component, tDBSQLRow, apply to the tDB2Row component, therefore the properties are not detailed again here.
For detailed information about generic tDBSQLRow properties, see tDBSQLRow properties on page 144.
Related scenarios
For tDB2Row related topics, see:
• tDBSQLRow Scenario 1: Resetting a DB auto-increment on page 145
• tMySQLRow Scenario: Removing and regenerating a MySQL table index on page 275.

136 JasperETL powered by Talend Copyright © 2007-Talend Inc
ComponentstDBInput
tDBInput
tDBInput properties
Component family Databases
Function tDBInput reads a database and extracts fields based on a query.
Purpose tDBInput executes a DB query with a strictly defined order which must correspond to the schema definition. Then it passes on the field list to the next component via a Main row link. The following DB-specific input components share tDBInput’s properties: tMysqlInput, tDB2Input, tOracleInput, tSybaseInput.
Note: For performance reasons, specific Input component (if offered) should always be preferred to generic DBInput component.
Properties Property type Either Built-in or Repository
Built-in: No existing property data is to be retrieved
Repository: Select the Repository file where Properties are stored. The following fields are pre-filled in using fetched data.
DB driver Available DBMS are MySQL,MS SQL and PostgreSQL..
Host Database server IP address
Port Listening port number of DB server.
Database Name of the database
Username and Password
DB user authentication data.
Schema type and Edit Schema
A schema is a row description, i.e., it defines the number of fields to be processed and passed on to the next component. The schema is either built-in or remotely stored in the Repository.
Built-in: The schema is created and stored locally for this component only. Related topic: Setting a built-in schema on page 51
Repository: The schema already exists and is stored in the Repository, hence can be reused. Related topic: Setting a repository schema on page 52
Query Enter your DB query paying particularly attention to properly sequence the fields in order to match the schema definition.

Copyright © 2007-Talend Inc JasperETL powered by Talend 137
ComponentstDBInput
Scenario 1: Displaying selected data from DB table
The following scenario creates a two-component job, reading data from a database using a DB query and outputting delimited data into the standard output (console).
• Click and drop a tDBInput and tLogRow component from the Palette to the design workspace.
• Right-click on the tDBInput component and select Row > Main. Drag this main row link onto the tLogRow component and release when the plug symbol displays.
• Select the tDBInput again so the properties tab shows up, and define the properties:
• The component property data are Built-In for this scenario.
• Select Mysql as database driver.
• Fill in the DB connection data in Host, Port, Database name, User name and password fields.
Encoding Select the encoding from the list or select Custom and define it manually. This field is compulsory for DB data handling.
Usage This component offers the flexibility benefit of the DB query and covers all possibilities of SQL queries. More scenarios are available for specific DB Input components

138 JasperETL powered by Talend Copyright © 2007-Talend Inc
ComponentstDBInput
• The schema is Built-In.This means that it is available for this job and on this station only.
• Click on Edit Schema and create a 2-column description including shop code and sales
• Type in the query making sure it includes all columns in the same order as defined in the Schema. In this case, as we’ll select all columns of the schema, the asterisk symbol makes sense.
• Enter the Encoding for information only. And click on the second component to define it.
• Enter the fields separator. In this case, a pipe separator.
• Now go to the Run Job tab, and click on Run to execute the job.
The DB is parsed and queried data is extracted and passed on to the Job log console. You can view the output file straight on the console.
Scenario 2: Using StoreSQLQuery variable
StoreSQLQuery is a variable that can be used to debug a tDBInput scenario which does not operate correctly. It allows you to dynamically feed the SQL query set in your tDBInput component.
• Use the same scenario as scenario 1 above and add a third component, tPerl.
• Connect tDBInput component to tPerl component using a trigger connection of ThenRun type. In this case, we want the tDBInput to run before the tPerl component.

Copyright © 2007-Talend Inc JasperETL powered by Talend 139
ComponentstDBInput
• Set both tDBInput and tLogRow component as in tDBInput scenario 1.
• Click anywhere on the design workspace to display the Context property panel.
• Create a new parameter called explicitly StoreSQLQuery. Enter a default value of 1. This value of 1 means the StoreSQLQuery is “true” for a use in the QUERY global variable.
• Click on the tPerl component to display the Properties. Enter the command Print to display the query content, press Ctrl+Space bar to access the variable list and select the global variable QUERY.
• Go to your Run tab and execute the job.
• The query entered in the tDBInput component shows at the end of the job results, on the log:

140 JasperETL powered by Talend Copyright © 2007-Talend Inc
ComponentstDBOutput
tDBOutput
DBOutput properties
Component family Databases
Function tDBOutput writes, updates, makes changes or suppresses entries in a database.
Purpose tDBOutput executes the action defined on the table and/or on the data contained in the table, based on the flow incoming from the precedin component in the job. The following DB-specific output components share tDBOutput’s properties: tMysqlInput, tDB2Input, tOracleInput, tSybaseInput.
Note: Specific Input component should always be preferred to generic DBInput component.
Properties Property type Either Built-in or Repository.
Built-in: No existing property data is to be retrieved
Repository: Select the Repository file where Properties are stored. The following fields are pre-filled in using fetched data.
Database driver Available DBMS are MySQL, MS SQL and PostgreSQL.
Host Database server IP address
Port Listening port number of DB server.
Database Name of the database
Username and Password
DB user authentication data.
Table Name of the table to be written. Note that only one table can be written at a time
In Java, use tCreateTable as substitute for this function..
Action on table On the table defined, you can perform one of the following operations:!None: No operation carried out!Drop and create the table: The table is removed and created again!Create a table: The table doesn’t exist and gets created.!Clear a table: The table content is deleted

Copyright © 2007-Talend Inc JasperETL powered by Talend 141
ComponentstDBOutput
Action on data On the data of the table defined, you can perform:!Insert: Add new entries to the table. If duplicates are found, job stops.!Update: Make changes to existing entries!Insert or update: Add entries or update existing ones.!Update or insert: Update existing entries or create it if non existing!Delete: Remove entries corresponding to the input flow.
Schema type and Edit Schema
A schema is a row description, i.e., it defines the number of fields to be processed and passed on to the next component. The schema is either built-in or remotely stored in the Repository.
Built-in: The schema is created and stored locally for this component only. Related topic: Setting a built-in schema on page 51
Repository: The schema already exists and is stored in the Repository, hence can be reused. Related topic: Setting a repository schema on page 52
Encoding Select the encoding from the list or select Custom and define it manually. This field is compulsory for DB data handling.
Additional Columns This option is not offered if you create (with or without drop) the Db table. This option allows you to perform actions on columns, which are not insert, nor update or delete actions or requires a particular preprocessing.
Name: Type in the name of the schema column to be altered or inserted as new column
SQL expression: Type in the SQL statement to be executed in order to alter or insert the relevant column data.
Position: Select Before, Replace or After, following the action to be performed on the reference column.
Reference column: Type in a column of reference that the tDBOutput can use to place or replace the new or altered column.
Commit every Number of rows to be completed before commiting batches of rows together into the DB. This option ensures transaction quality (but not rollback) and above all better performance on executions.

142 JasperETL powered by Talend Copyright © 2007-Talend Inc
ComponentstDBOutput
Scenario: Displaying DB output
This following scenario is a three-component job aiming at creating a new table in the database defined and filling it with data. The tFileInputdelimited passes on the Input flow to the tDBoutput component. As the content of a DB is not viewable as such, a tLogRow component is used to display the main flow on the Run Job console.
• First click and drop the three components required for this job.
• On the Properties tab of tFileInputDelimited, define the input flow parameters. In this use case, the file contains cars’ owner id, makes, color and registration references organised as follows: semi-colon as field separator, carriage return as row separator. The input file contains a header row to be considered in the schema. If this file is already described in your metadata, you can retrieve the properties by selecting the relevant repository entry list.
• And also, if your schema is already loaded in the Repository, select Repository as Schema type and choose the relevant metadata entry in the list. If you haven’t defined the schema already, define the data structure in the built-in schema you edit.
• Restrict the extraction to 10 lines, for this example.
• Then define the tDBOutput component to configure the output flow. Select the database to connect to. Note that you can store all the database connection details in different context variables. For more information about how to create and use context variables , see Defining a job design context and related variables on page 94.
Usage This component offers the flexibility benefit of the DB query and covers all possibilities of SQL queries.

Copyright © 2007-Talend Inc JasperETL powered by Talend 143
ComponentstDBOutput
• Fill in the table name in the Table field. Then select the operations to be performed:
• As Action on table, select Drop and create table in the list. This allows you to overwrite the possible existing table with the new selected data. Alternately you can insert only extra rows into an existing table, but note that duplicate management is not supported natively. See tUniqRow properties on page 334 for further information.
• As Action on data, select Insert. The data flow incoming as input will be thus added to the selected table.
• To view the output flow easily, connect the DBOuput component to an tLogRow component. Define the field separator as a pipe symbol. Press F6 to execute the job.
• As the processing can take some time to reach the tLogRow component, we recommend you to enable the Statistics functionality on the Run Job console.
Related topic: tMysqlOutput properties on page 261

144 JasperETL powered by Talend Copyright © 2007-Talend Inc
ComponentstDBSQLRow
tDBSQLRow
tDBSQLRow properties
Component family Databases
Function tDBSQLRow is the generic component for database query. It executes the SQL query stated onto the specified database. The row suffix means the component implements a flow in the job design although it doesn’t provide output. The following DB-specific row components share tDBSQLRow’s properties: tMySQLRow, tDB2Row, tOracleRow, tSybaseRow.
Purpose Depending on the nature of the query and the database, tDBSQLRow acts on the actual DB structure or on the data (although without handling data). The SQLBuilder tool helps you write easily your SQL statements.
Properties Property type Either Built-in or Repository.
Built-in: No existing property data is to be retrieved
Repository: Select the Repository file where Properties are stored. The following fields are pre-filled in using fetched data.
DB driver Available DBMS are MySQL, MS SQL and PostgreSQL. or other specific DBMS
Host Database server IP address
Port Listening port number of DB server.
Database Name of the database
Username and Password
DB user authentication data.
Schema type and Edit Schema
A schema is a row description, i.e., it defines the number of fields to be processed and passed on to the next component. The schema is either built-in or remotely stored in the Repository.
Built-in: The schema is created and stored locally for this component only. Related topic: Setting a built-in schema on page 51
Repository: The schema already exists and is stored in the Repository, hence can be reused. Related topic: Setting a repository schema on page 52
Query type Either Built-in or Repository.
Built-in: Fill in manually the query statement or build it graphically using SQLBuilder

Copyright © 2007-Talend Inc JasperETL powered by Talend 145
ComponentstDBSQLRow
Scenario 1: Resetting a DB auto-increment
This scenario describes a single component job which aims at reinitializing the DB auto-increment to 1. This job has no output and is generally to be used before running a script.
• Drag and drop a tDBSQLRow component from the Palette to the Job designer.
• On the Properties panel, fill in the DB connection properties.
Repository: Select the relevant query stored in the Repository. The Query field gets accordingly filled in.
Query Enter your DB query paying particularly attention to properly sequence the fields in order to match the schema definition.
Encoding Select the encoding from the list or select Custom and define it manually. This field is compulsory for DB data handling.
Usage This component offers the flexibility benefit of the DB query and covers all possibilities of SQL queries.
Use the relevant DBRow component according to the DB type you use. Most of the database have their specific DBRow component.

146 JasperETL powered by Talend Copyright © 2007-Talend Inc
ComponentstDBSQLRow
• The general connection information to the database is stored in the Repository. The Database Driver is a generic ODBC driver.
• The Schema type is built-in for this job and describes the Talend database structure. The schema doesn’t really matter for this particular instance of job as the action is made on the table auto-increment and not on data.
• The Query type is also built-in. Click on the three dot button to launch the SQLbuilder editor, or else type in directly in the Query area: ! Alter table <TableName> auto_increment = 1
• Then click OK to validate the Properties. Then press F6 to run the job.
The database autoincrement is reset to 1.
Related topics: tMysqlRow properties on page 275.

Copyright © 2007-Talend Inc JasperETL powered by Talend 147
ComponentstDenormalize
tDenormalizetDenormalize Properties
Scenario 1: Denormalizing on one column in Perl
This scenario illustrates a Perl job denormalizing one column in a delimited file.
• Click and drop the following components: tFileInputDelimited, tDenormalize, tLogRow.
• Connect the components using Row main connections.
Component family Processing
Function Denormalizes the input flow based on one column.
Purpose tDenormalize helps synthesize the input flow.
Properties Schema type and Edit Schema
A schema is a row description, i.e., it defines the number of fields that will be processed and passed on to the next component. The schema is either built-in or remote in the Repository. In this component, the schema is read-only.
Built-in: The schema will be created and stored locally for this component only. Related topic: Setting a built-in schema on page 51
Perl featureColumn to denormalize
Select the column from the input flow which the normalization is based on (included in key)
Java featureGroup by Select one or several columns to be
grouped. We recommend to remove unused columns from the schema before processing.
Separator Enter the separator which will delimit data in the denormalized flow.
Deduplicate items Removes duplicates when concatenating denormalized values.
Usage This component can be used as intermediate step in a data flow.
Limitation n/a

148 JasperETL powered by Talend Copyright © 2007-Talend Inc
ComponentstDenormalize
• On the tFileInputDelimited properties panel, set the filepath to the file to be denormalized.
• Define the Header, Row Separator and Field Separator parameters.
• The input file schema is made of two columns, Fathers and Children.
• In the Properties of tDenormalize, define the column that contains multiple values to be grouped.
• In this use case, the column to denormalize is Children.
• Set the Item Separator to separate the grouped values. Beware as only one column can be denormalized.
• Check the Deduplicate items, if you know that some values to be grouped are strictly identical.

Copyright © 2007-Talend Inc JasperETL powered by Talend 149
ComponentstDenormalize
• Save your job and run it.
All values from the column Children (set as column to denormalize) are grouped by their Fathers column. Values are separated by a comma.
Scenario 2: Denormalizing on multiple columns in Java
This scenario illustrates a Java job denormalizing two columns from a delimited file.
• Click and drop the following components: tFileInputDelimited, tDenormalize, tLogRow.
• Connect all components using a Row main connection.
• On the tFileInputDelimited Properties panel, set the filepath to the file to be denormalized.
• Define the Row and Field separators, the Header and other information if required.
• The file schema is made of four columns including: Name, FirstName, HomeTown, WorkTown.

150 JasperETL powered by Talend Copyright © 2007-Talend Inc
ComponentstDenormalize
• In the tDenormalize component Properties, select the columns that contain the repetition. These are the column which are meant to occur multiple times in the document. In this use case, FirstName and Name are the columns against which the denormalization is performed.
• Add as many line to the table as you need using the plus button. Then select the relevant columns in the drop-down list.
• Define the delimiter for concatenated values. In this case, the comma is used.
• Save your job and run it.
• The result shows the denormalized values concatenated using a comma.

Copyright © 2007-Talend Inc JasperETL powered by Talend 151
ComponentstDenormalize
• Back to the tDenormalize components Properties, check the Deduplicate box to remove the duplicate occurences.
• Save your job again and run it.
This time, the console shows the results with no duplicate instances.

152 JasperETL powered by Talend Copyright © 2007-Talend Inc
ComponentstDie
tDieBoth tDie and tWarn components are closely related to the tLogCatcher component.They generally make sense when used alongside a tLogCatcher in order for the log data collected to be encapsulated and passed on to the output defined.
tDie properties
Related scenarios
For uses cases in relation with tDie, see tLogCatcher scenarios:
• Scenario1: warning & log on entries on page 226
• Scenario 2: log & kill a job on page 228
Component family Log & Error
Function Kills the current job. Generally used with a tCatch for log purpose.
Purpose Triggers the tLogCatcher component for exhaustive log before killing the job.
Die message Enter the message to be displayed before the job is killed.
Error code Enter the error code if need be, as an integer
Priority Set the level of priority, as an integer
Usage Cannot be used as a start component.
Limitation n/a
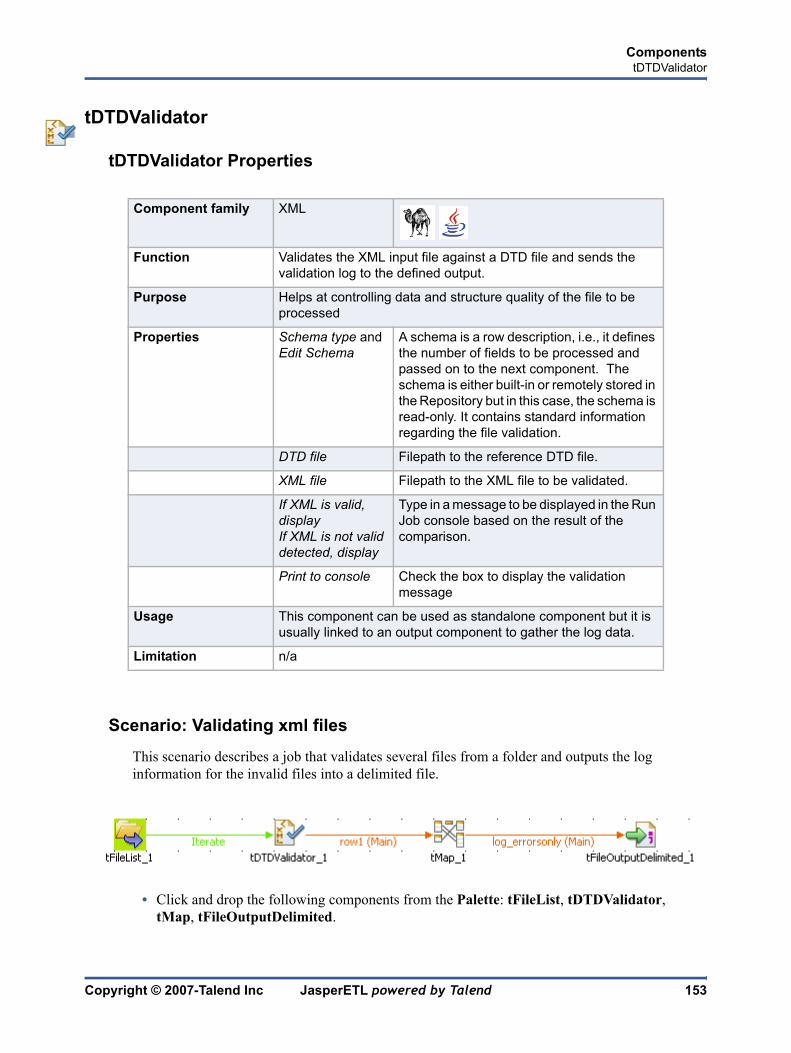
Copyright © 2007-Talend Inc JasperETL powered by Talend 153
ComponentstDTDValidator
tDTDValidator
tDTDValidator Properties
Scenario: Validating xml files
This scenario describes a job that validates several files from a folder and outputs the log information for the invalid files into a delimited file.
• Click and drop the following components from the Palette: tFileList, tDTDValidator, tMap, tFileOutputDelimited.
Component family XML
Function Validates the XML input file against a DTD file and sends the validation log to the defined output.
Purpose Helps at controlling data and structure quality of the file to be processed
Properties Schema type and Edit Schema
A schema is a row description, i.e., it defines the number of fields to be processed and passed on to the next component. The schema is either built-in or remotely stored in the Repository but in this case, the schema is read-only. It contains standard information regarding the file validation.
DTD file Filepath to the reference DTD file.
XML file Filepath to the XML file to be validated.
If XML is valid, display!If XML is not valid detected, display
Type in a message to be displayed in the Run Job console based on the result of the comparison.
Print to console Check the box to display the validation message
Usage This component can be used as standalone component but it is usually linked to an output component to gather the log data.
Limitation n/a

154 JasperETL powered by Talend Copyright © 2007-Talend Inc
ComponentstDTDValidator
• Connect the tFileList to the tDTDValidator with an Iterate link and the remaining component using a main row.
• Set the tFileList component Properties, to fetch an XML file from a folder.
• Change the Filemask to *.xml. Mind the quotes depending on the Perl or Java version you are using.
• Uncheck the Case Sensitive box.
• In the tDTDValidate component Properties, the schema is read-only as it contains standard log information related to the validation process.
• Set the DTD file to be used as reference.
• Press Ctrl+Space bar to access the variable list. In the XML file field, select the current filepath global variable : $_globals{tFileList_1}{CURRENT_FILEPATH} (in Perl)
• In the various messages to display in the Run Job tab console, use the jobName to recall the job name tag. Recall the filename using the relevant global variable: $_globals{tFileList_1}{CURRENT_FILE}. Mind the Perl or Java operators such as the dot or the plus sign to build your message.
• Check the Print to Console box.
• In the tMap component, drag and drop the information data from the standard schema that you want to pass on to the output file.

Copyright © 2007-Talend Inc JasperETL powered by Talend 155
ComponentstDTDValidator
• Once the Output schema is defined as required, add a filter condition to only select the log information data when the XML file is invalid.
• Follow the best practice by typing first the wanted value for the variable, then the operator based on the type of data filtered then the variable that should meet the requirement. In this case (in Java and Perl): 0 == $row1[validate]
• Then connect (if not already done) the tMap to the tFileOutputDelimited component using a main row. Name it as relevant, in this example: errorsOnly.
• In the tFileOutputDelimited Properties, Define the destination filepath, the field delimiters and the encoding.
• Save your job and press F6 to run it.
On the Run Job console the messages defined display for each of the invalid files. At the same time the output file is filled with log data.
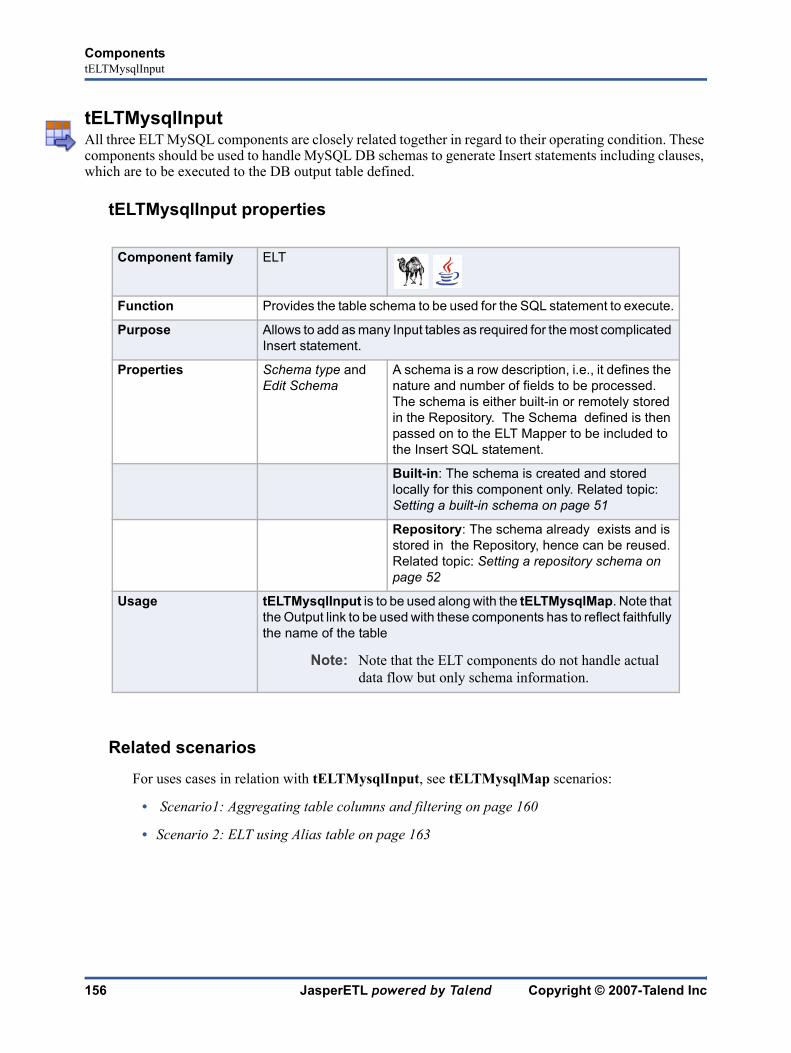
156 JasperETL powered by Talend Copyright © 2007-Talend Inc
ComponentstELTMysqlInput
tELTMysqlInputAll three ELT MySQL components are closely related together in regard to their operating condition. These components should be used to handle MySQL DB schemas to generate Insert statements including clauses, which are to be executed to the DB output table defined.
tELTMysqlInput properties
Related scenarios
For uses cases in relation with tELTMysqlInput, see tELTMysqlMap scenarios:
• Scenario1: Aggregating table columns and filtering on page 160
• Scenario 2: ELT using Alias table on page 163
Component family ELT
Function Provides the table schema to be used for the SQL statement to execute.
Purpose Allows to add as many Input tables as required for the most complicated Insert statement.
Properties Schema type and Edit Schema
A schema is a row description, i.e., it defines the nature and number of fields to be processed. The schema is either built-in or remotely stored in the Repository. The Schema defined is then passed on to the ELT Mapper to be included to the Insert SQL statement.
Built-in: The schema is created and stored locally for this component only. Related topic: Setting a built-in schema on page 51
Repository: The schema already exists and is stored in the Repository, hence can be reused. Related topic: Setting a repository schema on page 52
Usage tELTMysqlInput is to be used along with the tELTMysqlMap. Note that the Output link to be used with these components has to reflect faithfully the name of the table
Note: Note that the ELT components do not handle actual data flow but only schema information.

Copyright © 2007-Talend Inc JasperETL powered by Talend 157
ComponentstELTMysqlMap
tELTMysqlMapAll three ELT MySQL components are closely related together in regard to their operating condition. These components should be used to handle MySQL DB schemas to generate Insert statements including clauses, which are to be executed to the DB output table defined.

158 JasperETL powered by Talend Copyright © 2007-Talend Inc
ComponentstELTMysqlMap
tELTMysqlMap properties
Connecting ELT components
The ELT components do not handle any data as such but table schema information that will be used to build the SQL query to execute.
Therefore the only connection required to connect these components together is a simple link.
Component family ELT
Function Helps to graphically build the SQL statement using the table provided as input.
Purpose Uses the tables provided as input, to feed the parameter in the built statement. The statement can include inner or outer joins to be implemented between tables or between one table and its aliases.
Properties Property type Either Built-in or Repository.
Built-in: No existing property data is to be retrieved
Repository: Select the Repository file where Properties are stored. The following fields are pre-filled in using fetched data.
Host Database server IP address
Port Listening port number of DB server.
Database Name of the database
Username and Password
DB user authentication data.
Encoding Select the encoding from the list or select Custom and define it manually. This field is compulsory for DB data handling.
Preview The preview is an instant shot of the Mapper data. It becomes available when Mapper properties have been filled in with data. The preview synchronization takes effect only after saving changes.
Map editor The ELT Map editor allows you to define the output schema as well as build graphically the SQL statement to be executed.
Usage tELTMysqlMap is used along with a tELTMysqlInput and tELTMysqlOutput. Note that the Output link to be used with these components has to reflect faithfully the name of the tables.
Note: Note that the ELT components do not handle actual data flow but only schema information.

Copyright © 2007-Talend Inc JasperETL powered by Talend 159
ComponentstELTMysqlMap
Note: The output name you give to this link when creating it should always be the exact name of the table to be accessed as this parameter will be used in the SQL statement generated.
Related topic: Link connection on page 48
Mapping and joining tables
In the ELT Mapper, you can select specific columns from input schemas and include them in the output schema.
• As you would do it in the regular Mapper editor, simply drag & drop the content from the input schema towards the output table defined.
• Use the Ctrl and Shift keys for multiple selection of contiguous or non contiguous table columns.
You can implement explicit joins to retrieve various data from different tables.
• Click on the Join drop-down list and select the relevant explicit join.
• Possible joins include: Inner Join, Left Outer Join, Right Outer Join or Full Outer Join and Cross Join.
• By default the Inner Join is selected.
You can also create Alias tables to retrieve various data from the same table.
• In the Input area, click on the plus (+) button to create an Alias.
• Define the table to base the alias on.
• Type in a new name for the alias table, preferrably not the same as the main table.
Adding where clauses
You can also restrict the Select statement based on a Where clause. Click on the Add filter row button at the top of the output table and type in the relevant restriction to be applied.
Make sure that all input components are linked correctly to the ELT Map component to be able to implement all inclusions, joins and clauses.
Generating the SQL statement
The mapping of elements from the input schemas to the output schemas create instantly the corresponding Select statement.

160 JasperETL powered by Talend Copyright © 2007-Talend Inc
ComponentstELTMysqlMap
The clause are also included automatically.
Scenario1: Aggregating table columns and filtering
This scenario describes a job gathering together several Input DB table schemas and implementing a clause to filter the resulting output using an SQL statement.
• Click and drop the following components: tELTMysqlIntput, tELTMysqlMap, tELTMysqlOutput.
• Three input components are required for this job.
• Connect the three ELT input components to the ELT mapper using links named following strictly the actual DB table names: owners, cars and resellers.
• Then connect the ELT mapper to the ELT Output component using another link that you call results.
• All three Input schemas are stored in the Metadata area of the Repository. They can therefore be easily retrieved.

Copyright © 2007-Talend Inc JasperETL powered by Talend 161
ComponentstELTMysqlMap
• Click on the ELT mapper component to define the Database connection details.
• The Database connection details are stored in the Repository again
• The default encoding for Mysql database is retained.
• Launch the ELT Map editor to set up the join between Input tables
• Drag & drop the ID_Owner column from the Owners table to the corresponding column of the cars table.
• Select INNER JOIN in the Cars table join list, and check Explicit Join, in front of the ID_Owners.
• Drag the ID_Resellers column from the Cars table to the Resellers table to set up the second join. Select here again INNER JOIN in the list of the Resellers table and check the Explicit Join box of the relevant column.
• Then select the columns to be aggregated into the output.
• Select all columns from the Cars and Owners table and only the Reseller_Name and City columns from the Resellers table.

162 JasperETL powered by Talend Copyright © 2007-Talend Inc
ComponentstELTMysqlMap
• Drag & drop them to the Results output table.
• The mapping displays in yellow and the joins display in dark violet.
• Click on the Generated SQL Select query tab to display the corresponding SQL Statement.
• Then implement a filter on the output table.
• Click on the Add filter row button of the output table.
• Restrict the Select using a Where clause such as: resellers.City ='West Coast City'
• See the reflected where clause on the Generated SQL Select query tab.
• Click OK to save the ELT Map setting.
• Define the ELT Output in the Properties Panel of the tELTMysqlOutput component.
• The Action on table is Drop and create table for this use case and the only action available on data in MySQL is Insert.
• The schema is to be synchronised with the tELTMysqlMap component as it aggregates several source schemas.

Copyright © 2007-Talend Inc JasperETL powered by Talend 163
ComponentstELTMysqlMap
All selected data are inserted in the results table as specified in the SQL statement defined respecting the clause.
Scenario 2: ELT using Alias table
This scenario describes a job that uses an Alias table. The employees table contains all employees details as well as the ID of their respective manager, which are also considered as employees and hence included in the employees table. The dept table contains location and department information about the employees.
• Drag and drop tELTMysqlInput components to retrieve respectively the employees and dept table schemas.
• In this use case, both schemas are stored in the Repository and can therefore be easily retrieved.

164 JasperETL powered by Talend Copyright © 2007-Talend Inc
ComponentstELTMysqlMap
• Then select the tELTMysqlMap and define the Mysql database connection details.
• Here again the connection information is stored in the Repository’s Metadata.
• Click on the button to launch the ELT Map editor.
• First make sure the correct input table is positioned at the top of the Input area, as the Joins are highly dependent on this position.
• In this example, the employees table should be on top.
• Drag and drop the DeptNo column from the employees table to the dept table to set up the join between both input tables.
• Check the Explicit Join box and define the join as an Inner Join.
• Then create the Alias table based on the employees table

Copyright © 2007-Talend Inc JasperETL powered by Talend 165
ComponentstELTMysqlMap
• Name it Managers and click OK to display it as a new Input table in the ELT mapper.
• Drag & drop the ID column from the employees table to the ID_Manager column of the newly added Managers table.
• Check the Explicit Join box and define it as Left Outer Join, in order for results to be output eventhough they contain a Null value.
• Drag and drop the content of both Input tables, employees and dept, as well as the Name column from the Manager table to the Output table.
• Click on the Generated SQL Select query tab to display the query to be executed.

166 JasperETL powered by Talend Copyright © 2007-Talend Inc
ComponentstELTMysqlMap
• Then click on the Output component and define the Action on data on Insert.
• Make sure the schema is synchronized with the Output table from the ELT mapper before running the job through F6 or via the toolbar.
The Department information as well as the Employees entries are coupled in the output, and the Manager Name could be retrieved via the explicit join.

Copyright © 2007-Talend Inc JasperETL powered by Talend 167
ComponentstELTMysqlOutput
tELTMysqlOutput
All three ELT MySQL components are closely related together in regard to their operating condition. These components should be used to handle MySQL DB schemas to generate Insert statements including clauses, which are to be executed to the DB output table defined.

168 JasperETL powered by Talend Copyright © 2007-Talend Inc
ComponentstELTMysqlOutput
tELTMysqlOutput properties
Component family ELT
Function Carries out the action on the table specified and inserts the data according to the output schema defined the ELT Mapper.
Purpose Executes the SQL Insert statement to the Mysql database
Properties
In Java, use tCreateTable as substitute for this function.
Action on table On the table defined, you can perform one of the following operations:!None: No operation carried out!Drop and create the table: The table is removed and created again!Create a table: The table doesn’t exist and gets created. If the table exists, an error is generated and the job is stopped.!Create table if doesn’t exist: Create the table if needed and carries out the action on data anyway.!Clear a table: The table content is deleted
Action on data On the data of the table defined, you can perform the following operation:!Insert: Add new entries to the table. If duplicates are found, job stops.!Note that in Mysql ELT, only Insert operation is available.
Schema type and Edit Schema
A schema is a row description, i.e., it defines the number of fields to be processed and passed on to the next component. The schema is either built-in or remotely stored in the Repository.
Built-in: The schema is created and stored locally for this component only. Related topic: Setting a built-in schema on page 51
Repository: The schema already exists and is stored in the Repository, hence can be reused. Related topic: Setting a repository schema on page 52
Encoding Select the encoding from the list or select Custom and define it manually. This field is compulsory for DB data handling.
Usage tELTMysqlOutput is to be used along with the tELTMysqlMap. Note that the Output link to be used with these components has to reflect faithfully the name of the table.
Note: Note that the ELT components do not handle actual data flow but only schema information.

Copyright © 2007-Talend Inc JasperETL powered by Talend 169
ComponentstELTMysqlOutput
Related scenarios
For uses cases in relation with tELTMysqlOutput, see tELTMysqlMap scenarios:
• Scenario1: Aggregating table columns and filtering on page 160
• Scenario 2: ELT using Alias table on page 163

170 JasperETL powered by Talend Copyright © 2007-Talend Inc
ComponentstELTOracleInput
tELTOracleInputAll three ELT Oracle components are closely related together in regard to their operating condition. These components should be used to handle Oracle DB schemas to generate Insert, Update or Delete statements including clauses, which are to be executed to the DB output table defined.
tELTOracleInput properties
Related scenarios
For uses cases in relation with tELTOracleInput, see tELTOracleMap Scenario 1: Updating Oracle DB entries on page 173.
Component family ELT
Function Provides the table schema to be used for the SQL statement to execute.
Purpose Allows to add as many Input tables as required for the most complicated Insert statement.
Properties Schema type and Edit Schema
A schema is a row description, i.e., it defines the nature and number of fields to be processed. The schema is either built-in or remotely stored in the Repository. The Schema defined is then passed on to the ELT Mapper to be included to the Insert SQL statement.
Built-in: The schema is created and stored locally for this component only. Related topic: Setting a built-in schema on page 51
Repository: The schema already exists and is stored in the Repository, hence can be reused. Related topic: Setting a repository schema on page 52
Usage tELTOracleInput is to be used along with the tELTOracleMap. Note that the Output link to be used with these components has to reflect faithfully the name of the table
Note: Note that the ELT components do not handle actual data flow but only schema information.

Copyright © 2007-Talend Inc JasperETL powered by Talend 171
ComponentstELTOracleMap
tELTOracleMapAll three ELT Oracle components are closely related together in regard to their operating condition. These components should be used to handle Oracle DB schemas to generate Insert, Update or Delete statements including clauses, which are to be executed to the DB output table defined.

172 JasperETL powered by Talend Copyright © 2007-Talend Inc
ComponentstELTOracleMap
tELTOracleMap properties
Connecting ELT components
For detailed information regarding ELT component connections, see Connecting ELT components on page 158.
Related topic: Link connection on page 48
Component family ELT
Function Helps to graphically build the SQL statement using the table provided as input.
Purpose Uses the tables provided as input, to feed the parameter in the built statement. The statement can include inner or outer joins to be implemented between tables or between one table and its aliases.
Properties Property type Either Built-in or Repository.
Built-in: No existing property data is to be retrieved
Repository: Select the Repository file where Properties are stored. The following fields are pre-filled in using fetched data.
Host Database server IP address
Port Listening port number of DB server.
Database Name of the database
Username and Password
DB user authentication data.
Encoding Select the encoding from the list or select Custom and define it manually. This field is compulsory for DB data handling.
Preview The preview is an instant shot of the Mapper data. It becomes available when Mapper properties have been filled in with data. The preview synchronization takes effect only after saving changes.
Map editor The ELT Map editor allows you to define the output schema as well as build graphically the SQL statement to be executed.
Usage tELTOracleMap is used along with a tELTOracleInput and tELTOracleOutput. Note that the Output link to be used with these components has to reflect faithfully the name of the tables.
Note: Note that the ELT components do not handle actual data flow but only schema information.

Copyright © 2007-Talend Inc JasperETL powered by Talend 173
ComponentstELTOracleMap
Mapping and joining tables
In the ELT Mapper, you can select specific columns from input schemas and include them in the output schema.
For detailed information regarding the table schema mapping and joining, see Mapping and joining tables on page 173.
Adding where clauses
For details regarding the clause handling, see Adding where clauses on page 173.
Generating the SQL statement
The mapping of elements from the input schemas to the output schemas create instantly the corresponding Select statement.
The clause defined internally in the ELT Mapper are also included automatically.
Scenario 1: Updating Oracle DB entries
This scenario relies on the job described in ELT MySQL components, Scenario1: Aggregating table columns and filtering on page 160. As the update action on the data is available in Oracle DB, this scenario describes a job updating particular entries of the results table, adding a model to the make column of the cars table.
• Define all three Input components as described in Scenario1: Aggregating table columns and filtering on page 160.
• When connecting the ELT Input components to the ELT mapper, make sure you use the relevant table names as these table names will be used as parameters in the SQL statement generated in the ELT mapper.
• Remove the additional clause used to filter the output columns.

174 JasperETL powered by Talend Copyright © 2007-Talend Inc
ComponentstELTOracleMap
• Add a new filter row to the output table in the ELT mapper to setup a relationship between input and output tables : owners.ID_OWNER=results.ID_OWNER
• Remove also all the columns unused for the Update action on the output table.
• Then apply the update to the Make column adding the mention C-Class preceding by a double-pipe.
• And also add the mention Sold by in front of the reseller name column from the resellers table.
• Check the Generated SQL select query to be executed.
• Click OK to validate the changes in the ELT mapper. And make sure the Oracle DB connection details are filled in in the tELTOracleMap component properties.
• Select the tELTOracleOutput component to define the Action on data to be carried out.
• There is no action on the table, and the Action on data is set to Update.
• Check that the Schema type corresponds to the output table from the ELT Mapper.
• In the Where clause area, add an additional clause: results.MAKE= ‘Mercedes’.

Copyright © 2007-Talend Inc JasperETL powered by Talend 175
ComponentstELTOracleMap
• Then press F6 to run the job and check the results table in a DB viewer.
The job executes the query generated and updates the relevant rows.

176 JasperETL powered by Talend Copyright © 2007-Talend Inc
ComponentstELTOracleOutput
tELTOracleOutput
All three ELT Oracle components are closely related together in regard to their operating condition. These components should be used to handle Oracle DB schemas to generate Insert, Update or Delete statements including clauses, which are to be executed to the DB output table defined.

Copyright © 2007-Talend Inc JasperETL powered by Talend 177
ComponentstELTOracleOutput
tELTOracleOutput properties
Component family ELT
Function Carries out the action on the table specified and inserts the data according to the output schema defined the ELT Mapper.
Purpose Executes the SQL Insert statement to the Mysql database
Properties
In Java, use tCreateTable as substitute for this function.
Action on table On the table defined, you can perform one of the following operations:!None: No operation carried out!Drop and create the table: The table is removed and created again!Create a table: The table doesn’t exist and gets created. If the table exists, an error is generated and the job is stopped.!Create table if doesn’t exist: Create the table if needed and carries out the action on data anyway.!Clear a table: The table content is deleted
Action on data On the data of the table defined, you can perform the following operation:!Insert: Add new entries to the table. If duplicates are found, job stops.!Update: updates entries in the table.
Schema type and Edit Schema
A schema is a row description, i.e., it defines the number of fields to be processed and passed on to the next component. The schema is either built-in or remotely stored in the Repository.
Built-in: The schema is created and stored locally for this component only. Related topic: Setting a built-in schema on page 51
Repository: The schema already exists and is stored in the Repository, hence can be reused. Related topic: Setting a repository schema on page 52
Encoding Select the encoding from the list or select Custom and define it manually. This field is compulsory for DB data handling.
Usage tELTOracleOutput is to be used along with the tELTOracleMap. Note that the Output link to be used with these components has to reflect faithfully the name of the table.
Note: Note that the ELT components do not handle actual data flow but only schema information.

178 JasperETL powered by Talend Copyright © 2007-Talend Inc
ComponentstELTOracleOutput
Related scenarios
For uses cases in relation with tELTOracleOutput, see tELTOracleMap Scenario 1: Updating Oracle DB entries on page 173.

Copyright © 2007-Talend Inc JasperETL powered by Talend 179
ComponentstFileCompare
tFileComparetFileCompare properties
Scenario: Comparing unzipped files
This scenario describes a job unarchiving a file and comparing it to a reference file to make sure it didn’t change. The output of the comparison is stored into a delimited file and a message displays in the console.
• Drag and drop the following components: tFileUnarchive, tFileCompare, and tFileOutputDelimited.
• Link the tFileUnarchive to the tFileCompare with Iterate connection.
Component family File/Management
Function Compares two files and provides comparison data (based on a read-only schema)
Purpose Helps at controlling the data quality of files being processed.
Properties Schema type and Edit Schema
A schema is a row description, i.e., it defines the number of fields to be processed and passed on to the next component. The schema is either built-in or remotely stored in the Repository but in this case, the schema is read-only.
File to compare Filepath to the file to be checked.
Reference file Filepath to the file, the comparison is based on.
If differences are detected, display!If no difference detected, display
Type in a message to be displayed in the Run Job console based on the result of the comparison.
Print to console Check the box to display the cumessage
Usage This component can be used as standalone component but it is usually linked to an output component to gather the log data.
Limitation n/a

180 JasperETL powered by Talend Copyright © 2007-Talend Inc
ComponentstFileCompare
• Connect the tFileCompare to the output component, using a Main row link.
• In the tFileUnarchive component properties, fill in the path to the archive to unzip.
• In the Extraction Directory field, fill in the destination folder for the unarchived file.
• In the tFileCompare Properties, set the File to compare. Press Ctrl+Space bar to display the list of global variables. Select $_globals{tFileUnarchive_1}{CURRENT_FILEPATH} or "((String)globalMap.get("tFileUnarchive_1_CURRENT_FILEPATH"))" according to the language you work with, to fetch the file path from the tFileUnarchive component.
• And set the Reference file to base the comparison on it.
• In the messages fields, set the messages you want to see in case the files differ or in case the files are identical, for example: '[job '.$_globals{job_name}.'] Files differ' if you work with Perl or "[job " + jobName + "] Files differ" if you work in Java.
• Check the Print to Console box, for the message defined to display at the end of the execution.
• The schema is read-only and contains standard information data. Click Edit schema to have a look to it.
• Then set the output component as usual with semi-colon as data separators.
• Save your job and press F6 to run it.

Copyright © 2007-Talend Inc JasperETL powered by Talend 181
ComponentstFileCompare
The message set is displayed to the console and the output shows the schema information data.

182 JasperETL powered by Talend Copyright © 2007-Talend Inc
ComponentstFileCopy
tFileCopy
tFileCopy Properties
Scenario: Restoring files from bin
This scenario describes a job that iterates on a list of files, copies each file from the defined source directory to a target directory. It then removes the copied files from the source directory.
• Click and drop a tFileList and a tFileCopy.
• Link both components using an Iterate link.
• In the tFileList Properties, set the directory for the iteration loop.
Component family File/Management
Function Copies a source file into a target directory and can remove the source file if so defined.
Purpose Helps to streamline processes by automating recurrent and tedious tasks such as copy.
Properties File Name Path to the file to be copied or moved
Destination Path to the directory where the file is copied/moved to.
Remove source file
Check this box to move the file to the destination.
Replace existing file
Check this box to overwrite any existing file with the newly copied file.
Usage This component can be used as standalone component .
Limitation n/a

Copyright © 2007-Talend Inc JasperETL powered by Talend 183
ComponentstFileCopy
• Set the Filemask to “*.txt” to catch all files with this extension. For this use case, the case is not sensitive.
• Then select the tFileCopy to set its Properties.
• In the File Name field, press Ctrl+Space bar to access the list of variables.
• Select the global variable ((String)globalMap.get("tFileList_1_CURRENT_FILEPATH")) if you work in Java, or $_globals{tFileList_1}{CURRENT_FILEPATH} if you work in Perl. This way, all files from the source directory can be processed.
• Check the Remove Source file box to get rid of the file that have been copied.
• Check the Replace existing file to overwrite any file possibly present in the destination directory.
• Save your job and press F6.
The files are copied onto the destination folder and are removed from the source folder.

184 JasperETL powered by Talend Copyright © 2007-Talend Inc
ComponentstFileDelete
tFileDelete
tFileDelete Properties
Scenario: Deleting files
This very simple scenario describes a job deleting files from a given directory.
• Click and drop the following components: tFileList, tFileDelete, tJava.
• In the tFileList Properties, set the directory to loop on in the Directory field.
• The filemask is “*.txt” and no case check is to carry out.
• In the tFileDelete Properties panel, set the File Name field in order for the current file in selection in the tFileList component be deleted. This allows to delete all files contained in the directory defined earlier on.
Component family File/Management
Function Suppresses a file from a defined directory.
Purpose Helps to streamline processes by automating recurrent and tedious tasks such as delete..
Properties File Name Path to the file to be copied or moved
Usage This component can be used as standalone component.
Limitation n/a
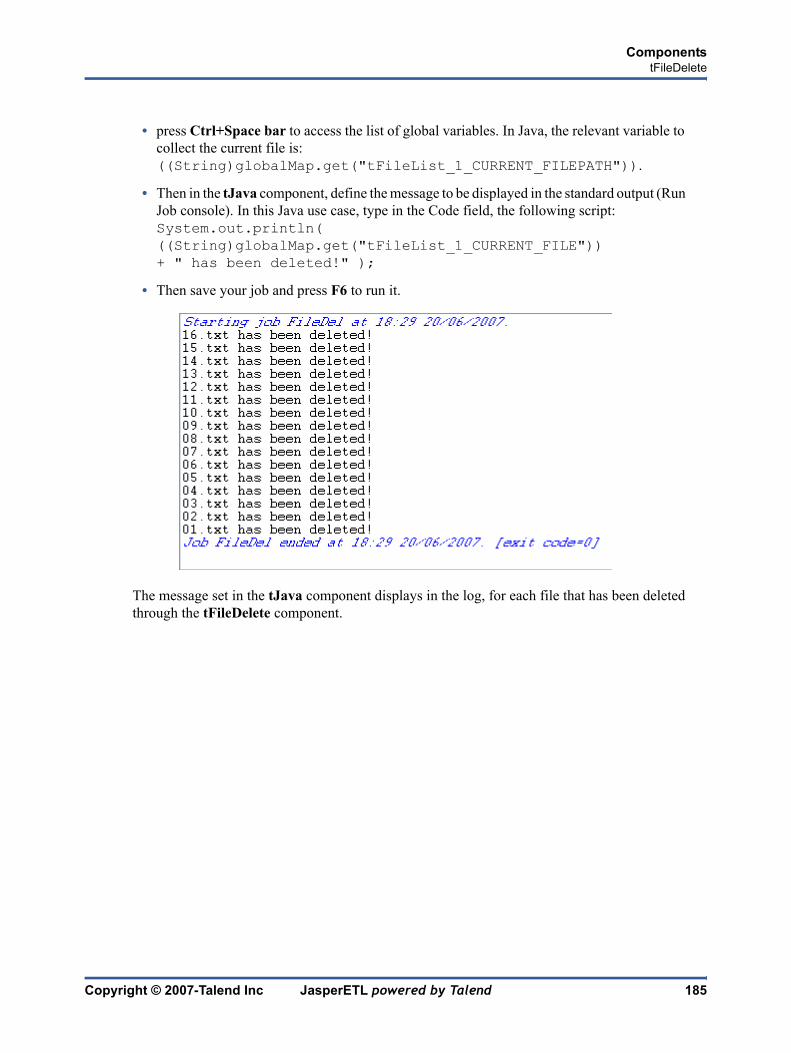
Copyright © 2007-Talend Inc JasperETL powered by Talend 185
ComponentstFileDelete
• press Ctrl+Space bar to access the list of global variables. In Java, the relevant variable to collect the current file is: ((String)globalMap.get("tFileList_1_CURRENT_FILEPATH")).
• Then in the tJava component, define the message to be displayed in the standard output (Run Job console). In this Java use case, type in the Code field, the following script: System.out.println( ((String)globalMap.get("tFileList_1_CURRENT_FILE")) !+ " has been deleted!" );
• Then save your job and press F6 to run it.
The message set in the tJava component displays in the log, for each file that has been deleted through the tFileDelete component.

186 JasperETL powered by Talend Copyright © 2007-Talend Inc
ComponentstFileFetch
tFileFetch
tFileFetch properties
Scenario: Fetching data through HTTP
This scenario describes a three-component job which retrieves data from an HTTP website and select data that will be stored into a delimited file.
• Click and drop a tFileFetch, a tFileInputRegex and a tFileOutputDelimited onto your workspace.
• In the tFileFetch Properties panel, type in the URI where the file to be fetched can retrieved from.
• In the Destination directory field, browse to the folder where the fetched file is to be stored.
Component family Internet
Function tFileFetch retrieves a file from HTTP
Purpose tFileFetch allows to fetch data contained in a file through HTTP protocol.
Properties URI Type in the URI of the HTTP site where the file is to be fetched from.
Destination Directory
Browse to the destination folder where the file fetched will be placed.
Destination Filename
Type in a new name for the file fetched, if need be.
Usage This component is generally used as a start component to feed the input flow of a job and is often connected to the job through a ThenRun link.
Limitation n/a

Copyright © 2007-Talend Inc JasperETL powered by Talend 187
ComponentstFileFetch
• In the Filename field, type in a new name for the file if you want it to be changed. In this example, filefetch.txt.
• Select the tFileInputRegex, set the File name so that it corresponds to the file fetched earlier.
• Using a regular expression, in the Regex field, select the relevant data from the fetched file. In this example: <td(?: class="leftalign")?> \s* (t\w+) \s* </td>
Take care to use the correct Regex syntax according to the generation language in use as the syntax is different in Java/Perl.
• Define the header, footer and limit if need be. In this case, we’ll ignore these fields.
• Define also the schema describing the flow to be passed on to the final output.
• The schema should be automatically propagated to the final output, but to be sure, check the schema in the Properties panel of the tFileOutputDelimited component.
• Then press F6 to run the job.

188 JasperETL powered by Talend Copyright © 2007-Talend Inc
ComponentstFileInputDelimited
tFileInputDelimited
tFileInputDelimited properties
Component family
File/Input
Function tFileInputDelimited reads a given file row by row with simple separated fields.
Opens a file and reads it row by row to split them up into fields then sends fields as defined in the Schema to the next job component, via a Row link.
Purpose
Properties Property type Either Built-in or Repository.
Built-in: No existing property data is to be retrieved
Repository: Select the Repository file where Properties are stored. The following fields are pre-filled in using fetched data.
File Name Name of the file to be processed. !Related topic:Defining the context variables on page 96
Field separator Character, string or regular expression to separate fields.
Row separator String (ex: “\n”on Unix) to distinguish rows.
Header Number of rows to be skipped in the beginning of file
Footer Number of rows to be skipped at the end of the file.
Limit Maximum number of rows to be processed. If Limit = 0, no row is read or processed.
Schema type and Edit Schema
A schema is a row description, i.e., it defines the number of fields that will be processed and passed on to the next component. The schema is either built-in or remote in the Repository. !Click Edit Schema to make changes to the schema. Note that if you make changes, the schema automatically becomes built-in.!Click Sync columns to retrieve the schema from the previous component connected in the job.
Built-in: The schema will be created and stored locally for this component only. Related topic: Setting a built-in schema on page 51
Repository: The schema already exists and is stored in the Repository, hence can be reused in various projets and job flowcharts. Related topic: Setting a repository schema on page 52
Skip empty rows Check this box to skip empty rows.

Copyright © 2007-Talend Inc JasperETL powered by Talend 189
ComponentstFileInputDelimited
Scenario: Delimited file content display
The following scenario creates a two-component job, which aims at reading each row of a file, selecting delimited data and displaying the output in the Run Job log console.
• Click and drop a tFileInputDelimited component from the Palette to the design workspace.
• Click and drop a tLogRow component the same way.
• Right-click on the tFileInputDelimited component and select Row > Main. Then drag it onto the tLogRow component and release when the plug symbol shows up.
• Select the tFileInputDelimited component again, and define its properties:
• Fill in a path to the file in the File Name field. This field is mandatory.
• Define the Row separator allowing to identify the end of a row. Then define the Field separator used to delimit fields in a row.
• In this scenario, the header and footer limits are not set. And the Limit number of processed rows is set on 50.
Extract lines at random/ Number of lines
Check this box to set the number of lines to be extracted randomly.
Encoding Select the encoding from the list or select Custom and define it manually. This field is compulsory for DB data handling.
Usage Use this component to read a file and separate fields contained in this file using a defined separator.

190 JasperETL powered by Talend Copyright © 2007-Talend Inc
ComponentstFileInputDelimited
• Select either a local (Built-in) or a remotely managed (Repository) Schema type to define the data to pass on to the tLogRow component.
• You can load and/or edit the schema via the Edit Schema function.
Related topics: Setting a built-in schema and Setting a repository schema on page 52
• As selected, the empty rows will be ignored.
• Enter the encoding standard the input file is encoded in. This setting is meant to ensure encoding consistency throughout all input and output files.
• Select the tLogRow and define the Field separator to use for the output display. Related topic: tLogRow properties on page 230.
• Check the Print schema column name in front of each value box to retrieve the column labels in the output displayed.
• Go to Run Job tab, and click on Run to execute the job.
The file is read row by row and the extracted fields are displayed on the Run Job log as defined in both components Properties.
The Log sums up all parameters in a header followed by the result of the job.

Copyright © 2007-Talend Inc JasperETL powered by Talend 191
ComponentstFileInputMail
tFileInputMail
tFileInputMail properties
Scenario: Extracting key fields from email
This two-component scenario is aimed at extracting some key standard fields and displaying the values on the Run Job console.
Component family File/Input
Function reads the header and content parts of an email file defined
Purpose helps to extract standard key data from emails
Properties File name Browse to the source email file
Schema type and Edit Schema
A schema is a row description, i.e., it defines the number of fields that will be processed and passed on to the next component. The schema is either built-in or remote in the Repository. !Click Edit Schema to make changes to the schema. Note that if you make changes, the schema automatically becomes built-in.!Click Sync columns to retrieve the schema from the previous component connected in the job.
Built-in: The schema will be created and stored locally for this component only. Related topic: Setting a built-in schema on page 51
Repository: The schema already exists and is stored in the Repository, hence can be reused in various projets and job flowcharts. Related topic: Setting a repository schema on page 52
Mail parts Column: This field is automatically populated with the columns defined in the schema that you propagated.
Mail part: Type in the label of the header part or body to be displayed on the output.
Usage This component handles flow of data therefore it requires input and output, hence is defined as an intermediary step.
Limitation n/a

192 JasperETL powered by Talend Copyright © 2007-Talend Inc
ComponentstFileInputMail
• Click and drop a tFileInputMail and a tLogRow component
• On the Properties tab, define the email parameters:
• Browse to the mail File to be processed. Define the schema including all columns you want to retrieve on your output.
• Once the schema is defined, click OK to propagate it into the Mail parts table
• On the Mail part column of the table, type in the actual header or body standard keys that will be used to retrieve the values to be displayed.
• Define the tLogRow in order for the values to be separated by a carriage return. On Windows OS, type in \n between double quotes.
• Press F6 to run the job and display the output flow on the execution console.
The header key values are extracted as defined in the Mail parts table. Indeed, the author, topic, delivery date and number of lines are part of the output displayed.

Copyright © 2007-Talend Inc JasperETL powered by Talend 193
ComponentstFileInputPositional
tFileInputPositional
tFileInputPositional properties
Component family File/Input
Function tFileInputPositional reads a given file row by row and extracts fields based on a pattern.
Purpose Opens a file and reads it row by row to split them up into fields then sends fields as defined in the Schema to the next job component, via a Row link.
Properties Property type Either Built-in or Repository.
Built-in: No existing property data is to be retrieved
Repository: Select the Repository file where Properties are stored. The following fields are pre-filled in using fetched data.
File Name Name of the file to be processed. Related topic:Defining the context variables on page 96
Field separator Character, string or regular expression to separate fields.
Row separator String (ex: “\n”on Unix) to distinguish rows.
Header Number of rows to be skipped in the beginning of file
Footer Number of rows to be skipped at the end of the file.
Limit Maximum number of rows to be processed. If Limit = 0, no row is read or processed.
Schema type and Edit Schema
A schema is a row description, i.e., it defines the number of fields that will be processed and passed on to the next component. The schema is either built-in or remote in the Repository.
Built-in: The schema will be created and stored locally for this component only. Related topic: Setting a built-in schema on page 51
Repository: The schema already exists and is stored in the Repository, hence can be reused in various projets and job flowcharts. Related topic: Setting a repository schema on page 52
Skip empty rows Check this box to skip empty rows.
Pattern Length values separated by commas, interpreted as a string between quotes. Make sure the values entered in this fields are consistent with the schema defined.
Encoding Select the encoding from the list or select Custom and define it manually. This field is compulsory for DB data handling.
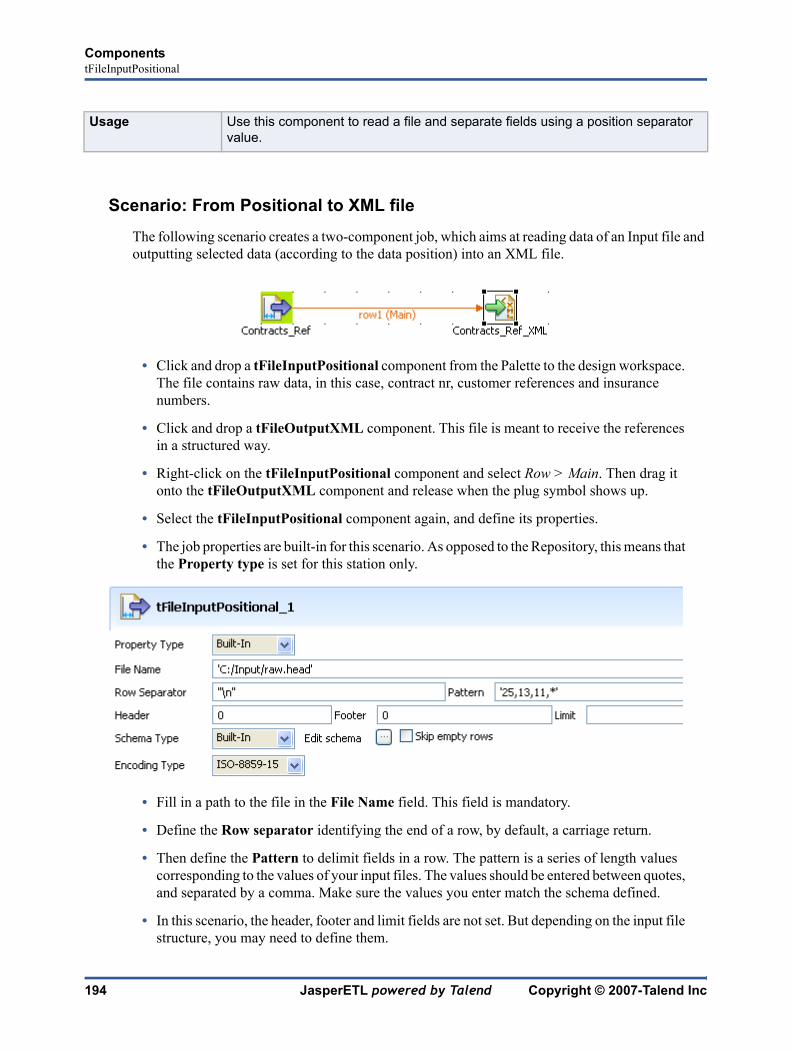
194 JasperETL powered by Talend Copyright © 2007-Talend Inc
ComponentstFileInputPositional
Scenario: From Positional to XML file
The following scenario creates a two-component job, which aims at reading data of an Input file and outputting selected data (according to the data position) into an XML file.
• Click and drop a tFileInputPositional component from the Palette to the design workspace. The file contains raw data, in this case, contract nr, customer references and insurance numbers.
• Click and drop a tFileOutputXML component. This file is meant to receive the references in a structured way.
• Right-click on the tFileInputPositional component and select Row > Main. Then drag it onto the tFileOutputXML component and release when the plug symbol shows up.
• Select the tFileInputPositional component again, and define its properties.
• The job properties are built-in for this scenario. As opposed to the Repository, this means that the Property type is set for this station only.
• Fill in a path to the file in the File Name field. This field is mandatory.
• Define the Row separator identifying the end of a row, by default, a carriage return.
• Then define the Pattern to delimit fields in a row. The pattern is a series of length values corresponding to the values of your input files. The values should be entered between quotes, and separated by a comma. Make sure the values you enter match the schema defined.
• In this scenario, the header, footer and limit fields are not set. But depending on the input file structure, you may need to define them.
Usage Use this component to read a file and separate fields using a position separator value.

Copyright © 2007-Talend Inc JasperETL powered by Talend 195
ComponentstFileInputPositional
• Select a Schema type to define the data to pass on to the tFileOutputXML component.
• You can load and/or edit the schema via the Edit Schema function. For this schema, define three columns, respectively Contracts, CustomerRef and InsuranceNr matching the three value lengths defined.
• Then define the second component properties:
• Enter the XML output file path.
• Enter a root tag (or more), to wrap the XML structure output, in this case ‘ContractsList’.
• Define the row tag that will wrap each line data, in this case ‘ContractRef’.
• Check the box Column name as tag name to reuse the column label from the input schema as tag label. By default, ‘field’ is used for each column value data.

196 JasperETL powered by Talend Copyright © 2007-Talend Inc
ComponentstFileInputPositional
• Enter the Encoding standard, the input file is encoded in. Note that, for the time being, the encoding consistency verification is not supported.
• Select the Schema type. If the row connection is already implemented, the schema is automatically synchronized with the Input file schema. Else, click on Sync columns.
• Go to the Run Job tab, and click on Run to execute the job.
The file is read row by row and split up into fields based on the length values defined in the Pattern field. You can open it using any standard XML editor.

Copyright © 2007-Talend Inc JasperETL powered by Talend 197
ComponentstFileInputRegex
tFileInputRegex
tFileInputRegex properties
Component family File/Input
Function Powerful feature which can replace number of other components of the File family. Requires some advanced knowledge on regular expression syntax
Purpose Opens a file and reads it row by row to split them up into fields using regular expressions. Then sends fields as defined in the Schema to the next job component, via a Row link.
Properties Property type Either Built-in or Repository.
Built-in: No existing property data is to be retrieved
Repository: Select the Repository file where Properties are stored. The following fields are pre-filled in using fetched data.
File Name Name of the file to be processed. !Related topic:Defining the context variables on page 96
Row separator String (ex: “\n”on Unix) to distinguish rows.
Regex This field is Perl or Java compatible and can contain multiple lines. Type in your regular expressions including the subpattern matching the fields to be extracted. !Note: In Java, antislashes need to be doubled in regexp
Regexp syntax is different if in Java/Perl
Header Number of rows to be skipped in the beginning of file
Footer Number of rows to be skipped at the end of the file.
Limit Maximum number of rows to be processed. If Limit = 0, no row is read or processed.
Schema type and Edit Schema
A schema is a row description, i.e., it defines the number of fields that will be processed and passed on to the next component. The schema is either built-in or remote in the Repository.
Built-in: The schema will be created and stored locally for this component only. Related topic: Setting a built-in schema on page 51

198 JasperETL powered by Talend Copyright © 2007-Talend Inc
ComponentstFileInputRegex
Scenario: Regex to Positional file
The following scenario creates a two-component job, reading data from an Input file using regular expression and outputting delimited data into an XML file.
• Click and drop a tFileInputRegex component from the Palette to the design workspace.
• Click and drop a tFileOutputPositional component the same way.
• Right-click on the tFileInputRegex component and select Row > Main. Drag this main row link onto the tFileOutputPositional component and release when the plug symbol displays.
• Select the tFileInputRegex again so the properties tab shows up, and define the properties:
Repository: The schema already exists and is stored in the Repository, hence can be reused in various projets and job flowcharts. Related topic: Setting a repository schema on page 52
Skip empty rows Check this box to skip empty rows.
Encoding Select the encoding from the list or select Custom and define it manually. This field is compulsory for DB data handling.
Usage Use this component to read a file and separate fields contained in this file according to the defined Regex.
Limitation n/a
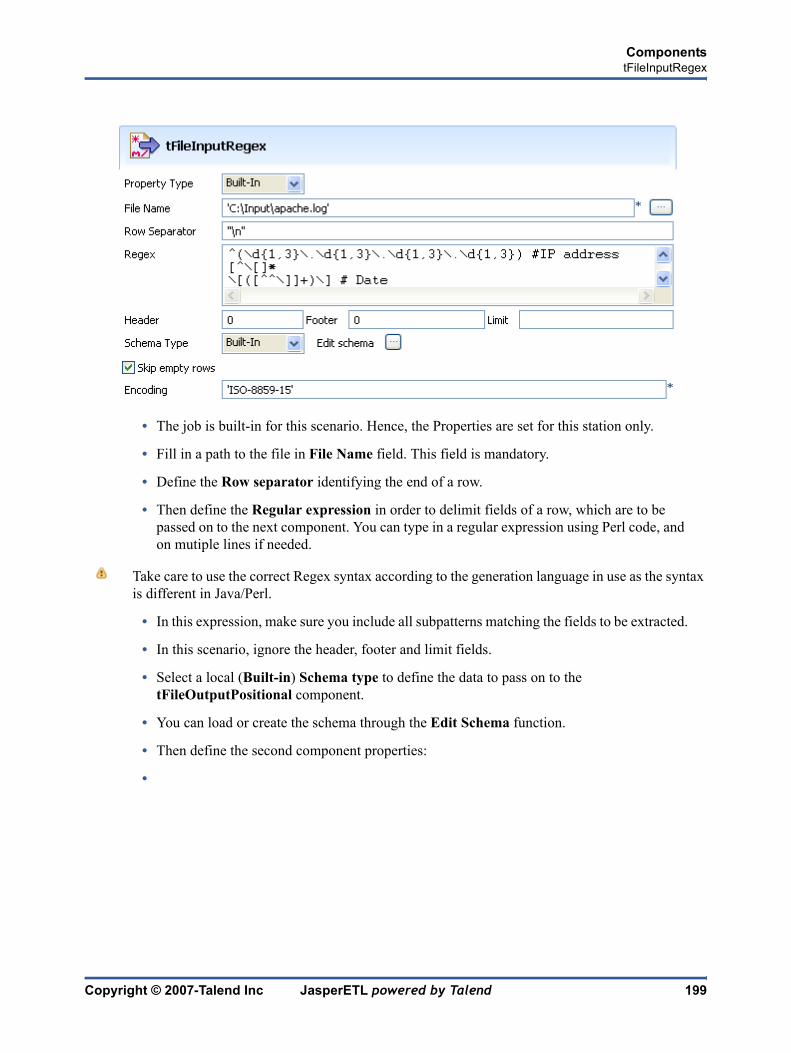
Copyright © 2007-Talend Inc JasperETL powered by Talend 199
ComponentstFileInputRegex
• The job is built-in for this scenario. Hence, the Properties are set for this station only.
• Fill in a path to the file in File Name field. This field is mandatory.
• Define the Row separator identifying the end of a row.
• Then define the Regular expression in order to delimit fields of a row, which are to be passed on to the next component. You can type in a regular expression using Perl code, and on mutiple lines if needed.
Take care to use the correct Regex syntax according to the generation language in use as the syntax is different in Java/Perl.
• In this expression, make sure you include all subpatterns matching the fields to be extracted.
• In this scenario, ignore the header, footer and limit fields.
• Select a local (Built-in) Schema type to define the data to pass on to the tFileOutputPositional component.
• You can load or create the schema through the Edit Schema function.
• Then define the second component properties:
•

200 JasperETL powered by Talend Copyright © 2007-Talend Inc
ComponentstFileInputRegex
• Enter the Positional file output path.
• Enter the Encoding standard, the output file is encoded in. Note that, for the time being, the encoding consistency verification is not supported.
• Select the Schema type. Click on Sync columns to automatically synchronize the schema with the Input file schema.
• Now go to the Run Job tab, and click on Run to execute the job.
The file is read row by row and split up into fields based on the Regular Expression definition. You can open it using any standard file editor.
Copyright © 2007-Talend Inc JasperETL powered by Talend 201
ComponentstFileInputXML
tFileInputXML
tFileInputXML Properties
Component family File/Input
Function tFileInputXML reads an XML structured file and extracts data row by row.
Purpose Opens an XML structured file and reads it row by row to split them up into fields then sends fields as defined in the Schema to the next component, via a Row link.
Properties Property type Either Built-in or Repository.
Built-in: No existing property data is to be retrieved
Repository: Select the Repository file where Properties are stored. The following fields are pre-filled in using fetched data.
Schema type and Edit Schema
A schema is a row description, i.e., it defines the number of fields that will be processed and passed on to the next component. The schema is either built-in or remote in the Repository.
Built-in: The schema will be created and stored locally for this component only. Related topic: Setting a built-in schema on page 51
Repository: The schema already exists and is stored in the Repository, hence can be reused in various projets and job flowcharts. Related topic: Setting a repository schema on page 52
File Name Name of the file to be processed. !Related topic:Defining the context variables on page 96
Loop XPath query Node of the tree, which the loop is based on
Mapping column/XPath Query
Column reflects the schema as defined by the Schema type field!XPath Query: Enter the fields to be extracted from the structured input.
Limit Maximum number of rows to be processed. If Limit = 0, no row is read nor processed.
Encoding Select the encoding from the list or select Custom and define it manually. This field is compulsory for DB data handling.
Limitation n/a

202 JasperETL powered by Talend Copyright © 2007-Talend Inc
ComponentstFileInputXML
Scenario: XML street finder
This very basic scenario is made of two components. A tFileInputXML component extracts from the defined street directory file and the output is displayed on the Run Job console via a tLogRow component.
• Select a tFileInputXML file from the File folder in the Palette. Click and drop also a tLogRow component and connect both components.
• On the Properties panel of the tFileInputXML, define the properties:
• As the street dir file used as input file has been previously defined in the Metadata area, select Repository as Property type. This way, the properties are automatically leveraged and the rest of the properties fields are filled in (apart from Schema). For more information regarding the metadata creation wizards, see Defining Metadata items on page 54.
• Select the same way the relevant schema in the Repository metadata list. Edit schema if you want to make any change to the schema loaded.
• The Filename shows the structured file to be used as input
• In Loop XPath query, change if needed the node of the structure where the loop is based.
• On the Mapping table, fill the fields to be extracted and displayed in the output.
• If the file size is consequent, fill in a Limit of rows to be read.

Copyright © 2007-Talend Inc JasperETL powered by Talend 203
ComponentstFileInputXML
• Enter the encoding if needed then double-click on tLogRow to define the separator character.
• At last, press F6 or go to Run Job and click Run to execute the job. On the console, the fields defined in the input properties are extracted from the XML structured and displayed.

204 JasperETL powered by Talend Copyright © 2007-Talend Inc
ComponentstFileList
tFileList
tFileList properties
Scenario: Iterating on a file directory
The following scenario creates a three-component job, which aims at listing files from a defined directory, reading each file by iteration, selecting delimited data and displaying the output in the Run Job log console.
• Click and drop a tFileList , a tFileInputDelimited and a tLogRow component into the Design workspace.
• Right-click on the tFileList component, and pull an Iterate connection to the tFileInputDelimited component. Then pull a Main row from the tFileInputDelimited to the tLogRow component.
• Now define the properties of all three components.
• First select the tFileList component, and click on Properties tab:
Component family File/Management
Function iterates on files of a set directory.
Purpose tFileList takes out a set of files based on a filemask pattern and iterates on each file.
Properties Directory Path to the directory where files are stored
Filemask Filename or filemask using wildcharacter (*) .
Case sensitive Create case sensitive filter on filenames.
Usage tFilelist provides a list of files from a defined directory on which to iterate

Copyright © 2007-Talend Inc JasperETL powered by Talend 205
ComponentstFileList
• Browse to the Directory of the files to process. To display the path on the job itself, use the hint label (__DIRECTORY__) that shows up when you browse over the Directory field. Type in this reference in the Label Format field of the View tab.
• Enter a Filemask using wildcards if need be.
• The case is sensitive.
• Click on the tFileInputDelimited component and set the properties:
• Enter the File Name field using a variable containing the current filename path, as you filled in in the properties of tFileList. Press Ctrl+Space bar to access the autocomplete list of variables.
• Fill in all other fields as detailed in the tFileInputDelimited section. Related topic: tFileInputDelimited properties on page 188
• Select the last component, tLogRow and fill in the separator to be used to distinguish field content displayed on the Log. Related topic: tLogRow properties on page 230.

206 JasperETL powered by Talend Copyright © 2007-Talend Inc
ComponentstFileList
The job iterates on the directory defined, and reads each file contained. Then delimited data is passed on to the last component which displays it on the Log.
For other scenarios using tFileList, see tFileCopy on page 182.

Copyright © 2007-Talend Inc JasperETL powered by Talend 207
ComponentstFileOutputExcel
tFileOutputExceltFileOutputExcel Properties
Related scenario
For tFileOutputExcel related scenario, see tSugarCRMInput on page 324.
Component family File/Output
Function tFileOutputExcel outputs data to an MS Excel type of file.
Purpose tFileOutputExcel writes an MS Excel file with separated data value according to a defined schema.
Properties File name Name or path to the output file. Related topic: Defining the context variables on page 96
Sheet name Name of the sheet
Include header Check the box to include header row to the output file
Schema type and Edit Schema
A schema is a row description, i.e., it defines the number of fields that will be processed and passed on to the next component. The schema is either built-in or remote in the Repository.
Built-in: The schema will be created and stored locally for this component only. Related topic: Setting a built-in schema on page 51
Repository: The schema already exists and is stored in the Repository, hence can be reused in various projects and job designs. Related topic: Setting a repository schema on page 52
Sync columns Click to synchronize the output file schema with the input file schema. The Sync function only displays once the Row connection is linked with the Output component.
Encoding Select the encoding from the list or select Custom and define it manually. This field is compulsory for DB data handling.
Usage Use this component to write an XML file with data passed on from other components using a Row link.
Limitation n/a

208 JasperETL powered by Talend Copyright © 2007-Talend Inc
ComponentstFileOutputLDIF
tFileOutputLDIF
tFileOutputLDIF Properties
Component family File/Output
Function tFileOutputLDIF outputs data to an LDIF type of file which can then be loaded into a LDAP directory.
Purpose tFileOutputLDIF writes or modifies a LDIF file with data separated in respective entries based on the schema defined,.or else deletes content from an LDIF file.
Properties File name Name or path to the output file. Related topic: Defining the context variables on page 96
Wrap Wraps the file content, every defined number of characters.
Change type Select Add, Modify or Delete to respectively create an LDIF file, modify or remove an existing LDIF file. In case of modification, set the type of attribute changes to be made.
Change on attributes
Select Add, Modify or Delete to respectively add a new attribute to the file, replace the attributes with new ones or suppress attributes from the file defined.
Schema type and Edit Schema
A schema is a row description, i.e., it defines the number of fields that will be processed and passed on to the next component. The schema is either built-in or remote in the Repository.
Built-in: The schema will be created and stored locally for this component only. Related topic: Setting a built-in schema on page 51
Repository: The schema already exists and is stored in the Repository, hence can be reused in various projects and job designs. Related topic: Setting a repository schema on page 52
Sync columns Click to synchronize the output file schema with the input file schema. The Sync function only displays once the Row connection is linked with the Output component.
Encoding Select the encoding from the list or select Custom and define it manually. This field is compulsory for DB data handling.
Usage Use this component to write an XML file with data passed on from other components using a Row link.
Limitation n/a

Copyright © 2007-Talend Inc JasperETL powered by Talend 209
ComponentstFileOutputLDIF
Scenario: Writing DB data into an LDIF-type file
This scenario describes a two component job which aims at extracting data from a database table and writing this data into a new output LDIF file.
• Click and drop a tDBInput and a tFileOutputLDIF component from the Palette to the design area. Bind them together using a Row > Main link.
• Select the tDBInput component, and go to the Properties panel then select the Properties tab.
• If you stored the DB connection details in a Metadata entry in the Repository, set the Property type as well as the Schema type on Repository and select the relevant metadata entry. All other fields are filled in automatically, and retrieve the metadata-stored parameters.
• Alternatively select Built-in as Property type and Schema type and fill in the DB connection and schema fields manually.
• Then double-click on tFileOutpuLDIF and define the Properties.
• Browse to the folder where you store the Output file. In this use case, a new LDIF file is to be created. Thus type in the name of this new file.
• In the Wrap field, enter the number of characters held on one line. The text coming afterwards will get wrapped onto the next line.

210 JasperETL powered by Talend Copyright © 2007-Talend Inc
ComponentstFileOutputLDIF
• Select Add as Change Type as the newly created file is by definition empty. In case of modification type of Change, you’ll need to define the nature of the modification you want to make to the file.
• As Schema Type, select Built-in and use the Sync Columns button to retrieve the input schema definition.
• Press F6 to short run the job.
The LDIF file created contains the data from the DB table and the type of change made to the file, in this use case, addition.

Copyright © 2007-Talend Inc JasperETL powered by Talend 211
ComponentstFileOutputXML
tFileOutputXML
tFileOutputXML properties
Component family File/Output
Function tFileOutputXML outputs data to an XML type of file.
Purpose tFileOutputXML writes an XML file with separated data value according to a defined schema.
Properties File name Name or path to the output file. Related topic: Defining the context variables on page 96
Root tag Wraps the whole output file structure and data.
Row tag Wraps data and structure per row
Column name as tag name
Check the box to leverage the column labels from the input schema, as data wrapping tag.
Split output in files If the XML file output is big , you can split the file every certain number of rows.
Schema type and Edit Schema
A schema is a row description, i.e., it defines the number of fields that will be processed and passed on to the next component. The schema is either built-in or remote in the Repository.
Built-in: The schema will be created and stored locally for this component only. Related topic: Setting a built-in schema on page 51
Repository: The schema already exists and is stored in the Repository, hence can be reused in various projects and job designs. Related topic: Setting a repository schema on page 52
Sync columns Click to synchronize the output file schema with the input file schema. The Sync function only displays once the Row connection is linked with the Output component.
Encoding Select the encoding from the list or select Custom and define it manually. This field is compulsory for DB data handling.
Usage Use this component to write an XML file with data passed on from other components using a Row link.
Limitation n/a

212 JasperETL powered by Talend Copyright © 2007-Talend Inc
ComponentstFileOutputXML
Scenario: From Positional to XML file
Find a scenario using tFileOutputXML component at section: Scenario: From Positional to XML file on page 194.

Copyright © 2007-Talend Inc JasperETL powered by Talend 213
ComponentstFileUnarchive
tFileUnarchivetFileUnarchive Properties
Related scenario
For tFileUnarchive related scenario, see tFileCompare on page 179.
Component family File/Management
Function Decompresses the archive file provided as parameter and put it in the extraction directory.
Purpose Unarchives a file of any format (zip, rar...) that is mostlikely to be processed.
Properties Archive file File path to the archive
Extract Directory Folder where the unarchived file is put
Java only features
Use archive name as root directory / Extract file paths
Check the box to reproduce the whole path to the file or if none exists create a new folder
Perl only featureUse Command line tools
Check this box to use another unarchiving tool than the one provided by default in the Perl package.
Usage This component can be used as a standalone component but it can also be used within a job as a Start component using an Iterate link.
Limitation n/a

214 JasperETL powered by Talend Copyright © 2007-Talend Inc
ComponentstFlowMeter
tFlowMeter
tFlowMeter Properties
If you have a need of log, statistics and other measurement of your data flows, see Automating stats & logs use on page 106.
Related scenario
Component family Log/Error
Function Counts the number of rows processed in the defined flow.
Purpose The number of rows is then meant to be caught by the tFlowMeterCatcher for logging purpose.
Properties Use input connection name as label
Check the box to reuse the name given to the input main row flow as label in the logged data.
Mode Select the type of values for the data measured: Absolute: the actual number of rows is logged!Relative: a ratio (%) of the number of rows is logged. When selecting this option, the reference
Thresholds Adds a threshold to watch proportions in volumes measured. you can decide that the normal flow has to be between low and top end of a row number range, and if the flow is under this low end, there is a bottleneck.
Usage Cannot be used as a start component as it requires an input flow to operate.
Limitation n/a

Copyright © 2007-Talend Inc JasperETL powered by Talend 215
ComponentstFor
tFor
tFor Properties
Scenario: Job execution in a loop
This scenario describes a job composed of a parent job and a child job. The parent job implements a loop which executes n times a child job, with a pause between each execution.
Component family Misc
Function tFor iterates on a task execution.
Purpose tFor allows to automatically execute a task or a job based on a loop
Properties From Type in the first instance number which the loop should start from. A start instance number of 2 with a step of 2 means the loop takes on every even number instance.
To Type in the last instance number which the loop should finish with.
Step Type in the step the loop should be incremented of. A step of 2 means every second instance.
Usage tFor is to be used as a starting component and can only be used with an iterate connection to the next component.
Limitation n/a

216 JasperETL powered by Talend Copyright © 2007-Talend Inc
ComponentstFor
• In the parent job, click and drop a tFor, a tRunJob and a tSleep component onto the workspace.
• Connect the tFor to the tRunJob using an Iterate connection.
• Then connect the tRunJob to a tSleep component using a Row connection.
• On the child job, click and drop the following components: tPOP, tFileInputMail and tLogRow.
• On the Properties panel of the tFor component, type in the instance number to start from (1), the instance number to finish with (5) and the step (1)
• On the Properties panel of the tRunJob component, select the child job in the list of stored jobs offered. In this example: popinputmail
• Select the context if relevant. In this use case, the context is default with no variables stored.
• In the tSleep Properties panel, type in the time-off value in second. In this example: 3 seconds
• Then in the child job, define the connection parameters to the pop server, on the Properties panel.
• In the tFileInputMail Properties panel, select a global variable as File Name, to collect the current file in the directory defined in the tPOP component. Press Ctrl+Space bar to access the variable list. In this example, the variable to be used is: $_globals{tPOP_1}{CURRENT_FILEPATH}
• Define the Schema, for it to include the mail element to be processed, such as author, topic, delivery date and number of lines.
• In the Mail Parts table, type in the corresponding Mail part for each column defined in the schema. ex: author comes from the From part of the email file.

Copyright © 2007-Talend Inc JasperETL powered by Talend 217
ComponentstFor
• Then connect the tFileInputMail to a tLogRow to check out the execution result on the Run Job view.
• Press F6 to run the job.

218 JasperETL powered by Talend Copyright © 2007-Talend Inc
ComponentstFTP
tFTP
tFTP properties
tFTP put
Note: If you enter a file path in the Filemask field, you don’t need to fill in the local directory field.
Component family Internet/FTP
Function This component transfers defined files via an FTP connection.
Purpose tFTP purposes vary according to the action selected. It can be used to get a file, put a file, remove a file or replace it on the FTP server defined.
Properties Host FTP IP address
Port Listening port number of the FTP site.
Username and Password
FTP user authentication data.
Local directory File Path. Use depends on action taken.
Remote directory File Path. Use depends on action taken.
Action List of available actions to transfer files. Related links: tFTP put, tFTP get, tFTP rename, tFTP delete on page 219.
Files Filemask of the file and New Name in case of Rename action. Wildcard character (*) can be used to transfer a set of files. Or right-click to add lines to the table.
Usage This component is typically used as a single-component sub-job but can also be used as output or end object.
Limitation tFTP cannot handle both a Get and a Put action at the same time. In order to carry out both actions in parallel, duplicate the tFTP component in the job and set them differently for both actions.
Purpose tFTP copies selected files from a defined local directory to a destination remote FTP directory.
Local directory Path to source location of the file(s).
Remote directory Path to destination directory of the file(s).
Filemask File names or path to the files to be transferred.

Copyright © 2007-Talend Inc JasperETL powered by Talend 219
ComponentstFTP
tFTP get
Note: If you enter a file path in the Filemask field, you don’t need to fill in the local directory field.
tFTP rename
Note: If you enter a file path in the Filemask field, you don’t need to fill in the local directory field.
tFTP delete
Note: If you enter a file path in the Filemask field, you don’t need to fill in the local directory field.
Scenario: Putting files on a remote FTP server
This scenario creates a single-component job which puts the files defined on a remote server.
• Click and drop a tFTP component onto the design workspace.
• Click on Properties tab, to define the tFTP component parameters:
Purpose tFTP retrieves selected files from a defined remote FTP directory and copy them into a local directory .
Local directory Path to destination location of the file.
Remote directory Path to source directory where the files can be fetched.
Filemask File name or path to the files to be transferred.
Purpose tFTP remotely renames or moves files in a a filesystem.
Local directory unused in this action.
Remote directory Source directory where the files to be renamed or moved can be fetched.
Filemask File name or path to the files to be renamed.
New name Enter the new name for the file.
Purpose tFTP remotely deletes files in a a filesystem.
Local directory unused in this action.
Remote directory Source directory where the files to be deleted are located.
Filemask File name or path to the files to be deleted.

220 JasperETL powered by Talend Copyright © 2007-Talend Inc
ComponentstFTP
• Fill in the Host IP address, the listening Port number, as well as the connection details.
• Fill in the local directory details unless you fill it directly in the different filemasks.
• Fill the details of the remote server directory.
• Select the action to be carried out, in this usecase, we’ll perform a Put action.
• Right-click in the Files area, to add new lines and fill in the filemasks of all files to be copied onto the remote directory.
• Click on Run Job tab and execute the job.
Files defined in the Filemask are copied on the remote server.

Copyright © 2007-Talend Inc JasperETL powered by Talend 221
ComponentstFuzzyMatch
tFuzzyMatch
tFuzzyMatch properties
Component family Data quality
Function Compares a column from the main flow with a reference column from the lookup flow and outputs the main flow data displaying the distance
Purpose Helps ensuring the data quality of any source data against a reference data source.
Properties Schema type and Edit Schema
A schema is a row description, i.e., it defines the number of fields that will be processed and passed on to the next component. The schema is either built-in or remote in the Repository. !Two read-only columns, Value and Match are added to the output schema automatically. These
Built-in: The schema will be created and stored locally for this component only. Related topic: Setting a built-in schema on page 51
Repository: The schema already exists and is stored in the Repository, hence can be reused in various projects and job designs. Related topic: Setting a repository schema on page 52
Matching type Select the relevant matching algorythm among:!Levenshtein:Based on the edit distance theory. This calculates the number of insertion, deletion or substitution required to match the reference !Metaphone:Based on the phonetics. It first loads the phonetics of all entries of the lookup reference and checks all entries of the main flow against it.!Double Metaphone:If disambiguation is required in Metaphone, use this option..
Min Distance (Levenshtein only) Set the minimum number of changes allowed to match the reference. If set to 0, only perfect matchs are returned.
Max Distance (Levenshtein only) Set the maximum number of changes allowed to match the reference.

222 JasperETL powered by Talend Copyright © 2007-Talend Inc
ComponentstFuzzyMatch
Scenario 1: Levenshtein distance of 0 in first names
This scenario describes a four-component job aiming at checking the edit distance between the First Name column of an input file with the data of the reference input file. The output of this Levenshtein type check is displayed along with the content of the main flow on a
• Drag and drop the following components from the Palette to the workspace: tFileInputDelimited (x2), tFuzzyMatch, tFileOutputDelimited.
• Define the first tFileInputDelimited properties. Browse the system to the input file to be analysed and most importantly set the schema to be used for the flow to be checked.
• In the schema, set the Type of data in the Java version, especially if you are in Built-in mode.
• Link the defined input to the tFuzzyMatch using a Main row link.
• Define the second tFileInputDelimited component the same way.
WARNING—Make sure the reference column is set as key column in the schema of the lookup flow.
Matching Column Select the column of the main flow that needs to be checked against the reference (lookup) key column
Unique Matching Check this box if you want to get the best match possible, in case several matchs are available.
Matching item separator
In case several matchs are available, all of them are displayed unless the unique match box is checked. Define the delimiter between all matchs.
Usage This component is not startable (green background) and it requires two input components and an output component.
Limitation/prerequisite
Perl users: Make sure the relevant packages are installed. Check the Module view for modules to be installed
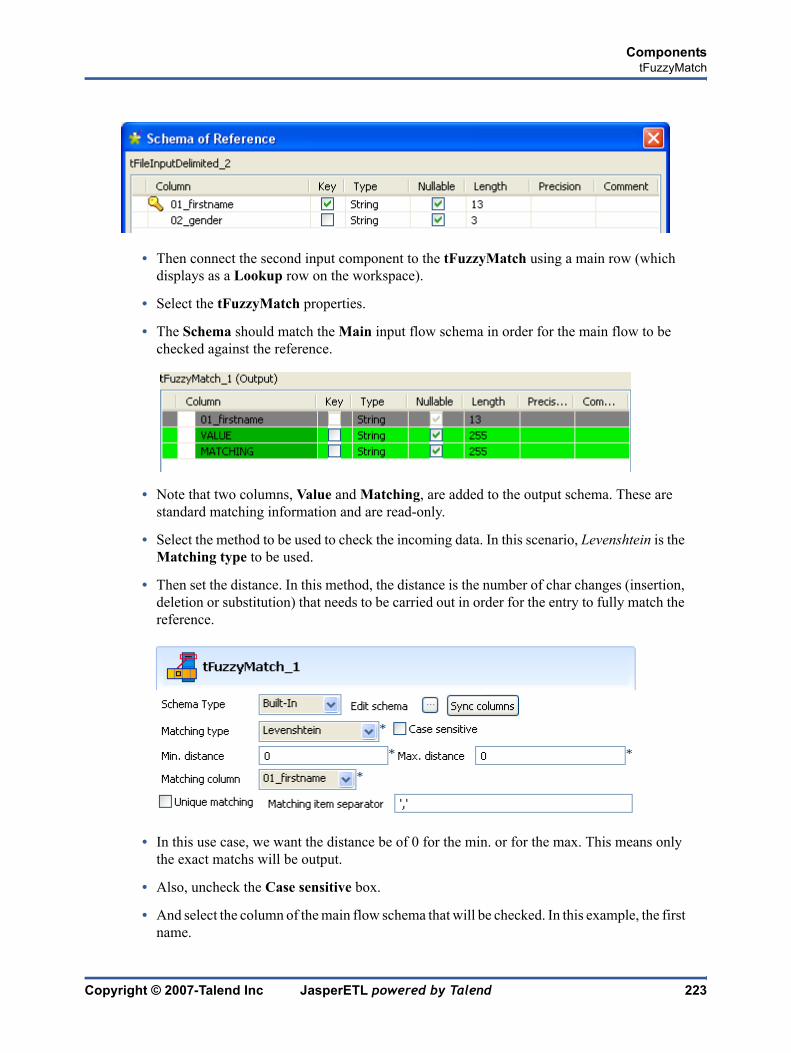
Copyright © 2007-Talend Inc JasperETL powered by Talend 223
ComponentstFuzzyMatch
• Then connect the second input component to the tFuzzyMatch using a main row (which displays as a Lookup row on the workspace).
• Select the tFuzzyMatch properties.
• The Schema should match the Main input flow schema in order for the main flow to be checked against the reference.
• Note that two columns, Value and Matching, are added to the output schema. These are standard matching information and are read-only.
• Select the method to be used to check the incoming data. In this scenario, Levenshtein is the Matching type to be used.
• Then set the distance. In this method, the distance is the number of char changes (insertion, deletion or substitution) that needs to be carried out in order for the entry to fully match the reference.
• In this use case, we want the distance be of 0 for the min. or for the max. This means only the exact matchs will be output.
• Also, uncheck the Case sensitive box.
• And select the column of the main flow schema that will be checked. In this example, the first name.

224 JasperETL powered by Talend Copyright © 2007-Talend Inc
ComponentstFuzzyMatch
• No need to check the Unique matching nor hence the separator.
• Link the tFuzzyMatch to the standard output tLogRow. No other parameters than the display delimiter is ot be set for this scenario.
• Save the job and press F6 to execute the job.
As the edit distance has been set to 0 (min and max), the output shows the result of a regular join between the main flow and the lookup (reference) flow, hence only full matchs with Value of 0 are displayed.
A more obvious example is with a minimum distance of 1 and a max. distance of 2, see Scenario 2: Levenshtein distance of 1 or 2 in first names on page 224.
Scenario 2: Levenshtein distance of 1 or 2 in first names
This scenario is based on the scenario 1 described above. Only the min and max distance settings in tFuzzyMatch component get modified, which will change the output displayed.
• In the Properties panel of the tFuzzyMatch, change the min distance from 0 to 1. This excludes straight away the exact matchs (which would show a distance of 0).
• Change also the max distance to 2 as the max distance cannot be lower than the min distance. The output will provide all matching entries showing a discrepancy of 2 characters at most.
• No other change of the setting is required.
• Make sure the Matching item separator is defined, as several references might be matching the main flow entry.

Copyright © 2007-Talend Inc JasperETL powered by Talend 225
ComponentstFuzzyMatch
• Save the new job and press F6 to run it.
As the edit distance has been set to 2, some entries of the main flow match several reference entries.
You can also use another method, the metaphone, to assess the distance between the main flow and the reference,
Scenario 3: Metaphonic distance in first name
This scenario is based on the scenario 1 described above.
• Change the Matching type to Metaphone. There is no min nor max distance to set as the matching method is based on the discrepancies with the phonetics of the reference.
• Save the job and press F6. The phonetics value is displayed along with the possible matchs.

226 JasperETL powered by Talend Copyright © 2007-Talend Inc
ComponentstLogCatcher
tLogCatcherBoth tDie and tWarn components are closely related to the tLogCatcher component.They generally make sense when used alongside a tLogCatcher in order for the log data collected to be encapsulated and passed on to the output defined.
tLogCatcher properties
Scenario1: warning & log on entries
In this basic scenario made of three components, a tRowGenerator creates random entries (id to be incremented). The input hits a tWarn component which triggers the tLogCatcher subjob. This subjob fetches the warning message as well as standard predefined information and passes them on to the tLogRow for a quick display of the log data.
Component family Log & Error
Function Fetches set fields and messages from PerlDie, tDie and/or tWarn and passes them on to the next component.
Purpose Operates as a log function triggered by one of the three: PerlDie, tDie or tWarn, to collect and transfer log data.
Schema type and Edit Schema
A schema is a row description, i.e., it defines the number of fields that will be processed and passed on to the next component. The schema is either built-in or remote in the Repository.
Built-in: The schema will be created and stored locally for this component only. Related topic: Setting a built-in schema on page 51
Repository: The schema already exists and is stored in the Repository, hence can be reused in various projets and job flowcharts. Related topic: Setting a repository schema on page 52
Catch PerlDie Check this box to trigger the tCatch function when a PerlDie occurs in the job
Catch tDie Check this box to trigger the tCatch function when a tDie is called in a job
Catch tWarn Check this box to trigger the tCatch function when a tWarn is called in a job
Usage This component is the start component of a secondary job which automatically triggers at the end of the main job
Limitation n/a

Copyright © 2007-Talend Inc JasperETL powered by Talend 227
ComponentstLogCatcher
• Click and drop a tRowGenerator, a tWarn, a tLogCatcher and a tLogRow from the Palette, on your workspace
• Connect the tRowGenerator to the tWarn component.
• Connect separately the tLogCatcher to the tLogRow.
• On the tRowGenerator editor, set the random entries creation using a basic Perl function:
• On the tWarn Properties panel, set your warning message, the code the priority level. In this case, the message is “this is a warning’.
• For this scenario, we will concatenate a Perl function to the message above, in order to collect the first value from the input table.
• On the tLogCatcher properties panel, check the tWarn box in order for the message from the latter to be collected by the subjob.
• Click Edit Schema to view the schema used as log output. Notice that the log is comprehensive.

228 JasperETL powered by Talend Copyright © 2007-Talend Inc
ComponentstLogCatcher
Press F6 to execute the job. Notice that the Log produced is exhaustive.
Scenario 2: log & kill a job
This scenario uses a tLogCatcher and a tDie component. A tRowGenerator is connected to a tFileOutputDelimited using a Row link. On error, the tDie triggers the catcher subjob which displays the log data content on the Run Job console.
• Click and drop all required components from various folders of the Palette: tRowGenerator, tFileOutputDelimited, tDie, tLogCatcher, tLogRow.
• On the tRowGenerator properties panel, define the setting of the input entries to be handled.
• Edit the schema and define the following columns as random input examples: id, name, quantity, flag and creation.
• Set the Number of rows onto 0. This will constitute the error which the Die operation is based on.
• On the Values table, define the Perl array functions to feed the input flow.

Copyright © 2007-Talend Inc JasperETL powered by Talend 229
ComponentstLogCatcher
• Define the tFileOutputDelimited to hold the possible output data. The row connection from the tRowGenerator feeds automatically the output schema. The separator is a simple semi-colon.
• Connect this output component to the tDie using a Trigger > If connection. Double-click on the newly created connection to define the if: !$_globals{tRowGenerator_1}{NB_LINE} <= 0
• Then double-click to select and define the Properties of the tDie component.
• Enter your Die message to be transmitted to the tLogCatcher before the actual kill job operation happens.
• Next to the job but not physically connected to it, click and drop a tLogCatcher and connect it to a tLogRow component.
• Define the tLogCatcher properties. Make sure the tDie box is checked in order to add the Die message to the Log information transmitted to the final component.
• Press F6 to run the job and notice that the log contains a black message and a red one.
• The black log data come from the tDie and are transmitted by the tLogCatcher. In addition the normal PerlDie message in red displays as a job abnormally died.

230 JasperETL powered by Talend Copyright © 2007-Talend Inc
ComponentstLogRow
tLogRow
tLogRow properties
Scenario: Delimited file content display
Related topics using a tLogRow component:
• tFileInputDelimited Scenario: Delimited file content display on page 189.
• tContextLoad Scenario: Dynamic context use in MySQL DB insert on page 123
• tWarn, tDie, tLogCatcher Scenario1: warning & log on entries on page 226 and Scenario 2: log & kill a job on page 228
Component family Log & Error
Function Displays data or results in the Run Job console
Purpose tLogRow helps monitoring data processed.
Properties Print values in table cells
Separator Enter the separator which will delimit data on the Log display
Print component unique name in front of each output row
Check this box in case several LogRow components are used. Allows to differenciate outputs
Print schema column name in front of each value
Check this box to retrieve column labels from output schema.
Use fixed length for values
Check this box to set a fixed width for the value display.
Usage This component can be used as intermediate step in a data flow or as a n end object in the job flowchart.
Limitation n/a

Copyright © 2007-Talend Inc JasperETL powered by Talend 231
ComponentstMap
tMap tMap properties
Note: For further information, see Mapping data flows in a job on page 80.
Scenario 1: Mapping with filter and simple explicit join (Perl)
The job described below aims at reading data from a csv file stored in the Repository, looking up at a reference file also stored remotely, then extracting data from these two files based on defined filters to an output file or a reject file.
This job is presented in Perl but could also be carried out in Java.
• Click on File in the Palette of components, select tFileInputCSV and drop it on the design area. Rename the Label to Cars, either by double-clicking on the label in the workspace or via the View tab of the Properties panel.
• Repeat this operation, and rename this second input component: Owners.
Component family Processing
Function tMap is an advanced use component, which integrates itself as plugin to JasperETL. .
Purpose tMap transforms and routes data from single or multiple sources to single or multiple destinations.
Properties Preview The preview is an instant shot of the Mapper data. It becomes available when Mapper properties have been filled in with data. The preview synchronization takes effect only after saving changes.
Mapping links display as
Auto: the default setting is curves links!Curves: the mapping display as curves !Lines: the mapping displays as straight lines . This last option allows to slightly enhance performance.
Map editor Mapper is the tMap editor. It allows you to define the tMap routing and transformation properties.
Usage Possible uses are from a simple reorganisation of fields to the most complex jobs of data multiplexing or demultiplexing transformation, concatenation, inversion, filtering and more...
Limitation The use of tMap supposes minimum Perl or Java knowledge in order to fully exploit its functionalities.!This component is a junction step, and for this reason cannot be a start nor end component in the job

232 JasperETL powered by Talend Copyright © 2007-Talend Inc
ComponentstMap
• Click on Processing in the Palette of components, select tMap and drop it on the design area.
• Connect the two Input components to the mapping component and customize the row connection labels.
• The Cars and Owners delimited files metadata are defined in the Metadata area of the repository. You can hence use their Repository reference in the Properties panel.
• Double-click on Cars, to set the Properties panel.
• Select Repository to retrieve Property type as well as Schema type. The rest of the fields gets automatically filled in appropriately when you select the relevant Metadata entry on the list.
• Double-click on the Owners component and repeat the setting operation. Select the corresponding Metadata entry.
For further information regarding Metadata creation in the Repository, see Defining Metadata items on page 54.
• Then double-click on the tMap component to open the Mapper. Notice that the Input area is already filled with the Input component metadata tables and that the top table is the Main flow table.
• Notice also that the respective row connection labels display on the top bar of the tables.
• Create a Join between the two tables on the ID_Owner field by simply dragging the top table ID_Owner field to the lookup input table.

Copyright © 2007-Talend Inc JasperETL powered by Talend 233
ComponentstMap
• Define this link as an Inner Join by checking the box.
• Click on the Plus button on the Output area of the Mapper to add three Output tables
• Drag and drop Input content to fill in the first output schema. For more information regarding data mapping, see Mapping data flows in a job on page 80.
• Click on the plus arrow button to add a filter row. In the Insured table, will be gathered cars and owners data which include an Insurance ID.

234 JasperETL powered by Talend Copyright © 2007-Talend Inc
ComponentstMap
• Therefore drag the ID_Insurance field to the Filter condition area and enter the formula used meaning ‘not undefined’: $Owners_data[ID_Insurance] ne ''
• The Reject_NoInsur table is a standard reject output flow containing all data that do not satisfy the required filter condition. Click the orange arrow to set the table as Reject Output.
• The third and last table gathers the schema entries whose Inner Join could not be established. One Owners_ID from the Car database does not match any Owner_ID from the Owner file.
• Click the violet arrow button to set the last table as the Inner Join Reject output flow.
• Click OK to validate and come back to the design area.

Copyright © 2007-Talend Inc JasperETL powered by Talend 235
ComponentstMap
• Add three tFileOutputDelimited components to the workspace and right-click on the tMap to connect the Mapper with all three output components, using the relevant Row connection.
• Relabel the three output components accordingly.
• Then double-click on each of them, one after the other, in order to define their respective output filepath. If you want a new file to be created, browse to the destination output folder, and type in a file name including the extension.
• Check the Include header box to reuse the column labels from the schema as header row in the output file.
• Run the Job using the F6 keystroke or via the Run Job panel.
• Output files have been created if need be.

236 JasperETL powered by Talend Copyright © 2007-Talend Inc
ComponentstMap
Scenario 2: Mapping with Inner join rejection (Perl)
This scenario, based on scenario 1, adds one input file containing Resellers details and extra fields in the main Output table. Two filters on Inner Joins are added to gather specific rejections.
• Click on File in the Palette of Components, and drop a tFileInputCSV component on the workspace.
• Connect it to the Mapper and put a label on the component and the connection.
• Double-click on the Resellers component, to define the Reseller input properties.
• Browse to the Resellers.csv file. Edit the schema and add the columns as needed to match the file structure.

Copyright © 2007-Talend Inc JasperETL powered by Talend 237
ComponentstMap
• You could also create a metadata entry for this file description and select Repository as properties and schema type. For further information, see Setting up a File Delimited schema on page 59.
• Double-click on the tMap component and notice that the schema is added on the Input area.
• Create a join between the main input flow and the resellers input. Check the Inner Join box to define that an Inner Join Reject output is to be created.
• Drag & drop the fields from the Resellers table to the main Output table.

238 JasperETL powered by Talend Copyright © 2007-Talend Inc
ComponentstMap
Note: When two inner joins are defined, you either need to define two different inner join reject tables to differenciate both rejections or if there is only one Inner Join reject output, both Inner Join rejections will be stored in the same output.
• On the output area, click on the plus button to add a new output table.
• Give a name to this new Output connection: Reject_ResellerID
• Click the Inner Join reject button to define this new output table as Inner Join Reject output.
• Drag & drop two fields from the main input flow (Cars) to the new reject output table. In this case, if the Inner Join cannot be established, these data (ID_Cars & ID_resellers) will be gathered in the output file and will help identify the bottleneck.

Copyright © 2007-Talend Inc JasperETL powered by Talend 239
ComponentstMap
• Now apply filters on the two Inner Join reject outputs, in order for to distinguish both types of rejection.
• In the first Inner Join output table (Reject_OwnerID), click the plus arrow button to add a filter line and fill it in with the following formula to gather only OwnerID-related rejection: not defined $Owners_data[ID_Owner]
• In the second Inner Join output table (Reject_ResellerID), repeat the same operation using the following formula: not defined $Resellers_data[ID_Reseller]
• Click OK to validate and close the Mapper editor.
• Right-click on the tMap component, click on Row and select Reject_ResellerID in the list.
• Connect the main row from the Mapper to the Reseller Inner Rejection output component
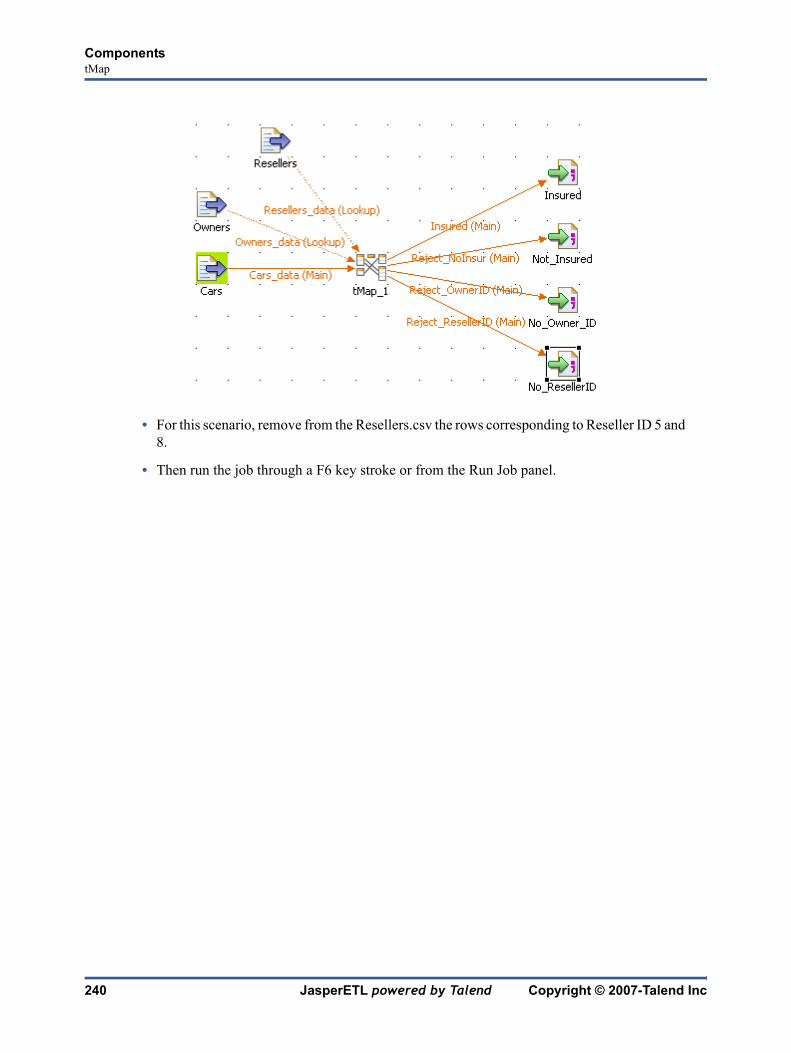
240 JasperETL powered by Talend Copyright © 2007-Talend Inc
ComponentstMap
• For this scenario, remove from the Resellers.csv the rows corresponding to Reseller ID 5 and 8.
• Then run the job through a F6 key stroke or from the Run Job panel.

Copyright © 2007-Talend Inc JasperETL powered by Talend 241
ComponentstMap
• The four output files are all created in the defined folder (Outputs).
• Notice in the Inner Join reject output file, NoResellerID.csv, that the ID_Owners field values matching the Reseller ID 5 and 8 were rejected from the cars file to this file.
Scenario 3: Cascading join mapping
As third advanced use scenario, based on the scenario 2, add a new Input table containing Insurance details for example.

242 JasperETL powered by Talend Copyright © 2007-Talend Inc
ComponentstMap
Set up an Inner Join between two lookup input tables (Owners and Insurance) in the Mapper to create a cascade lookup and hence retrieve Insurance details via the Owners table data.
Scenario 4: Advanced mapping with filters, explicit joins and Inner join rejection (Java)
This scenario introduces a job in Java tMap which allows to find the reseller’s customer leads who are owners of a defined make, and have between 2 and 6 children (inclusive), for upsale purpose for example.
• Drag and drop the following components from the Palette: tFileInputDelimited (x3), tMap, tFileOutputDelimited (x2)
• Connect the input flow components to the tMap using a Main row connection. Pay attention to the file you connect first as it will automatically be set as Main flow. And all other connections will thus become Lookup flows.
• Define the Properties of each of the Input components. For example, define the Resellers file path used as Main flow in the job.

Copyright © 2007-Talend Inc JasperETL powered by Talend 243
ComponentstMap
• Define the delimited file to be used, the Row and the Field Separator, the Header and Footer rows if any.
• Edit the Schema if it hasn’t been stored in the Repository. You will retrieve this schema in the Main table at the top of the Input area of the mapper.
• Carry out these previous steps for the other Input components: Cars and Owners. These two Lookup flows will fill in secondary (lookup) tables in the Input area of the Mapper.
• Then double-click on the tMap component to launch the Mapper and define the mapping and filters.
• First set the explicite joins between the Main flow and the Lookup flows.
• Simply drag & drop the ID_Resellers column towards the corresponding column and this way fill in the Expression key field of the Lookup table.

244 JasperETL powered by Talend Copyright © 2007-Talend Inc
ComponentstMap
• The explicit join displays in color along with a hash key.
• Then in thr Expr. Key of the Make column, type in (in Java) the filter. In this use case, simply type in “BMW” as the search is focused on the Owners of this particular Make.
• Implement a cascading join between the two lookup tables Cars and Owners, in order to retrieve owners information regarding the number of children they have.
• Simply drag and drop the ID_Owners column from the Cars table towards the Expr. Key field of the id_owner column from the Owners table.
• Click the Filter button next to the Inner Join button to display the Filter expression area.
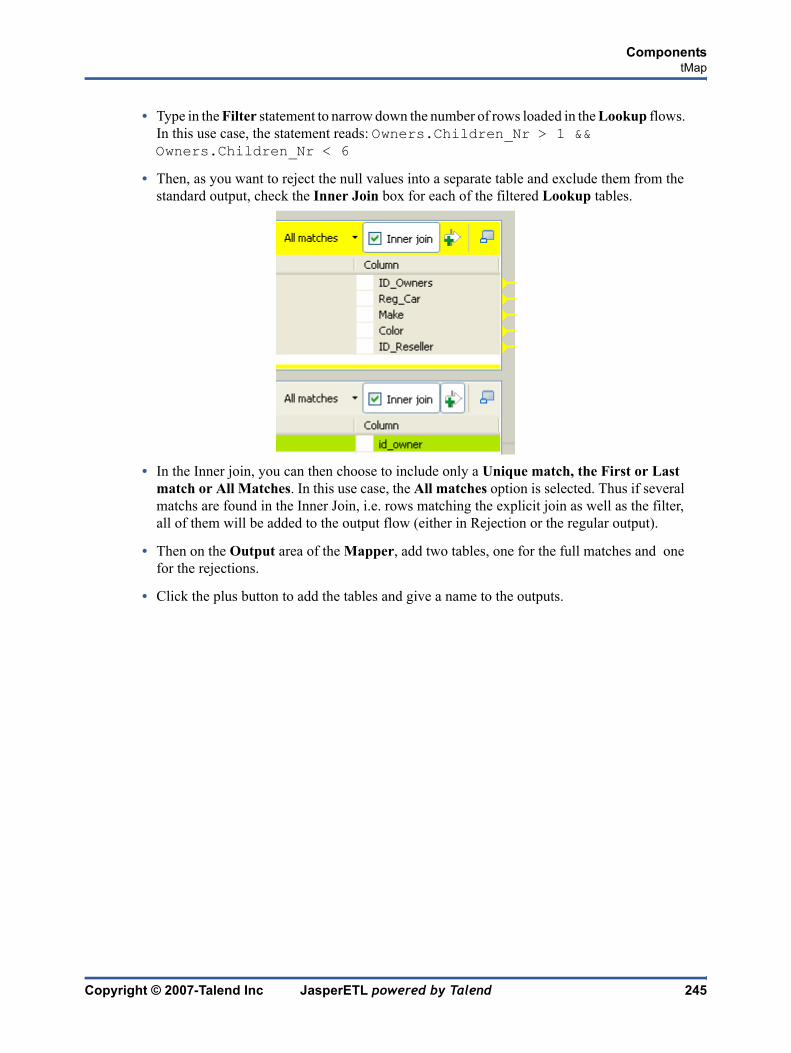
Copyright © 2007-Talend Inc JasperETL powered by Talend 245
ComponentstMap
• Type in the Filter statement to narrow down the number of rows loaded in the Lookup flows. In this use case, the statement reads: Owners.Children_Nr > 1 && Owners.Children_Nr < 6
• Then, as you want to reject the null values into a separate table and exclude them from the standard output, check the Inner Join box for each of the filtered Lookup tables.
• In the Inner join, you can then choose to include only a Unique match, the First or Last match or All Matches. In this use case, the All matches option is selected. Thus if several matchs are found in the Inner Join, i.e. rows matching the explicit join as well as the filter, all of them will be added to the output flow (either in Rejection or the regular output).
• Then on the Output area of the Mapper, add two tables, one for the full matches and one for the rejections.
• Click the plus button to add the tables and give a name to the outputs.

246 JasperETL powered by Talend Copyright © 2007-Talend Inc
ComponentstMap
• Drag and drop data from the Main and Lookup tables in the Input area, towards the respective output tables, following the type of information you want to fetch.
• In the rejection table used to direct the non-matches from the external join or the filter, click the Inner Join Reject button (violet arrow) to activate it.
• On the Designer space, right-click on the tMap and pull the respective output link to the relevant components.
• Define the Properties of the Output components.
• Define the filepath, the expected Row and Field separator. And for this use case, check the Include Header box.

Copyright © 2007-Talend Inc JasperETL powered by Talend 247
ComponentstMap
• The Schema should be automatically propagated from the Mapper.
• Save you job, then go to the Run Job tab and check the Statistics box to follow the processing thread.
The statistics show that several matches were found and therefore the sum of the output rows (Main + rejected) exceeds the Main flow input rows.
Scenario 5: Advanced mapping with filters and a check of all rows
This scenario is a modfied version of the preceding scenario. It describes a job that apply filters and then check each row of loaded lookup rows.

248 JasperETL powered by Talend Copyright © 2007-Talend Inc
ComponentstMap
• Take the same job as in Scenario 4: Advanced mapping with filters, explicit joins and Inner join rejection (Java) on page 242.
• No changes are required in the Input delimited files.
• Launch the Mapper to change the mapping and the filters.
• Remove all explicit joins between the Main table and the Cars Lookup table.
• Notice that the All Matches setting changes automatically to All Rows. In fact, as no explicit join is declared (no hash keys), all lookup rows need to be loaded and checked against all main flow rows.

Copyright © 2007-Talend Inc JasperETL powered by Talend 249
ComponentstMap
• Remove the Expr. key filter (“BMW”) from the Cars table.
• And click the Filters button to display the Filter area. Then type in the new filter to narrow down the search to BMW or Mercedes car makes. The statement reads as follows: Cars.Make.equals("BMW") || Cars.Make.equals("Mercedes")
• The filter on the Owners Lookup table doesn’t change from the previous scenario.
• Define new file paths for the respective outputs.
• Save the job and enable the Statistics on the Run Job tab before executing the job.
The Statistics show that a cartesian product has been carried out between the Main flow rows with the filtered Lookup rows.

250 JasperETL powered by Talend Copyright © 2007-Talend Inc
ComponentstMap
The content of the main output flow shows that the filtered rows have correctly been passed on.
Whereas, the Reject result clearly shows the rows that didn’t match one of the filter.

Copyright © 2007-Talend Inc JasperETL powered by Talend 251
ComponentstMSSqlInput
tMSSqlInput
tMSSqlInput properties
The properties of the generic component, tDBInput, apply to the tMSSqlInput component, therefore the properties are not detailed again here.
For detailed information about generic tDBInput properties, see tDBInput properties on page 136.
Related scenarios
Related topics in tDBInput scenarios:
• Scenario 1: Displaying selected data from DB table on page 137
• Scenario 2: Using StoreSQLQuery variable on page 138
Related topic in tContextLoad Scenario: Dynamic context use in MySQL DB insert on page 123.
252 JasperETL powered by Talend Copyright © 2007-Talend Inc
ComponentstMSSqlOutput
tMSSqlOutput
tMSSqlOutput properties
The properties of the generic component, tDBOutput, apply to the tMSSqlOutput component, therefore the properties are not detailed again here.
For detailed information about generic tDBOutput properties, see DBOutput properties on page 140.
Related scenarios
For tMSSqlOutput related topics, see:
• tDBOutput Scenario: Displaying DB output on page 142
• tMySQLOutput Scenario: Adding new column and altering data on page 261.

Copyright © 2007-Talend Inc JasperETL powered by Talend 253
ComponentstMSSqlRow
tMSSqlRow
tMSSqlRow properties
The properties of the generic component, tDBSQLRow, apply to the tMSSqlRow component, therefore the properties are not detailed again here.
For detailed information about generic tDBSQLRow properties, see tDBSQLRow properties on page 144.
Related scenarios
For tMSSqlRow related topics, see:
• tDBSQLRow Scenario 1: Resetting a DB auto-increment on page 145
• tMySQLRow Scenario: Removing and regenerating a MySQL table index on page 275.

254 JasperETL powered by Talend Copyright © 2007-Talend Inc
ComponentstMysqlConnection
tMysqlConnection
This component is closely related to tMysqlCommit and tMysqlRollback. It usually doesn’t make much sense to use one of the latters without using a tMysqlConnection component to open a connection for the current transaction.
tMysqlConnection Properties
Scenario: Inserting data in mother/daughter tables
The following job is dedicated to advanced database users, who want to carry out multiple table insertions using a parent table id to feed a child table. As a prerequisite to this job, follow the steps described below to create the relevant tables using an engine such as innodb.
• In a command line editor, connect to your Mysql server.
• Once connected to the relevant database, type in the following command to create the parent table: create table f1090_mum(id int not null auto_increment, name varchar(10), primary key(id)) engine=innodb;
Component family Databases
Function Opens a connection to the database for a current transaction.
Purpose Allows to commit a whole job data in one go to the output database as one transaction when validated.
Properties Property type Either Built-in or Repository.
Built-in: No existing property data is to be retrieved
Repository: Select the Repository file where Properties are stored. The following fields are pre-filled in with fetched data.
Host Database server IP address
Port Listening port number of DB server.
Database Name of the database
Username and Password
DB user authentication data.
Encoding type Select the encoding from the list or select Custom and define it manually. This field is compulsory for DB data handling.
Usage This component is to be used along with Mysql components, especially with tMysqlCommit and tMysqlRollback components.
Limitation n/a

Copyright © 2007-Talend Inc JasperETL powered by Talend 255
ComponentstMysqlConnection
• Then create the second table: create table baby (id_baby int not null, years int) engine=innodb;
Back into JasperETL, the job requires seven components including tMysqlConnection and tMysqlCommit.
• Drag and drop the following components from the Palette: tFileList, tFileInputDelimited, tMap, tMysqlOutput (x2).
• Connect the tFileList component to the input file component using an Iterate link as the name of the file to be processed will be dynamically filled in from the tFileList directory using a global variable.
• Connect the tFileInputDelimited component to the tMap and dispatch the flow between the two output Mysql DB components. Use a Row link for each for these connections representing the main data flow.
• Set the tFileList component properties, such as the directory. name where files will be fetched from.
• Add a tMysqlConnection component and connect it to the starter component of this job, in this example, the tFileList component using a ThenRun link to define the execution order.
• In the tMysqlConnection Properties panel, set the connection details manually or fetch them from the Repository if you centrally stored them as a Metadata DB connection entry. For more information about Metadata, see Defining Metadata items on page 54.
• On the tFileInputDelimited component’s Properties panel, press Ctrl+Space bar to access the variable list. Set the File Name field to the global variable: $_globals{tFileList_1}{CURRENT_FILEPATH}

256 JasperETL powered by Talend Copyright © 2007-Talend Inc
ComponentstMysqlConnection
• Set the rest of the fields as usual, defining the row and field separators according to your file structure.
• Then set the schema manually through the Edit schema feature or select the schema from the Repository. In Java version, make sure the data type is correctly set, in accordance with the nature of the data processed.
• Change the encoding if different from the default one.
• In the tMap Output area, add two output tables, one called mum for the parent table, the second called baby, for the child table.
• Drag the Name column from the Input area, and drop it to the mum table.
• Drag the Years column from the Input area and drop it to the baby table.
• Make sure the mum table is on the top of the baby table as the order is determining for the flow sequence hence the DB insert to perform correctly.
• Then connect the output row link to distribute correctly the flow to the relevant DB output component.

Copyright © 2007-Talend Inc JasperETL powered by Talend 257
ComponentstMysqlConnection
• In each of the tMysqlOutput components’ Properties panel, check the Use an existing connection box to retrieve the tMysqlConnection details.
• Notice (in Perl version) that the Commit every field doesn’t show anymore as you are supposed to use the tMysqlCommit instead to manage the global transaction commit. In Java version, ignore the field as this command will get overridden by the tMysqlCommit.
• Set the Table name making sure it corresponds to the correct table, in this example either f1090_mum or f1090_baby.
• There is no action on the table as they are already created.
• Select Insert as Action on data for both output components.
• Click on Sync columns to retrieve the schema set in the tMap.
• Change the encoding type if need be.
• In the Additional columns area of the DB output component corresponding to the child table (f1090_baby), set the id_baby column so that it reuses the id from the parent table.
• In the SQL expression field type in: '(Select Last_Insert_id())'
• The position is Before and the Reference column is years.
• Add the tMysqlCommit component to the job workspace and connect it from the tFileList component using a ThenRun connection in order for the job to terminate with the transaction commit.
• On the tMysqlCommit component Properties panel, select in the list the connection to be used.
Save your job and press F6 to run it.

258 JasperETL powered by Talend Copyright © 2007-Talend Inc
ComponentstMysqlConnection
The parent table id has been reused to feed the id_baby column.

Copyright © 2007-Talend Inc JasperETL powered by Talend 259
ComponentstMysqlCommit
tMysqlCommit
This component is closely related to tMysqlCommit and tMysqlRollback. It usually doesn’t make much sense to use these components independently in a transaction..
tMysqlCommit Properties
Related scenario
This component is closely related to tMysqlCommit and tMysqlRollback. It usually doesn’t make much sense to use one of the latters without using a tMysqlConnection component to open a connection for the current transaction.
For tMysqlCommit related scenario, see tMysqlConnection on page 254.
Component family Databases
Function Validates the data processed through the job into the connected DB
Purpose Using a unique connection, commits in one go a global transaction instead of every row or every batch. Provides a gain in performance
Properties Component list Select the tMysqlConnection component in the list if more than one connection are planned for the current job.
Usage This component is to be used along with Mysql components, especially with tMysqlConnection and tMysqlRollback components.
Limitation n/a

260 JasperETL powered by Talend Copyright © 2007-Talend Inc
ComponentstMysqlInput
tMysqlInput
tMysqlInput properties
The properties of the generic component, tDBInput, apply to the tMysqlInput component, therefore the properties are not detailed again here.
For detailed information about generic tDBInput properties, see tDBInput properties on page 136.
Related scenarios
Related topic in tDBInput scenarios:
• Scenario 1: Displaying selected data from DB table on page 137
• Scenario 2: Using StoreSQLQuery variable on page 138
Related topic in tContextLoad Scenario: Dynamic context use in MySQL DB insert on page 123.
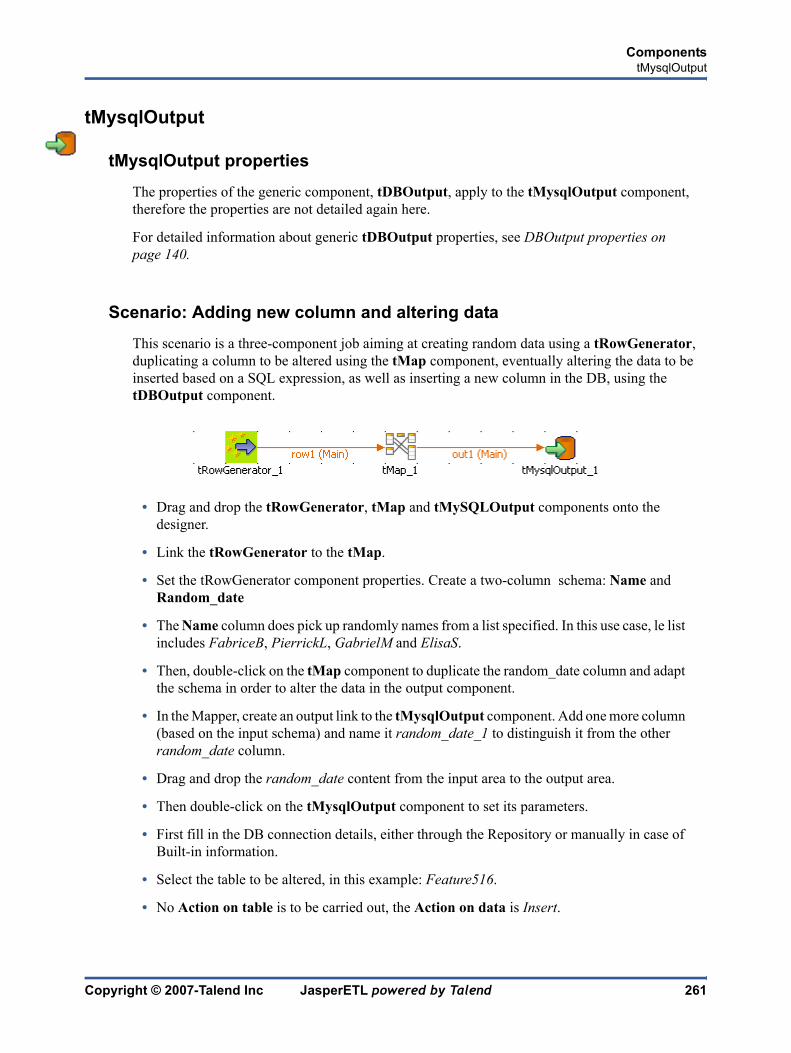
Copyright © 2007-Talend Inc JasperETL powered by Talend 261
ComponentstMysqlOutput
tMysqlOutput
tMysqlOutput properties
The properties of the generic component, tDBOutput, apply to the tMysqlOutput component, therefore the properties are not detailed again here.
For detailed information about generic tDBOutput properties, see DBOutput properties on page 140.
Scenario: Adding new column and altering data
This scenario is a three-component job aiming at creating random data using a tRowGenerator, duplicating a column to be altered using the tMap component, eventually altering the data to be inserted based on a SQL expression, as well as inserting a new column in the DB, using the tDBOutput component.
• Drag and drop the tRowGenerator, tMap and tMySQLOutput components onto the designer.
• Link the tRowGenerator to the tMap.
• Set the tRowGenerator component properties. Create a two-column schema: Name and Random_date
• The Name column does pick up randomly names from a list specified. In this use case, le list includes FabriceB, PierrickL, GabrielM and ElisaS.
• Then, double-click on the tMap component to duplicate the random_date column and adapt the schema in order to alter the data in the output component.
• In the Mapper, create an output link to the tMysqlOutput component. Add one more column (based on the input schema) and name it random_date_1 to distinguish it from the other random_date column.
• Drag and drop the random_date content from the input area to the output area.
• Then double-click on the tMysqlOutput component to set its parameters.
• First fill in the DB connection details, either through the Repository or manually in case of Built-in information.
• Select the table to be altered, in this example: Feature516.
• No Action on table is to be carried out, the Action on data is Insert.

262 JasperETL powered by Talend Copyright © 2007-Talend Inc
ComponentstMysqlOutput
• In the Additional Columns area, set the alteration to be performed on columns and the specific insertion of a new moment column onto the database.
• The One_month_later column is a replacement column for the random_date_1 column. Also, the data it-self gets altered using an SQL expression, which adds one month to the randomly picked-up date of the random_date_1 column. ex: 2007-08-12 becomes 2007-09-12
• Therefore, in Name field goes the new column label (One_Month_Later) and in SQL expression field, type in the relevant addition script to be performed: 'adddate(?, interval 1 month)' then as Position, select Replace, and the Reference column is Random_date_1.
• Note that for this job we duplicated the random_date_1 column in the DB table before replacing one instance of it with the One_Month_Later column. The aim of this workaround was to be able to view upfront the modification performed.
• The second entry is the new column, moment, to be inserted into the database table. As SQL expression, type in the moment function: now() and in the Position field, select Before, the Reference column is name in this example.
• Once the Output setting is complete, press F6 to run the job.
Two new columns were added or altered onto the DB table: One_Month_Later and Moment.
Related topic: DBOutput properties on page 140

Copyright © 2007-Talend Inc JasperETL powered by Talend 263
ComponentstMysqlOutputBulk
tMysqlOutputBulk
tMysqlOutputBulk and tMysqlBulkExec components are used together to first output the file that will be then used as parameter to execute the SQL query stated. These two steps compose the tMysqlOutputBulkExec component, detailed in a separate section. The interest in having two separate elements lies in the fact that it allows transformations to be carried out before the data loading.

264 JasperETL powered by Talend Copyright © 2007-Talend Inc
ComponentstMysqlOutputBulk
tMysqlOutputBulk properties
Component family Databases
Function Writes a file with columns based on the defined delimiter and the MySql standards
Purpose Prepares the file to be used as parameter in the INSERT query to feed the MySQL database.
Properties Property type Either Built-in or Repository.
Built-in: No existing property data is to be retrieved
Repository: Select the Repository file where Properties are stored. The following fields are pre-filled in using fetched data.
File Name Name of the file to be processed. !Related topic:Defining the context variables on page 96
Field separator Character, string or regular expression to separate fields.
Row separator String (ex: “\n”on Unix) to distinguish rows.
Append Check this option box to add the new rows at the end of the file
Include header Check this box to include the column header to the file.
Schema type and Edit Schema
A schema is a row description, i.e., it defines the number of fields that will be processed and passed on to the next component. The schema is either built-in or remote in the Repository.
Built-in: The schema will be created and stored locally for this component only. Related topic: Setting a built-in schema on page 51
Repository: The schema already exists and is stored in the Repository, hence can be reused in various projects and job designs. Related topic: Setting a repository schema on page 52
Sync columns Click to synchronize the output file schema with the input file schema. The Sync function only displays once the Row connection is linked with the Output component.
Encoding Select the encoding from the list or select Custom and define it manually. This field is compulsory for DB data handling.
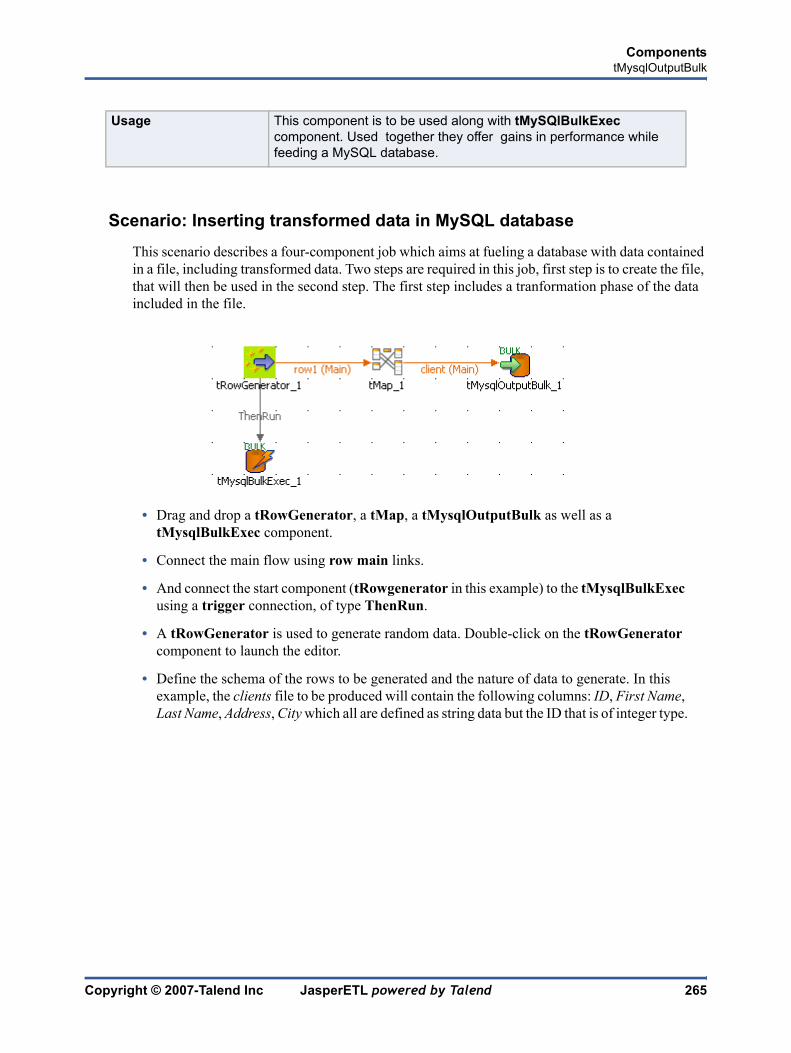
Copyright © 2007-Talend Inc JasperETL powered by Talend 265
ComponentstMysqlOutputBulk
Scenario: Inserting transformed data in MySQL database
This scenario describes a four-component job which aims at fueling a database with data contained in a file, including transformed data. Two steps are required in this job, first step is to create the file, that will then be used in the second step. The first step includes a tranformation phase of the data included in the file.
• Drag and drop a tRowGenerator, a tMap, a tMysqlOutputBulk as well as a tMysqlBulkExec component.
• Connect the main flow using row main links.
• And connect the start component (tRowgenerator in this example) to the tMysqlBulkExec using a trigger connection, of type ThenRun.
• A tRowGenerator is used to generate random data. Double-click on the tRowGenerator component to launch the editor.
• Define the schema of the rows to be generated and the nature of data to generate. In this example, the clients file to be produced will contain the following columns: ID, First Name, Last Name, Address, City which all are defined as string data but the ID that is of integer type.
Usage This component is to be used along with tMySQlBulkExec component. Used together they offer gains in performance while feeding a MySQL database.

266 JasperETL powered by Talend Copyright © 2007-Talend Inc
ComponentstMysqlOutputBulk
• Some schema information don’t necessarily need to be displayed. To hide them away, click on Columns list button next to the toolbar, and uncheck the relevant entries, such as Precision or Parameters.
• Use the plus button to add as many columns to your schema definition.
• Click the Refresh button to preview the first generated row of your output.
• Then select the tMap component to set the transformation.
• Drag and drop all columns from the input table to the output table.
• Apply the transformation on the LastName column by adding uc in front of it.
• Click OK to validate the transformation.
• Then double-click on the tMysqlOutputBulk component.
• Define the name of the file to be produced in File Name field. If the delimited file information is stored in the Repository, select it in Property type field, to retrieve relevant data. In this use case the file name is clients.txt.

Copyright © 2007-Talend Inc JasperETL powered by Talend 267
ComponentstMysqlOutputBulk
• The schema is propagated from the tMap component, if you accepted it when prompted.
• In this example, don’t include the header information as the table should already contain it.
• The encoding is the default one for this use case.
• Click OK to validate the output.
• Then double-click on the tMysqlBulkExec to set the INSERT query to be executed.
• Define the database connection details. We recommend you to store this type of information in the Repository, so that you can retrieve them at any time for any job.
• Set the table to be filled in with the collected data, in the Table field.
• Fill in the column delimiters in the Field terminated by area.
• Make sure the encoding corresponds to the data encoding.
• Then press F6 to run the job.
The clients database table is filled with data from the file including upper-case last name as transformed in the job.

268 JasperETL powered by Talend Copyright © 2007-Talend Inc
ComponentstMysqlOutputBulk
For simple Insert operations that don’t include any transformation, the use of tMysqlOutputBulkExec allows to spare a step in the process hence to gain some performance.
Related topic: tMysqlOutputBulkExec properties on page 272

Copyright © 2007-Talend Inc JasperETL powered by Talend 269
ComponentstMysqlBulkExec
tMysqlBulkExectMysqlOutputBulk and tMysqlBulkExec components are used together to first output the file that will be then used as parameter to execute the SQL query stated. These two steps compose the tMysqlOutput-BulkExec component, detailed in a separate section. The interest in having two separate elements lies in the

270 JasperETL powered by Talend Copyright © 2007-Talend Inc
ComponentstMysqlBulkExec
fact that it allows transformations to be carried out before the data loading in the database.
tMysqlBulkExec properties
Component family Databases
Function Executes the Insert action on the data provided.
Purpose As a dedicated component, tMysqlBulkExec offers gains in performance while carrying out the Insert operations to a MySQL database
Properties Property type Either Built-in or Repository.
Built-in: No existing property data is to be retrieved
Repository: Select the Repository file where Properties are stored. The following fields are pre-filled in using fetched data.
Host Database server IP address
Port Listening port number of DB server.
Database Name of the database
Username and Password
DB user authentication data.
Table Name of the table to be written. Note that only one table can be written at a time and that the table must exist for the insert operation to succeed.
File Name Name of the file to be processed. !Related topic:Defining the context variables on page 96
Fields terminated by Character, string or regular expression to separate fields.
Encoding Select the encoding from the list or select Custom and define it manually. This field is compulsory for DB data handling.
Commit every Number of rows to be completed before commiting batches of rows together into the DB. This option ensures transaction quality (but not rollback) and above all better performance on executions.
Usage This component is to be used along with tMySQLOutputBulk component. Used together, they can offer gains in performance while feeding a MySQL database.
Limitation n/a

Copyright © 2007-Talend Inc JasperETL powered by Talend 271
ComponentstMysqlBulkExec
Related scenarios
For uses cases in relation with tMysqlBulkExec, see the following scenarios:
• tMysqlOutputBulk Scenario: Inserting transformed data in MySQL database on page 265
• tMysqlOutputBulkExec Scenario: Inserting data in MySQL database on page 273

272 JasperETL powered by Talend Copyright © 2007-Talend Inc
ComponentstMysqlOutputBulkExec
tMysqlOutputBulkExec
tMysqlOutputBulkExec properties
Component family Databases
Function Executes the Insert action on the data provided.
Purpose As a dedicated component, it allows gains in performance during Insert operations to a MySQL database.
Properties Property type Either Built-in or Repository.
Built-in: No existing property data is to be retrieved
Repository: Select the Repository file where Properties are stored. The following fields are pre-filled in using fetched data.
Host Database server IP address
Port Listening port number of DB server.
Database Name of the database
Username and Password
DB user authentication data.
Table Name of the table to be written. Note that only one table can be written at a time and that the table must exist for the insert operation to succeed.
File Name Name of the file to be processed. !Related topic:Defining the context variables on page 96
Field separator Character, string or regular expression to separate fields.
Row separator String (ex: “\n”on Unix) to distinguish rows.
Encoding Select the encoding from the list or select Custom and define it manually. This field is compulsory for DB data handling.
Commit every Number of rows to be completed before commiting batches of rows together into the DB. This option ensures transaction quality (but not rollback) and above all better performance on executions.
Usage This component is mainly used when no particular tranformation is required on the data to be loaded onto the database.
Limitation n/a

Copyright © 2007-Talend Inc JasperETL powered by Talend 273
ComponentstMysqlOutputBulkExec
Scenario: Inserting data in MySQL database
This scenario describes a two-component job which carries out the same operation as the one described for tMysqlOutputBulk properties on page 264 and tMysqlBulkExec properties on page 270, although no transformation of data is performed.
• Click and drop a tRowGenerator and a tMysqlOutputBulkExec component.
• The tRowGenerator is to be set the same way as in the Scenario: Inserting transformed data in MySQL database on page 265. The schema is made of four columns including: ID, First Name, Last Name, Address and City.
• Then set the DB connection if needed, the best practices being to store the connection details in the Metadata repository.
• Then fill in the table to be filled in with the generated data in the Table field.
• And the name of the file to be loaded in File Name field.
Then press F6 to execute the job.
The result should be pretty much the same as in Scenario: Inserting transformed data in MySQL database on page 265, but the data might differ as these are regenerated randomly everytime the job is run.

274 JasperETL powered by Talend Copyright © 2007-Talend Inc
ComponentstMysqlRollback
tMysqlRollback
This component is closely related to tMysqlCommit and tMysqlConnection. It usually doesn’t make much sense to use these components independently in a transaction..
tMysqlRollback properties
Scenario: Rollback from inserting data in mother/daughter tables
Based on the tMysqlConnection Scenario: Inserting data in mother/daughter tables on page 254, insert a rollback funtion in order to prevent unwanted commit.
• Drag and drop a tMysqlRollback to the workspace and connect it to the Start component.
• Set the Rollback unique field on the relevant DB connection.
This complementary element to the job ensures that the transaction won’t be partly committed.
Component family Databases
Function Cancel the transaction commit in the connected DB.
Purpose Avoids to commit part of a transaction unvolontarily.
Properties Component list Select the tMysqlConnection component in the list if more than one connection are planned for the current job.
Usage This component is to be used along with Mysql components, especially with tMysqlConnection and tMysqlCommit components.
Limitation n/a

Copyright © 2007-Talend Inc JasperETL powered by Talend 275
ComponentstMysqlRow
tMysqlRow
tMysqlRow properties
The properties of the generic component, tDBSQLRow, apply to the tMysqlRow component, therefore the properties are not detailed again here.
For detailed information about generic tDBSQLRow properties, see tDBSQLRow properties on page 144.
Scenario: Removing and regenerating a MySQL table index
This scenario describes a four-component job which wants to remove a table index, make a select insert action onto a table then regenerate the index.
• Select and drop the following components onto the graphical workspace: tMysqlRow (x2), tRowGenerator, tMysqlOutput.
• Connect tMysqlIntput to the tRowGenerator.
• Then using a ThenRun connection, link the first tMysqlRow to the tMysqlInput,
• Then connect tRowGenerator to the second tMysqlRow using a ThenRun link again.
• Select the tMysqlRow to fill in the DB Properties.
• In Property type as well in Schema type, select the relevant DB entry in the list.
• The DB connection details and the table schema are accordingly filled in.
• Propagate the properties and schema details onto the other components of the job.
• The query being stored in the Metadata area of the Repository, you can also select Repository in the Query type field and the relevant query entry.

276 JasperETL powered by Talend Copyright © 2007-Talend Inc
ComponentstMysqlRow
• If you didn’t store your query in the Repository, type in the following SQL statement to alter the database entries: drop index <index_name> on <table_name>
• Then select the second tMysqlRow component, check the DB properties and schema.
• Then type in the SQL statement to recreate an index on the table using the following statement: create index <index_name> on <table_name> (<column_name>);
• The tRowGenerator component is used to generate automatically the columns to be added to the DB output table defined.
• Select the tMysqlOutput component and fill in the DB connection properties either from the Repository or manually the DB connection details are specific for this use only. The table to be fed is named: comprehensive.
• The schema should be automatically inheritated from the data flow coming from the tLogRow. Edit the schema to check its structure and check that it corresponds to the schema expected on the DB table specified.
• The Action on table is None and the Action on data is Insert.
• No additional Columns is required for this job.
• Press F6 to run the job.
If you manage to watch the action on DB data, you can notice that the index is dropped at the start of the job and recreated at the end of the insert action.
Related topics: tDBSQLRow properties on page 144.

Copyright © 2007-Talend Inc JasperETL powered by Talend 277
ComponentstMsgBox
tMsgBox
tMsgBox properties
Scenario: ‘Hello world!’ type test
The following scenario creates a single-component job, where tMsgBox is used to display the pid (process id) in place of the traditional “Hello World!” message.
• Click and drop a tMsgBox component into the workspace.
• Define the dialog box display properties:
Component family Misc
Function Opens a dialog box with an OK button requiring action from the user.
Purpose tMsgBox is a graphical break in the job execution progress.
Properties Title Text entered shows on the title bar of the dialog box created.
Buttons Listbox of buttons you want to include in the dialog box. The button combinations are restricted and cannot be changed.
Icon Icon shows on the title bar of the dialog box.
Message Free text to display as message on the dialog box. Text can be dynamic (for example: retrieve and show a file name).
Usage This component can be used as intermediate step in a data flow or as a start or end object in the job flowchart.!It can be connected to the next/previous component using either a Row or Iterate link.
Limitation For Perl users: Make sure the relevant package is installed.

278 JasperETL powered by Talend Copyright © 2007-Talend Inc
ComponentstMsgBox
• ‘My Title’ is the message box title, it can be any variable.
• In the Message field comes the message text in quotes concatenated with the Perl scalar variable ($$) containing the “pid” for this example.
• Switch to the Run job tab to execute the job defined.
The Message box displays the message and requires the user to click OK to go to the next component or end the job.
After the user clicked on OK button, the Run Job log is updated accordingly.
Related topic: Running a job on page 101

Copyright © 2007-Talend Inc JasperETL powered by Talend 279
ComponentstNormalize
tNormalizetNormalize Properties
Scenario: Normalizing data
This simple scenario illustrates a job that normalizes a list of tags for Web forum topics and outputs them into a table in the standard output console (Run Job tab).
• Click and drop the following components onto the designing workspace: tFileInputDelimited, tNormalize, tLogRow.
• In the tFileInputDelimited properties, set the input file to be normalized.
Component family Processing
Function Normalizes the input flow following SQL standard.
Purpose tNormalize helps improve data quality and thus eases the data update.
Properties Schema type and Edit Schema
A schema is a row description, i.e., it defines the number of fields that will be processed and passed on to the next component. The schema is either built-in or remote in the Repository. In this component, the schema is read-only.
Built-in: The schema will be created and stored locally for this component only. Related topic: Setting a built-in schema on page 51
Column to normalize
Select the column from the input flow which the normalization is based on
Separator Enter the separator which will delimits data in the input flow.
Usage This component can be used as intermediate step in a data flow.
Limitation n/a

280 JasperETL powered by Talend Copyright © 2007-Talend Inc
ComponentstNormalize
• The file schema is stored in the repository for ease of use. It is made of one column, called Tags, containing rows with one or more keywords.
• Set the Row Separator and the Field Separator.
• On the tNormalize Properties panel, define the column the normalization operation is based on.
• In this use case, the column to normalize is Tags.
• The Item separator is the comma, surrounded here by single quotes as the job is done in Perl.
• In the tLogRow component, check the Print values in the cells of table box.

Copyright © 2007-Talend Inc JasperETL powered by Talend 281
ComponentstNormalize
• Save the Job and run it.
The values are normalized and displayed in a table cell on the console.

282 JasperETL powered by Talend Copyright © 2007-Talend Inc
ComponentstOracleInput
tOracleInput
tOracleInput properties
The properties of the generic component, tDBInput, apply to the tOracleInput component, therefore the properties are not detailed again here.
For detailed information about generic tDBInput properties, see tDBInput properties on page 136.
Related scenarios
Related topics in tDBInput scenarios:
• Scenario 1: Displaying selected data from DB table on page 137
• Scenario 2: Using StoreSQLQuery variable on page 138
Related topic in tContextLoad Scenario: Dynamic context use in MySQL DB insert on page 123.

Copyright © 2007-Talend Inc JasperETL powered by Talend 283
ComponentstOracleBulkExec
tOracleBulkExec
tOracleBulkExec properties
Component family Databases
Function tOracleBulkExec inserts, appends, replaces or truncate data in an Oracle database.
Purpose As a dedicated component, it allows gains in performance during operations performed on data of an Oracle database.
Properties Property type Either Built-in or Repository.
Built-in: No existing property data is to be retrieved
Repository: Select the Repository file where Properties are stored. The following fields are pre-filled in using fetched data.
Service Name Oracle Service Name or SID in Oracle database.
Note: In Java projects, the full database connection details are required.
Username and Password
DB user authentication data.
Table Name of the table to be written. Note that only one table can be written at a time
Action on data On the data of the table defined, you can perform:!Insert: Inserts rows to an empty table. If duplicates are found, job stops.!Append: Add rows to the existing data of the table!Replace: Overwrites some rows of the table!Truncate: Drops table entries and inserts new input flow data.
Data File Name Name of the file to be processed. !Related topic:Defining the context variables on page 96
Fields terminated by Character, string or regular expression to separate fields.
Fields optionnally enclosed by
Data enclosure characters.
Encoding Select the encoding from the list or select Custom and define it manually. This field is compulsory for DB data handling.
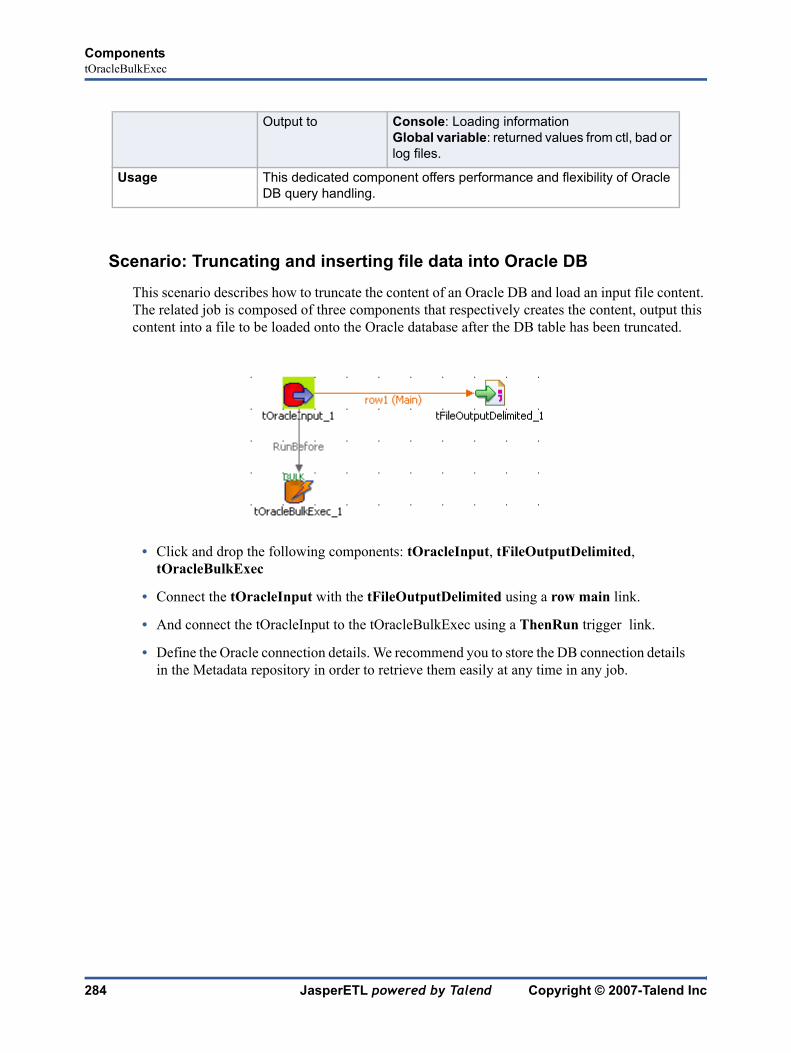
284 JasperETL powered by Talend Copyright © 2007-Talend Inc
ComponentstOracleBulkExec
Scenario: Truncating and inserting file data into Oracle DB
This scenario describes how to truncate the content of an Oracle DB and load an input file content. The related job is composed of three components that respectively creates the content, output this content into a file to be loaded onto the Oracle database after the DB table has been truncated.
• Click and drop the following components: tOracleInput, tFileOutputDelimited, tOracleBulkExec
• Connect the tOracleInput with the tFileOutputDelimited using a row main link.
• And connect the tOracleInput to the tOracleBulkExec using a ThenRun trigger link.
• Define the Oracle connection details. We recommend you to store the DB connection details in the Metadata repository in order to retrieve them easily at any time in any job.
Output to Console: Loading information!Global variable: returned values from ctl, bad or log files.
Usage This dedicated component offers performance and flexibility of Oracle DB query handling.

Copyright © 2007-Talend Inc JasperETL powered by Talend 285
ComponentstOracleBulkExec
• Define the schema, if it isn’t stored either in the Repository. In this example, the schema is as follows: ID_Contract, ID_Client, Contract_type, Contract_Value.
• Change the default encoding to AL32UTF8 encoding type.
• Define the tFileOutputDelimited component parameters, including output File Name, Row separator and Fields delimiter.
• Set also the encoding to the Oracle encoding type as above.
• Then double-click on the tOracleBulkExec to define the DB feeding properties.
• Fill in the DB connection details if they are not available from the Repository.
• Fill in the name of the Table to be fed and the Action on data to be carried out, in this use case: insert.
• Define the encoding as in preceding steps.
• For this scenario, the log output is to be displayed in the console.

286 JasperETL powered by Talend Copyright © 2007-Talend Inc
ComponentstOracleBulkExec
Press F6 to run the job. The log output displays in the Run Job tab and the table is fed with the parameter file data.
Related topic: Scenario: Inserting data in MySQL database on page 273

Copyright © 2007-Talend Inc JasperETL powered by Talend 287
ComponentstOracleOutput
tOracleOutput
tOracleOutput properties
The properties of the generic component, tDBOutput, apply to the tOracleOutput component, therefore the properties are not detailed again here.
For detailed information about generic tDBOutput properties, see DBOutput properties on page 140.
Related scenarios
For tOracleOutput related topics, see:
• tDBOutput Scenario: Displaying DB output on page 142
• tMySQLOutput Scenario: Adding new column and altering data on page 261.

288 JasperETL powered by Talend Copyright © 2007-Talend Inc
ComponentstOracleRow
tOracleRow
tOracleRow properties
The properties of the generic component, tDBSQLRow, apply to the tOracleRow component, therefore the properties are not detailed again here.
For detailed information about generic tDBSQLRow properties, see tDBSQLRow properties on page 144.
Related scenarios
For tOracleRow related topics, see:
• tDBSQLRow Scenario 1: Resetting a DB auto-increment on page 145
• tMySQLRow Scenario: Removing and regenerating a MySQL table index on page 275.

Copyright © 2007-Talend Inc JasperETL powered by Talend 289
ComponentstPerl
tPerl
tPerl properties
Scenario: Displaying number of processed lines
This scenario is a three-component job showing in the Log the number of rows being processed and output in an XML file.
• Click and drop three components from the Palette to the workspace: tFileInputDelimited, tFileOutputExcel, tPerl
• Right-click on the tFileInputDelimited object and connect it to the tFileOutputExcel component using a main Row.
• Right-click again on tFileInputDelimited and link it with the tPerl component using a Trigger > ThenRun link. This link means that, following the arrow direction, the first component (tFileDelimited) will run before the second component (tPerl).
Component family Processing
Function tPerl transforms any data entered as argument of Perl commands.
Purpose tPerl is an (Perl) editor that is a very flexible tool within a job.
Properties Code Type in the Perl code based on the command and task you need to perform. For further information about Perl functions syntax, see JasperETL online Help (under Talend Open Studio User Guide > Perl)
Usage Typically used for debugging but can also be used to display a variable content.
Limitation This component requires an advanced Perl user level and is not meant to be used with a Row connection as is meant for single use.

290 JasperETL powered by Talend Copyright © 2007-Talend Inc
ComponentstPerl
• Click once on tFileInputDelimited and select Properties tab to define the component properties.
• The Properties are not reused from or for another job stored in the repository, but instead are used for this job only. Therefore select Built-In in the drop-down list.
• Enter a path or browse to the file containing the data to be processed. In this example, the text file gathers a list of names facing the relevant email addresses.
• Define the Row and Field separators. In this scenario, there is one name and the matching email per row. And the fields are separated by a semi-colon.
• The first row of the file contains the labels of the columns, therefore it should be ignored in the job. Therefore the the Header field value is 1.
• There is no footer nor limit value to be defined for this scenario.
• The Schema type is also built-in in this case. Click on Edit Schema and describe the content of the input file. In this scenario, there are two columns labelled Name and Emails, of type String and with no length defined. Key field being Email.
• Select the tFileOutputExcel component and define it accordingly.
• Select the output file path, Sheet and synchronize the schema.
• Then define the tPerl sub-job in order to get the number of rows transferred to the XML Output file.

Copyright © 2007-Talend Inc JasperETL powered by Talend 291
ComponentstPerl
• Enter the Perl command print to get the variable containing the number of rows read in the tFileInputDelimited. To access the list of available variables, press Ctrl+Space then select the relevant variable in the list.
• For a better readability in the Run Job log, add equal signs before and after the commands. Note also that commands, strings and variables are coloured differently.
• Then switch to the Run Job tab and execute the job.
The job runs smoothly and create an output xml file following the two-field schema defined: Name and Email.
The Perl command result is shown in the job log.

292 JasperETL powered by Talend Copyright © 2007-Talend Inc
ComponentstPostgresqlInput
tPostgresqlInput
tPostgresqlInput properties
The properties of the generic component, tDBInput, apply to the tPostgresqlInput component, therefore the properties are not detailed again here.
For detailed information about generic tDBInput properties, see tDBInput properties on page 136.
Related scenarios
Related topics in tDBInput scenarios:
• Scenario 1: Displaying selected data from DB table on page 137
• Scenario 2: Using StoreSQLQuery variable on page 138
Related topic in tContextLoad Scenario: Dynamic context use in MySQL DB insert on page 123.

Copyright © 2007-Talend Inc JasperETL powered by Talend 293
ComponentstPostgresqlOutput
tPostgresqlOutput
tPostgresqlOutput properties
The properties of the generic component, tDBOutput, apply to the tPostgresqlOutput component, therefore the properties are not detailed again here.
For detailed information about generic tDBOutput properties, see DBOutput properties on page 140.
Related scenarios
For tPostgresqlOutput related topics, see:
• tDBOutput Scenario: Displaying DB output on page 142
• tMySQLOutput Scenario: Adding new column and altering data on page 261.
294 JasperETL powered by Talend Copyright © 2007-Talend Inc
ComponentstPostgresqlRow
tPostgresqlRow
tPostgresqlRow properties
The properties of the generic component, tDBSQLRow, apply to the tPostgresqlRow component, therefore the properties are not detailed again here.
For detailed information about generic tDBSQLRow properties, see tDBSQLRow properties on page 144.
Related scenarios
For tPostgresqlRow related topics, see:
• tDBSQLRow Scenario 1: Resetting a DB auto-increment on page 145
• tMySQLRow Scenario: Removing and regenerating a MySQL table index on page 275.

Copyright © 2007-Talend Inc JasperETL powered by Talend 295
ComponentstRowGenerator
tRowGenerator
tRowGenerator properties
The tRowGenerator Editor opens up on a separate window made of two parts:
• a Schema definition panel at the top of the window
• and a Function definition and preview panel at the bottom.
Component family Misc
Function tRowGenerator generates as many rows and fields as needed using random values taken in a list.
Purpose Can be used to create an input flow in a job for testing purpose in particular for boundary test sets
Properties Row generation editor
The editor allows you to define precisely the columns and nature of data to be generated. You can use predefined routines or type in yourself the function to be used to generate the data specified
Usage The tRowGenerator Editor’s ease of use allows users without any Perl or Java knowledge to generate random data for test purpose.
Limitation n/a

296 JasperETL powered by Talend Copyright © 2007-Talend Inc
ComponentstRowGenerator
Defining the schema
First you need to define the structure of data to be generated.
• Add as many columns to your schema as needed, using the plus (+) button.
• Type in the names of the columns to be created in the Columns area and check the Key box if required
• Make sure you define then the nature of the data contained in the column, by selecting the Type in the list. According to the type you select, the list of Functions offered will differ. This information is therefore compulsory.
• Some extra information, although not required, might be useful such as Length, Precision or Comment. You can also hide these columns, by clicking on the Columns drop-down button next to the toolbar, and unchecking the relevant entries on the list.
• In the Function area, you can select the predefined routine/function if one of them corresponds to your needs.You can also add to this list any routine you stored in the Routine area of the Repository. Or you can type in the function you want to use in the Function definition panel. Related topic: Defining the function on page 297
• Click Refresh to have a preview of the data generated.
• Type in a number of rows to be generated. The more rows to be generated, the longer it’ll take to carry out the generation operation.
Note: Note that the functions list differs from Perl to Java.

Copyright © 2007-Talend Inc JasperETL powered by Talend 297
ComponentstRowGenerator
Defining the function
You selected the three dots [...] as Function in the Schema definition panel, as you want to customize the function parameters.
• Select the Function parameters tab
• The Parameter area displays Customized parameter as function name (read-only)
• In the Value area, type in the Perl or Java function to be used to generate the data specified.
• Click on the Preview tab and click Preview to check out a sample of the data generated.
Scenario: Generating random java data
The following scenario creates a two-component job made in Java, generating 50 rows structured as follows: a randomly picked-up ID in a 1-to-3 range, a random ascii First Name and Last Name generation and a random date taken in a defined range.
• Click and drop a tRowGenerator and a tLogRow component from the Palette to the workspace.
• Right-click on the tRowGenerator component and select Row > Main. Drag this main row link onto the tLogRow component and release when the plug symbol displays.
• Double-click on the tRowGenerator component to open the Editor.
• Define the fields to be generated.
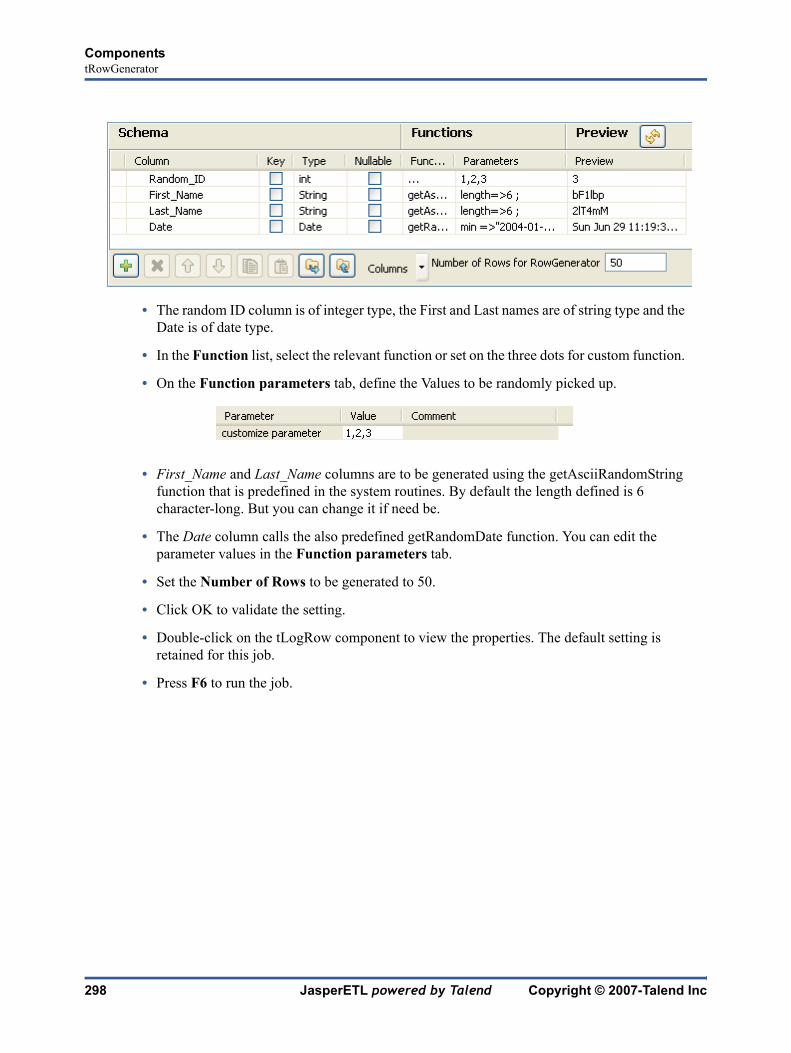
298 JasperETL powered by Talend Copyright © 2007-Talend Inc
ComponentstRowGenerator
• The random ID column is of integer type, the First and Last names are of string type and the Date is of date type.
• In the Function list, select the relevant function or set on the three dots for custom function.
• On the Function parameters tab, define the Values to be randomly picked up.
• First_Name and Last_Name columns are to be generated using the getAsciiRandomString function that is predefined in the system routines. By default the length defined is 6 character-long. But you can change it if need be.
• The Date column calls the also predefined getRandomDate function. You can edit the parameter values in the Function parameters tab.
• Set the Number of Rows to be generated to 50.
• Click OK to validate the setting.
• Double-click on the tLogRow component to view the properties. The default setting is retained for this job.
• Press F6 to run the job.

Copyright © 2007-Talend Inc JasperETL powered by Talend 299
ComponentstRowGenerator
The 50 rows are generated following the setting defined in the tRowGenerator editor and the output is displayed in the Run Job console.

300 JasperETL powered by Talend Copyright © 2007-Talend Inc
ComponentstRunJob
tRunJob
tRunJob Properties
Scenario: Executing a remote job
This particular scenario describes a single-component job calling in and executing another job. The job to be executed reads a basic delimited file and simply displays its content on the Run Job log console. The particularity of this job lies in the fact that this latter job is executed from a separate job and uses a context variable to prompt for the input file to be processed.
Component family System
Function Executes the job called in the component’s Properties, in the frame of the context defined.
Purpose tRunJob helps mastering complex job systems which need to execute one job after another.
Properties Process Select the job to be called in and processed. Make sure you already executed once the job called, beforehand, in order to ensure a smooth run through the tRunJob.
Context If you defined contexts and variables for the job to be run by the tRunJob, select the applicable context entry on the list.
Context parameter You can change the selected context parameters. Click the plus button to add the parameters as defined in the Context of the child job
Generate Code Click the button to validate the context selection in the tRunJob and generate the relevant code.
Usage This component can be used as a standalone job or can help clarifying complex job by avoiding having too many sub-jobs all together in one job.
Limitation n/a

Copyright © 2007-Talend Inc JasperETL powered by Talend 301
ComponentstRunJob
Create the first job reading the delimited file.
• Click and drop a tFileInputDelimited and a tLogRow onto the Designer.
• Set the input component properties in the Properties panel.
• Set the Property type on Built-In for this job.
• In File Name, browse to the input file. In this example, the file is a txt file called Comprehensive.
• Select the path to this Input file and press F5 to open the Variable configuration window.
• Give a name to the new context variable, in this scenario, it is called File.

302 JasperETL powered by Talend Copyright © 2007-Talend Inc
ComponentstRunJob
• No need to check the Prompt for value box nor set a prompt message for this use case, as the default parameter value is ok to be used.
• Click Finish to validate and press again Enter to make sure the new context variable is stored the File Name field.
• Back on the Properties view, type in the field and row separators used in the input file.
• In this case, no header nor footer are to be set. But set a limited number of rows to be processed. In the Limit field, type in 50.
• The Schema type is Built-in for this scenario. Click the three-dot button to configure manually the schema.
• Add two columns and name them following the first and second column name of your input file. In this example: ID and Registration.
• If you stored your schema in the repository, you only need to select the relevant metadata entry corresponding to your input file structure.
• Then link the Input component to your output component, tLogRow.
Create the second job, to play the role of master job.
• In the Properties panel of the tRunJob component, select the job to be executed.

Copyright © 2007-Talend Inc JasperETL powered by Talend 303
ComponentstRunJob
• We recommend you to run once the called-in job before executing it through the tRunJob component in order to make sure it runs smoothly.
• In the Context field, select the relevant context. In this case, only the Default context is available and holds the context variable created earlier.
• Click Generate Code to validate the context selection and generate the related code.
• Save the master job and press F6 to run it.
The called-in job reads the data contained in the input file, as defined by the input schema, and the result of this job is displayed directly in the Run Job console.
Related topic: Scenario: Job execution in a loop on page 215

304 JasperETL powered by Talend Copyright © 2007-Talend Inc
ComponentstSalesforceInput
tSalesforceInputtSalesforceInput Properties
Related scenario
The operation is similar to the connection to SugarCRM, therefore see scenario of tSugarCRMInput on page 324 for more information.
Component family Business
Function Connects to a module of a Salesforce database via the relevant webservice.
Purpose Allows to extract data from a Salesforce DB based on a query.
Properties Salesforce Webservice URL
Type in the webservice URL to connect to the Salesforce DB.
Username and Password
Type in the Webservice user authentication data.
Module Select the relevant module in the list
Schema type and Edit Schema
A schema is a row description, i.e., it defines the number of fields that will be processed and passed on to the next component. The schema is either built-in or remote in the Repository. !Click Edit Schema to make changes to the schema. Note that if you make changes, the schema automatically becomes built-in.!In this component the schema is related to the Module selected.
Query condition Type in the query to select the data to be extracted. Example: account_name= ‘Talend’
Usage Usually used as a Start component. An output component is required.
Limitation n/a

Copyright © 2007-Talend Inc JasperETL powered by Talend 305
ComponentstSalesforceOutput
tSalesforceOutput
tSalesforceOutput Properties
Related scenario
No scenario is available yet for this component.
Component family Business
Function Writes in a module of a Salesforce database via the relevant webservice.
Purpose Allows to write data into a Salesforce DB.
Properties Salesforce Webservice URL
Type in the webservice URL to connect to the Salesforce DB.
Username and Password
Type in the Webservice user authentication data.
Action Insert or Update the data in the Salesforce module.
Module Select the relevant module in the list
Schema type and Edit Schema
A schema is a row description, i.e., it defines the number of fields that will be processed and passed on to the next component. The schema is either built-in or remote in the Repository. !Click Edit Schema to make changes to the schema. Note that if you make changes, the schema automatically becomes built-in.!Click Sync columns to retrieve the schema from the previous component connected in the job.
Usage Used as an output component. An Input component is required.
Limitation n/a

306 JasperETL powered by Talend Copyright © 2007-Talend Inc
ComponentstSendMail
tSendMail
tSendMail properties
Scenario: Email on error
This scenario creates a three-component job which sends an email to defined recipients when an error occurs.
Component family Internet
Function tSendMail sends emaiils and any attachements to defined recipients.
Purpose tSendMail purpose is to notify recipients about a particular state of the job or possible errors .
Properties To Main recipient email address
From Sending server’s email address
Cc Carbon copy recipient email
Subject Heading of the mail
Message Body message of the email. Press Ctrl+Space to display the list of available variables
Attachment Filemask or path to the file to be sent along with the mail, if any.
Other Headers Type in the Key and corresponding value of any header information that does not belong to the standard header.
SMTP Host and Port
IP address of SMTP server used to send emails.
Usage This component is typically used as one sub-job but can also be used as output or end object. It can be connected to other components with either Row or Iterate links.
Limitation Note that email sendings with or without attachment require two different perl module

Copyright © 2007-Talend Inc JasperETL powered by Talend 307
ComponentstSendMail
• Click and drop the following components from your palette to the workspace: tFileInputDelimited, tFileOutputXML, tSendMail.
• Define tFileInputdelimited properties. Related topic: tFileInputDelimited properties on page 188.
• Right-click on the tFileInputDelimited component and select Row > Main. Then drag it onto the tFileOutputXML component and release when the plug symbol shows up.
• Define tFileOutputXML properties.
• Drag a Run on Error link from tFileDelimited to tSendMail component.
• Define the tSendMail component properties:
• Enter the recipient and sender email addresses, as well as the email subject.
• Enter a message containing the error code produced using the corresponding global variable. Access the list of variables by pressing Ctrl+Space.
• Add attachments and extra header information if any. Type in the SMTP information.

308 JasperETL powered by Talend Copyright © 2007-Talend Inc
ComponentstSendMail
In this scenario, the file containing data to be transferred to XML output cannot be found. tSendmail runs on this error and sends an notification email the defined recipient.

Copyright © 2007-Talend Inc JasperETL powered by Talend 309
ComponentstSleep
tSleep
tSleep Properties
Related scenarios
For use cases in relation with tSleep, see tFor Scenario: Job execution in a loop on page 215.
Component family Misc
Function tSleep implements a time off in a job execution.
Purpose Allows to identify possible bottlenecks using a time break in the job for testing or tracking purpose. In production, it can be used for any needed pause in the job to feed input flow for example.
Properties Pause (in second) Time in second the job execution is stopped for.
Usage tSleep component is generally used as a middle component to make a break/pause in the job, before resuming the job.
Limitation n/a

310 JasperETL powered by Talend Copyright © 2007-Talend Inc
ComponentstSortRow
tSortRow
tSortRow properties
Component family Processing
Function Sorts input data based on one or several columns, by sort type and order
Purpose Helps creating metrics and classification table.
Properties Schema type and Edit Schema
A schema is a row description, i.e., it defines the number of fields that will be processed and passed on to the next component. The schema is either built-in or remote in the Repository. !Click Edit Schema to make changes to the schema. Note that if you make changes, the schema automatically becomes built-in.!Click Sync columns to retrieve the schema from the previous component connected in the job.
Built-in: The schema will be created and stored locally for this component only. Related topic: Setting a built-in schema on page 51
Repository: The schema already exists and is stored in the Repository, hence can be reused in various projets and job flowcharts. Related topic: Setting a repository schema on page 52
Criteria Click + to add as many lines as required for the sort to be complete. By default the first column defined in your schema is selected.
Schema column: Select the column label from your schema, which the sort will be based on. Note that the order is essential as it determines the sorting priority.
Sort type: Numerical and Alphabetical order are proposed. More sorting types to come.
Order: Ascending or descending order.
Usage This component handles flow of data therefore it requires input and output, hence is defined as an intermediary step.
Limitation n/a

Copyright © 2007-Talend Inc JasperETL powered by Talend 311
ComponentstSortRow
Scenario: Sorting entries
This scenario describes a three-component job. A tRowGenerator is used to create random entries which are directly sent to a tSortRow to be ordered following a defined value entry. In this scenario, we suppose the input flow contains names of salespersons along with their respective sales and their years of presence in the company. The result of the sorting operation is displayed on the Run job console.
• Click and drop the three components required for this use case: tRowGenerator, tSortRow and tLogRow.
• Connect them together using Row main links.
• On the tRowGenerator editor, define the values to be randomly used in the Sort component. For more information regarding the use of this particular component, see tRowGenerator properties on page 295.
• In this scenario, we want to rank each salesperson according to its Sales value and to its number of years in the company.
• Double-click on tSortRow to display the Properties tab panel. Set the sort priority on the Sales value and as secondary criteria, set the number of years in the company.

312 JasperETL powered by Talend Copyright © 2007-Talend Inc
ComponentstSortRow
• Use the plus button to add the number of rows required. Set the type of sorting, in this case, both criteria being integer, the sort is numerical. At last, given that the output wanted is a rank classification, set the order as descending.
• Make sure you connected this flow to the output component, tLogRow, to display the result in the Job console.
• Press F6 to run the Job or go to the Run Job panel and click Run.The ranking is based first on the Sales value and second on the number of years of experience.

Copyright © 2007-Talend Inc JasperETL powered by Talend 313
ComponentstSQLiteInput
tSQLiteInput
tSQLiteInput Properties
Scenario: Filtering SQlite data
This scenario describes a rather simple job which uses a select statement based on a filter to extract rows from a source SQLite Database and feed an output SQLite table.
Component family Databases
Function tSQLiteInput reads a database file and extracts fields based on an SQL query. As it embeds the SQLite engine, no need of connecting to any database server.
Purpose tSQLiteInput executes a DB query with a defined command which must correspond to the schema definition. Then it passes on rows to the next component via a Main row link.
Properties Database Filepath to the SQLite database file.
Schema type and Edit Schema
A schema is a row description, i.e., it defines the number of fields to be processed and passed on to the next component. The schema is either built-in or remotely stored in the Repository.
Built-in: The schema is created and stored locally for this component only. Related topic: Setting a built-in schema on page 51
Repository: The schema already exists and is stored in the Repository, hence can be reused. Related topic: Setting a repository schema on page 52
Query type The query can be built-in for a particular job or for commonly used query, it can be stored in the repository to ease the query reuse.
Query If your query is not stored in the Repository, type in your DB query paying particularly attention to properly sequence the fields in order to match the schema definition.
Encoding Select the encoding from the list or select Custom and define it manually. This field is compulsory for DB data handling.
Usage This component is standalone as it includes the SQLite engine. This is a startable component that can iniate a data flow processing.

314 JasperETL powered by Talend Copyright © 2007-Talend Inc
ComponentstSQLiteInput
• Click and drop from the Palette, a tSQLiteInput and a tSQLiteOutput component.
• Connect the input to the output using a row main link.
• On the tSQLiteInput properties, type in or browse to the SQLite Database input file.
• The file contains hundreds of lines and includes an ip column which the select statement will based on
• On the tSQLite Properties, edit the schema for it to match the table structure.

Copyright © 2007-Talend Inc JasperETL powered by Talend 315
ComponentstSQLiteInput
• In the Query field, type in your select statement based on the ip column.
• Select the right encoding parameter.
• On the tSQLiteOutput component Properties panel, select the Database filepath.
• Type in the Table to be fed with the selected data.
• Select the Action on table and Action on Data. In this use case, the action on table is Drop and create and the action on data is Insert.
• The schema should be synchronized with the input schema.
• Select the encoding and define the threshold to commit.
• Save the job and run it.
The queried data are returned in the defined SQLite file.

316 JasperETL powered by Talend Copyright © 2007-Talend Inc
ComponentstSQLiteOutput
tSQLiteOutput
tSQLiteOutput Properties
Component family Databases
Function tSQLiteOutput writes, updates, makes changes or suppresses entries in an SQLite database. As it embeds the SQLite engine, no need of connecting to any database server.
Purpose tSQLiteOutput executes the action defined on the table and/or on the data contained in the table, based on the flow incoming from the preceding component in the job.
Properties Property type Either Built-in or Repository.
Built-in: No existing property data is to be retrieved
Repository: Select the Repository file where Properties are stored. The following fields are pre-filled in using fetched data.
Database Filepath to the Database file
Table Name of the table to be written. Note that only one table can be written at a time
In Java, use tCreateTable as substitute for this function..
Action on table On the table defined, you can perform one of the following operations:!None: No operation carried out!Drop and create the table: The table is removed and created again!Create a table: The table doesn’t exist and gets created.!Clear a table: The table content is deleted
Action on data On the data of the table defined, you can perform:!Insert: Add new entries to the table. If duplicates are found, job stops.!Update: Make changes to existing entries!Insert or update: Add entries or update existing ones.!Update or insert: Update existing entries or create it if non existing!Delete: Remove entries corresponding to the input flow.
Schema type and Edit Schema
A schema is a row description, i.e., it defines the number of fields to be processed and passed on to the next component. The schema is either built-in or remotely stored in the Repository.

Copyright © 2007-Talend Inc JasperETL powered by Talend 317
ComponentstSQLiteOutput
Related Scenario
For scenarios related to tSQLiteOutput, see tSQLiteInput on page 313.
Built-in: The schema is created and stored locally for this component only. Related topic: Setting a built-in schema on page 51
Repository: The schema already exists and is stored in the Repository, hence can be reused. Related topic: Setting a repository schema on page 52
Encoding Select the encoding from the list or select Custom and define it manually. This field is compulsory for DB data handling.
Perl components do not include this feature yet.
Additional Columns This option is not offered if you create (with or without drop) the Db table. This option allows you to perform actions on columns, which are not insert, nor update or delete actions or requires a particular preprocessing.
Name: Type in the name of the schema column to be altered or inserted as new column
SQL expression: Type in the SQL statement to be executed in order to alter or insert the relevant column data.
Position: Select Before, Replace or After, following the action to be performed on the reference column.
Reference column: Type in a column of reference that the tDBOutput can use to place or replace the new or altered column.
Commit every Number of rows to be completed before commiting batches of rows together into the DB. This option ensures transaction quality (but not rollback) and above all better performance on executions.
Usage This component is requried to be connected to an Input component.

318 JasperETL powered by Talend Copyright © 2007-Talend Inc
ComponentstSQLiteRow
tSQLiteRow
tSQLiteRow Properties
Component family Databases
Function tSQLiteRow executes the defined query onto the specified database and uses the parameters bound with the column .
Purpose A prepared statement uses the input flow to replace the placeholders with the values for each parameters defined. This component can be very useful for updates.
Properties Property type Either Built-in or Repository.
Built-in: No existing property data is to be retrieved
Repository: Select the Repository file where Properties are stored. The following fields are pre-filled in using fetched data.
Schema type and Edit Schema
A schema is a row description, i.e., it defines the number of fields to be processed and passed on to the next component. The schema is either built-in or remotely stored in the Repository.
Built-in: The schema is created and stored locally for this component only. Related topic: Setting a built-in schema on page 51
Repository: The schema already exists and is stored in the Repository, hence can be reused. Related topic: Setting a repository schema on page 52
Query type Either Built-in or Repository.
Built-in: Fill in manually the query statement or build it graphically using SQLBuilder
Repository: Select the relevant query stored in the Repository. The Query field gets accordingly filled in.
Query Enter your DB query paying particularly attention to properly sequence the fields in order to match the schema definition.
Prepared statement and Input parameters
Check the Prepared statement box, to display the Input parameters table.!In the table, click the plus button to add a row for each parameters invoked in the query.
Encoding Select the encoding from the list or select Custom and define it manually. This field is compulsory for DB data handling.

Copyright © 2007-Talend Inc JasperETL powered by Talend 319
ComponentstSQLiteRow
Scenario: Updating SQLite rows
This scenario describes a job which updates an SQLite database file based on a prepared statement and using a delimited file.
• Click and drop a tFileInputDelimited and a tSQLiteRow component.
• On the tFileInputDelimited Properties panel, browse to the input file that will be used to update rows in the database.
• There is no header nor footer. The Row separator is a carriage return and the field separator is a semi-colon.
• Edit the schema in case it is not stored in the Repository.
• Make sure the length and type are respectively correct and large enough to define the columns.
Commit every Number of rows before commiting

320 JasperETL powered by Talend Copyright © 2007-Talend Inc
ComponentstSQLiteRow
• Then in the tSQLiteRow Properties panel, set the Database filepath to the file to be updated.
• The schema is read-only as it is required to match the input schema.
• Type in the query or retrieve it from the Repository. In this use case, we updated the type_os for the id defined in the Input flow. The statement is as follows: 'Update download set type_os=? where id=?'
• Then check the Prepared statement box to display the placeholders’ parameter table.
• In the Input parameters table, add as many lines as necessary to cover all placeholders. In this scenario, type_os and id are to be defined.
• Set the Commit every field and select the Encoding type in the list.
• Save the job and press F6 to run it.
The dowload table from the SQLite database is thus updated with new type_os code according to the delimited input file.
Copyright © 2007-Talend Inc JasperETL powered by Talend 321
ComponentstStatCatcher
tStatCatcher
tStatCatcher properties
Scenario: Displaying job stats log
This scenario describes a four-component job, aiming at displaying on the Run Job console the statistics log fetched from the file generation through the tStatCatcher component.
Component family Log & Error
Function Based on a defined sch.ema, gathers the job processing metadata at a job level as well as at each component level.
Purpose Operates as a log function triggered by the StatsCatcher Statistics checkbox of individual compoenents, and collects and transfers this log data to the output defined.
Schema type A schema is a row description, i.e., it defines the fields to be processed and passed on to the next component. In this particular case, the schema is read-only, as this component gathers standard log information including:
Moment: Processing time and date
Pid: Process ID
Father_pid: Process ID of the father job if applicable. If not applicable, Pid is duplicated.
Root-pid: Process ID of the root job if applicable. If not applicable, pid of current job is duplicated.
Project: Project name, the job belongs to.
Job: Name of the current job
Context: Name of the current context
Origin: Name of the component if any
Message: Begin or End.
Usage This component is the start component of a secondary job which triggers automatically at the end of the main job. The processing time is also displayed at the end of the log.
Limitation n/a

322 JasperETL powered by Talend Copyright © 2007-Talend Inc
ComponentstStatCatcher
• Click and drop the required components: tRowGenerator, tFileOutputDelimited, tStatCatcher and tLogRow
• In the Properties panel of tRowGenerator, define the data to be generated. For this job, the schema is composed of three columns: ID_Owners, Name_Customer and ID_Insurance, generated using Perl script.
• The number of rows can be restricted to 100.
• Click on the Main tab of the Properties view.
• And check the tStatCatcher Statistics box to enable the statistics fetching operation.
• Then, define the output component’s properties. In the tFileOutputDelimited Properties panel, browse to the output file or enter a name for the output file to be created. Define the delimiters, such as semi-colon, and the encoding.

Copyright © 2007-Talend Inc JasperETL powered by Talend 323
ComponentstStatCatcher
• Click on Edit schema and make sure the schema is recollected from the input schema. If need be, click on Sync Columns.
• Then click on the Main tab of the Properties view, and check here as well the tStatCatcher Statistics box to enable the processing data gathering.
• In the secondary job, double-click on the tStatCatcher component. Note that the Properties are provided for information only as the schema representing the processing data to be gathered and aggregated in statistics, is defined and read-only.
• Define then the tLogRow to set the delimiter to be displayed on the console.
• Eventually, press F6 to run the job and display the job result.
The log shows the Begin and End information for the job itself and for each of the component used in the job.

324 JasperETL powered by Talend Copyright © 2007-Talend Inc
ComponentstSugarCRMInput
tSugarCRMInput
tSugarCRMInput Properties
Scenario: Extracting account data from SugarCRM
This scenario describes a two-component job which aims at extracting account information from a SugarCRM database to an Excel output file.
• Click and drop a tSugarCRMInput and a tFileOutputExcel component.
• Connect the input component to the output component using a main row link.
• On the tSugarCRMInput Properties panel, fill in the connection information in the SugarCRM Web Service URL as well as the Username and Password fields
Component family Business
Function Connects to a module of a Sugar CRM database via the relevant webservice.
Purpose Allows to extract data from a SugarCRM DB based on a query.
Properties SugarCRM Webservice URL
Type in the webservice URL to connect to the SugarCRM DB.
Module Select the relevant module in the list
Username and Password
Type in the Webservice user authentication data.
Schema type and Edit Schema
A schema is a row description, i.e., it defines the number of fields that will be processed and passed on to the next component. The schema is either built-in or remote in the Repository. !Click Edit Schema to make changes to the schema. Note that if you make changes, the schema automatically becomes built-in.!In this component the schema is related to the Module selected.
Query condition Type in the query to select the data to be extracted. Example: account_name= ‘Talend’
Usage Usually used as a Start component. An output component is required.
Limitation n/a
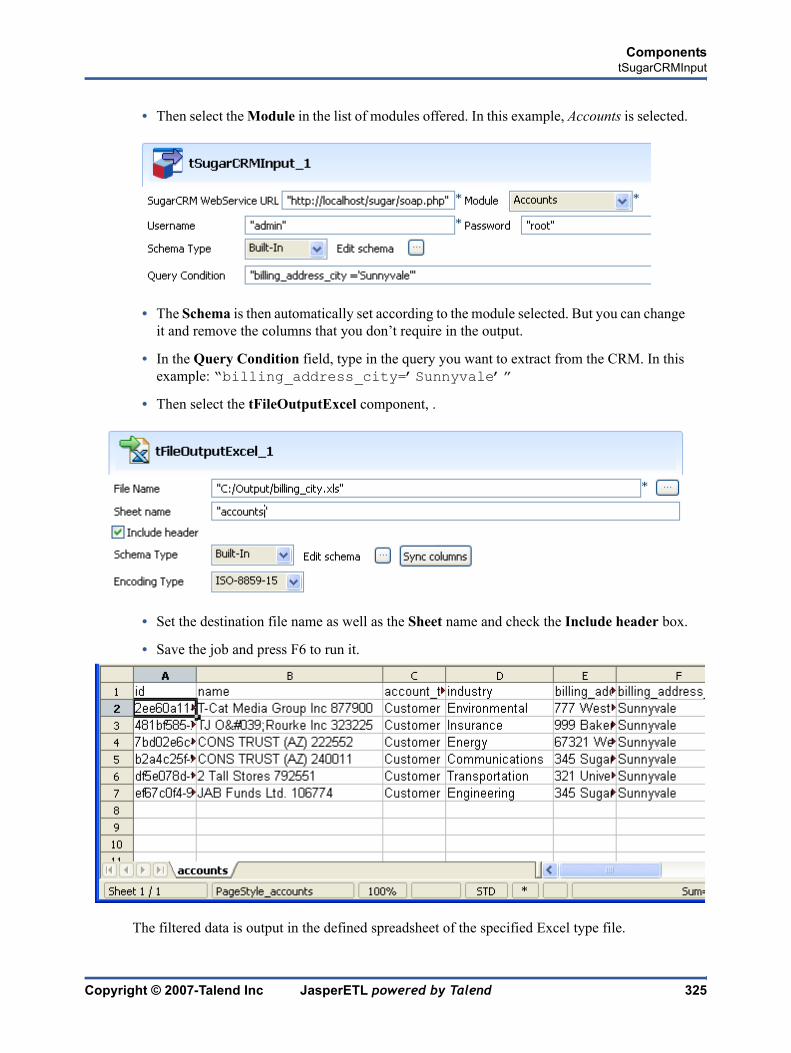
Copyright © 2007-Talend Inc JasperETL powered by Talend 325
ComponentstSugarCRMInput
• Then select the Module in the list of modules offered. In this example, Accounts is selected.
• The Schema is then automatically set according to the module selected. But you can change it and remove the columns that you don’t require in the output.
• In the Query Condition field, type in the query you want to extract from the CRM. In this example: “billing_address_city=’Sunnyvale’”
• Then select the tFileOutputExcel component, .
• Set the destination file name as well as the Sheet name and check the Include header box.
• Save the job and press F6 to run it.
The filtered data is output in the defined spreadsheet of the specified Excel type file.

326 JasperETL powered by Talend Copyright © 2007-Talend Inc
ComponentstSugarCRMOutput
tSugarCRMOutputtSugarCRMOutput properties
Related Scenario
No scenario is available yet for this component.
Component family Business
Function Writes in a module of a Sugar CRM database via the relevant webservice.
Purpose Allows to write data into a SugarCRM DB.
Properties SugarCRM Webservice URL
Type in the webservice URL to connect to the SugarCRM DB.
Module Select the relevant module in the list
Username and Password
Type in the Webservice user authentication data.
Action Insert or Update the data in the SugarCRM module.
Schema type and Edit Schema
A schema is a row description, i.e., it defines the number of fields that will be processed and passed on to the next component. The schema is either built-in or remote in the Repository. !Click Edit Schema to make changes to the schema. Note that if you make changes, the schema automatically becomes built-in.!Click Sync columns to retrieve the schema from the previous component connected in the job.
Usage Used as an output component. An Input component is required.
Limitation n/a

Copyright © 2007-Talend Inc JasperETL powered by Talend 327
ComponentstSybaseInput
tSybaseInput
tSybaseInput properties
The properties of the generic component, tDBInput, apply to the tSybaseInput component, therefore the properties are not detailed again here.
For detailed information about generic tDBInput properties, see tDBInput properties on page 136.
Related scenarios
Related topic in tDBInput scenarios:
• Scenario 1: Displaying selected data from DB table on page 137
• Scenario 2: Using StoreSQLQuery variable on page 138
Related topic in tContextLoad Scenario: Dynamic context use in MySQL DB insert on page 123.

328 JasperETL powered by Talend Copyright © 2007-Talend Inc
ComponentstSybaseOutput
tSybaseOutput
tSybaseOutput properties
The properties of the generic component, tDBOutput, apply to the tSybaseOutput component, therefore the properties are not detailed again here.
For detailed information about generic tDBOutput properties, see DBOutput properties on page 140.
Related scenarios
For use cases in relation with tSybaseOutput, see:
• tDBOutput Scenario: Displaying DB output on page 142
• tMySQLOutput Scenario: Adding new column and altering data on page 261.
Copyright © 2007-Talend Inc JasperETL powered by Talend 329
ComponentstSybaseBulkExec
tSybaseBulkExec
tSybaseBulkExec properties
Related scenarios
For tSybaseBulkExec topic, see:
Component family Databases
Function Executes the Insert action on the data provided.
Purpose As a dedicated component, it allows gains in performance during Insert operations to a Sybase database.
Properties Property type Either Built-in or Repository.
Built-in: No existing property data is to be retrieved
Repository: Select the Repository file where Properties are stored. The following fields are pre-filled in using fetched data.
Server Database server IP address
Database Name of the database
Username and Password
DB user authentication data.
Table Name of the table to be written. Note that only one table can be written at a time and that the table must exist for the insert operation to succeed.
File Name Name of the file to be processed. !Related topic:Defining the context variables on page 96
Fields terminated by Character, string or regular expression to separate fields.
Encoding Select the encoding from the list or select Custom and define it manually. This field is compulsory for DB data handling.
Output to Console: Loading information!Global variable: Returned values from log files.
Usage This component is mainly used when no particular tranformation is required on the data to be loaded onto the database.
Limitation As opposed to the Oracle dedicated bulk component, no action on data is possible using this Sybase dedicated component

330 JasperETL powered by Talend Copyright © 2007-Talend Inc
ComponentstSybaseBulkExec
• tMysqlOutputBulkExec Scenario: Inserting transformed data in MySQL database on page 265
• tOracleBulkExec Scenario: Truncating and inserting file data into Oracle DB on page 284.

Copyright © 2007-Talend Inc JasperETL powered by Talend 331
ComponentstSybaseRow
tSybaseRow
tSybaseRow properties
The properties of the generic component, tDBSQLRow, apply to the tSybaseRow component, therefore the properties are not detailed again here.
For detailed information about generic tDBSQLRow properties, see tDBSQLRow properties on page 144.
Related scenarios
For tSybaseRow related topics, see:
• tDBSQLRow Scenario 1: Resetting a DB auto-increment on page 145
• tMySQLRow Scenario: Removing and regenerating a MySQL table index on page 275.

332 JasperETL powered by Talend Copyright © 2007-Talend Inc
ComponentstSystem
tSystem
tSystem properties
Scenario: Echo ‘Hello World!’
This scenario is a two-component job showing a message in the Log.
• Click and drop a tSystem and a tPerl component onto the workspace.
• Right-click on tSystem, and pull a ThenRun link between the two components. When executing the job, the first component will then trigger before the second one.
• Click on the tSystem and select the Properties tab:
• Enter the echo command and string “Hello World!” to be displayed
Component family System
Function tSystem executes one or more system commands.
Purpose tSystem can call other processing commands, already up and running in a larger job.
Properties Command Enter the system command. Note that the syntax is not checked.
Output Select the type of output for the processed data to be passed onto.
to console: standard output passes on data to be viewed in the Log view.
to global variable: data is put in output variable linked to tsystem component.
Usage This component can typically used for companies which already implemented other applications that they want to integrate into their processing flow through Talend.
Limitation n/a

Copyright © 2007-Talend Inc JasperETL powered by Talend 333
ComponentstSystem
• Select To a global variable option as Output to include the command output value into
• Then select the tPerl component
• Enter a Perl command to display the tSystem output variable in the console.
• Go to the Run Job tab and execute the job.
The job executes an echo command and shows the output in the Log using a Print command in the tPerl component.

334 JasperETL powered by Talend Copyright © 2007-Talend Inc
ComponentstUniqRow
tUniqRow
tUniqRow properties
Scenario: Unduplicating entries
Based on the tSortRow job, the tUniqRow component is added to the job in order to uniquify the entries in the output flow. In fact, as the input data is randomly created, duplication cannot be avoided.
Component family Data Quality
Function Compares entries and removes the first encountered duplicate from the input flow.
Purpose Ensures data quality of input or output flow in a job.
Properties Schema type and Edit Schema
A schema is a row description, i.e., it defines the number of fields that will be processed and passed on to the next component. The schema is either built-in or remote in the Repository. !Click Edit Schema to make changes to the schema. Note that if you make changes, the schema automatically becomes built-in.!Click Sync columns to retrieve the schema from the previous component connected in the job.!
If you want the deduplication to be carried out on particular columns, define them on the schema.
Built-in: The schema will be created and stored locally for this component only. Related topic: Setting a built-in schema on page 51
Repository: The schema already exists and is stored in the Repository, hence can be reused in various projets and job flowcharts. Related topic: Setting a repository schema on page 52
Case sensitive Check the box to consider the lower or upper case.
Usage This component handles flow of data therefore it requires input and output, hence is defined as an intermediary step.
Limitation n/a

Copyright © 2007-Talend Inc JasperETL powered by Talend 335
ComponentstUniqRow
• On the Properties tab panel of the tUniqRow component, click Edit Schema... to set the Key on Names field to uniquify the output flow on this criteria.
• Check the Case Sensitive box to differenciate lower case and upper case.
• Press F6 to run the job again. The console displays the sorted and unique results

336 JasperETL powered by Talend Copyright © 2007-Talend Inc
ComponentstWarn
tWarnBoth tDie and tWarn components are closely related to the tLogCatcher component.They generally make sense when used alongside a tLogCatcher in order for the log data collected to be encapsulated and passed on to the output defined.
tWarn properties
Related scenarios
For uses cases in relation with tWarn, see tLogCatcher scenarios:
• Scenario1: warning & log on entries on page 226
• Scenario 2: log & kill a job on page 228
Component family Log/Error
Function Provides a priority-rated message to the next component
Purpose Triggers a warning often caught by the tLogCatcher component for exhaustive log.
Warn message Type in your warning message
Code Define the code level
Priority Enter the priority level as an integer
Usage Cannot be used as a start component. If an output component is connected to it, an input component should be preceding it.
Limitation n/a

Copyright © 2007-Talend Inc JasperETL powered by Talend 337
ComponentstWebServiceInput
tWebServiceInputtWebServiceInput properties
Component family Internet
Function Calls the defined method from the invoked webservice, and returns the class as defined, based on the given parameters.
Purpose Invokes a Method through a webservice and for the described purpose
Properties Schema type and Edit Schema
A schema is a row description, i.e., it defines the number of fields that will be processed and passed on to the next component. The schema is either built-in or remote in the Repository. !Click Edit Schema to make changes to the schema. Note that if you make changes, the schema automatically becomes built-in.!Click Sync columns to retrieve the schema from the previous component connected in the job.
End Point URI Resource identifier of the web service
WSDL Description of Web service bindings and configuration
Java only fieldSOAPAction URI SOAP standard end point if required
Method Name Enter the exact name of the Method to be invoked. !The Method name MUST match the corresponding method described in the Web Service. The Method name is also case-sensitive.
Java only fieldReturn class Select the type of data to be returned by the
method. Make sure it fully matches the one defined in the method.
Note: For .Net services, use the returned class: org.apache.axis.types.Schema.class
Parameters Enter the parameters expected and the sought values to be returned. Make sure that the parameters entered fully match the names and the case of the parameters described in the method.
Usage This component is generally used as a Start component . It requires to be linked to an output component.
Limitation n/a

338 JasperETL powered by Talend Copyright © 2007-Talend Inc
ComponentstWebServiceInput
Scenario: Extracting images through a Webservice
This scenario describes a two-component job aiming at using a Webservice method and display the output on the standard view.
The method takes a full url as an input string and returns a string array of images from a given web page.
• Click and drop a tWebServiceInput component and a tLogRow component.
• On the Properties view of the tWebServiceInput component, define the WSDL specifications, such as End Point URI, WSDL and SOAPAction URI where required.
• If the Web service you invoked requires authentication details, check the box and provide the relevant authentication information.
• In the Method Name field, type in the method name as defined in the Web Service description. The name and the case of the method entered must match exactly the corresponding Web service method.
• Then select the return class corresponding to the expected value type.
• In the Parameters area, click the plus (+) button to add a line to the table.
• Then type in the exact parameters’ name as expected by the method.

Copyright © 2007-Talend Inc JasperETL powered by Talend 339
ComponentstWebServiceInput
• In the Value column, type in the URL of the Website, the images are to be extracted from.
• The Class column is automatically filled in with the return class type selected earlier.
• Link the tWebServiceInput component to the standard output component, tLogRow.
• Then press F6 to run the job.
All images extracted from the given website are returned as a list of URLs on the Run Job view.

340 JasperETL powered by Talend Copyright © 2007-Talend Inc
ComponentstXSDValidator
tXSDValidator
tDTDValidator Properties
Related scenario
For related tXSDValidator use cases, see Scenario: Validating xml files on page 153.
Component family XML
Function Validates the XML input file against a XSD file and sends the validation log to the defined output.
Purpose Helps at controlling data and structure quality of the file to be processed
Properties Schema type and Edit Schema
A schema is a row description, i.e., it defines the number of fields to be processed and passed on to the next component. The schema is either built-in or remotely stored in the Repository but in this case, the schema is read-only. It contains standard information regarding the file validation.
XSD file Filepath to the reference DTD file.
XML file Filepath to the XML file to be validated.
If XML is valid, display!If XML is not valid detected, display
Type in a message to be displayed in the Run Job console based on the result of the comparison.
Print to console Check the box to display the validation message
Usage This component can be used as standalone component but it is usually linked to an output component to gather the log data.
Limitation n/a

Copyright © 2007-Talend Inc JasperETL powered by Talend 341
ComponentstXSLT
tXSLT
tXSLT
Scenario: Transforming XML to html using an XSL stylesheet
This scenario describes a job applying an xsl stylesheet on an xml file and outputs an html file.
• Drag and drop the tXSLT component.
• On the Properties view of the component, set the XML file to be transformed. In this use case, a list of MP3 titles and their corresponding artist
• Then set the filepath to the relevant XSL file in order to apply the wanted transformation.
Component family XML
Function Refers to an XSL stylesheet, to transform an XML source file into a defined output file.
Purpose Helps to transform data structure to another structure.
Properties XML file Filepath to the XML file to be validated.
XSL file Filepath to the reference XSL transformation file.
Output file Filepath to the output file. If the file doesn’t exist, it will be created. The output file can be any structured or unstructured file such as html, xml, txt or also pdf or edifact depending on your xsl.
Usage This component can be used as standalone component.
Limitation n/a
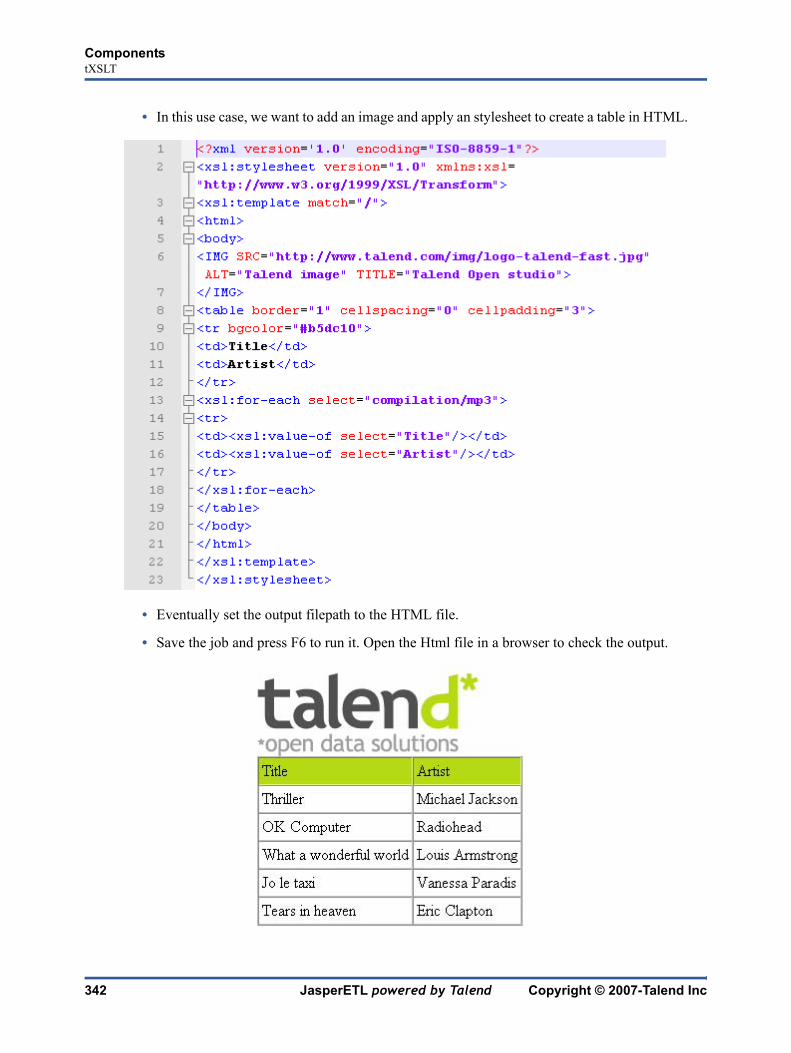
342 JasperETL powered by Talend Copyright © 2007-Talend Inc
ComponentstXSLT
• In this use case, we want to add an image and apply an stylesheet to create a table in HTML.
• Eventually set the output filepath to the HTML file.
• Save the job and press F6 to run it. Open the Html file in a browser to check the output.

Copyright © 2007-Talend Inc JasperETL powered by Talend 343
—Managing projects—
Managing projects
Importing projectsOn the login window, click Import projects to open the Import wizard. Click on Open several projects if you intend to import more than one project at once.
Or in JasperETL main window, click on the Import projects button on the toolbar.
Click Browse... to select the Workspace directory or the specific project folder. By default, the workspace in selection is the current release’s one. Browse up to reach the previous release workspace directory containing the projects to import.
Check the Copy projects into workspace option box to make a copy of the project instead of moving them. If you want to remove the original project directories from the previous JasperETL release workspace directory, uncheck this box. But we strongly recommend you to keep it selected for backup purpose.

344 JasperETL powered by Talend Copyright © 2007-Talend Inc
Managing projectsImporting Job samples (Demos)
Select in the list the projects to import and click Finish to validate.
In the login window, the projects imported now display in the Project list, select it from the list
Or from JasperETL workspace, click File > Switch projects... to get back to the login window.
Click OK to launch JasperETL.
Note: A generation initialization window might come up when launching the application. Wait until the initialization is complete.
If, instead of importing the whole project, you’d rather select individual items from your projects,
Importing Job samples (Demos)As for the import of projects from previous releases of JasperETL, you can import in your workspace the Demos project folder, that includes numerous samples of job.
On the Login window of JasperETL, click on the Demos button.
Select your preferred language between Perl and Java.

Copyright © 2007-Talend Inc JasperETL powered by Talend 345
Managing projectsMigration tasks
The Job samples covering all needs are automatically imported into your workspace and made available in the Repository.
A message displays to confirm the import operation successfully.
The Demos project displays in the list of existing Projects in the Login window.
You can use these samples to get started with your own job design.
Migration tasksMigration tasks are performed to ensure the compatibility of the projects you created with a previous version of JasperETL with the current release.
As some changes might become visible to the user, we thought we’d share these update tasks with you through an information window.
Some changes that affect the usage of JasperETL include, for example:
• tDBInput used with a MySQL database becomes a specific tDBMysqlInput component the aspect of which is automatically changed in the job where it is used.
• tUniqRow used to be based on the Input schema keys, whereas the current tUniqRow allows the user to select the column to base the unicity on.
This information window pops up when you launch the project you imported (created) in a previous version of JasperETL.
It lists and provides a short description of the tasks which were successfully performed so that you can smoothly roll your projects.

346 JasperETL powered by Talend Copyright © 2007-Talend Inc
Managing projectsImporting Repository items
Importing Repository itemsYou can now import items from previous versions of JasperETL or a different project of your current version.
The items you can possibly import are multiple:
• Business Models
• Jobs Designs
• Routines
• Documentation
• Metadata
Right-click on the node of the Repository, you want to import an item to. Then select Import items function on the pop-up menu. Follow the wizard to complete the import process.
Note: Note that if the item is already present in the current workspace, the item will not be suggested.
Exporting projectsOn JasperETL workspace, the toolbar allows you to export the current project.
Click on the Export project button of the toolbar, at the top of JasperETL main window.

Copyright © 2007-Talend Inc JasperETL powered by Talend 347
Managing projectsExporting projects
The Export window opens up on the workspace directory showing the projects you can export to an archive file.
You can select multiple projects or only select parts of the project through the Select Types link, if need be (for advanced users).
Type in the name of the archive or browse to the archive file if it already exists.
In the Option area, select the compression format and the structure type you prefer.
Click Finish to validate.

348 JasperETL powered by Talend Copyright © 2007-Talend Inc
Managing projectsExporting projects

Copyright © 2007-Talend Inc JasperETL powered by Talend i
AActivate/Deactivate ..................................................................................................................94Alias .......................................................................................................................................159Appearance ..............................................................................................................................35Assignment table ......................................................................................................................37
BBreakpoint ..............................................................................................................................103Business Model ............................................................................................................15, 27, 28
Creating ..............................................................................................................................28Opening ..............................................................................................................................28
Business Modeler .....................................................................................................................29Business Models ......................................................................................................................27
CCode .........................................................................................................................................15Code Viewer ......................................................................................................................20, 21Component .......................................................................................................................42, 115
Activate ..............................................................................................................................49External ..............................................................................................................................25Start ....................................................................................................................................53
ConnectionIterate .................................................................................................................................47Link ....................................................................................................................................48Lookup ...............................................................................................................................45Main ...................................................................................................................................45Output ................................................................................................................................45Row ....................................................................................................................................45
Context ...................................................................................................................100, 102, 300
DData quality
tAddCRCRow ..................................................................................................................129tFuzzyMatch ....................................................................................................................221
DatabasetDB2Input ........................................................................................................................133tDB2Output ......................................................................................................................134tDBInput ..........................................................................................................................136tDBOutput ........................................................................................................................140tDBSQLRow ....................................................................................................................144tMSSqlInput .....................................................................................................................251tMSSqlOutput ..................................................................................................................252tMSSqlRow ......................................................................................................................253tMysqlBulkExec ..............................................................................................................269tMysqlCommit .................................................................................................................259

ii JasperETL powered by Talend Copyright © 2007-Talend Inc
tMysqlConnection ............................................................................................................254tMysqlInput ......................................................................................................................260tMysqlOutput ...................................................................................................................261tMysqlOutputBulk ...........................................................................................................263tMysqlOutputBulkExec ...................................................................................................272tMysqlRollback ................................................................................................................274tMysqlRow .......................................................................................................................275
Debug mode ...........................................................................................................................104Delimited .................................................................................................................................59Documentation .........................................................................................................................16
EEdit Schema .............................................................................................................................52ELT
tELTMysqlInput ..............................................................................................................156tELTMysqlMap ...............................................................................................................157tELTMysqlOutput ............................................................................................................167tELTOracleInput ..............................................................................................................170tELTOracleMap ...............................................................................................................171tELTOracleOutput ...........................................................................................................176
Explicit Join ...........................................................................................................................159Exporting
Projects .............................................................................................................................346
FFile
tFileCompare ...................................................................................................................179tFileCopy .........................................................................................................................182tFileDelete ........................................................................................................................184tFileInputDelimited ..........................................................................................................188tFileInputMail ..................................................................................................................191tFileInputPositional ..........................................................................................................193tFileInputRegex ...............................................................................................................197tFileInputXML .................................................................................................................201tFileList ............................................................................................................................204tFileOutputExcel ..............................................................................................................207tFileOutputLDIF ..............................................................................................................208tFileOutputXML ..............................................................................................................211tFileUnarchive .................................................................................................................213
File XMLLoop limit ..........................................................................................................................74
FilePositional ...........................................................................................................................64FileRegex .................................................................................................................................67
Copyright © 2007-Talend Inc JasperETL powered by Talend iii
GGeneration language ................................................................................................................13Graphical workspace ..........................................................................................................17, 27Grid ..........................................................................................................................................34
HHash key ..................................................................................................................................83
IImporting
Items .................................................................................................................................346Inner join ..................................................................................................................................86Inner Join Reject ......................................................................................................................86Internet
tFileFetch .........................................................................................................................186tFTP .................................................................................................................................218tSendMail .........................................................................................................................306
ItemImporting .........................................................................................................................346
Iterate .......................................................................................................................................47
JJob
Creating ..............................................................................................................................41Opening/Creating ...............................................................................................................39Running ....................................................................................................................101, 102
Job Designer ............................................................................................................................41Panels .................................................................................................................................43
Job Designs ..................................................................................................................15, 39, 40Job script
Exporting .........................................................................................................................104Join
Explicit .............................................................................................................................159
KKey ...........................................................................................................................................83
LLDIFfile ...................................................................................................................................68Left Outer Join .......................................................................................................................165Link ..........................................................................................................................................48Log&Error
tDie ...................................................................................................................................152tLogCatcher .....................................................................................................................226
Log/error
iv JasperETL powered by Talend Copyright © 2007-Talend Inc
tLogRow ..........................................................................................................................230tStatCatcher ......................................................................................................................321
Logs .........................................................................................................................................18Lookup .....................................................................................................................................46
MMain properties ........................................................................................................................38Main row ..................................................................................................................................45Mapper .....................................................................................................................................48Metadata .............................................................................................................................16, 54
DB Connection schema .....................................................................................................55FileDelimited schema ........................................................................................................59FileLDIF Schema ...............................................................................................................68FilePositional schema ........................................................................................................64FileRegex schema ..............................................................................................................67FileXML schema ...............................................................................................................71
MisctContextLoad ...................................................................................................................122tFor ...................................................................................................................................215tMsgBox ...........................................................................................................................277tRowGenerator .................................................................................................................295
ModelArranging .....................................................................................................................33, 34Assigning ...........................................................................................................................37Commenting .......................................................................................................................33Copying ..............................................................................................................................38Deleting ..............................................................................................................................38Moving ...............................................................................................................................38Saving ................................................................................................................................38
Modeler ....................................................................................................................................29Multiple Input/Output ..............................................................................................................48
OObject .......................................................................................................................................30Outline ...............................................................................................................................20, 21Output ......................................................................................................................................46
PPalette .........................................................................................................17, 29, 30, 33, 41, 42
Components .....................................................................................................................115Note ....................................................................................................................................33Note attachment .................................................................................................................33Select ..................................................................................................................................33Zoom ..................................................................................................................................33
Primary Key .............................................................................................................................83

Copyright © 2007-Talend Inc JasperETL powered by Talend v
ProcessingtAggregateRow ................................................................................................................117tDenormalize ....................................................................................................................147tMap .................................................................................................................................231tNormalize .......................................................................................................................279tPerl ..................................................................................................................................289tSortRow ..........................................................................................................................310tUniqRow .........................................................................................................................334
ProjectExporting .........................................................................................................................346
Properties ...............................................................................................................17, 18, 29, 34Comment ............................................................................................................................51Main ...................................................................................................................................38Properties ...........................................................................................................................51Rulers & Grid .....................................................................................................................34View ...................................................................................................................................50
QQuery
SQLBuilder ........................................................................................................................75
RRecycle bin ........................................................................................................................16, 38Refresh .....................................................................................................................................12Regular Expressions ................................................................................................................68Relationship .............................................................................................................................31
bidirectional .......................................................................................................................32directional ..........................................................................................................................32Simple ................................................................................................................................32
Repository ..............................................................................................................12, 14, 27, 39Routine .....................................................................................................................................15Row ..........................................................................................................................................45
Main ...................................................................................................................................45Rulers .......................................................................................................................................34Run Job ....................................................................................................................18, 101, 102
SScheduler .................................................................................................................................19Schema
Built-in ...............................................................................................................................53Shape ........................................................................................................................................30SQLBuilder ..............................................................................................................................75Start ..........................................................................................................................................53Statistics .................................................................................................................................102StoreSQLQuery ...............................................................................................................98, 138

vi JasperETL powered by Talend Copyright © 2007-Talend Inc
Sync columns ...........................................................................................................................52System
tRunJob ............................................................................................................................300tSystem .............................................................................................................................332
TTable
Alias .................................................................................................................................159Technical name ........................................................................................................................13tFlowMeterCatcher ................................................................................................................106tLogCatcher ...........................................................................................................................106tMap .........................................................................................................................................48Traces .....................................................................................................................................103Trigger
Run After ...........................................................................................................................47Run Before .........................................................................................................................47Run if .................................................................................................................................48Run if Error ........................................................................................................................48Run if OK ...........................................................................................................................48ThenRun .............................................................................................................................47
tStatCatcher ............................................................................................................................106
VVariable ............................................................................................................................96, 300
StoreSQLQuery .........................................................................................................98, 138Views
Moving ...............................................................................................................................43
XXML
tDTDValidator .................................................................................................................153XMLFile ..................................................................................................................................71Xpath ........................................................................................................................................73