MyApps.UTSA. Hosted Applications . Guide to using myUTSA Apps . Version 2.0.1 . 2016. The Office of...
39
MyApps.UTSA.edu Hosted Applications Guide to using myUTSA Apps Version 2.0.1 2016 The Office of Information Technology The University of Texas at San Antonio 1/15/2016
Transcript of MyApps.UTSA. Hosted Applications . Guide to using myUTSA Apps . Version 2.0.1 . 2016. The Office of...

MyApps.UTSA.edu Hosted Applications Guide to using myUTSA Apps Version 2.0.1
2016
The Office of Information Technology The University of Texas at San Antonio
1/15/2016

MyApps.UTSA.edu
©The University of Texas at San Antonio • Office of Information Technology • v2.0 Page 2
Contents 1) Overview .......................................................................................................................................... 3
2) Install the Citrix Client on a PC ......................................................................................................... 3
3) Accessing local drives and resources on a PC with Web Client installed ......................................... 7
4) Install the Citrix Web Client on a MAC ........................................................................................... 10
5) Accessing local drives and resources on a MAC with Web Client installed ................................... 20
6) Configure the Citrix Receiver on a Mac to not require the Web Browser to remain open ........... 22
7) Configure the Citrix Receiver on iOS .............................................................................................. 25
8) Accessing local drives and resources on an iOS device ................................................................. 29
9) Configure the Citrix Receiver on Android ...................................................................................... 32
10) Accessing local drives and resources on an Android device .......................................................... 38

MyApps.UTSA.edu
©The University of Texas at San Antonio • Office of Information Technology • v2.0 Page 3
Overview
The Citrix receiver allows users of any Windows®, Mac, Linux, iOS or Android operating system to connect to myUTSA Apps and is designed to work with myUTSA Apps, allowing you to launch applications and define settings. Using this web based method is the easiest way to connect to myUTSA Apps since all of your application icons are automatically generated and all of your printers and drives are automatically mapped to the myUTSA Apps session.
Before using the myUTSA Apps Web Interface on a Windows® PC or Mac the client needs to be installed on your operating system. This document outlines the steps involved in browsing to the myUTSA Apps Web Interface and installing the Citrix Receiver Plugin for a PC.
Install the Citrix Client on a PC
1. Browse to https://receiver.citrix.com and download and open the Citrix reciever installer. (The site will detect the Operating System you are on and provide a link to the appropriate client)
2. Start the installation

MyApps.UTSA.edu
©The University of Texas at San Antonio • Office of Information Technology • v2.0 Page 4
3. Read ther license agreement, if you accept the license, check the accept box, select Next
4. Leave Enable single sign-on unchecked, select next
5. Choose if you’d like to join the improvement program or not, select Install

MyApps.UTSA.edu
©The University of Texas at San Antonio • Office of Information Technology • v2.0 Page 5
6. When has been sucessfully the client is installed, select Finish
7. Once the client is installed, browse to the myUTSA Apps web interface https://myapps.utsa.edu and enter your myUTSA ID & password in and click the Logon button.

MyApps.UTSA.edu
©The University of Texas at San Antonio • Office of Information Technology • v2.0 Page 6
8. Applications are grouped into folder name. To access, click the application folder, in this example, MathCAD.
9. Component applications are displayed in the pop-out window, the example shown has one component application. Click the application you want to launch.
10. A pop-up window will be displayed indicating that the application is making a connection and is
about to launch

MyApps.UTSA.edu
©The University of Texas at San Antonio • Office of Information Technology • v2.0 Page 7
Accessing local drives and resources on a PC with Web Client installed
Local resources (Local Hard Drives/USB sticks etc.) are displayed under the Other category when opening and saving a files, named as <Device Type> on <Your Computer Name>
Always save your work to local resources or Network Shares (I: Drive / S: Drive)*.

MyApps.UTSA.edu
©The University of Texas at San Antonio • Office of Information Technology • v2.0 Page 8
The first time access to local resources is made, a request will pop-up requesting access. Select the appropriate access level you require. If you are accessing from a trusted computer and know the access level you need always, you can check the do not ask me again for this site and you won’t be prompted again.
If the access level you selected needs to be changed this is amended under the connection center option from the Citrix client. Right click on the Citrix client icon in the task tray and select Connection Center

MyApps.UTSA.edu
©The University of Texas at San Antonio • Office of Information Technology • v2.0 Page 9
Select the server that is hosting the application running and select Preferences
Change the access permissions under File Access and select OK

MyApps.UTSA.edu
©The University of Texas at San Antonio • Office of Information Technology • v2.0 Page 10
Install the Citrix Web Client on a MAC
IMPORTANT NOTE: The Web Client requires that the browser remains open when using MyApps hosted applications, if it closed mid-session all MyApps hosted applications will lose connectivity and potential lose any data being worked on.
1. Browse to https://receiver.citrix.com and download and open the Citrix reciever installer.
2. Safari may pop up with a certificate error, select continue

MyApps.UTSA.edu
©The University of Texas at San Antonio • Office of Information Technology • v2.0 Page 11
3. Browse to the Downloads folder and run the CitrixReceiverWeb.dmg
4. Select Install Citrix Receiver

MyApps.UTSA.edu
©The University of Texas at San Antonio • Office of Information Technology • v2.0 Page 12
5. Select Continue
6. Select Continue

MyApps.UTSA.edu
©The University of Texas at San Antonio • Office of Information Technology • v2.0 Page 13
7. Read the license agreement and select continue
8. If you agree to the license agreement, select Agree

MyApps.UTSA.edu
©The University of Texas at San Antonio • Office of Information Technology • v2.0 Page 14
9. The location of install can be changed or select Install to accept the default client install location
10. Enter in your Mac credentials to authorize the install and select Install Software

MyApps.UTSA.edu
©The University of Texas at San Antonio • Office of Information Technology • v2.0 Page 15
11. Installation will start
12. Once installation has completed, select Close

MyApps.UTSA.edu
©The University of Texas at San Antonio • Office of Information Technology • v2.0 Page 16
13. Eject the mounted DMG file and delete installer (DMG) if desired
14. Open Safari and select preferences
15. Select Security and Select Plug-In Settings

MyApps.UTSA.edu
©The University of Texas at San Antonio • Office of Information Technology • v2.0 Page 17
16. Select the Citrix Receiver plugin and select the drop down option (defaulted to ASK)
17. Change the option to Allow Always and Select Done

MyApps.UTSA.edu
©The University of Texas at San Antonio • Office of Information Technology • v2.0 Page 18
18. Once the client is installed, browse to the myUTSA Apps web interface https://myapps.utsa.edu and enter your myUTSA ID & password in and click the Logon button.

MyApps.UTSA.edu
©The University of Texas at San Antonio • Office of Information Technology • v2.0 Page 19
19. Select the application folder and application to launch and click to launch
20. Application launch status will be displayed and the citrix reciever will show in the applciation bar as active
**NOTE** The application will launch on Desktop 1 initially but can be moved to alternative Desktops through mission control once launched

MyApps.UTSA.edu
©The University of Texas at San Antonio • Office of Information Technology • v2.0 Page 20
Accessing local drives and resources on a MAC with Web Client installed
Local resources (Local Hard Drives/USB sticks etc.) are displayed under the Other category under Computer when opening and saving a files, named as
<Device Type> (<DRIVE LETTER> on <Your Computer Name>)
Always save your work to local resources or Network Shares (I: Drive / S: Drive)*. For the below example: Local Disk (C: on iMac) is the root of the Hard drive (excluding vizability to system folders) Local Disk (H: on iMac) is the current users home folder Removable Disk (E: on iMac) is a remoable device (eg. USB Stick)

MyApps.UTSA.edu
©The University of Texas at San Antonio • Office of Information Technology • v2.0 Page 21
The first time access to local resources is made, a request will pop-up requesting access. Select the appropriate access level you require. If you are accessing from a trusted computer and know the access level you need always, you can check the do not ask me again for this site and you won’t be prompted again.
If permissions need to be altered for local resources, select Preferences from the Citrix Viewer from the system menu
Amending the permissions from the Devices tab
MyApps.UTSA.edu
©The University of Texas at San Antonio • Office of Information Technology • v2.0 Page 22
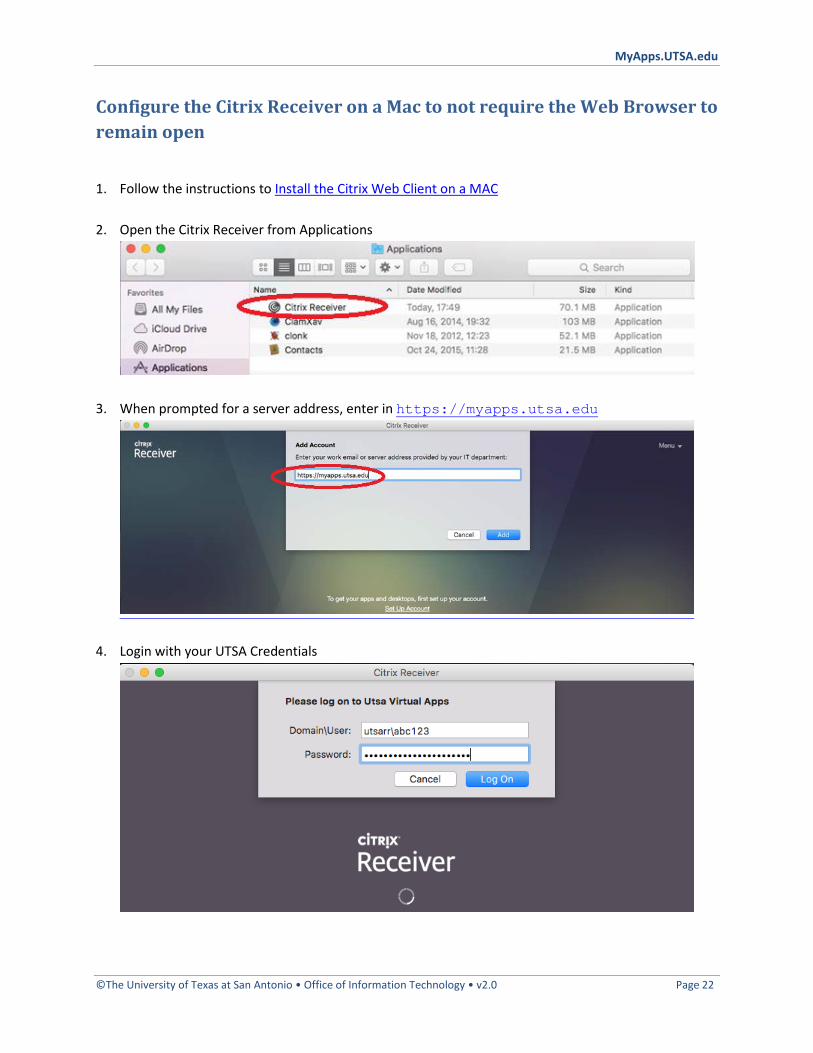
Configure the Citrix Receiver on a Mac to not require the Web Browser to remain open
1. Follow the instructions to Install the Citrix Web Client on a MAC
2. Open the Citrix Receiver from Applications
3. When prompted for a server address, enter in https://myapps.utsa.edu
4. Login with your UTSA Credentials

MyApps.UTSA.edu
©The University of Texas at San Antonio • Office of Information Technology • v2.0 Page 23
5. Add your favorite applications to the Citrix Receiver window by clicking on the +
6. Select the application group and the associated application

MyApps.UTSA.edu
©The University of Texas at San Antonio • Office of Information Technology • v2.0 Page 24
7. The application will be added to the main Citrix Receiver window, repeat step 6 with an additional applications you want to add to your favorite’s window (these will remain in place each time you open up the receiver client). Launch the application by clicking on the icon in your favorites window
8. The Citrix Receiver will provide a status window and launch the applications selected
9. Configuration of local resource access is the same as Accessing local drives and resources on a MAC with Web Client installed

MyApps.UTSA.edu
©The University of Texas at San Antonio • Office of Information Technology • v2.0 Page 25
Configure the Citrix Receiver on iOS
1. Open the Apple AppStore and search for Citrix Receiver
2. Download and install the Citrix Receiver, entering in your Apple ID / Credentials when prompted

MyApps.UTSA.edu
©The University of Texas at San Antonio • Office of Information Technology • v2.0 Page 26
3. Once installed, open the Citrix Receiver and select Add Account
4. Enter in the address as myapps.utsa.edu and select Next
5. The address should translate to https://myapps.utsa.edu automatically, enter in your UTSA credentials and add the domain name as utsarr.net and select Save

MyApps.UTSA.edu
©The University of Texas at San Antonio • Office of Information Technology • v2.0 Page 27
6. Launch the Citrix Receiver from the iOS Launcher 7. Add your favorite applications to the Citrix Receiver window by clicking on the +
8. Select the application group

MyApps.UTSA.edu
©The University of Texas at San Antonio • Office of Information Technology • v2.0 Page 28
9. Select the + to add it to your Citrix Receiver favorites
10. The application will be added to the main Citrix Receiver window, repeat step 6 with an additional applications you want to add to your favorite’s window (these will remain in place each time you open up the receiver client). Launch the application by clicking on the icon in your favorites window

MyApps.UTSA.edu
©The University of Texas at San Antonio • Office of Information Technology • v2.0 Page 29
11. The Citrix Receiver will provide a status window and launch the applications selected
Accessing local drives and resources on an iOS device 1. Once an application is launched the local resources will be shown as Local Disk under Computer
(C: on <Owner Name> iPad)

MyApps.UTSA.edu
©The University of Texas at San Antonio • Office of Information Technology • v2.0 Page 30
2. With the following locations available to use for local storage
3. To return to the Citrix Receiver window select the Citrix Receiver menu bar (Top Center of the screen and drag down to display options – Home returns to the Receiver window)

MyApps.UTSA.edu
©The University of Texas at San Antonio • Office of Information Technology • v2.0 Page 31
4. Access settings for the iOS client can be configured from cog in top right of the Citrix Receiver
5. To logout of your MyApps session select the person icon (Top right of the Citrix receiver) and select Log Off

MyApps.UTSA.edu
©The University of Texas at San Antonio • Office of Information Technology • v2.0 Page 32
Configure the Citrix Receiver on Android
1. From the Google Play store search for Citrix Receiver and Citix Receiver
2. Select Install

MyApps.UTSA.edu
©The University of Texas at San Antonio • Office of Information Technology • v2.0 Page 33
3. If you accept the permissions requested, select Accept
4. Once installed select OPEN

MyApps.UTSA.edu
©The University of Texas at San Antonio • Office of Information Technology • v2.0 Page 34
5. Select Add Account
6. Enter in the Address as Myapps.utsa.edu and select Next

MyApps.UTSA.edu
©The University of Texas at San Antonio • Office of Information Technology • v2.0 Page 35
7. Enter in your UTSA credentials, Domain as utsarr.net and select Add
8. Select the myapps.utsa.edu account

MyApps.UTSA.edu
©The University of Texas at San Antonio • Office of Information Technology • v2.0 Page 36
9. Enter in your UTSA password and select connect
10. Select the application’s folder that you want to launch e.g. ChemDraw
11. Select the application to launch it

MyApps.UTSA.edu
©The University of Texas at San Antonio • Office of Information Technology • v2.0 Page 37
12. Optionally the application can be added to your Favorites list or to your Android devices home
screen by holding the application and selecting one of the three options
13. The first time an application is launched the Gestures screen will be shown for reference

MyApps.UTSA.edu
©The University of Texas at San Antonio • Office of Information Technology • v2.0 Page 38
Accessing local drives and resources on an Android device 1. From the main Citrix Receiver screen select the settings tab
2. Select Advanced and select Use device storage
3. Select the level of access permissions you want to set, typically will be Full Access

MyApps.UTSA.edu
©The University of Texas at San Antonio • Office of Information Technology • v2.0 Page 39
4. Once an application is launched the local resources will be shown as Removable Disk (C: on <device name>) under Computer
5. Amendments to keyboard, mouse functions is gained by swiping down on the arrow at the top center of the Citrix receiver when an application has been launched
Showing the following options


![[Filmmaking Technique] - Digital Film Tools 55mm Manual 2.0.1](https://static.fdocuments.in/doc/165x107/577cdef91a28ab9e78b034ab/filmmaking-technique-digital-film-tools-55mm-manual-201.jpg)