Instructables.com - Folding workbench and bench top power ...
16
http://www.instructables.com/id/Folding-Workbench-and-Bench-Top-Power-Tool-Organiz/ technology workshop craft home food play outside costumes Folding workbench and bench top power tool organizer by baker519 on December 24, 2016 Table of Contents Folding workbench and bench top power tool organizer . . . . . . . . . . . . . . . . . . . . . . . . . . . . . . . . . . . . . . . . . . . . . . . . . . . . . . . . . . . . . . . . . . . . . . . . . . . . . . . . . 1 Intro: Folding workbench and bench top power tool organizer . . . . . . . . . . . . . . . . . . . . . . . . . . . . . . . . . . . . . . . . . . . . . . . . . . . . . . . . . . . . . . . . . . . . . . . . . . 2 Step 1: Studying the plans and selecting materials . . . . . . . . . . . . . . . . . . . . . . . . . . . . . . . . . . . . . . . . . . . . . . . . . . . . . . . . . . . . . . . . . . . . . . . . . . . . . . . . . . 3 Step 2: Making half lap joint to attach legs to mobile base . . . . . . . . . . . . . . . . . . . . . . . . . . . . . . . . . . . . . . . . . . . . . . . . . . . . . . . . . . . . . . . . . . . . . . . . . . . . 4 Step 3: Making the leg levelers . . . . . . . . . . . . . . . . . . . . . . . . . . . . . . . . . . . . . . . . . . . . . . . . . . . . . . . . . . . . . . . . . . . . . . . . . . . . . . . . . . . . . . . . . . . . . . . . 5 Step 4: Mitering the corners . . . . . . . . . . . . . . . . . . . . . . . . . . . . . . . . . . . . . . . . . . . . . . . . . . . . . . . . . . . . . . . . . . . . . . . . . . . . . . . . . . . . . . . . . . . . . . . . . . . 7 Step 5: Drilling the leg connectors . . . . . . . . . . . . . . . . . . . . . . . . . . . . . . . . . . . . . . . . . . . . . . . . . . . . . . . . . . . . . . . . . . . . . . . . . . . . . . . . . . . . . . . . . . . . . . 9 Step 6: Drilling the legs . . . . . . . . . . . . . . . . . . . . . . . . . . . . . . . . . . . . . . . . . . . . . . . . . . . . . . . . . . . . . . . . . . . . . . . . . . . . . . . . . . . . . . . . . . . . . . . . . . . . . . 10 Step 7: Frame and Final Assembly . . . . . . . . . . . . . . . . . . . . . . . . . . . . . . . . . . . . . . . . . . . . . . . . . . . . . . . . . . . . . . . . . . . . . . . . . . . . . . . . . . . . . . . . . . . . . 11 Related Instructables . . . . . . . . . . . . . . . . . . . . . . . . . . . . . . . . . . . . . . . . . . . . . . . . . . . . . . . . . . . . . . . . . . . . . . . . . . . . . . . . . . . . . . . . . . . . . . . . . . . . . . . . 16 Advertisements . . . . . . . . . . . . . . . . . . . . . . . . . . . . . . . . . . . . . . . . . . . . . . . . . . . . . . . . . . . . . . . . . . . . . . . . . . . . . . . . . . . . . . . . . . . . . . . . . . . . . . . . . . . . . . . 16 Comments . . . . . . . . . . . . . . . . . . . . . . . . . . . . . . . . . . . . . . . . . . . . . . . . . . . . . . . . . . . . . . . . . . . . . . . . . . . . . . . . . . . . . . . . . . . . . . . . . . . . . . . . . . . . . . . . 16
Transcript of Instructables.com - Folding workbench and bench top power ...

http://www.instructables.com/id/Folding-Workbench-and-Bench-Top-Power-Tool-Organiz/
technology workshop craft home food play outside costumes
Folding workbench and bench top power tool organizerby baker519 on December 24, 2016
Table of Contents
Folding workbench and bench top power tool organizer . . . . . . . . . . . . . . . . . . . . . . . . . . . . . . . . . . . . . . . . . . . . . . . . . . . . . . . . . . . . . . . . . . . . . . . . . . . . . . . . . 1
Intro: Folding workbench and bench top power tool organizer . . . . . . . . . . . . . . . . . . . . . . . . . . . . . . . . . . . . . . . . . . . . . . . . . . . . . . . . . . . . . . . . . . . . . . . . . . 2
Step 1: Studying the plans and selecting materials . . . . . . . . . . . . . . . . . . . . . . . . . . . . . . . . . . . . . . . . . . . . . . . . . . . . . . . . . . . . . . . . . . . . . . . . . . . . . . . . . . 3
Step 2: Making half lap joint to attach legs to mobile base . . . . . . . . . . . . . . . . . . . . . . . . . . . . . . . . . . . . . . . . . . . . . . . . . . . . . . . . . . . . . . . . . . . . . . . . . . . . 4
Step 3: Making the leg levelers . . . . . . . . . . . . . . . . . . . . . . . . . . . . . . . . . . . . . . . . . . . . . . . . . . . . . . . . . . . . . . . . . . . . . . . . . . . . . . . . . . . . . . . . . . . . . . . . 5
Step 4: Mitering the corners . . . . . . . . . . . . . . . . . . . . . . . . . . . . . . . . . . . . . . . . . . . . . . . . . . . . . . . . . . . . . . . . . . . . . . . . . . . . . . . . . . . . . . . . . . . . . . . . . . . 7
Step 5: Drilling the leg connectors . . . . . . . . . . . . . . . . . . . . . . . . . . . . . . . . . . . . . . . . . . . . . . . . . . . . . . . . . . . . . . . . . . . . . . . . . . . . . . . . . . . . . . . . . . . . . . 9
Step 6: Drilling the legs . . . . . . . . . . . . . . . . . . . . . . . . . . . . . . . . . . . . . . . . . . . . . . . . . . . . . . . . . . . . . . . . . . . . . . . . . . . . . . . . . . . . . . . . . . . . . . . . . . . . . . 10
Step 7: Frame and Final Assembly . . . . . . . . . . . . . . . . . . . . . . . . . . . . . . . . . . . . . . . . . . . . . . . . . . . . . . . . . . . . . . . . . . . . . . . . . . . . . . . . . . . . . . . . . . . . . 11
Related Instructables . . . . . . . . . . . . . . . . . . . . . . . . . . . . . . . . . . . . . . . . . . . . . . . . . . . . . . . . . . . . . . . . . . . . . . . . . . . . . . . . . . . . . . . . . . . . . . . . . . . . . . . . 16
Advertisements . . . . . . . . . . . . . . . . . . . . . . . . . . . . . . . . . . . . . . . . . . . . . . . . . . . . . . . . . . . . . . . . . . . . . . . . . . . . . . . . . . . . . . . . . . . . . . . . . . . . . . . . . . . . . . . 16
Comments . . . . . . . . . . . . . . . . . . . . . . . . . . . . . . . . . . . . . . . . . . . . . . . . . . . . . . . . . . . . . . . . . . . . . . . . . . . . . . . . . . . . . . . . . . . . . . . . . . . . . . . . . . . . . . . . 16

http://www.instructables.com/id/Folding-Workbench-and-Bench-Top-Power-Tool-Organiz/
Intro: Folding workbench and bench top power tool organizerI have a problem in my shop, I AM RUNNING OUT OF HORIZONTAL SURFACE AREA, (tables, benches, and shelves) I have many bench top power tools that I useoccasionally for different projects, but most of the time they just sit on their stand gathering dust. I have tried to get each it owns separate stand, but I am running out ofroom for individual stands.
I saw an article in Wood magazine issue 179, October 2007 that put the tools on bases, the bases are a standard size so a rack storage system would store the toolsbetween uses. A stand was built to accept the bases so one tool could be used one at a time. This is a solution, but when I build a project I may want access to several ofthe tools during the build. Having multiple stands defeated the advantage of the racking system. Then I ran across a Russian (I think, do not speak or read the language)site of plans.
http://www.instwood.com/2014/09/blog-post.html
Used google translator to convert to English, they label it folding desk
I watched their videos and decided to order their plans. I figured I could setup 2-4 tools on the folding table and it takes about the same storage room as on dedicatedbench. I plan to build the folding bench, one tool stand, and 2-3 storage racks, I need storage for 2-bench grinders, a 6" abrasive saw, 4x36 belt/disc sander, cold metalcut saw, drill press, pantorouter, 4 benchtop router tables, scrollsaw, drum sander, and may also store hand tools, 3 orbital sanders, 4 pad sander, battery circular saw,circular saw, jigsaw, reciprocating saw, and hammer drill. Currently the lawnmower and wheel barrow get moved outside for additional space in the shop. This foldingbench would add horizontal surface area in that garage bay.

http://www.instructables.com/id/Folding-Workbench-and-Bench-Top-Power-Tool-Organiz/
Step 1: Studying the plans and selecting materialsThe plans call for a bench top 1650x850 mm (65x33.5 inches). I have a counter top that is 76x28. Checking the plans I do not see any reason that this counter top will notwork. The pivot points will remain the same as the plans, but the size of the bench will change. The pivot points need to stay in the same position so when the table foldsit stays in the envelop of the base. Also the outboard legs will be the same distance from the end, with the additional length between the legs. The width does not effectthe folding. Also the frame is specified to be 28x100 mm (1-1/8x3-7/8 inch) I have 1x6 (3/4x5-1/2 inch).
I do not like measuring and calculating measurements, so I transfer as many measurements as I can from mating parts. In this case the bench top frame is the samedimension as the bench top so the frame boards are placed on top of the counter top and the length and width are transferred to the boards. The board is then taken tothe saw and the blade is lined up so it just cuts the line on the waste side of the piece. This is done for both the top frame and the base frame. (I changed the base frameto miter corners like the top)
The legs were cut to length using a metric ruler (why mess with conversions if you have a metric rule) After the first leg was cut it was used as the pattern for the secondso they are the same. The front and rear legs are different lengths.
The top frame and leg connectors (4) were cut, the first one measured and the other 3 copied from the first.
The use of 1x6 frame material causes the need to move the pivot points and shorten the overall length of the leg.
The legs were reduced 60 mm in length and the top pivot points were moved down 20 mm. The leg connectors were lengthen 80 mm and the pivot point was changed 20mm.

http://www.instructables.com/id/Folding-Workbench-and-Bench-Top-Power-Tool-Organiz/
Step 2: Making half lap joint to attach legs to mobile baseThe base legs are attached to the mobile base with half lap joints. I cut these on a sliding compound miter saw. There is a depth stop on this saw and using a digitalcaliper the cut was set for half the material thickness. Then the center of base side and the leg were found (I used the metric rule it is easier to divide decimal units thanan inch and a fraction). The mating parts were aligned and the widths were transferred for cutting. The saw was setup using a piece butted against the blade and then thestop is set using the width of the board. Again cuts were made to the line with the saw kerf on the waste side. Several cuts were made, the material was broken out with achisel, then the saw blade was used to plane the surface smooth by moving the part under the blade laterally.
http://www.instructables.com/id/Folding-Workbench-and-Bench-Top-Power-Tool-Organiz/
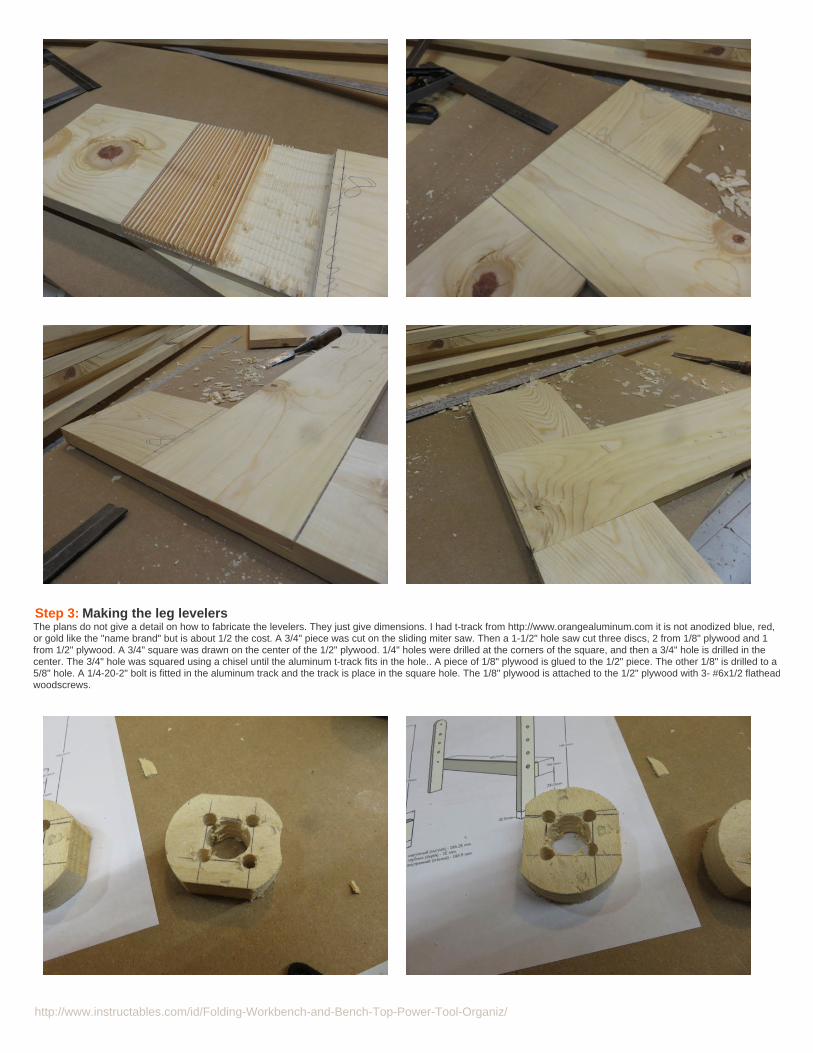
Step 3: Making the leg levelersThe plans do not give a detail on how to fabricate the levelers. They just give dimensions. I had t-track from http://www.orangealuminum.com it is not anodized blue, red,or gold like the "name brand" but is about 1/2 the cost. A 3/4" piece was cut on the sliding miter saw. Then a 1-1/2" hole saw cut three discs, 2 from 1/8" plywood and 1from 1/2" plywood. A 3/4" square was drawn on the center of the 1/2" plywood. 1/4" holes were drilled at the corners of the square, and then a 3/4" hole is drilled in thecenter. The 3/4" hole was squared using a chisel until the aluminum t-track fits in the hole.. A piece of 1/8" plywood is glued to the 1/2" piece. The other 1/8" is drilled to a5/8" hole. A 1/4-20-2" bolt is fitted in the aluminum track and the track is place in the square hole. The 1/8" plywood is attached to the 1/2" plywood with 3- #6x1/2 flatheadwoodscrews.

http://www.instructables.com/id/Folding-Workbench-and-Bench-Top-Power-Tool-Organiz/

http://www.instructables.com/id/Folding-Workbench-and-Bench-Top-Power-Tool-Organiz/
Step 4: Mitering the cornersThe frame pieces for the counter top and mobile base need the corners mitered to 45 degrees. The sliding compound miter saw is setup for the cut. To setup the sawsample cuts are made and measured. To measure align the pieces with the blades of the square, then slide the joint to the square corner as the gap closes you can see ifthe joint is closing evenly or if the top or bottom are closing faster. Depending on the side of the blade you are making the cuts determines whether you make the tiltlarger or smaller. Trial and error until you get a joint that closes evenly.
I have a laser on my saw making it easy to align the cut to the outside edge of the part. If you do not have a laser on your saw you can setup a two piece stop block.Clamp a trial piece on the "good" side of the saw. Make a miter cut and discard the scrap. Now take a rectangular piece about 4 inches long placing it against the miteredend. Now clamp a stop block on the waste side of the saw against the 4" piece. Unclamp the trial piece. Place the 4" piece against the stop block, place the part to bemitered on the "good" side against the 4" block. Either clamp or hold the part being mitered in place and remove the 4" block. Make the cut. Repeat for the other end.

http://www.instructables.com/id/Folding-Workbench-and-Bench-Top-Power-Tool-Organiz/

http://www.instructables.com/id/Folding-Workbench-and-Bench-Top-Power-Tool-Organiz/
Step 5: Drilling the leg connectorsThe leg connectors are clamped together for drill of the pivot holes. The holes for the mounting screws are marked on the top part. The screw holes have no accuracy orprecision so the holes were marked 1" from the edge. The center screw hole was drill 1/4" and drill through the 4 parts. A 1/4-20 bolt was put in the hole and a nut andwasher were tightened to the stack. The clamps can be removed for drilling the 1/2 pivot hole. The hole need to be located accurately so the table will fold properly. Drillall parts at once and mark one edge so that during assembly that edge can be used as a reference when locating the connectors.

http://www.instructables.com/id/Folding-Workbench-and-Bench-Top-Power-Tool-Organiz/
Step 6: Drilling the legsThe legs are drilled like the connectors. Clamp 2 parts together. Mark hole locations. drill lower 1/4" hole. Install bolt, remove clamps. Now drill the 1/2" and mark one sidefor installation reference.
After drill the pivot holes the clamping holes 1-1/4" are drill these are not precise and accuracy is not needed. They are just clearance holes for clamping.
Using a compass draw arcs on the top of the legs and then cut the clearance radius and smooth the cut using a disc sander.

http://www.instructables.com/id/Folding-Workbench-and-Bench-Top-Power-Tool-Organiz/
Step 7: Frame and Final AssemblyUsing corner clamping square (these are purchased, but homemade ones will work as well) the frame is clamped square and corner braces are installed.
Both the top and mobile base frames are assembled.
Attach the legs to the mobile base, using screws (after the workbench is complete and working all joints will be disassemble and glue will be apply and re-screwed)
Attach the leg connectors to the top frame. Measure for the mobile end to locate the connectors the same distance from the end on both sides. Then measure the fixedend connectors and install.
Attach the leg levelers to the fixed legs.
Attach the legs to the connectors.
Test the assembly for function, if does not function properly make adjustments accordingly. If holes are drilled incorrectly a dowel can be glued in the hole and re-drilledproperly.
The first assembly would not fold up, the end did not clear the mobile base. The top frame on my bench is 40 mm wider than the plans and the mobile leg was installedper the plans. The leg connector was moved 40 mm towards the end, this eliminated the interference of the frame and the base.
When the assembly work properly you can think how you want to accessorize the workbench. If you are going to use as a workbench you can drill clamp holes in the topframe per the instructions and a channel for the t-track(disassemble for easier drilling and dadoing). If you will be using it just as a table this step is not needed. For usesas a table saw or router table additional bracing and shelving will be need in the frame to accommodate the tools. (installation depends on your equipment) The top willalso have to be modified accordingly. For a workbench the top will be drilled 3/4" for hold downs or clamps. This is done with a template and a router per instwood'svideo.
The castors were installed 1" from the outside to avoid interference with the base frame.
My bench will now be disassembled and the clamp holes and t-track will be installed. Also the lower braces will be fabricated and installed.
Final assembly, glue joints, attach mobile base, attach top, attach shelf if used.
A future instructable will document construction of a bench tool organizer, a unit bench, and modifications to this workbench to work with the organizer. (do not glue thetop, just attach with screws so modifications can be made easily)
Also thinking of a BBQ and grilling table with a torsion box top (1/8" top and grid bracing, light weigh) and peg board across legs for storage of utensil. Store charcoal onmobile base.
A friend saw the bench and asked it a smaller version could be made to use as an utility table. She currently does sewing craft items and has a large board she uses forcutting patterns etc. and staging parts before sewing. This board is supported between 2 stools from the kitchen. She wants the folding table to sit where the trash cansits when not in use. Then it can be taken to the center of the room and the cutting board can be set on top, will see if additional supports are needed. These supposecan be mounted in the t-track and removed for storage.

http://www.instructables.com/id/Folding-Workbench-and-Bench-Top-Power-Tool-Organiz/

http://www.instructables.com/id/Folding-Workbench-and-Bench-Top-Power-Tool-Organiz/

http://www.instructables.com/id/Folding-Workbench-and-Bench-Top-Power-Tool-Organiz/

http://www.instructables.com/id/Folding-Workbench-and-Bench-Top-Power-Tool-Organiz/
http://www.instructables.com/id/Folding-Workbench-and-Bench-Top-Power-Tool-Organiz/
Related Instructables
DIY UtilityTables byMacGyver9
DIY Project:How to make aworkbench byMyFixitUpLife
Setting Up aWorkshop bywoodskills
Cardboard,Cardboard,Cardboard! byCreativeman
Workbench incloset bynatebman
Custom WoodWorkbench bycyranohadden
Advertisements
Comments